

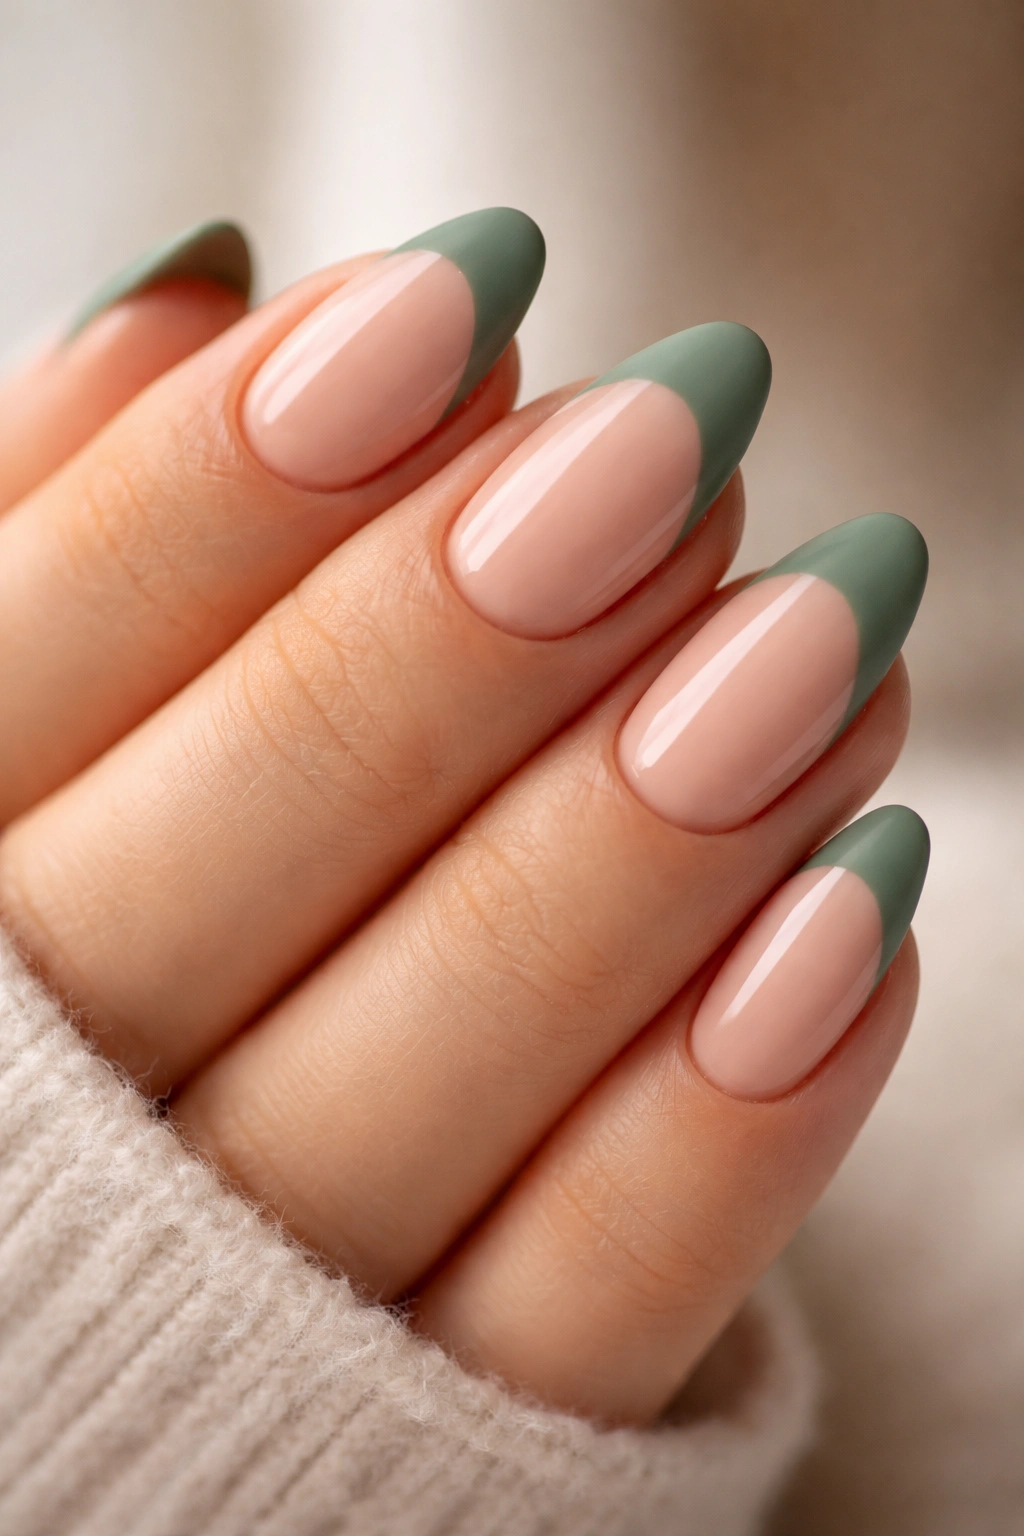
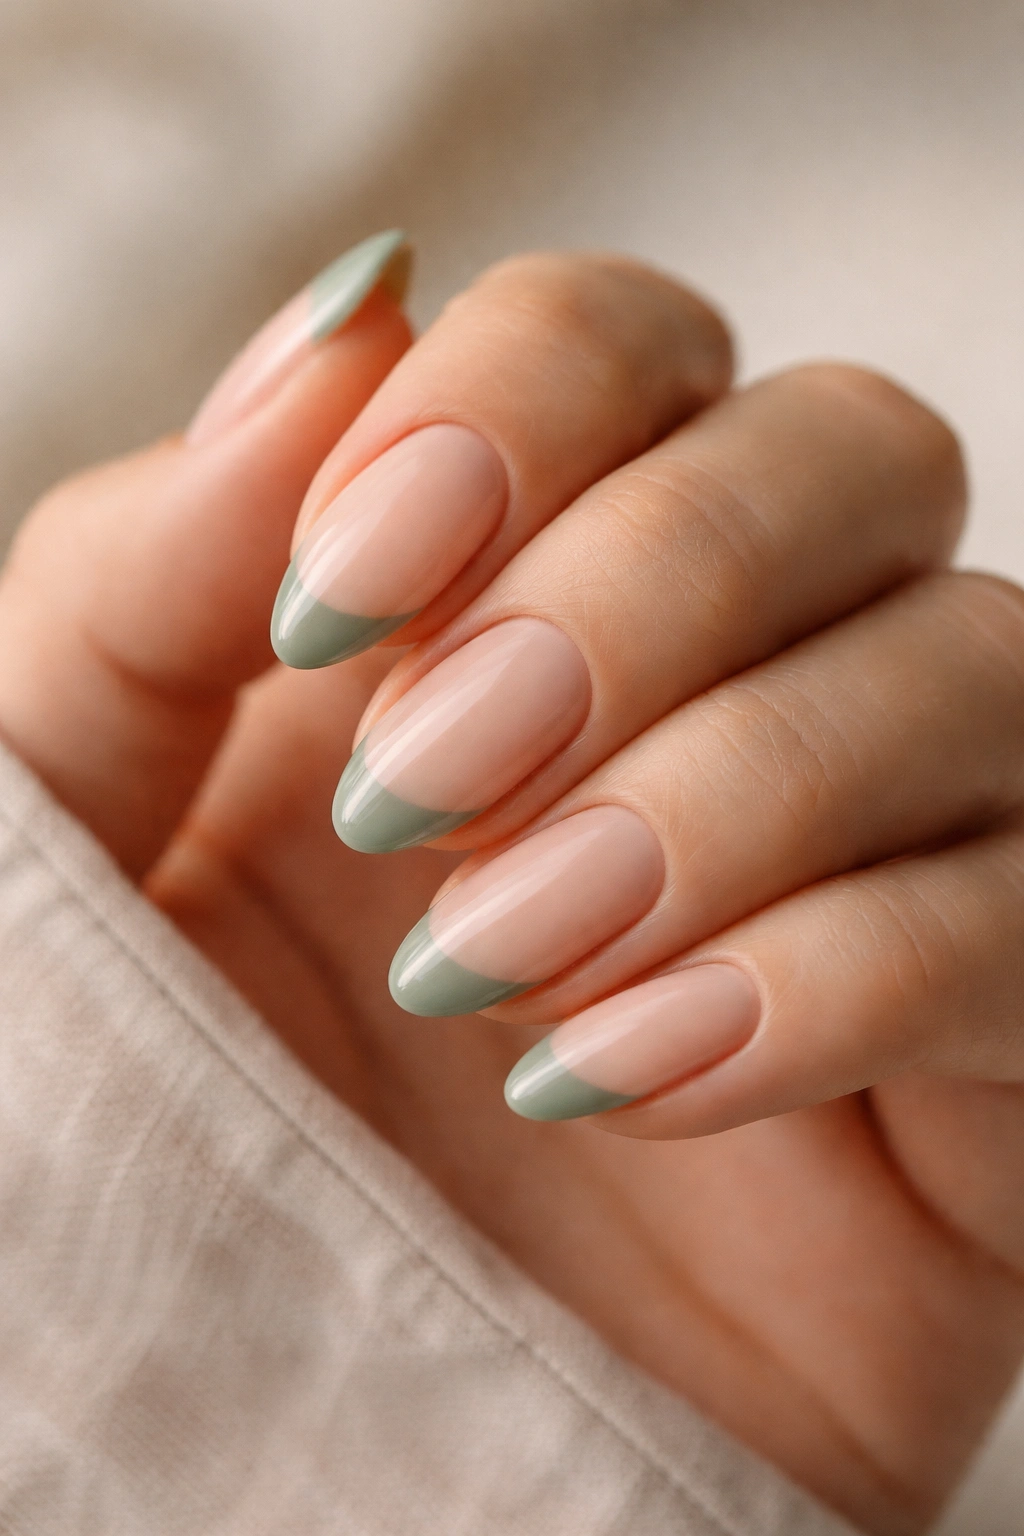
Sage green has been quietly taking over nail appointments — and short almond nails are arguably the best canvas it’s ever found. Something about the combination just works. The soft, muted earthiness of sage sits against the almond shape’s tapered curve in a way that reads polished without looking overdone. Add a French tip, and the result manages to feel both classic and genuinely fresh at the same time.
Short almond nails deserve more credit than they usually get. They’re long enough to show off a proper French smile line, but short enough to stay practical — the kind of nails you can type with, cook with, and go about your life in without thinking twice. And because the almond shape naturally narrows toward the tip, even a 3mm sage tip looks intentional and clean. The proportion is almost built in.
The sage French tip works across bases, too. Whether you go sheer and barely-there or lean into a warm cream or milky white underneath, the tip acts as the focal point without demanding attention. This is a color that earns notice by not shouting — which is probably why it keeps filling salon appointment books without any sign of slowing down.
What follows is 17 takes on the sage green French tip, ranging from the cleanest minimalist version to layered designs featuring dried flowers, chrome lines, and bold color-blocking. Some you can do at home with a steady hand and a thin brush; others are worth booking a skilled nail tech for. Either way, this is your shortlist.
Why Sage Green and the Almond Shape Are Such a Natural Pairing
Sage green is a muted, grey-toned green that sits somewhere between eucalyptus and olive — soft, earthy, and almost herbal in quality. It doesn’t scream. That subtlety is exactly what makes it so wearable on nails. On a French tip, where the color only covers a relatively small surface area, sage reads as refined rather than bold. The nude or sheer base underneath does most of the work; the sage tip is the punctuation mark.
The almond shape amplifies this. Almond nails taper gently to a soft, rounded point — not as dramatic as stiletto, not as flat as square. The curved smile line of a French tip follows the natural arc of the almond shape in a way that looks organic and intentional rather than applied and geometric. On square or squoval nails, a French tip can look slightly blocky at the corners. On almond nails, the curve of the smile line and the curve of the tip work in the same direction — which is part of why this combination looks so clean and intentional up close and at every other viewing distance.
Short almond nails — typically worn around 5 to 7mm past the fingertip — keep the sage tips small and elegant. A thick, wide French tip would overwhelm the look. Here, the tips tend to run 2 to 4mm of coverage, sometimes even less for a micro-French version. That restraint is a feature, not a limitation.
The Color Temperature Question
One thing worth knowing before you pick a sage shade: sage green polishes vary widely. Some lean cooler with more grey in them, which pairs especially well with fair skin tones and cool-toned jewelry like silver or white gold. Others lean warmer with a hint of olive or yellow undertone, which tends to be more flattering on medium and deeper skin tones and looks beautiful next to gold hardware and warm bases.
The tip’s color reads differently depending on your base, too. A sage tip over a cool, pinkish nude will look more pastel and airy. The same sage tip over a warm cream or honey nude will look richer and more earthy. Worth doing a test swatch on a nail wheel if you’re choosing between bottles or mixing custom shades.
What to Know Before You Choose Your Sage Shade

Not all sage greens are created equal. The difference between a sage that works and one that reads muddy or flat is usually about saturation and undertone. The sweet spot for French tips is a sage that’s desaturated enough to feel soft, but pigmented enough to show up clearly against whatever base you’re using.
For at-home application, gel polish tends to be easier to control on French tips because of the slower handling time — you have more room to adjust the smile line before curing. Regular polish works too, but it sets fast. If you’re freehanding the smile line, a thin nail art brush dipped in gel or polish gives you the most control. French tip guides (those small adhesive strips) can help achieve a clean curve, but they don’t always conform perfectly to the almond shape’s tapering edge — especially at the inner corners, where the tape tends to lift or leave a gap. You’ll almost always need a cleanup brush afterward.
Press-on almond nails in sage French tip styles are also worth considering. The quality has improved significantly over the years, and for short durations — a weekend event, a few days of testing a look before committing to gel — they’re a solid way to try a design before booking an appointment.
A topcoat is non-negotiable. Sage green in particular can look flat without one. A glossy topcoat brings out the depth in the color, while a matte topcoat gives it a slightly chalky, fashion-forward finish that reads more editorial. Both are valid — and whichever you choose changes the personality of the design entirely.
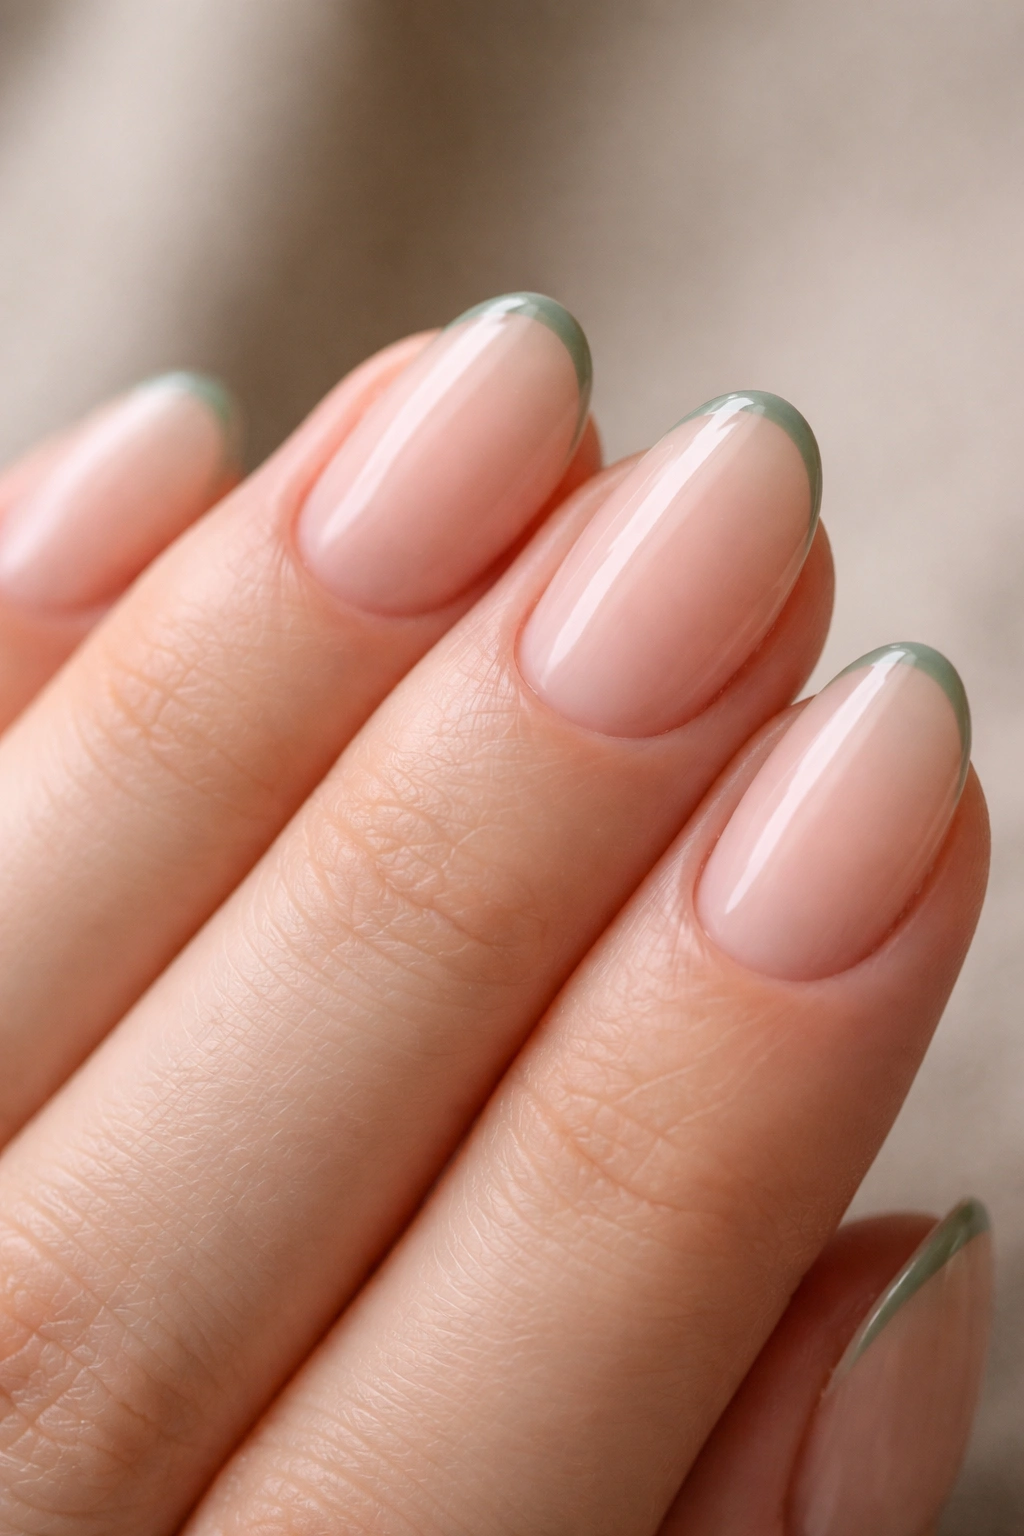
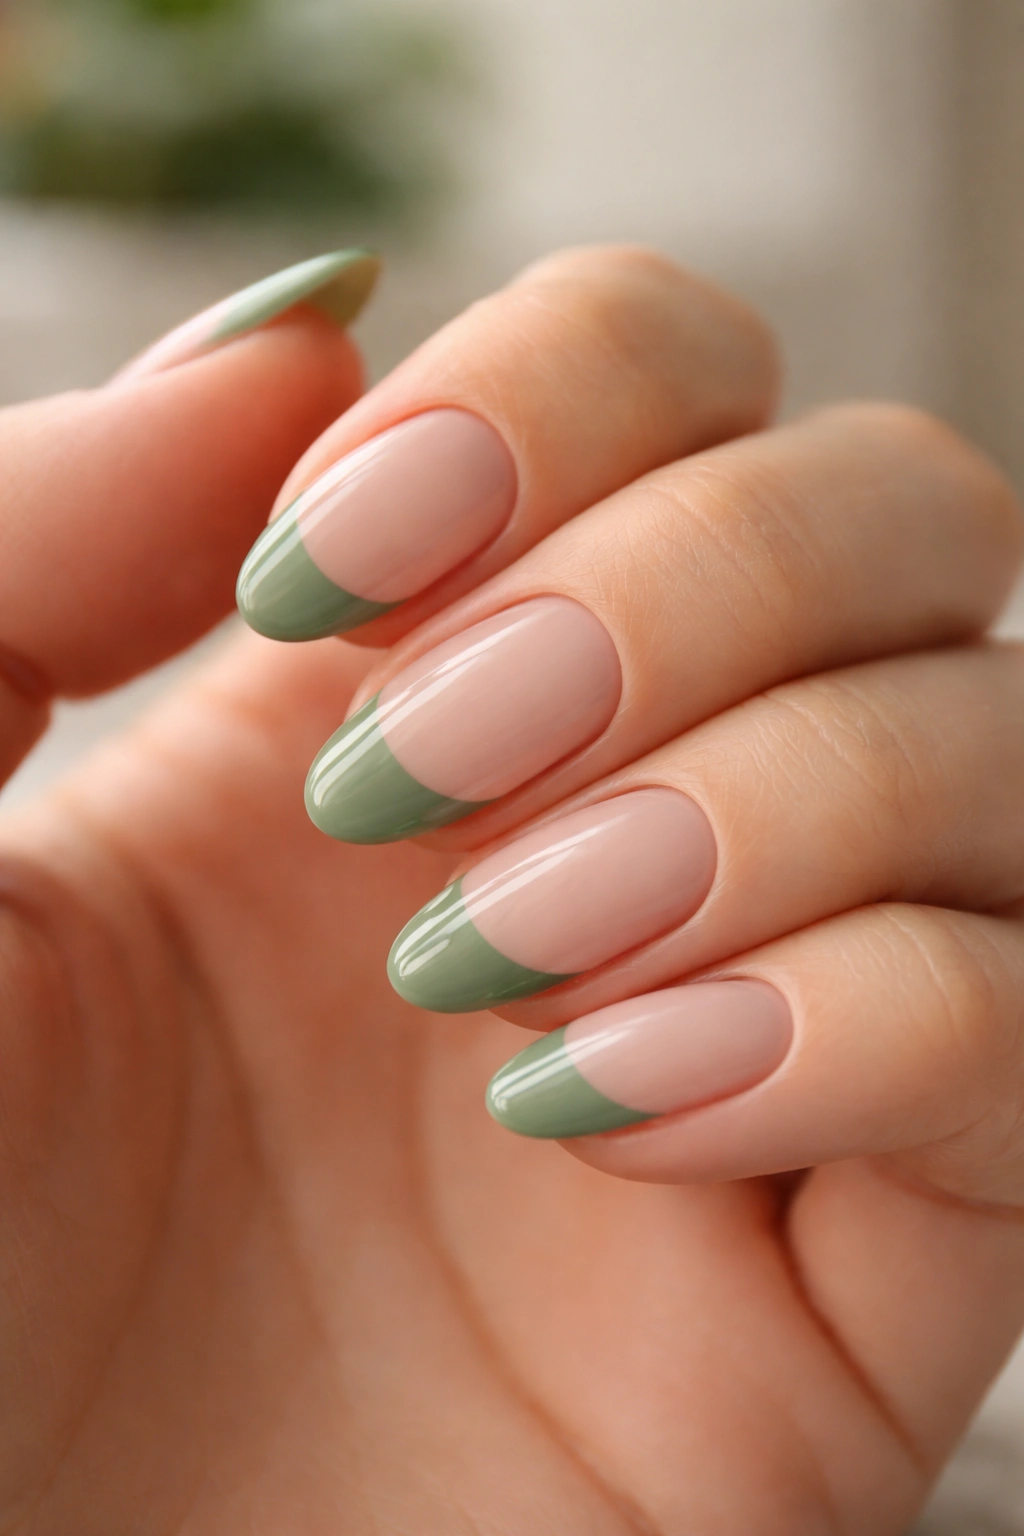
1. Classic Sage French Tips on a Sheer Nude Base
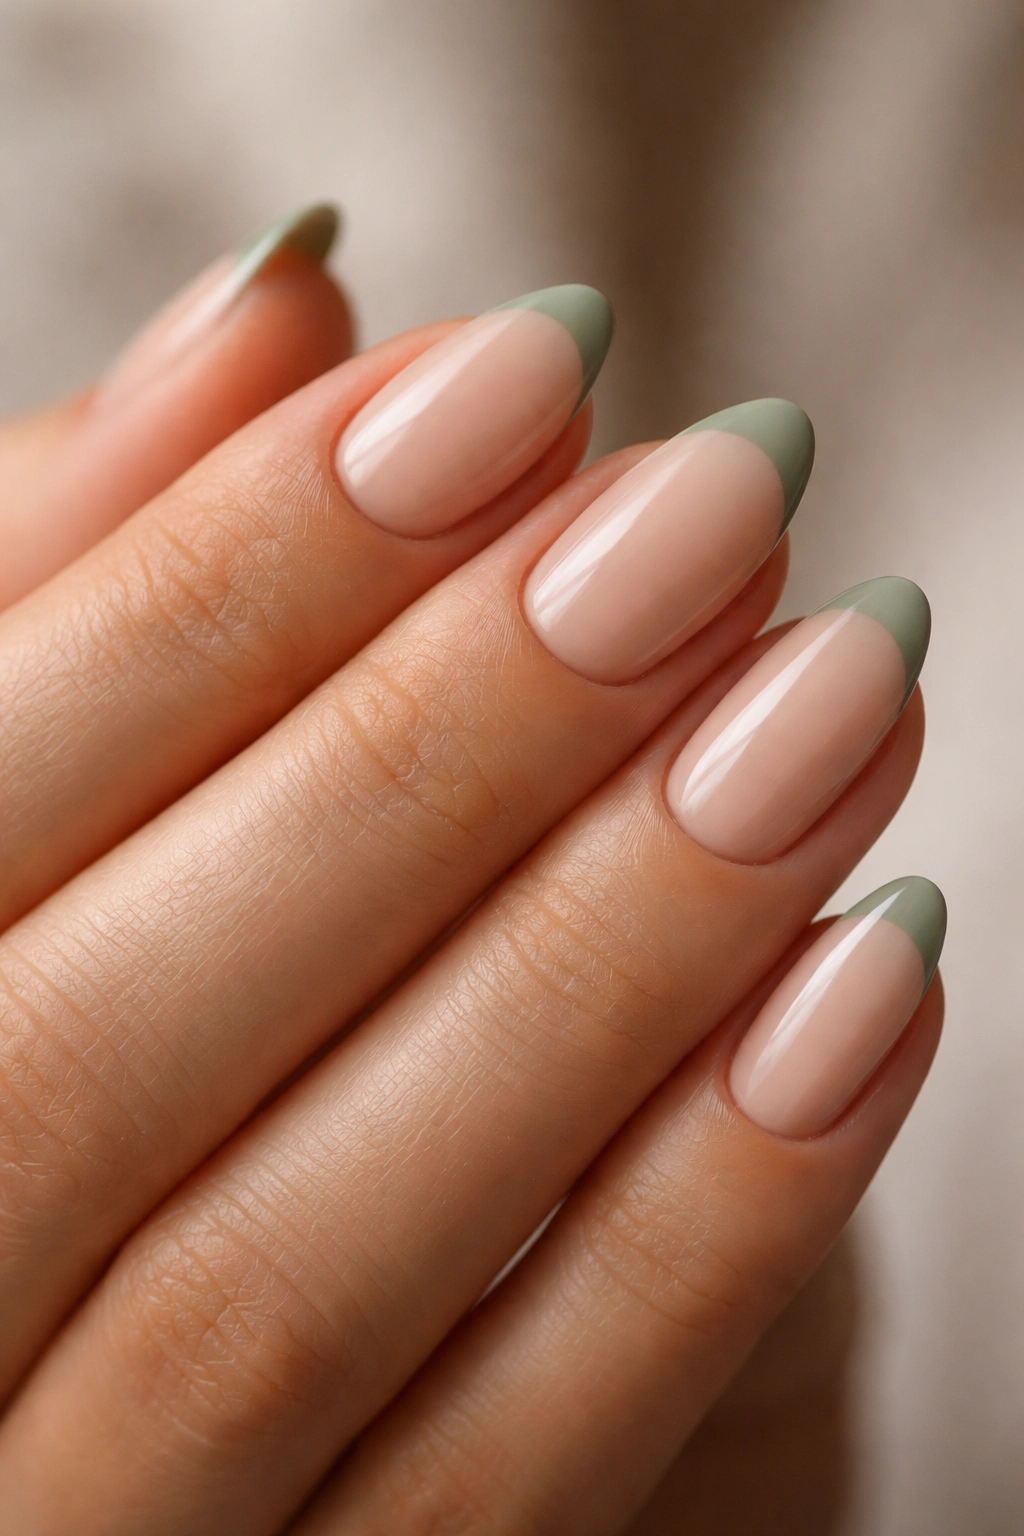
This is where most people should start. Clean, quiet, impeccably polished — the classic sage French tip on a sheer nude base is the kind of nail look that goes with everything and offends no one, and I mean that as a compliment.
The base here is a sheer or translucent nude — something close to your natural nail color but more even and luminous. A milky sheer, a barely-there beige, or even just a strengthening base coat with a slight tint all work. Over that, the sage tip is applied in a thin crescent that follows the natural smile line of the almond shape, typically 2 to 3mm wide.
Why This Version Is the Hardest to Get Wrong
There’s no complex nail art, no multiple colors to balance, and no special tools beyond a thin brush and a steady hand. If you’re new to French tips or new to sage as a color, this is the version to start with. It gives you the full effect of the design without any additional complexity.
How to Get the Most Out of This Look
- Two thin coats of sage over the tip rather than one heavy one — this prevents bubbling and keeps the smile line sharper
- A slightly rosy or pink-toned sheer base makes the sage tip stand out more than a yellow-toned base would
- Cure each gel layer fully, especially at the free edge — sage tips chip first at the very tip
- Seal with a high-shine topcoat and cap the free edge (run the topcoat directly across the tip’s edge) to prevent peeling
One thing worth noting: the thinner the tip, the more elegant this version looks. Resist the urge to cover too much nail. On short almond nails, a narrow crescent of sage is genuinely all you need.
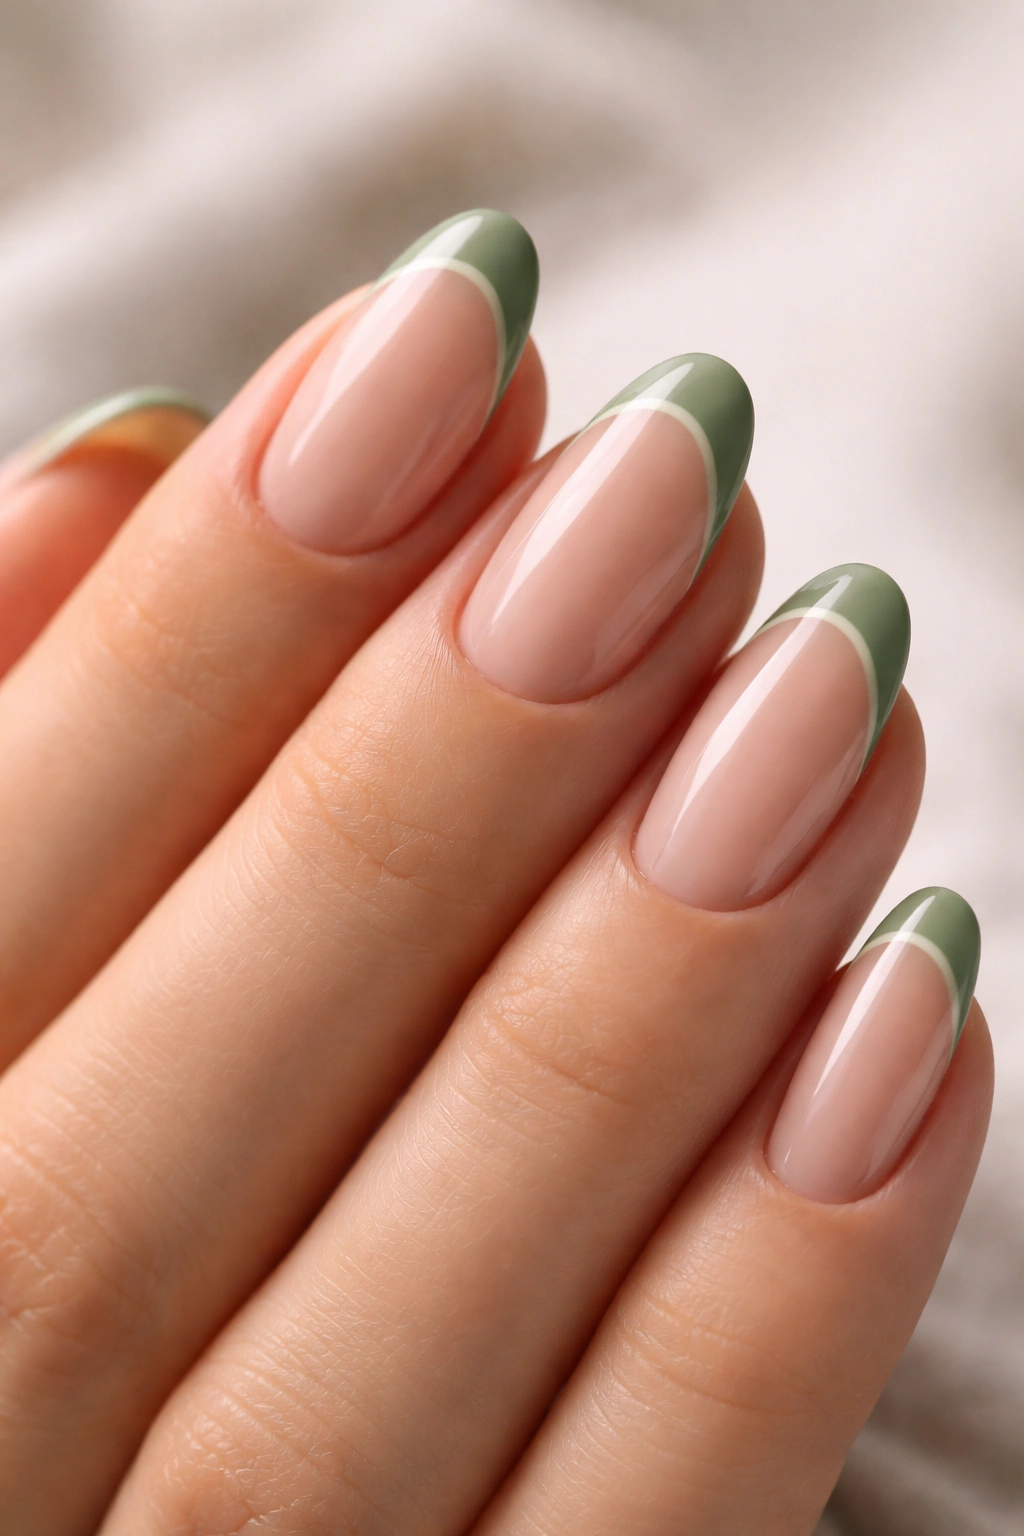
2. Sage and White Double French Tips
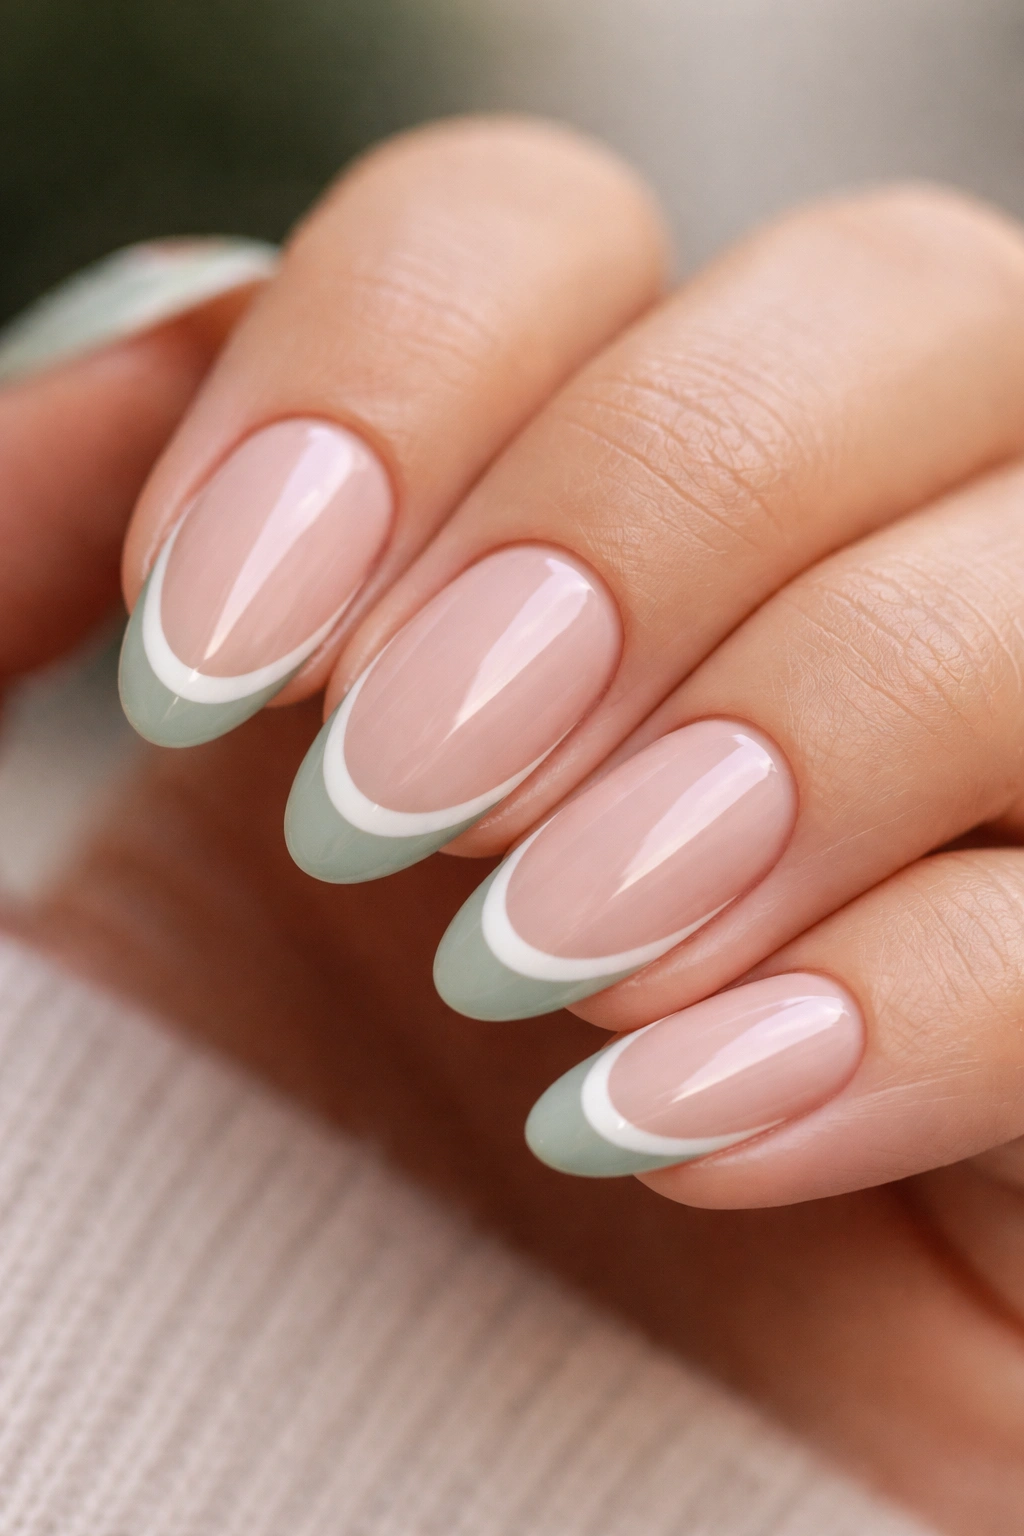
Two smile lines instead of one. The double French tip takes the classic format and adds a second, thinner line underneath the main colored tip — here, a fine white or cream line sits just below the sage crescent, separating the tip from the base.
Why does it work? The white inner line creates a visual buffer that makes the sage tip look more defined. It also adds a graphic quality without any actual nail art — just two stacked smile lines in different colors. The contrast between warm white and soft sage creates a layered effect that’s surprisingly detailed when you look closely.
On short almond nails, the double tip works best when the sage is 2 to 3mm wide and the white underlayer is 1mm or less. Sage should be clearly dominant, with the white acting as a trim detail. If the white line gets too thick, the whole look starts to feel heavy on a shorter nail bed.
Getting the second line clean requires a thin nail art liner brush — roughly a size 0 — and slow, deliberate strokes that follow the smile line curve. Do the white line first, cure it fully, then apply the sage tip on top. If the sage overlaps slightly onto the white, it actually makes the transition look more intentional rather than like a technical mistake.
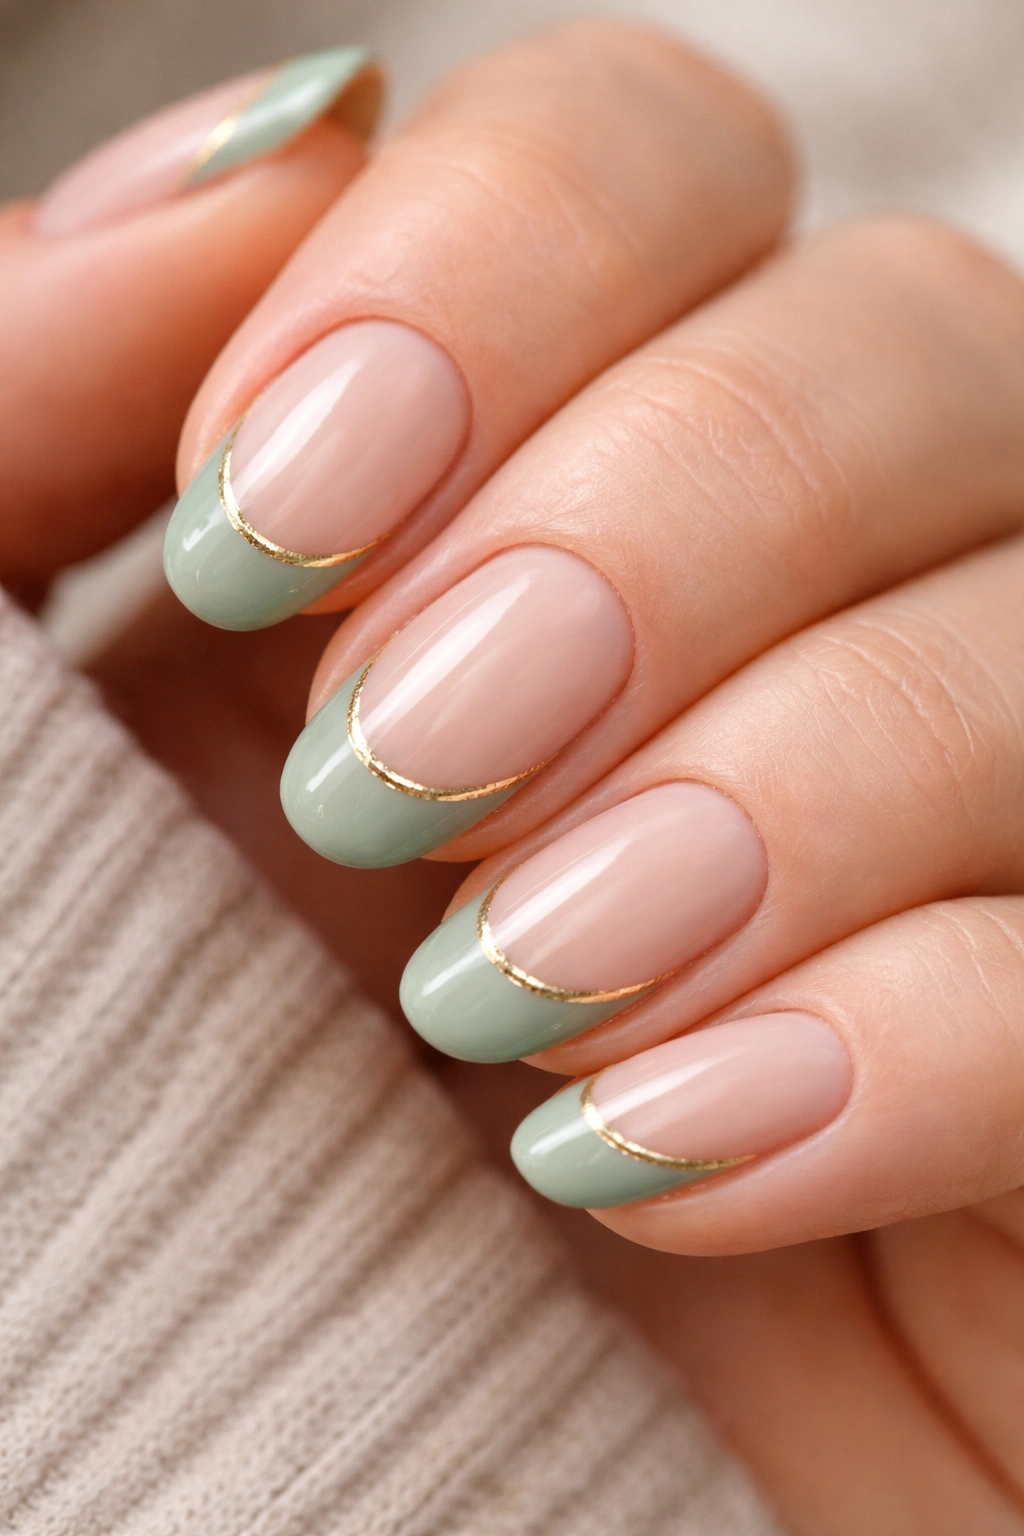
3. Sage Tips with a Thin Gold Foil Smile Line
One detail can change everything about a design.
Strip the French tip back to its simplest form and add exactly one element: a hair-thin line of gold foil or metallic gold gel sitting right along the inner edge of the sage tip.
That gold line carries more weight than its size suggests. It separates the tip from the base with precision and light — the metallic reflects differently than the matte or glossy sage, which makes the design look intricate without any actual nail art involved. On short almond nails, where every detail is visible up close, this level of precision reads as highly refined.
The application method matters. Gold foil transfer applied to a partially cured gel layer is the most effective technique — press the foil sheet onto a tacky gel surface, pull it back slowly, and the foil deposits where it adhered. For a controlled line rather than full-foil coverage, use a small flat brush to “paint” the foil precisely onto the smile line edge. Metallic gold gel liner is the more controllable option if you have access to it. A single stroke with a thin brush right along the inner smile line is enough. Cure and seal. The result looks like something from a high-end salon, achieved in one deliberate step.
What Shade of Gold to Use
Warm yellow gold reads richly against sage’s green undertones. Champagne gold — which sits between gold and silver — is a softer option if full yellow gold feels too loud. Rose gold works too: it brings in a warm pink undertone that plays well against the grey-green of sage, though the overall mood shifts from editorial to romantic. Pick based on whether you want drama or softness.
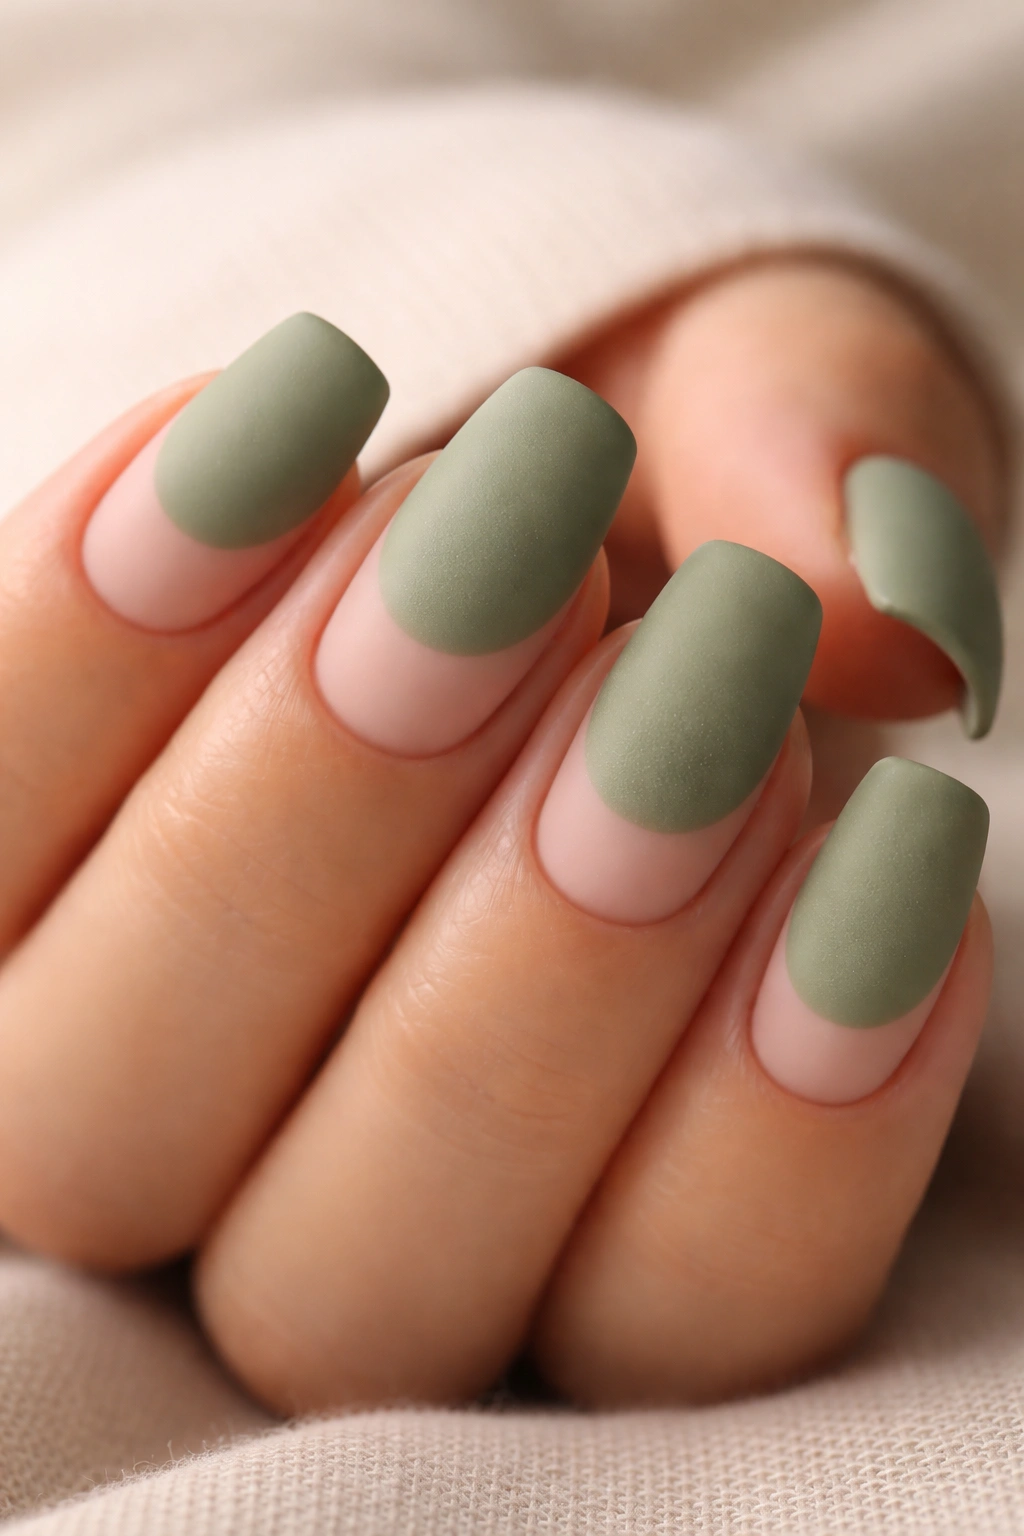
4. Matte Sage Tips Paired with a Glossy Nude Base
Texture contrast does more work than most people expect.
In this version, the base coat gets a high-shine glossy finish while the sage tip receives a matte topcoat. That’s the entire design — no different colors, no added art. Two finishes on the same nail. The contrast is subtle but catches the eye in a way that a uniform-finish French tip simply doesn’t. The matte tip absorbs light while the glossy base reflects it, giving the nail a quiet two-dimensional quality — like the nail is divided into two separate objects. You notice it up close and keep noticing it.
Technically, this requires two topcoats. Apply the glossy topcoat to the base portion of the nail first, stopping just before the smile line. Then apply a matte topcoat over the sage tip only. A cleanup brush with acetone keeps the transition line sharp where the two topcoats meet. Clean up any overlap while everything is still wet.
One warning worth heeding: matte topcoats on gel dull over time, especially on tips that take daily impact. Refresh with a thin new coat of matte topcoat after about a week to keep the contrast looking intentional rather than worn out.
5. Sage Ombré French Tips with a Soft Gradient Fade
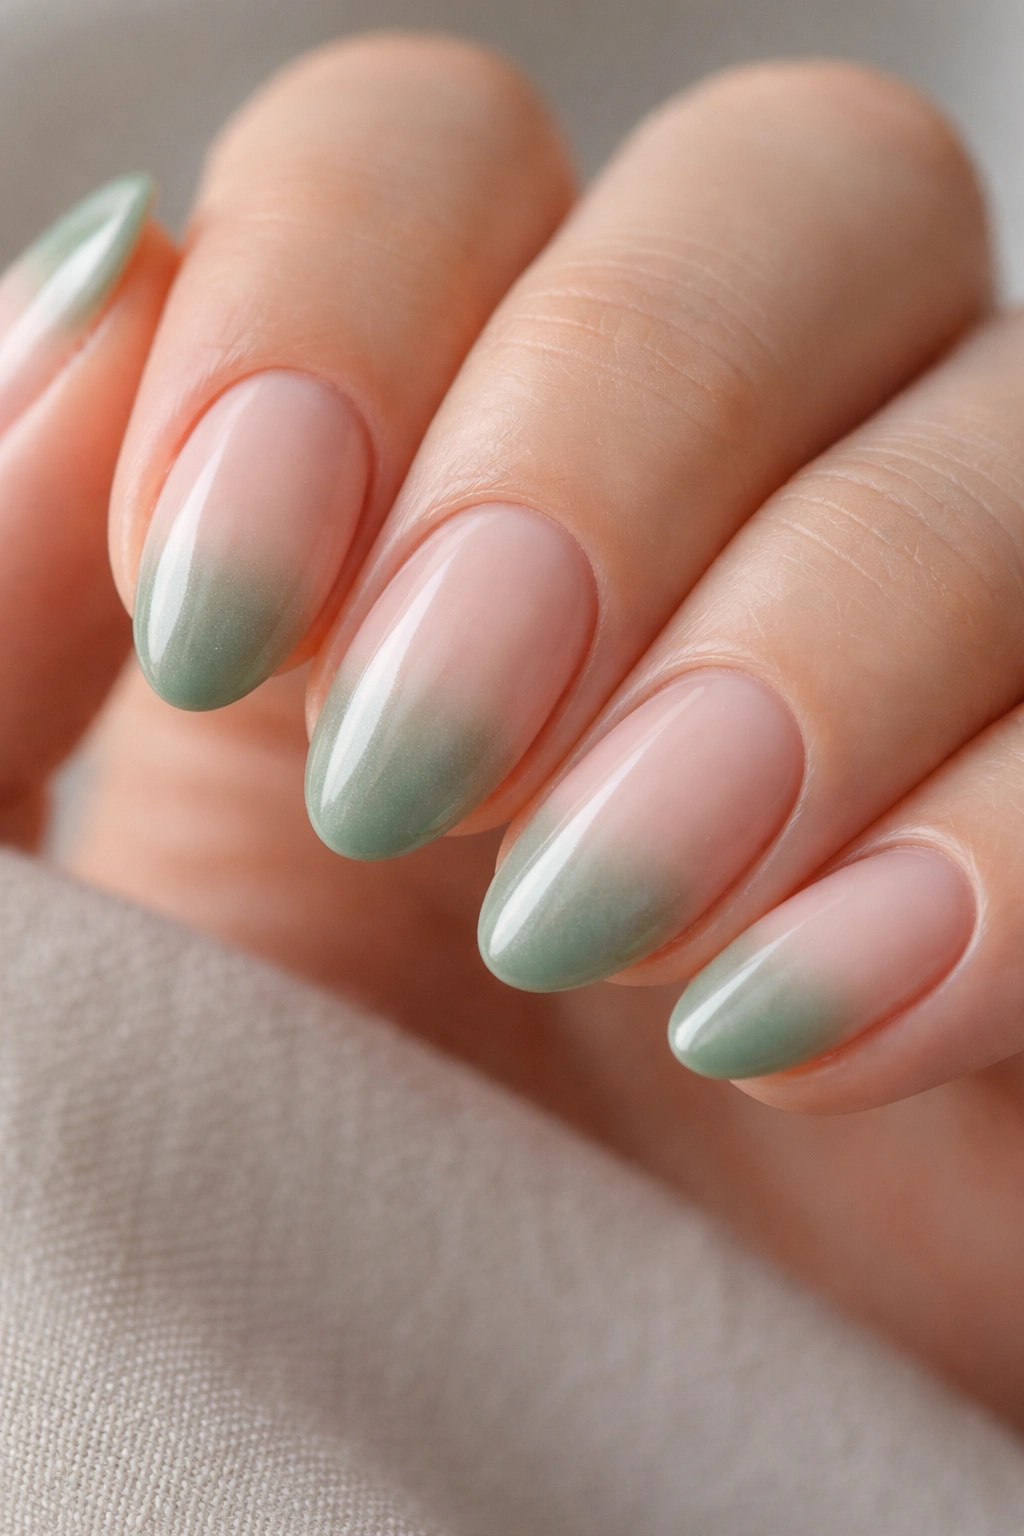
Instead of a hard smile line, the sage color melts into the base through a gradient — starting at full opacity at the very tip and fading toward sheer or transparent as it moves down the nail. The result is a softer version of the French tip that still reads as a tip-focused design rather than a full-coverage nail.
The sponge method works well here. Load a small cosmetic sponge with sage shade, dab off the excess on a paper towel until the application looks barely-there, then press it repeatedly onto the tip area. Each press deposits a thin layer — build up 5 to 8 layers until the opacity at the very edge is solid and the gradient fades naturally toward the middle of the nail. A glossy or gel topcoat blends the layers together visually once you’re done.
Why Almond Shapes Suit This Method
The tapered almond tip concentrates the gradient on a smaller, narrower surface at the edge, which naturally makes the fade look cleaner than it would on a wide square tip. Less blending, better results.
Color Options Within This Style
- Sage fading to bare/sheer — the most natural-looking version
- Sage fading to sheer white — creates a soft, washed-out gradient with a milky quality
- Sage fading to warm cream — richer and more opaque, suits deeper skin tones well
- Sage fading to ice green or mint — more experimental, shifts the mood toward nail-art territory
Each of these changes the feel of the manicure significantly. The first two read soft and subtle; the last is a statement.
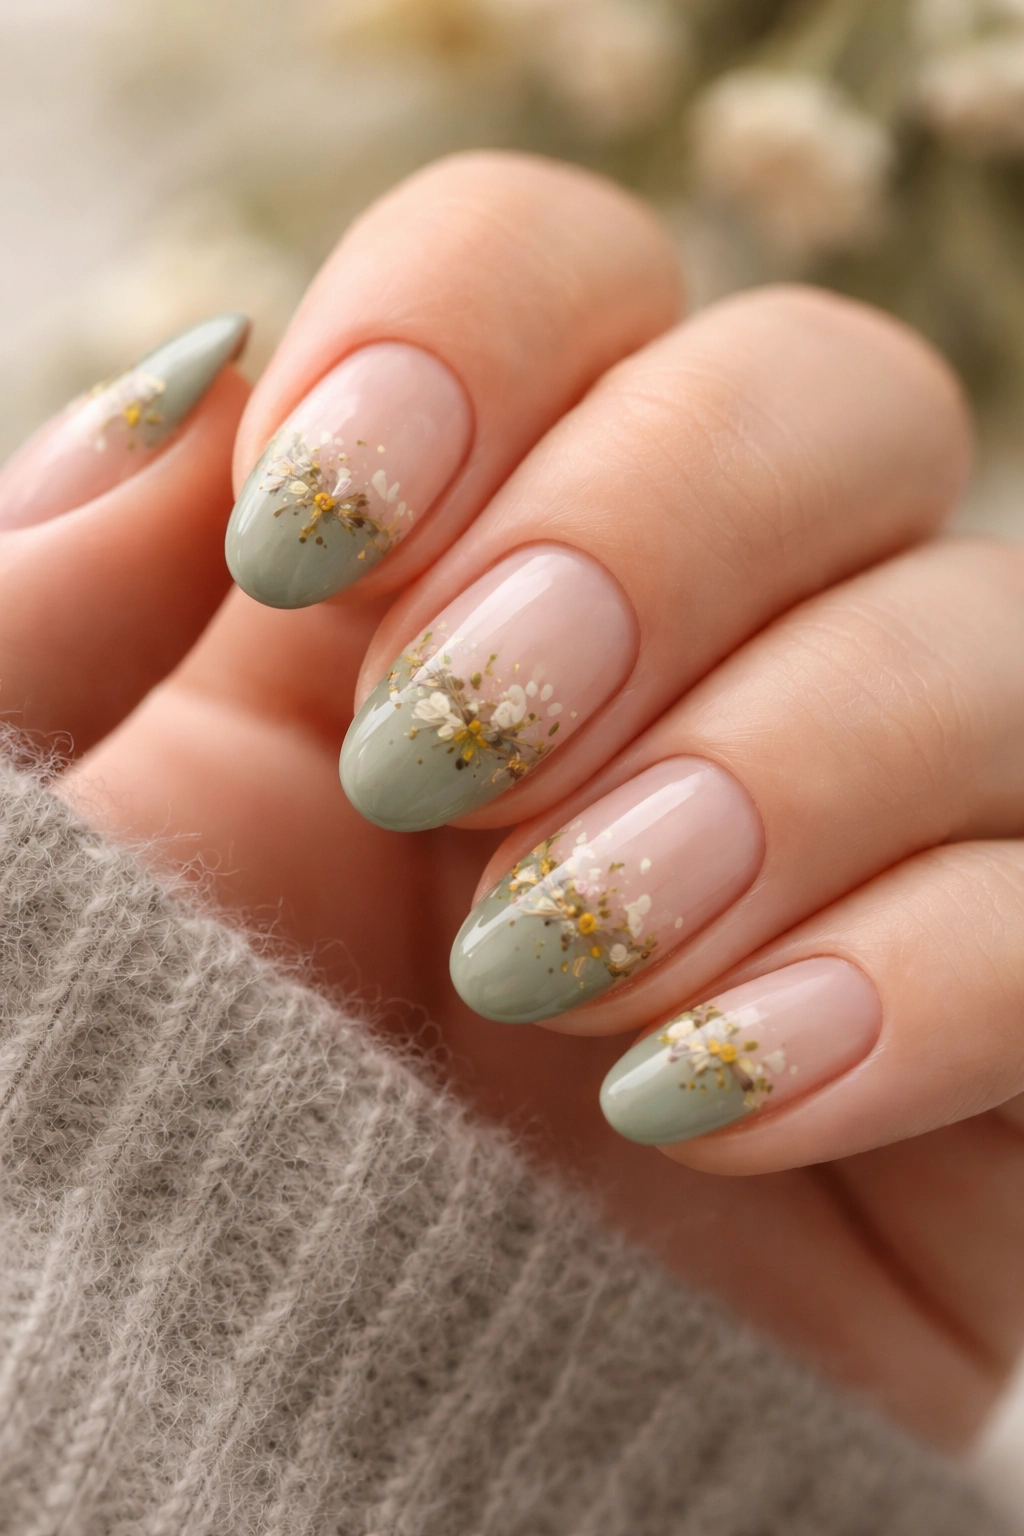
6. Sage Tips with Delicate White Daisy Nail Art
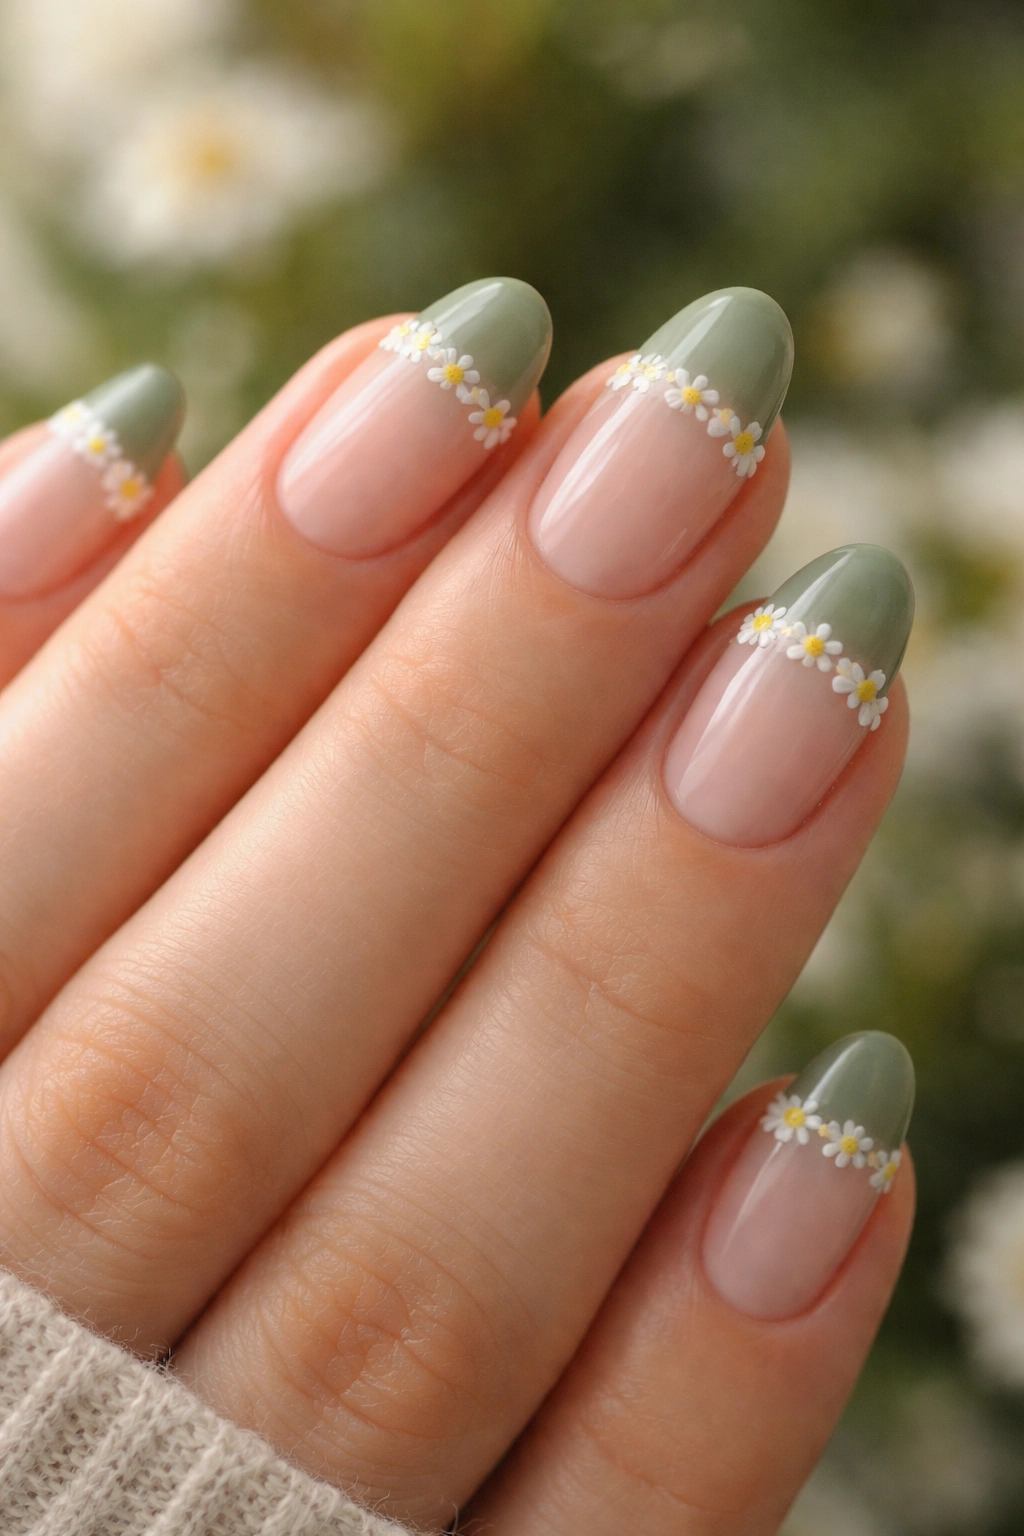
Flowers and French tips are a classic combination for a reason — the organic shapes of petals echo the curved smile line of the tip in a way that feels cohesive rather than random. On sage green tips specifically, tiny white daisies placed right at the junction of the tip and the base are especially charming.
These daisies are small. Typically 4 to 6mm across on a short nail, which means you’re working with petals roughly 1 to 2mm each. A thin dotting tool or a fine nail art brush handles the job. Create a ring of small oval-shaped white petals around a central yellow or white dot, cure or let dry, then finish with topcoat.
Place the daisies straddling the smile line — half on the sage tip, half on the nude base. This ties the two color areas together and makes the design feel intentional. One daisy per nail is plenty on short almond nails; two daisies on the ring finger accent nail can vary the intensity across the manicure without overloading shorter nails.
The overall mood here is soft and slightly cottagecore. It works whenever you want something with more personality than a plain French tip but less complexity than full nail art. The sage and white combination stays earthy and calm even with flowers added — nothing about it feels fussy.
7. Negative Space Sage French Tips
Here’s where things get more architectural. Negative space tips use the bare nail itself as part of the design — instead of covering the base with a color, the unpainted nail shows through, with the sage green appearing as a tip or outlined shapes rather than full coverage.
One execution: the sage tip is applied as normal, but the base of the nail is left completely bare — no base coat, no sheer polish. Just the natural nail. The contrast between the translucent natural nail and the opaque sage tip is the entire design. It’s more graphic than a standard French tip and suits nail beds that are healthy and even in color.
Another execution: sage fills the tip area and also appears as thin outlines or borders partway down the nail, leaving a window of bare nail visible in between. This requires a thin nail art brush and a confident hand to execute cleanly.
The look is distinctly minimalist-editorial. Not for every occasion, but for settings where conventional polish feels boring and avant-garde nail art feels like too much, negative space nails occupy an interesting middle ground. Keep nails well-hydrated and lightly buffed for this look — the bare natural nail is on full display, so any ridges or dryness will be visible. Apply a ridge-filling base coat if needed, but stick to clear or sheer to preserve the negative-space effect.
8. Sage and Cream Color-Block French Tips
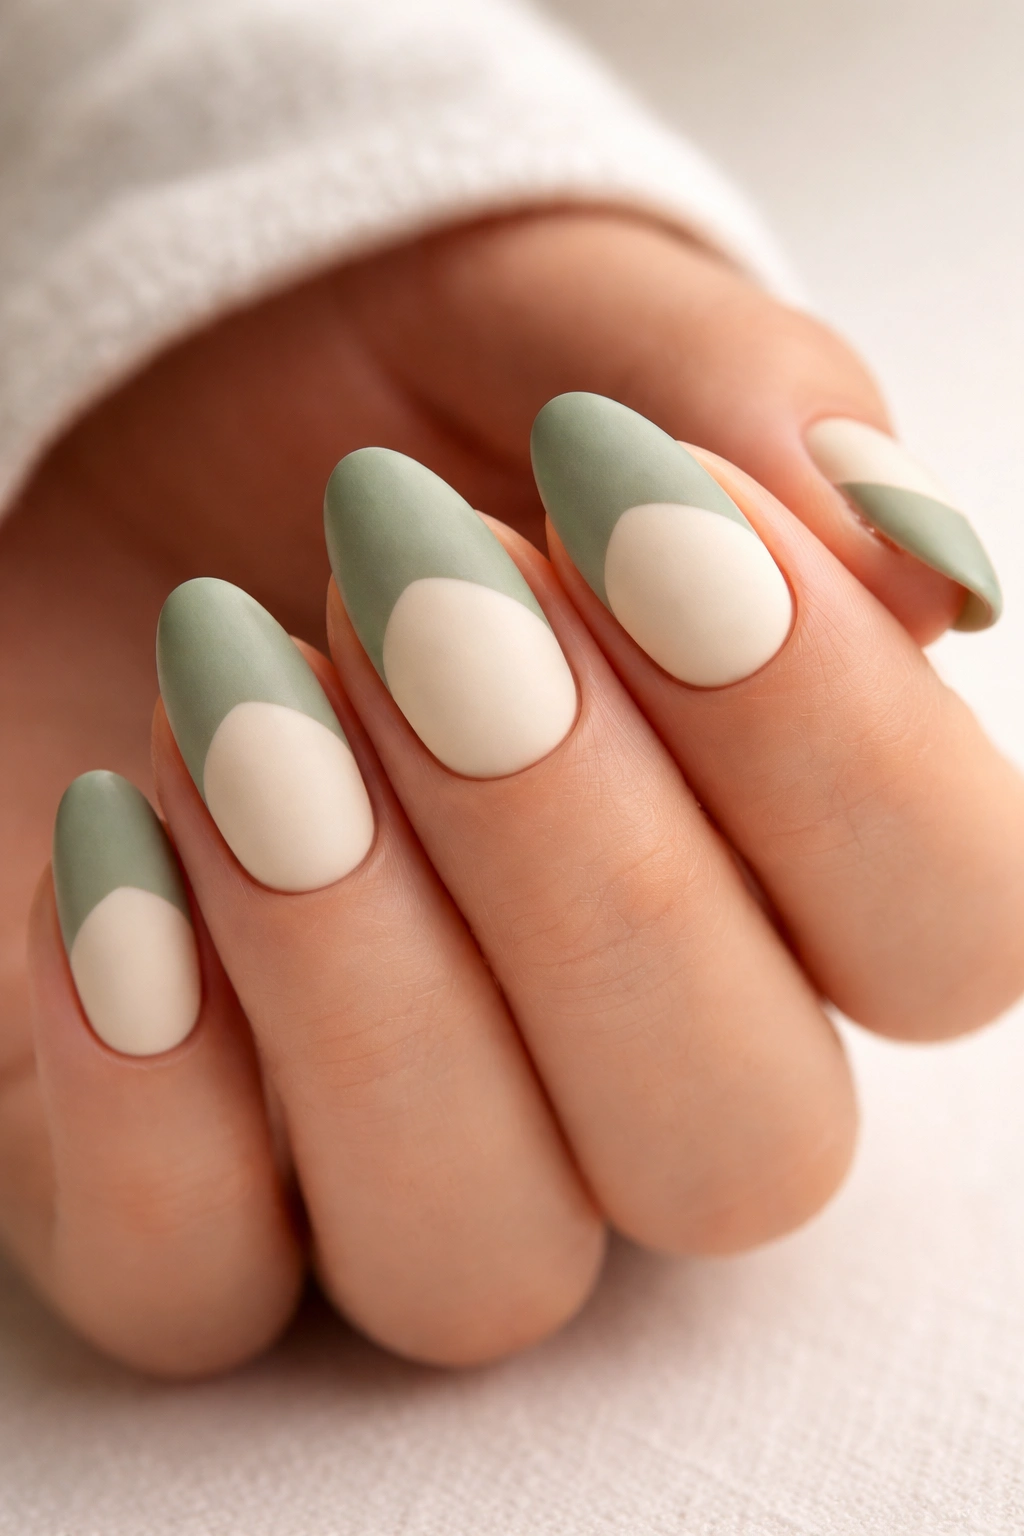
Unlike a traditional French tip — which treats the tip as an accent to a dominant base color — this version makes both the tip and the base equal, deliberate players. The nail is divided into two distinct color blocks: sage green occupies the tip half, and a warm cream or off-white occupies the lower half. The division line is clean and intentional, creating a strong visual split that reads closer to color-blocking than a classic French tip.
The cream used here isn’t a neutral background — it’s its own color, chosen deliberately to complement the sage. A warm ivory or butter-cream shade works better than a bright white. The warmth in the cream picks up the slight yellow undertone present in most sage greens and keeps the palette harmonious. Bright white creates too much stark contrast and risks pushing the design toward clinical territory, which isn’t the effect you’re after.
This design has a distinctly ’70s or Scandinavian-design quality — bold color-blocking with a restrained, earthy palette. On short almond nails, it stays graphic without feeling heavy. A matte topcoat on both sections enhances the color-block quality; a glossy finish unifies the look and makes it feel more sleek. Apply the cream first as a full base coat, cure it, then apply the sage tip with a thin brush. French tip tape or a guide strip helps achieve a clean line, but you’ll still need a cleanup brush for the almond’s inner corners.
9. Sage Tips with a Thin Silver Chrome Line
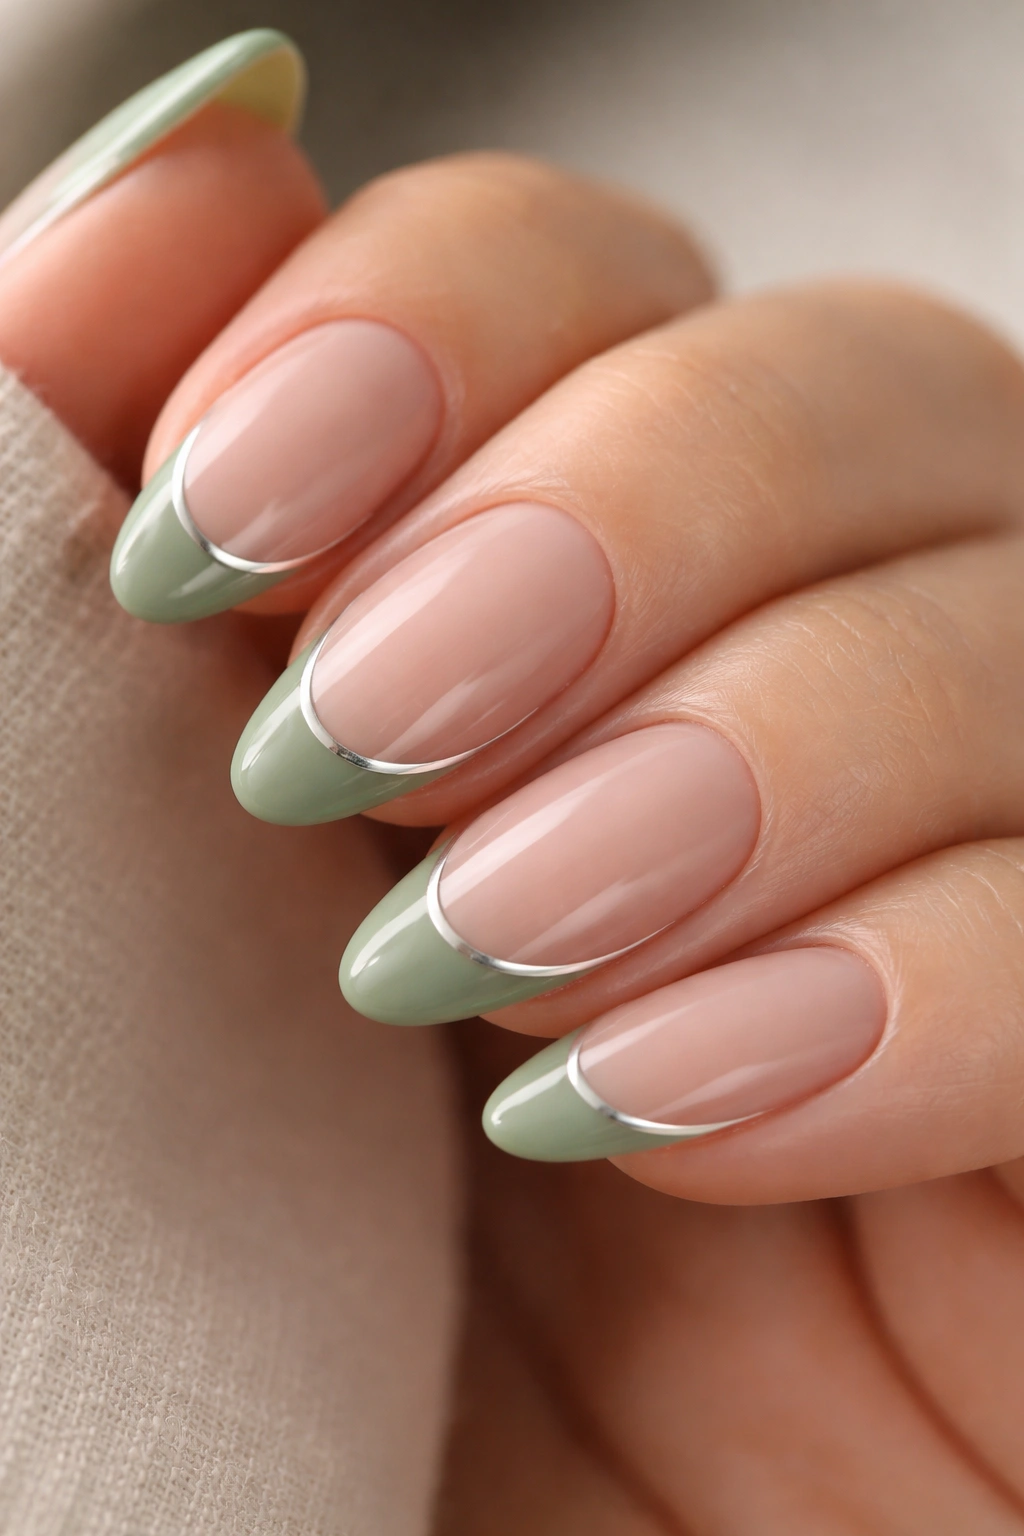
If the gold foil version leans editorial and warm, silver chrome reads cooler and sharper. Same concept — a hair-thin metallic line sits at the inner edge of the sage tip — but the silver creates a different contrast against sage’s grey-green base. Where gold feels organic and earthy, silver feels precise and modern.
Silver chrome powder applied over gel gives the most mirror-like finish. Use a silicone tool or a fine eyeshadow brush to press and buff the chrome powder onto a tacky, uncured topcoat right along the smile line. The chrome adheres where the gel is tacky, so precision comes from where you apply pressure — not from the tool size. Cure after applying, then seal with a no-wipe topcoat to lock it in.
The resulting silver line looks almost liquid — like a thread of mercury running along the tip’s edge. Against the soft, earthy sage, the contrast is unexpectedly striking. Under direct light, the chrome line flashes and shifts across the spectrum. Under dimmer, warmer light, it reads as a clean silver stripe. Both outcomes are worth having.
The silver-sage combination suits cool-toned jewelry particularly well. If you reach for silver rings and white-gold pieces by default, this design coordinates with your accessories in a way the gold version doesn’t.
10. Micro French Sage Tips with a Barely-There Smile Line
Smaller is sometimes stronger.
The micro French tip — sometimes called a baby French — uses a smile line so thin it barely registers from a distance. Up close, you see a delicate 1mm crescent of sage at the very edge of the nail. From arm’s length, the nail looks almost natural, like a healthy free edge with a clean finish.
This is the understated end of the sage French tip spectrum. It works for people who want color on their nails without anything that reads as a statement. Nail art for people who claim they don’t wear nail art.
Getting the smile line thin enough requires a brush with very few hairs — a zero liner or a trimmed-down fan brush works well. Load the brush lightly with sage gel or polish, wipe off most of it on the edge of the bottle or a folded paper towel, and apply just the bare tip of the brush to the nail edge. Light pressure is everything here. Heavy loading is the enemy of a clean micro tip.
The micro French tip pairs particularly well with glassy topcoats — the kind that create a shiny, almost wet-looking surface. The hint of sage underneath a glassy finish looks impossibly refined, like the color is coming from inside the nail rather than sitting on top of it. It’s the nail equivalent of “no-makeup makeup.”
11. Outlined Sage French Tips with a Fine Dark Border

Take the sage tip and trace its outer edge with a fine dark line. The outlining color can be deep olive green (nearly black-green), rich espresso brown, or a dark forest green — whatever feels most intentional against your specific sage shade. That thin border acts like the outline in an illustration, turning the sage tip from a soft, organic accent into something more graphic and structured.
Apply the outline over a fully cured sage tip, using a thin nail art liner brush or a nail art pen. If using a brush, thin your gel outline color by mixing it with a small amount of gel topcoat in roughly a 3:1 ratio. This gives you a more controllable consistency that flows without clumping or spreading. Trace the smile line from one corner to the other in a single smooth stroke. Then trace the free edge across the top of the tip.
Two strokes per nail, total. Hold the brush like a pencil and rotate your wrist rather than dragging the brush across a fixed arm. Cure each stroke before applying the next if you’re using gel, to prevent the line from shifting while wet.
The result looks precise and considered — the kind of design that suggests genuine nail art knowledge and confidence, without requiring the most technically demanding execution on this list. Where the standard sage French tip is quiet and polished, the outlined version has an architectural quality that makes it feel like a deliberate design choice from the first glance.
12. Sage Tips with Embedded Dried Wildflowers
This one is a commitment — in time, in technique, and in the “everyone will ask about your nails” department.
Dried wildflowers embedded directly into gel overlays have become one of the more sought-after nail art techniques, and for good reason. The result genuinely looks three-dimensional: tiny pressed flowers preserved under a smooth gel dome, visible through the nail’s surface like botanical specimens under glass. On a sage French tip, the flowers typically sit right at the smile line — half on the tip, half on the base — or tucked within the sage area itself.
For the layered approach: apply your nude or sheer base, cure it fully, then apply a thin layer of clear gel at the tip area. Partially cure this layer — about 10 seconds under an LED lamp — so it’s tacky but not fully set. Press a tiny dried flower directly onto the tacky gel. Small chamomile florets, forget-me-nots, or individual lavender buds work best at this scale; they’re small enough to sit flat without creating awkward lumps. Apply your sage tip color around or over the flower, then build up several layers of clear gel on top to encase it in a smooth dome with no raised edges that could lift or snag.
Builder gel works better than standard topcoat gel for this — it provides more structural depth. Expect to apply 3 to 4 layers of clear gel over the flower, curing each layer fully, until the surface feels completely level when you run a finger across it.
Source pre-dried nail florals from nail supply shops specifically. They’re cut to the right scale and dry more cleanly than flowers you press yourself at home. The payoff is a design that simply cannot be replicated with standard polish techniques — it has depth and texture that rewards every close inspection.
13. Sage Tips with a Swirling White Line Art Design
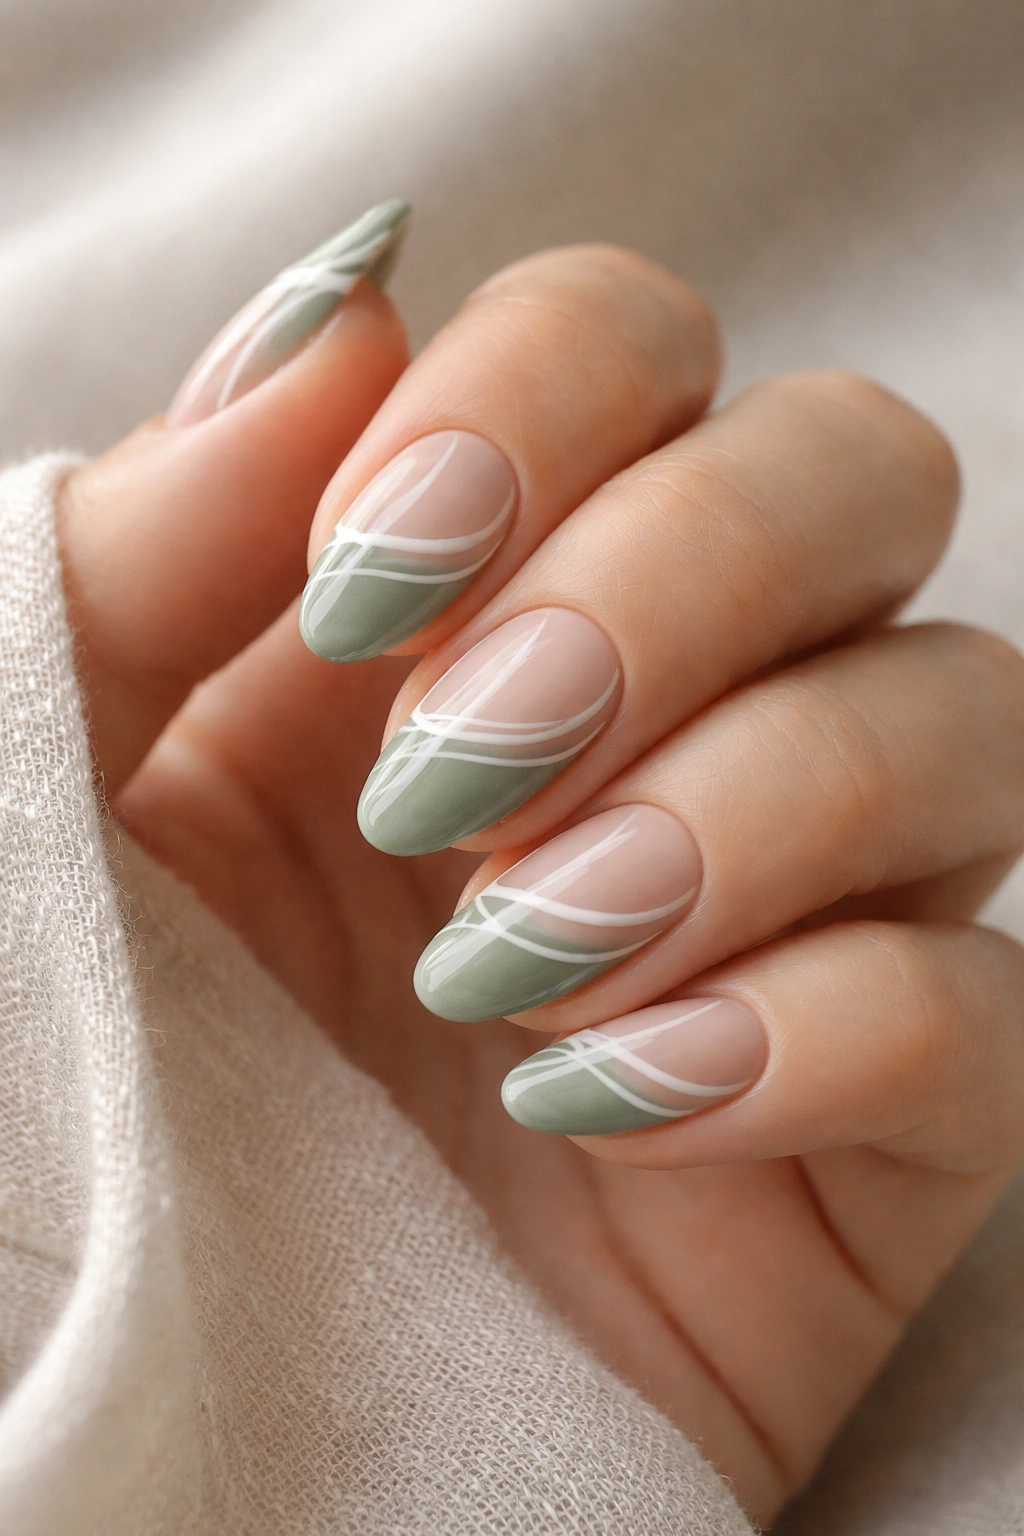
Swirl art borrows from marble aesthetics and abstract illustration, and it works with sage green tips in a way that’s surprisingly cohesive. Once the sage French tip is complete, a thin nail art brush applies loose, curving white lines over the tip area and extending down onto the base — organic, flowing strokes that feel more like calligraphy than illustration.
The lines don’t need to follow any strict pattern. In fact, the freer the strokes, the better this looks. Start at a point along the tip, let the brush curve naturally downward in a loose S or C shape, and lift the brush gradually so the stroke tapers at the end. Add two or three of these strokes per nail, varying the starting points and directions slightly across the fingers.
This design shifts the personality of the sage tip noticeably. Where the standard sage French tip is quiet and polished, the swirl version is expressive and slightly bohemian. Both are beautiful — they just have completely different energy. If you’ve been wearing the classic version for a while and want something with more personality without changing the fundamental design, the swirl overlay is the easiest upgrade.
A thin white nail art gel or a nail art pen makes this achievable without formal nail art training. Hold the brush lightly — grip pressure is what causes wavering lines. Let the brush do the work, and any wobble in the line reads as intentional organic movement rather than a mistake.
14. Chunky Sage French Tips with Extra Wide Coverage
Flip every convention about thin, restrained French tips and go wide.
The chunky French tip covers a third to nearly half the nail in sage green, creating a bold, graphic look that’s closer to color-blocking than a traditional tip design. On short almond nails, this reads as confident and intentional rather than overwhelming — the tapered nail shape keeps the wide tip from looking blocky the way it would on a square nail.
The smile line here is still curved, just positioned much further down the nail — 5 to 7mm from the tip rather than the standard 2 to 3mm. The sage coverage becomes substantial enough to genuinely change the color balance of the nail. Choose a sage that’s well-pigmented and applies evenly in two coats; a sheer or patchy sage will look visibly uneven at this scale, and there’s no hiding that.
A matte topcoat over the sage portion works particularly well in this format. It makes the wide tip feel like a deliberate statement rather than an oversized accident. Some versions of this design also add a thin gold or white line along the smile line edge to give the thick tip a crisp border — an element that sharpens the look and makes it clear the extra width was entirely on purpose.
15. Sage Tips on a Milky White Base

The base color changes everything, and this version is proof.
Swap the nude base for a milky white — a softly opaque white with a slight haze rather than a stark, bright finish — and the sage tip takes on a completely different character. Where sage over nude reads earthy and organic, sage over milky white reads crisper, cooler, and more polished.
The milky base creates more contrast, which makes the sage tip stand out more clearly. On lighter skin tones, this combination reads almost pastel — soft and airy, reminiscent of eucalyptus sprigs or frosted botanicals. On deeper skin tones, the sage-on-white contrast is sharper and more striking. A soft, slightly warm white works better here than a crisp bright white. Think the inside of a seashell or the surface of fresh cream — that slightly muted, hazy quality. Stark bright white pushes the design toward clinical territory, which isn’t the mood you’re after.
This base also works particularly well if you’re dealing with mixed nail lengths across a hand — it visually unifies the manicure even when the almond tips vary slightly in length, which happens more often than you’d expect with natural nails.
16. Sage Tips with Pearl or Rhinestone Accents
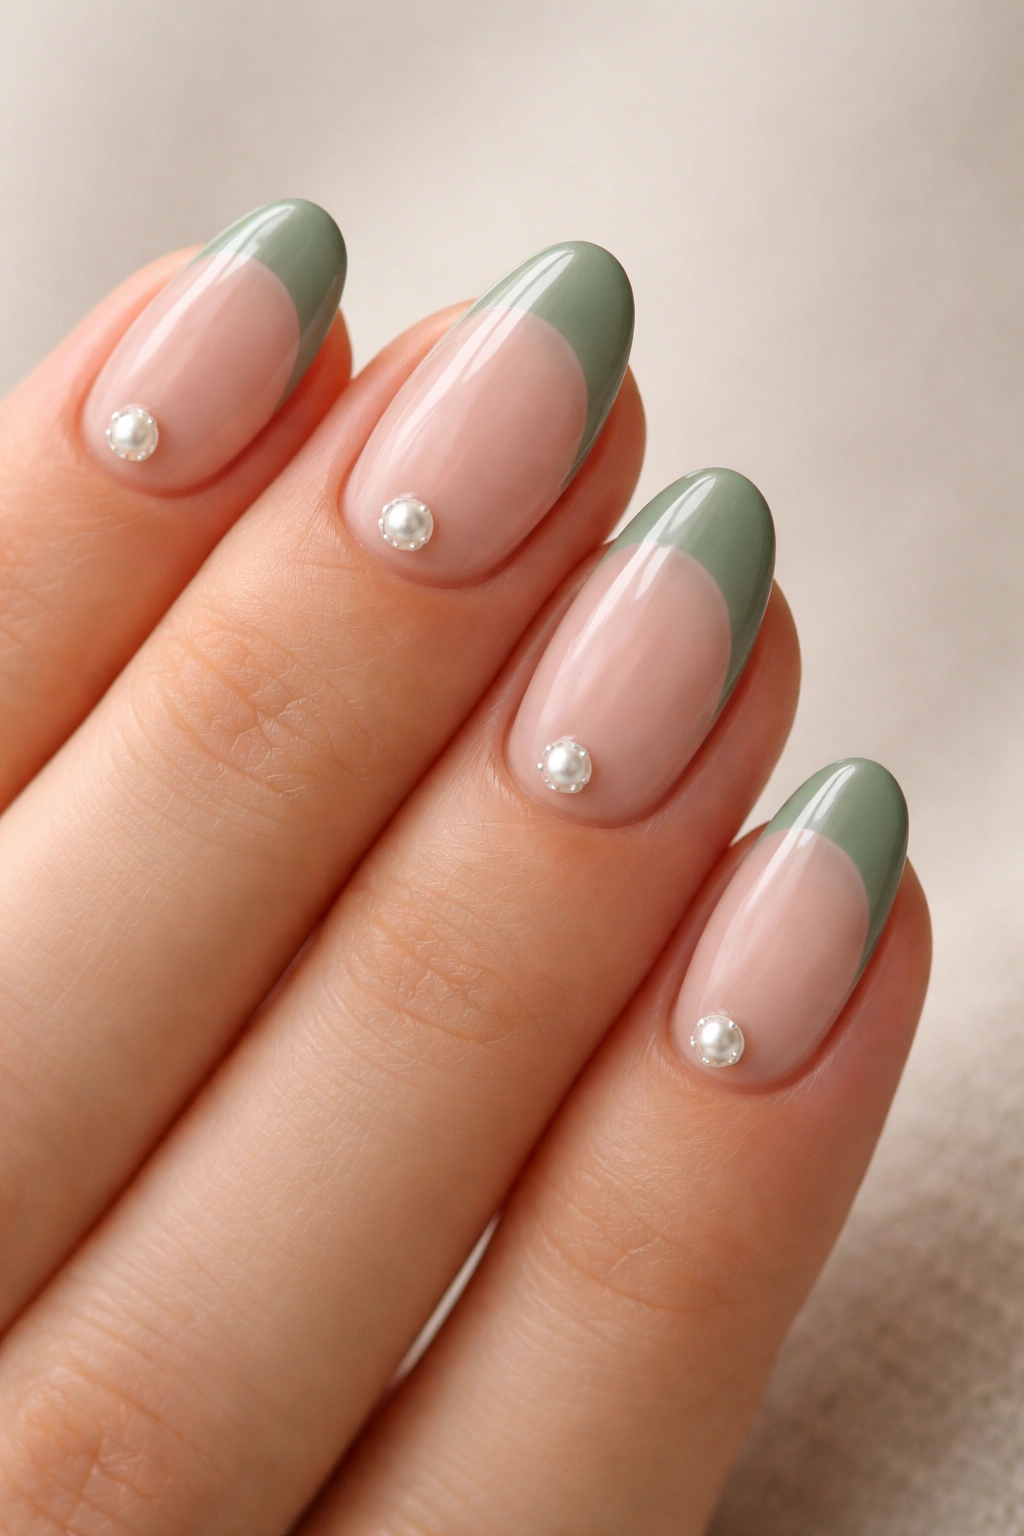
A single flatback rhinestone or pearl, placed exactly at the center of the smile line, transforms a simple sage French tip into something distinctly more elevated.
Pearls lean romantic and vintage-inspired — they carry a soft luster that echoes the muted, natural quality of sage green. The combination feels considered and grown-up without being showy. Rhinestones — crystal clear or champagne-toned — lean more editorial and formal. They catch light sharply and make a simple design look evening-appropriate.
Size matters here. A 1.5 to 2mm stone hits the right scale on a short almond nail. Anything larger and the stone overwhelms the tip; anything smaller and it simply disappears. Placement is equally important — center of the smile line, not off to one side and not positioned on the tip itself. That centered position creates symmetry and draws the eye to the junction between tip and base in a deliberate way.
To set the stone in gel: apply it to a slightly uncured topcoat layer, press gently, then cure. A small drop of gel on the back of the stone before placing adds holding power. Seal with topcoat going around the stone rather than over it — flooding a raised stone with thick topcoat dulls the finish and creates an uneven surface. For press-on rhinestones without gel, stone-specific nail adhesive holds better than standard nail glue and is less likely to displace the stone during application.
17. Sage Tips with Holographic Glitter Fade at the Free Edge
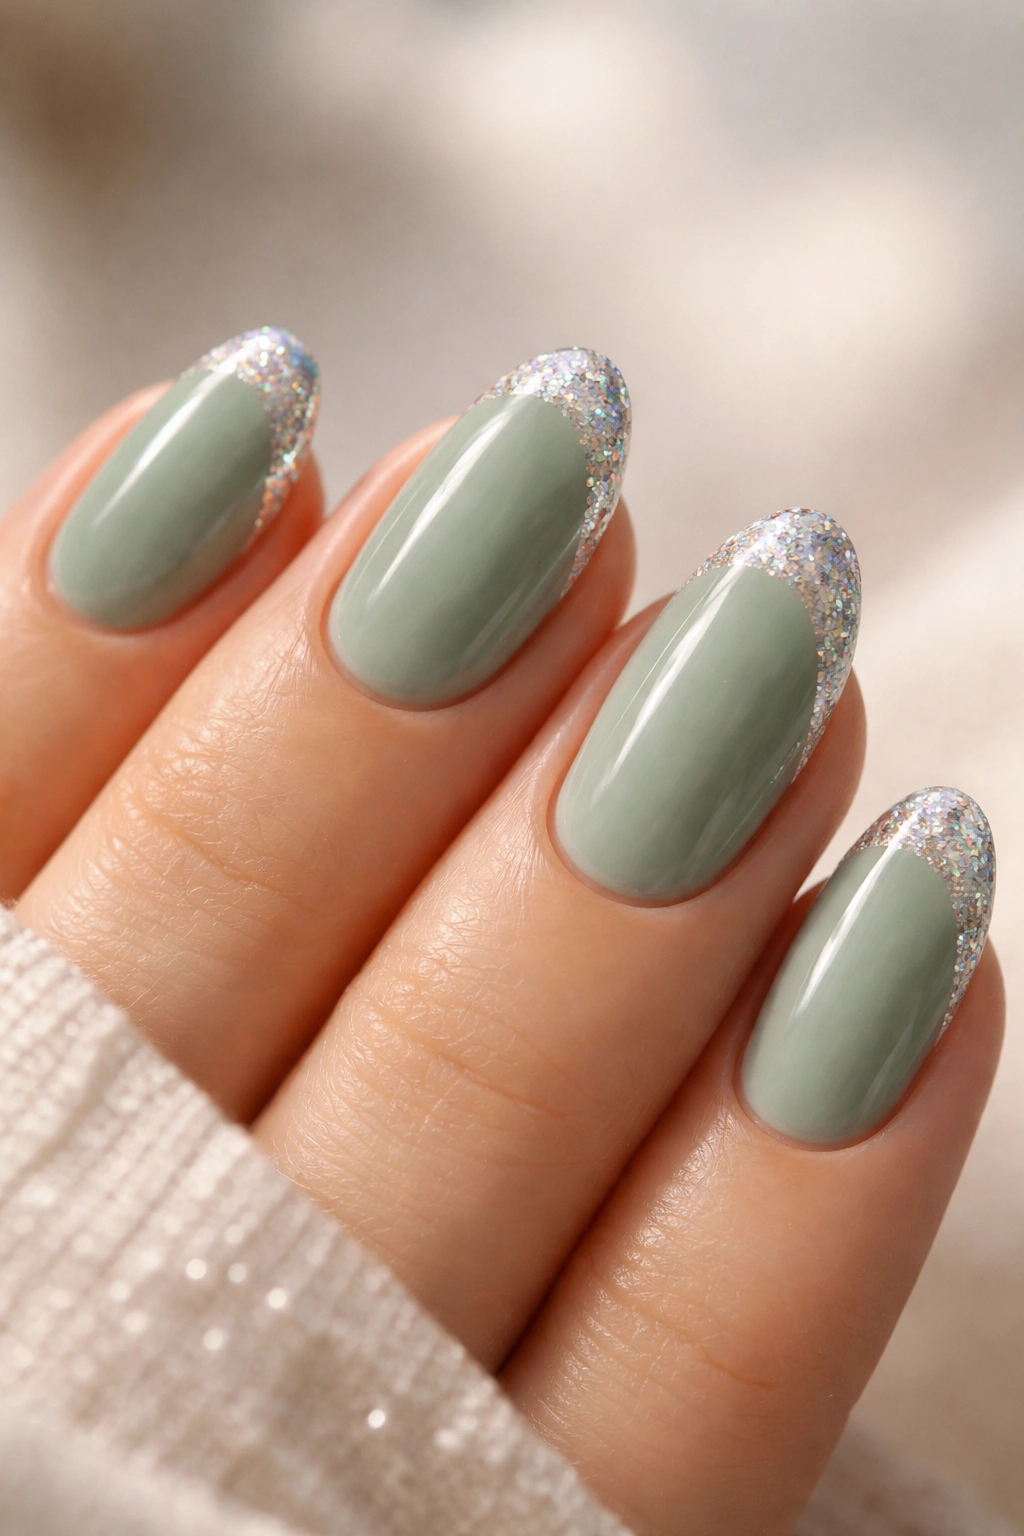
The most dramatic entry on this list — and deliberately so.
This design takes the sage French tip and adds a holographic glitter gradient along the very free edge, so the outermost 1 to 2mm of the sage tip transitions from solid color into prismatic shimmer. The glitter runs along the outermost edge of the sage and blends upward and inward into the solid sage, rather than sitting as a separate stripe. The effect is a tip that seems to shift at the very edge — catching greens, purples, and golds depending on the light source — while the rest of the sage remains matte or glossy and grounded.
Superfine holographic glitter gel — not chunky craft glitter, but the prismatic micro-fine kind available from nail supply brands — applied over a tacky gel base layer at the free edge and stippled inward with a small flat brush achieves this gradient cleanly. Two to three thin applications of glitter gel build opacity gradually without clumping or bunching. Cure each layer before adding the next one.
On short almond nails, this doesn’t read as a party manicure. The design is still led by the sage, and the glitter fringe is a supporting detail — present when you’re looking for it, subtle when you’re not. Under direct light, the tip shifts and moves color in a way that’s genuinely hard to stop looking at. Under softer, indirect light, it reads as a sage tip with a slight shimmer at the edge. That versatility makes it considerably more wearable than you might expect from any design with glitter in the description.
Getting a Clean Smile Line on Almond Nails at Home
The smile line is where most DIY French tips fall apart. On round or square nails, straight tape or pre-cut French guides can get you a decent result. On almond nails, the curved tip and narrowing sides mean those guides don’t always conform to the nail’s edge — especially at the inner corners, where tape tends to lift or leave a gap.
Three methods that actually work at home:
The freehand brush method is the most controlled once you develop the feel for it. Use a thin, flat brush — a French brush or a size 1 flat gel brush — loaded sparingly with sage polish or gel. Start from one inner corner of the smile line, press the brush flat against the nail, and sweep in a single stroke toward the center. Repeat from the opposite corner, meeting in the middle. Keep your arm still and rotate your wrist — don’t drag the brush across a stationary arm. Practice the stroke on paper or a practice hand before committing to your actual nail.
Liquid latex or nail barrier lets you work with less precision. Paint the barrier around the perimeter of the nail bed, apply your sage tip without worrying too much about overspray, let it dry, then peel the barrier away cleanly. A small cleanup brush handles any remaining gaps with acetone.
Curved tape works better than straight strips on almond nails. Cut a gentle curve into standard tape using scissors or a small hole punch — the curve should follow the natural arc of your smile line. Press it firmly, especially at the corners, and remove it while the polish is still slightly wet. There’s a 30 to 60 second window depending on the formula where the tape lifts cleanly without dragging.
One thing most guides skip entirely: the cleanup brush is just as important as the application brush. A thin, angled brush loaded with acetone lets you sharpen the smile line after the fact — cleaning up any sage that crept too far into the base, refining the curve where it went uneven, and sharpening those inner corners where tape always leaves something to be desired. That final cleanup step is what separates a professional-looking smile line from a handmade one.
Final Thoughts
Sage green French tips on short almond nails occupy a specific and genuinely valuable spot in the nail-design world — versatile enough for everyday wear, considered enough to feel intentional, and distinctive enough that people notice and ask.
If you’re starting from scratch, the classic sage over nude (#1) and the micro French version (#10) are the logical entry points. Both are forgiving to apply, look consistently good regardless of skill level, and give you an honest sense of what the sage French tip aesthetic actually looks like on your specific nails — before you invest time in the more involved designs. Once you’ve got those down, the outlined tip (#11) and the dried wildflower design (#12) are worth the extra effort — both reward close inspection in a way that’s genuinely satisfying to wear.
The shape does a significant amount of work here. Short almond nails have a natural proportion that flatters most nail beds, and the curved tip means even simple designs read as purposeful and well-considered. A good shape, a beautiful earthy color, and a steady hand at the smile line — that combination covers most of what makes this style work. The rest is just deciding which version suits you most right now.
