

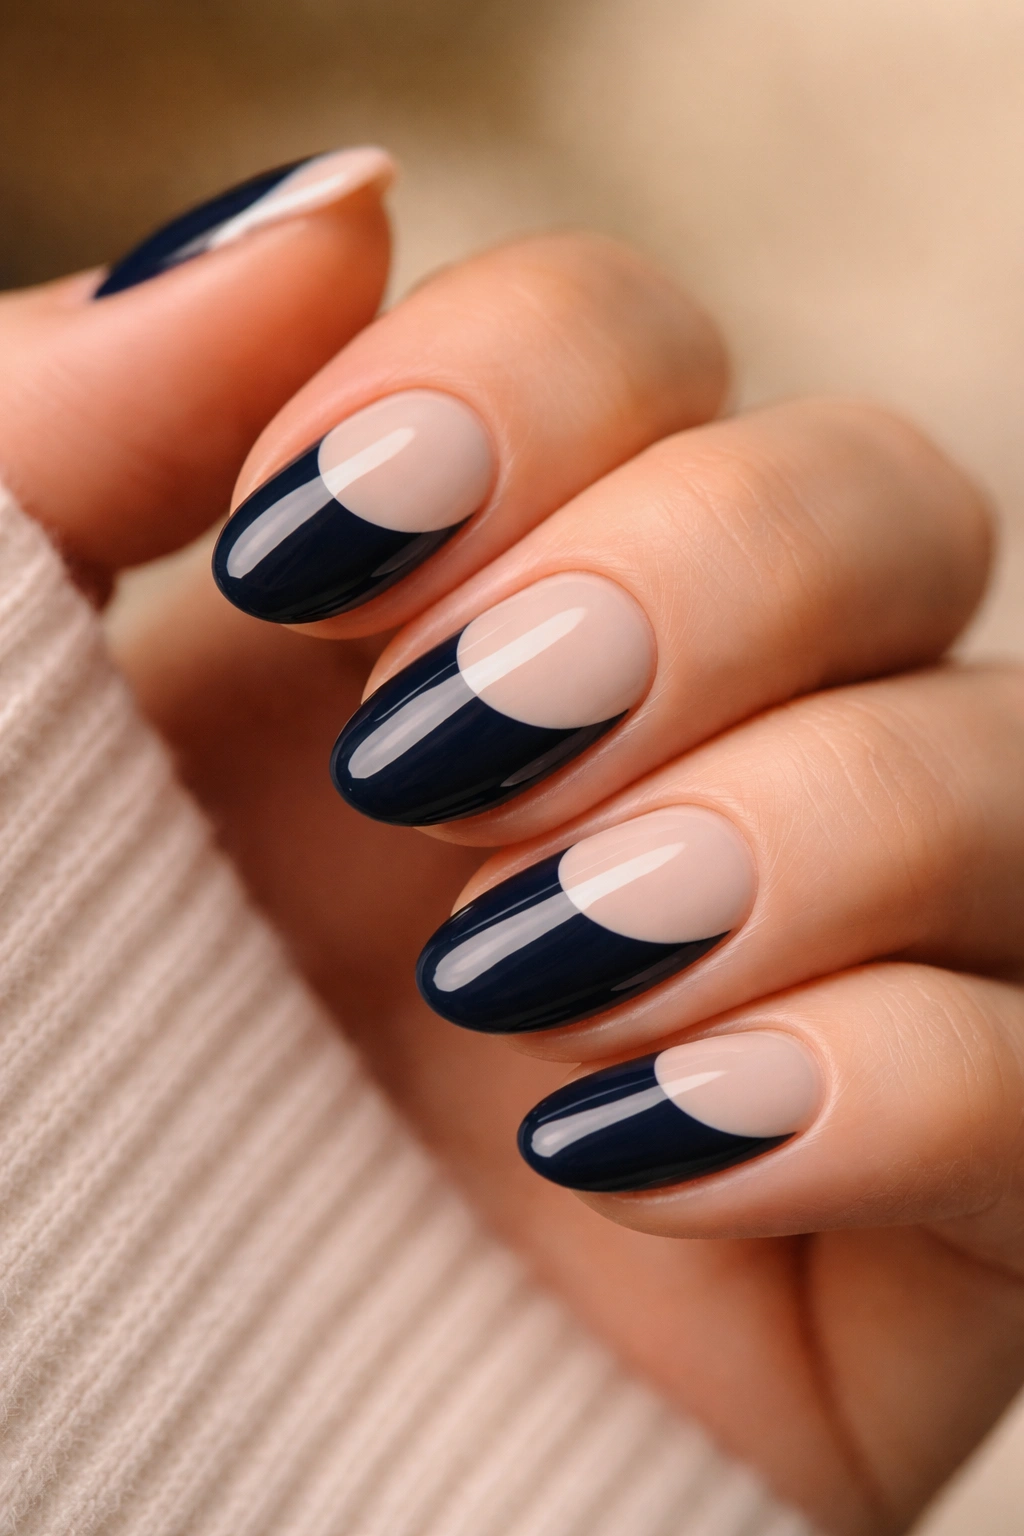
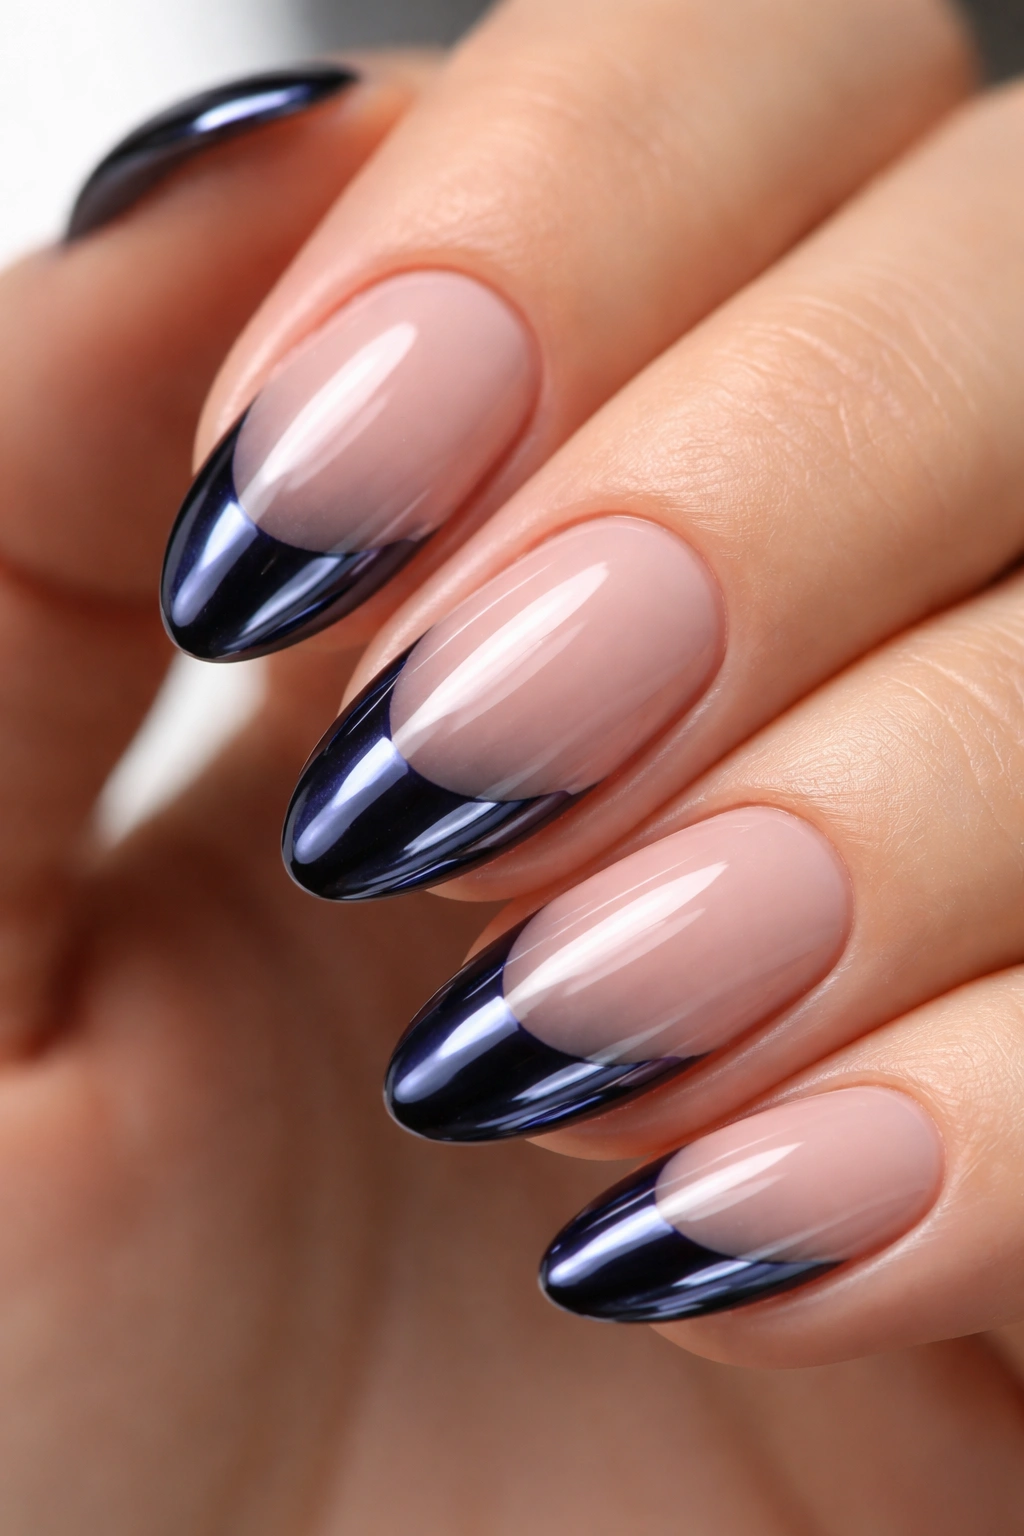
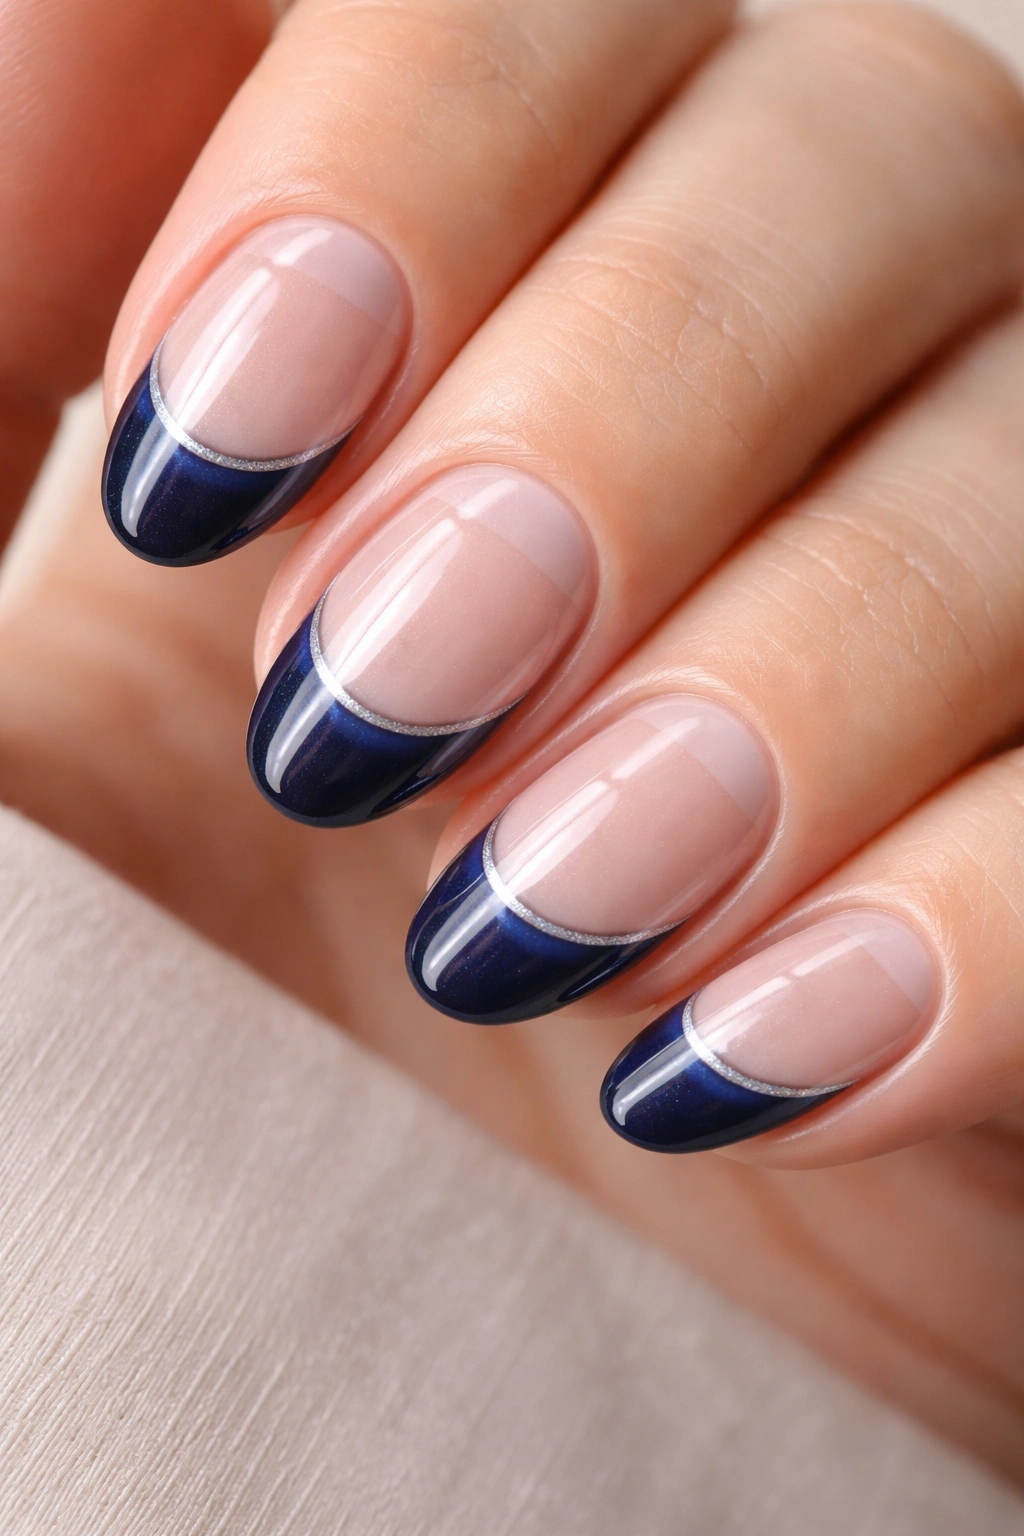
Navy blue has this quiet authority that most colors cannot match. It’s deep without being heavy, bold without being aggressive — and when you set it against a nude base at the tip of a short almond nail, something clicks into place.
Short almond nails hit a sweet spot. Long enough to carry detailed nail art, short enough to hold up through a full work week without snagging on a keyboard or catching on a sweater. The almond shape — that soft, slightly pointed oval — elongates the finger visually and creates a graceful pocket at the tip that French designs slot right into. It’s one of those shape-and-art pairings that just makes sense.
What separates navy French tips from a standard white-tipped French manicure isn’t only the color swap. It’s the mood shift. Navy reads almost architectural against a warm nude base. Against a cool milky white, it feels softer, more romantic. Add chrome or fine glitter and it pushes into something editorial. The same structural technique produces completely different aesthetics depending on what you build around it — and that flexibility is real, not the vague kind attached to every beauty roundup.
The 17 designs below cover the full range: some are doable at home in under 10 minutes with tape and a steady hand; others are the kind of thing worth booking an appointment for. Every one of them is built specifically for the short almond shape — designed for its proportions, curves, and angles, not just adapted from square or stiletto nail art.
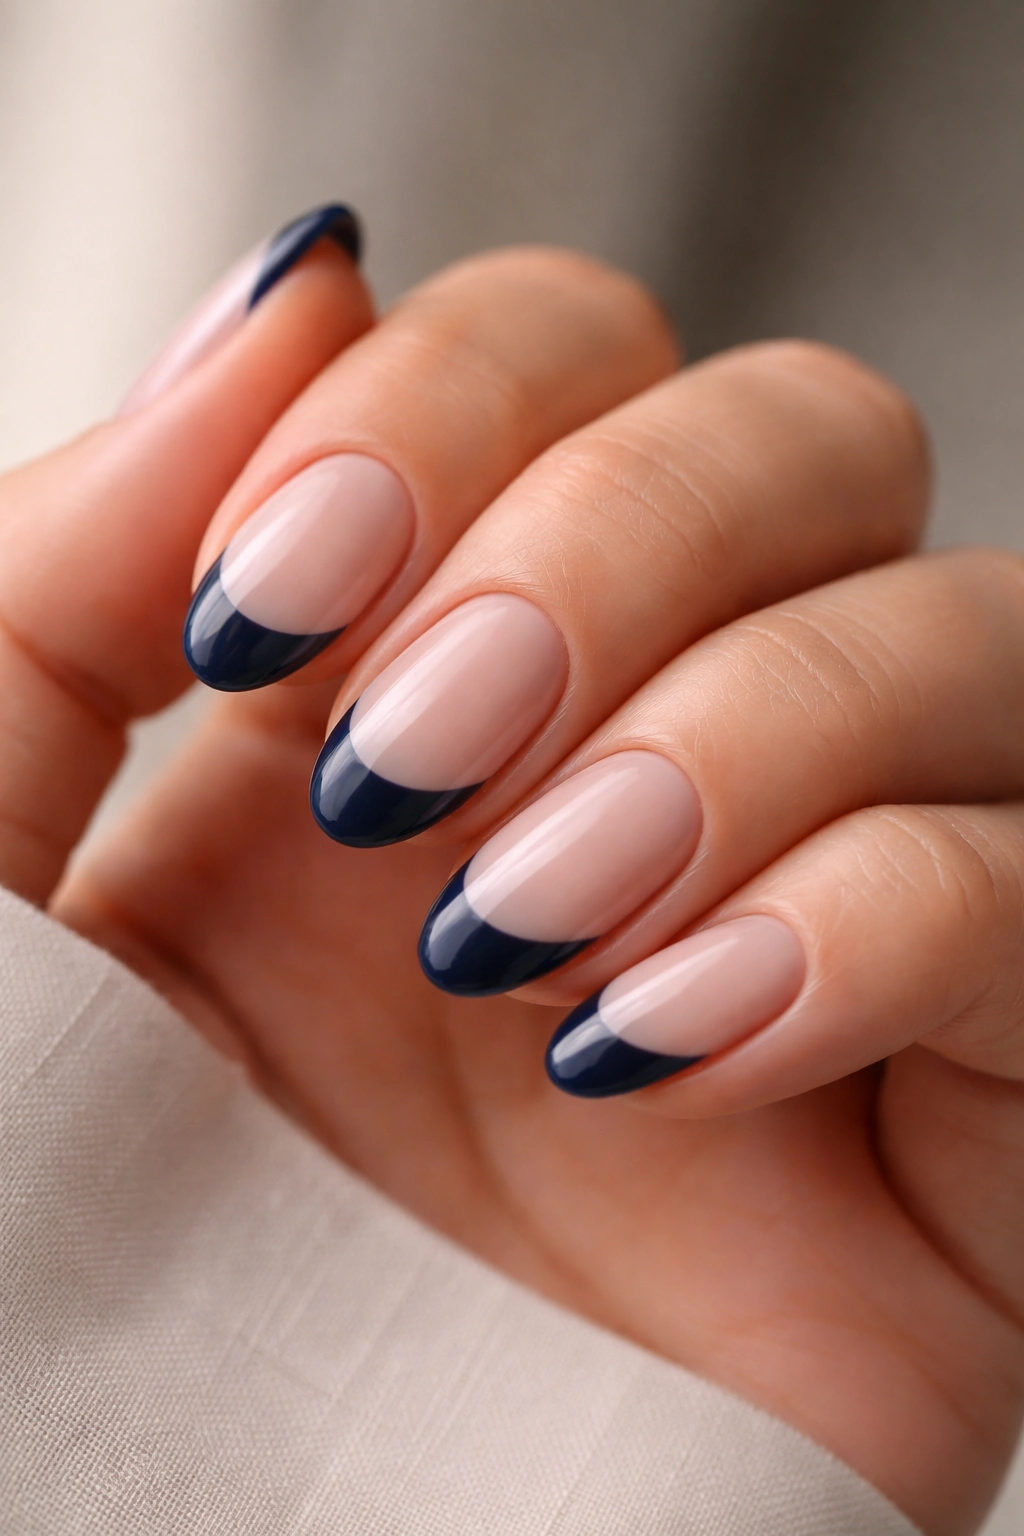
1. Classic Navy French Tip on a Sheer Nude Base
The one that started everything. A clean navy smile line against a sheer or nude base is still one of the strongest nail looks you can wear, and on short almond nails it reads sharper than it does on almost any other shape.
Tip width matters more here than most people expect. On a short nail, a wide tip overpowers the nude base and makes the nail look stubby. Aim for about 20-25% of the total nail length — if your almond nail is roughly 1.5 cm long, the navy band should be no wider than 3-4 mm. Any thicker and the elegant proportions collapse.
Nail tape is the most reliable tool for getting that crisp smile line. Press it firmly along the curve of your natural nail tip, paint one thin coat of navy, let it dry for a full 90 seconds before peeling the tape, then apply a second coat to the exposed tip. This two-coat approach with the tape removed between applications prevents the polish from pooling at the edge — which is exactly what gives French tips that thick, slightly clunky look you’re trying to avoid.
The base coat finish changes everything. A glossy sheer nude keeps the look polished and timeless. A slightly satin or matte nude base shifts the same navy tip into something more editorial. Both work — they just feel completely different.
2. Fine Glitter Navy French Tip
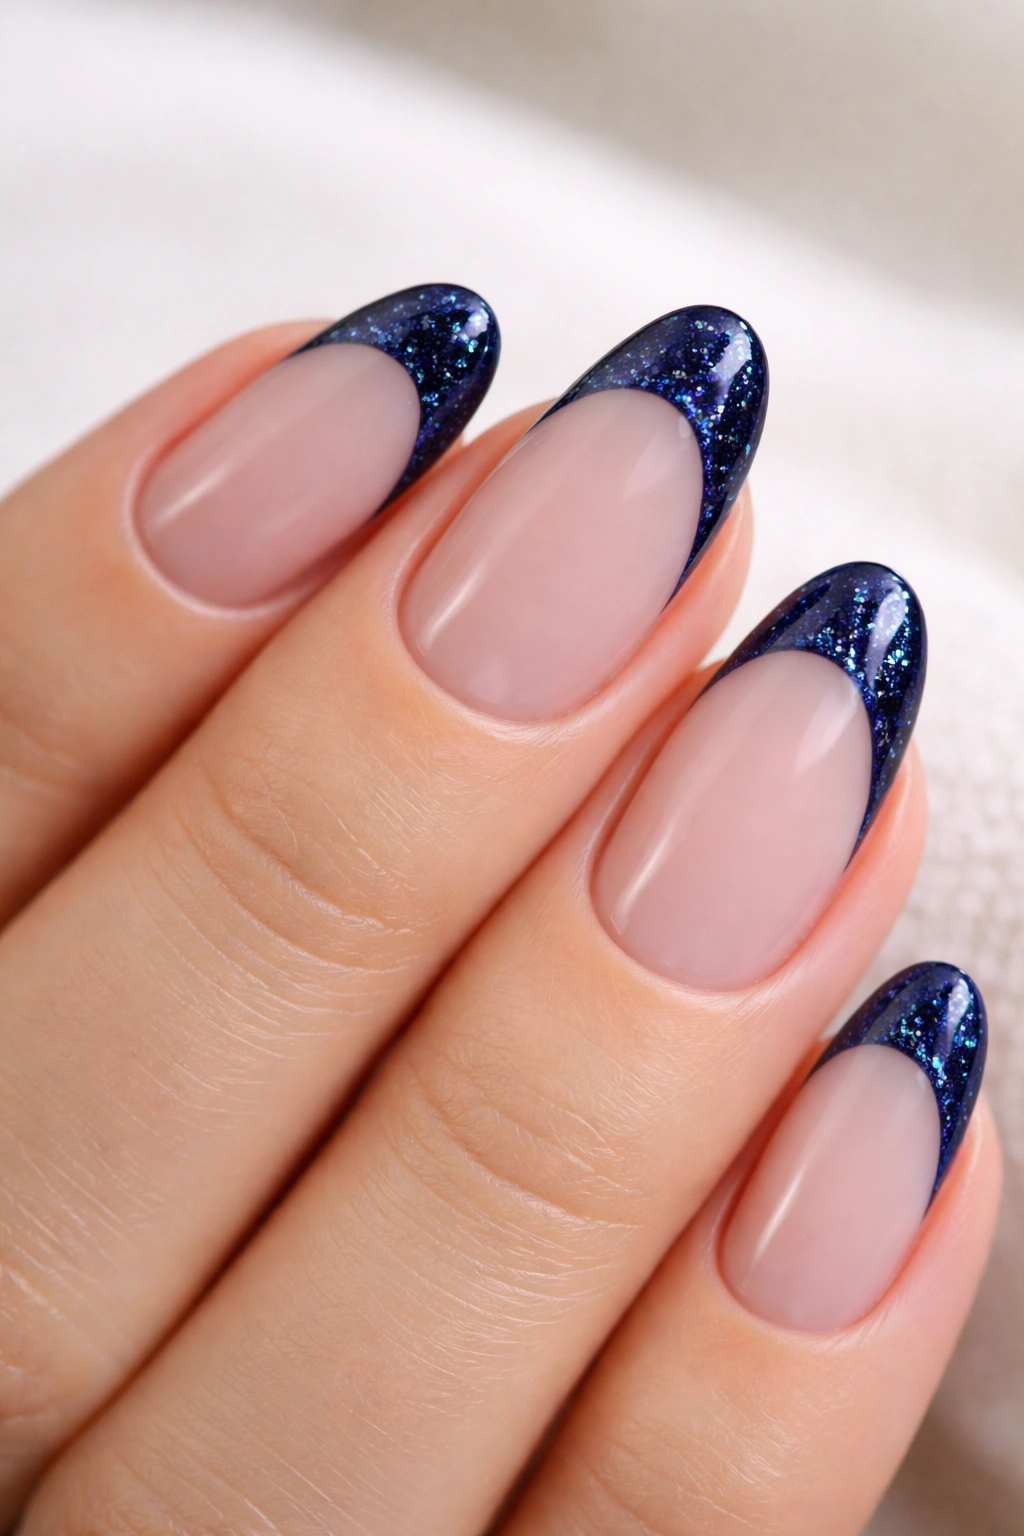
Think of this as the classic with texture. The navy tip is still there, still precise, but the polish itself carries fine holographic glitter in a navy base — or a strip of fine glitter is applied right along the smile line over a dry flat navy tip.
Fine vs. Chunky Glitter on a Short Nail
Fine holographic glitter in a deep navy base looks like starlight compressed into a narrow band. It stays refined, catches light as the hand moves, and doesn’t fight the proportions of a short nail. Chunky glitter tends to look bumpy on a tip this small — every facet becomes visible up close and the surface reads as rough rather than luminous. Go fine. Like a dust rather than a sparkle.
Getting a Smooth Surface
- Apply the glitter polish as your tip color, or layer fine glitter mixed into a clear top coat over a dry navy tip
- Seal with a gel-effect or self-leveling top coat to smooth out any texture variation
- Let the top coat cure fully before touching anything — glitter tips stay tacky longer than they look
Practical heads-up: fine glitter tips attract lint and fibers while they’re curing. Check the surface carefully before the top coat fully sets.
3. Matte Navy Tip on a Glossy Sheer Base
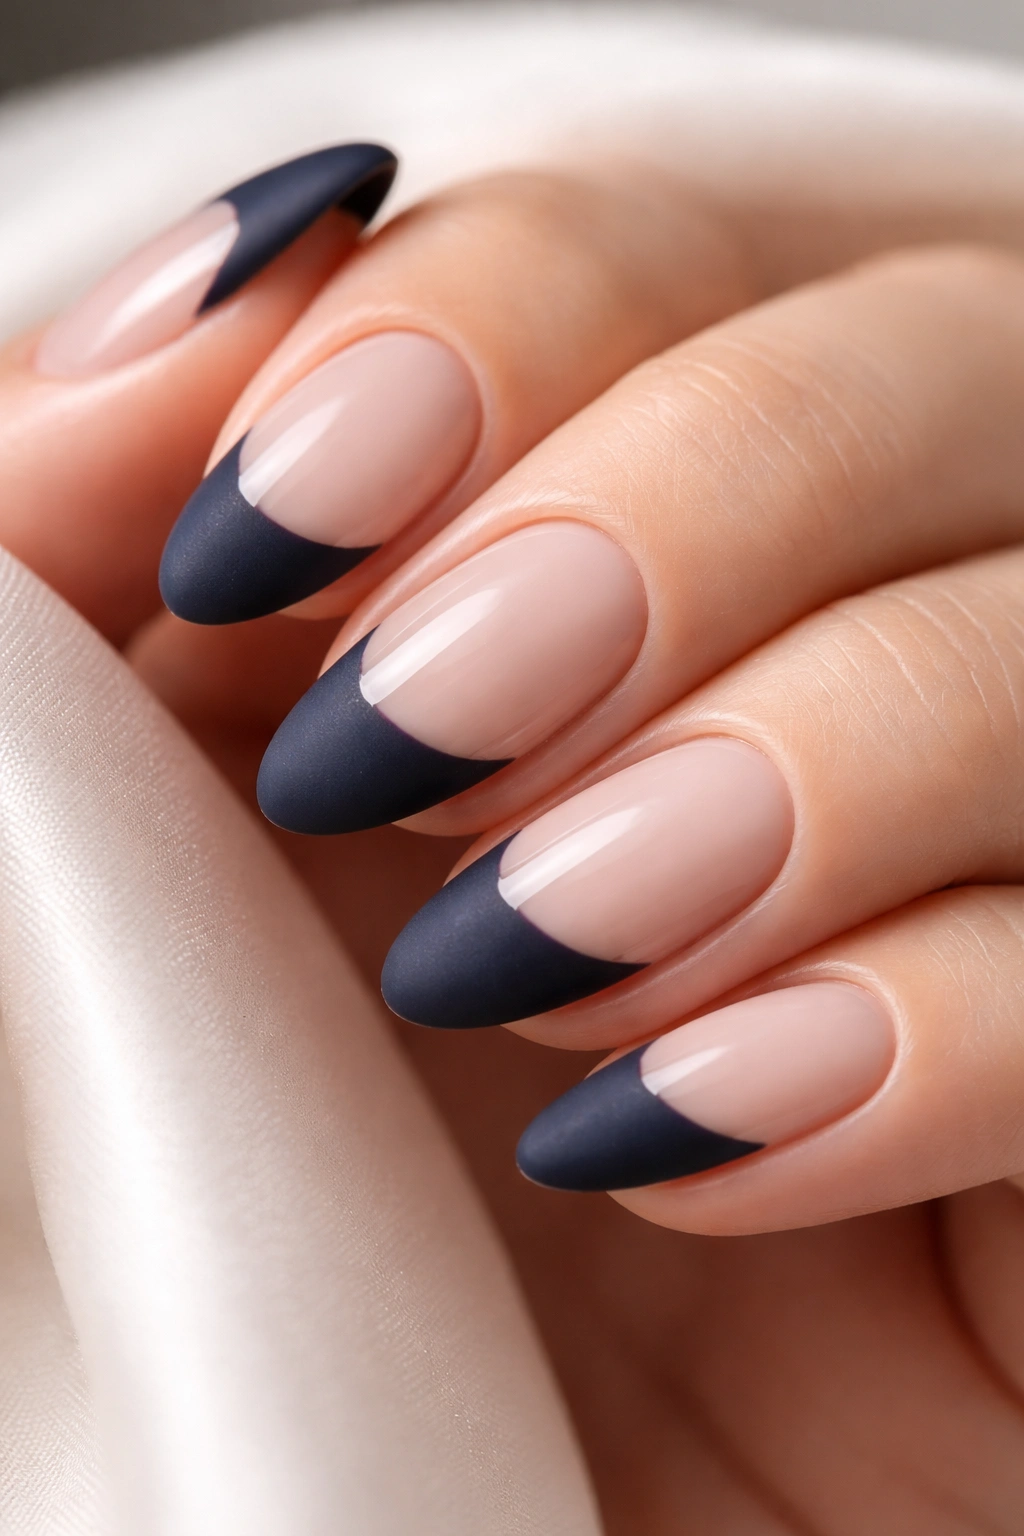
The contrast between a matte tip and a glossy base is one of the most striking finish combinations in nail art — and it costs almost nothing extra to pull off.
Apply your sheer or nude base with its glossy finish as normal. Paint the navy tip. Let everything dry completely — this step cannot be rushed, because brushing a matte top coat over even slightly tacky polish causes streaking and patchy areas. Once the tip is fully dry, use a matte top coat only over the navy portion. Keep strokes short and even, and stay about 0.5 mm inside the tip edge to prevent the matte coating from bleeding slightly over the glossy base.
The result is a nail that looks almost two-dimensional at the tip. The glossy base reflects light and looks wet. The matte navy absorbs it and looks like velvet fabric.
A warm greige or taupe base tends to work better here than a pale cool pink. The warmth in the base creates a more interesting push-pull against the cool depth of the navy matte — a detail worth thinking about before you reach for the lightest nude on your shelf.
4. Navy to Nude Ombre French Tip
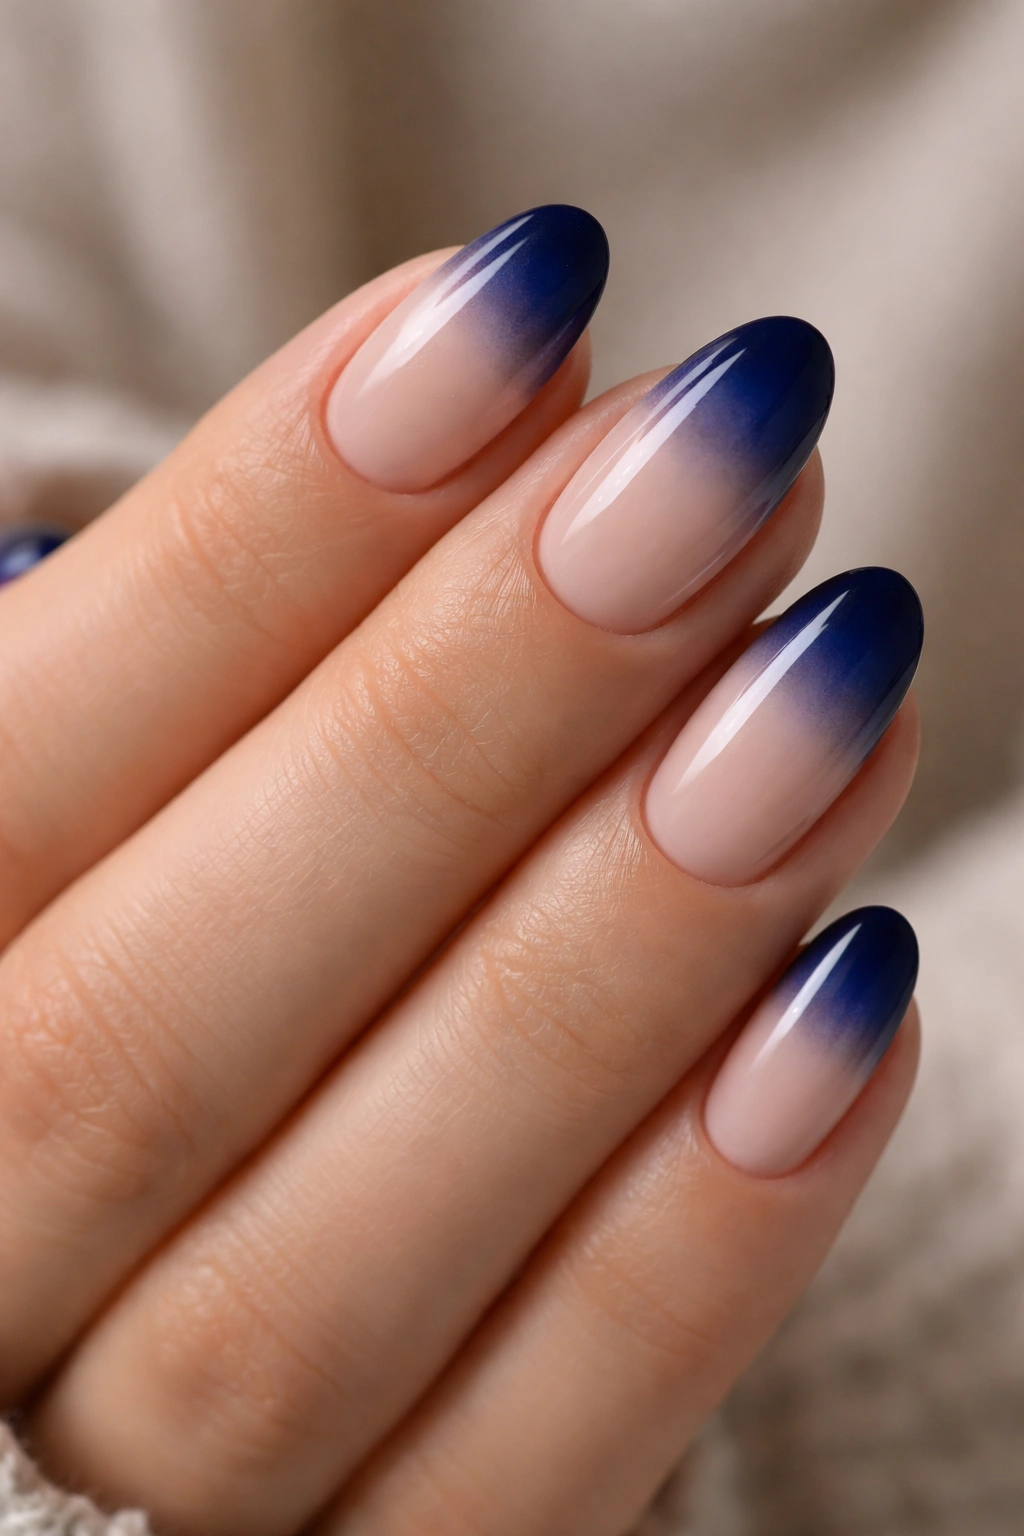
Why does the ombre version look harder than it is? Probably because a seamless gradient looks so deliberate when it’s done well — it reads as professional even when made at home with a cosmetic sponge and a little patience.
The sponge method is what actually works on short almond nails. Apply your nude base first. Load one edge of a pointed cosmetic sponge with your navy polish. Dab repeatedly at the tip, moving the navy slightly deeper into the center of the nail with each pass. Press, don’t drag — dragging creates hard lines at the edges of the gradient where you want soft, dissolving color.
Getting the Transition Right
The gradient should fade from full navy at the very tip to nothing by roughly the halfway point of the nail. Three to four sponge passes will build depth without creating opacity streaks. Let each pass rest for 30-40 seconds before adding the next layer.
A glossy top coat applied over the entire nail — not just the tip — blurs the transition lines further and gives the ombre that cohesive, polished finish that makes the gradient look intentional rather than accidental.
Skip the glitter version of this if you’re attempting ombre for the first time. It adds complexity that isn’t worth tackling until the plain gradient is sitting cleanly.
5. Navy Tip with Gold Foil Along the Smile Line
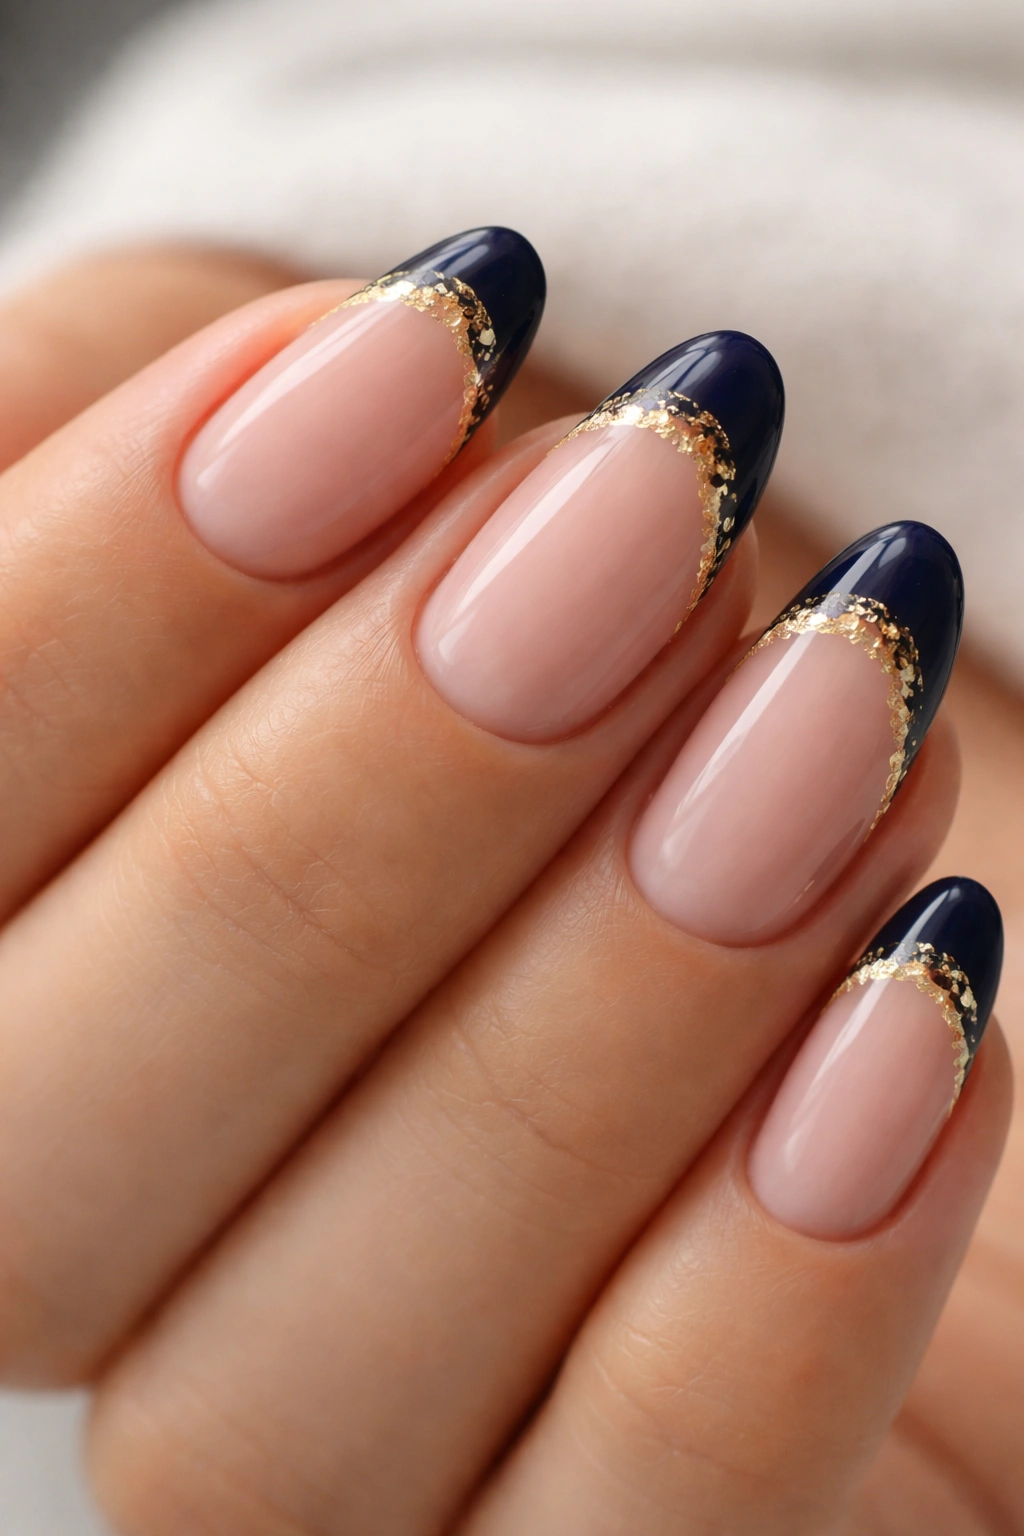
Picture the smile line outlined in crumpled gold leaf — slightly irregular, slightly fragmented, each piece catching light differently across the width of the tip. That’s what foil does to a navy French tip, and on a short almond nail it looks precise and considered rather than overdone.
The technique requires foil adhesive painted right along the base of the navy tip before the foil is pressed on. Use a fine pointed brush to apply the adhesive in the exact curve of the smile line. Let it dry to a tack — usually 2-3 minutes, when it shifts from white to slightly clear. Press the gold foil sheet against it, hold for 5 seconds, and peel back slowly.
What the Transfer Actually Looks Like
- The foil won’t land in a perfectly solid strip — the fragmented, irregular result is the aesthetic you’re after
- Small gaps are fine; additional foil can be layered in any sections that need more coverage
- Seal immediately with a gel-effect top coat, because foil chips off fast without a solid protective layer
The navy-and-gold pairing has something almost regal about it that looks striking on even the simplest nail shape. It works particularly well as a single accent — the full foil treatment on the ring finger, clean navy French tips on the remaining four.
6. Reverse French Tip — Navy Base with a Pale Tip
Unlike the classic version where navy sits at the tip, this design inverts the whole concept: navy covers the lower two-thirds of the nail, and a pale blush, cream, or white tip sits at the top.
The reversal is subtle from a distance. Up close, the visual logic flips entirely, and the pale tip creates a floating, lifted quality at the almond point that actually makes the nail look slightly longer than the standard French tip does. The dark base near the cuticle visually grounds the nail; the light tip draws the eye toward the tapered point.
Execution is more forgiving than the standard version. The deep navy base hides any slight unevenness near the cuticle — the area where most French tip imperfections live. Precision matters most at the line where navy meets the pale tip. Place tape about 65% up the nail rather than at the very tip to get the clean edge where the two colors transition.
A warm cream or off-white at the tip reads better than stark white here. The warmth softens the transition line and prevents the two colors from looking abrupt where they meet against the cold depth of navy.
7. Micro Rhinestone Line Along the Navy Smile Line
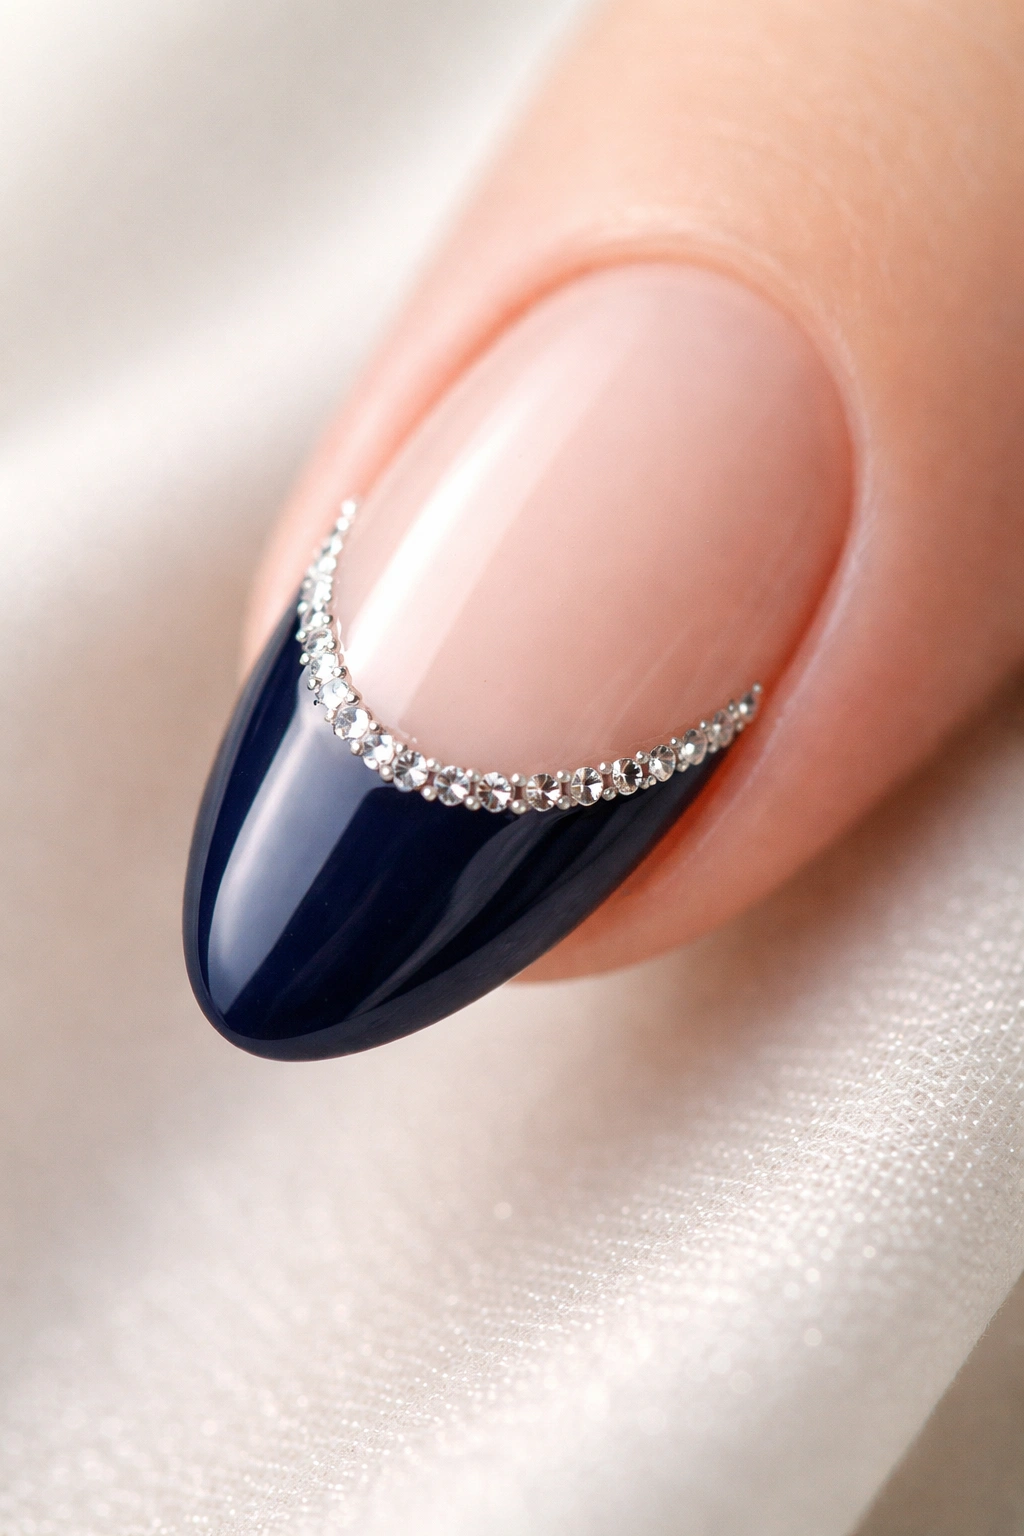
A single row of micro crystals placed right along the lower edge of the navy tip — sitting exactly on the smile line — adds a level of precision and sparkle that reads far more considered than a standard rhinestone accent nail would.
Choosing the Right Stone Size
SS3 or SS5 rhinestones (roughly 1-1.5 mm across) are the right scale for this. Anything larger dominates the design on a short nail and looks costume-y rather than polished. The goal is a fine, delicate line that catches the light when the hand moves, not a statement border that competes with the tip design itself.
Placing the Stones Without Them Sliding
Apply your base and navy tip, then brush a layer of top coat over the full nail and wait about 45 seconds until it’s slightly tacky — that tackiness acts as your adhesive. Using a dotting tool with a tiny dot of nail glue at its tip (which transfers the stone without it slipping off the tool), place each crystal one at a time along the smile line, working from the center out to both sides.
- Leave a gap roughly one stone’s width between each crystal for a clean, evenly spaced result
- Apply a second top coat immediately after placing all stones — use only the tip of the brush rather than a full stroke to avoid dragging anything out of position
- Avoid water for at least 2 hours; the seal needs time to cure fully around each stone’s base
8. Midnight Chrome French Tip
Chrome powder applied to the tip of a short almond nail in a midnight navy shade does something regular polish cannot replicate. The surface becomes mirror-like, and it shifts from navy to near-black to deep violet as the hand moves and the light angle changes.
This typically requires a gel base. Chrome powders bond to a cured gel top coat that hasn’t been wiped — the sticky layer left behind is what the powder actually adheres to. Without a UV or LED lamp at home, non-gel chrome options do exist (applied over regular polish with a sponge-tip applicator), but the depth and staying power aren’t comparable to the gel version.
The result looks almost liquid. Under fluorescent light it reads deep navy. In natural daylight it approaches near-black. In warm evening light, a slight violet cast comes through the metallic surface. It’s one of those finishes that genuinely changes throughout the day — which is part of why people find it hard to stop looking at.
One practical point: chrome tips chip at the edge first, and the metallic powder doesn’t touch up invisibly the way flat polish does. A full gel application lasts significantly longer here — the chrome finish is always the first element to show wear.
9. Negative Space Navy French Tip
A strip of clear nail between the cuticle area and the navy tip — a clean horizontal window that makes the navy band appear to float above the nail plate. The effect is geometric and considered.
Short almond nails handle this design well. The small canvas makes even a single gap look intentional rather than unfinished, which is a problem on longer nails where more complex geometry is needed to fill the space. Here, minimal is exactly right.
The method: apply a clear or nude base over the entire nail. Place a strip of tape horizontally about 30% up from the cuticle. Paint navy from that tape line all the way to the tip. Remove the tape while the polish is still slightly wet — not completely dry, which can pull — and you’re left with a clean window of base-only nail separating the cuticle area from the start of the navy band.
Rubbing chrome or pearl pigment into just that negative space strip takes the design further. A band of silver chrome between a clear base and a navy tip creates three distinct visual zones across roughly 5 mm of nail, and that layered effect photographs exceptionally clearly.
10. Tiny Florals Painted Inside the Navy Tip
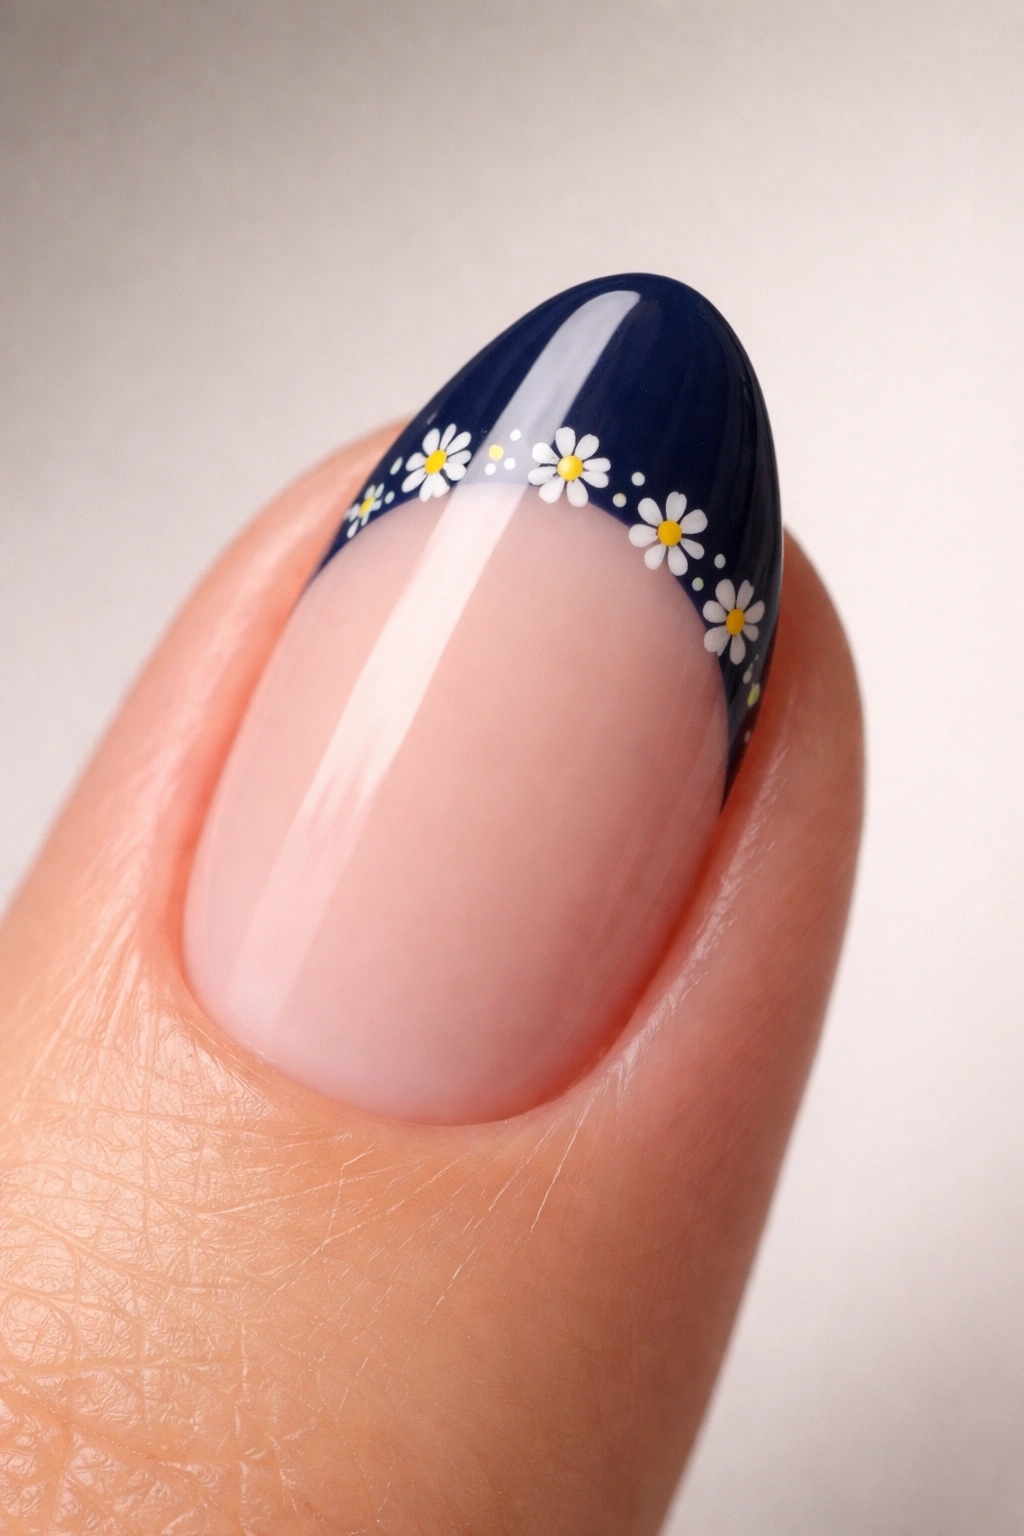
A small dot of white pressed lightly with a dotting tool makes the first petal. Three or four dots placed in a loose cluster make a micro flower sitting right at the boundary between nude base and navy tip. Add a single yellow dot at the center with a toothpick dipped in yellow polish and you have a complete micro daisy.
This one is labor-intensive. Not sugarcoating that. Each petal requires either a 000-size nail art liner brush or a fine dotting tool, and the patience to work at a scale where the whole flower is maybe 3 mm wide. But the effect is completely unlike anything else on this list — it reads as hand-done because it genuinely is, and that quality shows.
The placement decision matters as much as the execution.
Where to Put the Florals
Florals look best on one or two accent nails — the ring finger is the expected choice, but the index finger creates a nice asymmetry if you prefer something less predictable. Extending floral treatment to all five nails gets crowded fast on a short almond shape, where the design starts reading as busy rather than detailed. Keep the remaining nails as clean navy French tips. The flowers only read as special when they have plain nails sitting beside them.
11. Navy Tip with a Tortoiseshell Accent Nail
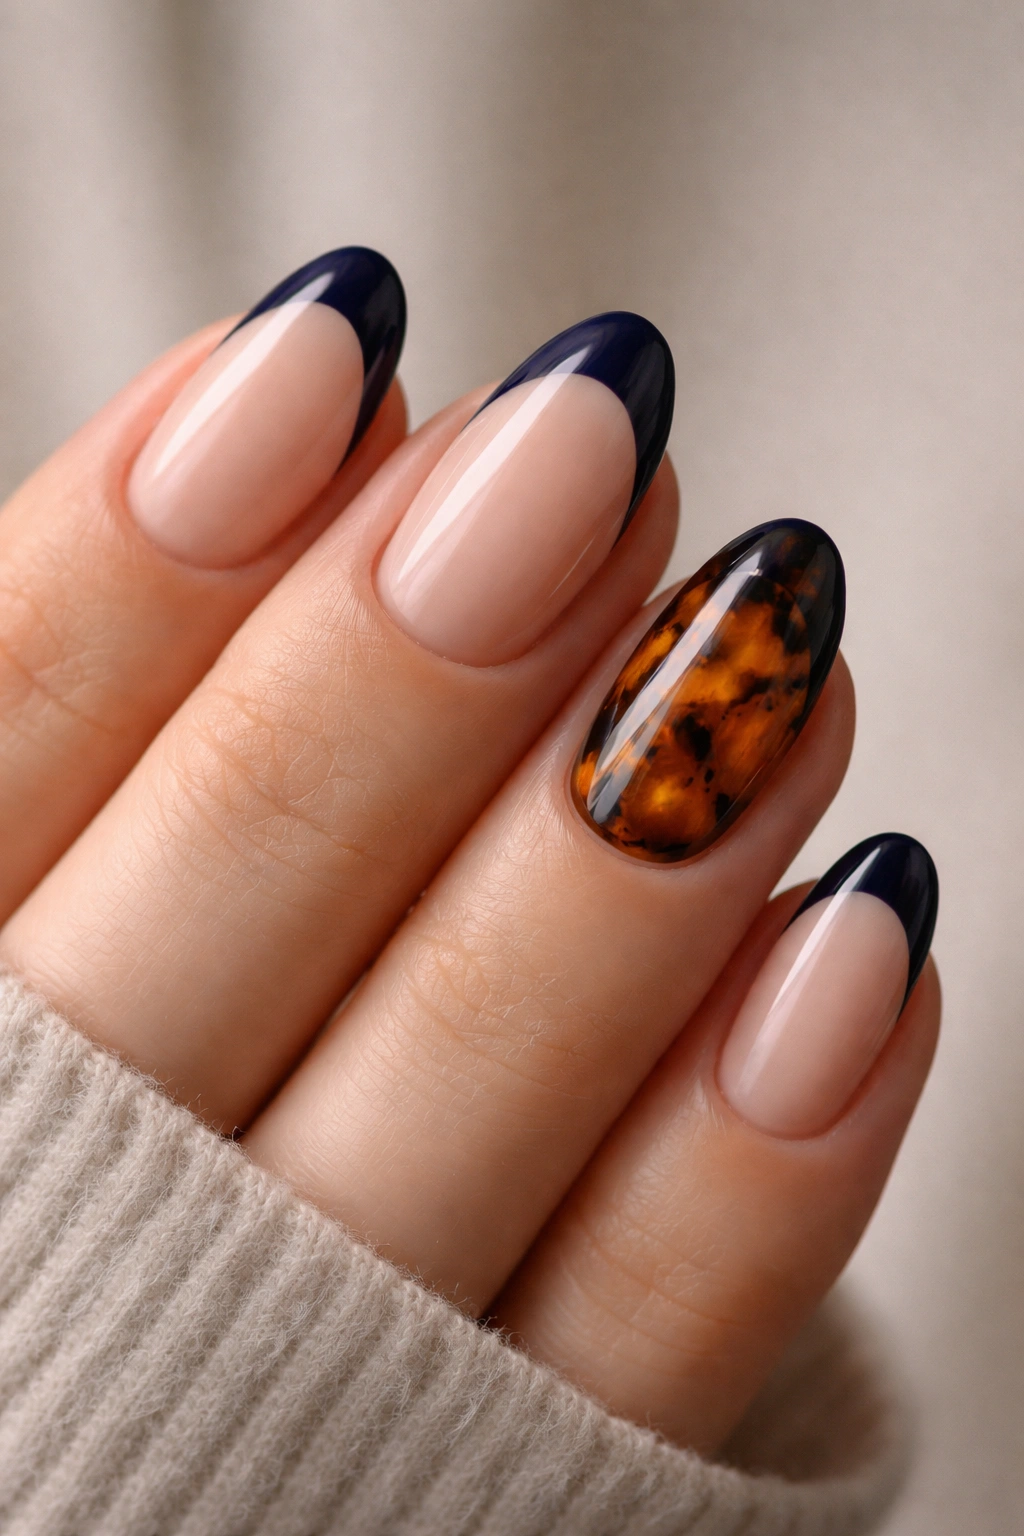
Four nails wear a clean navy French tip. One nail — typically the ring finger — gets the full tortoiseshell treatment: warm amber, cognac, and honey tones on a honey base, with black edges that bleed slightly into the amber patches. The warmth of the tortoiseshell against the cool precision of the navy creates a contrast that makes both elements look stronger side by side.
Building a tortoiseshell nail involves layering. Honey or amber base first. Irregular patches of darker amber applied with the corner of a makeup sponge. Small touches of black at the edge of each amber patch before the lower layer fully dries, so the borders blend slightly. A pale gold or champagne highlight in the lighter zones. Then a thick, glossy top coat to seal everything and pull out the depth of the pattern.
The warm-cool pairing is what drives the whole look. Navy alone runs cold and precise. The tortoiseshell injects organic warmth and softens the set without undercutting the navy’s authority on the other four nails.
Use a cognac-brown in the terracotta-adjacent range as the lightest base layer of the tortoiseshell — it reads more natural against cool navy than a straight orange-amber would, and the slight warmth bridges the two aesthetics without forcing them together.
12. Double Navy Stripe French Tip
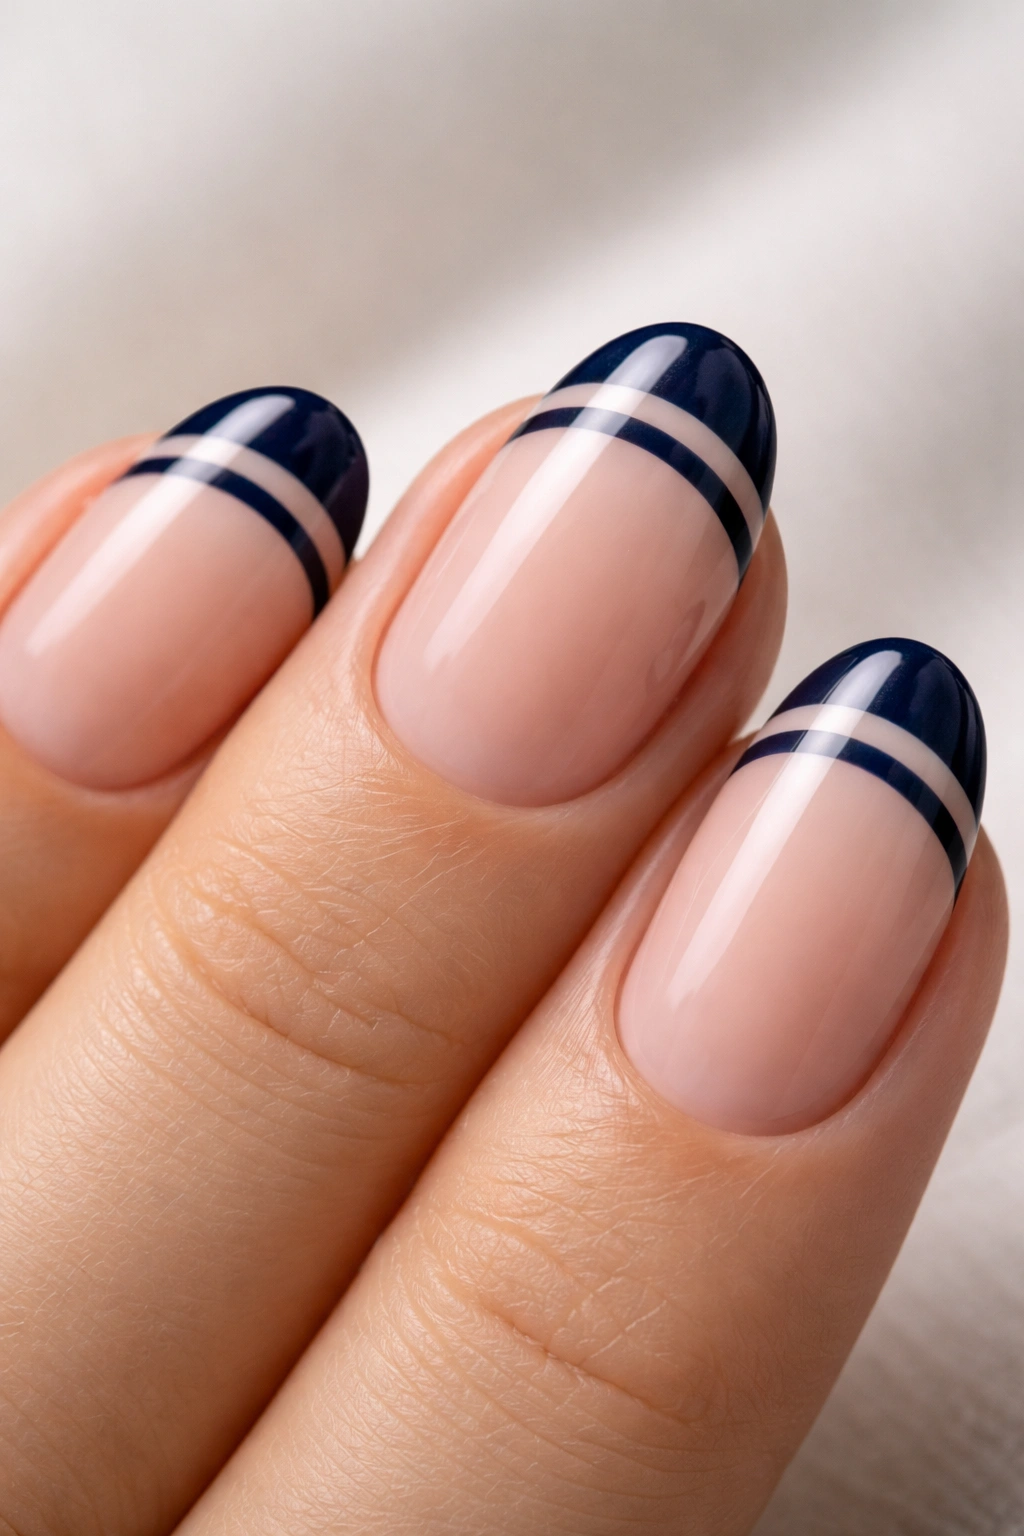
Two parallel lines at the tip instead of one solid band. The outer line sits at the nail’s natural tip; the second runs about 2 mm below it — both navy, both roughly 1-1.5 mm wide, with a strip of nude or bare nail between them.
Simple in concept. In practice, two strips of nail tape placed precisely at the outer and inner edge of the gap are the only reliable way to get both lines following the same curve across all five nails. An almond shape has a consistent curve, but no two nails on the same hand are perfectly identical — the tape accommodates those small variations where a freehand approach wouldn’t.
The double line looks less like a traditional French manicure and more like graphic nail art. Something from a runway look rather than a standard salon menu. It photographs particularly well against deeper skin tones, where the contrast between the pale gap and the navy stripes reads sharply and clearly.
13. Celestial Navy Tip with Star and Moon Details
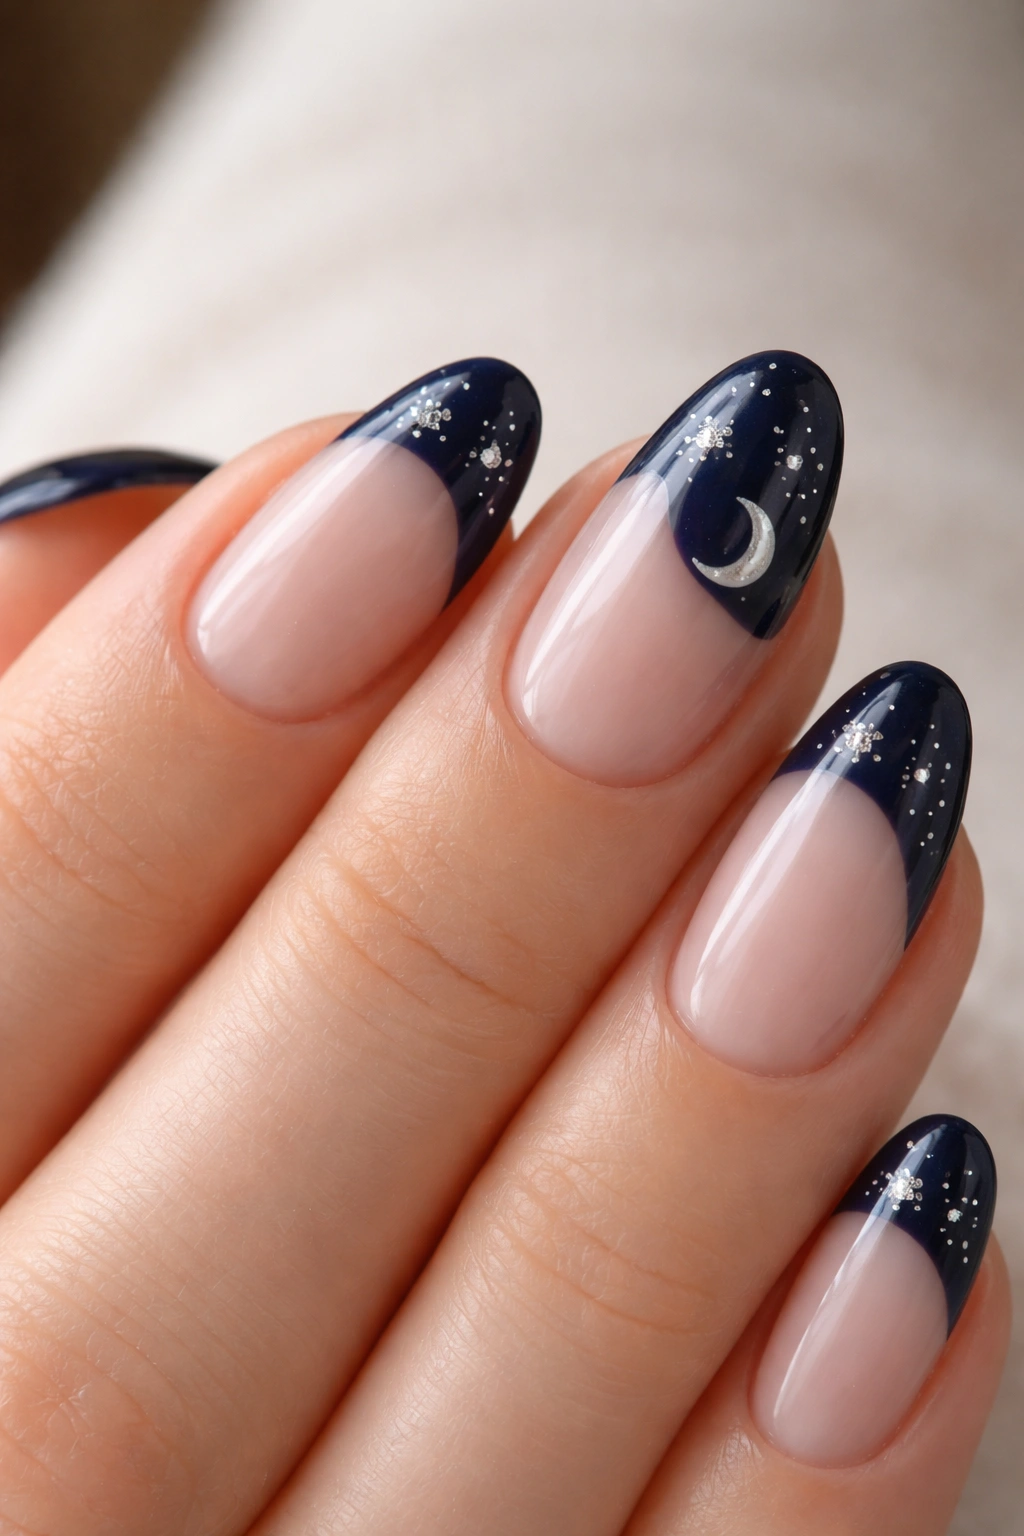
Navy practically asks for celestial imagery — it’s already the color of night sky, already deep-water adjacent. A clean navy French tip with tiny silver star details painted inside the tip takes the design exactly where the color naturally points, without forcing anything conceptually.
What Stars Look Like at This Scale
On a short almond nail, each star will be 1-2 mm across at most. They’re not illustrated objects — they’re four short crossing strokes made with a fine liner brush. A four-pointed cross reads clearly as a star at this size; a six-pointed star needs more nail real estate than a short nail usually offers.
Placement That Doesn’t Look Cluttered
- Two or three stars scattered unevenly across the navy tip — symmetric placement reads stiff
- A small crescent moon in one corner of the tip with a pair of stars near it
- A three-point constellation trace (stars connected by fine silver lines) running across the tip of one accent nail
Silver reads better than white for celestial details here. It has enough metallic presence to show through the depth of the navy without being applied thickly, and the metallic quality gives the details visual weight without competing with the base color.
14. Navy Tip with White Abstract Brushstroke Lines
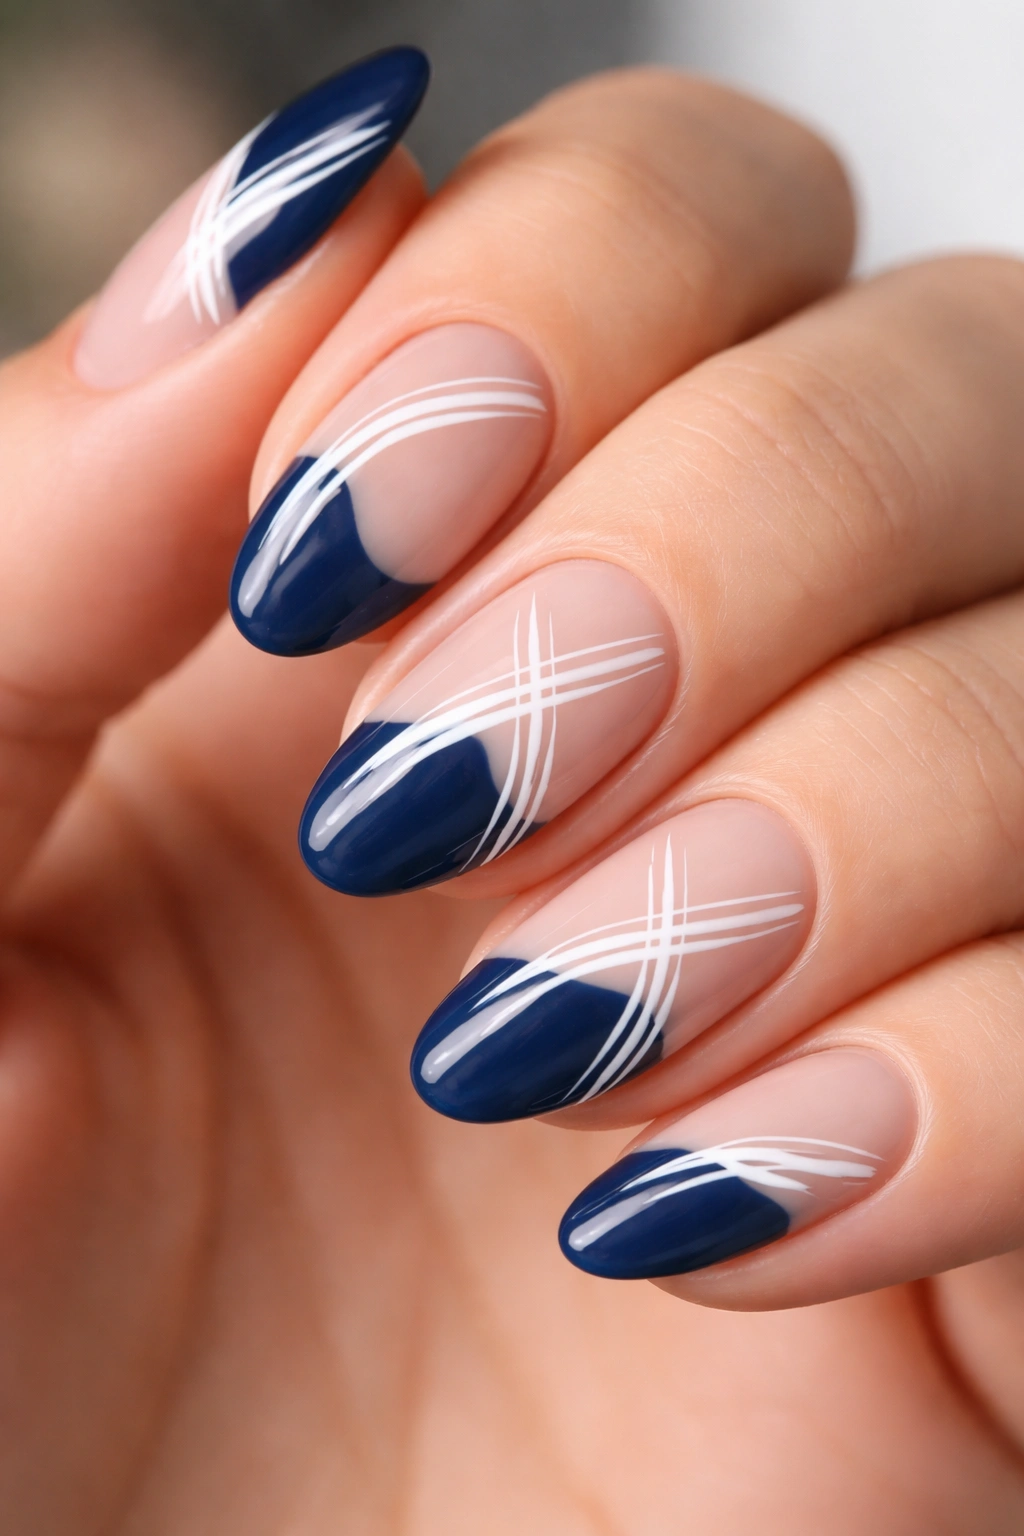
A clean navy French tip — precise, finished — with one or two thin white lines cutting across the navy band. Not straight. Not geometric. Slightly irregular, slightly variable in thickness along their length, with the natural imprecision of a brush moved at speed.
The imperfection is the point. A perfectly straight white line turns this into a graphic design. A line with slight variation in weight, a natural start-and-stop quality, and a trace of the brush’s movement in it turns the same mark into something that reads as artistic and deliberate.
Load a fan brush lightly with white polish. Pull it across the navy tip in a single stroke. Don’t go back over it — one pass is the whole look. The stroke should take about half a second. Speed and light pressure create the right line; slow and deliberate strokes create something stiff that defeats the whole point.
Two lines work on a short nail. Three lines crowd the tip. Keep white to a minimum so the navy remains dominant and the brushstrokes read as accent rather than decoration.
15. Pearl Shimmer Base with Classic Navy Tip
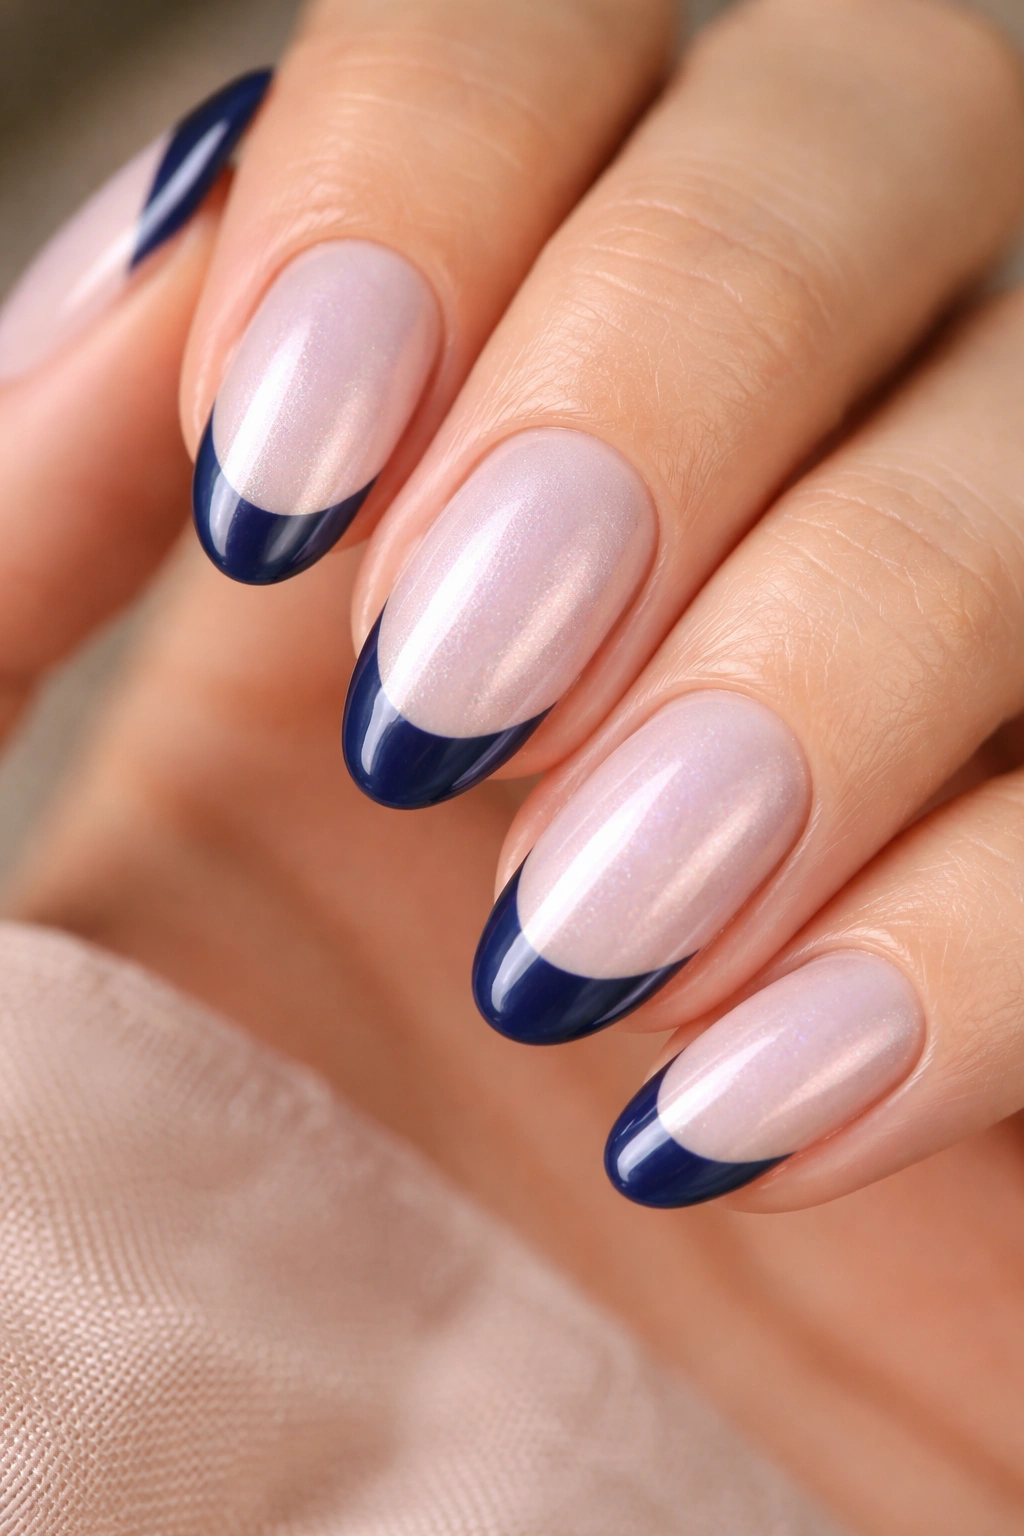
Instead of the usual nude or sheer base, this version pairs the navy tip with a pearl base — slightly iridescent, fine-shimmer, the kind that shifts between white, pale blush, and faint lavender depending on the light angle.
The result is softer and more dimensional than the classic version. The pearl base has a gentle luminosity that makes the navy tip look richer by contrast, and the subtle color shift in the base adds visual depth without any additional nail art. The finish does the work.
This combination holds up especially well under warm yellow light, where pearl polishes pick up a champagne quality that makes the whole nail look cohesive and considered. Under cool white light, the lavender shift comes through more and makes the navy read deeper.
Look for polishes labeled “pearlescent” or “moonstone” rather than heavy-sparkle options. The shimmer needs to be fine enough to blend into the polish body rather than sitting on the surface as a separate texture — that surface-level shimmer can work against a clean, polished tip design.
16. Angular Geometric French Tip
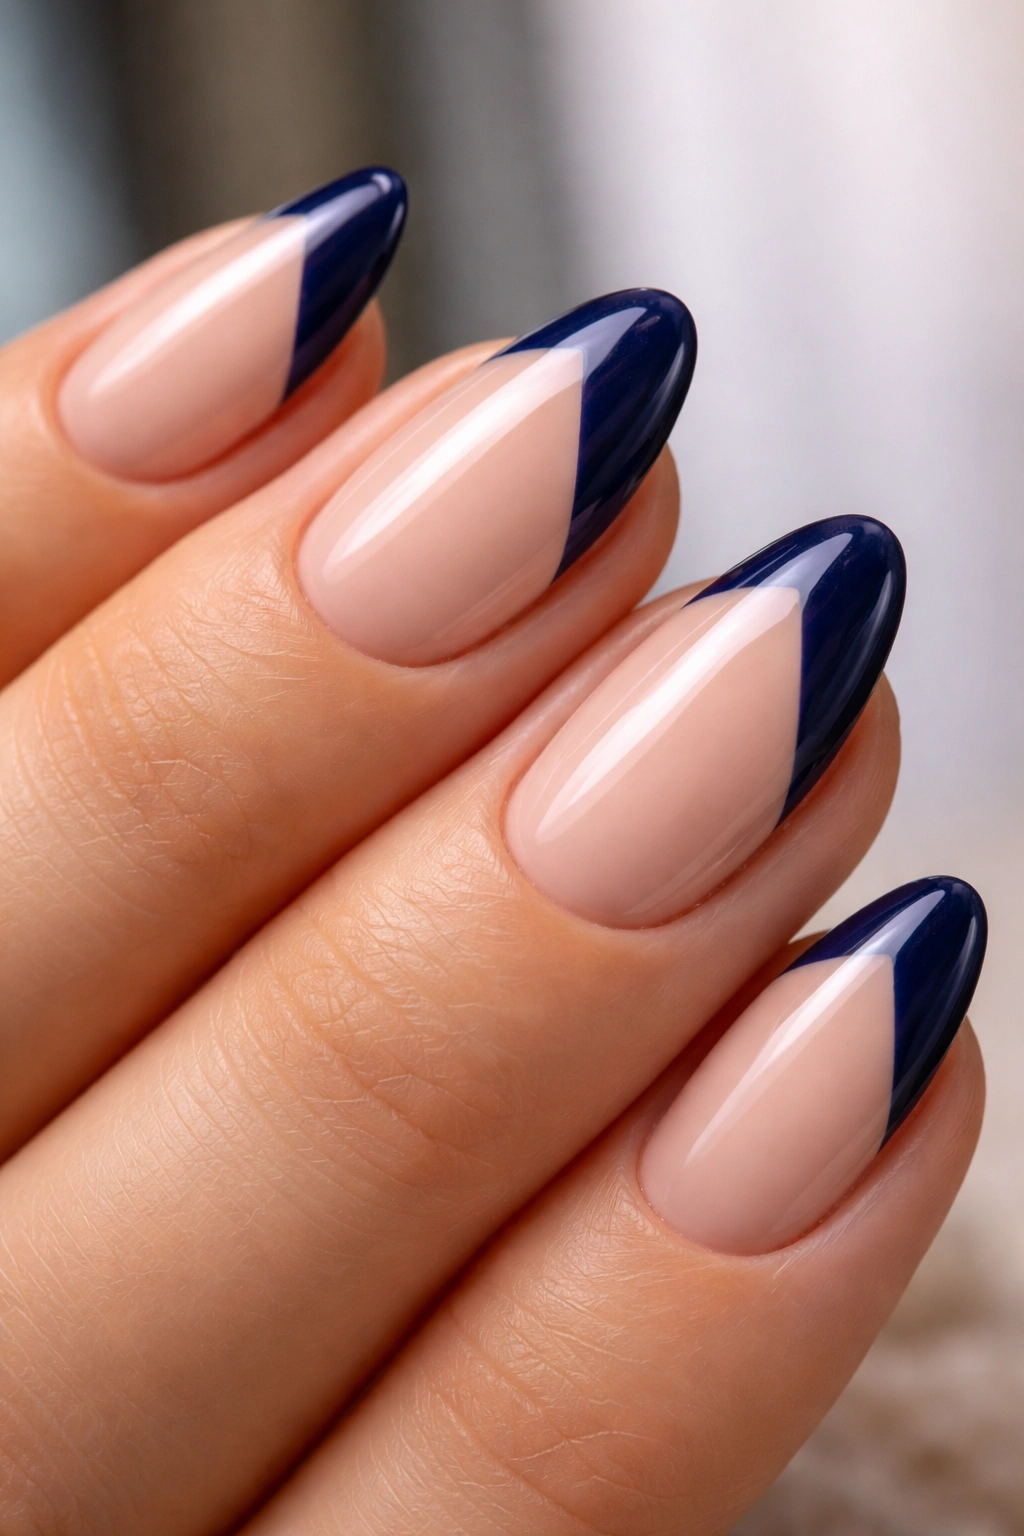
Forget the traditional curved smile line. The angular version uses a straight diagonal cut across the nail, or a sharp inverted V that meets in a point at the center — replacing the organic curve with something that reads as designed.
The V-cut works particularly well on almond nails. The meeting point of the V echoes the tapered tip of the almond silhouette itself, creating a visual rhyme between the nail shape and the interior design that feels cohesive and thought-through. Apply two strips of tape angled inward from each side of the nail, meeting at a central point. Paint the navy below the tape. Peel both strips at the same time — or as close to simultaneously as possible — so the polish doesn’t pull unevenly. A fine liner brush handles any cleanup at the point where the two tape lines met.
The angular tip reads cleanest in a true mid-depth navy — not so pale it drifts toward blue-grey, not so dark it swallows the geometry in lower light. The shape depends on crisp, visible contrast between the navy tip and the base color to make the cut-line read clearly.
17. Razor-Thin Navy Tip Line on a Milky White Base
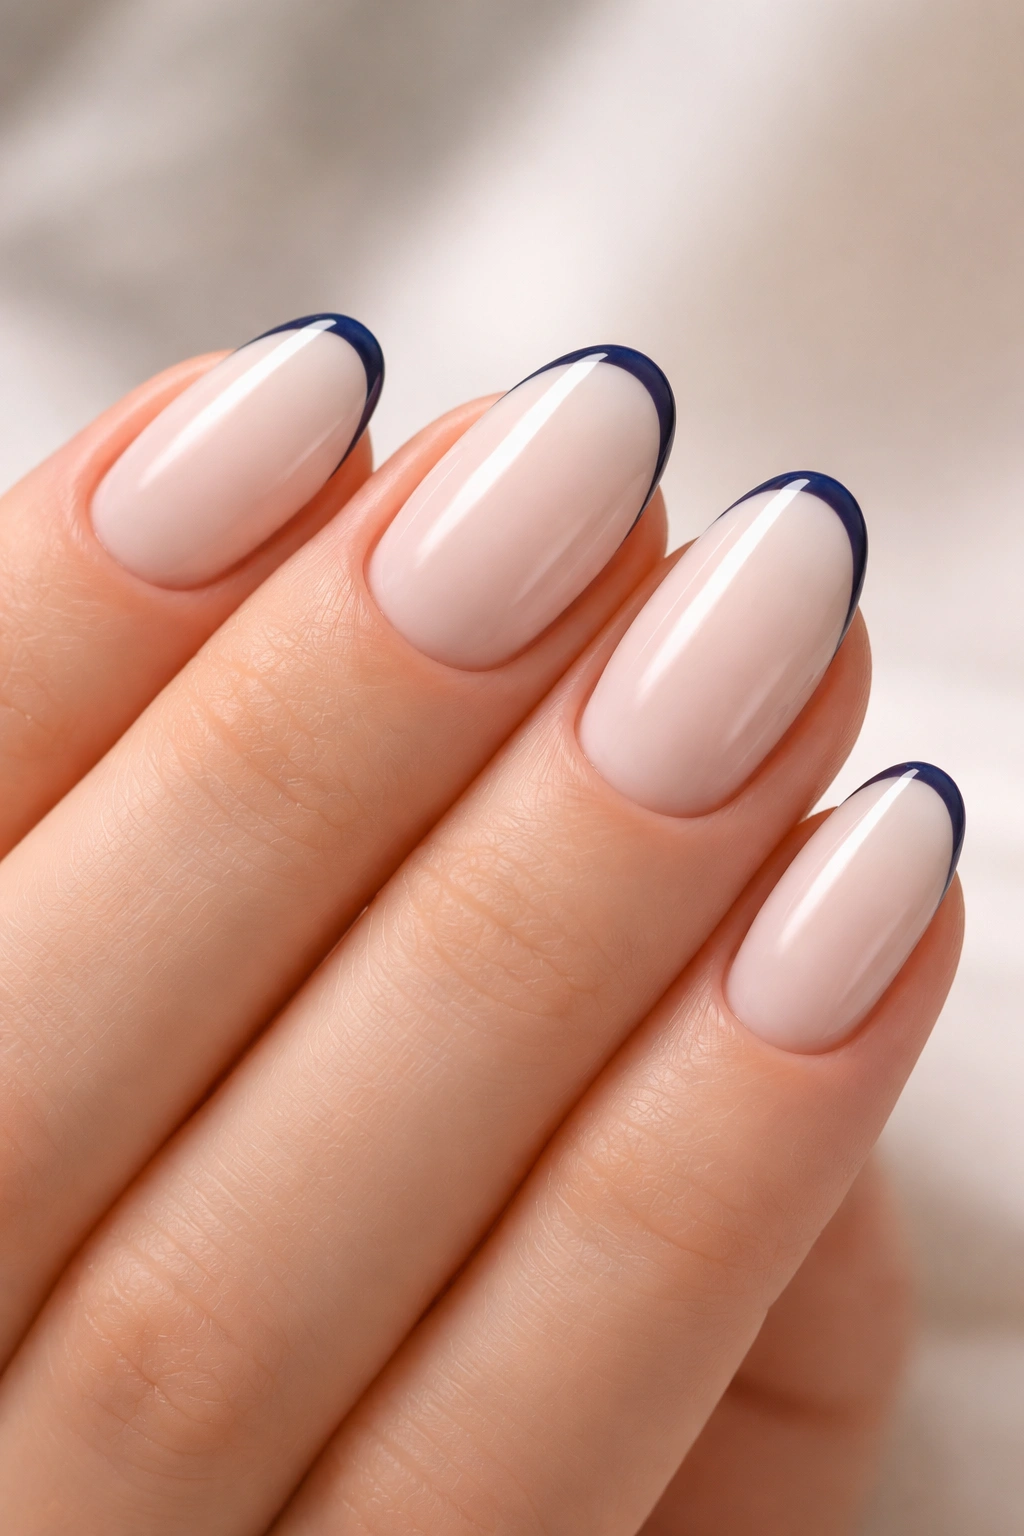
Possibly the most underrated design on this entire list. A milky white base — opaque, smooth, porcelain-adjacent — with a razor-thin navy tip line at the edge. Not a band. A line. About 1.5-2 mm wide, sometimes less.
The key word is thin. Navy against milky white is sharper and more graphic than the classic nude base version because the milky white has no transparency to soften the contrast. The edge reads almost like a pen stroke on paper — a clean, precise mark with nothing to blur it.
This works best applied with a nail art liner brush rather than a standard polish brush. The liner gives you control over line width that a regular brush doesn’t, and you can follow the exact curve of the almond tip without the wider bristles flooding polish past the edge. One thin coat is usually enough; the navy pops against the white base without needing depth to show.
Understated in the best way. People often look twice at this manicure because they can’t immediately identify what makes it look so clean and precise. The answer is the combination of the milky white base — which is itself slightly unusual against the more common nude — and that narrow, ink-like navy line. Two simple elements, executed exactly right.
Final Thoughts
Short almond nails and navy French tips are a pairing that holds up for a reason. The almond shape’s natural taper gives the French tip line a clear, elegant context to sit in, and navy’s depth plays across every base color and finish in a way that most single-color tip choices don’t. From a razor-thin line on milky white to full chrome to celestial star art, the same structural concept covers an enormous range without ever looking repetitive.
A few things worth carrying into your next appointment or DIY session: a well-formulated self-leveling top coat is the single biggest factor in how long any of these designs hold up, more than the polish brand or prep work. And if you’re attempting something new at home — the angular geometric cut, the ombre, the gold foil — do one test nail on your non-dominant hand before committing to all ten. The technique almost always needs one run-through.
Navy is forgiving in its depth. Small imperfections absorb into the dark pigment. A slightly off smile line reads better in navy than it would in a pale color where every wobble is visible. That’s a practical advantage worth using, especially when you’re learning a new technique.
