

Butterfly nail art falls apart fast when the design ignores the shape underneath it. A butterfly wing needs room to stretch, a clear place for the eye to land, and enough structure that the details do not blur into glitter, gems, and color haze. That is why butterfly coffin nails make so much sense. The flat tapered tip gives wing art a natural frame, and the longer sidewalls let color gradients, foil, decals, and hand-painted lines breathe.
I like butterfly sets most when they do one thing well instead of ten things at once. Give me a milky pink base, one sharply placed wing across two nails, and a glossy top coat over a crowded set with chrome, rhinestones, foil flakes, sugar glitter, and three sticker styles fighting each other. Nail art has the same problem outfits do: once every detail starts asking for attention, nothing feels crisp anymore.
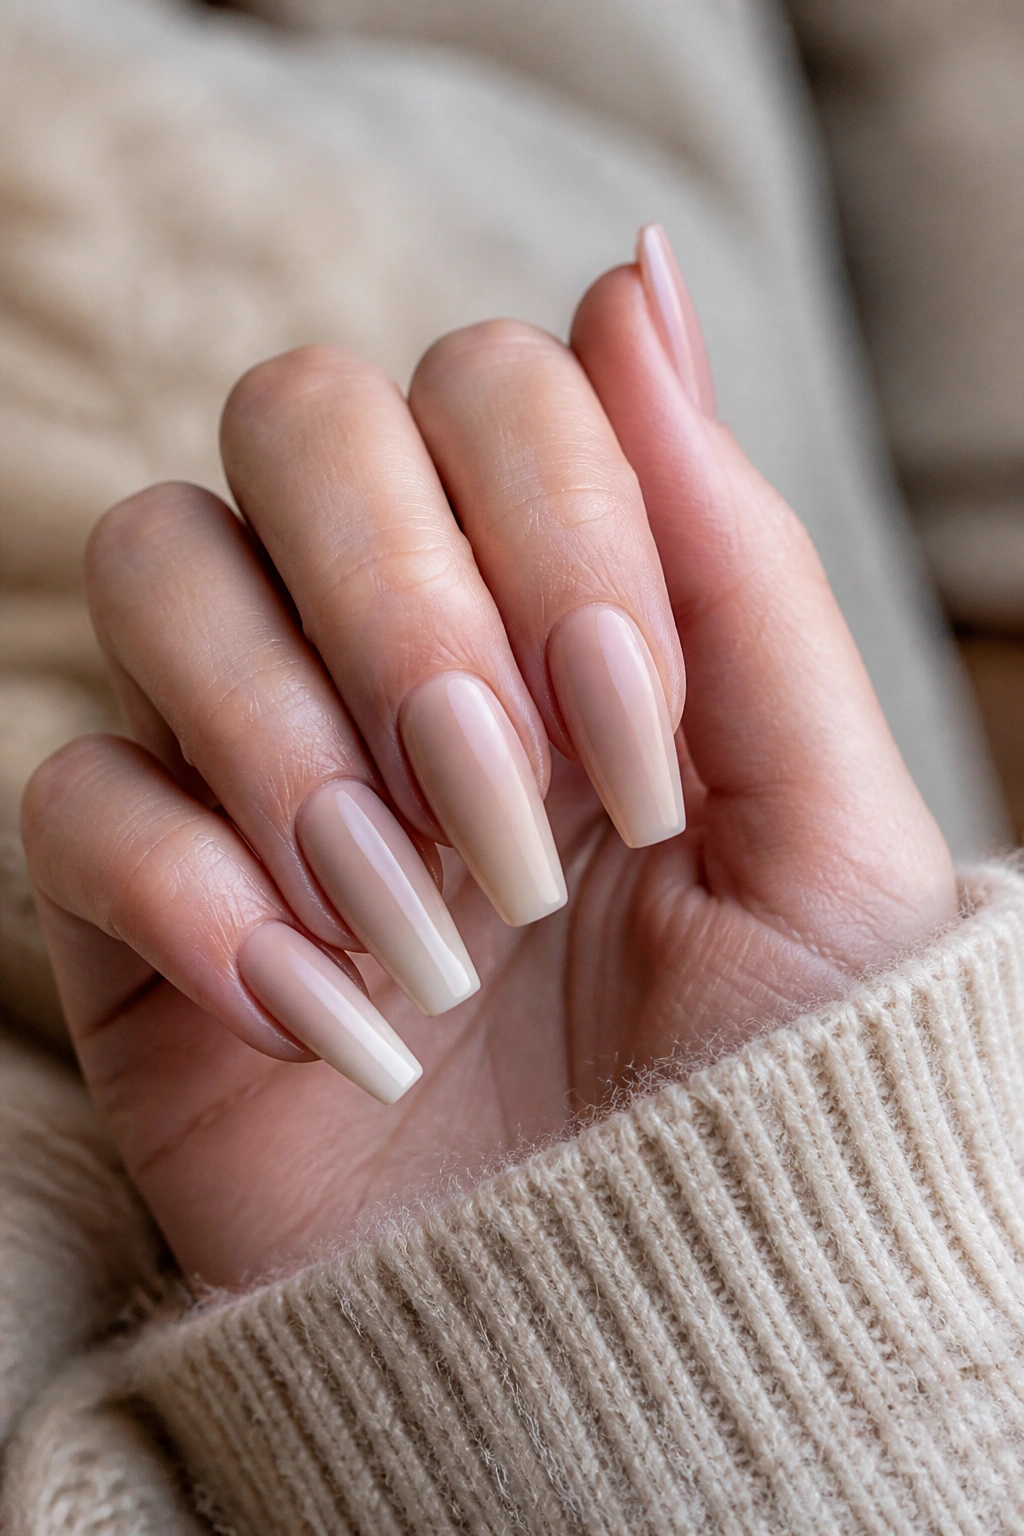
Coffin nails also hide a small trick. They look dramatic, yet they are easier to style than sharp stilettos because the squared tip gives you a cleaner canvas for French lines, ombré blends, and centered decals. Most salon techs build them with acrylic or hard gel, then refine the sidewalls with a 180-grit file until the tip looks slim without turning weak or flimsy. That file work matters more than people think.
Some butterfly designs lean soft and airy. Others go dark, glossy, and almost a little gothic. The sets below cover both ends of that range, plus the smart middle ground that keeps showing up in salon chairs for a reason.
Why Butterfly Coffin Nails Work So Well on a Tapered Shape

A coffin nail already gives you a visual line from cuticle to tip. Butterfly art likes direction, and that taper gives it one. Wings can sit diagonally across the nail, spread across two fingers, or hover near the tip without looking cut off. On a short square nail, the same decal often looks cramped. On almond, it can work, though the curved tip changes the mood and pulls the eye inward.
Length helps, but shape does most of the heavy lifting.
The butterfly itself brings symmetry, and the coffin silhouette gives you a straight edge to balance that softness. That is why even a basic set—a nude base with one black wing accent—can look thought-out when the filing is clean. The design reads better because the outline has structure under it.
Another small detail: coffin nails give negative space more power. If you leave half the nail sheer or milky, the empty area does not feel unfinished. It feels deliberate. A butterfly wing floating over clear or translucent polish looks almost suspended, which is hard to pull off on shorter rounded shapes.
There is a practical side too. If you wear medium coffin nails instead of extra-long ones, you still get enough room for wing detail while keeping your hands workable for typing, makeup, and opening cans without that awkward side-grab people do when their nails get too long.
Pick the Length, Base Color, and Finish Before You Pick the Butterfly
A lot of disappointing manicure appointments start with the art choice instead of the foundation. The smarter move is to lock down three things first: length, base color, and finish. Once those are set, the butterfly design almost picks itself.
If your nails are under about 1/4 inch past the fingertip, go for a shorter coffin with mini wings, partial outlines, or butterfly decals on two accent nails. Longer lengths can handle split-wing art across adjacent fingers, encapsulated pieces, and 3D details. Trying to squeeze those onto a short nail usually ends in muddy-looking clutter.
Base color changes the whole mood. Keep it simple:
- Sheer pink or nude makes the butterfly the star and softens bold linework.
- Milky white gives holo stickers and iridescent foil a cleaner background.
- Black, deep green, or wine tones turn butterfly art darker and more graphic.
- Jelly shades let light pass through the nail, which works well with chrome outlines and floating decals.
Finish matters too. Gloss sharpens detail. Matte mutes it and can make bright colors look powdery. Chrome topcoats read sleek, though they show scratches faster, especially near the tip.
One more thing, and it matters: tell your nail tech whether you want hand-painted art, stickers, stamping, or charms. Hand painting takes more time and often costs more, though the placement usually looks cleaner. Stickers can look excellent when sealed flat under builder gel. Raised charms look fun for a night out and annoying by day four if you wear knit sleeves or wash your hair often.
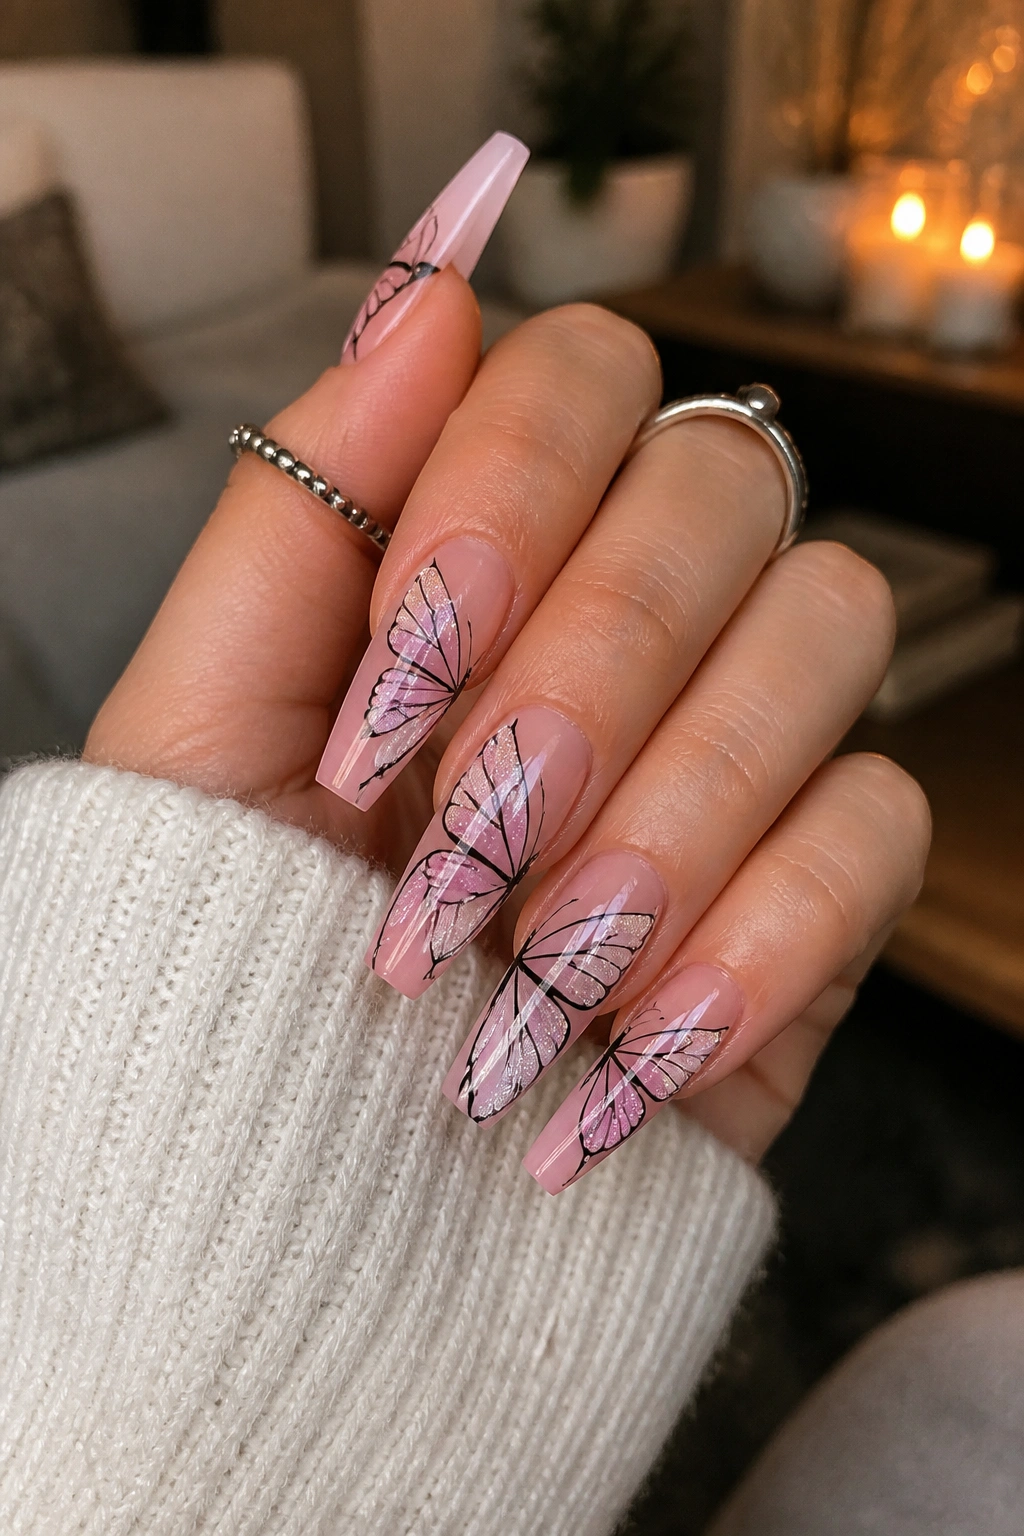
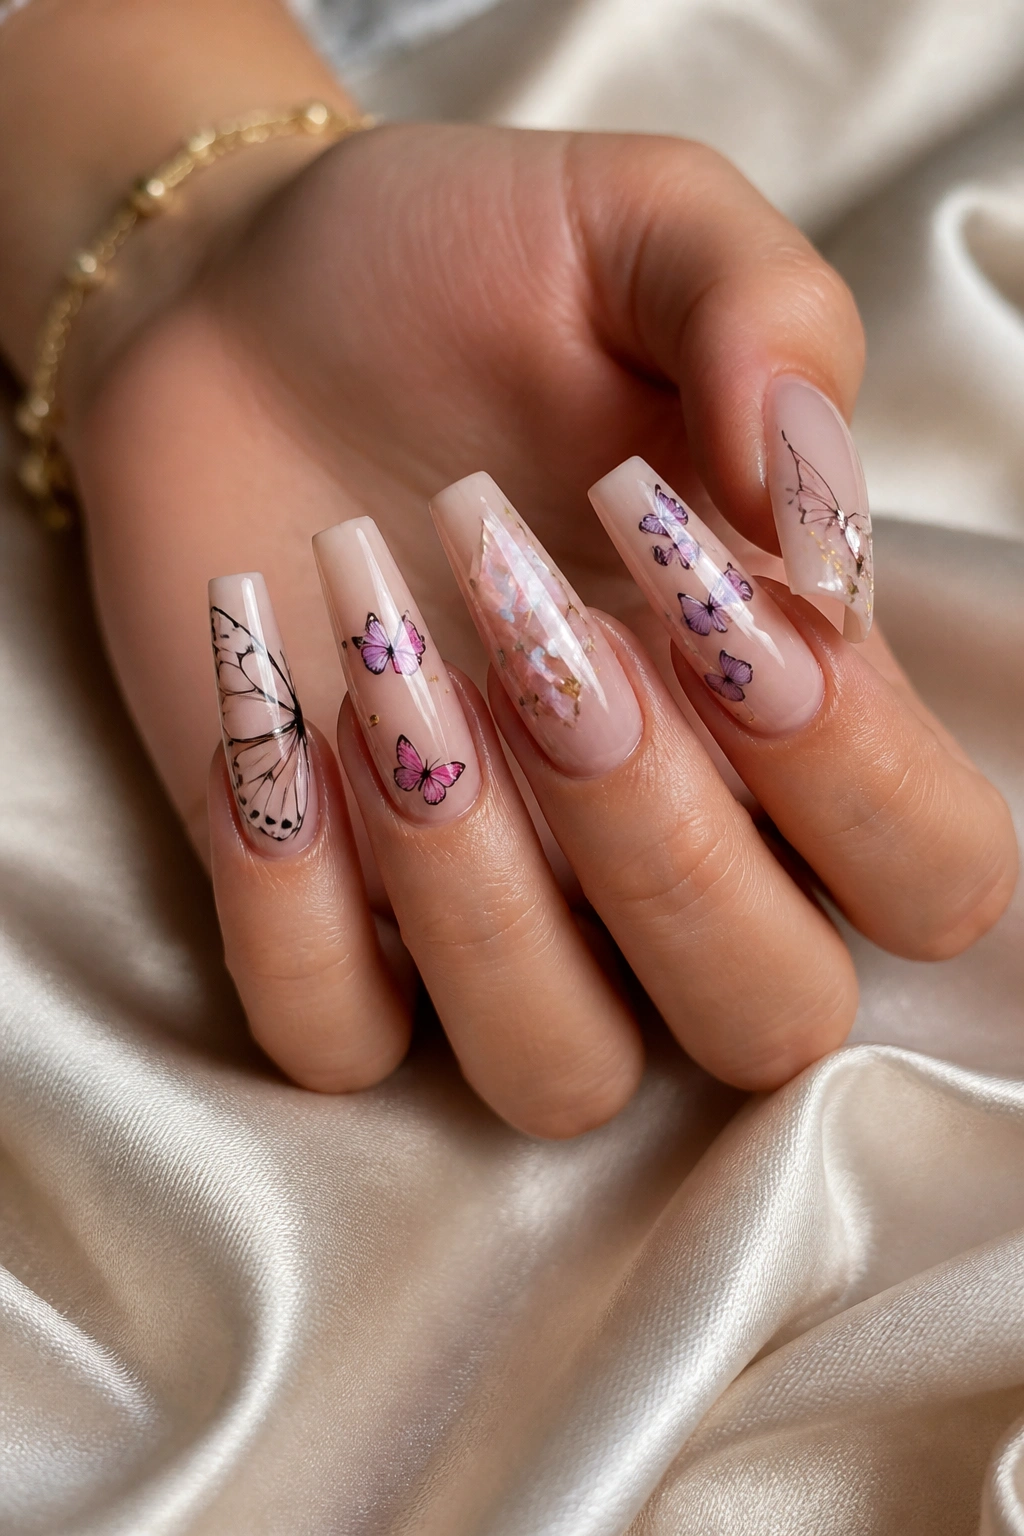
1. Sheer Pink Butterfly Coffin Nails With Micro Glitter
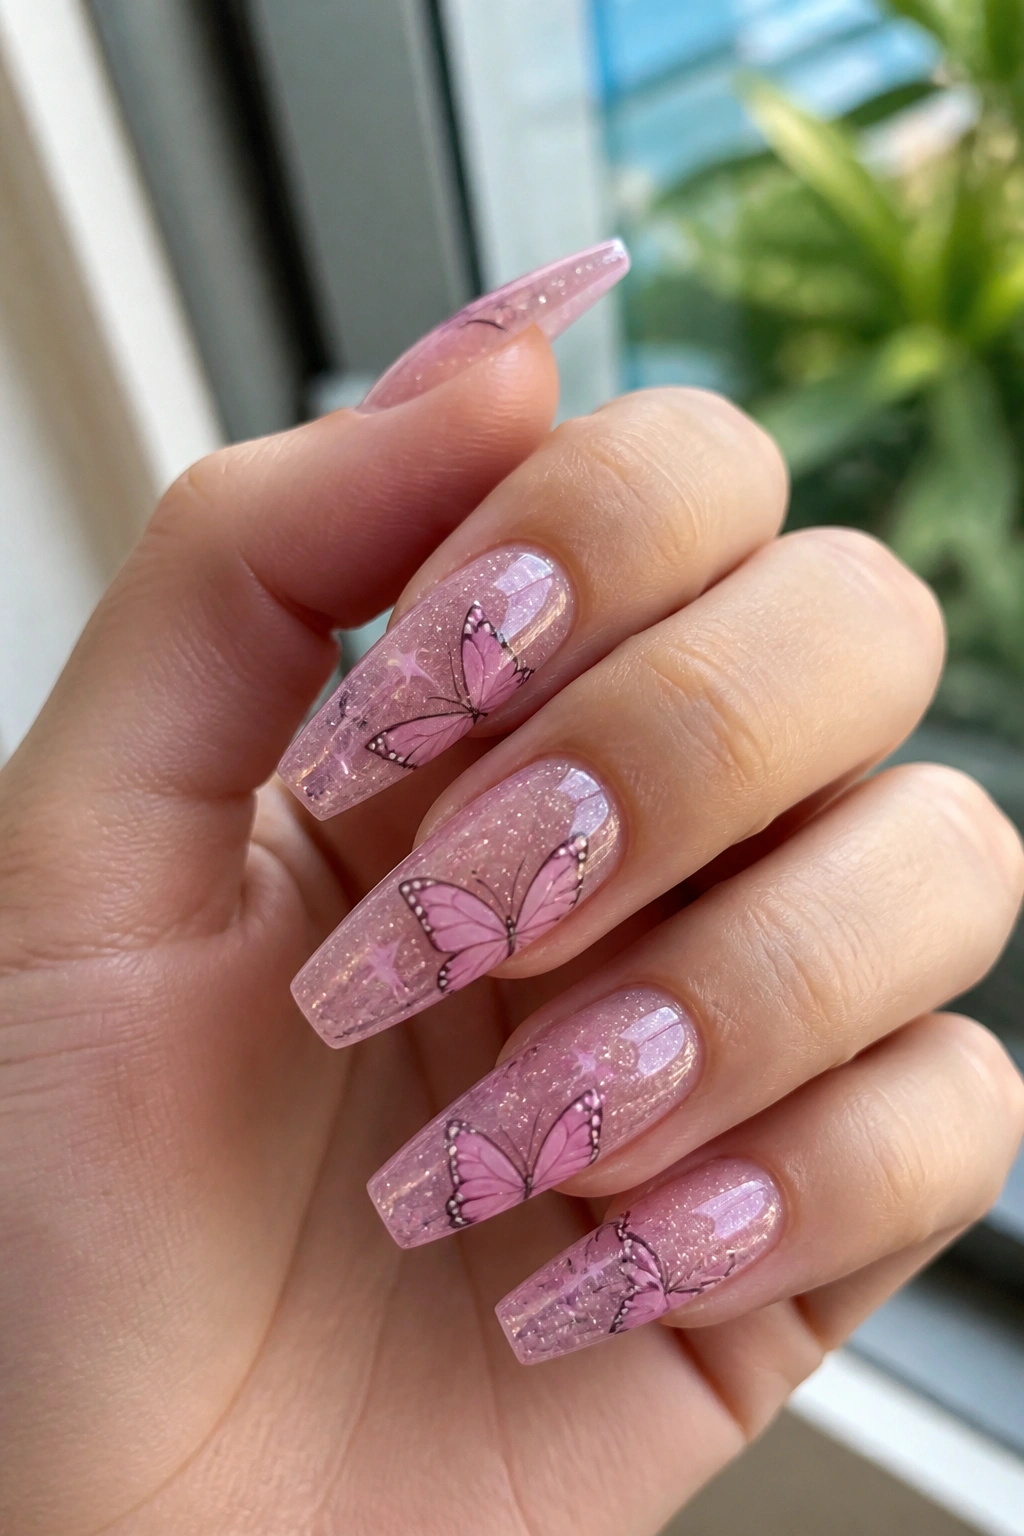
If you want the safest bet on this list, start here. A sheer pink coffin set with butterfly details almost never looks heavy, and that is the whole point. The color keeps the nail bed fresh and natural-looking, while a fine glitter wash adds a little movement without covering the butterfly itself.
Why this design keeps working
The base should look translucent, not opaque. Think soft pink jelly or milky blush, built in two thin coats so the nail still has some depth. Then the butterfly art goes on top—usually one full wing on the ring finger and a partial wing on the middle or index. Black outline works, though white linework can look softer if your skin tone leans cool.
Micro glitter does a different job than chunky glitter. It fills the empty space with a light shimmer, but it does not block the lines of the wing. That separation matters. Once the glitter pieces get large, the butterfly loses shape.
Ask for these details
- Medium coffin length keeps the design elegant and easy to wear.
- One or two accent nails stops the set from feeling sugary.
- A glossy top coat makes the pink look glassy and keeps the glitter fine, not gritty.
- Silver or iridescent flecks work better than multicolor confetti here.
My take: this is the set I suggest when someone wants butterfly nails for the first time and does not want to regret the choice two days later.
2. Clear Tip Butterfly Coffin Nails With Encapsulated Wings
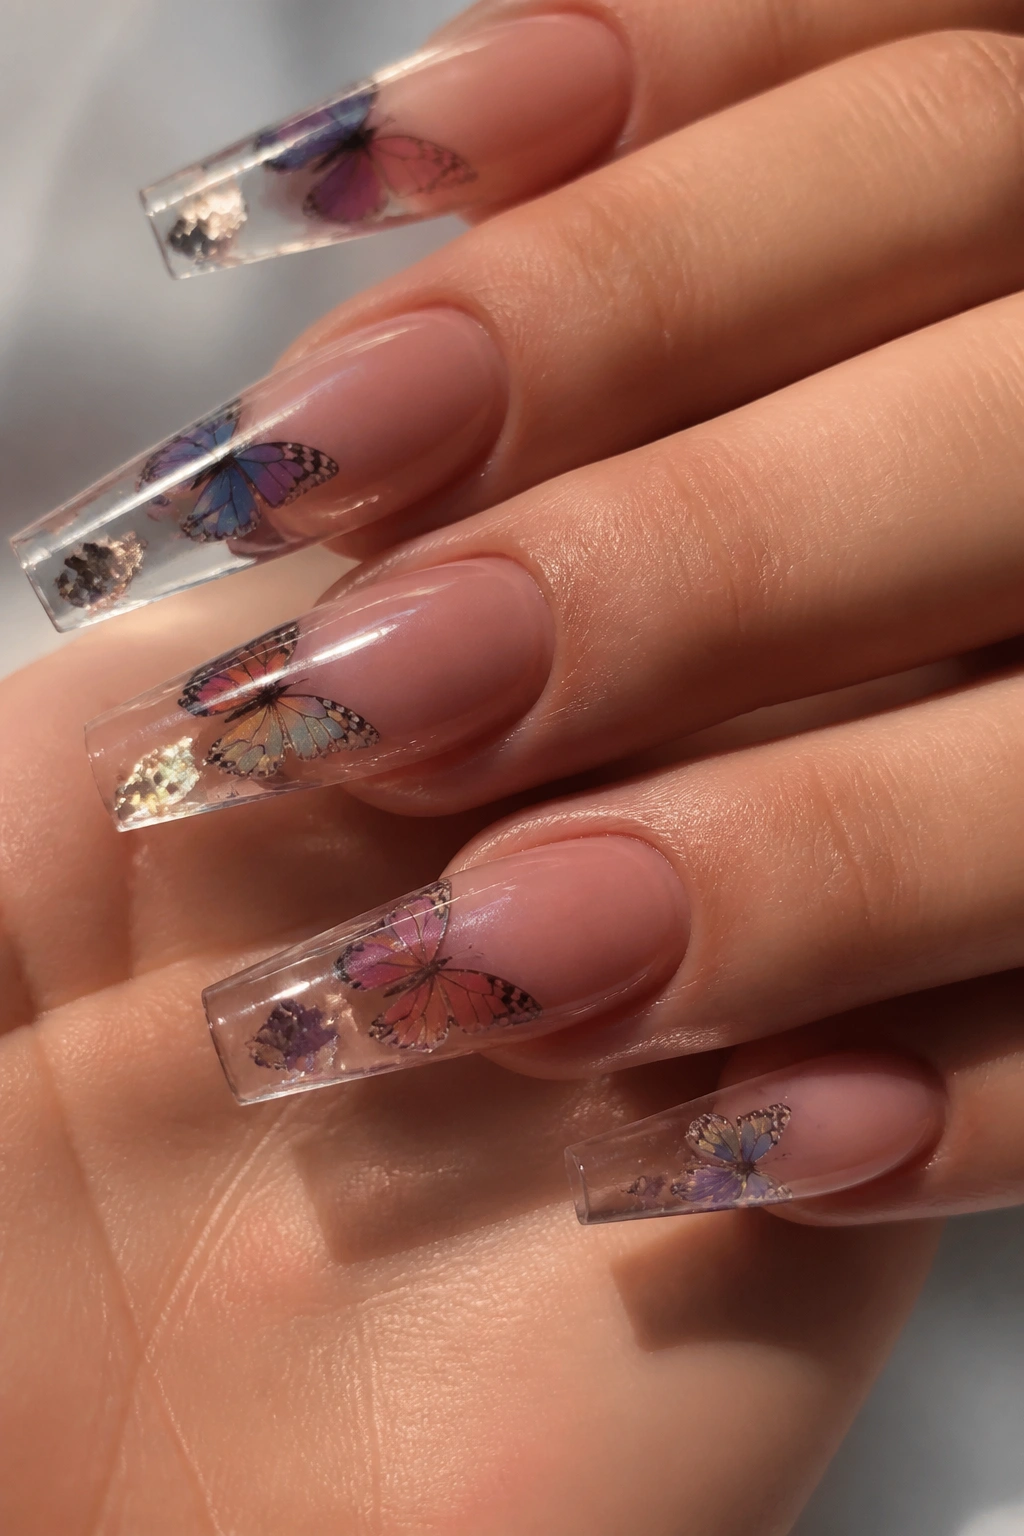
Encapsulated butterfly art looks better than surface stickers nine times out of ten. There, I said it.
When the wing sits under clear acrylic or builder gel, the whole nail gets a smooth, glass-like finish. You can see the butterfly, foil, glitter, or dried petals through the clear tip, but you cannot feel the edge with your fingertip. That matters because sticker edges are often the first thing to catch on towels, sweaters, and hair.
This style works best on medium-long or long coffin nails. Short lengths do not give the transparent tip enough room to show off the suspended design. Ask for a natural nude or soft pink near the nail bed, fading into a clear tip with one encapsulated wing piece placed off-center. Too many encapsulated elements start to look like a resin keychain.
Cost can climb here because the build takes more time. A tech has to place the art flat, seal it, then shape the nail without filing into the design. Worth it, though, if you want that glossy “trapped under glass” look instead of a sticker-on-top finish.
One caution. Grow-out shows faster on clear styles than on milky nude bases, so plan your fill schedule around two to three weeks if you like your manicure looking crisp.
3. Lavender Ombre Coffin Nails With White Butterfly Linework
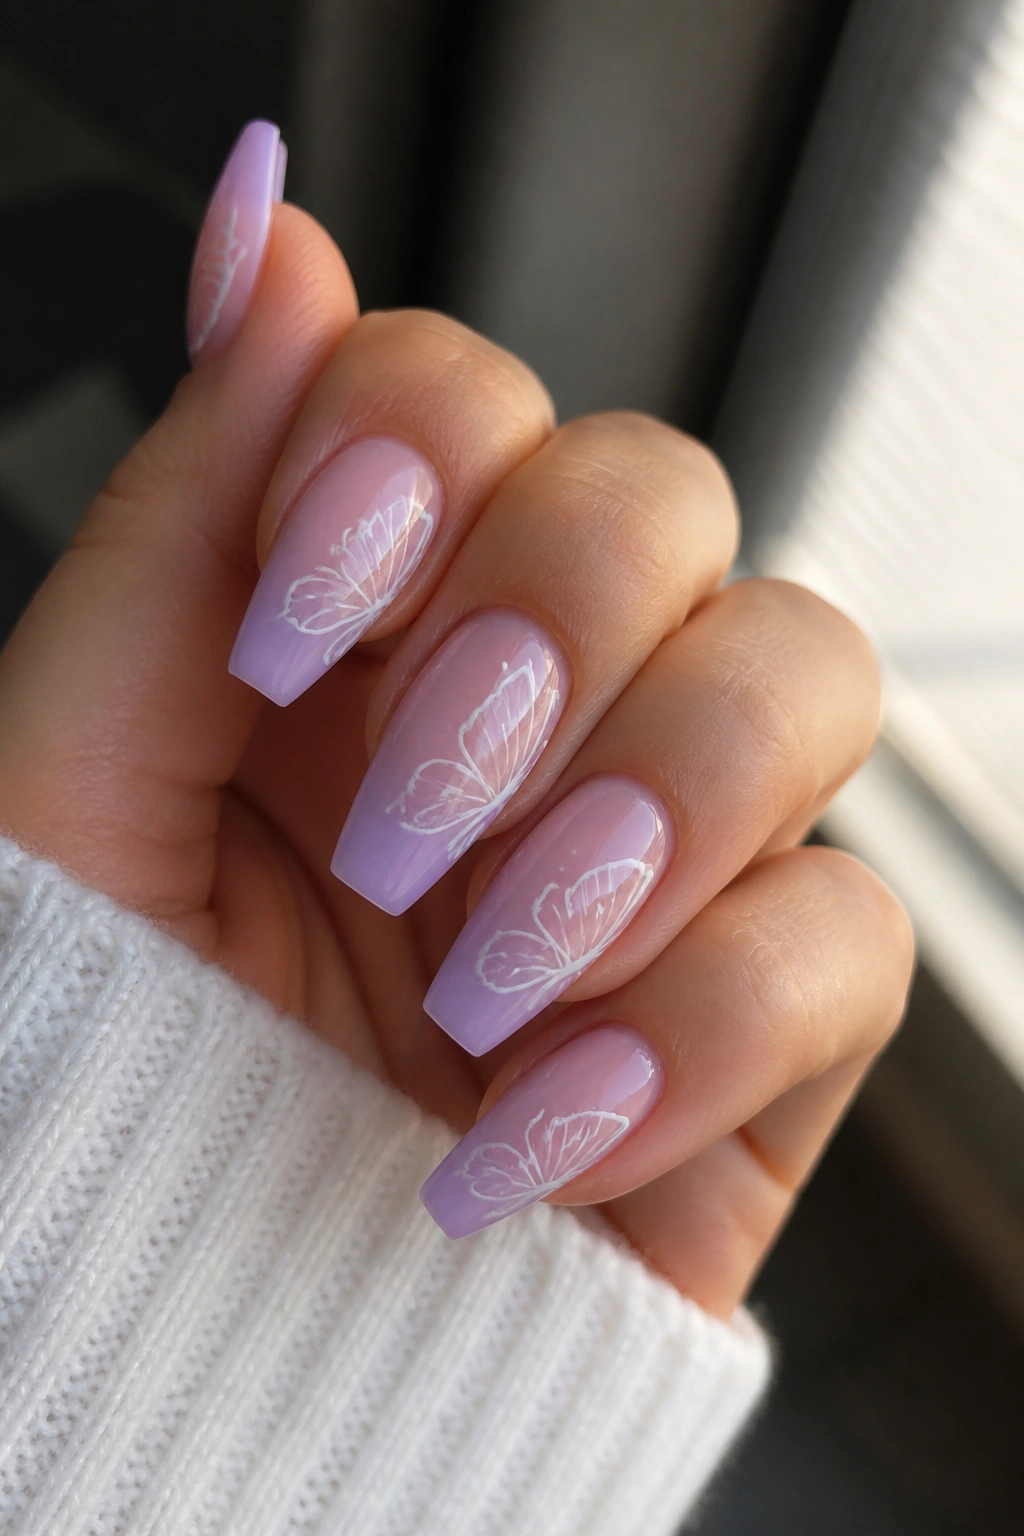
Why does lavender work so well with butterfly art? Because it already feels airy before the wing even goes on.
A lavender ombré usually fades from nude at the cuticle into soft purple near the tip. That fade gives the butterfly a built-in background, almost like a sky gradient, though it stays wearable enough for daily life. White linework over lavender looks lighter than black, and it keeps the mood soft rather than graphic.
The trick is restraint. One full butterfly on each hand is enough. Maybe two, if the rest of the nails stay clean. Once every nail gets a wing, glitter, and stones, the ombré disappears into the noise.
How to wear it without losing the shape
Keep the purple pale. Deep violet can look heavy on a coffin shape unless the set is extra long and sharply filed. Ask for a sponge blend or airbrushed fade with no hard stripe in the middle. The color should melt from nude to lavender, not split into two separate blocks.
A pearl top coat can work here, though I would skip chrome powder. Chrome tends to flatten soft butterfly linework unless the design is bold and thick. Thin white lines over a glossy lavender fade feel fresher and cleaner.
This set is especially good if you like feminine nail art but hate anything that looks sugary.
4. Baby Blue Butterfly French Coffin Nails
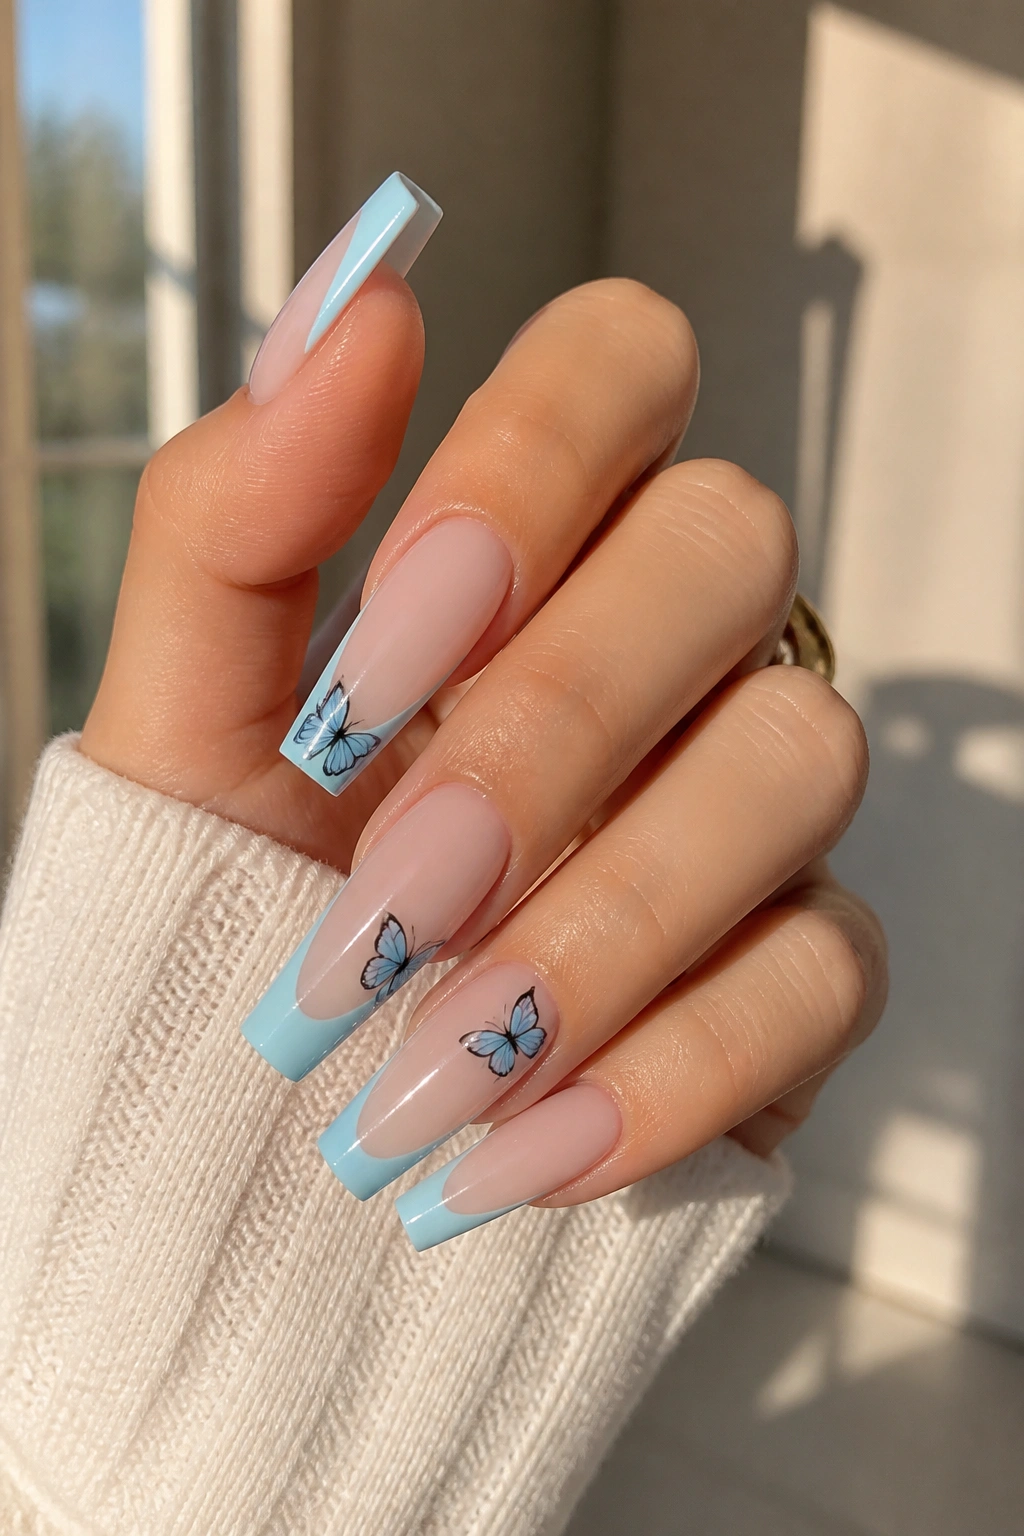
A full blue set can feel like a lot. A baby blue French with butterfly art gives you the color hit at the tip and leaves the rest of the nail open, which makes the whole manicure easier to live with.
Picture a sheer nude base, slim blue French edges, and one floating butterfly wing crossing from the sidewall toward the center. That little bit of asymmetry keeps the set from looking stiff. Butterfly designs need air around them, and a French layout gives them that space.
Here is what makes this version stronger than a standard pastel set:
- The blue tip frames the wing without filling the whole nail with color.
- Shorter medium lengths still work, since the wing can sit above the smile line instead of taking over the full nail.
- White highlights on the blue tip help the shape read cleaner from a distance.
- A split-wing design across ring and middle fingers adds detail without making every nail busy.
I would ask for a crisp, narrow French line rather than a deep smile line. Once the blue takes up half the nail, the butterfly starts competing with the tip. Keep the blue sheer or milky, not neon.
And yes, this style looks far more expensive than it usually is because the set uses placement instead of bulk.
5. Black and Nude Butterfly Coffin Nails With Gold Foil
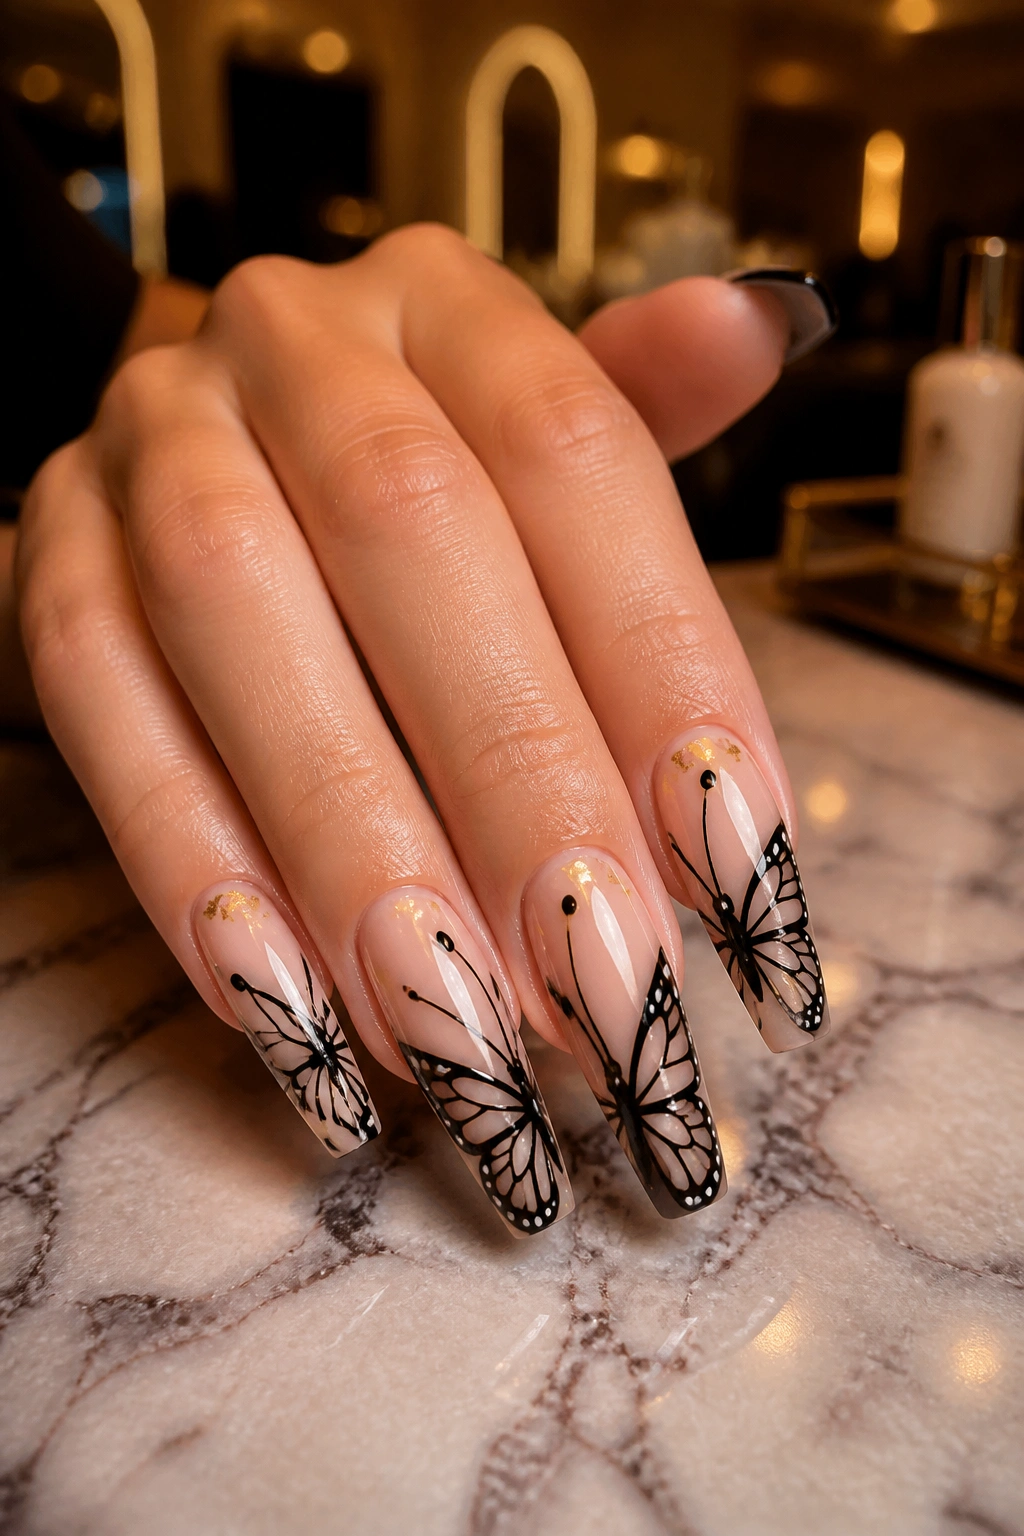
This one has attitude.
A nude base with black butterfly wings already gives you hard contrast, and that contrast is the whole appeal. The coffin shape sharpens it even more because the straight sidewalls echo the graphic lines in the butterfly outline. If pastel butterflies feel too sweet, black linework fixes that problem fast.
Gold foil changes the mood. Without it, the set can feel flat or a little severe. Tiny torn pieces of foil near the cuticle or tucked behind one side of the wing warm the design up and break the black into layers. The effect is less “cute butterfly” and more “fashion set with butterfly art.”
I like this style best on long coffin nails with a pink-beige nude base. Peachy nude can work, though it shifts the black warmer. If you have a cooler skin tone, ask for a rosier nude so the gold and black do not fight each other.
Keep the foil sparse. Two or three tiny pieces on each accent nail is enough. Big foil chunks start to pull the eye away from the wing detail, and once that happens, you are paying for art nobody notices first.
The only downside is maintenance. Black tips, black outlines, and naked nude space all show wear faster than milky sets do. Seal the free edge well, wear gloves for dishwashing, and do not use your nails to pop open soda cans unless you enjoy booking repairs.
6. Milky White Butterfly Coffin Nails With Holographic Stickers
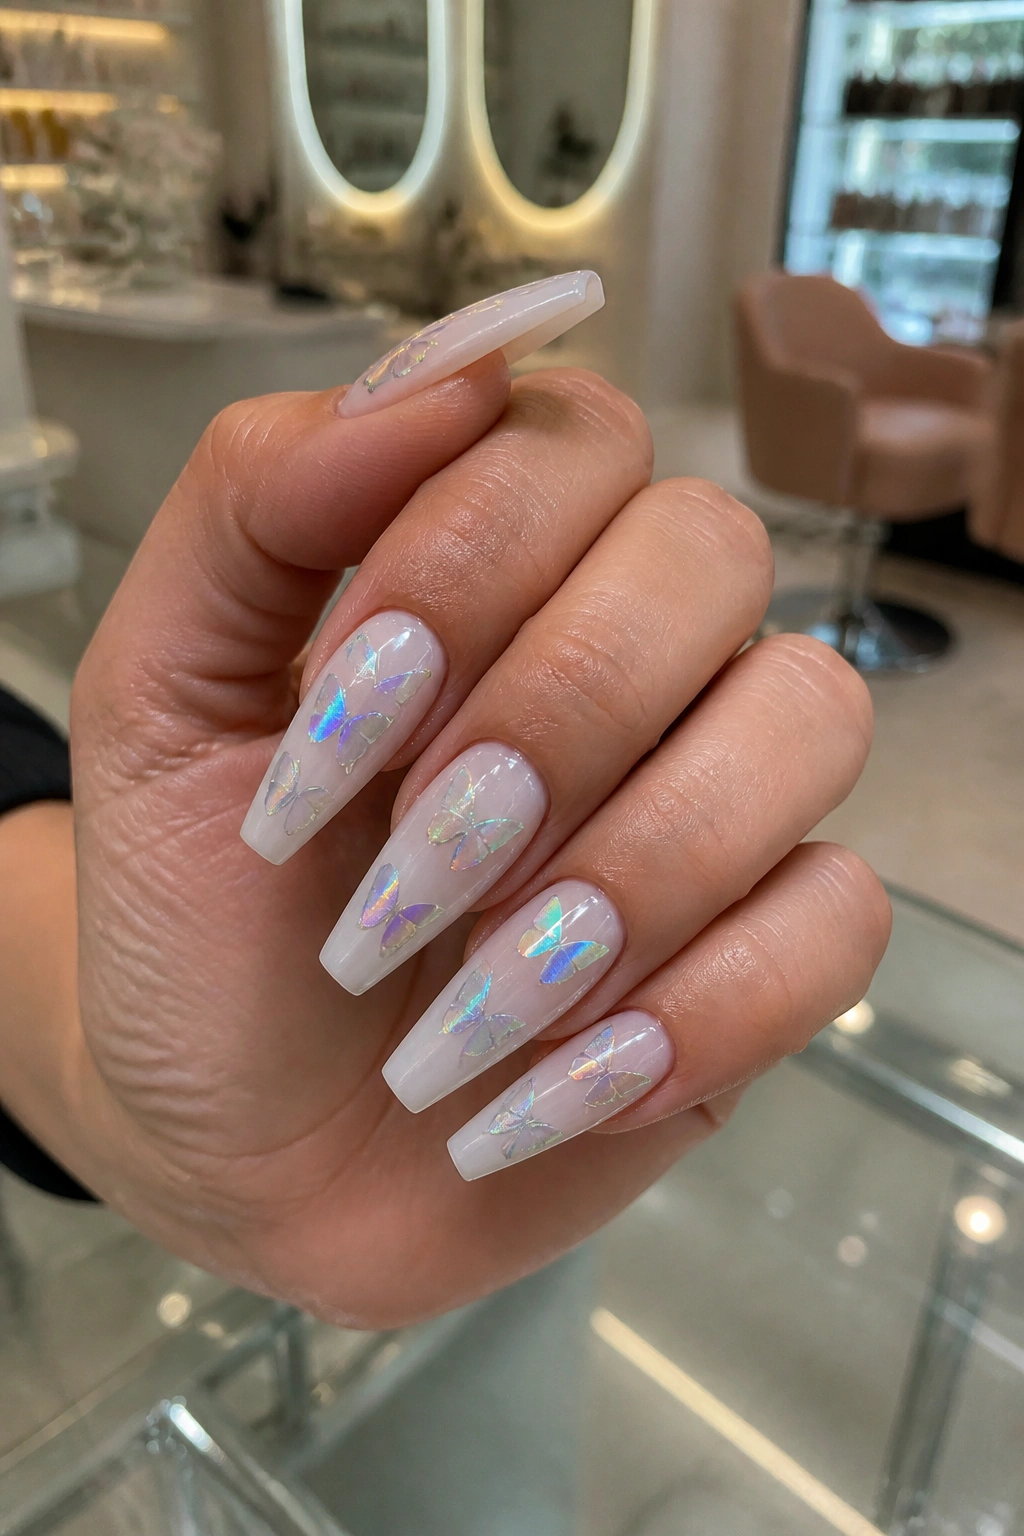
Unlike dark butterfly sets, milky white gives holographic details room to shift color. Under indoor light, the wings may flash blue, pink, then a little green at the edges. Over black polish, that same sticker can look harsh. Over clear, it can disappear. Milky white lands in the sweet spot.
The base should look creamy, not chalky. Chalky white polish can make the whole set feel cheap, especially on coffin nails where the flat tip already has a strong shape. A milky gel base softens the white and keeps the sticker from looking pasted on.
This is one of the few sticker-heavy looks I like without apology. Why? Because holo butterfly decals often have tiny color shifts and printed details that are hard to mimic by hand unless your tech is a painter with a surgeon’s patience. If the sticker is laid flat and fully sealed, it can look clean for the full wear cycle.
Good ways to keep it sharp
- Use one large holo butterfly and a second smaller one, not five scattered decals.
- Add fine silver glitter near the cuticle, not over the wings.
- Stick to gloss finish so the holographic shift stays visible.
- Ask for encapsulation or a thick top coat if the decal edge lifts easily.
I keep coming back to this set because it feels bright without needing loud color.
7. Jelly Pink Butterfly Coffin Nails With Chrome Edges
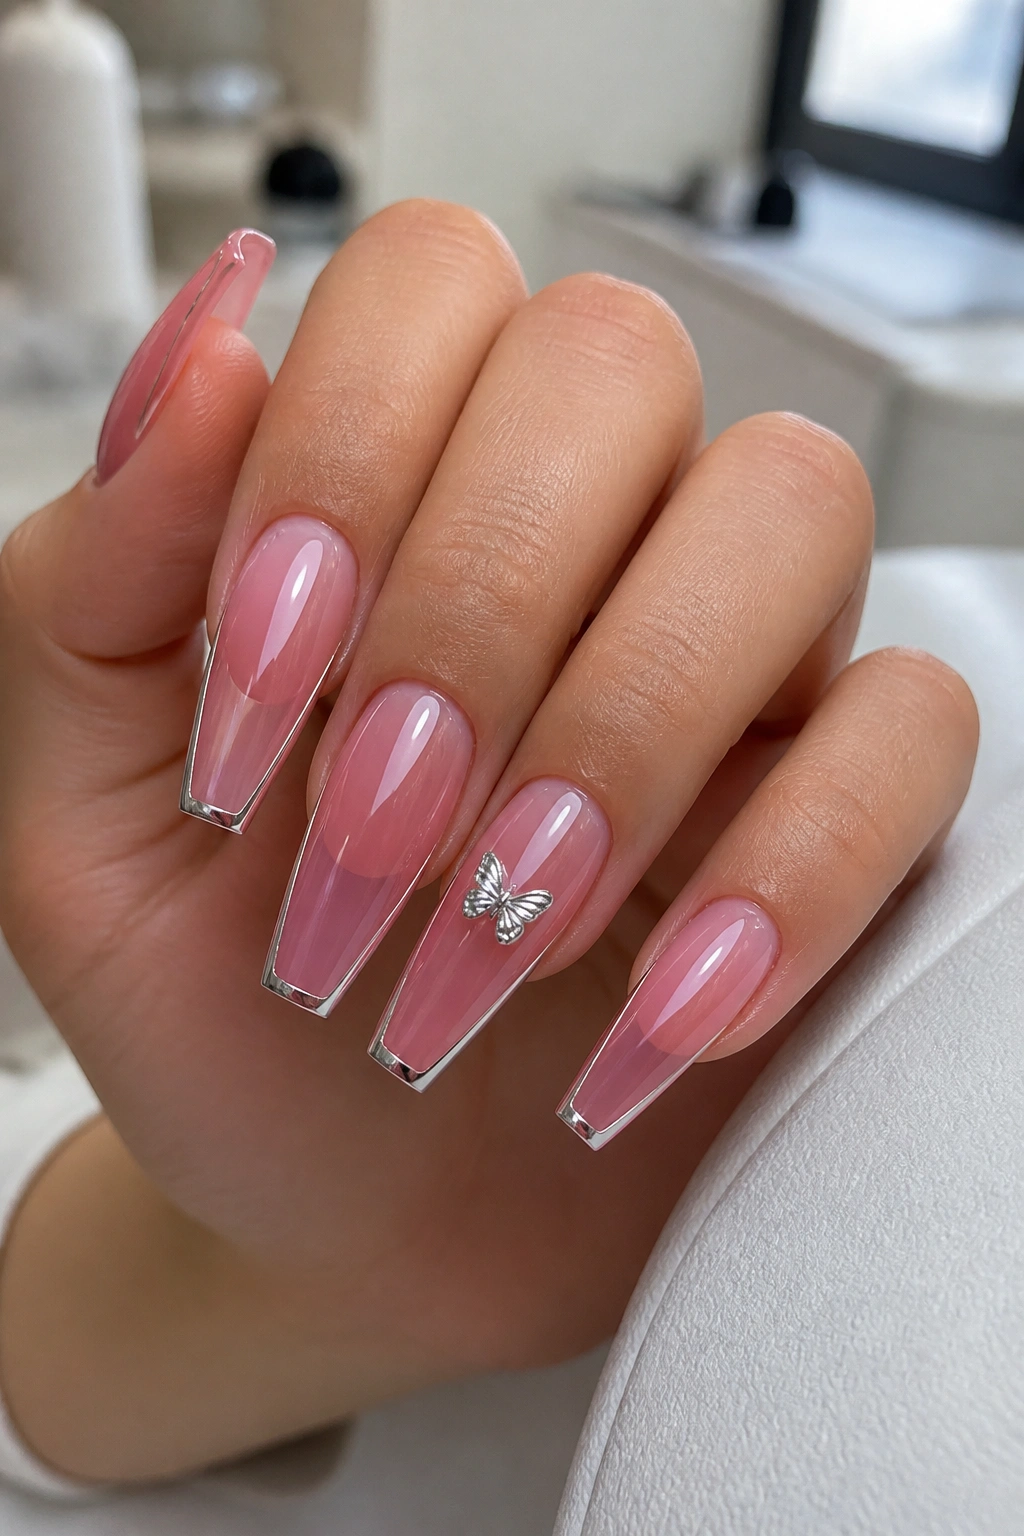
Candy, though not childish.
Jelly pink nails already have that translucent, syrupy look that makes fingertips appear lit from underneath. Add a thin chrome line along the sidewalls or tip, then place a small silver or white butterfly on one or two nails, and the set turns sleek instead of sugary.
The chrome should stay thin. That is the part people get wrong. A fat chrome border takes over the coffin shape and starts reading like a metal frame. A hairline edge—think liner-brush thin—works better because it traces the silhouette without shouting over the butterfly art.
What makes this one different
The appeal is contrast in texture, not contrast in color. You have a juicy jelly base, a mirror-bright edge, and a light butterfly placed over a transparent pink field. The nail catches different moods from different angles. From straight on, it looks soft. Tilt your hand, and the chrome line jumps first.
Acetone, hand sanitizer, and rough filing can dull chrome faster than plain top coat. If you choose this set, ask your tech to seal the chrome under top coat where possible. Some chrome styles sit on top of the final layer and scratch easier.
If you want a butterfly manicure that feels younger, sharper, and less floral, this is a smart one.
8. Matte Mauve Coffin Nails With a Velvet Butterfly Accent
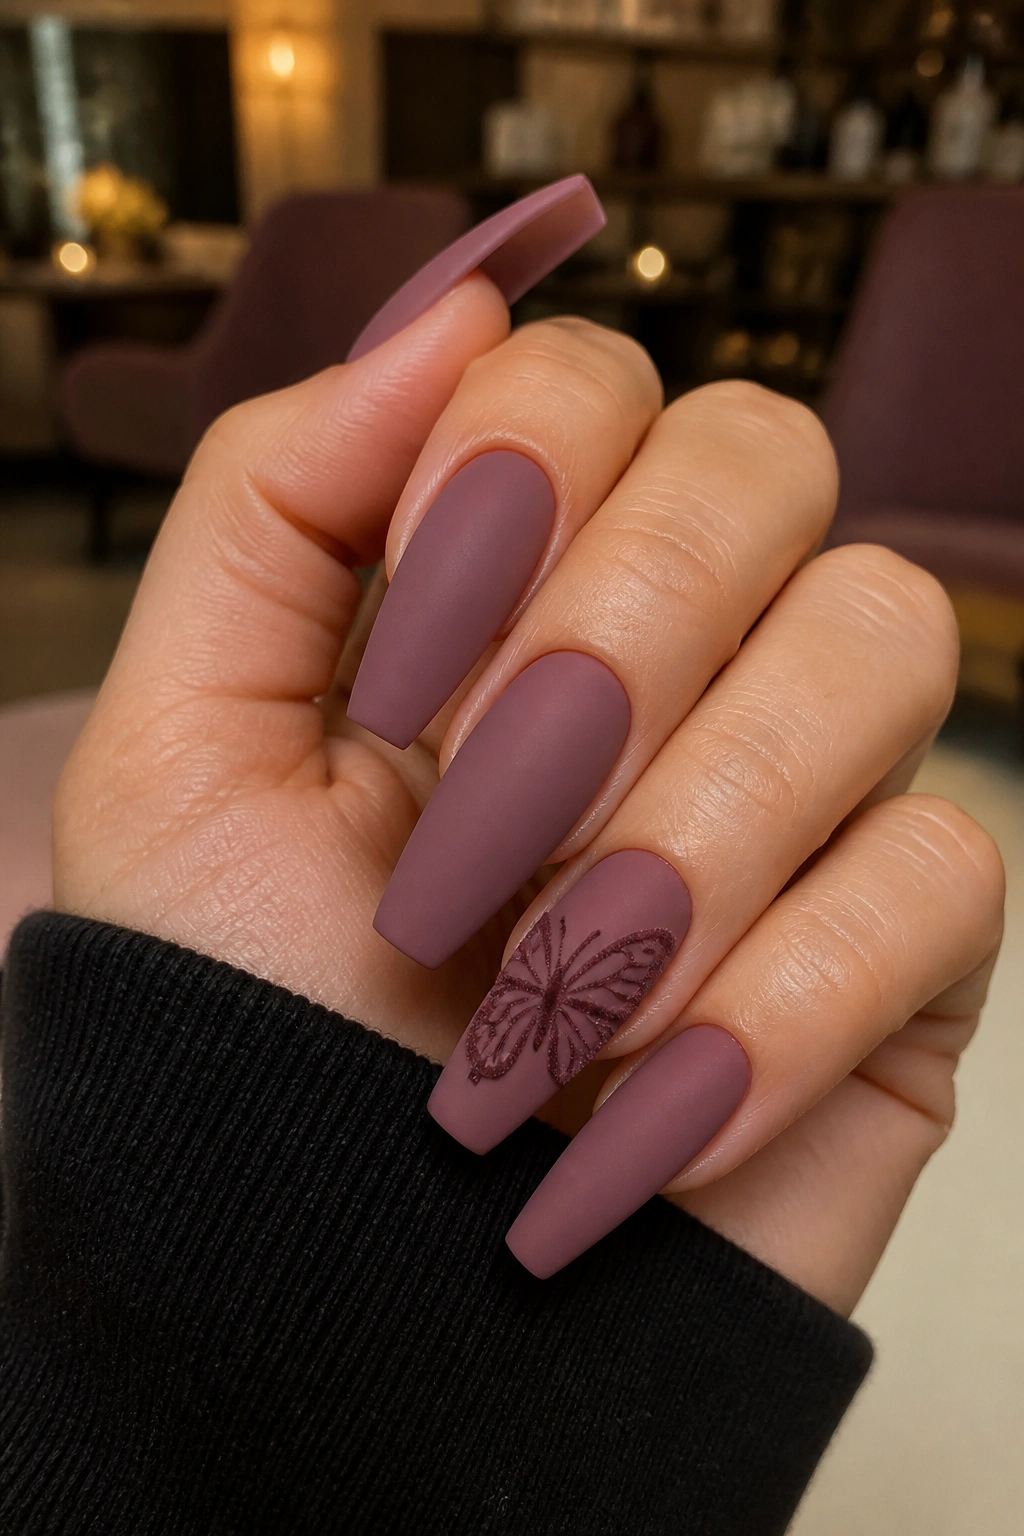
Matte can kill detail when it is used without a plan. Used well, it makes one glossy or magnetic detail stand out harder than any rhinestone ever will.
A mauve coffin set with a matte finish gives you a soft, powdery background. Then one butterfly accent nail—either glossy linework over matte or a velvet cat-eye butterfly over the same mauve base—creates the contrast. Your eye goes straight to the shift because the rest of the set stays quiet.
I would not put velvet magnetic polish on all ten nails here. One accent nail on each hand is enough. Maybe two if the base color is pale and the coffin length is long. More than that, and the butterfly idea gets lost under the cat-eye flash.
Mauve works because it sits between pink and taupe. It does not pull too sweet, and it does not look flat on skin the way gray-lilac sometimes can. If your tech has a mauve builder gel, even better; the depth tends to look richer than flat polish.
There is one catch: matte top coats show oil and product residue faster. If you use cuticle oil, hand cream, or makeup often, expect the surface to look darker until you wipe it clean with alcohol. Small issue. Still worth it for the contrast.
9. Sunset Orange Butterfly Coffin Nails With Aura Centers
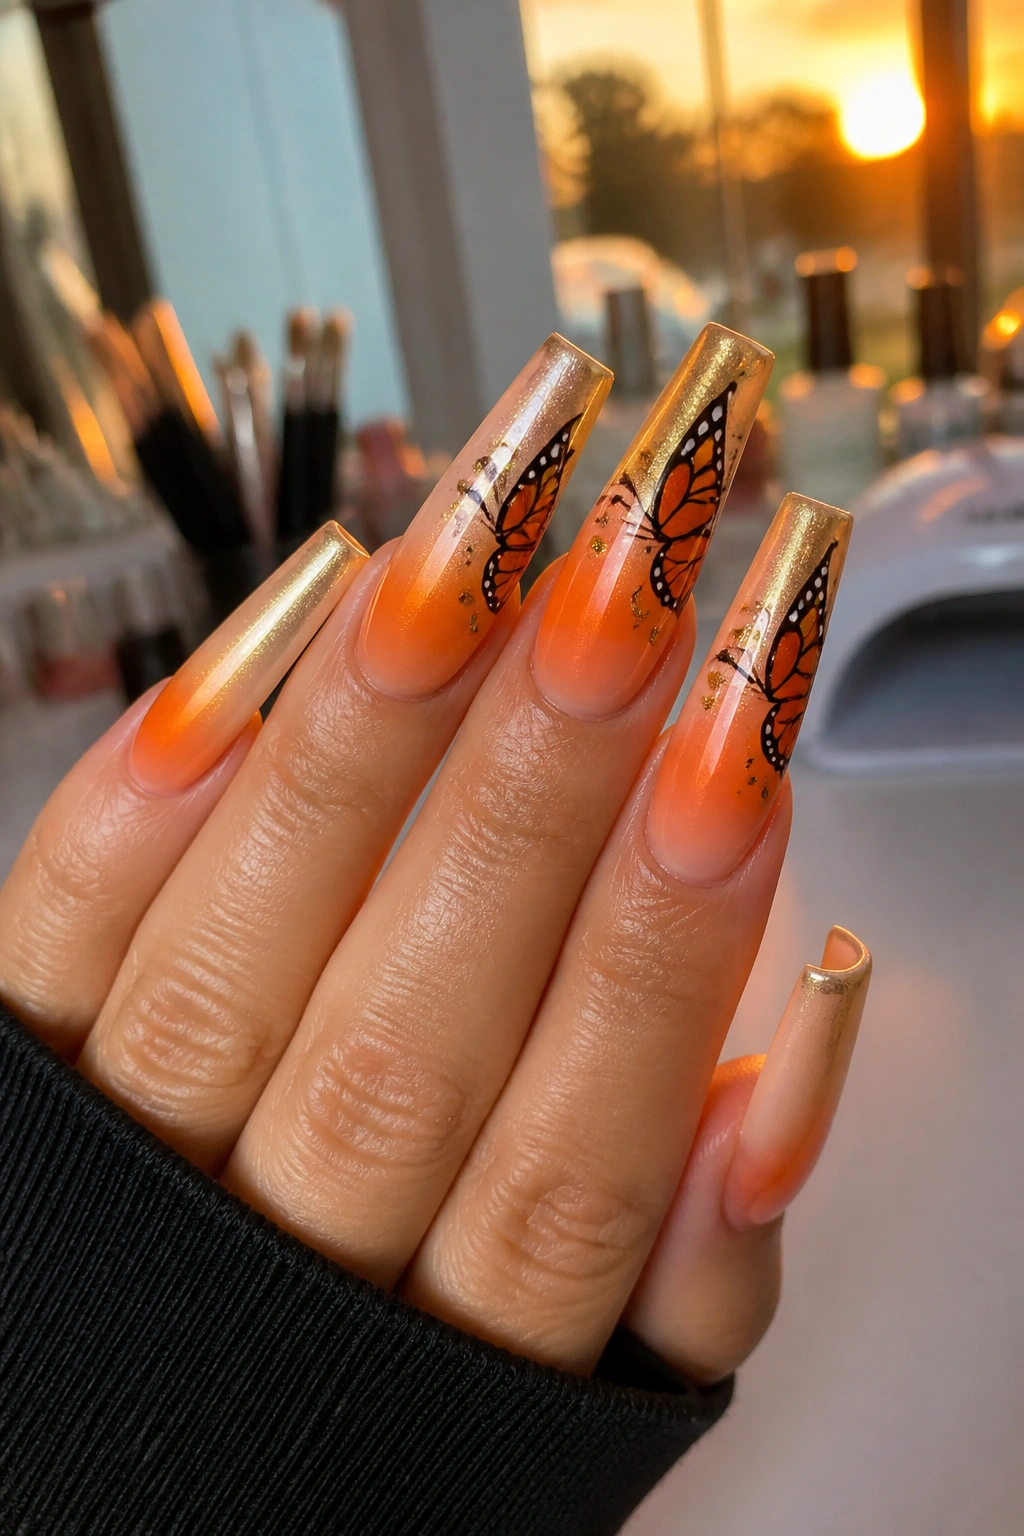
Peach. Tangerine. Coral. A little gold at the edge.
This style leans warm and glowy, and it works best when the color sits in the center of the nail like a soft aura rather than covering the whole tip. An airbrushed orange center fading into nude edges gives the butterfly art a sunset backdrop without making the set feel heavy.
Black wing outlines look strong here, especially if they are placed near the upper third of the nail where the orange is strongest. White linework can work too, though it softens the contrast and gives the manicure a hazier feel. I prefer black or deep brown against orange because the wing detail stays crisp.
The details that make it land
- Keep the aura circle soft and diffused, not a hard dot in the middle.
- Use orange on two to four nails, then leave the rest nude with smaller butterfly accents.
- A hint of gold chrome powder near the tip can warm the set without turning it metallic.
- Medium-long length gives the aura enough space to fade cleanly.
Cheap orange pigments can stain porous acrylic if the nail is not sealed well, so this is a set where top coat quality matters. Ask for two thin layers rather than one thick dome. Thick top coat can warp the fine butterfly lines at the side when it cures.
10. Shorter Coffin Nails With Minimal Butterfly Outlines

You do not need extra-long nails to wear butterfly art.
Short coffin nails—more “soft ballerina” than dramatic coffin—look sharp with minimal outlines placed on two fingers and a clean nude or milky base on the rest. This is the set for people who type all day, wear contact lenses, cook often, or hate that long-nail learning curve where picking up coins starts to feel like a side quest.
The key is scale. A full rainbow wing with glitter, foil, and gems will swallow a short nail. A tiny black outline, white wing tip, or one partial butterfly crossing the corner of the nail looks intentional and neat.
How to keep short coffin from looking stubby
Ask your tech to taper the sidewalls gently and keep the tip narrow enough to read coffin without flattening it into a square. Too wide, and the nail looks blocky. Too narrow, and the short length starts resembling almond with a flat end. That midpoint takes skill.
I like short minimal butterfly nails with sheer beige, cool pink, or soft taupe bases. Skip dark full-color polish unless you want the butterfly art to stand in tiny high contrast. On small canvases, open space is not empty. It is doing work.
This one may be the most wearable set on the list.
11. Emerald and Black Butterfly Coffin Nails
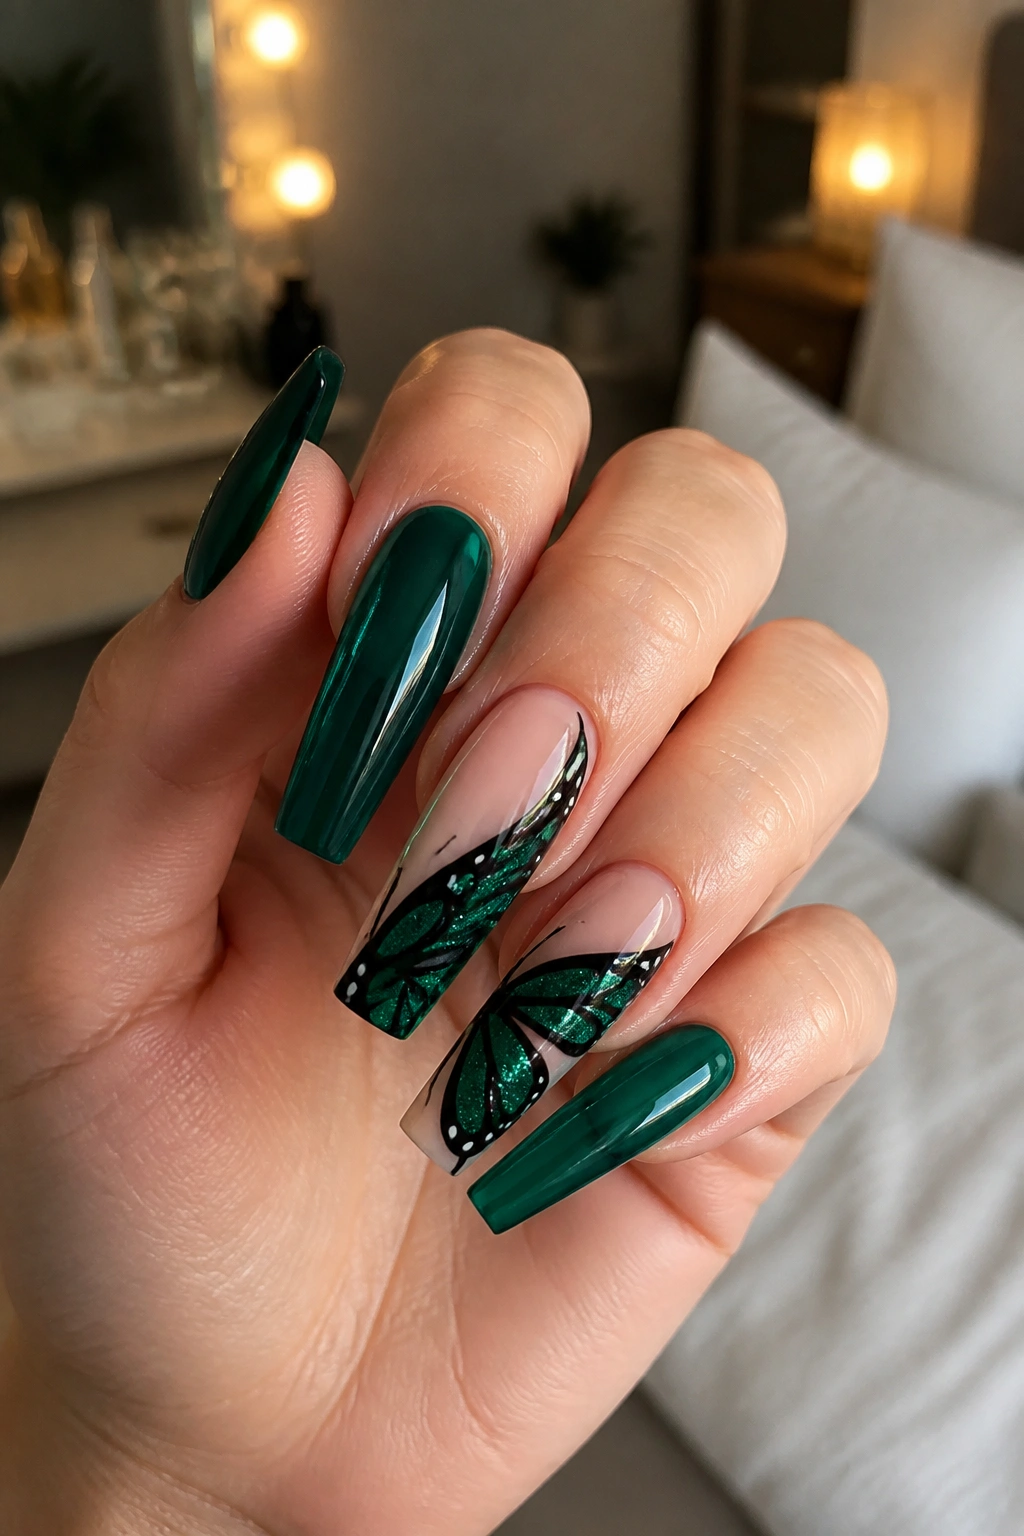
When pastel butterfly nails feel a little too soft, emerald fixes the mood fast. A deep green base with black wing details has the same dramatic pull as black-and-gold sets, though it feels richer and less stark.
I would not cover every nail in solid emerald. Better to mix a few full-color nails with nude or sheer bases, then place black butterflies over the lighter nails so the art can breathe. Green foil flecks or a dark chrome stripe can tie the set together without making it look busy.
Who this design suits best
If you like jewelry tones, darker outfits, or shorter color palettes—black, cream, camel, denim, deep brown—emerald butterfly nails fit in with your clothes far easier than pastel sets do. The manicure looks intentional, not seasonal or costume-like.
Small choices that matter
Use a green with depth, not flat bottle-green cream polish. Jelly emerald, cat-eye emerald, or a translucent glassy green often looks richer on coffin shapes because the light moves through the nail instead of sitting dead on top. Black linework should stay fine and sharp. Thick outlines can make the butterflies look cartoonish.
I am fussy about this color pairing, and for good reason. Done badly, it can drift into craft-store territory. Done well, it looks polished and expensive.
12. Rhinestone Butterfly Coffin Nails With Cuticle Crystals

Rhinestones can turn butterfly nails into a mess fast. They can also look striking if you treat them like jewelry instead of confetti.
Start with one focal nail on each hand. Build the butterfly with flatback crystals, or place a crystal cluster at the cuticle and let hand-painted wings stretch upward from it. That layout keeps the weight close to the base of the nail, where it is less likely to snag than a raised charm stuck near the tip.
Use small stones first. Sizes around SS5 to SS10 usually sit flatter and last longer than oversized gems on everyday sets. Bigger stones have their place, though I save them for event nails when long wear matters less than impact.
A few practical notes matter here more than taste:
- Keep 3D crystal work to two nails per hand at most.
- Ask for gel glue plus top-coat framing, not a blob of adhesive under one stone.
- Avoid placing bulky gems on the thumb if you text often.
- Plan for gentle wear; crystals loosen fastest when your nails scrape against keys, cans, and jean buttons.
I like rhinestone butterfly sets best on neutral bases—nude, blush, milky white—because the stones already add enough visual noise. Color plus crystals plus butterfly linework can tip over into costume if you are not careful.
13. Press-On Butterfly Coffin Nails With an Airbrushed Fade
Press-ons have gotten far better than people give them credit for, especially in coffin shapes. If you want butterfly nails for a trip, a party, a weekend, or one photo-heavy stretch of life, a good press-on set can look sharp without the salon time.
The difference between cheap-looking press-ons and convincing ones comes down to thickness, fit, and finish. You want a nail that is thin near the cuticle, not blunt like a plastic spoon edge. Airbrushed fades help a lot because they mimic salon ombré work and hide the join between color and natural nail better than a flat block of polish.
How to make them last longer than two days
Prep matters more than the set itself. Push back cuticles, lightly buff shine off the natural nail, wipe with alcohol, and size each tip before you open the glue. If a press-on sits on skin at either side, it will pop faster.
Glue tabs are fine for one evening. Nail glue gives better wear—often five to ten days if the fit is clean and you keep water exposure low for the first few hours. Press each nail down for about 30 seconds, especially at the sidewalls, where lifting usually starts.
Butterfly press-ons work best with printed wings, chrome accents, or airbrushed pastel fades. Heavy gem clusters tend to pop off sooner unless the base tip is sturdy.
14. 3D Butterfly Coffin Nails With Sculpted Wings

This style is all drama, and I mean that as praise and warning.
A sculpted 3D butterfly on a coffin nail usually uses acrylic or thick gel to build raised wings that lift slightly from the surface. Sometimes the body is a gem. Sometimes the wings are translucent and tinted, almost like candy glass. Either way, this is not your low-maintenance manicure.
Placement decides whether the set looks editorial or clumsy. One raised butterfly on each hand, usually on the ring finger or middle finger, is enough. Put 3D elements on four or five nails and you will spend your week catching them on towels, hair, knitwear, and your own pockets.
Long coffin shapes handle the weight better because the tip gives the sculpted piece room to sit without hanging over the edge. A short coffin nail with a chunky 3D butterfly often looks crowded and top-heavy. Ask your tech to angle the wings upward slightly, though not so far that they snag at the first sweater sleeve.
This is the set I would save for an event, a shoot, or a short wear window when you want people to notice your nails from across the table. Daily errands are another story. Beautiful idea. Annoying grocery trip.
15. Nude Base Butterfly Coffin Nails With Mismatched Art
If you cannot choose one butterfly style, mismatched art is the answer—though it needs rules or it slides into chaos fast.
Start with the same nude base on every nail. That one decision keeps the set cohesive. Then vary the butterfly art from nail to nail: one split wing across two fingers, one mini butterfly near the cuticle, one nail with a flutter of tiny silhouettes, one with foil under a translucent wing, one left plain for rest. Same family, different personalities.
I like mismatched butterfly sets because they let you use more than one texture without overloading a single nail. Chrome on one finger, line art on another, maybe one crystal center—spread out, not stacked. Coffin shape helps here because the shared silhouette keeps the manicure looking organized even when the artwork shifts.
A strong mismatch formula
- Two feature nails with the biggest wing detail.
- Two supporting nails with mini butterflies or foil.
- Five or six quiet nails with gloss, shimmer, or plain nude.
- One color story so the set still feels tied together.
The quiet nails matter most. If every finger is the “fun” finger, the eye gets tired. A mismatched set needs pauses.
This approach also helps when you are bringing reference photos to a tech. Instead of asking for one exact copy, you can pull details from two or three designs and build a custom set that looks like yours, not like a screenshot.
Final Thoughts
The butterfly sets that hold up best are not always the loudest ones. Shape, spacing, and finish do more for coffin nails than extra glitter ever will. A clean file, a smart base color, and one butterfly placed in the right spot can beat a crowded ten-nail art set every time.
If I had to narrow the list down, I would point most people toward sheer pink with micro glitter, encapsulated clear tips, or short minimal outlines. Those three cover the soft, glossy, wearable end of butterfly coffin nails, and they age better between appointments than bulky charms or overloaded stickers.
Bring your tech two or three favorites, not fifteen screenshots and a vague “something like this.” Tell them your length limit, whether you want hand-painted art or decals, and how rough you are on your hands. That short conversation usually makes the manicure turn out far better than the inspiration photo alone.
