

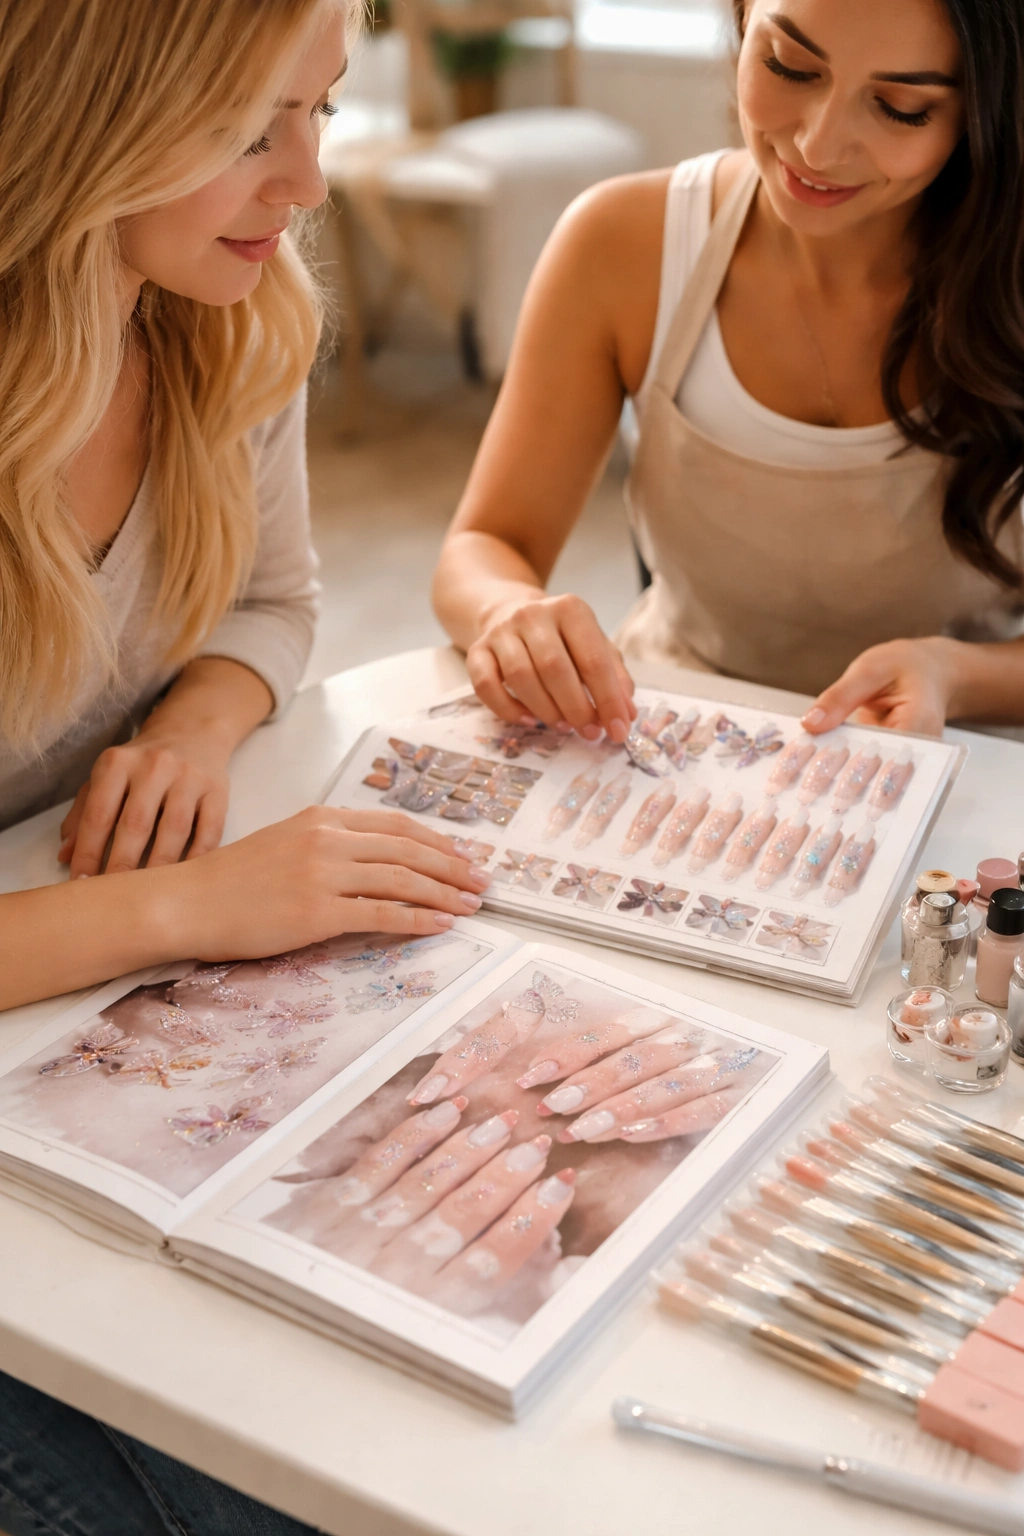
Most butterfly ballerina nails fail for one reason: too much happening on too little space. The butterfly itself is delicate, the ballerina shape is long and clean, and when those two ideas fight each other, the manicure goes from pretty to cluttered fast. Get the balance right, though, and butterfly ballerina nails have a soft, dressy look that still feels playful.
I like this pairing more than most cute nail trends because the shape actually helps the art. A rounded square tip gives you enough width for wings, while the tapered sides keep the design from feeling blocky. On a short oval, butterflies can look cramped. On a sharp stiletto, they can start to feel harsh. Ballerina nails sit in the sweet spot.
There’s also a detail nail techs know well: butterflies look better when they seem to land, not when they’re stamped onto every nail at the same size. A sheer pink base, one larger wing on a ring finger, two tiny decals near the cuticle on the other hand—that kind of placement makes the whole set feel more expensive.
Some sets whisper. Some flirt. Some go full glitter-garden. The best ones still keep that long, graceful ballerina silhouette front and center.
Why Butterfly Details Sit So Well on a Ballerina Nail Shape
A ballerina nail gives butterfly art room to breathe. That matters more than people think.
The shape—often called a soft coffin—has two features that help detailed nail art: tapered sidewalls and a flat tip. The taper draws the eye inward, which makes wings, outlines, and small gem trails look neater. The flat edge gives your nail tech a stable area for French tips, half-wing designs, or a clean block of color behind a decal.
The flat tip does part of the work for you
On a rounded tip, a butterfly can warp visually because the edges curve away. The ballerina shape keeps the top edge straighter, so line art reads cleanly from a normal viewing angle. If you want wing detail with white veins, gold foil, or black outline work, that extra bit of visual order helps.
Medium to long length works best here. A free edge of 10 to 16 mm usually gives enough space for detail without making daily life annoying. Go longer than that if you love drama, but know what you are signing up for when you text, button jeans, or fish a card out of your wallet.
Short ballerina still works—if you scale the art down
You do not need long acrylics to wear butterfly nails well. Short ballerina can look crisp and grown-up, especially with micro decals or a single wing accent near one corner of the nail. What you should skip on a shorter set is heavy layering: glitter base, chrome, gems, a butterfly charm, and line art all at once. There is no room for that.
A good rule: the shorter the nail, the fewer butterfly details you need.
That one rule saves a lot of manicures.
What Keeps Butterfly Nail Art Pretty Instead of Busy
More decoration does not make butterfly nails better. Usually it does the opposite.
Butterflies already have built-in shape, contrast, and movement. Add too many competing extras and the eye has nowhere to rest. The prettiest sets tend to use one focal effect—maybe chrome, maybe foil, maybe 3D charms, maybe crisp hand-painted wings—and then let the base color stay calm.
Here’s the formula I keep coming back to when a butterfly set needs polish rather than chaos:
- Pick 2 main colors, then one accent finish such as chrome, glitter, or foil.
- Use larger butterflies on 2 nails max per hand.
- Leave at least 3 nails quieter with sheer polish, a soft ombré, or a clean French tip.
- Match the butterfly scale to the nail length. Tiny decals suit shorter ballerina shapes; layered wings and gems need more space.
- Keep rhinestones small. Stones around 1.5 to 2 mm add light without turning the set bulky.
- Choose a milky or sheer base if you want the butterfly art to look airy.
Ask for a top coat that smooths the surface without burying the detail. That matters with foil, stamped lines, and thin decals. A top coat that is too thick can blur tiny white veins and soften crisp black outlines. You want glossy, not flooded.
And yes, negative space helps. A bare crescent near the cuticle or a transparent patch around a wing can make the whole manicure feel cleaner—almost lighter.
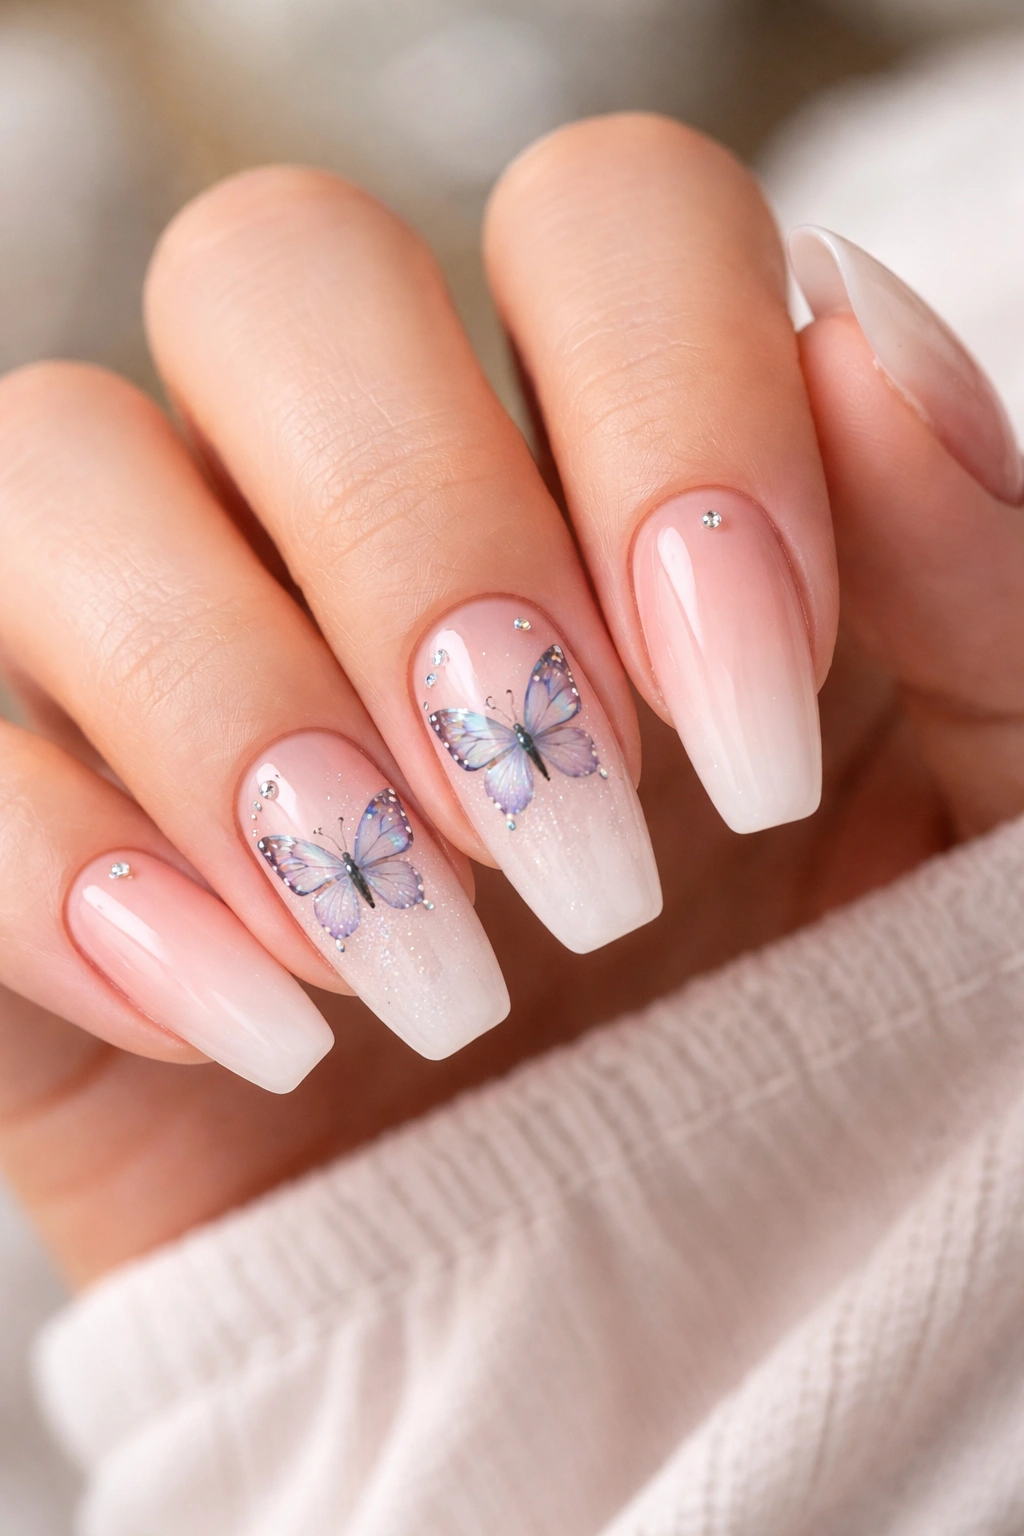
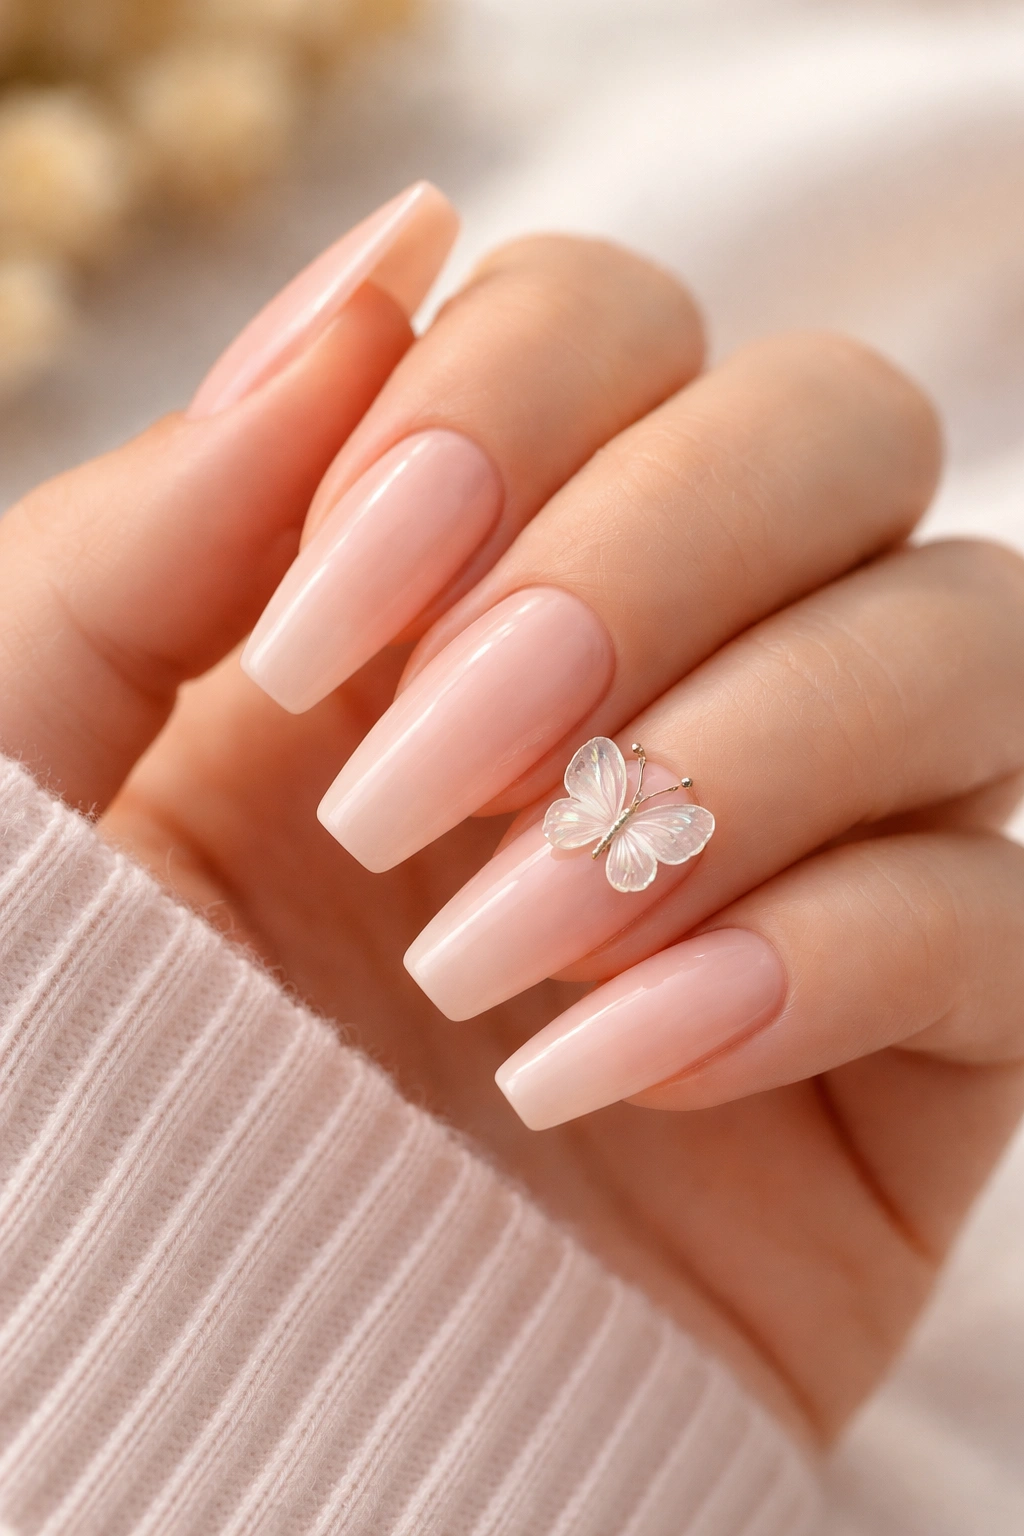
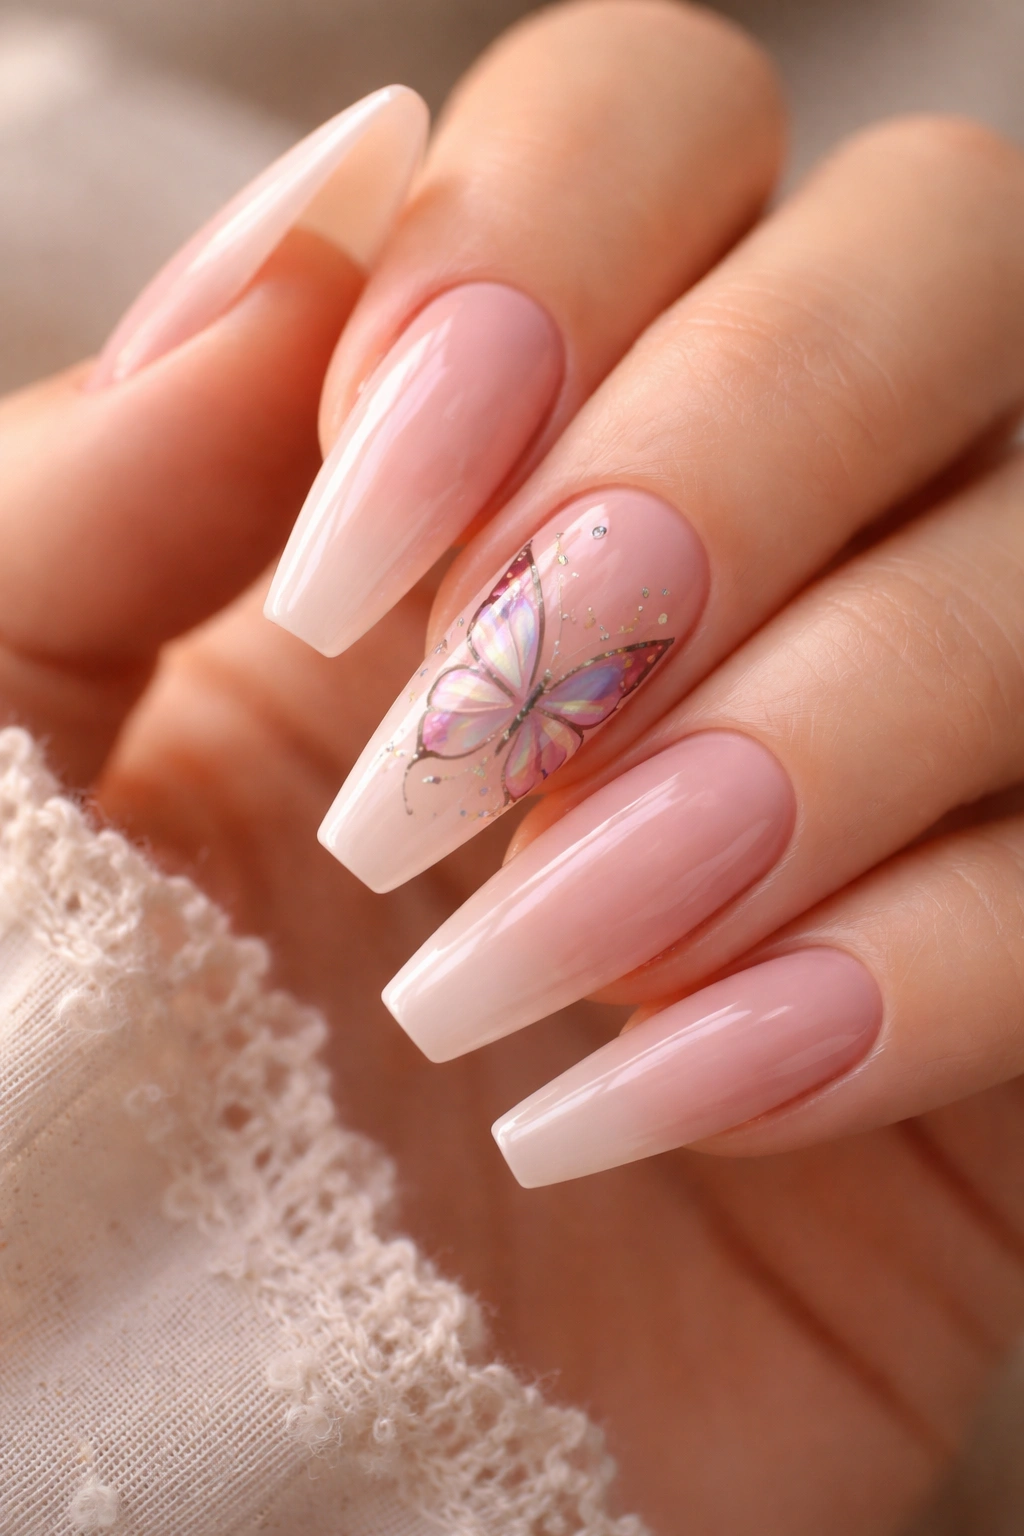
1. Milky Pink Base With Floating White Butterflies
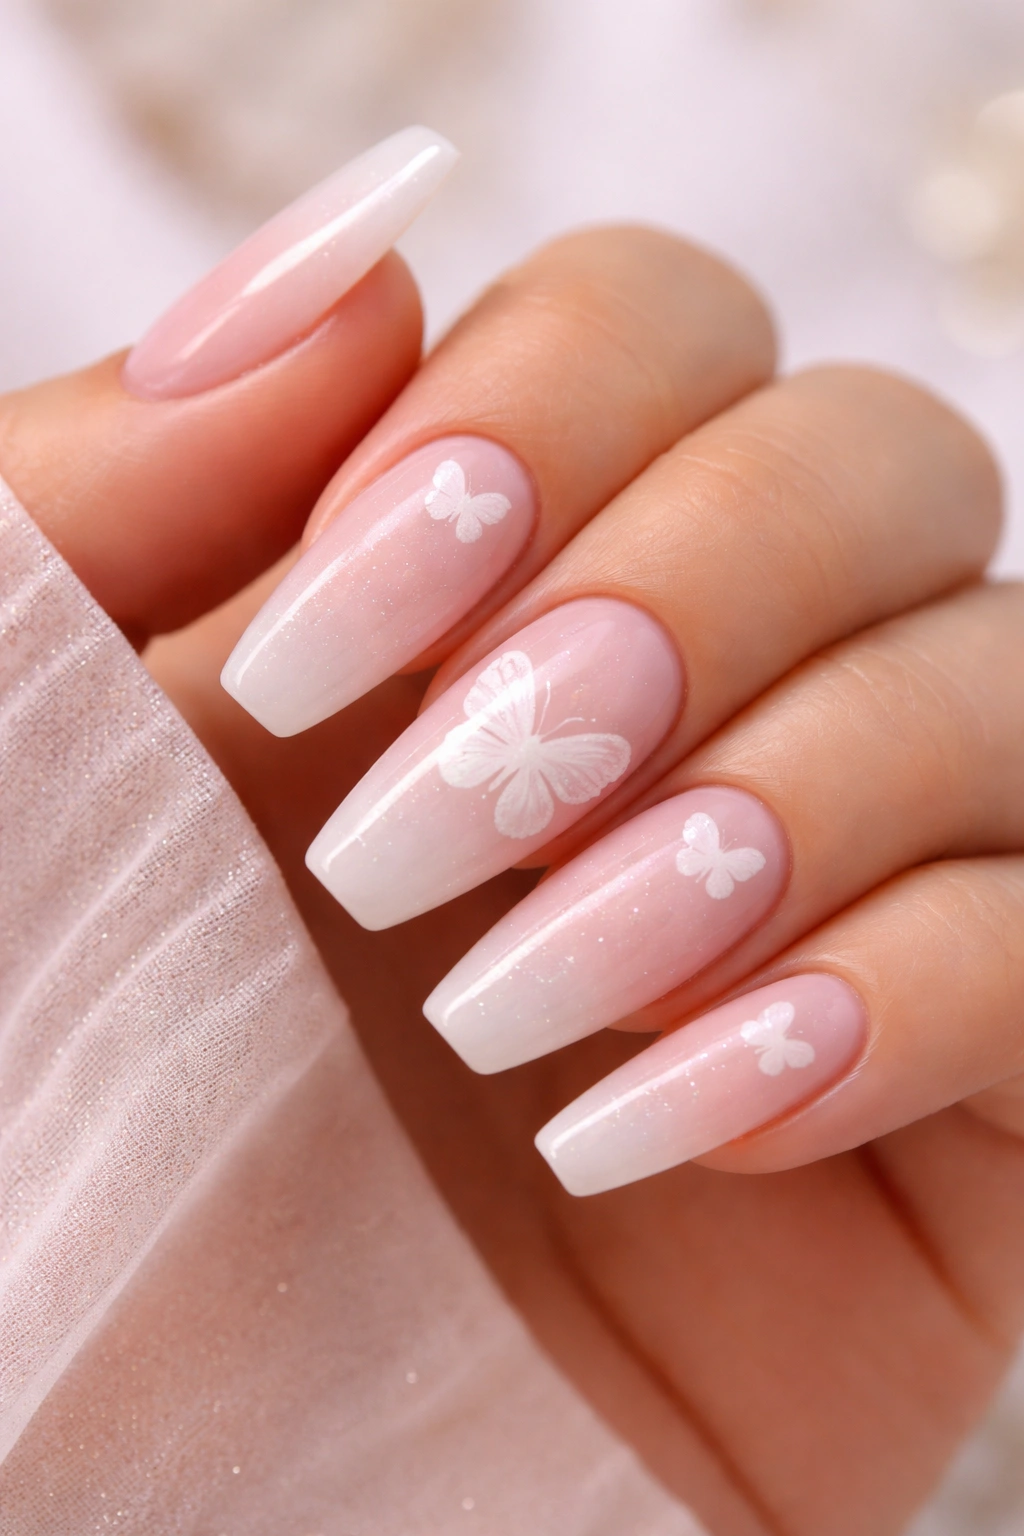
This is the set I would point most people toward first. Milky pink butterfly ballerina nails are soft without looking childish, and they flatter almost every skin tone because the base sits in that creamy blush range rather than a loud candy pink.
Why it works so well
White butterflies look airy against a semi-sheer pink base. The contrast is there, but it is gentle. That gives the manicure a bridal, polished feel even when the butterfly decals are large enough to notice from across a table.
Use one full butterfly on each ring finger, then smaller partial wings on one or two neighboring nails. That spacing keeps the design from turning into wallpaper. A faint shimmer top coat can help, though I prefer plain gloss here. Too much sparkle steals attention from the white wing lines.
Quick design notes
- Ask for a jelly pink or milky builder base, not an opaque bubblegum shade.
- White butterflies look best when the wing edges stay fine and crisp, not thick.
- Keep the butterflies slightly off-center for a more natural placement.
- A nail length around medium-long gives enough room for one full wing without crowding.
Best salon note: ask your tech to place at least one butterfly so it appears to drift diagonally across the nail instead of sitting square in the middle.
2. Lavender Ombré With Silver Foil Wings
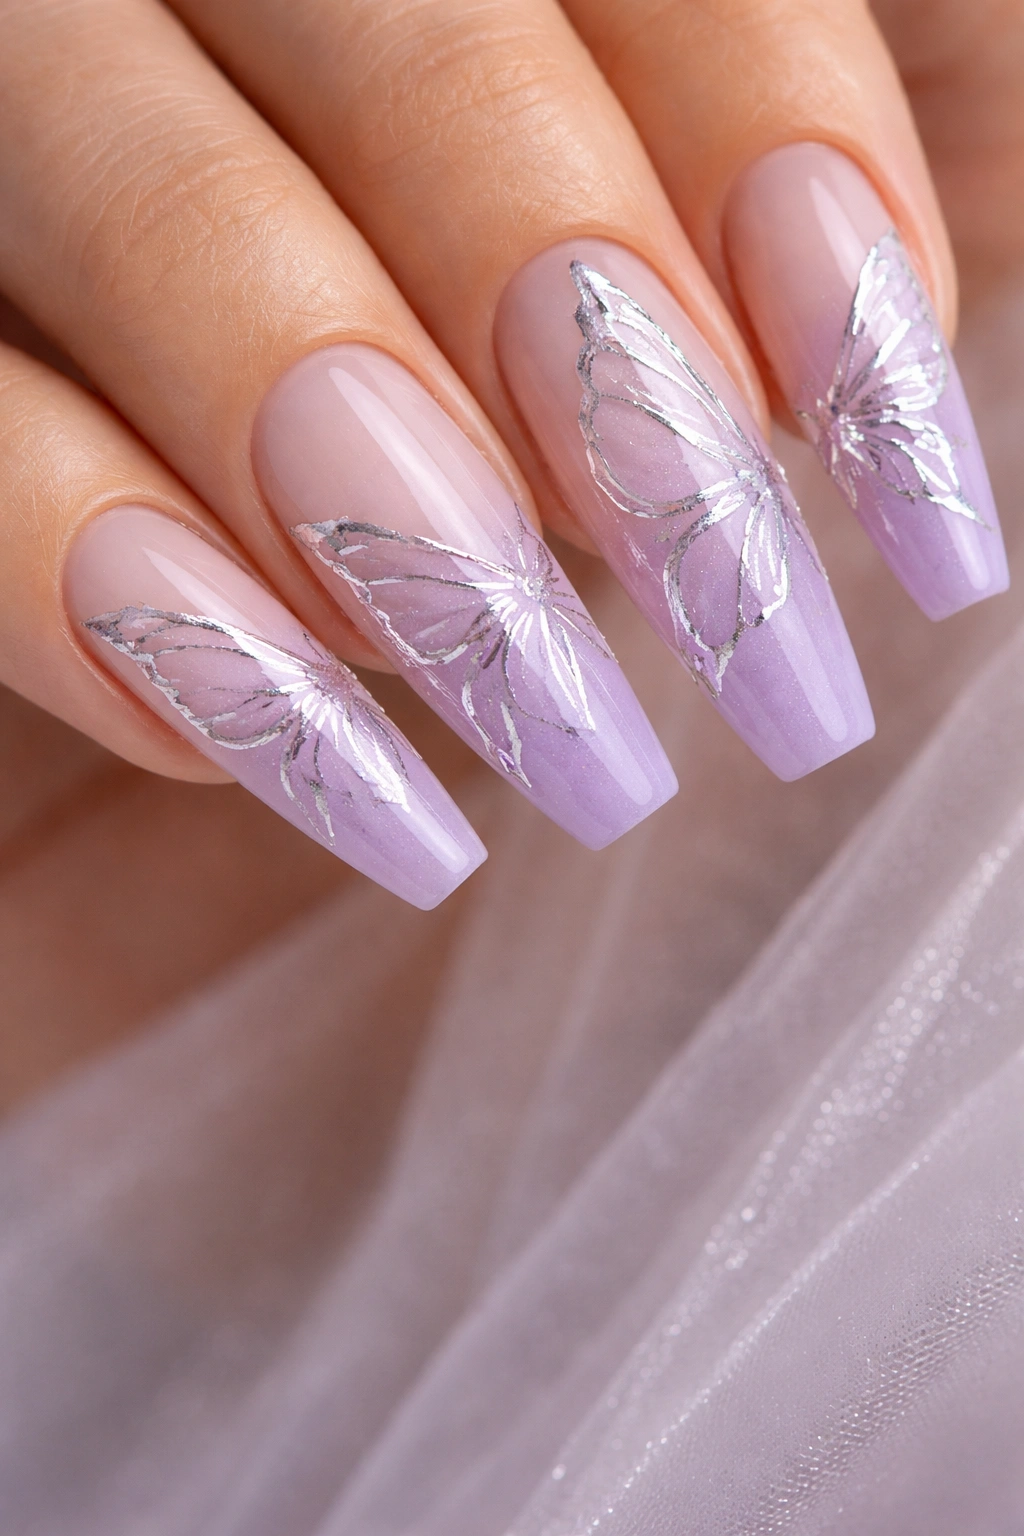
Silver foil and lavender belong together. That cool-toned pairing has a frosty, light-catching finish that still stays feminine, and the ballerina shape gives the ombré fade enough length to look smooth instead of abrupt.
A good version of this design starts with a sheer nude or pale lilac near the cuticle, then melts into a richer lavender toward the tip. The butterflies can be done as silver foil outlines, foil-filled wings, or ultra-thin metallic decals. I lean toward foil outlines because they reflect light in a softer, broken way than full chrome.
Wearable? Yes. High-maintenance? A little.
Foil can wrinkle if the surface is not sealed well, so this set needs a careful top coat and a decent apex if you are wearing acrylic or builder gel. I would not choose it for a rough week of packing boxes or doing a lot of hands-on work. For dinners, events, or a polished everyday set, though, it has charm without looking sugary.
One more thing. Skip giant crystals here. Lavender ombré already gives the eye movement, and the silver foil adds enough flash on its own.
3. Nude Ballerina Nails With Black Butterfly Line Art
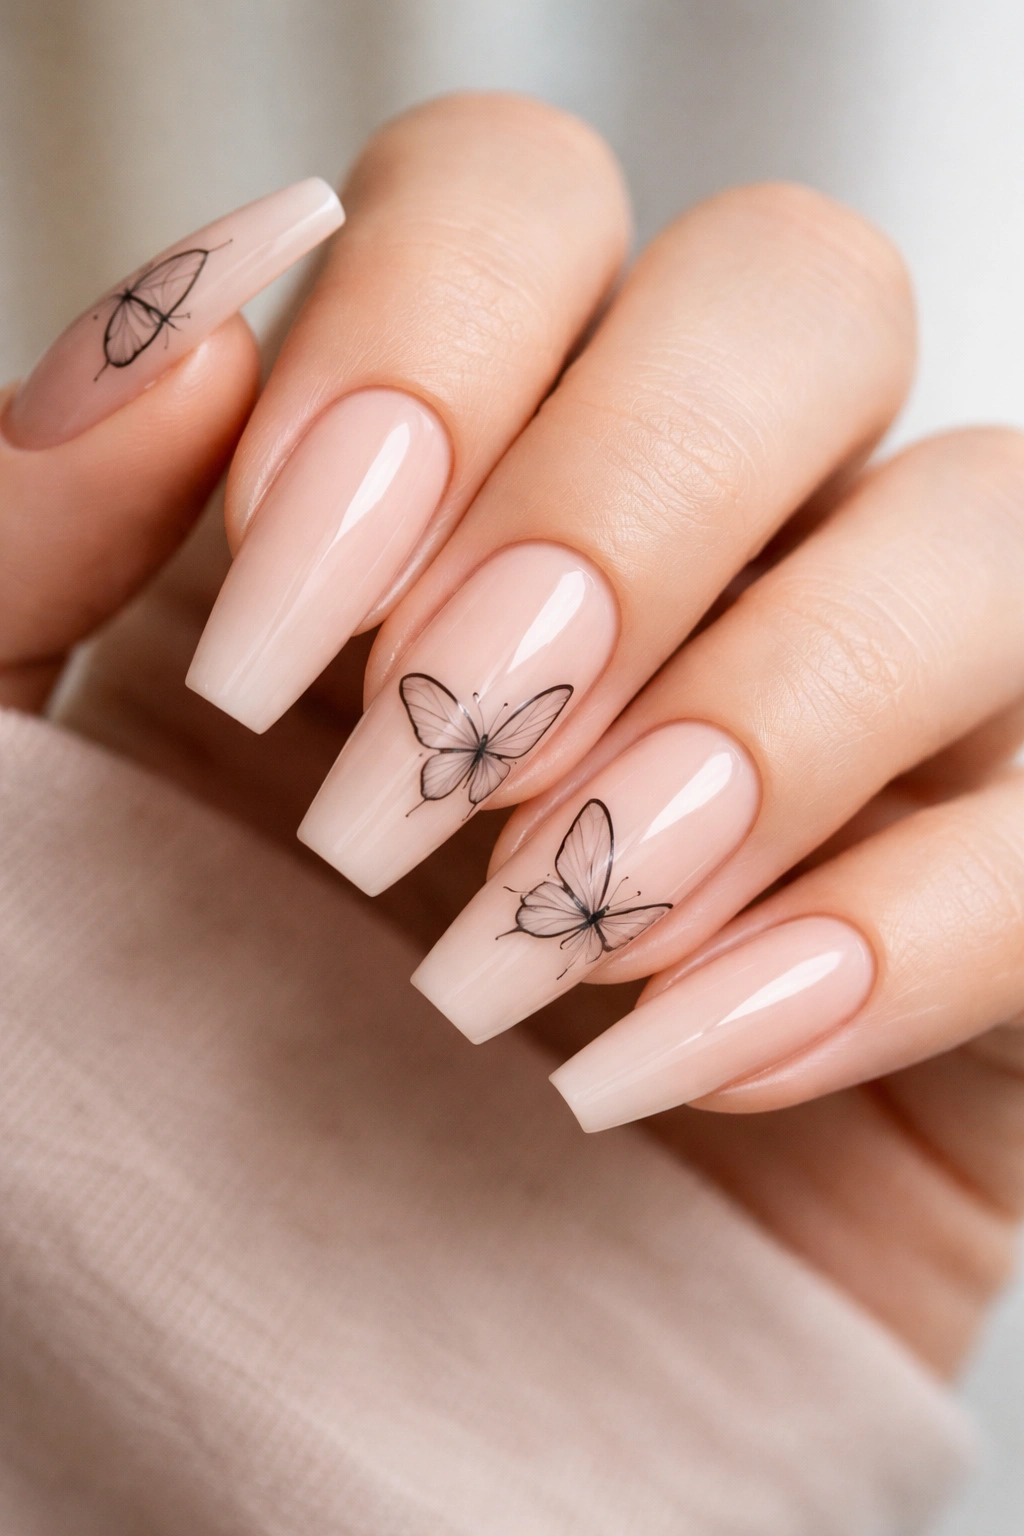
Why does black butterfly line art look so chic on a nude base?
Because the contrast sharpens everything. The ballerina shape looks slimmer, the butterfly wings look more graphic, and the whole manicure moves away from sweet and into something cleaner—almost fashion-sketch territory. If pastel butterfly nails are not your thing, this is the version that might win you over.
A beige nude, pink-beige, or caramel nude all work, depending on your undertone. Then your tech can add black line art butterflies with a fine brush or stamping plate. Hand-painted versions usually look better because the wing placement can follow the shape of each nail, though a clean stamp is faster and often more affordable.
How to ask for it at the salon
Ask for ultra-fine black outlines, not thick cartoon wings. Thin lines matter here. So does empty space. You want one full butterfly, one split wing, maybe a dotted flight trail if your tech has a steady hand. More than that, and the design starts losing its edge.
A matte top coat changes the mood entirely. Gloss makes the nude base look dressier. Matte turns the set into something cooler and a bit sharper. I like both, but matte black line art on a warm nude base has a pull I keep coming back to.
4. Baby Blue French Tips With Tiny Butterfly Decals
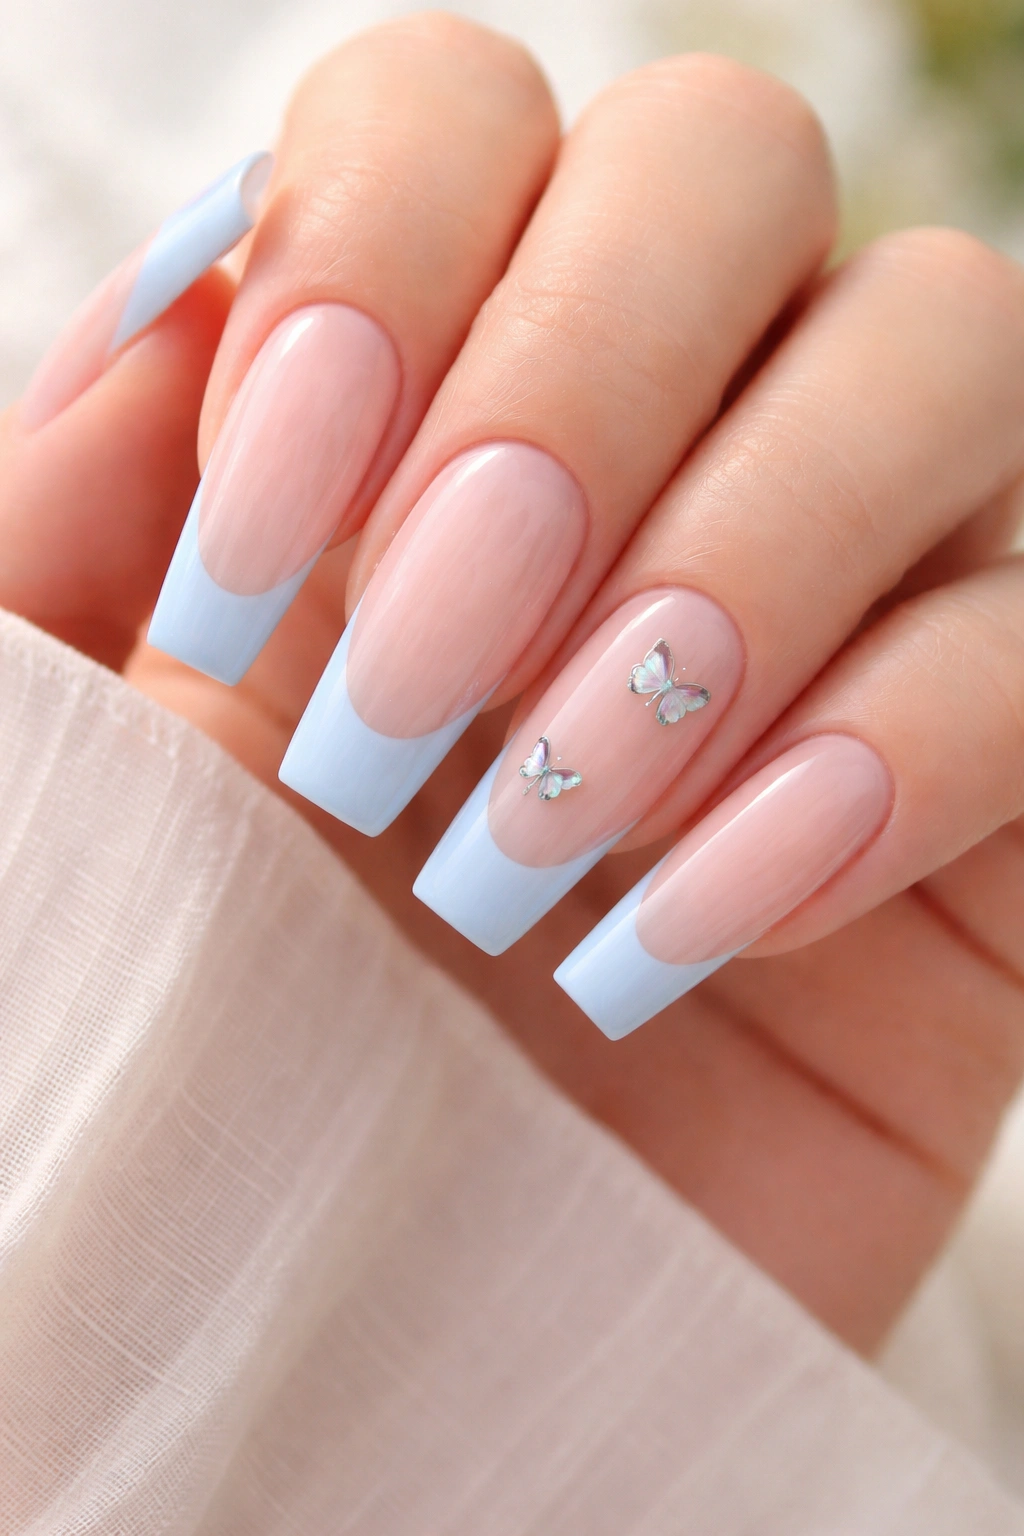
Picture a clean baby blue French on a long ballerina nail, then one tiny butterfly decal resting near the smile line. Not ten decals. One or two. That is what makes this set work.
The French tip gives structure. The tiny butterflies add personality. Together, they read fresh rather than busy.
This design suits anyone who wants butterfly nails without committing to full artwork on every finger. It also grows out nicely, which matters if you stretch your fills longer than you probably should. A sheer nude base hides regrowth better than a full-coverage color, and the butterflies stay far enough from the cuticle that they do not draw attention to the gap.
A few details make a big difference:
- Keep the blue soft—powder blue, not electric cobalt.
- Use micro decals or hand-painted mini wings no wider than about 5 to 7 mm.
- Put the butterflies on accent nails only, usually ring finger and thumb.
- Ask for a crisp smile line; a messy French ruins the whole effect.
I would wear this set in a heartbeat for a clean spring-to-summer mood, though it also works during colder months when you want color without going dark.
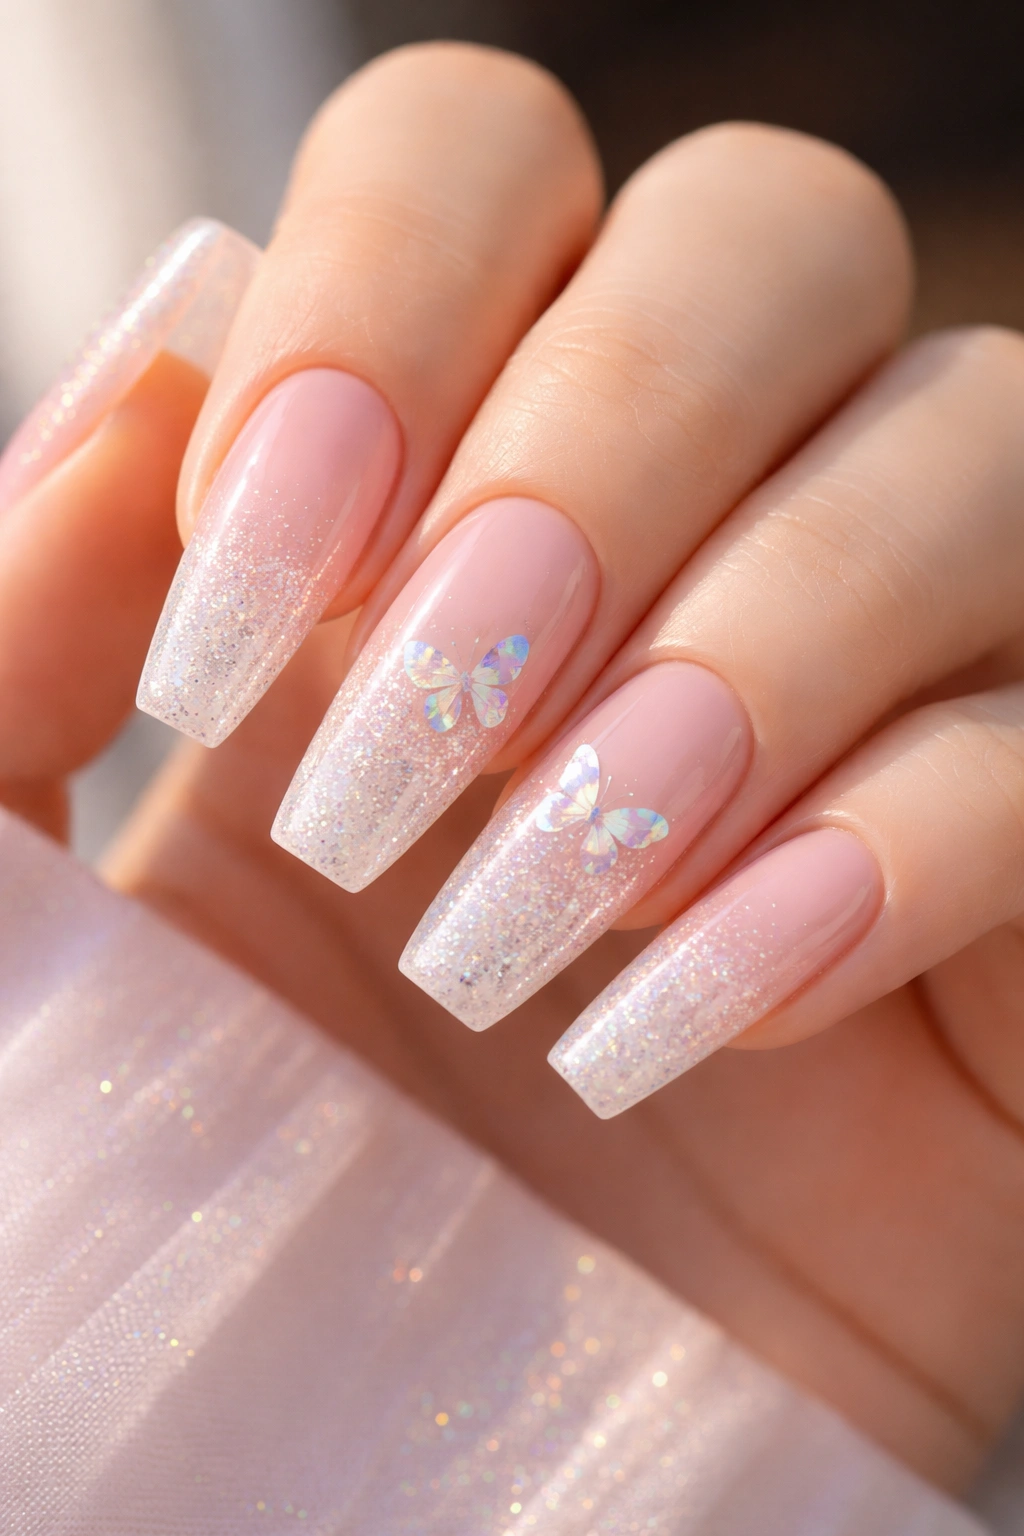
5. Clear Jelly Butterfly Ballerina Nails With Suspended Glitter
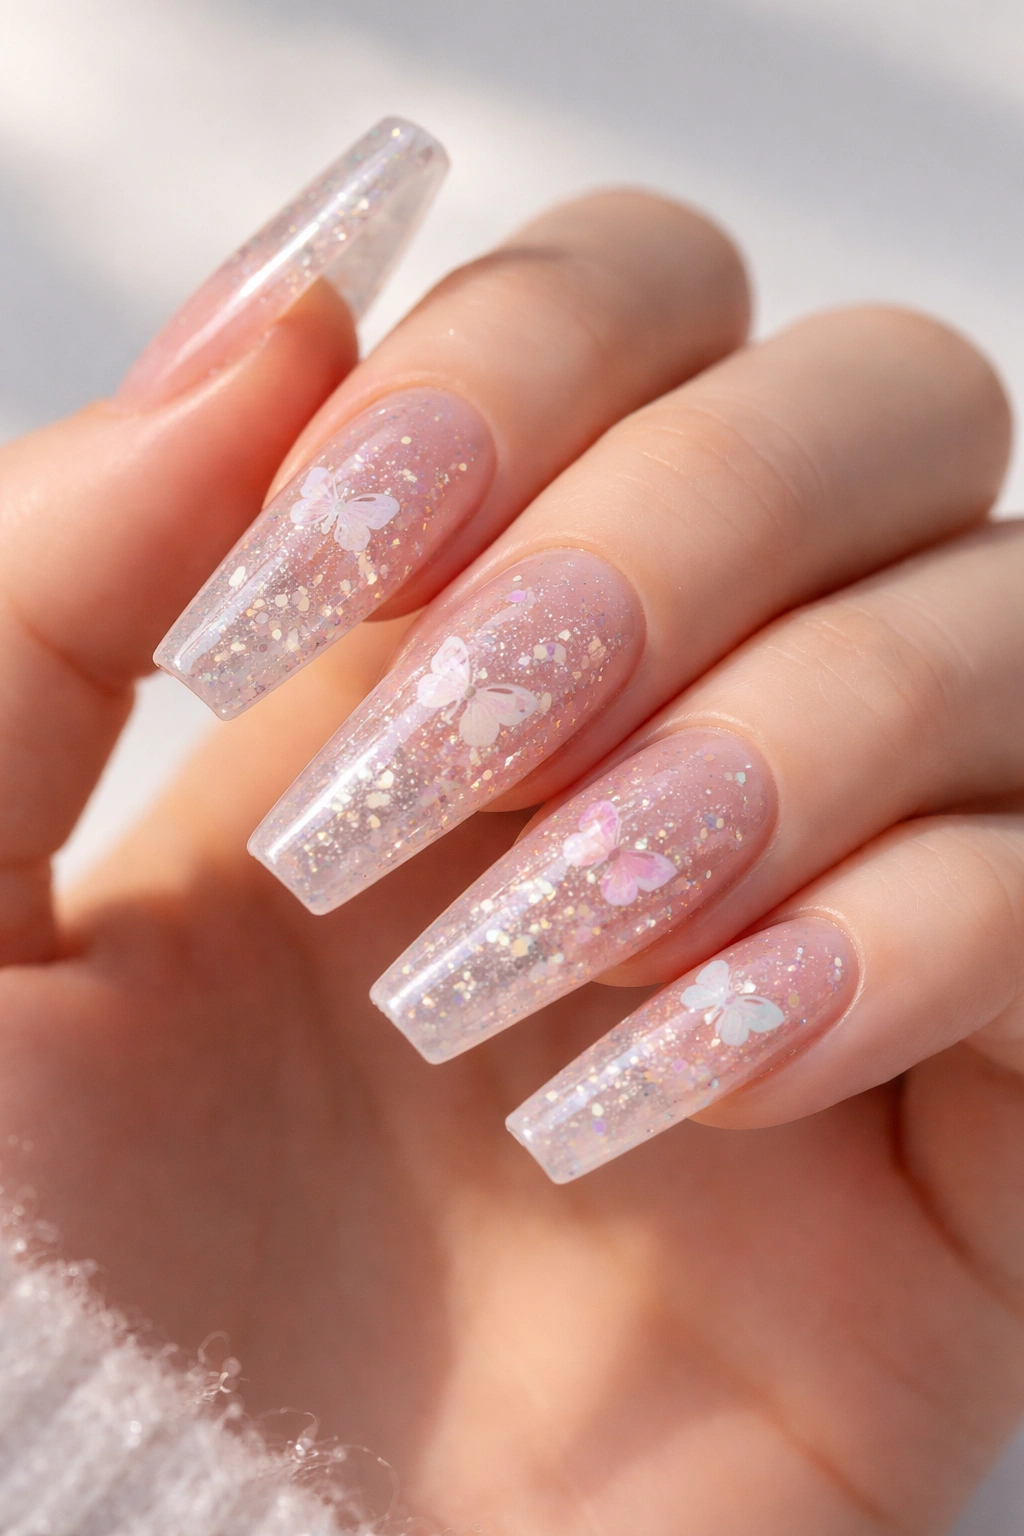
There is something fun about a clear jelly set that still manages to look polished. On butterfly ballerina nails, that transparent effect can make the art feel like it is floating inside the nail rather than sitting on top of it.
The trick is restraint. You want a clear or faintly tinted jelly base, a small amount of iridescent glitter, and butterflies placed with room around them. Too much glitter turns the nail cloudy. Then you lose the suspended look that makes this design special.
I prefer this on longer ballerina shapes because the transparency reads better when there is more visible length. A short clear set can still work, though the butterflies need to stay small or partial. Think split wings at the corners, not giant decals in the center.
This is also one of the better options if you like press-on nails. Jelly finishes and clear butterfly decals translate well to press-ons because the design does not rely on thick hand-painted texture. If you do go the press-on route, look for tabs or glue that hold the sidewalls down cleanly. Lifting along the edges ruins clear sets faster than almost anything else.
Gloss only. Matte kills the glassy effect.
6. Blush Base With Rose Gold Chrome Butterfly Accents
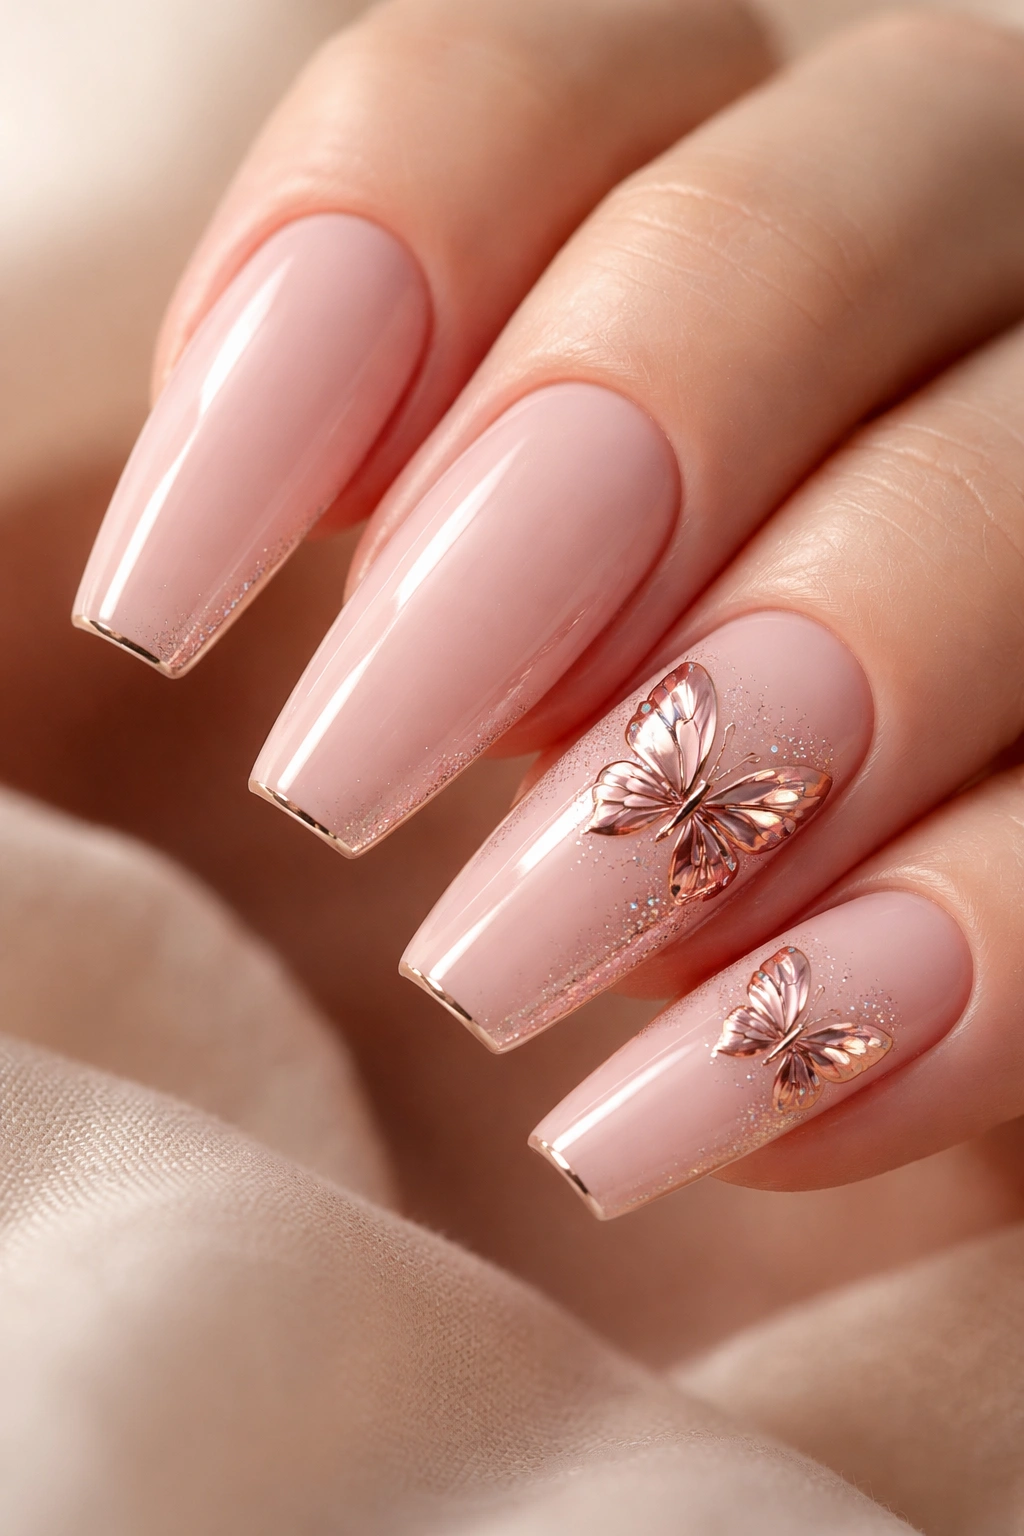
Unlike silver foil butterfly sets, rose gold chrome feels warmer, softer, and a bit more dressed up. It plays well with blush, dusty pink, soft peach, and beige-nude bases, and it gives butterfly accents a richer glow without veering into harsh metallic territory.
I would not put chrome butterflies on every nail. Two accent nails are enough. Then echo the metal with a slim chrome French edge or a tiny cuticle moon on one more finger. That kind of repetition ties the set together without repeating the butterfly itself over and over.
Who is this best for? Anyone who likes jewelry-toned nails but still wants a gentle palette. Rose gold often looks especially good against medium and deep skin tones because the warmth in the metal keeps the manicure from reading icy or flat.
There is one catch. Chrome shows surface flaws.
If the nail underneath is lumpy, or the top coat is uneven, the reflection will magnify it. That means prep matters more here than with a milky pink set. Smooth base, clean filing, crisp cuticle line. No shortcuts.
7. Soft Peach Base With 3D Butterfly Charms
A 3D butterfly charm can go wrong fast. Cheap plastic, clumsy placement, too many gems around it—suddenly the set looks bulky and catches on knitwear by lunchtime. Done well, though, a single raised butterfly on a soft peach ballerina nail is charming in the best sense of the word.
I like peach as the base because it has warmth without the sweetness of baby pink. That warmth helps the 3D detail look intentional rather than toy-like. A creamy peach, apricot nude, or peach-beige works especially well with pearlized charms or translucent resin butterflies.
What makes this version wearable
Use one charm per hand, usually on the ring finger. Keep the rest of the nails flatter, with maybe a tiny crystal trail or a painted wing echo on one neighboring nail. If every finger has raised parts, daily life becomes annoying fast—washing hair, putting on tights, opening cans, all of it.
Placement tips that save the set
- Set the charm slightly above center, not right at the free edge where it can lift.
- Choose a charm no larger than about 8 mm on a medium-length nail.
- Pair it with gloss, not chunky glitter.
- Ask your tech to secure it with builder gel around the base, not only top coat.
I love this look for an event set. For everyday wear over two or three weeks, I would choose flatter art.
8. White Marble Ballerina Nails With Gold Butterfly Accents
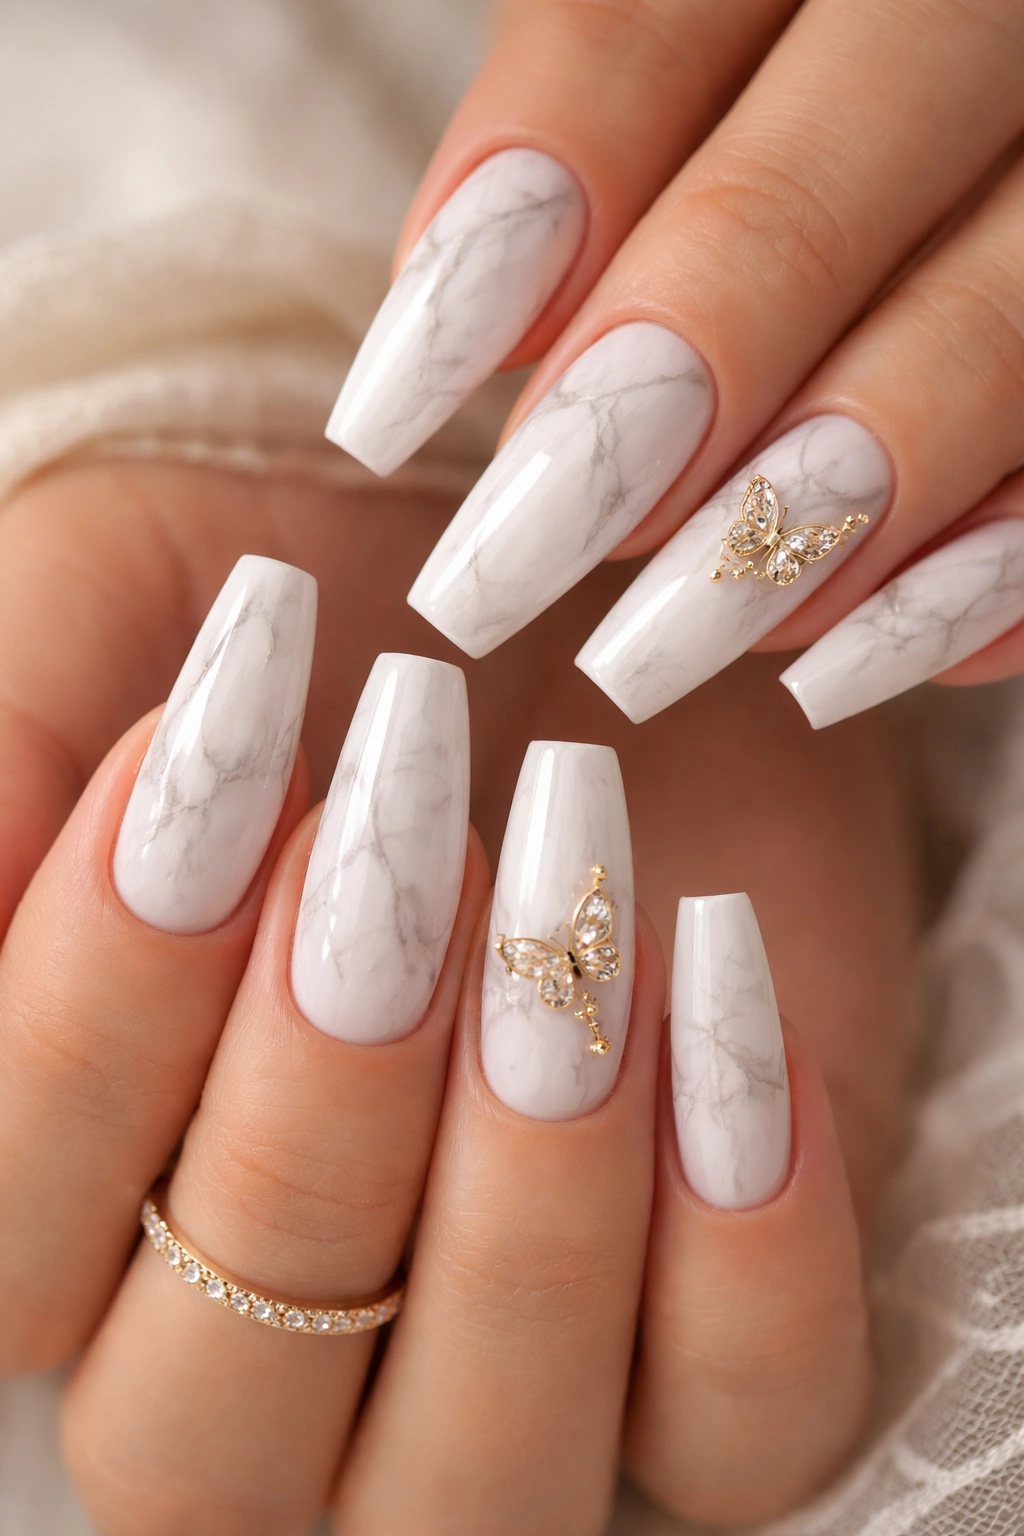
Marble and butterflies sound like a lot together, and they can be. The reason this combo works is that one element needs to stay quiet. In this case, that should be the marble.
Use a soft white or ivory marble with thin gray veining, then add small gold butterfly accents on one or two nails. The marble gives the set texture and movement. The butterflies act like jewelry. If the veining turns dark and dramatic, the butterflies start fighting for space.
This design suits medium to long ballerina nails because the marble pattern needs room to stretch. Short nails can make marble veining look cramped, almost scribbled. On a longer shape, the lines travel more naturally from cuticle to tip.
I also like that gold changes the mood here. Silver would make the set feel colder and more stone-like. Gold keeps it warmer and a bit dressier. You can use foil butterflies, tiny stickers sealed under gel, or hand-painted outlines filled with metallic pigment.
A small opinionated note: skip chunky gold flakes all over the nail. Marble already has visual movement. Big foil patches muddy the effect.
9. Lilac Aura Nails With Micro Butterflies
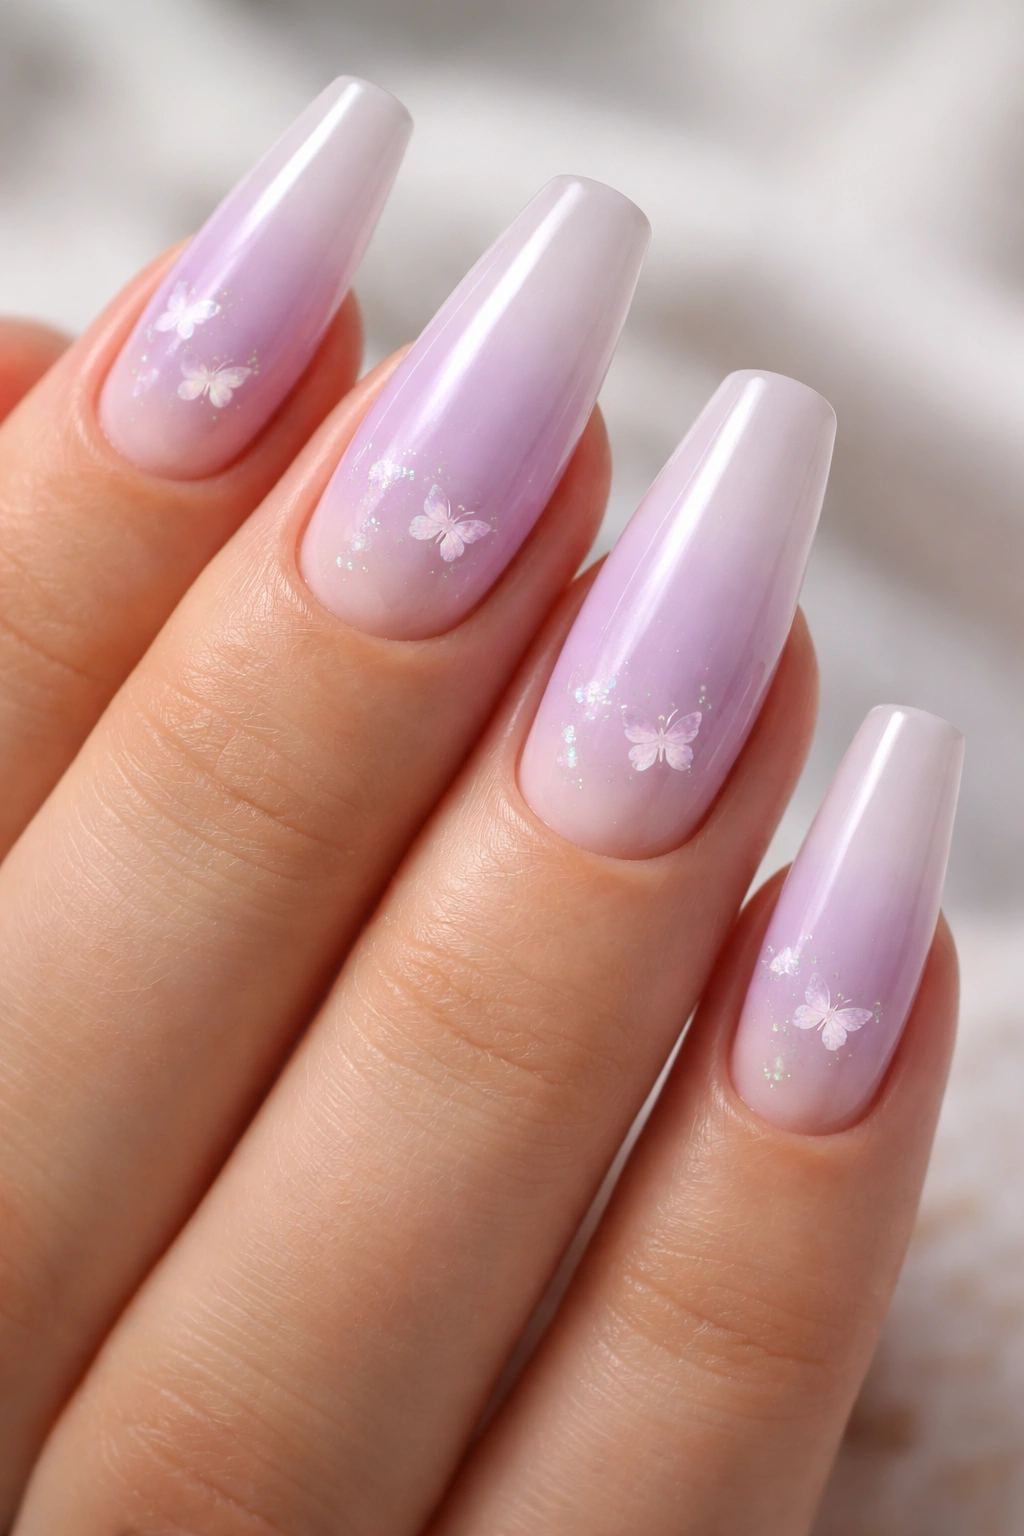
Aura nails can be hit or miss, mostly because the center glow is often placed too harshly. On a ballerina shape, though, a soft lilac aura with micro butterflies can look dreamy without sliding into airbrushed chaos.
The best version starts with a sheer nude, milky lavender, or cool pink base. Then a slightly deeper lilac bloom sits in the center of the nail, fading outward so the edges stay translucent. The butterflies need to be tiny—more like little visitors than headline art.
Why micro art matters here
Aura already gives you a focal point. If you place a full large butterfly over that glow, the set gets crowded. Micro decals near one corner, or two tiny hand-painted butterflies drifting off the side, keep the center haze visible. That is the point.
A chrome pearl powder can work over this design, but only in a whisper-thin layer. Too much and the lilac turns gray.
If you want a softer butterfly manicure that still feels current without shouting for attention, this one hits the mark. It has movement, color, and that slightly blurred halo effect people keep asking for—yet the shape still looks clean.
10. Matte Taupe Ballerina Nails With Monarch Wing Tips
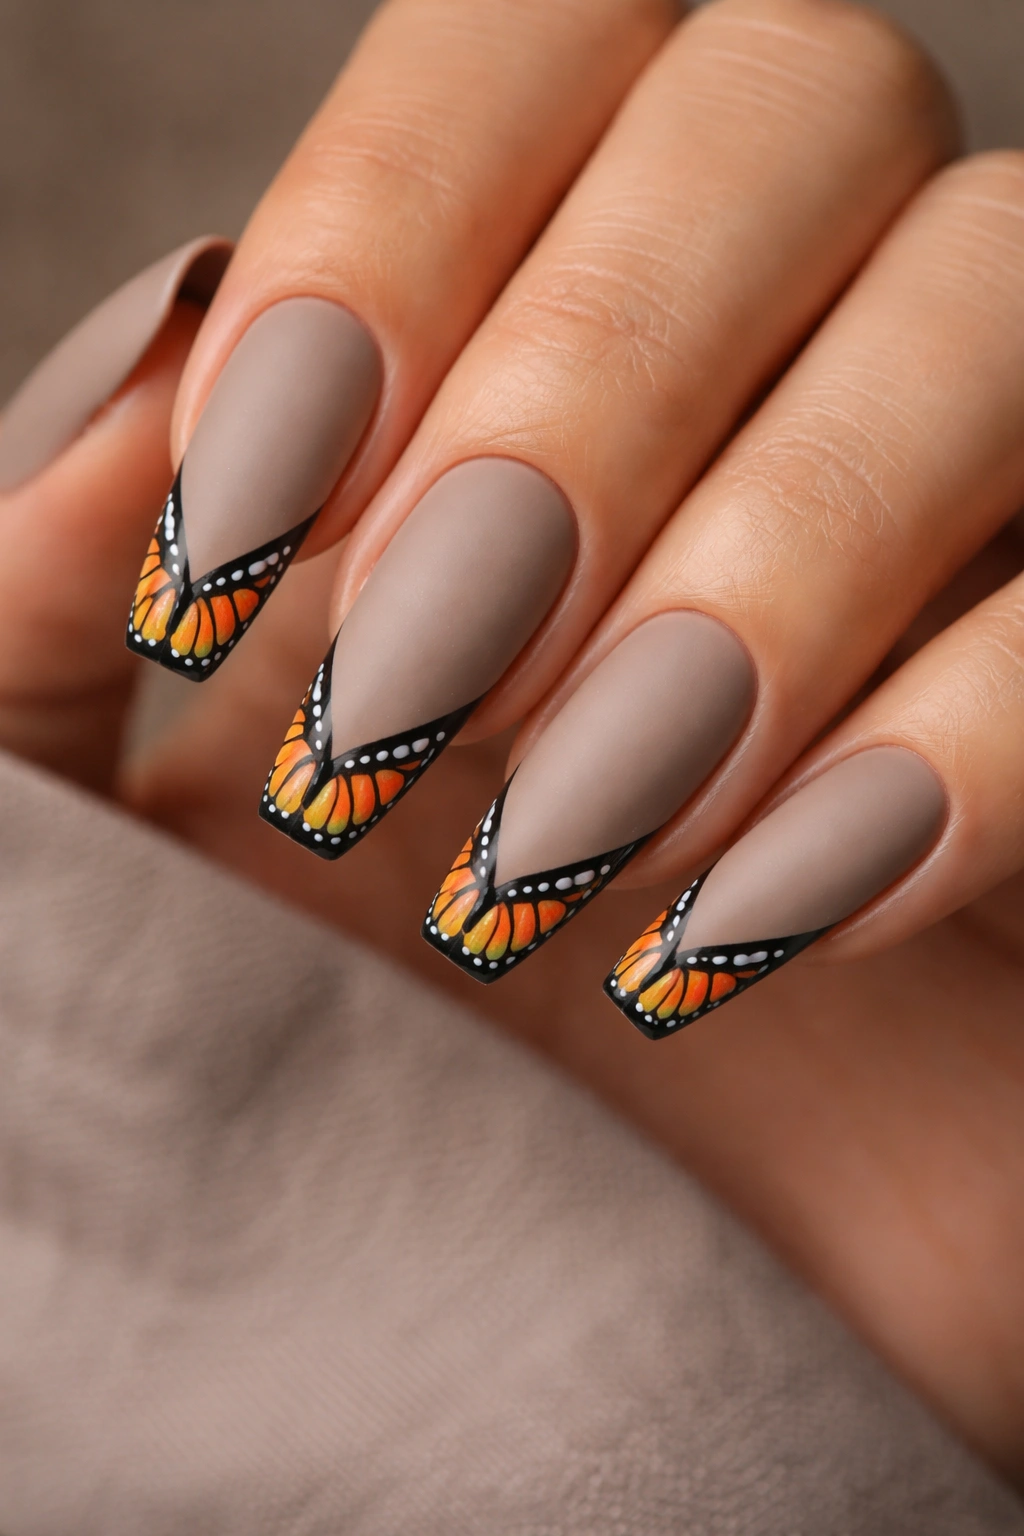
Most butterfly nail sets lean pastel. This one doesn’t, and that is why I like it.
A matte taupe base with monarch wing tips gives butterfly art a moodier edge. You keep the recognizable orange, black, and white pattern of monarch wings, but only on the tips or outer corners. The rest of the nail stays muted, dusty, and clean. That contrast makes the orange stand out harder than it would on a bright base.
This is one of the strongest choices if you want butterfly nails that do not feel sugary. Taupe, greige, or mushroom-beige anchor the set. Matte top coat removes glare and makes the wing pattern look almost velvety. It is a smart option for autumn wardrobes, darker coats, leather bags, and neutral clothing—though, frankly, I would wear it any time I wanted butterfly art with some backbone.
A few specifics help:
- Keep the monarch orange to one-third of the nail or less.
- Use fine white dots along the black edge so the wing still reads clearly.
- Leave at least 2 nails plain matte taupe for breathing room.
Not every butterfly manicure needs to be soft pink and sparkly. This one proves the point.
11. Sheer Nude Nails With Blue Butterfly Clusters
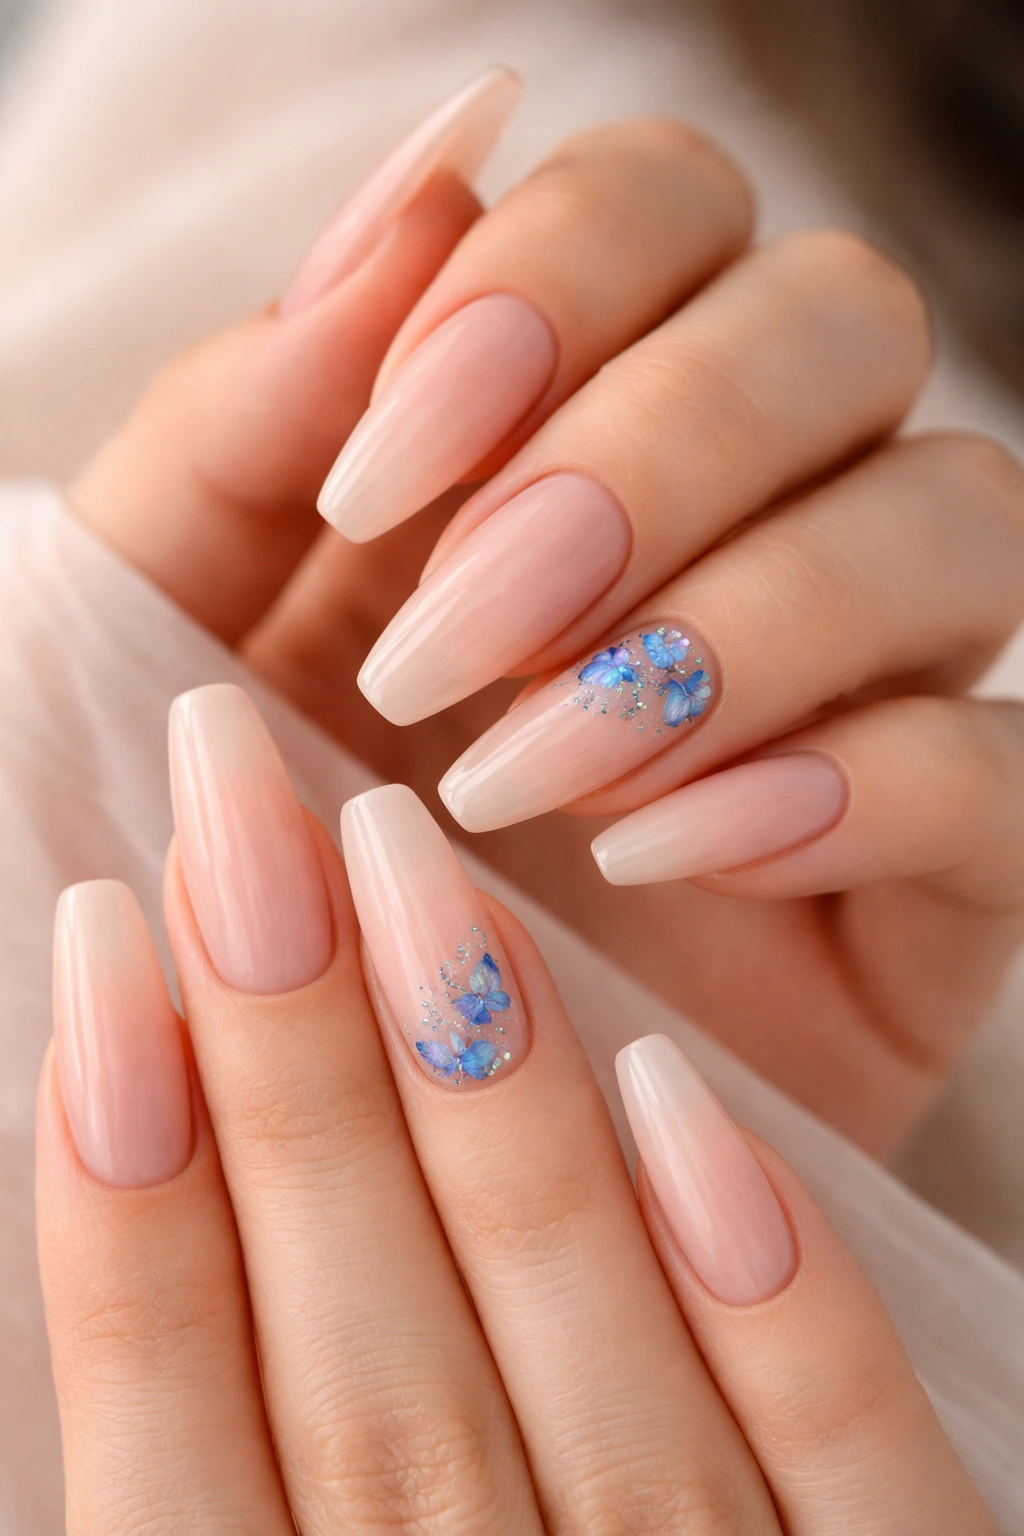
Blue butterflies have a cooler, cleaner feel than pink or purple ones. On a sheer nude base, they stand out in a fresh way without taking over the whole manicure.
I like clustered placement here. Instead of one centered decal on each accent nail, use two or three small butterflies that gather near one sidewall or drift up from the cuticle area. The spacing should feel loose, like they moved there, not like they were measured with a ruler. Oddly enough, a tiny bit of irregularity is what keeps this design from looking stiff.
Deep cobalt can work, though I prefer powder blue, cornflower, or soft sapphire for most skin tones. Those shades keep the manicure lighter. Pair them with a glossy sheer nude or a milky beige-pink base, then add a few silver micro dots if you want a little extra shine.
This set photographs well, yes, but more important, it looks good in person from normal distance. You notice the blue first, then the butterfly detail once you look closer. That second look matters. Good nail art often reveals itself in layers.
12. Pink-to-Clear Glitter Fade With Holographic Butterflies
If you want sparkle, wear sparkle. Just be smart about where it sits.
A pink-to-clear glitter fade is one of the better homes for holographic butterfly decals because the glitter can live near the tip or trail upward from the free edge, leaving the cuticle cleaner. That placement keeps the set from looking overloaded, especially on longer ballerina nails where too much holographic material can turn into visual static.
The trick is to choose one glitter texture. Fine glitter works best. Chunky hex glitter competes with the butterfly shape and makes the surface look busy even when it is sealed well. Then place one or two holographic butterflies where the glitter density starts to thin out. That gives the illusion that the butterfly is lifting out of the shimmer.
A strong way to wear this set
Use a sheer pink builder base, then fade fine iridescent glitter from the tip upward about halfway. Put the holographic butterfly on the middle or ring finger and leave the other nails with only the glitter fade. You get shine, movement, and a clear focal point.
I would save this design for times when you want a little more flash. Not costume-level. Not pageant. Just brighter than your everyday nude set.
13. Sage Green Ballerina Nails With Botanical Butterfly Art
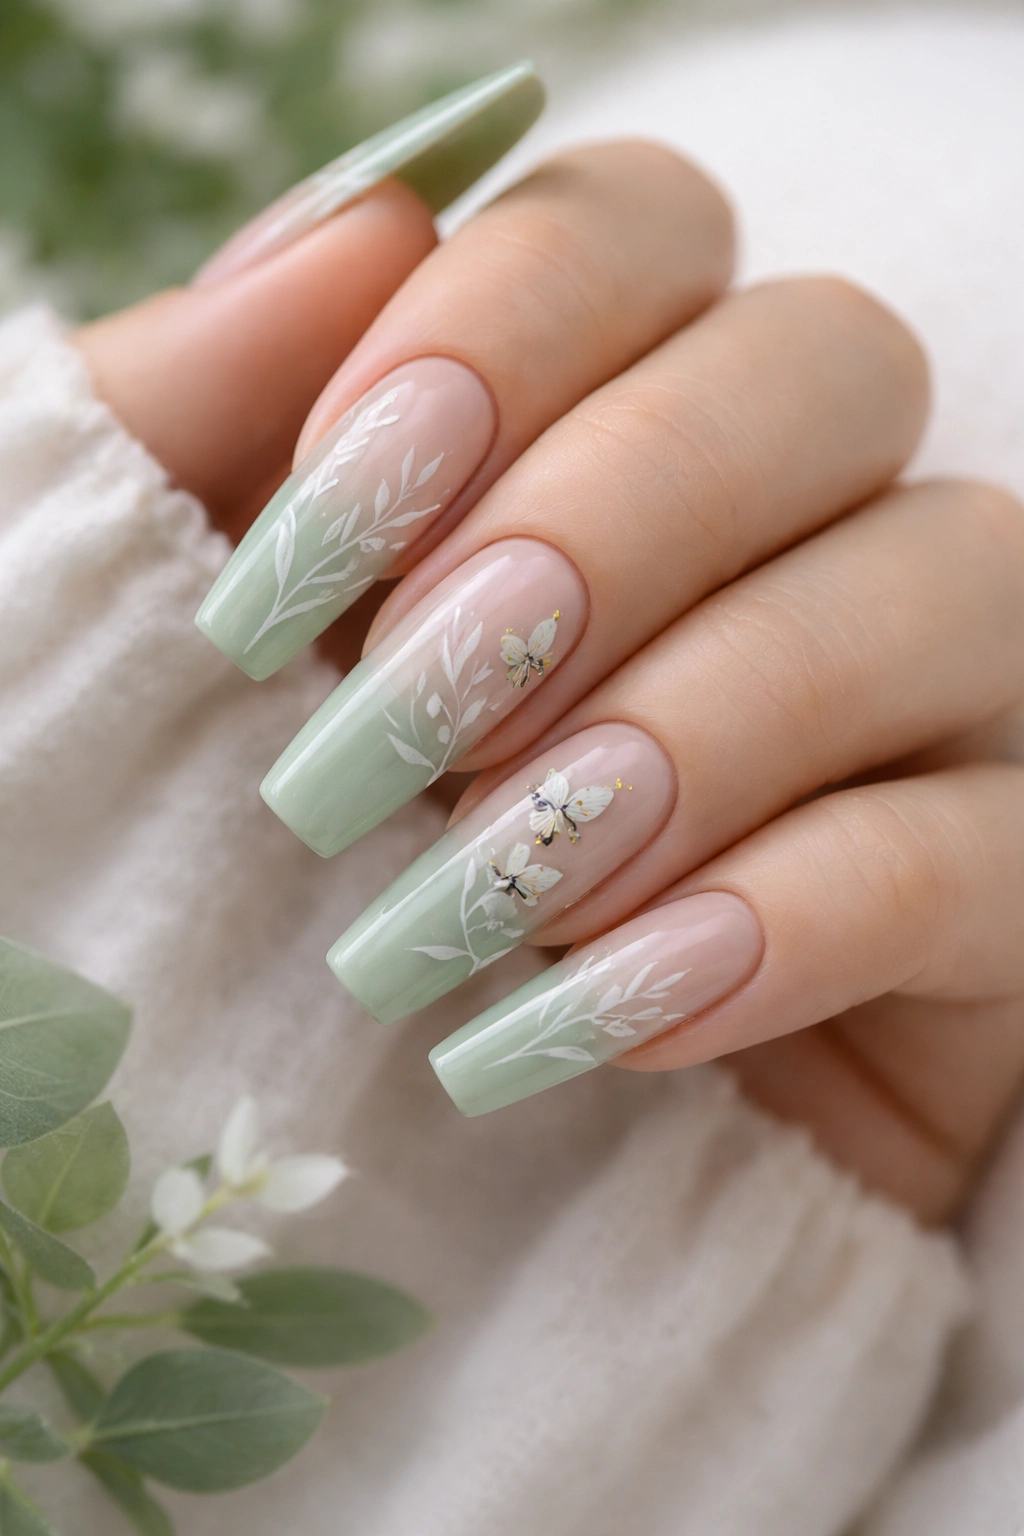
Sage green does something soft pink cannot: it gives butterfly nails an earthy side. Pair it with fine botanical line work—tiny leaves, stems, maybe a pressed-flower feel—and the butterflies stop reading sugary. They start looking calm, almost garden-inspired.
This is a set for someone who likes color but wants it muted. Sage, dusty eucalyptus, or gray-green all work. Keep the finish glossy if you want a fresher feel, or matte if you want the set to lean moodier and more editorial. I prefer gloss here because it keeps the green from looking chalky.
Botanical butterfly art should stay thin. A hand-painted wing with a leaf trail on one side of the nail can be gorgeous. A fully loaded nail with leaves, flowers, butterflies, gems, and glitter? Too much. The green deserves space around it.
A few practical notes:
- Best on medium or long ballerina nails, where the art can stretch.
- White or cream line work pops best against sage.
- Tiny gold studs near the cuticle can work, but one per nail is enough.
I rarely say a butterfly set feels quiet, but this one does.
14. Pearl White Nails With Iridescent Butterfly Wings
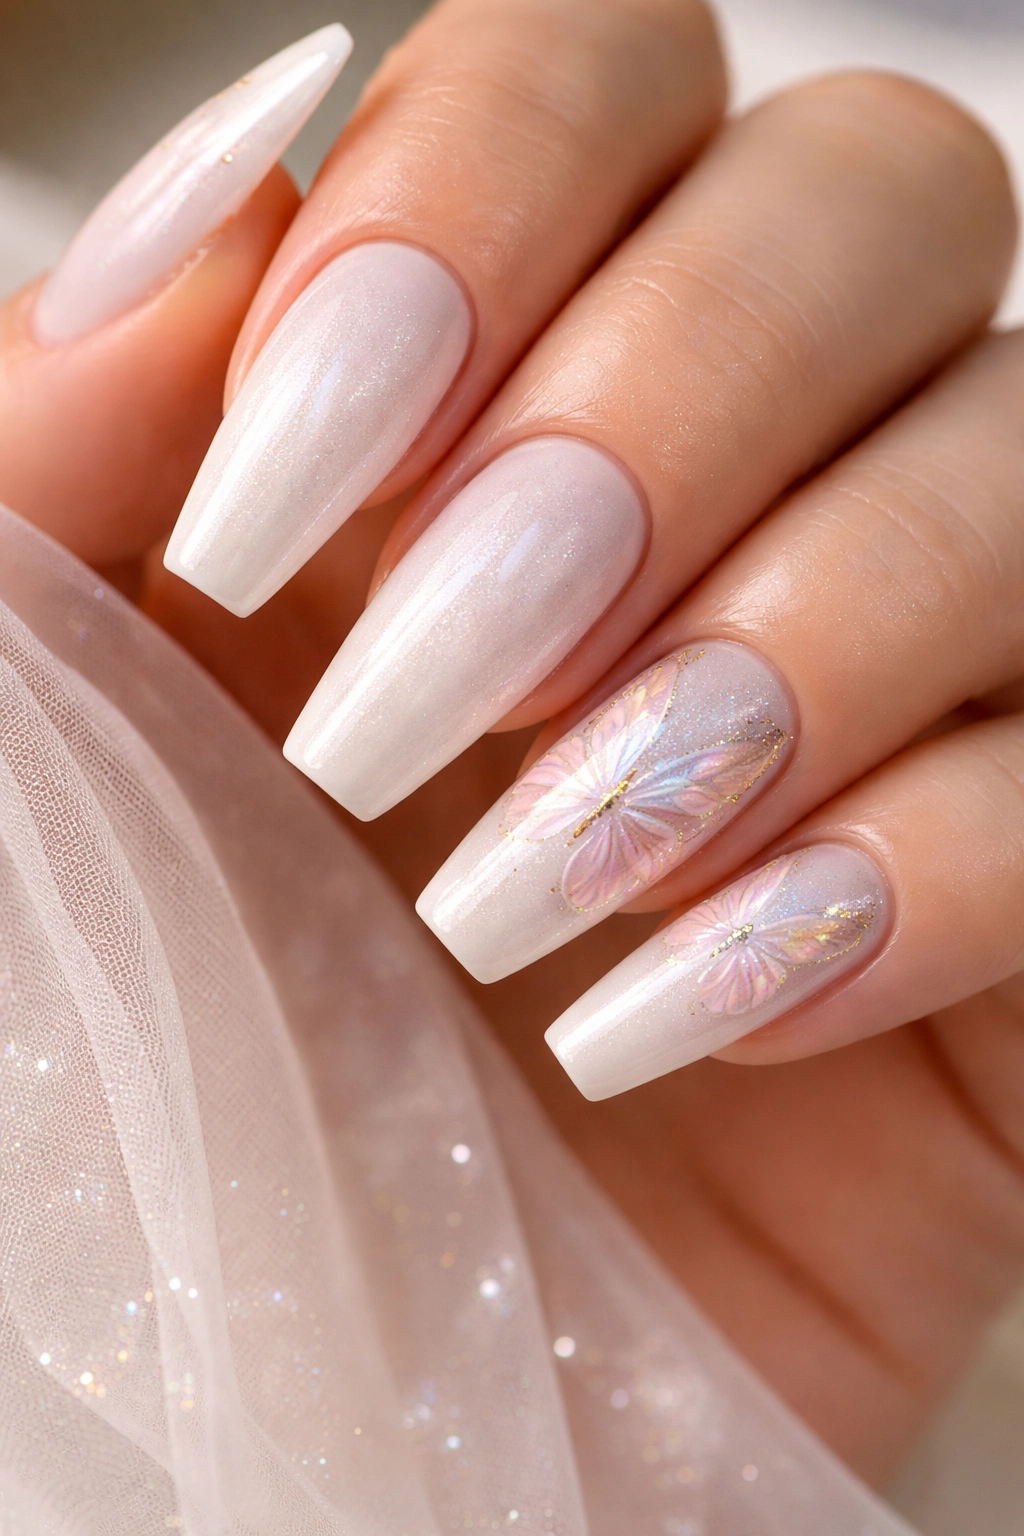
Pearl white can look bridal, icy, or almost seashell-like depending on the powder and top coat used. Add iridescent butterfly wings and you get a manicure that changes mood as the light hits it—pink from one angle, blue from another, soft gold at the edges.
That shifting finish suits butterfly art better than flat white polish because wings are supposed to feel a little alive. A pearly base gives movement without needing glitter in every corner.
What to ask for
Ask for a soft pearl or glazed-white base, then iridescent wing details on two accent nails. Full butterflies work, but split wings framing the outer edge of the nail often look cleaner. A subtle chrome powder over the whole set can tie the look together if it is buffed thinly.
Where this set can go wrong
Too much white opacity makes the nails look correction-fluid bright. Then the pearl effect gets lost. You want a white that still has some softness to it—milky, not stark. Also, if the wings are cut from thick film decals, the edges can show through the top coat. Thin decals or hand-painted iridescent gel look better.
This one leans dressy. I would absolutely pick it for a wedding guest manicure, a dinner set, or any week when you want your hands to feel polished every time you pick up a glass.
15. Mocha Nude Ballerina Nails With a Minimal Single-Wing Accent
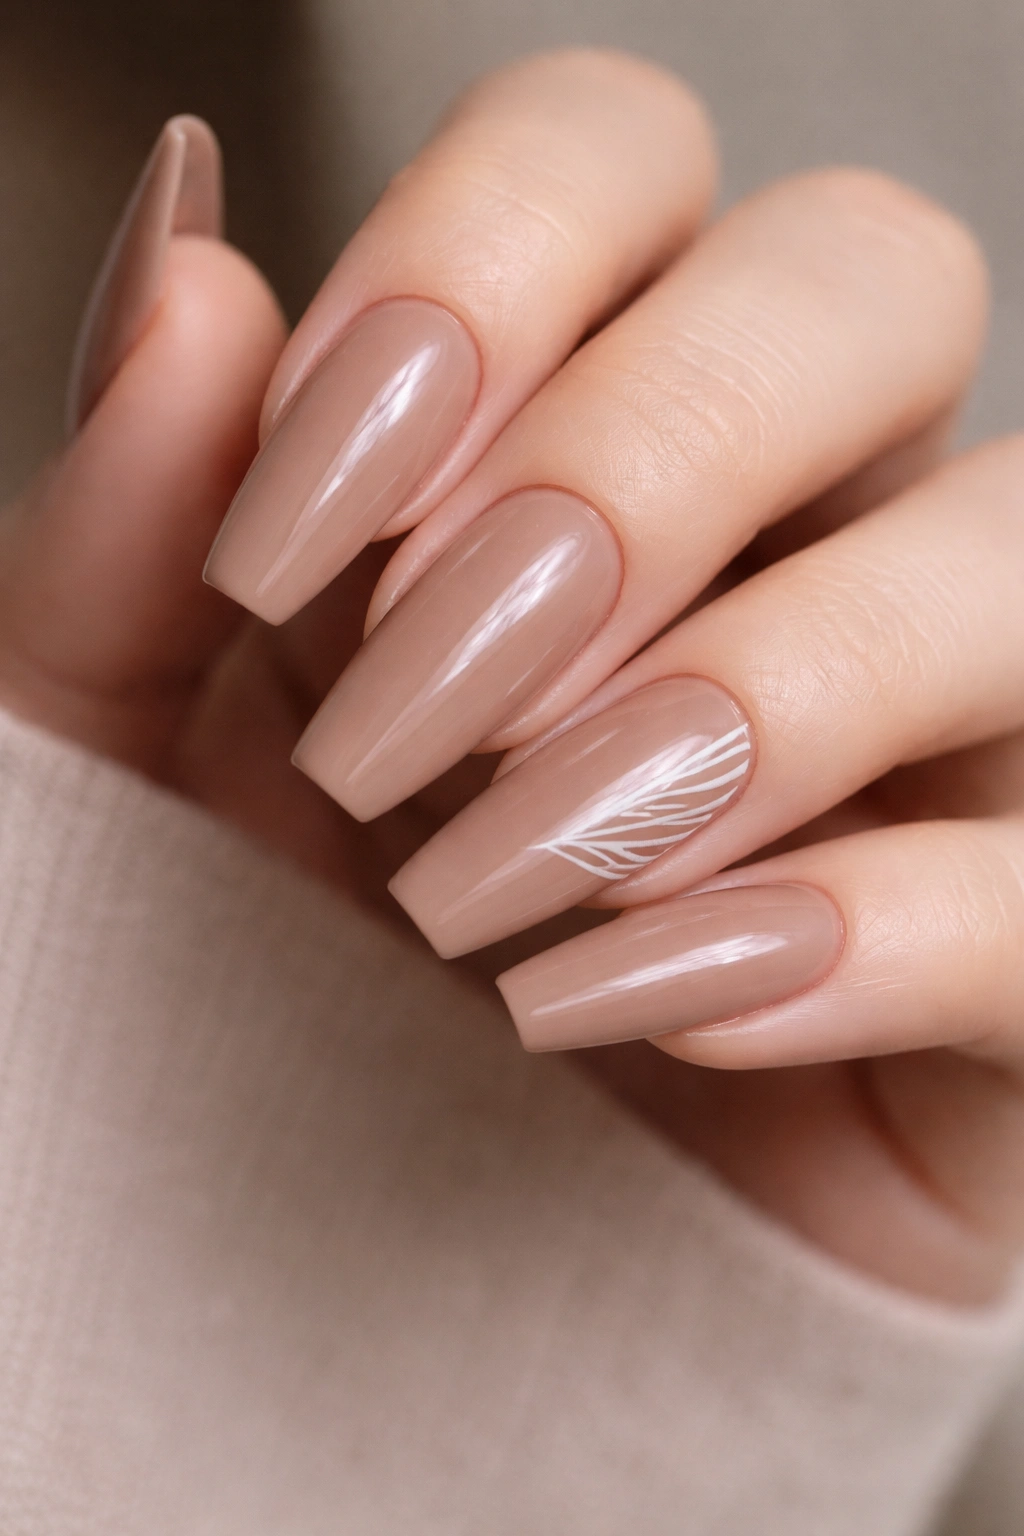
Sometimes one wing says more than a full butterfly.
A mocha nude base with a single-wing accent—usually placed on the outer corner of one or two nails—is one of the cleanest ways to wear butterfly art. It works because the wing becomes part of the shape itself. On a tapered ballerina nail, that diagonal wing line echoes the taper and makes the fingers look longer.
This is also one of the best butterfly designs for people who usually wear neutrals. Mocha, latte, cocoa-beige, or pink-brown shades keep the manicure grounded. Then you add a white, black, gold, or pale blue single wing for contrast. I am partial to cream or gold here. Black looks sharper; cream looks softer.
No glitter needed. No gems required. Maybe a high-gloss top coat, maybe matte if you want the set to feel more understated. That is it.
The reason I rate this so highly is simple: it ages well across the full life of the manicure. As the set grows out, the wing still looks intentional because it is not fighting a crowded background. Clean nails often outlast busy nails, at least visually.
What to Ask for at the Salon Before Your Butterfly Set Starts
A pretty idea is not enough. The execution decides everything.
Bring 2 or 3 reference photos max, and make sure they share the same mood. One milky pink decal set, one taupe monarch tip set, and one 3D charm set do not belong in the same appointment unless you want your tech to guess which part you mean. Pick one lane.
Tell your nail tech these details clearly:
- Shape: ballerina or soft coffin
- Length: short, medium, or long, with a photo if possible
- Base finish: sheer, milky, opaque, matte, glossy, pearl, jelly
- Butterfly style: decal, hand-painted, foil, chrome, 3D charm, wing tip only
- Accent count: full art on 2 nails, subtle detail on the rest, or minimal single-wing placement
- Texture tolerance: flat only, mild gems, or one raised charm per hand
A good tech will also care about structure. Long ballerina nails need a balanced apex, especially if you are adding gems or charms. If the nail is thin through the stress area, the prettiest butterfly design in the world will not save it from snapping when you reach into your bag.
Do not skip this conversation. Five extra minutes up front can save you two weeks of staring at nails you almost love.
Final Thoughts
Butterfly nail art works best when the shape does half the styling for you, and that is exactly what the ballerina silhouette does. It gives the design length, balance, and enough flat space for wings to read cleanly.
If you want the safest choice, start with milky pink, nude, or pearl white and keep the butterfly detail to two or three accent nails. If you want more edge, go taupe monarch, black line art, or mocha with a single-wing accent. Those sets feel sharper and less sweet.
My strongest opinion here? Do less than you think you need. Butterflies already carry detail in their shape. Give them room, keep the base clean, and the manicure will look prettier on day ten than a crowded set ever does on day one.
