

Your nails can look like you just walked out of a high-end salon, even when you’ve applied the polish yourself at home on a budget. The secret isn’t expensive products or complicated techniques — it’s understanding which visual tricks create that premium, polished appearance that makes people stop and compliment your hands. Some of the most luxurious-looking nail designs actually rely on simple color theory, smart product choices, and strategic placement rather than intricate hand-painting skills or pricey specialty items.
The gap between “affordable” and “expensive-looking” has never been smaller than it is right now. You can achieve that coveted high-fashion nail aesthetic by focusing on clean lines, sophisticated color combinations, and finishes that catch light in interesting ways. The nail designs that photograph beautifully and turn heads aren’t necessarily the ones that took hours to create or required a bottle of imported gel polish. They’re the ones that demonstrate restraint, intentionality, and an understanding of what actually reads as expensive versus trendy or overdone.
Throughout this guide, you’ll discover specific nail ideas that consistently deliver that polished, luxury appearance while remaining completely achievable with drugstore products and basic tools. Each design plays with principles like minimalism, negative space, metallic accents, and high-shine finishes — the visual language of designer manicures. Whether you’re looking to refresh your regular manicure routine or you’re planning nails for a special occasion, these approaches will help you create something that absolutely reads as expensive, no matter your actual budget.
1. Minimalist Geometric Nail Art
Geometric nail designs have a way of looking intentional and sophisticated, especially when you strip them down to their simplest elements. A single thin line running horizontally across the nail, a small triangle in one corner, or a clean vertical stripe creates an architectural quality that feels inherently expensive. The power of minimalist geometric nails lies in their restraint — they suggest that you’re confident enough in your style that you don’t need to fill every inch of nail space with color or decoration.
Why Clean Lines Read as Luxury
Geometric designs work because they appear deliberate and custom-made, almost like you had them drawn by a nail artist. When executed cleanly, even the simplest line communicates precision and attention to detail. A single gold or silver line over a neutral base, or a small black triangle accent on a nude or white nail, has a designer boutique quality that catches attention without screaming for it. The sophistication comes from knowing exactly what to leave out.
How to Execute It Perfectly
- Use a thin striping brush or a fine-tipped nail art liner to draw your lines while the base polish is still slightly tacky, or wait until it’s completely dry and use a steady hand
- Keep your geometric shapes to one or two per hand maximum — place them on different nails for balance and visual interest
- Pair geometric accents with neutral, creamy base colors (soft beige, warm ivory, cool white) for maximum polish
- Seal everything under a glossy top coat for a professional, finished appearance
- Practice your lines on a piece of paper first if you’re nervous about precision
Pro tip: If perfect hand-drawn lines stress you out, nail striping tape is a legitimate shortcut that delivers professional-looking results every single time and costs under three dollars.
2. Chrome and Mirror Finish Nails

Chrome and mirror finishes instantly elevate any manicure because they create a dimension and light-catching quality that’s genuinely difficult to achieve with regular polish. The ultra-reflective, liquid-mercury appearance of a chrome finish reads as high-end and fashion-forward, and these finishes have become increasingly accessible as drugstore brands have developed their own versions. A chrome or mirror manicure will absolutely turn heads and photograph beautifully, which is why you see them everywhere on luxury nail accounts and in high-end salons.
What Creates That Expensive Mirror Effect
Chrome powders work by creating an ultra-reflective metallic surface that shifts and glimmers depending on the angle and light. The effect is so eye-catching that people assume it must be expensive or require professional application, when in reality, budget-friendly chrome powders deliver nearly identical results to salon versions. The trick is using a good base and top coat to lock the powder in place and create that perfectly smooth, reflective finish. The payoff is a manicure that looks polished, current, and completely premium.
The Foolproof Application Method
- Paint a sticky base coat (most gel brands and some regular polishes have one) and allow it to dry completely
- Generously apply your chosen chrome powder using a velvet or soft applicator pad, pressing firmly to ensure good color payoff
- Buff away excess powder gently and seal with a glossy top coat
- A second layer of powder can increase the intensity of the effect if desired
- Alternatively, many brands now make chrome polishes that don’t require separate powder, though the powder versions typically deliver more intense shine
- Choose silver, rose gold, or champagne chrome for the most universally flattering and expensive-looking results
Worth knowing: Chrome finishes show fingerprints and dust slightly more than regular polish, so keep a soft microfiber cloth handy for quick touch-ups between washes.
3. Ombré and Gradient Effects
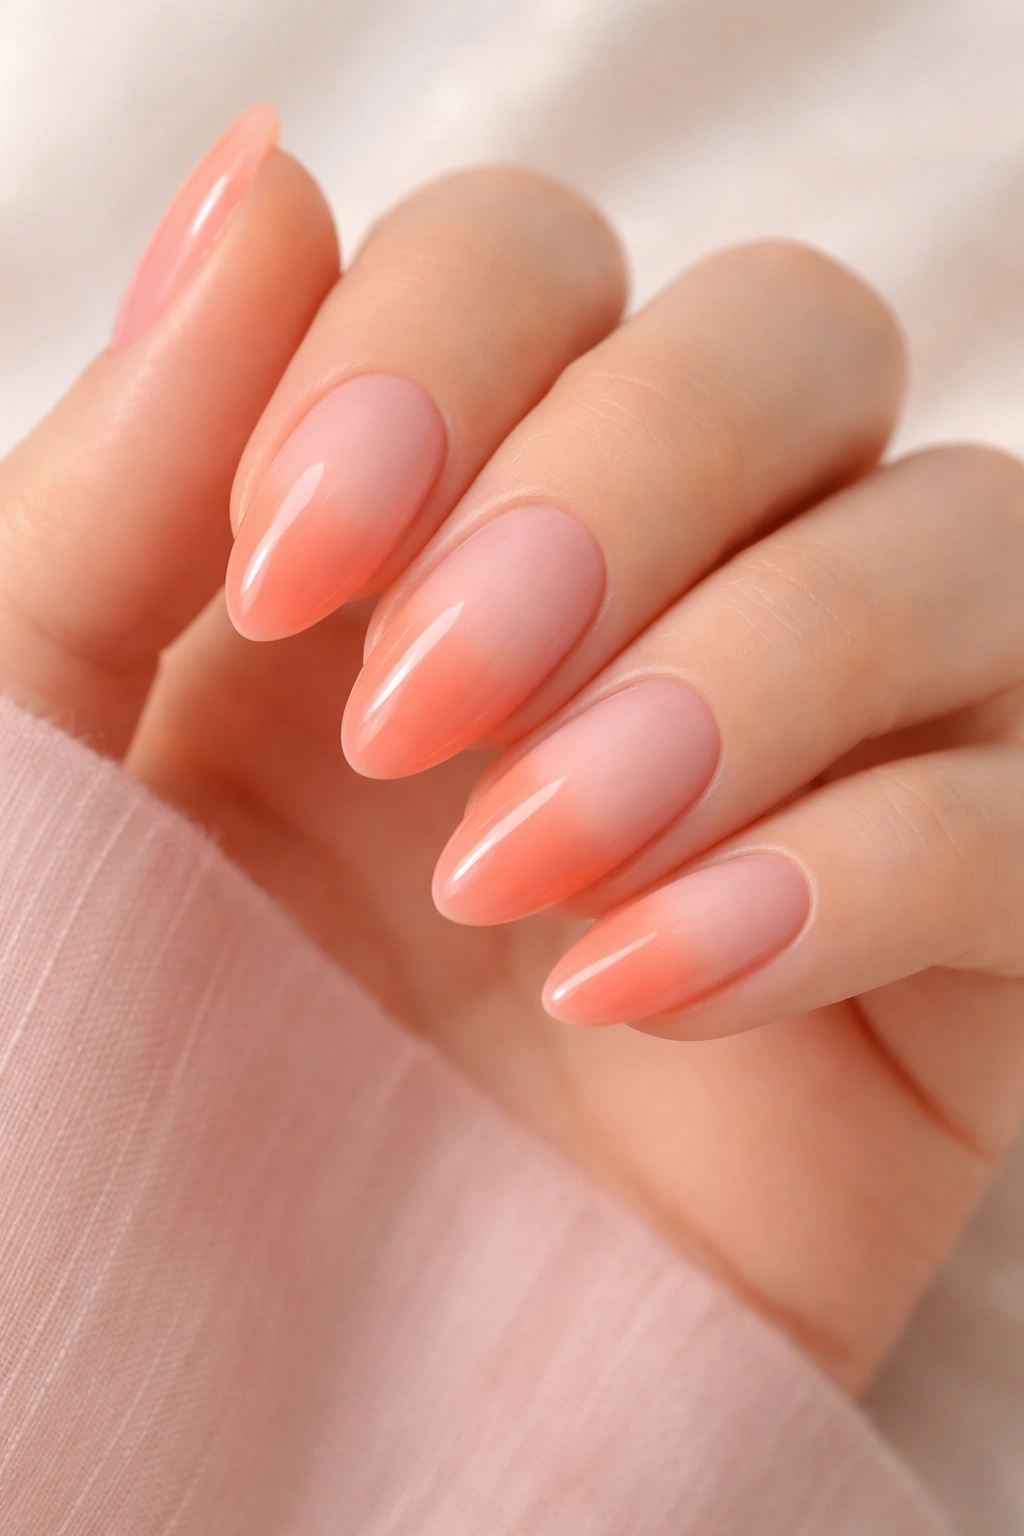
An ombré or gradient effect — where color transitions smoothly from one shade to another across the nail — creates visual depth and interest that photographs incredibly well. The effect makes nails look professionally designed, especially when you choose colors from within the same family or use complementary shades that flow naturally into one another. A gradient from pale pink to deeper coral, soft peach to warm gold, or cool lavender to rich plum delivers that high-end salon aesthetic that people notice and compliment.
Why Gradients Feel Luxurious
Gradient effects work because they demonstrate a thoughtful approach to color and composition. Rather than stopping at a single color, a gradient shows that you’ve considered how shades interact with one another and designed a transition that’s pleasing to the eye. The technique also creates the illusion of length and shape, drawing the eye from the base of the nail to the tip in an elegant, flattering way. Even simple two-color gradients read as intentional design rather than accidental color choice.
Three Methods to Create Beautiful Gradients
Sponge Method: Dot two coordinating polish colors onto a cosmetic sponge, dab the sponge onto the nail in a stippling motion, then seal with top coat. This method is forgiving and delivers soft, blended transitions.
Brush Blending: Apply one color to the nail, then while it’s still wet, use a clean, dry brush to soften the edge where a second color meets the first, creating a feathered transition. This takes practice but delivers the most controlled results.
Ombré Stick: Some brands sell pre-made ombré sticks or gradient wheels that you apply directly to the nail like a regular polish — these deliver instant, foolproof gradients with zero skill required.
Quick tip: Cooler-toned gradients (blues, purples, grays) feel more modern and sophisticated, while warm gradients (peachy, golden, coral) feel more romantic and flattering for everyday wear.
4. Marble Nail Designs
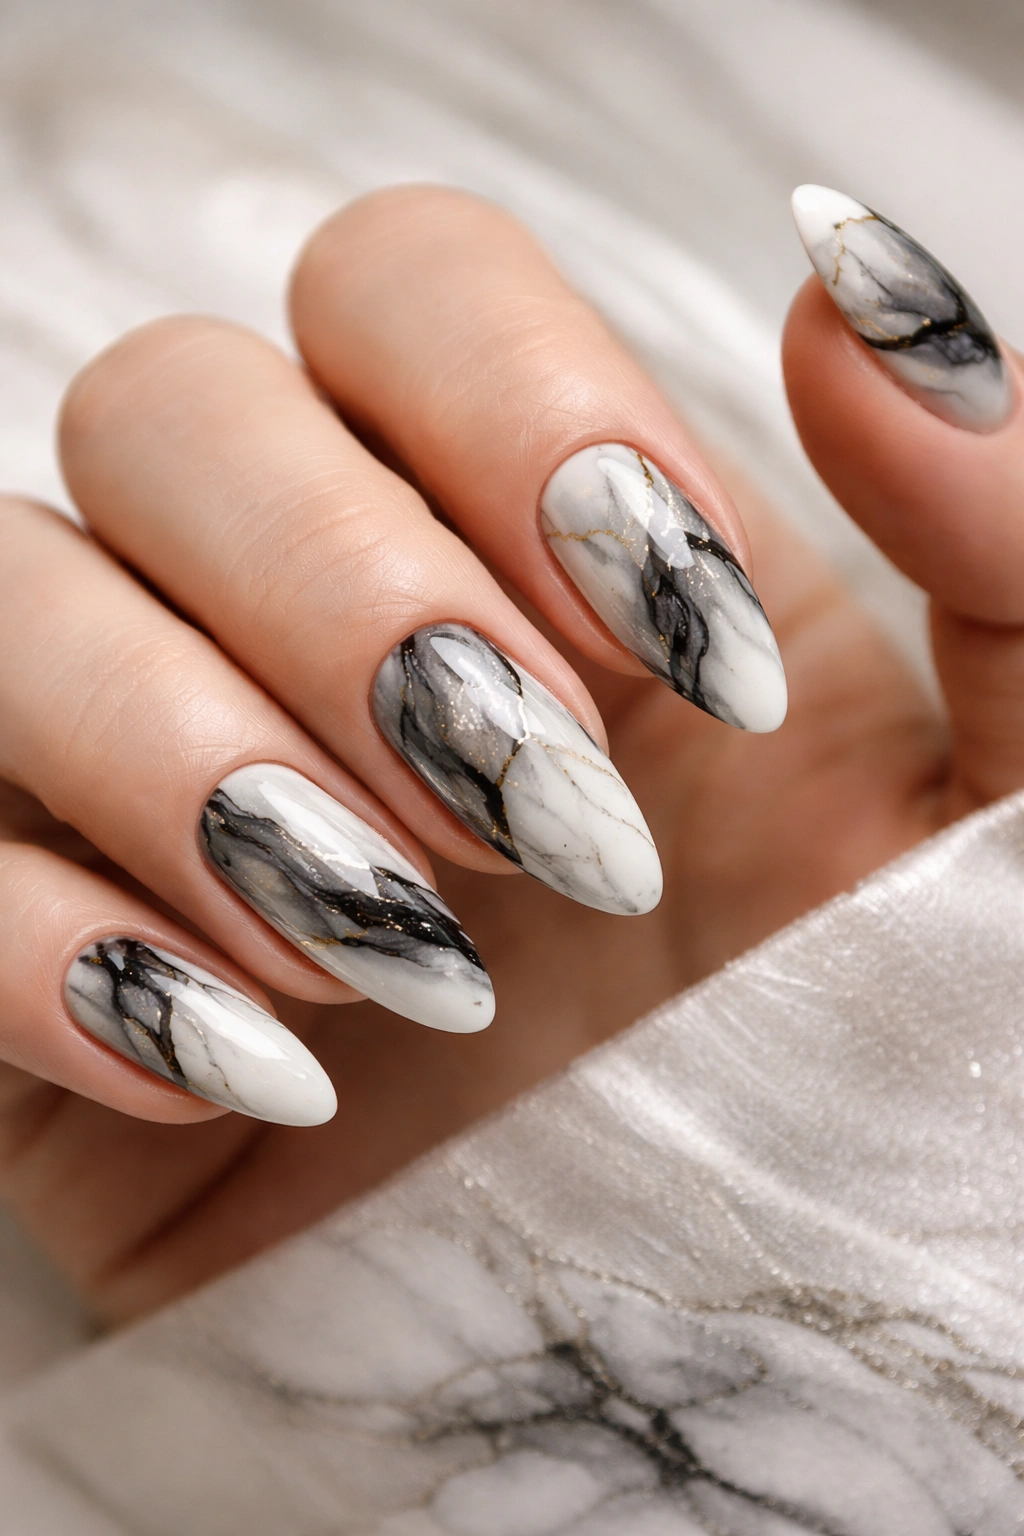
Marble nails evoke natural stone, luxury materials, and high-end design aesthetics — which is exactly why they read as expensive even when created with budget supplies. A classic black and white marble design, or a softer version in grays and whites, instantly elevates your manicure and pairs beautifully with absolutely any outfit or occasion. The organic, flowing veining pattern of marble means your design will never look exactly the same twice, which gives it a custom, artisanal quality.
The Psychology Behind Marble’s Luxury Appeal
Marble is associated with upscale salons, high-end architecture, and luxury goods — so incorporating marble into your nails subconsciously signals sophistication and style. The pattern is complex enough to look intentional and expertly applied, yet forgiving enough that slight imperfections actually enhance the organic, natural stone effect. A marble manicure tells people that you have elevated taste without requiring that you have elevated skills.
The Water Droplet Marble Technique
- Paint your chosen base color (white, cream, or a soft neutral) on each nail and allow it to dry completely
- In a small cup or bowl of room-temperature water, drop a contrasting polish color (black, dark gray, or navy) directly onto the surface
- Immediately drop a second accent color into the center of the first drop while it’s still floating
- Use a thin nail art brush or toothpick to drag through the drops in one direction to create veining, or create swirls and patterns as desired
- Dip each nail quickly into the water at an angle, allowing the pattern to wrap around the nail surface
- Pat gently with a paper towel to remove excess water and allow to air dry, then seal with top coat
Insider note: Room-temperature water works better than warm or cold — warm water makes polish spread too quickly and cold water makes it move too slowly. Practice on a couple of nails first to dial in your technique before doing all ten.
5. Negative Space Nail Art
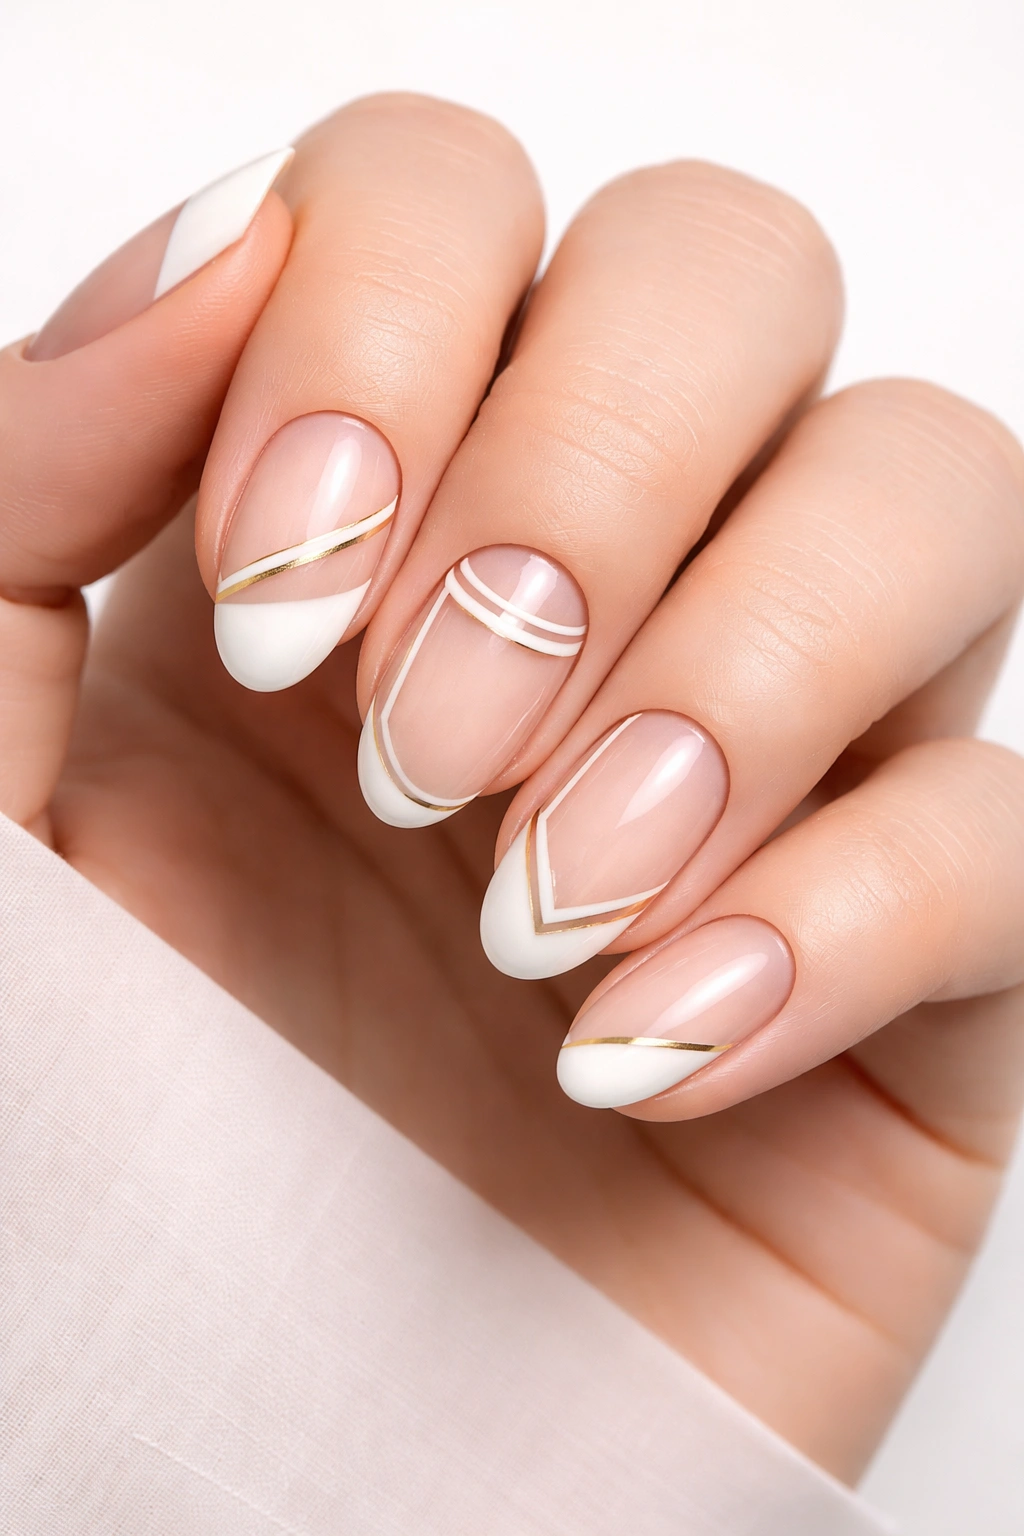
Negative space designs intentionally leave portions of the natural nail or base color visible, creating visual interest through what’s not covered rather than what is. A nail with a geometric cutout, a frame design around the edges, or strategically placed accent colors on a mostly-bare nail reads as modern, intentional, and designer-level sophisticated. The principle of negative space is fundamental to luxury design across all mediums — jewelry, fashion, graphic design — so nails that employ it automatically feel more upscale.
Why Negative Space Feels Expensive and Modern
Negative space communicates restraint and intentional design. Rather than filling every available space, you’re making a deliberate choice about which areas deserve color or detail, and which areas benefit from breathing room. This approach is favored by contemporary nail artists and high-end salons because it photographs beautifully, translates across different skin tones, and feels timeless rather than trendy. A negative space design suggests that whoever created it understands design principles — which is the hallmark of professional work.
Specific Negative Space Designs That Work Beautifully
- Frame design: Paint an outline or border frame around the edge of the nail in a metallic or contrasting color, leaving the center bare or filled with a soft base color
- Geometric cutout: Create a triangle, circle, or rectangular cutout in a corner or the center of the nail using negative space
- Half-moon accent: Paint just the lunula (the half-moon area near the cuticle) in a contrasting color, leaving the rest of the nail bare or neutral
- Stripe pattern: Alternate painted and unpainted vertical or horizontal stripes for a modern, architectural effect
- Tip accent: Paint only the tip of the nail, creating a French manicure variation, or leave the tip bare with color only on the nail bed
Pro tip: Negative space designs work best with extremely clean lines and pristine negative space areas — any excess polish in the bare areas will ruin the effect, so use cuticle pushers and acetone on a thin brush to clean up edges if needed.
6. Metallic Accent Nails
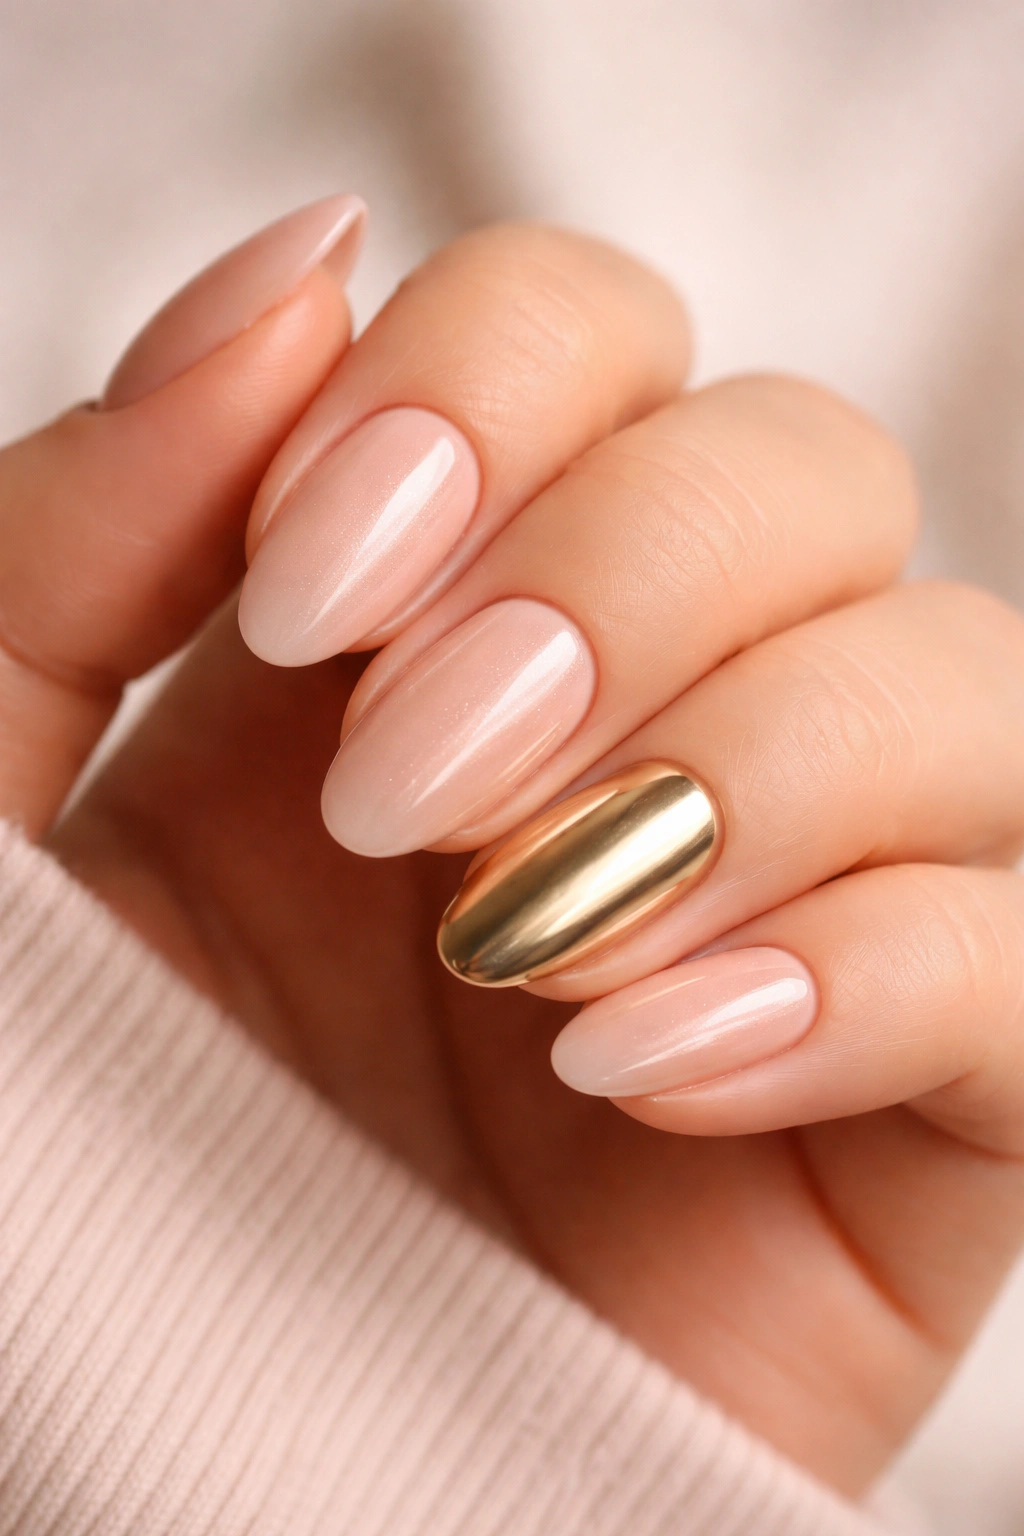
A single metallic accent nail — or metallic accents on just one or two nails — creates an interesting focal point without overwhelming your manicure. Gold, silver, rose gold, or copper accents on nude, white, or soft-colored nails read as intentional luxury touches, like the understated jewelry choices that actually signal wealth and good taste. Metallic accents work particularly well on accent nails (the ring finger, often called the fourth finger) because they draw attention to your hands without dominating the overall look.
How to Choose Your Metallic Shade
Gold works best on warm-toned skin and pairs beautifully with warm neutrals (peach, warm beige, coral) or jewel tones (emerald, sapphire, ruby). Silver and chrome suit cool-toned skin and pair elegantly with cool neutrals (cool white, soft gray) or cool jewel tones (amethyst, topaz). Rose gold is universally flattering and bridges warm and cool tones — it pairs exceptionally well with blush tones, dusty rose, and warm nudes. Copper is underrated and creates a sophisticated, autumn-inspired feel when paired with warm neutrals or burgundy.
Application Methods for Perfect Metallic Accents
- Foil method: Press metallic foil or adhesive metallic sheets onto wet base coat using foil transfer tools — delivers mirror-like results with minimal skill
- Metallic polish: Use a thick, high-pigment metallic polish applied in 2-3 layers to build opacity and shine
- Metallic powder: Apply a sticky base, dip into metallic powder (similar to chrome application), and seal with top coat for an ultra-luxe finish
- Nail stickers or wraps: High-quality metallic nail stickers deliver professional-looking results with zero application skill required
- Paint-on metallic liquid: Some brands make pourable metallic liquids that apply like polish but deliver foil-like effects
Worth knowing: Metallics show every fingerprint and dust particle, but they photograph absolutely beautifully in natural light and create genuine heads-turning moments in person.
7. Matte Top Coat Manicure
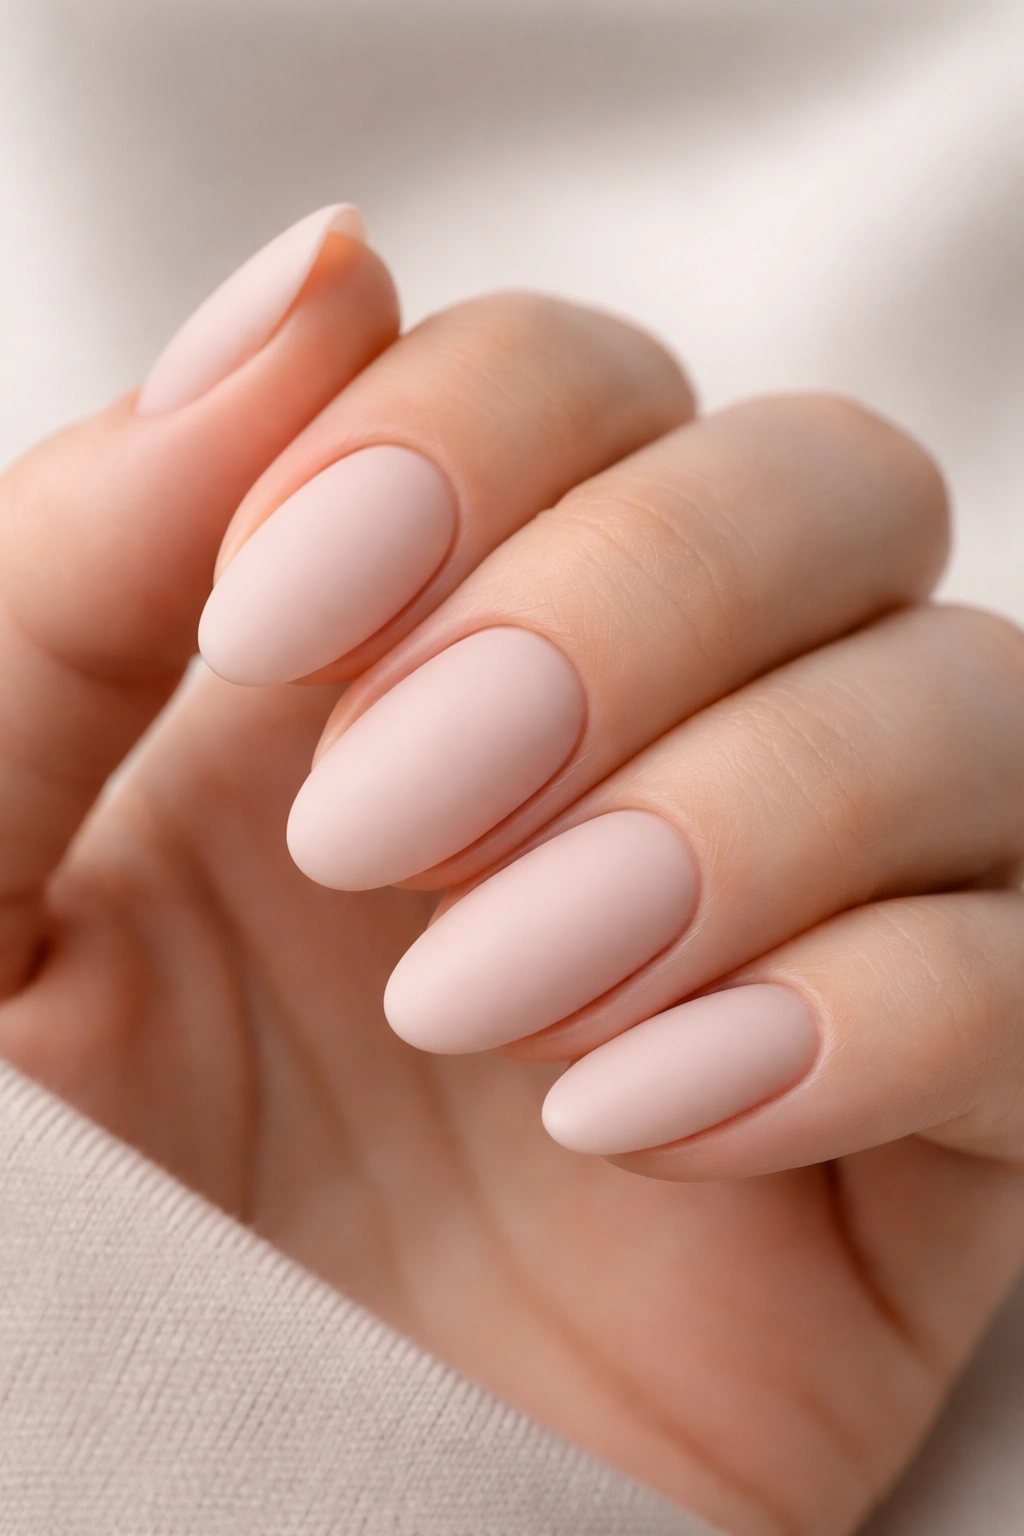
A glossy finish is classic and reliable, but switching to a matte top coat instantly transforms any manicure into something that feels more current, textured, and sophisticated. Matte finishes are particularly popular in high-end salons right now because they read as intentional, modern, and effortlessly chic. Even a simple single-color manicure becomes noticeably more interesting and upscale when finished with a matte coat instead of glossy — the visual effect is softer, more velvety, and genuinely luxurious to touch.
Why Matte Finishes Read as High-End
Matte finishes have a subtle, understated quality that feels more refined than high-shine gloss. The velvety texture creates visual depth and interest without additional colors or designs. Matte nails also show fewer fingerprints and marks than glossy nails, which means they photograph beautifully and maintain their polished appearance throughout the day. The trend toward matte finishes in luxury nail spaces has made this finish synonymous with professional, expensive-looking manicures.
How to Create a Perfect Matte Finish
- Apply your chosen base color and allow it to dry completely
- Once the color is fully set, apply a matte top coat using smooth, even strokes — work from the center of the nail outward to the edges
- Allow the matte coat to dry completely (follow your specific product’s timing recommendations)
- A second layer of matte coat can intensify the effect if desired
- If you prefer a subtle semi-matte finish rather than fully matte, apply a matte coat and allow it to dry, then lightly buff the surface with a soft nail file or buffer to create a softer finish
Pro tip: Matte finishes work exceptionally well with cool, jewel-toned colors (deep greens, rich purples, dark blues) and with pale, soft neutrals (cream, pale gray, dusty rose) — they’re less flattering over very warm or very bright colors.
8. Two-Tone Color Blocking
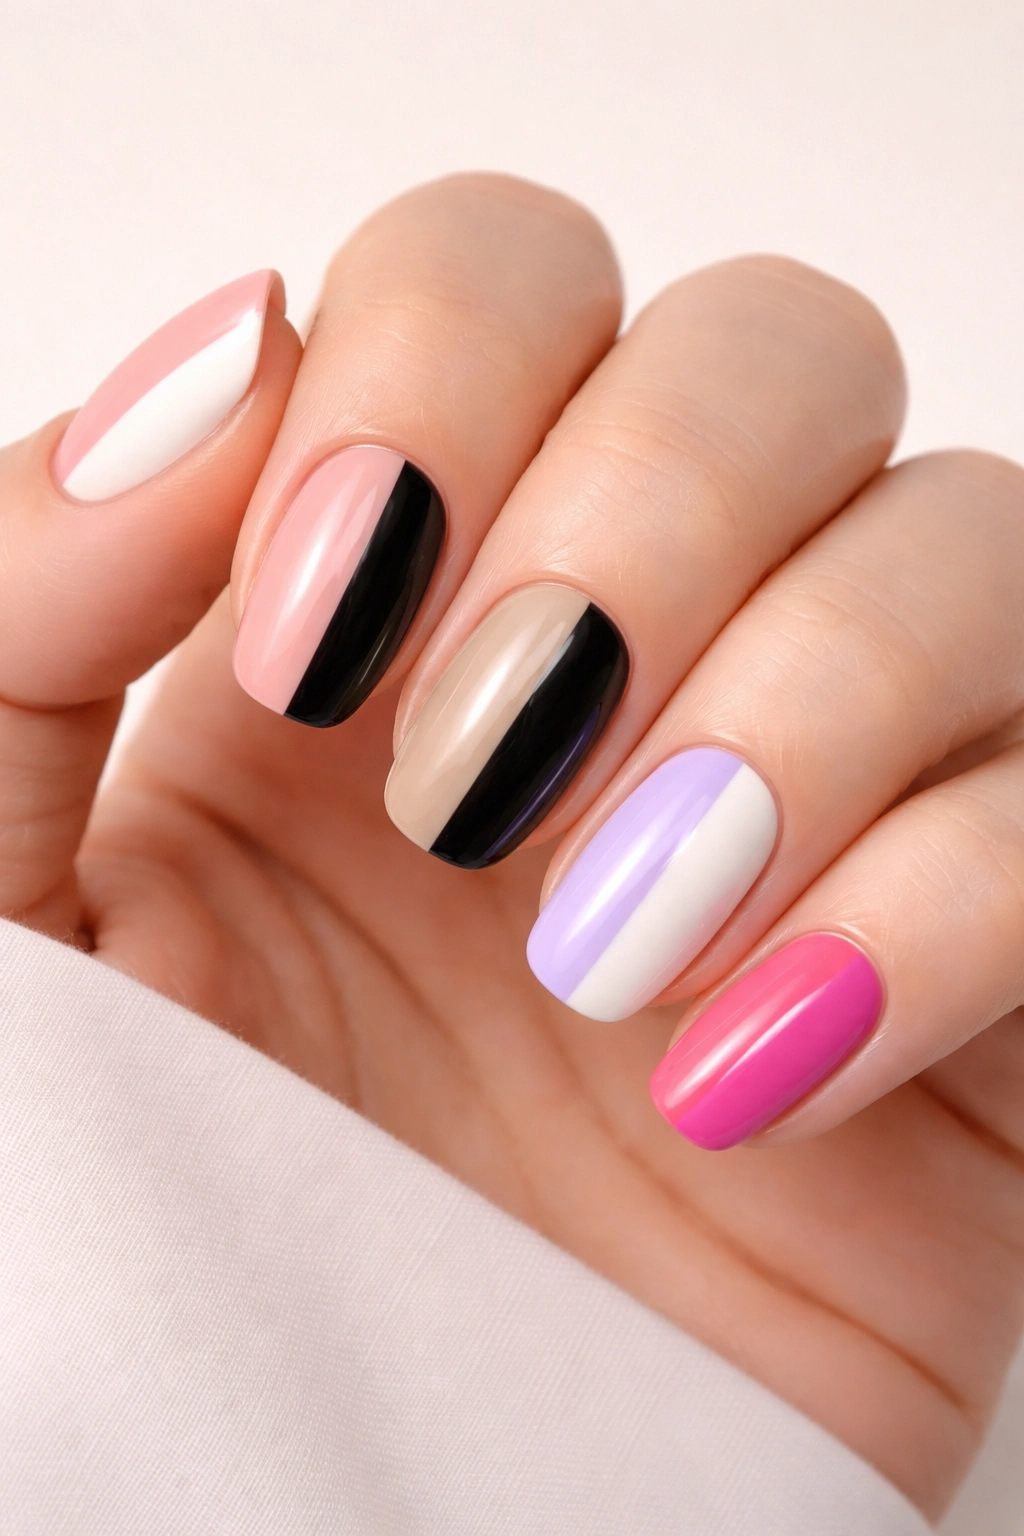
Color blocking — where distinct blocks or sections of contrasting colors are applied to the nail — creates a bold, graphic effect that looks professionally designed and intentionally modern. Rather than blending or gradating, color blocking keeps colors distinct and separate, creating clean visual divisions. A nail split vertically between two colors, horizontally across the nail, or with distinct geometric blocks reads as fashion-forward and designer, and it’s surprisingly simple to execute with basic tools.
Why Color Blocking Reads as Expensive and Intentional
Color blocking is fundamental to contemporary fashion and design — it’s the visual language of high-end graphic design and modern art. When applied to nails, it communicates that you understand color theory, proportion, and intentional design choices. The clean separation between colors requires precision and planning, which creates the impression of professional work. A color-blocked manicure tells people that you care about aesthetics and have a defined point of view about your style.
Specific Color-Blocking Patterns That Work
- Vertical split: Paint one side of the nail in one color, the other side in a contrasting shade, with a clean line down the center
- Horizontal bands: Create two or three distinct color bands stacked horizontally across the nail
- Corner blocks: Fill one corner of the nail in an accent color while leaving the rest of the nail a neutral base
- Diagonal division: Paint a diagonal line across the nail with different colors on either side
- Half-and-half tip: Paint the nail bed one color and the tip a completely contrasting shade
Quick tip: Use painter’s tape to create perfectly clean divisions between colors — apply tape to create your desired lines, paint over it, remove the tape once the polish is dry, and finish with top coat for flawless edges.
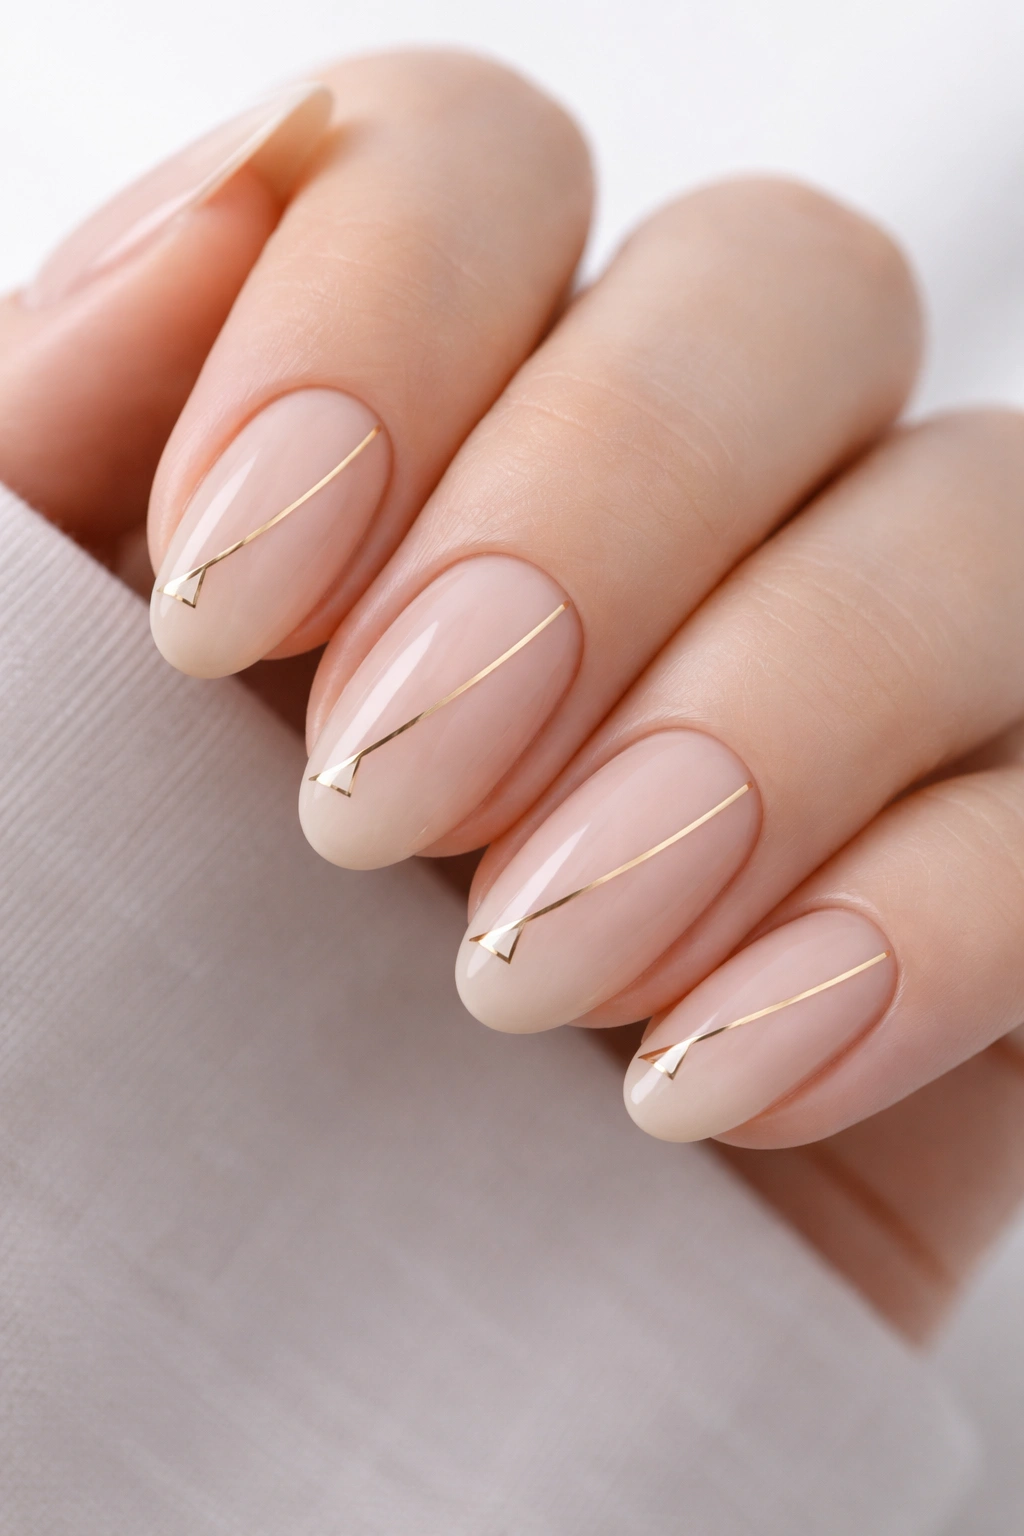
9. Fine Line Nail Details
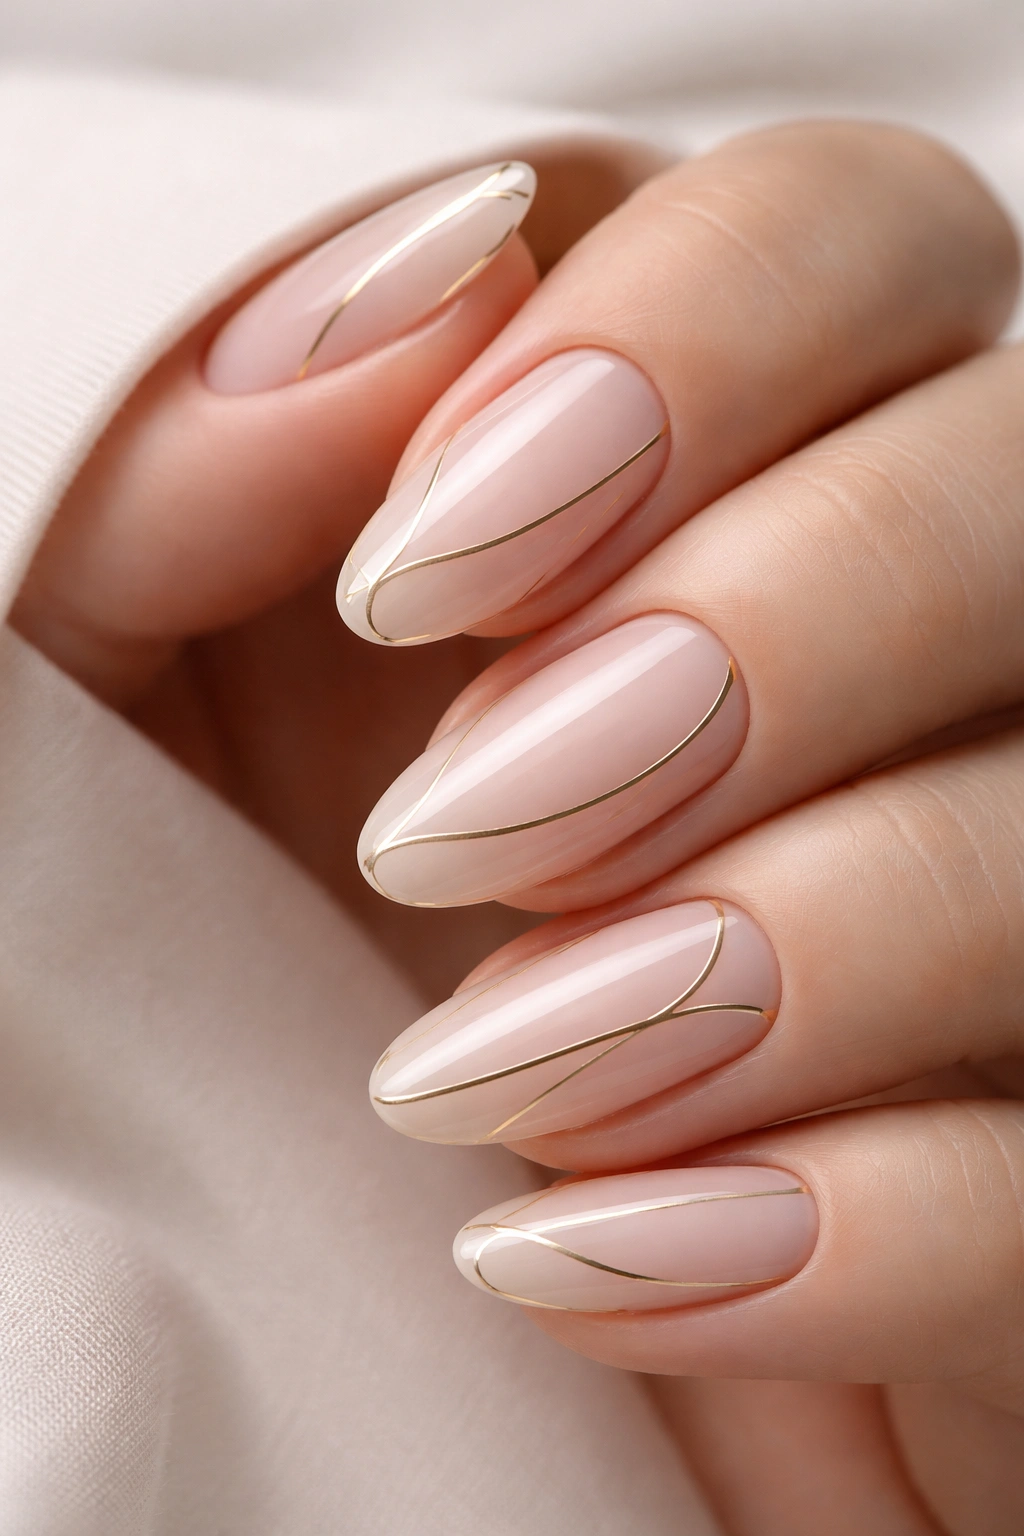
Delicate, thin-line details — such as fine brushstrokes, thin striping, or minimalist linework — create an elegant, refined look that reads as custom and artistic. A single thin gold or silver line, fine brush details that outline or frame the nail, or subtle linework that emphasizes nail shape conveys precision and artistic sensibility. These designs are forgiving because the fine, delicate nature of thin lines actually makes imperfections less noticeable, while still delivering that sophisticated, intentional appearance.
What Makes Fine Lines Feel Luxurious
Thin, precise lines suggest hand-crafted, custom work — they signal that time and attention have been paid to every detail. Unlike bold or thick designs, fine line details feel understated, elegant, and almost minimalist in their approach. The restraint and precision required to execute fine lines communicates expertise and intentionality. A nail with fine-line details looks like it was created by someone with genuine skill and aesthetic sensibility, which is exactly the impression you want to give.
Tools and Techniques for Perfect Fine Lines
- Thin striping brush: A professional-grade thin brush (size 00 or 000) allows for precise line work and is worth the small investment
- Nail art pen: Fine-tipped nail art pens deliver consistent, thin lines without requiring brush skills and cost under five dollars
- Toothpick or detail tool: A basic toothpick or metal detail tool from any nail art kit can create surprisingly precise lines when you practice
- Liner polish: Thin, high-pigment liner polishes apply more smoothly than regular polish and create crisp, defined lines
- Freehand versus guided: Practice your lines on paper first, or use light pencil marks on the nail to guide your line placement before committing to polish
Insider note: Thin lines are actually more forgiving than thick ones because they don’t show as much if they’re slightly wobbly — embrace the organic quality and focus on overall placement rather than perfection.
10. Pearl and Iridescent Finishes
Pearl and iridescent finishes create a subtle shimmer and color-shifting effect that reads as sophisticated, expensive, and genuinely beautiful in person and in photographs. Unlike glittery finishes that can feel juvenile, pearl and iridescent finishes have an understated elegance — they catch light in interesting ways without being loud or demanding attention. A soft pearl finish over a neutral base, or an iridescent polish that shifts between complementary colors, delivers that high-end aesthetic that makes people wonder if you just came from a professional salon.
Why Pearls and Iridescent Effects Feel Premium
Pearl finishes evoke pearls themselves — a luxury material associated with elegance, timelessness, and upscale style. The subtle shimmer and glow created by pearl pigments adds dimension without overwhelming the overall look. Iridescent finishes, which shift between multiple colors depending on light and angle, have an almost magical quality that draws the eye. Both effects read as intentionally chosen and carefully considered, rather than accidental or trendy.
How to Apply Pearl and Iridescent Products
- Pearl polish: Apply as you would regular polish, using 2-3 layers to build opacity and achieve the full pearl effect — the shimmer becomes more evident with each layer
- Pearl powder: Similar to chrome or metallic powders, press pearl powder onto a sticky base coat and seal with top coat for an intense, multidimensional finish
- Iridescent nail wraps: High-quality iridescent wraps deliver flawless results without requiring application skills
- Iridescent top coat: Apply your chosen base color, then seal with an iridescent top coat that adds shimmer and color-shifting properties
- Layering technique: Apply a pale base color, then layer a translucent iridescent polish over the top to create depth and dimension
Pro tip: Pearl and iridescent finishes are most striking in natural daylight — they photograph beautifully in bright conditions but may appear more subtle in artificial indoor light, so apply them when you’ll be spending time outside.
Final Thoughts
Creating expensive-looking nails has nothing to do with spending a lot of money and everything to do with understanding which visual techniques, color choices, and finishes create that polished, intentional aesthetic that reads as luxury. The designs covered in this guide — from minimalist geometry to sophisticated marble effects to subtle pearl finishes — all work because they demonstrate restraint, intentionality, and an understanding of design principles.
What actually separates an expensive-looking manicure from one that looks budget-conscious isn’t the cost of the products you use — it’s the thoughtfulness of your choices. Selecting a cohesive color palette, committing to clean lines and precision, choosing finishes that photograph beautifully, and resisting the urge to overcomplicate your design are the real secrets. A single perfectly executed accent nail reads as more expensive than a complicated design with sloppy execution.
Start by choosing one or two of these approaches that resonate with your personal style, and practice them until you feel genuinely confident. Once you’ve mastered a few techniques, you can mix and match them — combining a matte finish with geometric accents, or layering metallic accents over a color-blocked base. The goal is to develop a signature aesthetic that feels intentional and designed, not accidental or random. That’s what truly reads as expensive, and that’s what people will notice and admire about your nails.
