

Wide coffin nails offer the ultimate canvas for nail art creativity. The generous surface area and elegant tapered shape create a naturally sophisticated silhouette that photographs beautifully and works across casual, professional, and special-occasion aesthetics. Whether you’re drawn to bold color blocking, intricate nail art, minimalist elegance, or statement embellishments, this nail shape delivers impact without feeling overdone.
The key to nailing wide coffin designs lies in understanding how proportions work with the broader base. A design that might feel cramped on a traditional square nail absolutely sings when spread across this wider palette. You can layer colors, textures, and details with confidence, knowing there’s plenty of room to breathe. Wide coffin nails also tend to be more forgiving for everyday wear than their narrower cousins—the thicker nail bed means less chance of breakage if you accidentally bump something.
What makes these designs stand out isn’t just trend-chasing; it’s the thoughtful combination of shape, color, and detail that makes your nails feel intentional and curated. Some of these ideas work beautifully as nail art you can replicate at home, while others might inspire a salon visit. Either way, each design below includes the specific techniques and materials that make it work, so you can make an informed choice about what actually suits your lifestyle and skill level.
1. Classic French Ombre Gradient

The wide coffin shape transforms a timeless French manicure into something that feels modern and deliberately chosen. Instead of a sharp white line, this design features a soft gradient that transitions from nude or soft pink at the base through white at the tips, creating an air-brushed, almost cloud-like effect. The broader nail surface lets you execute this gradient smoothly without it looking cramped or poorly proportioned.
Why This Look Works
A French ombre respects professional dress codes while still feeling like you made an intentional style choice. The soft gradient reads as sophisticated and polished, and the design works year-round. The technique also camouflages any slight imperfections in your gradient application because the whole point is a soft transition rather than precision.
How to Create It
- Use a soft pink or nude base coat as your foundation across the entire nail
- Apply white polish to a makeup sponge and dab it onto the tips, starting heavy and decreasing pressure as you work toward the middle
- Blend the colors together using a clean sponge or soft brush with a touch of clear topcoat
- Seal everything with a high-shine topcoat to emphasize the gradient
- The key is patience—multiple light layers blend better than one heavy application
Pro tip: If sponging feels tricky, try using a soft angled brush instead. It gives you more control while still creating a soft blend rather than a sharp line.
2. Deep Burgundy with Gold Leaf Accent
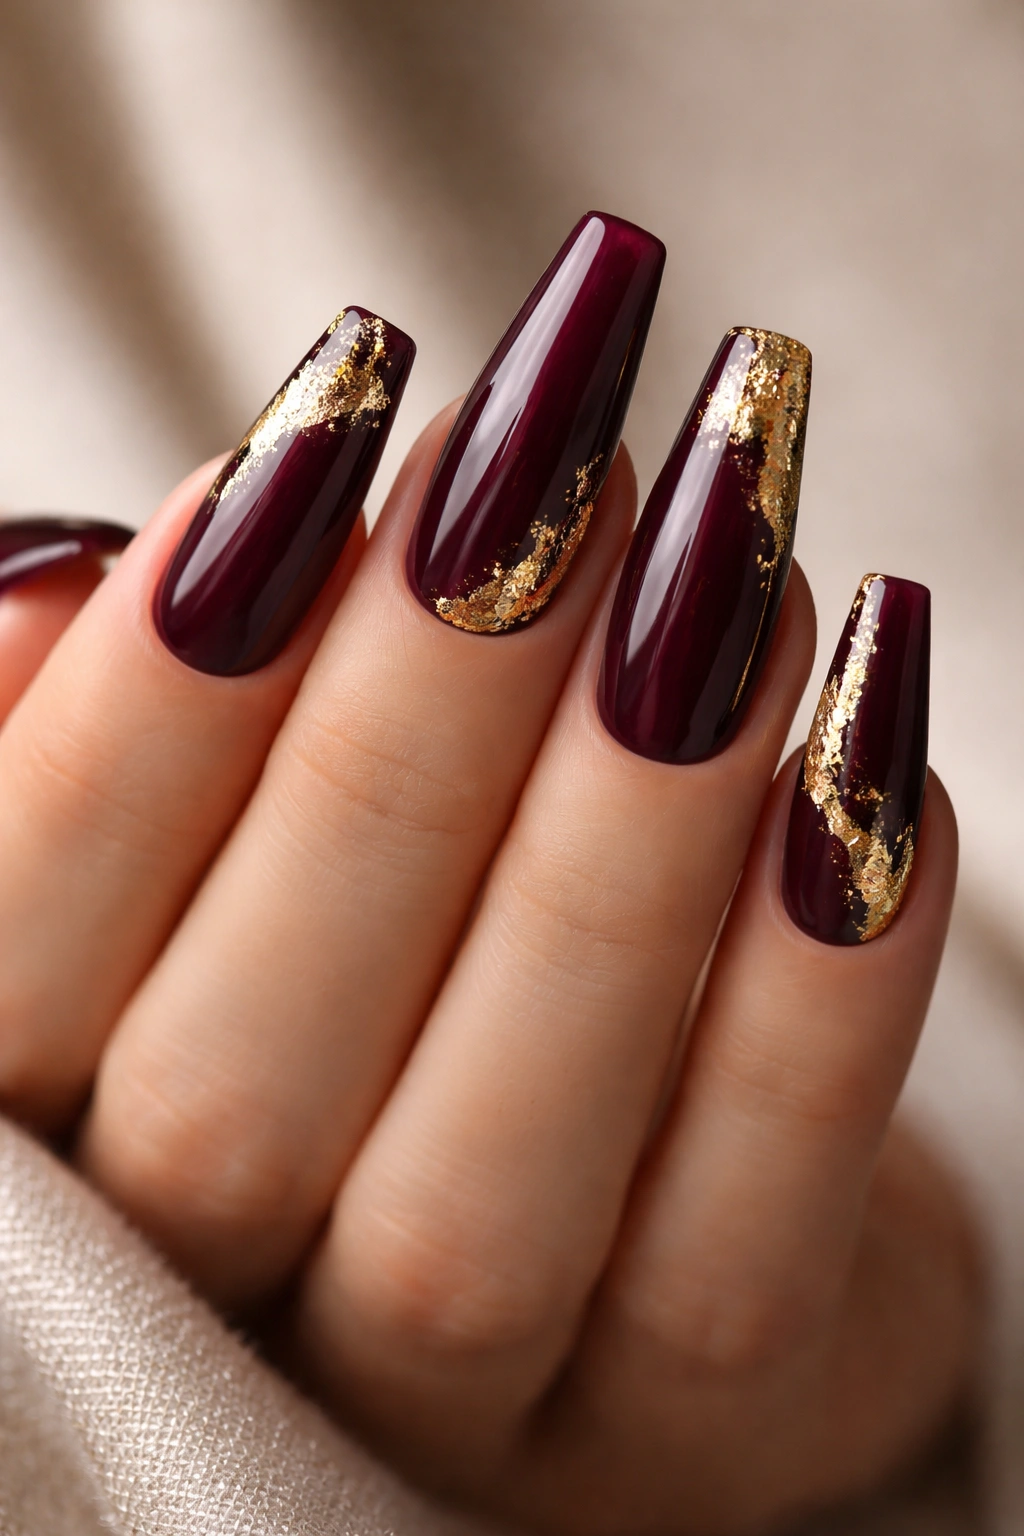
Rich burgundy polish provides an elegant base that feels simultaneously bold and understated, and the wide nail surface gives you room to add metallic accents without overwhelming the design. Gold leaf scattered across the nail or concentrated along one edge catches light beautifully and adds dimension without requiring advanced artistic skills. This combination works for professional settings, date nights, or anywhere you want your nails to feel intentional but not costume-like.
The Psychology of This Combination
Burgundy reads as sophisticated and confident—it’s a color that works across all skin tones, and gold adds luxury without being flashy. The wide coffin shape ensures the gold doesn’t disappear into the design; instead, it becomes a deliberate accent that enhances rather than overwhelms.
Application Steps
- Apply two coats of deep burgundy polish, allowing proper drying between coats
- While the second coat is still slightly tacky, apply loose gold leaf pieces using a thin brush or tweezers
- Press gently and let it adhere naturally—slightly imperfect placement looks more intentional than perfectly placed leaf
- Seal with a glossy topcoat that holds the leaf in place
- Optional: add a thin gold line along one edge using a gold gel liner
Worth knowing: Gold leaf adheres better when applied to slightly tacky polish, so don’t wait for your base color to fully dry before applying the leaf.
3. Milky Nude with Delicate Line Work
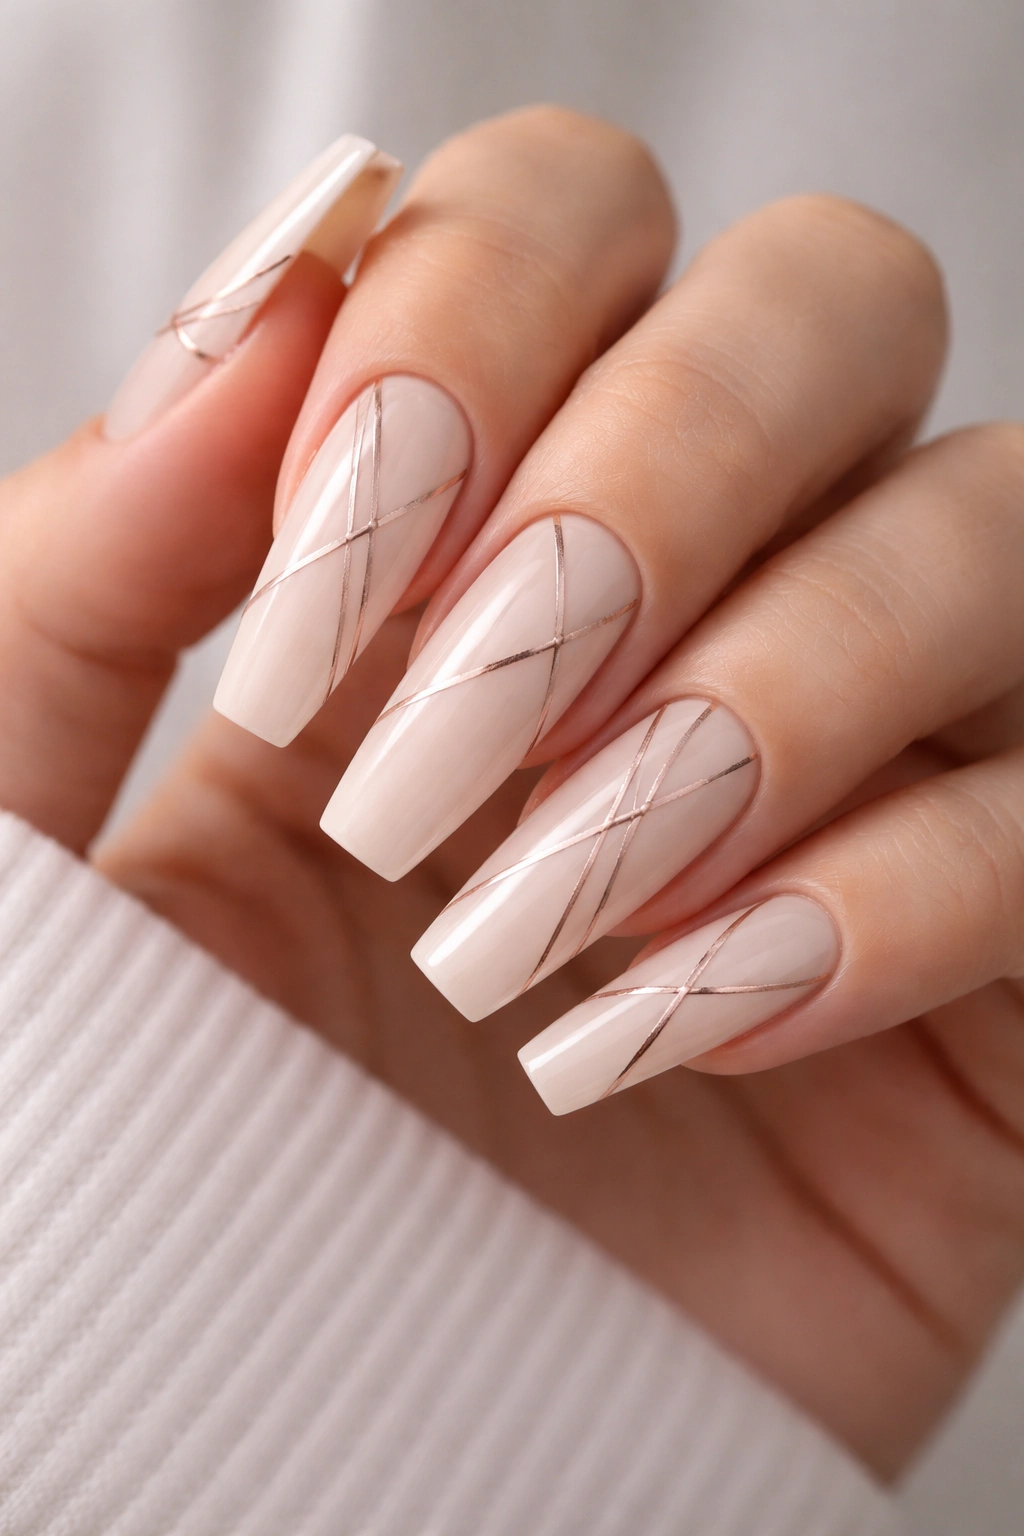
Soft, milky nude polish creates a warm, neutral base that feels almost like your own nails but elevated. Fine line work in black, rose gold, or burnt orange adds geometric interest without requiring steady hands—even slightly wobbly lines read as intentional and artistic on this background. The wide surface gives you room to add multiple lines, small geometric shapes, or abstract line patterns that would feel crowded on narrower nails.
What Makes Line Work Effective
Simple line work relies on contrast and negative space to look polished. Because the milky nude is so neutral, even simple lines in complementary colors pop. The wide nail shape means lines can be longer and more elaborate without feeling fussy or overwhelming the overall design.
Design Options
- Delicate vertical lines spaced evenly across the nail in contrasting color
- Geometric shapes like triangles or hexagons placed in the corner or center
- Abstract wavy or curved lines that suggest movement
- A combination of short and long lines creating visual rhythm
- Minimalist line patterns that reference marble veining
Insider note: Use a thin gel liner or gel pen rather than regular polish for the sharpest, finest lines. They give you more control and less likely to blob or spread.
4. Glossy Red with Rhinestone Scatter
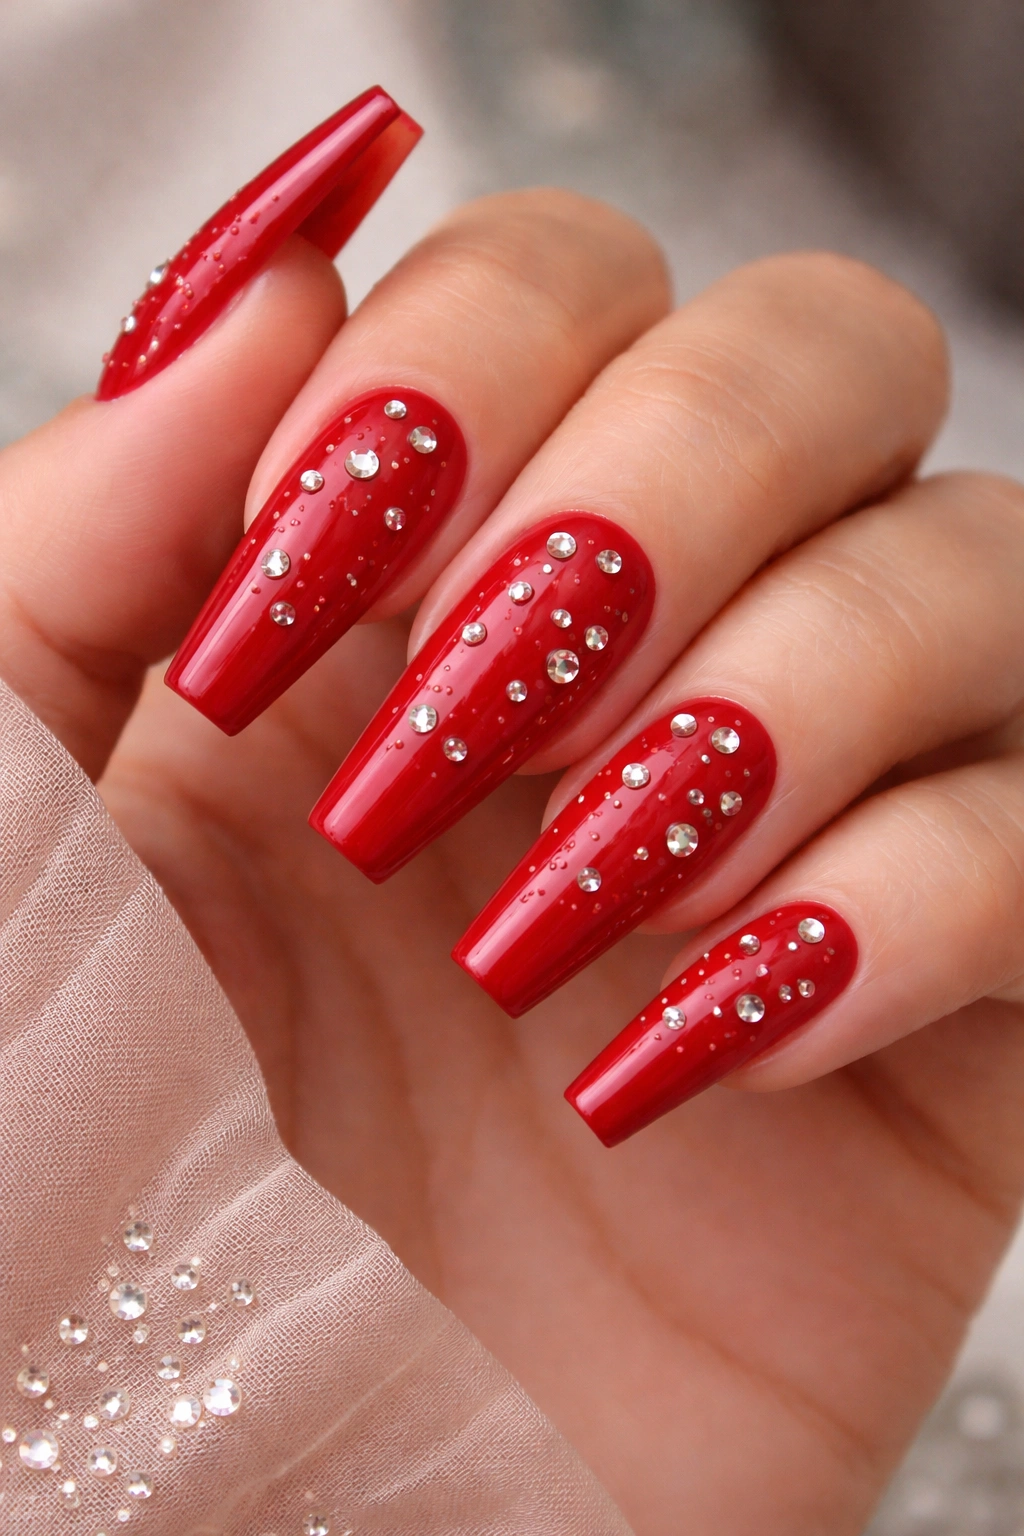
There’s nothing quite like glossy red nails for instant polish and confidence. Add scattered rhinestones in varying sizes across the surface—concentrated near the cuticle, the tips, or sprinkled throughout—and you’ve created a design that feels celebratory without requiring intricate nail art skills. The wide surface accommodates the rhinestones beautifully, and each one catches light individually rather than getting lost.
Why Red Demands Presence
Glossy red is one of the few colors that automatically reads as intentional and put-together, regardless of what you’re wearing. Adding rhinestones elevates it to special-occasion territory while keeping the base simple enough that it doesn’t require constant touch-ups from a salon.
Rhinestone Application
- Apply at least two coats of glossy red polish and allow to dry completely
- Use a dotting tool or toothpick dipped in clear topcoat or nail glue to place rhinestones where you want them
- Press each stone firmly with the flat end of your dotting tool for secure placement
- Vary sizes for visual interest—mix large center stones with smaller ones around them
- Seal everything with glossy topcoat to secure the stones and create shine
Pro tip: Place stones while your topcoat is slightly tacky rather than fully dry; they’ll adhere more securely without sliding around.
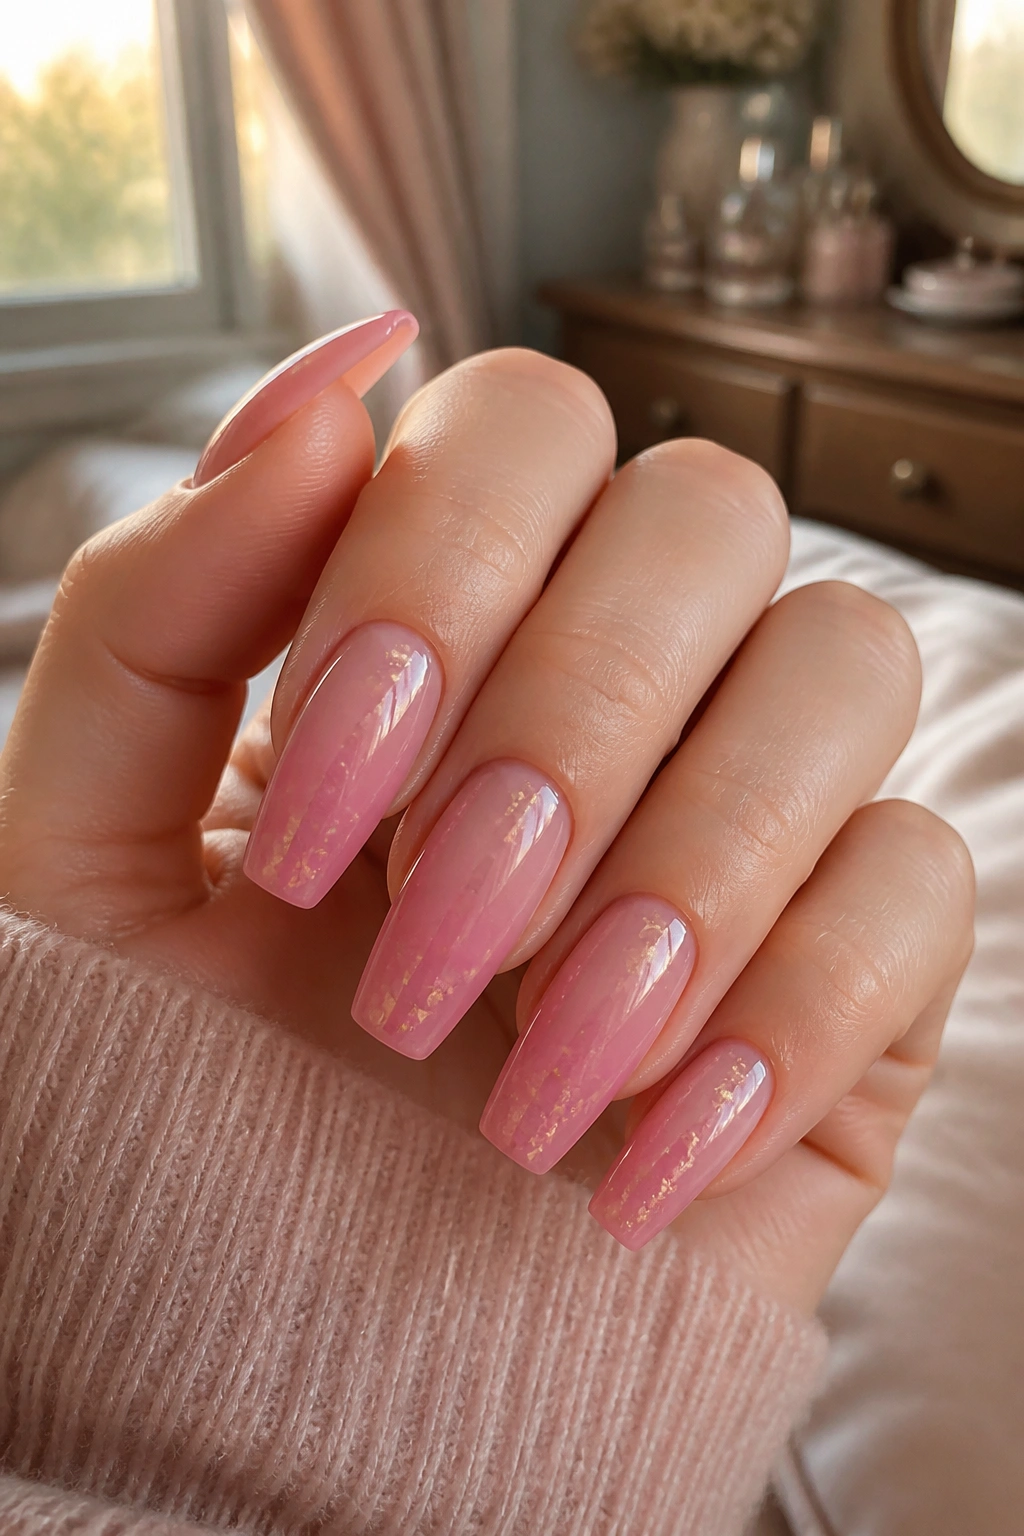
5. Soft Blush with Negative Space Leaf Design

Create an organic, nature-inspired design using negative space—literally leaving your natural nail showing through. Apply soft blush pink to the main surface, then use a thin brush or stencil to paint leaf shapes in white or cream, intentionally leaving the background nude. This reverse approach looks more artistic than traditional painting and the wide nail shape lets each leaf breathe without getting cramped.
The Appeal of Negative Space
Negative space designs feel modern and thoughtful because they require the artist (you) to think about what’s not there as much as what is. The technique is actually easier than filling in every space because you’re working with bold shapes and letting the background do visual work.
Creating the Leaf Design
- Apply two coats of soft blush pink and let dry completely
- Sketch light leaf shapes with a pencil or use a stencil as a guide
- Paint the space around the leaf shapes in white or cream
- Use thin lines to suggest leaf veins in a complementary color
- The natural nail showing through becomes part of the design
- Finish with glossy topcoat to blend everything and add shine
Worth knowing: This design works better with longer nails where there’s enough surface area for leaf shapes to read clearly without looking cramped.
6. Galaxy Pattern with Star Dust Effect
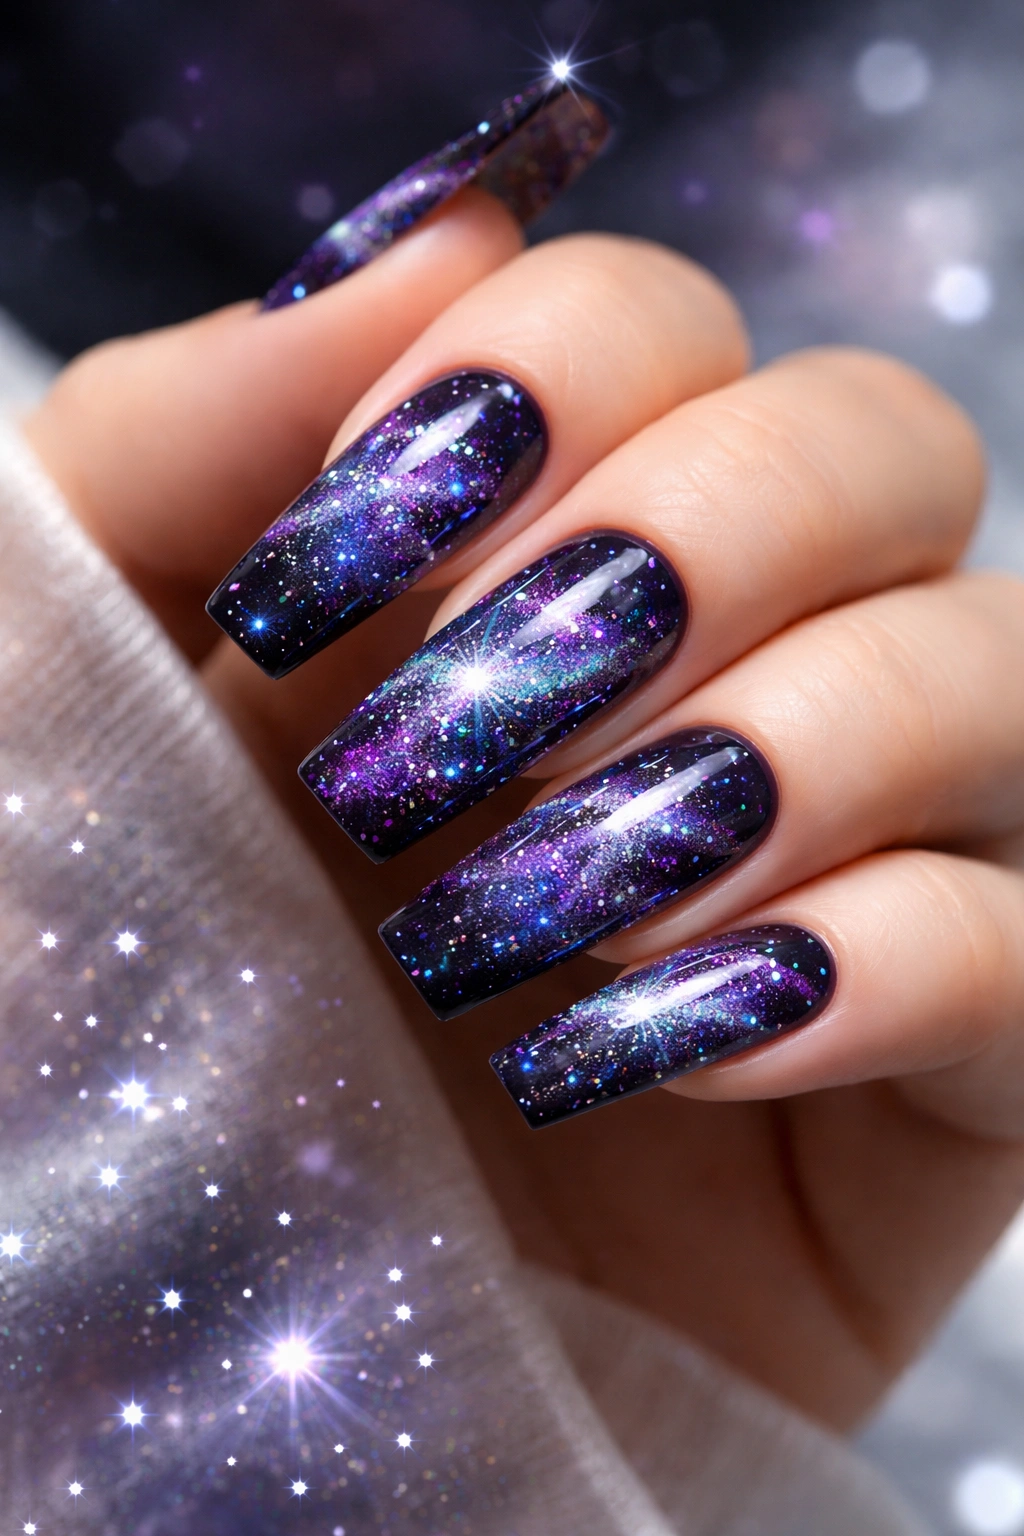
Transform your wide coffins into a cosmic canvas using dark blue or purple as your base, then layer white, silver, and iridescent polishes in splatters and swirls to mimic stars and nebulae. The technique is forgiving because space-themed nail art doesn’t require precision—random splatters actually look more authentic than perfectly placed elements. The wide nail shape gives you room to create actual depth and dimension in the galaxy effect.
Creating Authentic Galaxy Effects
A real galaxy design uses layering and texture to suggest depth. You’re not trying to paint a realistic space photo; you’re creating an impression of cosmic activity. The wide nail surface lets you add multiple layers and textures without it feeling cluttered or overworked.
Step-by-Step Galaxy Creation
- Apply a dark blue, purple, or black base coat and let dry completely
- Use a sponge to dab on white and silver polish in the center, creating density
- Add specks of iridescent or glitter polish by flicking a thin brush across the nail
- Layer a very thin wash of translucent white or silver over parts of the design
- Add individual “stars” with a dotting tool and white or gold polish
- Finish with a glossy topcoat that emphasizes the depth
Insider note: The more layers you add, the more dimensional the design becomes. Don’t be afraid to go heavy with white and silver—space is bright.
7. Soft White with Painted Wildflower Details
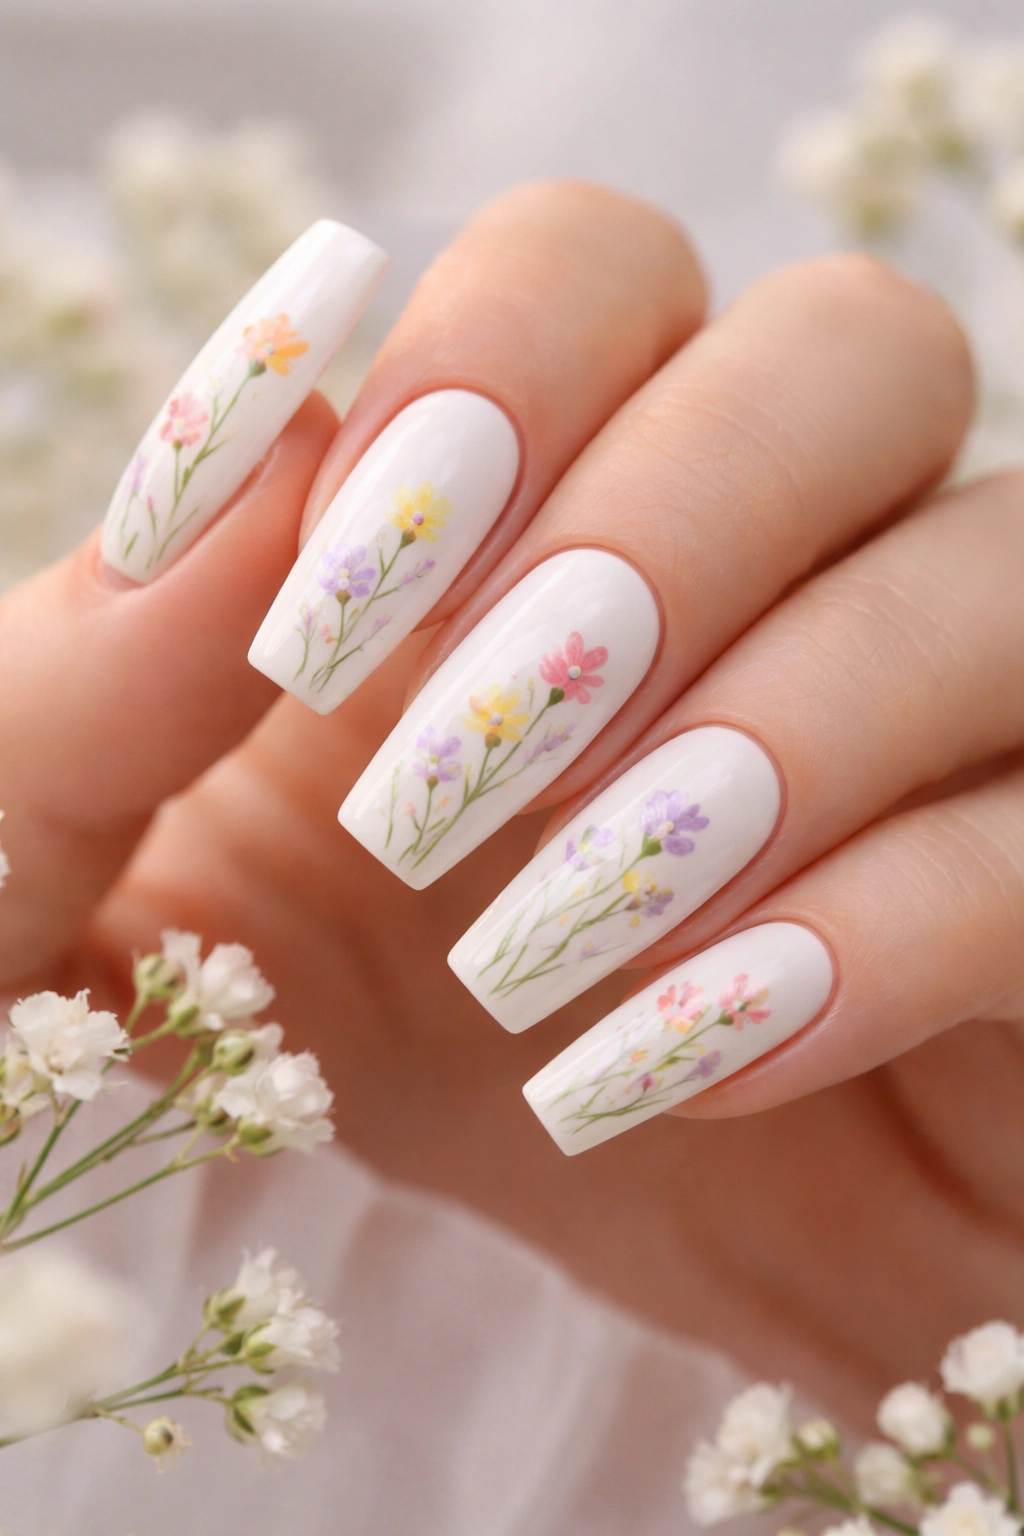
Delicate hand-painted wildflowers on a crisp white base create a design that feels artisanal without requiring professional-level painting skills. Use thin brushes and simple flower shapes—small circular blooms in soft pinks, yellows, or purples with thin green stems. The wide coffin shape gives each flower room to be recognized as an individual element rather than blending together into a confused pattern.
Why Florals on White Feel Fresh
White serves as a clean, bright canvas that makes colors pop. Wildflowers on white read as sophisticated and garden-inspired rather than juvenile, especially when you keep the painting intentionally loose and organic rather than perfectly symmetrical.
Painting Simple Wildflowers
- Start with a white base and let dry completely
- Use a very thin brush and thin polish (or dilute with a drop of topcoat if needed)
- Paint small circular or oval shapes in soft colors for flower heads
- Add thin curved lines in green for stems
- Use tiny dots in the center of flowers for stamen detail
- Space flowers organically across the nail rather than in perfect rows
- Seal with matte topcoat for a softer look, or glossy for more shine
Pro tip: Practice on a piece of paper first. Once you understand the motion and pressure needed, transferring that to nails feels natural.
8. Black Base with Holographic Confetti
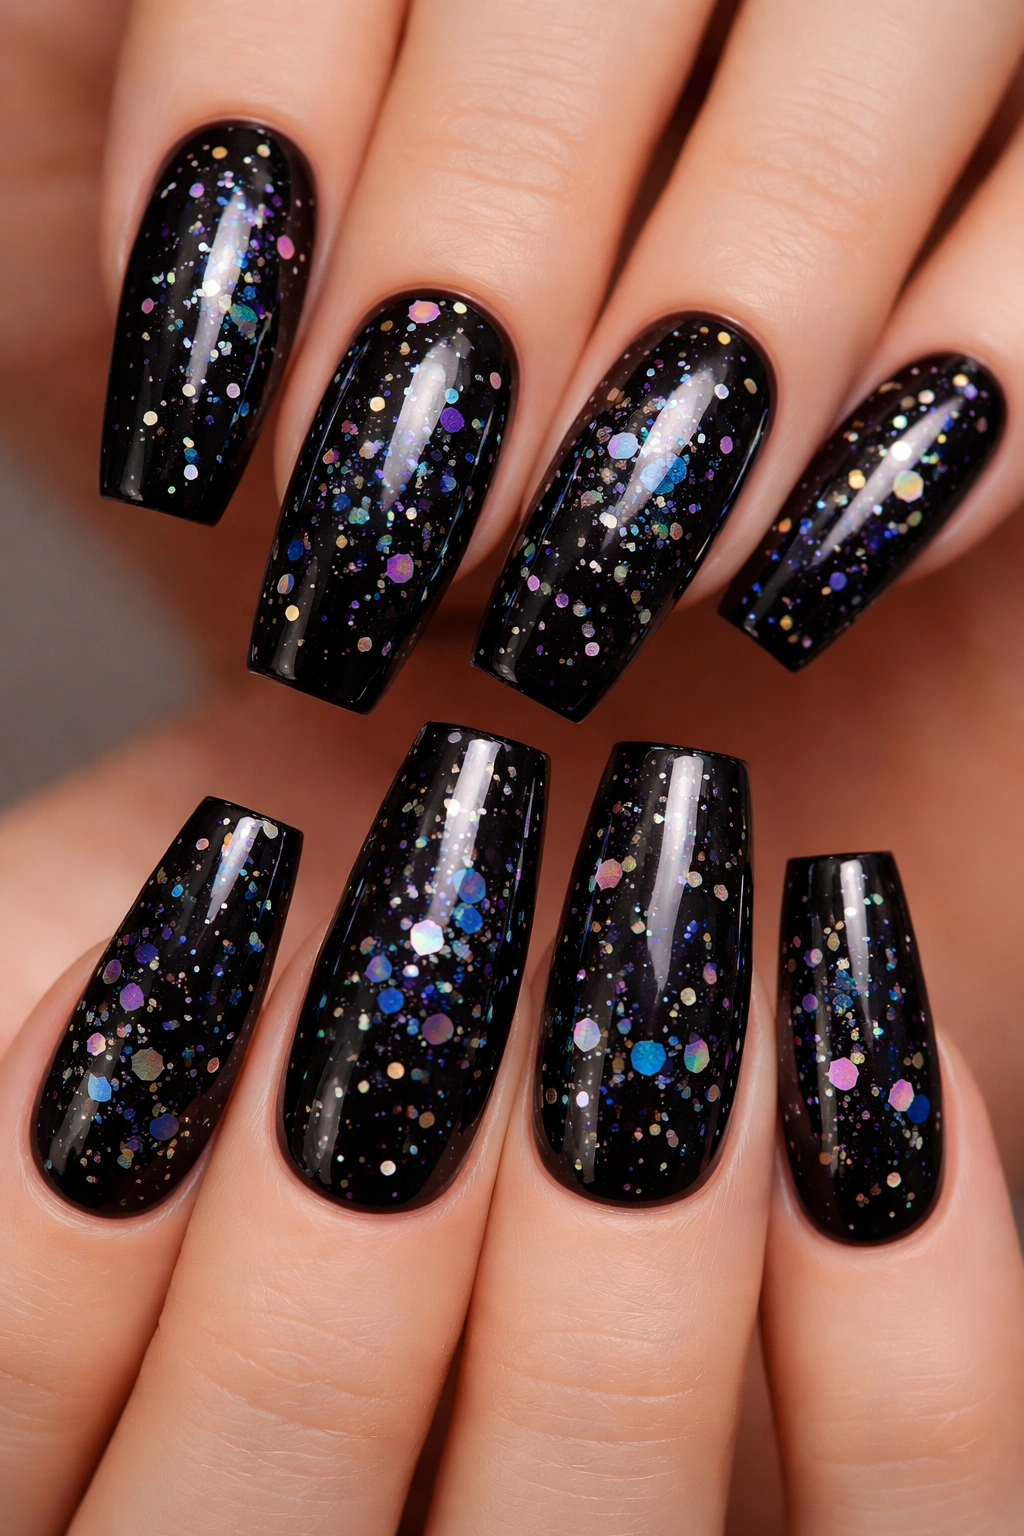
Create dramatic contrast by pairing a sophisticated black base with scattered holographic confetti pieces or small holographic decals. The wide nail surface lets each holographic element catch light independently, creating a dazzling effect that shifts as you move your hand. This design reads as fun and celebratory while maintaining edge and polish through the black base.
Why Holographic Details Matter
Holographic elements naturally draw attention without requiring multiple colors or complex patterns. Because they shift and change with light, they keep the design visually interesting and dynamic. The black base ensures they’re the clear focal point rather than getting lost in a busy design.
Application Approach
- Apply two coats of jet black polish and let dry completely
- Cut holographic confetti into small irregular shapes or use pre-made holographic decals
- Apply small amounts of clear topcoat or nail glue where you want each piece
- Press decals or confetti firmly into place using a tool or the flat end of a brush
- Seal everything with multiple coats of glossy topcoat
- Build up the topcoat slightly thicker than normal to create a domed effect
- Consider adding a chrome or metallic accent along the edge for extra dimension
Worth knowing: Holographic pieces are extremely light-reflective, so a little goes a long way. You don’t need to cover the entire nail—scattered placement is more sophisticated.
9. Nude with Micro Crystal Ombre
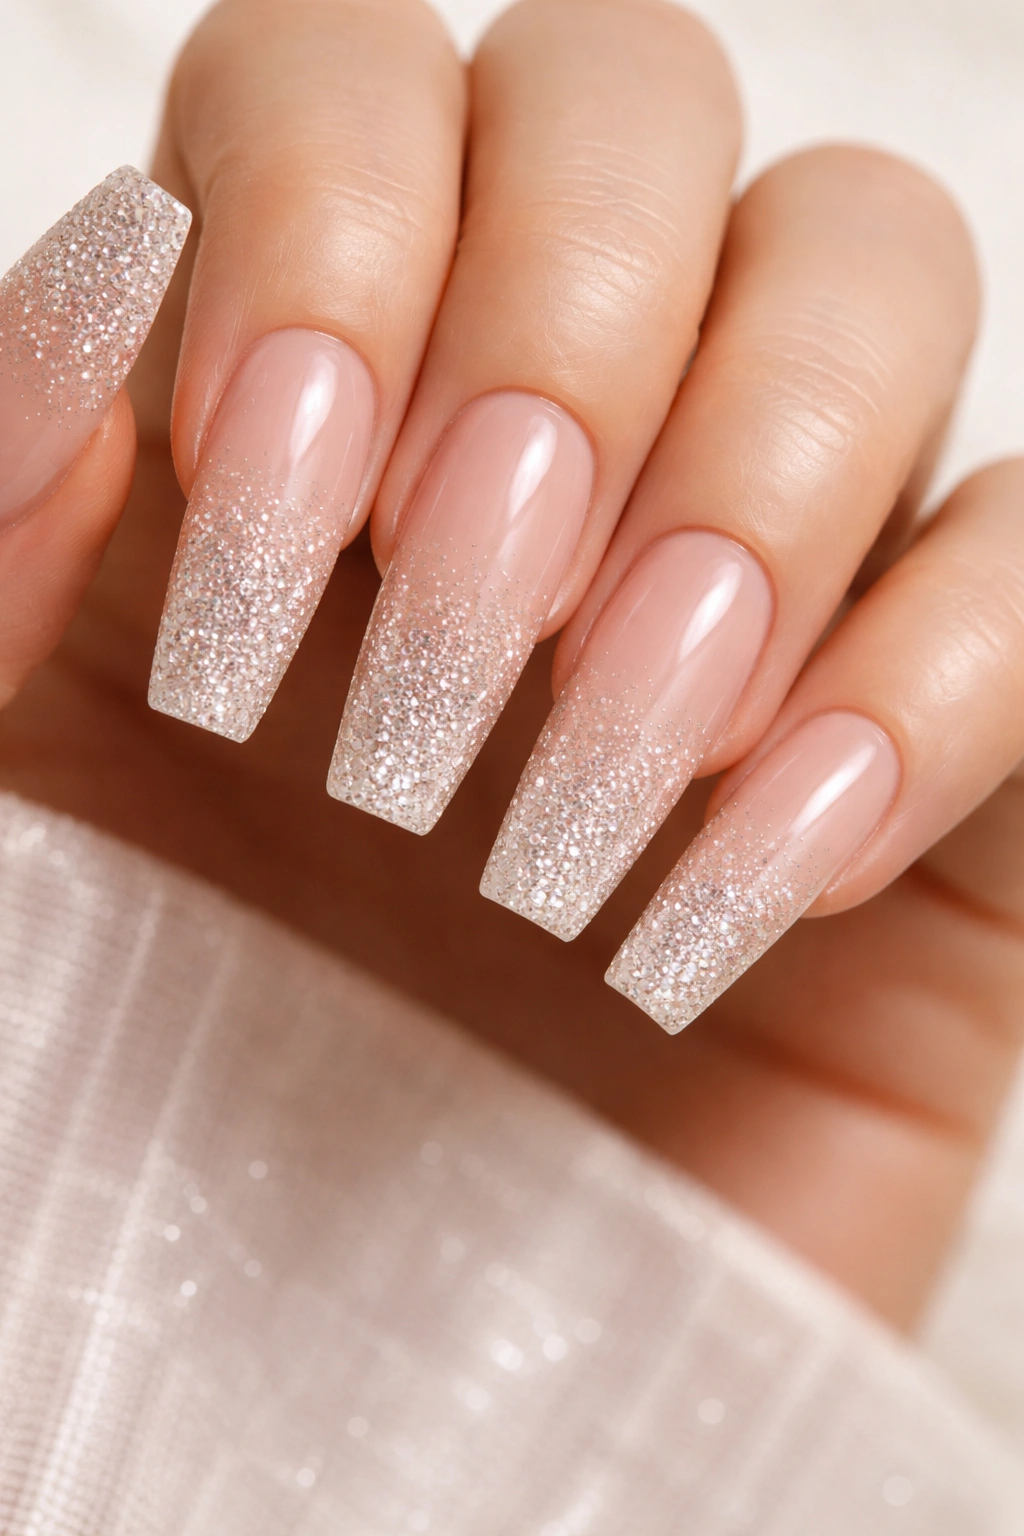
Create an ombre effect using increasingly dense micro crystals or rhinestones from the cuticle to the tip. Start with a light dusting of tiny crystals at the base, building density as you move toward the tip until the very tip is nearly covered in sparkle. This gradient effect feels sophisticated and catches light beautifully without looking costume-like because the nude base prevents it from reading as costume jewelry.
The Strategy Behind Crystal Ombre
Crystal ombre works because it suggests movement and depth while maintaining visual balance. The eye naturally moves from less dense to more dense, from simple to sparkly, creating a sense of intentional design rather than random placement. The wide nail surface gives you enough room to execute the density gradient smoothly.
Creating the Gradient
- Apply nude base coat and let dry completely
- Use a small dotting tool or toothpick dipped in clear topcoat or nail glue
- Place micro crystals in a loose cluster near the cuticle area
- Gradually increase density as you move toward the tip
- By the tip, you should have enough crystals that they’re touching or nearly overlapping
- Seal with glossy topcoat, applying slightly thicker coats to secure crystals
- Consider using a builder gel topcoat for extra security and dimension
Pro tip: Invest in a variety of micro crystal sizes (2mm, 3mm, 4mm) to create more sophisticated density gradation than using one size would provide.
10. Forest Green with Gold Geometric Patterns
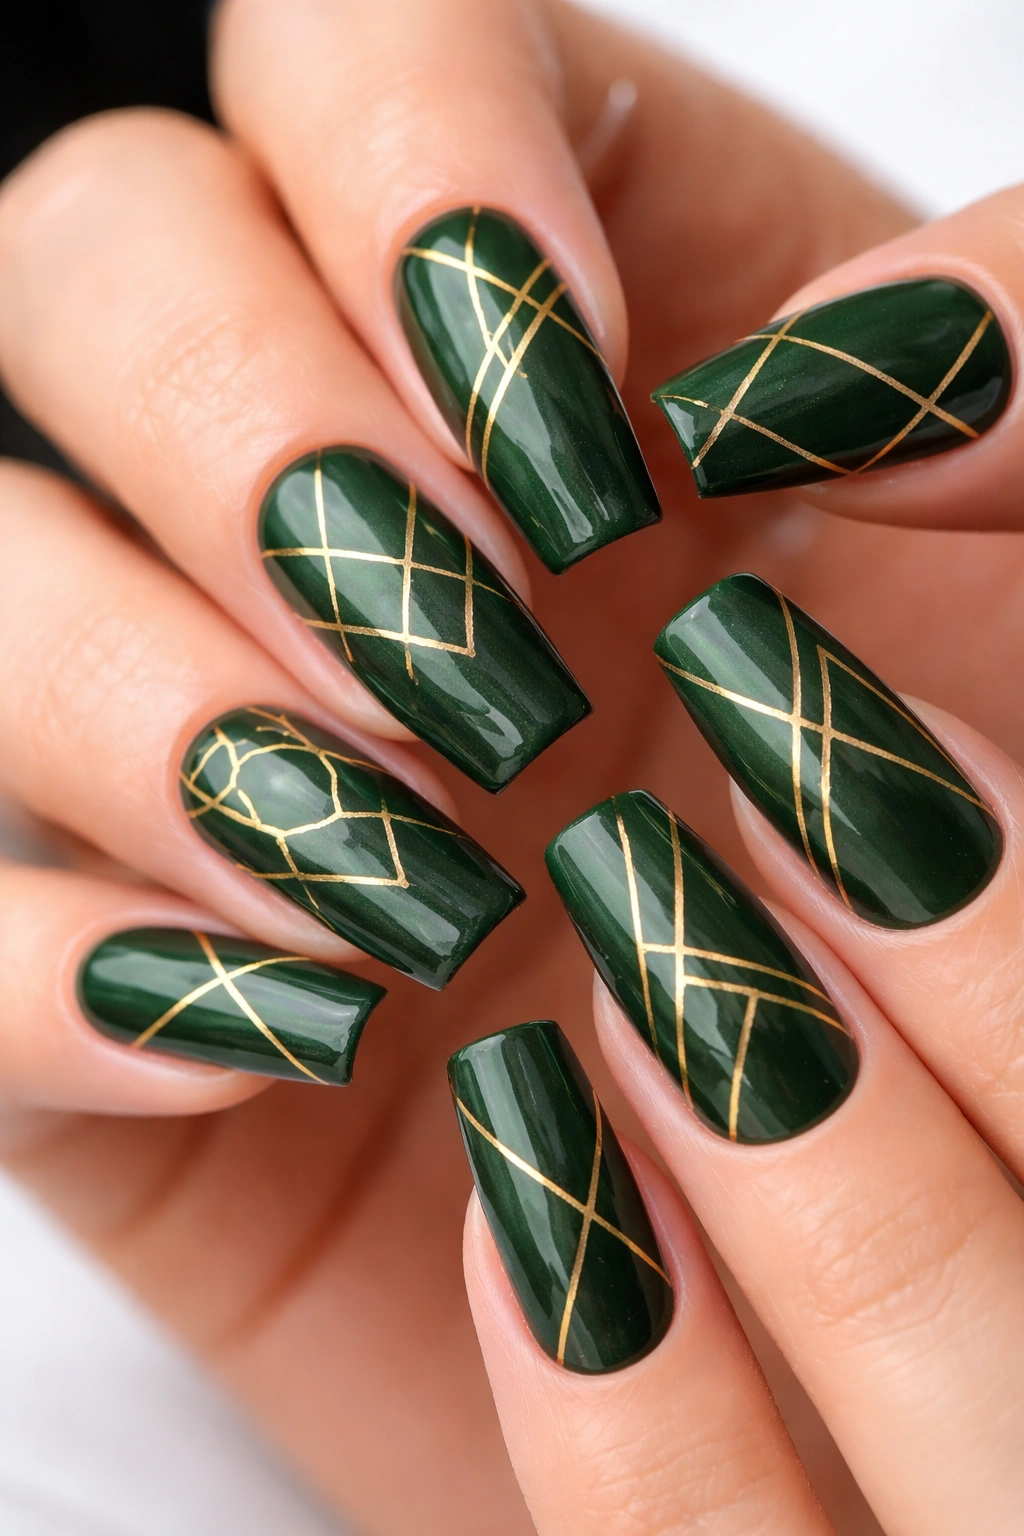
Deep forest green polish provides a luxurious, moody base that works across seasons and occasions. Layer thin gold lines into geometric patterns—triangles, hexagons, or abstract angular shapes that reference art deco or modern geometric design. The wide nail shape lets geometric patterns read clearly and intentionally rather than feeling cramped or busy.
Why Geometric Patterns Elevate a Solid Color
A geometric pattern transforms a solid color into something that feels designed and intentional. The pattern draws the eye and creates visual interest without the design feeling fussy or requiring complicated brushwork. Geometric lines are actually easier to execute than curved, organic patterns.
Creating Geometric Patterns with Gold
- Apply two coats of forest green and let dry
- Use a thin gold gel liner or gold gel pen for precision
- Plan your pattern lightly with a pencil first
- Paint geometric shapes in thin, clean lines
- Common patterns: stacked triangles, hexagonal grid, angular lines from corner to corner
- Leave space between elements so the green shows through
- Seal with glossy topcoat to make the gold pop against the green
- Consider a matte topcoat on the green only for contrast with glossy gold
Worth knowing: Gold gel liners give you more control than regular polish. If you don’t have a gel liner, use a very thin brush and gel or regular polish.
11. Cream Base with Abstract Watercolor Wash
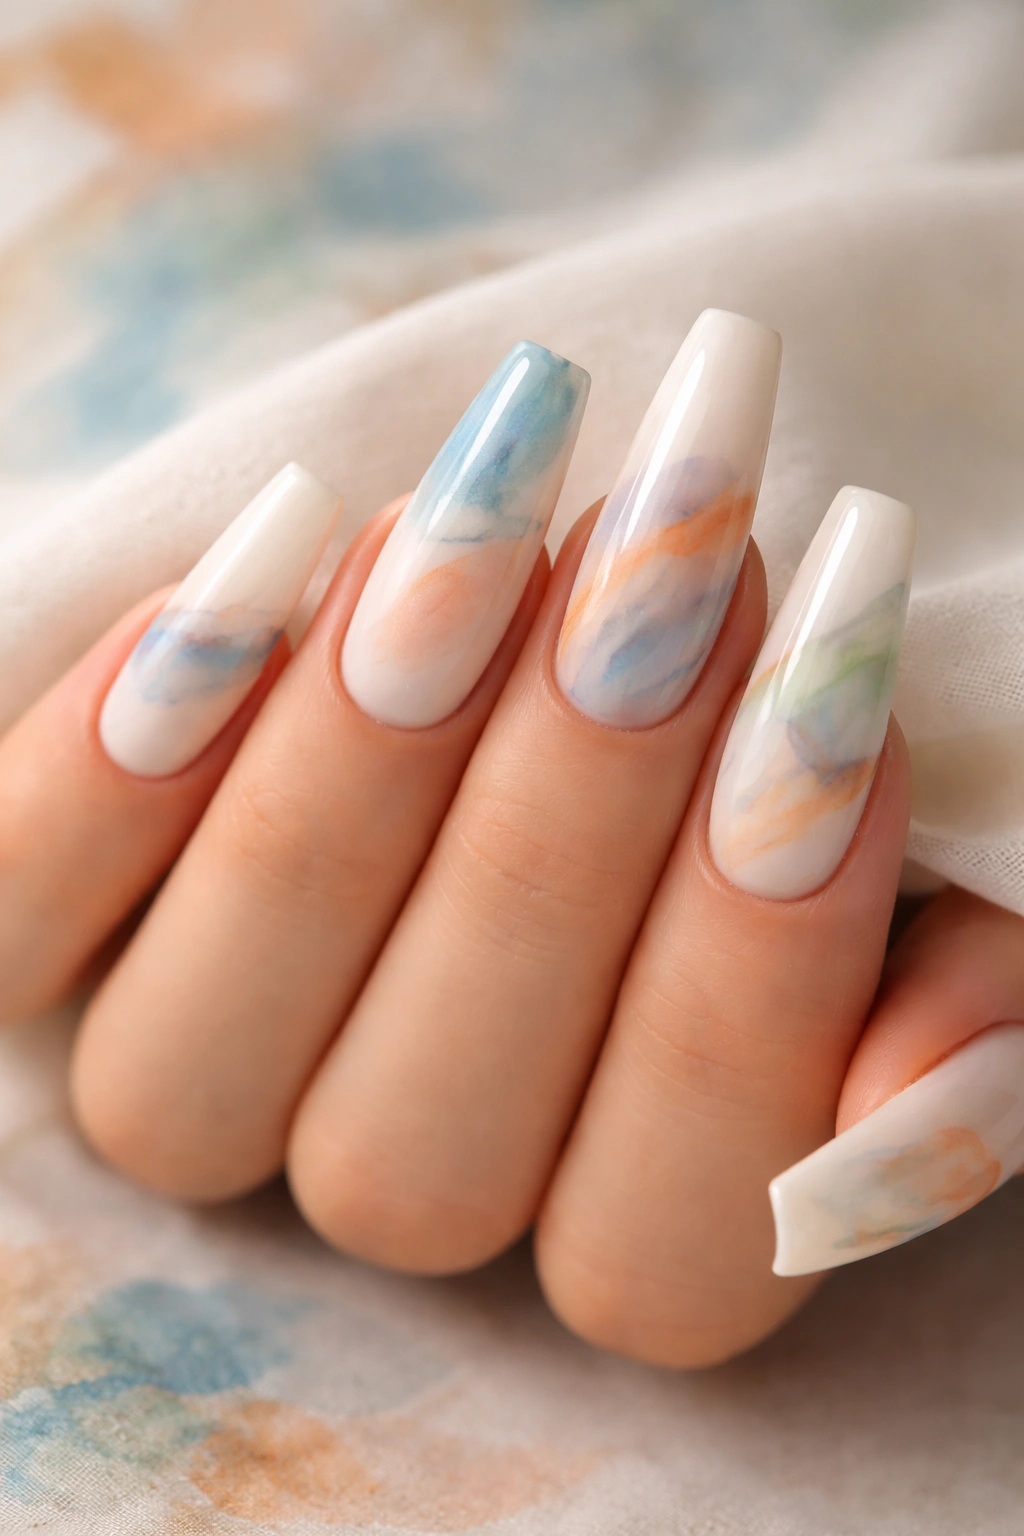
Create an artistic, one-of-a-kind design using watercolor technique with nail polish. Start with a cream or pale yellow base, then apply thin washes of complementary colors (soft blues, warm peachy tones, or muted greens) using a slightly wet brush or sponge. The colors should blend and merge organically, creating an abstract effect that feels artistic and intentional. The wide coffin shape accommodates the watercolor movement beautifully.
The Beauty of Watercolor Imprecision
Watercolor nail art embraces imperfection as part of the design. There are no “mistakes” because the whole point is organic, flowing color. Each nail becomes genuinely unique, even if you try to replicate the technique multiple times.
Watercolor Application
- Start with pale cream or yellow base coat
- Mix thin washes of colored polish by combining one part polish with one part clear topcoat or a dedicated nail polish thinner
- Use a soft brush or sponge to apply washes, allowing colors to merge where they meet
- Work quickly before the polish dries
- Add more concentrated color in some areas for dimension
- Seal with glossy topcoat once fully dry
- The topcoat will make the watercolor effect more vivid
Insider note: This technique works better with gel polish because you have more time to blend before it dries, but traditional polish works too if you work quickly.
12. Soft Pink with Pearl Inlay Details
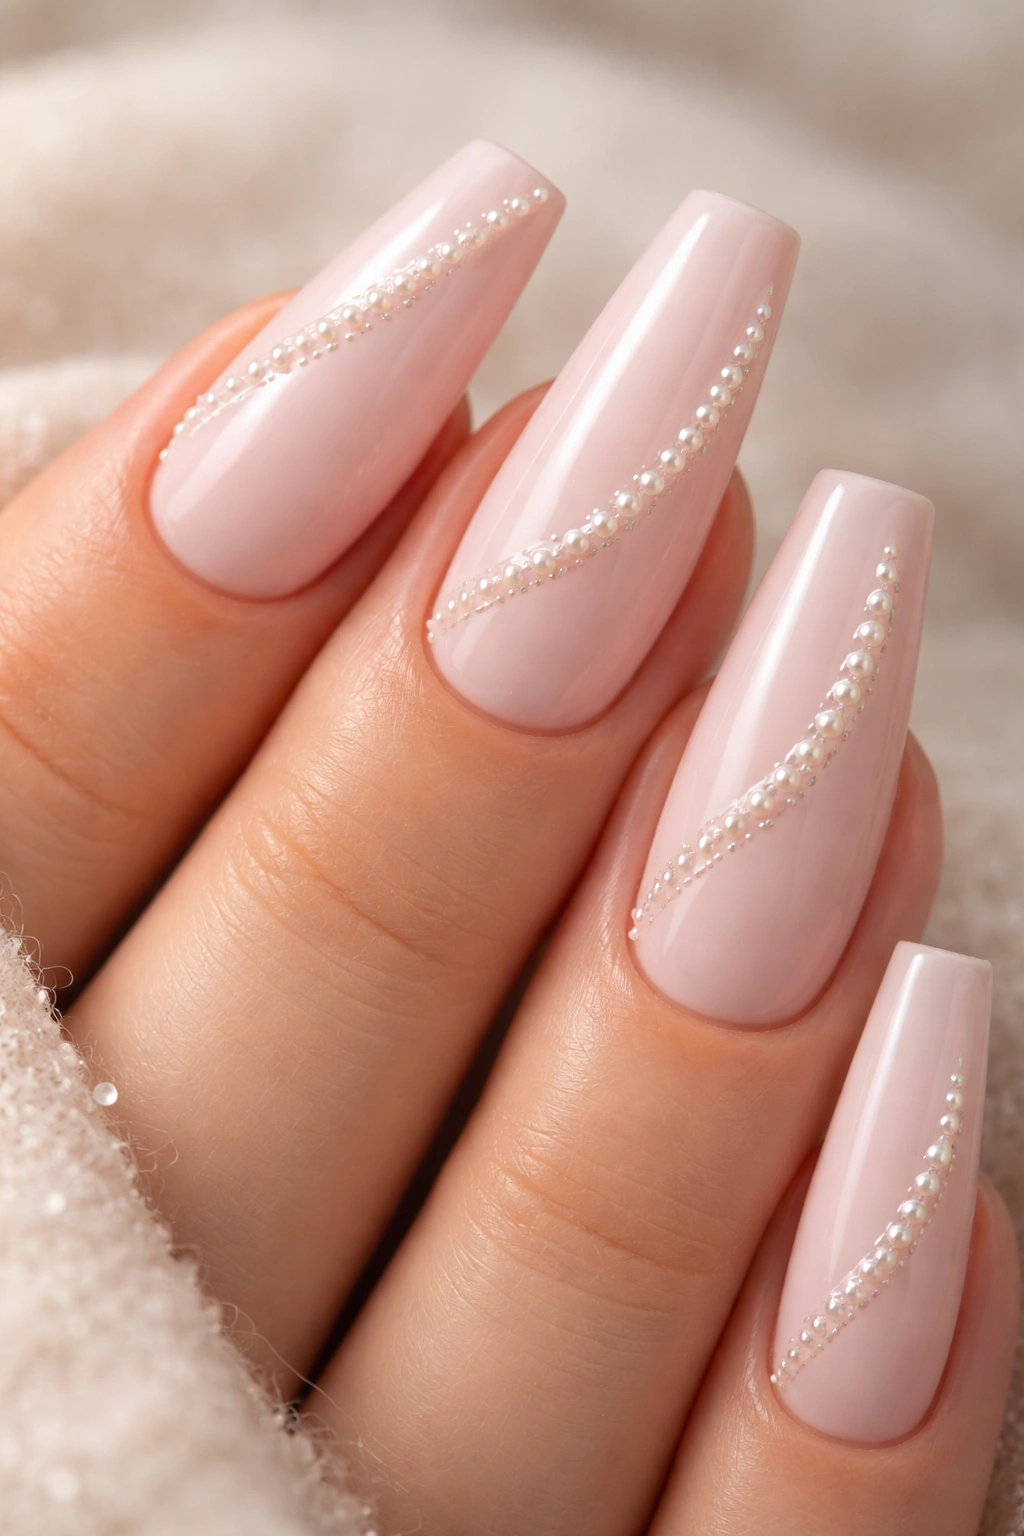
Apply soft pink as your base, then strategically place small pearl or opal-colored elements into shallow grooves or ridged patterns you create. This dimensional approach adds texture and luxury without requiring intricate painting skills. Pearls catch light in a soft, subtle way that reads as expensive and thoughtfully executed rather than trying too hard.
Why Pearls Feel Luxurious
Pearl finishes naturally suggest luxury because they’re uncommon in everyday nail design. Even a simple placement of pearl accents elevates a basic color into something that feels special and considered. The soft shimmer of pearls complements most skin tones beautifully.
Creating Pearl Details
- Apply soft pink base coat in either glossy or matte finish
- Use a dotting tool to apply clear topcoat or thin gel where you want pearls
- Place small pearl beads or pearl-finish rhinestones into the topcoat
- Press gently and allow to set
- Consider creating a pattern: pearls along the edge, scattered throughout, or clustered in one area
- Seal with glossy topcoat, being careful not to dislodge the pearls
- The topcoat creates a smooth, unified finish
Pro tip: Pearl beads are lighter than traditional rhinestones, so they’re less likely to shift or fall off if properly sealed.
13. Charcoal Gray with Minimalist White Line Art
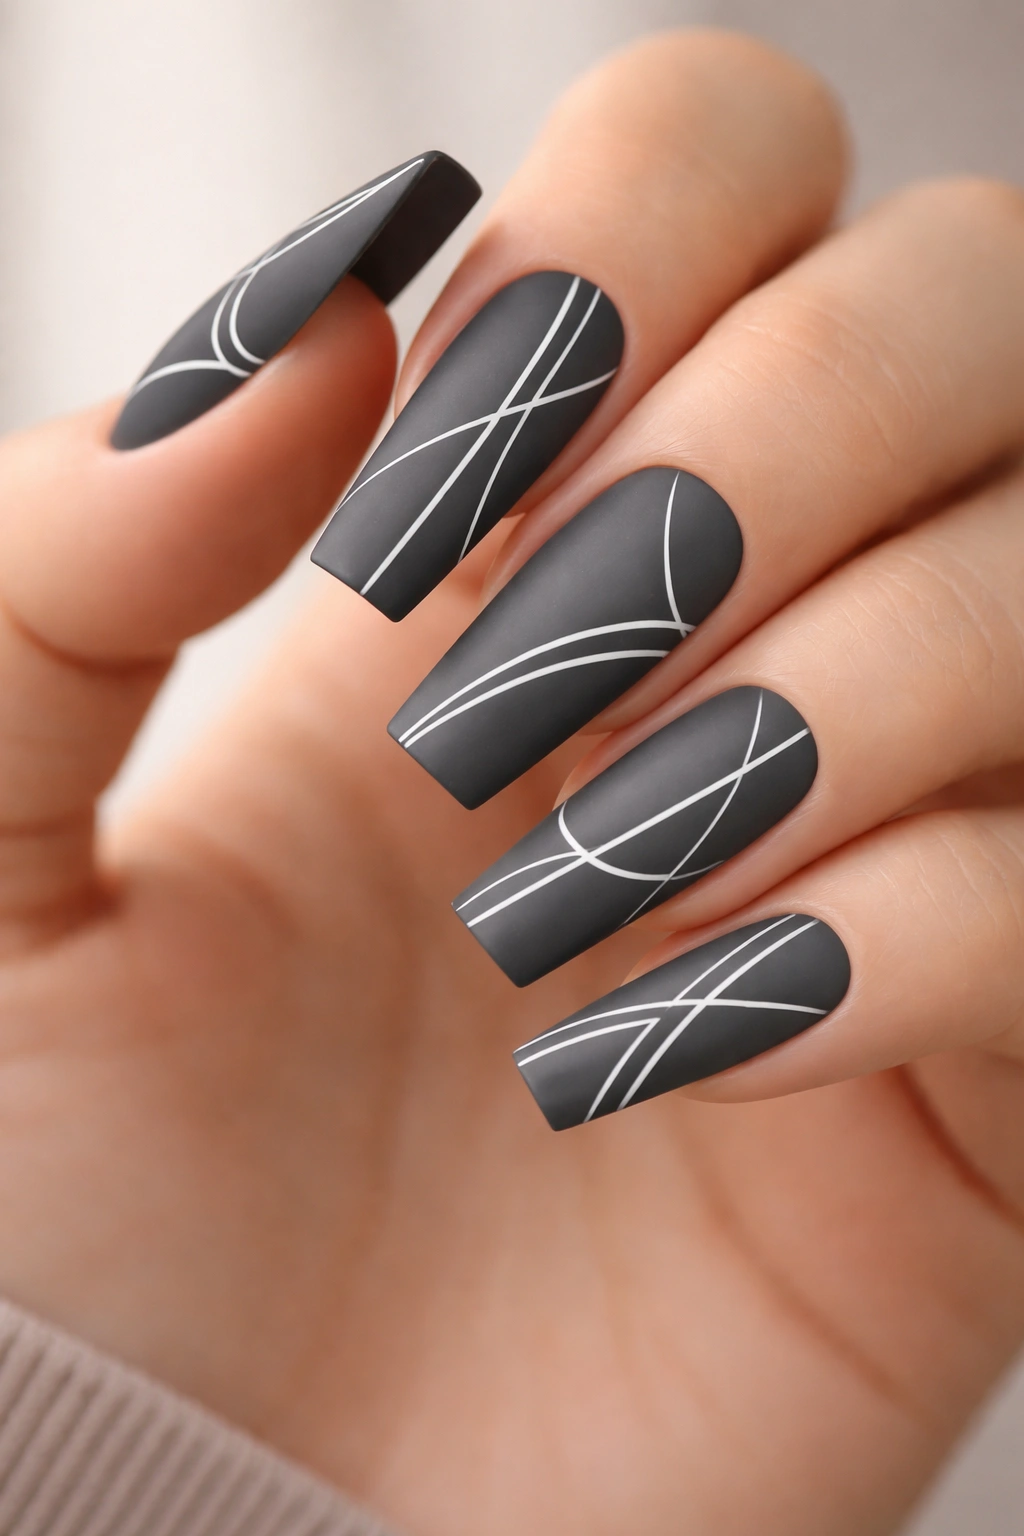
Charcoal gray provides a sophisticated, neutral base that works for any occasion. Create minimalist white line art on top—simple geometric shapes, abstract line drawings, or minimalist faces created with just a few lines. The contrast between gray and white is crisp and intentional, and the minimalist approach feels modern and refined. The wide nail allows each line to be appreciated as part of a thoughtful composition rather than cramped.
The Power of Minimalist Line Art
Minimalist line art is perhaps the most forgiving form of nail art because imperfection is literally part of the aesthetic. A slightly wobbly line, an asymmetrical shape, or rough edges all contribute to the hand-drawn, artistic feel. The wide coffin shape prevents minimalist designs from feeling empty.
Creating Minimalist Line Art
- Apply two coats of charcoal gray and let dry completely
- Use a thin white brush or white gel liner
- Choose your design: simple geometric shapes, abstract lines, tiny face, or constellation pattern
- Draw using just a few defining lines
- Leave plenty of gray showing through
- The design should take up only 30-40% of the nail surface
- Finish with glossy topcoat for clean, sharp contrast
Worth knowing: White on gray has enough contrast to read clearly, but it’s less stark than white on black, which can feel heavy.
14. Sunset Ombre with Metallic Orange Gradient
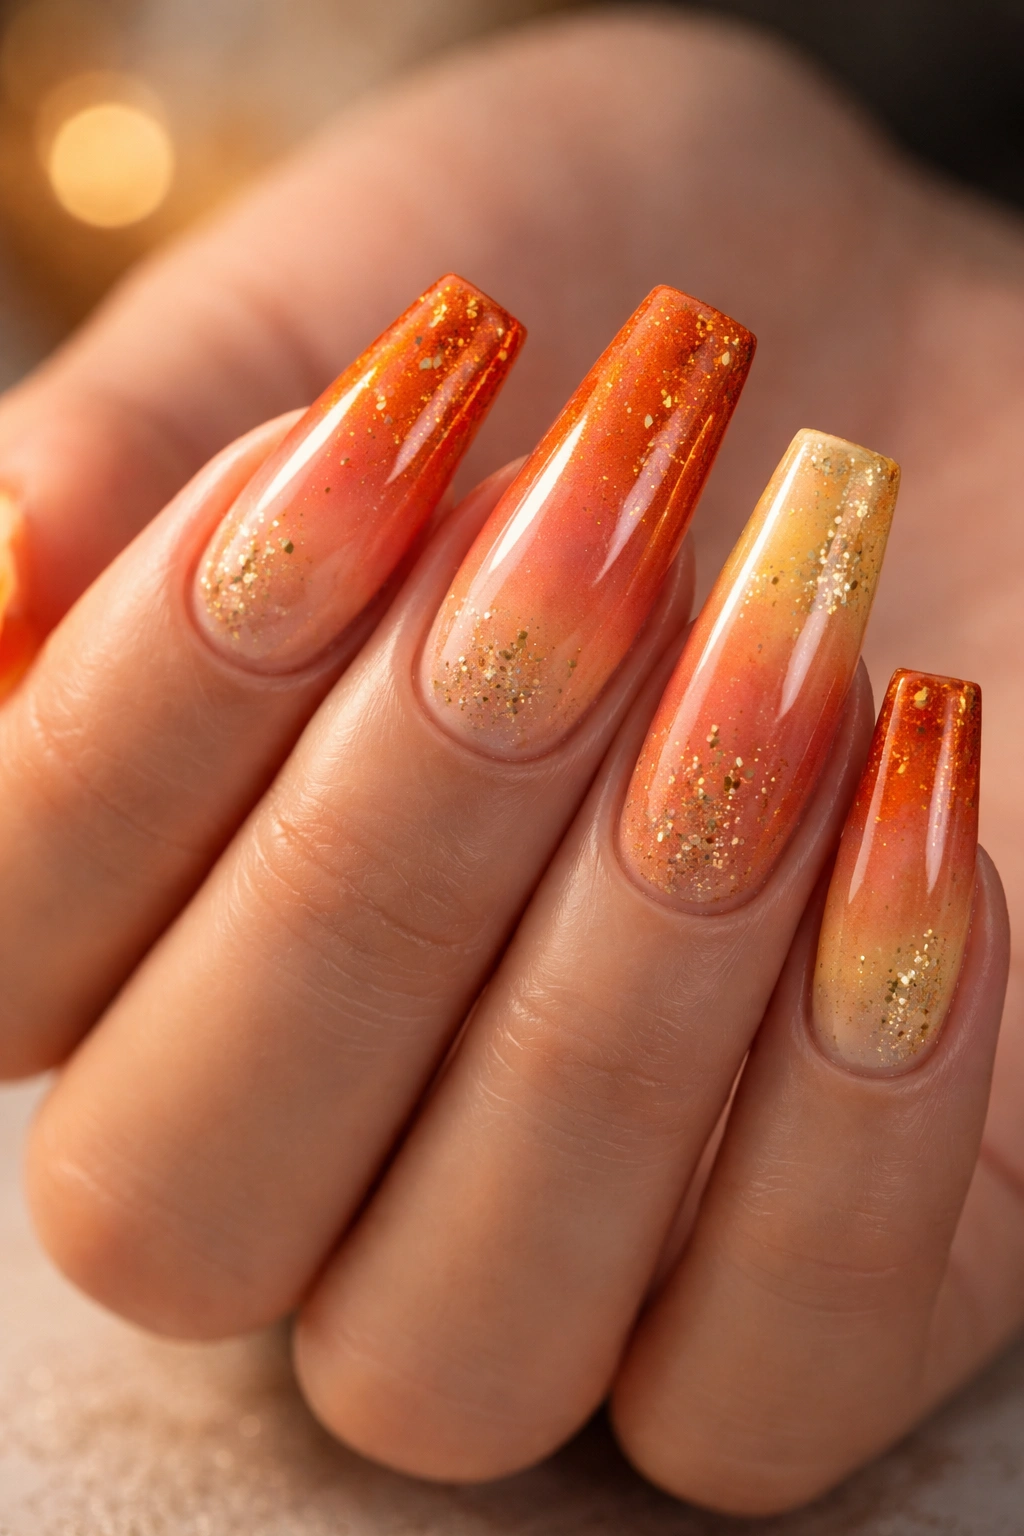
Capture the warmth of a sunset using a gradient from deep orange at the base through peachy tones to soft yellow at the tips. Layer in tiny metallic flakes or scattered gold specs throughout to mimic light breaking through clouds. The wide nail surface lets you create actual depth in the gradient—it’s not just a thin line of color change but a genuine transition across the broad surface.
Creating Authentic Sunset Movement
A sunset ombre works because it references something real and universally admired. The gradient should feel natural rather than artificial—multiple soft layers of blended color rather than sharp color demarcation. Metallic elements add complexity without requiring precision.
Sunset Gradient Technique
- Apply deep orange base and let dry
- Use a makeup sponge to apply peachy tone over approximately the middle third
- Sponge yellow or pale orange over the tips, extending backward
- Blend where colors meet using a clean sponge with a tiny touch of clear topcoat
- Add scattered metallic gold or bronze flakes using a thin brush
- Consider a soft matte topcoat over the gradient with glossy topcoat over the metallics
- The mixed finishes add visual interest and dimension
Insider note: If sponging feels messy, try using a soft angled brush instead. Work quickly and blend as you go.
15. Wine Red with Black Lace Overlay
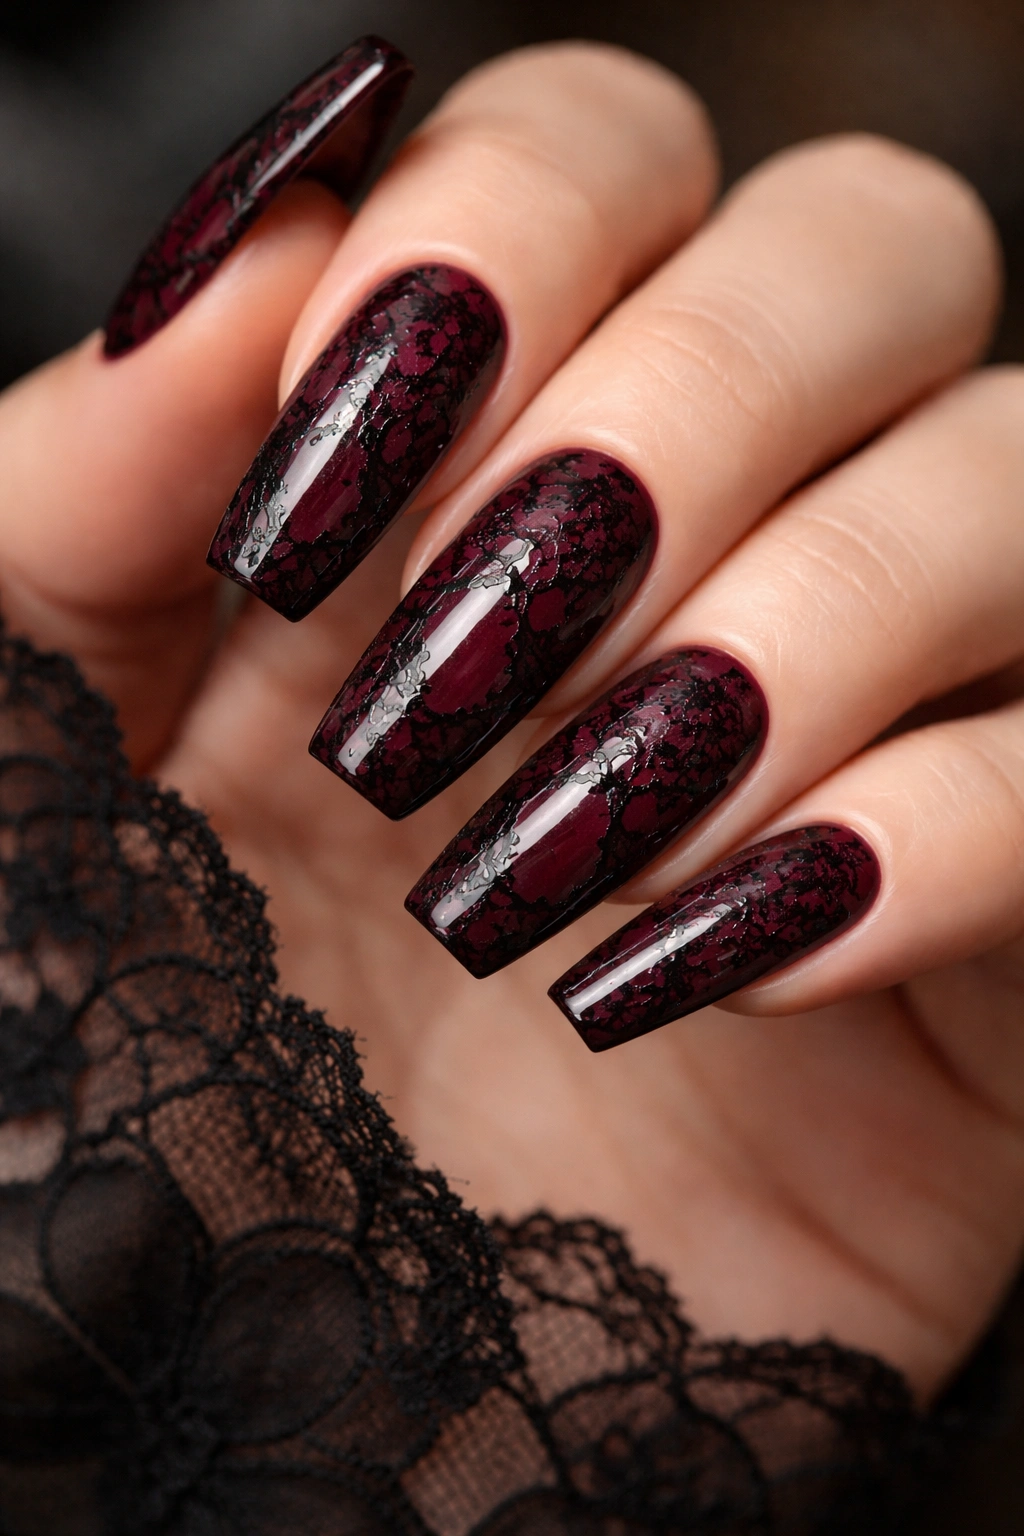
Apply deep wine red as your base, then create a delicate black lace pattern on top using either hand-painted lines, thin lace decals, or stamped designs. The contrast between rich red and black is sophisticated and luxurious, and the lace detail adds femininity and complexity without requiring freehand artistic ability. The wide nail accommodates lace patterning beautifully without it feeling cramped or overwhelming.
Why Lace Details Feel Elevated
Lace patterns automatically suggest elegance and vintage romance. Even simple lace creates visual interest and sophistication. The wide nail shape means the lace pattern reads clearly as intentional design rather than getting lost in the surface.
Creating Lace Overlay
- Apply two coats of wine red and let dry
- Option 1: Use a nail stamp with a lace pattern and black polish to transfer the design
- Option 2: Apply a lace decal using clear topcoat as adhesive
- Option 3: Hand-paint thin lace lines using black gel liner
- Layer the lace pattern across the entire nail or just along the edge
- Seal with glossy topcoat to unify the design
- Consider adding a tiny detail like a single rhinestone at the center of a lace element
Pro tip: If hand-painting feels intimidating, invest in a few lace stamp plates—they deliver lace patterns reliably without requiring artistic skill.
16. Icy Blue with Silver Chrome Tips
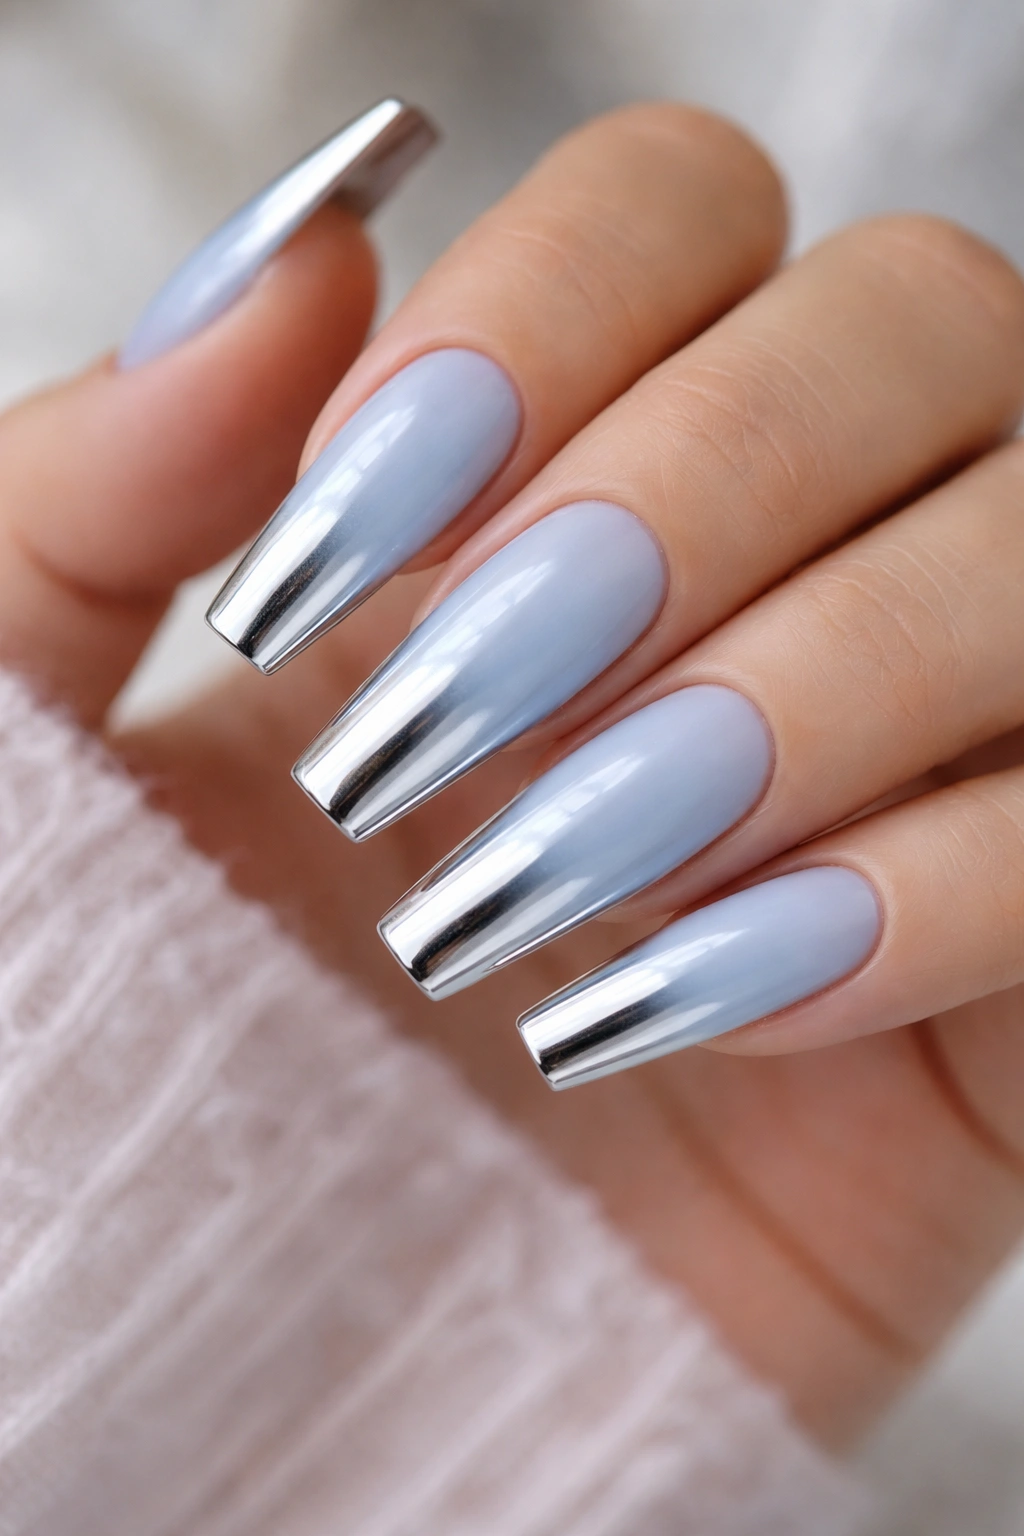
Create a gradient from pale icy blue at the cuticle to full chrome silver on the tips. Chrome finishes naturally draw attention and catch light dramatically, so concentrating the chrome on the tips prevents the effect from being overwhelming while creating maximum visual impact. The wide nail shape means the chrome tips have significant presence without dominating the entire nail.
Why Chrome Works Best as an Accent
Full chrome nails can feel costume-like or overly trendy. Using chrome strategically—just on the tips, in an ombre, or concentrated in one area—gives you the futuristic, eye-catching effect without commitment to a purely chrome finish. The gradient from solid to chrome also creates natural depth and dimension.
Chrome Gradient Application
- Apply two coats of icy blue and let dry completely
- Apply chrome powder to a chrome gel base coat, working from the tips backward
- Create a gradient by using less chrome powder as you move toward the cuticle
- Buff away excess powder and seal with topcoat
- The topcoat will deepen the chrome effect
- Consider adding a thin silver line separating the blue and chrome for definition
Worth knowing: Chrome powder requires a specific base (usually a tacky gel base) to adhere properly. Regular polish won’t hold it effectively.
17. Nude with Dimensional Texture Pattern
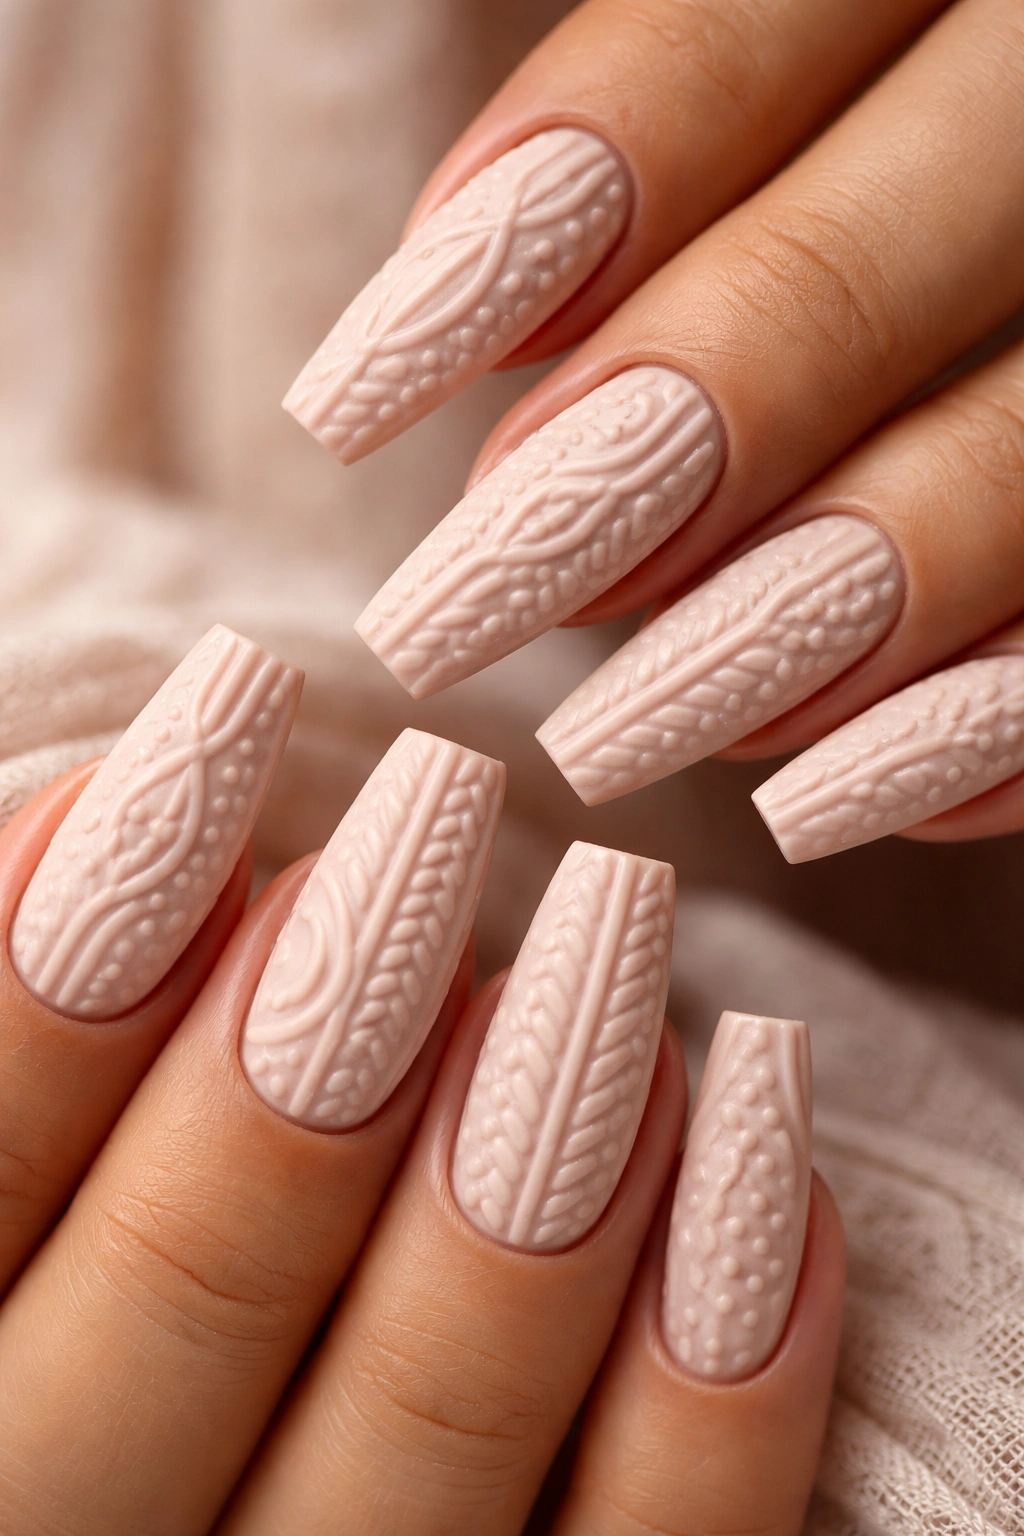
Create texture and dimension using ridged or embossed polish that’s designed to dry with a 3D effect. Apply nude as your base, then use textured polish to create patterns—could be subtle all-over texture, specific geometric patterns, or scattered dimensional elements. The wide nail surface showcases texture beautifully, and the subtle nude color lets the texture itself be the main design element rather than competing with bold colors.
The Appeal of Textured Polish
Textured polish is experiencing renewed interest because it adds a tactile element that regular polish can’t achieve. It’s genuinely different and interesting while remaining sophisticated. The 3D effect photographs beautifully and catches light in unique ways.
Creating Textured Designs
- Apply nude base coat and let dry completely
- Apply textured polish according to package directions
- Textured polish typically dries with visible dimension—no additional techniques needed
- Consider concentrating the texture in specific areas: tips, edges, or geometric patterns
- A single coat of texture usually provides the effect; multiple coats make it bumpy rather than intentionally dimensional
- Seal with topcoat, understanding that topcoat will slightly smooth the texture (this is fine—it prevents the texture from catching and peeling)
Pro tip: If you apply topcoat, use a light touch and let it dry fully. Heavy topcoat application will flatten your texture.
18. Sage Green with Pressed Flower Design
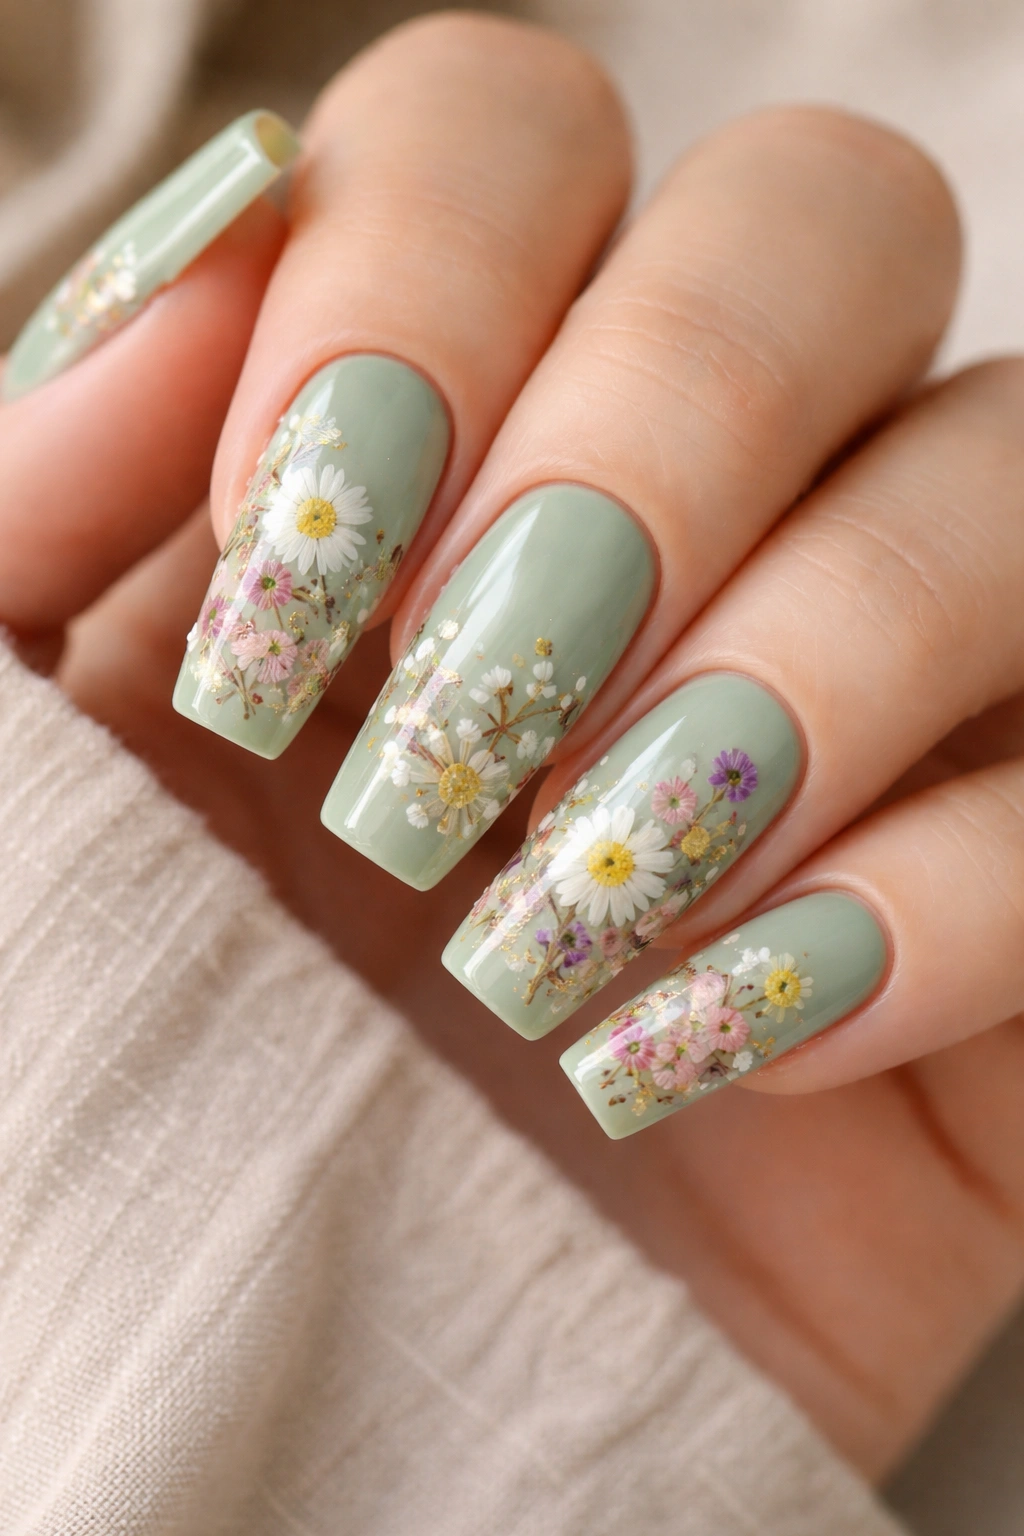
Create a botanical design by embedding actual pressed flowers under clear polish. Apply sage green as your base, then carefully place tiny pressed flowers (real dried flowers or nail art flowers designed for this purpose) on the nail using clear topcoat as adhesive. Cover with clear topcoat to seal everything in. This creates a nature-inspired design with genuine depth and dimension. The wide coffin shape gives flowers room to be clearly visible rather than lost in the surface.
The Botanical Trend Appeal
Real or pressed flower designs feel organic and artistic without requiring painting or drawing skills. Each flower placement is unique, making your nails genuinely one-of-a-kind. The combination of natural elements with the artificial polish creates an interesting contrast.
Embedding Flowers Properly
- Apply sage green base coat and let dry completely
- Have your pressed flowers ready (available at nail supply stores or dried at home)
- Apply a drop of clear topcoat or nail glue where you want each flower
- Place the flower carefully using a tool or tweezers
- Press gently so it adheres fully
- Once adhesive is set, carefully apply more clear topcoat over the flower
- Build topcoat in thin layers rather than one thick coat to avoid dislodging the flower
- The final topcoat should seal the flower completely
Worth knowing: Real pressed flowers require careful handling and may fade over time. Nail art flowers designed specifically for this application are more durable.
19. Burnt Orange with Copper Leaf Texture
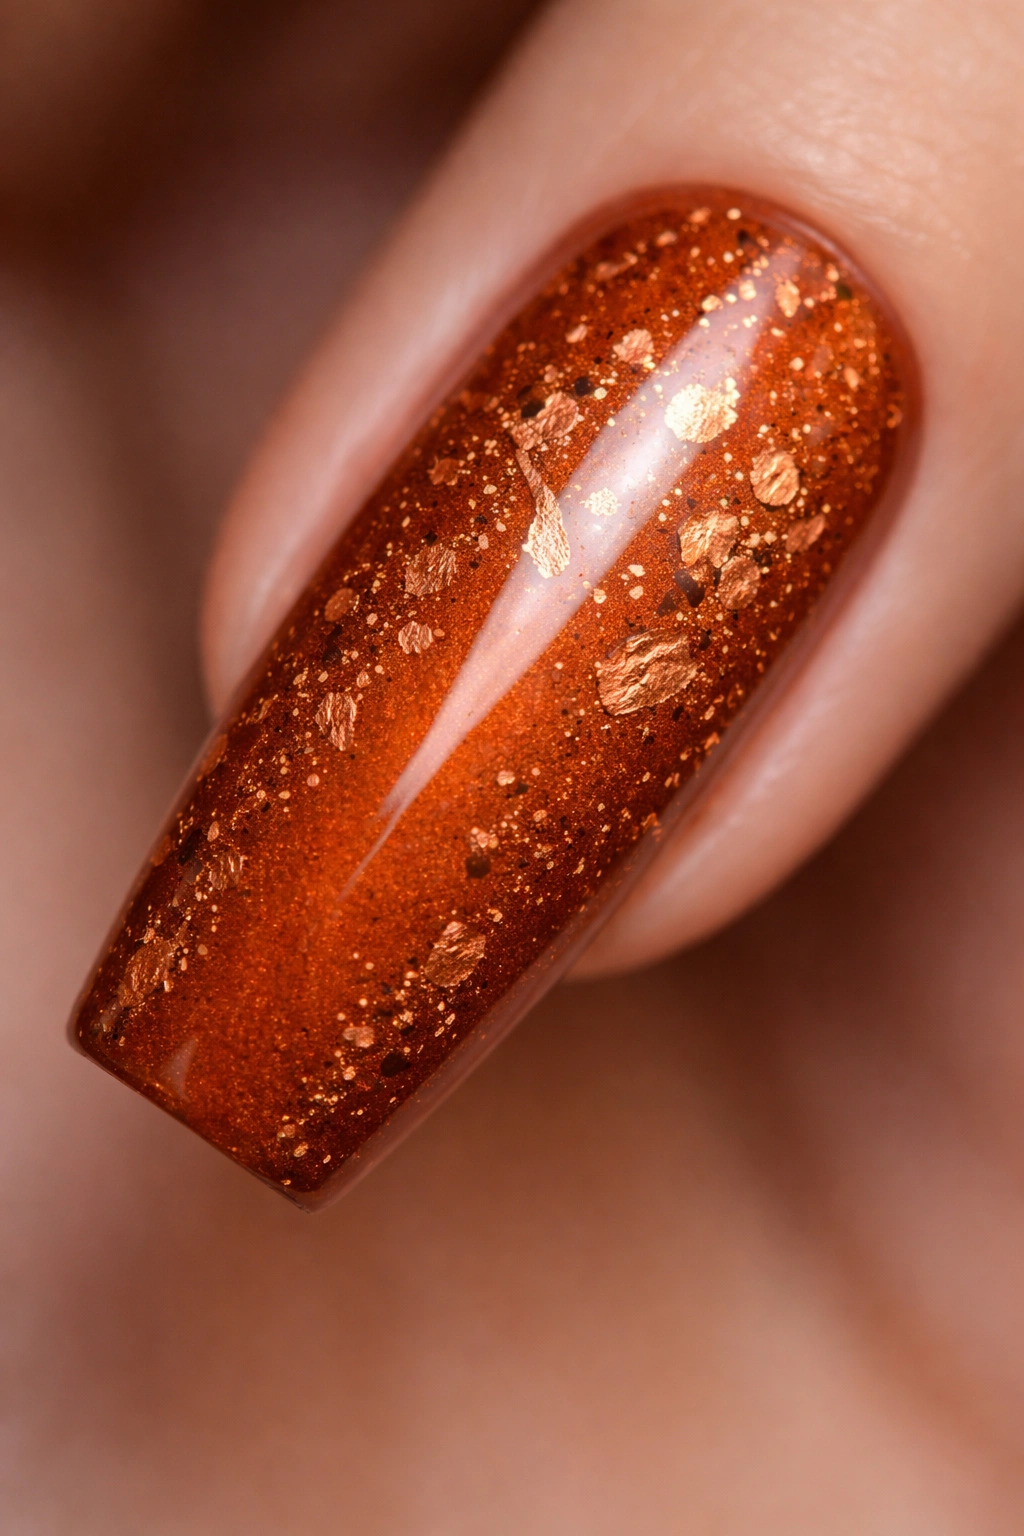
Apply burnt orange polish as your base, then layer in copper leaf or copper flakes mixed directly into or scattered over the surface. The warm, earthy tones complement each other beautifully, and the copper adds subtle luxury and dimension without creating visual chaos. The wide nail accommodates the layered texture smoothly, with copper elements distributed across the entire surface.
Why Copper Complements Warm Tones
Copper is a warm metal that enhances warm colors. The combination of burnt orange and copper reads as intentional and luxury rather than random or clashing. This is a sophisticated, warm-toned alternative to more common gold or silver combinations.
Creating Copper Texture
- Apply burnt orange base coat and let dry
- Mix copper flakes or foil pieces into a clear topcoat for an even distribution
- Apply this copper-infused topcoat in one or two coats
- Alternatively, scatter loose copper flakes over wet topcoat and seal with another coat
- The copper should be distributed throughout rather than concentrated in one area
- A glossy topcoat will make the copper shine and catch light beautifully
Insider note: Copper foil creates a different effect than copper flakes. Foil pieces are larger and create more defined pockets of shine, while flakes distribute more evenly.
20. Pale Pink with Micro-Dot Pattern
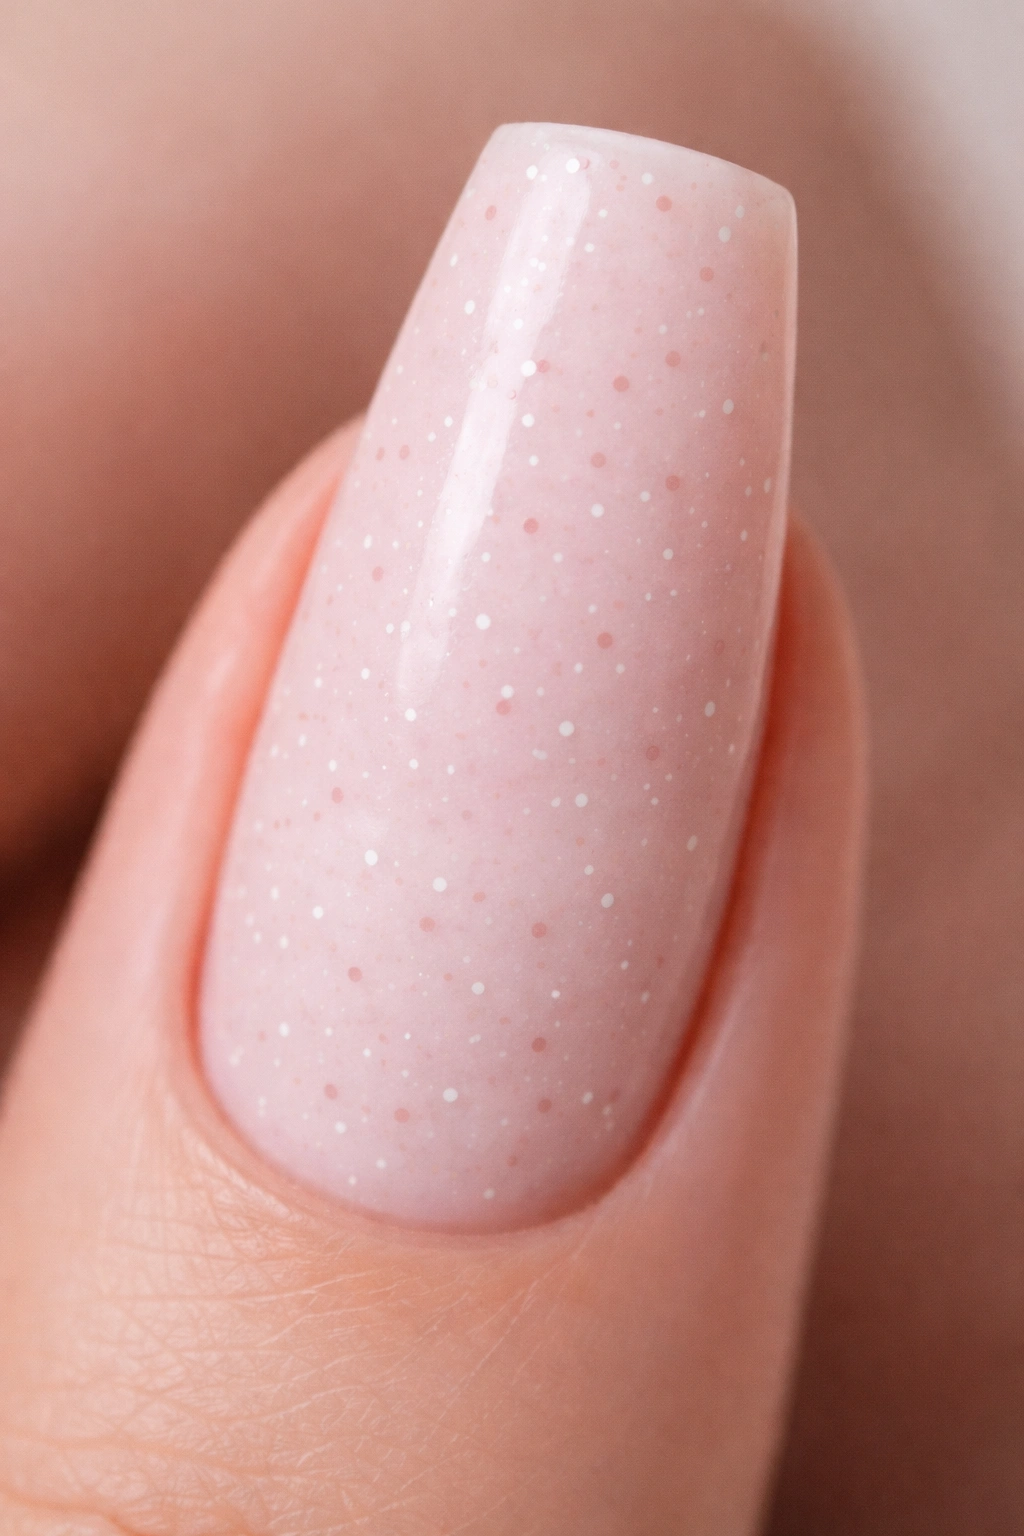
Create a delicate, sophisticated design using incredibly small dots scattered or patterned across a pale pink base. Use a thin brush, a dotting tool, or specialized micro-dot polish applicators to create dots in white, blush, or dusty rose. The dots should be small enough to feel delicate and refined rather than bold or juvenile. The wide nail surface accommodates dotting beautifully, allowing patterns to develop across the entire nail.
Why Micro-Dots Feel Sophisticated
Small, densely packed dots create visual interest and texture without requiring drawing skills. The pattern can be random (scattered across the nail) or organized (geometric rows), both of which read as intentionally designed. The small scale prevents the design from feeling childish or overwhelming.
Creating Micro-Dot Patterns
- Apply pale pink base coat and let dry completely
- Use a dedicated dotting tool (the finest size you can find) dipped in contrasting polish
- Create dots by pressing the tool straight into the nail surface and lifting without twisting
- Work systematically across the nail: left to right, top to bottom
- Space dots 2-3mm apart for an intentional pattern rather than immediately adjacent
- You can also scatter dots randomly without pattern for a more organic feel
- Seal with glossy topcoat to make the dots pop
Pro tip: Clean your dotting tool after every 2-3 dots to prevent polish buildup, which creates irregular dots.
21. Deep Plum with Gold Flecks and Matte Finish
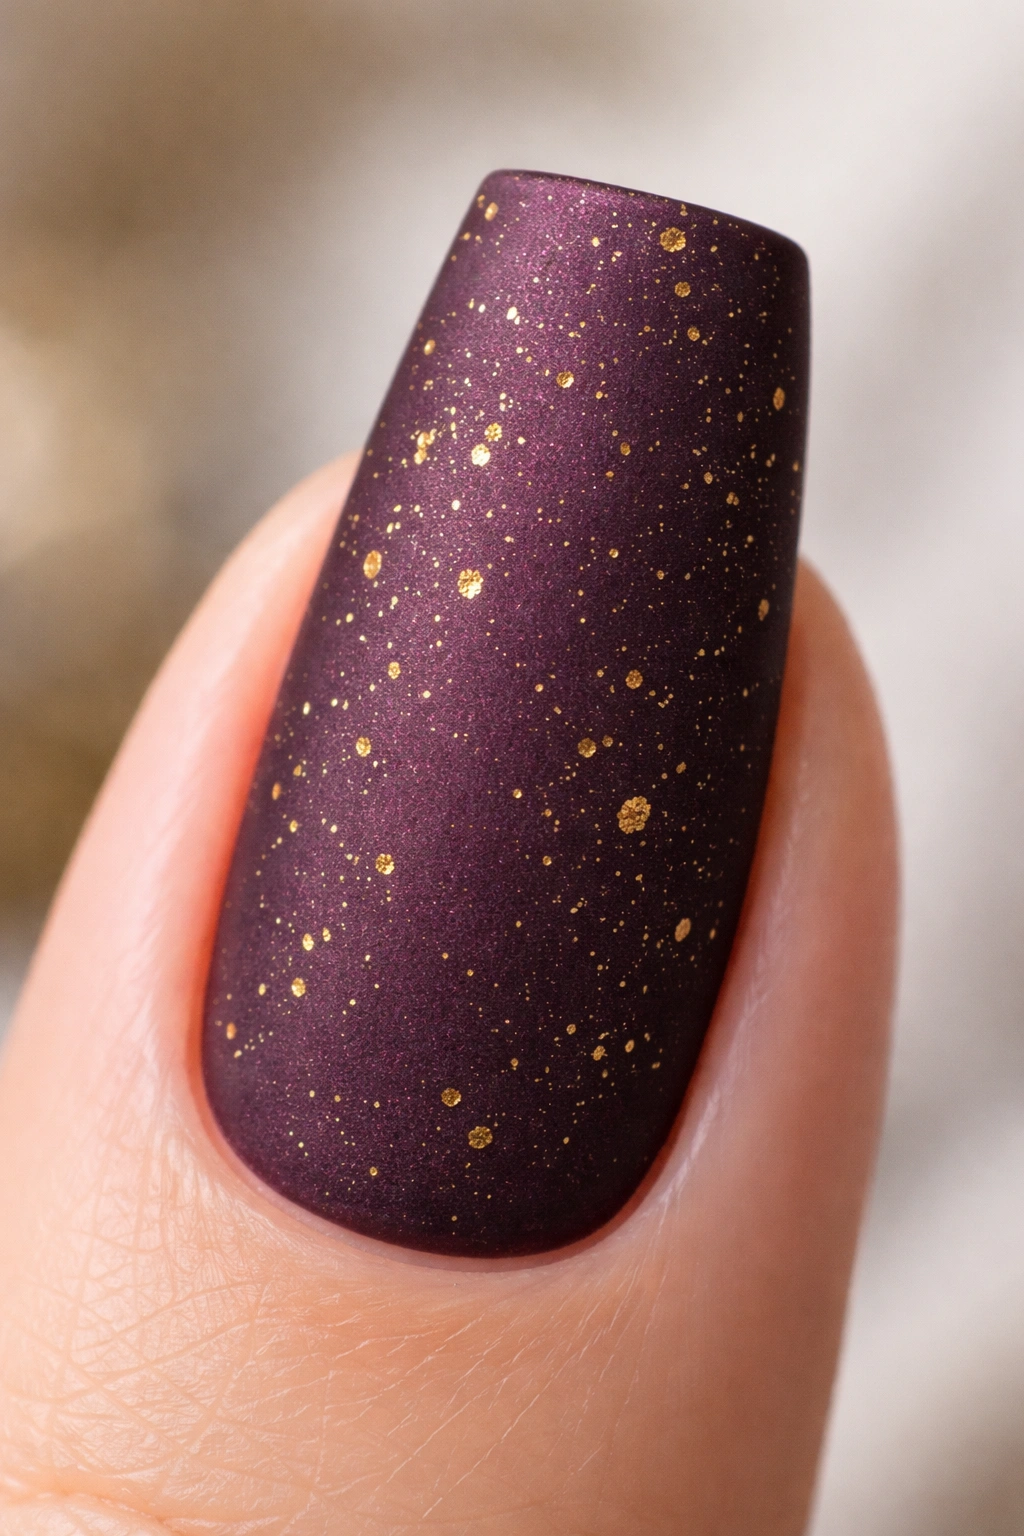
Apply deep, jewel-toned plum polish as your base, then scatter gold flecks or fine gold dust throughout. Finish with a matte topcoat that creates a soft, velvety texture and makes the gold flecks stand out against the non-reflective background. The combination of matte and sparkle is sophisticated and unexpected. The wide nail surface lets the matte finish feel intentional rather than like it’s trying to hide something.
Why Matte with Sparkle Works
Matte finishes have become increasingly popular because they feel modern and unexpected. Pairing matte with gold sparkle creates interesting visual contrast—the matte absorbs light while the flecks catch it, creating dimension and interest. This combination works beautifully in professional and creative settings.
Creating Matte Sparkle Design
- Apply two coats of deep plum and let dry
- Sprinkle fine gold flecks or dust onto wet topcoat, or mix them into the topcoat before application
- Allow to dry completely
- Apply a matte topcoat (specialized matte topcoat, not matte polish as your finish)
- The matte topcoat will set everything and create the velvety effect
- Consider sealing the matte finish with a thin coat of glossy topcoat only on the fleck areas for interesting mixed finish
Worth knowing: Most matte topcoats need light touch application. Heavy topcoat can create an uneven matte finish or look dusty rather than velvety.
22. Cream with Hand-Drawn Botanical Line Sketch
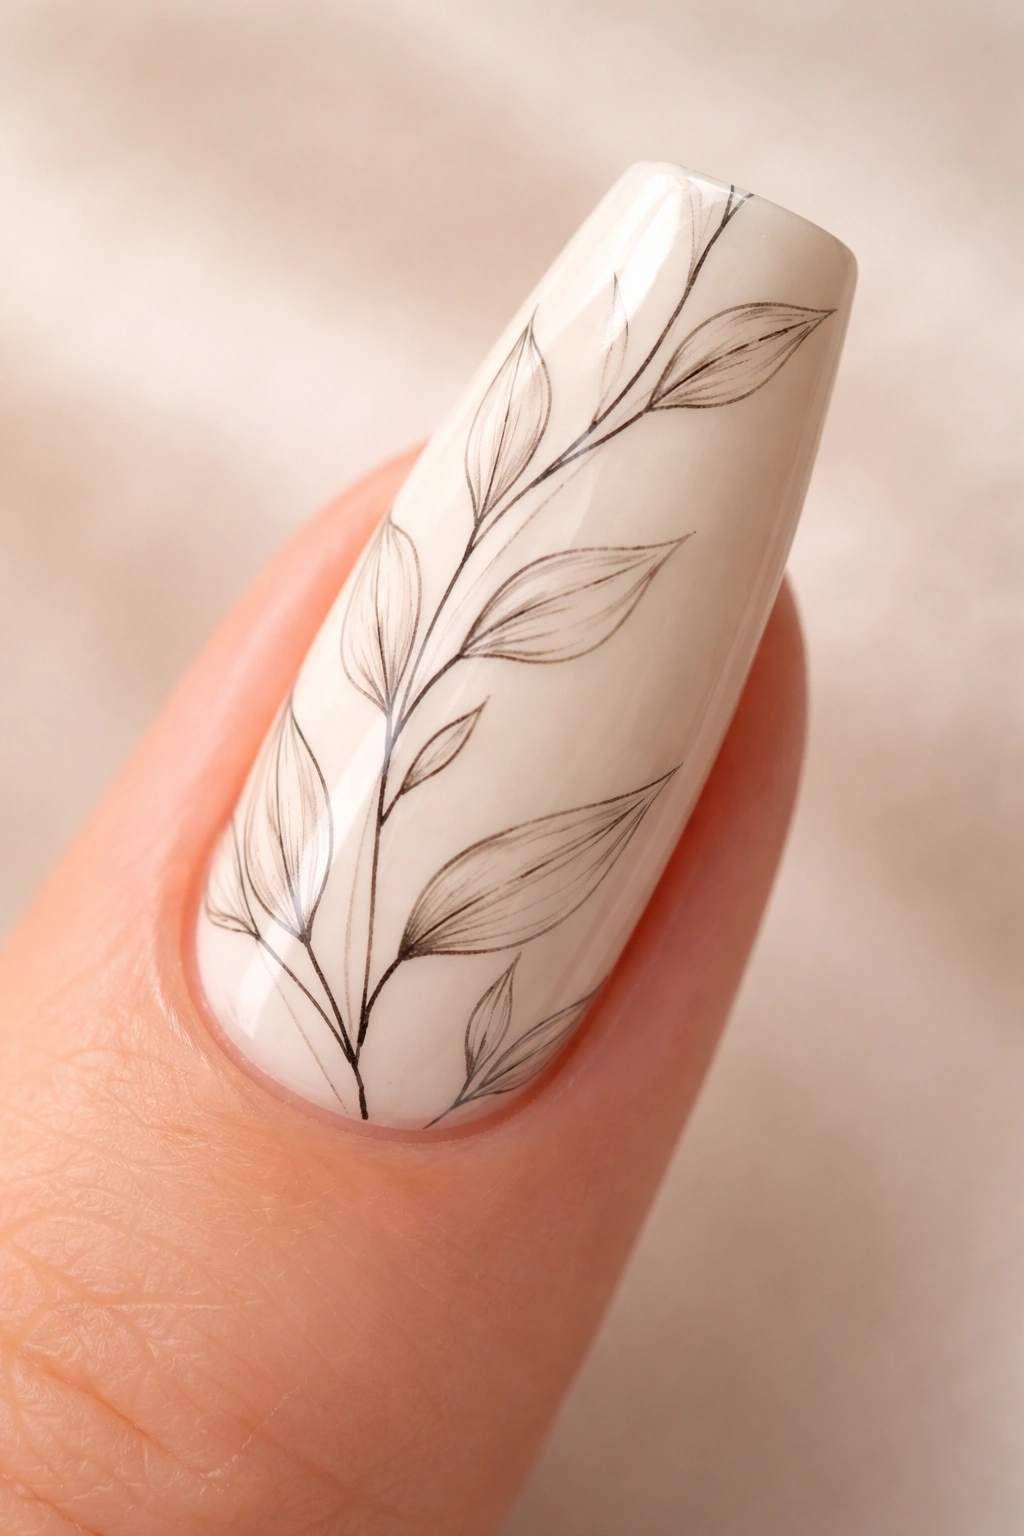
Use a cream or off-white base, then hand-paint or draw simple botanical elements in thin black or dark green lines. Create sketches of leaves, simple flowers, branches, or herbs using thin, confident lines. The sketched quality is intentional—slightly imperfect linework looks more artistic and hand-drawn than perfectly precise botanical illustration. The wide nail provides enough space for botanical elements to be recognizable and detailed.
The Botanical Sketch Aesthetic
Botanical sketches feel artistic and nature-inspired without requiring photorealistic painting skills. The hand-drawn quality is part of the appeal. Viewers appreciate the sketched style more than they would a perfect representation, because it clearly shows intentional artistic choice.
Creating Botanical Sketches
- Apply cream base coat and let dry
- Use a thin brush and black or dark green polish (or gel liner for more control)
- Sketch simple botanical elements: leaf shapes, simple flowers, delicate branches
- Keep lines thin and sketchy rather than bold
- Use simple shapes: oval leaves, circular flowers, branching lines
- Space elements so they’re recognizable but the cream shows through
- Seal with glossy topcoat
- The topcoat makes the lines crisp and makes the cream shine
Pro tip: Sketch lightly with pencil first to plan your layout, then trace over with polish. The pencil marks will disappear under topcoat.
23. Coral with Iridescent Glitter Fade
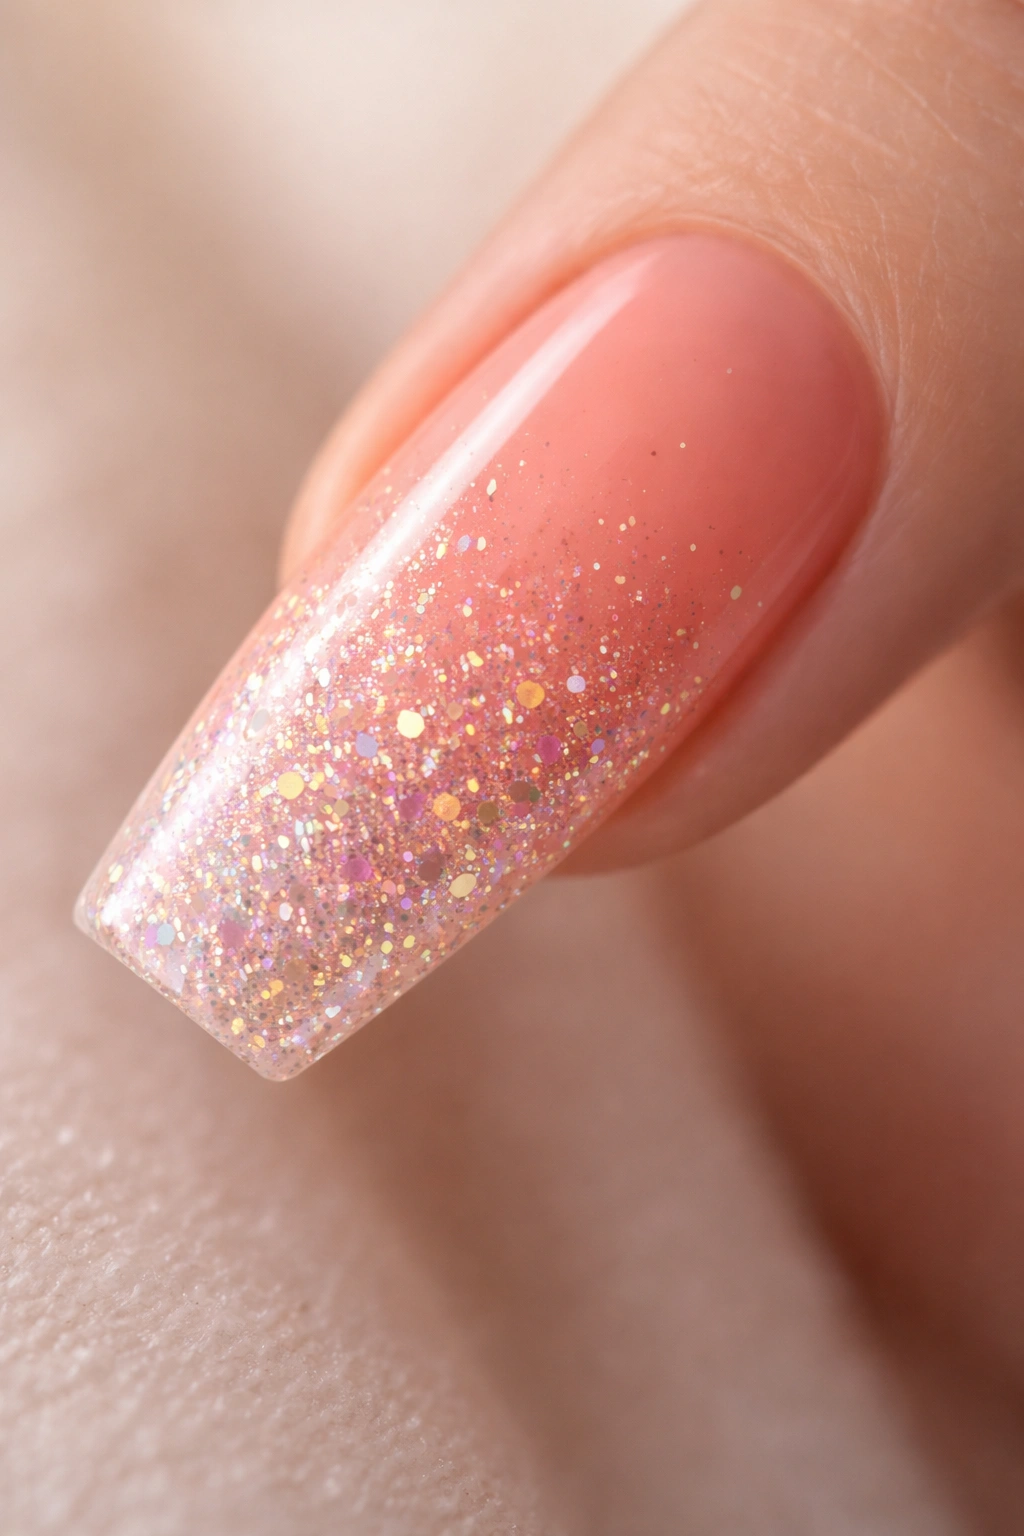
Apply coral as your base, then create a fade effect using increasingly dense iridescent glitter from the cuticle area to the tips. Start with a light dusting of glitter near the base and build to nearly solid glitter coverage at the tips. The iridescent quality means the glitter shifts color subtly as you move your hand, creating a dynamic effect. The wide nail accommodates the glitter gradient smoothly, with glitter distributed across the entire surface for cohesive design.
Why Iridescent Over Traditional Glitter
Iridescent glitter is more sophisticated than rainbow or multi-color glitter because it shifts color subtly rather than declaring multiple colors at once. It catches light beautifully and works with virtually any base color. The shimmer feels luxurious rather than costume-like.
Creating Glitter Gradient
- Apply coral base coat and let dry completely
- Mix iridescent glitter into clear topcoat for an even distribution, or apply glitter-infused topcoat
- Apply this mixture starting near the cuticle in a light layer
- Gradually increase density as you move toward the tips
- By the tip, the glitter should be heavily concentrated
- You can also sponge-apply glitter-infused topcoat rather than painting it on
- Seal with glossy topcoat to secure the glitter and create shine
Insider note: Loose glitter works but is more prone to shifting. Pre-made glitter-infused topcoats or nail polish designed with suspended glitter provides better adhesion.
24. Black with White Marble Vein Pattern
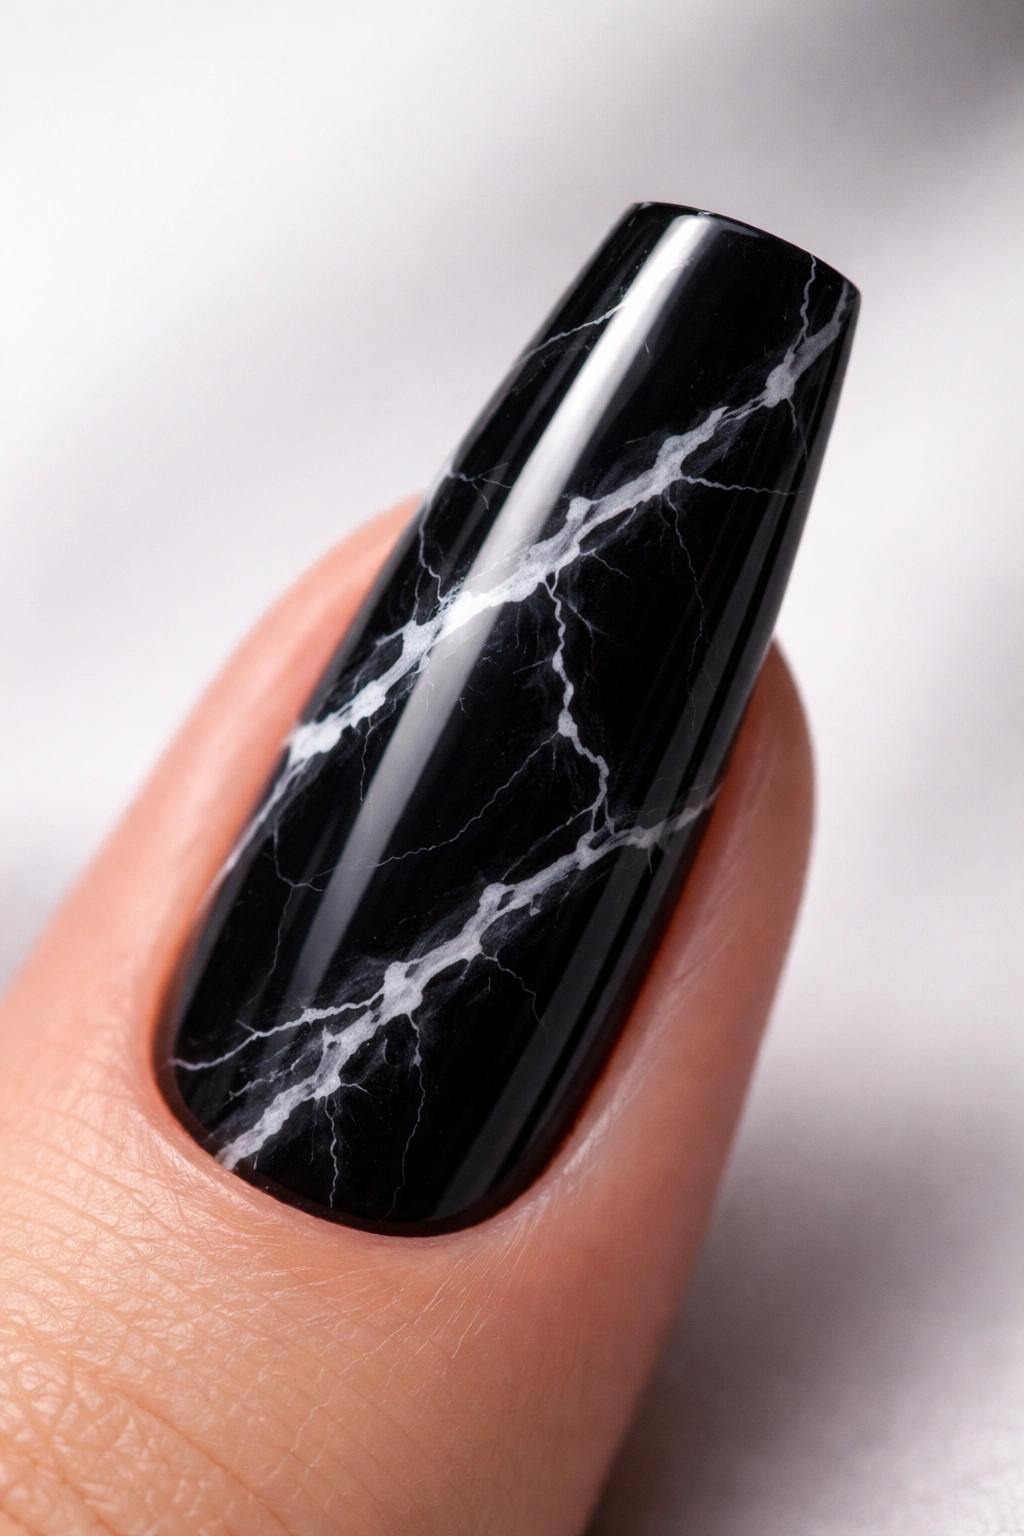
Create the appearance of marble by applying white veining across a jet black base using thin lines or natural marble techniques. Mix white polish into a clear topcoat, then drag thin brushes through it to create marble veining patterns, or use specialized marble nail art techniques. The contrast between black and white is crisp and sophisticated, and marble patterning adds luxury and visual interest. The wide nail surface accommodates veining beautifully without it looking cramped.
Why Marble Translates to Luxury
Marble is associated with upscale design, luxury materials, and timeless elegance. Recreating marble on nails signals sophistication and intentional design. The veining pattern is organic enough that slight imperfections read as intentional rather than like mistakes.
Creating Marble Veining
- Apply jet black base coat and let dry completely
- Option 1: Mix white polish into clear topcoat and drag thin brush through it to create veins
- Option 2: Use a specialized marble tool or toothpick to drag white polish through wet topcoat
- Option 3: Use white gel liner to draw vein patterns freehand
- Veins should be thin and irregular, crossing the nail at varying angles
- Leave areas of solid black showing through so the marble doesn’t overwhelm the design
- Seal with glossy topcoat to unify the design and make it shine
Pro tip: Look at photos of real marble for inspiration on vein patterns. Nature’s patterns are more interesting than symmetrical human-designed ones.
25. Soft Lavender with Tiny Crystalline Details
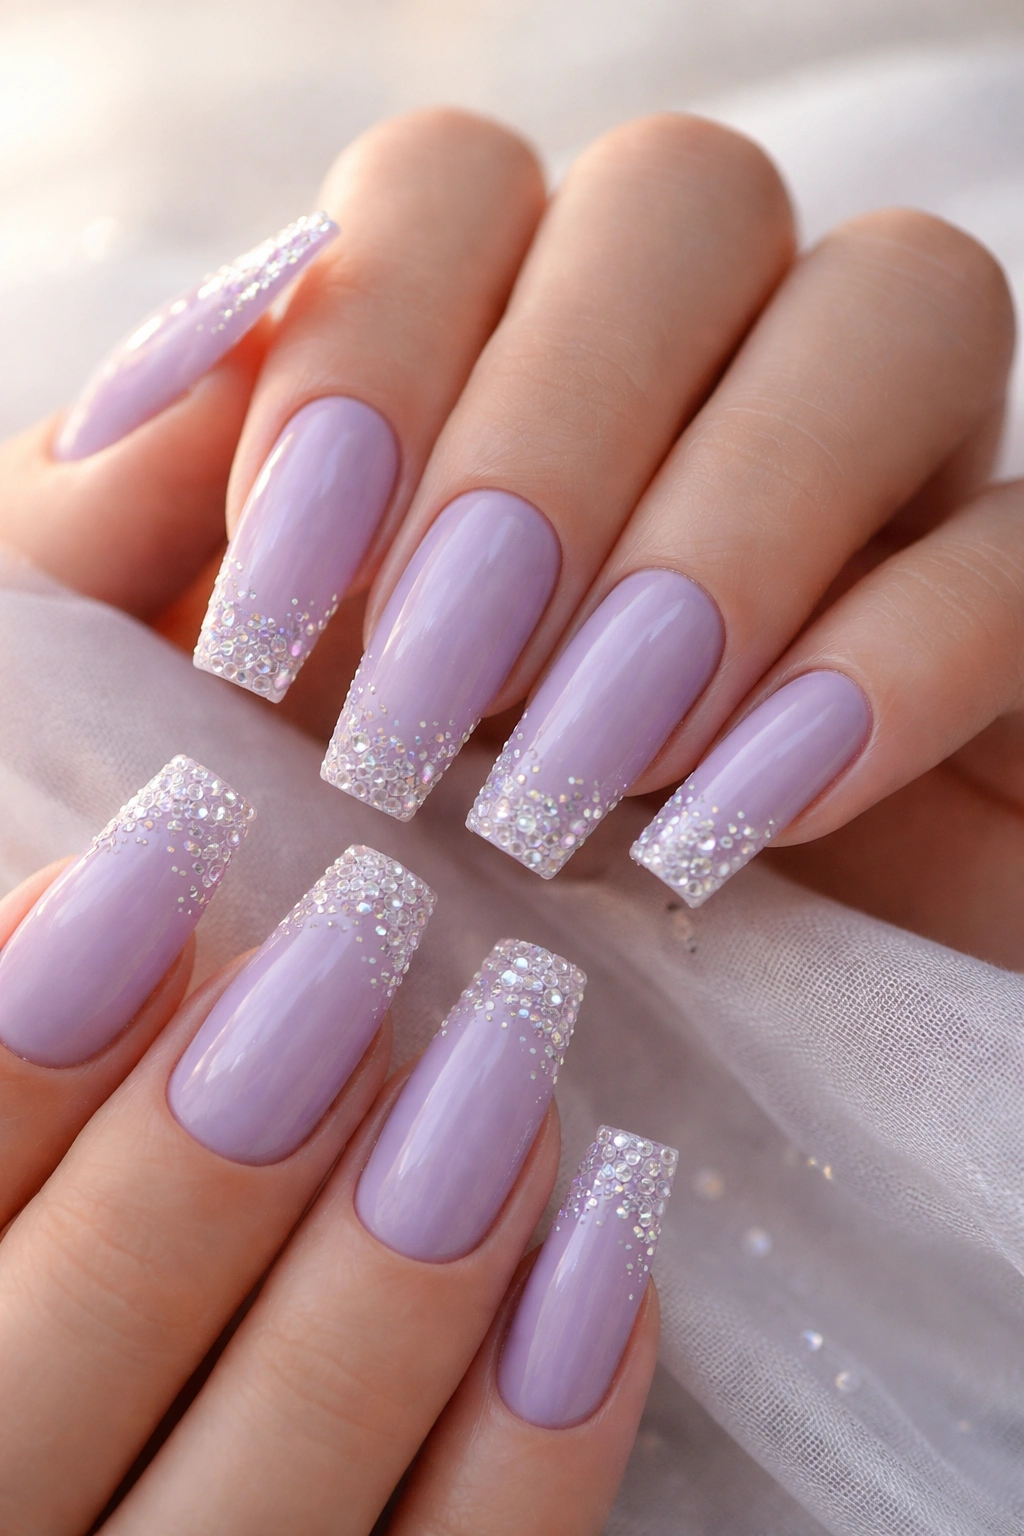
Apply soft lavender as your base, then add tiny crystalline details in white, silver, or iridescent tones. Crystalline details can be achieved using specialized crystalline polish, small crystal beads, or micro rhinestones applied to create a frost or crystalline effect. The delicate lavender provides a calming, elegant backdrop for sparkly elements. The wide nail accommodates crystalline details without them feeling lost or cluttered.
The Lavender + Crystal Combination
Lavender is calming and sophisticated, and pairing it with crystalline details adds just enough sparkle to feel special without being costume-like. This combination works beautifully for formal events or as a signature everyday look.
Creating Crystalline Details
- Apply lavender base coat in either glossy or matte finish
- Apply tiny beads or micro rhinestones using clear topcoat as adhesive
- Create patterns: scattered throughout, concentrated near the tips, or along the edges
- Consider using multiple sizes of crystals for more sophisticated depth
- Seal with glossy topcoat, being careful not to dislodge the crystals
- The topcoat should create a smooth, unified finish
- Let dry fully before touching or using hands
Worth knowing: Crystalline details look best on longer nails where there’s actual surface area for them to shine. On very short nails, they can feel overwhelming.
26. Chocolate Brown with Metallic Rose Gold Stripes
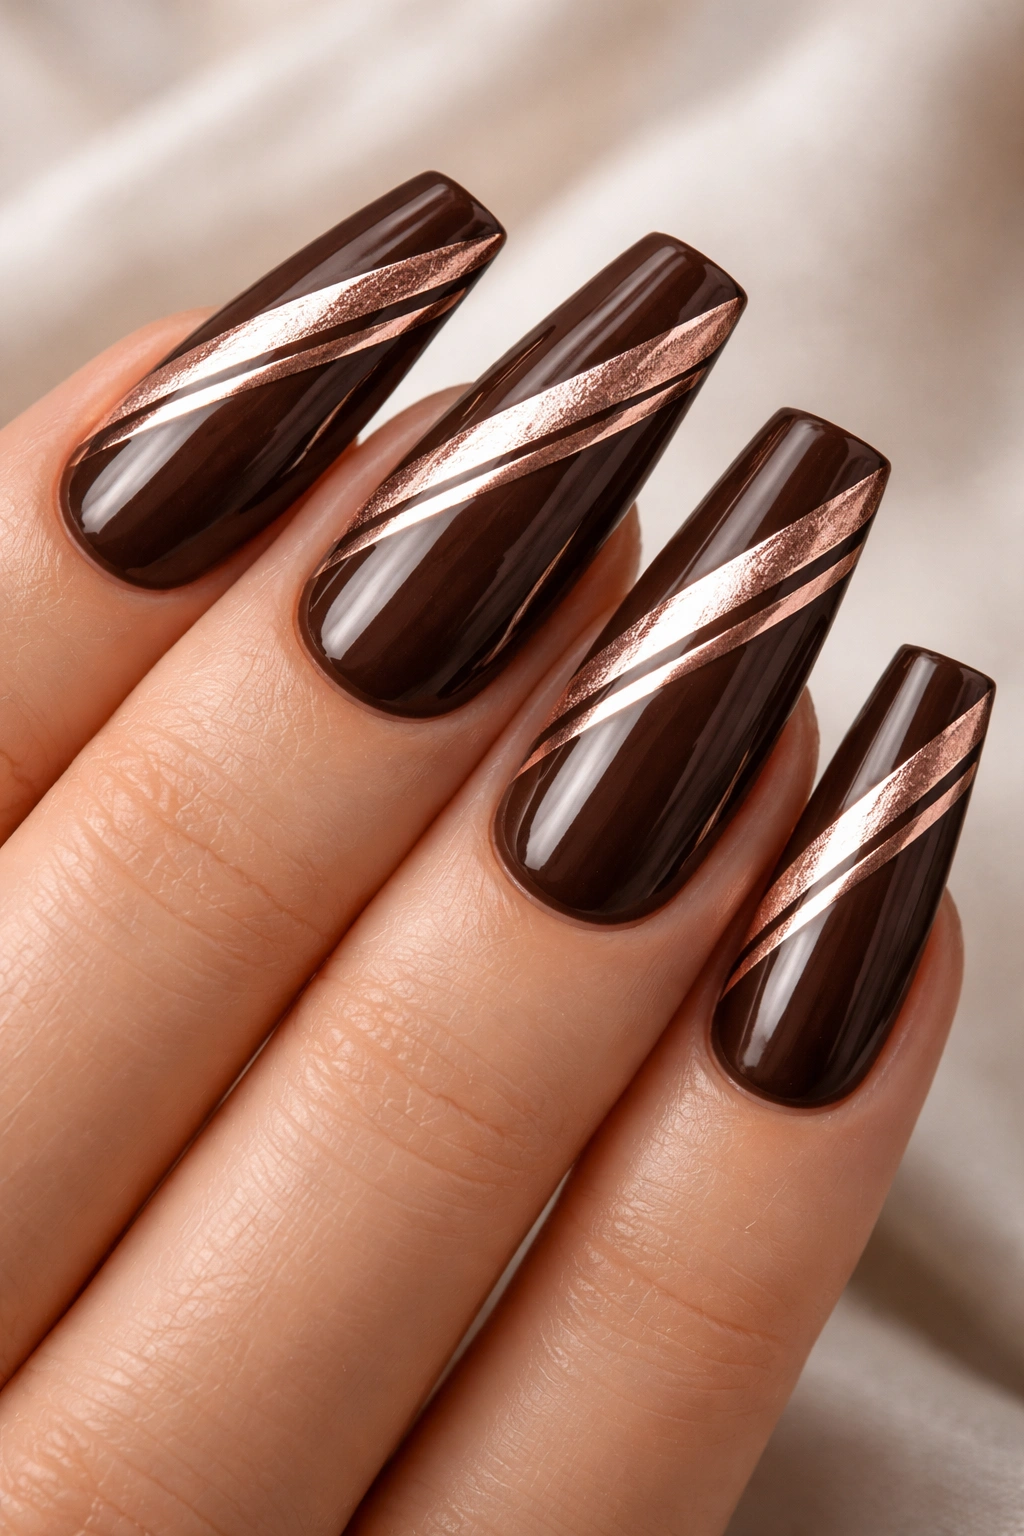
Apply rich chocolate brown as your base, then paint thin metallic rose gold stripes running either vertically, diagonally, or in a chevron pattern. The warm brown and rose gold combination is contemporary and flattering on all skin tones. The stripes add visual interest and movement without requiring complicated art. The wide nail accommodates stripes beautifully, with space for multiple stripes or thicker stripes than would work on narrower nails.
Why Rose Gold Feels Current
Rose gold is flattering, warm, and contemporary without feeling trendy or dated. It works across seasons and occasions. The combination with warm brown is earthy and sophisticated.
Creating Metallic Stripe Pattern
- Apply two coats of chocolate brown and let dry
- Measure and mark stripe placement lightly with pencil if you want even spacing
- Use rose gold gel liner, metallic polish, or metallic gel for the stripes
- Paint stripes in your chosen direction: vertical, diagonal, or chevron
- Space stripes evenly or vary spacing for different effects
- Make stripes thin enough that brown shows between them
- Seal with glossy topcoat to make metallic elements pop
Insider note: If you want perfect stripes, use painter’s tape or nail striping tape to mask the areas you don’t want metallic color. Apply metallic polish, remove tape, and topcoat.
27. Blush Pink with Rose Gold Geometric Accents
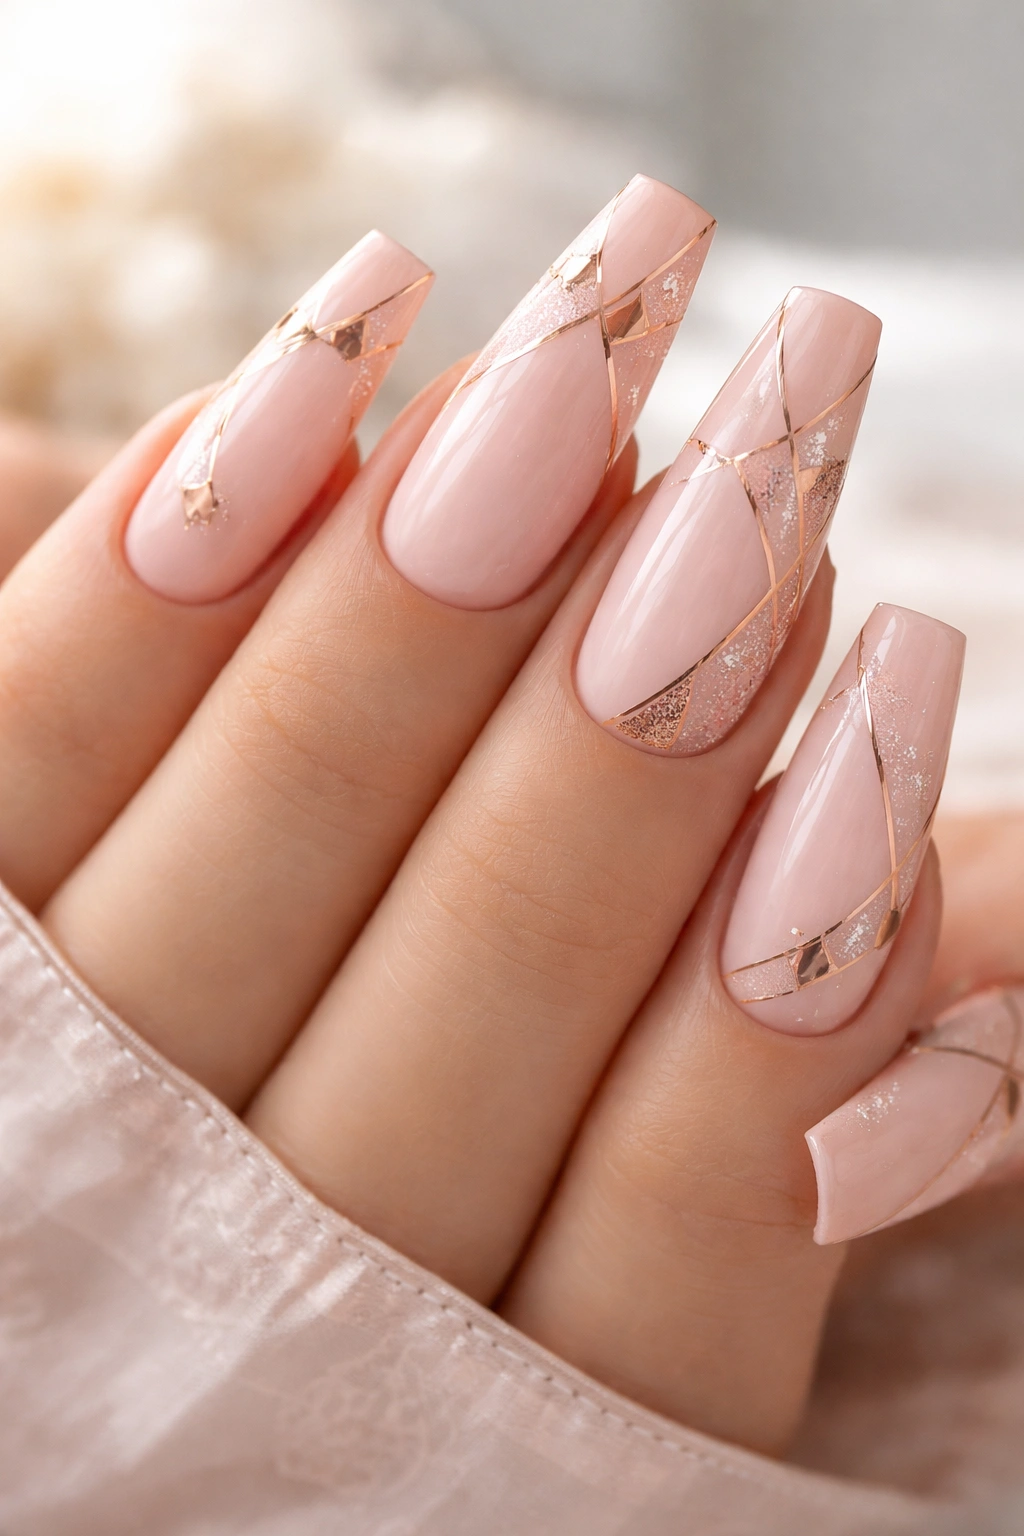
Start with a soft blush pink base, then create geometric shapes or patterns using rose gold metallic polish. Triangles, hexagons, or abstract angular shapes scattered across the nail or concentrated along the edge all work beautifully. The soft pink and warm rose gold combination is feminine and sophisticated without feeling overly delicate. The wide nail gives geometric shapes room to be appreciated as intentional design elements.
Why Geometric + Metallic Works
Geometric shapes suggest intentional, modern design. Metallic finishes add luxury and catch light. Together, they create a look that’s contemporary, sophisticated, and effortlessly elevated.
Creating Geometric Rose Gold
- Apply blush pink base coat and let dry
- Plan your geometric pattern lightly with pencil
- Use rose gold gel liner or metallic polish with a thin brush
- Paint geometric shapes: triangles pointing down or up, hexagons, stacked shapes
- Leave blush pink showing between the shapes
- Consider outlining shapes in rose gold for definition, or filling them in for more impact
- Seal with glossy topcoat to unify the design
Pro tip: Stacked triangles pointing alternately up and down create an elegant pattern without requiring perfect precision.
28. Navy Blue with Pearl White Detail

Apply deep navy blue as your base, then add pearl white details—could be thin lines, small shapes, scattered dots, or concentr ated along one edge. Pearl white has subtle shimmer that makes it more interesting than flat white. The high contrast between navy and pearl white is crisp and sophisticated. The wide nail accommodates detailed elements beautifully without them feeling lost or overwhelming.
The Navy and Pearl White Aesthetic
Navy is one of the most versatile colors that works year-round and across virtually all occasions. Pearl white adds just enough detail to feel intentional without being overly complicated. This combination is sophisticated and timeless.
Creating Navy and Pearl White Details
- Apply two coats of navy blue and let dry
- Use pearl white polish, pearl white gel, or pearl white gel liner for details
- Create your design: thin lines, dots, geometric shapes, or edge accents
- Pearl white will have subtle dimension against navy
- You can also mix pearl white powder into clear topcoat for a more dispersed shimmer
- Seal with glossy topcoat to enhance the pearl effect
Worth knowing: Pearl finishes show up best against darker colors. Navy provides excellent contrast for pearl to shine.
29. Peachy Nude with Fine Gold Foil Texture
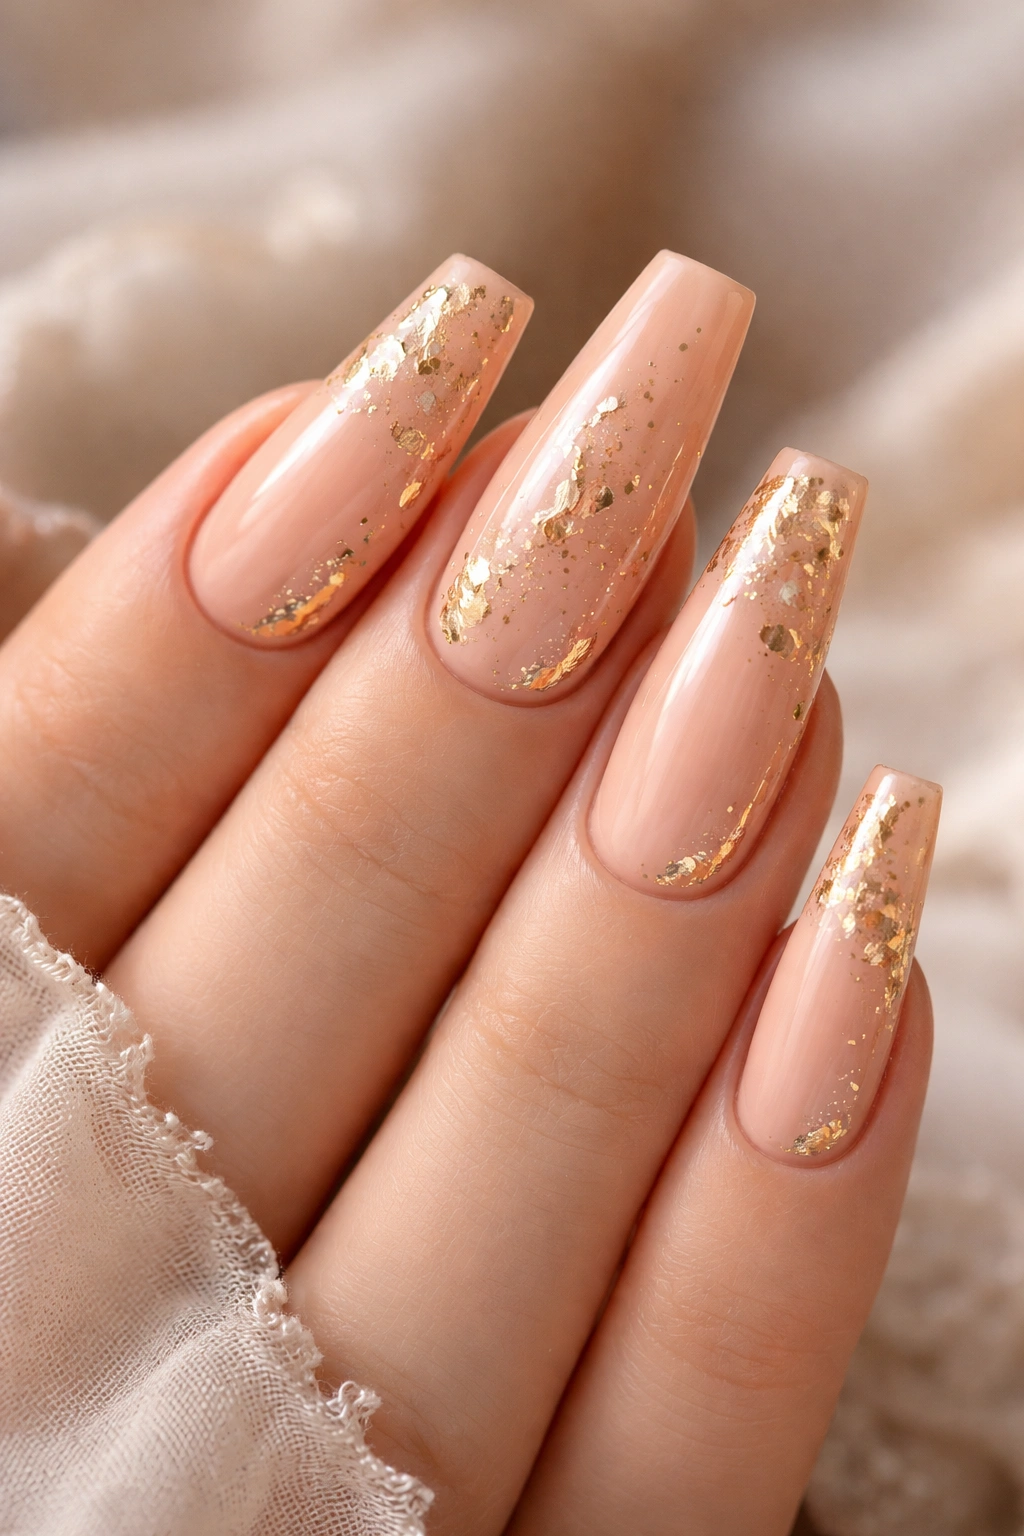
Apply warm peachy nude as your base, then layer in fine gold foil pieces scattered throughout or concentrated in specific areas. Gold foil creates a luxury effect with visual dimension. The peachy nude is warm and flattering, and the scattered gold adds just enough detail to feel elevated. The wide nail accommodates foil pieces beautifully, with elements distributed for cohesive, intentional appearance.
Why Gold Foil Feels Luxury
Gold foil is different from glitter or flecks—it’s larger, more structured, and catches light in distinct ways. It feels more intentional and luxury than glitter. Even scattered across the nail, it reads as sophisticated rather than trying too hard.
Creating Gold Foil Details
- Apply peachy nude base coat and let dry
- Tear or cut gold foil into small, irregular pieces
- Apply clear topcoat to the areas where you want foil
- Place foil pieces into the wet topcoat using a tool or tweezers
- Press gently and allow to set
- Apply another coat of topcoat over everything to seal the foil in place
- Build topcoat in thin layers rather than one thick coat
- The final finish should be smooth and unified
Pro tip: Gold foil flakes work better than smooth foil sheets for nail application, as they conform better to the curved nail surface.
30. Soft Gray with Minimalist Black Accent Line
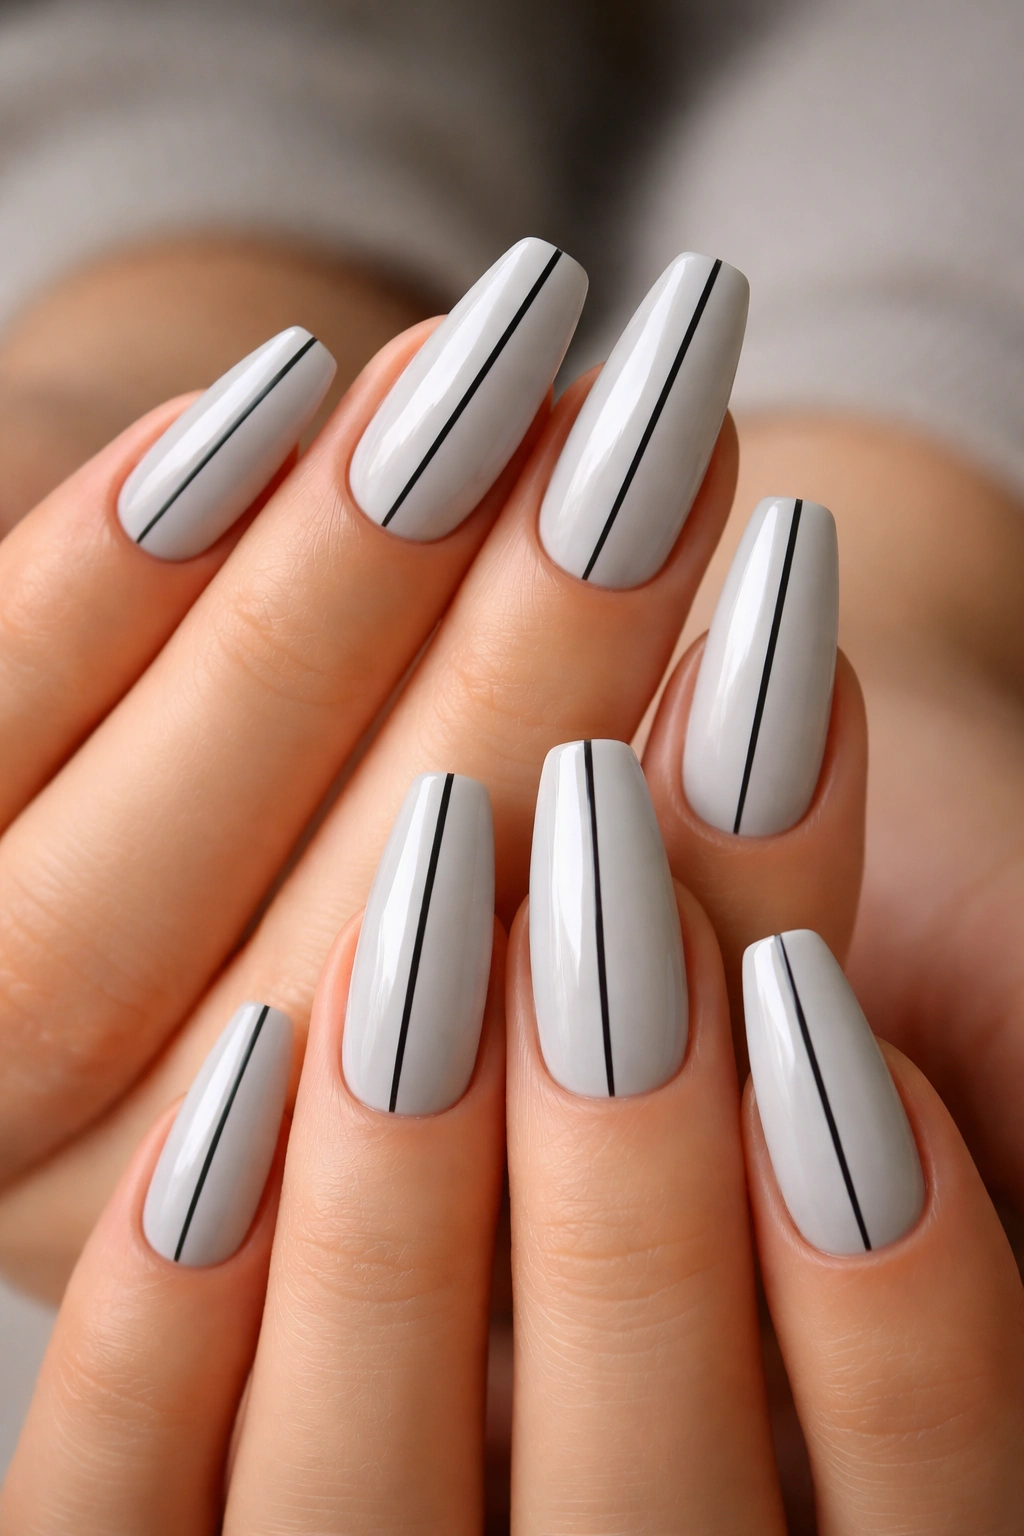
Finish your collection with an elegant, understated design. Apply soft gray as your base, then create a single minimalist accent line in black using a thin brush or gel liner. This line could run vertically down the center, diagonally across the nail, along the edge, or even wrap around the nail sides. The simplicity is the point—one intentional detail rather than complicated patterns. The wide nail surface makes this minimal design feel intentional rather than empty.
The Power of Understatement
In a world of increasingly elaborate nail designs, a single minimal line can feel refreshingly intentional and sophisticated. It shows confidence in keeping things simple and letting the base color and clean lines do the work.
Creating the Minimal Accent Line
- Apply soft gray base coat and let dry completely
- Plan your line placement lightly with pencil
- Use thin black brush or black gel liner for precision
- Draw your line in one confident stroke if possible
- Options: vertical center line, diagonal from corner, horizontal line, or curved accent
- The line can be centered or off-center depending on your preference
- Seal with glossy topcoat to make the line crisp and sharp
Insider note: The beauty of this design is that you can change the line placement weekly while keeping the same base color, creating infinite variety from one nail shape.
Final Thoughts
Wide coffin nails offer exceptional versatility for both simple, elegant designs and intricate, detailed artwork. Whether you’re drawn to bold colors, delicate details, metallic accents, or minimalist simplicity, this nail shape provides enough surface area to execute your vision beautifully without feeling overwhelming or costume-like.
The designs above represent just the beginning of what’s possible with wide coffins. You can combine elements—add rhinestones to a gradient, layer metallic accents over solid colors, or mix multiple design techniques on different nails. The key is choosing designs that genuinely appeal to you and feel authentic to your style rather than chasing trends for their own sake.
Start with designs that match your skill level and preferred aesthetic, then gradually experiment with new techniques as you gain confidence. If you’re working with a nail technician, these design ideas provide excellent inspiration for conveying exactly what you want. If you’re doing your own nails, remember that slightly imperfect hand-painted details, irregular patterns, and personal touches are actually more interesting than machine-perfect precision.
The best nail design is one that makes you feel confident and excited to show off your hands. Wide coffin nails give you the canvas to express yourself beautifully.
