

Dark red nails have a way of making a statement that few other colors can match. There’s something inherently sophisticated about deep crimson, burgundy, and wine-toned reds—they’re bold without being screaming loud, elegant without feeling stuffy, and somehow both classic and contemporary at once. When you shape those dark reds into coffin nails (also called ballerina nails), you’re amplifying that power tenfold. The coffin shape—tapered sides that widen toward the nail bed, then flat across the top—creates an elongated silhouette that demands attention and frames nail art beautifully.
Long coffin nails in dark red are particularly striking because the color depth plays against the nail’s dramatic geometry. Unlike shorter nails where the shape is constrained, long coffins give you real canvas to work with. You can keep it minimalist and let the color and shape do all the talking, or you can layer in metallic accents, intricate designs, and textural elements that transform these into true statement nails. The length also makes the coffin’s distinctive shape more pronounced—that flat top creates a bold horizontal line that photographs beautifully and catches light in ways that shorter nails simply can’t.
Whether you’re drawn to pure oxblood elegance or complex nail art that incorporates dark red as the base, these fifteen designs show you exactly what’s possible. Each one takes that core dark red tone and pushes it in a different direction, from gothic drama to understated luxury to playful texture. Let’s explore designs that’ll make you want to book a nail appointment immediately.
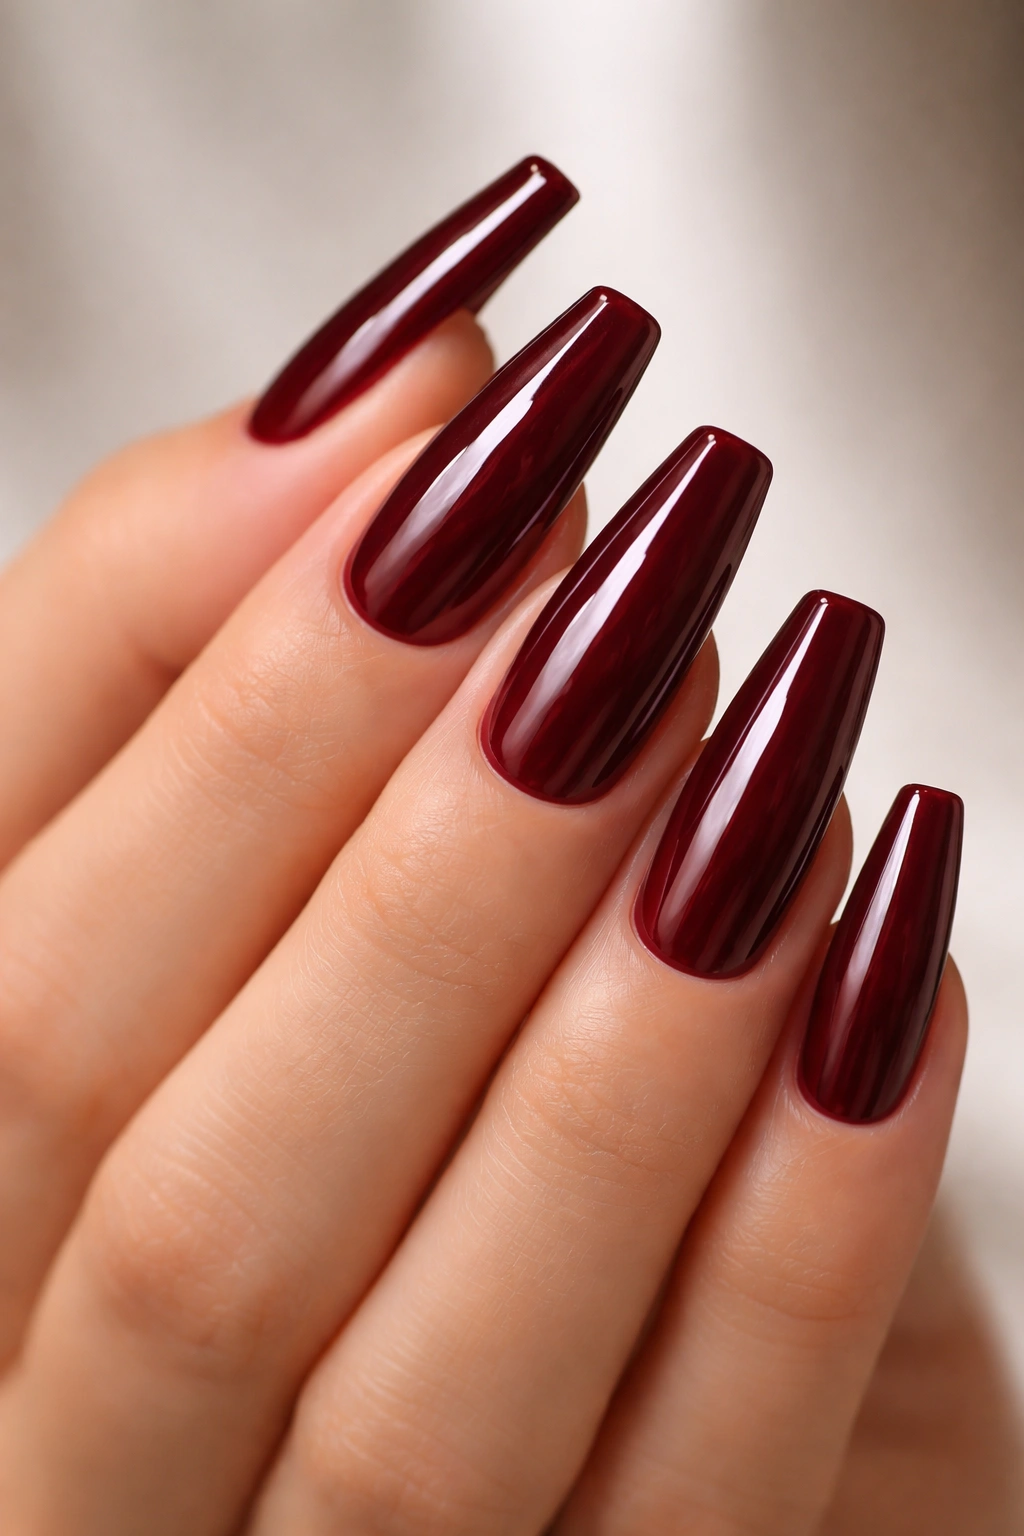
1. Classic Oxblood Coffin
The oxblood coffin is the foundation piece—pure, unapologetic dark red with zero embellishment. This shade sits somewhere between true red and burgundy, with just enough brown undertone to feel grounded and sophisticated rather than party-ready. The beauty here is in the simplicity: a perfectly shaped coffin with high-gloss finish that catches light with every hand movement.
Why This Design Works So Well
Oxblood has been the unofficial uniform of people with refined taste for years. It looks equally at home in a boardroom or at a cocktail party because it reads as intentional rather than trendy. The coffin shape makes even this minimal design feel modern—if you wore this exact color on a round nail, it might feel dated, but on a coffin, it’s undeniably current.
Application Tips and Finish
- Use a true burgundy-red base with enough opacity that two coats give complete coverage
- Apply a glossy top coat for maximum shine and depth—matte finishes make dark reds look flatter and less luxurious
- Seal the edges carefully so the color looks clean and intentional
- Pro tip: Apply the top coat in thin layers rather than one thick coat; this prevents the glossy finish from sliding and pooling at the free edge
Styling This Look
Oxblood coffins pair beautifully with gold jewelry, neutral clothing, and almost any skin tone. The simplicity means they work as a “blank canvas” for any outfit aesthetic—minimalist, maximalist, edgy, or refined. This is the nail design that works whether you’re dressed down in a sweater or formal in a blazer.
2. Dark Red with Gold Foil Accent
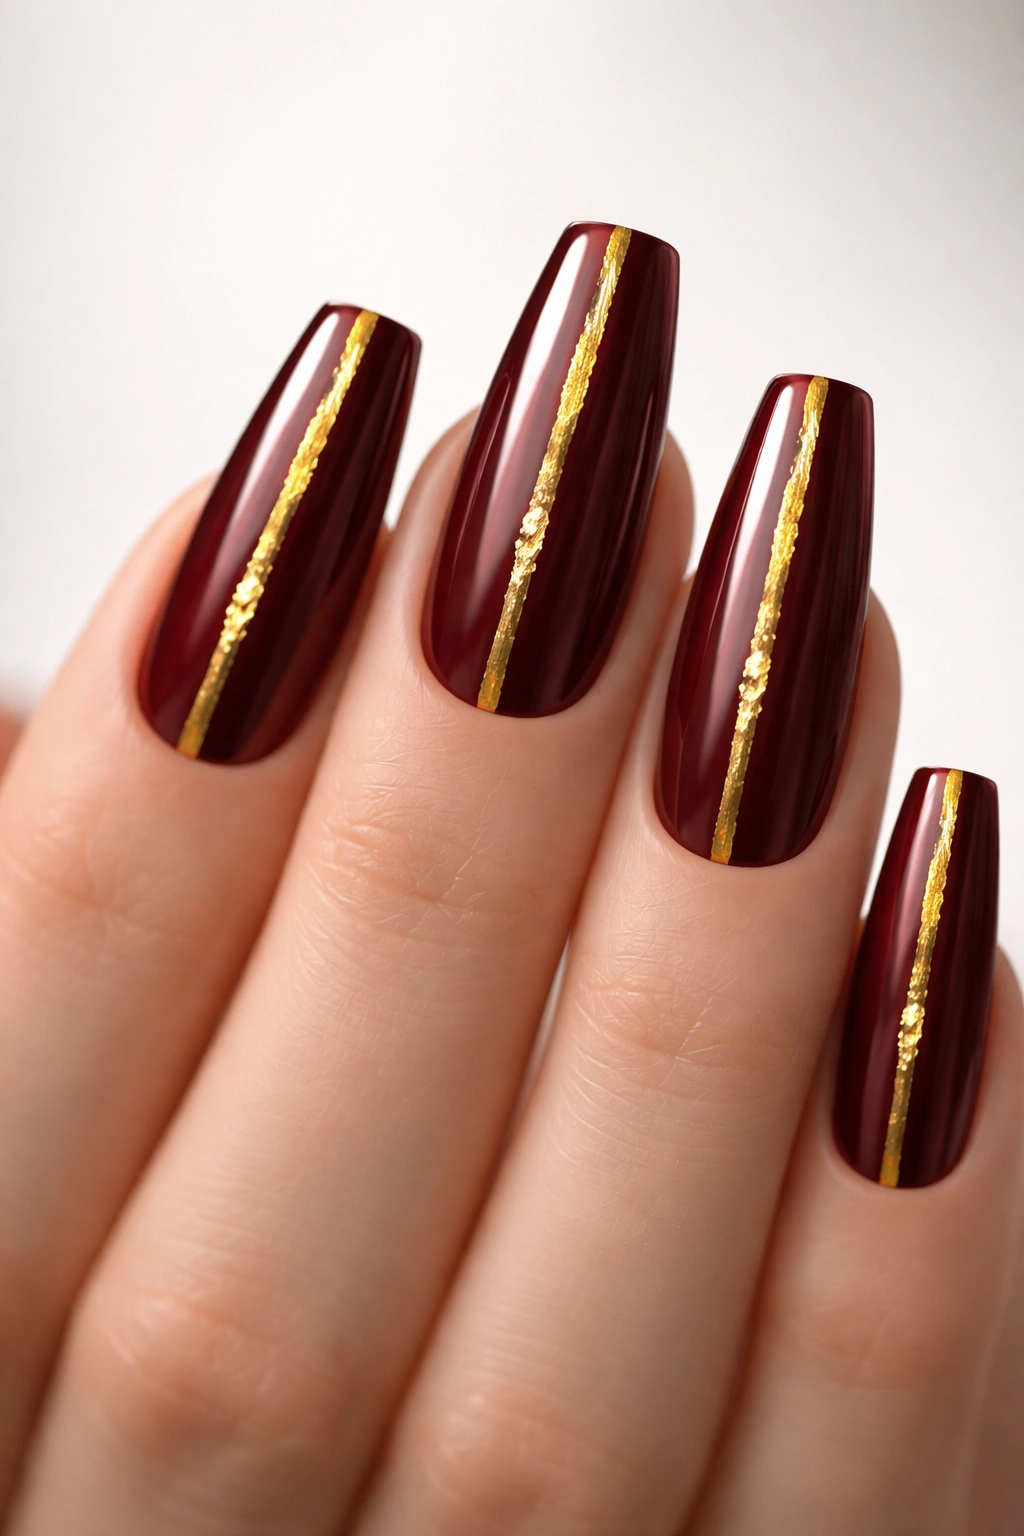
Take that oxblood base and add thin vertical stripes of gold foil running down the center of each nail. The foil catches light differently than regular metallic polish—it has dimension and reflects light in scattered patterns rather than a uniform sheen. This design transforms the simplicity of solid color into something with visual movement.
The Technical Details
The foil application requires a specific approach: paint the dark red base and let it cure fully (if using gel) or dry completely. Then apply a thin, sticky base layer to just the center stripe area. While tacky, carefully place the gold foil, pressing down gently and peeling away the backing. The contrast between matte foil placement and glossy surrounding red creates understated luxury.
Why Foil Over Metallic Polish
Actual foil has a different visual quality than metallic polish or liquid chrome. It sits slightly raised on the nail surface and reflects light more dramatically. The foil catches and scatters light differently depending on how you angle your hand, making the nails look more dimensional and expensive-looking than a flat metallic finish would achieve.
Real-World Styling
This design bridges minimalist and statement-making. It’s not plain, but it’s not crowded either. Works especially well if you have professional nail care—foil details look most refined when the overall nail shape and surface are flawless. Pairs beautifully with neutral clothing in jewel tones.
3. Burgundy Gradient to Black Ombre
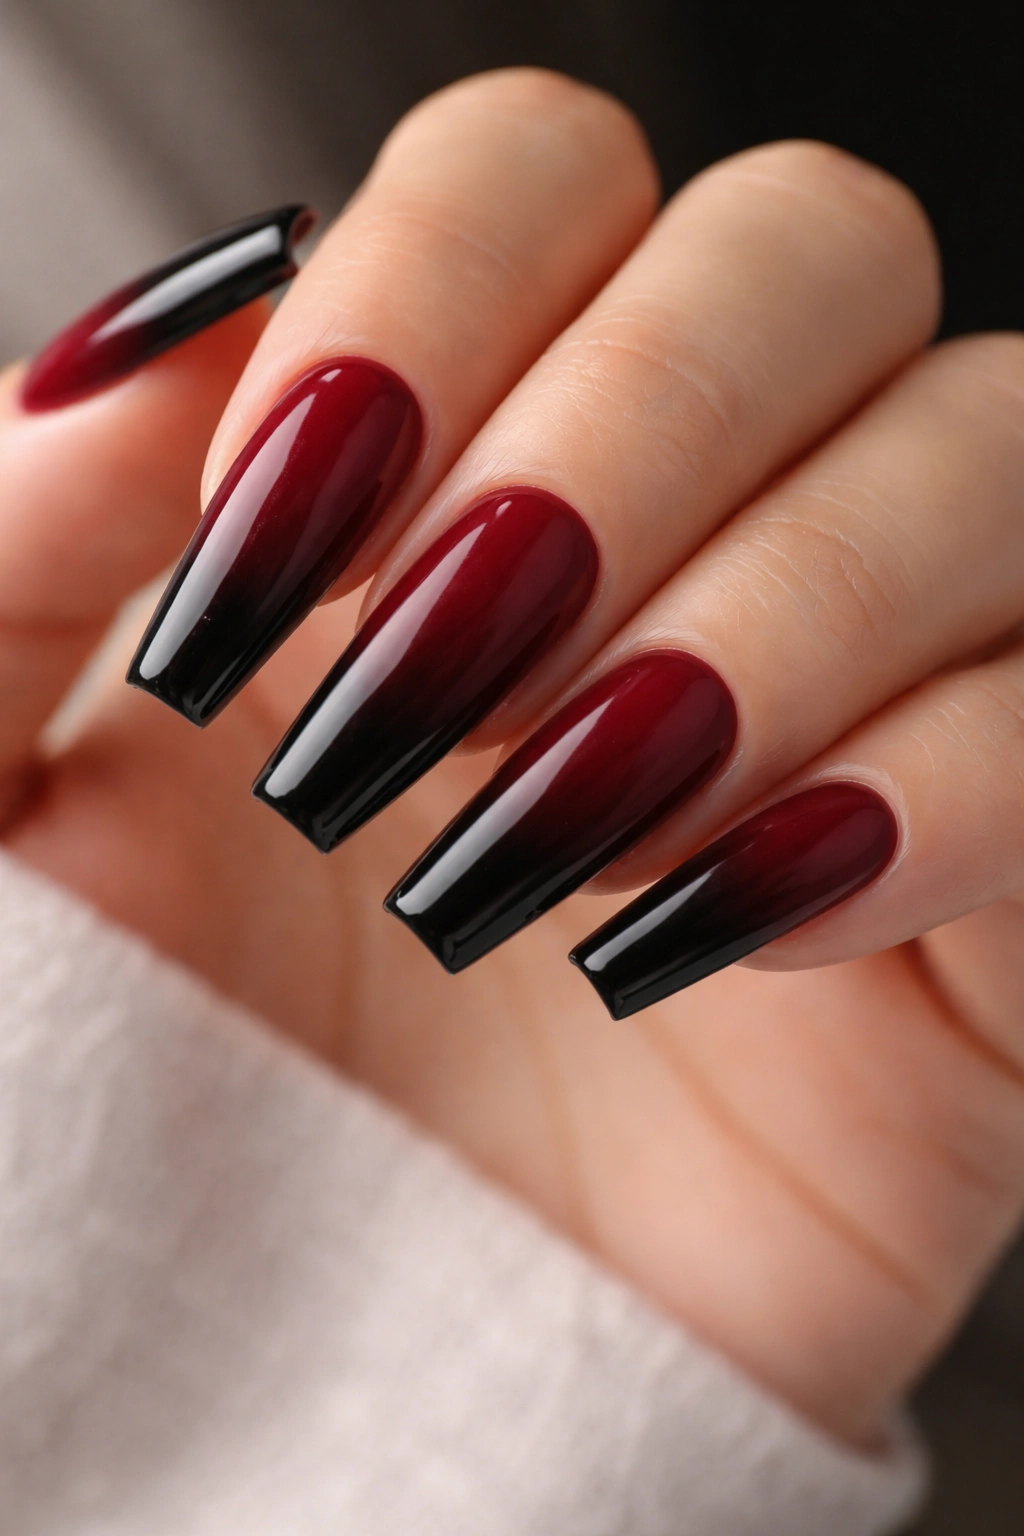
Start at the base with a deep burgundy-red and gradually shift to pure black toward the free edge. This gradient requires blending—either through sponging multiple shades together or using a pre-made ombre polish designed specifically for this effect. The result feels almost like looking at dark wine held up to light.
Creating the Gradient Effect
If building the gradient yourself, use three shades: deep red, a medium burgundy-brown, and black. Sponge them onto a makeup sponge in order from light to dark, then press the sponge against the nail and dab multiple times to blend. Work with smaller amounts of polish than you’d think—it’s easier to add more than to remove overapplication. The sponging motion creates that soft transition rather than hard lines.
The Psychology of the Ombre
Gradients create movement visually, pulling the eye from base to tip. On coffin nails, this downward flow complements the shape’s natural taper. The gradient also makes long nails feel less stark—the color variation breaks up the length and keeps the eye moving through the design rather than getting lost in one flat tone.
Styling and Occasion
The gradient from burgundy to black reads as more dramatic than solid oxblood but less edgy than full black. It’s perfect for situations where you want polish and sophistication with just a hint of edge. The red-to-black progression also works seasonally—deeper with the darker months, more burgundy-forward in warmer seasons.
4. Dark Red with Negative Space Lines
Paint the full nail in dark red, then use a thin brush or nail art pen to create parallel negative space lines—clean strips where the nail bed shows through. Typically done with 2-3 lines running vertically down the center, these gaps create a geometric aesthetic that’s decidedly modern. The contrast between the dark red and the flesh tone showing through is subtle but striking.
Design Variations Within This Concept
Some versions use three evenly spaced vertical lines. Others do horizontal lines. The most visually interesting variation places lines asymmetrically—not in a messy way, but intentionally offset to create tension and visual interest. The lines should be thin enough that they feel like a design choice rather than a mistake.
Why Negative Space Works
Negative space designs feel contemporary because they play with what isn’t there rather than just what is. On a coffin shape, negative lines emphasize the nail’s geometry—they either flow with the taper or cut across it intentionally. This is sophisticated minimalism that reads as intentional and editorial.
Best Execution
Use a thin liner brush or nail art pen for crisp, clean lines. Wobbly lines read as accidents; perfect lines read as design. If you’re not confident with steady hand application, use thin striping tape as a guide. Even with tape, you need precision with polish placement, so take your time.
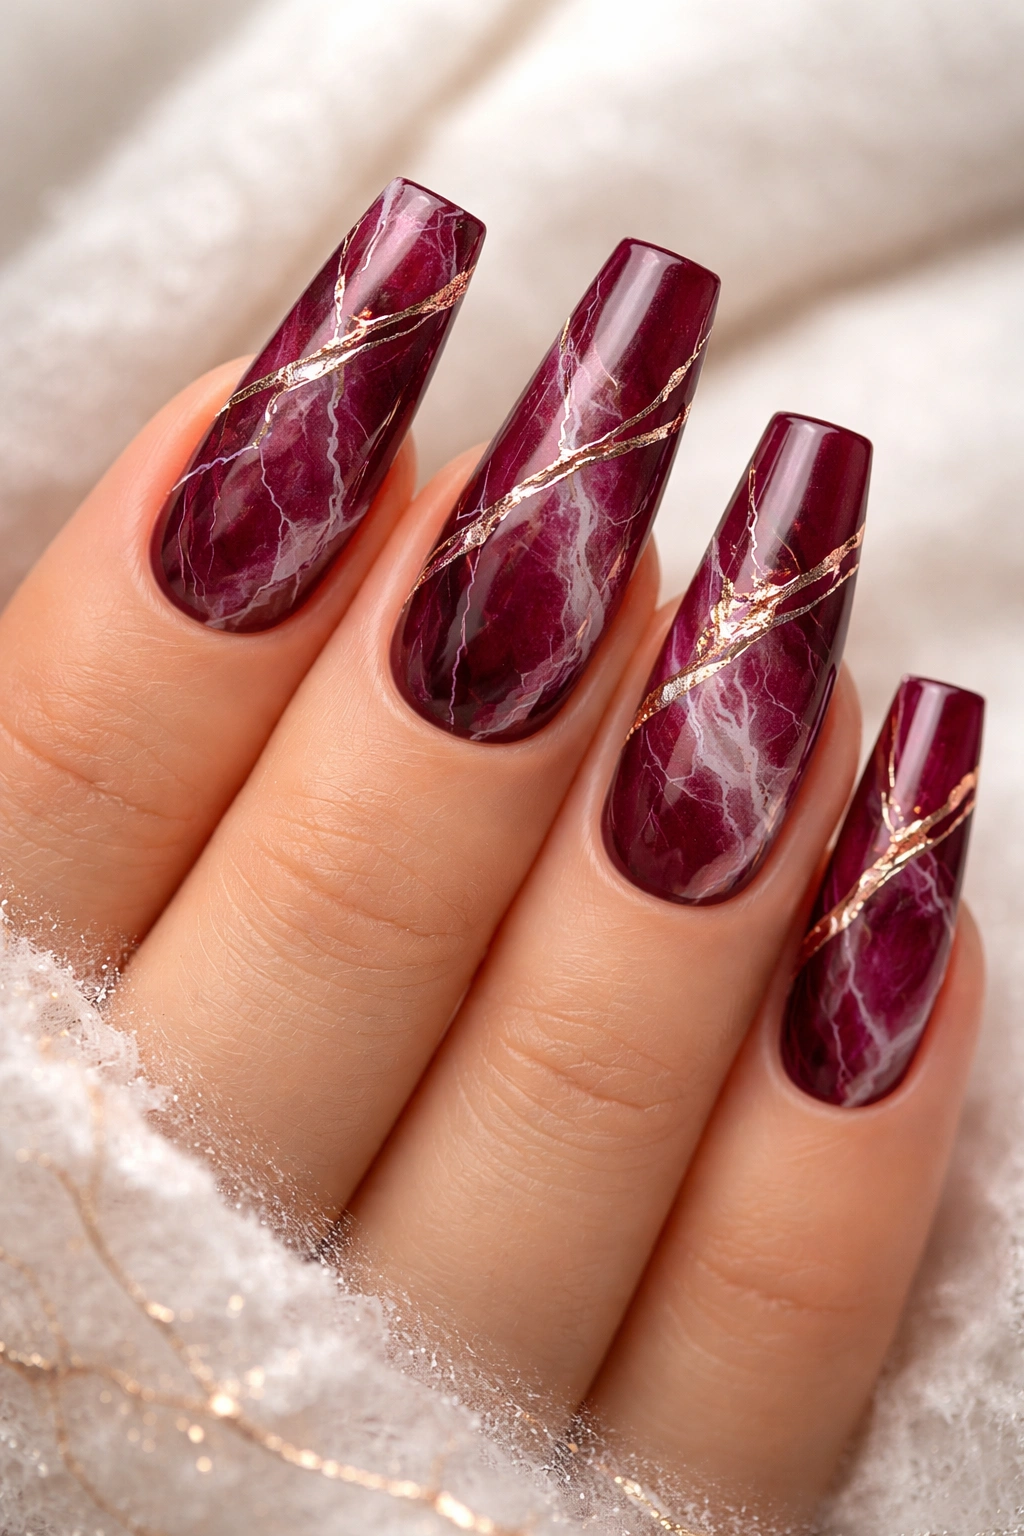
5. Oxblood with White Marble Detail
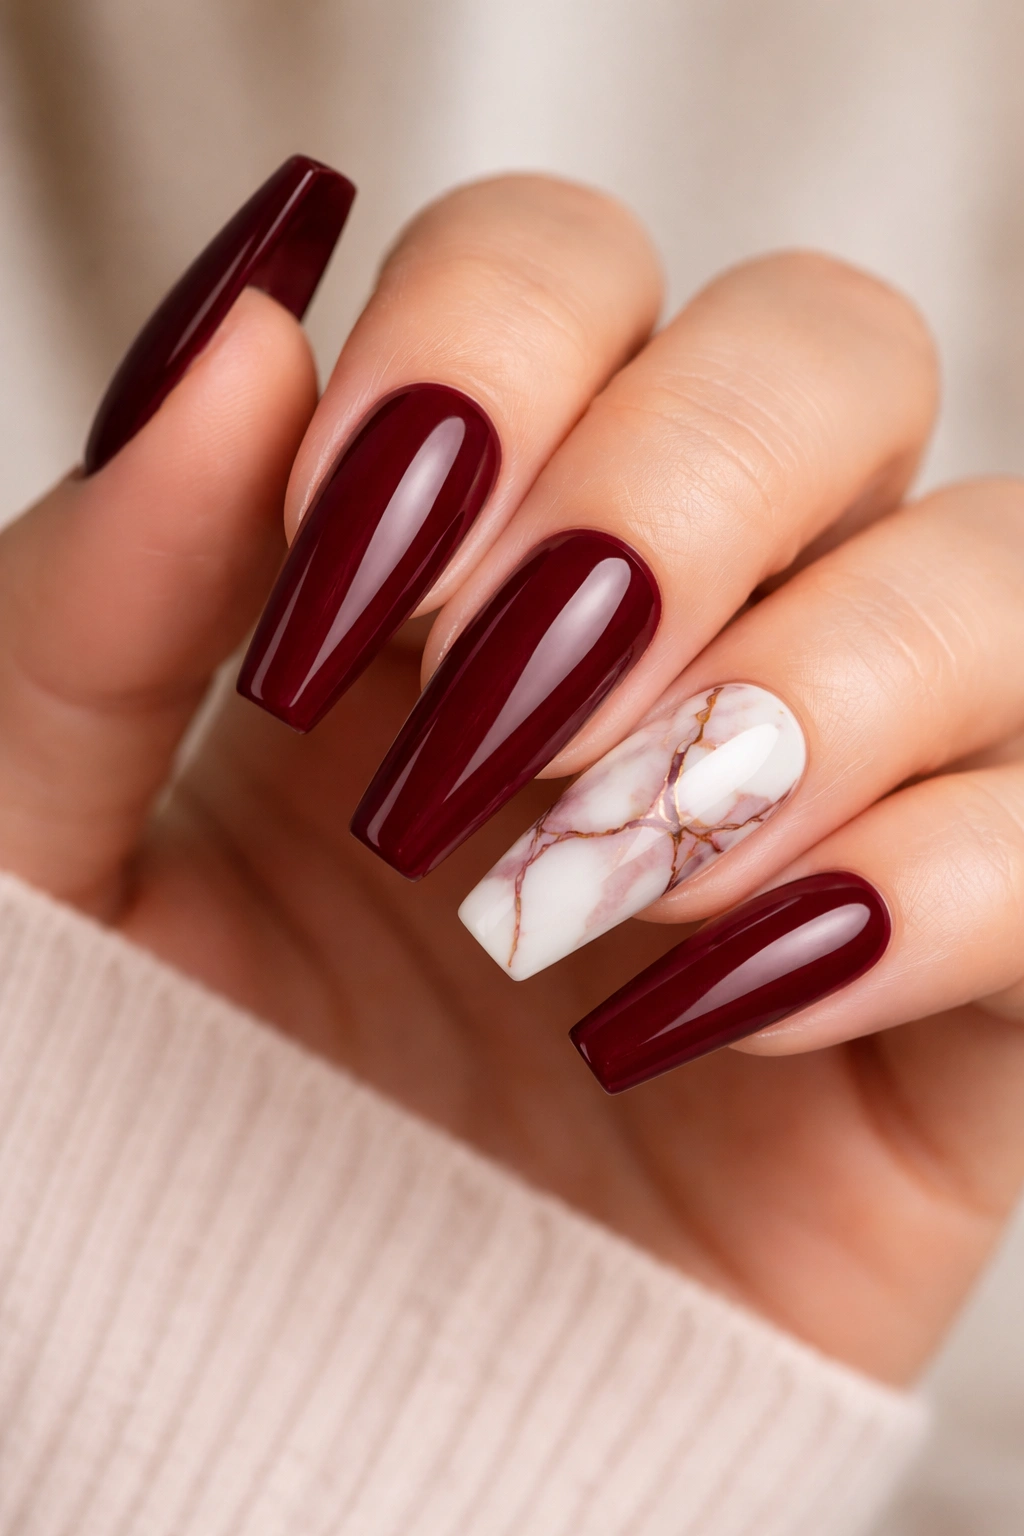
Combine solid oxblood on most of the nail with white marble veining on one or two accent nails (typically the ring finger). The marble creates organic, meandering lines that look like natural stone when done well. This breaks up the monochromatic look while keeping the design sophisticated and balanced.
Creating Convincing Marble
Marble isn’t about perfect precision—it’s about organic randomness that happens to look refined. Use a thin brush and white polish (opaque, not sheer). Paint irregular lines with slight tremors, letting them branch and curve naturally. Don’t overthink it; overly controlled marble looks fake. The best marble has character and slight imperfection.
Where to Place the Marble
Marbling just one or two nails creates focal points without overwhelming the design. The ring finger is traditional because it’s visually prominent. Some people do the thumb as well since it’s visible from different angles. Doing all five nails in marble would compete too much; the contrast between matte oxblood and detailed marble is what makes this work.
Finishing the Look
Seal everything with a top coat so the marble detail doesn’t smudge. The glossy finish over the white marble makes it pop even more against the oxblood. If you prefer a matte finish on the oxblood base, use a matte top coat only on the solid-color nails and gloss on the marble—the finish contrast adds another layer of visual interest.
6. Dark Red Velvet Texture
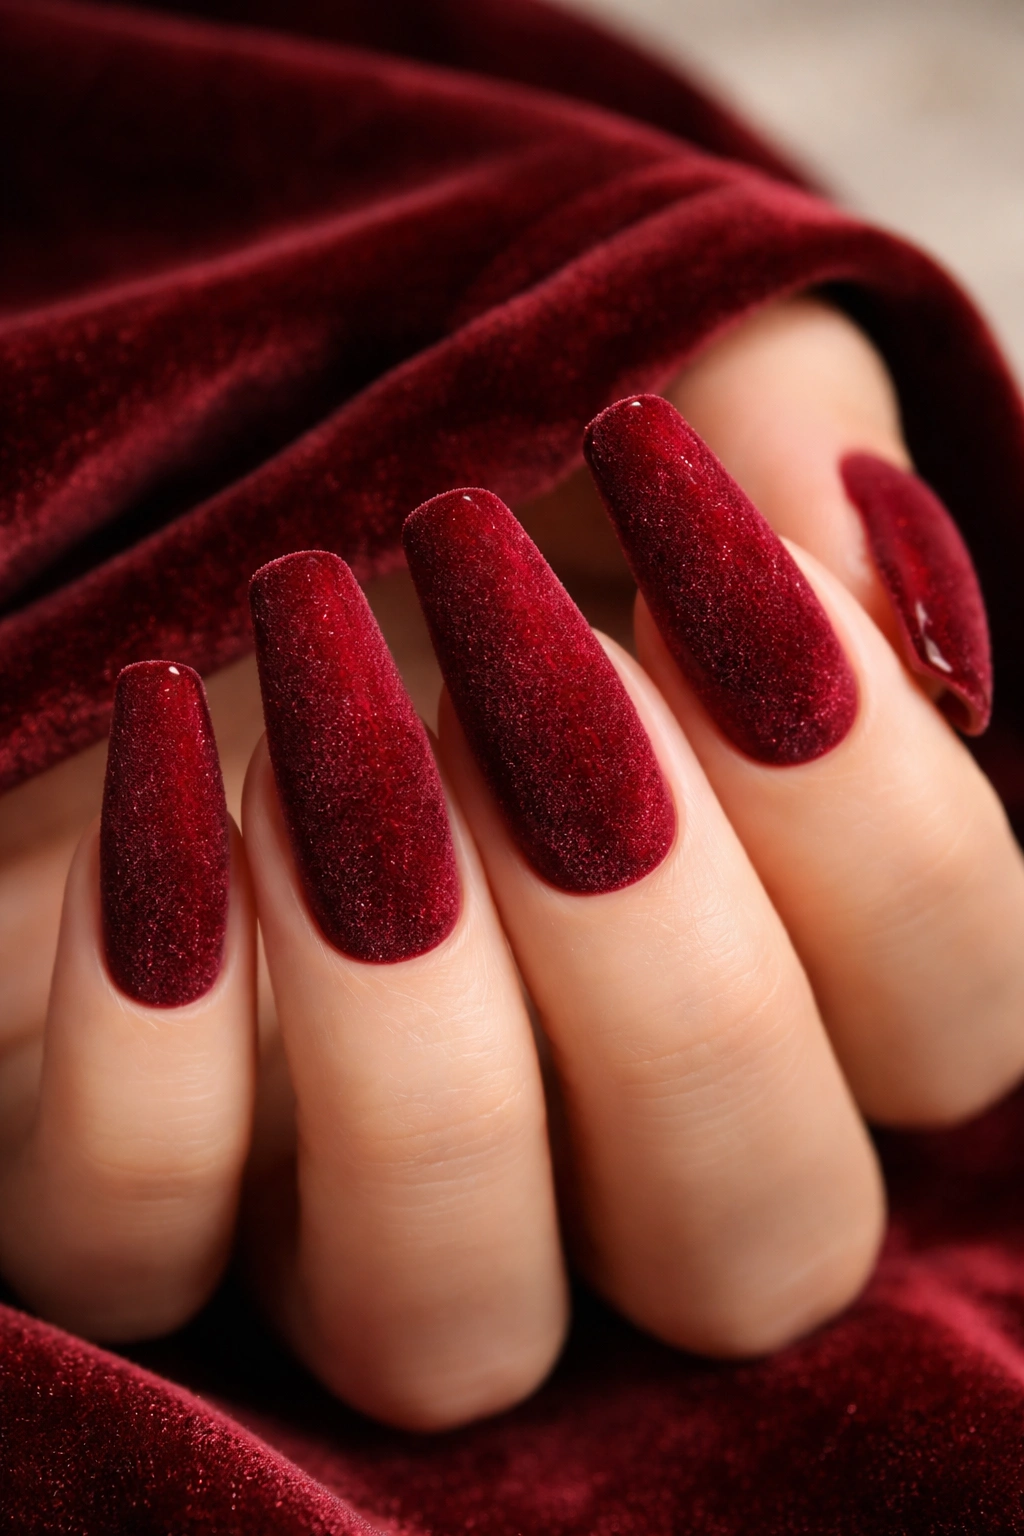
Use a velvet powder or velvet finish polish designed specifically for nails. These create a soft, fuzzy texture that feels almost velvety to the touch (though it’s not—it’s still smooth polish with a particular finish). The texture converts dark red from sleek to sensual. Velvet finishes have a subtle matte quality that photographs beautifully and makes nails look richer than glossy versions.
How Velvet Finish Works Technically
Velvet powders are tiny fibers that adhere to wet top coat, creating microscopic texture. Some brands use a flocking technique; others use specialty base coats designed to grab powder. The result catches light differently than any other finish—it’s neither matte nor glossy, but something in between that feels almost luxurious. The texture is subtle in person but dramatic in photographs.
Durability and Care
Velvet finishes are slightly more delicate than standard gel or polish because the texture can snag or pill with rough treatment. Avoid scrubbing with nails or dragging them across textured surfaces. With normal wear, velvet looks stunning for 2-3 weeks. Some velvet finishes can be topcoated with gloss for added protection, which gives you a hybrid look—textured underneath with a glossy seal on top.
Styling Velvet Nails
Velvet coffins in dark red read as luxurious and tactile. They pair beautifully with soft textures in your clothing—velvet, cashmere, silk. The nails become a texture story rather than just a color story. Velvet finishes also photograph exceptionally well, with more dimension than solid polish.
7. Burgundy with Gold Geometric Triangles
Paint the full nail burgundy-red, then add metallic gold triangles or angular shapes, either scattered across the nail or forming a deliberate pattern. Geometric shapes feel graphic and modern compared to organic florals or abstract designs. Triangles specifically complement the coffin shape’s sharp angles beautifully.
Design Layout Options
One approach: paint a row of small gold triangles across the middle of each nail. Another: place one large triangle at the tip of each nail, pointing downward. A third option layers triangles asymmetrically, creating visual movement. The key is intentionality—every triangle should feel placed, not random.
Making Gold Geometric Shapes Pop
Use a bright, reflective gold polish or metallic paint. Chrome gold looks even more striking than matte gold on this background. Apply in thin, even coats so the shape edges are crisp. Use a thin brush or stamping plate designed for geometric patterns if you want perfectly precise triangles. Slightly imperfect shapes can work too if they’re intentionally asymmetrical and balanced.
When to Wear This
Geometric gold triangles feel modern, graphic, and slightly edgy—perfect for creative professionals or anyone wanting their nails to feel intentional and editorial rather than traditionally feminine. The design works with contemporary fashion but also complements bold jewelry and statement pieces.
8. Dark Red Crackle Finish
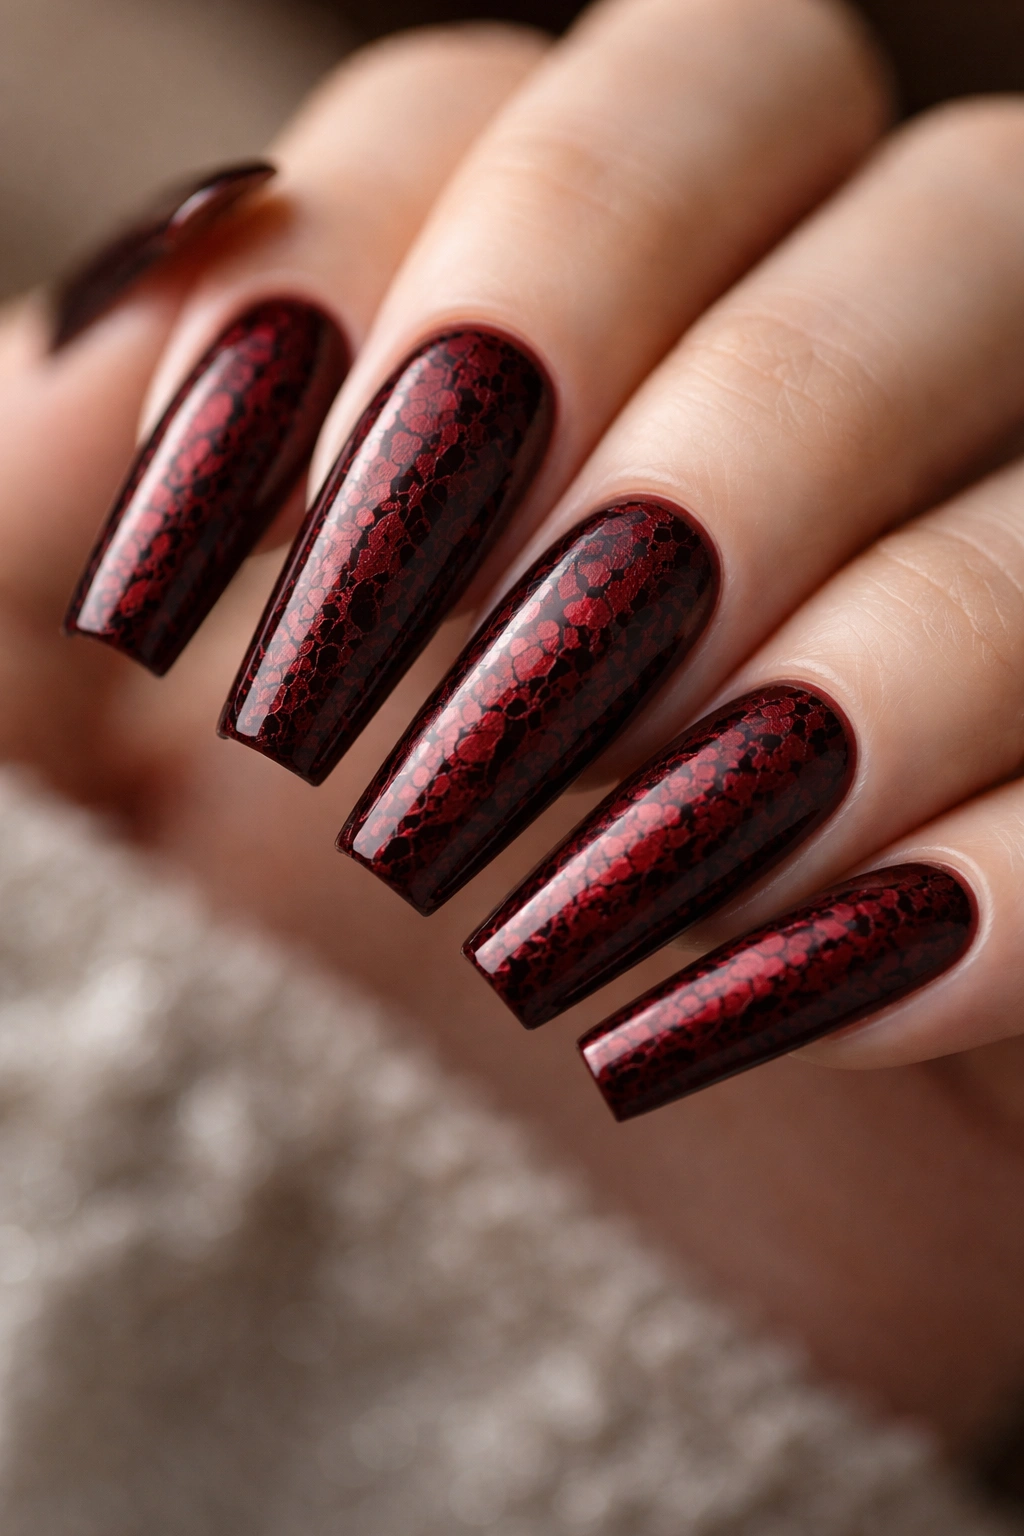
Apply dark red as a base, then layer on top a specially formulated crackle or shatter polish that creates a network of fine cracks across the surface. These cracks expose the base color underneath or a contrasting color underneath, creating a fractured glass or shattered ceramic effect. The technique transforms flat color into visual texture and complexity.
How Crackle Polish Works
Crackle polish is designed to harden faster than the base coat, creating tension that naturally breaks into cracks. It’s applied in thin coats—too much product prevents the cracking pattern from forming. The cracks are completely predictable (they’ll always form across the nail), but the specific pattern varies slightly each application, so it feels organic rather than stamped.
Color Combinations
Dark red crackle over dark red creates a textured monochromatic look—visual interest without color contrast. Dark red base with black crackle on top is more dramatic. Some versions use gold or silver crackle over burgundy for luxury vibes. The color of the crackle completely changes the design’s personality.
Longevity and Wear
Crackle finishes show wear slightly faster than solid polish because the cracks are prone to catching and snagging with daily life. Expect 10-14 days before the effect starts looking worn. The trade-off is the visual drama—crackle nails make a statement that solid color simply doesn’t.
9. Wine Red with Constellation Nail Art
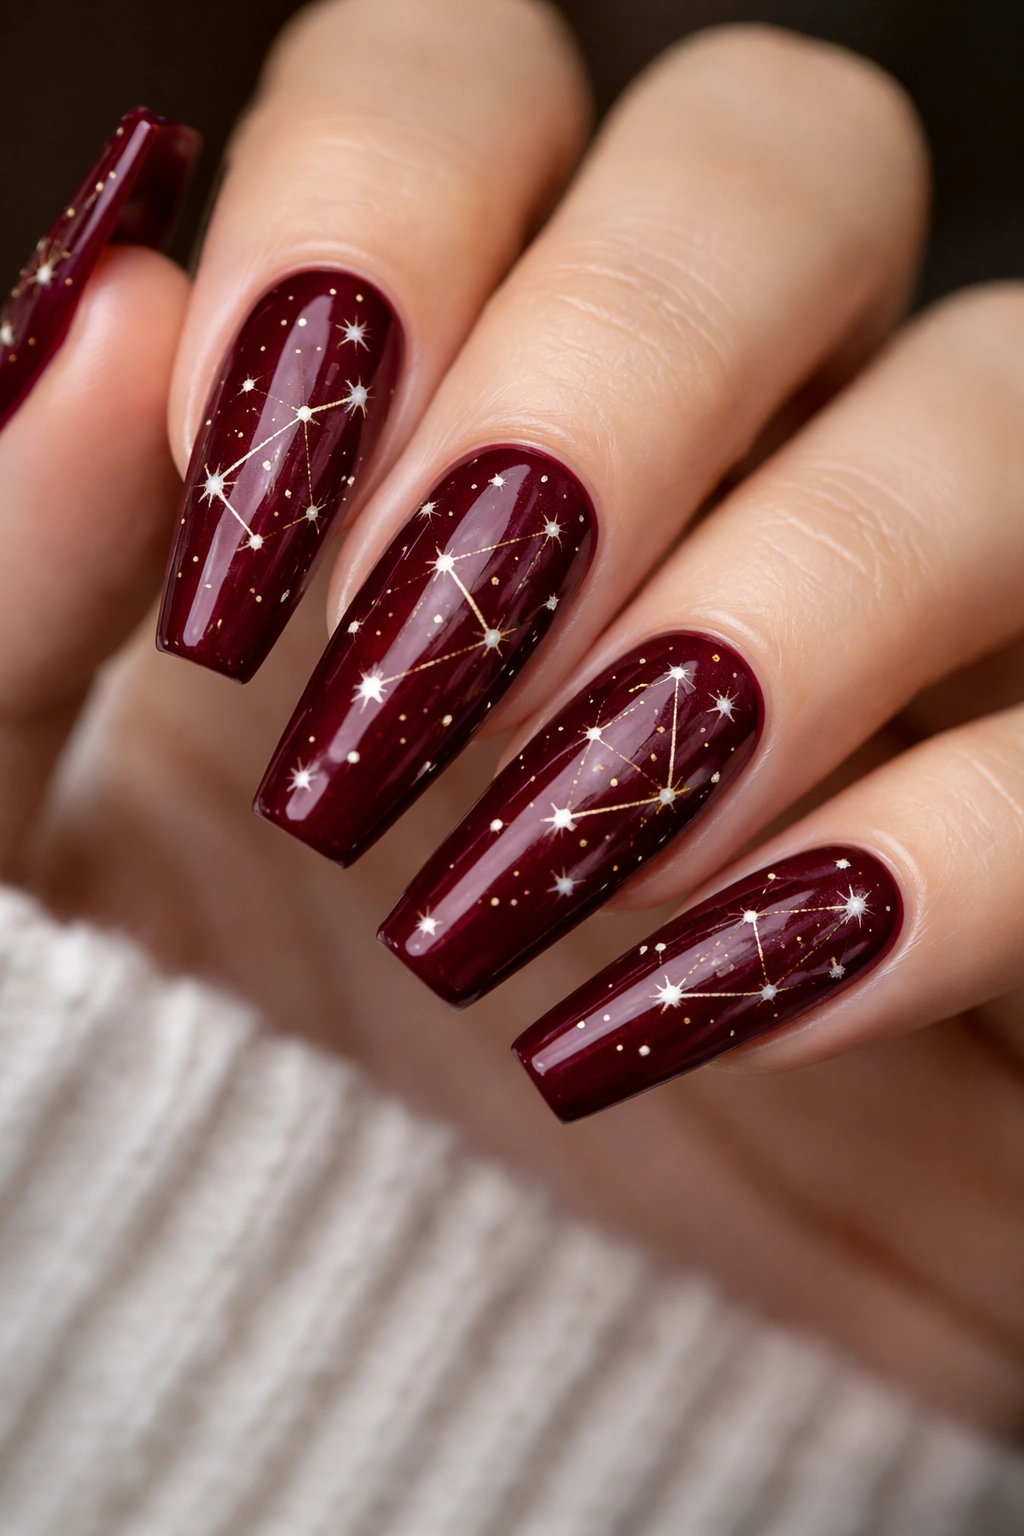
Paint each nail in wine red (a slightly more muted, grape-toned dark red), then add tiny white or gold dots connected by thin lines to create a constellation effect. Each nail can have a different constellation, or you can create a unified design that flows across all ten nails. The effect is celestial and magical without being over-the-top girly.
Constellation Design Approach
Research actual constellations or create your own. Place small dots where stars would be, then connect them with ultra-thin lines using a thin liner brush or dotting tool. The lines should be barely visible—the constellations should feel suggested rather than loudly drawn. This requires patience and a steady hand (or a very thin striping tape for guides).
Color Contrast Options
White constellations on wine red create high contrast that photographs beautifully. Gold or silver constellations are more subtle and sophisticated. Some people do a hybrid: white dots with gold connecting lines. The background wine red should be deep enough that whatever constellation color you choose shows up clearly.
Making It Feel Sophisticated vs. Childish
The difference comes down to execution. Perfectly placed dots with clean, thin lines = sophisticated. Sloppy dots with thick lines = crafty. This design lives or dies based on precision. If you’re not confident with freehand accuracy, use nail art stencils or guides designed specifically for constellation patterns.
10. Dark Red with Holographic Glitter Gradient
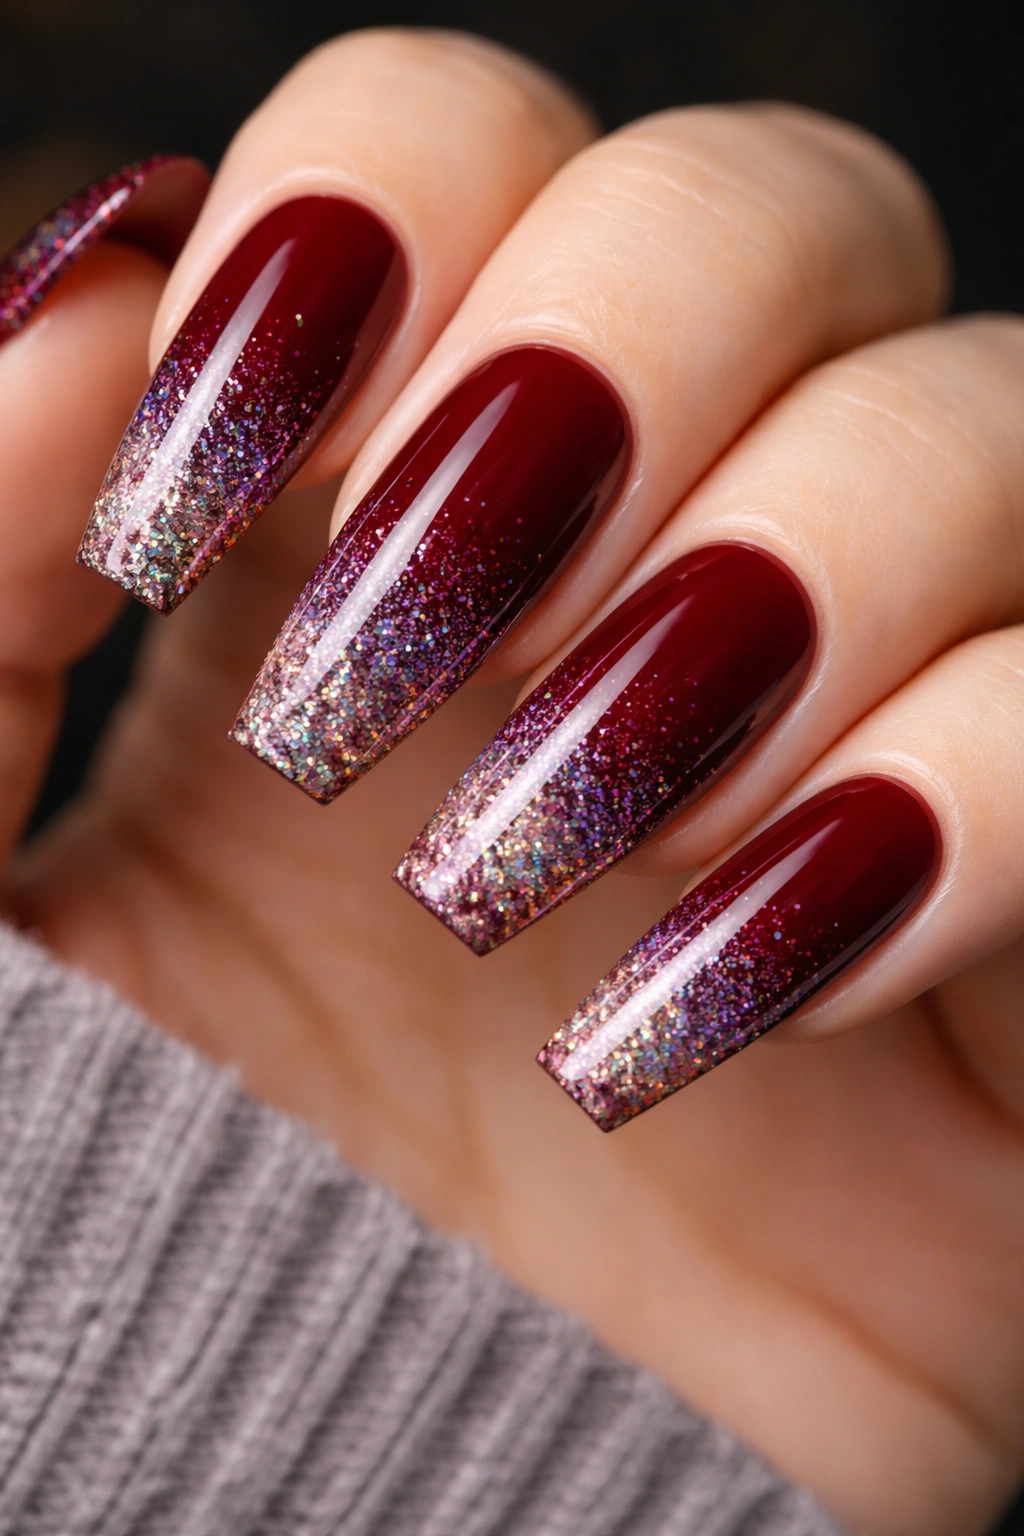
Start with solid dark red, then layer on holographic glitter polish that gets progressively denser toward the tip, creating a gradient effect. Holographic glitters refract light and show rainbow effects at different angles, making them visually complex and eye-catching. The gradient from solid red to sparkle creates movement and dimension.
Layering Glitter Successfully
Apply the dark red base coat completely and let it cure/dry. Then apply the holographic glitter polish in very thin layers toward the tip, building density gradually. Each thin layer should be fully cured before adding the next. This creates a smooth gradient rather than a chunky, uneven finish. The glitter particles should be small enough that the gradient looks refined, not craft-project-ish.
Glitter Without the Mess
Loose glitter falls everywhere and can be frustrating to work with. Pre-mixed glitter polish designed for gradient application is much cleaner and gives better results. The glitter particles are suspended in the polish base, so they apply evenly and stay where you put them.
Removal and Longevity
Glitter nails require patience to remove since the glitter particles hold onto the nail even after polish dissolves. Soak in acetone for 15+ minutes and gently roll the softened polish off rather than scraping. These nails last well (2-3 weeks easily) because the glitter essentially locks the polish in place and prevents chipping at the edges.
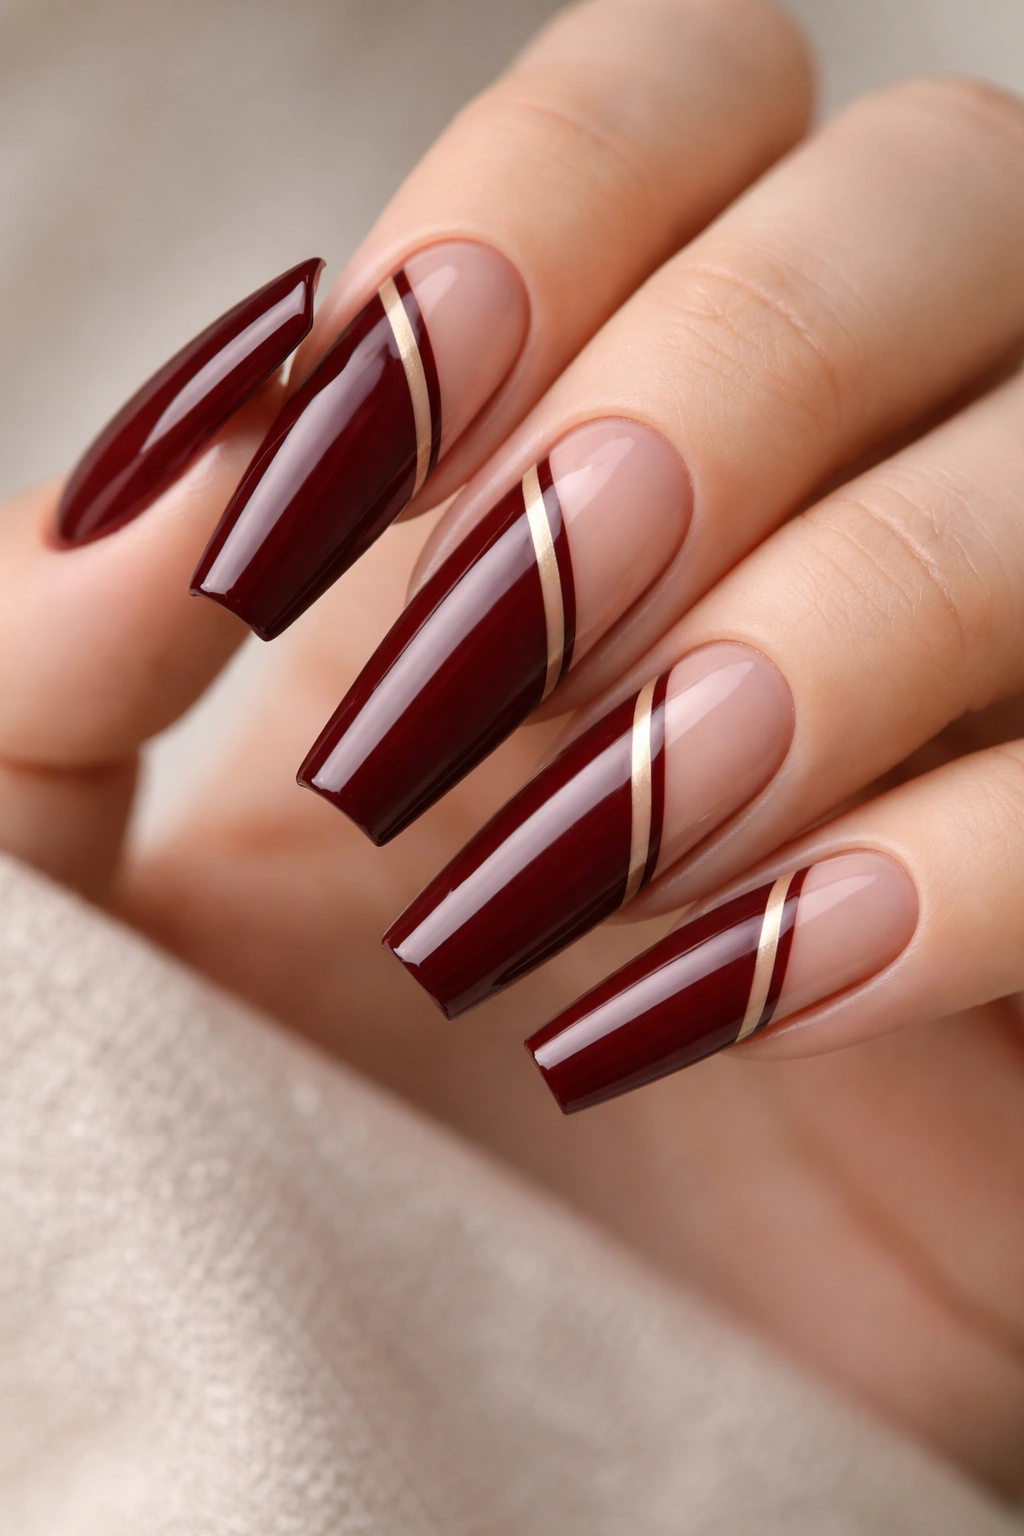
11. Burgundy with Black French Ombre Tip
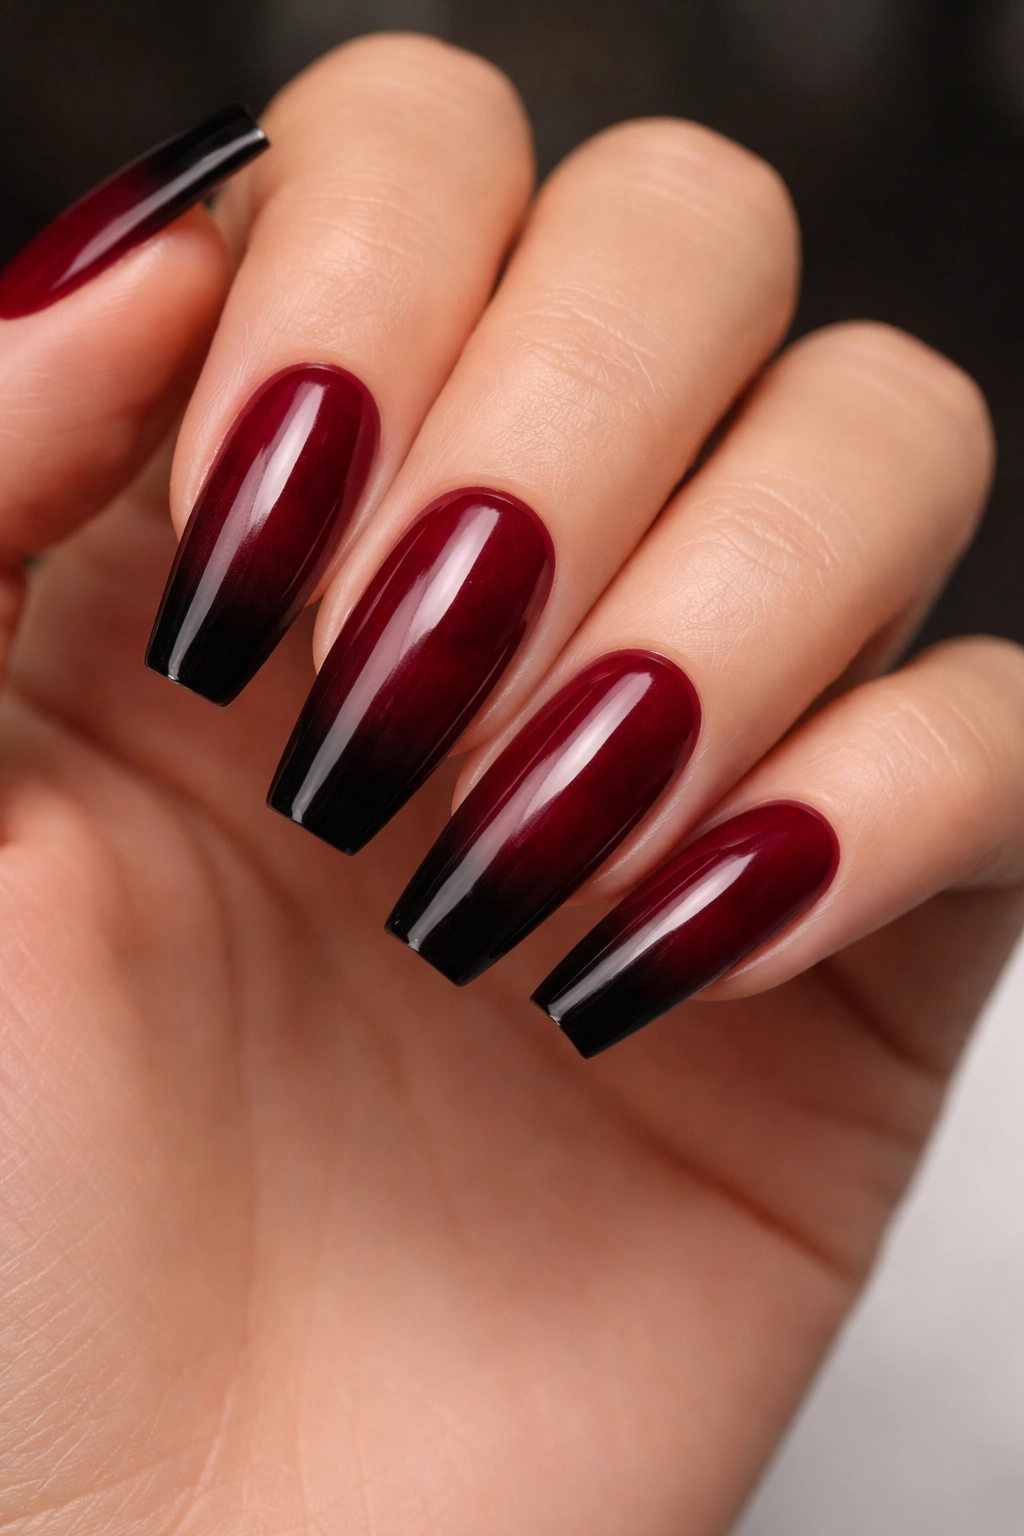
A play on the traditional French manicure: instead of white tips, use a black-to-burgundy ombre gradient. The burgundy-red base transitions to black at the very tip, creating definition and visual weight at the free edge. It’s a modern interpretation of a classic that feels fresh on coffin nails.
Building the Ombre Tip Effect
Paint the full nail in burgundy-red and let it dry/cure. Create the ombre transition by sponging black polish onto the tip area, blending it upward into the burgundy with a clean sponge. The transition zone should be roughly 1/4 to 1/3 of the nail from the tip. The ombre works best when there’s a clear visual flow from one color to the other rather than a hard line.
Why This Works on Coffin Shapes
The coffin’s flat tip naturally frames the ombre—the horizontal line at the nail’s edge acts as a boundary for the color transition. A round or pointed nail would lose some of this effect because the tip narrows to a point rather than being defined by a flat edge. The coffin shape actually makes this design more impactful.
Styling and Durability
This design reads as polished and intentional. The black adds just enough edge to keep it from feeling traditional or dated. It’s modern enough for creative folks but professional enough for conservative environments. The ombre hides wear better than a solid design would.
12. Dark Red with 3D Rhinestone Accents
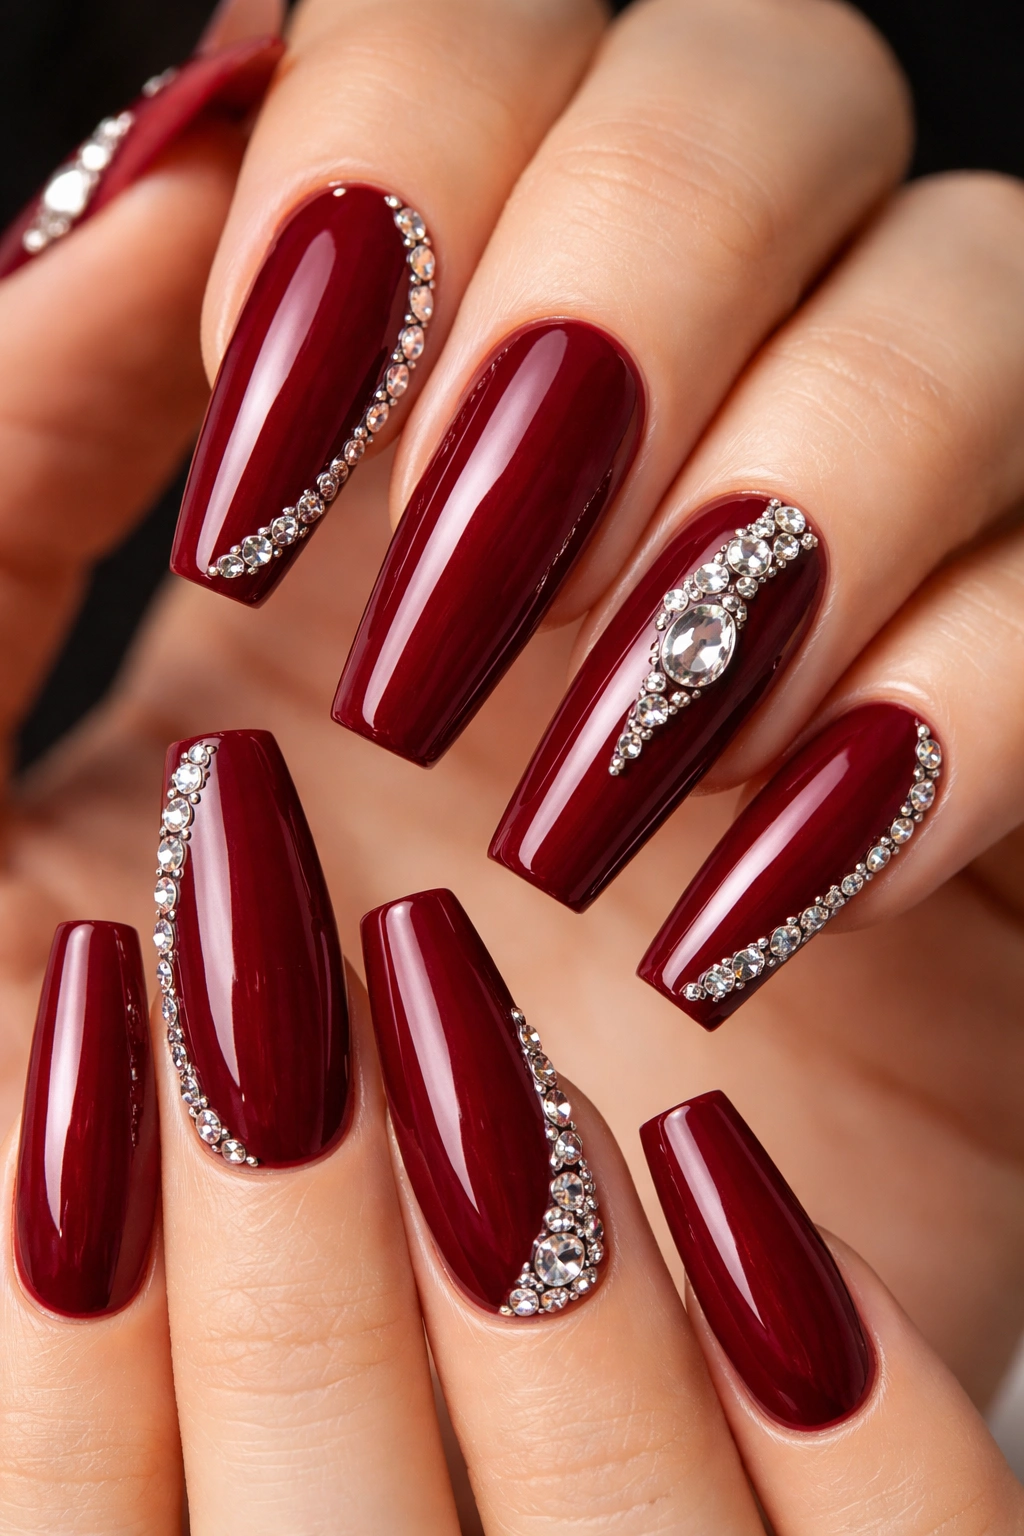
Paint the nails in dark red, then add strategically placed rhinestones or crystals to create dimension and sparkle. Rather than covering the nail in stones (which can feel costume-y), place them along the edge, scattered asymmetrically, or in a geometric pattern. High-quality crystals catch light and create an almost jewel-like effect.
Placing Rhinestones for Maximum Impact
Less is more with crystal accents. A single crystal on the accent nail or a vertical line of three crystals down the center creates focus without overwhelming. The spacing and placement should feel intentional, not random. Placing larger crystals on just the ring and pinky fingers creates natural focal points while leaving most of the nail surface visible.
Securing Crystals Permanently
Use clear rhinestone glue specifically designed for nails, or apply rhinestones to wet top coat and seal everything with an additional layer of gloss on top. The seal ensures they stay put through daily wear. Self-adhesive rhinestones are less reliable—they tend to loosen with time, water exposure, or daily activities.
When to Wear Crystal Accents
Rhinestone coffins are fancier than solid color—appropriate for special occasions, formal events, or when you want to feel extra polished. They work beautifully with evening wear and jewelry. The crystals catch light constantly, so you’ll notice the nails in photographs and person.
13. Oxblood with Stamped Lace Detail
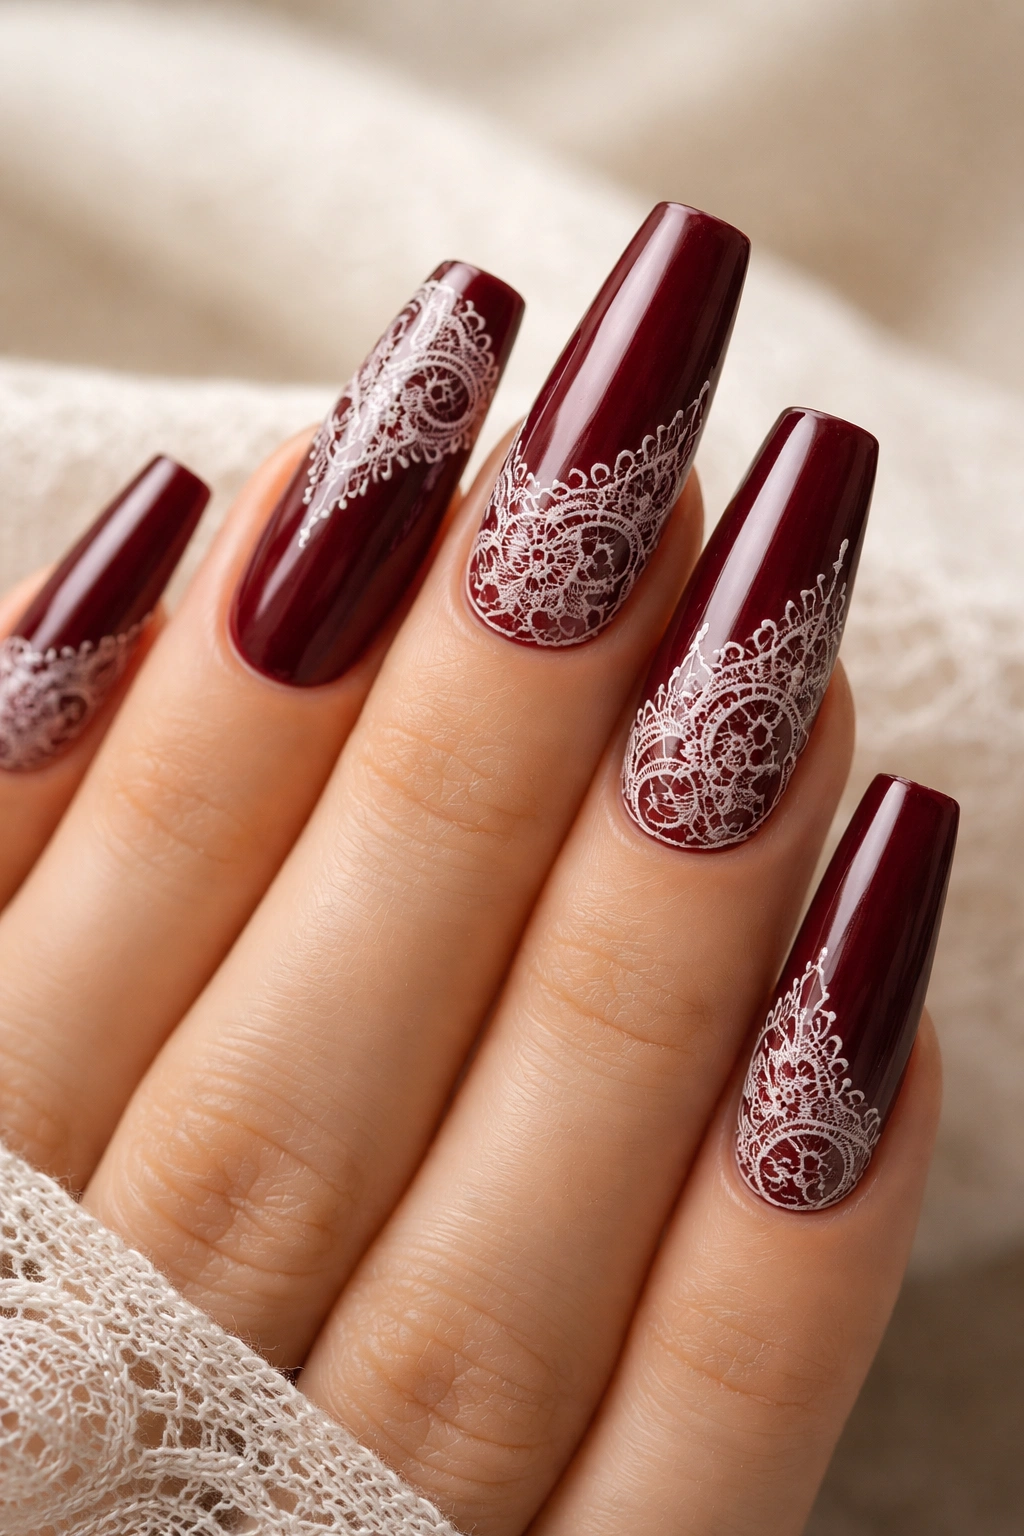
Use a dark red base coat, then apply intricate lace patterns using nail stamping plates and white or gold polish. Lace stamping creates delicate, detailed designs without requiring freehand art skills. The contrast between the rich oxblood and the intricate lace pattern feels simultaneously edgy and romantic.
How Nail Stamping Works
Nail stamping uses specially designed metal plates with etched designs. You apply polish to the design, scrape excess off, and press a stamper against the plate to pick up the design. Then stamp the pattern onto the nail. It requires some practice to get consistent pressure and placement, but results are dramatically faster and more precise than freehand work.
Lace Design Variations
Full-nail lace coverage is ornate and appropriate for special occasions. A lace border just along the cuticle and tip creates a framing effect that feels more wearable for daily life. Asymmetrical lace (concentrated on one or two nails) makes the design feel editorial rather than matching-set-y.
Making Stamped Designs Look Refined
Use high-quality stamping plates designed by professional nail artists—cheaper plates have dull details and less precise etching. Stamp in contrasting colors: white on oxblood is crisp and clear; gold on oxblood is more refined and luxurious. Seal everything with a shiny top coat so the stamped details pop.
14. Burgundy Marble with Rose Gold Accents
Apply burgundy base, then create white marble veining on all or some nails. Add thin rose gold lines or small dots strategically throughout the marble pattern. The rose gold catches light and adds warmth to the white-and-burgundy color story. This is design layering that feels sophisticated rather than crowded.
Combining Marble and Metallic
Start with marble application (white on burgundy, allowing organic irregular lines). Once completely dry, apply thin rose gold lines following the contours of the marble veining, or place small rose gold dots at the intersection points of the white lines. The metallic adds richness without competing for attention.
Positioning Rose Gold for Balance
Rather than scattering rose gold randomly, place it intentionally. Maybe along the cuticle edge, or at the nail’s center, or along the free edge. The positioning should feel like a design choice, not a mistake. Rose gold is warmer than silver, making it perfect for deeper burgundy shades.
Overall Aesthetic
This design reads as art-forward and luxurious. It works beautifully on longer coffin nails where the space allows for layered detail without feeling cramped. The combination of organic (marble) and geometric (metallic placement) creates visual interest and sophistication.
15. Deep Burgundy with Champagne Shimmer

Apply a deep burgundy base—the darkest red tone in the range—then layer on a champagne shimmer polish over the top. The shimmer creates a luminous, almost glowing effect that makes the dark burgundy look dimensional and expensive. The champagne (warm, peachy gold tones) complements the wine undertones beautifully.
Shimmer vs. Glitter
Shimmer contains fine, reflective particles that create a soft glow rather than discrete sparkles. It’s more subtle and sophisticated than glitter, making it appropriate for professional settings while still feeling special. The particles are so small that the nail surface feels completely smooth, unlike chunky glitter.
Layering for Maximum Glow
Apply the burgundy base fully and completely (two coats if needed for opacity). Once fully cured, apply the champagne shimmer in one thin layer. The shimmer particles will sit on top of the burgundy, reflecting light and creating depth. A thin top coat seals everything and adds gloss.
Seasonal Adaptability
The deep burgundy with champagne shimmer works year-round. In warmer months, the champagne tones feel summery and warm. In darker months, the deep burgundy takes the lead and the shimmer adds just enough sparkle for the season. It’s one of those designs that transforms slightly depending on what you pair it with.
Final Thoughts
Dark red coffin nails offer an enormous range of possibilities—from understated elegance to dramatic statement-making. The color works across skin tones, professional and casual settings, and every personal style from minimalist to maximalist. The coffin shape amplifies whatever design you choose, making even a solid color feel modern and intentional.
The real magic happens when you understand that dark red isn’t one flat color—it’s a spectrum from true red to burgundy to oxblood to wine tones, each with its own personality. A crisp, cool-toned red reads different than a warm burgundy with brown undertones, even though they sit next to each other on the color wheel. Experimenting with different shades within the dark red family lets you dial in exactly the vibe you’re after.
Long coffin nails give you the space to layer techniques and create real nail art without everything feeling crowded or chaotic. Whether you go for pure sophistication with oxblood and gold foil, edgy drama with a burgundy-to-black ombre, or romantic elegance with lace and rose gold accents, these designs prove that dark red coffins are endlessly versatile. Find the design that speaks to your aesthetic, and don’t be surprised when people start asking for your nail artist’s information.
