

There’s something magical about October that brings out everyone’s creative side. Maybe it’s the crisp autumn air or the anticipation of candy-filled nights, but Halloween has a way of making us want to express ourselves in bold, unexpected ways. And what better canvas than your fingertips?
Your nails are like tiny billboards that go everywhere you do. They’re conversation starters at coffee shops, mood boosters during Zoom calls, and the perfect finishing touch to any Halloween costume. Whether you’re planning to dress up as a glamorous vampire or spend the evening handing out candy in your comfiest sweats, a Halloween-themed manicure lets you celebrate the season without committing to a full costume.
The best part? Halloween nails don’t have to be scary to be stunning. Sure, you can go full horror movie with blood drips and creepy crawlies, but you can also keep things chic with moody colors, subtle accents, or playful designs that lean more cute than creepy. From minimalist ghost tips to elaborate 3D masterpieces, there’s a spooky-season look for every style and skill level.
1. Classic Blood Red Manicure

Sometimes simplicity speaks volumes, and nothing says Halloween quite like a fresh coat of blood-red polish. This timeless look works whether you’re hitting up a Halloween party or just want to feel a bit more mysterious during your daily routine.
The key to nailing this look is choosing the right shade of red. You’re not going for cherry or coral here—think deeper, richer, more vampiric. A true blood red has slight burgundy or wine undertones that make it feel sophisticated rather than summery. Apply two coats for full opacity, and don’t skip the glossy top coat. That high-shine finish is what transforms regular red into something that looks wet and freshly applied.
Nail artist Rachel Joseph notes that blood red is a Halloween staple for good reason. It pairs beautifully with virtually any costume, from witches to devils to classic vampires. The beauty of this look is its versatility—dress it up with a matte top coat for a modern vibe, or add a single accent nail with tiny rhinestones or nail art for extra drama.
For those with shorter nails, this look is absolutely perfect. The rich color creates the illusion of length while the glossy finish catches light beautifully. If you’re feeling adventurous, try alternating between glossy and matte finishes on different fingers for a contemporary twist that keeps things interesting.
2. Glow-in-the-Dark Ghost Nails
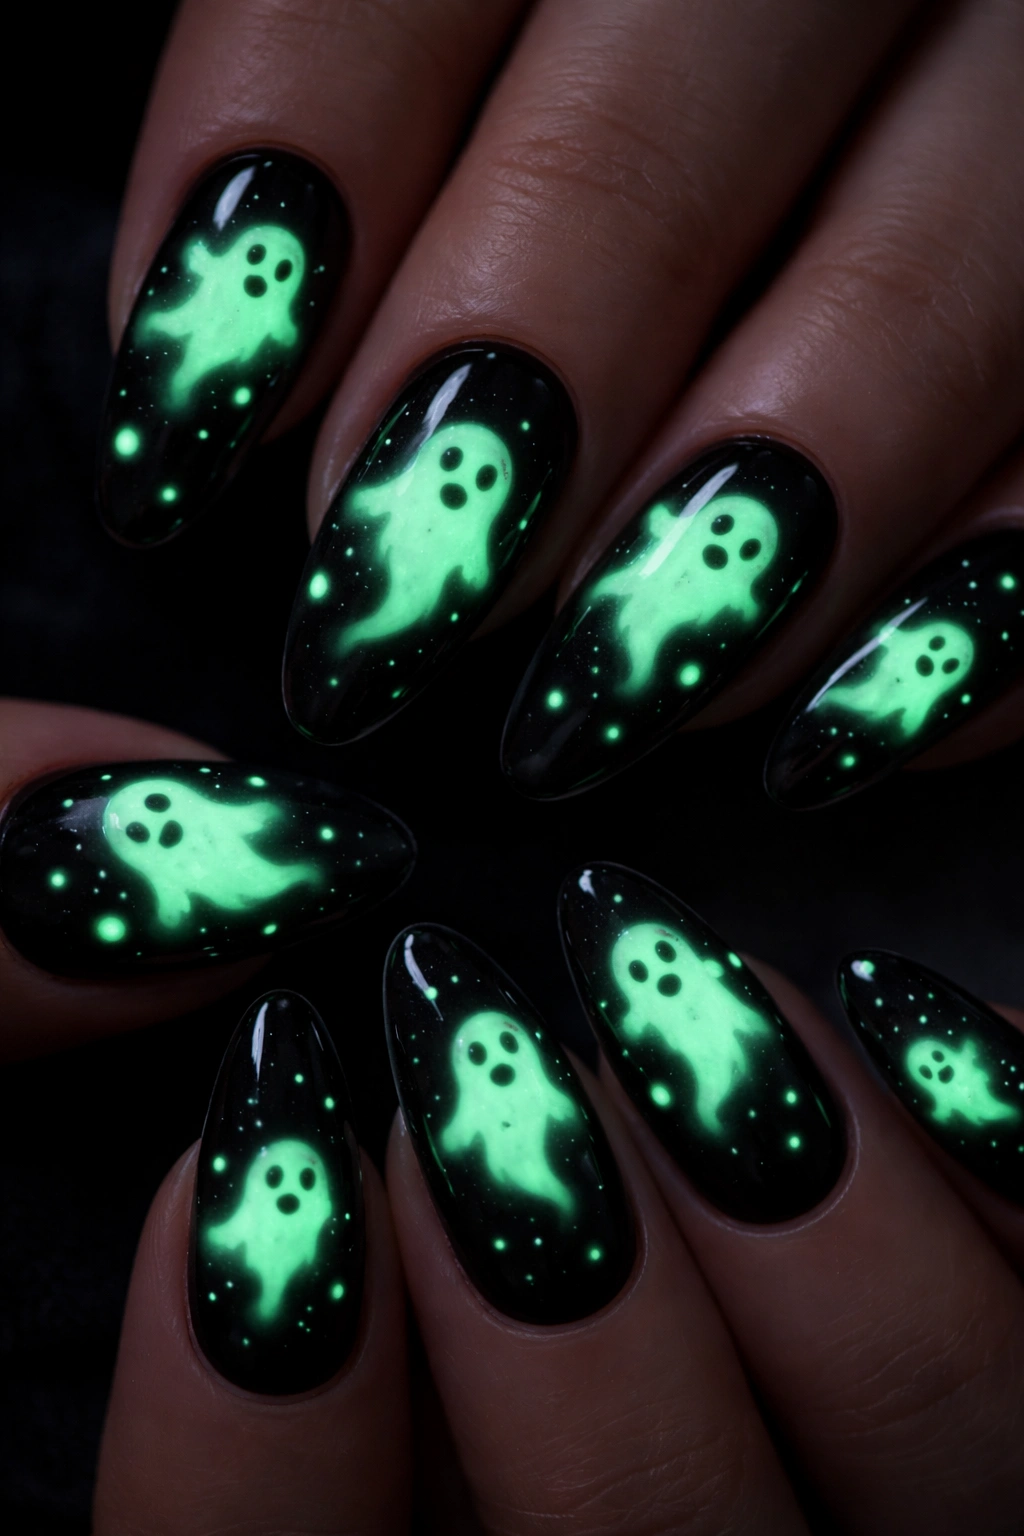
Here’s where things get fun. Glow-in-the-dark polish isn’t just for kids’ crafts anymore—it’s become a legitimate nail trend that’s perfect for Halloween festivities. Picture this: your nails look chic and sophisticated in daylight, then surprise everyone when the lights go down at the party.
Start with a jet-black base for maximum contrast. Once that’s completely dry, use glow-in-the-dark polish to paint adorable ghost shapes across your nails. You can keep them simple with basic ghost outlines, or get creative with different expressions and poses. Some ghosts can wave, others can look surprised—let your imagination run wild.
The technical trick here is layering. Glow-in-the-dark polish often needs two or three coats to achieve that eye-popping effect you’re after. Be patient between coats, letting each layer dry thoroughly. For added dimension, some nail artists sprinkle silver glitter over the black base before adding the ghosts, creating a starry night effect that’s gorgeous even before it glows.
This design works brilliantly on any nail length, though longer nails give you more room to create elaborate ghost scenes. If you’re doing this at home, grab a thin nail art brush or even a toothpick to create the ghost shapes. The beauty of ghosts is that they’re supposed to be a bit wonky and imperfect—it adds to their charm.
3. Glazed Chrome French Tips
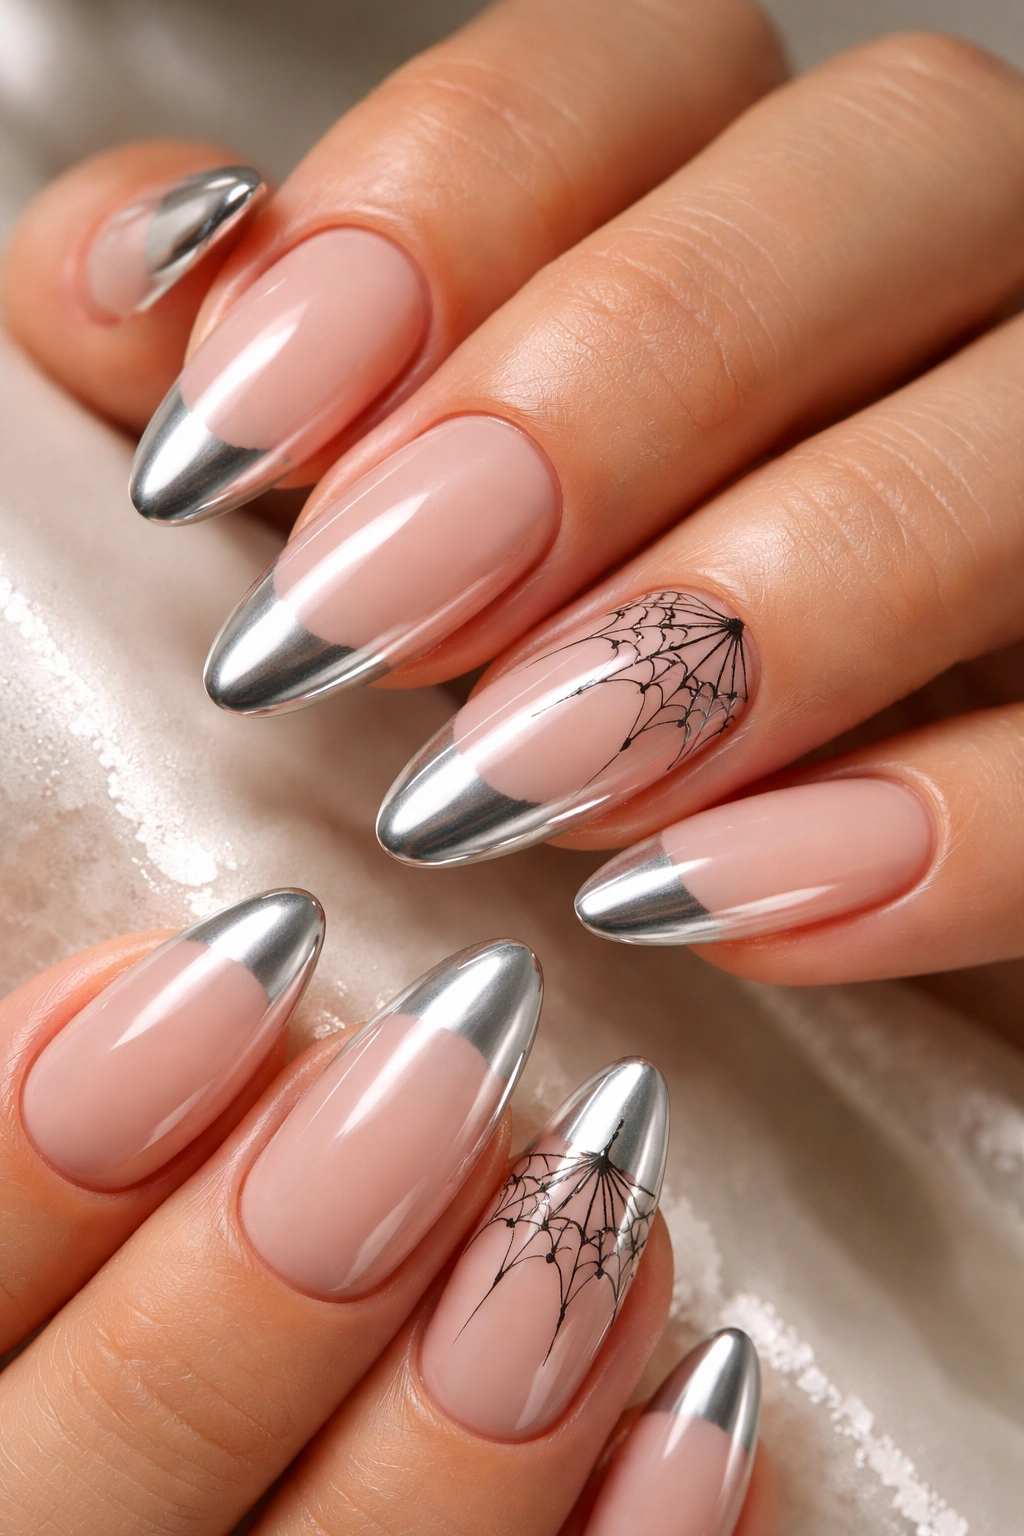
Who says Halloween nails have to abandon elegance? These 24-karat chrome French tips with delicate cobweb accents prove you can be spooky and sophisticated at the same time. This look has been trending hard because it manages to feel both festive and timeless.
The chrome finish gives these nails an almost liquid metal appearance that catches every bit of light. Start with a neutral or nude base—think soft beige or milky pink. Then apply chrome powder or chrome polish to create those gleaming tips. The tapered almond shape works particularly well here, giving you that elongated, elegant silhouette.
The spiderweb detail is what transforms this from everyday glam to Halloween-ready. Using a fine liner brush and black polish, carefully draw delicate webs on one or two accent nails. Keep the lines thin and precise—you’re going for intricate, not heavy-handed. This subtle nod to the season means you can wear these nails through early November without feeling like you’re clinging to Halloween past.
According to Paintbox creative director Mabelyn Alva, choosing your color palette strategically makes all the difference. For Halloween, she loves working with metallics as a base because they add that supernatural shimmer while remaining wearable. These nails photograph beautifully, making them perfect if you’re planning to document your Halloween adventures on social media.
4. Orange Aura Ombre
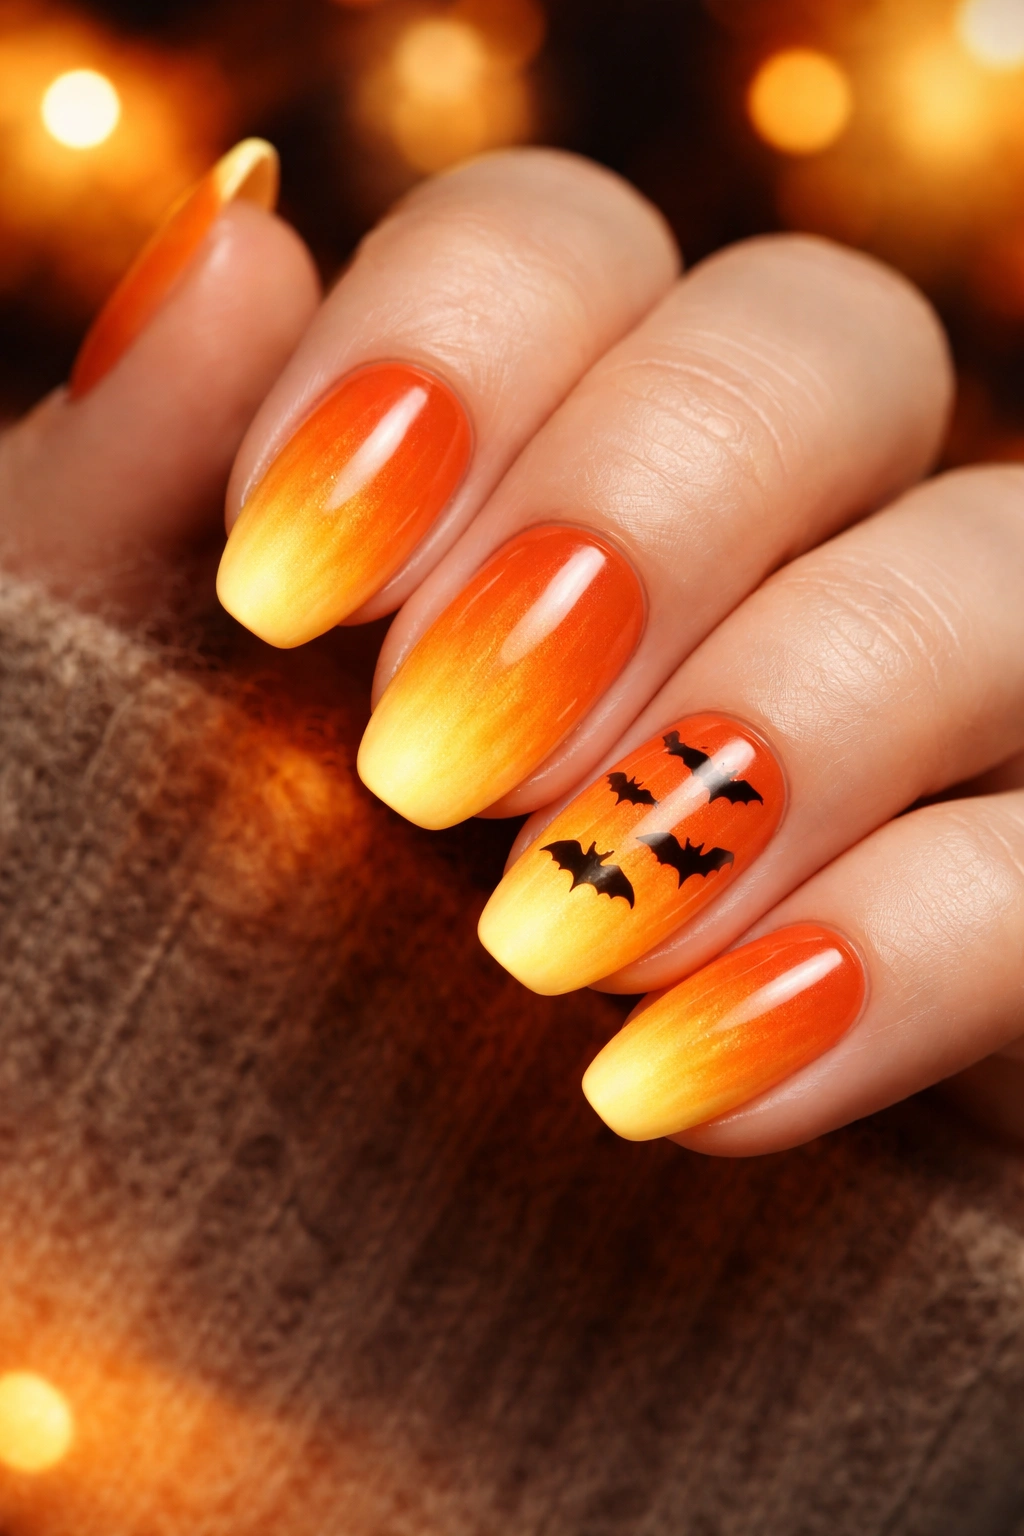
Aura nails have been having a major moment this year, and the technique translates beautifully to Halloween vibes. This design creates a gorgeous gradient effect that looks like a glowing jack-o-lantern or a warm autumn sunset, depending on how you squint at it.
Creating aura nails requires either a steady hand or a makeup sponge. Start with a darker orange base—think burnt orange or pumpkin spice. While it’s still slightly tacky, use a sponge to dab lighter orange or yellow polish in the center of each nail, working outward. The goal is that hazy, diffused look where colors melt into each other without harsh lines.
The beauty of aura nails is that no two nails need to look identical. Actually, it’s better if they don’t. This organic variation makes the whole look feel more artistic and intentional. Some nails can have the light spot closer to the cuticle, others near the tip—it all adds to that ethereal, glowing effect.
For an extra Halloween touch, add tiny black bats or stars on one or two accent nails. Keep these details small and sparse so they don’t compete with the beautiful gradient you’ve created. This design works on any nail length and is surprisingly forgiving if you’re attempting it at home. The sponging technique naturally creates that blurred effect, so even if your application isn’t perfect, it’ll still look intentional.
5. Minimalist Black Spiderweb
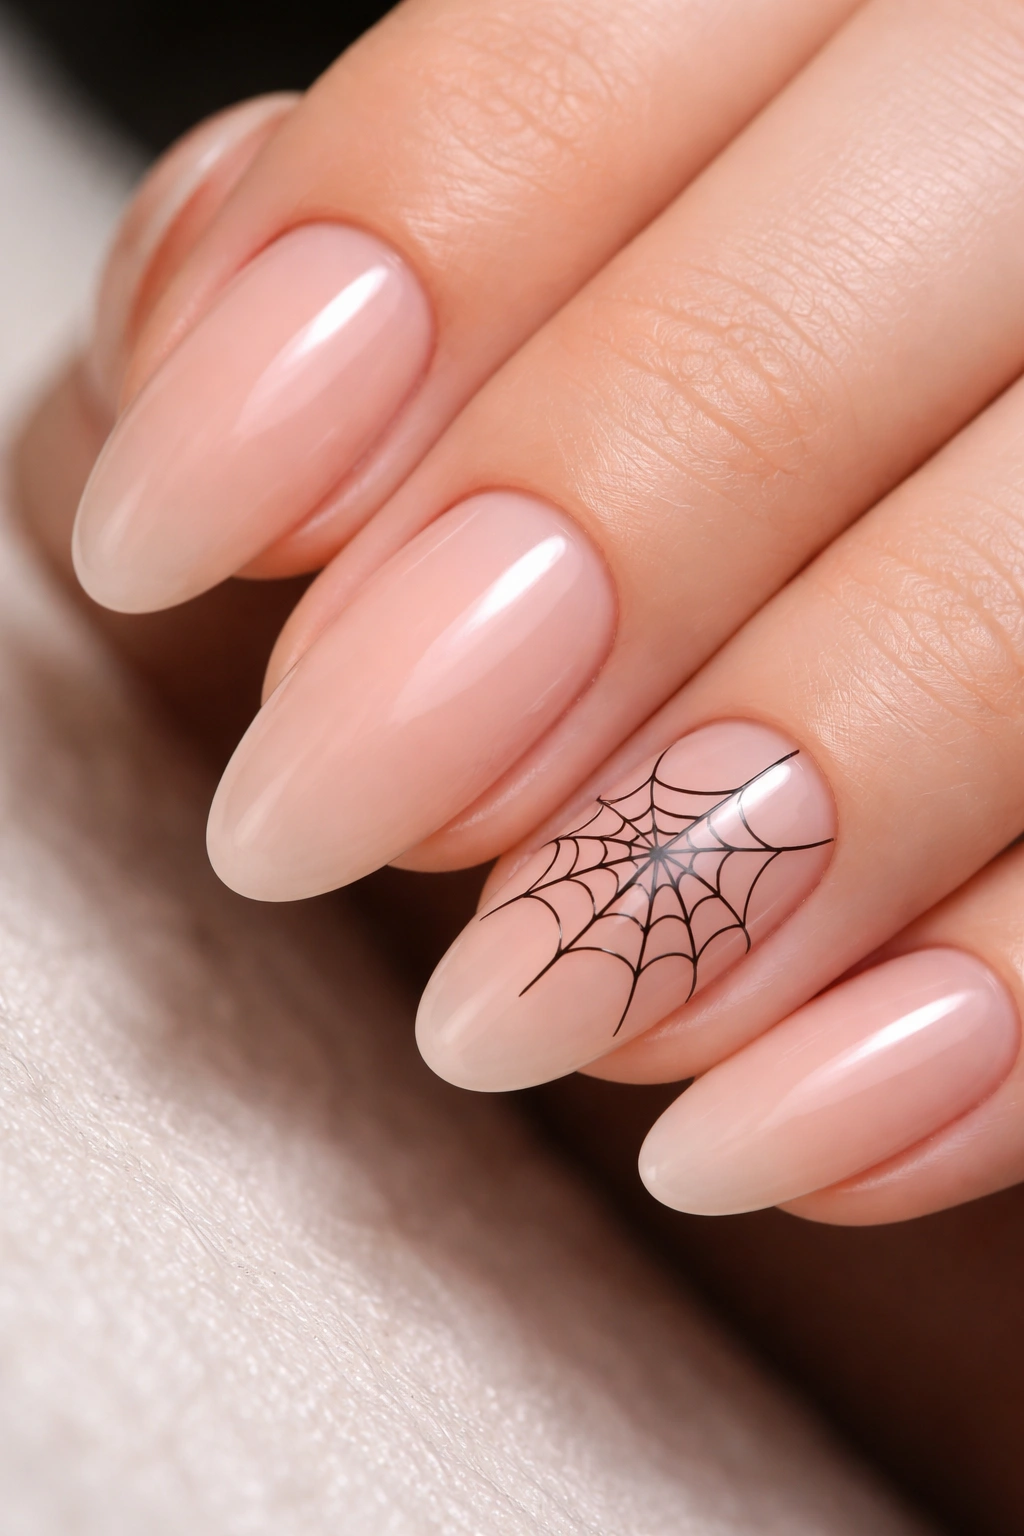
If you typically stick to simple manicures but want to acknowledge the season, this understated spiderweb design hits the sweet spot. It’s spooky without being in-your-face about it, which means you won’t feel silly wearing it to the office or a casual dinner.
Start with a clean, sheer pink or nude base—something close to your natural nail color. On one or two accent nails (typically the ring fingers), use a thin brush and black polish to draw delicate spiderweb lines. The key word here is delicate. You’re sketching fine, precise lines that look almost hand-drawn, not painting bold graphics.
The crisp line between the design and your natural nail is what elevates this from crafty to chic. Take your time with the application, and don’t be afraid to clean up any wobbly lines with a small brush dipped in acetone. The more precise your lines, the more sophisticated the final result.
This design is brilliant because it reads as classic and elegant from a distance, but reveals its Halloween spirit up close. It’s perfect for anyone in a professional environment who still wants to participate in seasonal fun. The subtlety also means you can comfortably wear these nails from early October through the end of the month without them feeling costume-y.
6. Dripping Blood French Manicure
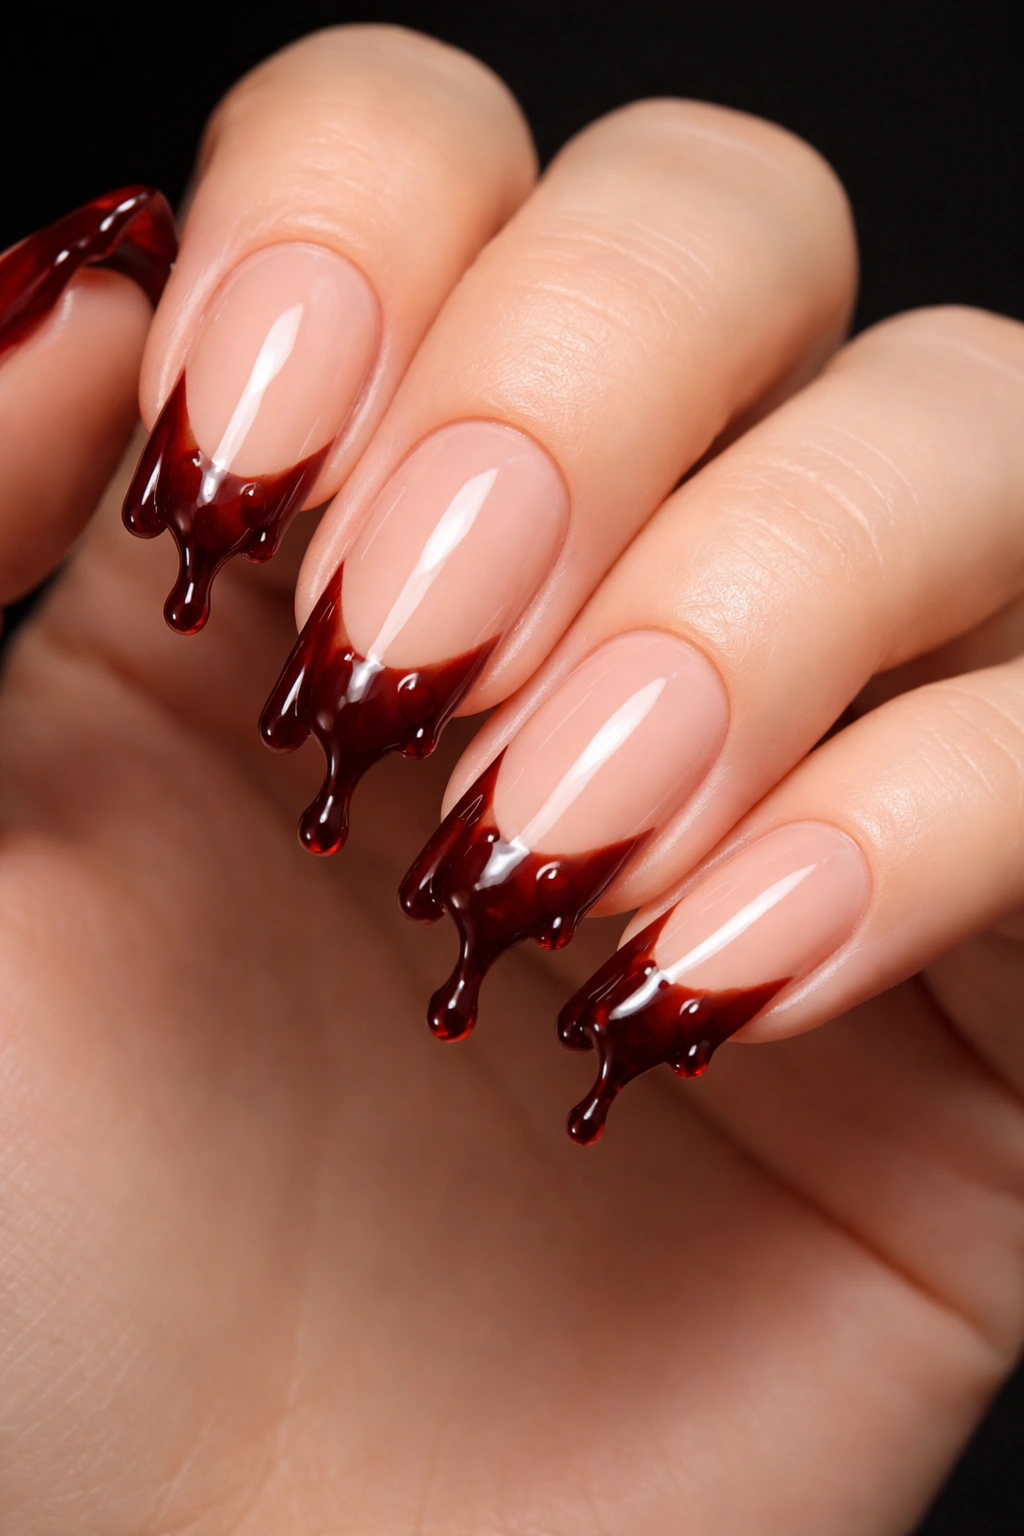
This vampy take on the classic French manicure is having a serious moment. Instead of a clean, straight smile line, you get gorgeous blood drips cascading down from blood-red tips. It’s dramatic, it’s eye-catching, and it’s easier to create than you might think.
Begin with a nude or pale pink base to provide contrast for those drips. Once dry, paint your tips in a deep red—we’re talking oxblood or burgundy. Here’s where it gets fun: while the red is still slightly wet, use a thin brush or dotting tool to drag small sections downward, creating those drip effects. Start at the tip and pull down, letting gravity inform the shape.
The trick is making each drip slightly different. Some should be longer, some shorter, some thicker than others. This variation makes the design look organic and realistic rather than repetitive or stamped. You can also add tiny dots near the tips to suggest dripping action that’s just beginning.
For added dimension, some nail artists layer a glossy red over a matte base, making those drips look genuinely wet. Seal everything with a high-shine top coat, and you’ve got nails that command attention. This design works beautifully on medium to long nails, where you’ve got enough real estate to let those drips travel.
7. Matte Black with Gold Accents
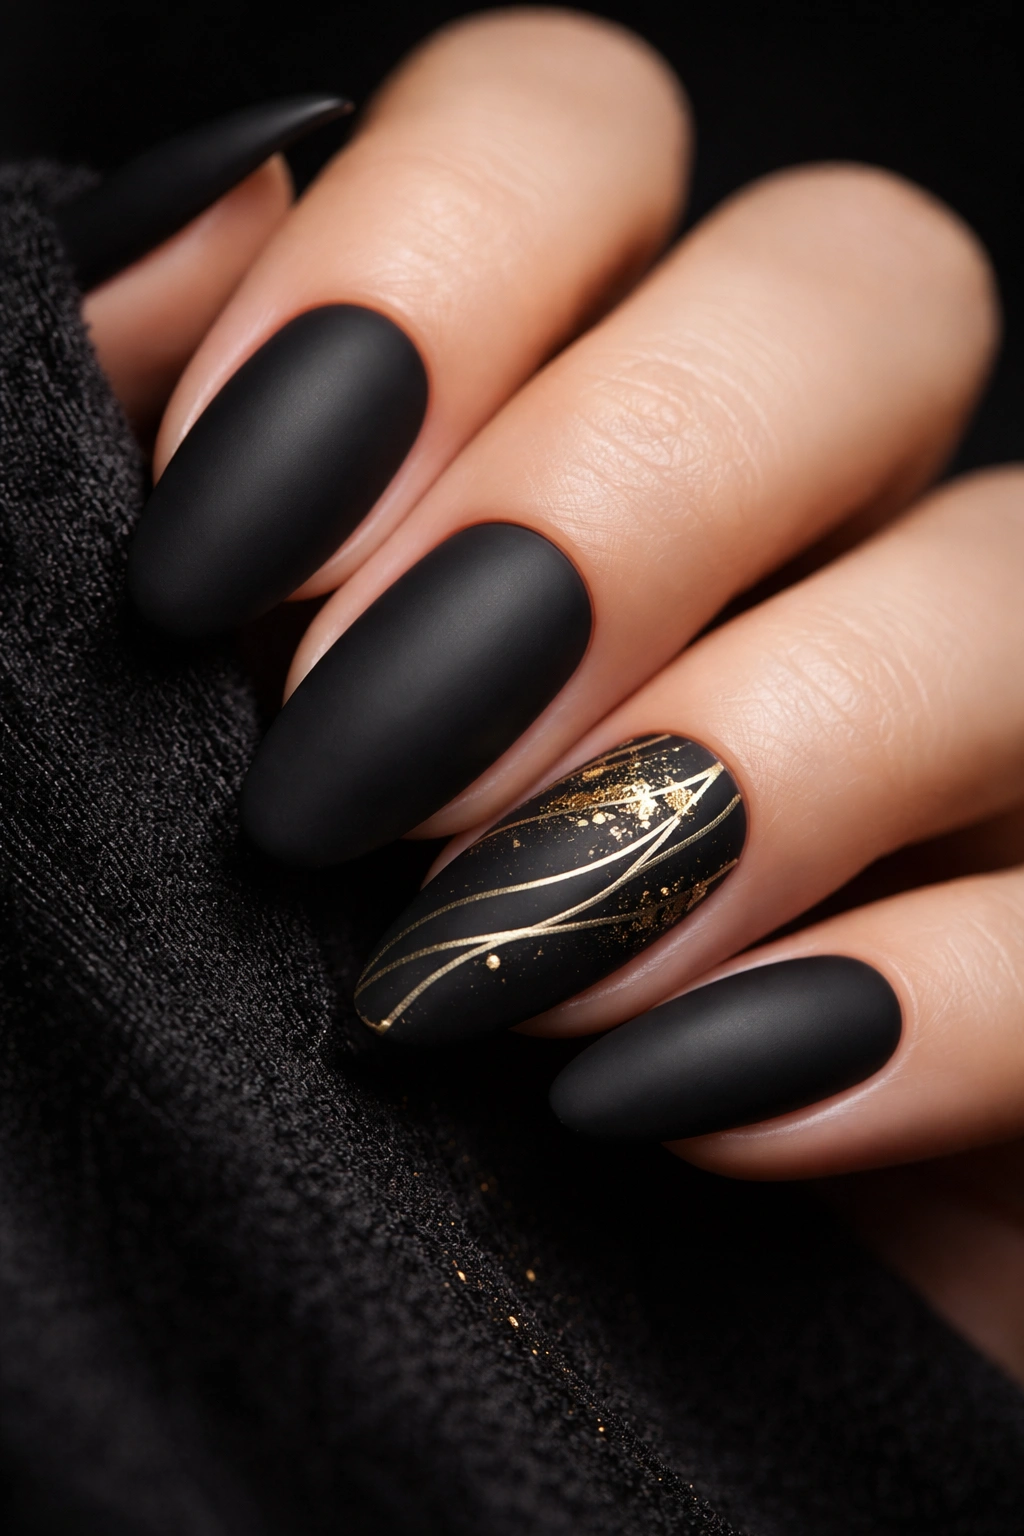
Not every Halloween manicure needs elaborate designs to make an impact. Sometimes, a sophisticated color combination does all the talking. Matte black nails with strategic gold accents manage to feel both gothic and glamorous—perfect for the person who wants their Halloween nails to have staying power.
Paint all your nails in matte black polish, which instantly creates that moody, mysterious vibe. The matte finish is less “vampire club” and more “fashion editorial,” giving you that elevated edge. Once your black base is completely dry, add delicate gold details to one or two accent nails. This could be thin gold lines, small dots, delicate stars, or even tiny gold foil flakes.
The contrast between matte and metallic is what makes this combination so visually interesting. The black absorbs light while the gold catches it, creating dynamic interplay that photographs beautifully. This is one of those looks that feels equally appropriate at a Halloween party or a fancy dinner.
Celebrity nail artist Brittney Boyce, known for her goth glam creations, predicts dark mattes will be huge this season. She loves adding 3D metal jewelry to black nails for extra edge. Even if you don’t go full 3D, tiny gold studs pressed into the wet polish before it dries can create a similar high-fashion effect. This design works on nails of any length and is surprisingly easy to pull off at home.
8. Pumpkin Spice Shimmer
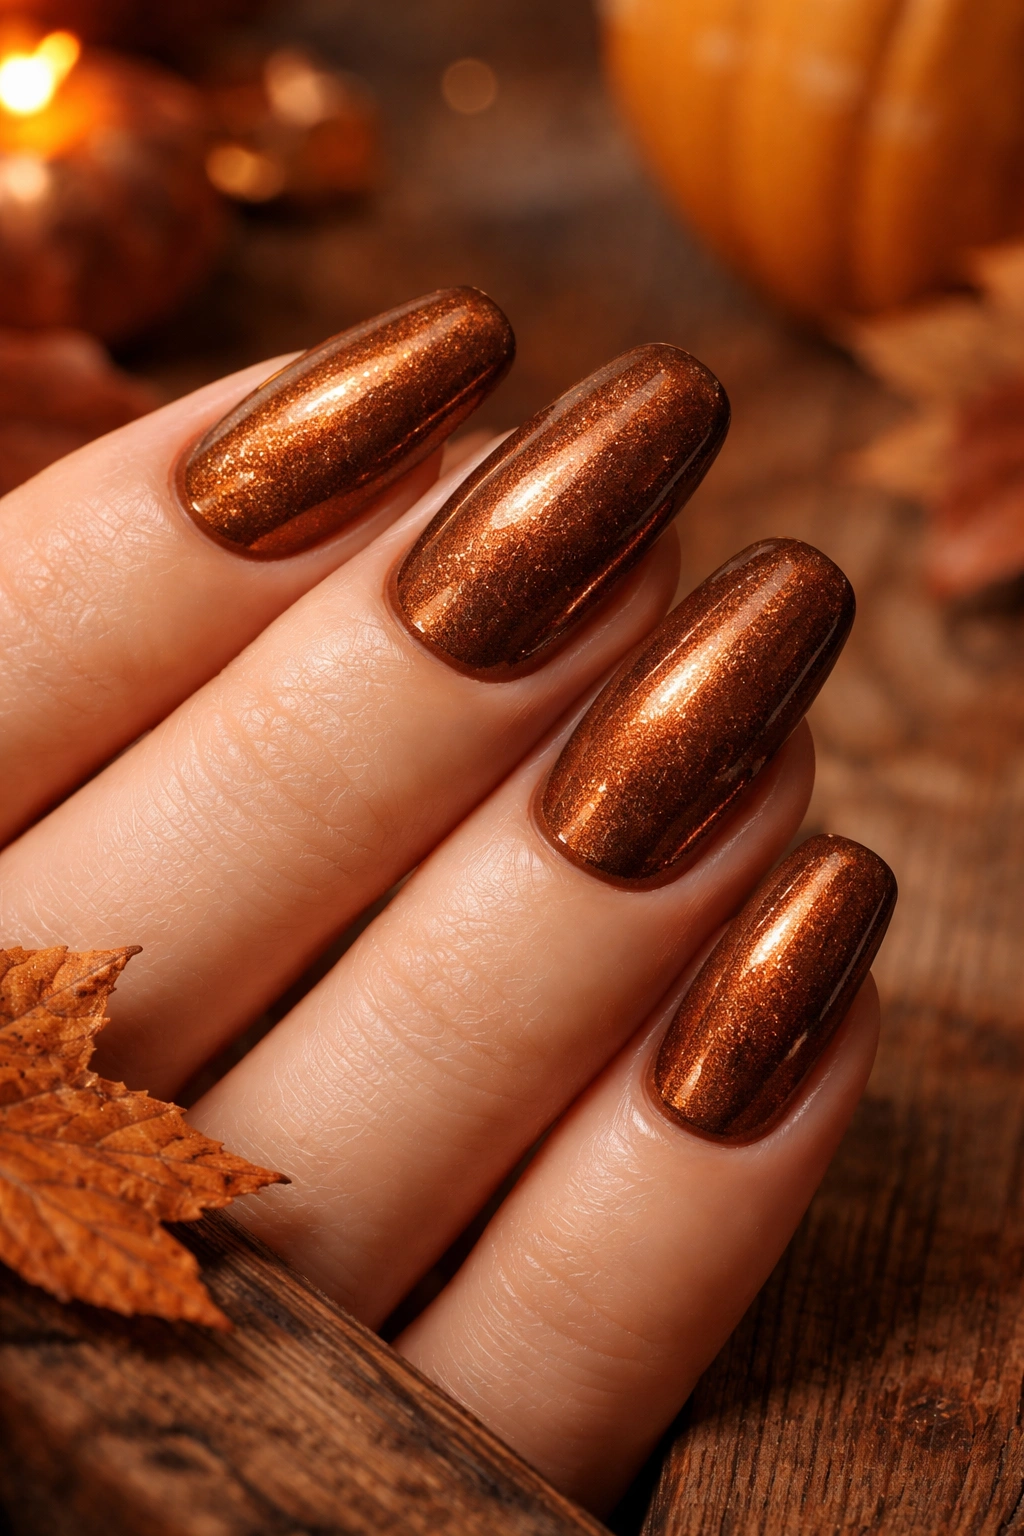
Can we talk about how absolutely gorgeous a shimmery brown manicure looks for fall? This pumpkin spice-inspired design captures all those cozy autumn vibes while still being festive enough for Halloween. It’s the nail equivalent of a perfect latte—warm, inviting, and impossible not to love.
Look for a brown polish with fine shimmer or micro-glitter throughout. You’re not going for chunky sparkle here—think more of a subtle sheen that catches the light. These polishes usually have names involving words like “bronze,” “copper,” or “toasted,” and they typically lean more warm than cool in undertone.
Apply two coats for full opacity, making sure each coat is completely dry before adding the next. The shimmer effect builds with layers, so don’t rush this step. The beautiful thing about this color family is how flattering it is across all skin tones, and how it complements literally every fall outfit in your closet.
This look is perfect for the person who wants Halloween-adjacent nails without committing to orange or black. The shimmer gives it enough personality to feel special, while the neutral-ish color keeps it wearable well into November and even Thanksgiving. You could absolutely wear these nails to a Halloween party or a fall wedding with equal confidence. For extra festivity, consider adding a tiny jack-o-lantern design on one accent nail.
9. Cat Eye Velvet Finish
Velvet or cat-eye nails create this mesmerizing magnetic effect that shifts as you move your hands. When done in deep Halloween colors, they take on an almost supernatural quality that’s absolutely perfect for spooky season. The polish contains iron particles that respond to magnets, creating dimension and depth.
Choose a color like deep purple, midnight blue, or forest green as your base. As you apply each coat, hold a special magnetic tool (usually included with cat-eye polishes) over the wet polish for several seconds. This draws the metallic particles into patterns—typically a line down the center that resembles a cat’s eye, hence the name.
The resulting effect is genuinely hypnotic. As you move your hands, the polish seems to shift and shimmer, revealing different depths of color. It’s like having liquid metal on your nails, with that dimensional quality that flat polish just can’t achieve. The effect photographs beautifully but looks even better in person.
These nails work wonderfully for anyone dressing as a witch, fortune teller, or any character with mystical powers. The shifting, shimmering quality feels magical and otherworldly. Cat-eye polish does require some practice to perfect, but even imperfect application looks intentional and artistic. The key is working quickly before the polish starts to dry, and making sure your magnet stays steady while the magic happens.
10. Cute Ghost French Tips
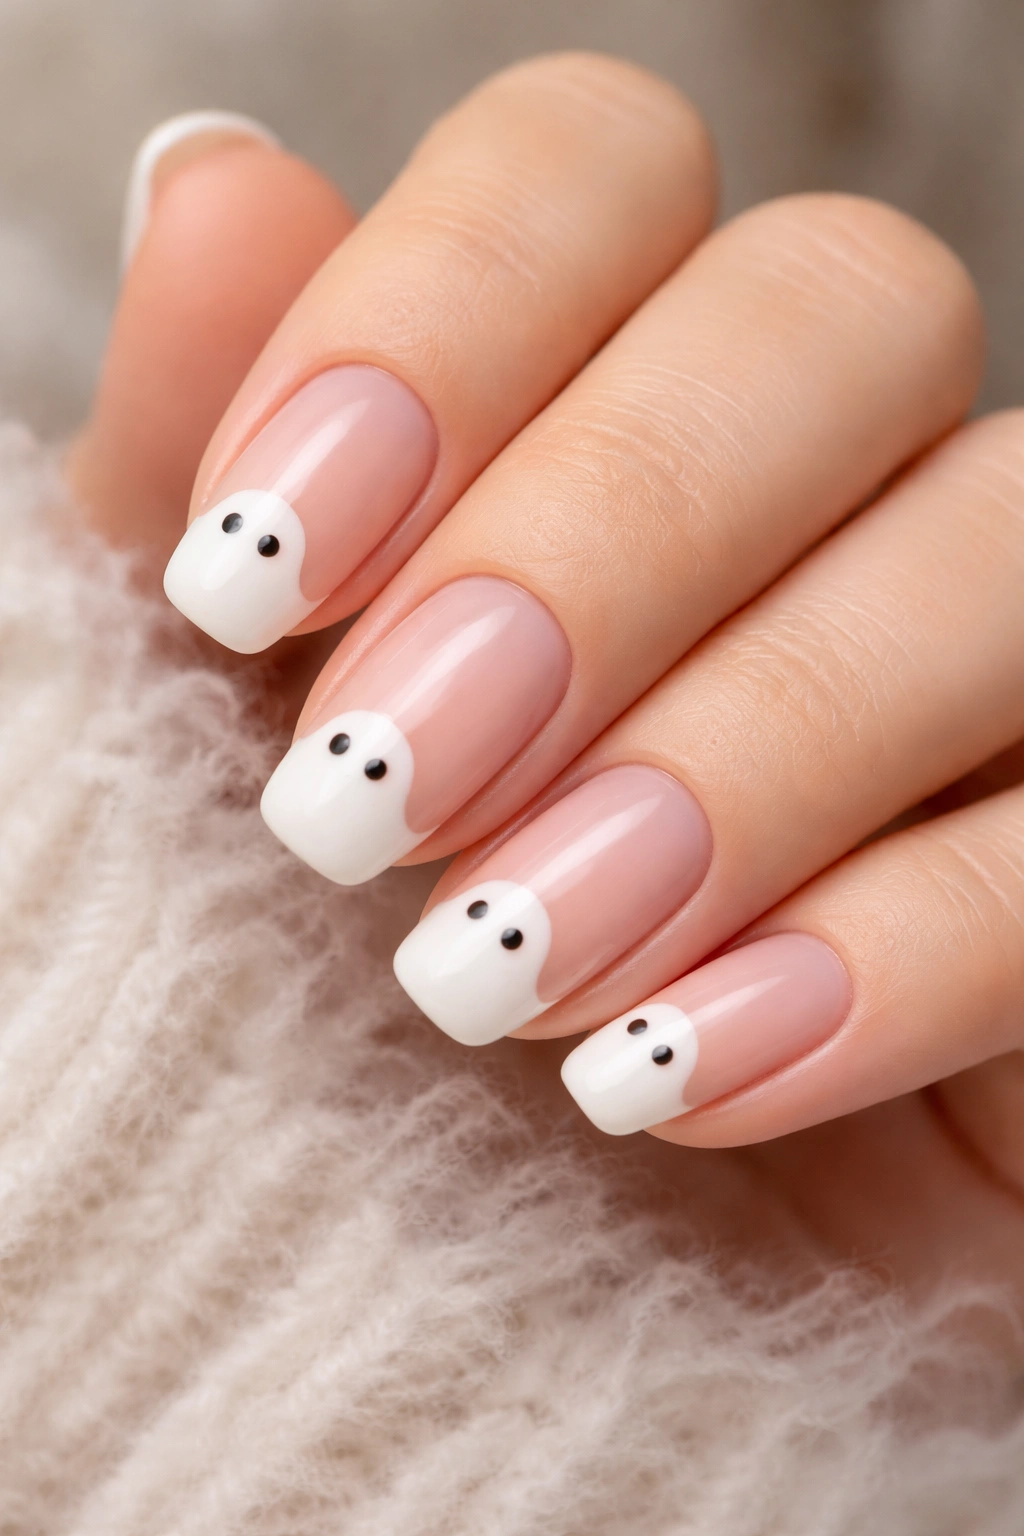
Sometimes the cutest Halloween ideas are the most irresistible, and these ghost-tipped nails are Exhibit A. Instead of traditional white tips, you get adorable little ghosts peeking over the edge of each nail. It’s playful, it’s charming, and it strikes that perfect balance between festive and wearable.
Start with a sheer pink or nude base—something that looks natural and polished. Once dry, use white polish to paint rounded shapes at the tips of your nails instead of the classic curved smile line. These rounded shapes become your ghost bodies. Let them dry completely before moving to the next step.
Using a dotting tool or the tip of a bobby pin, add two small black dots for eyes. This is where your ghosts get their personality. Make some with eyes close together, others further apart. You can even do sideways glances or surprised expressions by playing with dot placement. Some nail artists add tiny mouths for even more character.
This design is surprisingly easy to DIY, which is why it’s become so popular. There’s no precision required—ghosts are supposed to look a bit imperfect and floaty. Even if your shapes aren’t perfectly round or your dots aren’t perfectly placed, it just adds to the handmade charm. These nails photograph adorably and work with literally any Halloween outfit or everyday fall wardrobe.
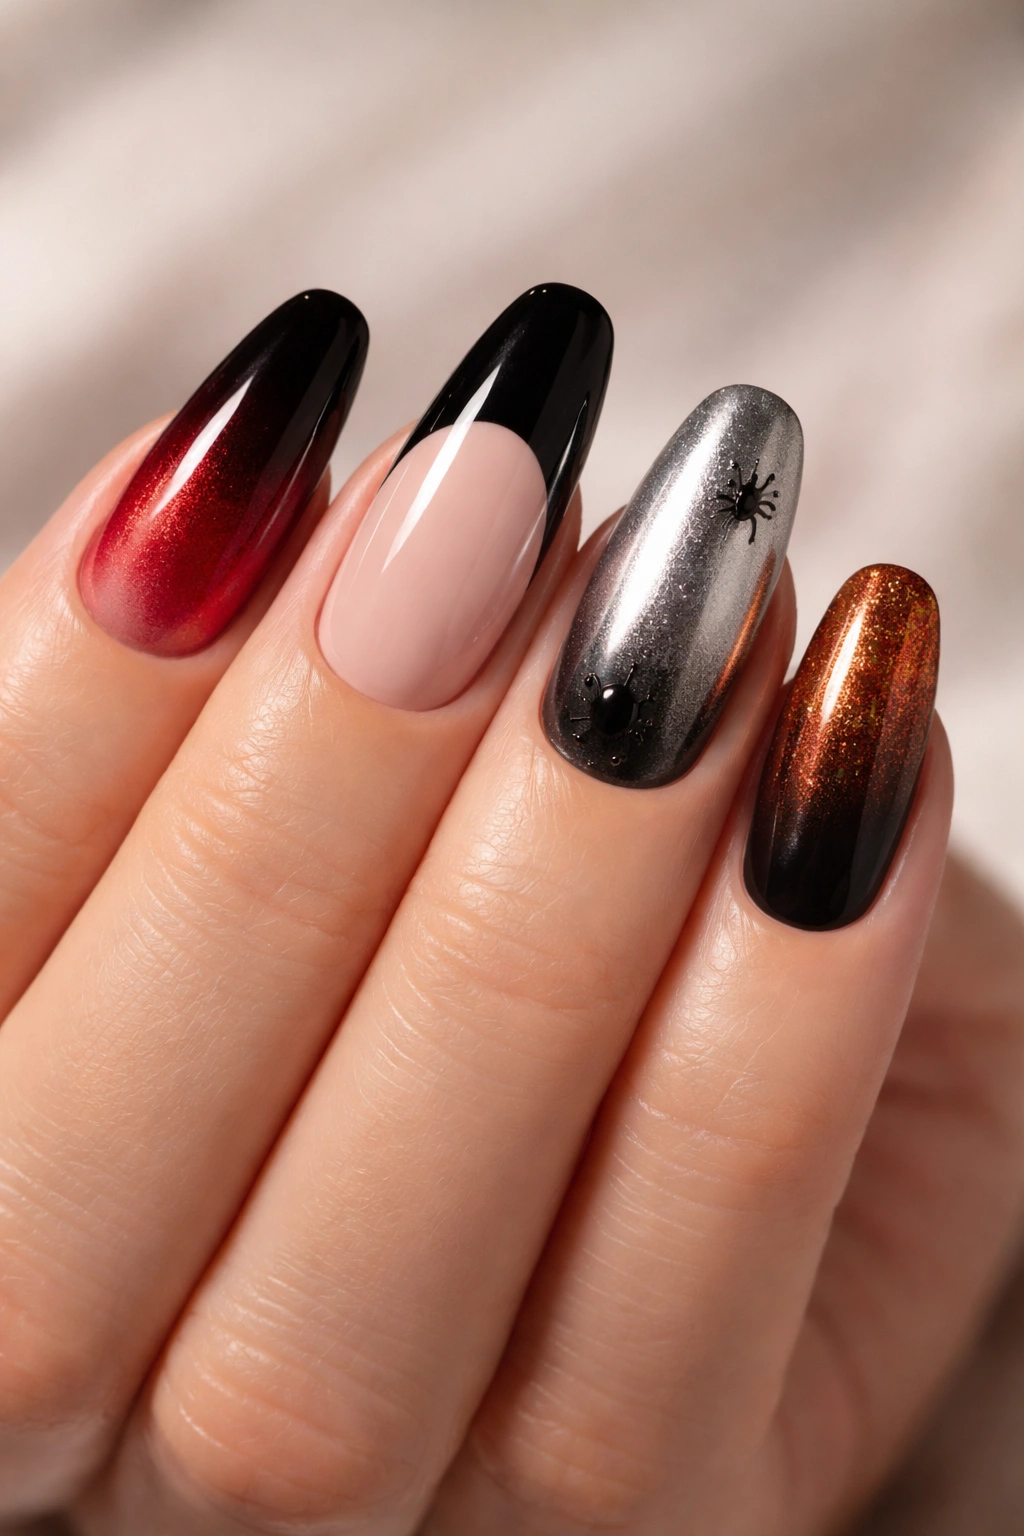
11. Spiderweb Chrome
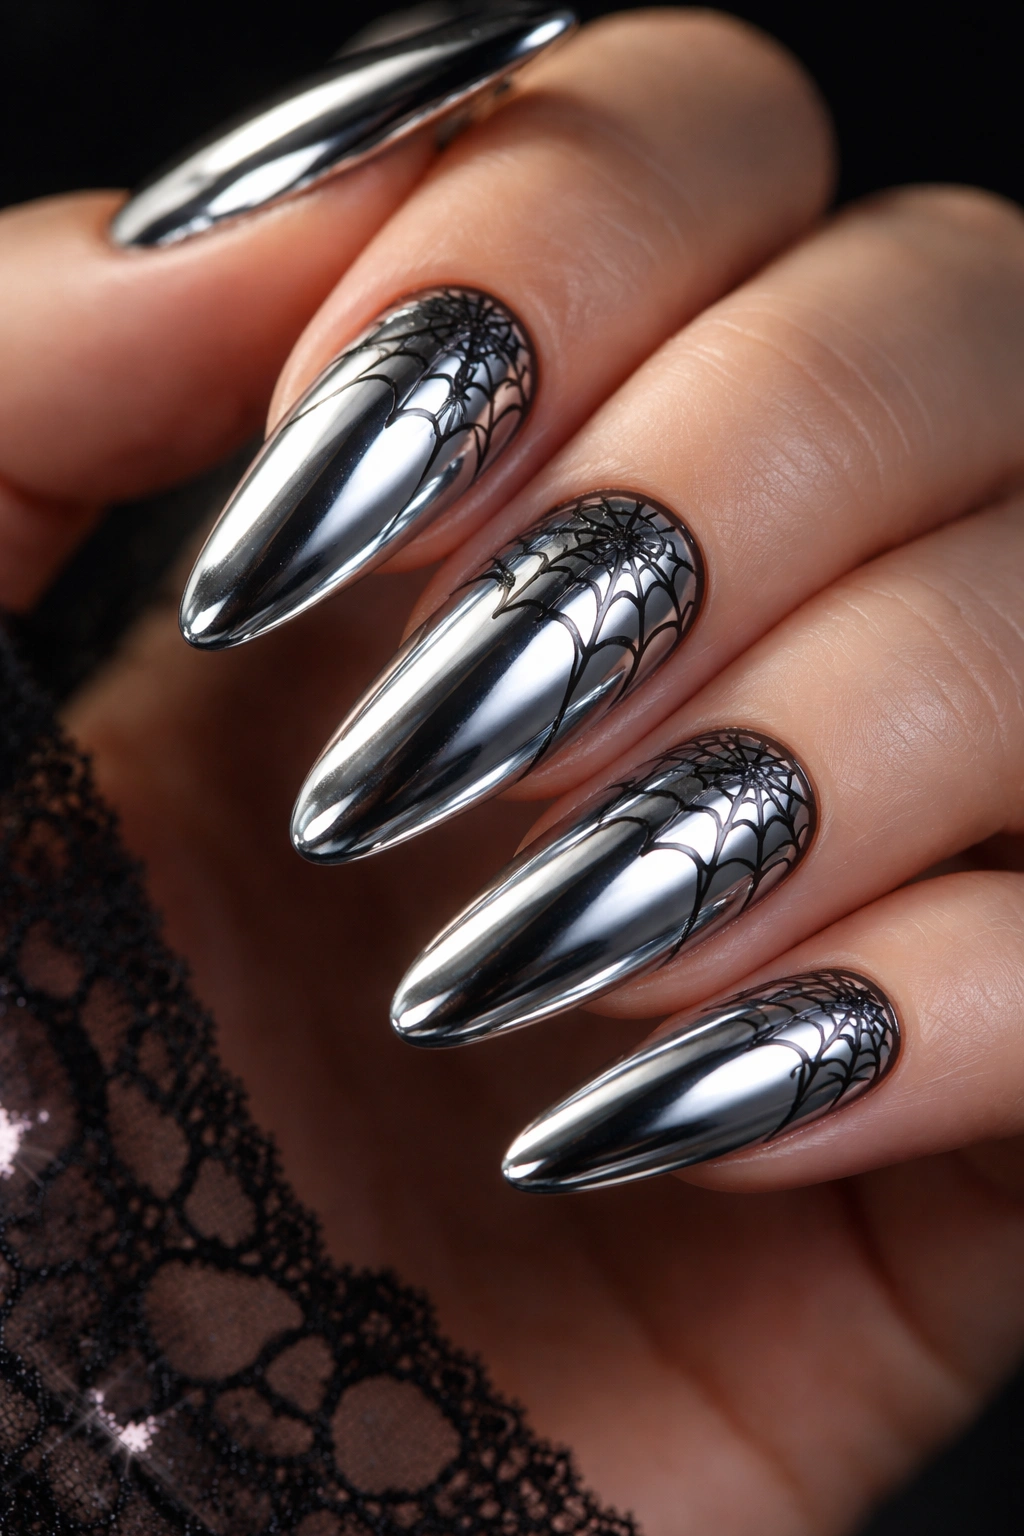
Imagine the delicate intricacy of a spiderweb combined with the futuristic shine of chrome polish. This combination shouldn’t work, but it absolutely does, creating a look that’s equal parts nature and sci-fi, traditional Halloween and cutting-edge trend.
Apply a chrome base in silver, gunmetal, or even rose gold. The chrome provides that mirror-like, reflective finish that’s been everywhere lately. Once your chrome is sealed with a no-wipe gel top coat (necessary to protect the chrome), use black polish and a fine liner brush to carefully draw spiderweb patterns on select nails.
The contrast is what makes this design so striking. The organic, delicate lines of the spiderweb against that super-modern chrome finish creates visual tension in the best way. You can go traditional with corner webs, or get creative with full-nail web designs that radiate from a central point.
For added detail, some nail artists place a tiny rhinestone or black bead where the spider would sit on the web. This 3D element catches light beautifully against the chrome background. The result is a manicure that looks expensive and editorial, perfect for anyone who wants their Halloween nails to feel high-fashion rather than craft-project.
12. Burnt Orange Negative Space
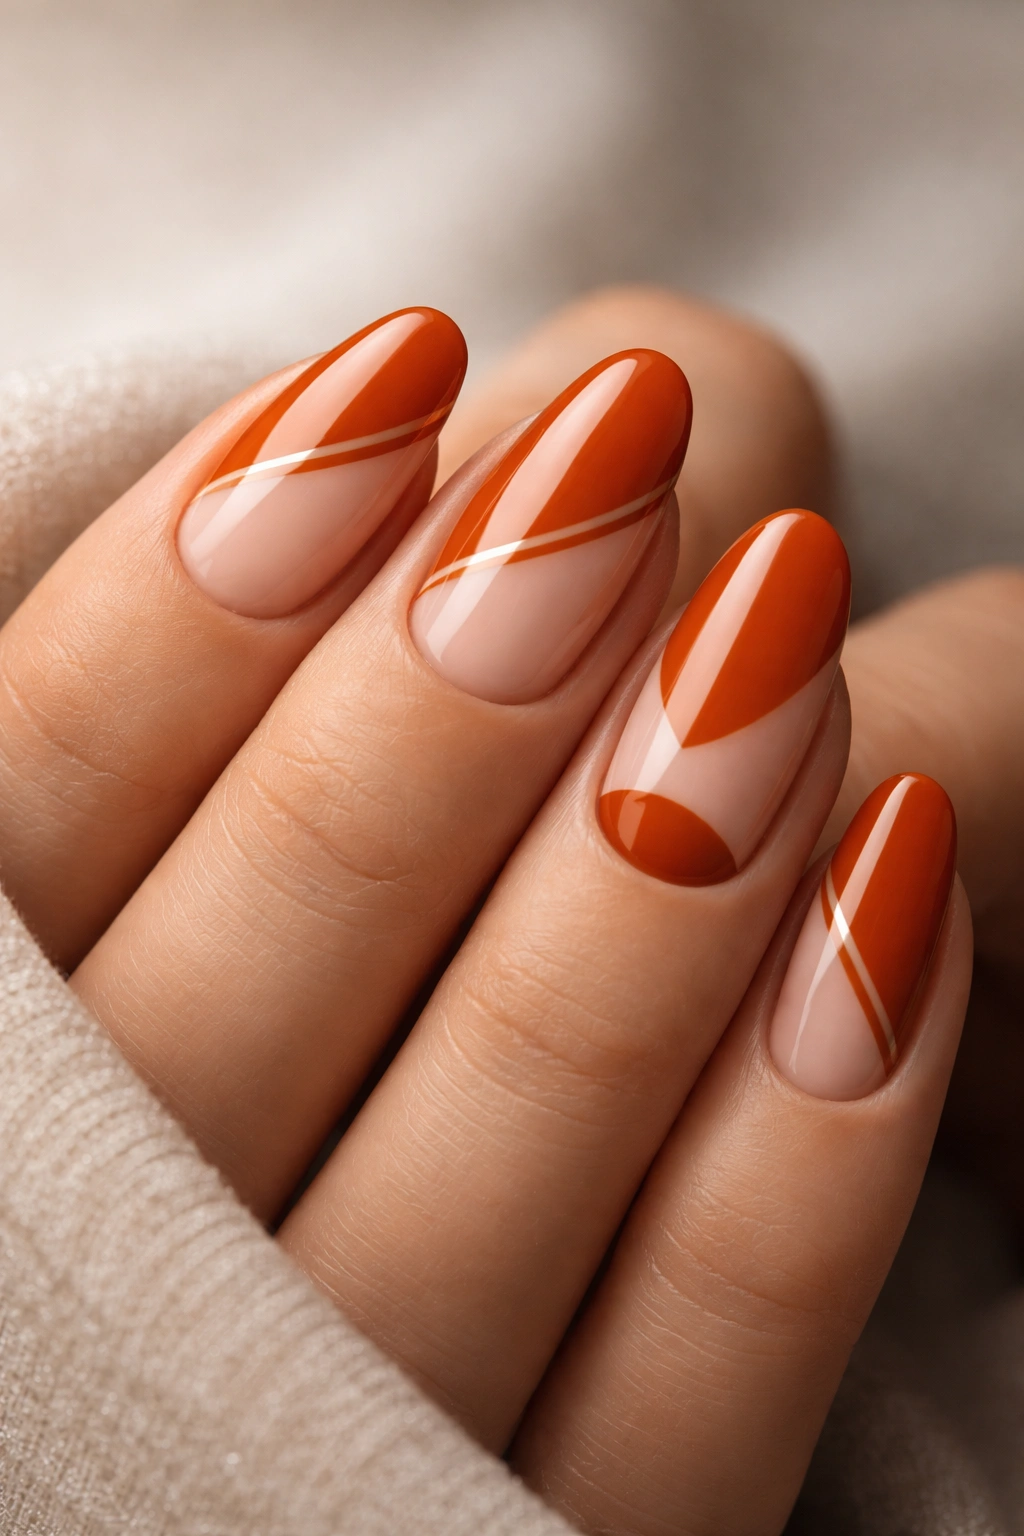
Negative space designs let your natural nail show through in strategic spots, creating geometric patterns that feel modern and artistic. When done with burnt orange polish—the unofficial color of autumn—you get a Halloween manicure that’s both on-trend and seasonally appropriate.
The technique involves using striping tape or careful freehand painting to leave portions of your natural nail visible. Common designs include diagonal lines, half-moons, or abstract shapes. The burnt orange provides that warm, pumpkin-y Halloween vibe while the negative space keeps things from feeling too heavy or costume-y.
This design requires some patience and precision, but the payoff is worth it. Start with a clear base coat to protect your natural nail, then carefully apply your burnt orange polish only where you want color. If you’re using tape, place it while the nail is bare, paint over everything, then carefully peel away the tape to reveal those clean negative spaces.
What’s brilliant about this look is how sophisticated it feels. You’re celebrating Halloween without any overtly spooky imagery, making these nails appropriate for literally any setting. They work in conservative offices, at fancy dinners, or at costume parties. The geometric, architectural quality of negative space designs always reads as intentional and artistic rather than cutesy or overly themed.
13. Black Glitter Ombre
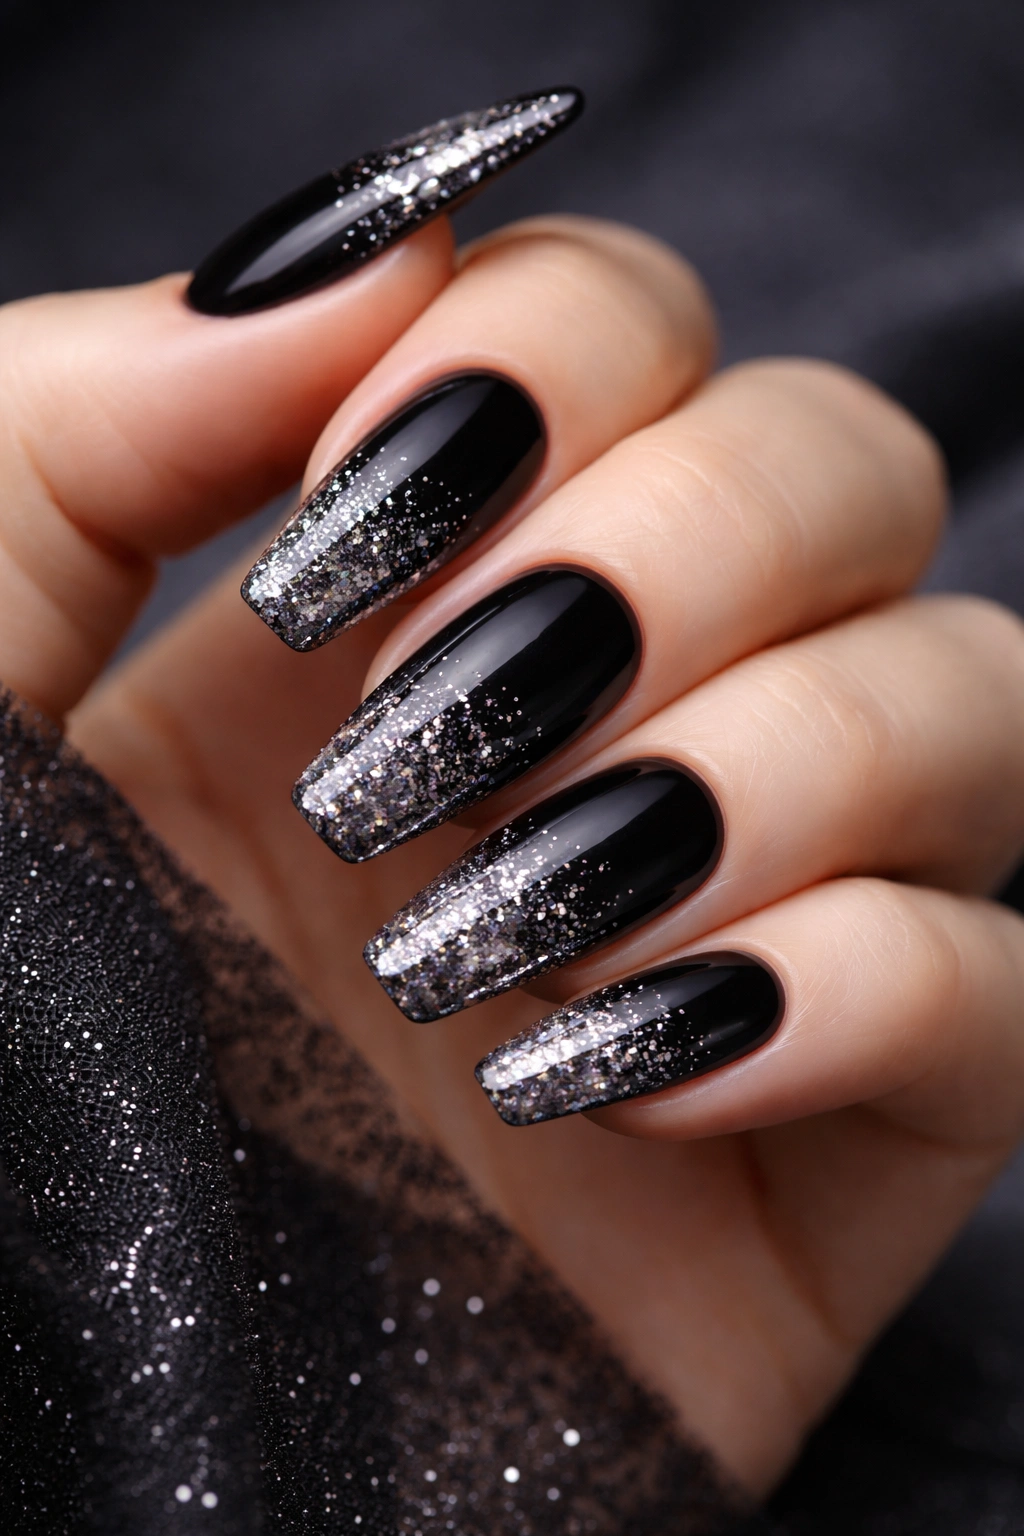
There’s something undeniably glamorous about black glitter, especially when it’s artfully applied in an ombre fade. This look combines the spooky darkness of black with the party-ready sparkle of glitter, resulting in nails that transition from elegantly simple to dazzlingly dramatic.
Start with a black creme polish as your base, applying it fully to the bottom third or half of your nail. Then, using a makeup sponge, dab on black glitter polish starting at the tips and working downward. The key is building gradually—multiple light layers create a smoother gradient than one heavy application.
The fade should be subtle and seamless, with the glitter concentrated at your tips and gradually dispersing as it moves toward your cuticles. This creates movement and dimension that catches every bit of light. Seal everything with a thick, glossy top coat to smooth out the texture that glitter naturally creates.
This manicure is perfect for anyone who wants drama without abandoning sophistication. The black keeps it moody and mysterious, while the glitter adds that celebratory sparkle that says you’re ready to party. It photographs beautifully, making it ideal if you’re planning to take lots of Halloween photos. The ombre technique also means this design works on any nail length—short nails get a concentrated glitter tip, while longer nails can show off a more gradual fade.
14. Orange and Black Flames
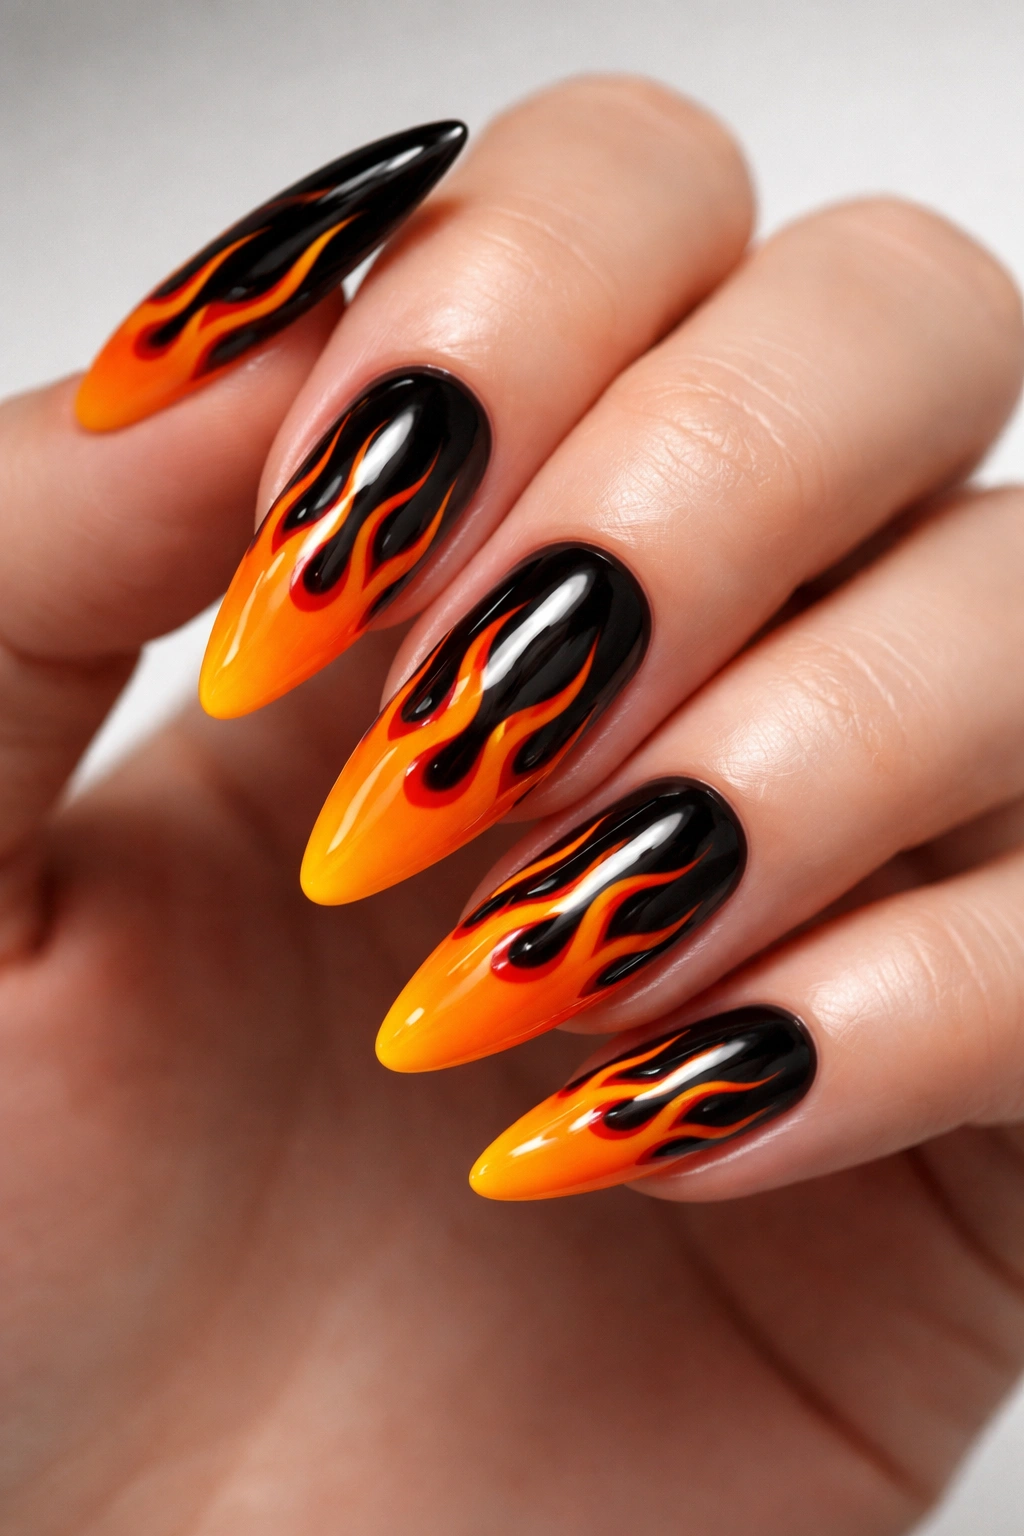
Flame nails have been trending hard, and when you execute them in Halloween colors, they become the perfect seasonal statement. These fiery nails manage to look cool and edgy rather than cheesy, which is exactly what you want from a bold design.
Creating flame nails requires some patience and a steady hand, though nail stickers and stamping plates can make the process easier. Start with an orange base—bright, neon orange works brilliantly here. Once dry, use black polish and a thin brush to paint flame shapes rising from the base of your nail toward the tips.
The secret to realistic-looking flames is making them irregular and organic. Real fire doesn’t create uniform shapes, so your flames shouldn’t either. Some should be taller, some shorter, some wider. Let them curve and bend naturally. You can outline the flames first and fill them in, or paint them solid and clean up the edges afterward.
For extra dimension, some nail artists add yellow or red details within the flames, creating a more complex fire effect. Others add a subtle gradient within the orange base, darkening toward the tips. The result is nails that genuinely look like they’re ablaze—dramatic, bold, and impossible to ignore. These work particularly well on longer nails where you have more space to let those flames dance.
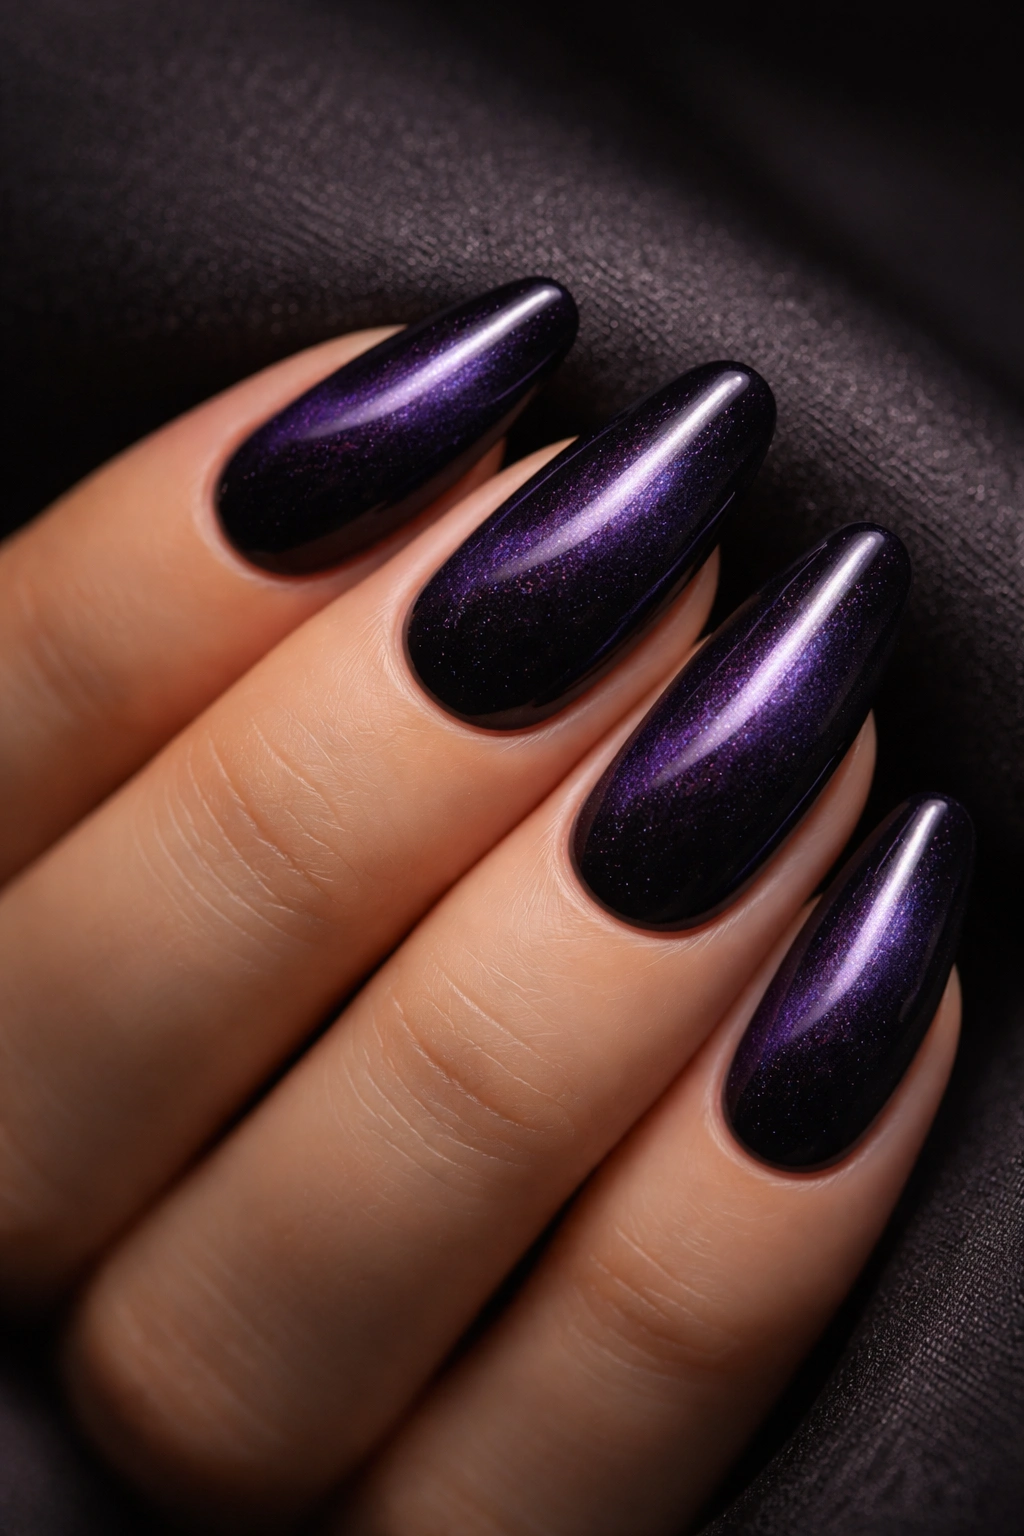
15. Witchy Purple Chrome
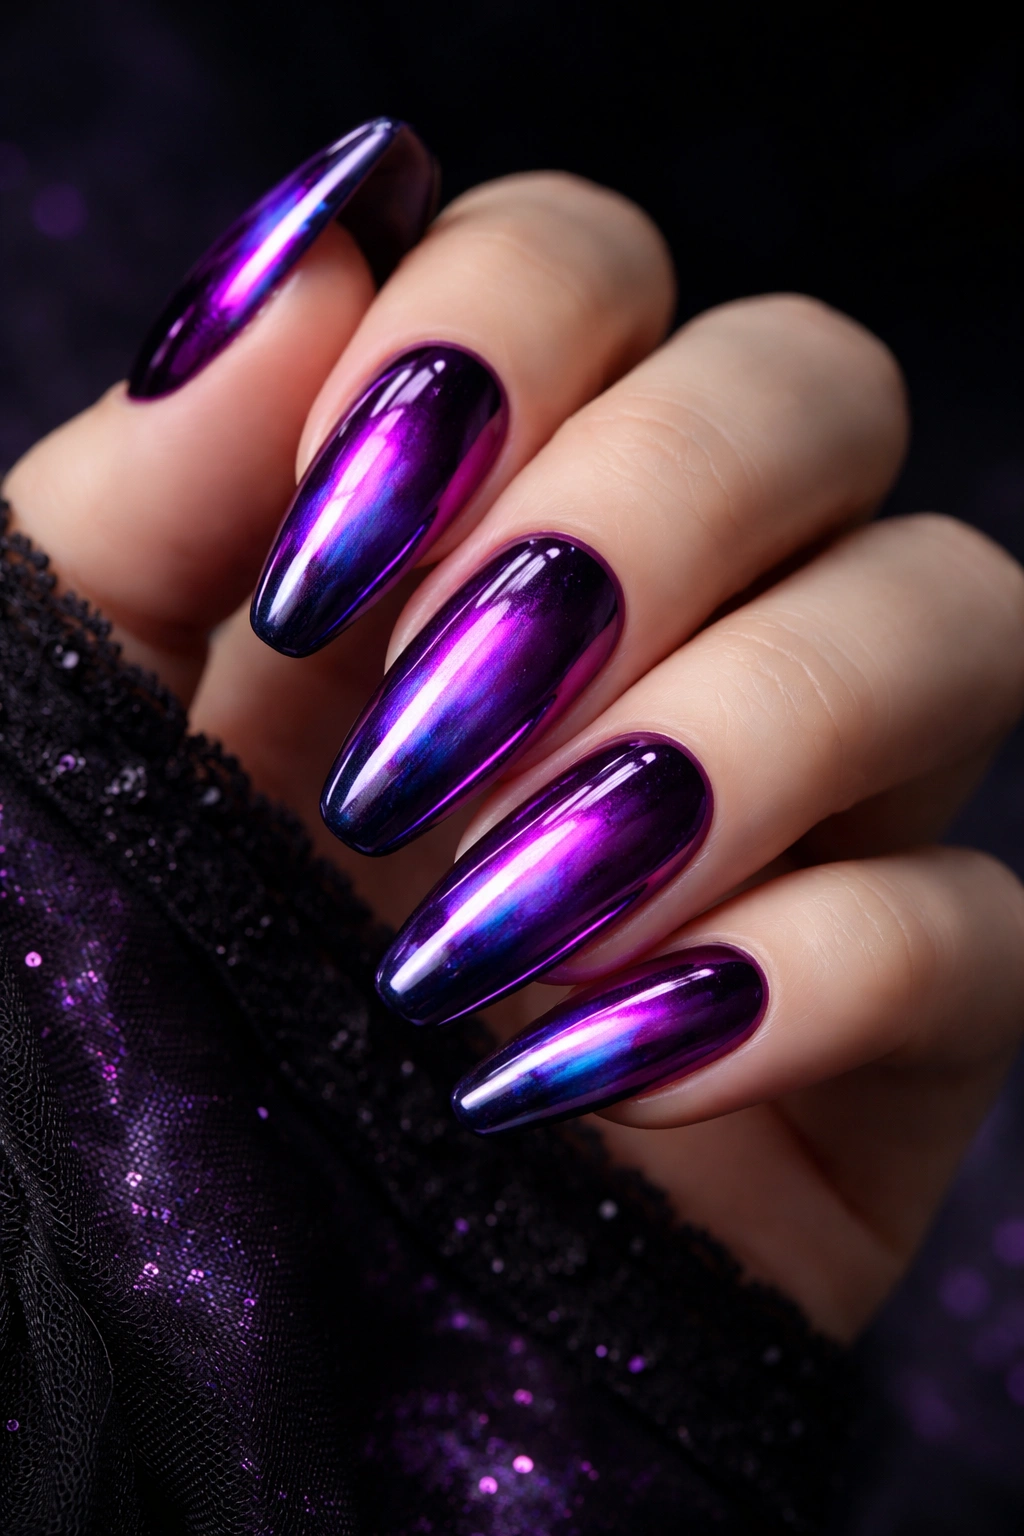
Deep purple with a chrome finish taps into all those mystical, magical, witchy vibes that make Halloween so enchanting. This color looks like crushed amethyst or liquid twilight, shifting between purple, pink, and blue depending on the light. It’s absolutely mesmerizing.
Chrome powder or chrome polish creates that mirror-like, metallic finish that’s been dominating nail trends. When applied over purple, it takes on an iridescent, almost holographic quality. The color shifts and changes as you move your hands, creating a dynamic effect that photographs beautifully but looks even better in real life.
This shade walks the line between Halloween-festive and everyday-wearable perfectly. It’s dark and moody enough to feel seasonally appropriate, but also sophisticated and fashion-forward enough to wear to work or dinner. The chrome finish elevates it from simple colored nails to something that feels special and intentional.
According to nail trend expert Christina Kao, chrome and glazed finishes continue dominating this fall, adding futuristic edge to Halloween outfits. She recommends darker shades like purple or gray for looks that are festive and chic simultaneously. This particular design pairs beautifully with witch costumes, obviously, but also works with vampire, gothic princess, or mystic fortune teller looks. The shimmer has an enchanted quality that feels genuinely magical.
16. Skeleton Hand Nail Art
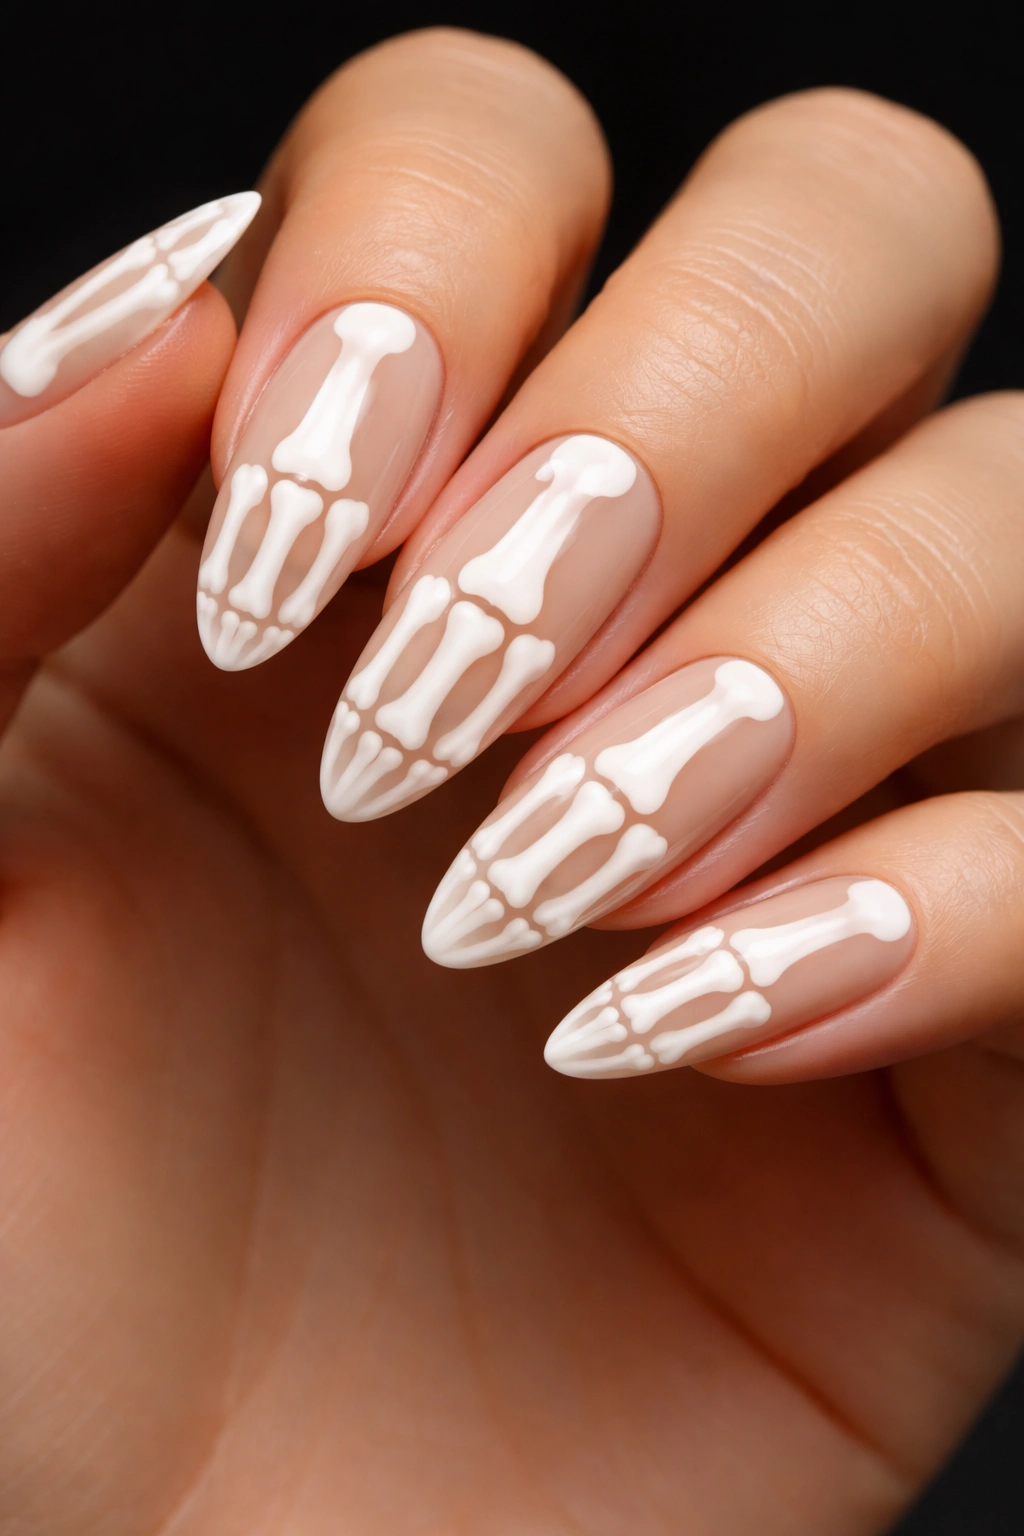
For those ready to commit to detailed Halloween nail art, skeleton hand designs are show-stopping and surprisingly wearable. This look transforms your nails into a continuation of your bones, creating an optical illusion that’s both creepy and cool.
The design typically features bone structures painted on each nail in white or cream polish against a nude or clear base. When you hold your hand naturally, the bones should align to create the appearance of an X-ray or anatomical drawing of your hand. Getting this right requires careful planning and precise placement.
Most people opt to have this done professionally because the detail work is intricate. However, skeleton hand nail decals and stamping plates exist for DIY enthusiasts. The key is making sure the proportions look realistic and the bones on adjacent fingers connect naturally when your fingers are together.
This design is perfect for anyone who wants to go all-in on Halloween without veering into gory territory. It’s spooky but artistic, creepy but fashion-forward. The look photographs incredibly well, making it a popular choice for people who know they’ll be documenting their Halloween festivities. While it’s definitely a commitment, skeleton nails are guaranteed to earn compliments and start conversations at every Halloween gathering you attend.
17. Matte Pumpkin Accent Nails
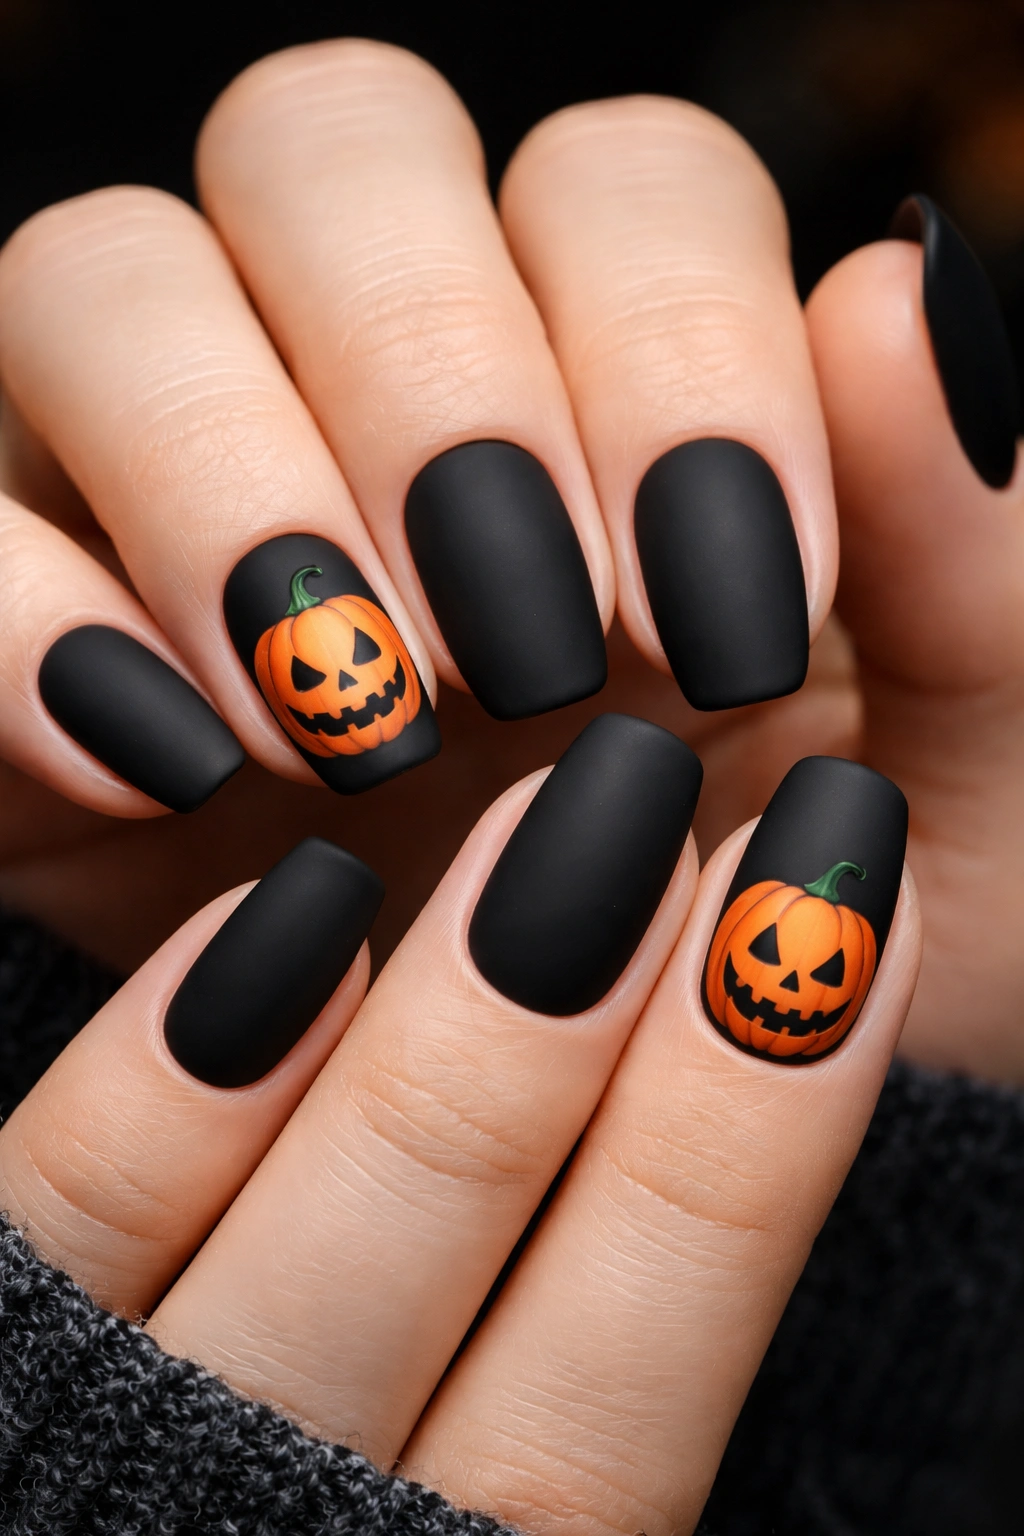
If you love the idea of pumpkin nails but don’t want every finger to scream “October,” this design offers the perfect compromise. Keep most nails a sophisticated matte black or deep burgundy, then add adorable jack-o’-lantern faces on one or two accent nails.
The matte finish is what keeps this from feeling too cutesy. Matte polish has an almost velvety appearance that immediately reads as more sophisticated than glossy. It also provides the perfect backdrop for your pumpkin designs, which can be painted in orange with black details for faces.
Creating the jack-o’-lantern requires steady hands or nail art decals. Paint a small orange circle or oval on your accent nail, then use black polish and a fine brush to add triangle eyes, a crooked nose, and that classic toothy grin. You can make each pumpkin have a different expression—happy, surprised, spooky, or silly.
This design is brilliantly versatile because you control how bold it reads. Want it super subtle? Use just one pumpkin accent nail and keep everything else solid-colored. Want more festivity? Add pumpkins to multiple nails or include other Halloween elements like bats or stars. The matte finish unifies everything, preventing it from looking too busy or childish.
18. Snakeskin Print with Orange Accents
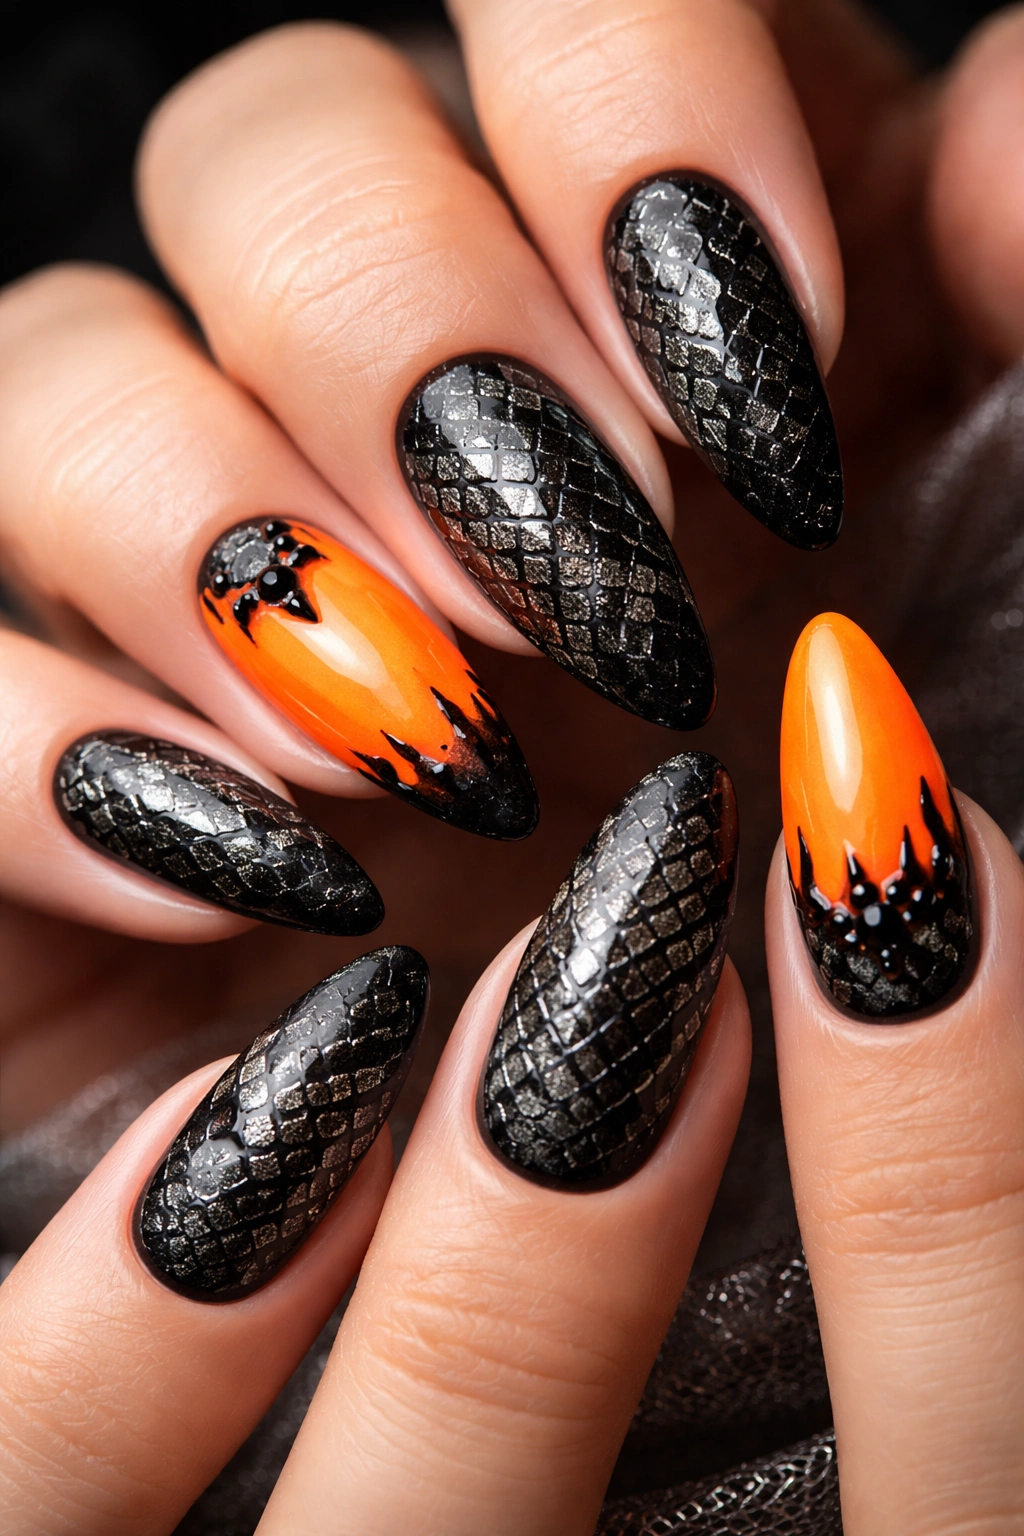
Snakeskin nail art might not immediately strike you as Halloween-themed, but when executed in the right colors, it captures that mysterious, slightly sinister energy that defines the season. Plus, snakes are witchy, and witchy definitely counts as Halloween.
Creating snakeskin nails involves a specific technique with plastic wrap or a makeup sponge. Apply a base color (black works beautifully), then while it’s still wet, lightly press crinkled plastic wrap onto the nail. This creates irregular, scale-like patterns. You can also use a green or brown base for more traditional snake coloring.
The Halloween twist comes from your accent nails. Paint one or two nails bright orange, or add orange details like dots or stripes to your snakeskin nails. This color combination—the dark, scaled texture with pops of pumpkin orange—feels perfectly seasonal without being literal about Halloween.
This design is perfect for anyone who wants something edgy and fashion-forward that nods to Halloween without being costume-y. The texture and pattern provide visual interest that keeps people looking, and the technique is actually quite forgiving for DIY attempts. Even imperfect snakeskin patterns look intentional because real snake scales are irregular too.
19. Beetlejuice Striped Nails
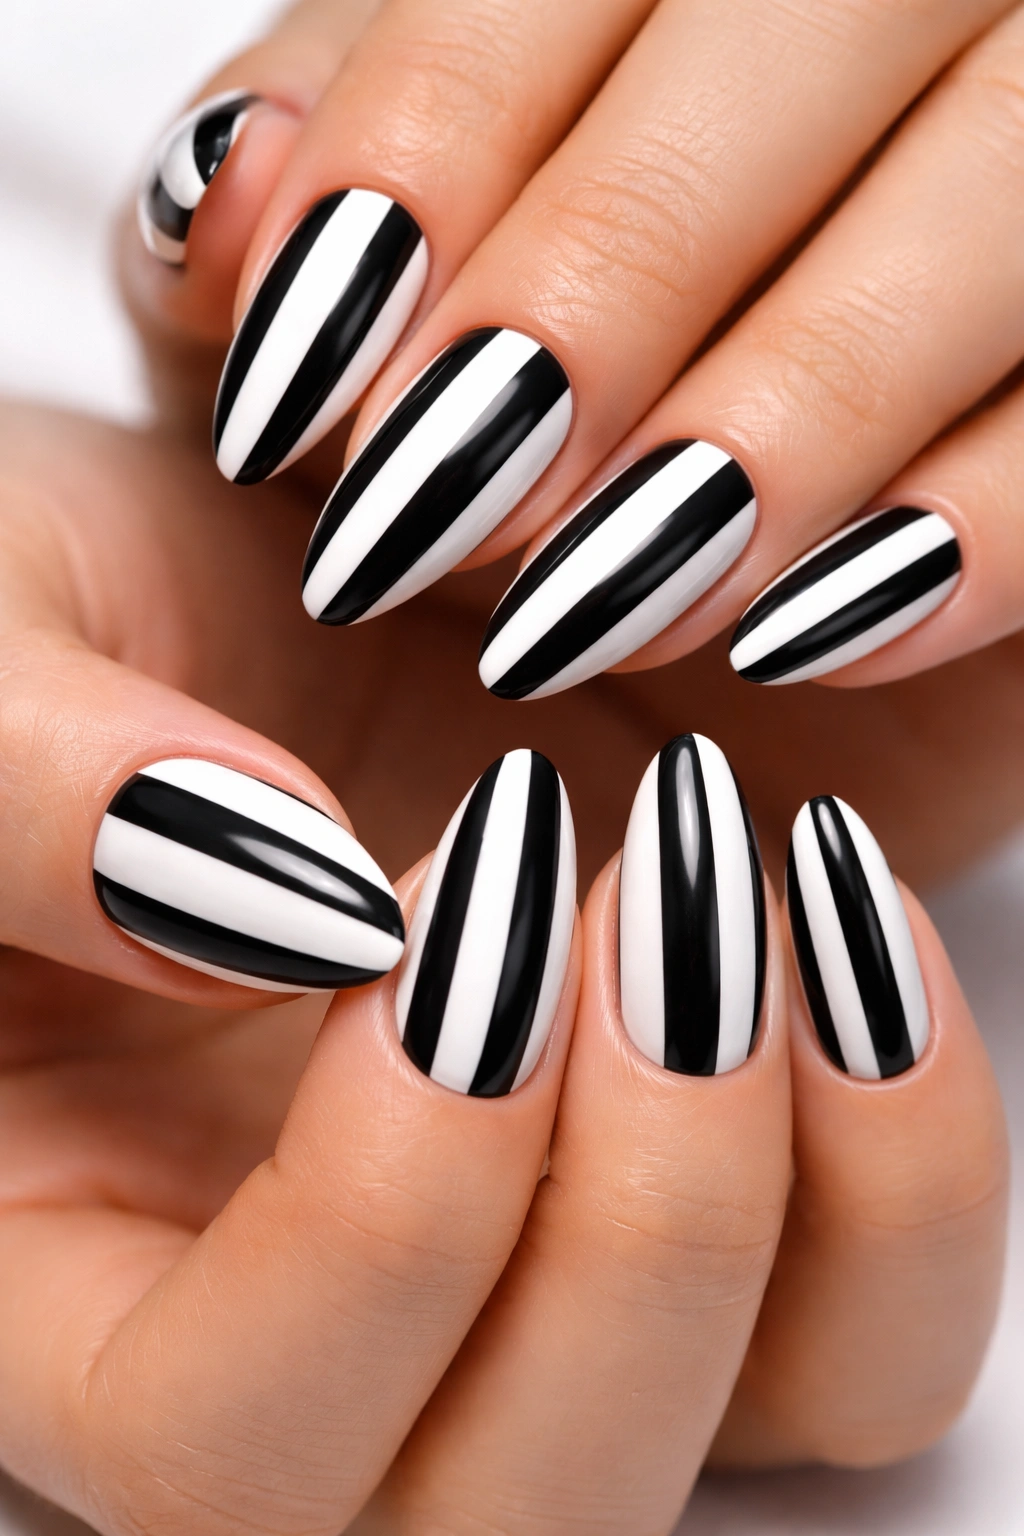
The black and white stripes from “Beetlejuice” have become iconic, and they translate beautifully to nail art. This design is instantly recognizable to fans of the Tim Burton classic, but even people unfamiliar with the movie will appreciate the bold, graphic impact of clean stripes.
Creating perfectly straight stripes requires either exceptional patience or striping tape. If you’re going the tape route, apply your base color first—either black or white. Once completely dry, place thin strips of tape vertically or horizontally across your nails, then paint over everything with your contrasting color. Carefully peel away the tape while the polish is still slightly wet to reveal clean, crisp stripes.
For a more authentic “Beetlejuice” vibe, some nail artists alternate the stripe direction on different nails or add purple and green accent nails to reference other colors from the movie. You can keep it simple with just black and white, or go full theme with character faces or other movie elements on one or two nails.
This design works brilliantly on any nail length and is surprisingly versatile. The high contrast makes a statement but remains chic and wearable. You could rock these nails with a full “Beetlejuice” costume or let them stand alone as your entire Halloween look. They’re bold enough to feel special but simple enough that you won’t feel silly wearing them to regular activities throughout October.
20. Blood Splatter French

For those who love horror movies and aren’t squeamish about a little gore, blood splatter nails deliver maximum Halloween impact. This design combines the classic elegance of French tips with terrifying red splatters that look genuinely shocking.
Start with classic white French tips—this provides the perfect canvas for your blood splatter effect. Once your white tips are completely dry, it’s time to get messy. Dip a small paintbrush or toothbrush in red polish, then flick the bristles to create tiny droplets that spray across your nails. The randomness is what makes it look realistic.
The key to good blood splatter is variation. Some drops should be tiny, others larger. Some nails should have heavy splatter, others just a few specks. This irregular distribution makes it look like something genuinely gruesome happened (in the best, most Halloween-y way possible).
Despite the gory appearance, this design maintains an element of sophistication thanks to those classic French tips underneath. It’s horror movie chic—perfect for anyone dressing as a serial killer, final girl, or just a well-dressed vampire who recently fed. Fair warning though: this design tends to prompt reactions, so be prepared for people to do double-takes when they notice your nails.
21. Moonlit Celestial Design
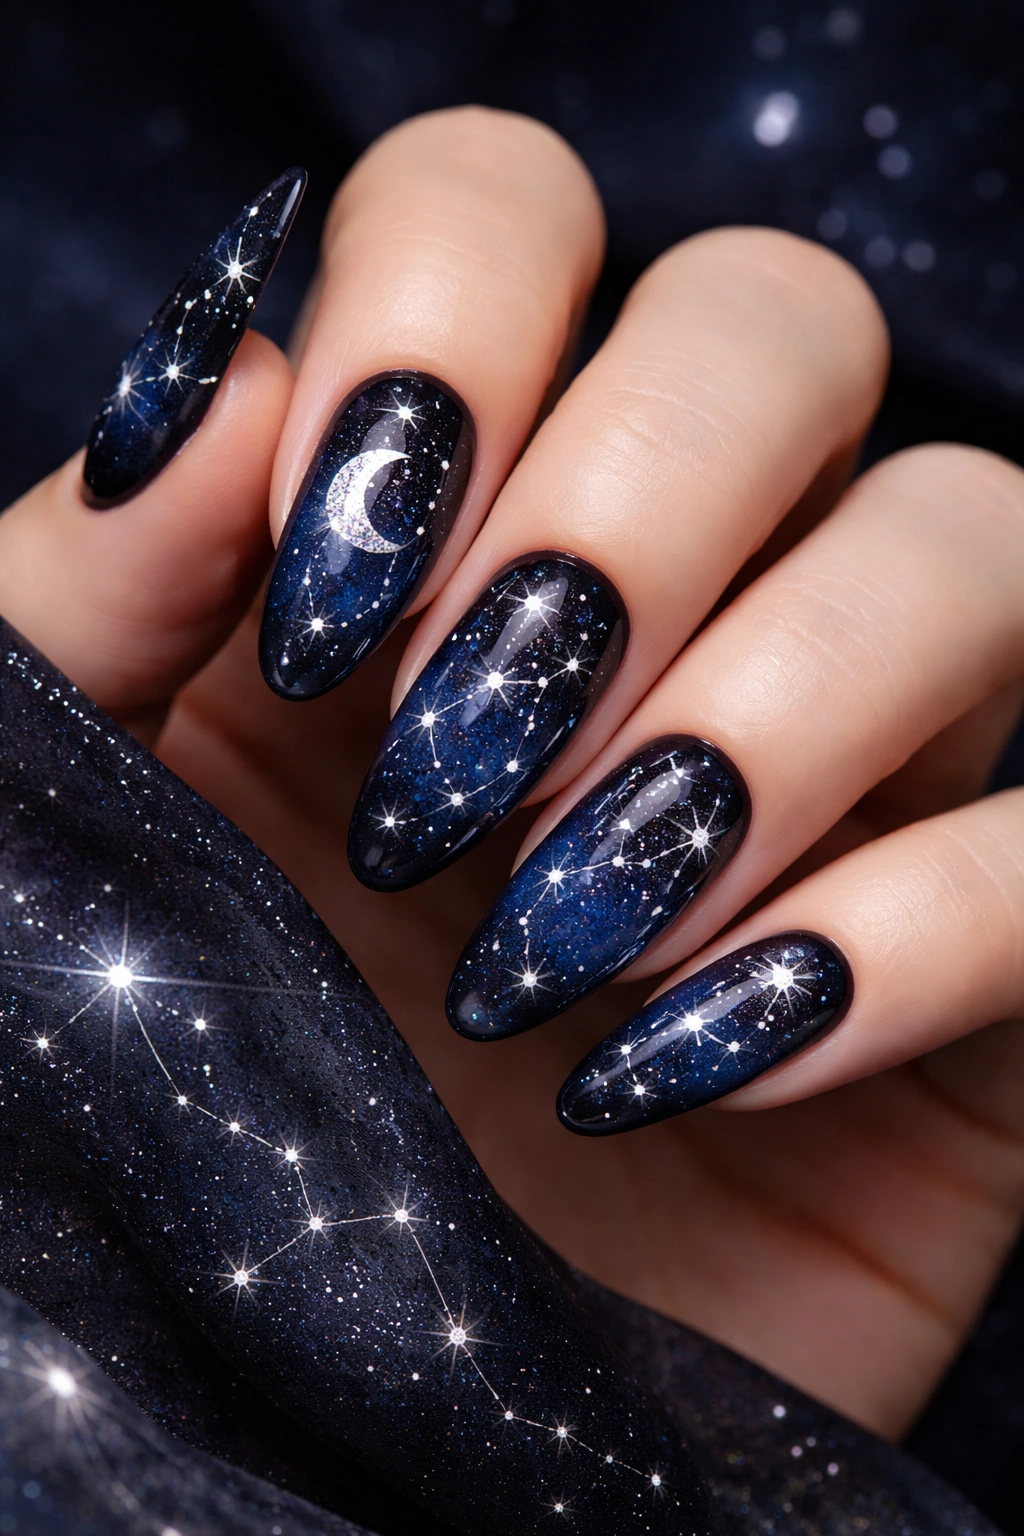
Channel your inner night sky with this moody celestial manicure featuring moons, stars, and constellations against a deep twilight background. This design captures Halloween’s mystical, magical elements without relying on traditional spooky imagery.
Begin with a dark base—midnight blue, deep purple, or black all work beautifully. Once dry, use white, silver, or gold polish to paint crescent moons, stars, and connecting dots that form constellations. You can reference real constellations or create your own celestial patterns.
The beauty of this design is how customizable it is. Want something subtle? Keep your celestial details minimal with just a few stars scattered across each nail. Want full drama? Pack your nails with elaborate constellation patterns, multiple moon phases, and clusters of stars in varying sizes.
For added dimension, some nail artists incorporate holographic glitter or star-shaped nail studs. This creates different textures and catches light beautifully, making your nails twinkle like an actual night sky. The design pairs perfectly with witch costumes, fortune teller outfits, or any mystical Halloween character. But honestly, these nails are gorgeous enough to wear without any costume at all.
22. Candy Corn Tips
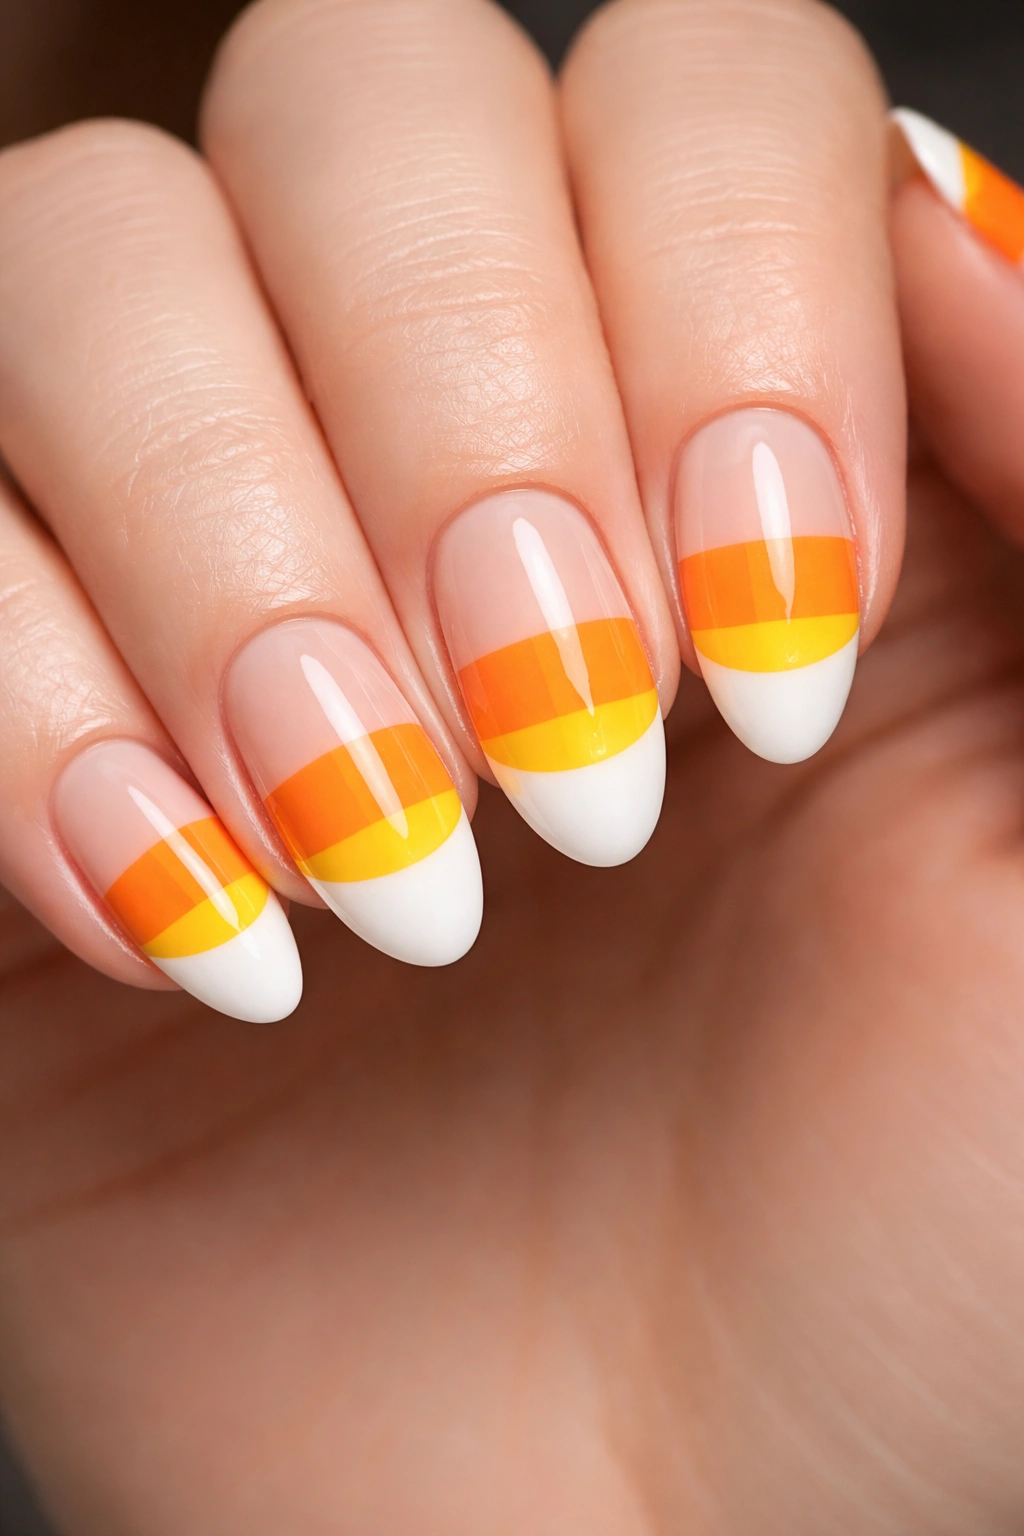
You either love candy corn or you don’t, but there’s no denying this tri-colored treat is undeniably Halloween. Translating that iconic yellow, orange, and white into nail art creates a fun, playful look that’s pure nostalgia.
The most literal interpretation involves painting your tips in the candy corn pattern—yellow at the base of the tip, orange in the middle, white at the very end. Getting clean divisions between colors requires either steady hands or striping tape. Apply each color separately, letting it dry completely before adding the next.
For a more abstract take, try a skittle manicure where each nail features one of the candy corn colors. Or create an ombre effect that transitions through all three shades. You could also keep most nails neutral and add detailed candy corn designs on just one or two accent nails.
This design leans decidedly cute rather than creepy, making it perfect for elementary school teachers, anyone working with kids, or just people who prefer their Halloween on the lighter, more playful side. The bright colors feel cheerful and festive without any scary elements. Plus, there’s something genuinely charming about turning controversial candy into a fashion statement.
23. Gothic Black Lace
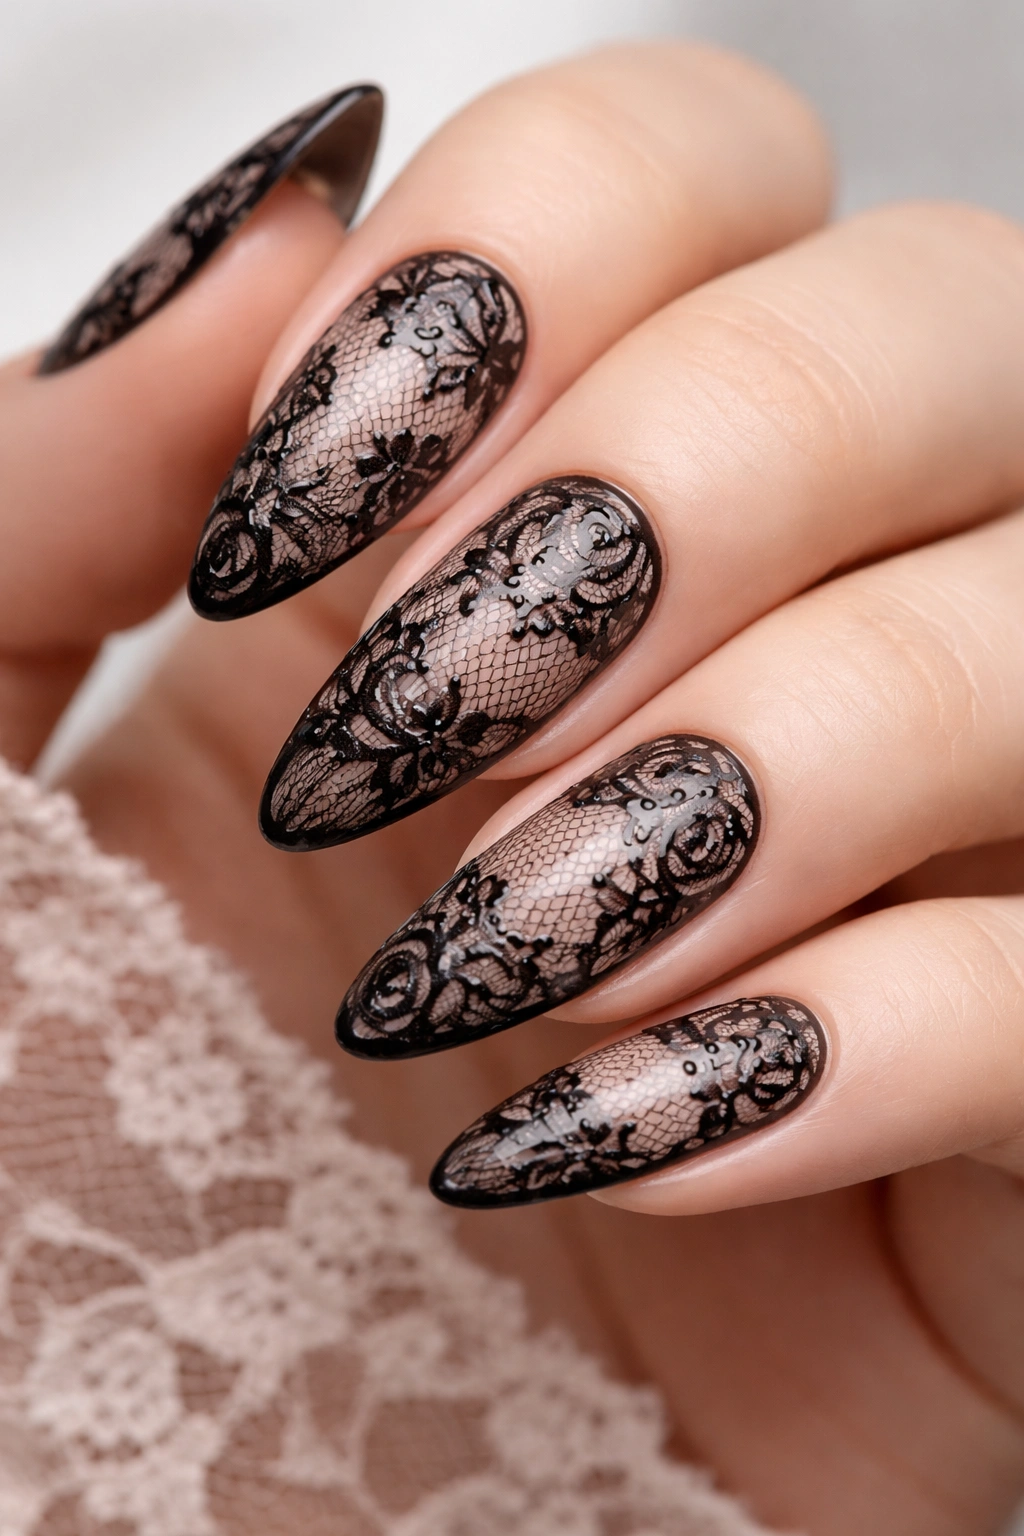
For a Halloween look that’s more Victorian Gothic than horror movie scary, black lace nail art delivers elegance with darkness. This design evokes images of haunted mansions, gothic heroines, and romantic vampires—all the atmospheric Halloween vibes without anything overtly spooky.
Creating lace nail art typically involves either stamping plates, nail stickers, or extremely detailed freehand painting. The design usually features intricate, delicate patterns in black against a nude, white, or pale pink base. The patterns mimic actual lace with their repetitive motifs and negative space.
What makes this design so stunning is the contrast between the delicate, feminine lace pattern and the dark, moody color. It’s simultaneously romantic and gothic, pretty and mysterious. The level of detail in good lace nail art is impressive, making it look like you’ve got actual fabric draped over your nails.
This manicure pairs beautifully with Victorian ghost costumes, vampire looks, or elegant witch ensembles. But it’s also sophisticated enough to wear as your everyday October manicure without feeling costume-y. The black and neutral color palette keeps it versatile, while the intricate pattern provides plenty of visual interest. These nails photograph gorgeously, especially in moody, low-light settings that emphasize the gothic aesthetic.
24. Neon Green Slime
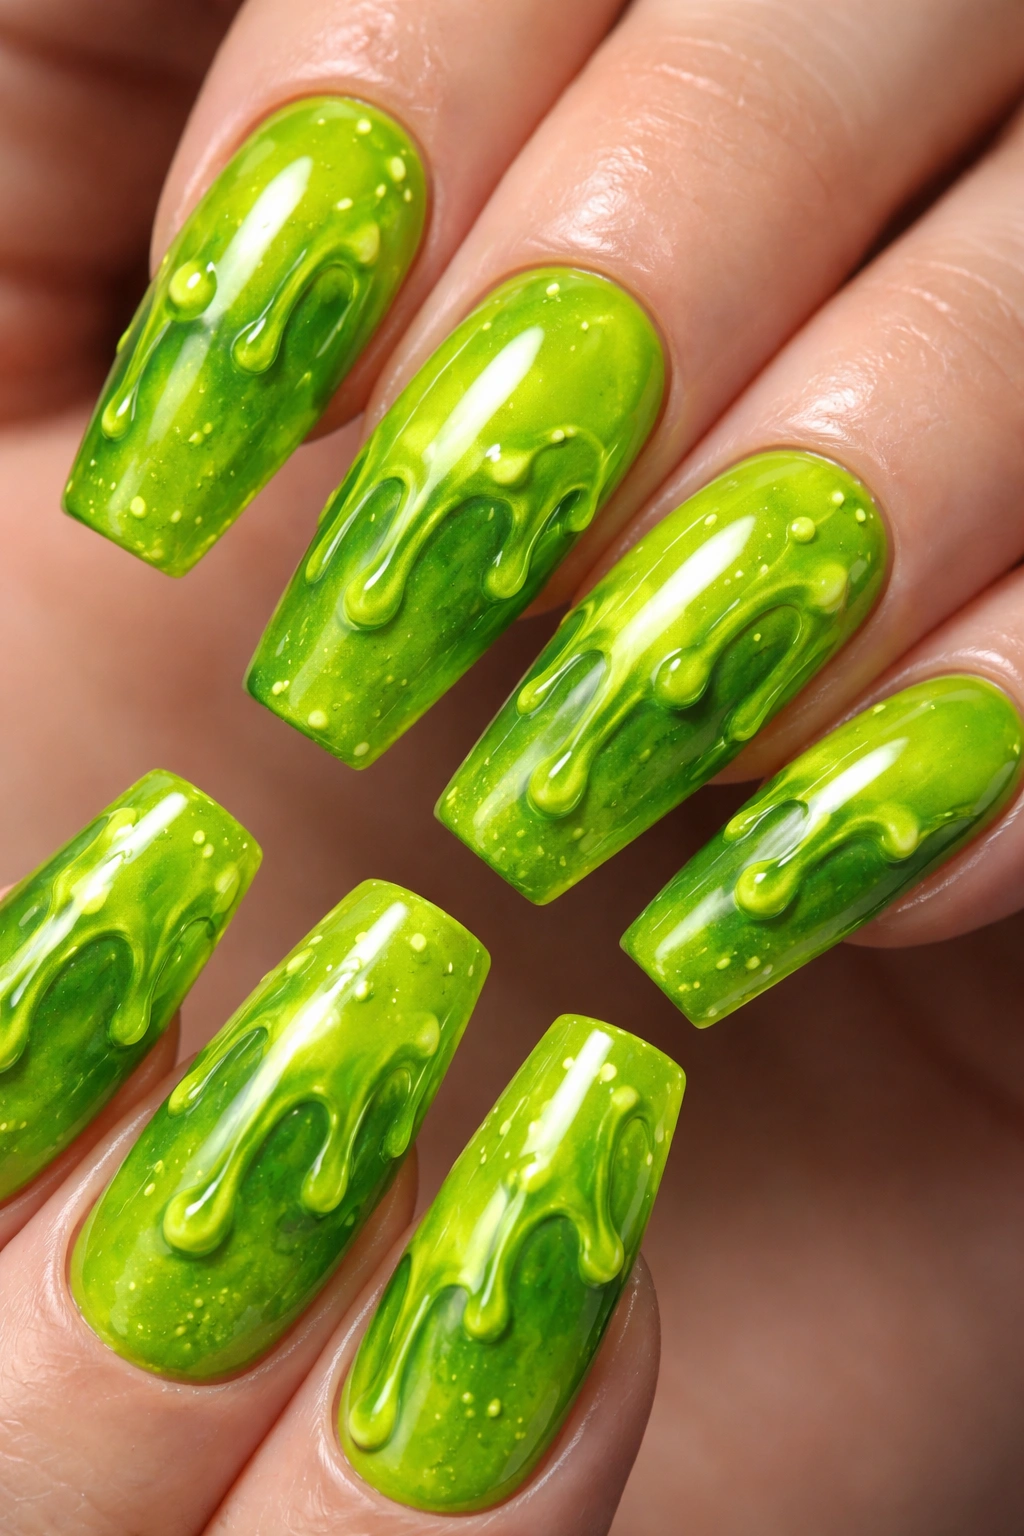
Nothing says “mad scientist” or “toxic waste” quite like neon green nails. This electric shade is surprisingly chic when styled correctly, especially with a high-gloss finish that makes it look genuinely wet and slimy.
The key to pulling off neon green is commitment. This isn’t a color for the timid—it demands attention and makes a statement. Choose a true neon that almost seems to glow, then apply multiple coats for full opacity. Neons can be sheer, so don’t be surprised if you need three coats for full coverage.
For extra slime effect, some nail artists add drip details in a slightly different shade of green or even metallic green accents that catch light differently. You could also incorporate 3D slime effects using builder gel for nails that genuinely look dimensional and goopy.
This design is perfect for anyone channeling their inner villain—think Poison Ivy, the Wicked Witch of the West, or any toxic swamp creature. The green flame trend that’s been popular lately pairs beautifully with this neon green base. Despite being such a bold, unconventional color, neon green actually works with many skin tones and can be surprisingly flattering. Just own the boldness and you’ll pull it off.
25. Vampire Fang Accent
For a literal take on vampire nails, some nail artists have been creating 3D fang designs that extend past the tip of your nails. This isn’t for everyone—it’s definitely a statement—but if you’re going all-in on Halloween, these are unforgettable.
The fangs are typically created using acrylic or builder gel, carefully sculpted and positioned to look like actual vampire teeth protruding from your nail tips. They’re usually white or off-white, sometimes with hand-painted details to make them look more realistic. Most people opt for fangs on just one or two accent nails rather than all ten fingers.
Creating this look definitely requires professional skills and special materials, so this is one to book with your nail tech rather than attempt at home. The fangs are surprisingly durable when done correctly, though you’ll want to be mindful of them during daily activities.
These nails are perfect for a full vampire costume and will absolutely be the topic of conversation wherever you go. They’re undeniably Halloween-specific, so plan accordingly if you’re getting them done—you probably won’t want to wear vampire fangs on your nails past November 1st. But for the ultimate Halloween nail statement that nobody else will have? These can’t be beat.
26. Pastel Halloween Mix
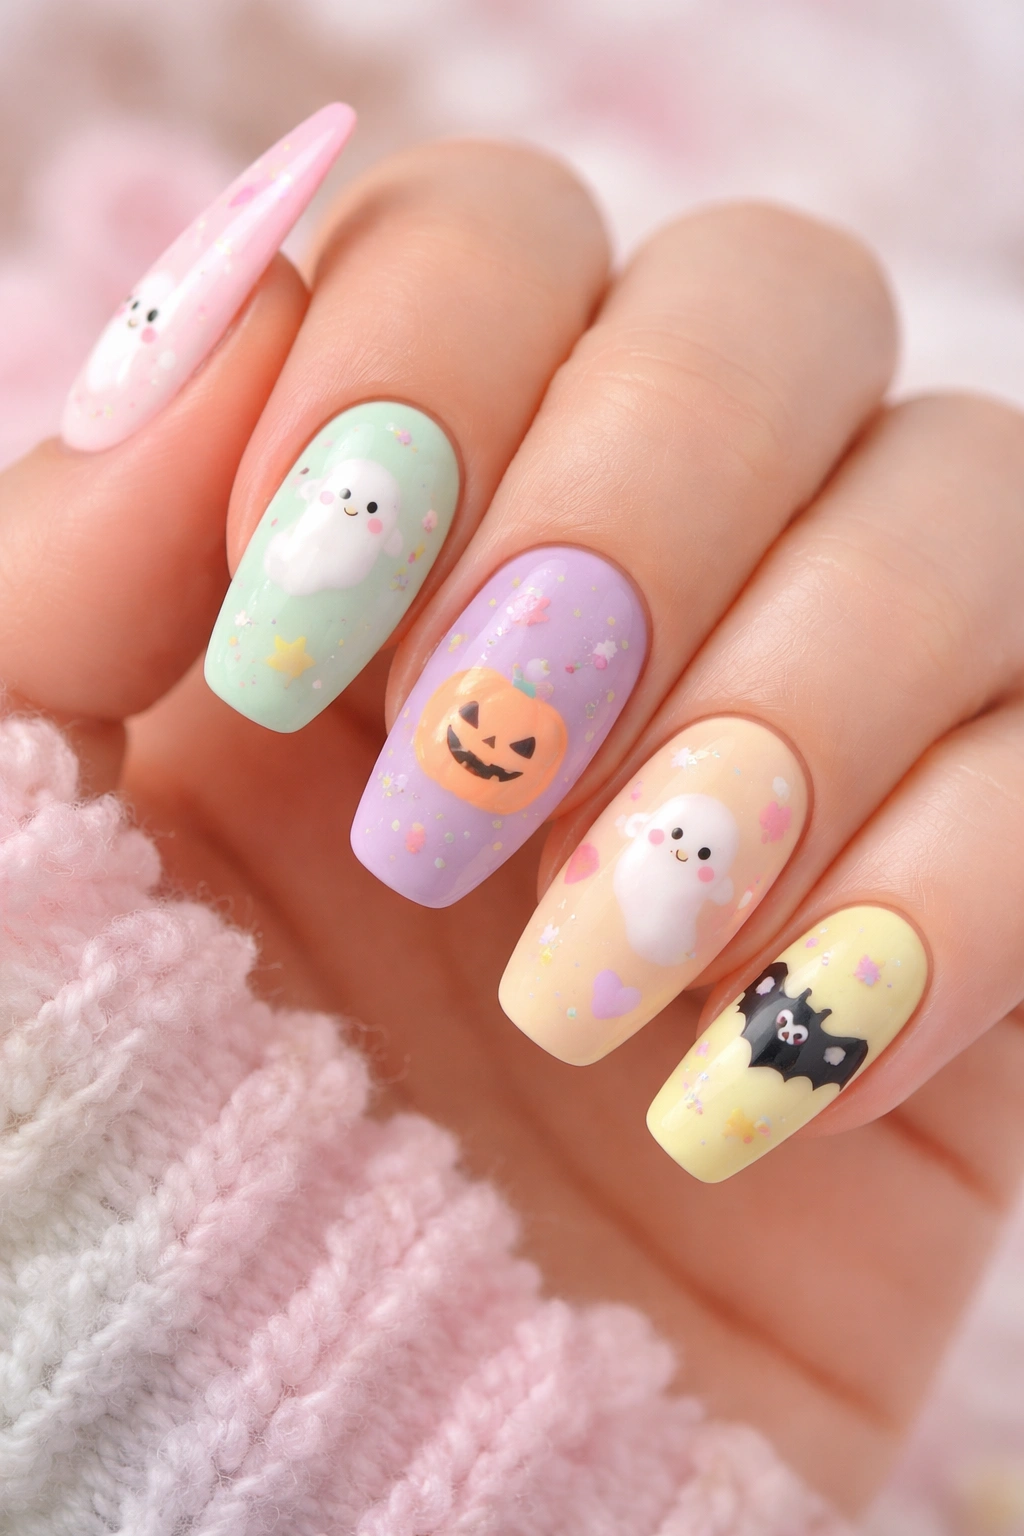
Who says Halloween colors have to be dark and moody? Pastel Halloween nails have become increasingly popular, offering a softer, more whimsical take on spooky season. Think baby pink, mint green, lavender, and pale yellow combined with traditional Halloween imagery.
The combination sounds like it shouldn’t work, but it creates this kawaii-meets-Halloween aesthetic that’s genuinely adorable. Picture tiny ghosts painted in soft purple, pumpkins in mint green, or bats in baby pink. The pastel colors make traditionally scary imagery feel friendly and cute instead.
This approach is perfect for anyone whose personal style leans more cute than creepy. It’s also great for younger people or anyone in a professional setting where traditional Halloween colors might feel too bold. The soft palette keeps things playful and fun without the intensity of classic orange and black.
You can create pastel Halloween nails by doing a skittle manicure with different pastel shades on each finger, then adding Halloween designs in coordinating or contrasting colors. Or keep one base color and vary your Halloween imagery across different nails. The key is maintaining that light, airy color palette that makes everything feel softer and more approachable. These nails are proof that Halloween can be whatever you want it to be.
27. Mix-and-Match Monster Mashup
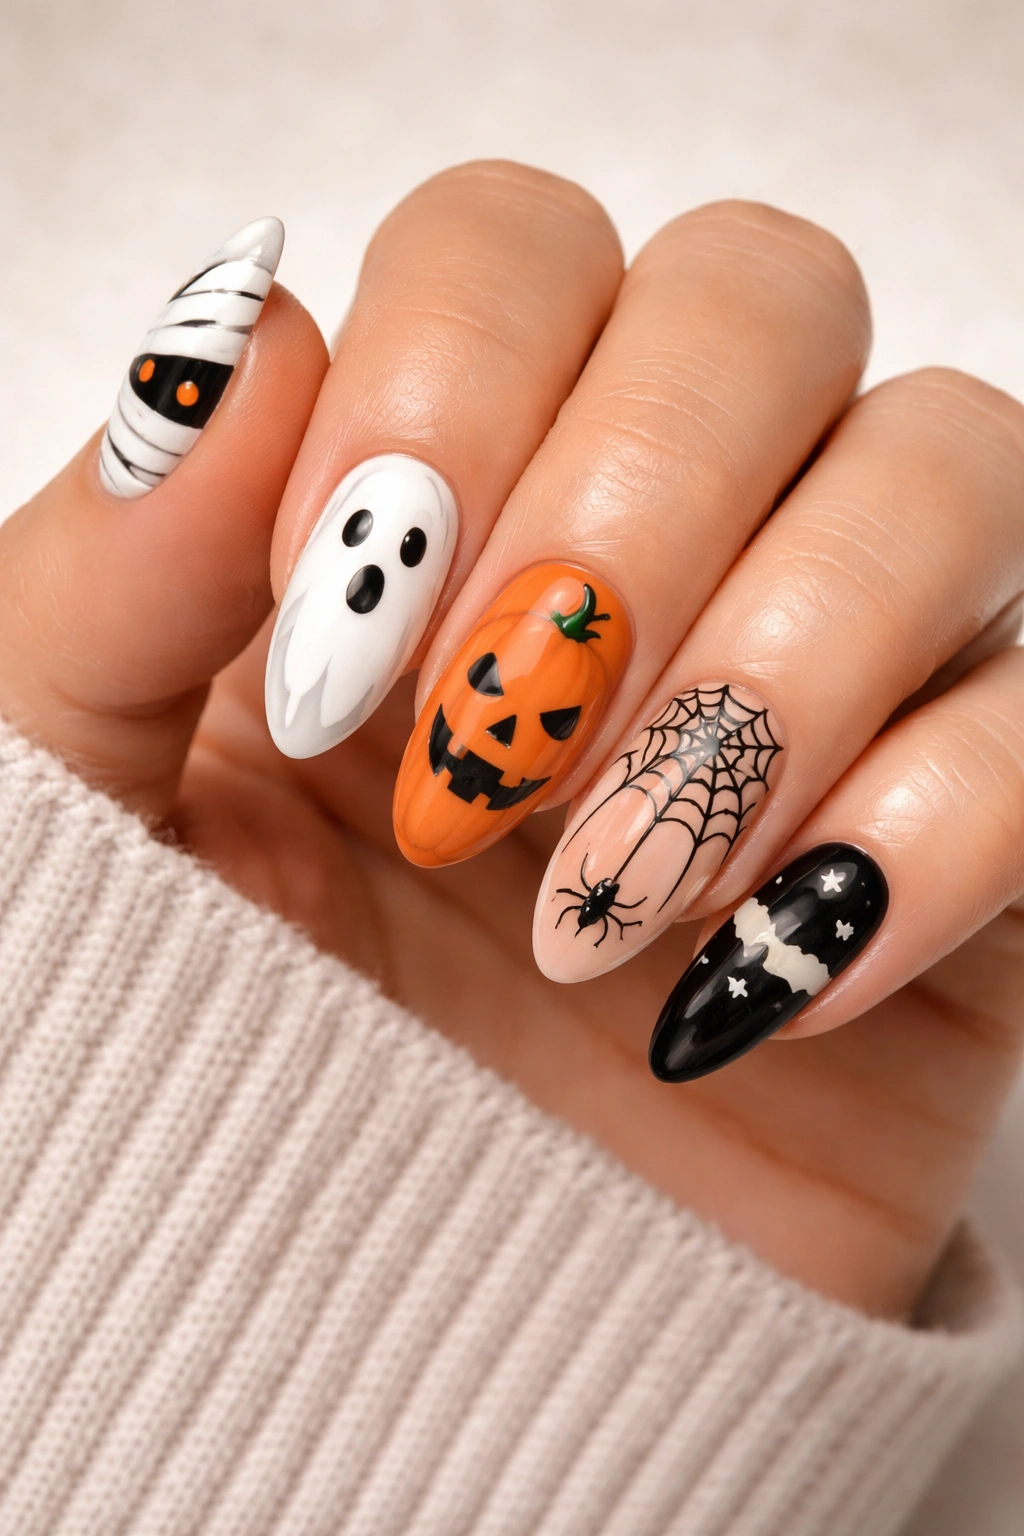
Can’t decide on just one Halloween design? Why not do them all? The mix-and-match approach gives you a different Halloween element on each finger, creating a full narrative across your hands. This maximalist approach is pure fun.
Popular combinations include mummies, ghosts, pumpkins, spiderwebs, and bats, each getting their own dedicated nail. You might have a mummy-wrapped thumb, ghost faces on your index fingers, tiny pumpkins on your middle fingers, spiderwebs on your ring fingers, and black cat silhouettes on your pinkies. The variety keeps things interesting and lets you showcase multiple design techniques.
The trick to making this look cohesive rather than chaotic is sticking to a unified color palette. Even though each nail features different imagery, using the same colors throughout ties everything together visually. Classic Halloween orange, black, and white work beautifully, or you could go with a more muted palette of burgundy, forest green, and cream.
This design is ideal for anyone who loves Halloween and wants to celebrate every aspect of it. It’s playful, creative, and shows real commitment to the holiday. These nails become instant conversation starters because there’s so much to look at and discuss. They’re also relatively forgiving for DIY attempts because each nail is its own small project, and perfection isn’t required when you’ve got this much going on.
28. Simple Black French Tips

Sometimes the most effective designs are the simplest. A clean black French manicure swaps white tips for jet-black ones, creating a look that’s elegant, modern, and subtly spooky all at once. No elaborate artwork required.
The beauty of this design is its versatility. Black French tips work with literally any outfit, any costume, any Halloween activity you might have planned. They’re fancy enough for upscale Halloween parties but understated enough for trick-or-treating with kids. The clean, graphic look reads as sophisticated rather than costume-y.
Creating perfect French tips requires a steady hand or French manicure guides. Apply your nude or pink base first, letting it dry completely. Then carefully paint your tips in glossy black polish, creating that classic curved smile line. Clean up any mistakes with a small brush dipped in acetone before sealing everything with top coat.
For extra Halloween flair without adding obvious imagery, consider adding a matte top coat to the black tips while keeping the base glossy. This contrast in finishes creates visual interest while maintaining the minimalist aesthetic. You could also experiment with the thickness of your tips—going slightly thicker than traditional French tips makes more of a statement. This design proves you don’t need bats, ghosts, or pumpkins to have perfectly festive Halloween nails.
29. Holographic Spiderweb
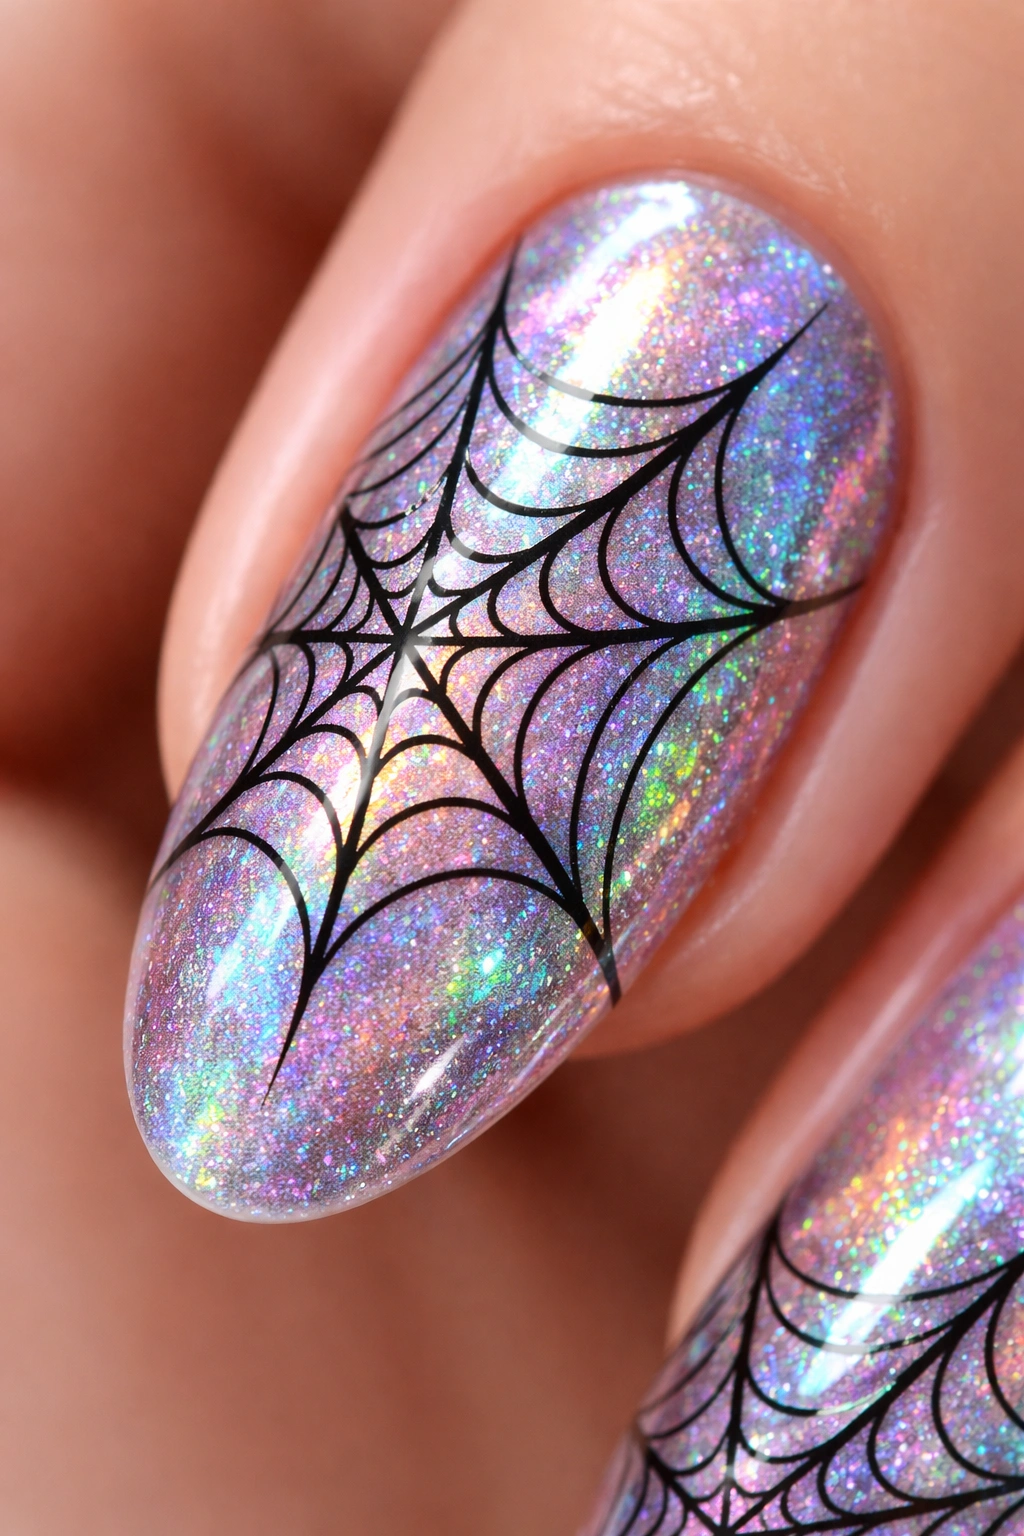
Holographic polish creates this rainbow-shifting, prism-like effect that’s absolutely mesmerizing. When combined with spiderweb details, it creates a magical, almost ethereal look that captures Halloween’s mysterious energy without being overtly scary.
Start with holographic polish as your base—this stuff is pure magic, shifting through rainbow colors as you move your hands. Popular Halloween-appropriate bases include holographic black, purple, or silver. Once your base is completely dry, use black polish and a fine liner brush to paint delicate spiderweb patterns.
The combination of the shifting, iridescent base with the stark black webs creates this fascinating contrast between magical and spooky. The webs stand out sharply against the holographic background, but that background keeps changing colors, creating a dynamic effect that never gets boring to look at.
This design works on any nail length and is actually fairly DIY-friendly if you’re comfortable with detail work. The holographic polish does most of the heavy lifting in terms of visual interest, so even simple web designs look impressive. For anyone who wants Halloween nails that feel special and unique without being overly themed, this strikes the perfect balance.
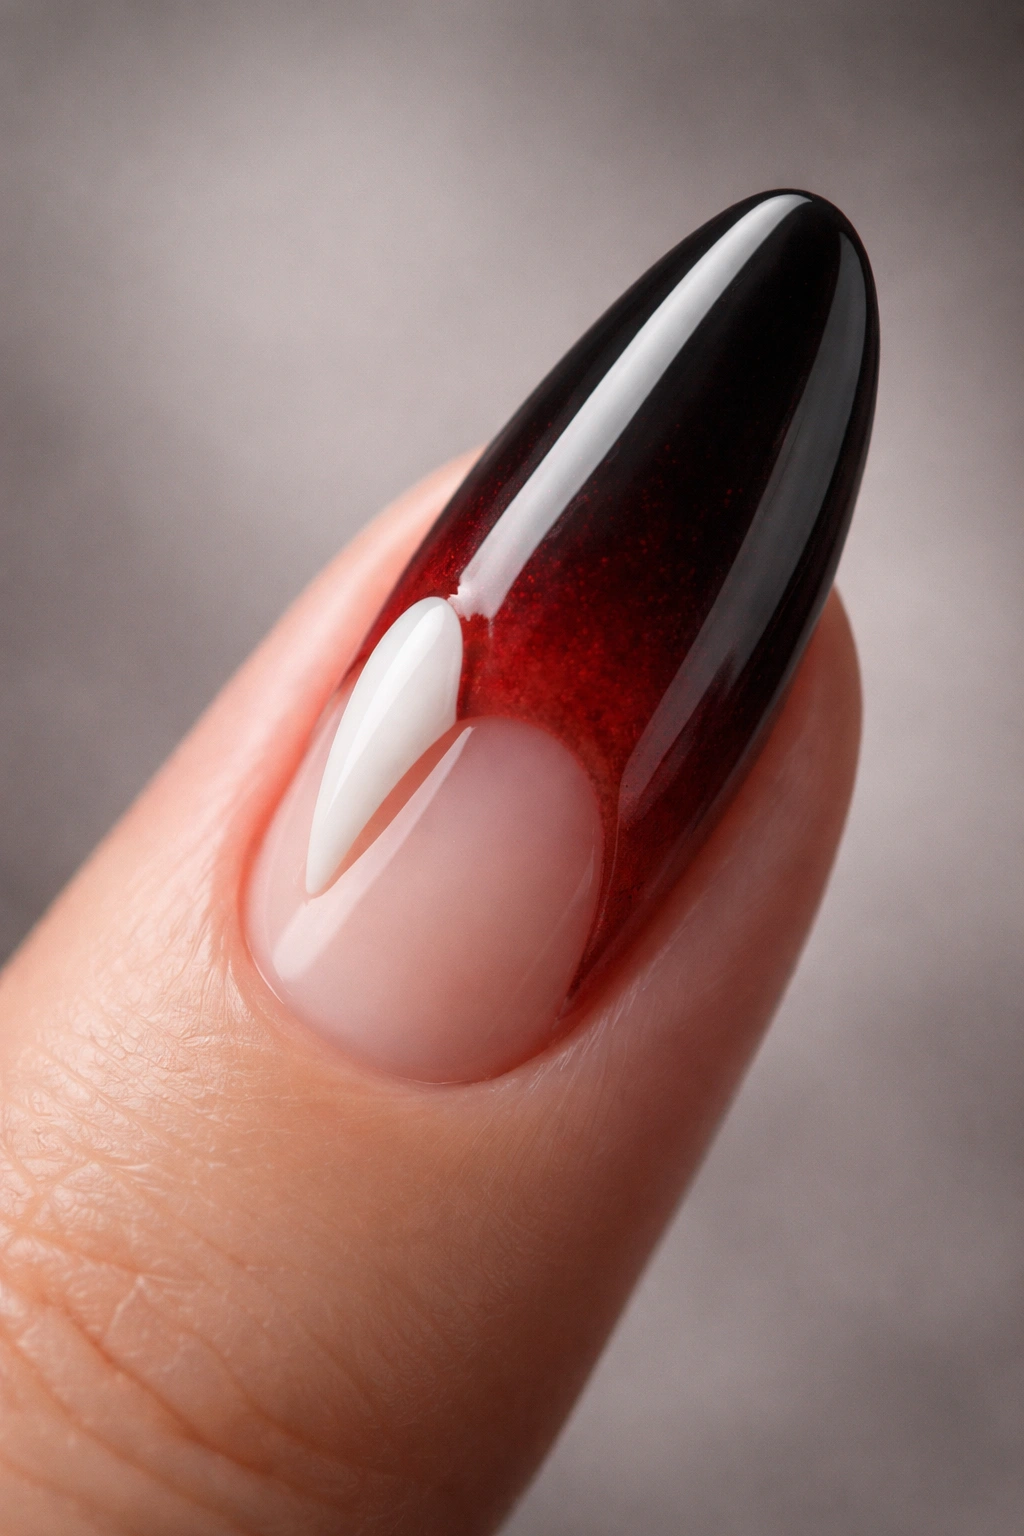
30. Red and Black Ombre
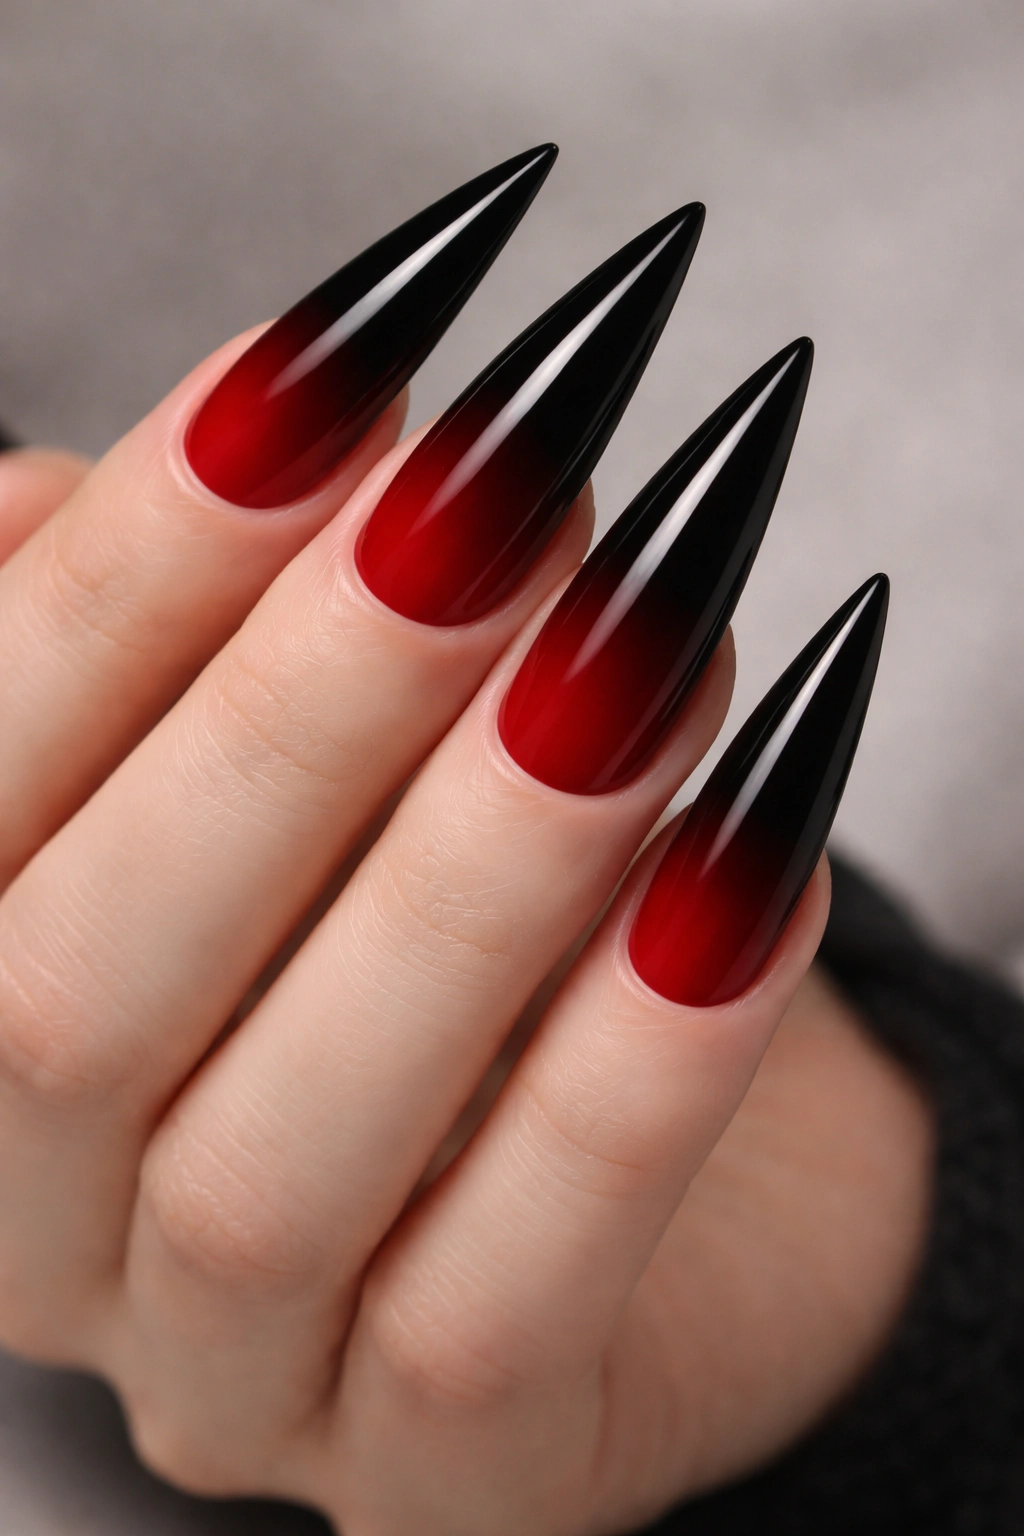
Vampire vibes, gothic romance, dark elegance—this red-to-black ombre captures it all. The gradual fade between these two classic Halloween colors creates depth and dimension that’s genuinely stunning, especially on longer nails where you have space to show off the transition.
Creating a smooth ombre requires patience and the right technique. Many nail artists use a makeup sponge, dabbing where the two colors meet to blend them together seamlessly. Start with your darker color (black) at the base and your lighter color (red) at the tips, or vice versa depending on your preference.
The key to professional-looking ombre is making that middle section where colors blend look smooth rather than muddy. This often requires multiple layers, building gradually rather than trying to achieve the perfect gradient in one go. Seal everything with a thick, glossy top coat to even out texture and amp up the shine.
This color combination is quintessentially vampy (in both the vampire and glamorous senses of the word). It pairs beautifully with vampire costumes obviously, but also works with devil, witch, or generic dark entity costumes. The sophisticated color fade means these nails don’t read as costumey, so you can comfortably wear them throughout October regardless of whether you’re actually dressing up.
31. Mummy-Wrapped Chrome
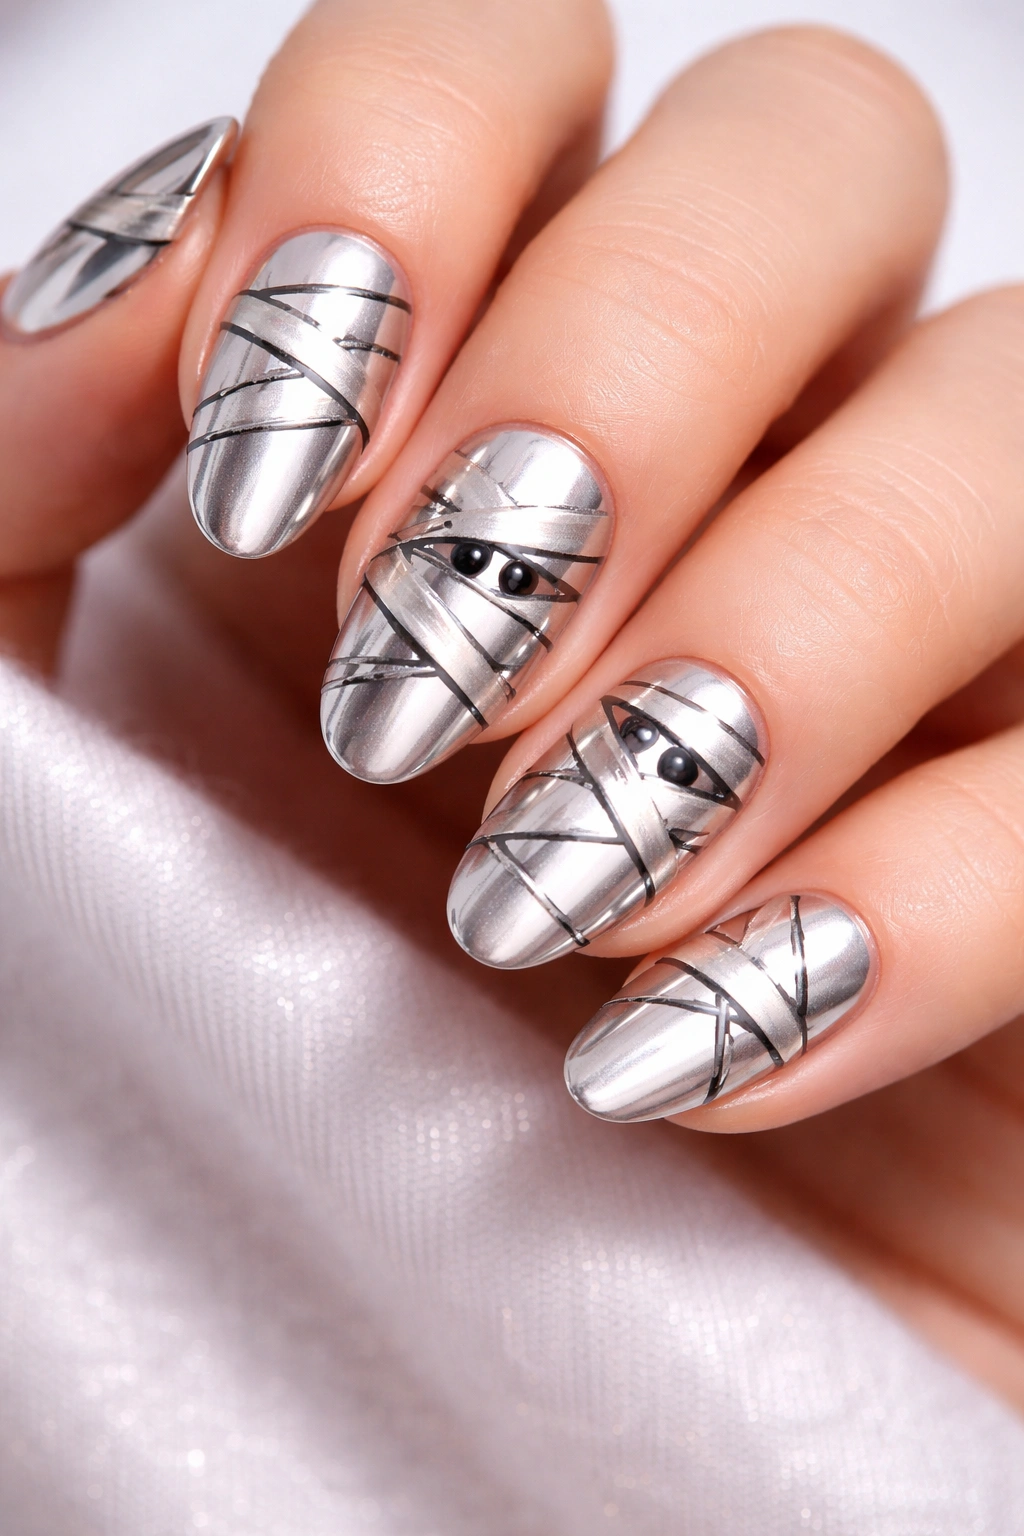
This creative design takes the classic mummy-wrap concept and gives it a modern, luxe twist with chrome finish. The result is bandages that look almost metallic, as if your mummy went glamorous.
Start with a chrome base in white, silver, or even rose gold. Once that’s applied and sealed properly (chrome requires specific application), use a thin brush to paint irregular horizontal and diagonal lines in a contrasting color—typically black or dark gray. These lines represent the spaces between mummy bandages.
The alternating sections of chrome and line work create this geometric, wrapped effect that clearly reads as mummy-inspired while still looking contemporary and chic. Adding tiny dots for eyes on one or two accent nails completes the character without making it too literal or cartoonish.
This design is brilliant because it takes a potentially cheesy Halloween icon (mummies) and makes it genuinely stylish. The chrome finish is what elevates it from craft project to fashion statement. These nails work beautifully for anyone who wants recognizable Halloween imagery but refuses to sacrifice style for theme. They photograph gorgeously and will definitely earn compliments for creativity.
Final Thoughts on Halloween Nail Designs
Your nails are the perfect place to experiment with Halloween spirit because they’re temporary, changeable, and visible every single time you look down at your hands. Unlike elaborate costumes that come out once a year, a Halloween manicure can bring you little moments of joy throughout the entire month of October.
The beauty of Halloween nails is there are truly no rules. Want to go full horror with bloody effects and creepy crawlers? Go for it. Prefer subtle autumn vibes with harvest colors and minimal design? That works too. Somewhere in between with playful ghosts or chic metallics? Perfect.
Don’t feel pressured to choose designs that don’t match your personal style just because it’s Halloween. The best manicure is one that makes you happy when you look at it. If you typically prefer minimalist, neutral nails, a simple blood-red polish or black French tips might be your perfect Halloween move. If you usually rock bold, intricate nail art, this is your chance to go absolutely wild with elaborate designs.
For anyone attempting these looks at home, remember that practice makes progress. Your first attempt at spiderwebs or ombre probably won’t be perfect, and that’s completely fine. Nail art is a skill that improves with time and repetition. Keep nail polish remover and a small cleanup brush handy, watch tutorial videos, and be patient with yourself.
If detailed designs feel overwhelming, there’s absolutely no shame in using nail stickers, stamping plates, or press-on nails. The nail industry has created amazing tools that make professional-looking designs accessible to everyone. The goal is nails that make you feel festive and confident, not stressed about perfection.
Whatever design you choose, make sure you’re starting with healthy nails and proper preparation. Clean, shaped nails with pushed-back cuticles provide the best canvas for any design. Always use a base coat to protect your natural nails from staining (especially important with dark polishes), and seal everything with a good top coat to extend the life of your manicure.
Halloween nails are meant to be fun—a creative outlet and a way to celebrate a season that’s all about transformation and self-expression. So whether you’re team spooky or team cute, team maximalist or team minimal, there’s a Halloween nail design out there with your name on it. Browse through inspiration, save your favorites, and let your fingertips join the Halloween celebration.
After all, October only comes once a year. Might as well make it count—ten fingernails at a time.
