

Long round nails have become the go-to canvas for holiday nail art, and for good reason—the generous surface area and soft, elegant shape provide the perfect foundation for festive designs that catch the light and draw admiring comments. Whether you’re heading to holiday parties, family gatherings, or simply want to celebrate the season with a little extra sparkle on your fingertips, there’s something undeniably special about investing in a bold, festive manicure during this time of year. The beauty of long round nails is that they work equally well with intricate hand-painted designs, minimalist geometric patterns, metallic accents, or full-coverage glitter—you’re never limited by shape when you’ve got this much real estate to work with.
The challenge, honestly, is choosing which direction to go. There are classic holiday colors and patterns that never go out of style, plus endless creative directions if you want to branch beyond traditional reds and greens. Some designs are perfect if you’re aiming for understated elegance, while others are unapologetically bold statements that say “I’m ready to celebrate.” The key is finding something that genuinely excites you and matches your personal style, rather than defaulting to whatever’s trending on social media.
This roundup is built on the principle that festive nail art should reflect who you are and what makes you happy during the holidays. Some designs lean into tradition, some embrace modern minimalism, and others push into genuinely creative territory. Each one works beautifully on long round nails, and each one is absolutely achievable whether you’re working with a professional nail technician or handling your manicure at home.
1. Deep Burgundy With Gold Geometric Accents
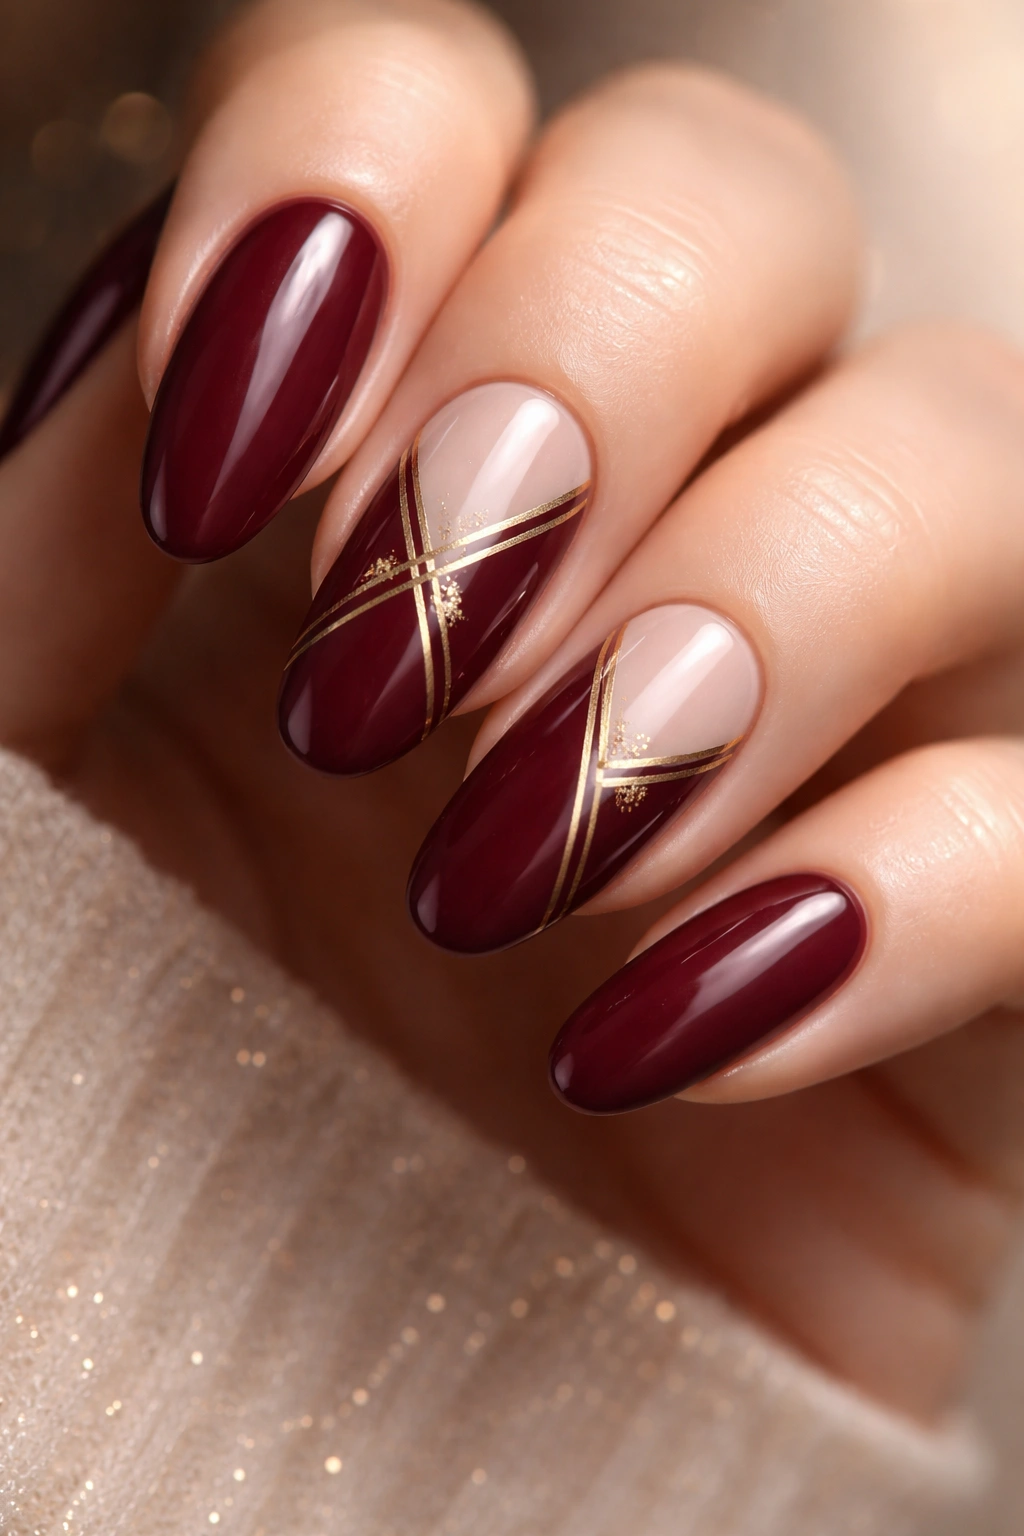
Deep burgundy is the sophisticated answer to traditional holiday red—it’s rich, slightly moody, and pairs perfectly with metallic gold accents that catch light from every angle. This combination feels inherently festive without screaming “holidays,” making it an excellent choice if you want something that bridges seasonal style and timeless elegance.
Why It’s Festive
Burgundy carries all the warmth and celebration of red while leaning into a more refined, wine-inspired sophistication that photographs beautifully and feels elevated for holiday events. The addition of geometric gold lines—whether thin stripes, triangles, or angular shapes—adds visual interest and prevents the design from feeling flat or one-dimensional. Gold metallics catch light naturally and create subtle shimmer without requiring glitter, which means the nails stay elegant even under indoor party lighting.
Design Details and Application Tips
- Paint all nails in a rich, creamy deep burgundy base (aim for 2-3 coats for full opacity)
- Use a thin gold liner brush or striping brush to create geometric patterns on 3-4 nails
- Try: thin vertical lines on the ring finger, small triangles on the pinky, a diagonal stripe on the middle finger, leaving 1-2 nails solid burgundy for balance
- Seal everything with a glossy top coat that amplifies the shine without adding texture
- This design works especially well if you have slightly longer nails (about ½ inch past the fingertip) because the geometric lines have more room to breathe
- Pro tip: If hand-painting gold lines feels intimidating, try using thin gold metallic tape strips applied before the burgundy dries—peel them off carefully once the burgundy hardens, and you’ll get perfectly crisp lines every single time.
2. Emerald Green With Diamond Sparkle
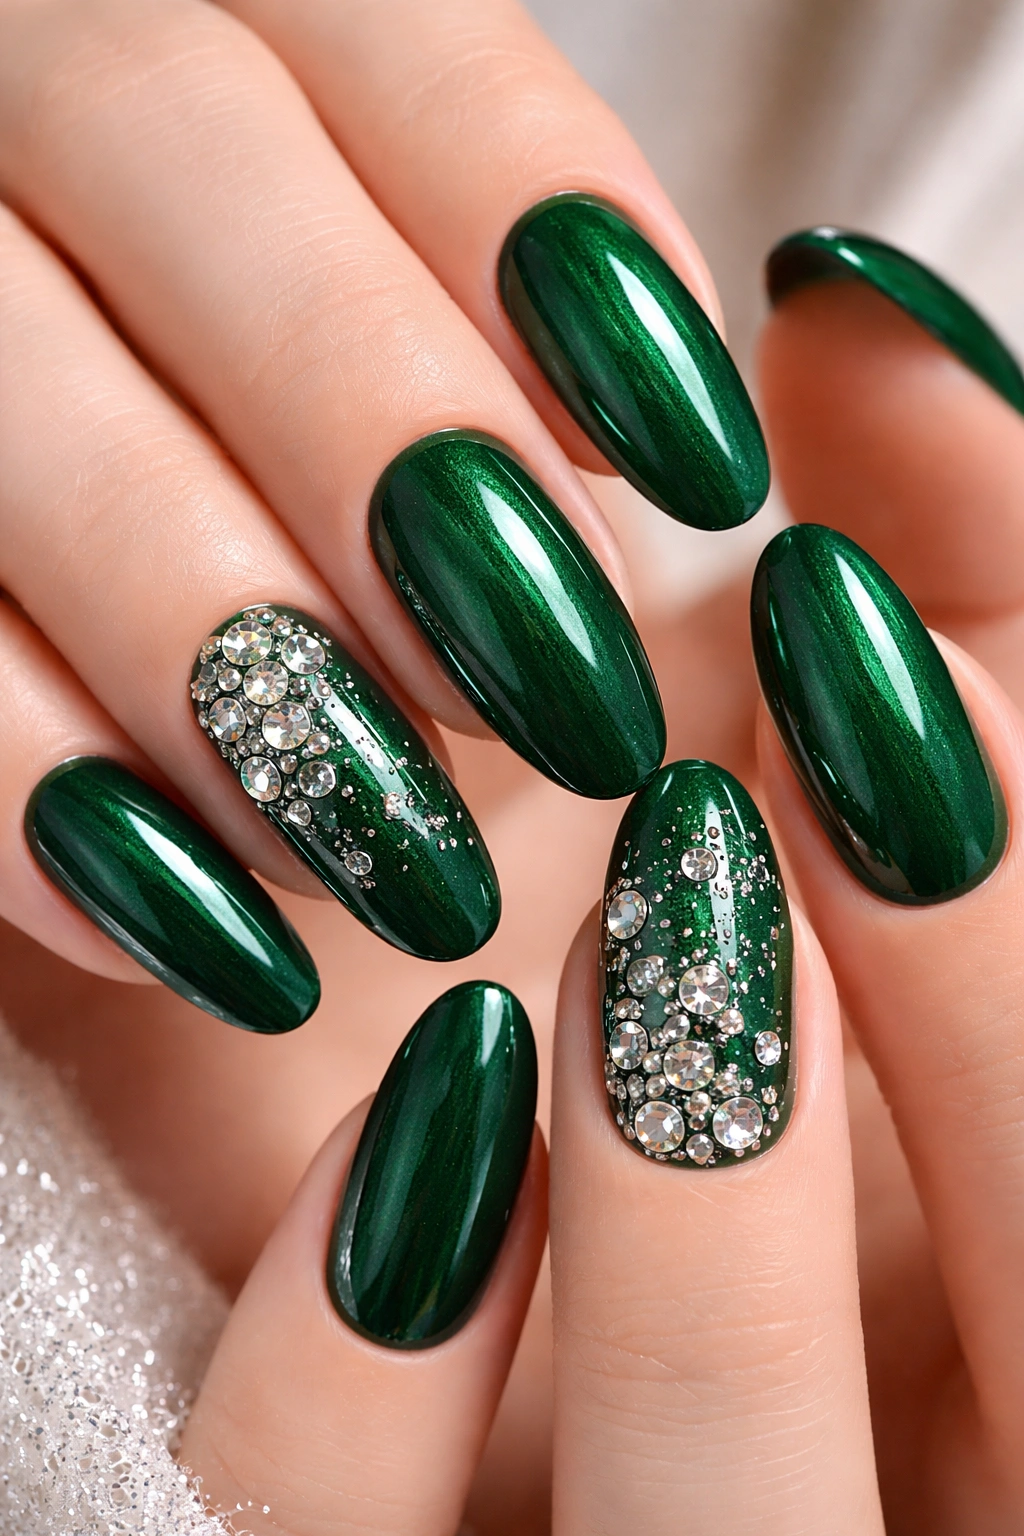
Emerald green is the jewel-tone holiday classic that somehow never feels overdone, especially when paired with strategic diamond-shaped glitter placements that add sparkle without overwhelming the entire nail. This design hits that sweet spot between festive and refined that works for everything from casual holiday dinners to formal celebrations.
What Makes It Elegant
Emerald green is inherently luxurious—it’s the color of expensive gemstones and holiday cocktails, which immediately elevates the perception of your entire manicure. By keeping most of the nail as a solid emerald base and adding diamond-shaped glitter accents only on certain nails (like just the ring finger and pinky, or creating a scattered pattern on alternating nails), you create visual interest that feels intentional rather than chaotic. The combination suggests both elegance and celebration simultaneously.
How to Layer This Design
- Start with 2-3 coats of a rich emerald green base polish
- Cut small diamond or rhombus shapes from metallic glitter sheets (or use pre-cut nail art stickers)
- Apply the diamond shapes to select nails using nail glue or a tacky base coat as adhesive
- Seal with a shiny top coat that creates a smooth, unified finish across both the solid color and the glitter elements
- The result should look like strategic jewel placement, not random sparkle
- This works beautifully on long round nails because the length gives you enough space to create a balanced, asymmetrical design
- Worth knowing: If you prefer working with loose glitter instead of stickers, use a slightly sticky top coat first, press individual diamond-shaped sections into the glitter while wet, then seal with a clear top coat once dry—it takes patience but creates a perfectly custom look.
3. Classic Red With White Striped Details
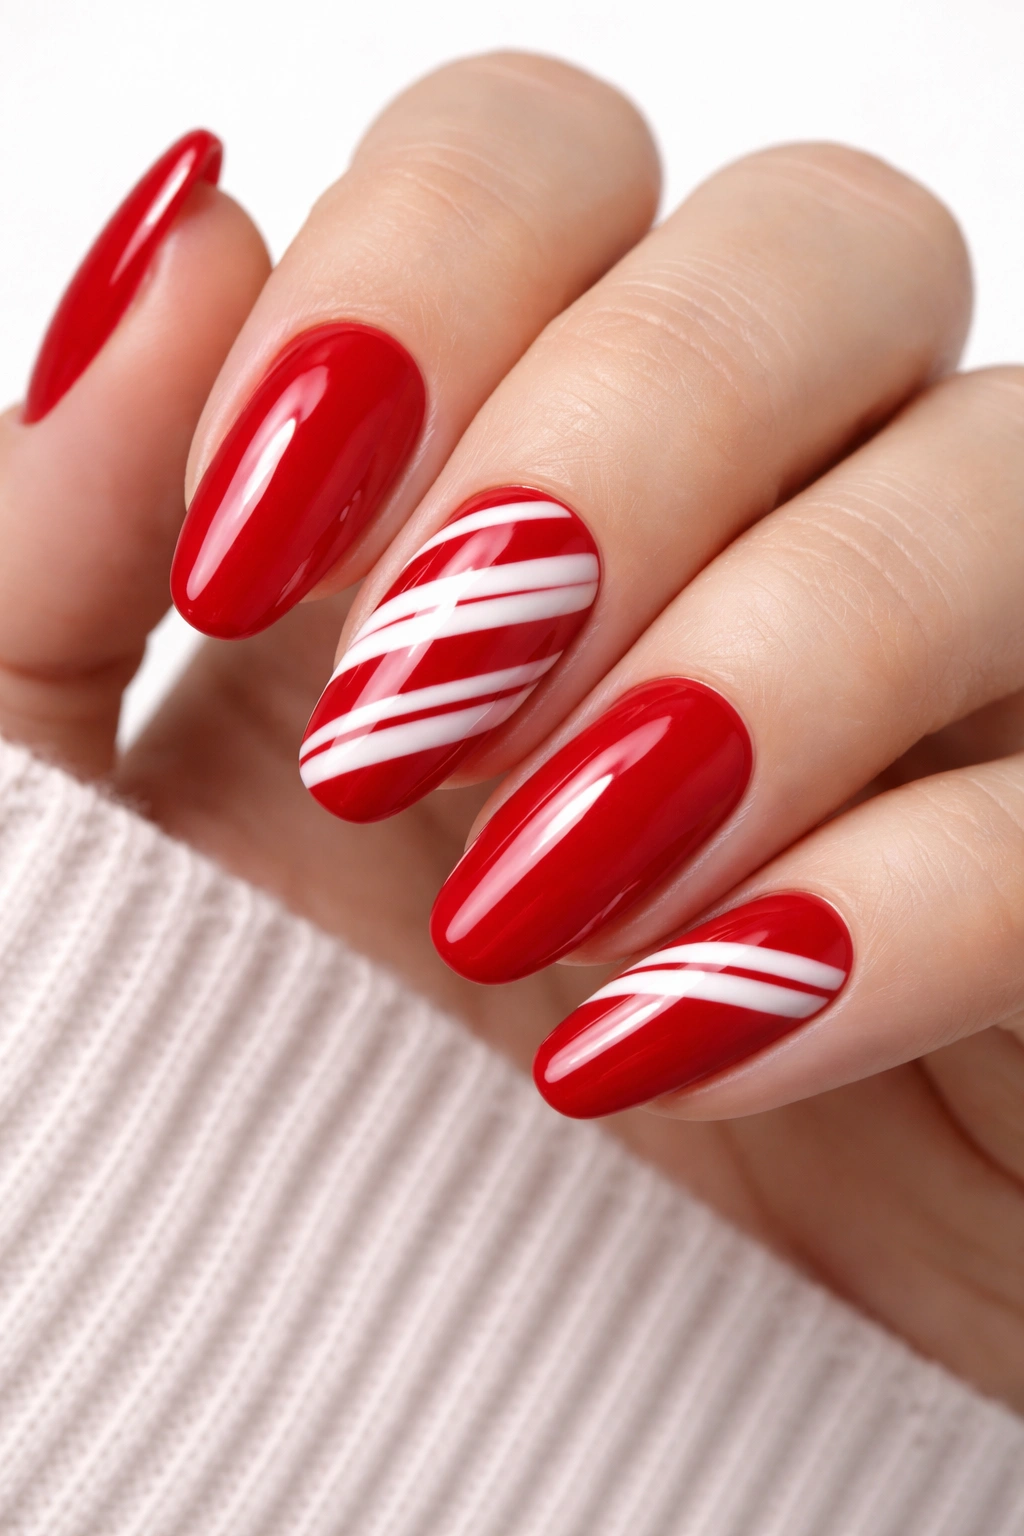
The ultimate holiday color combo—a bold, true red paired with clean white stripes—is timeless for a reason. On long round nails, this design reads as intentional and well-executed rather than trying too hard, and it works for every holiday event imaginable. The simplicity is actually what makes it work so effectively.
Why This Design Never Fades From Style
Red and white are the colors of holiday tradition, but the reason this design endures is that it’s technically interesting without being complicated—the geometric precision of white stripes against a bright red base feels modern and graphic rather than dated. The color contrast is so high that even if the stripes aren’t perfectly straight, the design still reads as sophisticated and deliberate. On long round nails, this contrast becomes even more striking because you have more surface area to showcase the pattern.
Creating Clean Striped Details
- Apply 2-3 coats of a glossy true red base (not too dark, not too orange-toned)
- Use a white gel polish or striping polish with a thin brush to paint either vertical stripes (spacing them about ¼ inch apart) or a series of horizontal bands
- Alternatively, use thin white striping tape applied vertically before the red base fully dries, peel off once dry, and seal with clear top coat
- Keep stripes consistent in width across all five nails for a polished, intentional appearance
- Consider painting 2-3 nails with full red background and white stripes, while leaving the accent nails (ring and pinky) solid red with just one or two accent stripes
- Seal with a glossy top coat that makes the red almost glow
- Pro tip: If you’re going for a brushstroke approach, let the red base dry completely before painting white stripes—wet polish underneath causes the white to bleed and looks messy. Patience here matters.
4. Champagne Chrome With Nude Ombre
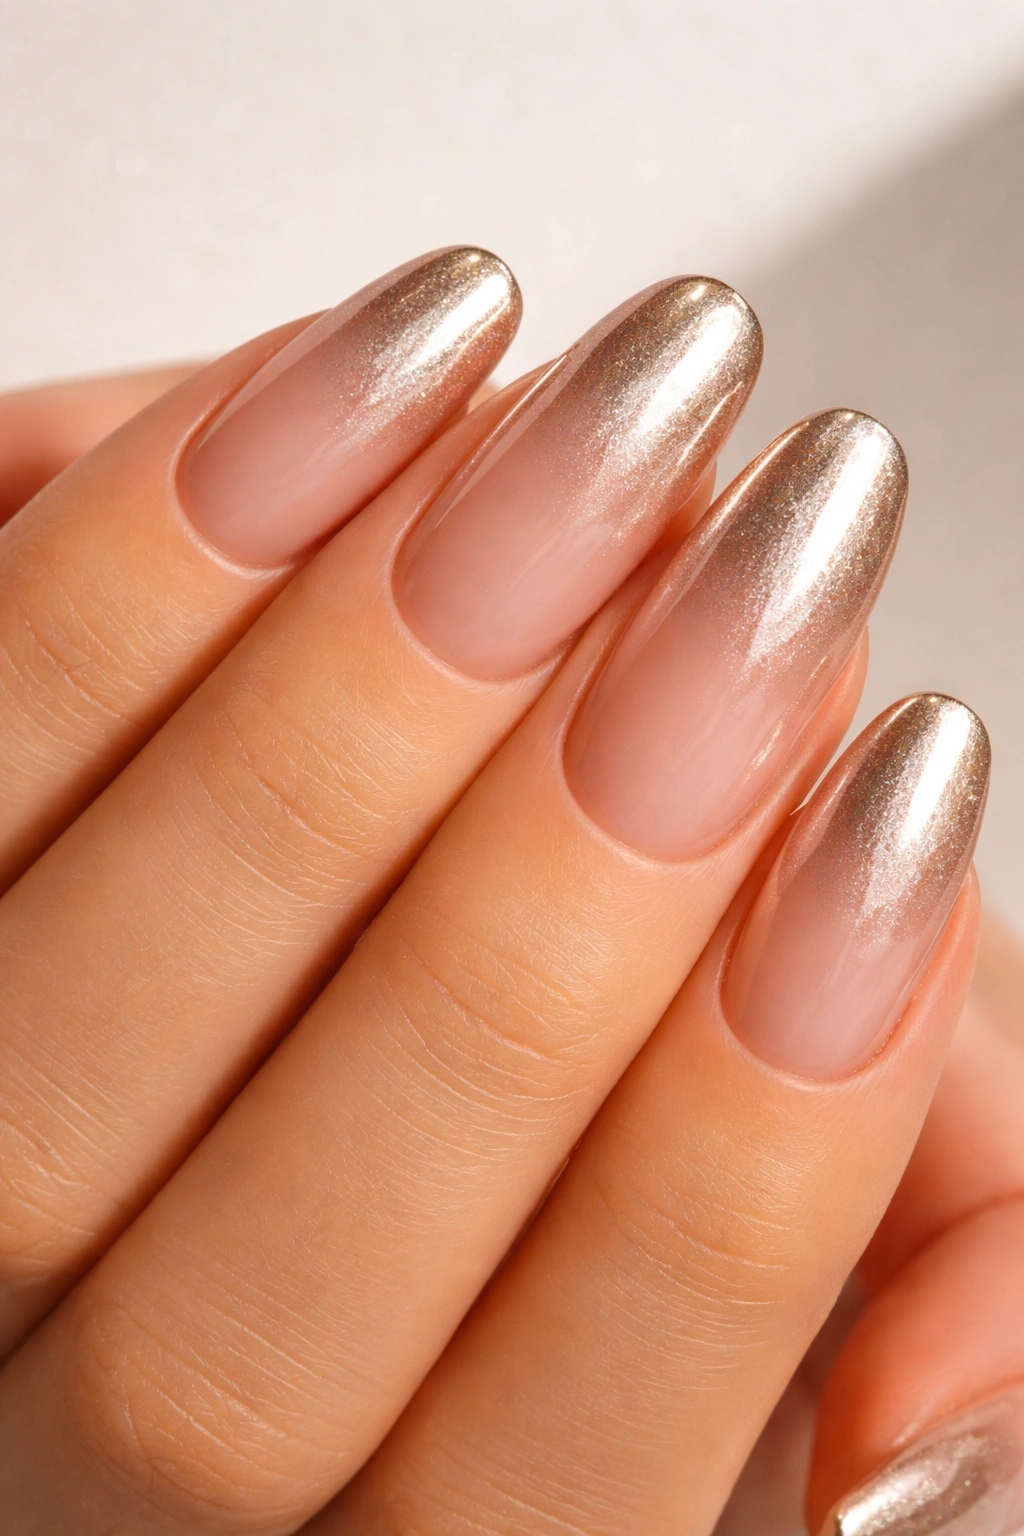
This is the design for anyone who wants their nails to feel celebratory and shimmering without screaming “holiday”—it’s sophisticated enough for professional settings while still being undeniably festive. Champagne chrome has an almost magical quality of seeming to change color depending on lighting, while the nude ombre base keeps the overall effect wearable and chic.
The Sophisticated Shimmer Appeal
Champagne chrome is literally made to catch light at every angle—it’s reflective without being glittery, which means it photographs beautifully and feels luxurious in person. When you layer a subtle ombre gradient from nude at the cuticle to slightly deeper tan or peachy-nude toward the tip, you create dimension and depth that makes the chrome effect even more striking. This design works especially well on long round nails because the length allows the ombre gradient to be visible and meaningful rather than getting lost on shorter nail beds.
Achieving the Ombre Chrome Effect
- Start with a nude-toned base polish that matches your skin tone (this is the foundation of the ombre)
- Sponge on a slightly deeper nude or peachy-nude shade toward the free edge of the nail, creating a gradient rather than a hard line
- Once fully dry, apply a champagne chrome powder over the entire nail using a soft brush, working in gentle circular motions
- Seal with a clear top coat that’s formulated specifically for chrome (regular top coat can dull the chrome effect)
- The result should shimmer and shift as your hands move—it’s subtle but undeniably special
- This works beautifully as an all-five-nails design because the consistency feels intentional and high-level
- Insider note: Chrome powder application is easier on nails that are completely smooth and even—file any ridges flat before applying the chrome for a flawless finish.
5. Hunter Green With Holly Berry Details
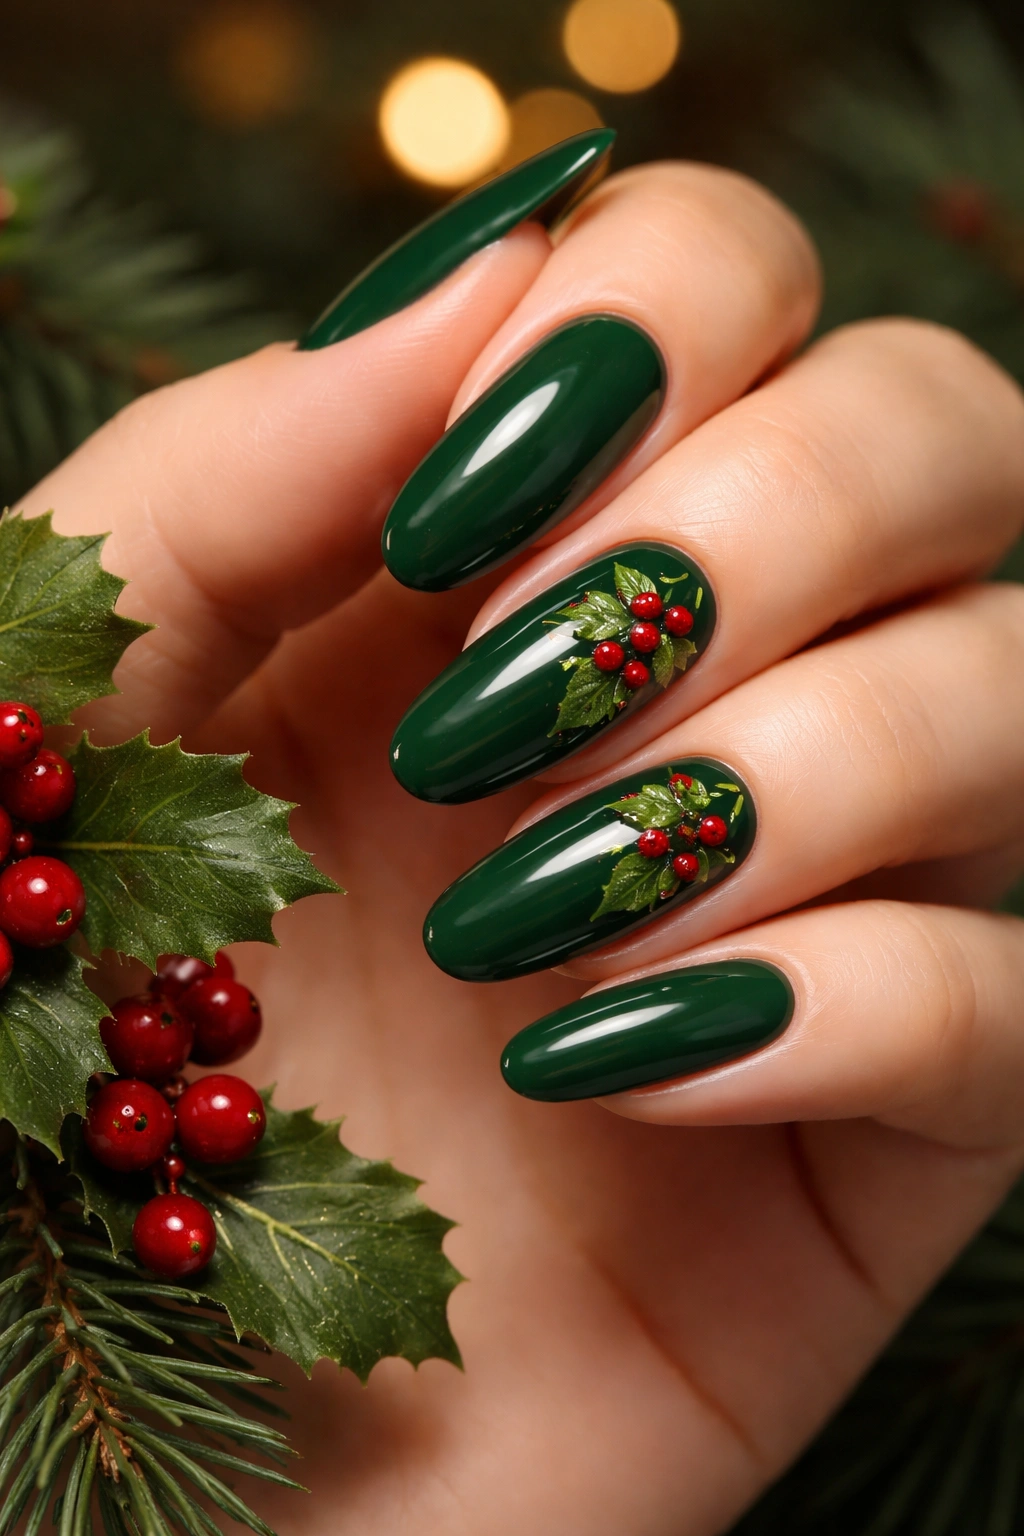
Hunter green provides a deep, rich holiday background that feels sophisticated rather than costume-y, and when you add tiny painted holly berries and leaves in red and white, you create a festive design that looks hand-illustrated and thoughtful. This is the choice for anyone who appreciates botanical elements and doesn’t mind a slightly more artistic approach to nail art.
The Botanical Festive Appeal
Holly is inherently associated with holiday tradition and celebration, and even a minimalist interpretation of holly leaves and berries adds a layer of seasonal meaning that feels intentional. The hunter green base is dark enough that red berries pop dramatically against it, creating visual interest without requiring glitter or chrome. On long round nails, you have plenty of space to arrange a scattered holly pattern that feels organic and artistic rather than cramped or overly busy.
Painting Holly Elements
- Apply 2-3 coats of a deep hunter green base polish (let it dry completely)
- Using a thin detail brush or a dotting tool, paint tiny red berries in small clusters (groups of 3-5 dots) scattered across 3-4 nails
- Add small pointed green leaves around the berries using a slightly lighter green or white leaf-shaped strokes
- Alternatively, paint entire 2-3 leaves with veins if you’re comfortable with the brushwork
- Leave at least one nail solid hunter green to balance the design
- Seal with a glossy or matte top coat—matte actually looks stunning with this design because it makes the hand-painted elements feel intentional and artistic
- Pro tip: Practice your holly berry and leaf pattern on a piece of paper first—once you have the hand motion down, it translates to nails much more confidently.
6. Icy Blue With Silver Snowflake Accents
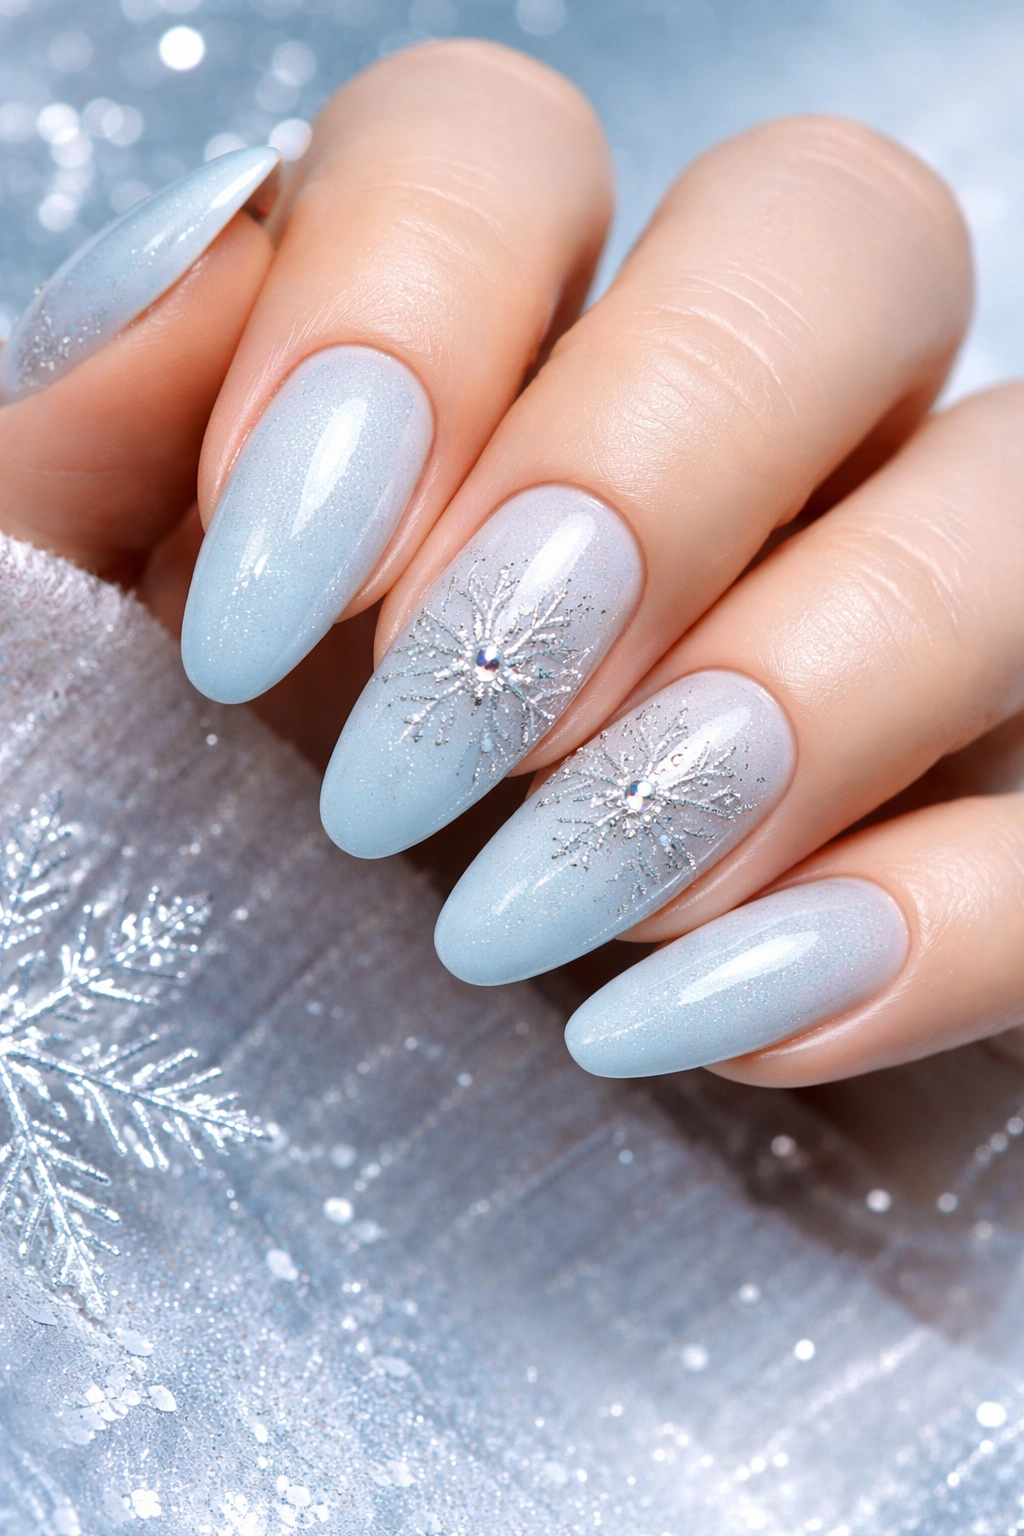
An icy, crystalline blue paired with delicate silver snowflakes creates a design that feels winter-inspired and magical without being heavy-handed. This works beautifully if your color palette tends toward cool tones, and it’s sophisticated enough to wear to professional settings during the holiday season.
Why This Design Feels Magical
Icy blue naturally evokes winter imagery—snow, ice, frost—and the color is just cool enough that it reads as festive and seasonal without being as expected as traditional holiday reds and greens. When you add silver snowflake accents (whether painted, stickered, or created with metallic details), you get a design that feels thematic and intentional. The combination reads as “winter celebration” rather than “basic holiday nails,” which is exactly what makes it stand out.
Layering Snowflakes on Icy Blue
- Start with a creamy, pale icy blue base polish (think frosted, not neon) applied in 2-3 coats
- Choose how you’ll add snowflakes: you can hand-paint delicate six-pointed snowflakes with a detail brush and silver polish, apply snowflake stickers, or use a snowflake-shaped stamp
- Paint snowflakes on 2-3 nails in staggered arrangements (not perfectly lined up, but scattered like actual snow)
- Leave at least 2 nails solid icy blue to balance the design’s visual weight
- Seal with either a glossy top coat (for shine) or a matte top coat (for a frosted, almost textured appearance that enhances the winter vibe)
- The design works wonderfully on long round nails because the length gives each snowflake enough space to be visible and beautiful
- Worth knowing: If you’re hand-painting snowflakes, start with the thinnest lines possible—they become more visible and impressive as you build them, rather than starting thick and having to scrape off mistakes.
7. Burgundy Velvet Matte With Rose Gold Accents
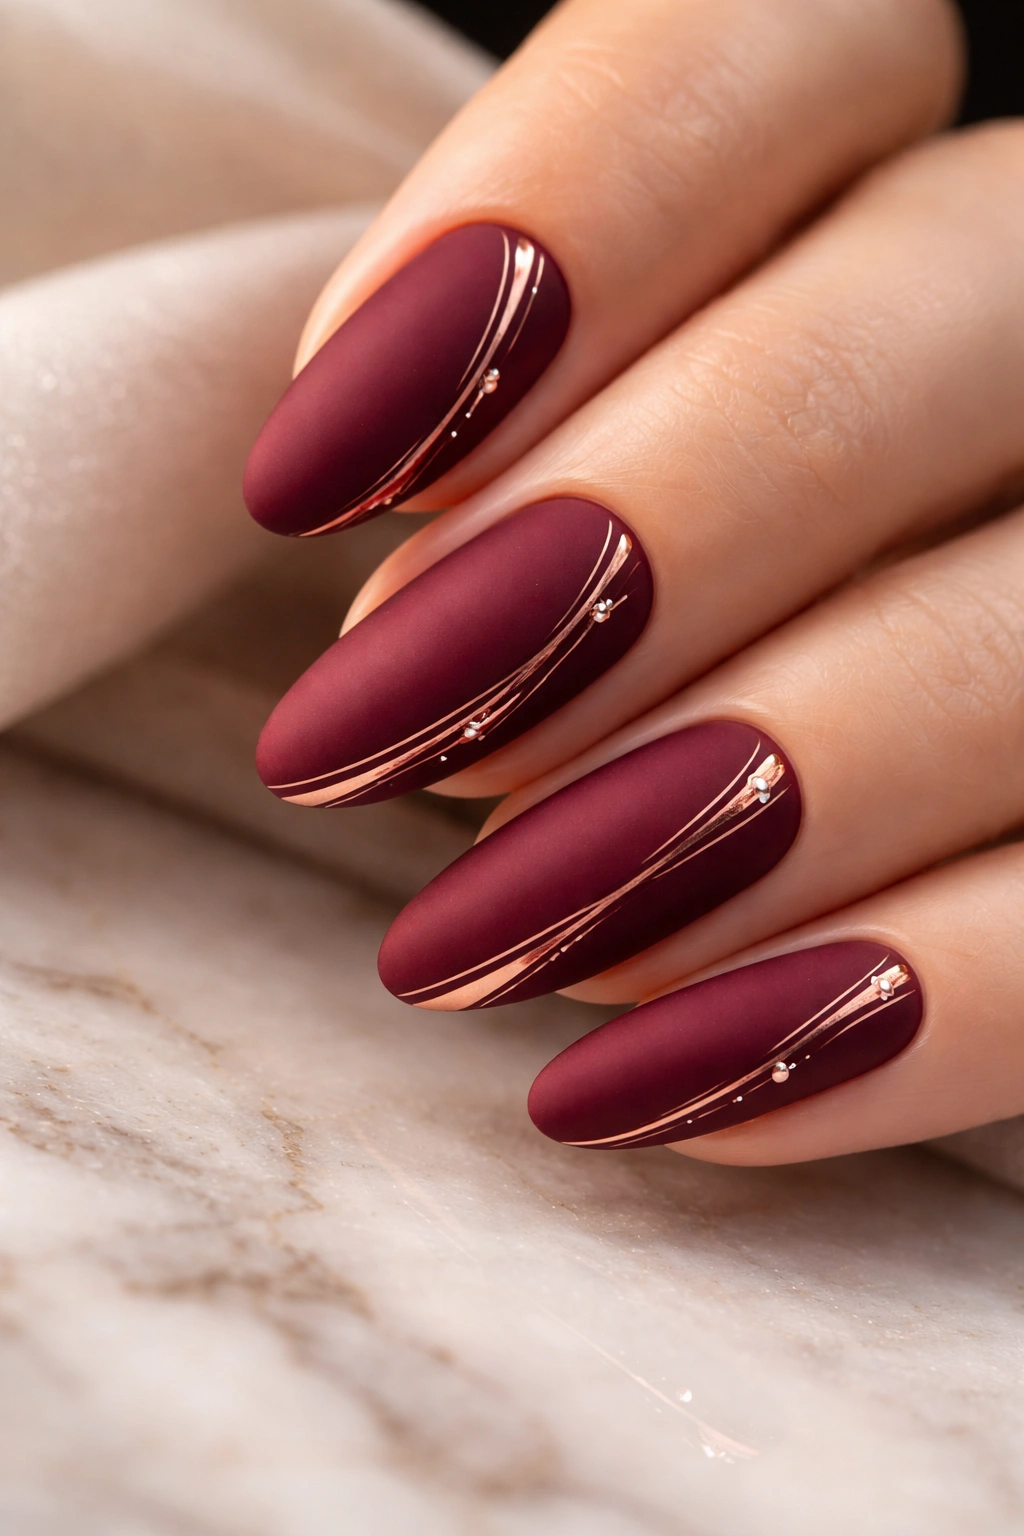
Matte burgundy has a luxurious, almost velvety quality that feels incredibly sophisticated and modern, especially when paired with rose gold metallic accents that add warmth and glamour without breaking the matte finish. This design is perfect if you want something that feels distinctly festive while still being fashion-forward and contemporary.
The Modern Matte Sophistication
Matte finishes have transformed nail art over the past several years, and a rich burgundy in matte is genuinely one of the most wearable, flattering finishes available. The matte texture absorbs light rather than reflecting it, which makes colors appear deeper and more luxurious. Adding rose gold accents—whether thin lines, small geometric shapes, or scattered metallic dots—creates warmth and visual interest while keeping the overall design refined. Long round nails in matte burgundy with rose gold details feel editorial and high-level.
Creating the Matte Rose Gold Design
- Apply 2-3 coats of burgundy polish, then seal with a matte top coat specifically formulated to give a velvety finish (not all top coats work equally—make sure you’re using a dedicated matte coat)
- Once fully dry, use a thin rose gold brush or metallic liner to add accents: thin vertical lines on 2 nails, small dots on 1 nail, or a geometric pattern on the accent nail
- Keep accents minimal so they enhance rather than overwhelm the matte burgundy
- The contrast between matte and metallic is what makes this design visually interesting—resist the urge to add too many metallic details
- Seal with the same matte top coat to maintain the unified finish throughout
- Pro tip: Let the burgundy and matte top coat cure for at least 2 hours before adding rose gold accents—trying to paint on a newly-matte surface can disturb the finish.
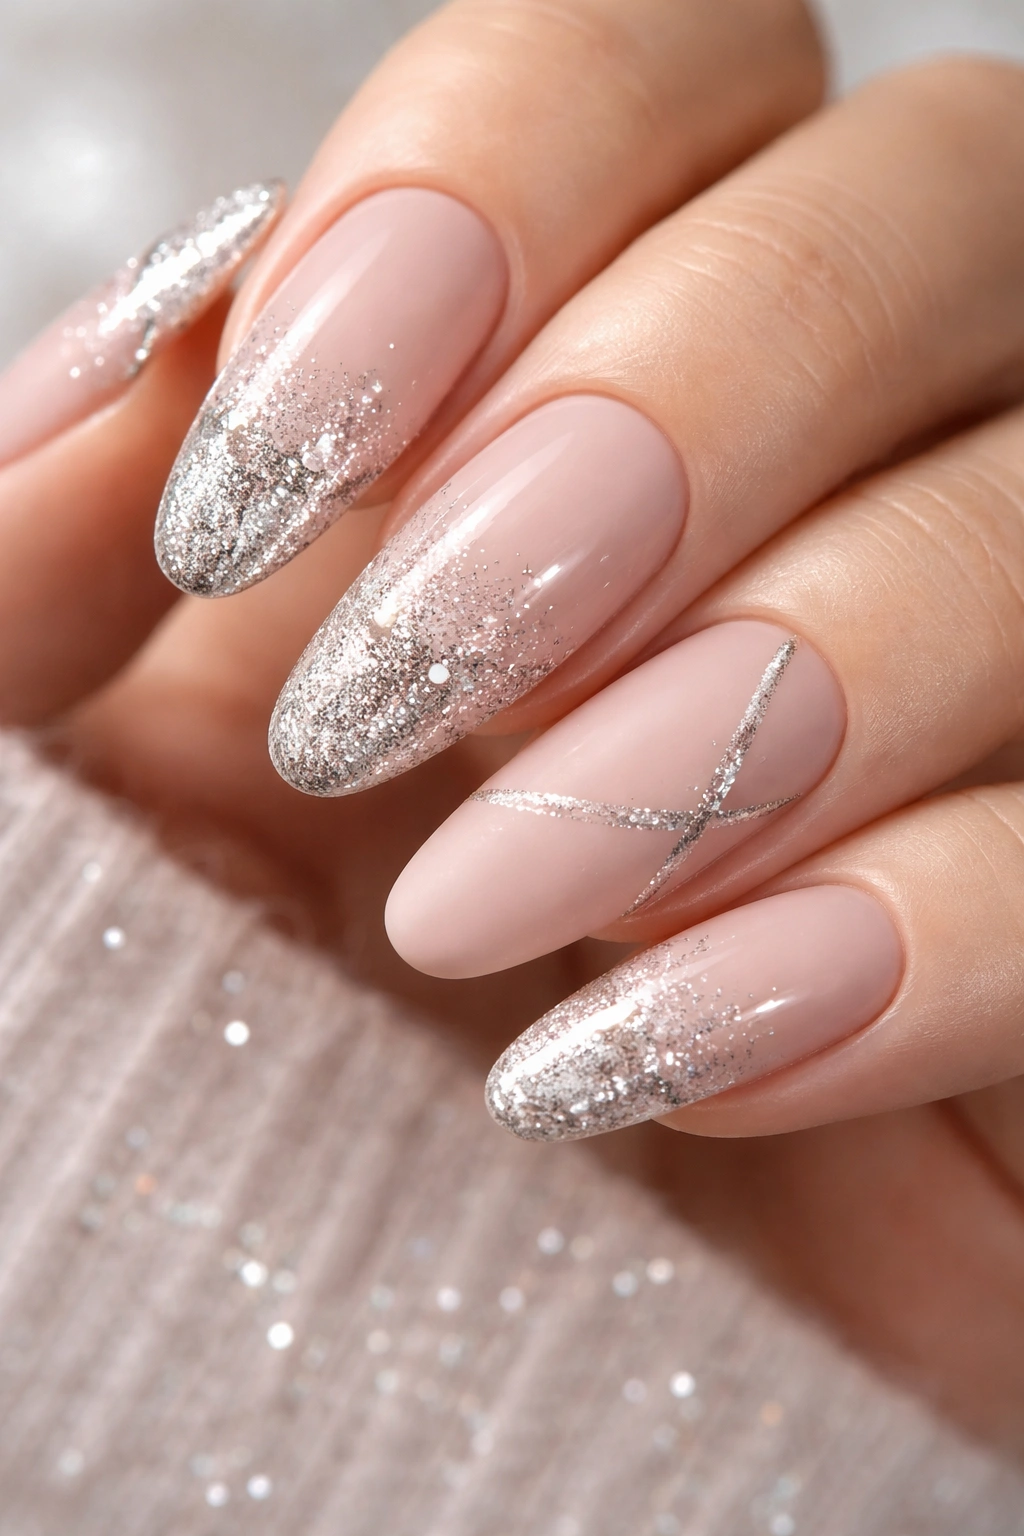
8. Nude Base With Gradient Glitter Fade
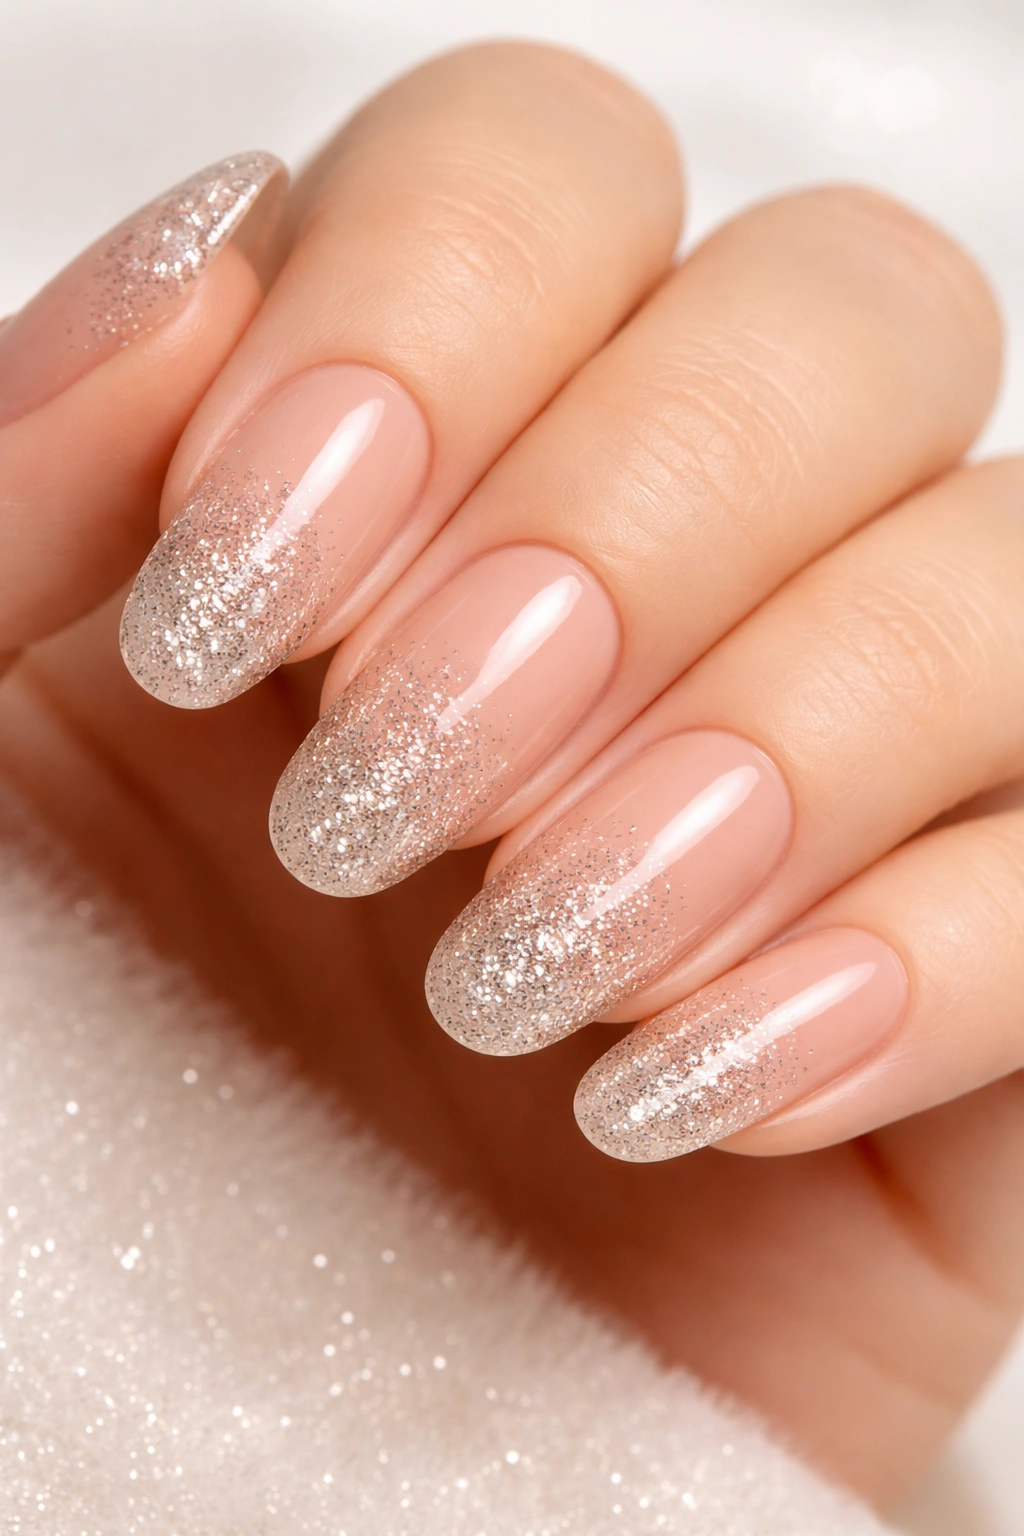
This design is elegantly simple but undeniably festive—a clean nude base with a strategic glitter gradient that fades from concentrated sparkle at the tips to barely-there shimmer at the cuticle creates visual interest and dimension. It’s the perfect choice if you prefer subtle festive touches over bold statements, and it transitions seamlessly from holiday events to everyday wear.
Why Gradient Glitter Works
A glitter gradient is visually interesting without being overwhelming because the glitter concentration is intentional and directional. By fading from heavy glitter at the free edge to minimal or no glitter at the cuticle, you maintain the sophistication of a nude base while adding that essential element of celebration. The design feels planned and artistic rather than like you just threw glitter everywhere. On long round nails, the gradient has enough space to be truly visible and create a compelling visual effect.
Building the Gradient Glitter Effect
- Apply 2-3 coats of a warm nude base polish that complements your skin tone
- Once fully dry, apply a tacky base coat or a clear glitter base to the tip third of the nail
- While the base coat is still slightly wet, sprinkle heavy concentration of fine glitter (gold, silver, or mixed metallic) onto just the tip area
- Press the glitter gently into the polish and tap off excess
- Apply another layer of base coat to the middle third of the nail and add a medium concentration of the same glitter
- Finish with the cuticle third in either nude only or the lightest dusting of glitter
- Once fully dry, seal the entire nail with a glossy top coat that creates a smooth finish and locks everything in place
- The result should feel sophisticated and subtly sparkly, with the glitter clearly concentrated at the tips
- Insider note: Use a fine, consistent glitter size throughout—mixing large and fine glitter can make the gradient look accidental rather than intentional.
9. Deep Red With Black Matte Cat-Eye Details
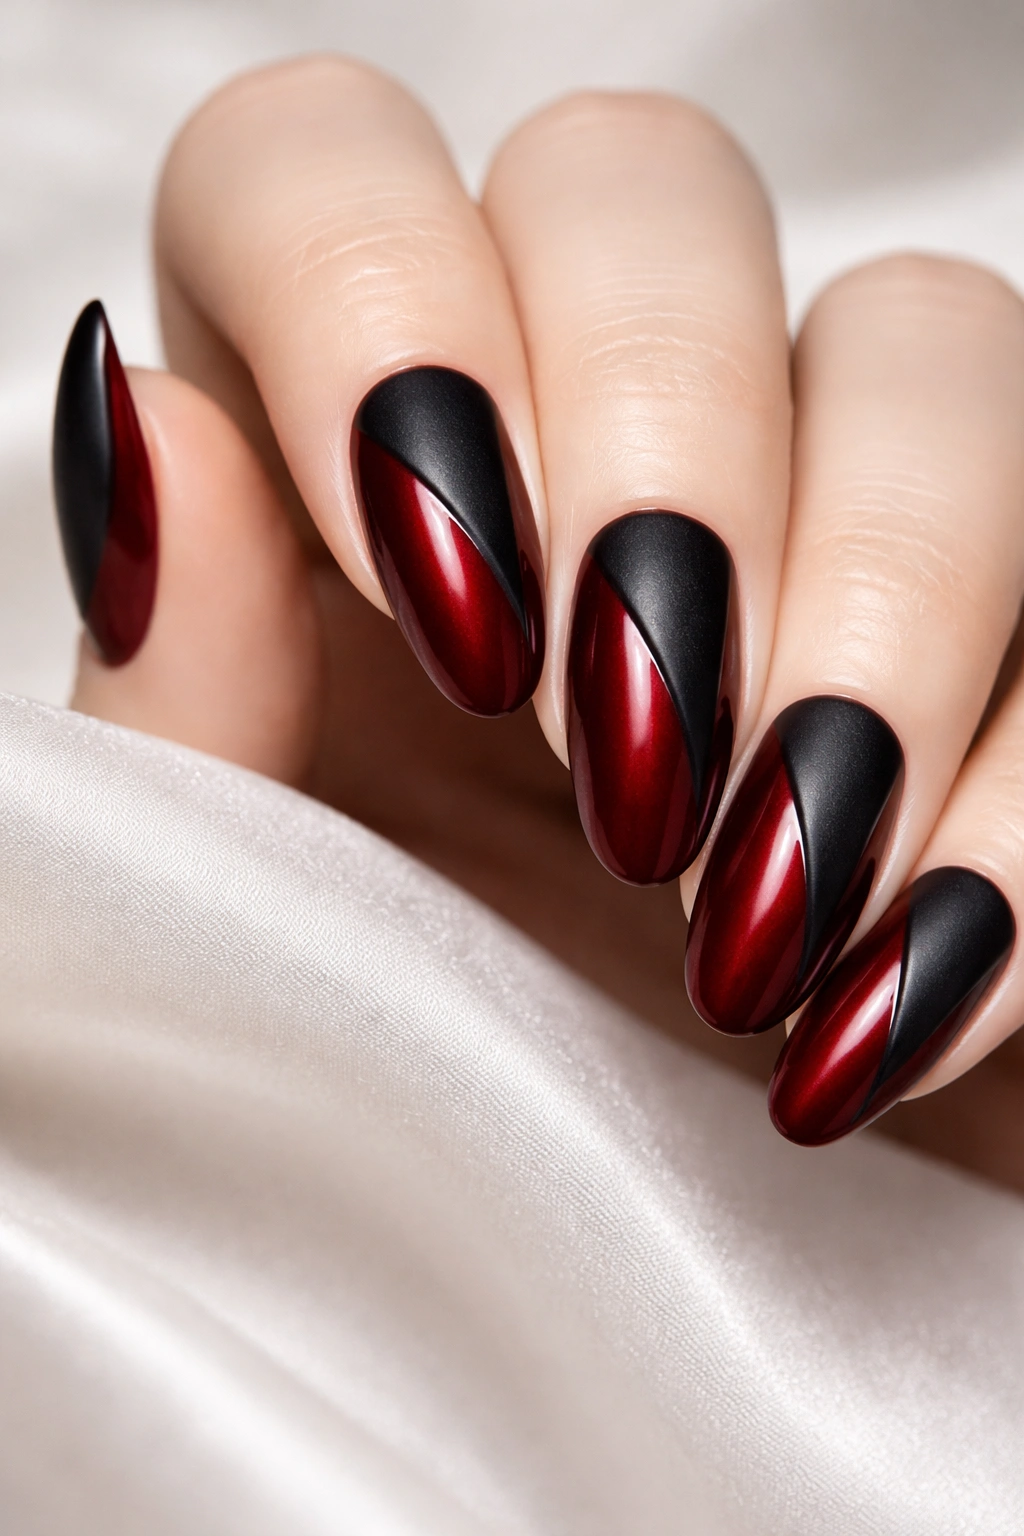
For anyone who wants to bring a touch of edgy style to their holiday nails, a deep red base paired with matte black cat-eye accents creates a dramatic, modern design that feels fashion-forward and slightly rebellious. This breaks away from traditional holiday aesthetics while still reading as intentionally festive.
The Modern Edge to Holiday Style
Deep red is festive, but the addition of matte black cat-eye details (sleek, graphic lines or shapes) transforms the design from traditional to contemporary. The contrast between the glossy red and the matte black creates visual drama and depth. Cat-eye details (whether actual eye shapes, geometric lines, or minimalist accent designs) add personality and style without requiring glitter or excessive ornamentation. Long round nails provide the perfect canvas for these striking details because you have enough space for the geometric shapes to be impressive.
Creating Black Cat-Eye Accents
- Start with 2-3 coats of a rich, deep red base polish with a glossy finish
- Once fully dry, use matte black gel or polish with a thin liner brush to create cat-eye shaped accents on 2-3 nails
- The cat-eye shape works best: a thin elongated line extending from the inner corner toward the outer edge, with the outer end slightly winged or pointed
- Alternatively, create abstract geometric lines, triangles, or minimalist eye-shaped designs in matte black
- Keep the black accents on only 2-3 nails to balance the design and let the red base shine
- Seal the entire nail with a glossy top coat that maintains the contrast between the glossy red and matte black
- Pro tip: If creating perfect cat-eye shapes feels challenging, use thin black nail art tape to create the basic shape, fill with matte black gel, then carefully peel away the tape for perfectly crisp lines.
10. Gold Metallic Base With Deep Purple Ombre
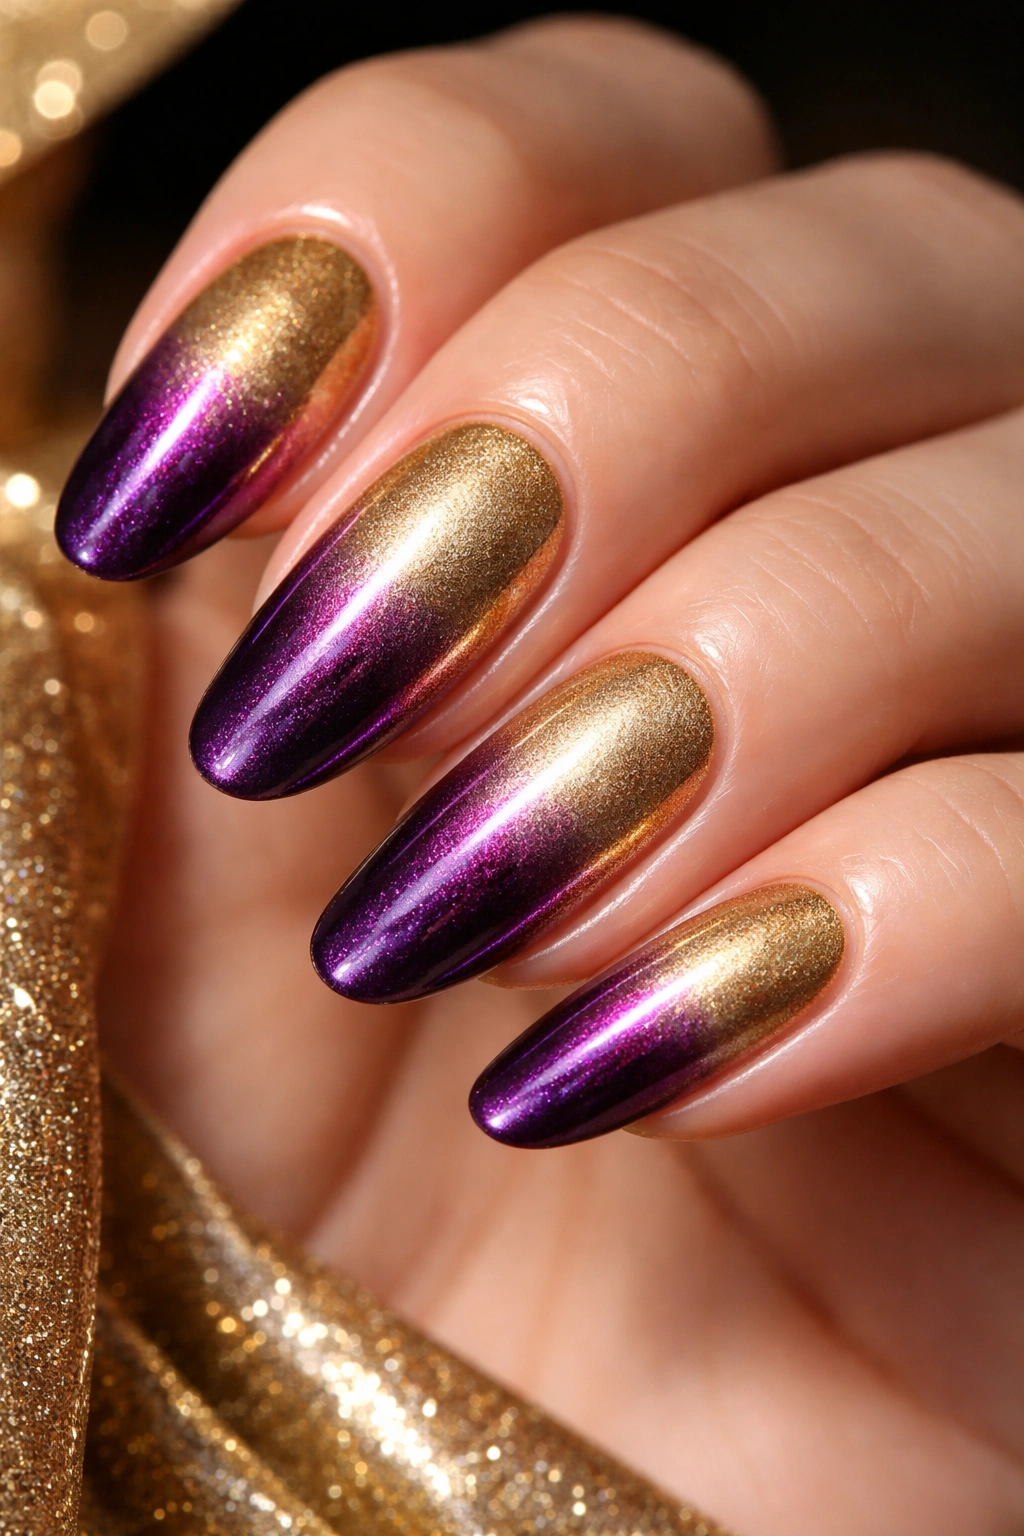
This is the design for anyone who wants maximum sparkle and visual interest—a rich gold metallic base overlaid with a deep purple ombre gradient creates a dual-tone effect that shifts and shimmers as your hands move. It’s undeniably festive while maintaining an air of sophistication through the jewel-tone color choice.
The Luxurious Metallic Approach
Gold metallics immediately read as celebratory and luxurious, and layering a deep purple ombre on top adds depth and visual complexity. The purple isn’t visible enough to completely cover the gold underneath—instead, it creates a stunning two-tone effect where both the gold shimmer and the purple richness are visible depending on how light hits the nails. This design looks expensive and high-level, which is exactly the vibe you want during holiday celebrations.
Building the Dual-Tone Metallic Design
- Apply 2-3 coats of a gold metallic polish base (ensure full opacity and that the gold is visible and gleaming)
- Once completely dry, mix or choose a deep purple shade and begin applying it to the tips of the nails with a sponge
- Sponge the purple toward the free edge and blend it inward, creating an ombre that fades from solid purple at the tip to translucent purple (showing the gold through) at the mid-nail
- Let some areas show more gold and others show more purple to create a natural, gradient effect rather than a hard line
- The goal is to see both colors on each nail, with their balance shifting depending on nail angle
- Seal with a glossy top coat that amplifies the metallic effect and creates a smooth, unified finish
- Worth knowing: Use a bouncing motion when sponging the ombre (dabbing rather than rubbing) to maintain the crispness of the gradient rather than creating a muddy blend.
11. White Base With Scattered Holly Berry Details
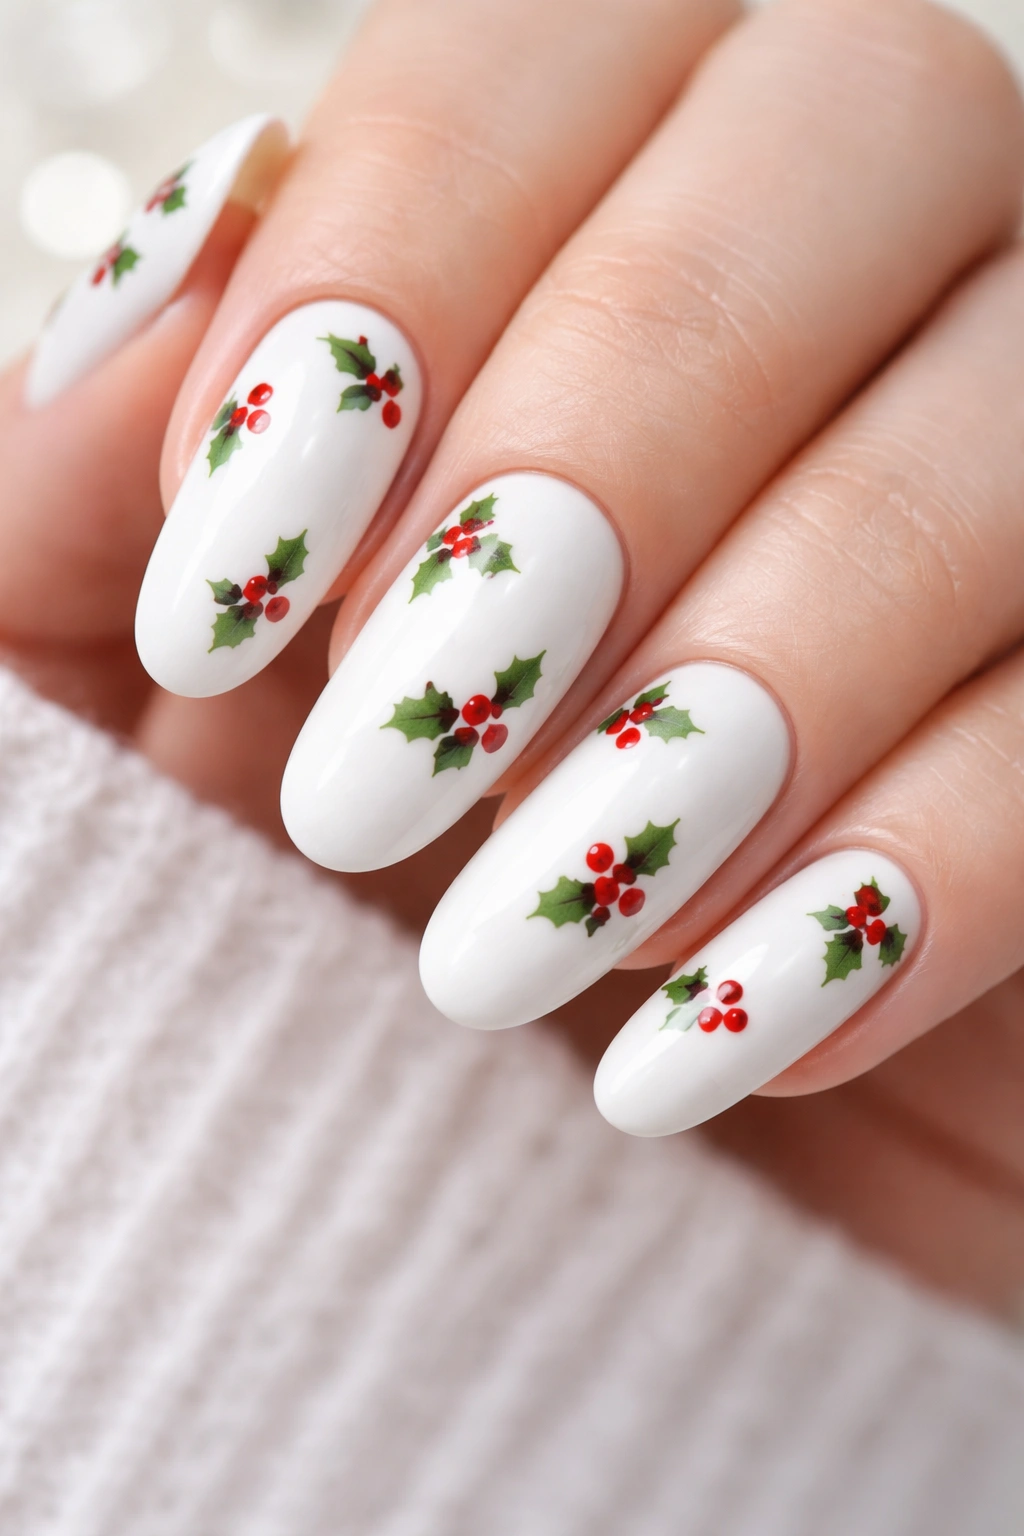
A clean white base provides a fresh, crisp backdrop for festive holly berry and leaf details—it’s minimalist in execution but deeply seasonal in feel. This design works beautifully if you want something that reads as intentional and artistic without being busy or overly decorated.
Why White Provides the Perfect Canvas
White nails read as clean, modern, and elegant, which means adding any festive details automatically stands out. Small clusters of red berries and green leaves scattered across the white base feel like a curated design choice rather than an afterthought. The simplicity of the base makes the botanical elements the focal point, and because the contrast is high (dark green and red against white), even small details are clearly visible. Long round nails in white with scattered berries feel sophisticated and artistic.
Painting Botanical Details on White
- Apply 2-3 coats of a bright, opaque white base polish
- Using a detail brush, paint small clusters of red berries across 3-4 nails (groups of 3-5 tiny dots per cluster)
- Add pointed green leaf strokes around the berry clusters in a natural, scattered arrangement
- Leave at least 1-2 nails solid white to maintain the design’s clean aesthetic
- Optional: add thin gold or silver branches connecting the berry clusters for additional botanical detail
- Seal with a glossy top coat that makes the white glow and keeps the design protected
- Pro tip: Red and green details pop more dramatically against white than against any other base color, so even if your brushwork isn’t perfect, the design still reads as intentional and special.
12. Emerald Green With Gold Foil Accents
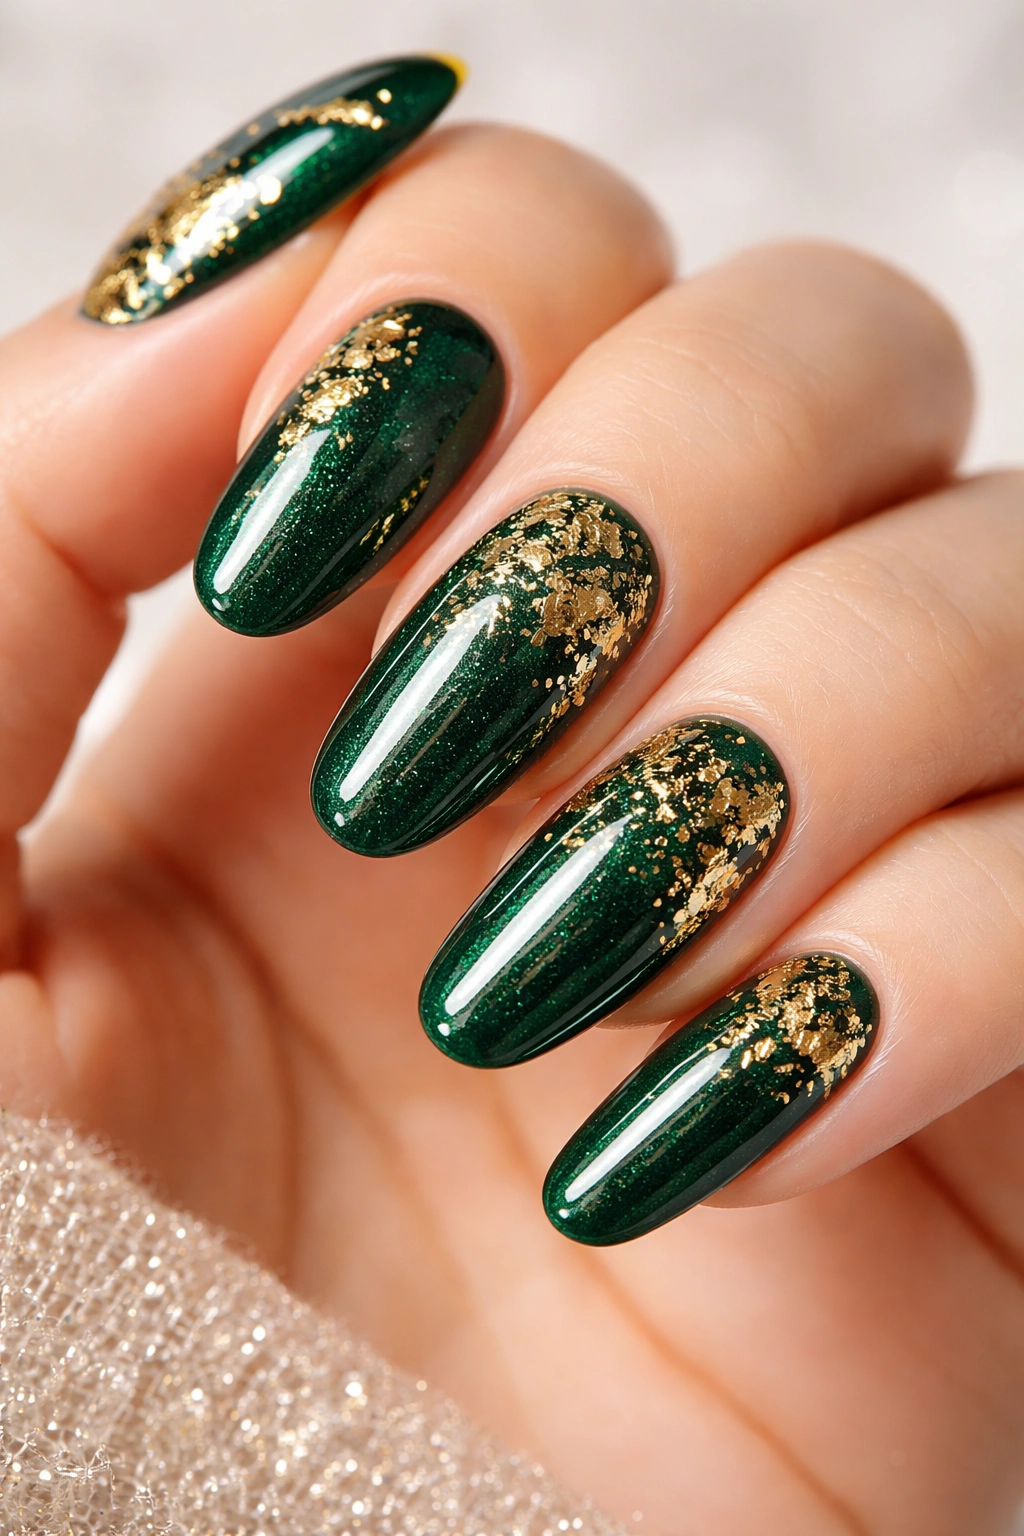
Similar to the diamond-sparkle design but with a twist—emerald green paired with genuine gold foil creates a luxurious, textured effect that catches light in unexpected ways. This is the design if you want something that feels truly special and slightly more elevated than standard glitter or metallic options.
The Textured Luxury of Foil
Gold foil has a three-dimensional quality that glitter and metallics don’t quite replicate—it’s literally a thin layer of gold leaf that adheres to the nail, creating actual texture and depth. Combined with a rich emerald green, foil accents feel absolutely luxurious and expensive, like you just stepped out of a high-end salon. The texture adds another sensory element—people can actually see the depth and dimension when they look closely, which makes the design feel more thoughtfully executed.
Applying Gold Foil to Emerald Nails
- Apply 2-3 coats of a rich, creamy emerald green base polish
- Once fully dry, apply a thin adhesive layer (foil adhesive or a sticky base coat) to select areas of 2-3 nails where you want foil accents
- Press small sheets or pieces of gold foil onto the adhesive, working in one section at a time
- Gently rub the foil with your finger to ensure it adheres fully, then carefully peel away the backing
- The foil should stick to the adhesive and remain on the nail, creating a textured metallic accent
- Apply a clear, thick top coat to seal the foil in place and keep it from peeling
- The result is a mixed-texture nail with glossy emerald and matte gold foil creating visual and tactile interest
- Insider note: Foil adhesive needs to be tacky but not wet—apply it about 30 seconds before using the foil for best adhesion results.
13. Classic Christmas Red With White Tips and Fine Gold Lines
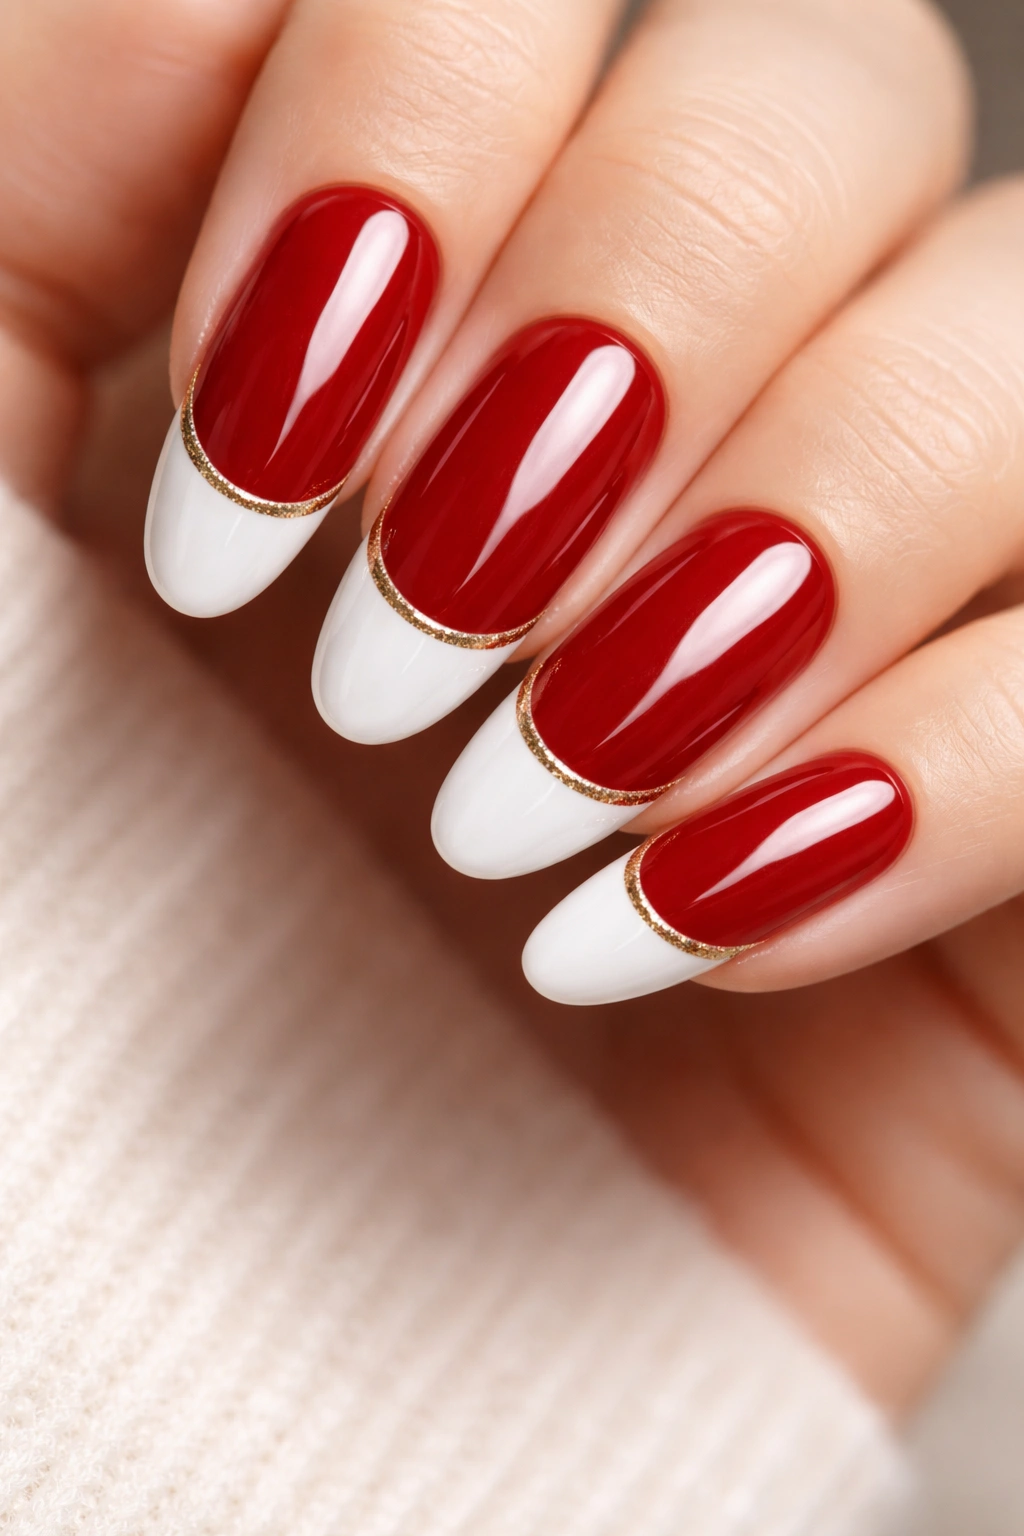
This is the holiday design that somehow never gets old—a deep Christmas red with a clean white tip (like a French manicure variation) and delicate gold lines running between the red and white sections. It’s timeless, elegant, and immediately recognizable as festive without being trendy or tied to any specific year.
The Enduring Appeal of Refined Holiday Nails
Red and white are the colors of holiday tradition, and the French manicure silhouette is inherently elegant and flattering on long nails. The addition of fine gold lines as a transition between sections elevates the design from basic to refined—it shows intention and care in the execution. This design works beautifully on long round nails because the length allows for a clearly defined white tip section that’s visible and striking without overwhelming the overall design.
Creating the Holiday French Variation
- Apply 2-3 coats of a rich, true Christmas red to the entire nail
- Once fully dry, use white polish and a thin brush or nail art tape to create a clean white tip section (about ¼ inch of the free edge)
- If using a brush, paint carefully; if using tape, apply the tape line, paint white across the tip, and carefully peel away the tape
- Once the white is fully dry, use a thin gold liner brush and gold polish to paint fine lines along the edge where red and white meet, or create thin vertical gold stripes in the white section
- Seal the entire design with a glossy top coat for shine and protection
- The result should feel polished, intentional, and seasonally festive
- Pro tip: If your white tip isn’t perfectly crisp, it doesn’t matter—the gold lines create visual interest and draw the eye away from minor imperfections while adding elegance to the design.
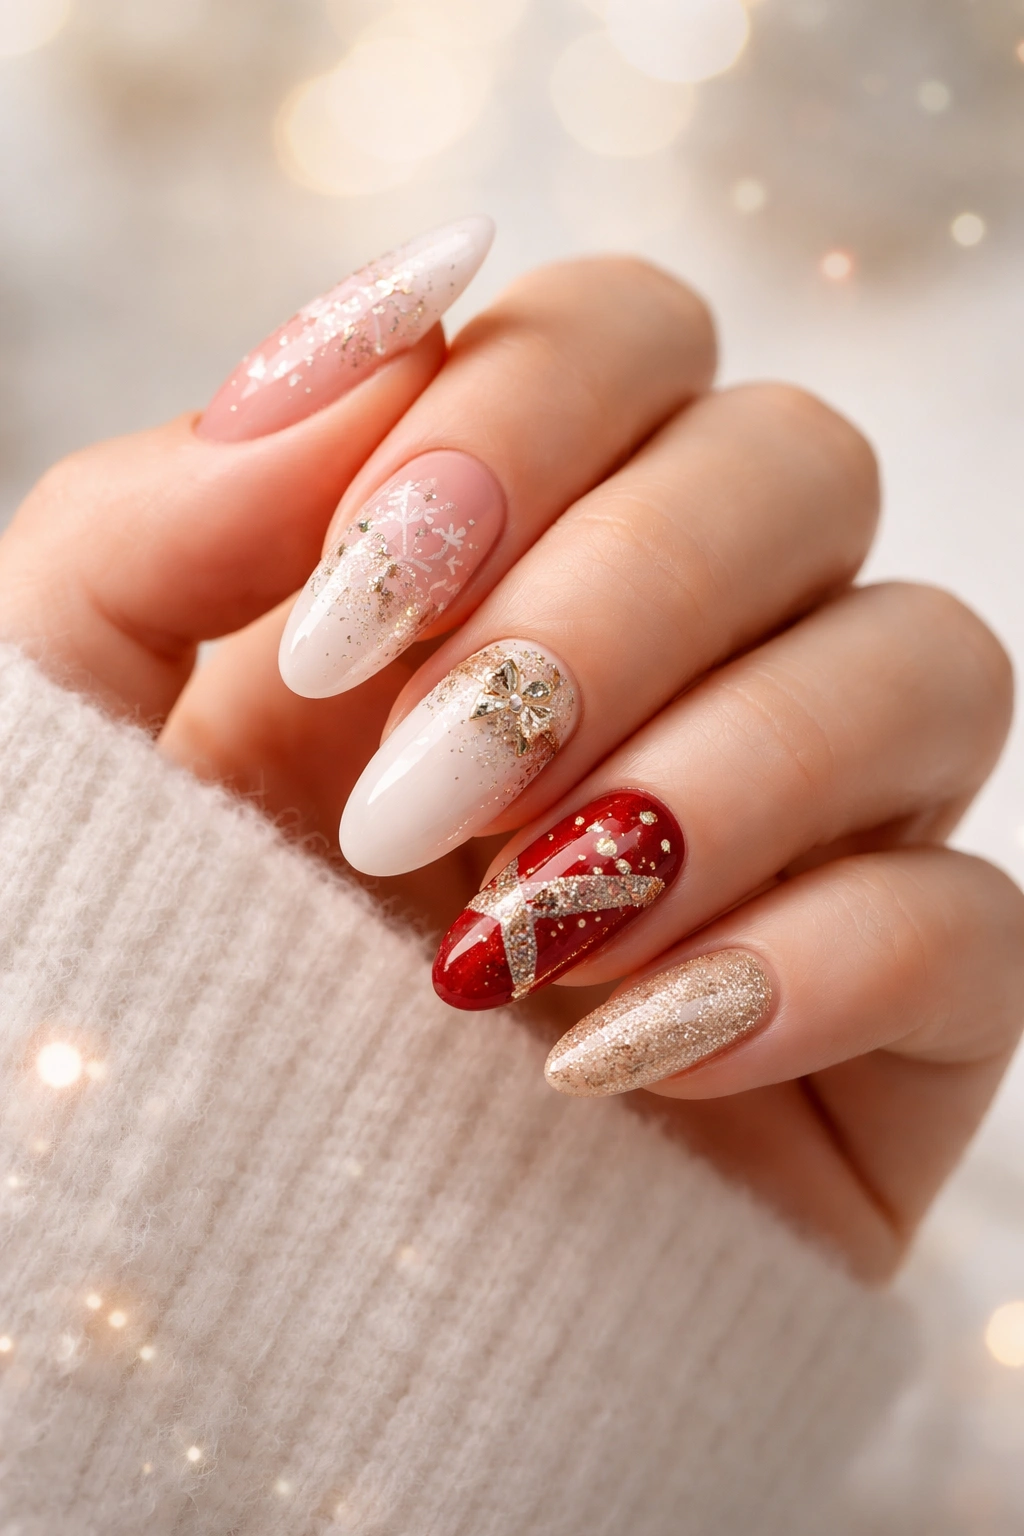
14. Blush Pink With Metallic Silver Sparkle And Matte Details
For a design that leans less into traditional holiday colors and more into contemporary celebration, a soft blush pink paired with metallic silver sparkle and matte accent details creates something that feels both festive and enduringly stylish. This works beautifully if your personal aesthetic tends toward soft, romantic, or minimalist styles.
The Modern Festive Approach
Blush pink is inherently soft and romantic, which might not immediately read as “holiday”—but when you add metallic silver sparkle and matte accent details, the design becomes undeniably celebratory. The contrast between glossy sparkle, matte texture, and soft pink creates visual interest and depth. This is a design that works equally well at a formal holiday event and at casual winter gatherings, making it versatile and wearable throughout the entire season.
Layering Texture and Shimmer
- Apply 2-3 coats of a warm blush pink base (should be visible and opaque)
- Once dry, apply a thin layer of metallic silver sparkle to just the tips of the nails (using either a sparkly polish or loose glitter with a sticky base)
- Add matte accent details on 1-2 nails: thin matte stripes, matte dots, or small geometric matte shapes in a complementary color like deep mauve or dusty rose
- The combination of glossy pink, metallic sparkle, and matte accents creates multiple visual textures that catch light differently
- Seal with a glossy top coat that maintains the sparkle and keeps everything unified
- Worth knowing: Let each layer dry completely before adding the next—blending wet layers creates muddy colors rather than distinct textures.
15. Navy Blue With White Snowflakes and Gold Accents
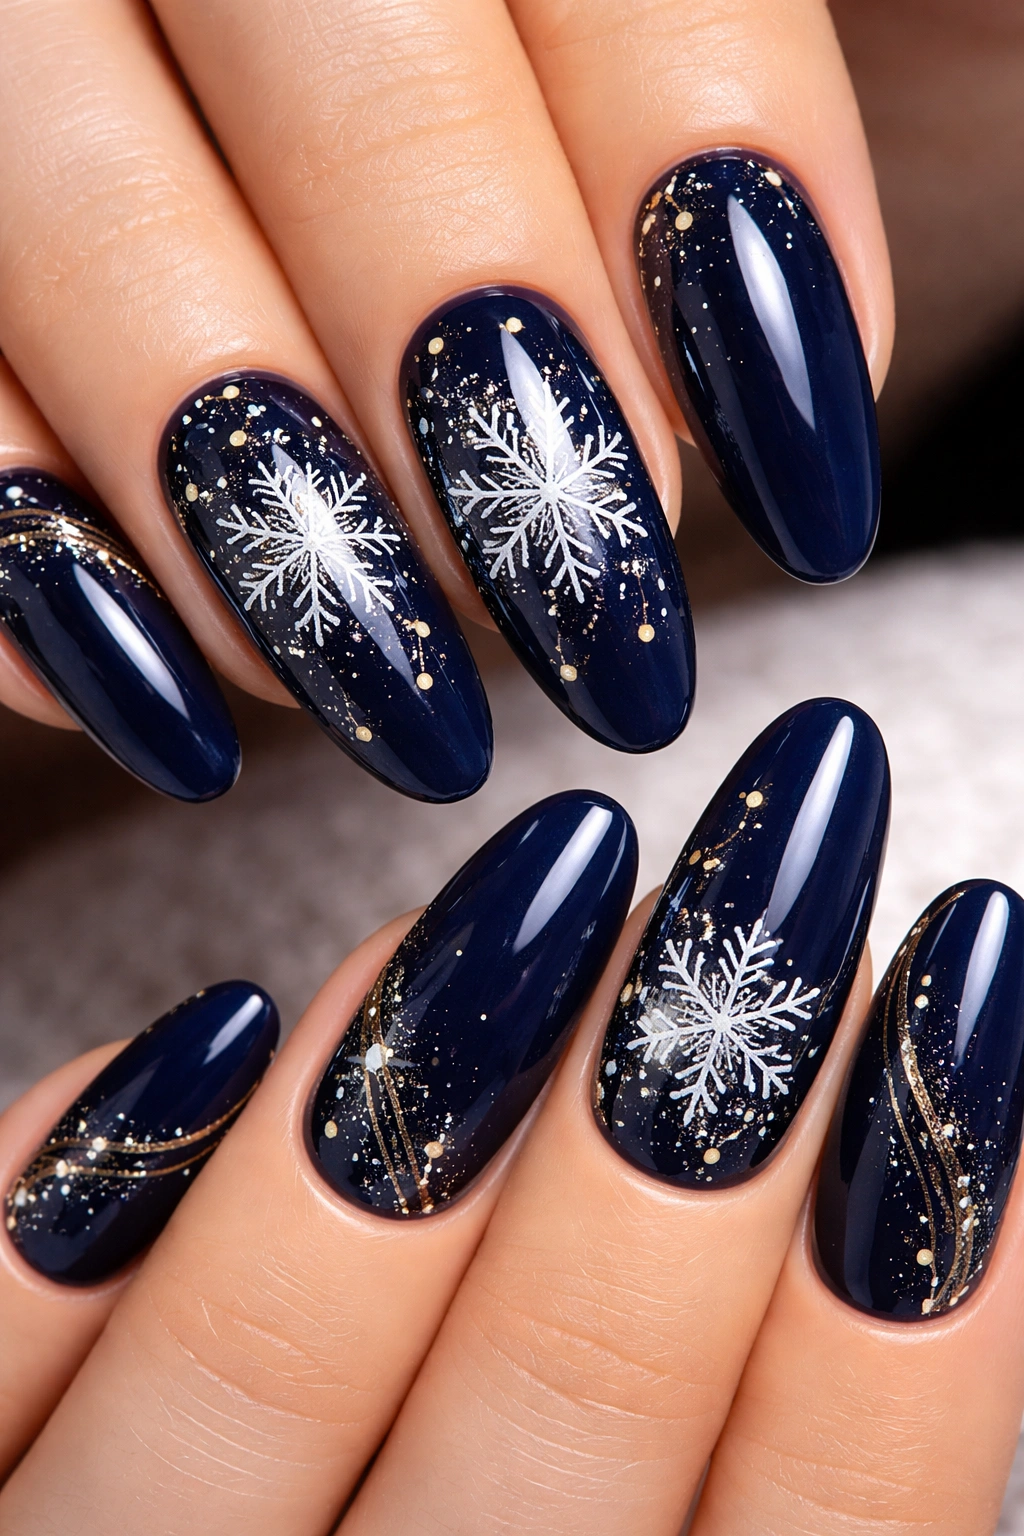
Finishing the roundup with a design that combines multiple festive elements—navy blue provides a rich, sophisticated base, white snowflakes add the winter element, and gold accents create warmth and celebration. This is an all-elements design that feels truly special and festive without being overwhelming.
The Complete Festive Experience
Navy blue is often overlooked as a holiday color, but it’s actually sophisticated and works beautifully as a seasonal choice. Layering white snowflake details on top adds clear seasonal meaning, and introducing gold accents (thin lines, small dots, or geometric details) adds that element of celebration and luxury. The three-part design (navy base, white details, gold accents) creates visual complexity and interest that keeps the design from ever feeling boring or flat.
Building the Multi-Element Design
- Apply 2-3 coats of a deep, rich navy blue base polish
- Once fully dry, use white polish with a detail brush or apply white snowflake stickers to create snowflake designs on 2-3 nails
- Paint snowflakes freehand or use stickers—both work equally well depending on your comfort level with detail work
- Add thin gold lines or small gold dots around the snowflakes using a gold metallic polish and thin liner brush
- Leave at least 1 nail solid navy with just gold accents (no snowflakes) to balance the design’s visual weight
- Seal everything with a glossy top coat that makes the white snowflakes pop against the navy background and amplifies the gold shine
- This is a design that reads as thoughtfully executed and specifically festive, perfect for any holiday celebration
- Pro tip: Apply the white snowflakes first, let them dry completely, then add gold accents around them—this prevents the colors from mixing and keeps each element distinct and visible.
Final Thoughts
Choosing a festive long round nail design comes down to understanding what feels authentic to your personal style while still celebrating the season. Whether you lean toward traditional holiday colors like deep reds and rich greens, or you prefer contemporary alternatives like blush pink or navy blue, there’s a design here that will make you feel confident and celebratory. The beauty of long round nails is that they’re forgiving enough to work with virtually any design approach—detailed hand-painted elements, metallic accents, matte textures, or minimalist geometric patterns all look elevated and intentional when you’ve got the length and shape working in your favor.
The designs in this roundup range from simple (emerald green with diamond accents) to multi-layered (navy with snowflakes and gold), so you can choose based on both your skill level and the amount of visual impact you want. If you’re working with a professional manicurist, bring these designs with you as inspiration—show your nail technician the photos or descriptions and let them know which elements you love most. If you’re creating these designs at home, take your time with the execution, let each layer dry fully before adding the next, and remember that even slightly imperfect details read as intentional when they’re part of a carefully planned design.
Most importantly, choose a design that genuinely excites you. The holidays are about celebration, and your nails should reflect that joy and anticipation. Whether you commit to a full set or just do your accent nails, whether you go classic or contemporary, long round festive nails are an easy, visible way to participate in the season’s excitement while expressing your personal aesthetic. You’ll catch them throughout your day—sparkling, beautiful, and impossible to ignore—and that constant little celebration on your fingertips makes everything feel just a bit more festive.
