

Short squoval nails are having a major moment, and honestly, there’s a reason they’re everywhere. The shape is that sweet spot between the practical durability of short nails and the sophisticated elongation of an oval or almond—it’s strong enough to handle winter gloves without snapping, but polished enough to look intentional and refined. Add moody, dark, atmospheric nail colors into the mix, and you’ve got the perfect cold-weather aesthetic that works whether you’re headed to holiday gatherings, casual coffee runs, or cozy nights in.
Moody nails—think deep burgundies, charcoal grays, forest greens, and near-black shades—have this naturally elegant, understated quality that pairs beautifully with winter wardrobes. They’re the opposite of loud. They don’t demand attention; they command it quietly. And when you choose designs that play with texture, metallics, minimalism, or subtle patterns, you create something that feels both current and timeless.
The squoval shape deserves its moment too. It’s genuinely flattering on most hand shapes and nail beds. It photographs beautifully. It feels grown-up and intentional without being trendy in a way that’ll feel dated in three months. Combined with moody color palettes, you get nail art that feels like a legitimate fashion statement—not just nail art, but an extension of your overall winter aesthetic.
1. Charcoal Gray with Delicate Gold Striping
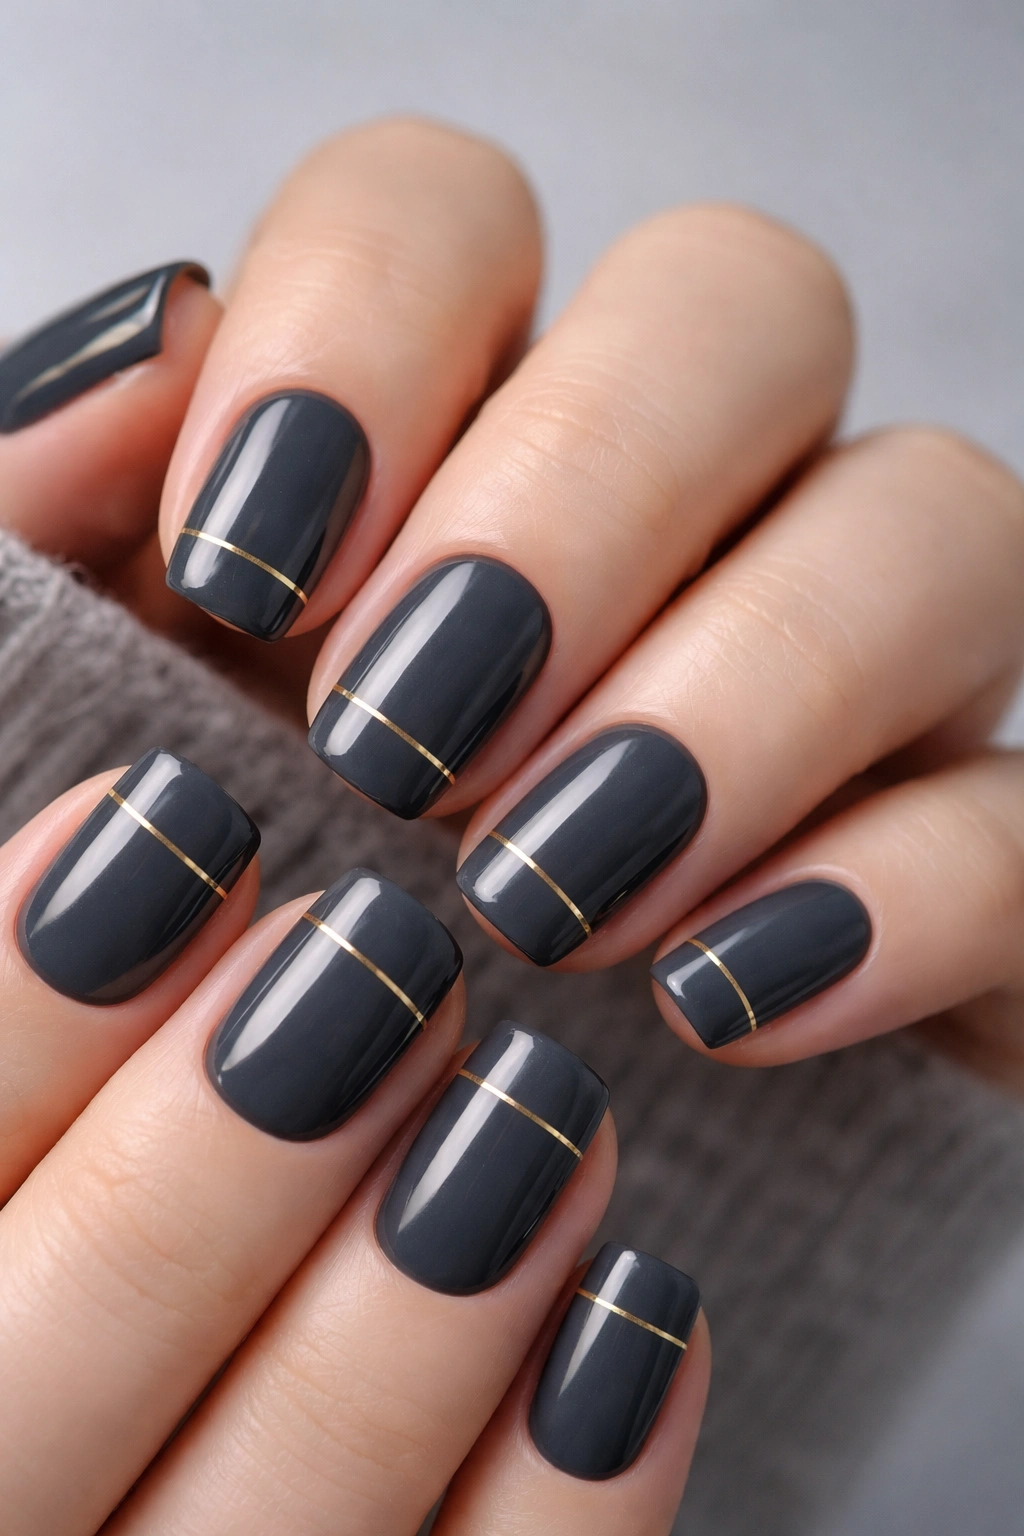
Charcoal gray is the thinking person’s black. It’s moody and sophisticated without the starkness of pure black, and it has this understated elegance that works with literally everything in your winter wardrobe. When you add thin, precise gold stripes—whether vertical, diagonal, or creating a subtle geometric frame—you elevate the look from minimalist to intentional.
Why This Design Works for Winter
Charcoal gray feels inherently cool-toned and sophisticated, which is exactly the energy of cold-weather fashion. The gold detailing catches light without being loud, giving you just enough dimension and visual interest to make the nails feel polished and put-together. Squoval nails show off this kind of linear detail beautifully because the shape gives you enough surface area for the stripes to really read clearly.
How to Nail This Look
- Use a high-quality charcoal gray base coat (two coats for full coverage)
- A thin brush or nail art striping pen is essential for clean, precise lines
- Gold metallic gel or regular polish works equally well—gel gives longer wear
- Place stripes on alternate nails for an unmatched, editorial feel, or on all nails for symmetry
- Seal everything with a glossy top coat to make the gold shine
- Pro tip: If you’re not confident with hand-drawn lines, use thin gold striping tape instead—it’s foolproof and removes cleanly
2. Deep Burgundy with Copper Foil Accents

Deep burgundy has this luxurious, almost wine-colored richness that feels expensive and grown-up. Pair it with copper foil accents—whether scattered across the nail or arranged in a deliberate pattern—and you’ve got a design that feels like autumn transitioning into the depths of winter. It’s warm but moody, which is a genuinely difficult balance to strike.
The Sophisticated Edge of Burgundy in Winter
Burgundy is the color that bridges seasons with elegance. It’s dark enough to feel moody and intentional, but warm enough that it doesn’t feel as stark as black or charcoal. When you layer copper foil over the top—especially on the tips or in geometric placements—the contrast between the deep base and the warm metallic creates real visual depth. Squoval nails give you just enough length for the copper accents to feel substantial and purposeful.
Application Tips for Flawless Results
- Apply 2-3 thin coats of deep burgundy for rich, even color
- Copper foil pieces adhere best when the base coat is still slightly tacky
- You can arrange foil in a ombre gradient from tip to center, or in geometric sections
- Finish with a top coat once the foil is positioned (don’t seal before placing foil, or it won’t stick)
- Seal thoroughly for wear longevity
- Worth knowing: Real copper foil lasts longer than cheaper metallic alternatives and won’t tarnish or flake as quickly
3. Forest Green Velvet Matte Finish
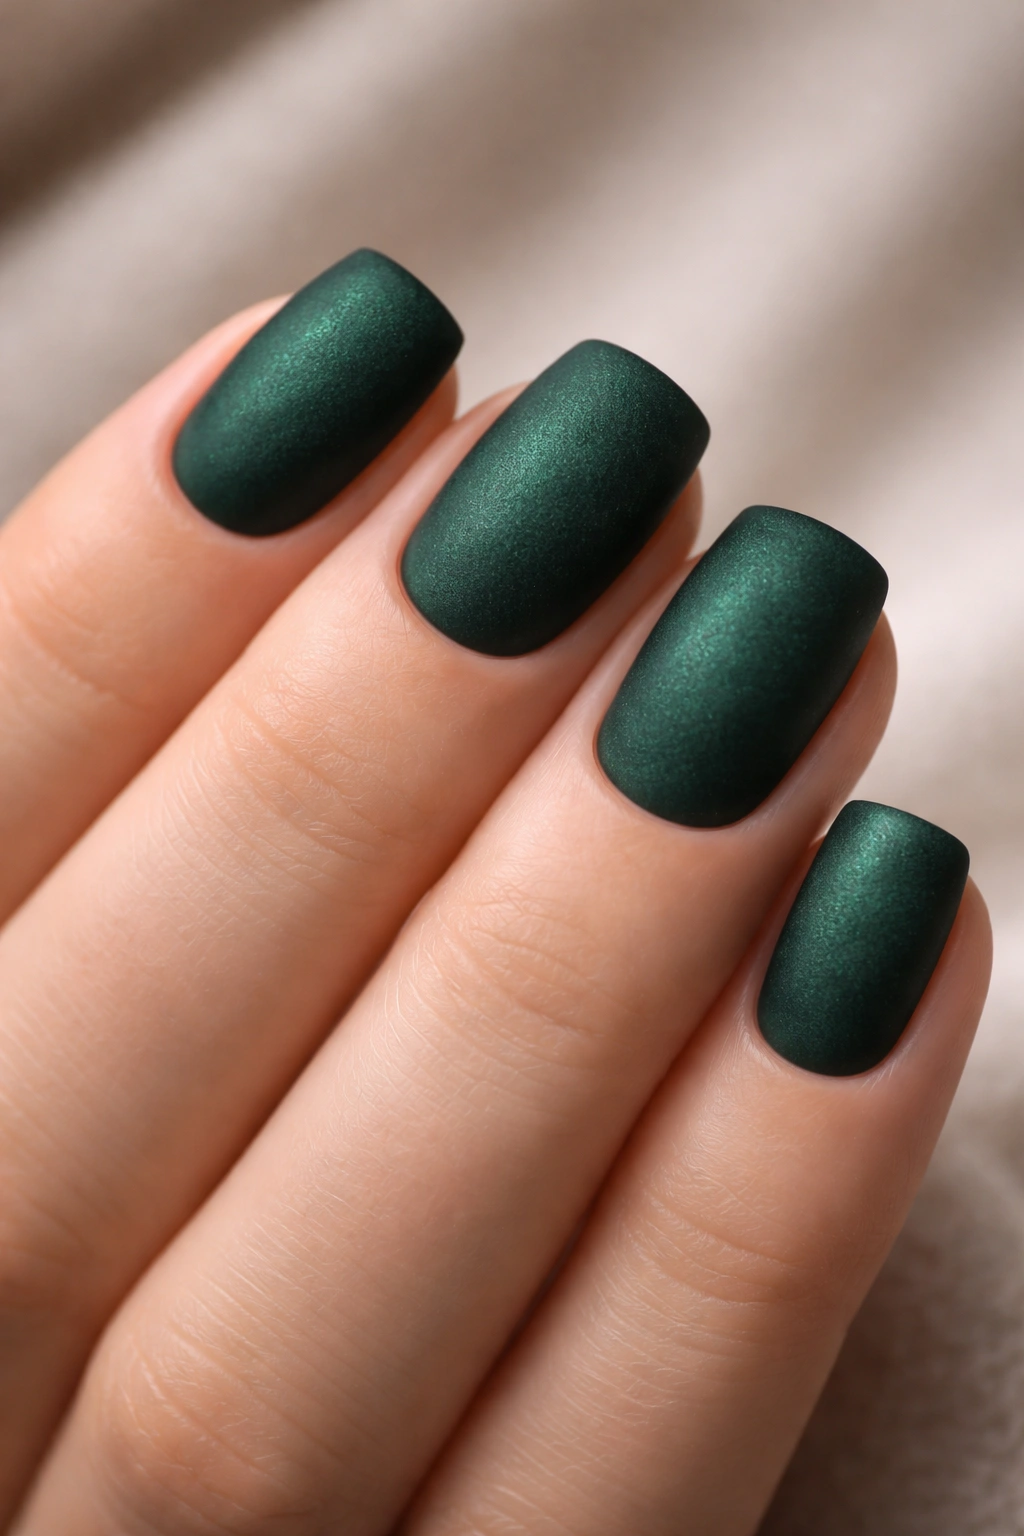
Forest green is the moody color people often overlook, but it’s genuinely stunning in winter. When you choose a velvety matte finish instead of glossy, the depth of the color becomes almost hypnotic. The matte texture gives it a sophisticated, almost fabric-like quality that feels completely different from shiny nails—more artistic, less corporate.
Why Matte Velvet Changes Everything
A glossy finish can sometimes read as plasticky or artificial, especially on very deep or saturated colors. Matte changes the entire visual weight of the color. Forest green goes from “nice shade” to “intentional art piece” when you strip away the shine. The velvety texture absorbs light differently, making the color appear richer and more complex. On squoval nails, this matte finish feels modern and editorial—like something you’d see on a runway or in a high-fashion magazine spread.
Getting the Matte Velvet Effect Right
- Apply 2-3 thin coats of forest green polish for even, velvety coverage
- Use a dedicated matte top coat specifically formulated for the velvet effect (regular matte toppers can look chalky)
- Quality matte finishes from established brands apply much more smoothly than cheaper alternatives
- The matte finish is delicate—handle carefully as it can be prone to chipping slightly earlier than glossy
- Consider a very light glossy top coat only on the tips to create subtle dimension
- Insider note: A matte forest green with just the tiniest hint of shimmer caught in certain light creates depth without compromising the matte aesthetic
4. Smoky Quartz Ombre from Deep Charcoal to Nude
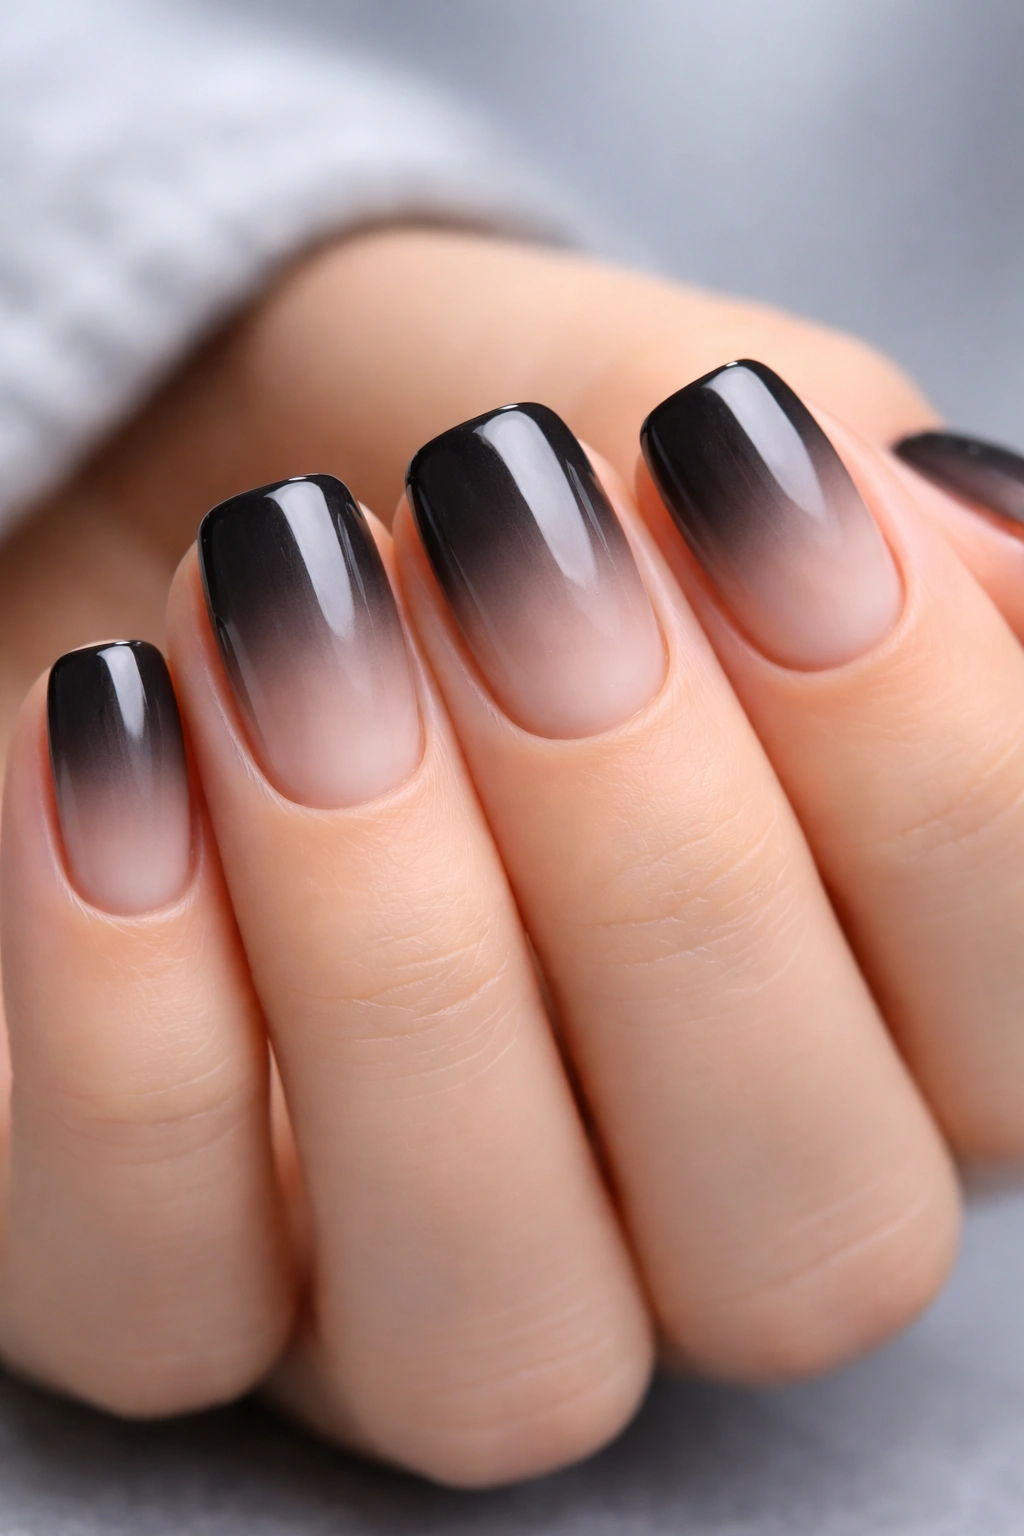
An ombre effect where deep charcoal fades to a soft nude or pale gray creates this gorgeous, almost geological aesthetic—like you’re wearing a piece of smoky quartz on your nails. The transition from dark to light is subtle but undeniably sophisticated, and it works beautifully on the elongated squoval shape where you have room for the gradient to fully develop.
The Moody Magic of Smoky Ombre
What makes this design special is that it’s moody without being all-dark. The darker tones at the base give you the moodiness and sophistication, while the lighter gradient prevents it from feeling heavy. It’s the kind of design that reads as effortlessly polished—like you didn’t try too hard, but you clearly know what you’re doing. The squoval shape is actually ideal for ombre because the shape’s length gives you maximum surface area for a smooth, visible gradient.
Techniques for a Seamless Ombre Transition
- Use a sponge with two coordinating shades: deep charcoal and a pale nude or cool gray
- Apply the darker shade to the base and work upward; apply the lighter shade to the tip and work down
- The sponge should slightly overlap the two colors in the middle—that’s where the blending happens
- Tap the sponge gently rather than dragging it; this creates a more diffused, natural gradient
- Clean up edges carefully with a brush and rubbing alcohol
- Finish with a generous, glossy top coat to seal and smooth the texture
- Pro tip: Practice the ombre on a nail wheel or practice nails first—it’s easier than it looks once you understand the sponge technique
5. Black Cat Eye with Gold Details
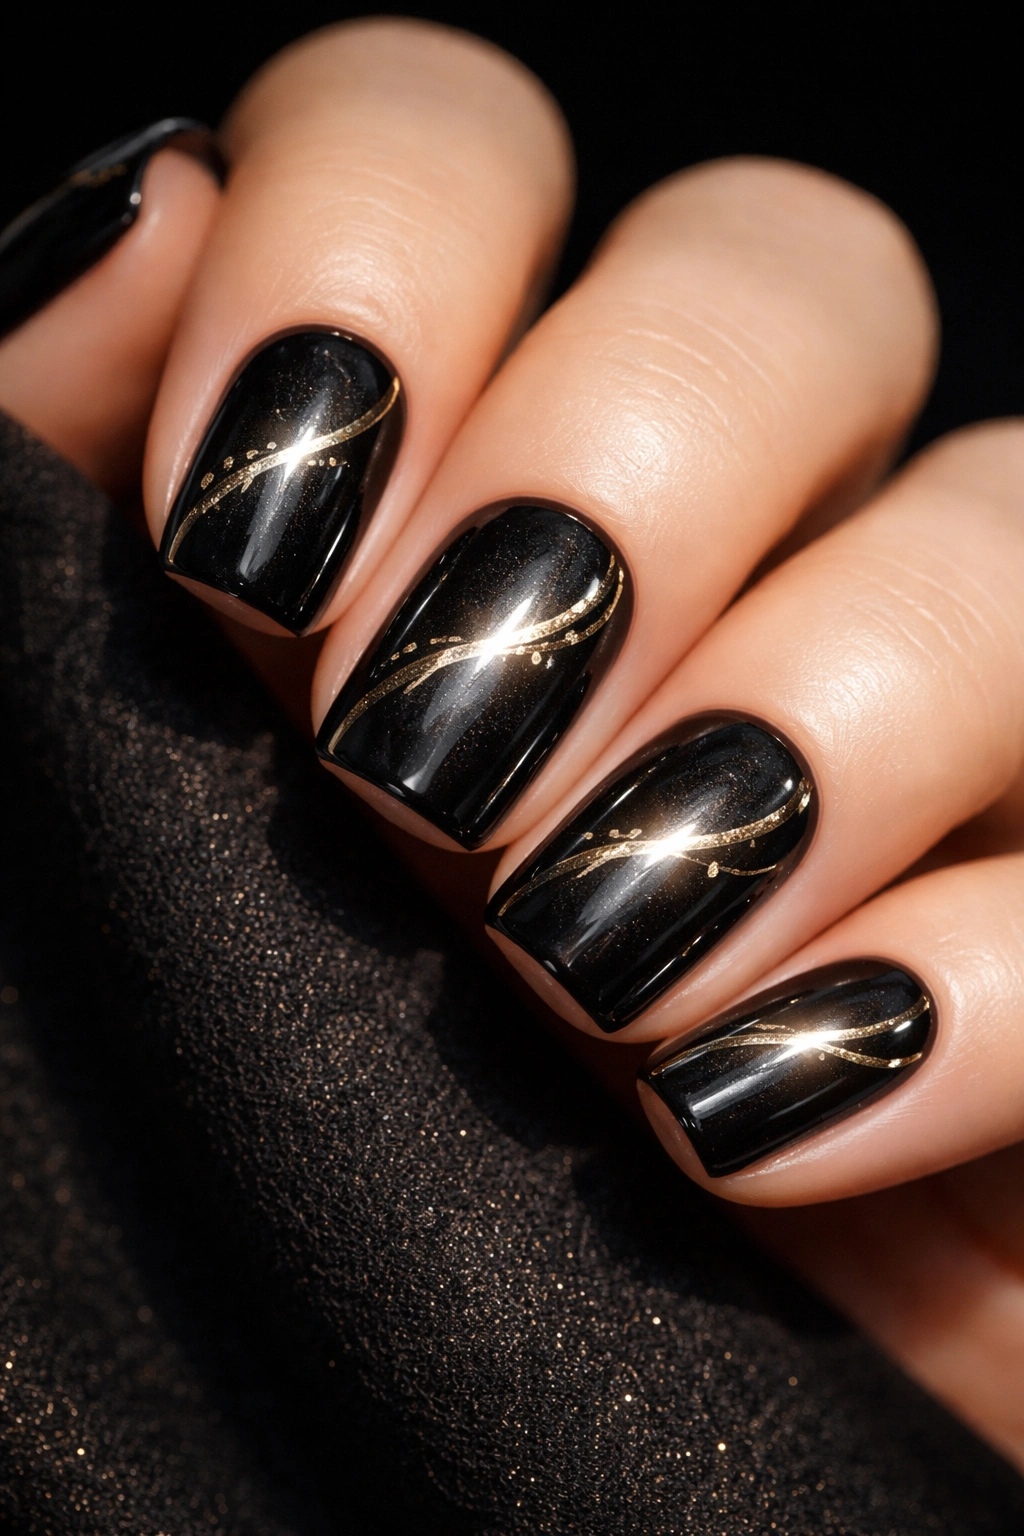
A cat eye effect on nails uses chrome or magnetic polish to create an illusion of movement and dimension. When you keep the base black (moody, minimal, powerful) and add delicate gold details—maybe a thin line at the base or gold foil placement—you get something that feels high-fashion and intentional. The cat eye trend on nails is having a major moment, and it works especially well on squoval shapes.
Why Black Cat Eye Feels So Modern
The cat eye effect works by using chrome powder or special magnetic polish that creates an optical illusion of a light-catching line across the nail. When the base is deep black, that luminous line becomes the focal point—it’s a subtle but undeniably sophisticated visual trick. Adding gold details grounds the look in warmth and prevents it from feeling too stark. On squoval nails, the elongated shape shows off the cat eye effect beautifully; you get a clear, defined line that reads from every angle.
How to Create a Flawless Cat Eye Effect
- Apply 2-3 coats of quality black gel or polish base
- Use a magnetic cat eye polish specifically designed for this effect (regular polish won’t respond to the magnet)
- Hold the magnet directly over the nail for 3-5 seconds without moving it—movement blurs the effect
- Apply gold foil or use a thin gold striping brush to add accents while the polish is still slightly wet
- Seal with a glossy top coat for dimension and longevity
- Cure under LED light if using gel products
- Worth knowing: High-quality chrome and magnetic polishes cost more upfront but produce far superior results than budget versions
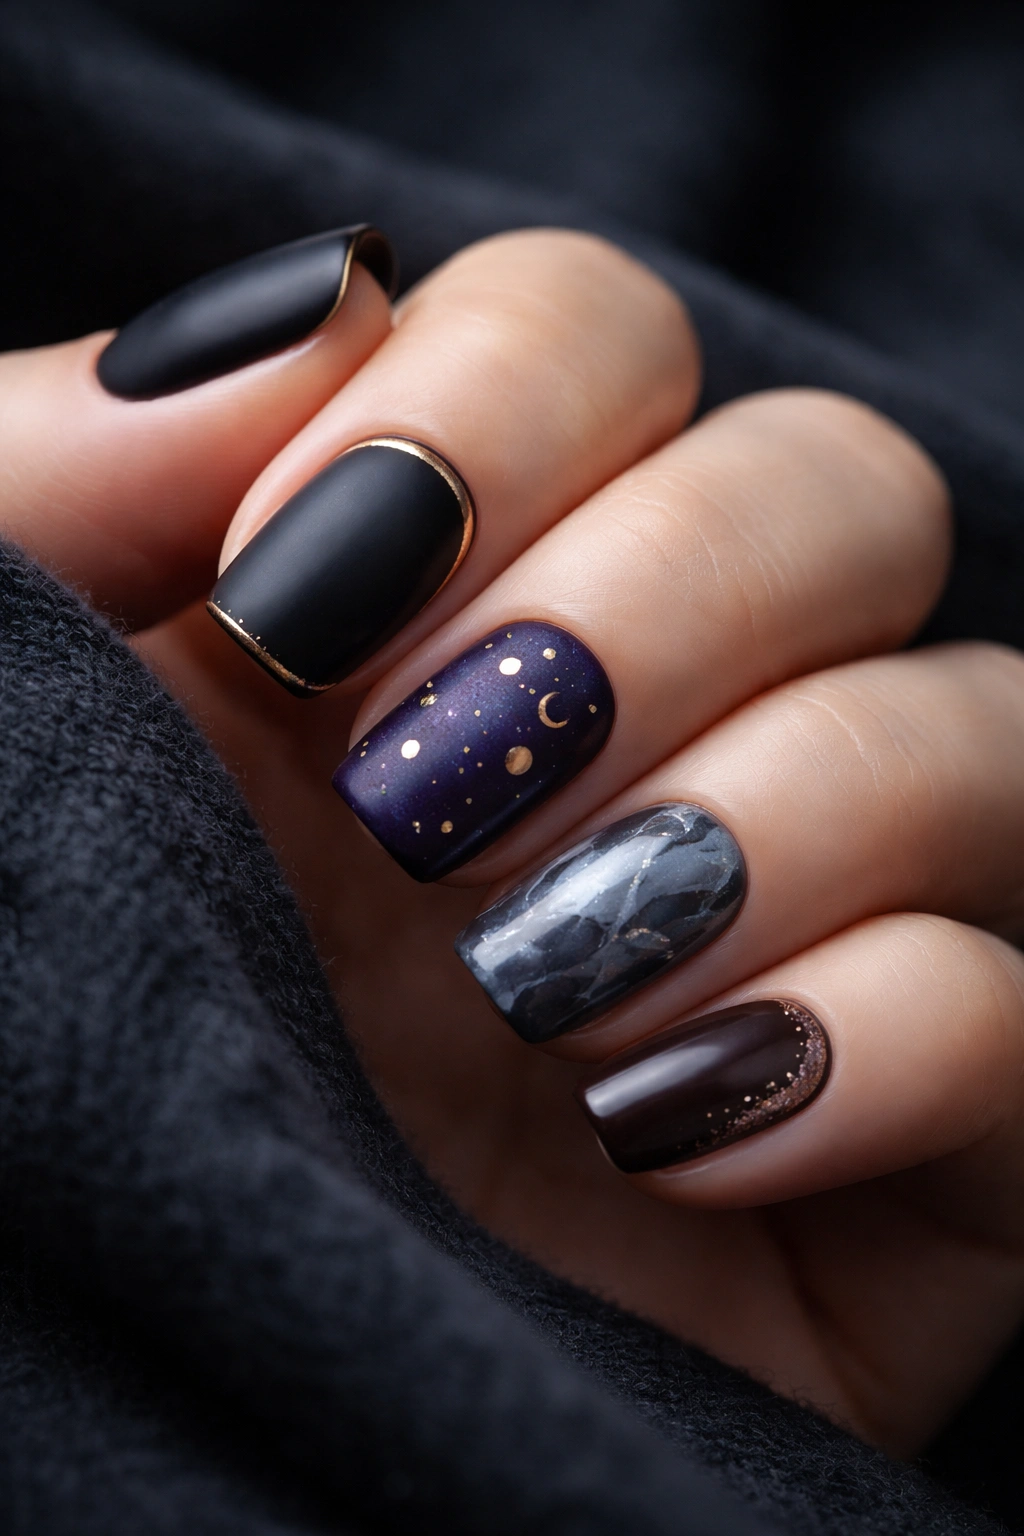
6. Moody Purple with Constellation Nail Art
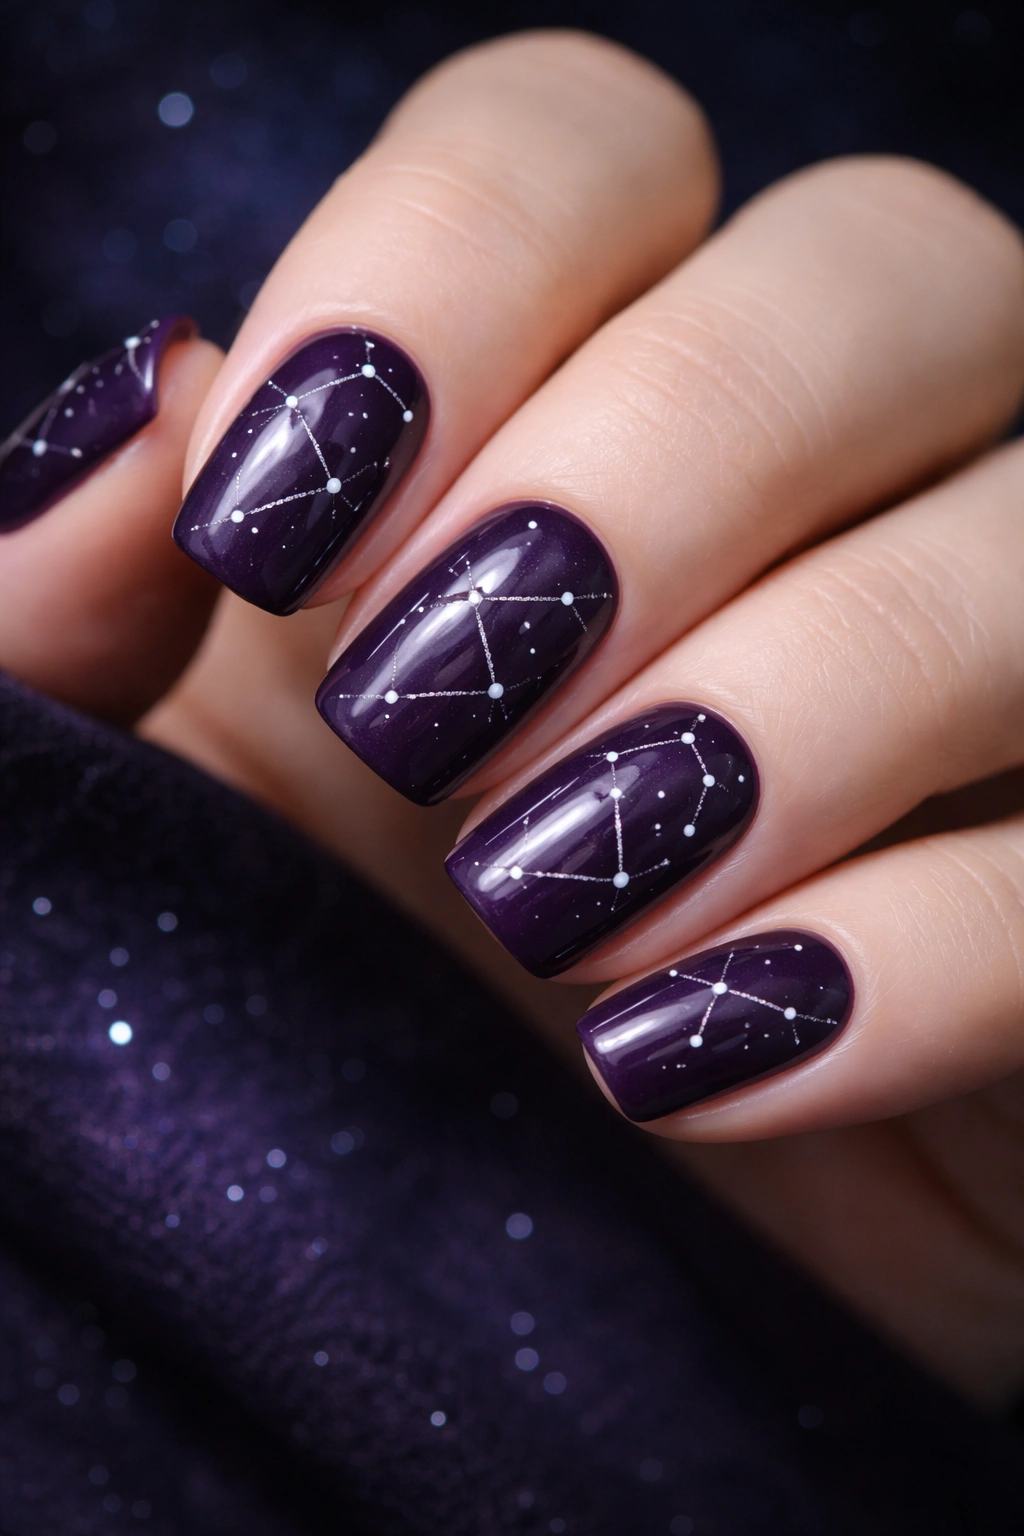
Deep purple is underrated as a moody winter color—it has this mystical, almost otherworldly quality that feels both sophisticated and slightly ethereal. Add constellation nail art (tiny dots connected with even tinier lines to create star patterns) and you’ve got something that feels artistic and intentional. The squoval shape gives you enough space for the constellation design to feel substantial and clear.
The Mystique of Purple Constellations
Purple itself is the color of mystery and luxury. When you layer constellation art on top—especially using a fine, steady brush or a dotting tool—you create multiple layers of visual interest. The tiny details read as thoughtful and artistic without being loud or overwhelming. Squoval nails are actually ideal for detailed nail art like this because the shape gives you a clean, defined canvas where fine details remain visible and don’t get lost in the overall shape.
Steps for Perfect Constellation Details
- Apply 2-3 coats of deep purple base (matte or glossy, depending on your preference)
- Use a very fine brush or nail dotting tool and white or gold polish for the constellation dots
- Dots should be tiny and varied in size for a natural, authentic look
- Connect dots with the thinnest possible lines to suggest constellation patterns
- Research actual constellations for inspiration (Orion, Cassiopeia, Ursa Major) or create your own abstract patterns
- Seal with a glossy top coat to protect the fine details
- Pro tip: Practice constellation placement on paper first to develop a pattern you love, then transfer it to your nails
7. Slate Gray Marble with Black Veining
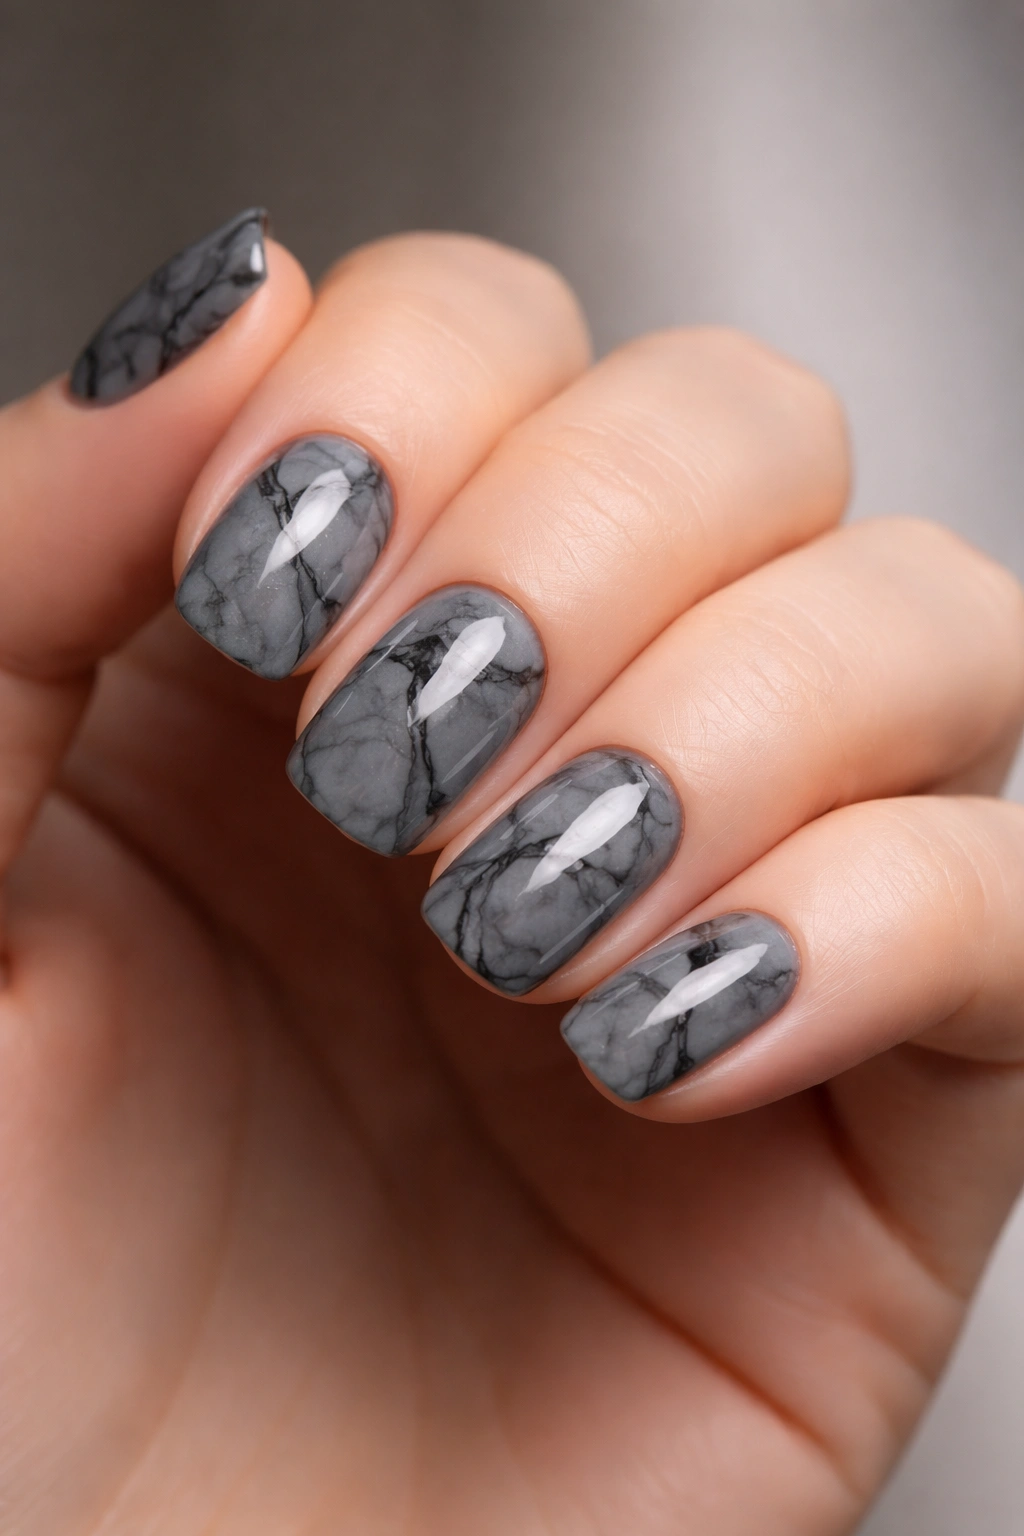
Marble is everywhere in design right now, and there’s a reason—it looks expensive, sophisticated, and completely intentional. When you execute marble nail art in slate gray with sharp black veining, you’re essentially wearing a miniature piece of luxury on your fingertips. The squoval shape actually complements marble patterns beautifully because the smooth, defined edges create the perfect frame for the intricate veining.
Why Marble Feels Inherently Luxe
Marble patterns are naturally organic and irregular, which means they look different on every nail—no two marbles are identical, and neither are your nails. That variation is part of what makes marble look authentic and high-end rather than like a printed pattern. Slate gray is the perfect base for marble because it has that cool, understated luxury that marble itself possesses. The black veining provides contrast and visual interest without being overdone.
Technique for Authentic-Looking Marble
- Apply 2-3 coats of slate gray base for smooth, even coverage
- Use a toothpick or very fine brush dipped in black or charcoal polish for the veining
- Create irregular, branching lines that don’t repeat—vary thickness and direction on each nail
- Some lines should be connected; others can be standalone
- Water-marbling technique is another option (nail art in water), but hand-painted gives you more control
- Seal with a glossy top coat for that luxe, polished finish
- Insider note: The key to authentic marble is embracing imperfection—the less perfect and precise your veining, the more it looks like actual stone
8. Deep Navy with Negative Space Snowflake
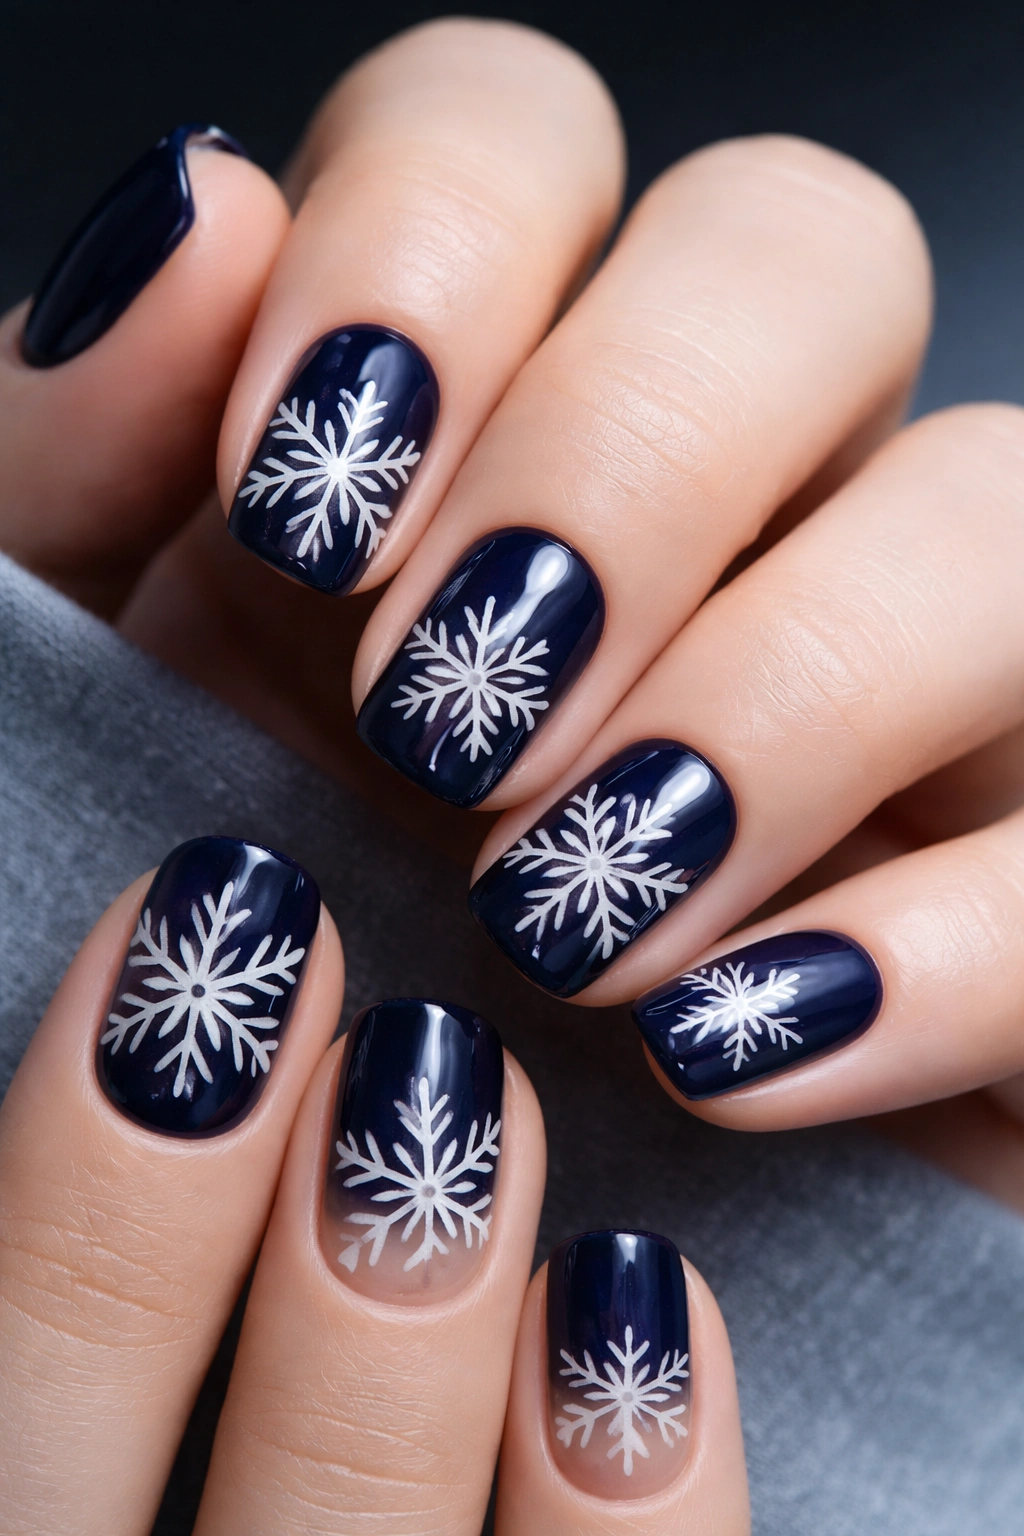
Deep navy is moody without being as dark as black, which makes it perfect for a design that incorporates negative space (bare nail showing through). When you create a snowflake pattern using negative space—where you remove polish to reveal the nail underneath—you get this beautiful contrast between the dark navy and the clean, bright nail color. It’s wintery without being literal, and it feels artistic and planned.
The Elegance of Negative Space Design
Negative space nail art has this inherent sophistication because it requires actual skill and planning—you can’t fake it by just adding polish on top. When you execute negative space properly, the contrast between what’s there and what’s not creates visual interest that reads immediately as intentional and high-skill. On squoval nails with navy as the base, a negative space snowflake becomes almost sculptural; the removed areas stand out clearly against the rich color.
How to Execute Negative Space Accurately
- Apply a base coat for protection
- Apply 2-3 coats of deep navy polish, letting each layer dry completely
- Use a fine brush and rubbing alcohol (or a specialized nail scraper tool) to carefully remove polish in a snowflake pattern
- Create the snowflake by working from the center outward—this keeps the pattern balanced and symmetrical
- Clean up any rough edges with the brush and alcohol
- Seal with a glossy top coat for even, polished appearance
- Worth knowing: Practicing your snowflake pattern on paper or practice nails first prevents mistakes on your actual manicure
9. True Black with Minimal Gold Frame
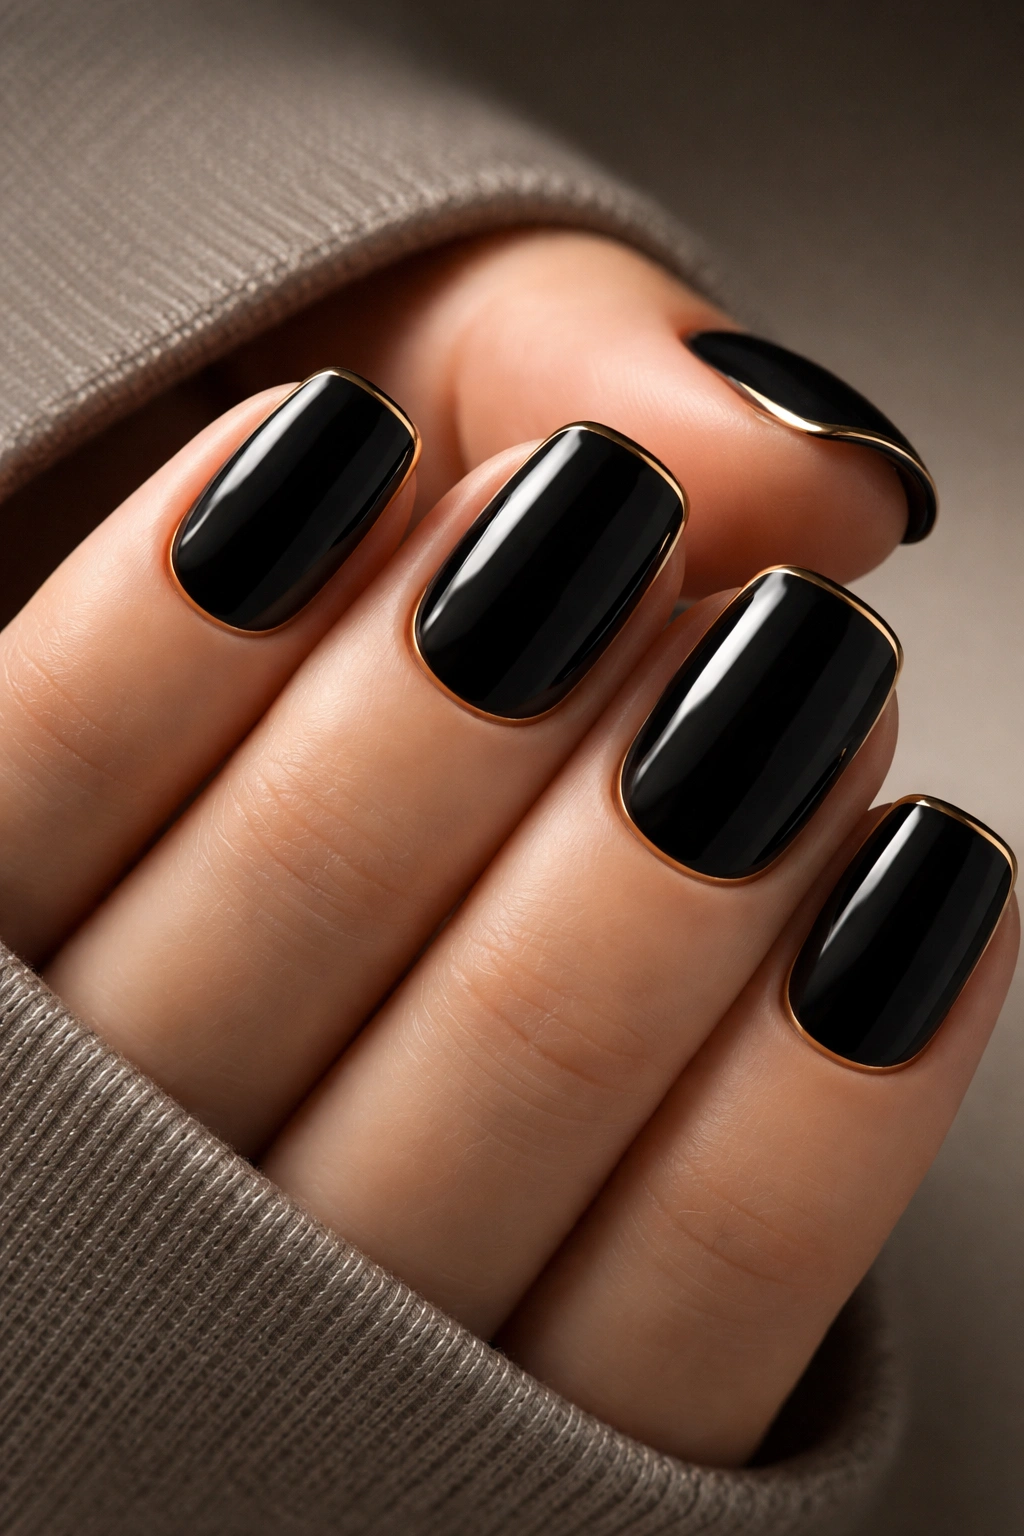
Sometimes the most sophisticated design is the simplest. True black is the ultimate moody shade—there’s nothing moody-er than pure black. When you add just a single, ultra-thin gold frame line around the very edges of the nail (or across the tip), you add a touch of luxury and intentionality without compromising the minimalist aesthetic. This design is all about letting the squoval shape and the deep color do the talking.
Why Minimalism Reads as Confidence
Minimal design is harder to pull off than complex design because there’s nowhere to hide. Every element has to matter. True black with a simple gold frame works because the contrast is clean, the execution is precise, and the overall effect is undeniably polished. It’s the nail equivalent of a perfectly tailored black blazer—simple but absolutely intentional. On squoval nails, this minimal approach actually emphasizes the shape itself; the nail becomes the art.
Executing Flawless Minimalist Design
- Apply 2-3 coats of true black gel or polish for opaque, even coverage
- Use a thin striping brush or striping tape for a perfectly straight gold line
- Place the line either as a thin frame around the entire edge or as a horizontal line across the tip
- Precision is everything with this design—wobbly lines read as careless
- Seal with a glossy top coat for maximum shine
- Pro tip: If hand-drawn lines make you nervous, striping tape is genuinely foolproof and creates flawless results
10. Muddy Olive with Copper Geometric Patterns
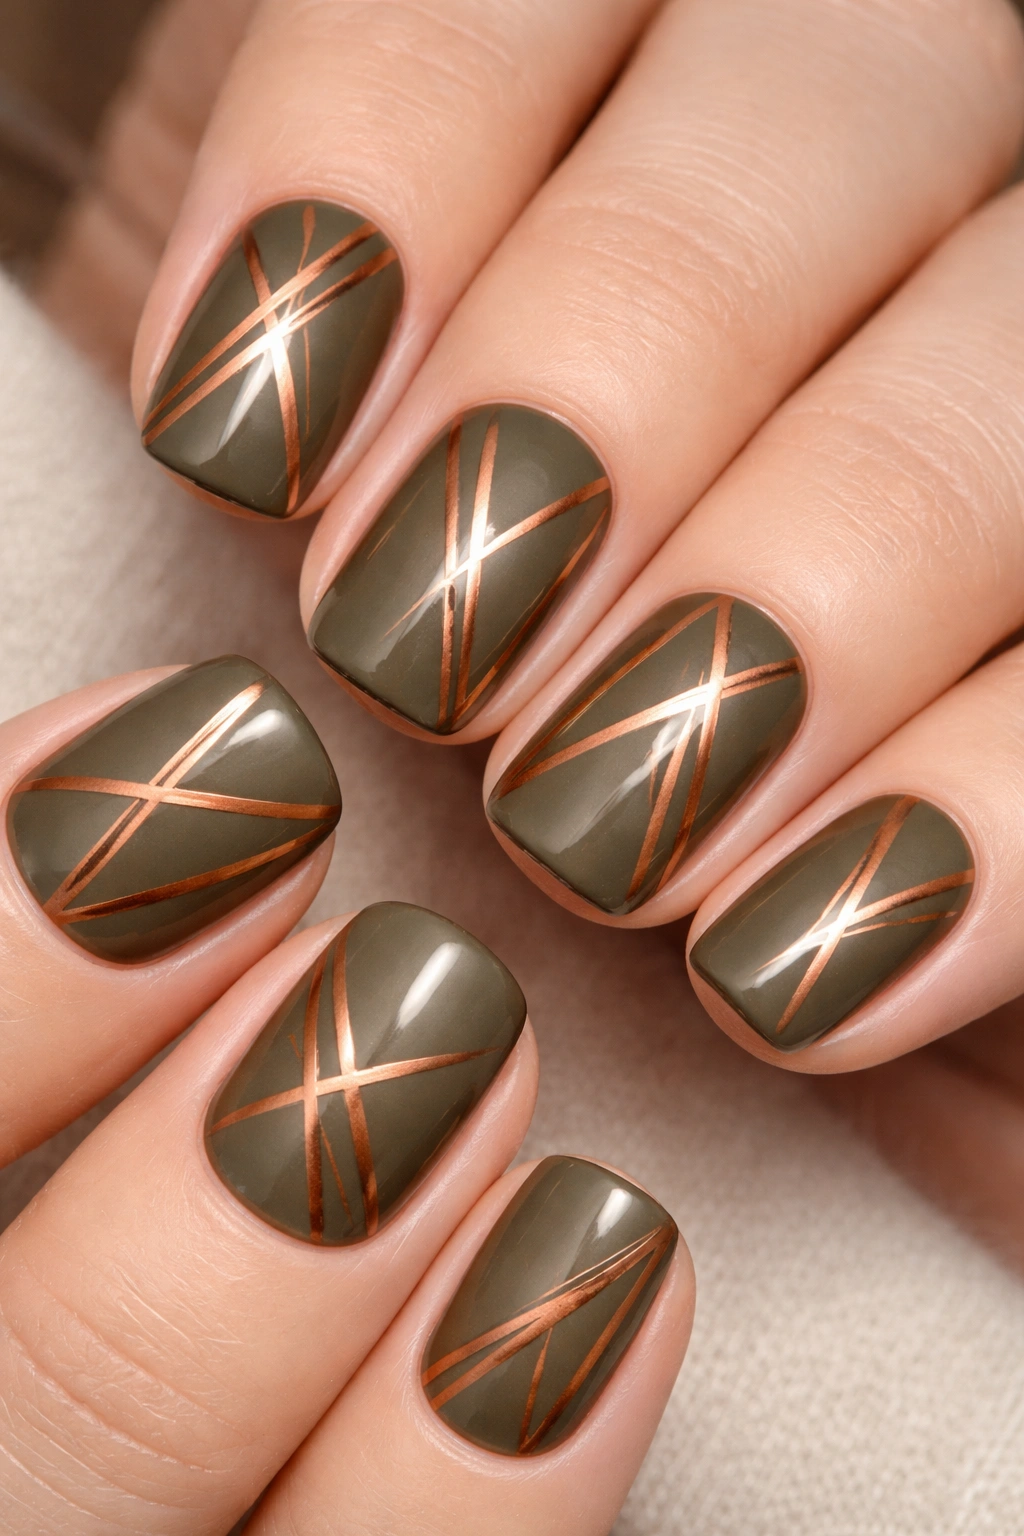
Muddy olive is a moody color that doesn’t get nearly enough attention. It sits at the intersection of green and brown, creating this earthy, understated tone that feels modern and artistic. Add copper geometric patterns—maybe triangles, lines, or abstract shapes—and you’ve got something that feels like wearable art. The geometric elements prevent the muted olive from reading as boring; they give it structure and intentionality.
The Unexpected Sophistication of Olive
Olive tones are having a moment in fashion and design because they feel natural, earthy, and effortlessly cool. When you apply that to nails with geometric detailing, you get something that reads as deliberately artistic rather than trendy. Copper against muddy olive creates this warm-moody contrast that’s genuinely beautiful—not the stark contrast of gold on black, but something softer and more complex. Squoval nails showcase geometric patterns beautifully because the defined shape gives you a clear canvas for patterns.
Creating Geometric Patterns with Precision
- Apply 2-3 coats of muddy olive as your base
- Use a thin brush or geometric guides (tape or stencils) for clean, straight lines
- Copper metallic polish works best for visibility against the olive base
- Geometric options: overlapping triangles, horizontal and vertical line combinations, abstract shapes, or consistent patterns on each nail
- Let each element dry before adding the next to prevent colors from blending
- Finish with a glossy top coat for polish and protection
- Insider note: Studying geometric nail art inspiration pins helps you develop pattern combinations that feel balanced and intentional
11. Gunmetal Gray with Debossed Texture Effect
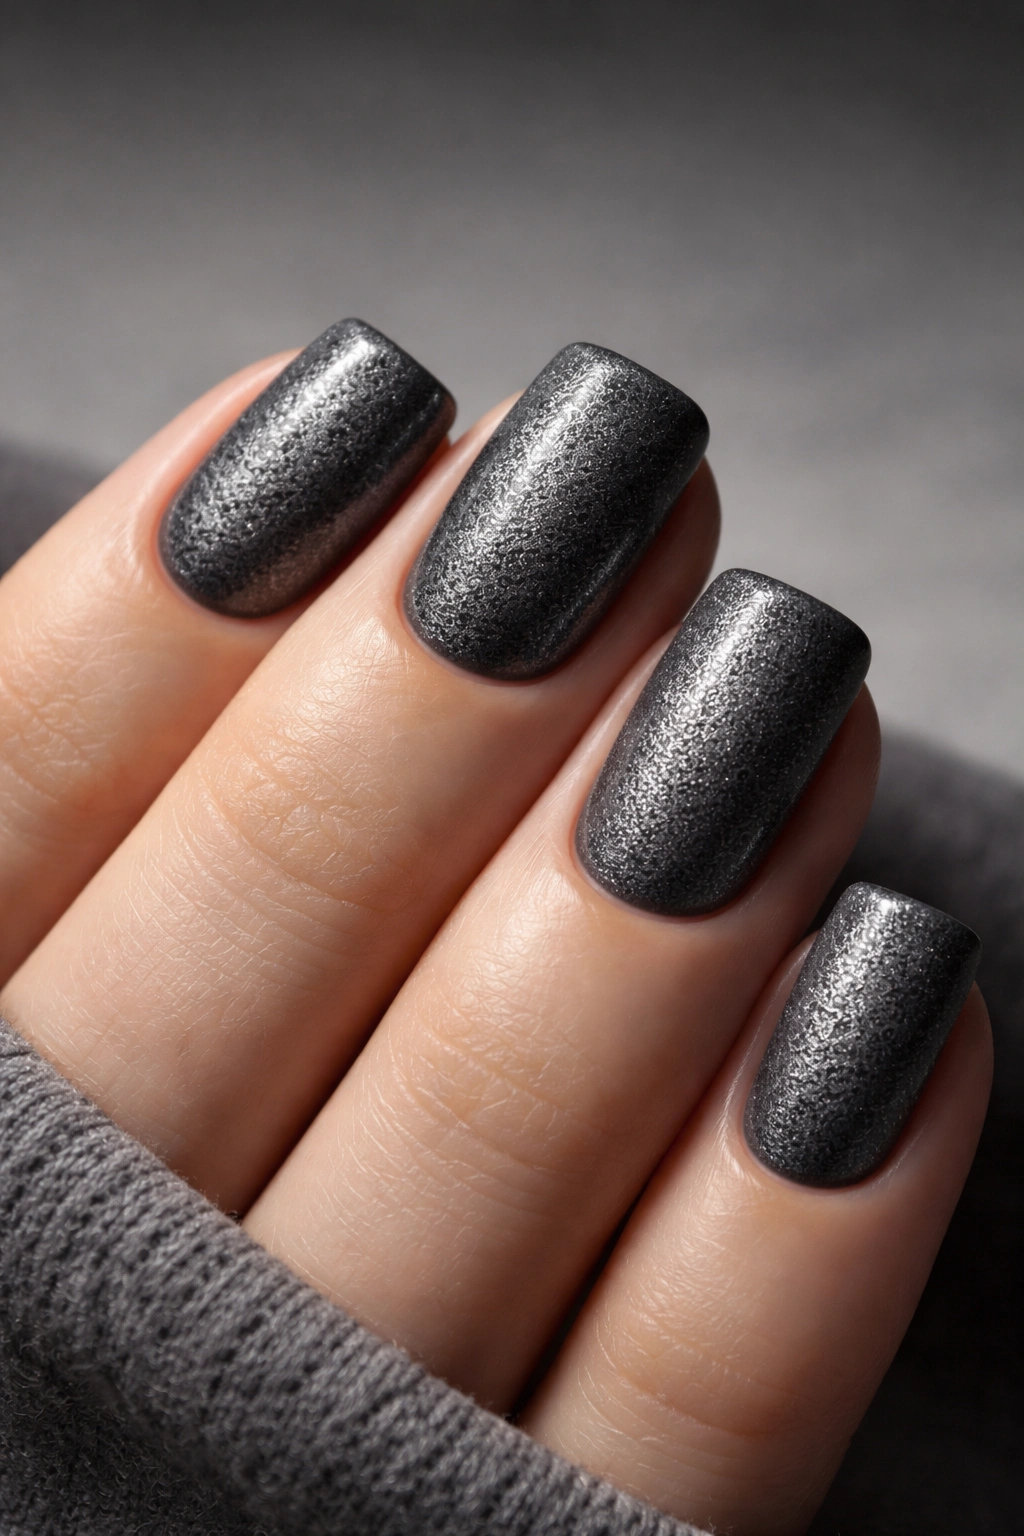
Gunmetal is deeper than regular gray and has this metallic, almost industrial quality that feels modern and sophisticated. When you add a debossed texture effect (where the surface appears to have slight indentations or carved areas), you create actual dimension on the nail. The texture catches light differently than flat polish, making the nail feel almost three-dimensional. This is an advanced technique, but the effect is absolutely worth the effort.
Why Texture Elevates a Simple Color
Texture adds a completely different dimension to nail design. While most nail art is visual (you see the color and pattern), texture engages another sense—you can feel the variation on the nail surface. This makes the design feel more sophisticated and intentional; it’s not just something pretty, it’s something carefully crafted. Gunmetal gray is the perfect base for textured effects because the subtle metallic qualities interact with the light and shadow created by the texture.
Technique for Creating Debossed Effects
- Apply a base coat for protection
- Apply 2-3 coats of gunmetal gray polish
- While the final coat is still slightly tacky, press a textured surface (specialized nail texture mat, leaf imprint, or even fine fabric) gently onto the nail
- The texture transfers to the polish surface, creating actual dimension
- Alternatively, use a debossed gel technique with sculpting gels (more advanced)
- Seal with a matte or semi-gloss top coat to show off the texture without excessive shine
- Pro tip: Texture mats and sculpting supplies are available from nail art suppliers and create professional results even for beginners
12. Dark Espresso Brown with Rose Gold Accents
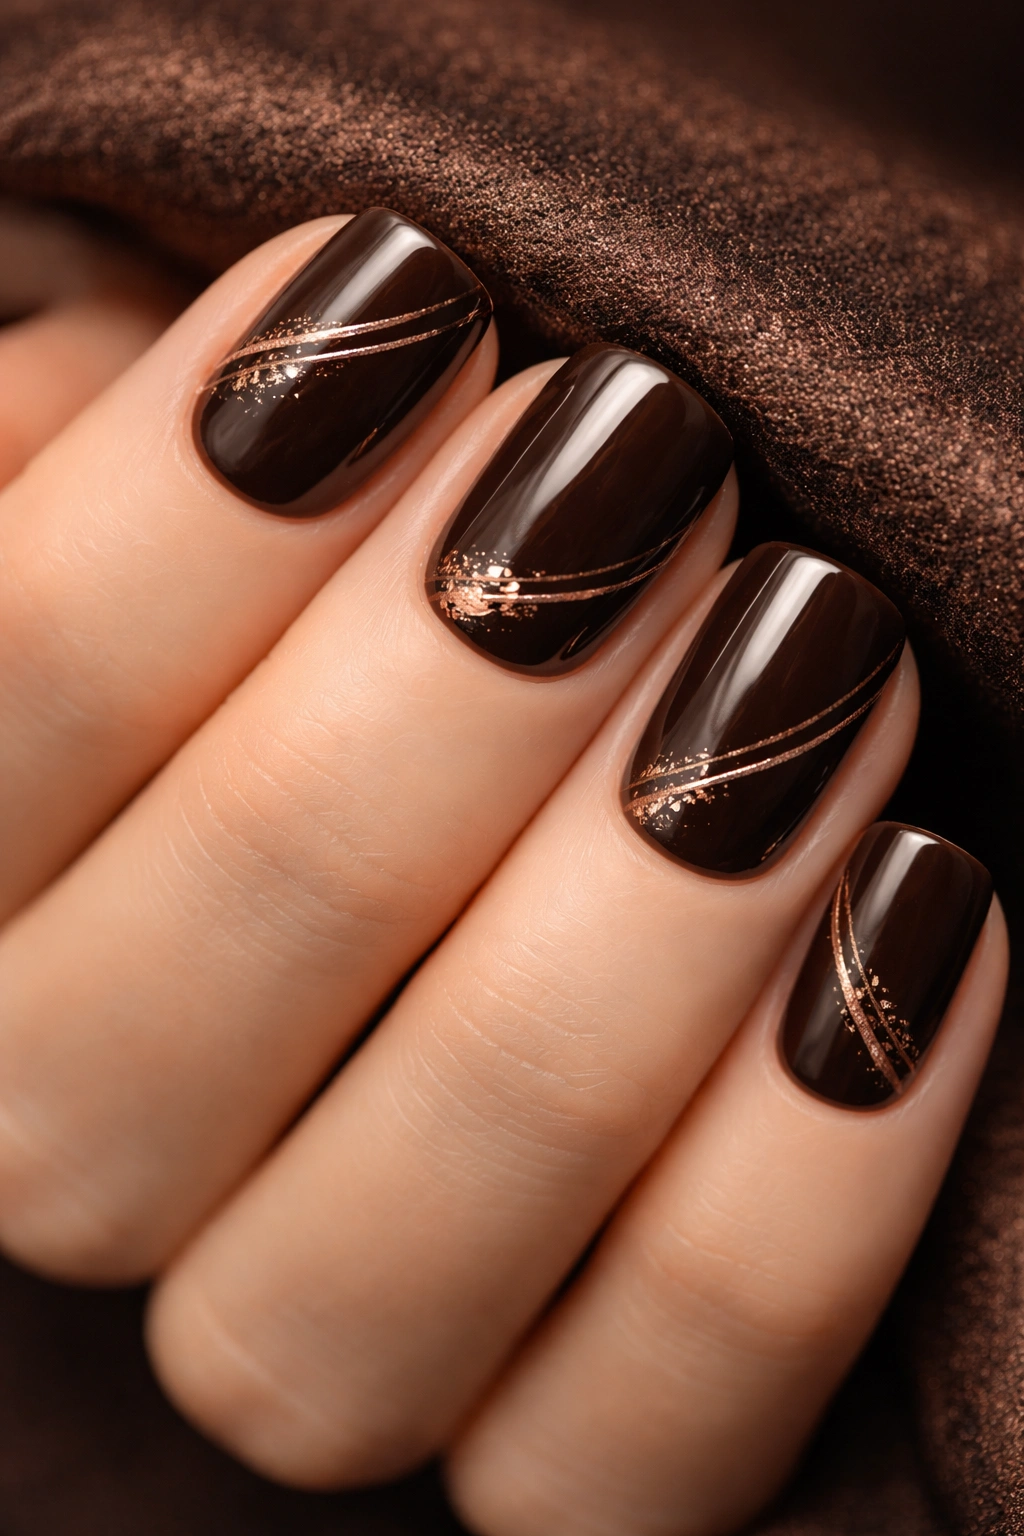
Dark espresso brown is possibly the most underrated moody nail color. It’s warm, sophisticated, and has this luxurious depth that feels expensive and intentional. When you add rose gold accents—whether as foil pieces, striping, or a subtle ombre gradient—you introduce warmth and femininity without compromising the moody aesthetic. This is the design that bridges moody and glam beautifully.
The Luxury of Warm-Toned Moody Colors
While charcoal and black are classically moody, espresso brown brings something different to the table. It’s moody but warm, which makes it feel approachable and wearable. Rose gold is the perfect complement because it shares that warmth while adding just enough shimmer to feel luxe. On squoval nails, this combination feels elegant and balanced—dark and moody but not severe. It’s the kind of manicure that works from the office to evening events.
Layering Espresso and Rose Gold Beautifully
- Apply 2-3 coats of dark espresso brown as your base
- Rose gold can be applied as: thin striping lines, ombre gradient from brown to rose gold, foil accents, or geometric shapes
- If doing ombre, use a sponge to blend espresso brown and rose gold polish at the tips
- If using rose gold foil, adhere small pieces while the top coat is still slightly tacky
- For striping, use a fine brush and a quality rose gold metallic polish
- Seal with a glossy top coat for shine and protection
- Worth knowing: Rose gold tends to photograph beautifully under natural light, showing incredible warmth and dimension
The Right Design for Your Winter Mood
Choosing a moody short squoval nail design is genuinely personal. Some of these designs skew toward minimalist and understated (the charcoal striping, the minimal gold frame). Others embrace artistic detail and dimension (the constellation art, the marble veining). Some bring warmth and luxury (the burgundy copper, the espresso rose gold). The beautiful thing about moody nails is that they work together—you can wear one of these designs for two weeks, then switch to another design in the same color family, and they’ll all feel cohesive and intentional.
The squoval shape itself deserves credit for its versatility. It’s short enough to be practical for real life and long enough to show off detail and design. It’s strong and confident without being trendy in a way that feels dated. And it works on virtually every hand shape and nail bed, which means whatever design you choose will look genuinely beautiful.
Winter is the perfect time to lean into moody aesthetics. These colors and designs aren’t light or summery—they feel intentional and artistic. They pair beautifully with dark winter clothing, cool-toned makeup, and the general vibe of the season. A well-executed moody nail design is an easy way to feel polished and put-together without effort, because the color and design do the heavy lifting.
Final Thoughts
The best moody squoval nail design is the one that makes you feel confident and intentional when you look at your hands. That might be the simplicity of black with gold, the artistry of constellations on purple, the luxury of marble on slate, or the warmth of espresso and rose gold. These twelve designs cover the spectrum of moody color possibilities, textures, and techniques—but the real magic is in finding which aesthetic resonates with you personally and executing it with confidence and precision.
What matters most is that the design feels like an extension of your personal style, not just something you copied because it looked pretty. Take time to consider which moody shades you naturally gravitate toward in your fashion and makeup choices. Notice which textures and finishes feel most like “you”—do you prefer matte sophistication or glossy shine? Minimal or detailed? Warm tones or cool tones? When you choose based on genuine preference rather than just following trends, your manicure will feel authentically yours, and that confidence is what truly makes it beautiful.
