

Squoval nails have become the go-to shape for anyone who wants the best of both worlds—the strength and practicality of square nails combined with the elegance and softness of ovals. When you pair this versatile shape with spring’s fresh color palettes and delicate design trends, you get a nail look that feels both modern and timeless. Short squoval nails specifically strike that perfect balance between professional polish and playful personality, making them ideal for people who need low-maintenance nails without sacrificing style.
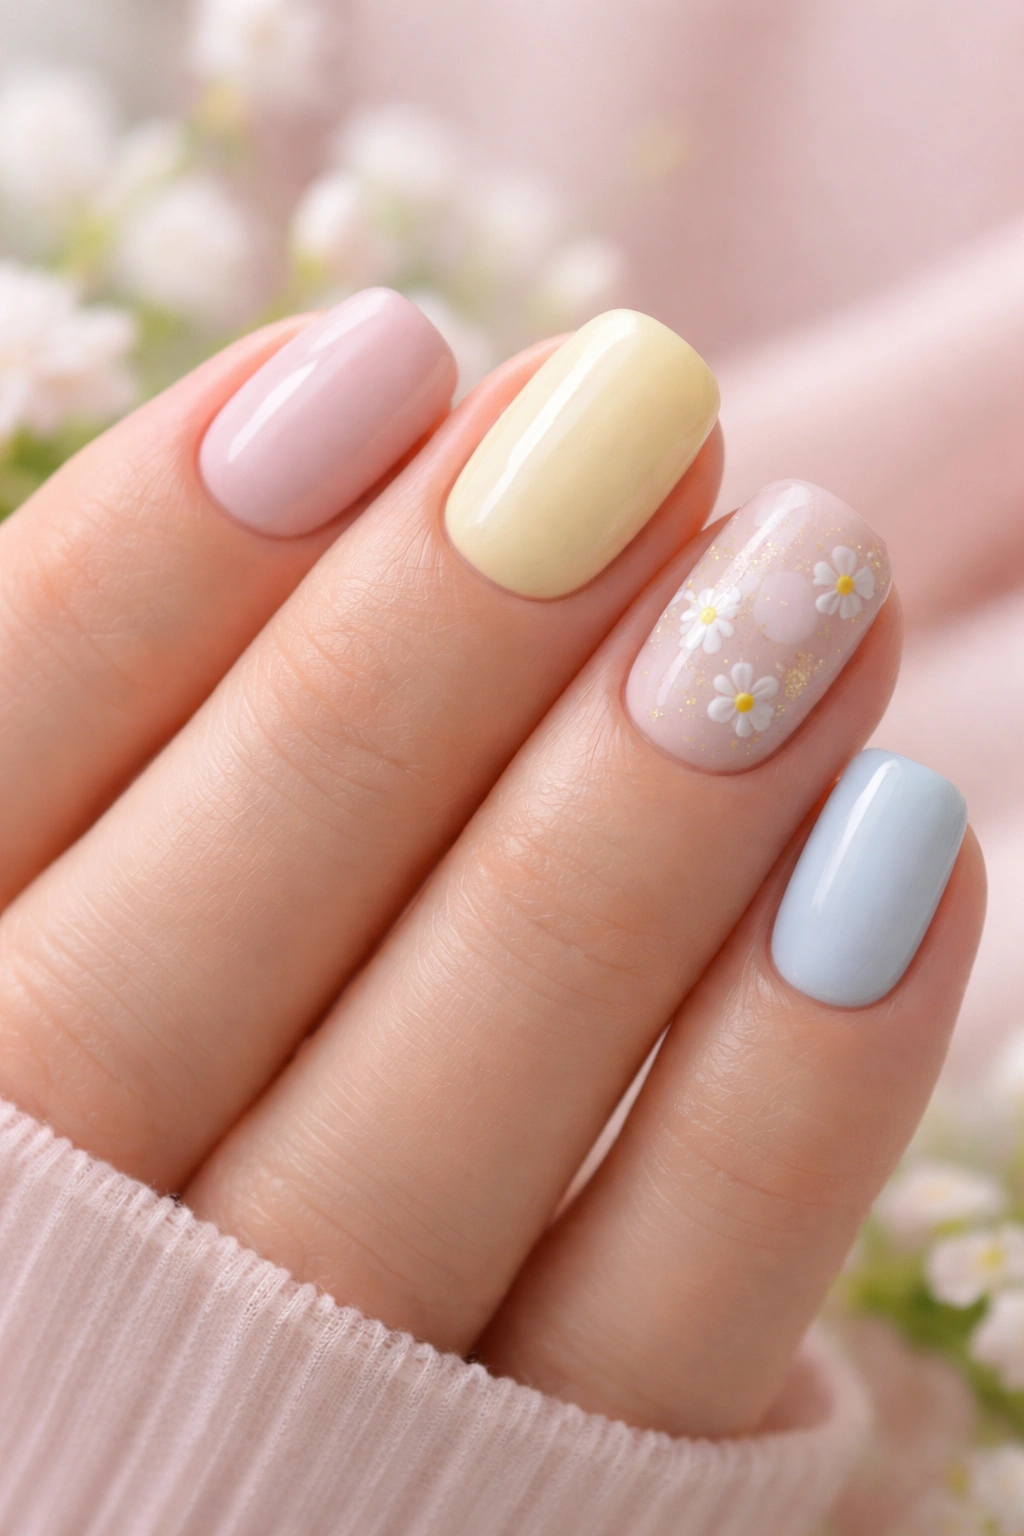
The beauty of short squoval nails during spring is that they’re forgiving enough for active lifestyles yet sophisticated enough for any occasion. Spring is all about renewal, lighter aesthetics, and celebrating the shift in weather, and your nails can reflect that energy perfectly. Short squovals work with pastels, metallics, florals, and minimalist designs without ever feeling overdone. Whether you’re heading back to the office after winter, attending spring events, or just wanting to refresh your look, these 15 designs offer something for every aesthetic and skill level.
What makes these designs work so beautifully on short nails is that the slightly squared-off oval shape creates a natural frame for creative details without requiring length to show them off. You’ll notice that many of these designs focus on negative space, subtle gradients, or small focal elements rather than large-scale art—because on shorter nails, restraint is actually what makes a design shine. Let’s walk through 15 fresh squoval nail designs that capture the spirit of spring while keeping things practical and wearable.
1. Soft Pastel Peach Gradient
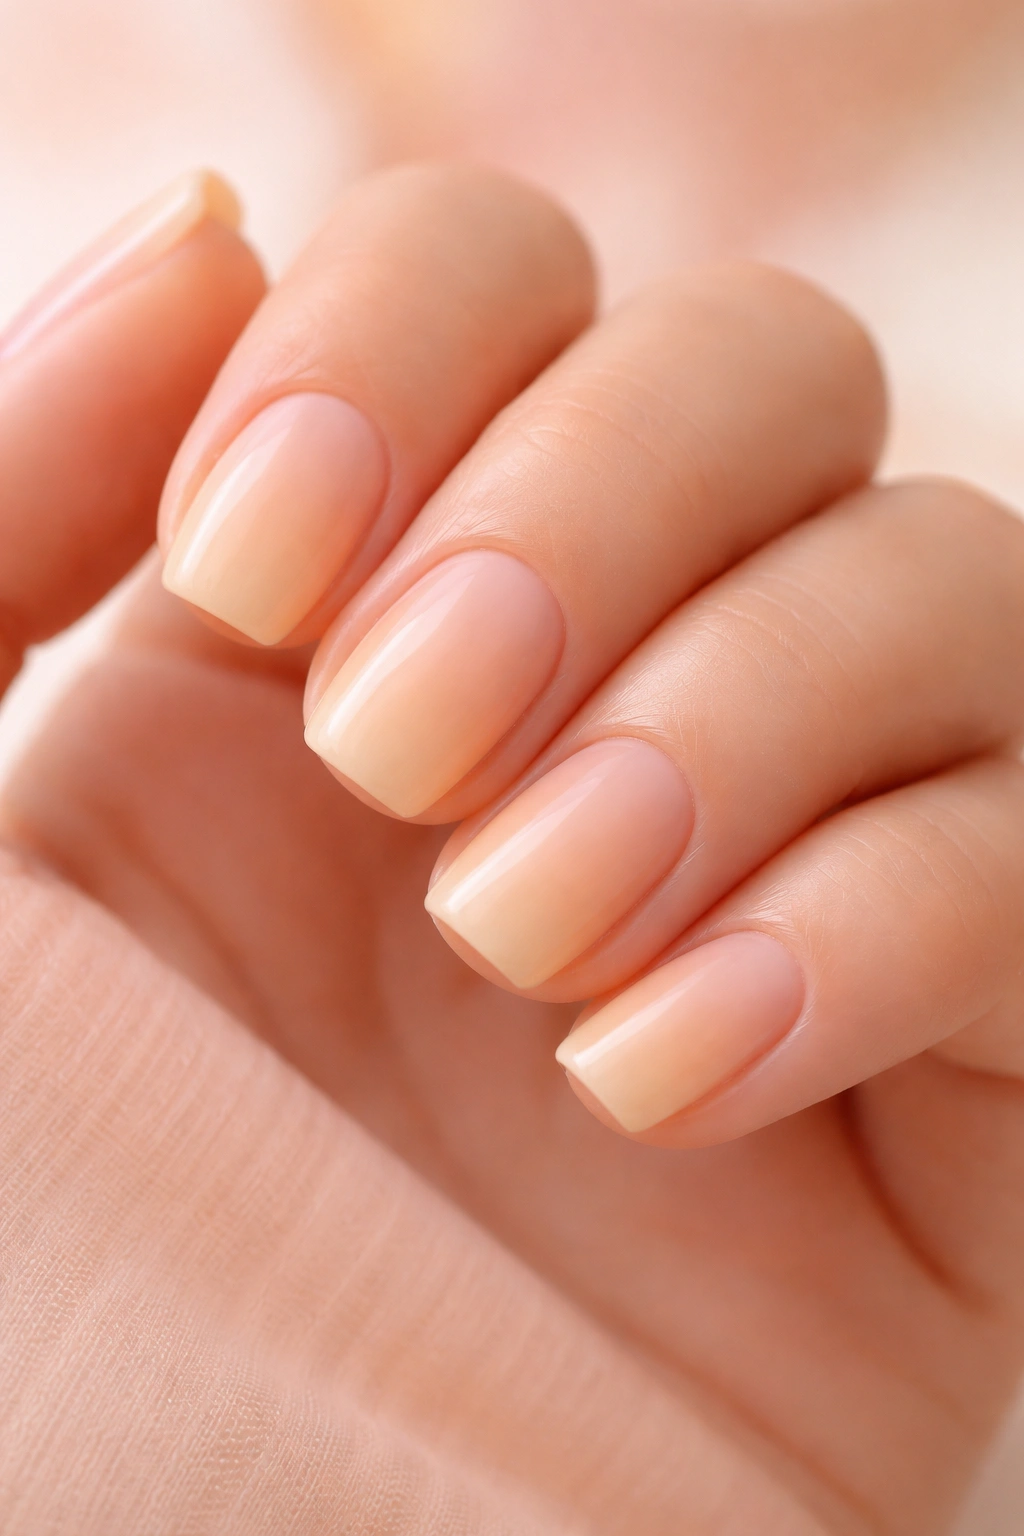
Peach is the quintessential spring color, and a soft gradient from ivory to peachy-nude on short squoval nails feels incredibly fresh and sophisticated. This design works beautifully because the gradient is gentle enough that it doesn’t require perfect precision, yet the color shift creates visual depth and interest that catches light as your hands move. The key to pulling this off is using a sponge to blend two coordinating shades where they meet, creating that soft, almost airbrushed effect that reads as expensive and intentional.
Why This Design Works for Spring
Peach tones are flattering on most skin tones and feel warm without being too bold. The gradient technique is technically achievable even if you’re not a nail art expert, and it creates a look that’s simultaneously calming and elevated. This design reads as sophisticated enough for professional settings while still feeling fresh and seasonal.
How to Create It at Home
- Use a light ivory or soft cream as your base and apply two coats for even coverage
- Mix a peachy-nude polish with a tiny amount of the base color on a palette or glass surface
- Dab a makeup sponge into both colors at the edge where they meet
- Gently dab and stipple the sponge across your nail in one direction, building the gradient from the cuticle down to the tip
- Use a damp sponge edge to soften any harsh lines
- Seal with a glossy top coat for dimension and longevity
Pro tip: If you’re nervous about the sponging technique, apply the base color on the nail first and let it dry completely—this gives you a buffer zone and makes blending easier because you’re working with a finished surface.
2. Milky White with Tiny Gold Flecks
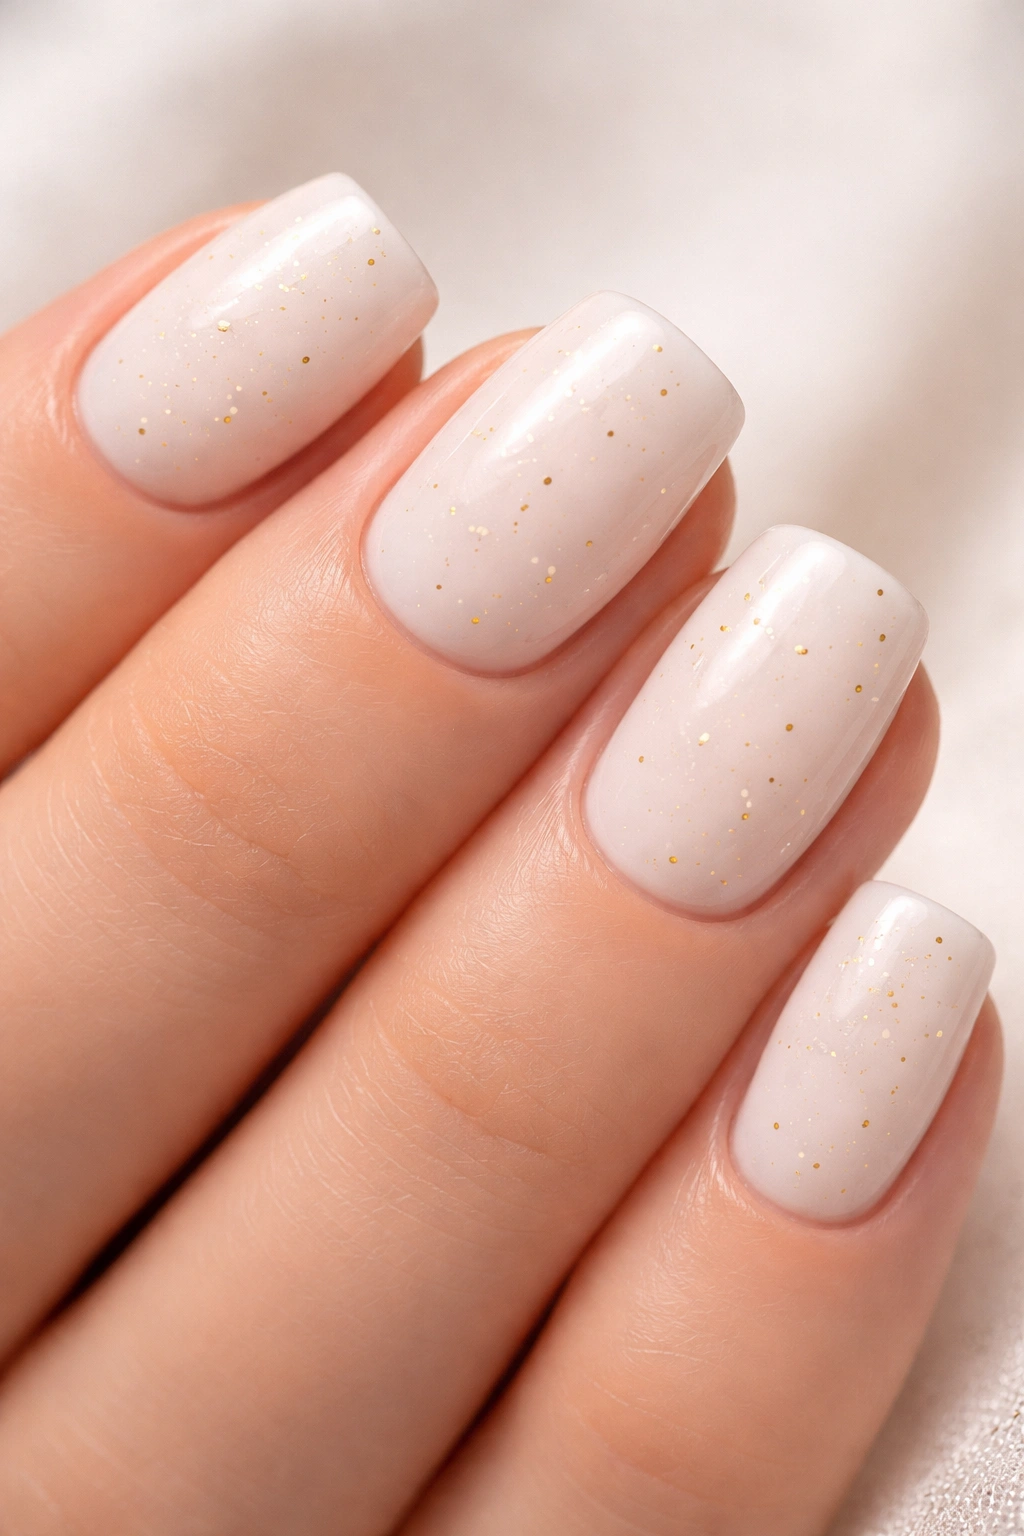
Sometimes the most elegant spring look is the simplest one. A creamy, milky-white base on short squoval nails paired with minimal gold flecks scattered across the surface feels modern, clean, and undeniably chic. This design works because it relies on texture and subtle shimmer rather than pattern, and it pairs with literally any outfit or aesthetic. The milky formula itself creates a soft-focus effect that’s flattering and grown-up without requiring any artistic skill.
The Appeal of Minimalist Spring Nails
There’s something deeply satisfying about nails that whisper rather than shout. This design is proof that spring doesn’t always mean florals and pastels—sometimes it means clarity, cleanliness, and a return to basics after a heavy winter. The gold specks add just enough personality to keep it from feeling sterile, while the white stays fresh and crisp no matter the season.
Application and Finishing
- Apply a milky-white base with a slightly sheer, creamy formula (not completely opaque) for that soft, diffused effect
- Once dry, use a thin brush or toothpick dipped in liquid gold (or very fine gold leaf polish) to place small flecks randomly across the nail surface
- You’re aiming for scattered placement, not a pattern—think of it as stars rather than a grid
- Seal with a shiny, clear top coat to make the flecks catch light and create dimension
Worth knowing: Milky formulas can be tricky because they often require three coats to look opaque and creamy rather than streaky. Be patient and let each coat dry completely.
3. Sage Green with Pressed Flowers
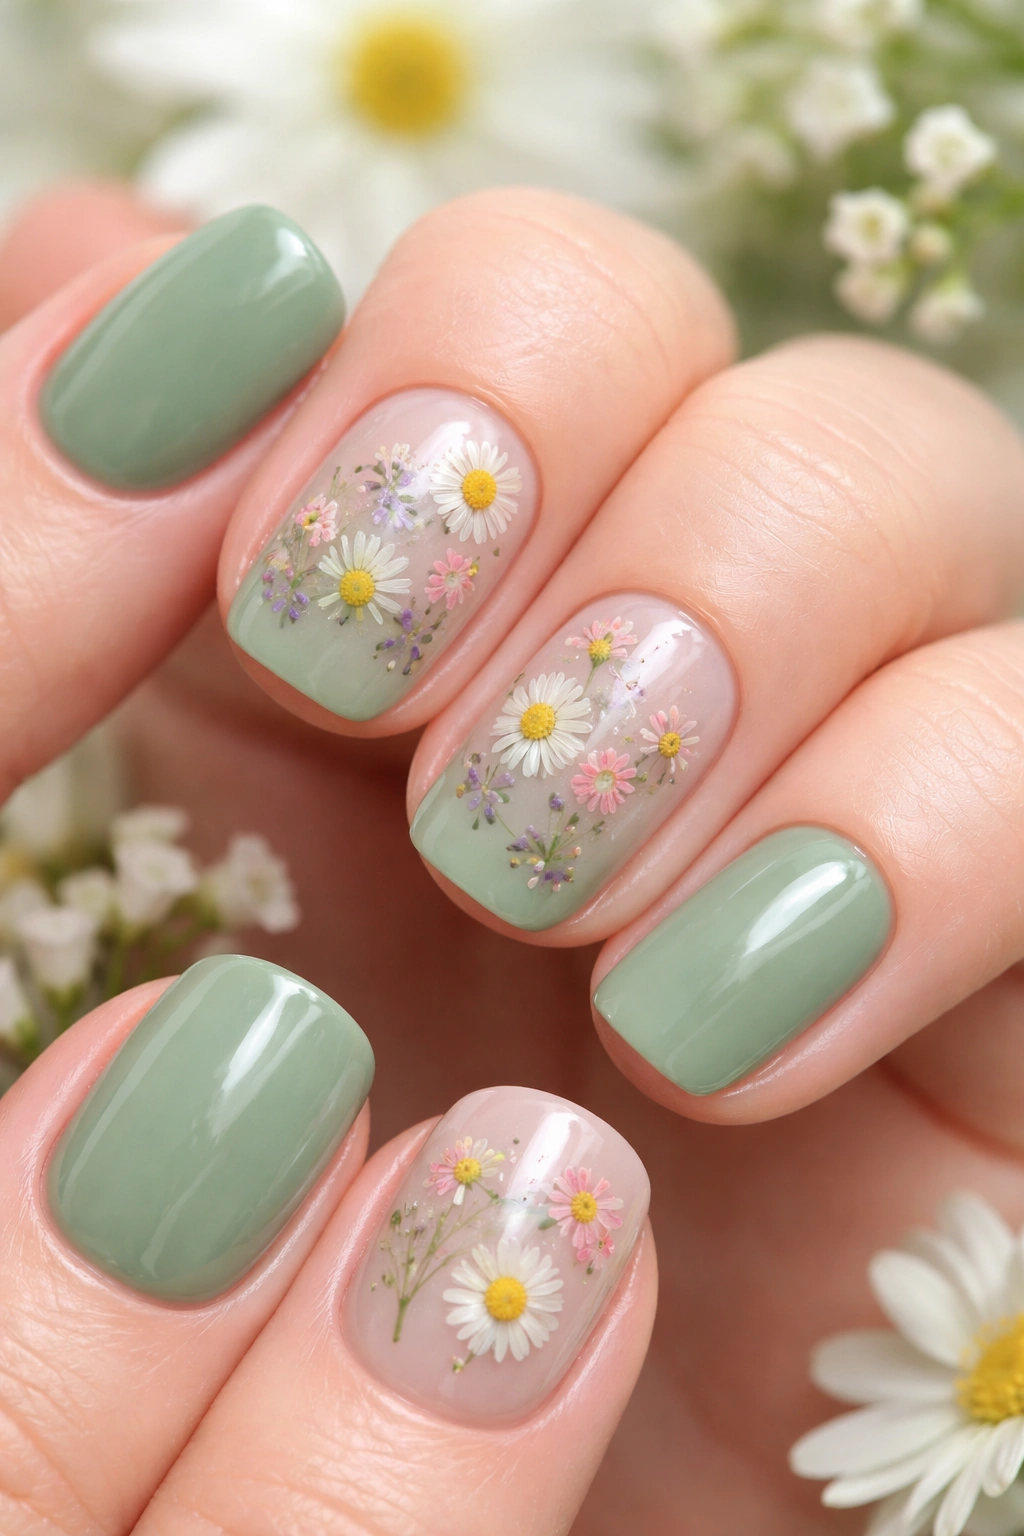
Sage green is having a major moment as the sophisticated alternative to hot pink or bright spring colors, and when you pair it with actual or nail-art-friendly pressed flowers, you create something botanical and thoughtful. On short squoval nails, this design feels garden-inspired without looking childish or overly cutesy. The muted green acts as a calm backdrop that lets the delicate flower details shine without overwhelming the nail.
Why Sage Green Reads as Spring
Sage is the color of new growth and fresh leaves—it’s spring personified in a way that feels natural rather than artificial. Unlike bright spring greens, sage has enough gray in it to feel sophisticated and wearable for any season, but combined with floral elements, it immediately reads as seasonal and intentional.
Creating This Look
- Paint sage green base (two coats for full coverage)
- Once fully dry, apply a layer of clear gel or glossy top coat
- Before it sets completely, place tiny pressed flowers (available in nail art supply shops) or create miniature hand-painted florals using a fine brush
- Seal everything with another layer of clear top coat to encapsulate the flowers
- The result should feel like the flowers are preserved beneath a layer of glass
Insider note: If you’re using real pressed flowers, make sure they’re completely dry first and handle them with tweezers to avoid getting oils from your fingers on them, which can cause discoloration.
4. Ballet Pink with French Tips
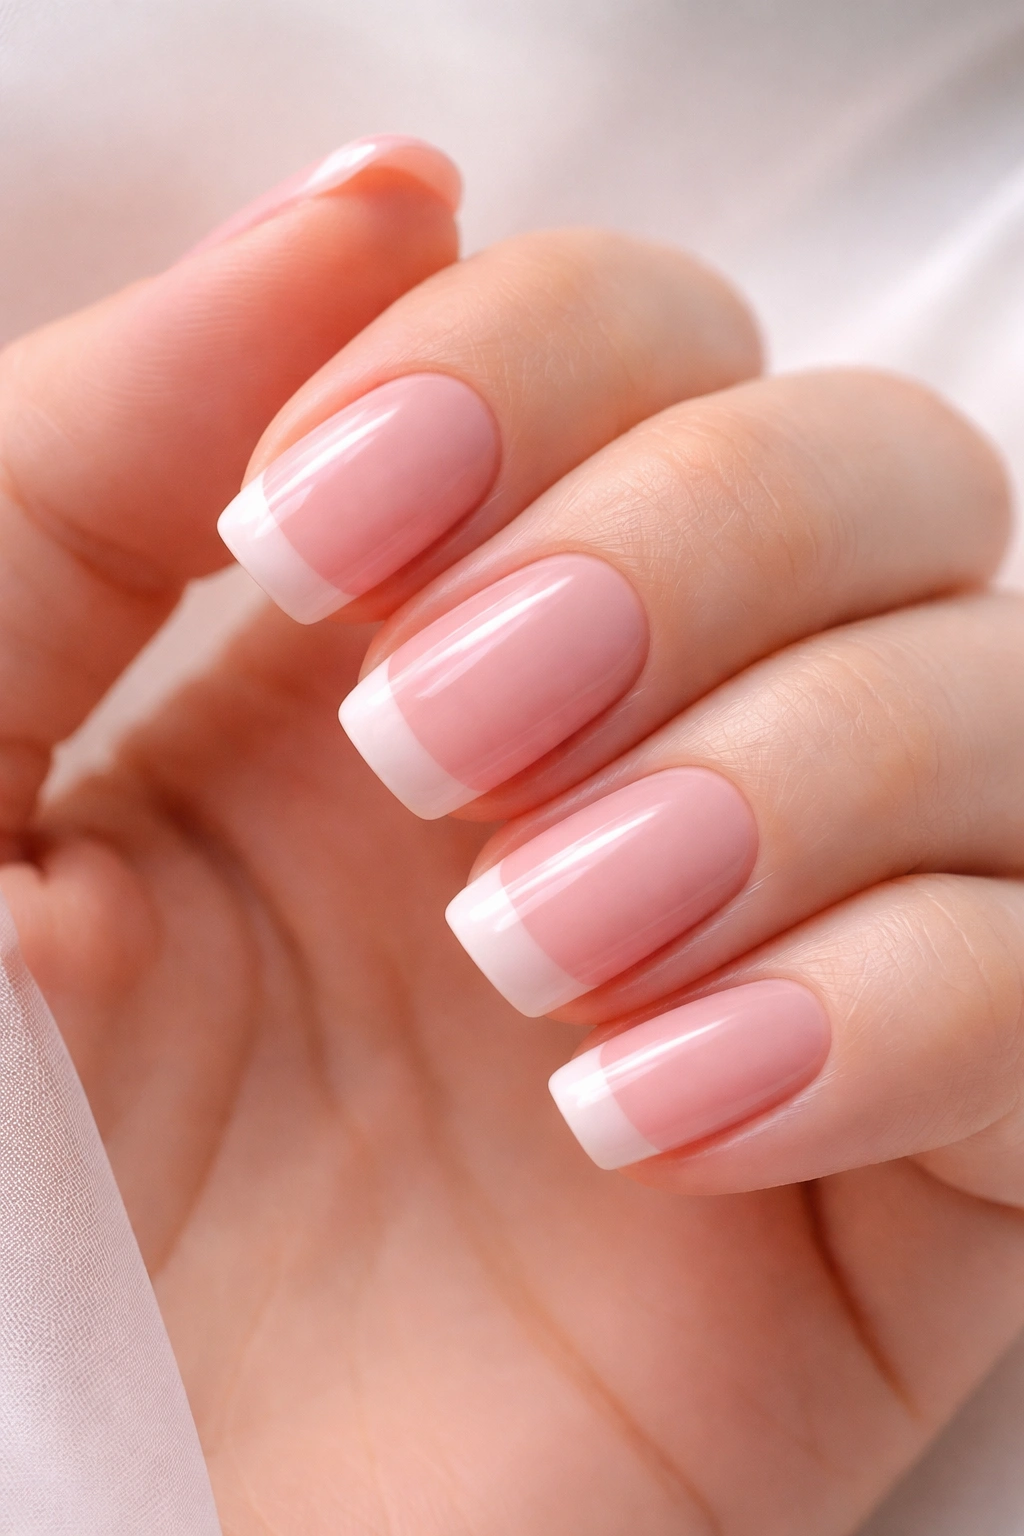
The French manicure is eternal, and reimagining it in soft ballet pink instead of white creates a look that’s undeniably spring but remains timeless and elegant. On short squoval nails, this design feels refined without any hint of trying too hard. The ballet pink warms the tone compared to traditional white tips, and it photographs beautifully while remaining appropriate for work, dates, and casual life.
The Modern Take on a Classic
French tips never went out of style because they’re genuinely flattering and versatile. By shifting the tip color to a soft pink instead of white, you’re honoring the classic while making it feel contemporary and seasonal. This design works across age ranges and professional environments because it reads as polished without being flashy.
Technique for Clean Tips
- Apply a nude-pink base and let it dry completely
- Use a thin, angled brush or a French tip template to paint the tips in a slightly deeper ballet pink or blush
- The tip should take up about one-quarter of the nail length—on short squovals, this means being careful not to make the tips too wide or they’ll overwhelm the nail
- Use thin, steady strokes and build the color in two thin coats rather than one thick coat (thick coats are harder to control)
- Seal with a glossy top coat for a professional finish
Pro tip: If you’re not confident with freehand, nail tip guides or stickers designed for French manicures are a game-changer and cost just a few dollars. Using them isn’t cheating—it’s being smart about achieving a polished result.
5. Blush Pink with Delicate Line Work
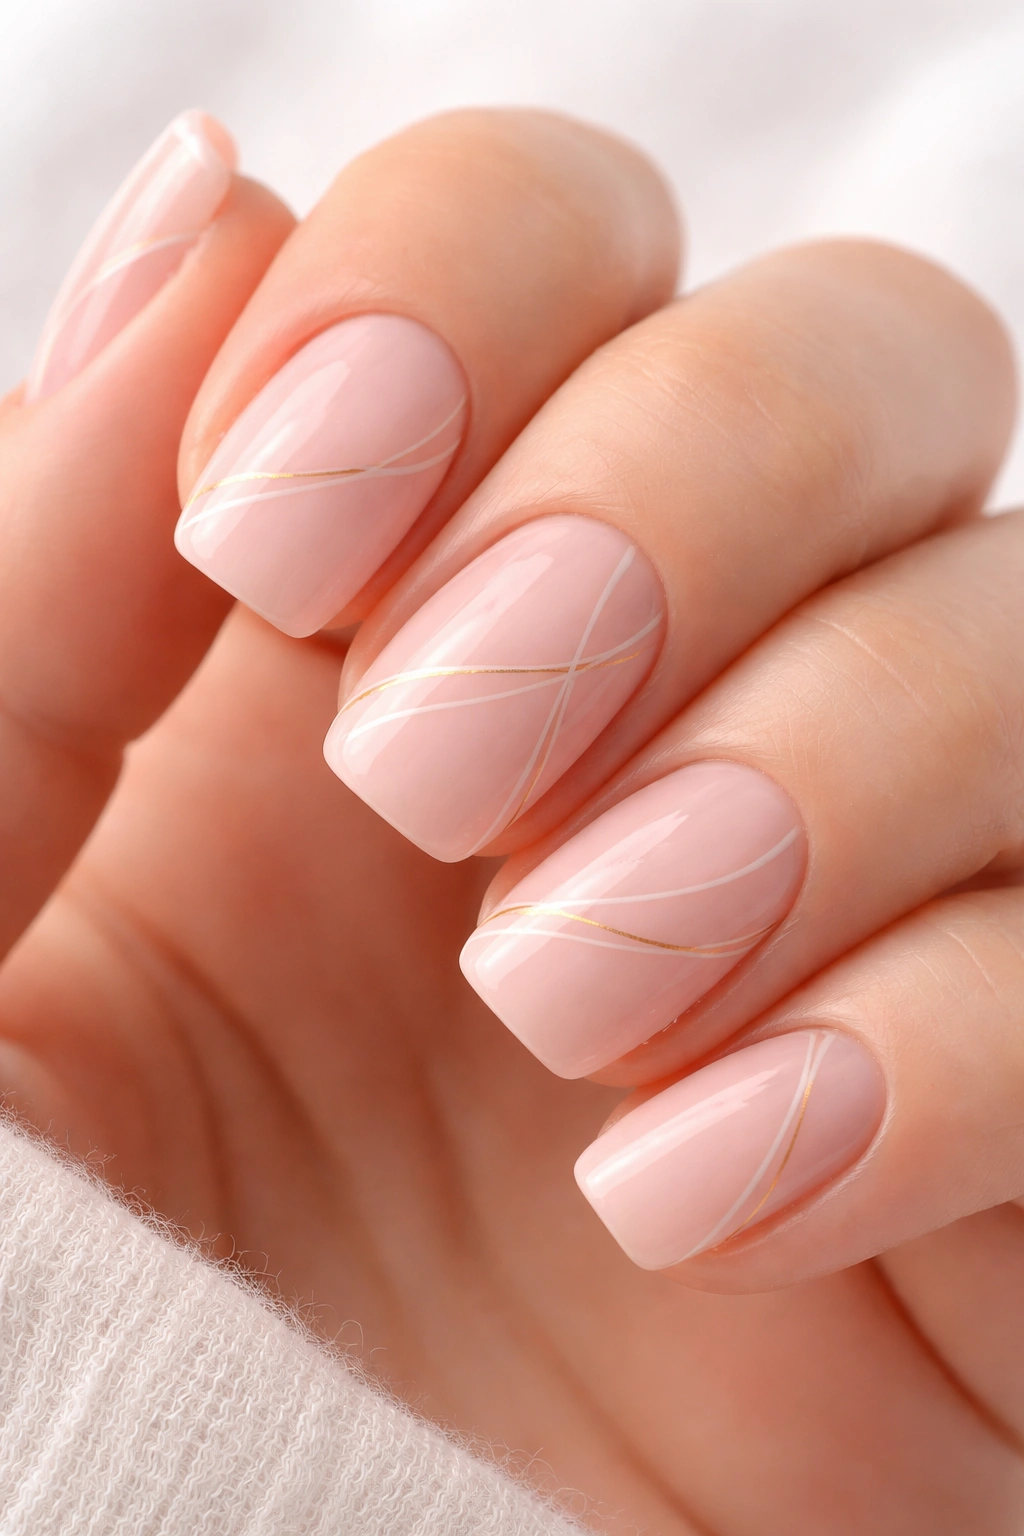
Blush pink is the warm, flattering neutral of the spring nail world, and adding minimal line work—thin gold, white, or slightly darker pink lines in abstract or geometric patterns—creates a design that’s interesting without being complicated. On short nails, less is genuinely more, and sparse line work leverages the full surface area to create movement and visual interest without cluttering the nail.
Why Blush Works Year-Round But Feels Spring
Blush is inherently spring-coded because it evokes the softness of spring flowers and the delicate light of the season, but it’s neutral enough to wear in summer, fall, and winter without looking out of place. The design stays fresh because the line work feels current and considered rather than dated or trendy-for-a-moment.
Creating Minimalist Line Art
- Start with two coats of blush pink as your base
- Use a thin nail art brush (size 000 or smaller) dipped in a contrasting color like champagne gold or white
- Sketch thin, slightly irregular lines across the nail—think of them as abstract or organic rather than perfectly geometric
- A few vertical lines with horizontal crosshatches, or scattered diagonal lines, create visual movement without looking busy
- Keep the lines thin and ensure you have plenty of bare blush-pink space showing between them
- Finish with a glossy top coat
Worth knowing: Thin lines are hardest to execute freehand, so take your time and steady your hand against your other nails. It’s better to apply multiple thin lines than one shaky thick line.
6. Cream Base with Tiny Daisy Details
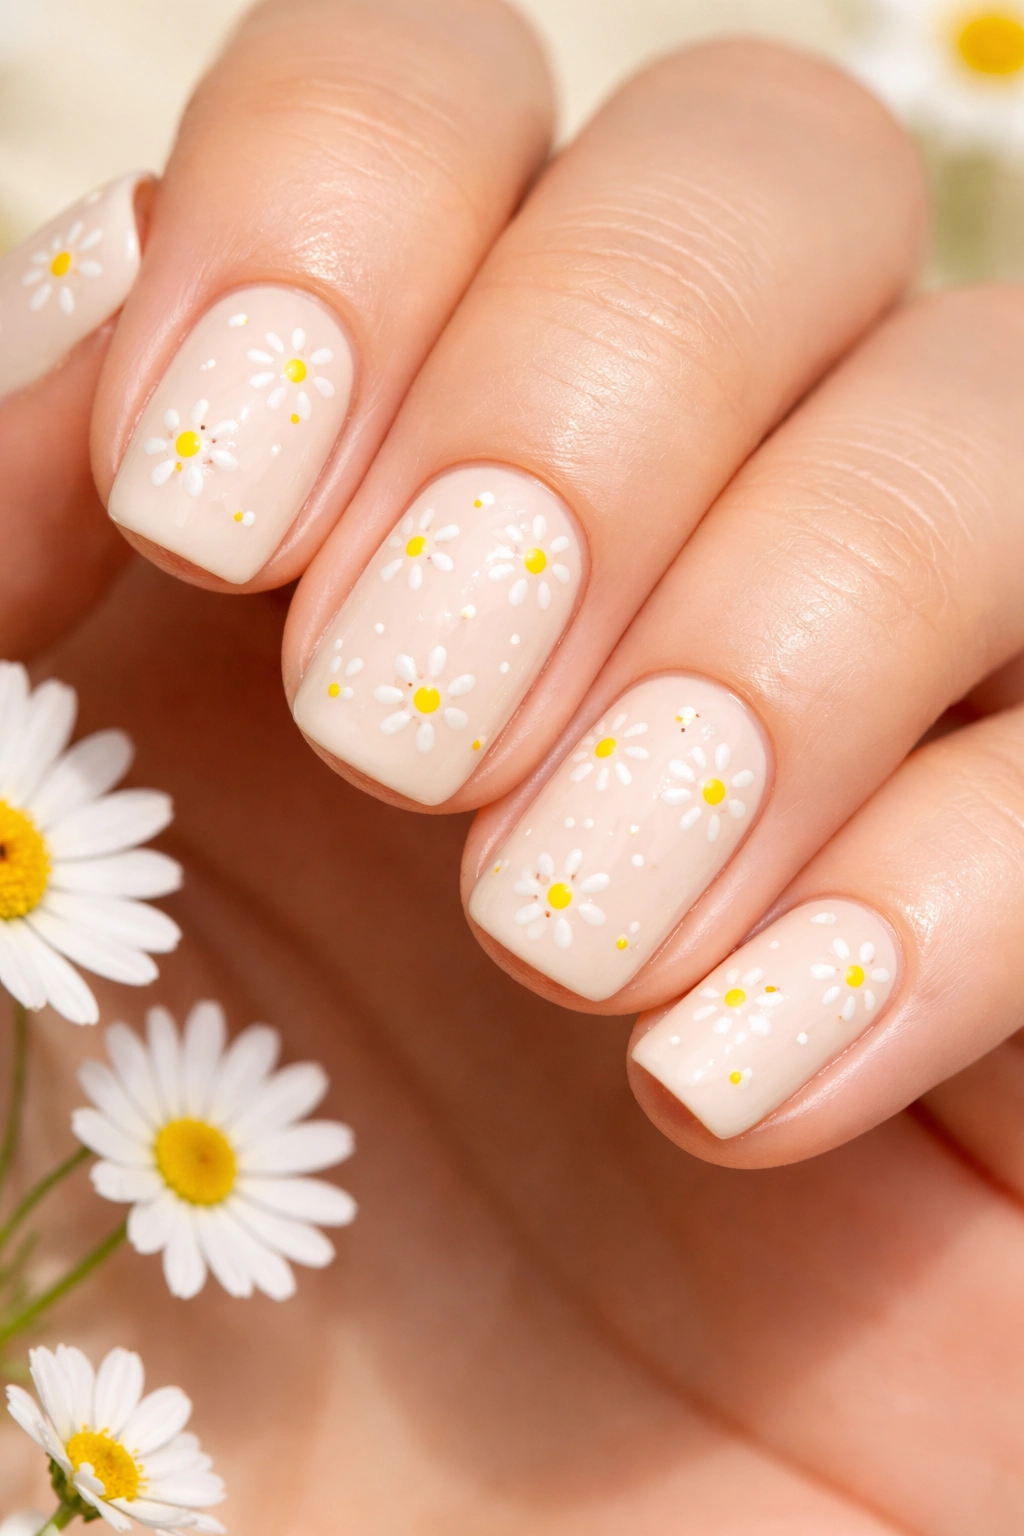
Cream is the sophisticated backdrop for spring nail art because it’s neutral, clean, and allows details to shine. Tiny daisies—whether hand-painted or added as decals—instantly evoke spring without requiring intricate skills. On short squoval nails, a single small daisy on the nail bed or a cluster of 2-3 daisies creates a sweet, garden-fresh look that’s personal without being overdone.
The Power of Subtle Florals
Florals are associated with spring so strongly that even minimal floral details read as seasonal and intentional. The advantage of cream is that it highlights whatever design sits on top of it, so even simple daisy shapes register beautifully. This design feels handmade and thoughtful rather than generic.
Application Options
- Apply two coats of cream base (the coverage should be smooth and even, not streaky)
- Option 1: Use a thin brush to paint miniature daisies with white and yellow polish, adding simple black dots for centers
- Option 2: Use nail decals featuring small daisies, positioning them where they feel balanced
- Option 3: Create one slightly larger daisy focal point and leave the rest cream
- Seal with glossy or matte top coat depending on the vibe you prefer
Pro tip: Nail decals are a legitimate tool, not a shortcut. Many professional nail technicians use them. If you go this route, ensure your base is completely smooth and dry, and apply the decal slowly and carefully to avoid air bubbles.
7. Icy Lavender with Chrome Tips
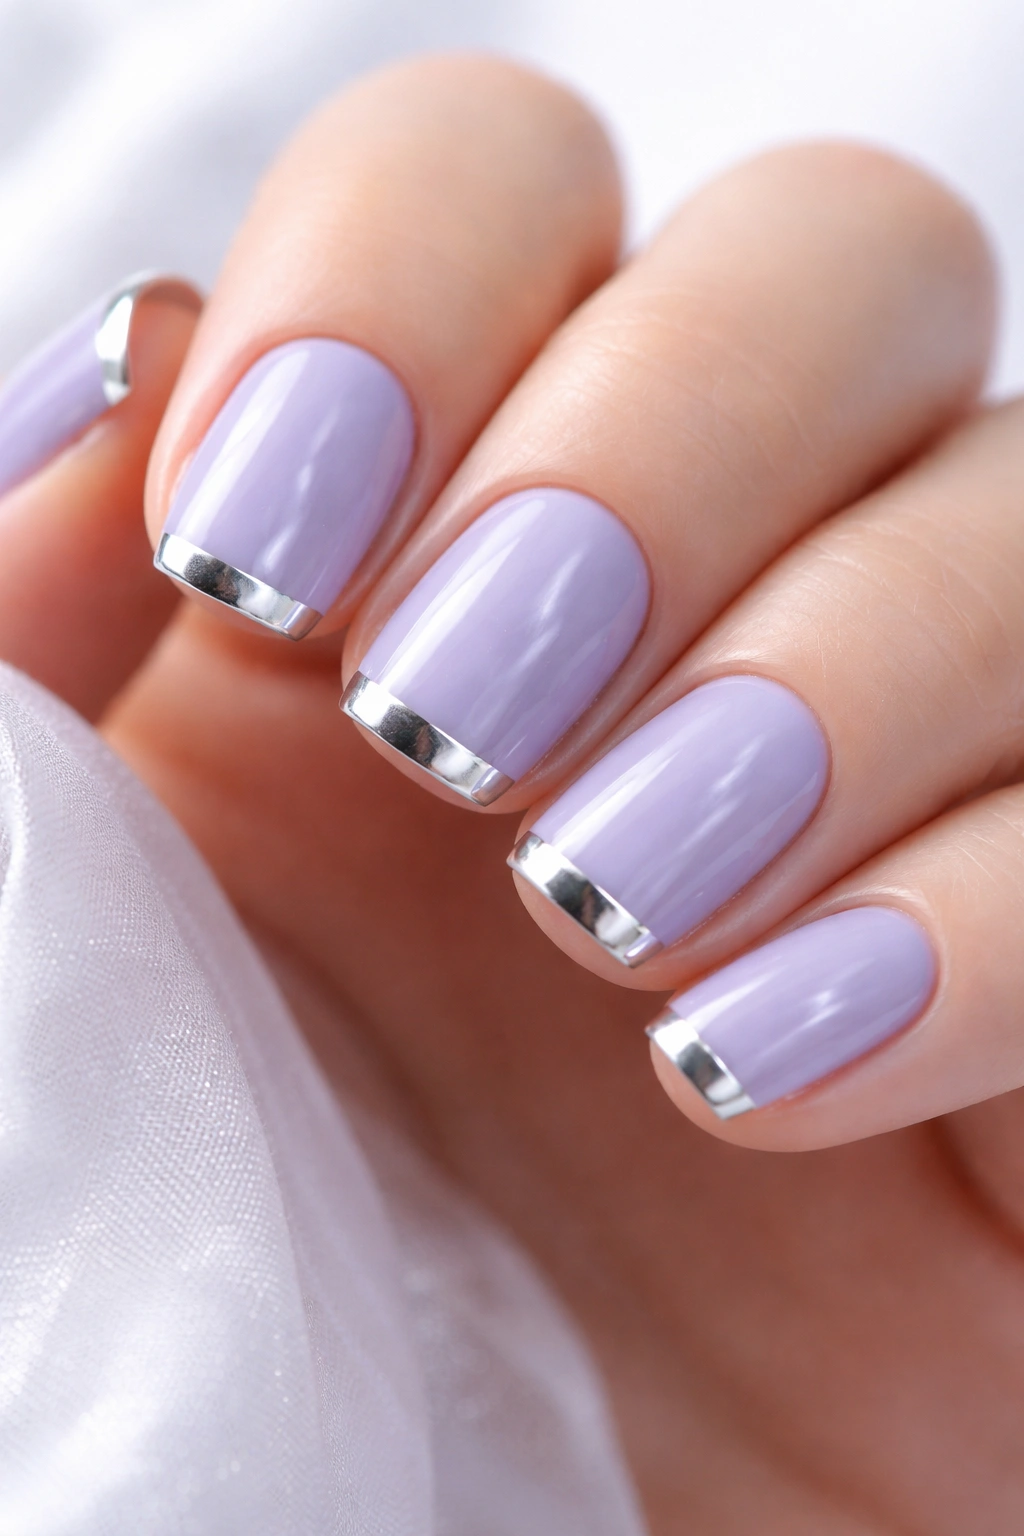
Icy lavender—that cool, slightly silvery take on purple—is the color that bridges spring and summer perfectly. Paired with chrome tips or a subtle metallic edge, this design feels modern and a little bit edgy while still being very spring. On short squoval nails, the slight color contrast between the base and the metallic effect creates enough visual interest to feel special without looking complicated.
Why Icy Lavender Reads as Spring
Lavender has been spring’s unofficial color for years, appearing in everything from garden guides to fashion runways. The icy, cool-toned version specifically feels contemporary and slightly futuristic, like spring is being reimagined for a modern aesthetic. When combined with metallics, it becomes a design that photographs beautifully and feels intentional.
Chrome and Metallic Application
- Paint icy lavender as your base (two coats, fully dried)
- Option 1: Use chrome powder on a gel polish top coat, applying just to the tips for a gradient effect
- Option 2: Use a metallic marker or pen to create a thin metallic line at the tip edge
- Option 3: Apply a thin stripe of metallic polish (gold, silver, or rose gold) horizontally across the tips
- Seal everything with a clear top coat to protect the metallic elements
- The metallic should feel like a subtle accent, not the main event
Worth knowing: Chrome powders require a sticky gel base layer, so if you’re using traditional polish, stick with metallic polish instead for easier application. Metallic polishes give you more control and less mess.
8. Soft Yellow with White Dots
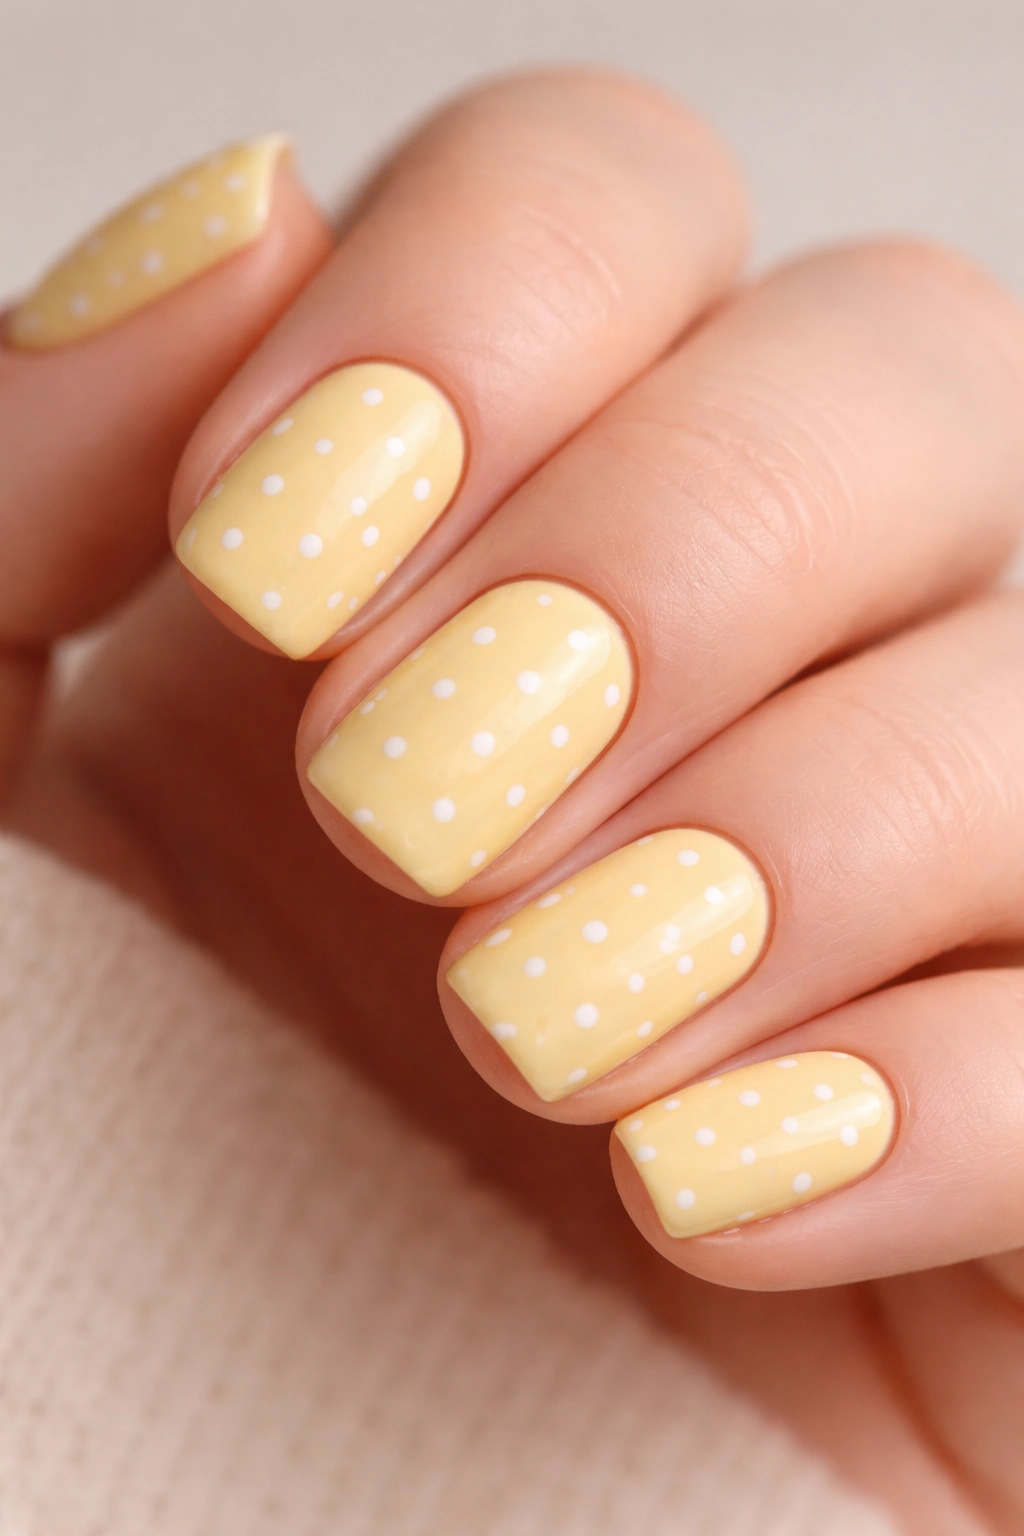
Soft, buttery yellow is an underrated spring color—it’s cheerful without being neon, warm without being orange, and surprisingly flattering on most skin tones. Adding small white dots in a scattered or organized pattern creates a playful, almost whimsical vibe that feels spring without being juvenile. On short squoval nails, this combination is perfectly proportioned and reads as confident and intentional.
The Charm of Unexpected Spring Colors
When people think spring nails, they think pastels and florals. Soft yellow sits in a sweet spot—it’s clearly seasonal, but it’s not the first color people reach for, which makes the choice feel personal and thoughtful. The white dots add structure and visual interest without requiring artistic skill.
Creating Polka Dot Details
- Apply soft yellow base in two coats
- Use a dotting tool (or the end of a bobby pin) dipped in white polish to create dots across the nail
- You can arrange dots randomly for a carefree feel or organize them in loose rows for something slightly more structured
- Make the dots consistent in size—uniformity creates visual harmony even when placement is scattered
- Apply a glossy top coat to finish
- The overall effect should feel balanced rather than chaotic
Insider note: Dotting tools are inexpensive and make perfectly round dots far easier than trying to use a brush. If you don’t have one, a bobby pin or even the back of a hair clip can work in a pinch.
9. Nude-Pink with Thin Rose Gold Stripes
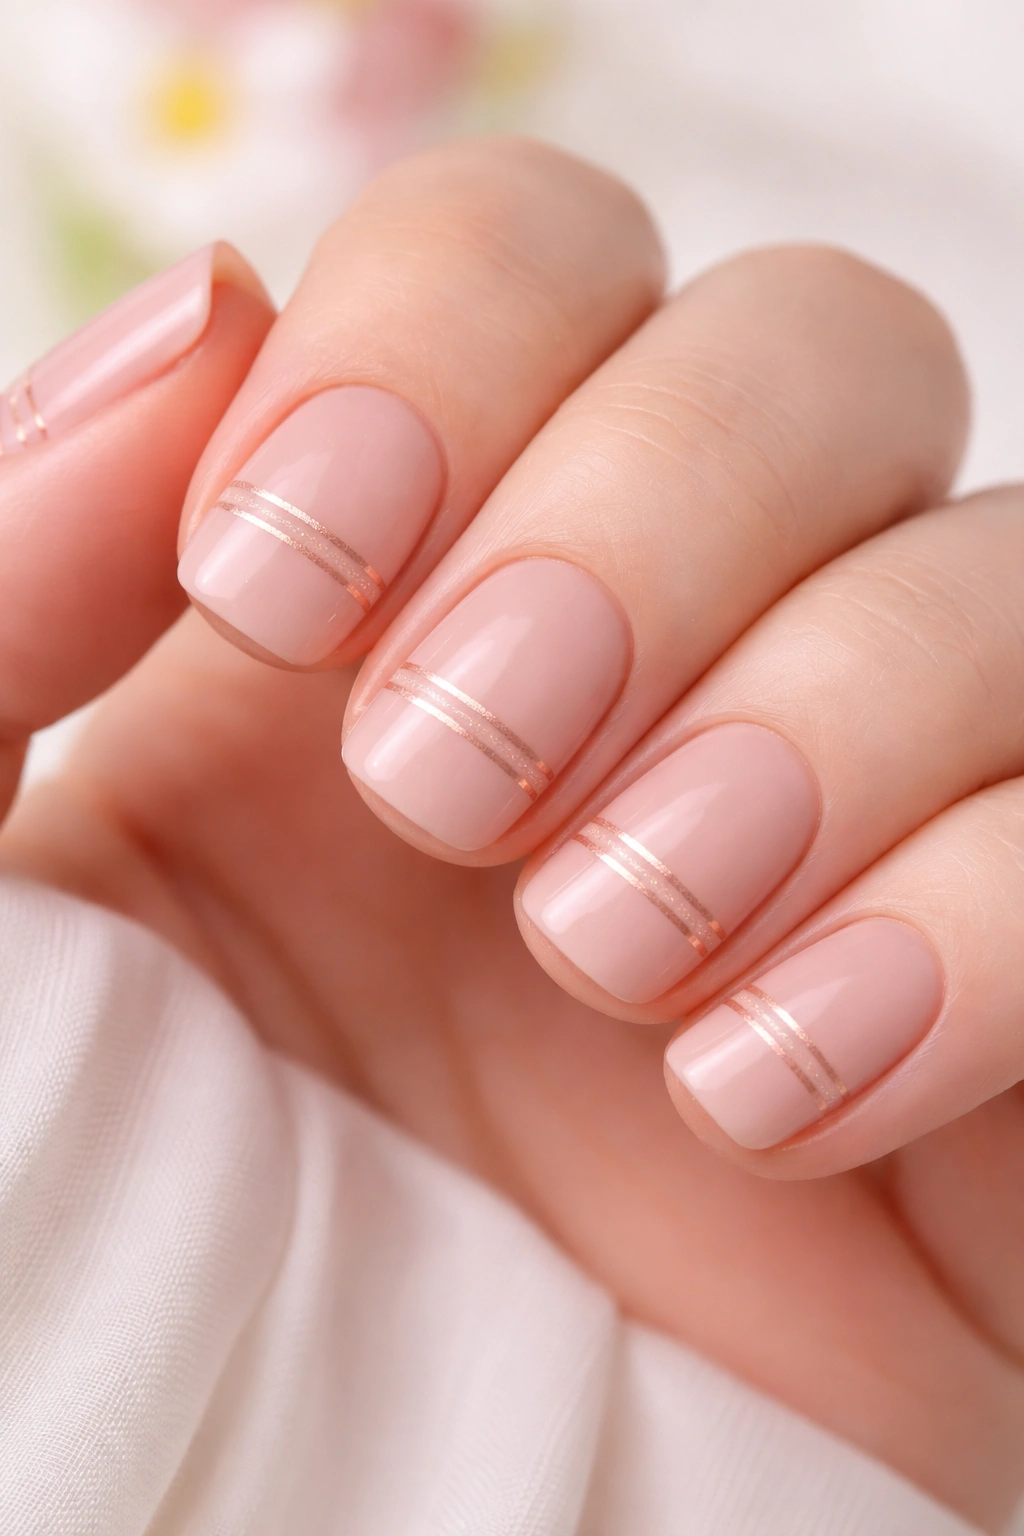
This design is the definition of understated elegance—a warm nude-pink base with super-thin rose gold horizontal or vertical stripes creates a look that’s sophisticated enough for any setting but still undeniably spring. On short squoval nails, the stripe element prevents the design from feeling too minimalist or boring, while the color combination keeps it warm and feminine without being pink-pink.
Nude-Pink as Spring’s Neutral
Nude-pink is the most universally flattering shade because it sits somewhere between your actual skin tone and a soft pink, creating an elongating effect while feeling polished. When you add metallic stripes, the design gains dimension and catches light beautifully without looking too trendy or experimental.
Stripe Placement and Execution
- Paint nude-pink base in two coats, ensuring complete, even coverage
- Once completely dry, use a thin striping brush dipped in rose gold metallic polish
- Paint thin, evenly-spaced horizontal or vertical stripes across the nail—aim for about 4-6 thin stripes depending on nail width
- Stripes don’t need to be perfectly straight; very slightly wavy stripes often look more interesting and less rigid
- Seal with a glossy top coat to make the metallic elements pop
- The stripes should be thin enough to complement the base rather than dominate it
Pro tip: If you’re worried about achieving even spacing, use a thin striping brush and establish a rhythm—paint one stripe, skip, paint one stripe, skip—rather than trying to eyeball even spacing.
10. Mint Green with Micro Glitter Gradient
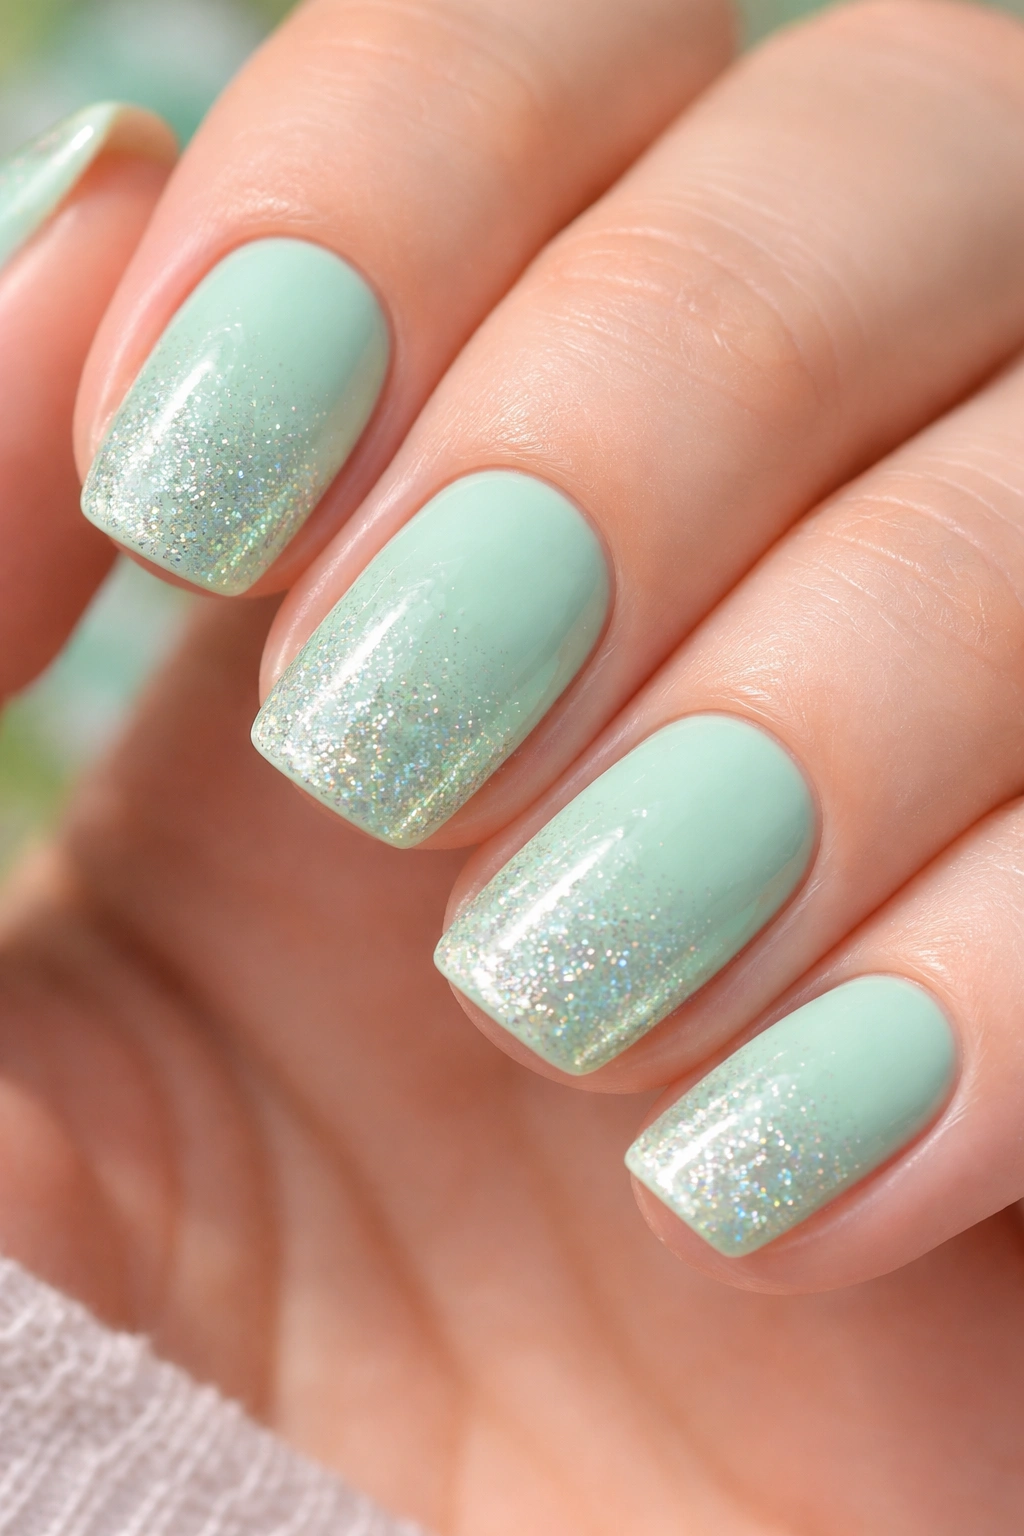
Mint is spring’s cooling color—it feels fresh, energizing, and pairs beautifully with subtle sparkle. A gradient where micro glitter concentrates at the tips and gradually fades to clear mint at the cuticle creates depth and visual movement without overwhelming short nails. This design is playful enough for casual wear but polished enough for professional or formal settings.
Mint Green’s Spring Psychology
Mint evokes fresh growth, cooling water, and the refreshing shift from winter to warmer weather. Unlike bright spring greens, mint is soft and approachable. When combined with just a hint of glitter, it becomes a design that feels both contemporary and timeless.
Creating a Glitter Gradient Effect
- Apply opaque mint green base in two coats
- Mix clear polish with micro glitter (available in nail supply shops) on a palette or glass surface
- Apply this glitter mixture to the tip area of the nail with a sponge or brush, gradually reducing the amount of glitter as you move toward the cuticle
- By the time you reach the cuticle area, you should have mostly clear polish with just hints of glitter
- The gradient should feel organic and soft, not abruptly striped
- Seal with a clear glossy top coat
- The final effect is mint that seems to sparkle more toward the tips
Worth knowing: Micro glitter is much easier to work with than large chunky glitter because it doesn’t create sharp edges and looks more refined on short nails. It also applies and removes more cleanly.
11. Peachy Nude with Negative Space Geometry
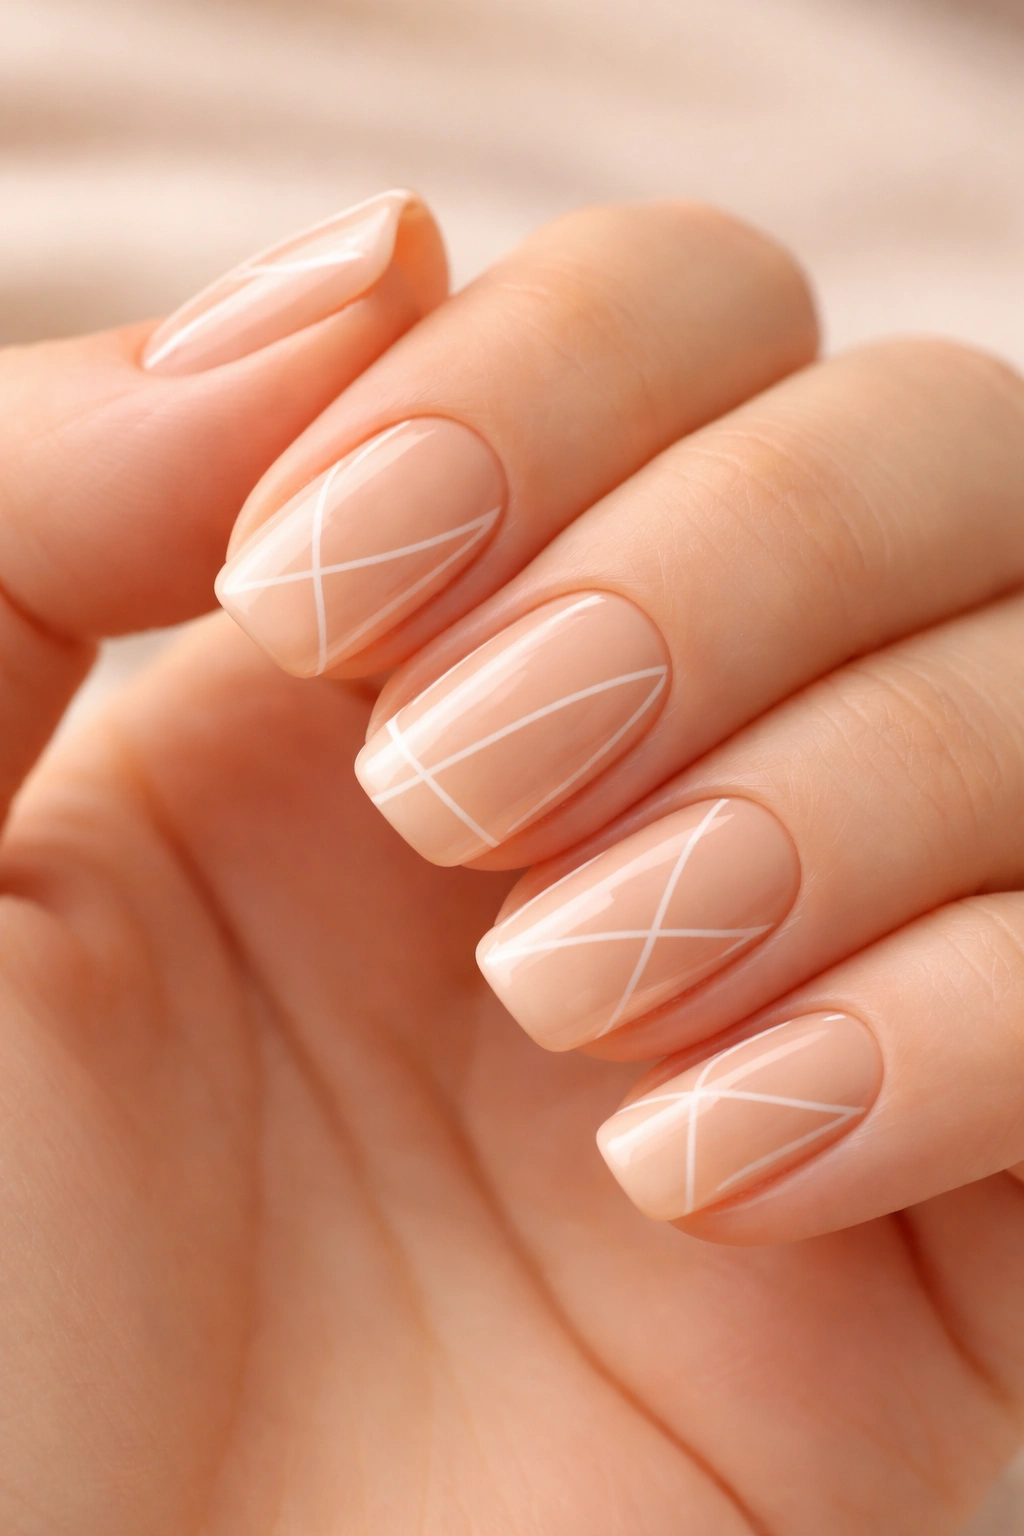
Peachy nude is the warm, forgiving base that works with all skin tones, and introducing negative space (bare nail showing through) with a geometric pattern creates a modern, architectural look without requiring color density. On short squoval nails, negative space designs feel sleek because the geometric shapes create direction and movement. This design feels especially spring-ready because it combines warmth with contemporary aesthetics.
Negative Space as a Design Technique
Negative space is when you deliberately leave bare nail visible as part of the design rather than covering the entire nail with polish. This technique creates an airy, less-is-more aesthetic that’s perfectly aligned with spring’s lighter energy. It’s also forgiving because if the geometric shapes aren’t perfectly precise, slight imperfection reads as intentional.
Creating Geometric Negative Space
- Paint peachy-nude base in two coats, or alternatively, use skin-tone as the base
- Use a thin striping brush or pen to outline geometric shapes (triangles, thin rectangles, thin lines) without filling them in
- The outlined shapes should frame sections of bare nail, creating visual interest and a modern look
- You can create one focal shape or multiple shapes depending on your preference
- Keep shapes simple and don’t overcomplicate the design—three or four geometric elements across the nail is plenty
- Finish with a glossy top coat over the painted portions only (the bare nail sections won’t have top coat, which is fine)
Pro tip: If geometric precision feels intimidating, start with simple thin diagonal lines or scattered triangles rather than trying to create a complex interlocking pattern.
12. Pale Pink with Gold Leaf Accents
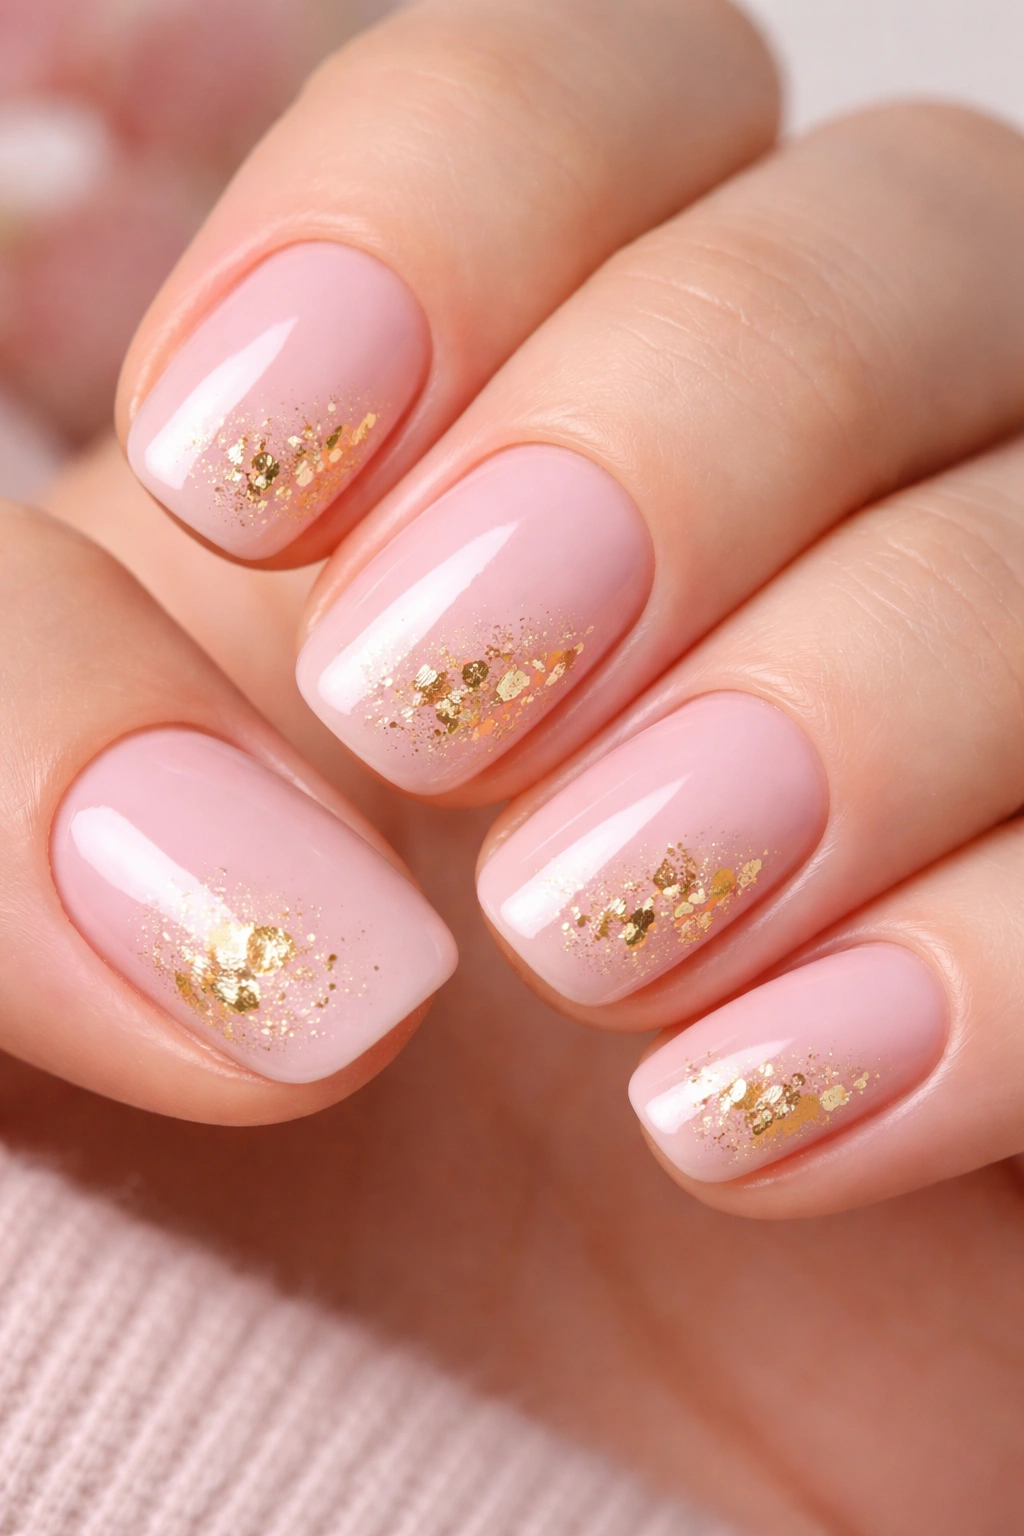
Gold leaf nail art sounds fancy and complicated, but it’s surprisingly approachable and creates a look that feels luxury and special without requiring serious artistic skills. Pale pink acts as the elegant canvas, and small pieces of gold leaf pressed onto the nail create texture and visual interest. On short squoval nails, you only need one or two small gold leaf applications to create impact.
Why Gold Leaf Feels Spring
Gold is spring’s metallic—warm, optimistic, and celebratory. Paired with soft pink, it creates a look that’s both romantic and sophisticated. Gold leaf specifically creates texture that catches light beautifully, making the nail feel dimensional and intentional.
Applying Gold Leaf Nail Art
- Paint pale pink base in two coats
- Once fully dry, apply a very thin layer of clear glossy or slightly sticky top coat to the area where you want to place gold leaf
- Using tweezers, carefully pick up tiny pieces of gold leaf and press them gently onto the sticky top coat
- The leaf should adhere without additional pressure
- You can apply multiple small pieces or create one larger accent area—experiment with what feels balanced on your nail
- Once the gold leaf is placed and the adhesive is set, apply a final glossy top coat to seal everything
- Be gentle when applying and removing the final top coat to avoid shifting the delicate leaf
Worth knowing: Gold leaf comes in booklets with tissue-thin sheets. It’s more affordable than you’d expect and lasts indefinitely if stored in a cool, dry place. A booklet of gold leaf costs just a few dollars and provides enough for multiple manicures.
13. Warm Beige with Thin Burgundy Accent Line
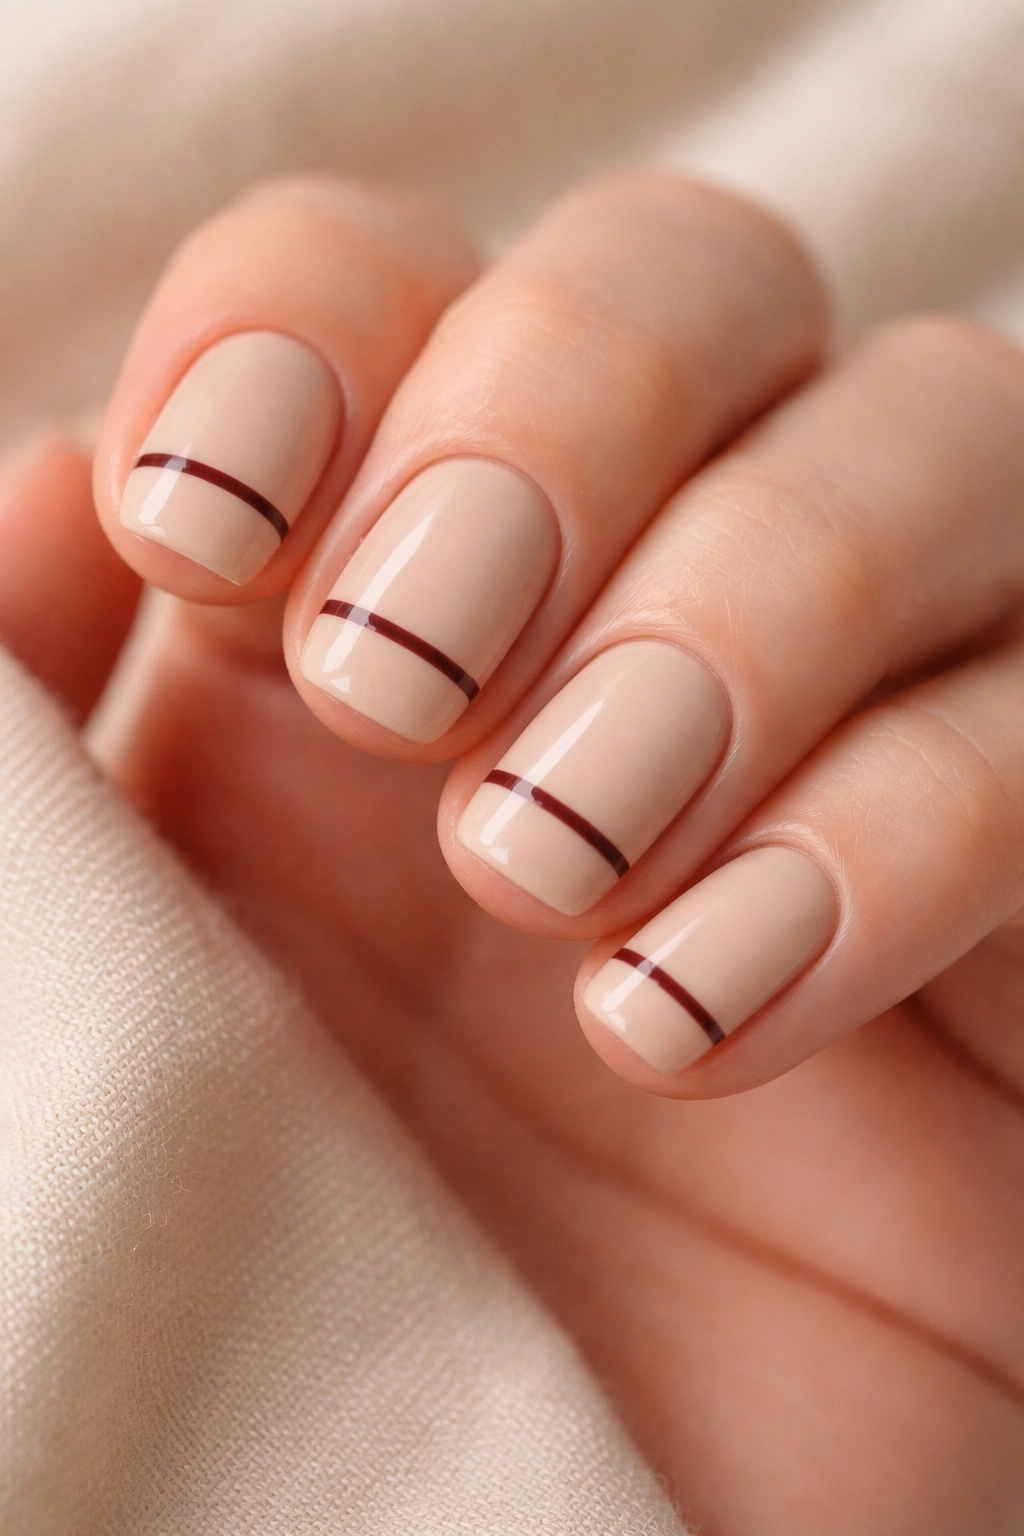
This design combines two elements that feel both spring and timeless: warm beige that elongates the nail and creates a neutral base, paired with a thin burgundy line that adds understated sophistication. This look is perfect for anyone who wants nail design to feel like detail rather than statement. On short squoval nails, the thin accent line creates enough visual interest without overwhelming the shape or size.
Beige as the Ultimate Spring Neutral
Beige is having a major renaissance because it’s genuinely flattering, photograph-friendly, and works with literally every outfit and aesthetic. Unlike stark white or pure nude, warm beige has personality while remaining neutral. The burgundy accent prevents it from feeling boring while staying sophisticated.
Creating the Accent Line
- Paint warm beige base in two coats for even, opaque coverage
- Once fully dry, use a thin striping brush dipped in burgundy or deep wine polish
- Paint one thin line horizontally across the middle of the nail, just below the tip, or vertically down the side of the nail
- The line should be thin enough to feel like an accent rather than a stripe—think of it as a detail that adds polish rather than a design element
- Ensure the line is clean and intentional (slightly wobbly is fine; sloppy is not)
- Seal with a glossy top coat
Pro tip: If you’re not confident in freehand line-drawing, use a thin nail art pen instead of a brush—the built-in tip makes control much easier.
14. Ballet Pink with Subtle Ombre Fade
Ombre nails, where one shade gradually transitions to another, have maintained popularity because the technique is forgiving and creates beautiful visual depth. On short squoval nails, an ombre from ballet pink to white or from ballet pink to nude creates a sophisticated look that’s both modern and romantic. The key is keeping the transition soft and subtle rather than dramatic—spring is about softness, after all.
Ombre as a Springtime Technique
Ombre is ideal for spring because it inherently creates a soft, transitional aesthetic that mimics the season’s gentle shifts and changes. Unlike sharp color blocks, ombre feels organic and natural. On short nails, subtle ombre is far more flattering than dramatic color shifts.
Creating a Soft Ombre Effect
- Paint a ballet pink base and let it dry completely
- Mix a lighter shade (white, pale nude, or very pale pink) on a palette or glass surface
- Using a makeup sponge, gently dab this lighter shade at the tips and gradually blend it into the base pink using stippling motions
- Don’t worry about creating a perfectly clean transition—slight irregularity reads as intentional and soft
- You’re aiming for a gradient that transitions gradually from full-color at the cuticle to very light at the tips
- Finish with a glossy top coat to seal and add dimension
- The result should feel like the nail gradually fades toward the tips rather than a sudden color change
Worth knowing: Ombre is one of the easiest techniques to do at home because perfect blending isn’t necessary—the sponge naturally creates soft transitions even if you’re not trying to be perfect.
15. Creamy Ivory with Small Pearl Accents
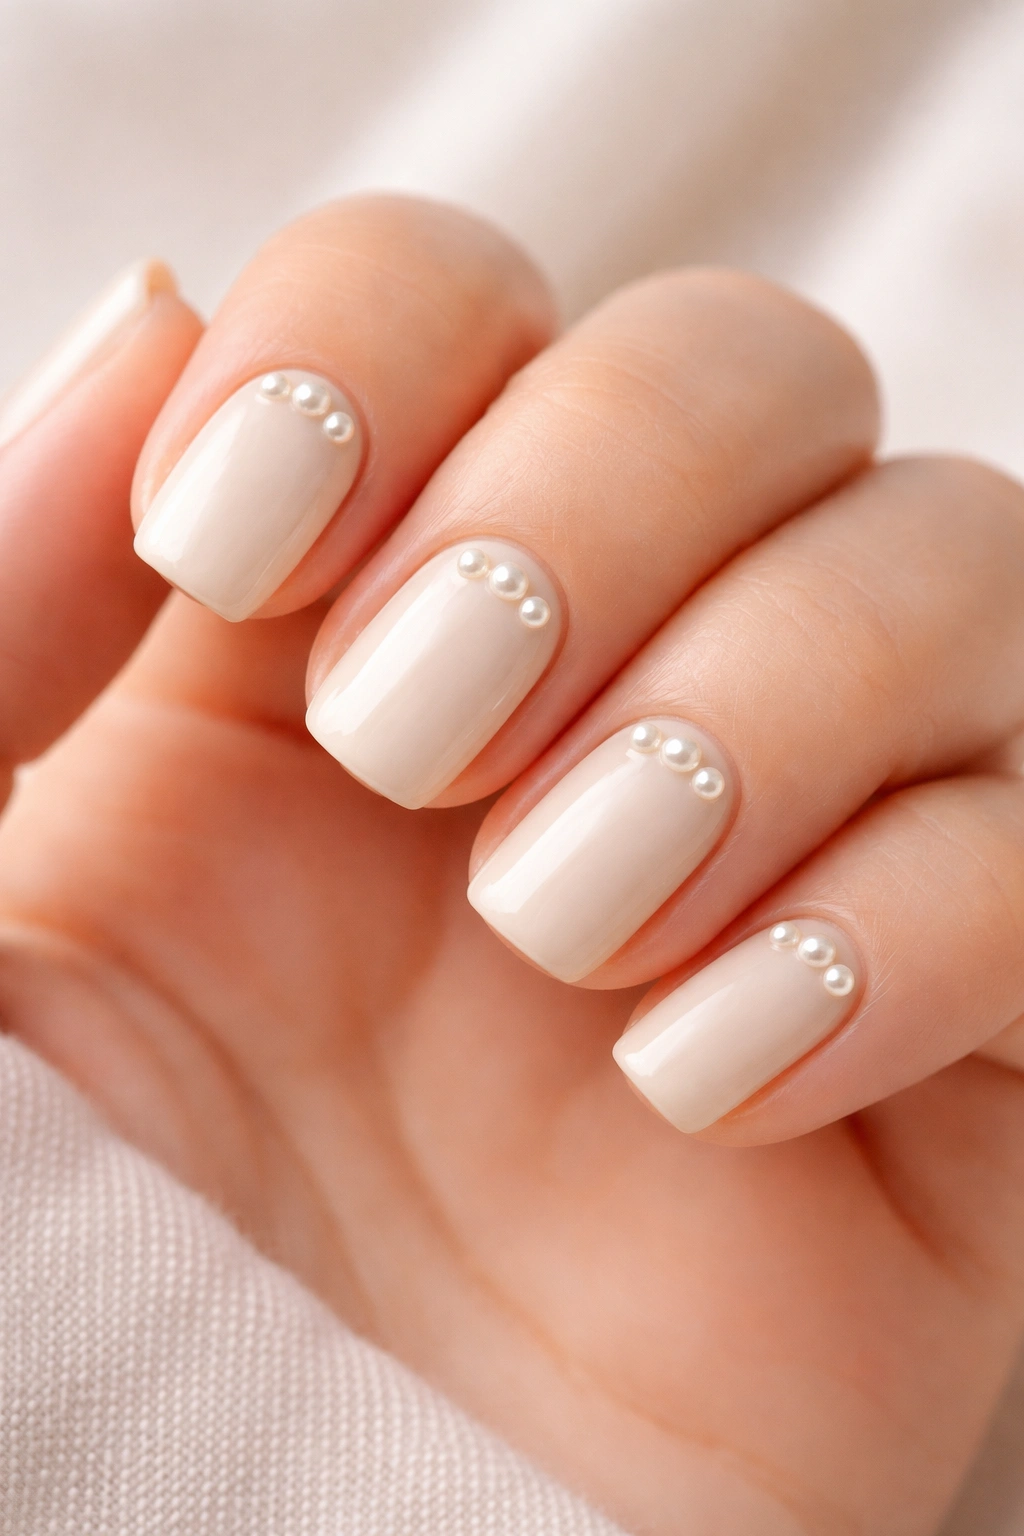
Ivory is arguably the most elegant nail color, and adding small pearl accents—either pearl polish details or actual pearl-effect polishes applied in small areas—creates a design that’s refined without being fussy. On short squoval nails, this approach feels grown-up and intentional while remaining completely wearable for any occasion. Pearls have a luxury quality that elevates even the simplest design.
Why Ivory and Pearl Feel Spring
Ivory is the color of spring flowers, fresh linen, and new beginnings. Pearls add shimmer and subtle iridescence that catches light the way spring light does. Together, they create a look that’s both classic and contemporary, perfect for anyone who wants their nails to feel special without drawing attention.
Incorporating Pearl Elements
- Apply creamy ivory base in two coats—the coverage should be smooth and opaque
- Option 1: Use a pearl-finish polish to create small dots or a thin accent stripe (using a dotting tool or thin brush)
- Option 2: Mix pearl polish with a tiny amount of clear polish and apply in small concentrated areas for a more subtle pearl glow
- Option 3: Use pearl duochrome polish (shifts color depending on angle) as a thin accent stripe
- The pearl elements should feel delicate and restrained rather than flashy—think of them as jewelry for your nails
- Seal with a glossy top coat to make the pearl elements catch light beautifully
Insider note: Pearl polishes and pearl duochromes come in various color variations—rose gold pearls, silver pearls, and iridescent pearls all pair beautifully with ivory bases.
Final Thoughts
Short squoval nails give you the foundation to wear virtually any design that speaks to you, and spring is genuinely the easiest season to style them because the aesthetic naturally favors softness, subtlety, and gentle details. The designs above range from minimalist to slightly more decorated, but none require advanced artistic skills or expensive products. What matters most is choosing a base color that makes you feel good and adding details that feel intentional rather than random.
The real magic of spring nail design is that it celebrates the joy of renewal and lightness without requiring your nails to do heavy lifting. Short squovals work because they read as polished and put-together while remaining practical for real life. You’re not choosing between beautiful nails and functional nails—on short squovals with spring designs, you get both.
Whether you’re drawn to soft pastels, unexpected metallics, or botanical details, the key to pulling off any of these designs is patience and precision over perfection. A slightly imperfect soft gradient or a gently wobbly line often reads as more charming and intentional than a technically flawless design that feels stiff. Spring is about embracing growth, lightness, and forward momentum—let your nails reflect that energy and confidence.
