

Pink and white ballerina nails can look clean and expensive—or they can look flat, chalky, and a little unfinished. The gap between those two results is smaller than most people think. It usually comes down to undertone, tip placement, and how the white plays against the tapered ballerina shape.
That shape matters more than people give it credit for. A ballerina nail has a long, narrowing sidewall with a squared-off tip, so color placement gets noticed fast. Put a thick white tip on a short nail and the whole set can feel stubby. Use a pink that turns orange against your skin and even sharp shaping will not save it.
I’ve seen the best pink and white sets use restraint. A milky pink base hides growth better than a flat bubblegum polish. A soft white can make the free edge look longer. Even the smile line matters—high and curved feels dressy, lower and straighter feels cleaner. Little choices. Big difference.
If you’re saving ideas for your next salon visit, start with the sets that fit your nail length, your job, and how much upkeep you can live with. Some of these are low-drama fill-friendly designs. Others are the kind of manicure you wear when you want your hands to do some talking.
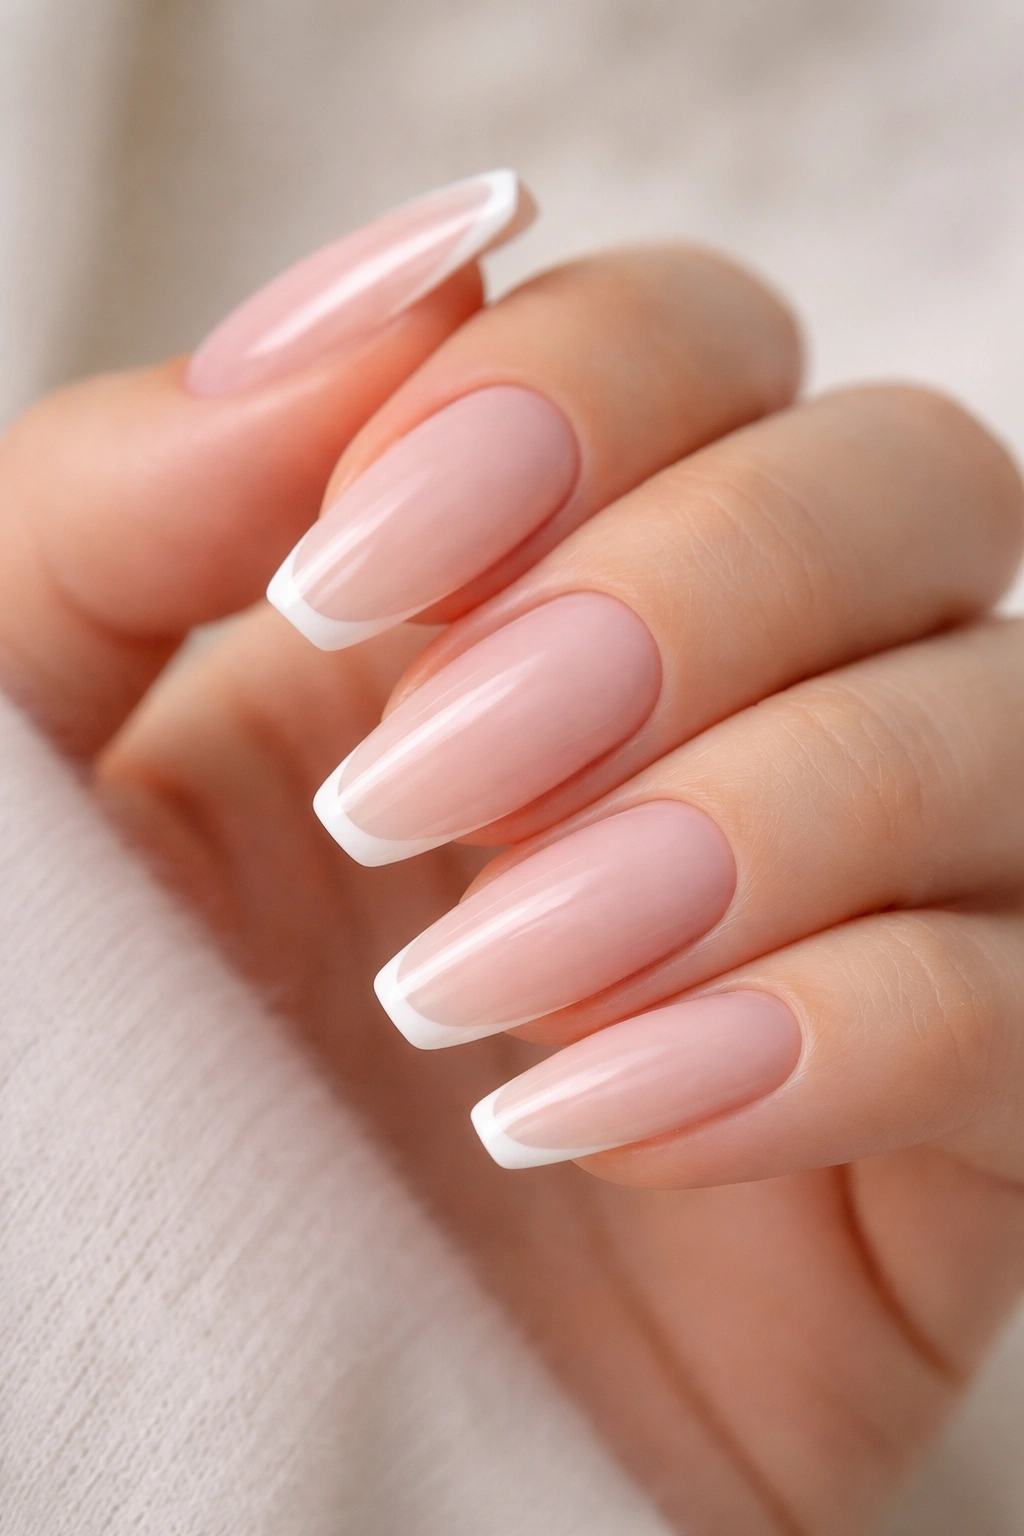
1. Soft Milky Pink With a Thin White Micro-French
This is the set I keep coming back to.
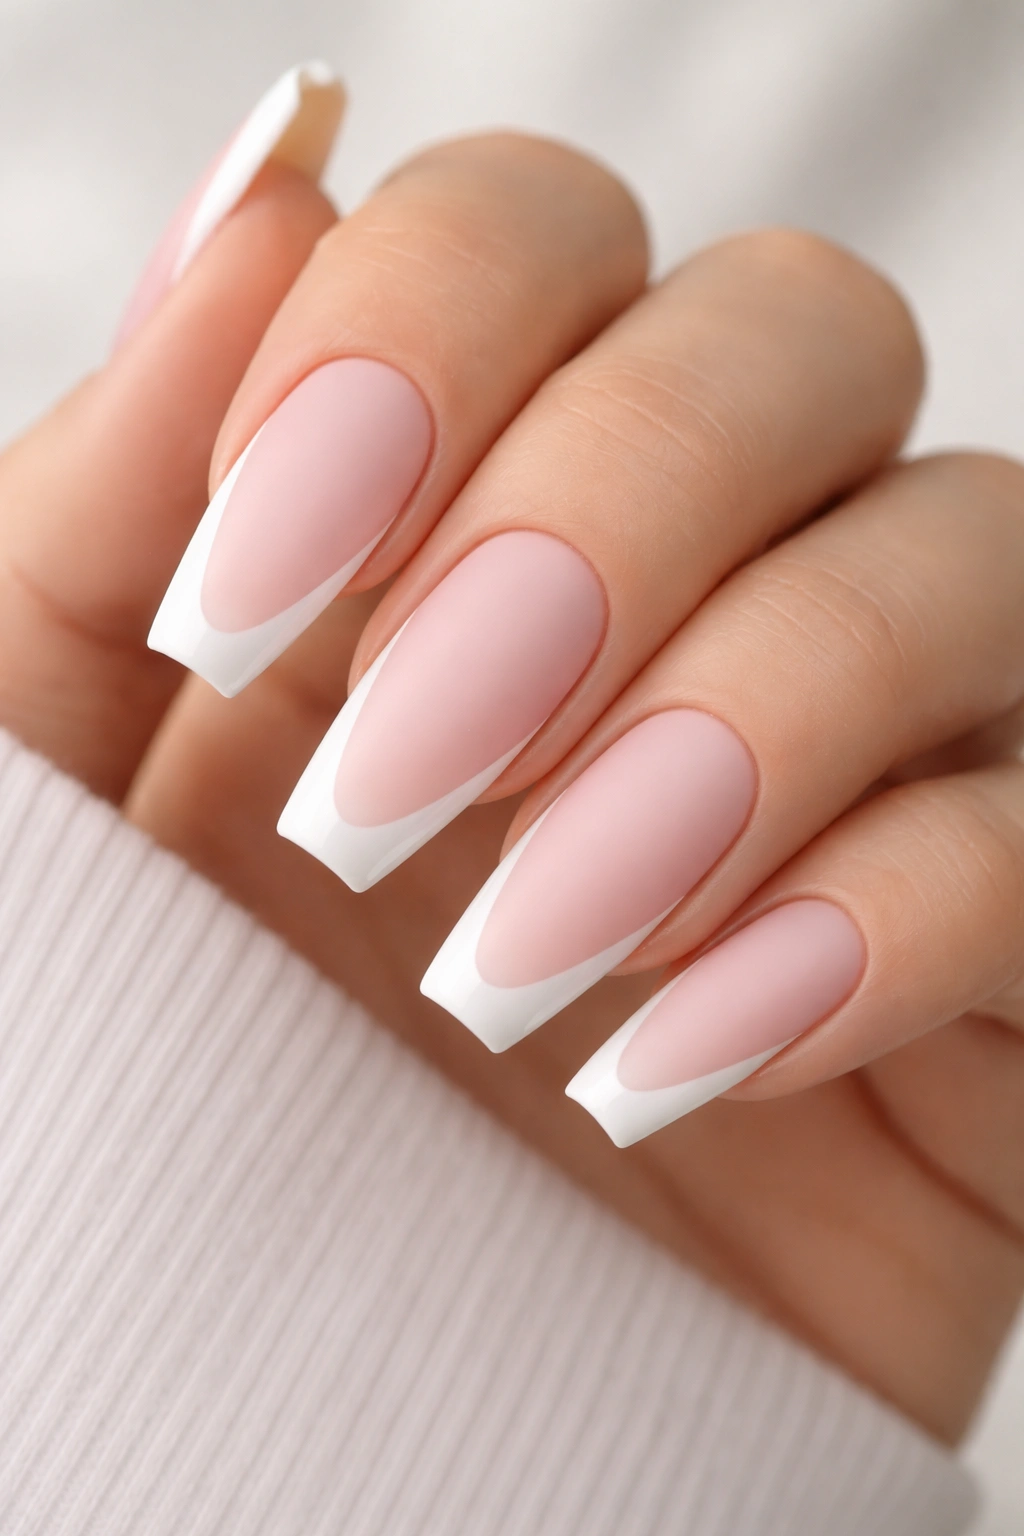
A milky pink base with a narrow white line at the tip does something that loud nail art rarely manages: it makes your hands look neat from every angle without stealing the whole outfit. On a ballerina shape, that skinny French edge follows the straight tip and keeps the taper visible, which is why it looks sharper than the same design on a round or almond nail.
Why this one works so well on ballerina nails
The key is proportion. Keep the white edge around 1 to 2 mm thick on medium-length nails, maybe 3 mm if the set is long. Any wider and the tip starts eating up the visible nail plate, which makes the shape feel heavier.
Milky pink matters too. A sheer cool pink softens the border between your natural nail and the product, so regrowth shows up less harshly after 10 to 14 days. If your skin has a warm or olive cast, ask for a pink with a touch of beige instead of a baby pink that can pull chalky.
What to ask your nail tech for
- A semi-sheer builder gel or rubber base in milky pink, not an opaque pastel.
- A hand-painted white micro-tip, since pre-shaped French guides often look too blunt on tapered nails.
- A high-gloss top coat, because this design relies on crisp contrast more than texture.
- A softly tapered ballerina shape, with the sidewalls filed straight so the thin white edge does not wobble.
Best match: gold rings, bridal outfits, office wear, and any day when you want clean nails that do not need explaining.
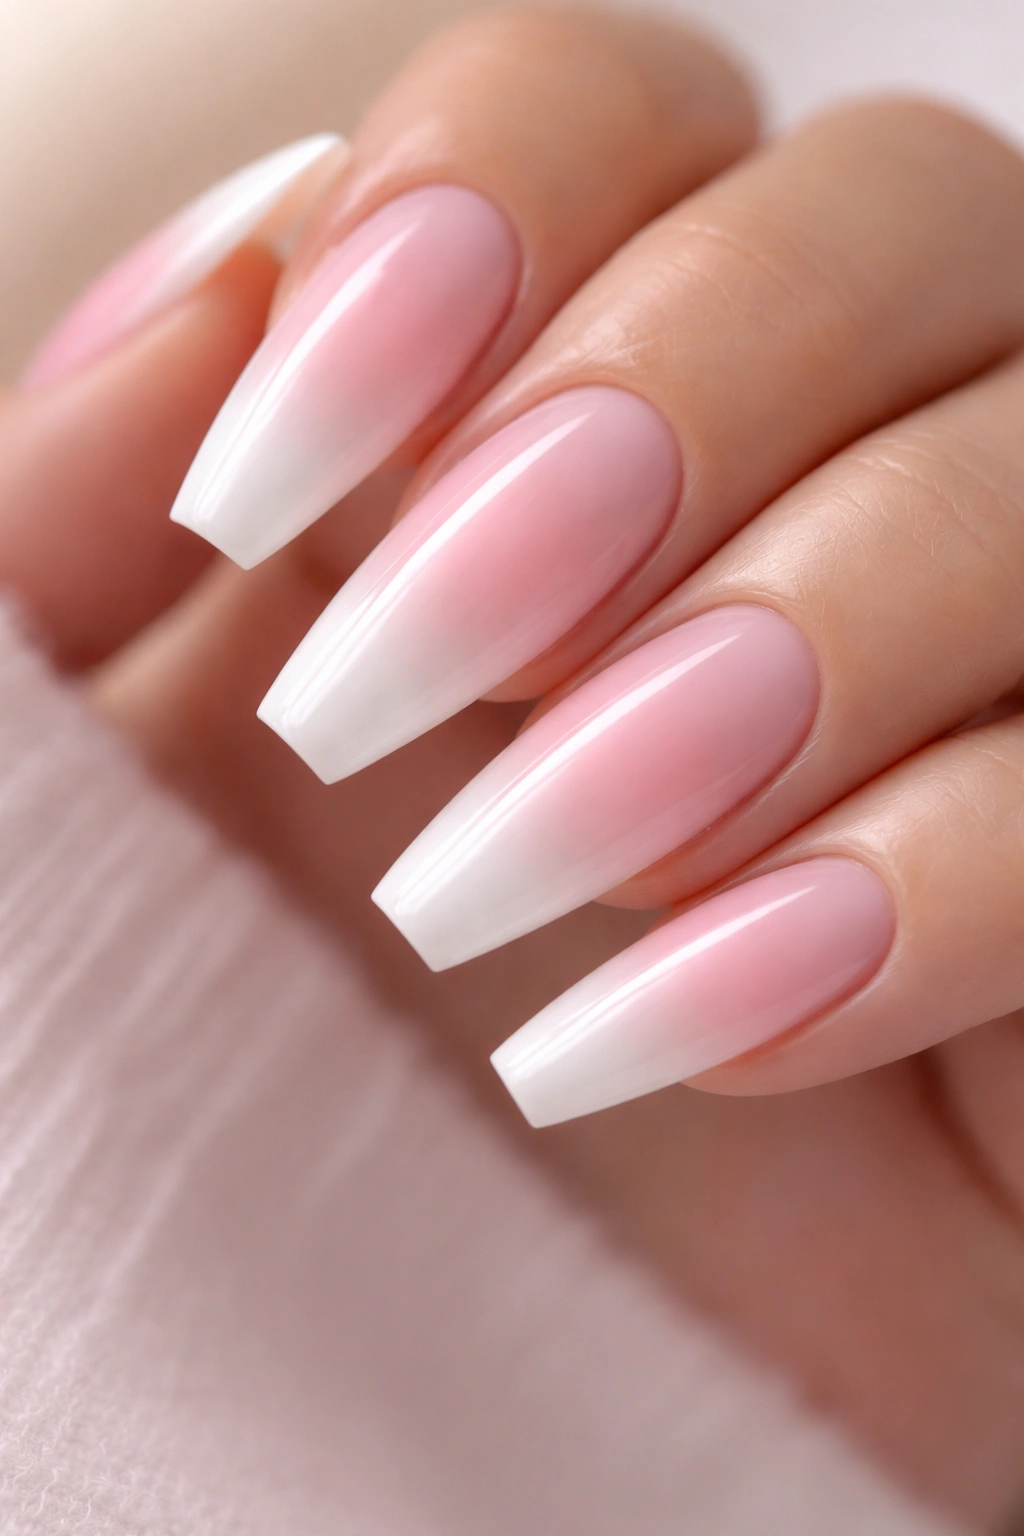
2. Pink and White Ballerina Nails With a Baby Boomer Fade
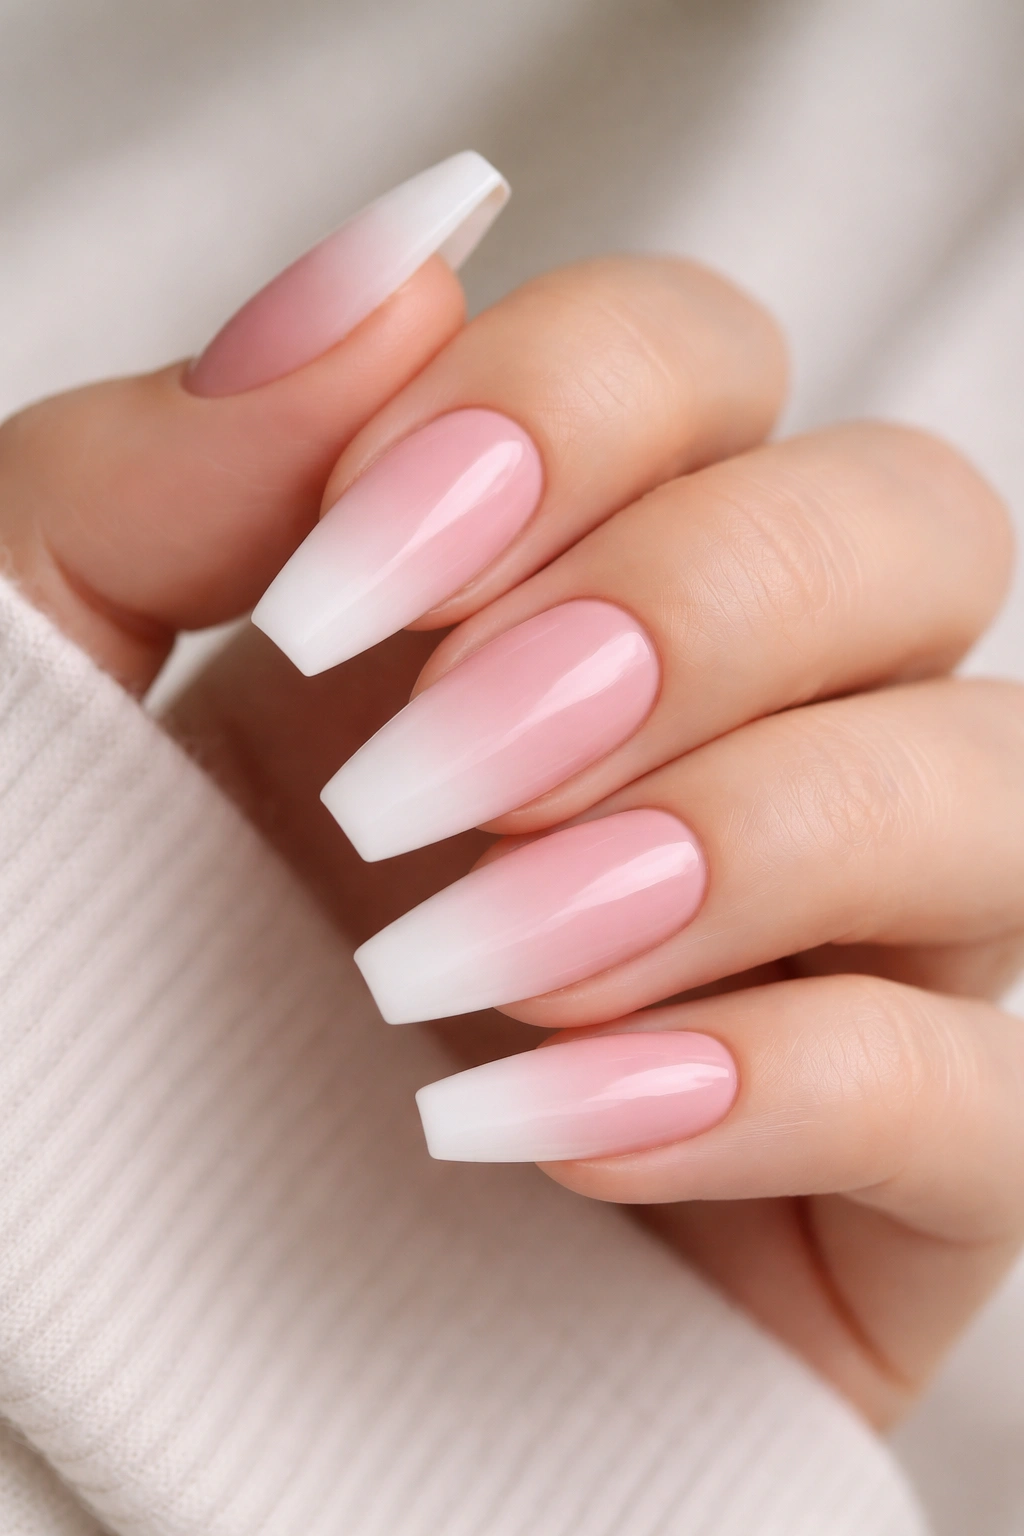
If a harsh French tip feels too stiff, the baby boomer fade is the answer. It blends soft pink at the cuticle into cloudy white at the tip, and on ballerina nails that fade looks longer and smoother because the shape already narrows toward the free edge.
The first thing I like about this set is how forgiving it is. Regrowth hides better than it does with a sharp French line, small chips are harder to spot, and the white does not hit you all at once. You get contrast, but it comes in gradually. That matters when you want something polished that still feels easy to wear on a Tuesday morning.
There’s a right way to do this fade. The white should begin around the upper third of the nail, not halfway down, unless the nails are long. Pull the blend too low and the set starts looking dusty instead of airy. A makeup sponge can work for regular polish at home, though salon airbrush or gel blending usually gives the cleanest result.
One warning: cheap white gel can turn the fade patchy. You’ll see little cloudy bands, especially in daylight. Ask for soft white rather than bright correction-fluid white if you want the blend to stay smooth.
I’d wear this for weddings, interviews, or weeks when you want your nails to look finished without checking them every three hours.
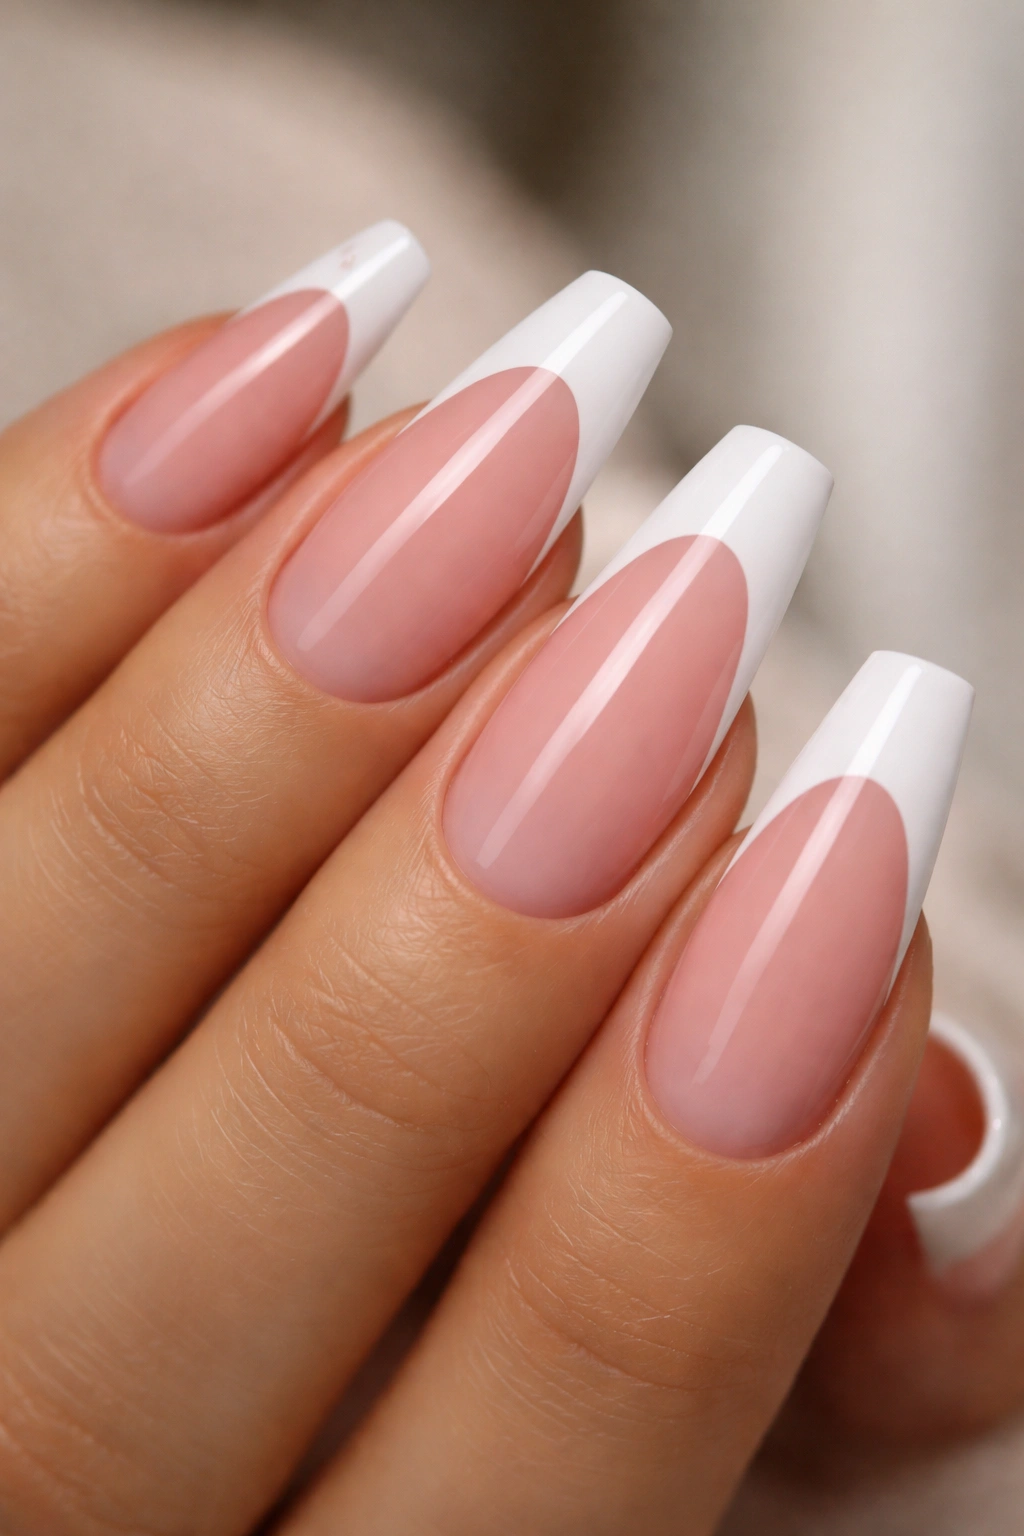
3. High-Contrast Deep Smile Line French
Want a French manicure that has more backbone?
A deep smile line French cuts the white tip into a pronounced U-shape, almost like the nail is smiling back at you. On a ballerina shape, that curve gives structure to the long sidewalls and makes the white tip look intentional rather than pasted on. It is cleaner than swirl art, sharper than ombré, and a lot dressier than a standard straight French.
You do need length for this one. Short ballerina nails can wear it, but the smile line has to sit higher and thinner or it crowds the nail bed. Medium and long sets are where this design earns its place.
How to keep it from looking harsh
Use a sheer pink or rosy nude base, not a flat pale polish. The transparency lets the smile line stand out while keeping the whole set from looking blocky. I also prefer a white tip with a soft cream cast rather than icy paper white. That tiny warmth stops the contrast from getting too stiff.
Ask your tech to file the tip flat and even before painting. A crooked free edge wrecks this design fast because the smile line draws your eye straight to the tip.
Salon notes worth saying out loud
- Ask for the smile line to sit 2 to 4 mm above the free edge on longer nails.
- A fine liner brush gives a better curve than a bottle brush.
- Gloss beats matte here. Matte can make the white look dry.
- If you wear silver jewelry often, a cooler pink base usually ties the look together better.
This one is not shy. That is the point.
4. White Chrome Tips Over a Sheer Pink Base
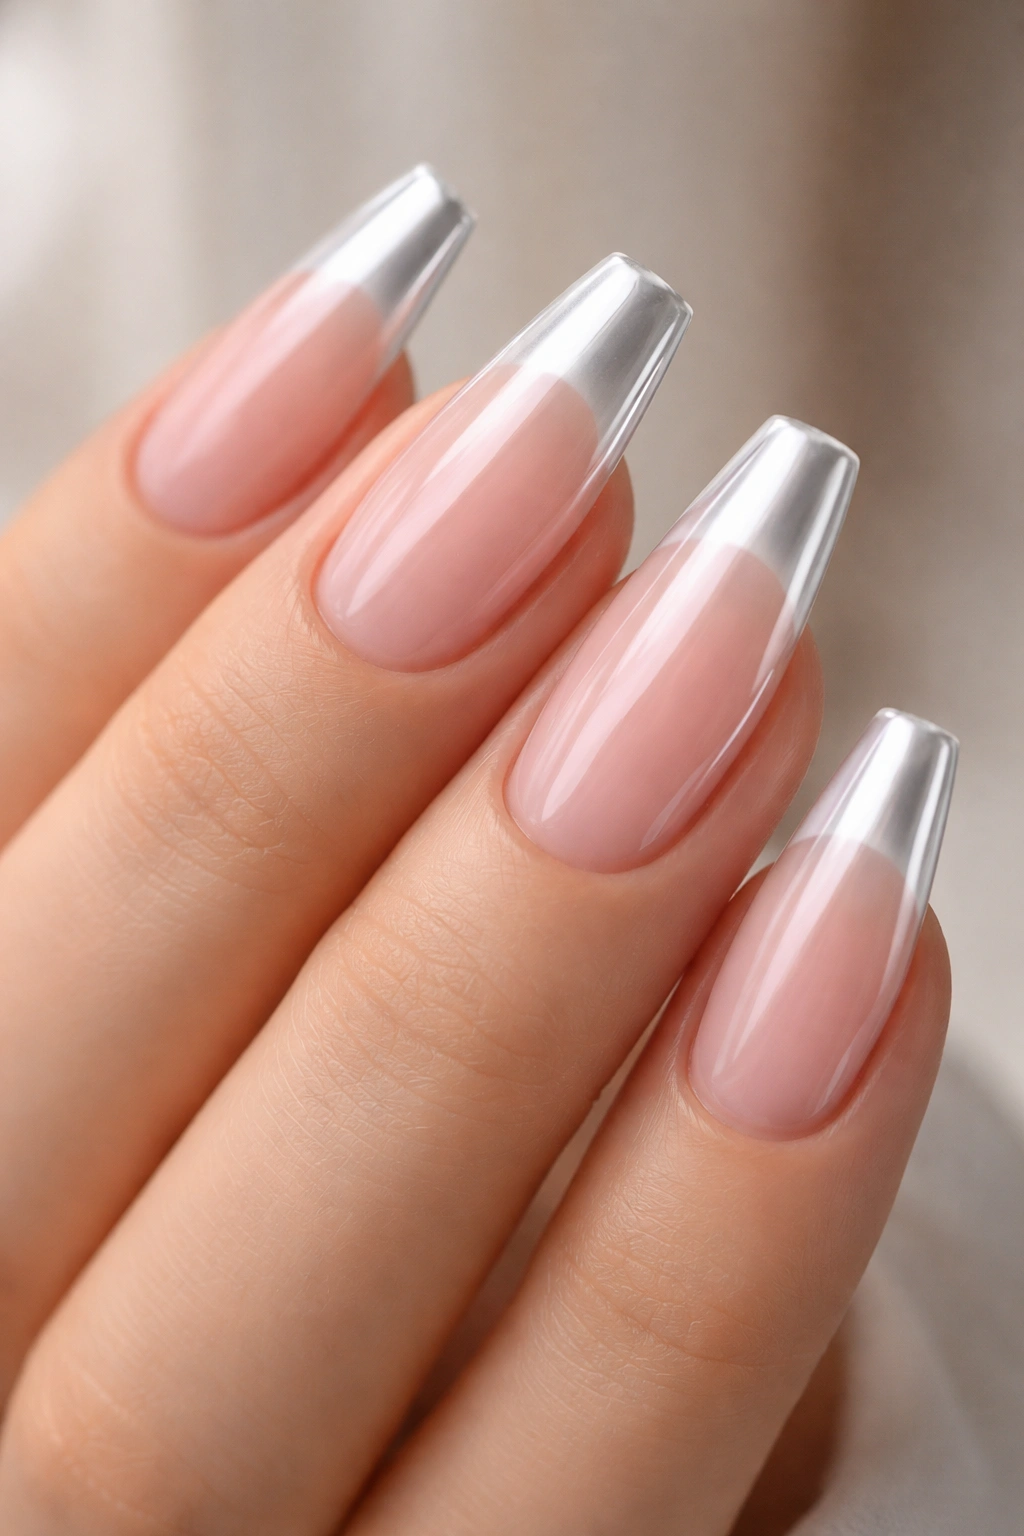
White chrome tips look far better on ballerina nails than on most other shapes. The flat tip gives the chrome a clean stopping point, and the taper keeps the finish from feeling bulky.
What makes this set work is restraint. Do not chrome the whole nail unless you want a full mirrored look. A better move is a sheer pink base with white chrome only on the tip section, almost like a futuristic French. The result reads crisp in indoor light and flashes brighter outside without turning into a disco ball.
The prep has to be right. Chrome powders grab onto every ridge, dent, and uneven patch, so the surface needs to be smooth before any pigment goes on. If you’ve ever seen chrome look sandy near the sidewalls, that usually comes from rushed buffing or uncured top coat.
I like this design for dressier events because it picks up light from rings and bracelets without adding extra stones or decals. You still get the pink-and-white color story, just with a harder, cleaner finish.
There is one catch. Chrome tips show wear sooner than plain painted tips, especially if you type hard, open soda cans with your nails, or use the tips as little tools—which, yes, everyone says not to do and then does anyway. Seal the edge well and plan on a refresh sooner than you would with a standard French.
5. Matte Ballet Pink With Gloss White Side Tips
Unlike a classic French, which puts the white straight across the free edge, this design places glossy white panels along the side tips of a matte pink base. It changes the whole silhouette. The eye follows the sides, so the nail looks longer and narrower without adding extra length.
That makes it a smart pick if your natural nail beds are short or wide. The matte pink softens the center, the side accents sharpen the outline, and the ballerina shape suddenly looks more sculpted. A standard French can make wide nails look wider. This does the opposite.
I would not use a dusty pink here. Go for ballet pink, rose-beige, or a sheer petal tone with enough warmth to keep the matte finish from looking flat. Then let the white side sections stay glossy. The texture contrast is what gives this set its edge.
Who wears this best? Someone who likes minimalist nail art but does not want the same salon set everyone else screenshots. It feels fashion-forward without asking for rhinestones, charms, or painted flowers.
Ask for the white to cover only the outer 20 to 25 percent of each tip, tapering inward as it reaches the free edge. Too much white and the design loses its sleek line. Too little and nobody can tell what the tech was trying to do.
6. Pink Jelly Base With Tiny White Cloud Details
I did not expect to like this one as much as I do.
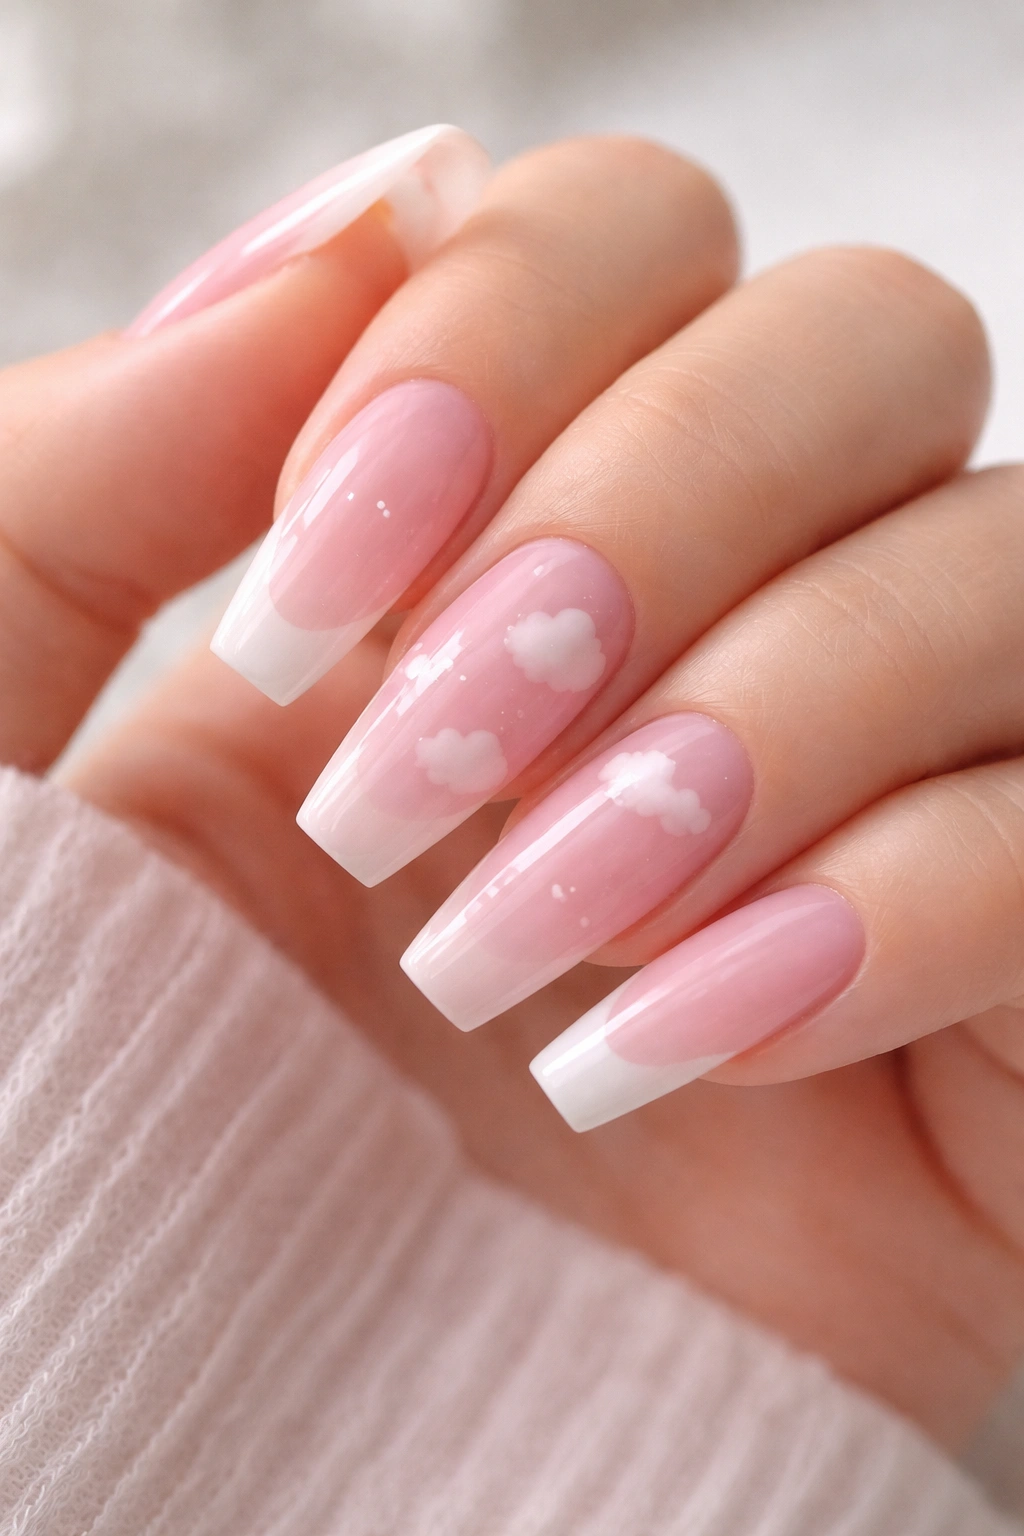
A pink jelly base gives the nail a translucent, candy-like look, and a few small white clouds stop it from feeling sugary. On ballerina nails, the flat tips give the clouds room to sit without looking crammed together. You get softness, but the shape keeps it from turning childish.
The clouds need to stay small. Three on one nail is plenty. Five is already pushing it unless the nails are long. What usually looks best is a mostly plain set with cloud art on two accent nails per hand, then solid jelly pink or plain white French details on the rest.
Key details that make this design land:
- Use a sheer pink jelly, not an opaque pink cream.
- Paint clouds with a dotting tool or a tiny detail brush, keeping the edges puffed but uneven.
- Add a faint white shadow under one side of the cloud if you want more depth.
- Keep the finish glossy so the jelly effect stays visible.
There’s a playful side to this set, and I like that. Not every pink and white manicure has to pretend it is headed to a wedding. This one works with denim, white sneakers, soft knitwear, and casual gold hoops.
The only thing I’d skip is loading it up with stars, moons, hearts, and glitter all at once. Pick one theme. Clouds already do the job.
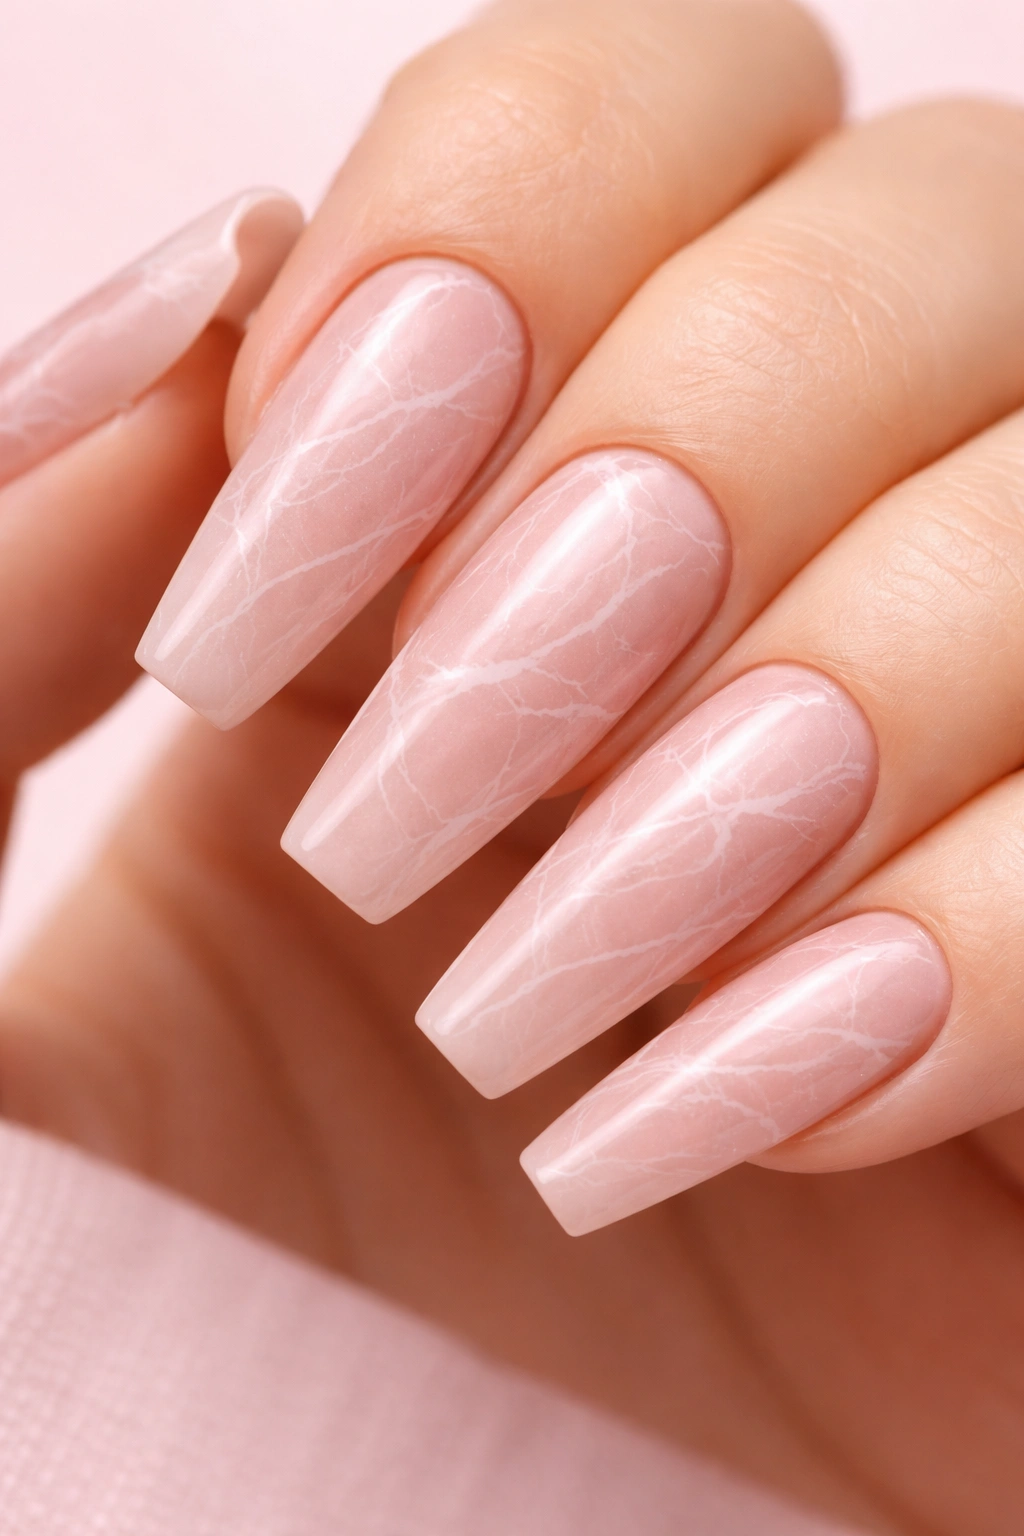
7. Rosy Nude Marble With Fine White Veining
Marble nails can look heavy fast, which is why a rosy nude base with thin white veining is such a good fit for ballerina nails. You still get movement and pattern, but the design stays light enough for the tapered shape to shine through.
What makes this marble feel clean instead of muddy
Start with a pink that leans nude—think rose-beige, not candy pink. Then drag fine white lines with a liner brush or a piece of plastic wrap while the gel is still workable. The veins should twist, break, and reconnect. Real stone does not form tidy stripes, and nails should not either.
A tiny touch of translucent white bloom gel helps soften the lines if the first pass looks too sharp. That blurred edge is what makes marble look expensive rather than hand-drawn in the wrong way.
Best way to wear it
- Use marble on 2 to 4 nails total, not all 10.
- Pair the pattern with solid milky pink or crisp white nails for contrast.
- Add a thin silver foil line only if the rest of the set stays plain.
- Keep the veining fine. Thick white swirls turn into abstract art, not marble.
I reach for this idea when someone wants nail art but hates cartoonish detail work. Marble gives you texture without stickers, bows, or gems. It has enough movement to feel special, yet it still matches tailored clothes, satin dresses, and plain white T-shirts.
8. White Half-Moons on a Blush Pink Base

Retro done right still looks fresh.
A white half-moon at the cuticle with a blush pink nail plate flips the usual French placement, and that little switch changes the mood right away. The design draws attention to the base of the nail instead of the tip, which can make grow-out look less abrupt when the pink is close to your natural tone.
This set works best when the half-moon is crisp and modest. Think a 3 to 4 mm crescent, not a giant white semicircle swallowing the lower third of the nail. On ballerina nails, that smaller moon keeps the set refined and lets the length carry the shape.
I like this look on medium-length nails because it breaks up the length without shortening it. Long ballerina nails can wear it too, though I’d keep the pink a little sheerer so the whole thing stays airy.
There’s something fashion-editor neat about this manicure. It feels less bridal, more styled. Wear it with monochrome outfits, structured jackets, or a clean white shirt and it suddenly makes sense.
One practical note: cuticle work has to be immaculate here. Dry skin, ragged eponychium, or flooding near the base will show right away because the design frames that area on purpose.
9. Sheer Pink With Tiny White Bow Accents
Do bows sound too sweet on paper? Maybe. On the nail, if they are done small and clean, they can look sharp.
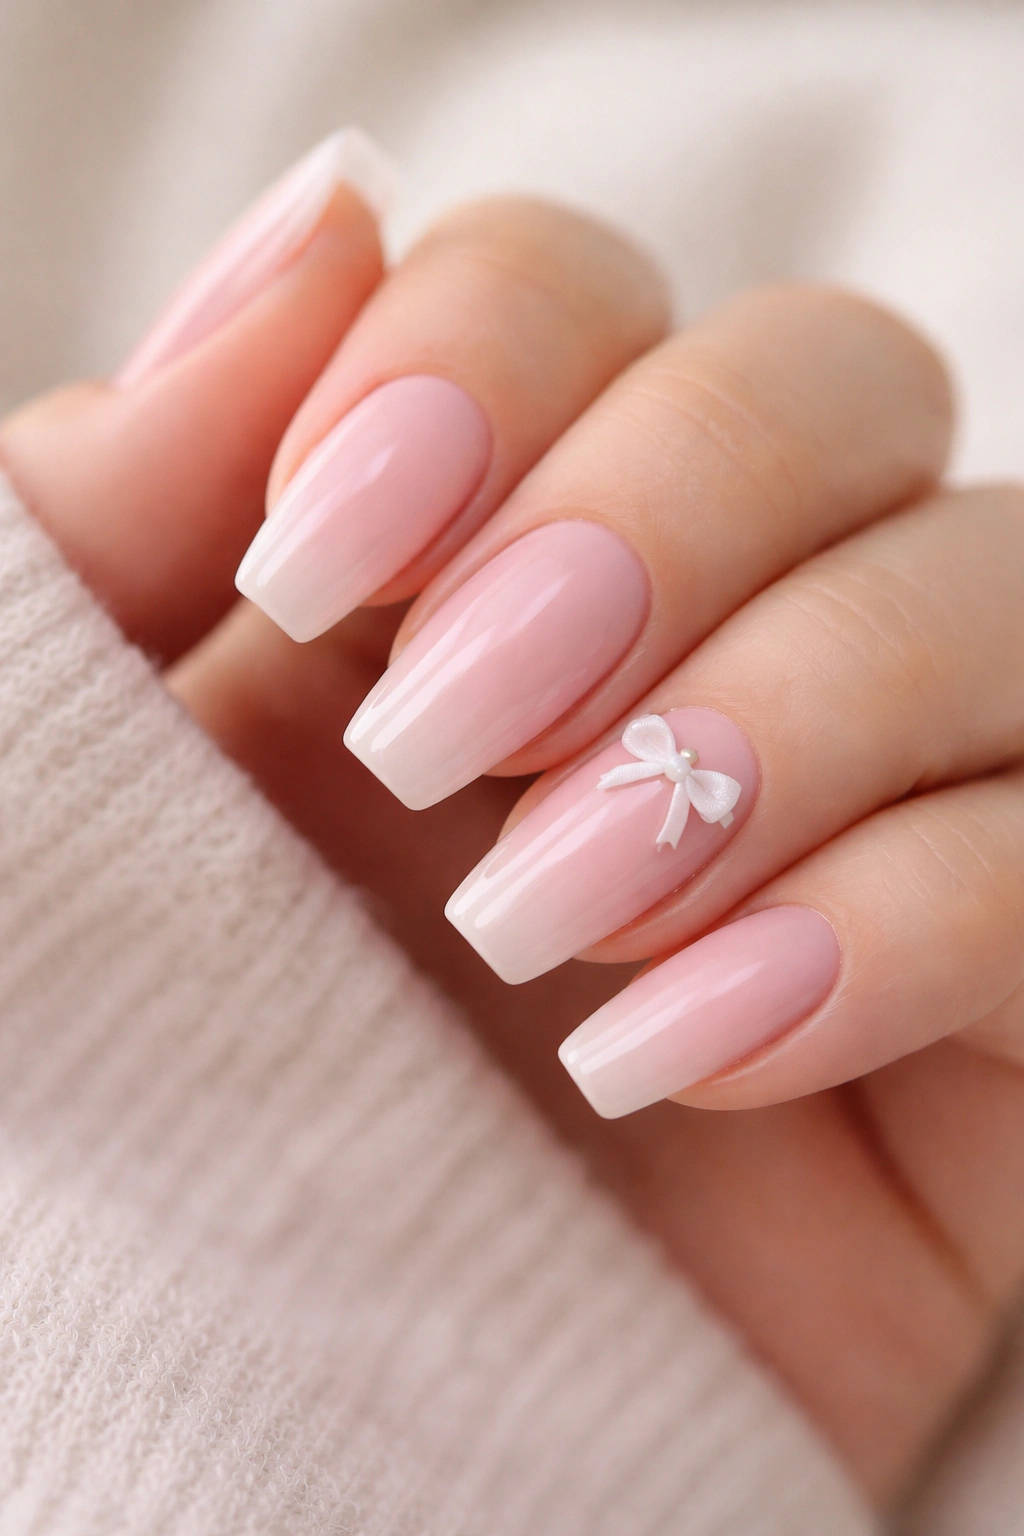
A sheer pink base with one or two tiny white bow accents works because the ballerina shape gives the design structure. The shape is grown-up. The bow is playful. That contrast keeps the set from going syrupy.
Where the bow should go
The best placement is near the upper center of one accent nail, or slightly off to one side on the ring finger. Put a bow on every nail and you’ve crossed into costume territory. One bow per hand is usually enough. Two if the rest of the set is plain.
Hand-painted bows beat chunky 3D charms for daily wear. Flat detail art catches less on sweaters, hair, and bags. If you want a raised look, ask for a micro-bead center or tiny gel knot rather than a full plastic embellishment.
A few choices that help this design stay chic
- Keep the pink sheer enough to show light through the nail.
- Use a soft white bow with thin loops, not thick cartoon ribbon shapes.
- Pair it with a micro-French or a plain gloss nail on the other fingers.
- Skip extra glitter unless it is limited to a pinpoint accent.
This is a date-night set if you ask me. Not because it is loud. Because it feels intentional.
10. Alternating Pink and White Sweater-Matte Ballerina Nails
Knitted texture on nails sounds like a bad idea until you see it on the right shape.
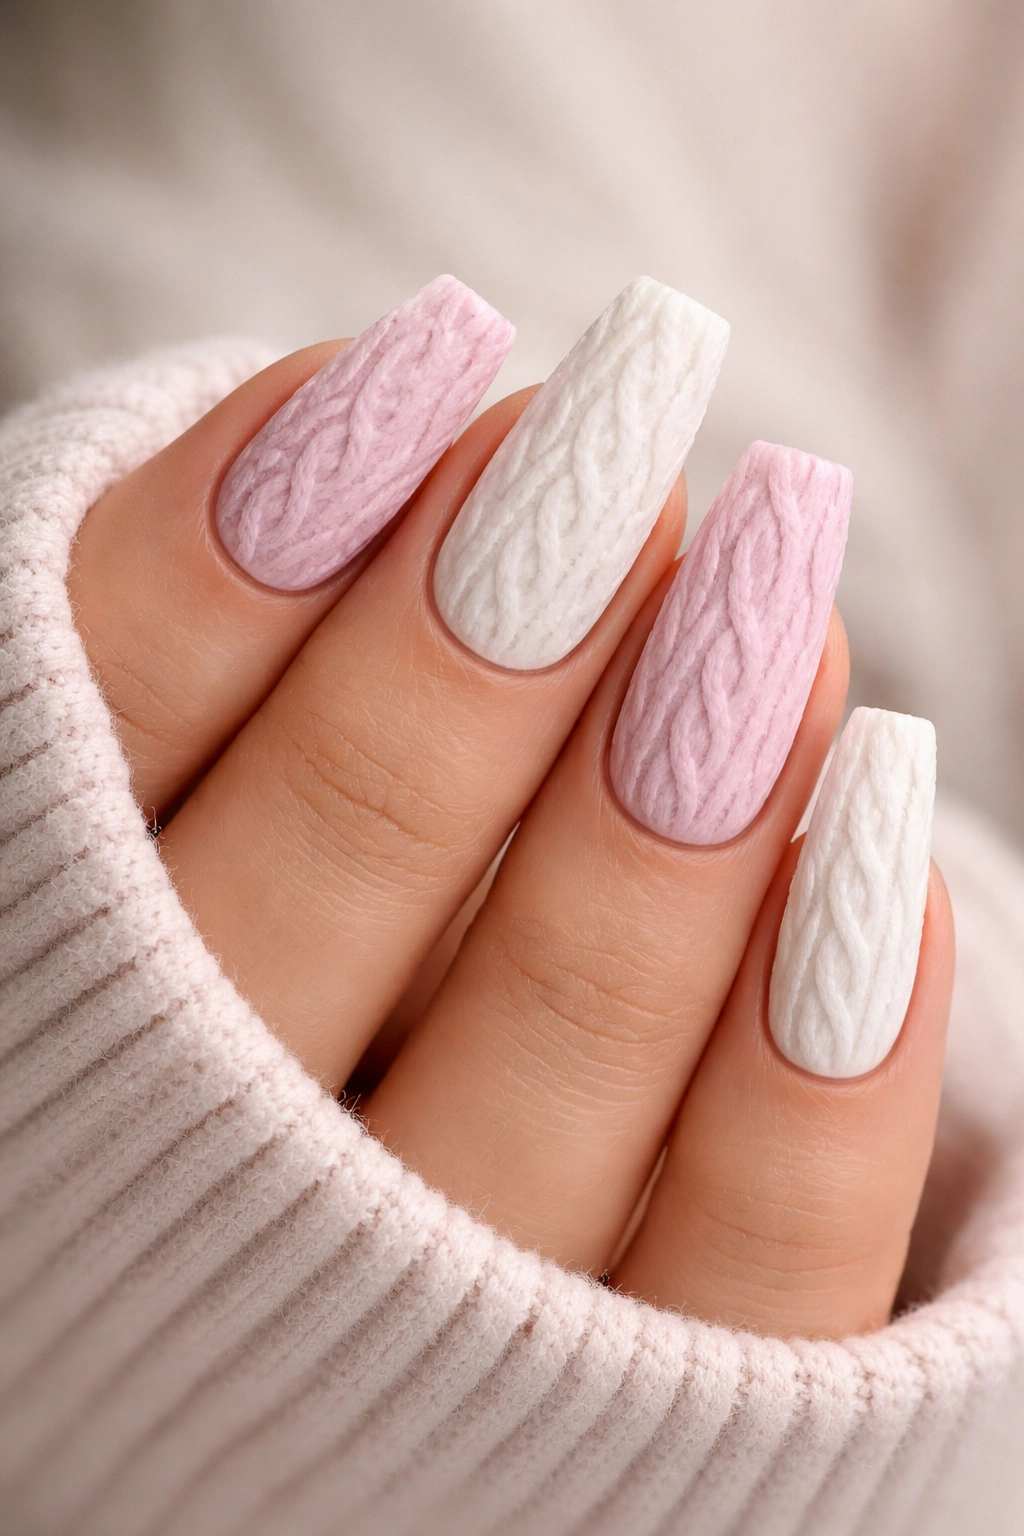
An alternating set of matte pink nails and matte white sweater-pattern nails gives ballerina nails a soft, fabric-like finish that somehow still feels sharp at the tip. The taper keeps the texture from looking clunky. On square nails it can feel blocky. On ballerina nails, it holds together better.
The trick is not to cover every finger with raised cable-knit lines. That gets busy fast. A stronger layout is five pink nails and five white-texture accents split across both hands, or even three sweater nails total. The raised gel pattern needs room to breathe.
What to pay attention to:
- Matte top coat has to be smooth first. Bumps under matte show up more than you’d think.
- Raised knit lines should sit thin and even, not like puffy toothpaste.
- Pure white texture looks crispest on one or two fingers paired with dusty blush or soft nude pink.
- This style holds lint more than glossy sets, so keep a soft brush around if that kind of thing bothers you.
I’d save this manicure for colder months, cozy outfits, and weekends when a soft texture feels right. It is not my first pick for a formal event. For casual wear, though, it has charm without needing sparkle.
11. Pearly Pink and White Ballerina Nails With 3D Flowers
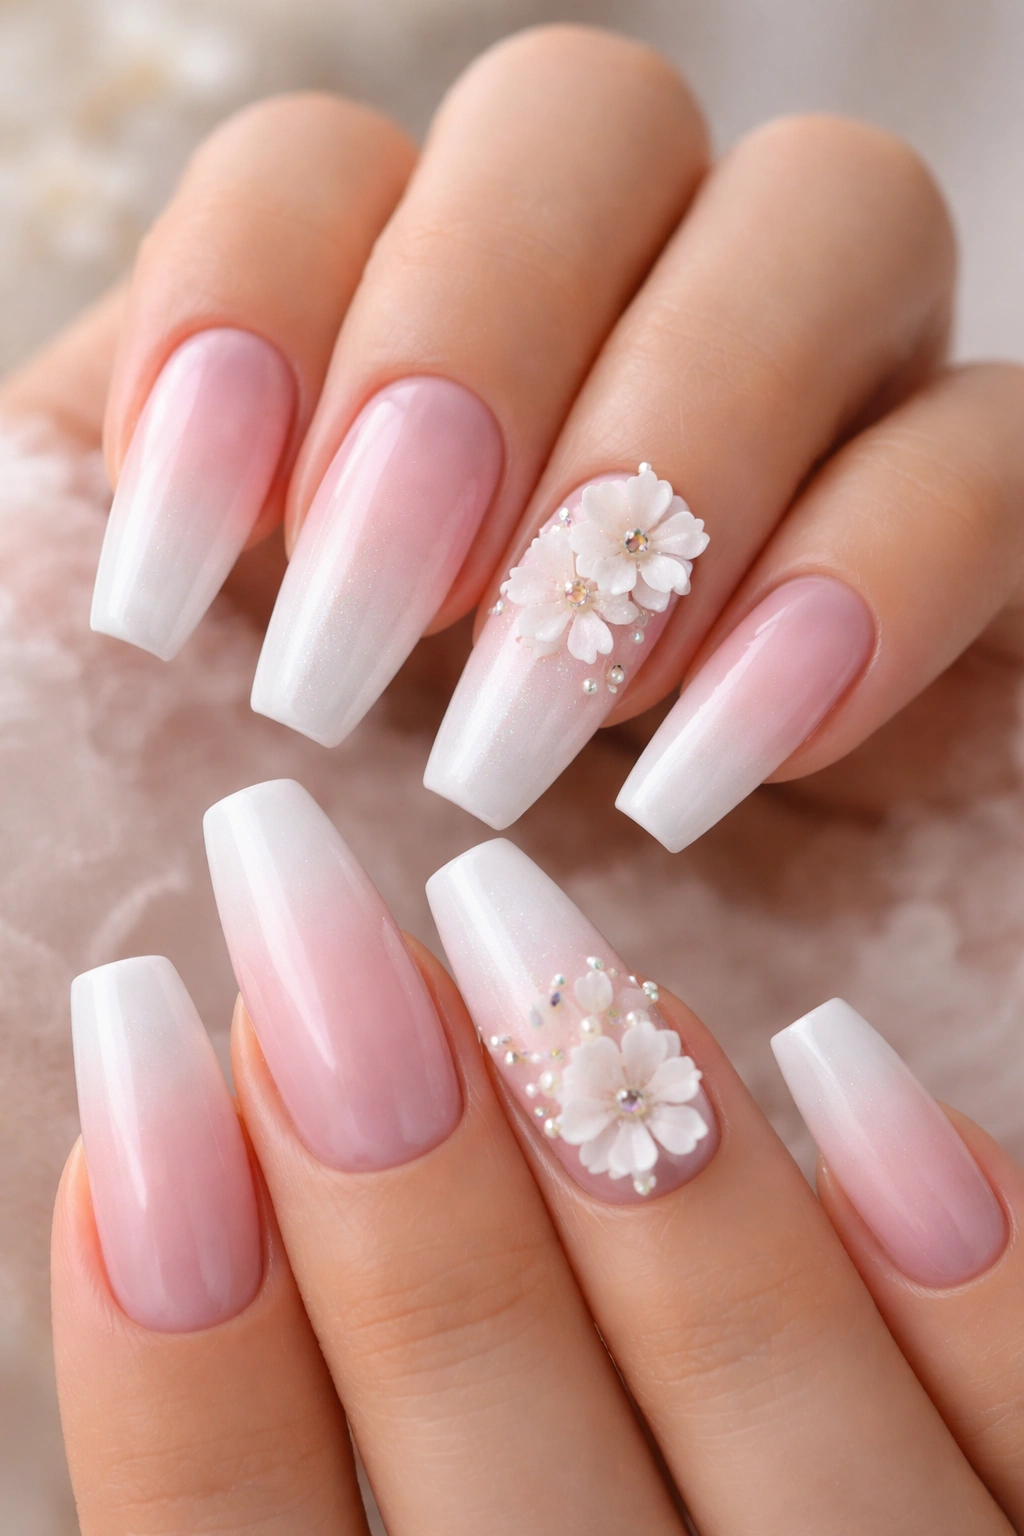
Pearl finishes can go wrong fast. Use too much shimmer, too many petals, and the whole set starts looking like decoration on a cake.
Done with some restraint, though, pearly pink and white ballerina nails with small 3D flowers can look refined and bridal without falling apart by day two. The shape helps because the flat tip gives the eye a strong line to hold onto while the flower adds softness.
I like a layout where one or two nails carry the floral work, one nail has a pearly white finish, and the rest stay in pearly pink or milky nude. That spacing matters. Every nail does not need a flower. Honestly, it should not.
Choose flowers built with gel petals that sit low to the nail, not tall acrylic blossoms that snag on everything you own. A center made from a tiny silver bead or one small pearl is enough. Bigger stones push the set into costume jewelry territory.
This design suits weddings, engagement photos, formal dinners, and any event where soft detail makes sense. It asks for maintenance, though. Raised art needs a little more care in the shower, while pulling on fitted clothes, and when you are digging through a bag for keys. Pretty, yes. Carefree, no.
12. Crisp White V-Tips on Shorter Ballerina Nails
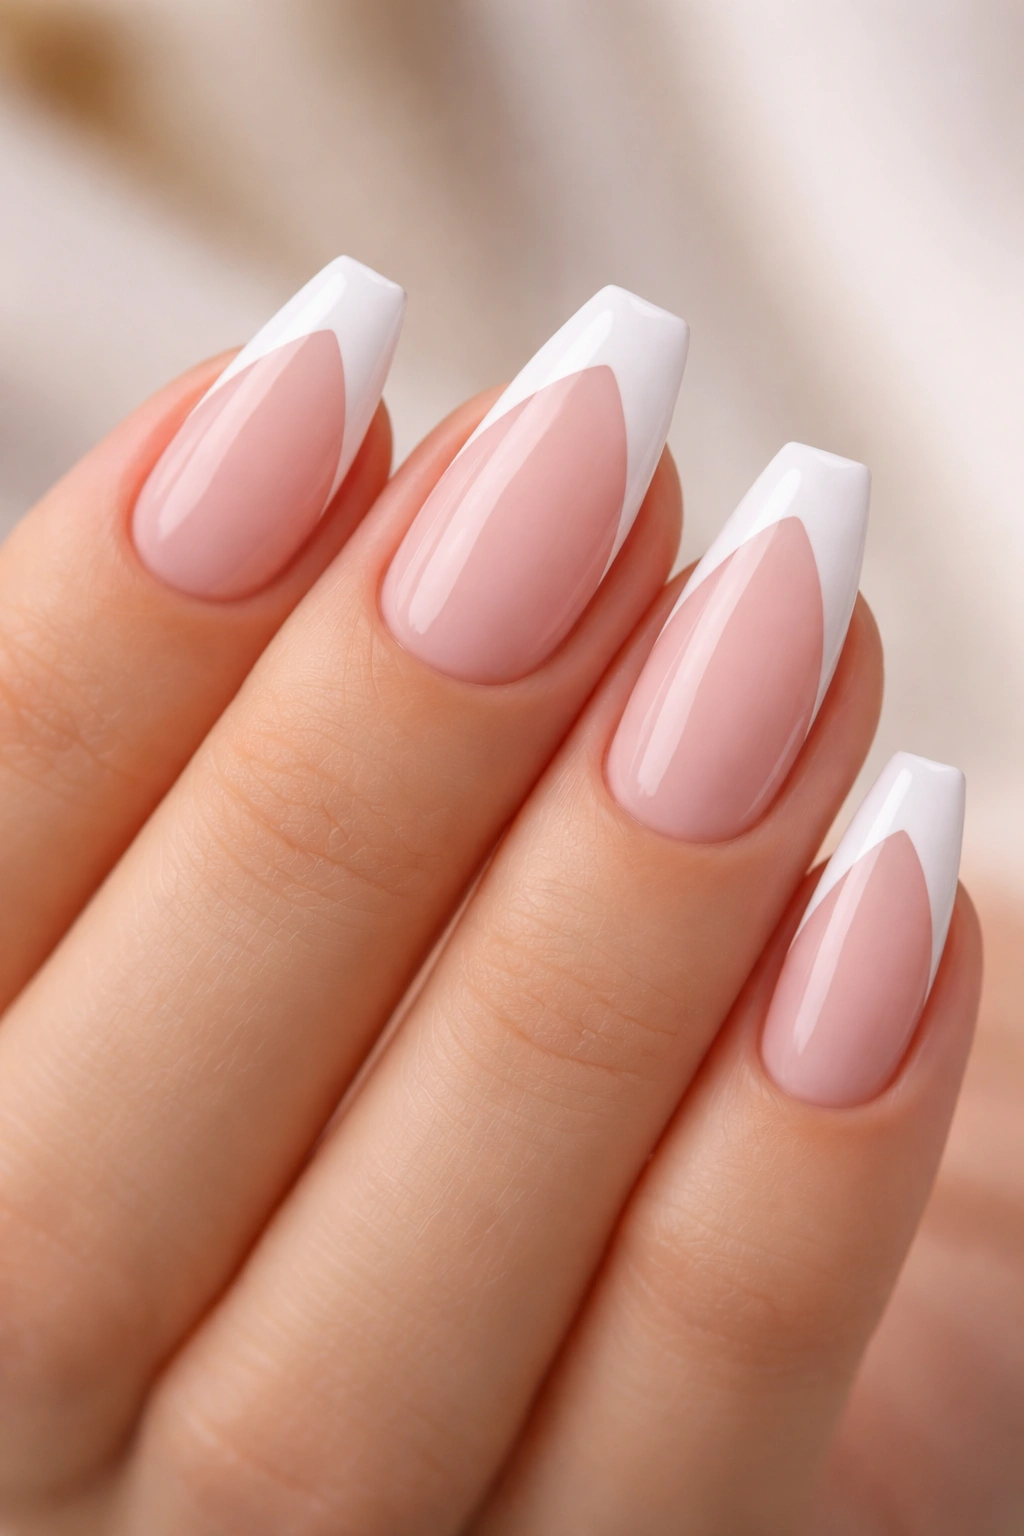
If your ballerina nails are shorter than what you usually see online, skip the chunky French. Try white V-tips instead.
A V-tip creates two diagonal white lines that meet near the center of the free edge, leaving more pink visible than a traditional French. That extra exposed pink makes short ballerina nails look longer, which is exactly what you want when the shape has only a little room to taper.
Compared with a rounded smile line, the V-tip feels cleaner and more architectural. It plays well with the squared tip and gives the whole set a narrow, pulled-in look. I think it is one of the smartest pink and white options for people who love the ballerina shape but cannot keep long nails for work or daily tasks.
Use a sheer blush or pink-beige base and keep the point of the V lifted slightly above the center edge. If the tip drops too low, it can make the nail look droopy. A fine liner brush is your friend here.
Who should pick this one? Anyone who wants structure without length. Nurses, keyboard-heavy office workers, parents with small kids, people who wear contact lenses—shorter nails make life easier, and this design does not punish you for choosing practicality.
13. Pink Aura Center With a Soft White Outline
Aura nails often lean neon, hazy, or festival-heavy. This version does not.
A soft pink aura center framed by a blurred white outline gives ballerina nails a dreamy airbrushed look while keeping the color story narrow and clean. The center stays rosy and diffused, the white halo lifts the edges, and the shape looks longer because the middle pulls your eye inward.
Why the placement matters
The pink glow should sit in the center third of the nail, feathering outward but not touching every edge. Then the white goes around it in a soft haze, not a hard ring. If the white border turns solid, the set loses that misty effect and starts reading like graphic nail art.
Airbrush gives the smoothest blend, though a sponge gradient can work for gel polish too. The finish should stay glossy. Matte kills the aura too much for my taste.
Good ways to keep it wearable
- Put the full aura design on all nails for a cohesive set, or on 4 accent nails with solid milky pink on the others.
- Keep the colors muted. Hot pink and bright white fight the soft effect.
- Ask for medium opacity so the nail still has some depth under the color.
- Add tiny pearls only if they are limited to one accent nail.
This one feels softer than chrome and less bridal than a French fade. If you want pink and white ballerina nails that look modern without reading loud, this is a smart choice.
14. White Lace Accent Nails With Soft Pink Solids
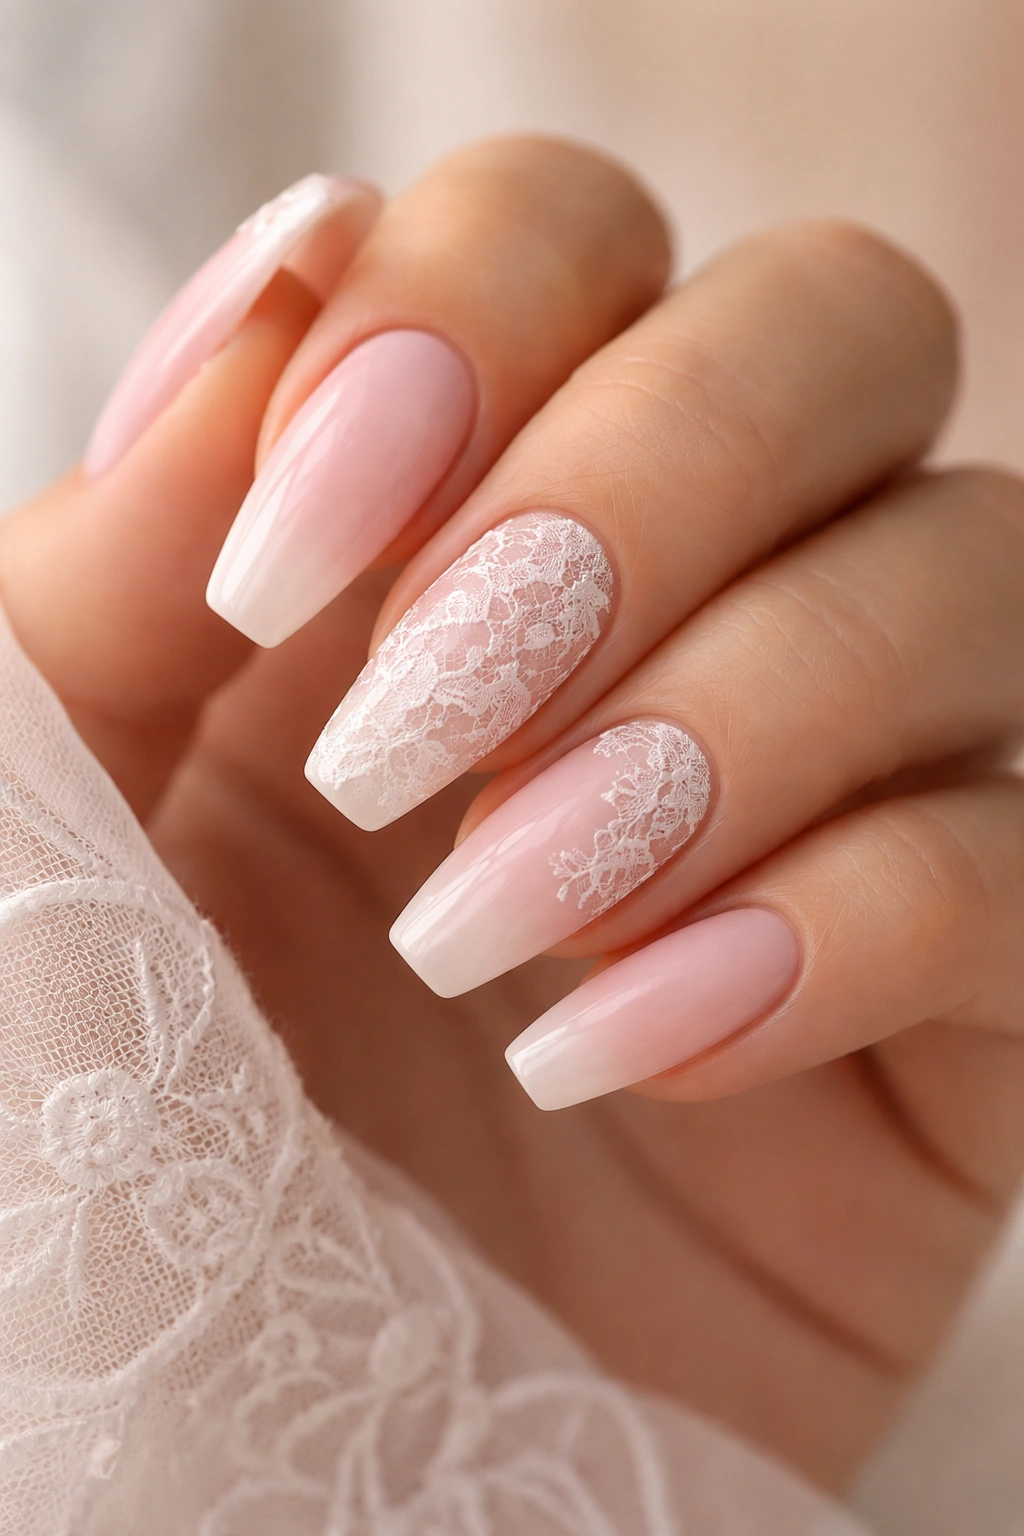
Lace is easy to overdo. One extra swirl, one extra rhinestone, and the manicure starts looking like the nail art equivalent of a crowded formal dress.
That is why white lace accents paired with soft pink solid nails work so well. The solids give your eye a place to rest. The lace gets its own stage. On ballerina nails, the long sidewalls give the pattern enough length to read as lace instead of random filigree.
I like lace best on one ring finger and one thumb, or one ring finger on each hand if you want less detail. Use a sheer blush or milky rose base under the lace so the white pattern stays visible but not stark. Fine mesh, tiny loops, and floral net shapes look strongest here. Thick swirls rarely do.
A stamping plate can help if hand-painted lace sounds too ambitious. Salon hand-painting gives a custom finish, though stamping often produces cleaner repeated detail at this scale. There is no shame in using the method that gives the better line.
This manicure fits bridal events, baby showers, dressier dinners, and any outfit with satin, lace, or soft tailoring. It is not an everyday set for me, though some people wear it easily. I prefer lace as a special-occasion accent, not a standing appointment look.
15. Pink and White Ballerina Nails With a Glitter Cuticle Fade
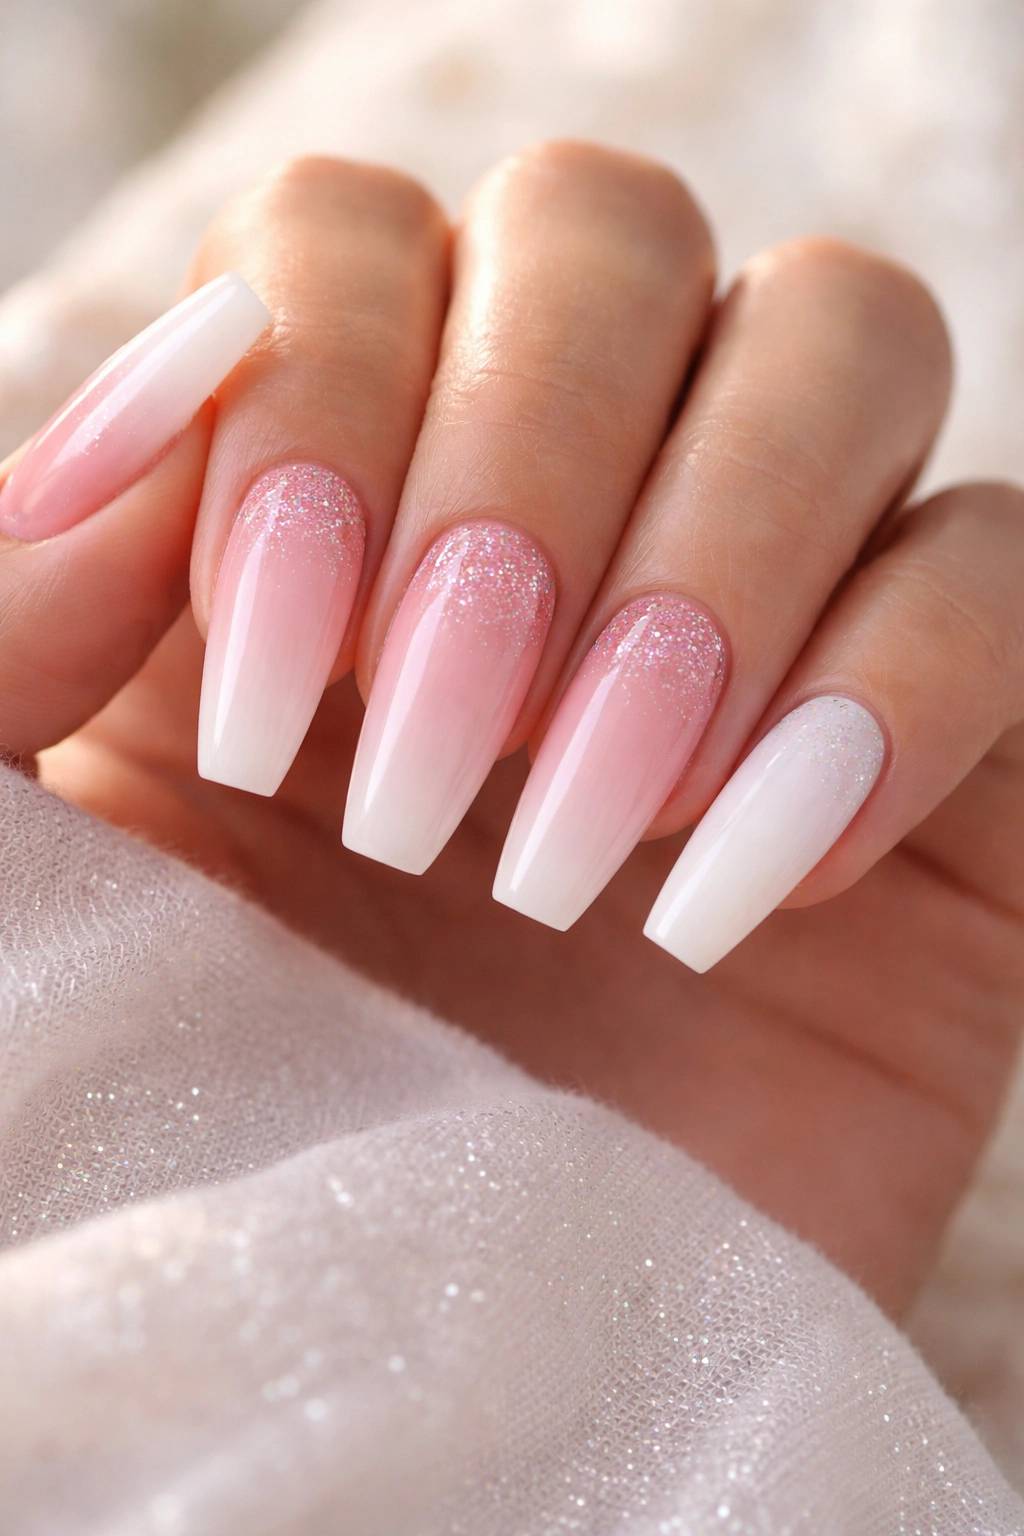
Glitter works better near the cuticle than people expect.
A pink base with a white glitter fade rising from the cuticle, plus one or two solid white nails, gives you shine without crowding the tip of the ballerina shape. That matters because the tip is where this silhouette gets its clean line. Load the free edge with glitter and you blur the shape. Keep the sparkle low and the taper stays sharp.
Why this placement is smarter than a full glitter tip
A cuticle fade grows out more gracefully. When your nails start to show new growth, the glitter already sits near that area, so the change looks softer. On a solid glitter French, wear at the tip is the first thing you notice. Here, you mostly notice the pink.
Choose fine white shimmer or sugar-fine glitter, not chunky hex pieces. Fine particles blend upward in a softer cloud. Chunky glitter can look like craft-store confetti, and once you see that, you cannot unsee it.
Best way to wear it
- Use a sheer or milky pink base.
- Pack the glitter densest at the cuticle line.
- Pull it upward no more than one-third of the nail length.
- Finish with one solid white nail or a white micro-French for balance.
I like this set for parties, birthdays, and nights when you want a little flash but still want the manicure to match a pale blazer the next morning.
Final Thoughts
The strongest pink and white ballerina nails usually are not the busiest ones. They are the sets where shape, color, and detail agree with each other. A thin French, a faded ombré, a clean V-tip, a small bow—each one works because it respects the long taper and flat edge instead of fighting them.
If you are torn between two ideas, pick based on upkeep first and mood second. Chrome tips, 3D flowers, and raised sweater texture need more care. Baby boomer fades, micro-French lines, and soft half-moons hide wear better and stay easier to live with between fills.
And if you only take one note to the salon, make it this: ask for the pink to suit your skin tone and the white to suit your length. That one choice changes the whole set.
