

Pink and red together shouldn’t work — at least that’s what old-school fashion rules insisted for decades. And yet here we are, watching the combination take over nail feeds everywhere from salon waiting rooms to social media, and it makes complete sense the second you see it on your own hands. Something about the warmth, the range, the way a deep cherry sits next to a dusty rose — it feels both bold and inherently wearable.
Short almond nails are a particular sweet spot for these colors. The almond shape — that gently tapered point with a rounded tip, narrowing from a full-width base — creates just enough elegance to balance saturated color without tipping into costume territory. Keep the length short (roughly 2–4mm of free edge beyond the fingertip) and you get all the drama of the shape without the maintenance headaches or the broken-nail frustration that comes with longer extensions.
What makes this combination genuinely exciting isn’t just the pairing itself. It’s how many directions you can take it — from a high-gloss single shade that gleams from across the table to delicate jelly finishes, tortoiseshell swirls, rhinestone clusters, and chrome powders that turn a simple short nail into a full statement. The designs below span beginner-friendly solids to more involved nail art, and I’ve included the technical details that actually matter: specific finishes to seek out, how to execute the trickier techniques, and which looks hold up best over two weeks of daily wear.
One thing worth saying upfront before getting into the list: the undertone factor matters considerably more with pinks than with reds. Reds are forgiving across the board — that’s part of why a classic red nail has survived every trend cycle intact. Pinks are more specific. Warm undertones (yellow, peach, golden) tend to look best with peachy pinks, corals, and strawberry reds, while cool undertones (pink, blue) lean naturally toward true pinks, fuchsias, and berry reds. Let that guide you as you scan through the entries below.
Why Short Almond Nails Work So Well with Bold Color
There’s a geometry argument worth making here. Long nails with saturated color can look heavy — the sheer surface area of a long coffin or stiletto nail means a single vivid shade has a lot of real estate to fill, which can overwhelm shorter fingers or feel dramatic in lower-key settings. On a short almond, that same color is contained within a compact, elegant shape. The tapered sides slim the nail visually, and the curved tip softens what might otherwise feel like a blunt, bold statement.
Short almonds also accommodate negative-space designs, ombre techniques, and foil work — all of which appear later in this list — because the proportions stay legible. On a long nail, a tiny floral motif can get lost in the space. On a nail that’s only 5–6mm from base to tip, a single rhinestone or a thin streak of gold foil becomes the entire focal point.
Gel polish is the most reliable base for everything on this list. It cures hard under UV or LED light, doesn’t smear or dent, and delivers the chip-free wear that regular polish on short nails rarely manages. That said, a couple of these designs — particularly the milky jelly look and the sheer rose with glitter — translate well with regular polish if sealed properly with a quality topcoat. I’ll flag which ones where it matters.
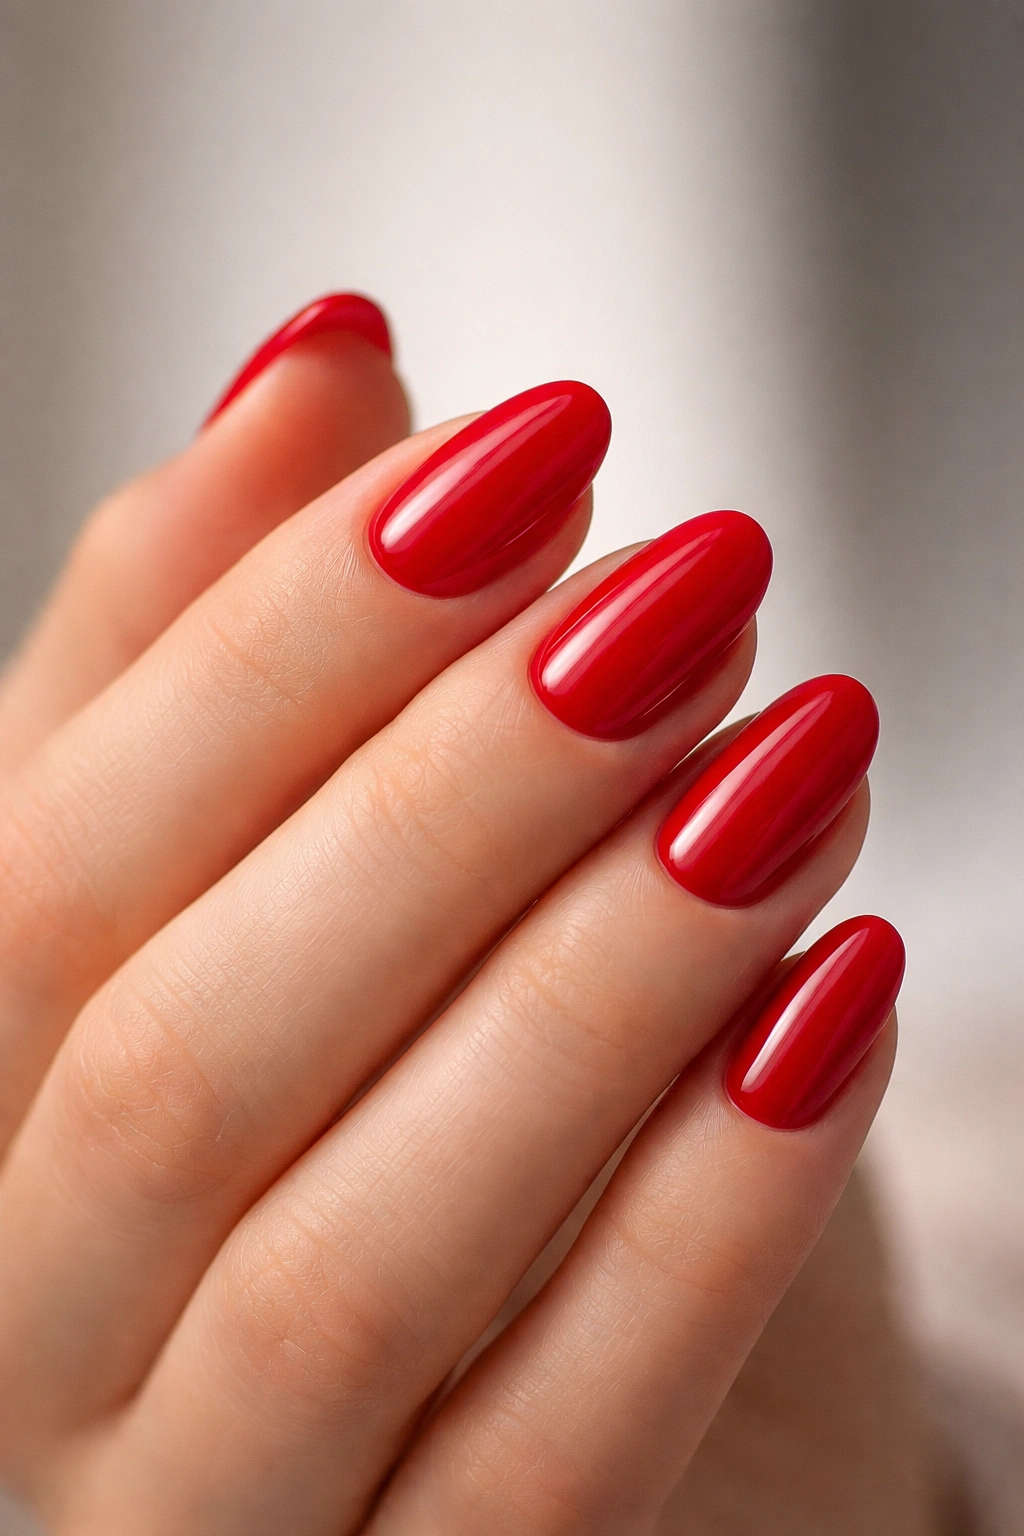
1. Classic Cherry Red Almond with High-Gloss Finish
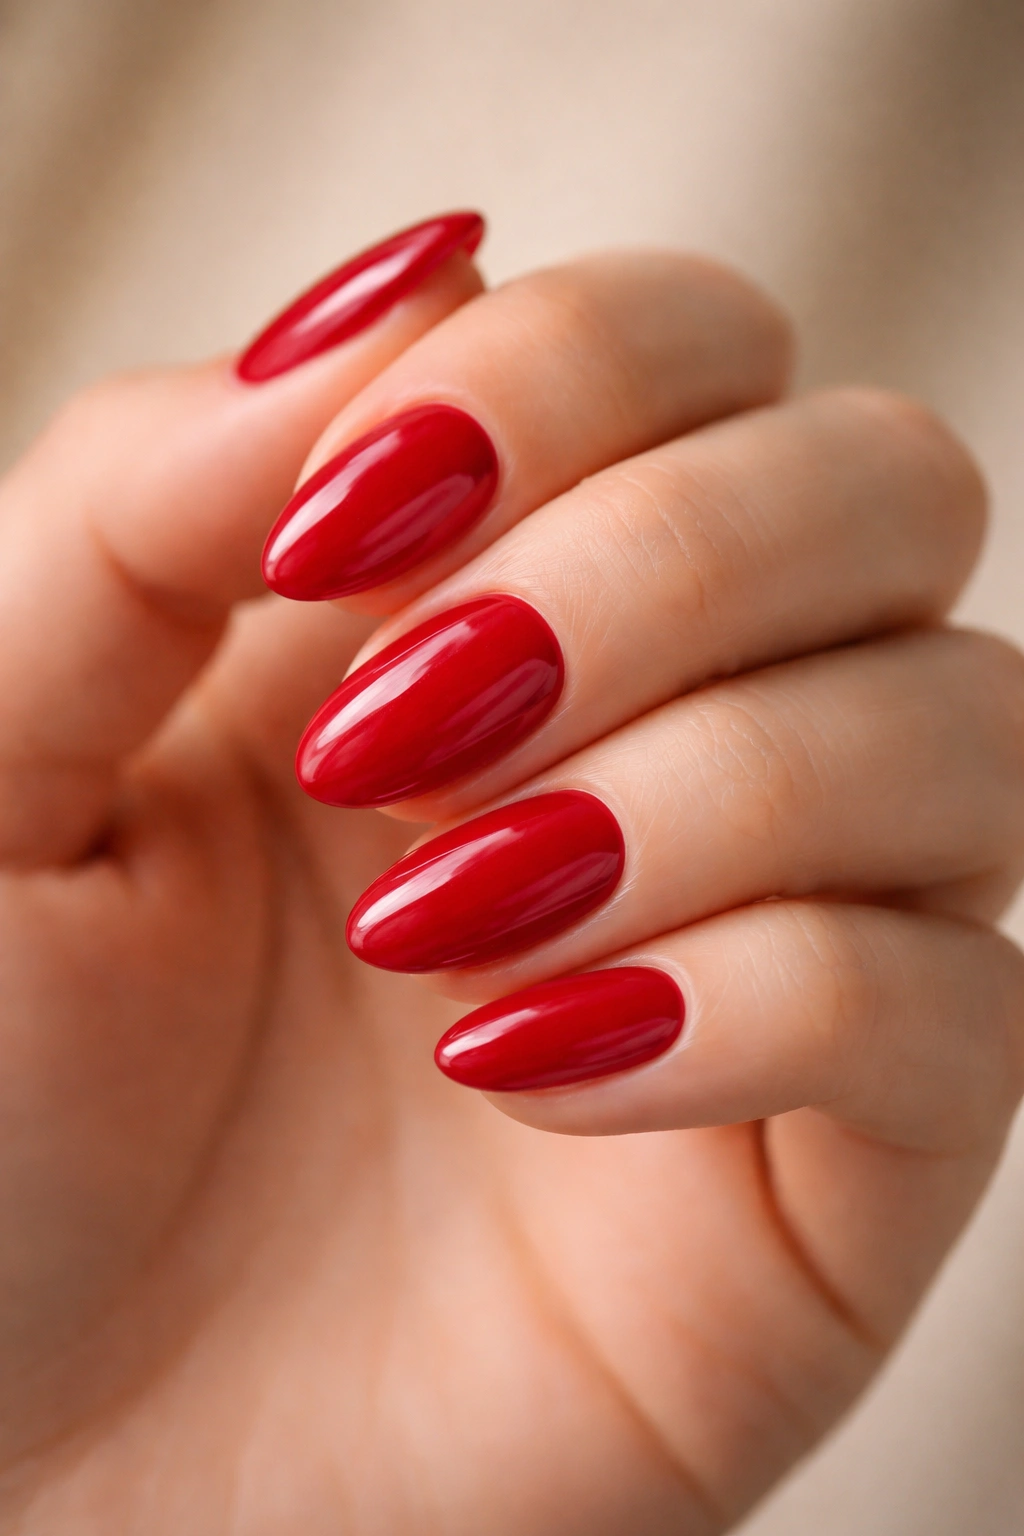
A good cherry red on a short almond nail is one of those looks that somehow manages to be both timeless and completely of the moment. It doesn’t need embellishment, layering, or a contrasting accent nail to work — it just works. But “cherry red” is doing a lot of work as a descriptor, because there’s a wide spectrum between a warm tomato-adjacent red and a cool, almost crimson cherry, and the difference on your hand can be significant.
The version that photographs best and translates well across skin tones is a medium red with a slight blue-to-neutral lean — think the color of a ripe Bing cherry rather than a red Skittle. On short almond nails, apply two full coats and cap the free edge (running your brush across the very tip of the nail) to prevent premature chipping. Seal with a high-shine topcoat — not satin, not matte. The glossy finish is doing real work here, giving the nail a lacquered depth that elevates it from basic to deliberate.
The free-edge cap is non-negotiable for red specifically. Because red pigment tends to be slightly sheer in its first coat, skipping this step almost always leads to tip wear showing against a white free edge — which ruins the whole effect faster than any other color on this list.
Apply the topcoat in two thin passes rather than one heavy one. A single thick coat of topcoat is prone to dragging the color underneath and leaving visible brush marks in the finish. Two thin passes give you the glassy result you’re after.
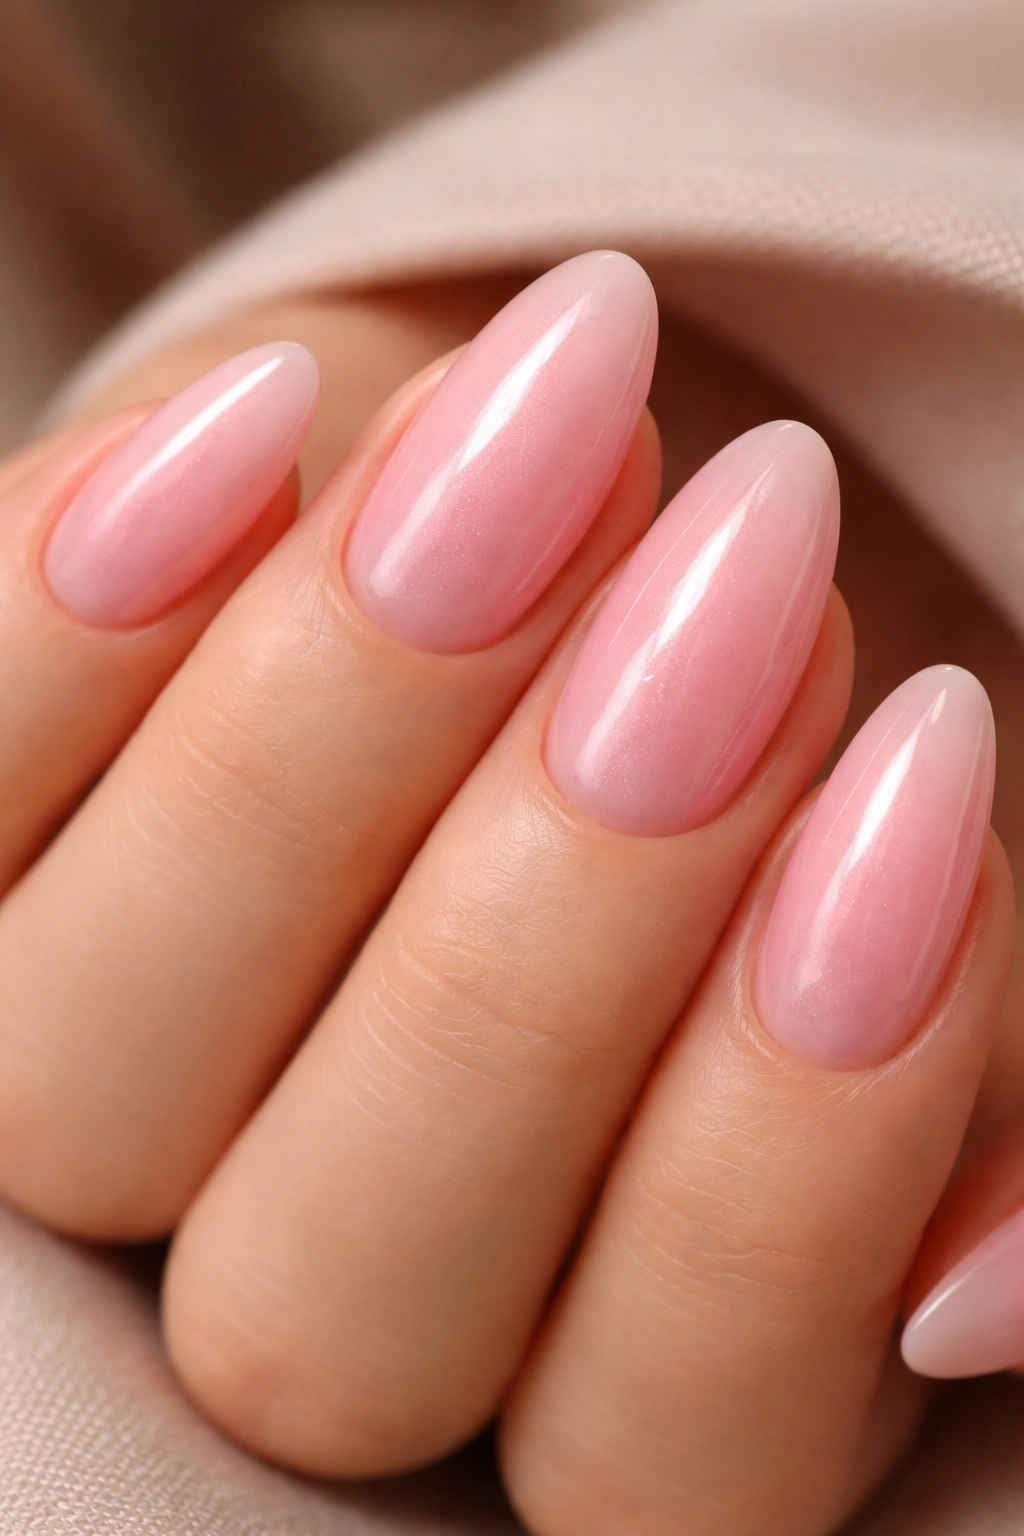
2. Sheer Blush Pink Glazed Jelly Look
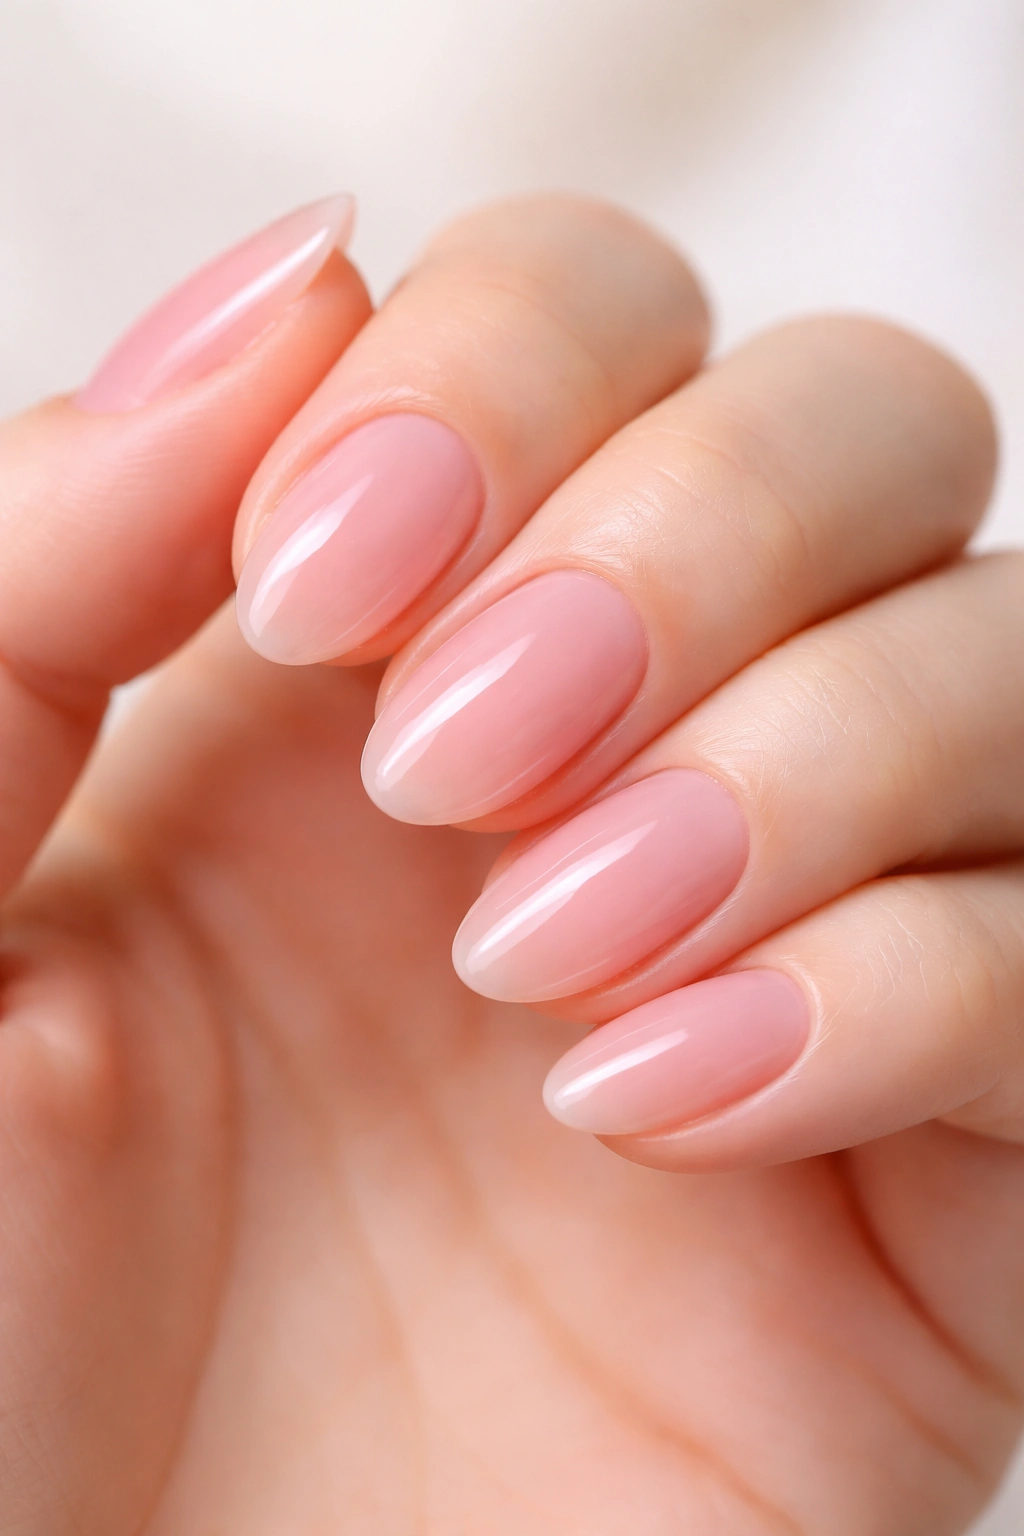
Why does the glazed jelly finish look so good on short nails specifically? Part of it is that the translucency doesn’t fight against the shorter nail length — seeing through the polish slightly makes the nail look elongated rather than truncated. The skin underneath reads through the color, softening the boundary between nail and finger in a way that opaque polish can’t replicate.
The glazed effect comes from building sheer, tinted pink polish in 3–4 thin coats rather than 1–2 opaque ones. You’re aiming for a color that sits somewhere between fully opaque and completely clear — a soft blush that still lets the nail bed show through at the base. If you’re using gel, look for polishes labeled “jelly” or “soft gel” in their names; these are specifically formulated to stay translucent even after curing. For regular polish, a sheer rose or pink with a slightly glossy base formula does the job. The finish should look dewy and almost wet, like the nail is lit from within.
Getting the Tone Right
The actual blush color matters here more than the technique. Go too pale and the effect disappears against light skin — you end up with what looks like barely-there color that reads as unpainted rather than intentionally sheer. Go too deep and you lose the translucency entirely, which defeats the whole purpose.
A blush with a slight peach warmth — something in the rose quartz family — hits the sweet spot for most skin tones. Three to four thin coats, cured between each one if using gel. A glossy topcoat at the end keeps that characteristic shine that makes the style immediately recognizable. Skip the matte topcoat entirely on this look.
3. Hot Pink with Gold Foil Accents
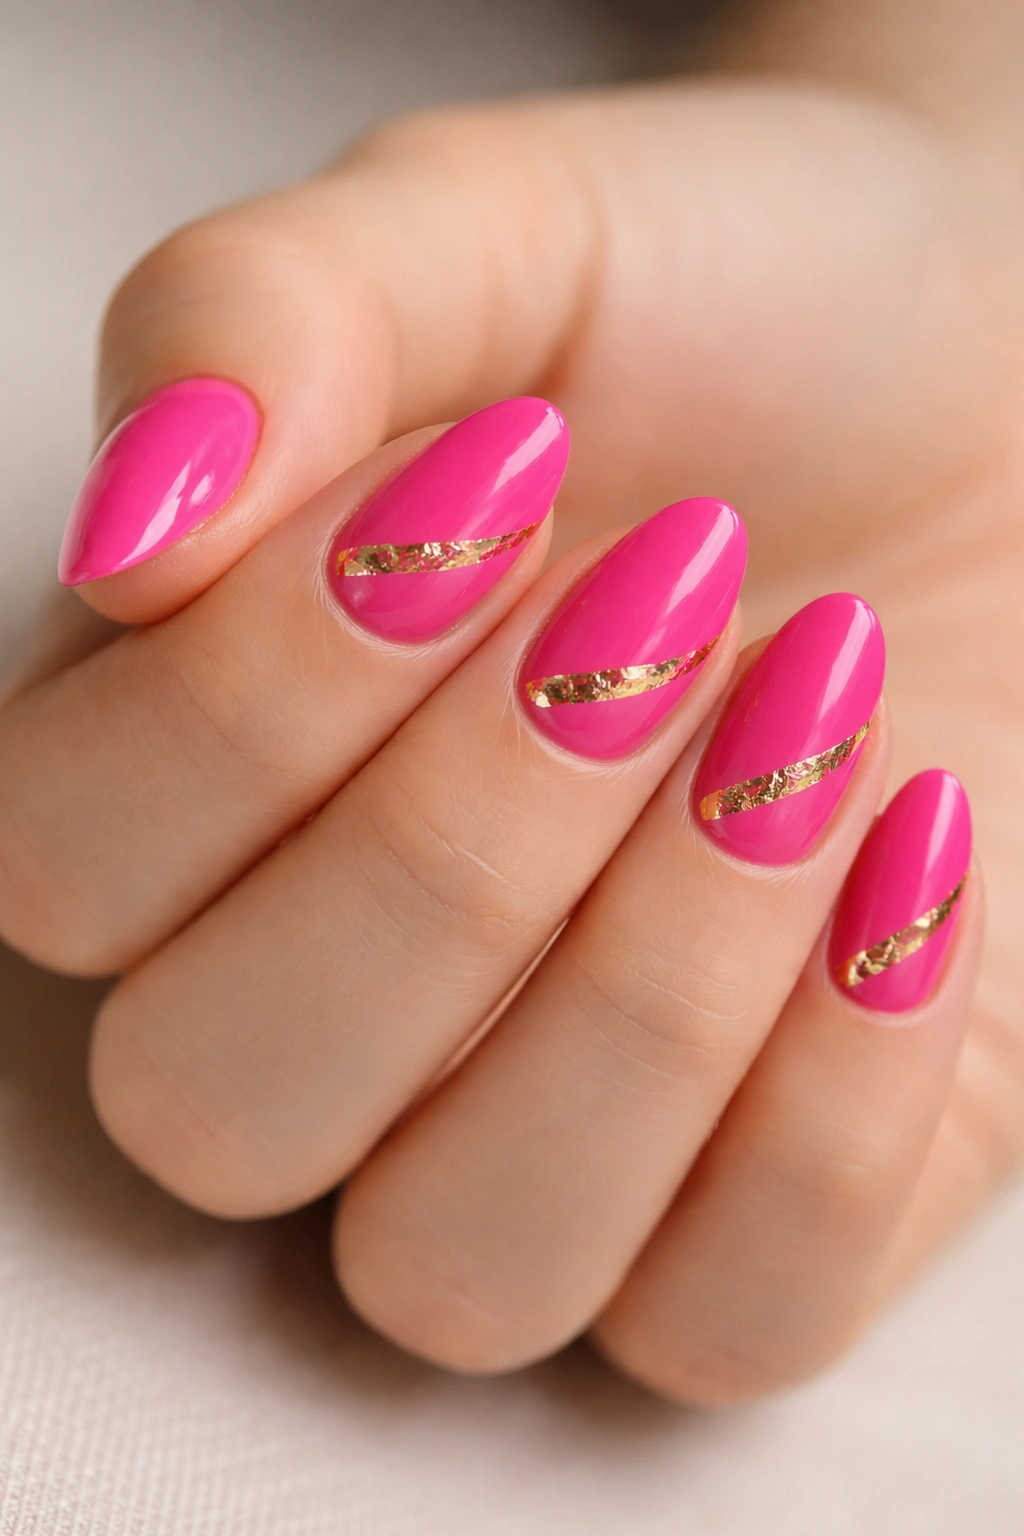
Hot pink alone on a short almond nail is confident bordering on aggressive — which isn’t a criticism at all. Some occasions call for exactly that energy. But adding gold foil accents tempers the brightness without dimming it. The metallic interrupts the saturation just enough to make the whole look feel intentional rather than loud.
How to Apply Foil on Short Nails
The technique matters a lot. Foil transfers work best on tacky gel — stop before the final cure, leaving a sticky inhibition layer on the surface — or you can use a dedicated foil adhesive that you paint on, let dry until just tacky, then press the foil sheet over. On short almonds, the most flattering placement is an asymmetric streak across the base: starting at one corner of the cuticle and dragging diagonally toward the opposite tip edge. This creates a dynamic line that doesn’t compete with the pointed tip.
What to Look for in Nail Foil
- Gold foil sheets (not glitter) give a clean, mirror-like streak without chunky texture
- The foil should transfer with a single press-and-peel motion — if it tears into fragments, the adhesive dried too long
- Seal with a non-wipe topcoat to avoid disturbing the foil during application
- Thin foil strips give you more placement control than large sheet sections on a short nail surface
Pair with sheer or bare nails on your ring fingers to let the hot pink and gold breathe without competing across all ten nails.
4. Dusty Rose Matte Almond Nails

Dusty rose in a matte finish occupies a completely different emotional register than anything else on this list. There’s no shine, no drama, no look-at-me quality — and somehow that restraint is what makes it so sophisticated. The color itself is a soft, slightly grayed pink that sits somewhere between a pale mauve and a washed-out red, and the matte finish amplifies that quiet quality by stripping out any reflective light.
What makes this work particularly well on short almond nails is the shape’s natural softness. A matte square nail can look slightly blunt. A matte almond nail looks deliberately delicate — the tapered point pulls the eye forward while the flat finish keeps everything subdued.
For execution: apply two full coats of your chosen dusty rose gel or polish, then swap your standard topcoat for a matte one. Matte topcoats need to be reapplied every 3–4 days if you’re wearing regular polish, since handling gradually adds sheen back to the surface over time. With gel, one matte topcoat cured under LED holds its flat finish for the full wear duration — typically 10–14 days before edges start lifting.
One practical thing worth knowing: matte nails show fingerprints and smudges more than glossy ones. A light buff with a dry cloth (not your fingers, which deposit more oil) keeps them looking clean between wash-ups.
5. Cranberry Red with Negative Space Design
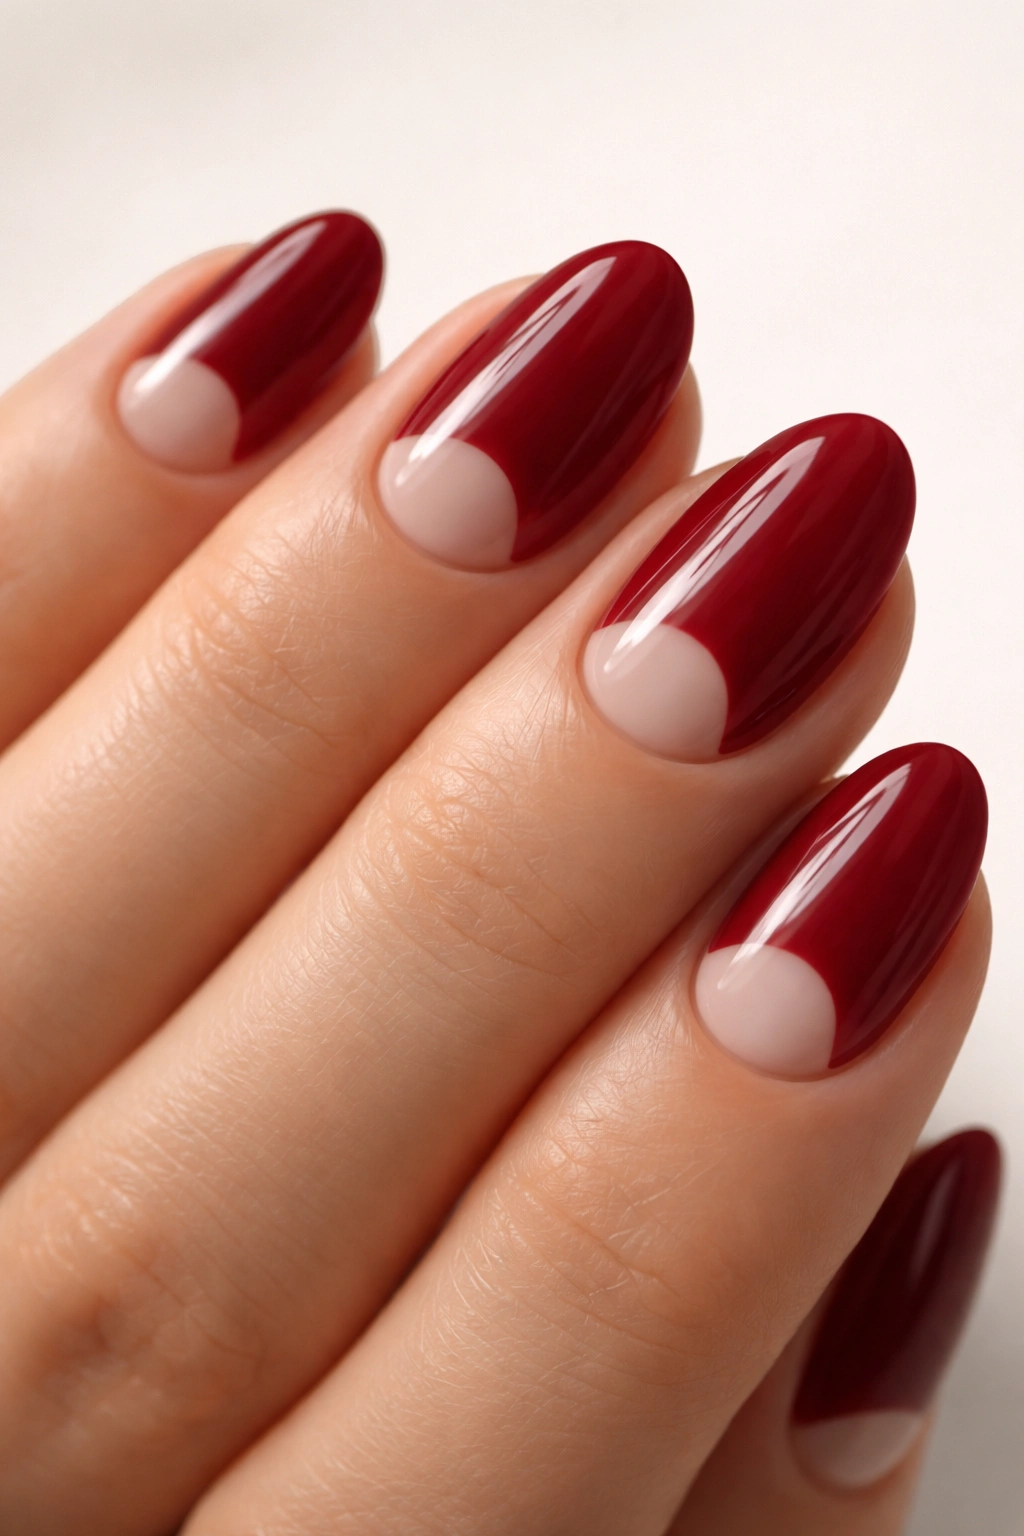
Cranberry sits deeper than cherry — it’s a red with enough blue in it to push toward burgundy without actually arriving there. On short almonds with negative space, you’re working with an intentional gap of unpainted nail near the cuticle that creates a graphic contrast between the deep color and the natural nail surface.
Picture a thin crescent of bare nail at the base, with cranberry filling the rest of the nail to the pointed tip. That’s the most popular negative space execution for short almonds, and it works because the crescent draws attention to the cuticle line — which, on a healthy nail, has a beautiful natural arch. The cranberry color then tapers toward the almond tip, creating a visual narrowing that makes even a short nail look elongated.
Getting the crescent line clean requires one of three approaches:
- A nail tape or thin striping tape pressed along the smile line before painting the cranberry
- A thin angled brush dipped in acetone to clean up the edge after application
- Liquid latex painted around the cuticle and peeled off after the color dries — the best option if your brush control isn’t perfectly consistent yet
The negative space doesn’t have to stay bare nail. Some versions fill the crescent with a different shade — a pale blush paired against cranberry reads as striking — or with a layer of clear glitter for texture without color.
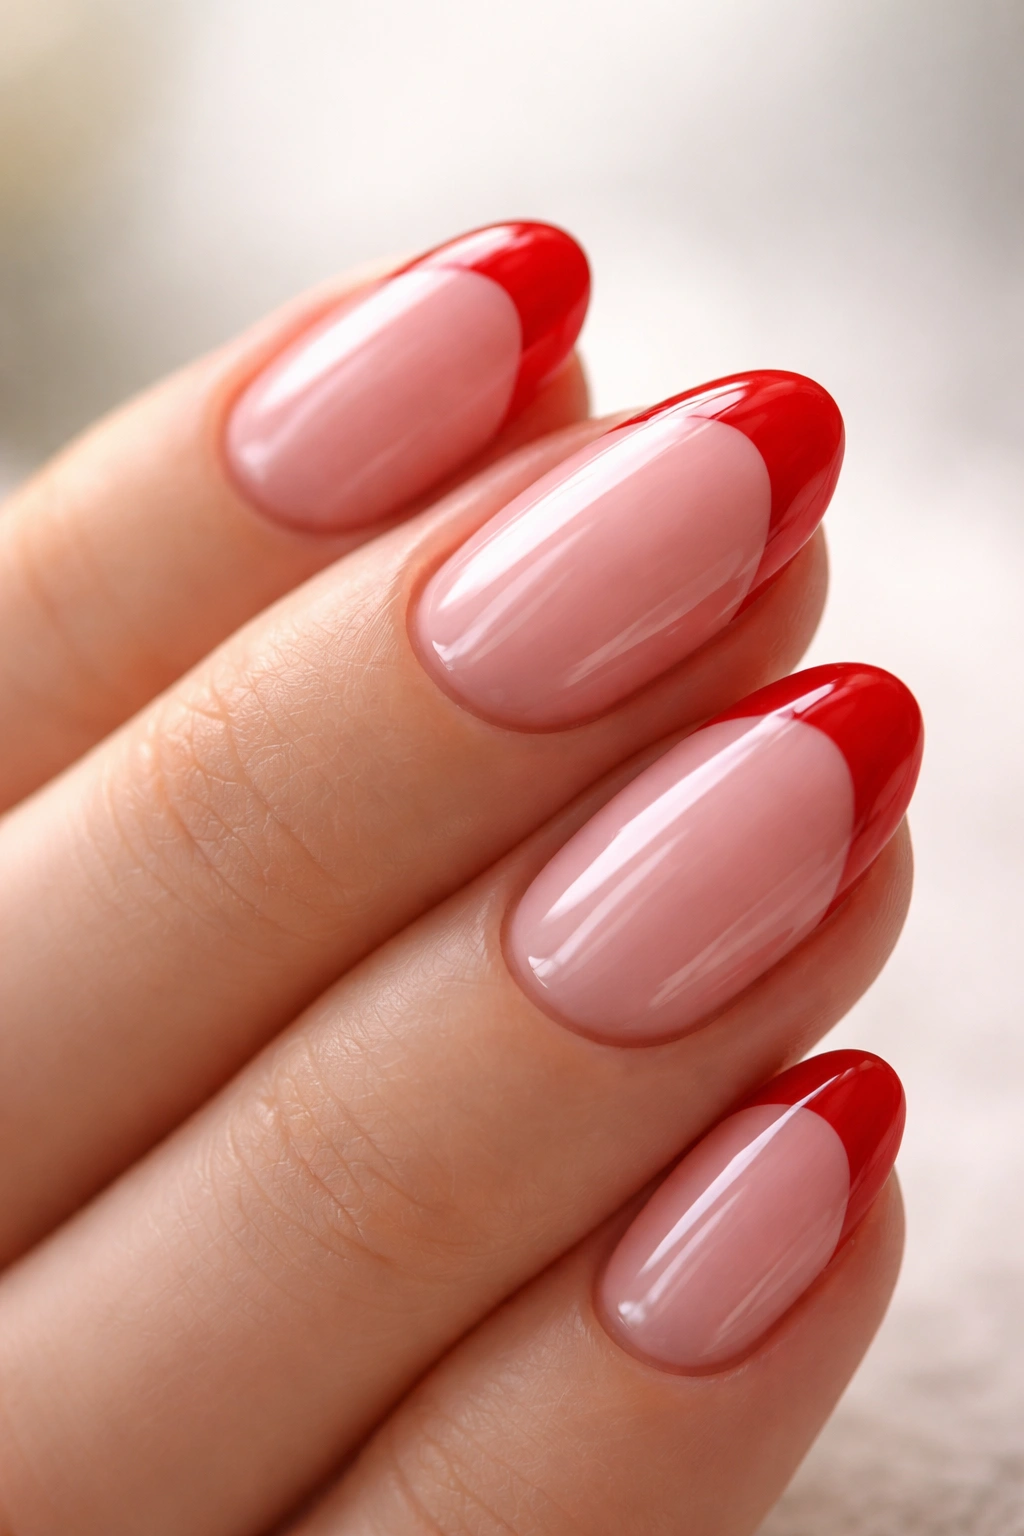
6. Baby Pink French Almond Tips
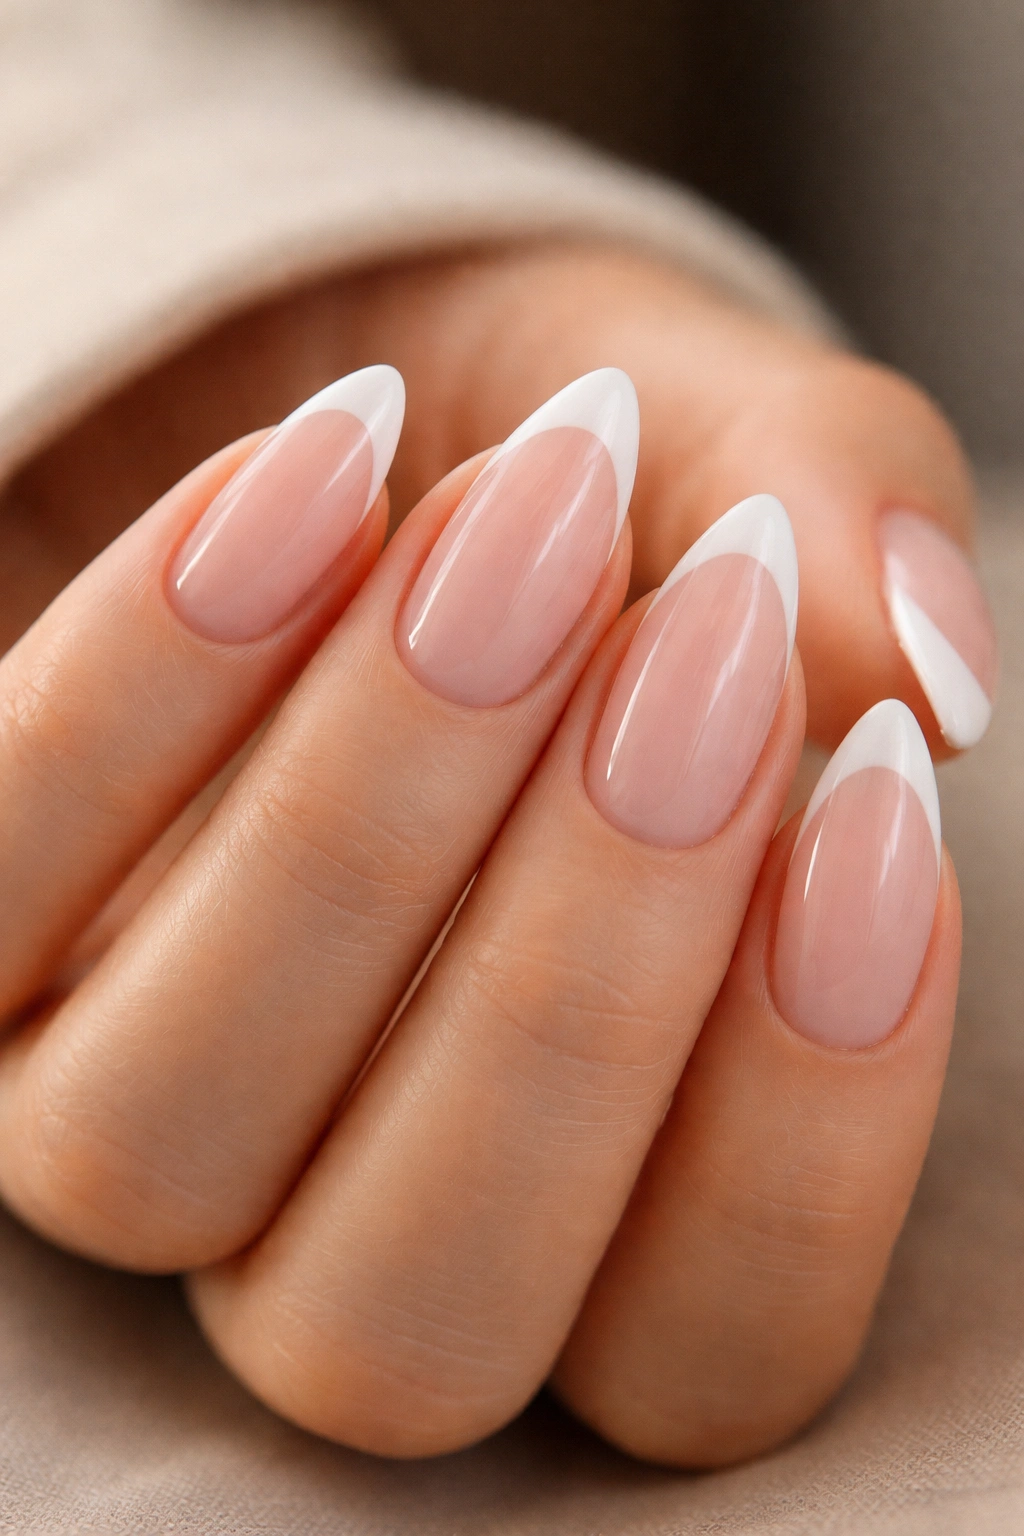
The traditional French manicure gets a meaningful shape upgrade on almond nails. On a round or square nail, the white tip sits as a straight horizontal line across the nail. On an almond, that line follows the curve of the tip, and when you bring the pink base up higher at the sides, it creates a more dramatic, pointed smile line that looks architectural rather than simply classic.
Baby pink for the base, white or off-white for the tip. The baby pink should be sheer enough that the nail bed shows through — around 20–30% opacity. Too opaque and the base reads as a flat color rather than a subtle skin-tone enhancement, which loses the whole point of the French approach.
What separates a polished French almond from a mediocre one is the tip width. Most people apply the white tip too wide, which makes the nail look shorter than it is. Keep the white tip to 2–3mm maximum on a short almond. Any wider and the proportion tips toward stubby rather than tapered.
For a modern take, try an off-white or ivory tip instead of bright white. Less stark, works especially well with warm-toned skin, and it’s less demanding on the clean-up front. You can also push the baby pink base into a slightly deeper rose for what’s sometimes called a “French ombré,” where the base deepens gradually rather than stopping at a clean smile line.
7. Deep Burgundy with Miniature Floral Art
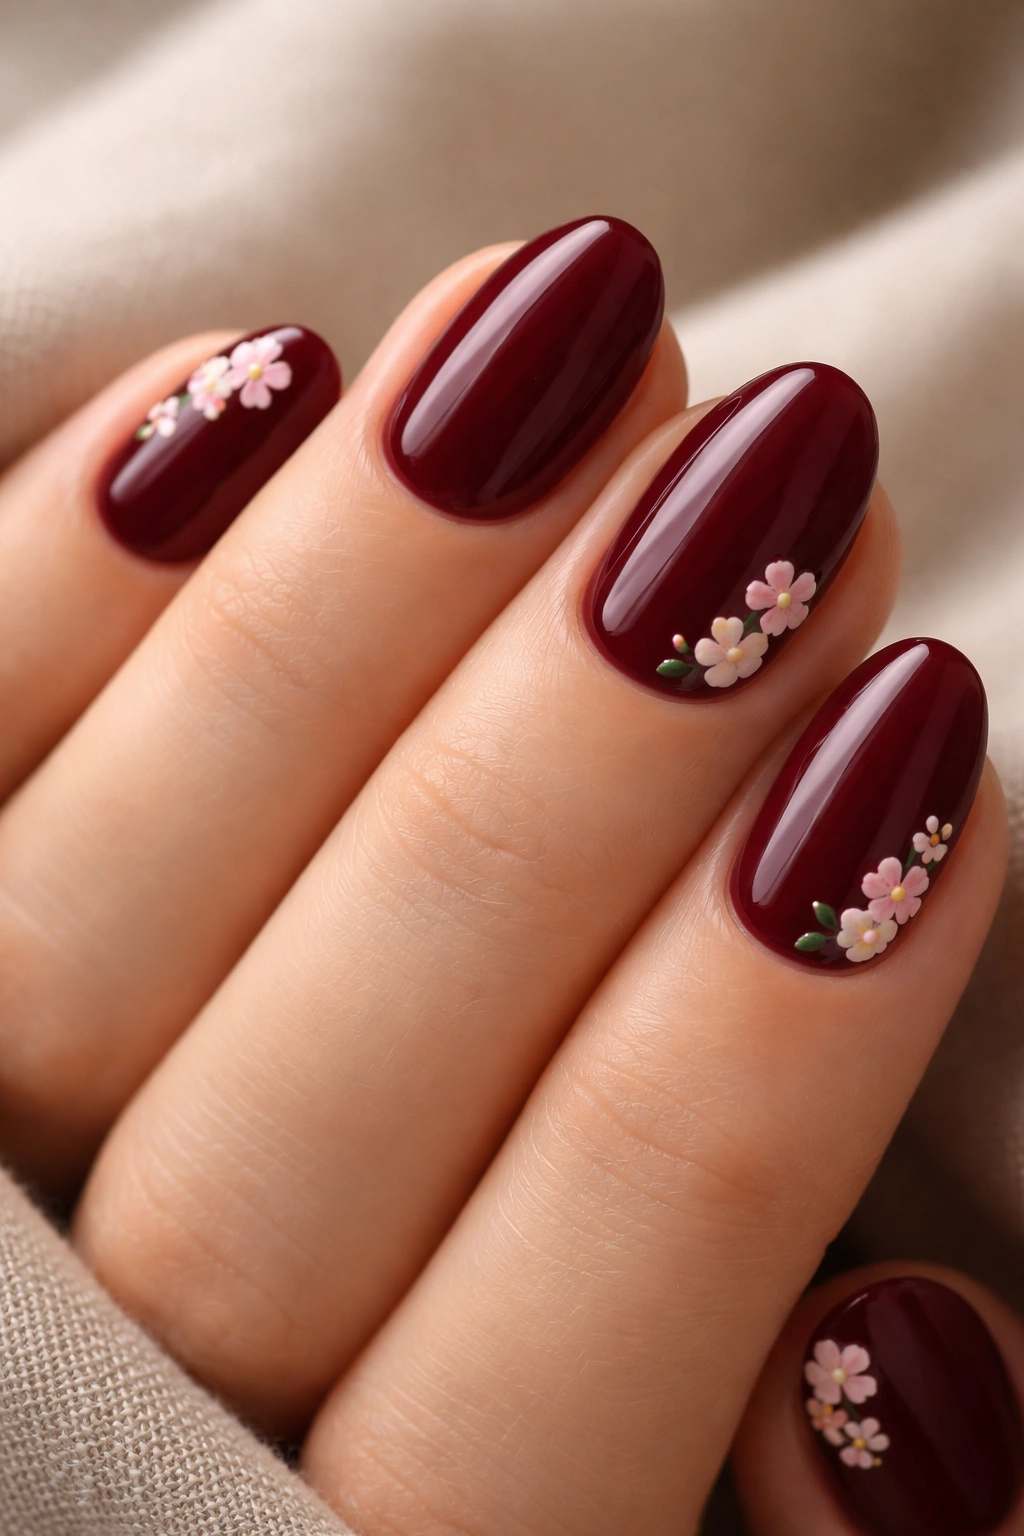
Here’s a look that rewards patience. Deep burgundy — almost a darkened red-wine shade, but not quite as purple as a true plum — acts as an excellent background for tiny floral details in pale pink, white, or ivory. On short almond nails, the nail becomes a small canvas, and the scale of the florals matters enormously.
Single small blooms — three to five petals, roughly 3–4mm across — work best at this length. Anything bigger crowds the nail and loses legibility. Flowers placed at the tip or corner of the nail (rather than centered) have more visual elegance because they reference the way florals actually grow — reaching outward, not sitting stationary in the middle of a frame.
The most accessible technique for the florals: a small dotting tool or the very tip of a bobby pin dipped in pale pink or white polish. Press five small dots in a rough circle, then add a single smaller dot in the center in gold or yellow. That’s it. A slightly more refined version uses a fine nail art brush to drag each petal inward from the tip — this creates a more realistic petal shape with a natural taper toward the base. A little imperfection in hand-painted florals reads as charming rather than flawed.
Apply the florals over a fully cured base coat — wet polish underneath will smear the moment you touch it. And seal everything with a topcoat thick enough to flatten the surface, or the individual petal dots will have a raised, bumpy texture you’ll feel every time you type or pick up a glass.
8. Pink Ombre Fading to Red Tips
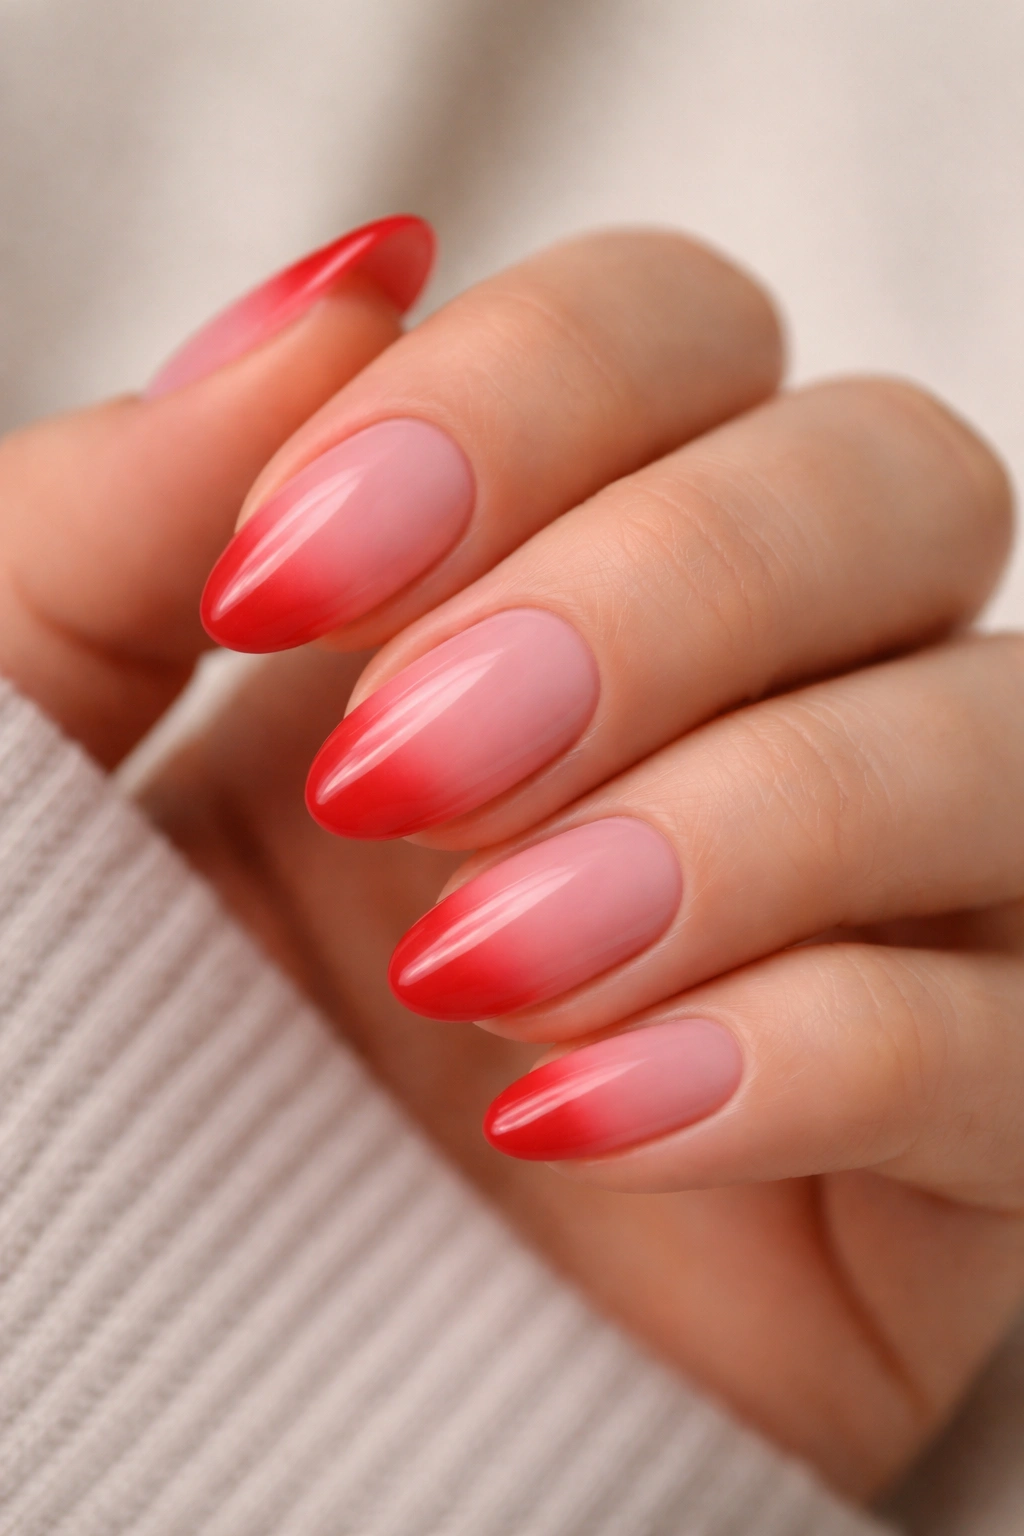
This technically counts as two colors in one nail, and it’s more achievable at home than most people assume. The ombre runs from a soft pink at the cuticle base — a medium pink with good opacity works better here than a sheer one — down to a brighter or deeper red at the tip. The gradient happens in the middle third of the nail, and that blending zone is where the technique lives.
Two Methods That Actually Work
Sponge method (regular polish): Paint both colors onto a makeup sponge in overlapping bands about 1cm wide, then press and dab the sponge onto the nail in repeated light motions. Repeat 3–4 times, building up the gradient gradually. Remove color from the skin with a thin brush dipped in acetone, and seal with topcoat. Messy to execute, satisfying to finish.
Dual-brush gel method: Apply the pink base across the whole nail and cure for 30 seconds. Apply the red at the tip only, bringing it roughly halfway down the nail. Before curing, take a clean brush and blend the junction line with small circular motions until the two colors merge. Cure fully. This method gives more control than the sponge and stays neatly within the nail boundary.
The final result should look like the nail is blushing — warm pink at the base deepening into red at the pointed tip. A high-gloss topcoat pulls the gradient together so it reads as one continuous flow of color rather than two shades pressed together.
9. Bold Red with White Minimalist Line Art
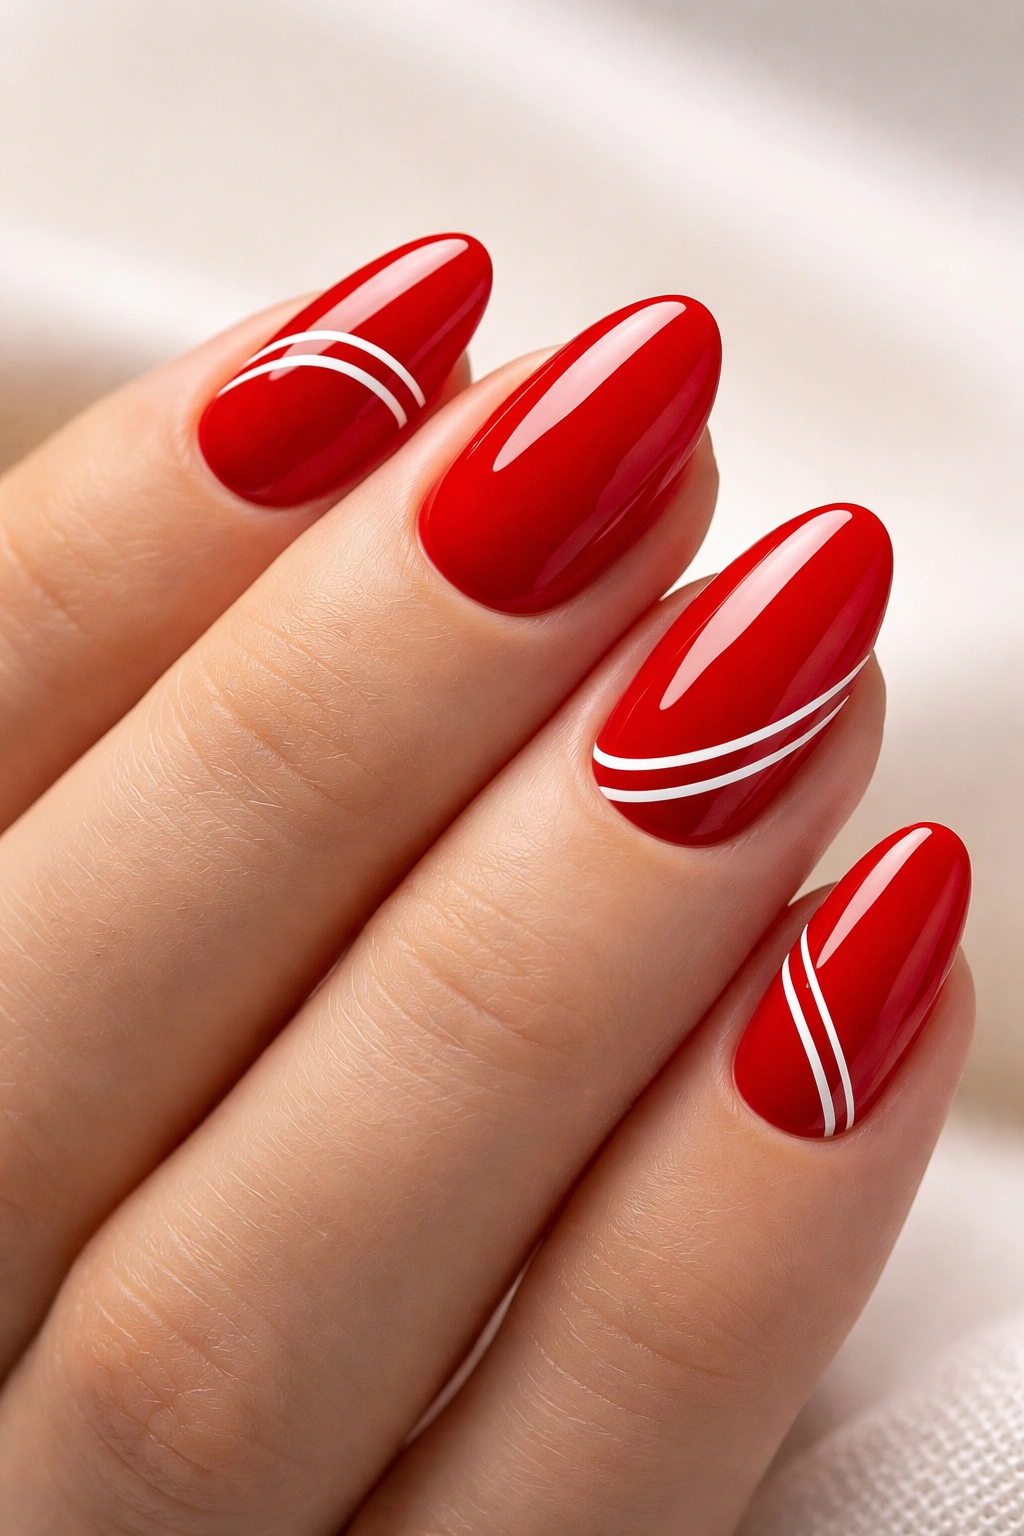
Minimalist line art on a red nail looks effortless and complex at the same time. That contradiction is exactly what makes it so satisfying to pull off. The red base does the heavy lifting, and the lines are purely decorative geometry: a single curved line near the tip, two parallel lines crossing at an angle, or a spiral that traces the almond’s natural taper from base to point.
White nail art gel is the material to use here — not regular nail polish. The pigmentation is denser and it stays opaque without flooding, meaning the line stays where you put it instead of spreading into the color underneath. A size 0 liner brush is the right tool. Dip once, wipe the excess on the back of your hand, and draw the line in a single fluid motion rather than a series of hesitant short strokes. One confident pass beats five careful ones every time.
Less is genuinely more on short nails.
Two or three lines maximum. The negative space between the red base and the white lines is part of the design — it needs room to breathe. Adding more lines to fill out the nail usually collapses the visual into noise rather than art.
A matte topcoat over white-on-red art shifts the whole register of the design. The lines lose a little brightness but the overall effect becomes more wearable for daily situations — almost editorial in its flatness.
10. Strawberry Milky Pink with Inner Glow
The milky nail look — sometimes described as an “inner glow” or “glazed” finish depending on who you ask — takes translucency a step further than the blush jelly entry earlier in this list. The goal is a nail that looks as if it has a soft internal luminance, a very gentle light diffusing from underneath the color rather than reflecting from the surface.
Strawberry milky pink sits in a slightly warmer register than plain blush — more strawberry cream than rose quartz, with a faint peachy warmth that makes it look alive rather than cool and clinical. The inner glow effect comes from layering a sheer pink over a pearl-white base coat. That pearl base reflects light from beneath the color layer, creating a dimensional quality that’s hard to explain but immediately obvious in person. Without the pearl base, you just have sheer pink. With it, there’s genuine depth.
Pearl base → sheer strawberry pink × 2–3 coats → high-gloss topcoat. That’s the whole formula.
If you’re building this with regular polish, press-on nails pre-finished with this effect are widely available and can look nearly identical to a gel salon result when properly sized and applied with nail glue rather than the adhesive tabs.
11. Wine Red with Rhinestone Embellishments
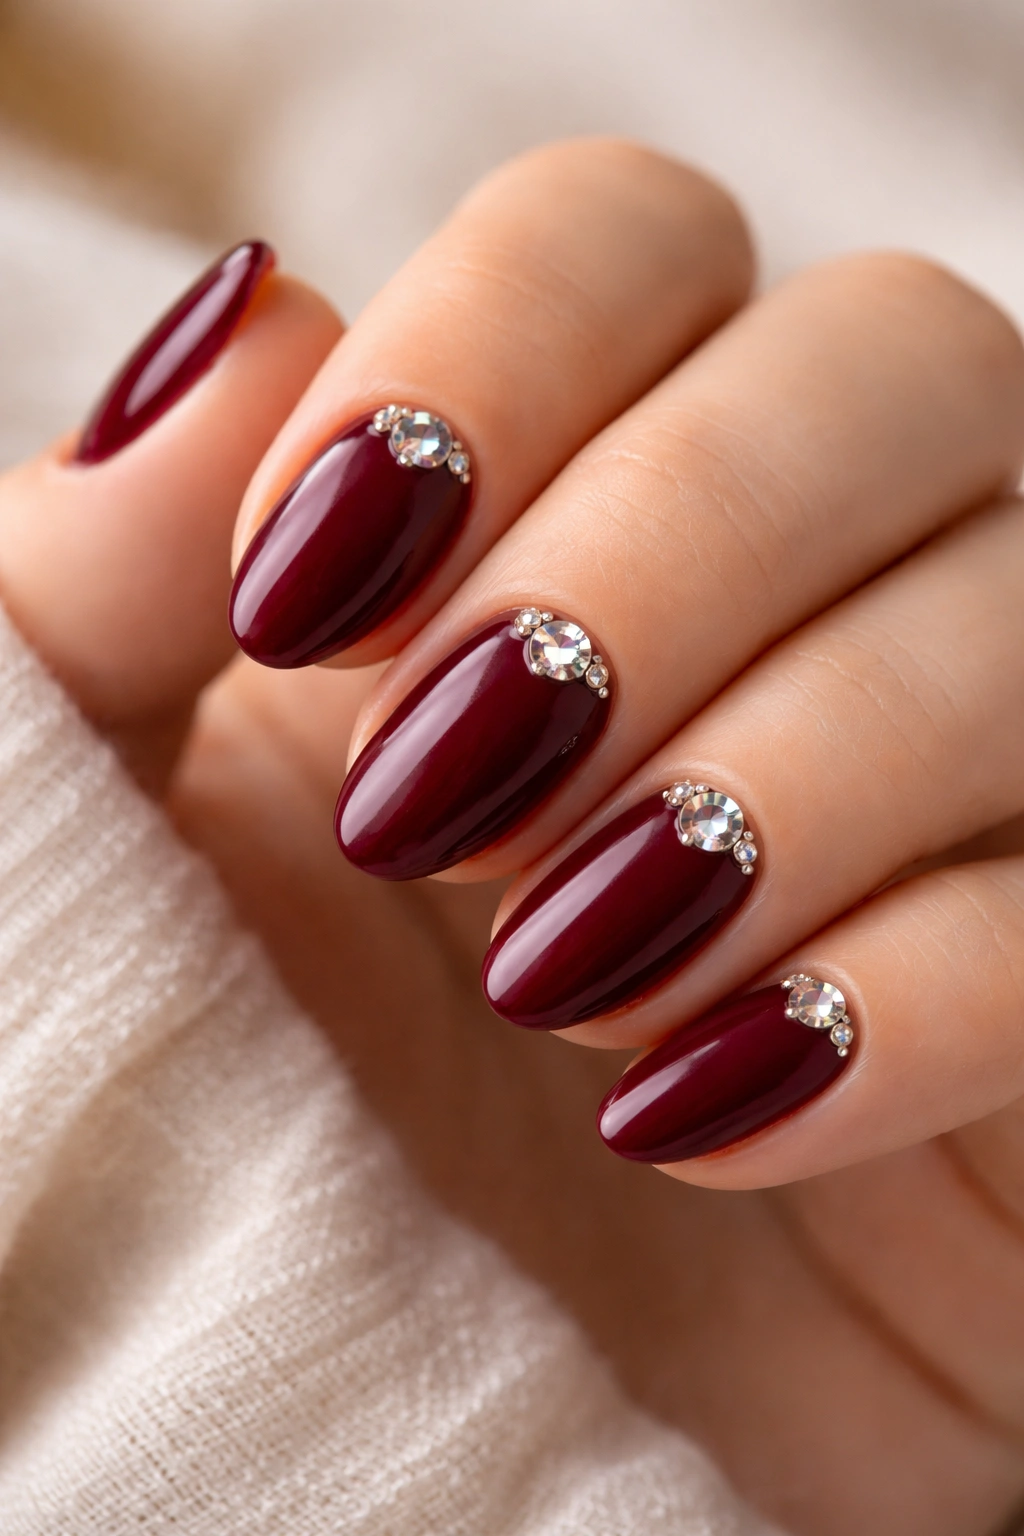
Wine red is a richer, slightly darker take on classic red — it has more purple than cherry or cranberry, but less than true burgundy. On short almonds it reads as deeply polished without feeling gothic, which makes it one of the most wearable dark options on this entire list. It suits formal events and casual Fridays equally, which isn’t something you can say about a lot of deep nail shades.
The rhinestones are the event. Not a scatter of tiny crystals across the whole nail — that gets visually chaotic on a compact surface. The placement that works best is a small cluster at the base near the cuticle, typically 3–7 stones in a loose crescent or triangular group. Anchoring the embellishment at the widest part of the nail creates a jeweled effect that references the look of a ring or a cuff rather than scattered glitter.
AB (aurora borealis) crystals in 1.5–2mm size catch the most light on short nails. The AB coating shifts between pink, purple, gold, and green depending on the angle — which plays beautifully against wine red. Apply with a small amount of nail glue or gel adhesive, let set for 60 seconds before moving the hand, and seal around (not directly over) the stones with topcoat to lock the edges without dulling the crystal surface.
An odd number of stones — 3, 5, or 7 — tends to look more composed than even groupings.
12. Pastel Pink with Red Tortoiseshell Swirls
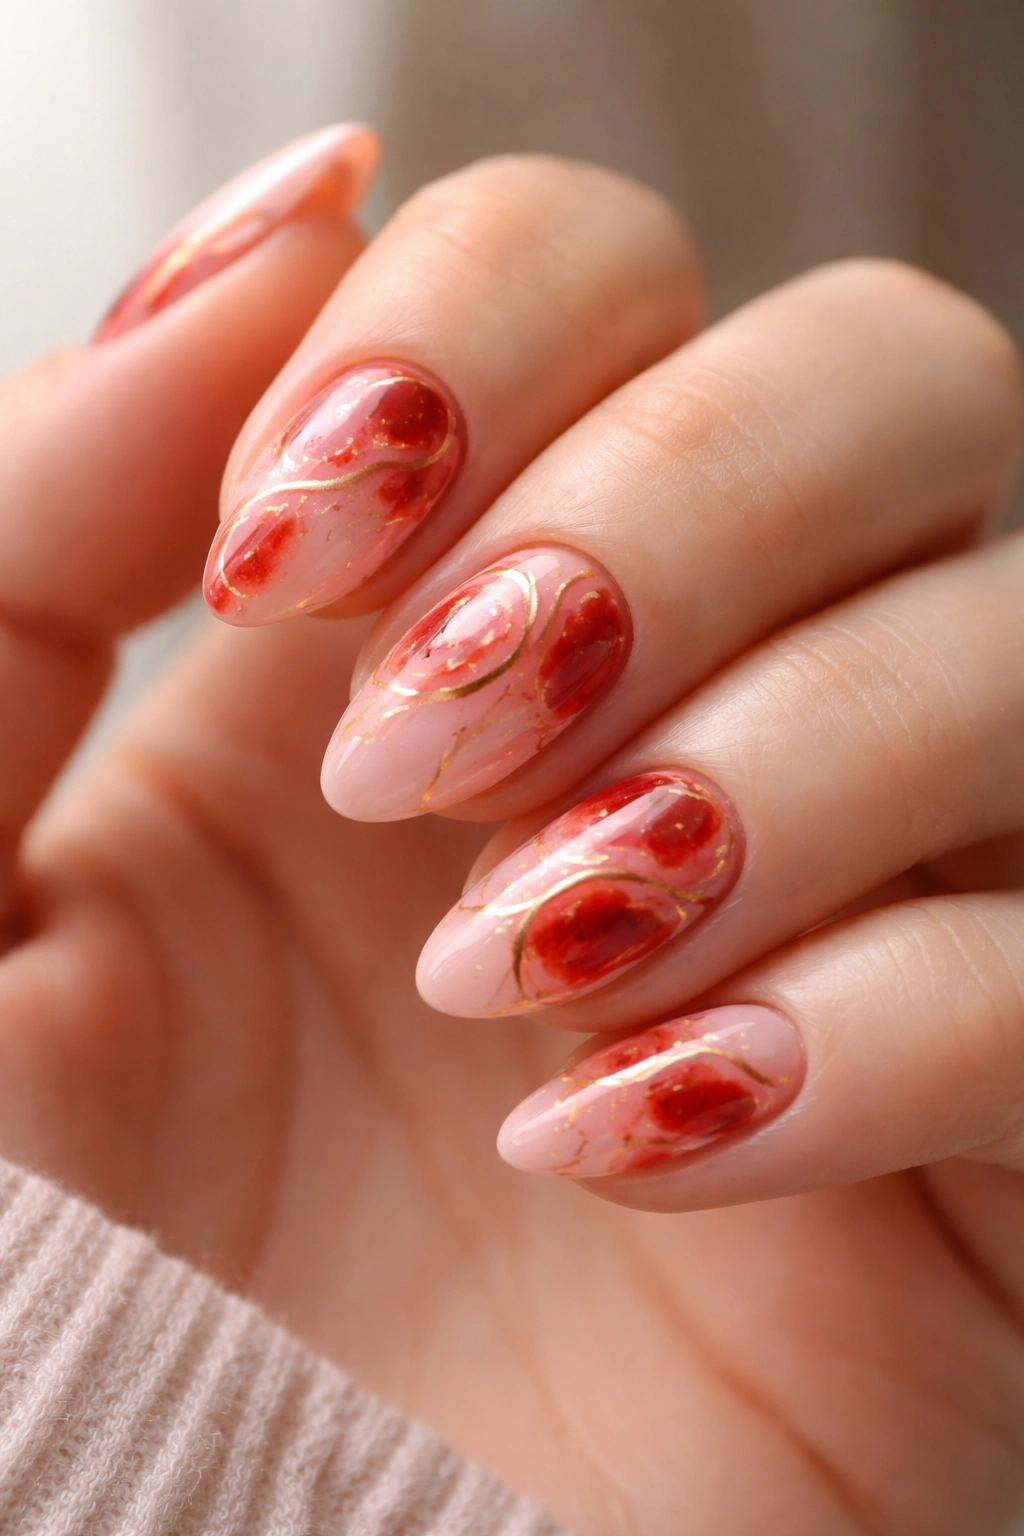
This one requires a different kind of attention because the technique itself is the design. Tortoiseshell nail art traditionally uses brown, amber, and black in a swirling, organic pattern that mimics the mottled surface of actual tortoise shell. This version replaces that warm amber palette with a pastel pink base and deep red swirls, sometimes with a thread of ivory or gold running through to separate the two main colors.
The process: start with a fully cured pastel pink base. Drop small, irregular patches of deep red across the nail surface using a thin brush or even the regular polish brush dabbed rather than stroked. Don’t aim for coverage or precision here — the imperfect, blob-like patches are the whole point. While the red patches are still wet, drag a very fine brush through them in long, irregular strokes to create the organic tortoiseshell pull effect. Work quickly. Wet polish blends; dried polish chips.
The result should look like the nail has abstract, flowing movement — not stripes, not polka dots, but something organic that leads the eye naturally across the nail without landing anywhere specific. If you can see the start and end of each stroke, the marks are too deliberate. Soften them.
Seal with a thick, glossy topcoat to flatten any texture and give the surface that glassy quality that makes tortoiseshell art look professional rather than accidentally messy.
13. Chrome Red Mirror-Finish Almonds
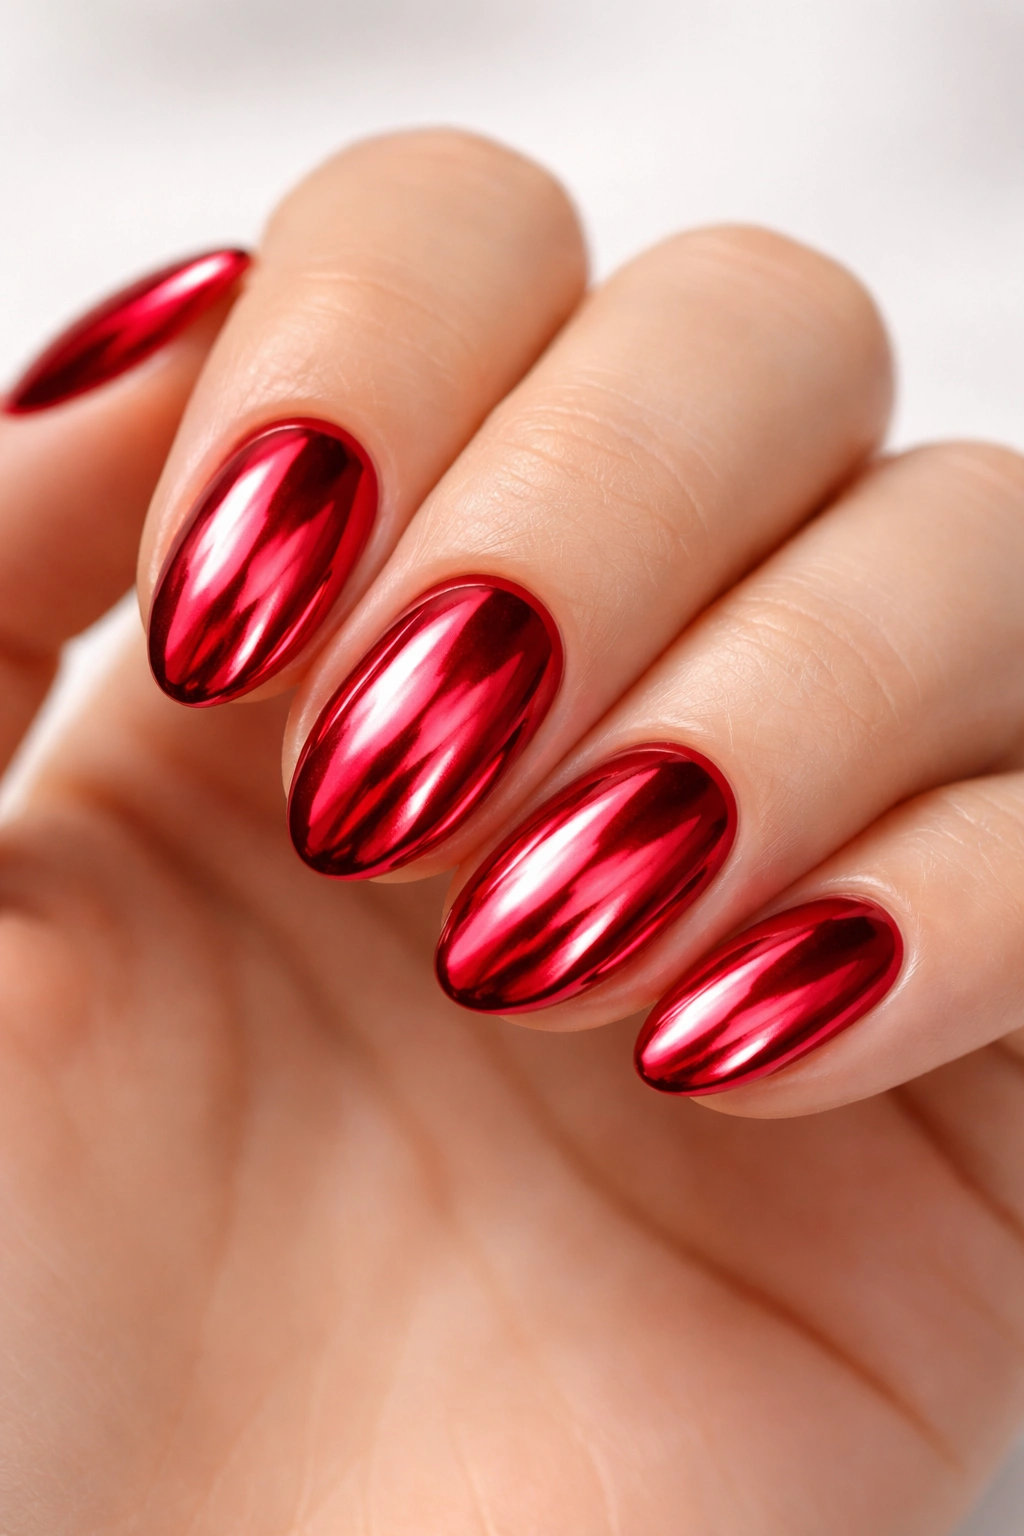
Chrome powder on a red nail is a genuinely different experience from standard gloss. Where a regular topcoat reflects light softly and diffusely, chrome creates a sharp mirror reflection — you can actually see a distorted image of your surroundings in the nail’s surface. On a short almond, the curved tip and tapered sides create a convex mirror effect that makes the nail look almost three-dimensional.
To achieve it: apply red gel as usual, cure fully, then apply a non-wipe topcoat — this step is critical — and cure that as well. While the non-wipe topcoat is slightly tacky, rub chrome powder over the nail using a silicone applicator or a felt pad in small circular motions. The powder adheres to the tacky layer and produces the mirror reflection almost immediately. Seal with a final topcoat.
The red underneath tints the chrome, so the final color lands somewhere between a metallic red and a rose gold depending on which chrome you use. Red-tinted chrome powder deepens the effect toward a true red metallic. Silver chrome over red cools it down toward a pink-leaning mirror finish.
Short almonds are actually the ideal shape for chrome work. The curved surface creates a shifting convex reflection that flat elongated shapes can’t replicate — the image in the nail moves and changes as you rotate your hand, which is legitimately dramatic for a 5mm nail. Long flat surfaces tend to reflect one thing; curved almonds reflect everything.
14. Pink and Red Color Block Split Design

Color blocking on nails has been a fixture in nail art for years because the concept is simple and the execution delivers a high-impact result with relatively minimal technique. On almond nails specifically, the pointed tip creates a natural meeting point for two color fields — which makes the split feel less arbitrary and more structural than it does on a square or round nail.
The classic execution: one half of the nail is pink, the other half is red, meeting in a sharp diagonal line that runs from one side of the cuticle to the opposite side of the tip.
Getting the Diagonal Line Sharp
This is where most home attempts fall apart. Not the color choice — the dividing line. The most reliable approach: press nail tape (or a thin strip of regular tape) diagonally across the nail after the first color has fully dried or cured. Apply the second color up to and over the tape edge. Peel the tape before the second color dries completely — peel while it’s still slightly tacky. If you wait until it’s bone dry, the edge can chip as you lift the tape and ruin the clean line entirely.
Clean any bleed with an acetone-dipped thin brush. The line should be crisp enough that you could trace it with a ruler.
Choosing the Right Pairing
Not all pink-red combinations read as color blocking. High-contrast pairs work best: a pale blush against a deep cherry, or a hot pink against a near-burgundy red. Combinations that are too close in value — a medium pink against a medium red — blur together and lose the graphic quality the design depends on. The two halves need to be clearly distinguishable at arm’s length.
15. Sheer Rose with Glitter Tips
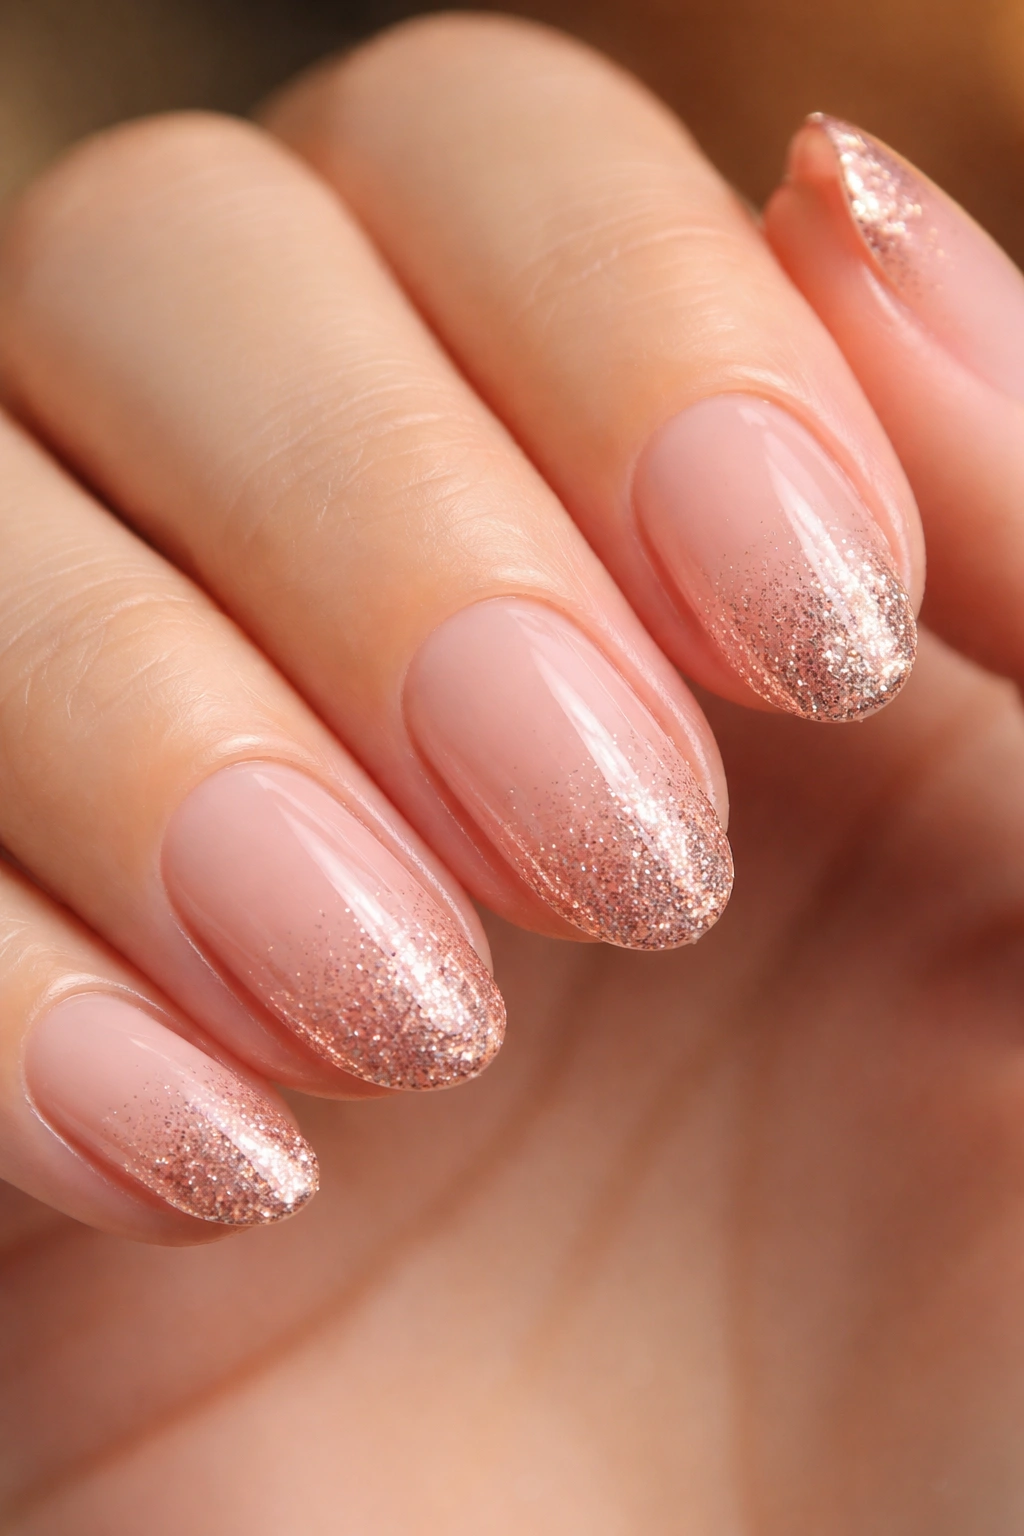
This one is for people who want sparkle without committing to a full glitter nail — which, on short almonds, can sometimes tip from festive into overwhelming depending on the particle size and how much coverage you go with. The sheer rose base keeps it wearable and day-appropriate, while the glitter stays contained to the tip and fades into the base color over 3–4mm.
The rose base should be sheer — similar in spirit to the blush jelly or milky pink from earlier, but with a slightly warmer, more saturated rose tone. Think faded red rose petal rather than baby pink. Over the cured or dried base, apply the glitter only to the tip: either a dedicated nail glitter gel in fine-to-medium particle size, or a chunky glitter polish applied with a smaller brush for precision at the free edge. The goal is a gradual fade from glitter into the rose base rather than a hard line where the glitter starts.
Rose gold or pink-tinted glitter particles maintain the warmth of the color story from base to tip. Silver or holographic glitter at the tip cools the look down slightly — not a problem, just a different result. Holographic works especially well under artificial lighting, where it throws small prismatic spots rather than straight metallic flash.
The key to making this last: glitter at the free edge chips faster than solid color because the particles create microscopic gaps where the polish can begin to lift. Capping the free edge thoroughly on every coat and reapplying topcoat every 3–4 days extends the wear time significantly — in practice, adding roughly 5–7 days to what you’d get without the extra topcoat applications.
Getting the Almond Shape Right Before Anything Else
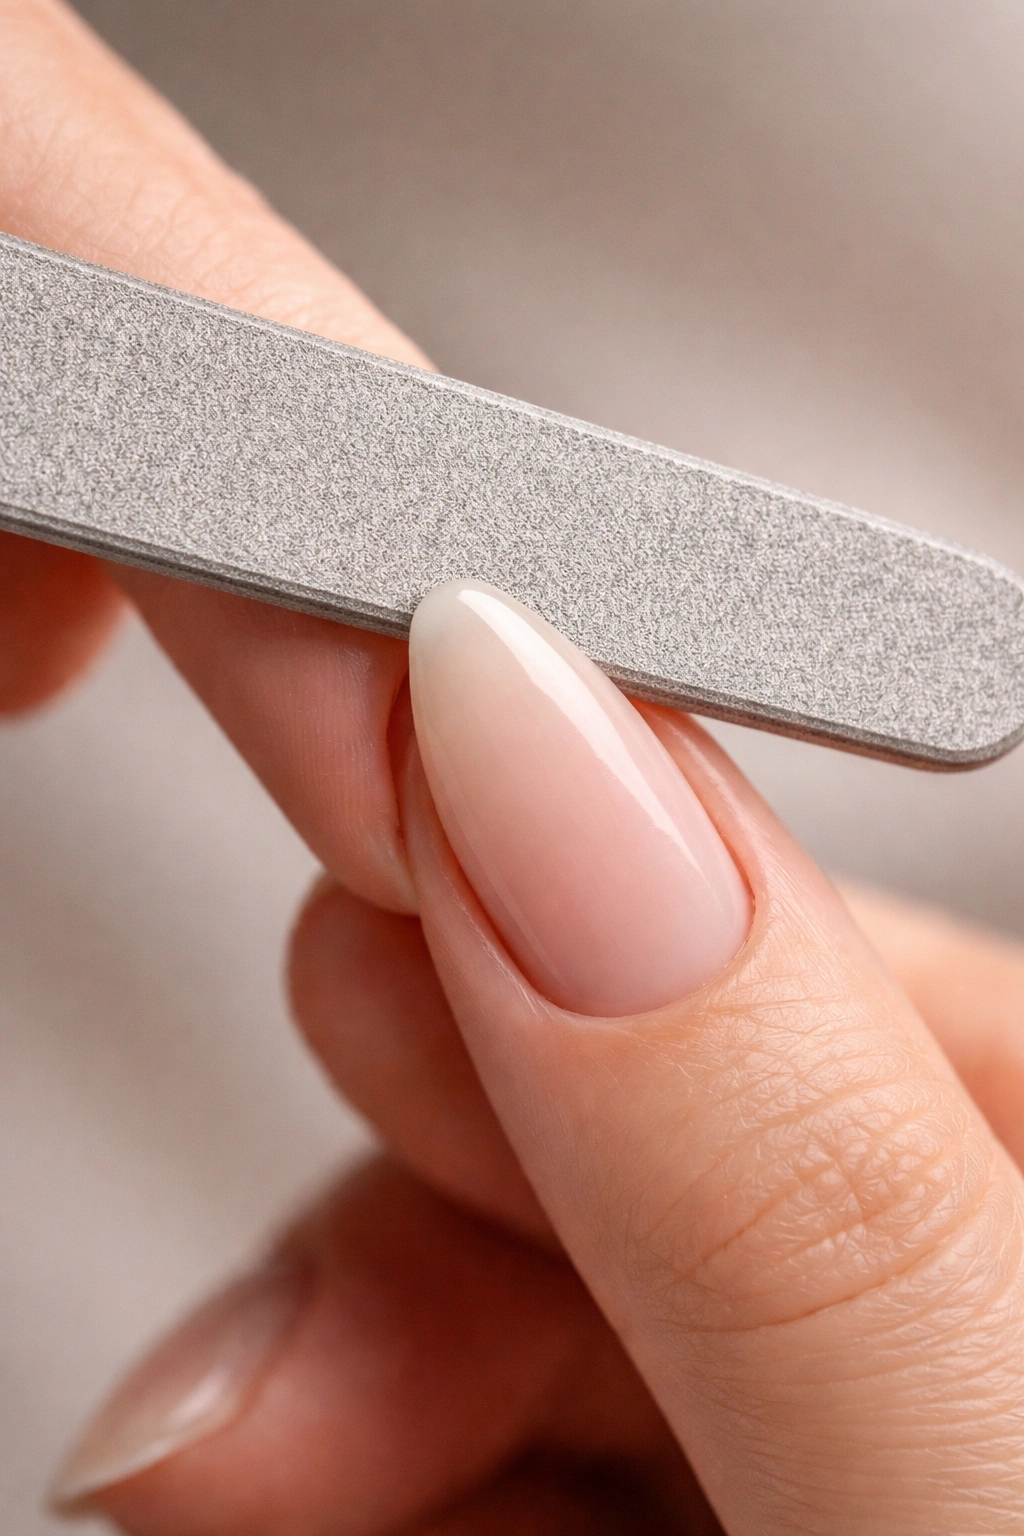
None of these designs land the way they’re supposed to without the right foundation shape. Short almond nails require a specific filing approach that people tend to either rush or overcorrect: you’re creating a taper on both sides of the nail that narrows toward the tip, finishing in a gently rounded — not sharp — point. That rounded apex is exactly what separates an almond from a stiletto. File from each outer corner toward the center using a 180-grit file, then smooth the tip with a 240-grit buffer. The nail should feel like one continuous curve from lateral wall to lateral wall — not a V-shape.
If you’re working with natural nails, keep all ten at roughly the same length before you start shaping. Inconsistency in nail length becomes magnified once you add color, and the almond shape is less forgiving of length asymmetry than rounder shapes are. A difference of even 2mm between nails reads as noticeably uneven on almonds.
How to Make Any of These Last on Short Nails
Short nails take more mechanical abuse than long ones — they’re positioned closer to the fingertip and contact surfaces more directly throughout the day. Three things make the biggest practical difference in wear time, regardless of which design you choose.
Prep the nail surface properly. Buff lightly with a 180-grit buffer before applying any base coat. This creates a slightly rough surface for the polish to grip onto. Clean off the dust with isopropyl alcohol, not water — water leaves trace residue that can block adhesion at the base coat level.
Cap the free edge on every single coat. Base coat, all color coats, topcoat — every layer. Run your brush across the very tip of the nail each time. This seals the edge and is the single biggest factor in preventing tip chipping, particularly with red and pink shades that show edge wear more visibly than darker colors.
Reapply topcoat every 3–4 days when wearing regular polish. This refreshes the seal over the tip and keeps the finish looking intentional rather than worn-out between reapplication sessions. With gel on natural or builder-overlay nails, the prep steps still apply — but a properly sealed gel system realistically lasts 12–18 days on short almonds before meaningful lifting begins.
Final Thoughts
The pink-and-red short almond combination stays in rotation precisely because it covers so much ground. A sheer blush jelly and a chrome red mirror finish are technically both “pink and red short almonds” — but they look nothing alike and suit completely different moods, occasions, and skill levels. That range is the whole point.
If you’re picking a starting point, the classic cherry red gloss and the pink-to-red ombre are both worth attempting early. The cherry red because it’s achievable with near-zero technique and delivers a consistently strong result. The ombre because once you nail the blending (with either the sponge or dual-brush method), that single skill opens up a huge number of other gradient combinations well beyond the red and pink family.
The designs that tend to impress the most in person — chrome, rhinestone clusters, tortoiseshell — are also the ones most people assume require a professional. They don’t. They require one or two practice runs on a nail wheel or an old press-on before committing to your actual nails. That 20-minute investment almost always closes the gap between a result you’re happy with and one that actually looks like something.
