

Coffin nails have become the go-to shape for anyone who wants bold, dramatic, and fashion-forward nail art. The distinctive tapered shape — wide at the base, narrowed toward the tip with a flat edge — gives you the perfect canvas for showcasing stunning gel designs. If you’ve been scrolling through nail inspiration and feeling overwhelmed by endless options, medium-length coffin nails strike that sweet spot between wearable elegance and head-turning impact.
The beauty of medium coffin nails lies in their versatility. They’re practical enough for daily wear without the fragility of extremely long nails, yet they provide plenty of real estate for intricate gel art. Whether you’re drawn to minimalist aesthetics, bold color combinations, or complex nail art techniques, medium coffin nails let you express your personal style without compromise. The gel formula means your chosen design will stay flawless and glossy for weeks — no chipping, no fading, just consistent beauty.
What makes medium coffin gel nails particularly special is how they photograph and how they catch light. The flat tip and gentle curves of this shape photograph beautifully, and gel finishes amplify that shine. You’re not limited to simple solid colors; the medium length opens doors to ombre effects, geometric patterns, metallic accents, and 3D embellishments that might feel overwhelming on shorter nails or impractical on extremely long ones.
Below, you’ll find 15 distinctive medium coffin gel nail ideas that showcase different techniques, color palettes, and aesthetic vibes. Each one translates beautifully into gel format and can be customized to match your personal style and lifestyle needs.
1. Soft Nude with Rose Gold Flake
This design combines understated elegance with just enough shimmer to catch light at the right angle. A creamy, warm nude gel base gives you that timeless foundation that pairs with everything in your wardrobe while maintaining a polished, sophisticated appearance. Rose gold flakes scattered across the nail surface — concentrated heavier near the cuticle and fading toward the tip — create dimension without feeling over-the-top.
Why It’s a Timeless Choice
The neutral nude base ensures these nails never clash with your outfit, and the rose gold flakes add just enough glamour to elevate an everyday manicure into something special. This design photographs beautifully in natural light and won’t look dated next season. It’s the kind of manicure you can wear to a job interview, a family dinner, or a casual weekend brunch without ever feeling out of place.
How to Get This Look
- Start with a gel base coat and cure
- Apply two thin, even coats of warm nude gel, curing between layers
- Mix rose gold flakes or dust into a clear gel topcoat — or use a pre-made rose gold gel polish
- Apply the shimmer mixture heavier near the cuticle, feathering it out toward the tip
- Seal with a glossy topcoat for maximum shine and protection
- Consider adding a delicate gold striping line down the center for additional elegance if desired
2. Deep Burgundy with Gold Leaf Accents
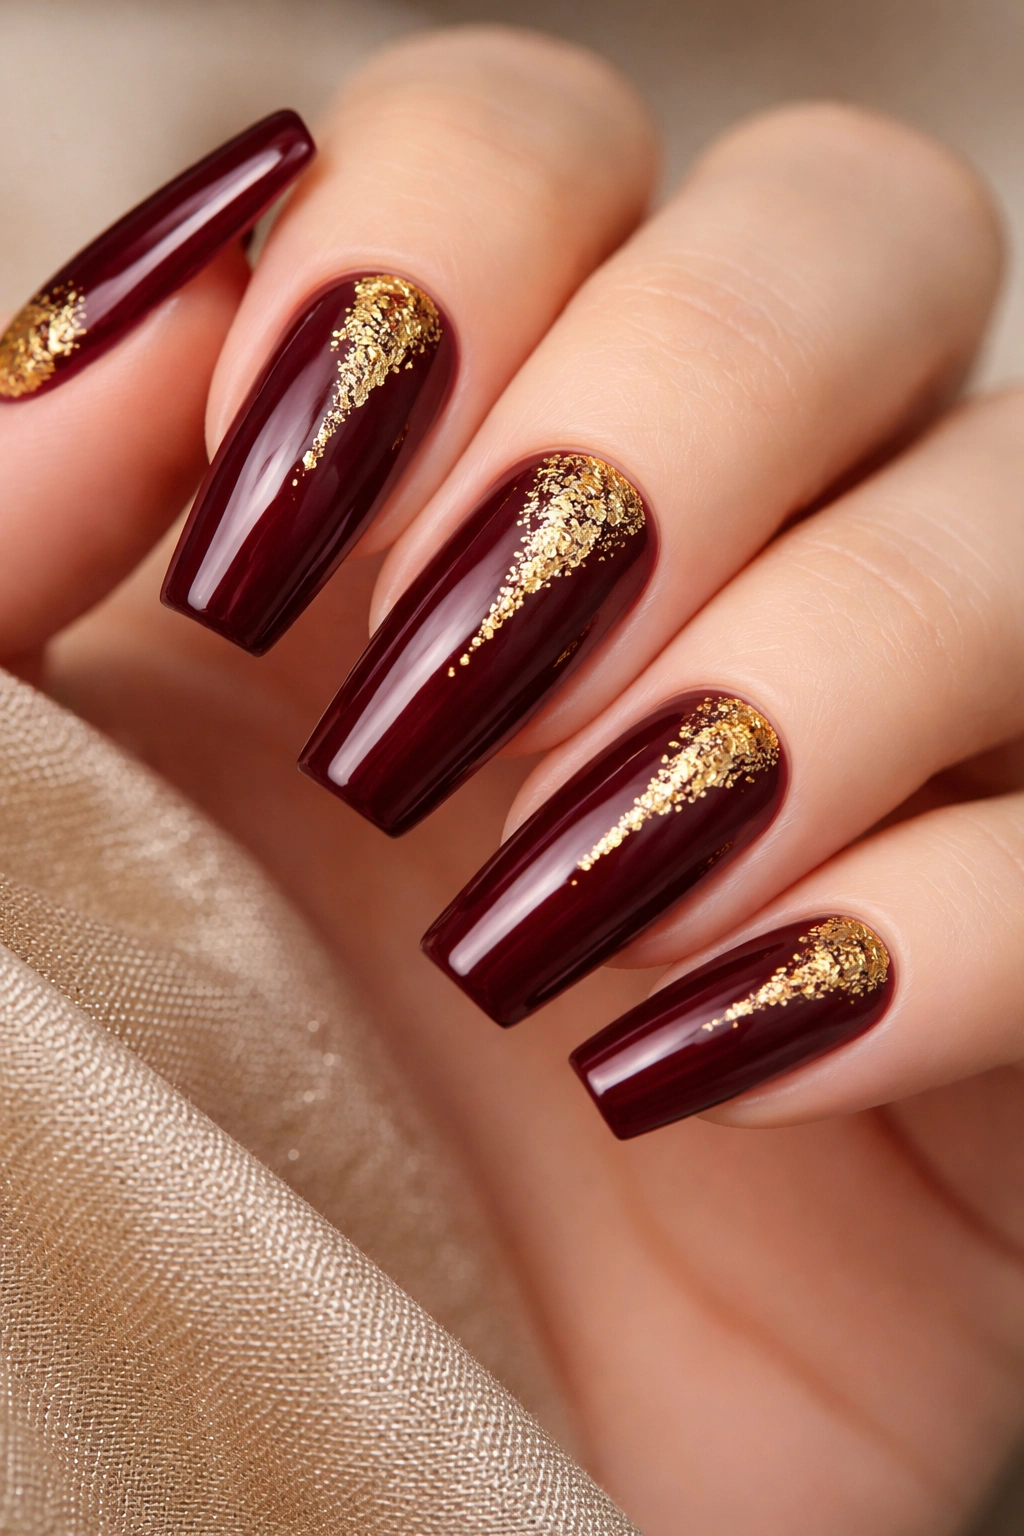
Deep burgundy gel polish creates an instantly luxurious, sophisticated base that reads as expensive and intentional. The richness of the color — that perfect balance between wine and chocolate — makes medium coffin nails look longer and more elegant. Gold leaf pieces applied strategically create an heirloom-quality effect that transforms the burgundy from professional to showstopping.
The Power of Jewel Tones
Burgundy works across all skin tones and seasons because it’s both warm and deep simultaneously. On medium coffin nails, this depth creates visual interest even in solid color form. Add the gold leaf accents running down the center of nails or clustered around the cuticle area, and you’ve got a design that feels like it belongs on a red carpet.
Application Details
- Apply gel base coat and cure thoroughly
- Layer two coats of burgundy gel, curing between each
- While the second layer is still tacky, apply thin sheets of gold leaf, pressing gently
- You can crumble the gold leaf slightly for a more organic, broken-glass effect
- Seal everything with a glossy or matte topcoat depending on your preference
- The contrast between the dark polish and bright metal is what makes this impact
3. Ombre Pink to White Gradient
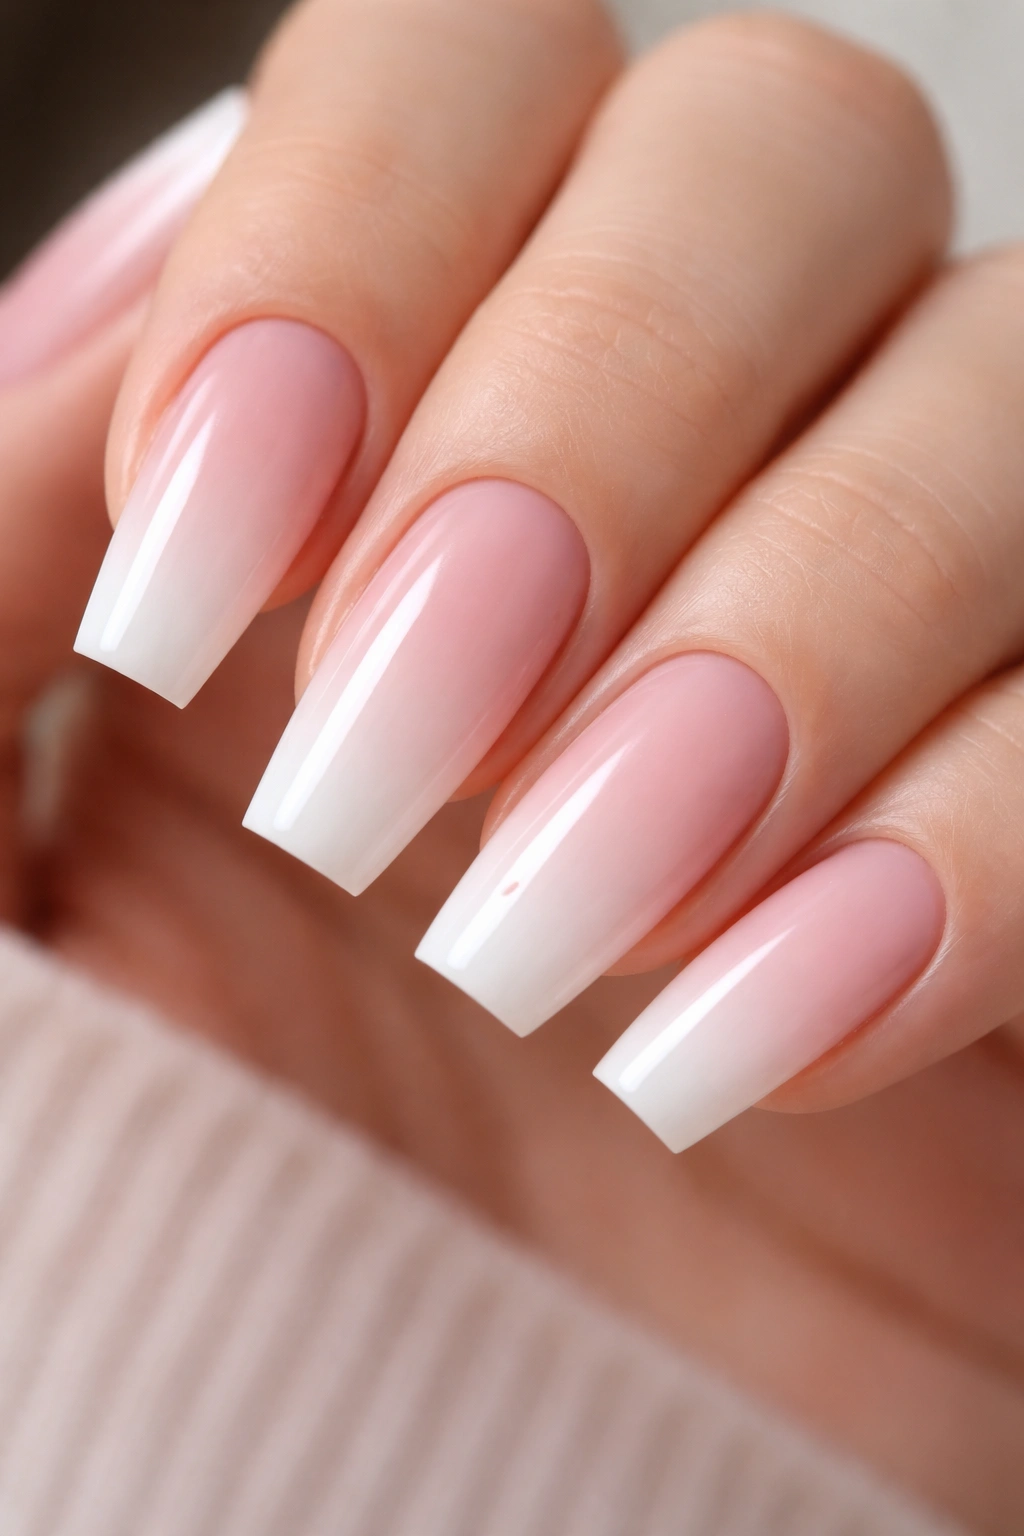
An ombre gradient from soft pink at the cuticle fading to pure white at the tip creates a dimensional, almost bridal quality that works year-round. This gradient design requires some technique to execute smoothly, but the payoff is a manicure that looks professionally done and feels incredibly versatile. Medium coffin nails provide enough surface area for a smooth, graduated transition without looking choppy or amateurish.
Why Gradients Look Premium
The ombre effect creates an optical illusion of length and elegance. Your eye follows the gradient from the rooted pink base to the bright white tip, and the nails appear longer and more refined than they actually are. This is pure visual magic, and it’s why gradient manicures never go out of style. The white at the tips also reinforces the coffin shape, emphasizing the architectural beauty of the nail form.
Creating a Flawless Gradient
- Apply gel base coat and cure
- Paint the lower half of each nail with soft pink gel and cure
- Using a sponge (a makeup sponge or special nail sponge), dab pink and white gel onto the sponge in a gradient pattern
- Gently sponge the gradient onto the nail from the middle toward the tip
- Build opacity with 2-3 sponging passes, curing between each
- Finish with a smooth topcoat to seal everything and create uniformity
- The key is patience — rushing the gradient creates visible lines instead of smooth transitions
4. Matte Black with Geometric Gold Lines
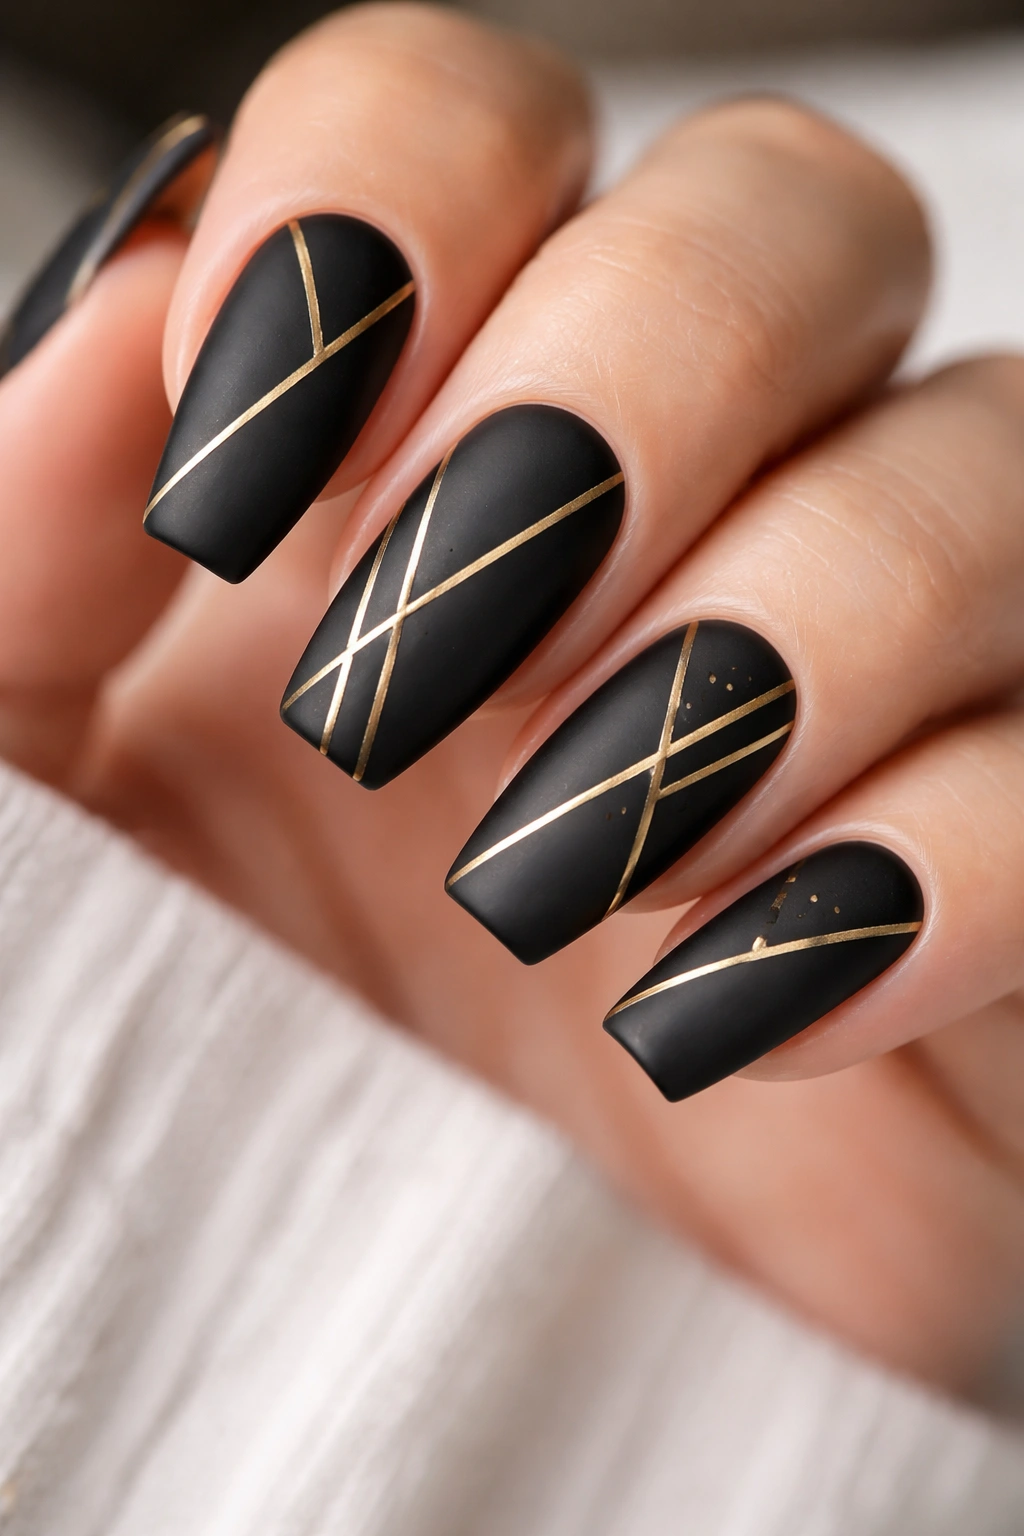
Matte black gel creates a chic, modern canvas that photographs like a dream. Sharp geometric gold lines — whether chevrons, triangles, or simple striping — transform the solid black into contemporary nail art. The contrast between matte and glossy (the gold lines should be left glossy) creates visual depth and prevents the design from feeling flat or boring.
Modern Minimalism at Its Best
This design says you’re confident, intentional, and aware of current design trends without being trendy in a fleeting way. Geometric patterns are timeless, and the matte-to-glossy contrast adds sophistication. On medium coffin nails, this design doesn’t feel too edgy or harsh — it feels curated and intentional.
Execution Steps
- Apply gel base coat and cure
- Apply two coats of matte black gel, curing between layers
- Use thin striping brushes or gold gel pens to apply geometric patterns — thin vertical lines, chevrons pointing toward the tip, or triangular shapes
- For perfect lines, apply striping tape before applying gold gel, remove tape immediately after, then cure
- Keep gold lines glossy while the background stays matte
- Topcoat only the gold lines if you want maximum contrast, or topcoat everything for a more blended, subtle effect
5. Soft Sage Green with Pressed Flowers
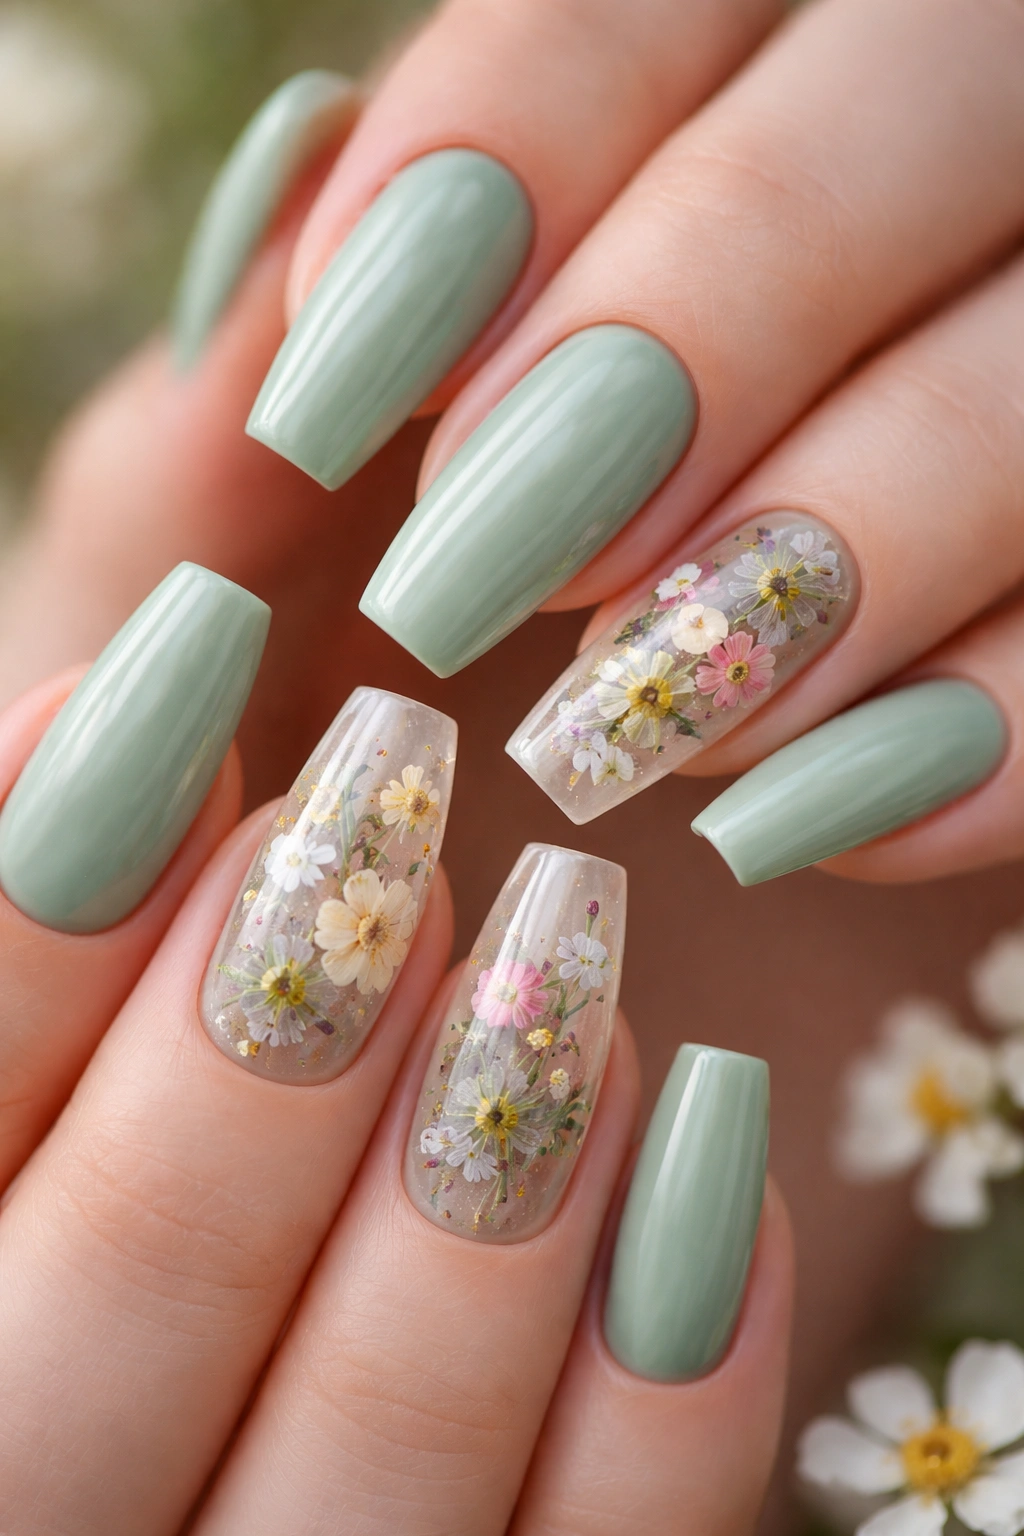
Soft sage green is the perfect nail color for anyone seeking calm, earthy elegance. Pressed flowers encased within clear gel layers create a botanical, almost ethereal quality that feels fresh and intentional. This design works beautifully on medium coffin nails because you have enough space to feature actual flower shapes without everything feeling cramped or busy.
The Botanical Trend (That Isn’t Going Anywhere)
Floral elements on nails never feel dated because flowers themselves are eternal. A soft, muted sage green grounds the design in nature while allowing delicate florals to shine. This is the manicure for anyone who loves plants, prefers softer aesthetics, or wants nails that feel like wearable art rather than a statement.
How to Encapsulate Pressed Flowers
- Apply gel base coat and cure
- Apply the first layer of sage green gel and cure
- Place tiny pressed flowers (baby’s breath, forget-me-nots, or dried petals) strategically on the nail
- Apply another layer of sage green gel over the flowers, pressing gently so they stay centered
- Cure this layer
- Add a final clear topcoat to seal and protect the flowers
- The flowers will appear to float within the layers, creating a 3D effect
- Source pressed flowers from specialty nail suppliers or press your own flowers weeks in advance
6. Deep Navy with White Pearl Swirls
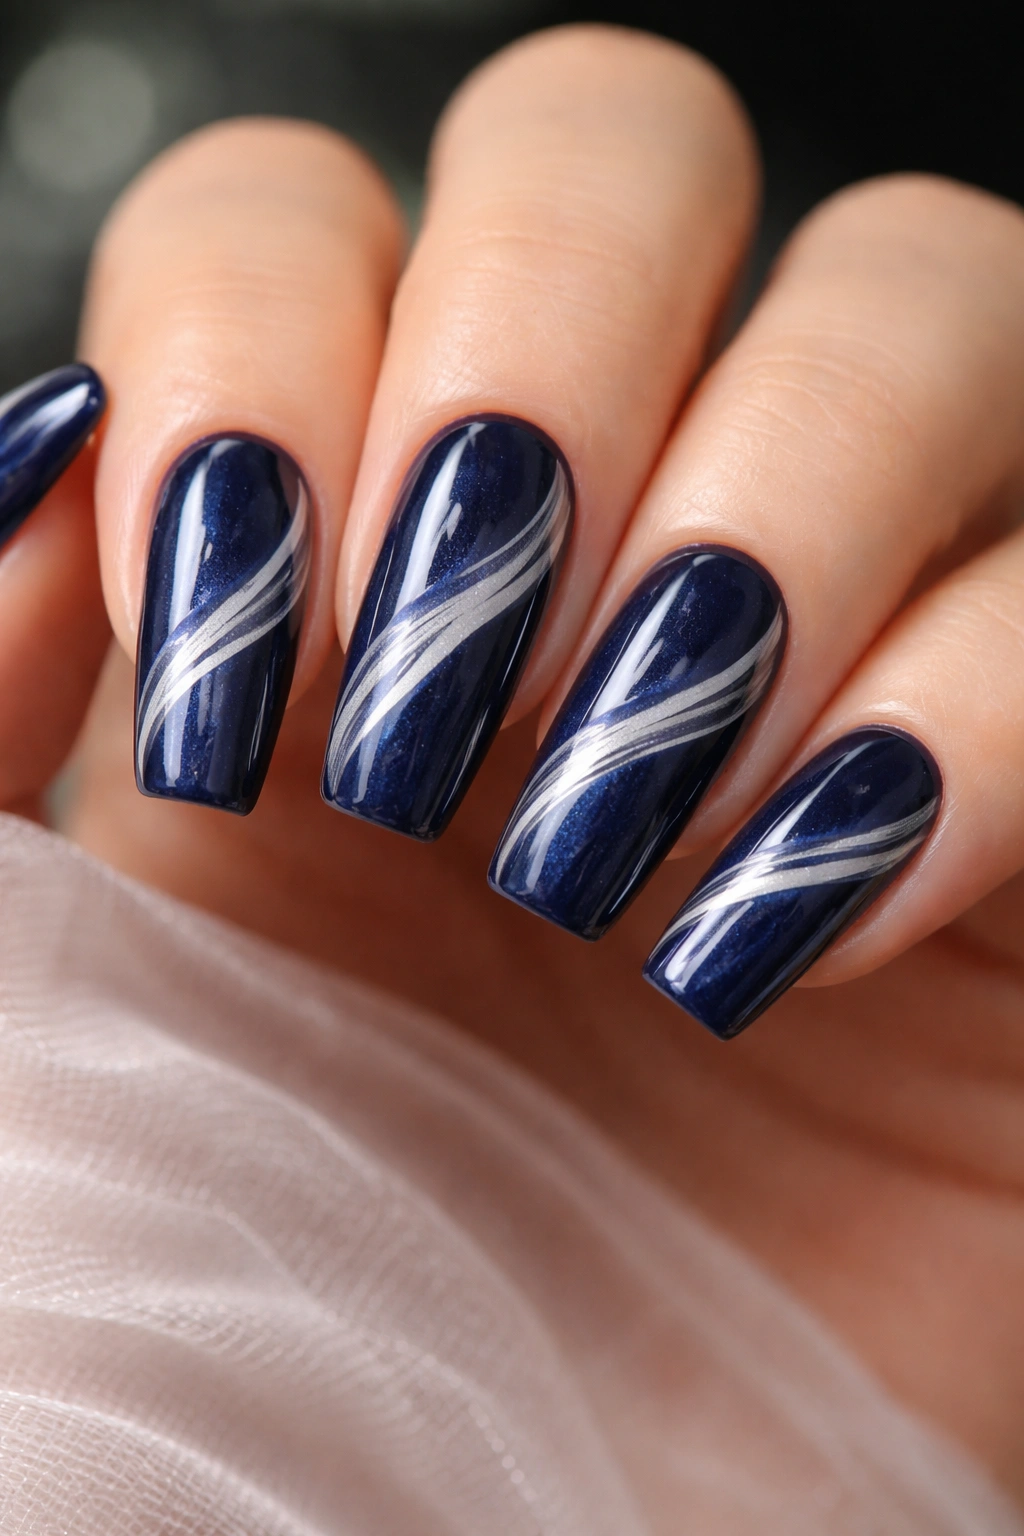
Navy blue is a color that conveys sophistication, reliability, and timelessness. When paired with white pearl swirls that dance across the surface, you get a design that feels both calming and visually interesting. The pearlescent quality of the white swirls catches light beautifully and prevents the navy from feeling flat or monotonous.
The Psychology of Navy and White
This color combination is inherently balanced — navy is grounding and calm, while white adds brightness and optimism. Together on medium coffin nails, they create a design that feels polished enough for professional settings and stylish enough for evening wear. The combination also works across all seasons and coordinates effortlessly with most wardrobes.
Creating Pearl Swirls
- Apply gel base coat and cure
- Apply two coats of deep navy gel, curing between layers
- Using a thin striping brush or marbling tool, apply white pearl or metallic white gel in loose, organic swirls across the nail surface
- Don’t overthink the pattern — randomness is part of the charm
- You can create swirls on just one or two accent nails if you prefer subtlety
- Cure after the pearl swirls and seal with topcoat
- The white should sit on top of the navy, not blend into it, for maximum contrast
7. Warm Terracotta with Copper Metallic Details
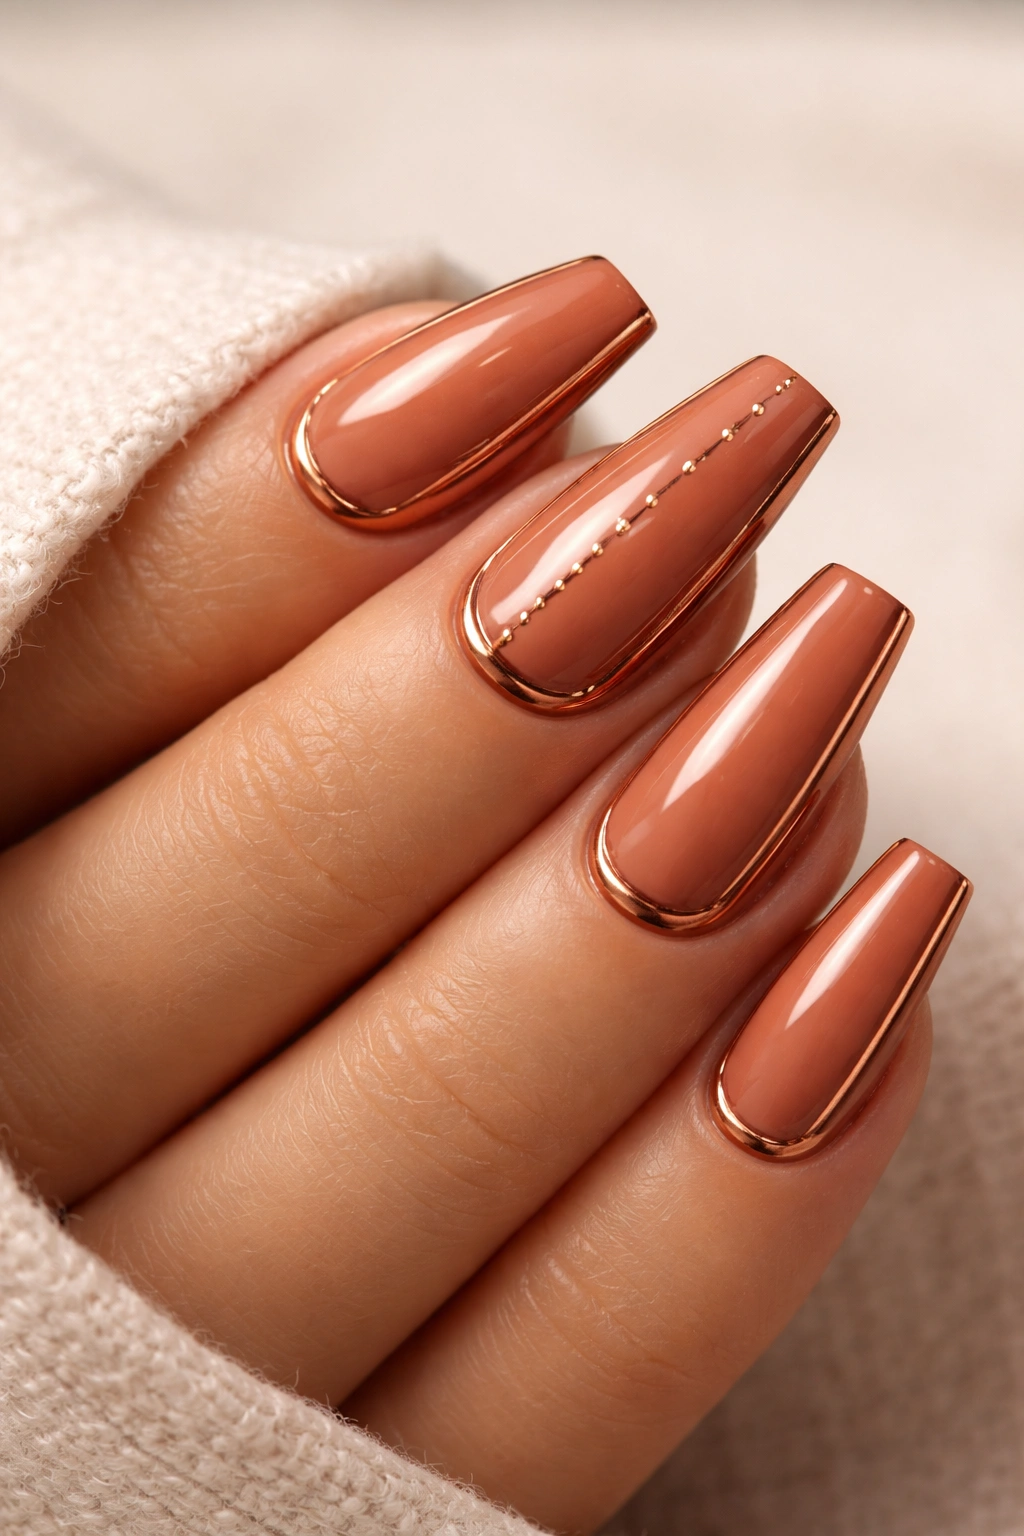
Terracotta is an earthy, warm tone that feels simultaneously trendy and timeless. It’s the color of sunrise, desert clay, and natural beauty. When you add copper metallic accents — perhaps a metallic frame around the cuticle, dots scattered across the nail, or thin metallic stripes — the design feels warm, intentional, and utterly wearable.
Warm Tones That Flatter Every Complexion
Terracotta has an almost magical quality where it seems to flatter nearly every skin tone. The warmth creates an energizing, happy vibe without feeling overly bright or summery. It’s sophisticated without being cold, and playful without being juvenile. On medium coffin nails, terracotta creates visual interest because of its depth and warmth.
Metallic Accent Placement
- Apply gel base coat and cure
- Apply two even coats of warm terracotta gel, curing between layers
- Use copper metallic gel and a thin brush to add details — consider a metallic frame around the cuticle area, delicate dots in the center, or thin striping down the sides
- Metallic gels can be streaky, so apply thin layers and cure between passes for smoothness
- Alternatively, use copper leaf for a more premium, broken-metal effect
- Seal everything with a glossy topcoat
- The metallic details should feel intentional and placed, not random and chaotic
8. Blush Pink with Delicate Lace Pattern
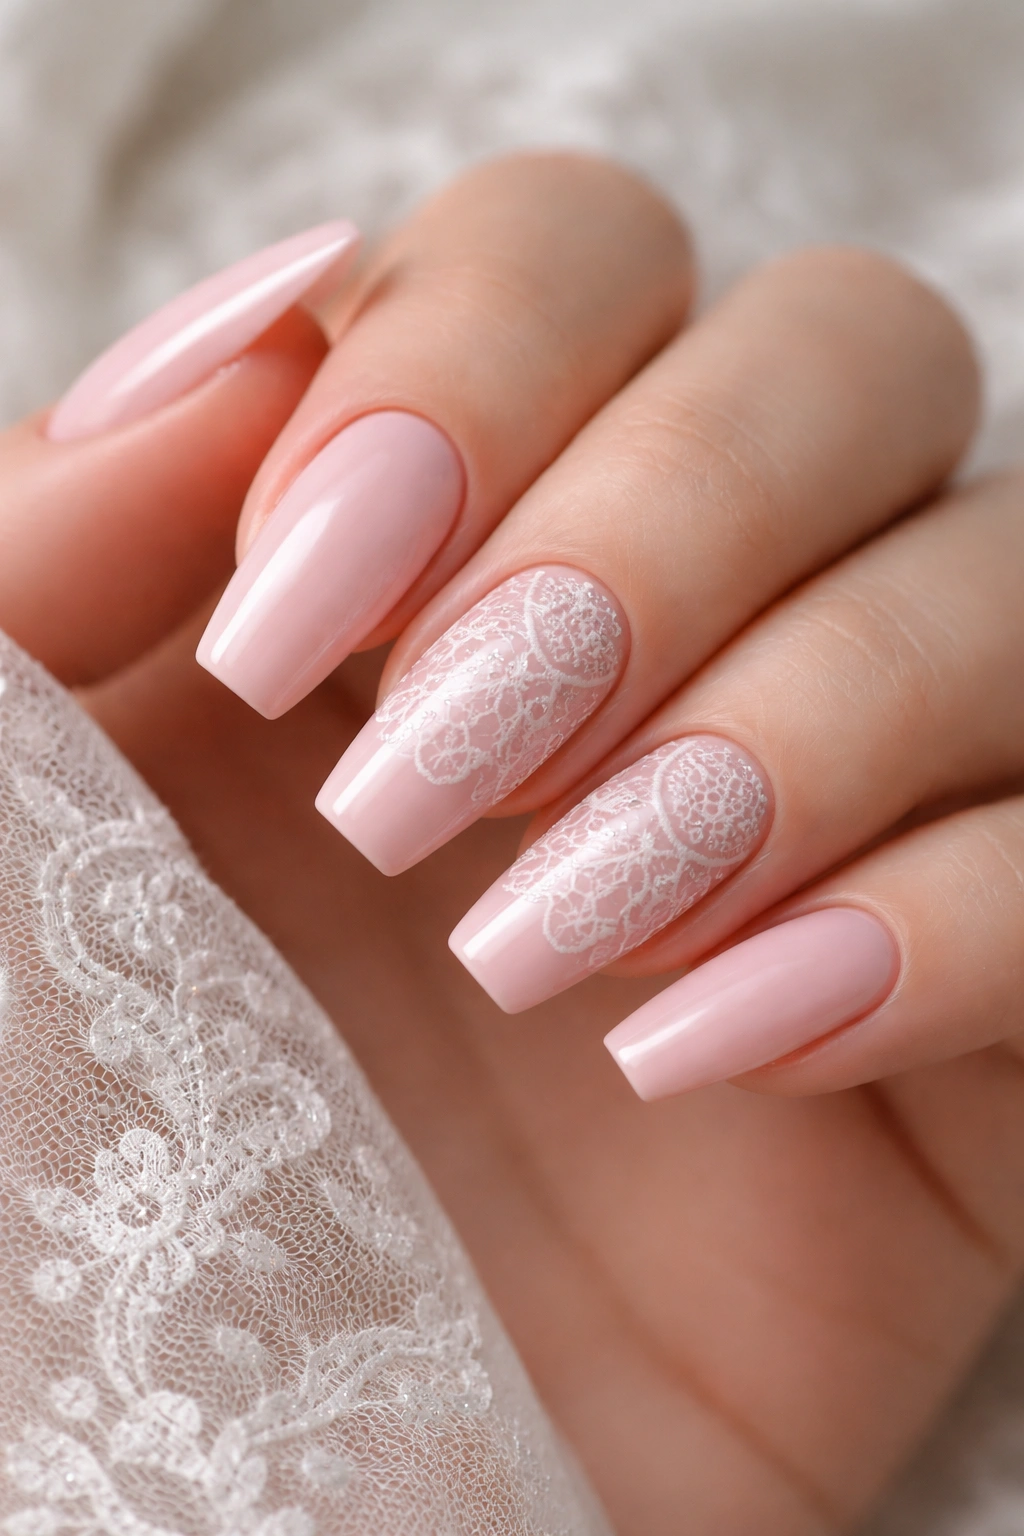
Blush pink is soft, romantic, and flattering to nearly every skin tone. When you layer delicate lace pattern over blush pink using a fine striping brush or specialized lace nail tools, you create something that feels incredibly elegant and just slightly romantic without being over-the-top feminine. This design works beautifully on medium coffin nails where the lace pattern has space to breathe.
Femininity With Edge
This design proves that delicate and sophisticated aren’t boring. The lace pattern adds complexity and visual interest without making the manicure feel juvenile or overly sweet. It’s the kind of design that works for weddings, date nights, or anytime you want nails that feel special and thoughtful.
Creating the Lace Effect
- Apply gel base coat and cure
- Apply two coats of blush pink gel, curing between layers
- Using a very fine striping brush and white or off-white gel, paint delicate lace patterns — tiny scallops, dots, and connecting lines inspired by actual lace designs
- Work slowly and carefully — lace patterns reward precision
- You can do lace on all nails or feature it as an accent on just one or two nails
- Consider adding a tiny clear rhinestone at key intersection points for subtle sparkle
- Cure after the lace work and seal with a glossy topcoat
9. Rich Plum with Holographic Sparkle
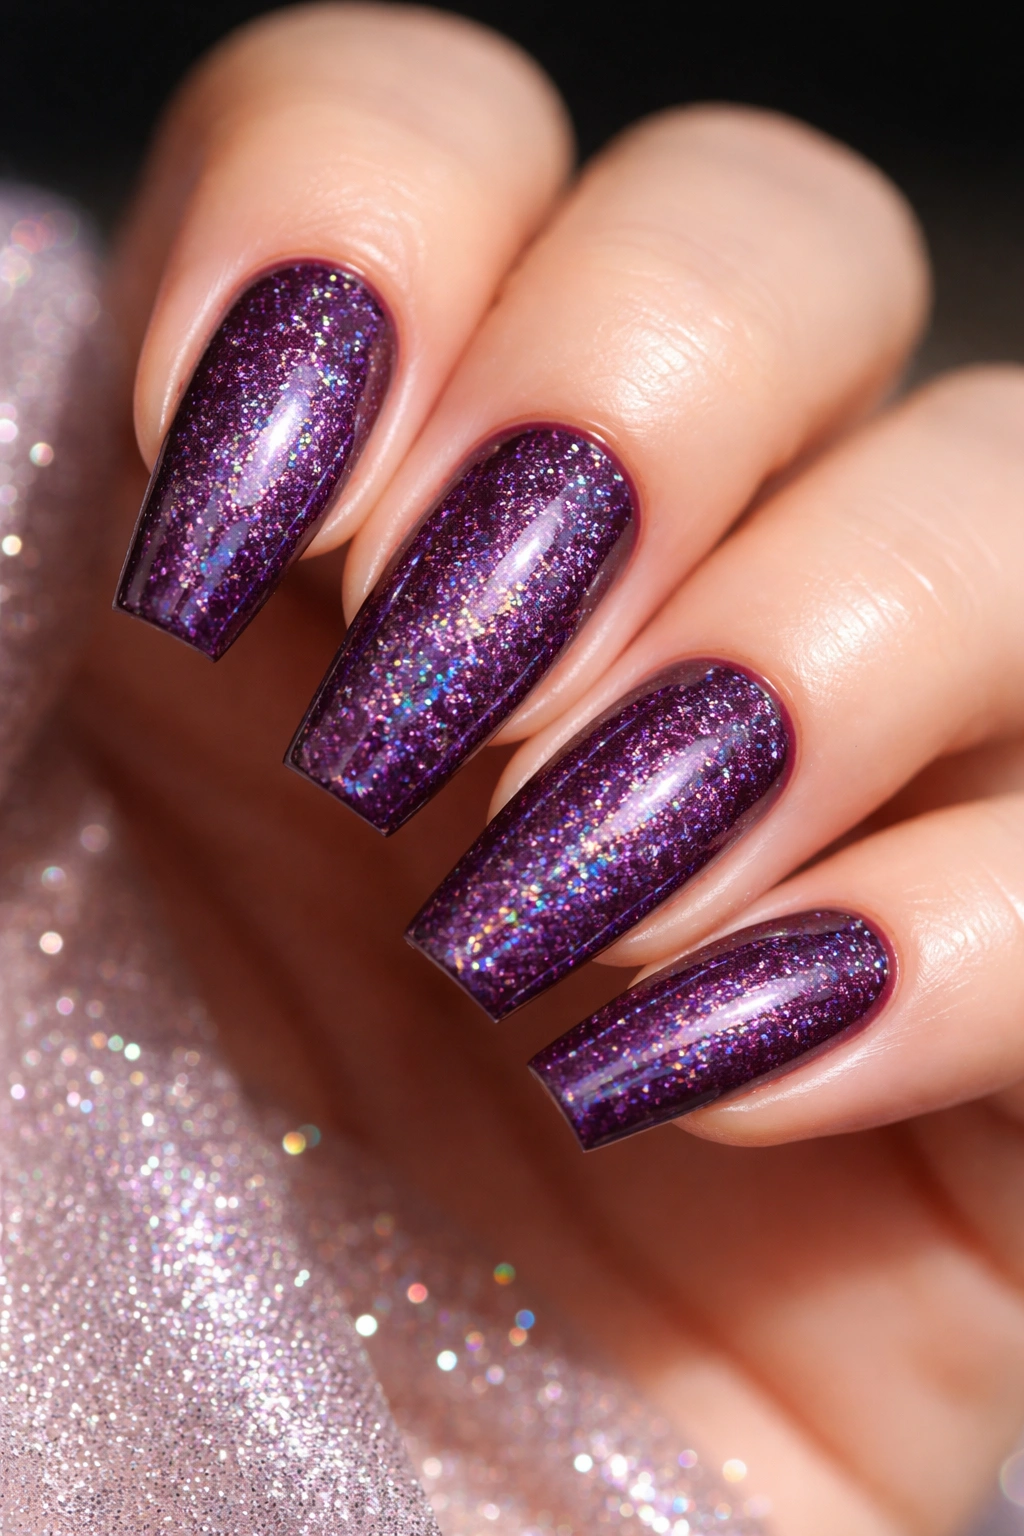
Rich plum is luxurious, dramatic, and makes medium coffin nails look instantly elevated. Holographic gel sparkles shift through rainbow colors as light hits the nail at different angles — it’s eye-catching without being loud, and it photographs incredibly beautifully. This design is perfect for anyone who loves color and wants something that feels special and intentional.
The Magic of Holographic Finishes
Holographic gels create an optical phenomenon — the nails seem to shift and change as you move your hands. It’s mesmerizing to look at and creates an impression of intentionality and expertise. On medium coffin nails, the holographic sparkle is visible enough to be impressive without overwhelming the design.
Applying Holographic Gel
- Apply gel base coat and cure
- Apply one generous coat of rich plum gel and cure
- Apply holographic gel over the plum — you can do a full coverage, or use holographic only in the center or tips for a more subtle effect
- Holographic gels are often slightly sheer, so you might need two layers for full opacity
- Cure between layers
- Seal with a clear topcoat, though many holographic gels are designed to be topcoat-free
- The holographic effect is most visible in sunlight or bright light — it’s subtle indoors but stunning outdoors
10. Classic White with Thin Black Striping
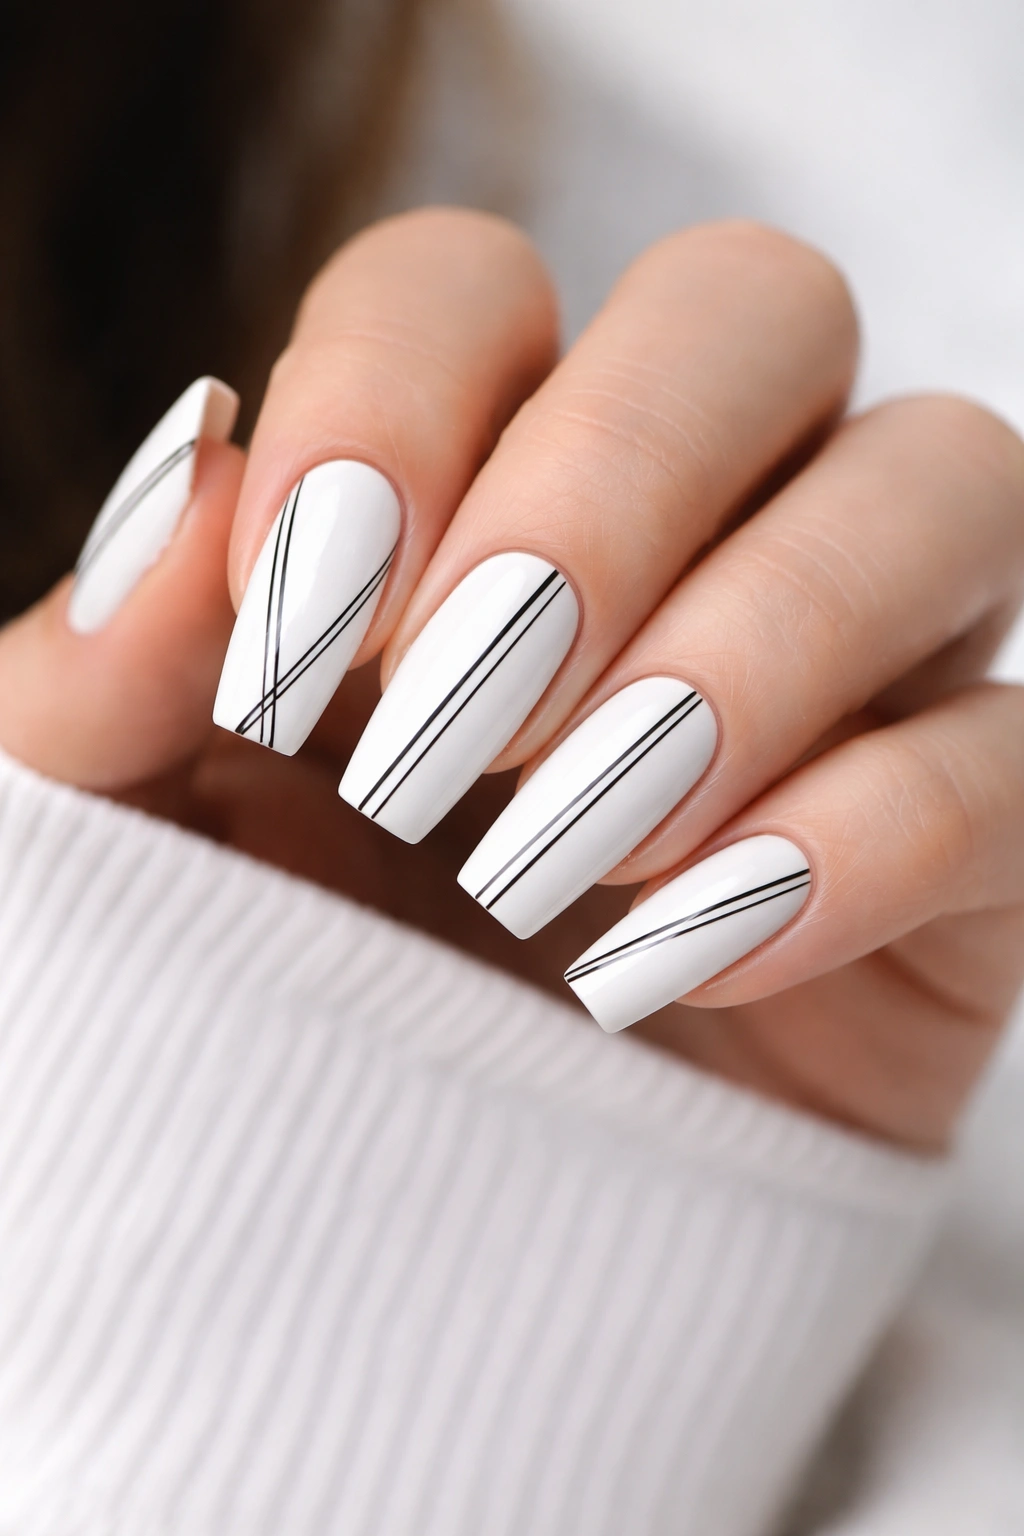
This design is the epitome of timeless elegance. Pure white forms the base while thin black stripes — whether vertical, horizontal, or diagonal — create geometric interest. It’s minimalist, striking, and somehow feels both modern and vintage simultaneously. The contrast between white and black is graphic and professional while still being interesting enough to showcase design skill.
Graphic Design Principles on Nails
The white and black combination is used in graphic design because of its universal appeal and high readability. On nails, this same principle applies — white and black together always look intentional, polished, and well-executed. There’s nowhere to hide with such a clean color combination, which is precisely why it’s impressive when done well.
Creating Clean Striping
- Apply gel base coat and cure
- Apply two coats of bright white gel, curing between layers
- Using a fine striping brush and jet black gel, apply thin, even lines across the nail
- For perfectly straight lines, use striping tape as your guide — apply tape before black gel, remove immediately after application, then cure
- Vertical lines elongate the nail shape, while diagonal lines add movement
- Consider leaving some nails completely white as accent nails for a mixed design
- Seal with topcoat for a glossy, protective finish
- The key is keeping lines thin and even — thick black lines look less sophisticated
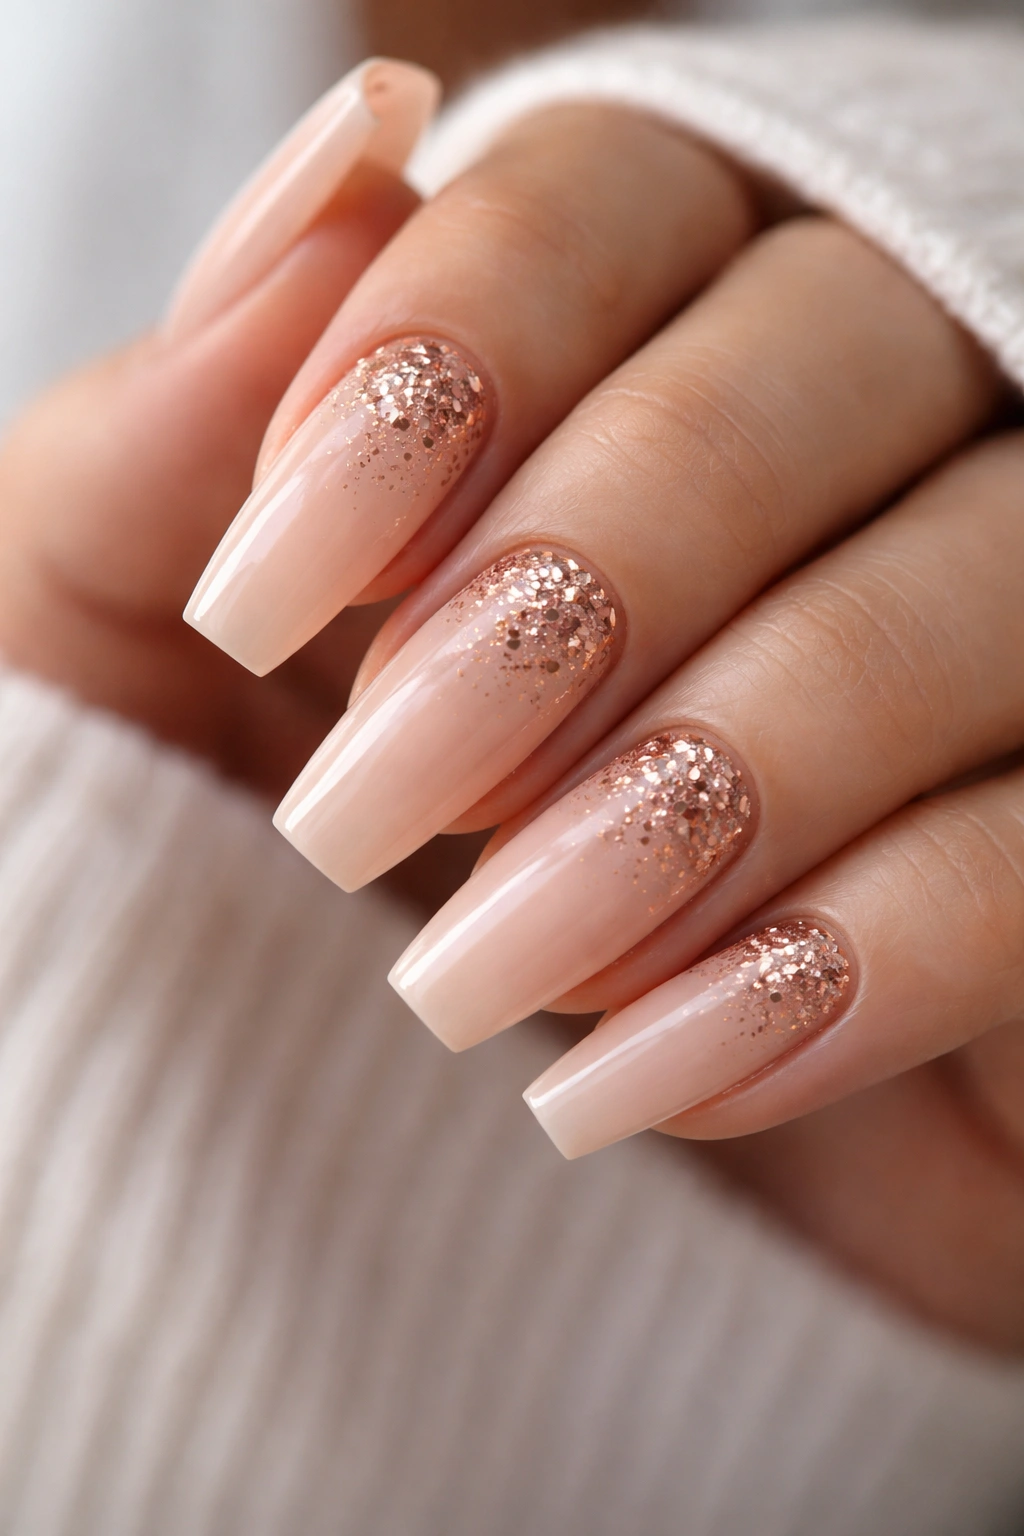
11. Champagne Nude with Subtle Rainbow Shimmer

This design is sophisticated yet playful, elegant yet fun. Champagne nude creates a warm, universal base that works as a barely-there manicure by itself. Add subtle rainbow shimmer — a delicate multi-color sparkle rather than obvious rainbow stripes — and you’ve got something that reads as intentional and interesting without being loud or cartoonish.
Understated Luxury Feeling
There’s something inherently elegant about barely-there designs with hidden details. Someone looking at your nails from across a room sees elegant champagne nude. Someone looking closely notices the rainbow shimmer and realizes you put real thought into this design. That layering of sophistication is what makes this design work so beautifully.
Building Subtle Shimmer
- Apply gel base coat and cure
- Apply two coats of champagne nude gel, curing between layers
- Mix tiny flakes of rainbow-colored materials (rainbow dust, iridescent flakes, or multi-color shimmer) into a clear gel
- Apply this mixture in thin layers — the champagne nude should still show through, just enhanced with subtle color shifts
- Build opacity gradually, curing between thin applications
- You want the rainbow element to be visible when light hits it directly, but not obvious in all lighting conditions
- Seal with a glossy topcoat to magnify the shimmer
- This is the kind of manicure that gets compliments from people who actually appreciate nail art
12. Emerald Green with Gold Geometric Frame
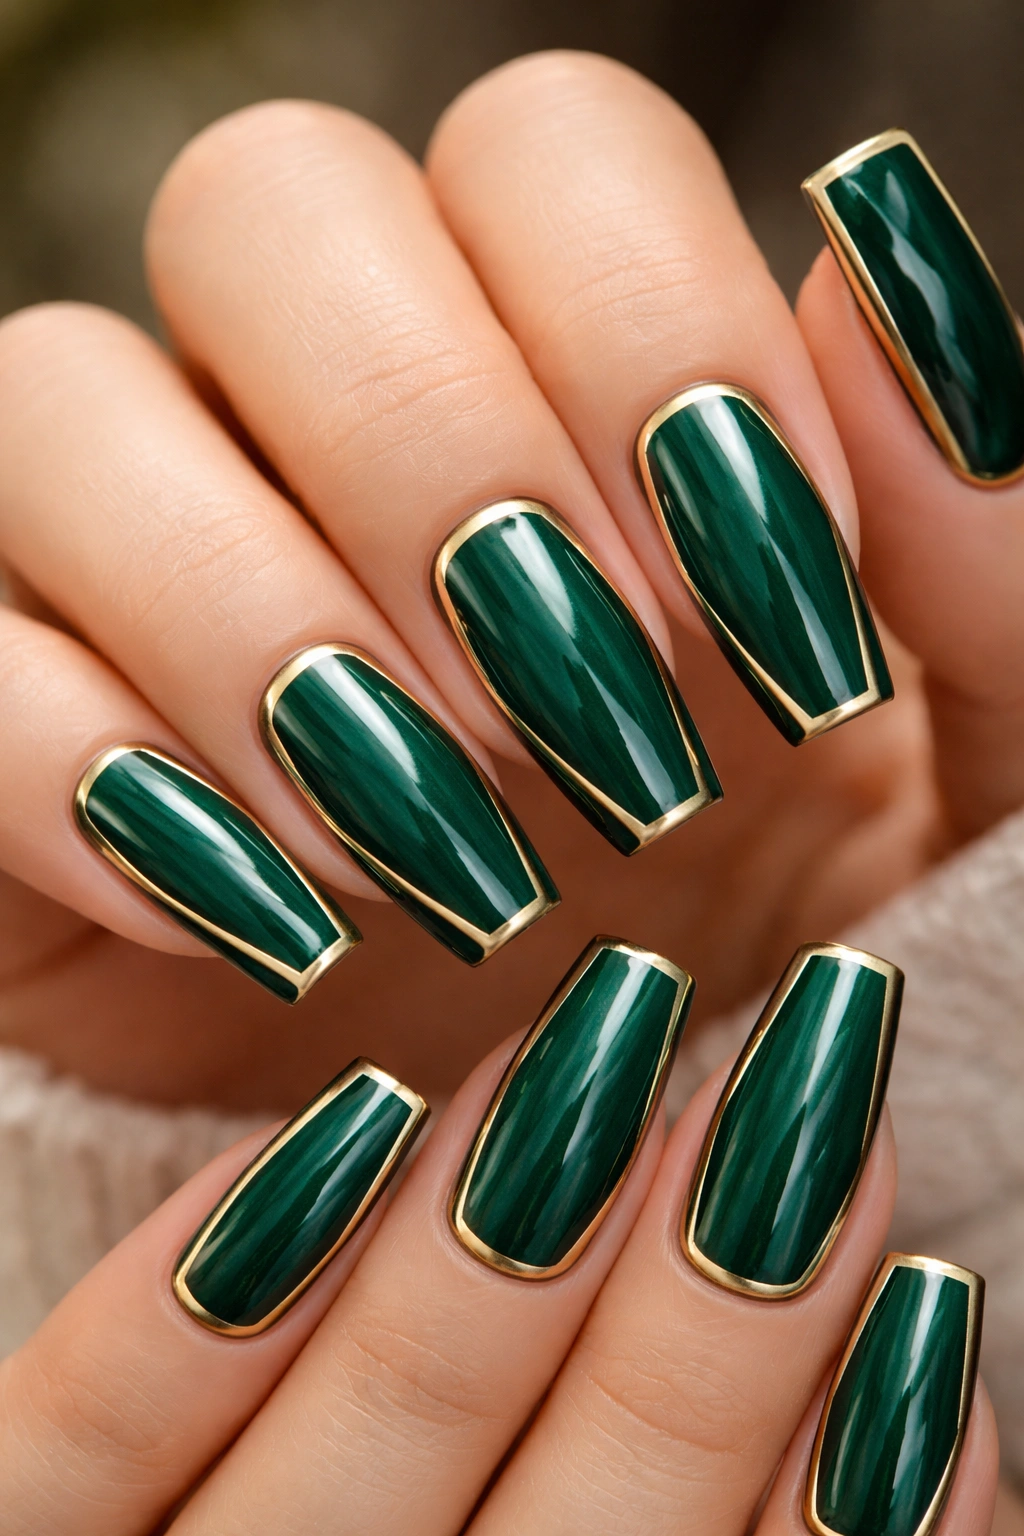
Emerald green is jewel-toned perfection — rich, sophisticated, and utterly timeless. A gold geometric frame around the edge of the nail (or as a border along the cuticle) transforms the emerald from solid to structured and intentional. This design feels expensive, polished, and like something you’d see in a luxury salon or magazine editorial.
Jewel Tones for Year-Round Wear
Green is a color that works in every season if you choose the right shade, and emerald is the most versatile of all greens. It’s sophisticated enough for professional settings, statement-making enough for special occasions, and wearable enough for everyday life. The gold frame adds a touch of luxury without feeling costume-like.
Creating the Gold Frame
- Apply gel base coat and cure
- Apply two coats of emerald green gel, curing between layers
- Using a thin striping brush and gold metallic gel, create a geometric frame — this could be a thin rectangular border around the entire nail edge, a triangle pointing down from the cuticle, or any geometric shape you prefer
- Keep the lines clean and precise — use striping tape if needed for perfect angles
- The frame should feel intentional and proportional to the nail size
- Some people prefer the frame to follow the actual edge of the nail, others prefer it floating slightly inward
- Seal with topcoat
- The metallic gold should be obviously shiny against the matte or satin finish of the emerald gel
13. Soft Peach with Microbeads for Texture
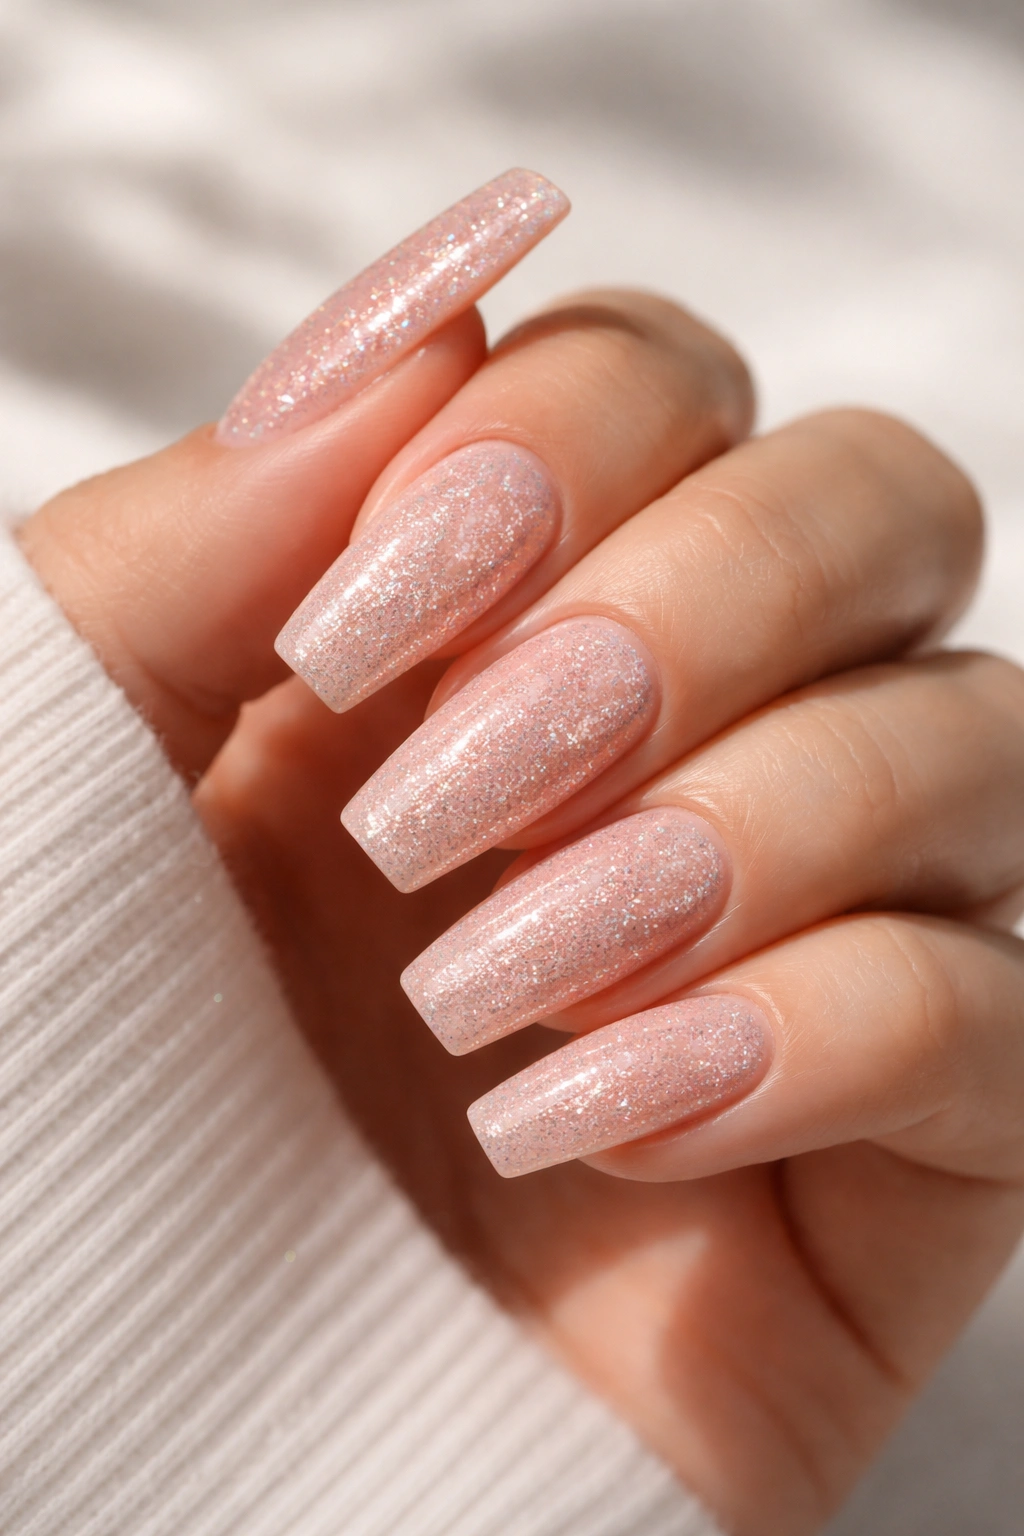
Soft peach creates an instantly warm, approachable, and romantic vibe. Adding microbeads (tiny beads mixed into gel) creates unexpected texture that catches light and creates visual interest. This design is perfect for anyone who loves nails that feel almost as tactile as they look. On medium coffin nails, texture adds dimension without overwhelming the overall aesthetic.
Texture as a Design Element
Most nail art is visual, but adding actual texture elevates the design into something more memorable and interesting. Microbeads catch light from multiple angles, creating sparkle and shimmer that solid gel polish can’t achieve. It’s a subtle way to add luxury and intentionality to a design.
Applying Microbeads
- Apply gel base coat and cure
- Apply one coat of soft peach gel and cure
- Mix microbeads (available from nail supply shops) into a clear gel or into slightly pigmented peach gel
- Apply this mixture in a thin, even layer across the nail or in specific areas (like a gradient toward the tip, or clustered on accent nails)
- You might need two applications to achieve the coverage and sparkle level you want
- Cure between layers
- Seal with a topcoat to smooth the surface slightly and protect the beads — the topcoat creates a glossy finish while letting the texture show through
- This design is slightly more delicate than solid gel, so be mindful of how your nails interact with rough textures or prolonged water exposure
14. Deep Navy with Tiny White Stars
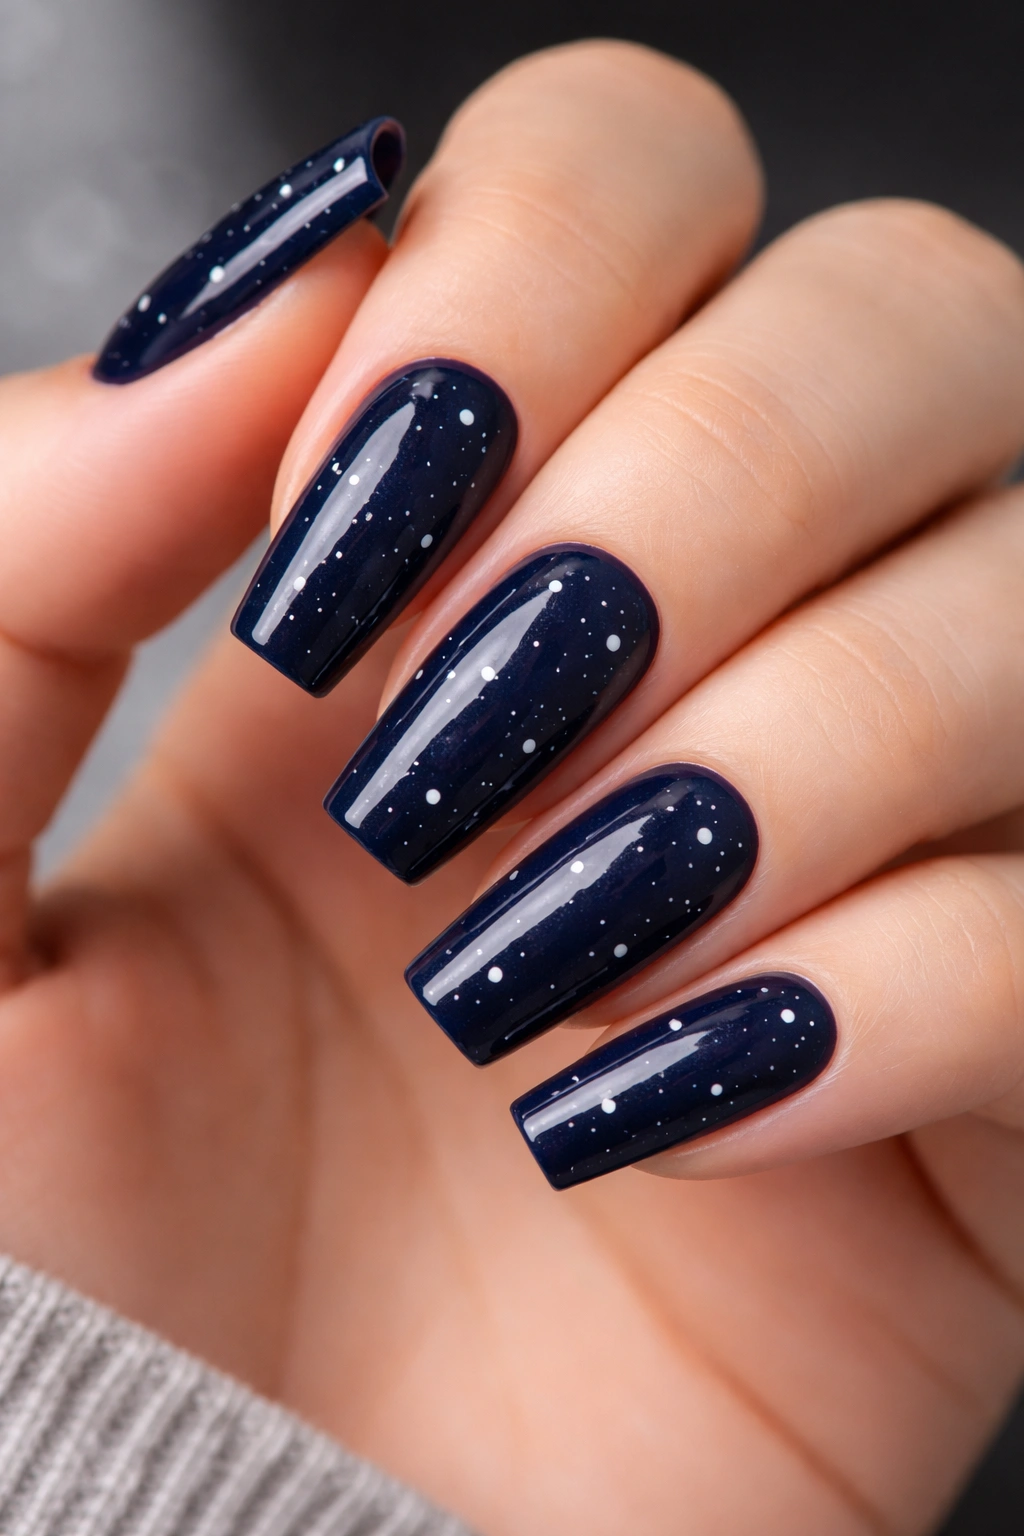
This design is whimsical yet sophisticated, playful yet wearable. Deep navy forms a calming base, while tiny white stars scattered across the surface create a dreamy, almost celestial quality. It’s the kind of design that makes people smile when they notice it, and it works perfectly on medium coffin nails where the stars have space to shine without feeling crowded.
The Charm of Celestial Designs
Stars are inherently romantic and optimistic symbols. They suggest wonder, hope, and looking toward the future. A starry night sky manicure taps into those positive associations while remaining elegant and wearable. It’s the kind of design that works for romantic dates, spiritual practices, or anyone who simply loves stars.
Creating Star-Covered Nails
- Apply gel base coat and cure
- Apply two coats of deep navy gel, curing between layers
- Using a fine dotting tool or thin brush and white gel, paint tiny five-pointed stars across the nail surface
- Vary the size slightly — some larger stars, some smaller ones creates visual interest
- Don’t over-populate the nail; stars should feel scattered and organic, not gridded or too dense
- You can place stars on all nails or create accent nails with fewer stars
- Consider using a star-shaped dotting tool for perfectly formed stars, or freehand them for a more whimsical feel
- Cure after star application and seal with topcoat
- The white stars should be opaque and clearly visible against the navy background
15. Neutral Tan with Tortoiseshell Pattern
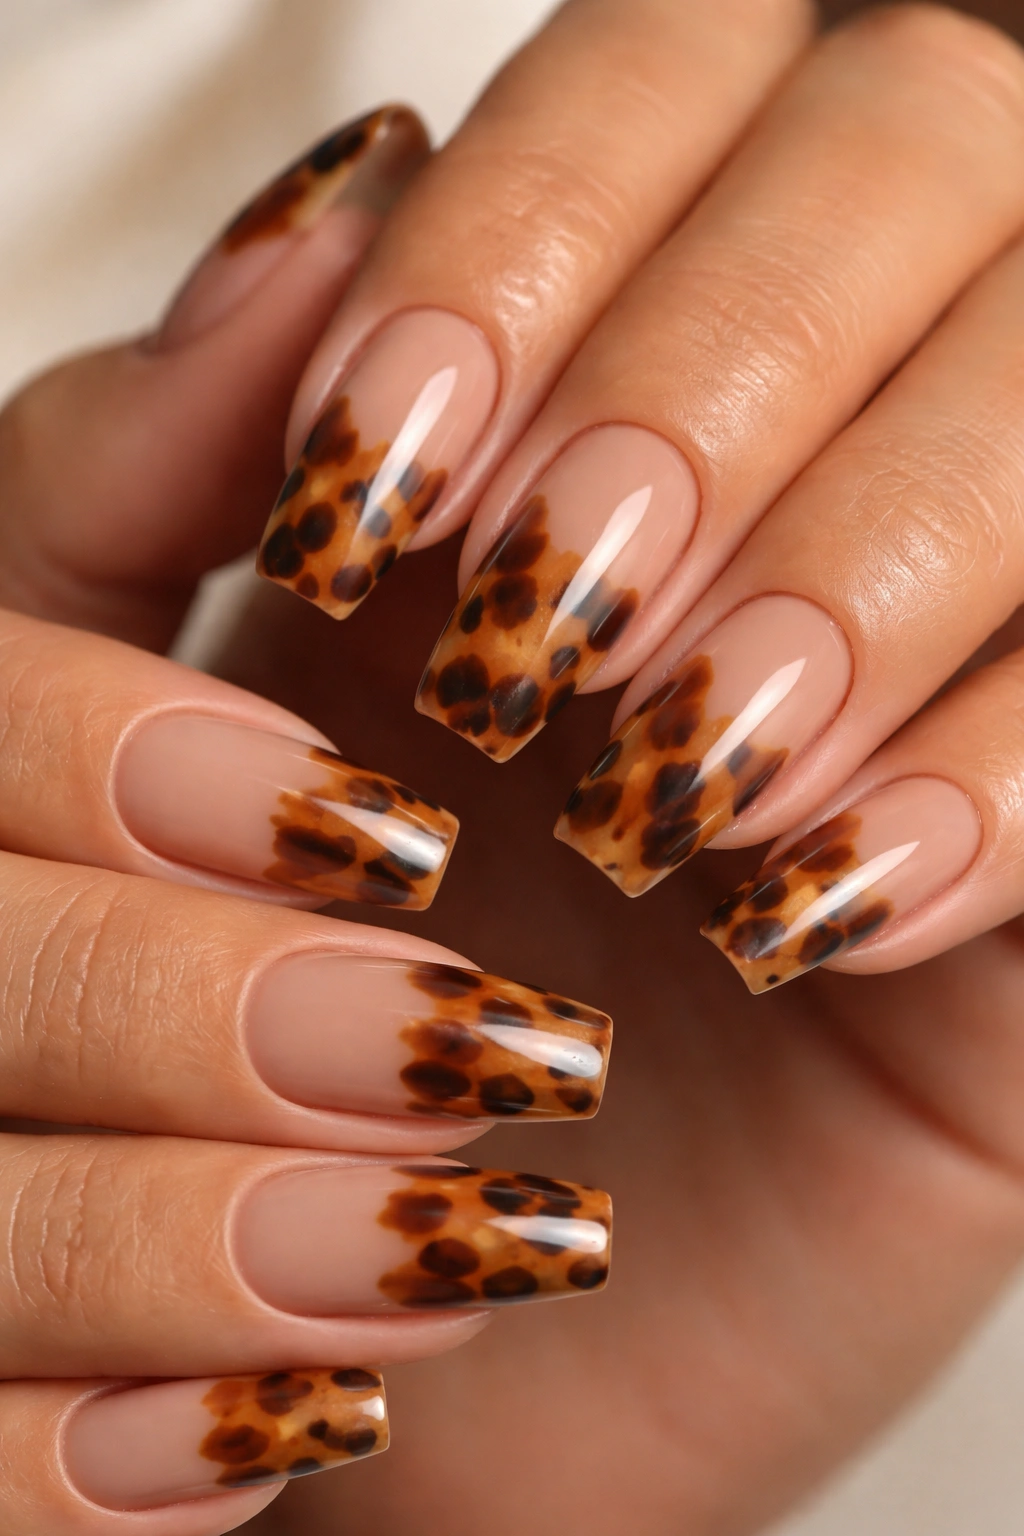
Tortoiseshell remains one of the most visually interesting and versatile nail patterns. On medium coffin nails with a neutral tan base, tortoiseshell creates an organic, almost natural-looking pattern that photographs beautifully and coordinates with virtually everything in your wardrobe. This design feels effortless while looking intentional and skillfully executed.
Tortoiseshell’s Enduring Appeal
Tortoiseshell has been popular in fashion and design for centuries, and for good reason — the organic, natural-looking pattern is visually engaging without being loud or obvious. Each tortoiseshell manicure is slightly different because the pattern isn’t perfectly symmetrical, which adds to the charm and makes each set of nails feel unique.
Creating a Tortoiseshell Pattern
- Apply gel base coat and cure
- Apply two coats of neutral tan gel as your base color, curing between layers
- Mix brown, caramel, and golden gel colors with a small amount of clear gel to create a slightly transparent mixture
- Using a thin brush or dotting tools, apply organic, irregular shapes with these colors across the nail — think of creating patches and irregular lines rather than a precise pattern
- Don’t be too precise; the beauty of tortoiseshell is its natural, random feel
- You can layer colors — apply brown, cure, then add caramel on top, creating depth and complexity
- Some people use a sponge to blend colors slightly for a more integrated look, while others keep the colors more distinct
- Add thin gold or bronze stripes through the pattern for extra visual interest
- Seal with a glossy topcoat that makes the pattern shine and look polished
Final Thoughts
Medium coffin nails offer the perfect balance between dramatic shape and practical wearability, and gel polish brings every design to life with professional-quality results that last for weeks. Whether you’re drawn to the understated elegance of nude-and-gold combinations, the boldness of jewel-toned solids, or the visual interest of patterns and textures, there’s a coffin nail gel design that matches your personal aesthetic and lifestyle.
The designs outlined above represent just the beginning of what’s possible with medium coffin gel nails. Each one can be customized in infinite ways — adjust colors to match your preferences, combine elements from different designs, or use these as inspiration for something entirely original. The key is choosing a design that makes you feel confident and happy every time you look at your hands.
Remember that gel application quality matters significantly. Whether you’re visiting a salon or applying gel at home, investing time in proper prep work, thin layers, and appropriate curing time ensures your chosen design looks salon-quality and lasts the full two to three weeks. Your nails are visible constantly throughout your day — make sure they’re displaying design and care that reflects how much you value yourself.
