

The fastest way to make a coffin manicure look expensive is not more rhinestones, more chrome, or longer length. It is better pattern control. Marble coffin nails can look sharp, soft, moody, polished, or a little dramatic, but the line between “stone-inspired” and “messy swirl” is thinner than most people think.
That is why this nail style gets judged hard.
When marble nail art works, it has movement. The veining looks light-handed, the base color has some depth, and the coffin shape gives the design enough space to stretch out instead of bunching up at the tip. When it misses, you usually see the same problems: veins that are too thick, too many accent colors, foil placed on every nail, or a coffin shape that is filed too wide and makes the whole set look blunt.
I have a soft spot for marble coffin nails because they do something plain nude sets cannot. They hold detail. The tapered sides and flat tip act like a little frame, so even a thin gray vein or a tiny gold crack has room to read from a normal distance. You do not need extra clutter. You need the right marble idea for the length, color family, and finish.
Why Marble Works So Well on a Coffin Nail Shape

Coffin nails give marble room to travel. That is the whole advantage.
On a square nail, a stone pattern can look boxed in. On a stiletto, the pointed tip can pull all the visual weight downward and make the design look cramped. Coffin nails sit in the middle. You get a narrow silhouette through the sidewalls, then a straight edge at the end, which means the veining can run diagonally, branch near the middle, and still leave negative space around it.
Length matters here, though not in the way people assume. Marble does not need dramatic long acrylics to look good. A short coffin shape with 3 to 5 millimeters past the fingertip can still hold a clean marble accent if the veins stay fine and the base stays sheer or milky. Once you go longer—think 8 to 12 millimeters past the fingertip—you can add bolder contrast, layered color, or metallic detailing without crowding the design.
The finish changes the mood too. Gloss gives marble that polished-stone look, almost like the nail surface has been buffed smooth. Matte strips away reflection and makes the pattern read more like chalk, clay, or honed stone. Neither one is better every time. The color decides.
And shape discipline matters more than art.
A proper coffin should taper gently from the sidewalls and finish with a flat free edge that is crisp, not flared. If the tip is too wide, even good marble work starts looking heavy. If it is pinched too hard, the design loses that broad slab-of-stone feel that makes marble nail art satisfying in the first place.
Small Design Choices That Keep Marble Coffin Nails Looking Clean
A marble set does not fall apart because the idea was bad. It falls apart because one extra detail pushed it too far.
Most of the better marble coffin nail sets follow a few quiet rules. They keep the base colors close together or pair one light shade with one dark shade. They use only one metallic accent. They leave at least two nails calmer than the rest. And they do not let every nail fight for attention at once.
Ask your nail tech for these specifics if you want a cleaner result:
- Veins no thicker than pencil lead on most nails. Thick lines turn marble into abstract swirl art.
- Two marble-heavy nails per hand at most if you are also using foil, chrome, or gems.
- A milky, sheer, or softly opaque base instead of flat white straight from the bottle, which can make the design look harsh.
- Gold foil in torn fragments, not full sheets, so it reads like mineral cracking rather than decoration pasted on top.
- Top coat matched to the color story: gloss for white, black, burgundy, rose quartz; matte for taupe, concrete gray, and some brown sets.
Salon language helps. If you say “I want marble,” you might get anything from wispy Carrara lines to blooming-gel clouds that look more like smoke. If you say “thin gray veining on a milky base with one gold-foil accent nail,” you are giving a usable blueprint.
One more thing. Leave some air in the design.
The best marble nail art has blank space around the pattern, the same way real stone has quiet areas between veins. A crowded set rarely looks polished up close, and from arm’s length it turns into visual noise.
1. Milky White Marble Coffin Nails with Hairline Gray Veins
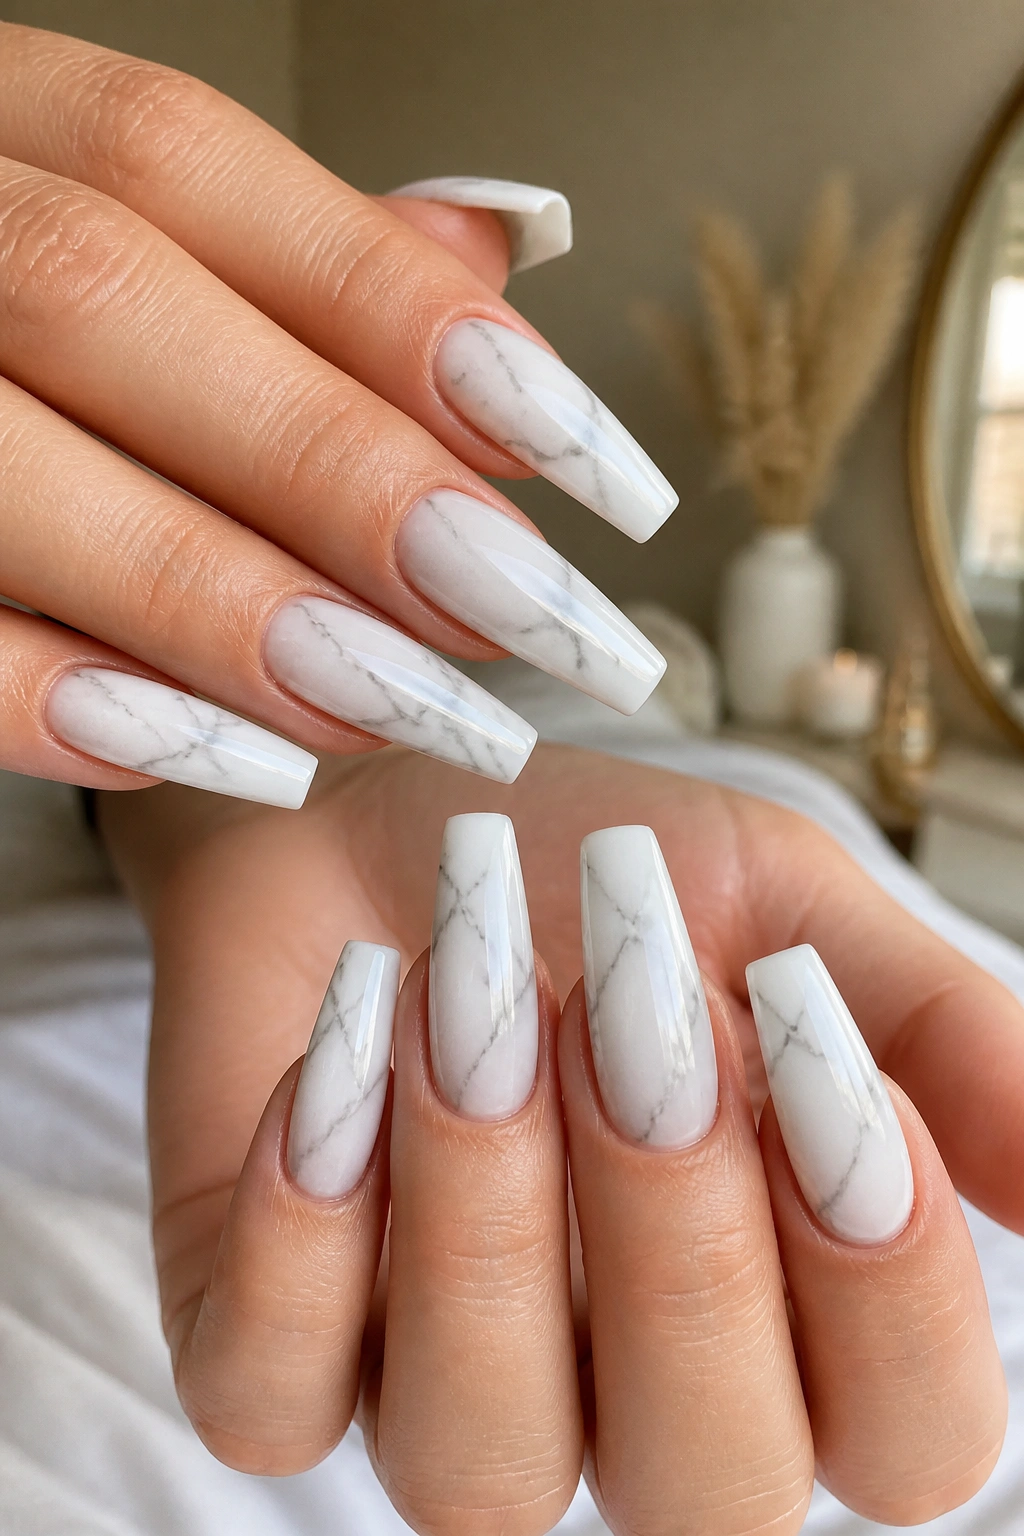
If you only try one version of marble coffin nails, make it this one. Milky white with thin gray veining is the style that keeps surviving every shift in nail taste because it looks neat, bright, and expensive with almost any outfit.
The base should not be stark correction-fluid white. That is the common mistake. A soft milk tone with a drop of translucency gives the marble some depth, so the gray lines look embedded instead of painted on top.
What makes this version hold up
Carrara-inspired marble works because the contrast is controlled. The gray should stay cool and light, somewhere between smoke and pencil graphite, with lines that break, fade, and reconnect. Straight stripes ruin it. So do chunky zigzags.
A glossy top coat is the better call here. You want that polished stone look, where the surface reflects light and the veins seem to sit a layer lower than the top shine.
Details worth asking for at the salon
- Use two full marble nails and three quieter nails on each hand if you want the set to stay crisp.
- Keep the veins diagonal or softly branching, not horizontal.
- Add one tiny fleck of silver foil only if the set feels too plain after the art is done.
- Choose a medium coffin length if you want the pattern to read from a distance without looking bulky.
Best move: pair this design with a square-cuticle cleanup and a high-gloss top coat refreshed every 5 to 7 days.
2. Nude Beige Marble with Soft Gold Foil
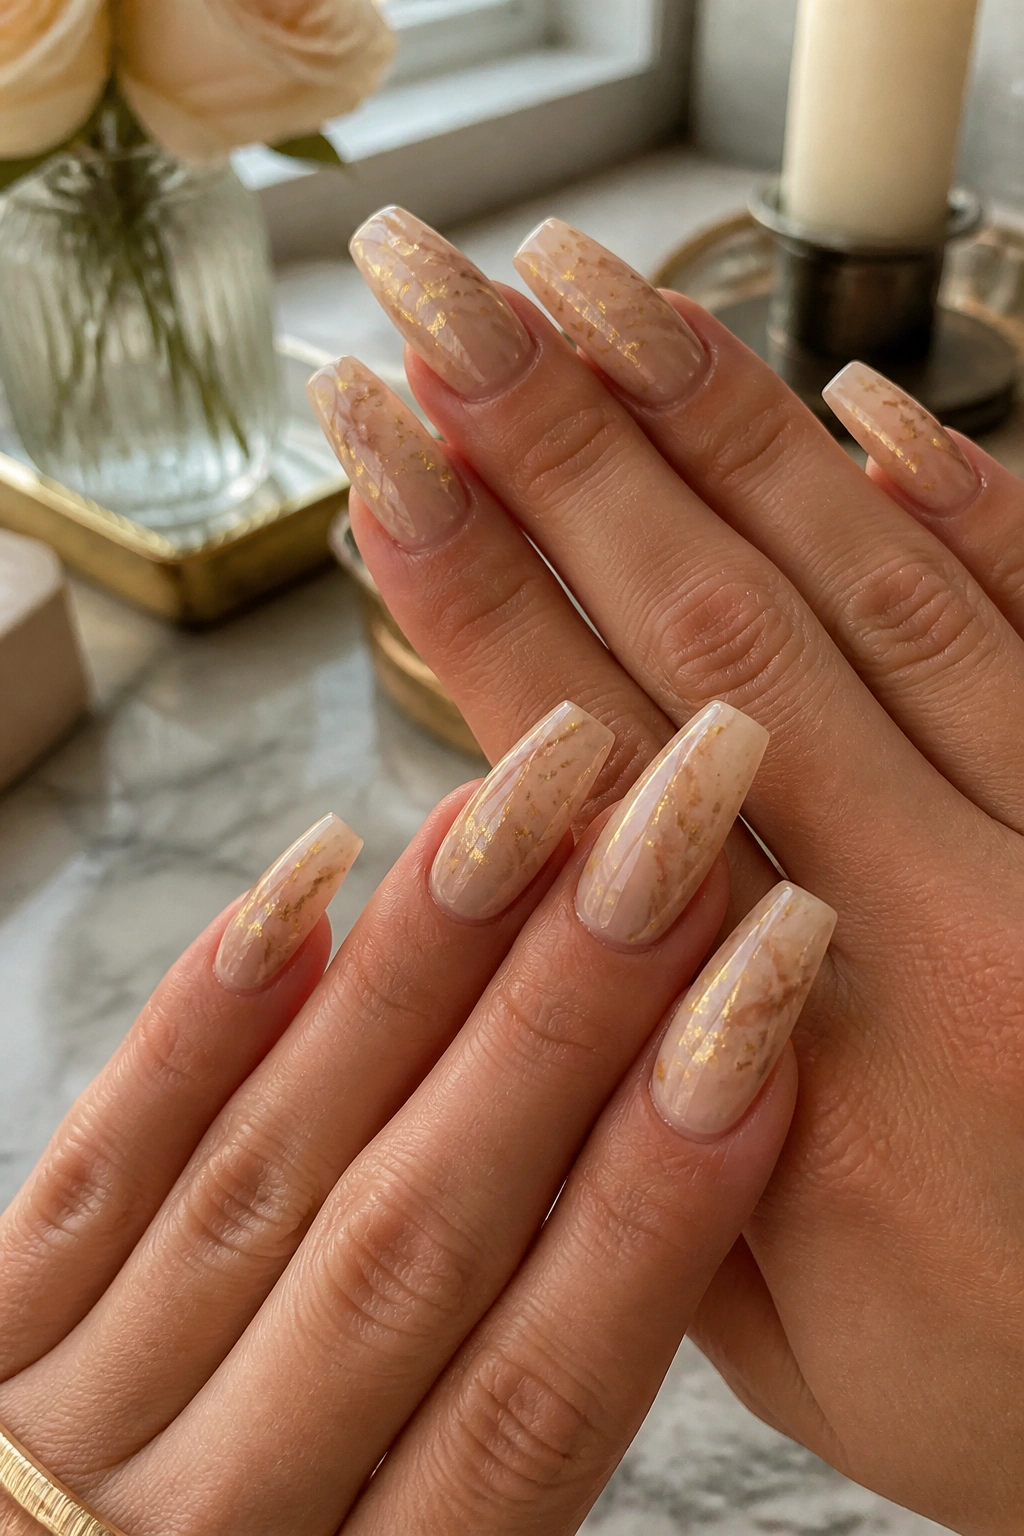
This is the marble set I recommend when someone wants nail art that still feels office-safe. Nude beige marble has warmth, which means it blends into the hand instead of jumping off it, and a little torn gold foil keeps it from fading into the background.
The trick is choosing the right nude. Go too pink and the marble starts reading sugary. Go too tan and the look gets muddy. A beige with a hint of peach or oat usually lands in the sweet spot because it flatters a wide spread of skin tones while still giving the white and taupe veining something to push against.
Gold foil can wreck this design if it is used like confetti. Keep it sparse—one or two broken flakes on the lower third of the nail, maybe the sidewall of an accent nail, not every fingertip. You want the foil to mimic mineral threads in stone, not party glitter. That difference sounds small until you see it in person.
Longer coffin nails make this look more dressed up, though a short-medium length still works if the base stays sheer and the foil stays minimal. Press-ons can pull this style off well too, partly because nude marble hides tiny pattern repetition better than bright white does. If you are doing these at home, bloom the beige and white together first, then place the gold after the pattern settles. Foil slapped into wet polish too early tends to smear and sink.
3. Black Marble Coffin Nails with Smoke-White Swirls
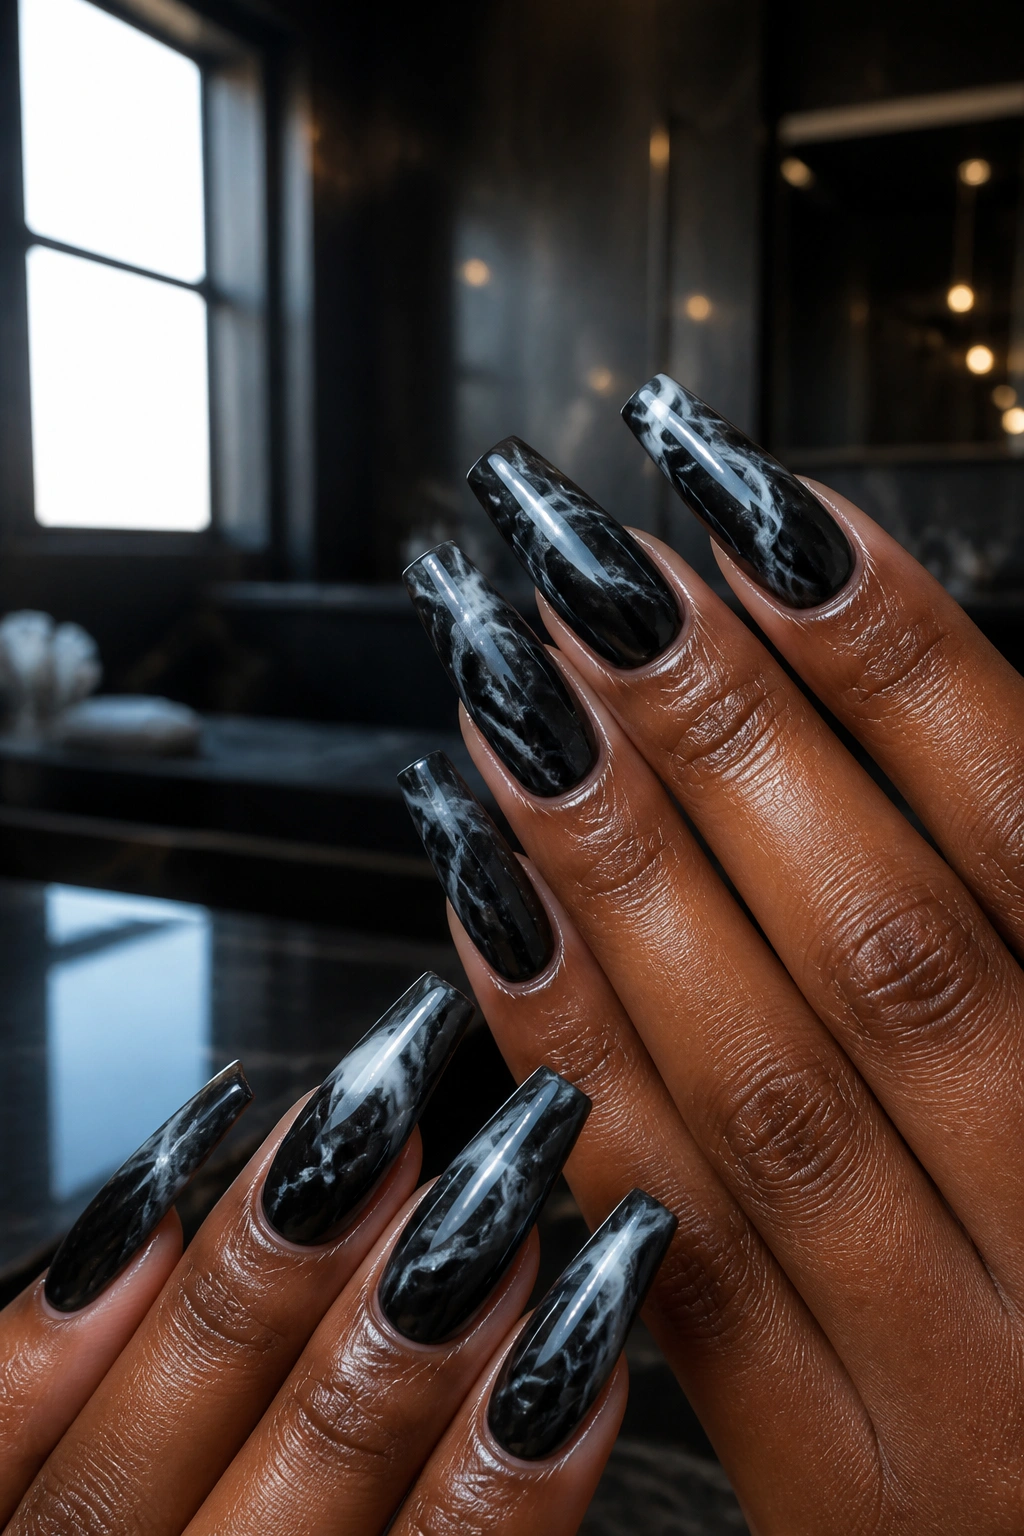
Black marble is not subtle. That is the point.
Still, there is a clean way to do it and a messy way. Good black marble coffin nails use a true black base, then soften it with smoky white veining or drifting gray clouds so the contrast looks layered instead of cartoonish.
Why does this style work when some dark nail art feels flat? Depth. A solid black nail with a shiny top coat can look like a sheet of patent vinyl. Once you add feathered white movement—thin in one area, foggier in another—the surface starts looking like polished stone, obsidian, or dark granite.
How the contrast stays sharp
White should not dominate the nail. Think of it as interruption, not coverage. One strong vein, one faded branch, one cloudy patch near the side. That is enough.
Silver lining tape or chrome can work here, but only on one or two nails. Gold pushes black marble in a warmer, more glam direction. Silver keeps it colder and cleaner.
A few practical notes matter:
- Longer coffin lengths suit black marble better than short ones because dark colors can make short nails look stubby.
- Ask for soft-edged veining, not bright opaque white blobs.
- Gloss is stronger than matte on this design because it gives the black some depth.
- Keep the cuticle area clean and lighter on detail; heavy art packed near the base can make grow-out look rough after a week.
This one has attitude. Use it when you want the manicure to register from across the room.
4. Rose Quartz Pink Marble with Glossy Finish
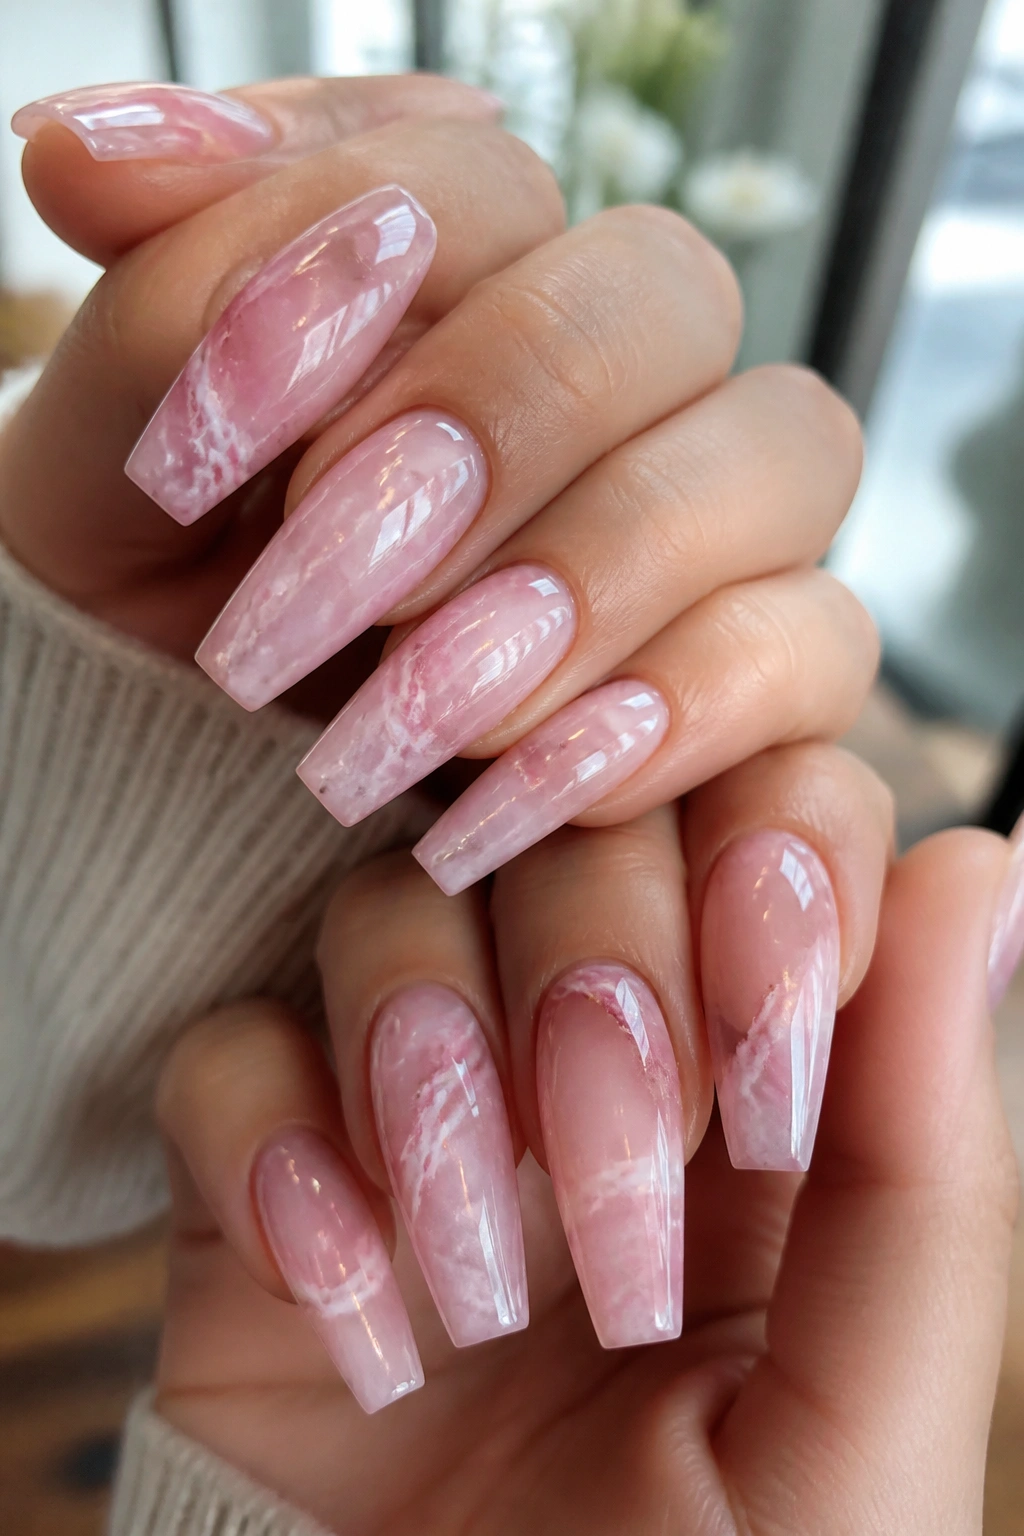
Picture a pale pink stone held up to a window. That is the mood here.
Rose quartz marble coffin nails usually look best when the base starts with a sheer blush or jelly pink, then picks up cloudy white ribbons and one or two deeper pink veins underneath a glossy top coat. The effect is softer than classic white marble and a lot more forgiving on shorter coffin lengths.
I like this design on medium nails because the shape stays elegant without tipping into costume territory. Rose quartz can look childish when the pink is bubblegum-bright or the marble pattern turns into obvious swirls. Keep the color dusty, translucent, and a little cool.
What gives it that stone feel instead of “pink nails with lines” is layering. A good tech will float some white bloom through the center, let it spread, then thread a darker pink or mauve line through one side so the pattern has depth.
Quick design notes:
- Best base: sheer blush, pale mauve-pink, or milky petal pink
- Best accent: one tiny gold crack or no metallic at all
- Best finish: high gloss, almost glassy
- Skip: chunky glitter, heart decals, heavy rhinestones
This is one of those sets that looks better in daylight than under salon lamps, which is usually a good sign. Sunlight picks up the cloudy layers and makes the nails look less painted, more mineral.
5. French Tip Marble Coffin Nails with a Crisp Nude Base
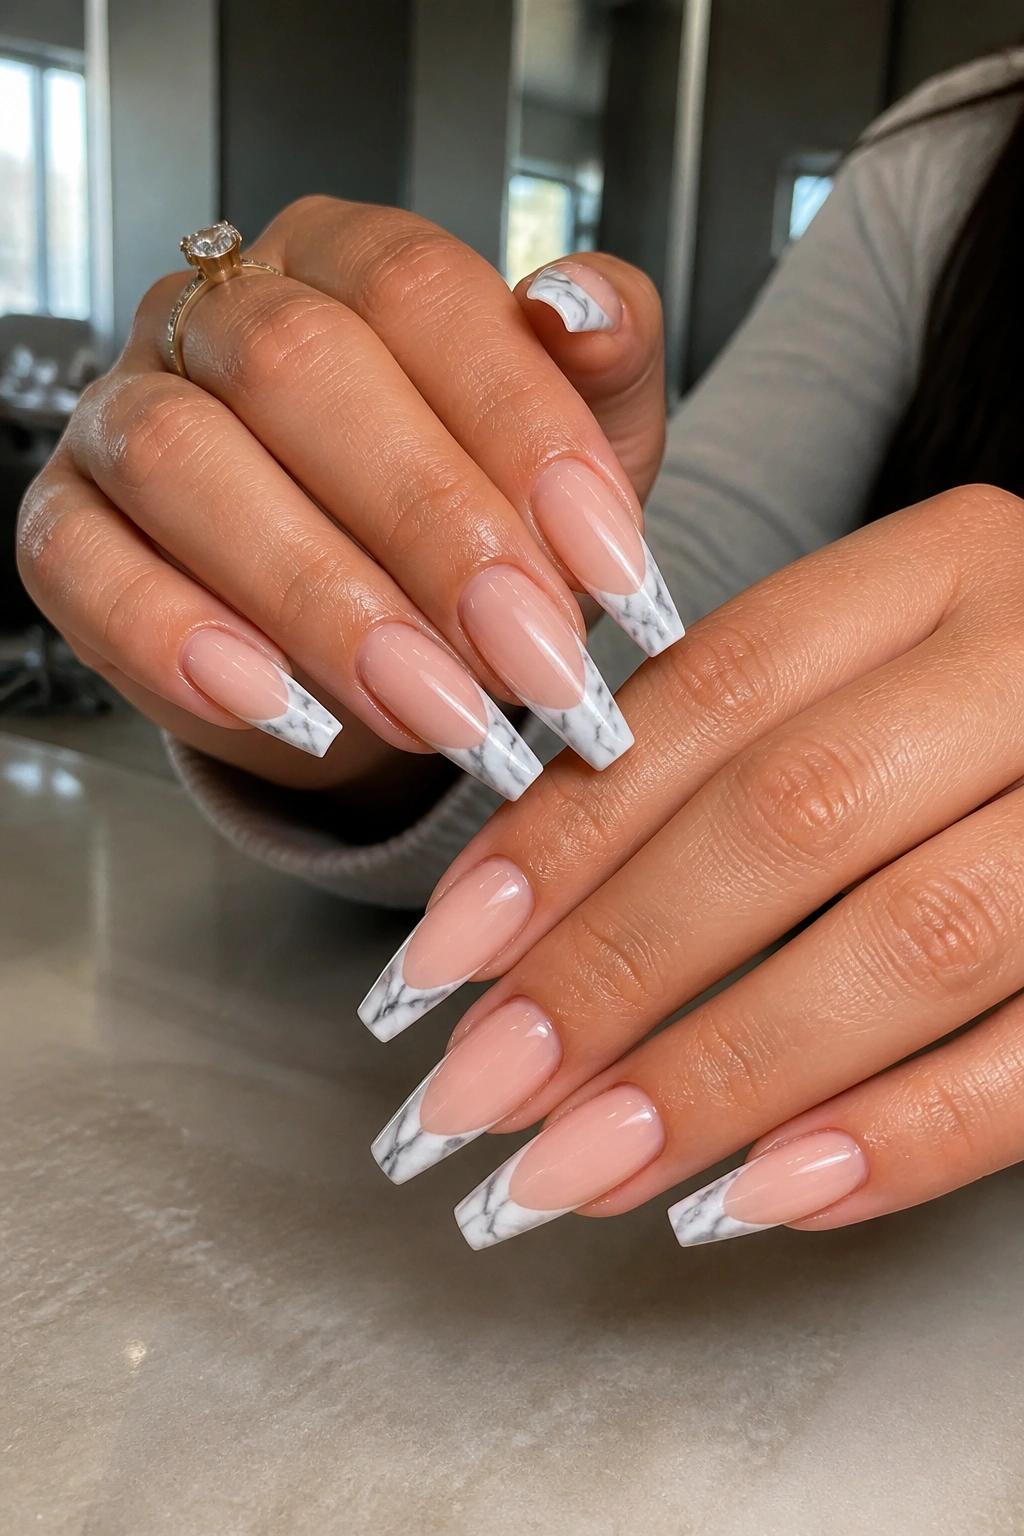
A full marble nail can be a lot. A marble French tip gives you the pattern without covering the entire set, and on a coffin shape it has a crispness that rounded nails do not.
The base is where this look wins or loses. Use a nude that matches the nail bed closely enough to lengthen the fingers, then confine the marble to the tip area. The smile line can be sharp and graphic or slightly softened depending on how bold you want the manicure to feel. Sharp usually looks stronger on medium or long coffin nails because the flat edge echoes the cut of the tip design.
White-and-gray marble is the easiest version to get right, though black tips with smoky marble also work if the base stays quiet. Some people add a thin metallic border between the nude and the marble tip. I only like that when the line is hair-thin. Anything heavier starts to chop the nail visually, which shortens the finger and makes the set look busier than it needs to.
This design also grows out better than full marble because the pattern sits away from the cuticle. That matters if you are hard on your hands or prefer to stretch your fills. For weddings, work events, or anyone who likes nail art but does not want to stare at ten patterned nails all day, marble French tips hit a smart middle ground.
6. Matte Taupe Marble with Thin White Webbing
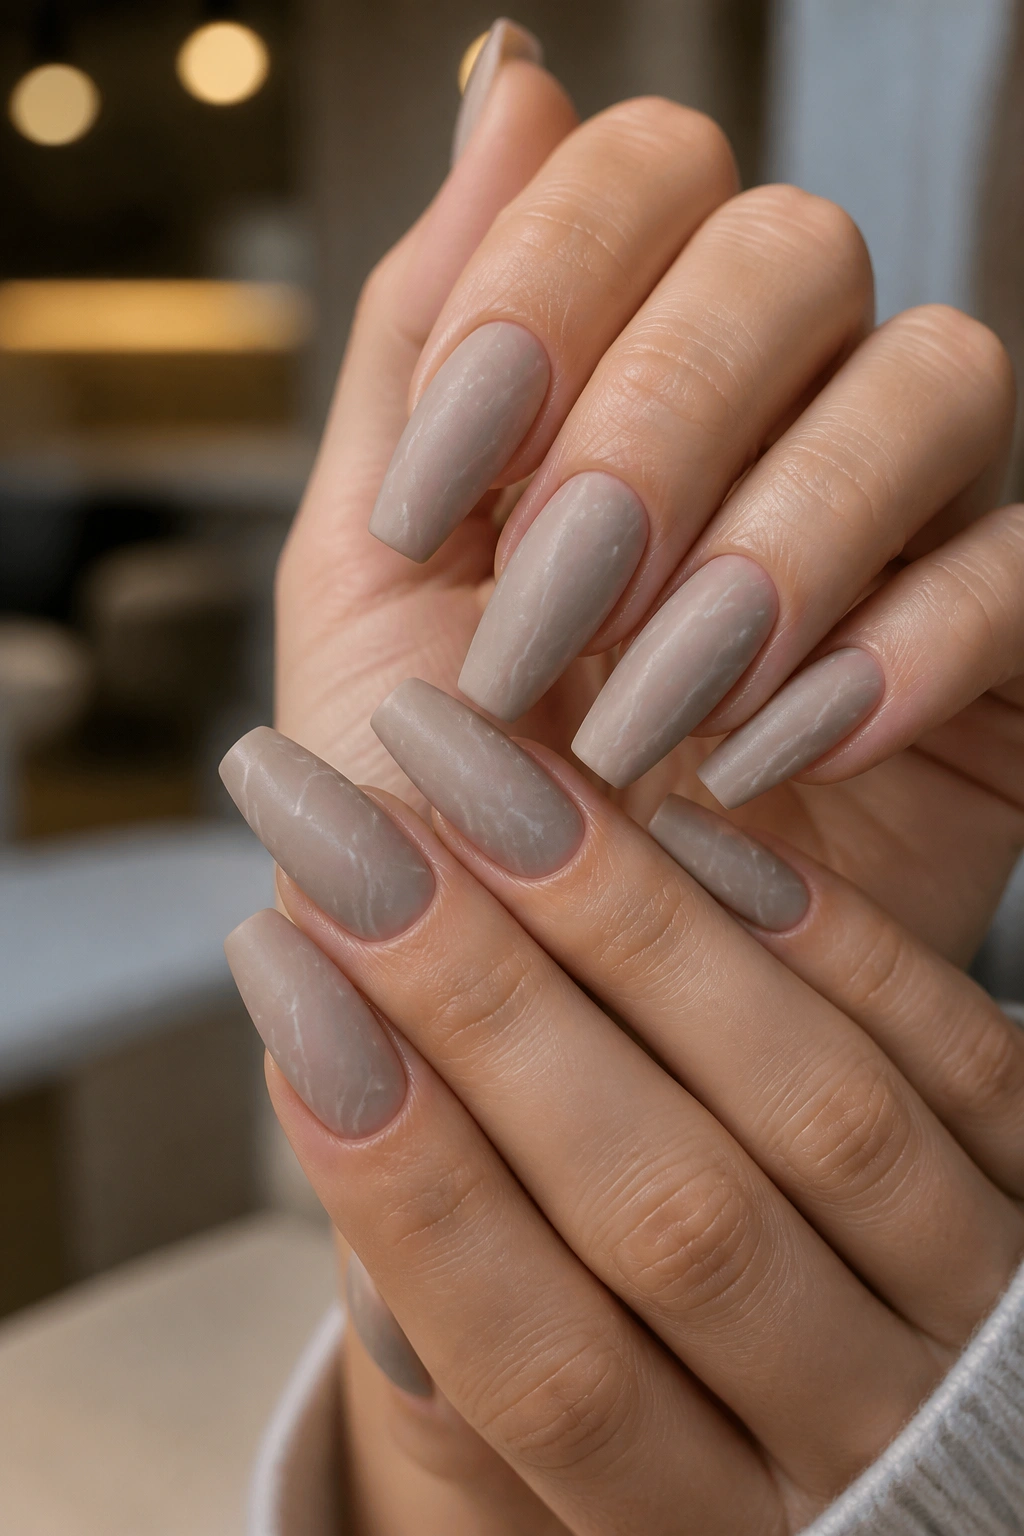
Unlike bright white marble, taupe marble looks best when it leans dry, dusty, and restrained. Gloss can make it look like beige plastic. Matte gives it that honed-stone effect that makes the color worth wearing.
Taupe is a useful neutral because it sits between gray, brown, and mushroom. That lets you pair it with cream, soft white, or faint charcoal without the design pulling too warm or too cold. On coffin nails, the look turns architectural in a way I enjoy—clean lines, softened by the stone pattern.
Who is this good for? Anyone who wants a set that feels grown-up without fading into plain nude. Matte taupe still has personality, though it does not shout.
Keep the veining thin and web-like, almost like cracks in dry clay. One or two nails can have denser patterning, but leave some nails with only one branch line or a cloudy patch near the edge. Matte finishes show texture more than gloss does, so the top surface has to be smooth before the final coat goes on. If there is any lump from foil, dried gel, or uneven layering, matte will expose it fast.
A few targeted choices make this style stronger:
- Choose mushroom taupe, not yellow-beige.
- Use chalk white or off-white webbing, not stark bright white.
- Keep embellishment close to zero. Maybe one micro-stud. Maybe none.
- Refresh matte top coat sooner than gloss; oils from the skin dull the look near the cuticle first.
This is the set I would pick with a wool coat, a plain ring stack, and nothing louder than that.
7. Emerald Green Marble with Gold Cracks
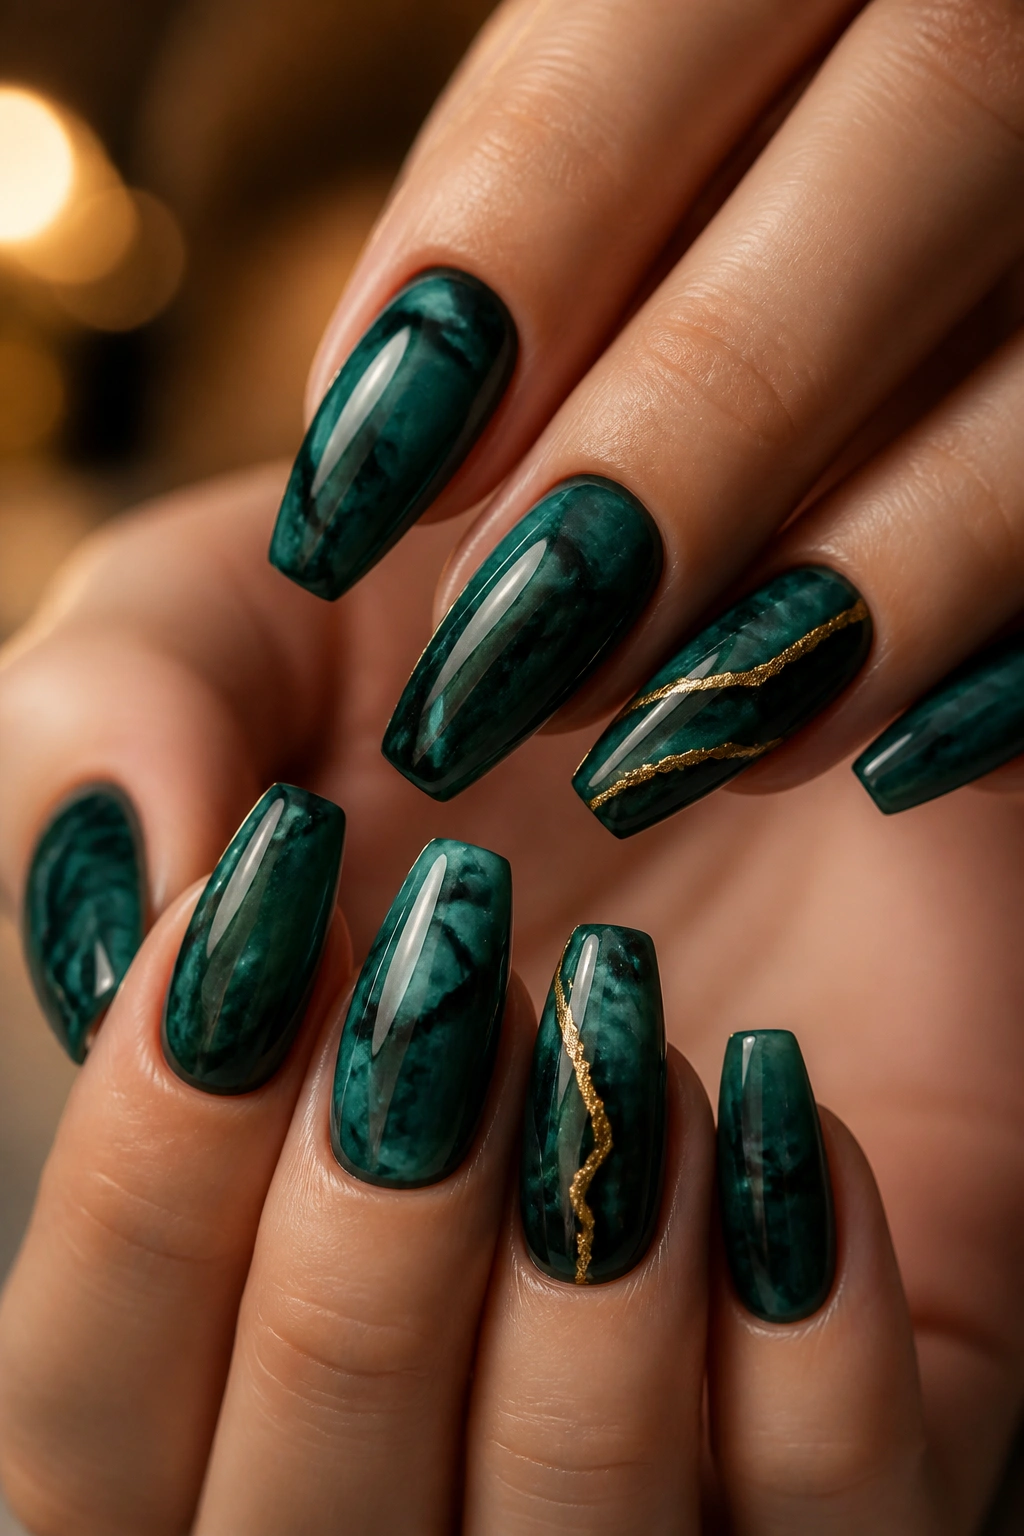
Green marble can look rich or cheap, and the split usually comes down to color depth. You want emerald, malachite, or deep bottle green, not neon slime green, and the veins need some black or dark forest shadow in them so the marble has body.
The coffin shape helps this design because green stone patterns often need room for curved bands, broken lines, and mineral-style streaks. A short square nail cuts that movement off too early. A medium or long coffin gives the color story enough space to breathe.
Best finish for this color family
Gloss is almost always the better choice. Green marble under shine looks lacquered and lush; matte can flatten the darker shades and make them read dusty unless the pattern is exceptional.
Gold detailing belongs here more than silver does. Not a lot—one sliver crossing a vein, one crack on an accent nail, one foil fragment near the side. Gold warms the green and helps it look intentional rather than muddy.
What to ask for
- A deep translucent green base layered over a darker undercoat
- Curved marbling, not random scribbles
- Black or dark forest shadows in a few areas for depth
- Gold placed on 2 nails per hand max
This set has evening energy. It works with black clothing, cream knits, and gold jewelry, and it does not need extra charm pieces hanging off the nails to make a statement.
8. Blue-Gray Marble Coffin Nails with a Silver Chrome Line
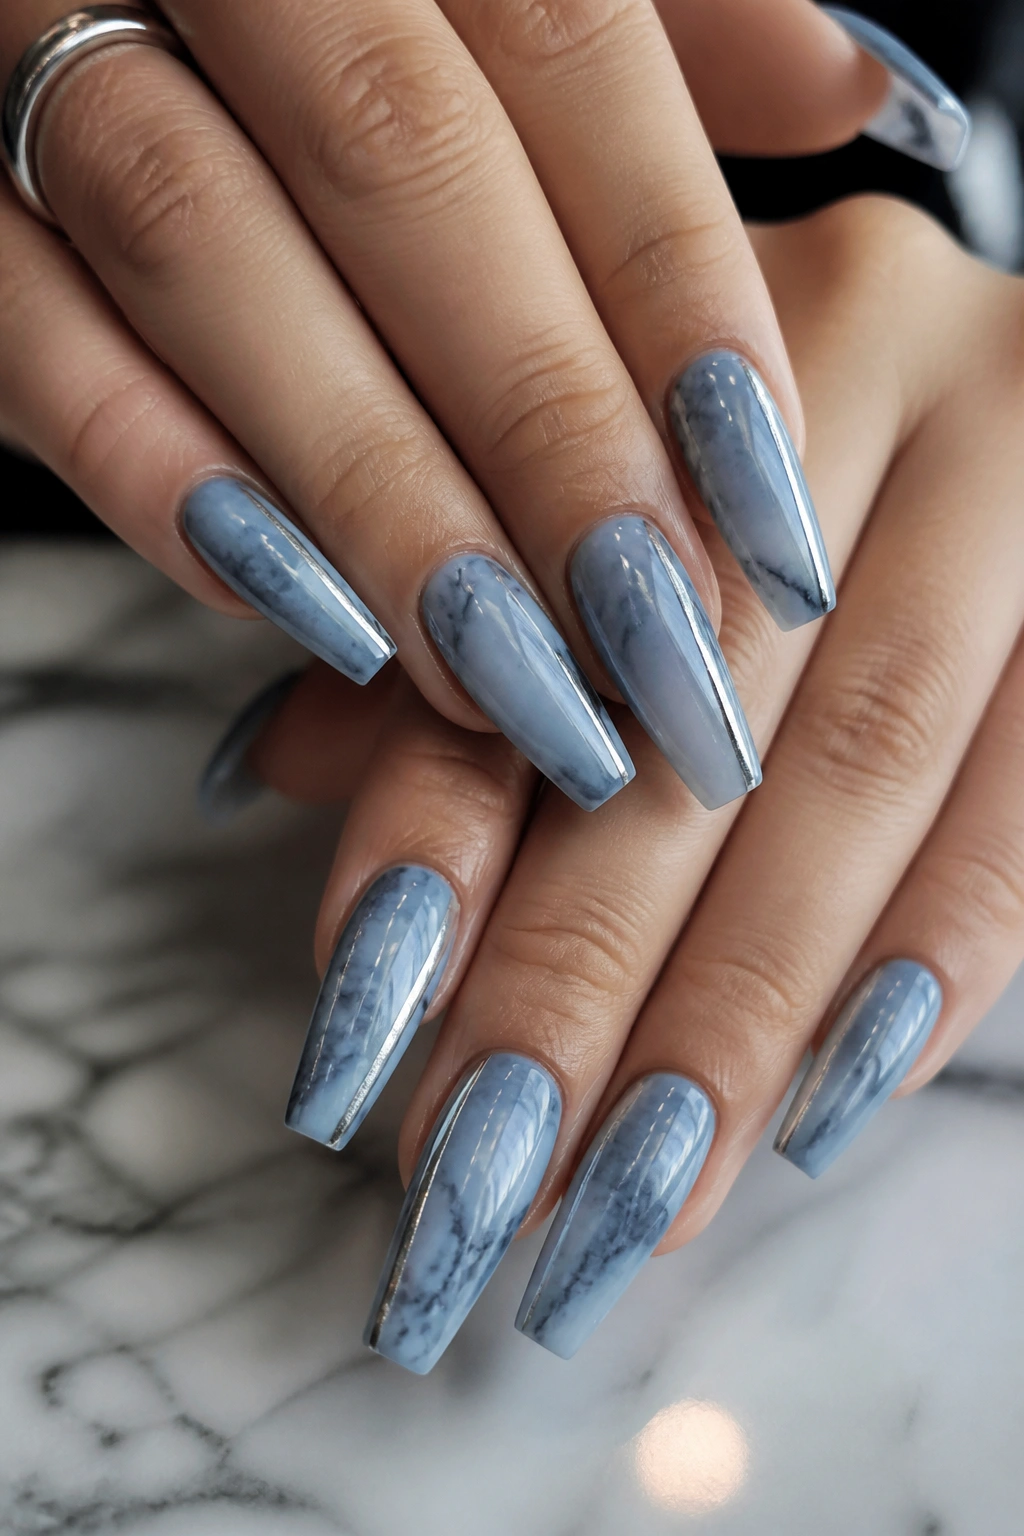
One chrome line can rescue a cool-toned marble set from looking flat. That is why this combination works.
Blue-gray marble sits in a calm, polished corner of nail art. It is softer than black, colder than taupe, and less expected than white. The danger is that it can start looking cloudy in a dull way if the shades blur too much. A single silver chrome line, placed along one vein or as a thin border on one accent nail, sharpens the whole design.
I like this set when the base uses layered blue-gray, soft white, and a hint of smoky slate. You do not need navy. Keep the palette airy. Think storm glass, not denim. The marble itself should look like it drifted into place, then one chrome detail gives your eye a clean edge to land on.
Placement matters. A vertical or diagonal chrome line lengthens the coffin shape. Horizontal placement can make the nail look cut in half. The silver also needs restraint. Mirror chrome on all ten nails would kill the stone effect. One line on two nails, maybe a slim chrome French edge on a third, and stop there.
This is a smart pick if your jewelry stays silver or white gold most days. It also pairs well with winter wardrobes—no, not a dated seasonal trend, just that blue-gray and brushed silver look good with knits, charcoal, navy, and pale coats when the weather turns cold.
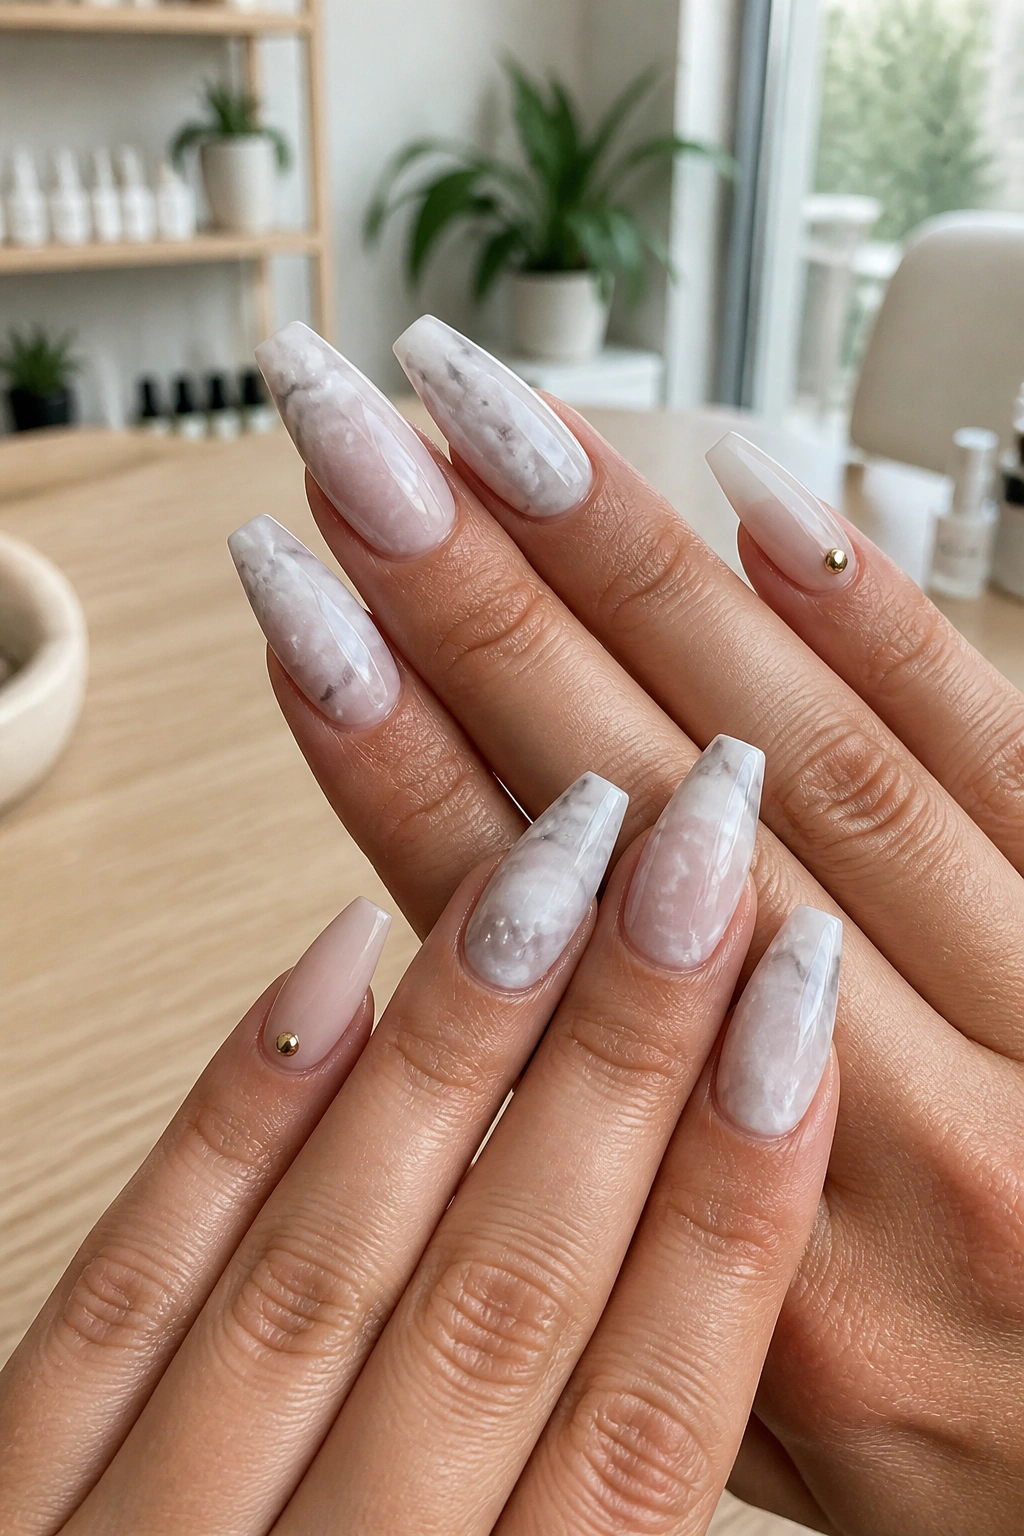
9. Short Coffin Nails with One Marble Accent Per Hand
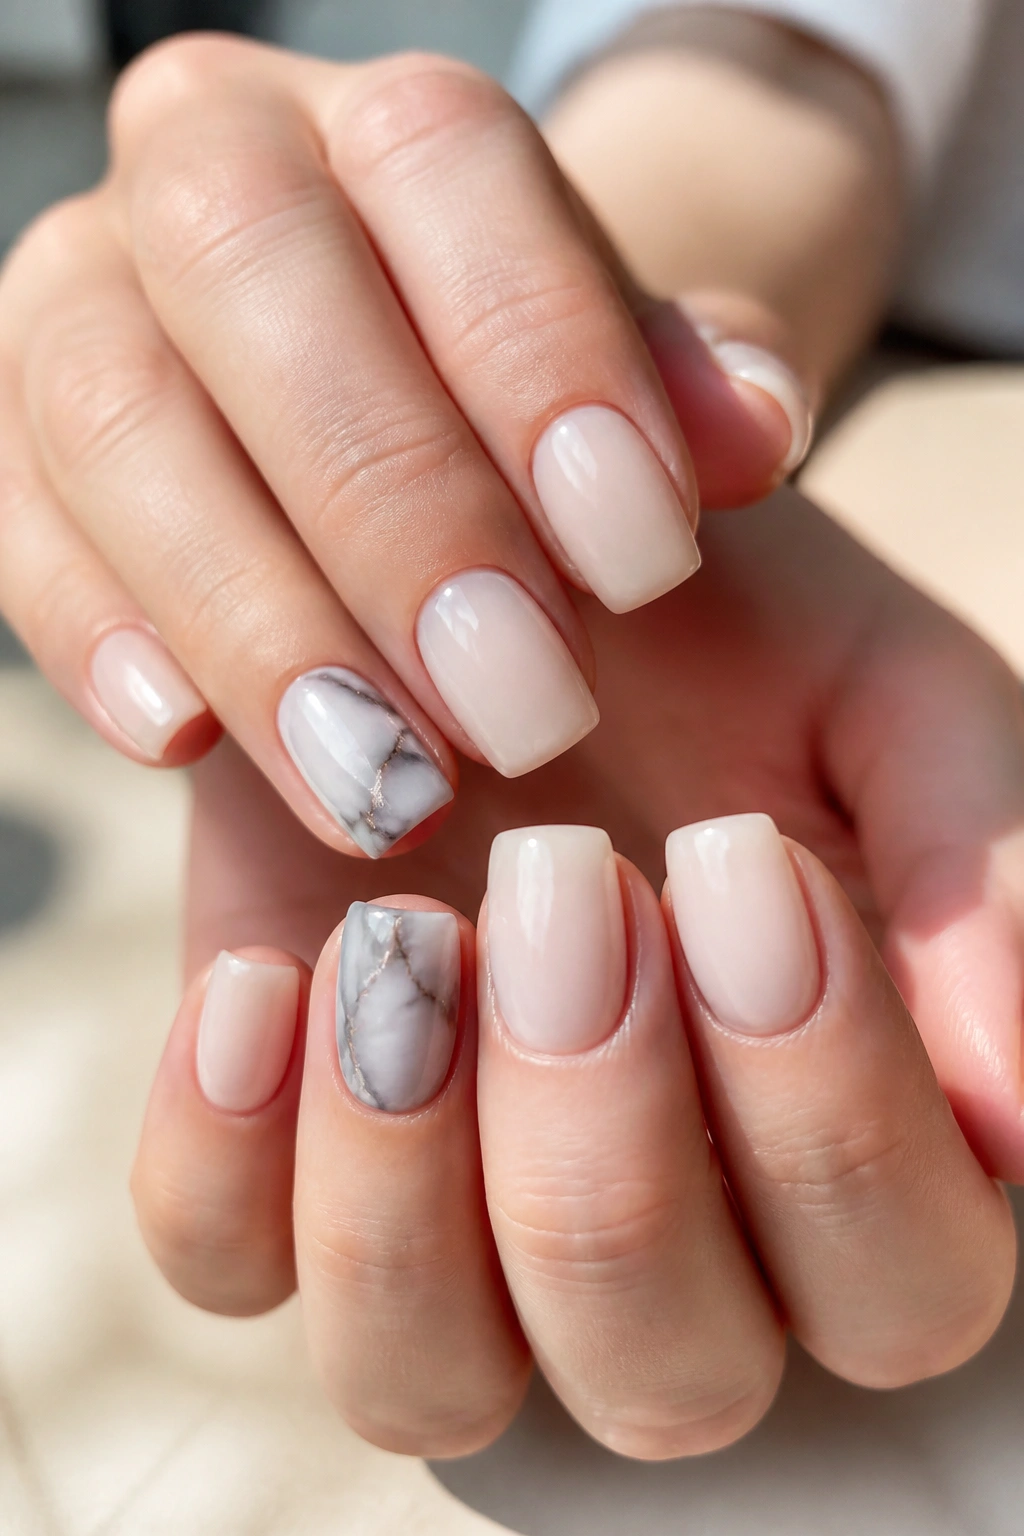
Not every good marble coffin manicure needs length. A shorter coffin with one marble accent nail per hand often looks cleaner than a full long set loaded with detail.
This approach works because it gives the eye somewhere to rest. The accent can sit on the ring finger, middle finger, or one of each if you like a less matched layout. Keep the other nails solid—milky white, nude beige, soft gray, dusty pink—and let the marble do its job on one nail at a time.
Short coffin nails need careful filing. You still want taper, but only a light one. Push it too far and the nails look squeezed. Leave them too wide and the shape starts reading square.
A few combinations hold up well:
- Nude base + white-gray marble accent
- Soft pink base + rose quartz accent
- Black base + one smoky marble nail
- Taupe base + matte white-web accent
This is also the easiest marble idea for press-ons or DIY gel sets. One accent nail means less pattern matching, less cleanup, and lower odds of muddying the design while you are trying to rush the second hand. If you use blooming gel at home, test the marble on a swatch first. Short nails give you less recovery room when the veins spread too far.
Small set. Good judgment.
10. Jelly Nude Marble with Cloudy White Bloom
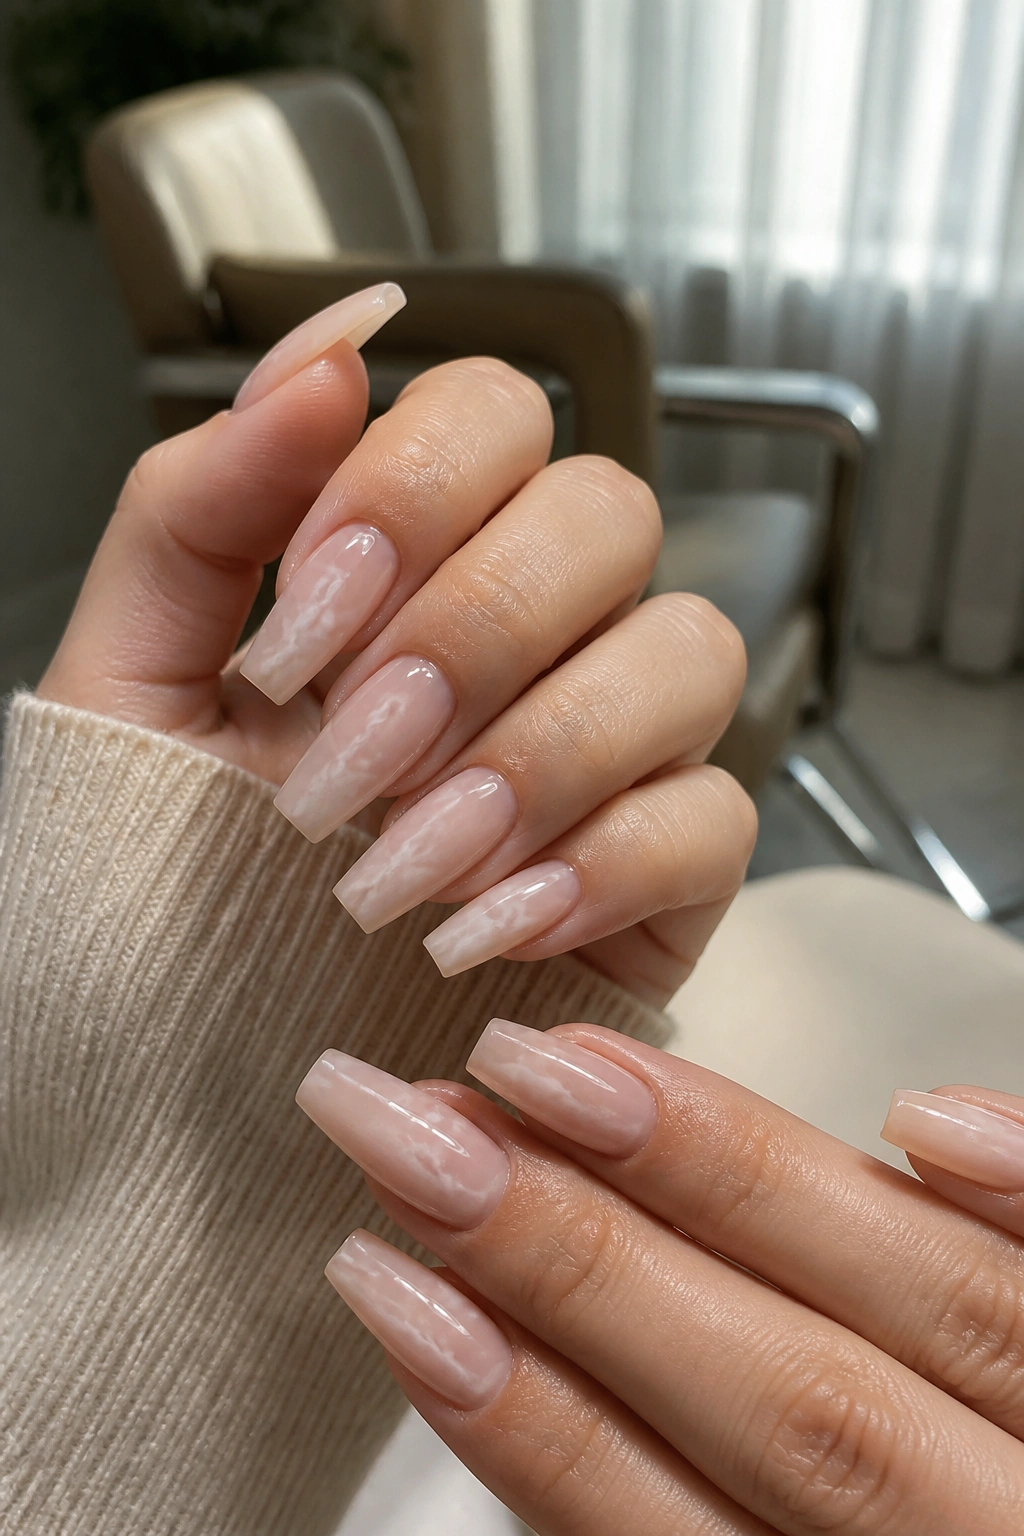
Want marble that looks softer than stone and less obvious than standard white veining? Go for a jelly nude base with cloudy white bloom.
The “jelly” part matters because translucency gives the nail a layered look. Opaque nude can make marble feel printed on. A sheer beige-pink base lets the white bloom spread under the surface visually, which reads closer to natural stone, polished resin, or even mist trapped in glass.
When the cloudy bloom looks right
The bloom should feather out at the edges. You want clouded patches, faint threads, and areas where the white almost disappears. Hard-edged swirls kill the effect.
This design suits medium coffin nails best. On long nails it can start looking too empty unless you add a second tone, maybe a touch of taupe or the faintest whisper of gold. On short nails, keep the bloom toward the center and sidewall so the nail does not lose shape.
If you are sitting in a salon chair, this is where I would be precise: ask for sheer nude, milky white blooming gel, low-contrast marble, and no chunky foil. The whole point is softness. Anything loud breaks the mood. Pair it with a glossy top coat and clean cuticle work, and the manicure looks polished in a quiet, almost editorial way—sorry, that sounds a bit fashion-magazine, but the description fits.
11. Brown Espresso Marble with Cream Veins
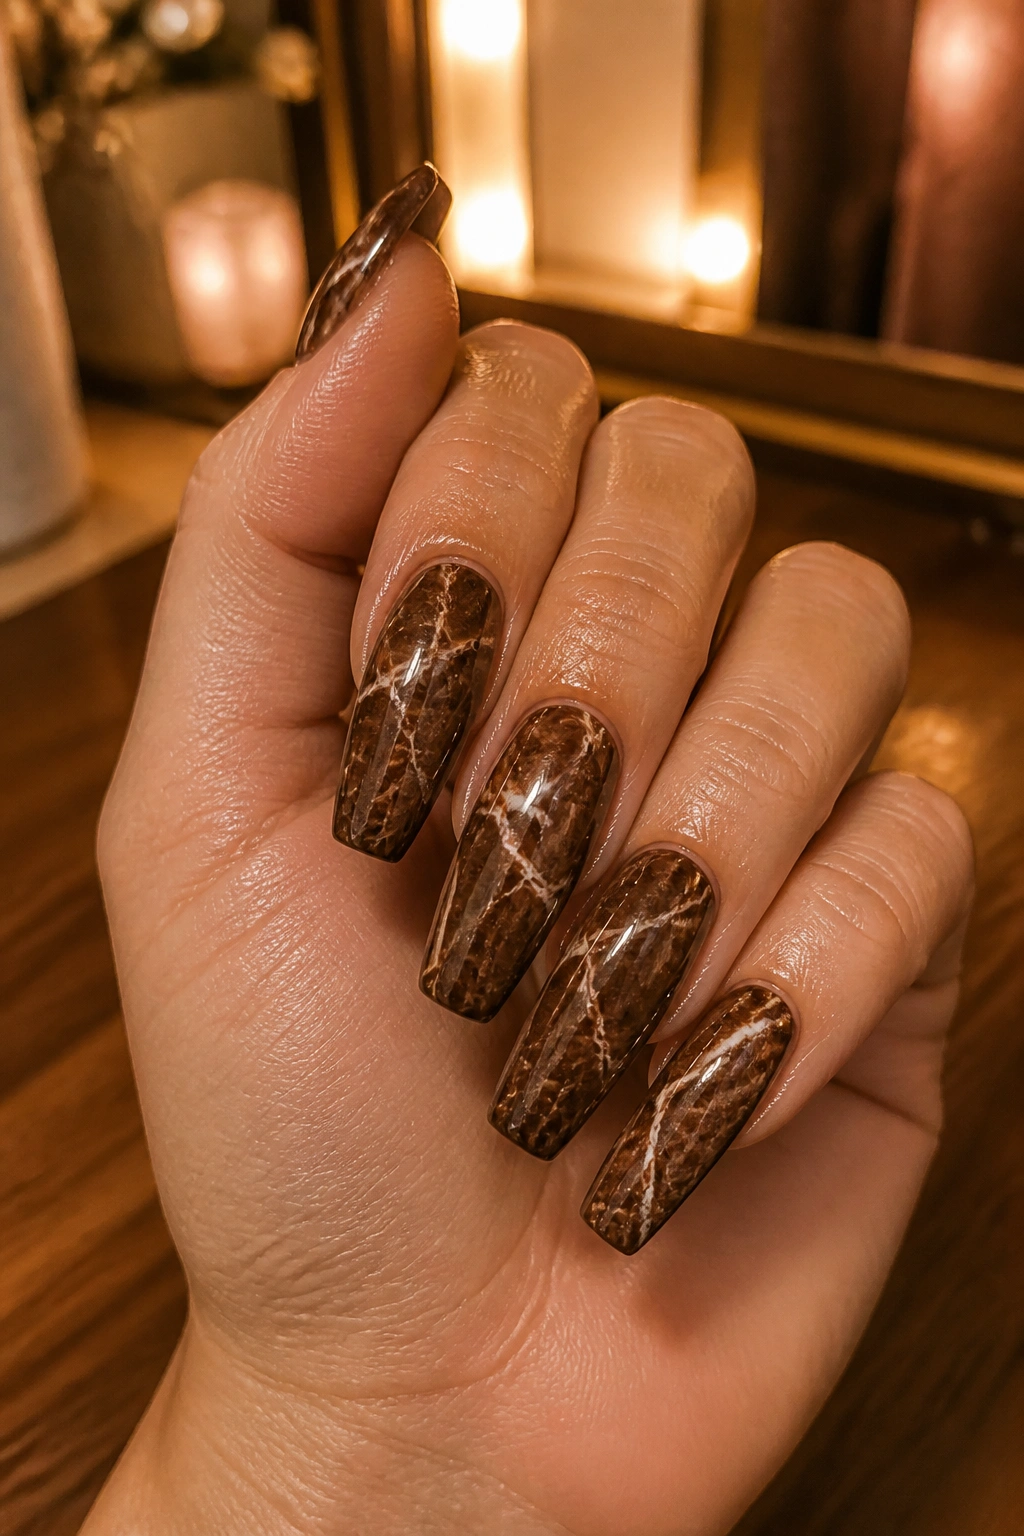
Brown nails took people a while to warm up to, and I still think most brown sets fail because the shade is wrong. Flat milk-chocolate polish can look dull fast. Espresso marble, though, has depth. Add cream veining and the whole manicure starts feeling richer, like dark stone, coffee swirled with milk, or polished wood with mineral lines running through it.
I like this design more than plain brown because it softens the heaviness of the color. Cream is the better vein shade here, not bright white. White against deep brown can look too stark and fake. Cream, camel, and a little translucent amber keep the pattern grounded.
Gloss works well, though a satin finish can also look strong if the nail surface is smooth. Matte brown is harder to pull off; it can make the set feel dusty unless the color has enough red or depth underneath. Espresso avoids that problem because it is dark enough to hold shape and warmth at the same time.
This manicure suits medium to long coffin nails and gold jewelry better than silver. It also hides minor wear well. Tiny scuffs near the tip do not announce themselves the way they do on black or white polish, which is useful if you type all day, dig through bags, or live the sort of life where your nails do not get treated gently.
12. Lilac Marble Coffin Nails with Micro Glitter
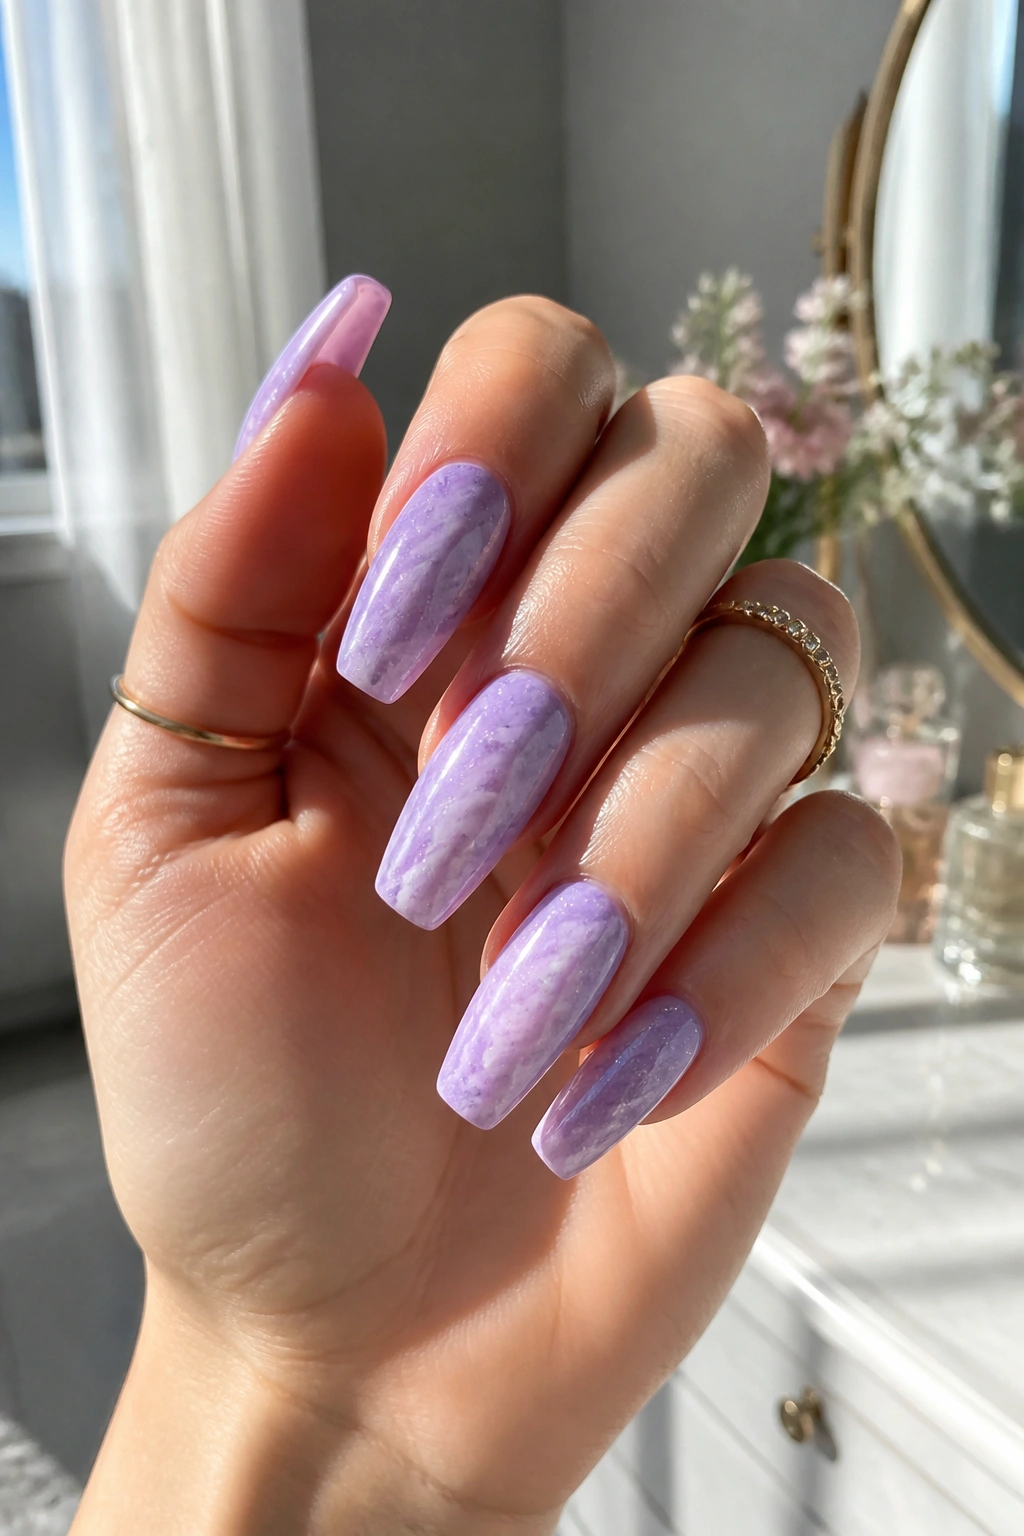
Soft.
That is the word that makes this set work. Lilac marble coffin nails can go wrong fast if the purple is candy-bright or the glitter is chunky enough to look like craft supplies. Keep the lilac muted, use micro glitter instead of large sparkle pieces, and let the marble pattern stay airy.
Placement matters more than glitter size
Micro glitter should sit where real stone might catch a mineral shimmer—around one vein, in a faded patch near the side, or dusted lightly over one accent nail. Covering the whole nail turns the set into glitter nails with marble underneath, which misses the point.
Lilac pairs well with white marble wisps, pale gray threads, and a hint of silver. You can also use a milk-lavender base and leave two nails nearly plain, then build denser marble on the thumb and ring finger. That asymmetry keeps the set from looking overworked.
This is one of the better spring-leaning color stories—there, I almost drifted into seasonal talk again. Forget that. What I mean is that lilac has lightness, so it feels easy to wear when you want color but not darkness. It works on medium coffin shapes, especially if your wardrobe lives in grays, creams, soft denim, and silver jewelry.
Keep the top coat glossy. Lilac can go flat under matte, and the micro shimmer disappears.
13. Negative Space Marble with Clear Panels
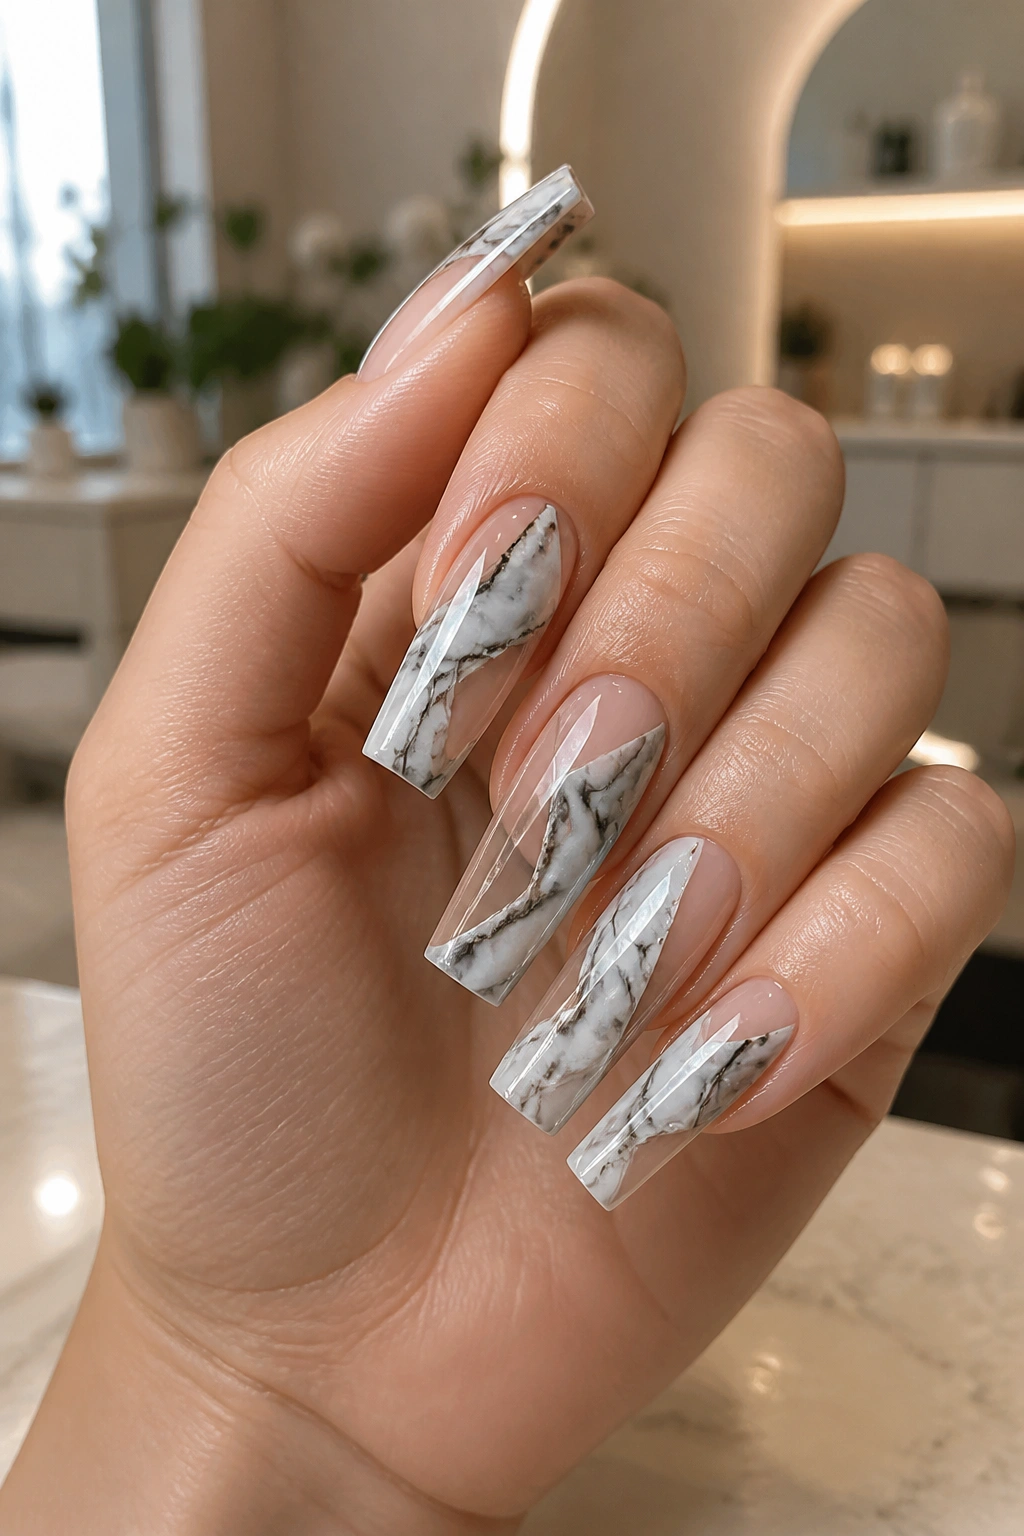
Counterintuitive, maybe, but leaving part of the nail clear can make marble look more expensive. Negative space gives the pattern breathing room, and on a coffin shape those clear panels add structure rather than making the design look unfinished.
You might see this as a diagonal clear section near the sidewall, a bare crescent at the cuticle, or a vertical strip that divides the marble from a sheer nude base. The better versions use transparency with intention. Random blank spots look like missing polish.
What makes this style stand out is contrast between texture and emptiness. Marble is visual noise by nature—veins, clouds, branching lines. Clear space calms it down.
Smart ways to use it:
- Diagonal clear side panel + white-gray marble on the rest of the nail
- Clear cuticle half-moon + nude marble body
- Vertical clear stripe + black marble on one side
- Two negative-space nails per hand max if the rest of the set already has detail
If you wear press-ons, check that the clear areas are actually clear and not cloudy plastic. Cheap tips can make negative space look yellow or fogged over, which ruins the clean effect. Gel tends to handle this style better because the transparency stays crisper under a good top coat.
This is one of the most modern takes on marble coffin nails, though “modern” is not the point. The point is control.
14. White Marble Ombre Coffin Nails with a Cuticle Fade

A full white marble nail can feel abrupt when the color starts hard at the base. Fade that marble out from the cuticle and the whole set looks smoother.
The ombre fade should begin with sheer nude or milky pink near the cuticle, then build into white marble through the middle and tip. On coffin nails, that gradient lengthens the finger and makes the pattern feel integrated instead of placed on top like a sticker. You still get the clean white-and-gray stone effect, but the grow-out looks softer and the transition feels more natural.
Compared with a standard marble French tip, this design is hazier and less graphic. Compared with full-coverage white marble, it is easier on the eye and often more flattering on shorter fingers. If you have ever liked marble nails in photos but found them too stark on your own hands, this version fixes that problem more often than not.
A few things matter for execution. The fade near the cuticle should be smooth, not chalky. Gray veins should start faint, then become clearer toward the tip. And if gold foil is added, keep it near the middle third where the ombre is already transitioning; foil jammed into the cuticle area interrupts the fade and makes the design look busy.
This set has a bridal side, yes, but it is not limited to that. It works whenever you want white marble without the hard edge.
15. Deep Burgundy Marble with High-Gloss Finish
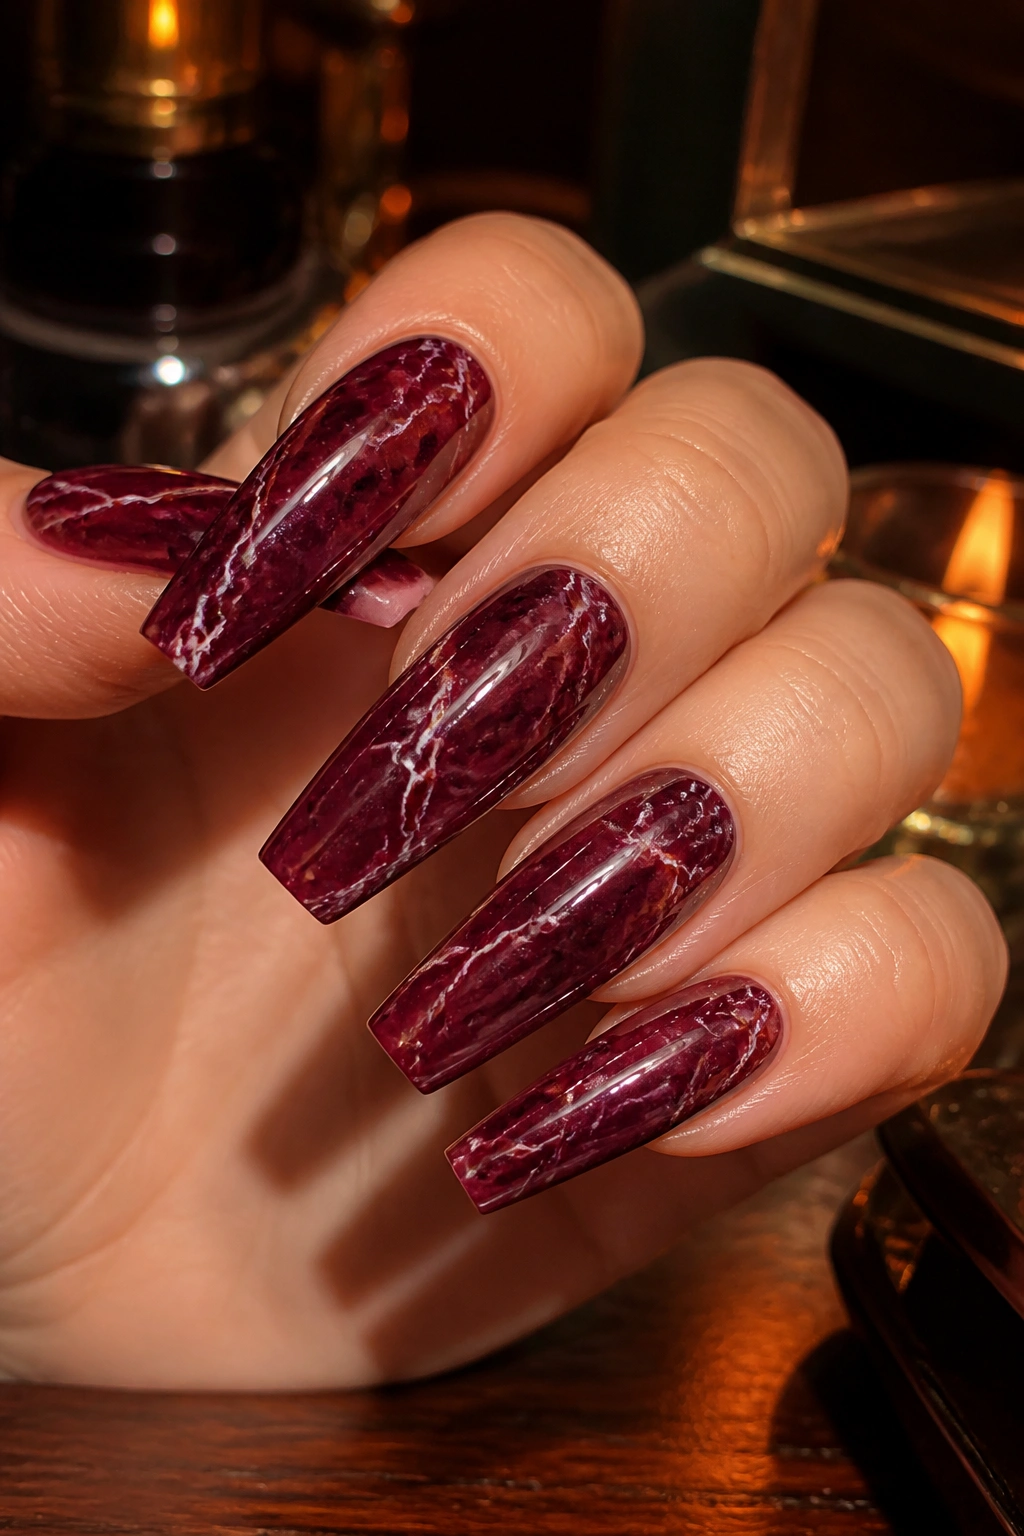
Dark red marble has a moody, polished feel that plain burgundy polish cannot match. The best version uses a deep wine or oxblood base, then threads through black-red shadowing, tiny white or blush veins, and a top coat glossy enough to make the color look wet.
Burgundy marble suits coffin nails because the shape keeps the dark shade elegant. On round nails, dark red can read softer. On coffin, it feels deliberate. A medium length is enough, though longer nails give the marble more room to show off those wine-colored layers.
This is not a design for heavy embellishment. No chunky crystals. No oversized charms. Maybe one sliver of gold leaf on an accent nail if the set needs warmth, but even that is optional. Burgundy already carries drama. Adding too much turns a strong color story into a crowded one.
The veining should stay restrained. White lines need to be thin and broken, almost like hairline cracks in polished stone. Pale blush can also work as a secondary vein if white feels too sharp. That little shift makes the manicure look richer and less stark, especially under warm indoor light.
I keep coming back to this one for evening wear because it looks finished the moment the top coat goes on. No extra trick needed.
Final Thoughts
The marble coffin nails that look best are rarely the busiest ones. Controlled veining, a smart color base, and enough empty space to let the pattern breathe do more than glitter, gems, or five accent techniques piled on one set.
If I had to narrow the strongest picks, I would point to milky white with gray veins, nude beige with sparse gold, rose quartz pink, blue-gray with a chrome line, and burgundy marble. Those five cover most moods without asking too much from the design.
One last practical note: save a reference photo, sure, but also save one sentence that explains why you like it—“thin veins,” “sheer base,” “only two marble nails,” “matte taupe, no foil.” That sentence helps your nail tech more than a collage ever will, and it usually leads to a set you will still like after the first rush of salon lighting wears off.
