

Heart coffin nails earn their place on saved manicure boards for one plain reason: the shape gives you enough room to make a heart look sharp, intentional, and readable from arm’s length instead of like two dots that melted together.
That sounds small, but it changes everything. If you’ve ever left the salon with a cute idea that turned muddy by day three, the problem usually was not the heart itself. It was the scale, the placement, or the way the design fought the coffin shape instead of using it.
The straight sidewalls and tapered tip of a coffin nail give nail art a built-in frame. A tiny heart near the cuticle looks neat because the nail narrows there. A larger heart at the free edge works because the tip has more width. Even a simple French tip gets more interesting when the smile line bends into a heart dip instead of a plain curve.
And that’s where heart nail art stops looking sugary and starts looking smart.
Why Heart Coffin Nails Look Better on a Tapered Tip
Heart coffin nails work because the shape does half the design job for you. Coffin nails have a straight, elongated body with a squared-off tip, so even small art has room to breathe. On a short rounded nail, a heart often gets cramped and chunky. On a coffin shape, the same heart can stay crisp.
Length matters too. A medium coffin set—usually with about 10 to 14 mm of free edge—gives enough space for one focal heart, a French variation, or a few tiny accents without crowding the nail. Once you go extra long, the design can handle chrome, ombré, crystals, or layered gel details.
Placement changes the mood. A heart near the center reads playful. A heart at the cuticle looks cleaner and a little dressier. A heart tucked into a French tip feels more grown-up than a full nail covered in decals.
I’ll say it plainly: the coffin shape is one of the few nail shapes that can handle sweet motifs without making the whole set look juvenile. That’s the appeal.
Matching Heart Size to Nail Length and Width
How big should the heart be? Smaller than most people think.
The fastest way to ruin a heart manicure is to make every heart too large for the nail bed. Once the two lobes of the heart take up more than about one-third of the nail width, the shape starts to blur under top coat, especially with gel. Thick top coat can soften sharp points. Then the design loses its edge.
A good working guide looks like this:
- Short coffin nails: keep hearts around 2 to 3 mm wide and use one focal nail, maybe two.
- Medium coffin nails: 3 to 5 mm hearts read well and still leave room for French tips, negative space, or glitter.
- Long coffin nails: you can go larger, but a single 6 mm heart or a few layered details usually looks cleaner than covering every nail.
Color affects scale too. Dark hearts on a sheer base look larger than pastel hearts on a nude base, even at the same size. Chrome outlines also pull the eye harder than soft gel painting, so they need a little more breathing room around them.
Small hearts fail fast.
What to Ask for Before Your Nail Tech Starts Painting
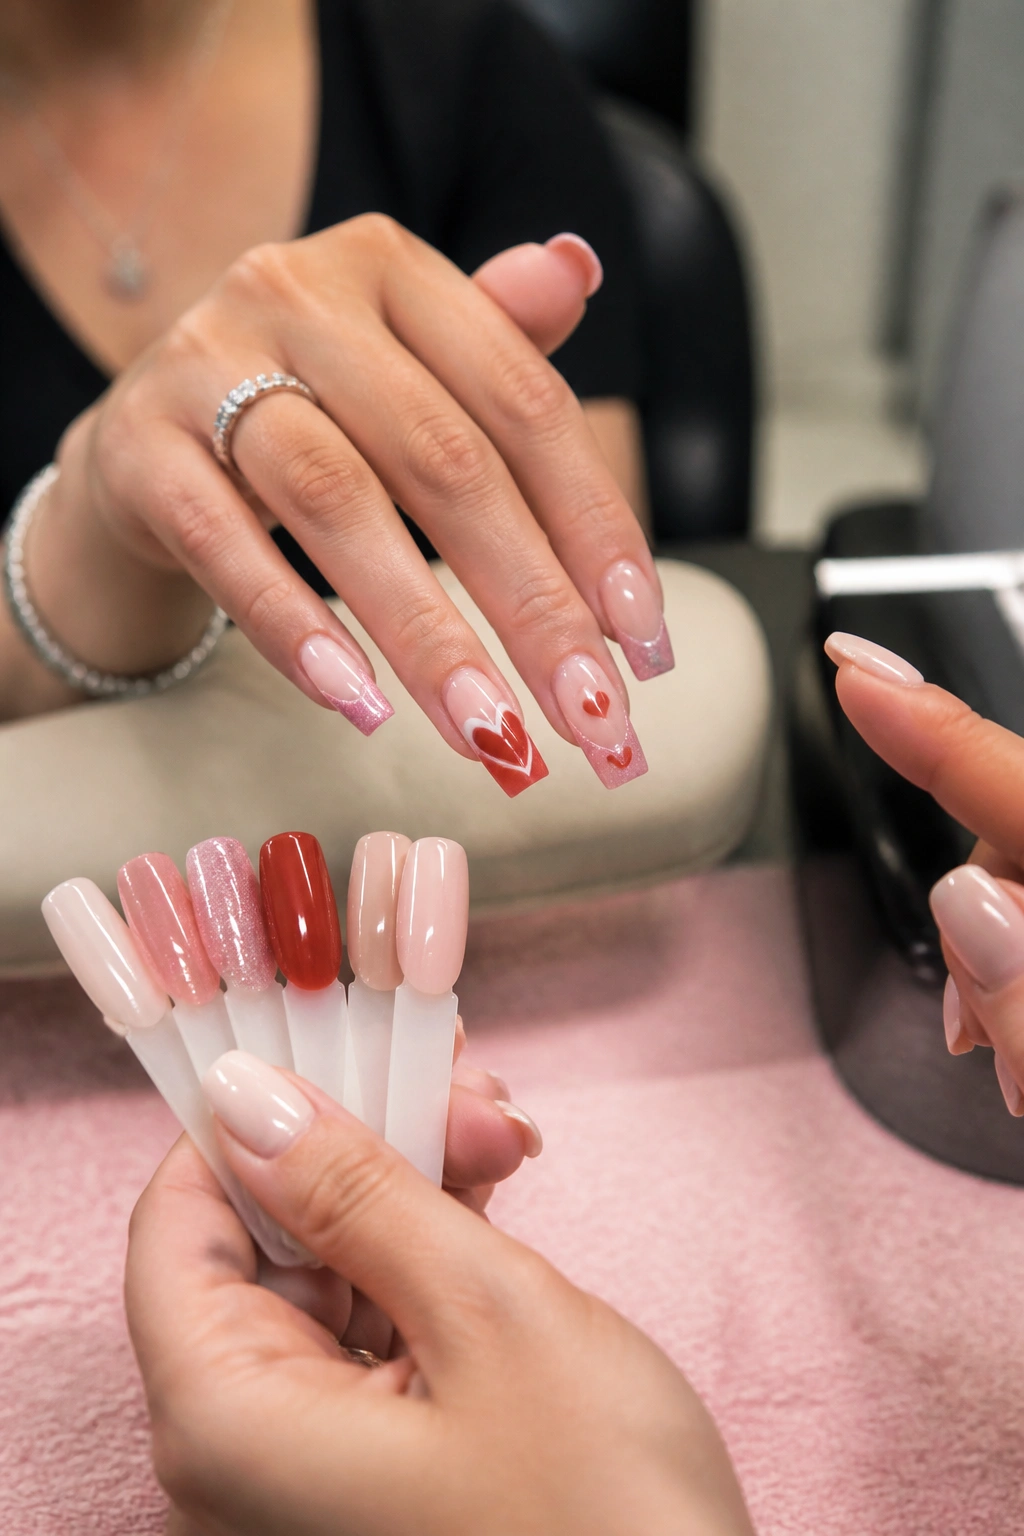
Picture the salon chair for a second. You’ve got your reference photo ready, the polish wall behind you is pulling you in six directions, and the tech asks what length and finish you want before you’ve even settled on the art.
Start with the structure first. Tell your nail tech whether you want acrylic, builder gel, soft gel tips, or press-ons, because the base changes how heart art sits and lasts. Acrylic gives you a firm canvas for chrome, charms, and raised gel hearts. Builder gel has a smoother, glassier finish and works well for jelly shades, aura blends, and clean line work. Press-ons can look good too, though tiny hand-painted hearts hold up better when they’re sealed under gel than when they’re sitting on top of glue-on plastic.
Then get specific:
- Ask for a medium or long coffin shape with straight sidewalls, not a narrow ballerina tip unless you want the hearts stretched.
- Ask for a smooth apex and even surface so the heart doesn’t wobble over bumps.
- Decide on glossy, matte, chrome, cat-eye, or jelly before the art starts.
- Bring two reference photos: one for shape, one for design. Mixing them usually gets better results than trying to copy one photo line for line.
One more thing. Dermatology guidance has long warned that rough removal of acrylic and gel enhancements can leave the nail plate dry, peeling, and easy to split. That matters here because heart sets often involve extra layers—stickers, chrome powder, builder gel, stones—and each added layer makes proper soak-off more important.
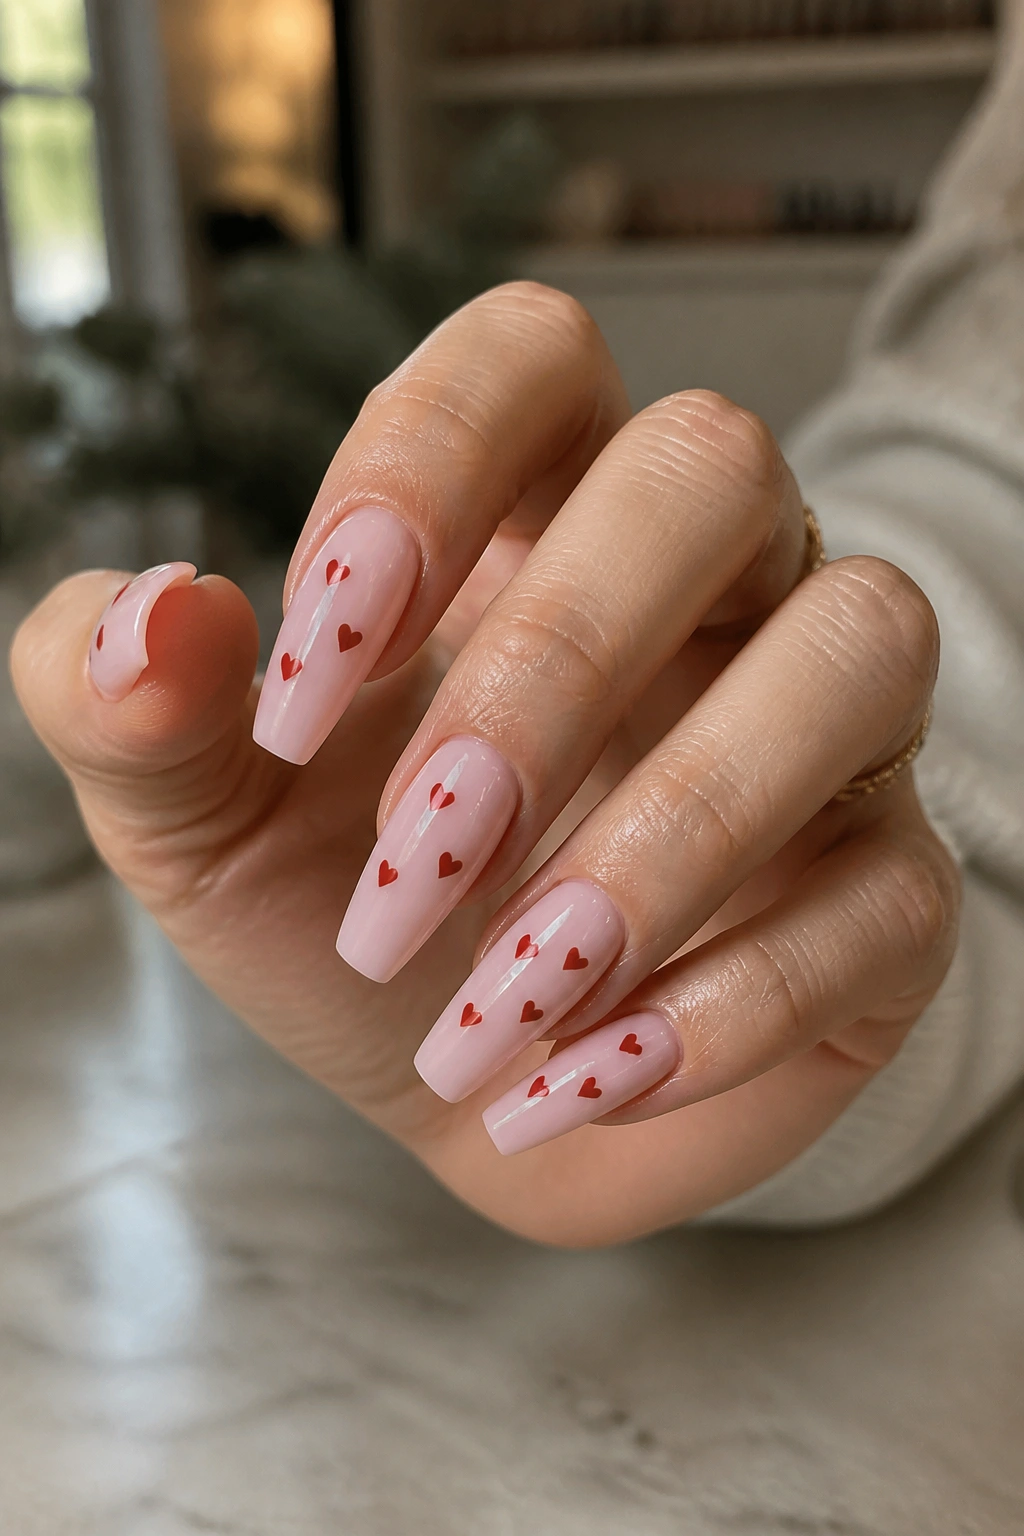
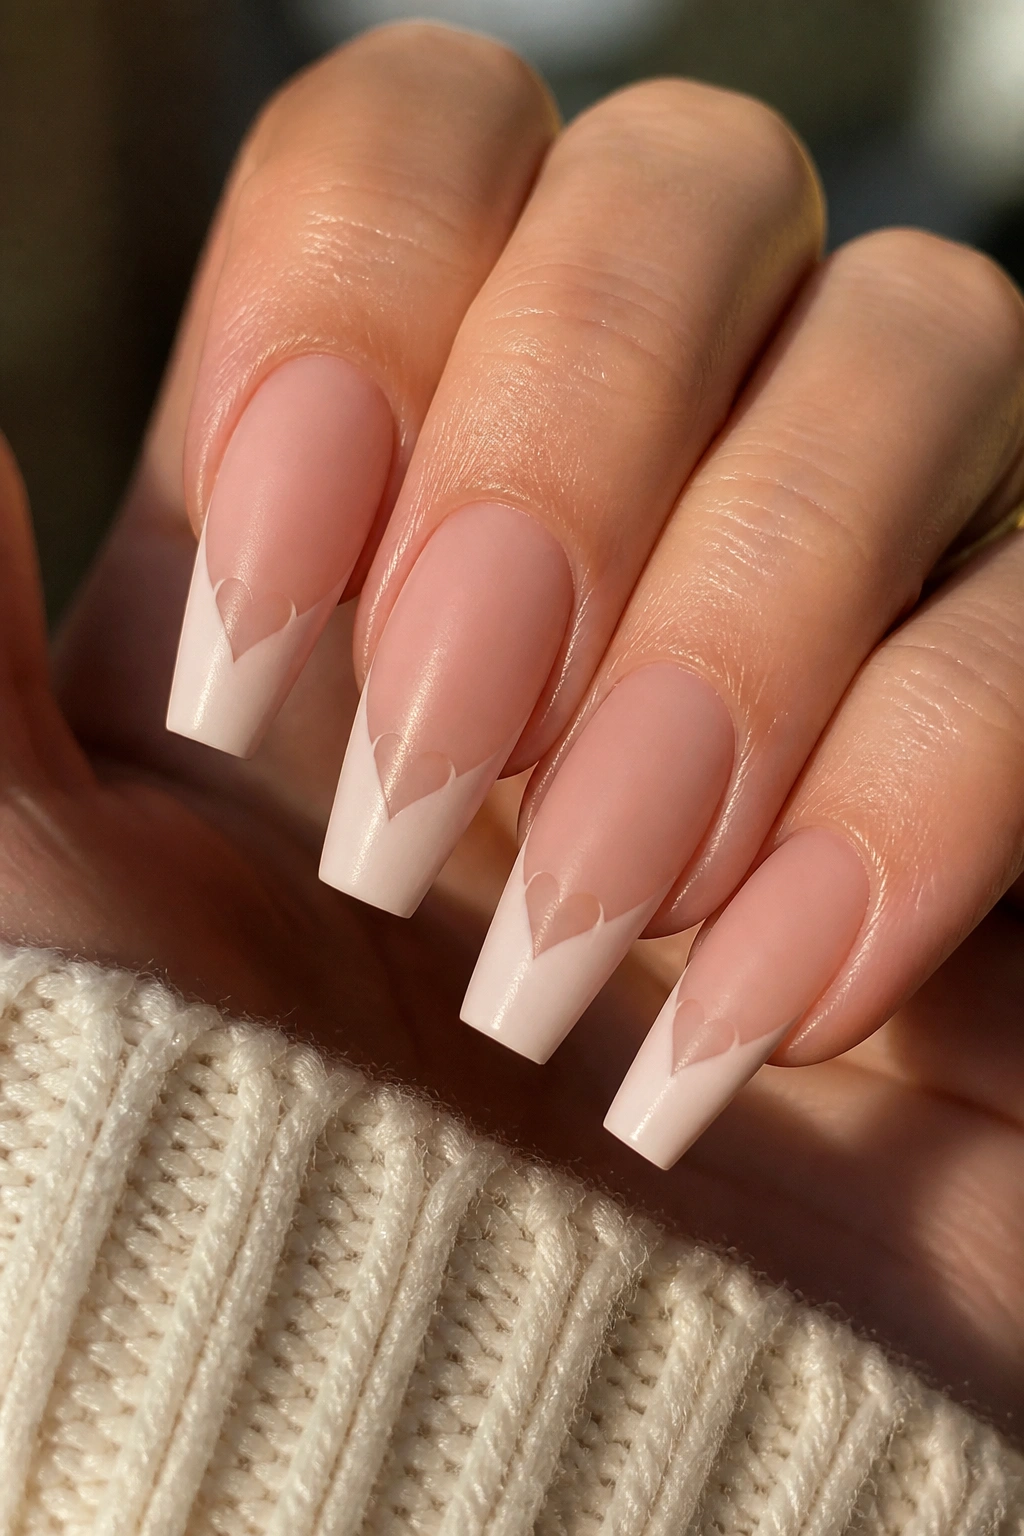
1. Milky Pink Heart Coffin Nails With Tiny Red Accents
A soft milky pink base and tiny red hearts is the set I’d suggest first if you like heart nail designs but do not want your hands to look overworked. The base has that creamy, semi-sheer look that hides ridges, smooths the nail bed, and keeps the red from feeling too loud.
Why This Combo Lands So Well
The trick is contrast. Milky pink sits close to the natural nail, while cherry red snaps into focus right away. Because the hearts are small, the eye reads them as detail rather than theme. That distinction matters.
Keep the hearts spaced out. One on the ring finger, two scattered across the middle and pinky, maybe a tiny double-heart on the thumb. More than that, and the design starts to lose the clean air between elements that makes it look polished.
What to Ask For
- A semi-sheer pink gel base with one to two coats, not a fully opaque baby pink
- Hearts painted with a fine liner brush, not chunky decals
- A high-gloss top coat so the milk base stays juicy instead of chalky
- Medium coffin length, where the tiny hearts stay proportional
Salon tip: ask for hearts no wider than a pencil eraser. Once they get bigger, this design shifts from crisp to cutesy fast.
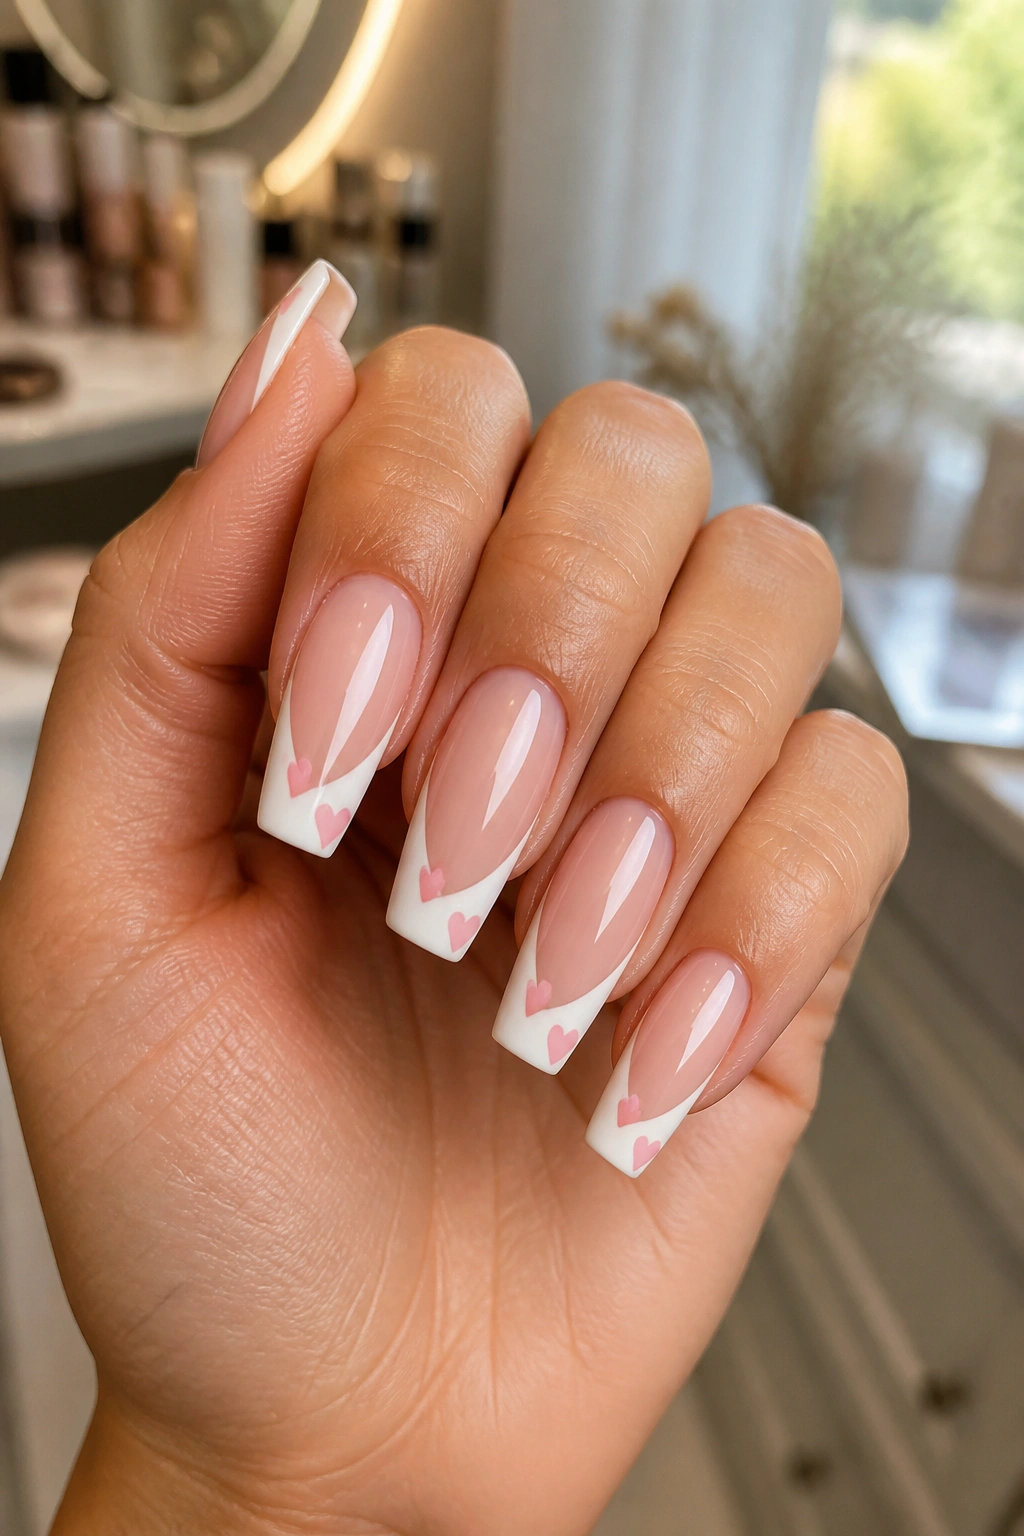
2. Soft Nude French Tips With a Heart Cutout Smile Line
French tips and heart art can fight each other. This version doesn’t, because the heart is built into the French instead of pasted on top of it.
The shape is the whole point. Instead of a standard curved smile line, the center dips into a tiny heart point, so each tip looks like it was carved into a soft V with rounded shoulders. On a nude base, that little change shows up from across the table but still feels restrained enough for everyday wear.
I like this design most on medium-length coffin nails with a tip depth of about 3 to 4 mm. Go shallower and the heart cutout disappears. Go too deep and the tip starts to look like costume nails. White is the classic choice, though a muted pink, espresso brown, or wine red can make the same design feel less bridal and more fashion-forward.
You also need a tech with steady line work. There is nowhere to hide a crooked heart French. If the left side sits even 1 mm higher than the right, your eye catches it right away. A slim striping brush and patient flash-curing between nails help keep both sides even.
This is one of those sets that looks simple in photos and is not simple in the chair.
3. Candy Apple Red Coffin Nails With One Negative-Space Heart
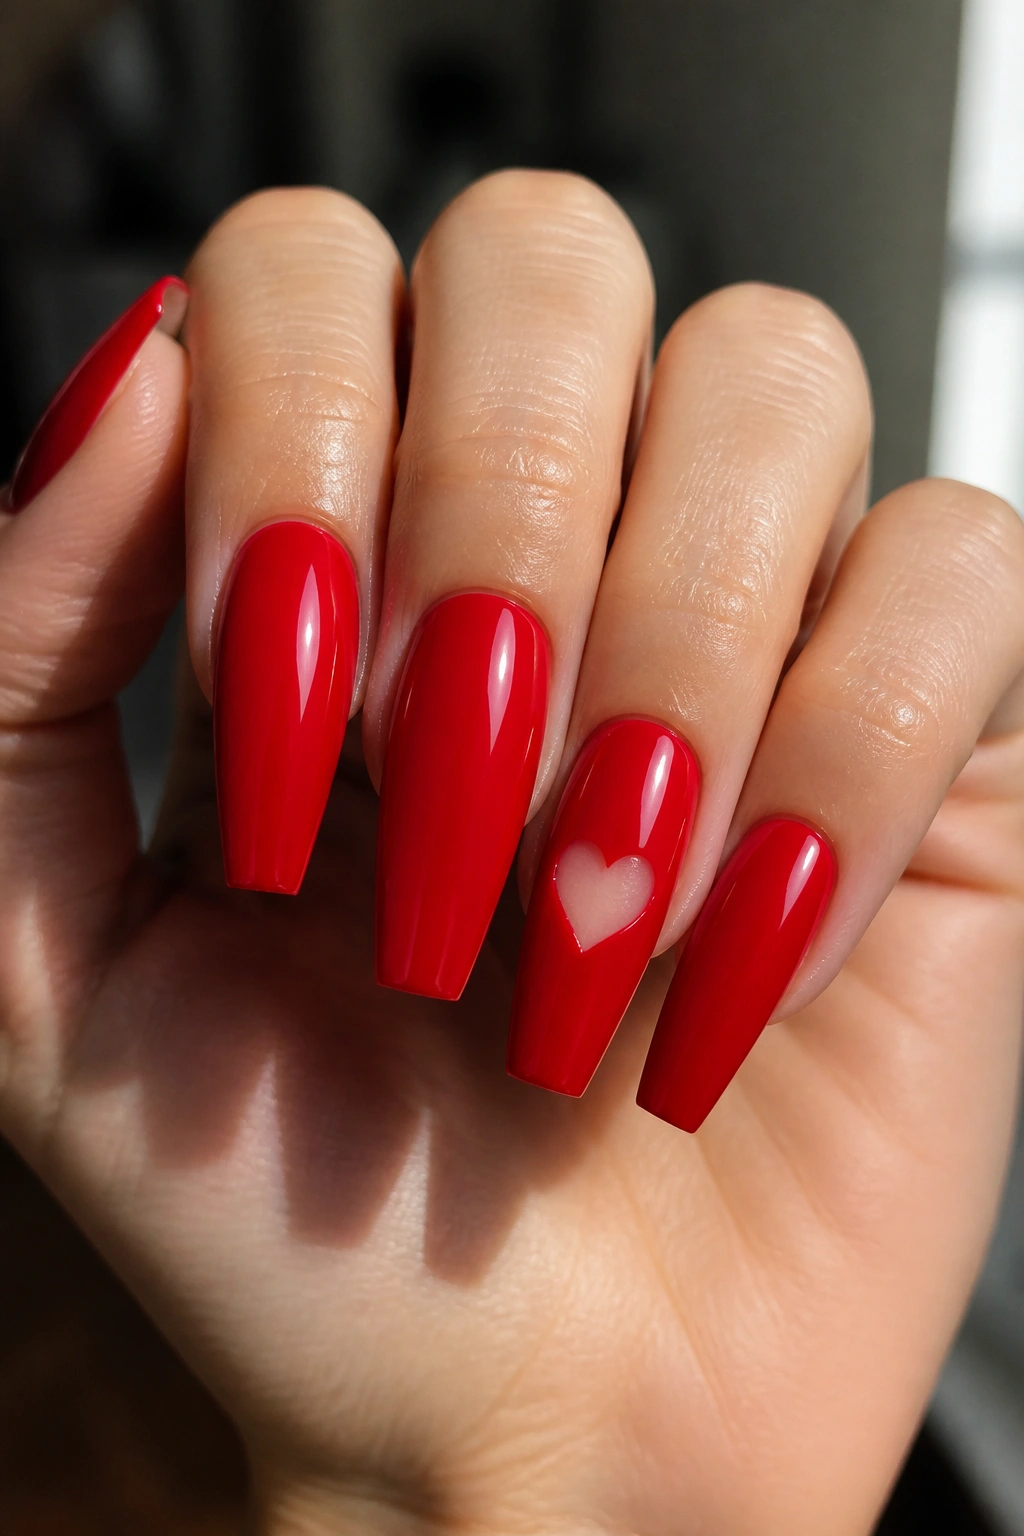
Want a heart manicure that reads bold before it reads sweet? Use one rich red shade across the full set and leave a single heart unpainted on one or two accent nails.
The power here comes from restraint. A full glossy red set already has enough presence, especially on coffin nails. The negative-space heart breaks that block of color with one sharp little window, and that empty shape ends up saying more than glitter or gems would.
Placement That Keeps It Sharp
Put the heart slightly above center, not dead in the middle of the nail. That off-center placement looks more editorial and less like a sticker sheet idea. I’d also keep the heart on the ring finger and thumb, or ring finger alone, rather than repeating it on every nail.
Red gel can shrink at the edges if it’s applied too thin. It can also flood the heart outline if it’s applied too thick. Your tech needs enough body in the polish to frame the cutout without dragging color back into it. Two thin coats usually give better edges than one heavy pass.
This one suits shorter medium coffin lengths better than extra-long tips. The empty heart stands out more when the nail is not fighting it for attention.
If You Wear a Lot of Gold Jewelry
Choose a red with a warm undertone—closer to tomato or lacquer red than blue-red. The whole set will look more connected on the hand.
4. Baby Pink Aura Nails With a Soft Centered Heart
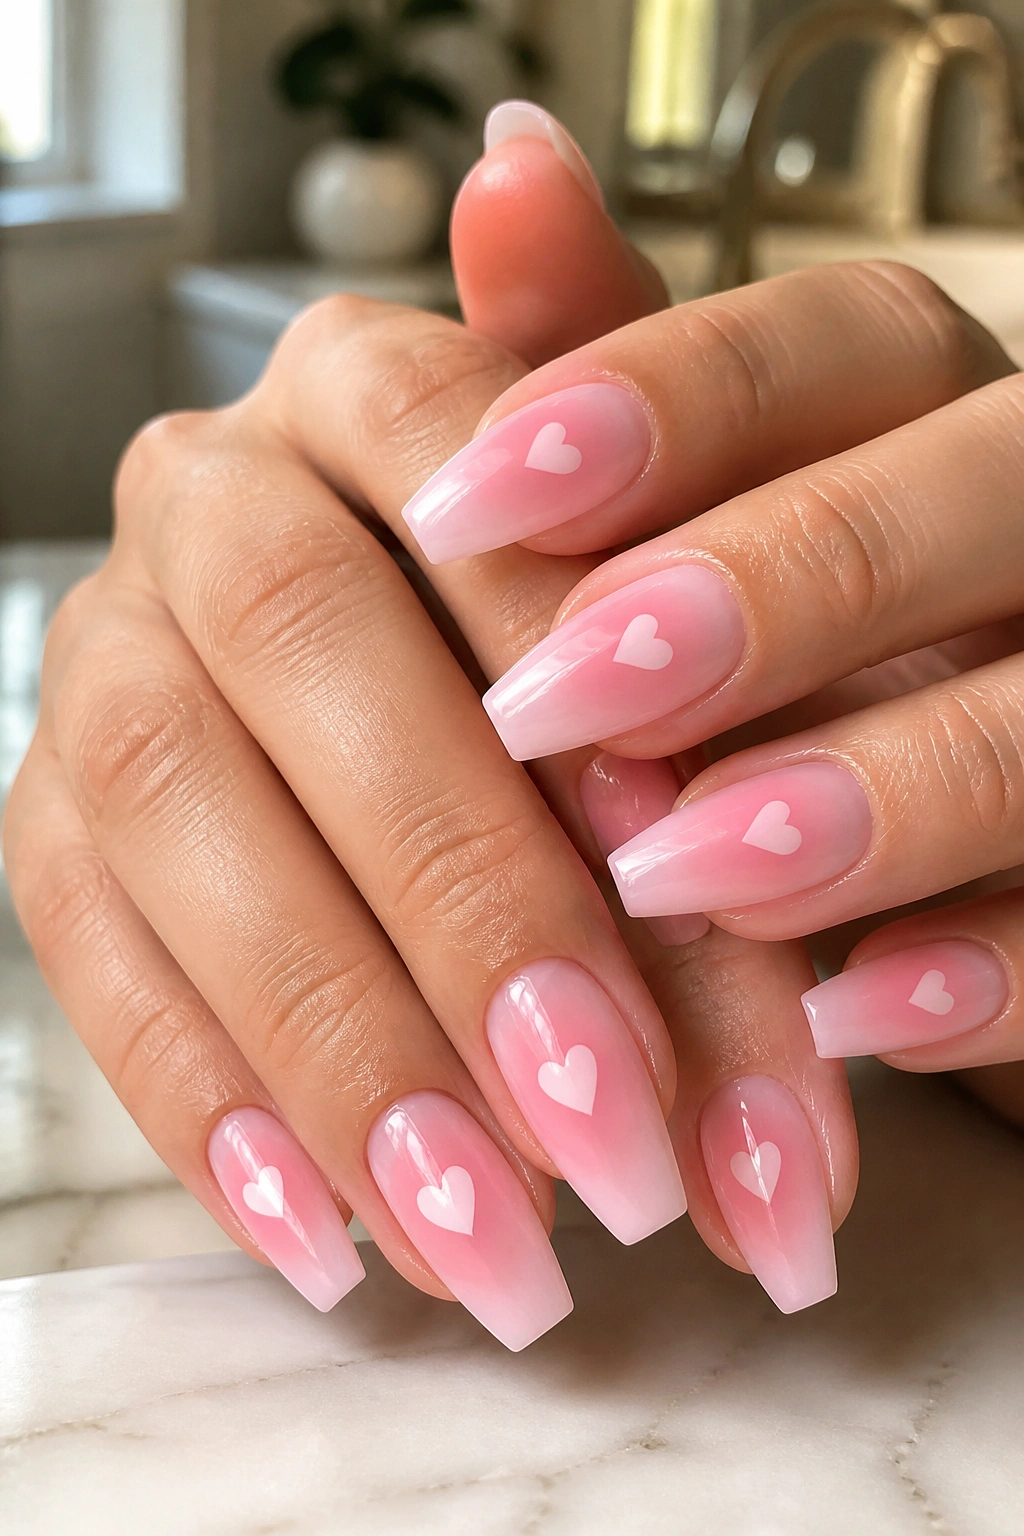
I’ve seen aura nails go muddy when the blend is too dark or the center glow is too large. Add a heart to that and the risk goes up. Still, when this set is done well, it has a soft-focus finish that flatters almost every skin tone.
The base usually starts sheer pink or pale beige. Then a brighter pink is airbrushed or sponged into the center, creating that blurred halo. A small heart—painted in white, crimson, or a deeper pink—sits over the aura center like a target. It sounds obvious. It does not look obvious when the blend is diffused enough.
Ask for a tight aura, not a giant wash of color. The glow should sit in the middle third of the nail, leaving a visible border of the base around it. That border is what keeps the set from turning into a blocky ombré.
A few practical notes help:
- Centered hearts look cleaner on medium to long coffin nails
- The heart should be smaller than the aura bloom, not the same size
- A gloss top coat works better than matte here because it keeps the gradient smooth
- Airbrush gives the cleanest fade, though sponge blending can still look good in the right hands
This design has a soft, candy-shell feel when you move your hands under light. That’s the charm.
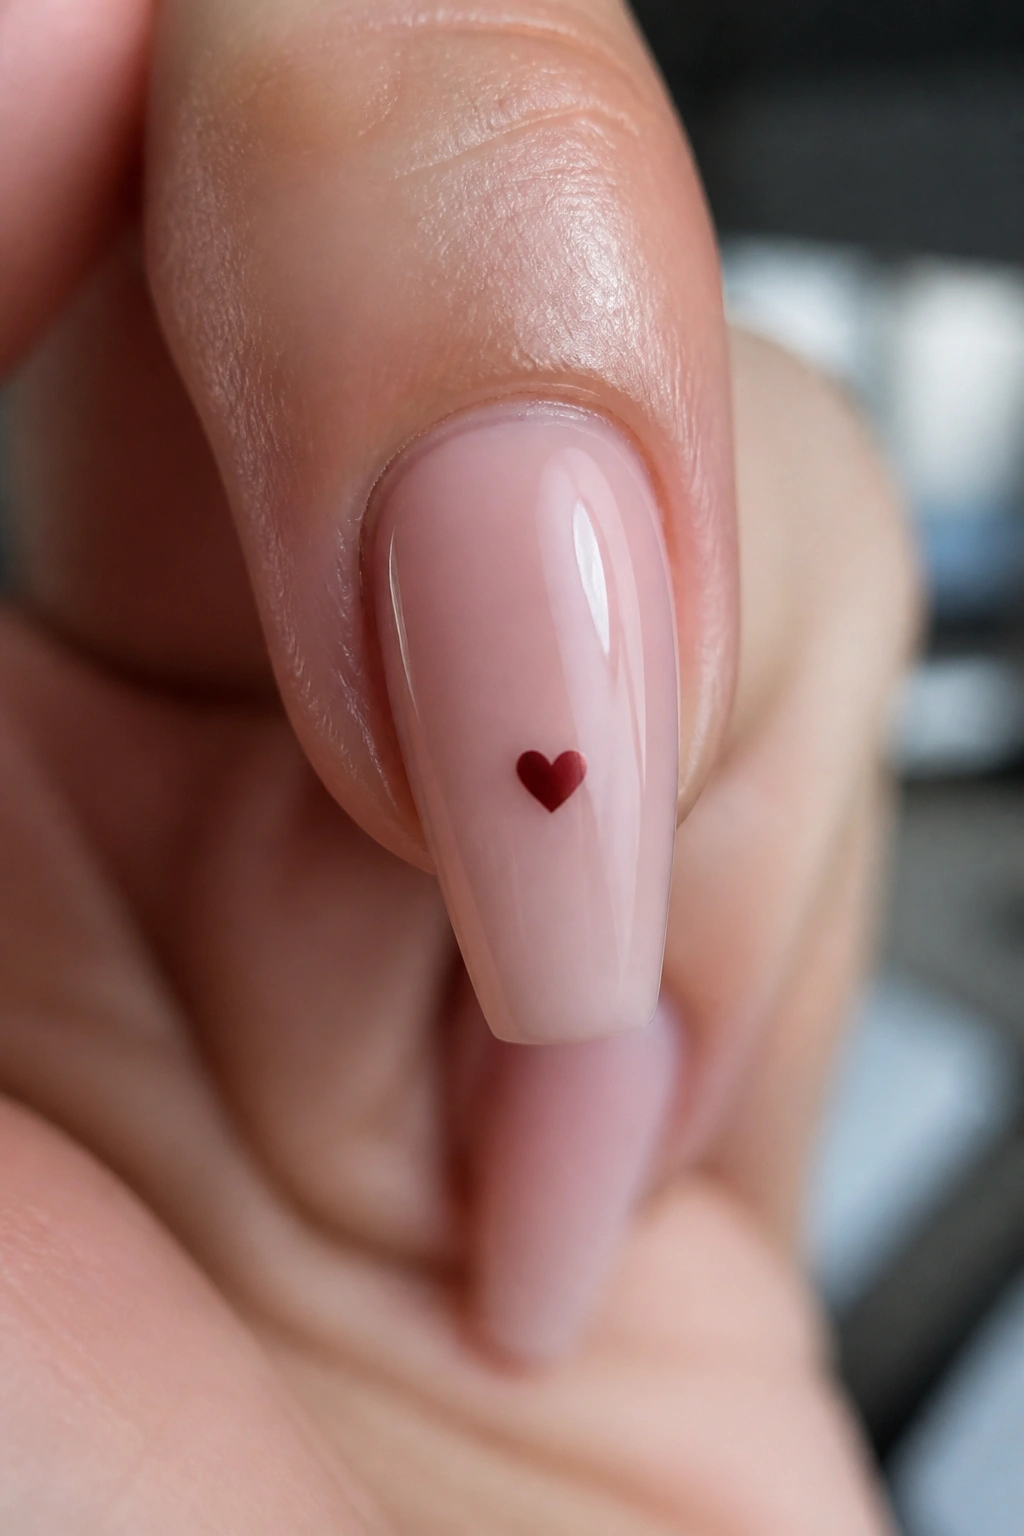
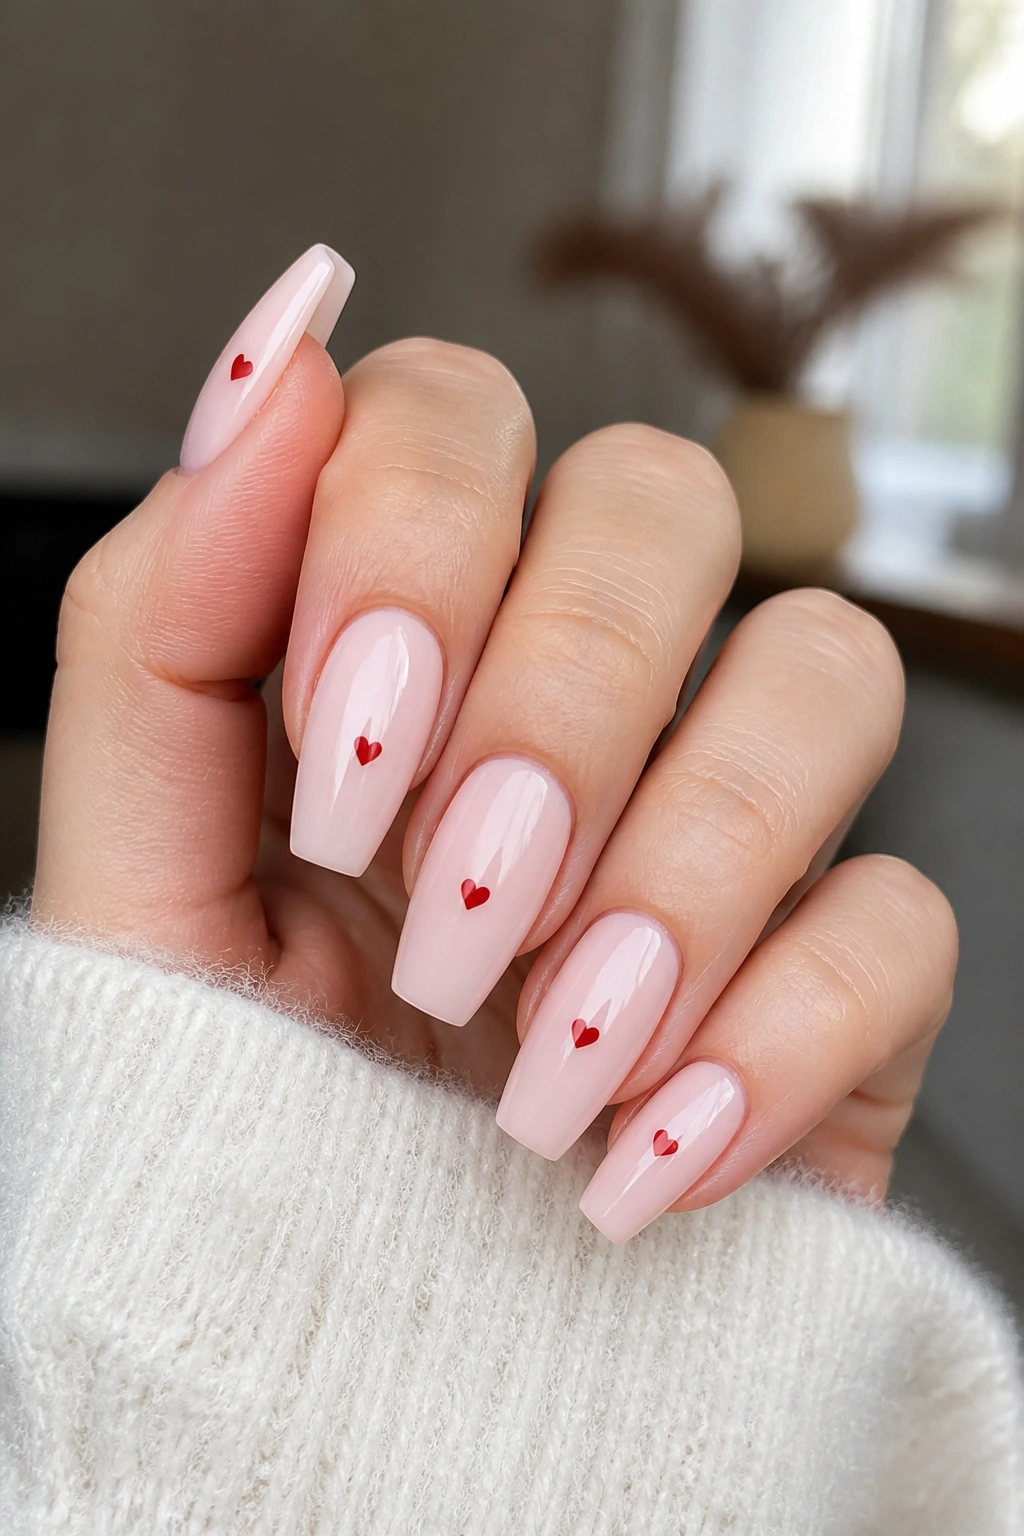
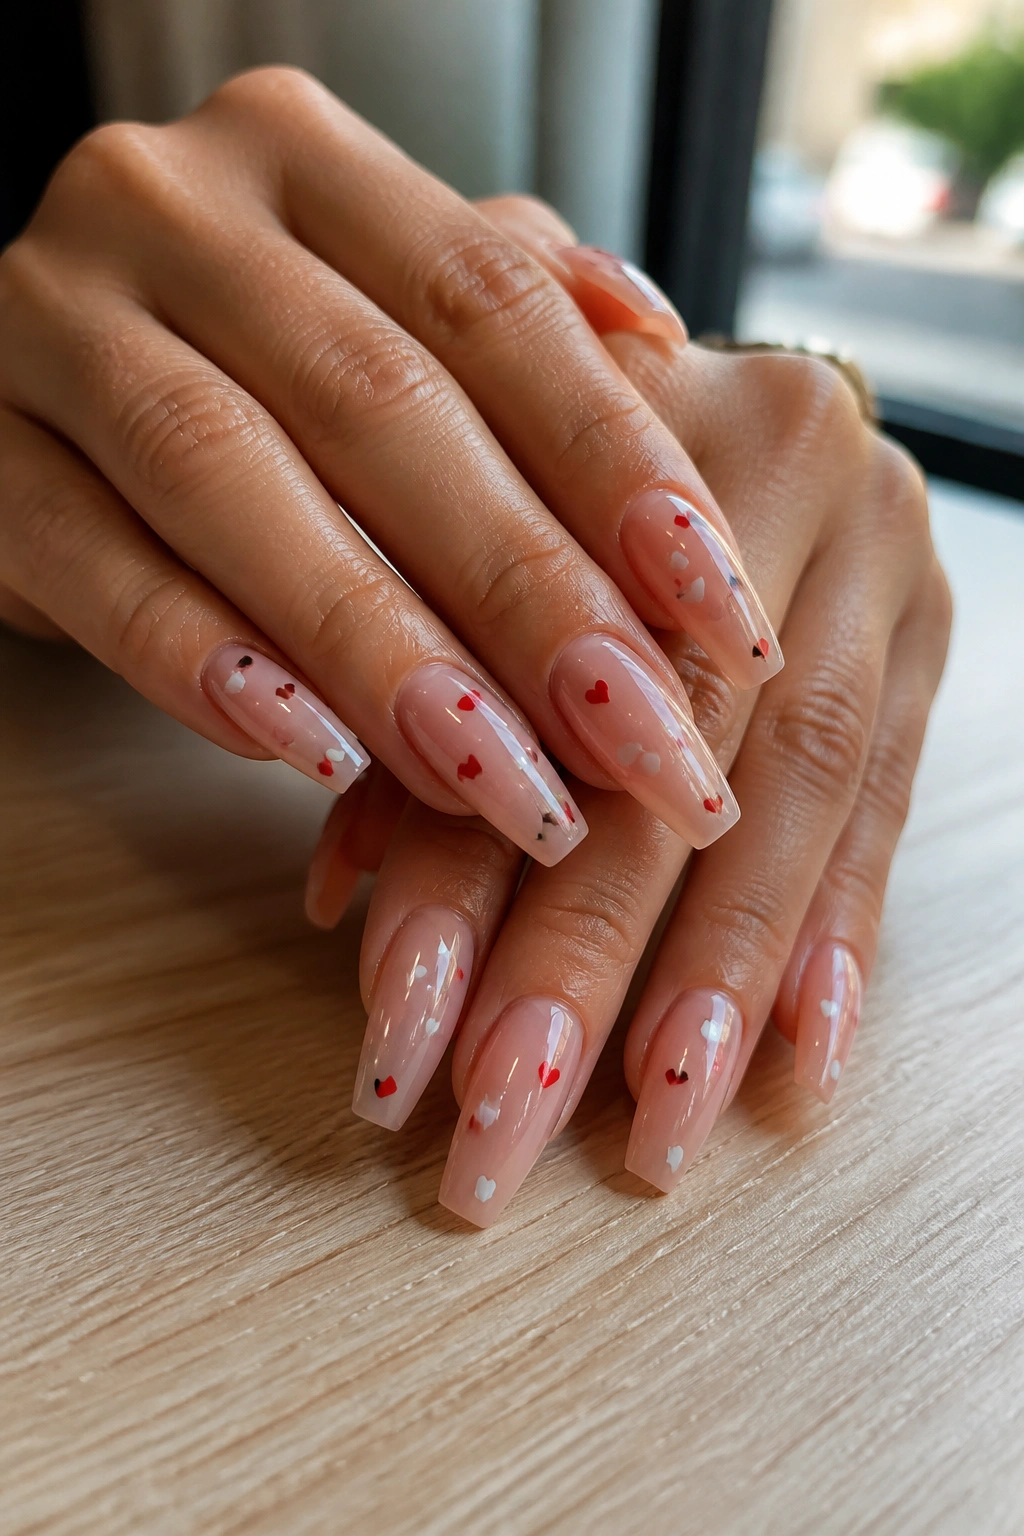
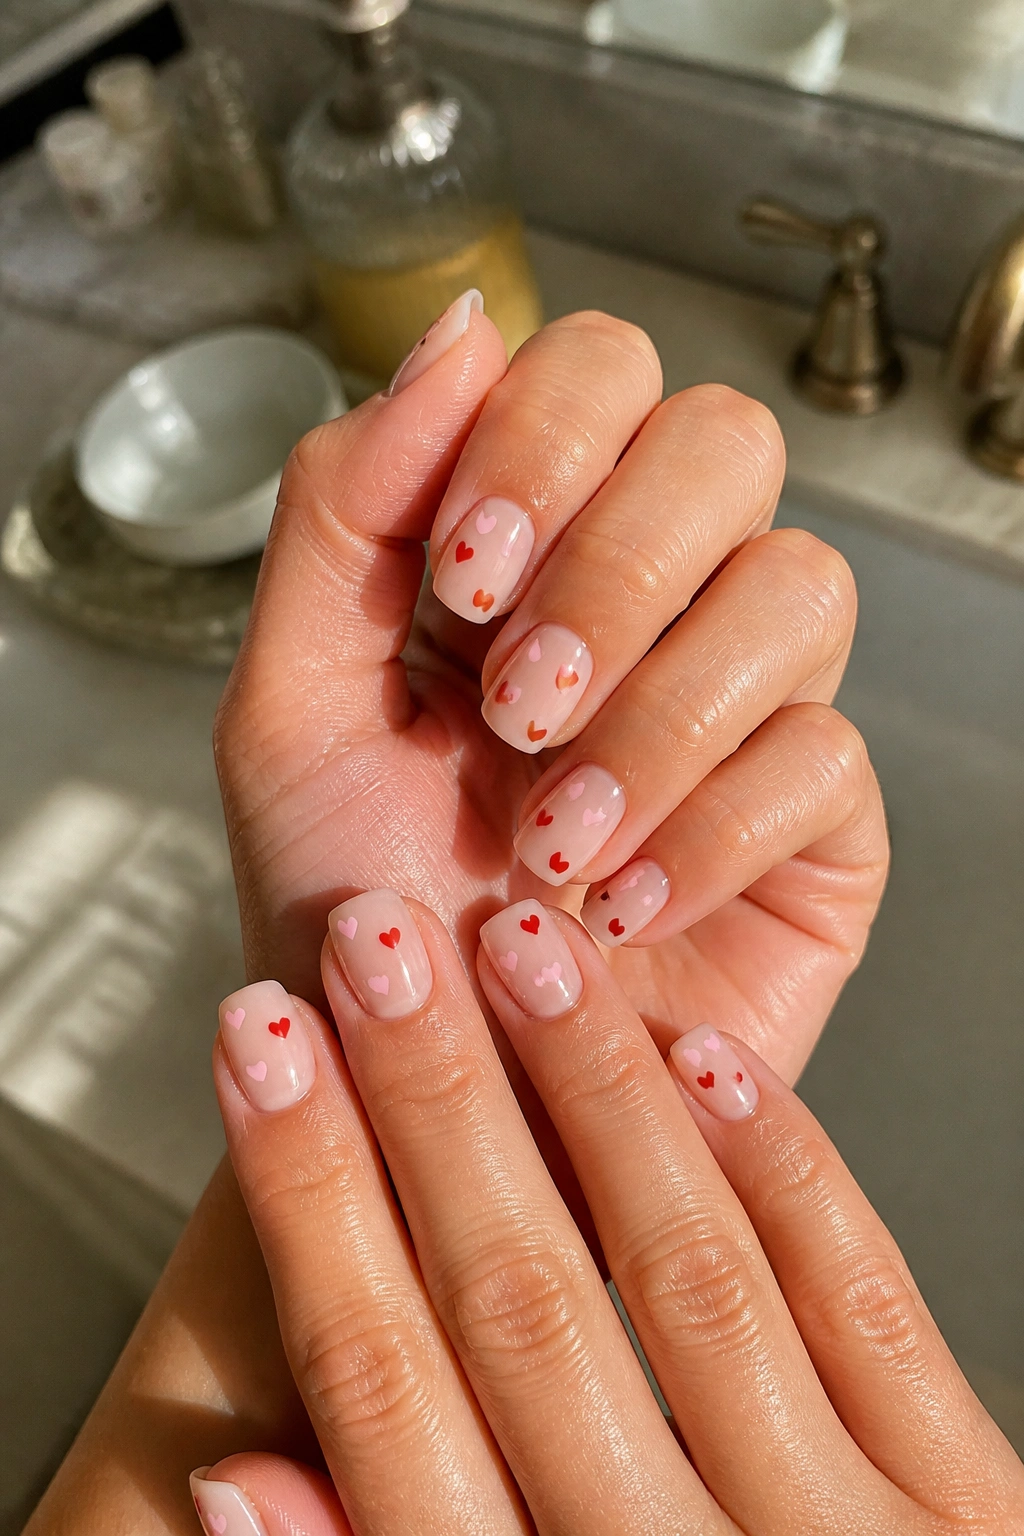
5. Sheer Nude Coffin Nails With Scattered Micro Hearts
Less art. More restraint.
A sheer nude base with scattered micro hearts is one of the easiest ways to wear heart coffin nails if you like cleaner hands, neutral clothes, and manicure details that show up in the second glance instead of the first. The base can be beige, rosy nude, or soft caramel depending on your undertone, and the hearts can be red, white, black, or even metallic.
What makes this set work is irregular placement. Do not line the hearts up like wallpaper. Put one near the tip, another near the sidewall, one tiny pair on the thumb, maybe a single lone heart close to the cuticle. That slight randomness gives the manicure movement.
Micro hearts also survive grow-out better than large focal art. When the set starts to move away from the cuticle after 10 to 14 days, the manicure still looks intentional because the design never depended on perfect center placement. If you do your own nails, this is also forgiving. A dotting tool and a liner brush can get you there without salon-level painting skills.
Black micro hearts on beige nude look cleaner than most people expect. White on rosy nude feels light and airy. Red is still the classic, though I’d keep it to four or five nails max so the whole set stays airy rather than crowded.
6. White Chrome Heart Coffin Nails With Pearl Details
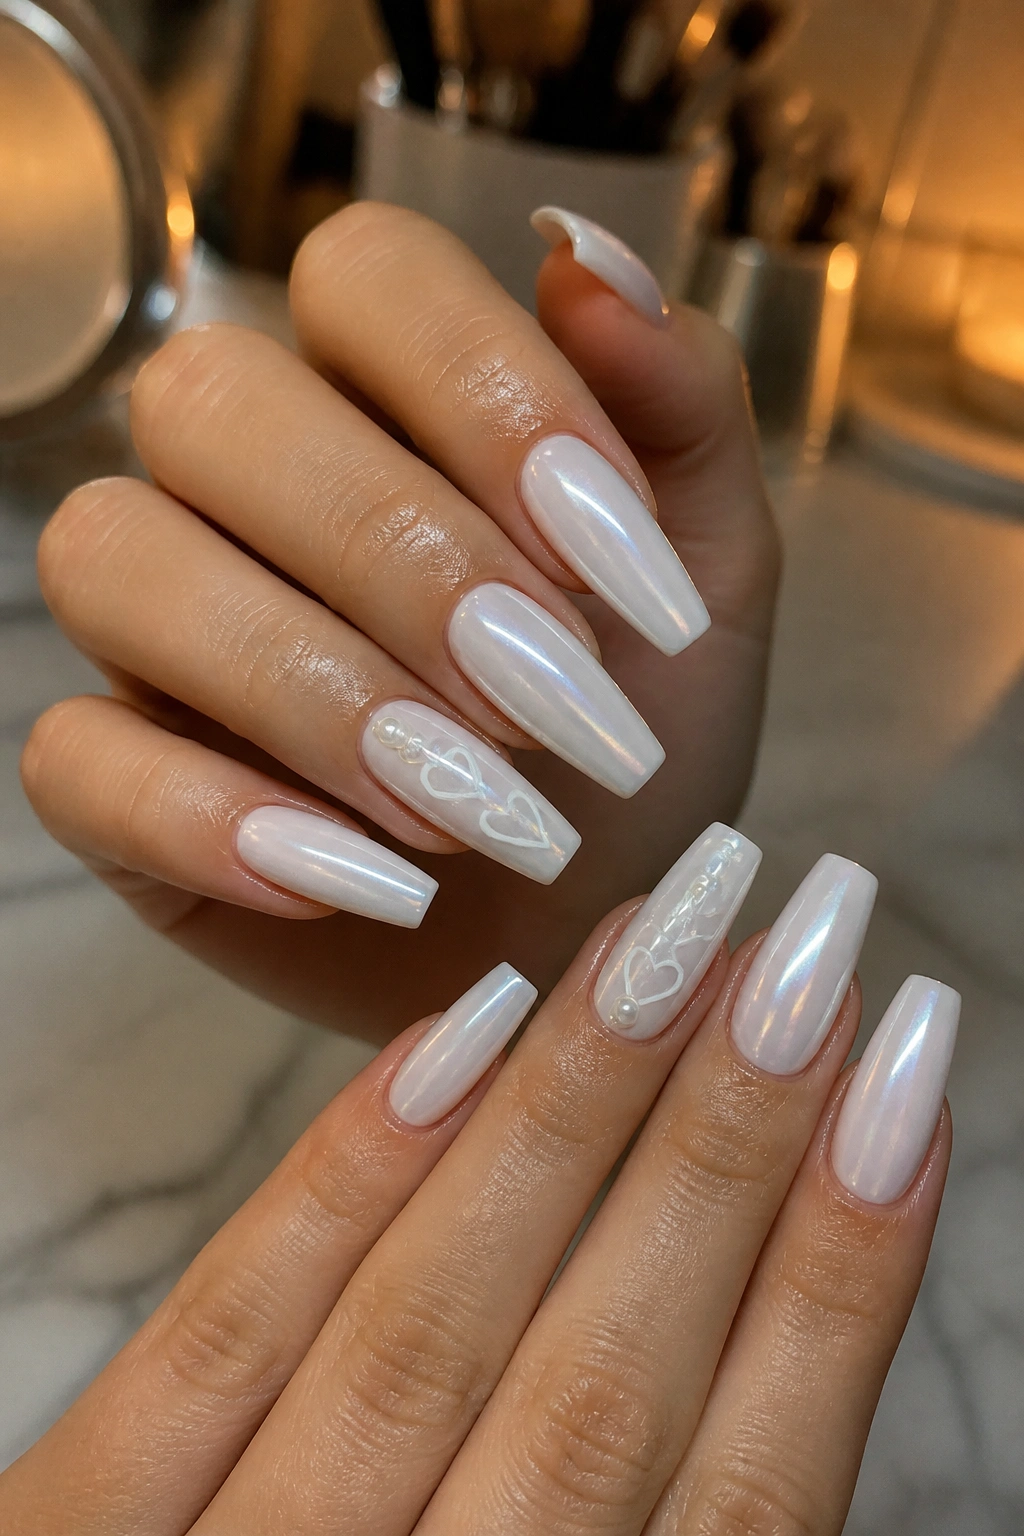
Unlike plain white polish, white chrome throws back light in a cooler, smoother way, which makes small heart details look more expensive. You get that glazed, pearl-shell finish without needing a full mirror chrome that can feel hard to wear day to day.
The best version starts with a milky white base, then a fine chrome powder is buffed on top until the nail looks almost wet. Tiny pearl accents—flat-back pearls, not oversized domes—sit near one or two painted hearts. Keep the pearls to one accent nail per hand or the set can get bulky.
This design suits people who like a cleaner palette but still want texture. It also photographs well under indoor light because the chrome reflects even when the room is dull, which plain white polish often does not. On medium-long coffin tips, the effect feels sleek. On extra-long tips with too many pearls, it starts leaning costume.
If you choose this one, ask for pearls no larger than 2 mm and make sure they are sealed well around the base with clear gel. Pearls that sit too high catch on knitwear, hair, and towel loops. You’ll notice by breakfast.
I’d wear this one for an event, a dinner out, or any week when you want your nails to look a little cooler than pastel pink but not full metallic.
7. Black French Coffin Nails With Tiny White Hearts
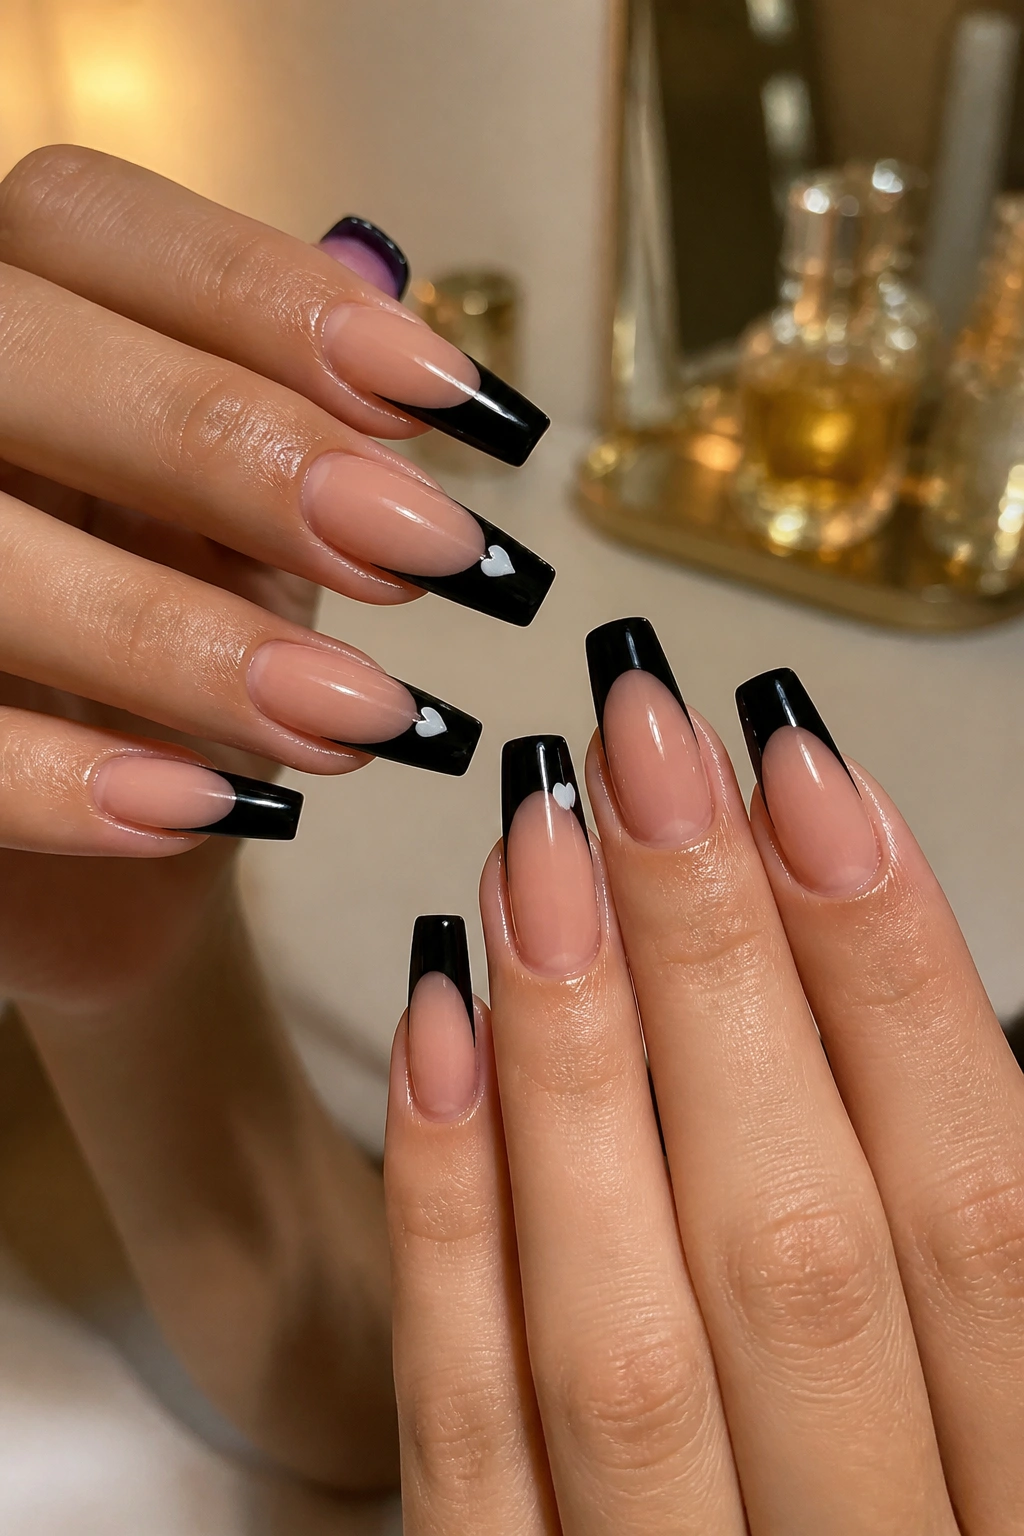
Black French tips on a coffin shape look sharper than most red sets, and the tiny white hearts keep them from feeling harsh. That contrast is the draw.
Skip full black nails unless you want the manicure to dominate your whole look. A sheer nude or beige base with inky black French tips gives you structure and space at the same time. Then you drop in one or two tiny white hearts—usually near the smile line or off to one side on an accent nail—and the design clicks.
Where This Design Wins
Black creates a clear edge at the square tip, so the coffin shape looks crisp from every angle. White hearts break up that edge and stop the manicure from turning heavy. It’s a small move, though it changes the mood from severe to playful.
Ask Your Tech For
- A deep black gel with full opacity in two coats
- Thin French tips, around 2 to 3 mm deep, unless your nails are extra long
- White hearts painted with a liner brush, not stamped
- A glossy top coat, because matte can flatten the contrast too much here
This is one of my favorite options if red hearts feel too obvious.
8. Matte Burgundy Coffin Nails With Glossy Raised Hearts
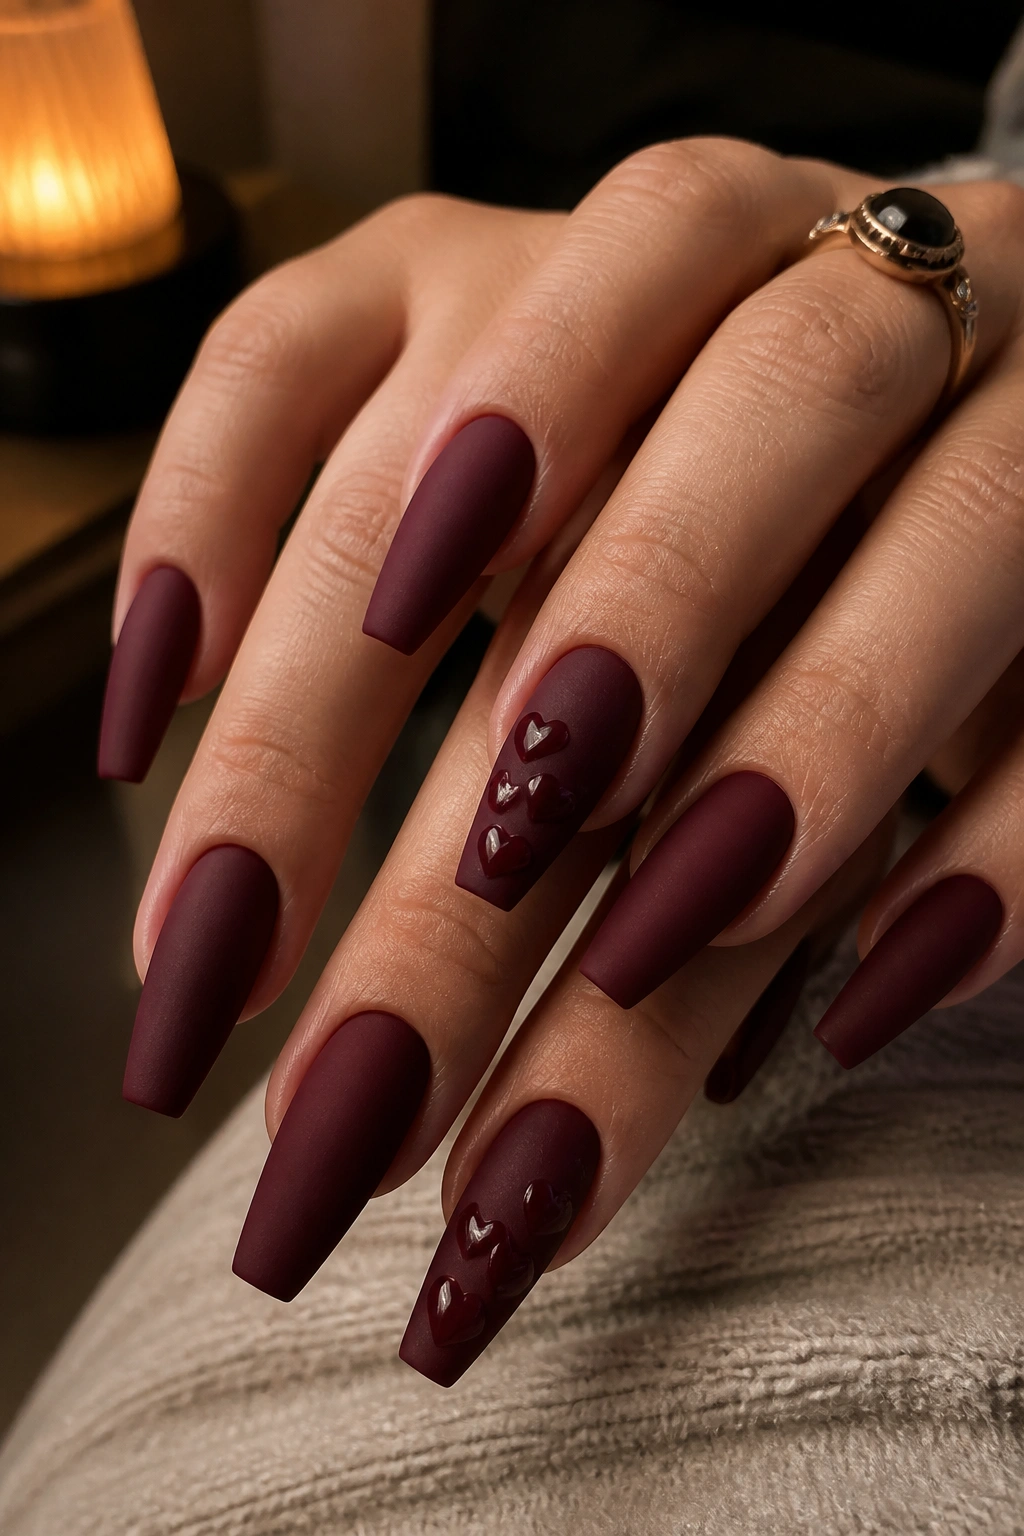
Run your fingertip lightly over this set and you’ll feel the difference before you clock the design. The nail surface is velvety matte, but the hearts sit on top in a glossy gel dome, almost like sealing wax flattened into a cleaner shape.
That texture contrast does the heavy lifting. Burgundy already has depth. When you switch the finish from matte across the nail to shiny only on the heart, the eye sees dimension without needing glitter, foil, or stones. It is a quieter kind of drama—still rich, still moody, just less noisy.
Raised gel hearts need control. Too much builder gel and the heart spreads, losing the point at the bottom. Too little and you lose the plump effect. The best raised hearts are no thicker than a sesame seed at the highest point. Any more than that and they start catching on pockets, denim seams, or your own hair.
Keep this set to one or two raised hearts per hand. Matte top coat over the whole nail first, cure it, then build the glossy hearts last. If the order is reversed, the matte can cloud the raised detail and you lose the whole reason for choosing the design.
This one looks especially good on long coffin nails, where the matte field gives the glossy heart enough room to stand out.
9. Clear Coffin Tips With Floating Glitter Hearts
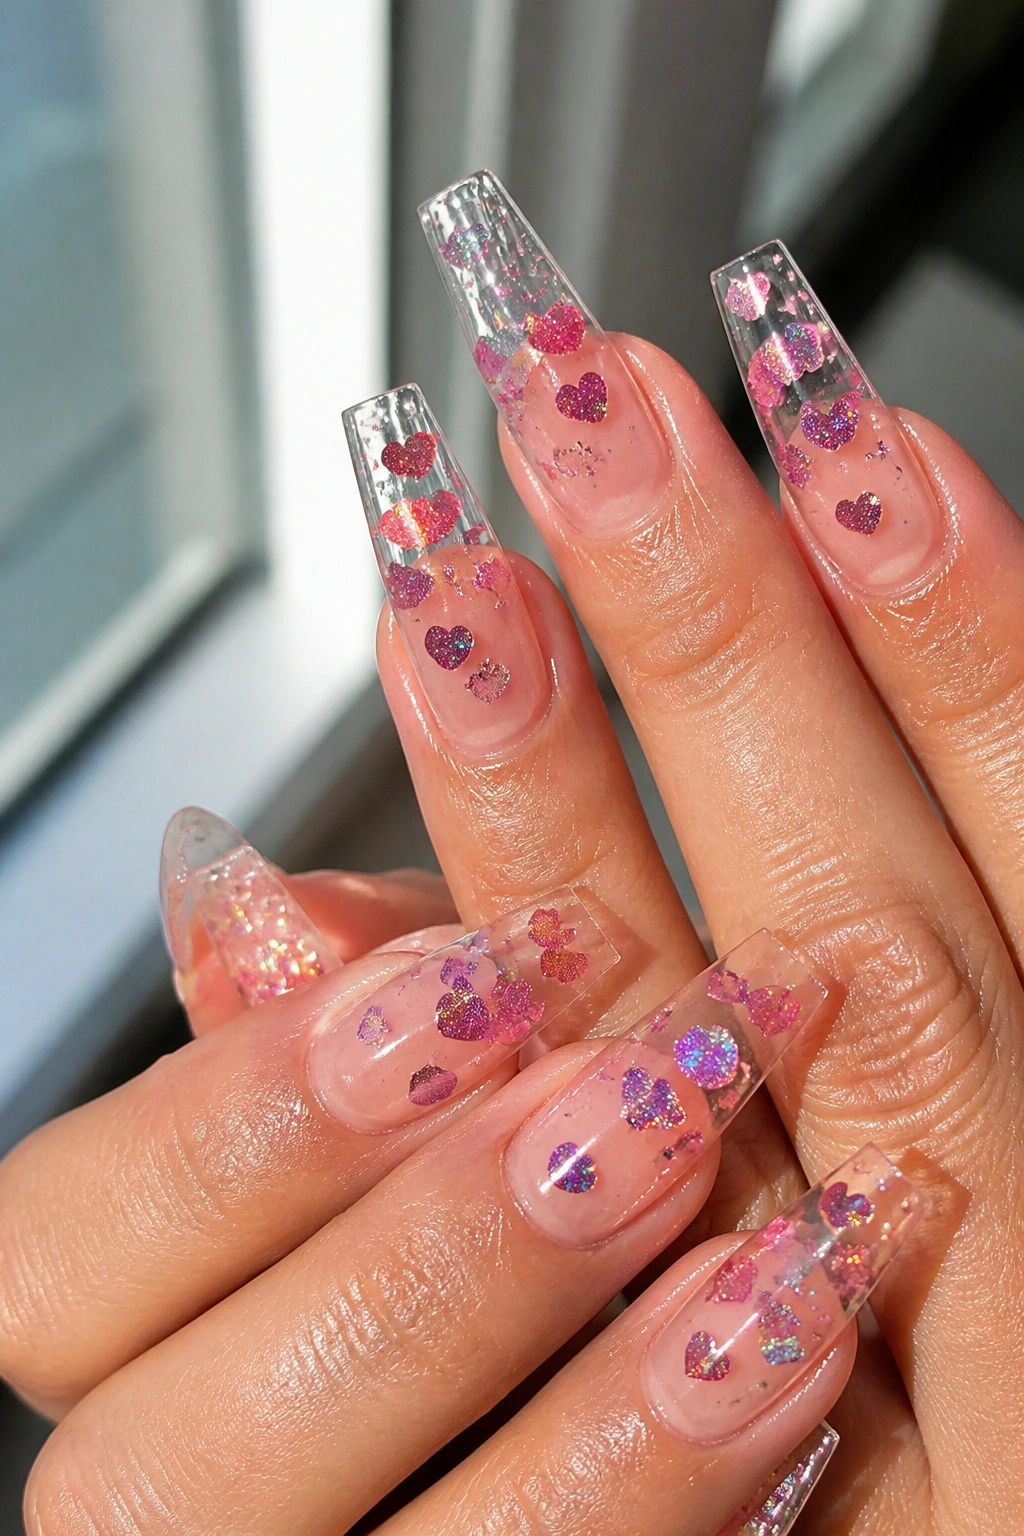
The first time you see a clear set with floating glitter hearts done well, it almost looks like the hearts are trapped inside glass. That illusion is what makes this design fun.
You can get there two ways. One is full encapsulation, where the glitter hearts sit between layers of clear product. The other uses transparent gel polish with fine glitter hearts placed on top and buried under a thick clear overlay. Encapsulation lasts better and looks cleaner from the side, though it takes longer.
A few details make or break it:
- Use small holographic or iridescent heart glitter, not chunky craft glitter
- Keep the clear section truly clear, not cloudy from over-filing
- Place the hearts at different depths and heights so they look suspended
- Pair with barely-there nude on the nail bed if you want more contrast between the natural area and the transparent tip
I would not load every nail with glitter. Two clear floating-heart nails on each hand is usually enough, with the rest in a sheer nude, soft pink, or high-shine jelly shade. That mix keeps the set airy.
This one also hides minor wear better than opaque pale polish. Tiny chips do not announce themselves the same way on a mostly clear design.
10. Blush Side-Swoop French Tips With Corner Hearts
What if you want something softer than a straight French but less sugary than pink hearts all over the set? Try a side-swoop tip.
Instead of the color running straight across the free edge, the blush tip starts lower on one sidewall and sweeps diagonally upward. A tiny heart sits at the point where the curve starts or ends, almost like punctuation. That slanted movement works beautifully on coffin nails because the straight sidewalls make the diagonal line feel deliberate.
The Placement Trick
Do not center the heart. Put it near the lower side of the swoop, where the eye enters the design first. A centered heart weakens the motion. Off to the side, the manicure feels more fluid.
Blush pink works best when it is at least two shades deeper than the nude base. If both colors are too close, the side French disappears unless you are standing right under bright light. White can work too, though blush has a softer hand.
This is a smart pick if you type, cook, or use your hands all day and want nail art that still feels sleek. No charms, no raised gel, no bulky crystal work. Just line, color, and one small detail placed where it counts.
11. Lavender Jelly Heart Coffin Nails With Silver Outlines
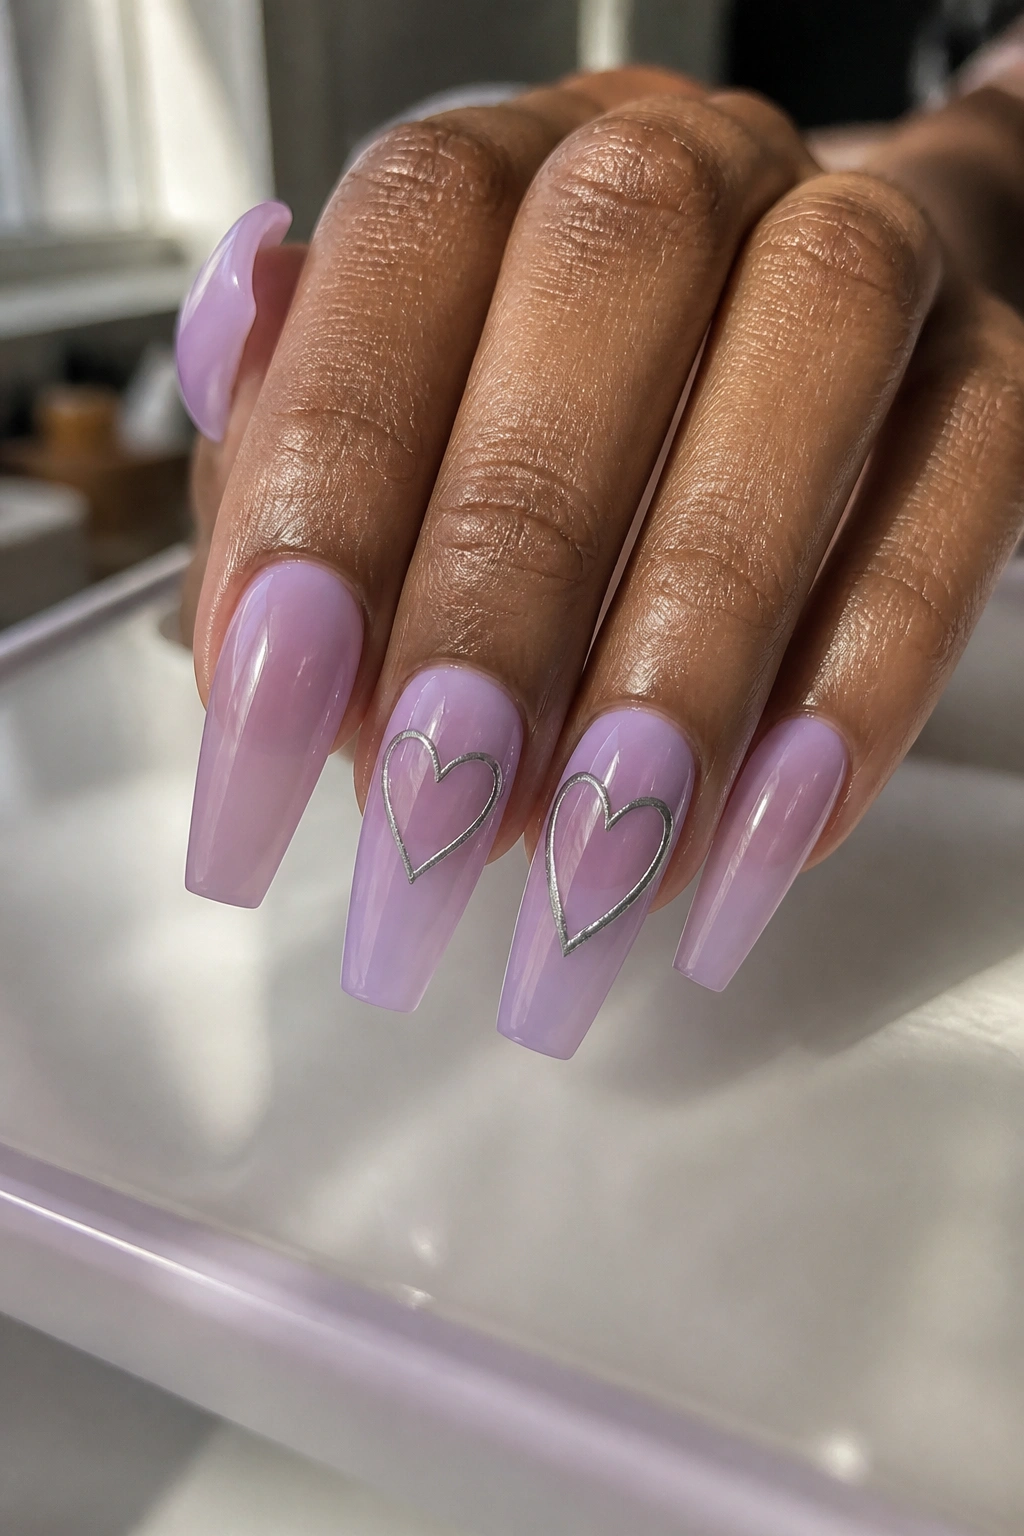
Compared with opaque lavender, a jelly lavender base looks lighter, cooler, and a bit more playful because light passes through the color instead of bouncing off a solid cream finish. Add a silver heart outline on top, and the whole set gains a little lift.
Jelly shades are not forgiving, though. The nail underneath has to be smooth, because bumps and patchiness show through. On a good builder gel or soft gel base, that translucency looks intentional. On a rough overlay, it can read messy.
Silver outline hearts should stay thin—about 1 mm or less—so the line looks drawn, not stamped. I like one outlined heart on the ring finger and maybe a mini double-heart on the thumb. If you do every nail, the silver can take over and the lavender loses its quiet cool tone.
This design suits medium to long coffin shapes best, where the jelly color gets enough surface area to glow a little under top coat. It’s especially good if you want color but you’re tired of red, nude, and white. Nails can be sweet without repeating the same three shades forever.
And yes, a silver outline also works with lilac cat-eye, though jelly gives the cleaner result.
12. Sheer Pink Lace Nails With Tiny Hearts
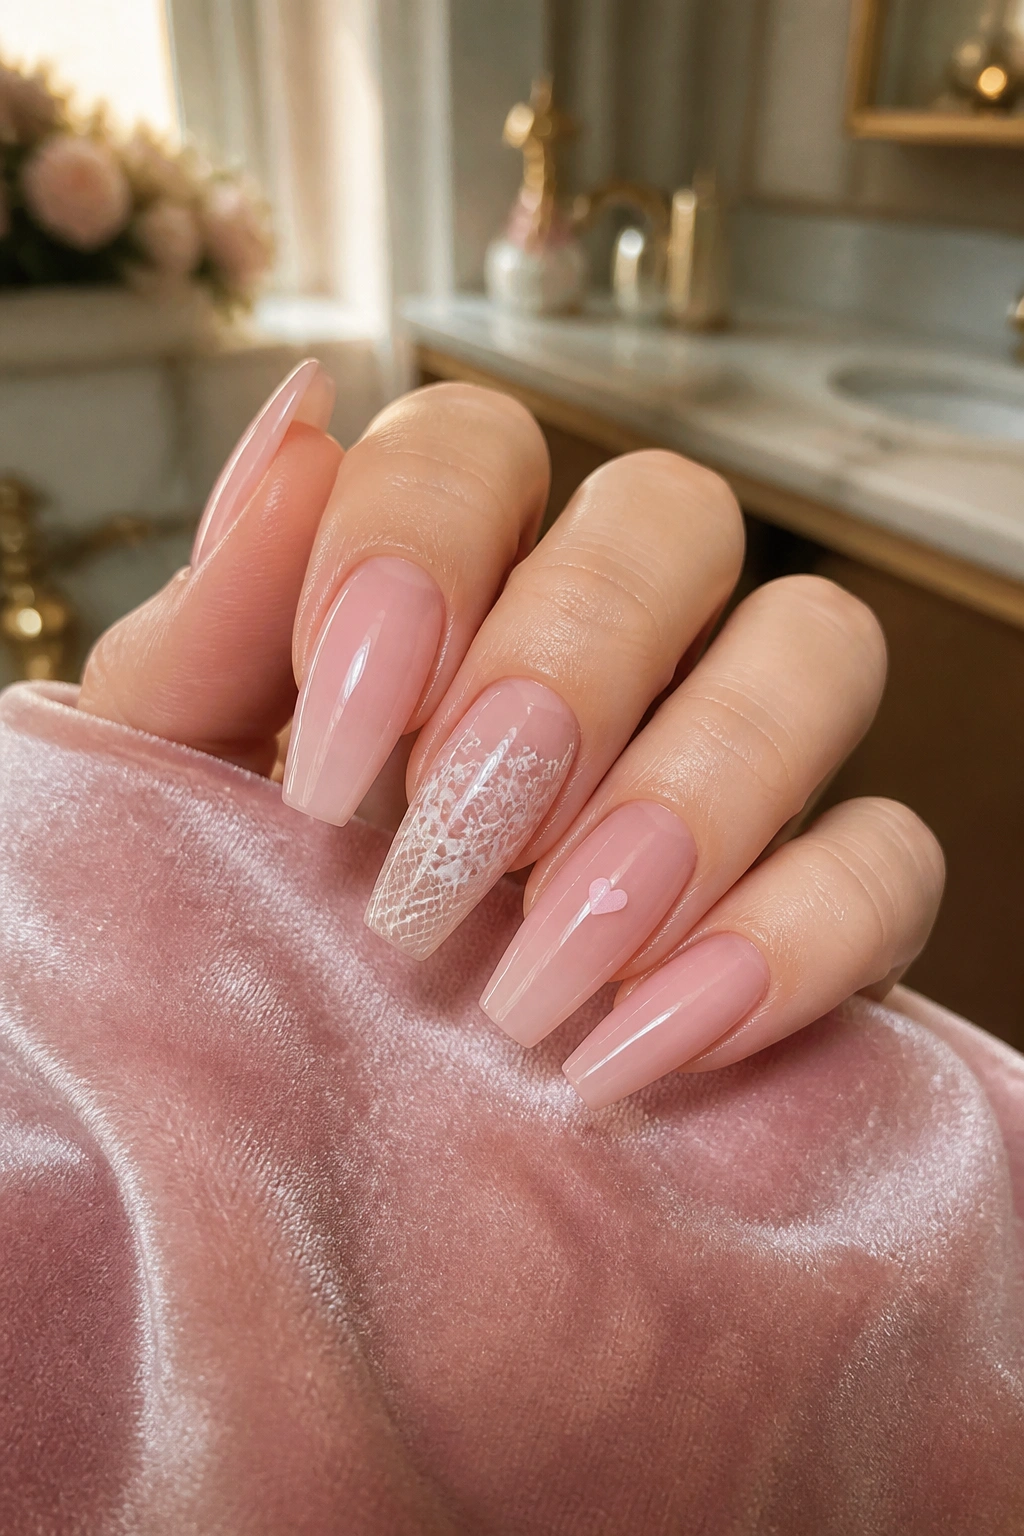
I have a soft spot for lace nail art when it is kept tight and fine. Big lace patterns can get old fast. Small lace panels paired with tiny hearts feel fresher.
The base here should stay sheer pink, not opaque bubblegum. Over that, your tech can stamp or hand-paint lace on one side of the nail, usually with white gel or a muted cream. The heart sits either tucked into the lace edge or floated alone on a neighboring nail. That separation matters. If the heart gets tangled inside too much detail, the whole manicure turns busy.
This set lives or dies by scale. Lace should look like a whisper at the edge of the nail, not a full wallpaper print. One accent nail per hand is often enough, maybe two if the rest of the manicure stays plain. I’d rather see one sharply painted lace panel than five rushed ones with blurry lines.
A glossy finish keeps the sheer pink skin-like and smooth. Matte can work, though it tends to flatten the lace and make white details look chalkier. If you want the set to feel softer, use off-white instead of bright white. That small color shift changes the whole mood.
It’s romantic, sure. More than that, it’s controlled.
13. Rose Gold Cat-Eye Coffin Nails With Magnetic Hearts
Metallic movement changes heart nail art in a big way. A cat-eye gel polish with rose gold shimmer gives you that shifting stripe of light, and when the magnetic pull is shaped around a heart, the design looks alive when your hand turns.
Why Magnetic Gel Needs a Plan
You cannot wing this one. The magnet has to be held in a consistent position nail by nail or the light band ends up uneven. On heart cat-eye nails, the shimmer usually sits inside the heart shape or traces around it, depending on the gel system being used.
A few things help keep it readable:
- Choose a darker base under the cat-eye, like mauve, plum, or cocoa, so the magnetic shimmer shows up
- Keep the heart to one or two accent nails because magnetic effects already pull hard
- Cure each nail after the magnet placement so the design does not drift
- Use a strong glossy top coat to deepen the glassy effect
This set is for anyone who wants heart coffin nails with more drama than plain polish can give. The shimmer line moves under restaurant lighting, office lighting, daylight—pretty much anywhere you turn your hand—and that motion is what keeps the manicure from feeling flat.
14. Crystal Cuticle Half-Moons With One Heart Accent Nail
Imagine a nude or blush base, one clean heart on the ring finger, and tiny crystals tucked along the cuticle in a half-moon on two other nails. Not a full rhinestone explosion. Just a neat little crescent that catches light when you grip a coffee cup or reach for your bag.
That cuticle placement is smart because it frames the nail without interrupting the coffin tip. It also keeps the heart art separate from the sparkle, so each detail gets its own space. If you put crystals around the heart itself, the design can get heavy fast.
Use flat-back stones in 1.5 to 2 mm sizes. Larger crystals are harder to secure and more likely to snag. A heart accent nail in plain polish or outline art works better here than a raised gel heart. You already have enough texture at the base.
This set suits weddings, dinners, parties, or any time you want a little jewelry built into the manicure. Still, I would keep crystal nails to two or three fingers per hand. Once every finger has stones, the line between polished and impractical gets thin.
15. Espresso Brown Coffin Nails With Cream Heart Art
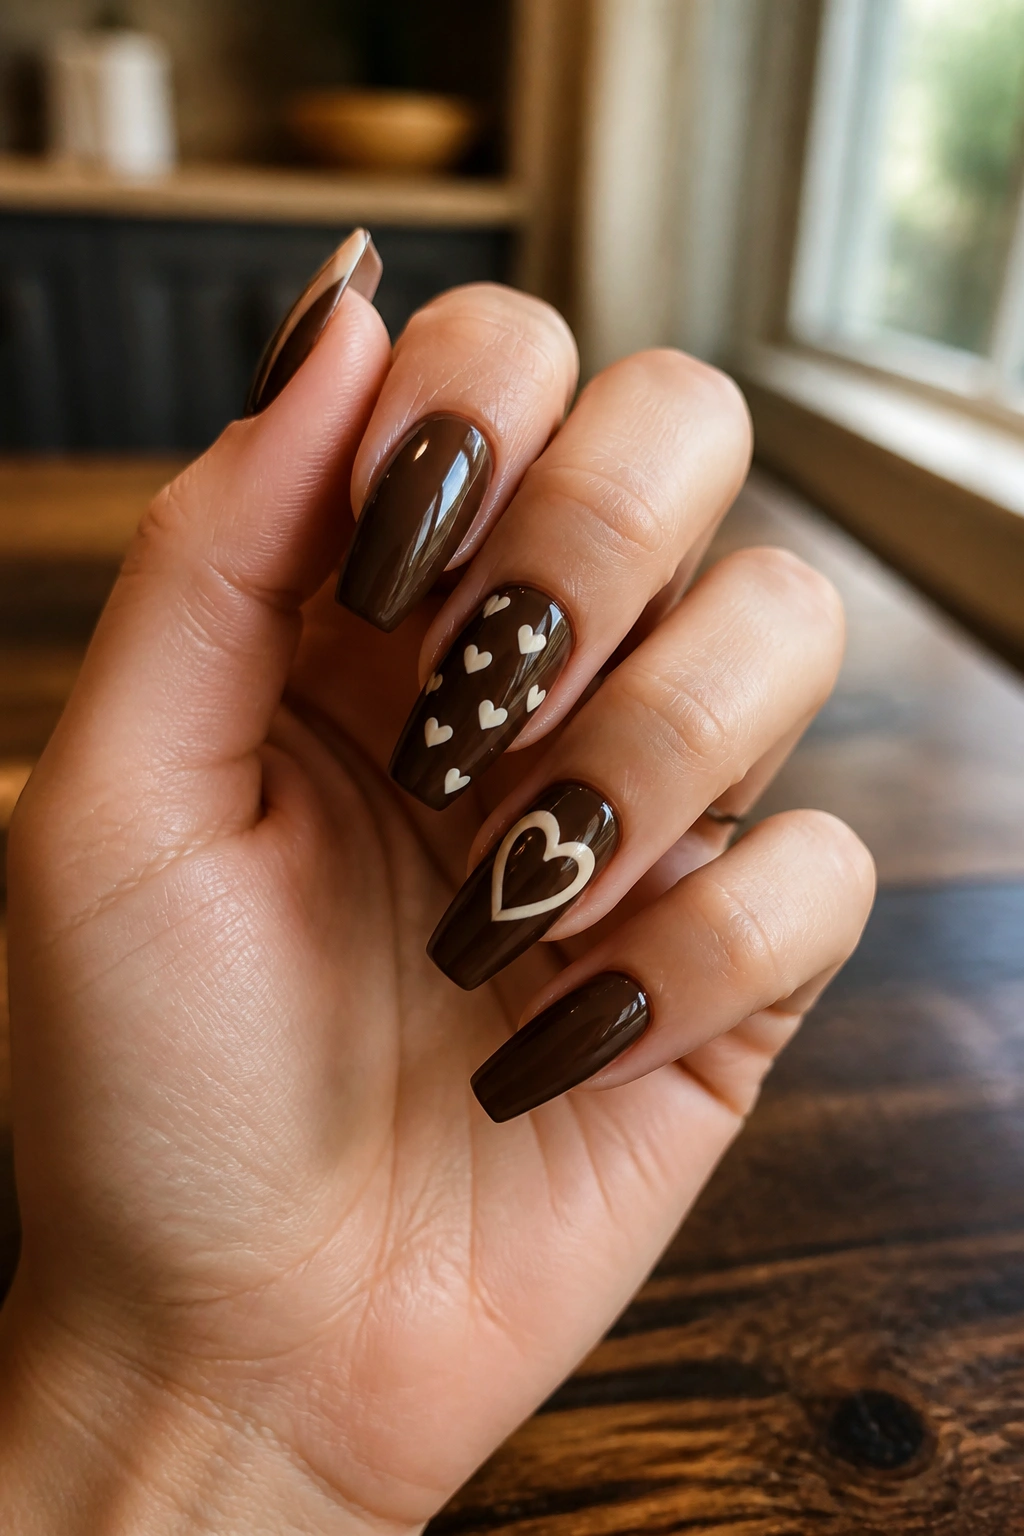
Red does not own heart nails.
Espresso brown with cream hearts is one of the smartest color swaps if you like the shape of a heart motif but want the manicure to feel richer, less obvious, and a little moodier. Brown gives the set warmth. Cream softens the contrast enough to keep it wearable.
The nicest version uses a glossy espresso base on most nails, then two accent nails with either tiny cream hearts or a single larger outlined heart. A micro-French in cream can tie the set together if you want more detail. I would not bring white into this palette unless the brown is pale enough to handle the jump. Cream looks smoother and more expensive against deep brown.
This color pairing flatters medium to deep skin tones especially well, though it can look strong on lighter skin too if the brown has a red undertone rather than a muddy gray base. Watch your polish undertones here. A cool brown can make cream look dull. A warmer coffee shade makes the cream read clean.
If pink and red heart manicures have started to bore you, this one resets the whole idea.
Keeping Tiny Hearts Crisp Between Appointments
A good set can still look rough after a week if you treat your nails like box cutters. Heart details are small, so any lifting, dullness, or tip wear shows earlier than it does on a plain nude manicure.
Cuticle oil helps more than people expect. One drop rubbed around each nail twice a day keeps the surrounding skin from looking papery and makes the whole set look fresher. Gloves for dishwashing are not glamorous, though matte top coat and chrome powder both last longer when you stop soaking them in hot water and soap for 20 minutes at a time.
If your set includes crystals, raised hearts, or pearls, book fills a little sooner—around the 2-week mark instead of stretching to 3. Once embellishments start to lift, they catch on fabric and hair, and then one loose stone becomes a missing heart detail by the end of the day.
Removal is where people wreck their nails. Do not peel off gel, builder, acrylic, or press-ons layered with art. Soak, file down carefully, or have the set removed professionally. The American Academy of Dermatology has noted that artificial nail systems and rough removal can leave nails brittle and split, and you feel that damage longest after detailed sets because you usually went through more layers to get the look.
Final Thoughts
The heart sets that age best are not always the loudest ones. A clean base, the right scale, and one well-placed detail will beat ten random decals every time.
If you’re choosing between two designs, look at your real life before you book the appointment. Typing all day, opening packages, washing dishes, or keeping your nails short changes what will still look good after ten days. Flat art, French variations, and negative space usually wear more gracefully than pearls, crystals, or raised gel.
And if you want my honest pick? I’d start with the milky pink micro-heart set or the black French with tiny white hearts. One is soft, one is sharper, and both let the coffin shape do what it does best—make nail art look clean.
