

Black coffin nails can make a hand look sharper in ten minutes flat. That sounds dramatic, but the effect is easy to spot once you’ve seen it a few times: the tapered sides slim the finger, the squared tip gives the shape some attitude, and black polish turns the whole outline into something crisp and graphic.
Not all black manicures hit the same note, though. A dead-flat matte top coat looks soft and inky, almost like pressed charcoal. A wet-look gloss leans closer to patent leather. Some black polishes pull blue, some read almost smoky gray, and some show every tiny ridge unless the nail plate is buffed smooth first.
I’ve always thought black polish is where technique stops being optional. One flooded cuticle, one uneven sidewall, one uncapped tip—and the manicure tells on itself fast. When the prep is clean, though, black coffin nails look polished in the best sense of the word: neat, intentional, a little bold, never sloppy.
And that range is what keeps black from getting boring. You can go stripped back with matte jet black, lean into smoky sheers and marble veining, or push all the way into chrome and crystal if you want the nails to announce themselves before your rings do.
Why Black Coffin Nails Look So Good on a Tapered Shape
Coffin shape gives black polish room to look sharp instead of blocky. That’s the whole trick. On a square nail, dark color can look wider than you meant. On a stiletto, the point can feel aggressive if you wear black every day. Coffin sits in the middle: tapered enough to slim the nail, blunt enough to stay wearable.
The sidewalls matter more than most people think
Dark polish highlights shape. If one sidewall angles in harder than the other, black makes that imbalance obvious. A nude manicure can hide small shaping flaws. Black will not. That’s why a good coffin set needs matching tapers on both sides and a straight, even free edge that doesn’t flare.
Length changes the mood too. A short coffin with 3 to 5 mm of free edge looks clean and practical. Medium length—around 6 to 10 mm past the fingertip—gives you the full coffin effect without making daily tasks annoying. Go longer than that and the manicure starts reading more editorial, which can be exactly what you want, but it does ask more from your hands.
Finish changes the whole personality
Matte black makes the shape look softer. Glossy black sharpens every line. Jelly black makes the tip feel lighter because the color has some see-through depth, while chrome bounces light hard enough to pull the eye to every curve.
Rings look better against black too. Little side note, but true. Yellow gold looks warmer, silver looks colder, and even plain stainless steel jewelry gets more edge next to a black set.
Picking the Right Finish and Wear Plan for Black Coffin Nails
Want your manicure to last more than four days without the tips looking tired? Finish choice matters almost as much as color choice.
Matte top coats are forgiving about small surface dents, but they pick up oil from cuticles and hand cream fast. Glossy finishes hide that problem better, yet they show scratches earlier. Chrome gives the biggest visual payoff, though it also demands the smoothest base because every ripple underneath will show through the powder.
The American Academy of Dermatology has long pointed out that repeated acetone exposure and rough gel removal can leave nails dry, peeling, or brittle. That’s worth keeping in mind if you love black gel sets, because dark polish often tempts people to peel when lifting starts at the corners. Do not do that. File the top layer, soak, lift gently, and stop scraping the second the natural nail starts feeling soft.
A few practical rules make black coffin nails wear longer:
- Use a ridge-filling or rubber base under opaque black polish if your nail plate has visible lines.
- Cap the free edge with color and top coat, especially on glossy or chrome looks where tip wear shows early.
- Apply cuticle oil twice a day if you wear matte black often; dry skin makes dark polish look harsher.
- Wear gloves for dishwashing and cleaning because hot water and detergent dull top coat faster than people expect.
- Refresh glossy sets with one thin layer of top coat after 3 to 4 days if you want that glassy finish to stay crisp.
One more thing. Coffin shape needs a little structure. If your natural nails bend at the corners, builder gel or a structured overlay usually holds the shape better than regular polish alone.
1. Flat Matte Jet-Black Coffin Nails
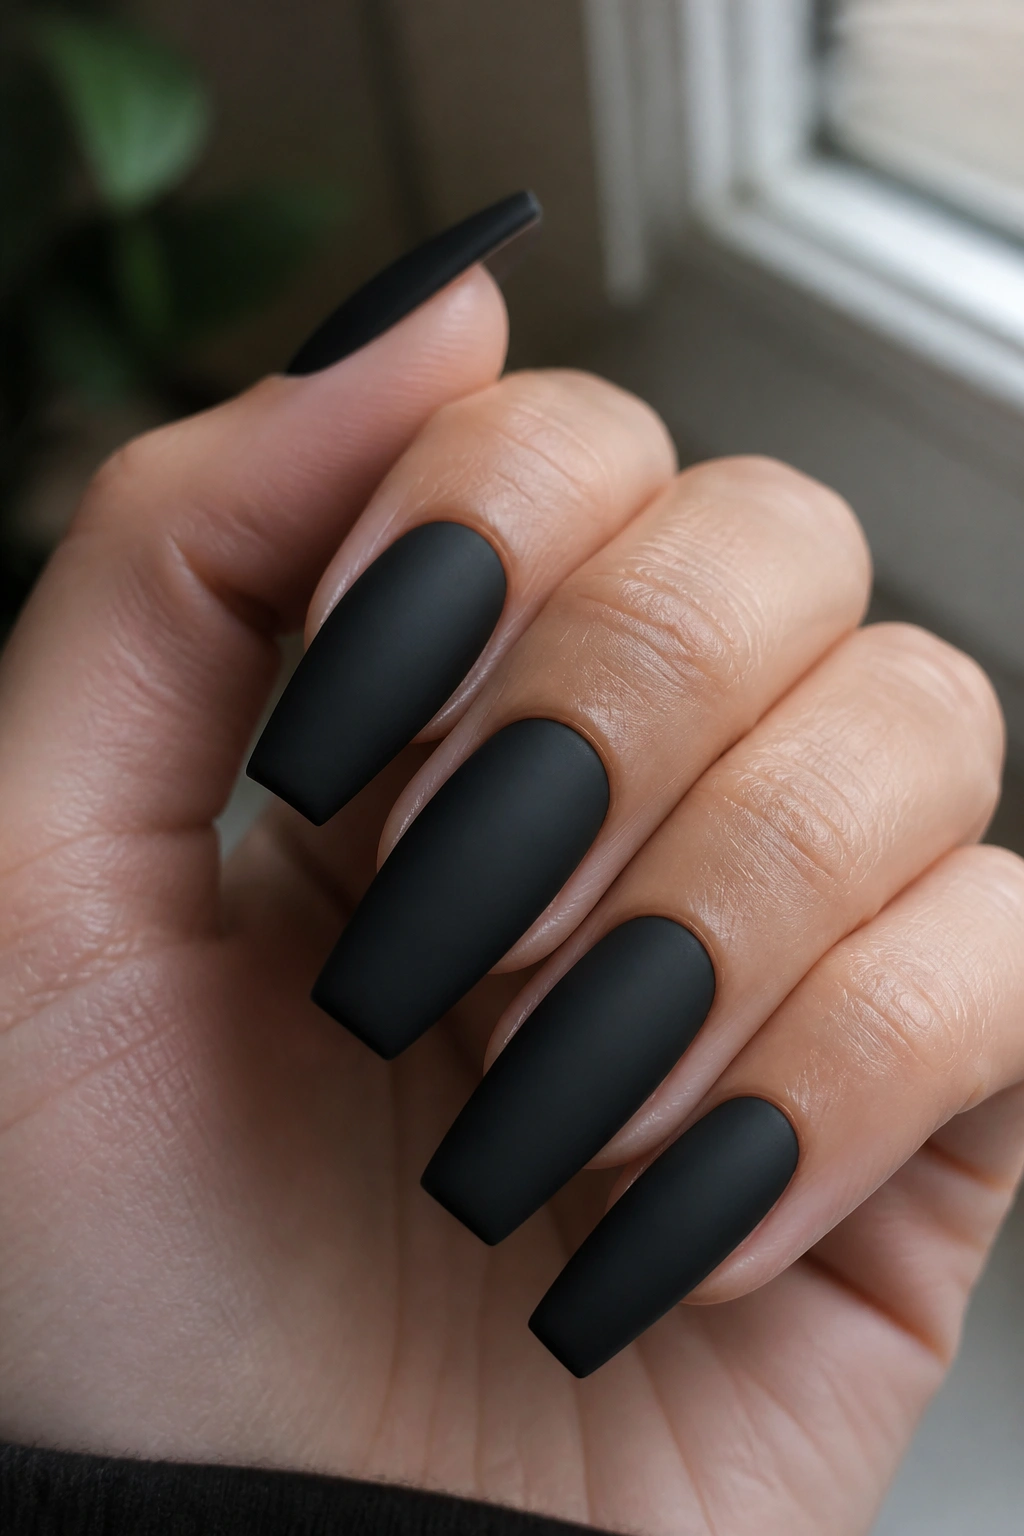
If you want the cleanest version of black coffin nails, start here. Flat matte jet black is the manicure that proves black doesn’t need glitter, foil, chrome, or artwork to earn attention. It looks direct. It looks neat. It also looks expensive when the shape is right.
What makes this one work is restraint. The color should be fully opaque in two thin coats or three whisper-thin coats, not one thick layer that floods the sidewalls. Then the matte top coat needs to go on evenly from cuticle to tip. Any patchiness shows up as random shiny spots, and once you see them, you cannot unsee them.
Why it works so well
The coffin shape keeps matte black from turning into a dark block at the end of the finger. The taper gives the eye a line to follow, while the flat tip keeps it grounded. Medium length is the sweet spot here. Too short and the matte finish can feel a bit cramped. Too long and the look gets harsher than most people want for daily wear.
Quick notes before you book it
- Best length: medium, around 6 to 9 mm past the fingertip
- Best base: a smoothing base coat or builder overlay
- Best skin pairing: all undertones, though blue-black polish looks cooler against pink or olive skin
- Best upkeep move: wipe the nails with alcohol once the top coat is cured if hand cream left any shine
My take: if you only wear black nails once in a while, this is the place to start. It’s the least fussy version, and when it chips, small edge wear is easier to soften with a fresh matte top coat than with glitter or art.
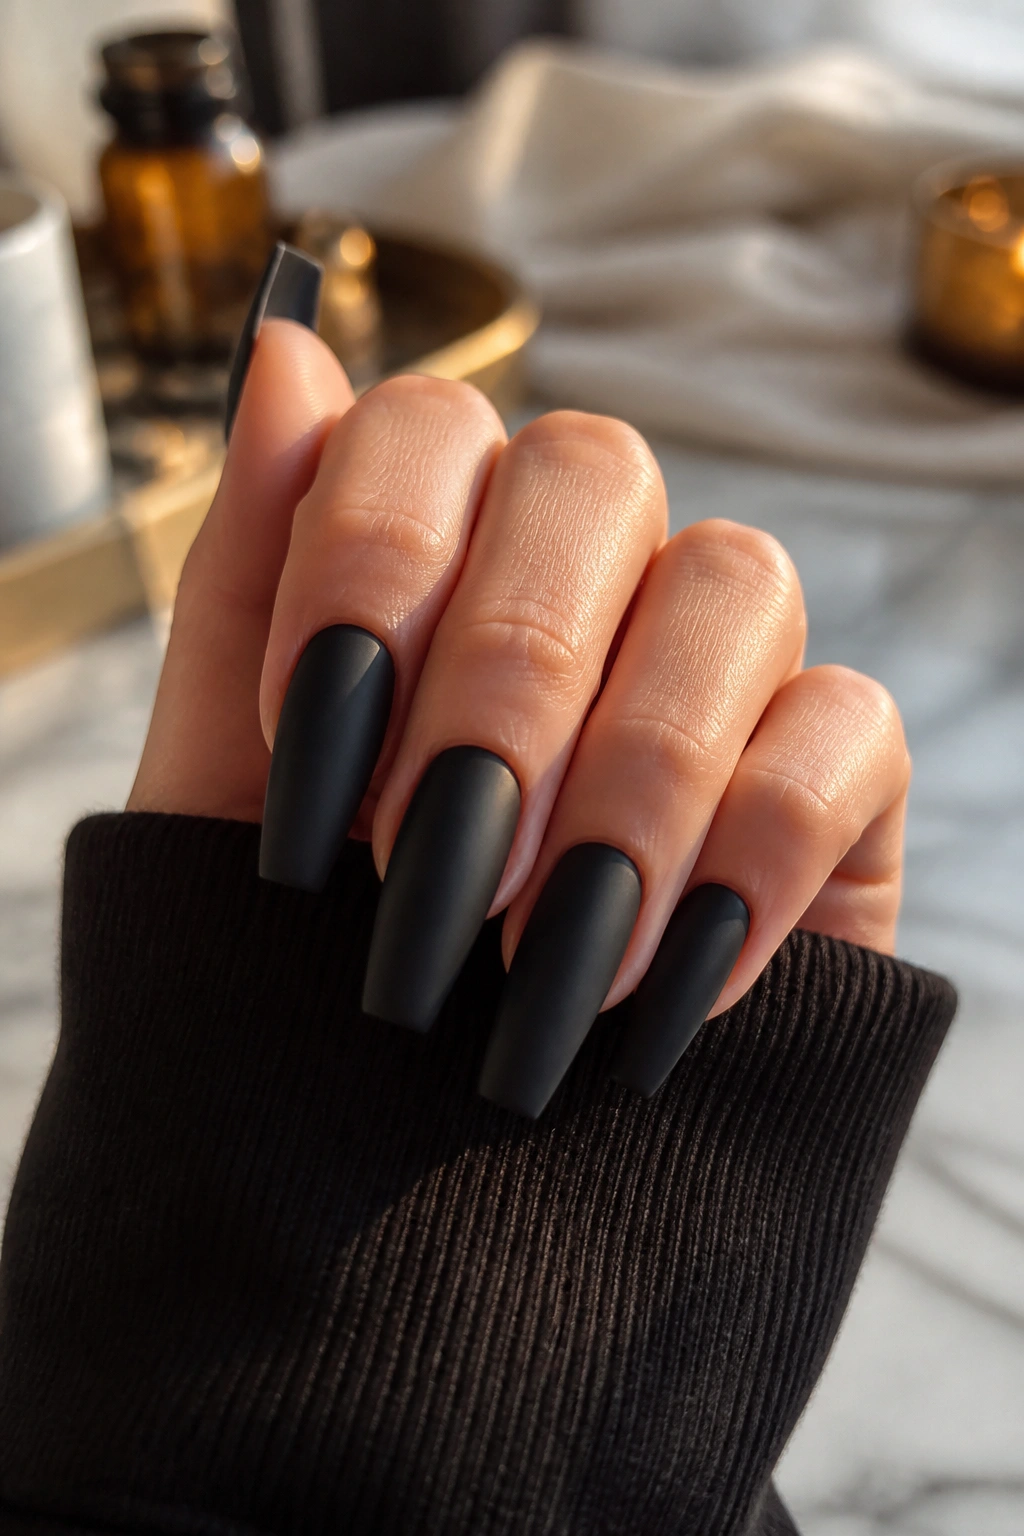
2. Soft Suede Matte Black Coffin Nails
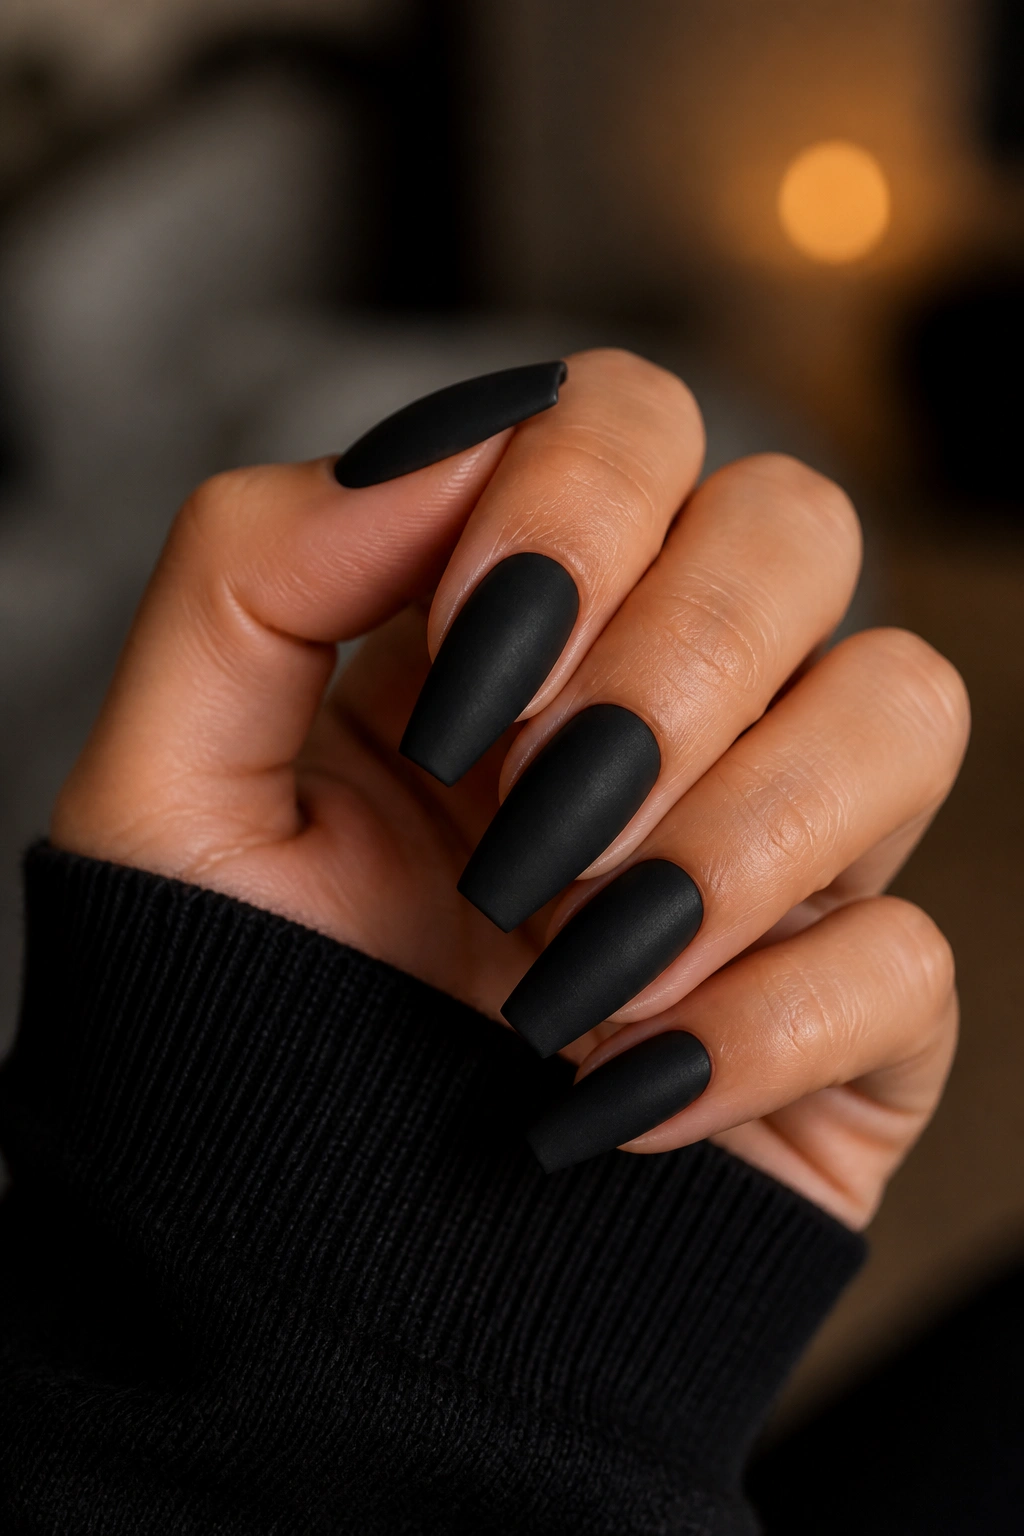
Not everyone wants a fully flat finish. Some people put on a dead matte top coat and feel like the nails look dusty by day three. Fair. A suede matte black sits between matte and satin, with a faint soft sheen that feels closer to fabric than chalk.
This finish does a nice job on hands that already have a lot going on—rings, watches, tattoos, stacked bracelets—because it doesn’t throw light around the way gloss does. The nails stay present, but they do not shout. I like that balance on medium-long coffins where a full shine might tip the whole look into “a bit much” territory.
Application matters here. A suede finish looks best over a black with strong pigment and no streaking, because the slight sheen makes thin spots easier to catch. Use thin, even strokes, then float the top coat over the surface instead of pressing the brush down. Pressing leaves drag marks, and on dark polish those marks can look like bruised patches.
The other good thing about suede black is wear. Tiny scuffs do not stand out the way they do on mirror gloss. If you type all day, handle keys, or spend time in a handbag full of chaos, that softer finish stays tidy longer.
I think this is the manicure for people who say they like black polish but not “high drama.” Suede gives you depth without the wet-lacquer shine.
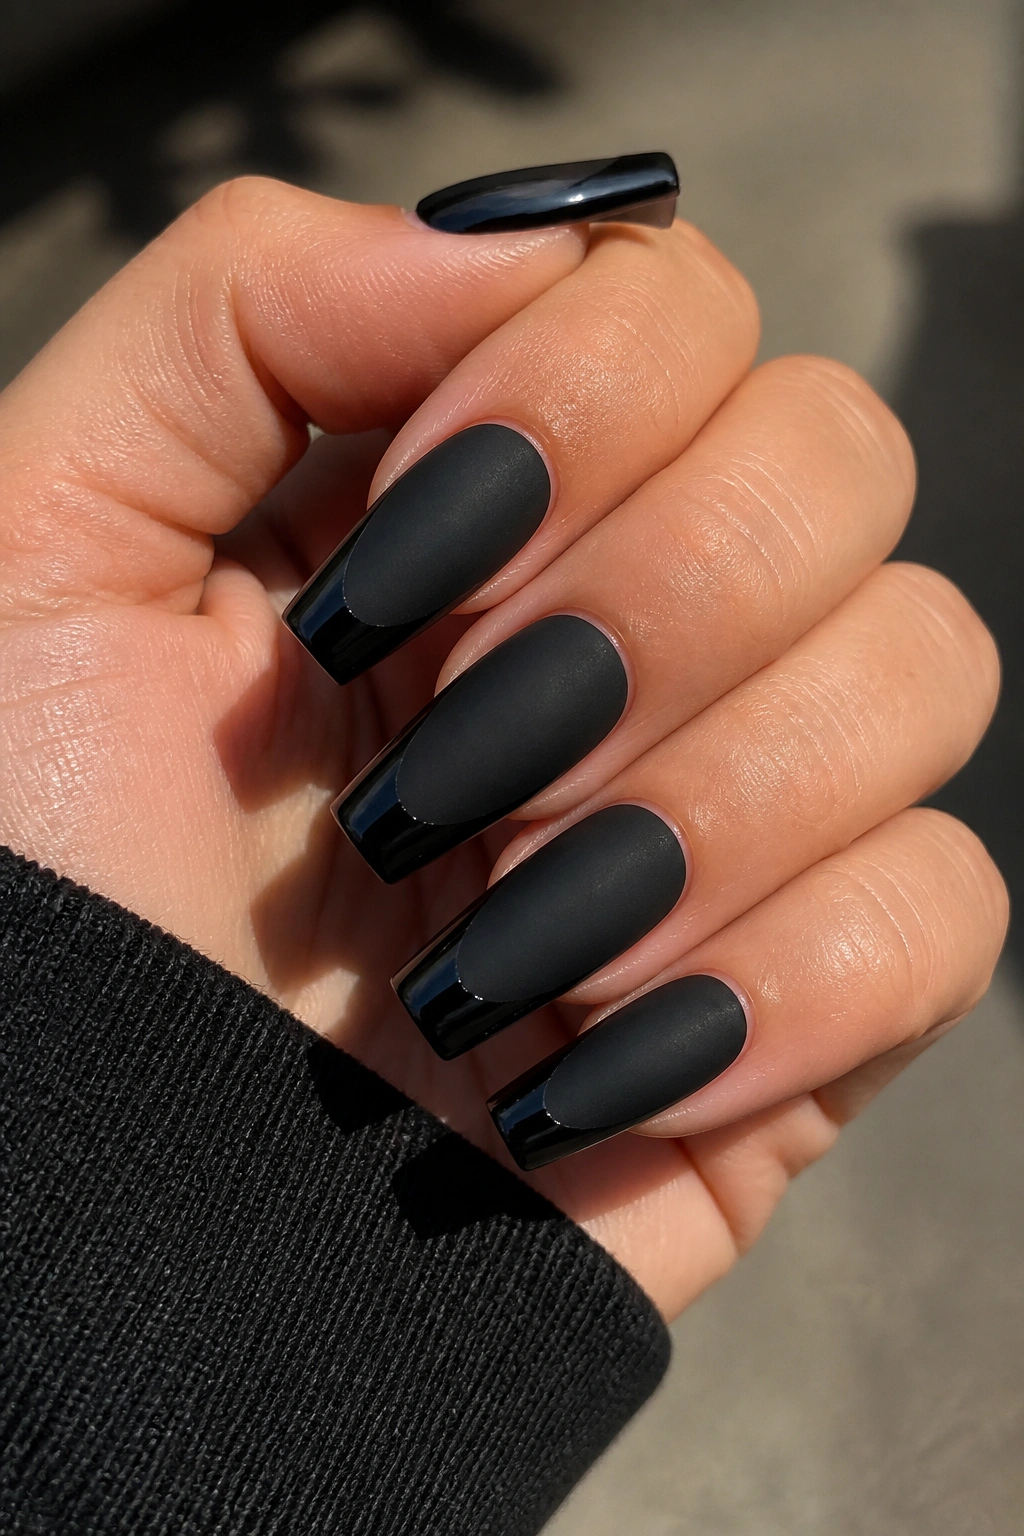
3. Matte Black Coffin Nails With Glossy French Tips
Why pair two finishes on the same nail? Because contrast does half the design work for you.
A matte black base with a glossy black French tip looks subtle from far away and much smarter up close. Same color. Same shape. Different texture. That tiny change makes the tip line pop without adding another shade, which is why this design feels polished rather than busy.
How to place the glossy tip
The tip should be narrow—about 2 to 3 mm wide on medium nails. Go wider and the design starts looking heavy, especially on shorter coffin shapes. I prefer a deep curved smile line rather than a flat stripe across the end, since the curve echoes the taper and keeps the nail from looking chopped off.
You need a crisp boundary between finishes, so this one is easier in gel. Cure the black base, apply matte top coat, cure again, then paint the French tip with a no-wipe glossy top coat or black gel plus gloss. Clean lines matter here. A shaky tip line ruins the whole point.
There’s something a little sly about this design. It doesn’t read as plain black, yet it also avoids the usual glitter-accent route. Good choice if you like nail art but hate nails that start arguing with every outfit in your closet.
4. Matte Black Coffin Nails With Thin Silver Side Stripes
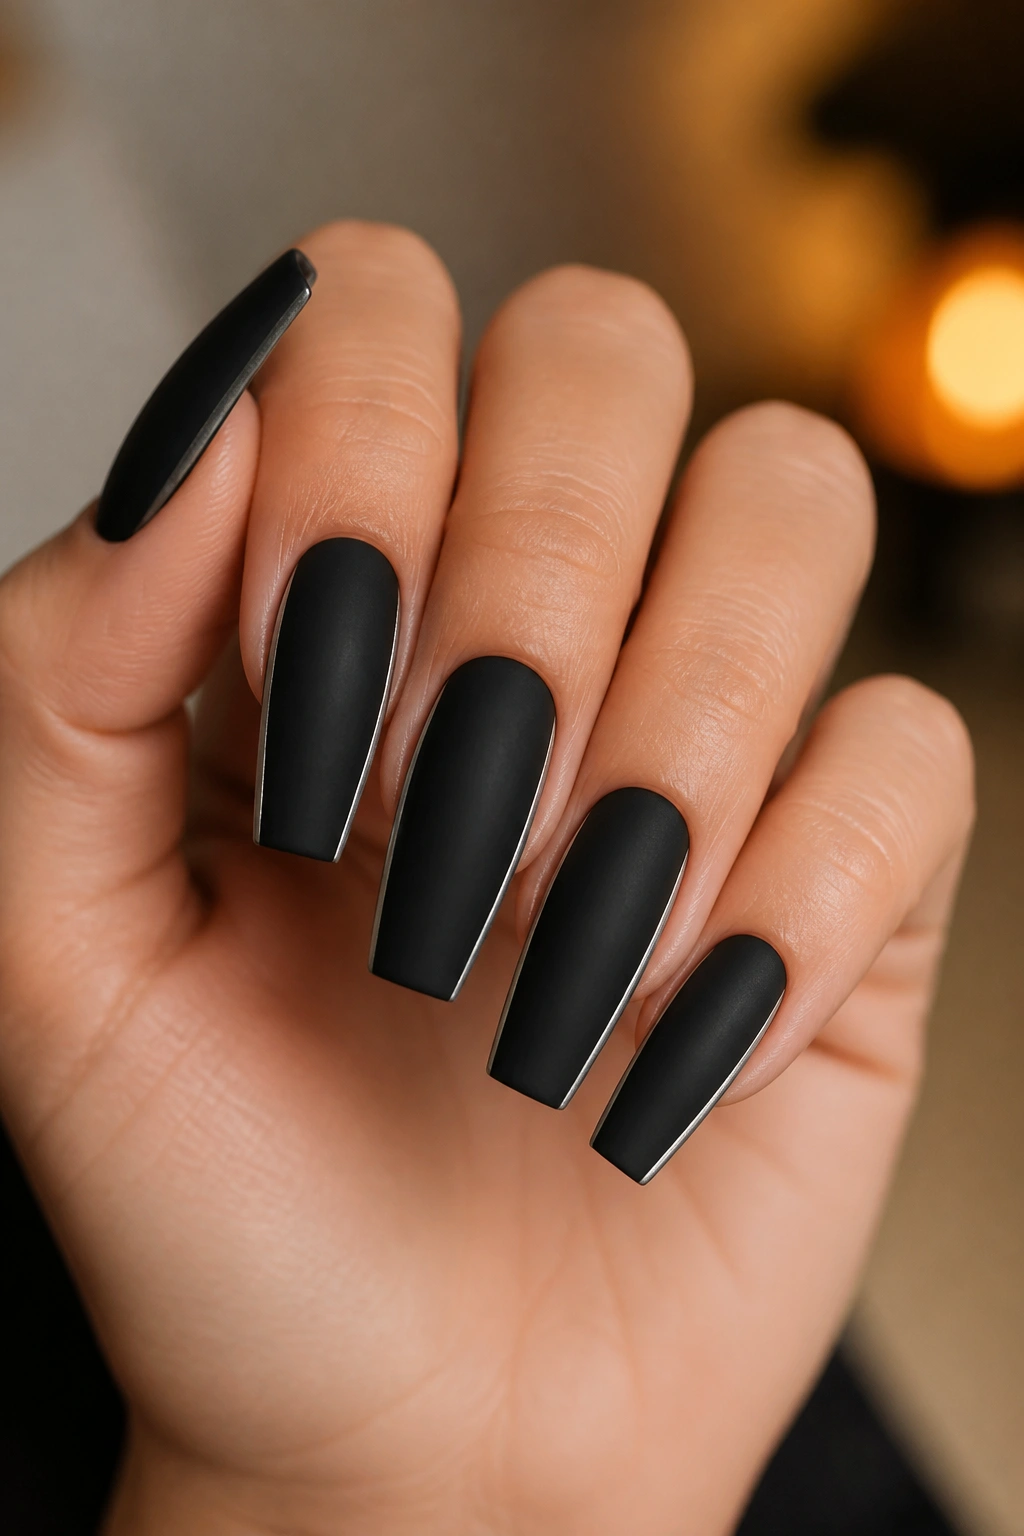
Picture a matte black nail with one razor-thin silver line running along the sidewall, or a line on each side if you want more structure. That’s it. No gems. No foil flakes all over the place. Just black, silver, and straight geometry.
This look does two useful things at once. First, the matte base keeps the design grounded. Second, the silver stripe lengthens the nail because the eye tracks that line from cuticle to tip. It’s a small trick, but it works.
A few details matter more than they seem:
- Keep the stripe under 1 mm wide so it reads as detail, not as a second color block.
- Place it slightly in from the edge if your sidewalls are not perfectly even; that hides shaping flaws.
- Use silver gel paint or ultra-thin striping tape sealed under top coat.
- Leave at least one nail solid black on each hand if you want the stripe to feel intentional rather than overused.
On short to medium coffin nails, one side stripe gives a clean, architectural look. Double stripes feel sharper on longer sets. Silver jewelry also ties into this design fast, which is handy if you already wear cool-toned rings every day.
I’d skip chunky glitter here. The whole point is precision.
5. Smoky Black Ombré Coffin Nails
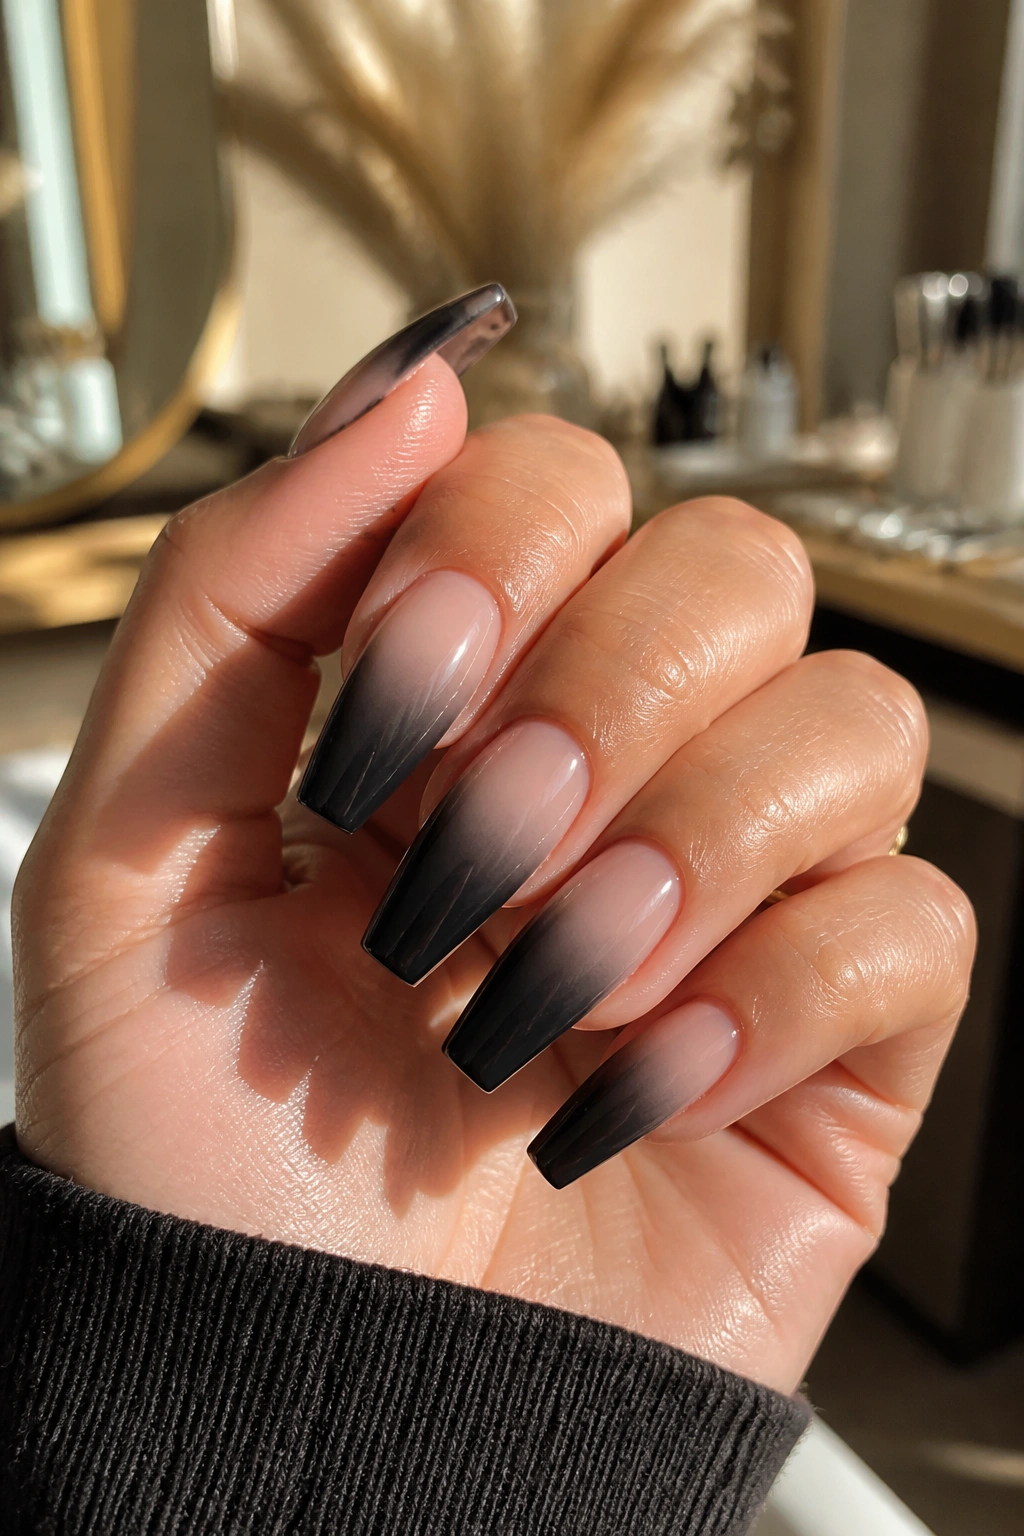
A soft black fade can make coffin nails look longer without making them look heavier. That’s why smoky ombré keeps showing up on request boards in salons. The dark color sits at the tip or lower half of the nail, then fades into sheer nude, beige, or milky pink toward the cuticle.
This is one of those designs that can go wrong in a hurry if the fade is blunt. You want smoke, not a stripe. Airbrush gives the smoothest result. A sponge blend can work too, though it needs patience and thin layers or you end up with a thick ridge where the pigment stacks.
The best version uses a soft charcoal haze through the middle, then deepens into black at the tip. Full black right from the midpoint down can look harsh on short nails. Medium and long coffin shapes have more room to stretch the fade, so they carry this design better.
Who it suits best
If you want black coffin nails that still feel a little lighter on the hand, this is the one. The sheer base keeps growth less obvious than a full black cuticle area, which buys you extra wear time. It also flatters shorter nail beds because the eye reads that nude space as more length.
I’m partial to a glossy top coat over ombré black. Matte can work, though the fade loses some depth when the surface goes flat.
6. Black Jelly Coffin Nails
Unlike opaque black, jelly black has depth. You can see through it a little, which makes the nail look like smoked glass rather than solid paint. On coffin shapes, that transparency softens the width of the tip and gives longer sets a lighter feel.
The catch is prep. Black jelly shows every inconsistency underneath. If the natural nail has white patches, old staining, or uneven extension fill, the sheer color will not hide it. A smooth neutral base underneath—often a soft nude or sheer black builder—makes the finished look cleaner.
You also need to know how sheer you want it. One coat gives a gray-black wash. Two coats look like dark ink. Three coats can edge back toward opaque, which defeats the point. I like two coats over a structured clear or nude base, sealed with high gloss so the depth stays visible.
Black jelly works especially well in warmer weather or on longer nails when solid black feels a bit heavy. It also pairs well with subtle details: tiny silver stars, a single gemstone, thin black French lines layered over the jelly base. Too much art, though, muddies that translucent depth.
This one feels cooler, moodier, and a little less strict than standard black polish. Same color family. Different personality.
7. Black Marble Coffin Nails With Gray Veining
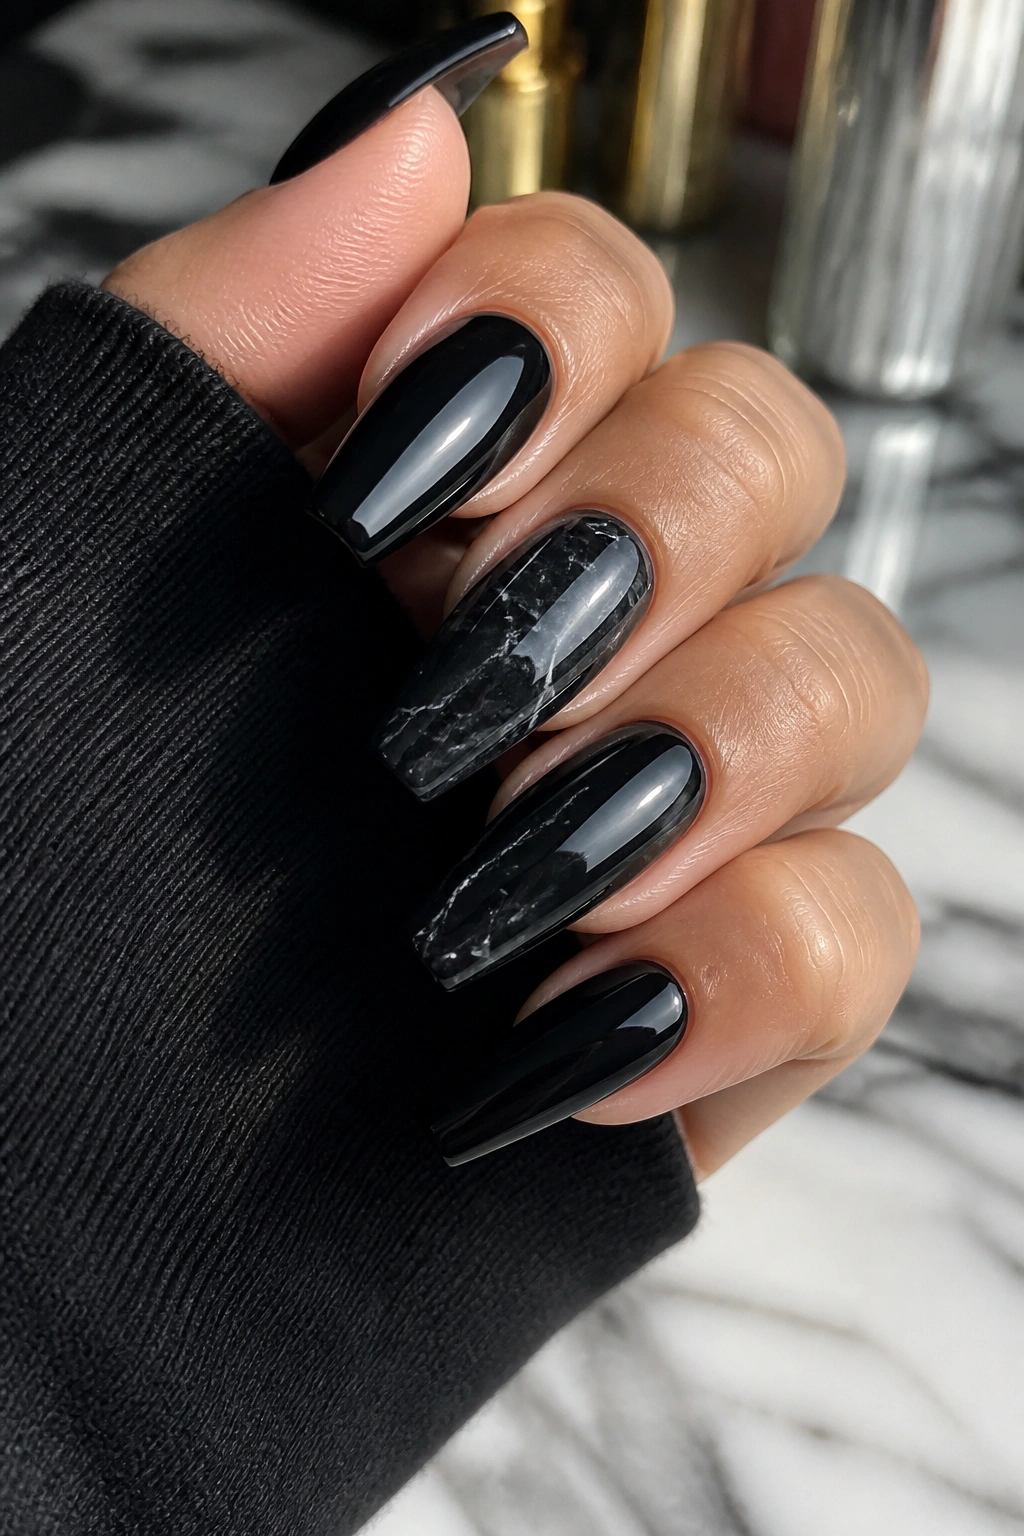
Marble can go tacky fast when the lines are thick and random. Done well, though, black marble on a coffin nail looks like polished stone—dense, cool, and expensive-looking without relying on a pile of embellishments.
I like a glossy black base for this more than matte because the shine makes the veining look set inside the nail rather than painted on top. Use a mix of soft gray, charcoal, and a whisper of white. One color alone can look flat. Too much white looks cartoonish.
The trick is restraint. You do not need every nail fully marbled. A stronger set usually keeps 8 to 10 nails mostly black and uses marble on 2 to 4 accent nails, or adds only one or two thin veins across each nail. Real stone has movement, but it also has quiet areas. Nails need that same breathing room.
Quick placement ideas that hold up well:
- Full marble on both ring fingers
- Thin diagonal veins across all nails
- One side-corner marble patch near the tip
- Black base with a single branching line on the thumb and middle finger
Seal it with gloss and cap the free edge well. Veining painted too close to the tip can chip first if it isn’t fully protected.
8. Black Glitter Fade Coffin Nails
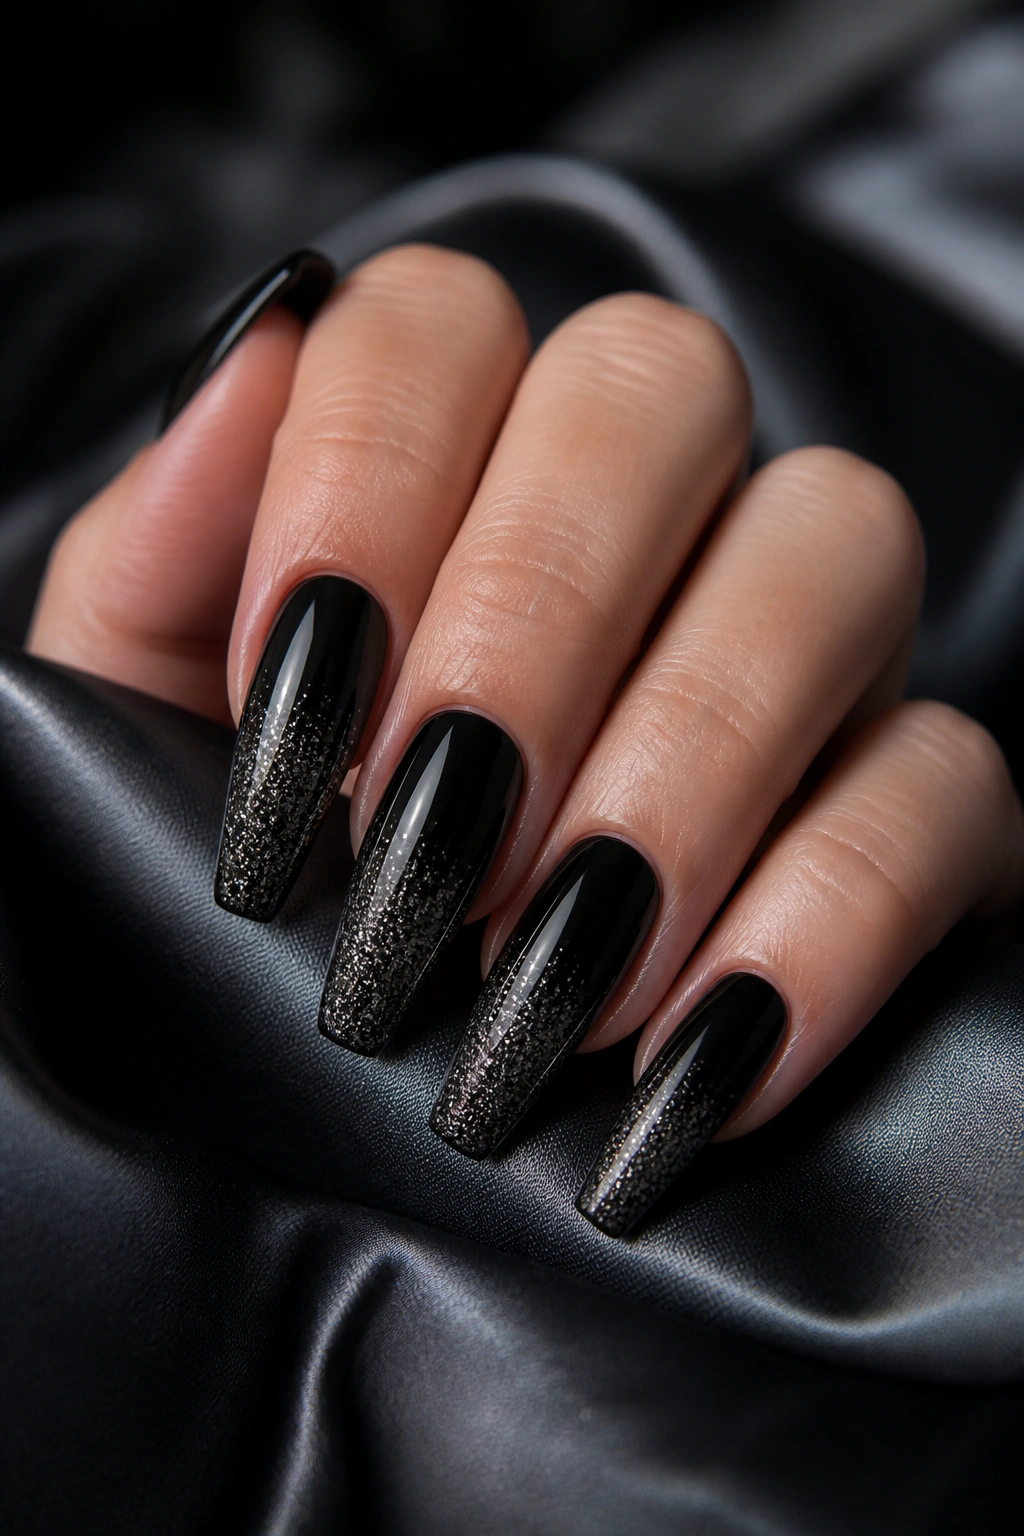
Some black manicures ask for more light, and glitter fade is the cleanest way to give it to them. I’m not talking about giant hex glitter packed wall to wall. I mean fine black, silver, or graphite sparkle concentrated at the tip and thinned out as it moves down the nail.
Why does this look better than a full glitter nail on coffin shape? Because the fade keeps the taper visible. Full glitter can blur the shape if the reflective pieces are chunky. A fade lets the outline stay sharp while the sparkle sits where it does the most work.
A good glitter blend usually starts with opaque black or a smoky nude base, then layers micro-glitter at the free edge. Pull a few particles downward with a detail brush so the fade looks scattered rather than pasted on. Top coat matters here. Use enough to bury the texture, then a second thin layer if the surface still feels grainy.
Short note from experience: silver glitter fade is easier to keep elegant than mixed-color glitter. Once red, blue, and green show up in the same black manicure, the whole thing starts heading toward party-store packaging.
If you want black coffin nails for nights out but still need them to make sense at brunch the next morning, glitter fade does that job better than a fully encrusted set.
9. Nude Coffin Nails With Black V-Tips
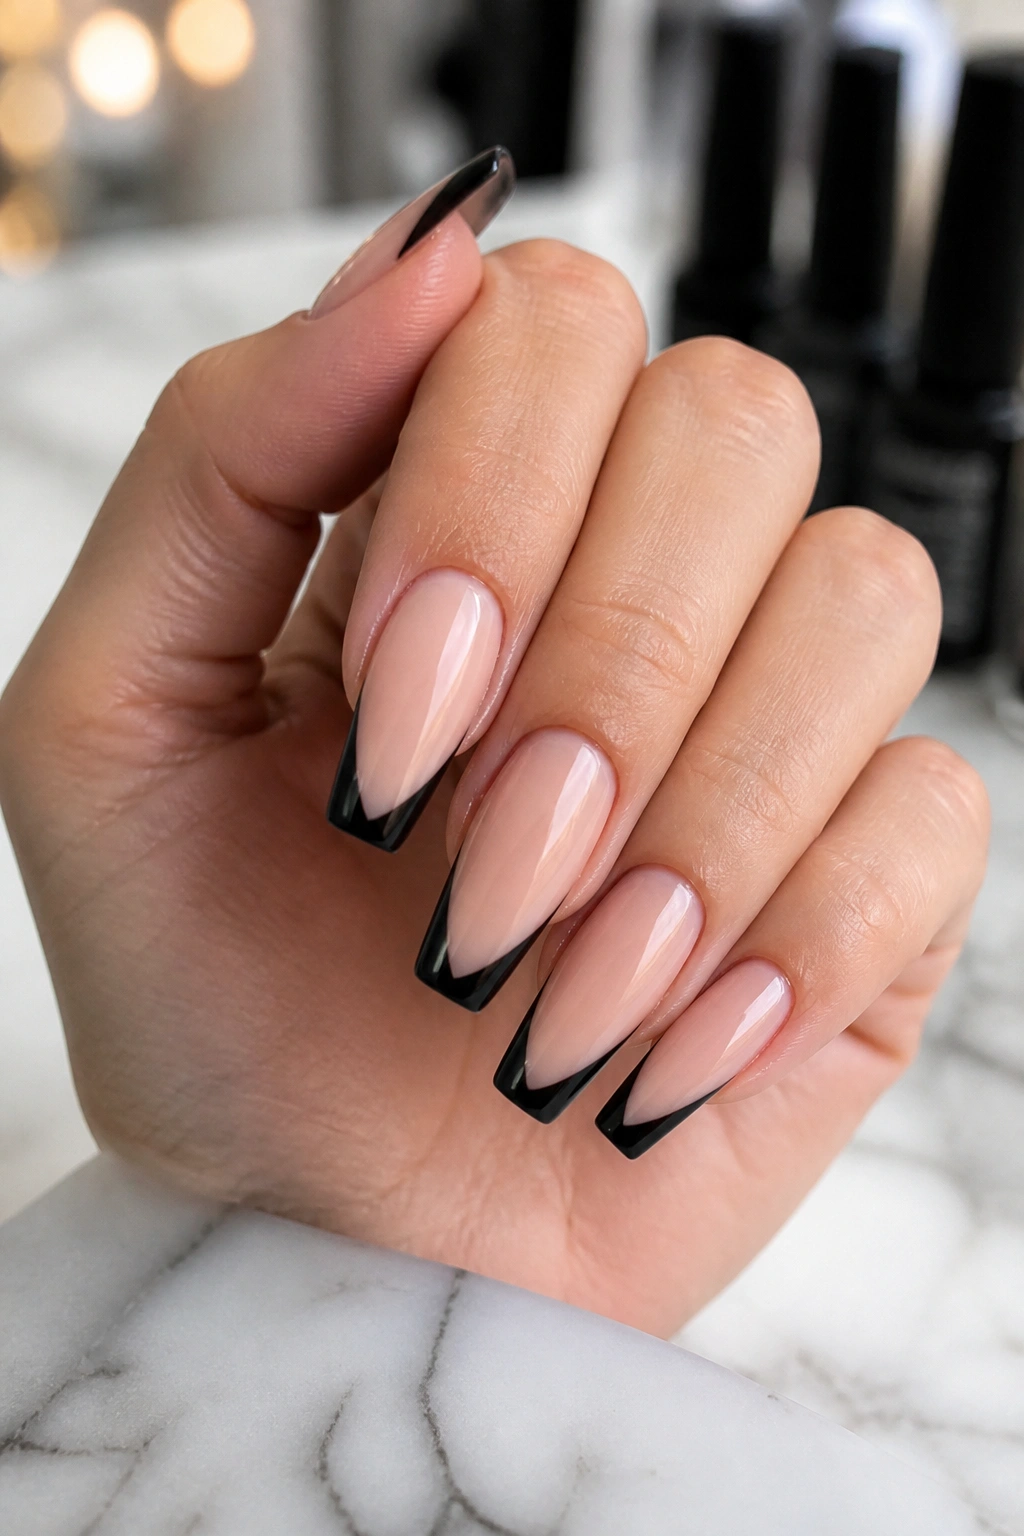
This is the sharpest French variation in the bunch. A black V-tip on a nude or sheer pink coffin nail echoes the shape itself, which makes the fingers look longer and the manicure look cleaner than a standard curved French line.
The V should sit centered and slim. When the arms of the V are too thick, the design starts taking over the whole nail. Medium coffin lengths carry it best because you need enough room to see the angle. On shorter nails, a micro-V works, but only if the tech keeps the lines thin and the apex smooth.
What I like here is the balance. You still get black coffin nails—just not wall-to-wall black. The nude base gives the eye a break, and it means grow-out is less obvious around the cuticle.
Keep these details tight
- Use a semi-sheer nude base that matches your undertone instead of a chalky pale pink
- Make the V point land slightly above the center of the free edge, not too low
- Keep the black dense and glossy so the line reads crisp
- Skip extra gems unless you’re using only one accent nail
This design has a tailored feel. If matte jet black is the leather jacket, black V-tips are the sharp blazer.
10. Sheer Nude Coffin Nails With Black Flame Art
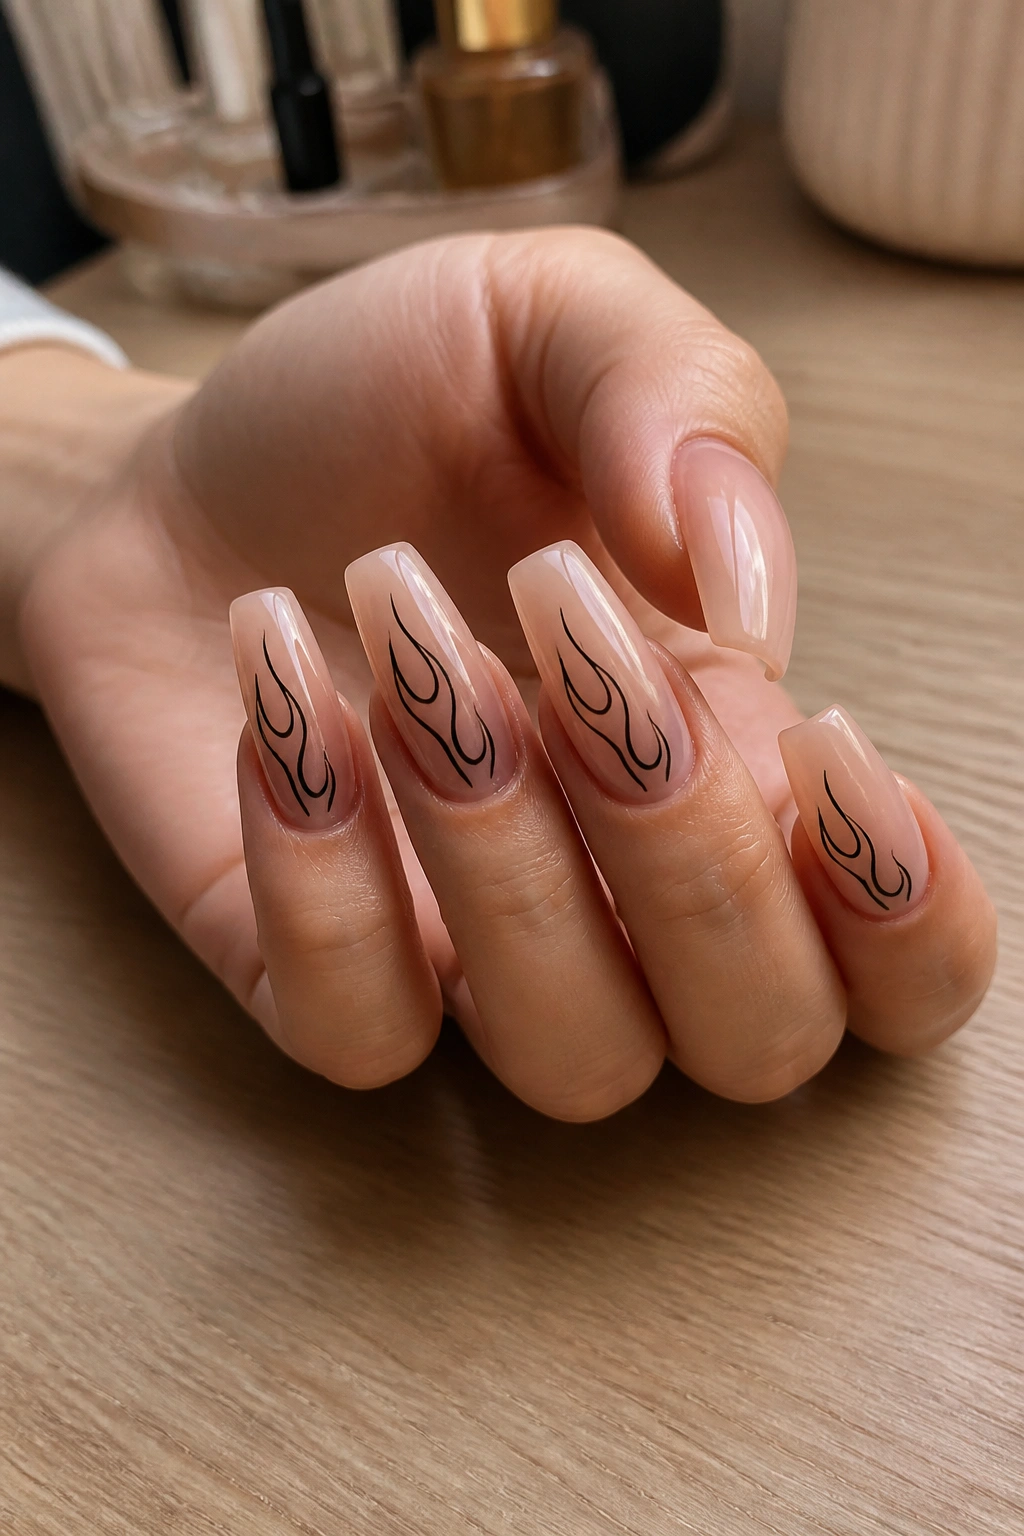
Flame nails can look dated if the artwork is thick, chunky, or spread across every nail like clip art. A better version uses thin, elongated black flames over a sheer nude base so the design follows the coffin shape instead of fighting it.
The longest flame should usually start near the free edge and stretch toward the center of the nail with tapered points. Rounded, blobby flames lose that sharp look. Coffin shape helps here because the squared tip gives the art a strong base, while the taper keeps the flames moving upward.
A few ways to keep black flame nails from getting messy:
- Use flames on 2 to 6 nails, not all 10 unless the lines are tiny
- Pair them with solid glossy black nails for contrast
- Keep the base sheer, not milky-opaque, so the black artwork stays the star
- Ask for hand-painted gel lines instead of thick decals when possible
There’s a little attitude built into this design, and that’s the appeal. It’s not office-neutral. It’s not trying to be. Still, if the lines are slim and the rest of the set stays clean, flame art can look sharper than people expect—less costume, more graphic ink.
11. Black and Gold Foil Coffin Nails
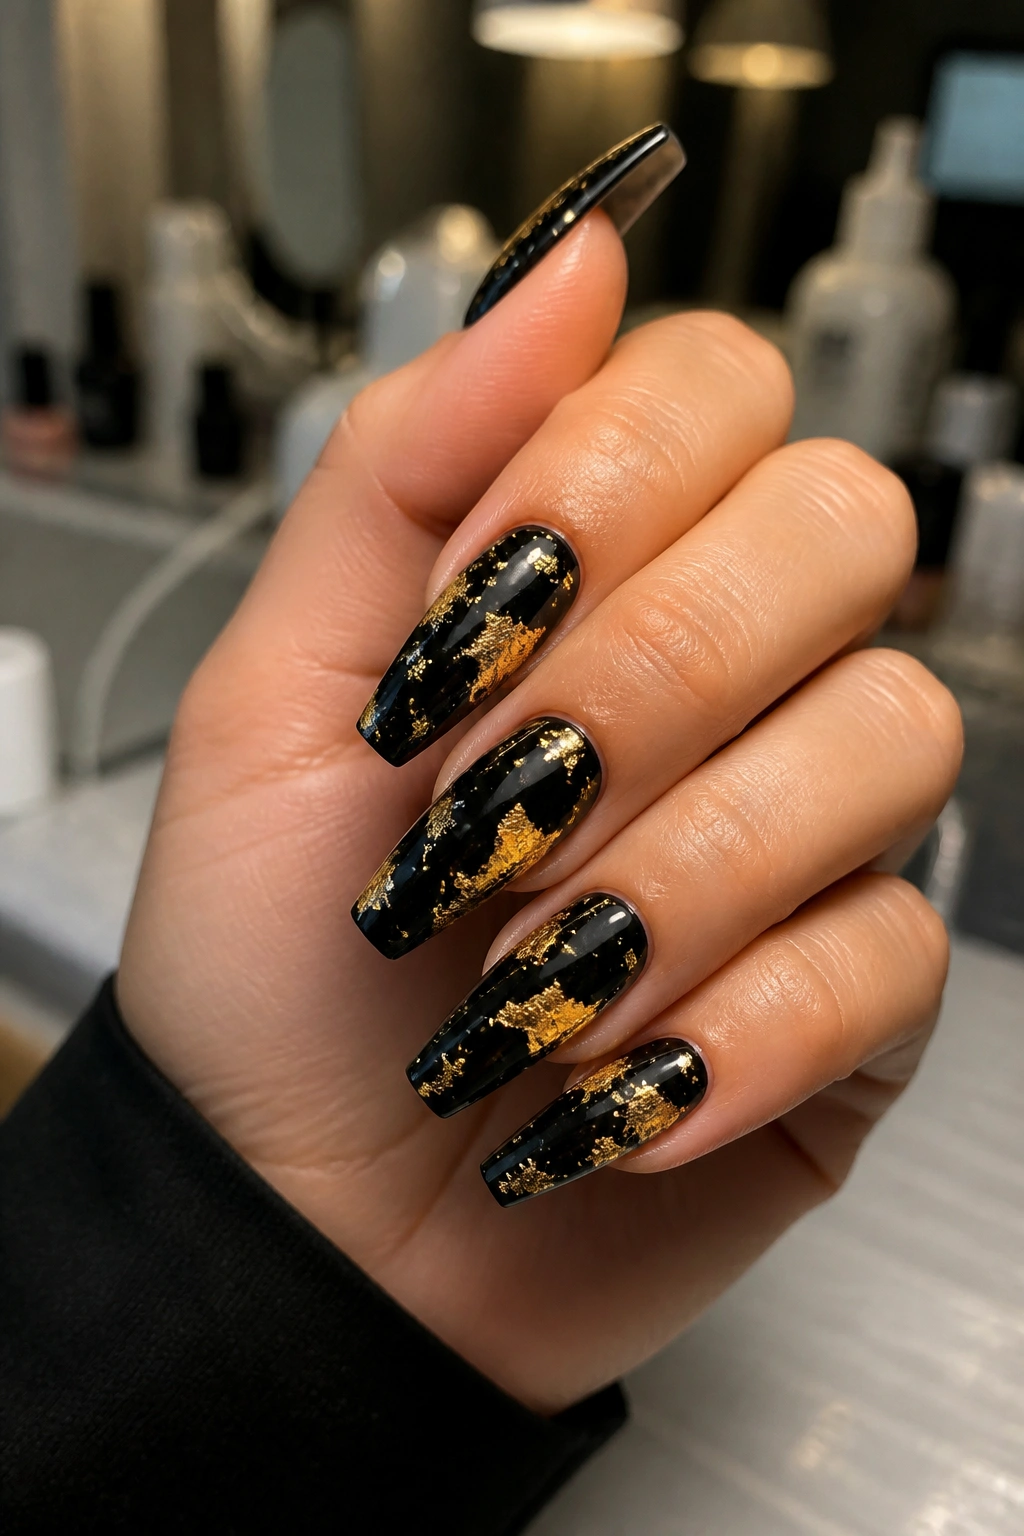
Gold foil against black is one of those combinations that almost never misses. The warmth of the metal wakes up the darkness of the base, and the coffin shape gives those torn foil pieces a strong frame so they don’t look random.
I prefer foil used in patches rather than scattered like confetti. A foil cluster near the cuticle on one nail, a torn strip across another, a broken edge detail at the tip—those placements feel controlled. Full foil on every nail gets loud in a hurry, especially on longer coffins.
Where foil looks best
Foil has more impact when it’s placed with intent. These placements tend to wear well and photograph well too:
- Cuticle crescent on accent nails
- Diagonal slash from one sidewall to the opposite tip
- Broken gold edge along the free edge
- Small torn flakes trapped inside black jelly or sheer smoke
Use transfer foil or loose foil under clear gel, then seal it thoroughly. If the edge of a foil piece sticks up, hair will find it. Hair always finds it.
This is one of my favorite black manicure ideas when someone wants jewelry built into the nail design. You get the contrast of black and metal without needing rhinestones on every finger.
12. Black Velvet Cat-Eye Coffin Nails
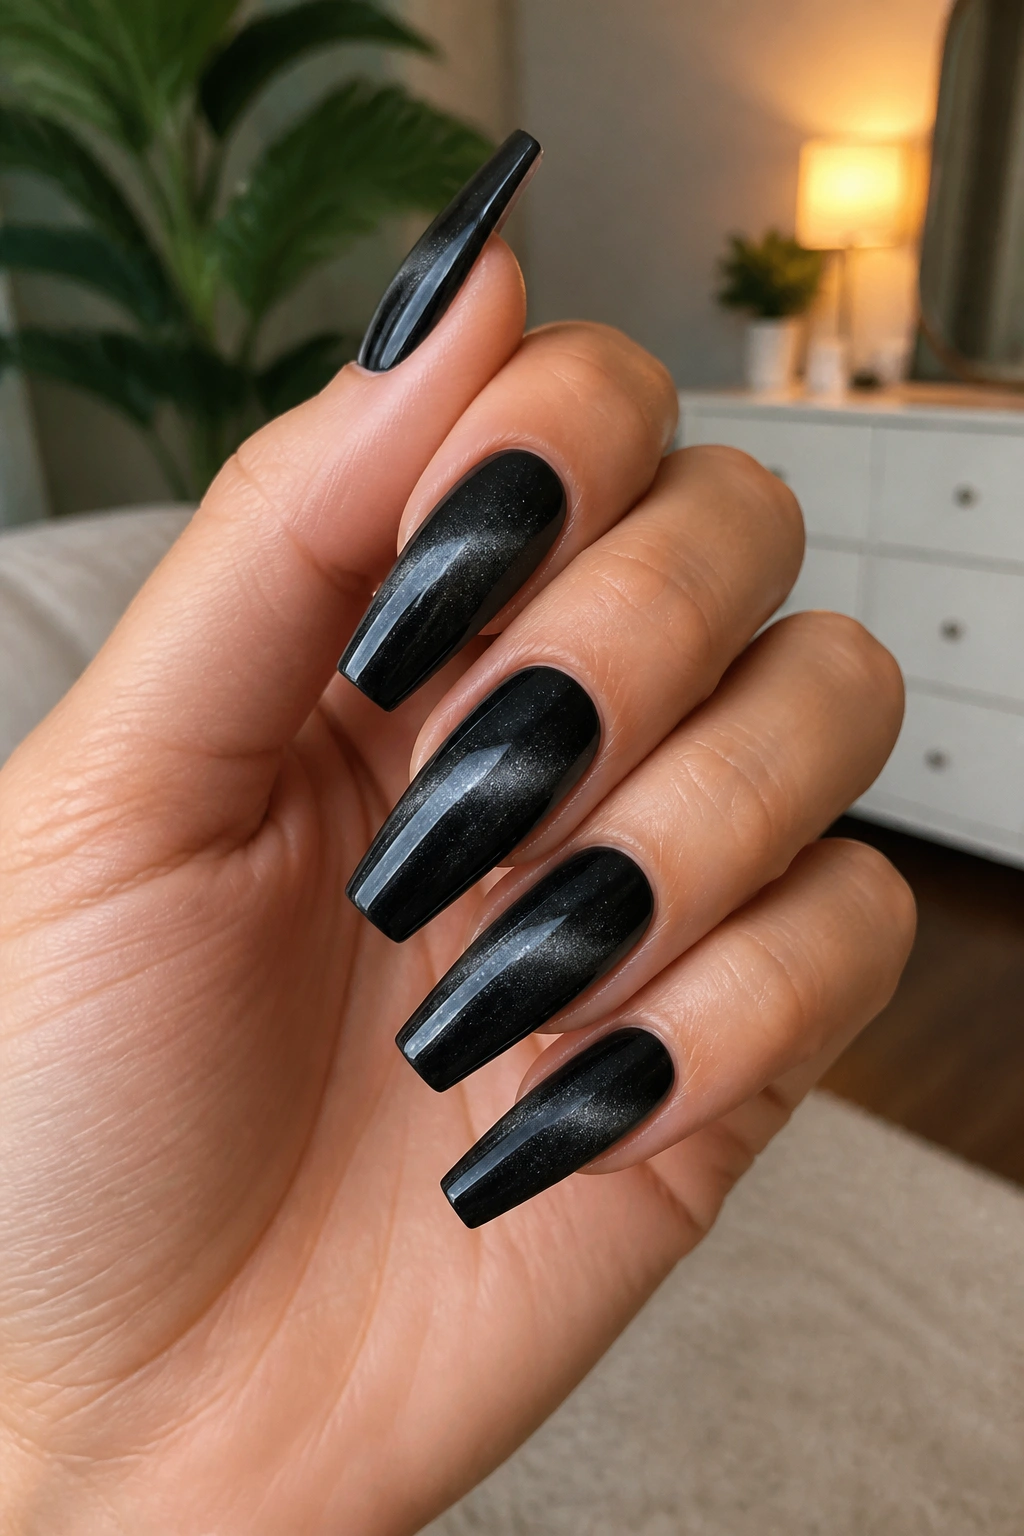
Magnetic velvet polish on a coffin nail can look like the center of the nail is glowing under dark fabric. That sounds dramatic because it is dramatic—but in a controlled way. Black velvet cat-eye gives you movement without making the manicure busy.
The finish comes from magnetic particles suspended in gel. Hold the magnet at one angle and you get a narrow diagonal beam. Hover it straight over the nail and you get a soft central glow. For black velvet, I like the magnet held over the nail for 10 to 15 seconds per finger to pull the shimmer into a diffused stripe rather than a hard line.
This design needs a smooth apex and a high-gloss top coat. Any lumps in the structure break the illusion because the reflective band bends in odd places. Medium-long coffin nails show the effect best. Short sets can wear velvet black too, but the magnetic shift has less room to move.
There is one downside. Cat-eye black can look flat in dim yellow lighting if the shimmer is too subtle. Ask for a magnetic gel with graphite or gunmetal particles rather than a barely-there silver shift. You want movement, not dust.
For evenings, this one hits a sweet spot between plain gloss and full chrome.
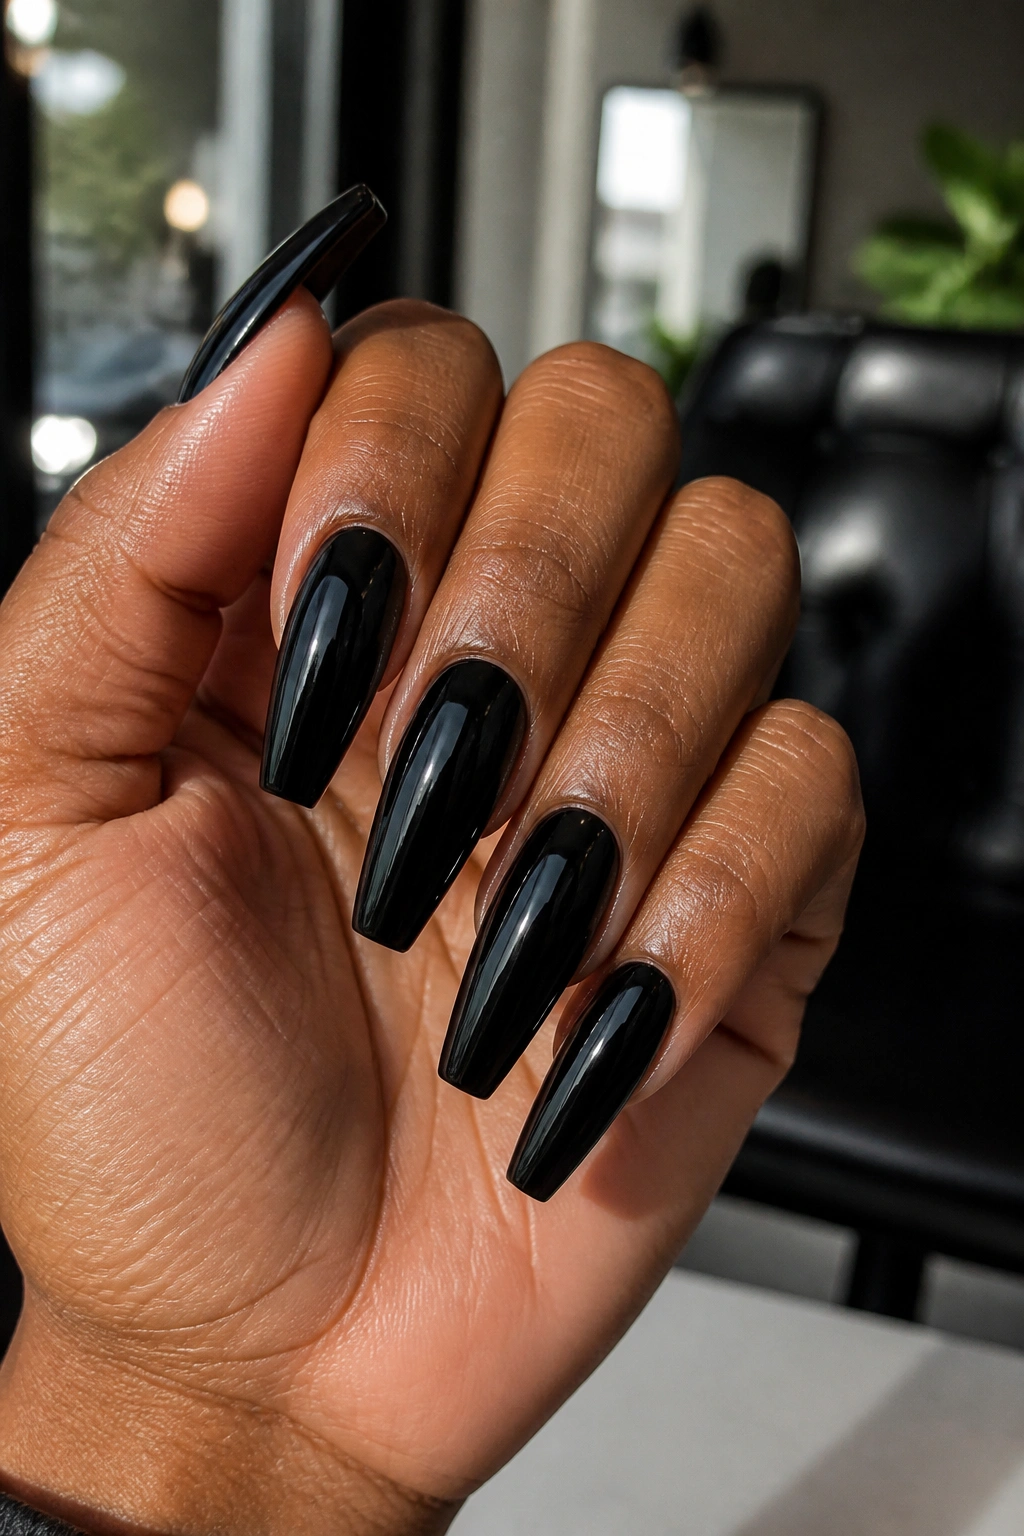
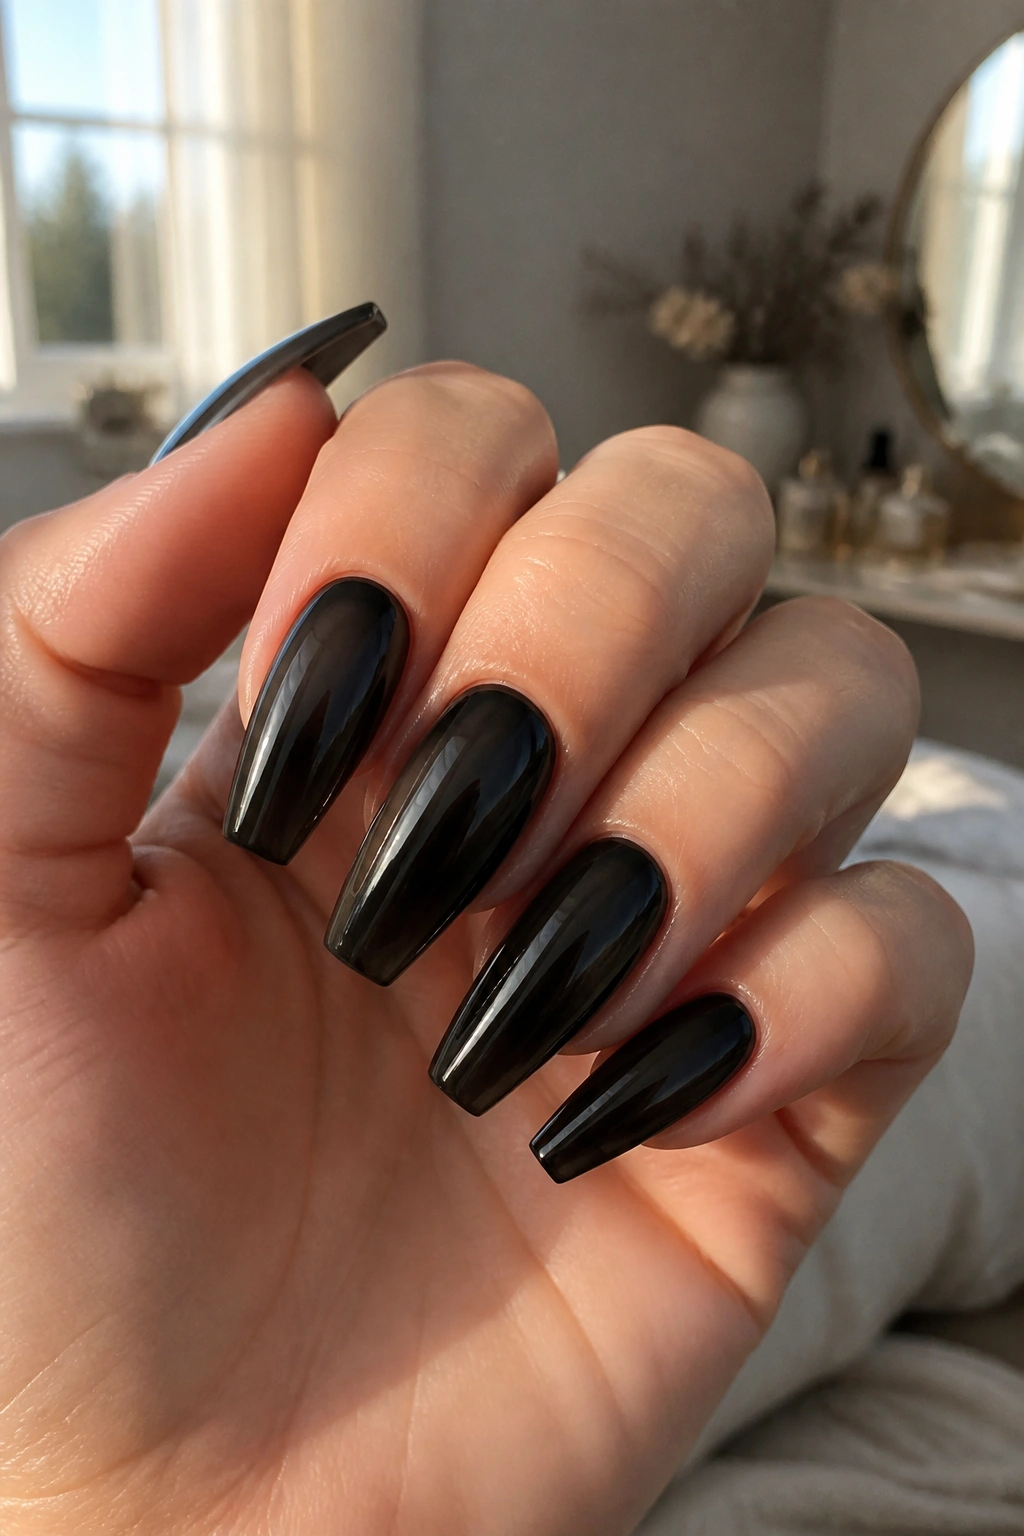
13. Patent-Gloss Black Coffin Nails
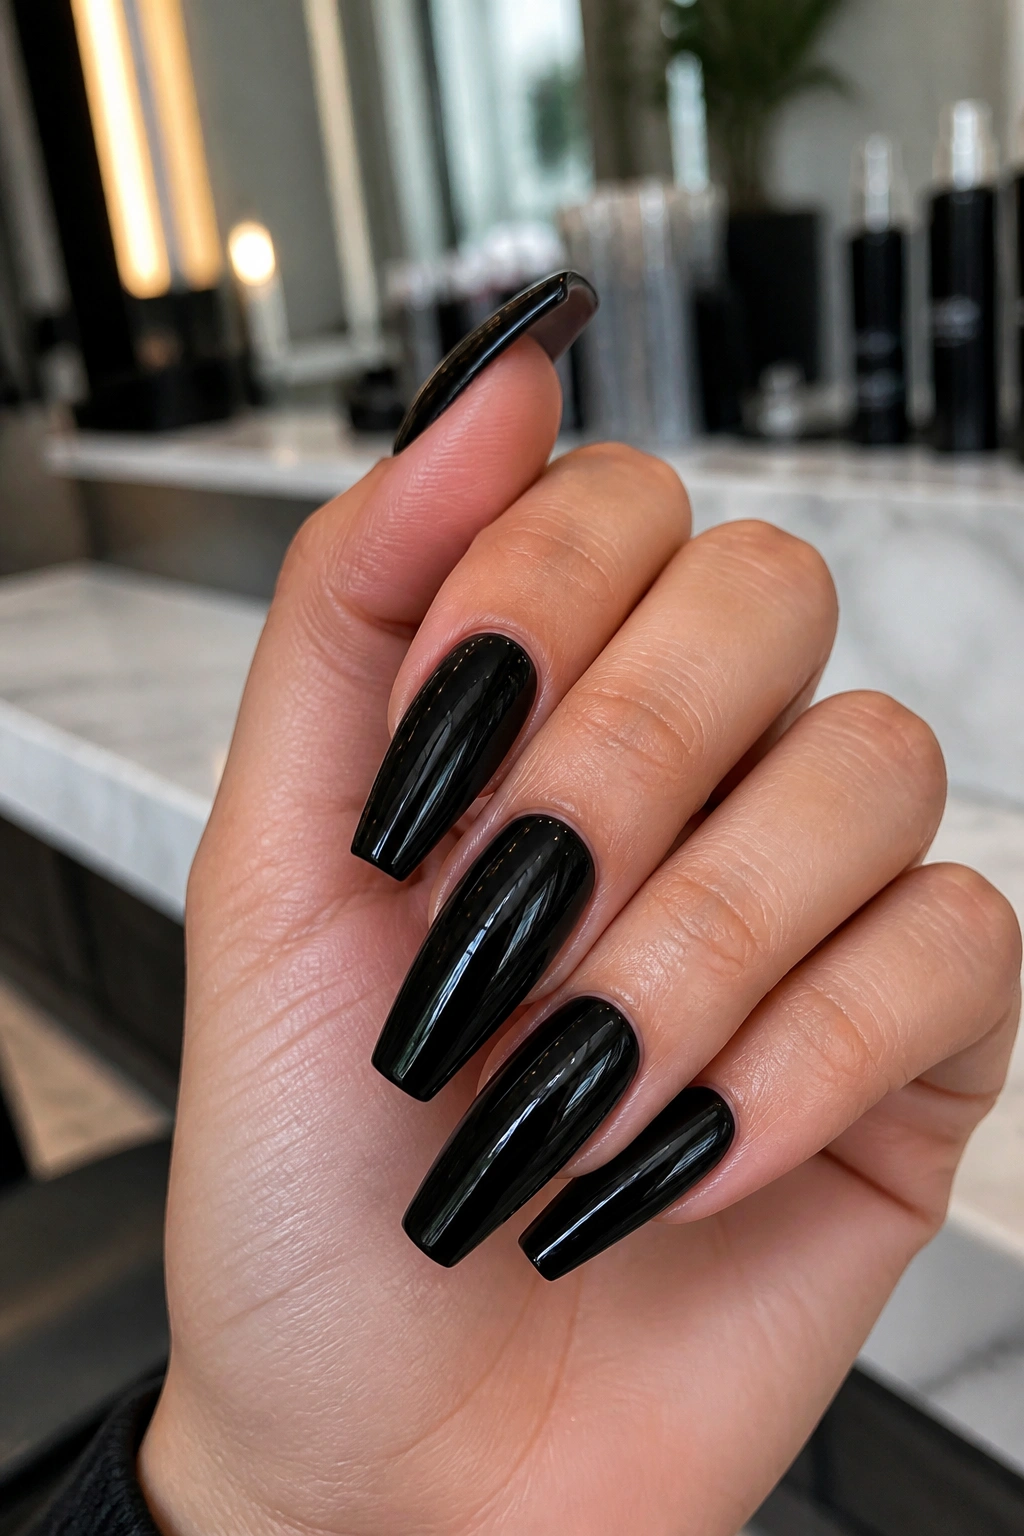
If matte black looks like charcoal, patent-gloss black looks like liquid vinyl. It is the most classic glossy version of black coffin nails, and I still think it beats half the complicated nail art sets people bring into salons.
Application has to be clean. Glossy black shows every bump, every lint speck, every missed sidewall. You want a smooth base, thin even color, and a top coat with enough body to level itself before curing. I like two layers of color and one generous layer of no-wipe gloss, capped carefully around the tip.
This manicure works on almost every length, which is part of its strength. Short coffin nails in patent black look tailored and sharp. Medium length looks sleek. Long coffin nails go full high-fashion without needing added design.
The wear plan is straightforward too. Re-top-coat after a few days if you want the wet shine to stay crisp, keep cuticles oiled so the black doesn’t look harsh against dry skin, and file tiny corner snags early before they turn into bigger chips.
Some nail looks are about detail. Patent black is about finish. When it’s smooth and glassy, you don’t need anything else.
14. Black Croc-Texture Coffin Nails
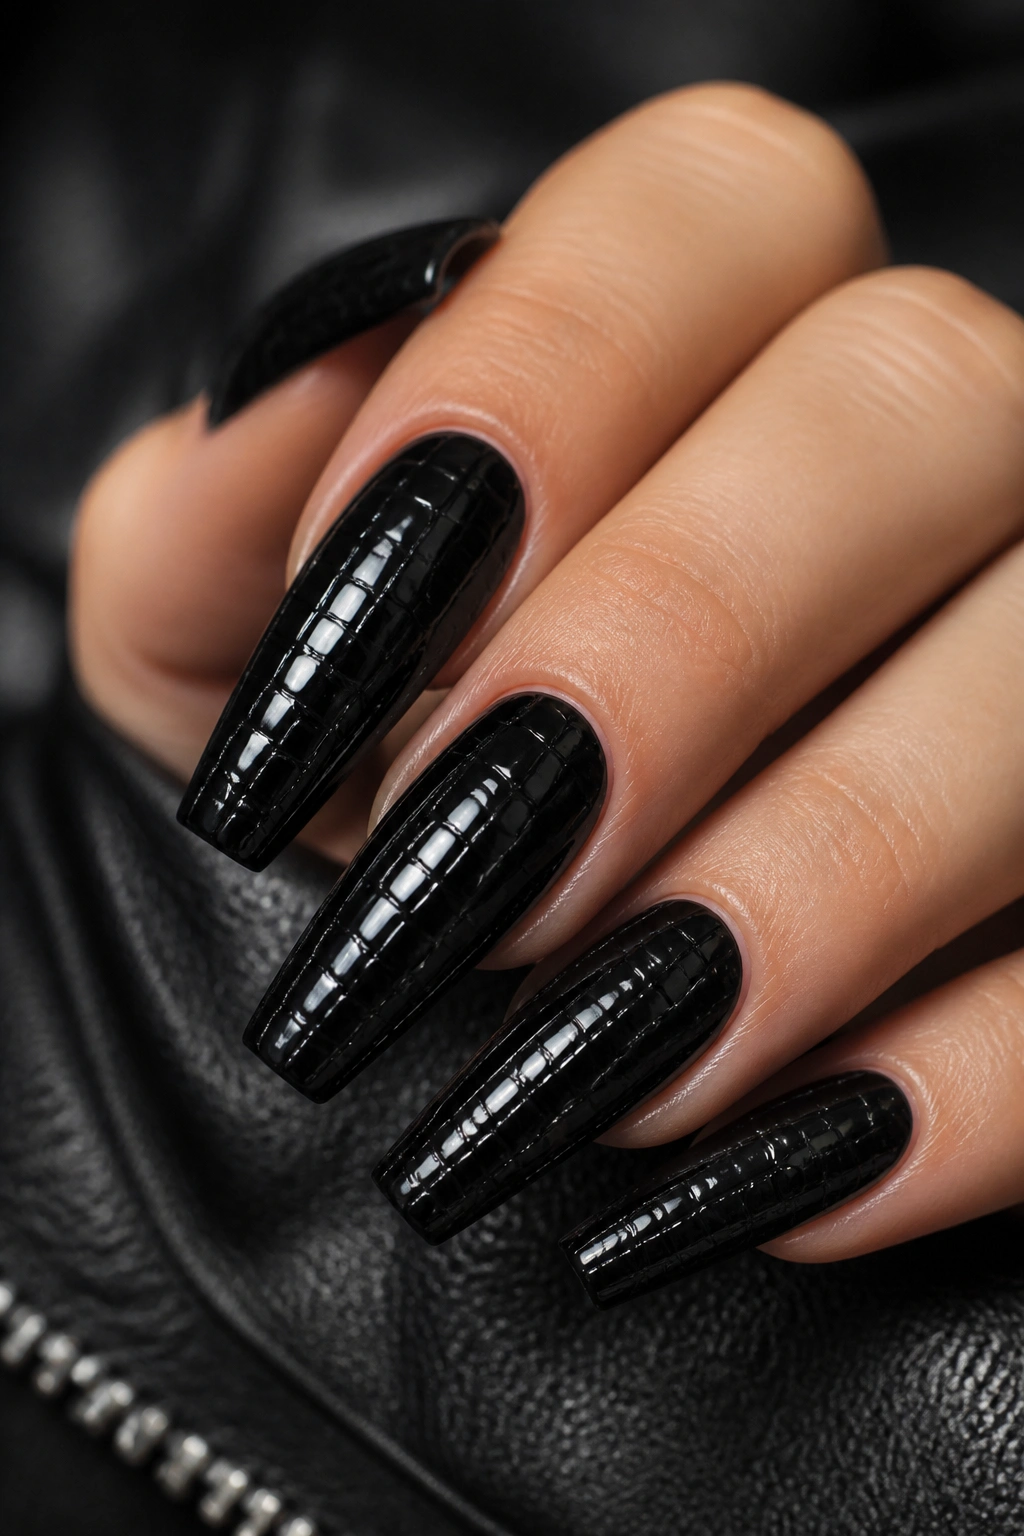
Textured black can be risky, yet croc-texture on coffin nails makes sense because the shape already has a structured, slightly luxe feel. Done right, the raised pattern looks like embossed leather. Done badly, it looks like someone dripped top coat and hoped for the best.
The cleanest version keeps the pattern glossy over a black base. You can build it with blooming gel, a textured stamping plate, or sculpted gel lines that create those uneven cell shapes. Matte croc exists too, though I think gloss shows the pattern better and keeps it from looking dusty.
Short caution here: not every finger needs the texture. One or two croc accent nails per hand usually says enough. A full 10-nail croc set can start feeling heavy, especially if the nails are long and the pattern is deep.
Try these pairings if you want the texture to land well:
- Glossy black croc on ring fingers with solid black on the rest
- Croc over a black-to-smoke ombré base
- Croc texture with a single gold foil accent
- Croc on thumbs only, if you want a quieter set from straight-on view
This look is unapologetically fashion-forward. It’s not the manicure I’d hand to a black-polish beginner. It is the manicure I’d suggest when plain gloss feels too safe.
15. Mirror Black Chrome Coffin Nails With Crystal Accents
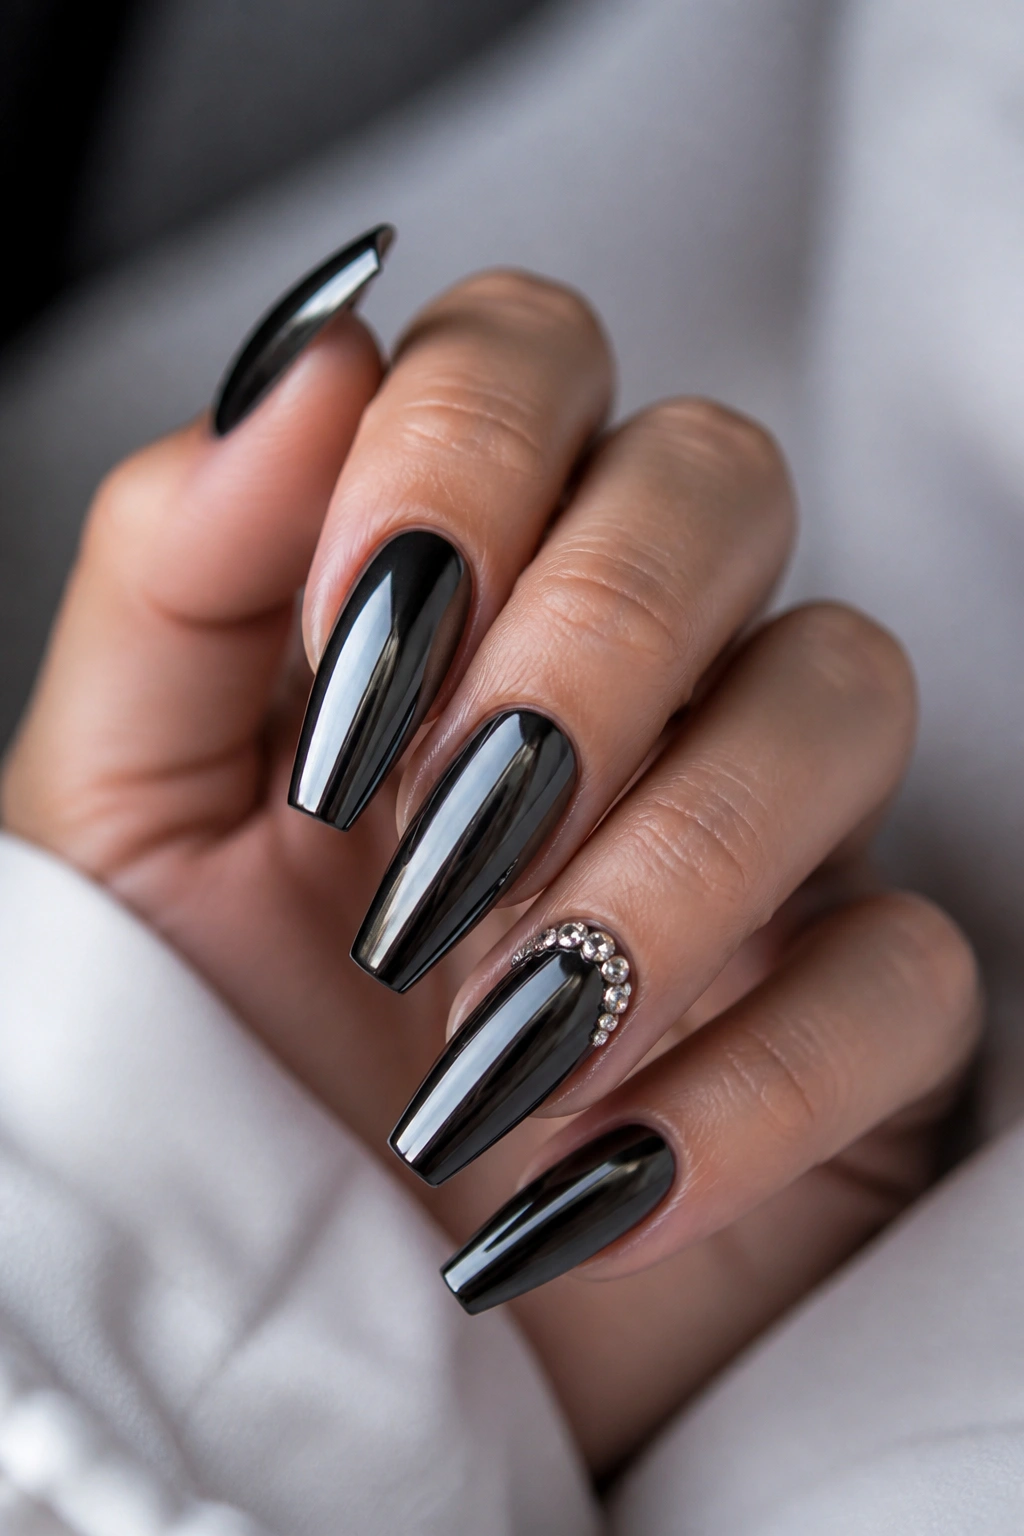
Here’s the glossy extreme. Mirror black chrome reflects light harder than patent gloss and reads almost metallic at certain angles, especially under cooler lighting. Add a small crystal arc near the cuticle and the whole set moves into full dress-up territory.
Chrome needs a near-flawless base. File the surface smooth, apply black gel, seal with a no-wipe top coat, cure, rub in the chrome powder while the surface still has that right slick feel, then seal again. If the no-wipe top coat is overcured or undercured, the powder won’t grip evenly. Tiny bald patches show up fast on dark chrome.
Crystals should stay edited. Three to five small stones at the base of one or two nails usually does enough. More than that, and the chrome reflection starts fighting the stones instead of framing them. I’d also keep the crystals lower on the nail rather than drifting into the center, where they can snag.
This is the black coffin set for events, photos, dinners out, or any moment when you want the manicure to feel dressed. It’s not low-maintenance. Chrome tip wear is noticeable, and crystals need secure gel placement. Still, if you want maximum shine without jumping into bright color, this is the finish that delivers it.
Final Thoughts
Black coffin nails are one of the few manicure ideas that can swing from stripped-down matte to full reflective chrome without losing their identity. The shape carries that whole range well. That’s why the finish matters so much: matte softens, gloss sharpens, jelly lightens, chrome amplifies.
If I had to narrow the list for real life, I’d pick flat matte jet black, matte with glossy French tips, and patent-gloss black as the three most wearable designs. If I wanted something with more personality, I’d jump straight to black velvet cat-eye or black and gold foil.
Whatever version you choose, spend the extra time on prep, sidewall symmetry, and top-coat choice. Black does not hide lazy work—but when the shape is crisp and the finish suits the design, it pays you back fast.
