

Glitter can make coffin nails look expensive fast—or make them look like a craft project gone wrong. The difference usually comes down to placement, glitter size, and how well the sparkle works with the sharp taper of the coffin shape. When glitter sits where the eye already wants to look—the tip, the cuticle line, a clean diagonal sweep—the whole manicure feels deliberate.
That shape matters more than people think. Coffin nails have a narrow sidewall and a flat end, so they give glitter a long runway. If the nail is too short, heavy sparkle can make the tip look blunt. Give it a bit more length—usually a medium extension or longer—and the same glitter starts to read sleek instead of chunky.
I’m picky about glitter manicures for one reason: too many sets throw every shiny thing onto the nail at once. Hex pieces, foil, chrome, rhinestones, cat-eye gel, all on one hand. It’s noise. The strongest glitter coffin nails usually choose one shine story and stick to it.
A small detail that nail techs know well: fine glitter lies flatter, cures smoother under gel, and chips less at the free edge than big uneven pieces. Chunky glitter has its place, no question, but it needs room and restraint. Once you get that balance right, glitter coffin nails stop feeling costume-y and start looking sharp.
How to Make Glitter Coffin Nails Look Clean Instead of Cluttered
Before getting into design ideas, it helps to know why some glitter sets feel polished and others feel messy. The coffin shape already has strong geometry. You do not need to fight that shape with random sparkle.
Start with one focal zone per nail. That could be the tip, the cuticle arc, the center line, or a suspended clear section. When glitter is scattered from sidewall to sidewall with no visual anchor, the shape loses its crisp edge.
Particle size matters too. Fine glitter—often called micro-glitter or shimmer dust—works best on short to medium coffin nails because it smooths out under top coat. Chunkier hex glitter or foil flakes suit medium-long and long sets, where there’s enough nail space for those pieces to look intentional instead of bulky.
A few rules I keep coming back to:
- Match glitter scale to nail length. Tiny sparkle for shorter nails, larger pieces for longer tips.
- Let one surface stay calm. If the base is packed with glitter, keep the artwork plain.
- Use contrast on purpose. Glitter pops harder against milky white, sheer nude, black, navy, emerald, and jelly tones.
- Cap the free edge well. Glitter manicures chip first at the tip, and coffin nails make that edge impossible to ignore.
- Ask for two thin top coats instead of one thick dome when the glitter is textured. The finish looks smoother and less lumpy.
And one more thing—skip craft glitter. Cosmetic-grade glitter is made for nail and skin use; craft glitter is not. That’s not salon snobbery. It’s a safety issue.
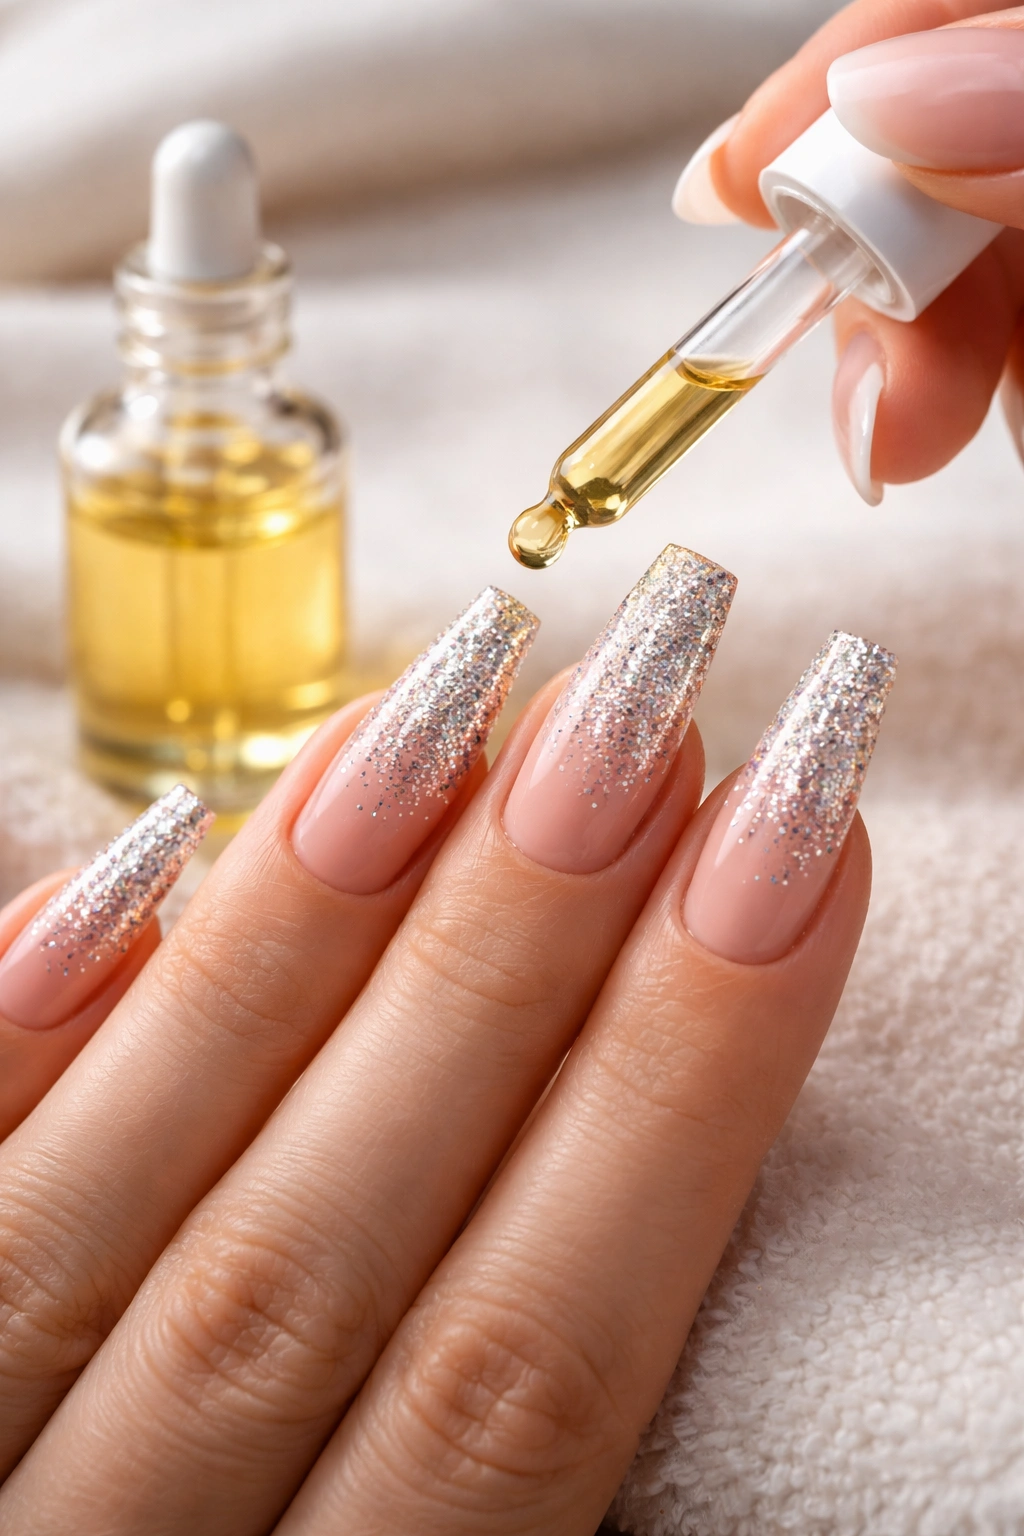
1. Silver Micro-Glitter Fade on a Soft Pink Base
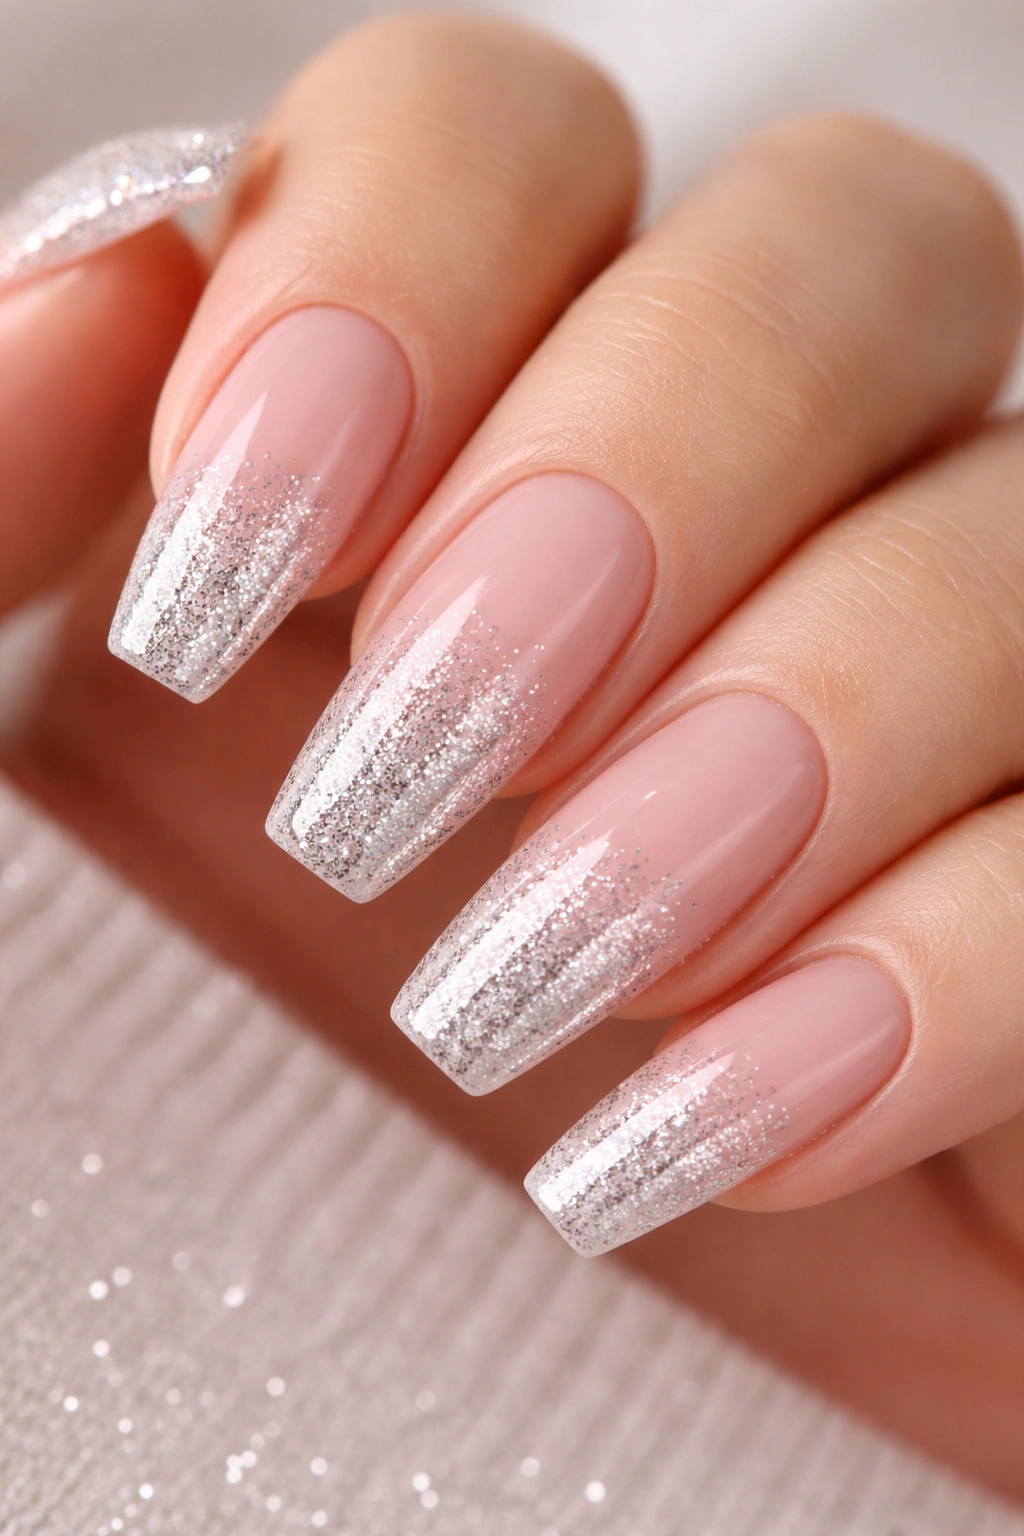
If you want glitter coffin nails that work with almost any outfit, a silver fade over soft pink is hard to beat. The base keeps the manicure grounded. The silver catches light at the tip, where the coffin shape already looks longest.
Why this one works
The fade softens the transition between natural-looking nail bed and bright sparkle. You still get shine, but the eye reads length first. That’s a smart move on medium coffin nails, where a full glitter nail can sometimes shorten the shape.
Use a sheer pink or beige-pink base, then pack fine silver glitter from the free edge downward, stopping around the top third of the nail. A makeup sponge or dense ombré brush gives the cleanest blend. Under gel, that gradient should look denser at the tip and almost dusted near the middle.
Quick details worth asking your nail tech for
- Best length: medium to medium-long
- Best finish: high-gloss top coat
- Best glitter size: ultra-fine or mixed fine shimmer
- Works well with: almond-pink skin tones, cool undertones, silver jewelry
I like this set most when the pink base is milky rather than peach-heavy. Peach can muddy the silver. A cooler pink keeps the sparkle crisp.
Try this tweak: add one fully silver accent nail on each hand if you want more flash without covering every nail.
2. Rose Gold Full-Cover Glitter with a Glassy Top Coat
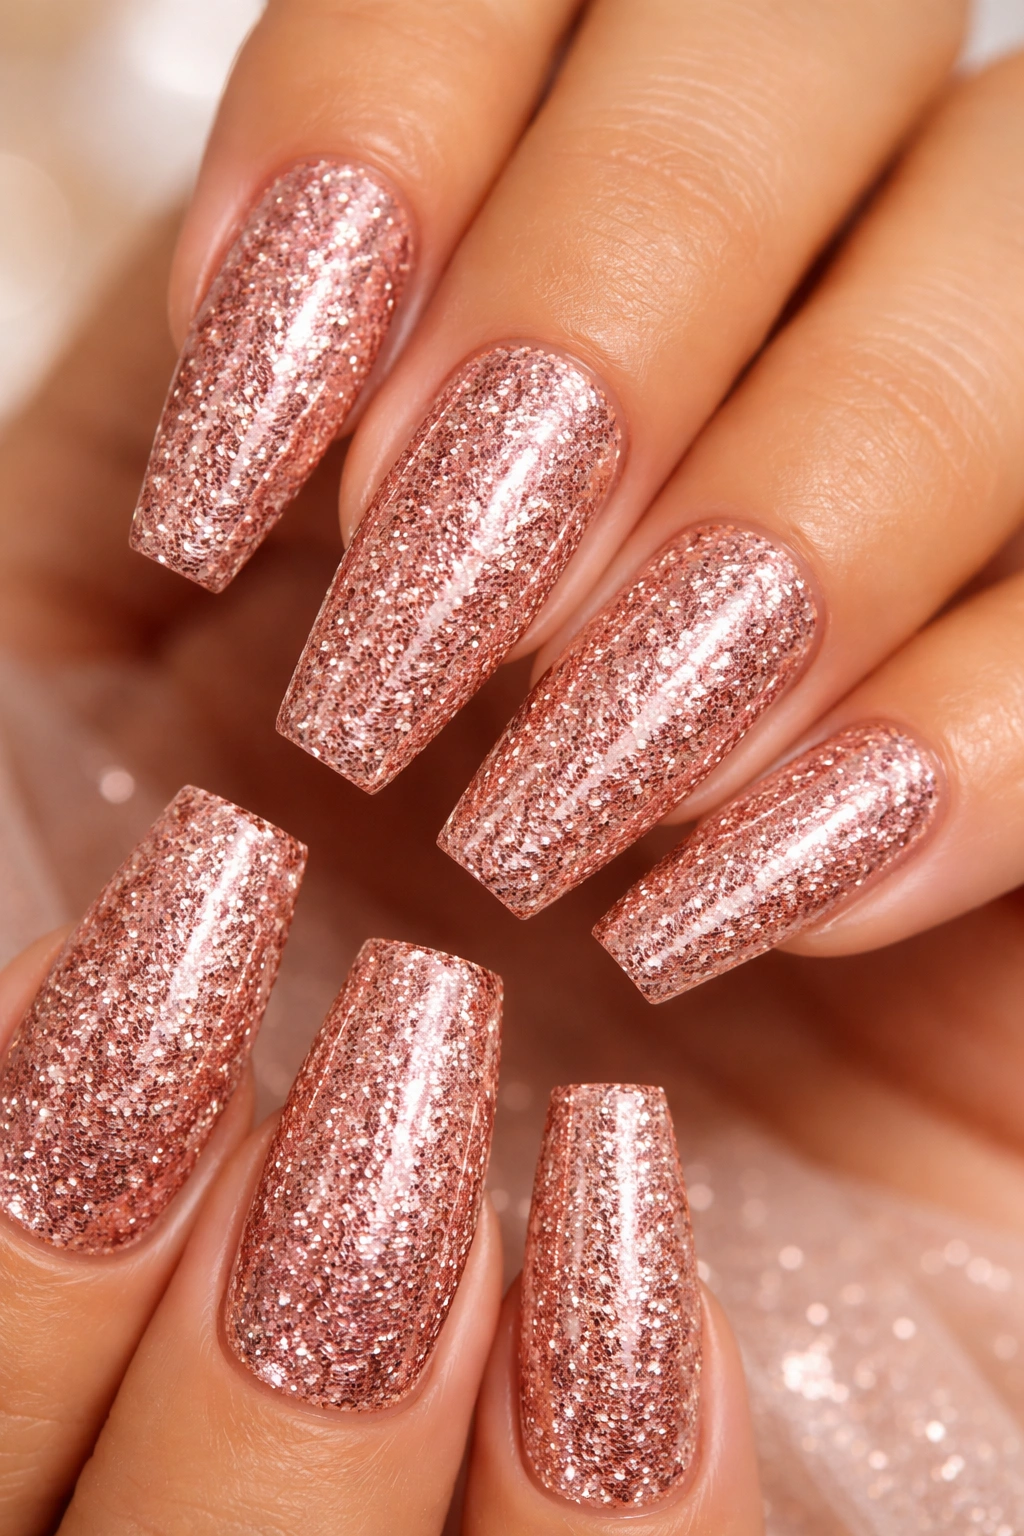
Full-cover glitter only works when the surface looks smooth. That’s the whole game here. Rose gold already gives you warmth, and on a coffin shape it feels cleaner than yellow gold when you want wall-to-wall sparkle.
A packed rose gold nail needs balance somewhere else, so I prefer this on a medium-long coffin with a sharp taper and a thin cuticle margin. If the glitter starts flooding the skin line, the manicure loses its polish fast. Ask for a precise cuticle application and a glassy top coat that seals every edge.
Rose gold also hides grow-out better than icy silver. That matters if you stretch your fills a bit past the point your nail tech would approve of—and yes, people do. The warmth blends more gently with natural nail tones, so the regrowth line doesn’t jump out as fast.
You can push this look in two directions. Fine rose gold shimmer gives a dense metal finish, almost like jewelry. A mix of fine glitter and tiny foil specks adds depth, which looks better up close. Photos flatten glitter; real life tells the truth.
One caution: pair this set with simple shaping. No rhinestones, no chrome flames, no 3D flowers. A full rose gold coffin nail already makes its point.
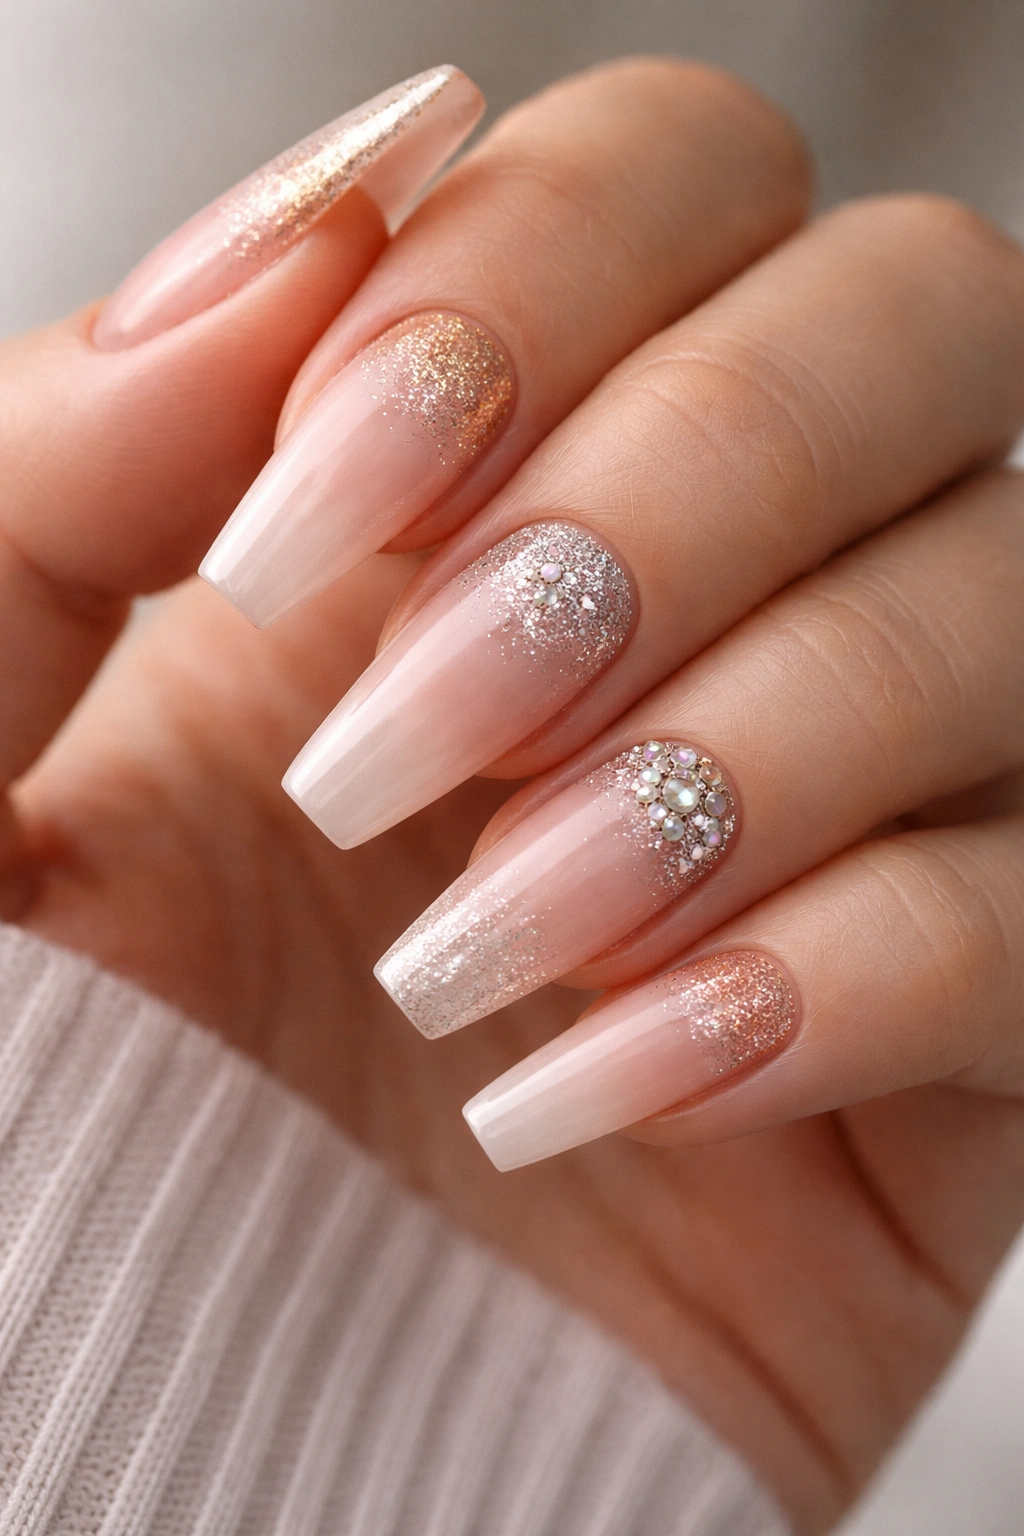
3. Nude Coffin Nails with Chunky Glitter at the Cuticle
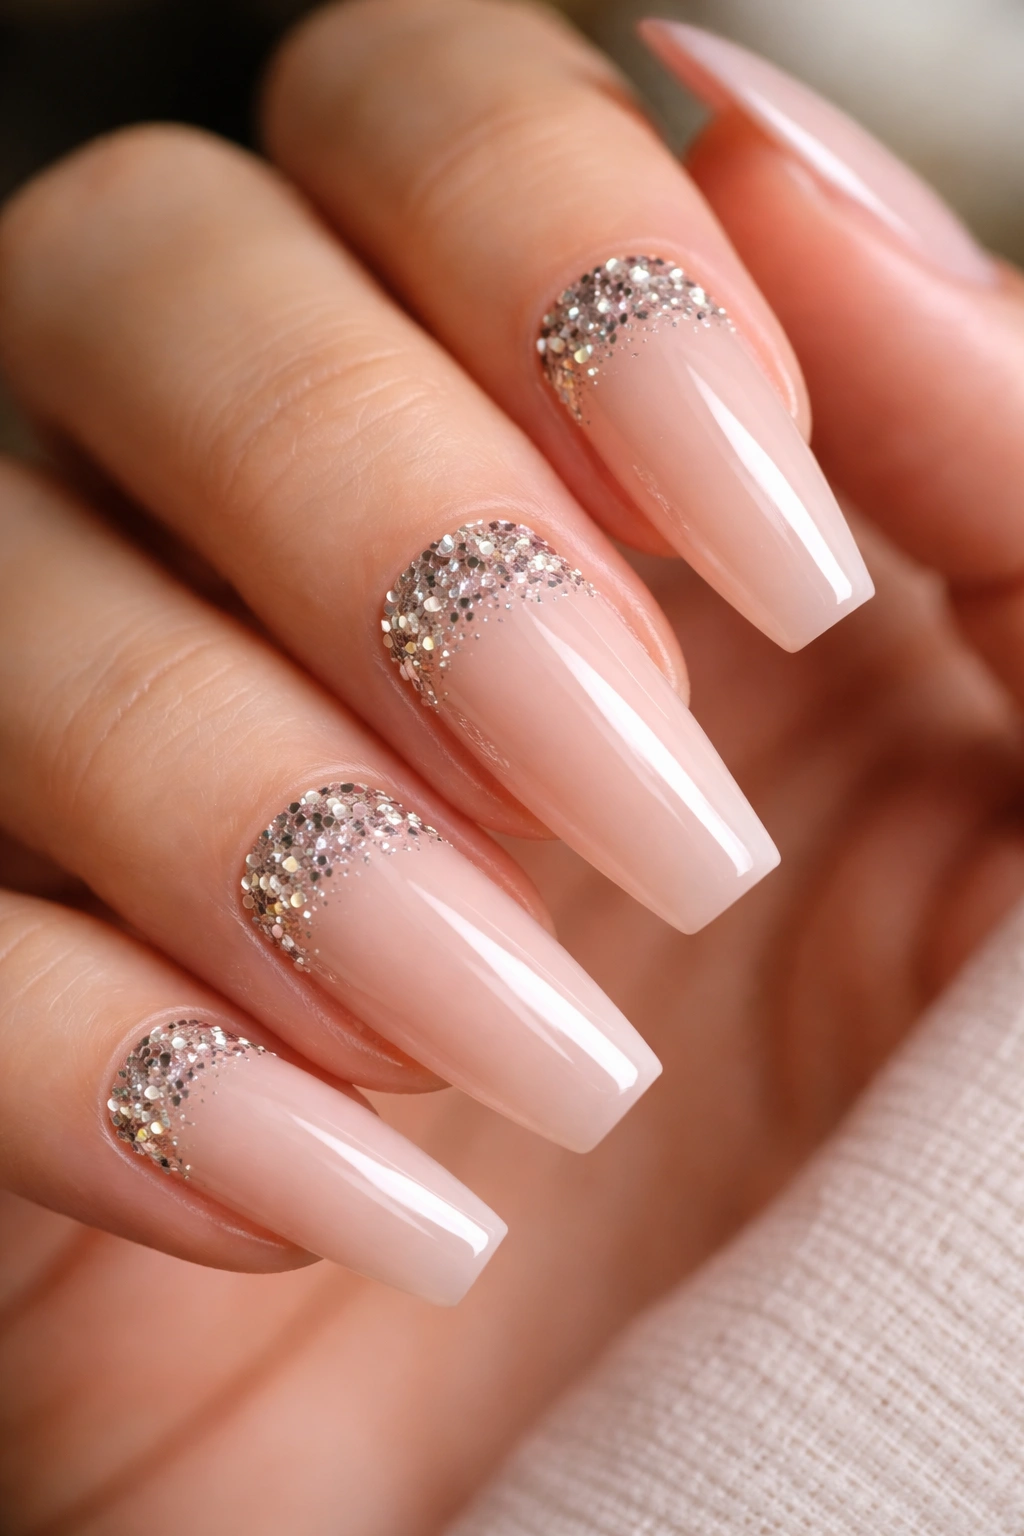
Why does cuticle glitter look so polished when full chunky glitter can look messy? Because the glitter stays in one place. The nude base does the quiet work, and the sparkle acts like jewelry at the root of the nail instead of swallowing the whole design.
A good nude for this set should match your skin tone within one or two shades, not sit on top of it like correction fluid. Then place chunky glitter in a crescent at the cuticle line, fading upward by only 4 to 6 millimeters. Keep the rest of the nail clean.
That tight placement matters.
Placement that keeps it sharp
Chunky glitter near the cuticle works best when the pieces vary a little in size but stay in one color family. Try champagne, pale gold, iridescent nude, or rose gold. If you mix silver hex glitter, rainbow flakes, and neon confetti on the same nail, the design loses control.
There’s a practical upside too. When glitter sits low on the nail, chips at the tip are less obvious. That makes this one easier to wear through daily life—typing, opening cans, digging through a tote bag full of nonsense.
If you want more shape definition, leave a hairline of nude between the glitter and the cuticle. That tiny negative-space border keeps the manicure from looking bulky at the base.
4. Black Coffin Nails with Holographic Glitter Tips
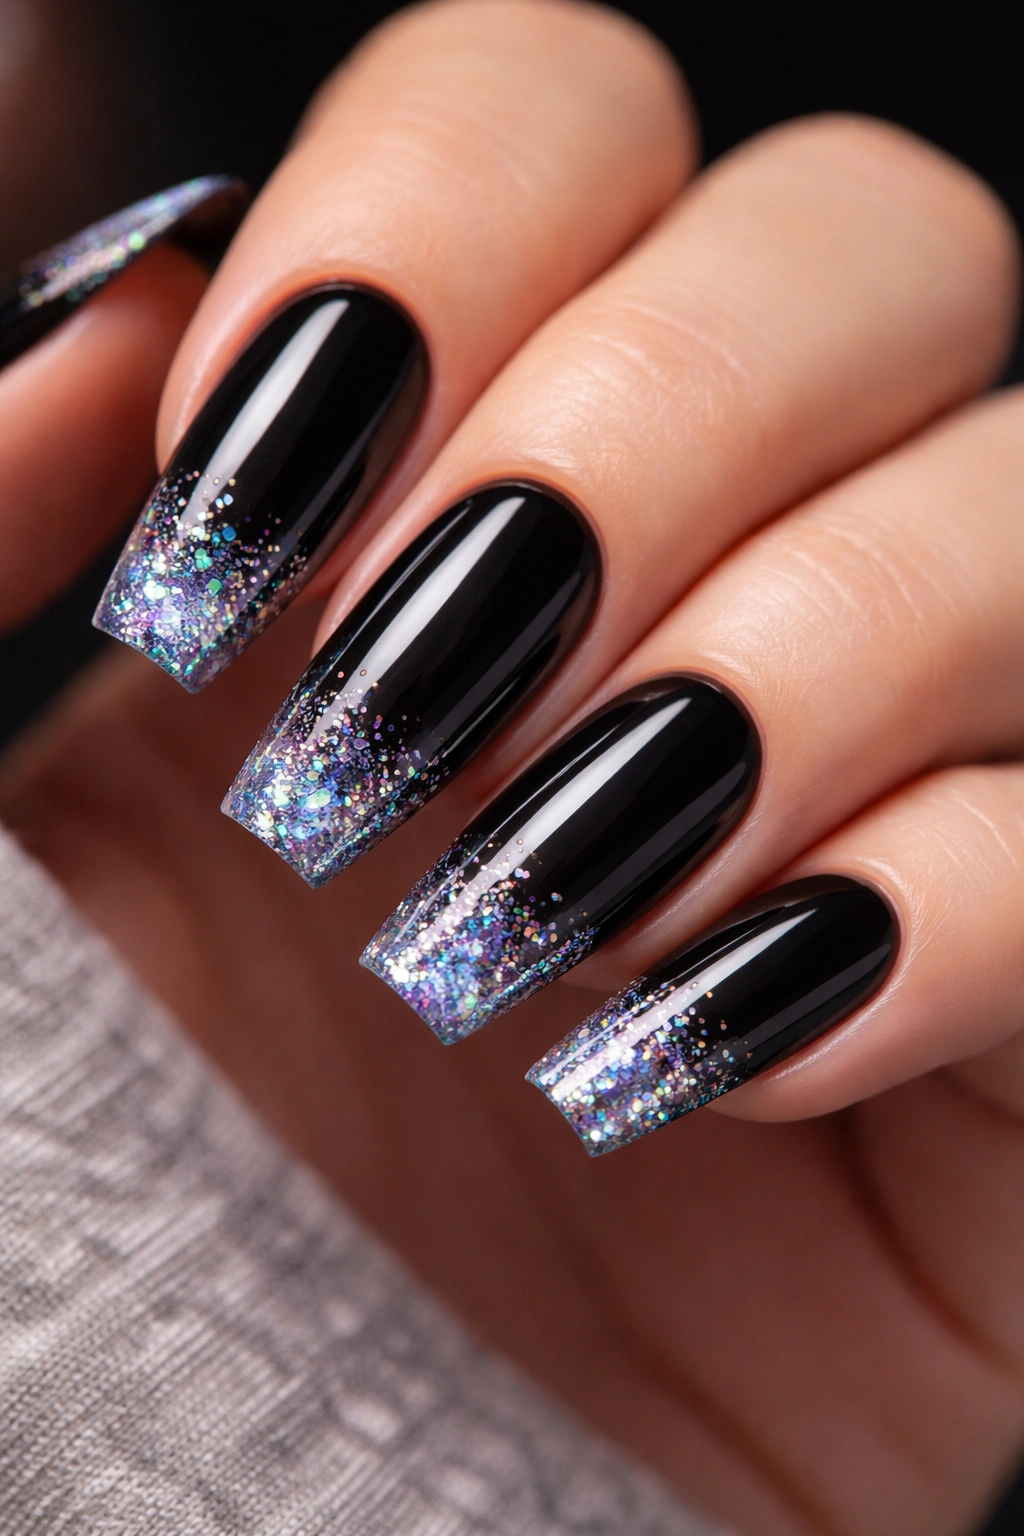
I once watched a black-and-holo coffin set change color under three different lights in one evening—white in daylight, rainbow under restaurant lighting, almost gunmetal in the car. That’s the appeal here. You get drama from the black base and movement from the holographic tip.
The trick is using holographic glitter only where it earns attention. Tips are the right call. A black full-cover nail with holo all over can look muddy, because the dark base swallows some of the prism effect. Put that holo at the end of the nail and the light has room to bounce.
A thin French-style arc works, but I like this design better as a deeper glitter tip, around one-fourth of the nail length. On a coffin shape, that wider band reinforces the flat edge and makes the taper look sharper.
A few details make or break this set:
- Choose a true black base, not charcoal. Gray weakens the contrast.
- Use holographic micro-glitter or small hex pieces. Oversized chunks can look rough at the edge.
- Seal the tip twice. Glitter at the free edge takes the hardest wear.
- Skip extra art on top. Black and holo already carry the set.
Under flash, this manicure goes almost electric. Under softer light, it reads sleek and dark. That range is why people keep coming back to it.
5. Milky White Coffin Nails with Opal Glitter Veils

This one is quieter. Not boring—quiet. There’s a difference.
Milky white has a soft blur to it, and opal glitter works because it doesn’t shout from ten feet away. You notice it when the hand turns, when the nail catches a side angle, when daylight pulls blue, pink, and green out of the same surface. On a coffin shape, that subtle shift feels cleaner than a heavy rainbow glitter mix.
I like this design best on medium-long nails with a slightly softened coffin tip rather than an aggressive sharp edge. The milkiness gives the manicure a smooth, cloudy backdrop, and the opal pieces look suspended inside it if they’re layered under builder gel or encapsulated acrylic. Top-layer glitter can still work, though it gives more texture and less depth.
Use restraint with the white. Too opaque, and the nail starts to look flat. Too sheer, and every line underneath shows through. The sweet spot is a semi-sheer milk bath effect where the free edge is faintly visible.
One accent move works well here: a single nail with a denser opal concentration near the center, almost like crushed shell. I would stop there. This is not the set for gems, studs, and chrome outlines. Leave it airy.
If you wear pearl jewelry, icy rings, or soft knits, this manicure slips right in without fighting anything else on your hand.
6. Burgundy Jelly Coffin Nails with Red Foil Flakes

Unlike classic red glitter nails, burgundy jelly with foil has depth. You’re not looking at sparkle sitting on top of the nail. You’re looking through tinted glass at flashes underneath, and that layered look suits coffin nails in a big way.
A jelly base should stay translucent. That’s what gives the manicure its candy-glass feel. Burgundy is a smart choice because it has enough pigment to feel rich while still letting light move through. Then the red foil flakes break that color up with irregular shine, almost like tiny embers trapped in resin.
This is one of those designs that looks better in person than in a photo. Cameras flatten jelly polish. Your eyes don’t.
Who does this work for? Anyone who likes dark nails but wants more movement than a plain wine manicure. It’s strong without looking heavy. On medium-long coffin nails, the translucence also keeps the shape from feeling blocky.
Ask for foil placement that stays denser near the center and lighter at the sidewalls. That spacing lets the jelly base show through. If the tech packs foil edge to edge, you lose the stained-glass effect and end up with a red metallic nail, which is a different look.
I’d wear this one through colder months with gold rings and a square-neck sweater. Yes, that’s specific. Some sets ask for a mood.
7. Champagne Ombré Glitter on Long Coffin Nails

Champagne glitter is the grown-up cousin of straight gold. It has a softer metal tone, and on long coffin nails it reads smoother, less brassy, more skin-friendly.
Where the ombré should start
For the cleanest result, the glitter should begin dense at the tip and taper down past the midpoint in a soft haze. On long coffin nails, stopping at one-third can look abrupt because the nail gives you more room. Use that extra space.
A nude base with a beige or pink undertone works well here. Pure white under champagne can pull the glitter too yellow. A skin-toned base keeps the fade expensive-looking and gives the shine a little warmth.
Why long length matters
This is one design that likes room. The longer nail lets the ombré stretch, and that stretch is what makes the fade look smooth instead of rushed. If you wear your coffin shape short, switch to fine shimmer and a shorter fade band.
Quick guide:
- Best length: long
- Best base: beige nude, rosy nude, soft caramel nude
- Best glitter: fine champagne shimmer with a few slightly larger flecks
- Best finish: high shine, no matte top coat
One tweak I love: add a thin outline of champagne glitter along one sidewall on the ring finger only. It gives the set a little edge without breaking the soft ombré mood.
8. Clear Coffin Nails with Floating Silver and Iridescent Glitter
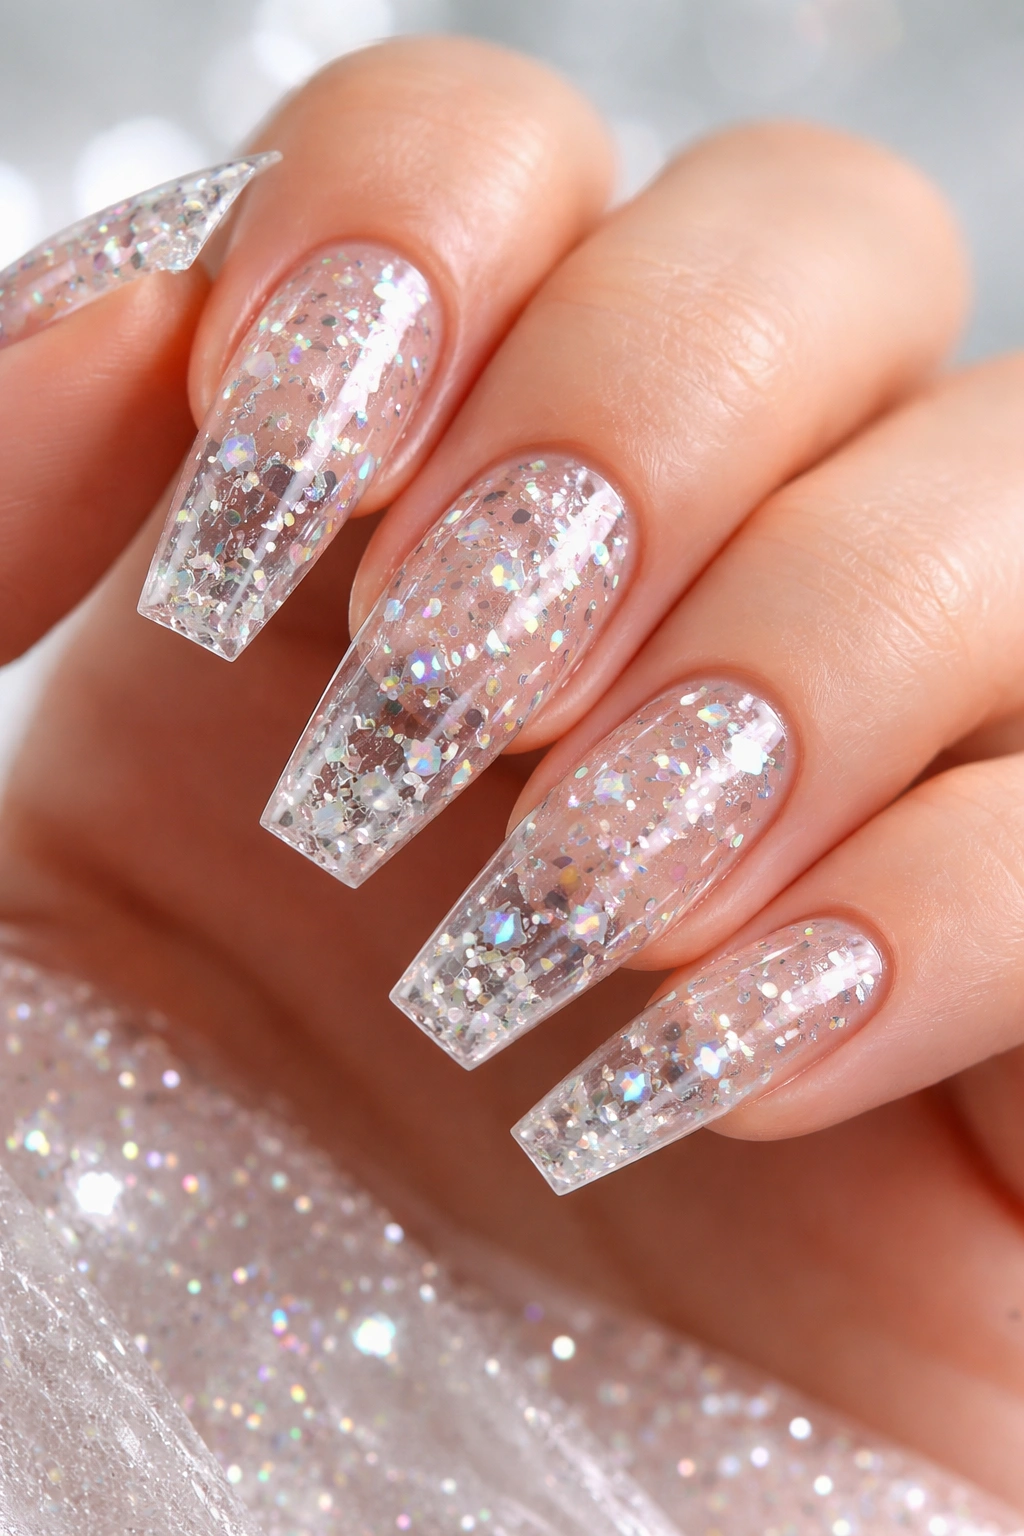
There’s something almost architectural about clear coffin nails. You see shape first, then sparkle trapped inside the structure. That layered, suspended effect is what makes this design so good.
A proper floating-glitter set should not look like loose confetti dropped into clear gel at random. The glitter needs spacing. Some pieces sit near the center, some toward the tip, a few close to the sidewall, but never packed so tightly that the nail turns cloudy. Think air between the sparkle.
Encapsulation is what gives this style its depth. The glitter goes between layers of clear product, then gets filed smooth so the surface stays glass-like. If you can feel sharp edges through the top coat, the set needs more refinement.
Silver and iridescent pieces work well together because silver gives bright flash while iridescent glitter shifts color with movement. Keep the shapes small—micro hex, tiny shards, fine flakes. Bigger pieces can create awkward thickness, and coffin nails already need enough structure at the sidewalls to avoid snapping.
This manicure asks for maintenance, though. Clear nails show everything: lifting, trapped bubbles, even a slightly messy underside. If your nail tech is meticulous, the result looks slick. If not, clear sets can expose every flaw. No place to hide.
9. Emerald Green Coffin Nails with Gold Flecks
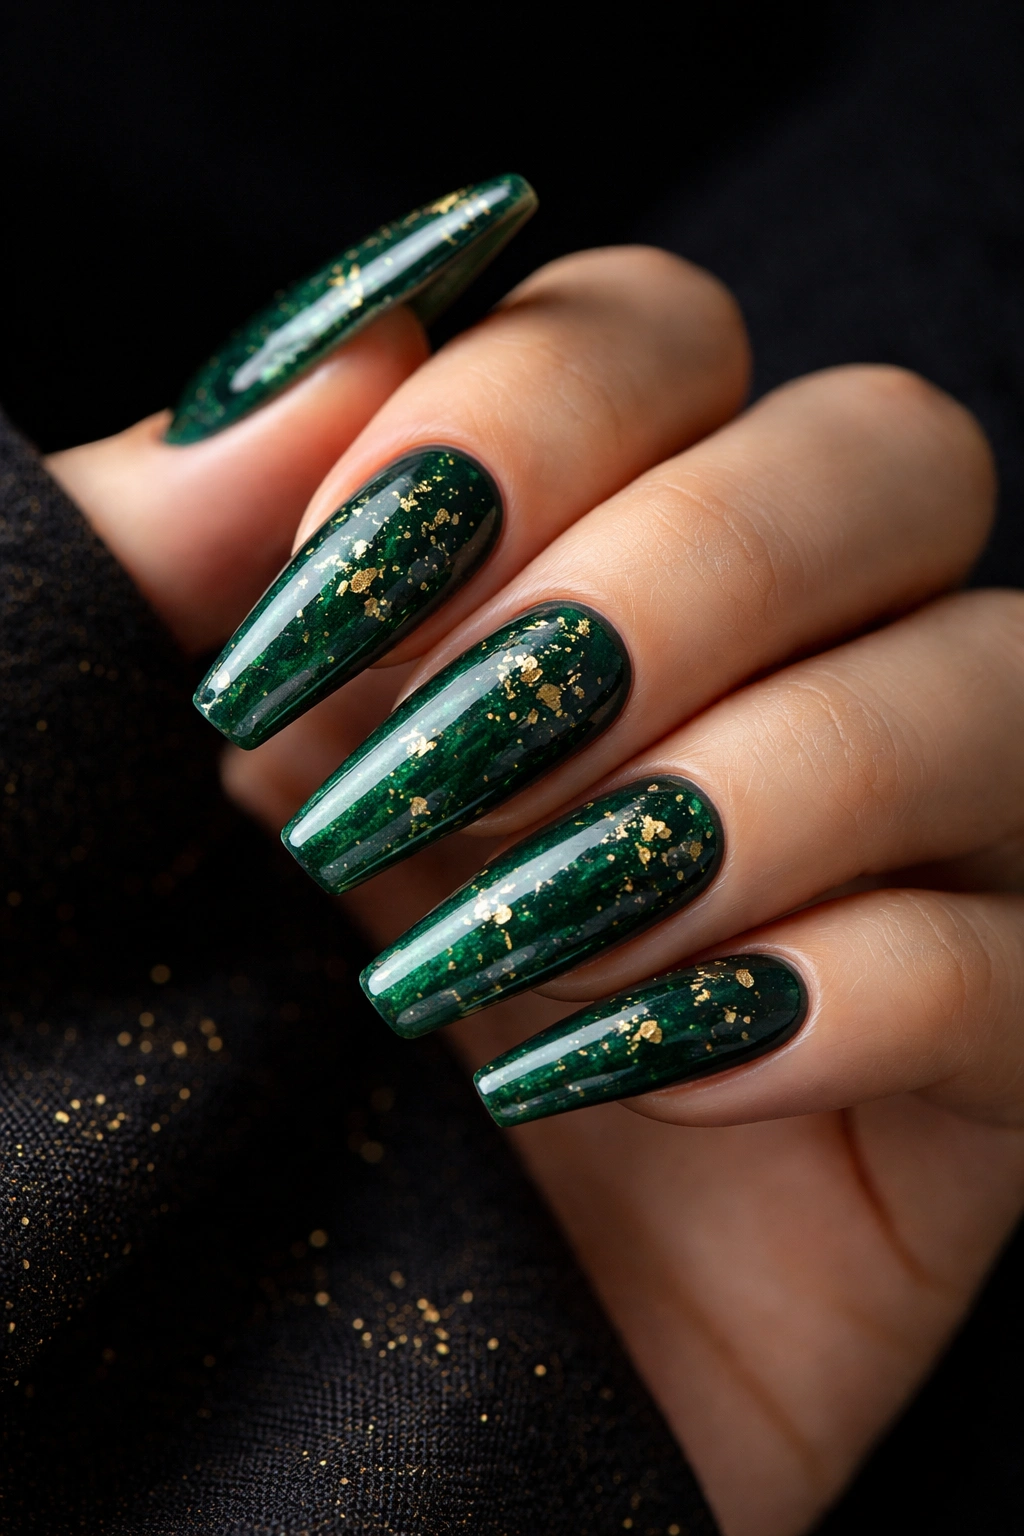
Emerald and gold can go cheap fast. That’s the risk. Use the wrong green, throw in oversized gold glitter, and the manicure starts looking like a holiday decoration.
Use the right shades, though, and it’s one of the richest glitter coffin nails you can wear.
The green should have depth—closer to jewel-tone emerald than grassy lime. Then the gold needs to come in as scattered flecks or foil fragments, not a dense metallic coat. Those broken flashes look more like mineral shimmer inside stone, which keeps the set grounded.
Why the color pairing works
Green sits cool. Gold brings warmth. On a coffin shape, that tension makes the taper stand out, because your eye catches both color and light at once. I like this set best with a glossy finish and at least one accent nail that is mostly emerald with only a whisper of gold near the tip.
Try a dark translucent base if you want more dimension. A jelly emerald with foil inside looks deeper than a flat cream green with glitter on top. And if you wear gold rings often, this set ties into them without feeling matched to death.
One caution: keep cuticles clean and shape sharp. Dark green shows every wobble in the outline.
10. French Tip Glitter Coffin Nails with Razor-Sharp Lines
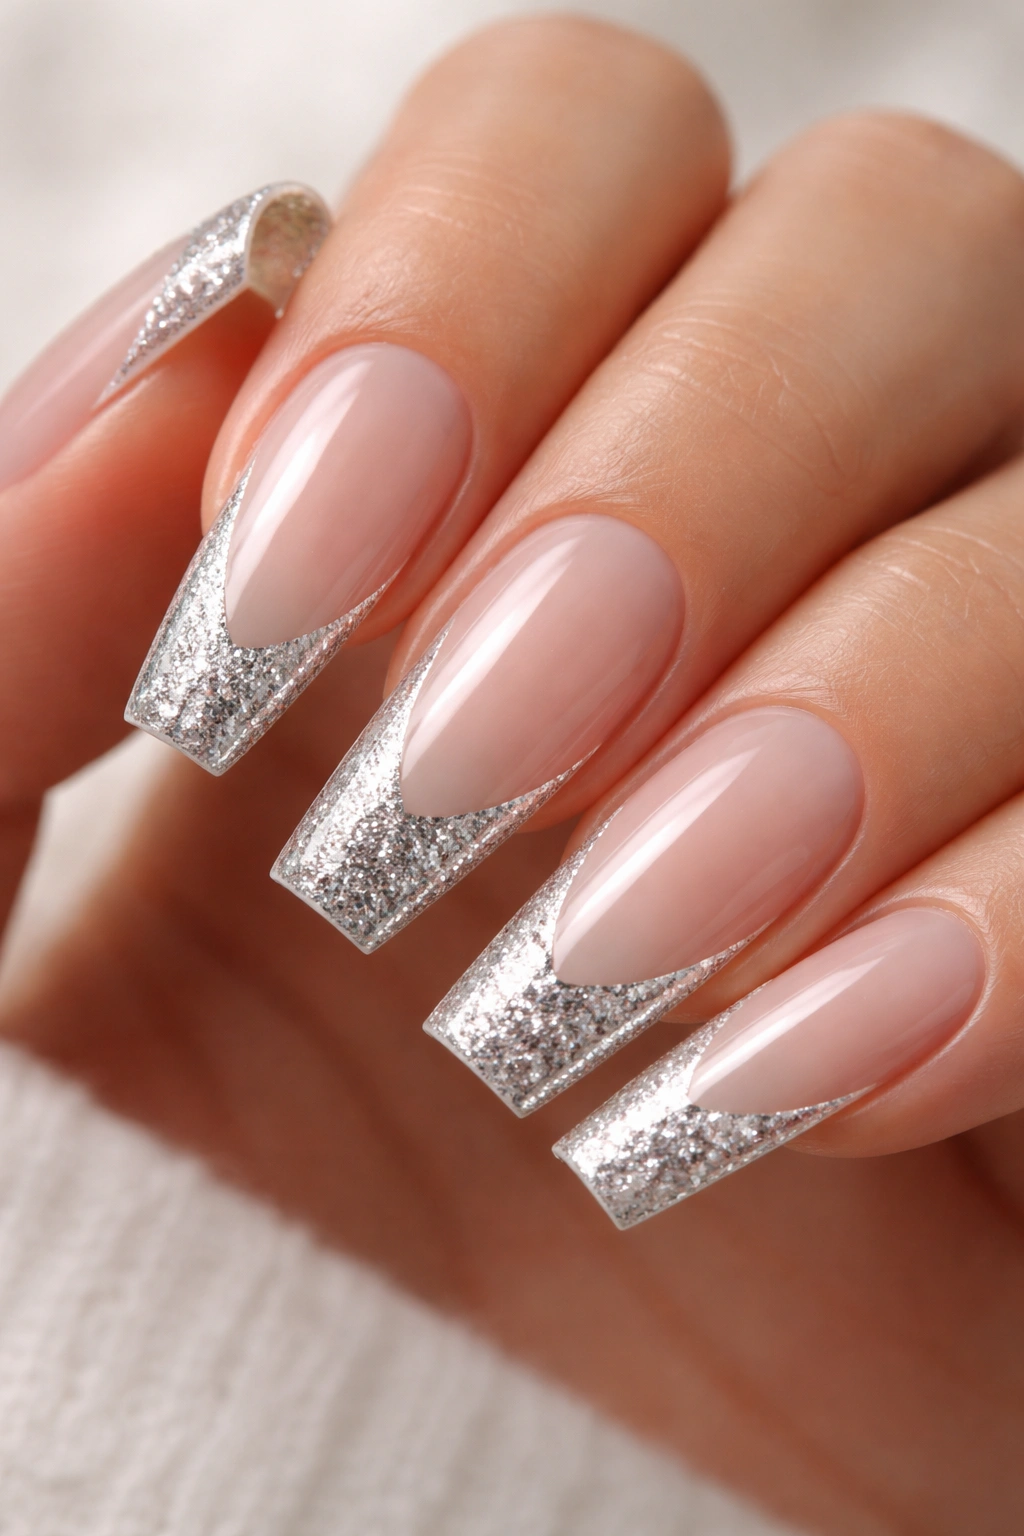
French tip glitter coffin nails work because they give glitter boundaries. That’s the whole charm. You get shine, but it’s locked into a crisp shape instead of washing across the nail.
A coffin tip already has that squared-off end, so the French line can sit flatter and wider than it would on an almond nail. I like a deep smile line here, almost halfway between a classic French and a color-block tip. Fine glitter works for a sleek finish. A blended mix of fine and medium glitter gives more texture and flash.
There are three strong ways to wear this one:
- Silver glitter tips on a milky pink base for a cool, clean finish
- Champagne or rose gold tips on a beige nude base for warmth
- Iridescent tips on a sheer white base if you want a frosted effect
Skip thick smile lines with chunky glitter. They can look lumpy from the side, and a coffin nail needs that side profile to stay tidy. Ask for the line to be painted first, then packed with glitter in thin layers so the edge stays crisp.
I keep coming back to this design because it wears well. Grow-out looks less harsh than full glitter. Tip chips can be patched. And the set still gives you that sparkly hit every time your hands move.
11. Lilac Chrome Coffin Nails with Stardust Glitter
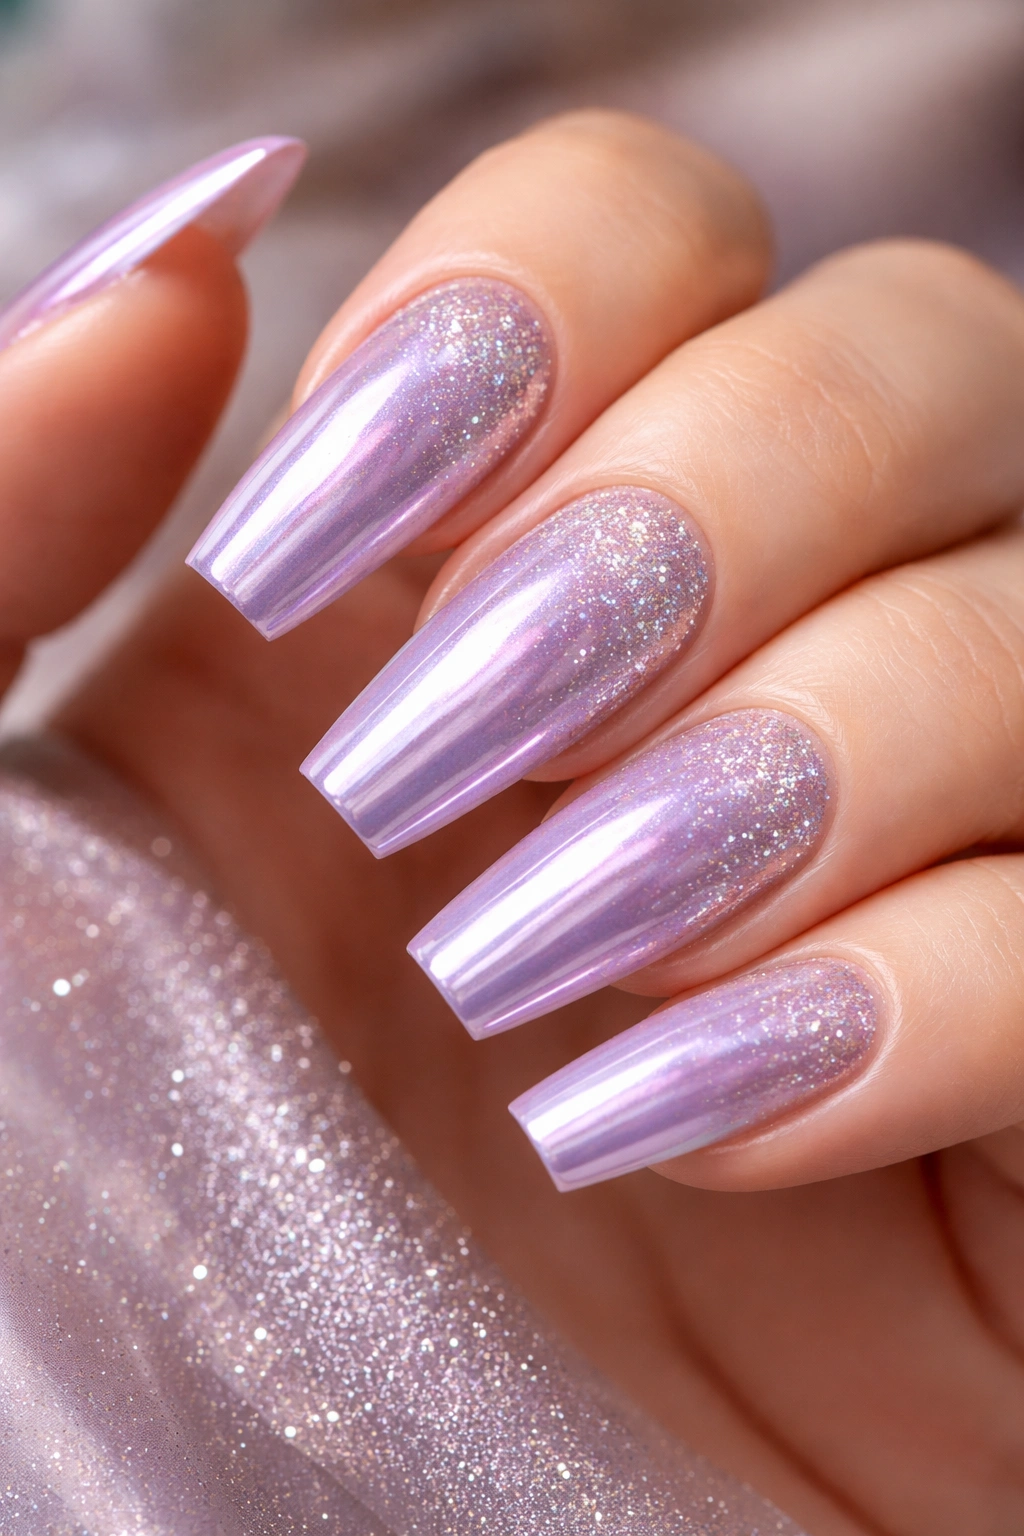
Some manicures want full attention the second you see them. This one works in stages. First you catch the lilac chrome sheen. Then you notice the stardust glitter laid over it—fine, scattered, almost dry-looking compared with the slick mirror base underneath.
That contrast is what makes the set interesting.
Chrome alone can feel too smooth, almost sterile on some coffin shapes. Stardust glitter breaks the surface visually without ruining the reflection. You still get the metallic glow, but the manicure feels more lived-in, less machine-finished.
I’d use this on medium coffin nails rather than extreme long lengths. Lilac already softens the look, and the shorter shape keeps the chrome from drifting into costume territory. A pale violet base under the chrome powder gives the color body, while a silver-lilac micro glitter dusted over the top adds that soft-speckled effect.
You do need a patient nail tech for this one. Chrome shows every dent, ripple, and patchy cure. The surface has to be smooth before powder goes on. Then the glitter layer needs restraint; too much and you bury the chrome payoff you spent time creating.
If silver feels cold and pink feels predictable, lilac chrome with a dusting of sparkle sits in a nice middle zone.
12. Matte Pink Coffin Nails with a Glitter Side Sweep
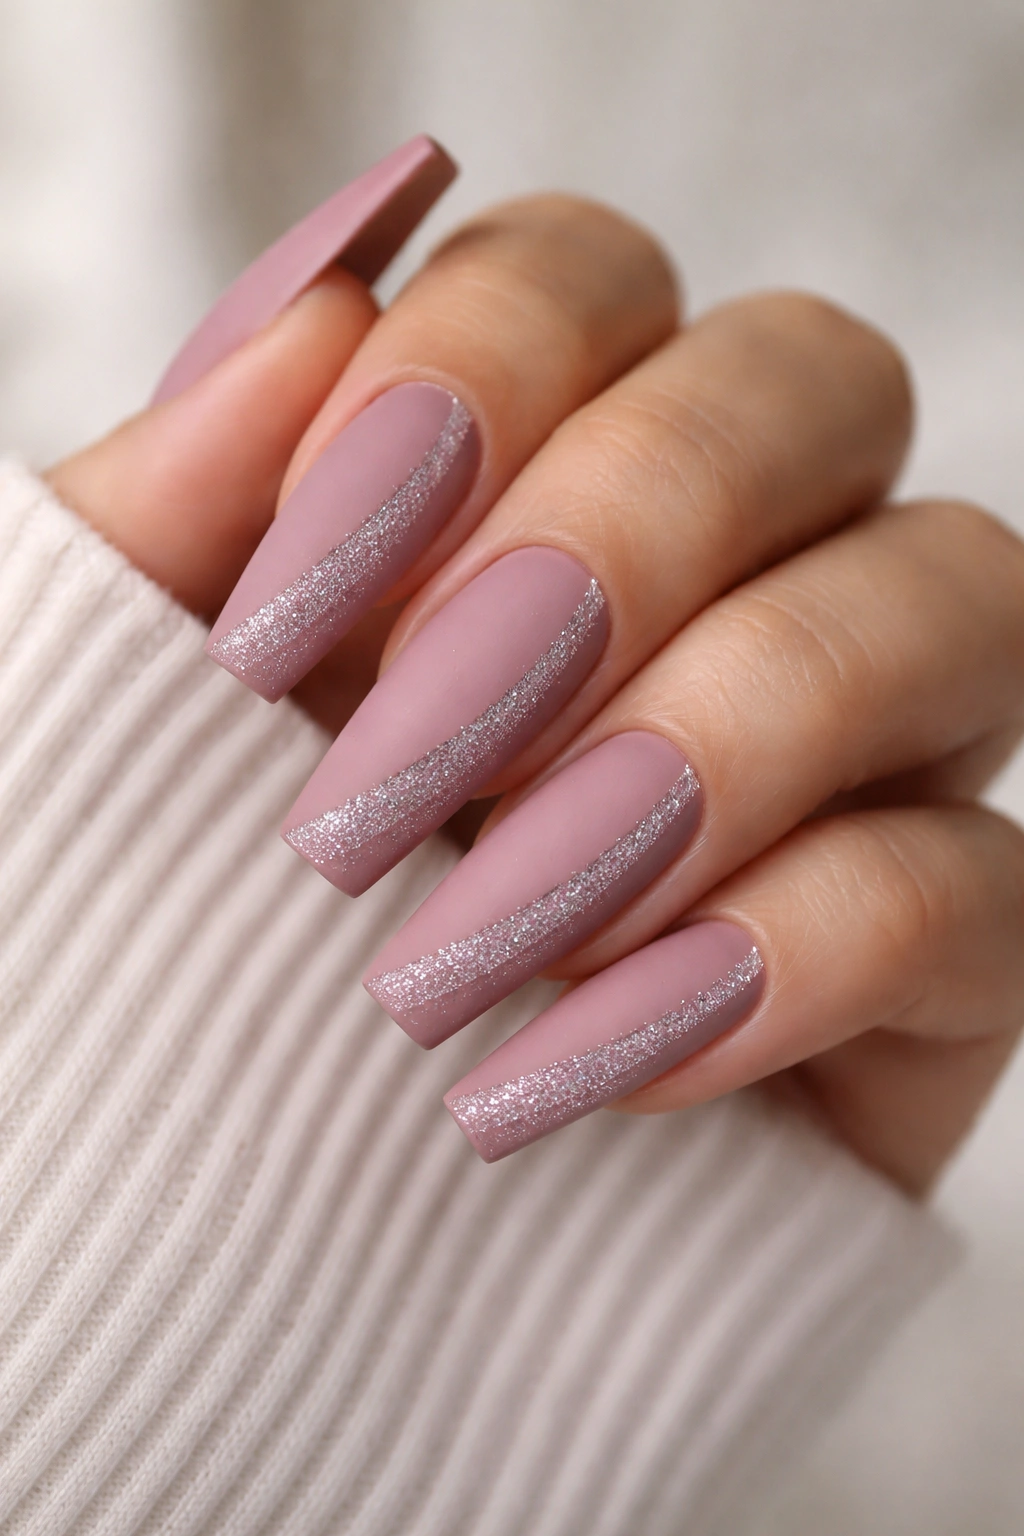
Matte and glitter on the same nail sound like they should fight each other. Sometimes they do. On a coffin shape, though, a diagonal side sweep of glitter over a matte pink base can look sharp because the texture contrast follows the long line of the nail.
Picture a dusty pink or mauve base with no shine at all. Then run a diagonal ribbon of fine glitter from one side of the cuticle down toward the opposite corner of the tip. That angled movement makes the nail look longer and slimmer.
What makes this design land:
- The pink needs body. Too pale and the matte finish looks chalky.
- The glitter band should stay narrow. Around 2 to 4 millimeters is enough.
- Use fine glitter. Chunky pieces sit awkwardly against matte top coat.
- Leave the rest of the nail untouched. Resist the urge to add dots, gems, or foil.
I like this set for people who want glitter but do not want a shiny manicure from edge to edge. Matte softens the whole hand. The sparkle line adds direction. It feels a little graphic, a little soft, and less expected than the usual ombré fade.
One practical note: matte top coat marks faster than gloss. Keep cuticle oil off the nail surface if you want that velvety finish to stay crisp.
13. Deep Navy Coffin Nails with Constellation Glitter
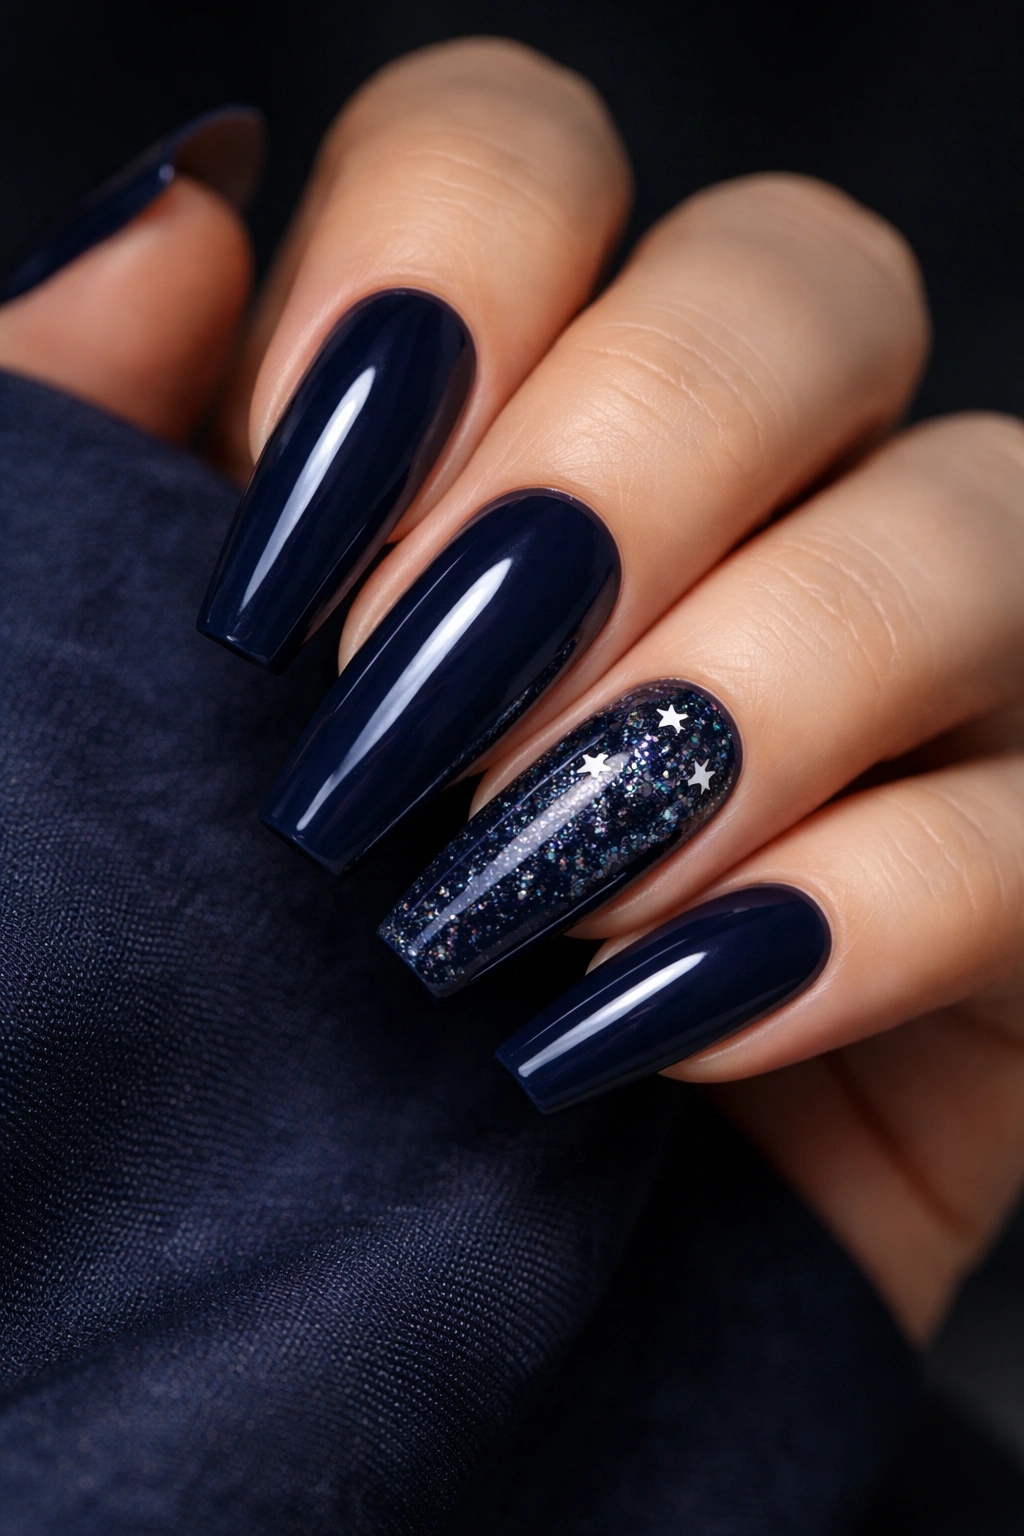
Navy can do things black cannot. It still looks dark and sleek, but it leaves room for silver glitter, tiny starbursts, and scattered reflective dots to show up with more depth. Black can flatten that detail. Navy lets it breathe.
Building the night-sky effect
Use a deep blue gel—almost ink-dark, but not pure midnight black. Then place fine silver glitter in clusters rather than covering the whole nail. A few tiny star decals or hand-painted white star points can work, though I’d keep them to one or two accent nails. Too much literal artwork turns the manicure costume-heavy.
Micro reflective glitter is a strong choice here. Under low light, it looks subtle. Under direct flash, it fires back hard. That shift gives the set some surprise.
Small choices that help
- Keep the background glossy, not matte
- Use silver, white, or icy blue accents instead of mixed rainbow glitter
- Concentrate the sparkle near the upper half of the nail on at least two fingers
- Leave one nail mostly plain navy for balance
I’ve seen this design done with moons, stars, glitter, foil, stickers, and rhinestones all at once. It’s too much. A night-sky manicure works best when there’s still darkness left on the nail.
14. Icy Blue Coffin Nails with Snow-Glass Glitter
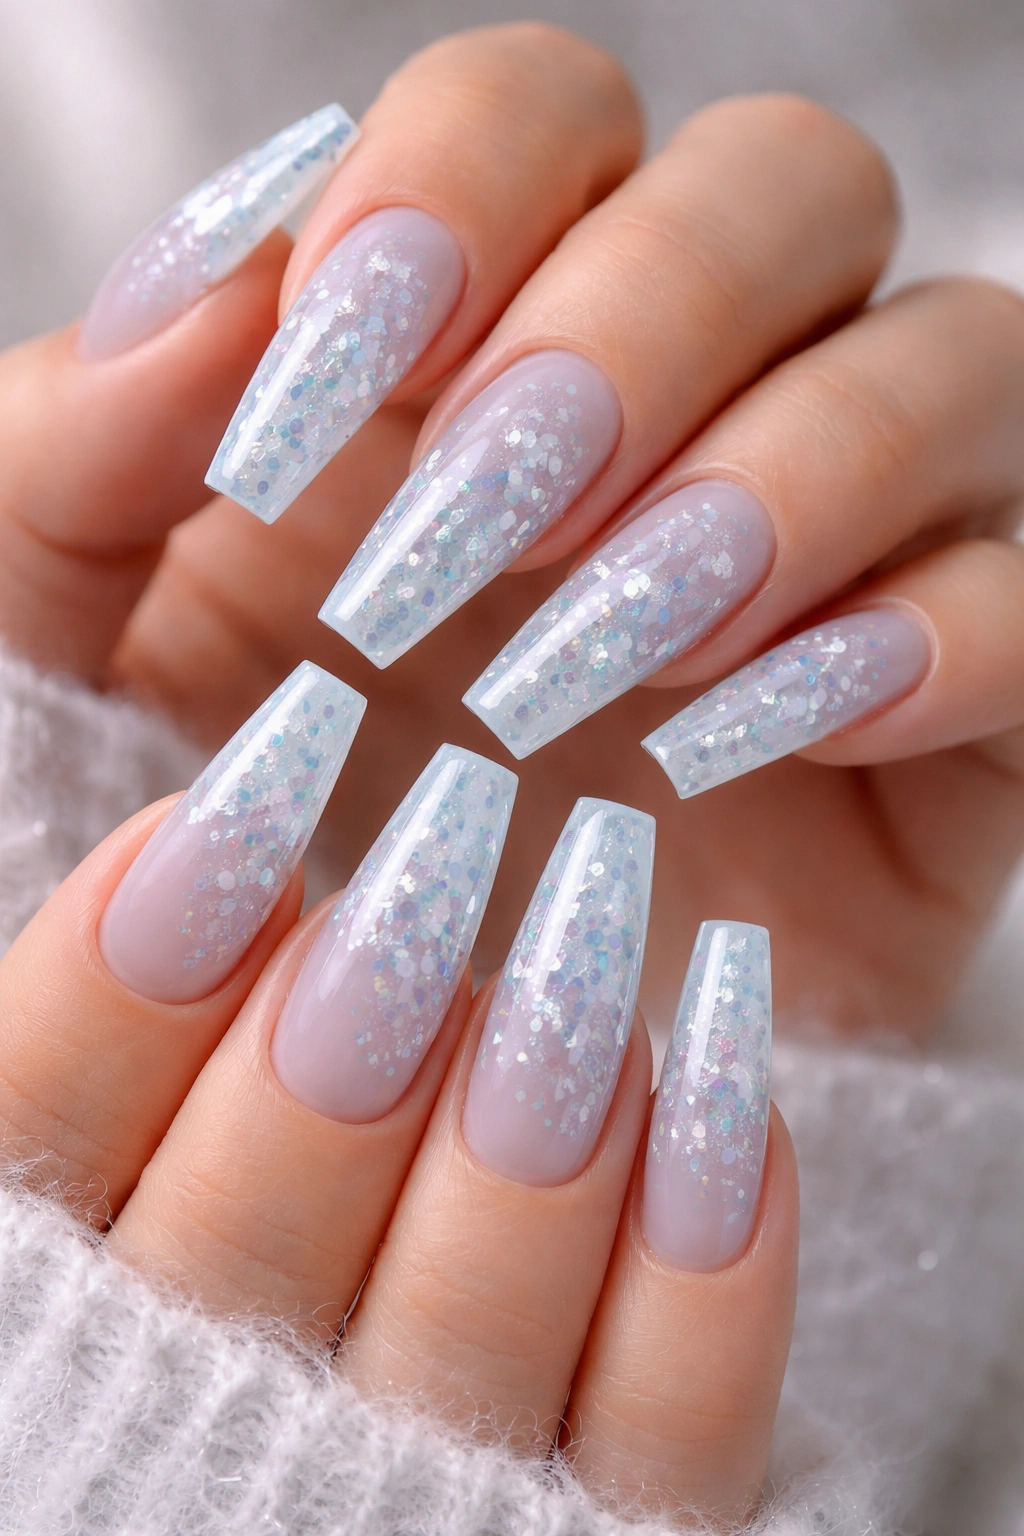
Cold-toned blue glitter nails can go juvenile if the shade is too sugary. An icy blue with broken, glass-like glitter looks cleaner because the color stays pale and the sparkle has sharper edges.
This style reminds me of crushed ice on a window ledge—soft blue underneath, then flashes of white-silver as the hand moves. On coffin nails, those angular glitter pieces echo the blunt tip in a way round shimmer doesn’t.
Use a semi-sheer ice blue base, then add irregular cellophane-style flakes or fine translucent shards under a smooth top layer. Encapsulation helps here. If those pieces sit on top, the texture can catch hair, fabric, and every knit sleeve you own.
Keep the palette tight: blue, pearl, silver. Skip rainbow glitter unless you want a louder finish. A touch of iridescence is enough.
This set also benefits from shape discipline. Ask for straight sidewalls and a neat square finish at the tip. With frosty shades, even tiny filing mistakes show up. Pale colors are unforgiving that way.
Wear this one when you want sparkle that feels crisp rather than warm. It pairs well with silver jewelry, gray knits, white shirts, and that clean, cold color palette some people never get tired of.
15. Gold Encapsulated Glitter in Extra-Long Coffin Nails
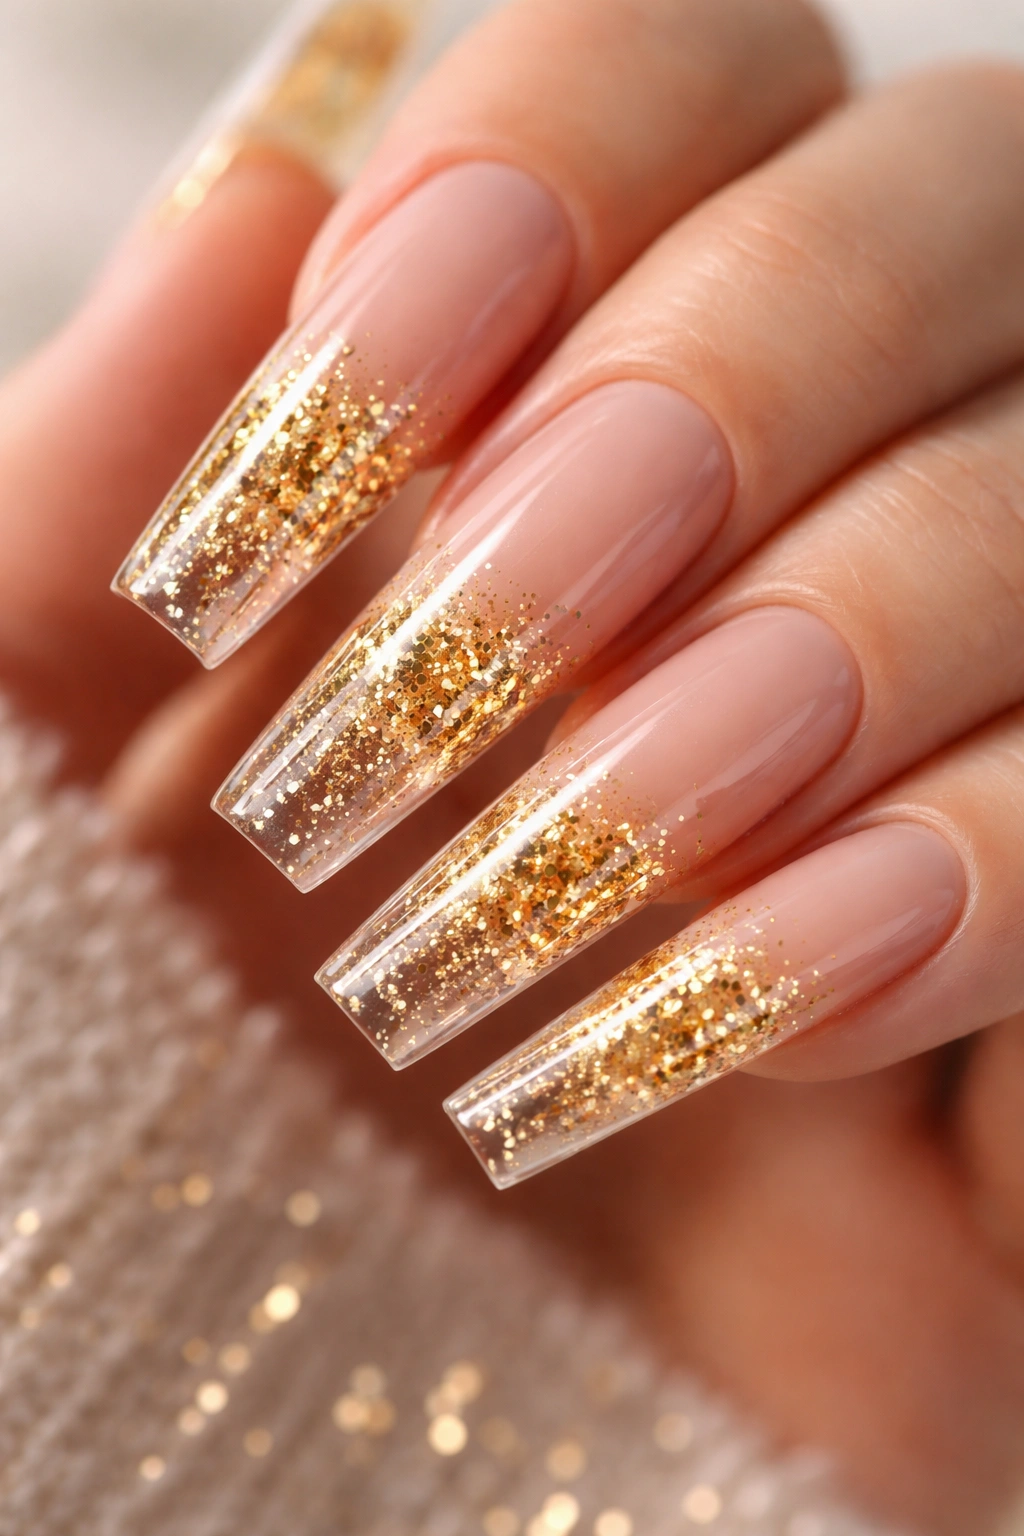
Extra-long coffin nails need confidence. They also need structure, because glitter packed into a long extension adds visual weight fast. When this design is done well, the result looks almost like a clear gold bar at the end of each finger.
Encapsulation is the key. Instead of laying glitter on top, the tech buries fine gold glitter, a few medium flecks, or foil fragments inside clear product so the nail looks deep and glossy rather than rough. That depth matters more on long lengths, where top-heavy glitter can otherwise look bulky.
A nude-to-clear transition at the nail bed keeps the set grounded. Full clear from cuticle to tip can work, but the grow-out gets obvious. A soft nude base fading into clear gold looks cleaner for longer and makes the extension feel attached to the hand rather than floating off it.
I’d save this look for people who already wear long nails well. Extra-long coffin shapes change how you type, grip, button, text, and open a can. You adapt, but there’s a learning curve. Worth it if you love the drama.
If you want the strongest version of this set, keep the gold tone slightly muted—champagne gold or antique gold—rather than loud yellow. The softer metal reads richer.
Keeping Glitter Coffin Nails Bright Between Fills
A glitter set can hide tiny scratches better than a flat cream manicure, but glitter coffin nails still need care. The sparkle does not save a lifting sidewall or a cracked tip.
Cuticle oil helps more than people give it credit for. Dermatology guidance on nail care keeps repeating the same practical point: removers and hand washing dry out the nail plate and surrounding skin. A drop of jojoba-based or squalane-based oil massaged into the cuticle twice a day helps the manicure look fresher and keeps the skin around the nail from turning ashy.
A few habits make a big difference:
- Wear gloves for dishwashing and cleaning
- Do not use your nail tip as a tool to pry stickers, cans, or package tabs
- File snags early with a fine-grit file instead of picking at them
- Book fills before the apex grows too far out, since a long coffin shape loses balance fast
- Ask for soak-off timing that makes sense for your system; hard gel, soft gel, and acrylic come off differently
One more reality check: glitter removal can be rough on natural nails if you switch sets often. Dense glitter polish and encapsulated designs usually need longer soaking, filing, or drilling than plain color. If your nails feel bendy afterward, take a break from full glitter coverage and wear a builder-base nude set for one cycle.
Final Thoughts
The best glitter coffin nails do not throw sparkle everywhere. They choose a lane—faded silver, cuticle glitter, floating clear glitter, deep jewel tones, sharp French tips—and let the coffin shape do half the work.
If I had to narrow the list, I’d point most people toward silver ombré, glitter French tips, milky white opal, and nude cuticle glitter first. Those four wear well, grow out gracefully, and still give you that flash when your hands move.
Then there are the mood sets—the black holo tip, the burgundy jelly foil, the extra-long encapsulated gold. Those are less about playing it safe and more about deciding that your nails get to be the loudest thing in the room. Sometimes that’s exactly the point.
