

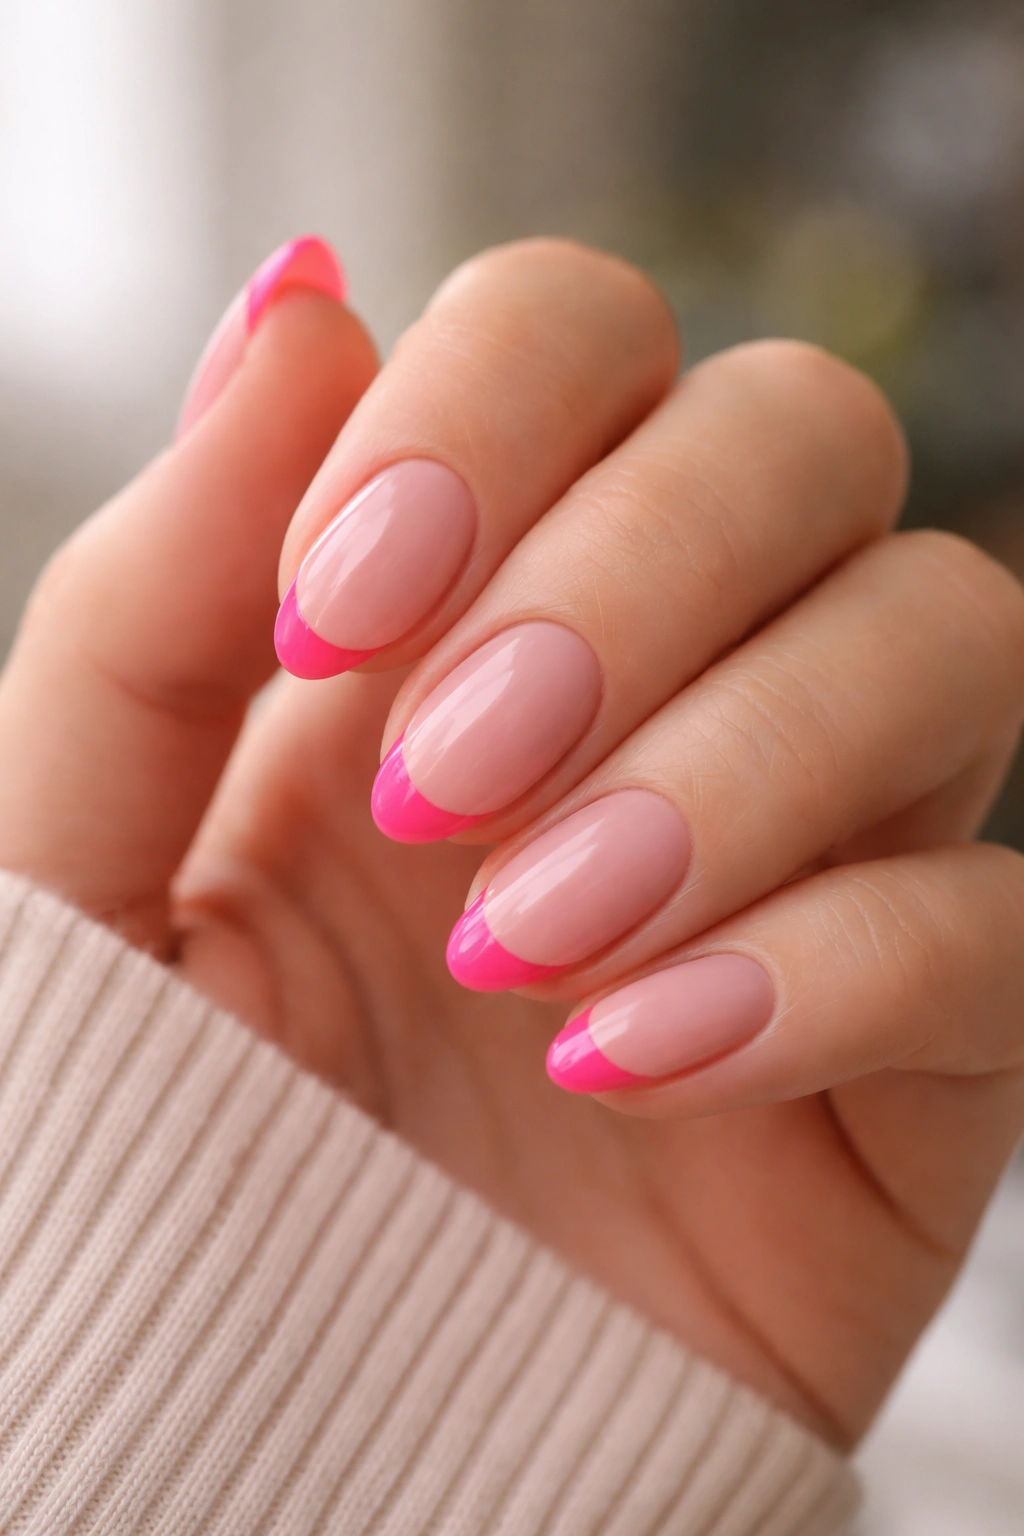
Short almond nails with a hot pink french tip occupy a particular aesthetic territory: bold enough to be noticed, shaped enough to look intentional, but short enough to wear every single day.
The combination sounds simple.
Getting it right isn’t — because the proportions matter more than most people expect, and a pink tip that’s even 1mm too thick or too thin changes the whole effect.
The almond shape earns its place here. Unlike a square nail, where the french tip runs straight across and can look blunt on shorter lengths, the almond’s tapered silhouette means the smile line curves gently inward. That curve gives the tip an organic quality, almost like it grew that way. On a nail that’s only 4 or 5mm long, that natural arc keeps the design from feeling like a tiny sticker slapped on the end of your finger.
Hot pink specifically — not baby pink, not bubblegum, not coral — does something genuinely different on a french tip. The saturation is high enough that even a thin 2mm line reads clearly without needing significant nail length. That makes this combination almost uniquely suited to people who want a designed nail without the maintenance headache of longer styles.
These 14 designs range from the most stripped-back single-line version to maximalist glitter-and-rhinestone variations. Some are easy enough to handle at home with a steady hand and a striping brush. Others are nail tech territory. Every one of them looks genuinely good on short almond nails — which is more than can be said for most nail art that looks sharp in photos but feels awkward in person.
Why Short Almond Nails and Hot Pink Make Such a Strong Combination
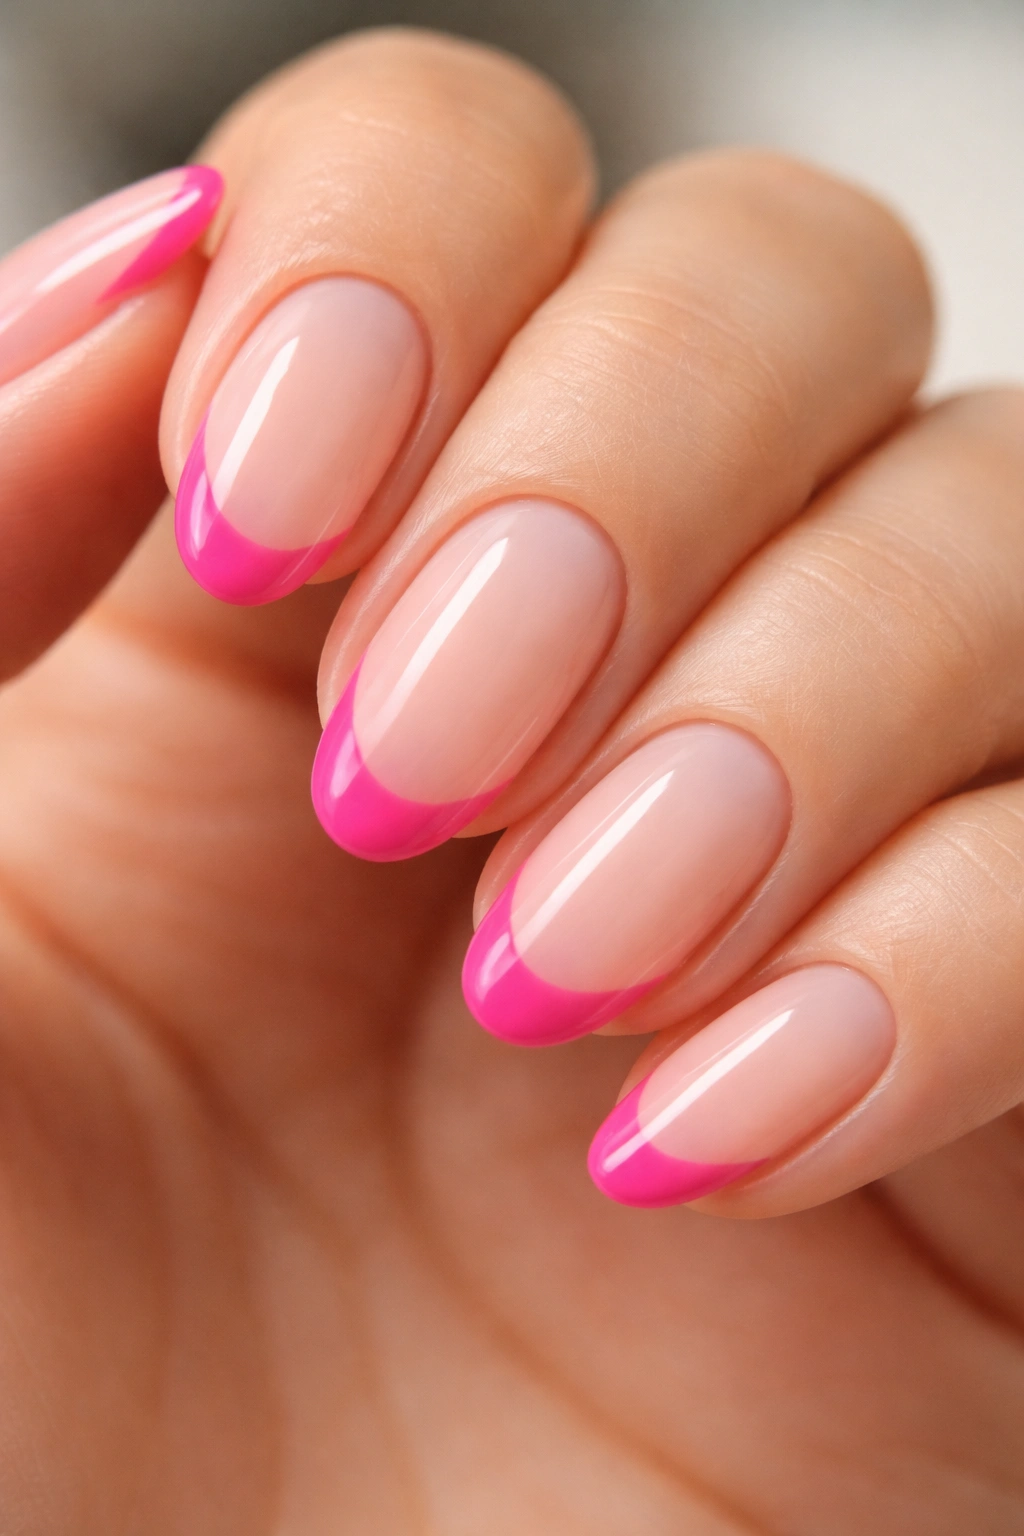
The almond shape — tapered sides, rounded pointed tip — does something for a french design that square and oval shapes simply can’t replicate. On a square nail, the french tip is a straight horizontal line. On an almond, it follows the nail’s contour in a slight upward curve called the smile line, and that curve reads as elegant even at shorter lengths.
Short almond nails, generally anywhere between 2mm and 6mm past the fingertip, sit in a sweet spot for this particular design. Long enough to show shape. Short enough to be practical. The french tip lands in the outermost 2-3mm of the nail, keeping proportions balanced without the tip dominating the nail bed.
Why Hot Pink Specifically
The original french tip uses white — because white creates the illusion of a longer, naturally shaped free edge. Hot pink doesn’t pretend to be a natural nail. It announces itself. That shift in intent is what makes the hot pink version feel more contemporary; you’re not mimicking a natural look, you’re designing one.
The specific shade matters too. A neon or electric pink — in the saturated magenta range — has enough contrast against a sheer nude or skin-tone base to work on shorter nails where a softer pink would disappear. With short almond nails, you want that contrast. It creates definition at the tip and emphasizes the almond’s silhouette at the same time.
A Quick Note on Skin Tone
Hot pink works broadly across skin tones, but the shade you choose shifts the look. On deeper skin tones, a neon electric pink hits harder and looks intentional. On lighter tones, a slightly warmer fuchsia reads as bold without overwhelming. If you’re choosing between two similar pinks, hold them against your inner wrist rather than the back of your hand — the inner wrist is a truer match for your nail bed skin.
Getting the Tip Proportions Right Before You Start
The tip width ratio matters more than most guides acknowledge.
On a short almond nail, the sweet spot for a french tip is roughly 1.5mm to 3mm wide. Narrower than 1.5mm and the color barely registers — it looks more like a colored edge than a french tip. Wider than 3mm on a short nail and the tip starts to overwhelm the nail bed, losing the elegant quality that makes the almond shape work.
The smile line shape is the second variable. For almond nails, the smile line should follow the contour of the tip — a gentle convex curve that mirrors the nail’s natural arc. A flat, straight-across tip looks right on a square or coffin nail but feels off on an almond. If you’re painting these yourself, map out the curve with a thin striping brush before committing to color.
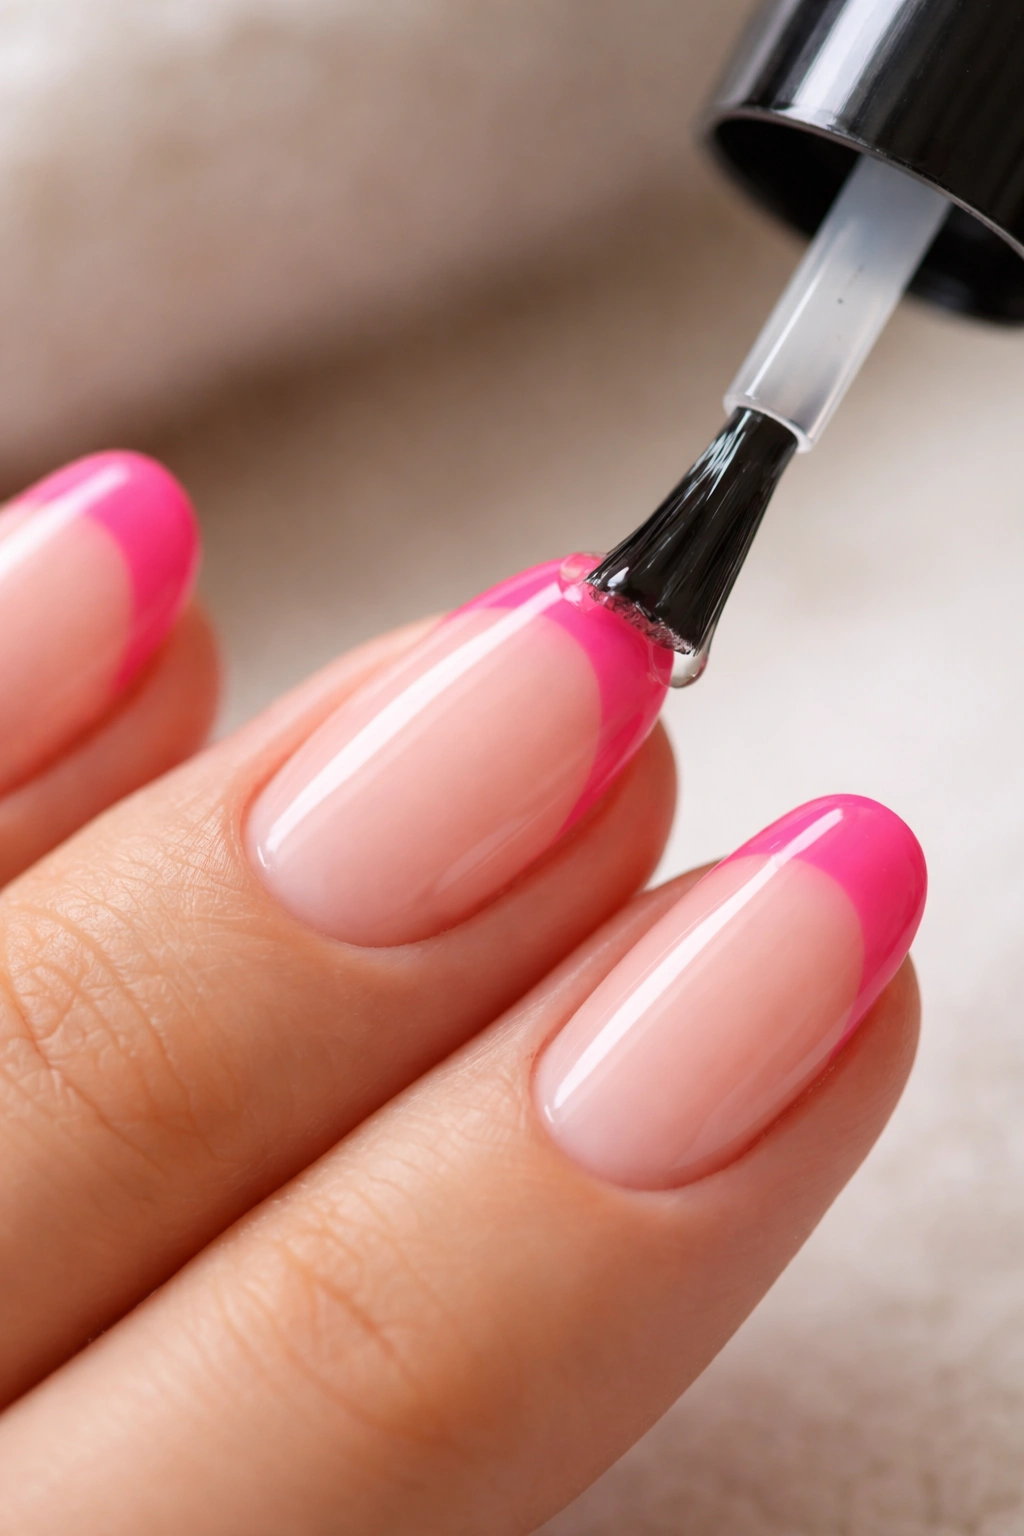
Gel vs Regular Polish for This Look
This is worth thinking through before you start. Regular hot pink polish on the french tip tends to bleed or feather along the edges, especially on a curved smile line. A gel formula stays exactly where you put it, cures hard, and gives you the crisp edge that makes a short french tip look intentional rather than sloppy.
Committed to regular polish? Use thin coats and seal the tip’s edge on the underside of the nail — run the brush along the very tip edge to lock the color in place. That one extra step adds a few days to your wear time.
Choosing the Right Base
The base coat or base color affects how the hot pink tip reads visually. A sheer nude base makes the pink tip pop with high contrast. A white or milky base softens the contrast slightly — the tip still reads hot pink, but it’s a little less electric. Clear or bare nail creates the cleanest, most modern look overall. Pick based on how much contrast you want, not what looks prettiest in the bottle.
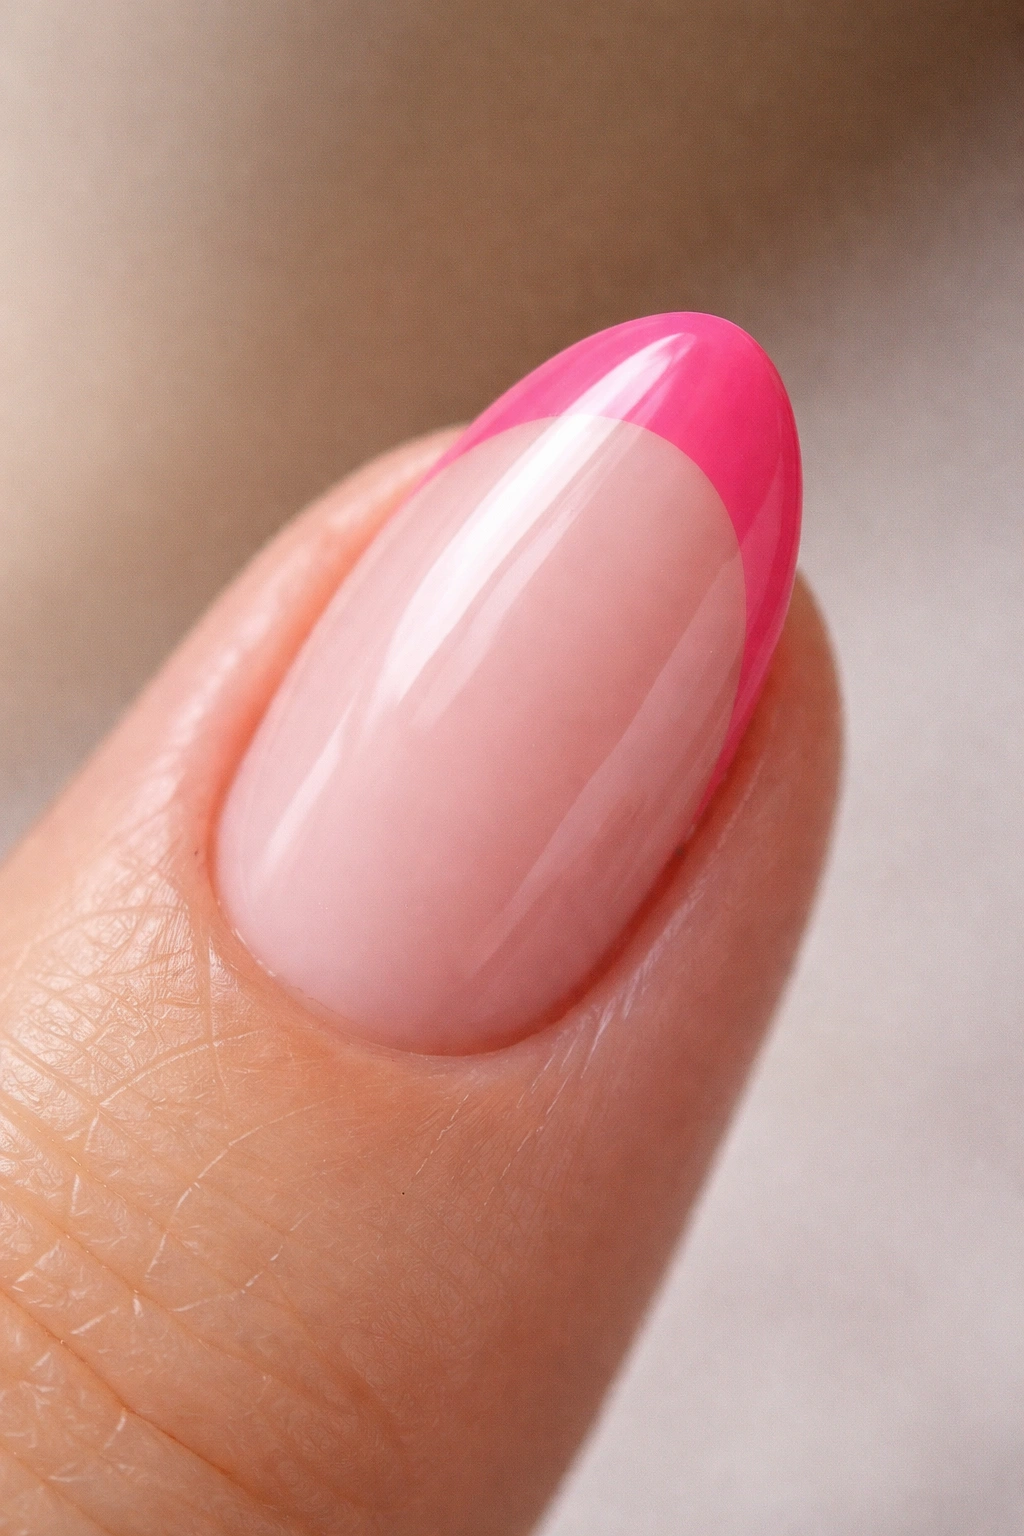
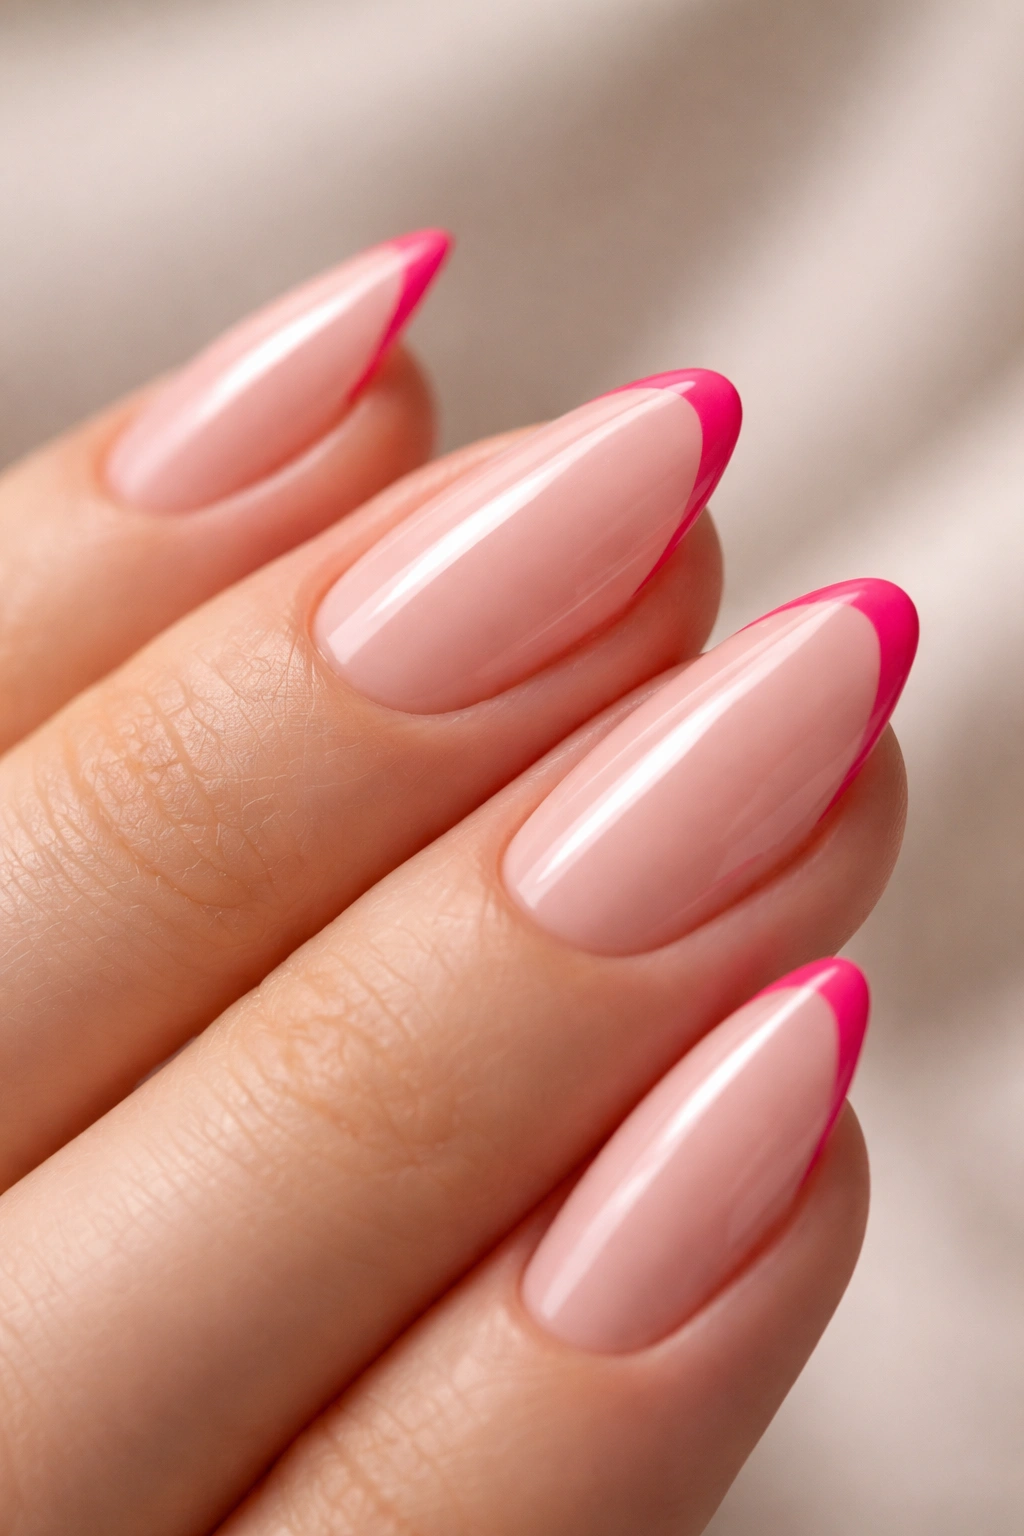
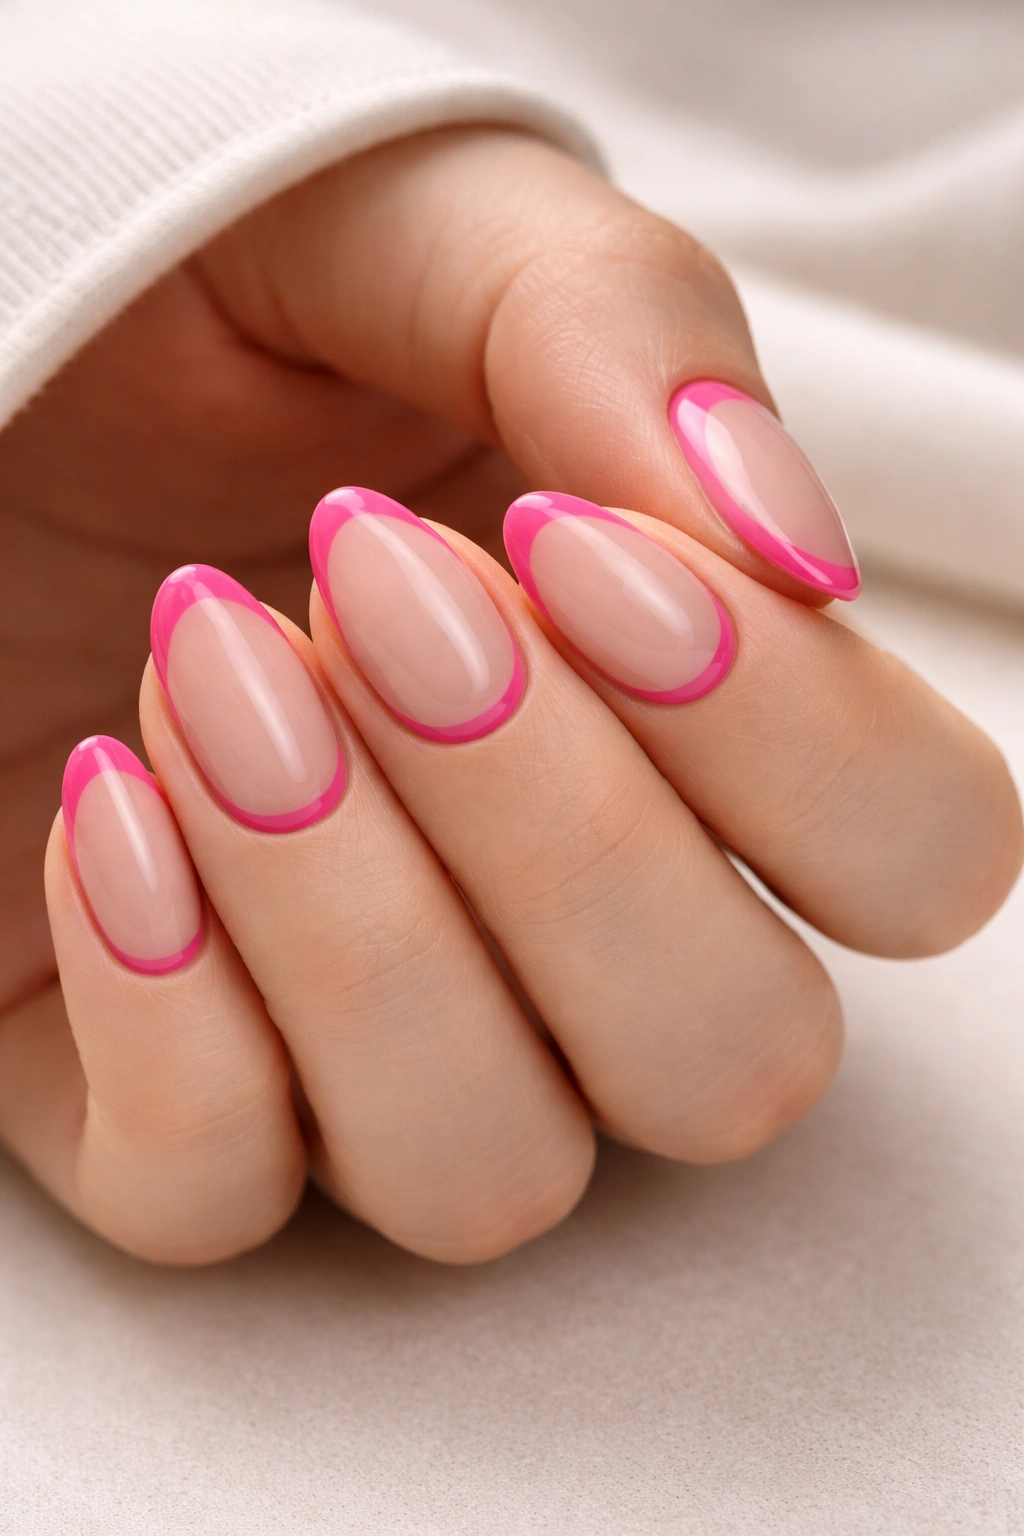
1. Classic Hot Pink French Tip on a Bare Almond Nail
The most minimal version of this whole category — and, honestly, often the best one.
A classic hot pink french tip on a bare or sheer base is the design that started this trend, and it holds up because the formula is stripped down to what actually matters: shape, color, proportion. The tip itself is a single clean application of saturated fuchsia or magenta pink, curved at the smile line to follow the almond tip’s contour. On a short nail, aim for a tip width between 2 and 2.5mm. Narrow enough to look elegant, wide enough to read as an actual color choice rather than a smear.
Why This Is the Right Place to Start
If you’re new to french tip nail art or new to the short almond shape specifically, this is the version to learn first. It teaches you the smile line shape and gives you a reference point for how the hot pink tone reads against your skin. Every other design in this list builds on this foundation — so getting it right first saves a lot of frustration later.
Quick Details to Know
- Finish: Glossy topcoat over the entire nail, including over the tip, for a unified surface
- Best base: Sheer nude or bare nail
- Tip width: 2 to 2.5mm on short almond nails
- Longevity: Gel formula lasts 10-14 days; regular polish needs a topcoat refresh by day 3-4
Pro tip: Apply the hot pink tip, let it dry fully, then apply a single thin layer of topcoat over the entire nail — base and tip together — to eliminate the small ridge at the smile line that causes nails to snag on fabric.
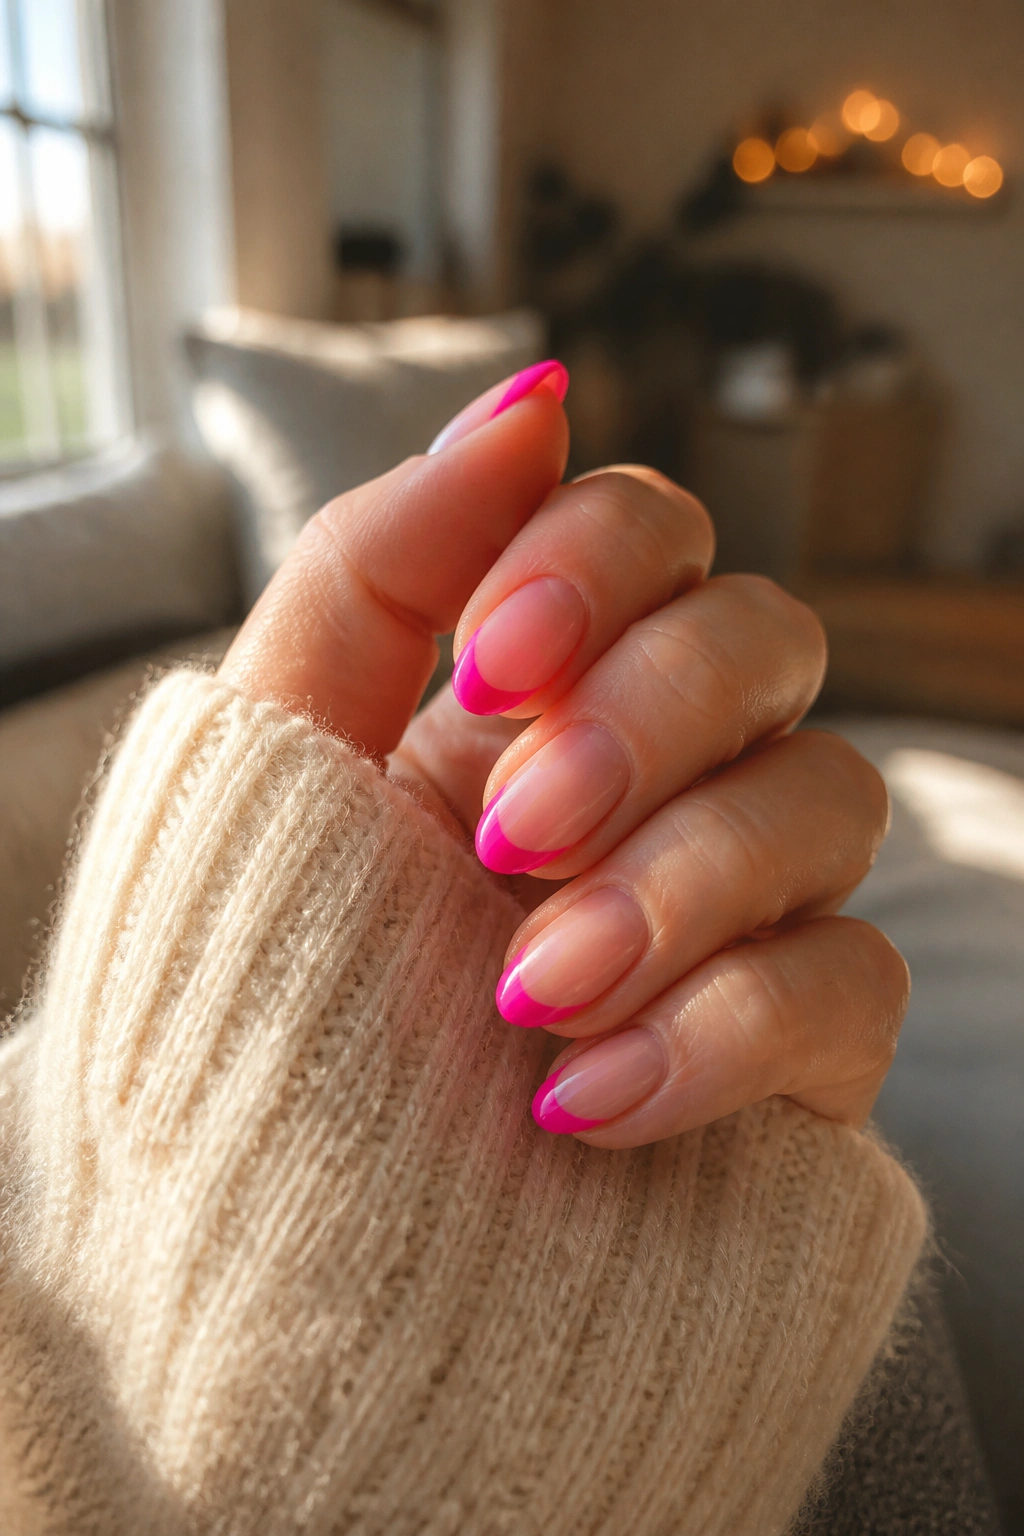
2. Neon Hot Pink Tip with a Sheer Nude Base
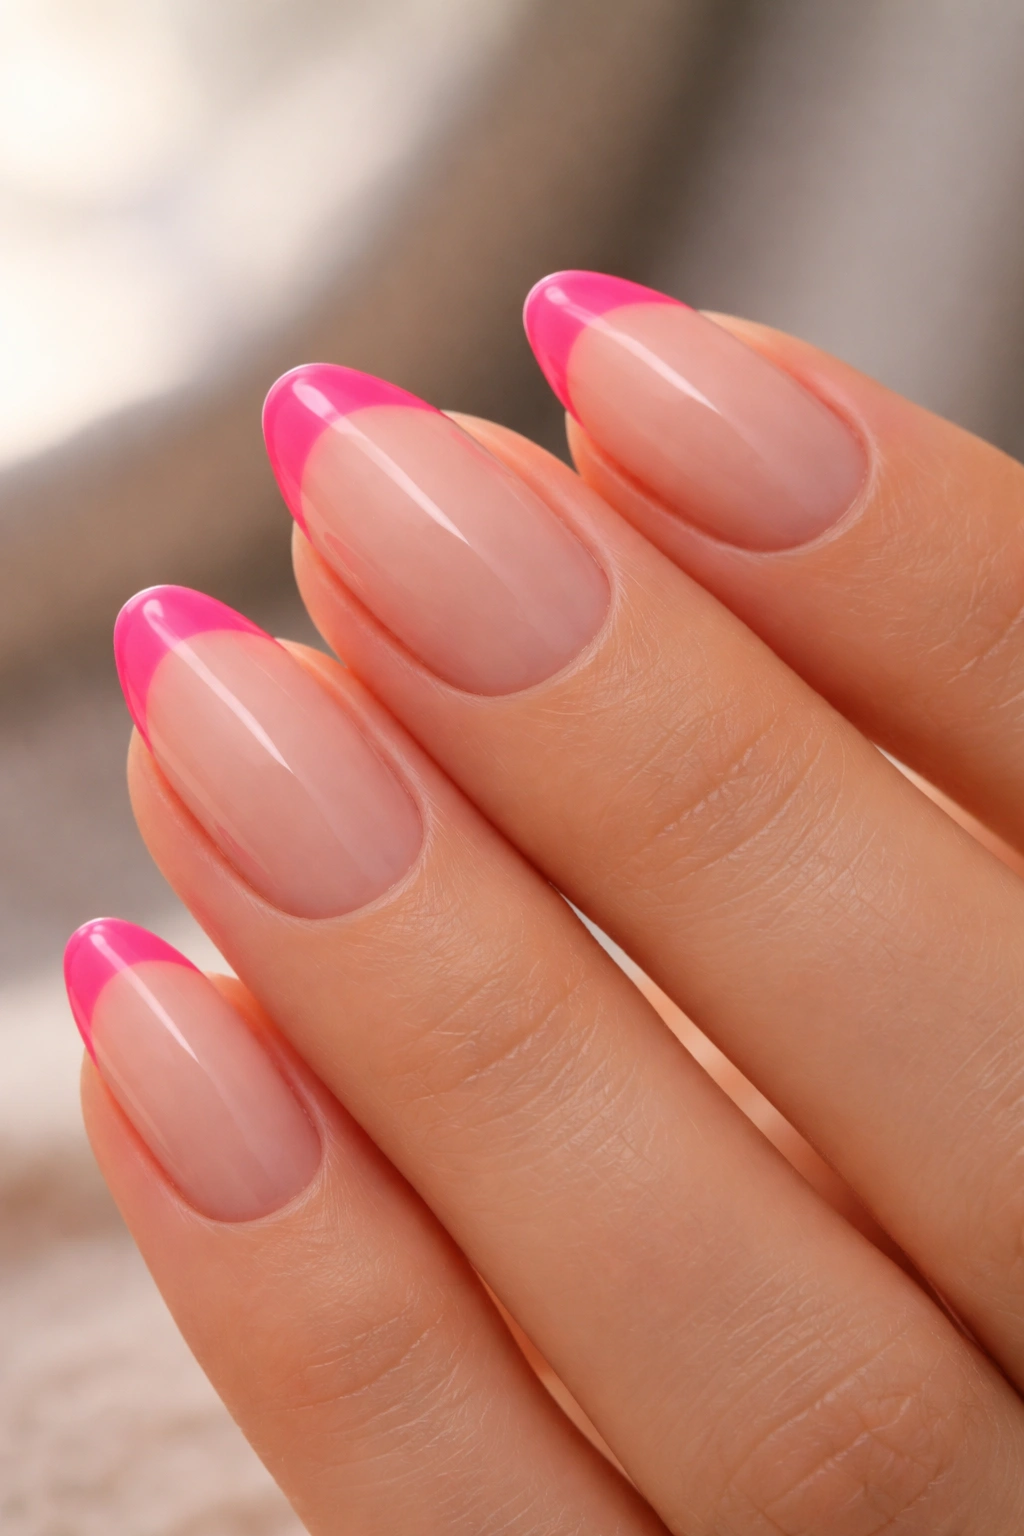
Neon and sheer are a contrast pairing that shouldn’t work — and somehow looks better than almost anything else in this category.
The sheer nude base is the key variable here. “Sheer nude” means a polish or gel that’s semi-transparent in the pink-beige or warm taupe range, showing some of the natural nail through it. That translucency softens the nail bed and creates a quiet, skin-like background. Against that backdrop, a neon hot pink tip — the kind that almost glows under fluorescent lighting — reads with maximum intensity. The contrast between barely-there and aggressively vivid is what makes this combination stop people mid-conversation.
For the neon specifically, look for polishes labeled “neon,” “UV reactive,” or “electric.” Most require a white base underneath them to hit full brightness. If you’re using gel, your nail tech will know to apply a white gel layer first. Painting at home? Apply a thin coat of white nail polish at the tip location before the neon pink. It takes an extra five minutes and the difference is dramatic — far more vivid and saturated than the same neon applied directly over a nude base.
The almond shape earns its place in this version too. The sheer base leaves the almond’s taper fully visible, and the neon tip draws the eye to the pointed silhouette. On a short nail, that intensity creates the impression of slightly more length. Not dramatically — but enough to notice.
Keep the topcoat glossy here.
A matte finish over neon kills the electric quality entirely.
3. Hot Pink Ombré French Tip (Gradient Style)
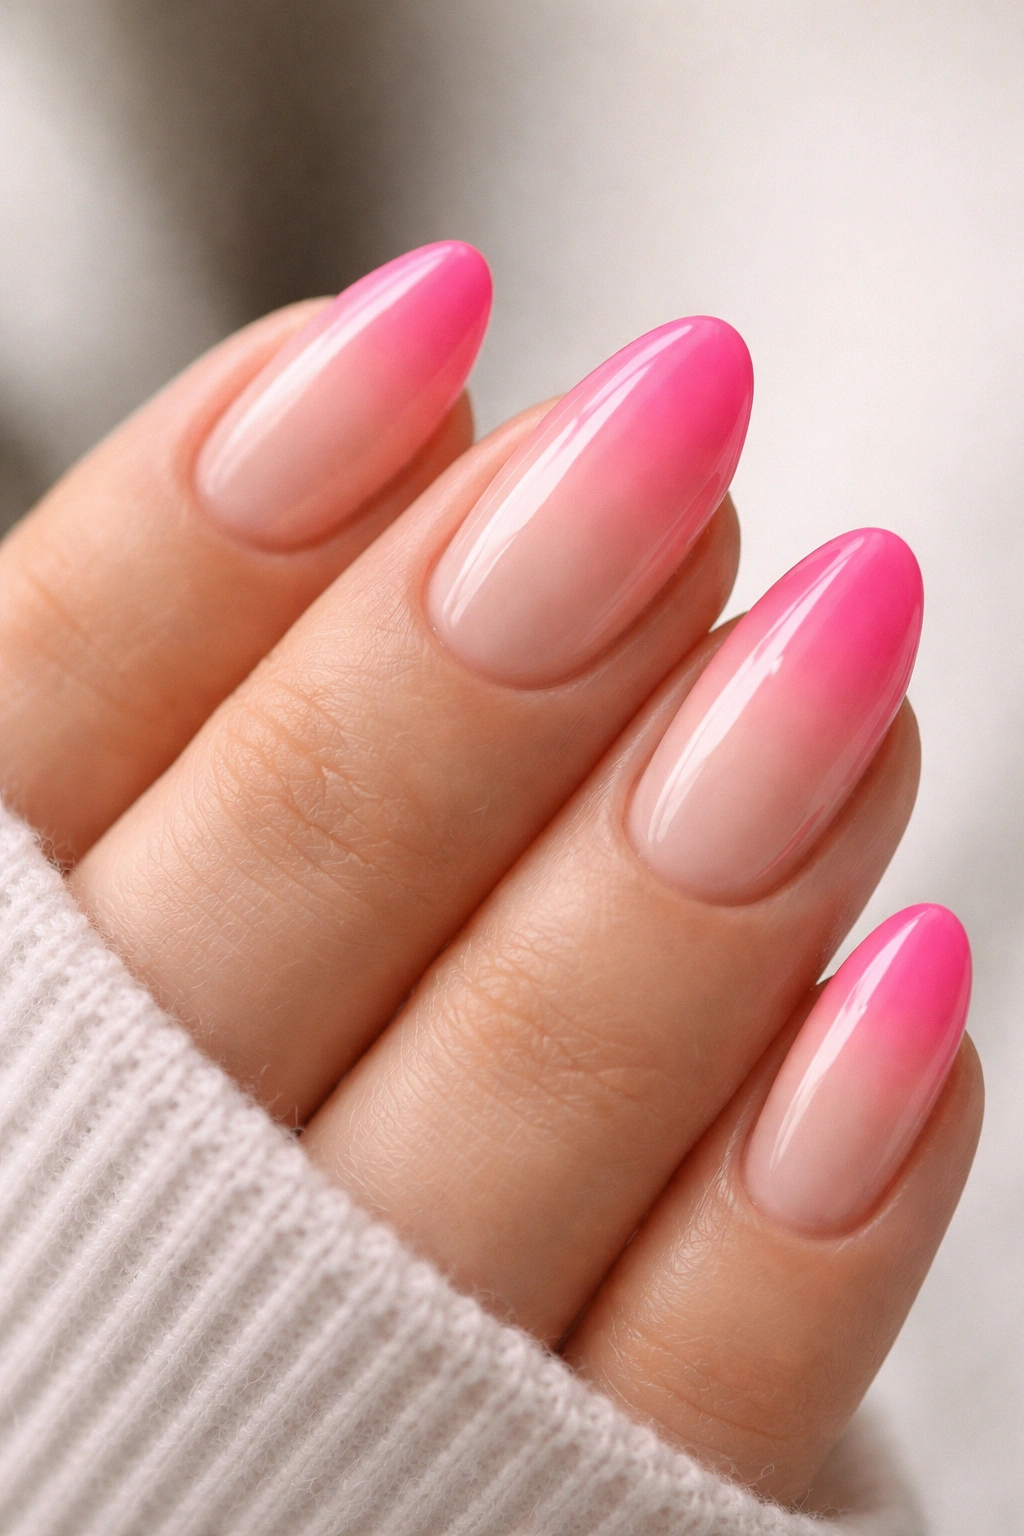
What separates an ombré french tip from a standard one? The edge — or rather, the absence of it.
Instead of a defined line where the base ends and the tip begins, an ombré version fades the hot pink in gradually. The color builds from nothing, starting around the middle of the nail and getting progressively more saturated toward the free edge. The effect is softer than a hard-line french tip but still clearly reads as a designed nail.
On a short almond nail, the gradient starts roughly in the center of the nail bed and deepens toward the tip. That gives you about 3-4mm of transition zone on an average short nail. And here’s something that surprises most people: the ombré version actually looks cleaner at the tip line than a standard french tip. Because the color builds gradually, any slight imperfection at the very edge disappears into the transition. If precision smile lines give you trouble, this approach is genuinely forgiving.
How the Technique Works
The standard method uses a small cosmetic sponge. Apply hot pink polish in a stripe across the sponge, then dab it onto the tip repeatedly in a bouncing motion, building the color gradually over a dried nude base. Seal with topcoat between each sponge layer to keep buildup manageable and the surface smooth.
In gel, ombré is done differently: apply a thin layer of pink gel at the tip and blend it while still wet using a flat brush or silicone tip tool, then cure in place. The gel version produces a smoother, cleaner gradient — but the blending window is only about 30-40 seconds before the gel starts to self-level. Work quickly, or the gradient will flatten itself out before you cure it.
4. Thin Hot Pink French Line with Negative Space
A 1mm french tip line is bolder than it sounds.
Negative space nail art uses the bare nail as part of the design itself, and this version takes that principle down to its most reduced form: just a thin stripe of hot pink at the very tip, no base color at all. The natural nail is the canvas. The 1mm line is the only design element.
Nothing else.
On a short almond nail, this looks arresting in a way that’s hard to predict from a description. The hot pink line traces the exact silhouette of the almond tip — that gentle curve — and the bare nail underneath makes everything feel open and clean. It’s the opposite of heavy nail art.
The smile line matters more here than in any other variation. Because the tip line is so thin and the rest of the nail is bare, any wobble in the curve is immediately visible. If you’re doing this at home, use nail tape or thin striping tape along the smile line, apply the color, then remove the tape before it dries fully. The tape gives you a crisp, perfect edge without requiring a particularly steady hand.
Worth knowing: this design works best when the natural nail is healthy and reasonably smooth. Ridges or staining on the nail bed will show through. That’s not necessarily a dealbreaker — some people find the raw, imperfect quality intentional — but it’s worth knowing before you commit.
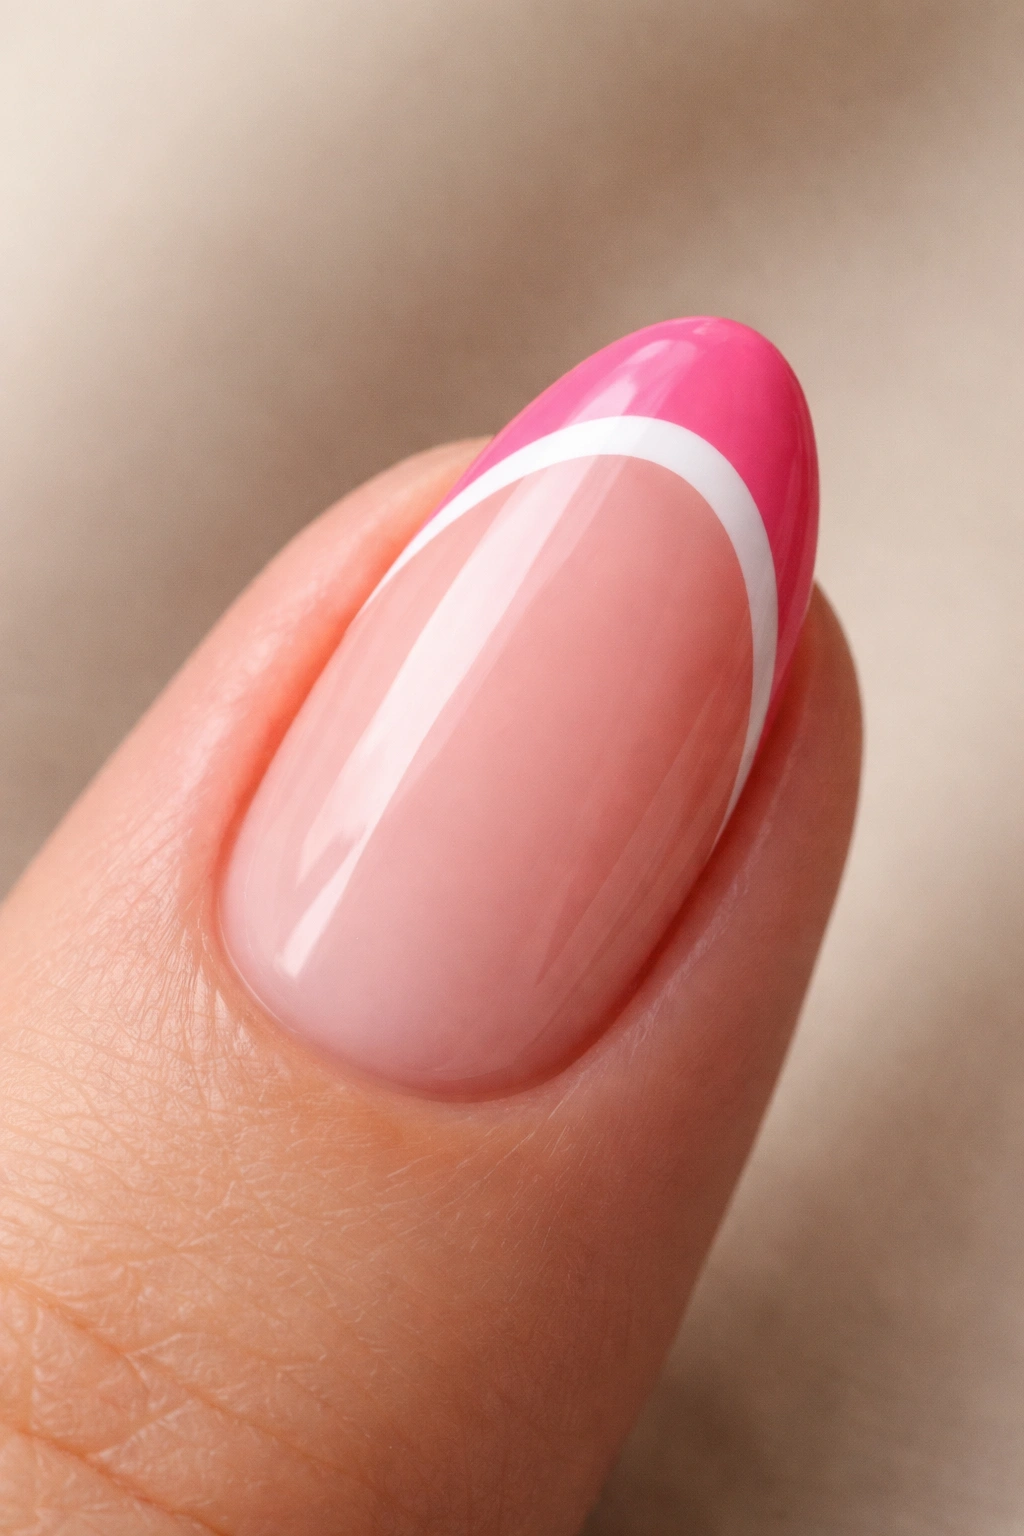
5. Hot Pink French Tip with White Micro Outline
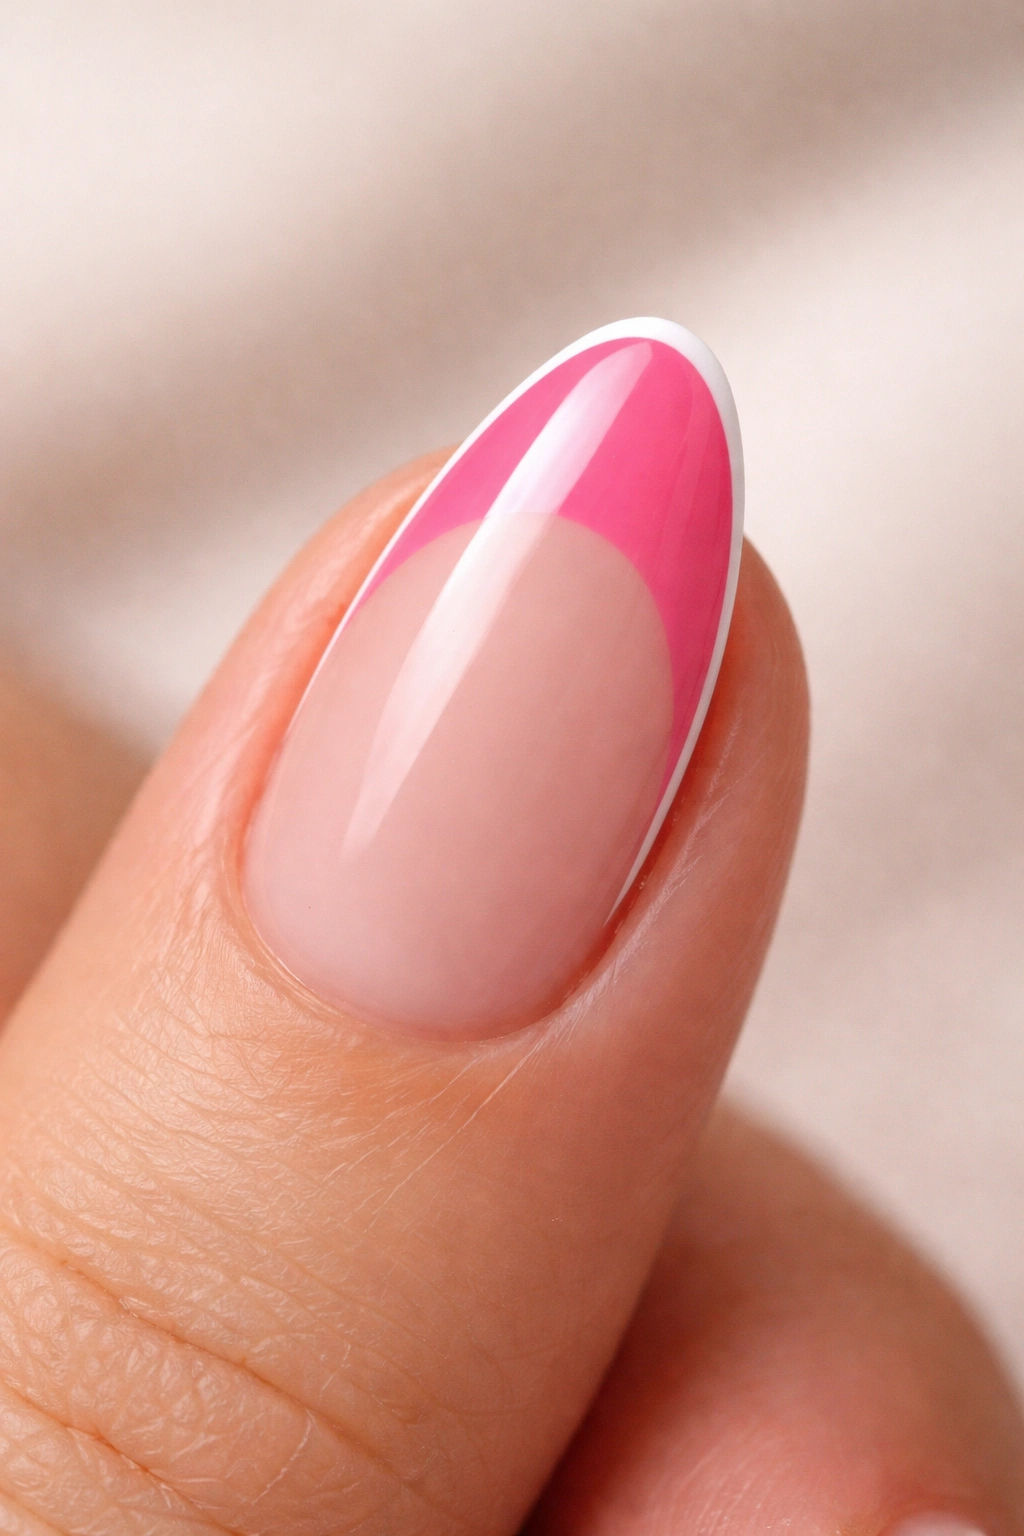
Picture this: you’ve painted a clean hot pink french tip, everything looks good — and then you run a hairline of white right along the inner edge of the smile line, following the exact curve. That tiny white line changes the whole character of the design.
The white outline technique comes from fine-liner nail art. A gel liner or a very thin striping polish in white traces the boundary between the hot pink tip and the base nail, creating a hard-edge definition that makes the tip look almost printed on. It separates the two zones with a sharpness you can’t get from a standard french tip alone, no matter how steady your hand.
On a short almond nail, the white outline also creates a slight optical illusion — the hot pink tip appears to sit on top of the nail rather than be part of it. It’s a small effect, but it gives the design more presence without adding any physical bulk.
A few specifics on making this work:
- Liner tool: Use a 0.1mm gel liner brush or a nail art fine-liner pen — anything thicker loses the hairline quality
- Sequence: Apply the white line after the hot pink tip is dried or cured, never before
- Steadying your hand: Rest your painting hand’s pinky on the table surface, not on the finger you’re working on
- Topcoat: Apply topcoat over the white line — you want it sealed underneath the final coat, not sitting exposed on top of it
This outline trick works on any nail design. But it’s particularly effective on a hot pink french tip because the contrast between the three zones — nude base, hot pink tip, white hairline — reads as a complete graphic composition even on a nail that’s only 5mm long.
6. Glitter Hot Pink French Tip
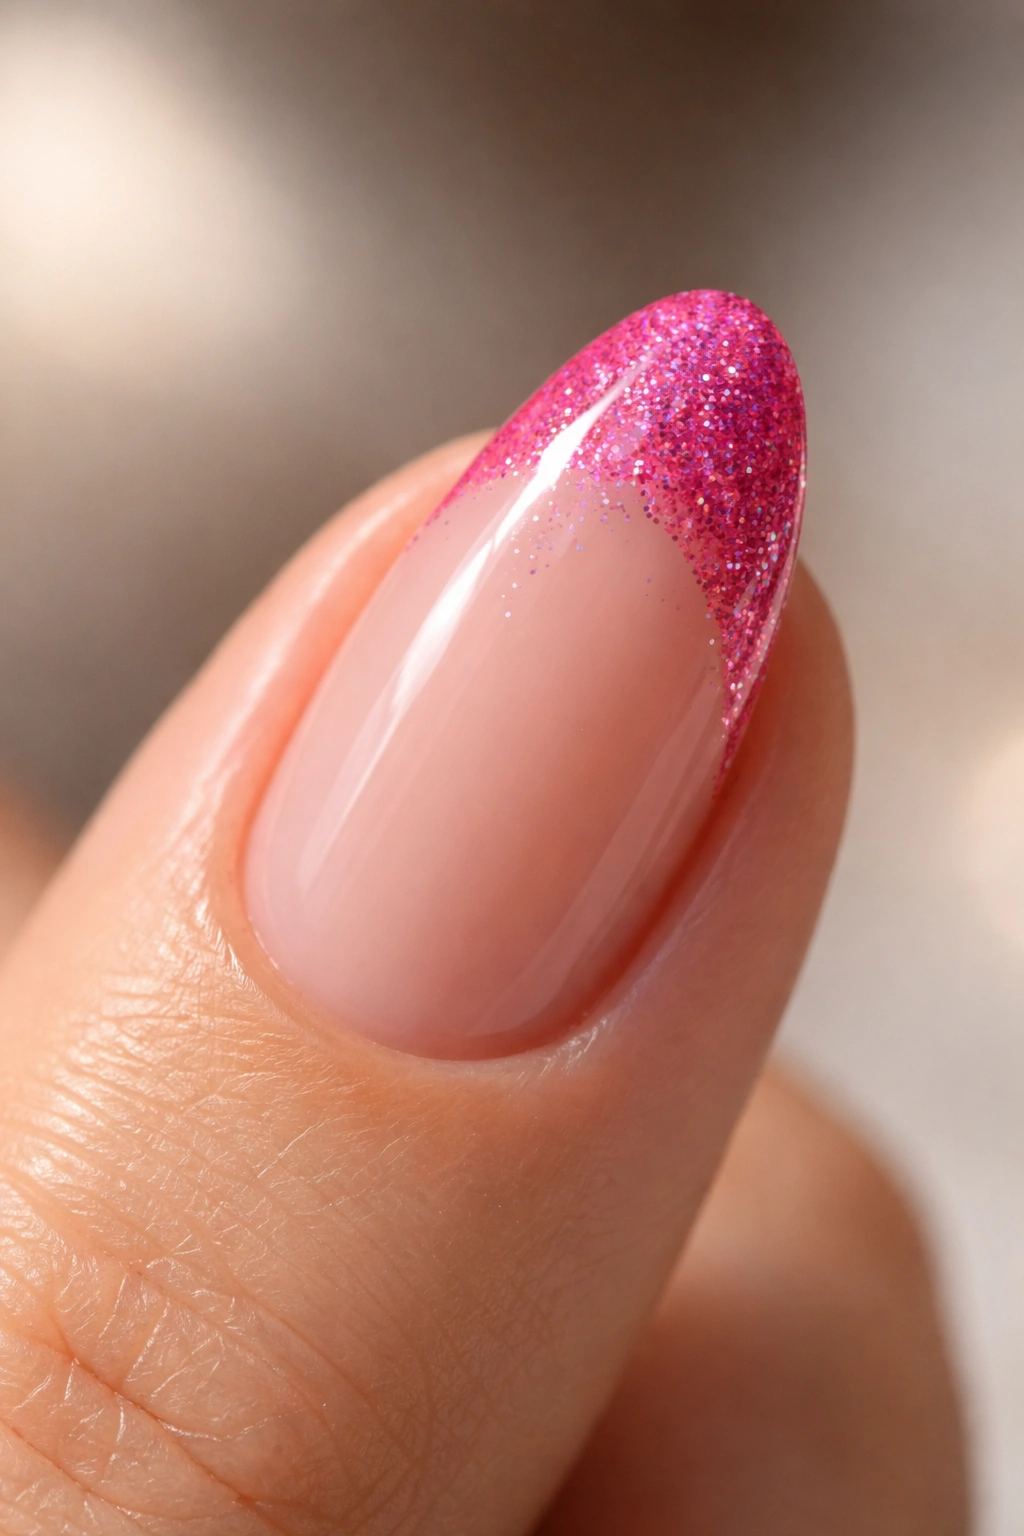
A glitter french tip and a solid french tip serve genuinely different purposes, and choosing the wrong one for the occasion is an easy mistake to make.
The solid hot pink tip is a day look. Clean, graphic, confident — it reads at a distance as a designed nail but doesn’t broadcast itself across a room. The glitter version is the opposite. Chunky pink glitter, fine holographic micro-glitter, or iridescent shimmer particles in the tip create movement and light reflection that a solid color can’t match. Every time your hand moves, the tip throws light back from a different angle.
On a short almond nail, glitter tips work best in one of two specific scales: very fine holographic particles that make the tip look like it’s been dusted with crushed diamond, or larger chunky glitter sealed under topcoat. Medium-sized glitter in between tends to look muddy at shorter lengths — the particles are too big to blend smoothly but too small to read as intentional sparkle.
How to Apply Glitter Only at the Tip
The cleanest method is to apply a sticky gel base layer at the tip, pour loose glitter onto it while wet, tap away the excess, then cure. This builds a slightly textured glitter tip with strong color payoff. For a flatter result, mix glitter particles into a clear gel or polish and apply it as a single thin layer — lays much flatter, needs less topcoat to smooth.
This is the event nail of the group.
Wear it to a wedding, a birthday dinner, a night out. For everyday wear, it’s probably too much — but that’s not a criticism, it’s just honest.
7. Hot Pink French Tip with a Floral Accent Nail
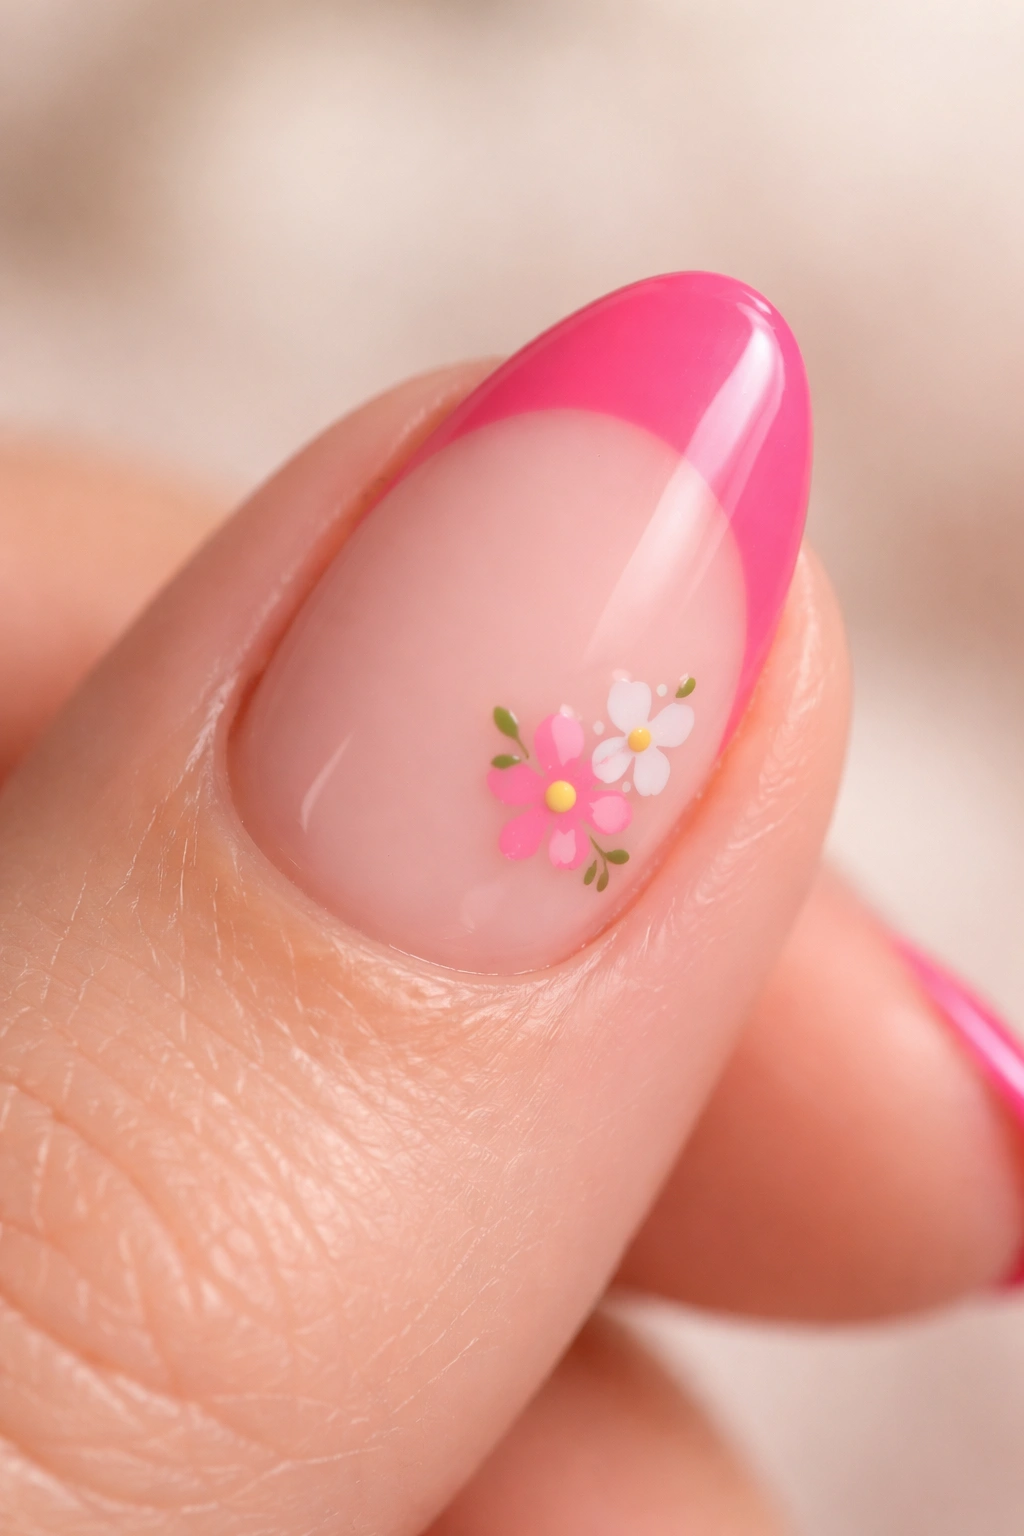
This is the version people most often bring to their nail tech when they want something that’s “not too much but still interesting.” One or two nails carry the floral art; the rest stay clean with the classic hot pink tip. The contrast between decorated and undecorated is exactly what makes it work.
The floral accent nail here usually features small painted flowers — white or cream blossoms with yellow or pink centers, sometimes more graphic cherry blossom-style petals — placed near the cuticle or scattered toward the tip over a clear base. The hot pink tip appears on the accent nail too, threading the main color through the whole design.
Color repetition is what keeps this from looking disconnected. If you’re painting tiny flowers, add pink petals or pink centers to echo the tip color. Without that connection, the accent nail can look like it belongs to a different manicure entirely.
Scale matters on short almond nails. Small flowers — 3mm to 5mm in diameter — stay proportional to the nail. Larger flowers crowd the nail bed and compete with the almond shape rather than working with it. A cluster of three tiny blossoms near the cuticle, each under 4mm, looks intentional and precise. One large statement flower looks cramped.
Gel nail art tools are worth specifying here. Regular nail art polish requires absolute dryness between layers and is much harder to control at small scale. Gel liner holds its shape and cures hard, which lets you layer colors without bleeding and add tiny details without disturbing what’s underneath.
8. Double French Tip in Hot Pink and White
Two french tip lines. Same nail. Layered.
The double french tip stacks a white line alongside — or just inside — the hot pink tip, creating a more graphic design that still reads as clean and structured. On a short almond nail, the double line works best when both lines are thin: aim for about 1.5mm each, with a 1mm gap between them if going side by side.
The Two Main Approaches
Stacked version: Hot pink tip is painted first, then a slightly thinner white line is painted over the inner edge of the pink. This creates the effect of two overlapping layers with visible depth between them — almost like a layered architectural detail compressed into 3mm of nail.
Parallel version: Two completely separate lines are painted with visible negative space between them. Pink at the very tip; white line 1-2mm inward. Both lines are visible as independent elements. This reads as more graphic and deliberately designed.
What to Know Before You Try It
- The stacked version is forgiving because the white line hides any minor wobbles in the inner edge of the pink tip
- The parallel version requires consistent spacing across all fingers — uneven gaps side by side are immediately noticeable
- Both versions work well in gel because each line cures before the next one goes on, preventing any bleeding between the two
- On short nails, keep the second line color white — other colors tend to make the design feel busy
Pro tip: Apply the outermost pink tip first, cure or dry completely, then use thin nail tape to mask the space between the two lines before painting the white inner line. Peel the tape before curing for a perfectly clean gap every time.
9. Hot Pink French Tip with Rhinestone Detailing
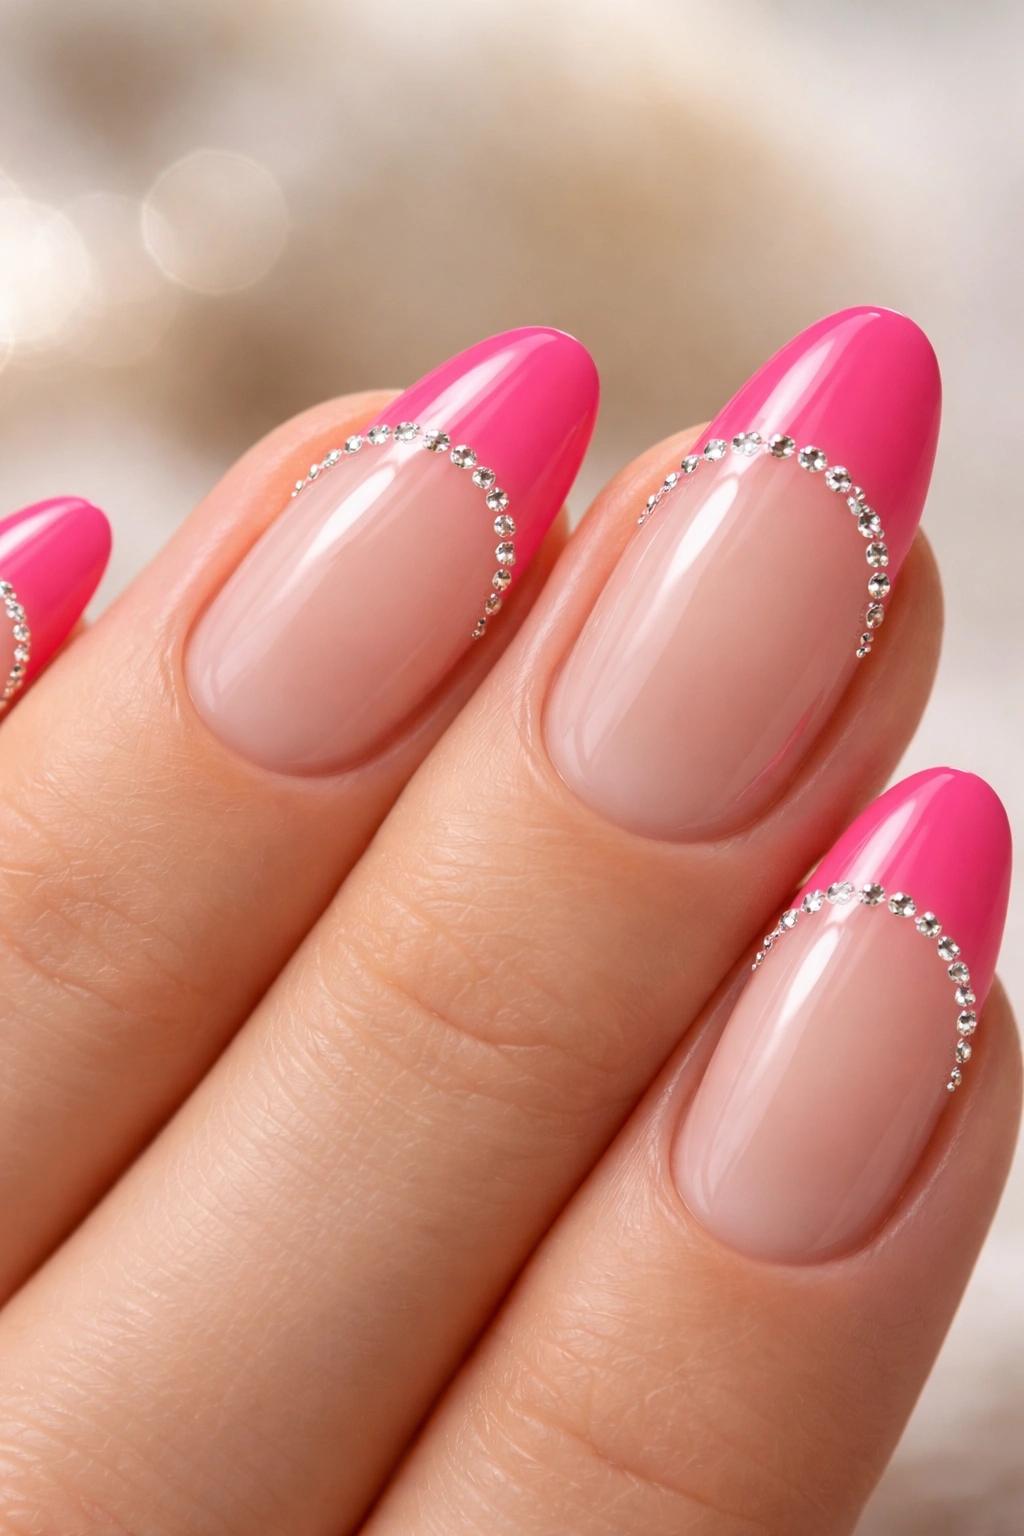
Done right, a single row of 1mm rhinestones along a hot pink smile line is one of the cleanest nail designs you can wear.
Done wrong, it looks like craft project leftovers.
The difference is almost entirely in rhinestone size and placement. On a short almond nail, the stones need to be small — SS3 to SS5 in crystal rhinestone sizing, which translates to roughly 1mm to 1.8mm in diameter. Anything larger and the stones crowd each other, creating too much bulk at the tip. A single line of SS4 crystals (about 1.5mm) in clear or aurora borealis finish, placed directly on the smile line curve, gives you a defined sparkle line that reads as expensive and refined — not overdone.
The setting method matters enormously. The easiest approach is to use a small detail brush dipped in gel topcoat as adhesive — pick up each rhinestone with a wax rhinestone picker or a slightly damp orangewood stick, place it on the gel, then cure the whole nail flat once all stones are positioned. This creates a strong, lasting bond. Setting rhinestones in nail glue and topcoating over them works too, but the topcoat tends to dull the crystal’s facets over time.
Placement variation worth knowing: some designs run rhinestones only at the corners of the smile line rather than all the way across — one stone at each point where the curve meets the nail edge. That’s an even more pared-back interpretation and works particularly well on very short nails where a full row of stones might feel crowded.
10. Matte Hot Pink French Tip
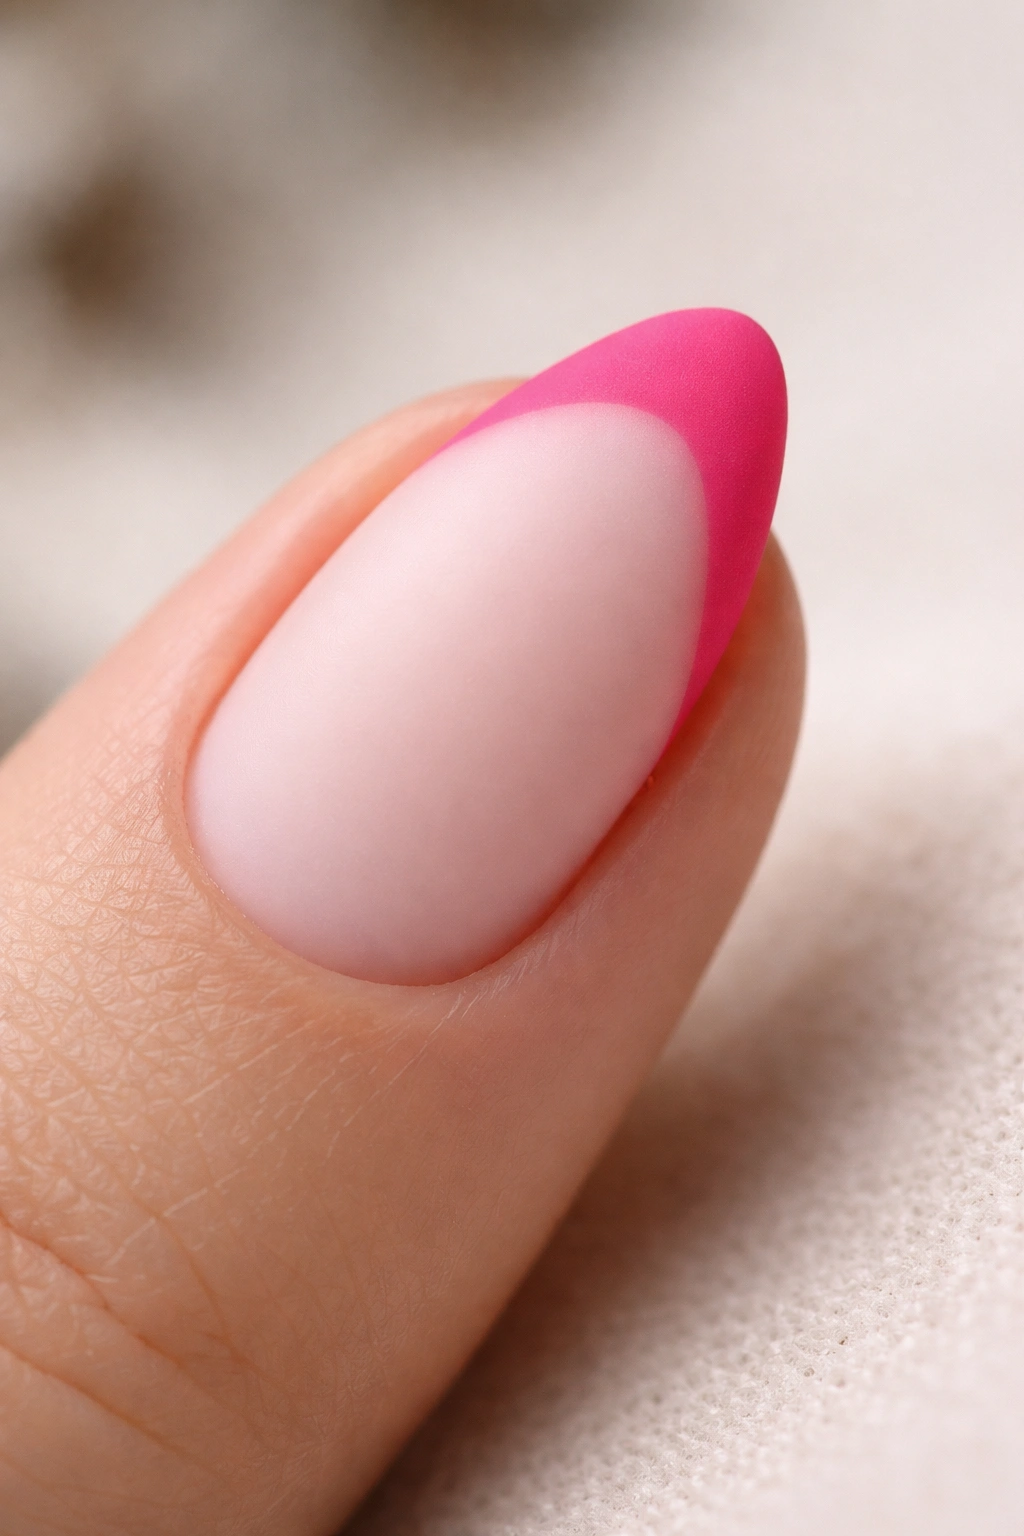
Why does matte finish change a nail design so completely? It comes down to light — specifically, how much of it the surface bounces back.
A glossy hot pink french tip reflects ambient light, which is partly what gives it that electric, bold quality. Switch to a matte topcoat and all that reflection disappears. The hot pink takes on a chalky, velvety quality — you can almost feel the texture just looking at it. It’s the same color, the same shape, but it reads as a completely different design. Softer, more textural, more fashion-forward in a quieter way.
On a short almond nail, the matte finish does something interesting to the shape as well. Without surface gloss, the nail reads as flat, which paradoxically makes the almond silhouette more visible rather than less. The shape becomes the most defining feature of the nail instead of the shine.
Matte hot pink tips pair well with a milky white base rather than a sheer nude, because the milky base has a slight opacity that complements the chalky quality of the matte tip. The result is a unified, almost tonal finish across the whole nail — clean and deliberate without any visible sparkle to distract from the shape.
One Honest Warning
Matte topcoats wear faster than glossy ones. The matting particles in the formula are the first thing to disappear with daily hand use. By day 4 or 5, high-contact areas near the tip start to develop a slight sheen where the matte coat has worn through. Reapply a thin layer of matte topcoat every 3-4 days to maintain the finish, or plan to redo the manicure around the one-week mark.
11. Hot Pink Reverse French Tip at the Cuticle
Your nail tech puts the hot pink not at the tip but at the base — right along the cuticle line, following the half-moon curve where the nail begins.
That’s the reverse french, and it’s one of the more structurally interesting directions in this whole group.
The reverse french (sometimes called a half-moon manicure) flips the traditional formula entirely. The colored element lives at the lunula — the pale half-moon at the base of the nail. A curved line of hot pink follows this natural shape, leaving the rest of the nail bare or in a nude base. On an almond nail, the reverse french creates an unexpected balance because the curved line at the base mirrors the curved tip, creating a kind of symmetry between the two ends of the nail.
Short almond nails work particularly well with the reverse design because the bare nail between the hot pink base line and the free edge creates generous negative space — which on a short nail looks deliberate rather than empty.
A few practical specifics:
- The half-moon curve at the cuticle is harder to follow precisely than the tip curve. Use curved nail tape or small round sticker reinforcers (the office supply store variety) to mask the half-moon area before painting
- Keep the hot pink line between 2 and 3mm wide at the base — the same proportional rules that apply to the tip apply here
- The rest of the nail can be bare, sheer nude, or a soft milky white — all three work
There’s something about seeing the hot pink at the base of a short almond nail that feels compositionally satisfying in a way the standard version doesn’t quite match.
12. Hot Pink French Tip with Abstract Line Art

Abstract line art has become one of the more reliable nail art directions for people who find florals too delicate and geometric patterns too rigid. And a hot pink french tip gives abstract lines something solid to anchor to.
The typical execution: a standard hot pink french tip on all nails, then on one or two accent nails, thin hand-drawn lines in black, white, or a contrasting color loop, intersect, or extend from the tip edge down toward the cuticle. The lines don’t need to spell out a shape or follow a pattern. A single curved stroke, a series of parallel marks, a loose cluster of intersecting lines near the tip — all of these work. The point is contrast between graphic line work and saturated color.
On short almond nails, abstract lines work best when they stay close to the tip rather than stretching down the full nail bed. A short nail doesn’t have the canvas for a sweeping multi-line composition. Instead, one or two lines extending 2-3mm inward from the hot pink tip, changing direction once, is enough to signal that the design is deliberate and considered.
Black gel liner is the right tool here. Nail art pens sit on the surface and get dragged by the topcoat brush. Gel liner applied with a 0.1mm brush, cured in place, then topcoated creates a permanent line that won’t smear. But the critical step most people skip: cure the liner fully before applying any topcoat. Topcoat applied over uncured gel liner picks up the pigment and smears it across the nail in a way that’s not fixable without starting over. One full cure cycle — even 30 seconds under the lamp — locks everything in place before you seal it.
13. Hot Pink French Tip on Natural Nails with a Strengthening Base

Natural nails carry a hot pink french tip just as well as gel nails. The prep is what makes the difference.
The biggest practical problem with french tips on natural nails isn’t the design — it’s that natural nails flex. When the nail bends, regular nail polish can crack right at the smile line because the polish is rigid and the nail underneath isn’t. A strengthening base coat addresses this directly.
Look for a base coat containing hydrolyzed wheat protein or calcium-based strengthening agents. These formulas bond to the nail surface and add structural rigidity without making the nail brittle or prone to snapping. Apply two thin coats of strengthening base, letting both dry completely — 15 to 20 minutes each — before layering the base color and hot pink tip on top. Then seal with a flexible topcoat, not a standard hard topcoat. Flexible or “rubber” topcoats stay pliable as the nail bends, which is the whole point.
One more technique worth doing on natural nails specifically: wrapping the tips. Run the brush slightly under the very edge of the free edge when applying both the color and topcoat, coating the exposed end of the nail. This seals the design against water and daily friction from underneath. Most people skip this step. It probably adds 4-5 days to the life of a regular polish manicure, and it takes about 20 extra seconds.
The hot pink tip on natural nails also looks slightly different from on gel. The sheer base has a translucency that gel can’t quite replicate, and the natural nail shows through in a way that gives the design a more organic, skin-like quality. Some people prefer it specifically for that reason.
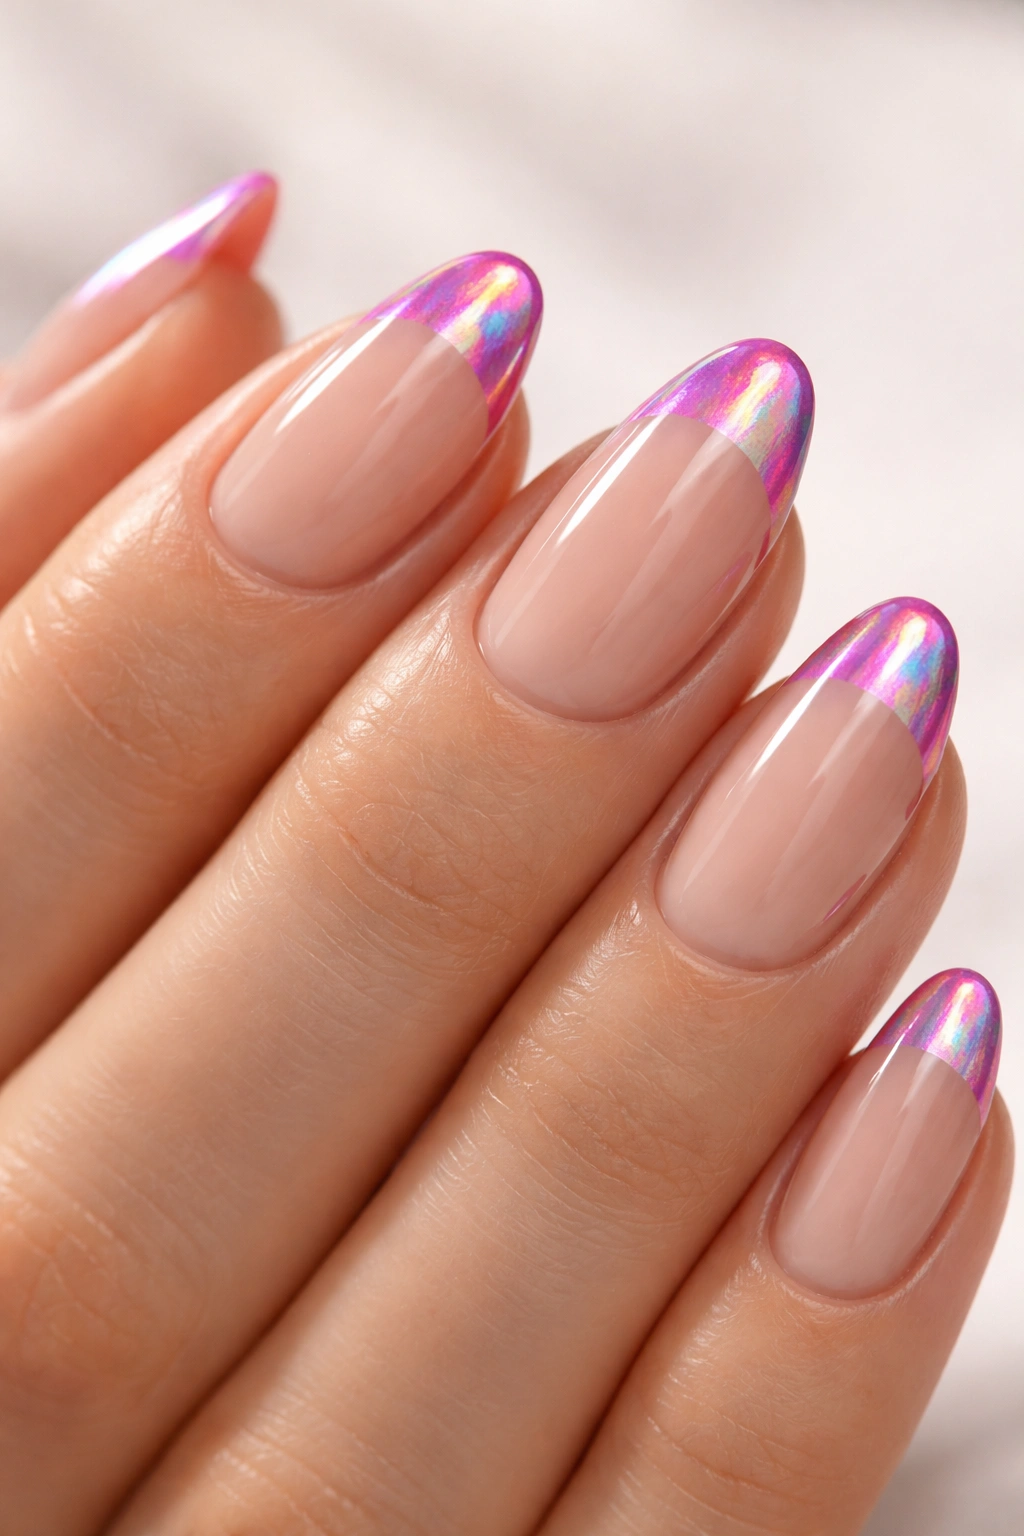
14. Holographic Hot Pink French Tip
Holographic is different from glitter.
Worth being specific about that.
Glitter reflects light in scattered sparkle points. Holographic reflects light as a spectrum — the tip shifts through pink, violet, silver, and back again as the angle changes. On a hot pink base, holographic particles add a color-shifting aurora to the pink rather than just adding sparkle. The tip moves every time your hand moves.
On a short almond nail, holographic french tips are among the most eye-catching designs available, but they need a clean, simple foundation. A sheer or nude base lets the holographic tip be the focal point. A heavy colored base competes with it. Keep everything else minimal so the tip gets to do what it’s designed to do.
Two Ways to Achieve the Effect
Chrome powder method: Apply the hot pink tip, cure it in gel, then buff a small amount of holographic chrome powder over the tip using a silicone applicator or a stiff, flat brush. Cure with a no-wipe topcoat to seal. This gives an intense, mirror-like holographic finish — the most dramatic option by a significant margin.
Holographic glitter gel method: Use a pre-mixed holographic glitter gel and apply it directly as the tip color. This creates a softer effect with more texture and visible sparkle. Easier for home application, but less mirror-like than the chrome powder technique.
Quick Details
- Finish: Always seal with glossy topcoat — holographic under matte loses the color-shifting effect entirely
- Best base: Sheer nude or bare nail; opaque bases compete with the tip and muddy the shift
- Technique difficulty: Chrome powder is intermediate; holographic glitter gel is beginner-friendly
- Wear: Chrome powder at the tip develops micro-scratches with heavy hand use — refresh with a thin topcoat layer around day 5
Pro tip: Apply chrome powder with a slightly damp silicone applicator rather than a dry one. The moisture activates the powder’s adhesion and gives you a deeper, more mirror-like finish in fewer passes.
Making Your Hot Pink French Tips Last Longer
The most common complaint with any french tip design is chipping at the smile line. That edge is the most vulnerable part of the nail — it’s where two surfaces meet, and the topcoat has to bridge that seam across daily movement, water exposure, and contact with everything your hands touch.
There’s a fix most people haven’t tried: seal the free edge. Run your topcoat brush along the very tip of the nail — the thin exposed end you’d see looking at your hand from the side. Coating that edge locks the entire design in from underneath, preventing water and friction from working their way under the tip color from below. Do this with both the color coats and the final topcoat. It takes 20 extra seconds per nail.
Topcoat Schedule for Regular Polish
Regular polish needs topcoat refreshes to survive past day 4. Apply a fresh thin layer at day 2-3, before any chipping starts — once a nail chips, topcoating over it traps an air pocket that accelerates the damage rather than fixing it. Keep a bottle of your topcoat accessible. This isn’t high maintenance; it’s about three minutes total and extends the design by 5-7 days reliably.
The Role of Cuticle Oil
Cuticle oil doesn’t just improve the skin around your nails — it keeps the nail itself flexible, which reduces stress fractures in the polish layer. A nail that’s hydrated and pliable underneath is much less likely to crack at the smile line than a dry, rigid one. Apply it daily around the cuticle and along the nail edges. Any jojoba oil-based cuticle oil works well here; the formulation matters much less than the habit of doing it.
When to Upgrade to Gel
If regular polish is wearing out before you’re ready for a change, gel is the straightforward solution. A properly cured gel hot pink french tip will last 10-14 days on short almond nails without any refreshing needed. The trade-off is removal — gel needs to be soaked off with acetone, roughly 10-15 minutes using foil wraps. For most people who wear this design regularly, that trade is worth it.
One last thing: avoid prolonged hot water exposure when possible. Long soaks in the bath, washing dishes without gloves, or extended hot showers cause the nail to expand and the polish to lift at the edges. It’s one of the biggest contributors to early wear on both gel and regular polish, and it’s almost entirely preventable.
Final Thoughts
Short hot pink french tips on almond nails work because every element pulls its weight. The shape creates the curve. The curve gives the tip elegance at shorter lengths. The hot pink carries enough pigment to read clearly without needing length as a crutch.
Across all 14 of these variations, the two variables that determine whether the design looks polished or haphazard are the smile line and the tip width. Get those right — 2 to 3mm wide, following the almond’s natural curve — and almost any finish lands well, whether that’s a matte velvet tip, a rhinestone-lined edge, or a chrome powder shift that turns heads across a room.
If you’re working through this list for the first time, start with the classic version or the neon nude combination. They teach you the proportions. The more technical designs — the reverse french, the parallel double line, the chrome holographic — build on muscle memory you develop from mastering the simpler ones first.
Pick the one that makes you stop scrolling. That’s the one worth trying first.
