

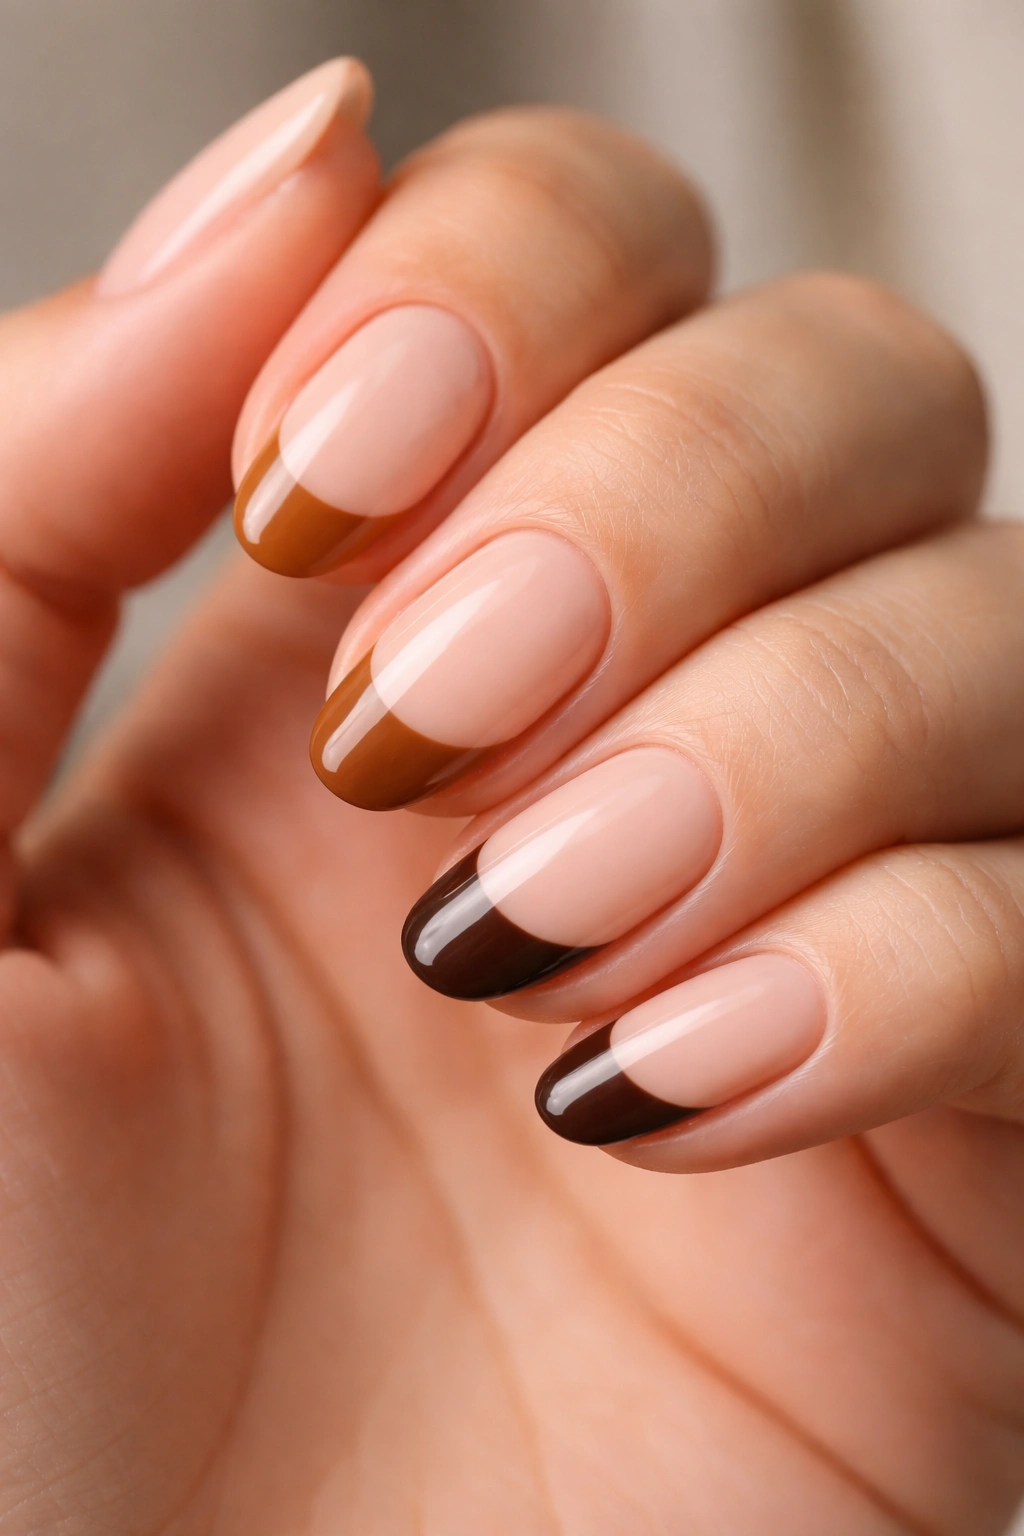
Brown French tips have done something clever. They took a style that used to mean only crisp white lines on square nails and made it feel warm, wearable, and honestly a little addictive. Pair that earthy tone with a short almond shape — that gentle taper that’s long enough to look elegant but short enough to actually live your life in — and you’ve got a combination that works on every skin tone, every occasion, and every skill level.
The short almond shape does something specific for brown tips that longer nails can’t quite replicate. The rounded point draws the eye toward the tip in a way that makes even the most minimal brown line look deliberate. At a short-to-medium length, the tip line sits somewhere between 2mm and 4mm wide — just enough to read as a statement, not so much that it overwhelms a nail that isn’t working with extra length. That proportion is hard to mess up, which is part of why this combination became so popular with people who are relatively new to nail art and seasoned nail obsessives alike.
There’s also a range here that most people underestimate. “Brown” covers a lot of ground — from barely-there caramel to deep espresso, with warm mocha and cool cocoa somewhere in the middle. And “French tip” in the brown world has expanded well beyond a single curved line to include ombre fades, geometric angles, glitter borders, tortoiseshell artwork, and chrome that shifts from copper to amber depending on the light.
Each design below comes with enough detail that you can either recreate it yourself or walk into a salon with a clear idea of exactly what you want.
Choosing Your Brown: A Quick Guide to the Spectrum
The word “brown” is doing a lot of work here. Walk into any nail supply store and you’ll find upward of 30 polishes that could technically qualify, ranging from a barely-there tan that reads as skin-adjacent to a near-black espresso that sits in its own category.
For brown French tips on short almond nails, the shades that photograph best and read most clearly in person fall into three zones:
Caramel and warm tan — These are your lightest options. Think the color of black tea with a splash of oat milk. They work especially well on medium to deep skin tones and create a look subtle enough for everyday wear without disappearing entirely.
Mocha and milk chocolate — This is the mid-range sweet spot. Rich enough to register clearly against most nail bases, warm enough to feel cozy rather than severe. These shades are forgiving on every skin tone.
Espresso and dark chocolate — Deep, almost-brown-black tones that read as a grown-up alternative to the traditional black French tip. High contrast, high impact, and more versatile than they seem once you stop thinking of them as strictly dark.
The finish matters as much as the shade. The same mocha brown as a matte tip looks entirely different from the same color in a glossy or chrome finish. Keep that in mind as you work through the designs below — many of them are essentially the same base shade transformed entirely by a change in texture or application technique.
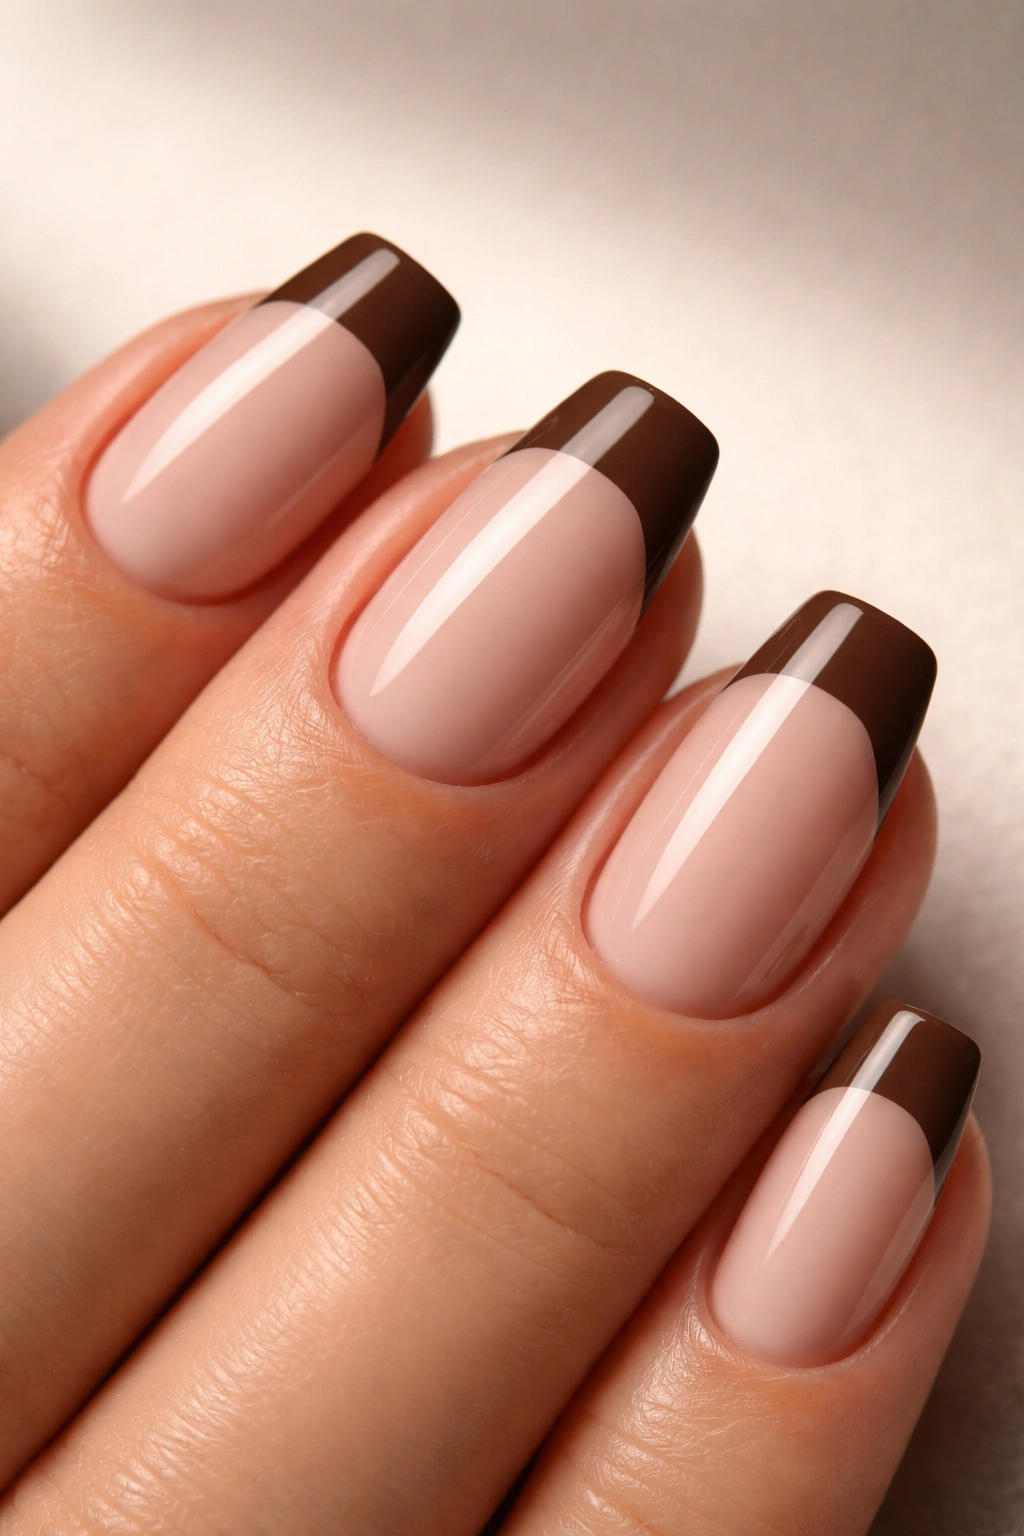
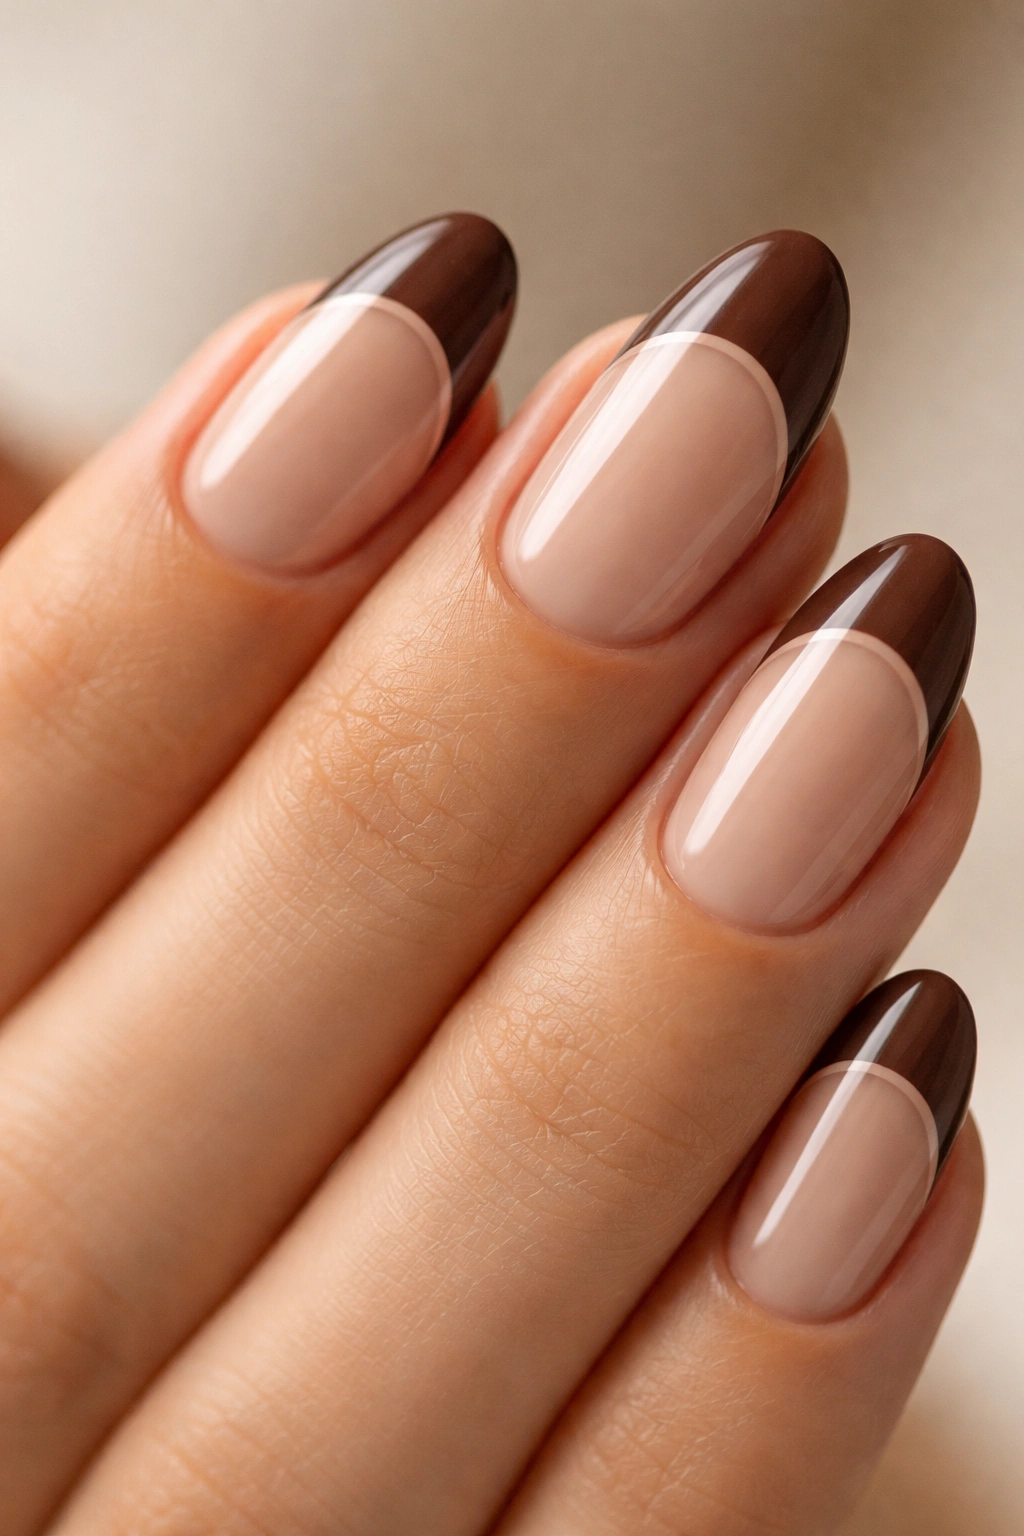
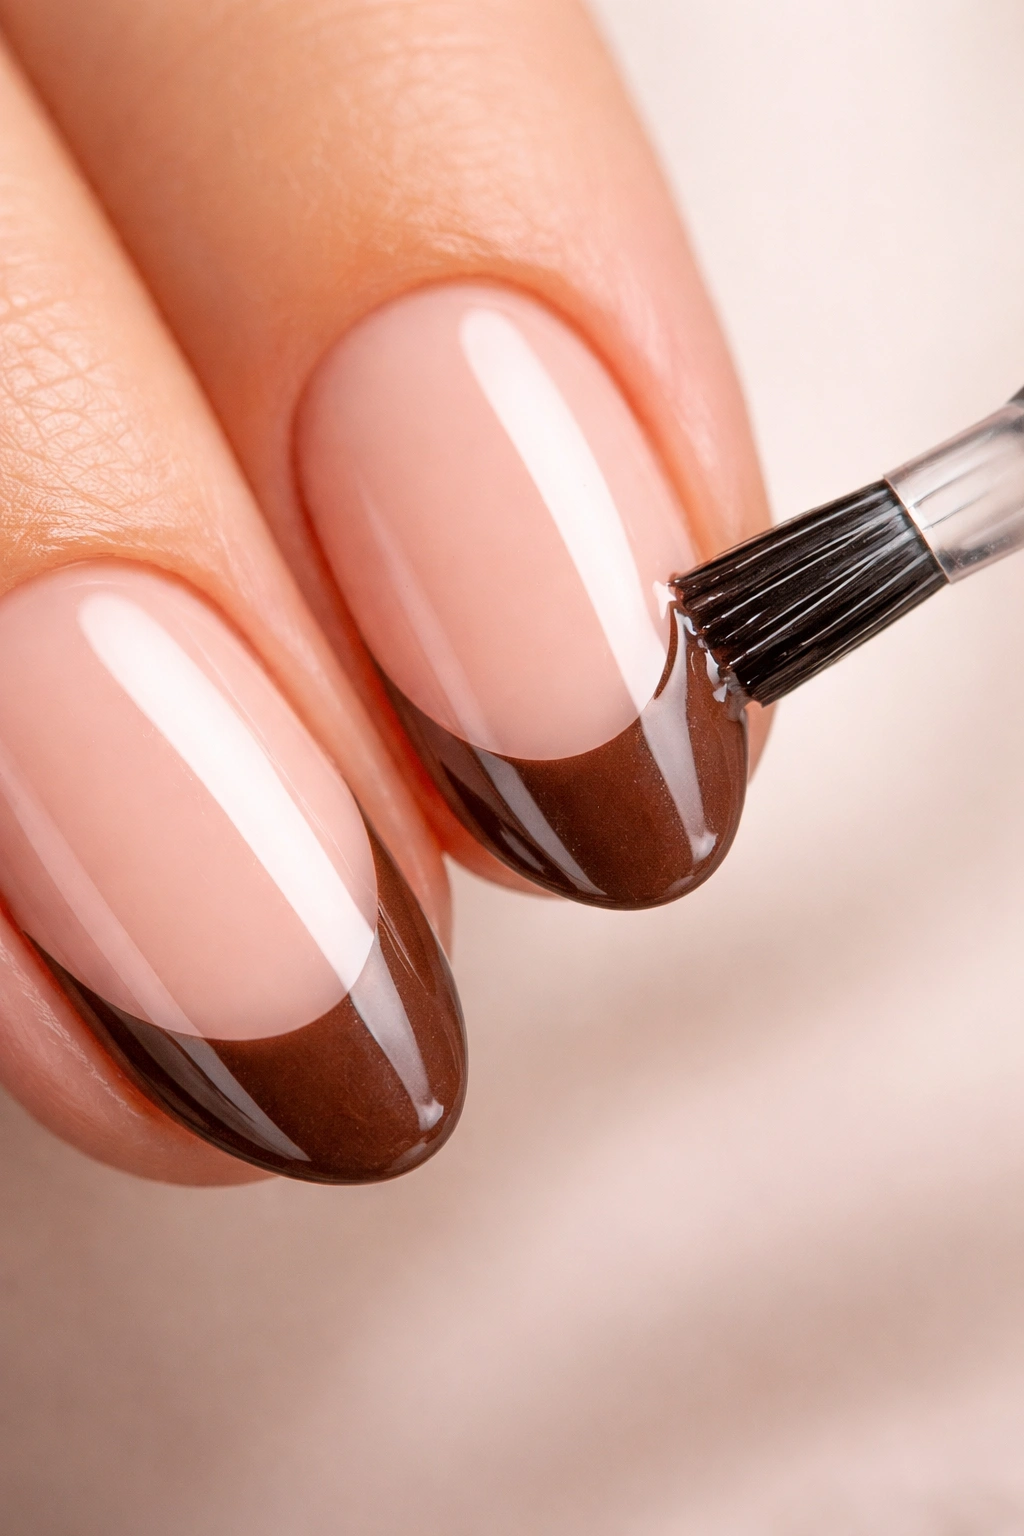
1. Classic Chocolate Brown Tips on a Bare Nude Base
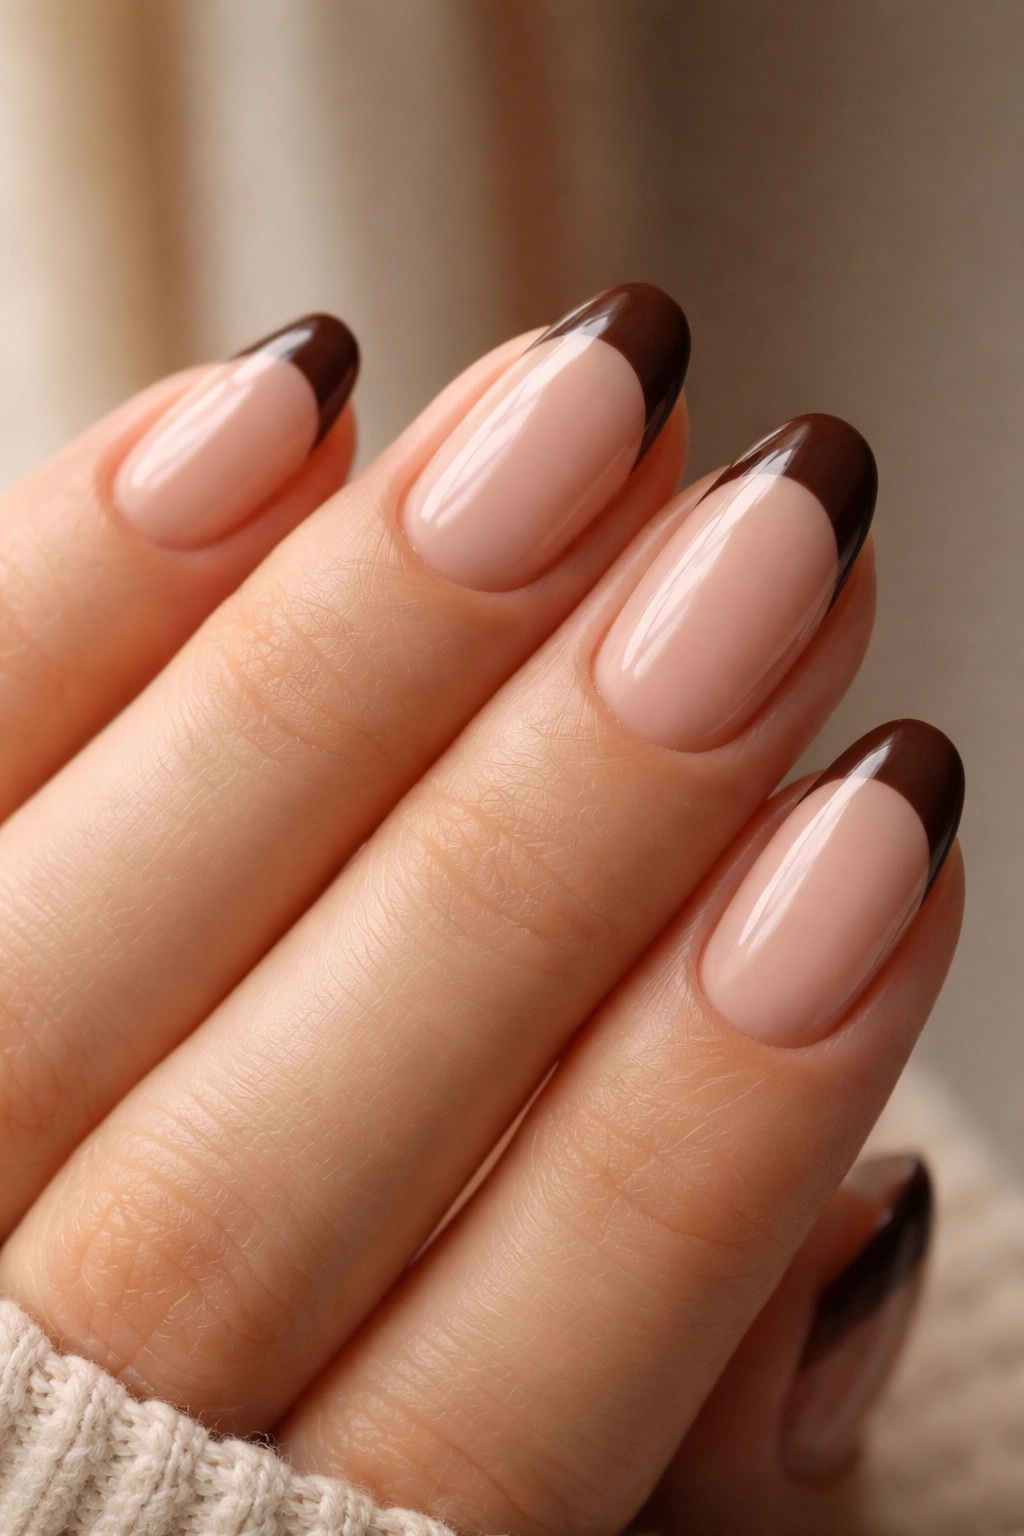
There’s something to be said for not overthinking it. The classic chocolate brown French tip — a clean, curved line in a medium-warm brown across the tip of a short almond nail, with nothing but a sheer or bare nude base underneath — is one of those rare nail designs that ages well. Not trendy, not trying too hard. Just clean.
The trick to making this look land is proportion. On a short almond shape, the brown tip line should sit no wider than 3mm at its peak, measured from the very tip. Any wider and it starts to read as a half-and-half design rather than a French tip. Any thinner and it disappears, especially under warm lighting. If you’re painting this at home with a thin nail art brush, use a single slow stroke from the outside corner inward, then repeat from the other corner to meet in the middle. Both sides don’t have to be perfect simultaneously — that’s what acetone and a cleanup brush are for.
For the base, resist the urge to go too pink. A sheer nude or a slightly warm beige — something close to your actual skin tone — lets the brown tip do all the talking. A base that’s too opaque or too rosy creates a jarring divide at the tip line that makes the design look less polished than a bare nail would.
Gel versions hold up for 2-3 weeks without chipping. For regular polish, a quality topcoat applied every 2-3 days extends the wear significantly.
2. Warm Caramel Tips on a Sheer Pink Base
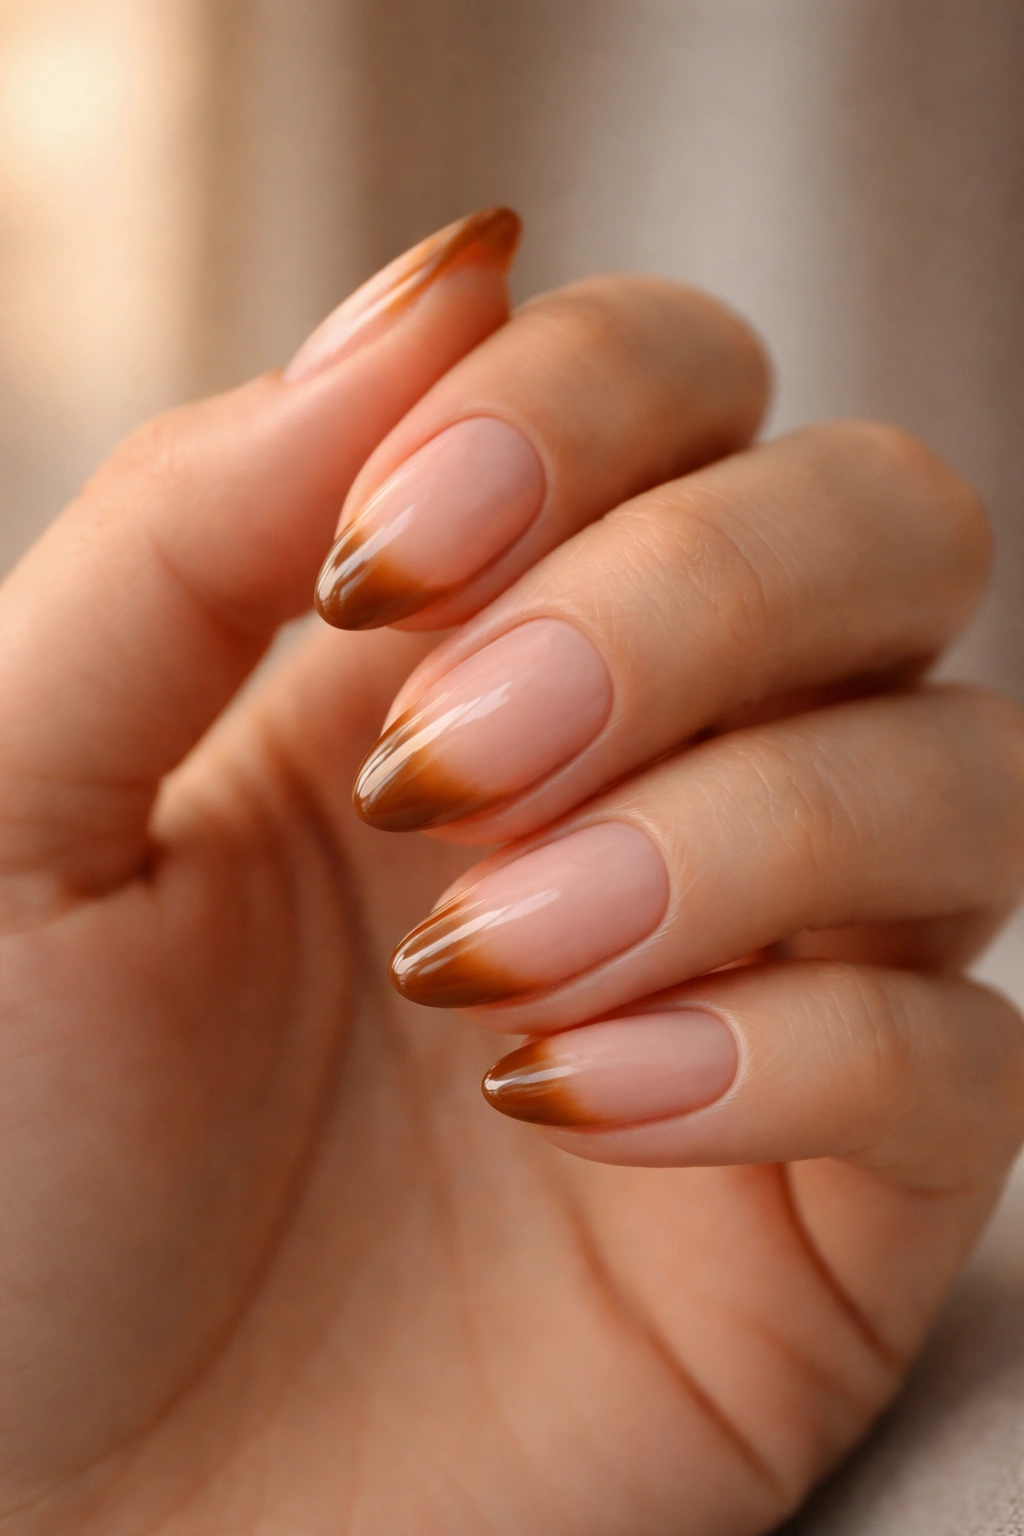
Think of this as the lighter, sunnier cousin of the classic chocolate French tip. Where espresso tips read as polished and intentional, warm caramel tips look like you didn’t have to try — like a tan line at the tip of your finger.
Getting caramel right comes down to undertone. True caramel has a golden, orange-leaning warmth — not the same as tan or beige. Look for a polish labeled “honey,” “toffee,” or “golden caramel” rather than anything with “nude” or “blush” in the name. You want it to be unmistakably a color, not a slightly-more-opaque version of your base.
A sheer pink base is the ideal pairing. Something with a barely-there rosy cast gives the whole look a warm, flushed quality that feels less constructed than a classic nude base. The pink and caramel together lean almost peachy in certain lights — which reads as wearable year-round.
On deeper skin tones, this combination is particularly striking. The caramel tip picks up warmth from the skin and looks like it was specifically chosen for that hand. On lighter skin tones it still works — it just carries a bit more visible contrast.
This is also one of the easiest designs to recreate at home without dedicated nail art tools. A clean strip of nail tape placed along the curved tip line, one coat of caramel above it, and careful removal of the tape before the polish fully dries gives you a sharp edge without a brush. The curve won’t be as clean as a pro’s work, but it’ll be close.
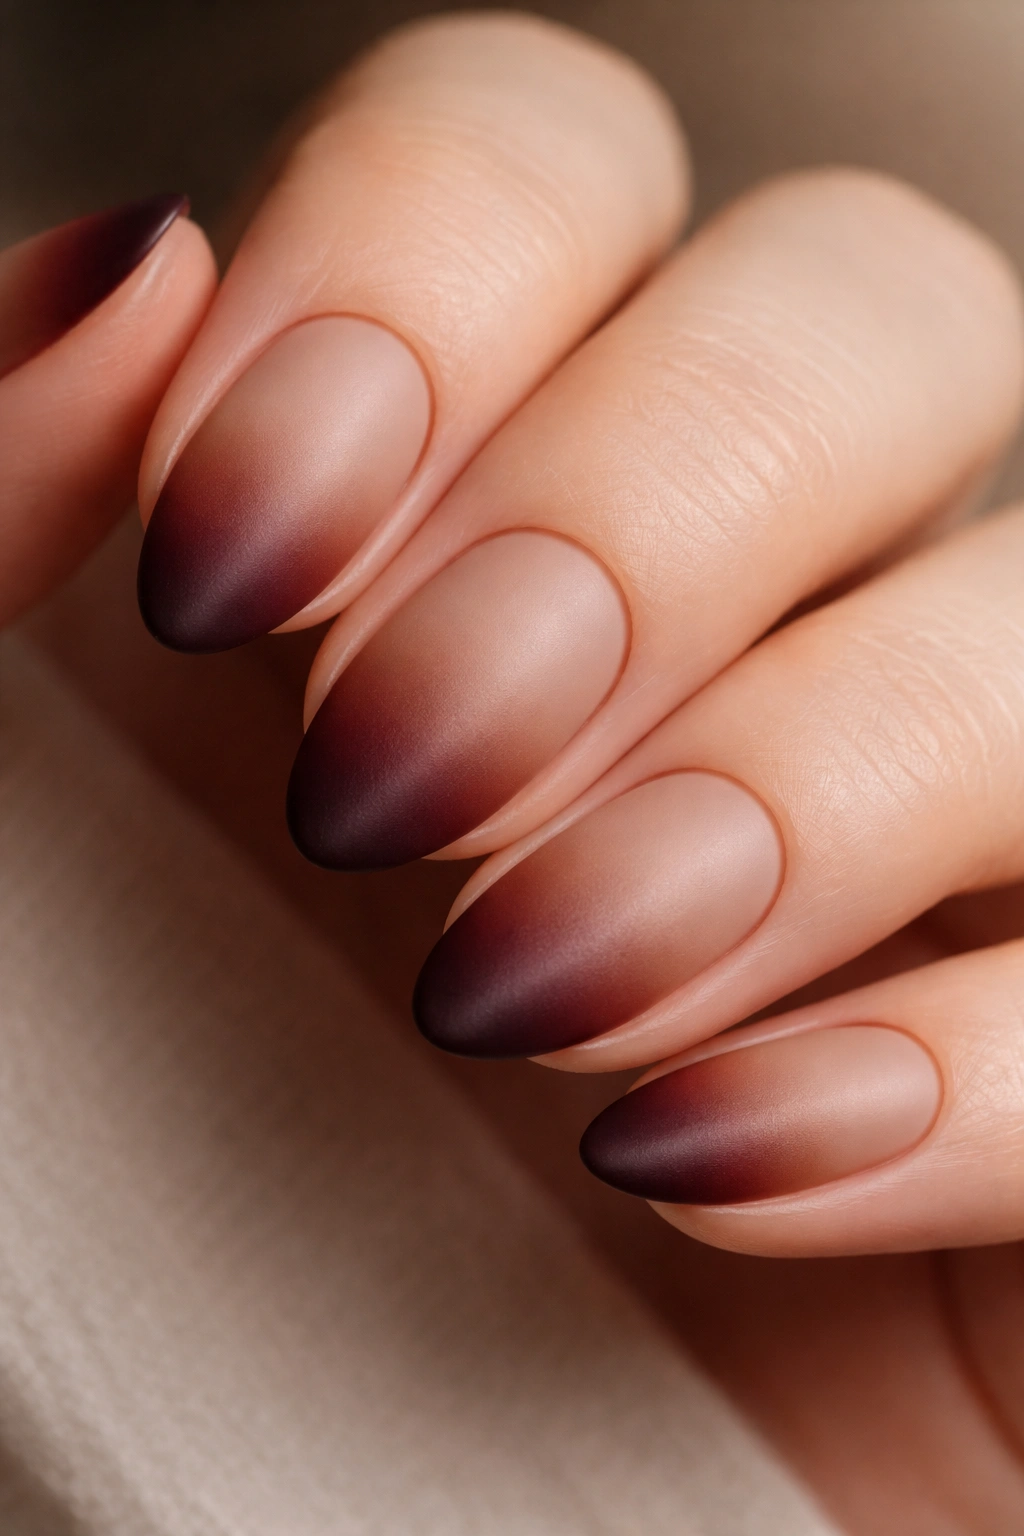
3. Espresso Ombre French Tips
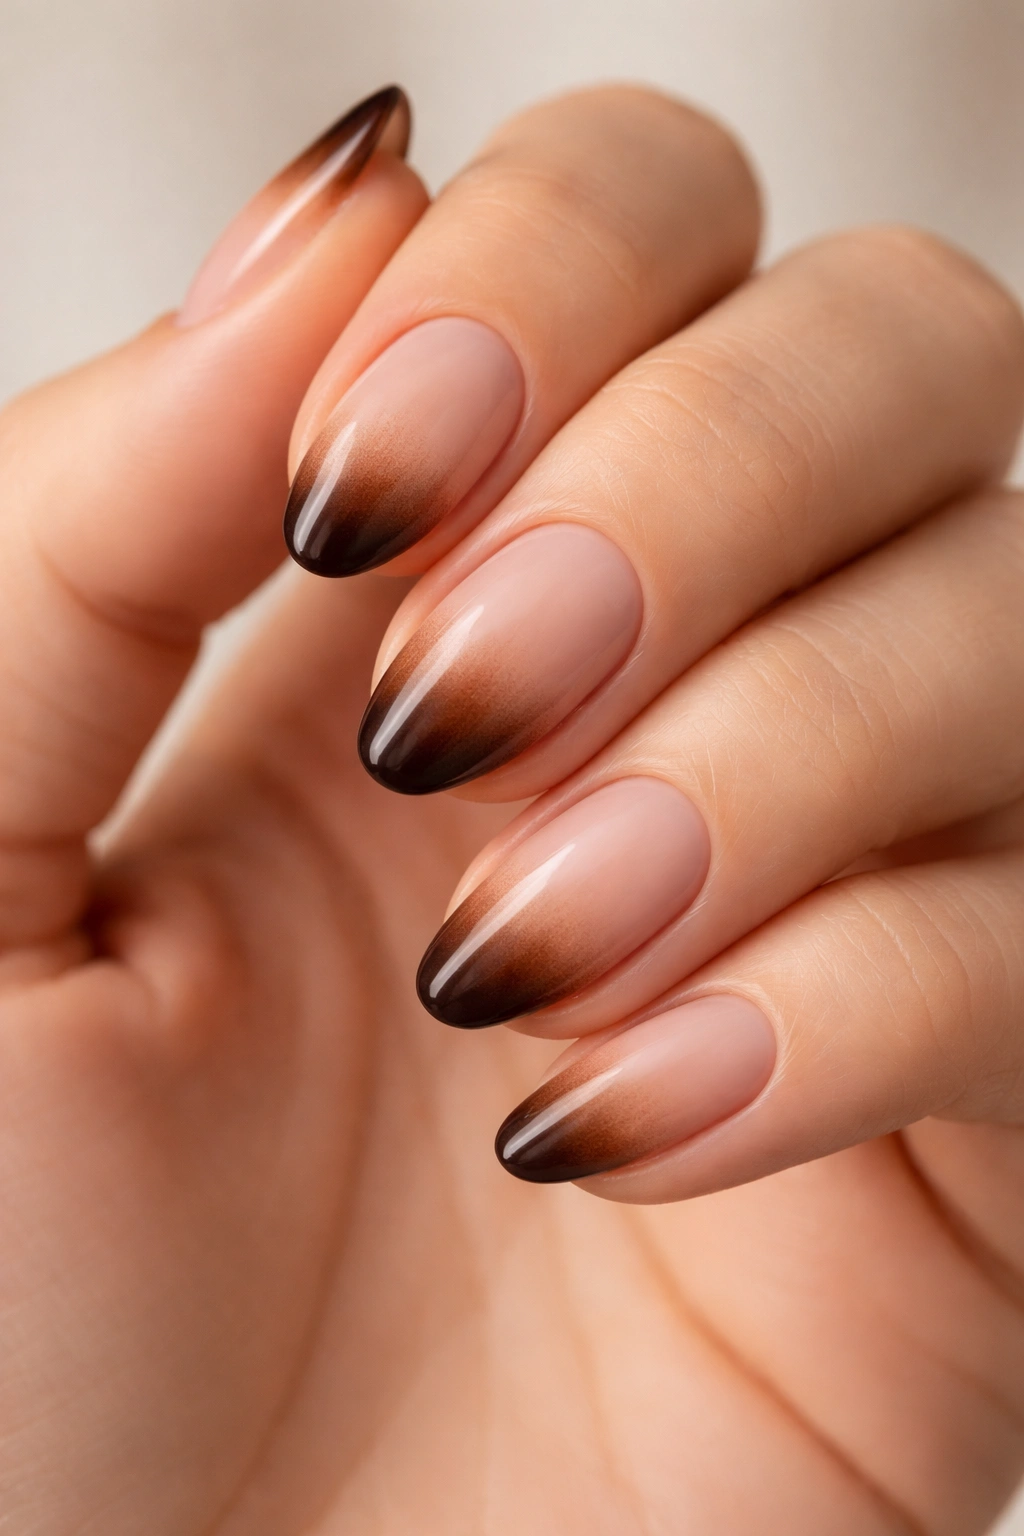
Ombre French tips took a while to translate successfully onto shorter nail lengths, where the gradient has less space to breathe. But on a short almond shape, the condensed gradient actually reads as more intentional — a tight, 3-4mm fade from bare nail to deep espresso at the tip looks almost like shadow.
How the Sponge Technique Works Here
The sponge method is the most reliable at this scale. Apply your deepest espresso shade to a small makeup sponge, dab it lightly onto the tip area in a rocking motion to work the color back toward the middle of the nail, then seal with topcoat before it dries. Multiple thin layers build more depth than one heavy pass.
The transition zone should be no more than 2mm wide on a short nail. If the gradient bleeds too far down, it stops reading as a French tip and starts reading as a dirty smudge. Define your starting point with a piece of tape if needed — it keeps the boundary clean while still allowing the natural sponge-fade above it.
Why Espresso Works Better Than Black for This Style
- Black ombre on short nails reads as harsh; espresso keeps the same visual impact with noticeably more warmth
- Espresso catches warm light differently — it can look almost amber near a window and near-black in shade, which gives the nail a living quality
- The soft ombre edge is more flattering on shorter nail lengths where hard, defined edges can feel abrupt
- Works beautifully over any base color, from bare natural nail to sheer pink to pale cream
Pro tip: A gel-polish formulation holds the ombre gradient significantly better than regular lacquer, which tends to bleed and soften over the first 24 hours.
4. Matte Brown Tips with a Glossy Nude Base
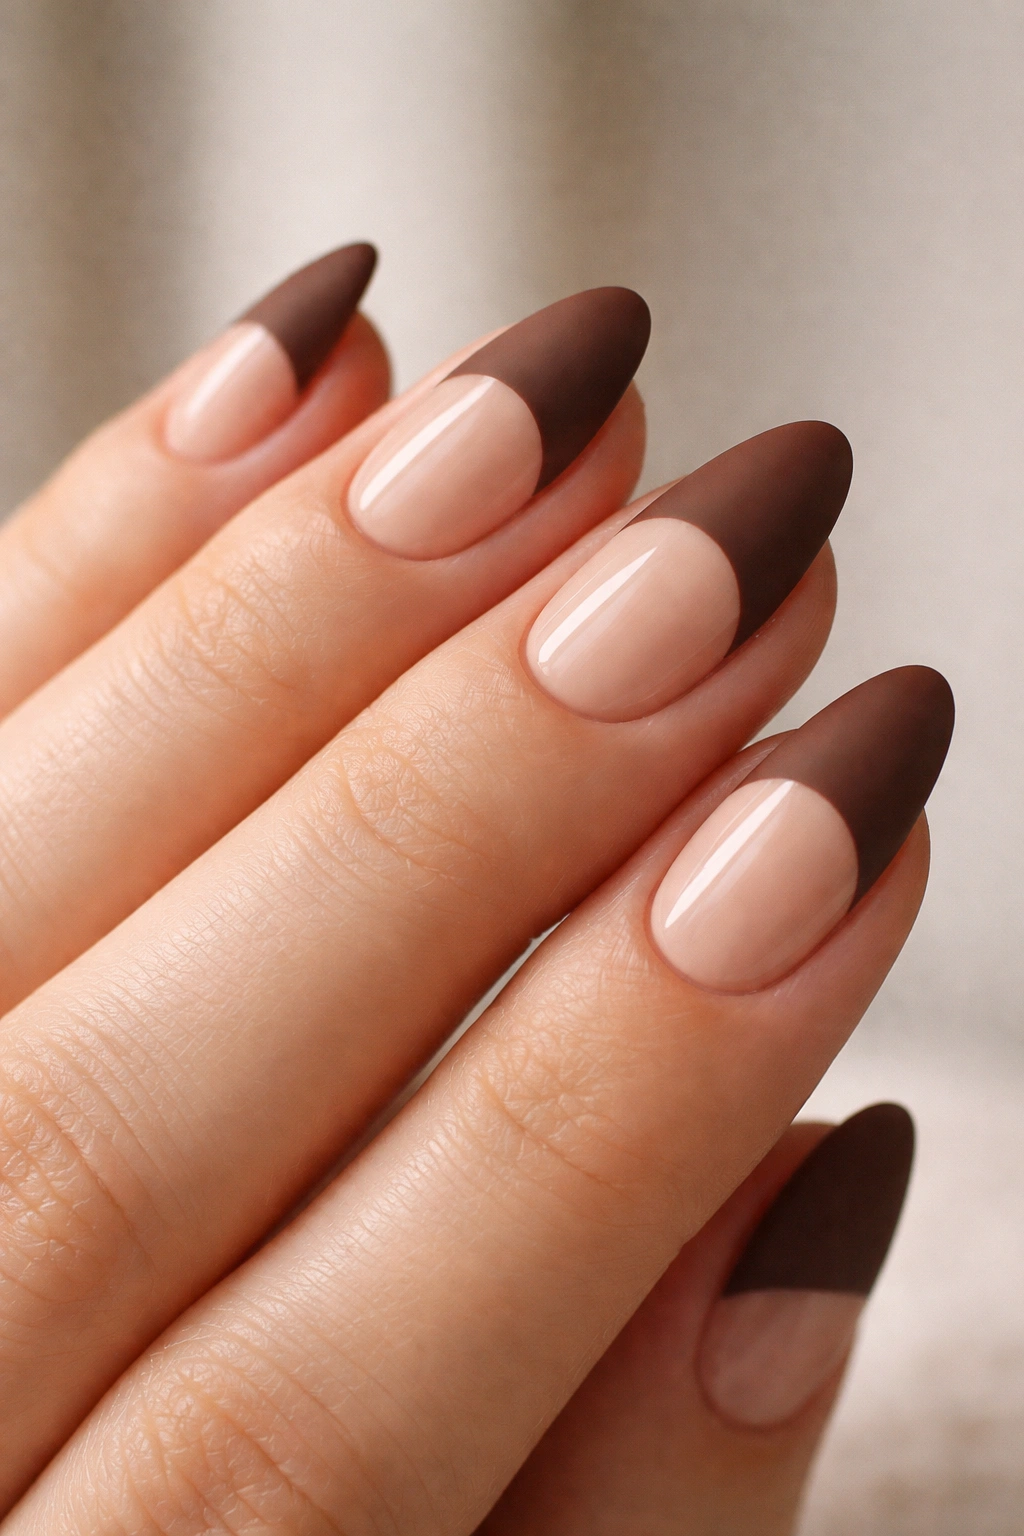
Most French tip designs play the same game: shiny tips, shiny base, everything matching in finish. This one flips the logic entirely — a matte-finish brown tip against a glossy nude base creates a contrast that’s subtle but immediately noticeable to anyone paying attention.
The matte tip absorbs light while the glossy base reflects it. On a short almond nail, this textural split draws the eye to the tip shape in a way that a uniform finish simply doesn’t. It looks considered without being complicated.
Unlike chrome or glitter tips, the matte-glossy contrast works best when it’s the only element. If your nails already have a lot going on — intricate art, bold jewelry — this design gets lost. It’s at its strongest when the finish difference does all the talking.
Who this works best for: Anyone who finds classic French tips a bit too safe but isn’t ready to commit to nail art. The finish switch is a low-risk way to add edge without adding complexity. Perfect for workplaces with conservative dress codes where visible nail art might feel like too much.
To get the cleanest result, apply your brown tip and let it cure fully, then seal the tip area only with a matte topcoat. Keep the base coated in regular glossy topcoat. If matte topcoat accidentally covers the base, the contrast disappears and the design reads muddy. Precision on the topcoat application step matters more here than anything else.
5. Brown Glitter French Tips
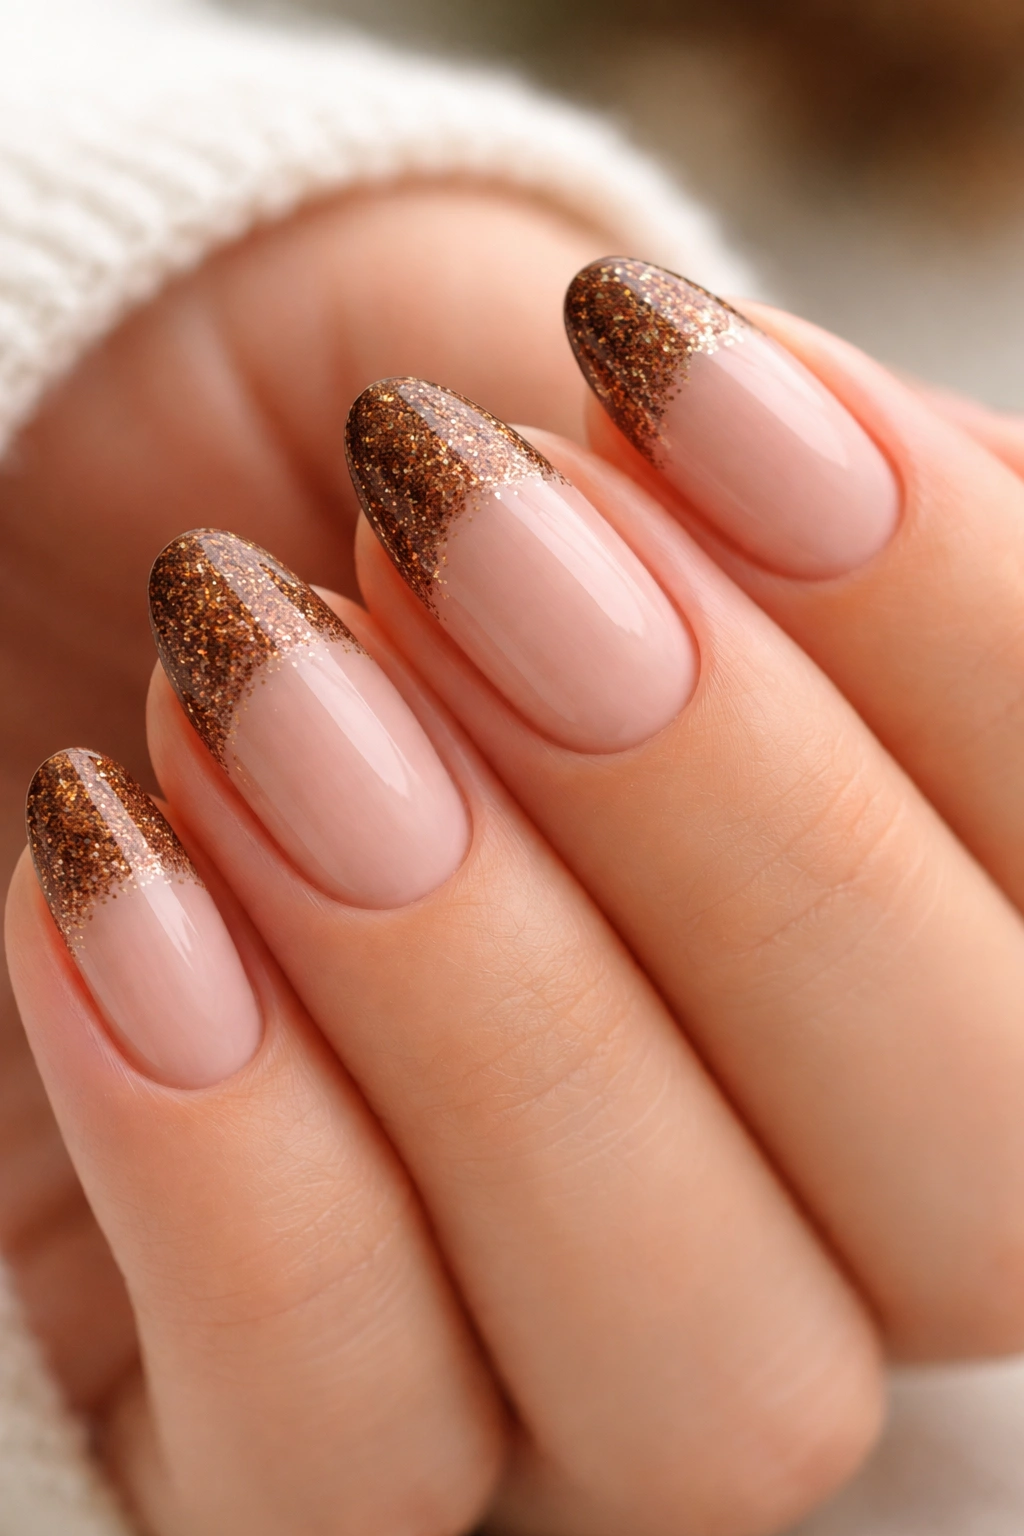
You’ve been restrained all week with your minimal nails, and now there’s a Saturday event that calls for something more. Brown glitter French tips exist exactly for that situation. They keep the warmth and wearability of a standard brown tip while adding the kind of shimmer that holds up under dim venue lighting and flash photography.
The glitter layer doesn’t replace the brown; it sits on top. A base coat of your brown shade first — medium chocolate or espresso works better than caramel here, since you need enough pigment to anchor the glitter visually — followed by a layer of fine gold or bronze-tinted glitter polish applied while the brown is still slightly tacky. The result is a tip that reads as brown in regular light but catches fire under direct illumination.
A few practical specifics worth knowing:
- Fine holographic glitter reads as more refined than chunky glitter; stick to particle sizes under 0.3mm for a polished result on short nails
- Gold-tinted glitter on brown creates warmth; silver glitter on brown creates an interesting cool-warm contrast that works surprisingly well in lower-temperature settings
- The glitter layer needs at least two coats of topcoat to feel smooth to the touch — a single layer over chunky glitter leaves a rough edge that snags on fabric and catches on everything
- Glitter polish is notoriously stubborn to remove; soak a cotton pad in acetone, hold it against the nail for 60-90 seconds, then slide the pad off in one direction rather than scrubbing
Glitter tips look slightly overdone in photos but land exactly right in person. Trust the live version over any screen preview.
6. Tortoiseshell-Painted Brown Tips
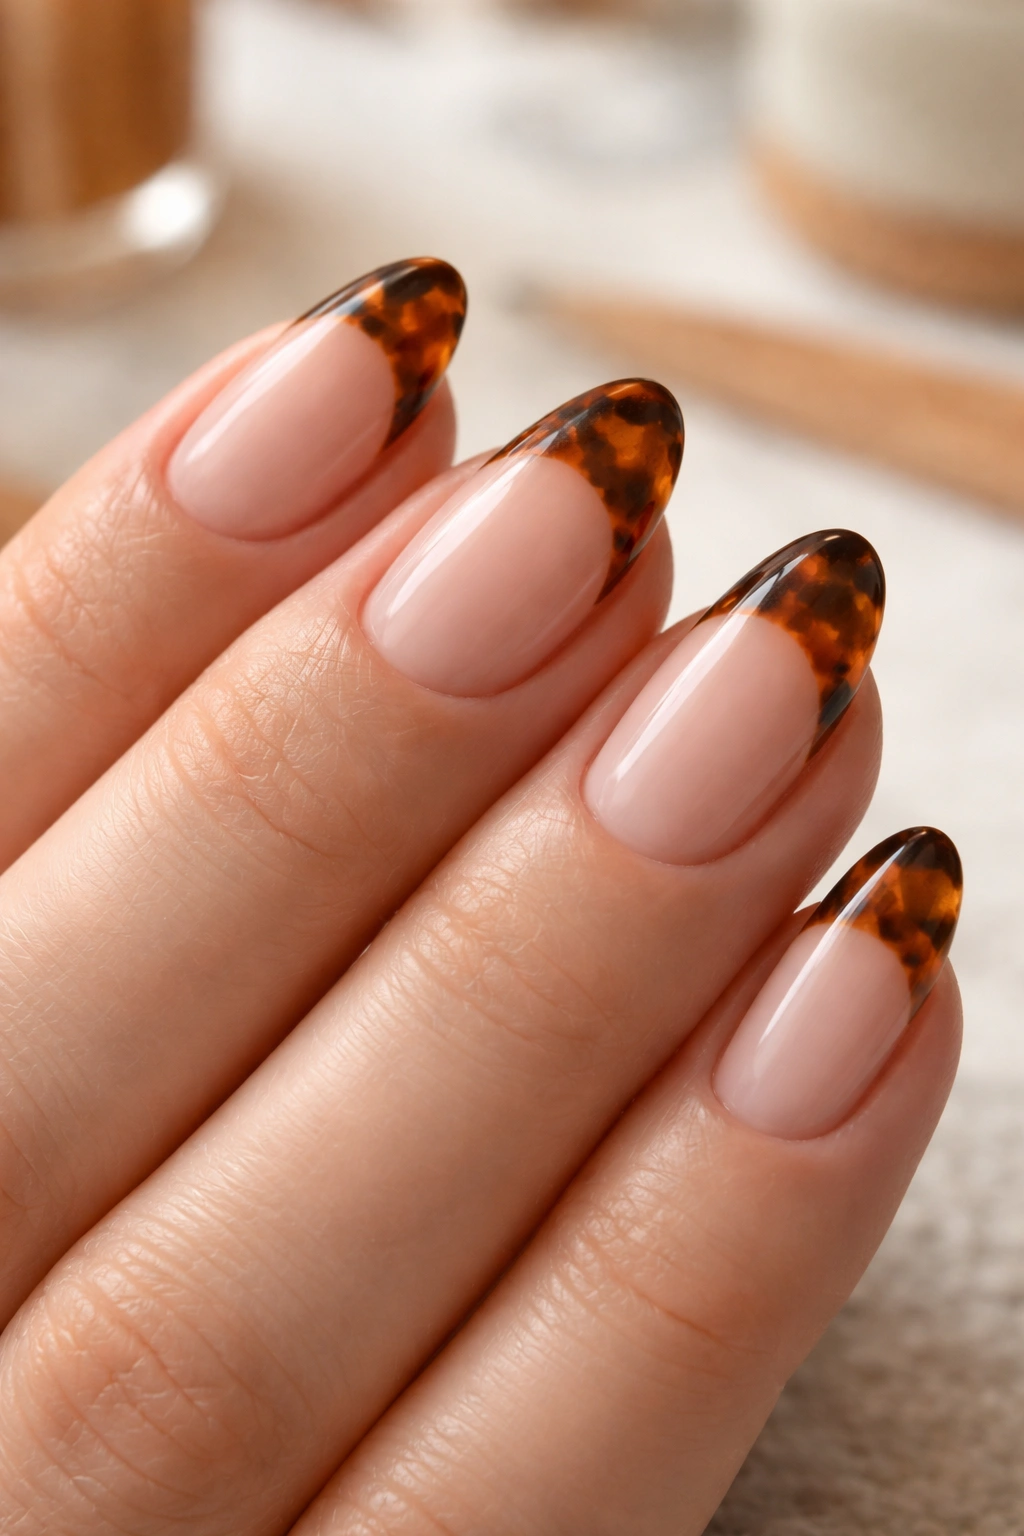
What happens when you take the warm amber-and-chocolate palette of tortoiseshell and confine it entirely to the tip of a short almond nail?
You get something that looks like a minor piece of wearable art — intricate enough to attract attention up close, clean enough to read as a traditional French tip from across the room. That’s the whole appeal of this design. It lives in two registers at once.
This is one of the more technically demanding looks on this list, but the bar for “good enough” tortoiseshell is genuinely low. The irregular, organic nature of tortoiseshell patterning means slight imperfections read as intentional. You’re not replicating a perfect stencil — you’re painting the chaos of a material that’s inherently messy and non-uniform.
The palette stays within the brown family: warm honey, amber, mid-brown, and a touch of near-black for the deepest shadows. These four tones, layered wet-on-wet so they bleed slightly into each other at the edges, create the tortoiseshell effect. None of them need to be mixed first.
How to Paint Tortoiseshell Tips on a Short Almond Shape
Start with a sheer honey or amber base across the entire tip zone. While that layer is still wet, use a thin nail art brush to drop irregular blobs of mid-brown at random angles — not in rows, not symmetrically. Add a few smaller touches of near-black in between, then drag a clean brush tip lightly through the wet layers to blend the edges without fully combining the colors. The tip line doesn’t need to be a perfect arc; a slightly uneven edge actually enhances the organic quality of the design.
Seal with a high-gloss topcoat once everything has dried, and the colors will deepen and clarify noticeably — the difference between a wet coat and a sealed, cured coat on tortoiseshell is significant.
7. Reverse Brown French Tips

The reverse French is the one nail design that consistently surprises people who see it for the first time on a short almond shape.
Instead of the tip being painted, the base of the nail — the curved crescent at the cuticle end — carries the brown. The body of the nail and the tip stay sheer, nude, or bare. Same idea as a classic French tip, just rotated 180 degrees.
On long nails, reverse French tips can read as maximalist. On short almond nails, the proportions tighten up, which pulls the design back to something that reads as elegant rather than theatrical. The brown crescent sits naturally within the shape of the nail’s base, echoing the cuticle line, and the untouched nail body keeps everything light.
The best approach for a clean reverse crescent is the acetone cleanup method rather than tape. Apply the brown color freehand in an arc at the nail base, then use an angled brush dipped in acetone to clean and sharpen the curved edge. It gives far more control over the crescent shape than tape does, since tape tends to shift on curved nail surfaces near the cuticle.
Dark chocolate and walnut browns work better here than lighter caramels. The reverse tip needs enough contrast to register clearly without the visual framing of the nail body surrounding it — a caramel reverse crescent on a natural base can blend together and become nearly invisible from more than a foot away.
8. Angular, Geometric Brown Tips
Forget the curve. Geometric brown French tips use sharp, straight edges — either horizontal across the nail or angled diagonally — in place of the traditional rounded tip line. On a short almond shape, this creates an interesting visual tension: the organic, curved outline of the almond shape against a deliberate, architectural tip line.
The most common geometric version is the straight horizontal cut — the line runs perfectly flat across the tip from one side to the other, no curve at all. It looks clean and graphic. The diagonal version angles the line from one corner to the opposite side, which makes a short nail appear slightly longer than it is.
Nail tape is the right tool for this. Cut thin strips of regular tape or use specialty nail tape sold in 2mm rolls, position it along your intended line, paint above it, and remove the tape immediately before the polish dries. The edge will be genuinely sharp — no wobble, no hand-steadiness required.
Color choice matters more here than in curved-tip designs. Geometric tips are graphic by nature, and a medium-value brown can get lost in that context. Go darker — espresso, walnut, or dark chocolate — and the straight line reads like ink on paper. Lighter caramels can work if the base is very sheer and the contrast is high enough, but they require more precise placement to land correctly.
One thing to have ready: an angled cleanup brush and a small amount of acetone. Even with tape, there’s often a small amount of bleed at the edge. Clean it up before the topcoat goes on and the result looks like it was done by a machine.
9. Brown and Gold Foil Tips
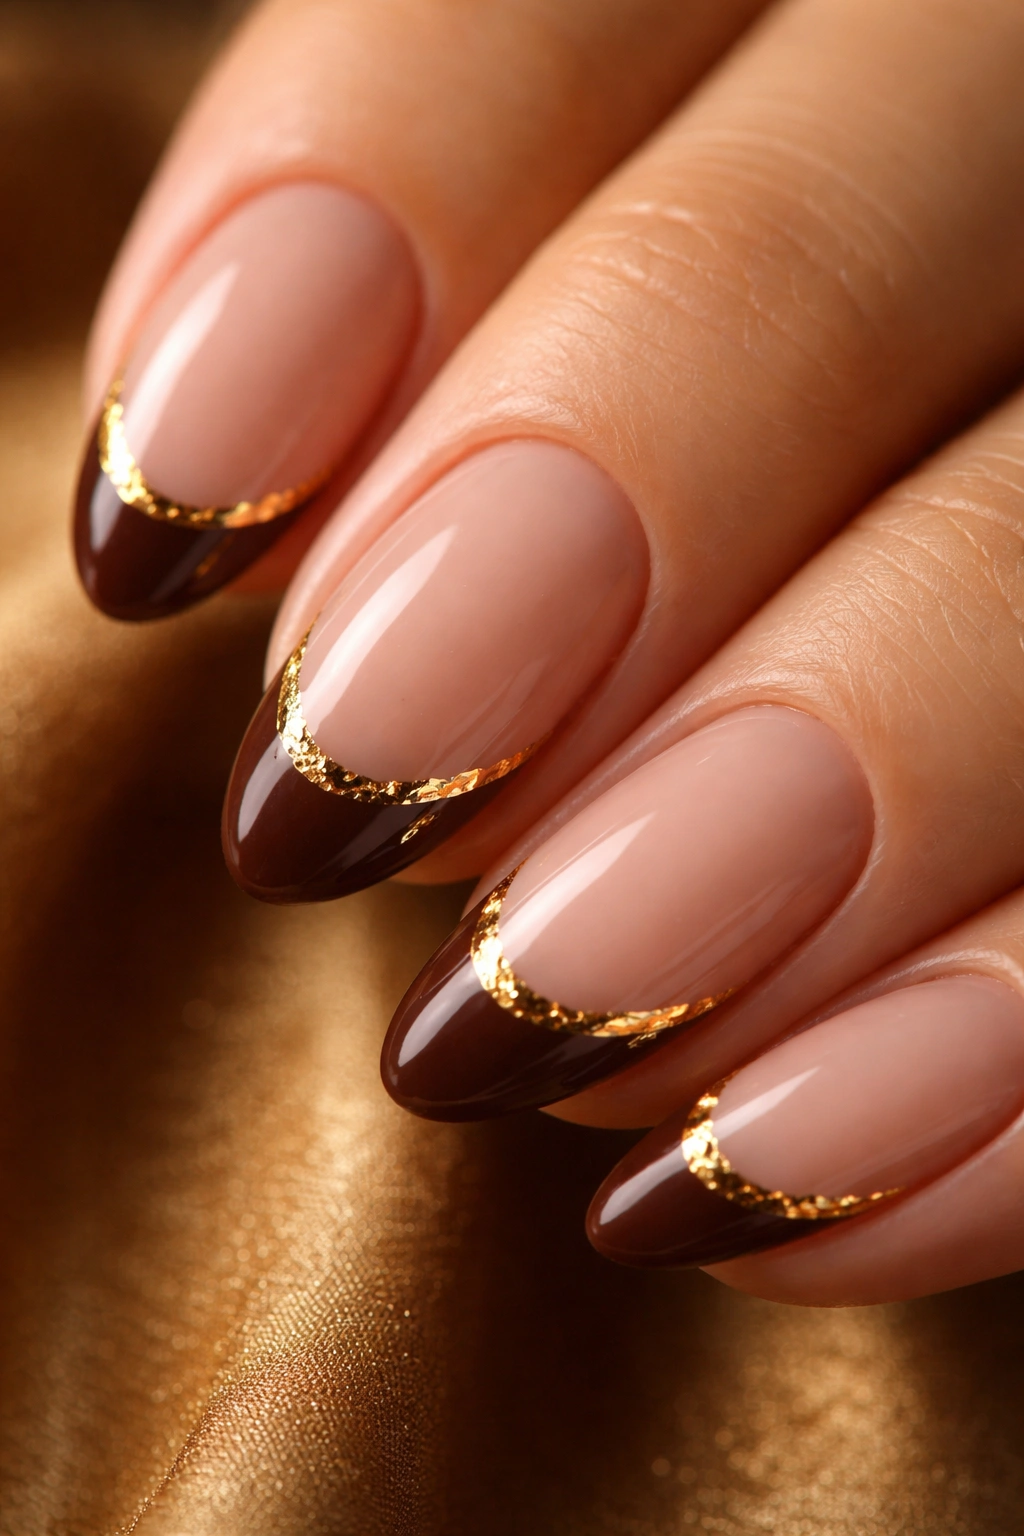
Gold foil and brown have a natural relationship — they share the same warm undertone family, which means they sit together without competing. On a short almond nail, a brown tip accented with thin strips of gold foil along the tip edge creates something that reads as expensive in a way that regular glitter can’t quite achieve.
The Difference Between Foil and Metallic Polish
Foil is a physical thin sheet applied to the nail after a tacky gel layer or dedicated foil adhesive, then lifted away to leave the metallic surface behind. Metallic polish is paint. The two look similar in photos but completely different in person — foil has depth and a slightly crinkled texture that catches light from multiple angles simultaneously, while metallic polish has a flat, uniform shine that doesn’t shift when you move your hand. If you’ve never applied foil before, the physical depth is the detail that makes people stop and ask about your nails.
How to Combine Foil with a Brown Tip
- Paint the brown tip first and cure or dry fully before touching the foil
- Apply a thin layer of foil adhesive only along the very edge of the tip — a strip no wider than 1mm
- Press the foil sheet metallic-side-down against the adhesive, hold for 5 seconds, then peel the backing away in one quick, firm motion
- If coverage is patchy, press a fresh piece of foil onto the same adhesive — do not re-apply adhesive on top of existing foil
- Seal with a no-wipe gel topcoat to protect the foil from lifting at the edges
Silver foil on a dark espresso base is a striking alternative to gold, leaning more editorial and less warm — worth trying if gold feels too predictable for what you want from this look.
10. Double-Line Brown French Tips
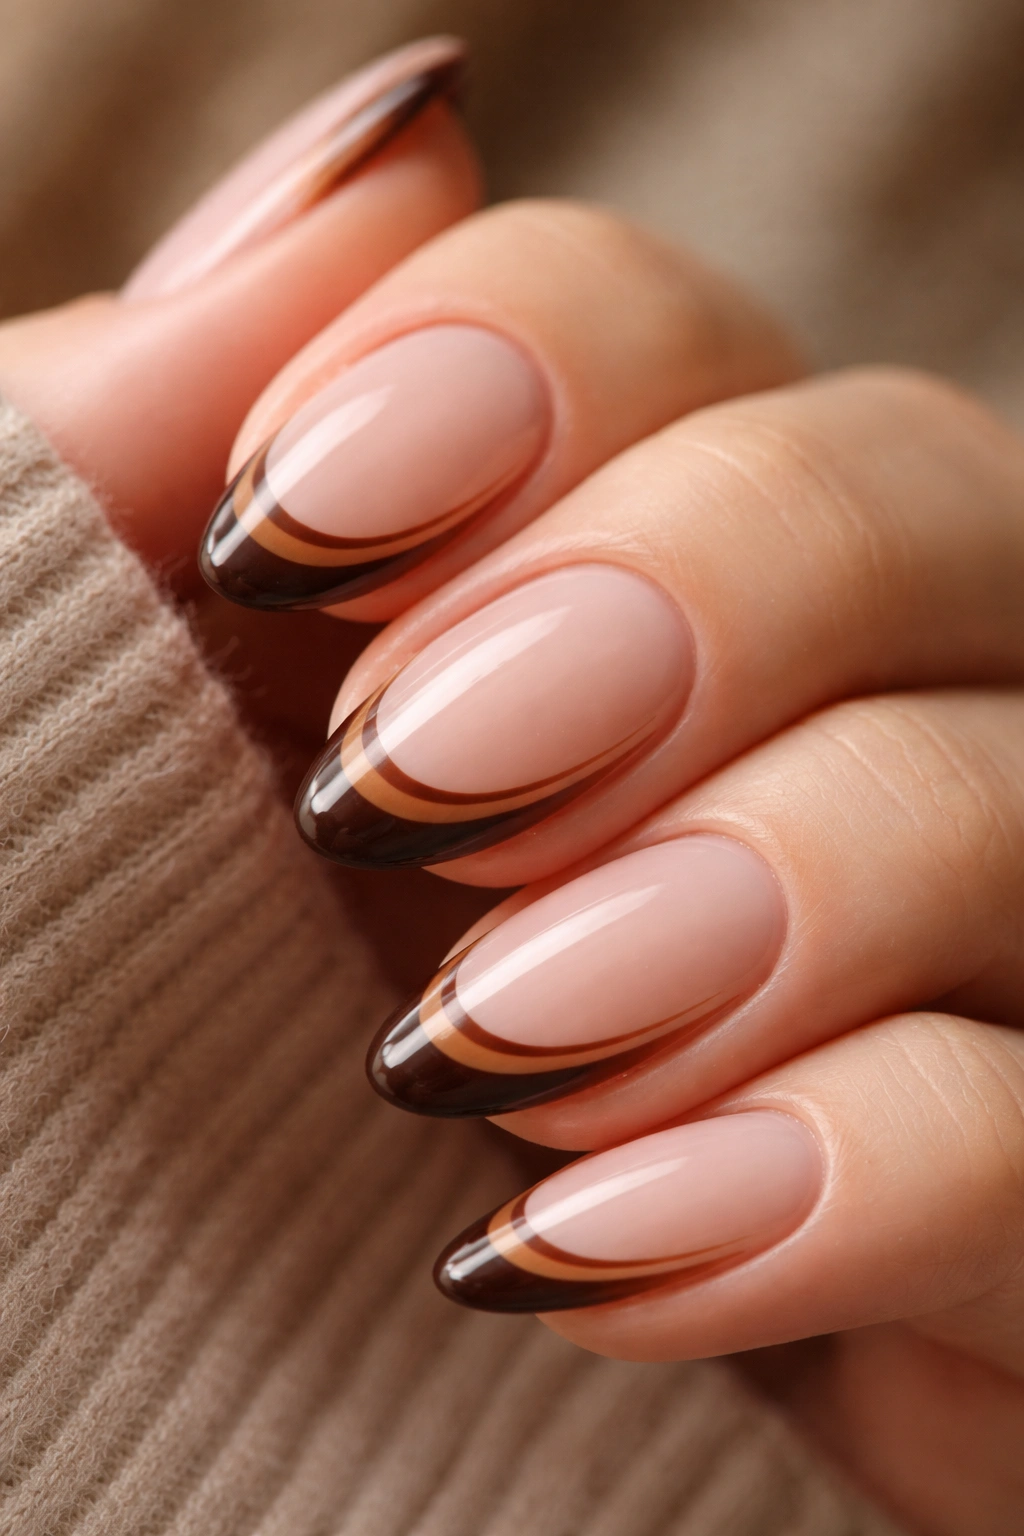
A standard French tip has one line. A double-line French tip has two — a thin hair-width stripe of one shade and a slightly thicker band of another, sitting parallel at the nail tip. On short almond nails in brown, this usually means a deeper chocolate outer line and a thinner caramel inner line (or the reverse), creating a layered tip that has significantly more depth than a single band.
What distinguishes this from every other design on this list: the layering happens within the tip zone itself, not between the tip and the base. The result is a French tip that rewards close attention — clean from a distance, intricate from a foot away.
The technique requires either a nail striping brush (very thin, with bristles 8-12mm long) or a nail art liner pen. The gap between the two lines should sit at no more than 0.5mm — wide enough to be visible, tight enough to read as a single composed element rather than two separate stripes.
Who benefits most from this design: Anyone who finds a single French tip too simple but doesn’t want to commit to full nail art or pattern work. The double line adds real complexity without requiring much artistic skill — just patience and a steady hand on the liner pen.
For the least stressful application, paint the wider band first, let it dry completely, then add the thinner second line on top or just inside it. Doing both lines while the first is still wet leads to muddy edges where the two shades bleed into each other and lose their separation.
11. Burgundy-Brown Blended Tips
Walk through any nail inspiration folder and you’ll hit burgundy-brown tips almost immediately. There’s a reason this combination keeps showing up — burgundy and brown share enough of the same red-brown undertone that they blend at their edges rather than contrasting sharply. The result is a French tip that looks like it might be one color from across the room but reveals itself as two when you look closely.
This design works differently from a standard brown tip. The base of the tip zone starts in a warm chocolate brown, which deepens or shifts into a red-plum burgundy at the very edge. Think of it as a brown tip with depth rather than a strict two-color design.
A few specifics on execution:
- The transition between brown and burgundy should happen within the last 1-2mm of the tip — any wider and the two colors start reading as separate rather than layered
- Wet blending gives the most natural result: apply brown, add a touch of burgundy while still wet, and blend at the meeting point with the tip of a clean brush
- Matte topcoat on this design is worth trying — the burgundy-brown palette without shine has an almost velvet quality that a glossy topcoat partially obscures
- On very fair skin, this combination reads quite dark; diluting the burgundy with a small amount of brown polish before applying keeps the overall tone in the warm-neutral zone
Burgundy-brown tips have the quality of looking like they were designed for the season you happen to be in, without being tied to any specific one. That’s the goal.
12. Negative Space Brown French Tips
What if the brown wasn’t a solid line at all, but a frame — with a gap of bare or sheer nail visible through the middle?
Negative space French tips in brown leave a small open channel within the tip zone. The outer edges of the tip carry the brown, but the center — a thin horizontal band — stays clear or sheer. On a short almond shape, this channel is typically no wider than 1mm, which is enough to register as a deliberate design choice rather than a missed patch of polish.
The visual effect is lighter and more architectural than a solid French tip. It photographs in a way that makes short nails look proportionally longer — the eye follows the negative space inward rather than registering the overall nail length. On short almond nails, that small optical effect is genuinely useful.
How to Create a Clean Negative Space Tip
Nail tape is non-negotiable here. Cut two thin strips and place them parallel to each other, defining the edges of the clear channel between them. Paint the brown above the outer tape strip (toward the nail tip) and below the inner tape strip (toward the nail body), leaving the gap between the two strips bare. Remove both tape strips before the polish dries. Seal the colored areas with a thin layer of topcoat, being careful not to flood the clear channel with too much product.
A sheer milky topcoat over the negative space area adds a subtle softness to the gap that looks more refined than leaving it completely bare — but this is optional. The bare version is striking on its own, particularly over a healthy natural nail.
13. Brown Chrome Mirror Tips
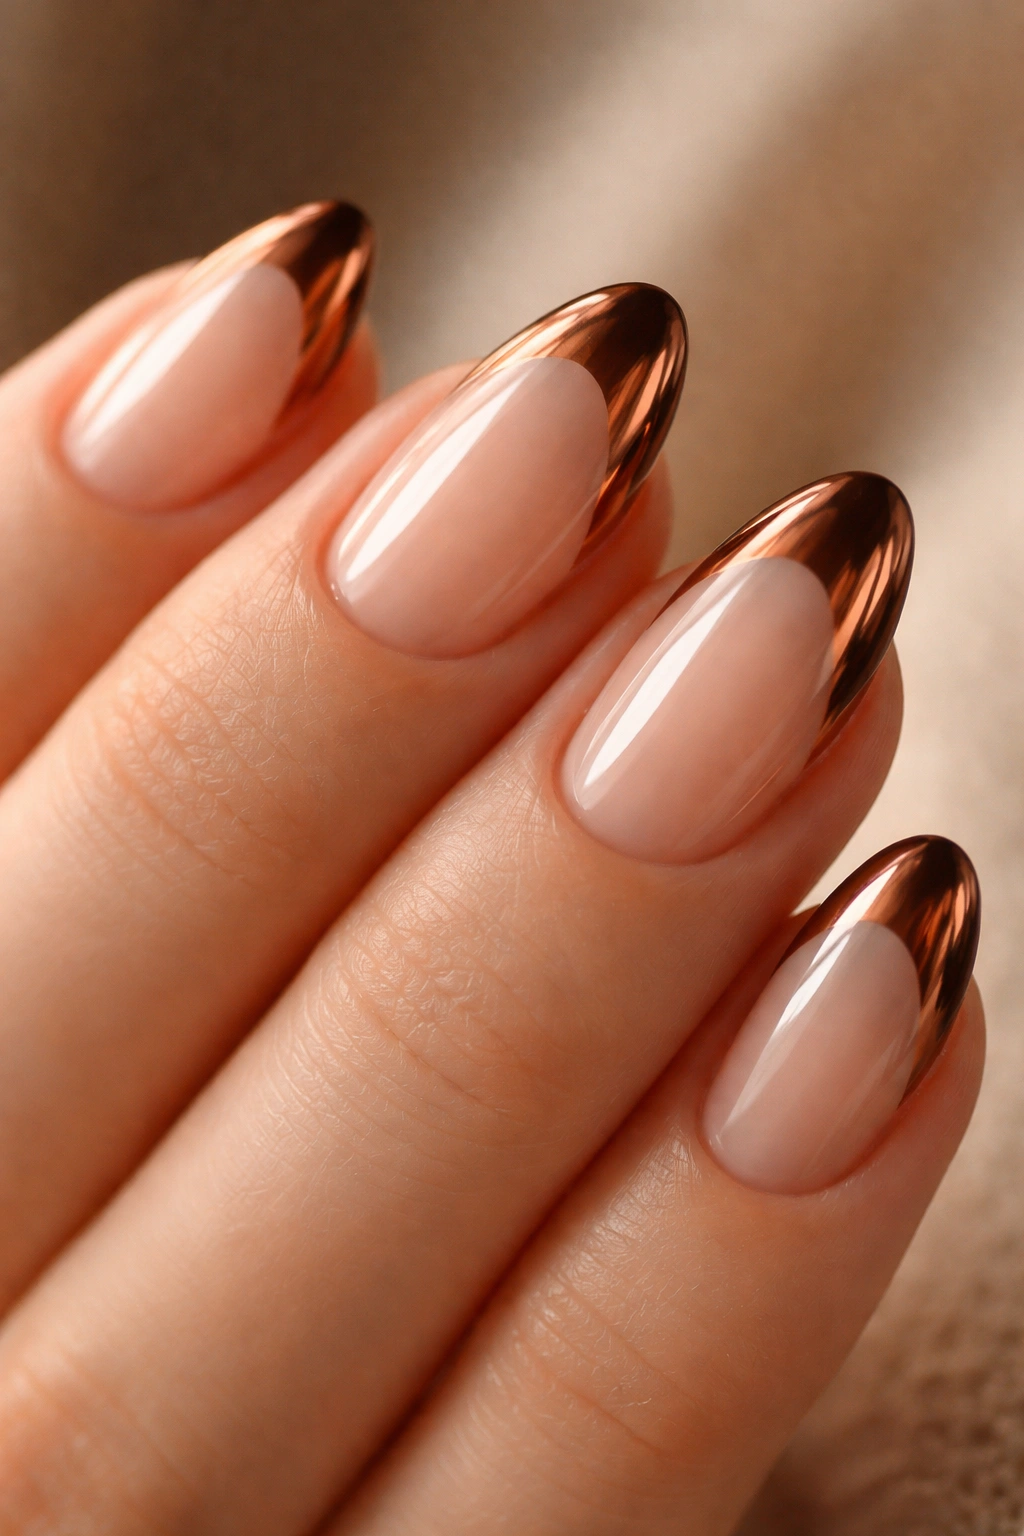
Chrome tips are one of the few designs that genuinely look more impressive in person than in any photo.
Brown chrome on a short almond shape — a mirror-finish, highly reflective brown that picks up and distorts the light around it — sits in an unexpected category: warm, metallic, almost like liquid copper in certain lights. Most chrome nail work defaults to silver, gold, or holographic. Brown chrome is more unusual and, because of that, more interesting.
The chrome effect comes from rubbing a finely milled powder over a cured, no-wipe gel topcoat using a silicone-tipped applicator or a soft eye shadow sponge. The powder fuses to the tacky layer and creates the mirror surface. Brown chrome powder tends to shift between deep copper, warm bronze, and near-espresso depending on the angle — which is what makes it interesting rather than just a brown metallic. The shifting is the point.
For short almond nails, the chrome zone needs to be precise. Chrome powder migrates with too much pressure; use light, circular buffing motions within the tip area only. Place tape along the edge of the tip line before buffing to prevent the powder from spreading onto the nail body. Remove the tape and seal with a no-wipe topcoat immediately after buffing.
The chrome finish also happens to be one of the longer-lasting options when applied over gel — holding its reflective quality for 10-14 days without significant dulling.
14. Brown Tips with Minimal Floral Line Art
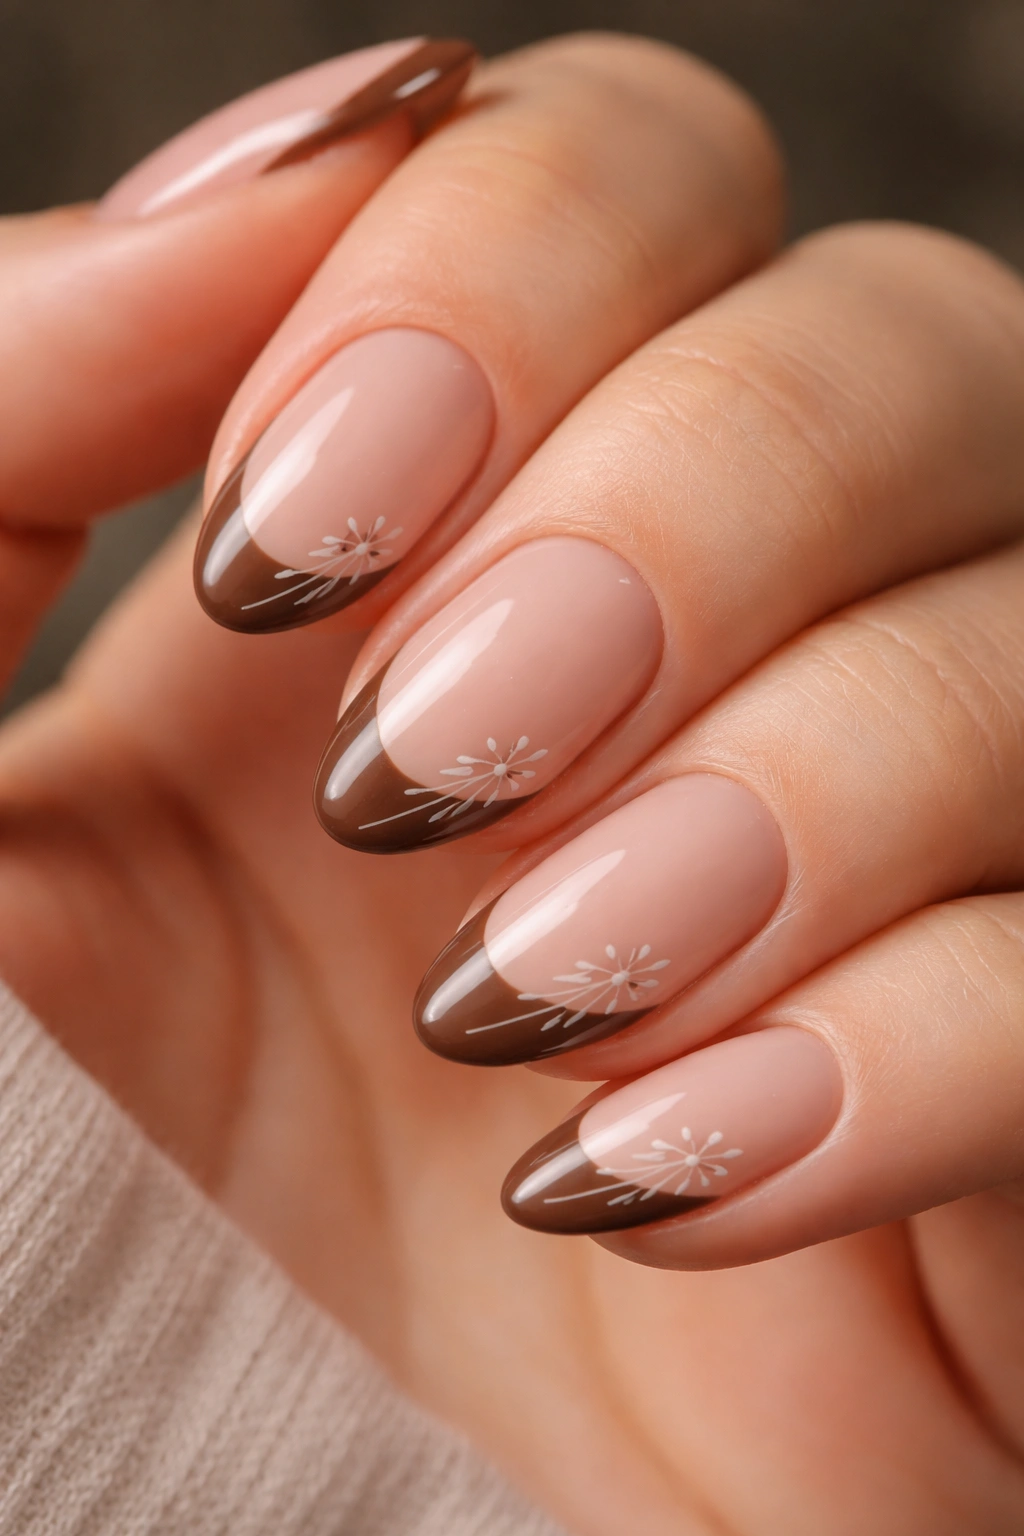
There’s a version of nail art that tries to do everything — flowers, leaves, abstract shapes, gradient, glitter — and then there’s this one, which does almost nothing and still lands beautifully. These are not the same category of design.
A thin, single-stroke floral line done in brown across a sheer or bare base is the design equivalent of a pencil sketch. A single curved stem with two or three small petals drawn in a fine-line style at the nail tip — no shading, no color fill, no layering — reads as both artful and restrained in a way that more elaborate nail art rarely achieves on short nails. Short nails don’t have the canvas for complex art. This design works with that limitation rather than against it.
The tools that make this possible are either a nail art liner pen with a 0.3mm tip or a very thin striping brush with long, flexible bristles. The brown color for the line art doesn’t need to match a separate tip color — you can use a single rich chocolate brown across the entire nail without any French tip at all, letting the floral sketch do the work entirely.
The key is keeping the drawing simple. One or two flower outlines at the tip area, with the rest of the nail left bare, creates negative space that makes the art feel placed rather than crammed. Adding more detail doesn’t improve this design. It makes it worse.
This is also one of the few designs where the quality of the result depends almost entirely on the quality of the brush or pen, not the technique. A proper 0.3mm nail art liner pen will make the difference between something that looks intentional and something that looks smudged. That tool is worth buying.
15. Sage Green Base with Chocolate Brown Tips
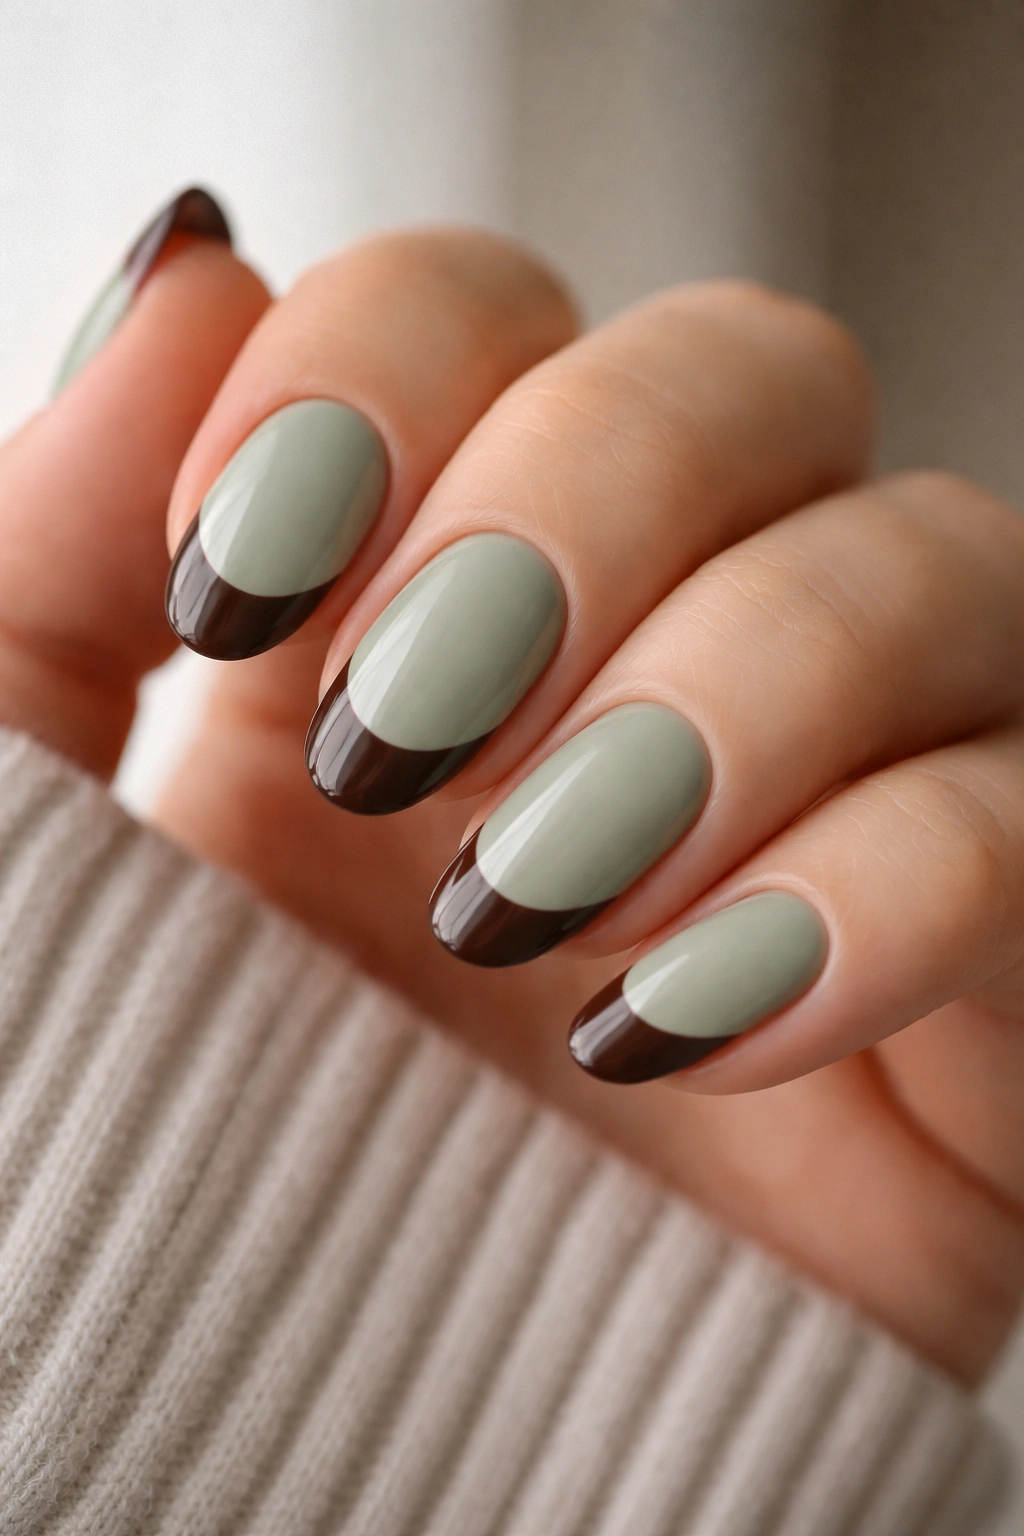
Sage green as a nail base has a relationship with brown that most people haven’t explored. Where classic nude and pink bases create a neutral frame for brown tips, sage green adds a botanical, earthy dimension that pushes the whole look into different territory — less traditional, more textural. Like something from a forest floor, which sounds strange until you see it on a hand.
The combination works because sage green and chocolate brown share the same muted, natural color family. Neither color is saturated or bright. They both sit in that grayed, understated zone that feels grounded rather than flashy. Together on a short almond shape, they read as cohesive in a way that a bolder color pairing wouldn’t.
Choosing the Right Shade of Sage
Not all sage greens work here. The versions that pair best with brown tips fall into three camps:
- Dusty sage: Gray-leaning, very desaturated — the quietest version, closest to a neutral. Most forgiving on different skin tones.
- Olive sage: Yellow-green-gray — warms up noticeably against brown tips, almost earthy and mossy in quality.
- True sage: Green-dominant but still soft — works well in warmer months when skin tones have more warmth to reflect.
Avoid bright or minty greens. These contrast with brown rather than harmonizing, and the result looks more like a color-blocking statement than a cohesive nail design.
Making the Tip Line Work Over a Colored Base
The brown tip needs to be at least one shade deeper than what you’d use over a nude base, since the sage green already provides visual weight. Medium chocolate can disappear slightly over sage — go darker, toward espresso, to keep the tip readable at normal viewing distances.
A matte topcoat over both sage and brown ties the two colors together and enhances the earthy, botanical quality of the combination. The glossy version is striking, but the matte version is the one that gets talked about.
16. Deep Walnut Tips with a Thin Ivory Inner Line
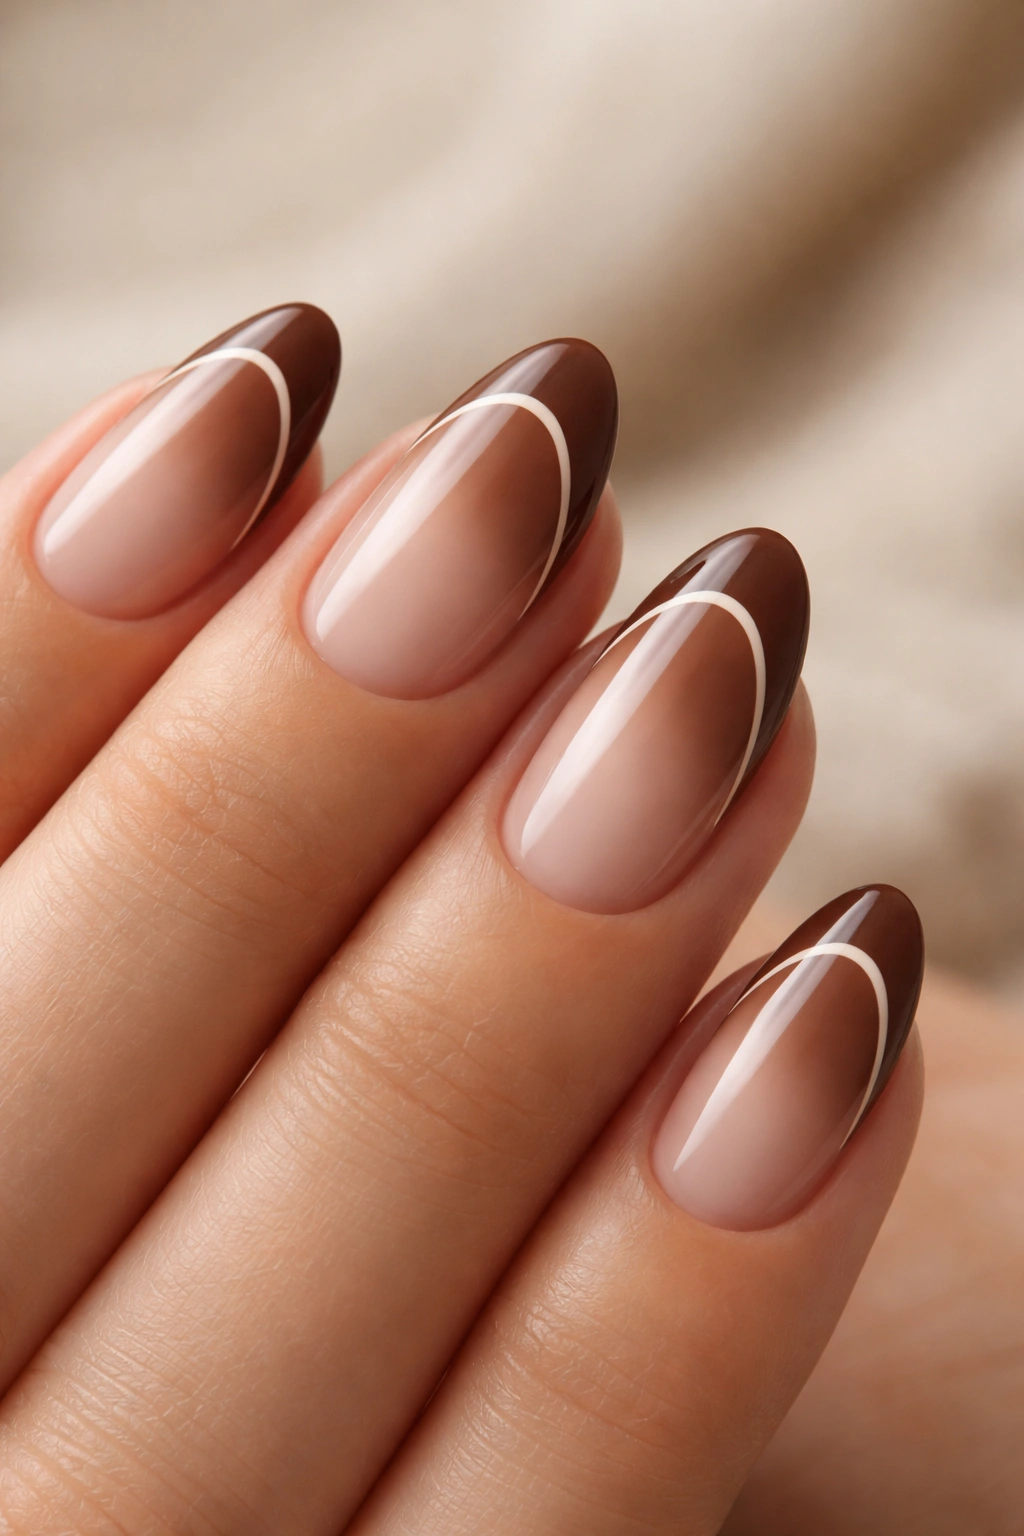
You know the nail design that looks deceptively simple in person but takes three passes to explain in a photo? This one.
Deep walnut brown tips with a hair-thin ivory or cream line drawn just inside the tip edge — a single fine stroke that sits roughly 0.5mm back from the tip — creates the visual impression of a nail tip that has literal depth, like a cross-section of two layered materials. The ivory line is the key detail. Without it, this is just a dark French tip. With it, the tip gains a dimension that makes the brown appear to float slightly above the nail surface. Tiny optical trick. Works.
The walnut shade specifically — a dark brown with a slight gray or purple undertone, rather than the warm-red direction of mahogany or the yellow warmth of chocolate — is what makes this version worth calling out by name. It’s the most sophisticated brown in the French tip toolkit. Less expected than espresso, more distinctive than standard chocolate.
Some notes on execution:
- Apply the walnut tip and cure or dry fully before touching the inner line
- Use a striping brush or a 0.3mm nail art liner pen with an ivory or off-white color — pure bright white is too stark and will jump off the nail; off-white stays in the warm family and harmonizes with walnut
- The line needs the brush held nearly perpendicular to the nail surface, moving in one slow, steady stroke from corner to corner without stopping
- If the line wobbles, remove it immediately with a clean brush dipped in acetone before it fully dries — removing dry ivory liner over walnut brown is messy
This design requires practice to get right on the first attempt. But when it lands, that thin ivory line inside a deep walnut tip looks like something from a high-end editorial spread. That gap between the brown and the bare nail — 0.5mm of ivory — is doing more work than anything else in the design.
Making Your Brown French Tips Last Longer
Brown French tips share the same failure points as any French tip style: tip wear, chipping at the edge, and the tip line that gradually lifts away from the nail body. A few specific habits make a measurable difference.
The most important one, and the most commonly skipped: seal the tip edge. When applying topcoat, drag the brush over the polish surface and then run it along the very edge of the tip itself — painting the thin exposed edge of the nail. This seals the color to the underside of the tip and significantly slows the rate at which the tip wears down from daily contact with surfaces. Most people apply topcoat only to the flat surface and miss the edge entirely.
For at-home regular-polish manicures, reapplying topcoat every 2-3 days adds 4-5 extra days of wear. Apply it thin — thick topcoat application over existing polish causes dragging and bubbling that actually shortens the lifespan.
For gel manicures specifically:
- Avoid soaking your nails in water for the first hour after curing — the gel is slightly more porous during that initial window and absorbs moisture faster
- Wear gloves for extended dishwashing; even gel chips faster under repeated exposure to hot, soapy water
- A thin gel topcoat refresh coat at the two-week mark extends most gel manicures to 3-4 weeks without full removal
Brown tip polish also tends to show shrinkage — where the color pulls back slightly from the cuticle edge — more visibly than darker shades. Keeping the tip sealed with topcoat and making sure your initial application goes close enough to the cuticle without touching the skin minimizes this. A small amount of shrinkage is normal in any gel polish and doesn’t mean the manicure is failing.
Final Thoughts
Short brown French tip almond nails occupy a quiet zone where a nail design says something without announcing itself. The 16 options above cover the full range from the five-minute Sunday-afternoon version to the salon appointment you’ll need to book a week in advance — but they all share the same underlying logic: warm tone, clean shape, proportions that work with short nails rather than against them.
If this is your first brown French tip, start with the classic chocolate on a nude base or the warm caramel version. Both are forgiving, both translate well in photos and in person, and both give you a clear baseline to work from before you start experimenting with foil, chrome, or the walnut-with-ivory-line design that requires a steadier hand.
The more involved designs on this list — the double line, the negative space tip, the tortoiseshell — reward the time you put into them. They’re not difficult because they require artistic talent; they’re difficult because they require patience and the right tools. A proper 0.3mm nail art liner pen will open up more of these designs for home use than any amount of technique will. Buy one before you attempt the floral line art or the ivory inner line. It’s a $5-8 tool that makes the difference between something that looks professional and something that looks like a second attempt.
Brown tips on short almond nails also have a practical advantage worth mentioning: brown shows tip wear less visibly than white. When the very tip of a white French tip chips or wears, it shows immediately as a color gap. When a brown tip chips slightly, the depth of the brown color softens the appearance of wear for an extra day or two. For short nails that see daily use, that’s not nothing.
