

White and gold nails strike that rare balance between understated elegance and head-turning glamour. It’s a pairing that feels luxurious without screaming for attention, refined without being boring. If you’ve been scrolling through nail inspo and can’t decide between crisp minimalism and something with a bit more sparkle, this color duo gives you both.
What makes white and gold so universally appealing is its versatility. The combination works beautifully across every nail shape, from short and practical to long and dramatic. You can wear it to a wedding, a job interview, or just because Tuesday needs a little elevation. The clean backdrop of white lets gold accents shine without overwhelming your look, while the warmth of gold prevents white from feeling too stark or clinical.
Celebrity manicurists and nail artists have embraced this pairing for good reason. The two shades complement each other effortlessly, creating designs that photograph beautifully and translate well across different styles. Whether you’re drawn to geometric precision, romantic florals, or modern abstract art, white and gold provide the perfect foundation.
We’ve gathered twelve stunning white and gold nail designs that showcase just how adaptable this color combination can be. From delicate French tips with metallic accents to bold chrome finishes, each look brings something different to your fingertips. You’ll find options for every skill level, occasion, and personal aesthetic. Get ready to screenshot your favorites.
1. Classic French Tips with Gold Borders

The French manicure gets an instant upgrade when you introduce a slim gold line. This design keeps the traditional elegance of crisp white tips while adding just enough metallic detail to feel special.
Why This Design Works
The gold border creates definition that makes your nail tips pop without adding bulk or visual weight. It’s sophisticated enough for formal settings but interesting enough to feel fashion-forward. The thin metallic line catches light beautifully, adding dimension that standard French tips lack.
This approach works particularly well on almond and oval nail shapes, where the curved gold line follows your natural nail contour. The result feels polished and intentional rather than fussy.
Styling Tips to Consider
- Keep the gold line uniform and precise for maximum impact
- A glossy topcoat makes both colors shine
- This pairs beautifully with gold jewelry without feeling matchy-matchy
- Works on both short and long nails
Pro tip: If you’re doing this at home, nail striping tape makes creating that perfect gold line much easier than freehand painting.
2. Marble Swirls with Gold Veining
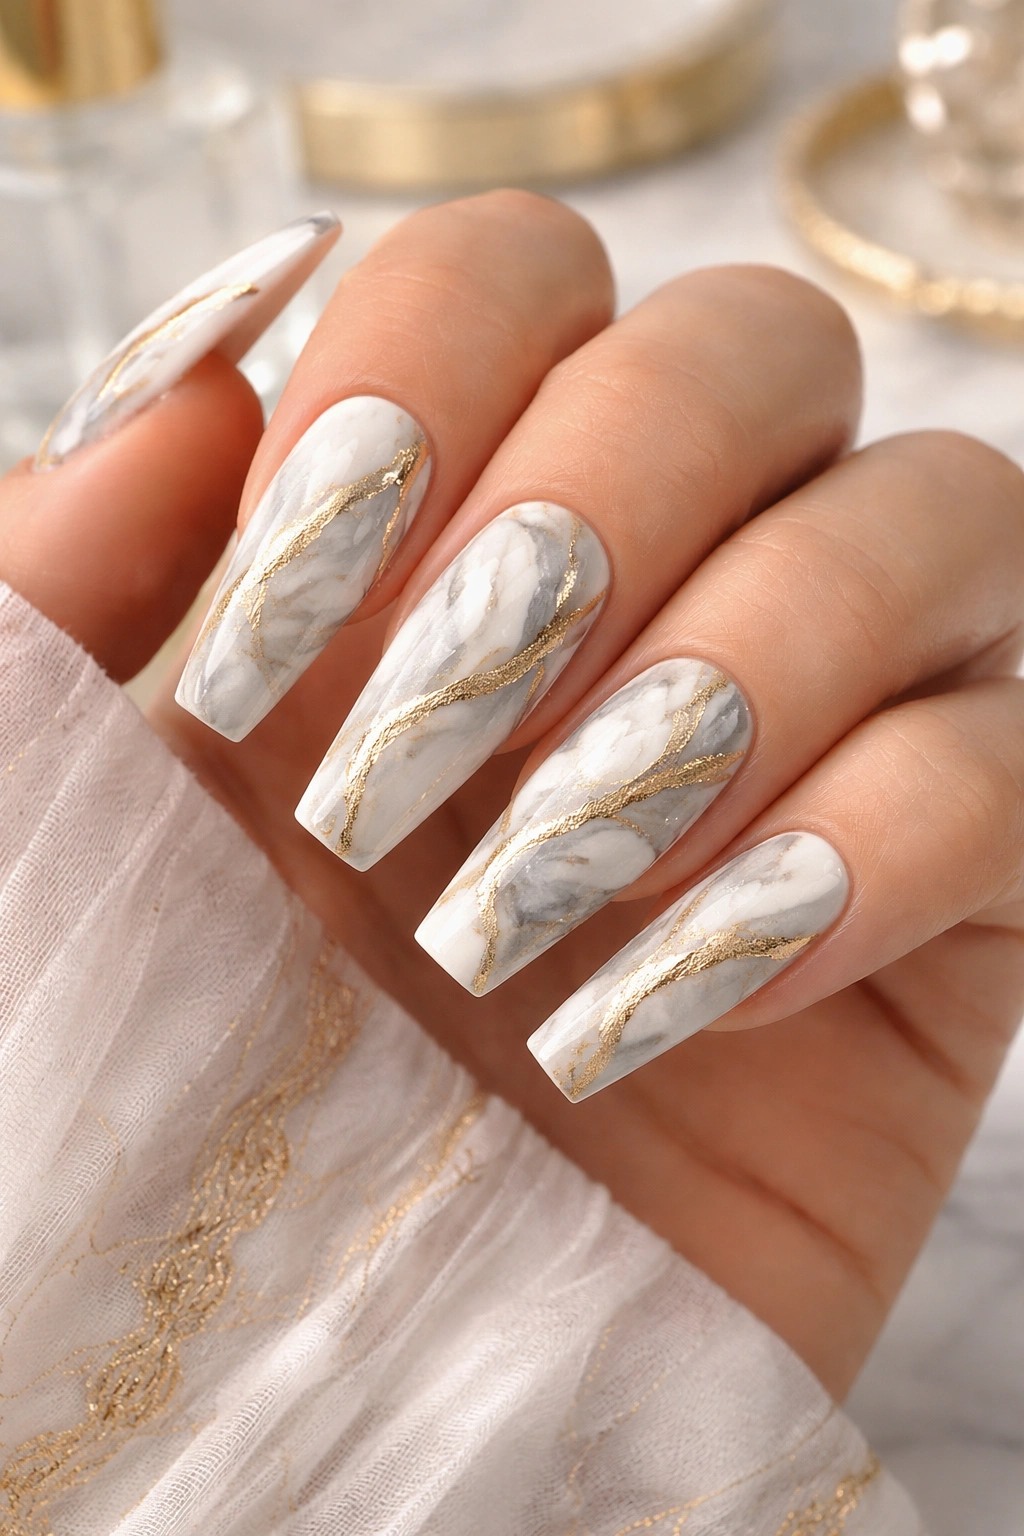
Marble nail art brings an artistic, high-end feel to your manicure. When you add gold foil or paint into those swirling white and gray patterns, you’re creating wearable luxury.
The Luxe Factor
There’s something inherently expensive-looking about marble effects. The organic, flowing patterns feel custom and unique since no two nails turn out exactly alike. Gold veining mimics the precious metal inlays you’d find in actual marble stonework, amplifying that luxurious association.
The soft, cloudy white base keeps the design from feeling too heavy, while strategic gold placement adds focal points that draw the eye. It’s bold without being loud.
Application Approach
You can achieve marble effects through water marbling, dry brush techniques, or even marble nail wraps if you want to skip the learning curve. Gold foil flakes pressed into wet topcoat create authentic-looking veining that photographs incredibly well.
This design looks stunning on longer nails where you have more canvas to work with, but shorter nails can pull it off by focusing the marble effect on one or two accent nails.
Fun fact: Marble nails have remained consistently popular because they’re forgiving—imperfections actually add to the natural stone aesthetic.
3. Negative Space Geometric Patterns
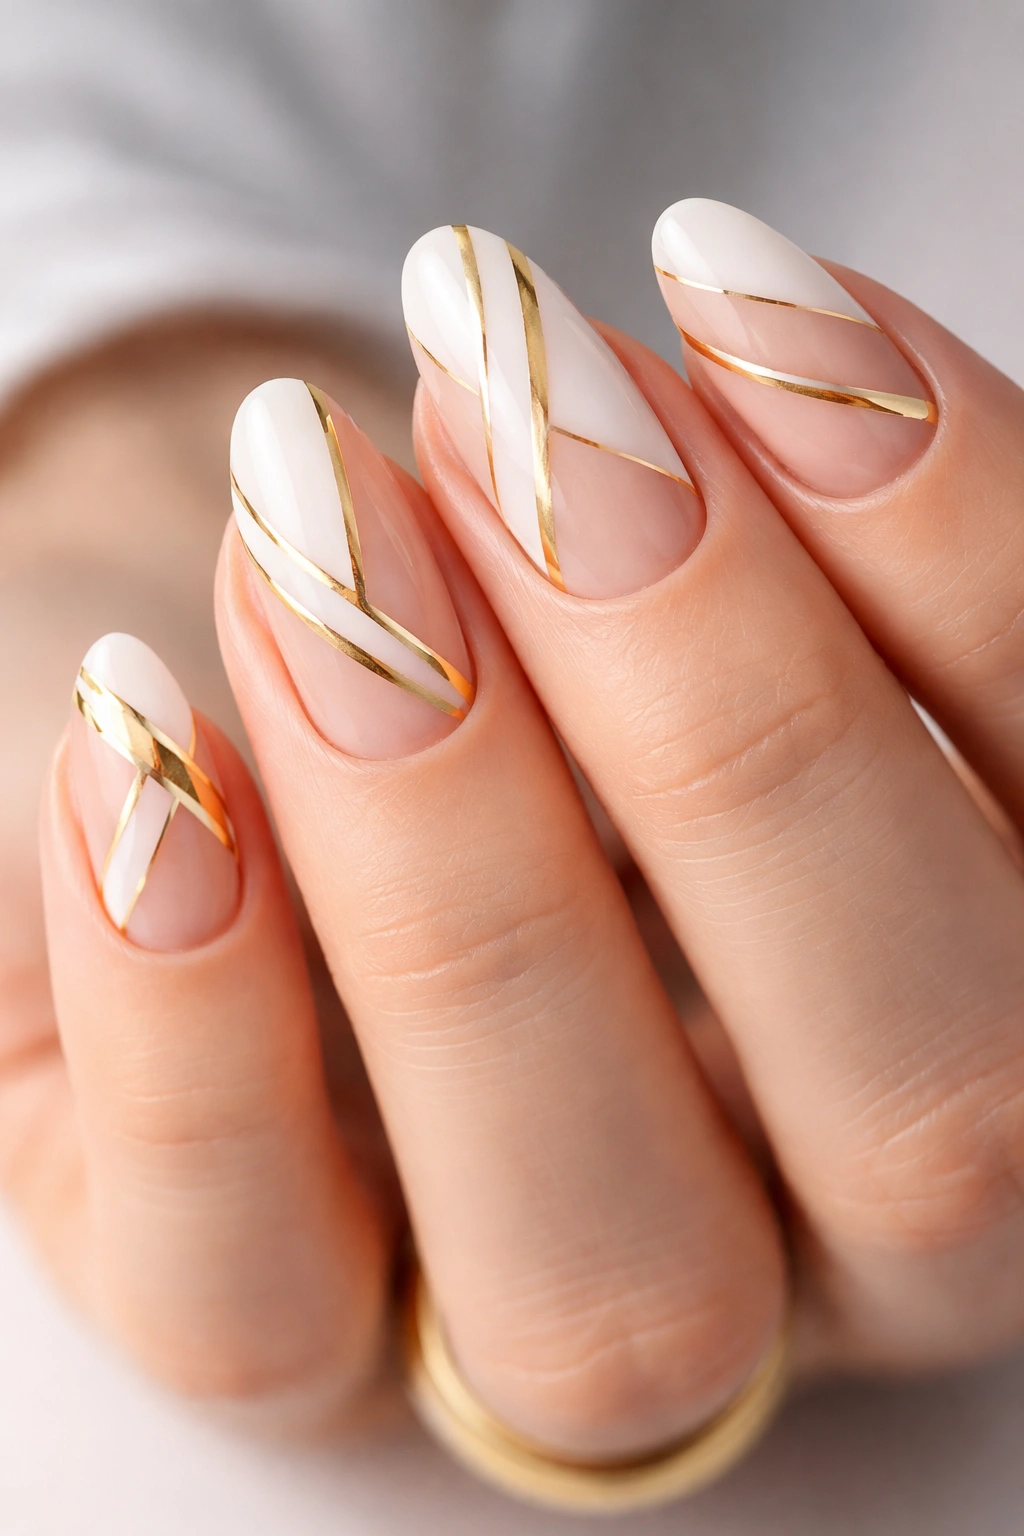
Negative space designs use your natural nail as part of the artwork, creating modern looks that feel airy and sophisticated. Gold lines and white sections combine with bare nail to create striking geometric compositions.
Modern Minimalism Meets Metallic
This style appeals to those who appreciate clean lines and architectural precision. The exposed natural nail keeps the design from feeling too heavy or opaque, while gold outlines provide structure and definition. White sections anchor the composition, creating balance.
The beauty of geometric negative space designs lies in their versatility. You can go with simple triangular sections, intricate grid patterns, or abstract angular shapes depending on your mood and skill level.
What Makes It Special
Negative space designs feel contemporary and art-forward. They photograph beautifully on social media because of their high contrast and clear visual interest. The combination of textures—bare nail, opaque white, shiny gold—creates depth that standard solid-color manis lack.
This approach works especially well if you prefer shorter nails, since the negative space creates the illusion of length without actual extension.
- Requires precise application for clean edges
- Nail guides or striping tape help achieve sharp lines
- Best with a strengthening base coat to protect exposed nail
4. Gold Chrome Tips on White Base
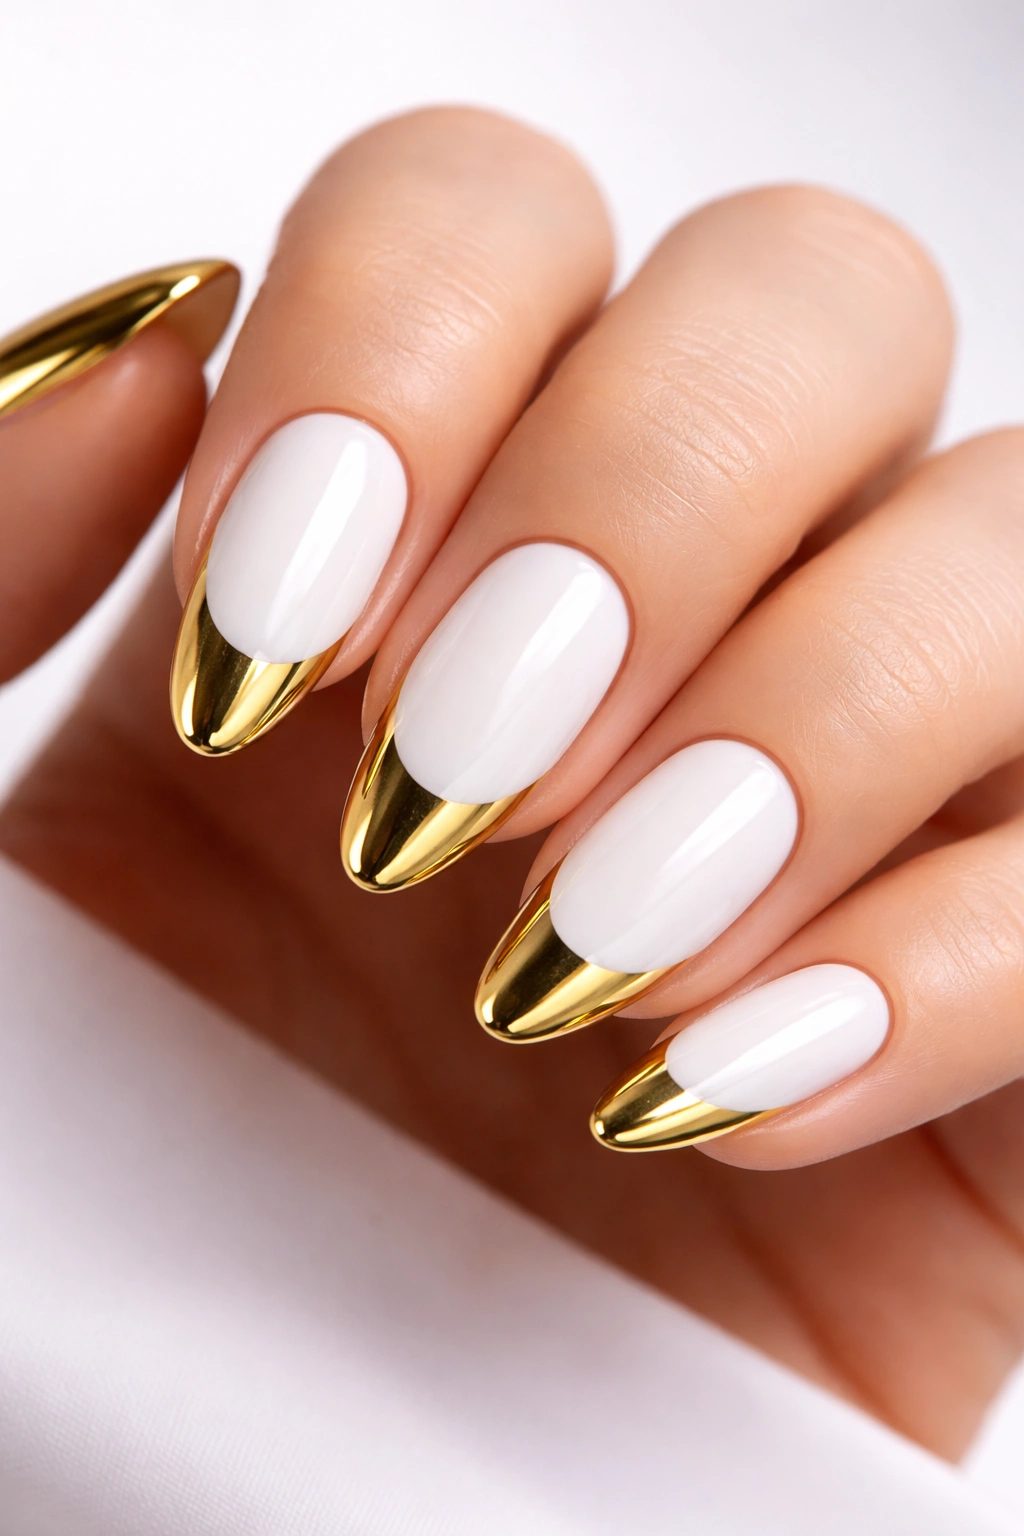
Chrome finishes have transformed nail art, and gold chrome delivers that mirror-like, reflective quality that feels futuristic yet elegant. Paired with a pristine white base, it’s eye-catching without being costume-y.
The Chrome Advantage
Gold chrome powder creates an effect that regular metallic polish simply can’t match. The reflective surface shifts and changes as light hits it from different angles, making your nails genuinely dynamic. Against a white base, that metallic shine pops dramatically.
Chrome tips give you the structure and elongation of a French manicure with way more personality. The sharp contrast between matte or glossy white and reflective gold creates visual interest that works in any setting.
Getting the Look Right
Chrome powder application requires gel polish and a no-wipe topcoat for proper adhesion, so this is one you’ll probably want a professional to handle unless you’re experienced with gel systems. The payoff is absolutely worth it—chrome finishes last beautifully and maintain their shine.
Consider varying the tip thickness across fingers for a modern, mismatched effect, or keep them uniform for classic appeal.
Worth noting: Gold chrome photographs spectacularly, making this an excellent choice for events where photos matter.
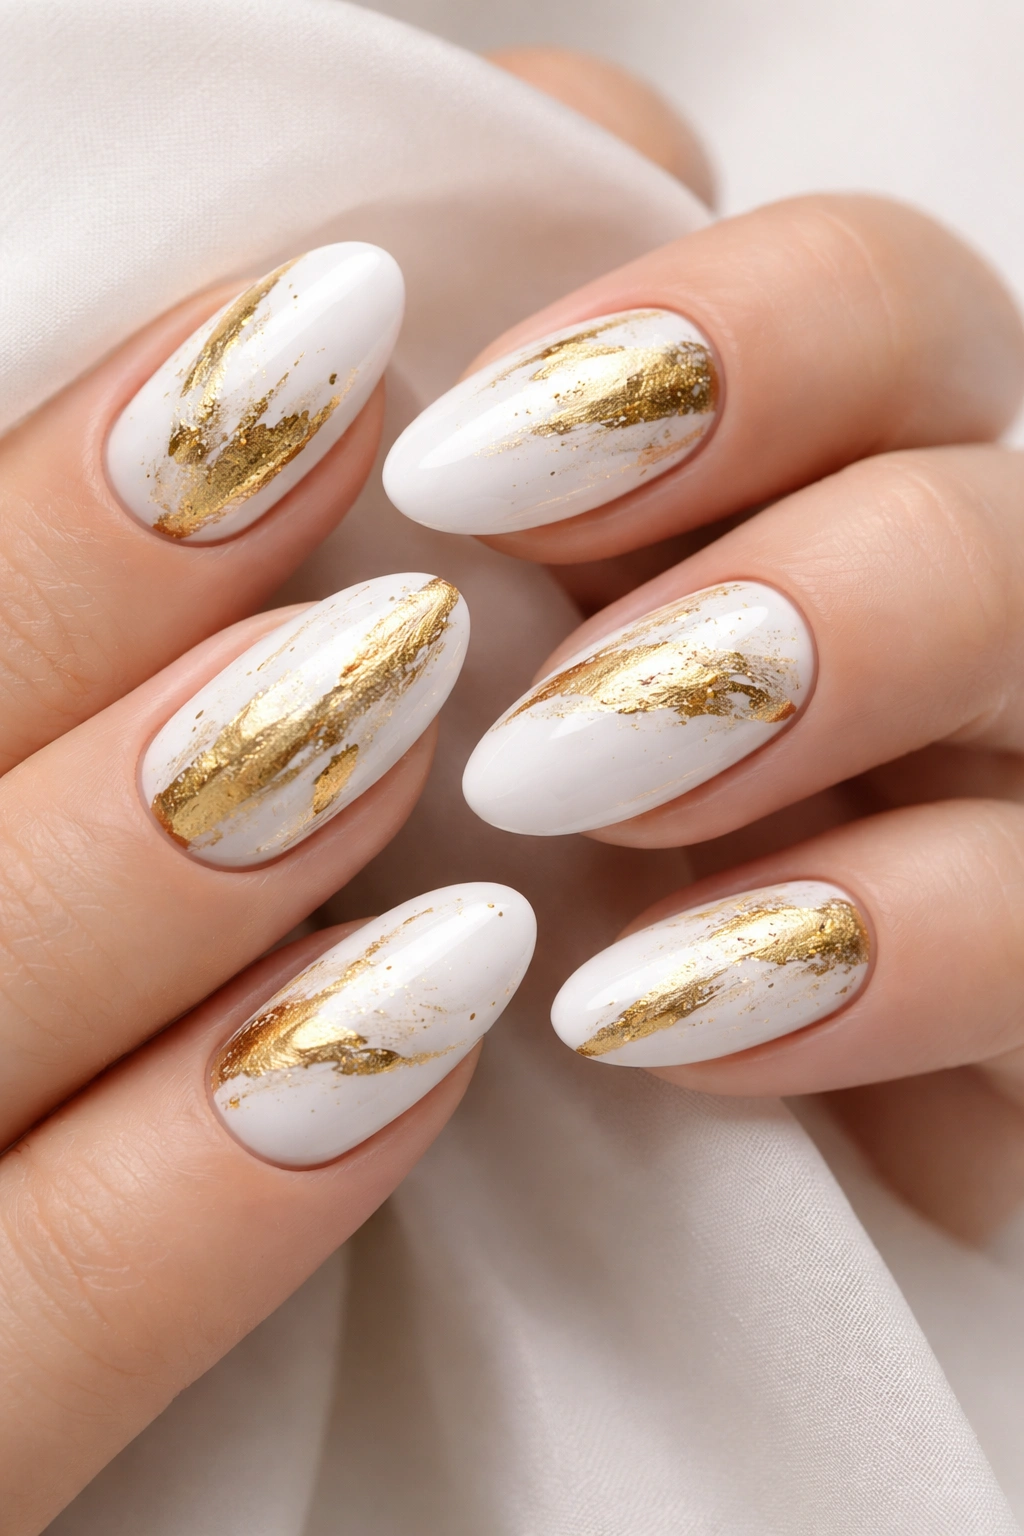
5. Delicate Gold Foil Accents
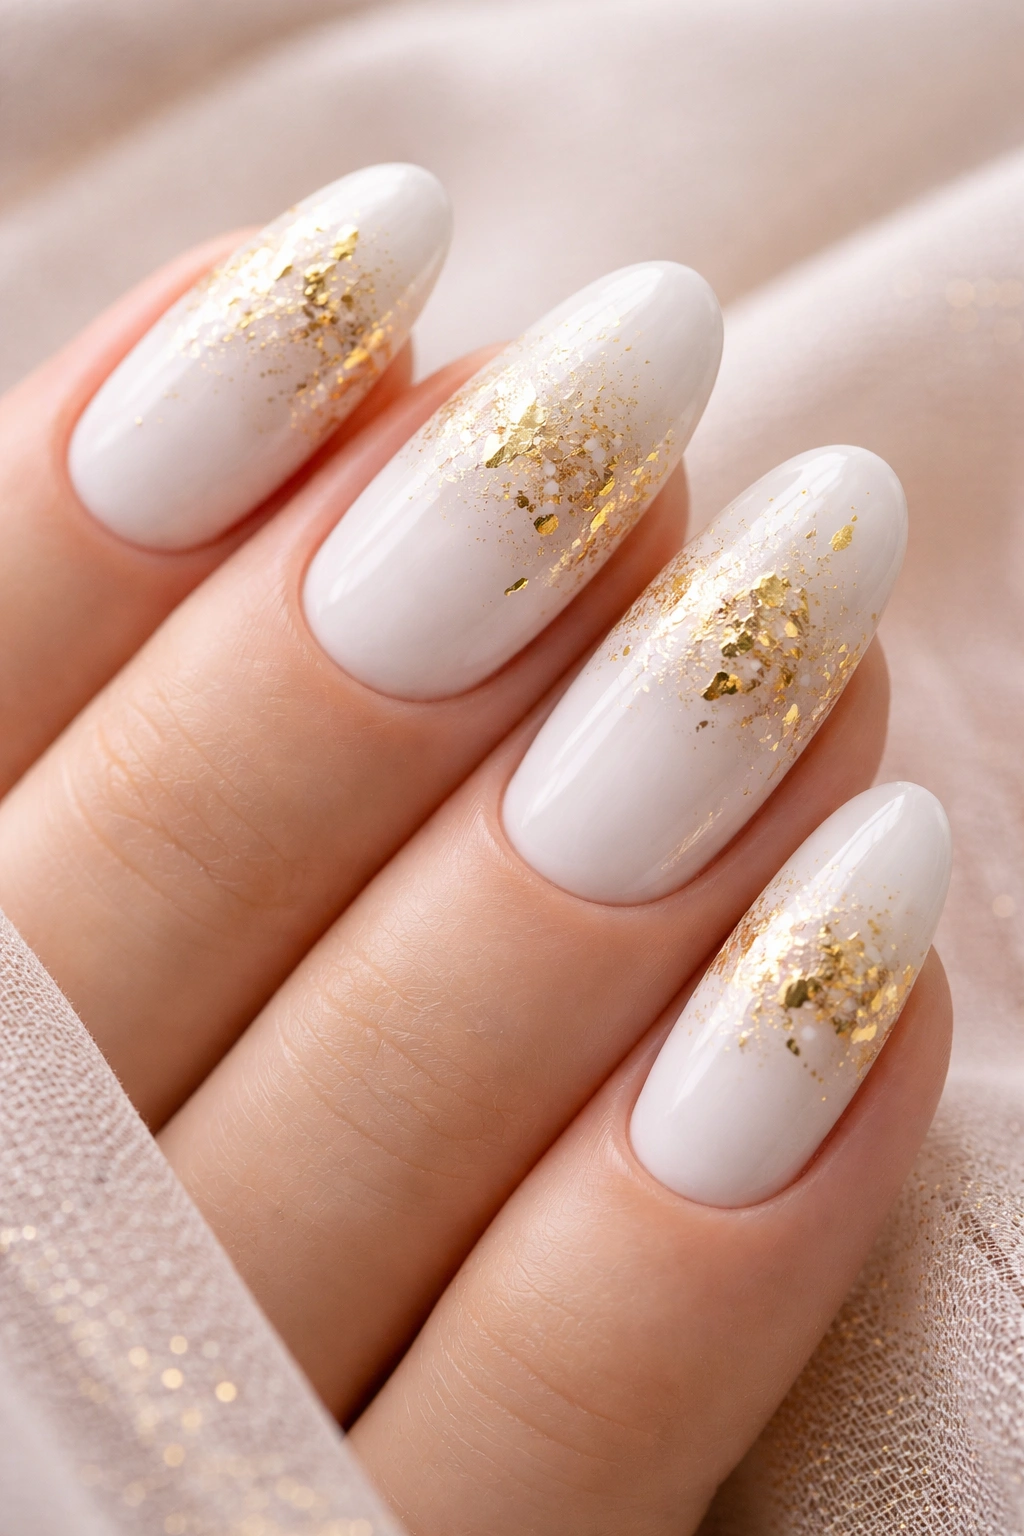
Gold foil brings texture and organic beauty to white nails. Unlike painted gold designs, foil creates irregular, light-catching patterns that feel artistic and slightly unpredictable.
Artisanal Elegance
Gold foil application creates a handcrafted quality that feels special and personalized. The flakes settle differently on each nail, giving you a coordinated set that’s still individually unique. It’s sophisticated without being stuffy, artistic without being chaotic.
The wispy, irregular edges of gold foil against a white background create a soft, romantic effect. This approach works beautifully for weddings, brunches, or any occasion where you want to look put-together but not overly formal.
How to Work with Foil
Foil adheres to special nail glue or sticky gel topcoat, and you press it on before sealing with a regular topcoat. You can apply foil sparingly for subtle shimmer or layer it more heavily for dramatic coverage. The technique is surprisingly forgiving—imperfect placement often looks better than trying to be too precise.
This design translates well to shorter nails since you don’t need length to make foil accents work. Even a few small gold flakes on white polish creates a finished, intentional look.
6. Pearl Embellishments on White and Gold
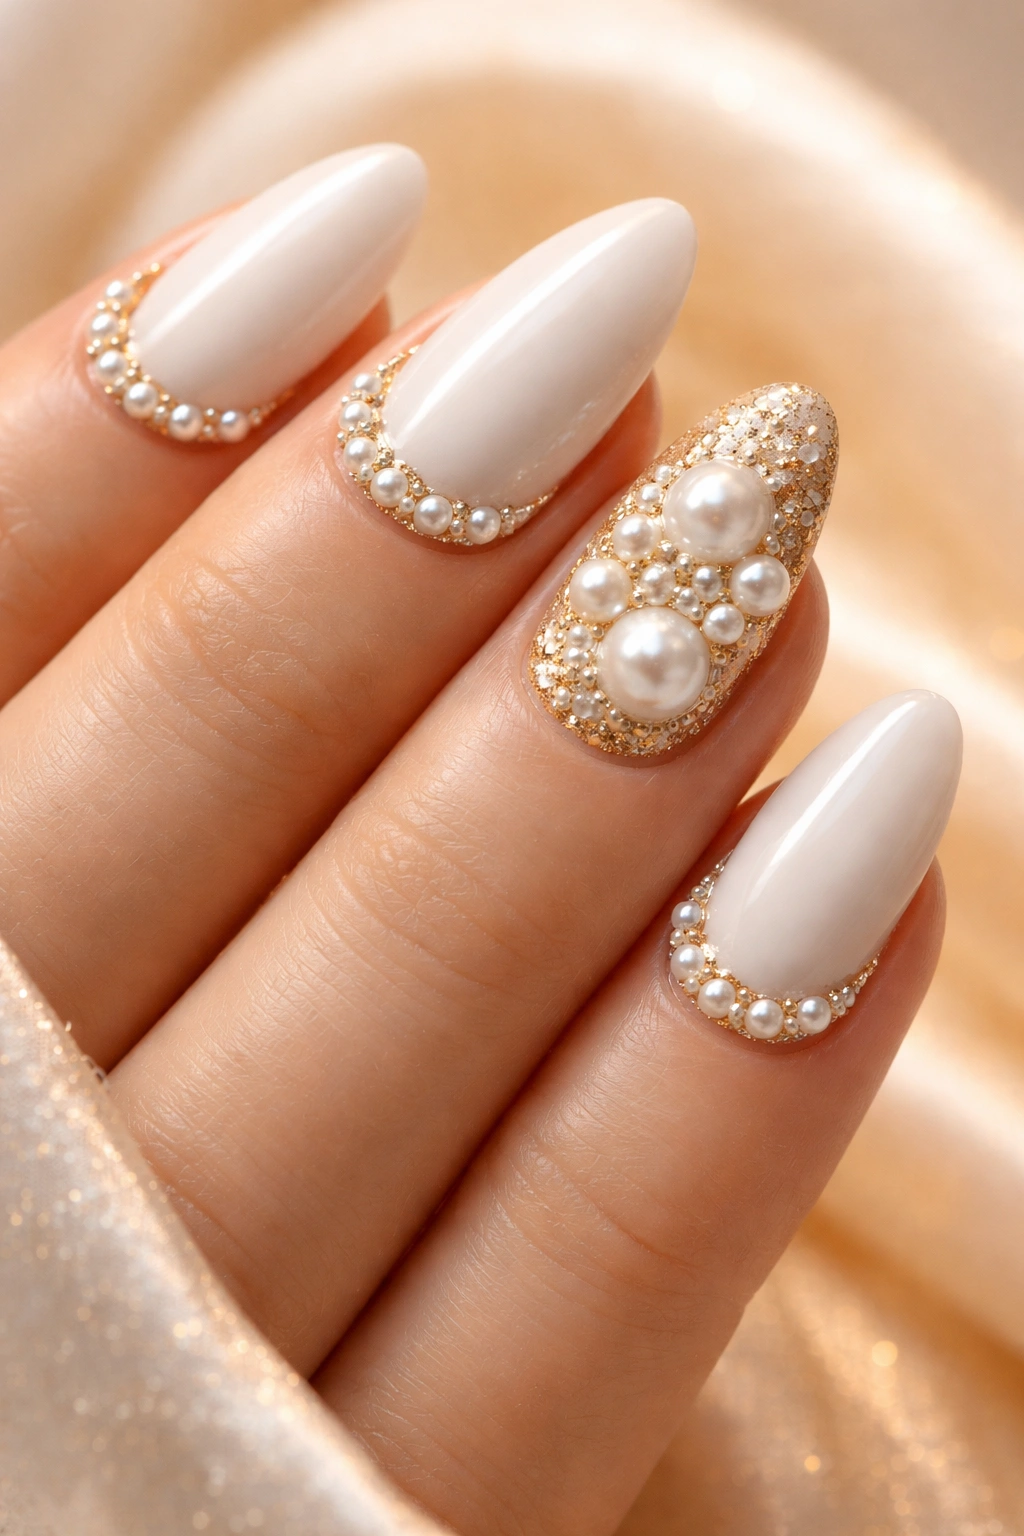
Three-dimensional pearl accents add a feminine, romantic dimension to white and gold nails. This design brings texture and a touch of vintage-inspired glamour.
Dimensional Beauty
Pearls create actual depth on your nails rather than just visual interest. They catch light differently than flat polish, adding movement and sophistication. When combined with white polish and gold details, pearls complete a color story that feels bridal, elegant, and timeless.
The key is strategic placement. Too many pearls can look costume-y, but thoughtfully positioned beads create focal points that enhance rather than overwhelm your design.
Placement Strategies
Try lining your cuticle area with tiny pearls for a halo effect, or create a diagonal line of pearls across one or two accent nails. Mixing pearl sizes adds visual interest—cluster small pearls with a few slightly larger ones for a more organic arrangement.
Gold accents can take the form of painted swirls, thin lines, or small gold studs placed among the pearls. The metallic warmth keeps the white and pearl combination from feeling too bridal or precious.
- Use nail glue designed for embellishments for best hold
- Apply pearls to wet topcoat, then seal with another layer once dry
- Expect these to add thickness, so they’re best for special occasions rather than everyday wear
7. Gold Glitter Gradient on White

A glitter gradient creates a soft, sparkling transition that feels celebratory without being over-the-top. Gold glitter dispersing across a white base gives you that perfect hint of shimmer.
Sparkle with Sophistication
Glitter gradients work because they’re concentrated enough to create impact while still feeling wearable. Starting dense at the tips and fading toward the cuticle creates a natural-looking effect that’s less “disco ball” and more “subtle glamour.”
Gold glitter specifically brings warmth and richness that silver or multicolor glitter can’t quite match. Against white, those gold particles catch light beautifully without competing for attention.
Creating the Fade
You can build a gradient by applying glitter polish with a makeup sponge for a soft fade, or carefully place glitter density manually using a fan brush. Start with your heaviest concentration at the tips and gradually use less product as you move toward the base.
This design photographs beautifully and adds festive energy to your look without requiring intricate nail art skills. It’s perfect for celebrations, holidays, or whenever you want your nails to feel a bit more special than usual.
Keep in mind: Glitter removal can be tricky, so wrapping nails in acetone-soaked cotton secured with foil for several minutes helps break down the sparkle.
8. Abstract Gold Brushstrokes
Abstract nail art lets you embrace artistic imperfection. Gold brushstrokes across a white base create a gallery-worthy look that’s surprisingly easy to achieve.
The Artistic Appeal
Abstract designs free you from the pressure of perfection. Irregular gold strokes, swirls, and shapes create visual interest precisely because they’re not uniform or symmetrical. It’s editorial, modern, and expresses personality.
The white background acts as your canvas, letting the gold elements stand out as the main event. This combination feels both sophisticated and creative—you’re wearing art, not just polish.
Creating Your Abstract Masterpiece
Use a fine detail brush or even a toothpick to create varied gold strokes. Mix thin lines with thicker marks, combine swirls with straight edges, and vary the density across nails. The trick is to avoid overthinking it—abstract art rewards spontaneity.
Consider leaving some nails mostly white with minimal gold, while featuring more elaborate abstract designs on accent nails. This creates balance and prevents the look from feeling too busy.
This approach works beautifully on all nail lengths and shapes. Short nails can feature simpler abstract elements, while longer nails give you more space for complex compositions.
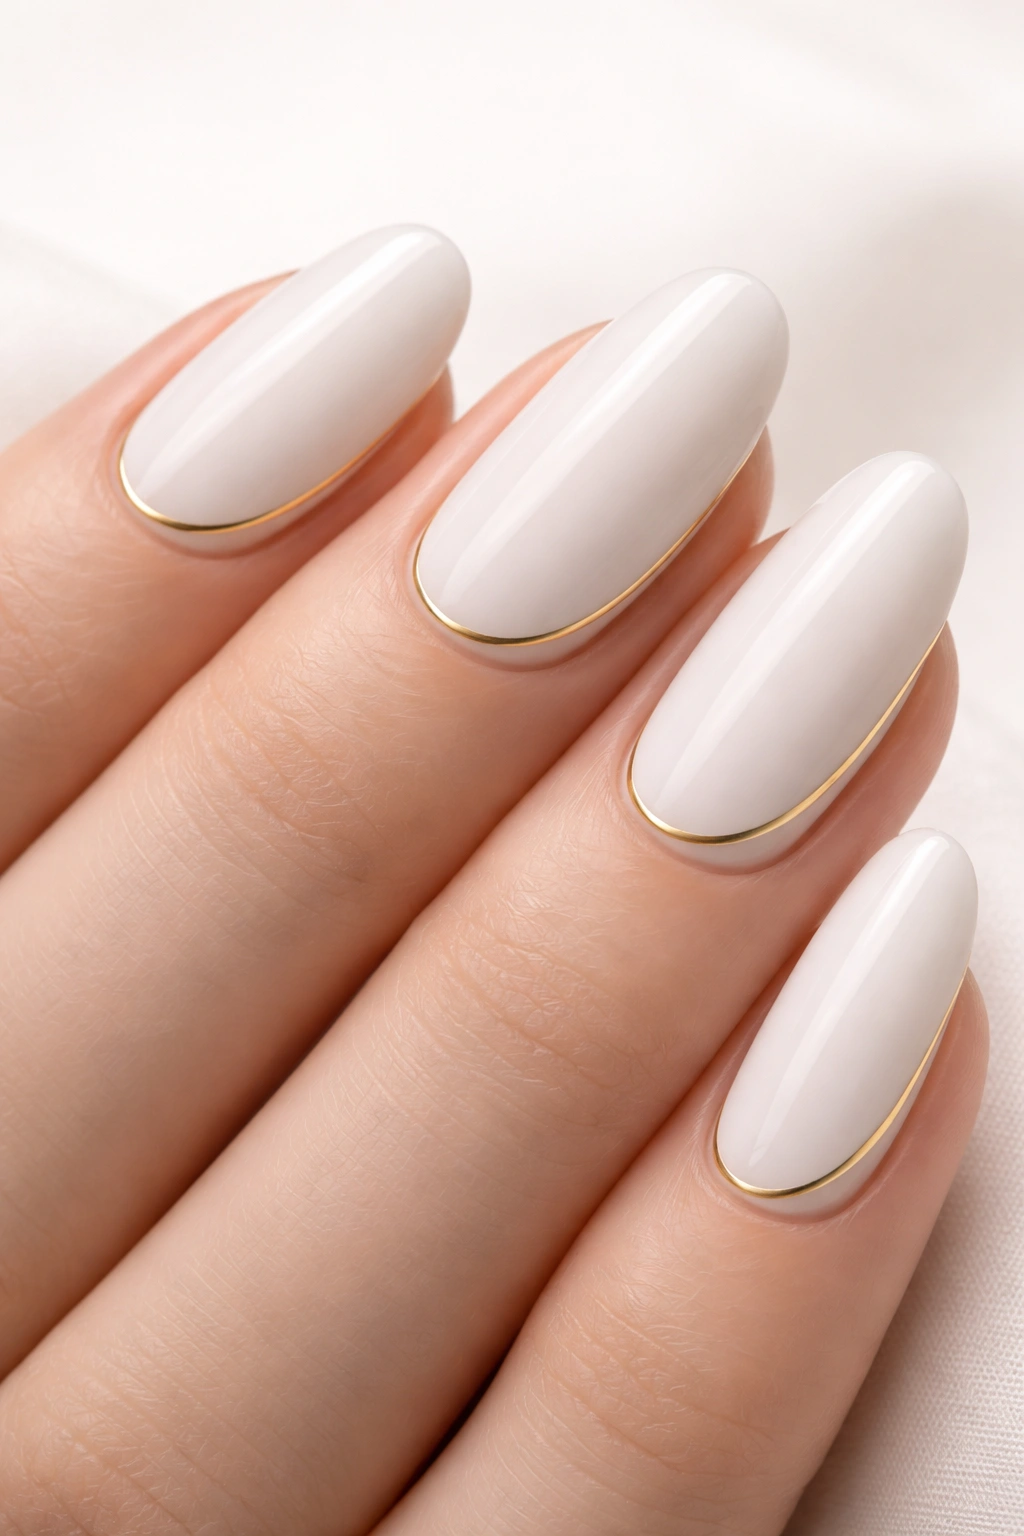
9. White Nails with Gold Cuticle Details
Reversing the typical French tip by placing gold at the cuticle area instead of the tips creates an unexpected, modern look. This design draws attention to the base of your nails for something genuinely different.
Why the Reverse Placement Works
Most nail art focuses on tips, making cuticle embellishments feel fresh and surprising. A thin gold arc following your cuticle line creates a sophisticated frame that highlights your nail shape beautifully.
This placement is also practical—cuticle area details grow out less noticeably than tip designs, potentially extending the life of your manicure. The white nail surface remains clean and uncluttered, keeping the overall effect minimal yet elevated.
Execution Details
You can create cuticle accents with gold striping polish, thin strips of gold foil, or even gold caviar beads for texture. The key is keeping the gold band thin and precise—thick cuticle lines can look more costume than chic.
This design particularly flatters almond and stiletto nail shapes, where the gold arc emphasizes the elegant taper. It works on shorter nails too, though you’ll want to keep the gold line especially delicate to maintain proportion.
Styling note: This pairs exceptionally well with gold rings, creating a coordinated but not matchy look.
10. Gold Starburst on White Coffin Nails
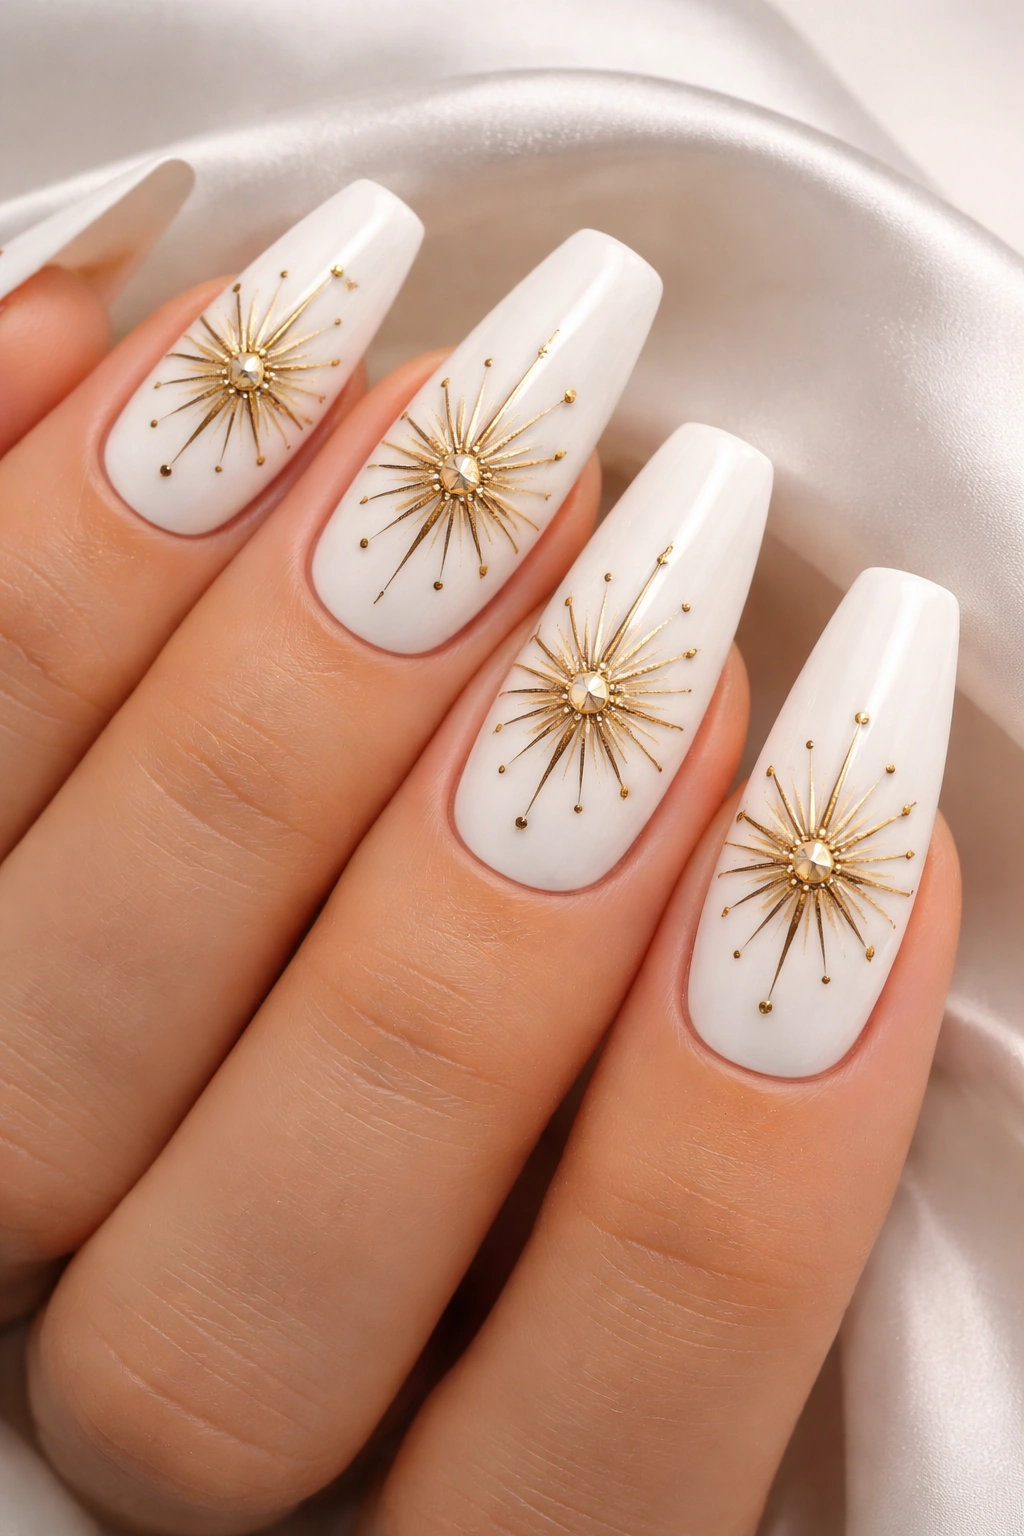
Starburst designs bring celestial energy to your manicure. Gold rays emanating from a central point on white nails create drama and dimension that’s perfect for special occasions.
Celestial Glamour
Starbursts feel both retro and modern—they reference vintage design elements while still looking current and fresh. The radiating lines create movement and energy, transforming your nails into tiny works of art.
On coffin-shaped nails specifically, starbursts complement the angular tip beautifully. The geometric nail shape echoes the linear quality of the starburst rays, creating visual harmony.
Design Variations to Try
You can center your starburst at the cuticle with rays extending toward the tip, place it at the tip with rays moving inward, or even create an off-center starburst for asymmetrical appeal. Gold chrome powder creates the most dramatic starburst effect, but gold striping polish or fine glitter lines work beautifully too.
Consider featuring one or two starburst accent nails rather than putting them on every finger—this prevents the design from feeling overwhelming and lets those detailed nails really shine.
Adding tiny rhinestones at the starburst center amplifies the celestial vibe and creates a focal point that catches light gorgeously.
11. White and Gold Swirl Combination
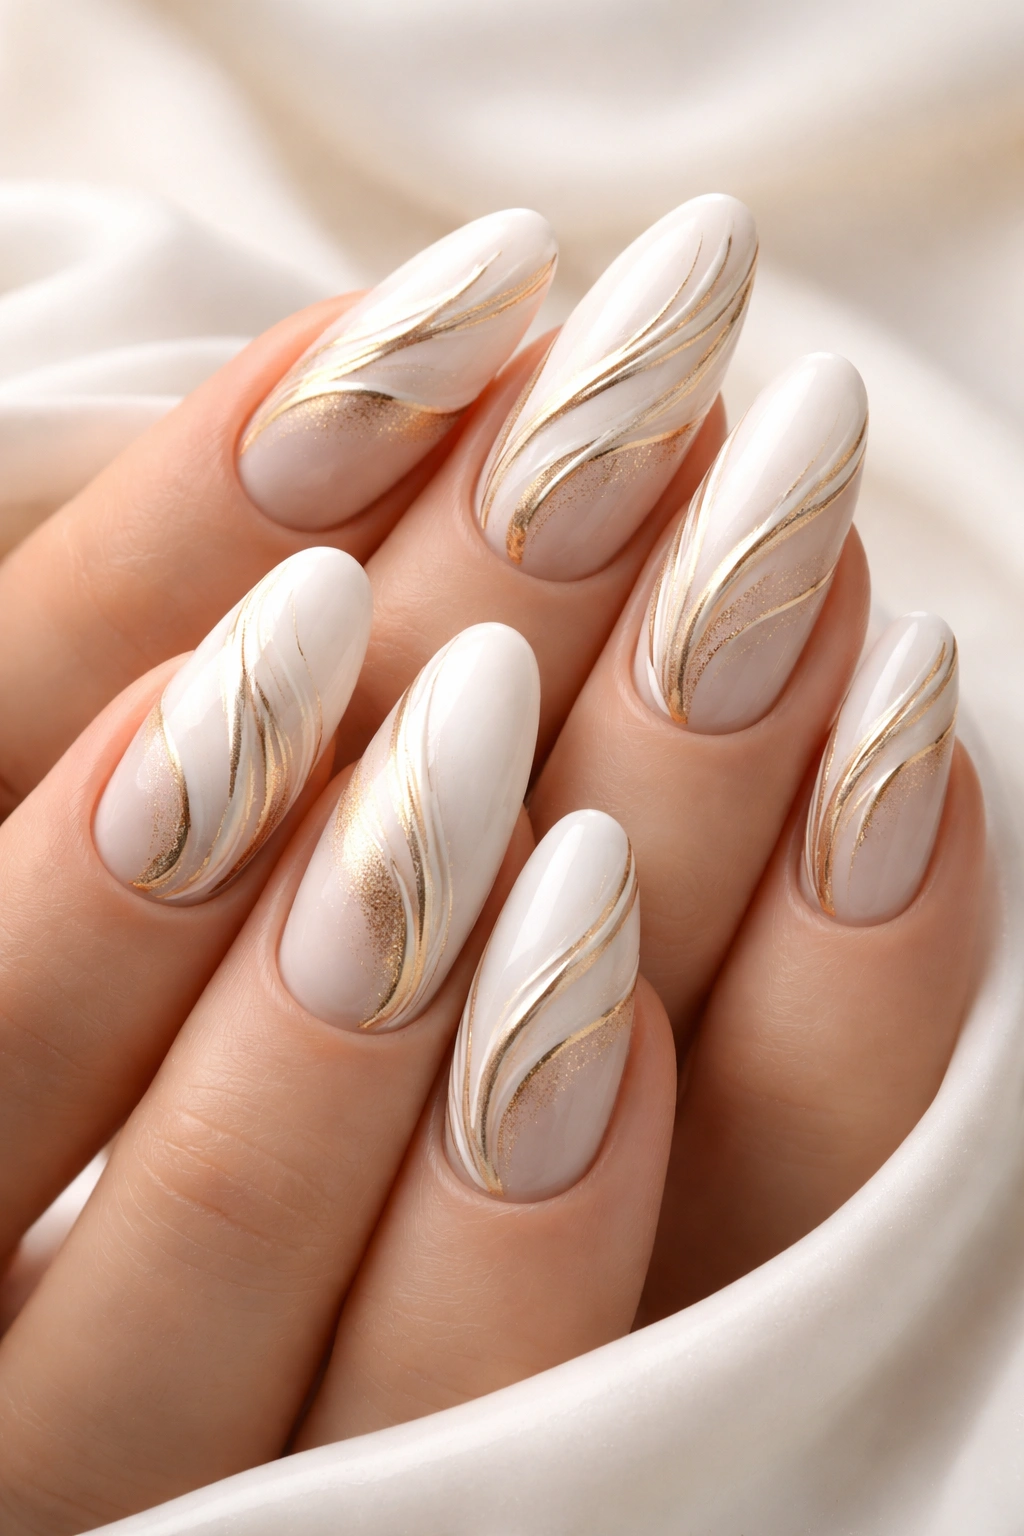
Swirling designs bring fluid movement and organic beauty to your nails. Gold and white swirls intertwining create a mesmerizing effect that’s both playful and elegant.
The Flow Factor
Swirls prevent your manicure from feeling static or flat. The curved, flowing lines create visual movement that draws the eye across your nails. This design has an almost hypnotic quality—it’s hard to stop looking at it.
White and gold swirls work particularly well because the high contrast makes each color’s path clear and distinct. The metallic gold catches light as your hands move, adding dimension that white alone couldn’t achieve.
Creating Seamless Swirls
You can achieve swirl effects through water marbling (tricky but stunning), freehand painting with a fine brush (requires a steady hand), or nail stamping plates (easiest option for consistent results). Each technique creates slightly different swirl qualities, so experiment to find what you like best.
Swirls look fantastic on all nail shapes but really shine on longer nails where you have room for the pattern to develop fully. On shorter nails, consider focusing swirls on one or two accent nails with solid white or gold on the others.
- Vary swirl thickness for more visual interest
- Let one color dominate slightly rather than trying for perfect 50/50 coverage
- Glossy topcoat enhances the fluid quality of swirl designs
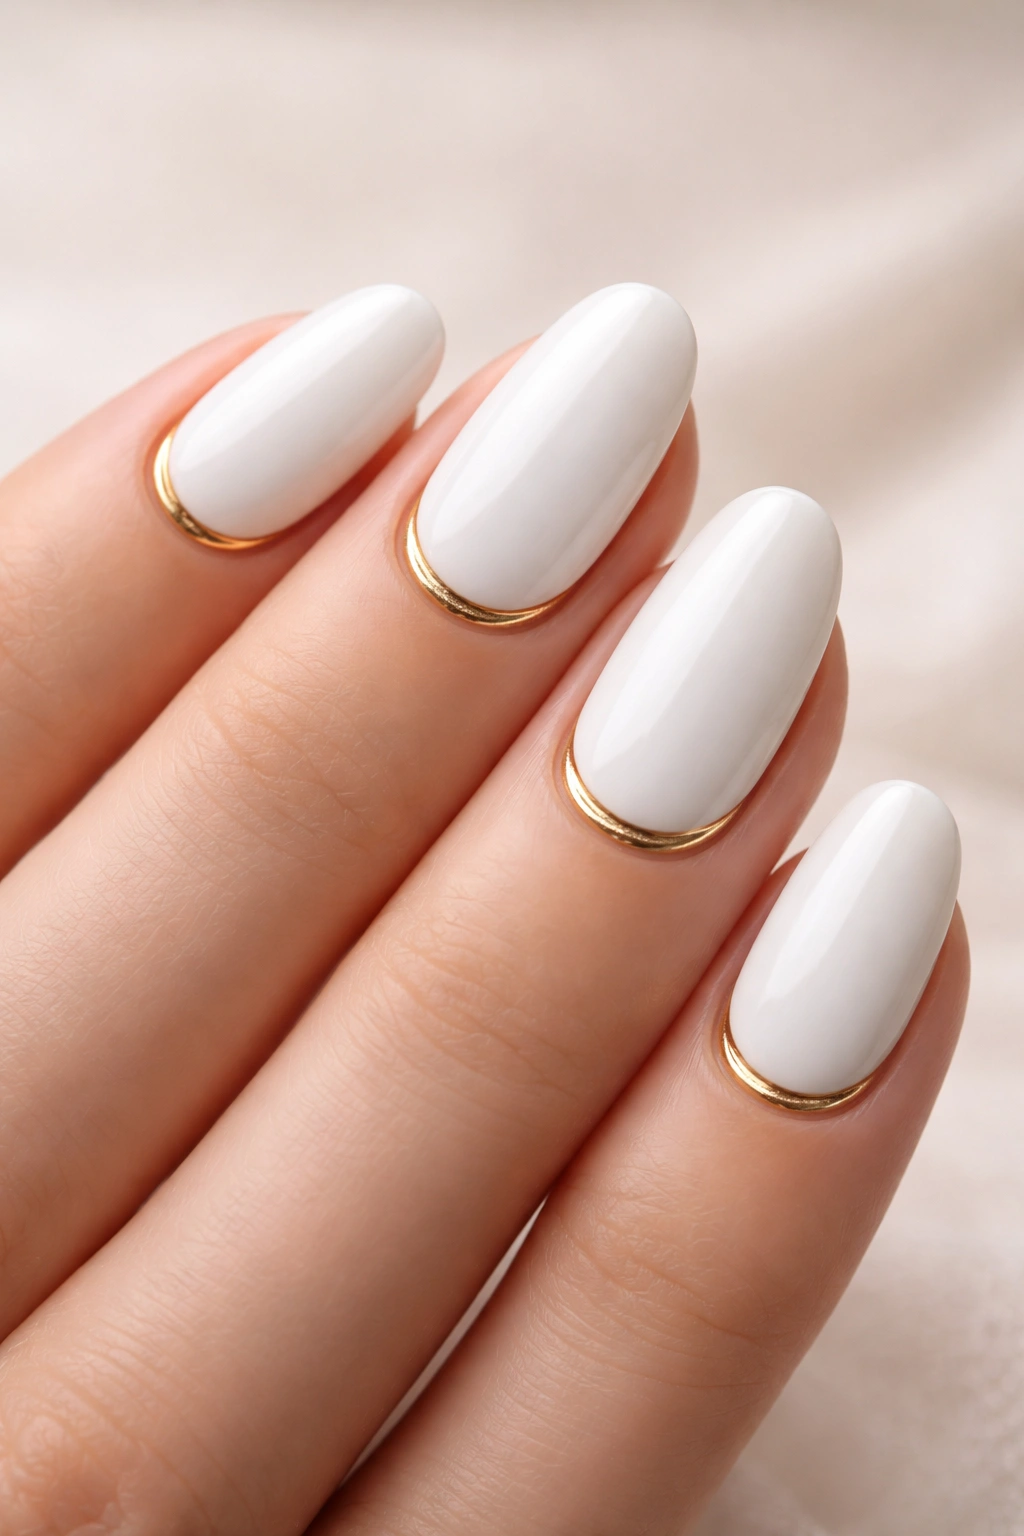
12. Minimalist Gold Line Accent
Sometimes the most impactful designs are the simplest. A single gold line on otherwise bare white nails proves that restraint can be just as striking as elaborate nail art.
The Power of Restraint
Minimalist designs let the quality of execution shine. One perfectly placed gold line demonstrates precision and intention. There’s nowhere to hide—the simplicity demands clean application and thoughtful placement.
This approach appeals to those who want their nails to look polished and interesting without being the loudest thing in the room. It’s quietly confident, sophisticated, and endlessly versatile.
Placement Makes the Difference
That single gold line can run vertically down the center of your nail, horizontally across the middle, diagonally from corner to corner, or follow your cuticle curve. Each placement creates a completely different effect, so consider what complements your nail shape best.
Vertical lines elongate and slim the appearance of your nails, while horizontal lines create width. Diagonal lines add dynamic energy, and curved lines following your cuticle emphasize nail shape.
This is the design that works absolutely everywhere—office meetings, formal events, casual weekends, and everything in between. The simplicity makes it appropriate for any setting while the gold detail keeps it from being boring.
Perfect for: Anyone wanting to dip their toes into nail art without committing to elaborate designs. It’s also ideal for maintaining a professional appearance while still expressing personal style.
White and gold nails deliver elegance without trying too hard. Whether you’re drawn to chrome finishes, delicate foil, geometric precision, or romantic pearls, this color pairing adapts to your style effortlessly. The combination flatters every skin tone, works across all nail lengths and shapes, and transitions seamlessly from everyday wear to special occasions. Pick your favorite design from this list, or mix elements from several to create something uniquely yours. Your nails deserve to shine.
