

There’s something deeply satisfying about short, well-maintained nails that complement rather than dominate your hands. Short squoval nails—that perfect hybrid between square and oval with subtle rounded corners—offer the ideal balance of practical strength and elegant aesthetic. They’re long enough to look intentional and polished, short enough to be genuinely functional, and the squoval shape works with nearly every hand shape and skin tone.
The earthy color palette is having a moment because it’s enduring. Terracotta, warm browns, mossy greens, dusty taupes, and clay-inspired shades create a sophisticated foundation that pairs with virtually any wardrobe and age group. These aren’t trend-dependent colors—they’re the shades you find in nature, which means they’ll look as good in five years as they do today. They photograph beautifully, feel appropriate for both casual and professional settings, and somehow make your hands look more intentional and curated.
What makes short squoval nails especially appealing is their low-maintenance reality. You avoid the constant breaking and catching that longer nails experience, yet the squoval shape prevents that stark, blunt appearance of purely square nails. The gentle curves along the sides create visual softening while the flat top still provides that modern, clean look. And when you combine this practical shape with earthy tones—colors that have been worn for centuries and feel inherently grounded—you get nail designs that feel both timeless and effortlessly chic.
1. Warm Cognac with Subtle Gradient
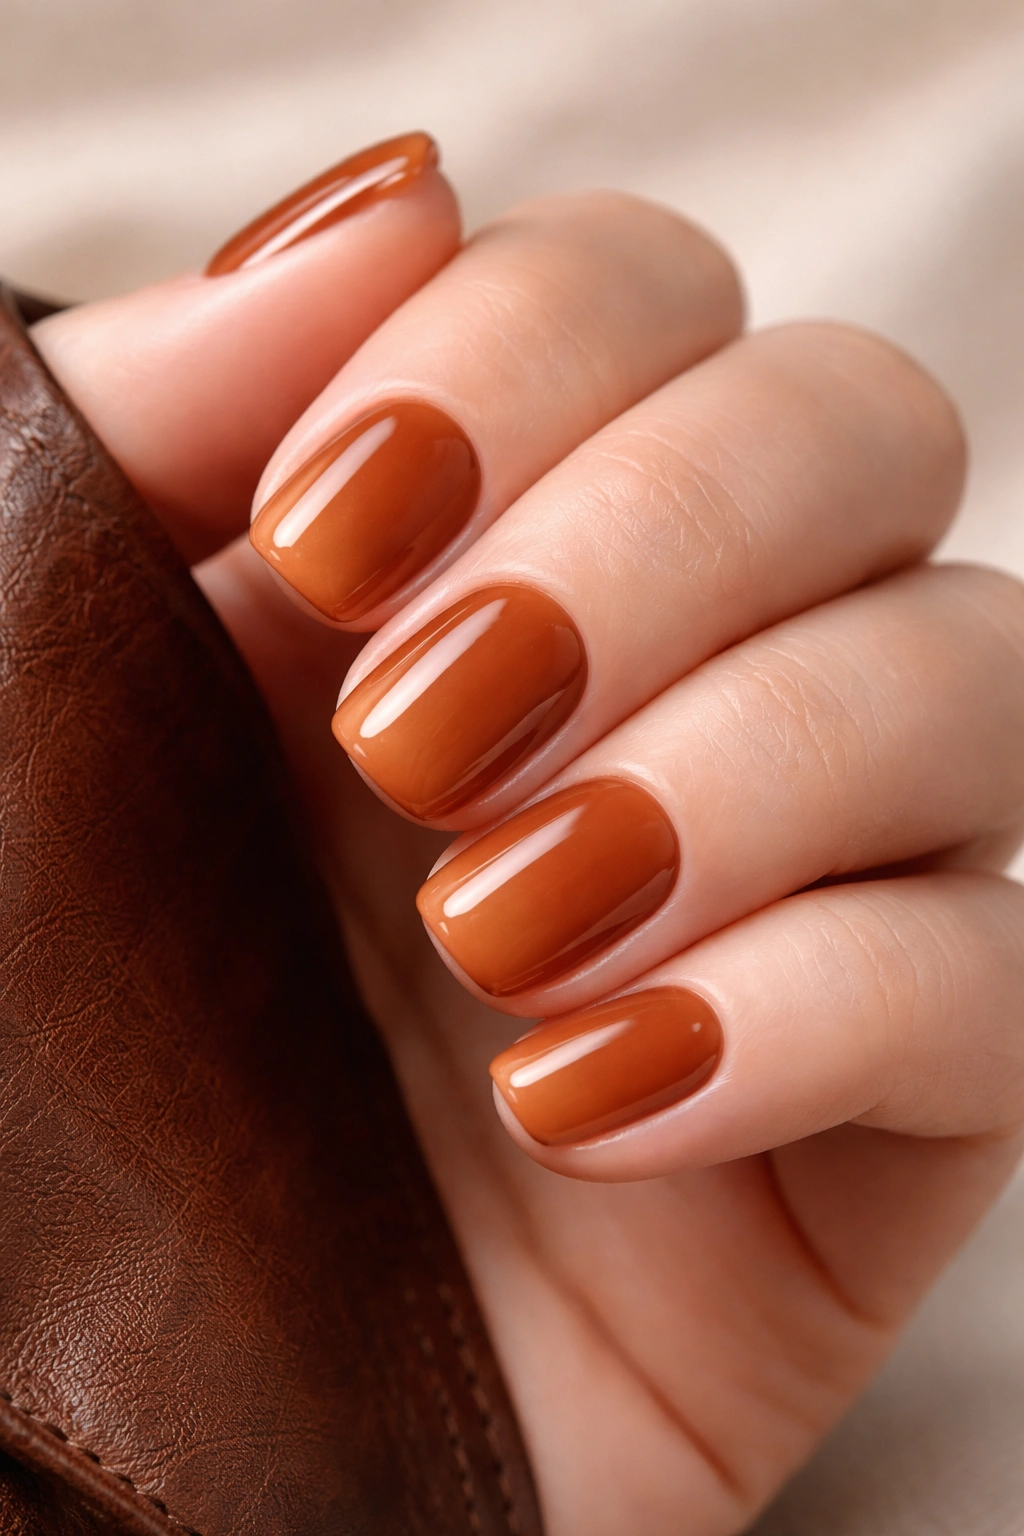
Warm cognac is the nail color equivalent of a perfectly worn leather jacket. It’s rich without being heavy, it reads as both neutral and luxurious, and it suits nearly every complexion. This design uses a warm cognac base with a barely-there gradient that deepens slightly toward the nail tip, creating dimension that catches light without being obvious.
Why This Works on Short Squoval Nails
The squoval shape allows the gradient to flow naturally without looking overwhelming. On shorter nails, a subtle color transition maintains the elegance of the manicure without making the design feel cramped or overly decorated. The cognac hue is sophisticated enough to pair with professional attire while warm enough to feel approachable and modern.
How to Create the Look
Apply a base coat, then two coats of your cognac shade. Use a makeup sponge or a gradient brush to lightly blend a slightly deeper brown (think espresso or chocolate) onto the upper portion of the nail. The goal is for the transition to be so gentle that some people won’t immediately notice it—that’s the marker of a professionally executed gradient.
Application Tips & Details
- Use a matte topcoat to enhance the leather-like appearance, or go glossy for a more polished feel
- The gradient works best when you limit the darker shade to just the top third of the nail
- Cognac shades work beautifully with warm-toned jewelry, copper accessories, and earthy makeup
- This design lasts 3-4 weeks without chipping when properly sealed
Pro tip: Cognac pairs exceptionally well with gold-toned metal—consider adding a thin gold stripe along the cuticle line if you want just a touch of shimmer.
2. Muted Sage Green with Matte Finish
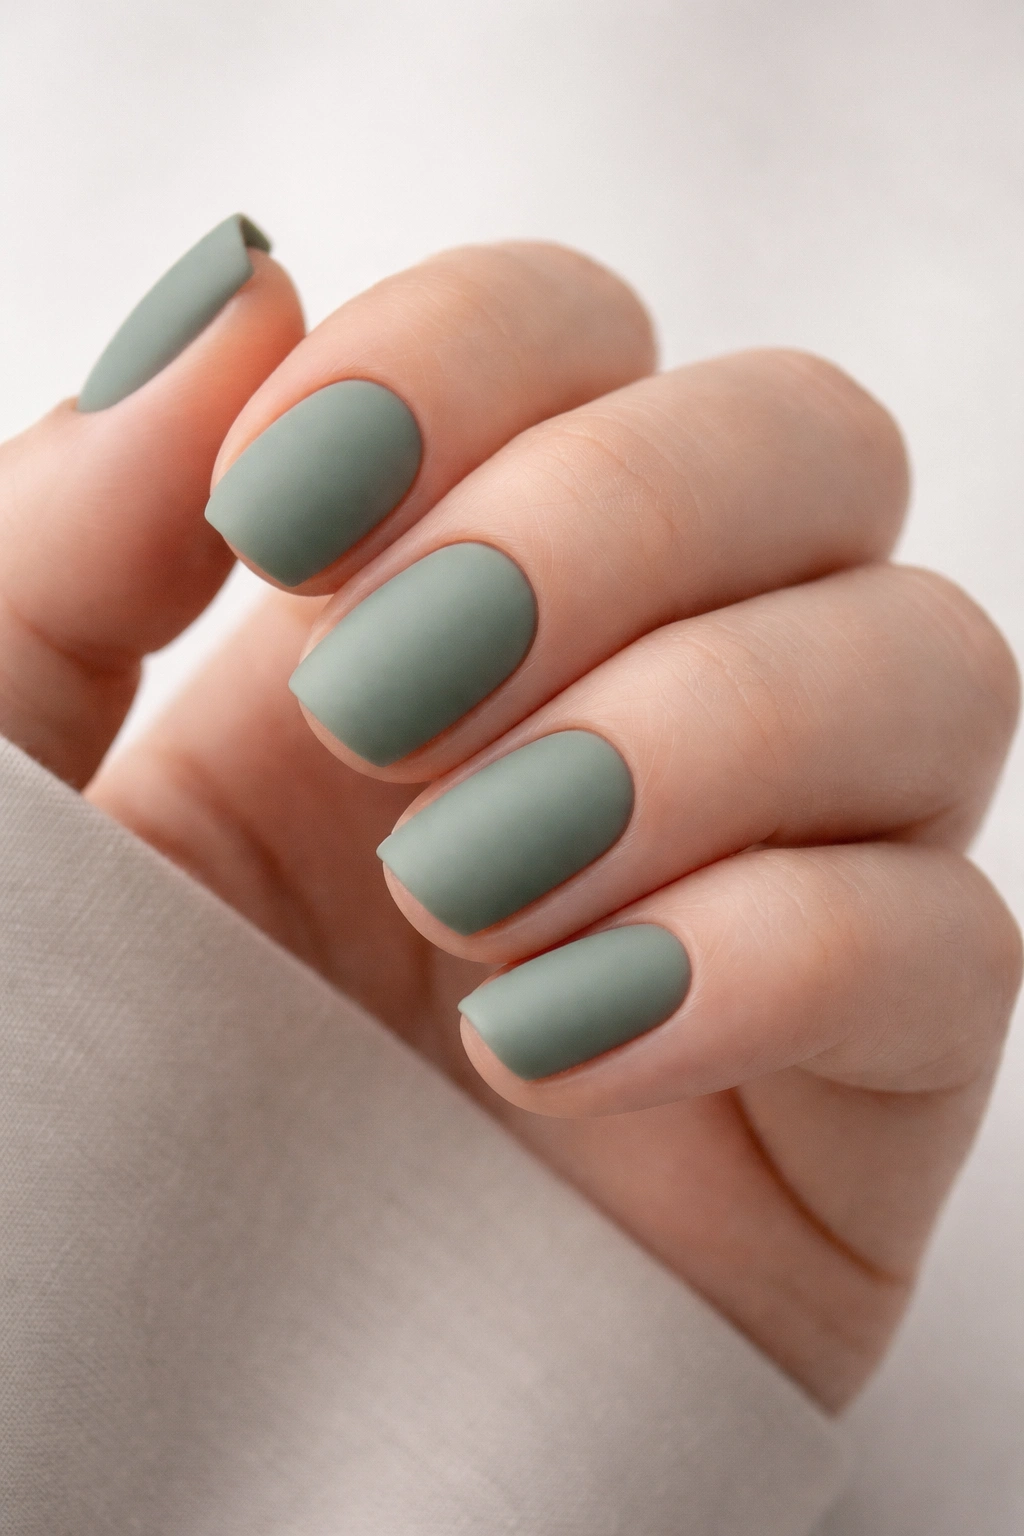
Muted sage green is the color of leaves in late autumn and the paint on cottages in the English countryside. It’s calming without being dull, distinctly earthy, and surprisingly versatile with different seasons and clothing palettes. A completely matte finish elevates this shade to gallery-worthy territory—the velvety texture creates depth that glossy versions can’t achieve.
The Psychology of Sage on Short Nails
Sage reads as intentional and thoughtful rather than trendy. On squoval nails, the matte finish prevents the design from feeling juvenile or overly decorated—instead, it registers as sophisticated and understated. The shape’s gentle curves soften the earthiness of the green, creating a design that feels balanced and refined.
Achieving the Perfect Matte Sage
Select a sage shade with enough gray undertones to prevent it from appearing too bright or juvenile. Apply two full coats, ensuring even coverage. Once the polish is completely dry, apply a matte topcoat specifically formulated for matte finishes (regular topcoat will make the color appear glossy). The matte topcoat is essential—it transforms the color from “regular green” into a statement-making design.
What Pairs Well With Sage
- White linen clothing and minimalist wardrobes
- Warm browns, creams, and natural linen tones
- Silver jewelry and cool-toned metals
- Neutral makeup in beige, taupe, or warm brown tones
- Autumn wardrobes featuring rust, cream, and chocolate
Worth knowing: Matte finishes require more maintenance than glossy finishes. You’ll want to reapply matte topcoat every 10 days or so if you’re regularly washing hands or using hand products, since the matte texture can wear down faster than traditional shine.
3. Dusty Rose with Pressed Flowers

Dusty rose is earthy pink without being sweet or cloying. This shade sits somewhere between mauve, muted rose, and warm taupe—it’s a color that reads differently depending on your undertone and lighting. Adding real or faux pressed flowers creates a botanical aesthetic that feels artisanal and entirely in harmony with the earthy color palette.
Why Pressed Flowers Work on Squoval Shapes
The flat top surface of squoval nails provides the ideal canvas for delicate pressed flower details. Unlike longer, more pointed nails, the squoval shape doesn’t make the flowers look awkwardly positioned or cramped. The gentle curves along the sides frame the design without competing with it.
Creating the Pressed Flower Design
Apply dusty rose as your base—two coats for full coverage. Once fully dry, carefully position tiny real or faux pressed flowers (available at most craft stores) onto select nails using tweezers. Secure them with a clear topcoat, allowing it to pool slightly around the flower edges to create a secure seal. Apply additional topcoat to ensure the flowers are completely encased and protected.
Design Variations & Combinations
- Place flowers on just the ring finger and pinky nail for accent impact
- Distribute flowers across all five nails for a cohesive botanical look
- Mix multiple flower varieties—baby’s breath with miniature roses, for example
- Combine with negative space (unpainted sections) for contemporary contrast
Pro tip: Real pressed flowers will last longer and look more delicate than many faux alternatives, but they require careful sourcing. Hobby shops and some botanical suppliers sell genuine pressed flowers specifically for nail art.
4. Deep Terracotta with Metallic Gold Accent Line
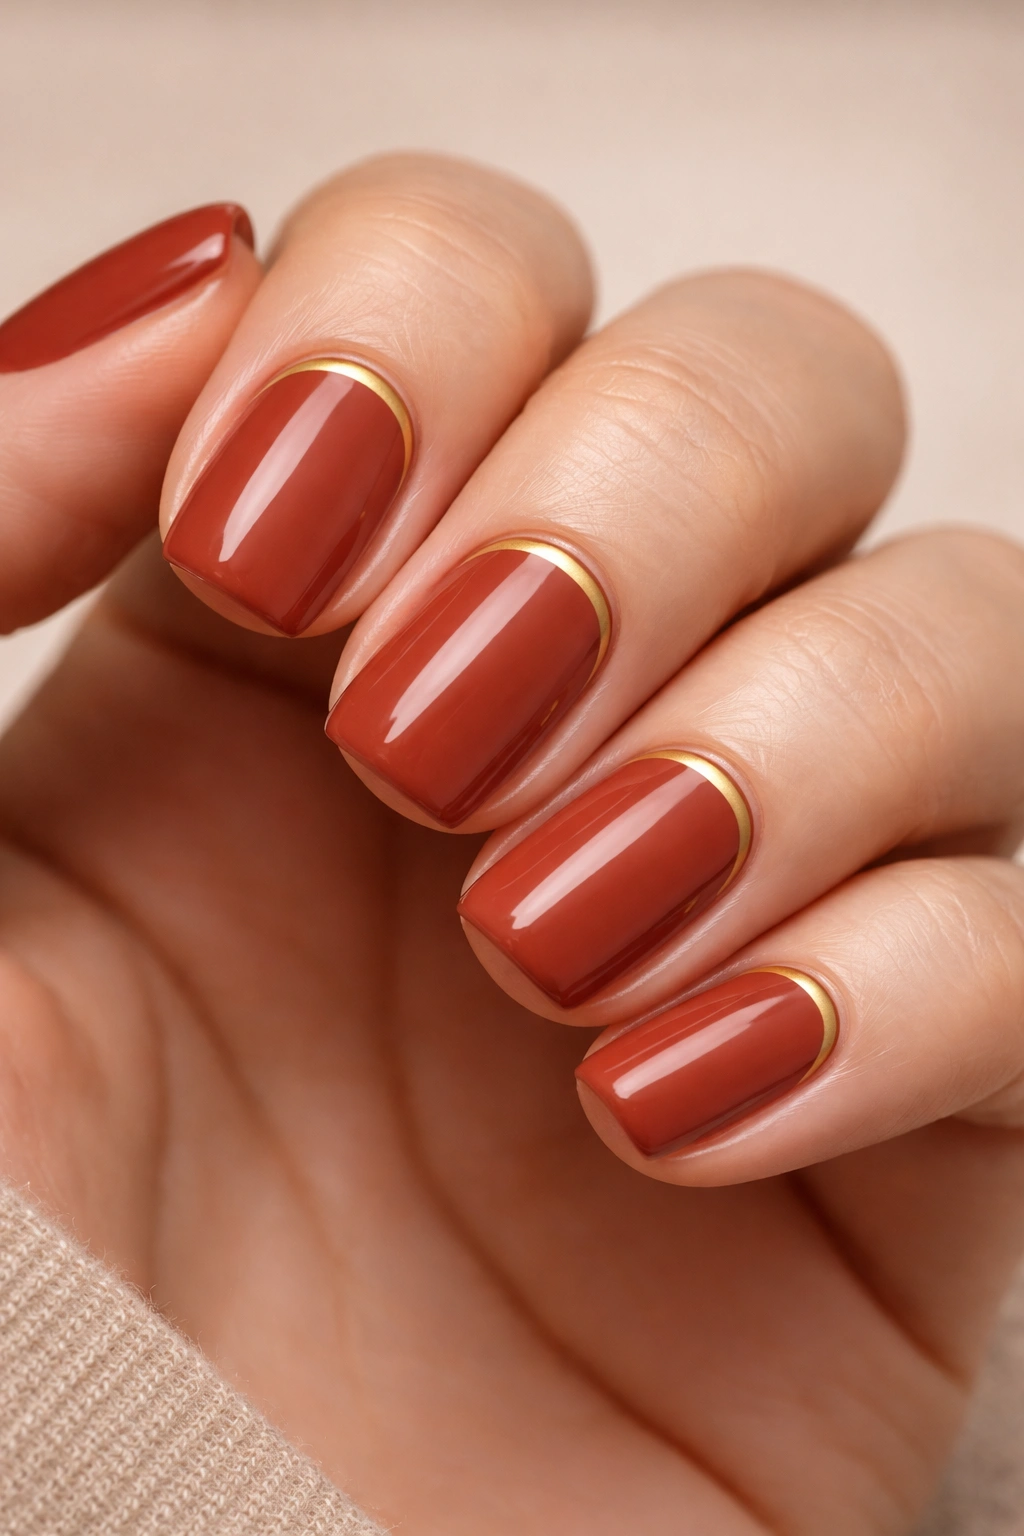
Terracotta is one of the most genuinely earthy colors available—it’s literally the color of fired clay. A deep terracotta shade creates richness and warmth, while a thin metallic gold line along the cuticle adds just enough shine to prevent the design from feeling completely matte. This balance makes it sophisticated enough for professional settings while maintaining plenty of visual personality.
The Ancient-Modern Appeal
Terracotta has been used for pottery and architecture for thousands of years, which gives it an inherent sense of authenticity. On short squoval nails, this depth of color and history translates into understated elegance. The gold accent creates a contemporary twist that acknowledges modern design trends without compromising the earthy foundation.
Executing the Gold Stripe
Paint your nails with two coats of deep terracotta, ensuring even coverage right to the edges. Once completely dry, use a thin striping brush or detail brush to apply metallic gold along the very edge where the nail meets the skin. The stripe should be no thicker than a credit card—precision creates impact more than width does.
Styling Suggestions
- Pairs beautifully with copper jewelry and warm metallics
- Complements rust-colored clothing, warm neutrals, and earth tones
- Works with both minimalist and maximalist fashion approaches
- Photographs exceptionally well in natural light
- Feels equally at home in casual and formal settings
Worth noting: The metallic gold line is delicate and can catch and wear. Apply your topcoat carefully over it, and consider using a gel topcoat for extended durability if you’re doing this design professionally.
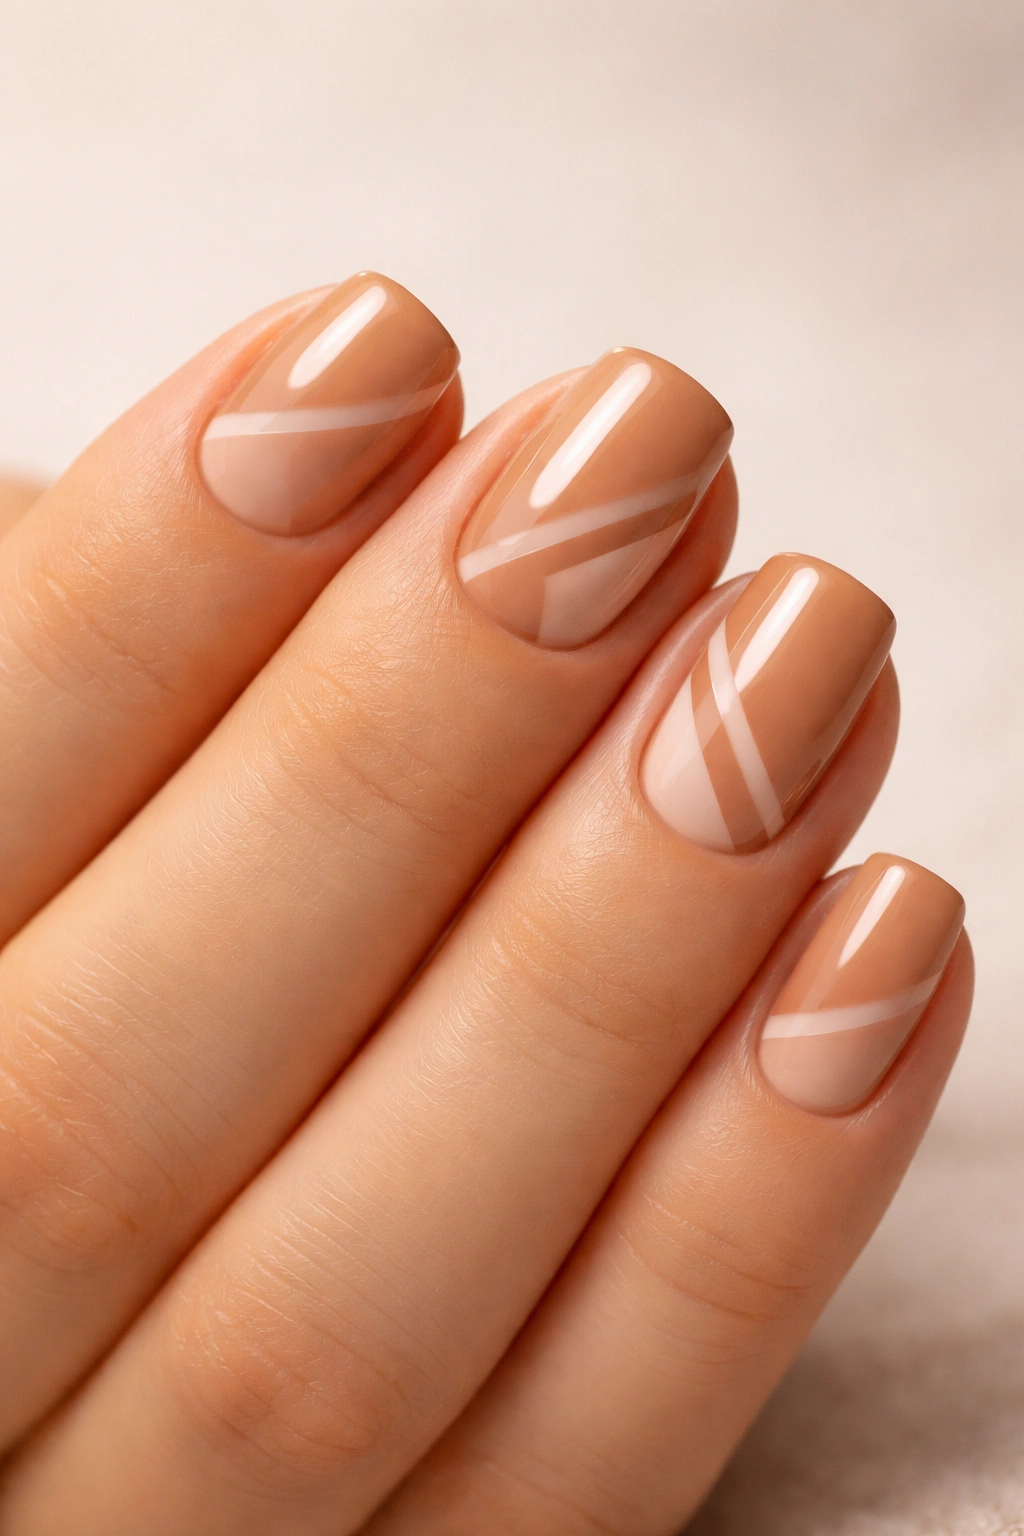
5. Creamy Taupe with Minimalist Line Details
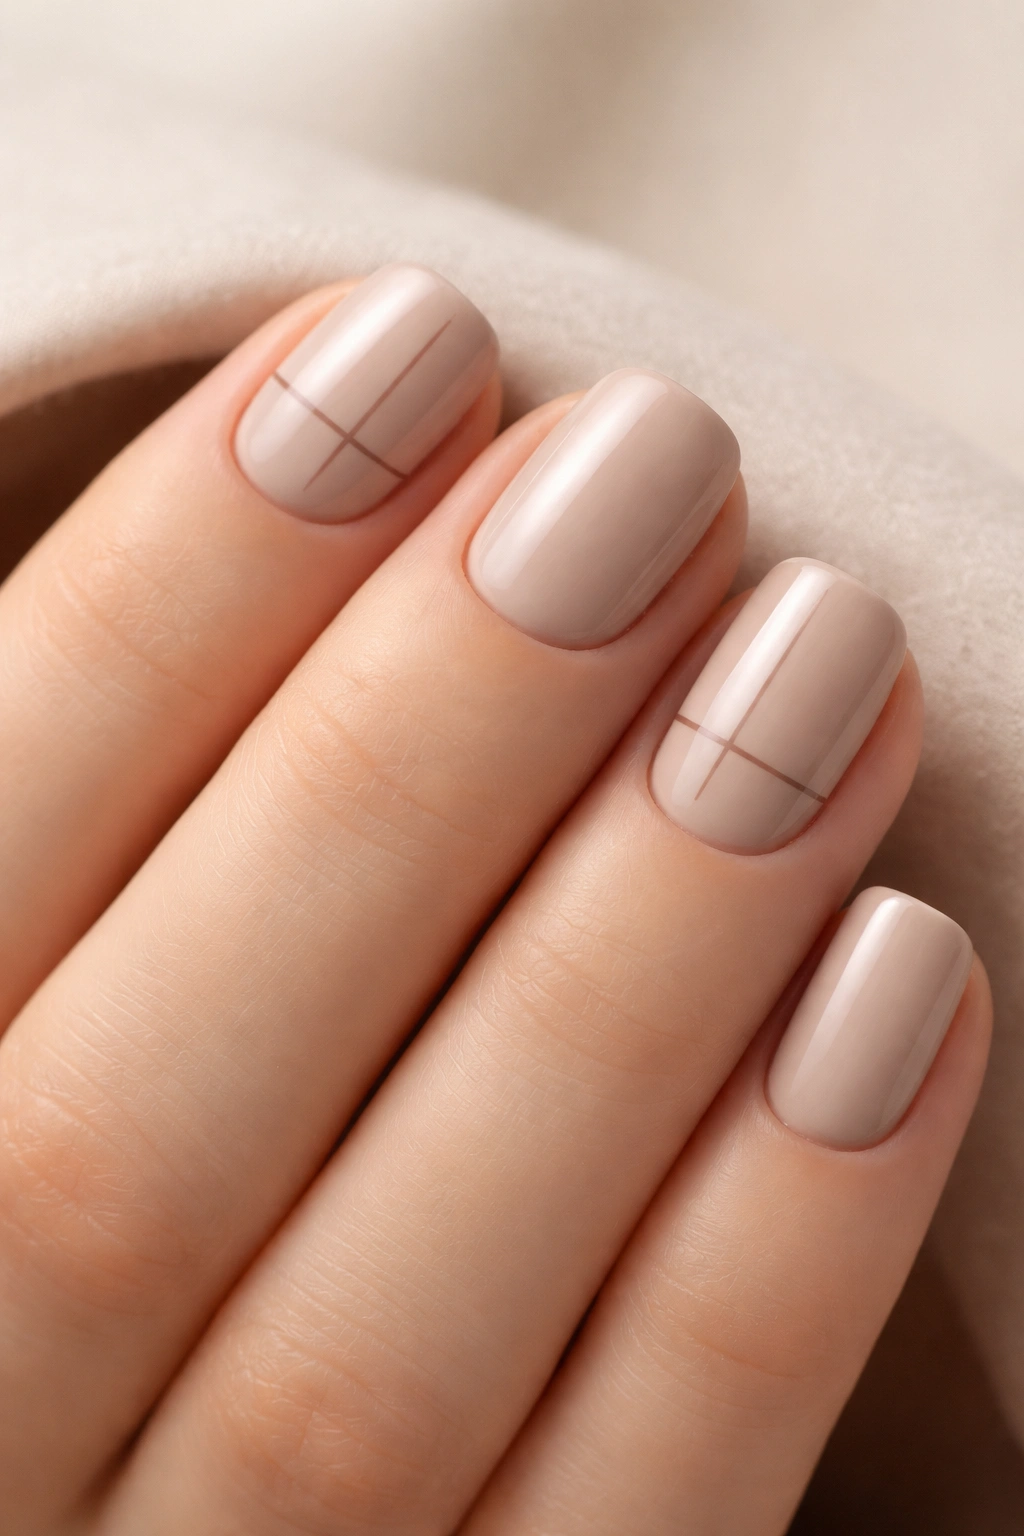
Creamy taupe is the chameleon of the earthy palette—it reads differently depending on your complexion, the surrounding colors in your space, and the lighting. It’s neither warm nor cool, neither beige nor gray, but somehow perfectly balanced between all of those. Minimalist line details—thin vertical or horizontal stripes in a complementary brown or deeper taupe—add contemporary interest without overwhelming the sophisticated base color.
Why Minimalism Works on Short Nails
Short nails can feel overwhelmed by complex designs, but strategic minimalist details create visual impact through restraint. On squoval nails specifically, thin line work draws attention to the shape itself rather than competing with it. The result feels modern, intentional, and effortlessly sophisticated.
Creating Minimalist Line Details
Apply your creamy taupe base in two coats. Once completely dry, use a very thin striping brush and a darker brown or deeper taupe shade to create your line pattern. Thin vertical lines spaced evenly down the center of each nail create one aesthetic. Thin horizontal lines near the cuticle or tip create a different vibe. The key is consistent spacing and steady hands—the lines should feel intentional and precise.
Line Pattern Variations
- Vertical lines creating a subtle striped effect
- Horizontal lines in bands across the nail
- Asymmetrical lines on just two or three nails
- Diagonal lines for a modern, angled aesthetic
- Lines that follow the curve of the nail shape
Pro tip: Practice your line work on a practice nail wheel before applying to your actual nails. Once you’ve got the steadiness and spacing down, the application feels confident and looks professional.
6. Warm Tan with Negative Space Design
Warm tan is approachable and friendly without reading as overly basic. It’s the color of sand, wheat fields, and warm wood furniture. When paired with negative space (areas where the nail is left bare or showing the natural nail), it creates a design that’s both bold and restrained. The negative space allows the squoval shape to be a design element in itself.
Understanding Negative Space on Squoval Nails
Negative space designs work especially well on squoval nails because the shape itself is already interesting. You’re not trying to disguise or decorate a plain shape—you’re highlighting it. By painting only specific portions of the nail and leaving other areas bare, you create visual geometry that feels intentional and design-forward.
Executing a Negative Space Design
Apply your warm tan to the entire nail with two coats. Once completely dry, use a fine brush and a matching or slightly darker shade to paint a geometric pattern that covers roughly half to two-thirds of the nail. Common options include a painted band along the cuticle with the tip left bare, a diagonal stripe creating two-tone geometry, or a curved section leaving the outer edge unpainted.
Popular Negative Space Patterns
- Horizontal band along the cuticle with bare tip
- Diagonal stripe creating left-side color and right-side bare nail
- Curved section along the side with bare space opposite
- Geometric triangular sections in alternating covered and bare
- Half-moon design at cuticle with bare nail surface
Worth knowing: Negative space designs require clean cuticle lines and precision. If you don’t have steady hand control, consider using nail stickers or guides to ensure crisp, intentional edges.
7. Olive Green with Matte and Glossy Contrast
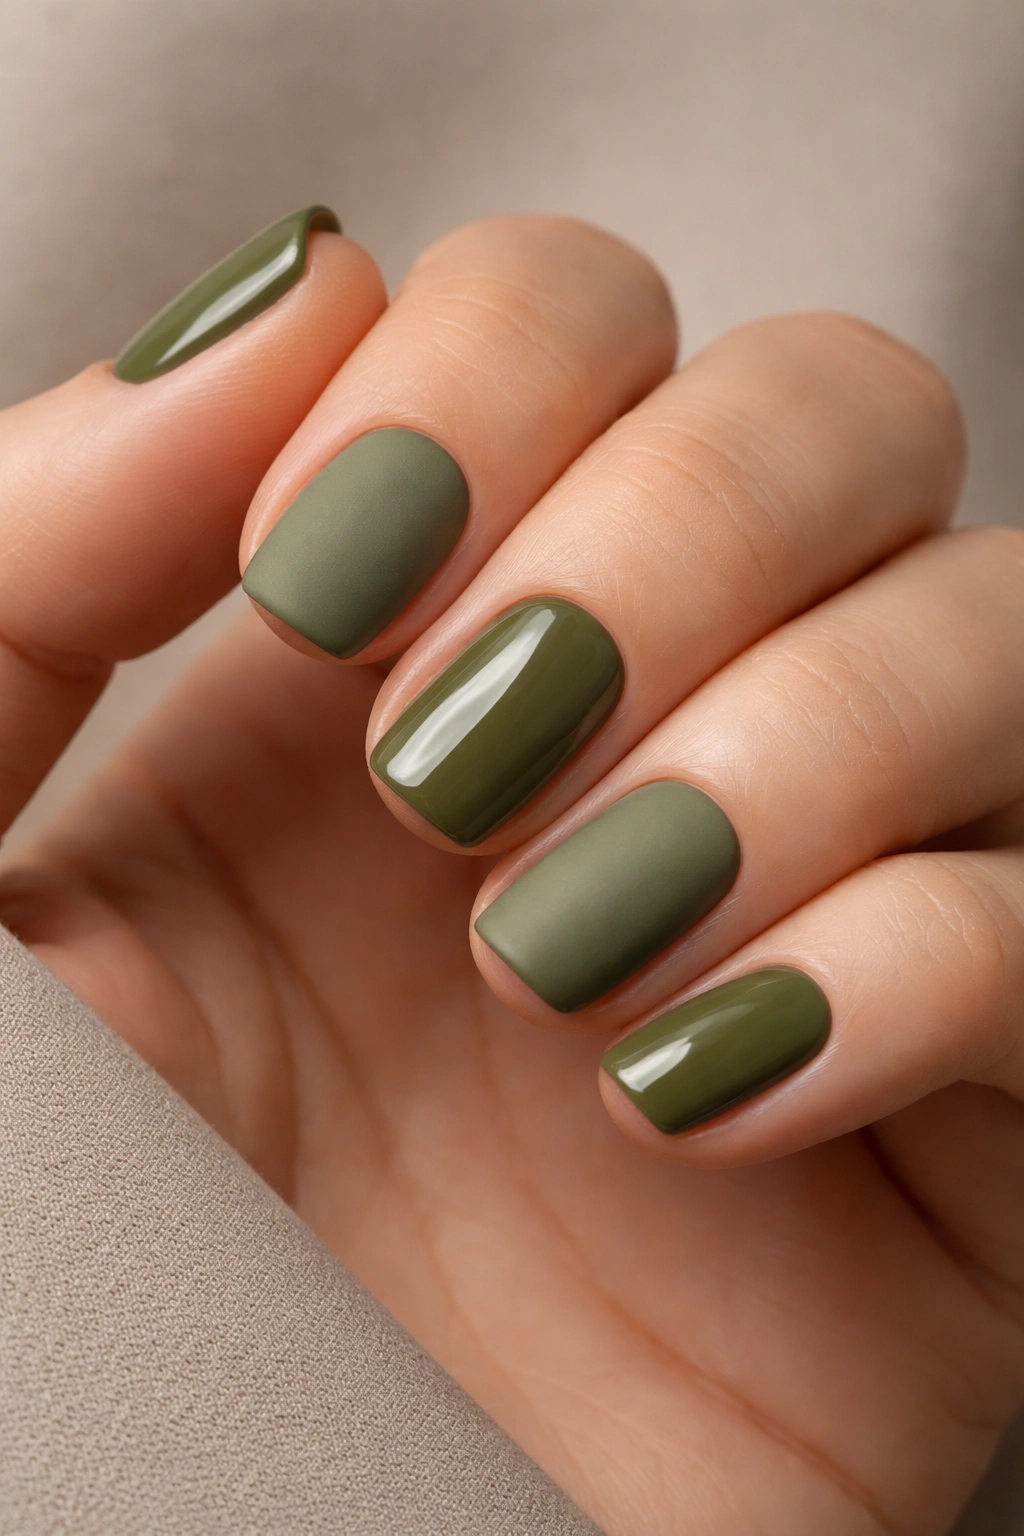
Olive green is sophisticated earthy—it’s green that leans brown, green that says “I understand color complexity.” This design uses matte olive on some nails and glossy olive on others, creating a textural contrast that’s visually engaging without adding a second color. The interplay between matte and glossy finishes makes the single color feel richer and more developed.
The Texture Contrast Strategy
By alternating matte and glossy finishes, you create visual interest that rivals multi-color designs, but with the cohesion and sophistication of a single-shade approach. On short squoval nails, this works particularly well because the shape remains the focus while the finish variation adds depth.
Creating the Matte and Glossy Look
Paint all nails with two coats of olive green. Once completely dry, apply matte topcoat to nails 1, 3, and 5 (thumb, middle, pinky), and glossy topcoat to nails 2 and 4 (index and ring). This staggered pattern creates a balanced visual rhythm. Alternatively, apply matte finish to all nails, then add glossy topcoat only to the tips for a half-matte, half-glossy effect on each nail.
Finish Combination Variations
- All matte except one accent nail in full gloss
- All glossy with matte topcoat only on the tips
- Matte on nails painted with one hand, glossy on the other
- Matte base coat with glossy topcoat only on nail tips
- Complete matte except for a thin glossy line at the cuticle
Pro tip: The finish contrast is most noticeable in direct lighting. When you’re presenting your hands in professional or formal settings, take a moment to let natural or studio light highlight the textural variation.
8. Warm Clay with Hammered Metallic Accents
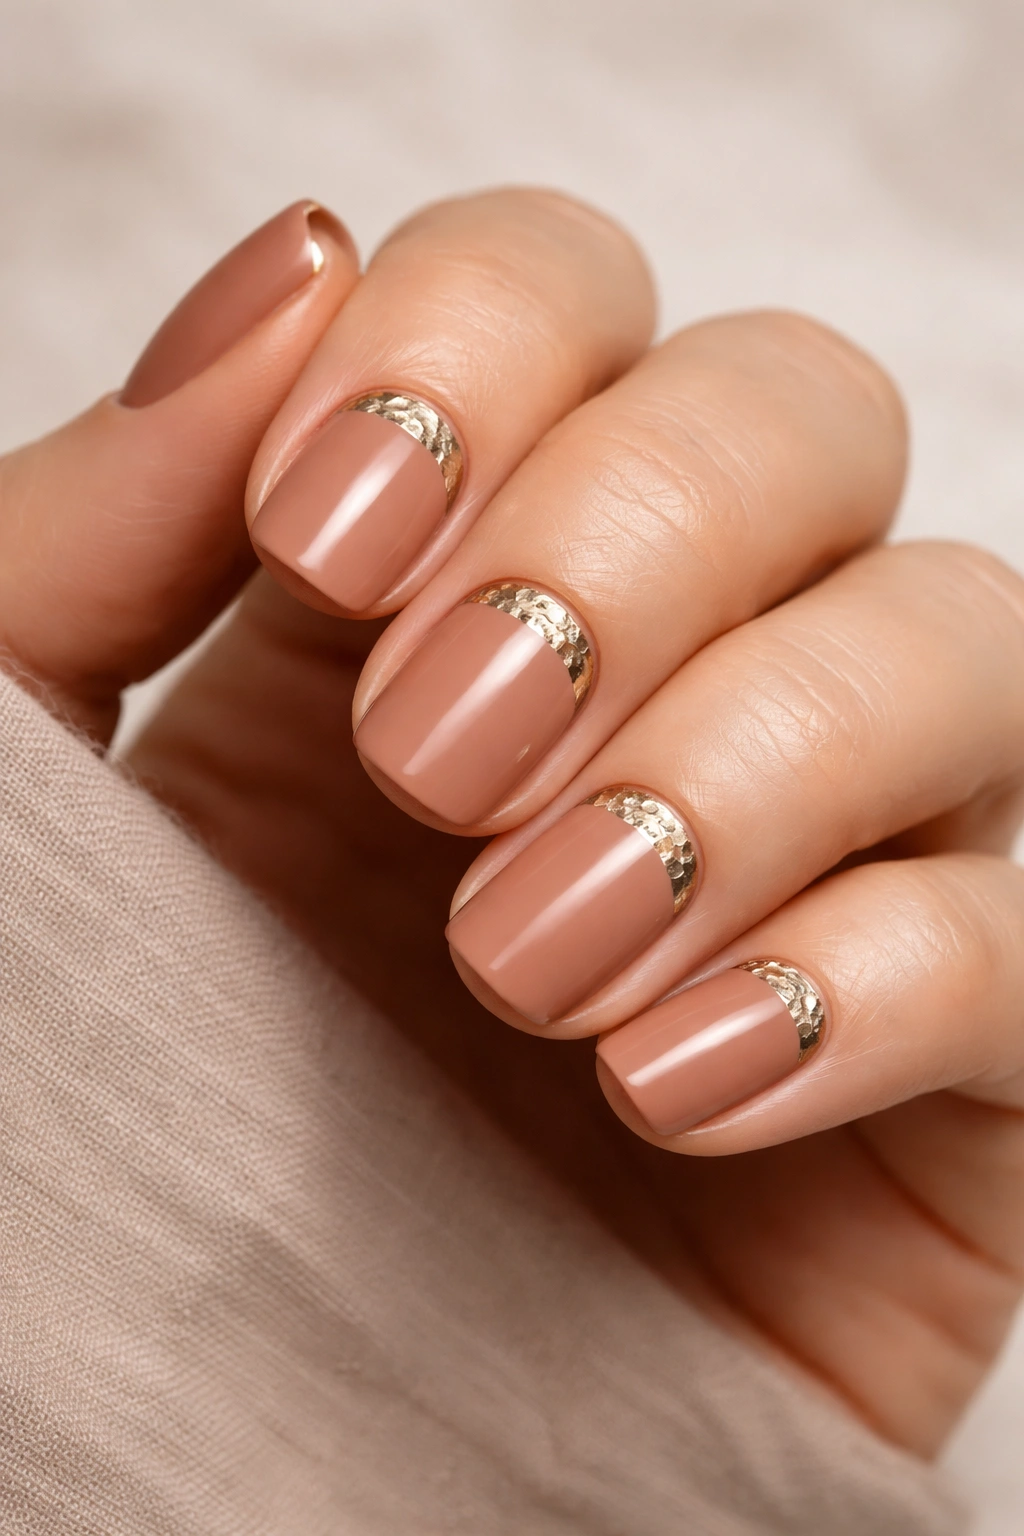
Warm clay captures the color of natural, unfinished earthenware—it’s subtle, genuine, and inherently sophisticated. Hammered metallic accents (using specialized hammered metallic polishes or foil techniques) add dimensionality and light-catching shine. The rough texture of hammered metallics contrasts beautifully with the smooth warmth of clay, creating a design that feels handcrafted and artisanal.
Why Hammered Metallics Elevate Earthy Designs
Smooth metallics can read as cold or corporate when paired with earthy tones, but hammered metallics maintain the organic, natural feeling while adding shimmer and movement. The textured finish feels intentional and artistic rather than overly decorative.
Applying Hammered Metallic Details
Paint your nails with two coats of warm clay. Once dry, use a thin brush to apply hammered metallic shade (copper, bronze, or champagne work beautifully) to create accent areas. You can paint the hammered shade along the cuticle line, on just the tips, or in small geometric sections. The hammered finish of the metallic shade itself creates the visual effect—you don’t need to do anything additional.
Metallic Accent Placement Options
- Thin line along entire cuticle edge
- Tips only, creating an ombre transition
- Accent nail on ring finger or pinky
- Small geometric sections (half-moons, triangles) as focal points
- Scattered or sprayed effect for an ethereal appearance
Worth knowing: Hammered metallic polishes require a very smooth base layer for the best effect. Make sure your clay base is completely even and dry before applying the metallics.
9. Dusty Brown with Negative Space Half-Moon

Dusty brown is brown that doesn’t feel heavy—it has gray undertones that prevent it from appearing too dark or intense. A negative space half-moon design (where the base of the nail near the cuticle is painted, and the tip shows the natural nail or is left bare) creates a contemporary, almost architectural aesthetic. The half-moon emphasizes the beautiful squoval shape rather than obscuring it.
The Half-Moon Shape on Squoval Nails
Because squoval nails have gently rounded corners and a slightly flattened top, a half-moon design works with the shape rather than against it. The curved cuticle area fills naturally with the painted section, and the bare nail area toward the tip creates a sophisticated, modern appearance.
Creating a Perfect Half-Moon
Paint your nails with two coats of dusty brown. Once completely dry, use a half-moon stencil (available at most beauty supply stores) or carefully hand-paint a curved line across the lower portion of the nail, leaving roughly the upper third to half of the nail bare. The curved line should follow the natural contour of your nail cuticle.
Half-Moon Design Variations
- Classic half-moon with painted base and bare tip
- Reverse half-moon with bare base and painted tip (less common but striking)
- Thick half-moon covering about half the nail
- Thin half-moon covering just the lower quarter
- Multiple thin half-moons creating striped effects
- Varied half-moon widths across different nails for asymmetrical interest
Pro tip: If you’re not confident hand-painting half-moons, stencils are your friend. They’re inexpensive, reusable, and eliminate the stress of trying to create perfect curves freehand.
10. Warm Beige with Delicate Speckled Pattern
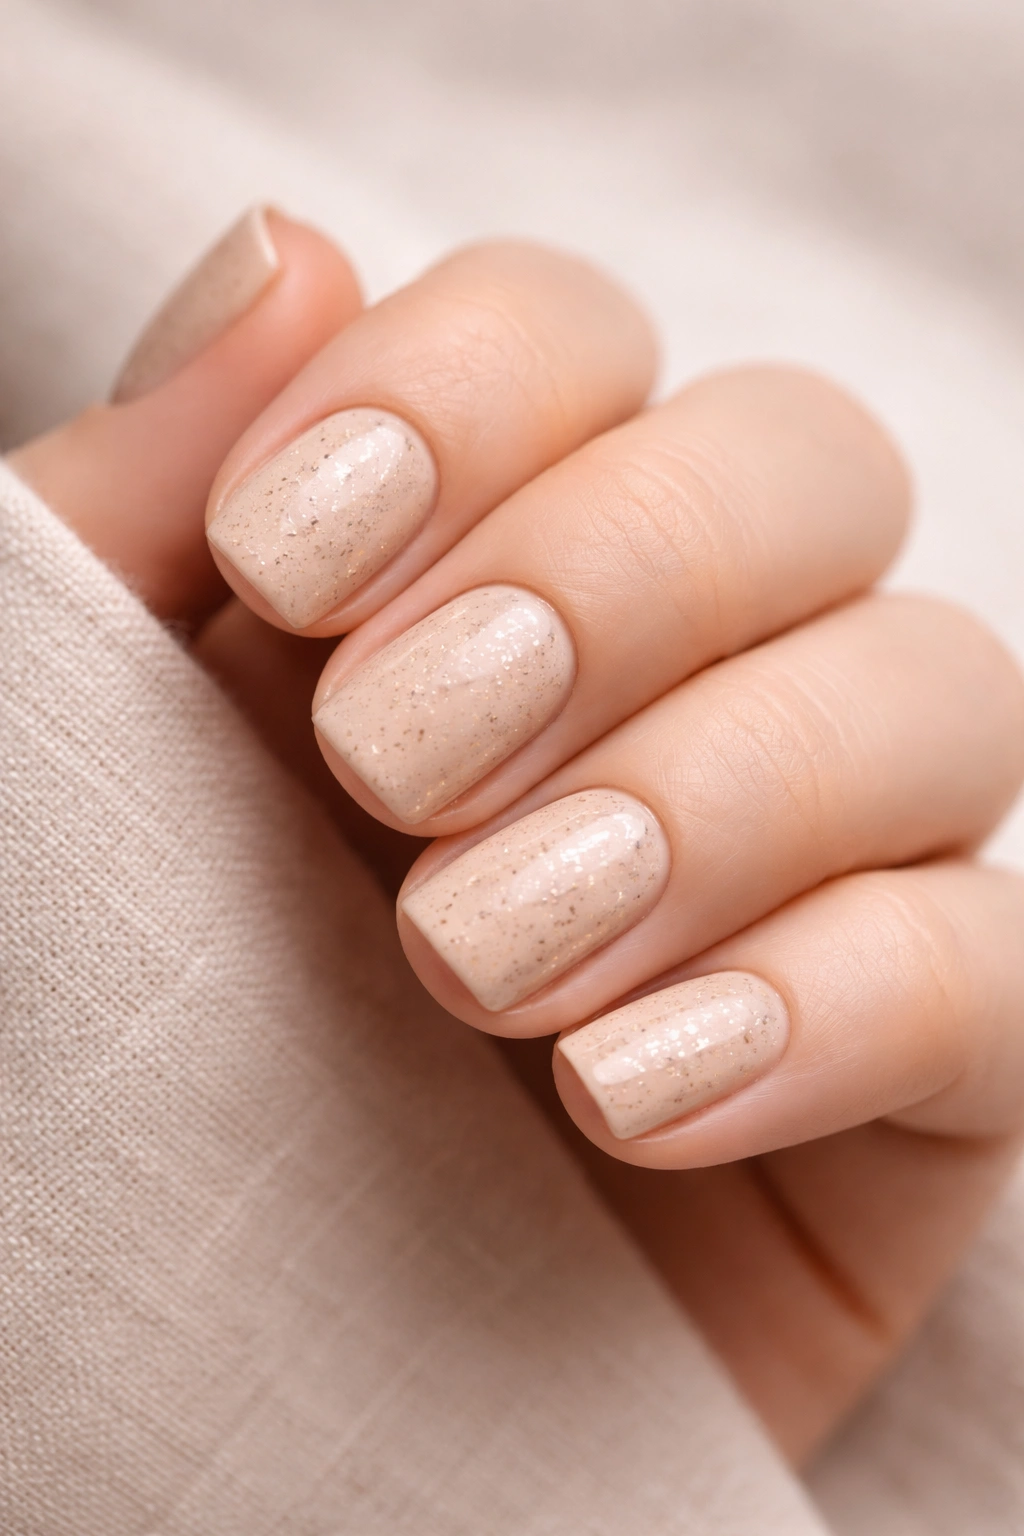
Warm beige is the nail equivalent of a cream-colored linen shirt—it’s subtle, versatile, and pairs with literally everything. A delicate speckled pattern (achieved using toothpick stippling, a fine brush, or specialized speckle brushes) adds understated texture and visual interest without dominating the design. The speckles should be sparse and organic-looking, almost accidental in appearance.
The Beauty of Speckled Design on Short Nails
Speckled patterns create the illusion of subtle dimensionality without requiring multiple colors. On short squoval nails, this means you get visual complexity without the design feeling busy or overwhelming. The pattern works because it honors the restraint inherent in minimal nail length.
Creating a Speckled Effect
Paint your nails with two coats of warm beige. Once completely dry, dip the tip of a toothpick or very fine brush into a complementary shade (warm brown, taupe, or even a deeper beige) and stipple tiny dots across the nail surface. The dots should be irregular and scattered, not uniform or patterned. Less is more—you’re aiming for a subtle effect, not a heavily speckled appearance.
Speckle Shade Options
- Warm brown speckles on warm beige base
- Darker taupe speckles on lighter beige
- Rust-colored speckles for additional warmth
- Charcoal gray speckles for subtle contrast
- Metallic bronze speckles for a touch of shimmer
Worth knowing: Speckled designs are incredibly forgiving because any slight imperfections contribute to the organic, hand-speckled aesthetic. This is a great design choice if precision paint work makes you nervous.
11. Rich Chocolate Brown with Glossy Finish and Simple Cuticle Design
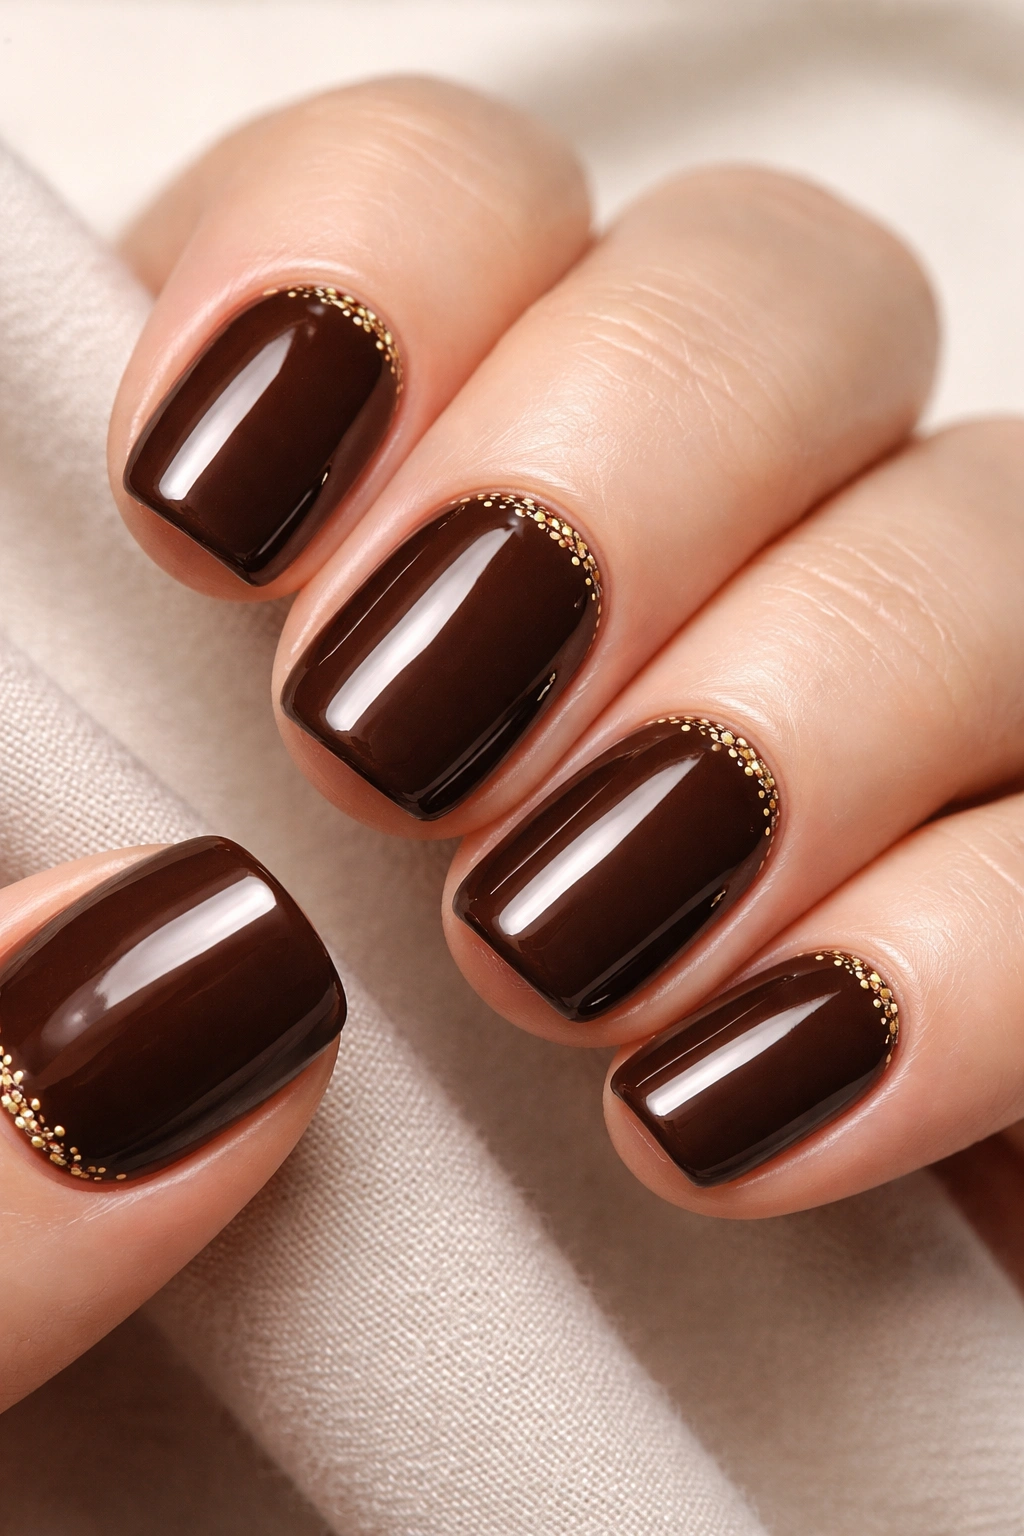
Rich chocolate brown is warm, sophisticated, and universally flattering. It’s the color of premium leather, dark wood, and quality coffee. A simple cuticle design—minimal detail work in the area where the nail meets the skin—focuses decoration in a way that feels intentional and contemporary. The rest of the nail remains clean and polished, emphasizing the beautiful squoval shape.
Why Cuticle Designs Work on Short Nails
Cuticle-focused designs take advantage of short nail length by concentrating detail in the area where it’s most visible when your hands are at rest or in motion. On squoval nails, this approach feels refined rather than bare—you’re not ignoring design; you’re making a deliberate choice about where it lives.
Executing a Cuticle Design
Paint your nails with two coats of rich chocolate brown in a glossy finish. Once completely dry, use a thin striping brush to create a simple line design at the cuticle. Options include: a thin gold or champagne line following the cuticle curve, small dots arranged in a pattern, a slightly thicker band of contrasting color, or even a tiny image (like a small dot or dash pattern).
Cuticle Design Pattern Ideas
- Single thin metallic line following the exact cuticle curve
- Three thin lines of varying colors arranged horizontally
- Small dot pattern creating a subtle border
- Thin geometric shapes (triangles, dashes) in repetition
- Gradient wash of a complementary color near cuticle
Pro tip: Cuticle designs are most effective when they’re subtle and well-executed rather than elaborate. The restraint is what makes the design sophisticated.
12. Warm Caramel with Embedded Metallic Flecks
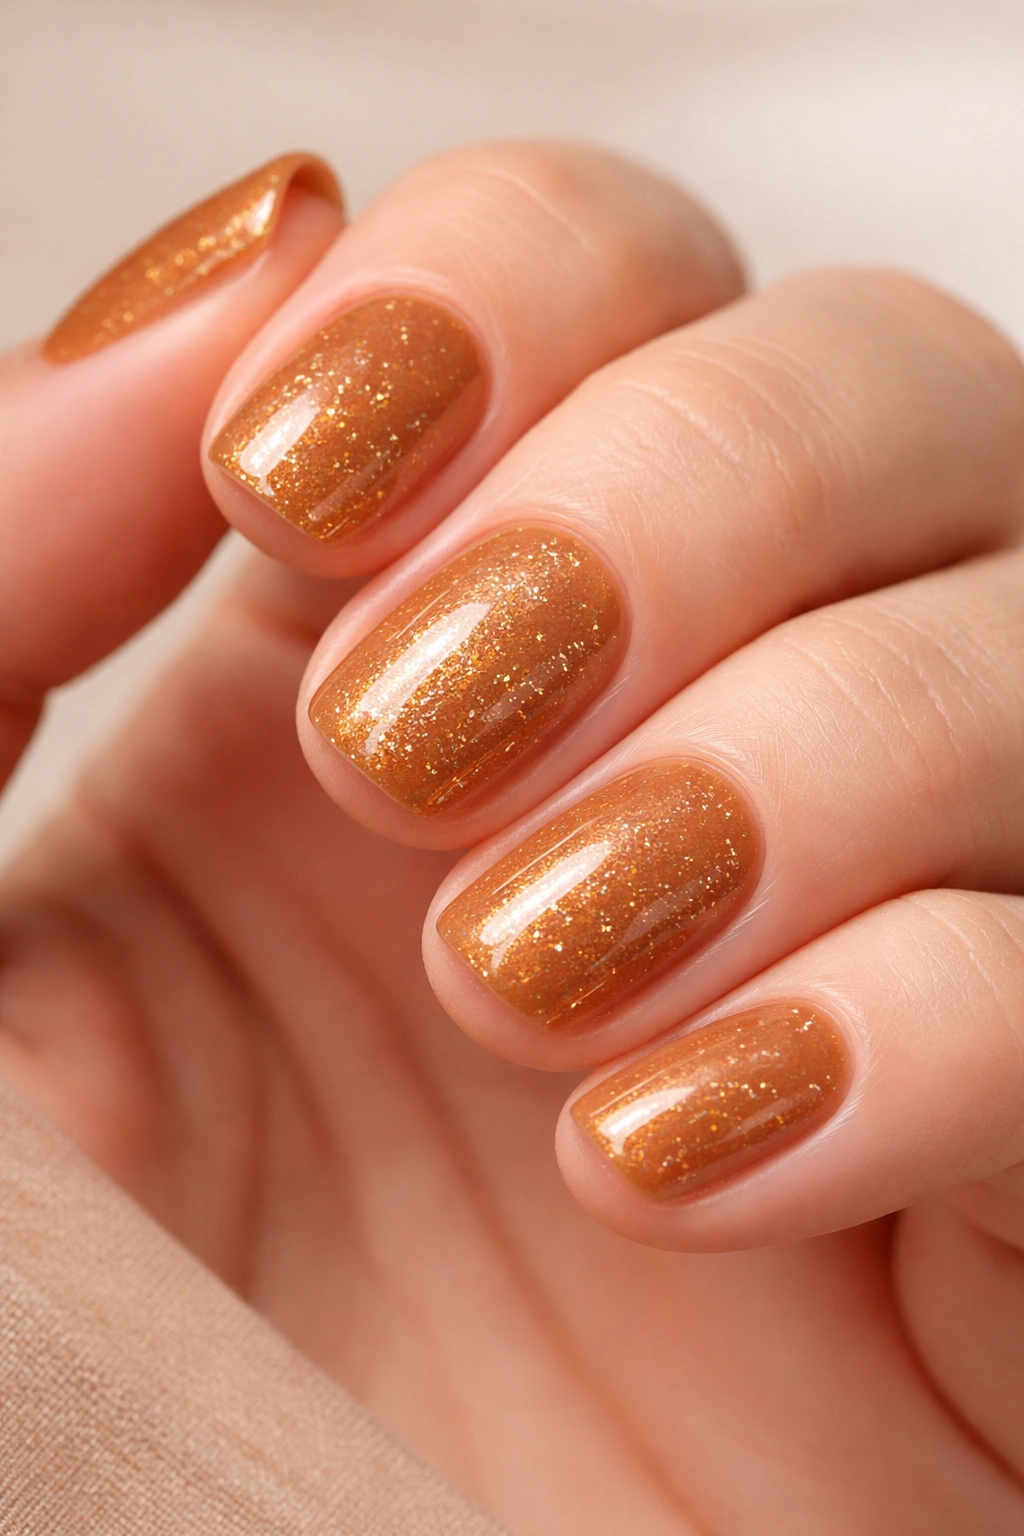
Warm caramel is rich, inviting, and deeply approachable. It’s the color of honey with just enough brown to ground it in earthy tones. Embedded metallic flecks—small pieces of metallic foil, glass flecks, or metallic glitter suspended in a clear or matching topcoat—catch light beautifully while maintaining the warmth and depth of the caramel base. The result is sophisticated shimmer that reads as intentional rather than overly decorated.
The Appeal of Embedded Metallics on Squoval Nails
Metallic flecks add light-catching dimension without creating a visually busy design. On short squoval nails, the flecks become focal points that draw attention to your hands without overwhelming the nail shape. The effect is elegant and modern—perfect for someone who wants some shine without overt glitter.
Embedding Metallic Flecks
Paint your nails with two coats of warm caramel. Once the topcoat is still slightly tacky but not wet, carefully sprinkle metallic flecks (buy them at beauty supply stores) onto select nails or across all nails depending on your preference. Press them very gently into the tacky topcoat using a soft brush. Once positioned, seal everything with another layer of clear topcoat to ensure the flecks stay permanently embedded.
Fleck Placement Strategies
- Dense fleck coverage across all nails for maximum shimmer
- Concentrated flecks on just the tips for a gradient effect
- Single accent nail with heavy fleck concentration
- Scattered flecks creating an ethereal, subtle effect
- Larger metallic foil pieces combined with smaller glitter for varied texture
Worth knowing: Embedded flecks require a slightly different application technique than regular glitter because you’re working while the topcoat is still tacky. It takes practice to position them exactly where you want them, but the result is worth the effort.
Final Thoughts
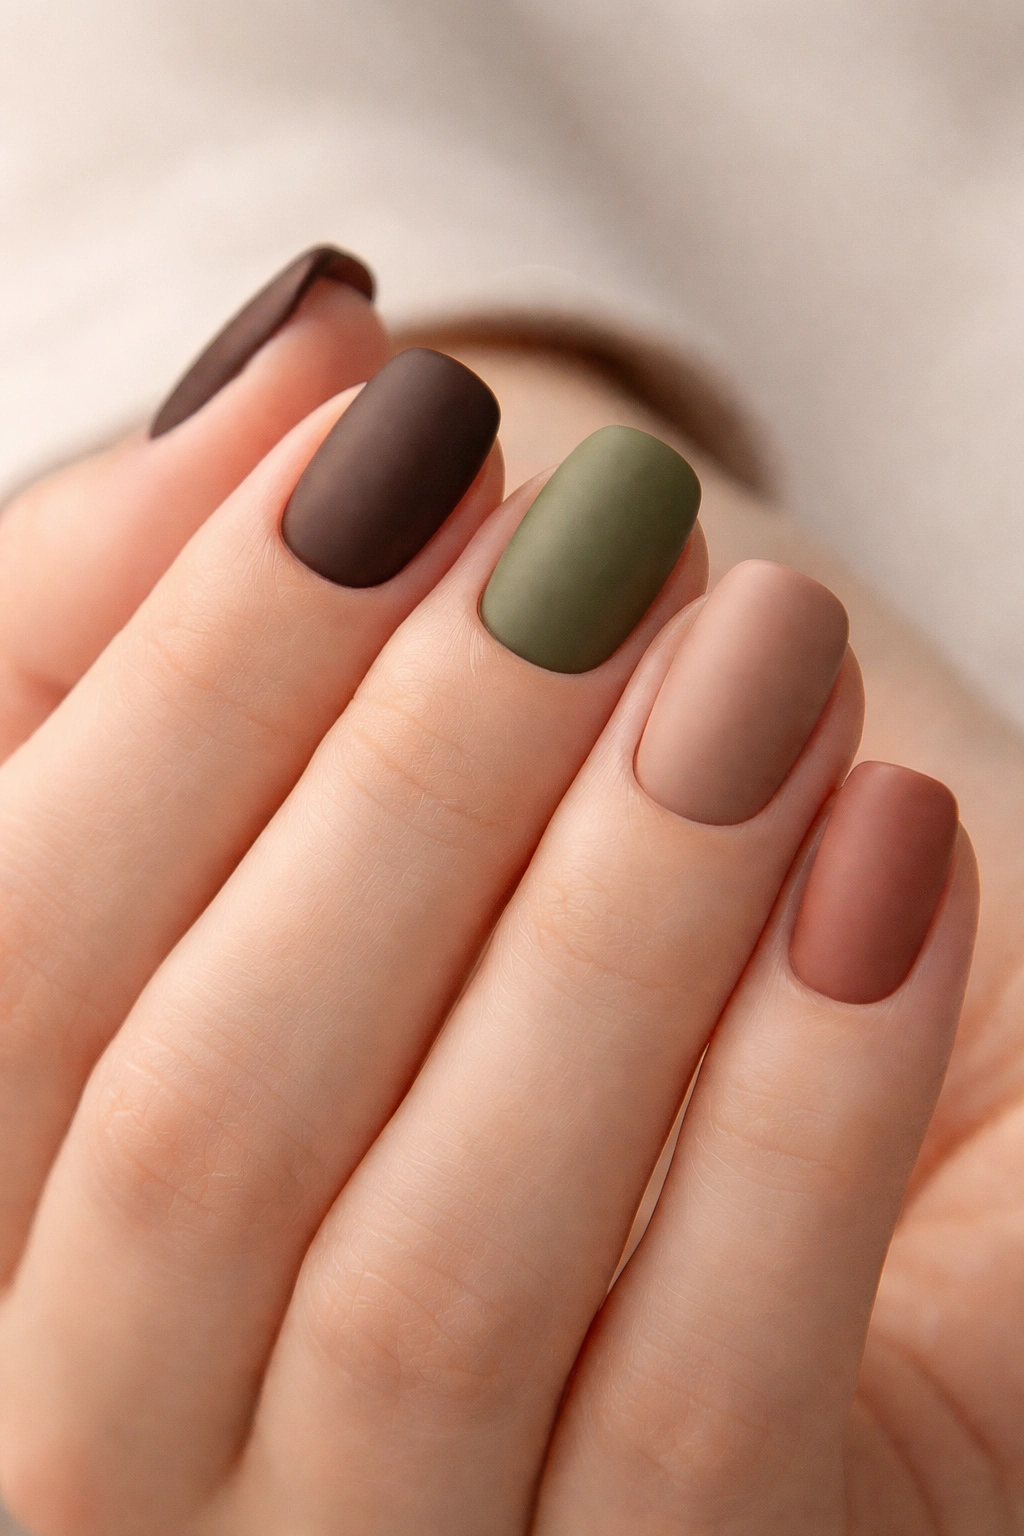
Short squoval nails paired with earthy colors create the sweet spot where practicality meets genuine style. These twelve designs demonstrate that you don’t need length or complexity to make your nails feel thoughtful and put-together. Whether you choose deep browns, calming greens, warm taupes, or clay-inspired shades, the earthy palette grounds your look in a way that trendy colors simply can’t match.
The beauty of earthy nail designs is their flexibility. You can dress them up for professional settings, keep them casual for everyday wear, or elevate them with metallic accents and decorative details depending on the occasion. Short squoval nails are forgiving in terms of maintenance—they resist breaking and catching, they require less frequent filing than longer shapes, and they work with nearly every lifestyle. Add an earthy color palette to that practical foundation, and you’ve got nails that work hard and look genuinely beautiful doing it.
The designs you’ve just explored aren’t limited to professional salon application either. While some require steady hands and practice, many of them—the simple color applications, the matte finishes, the negative space designs—translate beautifully to at-home manicures. Start with the simpler options if you’re new to DIY nails, and work your way toward the more detailed designs as your confidence and skill grow. The palette itself is incredibly forgiving; earthy shades are hard to get wrong, and small imperfections somehow read as intentional within these natural, organic color families.
Whatever design you choose, remember that the foundation is always your nail health. Keep nails properly moisturized, use quality base coats to prevent staining, and don’t skip topcoat—it’s not just about shine, it’s about protection and longevity. With proper care, any of these designs will maintain its beauty for three to four weeks, through regular hand washing, dishwashing, and daily life. That durability combined with the timeless appeal of earthy tones means your manicure investment continues paying dividends week after week.
