

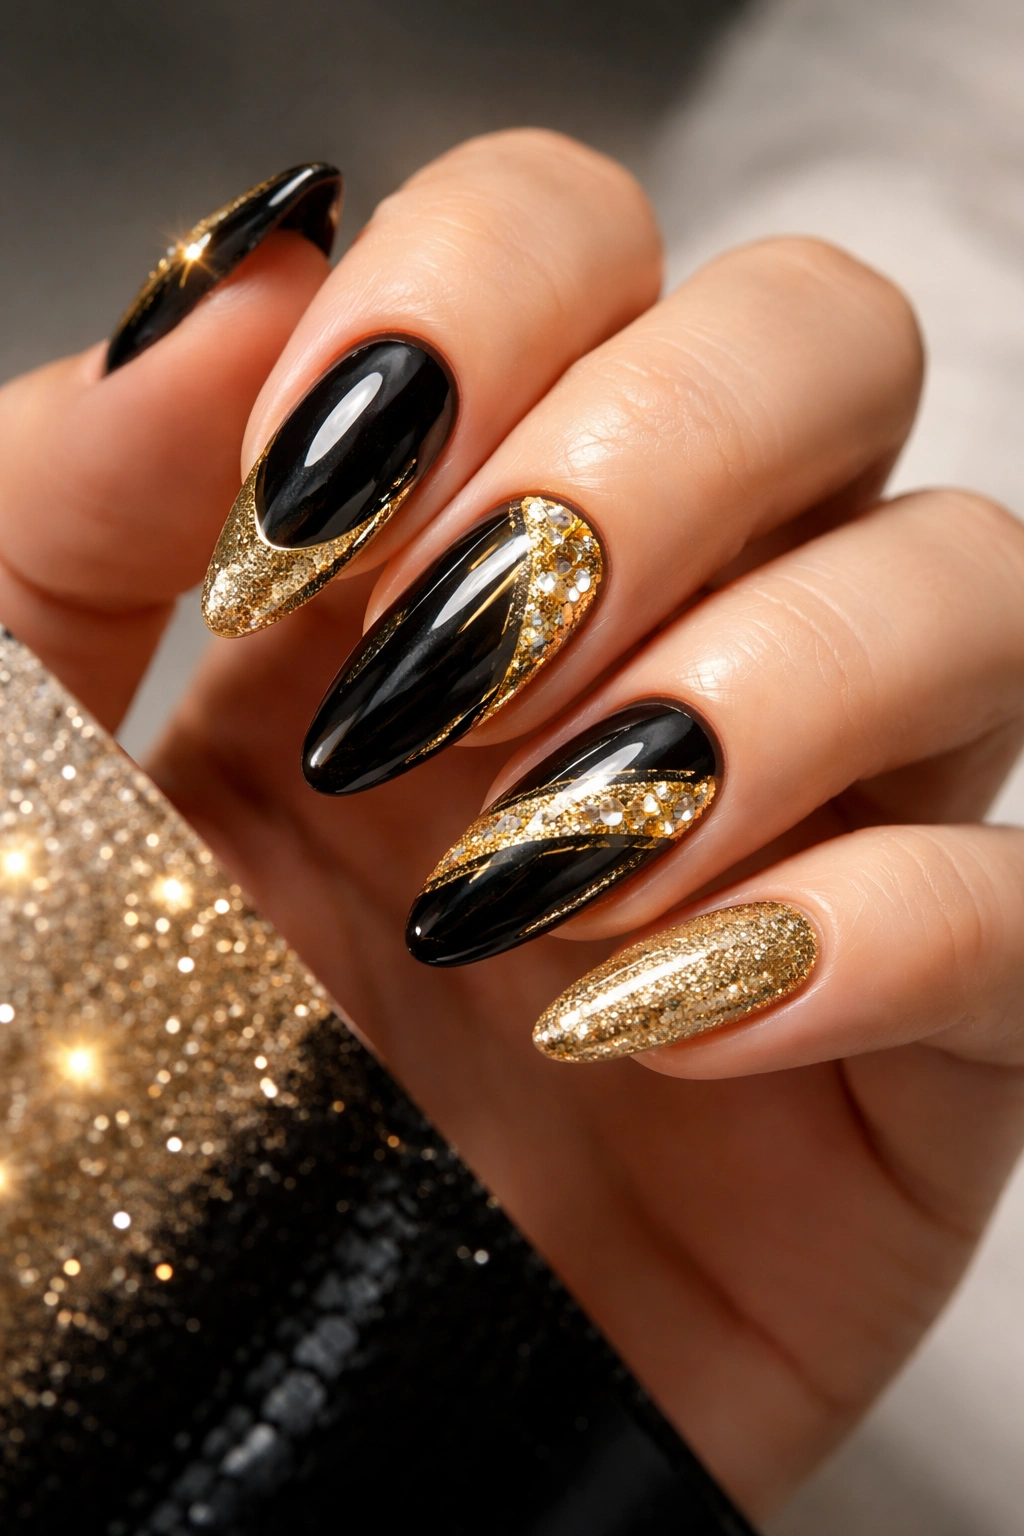
Black and gold—it’s the nail equivalent of a timeless little black dress paired with statement jewelry. This color duo has serious staying power, and for good reason. The deep richness of black combined with the lustrous shimmer of gold creates an instantly sophisticated look that works for literally any occasion, whether you’re heading to a gala or running errands on a Tuesday. The beauty of this pairing is that it’s never boring; the possibilities for how you can blend, layer, and accent these two colors are genuinely endless.
What makes black and gold nail designs so universally flattering is their versatility. They complement virtually every skin tone, work with any fashion aesthetic (from casual to formal), and they feel just as appropriate for a quiet dinner as they do for a night out dancing. You can go minimalist with a single gold stripe down a black base, or you can go full dramatic with glitter, rhinestones, and intricate patterns. The contrast between the two colors also means that even simple designs look polished and intentional—there’s no such thing as a “basic” black and gold manicure.
The designs in this guide range from elegant and understated to bold and eye-catching, so whether you’re someone who prefers subtle sophistication or statement-making sparkle, you’ll find something that speaks to your style. Each design comes with practical tips on how to achieve it, what products work best, and how to customize it to match your personal taste. Think of these not as rigid rules but as starting points for creating a manicure that feels authentically you.
1. Classic Gold Foil on Black Base
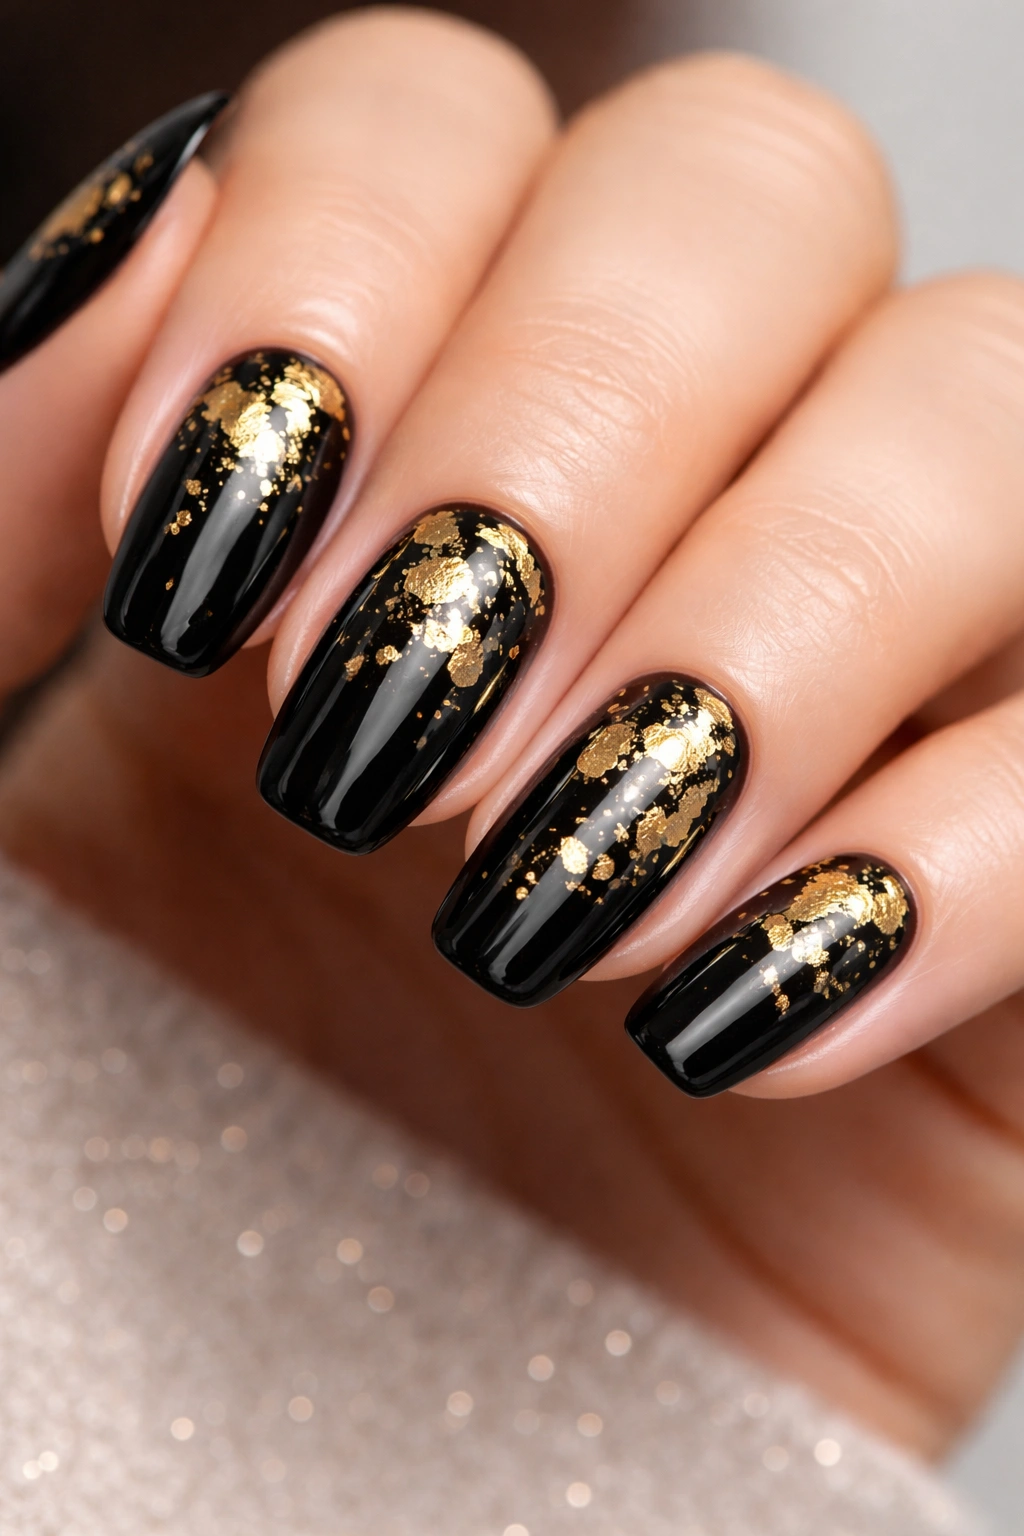
There’s a reason this design appears in every nail artist’s portfolio—it’s effortlessly chic and takes almost no skill to pull off at home. Start with a glossy black nail polish as your foundation, letting it dry completely so the foil has a smooth surface to grip. Once dry, carefully tear or cut small pieces of gold foil and press them onto your nails using a sticky base coat or a damp brush.
Why This Design Works So Well
The beauty of gold foil is that it catches light beautifully without requiring the precision of hand-painted details. You can scatter the foil randomly across the nail, create a dramatic gradient from cuticle to tip, or frame the edges with a clean outline. The irregular, organic placement actually looks more intentional than perfectly uniform patterns. This design reads as luxurious and expensive, even though it’s genuinely one of the easiest to recreate at home.
How to Apply It Like a Pro
Use a tweezers to handle the foil pieces so your fingers don’t damage them. Press each piece firmly for 3-5 seconds and seal everything with a quality top coat—this keeps the foil from peeling and ensures your design lasts the full two weeks. If you want a more geometric look, use painter’s tape to create clean lines and apply foil only within the taped sections before carefully peeling the tape away. The key is using enough top coat; most foil designs fail because people skimp on the seal.
2. Matte Black with Glossy Gold Stripes
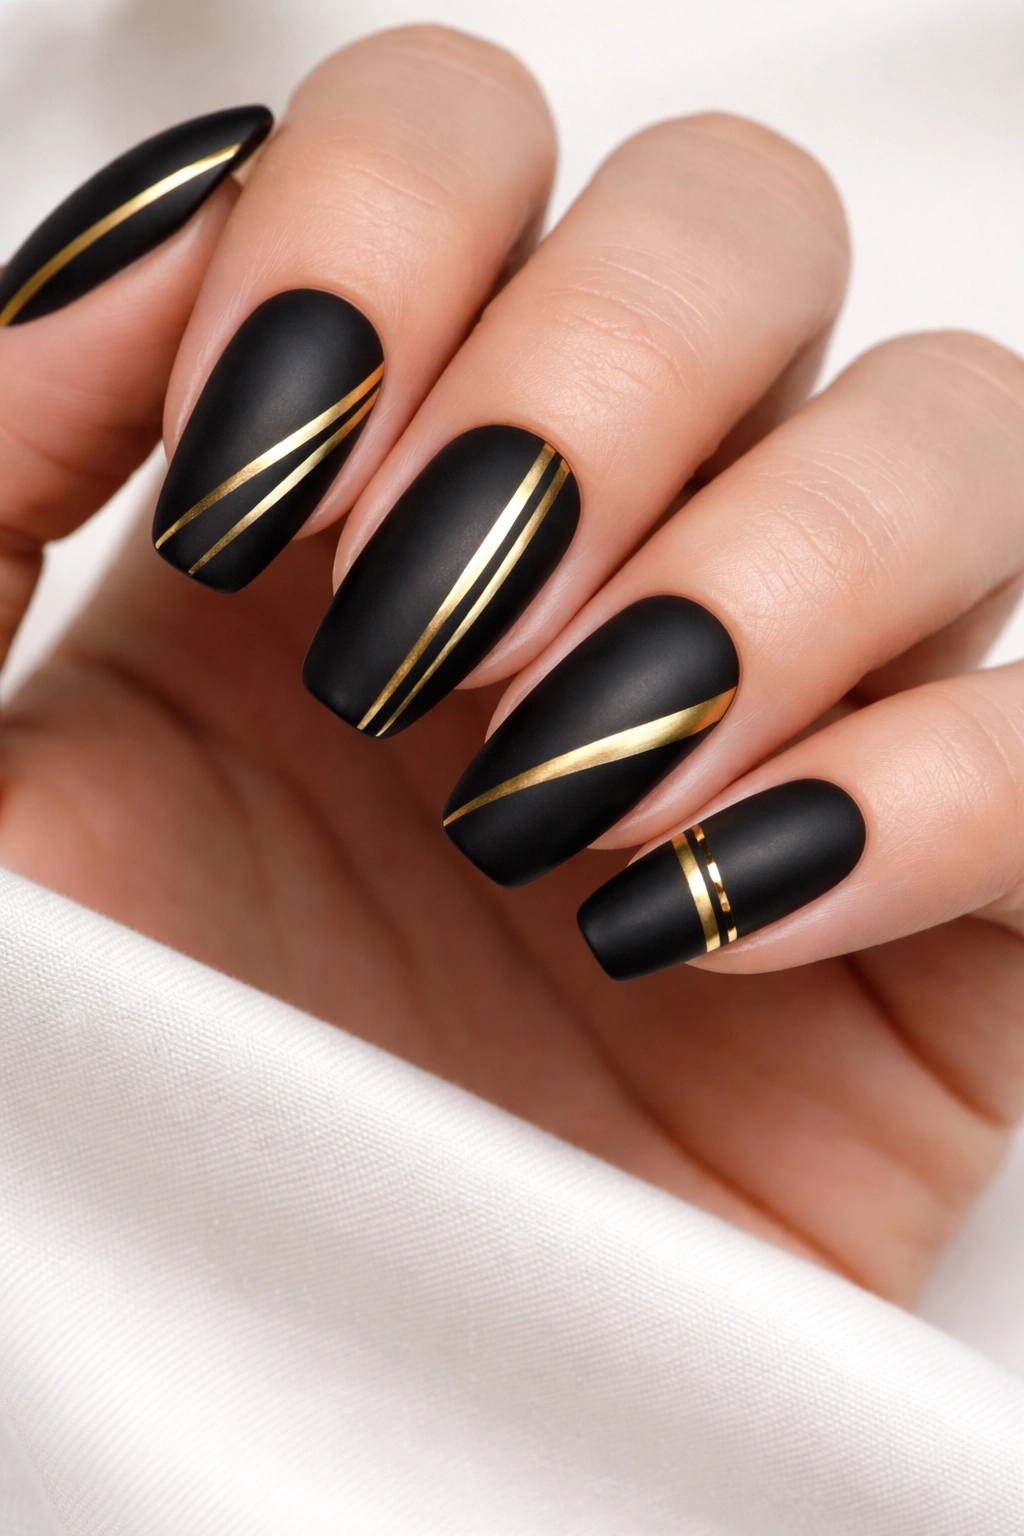
This design thrives on the tension between finishes. The matte black provides a soft, velvety base that feels modern and sophisticated, while the glossy gold stripes deliver shine and contrast that catches every light source in the room. The textural difference between matte and glossy is what elevates this from simple to striking.
Creating Clean, Precise Lines
Use gold striping tape or thin nail art tape to create perfectly straight lines—there’s no shame in using tools that make precision easier. Apply the tape vertically, diagonally, or horizontally depending on your preference, then paint over the exposed areas with glossy gold polish. Let it dry before peeling away the tape to reveal sharp edges. If you want slightly softer stripes, skip the tape and use a thin striping brush with a very steady hand, or embrace the hand-painted imperfection and make it intentional by varying the stripe widths.
Customizing This Look
Try doing stripes on only your accent nail while keeping the rest of your nails solid matte black—this gives you glam without committing to full drama. You can also layer patterns, creating a background matte black with gold stripes and then adding tiny gold dots or shapes for additional dimension. The contrast in finishes means even a simple stripe design looks way more elaborate than the actual effort required.
3. Glitter Gradient from Black to Gold
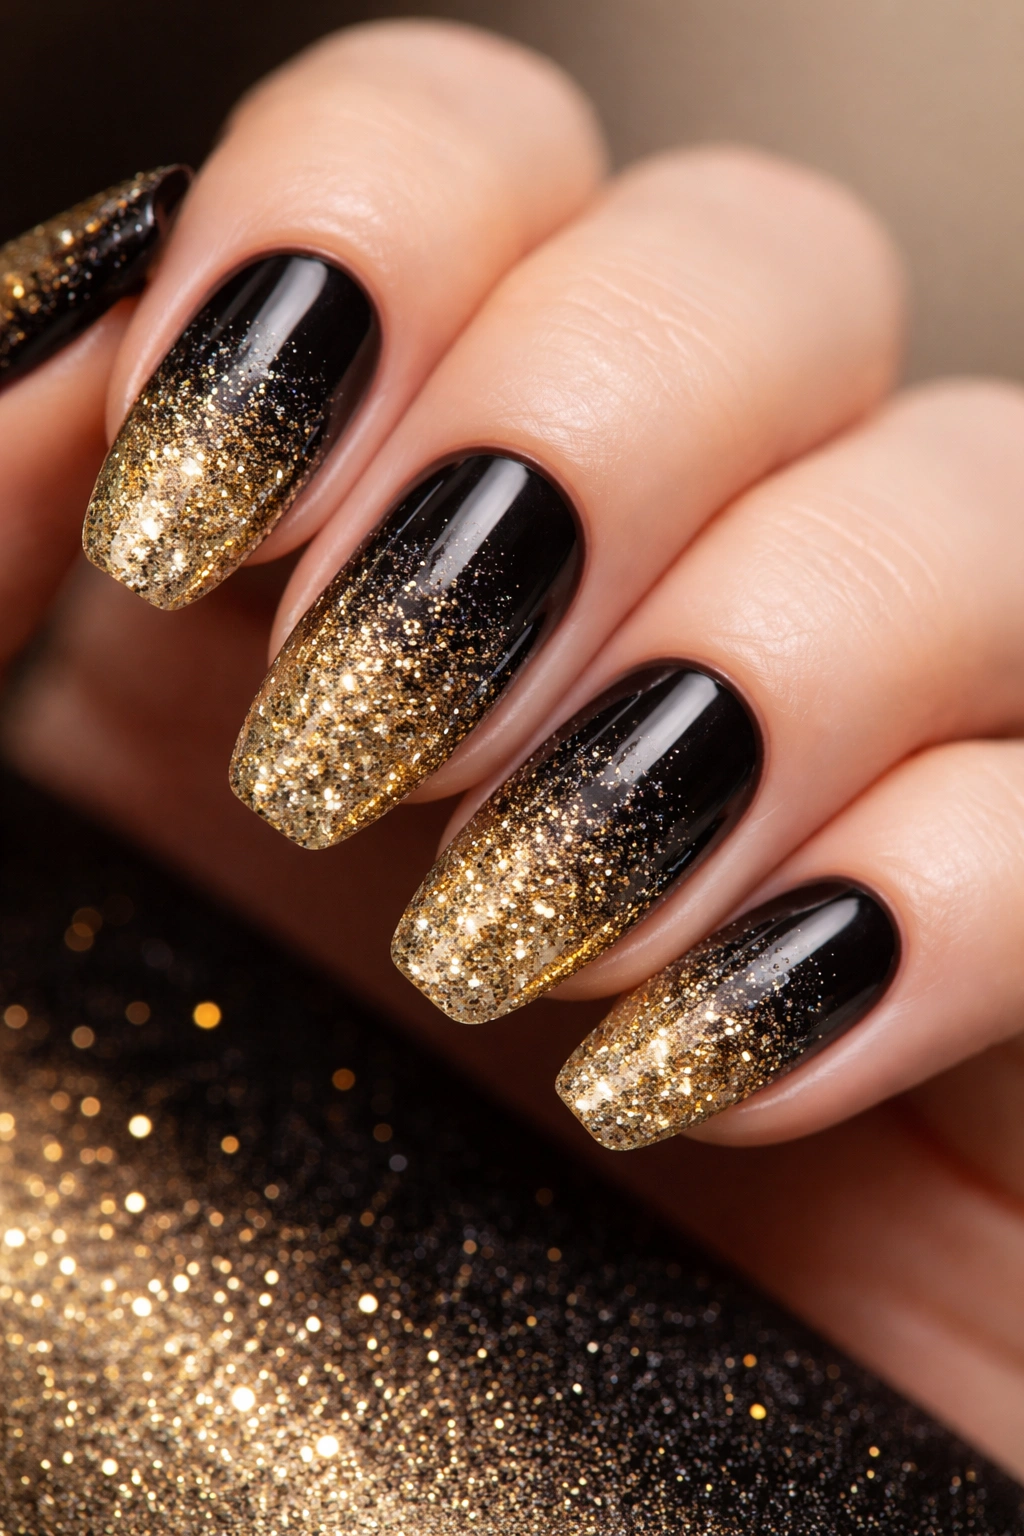
A gradient or ombré using black at the base and gold glitter fading toward the tips is the definition of elegant drama. This design captures the essence of luxury by suggesting movement and depth, as if your nails are transforming from night to sparkle.
Blending Glitter Seamlessly
The secret to making a glitter gradient look polished rather than sloppy is using a makeup sponge to dab and blend. Apply your black base coat, let it dry, then lightly apply gold glitter polish to the tips using the sponge in a dabbing (not wiping) motion. Work inward toward the cuticle, decreasing the concentration of glitter as you move up the nail. This creates a gradual transition rather than a harsh line. The glitter naturally blends because you’re stippling it on instead of dragging it.
Finish and Longevity
Seal the entire nail with at least two coats of glossy top coat, pressing firmly to ensure the glitter doesn’t shift or shed. If you want extra staying power, use a gel top coat or a sticky base coat under the glitter. This design is stunning for parties and celebrations because the glitter catches light as you move, creating an almost hypnotic shimmer.
4. Art Deco Geometric Patterns
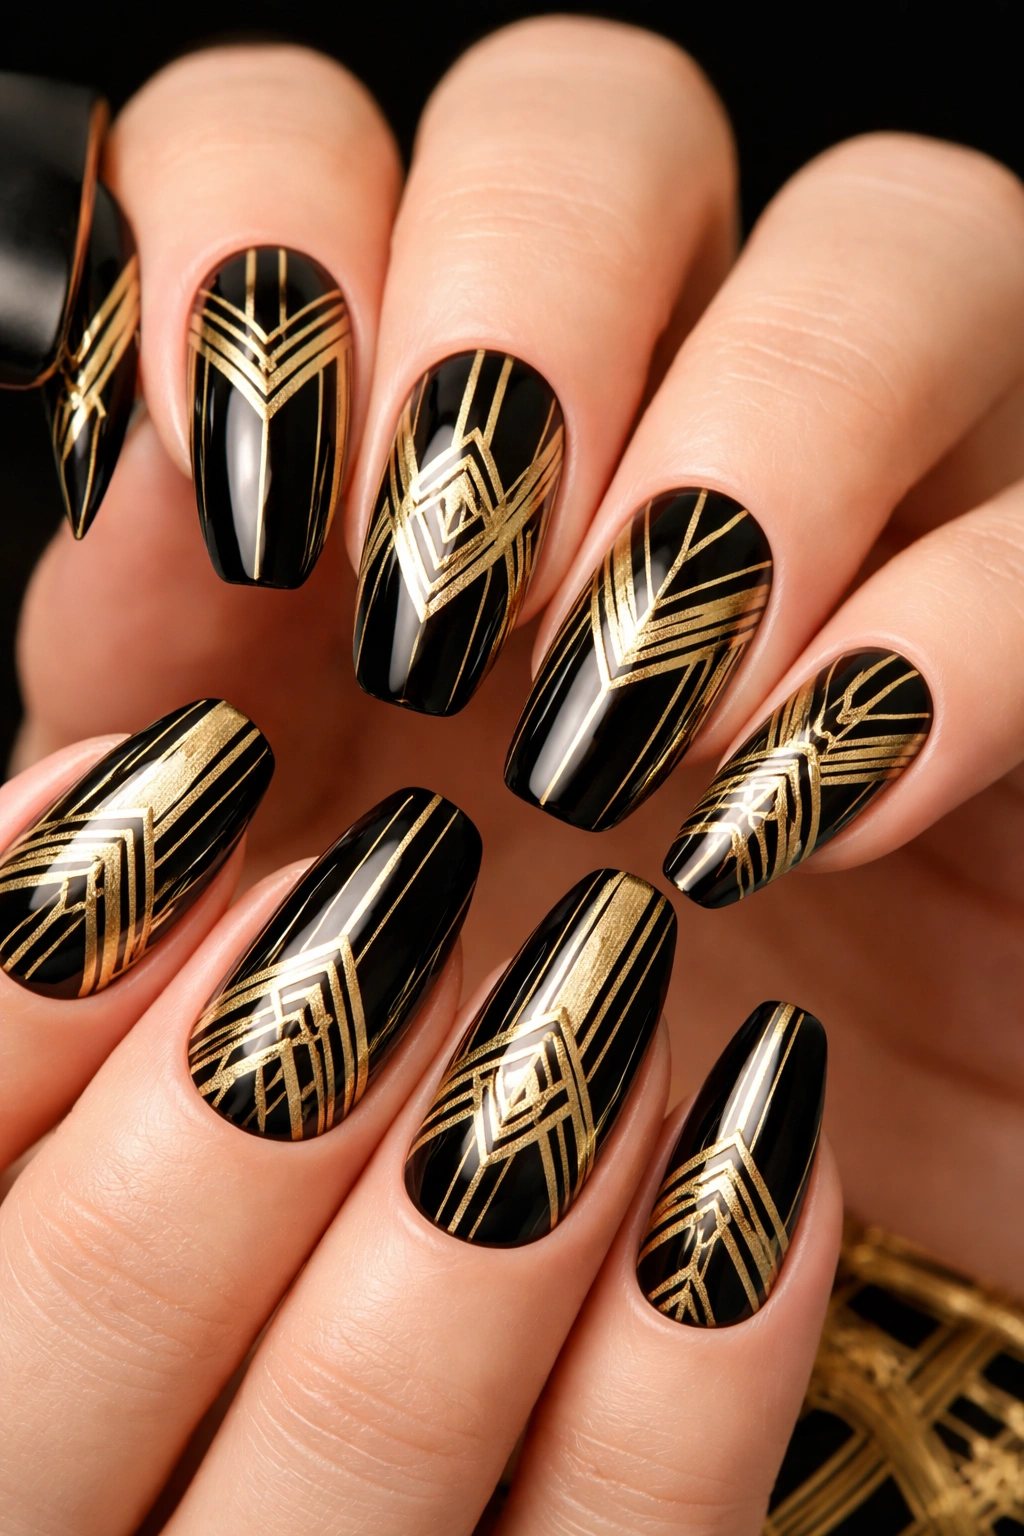
Art Deco designs bring a touch of 1920s glamour to your nails through bold geometric shapes, sharp angles, and symmetrical patterns. Paint these on a black or gold base and let the other color serve as your detail color, creating a striking high-contrast look that feels intentional and artistic.
Designing Geometric Shapes
Thin striping brushes are your best friend here—use them to paint precise triangles, chevrons, sunburst patterns, or interlocking lines. If freehand feels too risky, use nail vinyls or stencils designed for geometric patterns, which allow you to paint shapes with confidence. Create a focal point in the center or upper third of the nail, then repeat smaller versions of the same pattern across each nail for cohesion.
Making the Pattern Feel Balanced
The key to Art Deco success is symmetry and proportion. Center your patterns, keep lines crisp and clean, and make sure shapes on your right hand mirror those on your left for a polished overall look. If you mess up a line, use a thin brush dipped in acetone to clean it up before the polish dries completely. Art Deco designs work beautifully on longer nails where you have more canvas, but they also look chic on shorter nails if you scale the patterns accordingly.
5. Black French Tips with Gold Glitter Accents
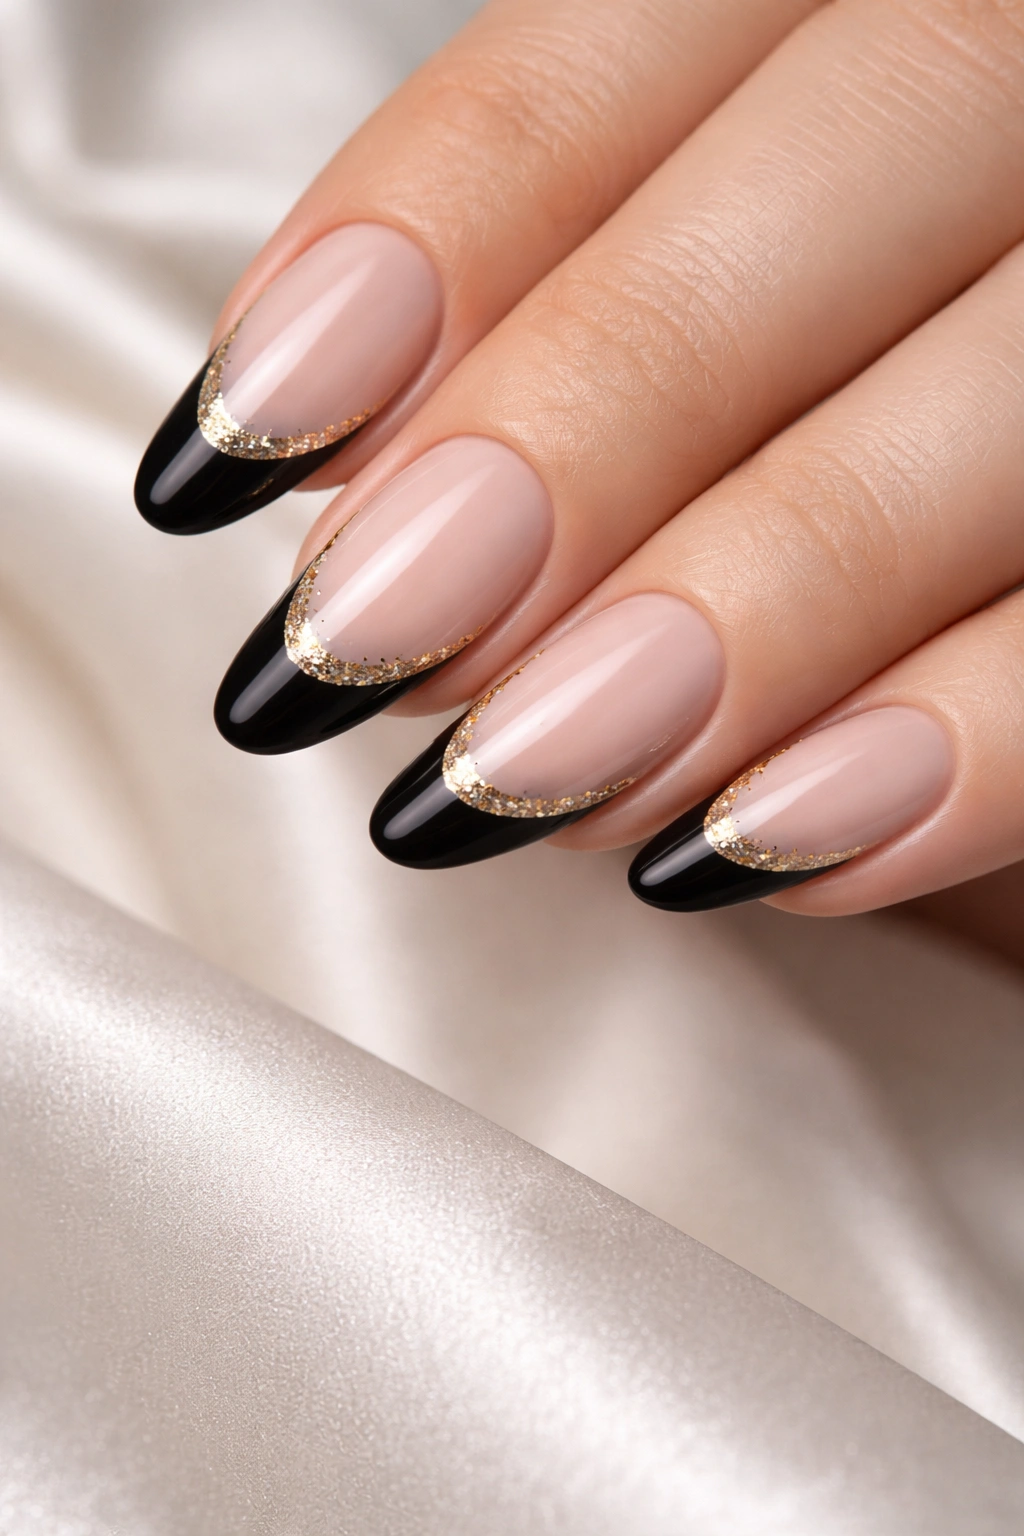
This is a modern twist on the timeless French manicure that adds glamour without overwhelming your nails. Create a traditional French tip using black polish instead of white, then add just a touch of gold glitter at the cuticle line or along the edge of the black tip for a sophisticated accent.
Achieving the Perfect Tip Line
Use a French manicure guide or guide stickers to create a clean, even line across the nail. Black polish shows every imperfection, so take your time and use thin, controlled strokes rather than trying to cover the area quickly. If the line isn’t perfect, don’t stress—a quick swipe with a thin brush and acetone fixes it instantly. The black creates a bold contrast against your skin, making even slightly imperfect lines look intentional.
Adding Gold Without Overdoing It
The gold glitter here should whisper, not shout. Use a very fine brush or a toothpick to apply a thin line of gold glitter at the base of the black tip, or dust a few scattered glitter particles along the edge. This restraint is what makes the design elegant rather than costume-y. The black and gold combination here feels refined and appropriate for work, dates, or formal events—which is exactly the vibe you want from a modern French manicure.
6. Intricate Gold Lace over Black

Lace patterns bring a delicate, romantic sophistication that transforms black into something feminine and artistic. Hand-paint fine gold lace using a thin brush, or use a stamping plate with detailed lace designs and a gold stamping polish for precision without the brushwork.
Creating Realistic Lace Details
If you’re stamping, choose a plate with intricate lace patterns and practice on a stamper first to ensure you’re transferring enough polish. Lace designs work best when they’re concentrated in one area—like a half-lace design across the lower half of the nail—rather than covering the entire surface. This gives your eye a place to rest and makes the design feel intentional rather than chaotic.
Hand-Painted Lace Alternative
If you want to hand-paint, start with a thin brush and gold polish, and focus on creating the appearance of interconnected loops and delicate lines. It doesn’t need to be perfect—slight variations actually add to the organic, handmade beauty. Use a magnifying lamp if you have tremor or difficulty with fine detail work; the magnification and extra light make precise work exponentially easier.
7. Celestial Black with Gold Stars and Moons
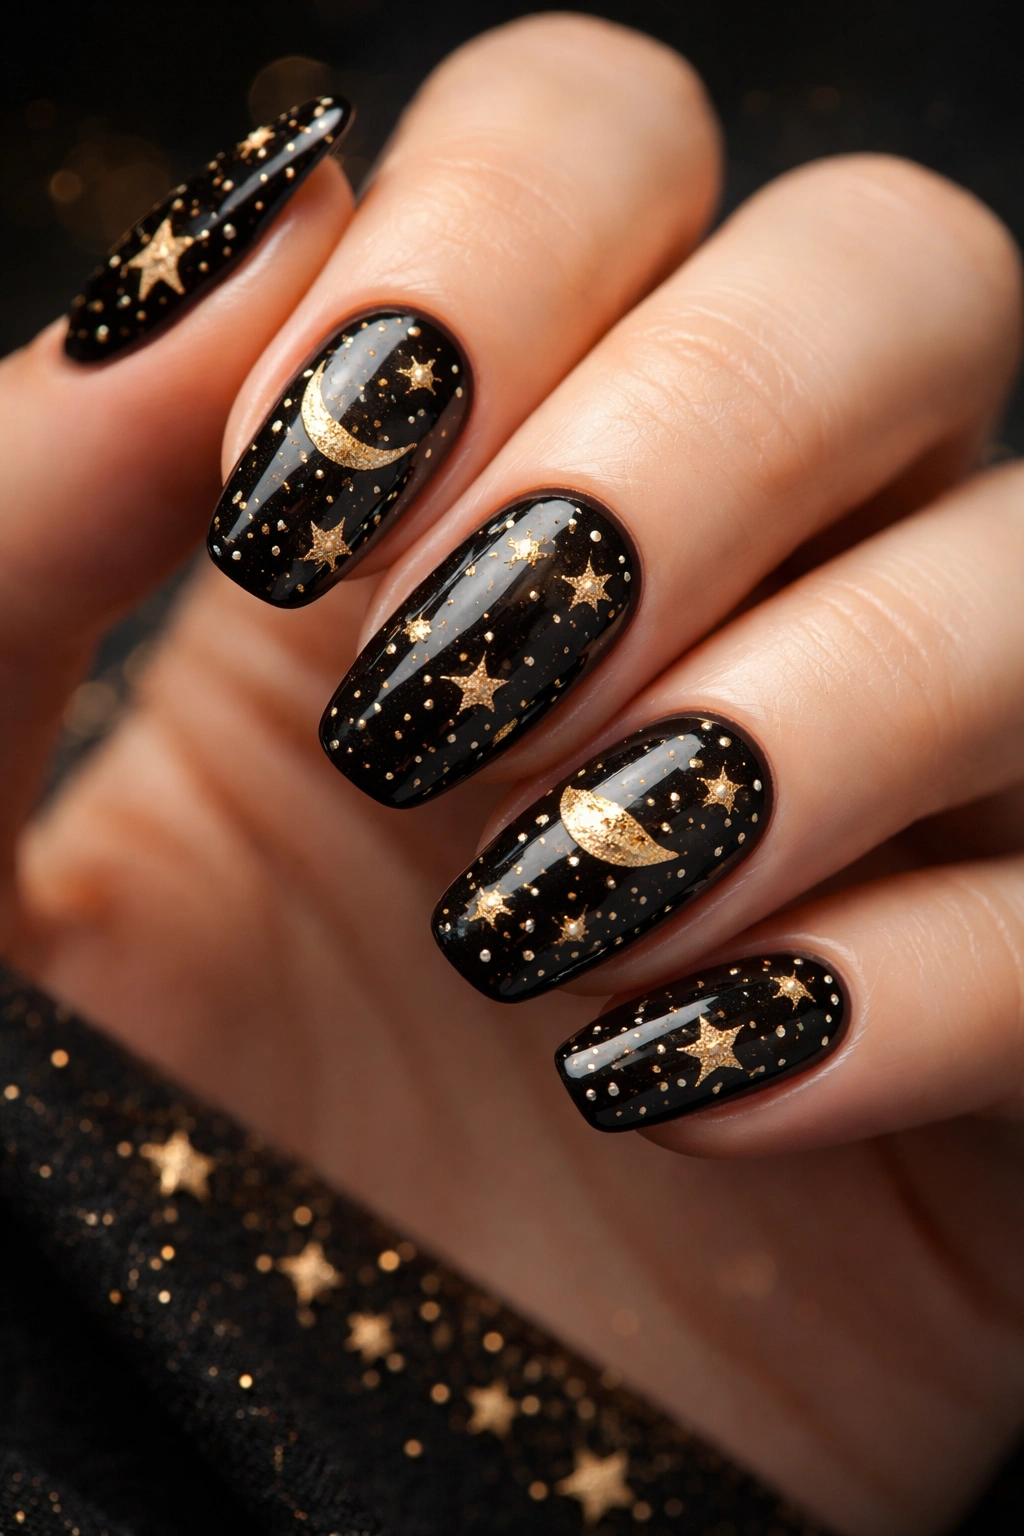
Tap into cosmic energy with a black base scattered with gold stars, moons, planets, or constellation patterns. This design is whimsical yet sophisticated, perfect for anyone who loves astronomy or just wants nails that feel a little bit magical.
Painting Celestial Elements
Use a dotting tool to create small circles for stars, then add tiny lines radiating outward to form star points. Paint crescent moons with a thin brush, experimenting with sizes and placements across your nails. Add planets as larger circles with rings or surface details, and connect stars with fine lines to form constellations if you want added complexity. The beauty of celestial designs is that imperfection actually enhances the effect—stars aren’t perfectly shaped, moons vary in size, so your hand-painted variations feel authentic.
Make It Personal
Research your zodiac constellation or the night sky from a meaningful date, then recreate that specific constellation on your nails. This personal touch transforms the design from beautiful to meaningful. Seal everything with glossy top coat to make the gold shine like starlight against the black night sky.
8. Bold Leopard Print with Gold Accents
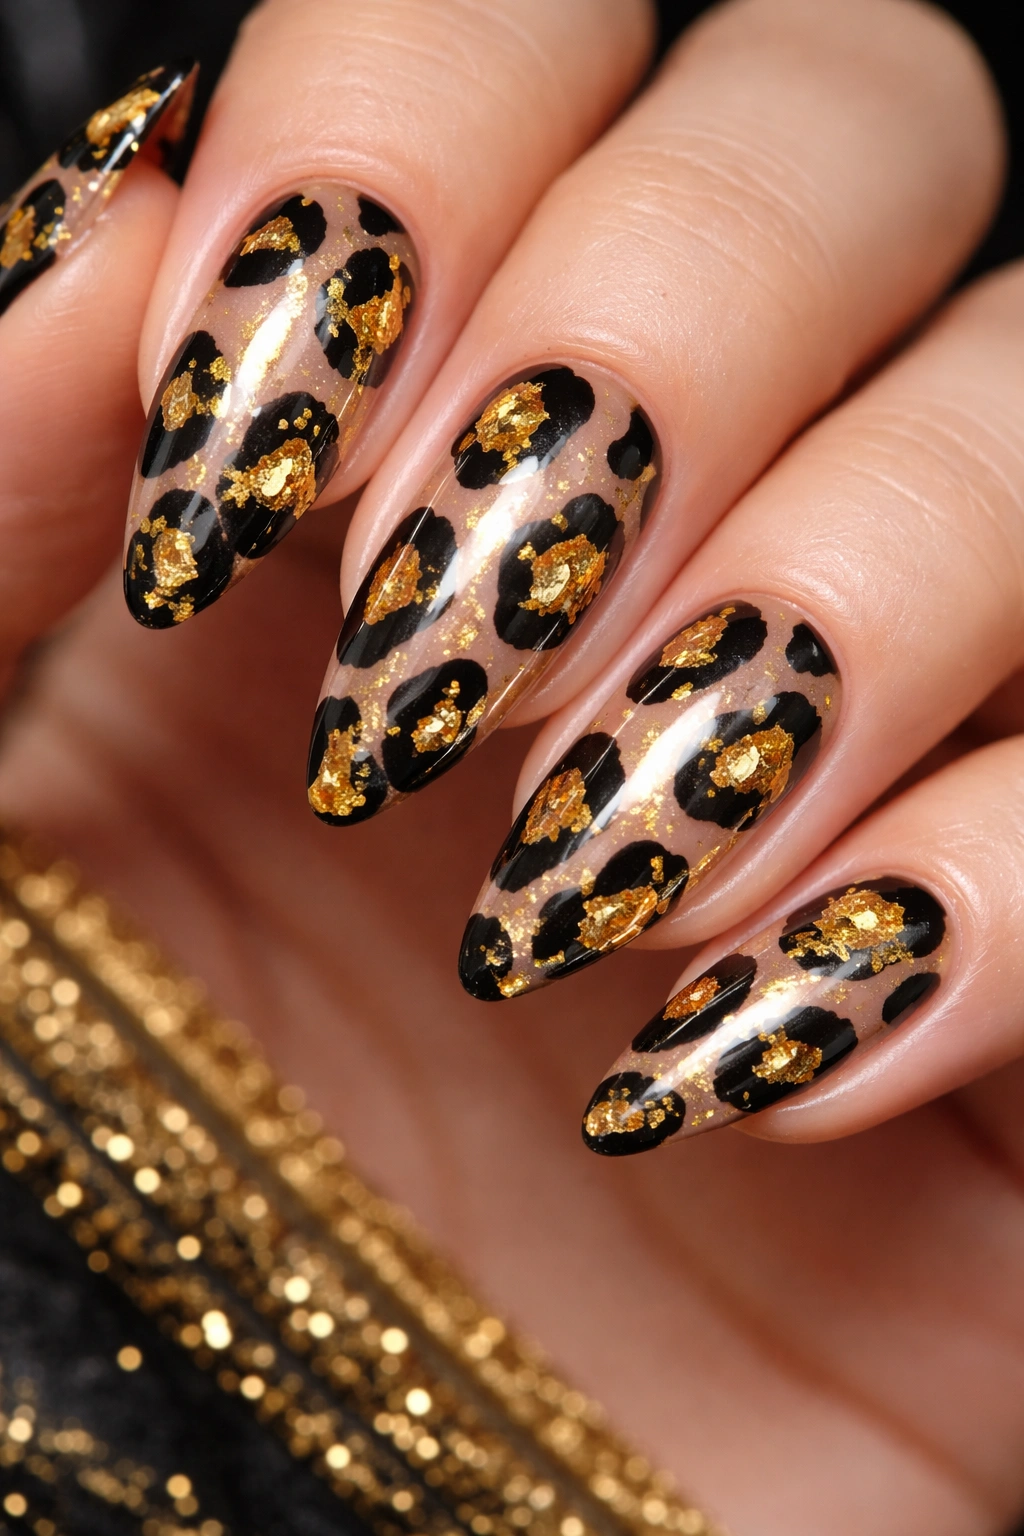
Animal print, especially leopard, is always in style—and it looks incredibly luxe when rendered in black spots on a nude or light base with gold foil outlining each spot or filling the centers. This design combines trend and timelessness in a way that feels fresh and fashion-forward.
Painting Realistic Leopard Spots
Leopard spots aren’t perfect circles; they’re organic, slightly irregular ovals and shapes clustered together. Use a thin brush and black polish to paint these shapes, varying the size between small and medium. Leave gaps between spots to create the characteristic leopard pattern look. Once the black spots dry, use gold foil or gold polish to outline each spot or fill in the center, depending on your preference. The gold against the black and nude creates rich dimension and elevates the design from casual to glamorous.
Alternative Stamping Method
If freehand painting feels intimidating, use a leopard print stamping plate with black stamping polish. Once stamped, go back with a thin brush and gold polish to add the gold accents. This hybrid approach gives you the precision of stamping with the custom detail of hand-painting.
9. Striped Design with Alternating Black and Gold Tips

This graphic design alternates black and gold tips across your nails, creating a bold, directional look that’s modern and striking. The repeated pattern feels intentional and cohesive across all ten nails.
Creating the Alternating Pattern
Paint one nail with a black tip and the next with a gold tip, continuing the pattern across all nails. Use a French manicure guide or striping tape to keep the tip line clean and even. The base can be nude, white, or transparent—something neutral that lets the contrast between black and gold tips shine. On each hand, try to mirror the pattern so your right and left hands coordinate, creating a balanced overall look.
Playing with Tip Shapes
This pattern works beautifully with almond, coffin, or stiletto nail shapes where the tip area is prominent enough to showcase the color. On shorter, rounder nails, the tips are less defined, so the pattern is less impactful. Scale this design to match your nail shape—if you have short nails, use thicker tip lines; if you have long nails, thinner tips create elegant contrast.
10. Marble Effect with Gold Foil Veining
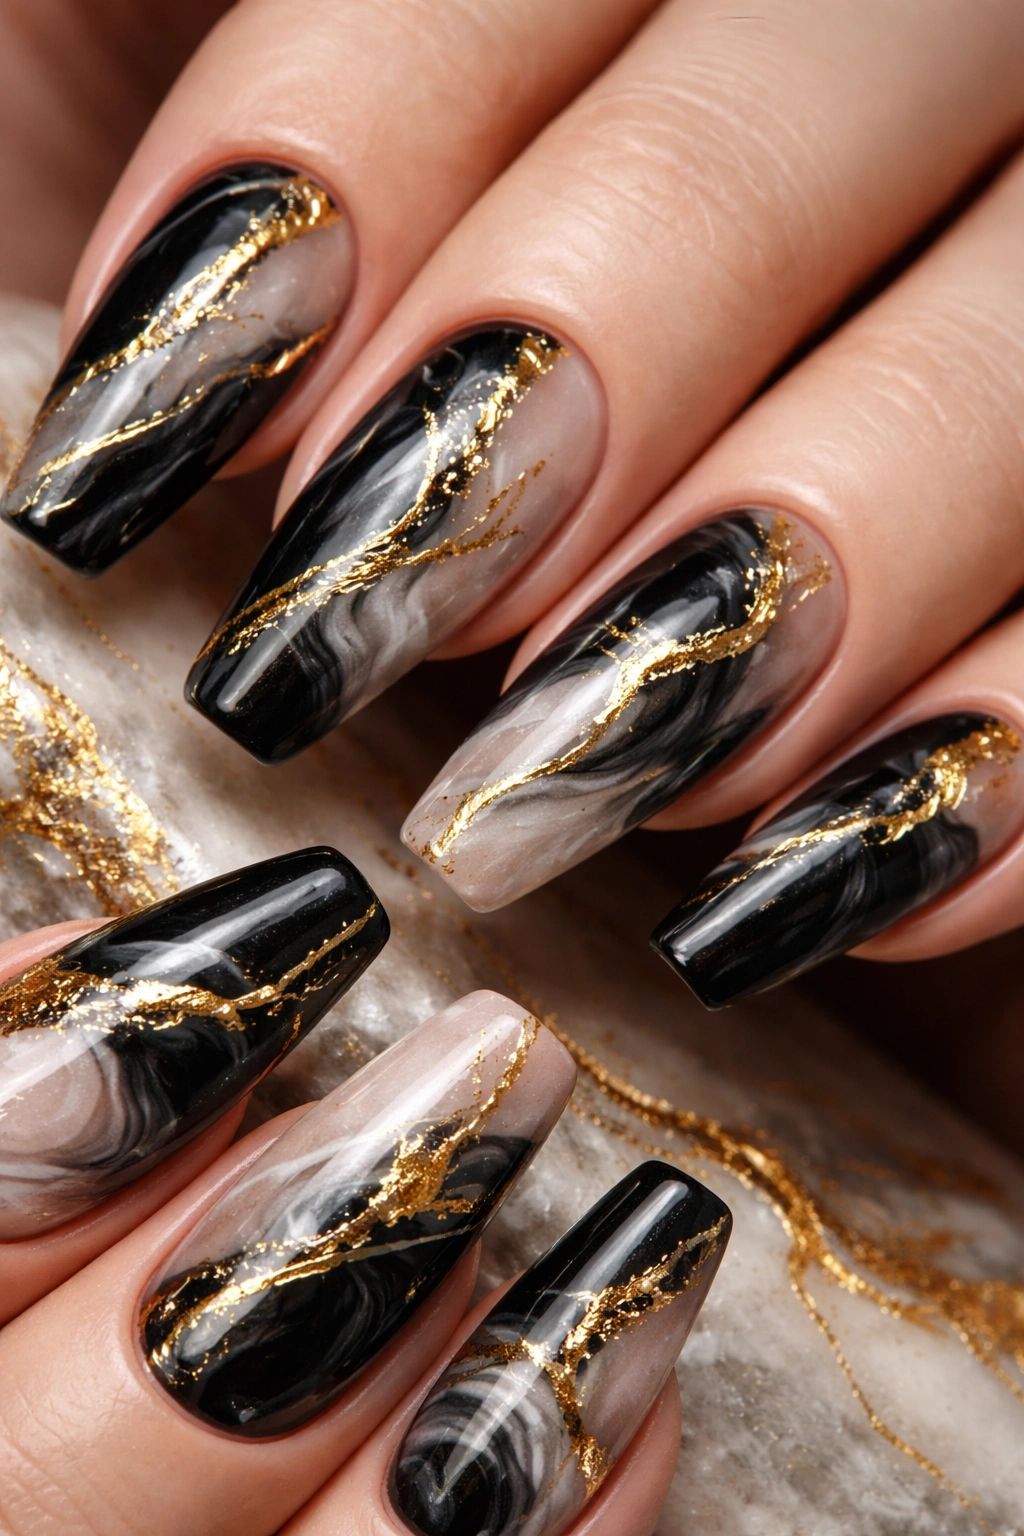
Marble designs suggest luxury and natural beauty—and when you add gold foil veining over the marble pattern, you elevate it to something almost jewelry-like. The combination of organic marble patterns with metallic gold creates both elegance and edge.
Creating Marble Without Water
You don’t need messy water marbling to achieve this look. Instead, use a thin brush to hand-paint swirled patterns using both black and a light neutral (white, beige, or soft gray) polish on a base color—say, a soft nude. Let the colors blend slightly where they meet, creating that characteristic marble effect. Once dry, go back with a thin brush or foil pieces to add gold veining that follows the swirls and color transitions.
Water Marble Technique
If you want to try traditional water marbling, drop black and gold polish into room-temperature water, swirl the colors together with a toothpick, and dip your nail in at an angle. This creates unpredictable, gorgeous marble patterns. The learning curve is steep—your first attempts probably won’t be gallery-worthy—but with practice (and patience), you’ll create stunning marbled nails with truly unique patterns since no two water marbles are exactly alike.
Final Thoughts
Black and gold is a combination that transcends trends because it taps into something fundamental about beauty—the contrast between darkness and light, matte and shine, simplicity and complexity. Whether you choose one of these designs exactly as described or use them as springboards for your own creative variations, you’re working with a color palette that’s inherently sophisticated and endlessly customizable.
The most important thing to remember is that nail art should feel like an expression of you, not a pressure to achieve perfection. A slightly wobbly line, an asymmetrical sparkle placement, or a glitter application that’s not perfectly even doesn’t make a design failed—it makes it handmade and genuine. Start with whichever design speaks to you most, keep your tools organized and your workspace well-lit, and don’t hesitate to watch tutorial videos or practice on press-on nails before committing to your natural nails.
Each of these ten designs is achievable at home with basic supplies, though a few specialty items—like a striping brush, dotting tools, or French manicure guides—make the process exponentially easier and less stressful. Invest in quality black and gold polishes that you love the formula and finish of; cheap polish chips faster and requires more coats, ultimately costing you more in time and frustration. Most importantly, have fun with it. Your nails are a small canvas for big self-expression, and black and gold gives you the perfect backdrop for creating something truly glam.
