

Pink and white nails have maintained their status as one of the most universally flattering and versatile manicure choices for good reason. The combination works because it’s simple enough for everyday wear yet sophisticated enough for formal occasions—there’s nothing trendy or dated about it. What makes these designs truly exceptional, however, is when they embrace clean aesthetics: minimalist execution, precise lines, intentional spacing, and designs that let the colors breathe rather than overwhelming the nail with busy details. Clean doesn’t mean boring; it means intentional, polished, and refined.
If you’ve been scrolling through endless nail inspiration and feeling overwhelmed by overly complicated designs, you’re in the right place. This guide focuses exclusively on pink and white nail ideas that prioritize clarity and elegance. These are the designs that look expensive not because of heavy embellishment, but because of flawless execution and timeless appeal. Whether you prefer a completely minimalist approach or understated accents that add just enough visual interest, you’ll find inspiration here that translates beautifully whether you’re getting professional acrylics, gel extensions, or applying polish yourself at home.
Let’s explore twelve distinct approaches to pink and white nails, each capturing a different interpretation of what “clean” really means. From barely-there translucence to structured geometry, these designs prove that restraint and sophistication go hand in hand.
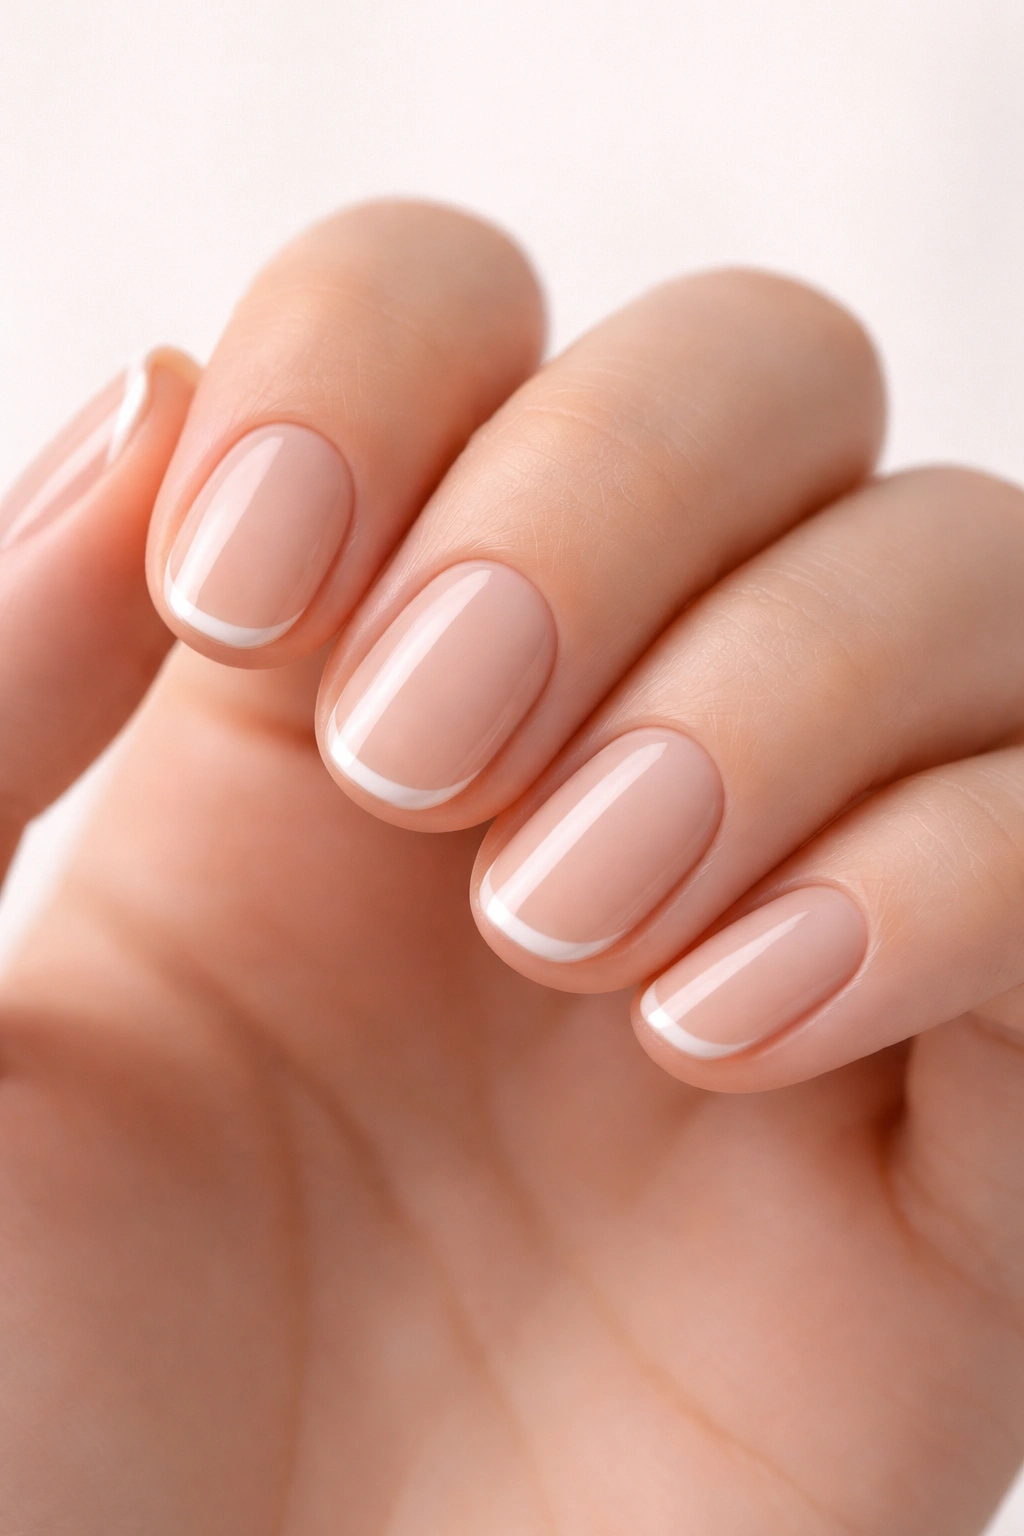
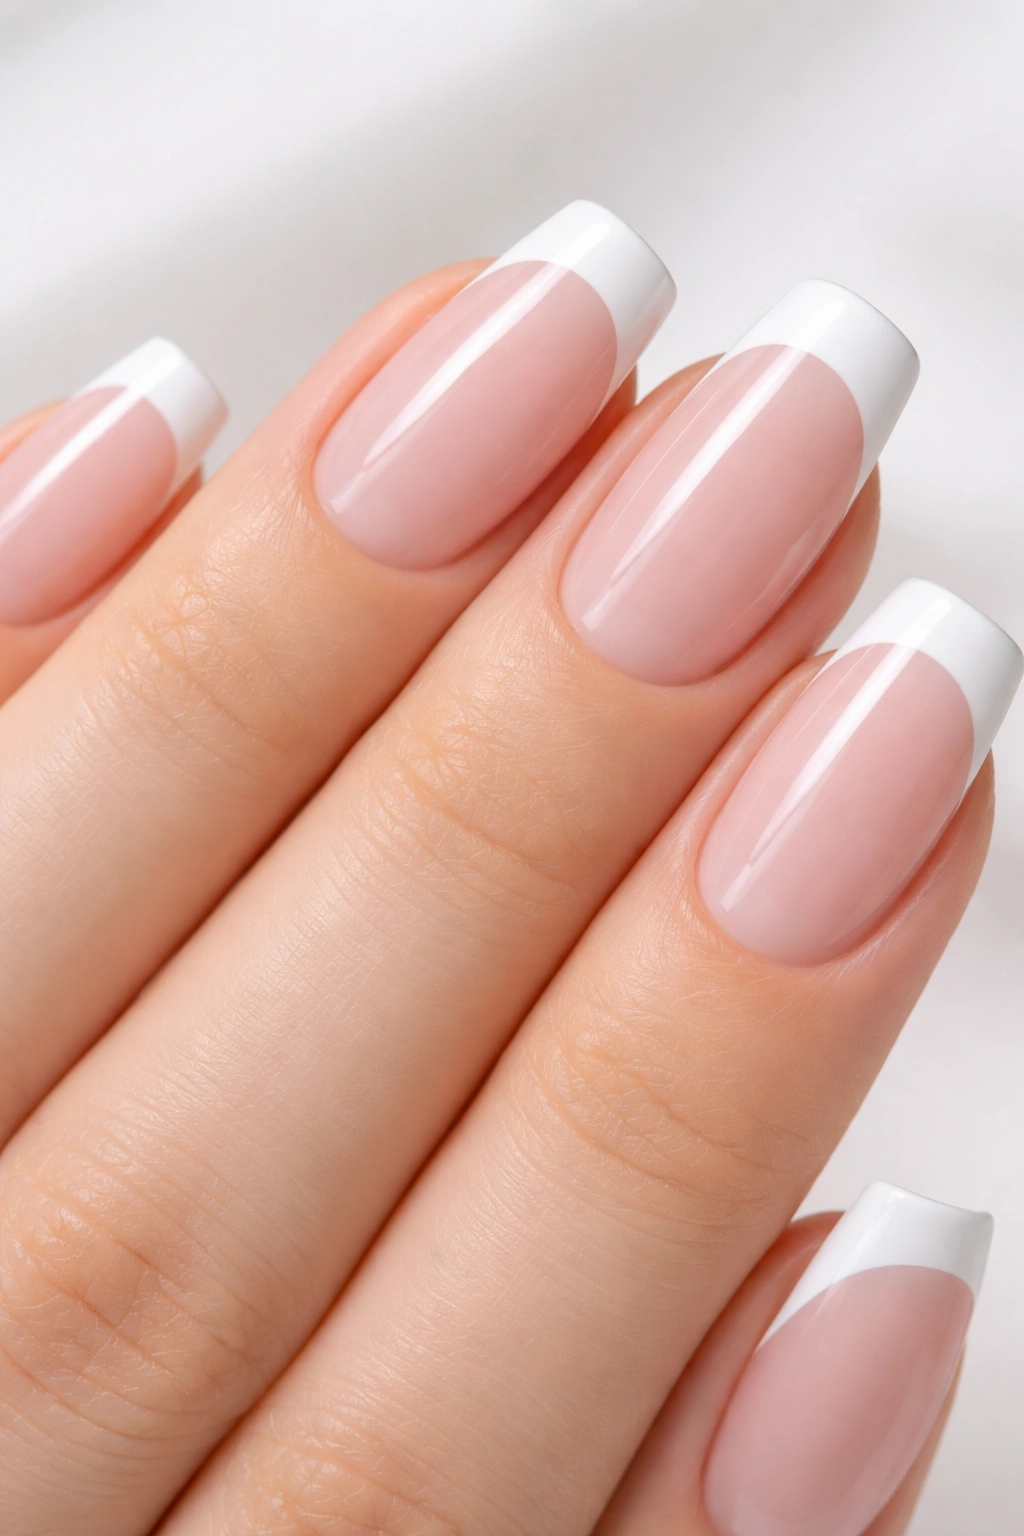
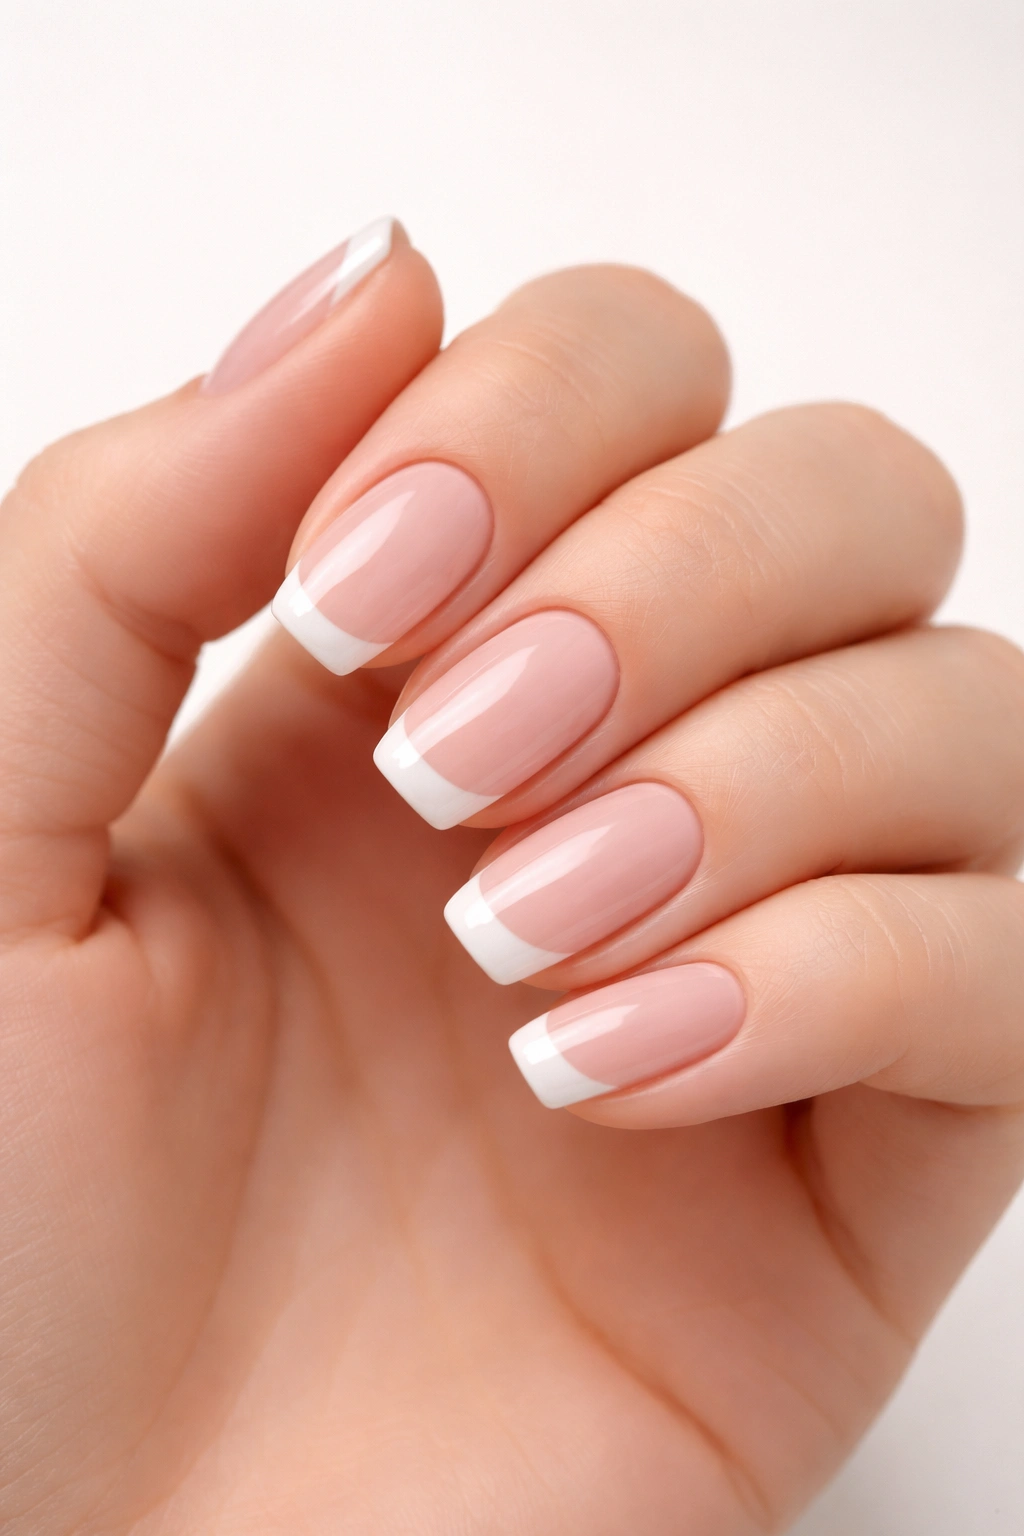
1. Classic French Tips with Soft Pink Base
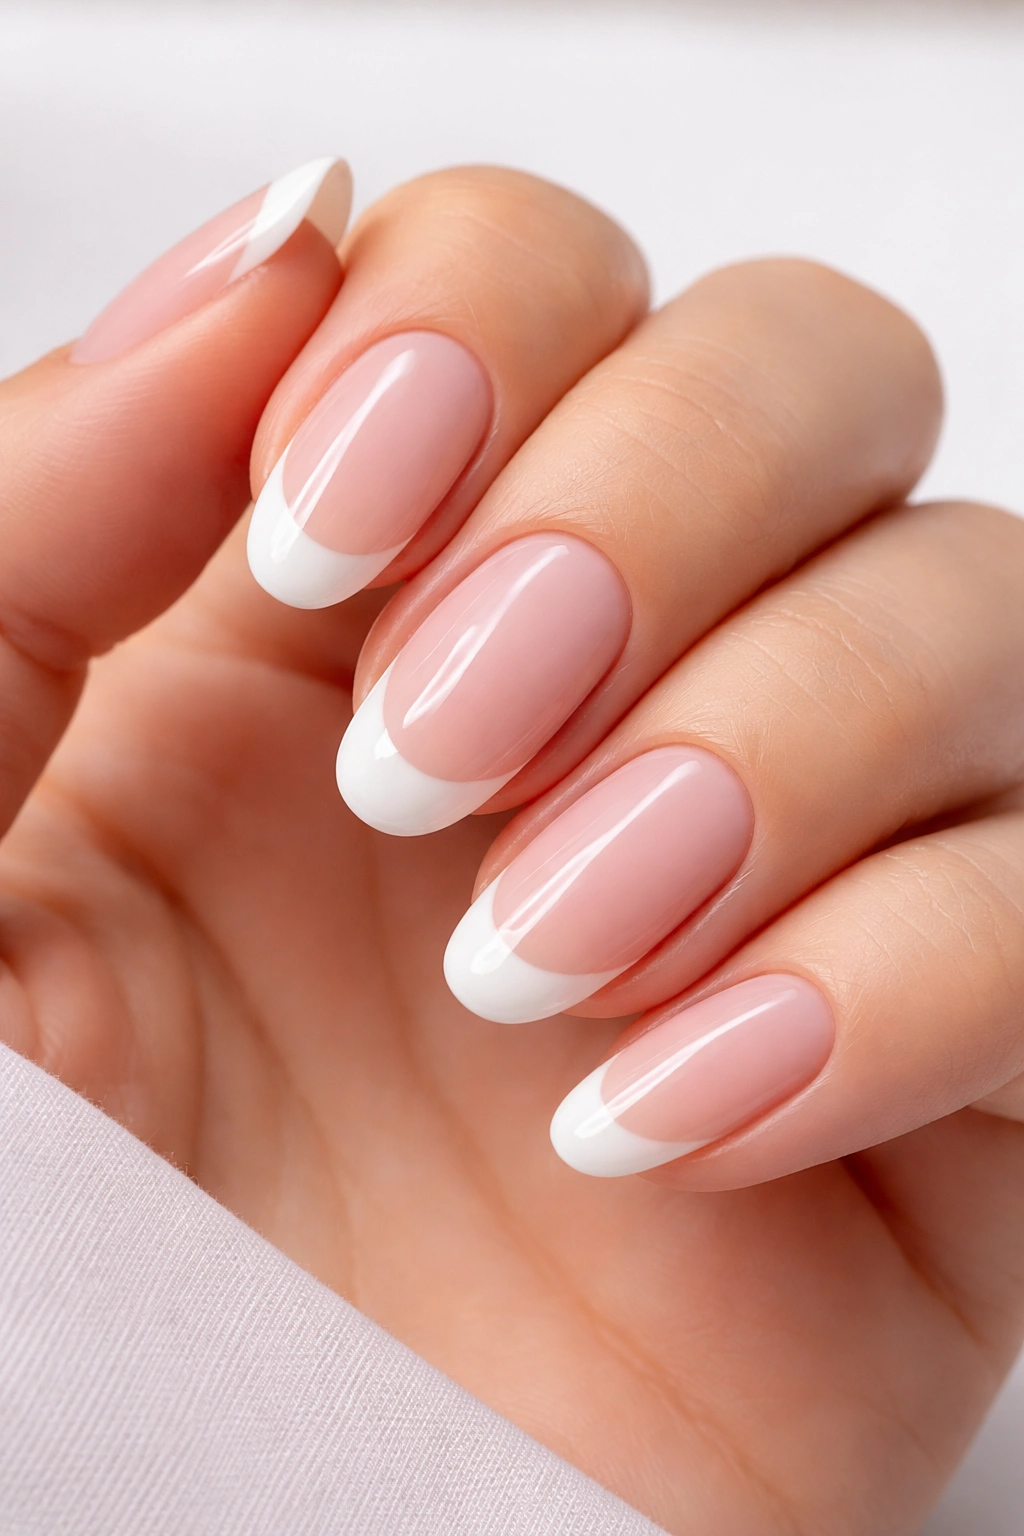
The French manicure remains undefeated for good reason—it’s the gold standard of clean nail design. This iteration pairs a soft, barely-there pink base with crisp white tips, creating a look that works in virtually any setting. The beauty lies in its simplicity: two colors, defined separation, nothing else. When executed well, this design feels expensive and intentional rather than basic.
Why It Works So Well
The soft pink base provides just enough color to add femininity and warmth without competing with the structural elements of your hand or jewelry. White tips create a visual elongation effect, making fingers appear slightly longer and more refined. The contrast between the delicate pink and the bright white naturally draws the eye, making the design inherently graphic even with zero embellishment. This is the design that adapts to every season, every outfit, and every occasion—it’s genuinely timeless because it’s never overdone.
Key Design Elements
- Soft pink base should be semi-transparent or opaque but not bold
- White tips typically cover the top third of the nail, though micro-tips are increasingly popular for a more modern feel
- The line separating pink and white should be clean and defined, not blurred or ombre
- No additional decorations needed; the two-color contrast is sufficient
- Works beautifully on oval, almond, or rounded nail shapes
Pro tip: If you’re doing this at home with regular polish, use a thin brush or nail art tape to create a sharp white line. Apply white polish in thin layers to avoid streaking, and use a glossy top coat to unify the two colors visually.
2. Milky Pink with Barely-There White Accent
For those who prefer maximum subtlety, this design takes clean to the next level. A creamy, milky pink covers the entire nail—dense enough to be opaque but with a soft, almost frosted quality—while a whisper-thin white line appears near the tip or along the cuticle. The white is minimal enough that it reads as an intentional detail rather than a full French tip, giving the design a modern, updated feel.
Why Minimalism Makes This Timeless
Milky finishes are having a permanent moment in nail design because they hit a sweet spot between visible color and neutral simplicity. The barely-there white accent acts as a visual anchor without dominating the design. This approach appeals to people who love the concept of pink and white nails but want something slightly more understated than a traditional French manicure. The restraint in itself becomes the design statement—it says “I know what I like and I don’t need anything extra to prove it.”
How to Perfect the Look
- Choose a milky pink polish that has a creamy, not glossy, finish
- The white accent can be a 1-2mm line positioned three-quarters of the way down the nail
- Alternatively, create a tiny white semicircle at the cuticle for a reversed take
- Use a glossy top coat to add dimension without shininess
- This design particularly shines on shorter nails where it feels modern rather than incomplete
Worth knowing: Milky polishes sometimes require three coats to achieve full opacity while maintaining that soft, frosted appearance. Don’t rush the application—allow each layer to dry completely.
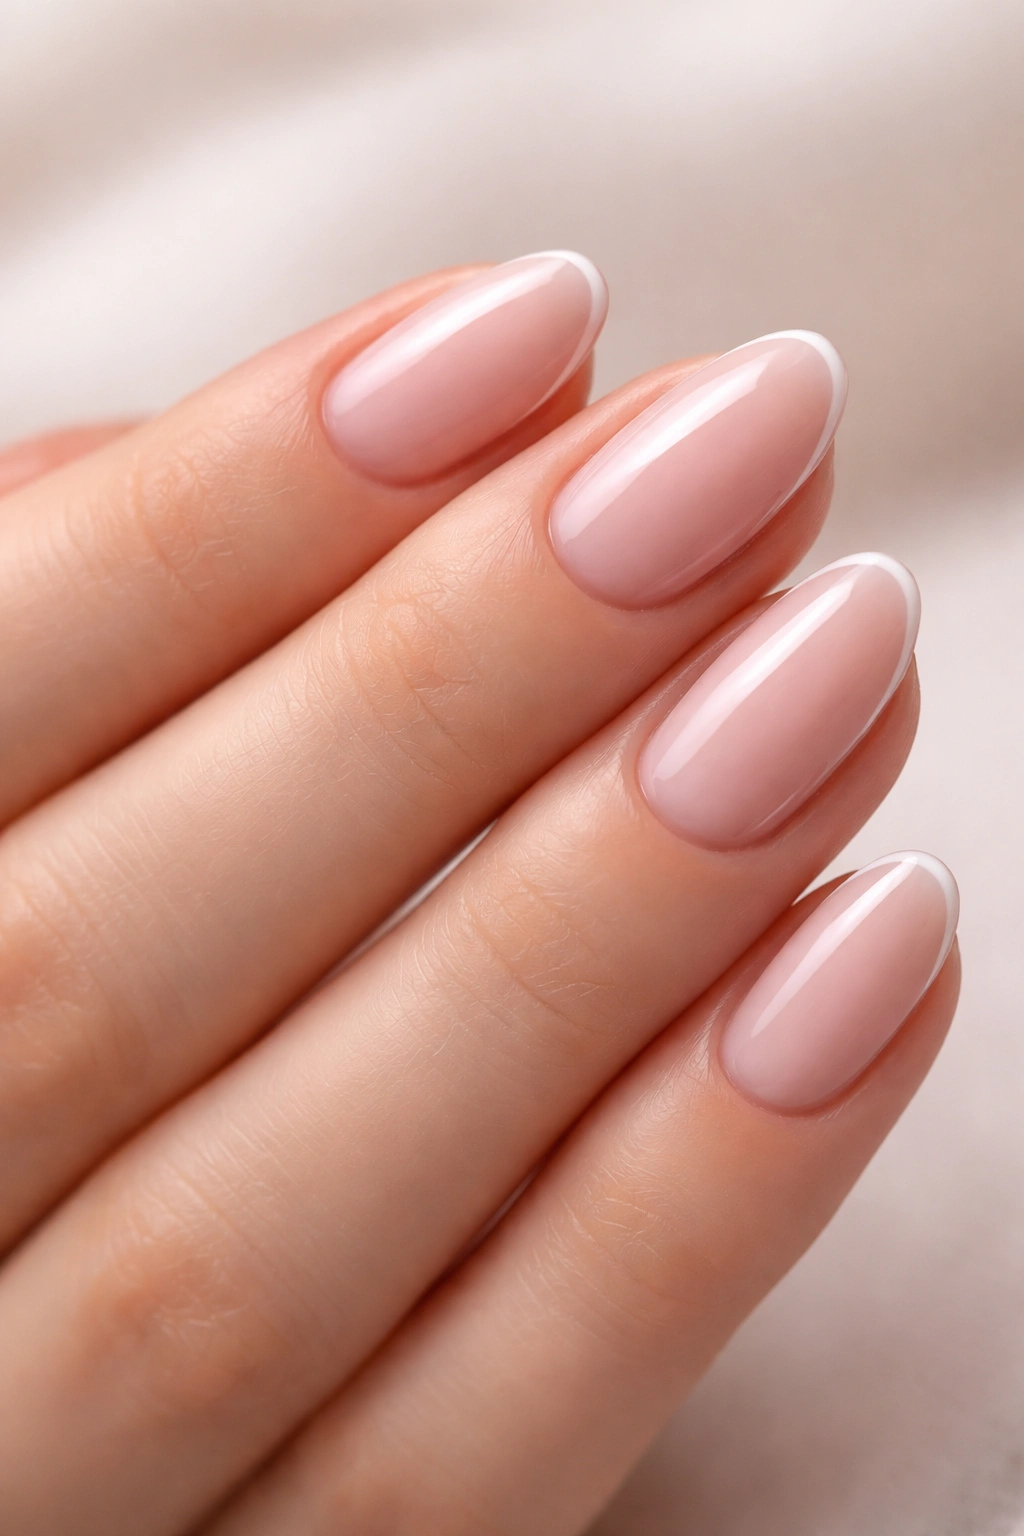
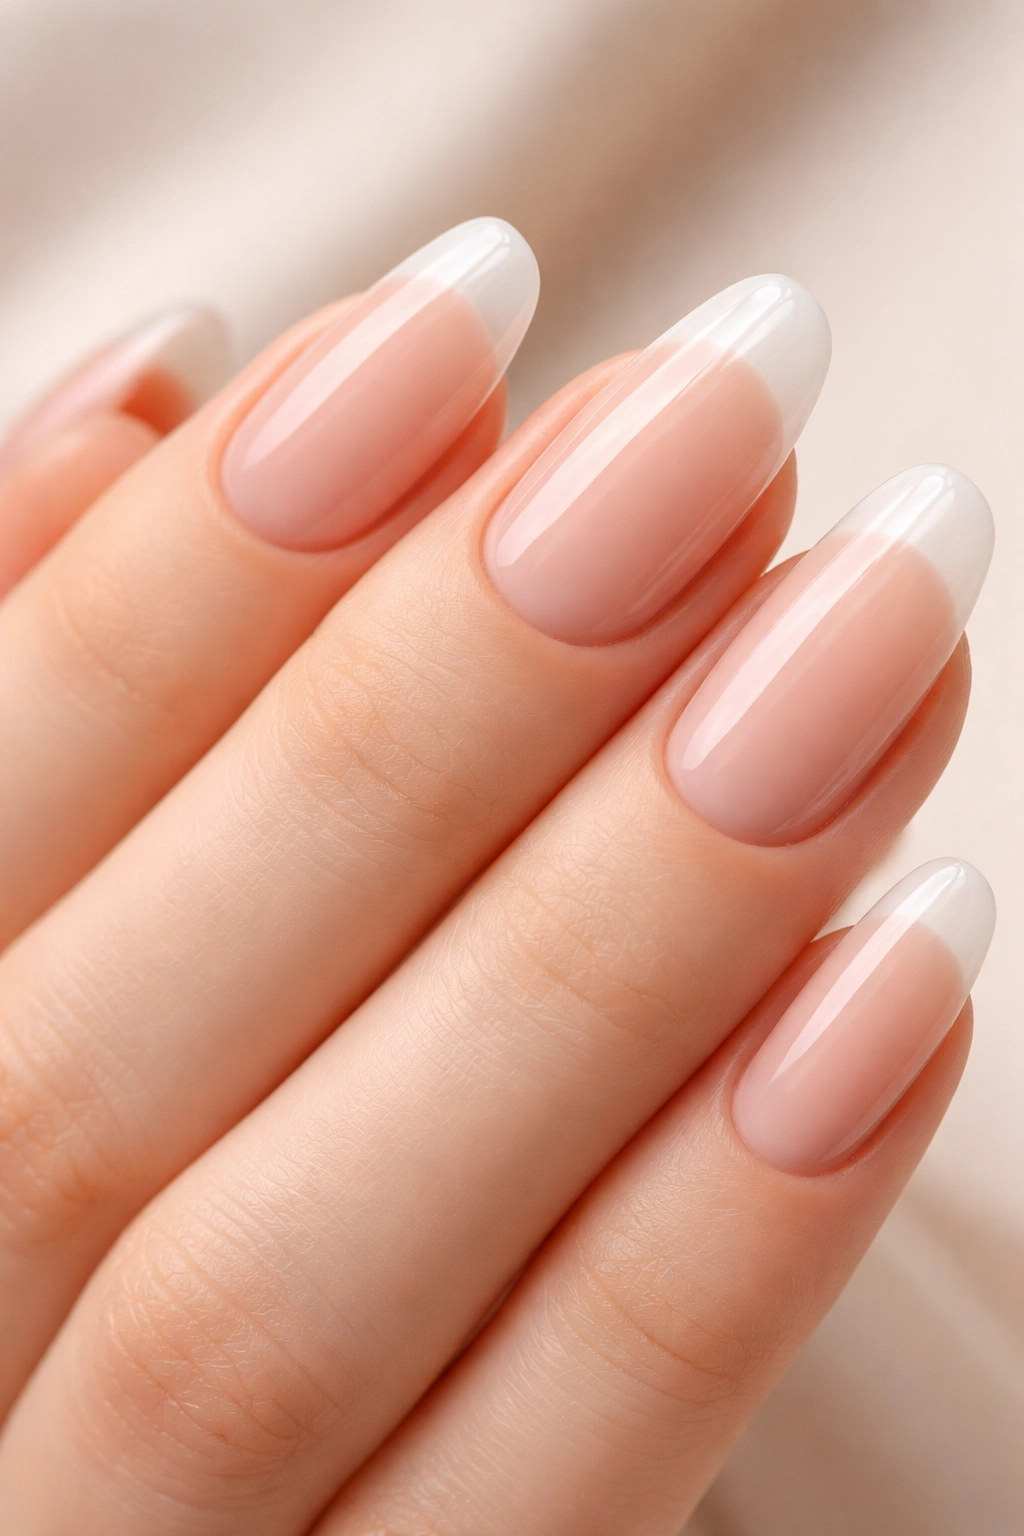
3. Micro French Tips on Clear or Nude Base
This is the clean design for minimalists who still want structure. Instead of covering the top third of the nail in white, you’re using only a hair-thin white line at the very edge—sometimes barely noticeable unless you’re looking closely. Pair this with either completely clear polish (showing your natural nail underneath) or a thin nude tone, and you have a design that’s almost invisible yet somehow completely elevated.
Why Less Is More
Micro tips represent the ultimate in refined nail design. They provide the visual benefit of French tips—length enhancement, finger elongation—without the boldness. This design particularly resonates with professional settings where you want nails to enhance rather than announce themselves. The technical skill required to execute micro tips consistently is also part of their appeal; they demonstrate precision and attention to detail.
Application and Nail Shape Compatibility
- Works best on almond or oval shapes where the tip has a natural point
- The white line should be no thicker than a toothpick line—barely-visible but definitely there
- Pair with either completely clear polish or a soft, almost-neutral pink
- Use a very fine brush or even a toothpick dipped in white polish for precise application
- Seal with a high-gloss top coat to make the white line catch the light subtly
Insider note: If you’re getting micro tips professionally, ask your technician to use a soft white (not brilliant white) so the effect reads as refined rather than stark.
4. Simple White Polka Dots on Soft Pink

Sometimes clean design means pattern, just done with restraint. White polka dots scattered across a soft pink base instantly add visual interest without feeling busy or chaotic. The key to keeping this design clean rather than cute is spacing the dots far enough apart and keeping them uniform in size. This is playful sophistication—charming but not juvenile.
Design Execution That Stays Elegant
The success of polka dots depends entirely on placement and scale. Dots should be small enough (roughly 2-3mm diameter) that they read as a pattern rather than large, obvious circles. Space them with intention—either distributed evenly across all nails or concentrated on accent nails with solid pink on the rest. Avoid the temptation to cover every millimeter of the nail. Empty space is your friend in clean design.
Achieving Precision
- Use a dotting tool (the end of a bobby pin works in a pinch, though actual dotting tools are inexpensive)
- Practice the dot size on a piece of paper first to build muscle memory
- Apply white polish slightly thicker than regular polish so dots don’t look pale or translucent
- Keep dots uniform in size for a more intentional, less random appearance
- Leave at least as much pink showing as you have dots visible
Pro tip: If you’re worried about perfectly round dots, embrace a slightly organic shape—it actually looks more hand-done and artistic than perfectly geometric dots.
5. Ombre Gradient from Pink to White
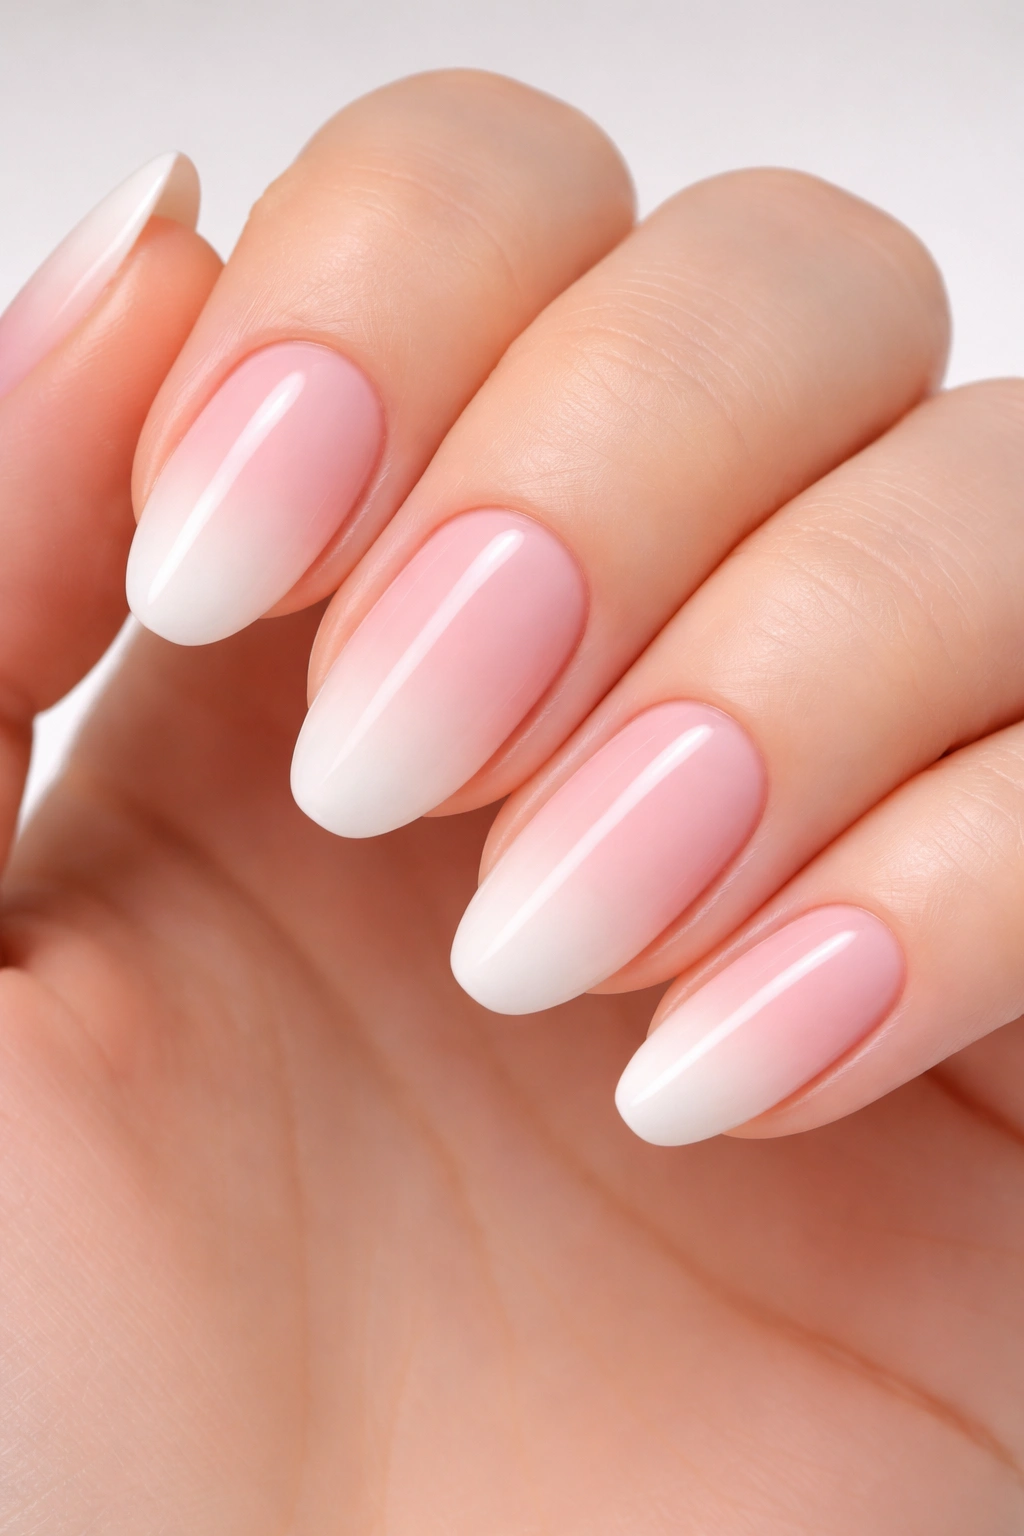
A true ombre effect—where soft pink gradually transitions to white moving from the cuticle toward the tip—requires patience but delivers pure elegance. The gradient should be smooth enough that you can barely detect where one shade ends and another begins. This is clean design because the simplicity of concept is matched by the technical precision required to execute it.
Creating the Perfect Gradient
Ombre nails are typically created using either a sponge method (dabbing layered colors with a makeup sponge) or a dedicated ombre sponge. The key is building the transition gradually rather than trying to achieve perfection in two or three swipes. Start with your softest pink shade at the cuticle and work toward increasingly concentrated white toward the tip, overlapping each layer slightly for a seamless blend.
Color Progression Strategy
- Begin with pale pink as your base color
- Apply a slightly deeper pink in the middle section
- Transition to a white or off-white at the very tip
- Use three to five shades rather than just two—more gradations mean a smoother transition
- Seal with a glossy top coat that helps blur any visible demarcation lines
- The ombre works beautifully on all nail shapes and lengths
Worth knowing: If your gradient looks striped rather than smooth, it’s usually because you’re not overlapping the sponge applications enough. Overlap by at least 25% on each pass.
6. Clean Geometric Stripes in Pink and White
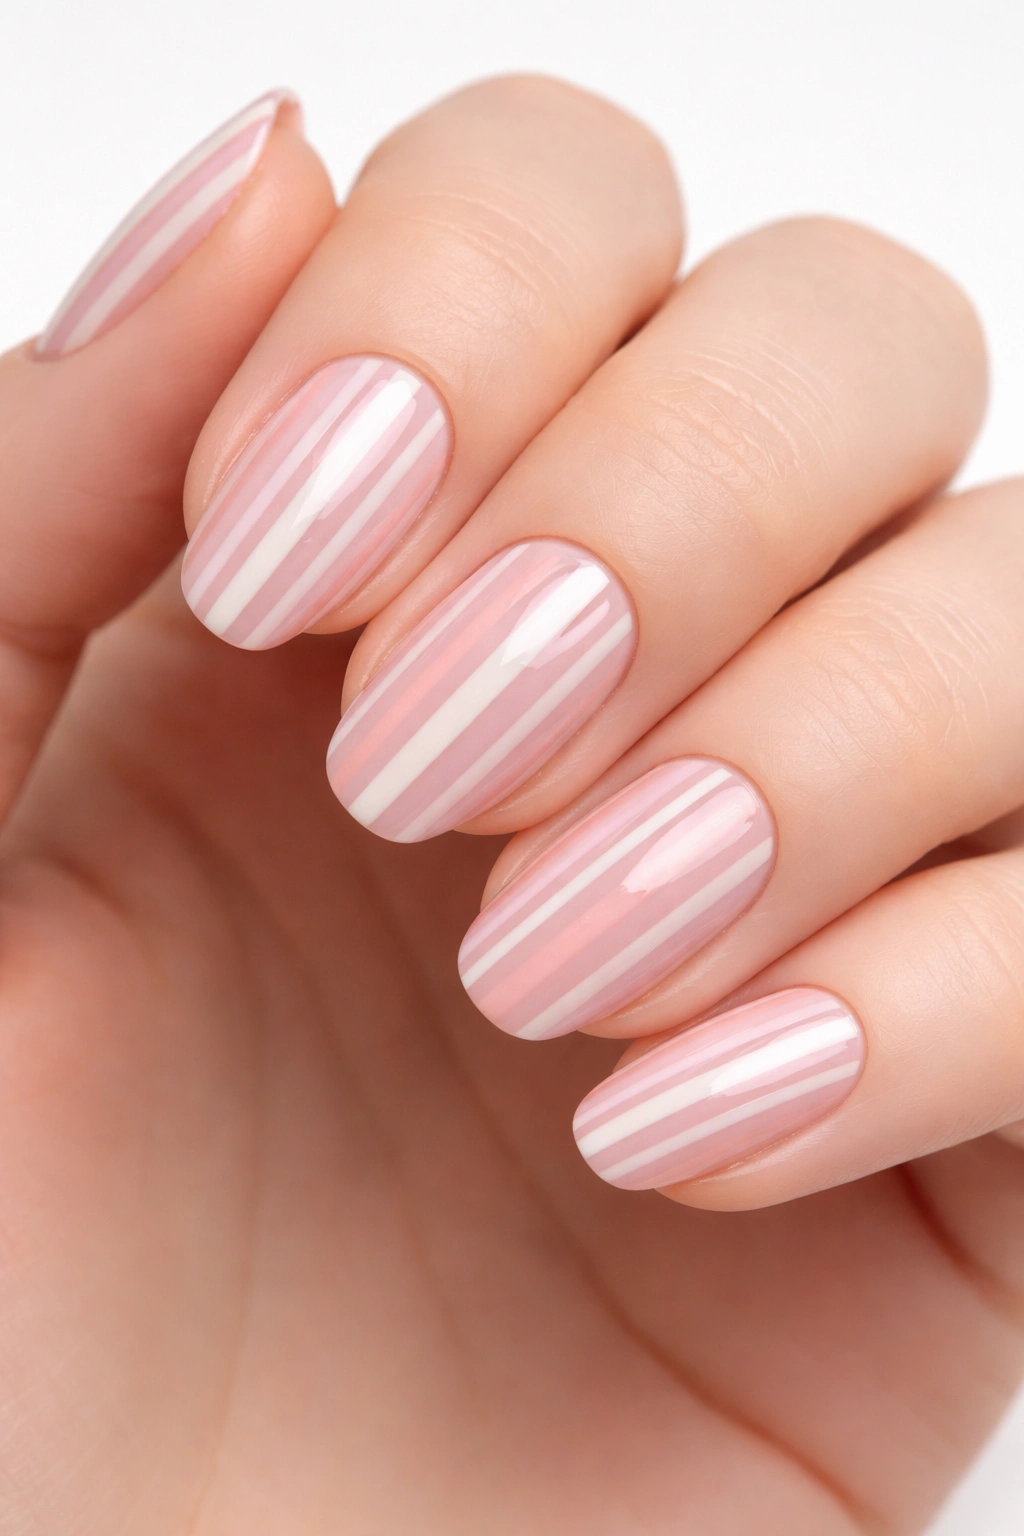
Structured geometry—like thin vertical or diagonal stripes alternating pink and white—represents clean design through precision. Unlike freehand designs that might appear unintentional, geometric patterns declare their purpose. They’re modern, graphic, and require attention to detail without being visually chaotic. Stripes are universally flattering and work on any nail shape.
Stripe Spacing and Proportion
The proportions of your stripes determine whether they feel playful or sophisticated. Very thin stripes (about 1mm) feel more refined and elegant, while thicker stripes (2-3mm) read as bolder and more graphic. The key is consistency—all stripes should be the same width. Use painter’s tape (regular masking tape works too) to create perfectly straight edges, or invest in striping nail tape, which is specifically designed for this purpose and adheres better than standard tape.
Design Variations
- Vertical stripes are the most classic and elongating choice
- Diagonal stripes at a 45-degree angle add movement and modernity
- Alternating single stripes create rhythm without feeling busy
- Reverse one or two nails (white base with pink stripes) for subtle visual interest
- Keep all nails consistent for maximum polish, or vary slightly for personality
Pro tip: Apply stripes to two coats of base color—single-coat applications sometimes look thin or patchy compared to the base.
7. White Base with Soft Pink French Tip
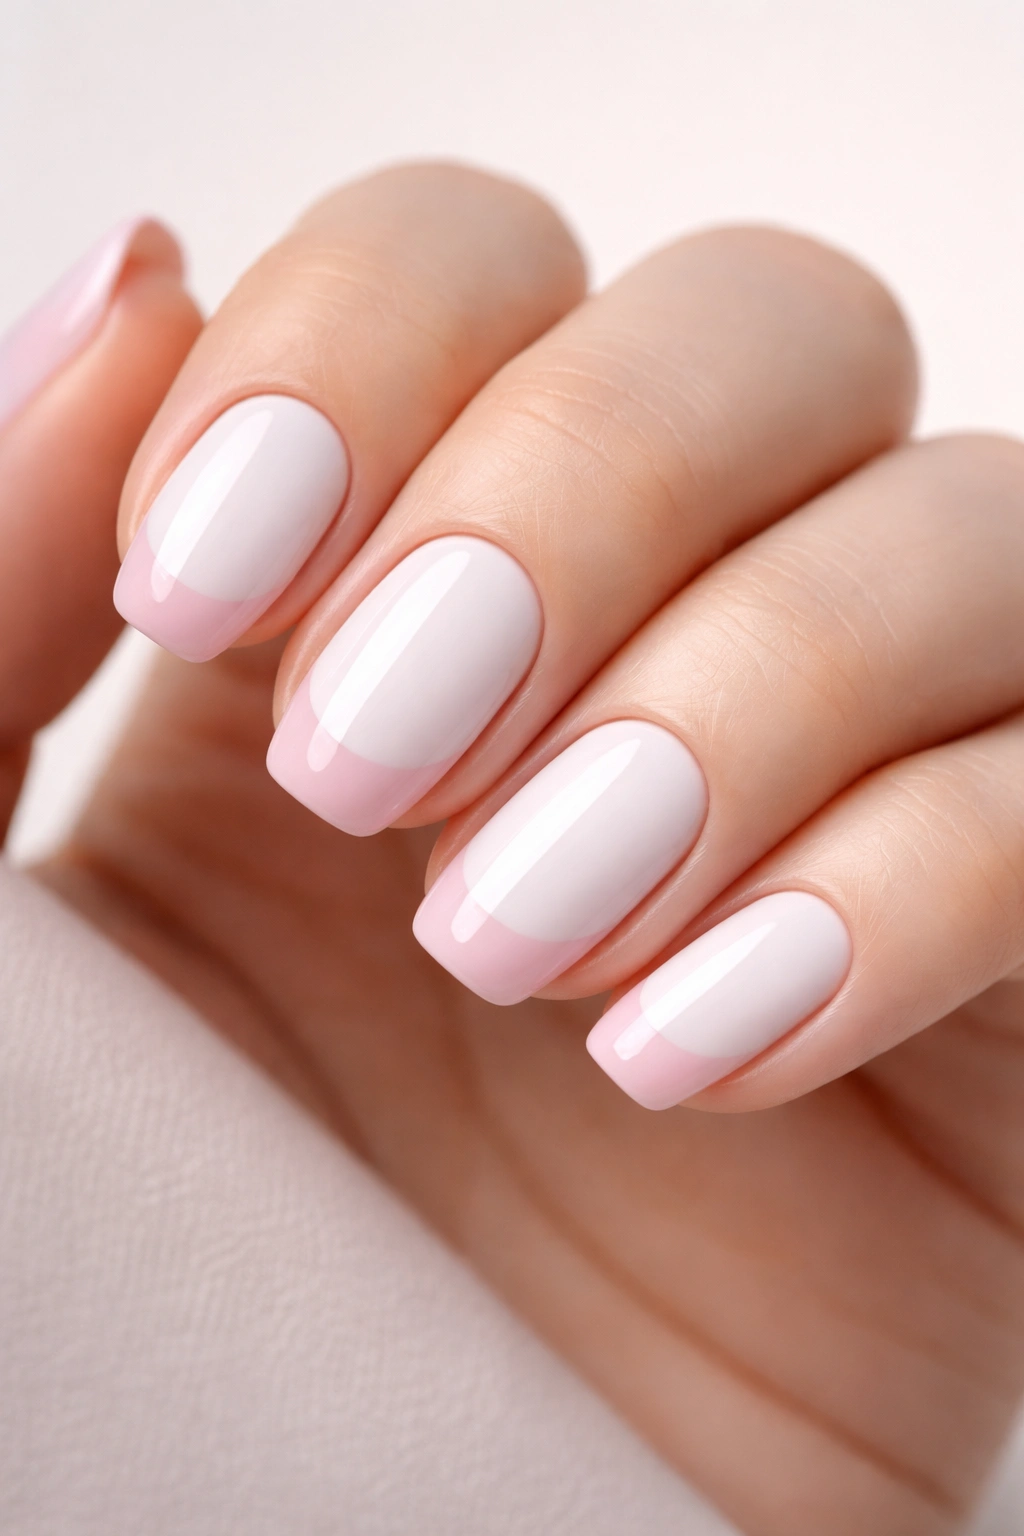
This is the inverted French manicure—a clean inversion of the traditional approach that feels fresh and contemporary. A bright, clean white base supports soft pink tips, creating a design that’s essentially the same structure as the classic French but with reversed psychology. White-based nails feel crisp and modern, while the soft pink adds warmth without overwhelming the design.
Why The Inversion Works
By flipping the traditional color arrangement, you create a design that feels both familiar and unexpected. The white base reflects a clinical cleanliness, while the pink tips add femininity. Together, they create balance. This design also reads slightly bolder than traditional pink-base French tips, making it perfect for those who want a bit more presence while maintaining complete sophistication.
Color Selection for White Bases
- Choose a pure white that’s bright but not harsh or yellowed
- The soft pink tips should be noticeably warmer than the white base for contrast
- This design works beautifully on medium to long nails where the tip color is clearly visible
- Shorter nails can work, but the pink tip area becomes proportionally smaller
- All nail shapes suit this design equally well
Worth knowing: White polish sometimes requires three coats to achieve true opacity. Build coverage gradually rather than applying one thick coat.
8. Nude Pink with Translucent White Tips
This design lives in the ultra-sophisticated zone where colors blend seamlessly. A nude-pink base (barely distinguishable from your natural nail tone) transitions into translucent white tips. The effect is ethereal—you see white, but you also see through it slightly, creating depth. This is refined, expensive-looking, and requires zero embellishment to feel complete.
Creating Translucent Elegance
The translucence is key here. Rather than opaque white, you’re using white that maintains a jelly-like quality—you can still see the nail bed slightly underneath. This requires choosing a semi-transparent white polish or diluting regular white polish slightly with clear polish. The base should be so close to nude that there’s barely a color distinction between your natural nail and the polish.
Technical Execution
- Start with a true nude base that matches your undertone as closely as possible
- Apply white in a French tip style but with lighter pressure to maintain translucence
- The white should appear as a soft gradient rather than a hard line
- Two thin coats of white work better than one thick coat for maintaining translucence
- Use a glossy top coat to enhance the glassy, precious appearance
Pro tip: If you can’t find semi-transparent white, mix regular white polish with clear polish in a 1:1 or 1:2 ratio to create translucence while maintaining enough pigment to see the color.
9. Subtle Negative Space Design on Pink Base
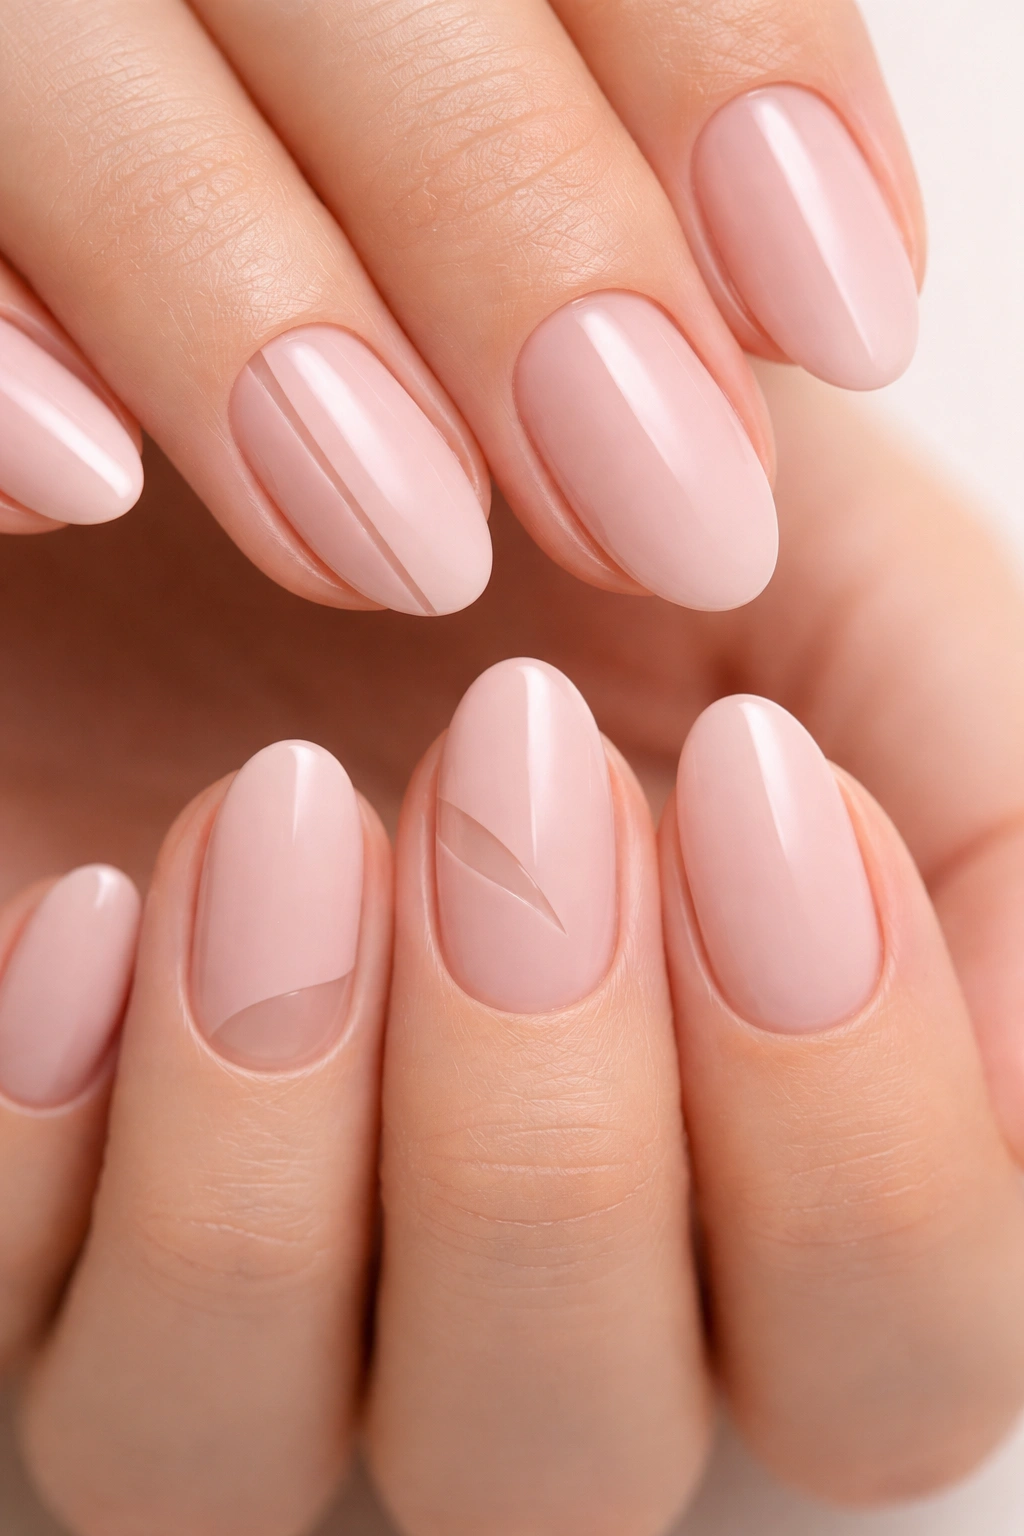
Negative space—leaving portions of the nail unpainted or painting around shapes rather than filling them in—creates clean designs through intentional emptiness. Imagine a soft pink base with a small geometric shape (like a thin rectangle or curved line) created entirely by the absence of color, revealing your natural nail underneath. It’s minimal, modern, and absolutely striking because of its simplicity.
Design Ideas Using Negative Space
- Create a thin vertical line down the center of the nail showing natural nail
- Leave a small rectangular patch of natural nail at the tip (inverted nail art)
- Draw a curved line at the cuticle that reveals natural nail rather than adding color
- Simple geometric shapes like triangles or half-moons in negative space
- Ensure the outline of your negative space is clean and precise
Why Negative Space Feels Modern
Negative space represents confidence in design—it says you don’t need to fill every inch to make an impact. It’s minimalist by definition and works beautifully on any nail length or shape. This design particular appeals to those who appreciate art and intentional composition over traditional decoration.
Worth knowing: Negative space designs require masking off areas precisely before applying your base color, or applying your base color carefully around pre-masked areas. Use tape or stickers to create clean edges.
10. Barely-Pink Jelly Base with White French Tips
Jelly nails—created with see-through or translucent polish—have become a permanent fixture in sophisticated nail design. A barely-pink jelly base (so transparent you see mostly your natural nail with just a hint of pink tint) topped with clean white French tips combines the trendy jelly effect with classic French manicure structure. The result feels fresh, clean, and surprisingly modern.
Selecting the Right Jelly Polish
True jelly polishes are specifically formulated to be translucent while maintaining enough pigment to add color. They’re different from diluted regular polish—jelly polishes have a specific texture and finish that’s intentional. Look for products specifically labeled “jelly” polish. They’re widely available and worth seeking out for this specific effect, which is nearly impossible to replicate with regular polish alone.
Application for Maximum Clarity
- Apply jelly polish in thin, even coats rather than thick coverage
- Two or three thin coats typically provide optimal color while maintaining translucence
- Use a white polish with high opacity for contrast against the translucent base
- The white French tips should be clearly visible and defined
- Seal with a glossy top coat that enhances the jelly effect
Insider note: Jelly polish sometimes applies less smoothly than regular polish. Use even brush strokes and allow each coat to dry fully before applying the next.
11. Soft Pink with Delicate White Line Work
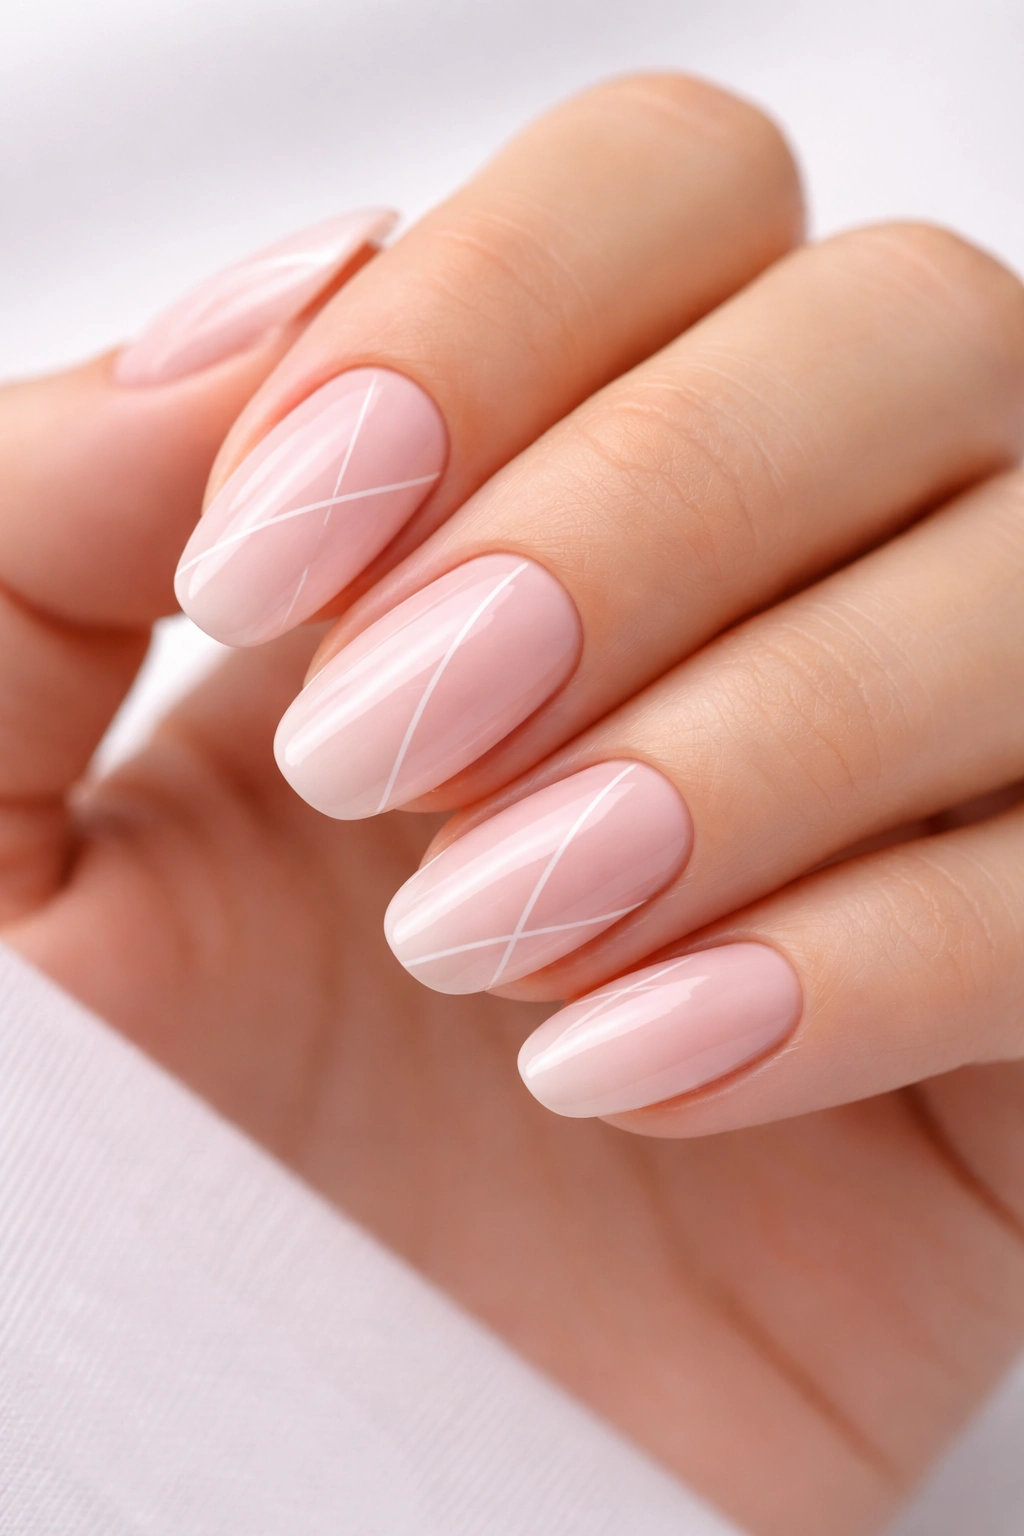
Line work—simple, precise lines applied with a thin brush or specialist tool—adds visual interest without feeling busy when done with restraint. Imagine a soft pink base with one or two delicate white lines creating simple geometric divisions or following the natural contour of your nail. This is art that respects minimalism. The lines should feel intentional and precise rather than decorative or playful.
Line Work That Stays Clean
- Vertical or horizontal lines offer the most graphic impact with minimal fuss
- Lines should be thin enough (1mm or less) that they read as design rather than distraction
- Keep the number of lines minimal—one per nail or one accent nail is sufficient for clean aesthetic
- Consider placing lines to enhance nail shape: vertical on round nails for elongation, horizontal on almond for balance
- Use a very fine brush or specialist nail art pen for precision
Design Variations Within Restraint
- Single line down the center of each nail for stark, modern aesthetic
- One horizontal line dividing the nail into upper and lower sections
- Curved lines that follow the arc of the French tip outline
- Lines on select accent nails only, with remaining nails solid pink
- Ensure all lines are perfectly straight or perfectly curved with no wavering
Pro tip: Practice your lines on paper first, using the same brush you’ll use on nails. This builds muscle memory and confidence before applying to actual nails.
12. Pearl or Iridescent Finish on Pink and White
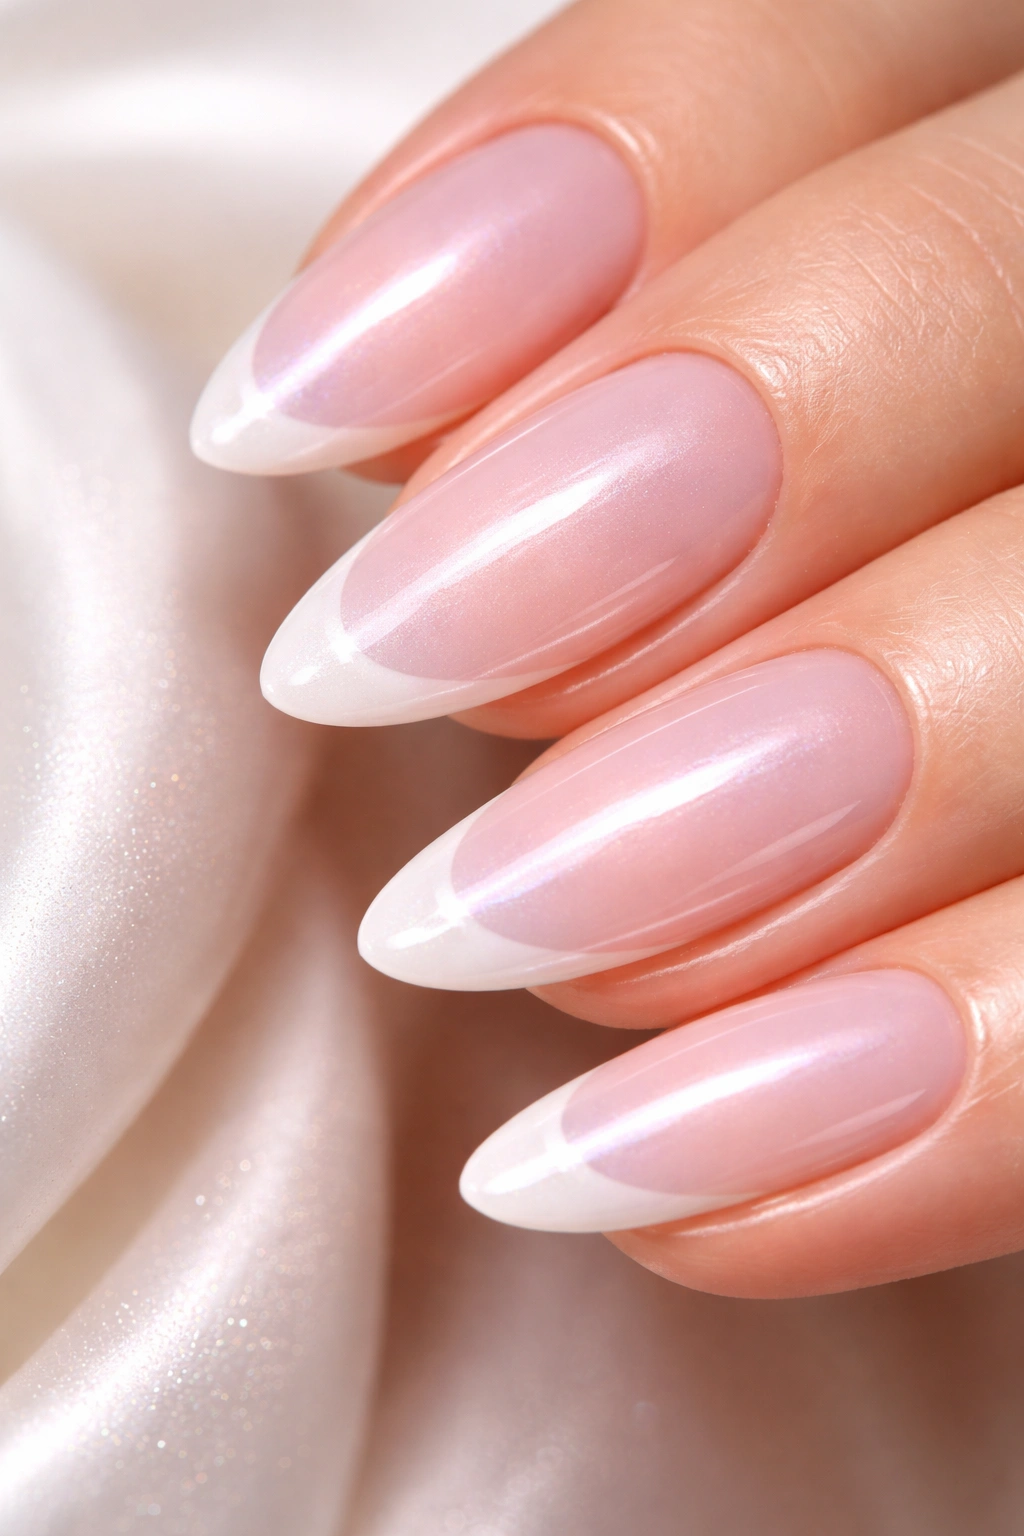
Adding subtle dimension through finish rather than color is the ultimate clean design move. A soft pink base with white French tips gains an entirely new level of sophistication when finished with pearl or iridescent top coat. The colors remain unchanged, but light interaction creates depth and luxury. This approach works because the texture/finish is an enhancement rather than an addition.
Understanding Pearl and Iridescent Finishes
Pearl finishes contain tiny suspended particles that catch light, creating subtle shimmer without obvious glitter. Iridescent finishes shift color slightly depending on the angle of light—appearing almost multidimensional. Both effects are sophisticated because they’re subtle; you notice the quality more than the sparkle. Apply a pearl or iridescent top coat over already-finished pink and white nails to maintain the simplicity of your base design while adding dimension.
Finish Application Strategy
- Ensure your base pink and white design is completely finished before applying specialty top coat
- Pearl and iridescent top coats work best over glossy bases, so use a glossy top coat first
- Apply the specialty finish in thin layers—you can always add more for additional shimmer
- The effect should be visible in certain light but not garish or overly glittery
- This technique works on any pink and white design, from French tips to ombre
Worth knowing: Pearl finishes show up better in natural light, while iridescent finishes are more dramatic under indoor lighting. Consider where you’ll wear the mani most when choosing between them.
Final Thoughts
Clean design is fundamentally about restraint and intention. Each of these twelve approaches to pink and white nails proves that you don’t need complexity to achieve sophistication. The magic happens when every design element serves a purpose—whether that’s creating visual elongation, adding subtle dimension, or simply letting two beautiful colors exist in harmony.
What ties all these designs together isn’t a specific technique or color ratio, but rather a philosophy: that less truly is more. Your pink and white nails should reflect polish and refinement rather than effort and elaboration. Whether you choose a micro French tip or an ombre gradient, a polka dot pattern or negative space, you’re working within a framework that values precision, clarity, and timeless appeal. These designs won’t feel dated in six months because they’re not built on trend cycles—they’re built on the foundation of what actually works and what actually flatters every hand, every skin tone, and every occasion. That’s the power of clean.
