

Short nails are having a major moment, and there’s absolutely no reason to think they can’t look elegant, sophisticated, and completely ready for any event you’re heading to. Whether you’re attending a wedding, an upscale dinner, a casual brunch, or a night out with friends, short nails can be just as stunning as their longer counterparts—sometimes even more so. The beauty of short nail designs is that they force you to focus on refinement, intention, and quality over quantity, which often results in a more polished, mature aesthetic.
What makes short nails so versatile is their practicality paired with endless design possibilities. You don’t have to sacrifice style for comfort or functionality. In fact, many people find that short nails feel more elegant precisely because they’re understated and require genuine artistry to make them pop. The key is choosing designs that work with your nail size rather than against it, focusing on precise details, complementary colors, and thoughtful accents that elevate the look without overwhelming the nail.
Throughout this guide, you’ll discover twelve classy short nail ideas that work beautifully for virtually any occasion. Each design has been chosen for its sophistication, versatility, and ability to read as intentional and polished rather than minimal or plain. From timeless French tips with modern twists to soft pastel shades with delicate embellishments, you’ll find options that suit your personal style while keeping that refined, put-together feeling that makes short nails so appealing.
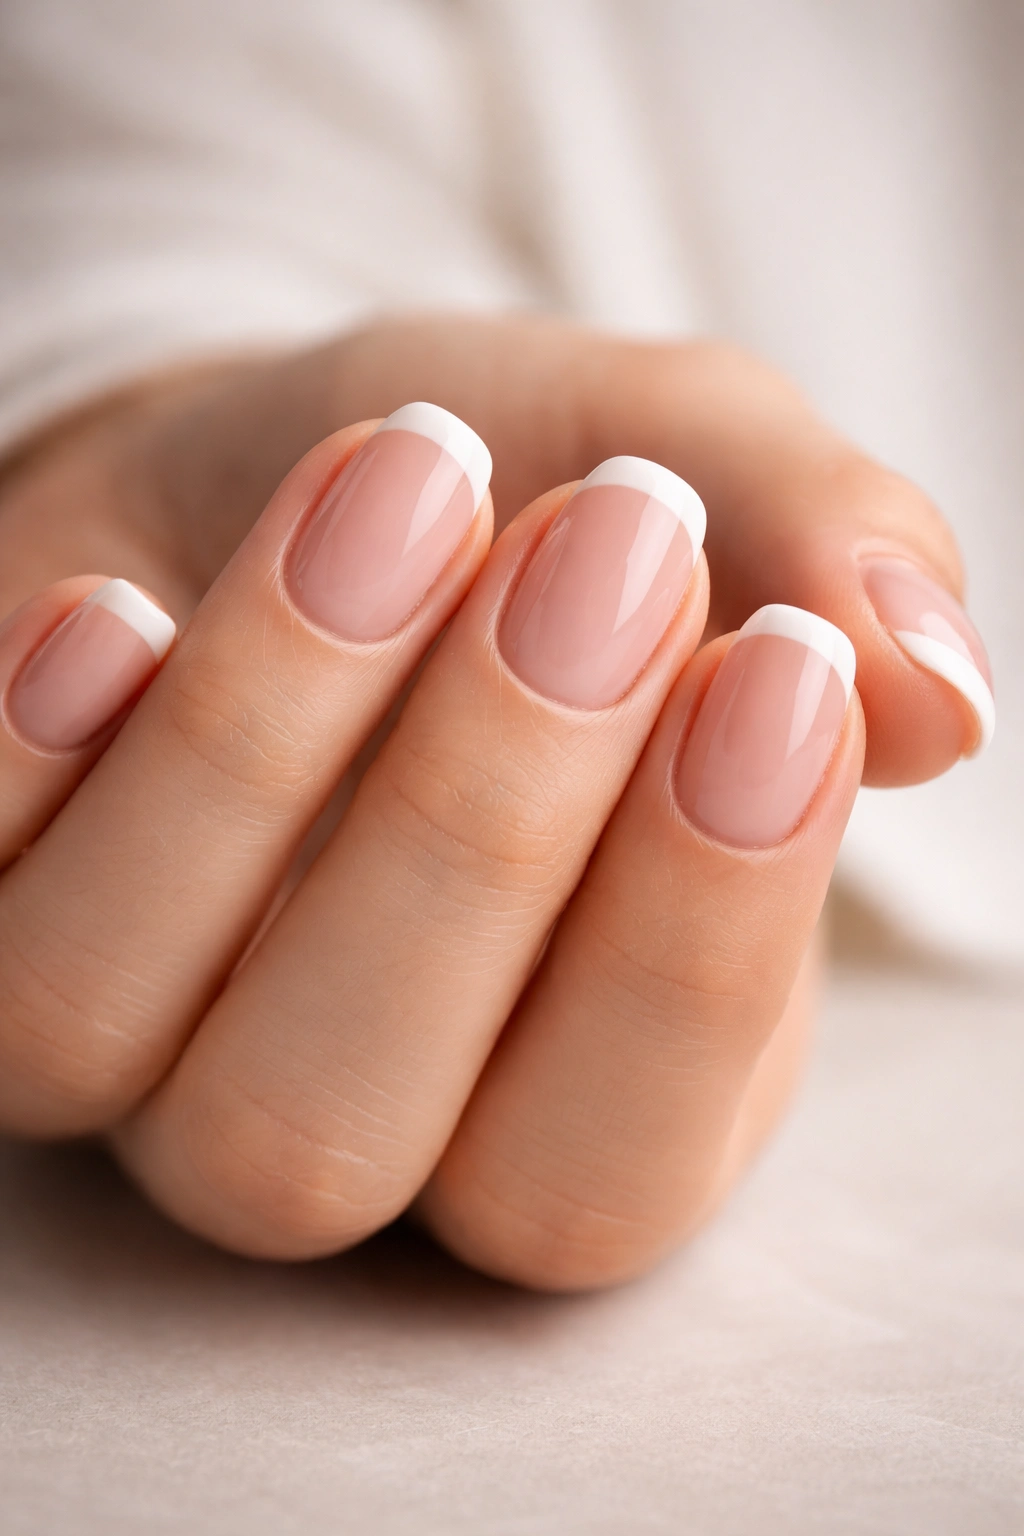
1. Creamy French Tips with Subtle Gold Details
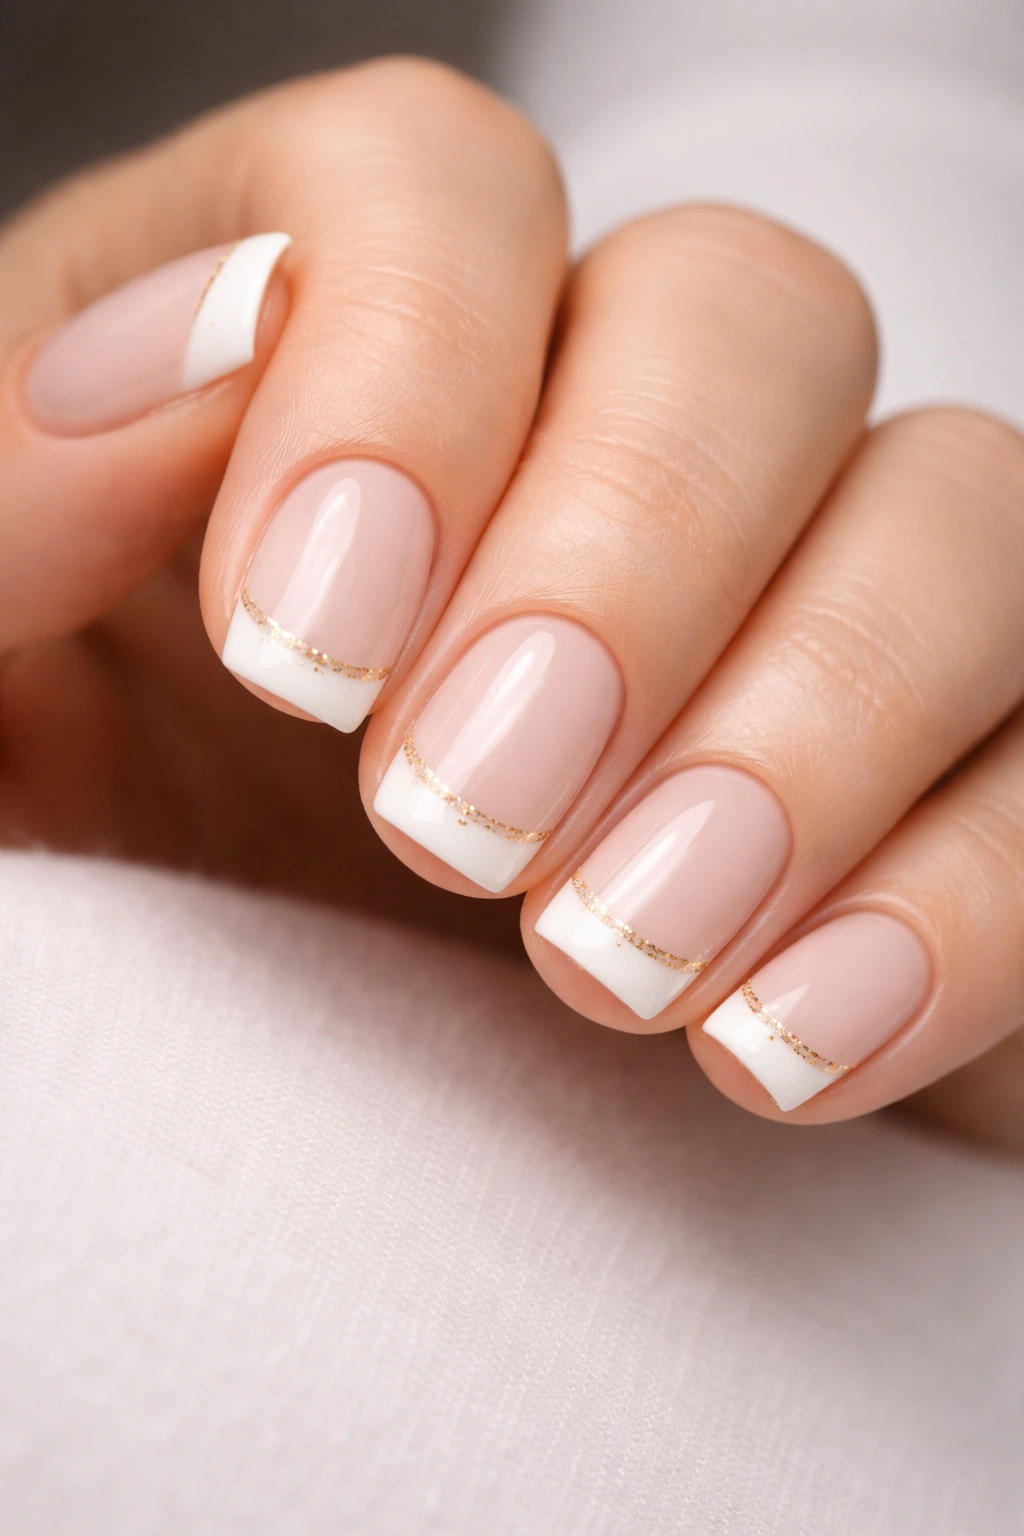
French manicures are the undisputed royalty of classy nail designs, and on short nails, they feel particularly elegant and intentional. The beauty of this timeless look is that it works for literally any occasion—it’s equally at home at a wedding as it is during a casual business lunch. Start with a milky, creamy nude or soft pink base that mimics the natural color of your nail bed, then add a crisp white tip using a thin striping brush or nail art tape for precision.
Why This Look Works for Every Occasion
The French manicure gained its status as a forever classic for good reason: it’s universally flattering, makes your fingers look longer and more elegant, and pairs beautifully with any outfit or jewelry. On short nails specifically, the clean lines of a French tip create visual structure that actually makes the nails appear larger and more refined. The white tip acts as a natural-looking extension, so even very short nails read as intentional and polished. This design works whether you’re heading to a formal event or keeping things casual.
Adding the Gold Details
To elevate this look beyond the traditional French manicure, add the tiniest amount of gold detailing—just a hairline of gold foil along the smile line where the white tip begins, or a minimal gold accent on the nail edge. You can also place a small gold line across the base of the nail or use a thin gold striping brush to create an elegant outline. The key is subtlety; you want the gold to whisper, not shout. This touch of warmth transforms a classic look into something with just enough personality to feel current and special.
How to Wear It
This look is perfect for rehearsal dinners, engagement parties, professional events, or anytime you want to look polished without trying too hard. Pair it with any nail shape—round, square, or oval all work beautifully—and finish with a high-gloss topcoat so the white tips are crisp and the gold catches light.
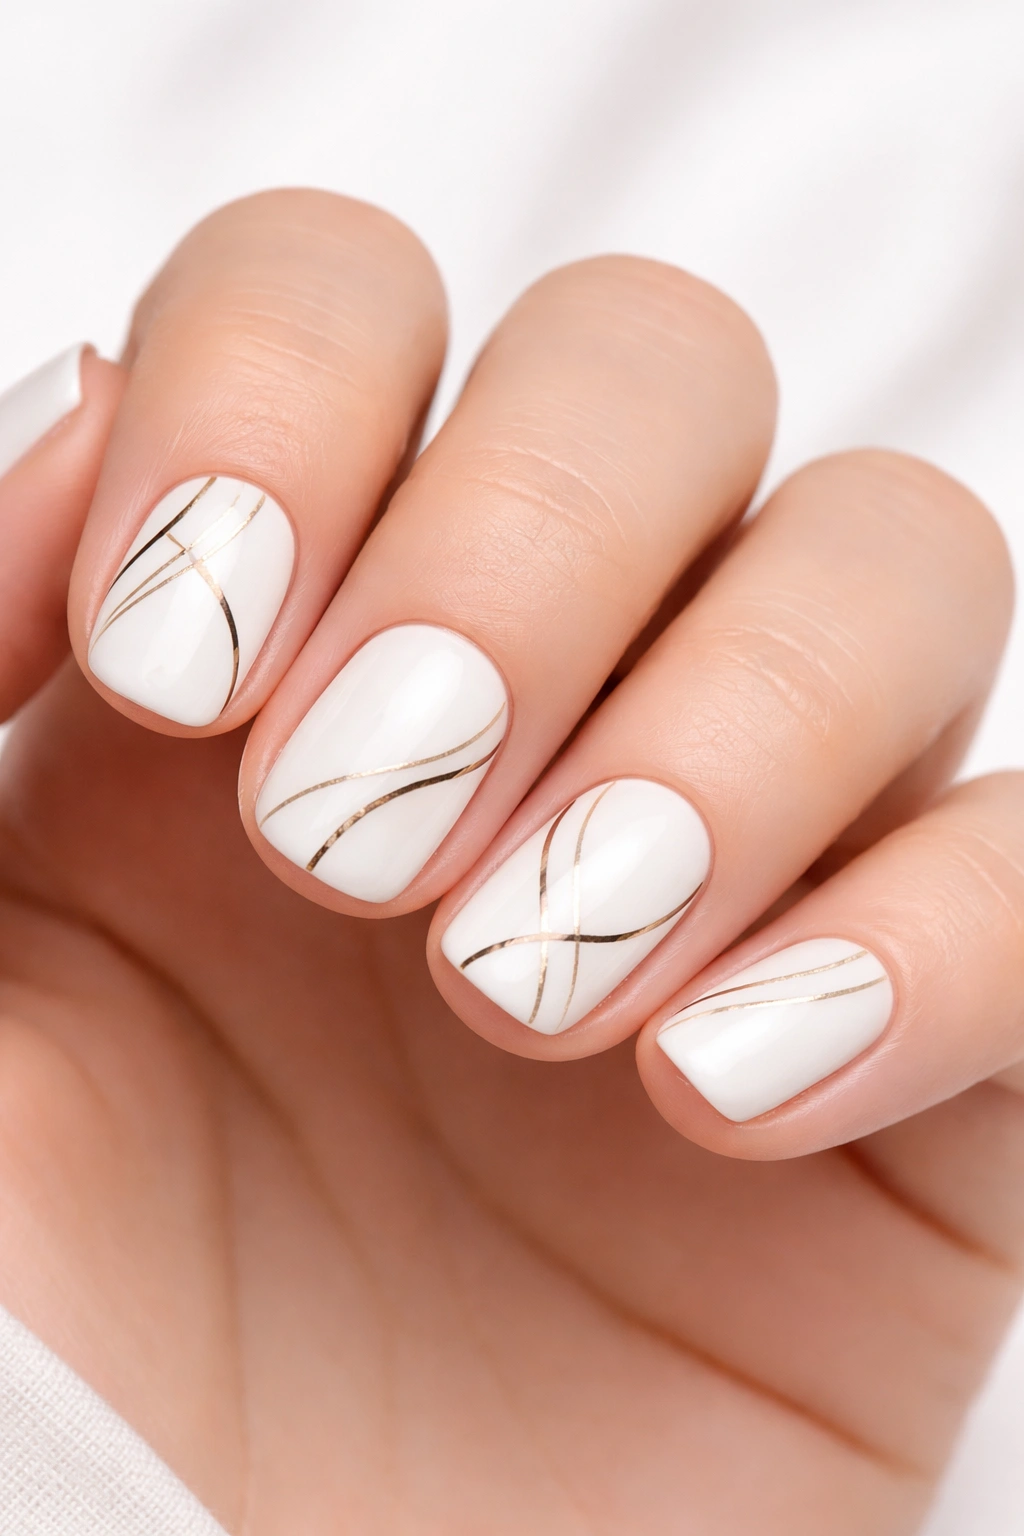
2. Soft Milky White with Minimalist Line Work
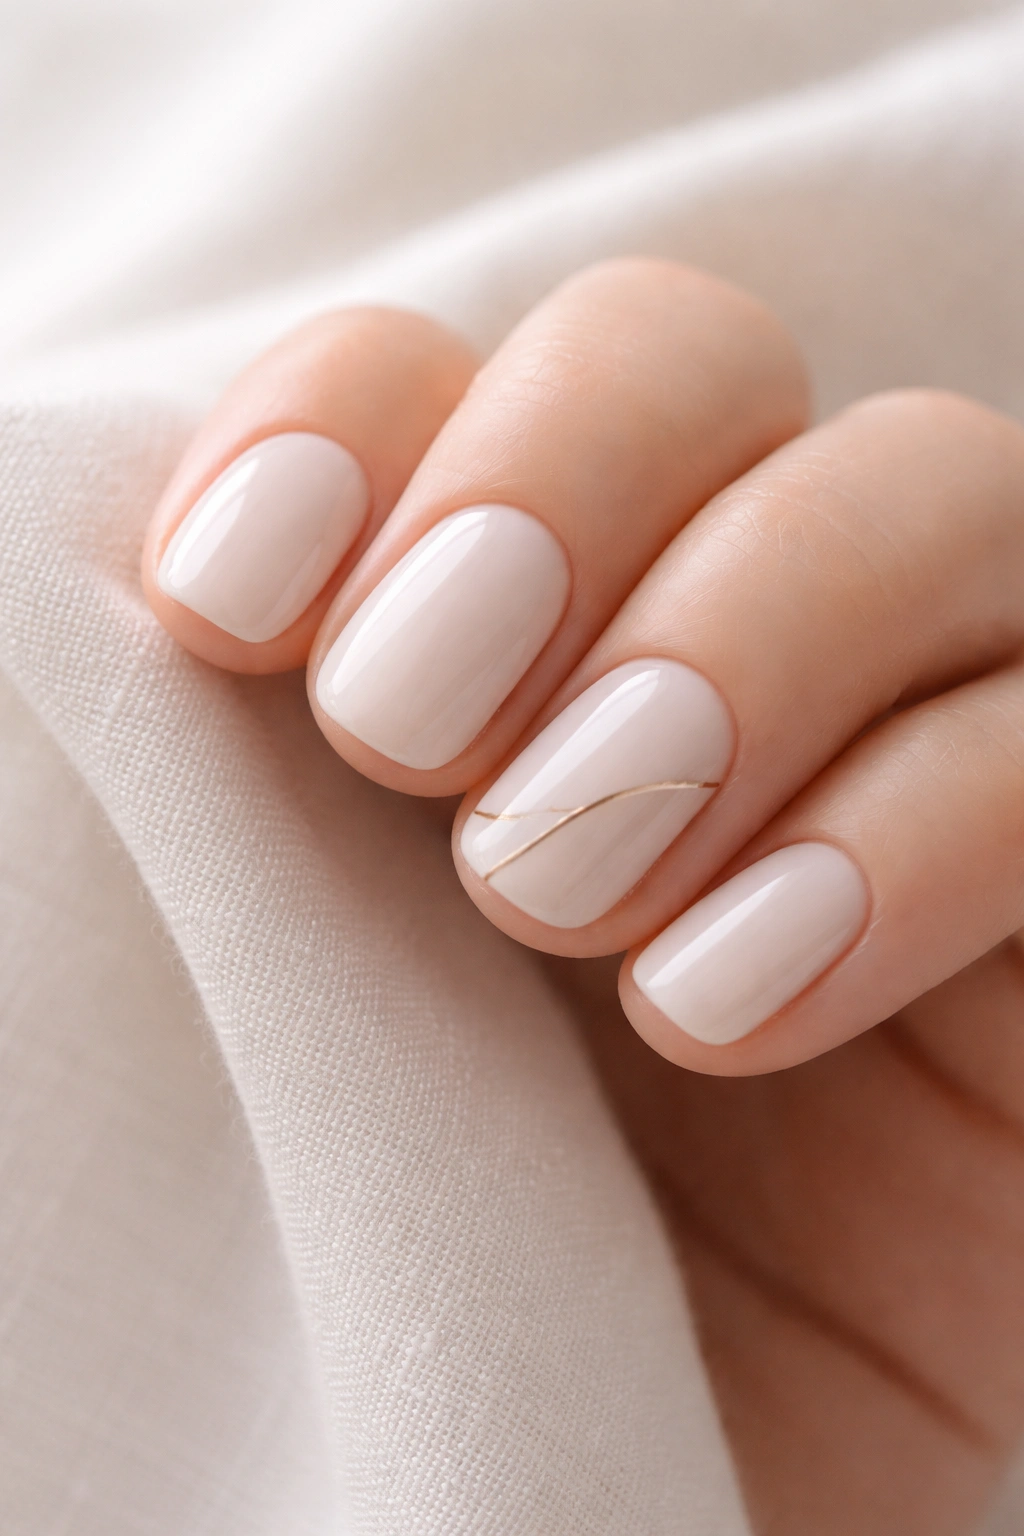
The milky white mani has become synonymous with quiet luxury, and there’s a reason it keeps showing up on everyone’s mood boards and in salon appointments. This soft, creamy shade sits somewhere between white and nude, giving nails a fresh, clean appearance that feels both sophisticated and effortlessly chic. When you pair milky white with minimal line work—a single black line, a delicate gold accent, or an abstract squiggle—you get a design that’s elegant without being fussy.
The Science of the Milky White Base
Milky white polish works beautifully on short nails because it creates the illusion of length and width without adding any actual bulk. The sheer, light quality of the color reflects light, making nails appear larger and more luminous. It’s also incredibly forgiving—minor imperfections in application are less noticeable than they would be with a true opaque white or dark shade. This makes milky white perfect if you’re doing your own manicure at home or if you want a design that looks effortlessly perfect rather than heavily worked.
Creating the Minimalist Line Work
The line work is where you inject personality into this look. Using a fine-tipped nail art brush and black gel or regular polish, draw a single clean line across one or two nails—it could be diagonal, horizontal, or even abstract and freeform. Alternatively, use a gold striping brush for something warmer, or try a dusty burgundy or deep teal for a subtle color moment. The line should be thin enough to feel delicate but confident enough to read as intentional. Practice on a few test nails if you’re nervous, or ask your nail artist to keep the lines super fine.
Best Occasions
This understated, elegant design works for nearly everything: professional events, dates, casual hangouts, even conservative wedding guest looks. The simplicity reads as sophisticated rather than plain because the execution is so clean and intentional.
3. Soft Blush Pink with Dainty Daisy Accents
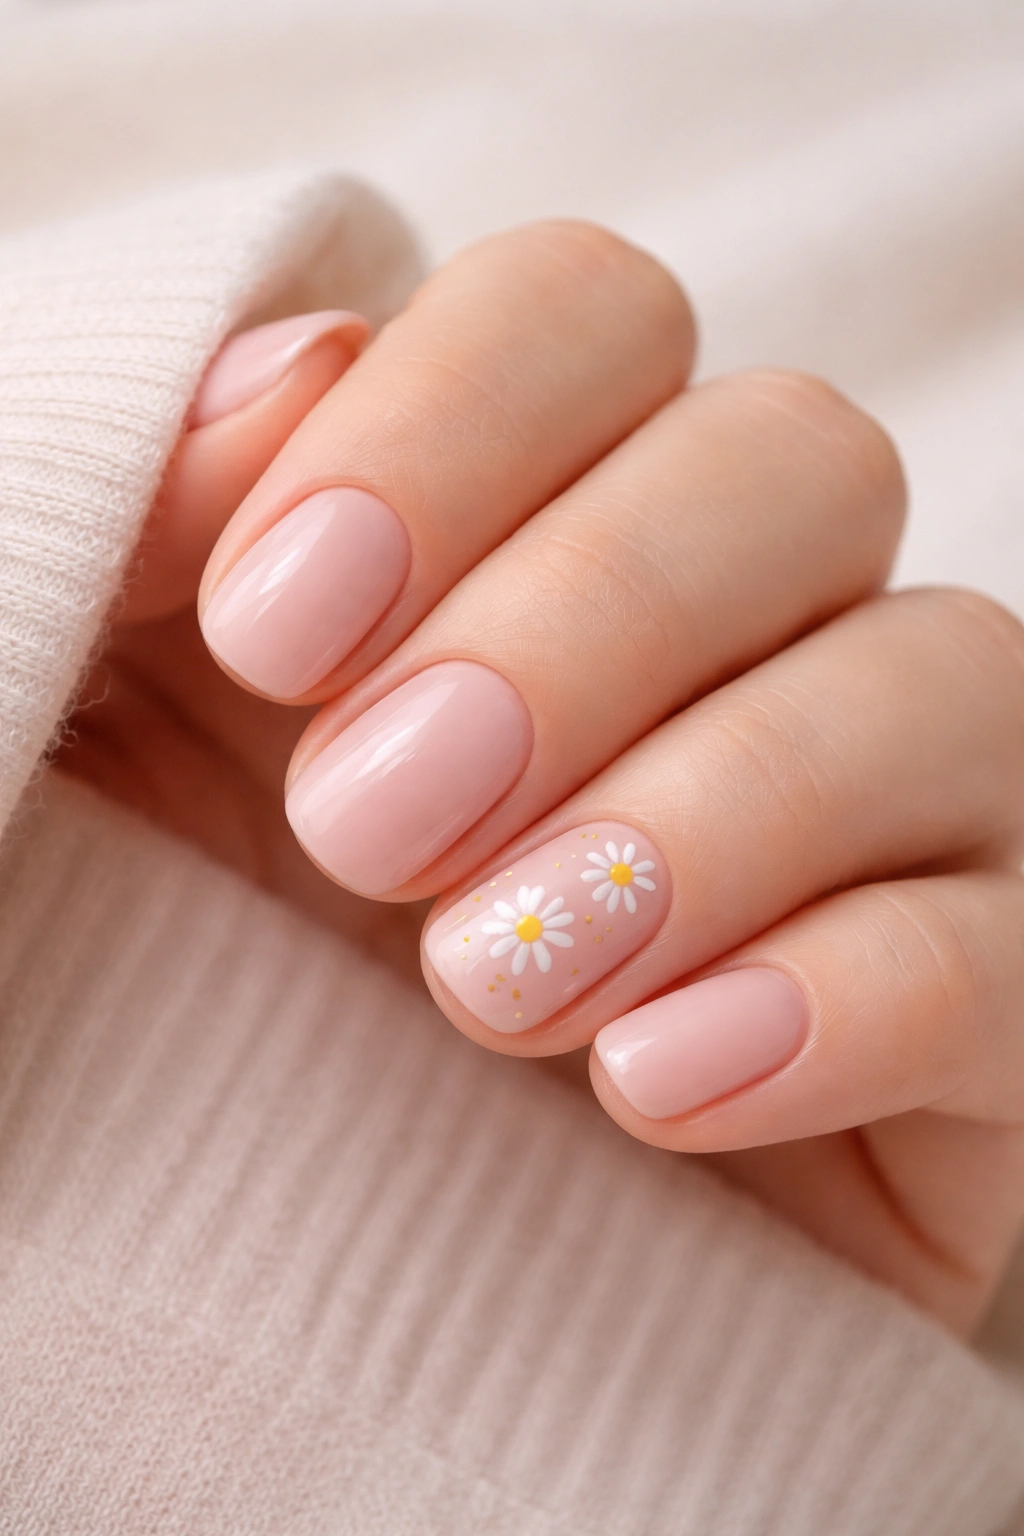
If you want something that feels feminine without being overtly cutesy, this is your design. A soft blush pink base provides a warm, flattering backdrop that works with any skin tone, while tiny daisy flowers scattered across one or two nails add just enough interest to make the manicure feel intentional and artistic. The combination feels modern, refined, and surprisingly versatile.
Choosing Your Blush Shade
The key to making a pink-based manicure look sophisticated rather than precious is picking the right shade of pink. You’re aiming for something soft and muted rather than bright or hot—think dusty rose, pale mauve-pink, or a warm peachy pink that leans neutral. Avoid anything too saturated or bubblegum-like if you want that classy vibe. The pink should feel like a natural enhancement to your skin tone, not a bold statement. Many nail brands have released soft blush options; look for shades with names like “Ballet,” “Petal,” “Blush,” or “Soft Rose.”
Creating Delicate Daisy Details
Using a thin dotting tool or the tip of a fine nail art brush, create tiny five-petaled flowers in white or cream polish. The petals should be small enough to feel delicate—think the size of a pinhead or slightly larger. Add a tiny yellow dot in the center of each flower. You only need two to four daisies total, scattered asymmetrically across your nails (perhaps one on the accent nail, one or two on others). Seal everything with a glossy topcoat so the flowers have dimension and shine.
When to Wear This Design
This design is perfect for spring and summer events, garden parties, bridal showers, or any occasion where you want to feel elegant and a bit romantic. It’s also lovely for date nights or situations where you want to feel put-together without being too formal.
4. Deep Burgundy with Reverse French Tips
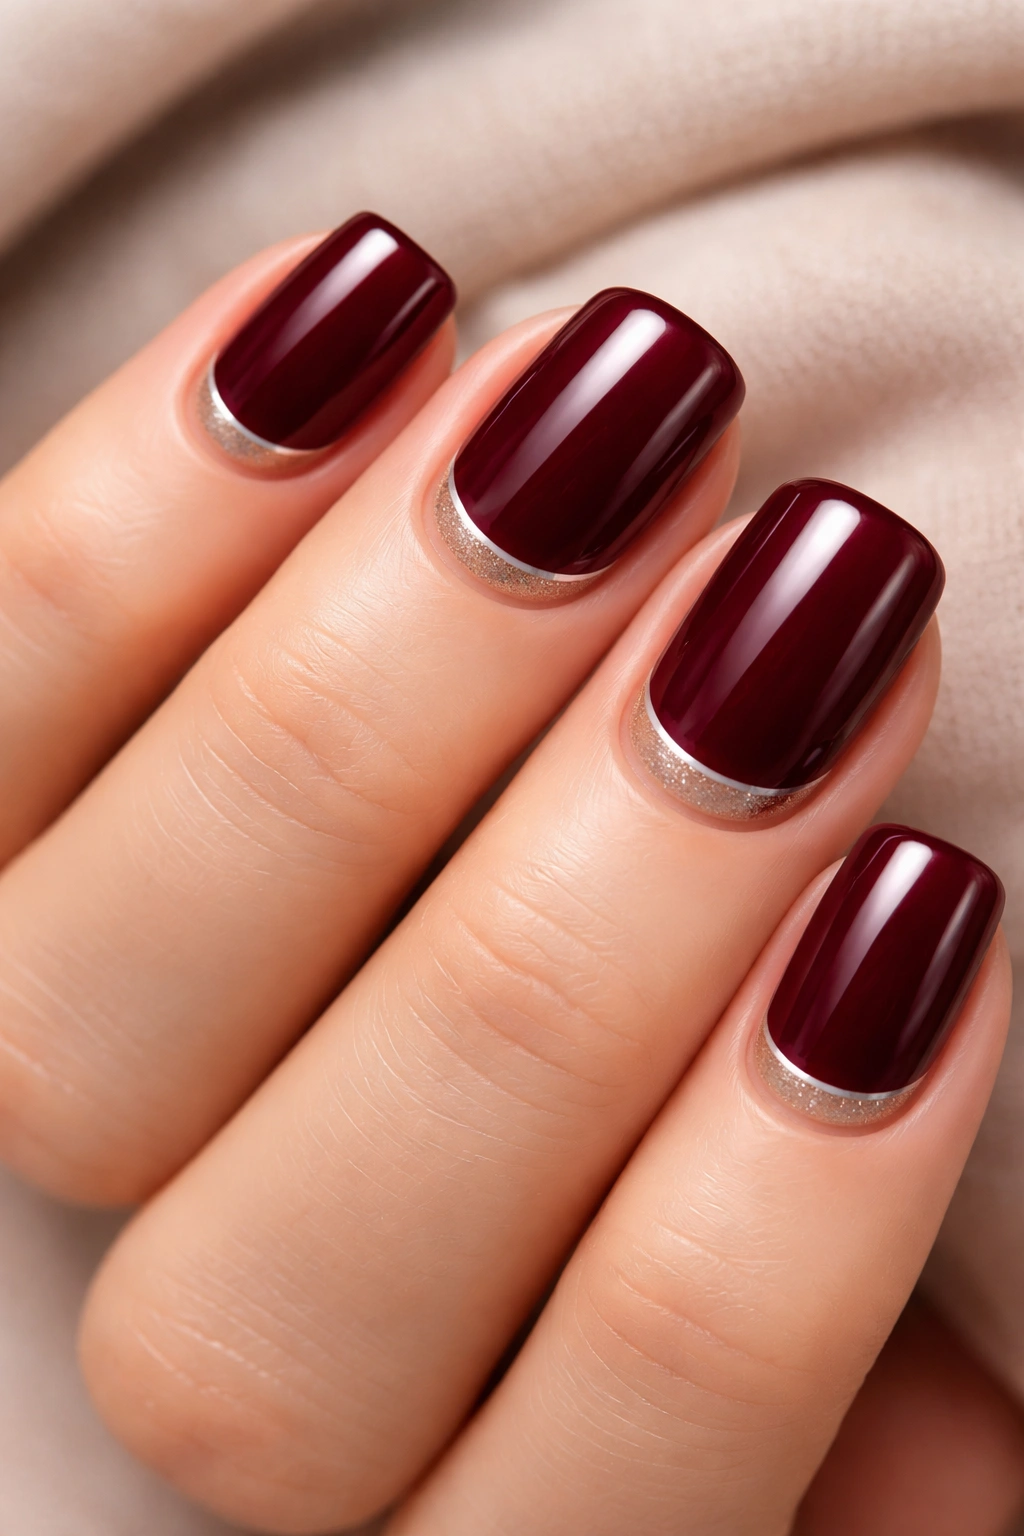
Burgundy nails scream sophistication and elegance, and when you flip the French manicure concept on its head with reverse French tips, you get a design that feels both classic and modern at once. Instead of white tips at the free edge, the color sits at the base of the nail near the cuticle, creating a bold, intentional look that works beautifully on short nails.
Why Burgundy Is the Power Color
Deep burgundy is richer and more elegant than standard red, making it feel less aggressive and more refined. It has Old Hollywood glamour, a touch of edge, and an undeniable sophistication that reads as mature and intentional. Burgundy is also incredibly flattering—it works across different skin tones and doesn’t show dirt or stains the way lighter colors do, which is practical for everyday wear. On short nails, burgundy is particularly striking because the color density makes the nails appear more substantial.
Executing the Reverse French
To create a reverse French, apply your burgundy polish as usual to cover the entire nail. Then, using a thin striping brush or nail art tape, paint a clean line across the base of the nail (near the cuticle) in a contrasting color—white, cream, gold, or even a brighter burgundy. You can make the line thick or thin depending on your preference. Alternatively, if you want to be more minimal, just paint a thin white or gold line at the very base, creating a subtle French-inspired detail without fully committing to the reverse tip look.
Styling and Occasions
This design works beautifully for evening events, dinner dates, formal gatherings, and professional settings where you want to feel polished and confident. Pair it with minimal jewelry to let the nails be the statement piece.
5. Crystal-Clear with Nude Jelly Base and Gemstone Accents
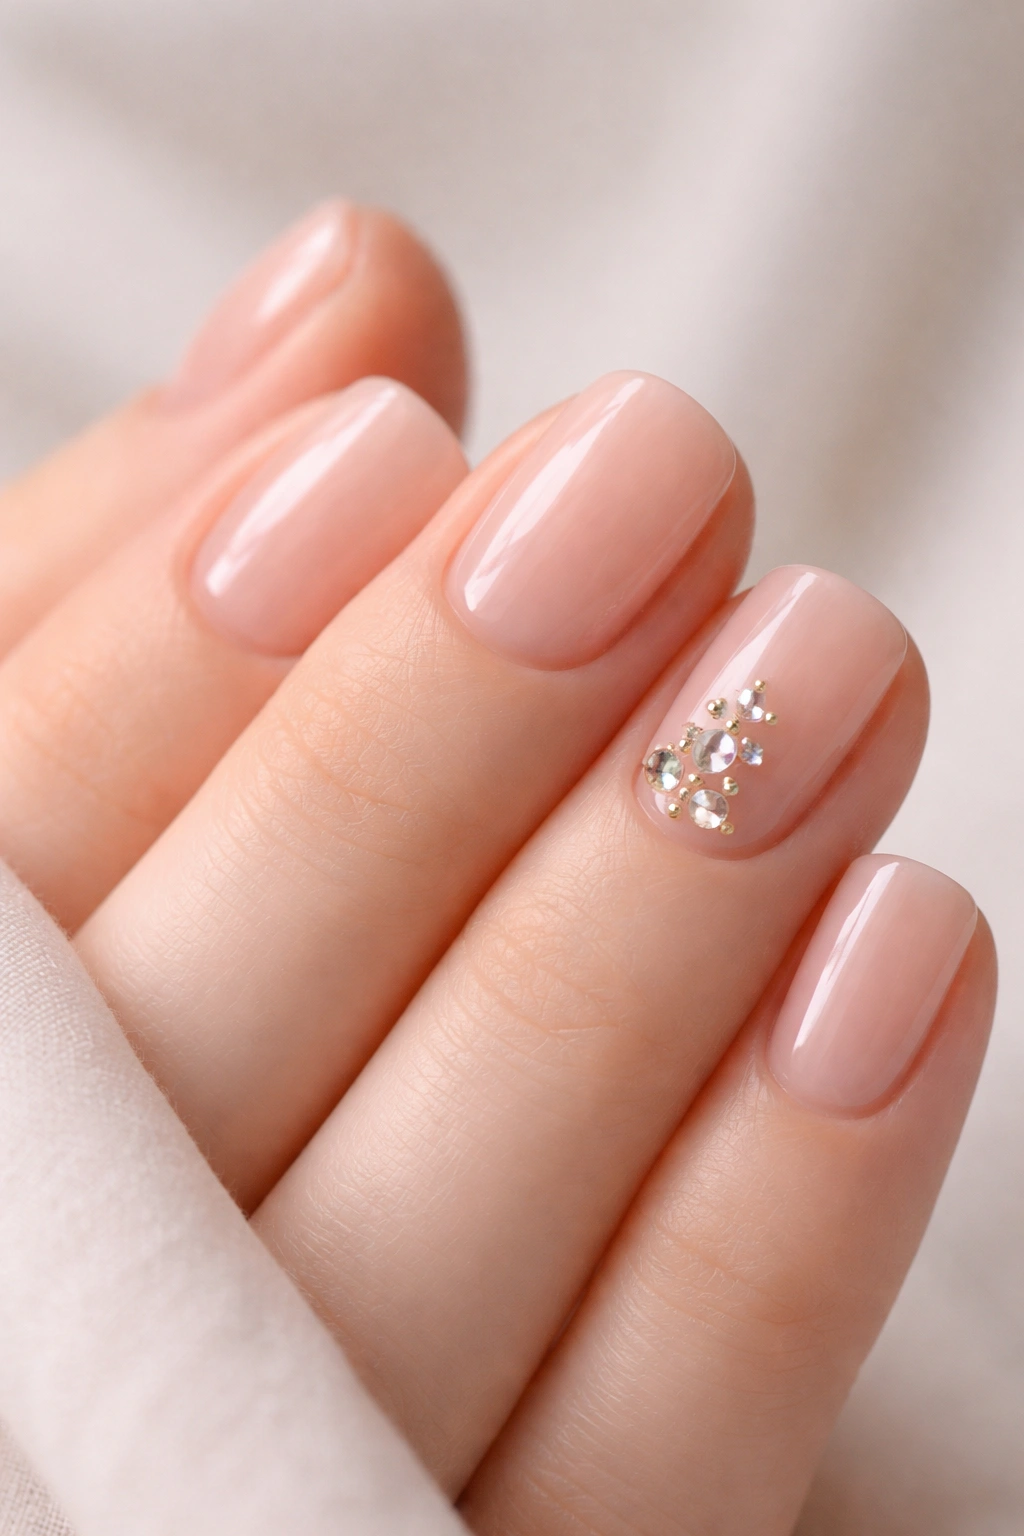
This design sits at the intersection of minimalism and glam, giving you a look that’s both understated and eye-catching. A nude or clear jelly base keeps things light and fresh, while strategically placed gemstones add sparkle and dimension without feeling over-the-top. It’s the perfect design for anyone who wants a little bit of shine but prefers to keep things elegant and wearable.
Understanding Jelly Polish
Jelly polish is sheer, glossy, and has a translucent quality that makes nails look fresh and youthful. A nude jelly sits somewhere between clear and a soft peachy-pink, creating a luminous, almost glass-like appearance. The beauty of jelly polish is that it photographs beautifully and catches light in the most flattering way. On short nails, jelly bases make the nails look larger and healthier because they’re so transparent and reflective.
Placing Gemstones Strategically
Rather than covering your nails in rhinestones, choose just a few high-quality gems and place them intentionally. You might put one gemstone on each accent nail, or cluster a few small stones in one corner of each nail. Alternatively, create a subtle gradient where you have more stones toward the tip and fewer near the cuticle. Use a gel adhesive or nail glue designed for rhinestones, and make sure each stone is secure before topcoating. Finish with a high-gloss topcoat to seal everything and create a seamless, polished appearance.
Perfect for Special Events
This design is absolutely stunning for engagement parties, date nights, weddings as a guest, or any time you want to look celebratory without going full-on glamorous. The transparency of the jelly base keeps it sophisticated, while the gems add just enough sparkle to feel festive.
6. Soft Lavender with Delicate Blue Squiggle Accent
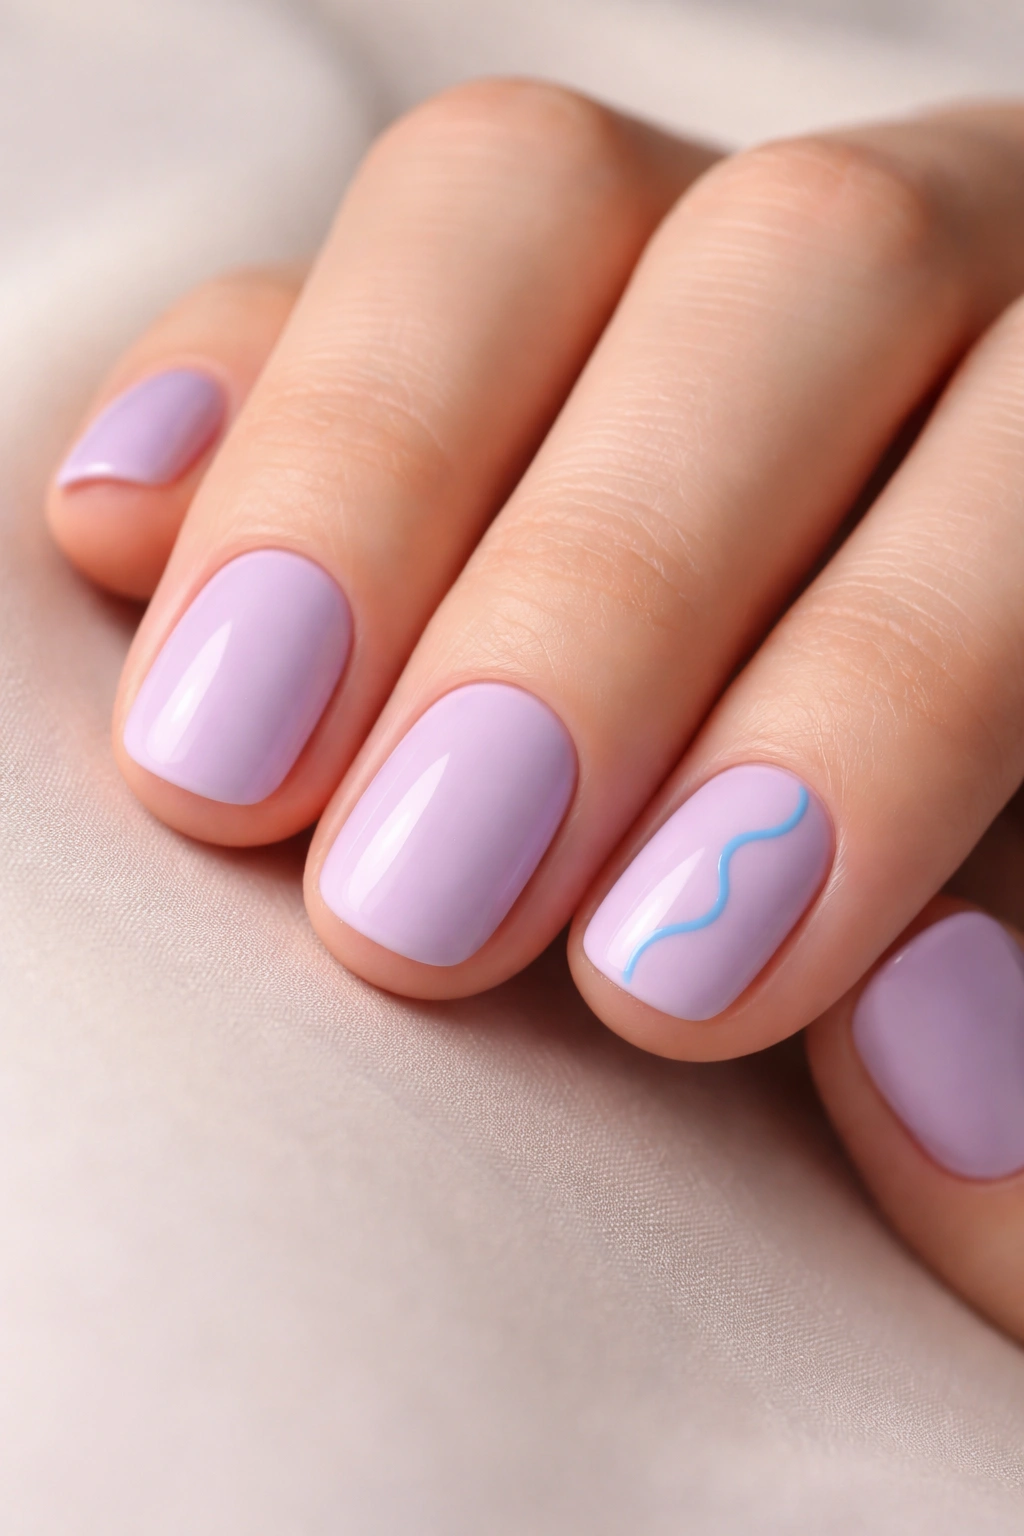
Lavender is having a major moment, and for good reason—it’s calming, romantic, and surprisingly versatile. When you pair a soft lavender base with a single delicate blue squiggle or abstract line, you get a design that feels artistic and intentional without being complicated or hard to wear. This combination of gentle pastels feels fresh and contemporary while still reading as classy.
Why Lavender Works for Short Nails
Lavender is a color that reads as sophisticated without being heavy or dark. It’s light enough to feel summery and playful, but the purple undertones give it enough depth to feel grown-up and refined. Lavender also has wonderful versatility—it works with warm and cool tones, reads beautifully in natural light and under artificial light, and pairs well with virtually any outfit. On short nails, soft lavender creates a delicate, feminine look that doesn’t overwhelm.
Creating the Blue Squiggle
Using a fine-tipped brush or nail art pen in a cool-toned blue (dusty blue, periwinkle, or even a pale cobalt), draw a single abstract squiggle or curved line on one or two nails. The squiggle should feel organic and free rather than perfectly geometric—think of it like a gentle brushstroke rather than a precise line. Let it flow off the edge of the nail or curve across the nail surface. The imperfection is actually part of the charm, making the design feel artistic rather than template-based. Finish with a glossy topcoat.
When to Wear It
This dreamy, artistic design works beautifully for casual dates, creative events, weekend gatherings, or anytime you want to feel a bit whimsical and refined simultaneously. It’s especially lovely during warmer months.
7. Nude Base with Delicate Black Line Detailing
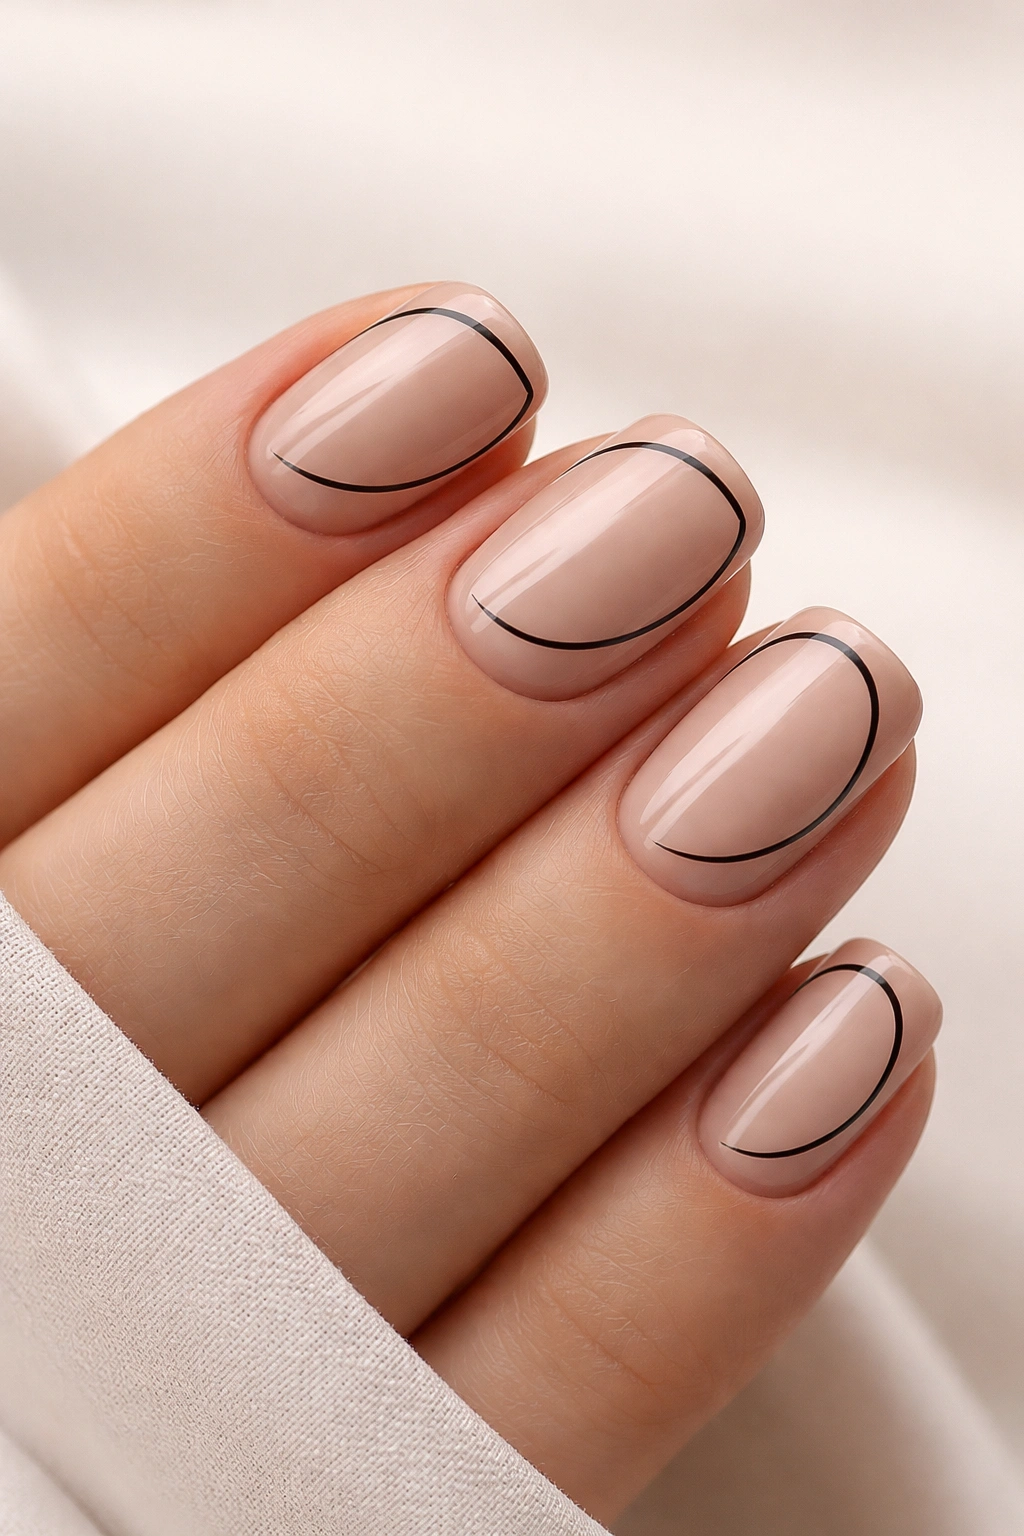
Sometimes the most sophisticated designs are the simplest ones. A warm nude base paired with thin, precise black line detailing is the epitome of understated elegance. This design requires a steady hand or a good nail artist, but the payoff is a manicure that looks expensive, intentional, and completely wearable for any occasion.
Selecting Your Perfect Nude
The nude shade you choose is crucial because it becomes the foundation of the entire look. Avoid anything too pink or too yellow—you’re aiming for a universal nude that mimics your nail’s natural color or sits just slightly warmer. This is typically a soft beige, warm taupe, or creamy peachy tone. The shade should be flattering against your skin tone and feel neutral rather than obviously colored. Apply two thin coats for full coverage without a streaky appearance, and finish with a glossy or matte topcoat depending on your preference.
Executing Precise Line Work
Using a fine-tipped nail art brush and black gel or polish, create clean, deliberate lines on your nude base. These could be thin lines that frame the edge of the nail, a delicate geometric design near the cuticle, minimal line work at the tip, or abstract lines that flow across the nail surface. The key is precision—wobbly or uncertain lines read as accidental rather than artistic. If you’re not confident in your hand-painting ability, ask your nail artist to keep the lines super fine and intentional. Alternatively, use nail art tape to create perfectly straight lines.
Versatility Across Events
This minimalist, graphic design works for literally any event. It’s sophisticated enough for formal occasions, artistic enough for creative settings, and refined enough for professional environments. It’s a true all-occasion manicure.
8. Champagne Gold Chrome with Nude Base
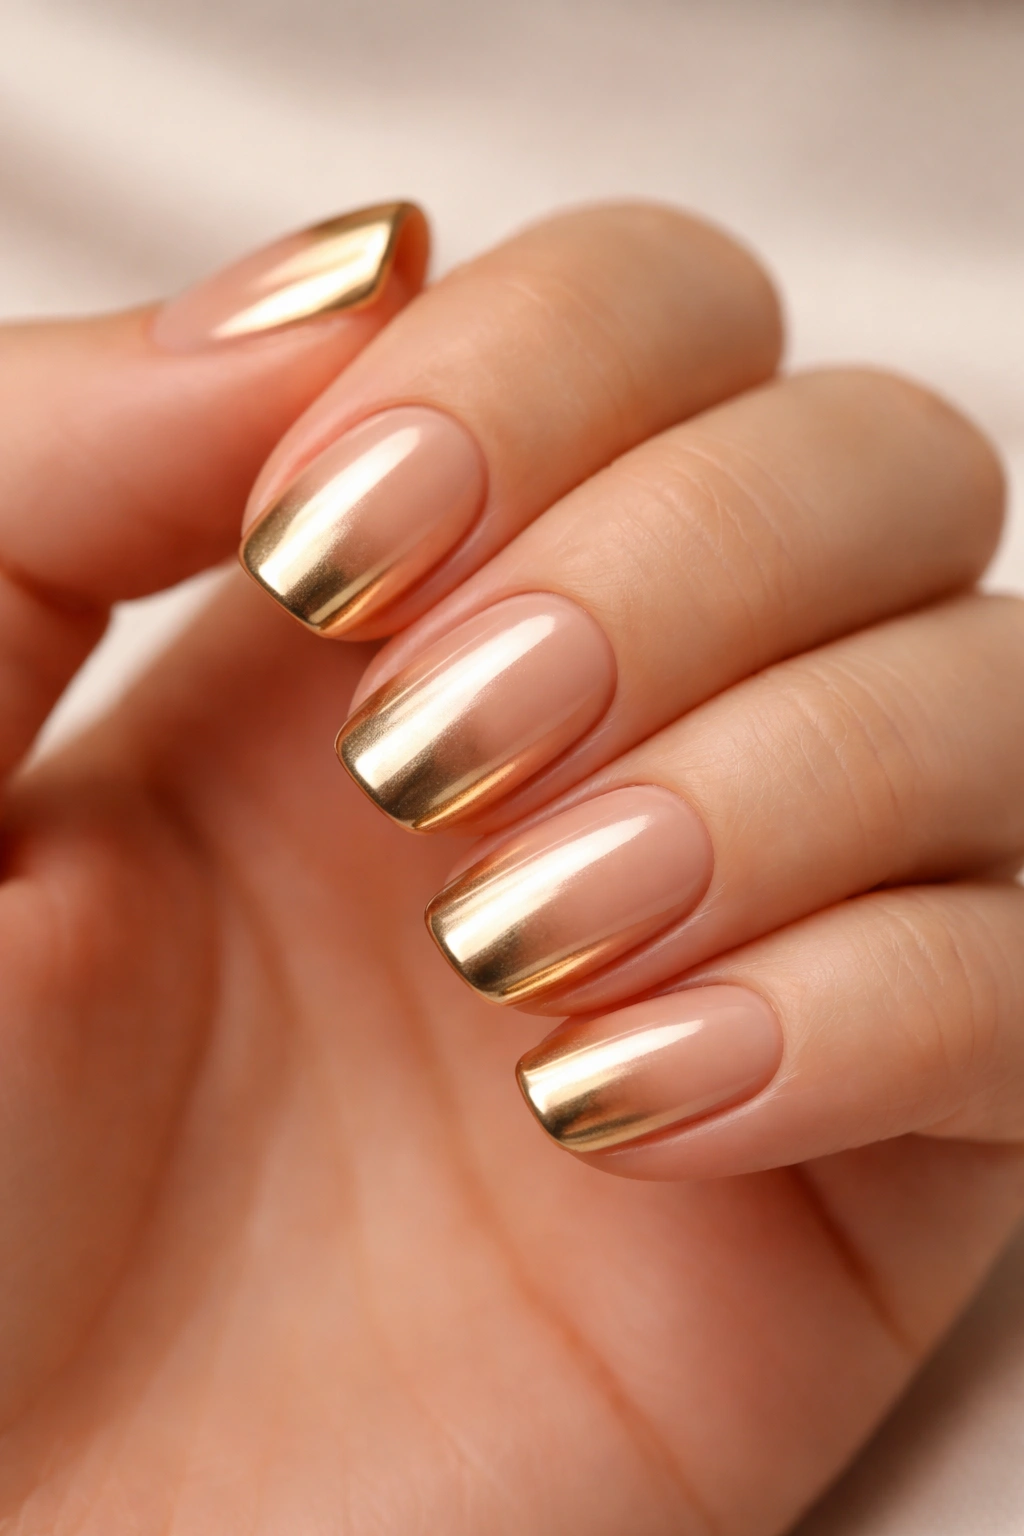
Chrome nails have become a major trend, and for good reason—the mirror-like finish is eye-catching without being over-the-top. When you apply champagne gold chrome over a soft nude base, you get a design that shimmers beautifully, catches light, and reads as both current and timeless. This is a design that gets compliments because it’s genuinely stunning.
Understanding Chrome Finish
Chrome polish uses special metallic pigments that create a reflective, mirror-like finish on the nail surface. When applied correctly, chrome gives an almost liquid-metal appearance that’s mesmerizing. Champagne gold chrome specifically has warm, luxurious undertones that feel elegant rather than flashy. The key to chrome is using a high-quality product and applying it in a well-ventilated area, as the pigments can be finicky.
Application Tips for Short Nails
Start with a soft nude base and two coats of a high-quality nude polish. Once dry, apply a very thin layer of chrome powder using a velvet or buffing brush, working in light circular motions. Build the chrome gradually rather than trying to get full coverage in one application—this gives you more control and a more refined finish. Once you’ve achieved your desired level of shimmer, seal with a clear topcoat to lock in the chrome and create a smooth, seamless surface.
Why It Works for Any Event
Chrome’s luxurious shimmer makes it feel celebratory and special, but the nude base keeps it grounded and wearable. This design is perfect for evening events, date nights, celebrations, or anytime you want to feel elevated and glamorous.
9. White Base with Minimalist Abstract Art
Abstract nail art sounds complicated, but when executed minimally on short nails, it becomes a work of wearable art. A clean white or off-white base provides the perfect canvas for abstract lines, squiggles, or shapes in contrasting colors. This design celebrates imperfection and artistic expression while still maintaining an air of sophistication.
Creating Abstract Designs
Using a fine nail art brush and one or two contrasting colors (classic black, deep burgundy, forest green, or dusty blue work beautifully), create abstract marks on your white base. These could be curved lines, angular shapes, dots clustered together, or freeform brushstrokes. The beauty of abstract art is that it doesn’t need to be perfect—in fact, a bit of organic irregularity makes it feel more artistic. Think of it like minimal line work or brush-stroke painting rather than structured geometric design. Use one accent nail as your main canvas, or scatter abstract elements across all five nails.
The Sophistication of Minimalism
What makes this design feel classy rather than chaotic is the restraint. You’re using a limited color palette (typically just the base and one accent color), minimal coverage (perhaps 20-30% of the nail surface), and intentional placement. The white negative space is just as important as the design itself, keeping everything feeling balanced and refined. This is where short nails really shine—the smaller canvas forces you to be intentional, which automatically feels more sophisticated.
Perfect for Artistic Types
This design is wonderful for anyone who appreciates art and design, creative professionals, or people who want their nails to feel like a personal statement. It works for casual events, creative gatherings, or professional settings with a more artistic bent.
10. Soft Pink Base with Tiny Pearl Embellishments
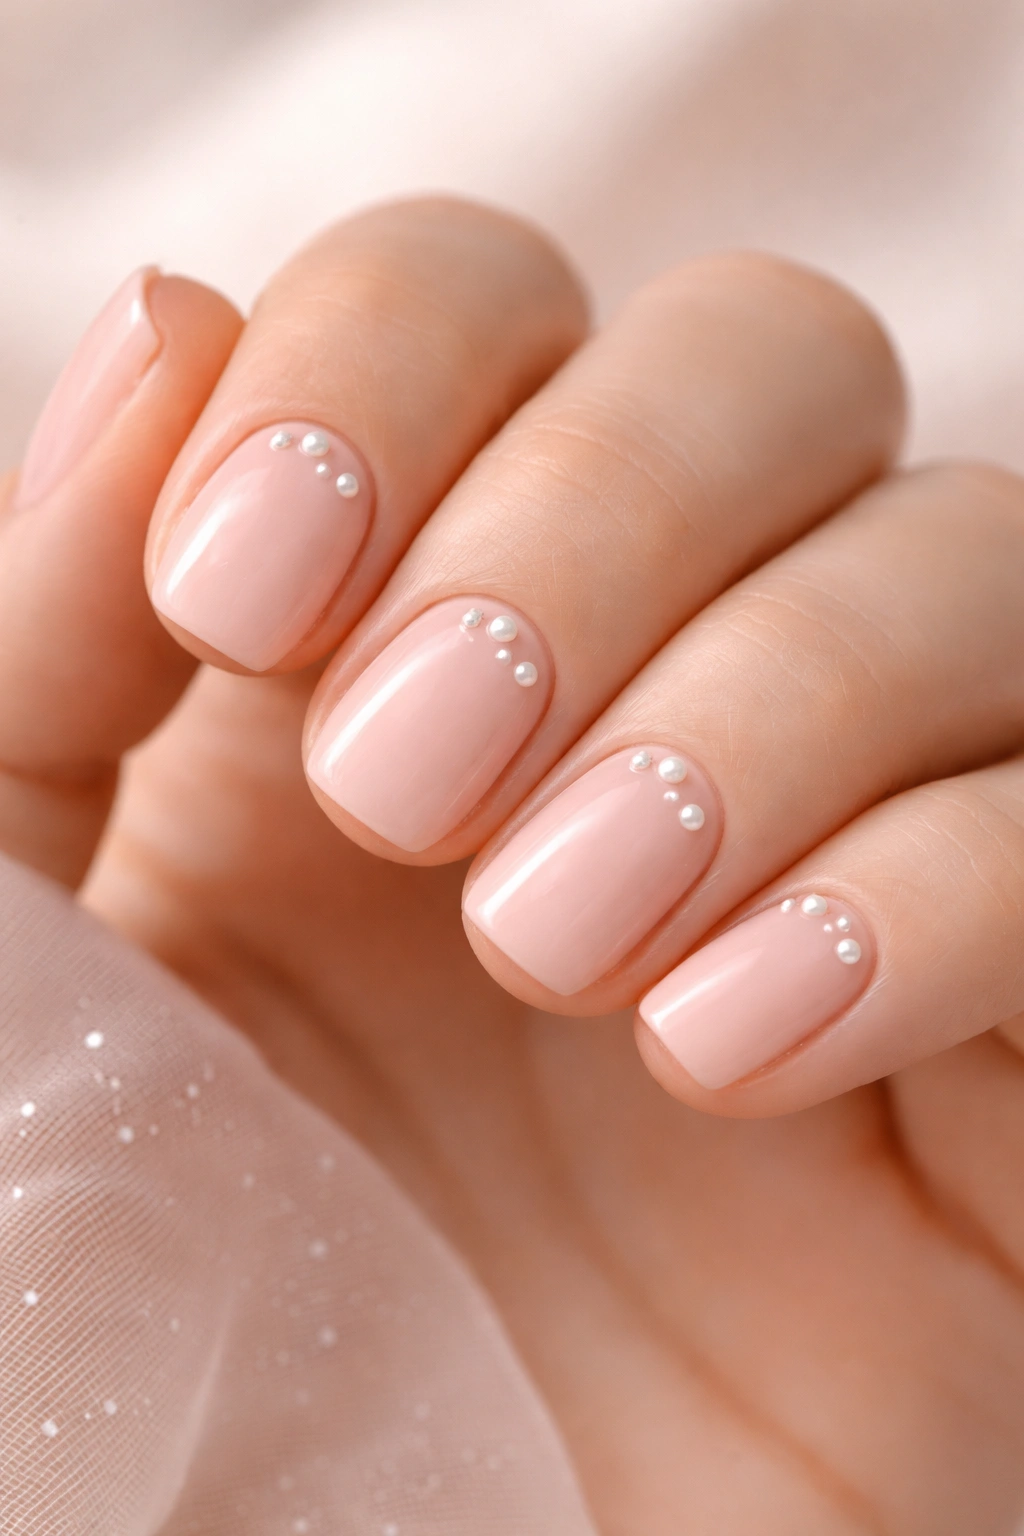
Pearls have long been associated with elegance and timeless beauty, and when you incorporate them into your short nail design, you get a manicure that feels refined, feminine, and genuinely luxurious. A soft pink base provides a romantic foundation, while tiny pearl accents add dimension and subtle sparkle.
Choosing Your Pearl Accents
Pearl nail embellishments come in various sizes—you want tiny ones that don’t overwhelm the short nail surface. Look for pearls in white, cream, champagne, or even subtle blush tones that coordinate with your base color. High-quality pearls have a lustrous finish that catches light beautifully, which is what gives this design its upscale feel. Apply pearls using a strong nail adhesive or gel, placing just a few on each nail or clustering them on one or two accent nails.
Placement Strategies
Rather than randomly scattering pearls, consider strategic placement that enhances the design. You might place three pearls in a diagonal line across one nail, create a small cluster near the cuticle, or place one pearl at the center of each nail for a subtle accent. Some people prefer to place pearls only on the ring and pinky fingers, creating asymmetrical interest. Finish with a top coat to seal everything and create a smooth, protective surface.
Occasions for Pearl Accents
This elegant, feminine design is absolutely perfect for bridal events (whether as a bride or guest), romantic dinners, engagement parties, or any time you want to feel special and put-together. The pearls add just enough glamour to feel celebratory without being costume-y.
11. Mauve Base with Soft Metallic Gold Outline
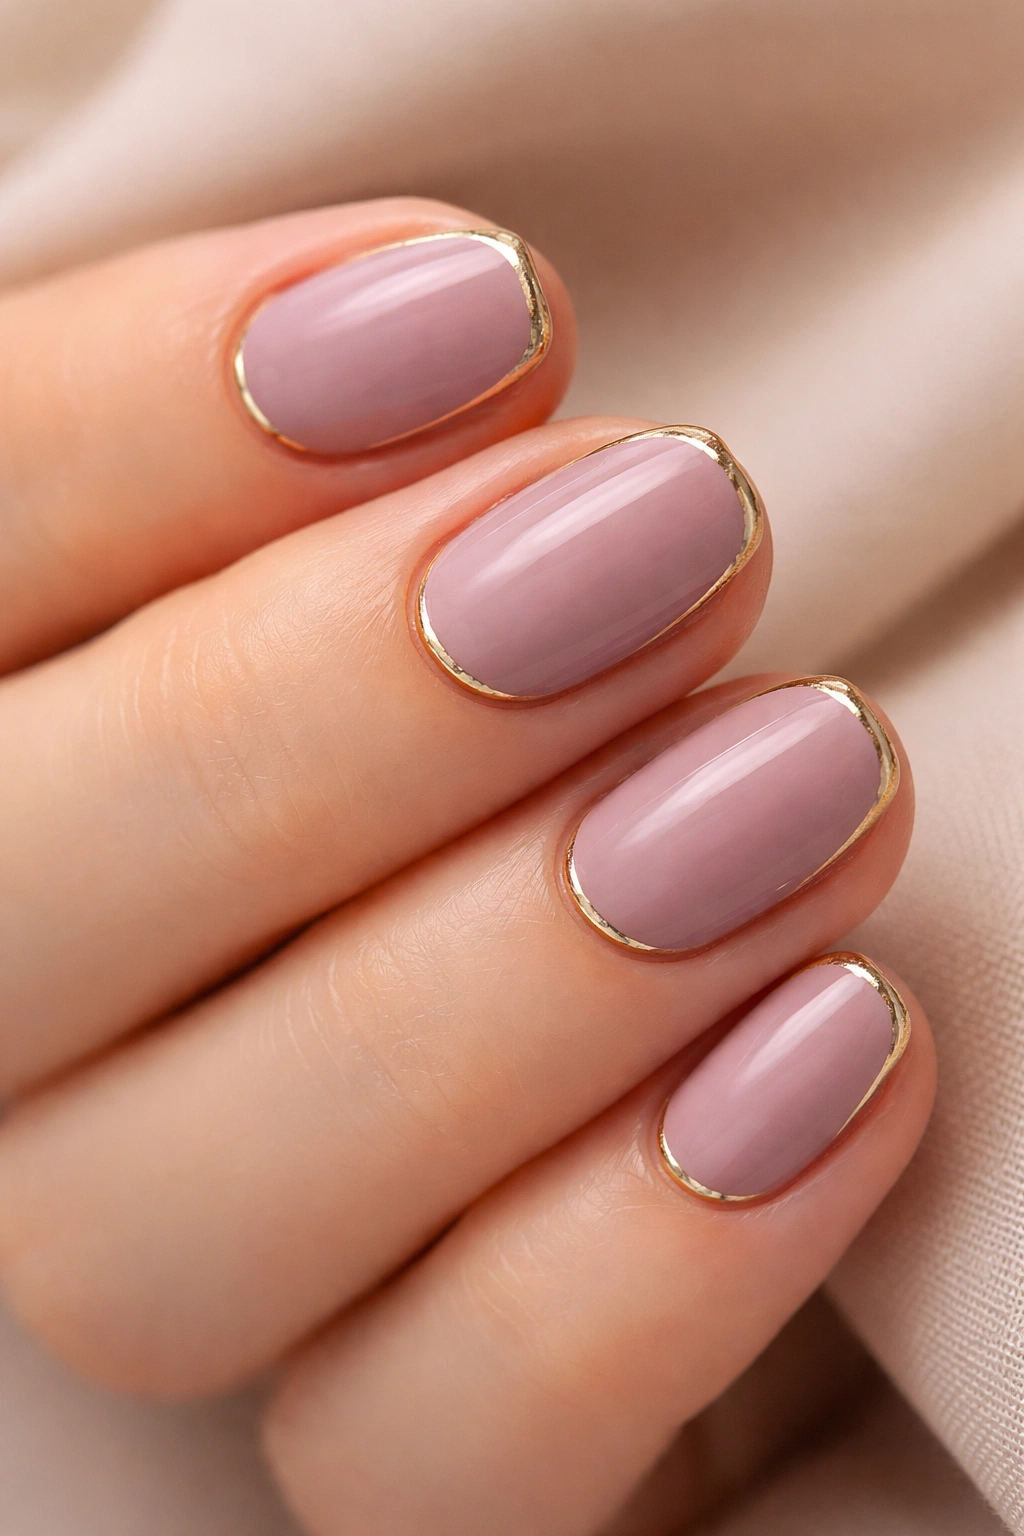
Mauve is one of those sophisticated, versatile colors that works across seasons and occasions. When you add a delicate metallic gold outline to the edge or smile line of your nail, you create a design that’s both elegant and current. This look has that expensive, high-fashion feel that makes you feel like you’ve just stepped out of a luxury salon.
Why Mauve Is the Sophisticated Choice
Mauve is cooler and more refined than standard pink, with just enough purple undertone to feel interesting and artistic. It photographs beautifully, works well in natural and artificial light, and is flattering across most skin tones. Unlike trendy bright colors that might feel dated in a season or two, mauve has a timeless quality that feels both current and enduring. It’s the kind of color choice that reads as someone who understands color theory and cares about aesthetics.
Applying the Gold Outline
Using a fine striping brush or gold nail art pen, create a thin, precise line along the edge of your nail or along the smile line (the curved edge where the white tip of a French manicure begins). The gold should be bright and metallic, creating a striking contrast against the mauve base. Keep the line thin and confident—this design is all about precision and intentionality. Finish with a high-gloss topcoat to make the gold shimmer and create a seamless, polished look.
Versatility Across Seasons and Events
This design works for professional events, dinner dates, gallery openings, or any time you want to feel sophisticated and slightly artistic. The mauve-and-gold combination feels especially beautiful in cooler months but works year-round.
12. Clear Base with Subtle Starburst Decal and Gemstone Centers
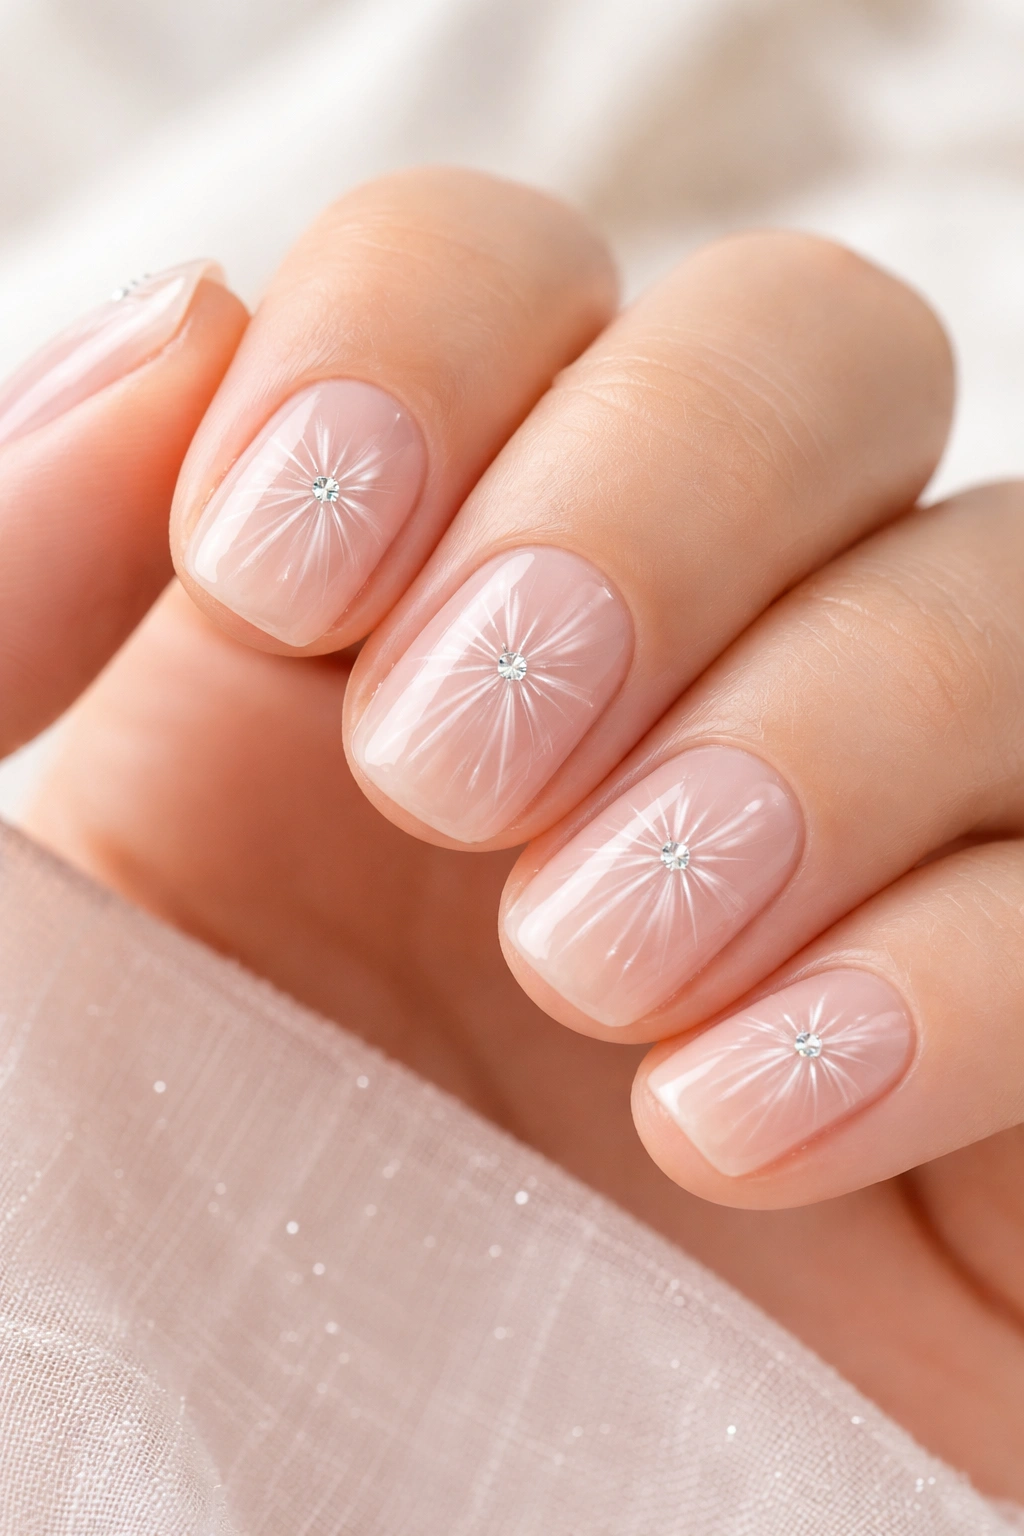
For a design that’s truly unique and eye-catching, clear nails with a starburst decal and tiny gemstone centers hit the perfect balance between minimal and special. This design feels editorial and artistic without being costume-y, making it perfect for anyone who wants their nails to be a conversation piece.
Understanding Nail Decals
Nail decals are pre-designed images that you can apply to your nails using special adhesive or by sliding them under a gel top coat. Starburst decals specifically feature radiating lines or rays emanating from a central point, creating a geometric, almost celestial feel. You can find decals online or create your own using nail art tools. Apply decals to a clear or nude base using the method that comes with your specific product—some require water for sliding application, while others use adhesive.
Adding Gemstone Details
Once your starburst decal is in place and sealed, add tiny gemstones in the center of each starburst design. These should be small enough not to overwhelm the design but substantial enough to catch light and draw attention. Use a strong nail adhesive designed for rhinestones, and make sure each stone is secure before topcoating. The gemstones add dimension and a touch of luxury that makes the design feel special and elevated.
Who Should Wear This Design
This design is perfect for anyone with an artistic sensibility, people who love celestial or mystical aesthetics, or anyone who wants their nails to feel truly unique. It works for evening events, creative gatherings, parties, or anytime you want to make a subtle statement.
Final Thoughts
The versatility and elegance of short nails truly shine when you put intention into your design choices. Whether you’re drawn to timeless classics like French tips or more artistic options like abstract designs, there’s absolutely a short nail look that aligns with your personal style and the occasion you’re attending. The beauty of short nails is that they demand intentionality and precision, which automatically elevates the overall look.
What matters most is choosing a design that makes you feel confident and comfortable. Pay attention to the details—precise lines, quality finishes, and thoughtful color choices—and your short nails will look just as polished and special as any longer style. The next time you’re getting ready for an event, remember that your short nails are a genuine asset, not a limitation. Book that manicure, choose a design that speaks to you, and get ready to receive compliments on how elegant and put-together your hands look.
