

Burgundy is one of those nail colors that just works—it’s sophisticated without trying too hard, warm without being loud, and it genuinely looks good on every skin tone. When you pair that deep wine shade with the elegant elongation of long oval nails, you’re not just painting your nails—you’re making a statement about having taste, confidence, and a real appreciation for the details that matter.
The thing about burgundy nails is that they’re a lot more versatile than people realize. Most people think of a solid burgundy manicure, but that’s barely scratching the surface. This color works beautifully with metallics, plays gorgeously with other jewel tones, creates stunning contrasts with neutrals, and becomes absolutely show-stopping when you add dimension through finishes, patterns, or complementary accent colors. Long oval nails give you the perfect canvas to explore these possibilities—the shape is just elongated enough to feel luxurious without being impractical, and it’s the ideal base for both minimalist designs and more detailed nail art.
What makes burgundy with long oval nails particularly compelling is how the silhouette amplifies the richness of the color. The tapered elegance of the oval shape actually draws your eye down the length of the nail, making the burgundy appear even deeper and more lustrous. You’re getting polish, shape, and proportion all working together to create something genuinely elevated—the kind of manicure that photographs well, holds up beautifully in professional settings, and looks just as good on a casual weekend.
We’re going to walk through 12 distinct ways to style burgundy on long oval nails, from timeless classics to unexpected modern twists.
1. Classic Solid Burgundy with a High Shine Topcoat

This is where the magic of burgundy really shows itself—sometimes the simplest approach is the most powerful. A pure, opaque burgundy cream applied in two thin coats and sealed with a generous glossy topcoat becomes almost jewel-like, catching light and reflecting it back with a deep, dimensional gleam that a flat matte finish just can’t match.
Why a Glossy Finish Elevates the Entire Look
The shine amplifies the depth of the burgundy pigment, making the color read as richer and more luxurious than it actually is. When light hits the high-gloss surface, it bounces off the curvature of your nail, creating subtle highlights along the edges and a luminous quality that draws attention. This is particularly striking on long oval nails because the elongated shape means more surface area for that shine to play across. Matte versions of the same color feel flat by comparison—still beautiful, but they lack that jewel-tone quality that makes burgundy special.
Application and Longevity Tips
- A paler burgundy (more wine than plum) looks younger and less severe, while a deeper burgundy with brown undertones reads as more dramatic and moody
- Apply thin coats rather than one thick coat—two thin layers create better opacity and a smoother finish than one heavy application
- Use a high-quality topcoat with UV protection to prevent the burgundy from oxidizing and turning orange-toned over time
- A glossy finish generally lasts 10-14 days before showing significant wear at the edges, depending on your daily activities
Pro tip: If you’re worried a solid burgundy might feel too formal for everyday wear, pair it with minimal jewelry and neutral clothing—it actually creates a surprisingly chic, understated look rather than feeling overdone.
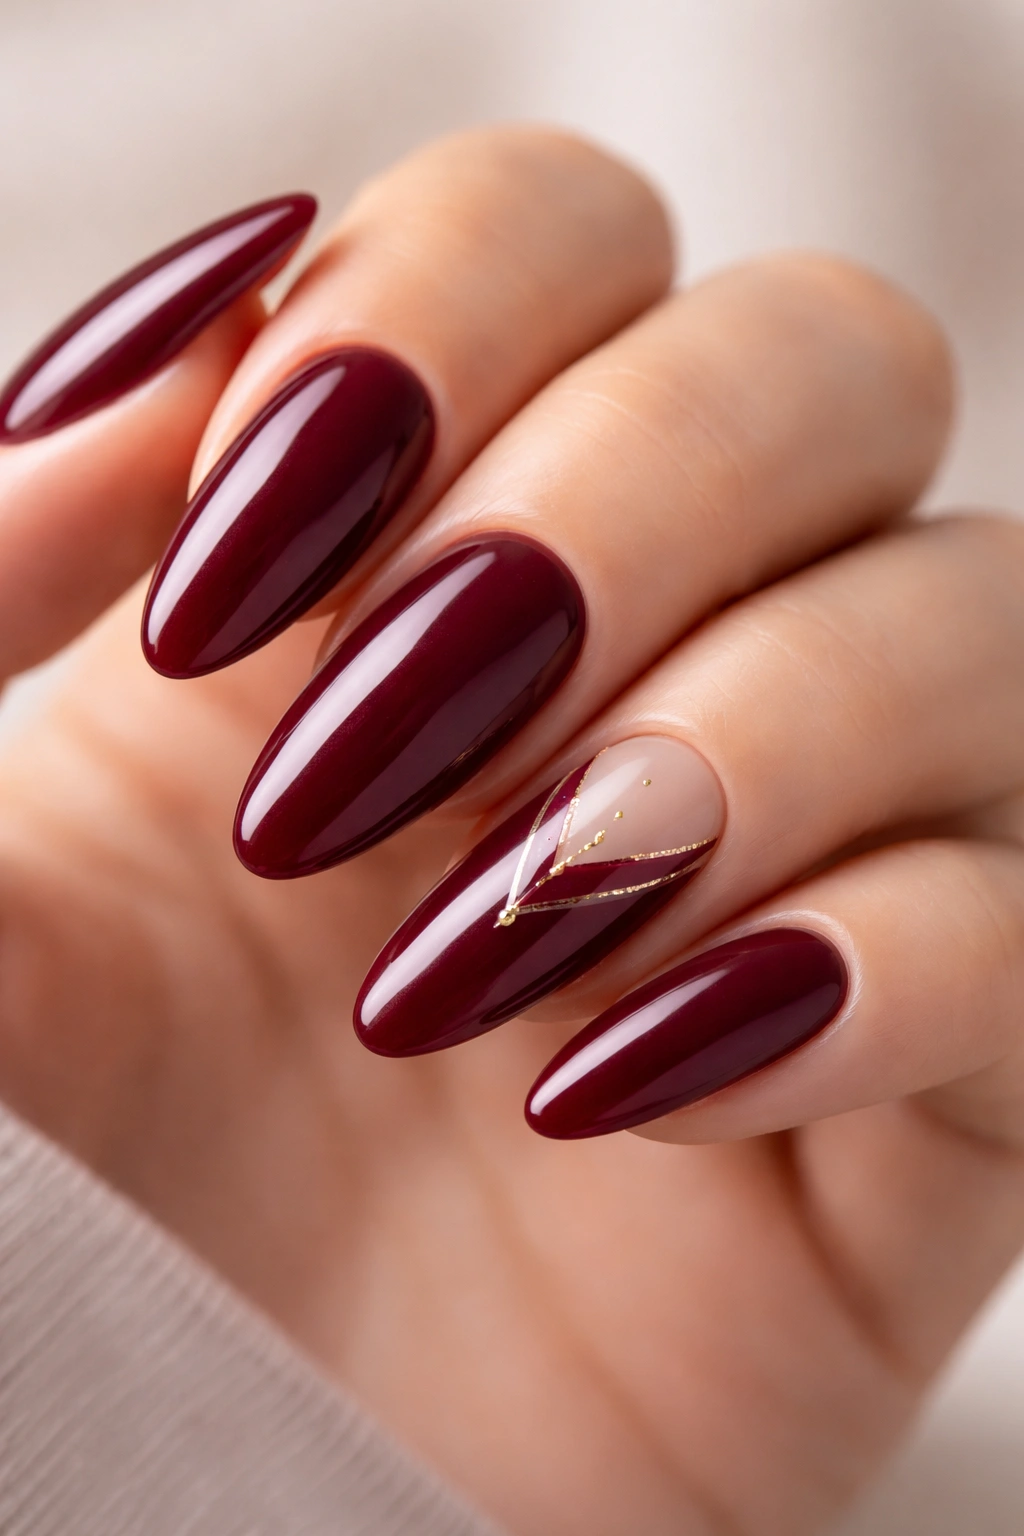
2. Burgundy Base with Gold Foil Accents on Ring Fingers
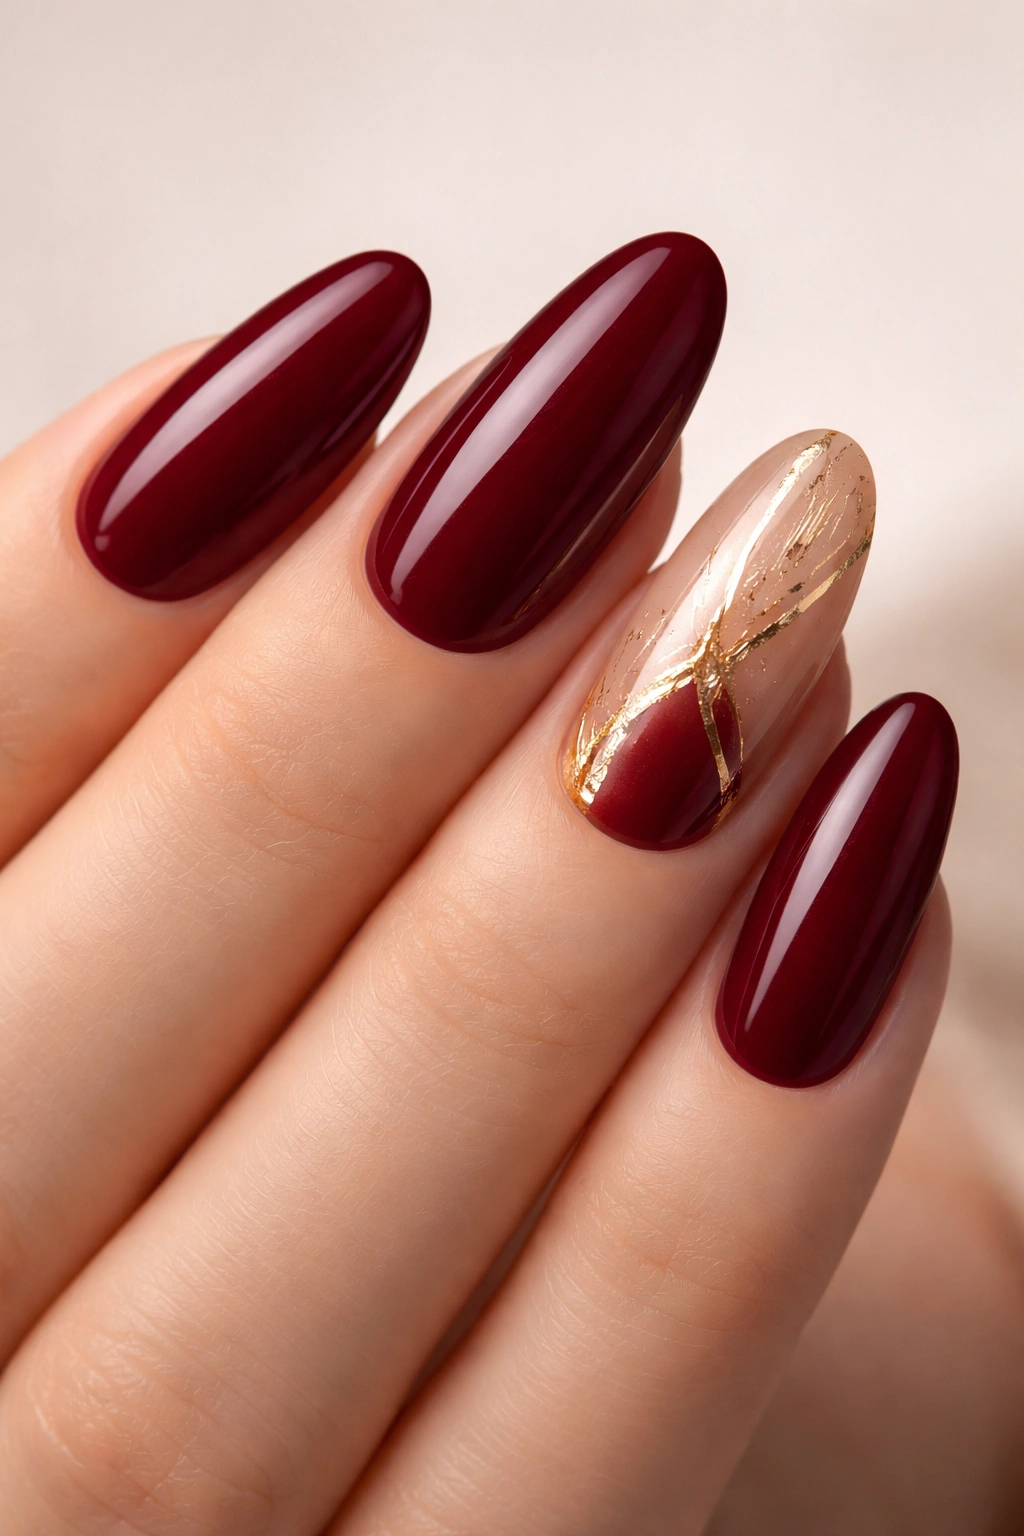
Here’s where things get interesting—keep the majority of your nails in solid burgundy, but on your ring fingers, add thin lines or geometric shapes of gold foil pressed into clear topcoat. The contrast between the deep wine and gleaming gold feels luxe and intentional without being costume-like.
Why This Combination Works So Well
Burgundy and gold have been paired together for centuries in everything from fine jewelry to interior design, and for good reason—they complement each other perfectly. Gold pulls out the warmth in burgundy, while burgundy makes gold look even more precious and luminous. When you apply gold foil as an accent rather than covering the entire nail, it creates visual interest and draws focus without overwhelming the elegance of the base color. On long oval nails, those gold lines feel like intentional design elements rather than decoration.
Design Variations That Look Professional
- A single thin gold line down the center of the ring finger, stopping just before the cuticle
- A small geometric shape—a triangle, square, or chevron—using gold foil on one corner of the nail
- Thin gold lines framing the edge of the nail (along the sides, not covering the surface)
- A delicate gold accent only on the upper third of the nail, fading into clear and then burgundy below
Worth knowing: Gold foil can sometimes shift or wrinkle if your topcoat isn’t completely sealed over it, so apply a protective clear topcoat layer and let it cure fully in a UV lamp before adding any additional topcoats.
3. Burgundy Ombre from Deep Wine to Nude
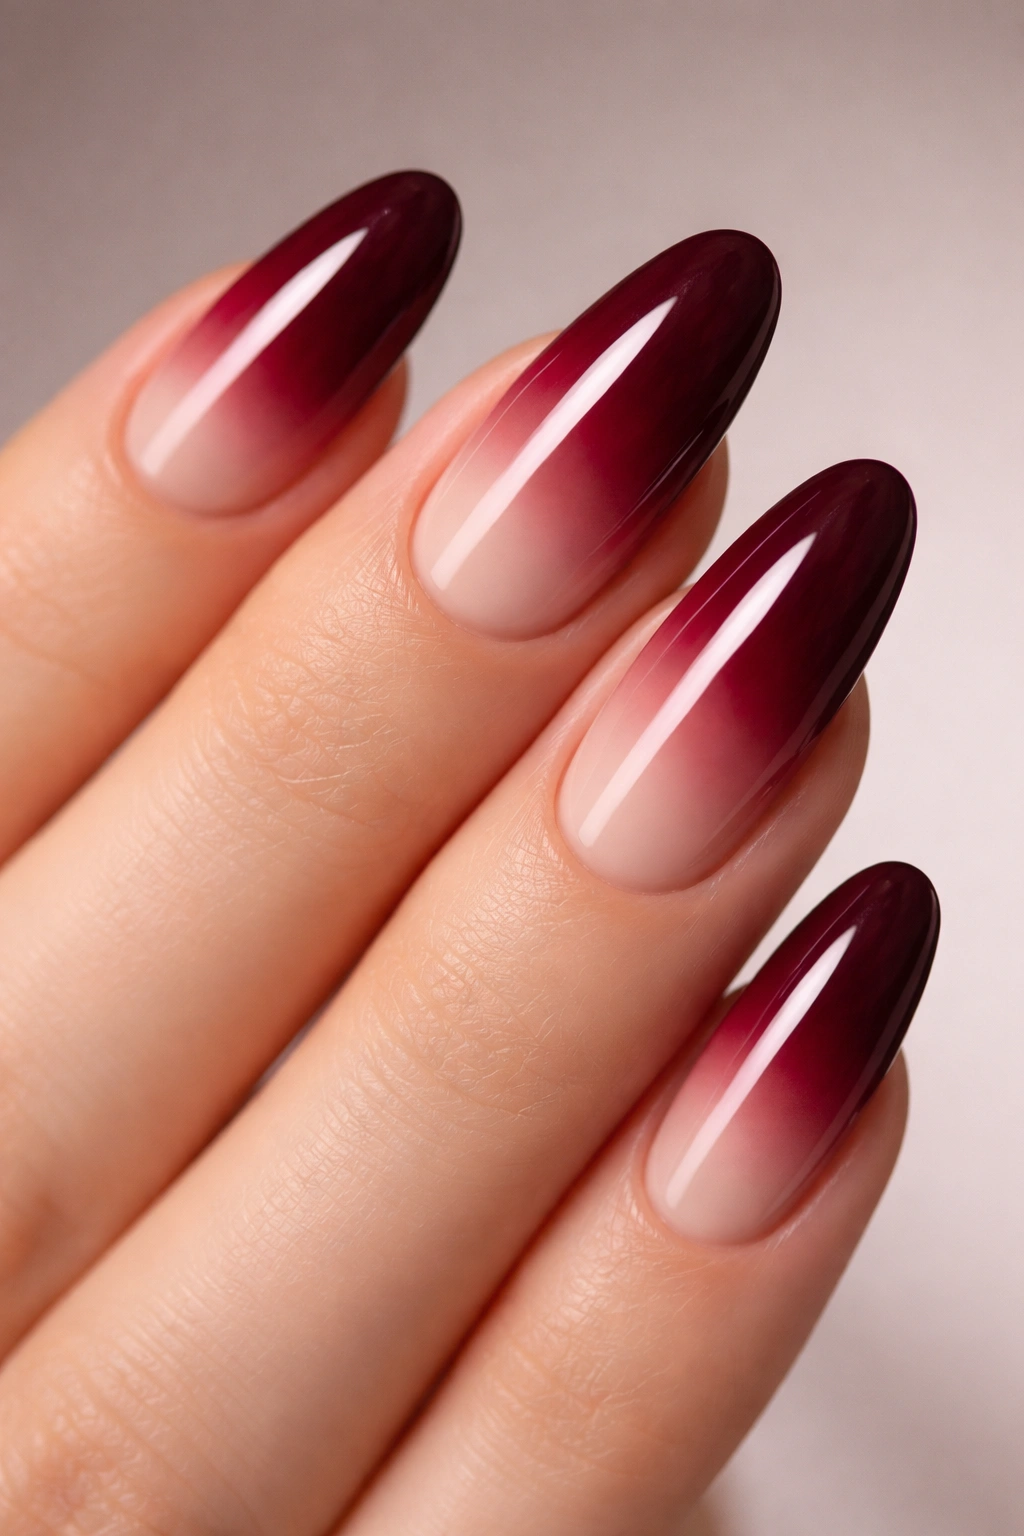
This is a gradient design where you start with rich burgundy at the base of the nail and gradually transition through lighter burgundy tones to pale nude or champagne at the tip. The effect is sophisticated, slightly trendy without being trendy-feeling, and it makes long oval nails look even more elegant.
How to Execute This Without It Looking Blotchy
The key to a seamless ombre is using a makeup sponge and doing multiple thin layers rather than trying to blend it out with a brush. Paint horizontal stripes of color on a makeup sponge (burgundy, medium burgundy, light burgundy, nude), then gently dab the sponge onto the nail in a rolling motion. This creates a softer transition than a hard gradient would. Then go back and clean up the cuticle area with rubbing alcohol on a small brush. The effort is worth it—a blotchy ombre looks unfinished, but a smooth gradient looks intentional and high-effort.
Color Combinations That Translate Well to This Effect
- Deep burgundy to dusty rose to light beige
- Burgundy to mauve to ivory
- Wine red to terracotta to champagne
- Dark burgundy to rust to cream
Insider note: This design photographs beautifully, which matters if you’re someone who documents your manicures. The gradient catches light differently depending on the angle, creating depth that shows up really well in photos.
4. Burgundy with Delicate White Lace Overlay
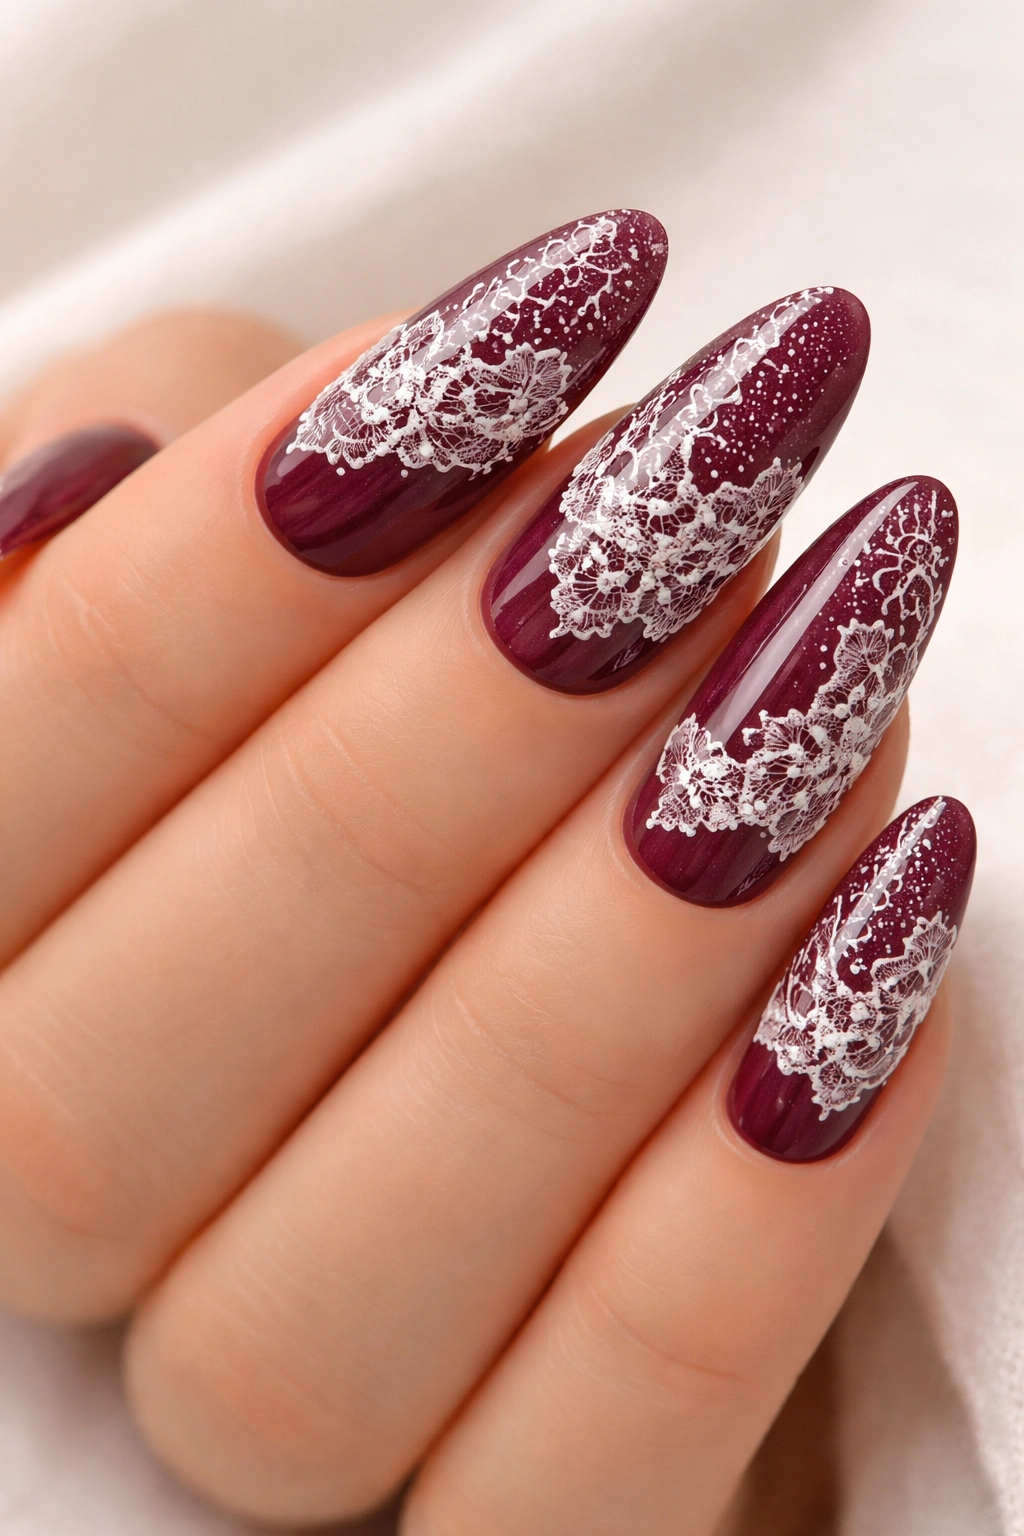
This is more intricate than some of the other designs, but it’s absolutely worth it if you have a bit of patience or access to a talented nail artist. Imagine solid burgundy as your base, with the finest white lace pattern delicately painted or stamped across the surface—think antique lace, not heavy doilies. It’s romantic without being frilly.
What Makes This Design Feel Elevated Rather Than Costume-Like
The key is restraint and detail size. The white lace should be thin, delicate, and intricate—tiny loops and open spaces rather than thick, heavy lines. When the lace is done well, it creates a texture and visual interest that reads as intentional artistry. Burgundy is a serious, sophisticated color, so pairing it with something delicate keeps the overall effect from becoming costume-y. The contrast between the depth of the burgundy and the airiness of the white lace is what makes this work.
Technical Options for Creating the Lace Pattern
- Hand-painted with a very fine liner brush (requires steady hands and real skill)
- Stamped using nail stamping plates designed with lace patterns (more accessible, can still look stunning)
- Stencil-created using specialized nail lace stencils and a thin brush
- Gel-based designs, which allow for more precision and longer wear
Pro tip: If you’re doing this yourself, test the design on a nail wheel or practice nail first—lace designs look great when they’re executed perfectly, but imperfect lace can read as sloppy.
5. Burgundy with Rose Gold Metallic Dust on Accent Nails
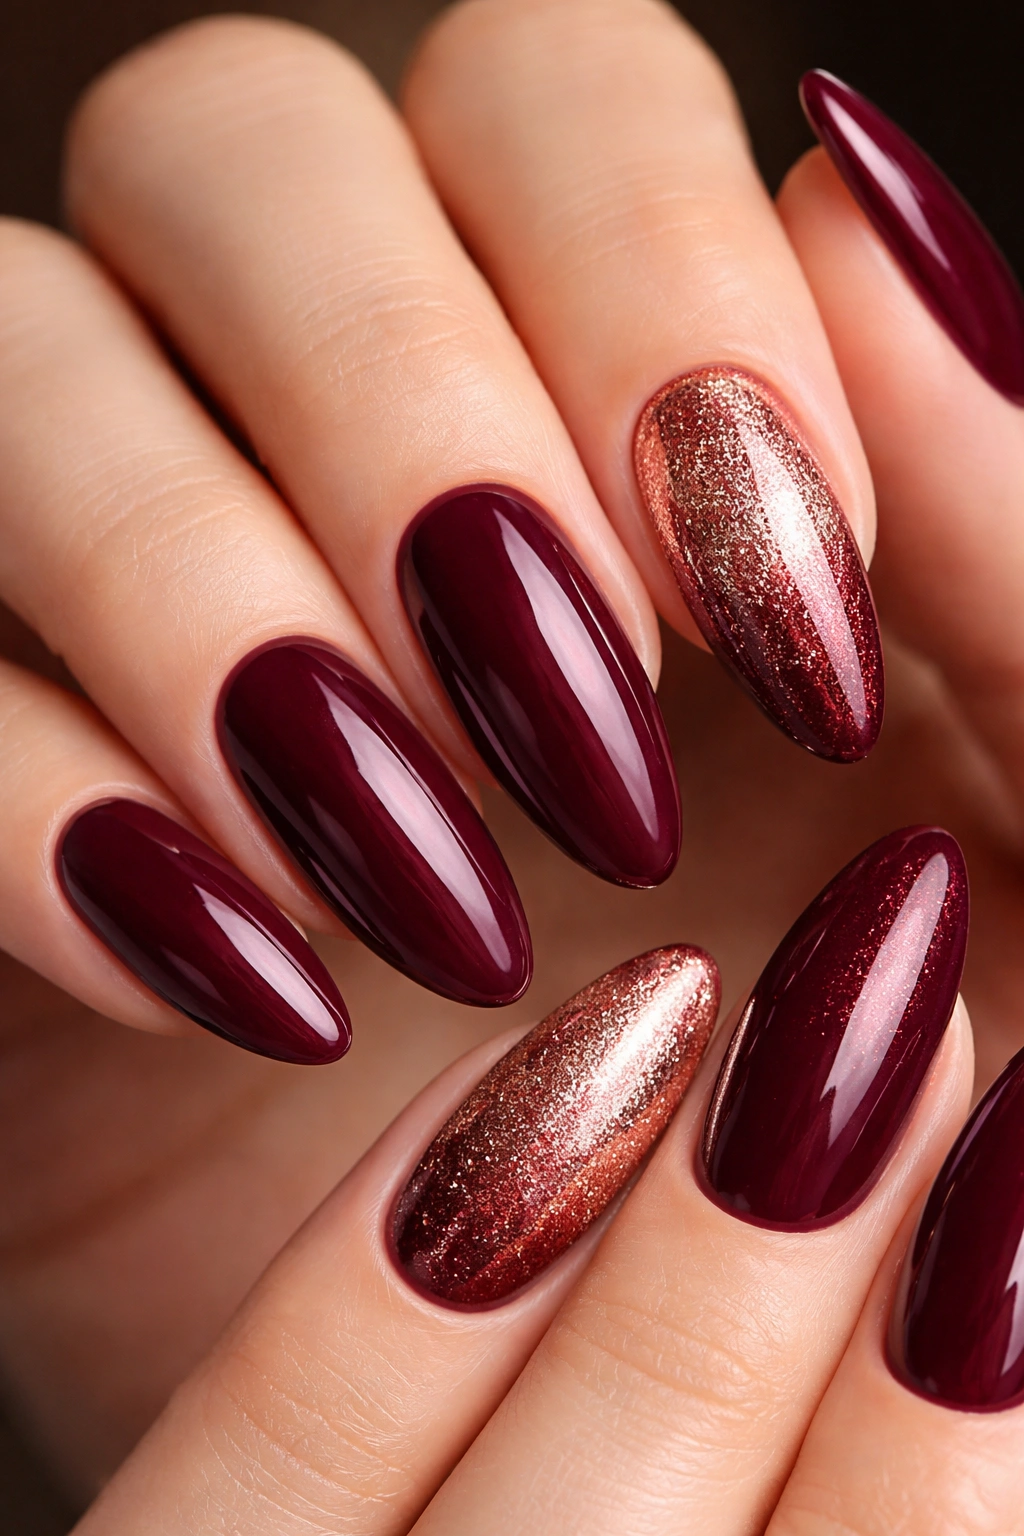
This design keeps most of your nails in solid burgundy while dedicating your accent nails (typically the ring finger on each hand) to a rose gold metallic chrome powder or dust finish. The metallized accents catch light in a different way than the deep burgundy, creating visual movement and a genuinely luxurious feel.
Why Rose Gold Works Better Than Yellow Gold Here
Rose gold has peachy, warm undertones that complement burgundy’s depth without making it feel one-note. Yellow gold is brighter and can sometimes make burgundy look duller by comparison, while rose gold creates a warm harmony. Chrome powder or metallic dust creates an almost liquid, mirror-like finish that’s different enough from the matte burgundy to feel intentional and polished. On long oval nails, that metallic accent nail becomes a small jewel.
How to Apply Metallic Dust for a Professional Finish
- Start with a gel base and cure it
- Apply a very thin layer of sticky gel topcoat (the residue that remains before curing)
- Use a specialized metallic dust applicator or a dense brush to work the powder into the sticky topcoat, pressing firmly
- Brush away excess dust gently
- Seal with a clear topcoat and cure fully
Worth knowing: Metallic dust finishes can shed or lose their luster if not properly sealed, so invest in a quality topcoat and follow the application process exactly.
6. Burgundy with Negative Space Geometric Design
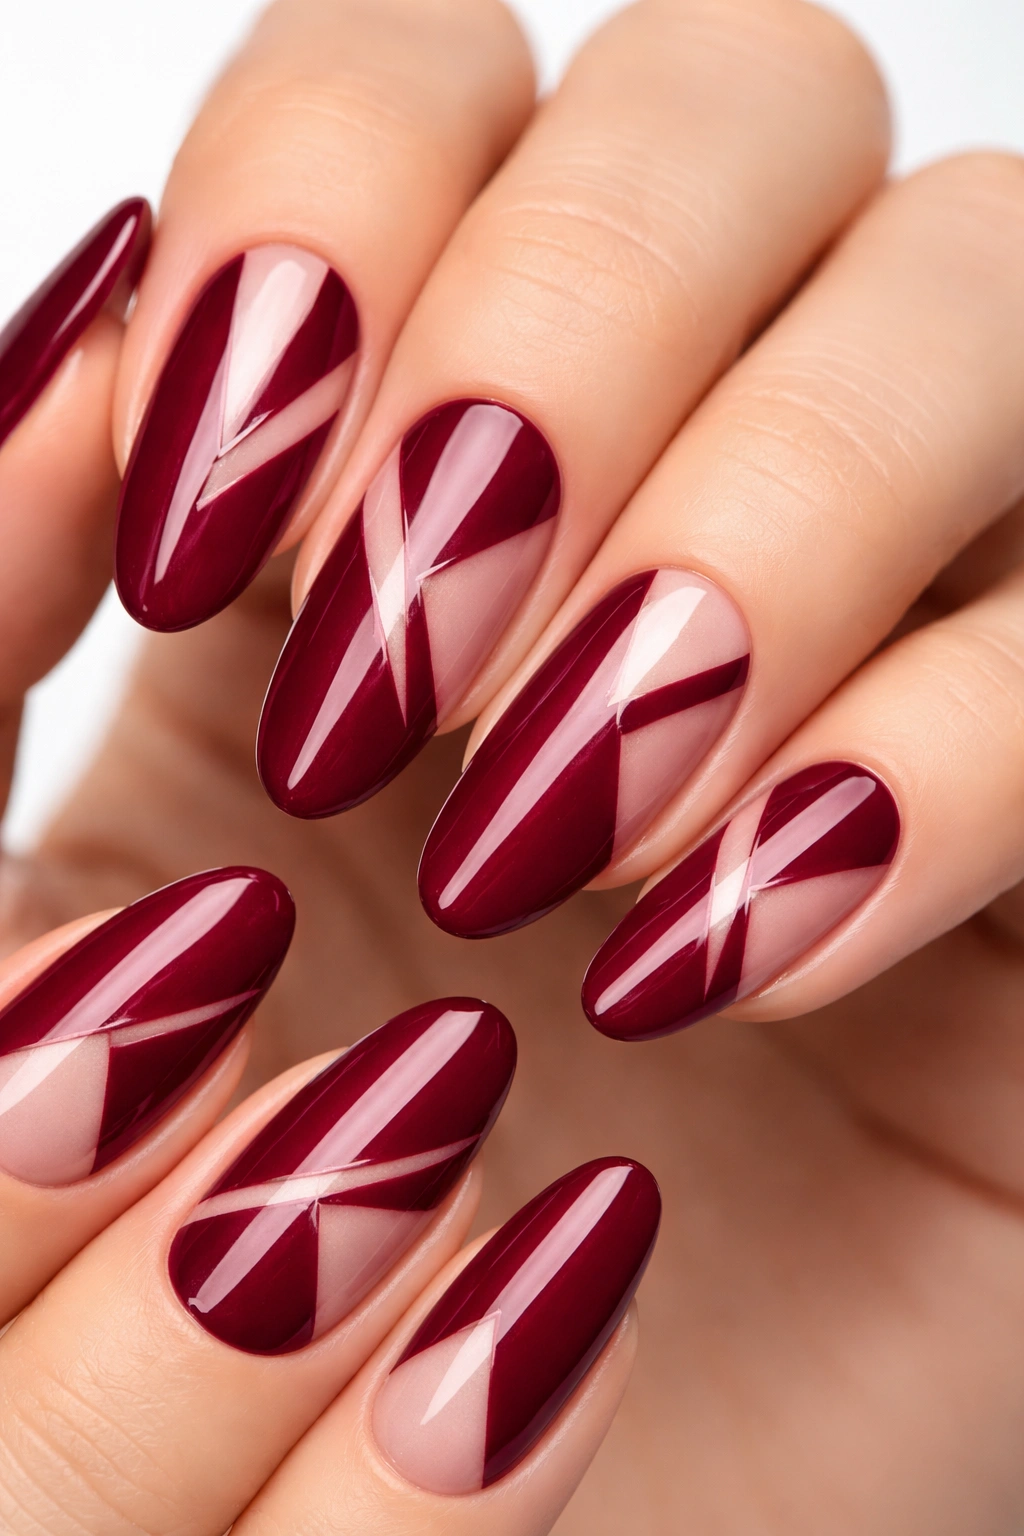
Instead of covering the entire nail with burgundy, create a geometric pattern using negative space—meaning you leave sections of the nail bare (showing the nail bed or a clear base underneath) while burgundy forms the pattern. Think angular lines, triangles, or abstract shapes. This approach feels very modern and architectural.
Why Negative Space Feels Fresh and Contemporary
Negative space designs create visual contrast without requiring multiple colors. The eye is drawn to the gaps and the shapes formed by the absence of color, which can make the design feel more interesting than something fully covered. On long oval nails, geometric negative space designs emphasize the elegant shape itself—the negative space often frames the outline of the nail or creates diagonal patterns that highlight the length.
Geometric Patterns That Look Professional and Intentional
- Diagonal stripes running from one corner to the opposite corner
- Triangular shapes at the tip or base
- Vertical lines creating a striped effect on half the nail
- Abstract angular shapes that look almost like broken glass or shattered patterns
- A small negative space window at the base or center of the nail
Pro tip: When creating negative space designs, use painter’s tape to create clean, sharp edges. Tape off the areas you want to keep bare, apply burgundy around them, and remove the tape while the polish is still slightly tacky for the cleanest lines.
7. Burgundy Marble Effect with Charcoal and Gold

Swirl charcoal gray and soft gold into a burgundy base to create a marbled, geological look—like polished stone or agate. The result feels natural, complex, and artistic without being loud. Each nail becomes unique, which is part of the appeal.
How to Create a Marble Effect That Actually Looks Intentional
The trick is using colors that are close enough in value and undertone to feel cohesive. Burgundy, charcoal, and gold work because they’re all warm-toned or neutral, so even when swirled together, they read as a unified design rather than chaotic. You’ll need a medium for this—either a specialized marble medium or regular topcoat mixed with a tiny bit of water in a dapping dish. Use a thin brush or a marbling tool to create swirls directly on the nail, then seal the whole thing with a topcoat.
Color Combinations That Create a High-End Marble Look
- Burgundy, slate gray, and rose gold
- Burgundy, charcoal, and champagne
- Deep burgundy, taupe, and copper
- Wine red, soft gray, and silver
Insider note: Marble designs are forgiving because imperfection is part of the aesthetic—a slightly off-center swirl or uneven distribution of color actually adds to the hand-marbled, artisanal feel.
8. Burgundy with Tiny Pearl or Diamond Embellishments
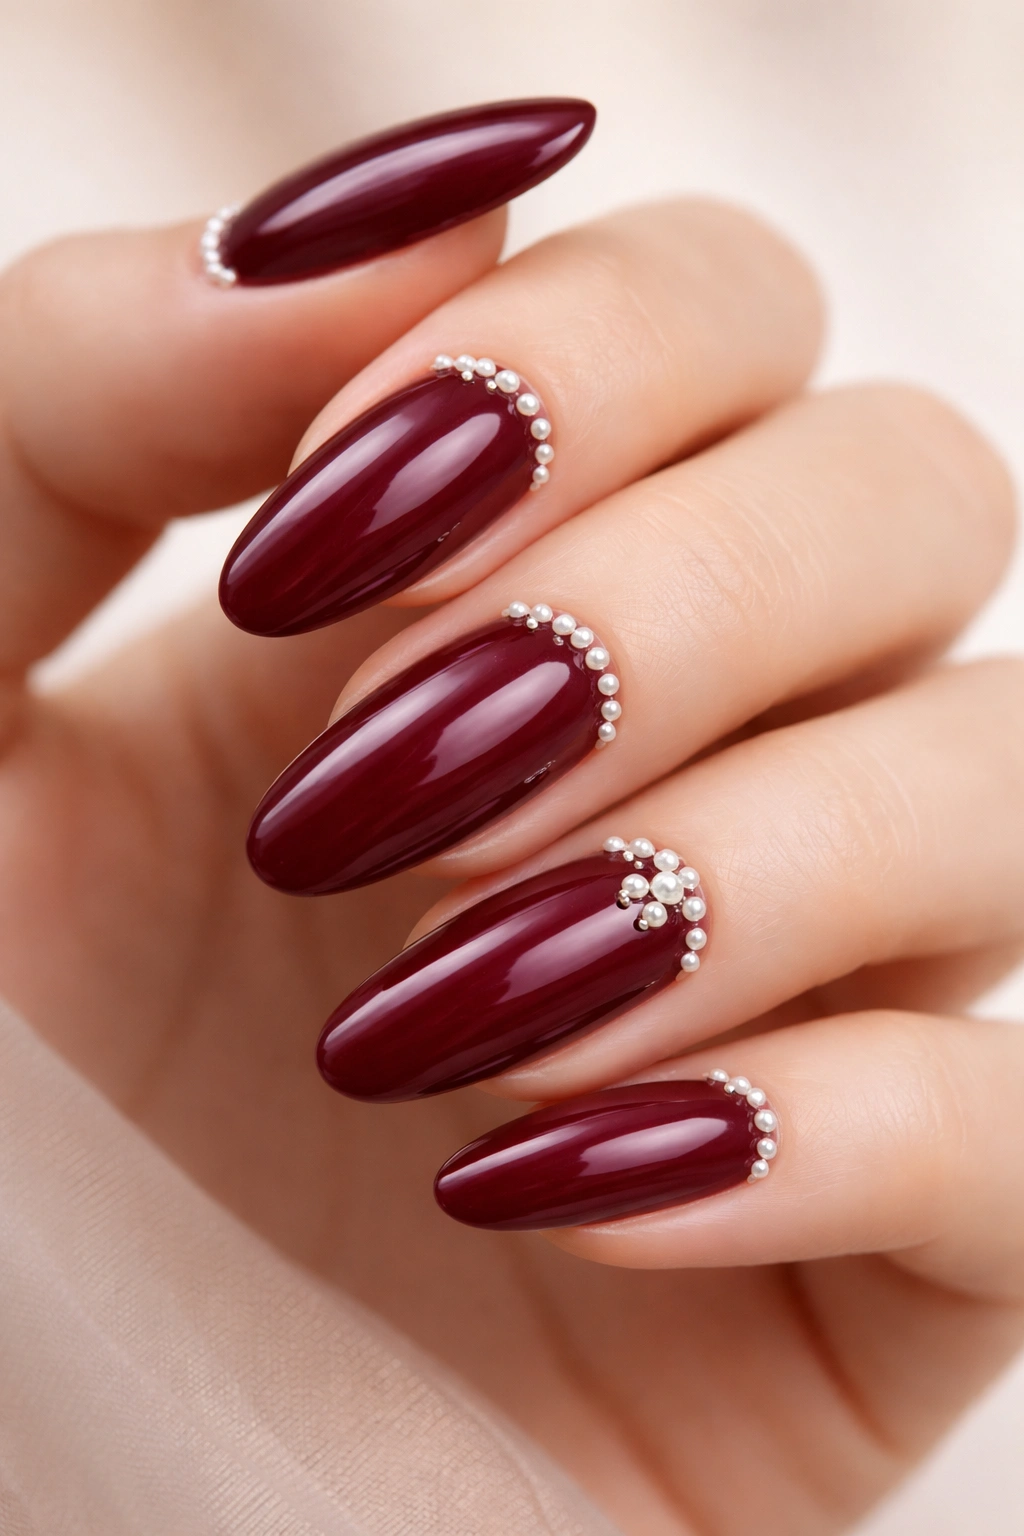
This is a minimal but unmistakably luxe approach—solid burgundy nails studded with tiny pearl accents, usually placed strategically along the cuticle line or in a small cluster on the accent nail. Real pearls add subtle dimension and texture, but high-quality nail pearls and crystals look surprisingly similar at a glance.
Where to Place Pearls for Maximum Impact with Minimal Maximalism
- Along the cuticle line on all nails for a subtle, elegant look
- In a small cluster (5-7 pearls) on the ring finger or middle finger
- At the base of the nail in a curved line that follows the cuticle
- In the very center of the nail in a small geometric pattern
The placement matters because it determines whether the design feels understated or attention-grabbing. Placing pearls along the cuticle keeps the focus on the color and shape of the nail itself, while clustered pearls on an accent nail make a clearer statement.
Application and Durability
- Use a nail glue specifically designed for rhinestones and pearls (regular nail glue can be too thick)
- Apply the glue to the back of the pearl, then press onto the nail for 10-15 seconds
- Seal around the pearls with a topcoat (this keeps them from catching on things and helps them stay put)
- Pearls and crystals typically last 5-7 days before losing their grip, depending on how much your hands contact surfaces
Pro tip: If you’re using real pearls, make sure they’re the kind designed for nail art—jewelry pearls have different coatings and won’t adhere as well.
9. Burgundy Base with Thin Silver or Chrome Striping
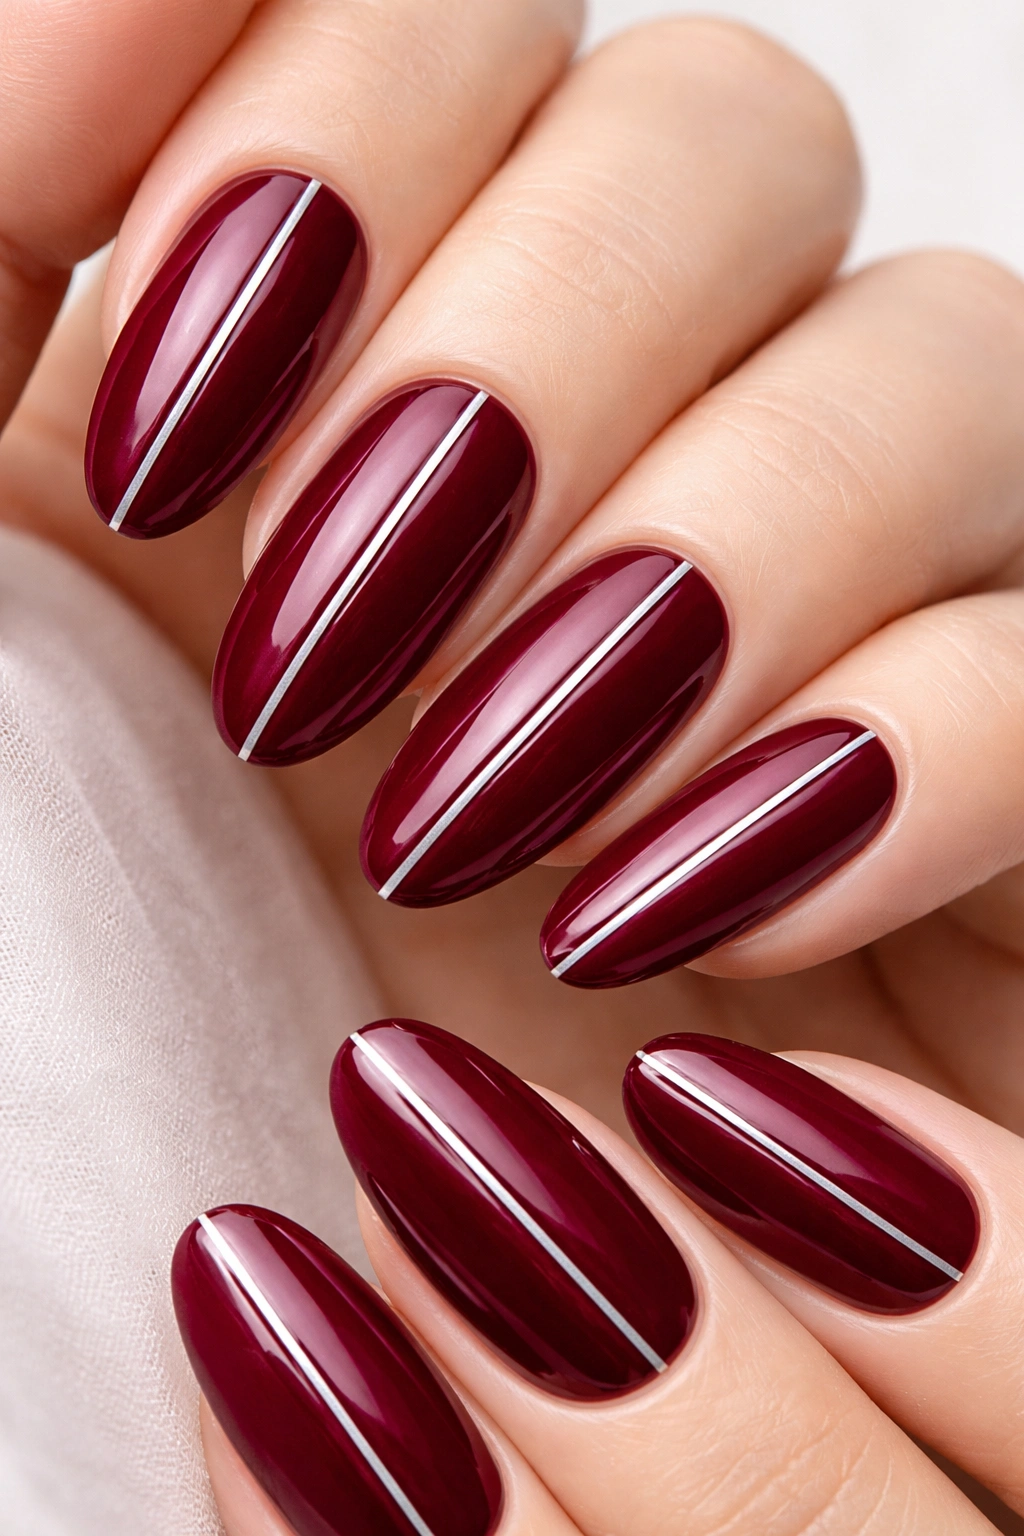
Imagine thin, precise lines of silver or chrome running either vertically down the length of the nail or in a thin frame around the edges of a burgundy base. The metallized lines are barely there, but they catch light in a way that makes the entire manicure feel more polished and intentional.
How Thin Metallized Stripes Transform a Solid Color
A solid color can feel beautiful but sometimes a bit flat, especially from a distance. Adding thin metallic stripes doesn’t fundamentally change the design—it’s still mostly burgundy—but those lines create definition, catch light, and give the eye something to follow down the length of the nail. On long oval nails, vertical striping emphasizes the length, while frame-style stripes emphasize the shape.
Execution Methods That Create Clean, Professional Lines
- Thin metallic gel applied with a precision gel brush (requires a steady hand)
- Thin metallic striping tape applied to the nail before topcoat (easiest, very clean results)
- Hand-painted with a striping brush and metallic polish (traditional method, forgiving)
- Stamped using specialized striping plates (requires stamping supplies but very precise)
Worth knowing: Metallic lines can sometimes look smudgy or dull if not sealed properly. Apply a clear topcoat and cure to get the full effect—the topcoat actually enhances the shimmer.
10. Burgundy with Subtle Red Glitter Gradient
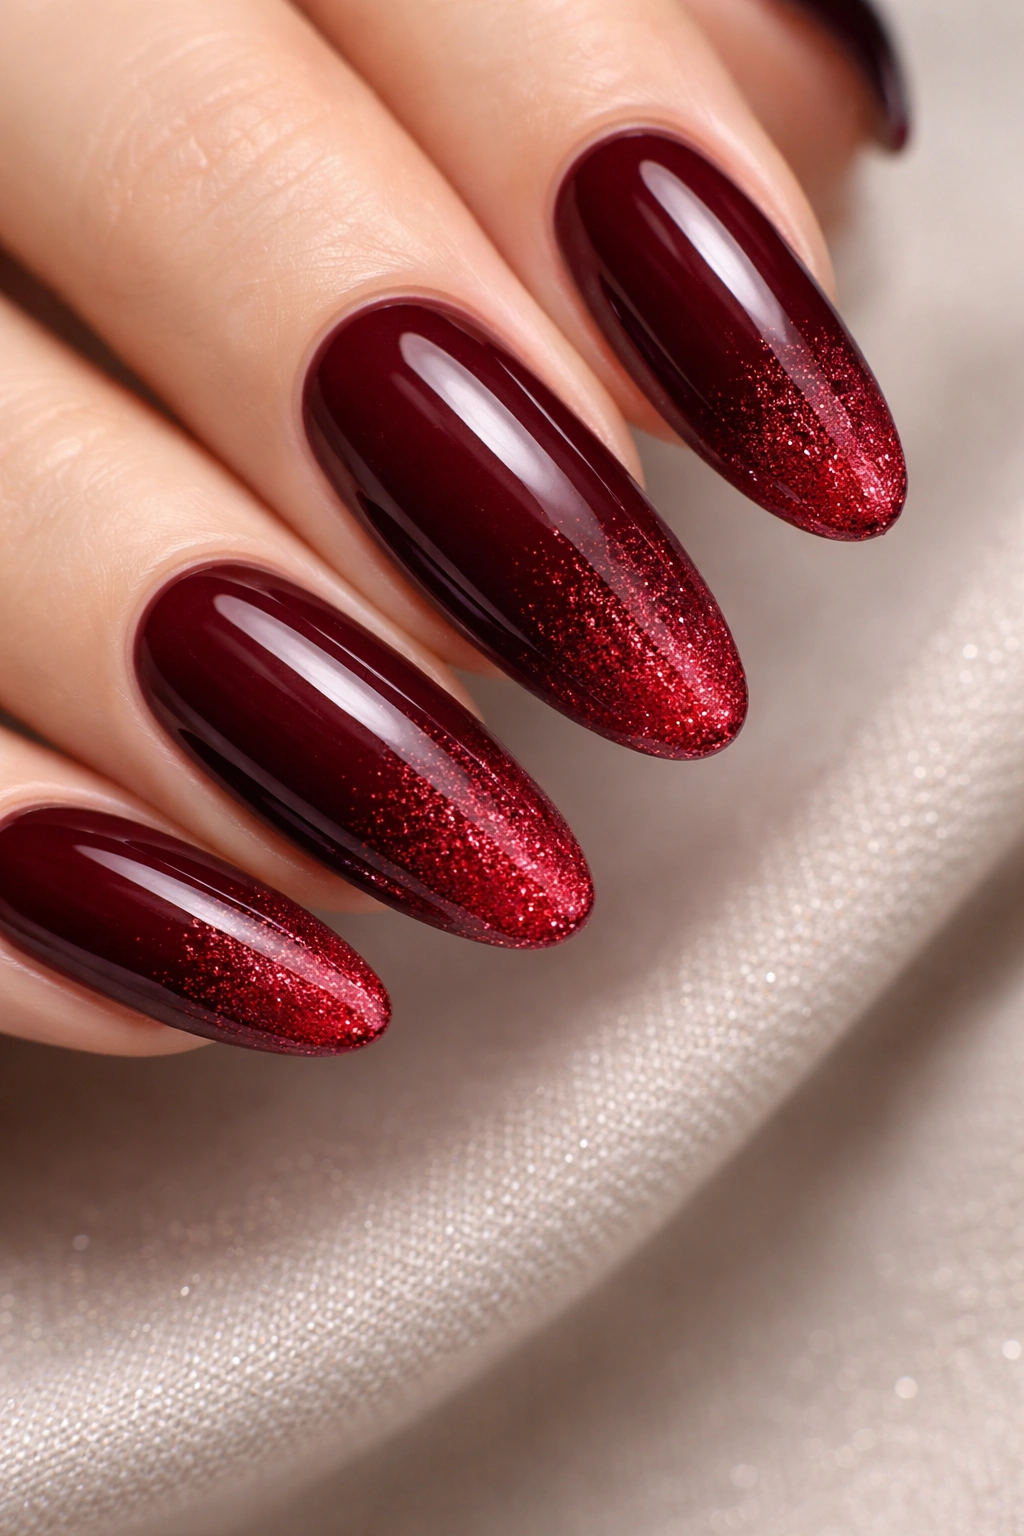
This is burgundy that gradually shifts to include more and more fine glitter as you move toward the tip, creating an effect that’s elegant and a tiny bit sparkly without being costume-like. The glitter is subtle enough to work in a professional setting while still catching light beautifully.
Why Fine Glitter Works Better Than Large Chunky Glitter
Chunky glitter reads as costume, while fine glitter (like cosmetic-grade microglitter) feels more like dimensional depth. When you layer fine glitter gradually from burgundy into the tip, you’re creating a subtle ombré effect that catches light softly rather than with harsh sparkle. On long oval nails, this gradient draws the eye down the length of the nail, emphasizing the elegant shape.
How to Apply Glitter Gradient Without It Looking Unintentional
- Apply burgundy base in two coats
- Mix fine red or burgundy glitter with clear gel or topcoat (a 1:1 ratio is a good starting point)
- Apply this mixture to just the tip of the nail (upper third), then use a clean brush to diffuse it upward slightly so it gradually fades into the solid burgundy
- Cure if using gel, then seal with a topcoat
- The key is using enough product to create visible sparkle but not so much that it becomes chunky or uneven
Insider note: If you’re doing this with regular polish rather than gel, apply the glitter mixture in thin layers and let each layer dry completely before adding the next—this prevents the glitter from sinking to the bottom.
11. Burgundy with Negative Space Accent Lines and a Nude Inner Nail
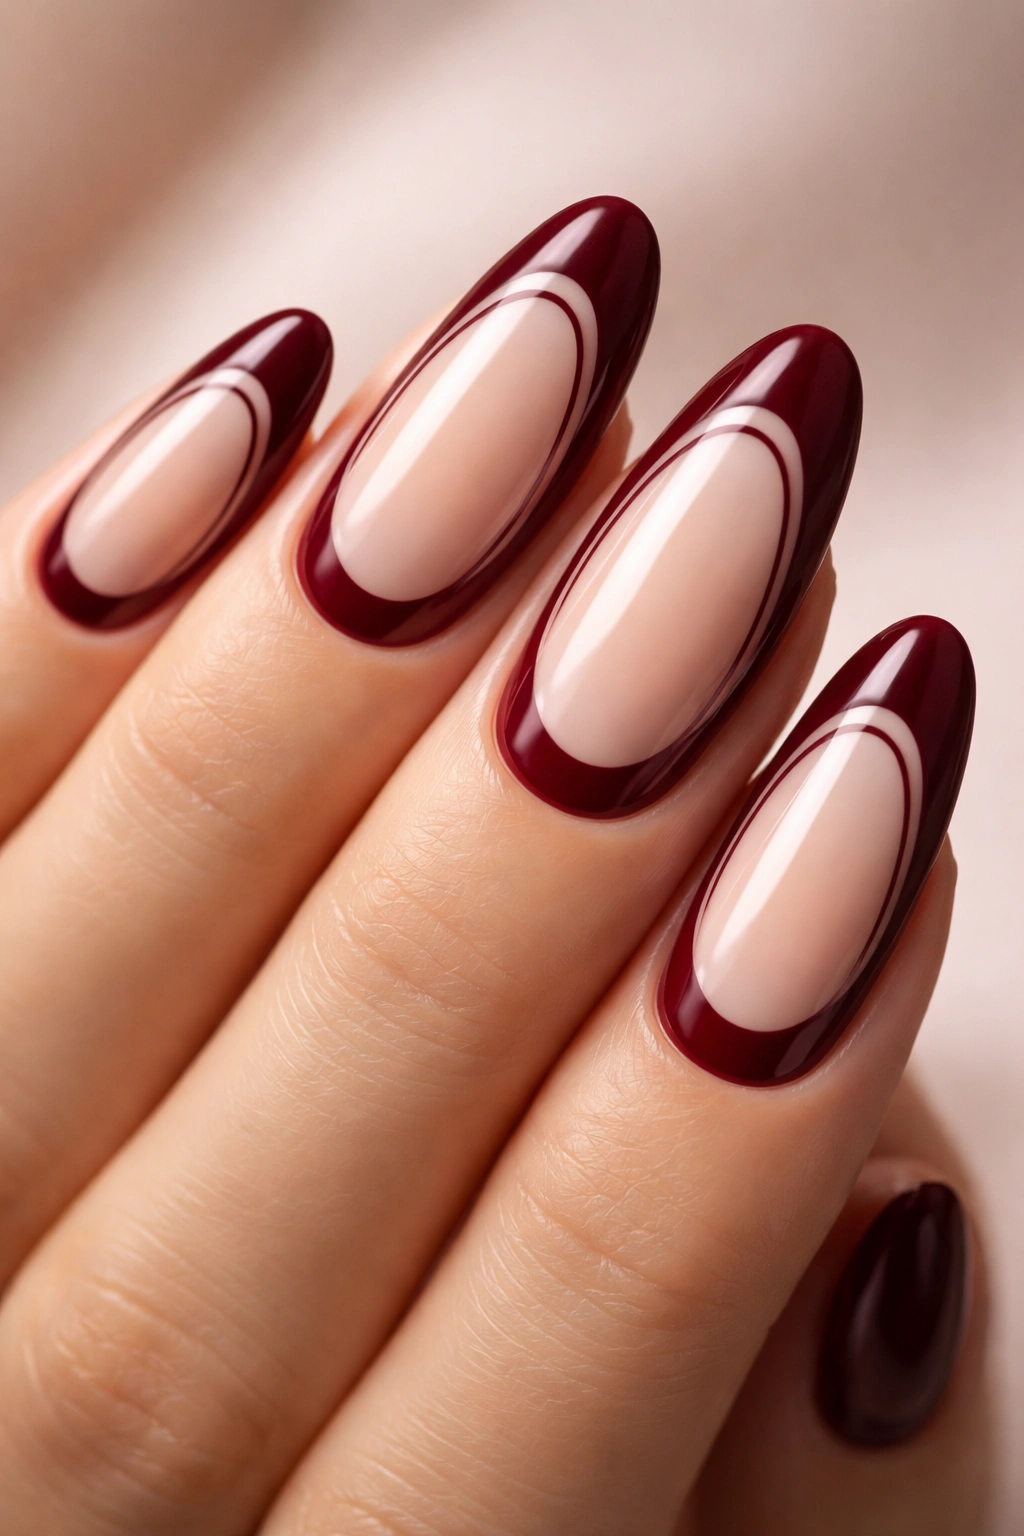
This design creates the visual illusion of a smaller nail inside the larger nail by using negative space strategically. The outer portion is burgundy, thin lines of negative space frame an inner area that’s painted a soft nude, creating a frame effect that’s geometric and surprisingly modern.
Why Framing Effects Make Long Nails Look Even More Intentional
The eye is naturally drawn to geometric framing, and when you create a frame within the shape of a long oval nail, you’re essentially emphasizing the elegant outline while creating internal visual structure. This design plays with positive and negative space in a way that feels architectural and intentional. It’s a subtle way to introduce a second color (the nude inside) without it feeling like a typical two-tone design.
Design Variations That Create Professional Results
- A thin burgundy frame around a nude center (like a border)
- Negative space lines in a geometric pattern that creates the illusion of a smaller nail inside
- Burgundy outer edges with a nude center and thin burgundy lines creating structure within the nude area
- A pointed or triangular negative space area at the tip, creating the impression of a smaller accent
Pro tip: This design requires precise work with painter’s tape or a very steady hand. Take your time with this one—clean lines make the design look intentional and polished, while shaky lines read as sloppy.
12. Burgundy with Holographic or Rainbow Duochrome Shimmer
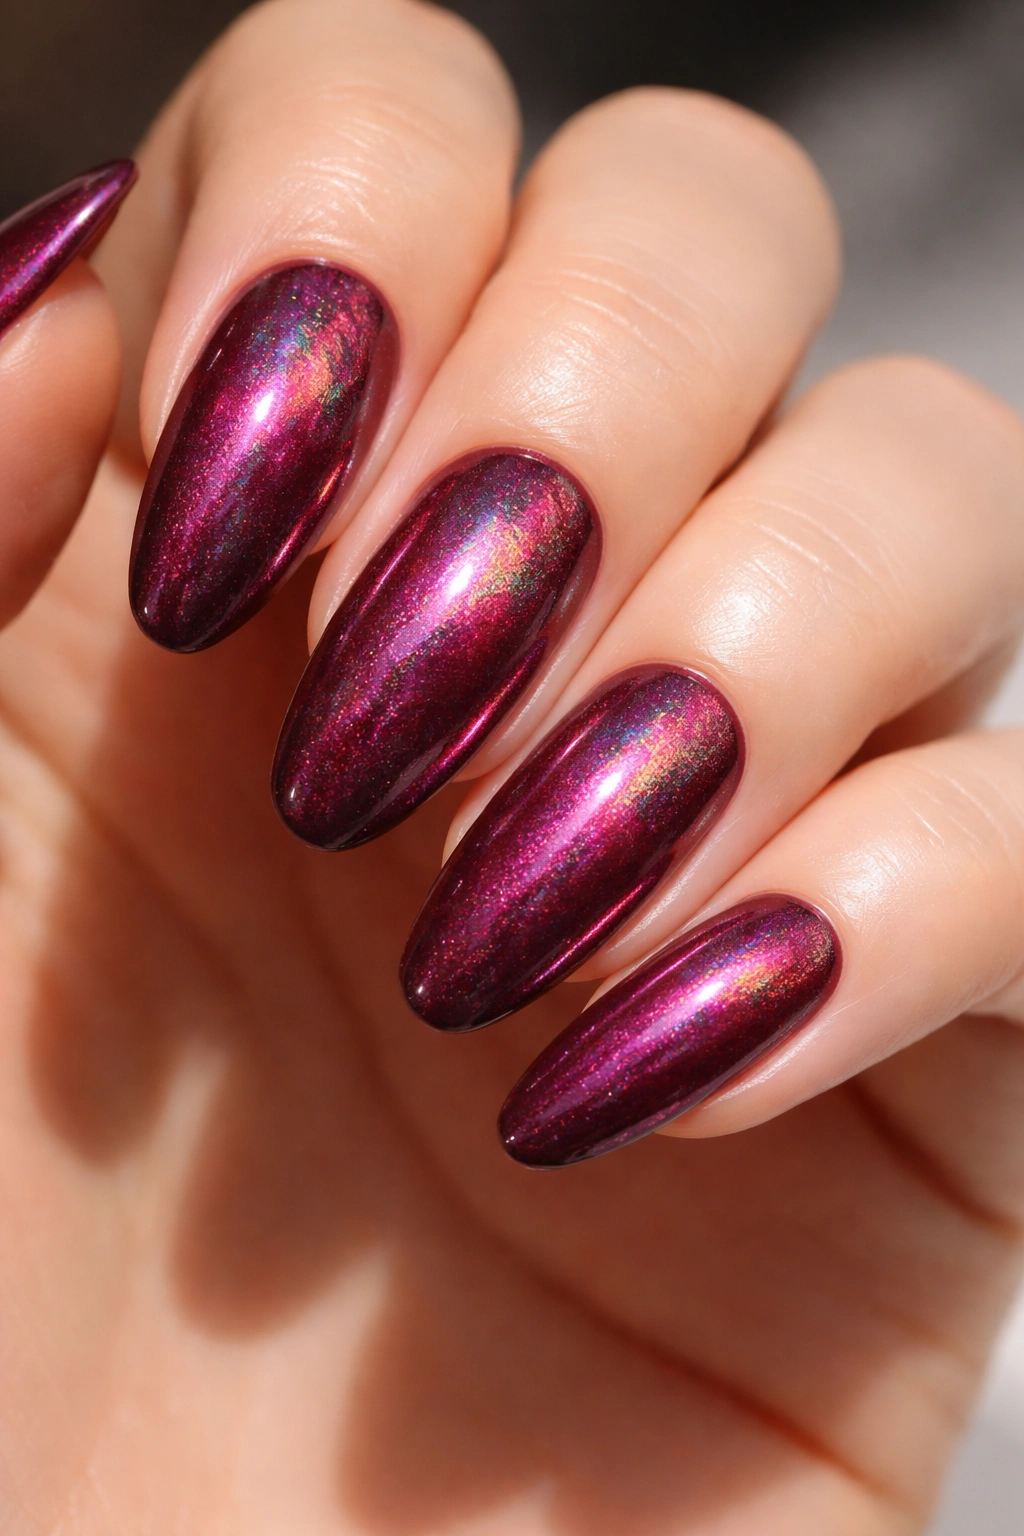
This is the most unexpected option—a burgundy base infused with a holographic or duochrome shimmer that shifts color slightly as you move your hand. It’s still primarily burgundy, but the shimmer catches light and creates flashes of other colors (pink, purple, gold, or even rainbow hues). It’s playful and modern without abandoning the sophistication of the base color.
What Makes Duochrome and Holographic Effects Feel Modern
Duochrome and holographic finishes are relatively recent innovations in nail technology, and they feel contemporary without feeling trendy. The way the color shifts subtly as you move your hand creates dimension and interest—it’s like the nail is actually multiple colors depending on how the light hits it. On long oval nails, this effect is genuinely mesmerizing because the elongated surface area means the shifting colors are more apparent.
How to Choose the Right Shimmer Effect for Your Skin Tone
- Cool skin tones look stunning with holographic and duochrome shimmers that include pink, blue, and purple shifts
- Warm skin tones benefit from duochrome shimmers that shift toward gold, copper, or peachy hues
- Neutral skin tones can wear virtually any duochrome, but duochrome shimmers with warmer components tend to feel more cohesive
- Consider your typical lighting environment—fluorescent light brings out cooler shifts, while warm indoor lighting emphasizes warmer duochrome effects
Worth knowing: Holographic and duochrome polishes tend to be pricier than standard polishes, but they’re worth the investment because the effect is impossible to replicate any other way.
Caring for Long Oval Burgundy Nails
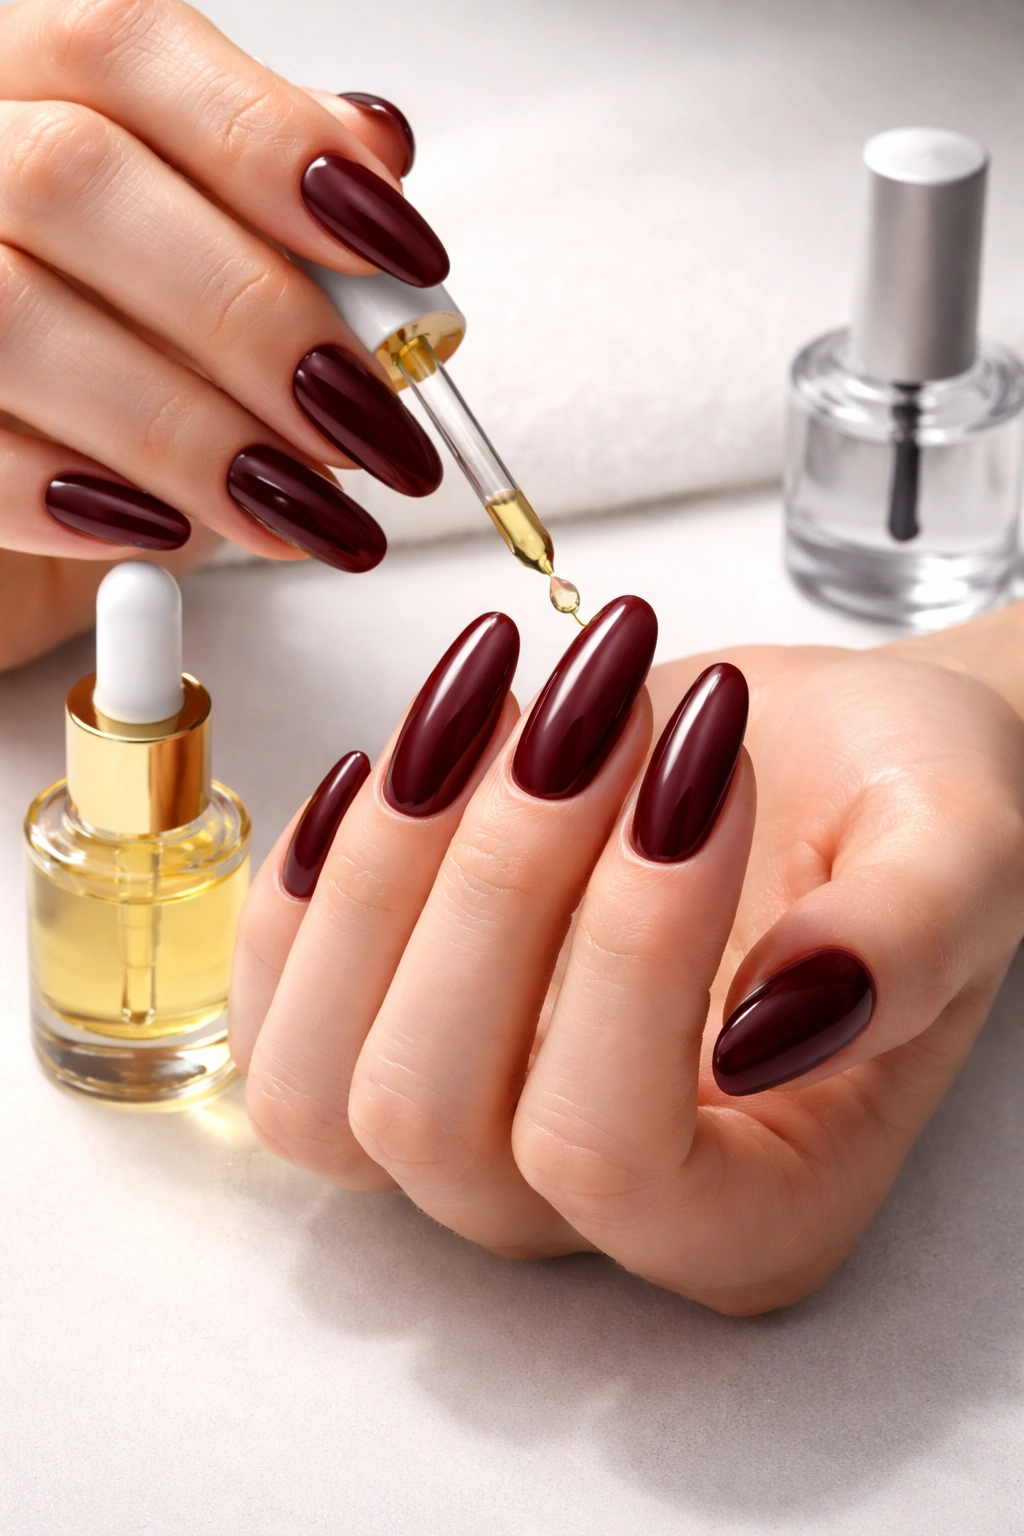
The shape and length of long oval nails means they require slightly more intentional care than shorter nails, and the deeper the color, the more visible any chips or imperfections become. Burgundy is particularly unforgiving of ragged edges or lifted polish—when a chip appears in a dark color, it’s immediately visible. To keep your long oval burgundy nails looking intentional and polished, apply topcoat every other day if you’re hard on your hands, and do a quick cuticle oil treatment before bed (this keeps the skin around the nail healthy and actually helps the polish adhere better at the edges).
Long oval nails are also more prone to breaking at the tip if you don’t support them properly. Avoid using your nails as tools, and consider regular strengthening treatments if you’re noticing thin, peeling nails. A good base coat is essential—it protects the nail surface and helps burgundy polish resist staining (deeper colors can actually stain the nail if applied without a base coat). If you’re planning to wear your nails long-term, invest in quality products and take your time with application. A slower, more careful approach to applying polish always yields better results than rushing.
Final Thoughts
Burgundy on long oval nails isn’t just a manicure—it’s a complete look that communicates sophistication, intention, and genuine personal style. Whether you’re going completely classic with a high-shine solid burgundy or exploring the more intricate designs like delicate lace overlays or geometric negative space patterns, the key is choosing a design that resonates with you and feels authentic to wear.
The beauty of this color and shape combination is the versatility. You can play it absolutely minimal and elegant, introduce metallics for a touch of glamour, add dimension through ombré or marble effects, or go bold with detailed artwork. There’s a burgundy long oval design that works for every occasion, every mood, and every level of nail art skill. The length of the nail itself adds instant elegance to whatever design you choose, and the oval shape is the most flattering nail shape for actually showing off that length without looking impractical.
Since you’re committing to a manicure that requires some maintenance and a bit of care to keep looking sharp, choose a design that genuinely excites you. The designs that matter most are the ones you actually want to look at every single time you look down at your hands.
