

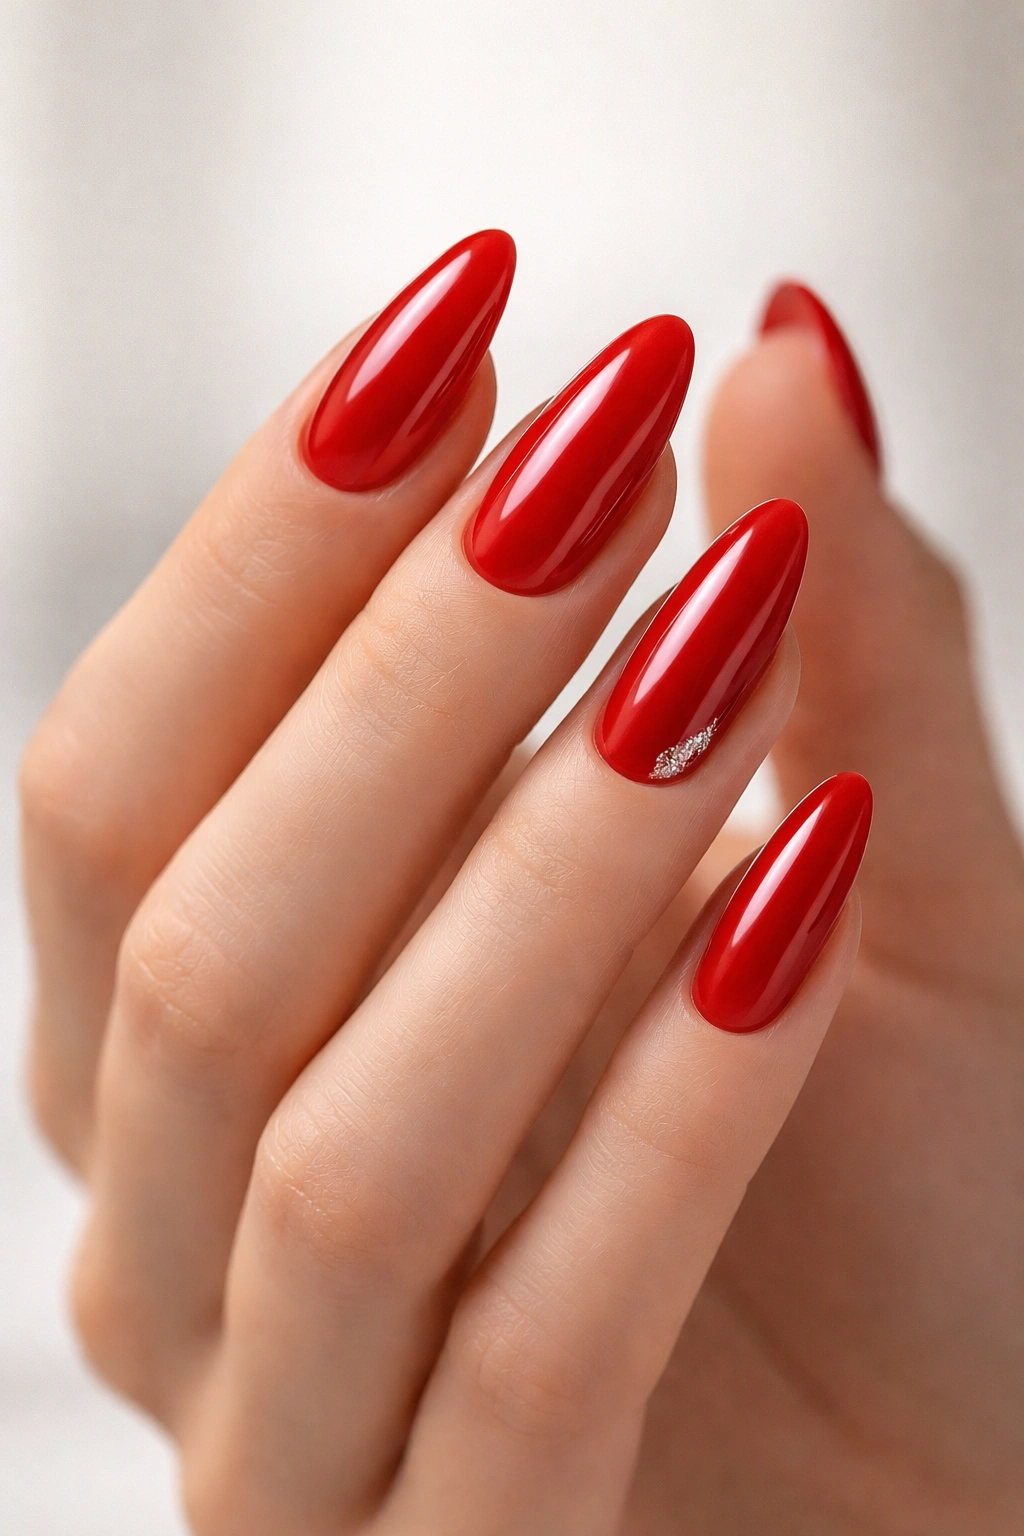
Red nails are a classic choice, but long oval shapes take that timeless elegance to a whole new level. There’s something undeniably sophisticated about the combination—the elongated oval creates a flattering silhouette on your hands, while red commands attention without needing any additional flair. The key to making red oval nails truly stand out isn’t just picking the shade, though that matters. It’s about finding a design that complements the shape, plays with texture, adds dimension, or brings an unexpected twist to the traditional red manicure.
The oval shape itself has made a major comeback in nail trends, and for good reason. Unlike the popular stiletto or coffin shapes that can feel edgy, ovals offer sophistication without aggression. They feel timeless, work for virtually any hand shape, and provide enough surface area to showcase really interesting nail art and finishes. Red is the foundation that makes everything work—it’s the ultimate statement color that reads as polished, confident, and intentional. But pair it with the right design details and your nails become something people genuinely notice and remember.
Whether you’re drawn to minimalist elegance, dramatic patterns, luxe finishes, or creative nail art, there’s a red oval nail design that deserves a spot in your rotation. These 15 options cover the full spectrum, from understated luxury to eye-catching artistry. Each one shows exactly why this combination has staying power in the world of nail design.
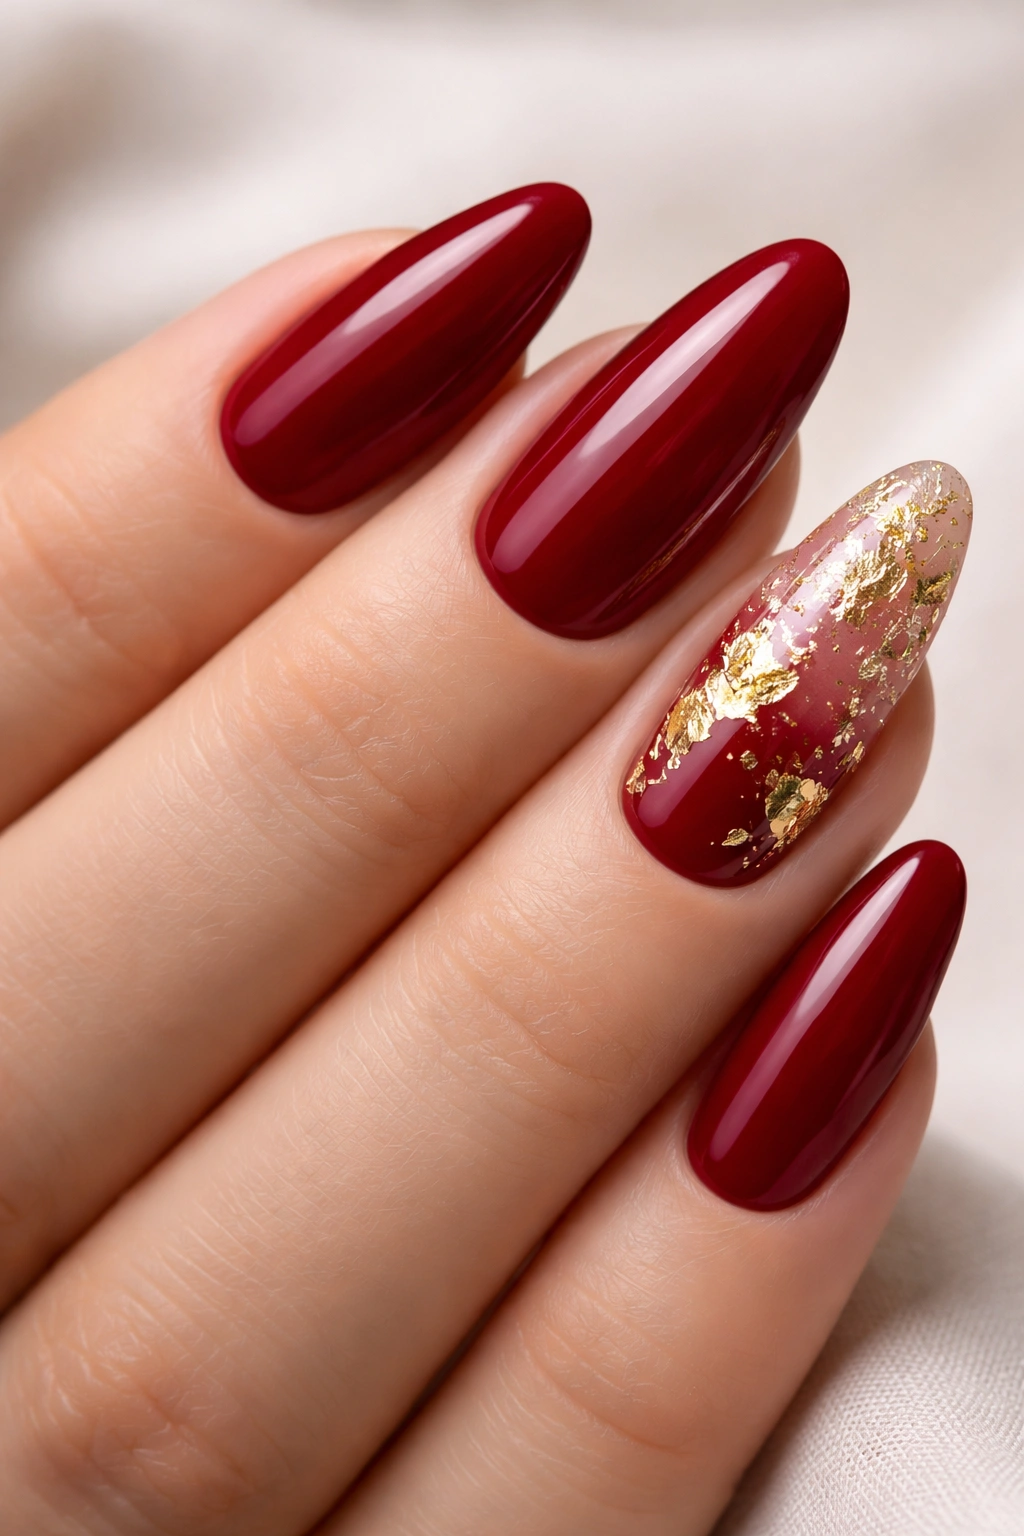
1. Classic Glossy Red with Gold Leaf Accents
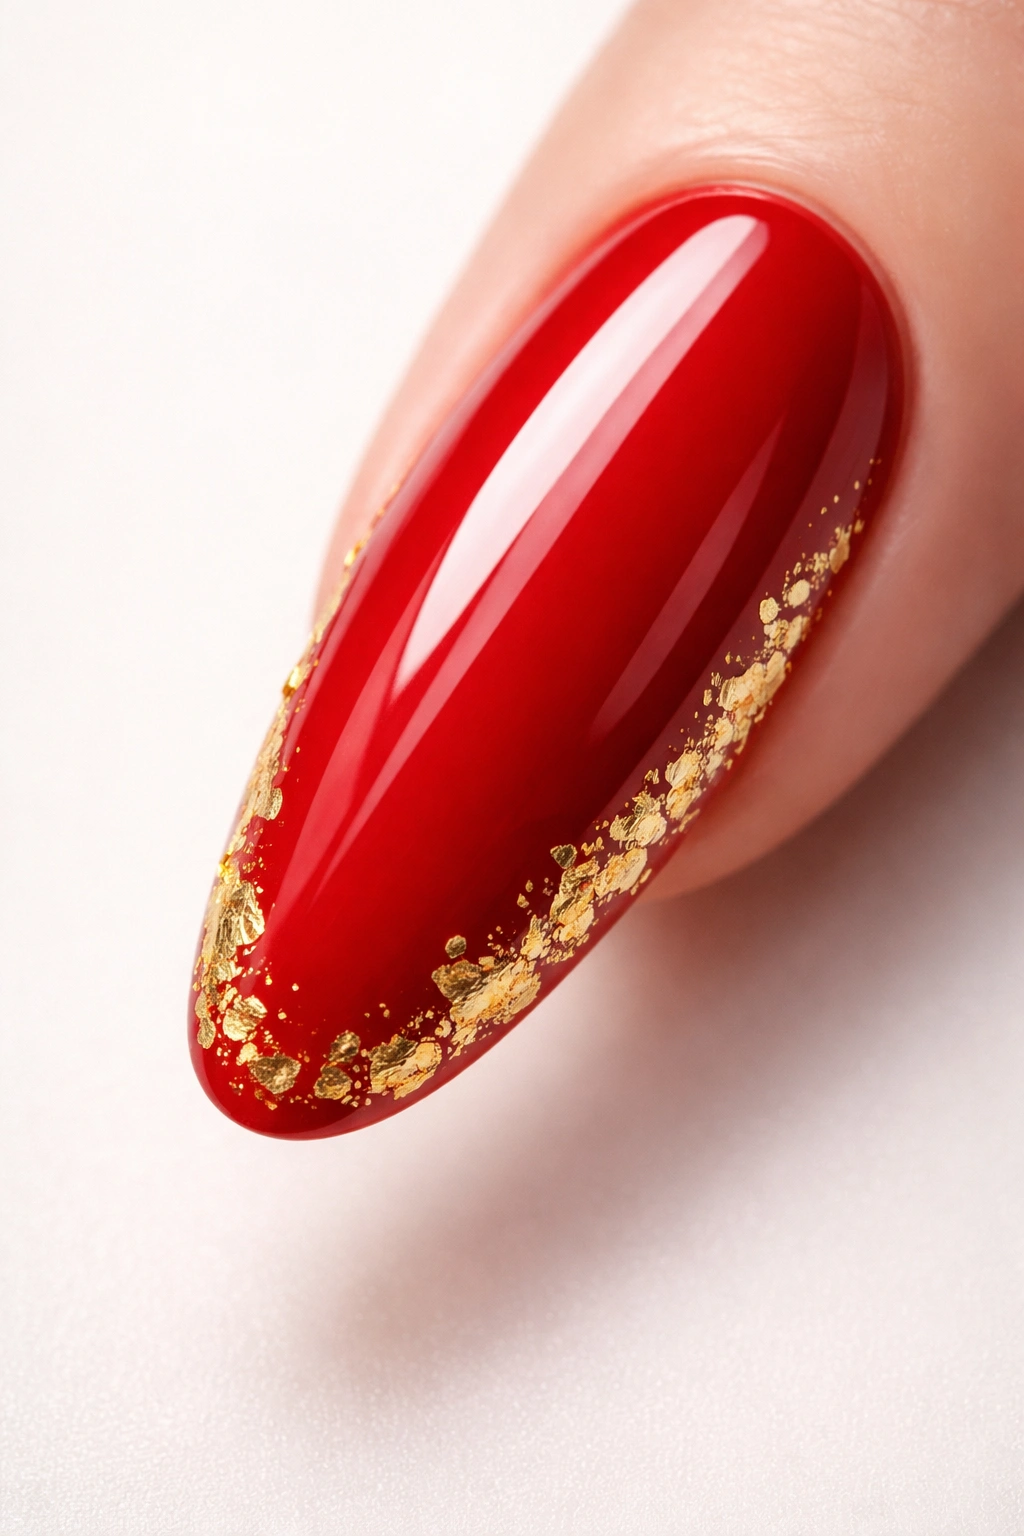
A high-shine glossy red base paired with delicate gold leaf fragments positioned along the edges or scattered across the nail creates instant luxury without overwhelming the design. The glossy finish amplifies the red’s richness, catching light beautifully, while the gold leaf adds dimension and a subtle touch of glamour that feels intentional rather than overdone.
Why It Stands Out
This design works because it respects the power of simplicity while refusing to be boring. The gold leaf acts as a sophisticated accent rather than the main event—think of it as jewelry on a red dress rather than a costume. The combination of high-shine red and metallic gold is inherently elegant, evoking vintage Hollywood glamour without requiring intricate detailing. The oval shape keeps everything refined, preventing the design from tipping into costume territory.
Design Elements to Consider
- Finish: High-gloss gel or traditional polish with a glossy topcoat creates maximum light reflection
- Gold placement: Apply delicate gold leaf flakes along one edge of the nail, or scatter 2-3 small fragments asymmetrically for a more organic look
- Nail length: This works beautifully at medium-long (around 3-4 inches from cuticle to tip) because the gold needs enough real estate to shine without crowding
- Maintenance: This design requires regular touch-ups to the glossy coat but the base color holds beautifully for 3-4 weeks
Pro tip: Use adhesive gold leaf rather than trying to paint metallic details—it catches light more dramatically and creates a genuinely luxury appearance.
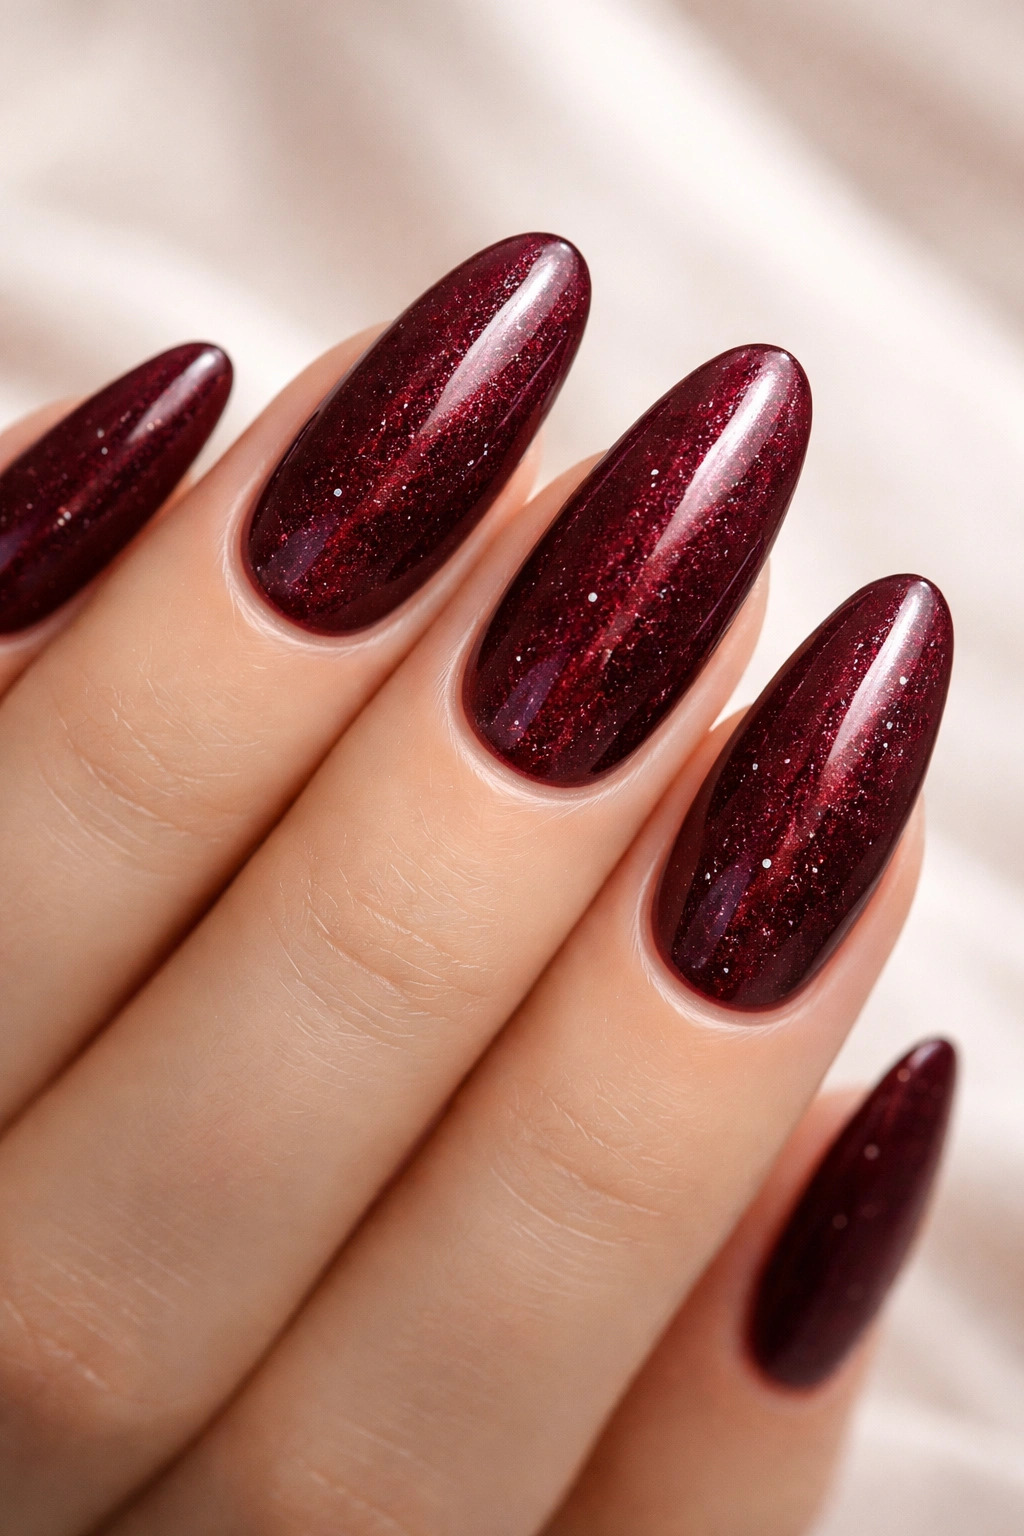
2. Deep Burgundy Red with Matte Finish
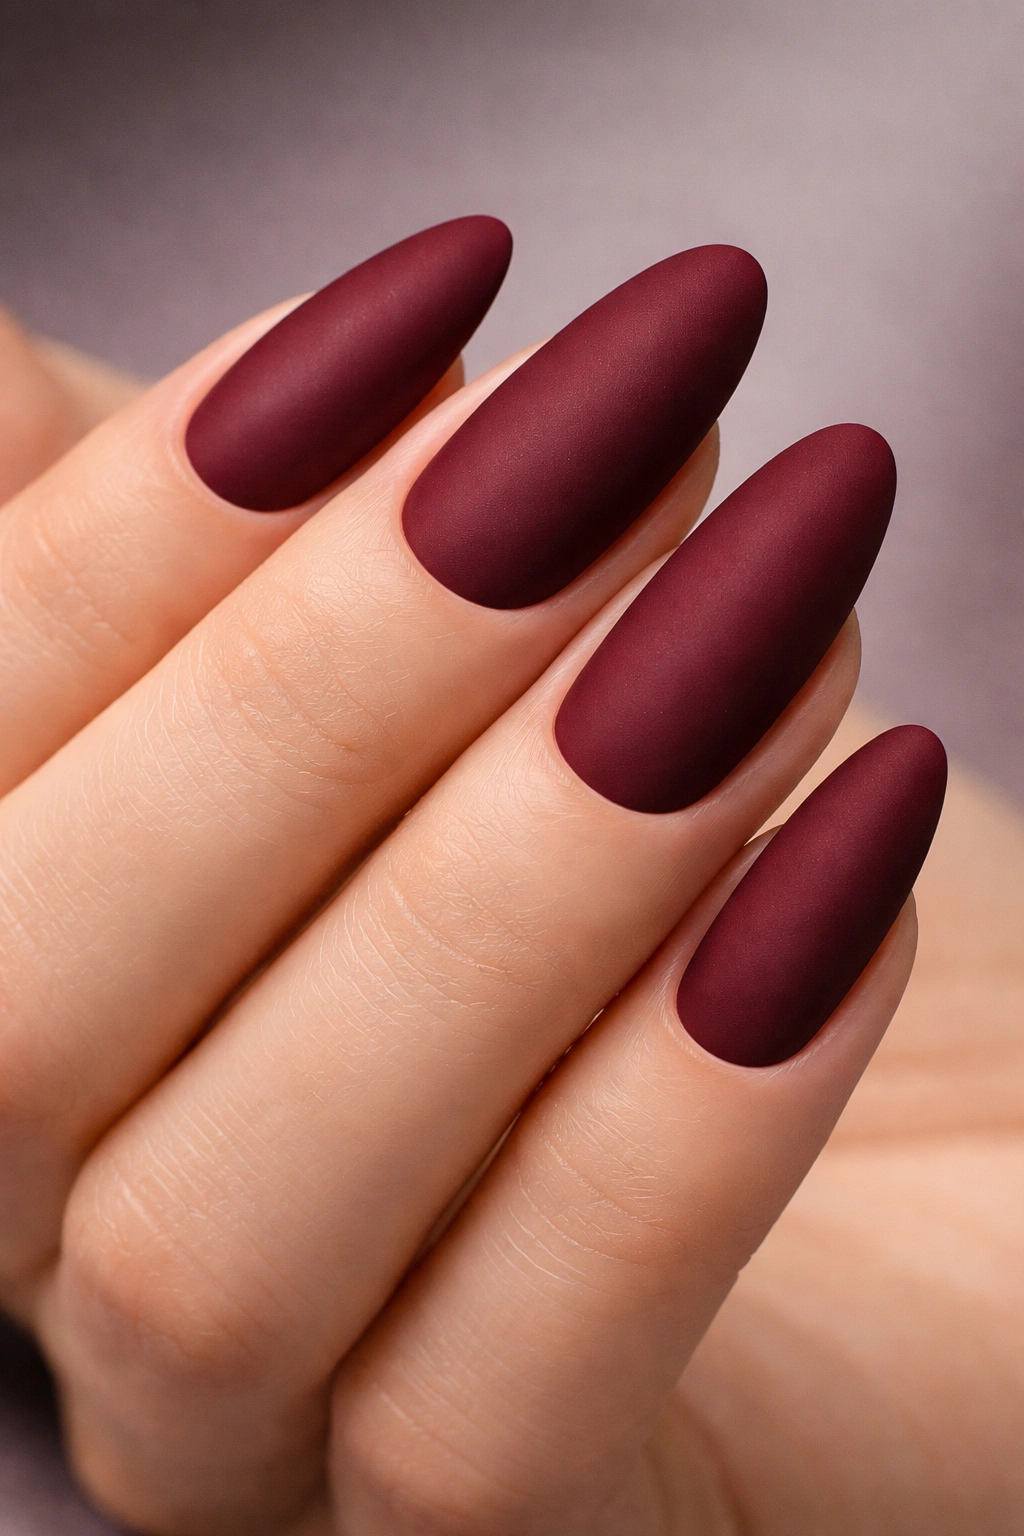
Matte red nails offer an entirely different mood than glossy versions—they feel modern, artistic, and a bit more understated. A deep burgundy-red in matte finish creates an almost velvety appearance that’s sophisticated and subtly bold. This shade works beautifully on long ovals because the matte finish draws less attention to any imperfections while emphasizing the nail shape’s clean lines.
What Makes It Different
Matte finishes have gained traction because they offer a more editorial, high-fashion aesthetic compared to traditional glossy nails. The lack of shine makes the color itself feel richer and more intense—burgundy red in matte reads as deeper and more luxurious than the same shade in glossy form. The oval shape becomes the star when you remove shine, so the nail bed needs to be perfectly shaped and prepped. This is a choice that signals intention and artistic sensibility rather than simply wanting shiny, colorful nails.
Key Details for This Look
- Shade selection: Opt for a true burgundy-red or wine-red rather than bright cherry red—these read more sophisticated in matte finish
- Application: Two thin coats of matte polish create better opacity than one thick coat
- Maintenance: Matte finishes can chip at edges, so regular filing and touch-ups every 7-10 days keep this looking pristine
- Nail care: Use cuticle oil daily since matte finishes can make nails appear drier than glossy alternatives
Worth knowing: Combine matte red with a glossy topcoat in a thin stripe or geometric shape for subtle contrast that adds visual interest without breaking the sophisticated aesthetic.
3. Ombré Red to Pink Gradient
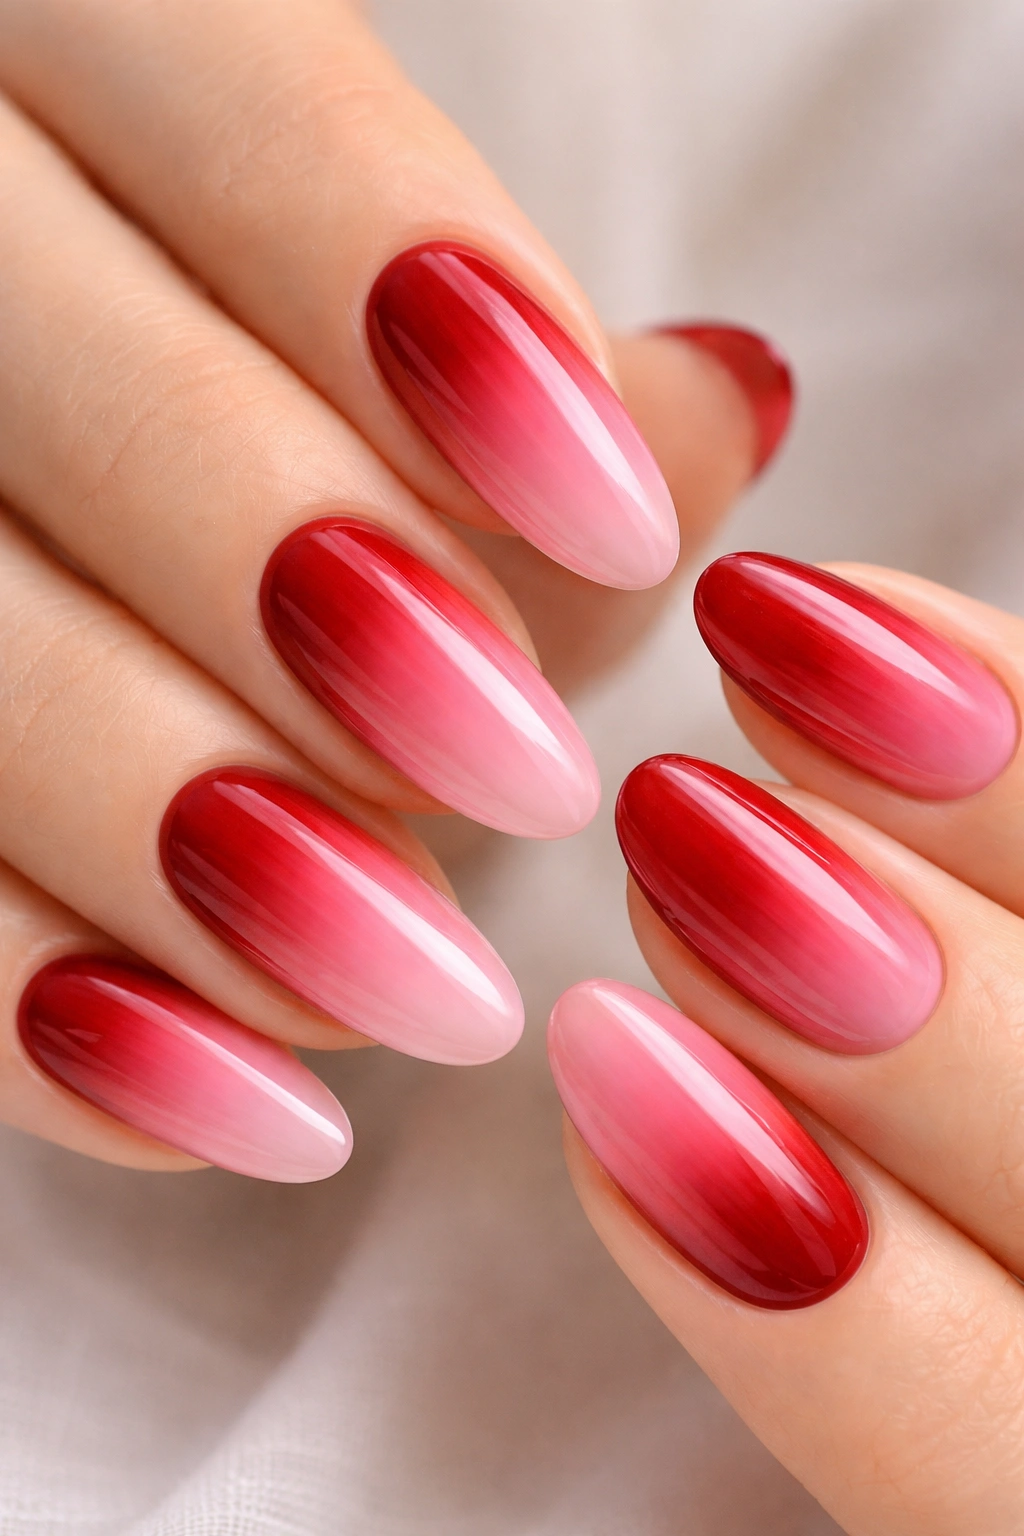
An ombré that flows from deep red at the base to soft pink at the tips creates a romantic, contemporary gradient effect. This works particularly well on long ovals because the length allows the color transition to fully develop without looking cramped. The effect is eye-catching but soft—dramatic in technique rather than in boldness of color.
Why It’s Stand-Out Worthy
Ombré designs demonstrate technical skill and visual sophistication. The gradient creates the illusion of dimension and movement, making even a simple two-color combination feel dynamic and intentional. On oval nails, the gradient follows the natural flow of the shape, creating a cohesive design that enhances rather than competes with the nail’s silhouette. This style bridges the gap between classic red and more playful pink, appealing to people who love red but want something less serious.
Technical Details
- Gradient strength: Decide whether you want a dramatic transition (red to nearly white-pink) or a subtle shift (deep red to dusty rose)
- Application method: Sponge technique works best—dab colors onto a makeup sponge, then sponge onto the nail in overlapping motions
- Color selection: Warmer pinks (coral-lean, peachy) create visual harmony, while cooler pinks (mauve-lean) create more contrast
- Blending: Use a thin brush dipped in clear or base color to blend and smooth any harsh lines between shades
Pro tip: Apply the ombré horizontally (base to tip) rather than side-to-side for the most flattering effect on oval nails.
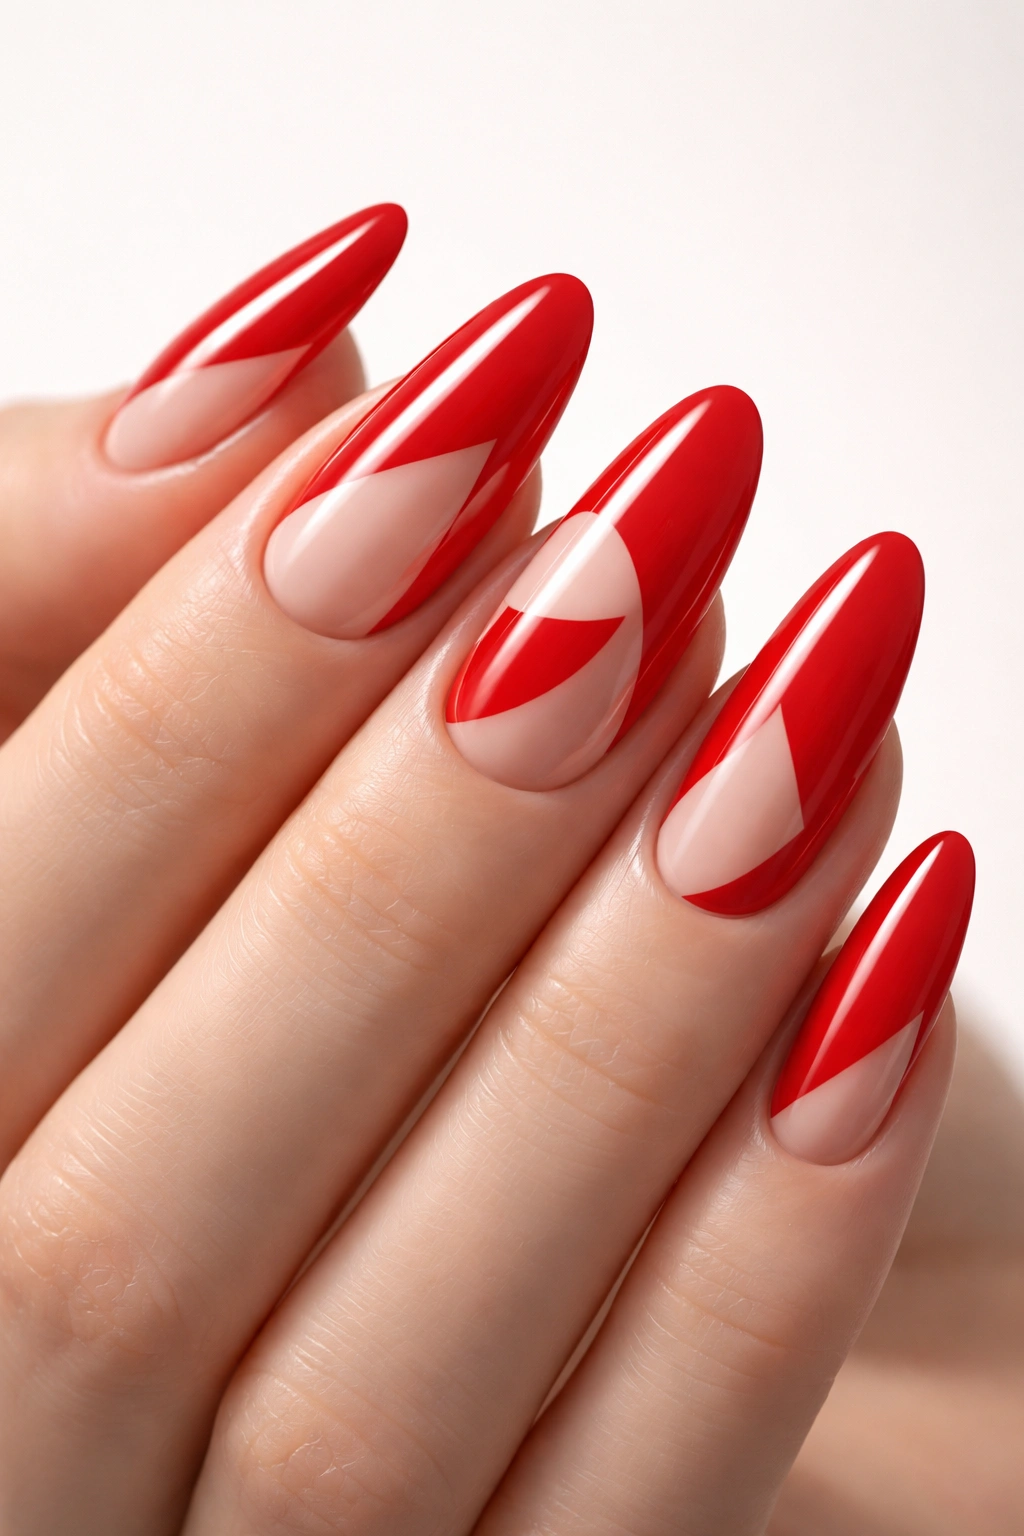
4. Red with Negative Space Geometric Shapes
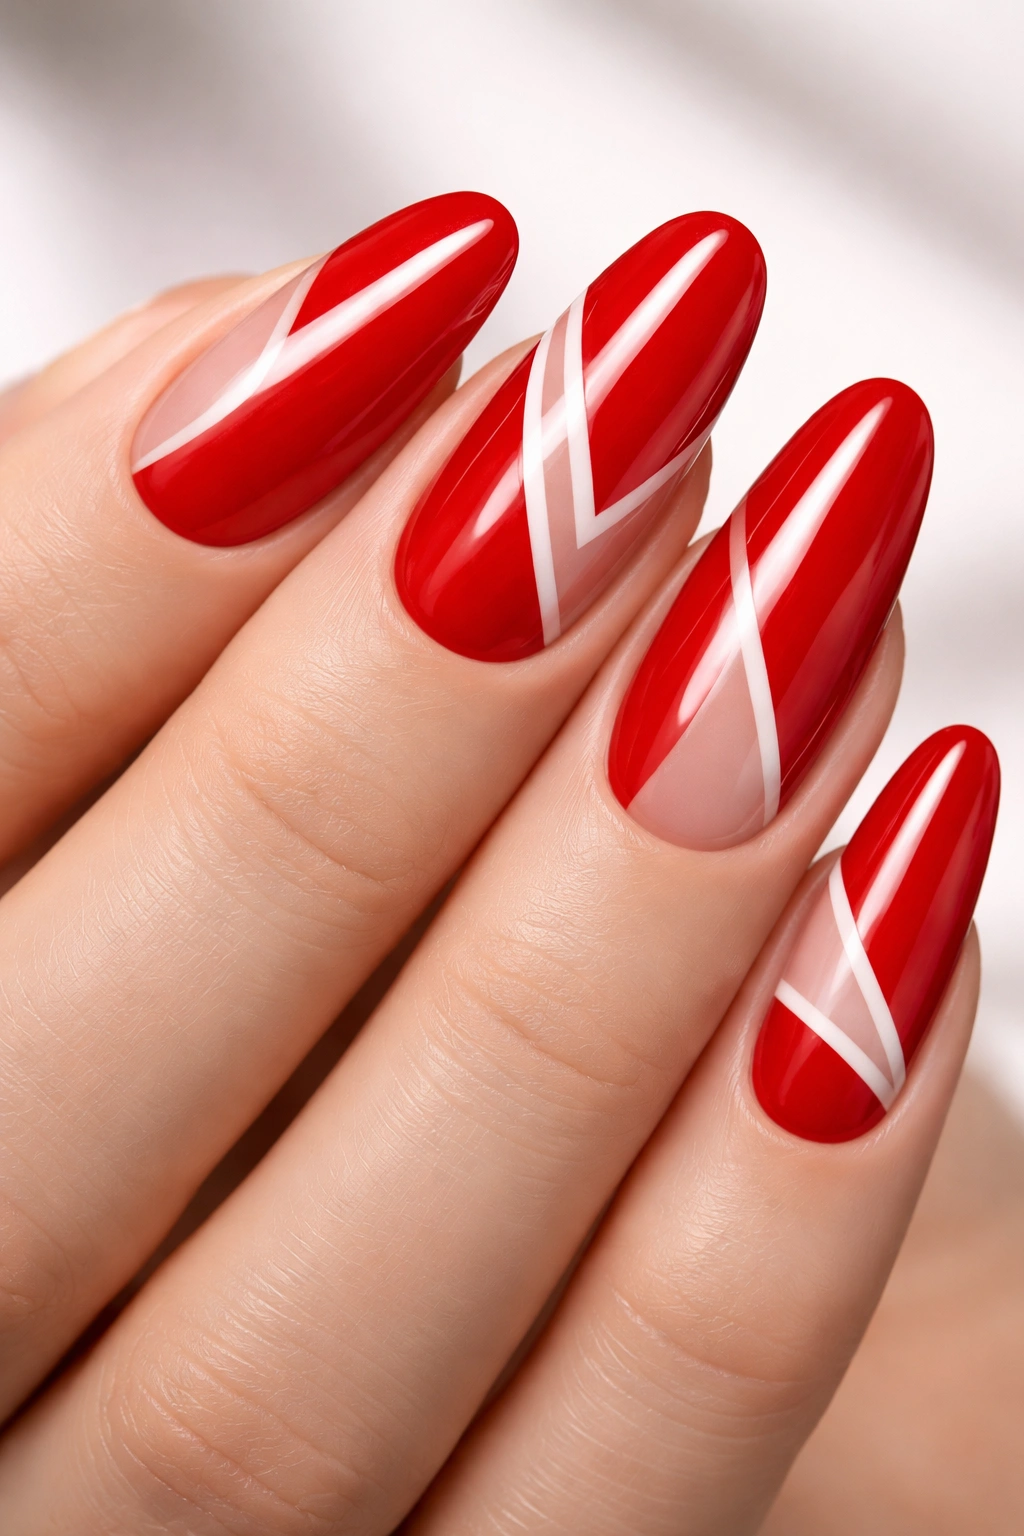
Negative space designs use the natural nail bed as part of the design—leaving strategic areas unpainted to create geometric patterns. A red base with white, nude, or natural nail showing through in triangles, lines, or abstract shapes creates modern, artistic appeal. This style demonstrates confidence because it works against the instinct to cover the entire nail.
What Catches the Eye
Negative space designs feel contemporary and fashion-forward because they break traditional nail art conventions. They’re bold without being loud, artistic without being chaotic. On long ovals, geometric negative space patterns are incredibly flattering—clean lines emphasize the nail’s elegant shape. The contrast between red and the natural nail creates visual interest from multiple angles, and the design actually showcases the health and condition of your real nails underneath.
Design Approaches
- Line patterns: Thin horizontal or diagonal stripes leaving gaps of natural nail
- Triangle designs: Paint solid red except for triangular cutouts in corners or along edges
- Abstract organic shapes: Curved, flowing unpainted sections for an artsy, less rigid feel
- Symmetry: Designs centered or mirrored down the middle nail generally look more intentional than random placements
Insider note: Pair negative space red with a slightly more muted red shade (burgundy rather than true red) to avoid the design feeling too graphic or busy.
5. Red Nails with Minimalist White French Tip
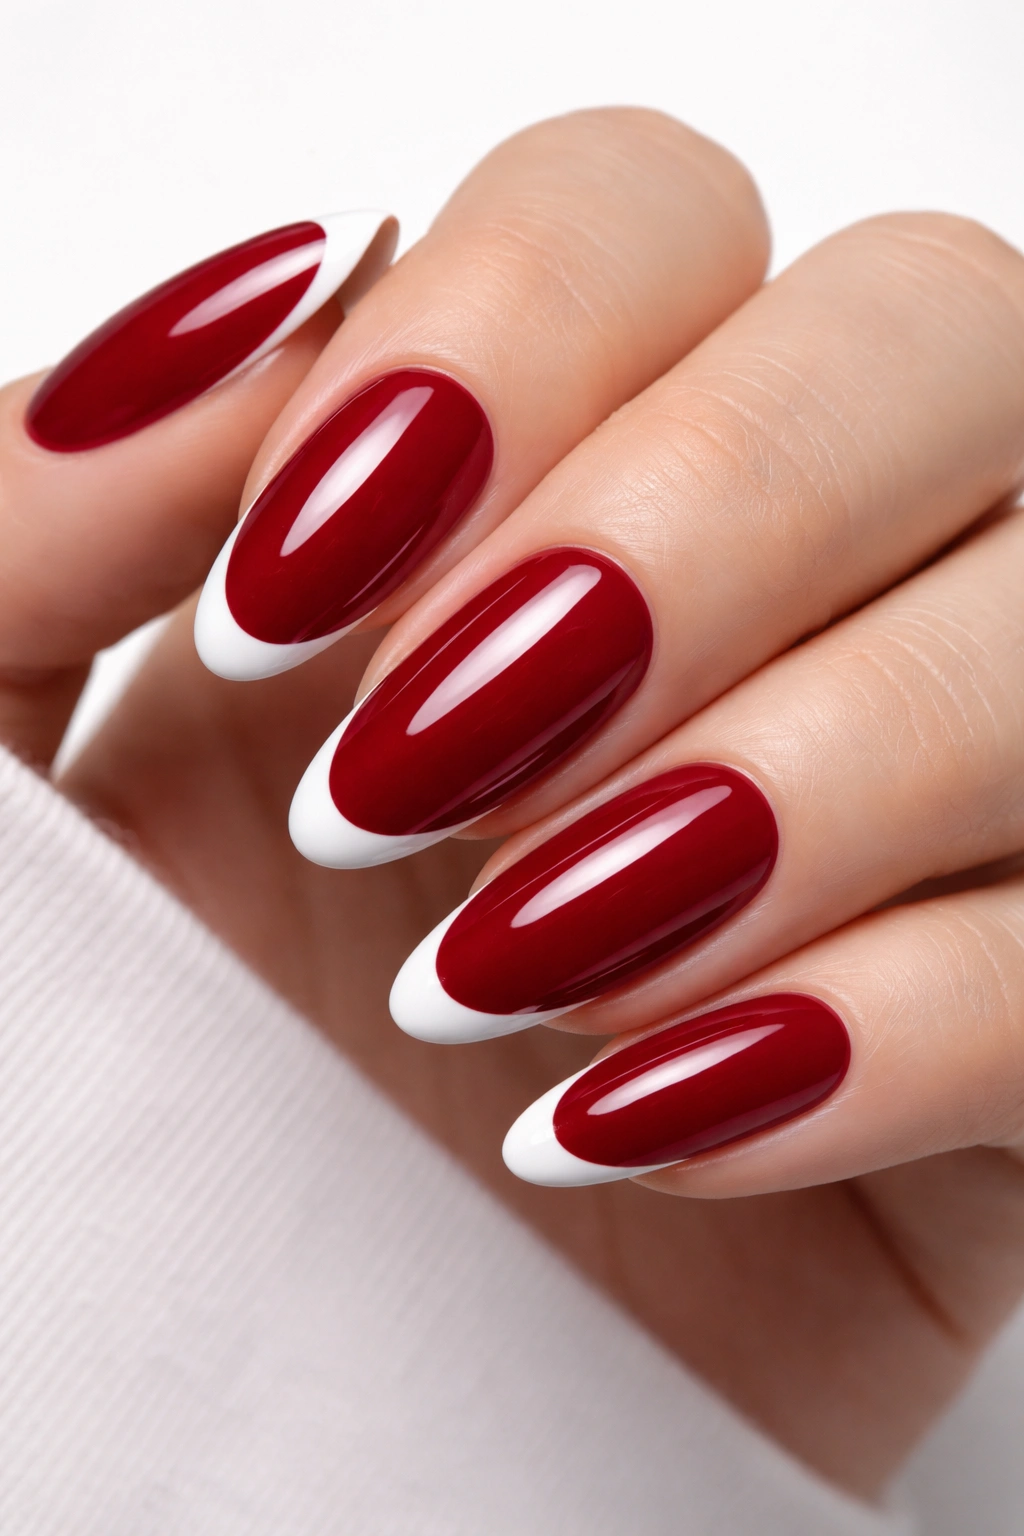
A refined take on the French manicure replaces the typical nude base with deep red and keeps the white tip minimal and understated. This classic pairing feels incredibly elegant while being distinctly modern. The white tip can be thin (almost like a hair-line) or medium width—adjusted based on preference—but the real sophistication comes from the color combination itself.
Why It Really Works
Red and white is one of the most timeless color combinations in fashion, and nails are no exception. The white tip creates definition and makes the nail appear longer, while the red base grounds the look in elegance rather than sweetness. This design reads as effortlessly put-together—the kind of manicure that works for professional environments, special occasions, and everyday wear. The oval shape is perfect for this because it showcases both the red and the white tip without any competing visual elements.
Execution Details
- Tip width: A hair-thin line (1-2mm) reads as ultra-refined, while a 3-4mm tip is more noticeable and bold
- Tip precision: Nail guide tape creates crisp edges—freehand is possible but requires serious skill
- Color contrast: True red with pure white creates maximum contrast; deep burgundy-red with cream white is softer
- Base coverage: Apply red first, then use tape to protect the red while painting white on the tips
- Topcoat: A glossy topcoat over both colors creates visual cohesion
Pro tip: Use a nail art pen with white paint for the finest, most precise line rather than brush application.
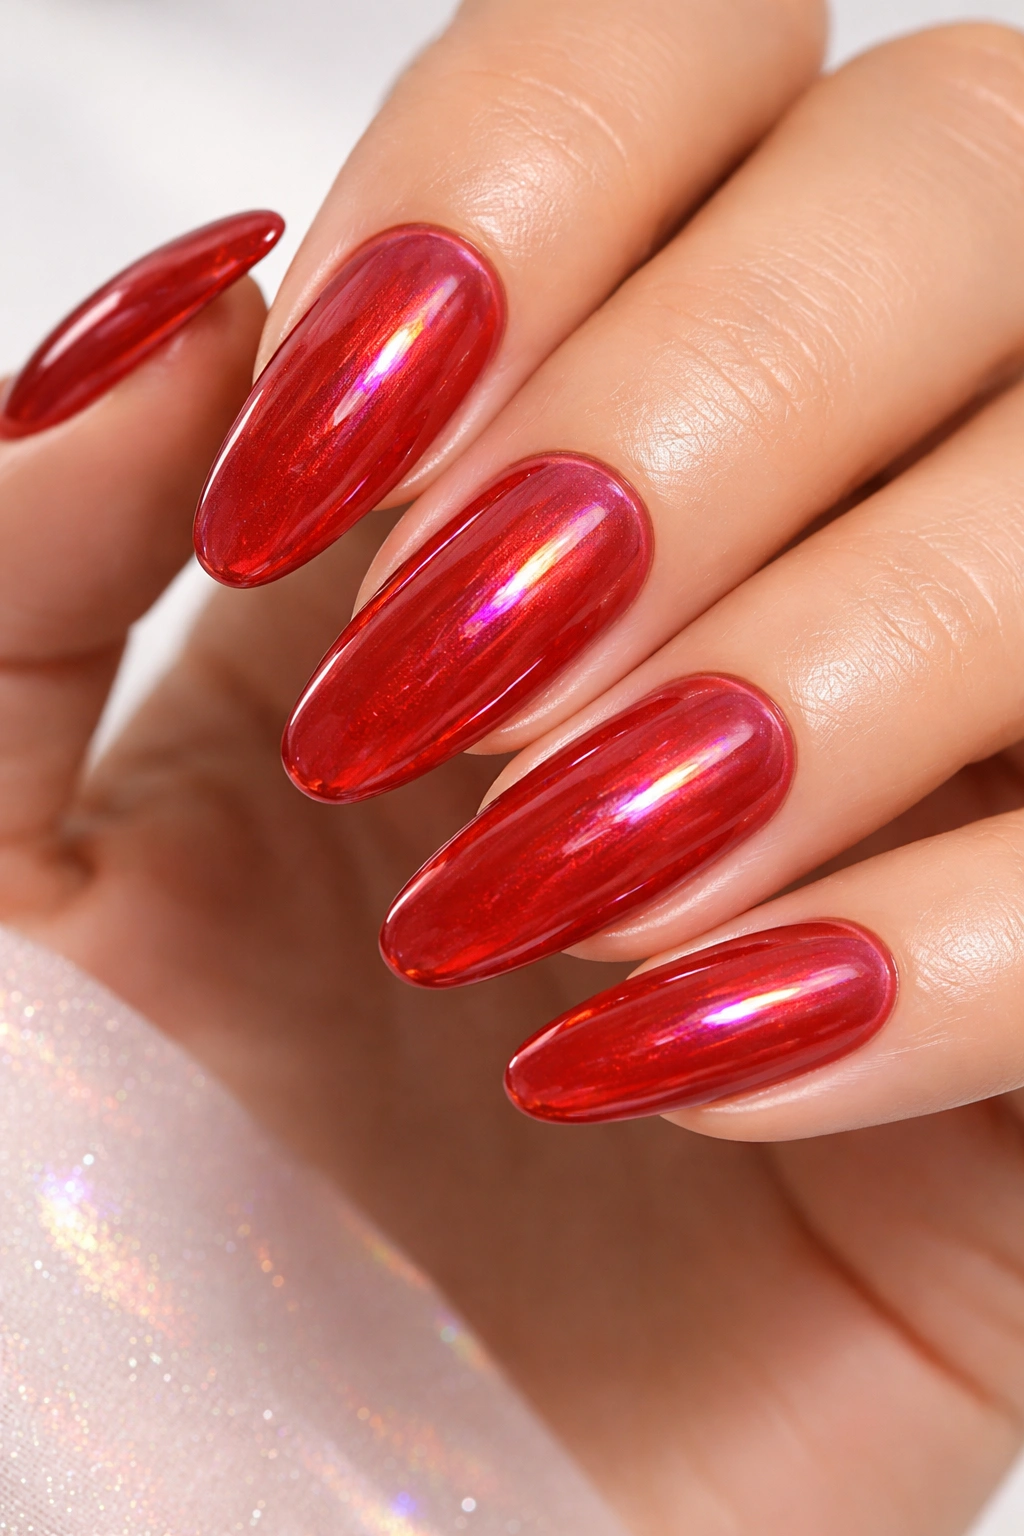
6. Textured Red Nails with Crushed Mirror Effect
A smooth red base topped with crushed mirror or chrome powder fragments creates a shattered glass, almost futuristic texture. The mirror flakes catch light from every angle, creating a dynamic, multi-dimensional surface. This design is bold and contemporary—the oval shape keeps it wearable rather than costume-like.
What Makes It Different
Mirror and texture effects have evolved from novelty finishes to genuinely sophisticated design choices. The crushed mirror effect on long red ovals creates visual movement and light-play that photographs beautifully and catches attention in person. This isn’t a subtle manicure—it’s intentionally statement-making while still being elegant. The red provides a cohesive base that grounds the reflective chaos, preventing the overall look from feeling chaotic.
Application Notes
- Base color: A glossy red is essential; matte bases won’t showcase the mirror effect properly
- Mirror powder application: Use a firm brush or applicator to press powders into wet topcoat or gel
- Coverage options: Full coverage creates maximum drama; strategic placement (tips only, or accent nails) is more subtle
- Sealing: A clear topcoat seals everything and adds glossy protection
- Longevity: Gel application lasts longer than traditional polish with this texture
Worth knowing: Not all mirror powders are created equal—invest in salon-quality products that don’t look flat or dull under regular lighting.
7. Red Nails with Fine Gold or Silver Striping
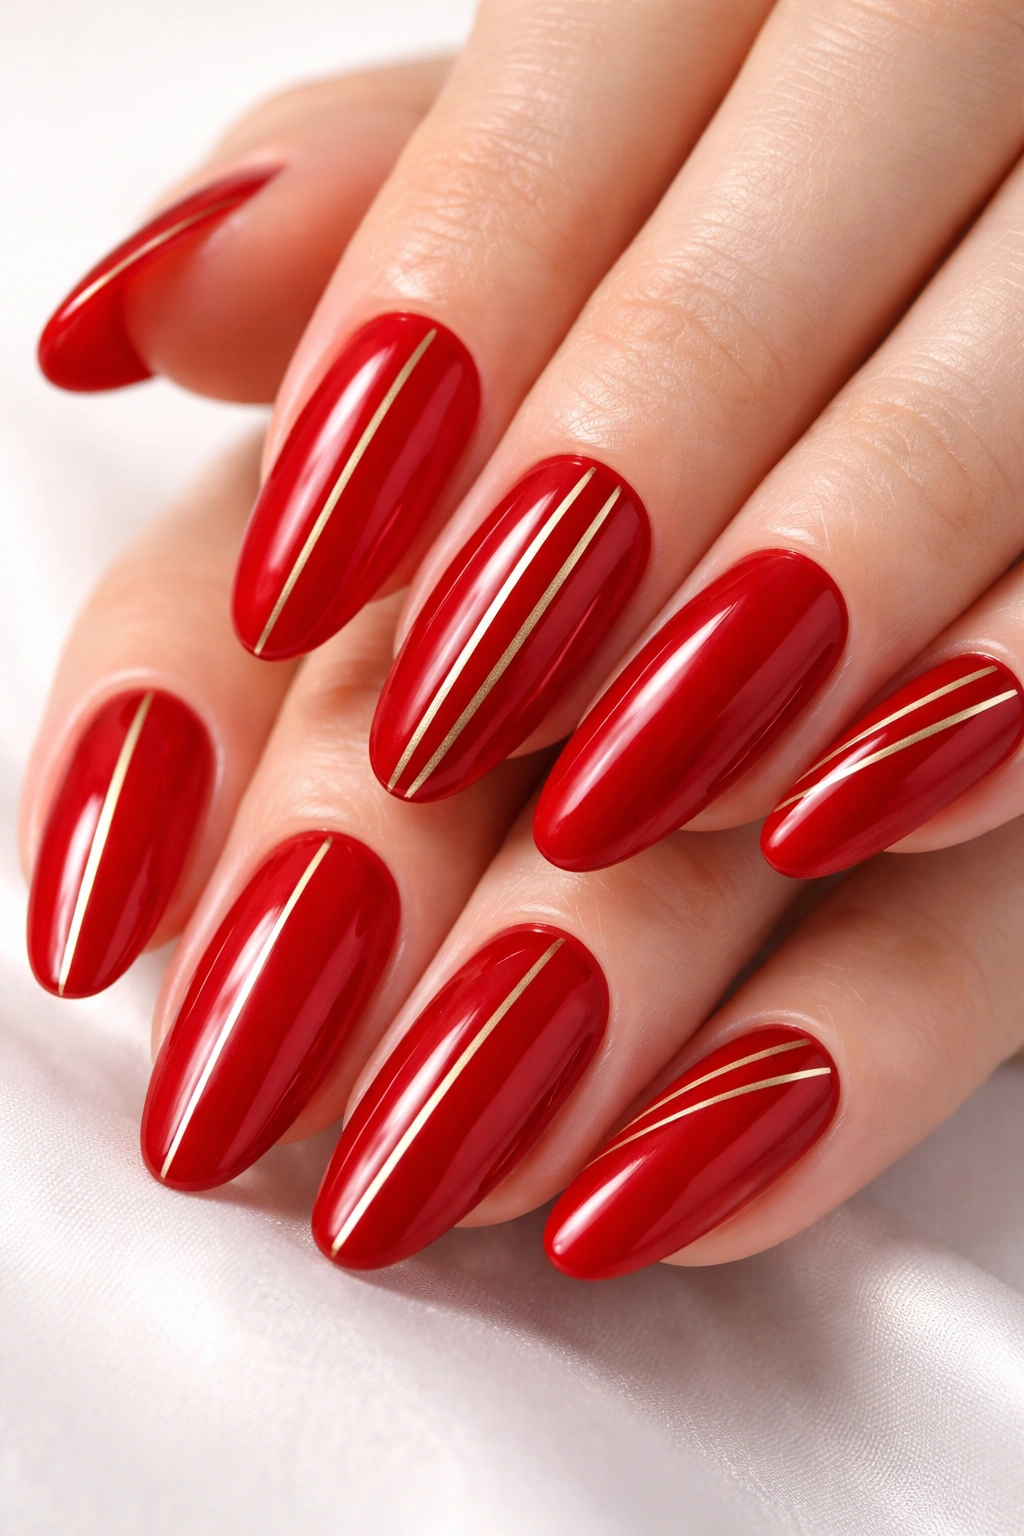
Delicate metallic stripes running vertically or in geometric patterns across a red base create understated sophistication. These aren’t thick racing stripes but rather refined linear details that add visual interest without overwhelm. The metallic color (gold for warmth, silver for cool-toned elegance) should feel like an accent rather than a co-star.
Why It Stands Out
Fine striping demonstrates technical precision and design intention. It’s not bold enough to be costume-like, but it’s distinctive enough that people notice your nails in conversation. On long ovals, vertical stripes actually elongate the already-long nail shape, creating an even more elegant silhouette. The metallic element catches light and adds subtle luxe appeal. This design works across seasons and occasions because it’s refined rather than trendy.
Design Considerations
- Stripe width: 0.5-1mm creates elegance; anything thicker starts feeling like racing stripes
- Stripe spacing: Evenly spaced stripes feel more intentional than random placement
- Pattern options: Vertical lines are classic; diagonal, grid, or scattered lines feel more contemporary
- Metallic choice: Warm gold complements all skin tones in red; silver is particularly striking with cooler-toned reds or burgundy
- Application tool: Nail art brushes or thin striping brushes create cleaner lines than regular polish brushes
Pro tip: Apply metallic stripes on top of a glossy or matte red base, then seal with one final clear topcoat to protect the detail.
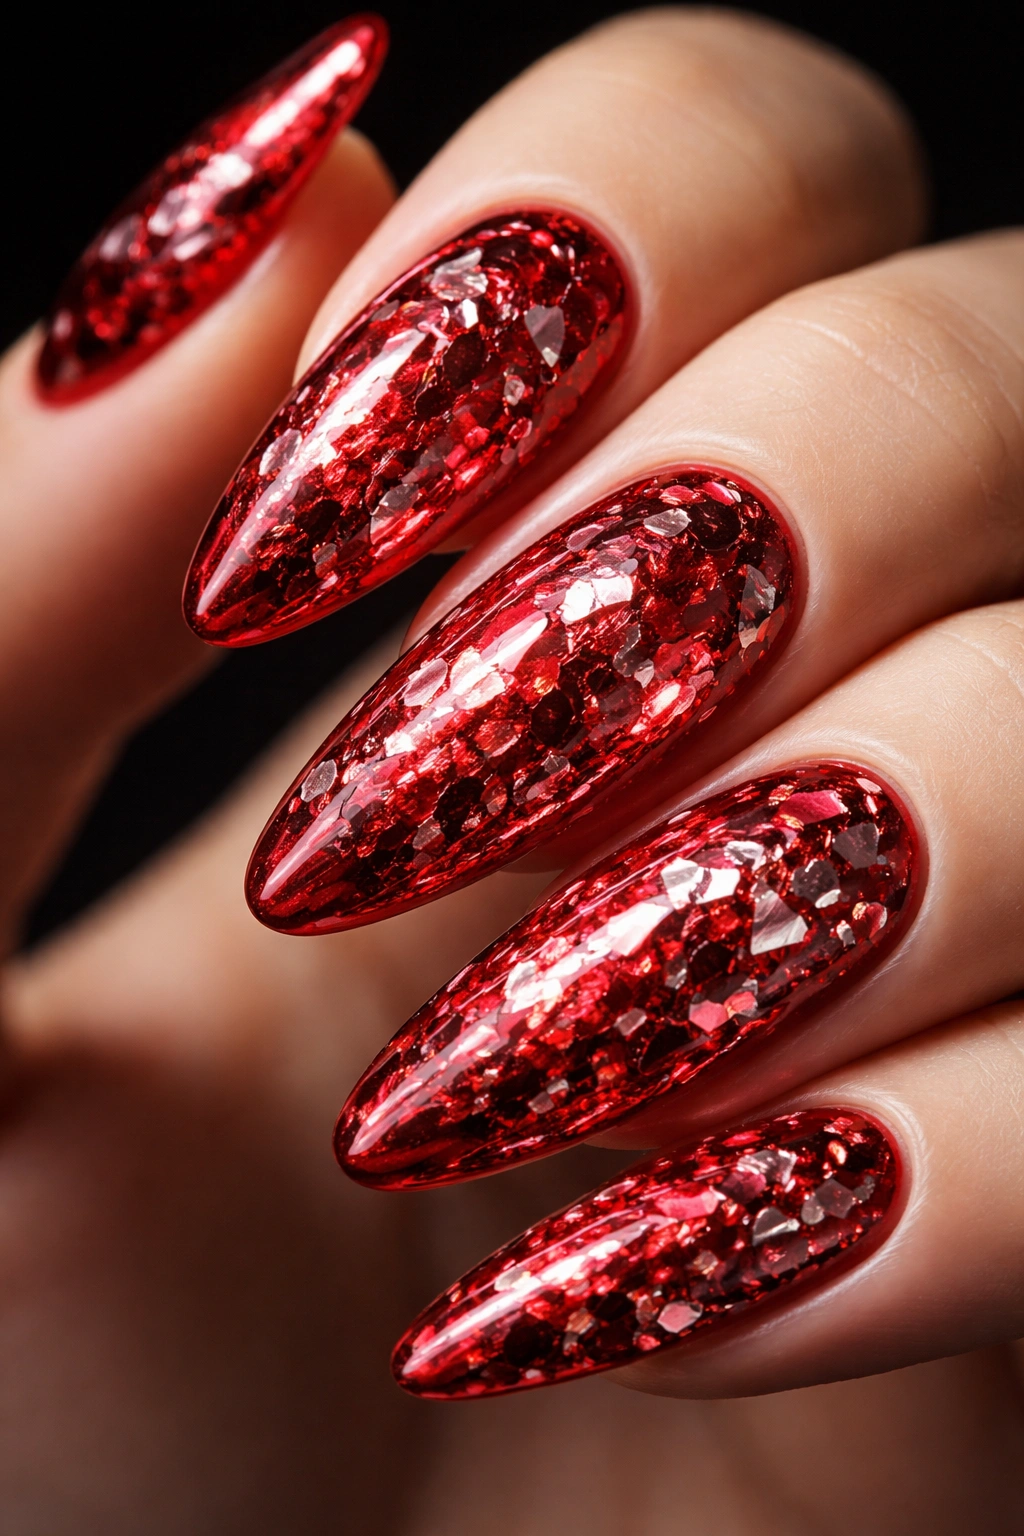
8. Burgundy-Red Nails with Subtle Pearl Flecks
A deep burgundy-red base mixed with tiny pearl or shimmer flecks creates depth and a luxurious, almost jewel-like appearance. This is more understated than full glitter but noticeably more interesting than solid color. The pearls catch light selectively, creating a sophisticated rather than flashy effect.
What Makes It Genuinely Striking
Pearl flecks in red create a sophisticated shimmer that reads as refined rather than glittery. The effect is subtle enough for professional settings but noticeable enough to make your nails feel special. The oval shape shows off this finish beautifully because the smooth surface becomes the canvas for the pearl’s light-play. Unlike full glitter nails, this effect remains elegant and wearable across contexts—you’re not sacrificing sophistication for visual interest.
Technical Details
- Fleck density: More is not better—aim for scattered, visible-but-not-overwhelming shimmer
- Pearl size: Tiny microbeads create elegance; large chunky glitter feels costume-like
- Base color: Deep burgundy-red or wine-red allows pearls to pop without the overall effect becoming too bright
- Application: Mix pearls into gel or polish, or apply them to the base coat before the final topcoat
- Removal: Pearl-flecked finishes require patient removal—use acetone soaks rather than aggressive scraping
Insider note: Burgundy-red with pearl flecks reads as more expensive than it actually is—perfect for creating luxury-looking nails without luxury pricing.
9. Red Nails with Delicate Black Line Art
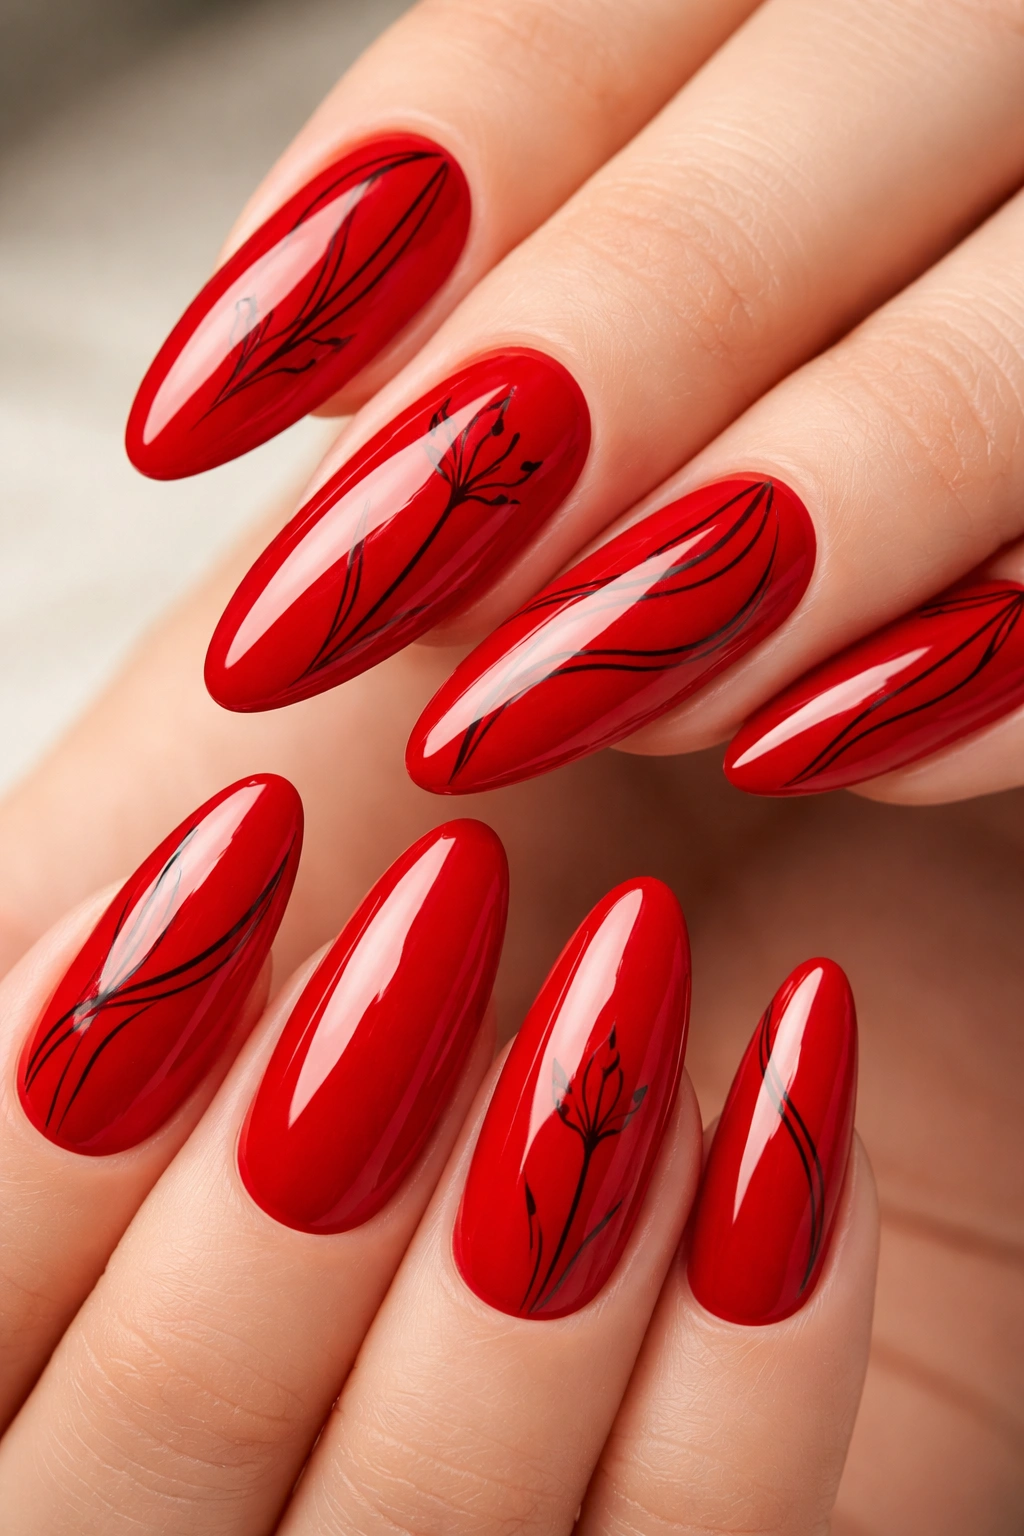
Thin black lines creating abstract designs, geometric patterns, or even minimalist florals over a red base bring artistic edge to the color. The black lines should be fine and intentional, not crude or heavy. This design marries boldness (red) with sophistication (black line art), creating visual interest without being chaotic.
Why It Works
Black line art over red creates strong contrast that’s visually striking from a distance. Up close, the detail and intention become apparent—this isn’t just a red manicure, it’s a deliberate artistic choice. The oval shape provides a clean canvas for line work; longer nails give the lines more room to develop without feeling cramped. This style appeals to people who want their nails to feel creative and fashion-forward rather than simply colorful.
Design Ideas
- Geometric patterns: Triangles, hexagons, grid patterns, or abstract shapes
- Organic designs: Thin branches, abstract florals, or flowing lines
- Negative space: Combine black lines with negative space for layered visual interest
- Accent nails: Black line art on all nails creates maximum impact; one or two accent nails feels more subtle
- Precision: Use ultra-thin nail art brushes or detail pens for clean, intentional lines
Pro tip: Sketch your design in pencil on the nail first, then paint over with thin black gel or acrylic for more control.
10. Glossy Red with Translucent Topcoat and Subtle Iridescent Shift
A pure glossy red base with a top layer of iridescent or color-shifting topcoat creates an unexpected visual effect. In different lighting, the nails shift slightly or show subtle rainbow holographic hints. This is far more refined than full holographic nails—the red remains dominant while the topcoat adds dimension.
What Catches Attention
Iridescent effects have moved beyond gimmicky territory into genuinely sophisticated design choices. The subtle color-shift is noticeable to people looking closely but doesn’t overwhelm the red base. This effect creates light-play that makes nails feel special and intentional. The oval shape showcases the effect beautifully—longer nails catch light from more angles, making the iridescent shift more apparent.
Application Details
- Base color: High-quality glossy red ensures the iridescent topcoat has a perfect foundation
- Topcoat selection: Subtle iridescent is key—avoid heavily holographic topcoats that completely change the red
- Light sensitivity: The effect is most visible in bright, natural light; less apparent in dim lighting
- Glossiness: The glossy topcoat is essential—matte bases won’t showcase the effect properly
- Longevity: Gel application holds this finish longer than traditional polish
Worth knowing: This effect photographs beautifully, especially in natural light or with the sun hitting nails at an angle.
11. Red Ombre with Nude or White Tips (Reverse French)
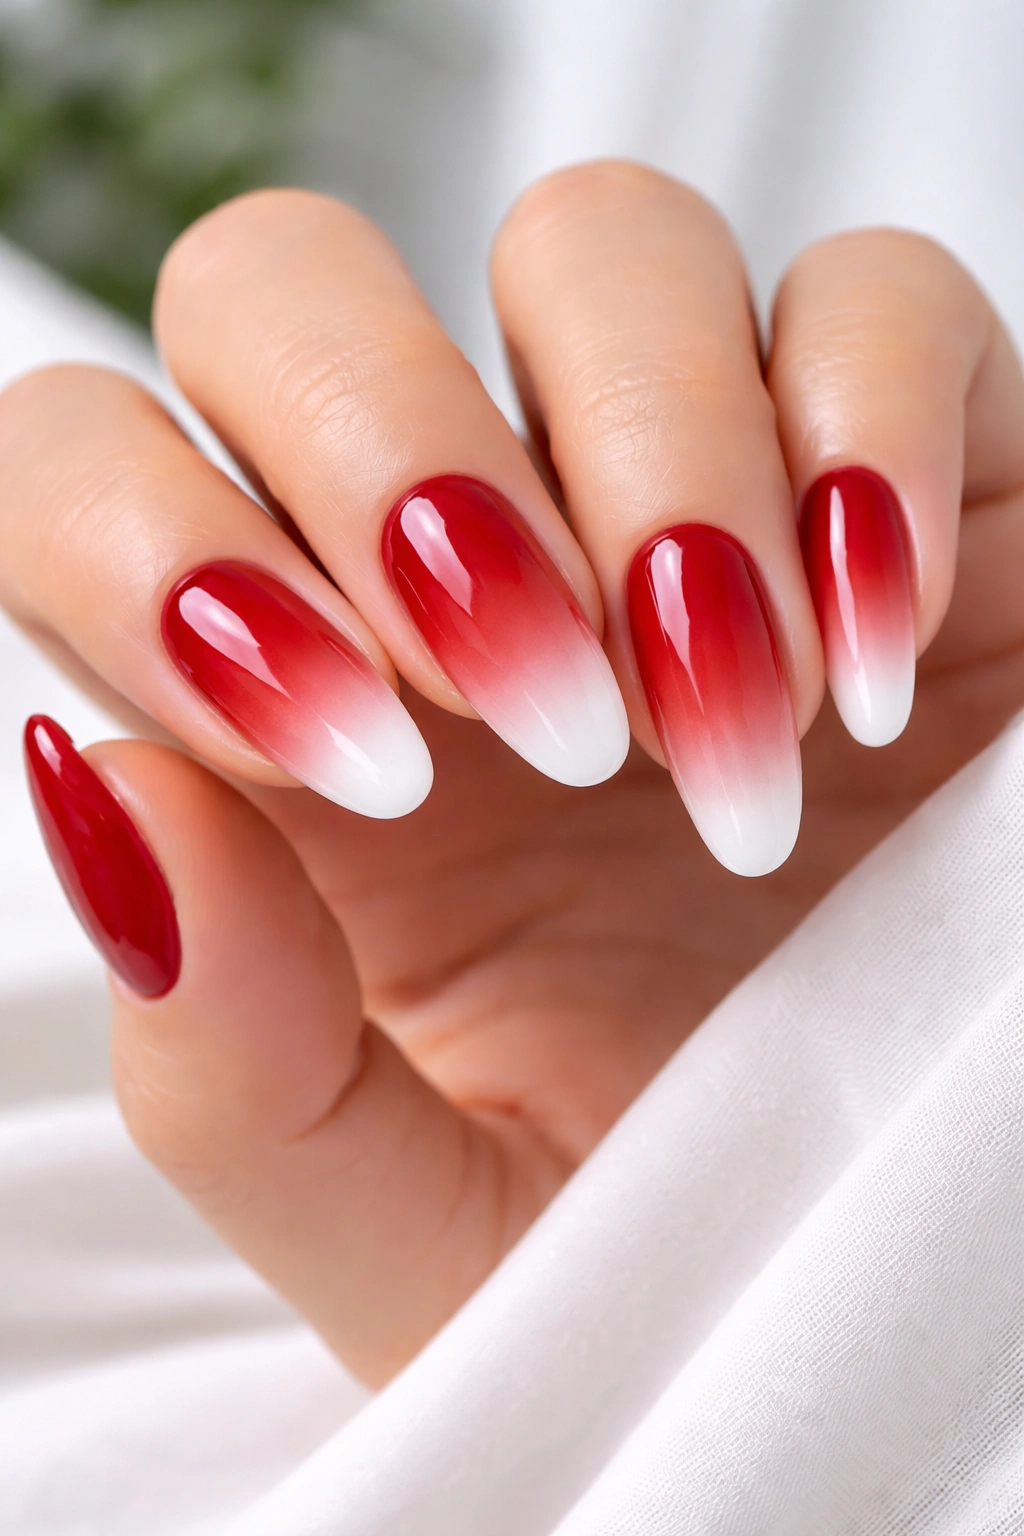
A gradient that flows from deep red or burgundy at the base to nude, champagne, or white at the tips creates a reverse French manicure effect. This modern take on a classic feels sophisticated and bridges the gap between bold red and subtle neutral. The gradient adds visual interest while maintaining overall elegance.
Why It Really Stands Out
Reverse French removes the “matchy” feeling of traditional red nails while maintaining the color’s boldness. The gradient from red to light creates an elongating effect that complements the oval shape beautifully. This design signals sophistication—it demonstrates technical skill and contemporary taste. It works across seasons and occasions because it’s bold without being aggressive, artistic without being costume-like.
Technical Execution
- Color selection: True red to white creates maximum contrast; burgundy-red to champagne is softer and warmer
- Gradient style: A smooth blended ombré is most elegant; you can also create a defined gradient with a distinct color-change point
- Sponge application: This technique works best for smooth, blended gradients
- Shade intensity: The stronger the color contrast, the more dramatic the effect
- Maintenance: Blended ombré requires periodic touch-ups as the base color grows out
Pro tip: Apply the gradient lighter at the very tip and gradually deepen toward the base for the most elongating effect.
12. Red Nails with Negative Space Manicure Design
A bold negative space design that creates a pattern across the entire manicure—not just individual nails—brings graphic artistry to red. Perhaps one nail features red with negative space while others show strategic cutouts that create a unified visual pattern across all five nails. This approach elevates simple red nails into true nail art.
What Makes It Stand Out
Coordinated negative space across a full manicure demonstrates serious design thinking. It’s artistic and intentional, signaling that these nails are a deliberate creative choice rather than a default color selection. The oval shape works beautifully with negative space because the consistent silhouette emphasizes the purity of the negative space design. This approach appeals to people who think of their nails as a canvas for artistic expression.
Design Approaches
- Theme development: Create a pattern or motif that flows from nail to nail (perhaps asymmetrical designs that create a cohesive whole)
- Color coordination: Use additional colors (white, nude, metallic) in the negative space sections for complexity
- Symmetry: Mirror designs on the thumb and pinkie for visual balance
- Negative vs. positive: Reverse the concept on some nails—negative space creates the pattern while red is the background
- Accent nail: Feature one nail as the focal point with the most complex design, while others support with simpler elements
Insider note: This design requires a skilled nail artist, but it creates a genuinely memorable manicure that feels completely unique.
13. Deep Red with Gold Foil or Leaf Details on Accent Nails
A solid deep red across most nails with one or two accent nails featuring gold foil fragments, leaf accents, or metallic details creates a focal point while maintaining overall cohesion. The accent nails showcase the metallic elements while the base nails provide visual grounding. This approach feels more refined than covering all nails with metallic details.
Why It’s Genuinely Elegant
Strategic accent nails create visual hierarchy and sophistication. The eye goes to the detailed accent nail first, then notices the solid red surroundings, creating a sense of intentional design. This approach provides visual interest without overwhelming. The oval shape is particularly flattering with this treatment—the solid red nails emphasize the shape while the accent nails add personality. This design works beautifully for people who love statement nails but want sophistication over theatricality.
Accent Nail Strategies
- Placement: Ring finger accent is classic; pinkie or index finger is slightly less expected
- Foil application: Gold or copper foil adhered to wet topcoat creates dimension and light-play
- Leaf positioning: Single large leaf (like a real gold leaf) on an accent nail looks artistic and intentional
- Combination: Pair foil with geometric shapes, lines, or other details for a more complex accent nail
- All five nails: Some prefer accent details on both ring fingers and thumb for balance
Pro tip: Use actual gold or metallic leaf (available at art supply stores) rather than nail-specific foils for a more authentic, artistic appearance.
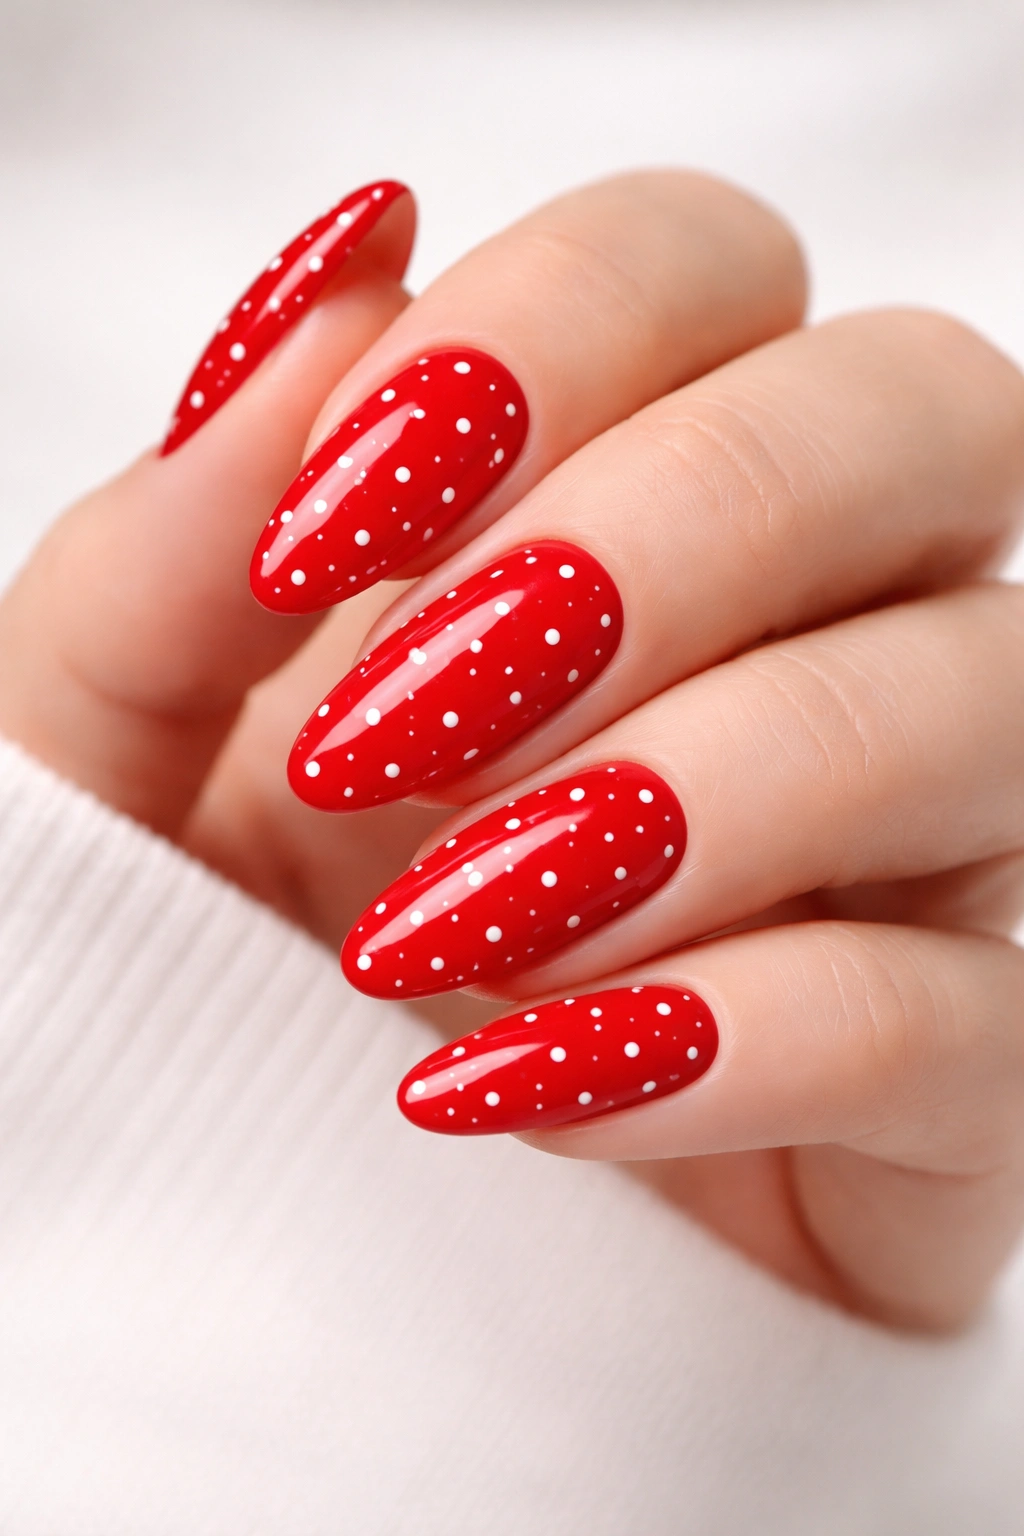
14. Bright Cherry Red with Subtle White Dot Pattern
A vibrant, true cherry red base with delicate white dots scattered across creates playfulness while maintaining sophistication. The white dots should be small and purposefully placed—think polka dots rather than speckles. This design bridges the gap between bold color and artistic detail.
What Makes It Strike the Right Balance
Dot patterns add visual interest without complexity. The contrast between bright red and white dots is eye-catching but the dots themselves are refined and orderly. The oval shape provides enough surface area for the dots to be visible but not so massive that they feel chaotic. This design appeals to people who love red’s boldness but want a manicure that feels playful rather than serious. The pattern elevates standard red to something more intentional.
Dot Pattern Details
- Dot size: 2-3mm dots read as sophisticated; larger dots feel more whimsical
- Dot spacing: Evenly spaced dots feel intentional; varying spacing is more organic and artistic
- Placement: Scattered randomly across the nail feels contemporary; organized rows feel more classic
- Intensity: Full coverage of small dots is eye-catching; sparse dots are more subtle
- Application: Use a dotting tool or the rounded end of a bobby pin to create perfectly round white dots
Worth knowing: This design works beautifully as an all-nail manicure or as an accent nail design paired with solid red on other nails.
15. Matte Red with Glossy French Tip and Thin Gold Line Separator
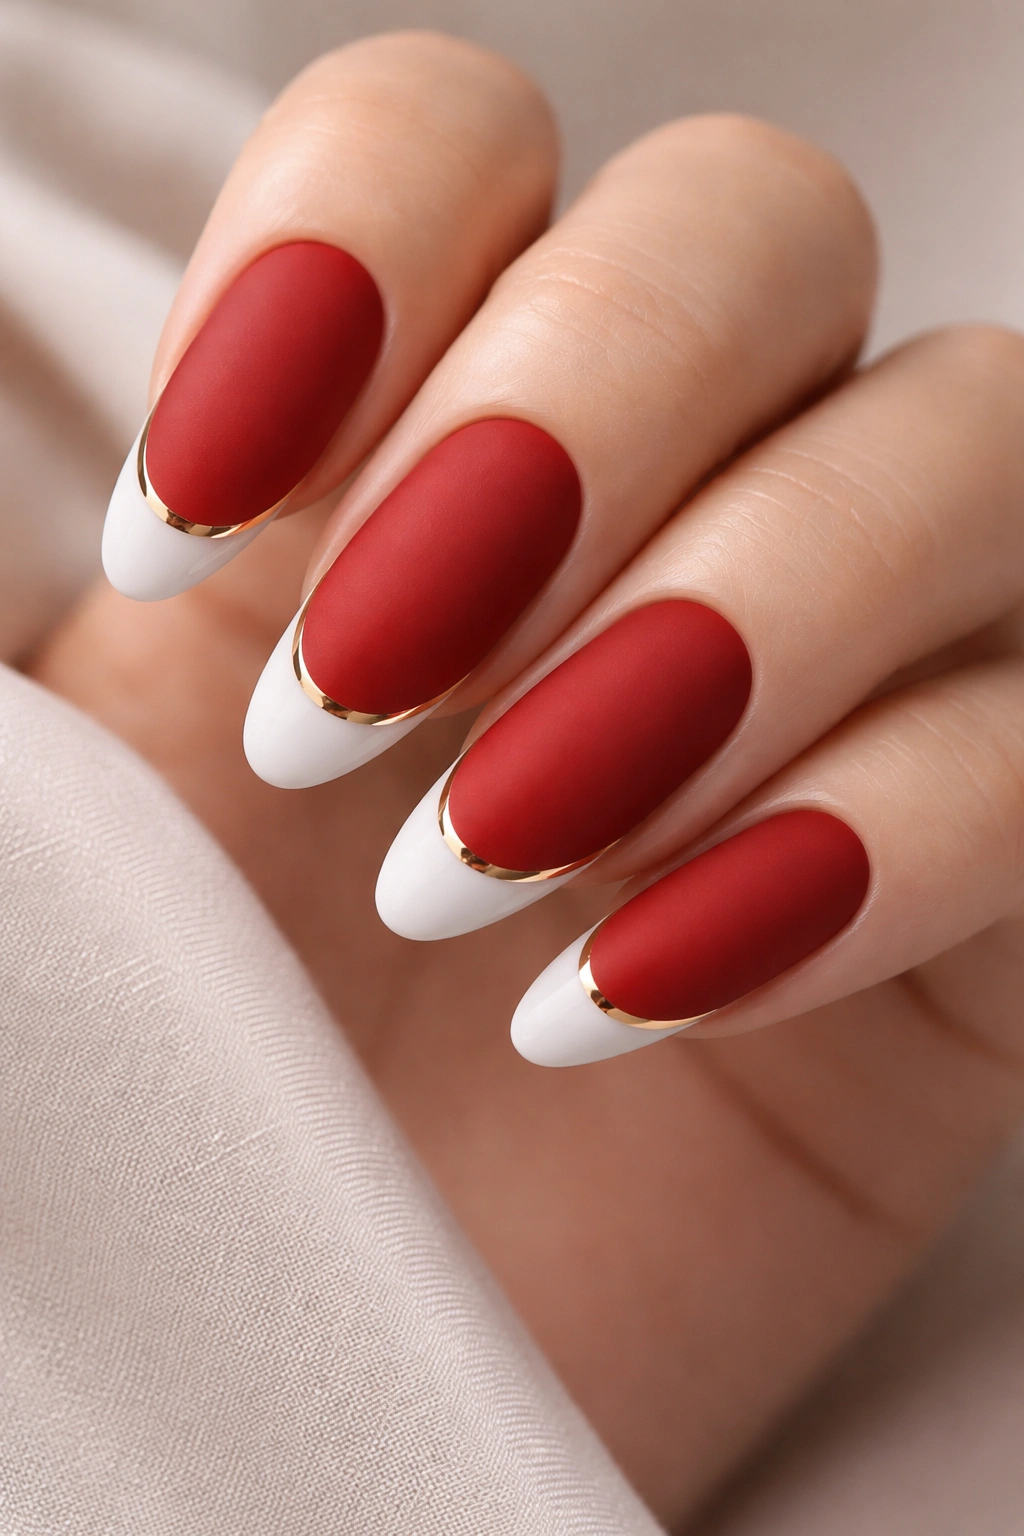
A matte red base with a crisp glossy white or nude French tip, separated from the base color by a delicate gold line, creates multi-dimensional sophistication. The contrast between matte and glossy finishes adds texture variation while the gold line detail elevates the classic French manicure concept. This design is refined, modern, and timeless all at once.
Why It’s Genuinely Stand-Out
This design layers multiple sophisticated elements—color contrast (matte red to glossy white), finish contrast (matte to glossy), and metallic detail—creating a manicure that feels expensive and intentional. The matte red provides understated boldness while the glossy tip adds polish and definition. The thin gold line brings luxury appeal without overwhelming. The oval shape showcases each element clearly, and the longer length allows the components to be fully visible and appreciated.
Technical Precision Required
- Finish quality: The matte red must be even and smooth; any streakiness undermines the design
- French tip precision: A crisp, clean line separating matte and glossy is essential; use nail guide tape
- Gold line details: A hair-thin gold line (0.5-1mm) between red and white is more elegant than thicker lines
- Topcoat application: Use separate topcoats—glossy on the tip, matte or satin on the base (or vice versa)
- Maintenance: The matte finish requires regular touch-ups; the glossy tip holds longer
- Application: This design is complex enough to require professional execution for optimal results
Pro tip: Use a nail art pen with metallic paint for the gold separator line rather than trying to freehand with brush application—precision is paramount with this design.
Key Takeaways
Red long oval nails offer an incredible range of possibilities—from timeless elegance to contemporary artistry. The key to choosing a design that truly stands out is thinking beyond the base color. Consider texture, pattern, metallic details, finish contrast, and negative space as tools to elevate the red from a simple color choice to a deliberate, sophisticated design choice. The oval shape is your ally here; it provides an elegant, flattering silhouette that complements virtually any design approach.
Whether you prefer minimalist refinement or bold artistic expression, there’s a red oval nail design that matches your personality and aesthetic. The designs above represent different moods and occasions—some are professional-appropriate, others are bold statements, and many work beautifully across contexts. The unifying factor is intentionality. Nails that stand out aren’t necessarily the most complex or the flashiest; they’re the ones that demonstrate thoughtful design choices and genuine attention to detail.
Your hands are visible constantly—in photos, during conversations, while working, while resting. That makes your nails worth investing in genuinely. Whether you choose to achieve these designs through professional application or attempt DIY versions, understanding what makes each design distinctive helps you communicate your vision clearly and choose a look that genuinely represents your taste.
