

Teal is the kind of color that stops people mid-conversation. It’s not quite blue, not quite green—it’s that perfect sweet spot between the calming serenity of ocean depths and the fresh, vibrant energy of spring growth. Whether you’re looking for something subtle to wear to the office or a statement-making design for a night out, teal nail designs deliver exactly what you need: sophistication, versatility, and undeniable style. The beauty of choosing teal for your nails is that this blue-green shade flatters virtually every skin tone, works with nearly any outfit in your closet, and transcends seasonal boundaries. You can rock teal in winter paired with cozy sweaters, in summer as an homage to tropical getaways, or anywhere in between. What makes teal so special is its chameleon-like ability to feel both bold and understated depending on how you style it. A solid coat of teal polish looks refined and polished. Add some metallic accents, and suddenly you have something luxurious. Mix it with other colors or patterns, and you’ve created a completely unique expression of your personality. If you’ve been scrolling through nail inspiration and keep coming back to teal, you’re not alone—this shade has become a favorite among nail enthusiasts, professional manicurists, and fashion-forward people everywhere. The good news? It’s easier than you might think to create stunning teal nail designs at home or bring these ideas to your favorite salon. We’ve curated ten absolutely gorgeous teal nail ideas that prove this color deserves a permanent spot in your rotation.
1. Teal Ombre With Glitter Accents

There’s something inherently magical about watching color fade from one shade to another, and teal ombre nails capture that magic perfectly. This design starts with a rich, deep teal at the base of your nail and gradually transitions into a softer, lighter shade—sometimes fading all the way to pale aqua or even white at the tips. The gradient effect creates depth and movement on your nails, making them visually interesting from every angle.
Why This Design Works So Well
The ombre technique is brilliant because it adds dimension without requiring intricate painting skills. The beauty lies in the smooth transition between shades, which can be achieved with a simple sponge-dabbing method. When you add glitter accents—whether scattered across just the tips or sprinkled throughout the gradient—you create a design that’s elegant enough for formal events but playful enough for everyday wear. The glitter catches light beautifully, adding that extra touch of glamour that makes people ask about your nails.
How to Create This Look at Home
- Start with a base coat to protect your natural nails from staining
- Apply your darkest teal shade and let it dry completely
- Mix several coordinating teal shades (light, medium, and dark)
- Using a makeup sponge, dab and blend the lighter shade over the darker one at the tips
- Repeat with the lightest shade, building the gradient gradually
- Once dry, apply a thin layer of clear gel or polish mixed with fine glitter
- Seal everything with a glossy top coat for a smooth, professional finish
Pro tip: The key to a seamless ombre is patience. Build your gradient in thin layers rather than trying to do it all at once. Each layer of color should partially dry before you add the next, giving you more control over the blending.
2. Minimalist Teal French Tips
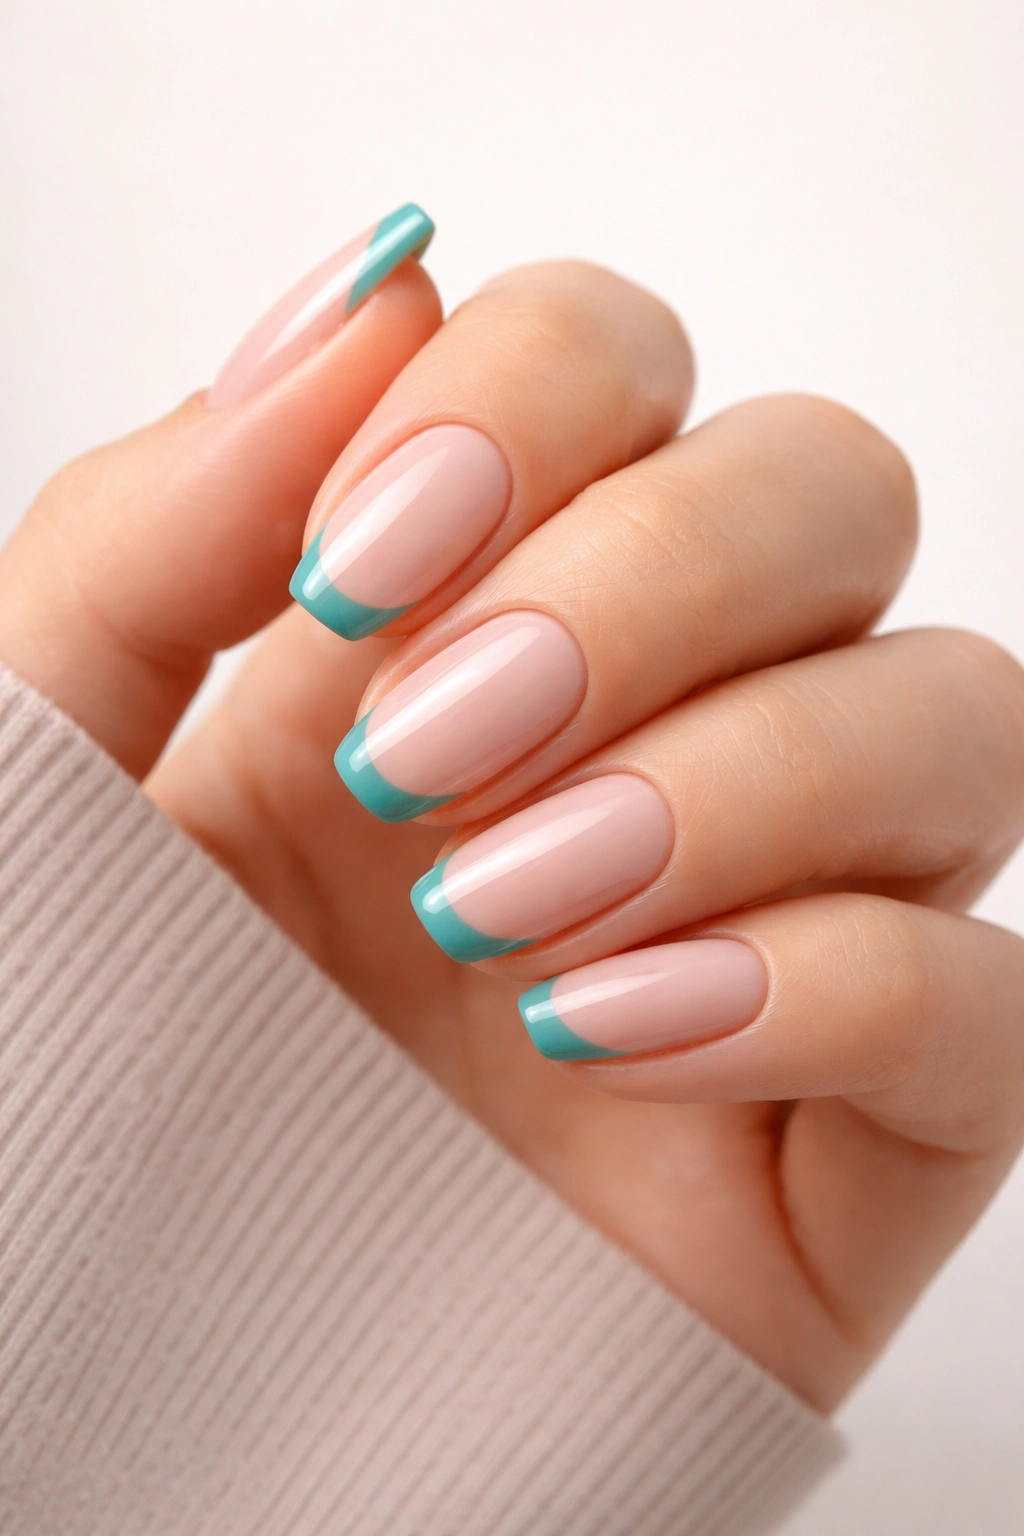
The French manicure is timeless for a reason—it’s elegant, professional, and flattering on every nail shape and length. But if traditional white tips feel too predictable, teal French tips offer a fresh, contemporary twist that still maintains that polished sophistication. This design keeps most of your nail in a neutral base (either your natural nail color or a soft beige), while the tips feature a clean line of vibrant teal.
The Appeal of Subtle Style
Minimalist nail designs are having a major moment, and rightfully so. They work for virtually any setting, from corporate offices to casual weekend brunches to formal events. Teal French tips specifically strike the perfect balance between making a statement and staying understated. The color is visible and noticeable, but the overall design is clean and refined. You’re not covering your entire nail with bold color—you’re using color strategically for maximum impact and sophistication.
Creating Perfect Teal French Tips
- File your nails into your desired shape, keeping them at a length you can manage
- Apply a base coat and let it dry
- Paint your nails with a nude, beige, or natural base color—or leave them bare if your natural nails are in great condition
- Using a thin nail art brush, carefully paint the teal tips in a clean, even line
- For straighter lines, use nail tape or a thin striping brush
- Apply a second coat if needed for opacity and coverage
- Finish with a high-shine top coat that emphasizes the polish’s smoothness
Worth knowing: This design actually grows out beautifully. Unlike full-coverage designs where regrowth is obvious, French tips look intentional even as your nails grow. This makes it perfect for people who can’t get to the salon frequently.
3. Teal and Gold Geometric Designs
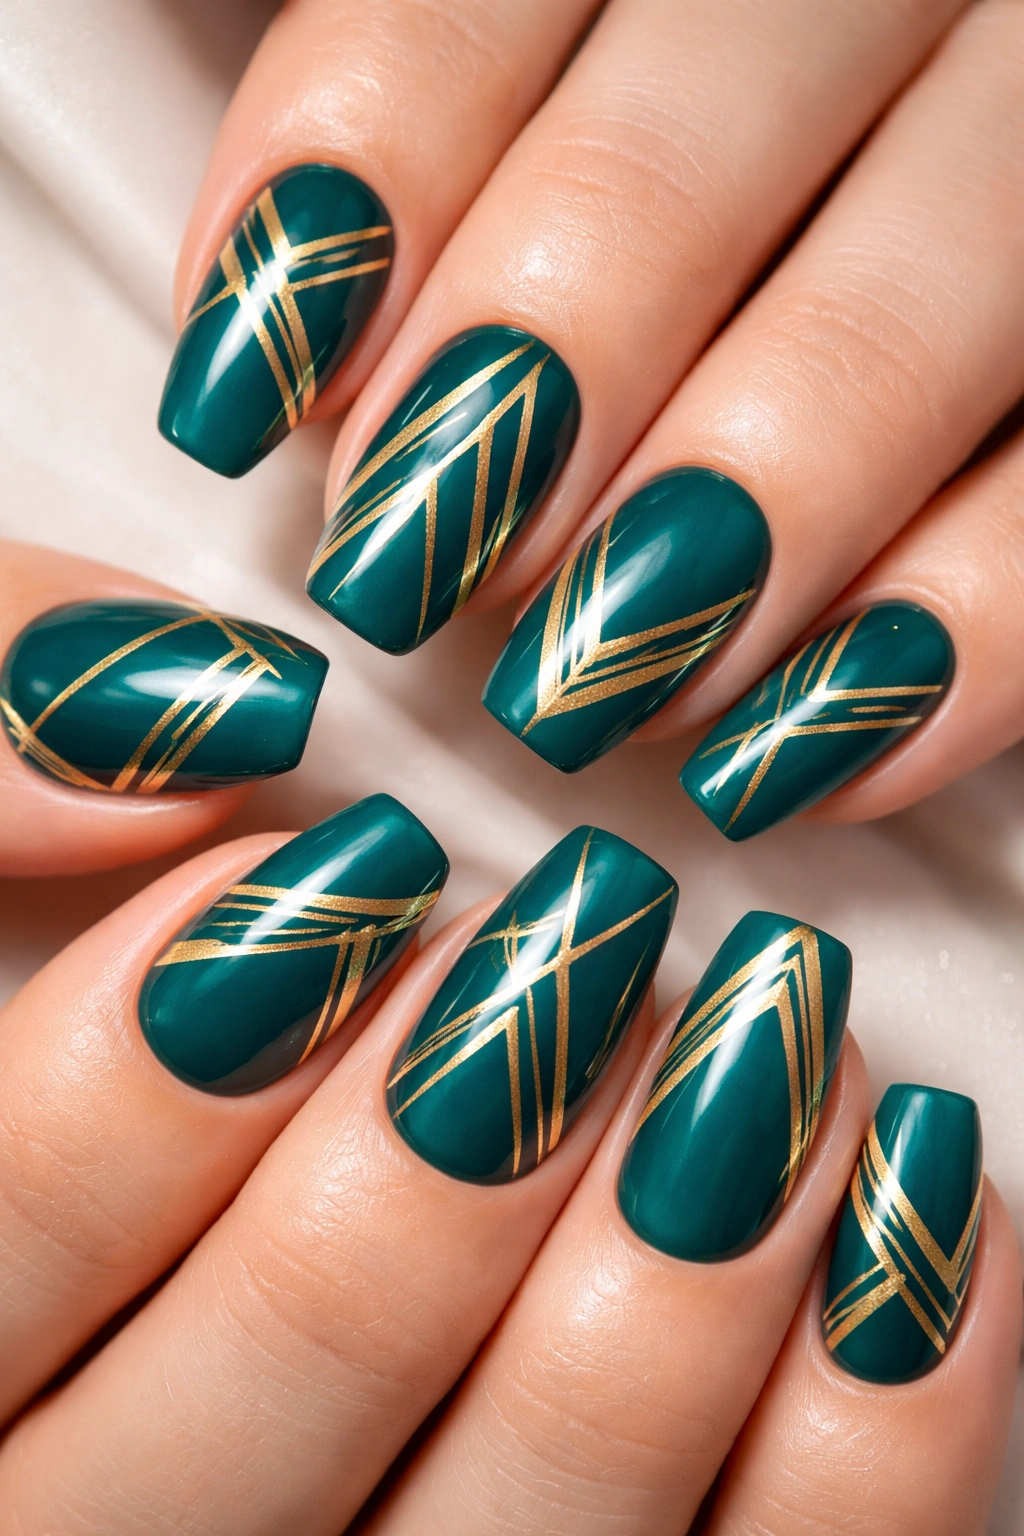
When teal meets gold, you get sophistication with a capital S. This combination is inherently luxurious—the cool blue-green tones of teal provide a stunning contrast to the warm shimmer of gold, creating a look that feels both modern and timeless. Geometric patterns amplify this effect, turning your nails into tiny works of abstract art.
Why Geometric Patterns Elevate Any Design
Geometric shapes—triangles, hexagons, lines, dots arranged in perfect patterns—instantly make a design feel intentional and curated. They’re clean, modern, and visually striking. When you combine geometric patterns with the teal-and-gold color combo, you’re creating something that looks like it belongs in a contemporary art gallery. The precision of the shapes combined with the luxury of the color pairing makes even a simple geometric design feel sophisticated and polished.
Achieving Geometric Perfection
- Apply a solid teal base coat and let it dry completely
- Use thin striping tape or a ruler to mark out your geometric shapes
- Mix a small amount of gold foil or use gold polish to fill your geometric sections
- If using foil, apply a sticky gel base first, then press the foil onto the sticky surface
- For painted gold patterns, use a thin brush and steady hand—or use a nail stamp for more precise designs
- Remove any tape carefully while the polish is still slightly wet
- Seal with a glossy or matte top coat depending on your preference
Quick facts:
- Gold foil application creates a more luxurious, mirror-like effect
- Painted gold requires a steadier hand but gives you more flexibility in design
- Geometric designs look especially striking on longer nails where there’s more canvas
- This combination works beautifully for weddings, evening events, and special occasions
4. Teal Floral Fantasy With Hand-Painted Details
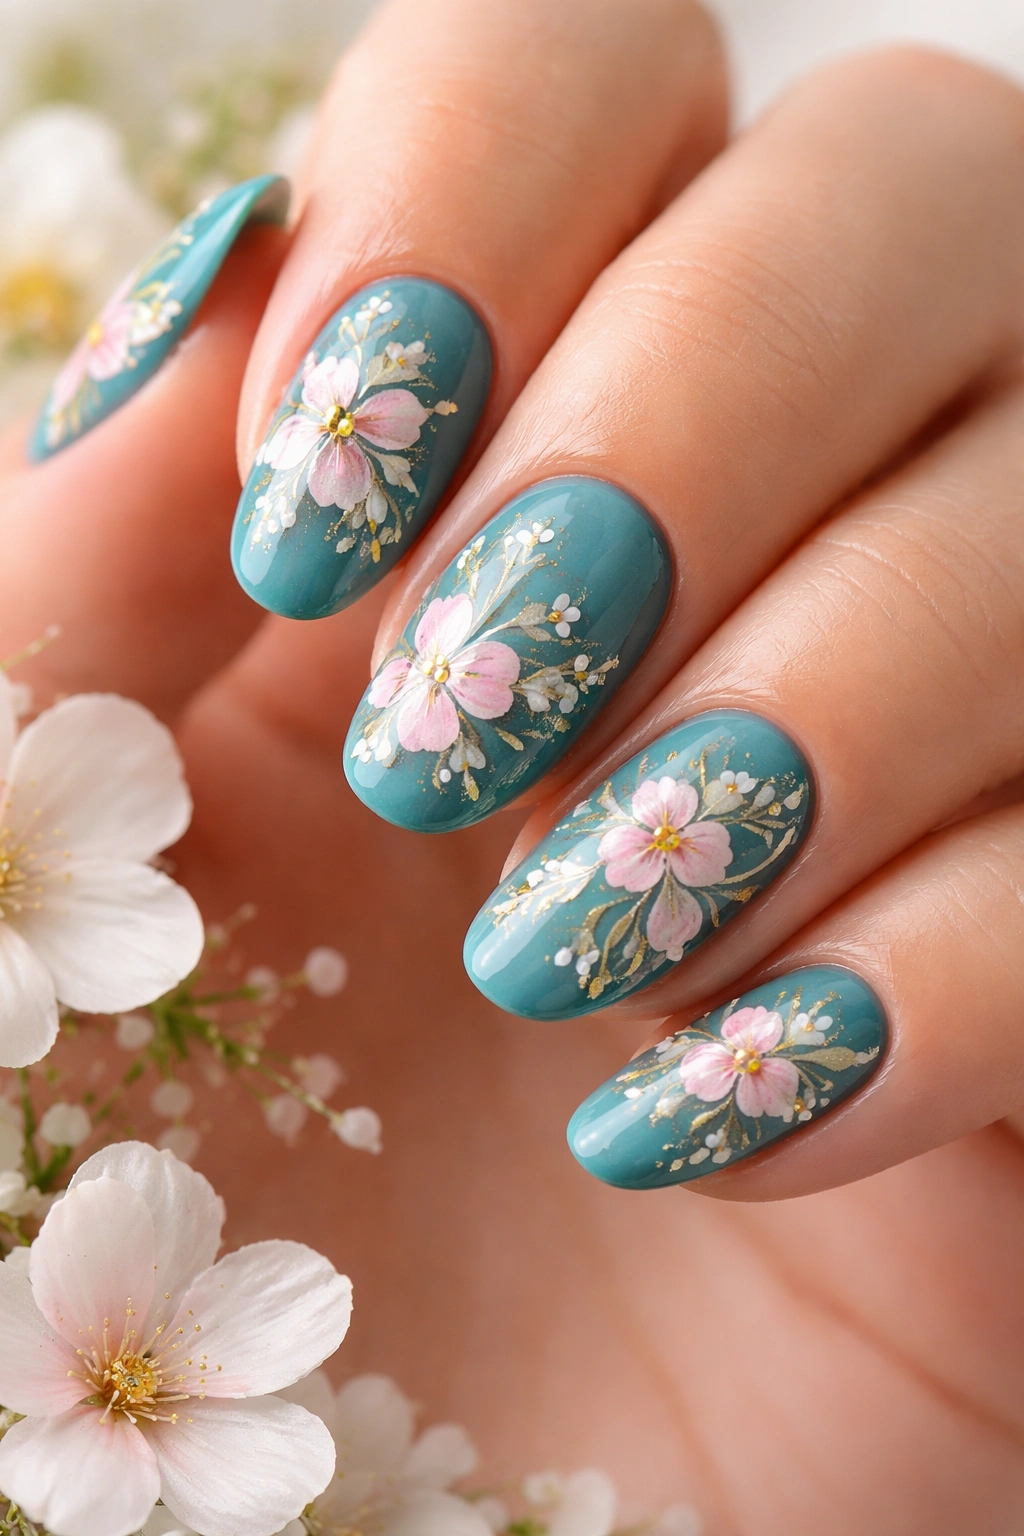
For those who love nature-inspired beauty, teal floral designs bring botanical elegance right to your fingertips. Imagine delicate flowers—roses, daisies, cherry blossoms, or wildflowers—painted in shades of pink, white, lavender, or gold against a gorgeous teal background. The result is a manicure that feels both feminine and sophisticated, perfect for spring and summer but wearable year-round.
The Art of Floral Nail Painting
Floral nail art might seem intimidating, but the wonderful thing about this style is that it doesn’t require perfect precision. Real flowers aren’t perfectly symmetrical or identical, so slight imperfections actually add to the charm and authenticity of your design. The key is using the right tools and taking your time with each brushstroke. A small detail brush and steady hand are your best friends here, though even if your flowers aren’t gallery-worthy, they’ll still be charming and beautiful on your nails.
Painting Teal Floral Nails Step-by-Step
- Start with a clean, well-filed nail and apply a base coat
- Paint your entire nail with teal polish and let it dry completely
- Using a thin detail brush, sketch out light guidelines for where your flowers will go
- Start painting individual petals using a contrasting color (white, pink, or coral work beautifully)
- Add leaves using light green or white, using sweeping brushstrokes
- Paint a small dot or center in a darker or contrasting color for the flower’s center
- Add delicate details like stamens or additional shading to bring depth to your flowers
- Seal everything with a clear top coat
Insider note: If hand-painting feels too challenging, nail stamps and stickers offer gorgeous floral designs that you can apply in seconds. You get the same beautiful result with zero stress.
5. Teal Marble Nail Art With Elegant Veining
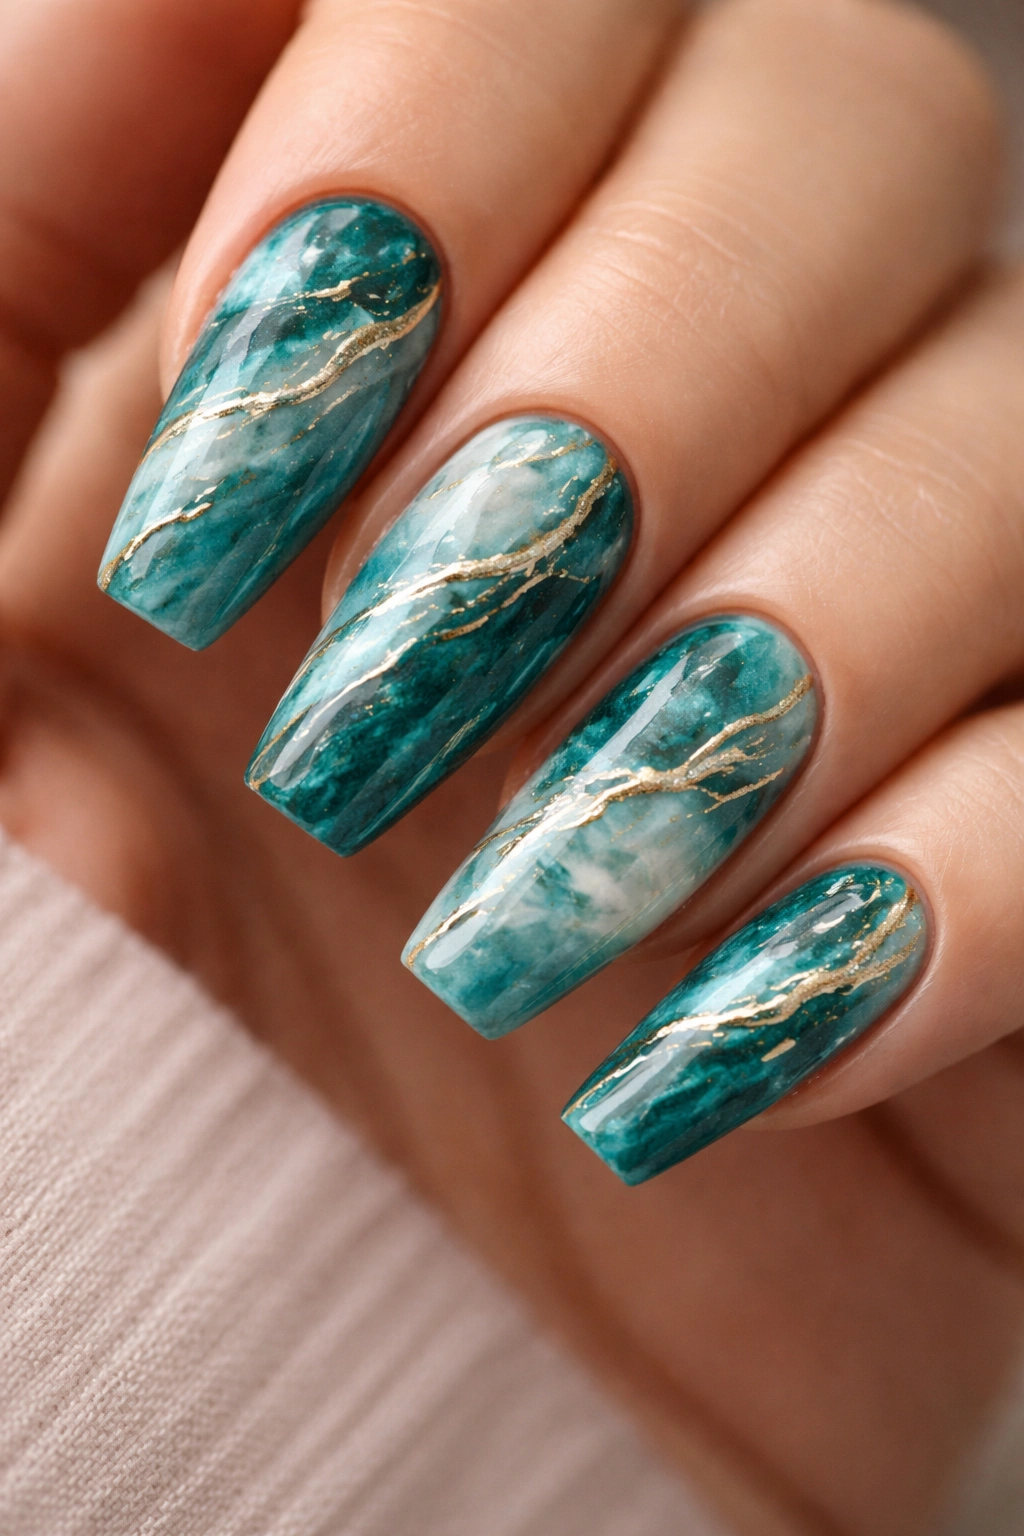
Marble nail designs have become a staple for good reason—they look expensive, sophisticated, and genuinely beautiful. When you execute this design in teal with white or gold veining, you create something that resembles natural stone and brings a touch of luxury to your manicure. Each nail ends up with a unique pattern, making your manicure feel truly one-of-a-kind.
The Magic of Marble Effects
Marble nail art works through a water-based technique that mimics the organic patterns found in actual marble stone. The beauty is that no two nails will look exactly the same, so you’re creating something genuinely unique. The teal base color provides a luxurious foundation, while white or gold veining adds contrast and visual interest. This design feels elevated enough for formal events but subtle enough that you could wear it to the office without raising eyebrows.
Creating Marble Teal Nails
- Apply a base coat and a solid coat of teal polish to all nails
- In a small bowl of room-temperature water, drop small amounts of white or gold nail polish
- Using a thin stick or toothpick, drag through the polish to create swirling, vein-like patterns
- Quickly dip your nail into the water at an angle, letting the marble pattern transfer to your nail
- Remove your nail and wipe away excess polish with a damp cloth
- Repeat for each nail, creating slightly different patterns on each one
- Apply a clear top coat once everything is completely dry
What to know: The water marble technique takes practice, and that’s completely normal. Your first few attempts might not be perfect, but each try gets easier. If water marbling seems intimidating, marble nail foils provide the same elegant effect with zero difficulty—just apply them over your teal base.
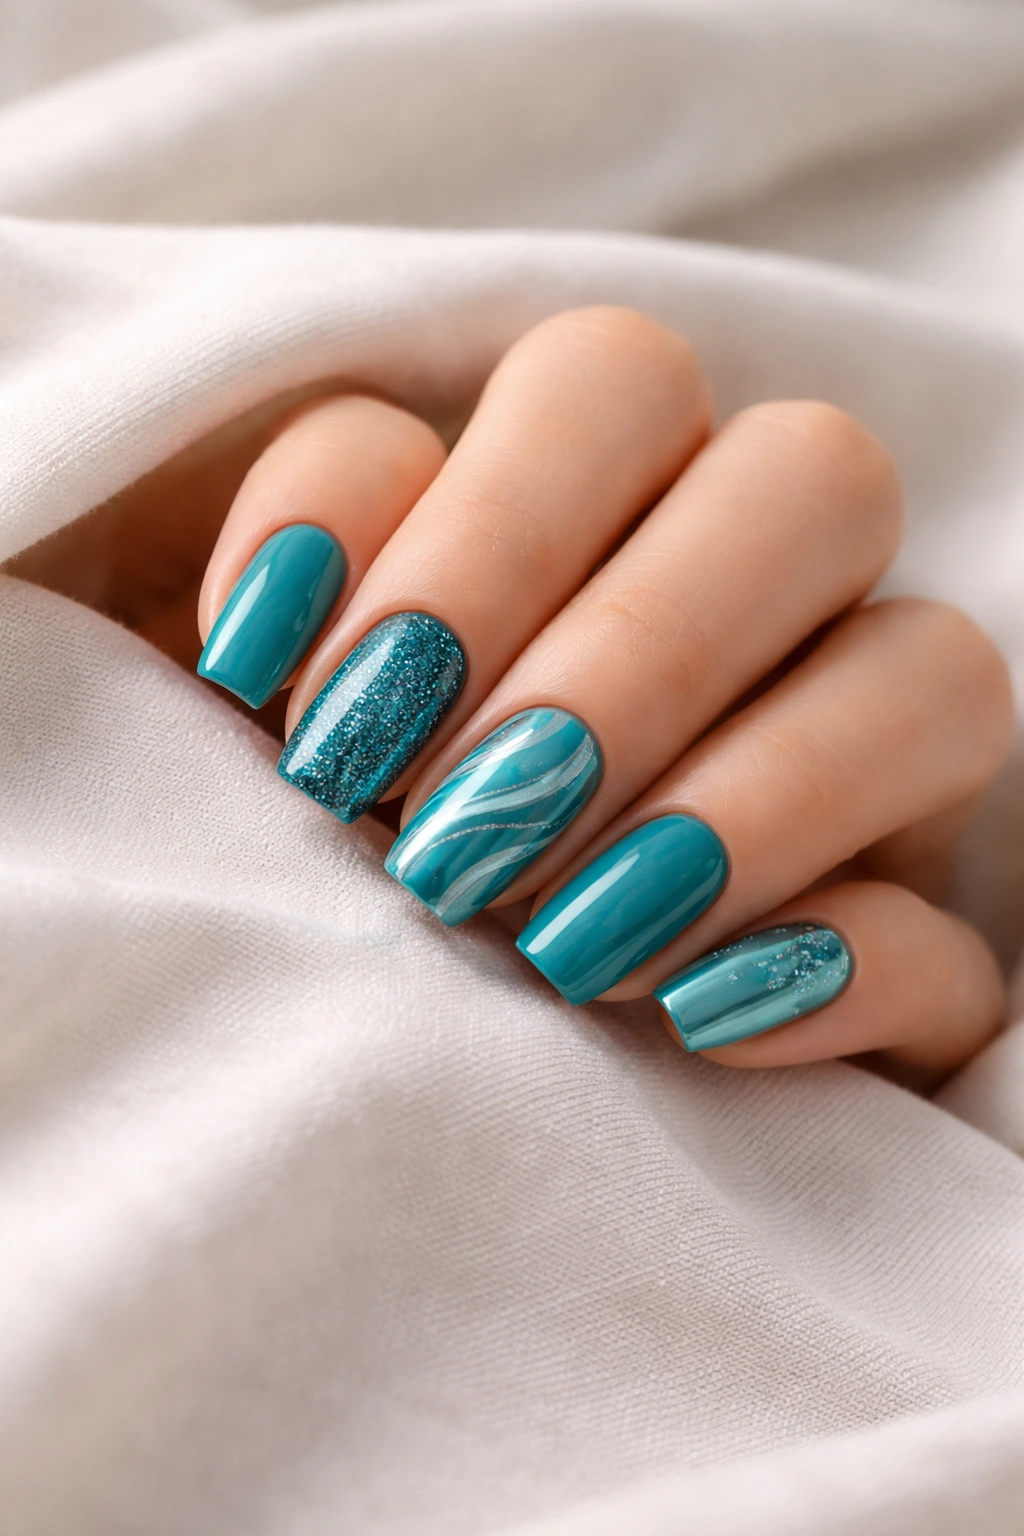
6. Teal and Silver Striped Nails With Modern Flair
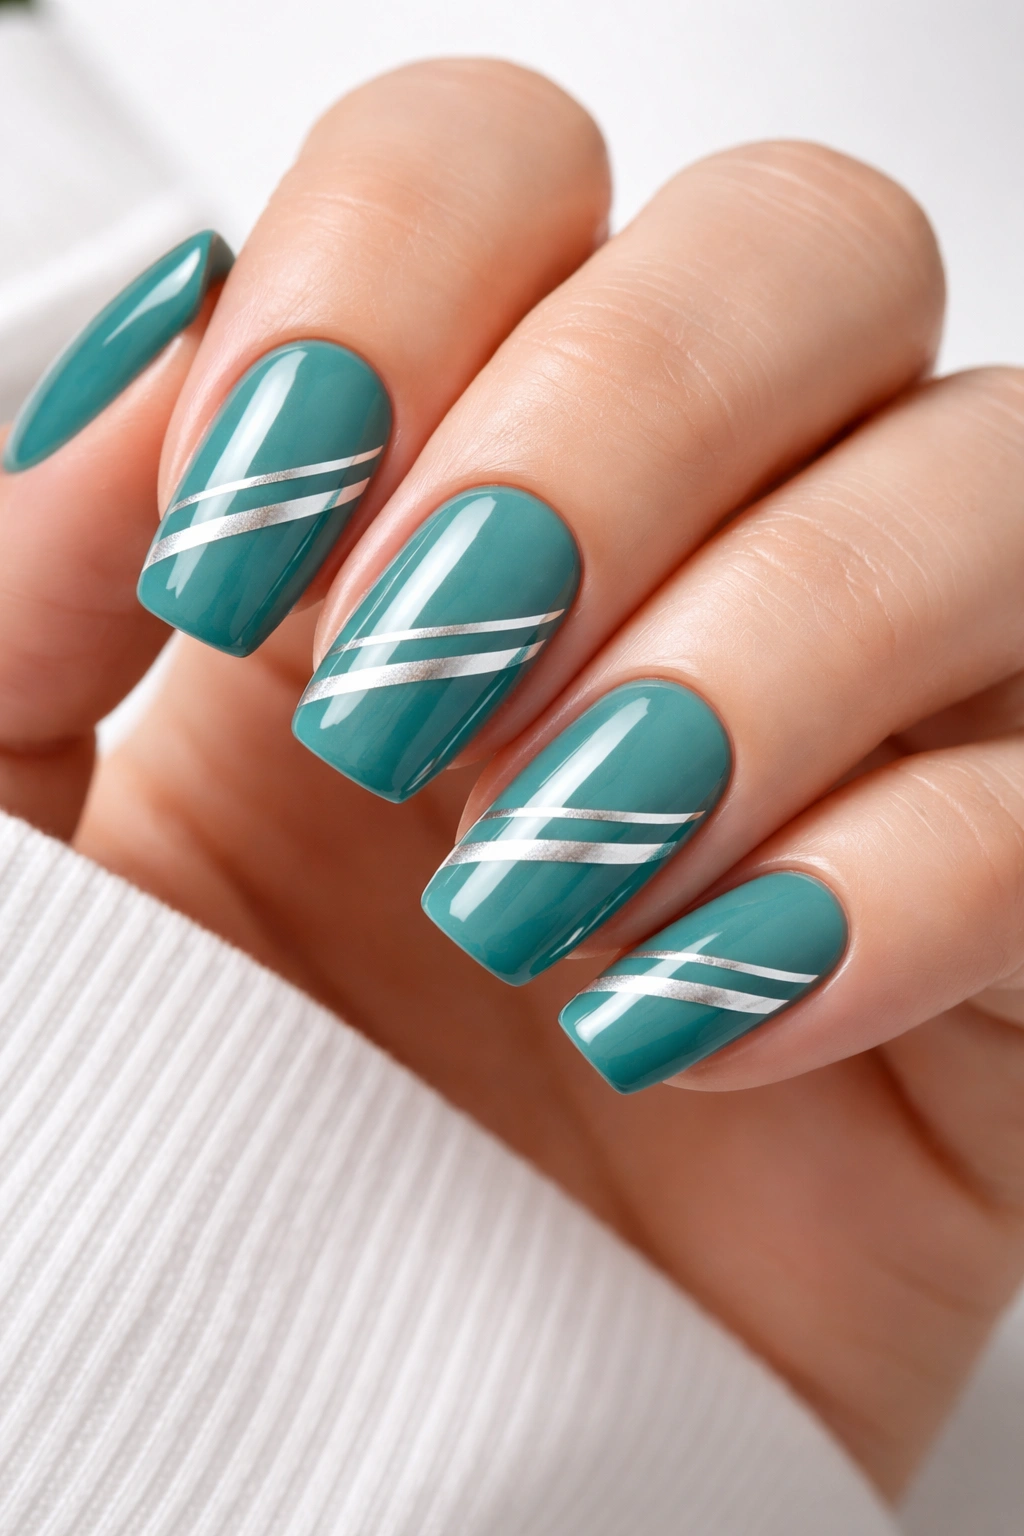
Sometimes the most elegant designs are the simplest ones. Teal and silver stripes create a crisp, clean look that’s both timeless and modern. Whether you choose thin, delicate lines or bold, thick stripes, this design works beautifully and feels surprisingly versatile. The contrast between the cool blue-green teal and the cool, reflective silver creates visual interest without being overwhelming.
Why Stripes Never Go Out of Style
Striped nail designs are classic because they’re clean, geometric, and visually striking. The pattern immediately draws the eye and adds sophistication to your hands. When you use silver stripes on teal, you’re combining two cool tones that complement each other perfectly. The reflective quality of silver adds shimmer and movement, making your nails catch light with every gesture.
Creating Perfect Striped Nails
- Apply a base coat and your teal polish, letting it dry completely
- Use thin nail striping tape to create evenly spaced lines across your nails
- Paint your silver or metallic polish over the taped areas
- Remove the tape carefully while the polish is still slightly wet for clean edges
- If creating thicker stripes, paint them freehand using a striping brush
- Apply a second coat of silver if needed for full opacity
- Seal with a glossy top coat for a smooth, professional finish
Quick facts:
- Striping tape gives you straighter, cleaner lines than freehand painting
- You can vary stripe thickness—thin lines feel elegant, thick stripes feel bolder
- This design works on any nail length or shape
- Silver stripes pair beautifully with teal on any skin tone
7. Glittery Teal Mermaid Nails With Magical Depth
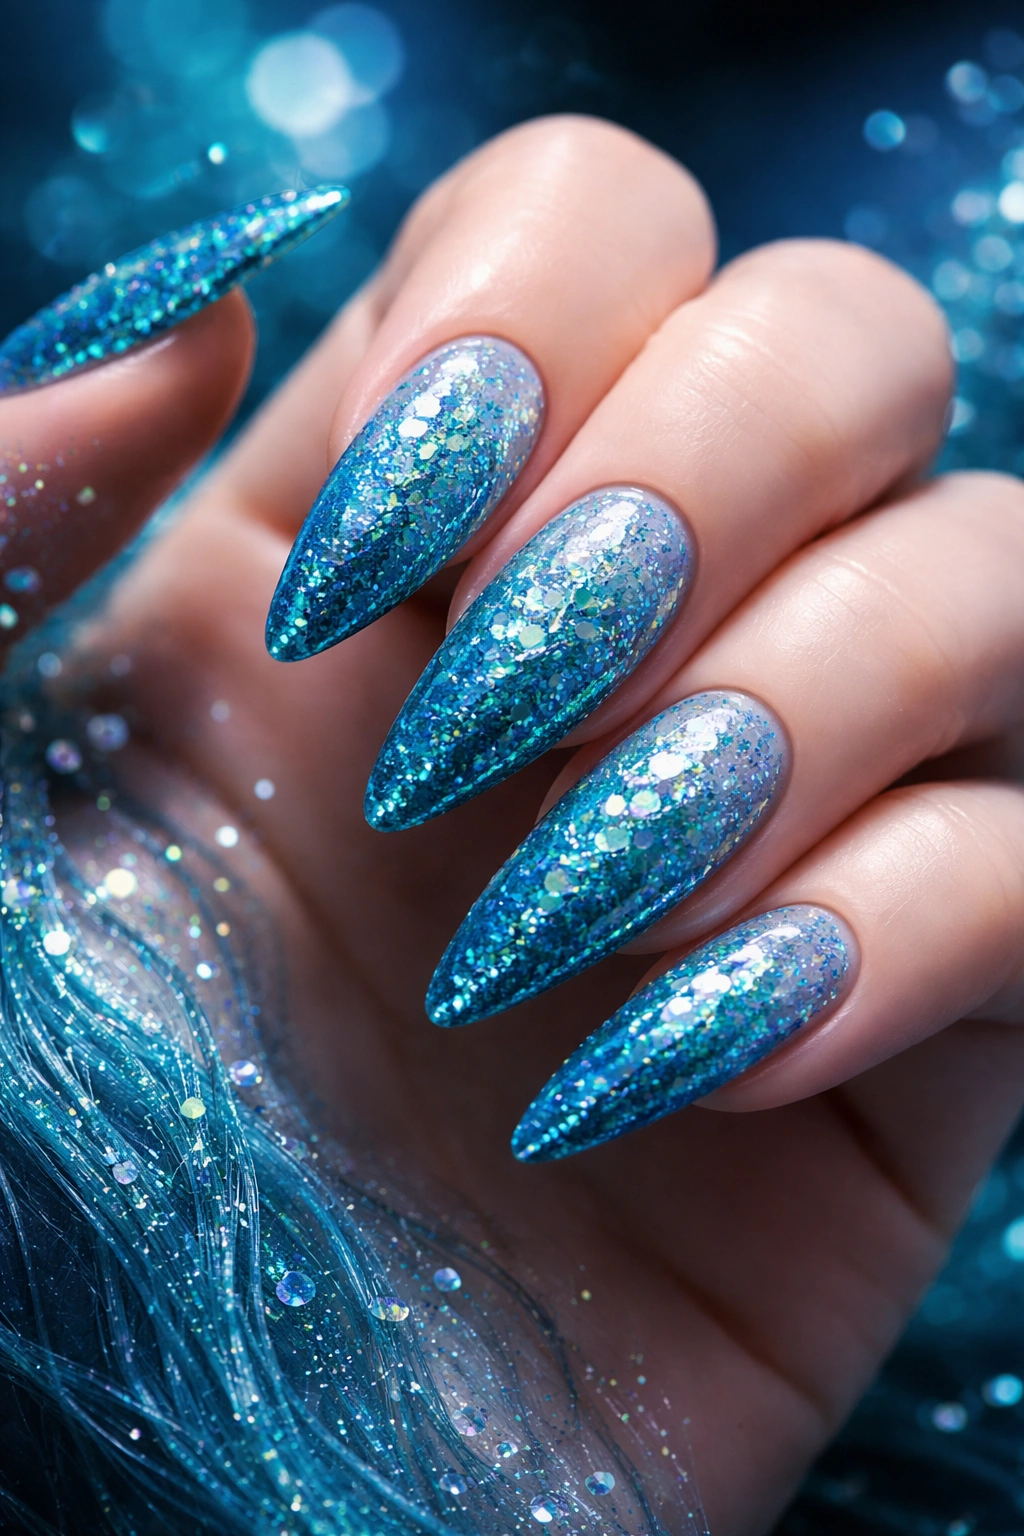
If you want nails that make a statement and capture everyone’s imagination, glittery teal mermaid nails deliver exactly that. This design combines the dreaminess of mermaid-inspired aesthetics with the sparkle and texture of glitter, creating something that looks like you’ve captured ocean magic on your fingertips. The layering of different textures and finishes creates stunning visual depth.
The Fantasy of Mermaid-Inspired Nail Art
Mermaid nails take inspiration from the iridescent scales of a fictional sea creature, using shimmering finishes and dimensional textures to create an underwater fantasy. Teal is the perfect base color for this concept because it already evokes ocean waters. When you add glitter, holographic accents, and layered textures, you create something genuinely enchanting. This design works best on longer nails where there’s room to showcase the complexity, but shorter nails can still look beautiful with this style—just use finer glitter to keep it proportionate.
Building Your Mermaid Teal Nails
- Apply a base coat and let it dry
- Paint your nails with a glittery teal polish or gel (seafoam or turquoise shades work beautifully)
- While the base is still slightly wet or tacky, sprinkle fine teal and blue micro-glitters onto your nails
- Add larger holographic or iridescent pieces for dimensional shimmer
- Press everything down gently with a clean brush or stamper head
- Apply a clear builder gel or top coat to seal everything and create a smooth surface
- Cure under a UV or LED lamp if using gel, or let dry if using traditional polish
Pro tip: The wet-nail method (applying glitter while polish is still tacky) ensures everything adheres properly and creates that magical dimensional effect. Layering different glitter sizes—fine glitter mixed with larger pieces—creates authenticity and interest.
8. Pastel Teal and White Swirl Designs
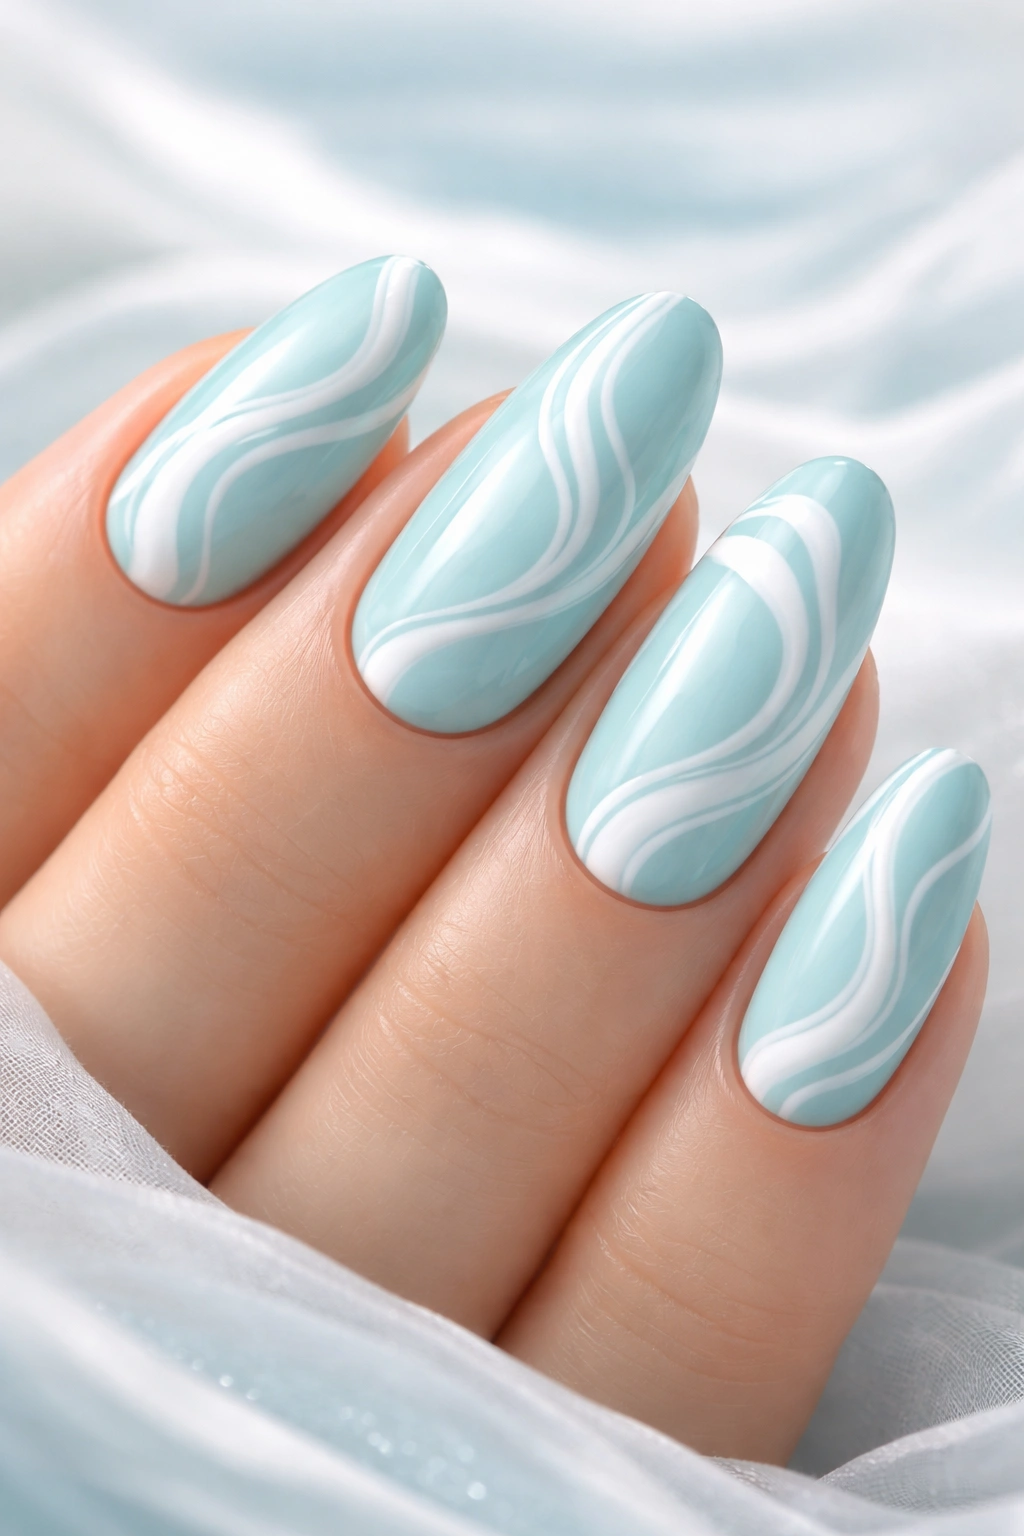
For those who prefer subtlety and serenity, pastel teal and white swirls offer the perfect alternative to bold designs. This aesthetic is calming to look at—it reminds you of gentle ocean waves and peaceful beach days. The soft, light teal paired with crisp white creates a design that’s both trendy and timeless, perfect for people who want color without intensity.
The Psychology of Pastel Colors
Pastel shades work on psychology. They’re easier on the eyes, feel more sophisticated in many contexts, and appeal to people who prefer understated elegance. Pastel teal specifically is the friendlier, gentler cousin of bold teal—it gives you that blue-green color family without the intensity. When paired with white in a swirl pattern, you create movement and flow while maintaining an overall peaceful aesthetic.
Creating Swirl Designs With Pastel Teal
- Apply a base coat followed by your pastel teal polish
- While the teal is still wet, apply small dots or thin lines of white polish across your nail
- Using a toothpick, dotting tool, or thin brush, gently drag through the white polish to create swirling patterns
- Drag from the white towards the teal color, or vice versa, depending on the effect you want
- Work quickly before the polish dries
- Wipe excess polish from your nail with a brush dipped in acetone
- Seal with a clear top coat for a smooth finish
Worth knowing: Timing is everything with swirl designs. Practice on a few nails first to get a feel for how quickly the polish dries and how much pressure to use. What feels like barely touching the polish actually creates beautiful, fluid lines.
9. Bold Teal and Black Geometric Nails For Statement Makers
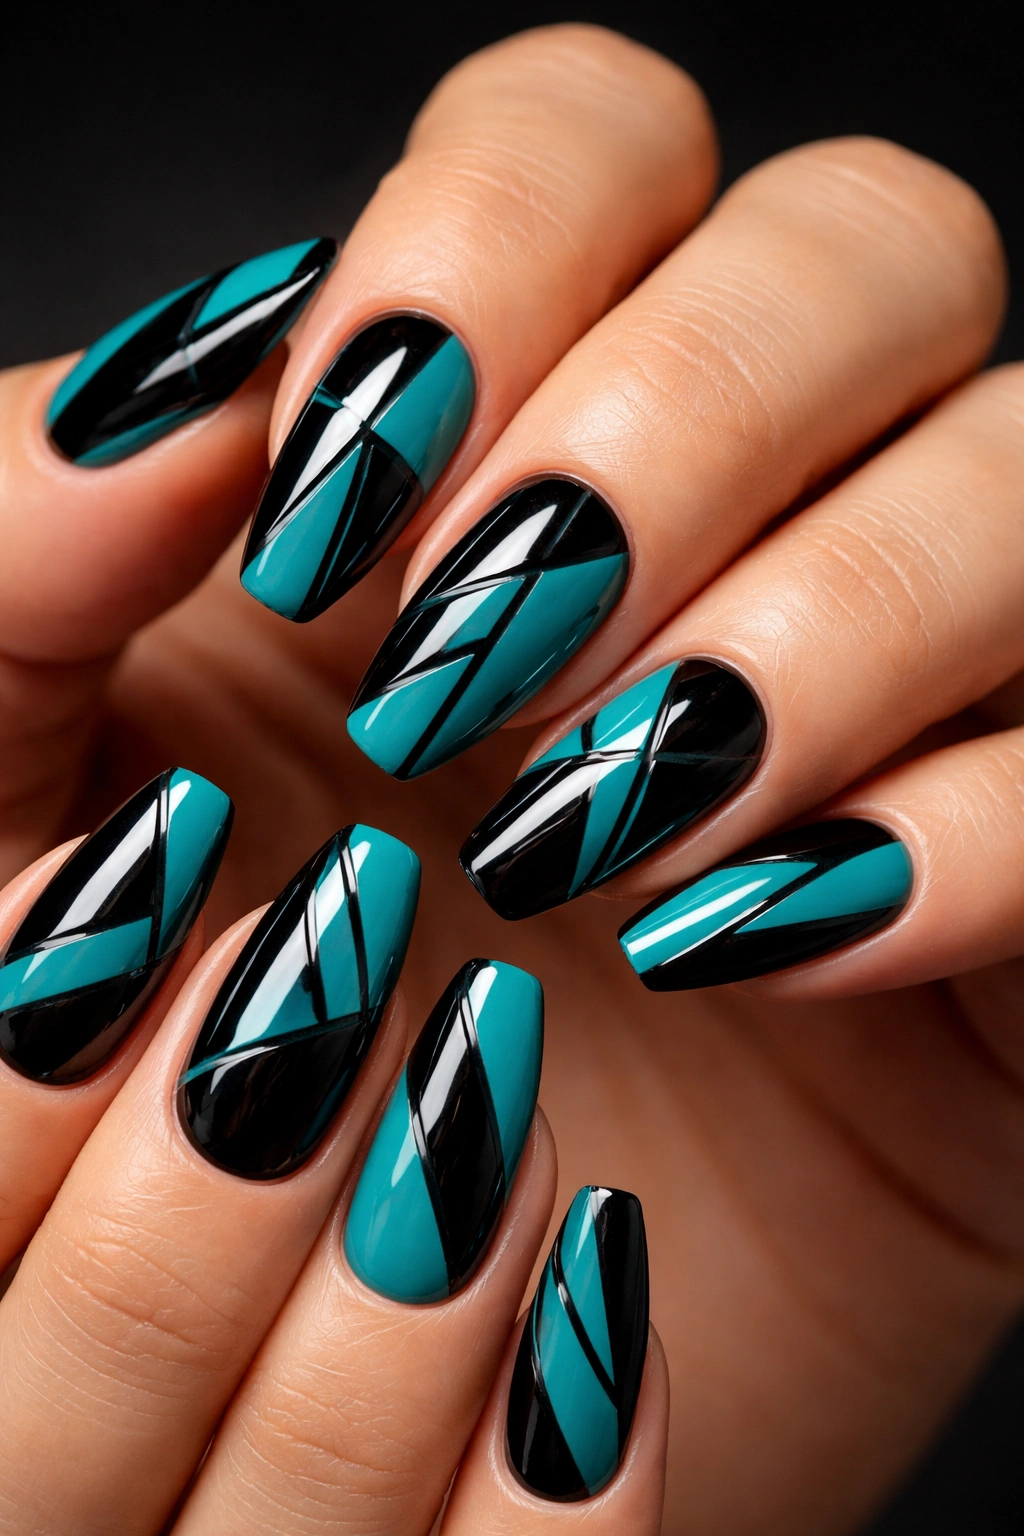
If you want your nails to make people stop and stare, bold teal and black geometric designs deliver maximum impact. The high contrast between vibrant teal and deep black creates a look that’s striking, modern, and unmistakably confident. These nails work beautifully for anyone who loves contemporary art, sharp style, and isn’t afraid to be noticed.
The Power of High-Contrast Color Combinations
Color psychology tells us that high contrast grabs attention—and that’s exactly what teal and black do together. The combination feels edgy yet refined, bold yet intentional. Black grounds the vibrant teal, preventing it from feeling too bright or overwhelming, while teal prevents black from feeling too dark or somber. The geometric shapes add structure and intention, making the design feel like careful artistic expression rather than random color.
Designing Teal and Black Geometric Nails
- Apply a base coat and either a teal or black base (whichever will be your primary color)
- If starting with teal, use thin striping tape or a steady hand to paint black geometric shapes (triangles, lines, hexagons, circles)
- If starting with black, use teal for your geometric accents
- Create negative space by leaving some of the nail unpainted, which adds modern sophistication
- Use a thin striping brush or nail art pen for precise lines
- For perfectly straight lines, use striping tape or a ruler as a guide
- Apply a second coat if needed for full opacity
- Seal with a glossy or matte top coat (matte gives an even more contemporary feel)
Quick facts:
- Negative space (intentionally unpainted areas) makes geometric designs feel more intentional and artistic
- This design looks particularly striking on longer, squarer nails
- You can make the geometric shapes as simple or complex as you want
- This combination works beautifully for creative professionals, artists, and anyone with a bold aesthetic
10. Teal and Rose Gold Foil Accents For Luxe Elegance
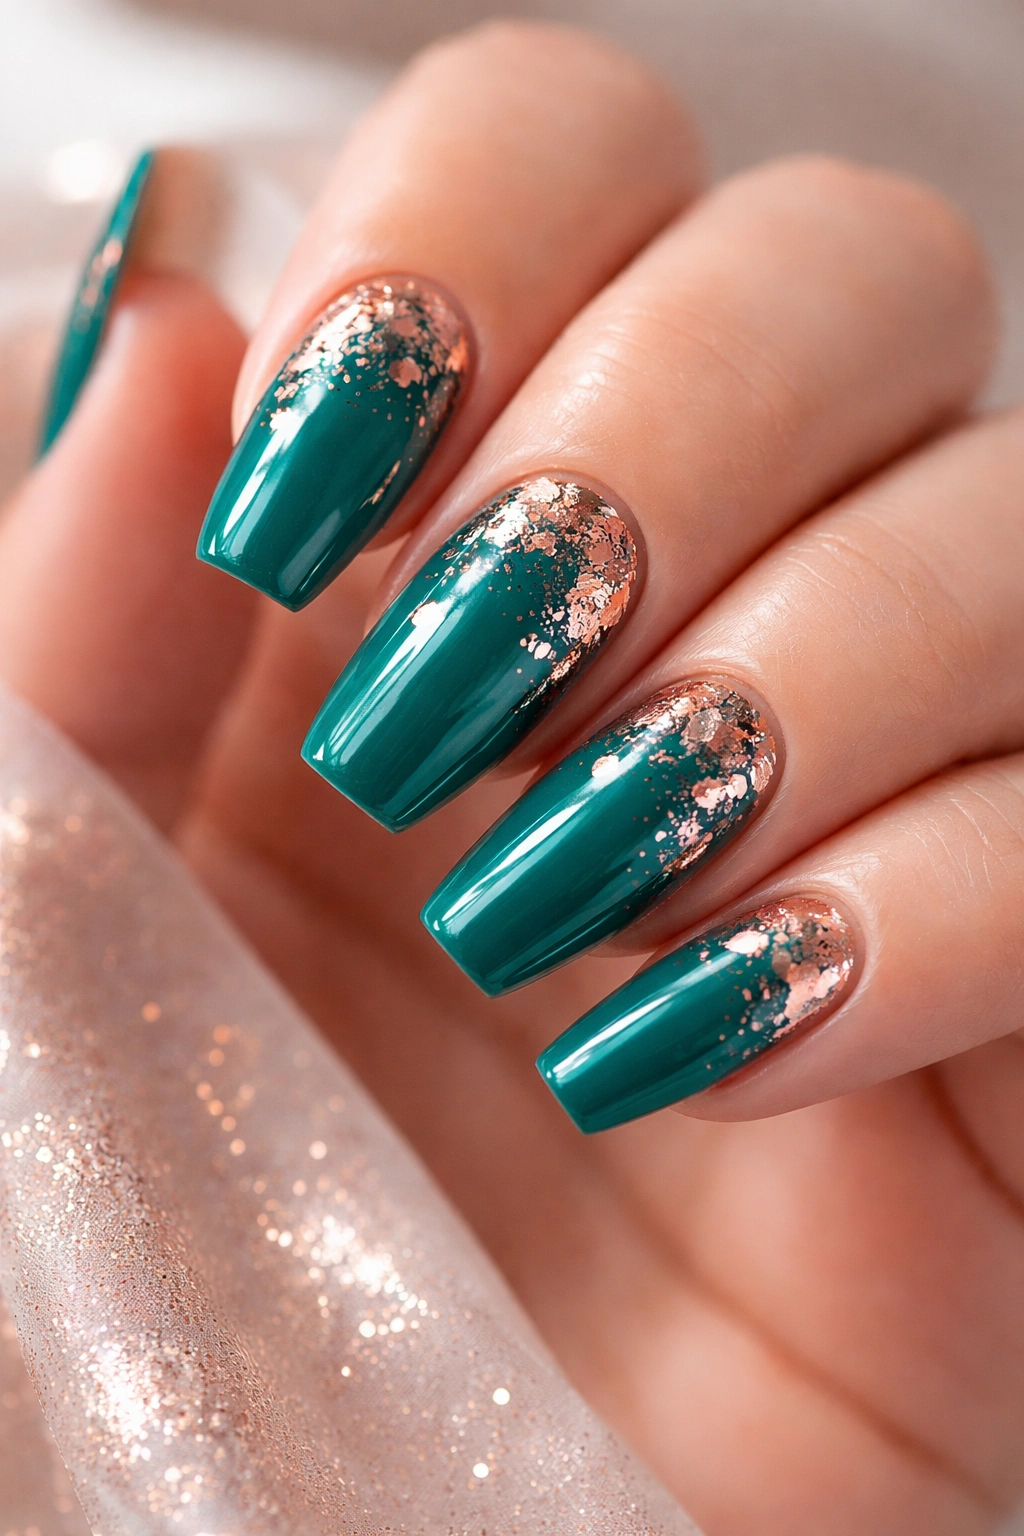
If you want your nails to feel genuinely luxurious, teal paired with rose gold foil accents delivers. The warmth of rose gold complements the cool sophistication of teal in an unexpected and absolutely beautiful way. Foil accents catch light and shimmer, creating a design that looks expensive and professionally done—whether you create it yourself or wear it to the salon.
The Luxury Factor of Metallic Foils
Foils have revolutionized nail art because they deliver that high-end, expensive look instantly. Unlike trying to paint metallic designs (which can be tricky), foil simply adheres to a sticky gel base, creating a perfect, mirror-like finish. Rose gold specifically is having a moment—it bridges the gap between traditional gold and contemporary design, working with virtually any aesthetic or skin tone.
Applying Teal and Rose Gold Foil
- Apply a base coat and paint your entire nail with teal polish
- Apply a layer of sticky gel base coat (or use a gel polish without the top coat)
- Cut or tear small pieces of rose gold foil into desired shapes (geometric, abstract, or random)
- Press the foil firmly onto the sticky gel surface using tweezers or a brush handle
- Apply gentle pressure for a few seconds to ensure adhesion
- Gently peel away the foil backing—the metallic coating should stay on your nail
- Repeat across your nails, creating a pattern or scattered accent effect
- Apply a final clear gel top coat to seal everything and create a smooth surface
- Cure under a UV or LED lamp
Pro tip: Rose gold foil works best when applied to a fully opaque teal base. The teal provides a beautiful backdrop that makes the rose gold shimmer stand out without competing for attention. You can create scattered foil pieces for a playful look or arrange them in patterns for something more structured.
Final Thoughts
Teal nail designs offer something genuinely special—a color that works year-round, flatters every skin tone, and pairs beautifully with virtually any outfit or occasion. Whether you’re drawn to the glamorous sparkle of glitter and foil, the sophisticated elegance of marble and geometric designs, or the understated charm of minimalist styles, there’s a teal nail idea here that speaks to your aesthetic. The wonderful thing about choosing teal is that you’re not limited by season or formality—these designs work for casual days at home, professional office settings, beach vacations, and formal events. Each design you choose tells a story about your style and personality. Maybe you’re the type who loves glamorous glitter and mirrors, or perhaps you prefer the clean lines and geometric precision of modern art. Maybe you’re drawn to the natural beauty of floral and marble designs, or the sophistication of minimalist French tips. Whatever your preference, teal gives you the perfect canvas to express yourself. Start with the design that speaks to you most, and don’t be afraid to experiment. Nail art is wonderfully forgiving—if you want to try something different next week, it grows out. The beauty of exploring teal nail designs is that each one teaches you something new about what you love and how you want to present yourself to the world. So pick up that teal polish, gather your nail art supplies, and create something beautiful. Your nails—and everyone who sees them—will thank you for it.
