

Long oval nails in white are having a major moment, and honestly, once you see how versatile and elegant this combination is, you’ll understand why. There’s something inherently sophisticated about the long oval shape — it’s more refined than a square, less dramatic than a stiletto, and it flatters practically every hand shape and skin tone. Add crisp white polish to that equation, and you’ve got a canvas that works for everything from corporate polish to weekend casual to special occasion glam.
The beauty of white long oval nails is that they’re deceptively flexible. A pure white can read minimalist and modern one day, then timeless and classic the next. Layer in textures, finishes, metallics, or subtle embellishments, and suddenly you’ve got twenty completely different looks that all share that clean, fresh foundation. Whether you’re after something so minimal it’s barely there or a design that makes a statement, white long oval nails deliver.
The challenge, though, is figuring out which direction actually suits you. Do you want to go full glossy and polished, or does a soft matte feel more like your vibe? Are you drawn to the simplicity of solid color, or do you want some visual interest through detailing? Should it be warm ivory or cool bright white? These choices matter because they determine whether your nails feel classic or trendy, understated or bold.
That’s exactly why I’ve rounded up twenty of my favorite white long oval nail designs — each one distinct enough to feel fresh, but all sharing that clean, elevated aesthetic that makes white oval nails so timeless. Whether you’re heading into a season of formal events, want to refresh your everyday look, or are just searching for that perfect “I feel put-together” nail design, you’ll find it here.
1. Classic Crisp White
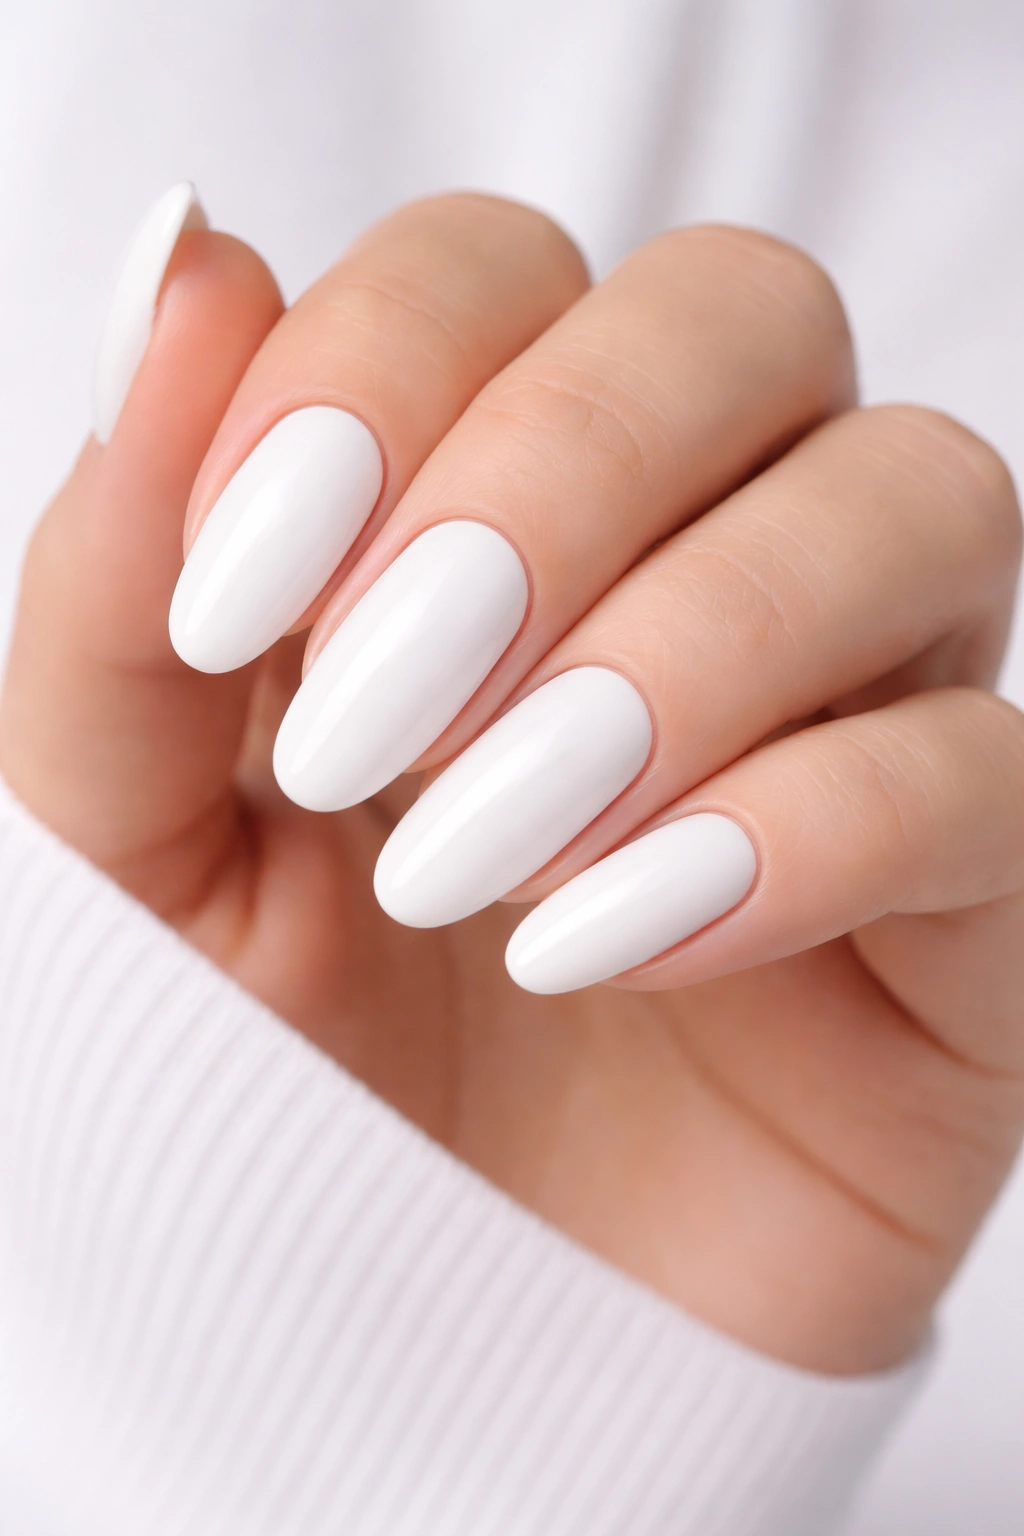
Nothing beats the pure simplicity of a flawless white — no additional flourishes, just the ideal execution of a timeless style. This is the nail equivalent of a perfectly fitted white button-up shirt: fundamentally elegant precisely because it demands refinement in every detail. The magic here lives entirely in the quality of the polish, the precision of the application, and the immaculate finish.
Why This Is Always the Right Choice
A true classic white oval nail works because it transcends trend. It reads as polished and intentional whether you’re in a boardroom, at brunch, or heading to a black-tie event. The long oval shape elongates the nail bed and creates a naturally flattering silhouette, and the white emphasizes that clean line perfectly. There’s zero visual clutter competing with the shape — the eye goes straight to the elegant curve of the nail itself.
The Details That Make It Perfect
- Use a bright white with slight cool undertones rather than warm off-white — cool whites feel more contemporary and less yellow-toned over time
- Apply three thin coats rather than two thick ones — thin layers cure evenly and look flawless longer
- Finish with a high-gloss top coat and let it cure fully before using your hands — 2-3 minutes makes a dramatic difference in the depth of shine
- Maintain crisp edges by cleaning the cuticle area weekly with a soft brush — any buildup dulls the clean aesthetic instantly
- Reapply top coat every 3-4 days to restore maximum shine between manicure visits
Pro tip: If your white polish yellows easily, add one drop of blue-tinted gel (like a sky blue or cornflower) to a bottle of white polish — it neutralizes any warmth and keeps the white looking fresh and bright indefinitely.
2. Minimalist Line Accents
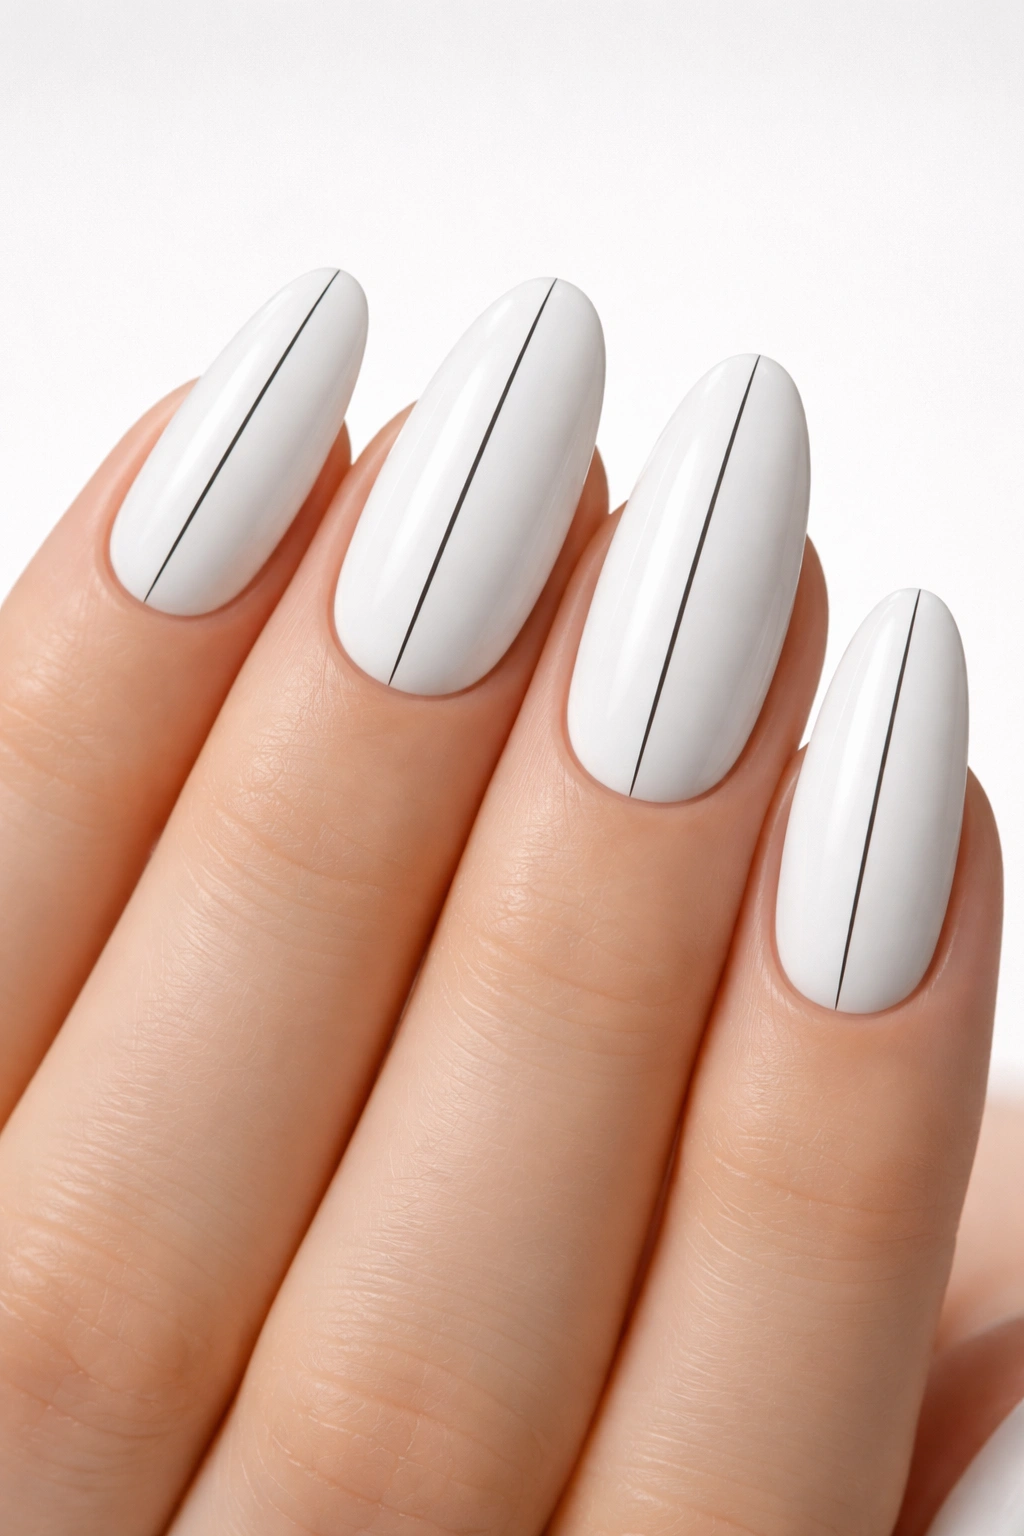
This design takes the classic white base and adds one element that completely changes the mood: a single thin line in black, navy, or charcoal running down the center of each nail from cuticle to tip. It’s graphic without being busy, intentional without feeling overdone, and it creates a visual line that makes the nail look even longer and more elegant.
Why Negative Space and Minimal Details Are So Powerful
One line does something interesting to the psychology of a manicure. It’s enough detail that your nails feel designed — like you made a choice beyond just picking a color. But it’s restrained enough that it never looks fussy or tries too hard. The line also visually extends the nail, making the long oval shape feel even more elongated and graceful. Minimal details are actually harder to execute well than a full design, which is why they read as so refined.
Execution Tips That Make the Difference
- Use a ultra-fine nail art brush or a liner pen (like a gel eyeliner) for perfectly consistent lines — freehand with a regular brush risks wobbly edges
- Apply the line in two or three very thin passes rather than one thick stroke — it looks cleaner and is easier to control
- Seal the line with a top coat immediately so the pigment doesn’t bleed or feather at the edges
- Experiment with placement: center line down the middle, slightly off-center for asymmetrical interest, or even a vertical line on just the ring finger and pinky for a subtle detail
- Try the line in deep colors (black, burgundy, forest green) for maximum contrast, or soft tones (taupe, dusty rose, gray) for a barely-there effect
Worth knowing: This design photographs exceptionally well and looks professional in work settings — clean enough for corporate but thoughtful enough to show personality.
3. Subtle Gold Geometric
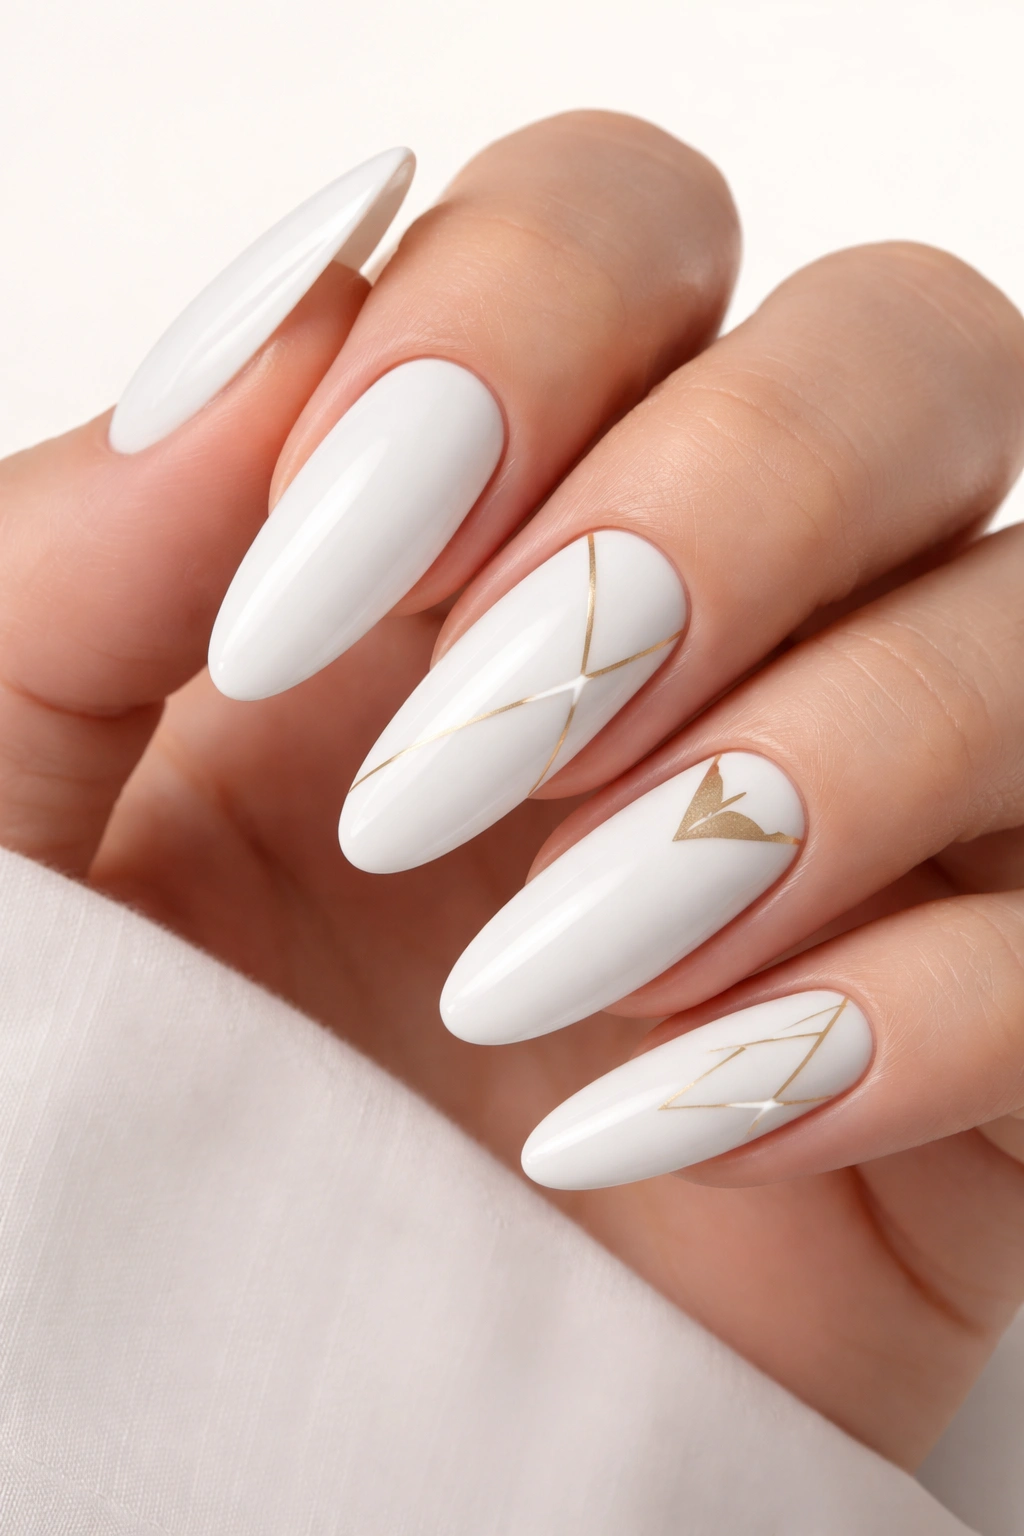
White paired with fine geometric patterns in gold creates an incredibly sophisticated look that feels contemporary without being trendy. Think delicate triangles, thin parallel lines, or understated hexagon shapes scattered across the nails in brushed or solid gold — enough visual interest to feel curated, but restrained enough to read as elegant rather than playful.
Why Gold Is the Perfect Metallic Pairing With White
Gold and white is essentially the visual equivalent of champagne and cashmere. Gold brings warmth to white’s coolness, creates a luxury aesthetic, and feels inherently dressy without requiring anything complicated. Geometric patterns are scalable — you can go super minimal with just two or three shapes total across all ten nails, or more abundant depending on how bold you want to feel. The key is precision in the shapes themselves, which makes them read as intentional design rather than decoration.
How to Build This Design
- Start with a glossy white base (2-3 coats cured fully)
- Use a gold gel or metallic polish with a very fine brush to sketch geometric shapes — triangles pointing up or down, thin parallel lines, small circles
- Vary the scale slightly from nail to nail so the design feels organic rather than rigidly uniform
- Consider adding geometric shapes only to 2-3 nails per hand (perhaps ring finger and pinky, plus the thumb) for a more subtle effect
- Alternatively, add one small geometric accent near the cuticle on each nail for a barely-there touch
- Seal everything with a clear top coat to protect the gold and keep the shine consistent
Insider note: If you’re not confident in your freehand geometry skills, use thin metallic striping tape available at any beauty supply store — apply it to the dried white base, seal with top coat, and remove the tape to reveal perfect lines.
4. Soft Glazed Effect
The glazed nail trend translates beautifully into white, creating an almost candied, semi-translucent appearance that looks thick and dimensional but feels incredibly light. This isn’t matte white — it’s a glossy white with a special sheen finish that makes it look almost liquid or glazed over, like frosting on a donut or a glassy glaze on ceramic.
What Makes the Glazed Finish So Mesmerizing
The glazed look works because it plays with light in an unusual way. The nail looks super thick and opaque, but there’s a specific shine and reflection that reads as almost edible or jewel-like. It’s luxurious without being loud, and it creates an almost three-dimensional effect. Long oval nails in this finish look incredibly polished because the shape and shine enhance each other — every movement catches light.
How to Achieve the Glazed Look
- Use a white polish specifically labeled “gel” or “glazed finish” — these have a thicker viscosity than regular polish
- Apply in one moderately thick coat after buffing the nail bed lightly to create grip
- Cure (if using gel) or dry completely for longer than normal — glazed finishes need full cure time to develop that signature thick appearance
- Add a glossy builder top coat that’s labeled “sticky” or “glazed” — this adds to the effect
- The final result should catch light differently than a standard glossy white — more reflective and almost creamy-looking
Pro tip: Glazed nails chip less easily than thin regular polish because of the thickness of the formula, making them actually practical for daily wear despite their fancy appearance.
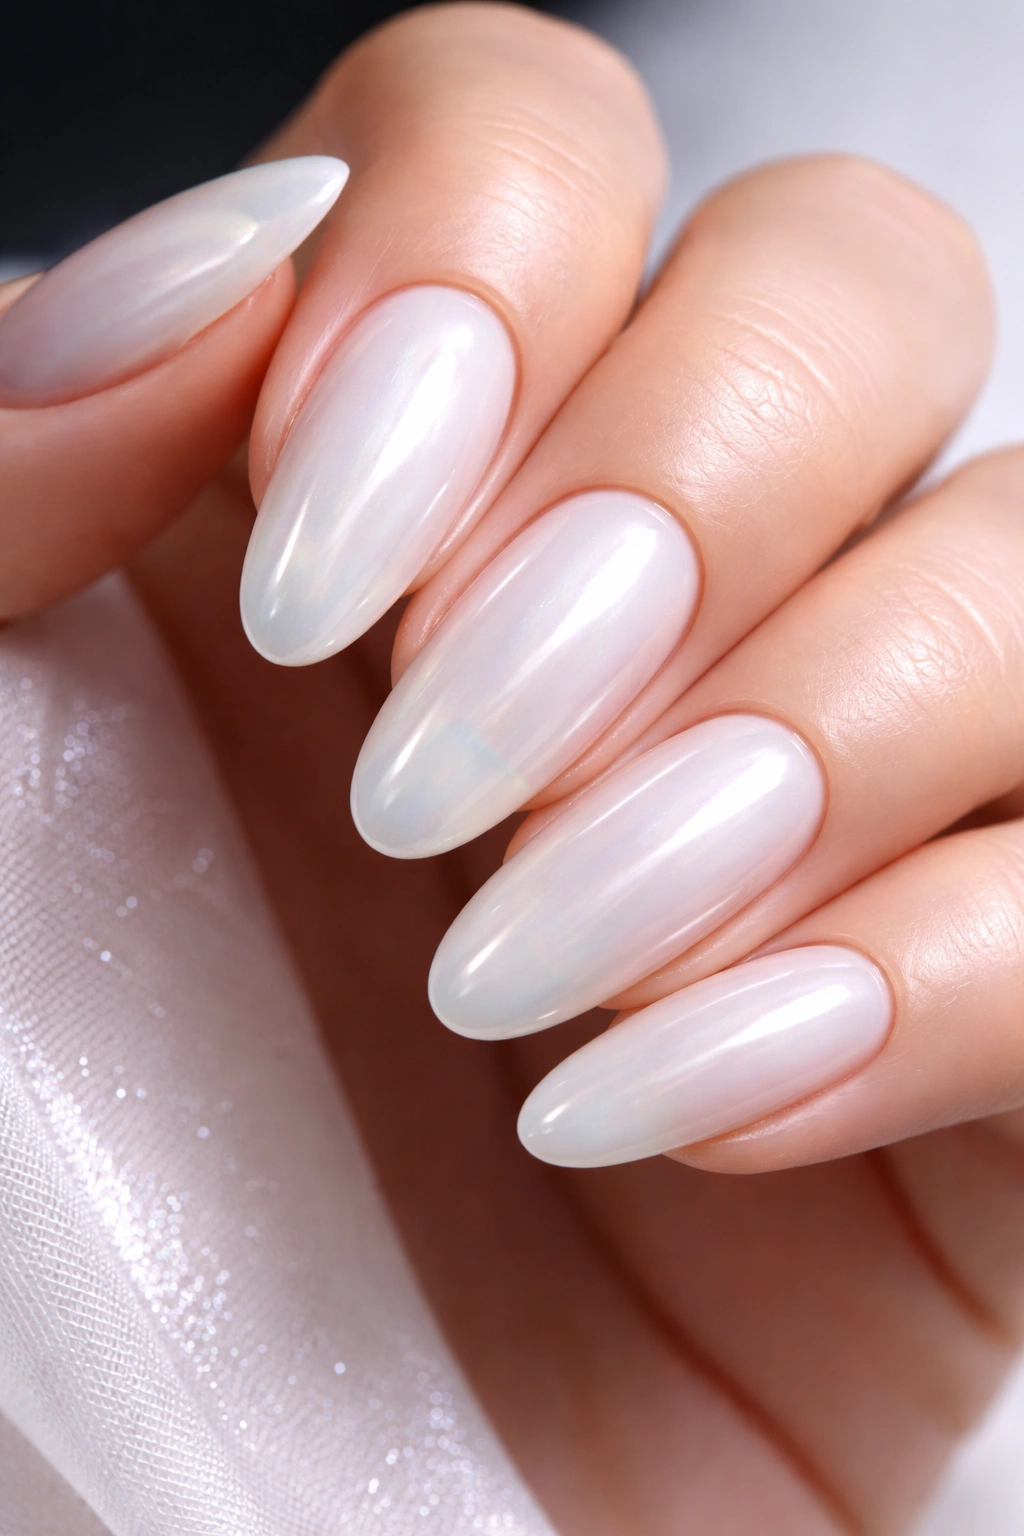
5. Pearl Ombre Gradient

This design layers white with soft pearl, creating a barely-there ombré that transitions from white at the base to luminous pearl at the tip. It’s gradient without being obvious, elegant without being complex, and it adds dimension to the nail in a way that feels modern and refined.
Why Subtle Ombré Reads as Elevated
An ombré works on long oval nails because the shape naturally guides the eye from base to tip — adding a subtle gradient just enhances that existing movement. White-to-pearl is one of the most understated ombre combinations possible, which is exactly what makes it sophisticated. It’s enough visual interest that your nails feel intentional, but restrained enough that it never looks staged or overdone. The pearl adds a luminous quality that straight white can’t quite achieve.
Building a Flawless Gradient
- Start with a white base (at least 2 coats)
- Mix white polish with pearl or translucent shimmer polish in a ratio that creates a shade slightly lighter than your white base — this becomes your transition shade
- Use a makeup sponge or a wet brush to apply the transition shade to the middle section of the nail, and the pure pearl to the tips
- Blend the colors by stippling (a dabbing motion, not brushing) where they meet
- Seal with a clear or slightly pearl-tinted top coat to enhance the dimensional effect
- The final look should be so subtle that it takes a moment for someone to realize there’s a gradient happening
Worth knowing: This design works beautifully under UV light or in bright natural light — the pearl becomes more visible and the gradient becomes slightly more pronounced, which is part of its appeal.
6. Negative Space Design
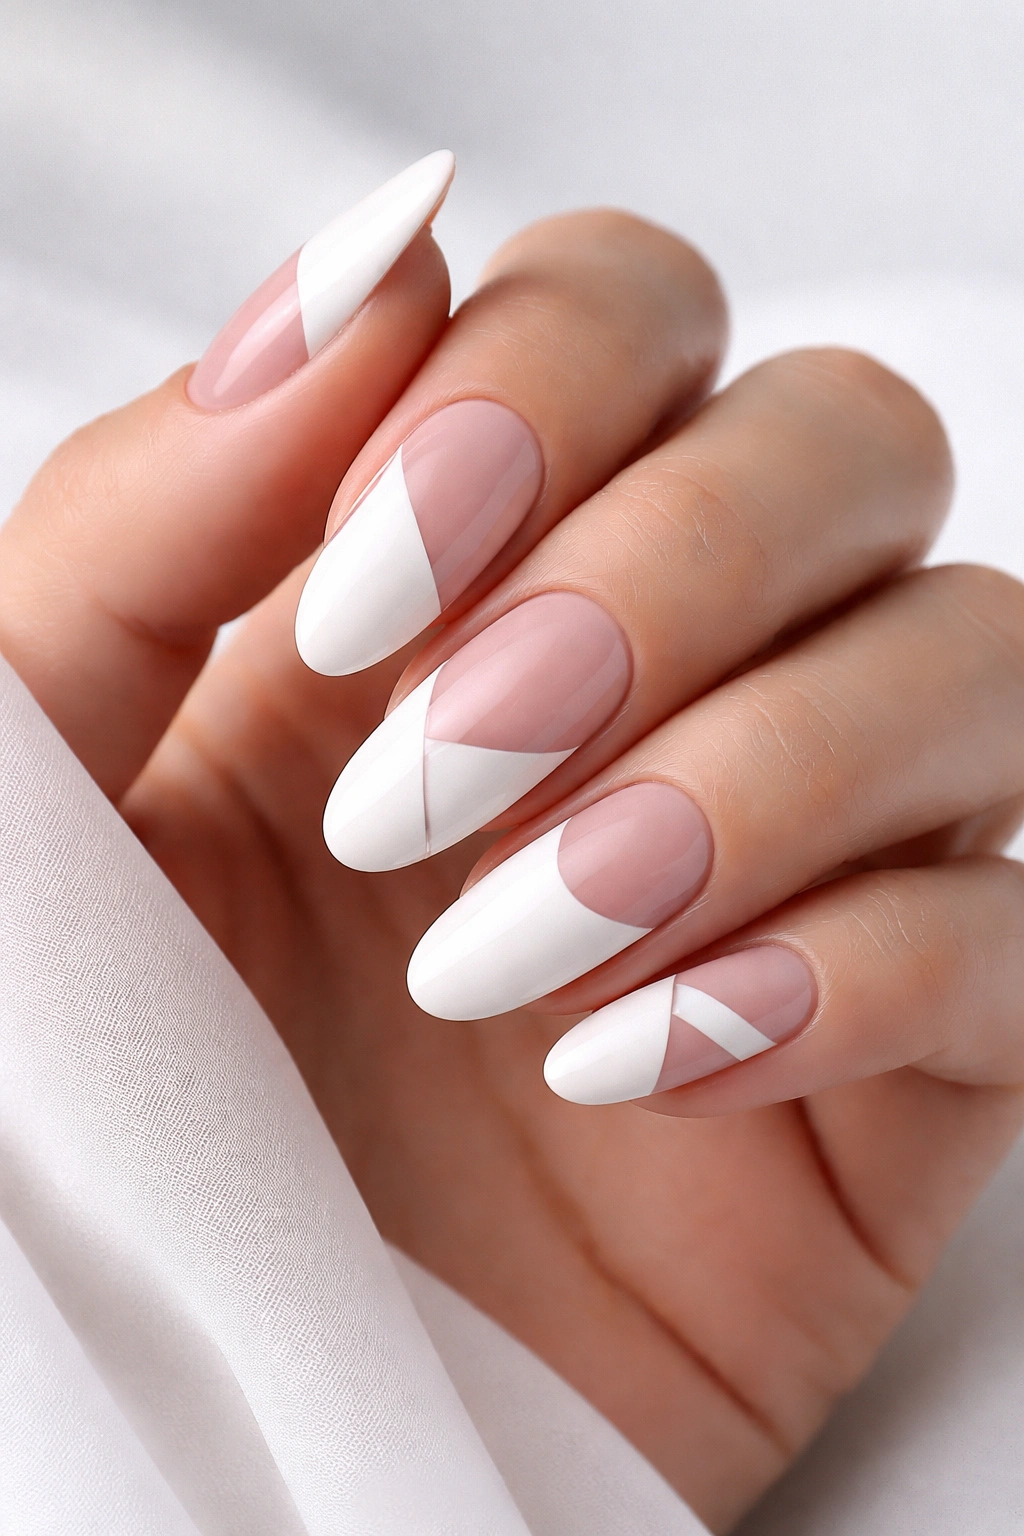
White nail designs that intentionally leave some of the natural nail bed exposed create a striking, modern aesthetic. Think a solid white oval with a thin semicircular cutout at the cuticle area, or a white tip with a clean horizontal gap separating it from a nude-based nail, or scattered geometric shapes where you can see through to the natural nail color below.
Why Negative Space Feels So Contemporary
Negative space designs work because they’re inherently sophisticated — they require confidence and intentionality to execute. There’s nowhere to hide in a negative space design; every element must be clean and precise. The contrast between the white polish and the natural nail color (or skin tone) creates visual interest without adding actual color or embellishment. It reads as modern and architectural rather than decorative.
Creating Clean Negative Space
- Plan the design on paper first — exact placement matters with negative space
- Use nail guides or stickers if you want perfectly geometric shapes (circles, semicircles, rectangles)
- Apply your white polish first, then carefully remove the guide to reveal clean negative space
- Alternatively, paint white and use a very fine brush to carefully “erase” shapes with non-acetone remover on a tiny brush for more organic shapes
- Seal the edges of the negative space with top coat to prevent the white from chipping unevenly
- Keep the white portion absolutely smooth — any texture shows the negative space design’s precision by contrast
Pro tip: Negative space designs feel more striking if the white portion is very opaque and glossy while the negative space shows off the natural nail’s texture — the contrast between matte and glossy, opaque and transparent, creates visual depth.
7. Delicate Floral Details
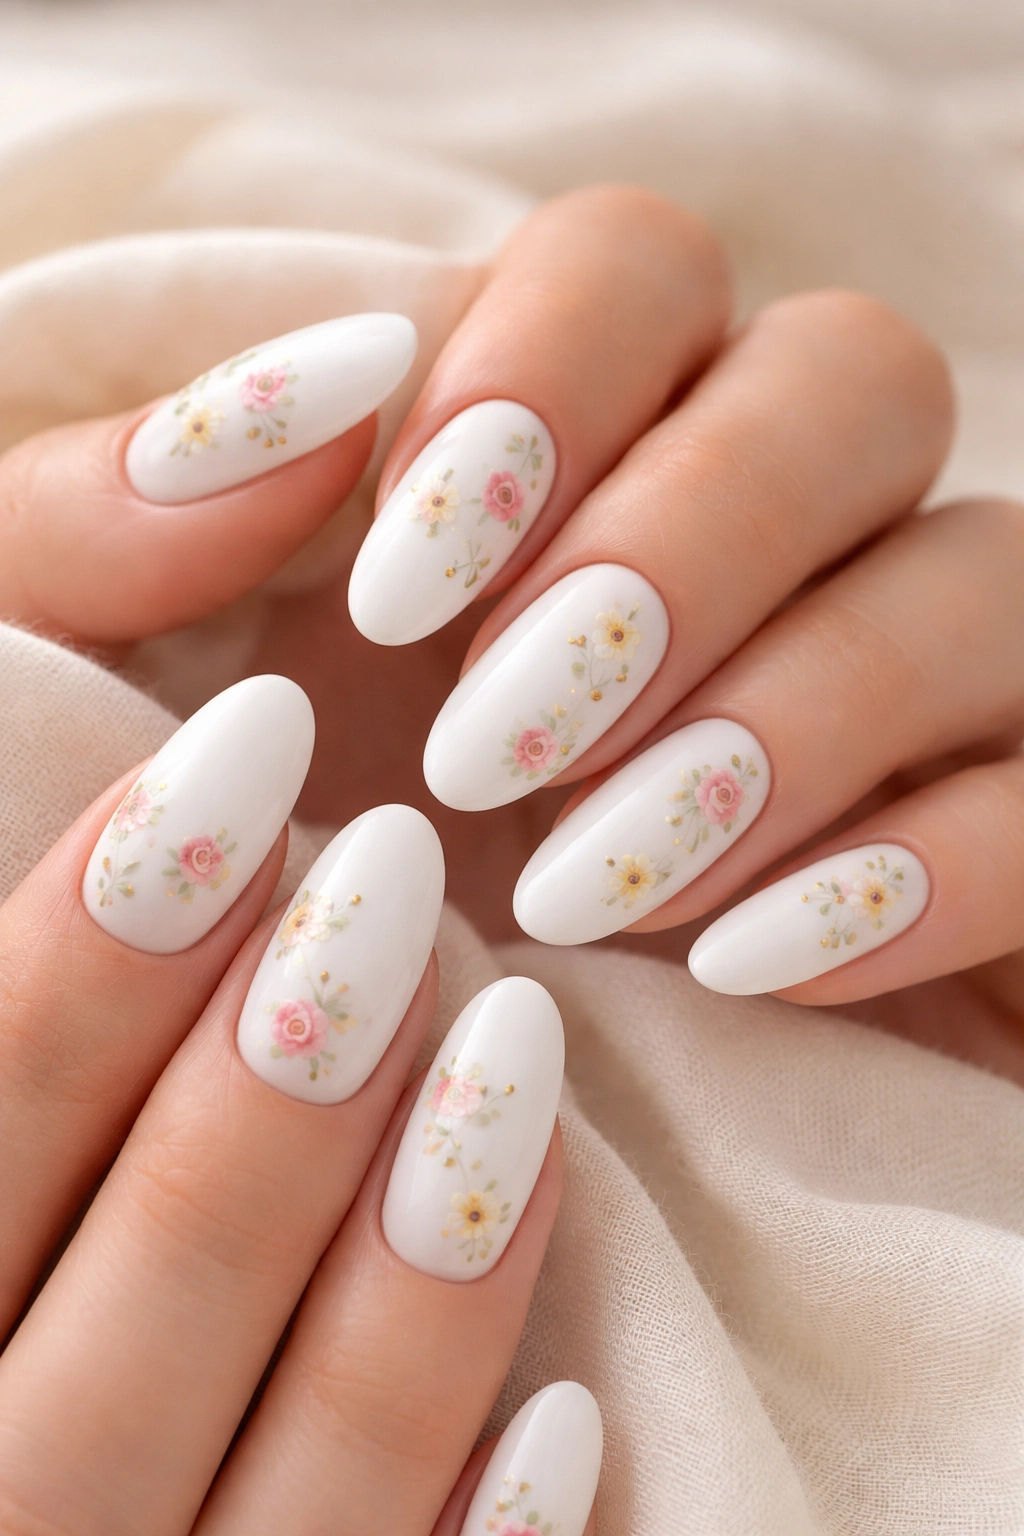
White long oval nails become a canvas for tiny botanical elements when you add delicate flowers — think small roses, tiny daisies, or minimalist wildflower stems scattered across the white base. These aren’t busy designs; they’re carefully placed single flowers on each nail or a small spray down one side of the nail.
Why Florals on White Feel Timeless
Botanical elements on white read as romantic without being frilly, artistic without being over-the-top, and they work across every season and occasion. White provides the perfect neutral backdrop that lets the floral details shine. Long oval nails give enough surface area that flowers have space to be detailed without the overall design feeling cramped. There’s something inherently elegant about nail art that incorporates nature.
Executing Delicate Florals
- Use a white base that’s opaque enough that colored flowers show up clearly (not translucent)
- Choose one or two flower styles to repeat across all nails for cohesion — don’t mix too many different flower types
- Apply flowers using a very fine brush and nail art acrylics or gel, starting with the main petal shape and building detail
- Simple five-petal flowers work better than complex roses for a delicate effect — easier to control, reads as more modern
- Consider adding tiny green stems or leaves in 1-2 nails per hand for botanical accuracy without overdoing green
- Seal flowers with a clear matte or glossy top coat depending on whether you want the flowers to have any texture
Worth knowing: Floral nail art reads differently depending on color choices — soft pastels feel romantic, jewel tones feel artistic, and neutral stems feel minimalist. Pick your palette based on the mood you want.
8. Sheer White Base with Glitter
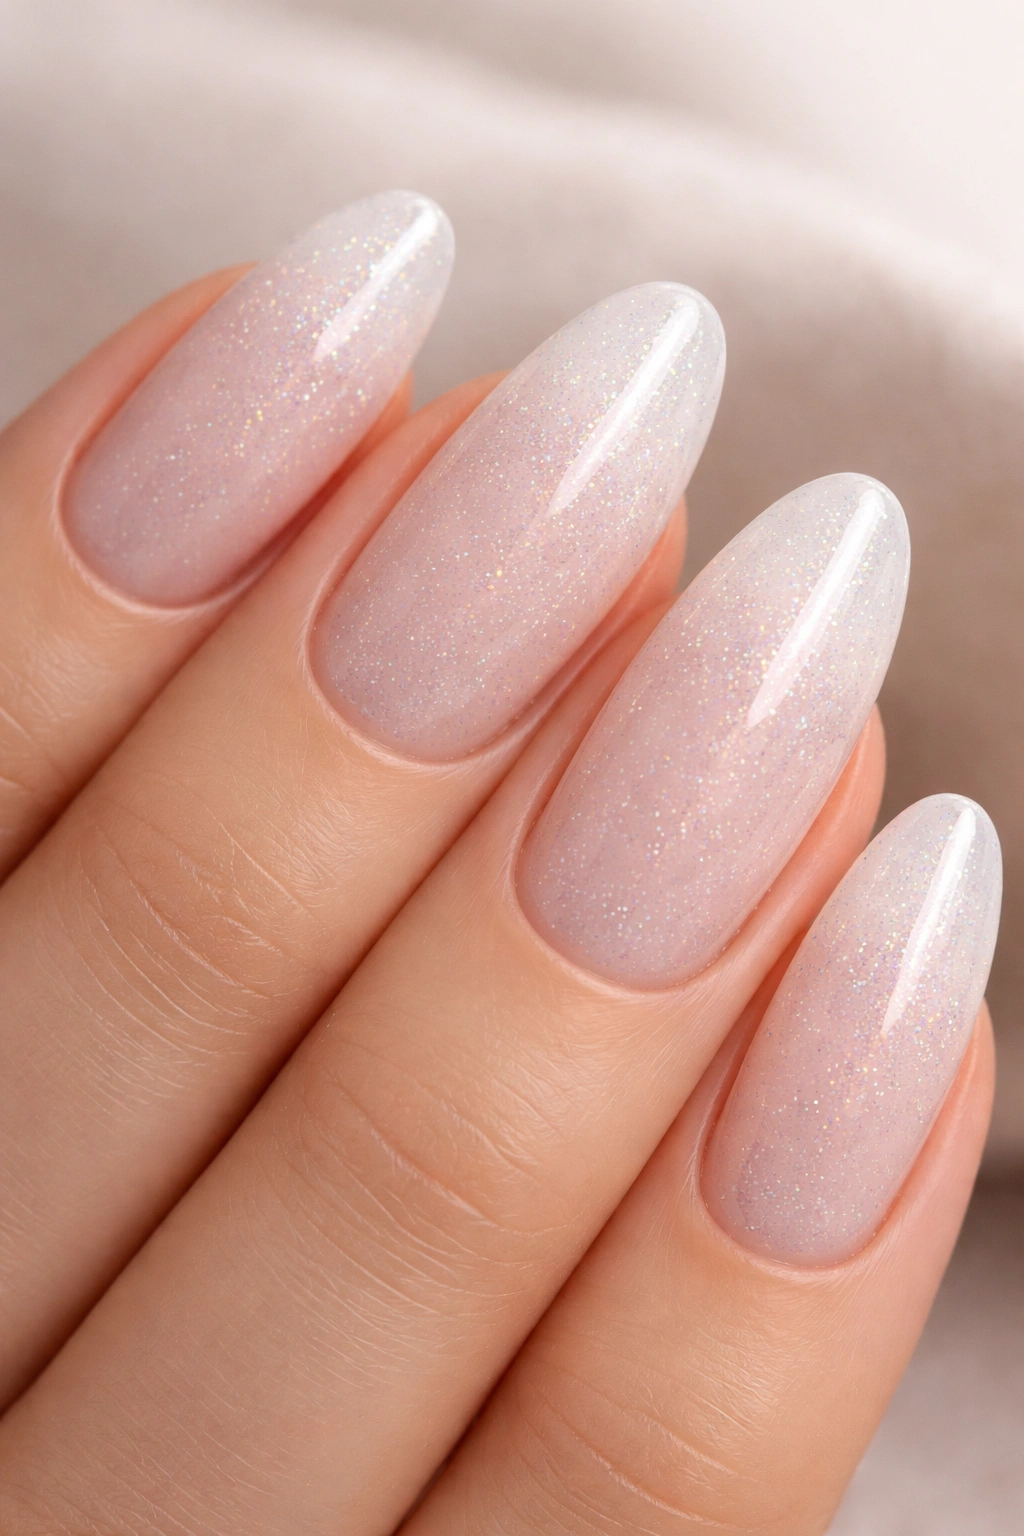
This design creates a white manicure that feels way more interesting than solid white, but it maintains that clean aesthetic because the glitter is subtle. The base is either a sheer white (where you can see through to the nail bed slightly) or a nude-white combination, and throughout the nail bed are tiny flecks of fine holographic, iridescent, or opalescent glitter that catch light but don’t dominate.
Why Sheer White with Subtle Sparkle Is So Practical
Adding glitter to white makes the design feel special without compromising the clean, professional aesthetic. The fine glitter sits within the white base rather than on top of it, so it doesn’t catch on things, look chunky, or feel costume-y. It’s enough sparkle to make you feel fancy without being overstated — perfect for days when you want to feel elevated but still look polished and professional.
Layering Glitter Into White Perfectly
- Choose an extremely fine glitter formula (holographic micro-glitter works best) rather than chunky craft glitter
- Apply your white base first (sheer white reads more luxe than opaque for this effect)
- While the base is still slightly tacky, sprinkle glitter or use a thin brush to apply glitter strategically
- Avoid putting glitter all the way to the cuticle — leave the cuticle area clean and focus glitter toward the center and tip of the nail for a more intentional look
- Seal with a clear top coat to lock the glitter in place and create a smooth, glass-like surface
- The glitter should read as embedded in the polish, not sitting on top of it
Insider note: If you don’t want glitter everywhere, try adding it to just the tips of the nails (like an ombre effect) or as an accent on one or two nails per hand for maximum impact and minimal sparkle.
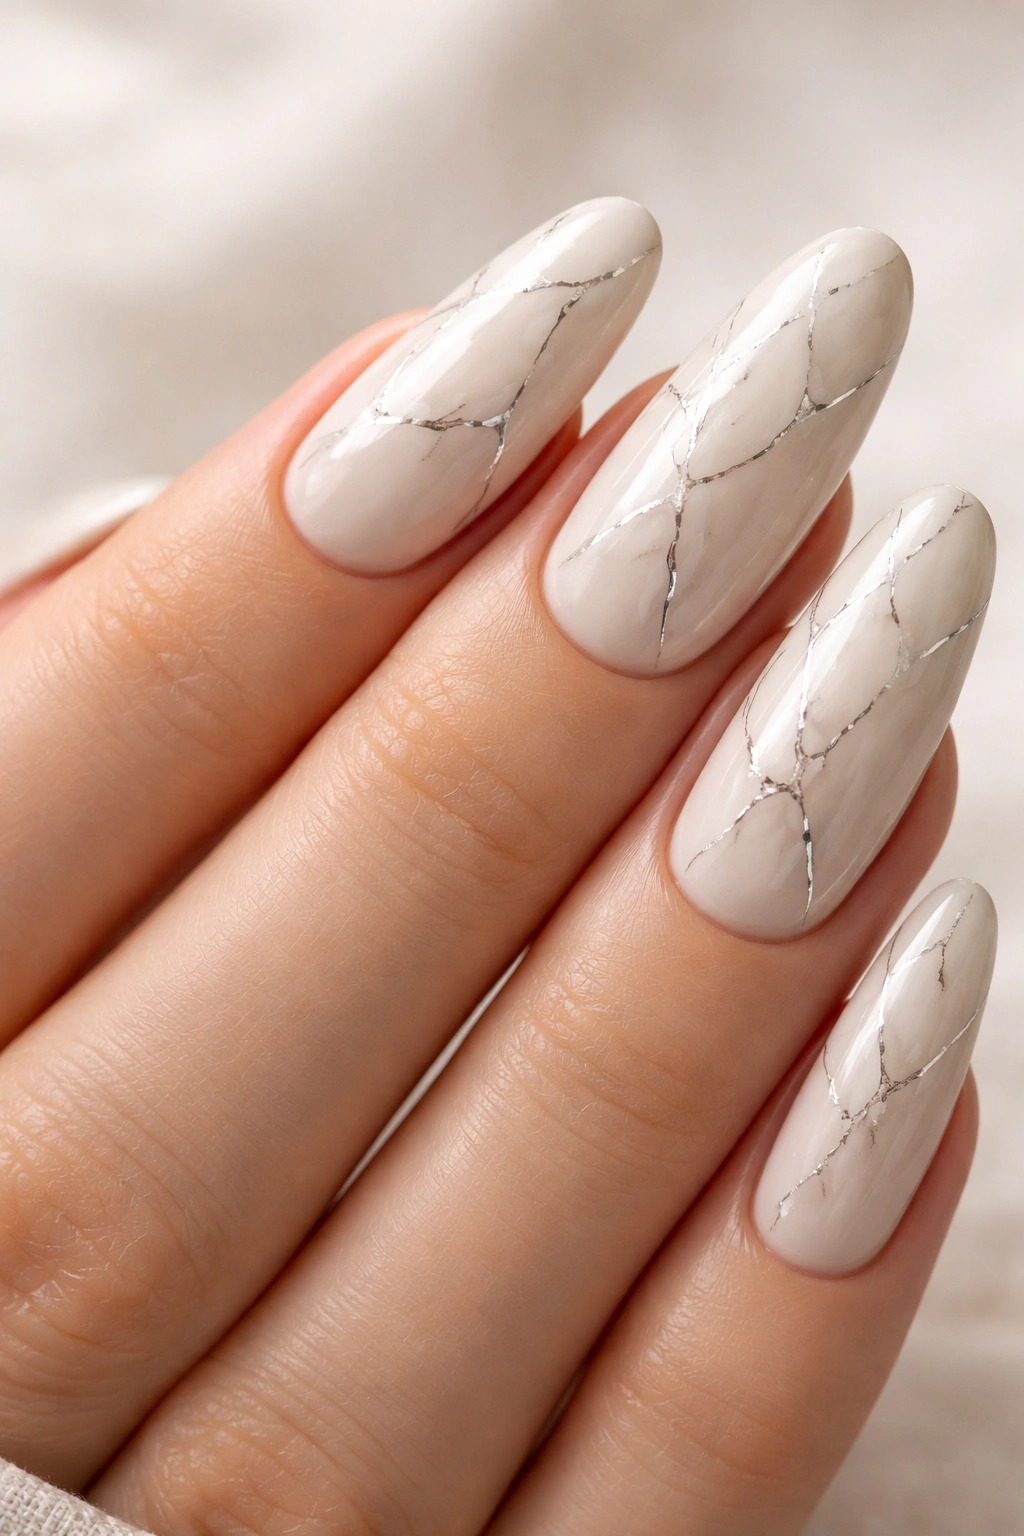
9. Marble Pattern Inlay
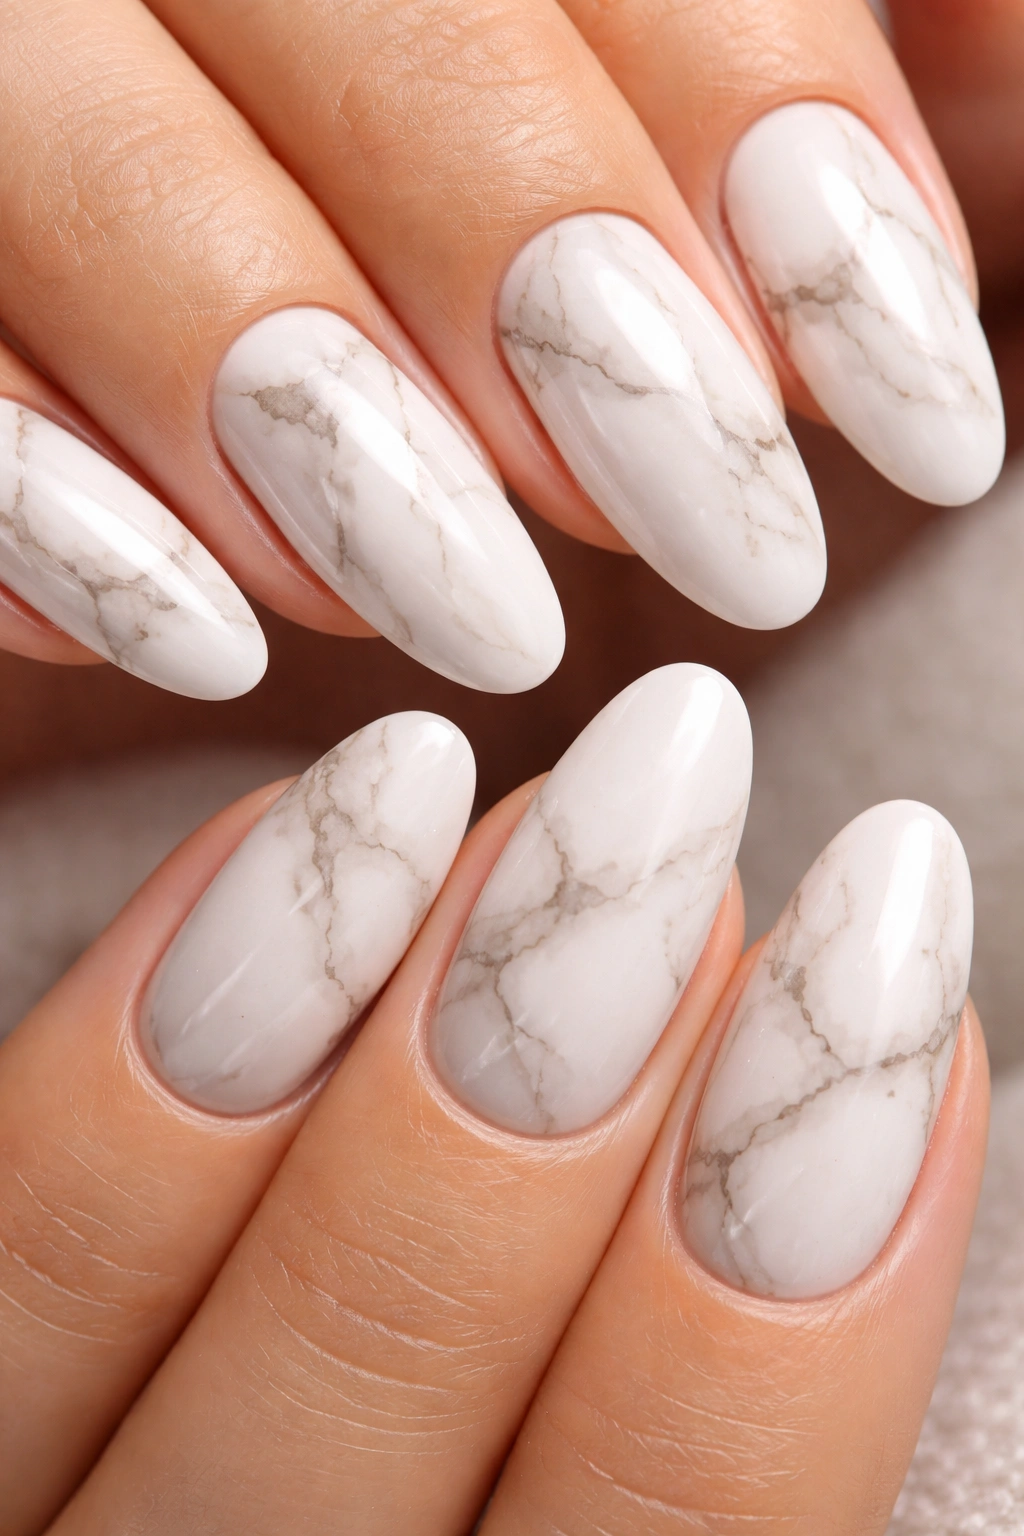
Marble designs in white are inherently elegant, and when executed on long oval nails, they read as art rather than nail design. Think soft swirls of gray, taupe, or nude integrated into the white base, creating an organic veining pattern that mimics real marble or agate. The key is that the pattern is integrated into the white itself, not painted on top.
What Makes Marble Feel So Sophisticated
Marble is literally stone, and wearing it on your nails creates an instant luxury aesthetic. The pattern is organic and unrepeatable, which means it feels natural rather than constructed. White marble (with soft gray or taupe veining) is timeless, upscale, and works in literally every setting. The long oval shape beautifully frames marble patterning because the shape gives the pattern room to breathe.
Creating Convincing Marble Nails
- Start with a pure white base (2-3 coats, fully cured)
- Mix together taupe, gray, and nude polishes in a small dish to create your “marble” shade — you want a soft variation, not a single flat color
- Using a thin brush or a paint-mixing stick, drag thin, irregular lines across the white base
- Don’t aim for symmetry — real marble is random, so embrace organic imperfection
- Use a slightly damp brush to very gently blend where the marble shade meets the white, but don’t over-blend or it becomes muddy
- Seal with a glossy top coat to give it that polished stone appearance
Pro tip: You can also use a dry brush technique — apply concentrated color to the brush without much liquid, then drag it across the nail for a more subtle effect that reads as veining rather than bold marble.
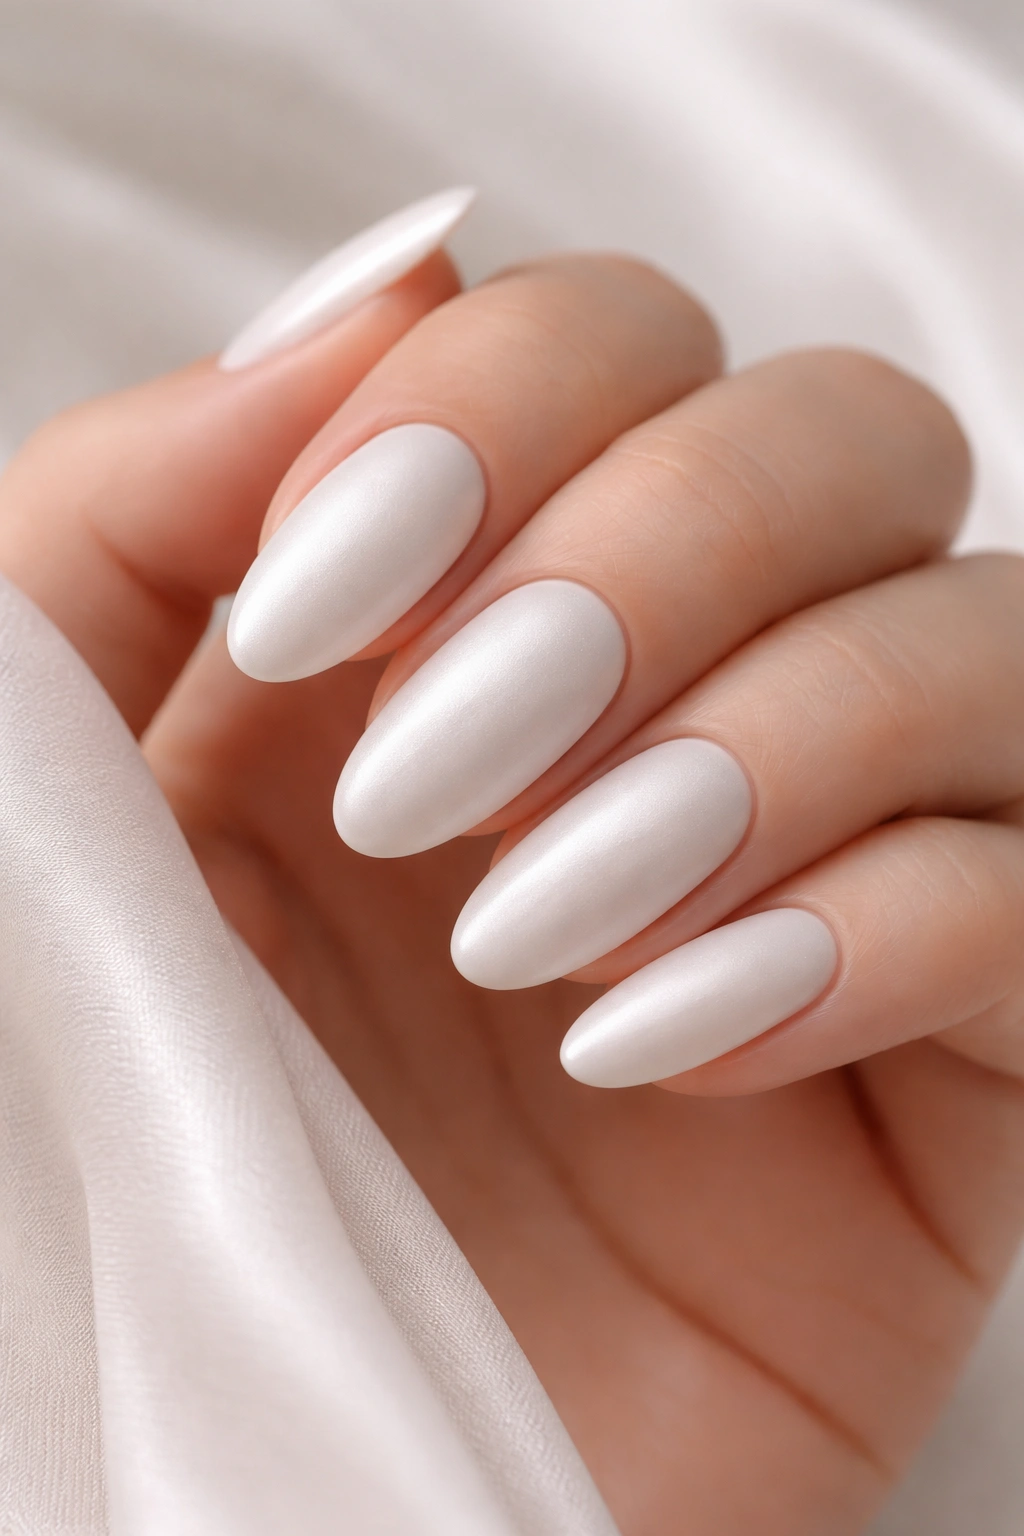
10. Frosted Matte Finish
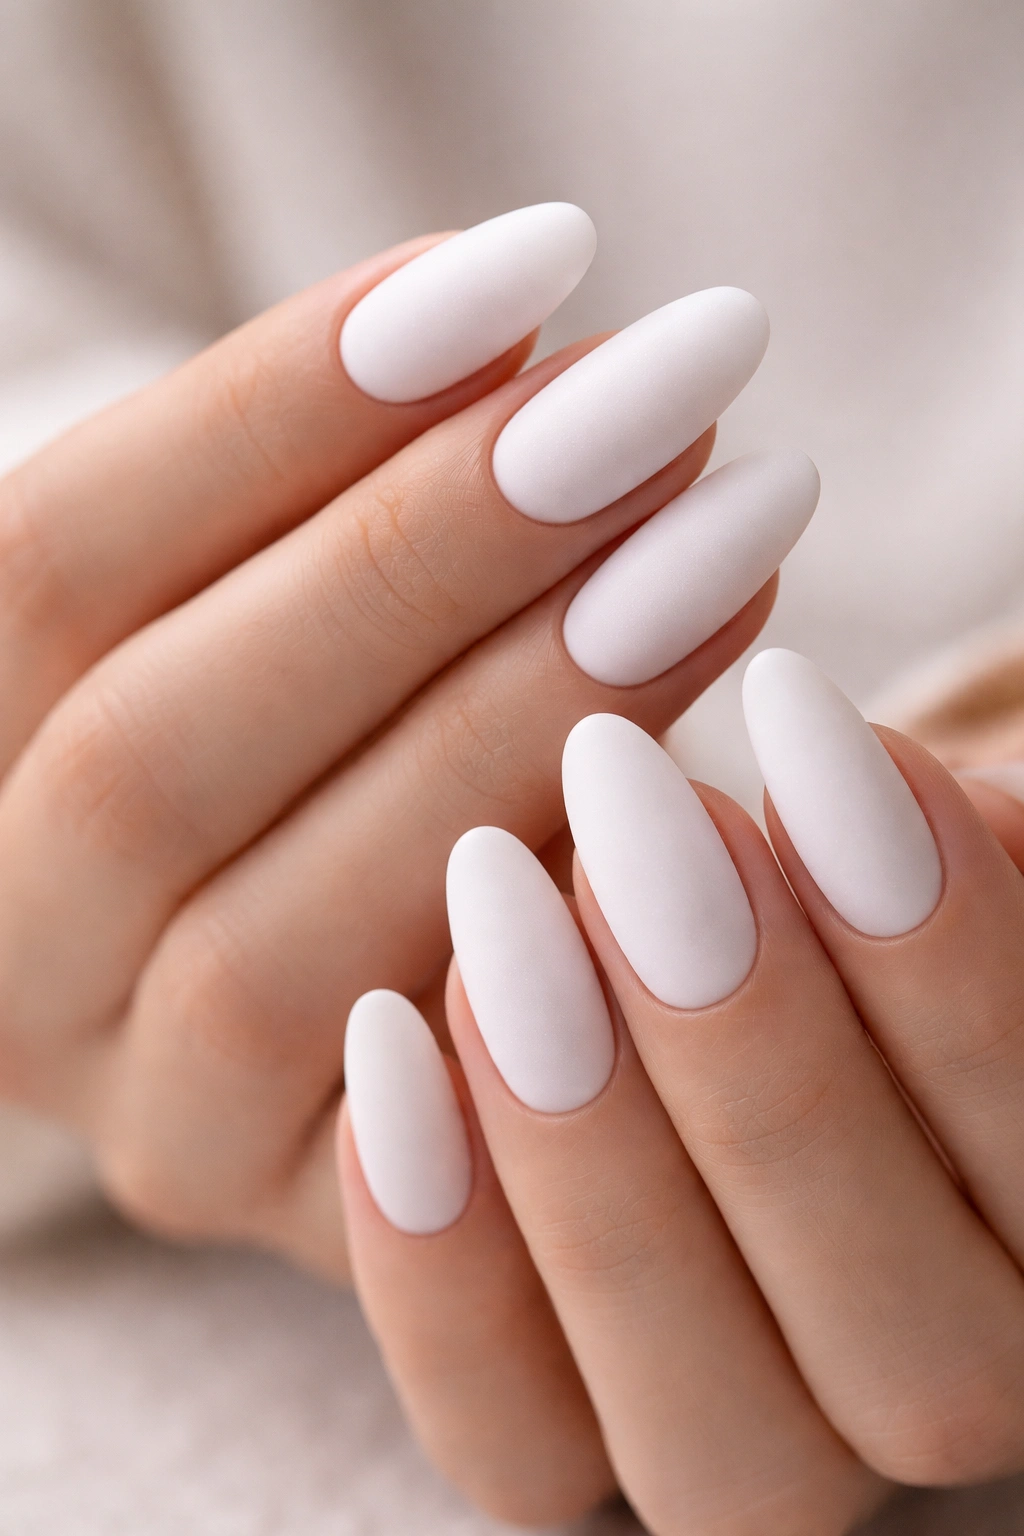
Instead of glossy white, try a frosted or satin matte white that has a soft, velvety appearance. This finish is less reflective than glossy but still refined — it reads as contemporary and luxe without the shine. A frosted white is also easier to maintain between salon visits because it doesn’t show water spots or fingerprints the way glossy finishes do.
Why Matte White Feels Modern and Intentional
Matte finishes have gained incredible traction in nail design because they feel sophisticated and different from the traditional glossy nails most people default to. Frosted white specifically has an almost luxe, tactile quality — it looks like you could touch it and feel soft velvet. The lack of shine actually emphasizes the shape of the nail even more than gloss does. For long oval nails, matte creates a sleek, architectural aesthetic.
Achieving a Flawless Frosted Finish
- Use a matte white polish or gel specifically formulated with a frosted effect — not a regular white with a matte top coat, which can look chalky
- Apply 2-3 thin, even coats to avoid streaking (matte finishes show application imperfections more easily than glossy)
- Cure or dry fully between coats
- Finish with a matte top coat if using regular polish, or cure with a matte builder if using gel
- The final result should have a soft luminosity, not look dull or dusty
- Maintain the matte finish by avoiding glossy products and using matte top coats consistently
Worth knowing: Matte white nails chip slightly differently than glossy — the matte finish can wear off in patches before the white itself chips, so rotating in touch-ups every 5-7 days keeps them looking intentional.
11. Nude-to-White Ombré
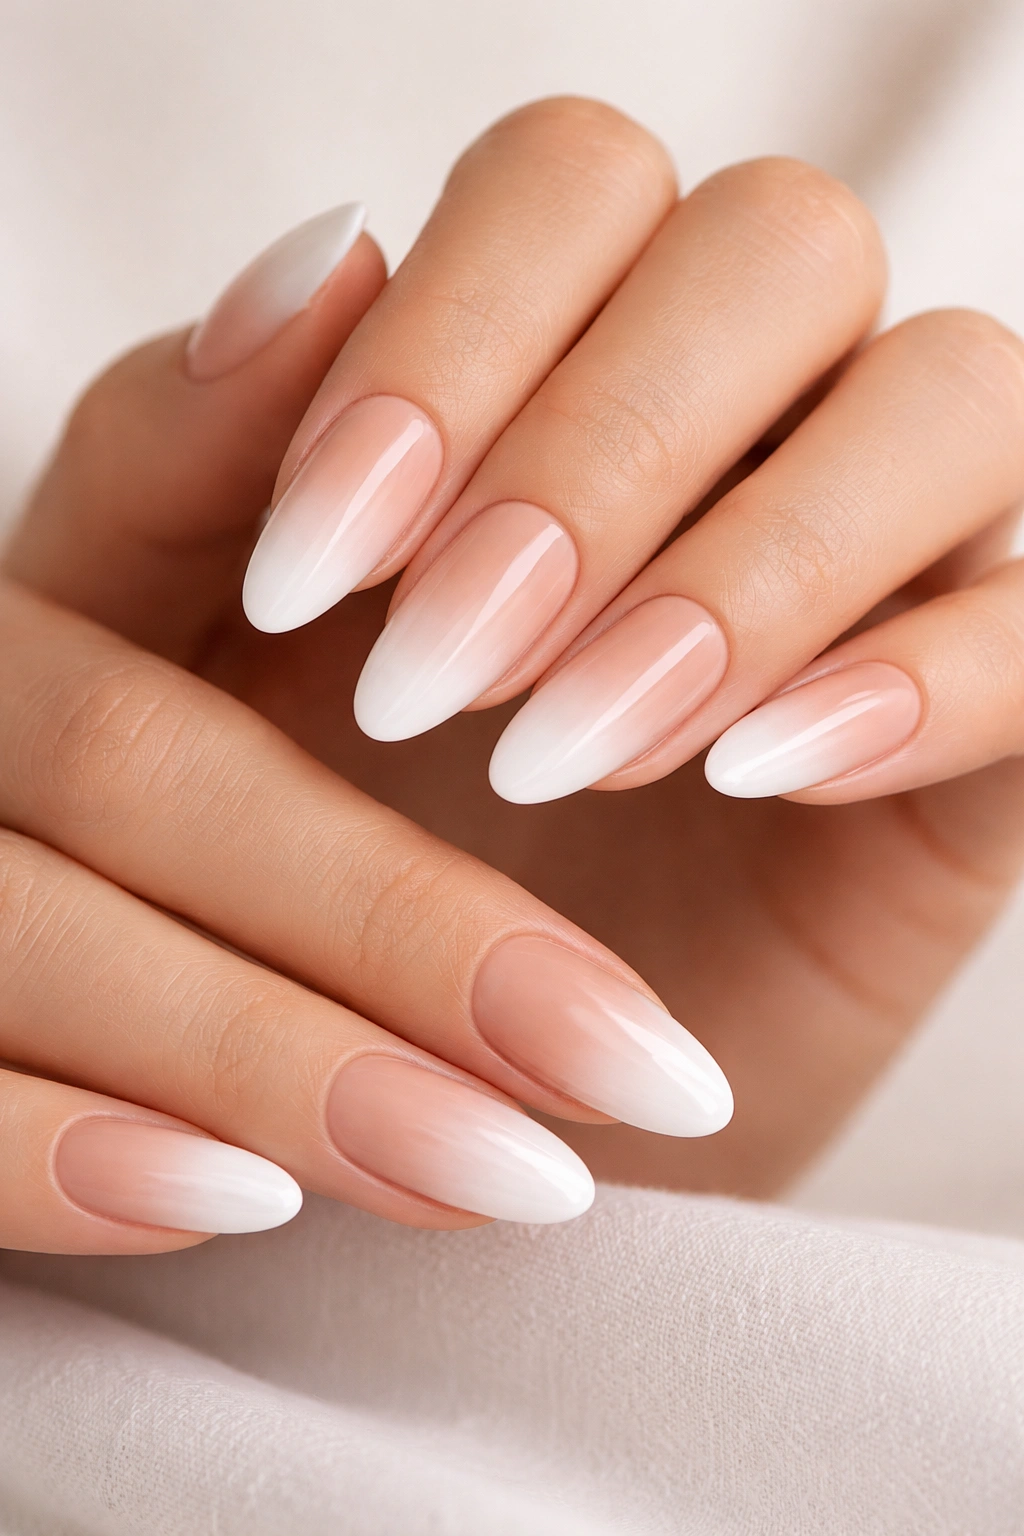
This ombré gradient transitions from your natural nude or skin tone at the base to bright white at the tips, creating an elongating effect that’s incredibly flattering. It’s similar to a traditional French manicure concept but executed as a smooth gradient rather than a hard line, making it feel more modern and artistic.
Why Nude-to-White Creates Such a Flattering Silhouette
The color transition from warm (nude) to cool (white) naturally draws the eye downward to the tips, which makes the nail appear longer than it actually is. Nude tones anchor the design to your hand and skin tone, preventing the white tips from looking stark or detached. The gradient also adds dimension and makes the manicure feel more intentional than either a solid white or a solid nude alone. This is the design that makes short nails look long and long nails look endless.
Perfecting the Ombré Gradient
- Start with a nude base that matches your skin tone (not too pink, not too orange, but a true neutral)
- Create a transition shade by mixing your nude and white in equal parts
- Apply the transition shade to the middle third of the nail using a sponge or stippling brush
- Apply pure white to the bottom third of the nail
- Blend the edges where colors meet using a very slightly dampened brush with a dabbing motion
- The blend should be gradual — there shouldn’t be a visible line where colors change
- Seal with a clear glossy top coat to enhance the dimensional effect and lock the gradient in place
Pro tip: Using a makeup sponge to apply the ombré (instead of a brush) creates a more diffused, professional gradient because the sponge texture distributes color more evenly than brush bristles.
12. Simple Dot Details
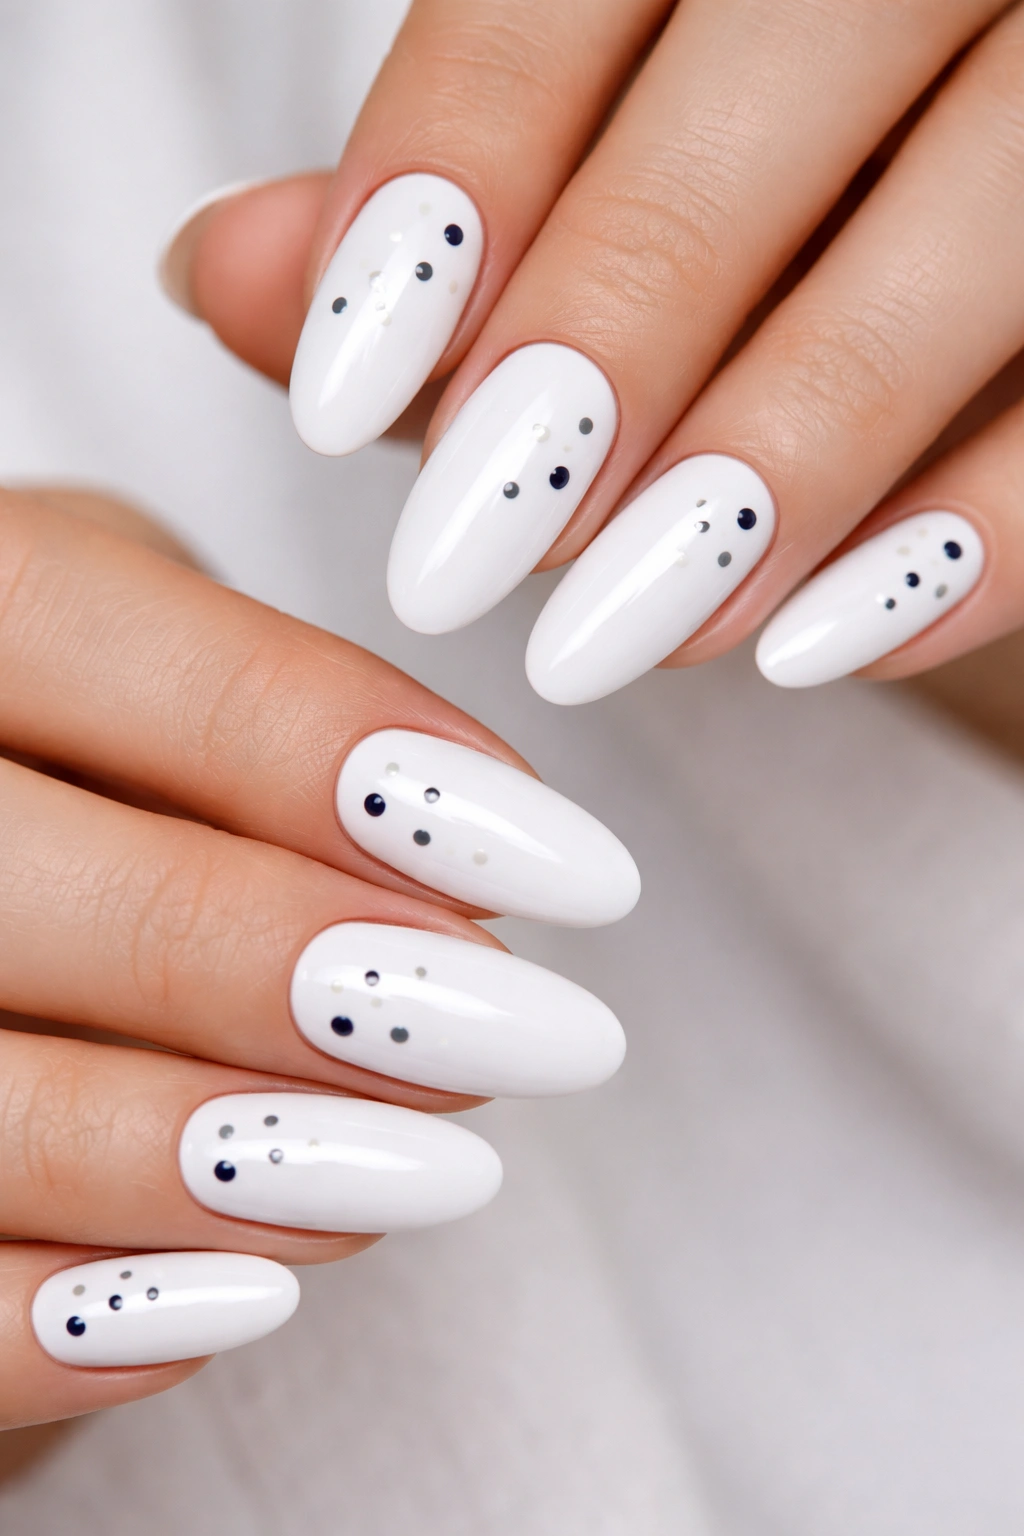
Small dots scattered strategically across white nails create visual interest without being complex or time-consuming. Think tiny navy, black, or soft gray dots — maybe 3-5 dots per nail, or just one or two dots on a few select nails. It’s minimal, modern, and incredibly chic.
Why Dots Work as Sophisticated Nail Art
A single element repeated creates rhythm, and dots are the simplest repetition to execute. They’re graphic enough to read as intentional design, but simple enough to maintain that clean white aesthetic. Dots can be placed randomly for a playful feel or in geometric patterns for something more structured — the scale and placement determine the mood. On long oval nails, even tiny dots create visual impact because the elongated shape gives them room to breathe.
Executing Perfect Dot Designs
- Use a dotting tool (available at any beauty supply store for a few dollars) or the end of a bobby pin for precision
- Dip the tool into gel or polish and gently press onto the nail, rotating slightly to create a perfect circle
- Plan dot placement before you start — sketching with a pencil on your nail can guide placement
- For randomly scattered dots, space them so they feel organic rather than gridded
- Try different sizes (tiny, small, medium) in the same color for visual variety
- Keep dots in similar shades (avoid too much color contrast) to maintain the clean aesthetic
- Seal with top coat to prevent dots from smudging or catching
Worth knowing: Dots work beautifully as an accent — you could add 2-3 dots just to your ring finger and pinky on each hand, leaving the other nails solid white, for a design that feels intentional but minimal.
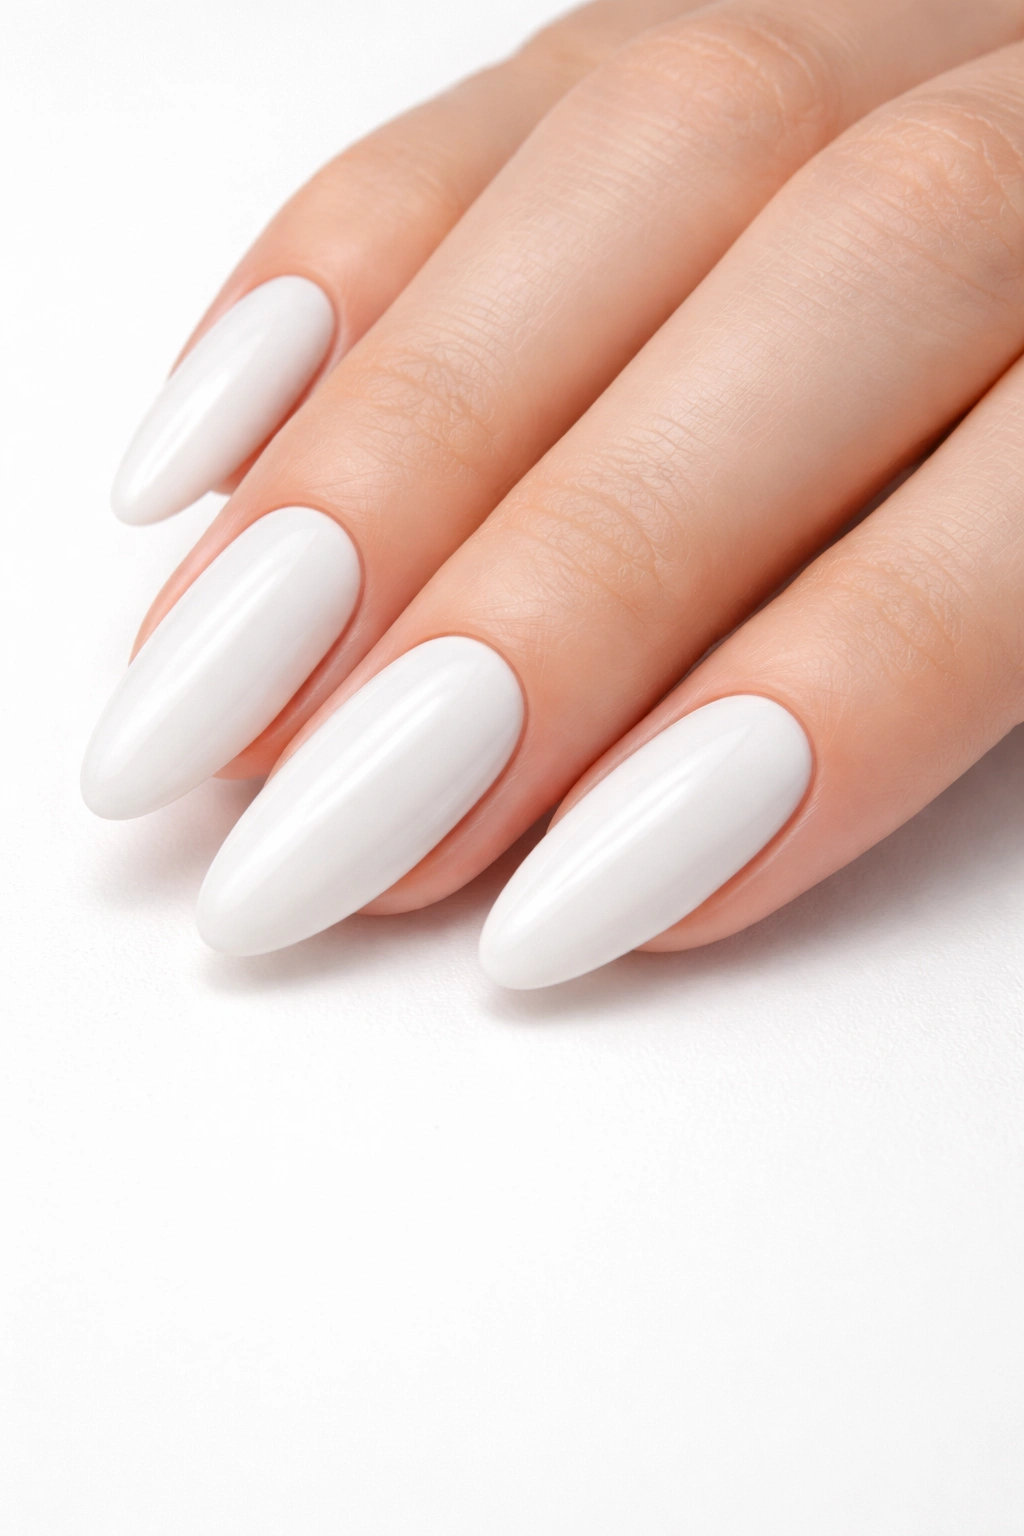
13. Glossy High-Shine
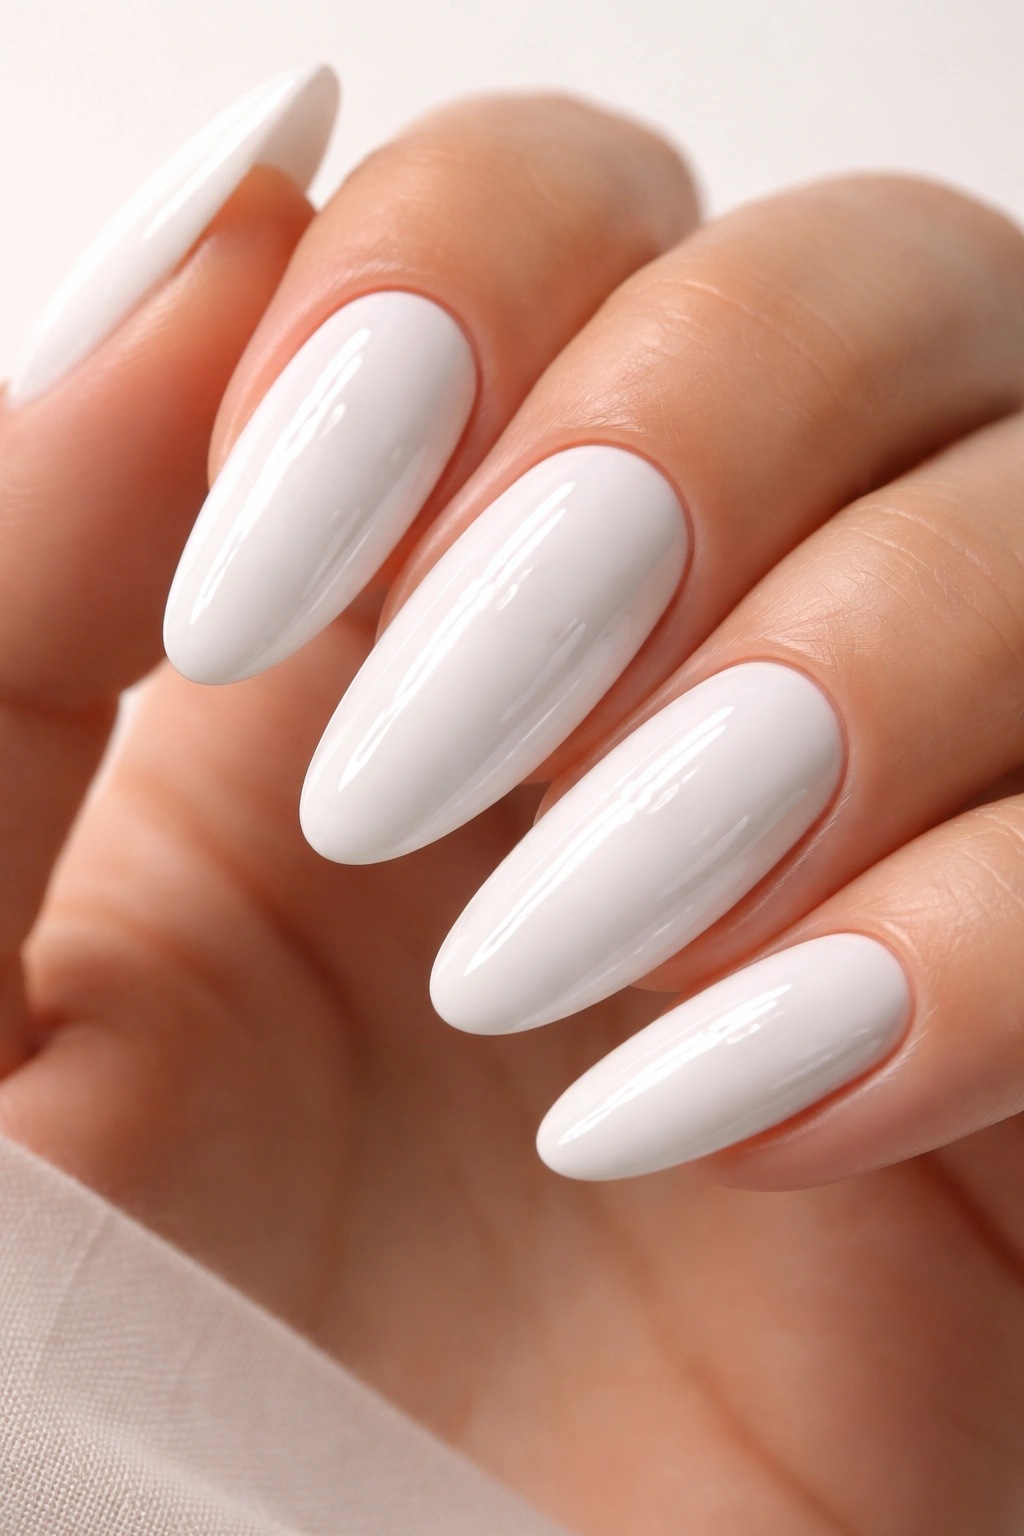
Sometimes the most elegant choice is literally the simplest execution: an ultra-glossy white that catches light in a way that makes your nails look expensive and impeccably maintained. This is white polish taken to its absolute best potential — thick, even, perfectly opaque, and so glossy it looks almost wet.
What Actually Makes White Nails Look Luxury
Luxury white nails live in the details of execution, not in complexity of design. The polish must be applied perfectly evenly with no bubbles, streaks, or rough edges. The cuticle line must be clean and precise. The glossiness must be so reflective that it almost looks like glass. The overall effect should be that someone might ask if you just got them done at a salon. High-shine white reads as inherently luxe because it requires attention and maintenance to maintain.
Creating Maximum Gloss and Shine
- Use a white polish with good opacity (check reviews if ordering online) so you don’t need more than 2-3 coats
- Apply thin coats rather than thick ones — thin coats cure evenly and dry faster
- Use a high-quality top coat specifically labeled “glossy” or “glass-like”
- Apply top coat generously and allow extra cure time (4-5 minutes for gel, or full dry time for regular polish) for maximum shine development
- The top coat is what creates the extreme shine, so quality matters here
- Consider using a gel formula if you’re not getting the gloss you want with regular polish
- Maintain the shine by reapplying top coat every 3-4 days
Insider note: If your white polish yellows quickly, this is actually a sign you need to upgrade your base coat — a protective base prevents staining and yellowing, keeping white nails looking bright longer.
14. Soft Chrome Tips
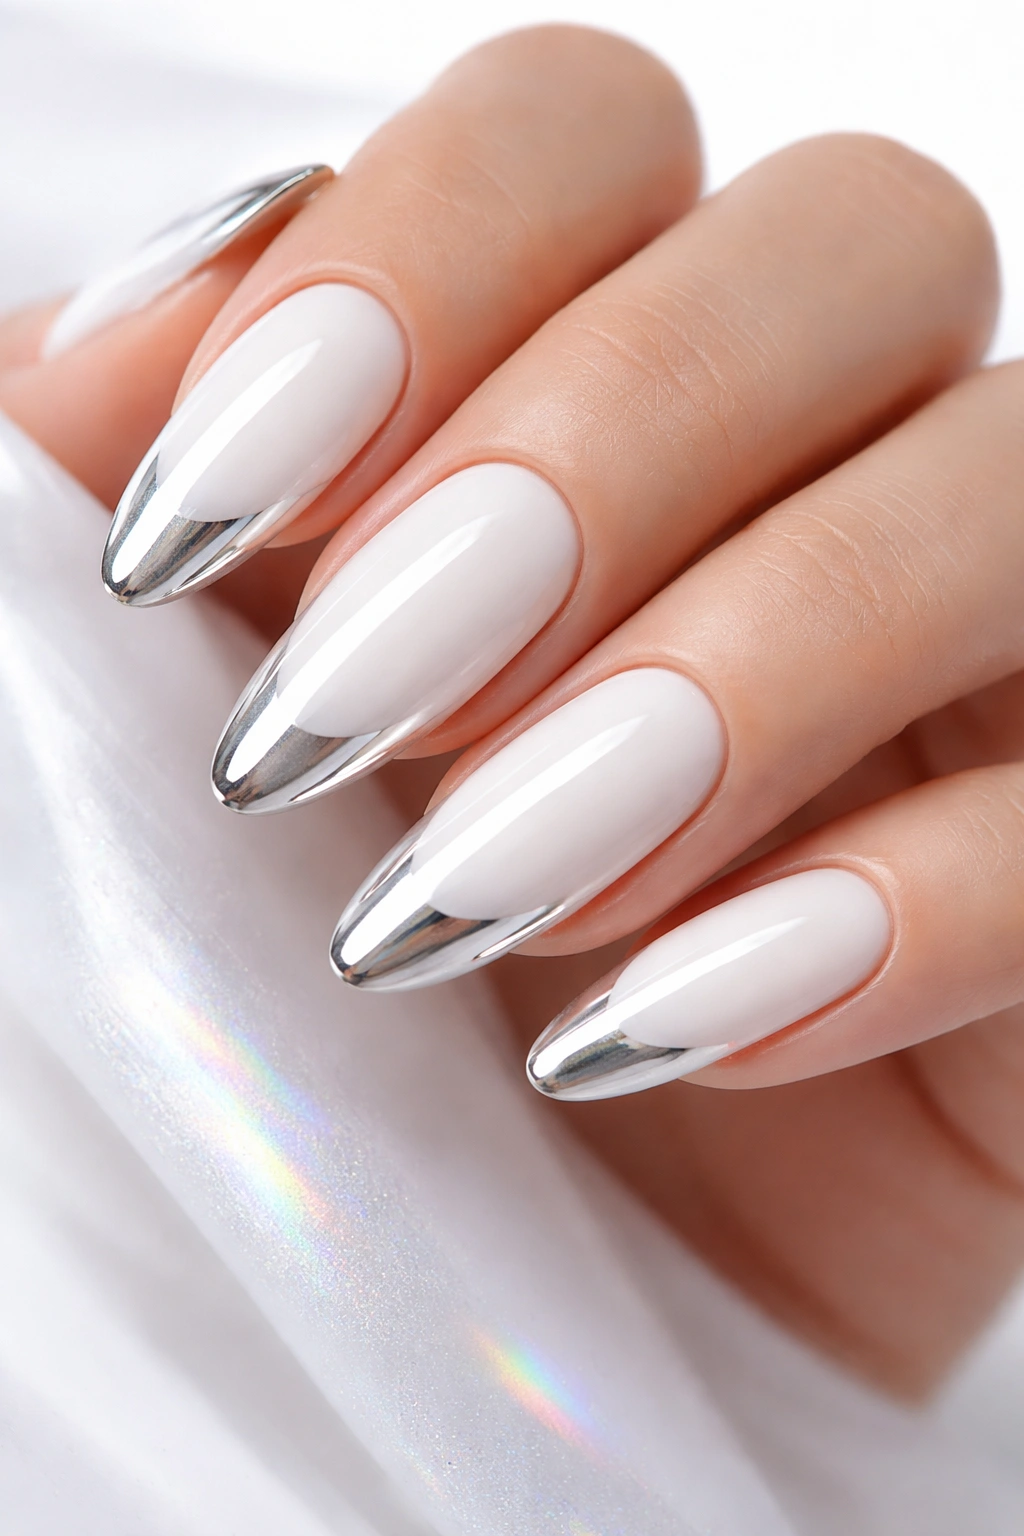
Chrome powder creates an almost mirror-like, metallic finish, and when you apply it just to the tips of white nails, it creates a modern take on the French manicure. The tips have that signature chrome shimmer while the base stays crisp white, creating a two-tone effect that’s contemporary without being bold.
Why Chrome Tips Modernize the Classic White Mani
Chrome nails exploded in popularity because the finish is genuinely unlike anything else — it’s almost liquid metal, and it catches light in a way that’s mesmerizing. When you apply chrome only to the tips, you maintain the clean aesthetic of white while adding unexpected luxury. This design reads as trendy enough to feel current, but the white base keeps it polished enough for professional settings. It’s special without being costume-y.
Applying Chrome Tips Successfully
- Start with a white base (opaque and fully cured)
- Apply a sticky gel to just the tip area of the nail (the bottom inch or so) as an adhesion base for the chrome powder
- Cure the sticky base
- Use a chrome powder applicator to gently buff the powder onto the tips — the motion is circular, not pressing down
- Work in sections and apply powder multiple times until you achieve the mirror effect you want
- Seal with a shiny top coat to protect the chrome and lock it in place
- Cure fully
- Chrome requires gentle care — it can chip if you’re not cautious with your hands
Pro tip: Chrome powder comes in different finishes (rose gold, silver, holographic, copper) so you can choose the tone that complements your white base best. Silver or holographic chrome reads as more contemporary.
15. French White Twist
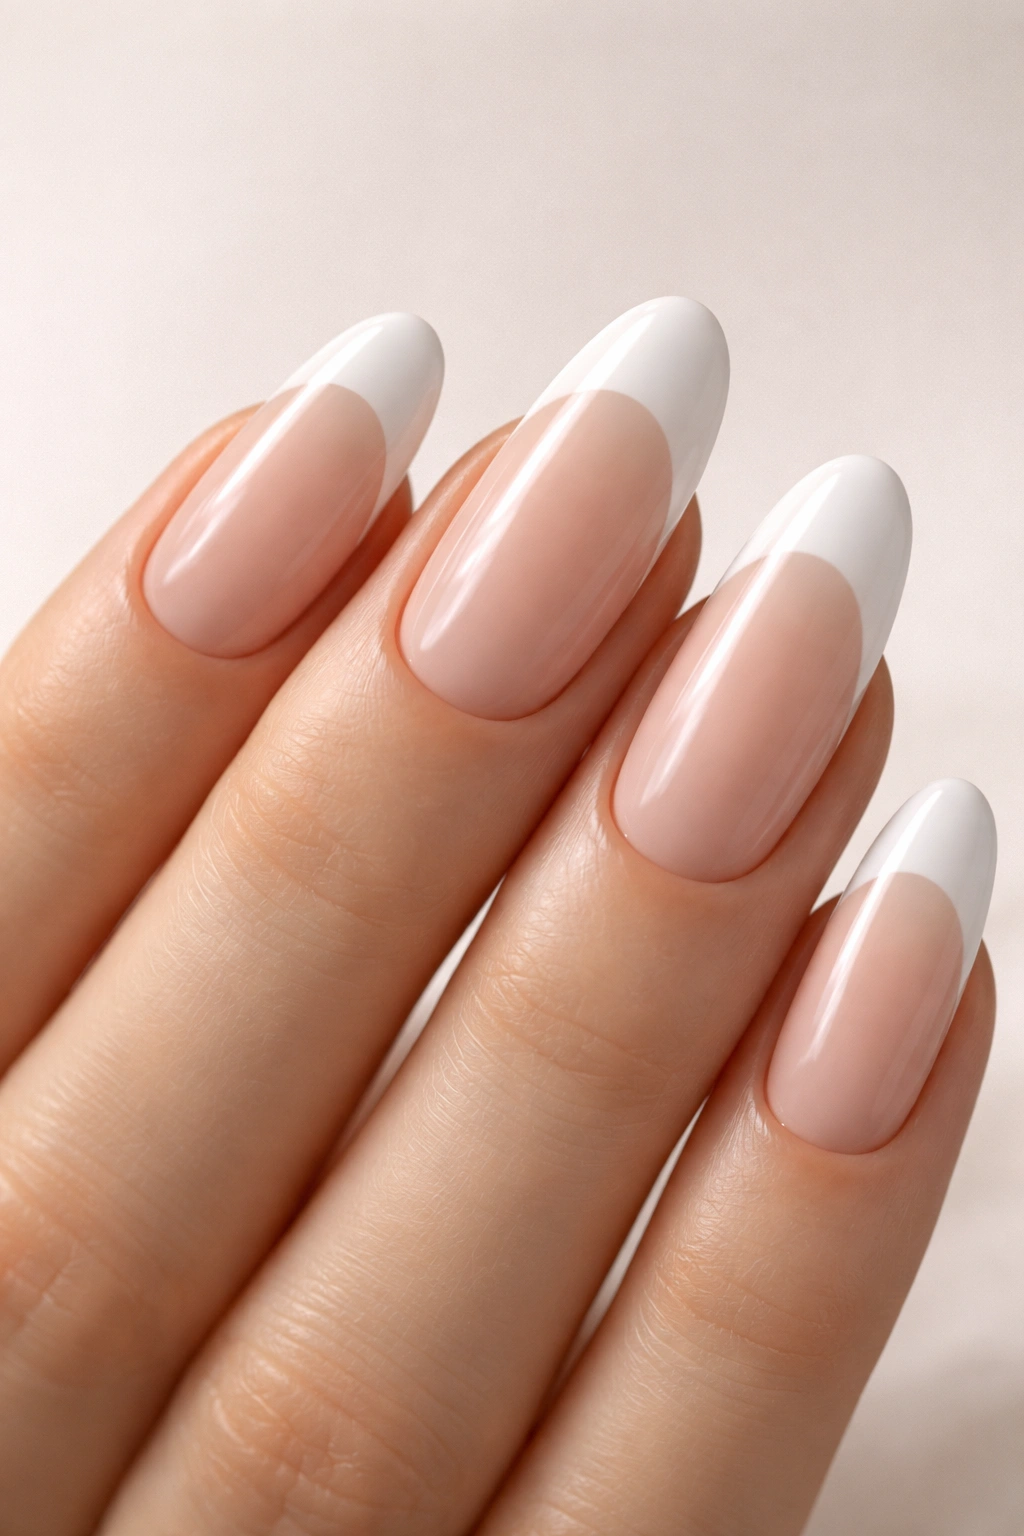
The French manicure is timeless, and reimagining it with an extra-long oval shape and a slightly thicker tip or a curved tip line creates something that feels both classic and contemporary. Instead of a stark white line at the tip, try an ombré French (gradient from white to nude), a slightly thicker tip, or a tip line that’s curved rather than straight for visual interest.
Why a Reimagined French Mani Never Gets Old
The French manicure works because it’s flattering, elongating, and infinitely elegant. Taking that proven concept and tweaking it slightly — maybe making the tip wider, adding a subtle gradient, or adjusting the curve of the line — keeps it fresh while maintaining its inherent sophistication. Long oval nails are the ideal shape for a French because the shape naturally emphasizes the tip, making the French line feel even more intentional.
Modern French Manicure Variations
- Ombré French: White base transitions into the tip rather than a sharp line — more gradient, less graphic
- Thick French: The white tip is thicker than traditional (maybe a quarter-inch instead of a thin line) for a bolder statement
- Curved French: Instead of a straight horizontal line, curve the white tip line slightly upward at the sides for a more organic feel
- Colored French: Use a soft nude, ivory, or even a pale pink as the base, keeping the white tips crisp
- Gradient French: Transition from white at the very tip to clear or nude at the cuticle for a barely-there effect
Worth knowing: A French manicure photographs beautifully and reads as universally elegant across every generation and demographic — it’s the design equivalent of a classic silk blouse.
16. Brushstroke Abstract
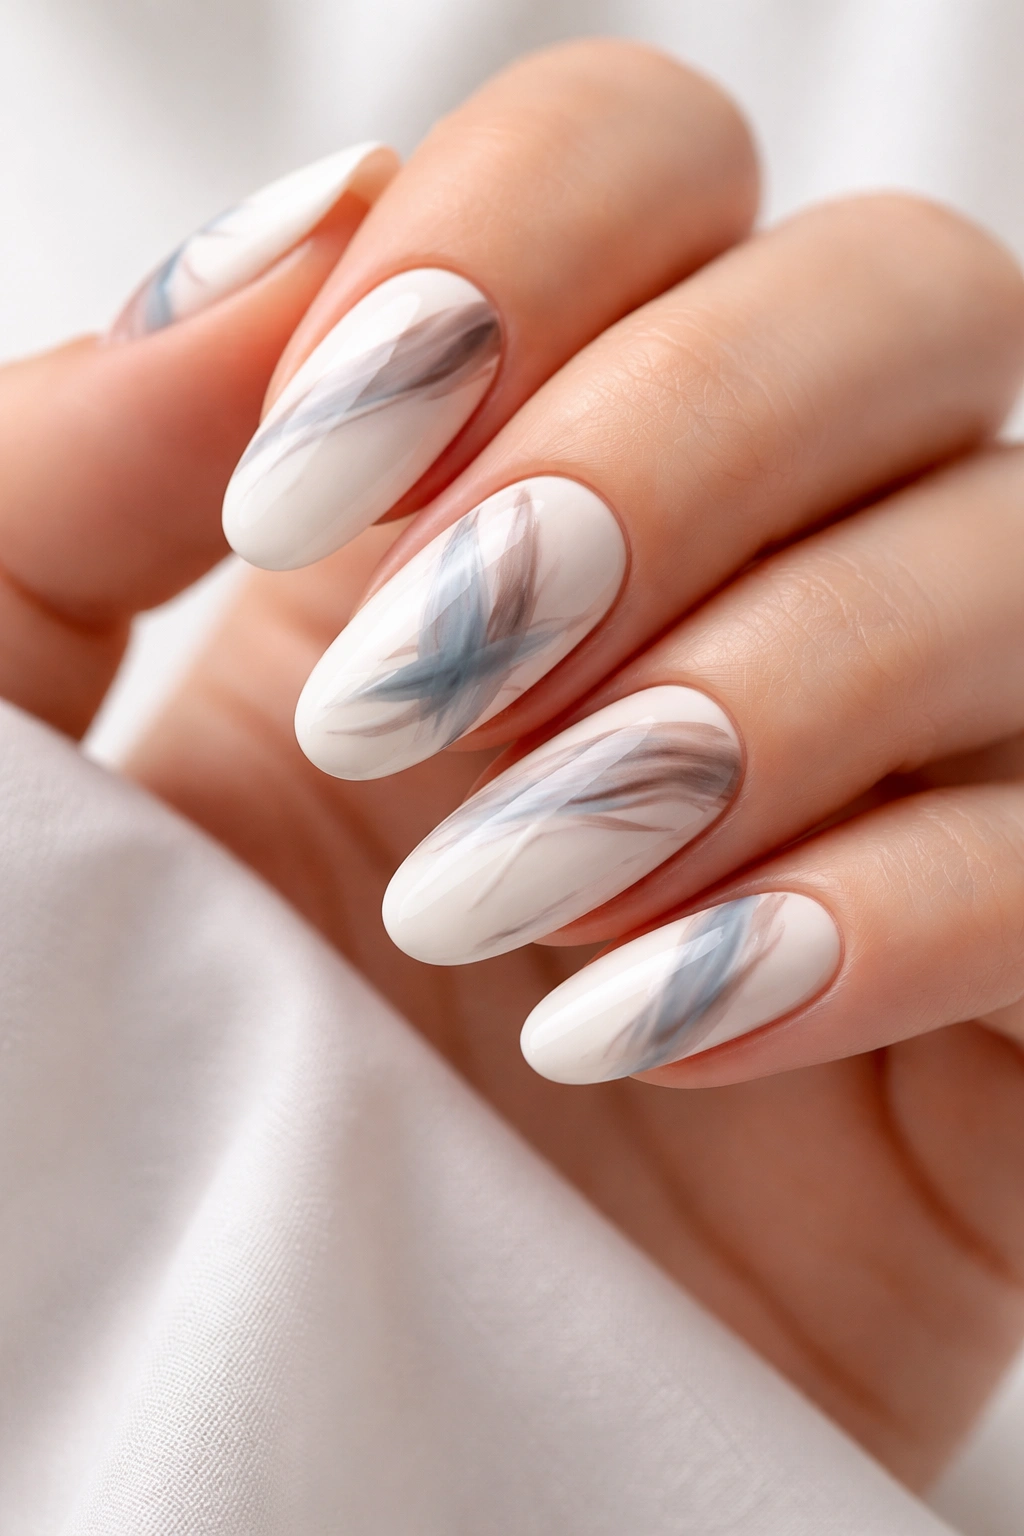
Freehand abstract brushstrokes in complementary colors (soft taupe, gray, charcoal, or even dusty blue) painted across white nails create an artistic, gallery-like aesthetic. These aren’t organized patterns — they’re intentionally loose, gestural marks that suggest an artist’s hand without being literally representational.
Why Abstract Art on Nails Reads as Elevated
Abstract designs work because they signal creativity and artistic intention. Unlike geometric designs, which feel controlled, or figurative designs, which can look literal, abstract work is inherently sophisticated. It gives the designer room for interpretation and personality while maintaining a refined aesthetic. Brushstroke abstracts on white feel like wearable art — you’re literally carrying a tiny canvas on your fingers.
Creating Confident Abstract Designs
- Use a white base that’s fully cured before adding any abstract elements
- Choose 1-2 complementary accent colors (not more, or it becomes chaotic)
- Use a thin brush to create loose, gestural marks — sweeping lines, curved strokes, layered marks
- Don’t overthink placement — abstract is about intuition and spontaneity
- Consider adding marks to all ten nails, or just a few select nails for a more editorial feel
- Let some marks extend from the nail tip, or keep them contained within the nail boundary
- Seal with a clear top coat
- The goal is that each nail looks slightly different but cohesive as a set
Insider note: Abstract designs read more polished if you use matte accent colors rather than glossy, and if the marks themselves have somewhat soft edges (from slightly diluted polish or gel) rather than being super crisp.
17. Minimal Geometric Blocks
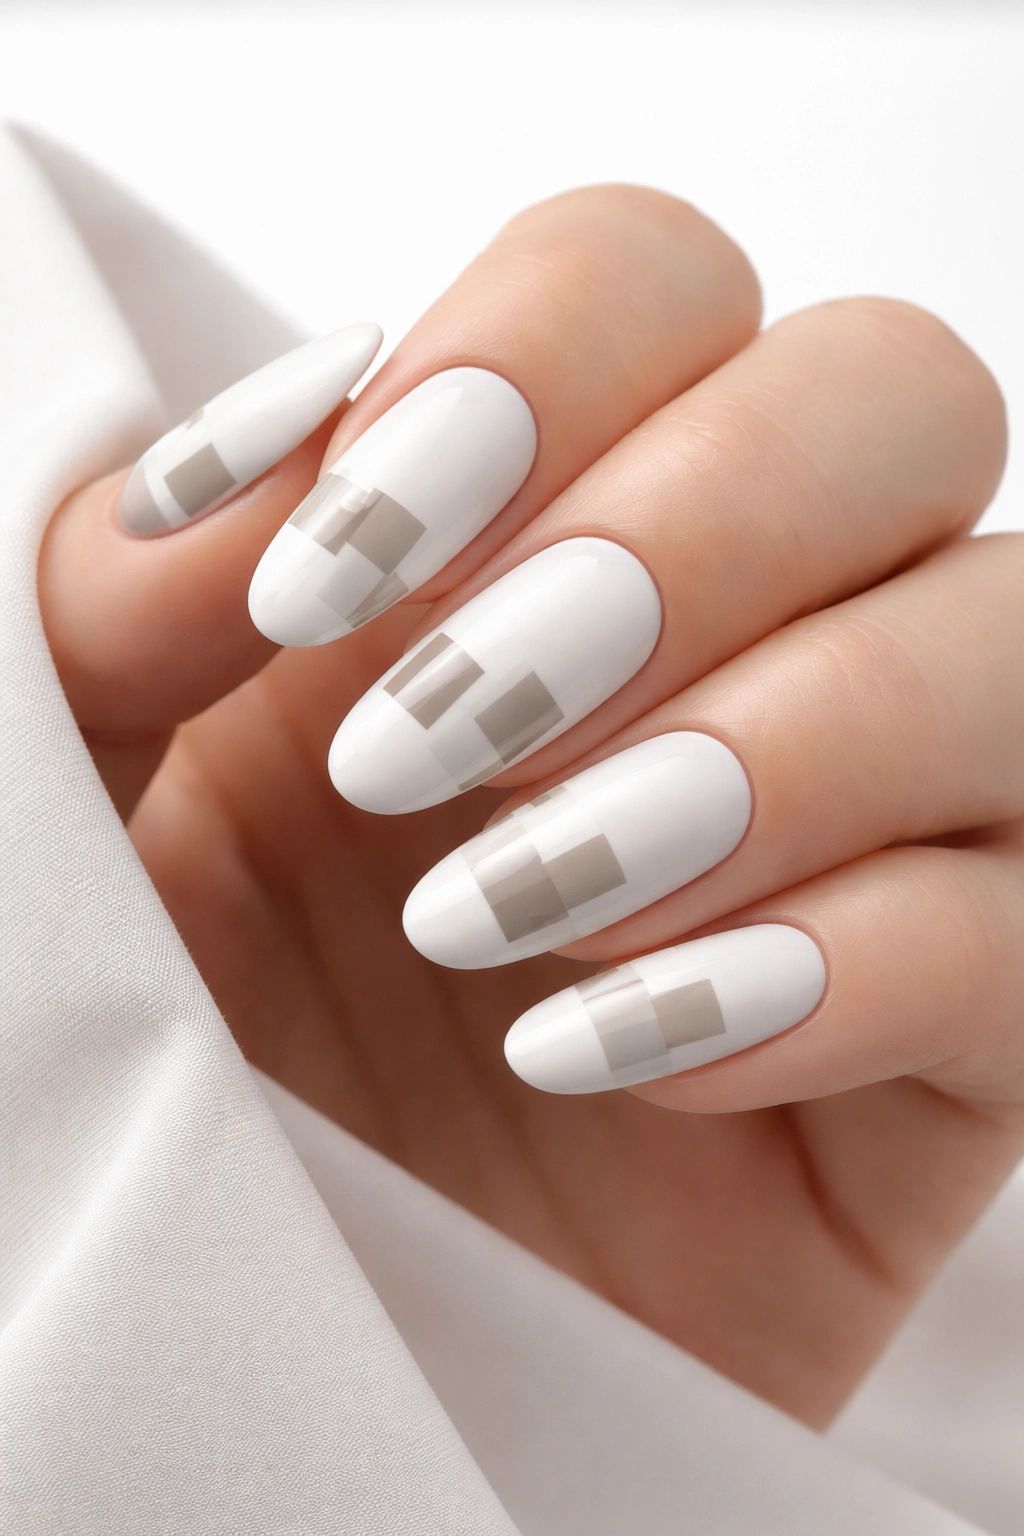
Instead of delicate lines, try structured geometric blocks — small rectangles, squares, or trapezoids in neutral shades (taupe, warm gray, soft charcoal) positioned precisely on the white nail. Each nail might have 2-3 blocks, or blocks might appear only on select nails. The overall effect is architectural and modern.
Why Structured Geometry Reads as Contemporary Luxury
Geometric designs appeal to our sense of order and symmetry, which reads as intentional and sophisticated. Structured blocks are less delicate than lines or dots, which gives them visual weight and makes them feel powerful. When executed in neutral tones, geometric designs feel like architectural nail art — refined and masculine-leaning without being actually masculine. On long oval nails, geometric blocks emphasize the nail’s shape because they’re placed within that canvas precisely.
Building a Geometric Block Design
- Plan placement with a pencil first — precision matters for geometry to read as intentional
- Use nail guides or striping tape to ensure blocks have clean, straight edges
- Apply solid color blocks or slightly gradient blocks within the guides
- Vary the size of blocks slightly so the design feels organic rather than robotic
- Consider asymmetrical placement (one block on some nails, two on others) for visual interest
- Blocks read better when the white portion is glossy and the blocks are either matte or a different finish
- Ensure clean edges by sealing the edges of blocks with top coat carefully
Worth knowing: You can create the block effect with striping tape even if freehand geometry feels intimidating — tape creates perfect lines every time, and peeling it off reveals clean edges.
18. Satin White Finish
Satin finish sits between matte and glossy — it has some shine but not the extreme reflectiveness of full gloss. A satin white is incredibly sophisticated because it’s unexpected, easy to maintain, and feels like a conscious choice rather than a default. The finish has a soft, almost fabric-like quality.
Why Satin Is the Sophisticated Middle Ground
Satin finishes have been gaining traction with people who find full gloss too shiny but matte too dull. Satin white reads as contemporary without feeling trendy, refined without being stark. The finish has subtle luminosity that catches light in a gentle way rather than a mirror-like way. For long oval nails, satin creates a sleek, professional aesthetic that feels intentional without requiring additional design.
Achieving a True Satin Finish
- Use a satin-finish white polish or gel — not a regular white with a glossy top coat
- Apply 2-3 even coats to avoid streaks (satin finishes sometimes show application imperfections more readily than glossy)
- Use a satin top coat specifically to maintain the finish (glossy top coat will ruin the satin effect)
- Allow full cure or dry time for the finish to develop properly
- The result should have a subtle glow, not a flat appearance
- Maintain satin nails with matte or satin top coats only, never glossy
Pro tip: If you love satin but struggle to maintain it between salon visits, add a drop of matte top coat to glossy top coat to create your own semi-satin finish that’s easier to reapply at home.
19. Ivory with Silver Veining
Ivory (a warmer, creamier white) paired with delicate silver veining creates a design that feels organic and luxe. Thin silver lines weave across the ivory base like cracks in porcelain or veining in natural stone. It’s elegant, grown-up, and surprisingly forgiving to maintain.
Why Warm Ivory Feels Different From Bright White
Ivory is warmer and creamier than pure bright white, which changes the entire vibe. Where bright white reads modern and contemporary, ivory feels more timeless and romantic. Adding silver veining to ivory creates a vintage-luxury aesthetic — like fine china or antique marble. The warmth of ivory combined with the cool shine of silver is inherently interesting. Silver veining is delicate enough to maintain that clean aesthetic while adding texture and depth.
Creating Silver Veining on Ivory
- Use a warm, creamy ivory as your base (2-3 coats, fully cured)
- Use a very fine brush and silver gel or polish to create veining patterns
- Apply veining in organic, branch-like patterns (don’t aim for total symmetry)
- Start with thin, main lines and add thinner secondary lines for depth
- Vary the spacing of veins so it feels natural rather than repetitive
- Seal with a clear top coat that enhances the silver shine
- The silver should sit on top of the ivory base, creating a layered effect
Worth knowing: This design is surprisingly forgiving because the warm ivory doesn’t show every smudge like pure white does, while the silver veining still reads as clearly defined and intentional.
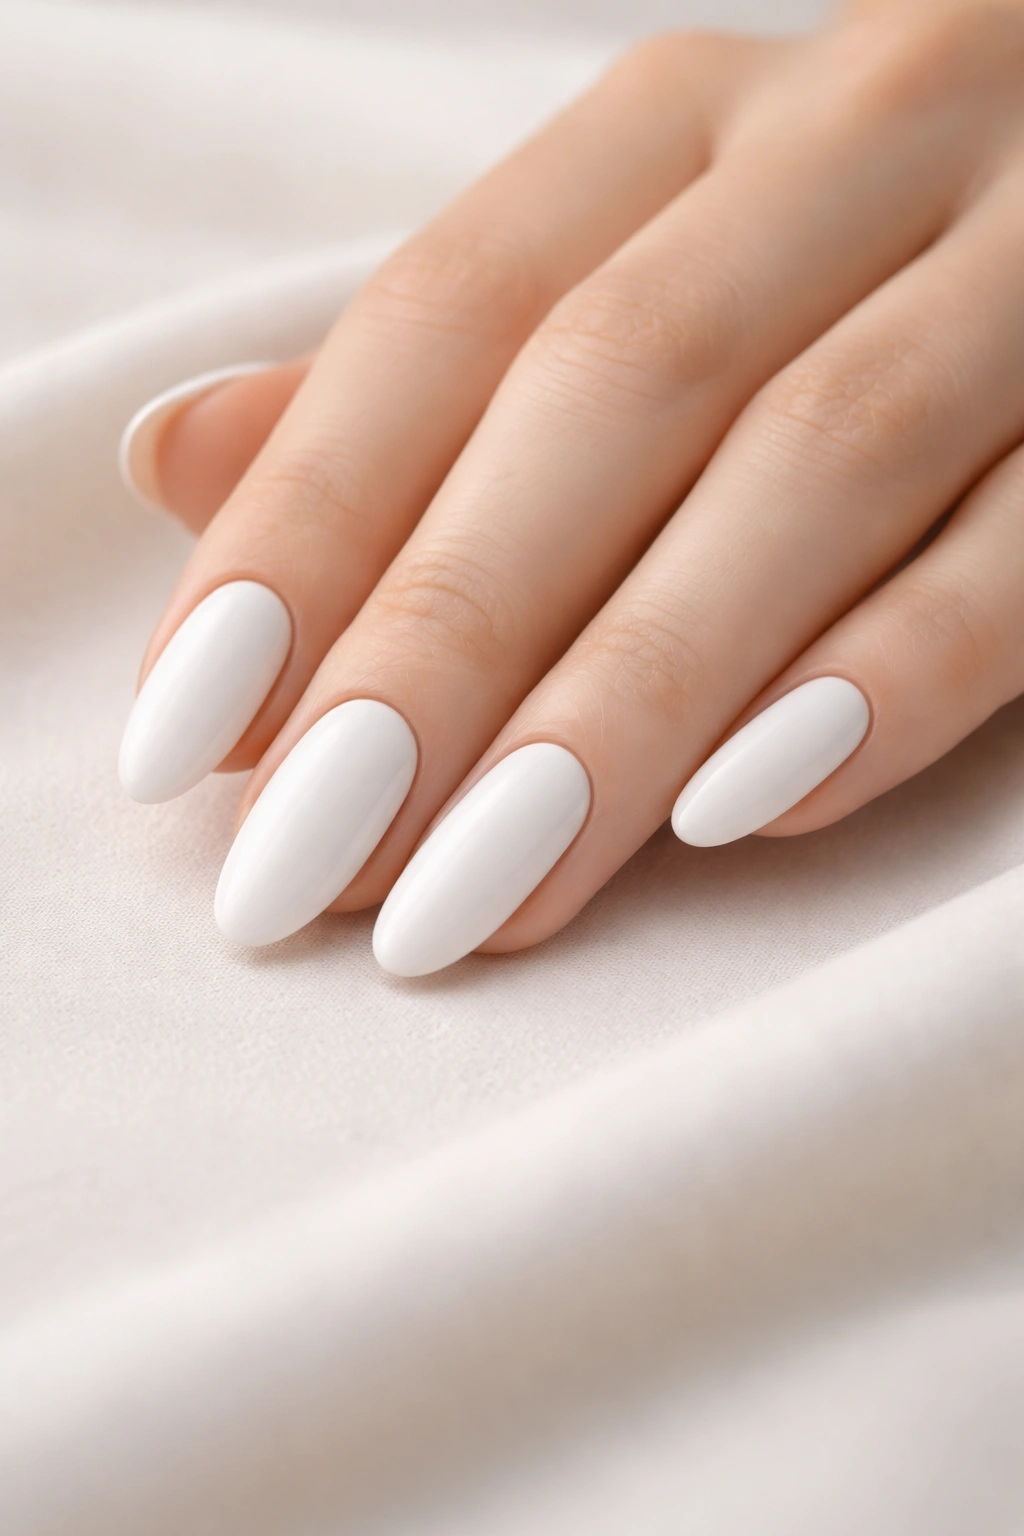
20. Pristine Glossy White
Return to the absolute foundation: a pristine, impeccably executed glossy white that’s so well-done it deserves to stand as a design all on its own. This is white polish elevated to art through sheer attention to detail — perfect opacity, flawless application, immaculate maintenance, and a shine so reflective it’s almost blinding.
Why Sometimes Perfect Simplicity Is the Ultimate Design
There’s a reason white long oval nails are a classic — they work because they’re fundamentally elegant. At a certain point of execution quality, simplicity becomes the design. When your white nails are so glossy they look wet, so evenly applied there’s not a single streak or bubble, and so perfectly maintained there’s no chips or yellowing, that’s a statement. It says you take care of yourself, you understand timeless style, and you don’t need tricks or embellishment to feel polished.
Maintaining Pristine White Nails
- Invest in a high-quality white polish (brands matter — some whites are naturally whiter and more opaque)
- Use a strengthening base coat to prevent yellowing and staining
- Apply thin coats (2-3 maximum) for an even, streak-free appearance
- Use a premium glossy top coat and allow full cure or dry time
- Maintain the manicure by avoiding staining activities and reapplying top coat every 3-4 days
- Clean under the nails regularly to prevent discoloration
- Touch up any chips immediately — pristine white shows every imperfection
- Keep your hands moisturized so the skin around the nails looks equally polished
Pro tip: The best white nails in the world are only as good as the maintenance. Committing to reapplication of top coat regularly and touching up immediately after any chips is what separates “nice white nails” from “showstopping white nails.”
Final Thoughts
White long oval nails represent something bigger than a simple color and shape choice — they’re a commitment to timeless elegance and intentional self-care. Whether you gravitate toward pure simplicity or prefer adding a subtle detail like veining, metallic accents, or soft textures, the foundation remains the same: clean, elevated, and unmistakably refined.
The beauty of this particular combination is how universally flattering it is. The long oval shape elongates the hand regardless of your actual hand shape or nail length. The white reads as polished whether you’re at work, heading somewhere fancy, or just running errands. There’s no season, no occasion, and no age where white long oval nails feel out of place.
Your choice of finish, texture, and embellishment ultimately comes down to how much you enjoy maintaining your nails and what feels authentic to your personal style. If you love a bold statement with minimal effort, pristine glossy white or a matte frost finish requires no additional elements. If you enjoy the ritual of detailed nail art, marble patterns, floral details, or geometric accents give you room for creativity. Either way, you’re guaranteed a manicure that makes you feel put-together and elegant every single time you look at your hands.
