

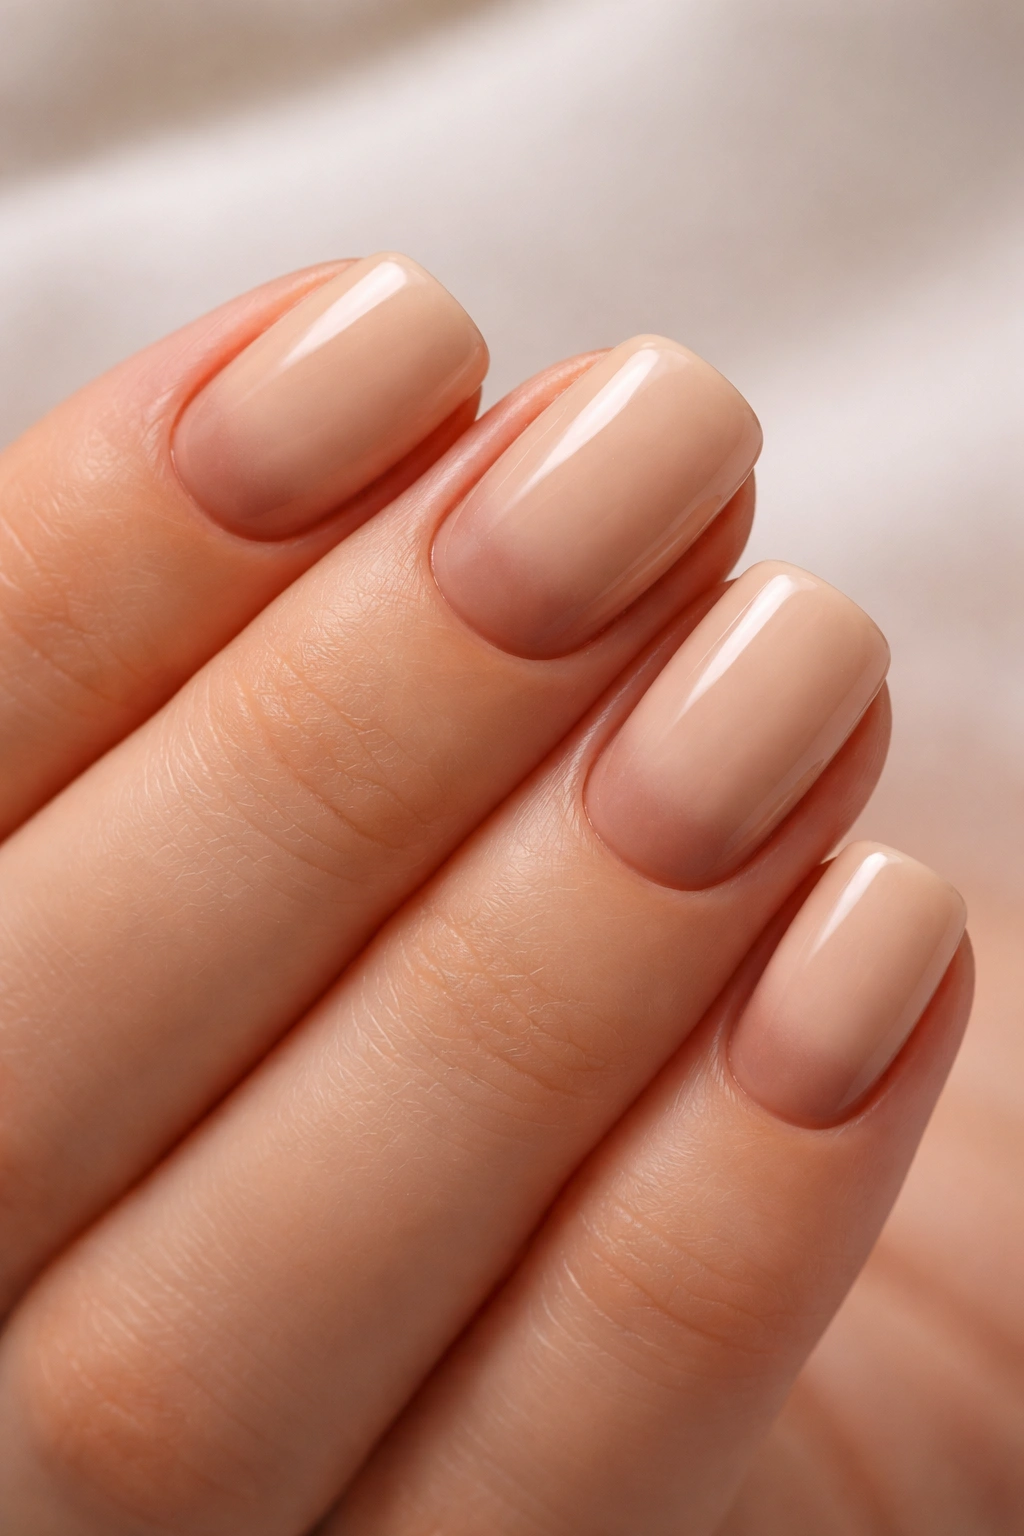
Short squoval nails might be one of the most flattering shapes you can choose if you’re committed to keeping your nails short. There’s something about the squared-off shape with those gentle rounded corners that photographs beautifully, photographs beautifully, photographs beautifully feels infinitely more polished than a blunt square, and actually works with your natural nail beds instead of fighting them. The squoval shape—that hybrid between square and oval—has become the go-to for people who want their nails to look intentional and well-groomed without the commitment of longer lengths or the practical limitations that come with them.
What makes short squoval nails so versatile is how they showcase color and design. They’re long enough for actual nail art and patterns, yet short enough that you can maintain them yourself without constant touch-ups. Whether you’re drawn to minimalist looks that let your nail shape do the talking, bold patterns that make a statement, or soft glazed finishes that feel effortlessly expensive, short squoval nails accommodate every aesthetic. The shape elongates your fingers while staying practical for everyday life—typing, cooking, gardening, and all the things that make longer nails impractical.
The designs in this collection range from understated and wearable to bold and trend-forward. You’ll find classic approaches that never date themselves, seasonal inspiration for warmer and cooler months, and creative techniques that look way more complicated than they actually are to execute. Whether you’re planning your next salon appointment or looking for inspiration to nail at home, these short squoval looks offer something for every skin tone, style preference, and occasion.
1. Clean White with Minimal Gold Striping
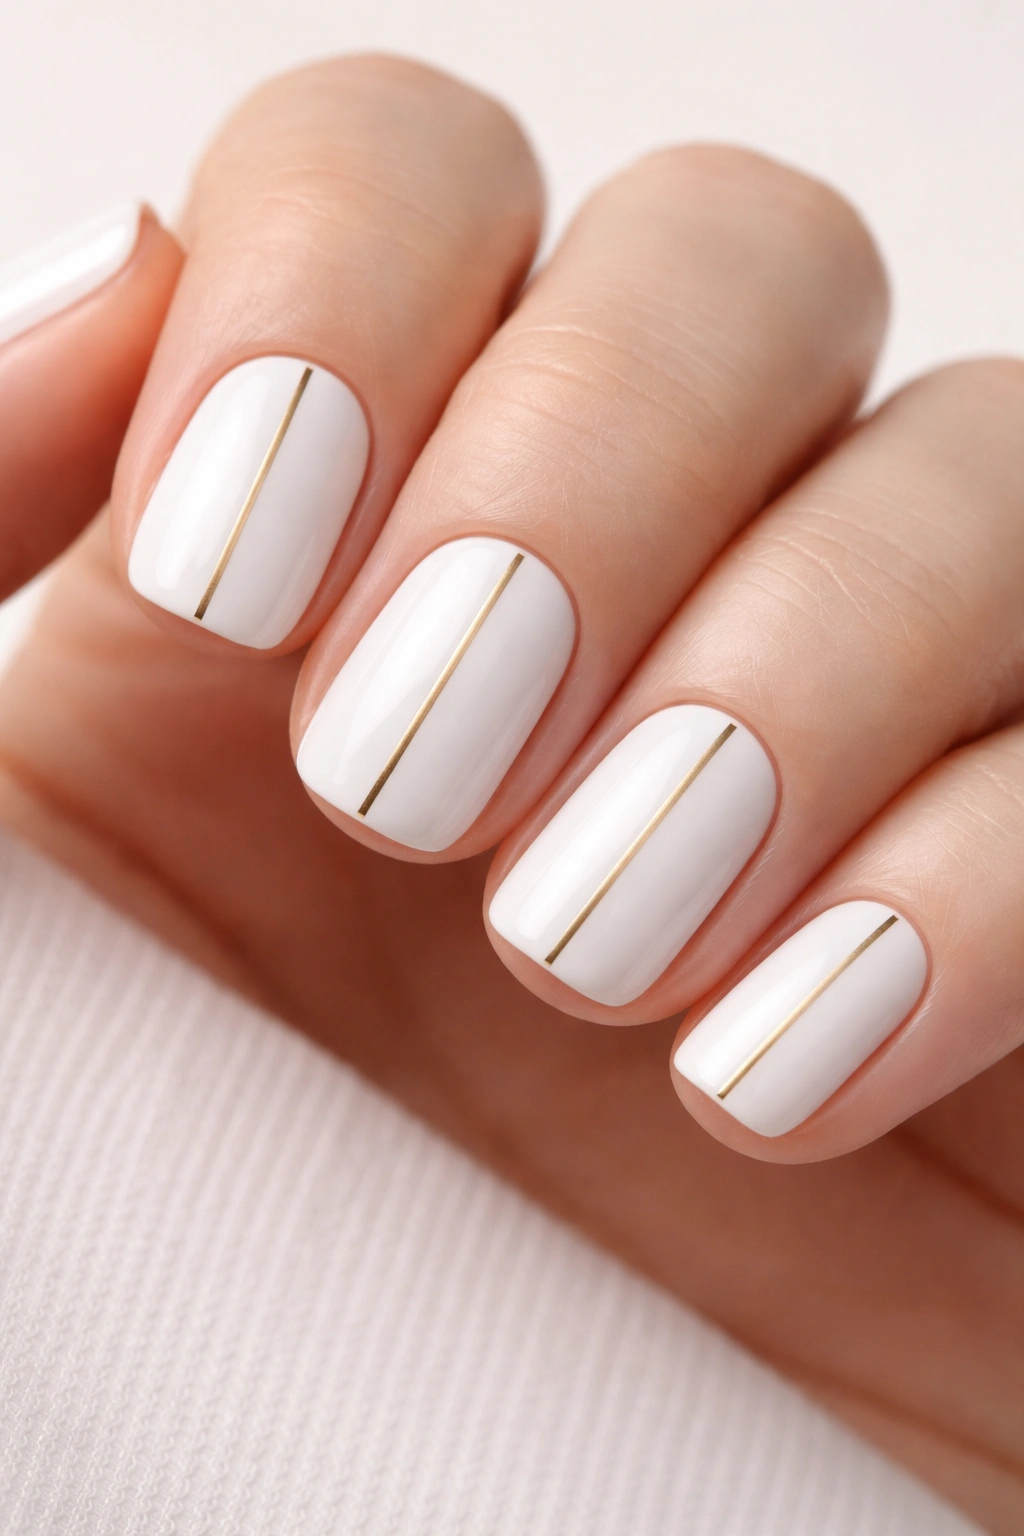
A pristine white base on short squoval nails becomes instantly elevated when you add a single thin gold stripe down the center of each nail. The contrast between the geometric precision of the stripe and the soft roundness of the squoval shape creates visual interest without overwhelming the nail. This look works beautifully on all skin tones because white is universally flattering, and the gold adds just enough warmth and luxury that it feels more intentional than plain white alone.
Why This Design Works So Well
The minimal stripe approach respects the natural elegance of the squoval shape rather than competing with it. White nails have an inherent cleanliness and polish that makes your hands look well-cared-for, while the gold line elevates it from basic to thoughtful. This combination works for professional settings, everyday wear, or even as a base for other nail art because it’s so neutral.
Application Tips and Best Practices
- Use a gel base coat or traditional base coat to prevent the white polish from staining your nail bed
- Apply the gold stripe using a thin striping brush or a toothpick dipped in gold gel or polish for maximum precision
- A matte top coat on the white with a glossy finish on the gold stripe creates visual depth and dimension
- If freehand striping feels intimidating, thin gold nail tape or nail guides make the line perfectly straight every time
Pro tip: Paint the stripe while the white base is still slightly tacky—it adheres better and creates a sharper line than trying to paint over fully set white polish.
2. Soft Pink with Pearl Finish
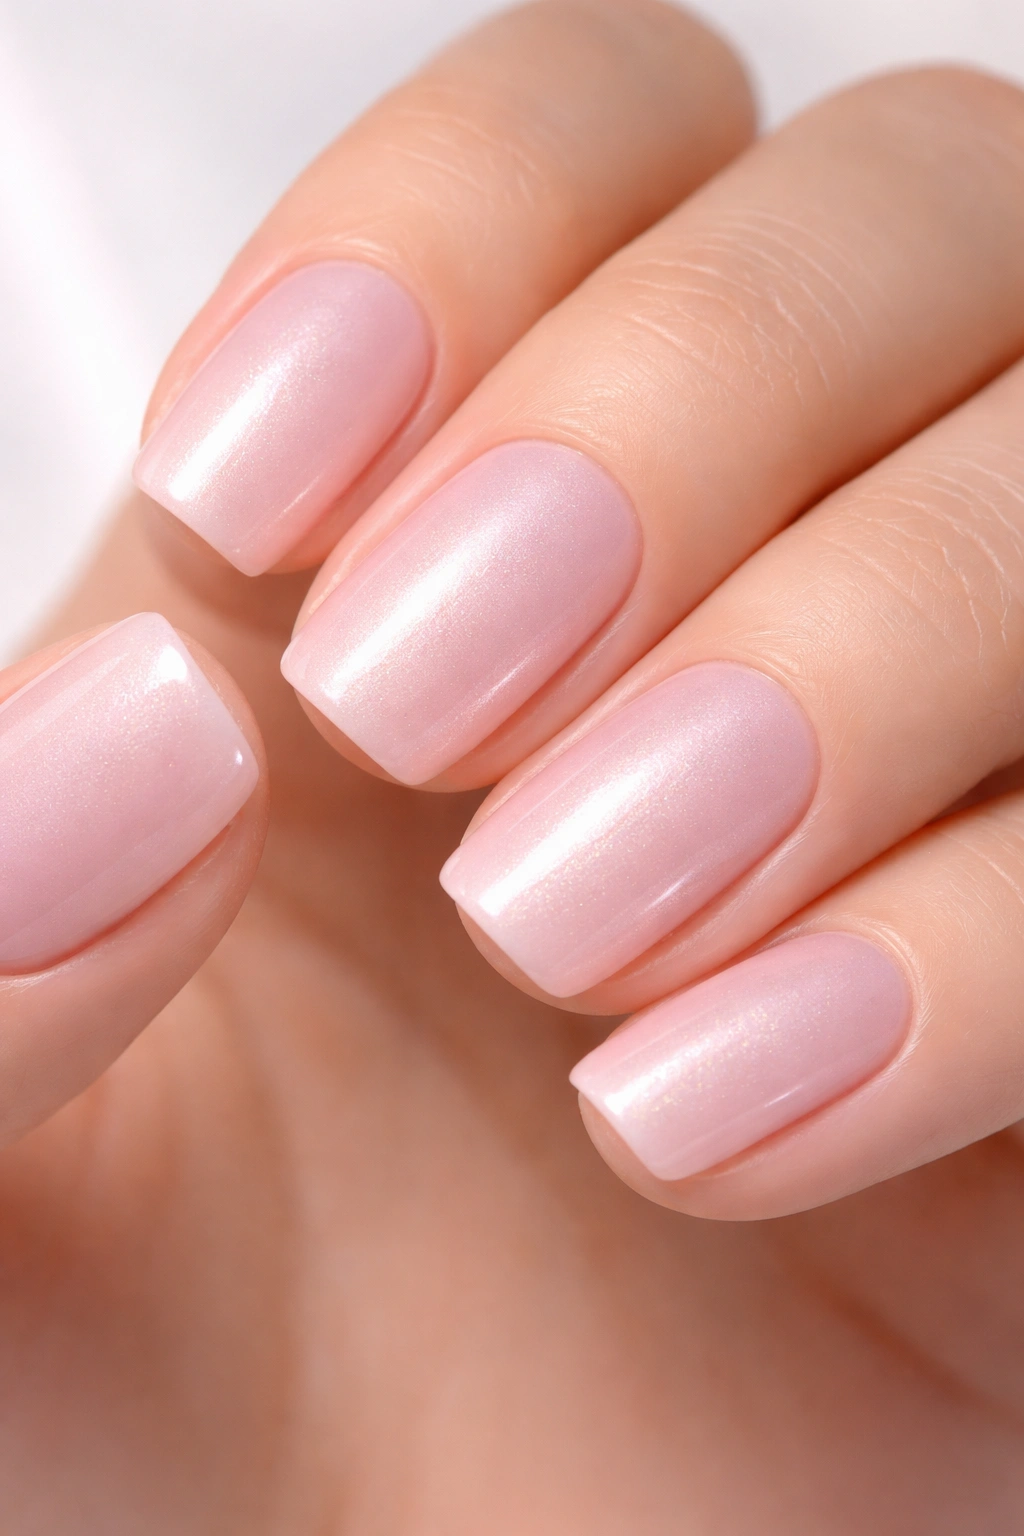
Soft pink squoval nails with a subtle pearl finish capture that effortless elegance that feels expensive without trying. The pearl shimmer catches light and creates dimension while remaining subdued enough for any occasion. This is the nail color that makes your hands look naturally radiant and creates a clean, groomed appearance that flatters every skin tone and works with virtually any outfit in your wardrobe.
What Makes the Pearl Effect So Flattering
Pearl finishes scatter light across your nails rather than reflecting it in one direction, which creates an almost luminous quality. On short squoval nails, this effect makes them appear fuller and slightly longer while staying completely understated. The soft pink base ensures the look reads as intentional and manicured rather than shimmery or frivolous.
How to Achieve This Look
- Start with a base coat to prevent any staining from the pink polish
- Apply 2-3 thin coats of soft pink with pearl pigment rather than one thick coat—layering creates better color and smoother pearl distribution
- A glossy top coat enhances the pearl effect and adds shine
- If you can’t find pink polish with built-in pearl, add pearl powder to a regular soft pink polish for a custom effect
Worth knowing: Pearl finishes show imperfections more than solid colors, so take extra care during application to avoid bubbles or streaks.
3. Burgundy with Matte Finish
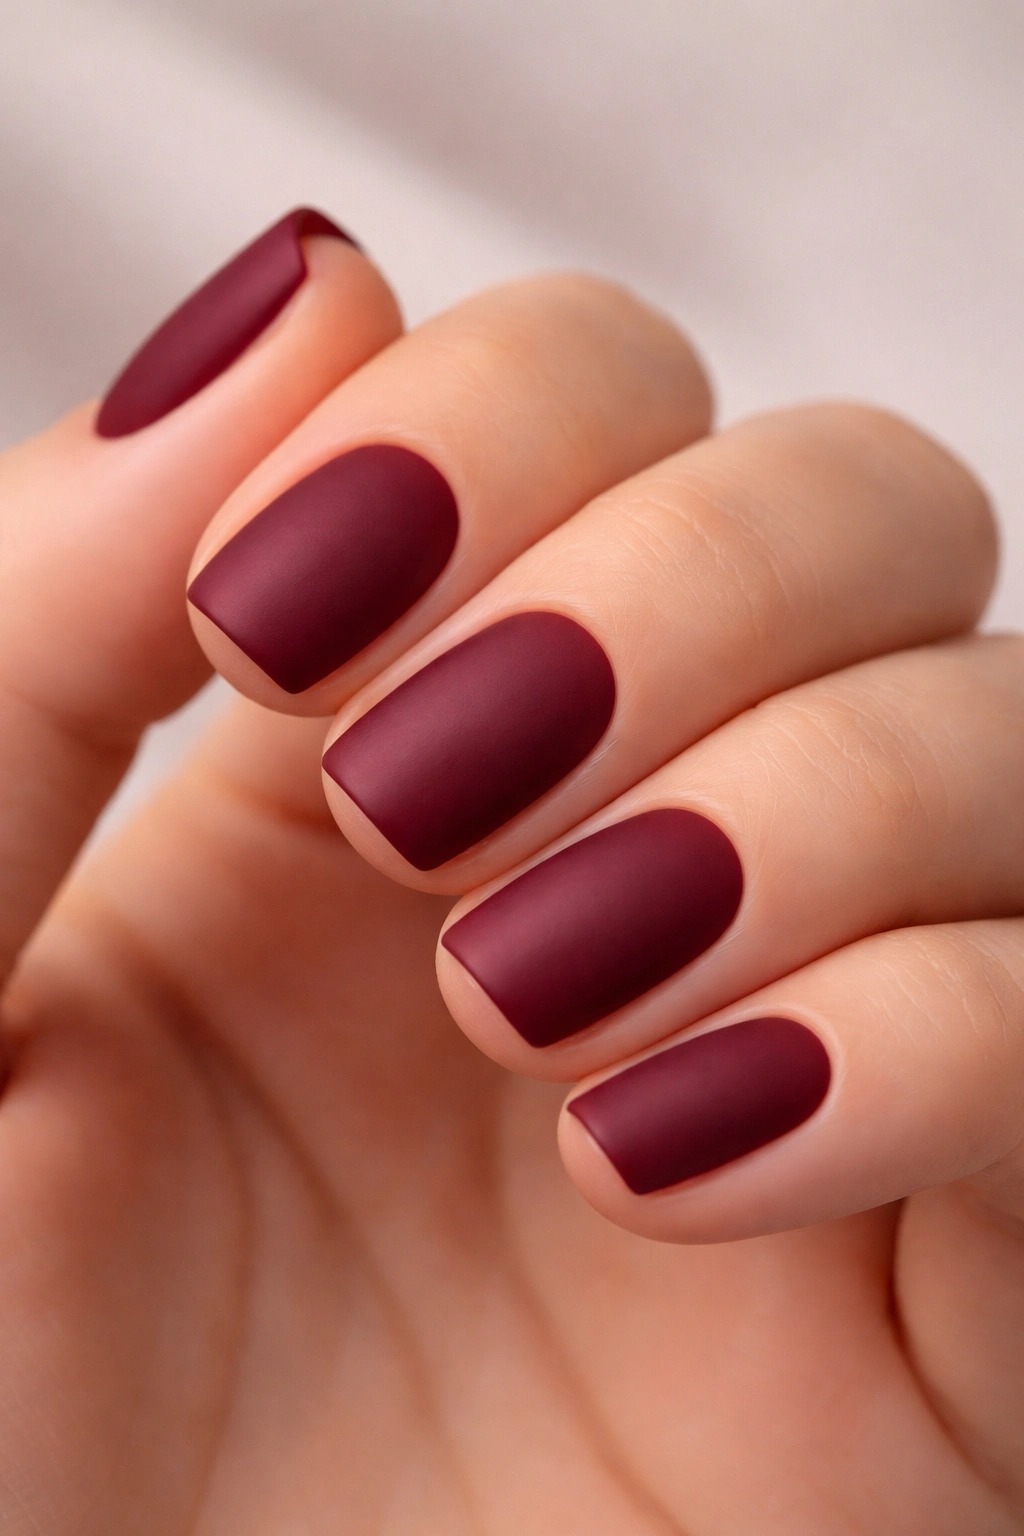
Matte burgundy on short squoval nails delivers a sophisticated, modern look that reads as intentional and fashion-forward. The richness of burgundy deepens the appearance of your nail beds while the matte finish creates a velvety, luxe aesthetic that feels completely different from glossy versions of the same color. This shade works particularly well on deeper skin tones, though it’s genuinely flattering across the spectrum when paired with the right undertones.
Why Matte Burgundy Commands Attention
The matte finish on burgundy creates a modern contrast to the soft curves of the squoval shape. It feels editorial and curated rather than casual, which makes it perfect for occasions where you want your nails to contribute to a polished overall look. Burgundy itself is complex enough that it reads as intentional without being loud or demanding.
Steps to Get the Matte Burgundy Effect
- Apply a base coat to protect your nails
- Use a burgundy gel polish or traditional polish formulated for matte finish
- If using regular polish, apply a matte top coat over glossy burgundy for the finish—you can find matte top coat in any beauty supply
- For added depth, create a very subtle gradient from deeper burgundy at the base to lighter burgundy at the tip
- A matte finish shows dust and fingerprints, so clean your nails throughout the day if that bothers you
Insider note: Pair matte burgundy with a very light pink or nude lip for maximum impact—the contrast between nail and lip colors becomes part of the overall aesthetic.
4. Nude Base with Delicate Floral Art
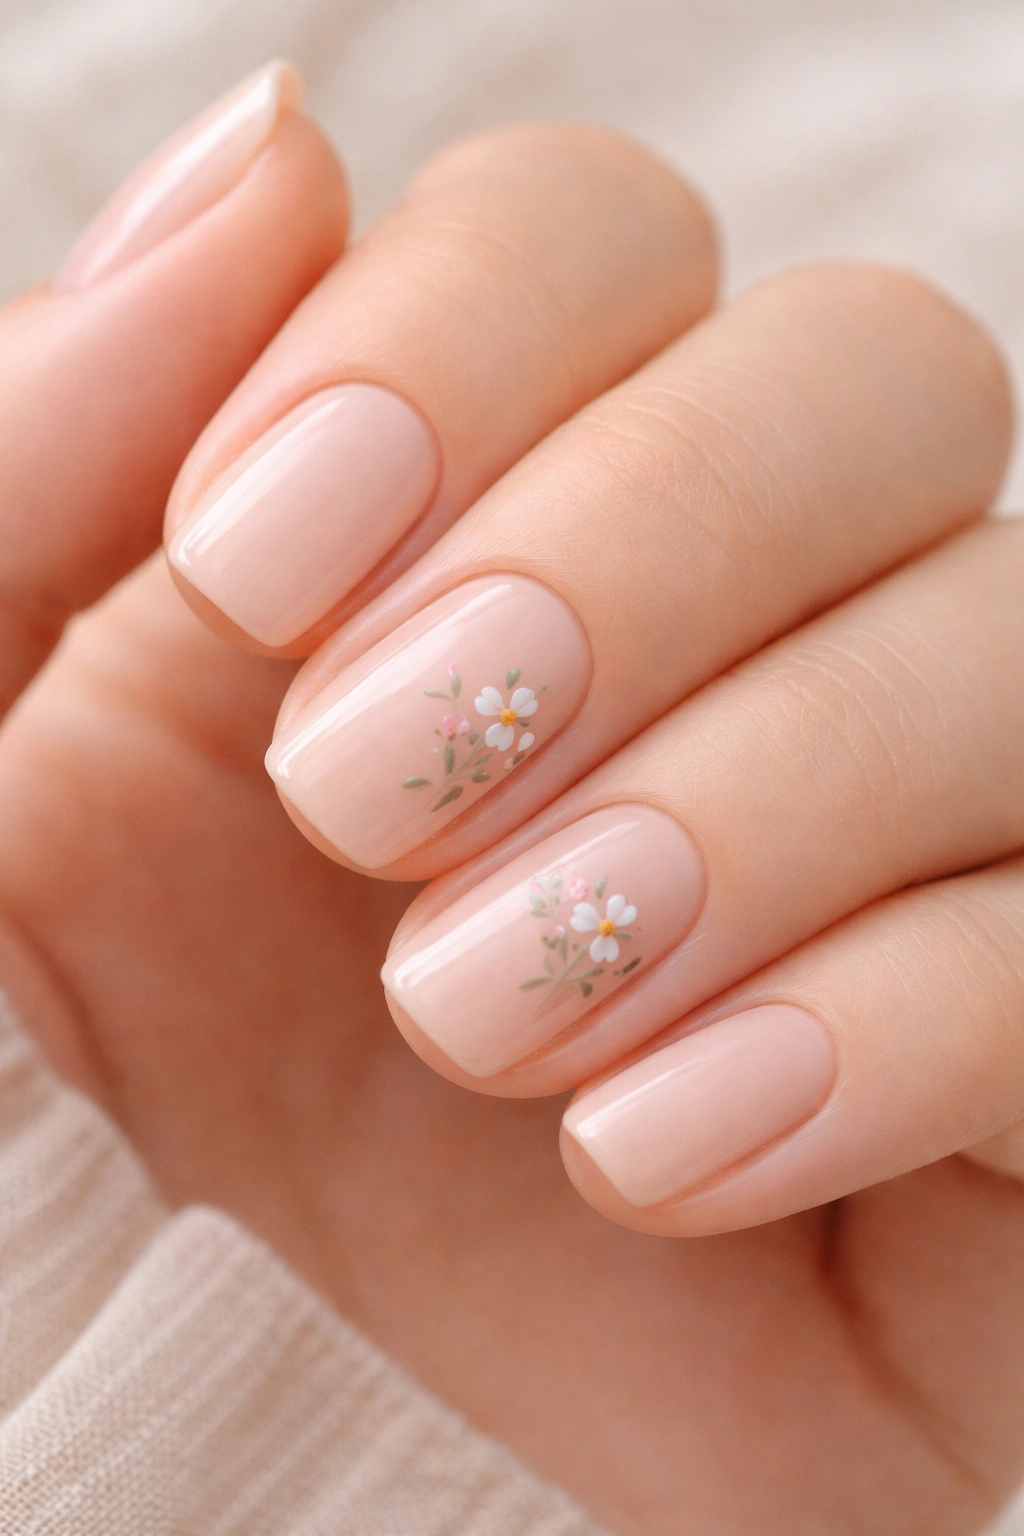
A neutral nude base transforms into something genuinely special when you add minimal floral art—think a single small flower on one or two nails, rendered in soft pinks or pastels. Short squoval nails provide just enough canvas for detailed florals without becoming overwhelming. The nude base keeps the look wearable and versatile while the floral detail adds a touch of personality and artistry that elevates the entire manicure.
What Makes This Combination So Effective
Nude backgrounds allow delicate art to shine without competing for attention. Floral designs have an inherent femininity and softness that feels elevated rather than juvenile, especially when executed with a light hand and realistic proportions. The combination works for weddings, professional settings, and everyday wear because the overall effect is one of intentional elegance.
Creating Beautiful Floral Details
- Use a thin detail brush or a size 0 brush for precise florals
- Start with the flower shape lightly—a tiny circle or dot in the nail’s center
- Add petals around the center with short, curved strokes
- Small leaves in soft green add dimension without complicating the design
- Place florals on the upper third of the nail or slightly off-center for the most flattering placement
- A glossy top coat makes the floral art pop while keeping the nude base smooth and even
Pro tip: Practice florals on a nail wheel or practice polish sheet before committing to your actual nails—the technique looks harder than it is once you’ve done it a few times.
5. Deep Teal with Scattered Gold Leaf
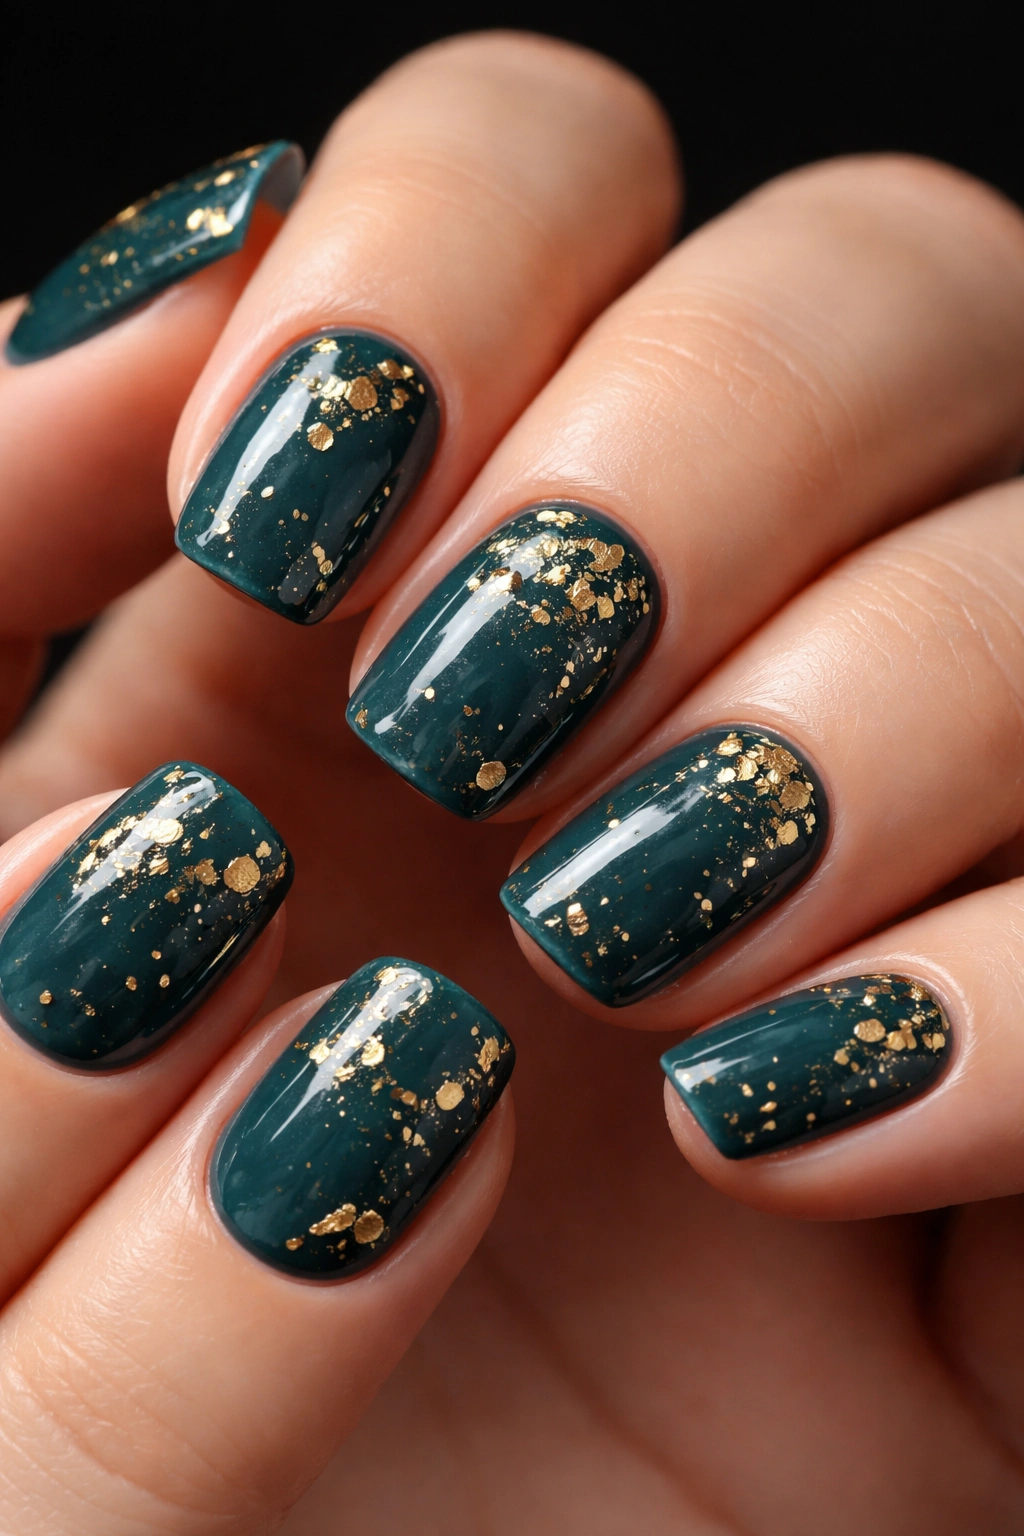
Deep teal squoval nails with scattered pieces of gold leaf create an immediate sense of luxury and artistic sophistication. The cool richness of teal pairs beautifully with the warmth of gold, and when you scatter the leaf pieces rather than creating a solid pattern, the effect reads as intentional rather than accidental. This look works especially well on medium to deeper skin tones, where teal appears more saturated and the gold creates stunning contrast.
Why Gold Leaf Creates That Expensive Look
Gold leaf catches light and creates dimension that regular gold polish simply cannot replicate. The scattered application means each angle of your hand shows the gold differently, creating movement and visual interest. On short squoval nails, this keeps the design from feeling flat or heavy.
Applying Gold Leaf Beautifully
- Paint your teal base and allow it to set completely—gold leaf adheres best to fully cured polish
- Cut small pieces of edible gold leaf (use edible because it’s safer for nail application)
- Use a thin brush or tweezers to place pieces exactly where you want them
- Press each piece gently with a toothpick or the back of your brush
- Seal everything with a thick glossy top coat to hold the gold leaf in place
- Work in a closed space or outdoors because gold leaf is extremely light and floats easily
Worth knowing: Scattered gold leaf will naturally migrate and break apart slightly with wear, which actually adds to the sophisticated, organic feel rather than detracting from it.
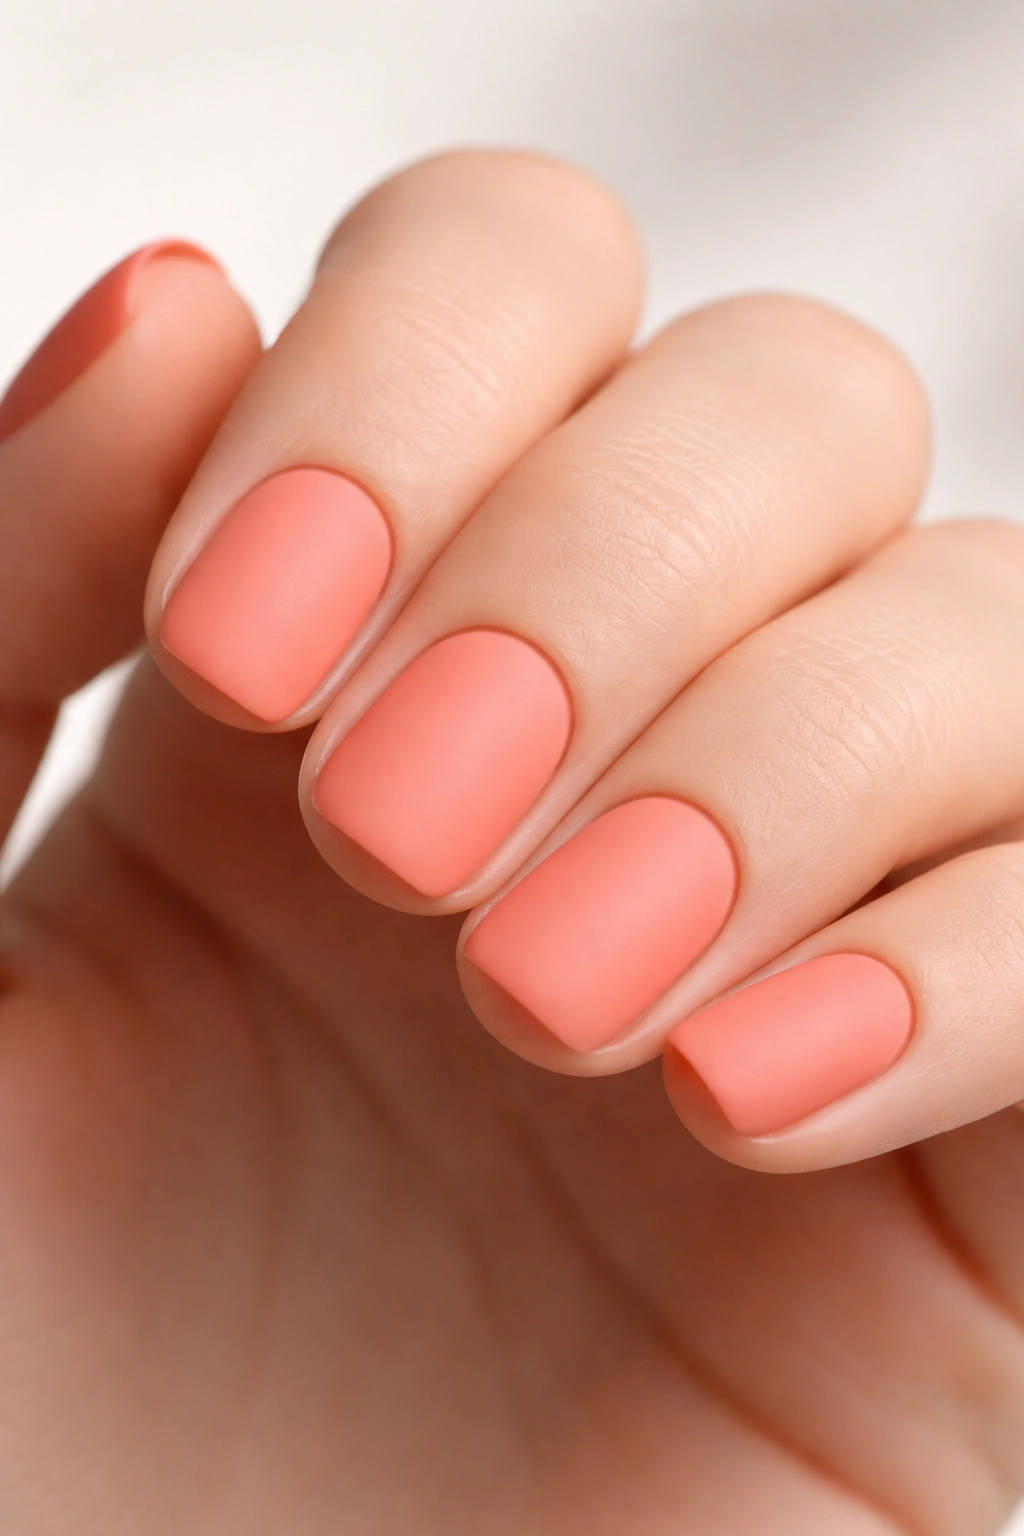
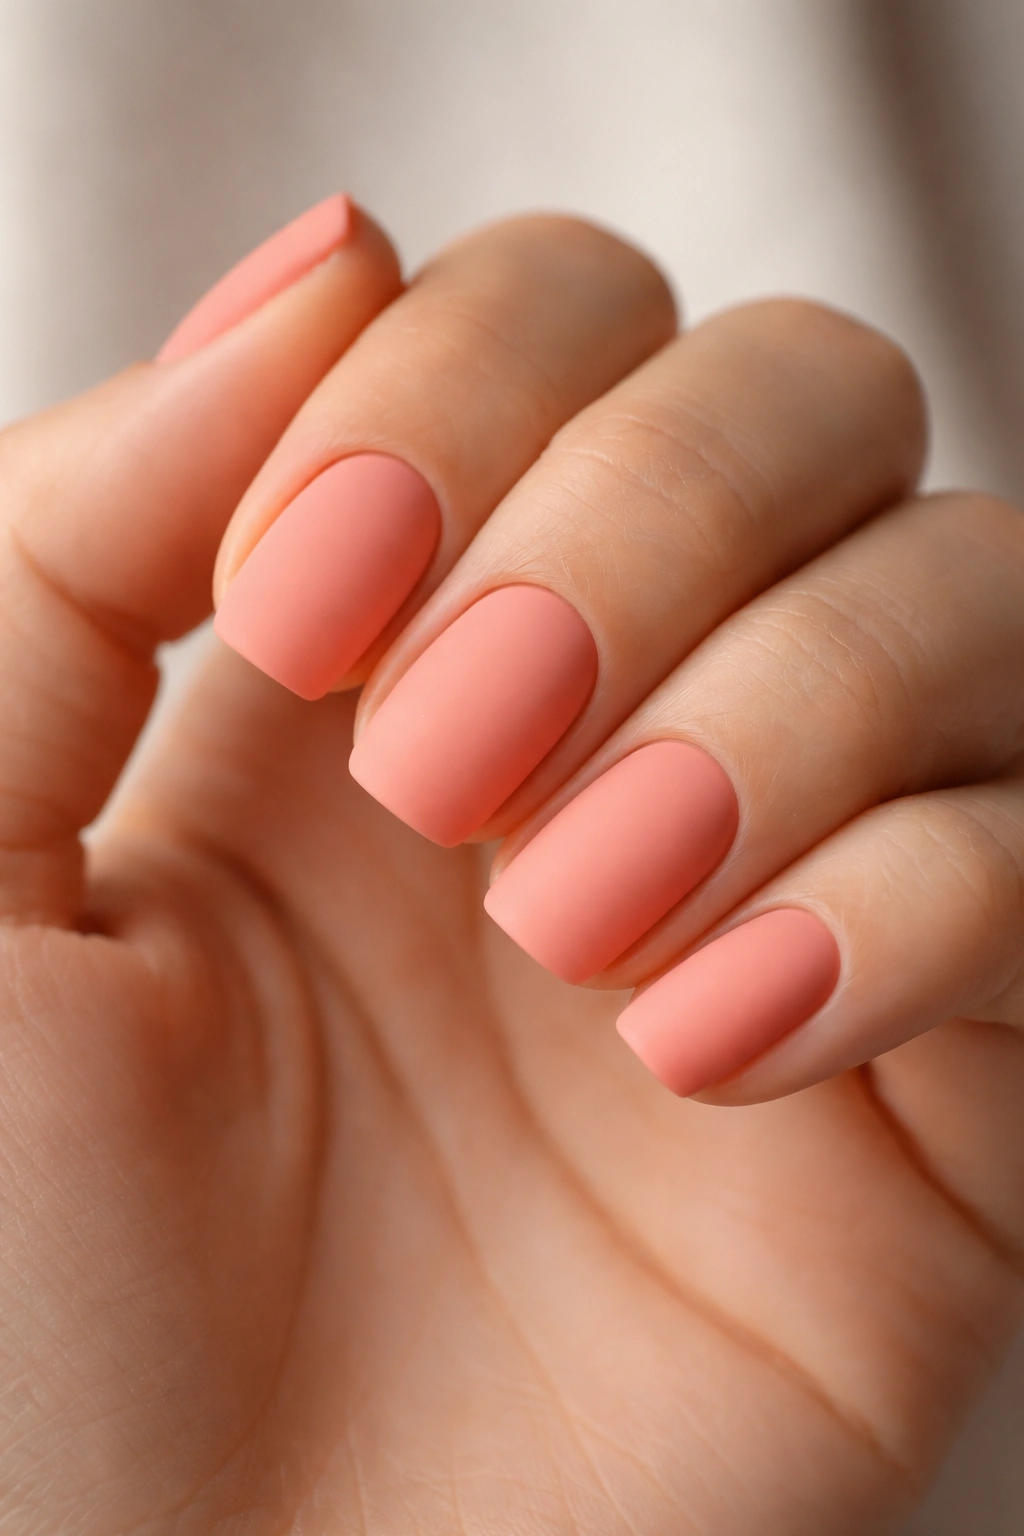
6. Soft Peach with Tan Ombre

Soft peach fading into tan creates a gradient that feels both wearable and artistic on short squoval nails. The ombre effect makes your nails appear slightly longer while the warm peachy base combined with tan shadows creates dimension and depth. This is a look that photographs beautifully and works particularly well during warmer months, though the colors are neutral enough that it translates year-round.
Understanding the Peach-to-Tan Gradient
A successful ombre relies on strategic color placement and blending. Rather than creating a sharp line between colors, the peach at the base gradually becomes more tan toward the tip, creating the illusion of depth and shadow. The squoval shape allows the gradient to follow your nail’s natural curve beautifully.
Techniques for a Seamless Ombre
- Apply soft peach as your base color across the entire nail
- Load a sponge with tan polish (the same sponge you use for makeup blending works perfectly)
- Dab tan onto the tip area, allowing it to blend naturally with the peach underneath
- Repeat the dabbing motion to build the tan color gradually
- Use a clean, slightly damp sponge to soften any harsh lines between colors
- A glossy top coat seals everything and creates a smooth, finished appearance
Pro tip: If sponge blending intimidates you, you can achieve a similar effect using a ombre powder designed for nails—the powder adheres to the sticky base of gel polish and creates an even more seamless gradient.
7. Cream Base with Black Fine Line Geometric
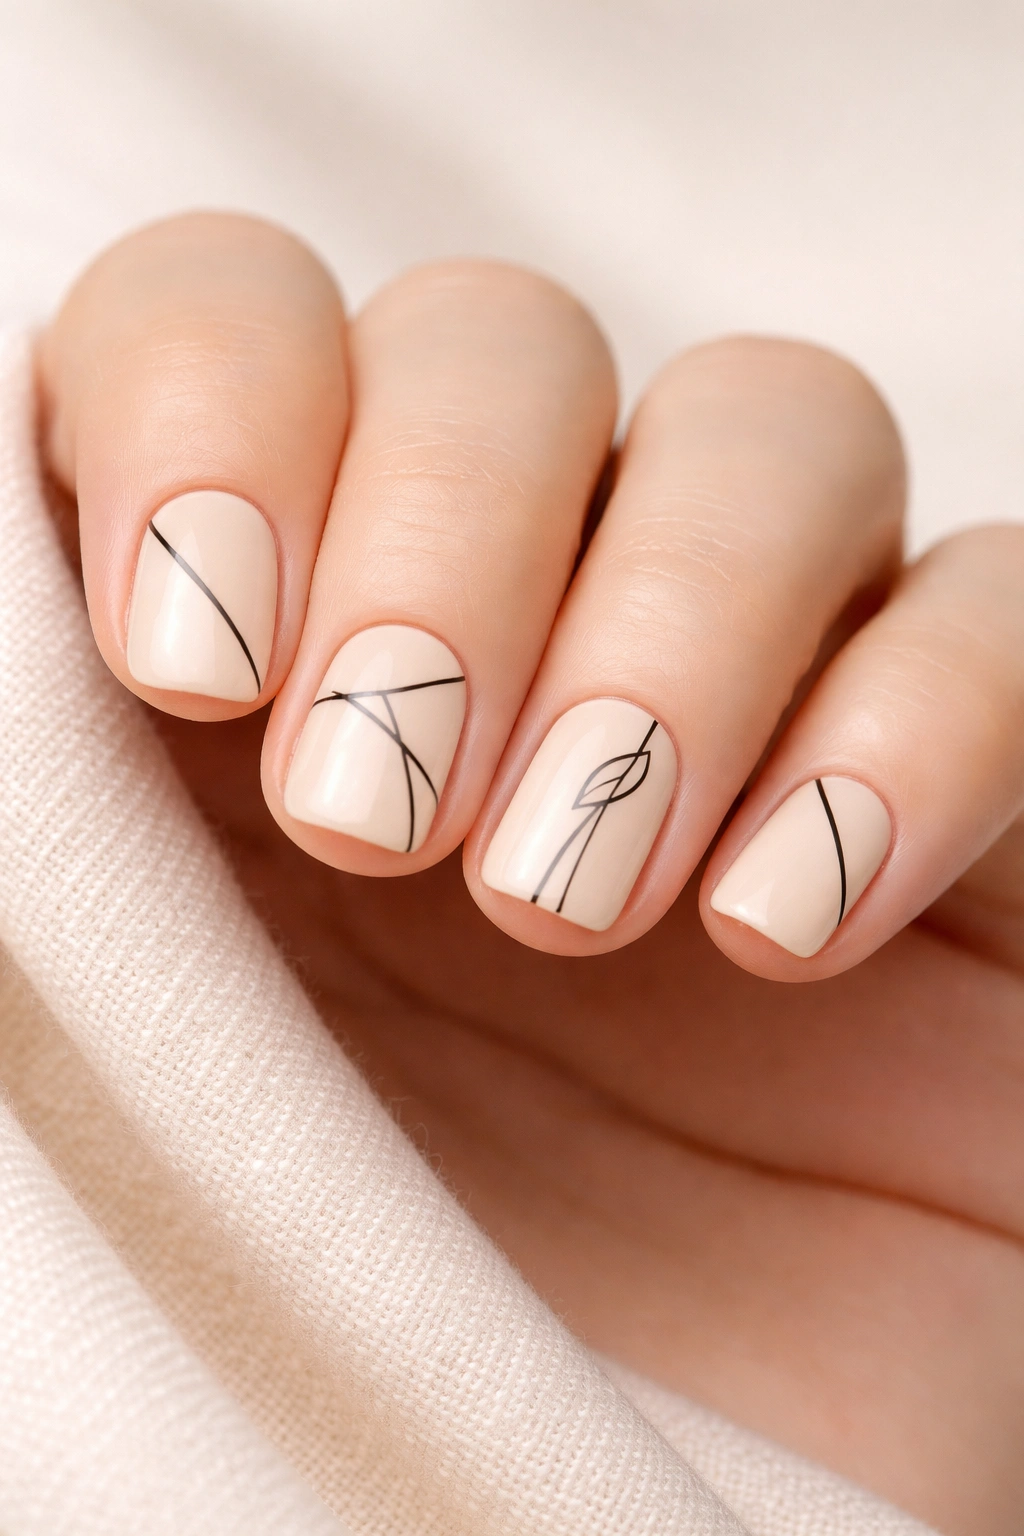
A creamy, warm base becomes architectural and modern when you overlay minimal black geometric lines creating subtle patterns. These might be thin horizontal stripes, a simple line drawing on the nail, or geometric shapes on a single accent nail. Short squoval nails work perfectly for this because the clean lines of the shape complement geometric designs beautifully without competing with them.
Why Black Lines on Cream Are So Striking
The high contrast between cream and black creates visual impact while remaining completely wearable and professional. The geometric precision reads as intentional and artistic rather than accidental or careless. This look has a Scandinavian minimalism aesthetic that feels current without being trend-dependent.
Executing Geometric Line Work
- Start with a creamy, opaque base coat in warm white or pale ivory
- Use a thin striping brush or even a fine-point eyeliner to draw black lines
- Keep lines thin (think hair-thin, not marker-thick) for maximum impact
- Work slowly—rushing is what creates wobbly lines
- Seal with a glossy top coat
- If black lines feel too stark, try dark brown or charcoal for slightly softer contrast while maintaining definition
Insider note: The imperfect, slightly hand-drawn quality of lines that aren’t perfectly straight actually adds to the artistic, intentional feel—perfection can sometimes read as less sophisticated than controlled imperfection.
8. Classic Red with Glossy Finish
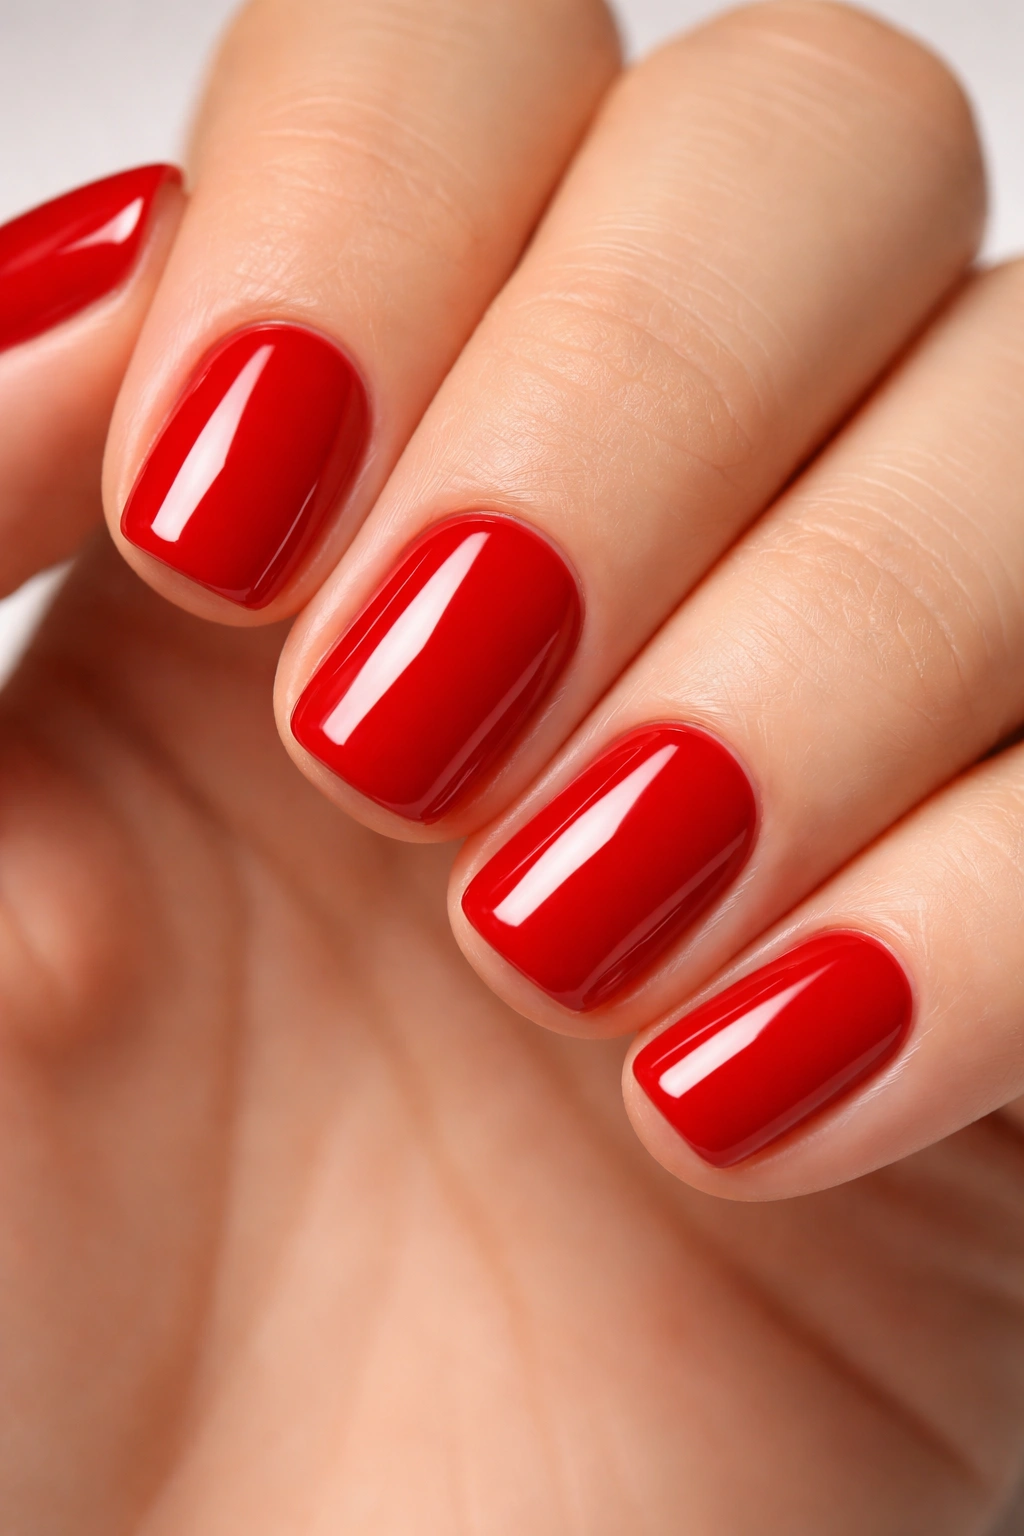
Classic true red on short squoval nails is timeless for a reason—it’s flattering, sophisticated, and immediately catches attention. The glossy finish enhances the depth of the red while maintaining an elegant rather than bold aesthetic. Red photographs beautifully and works for virtually every occasion from professional settings to evening events, and it’s universally flattering across every skin tone when you choose the right undertone.
Choosing the Right Red Undertone
Not all reds are created equal. Reds with blue undertones look crisp and cool, flattering fair and olive skin tones. Reds with orange undertones feel warmer and more vibrant, working beautifully on deeper skin tones. The key is choosing a red that harmonizes with your natural coloring rather than fighting against it.
Applying Red Flawlessly
- Use a base coat to prevent staining—red pigment can deposit into your nail and create permanent discoloration
- Apply thin, even coats rather than one heavy coat—red polish is often streaky and benefits from layering
- Most reds need 3-4 thin coats to achieve true, opaque color
- Use a quality top coat to protect your manicure and maintain that glossy shine
- Clean up any polish that gets on your cuticles immediately rather than after it dries
Pro tip: Red polish chips more noticeably than darker colors, so if longevity matters to you, invest in a high-quality gel-based formula or a long-wear traditional polish with a hardening top coat.
9. Nude with Thin Silver Outline
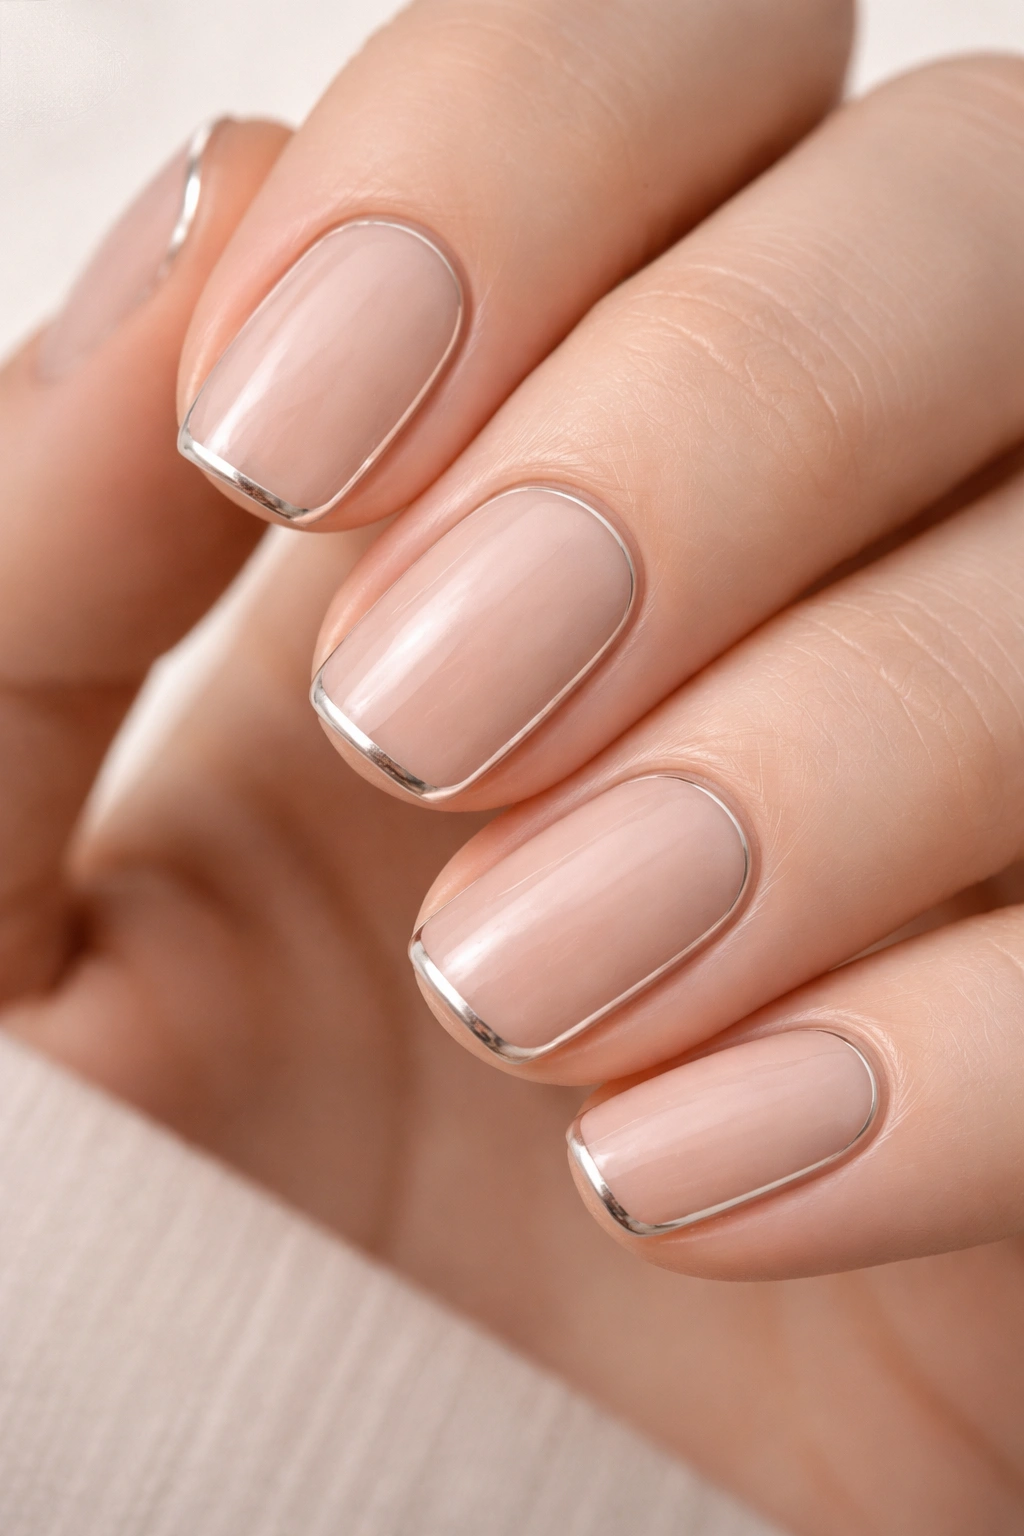
A neutral nude base becomes graphic and contemporary when you add a thin silver outline around the entire perimeter of each nail. This negative space technique makes your nail shape become part of the design itself rather than just the canvas. Short squoval nails look particularly striking with this approach because the outlined silhouette emphasizes the shape that makes squovals so flattering.
Why Outlined Nails Feel So Modern
Outlined designs play with negative space and create an almost architectural quality. The thin line draws attention to the nail shape itself—the entire point of choosing squovals in the first place. This look works for artistic people who appreciate minimalism and thoughtful design without needing bold color or patterns to make an impact.
Creating a Clean Outline
- Paint your nude base and allow it to cure completely
- Use a very thin striping brush or even a thin eyeliner brush to outline the perimeter
- Work slowly, using the edge of the nail as your guide
- You can outline right on the edge or create the line very slightly inside the edge for a more graphic effect
- Seal with a top coat to prevent the silver from chipping
- If you mess up the outline, it’s easy to clean up with a cotton swab and nail polish remover before the outline fully sets
Worth knowing: The outline doesn’t have to be perfectly smooth—slight irregularities actually add to the hand-drawn, artistic quality of the design.
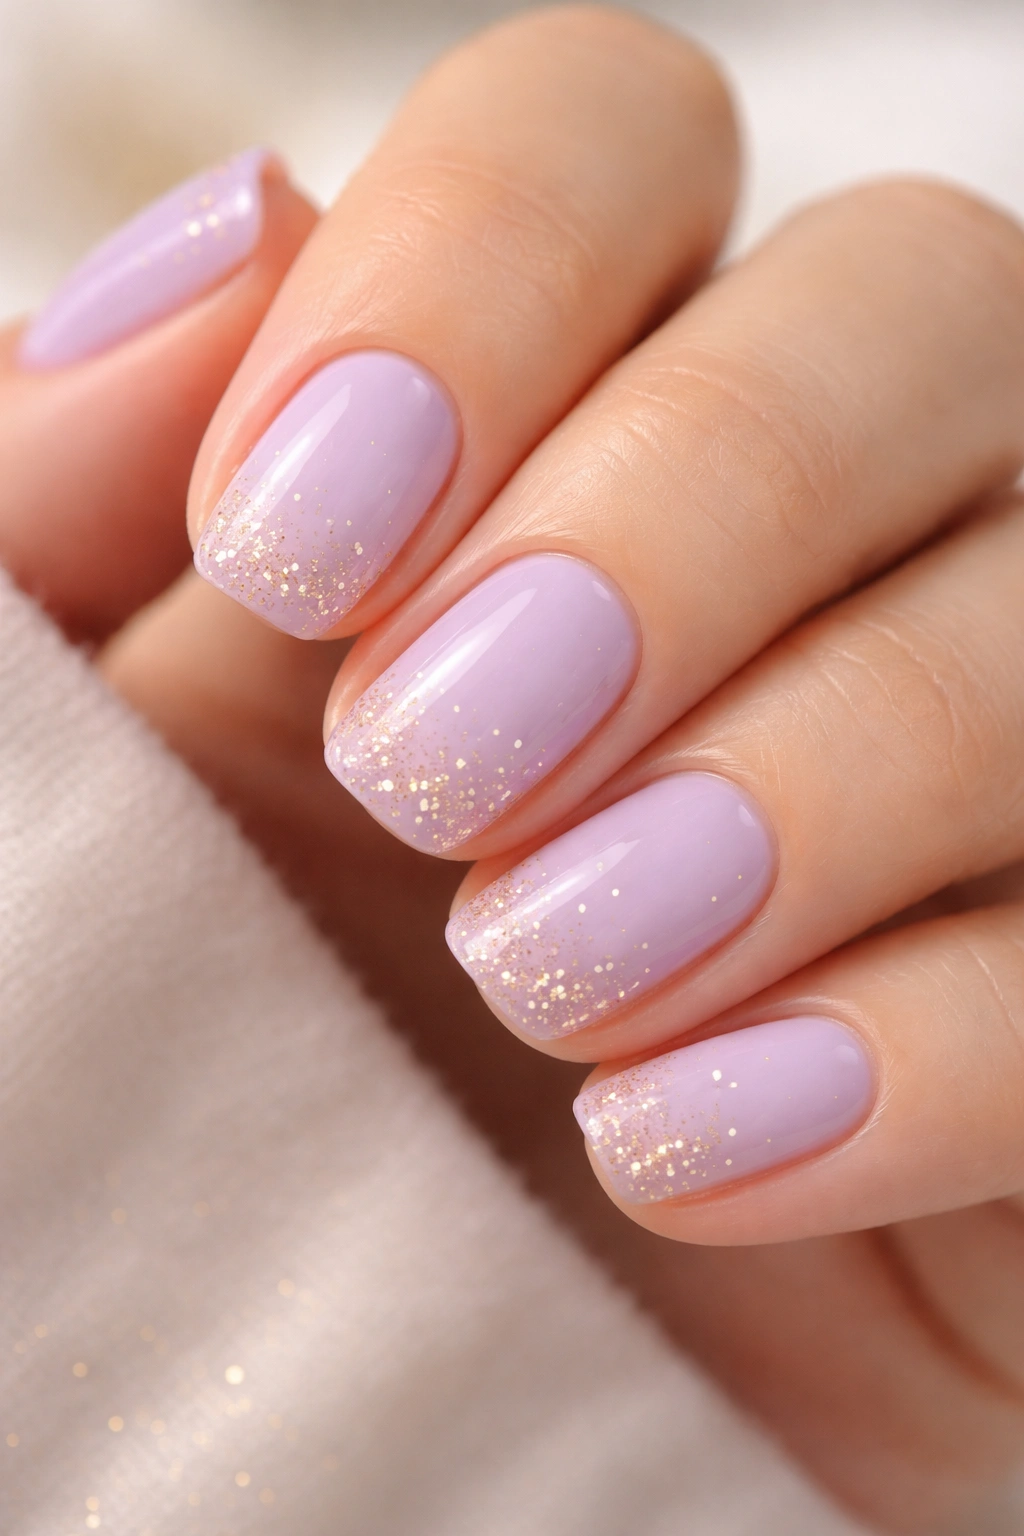
10. Soft Lavender with Subtle Sparkle
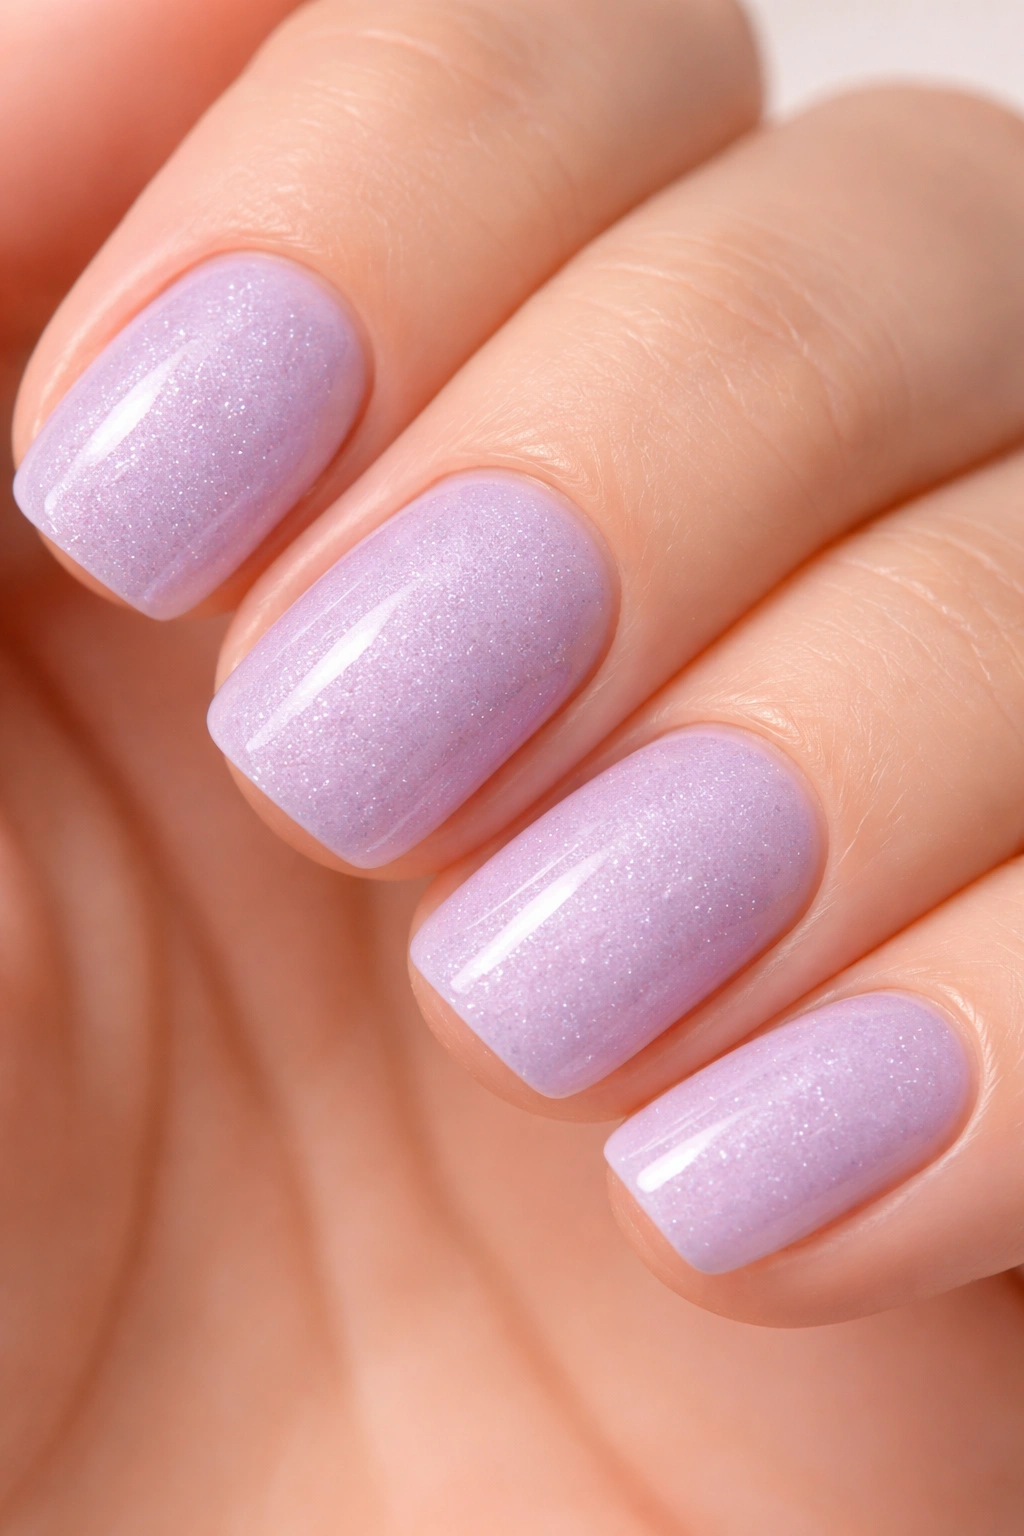
Soft lavender squoval nails with fine sparkle create an ethereal, feminine look that reads as both refined and slightly romantic. The sparkle should be subtle—not chunky glitter but fine, delicate shimmer that catches light without overwhelming the nail. Lavender is universally flattering, works across skin tones, and the addition of sparkle elevates it from basic to special-occasion-worthy.
Creating the Perfect Subtle Sparkle Effect
Sparkle on nails can easily veer into costume territory if you’re not deliberate about execution. Fine glitter particles suspended throughout the polish, or a sheer sparkle top coat over solid lavender, creates the sophistication you’re after. The key is restraint—coverage that catches light but doesn’t obscure your base color.
Steps for Sparkling Lavender
- Apply soft lavender as your base—two thin coats create better coverage than one thick coat
- For built-in sparkle polish: apply a clear top coat with fine glitter mixed throughout, or use a commercial sparkle top coat
- For custom sparkle: apply a clear gel base, sprinkle fine glitter while the gel is still sticky, and seal with a top coat
- Only apply sparkle to the entire nail if you want maximum shimmer—applying it to just the tips creates a subtle effect
- Use a high-quality top coat to prevent glitter from shifting or peeling
Pro tip: Lavender photographs beautifully under most lighting, so this is a great choice if you enjoy taking nail photos.
11. Chocolate Brown with Cream Accent Nail
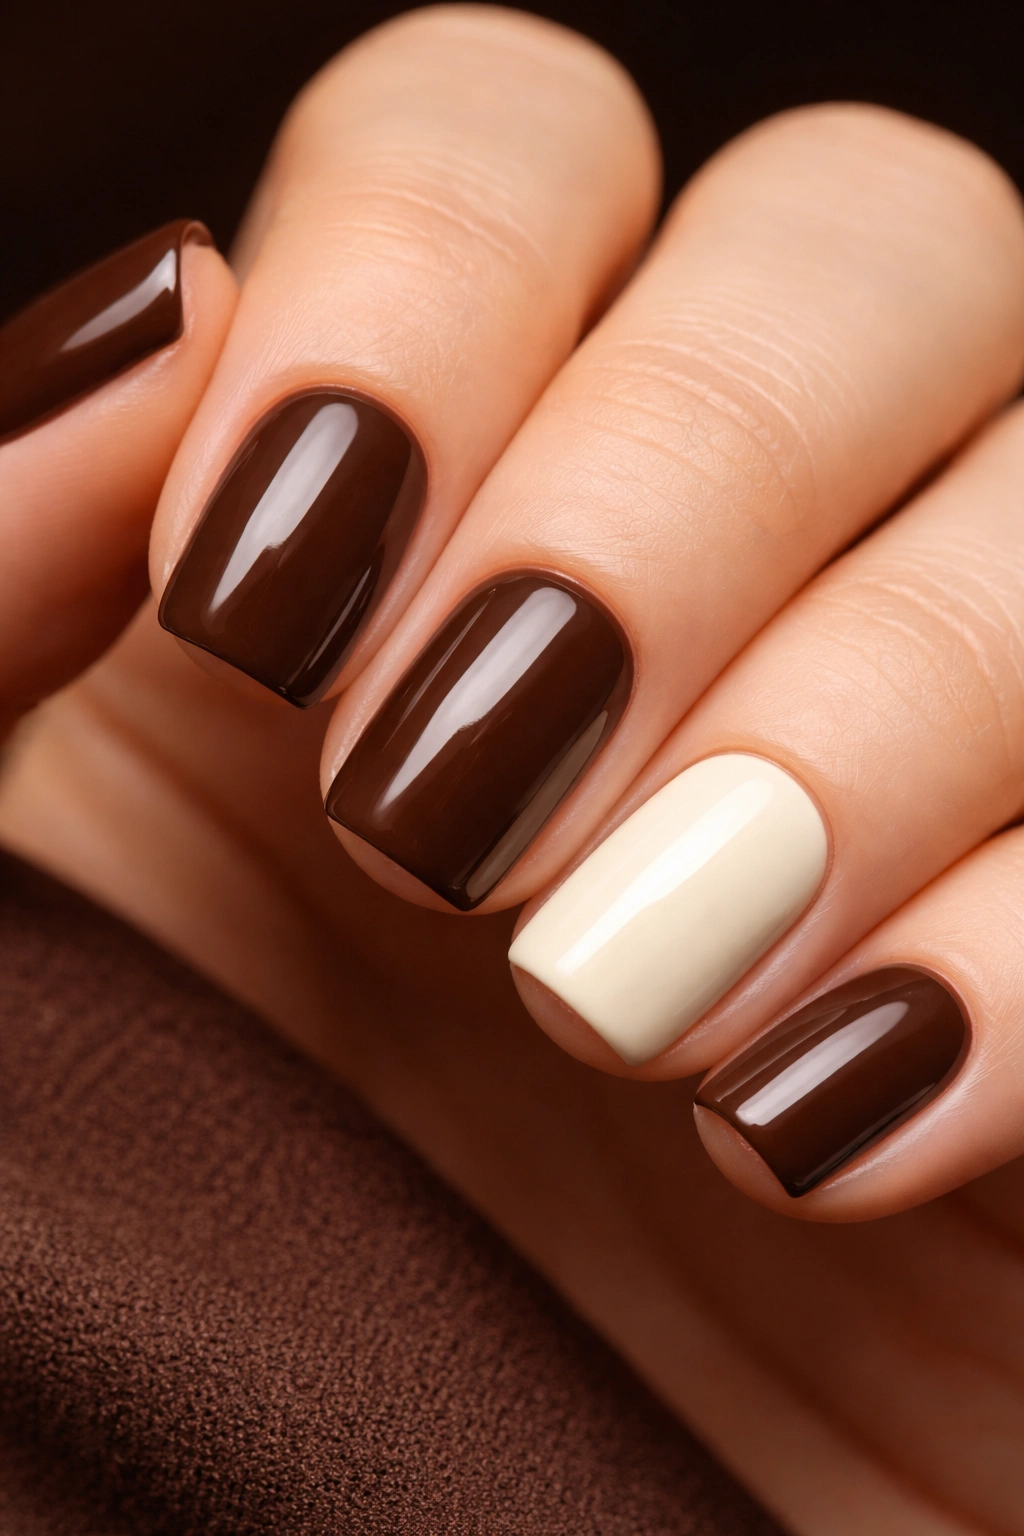
Deep chocolate brown squoval nails with one accent nail in soft cream create sophisticated contrast without being loud or demanding. The brown acts as a neutral statement color while the cream accent adds visual interest and breaks up the monotony. This color combination works beautifully on all skin tones, though it’s particularly striking on medium to deeper skin tones where chocolate brown becomes truly rich and luminous.
Why Brown-and-Cream Combinations Feel Luxe
Chocolate brown reads as sophisticated and intentional—it’s not a color people choose by accident. Pairing it with cream creates a high-end, almost editorial aesthetic. The contrast is strong enough to be striking but neutral enough that it works in professional settings. This combination bridges the gap between completely neutral nails and nails that make a clear design statement.
Styling the Brown-and-Cream Look
- Paint all nails in chocolate brown first—use 2-3 thin coats for opaque coverage
- Choose your accent nail (ring finger, pinky, or even your dominant hand’s middle finger)
- Paint the accent nail in soft cream, creating a clean transition without trying to blend them
- A glossy top coat on both colors creates a cohesive, finished look
- For added interest, you can add a thin chocolate line on the cream accent nail, or keep it completely clean and simple
Insider note: If you like this color combination but want more visual interest, you can substitute the cream accent nail with fine white striping or subtle cream polka dots on the chocolate brown for a slightly busier version of the same idea.
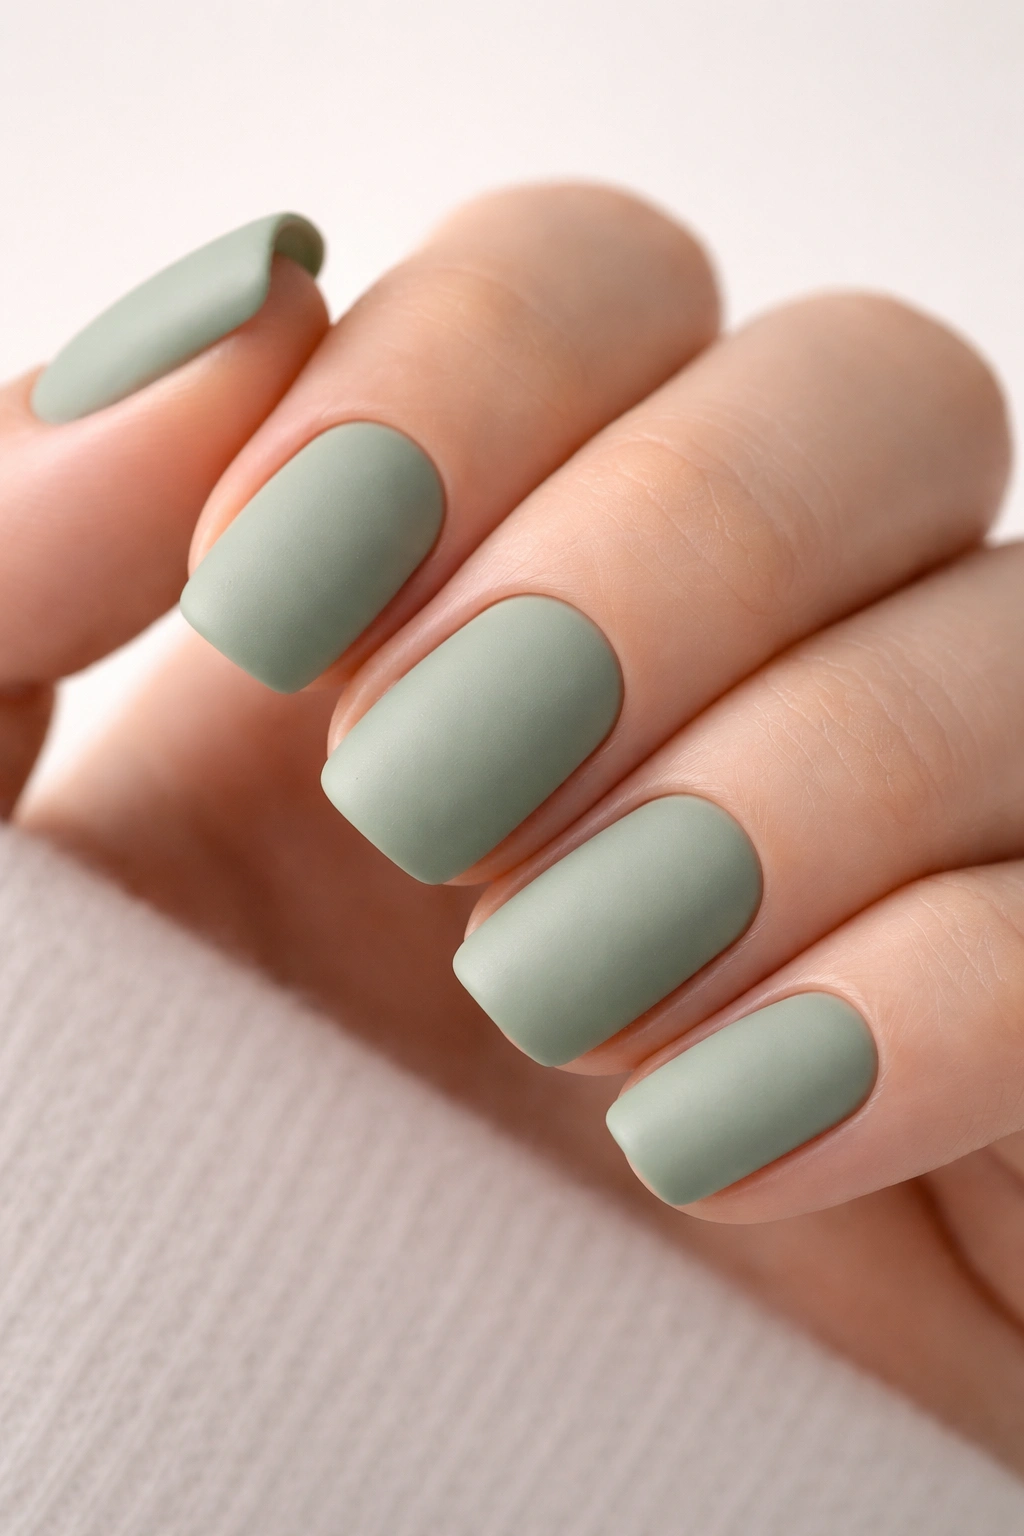
12. Soft Sage with Matte Finish
Matte sage green on short squoval nails creates a calming, contemporary look that feels artistic without being loud. Sage is complex enough that it reads as intentional rather than basic, while the matte finish adds a modern, velvety quality. This is a color that works beautifully during all seasons and pairs well with virtually every outfit in your wardrobe, making it incredibly practical despite feeling special.
Understanding Sage as a Sophisticated Color Choice
Sage sits in that sweet spot between green and gray, making it more subdued than true greens while maintaining the calming qualities that make green so appealing. The matte finish prevents it from looking overly shiny or costume-like, instead creating an understated elegance. On short squoval nails, matte sage feels very current without being trend-dependent in a way that will date the look.
Achieving Perfect Matte Sage
- Start with a base coat to protect your natural nails
- Apply sage polish in 2-3 thin coats for even coverage (matte polishes often need more layers than glossy ones)
- You can use a matte polish formula, or apply a high-quality matte top coat over glossy sage
- Make sure your top coat is truly matte—some finishes claim to be matte but have a slight sheen
- Matte finishes show fingerprints and dust more than glossy ones, so clean your nails regularly if this bothers you
Pro tip: If you love matte sage but find the finish too low-shine for your taste, try a satin finish top coat instead—it’s more durable and still maintains that soft, velvety aesthetic while showing less fingerprints.
13. Blush Pink with Tiny White Dots
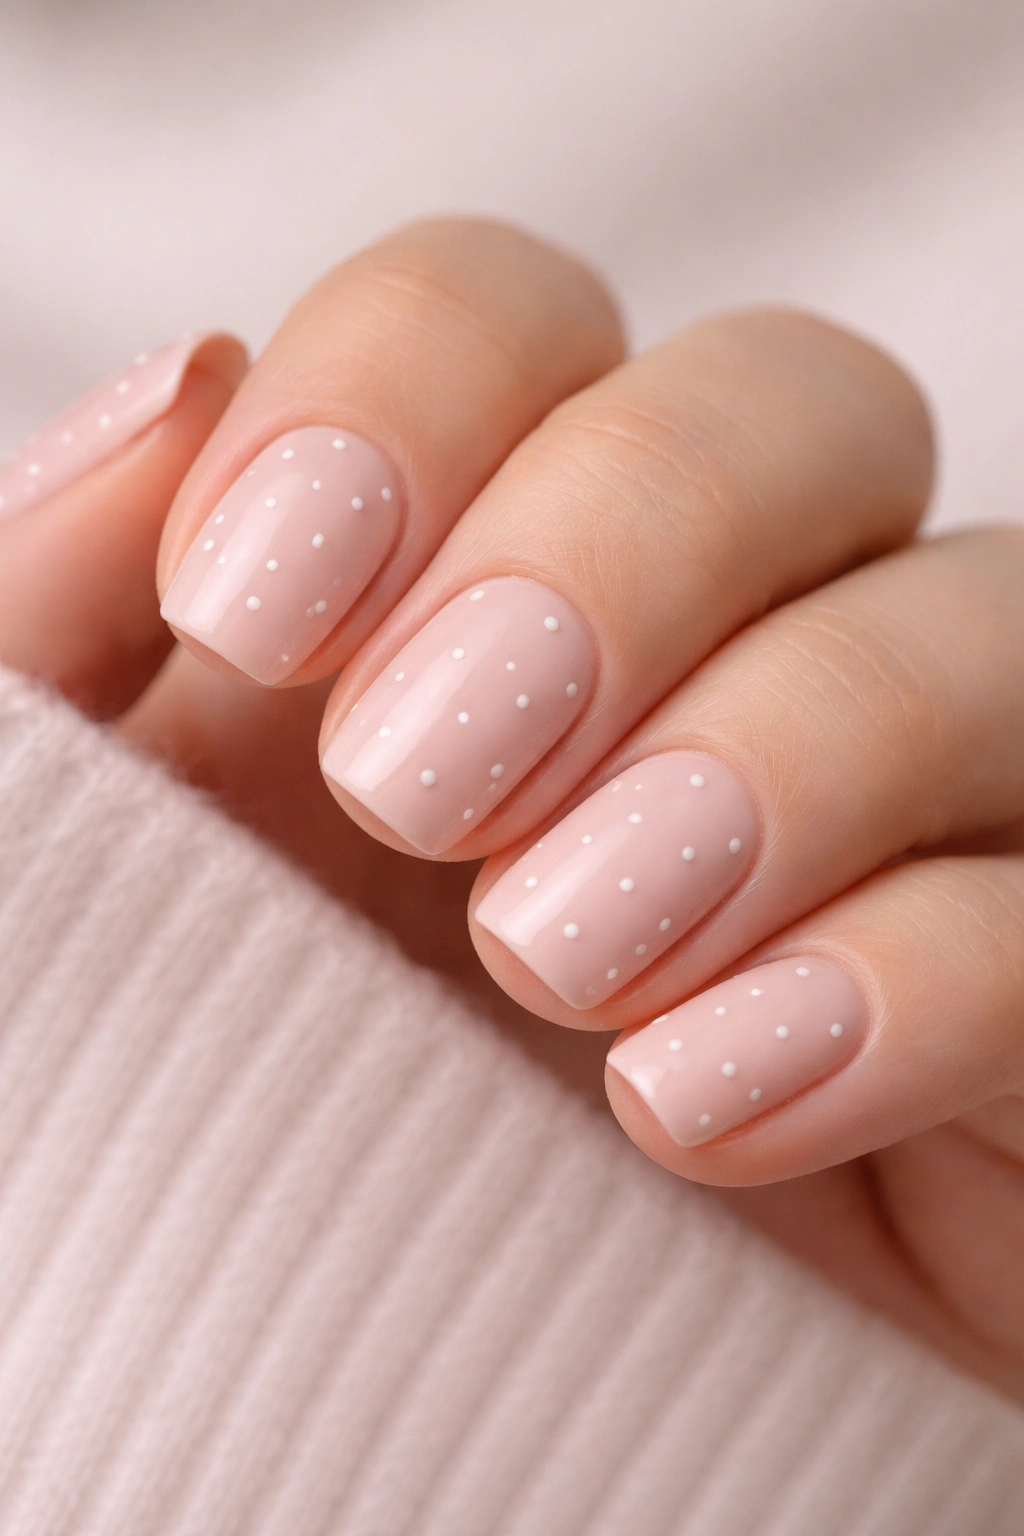
Soft blush pink squoval nails dotted with tiny white dots create a delicate, playful aesthetic that reads as both sophisticated and approachable. The dots should be small enough that they feel refined rather than childish—think sprinkled rather than clustered. This look works beautifully for people who want some personality in their nail design without committing to bold colors or complex patterns.
Creating Precise Dot Placement
Perfect dots require a very specific tool and technique. Rather than trying to apply dots free-hand, using a dotting tool or even a toothpick dipped in white polish creates much more consistent, professional-looking results. The size of your dots matters—tiny is more sophisticated than large and cartoonish.
Steps for Perfect Polka Dots
- Apply blush pink as your base in 2-3 thin coats
- Use a dotting tool (or a toothpick, bobby pin head, or even the end of a small paintbrush handle) dipped in white polish
- For consistent dots, stamp each dot using slight twisting pressure rather than dragging the tool across the nail
- Space dots randomly but not too densely—the nail should still feel mostly like solid blush pink with decorative dots
- Place more dots toward the center and tips of the nail for visual balance
- Seal with a glossy top coat to protect the dots and create a smooth, finished appearance
Worth knowing: Dots created with a dotting tool often look slightly raised on the nail, which adds dimension and makes them look more intentional than if you were to paint them flat.
14. Pale Yellow with Subtle Gradient
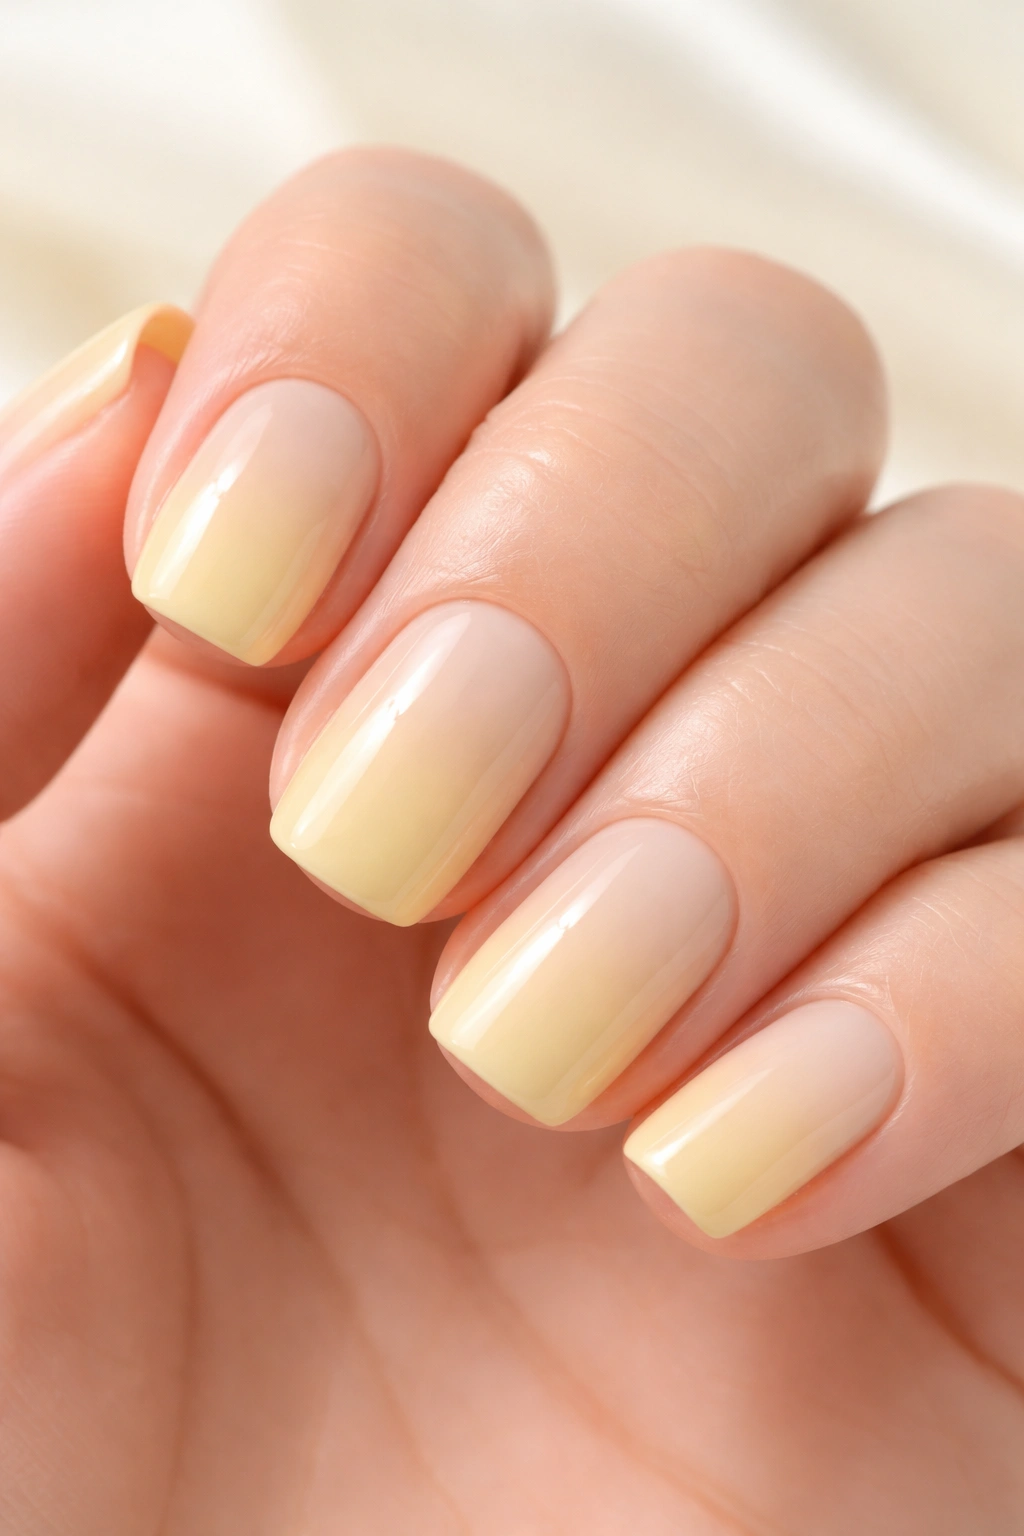
Pale yellow squoval nails fading slightly deeper toward the tips create a luminous, cheerful look that feels sophisticated rather than childish. The gradient is so subtle that it reads more as dimension and depth than as a bold design choice. Yellow works surprisingly well on nearly every skin tone when you choose pale rather than neon or mustard versions, and the subtle gradient adds complexity that makes this look feel more designer than basic.
Why Pale Yellow Works as a Neutral
Yellow gets dismissed as difficult or impractical, but pale versions have a sophisticated warmth that reads as intentional and flattering. The gradient technique prevents the color from feeling flat, instead creating the illusion of length and shape. This is an underrated choice that feels fresh and uplifting without being attention-demanding.
Creating a Subtle Yellow Gradient
- Start with pale yellow as your base color across the entire nail
- Load a makeup sponge with a slightly deeper golden yellow
- Gently dab the sponge onto just the tips of your nails, creating a soft transition to the deeper yellow
- Blend lightly with a clean, slightly damp sponge to soften the transition
- Seal with a glossy top coat
- The gradient should be so subtle that from a distance it appears as a single pale yellow, while close inspection reveals the depth
Pro tip: If sponge blending feels too imprecise, you can achieve a similar effect using yellow ombre powder on a gel base, which creates a more controlled gradient.
15. Deep Navy with White Striping
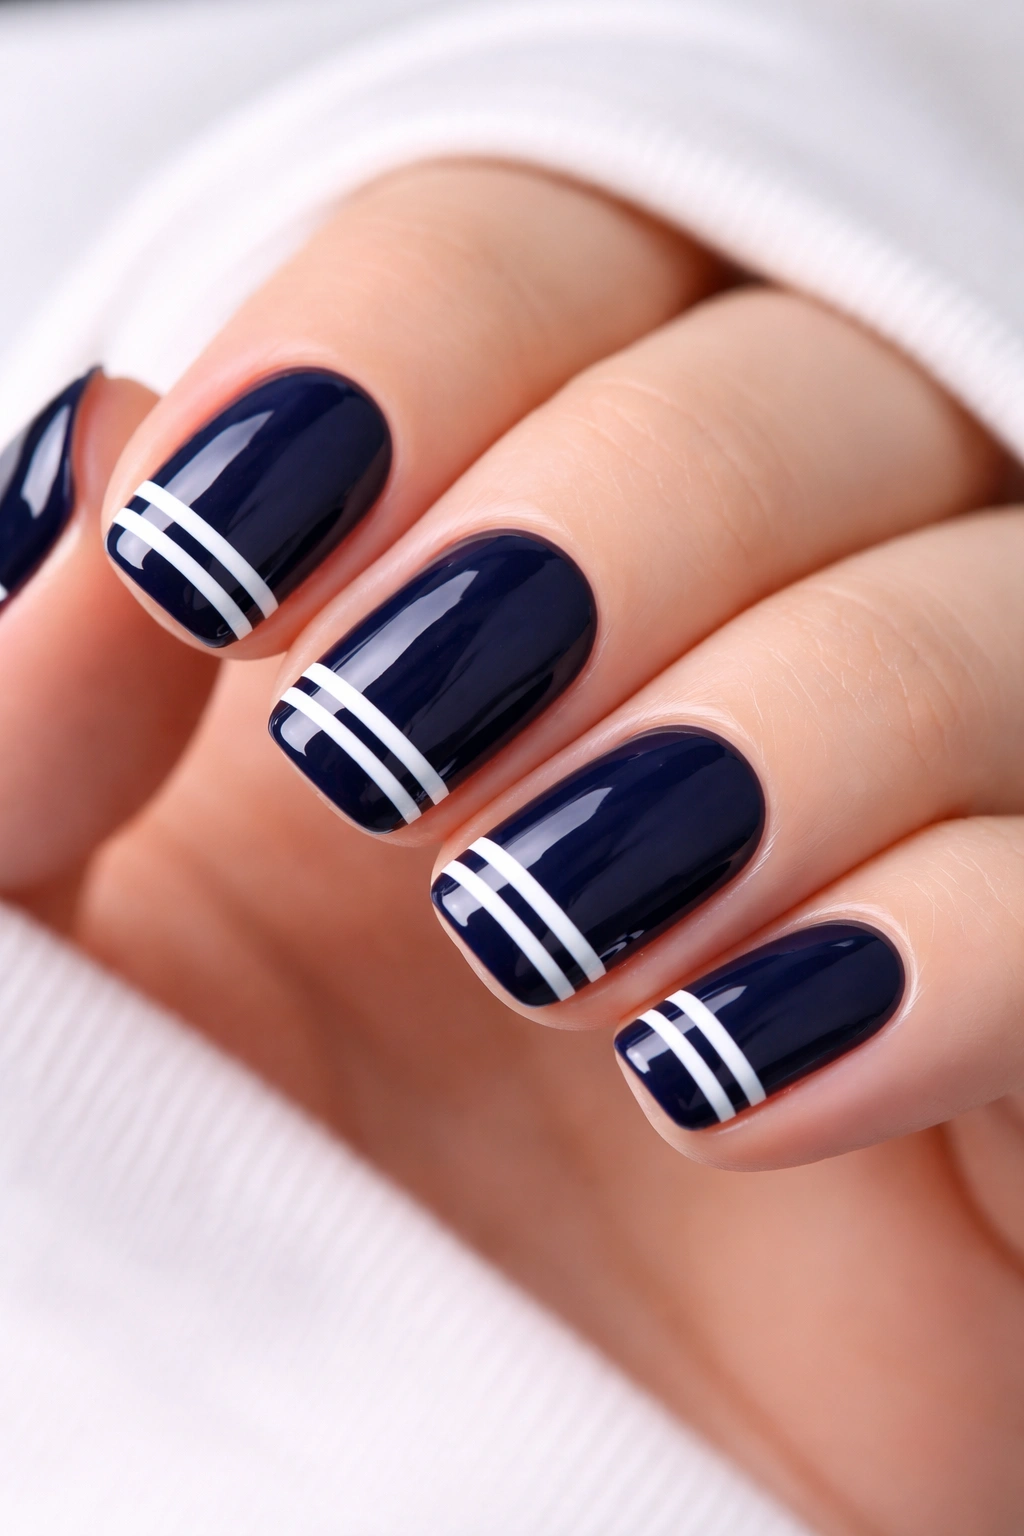
Deep navy blue squoval nails with clean white striping create an instantly pulled-together, nautical-inspired look that’s both classic and contemporary. The stripes can be thin and delicate or bolder, depending on your preference, but thin works better with short squoval nails to prevent the design from overwhelming the shape. Navy and white is a color combination that never dates itself and works for virtually every occasion.
Understanding the Appeal of Navy and White
Navy is one of the most versatile nail colors—it reads as professional, it works with every outfit, and it’s flattering on every skin tone. Adding white striping elevates it from solid color to a considered design without becoming costume-like or overly busy. The contrast between navy and white creates visual impact while remaining completely wearable.
Executing Navy with White Stripes
- Paint deep navy as your base in 2-3 thin coats for opaque, glossy coverage
- Use a thin striping brush and white polish to create your stripes
- Thin horizontal stripes create a sophisticated look, while vertical stripes feel more graphic
- You can do full-nail stripes or stripes only on the tips for a more subtle effect
- Spacing matters—evenly spaced stripes look more intentional than random placement
- Seal with a high-quality glossy top coat to prevent the white from yellowing or chipping
Insider note: If painting perfect stripes feels intimidating, thin navy and white striped nail tape applied over a glossy navy base creates the same effect with zero freehand brush work required.
16. Soft Coral with Matte Finish
Matte soft coral on short squoval nails creates a modern, artistic look that photographs beautifully and feels appropriate for most occasions. Coral in matte finish loses any potential sweetness or beachy associations it might have in glossy form, instead reading as intentional and sophisticated. The warmth of coral works beautifully on warm and medium skin tones, while the matte finish ensures it never looks overly casual.
Why Matte Coral Feels Elevated
Glossy coral can feel summery and casual, but switch to matte and the entire impression shifts toward contemporary artistic. Matte finishes add a velvety quality that makes the color feel more expensive and thoughtfully chosen. On short squoval nails, matte coral creates an intentional, almost editorial aesthetic that suggests the wearer has deliberate taste.
Creating Flawless Matte Coral
- Apply a base coat to protect your nails
- Use coral polish formulated for matte finish, or apply glossy coral with a matte top coat
- Build color with 2-3 thin coats rather than one heavy coat
- Matte finishes show application imperfections more than glossy ones, so apply carefully
- A true matte top coat is critical—some products claim matte but maintain slight sheen
- Plan for regular maintenance as matte finishes show dust and fingerprints more than glossy ones
Pro tip: Pair matte coral with white or cream separators on a glossy base if you want some dimension without committing fully to matte across all nails.
17. Champagne with Gold Fleck Sparkle
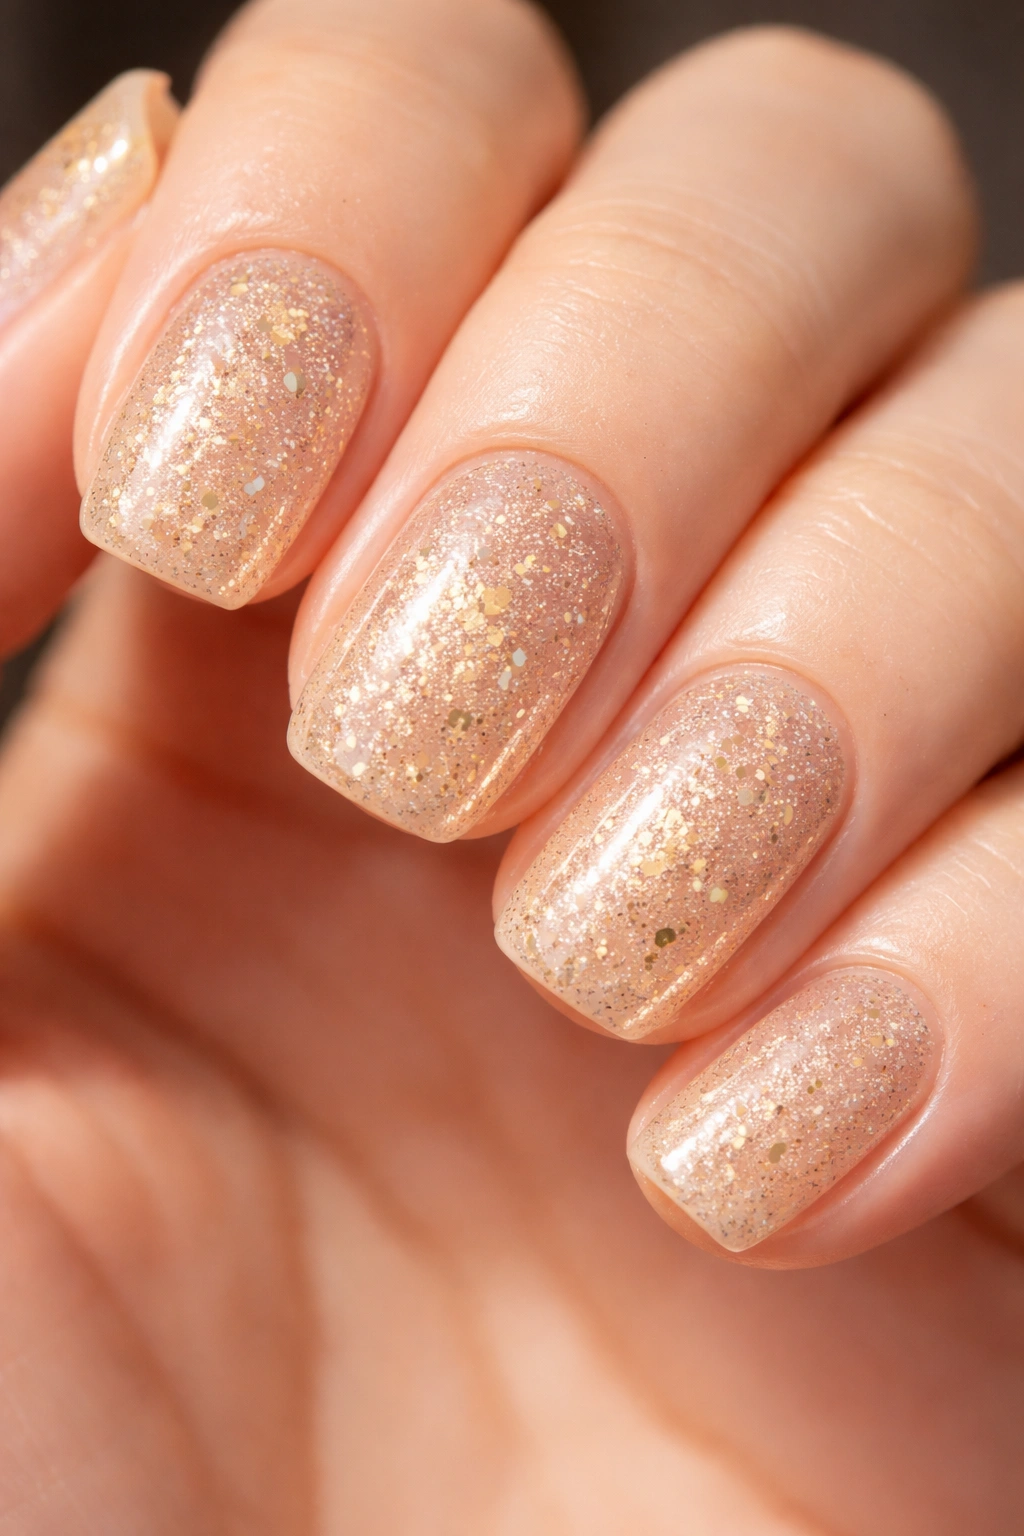
Champagne-colored squoval nails with champagne-colored fleck sparkle create a glamorous, sophisticated look that’s subtle enough for everyday wear but sparkly enough for special occasions. The shimmer and sparkle are built into the color itself rather than overlaid on top, which prevents the look from reading as costume-like. Champagne works beautifully on all skin tones and coordinates with virtually every outfit imaginable.
Why Champagne Is Such a Versatile Choice
Champagne isn’t quite pink, isn’t quite gold, and isn’t quite neutral—it’s this magical in-between that works with everything. The fleck sparkle adds dimension and catches light beautifully without being chunky or heavy. On short squoval nails, champagne creates an instantly polished aesthetic that reads as expensive and intentional.
Achieving Champagne with Sparkle
- Use a champagne gel polish or traditional polish with fleck sparkle already incorporated
- If you’re customizing, start with a sheer champagne base and layer with a sparkle top coat
- Build color with thin coats to prevent the champagne from appearing too opaque and flat
- A high-quality glossy top coat enhances the sparkle and creates a smooth, glass-like finish
- The fleck sparkle should be visible but not overwhelming—the champagne base color should always be the dominant visual
Worth knowing: Champagne sparkle polish is incredibly forgiving because the sparkle catches light and distracts from any imperfections in your application.
18. Forest Green with Glossy Finish
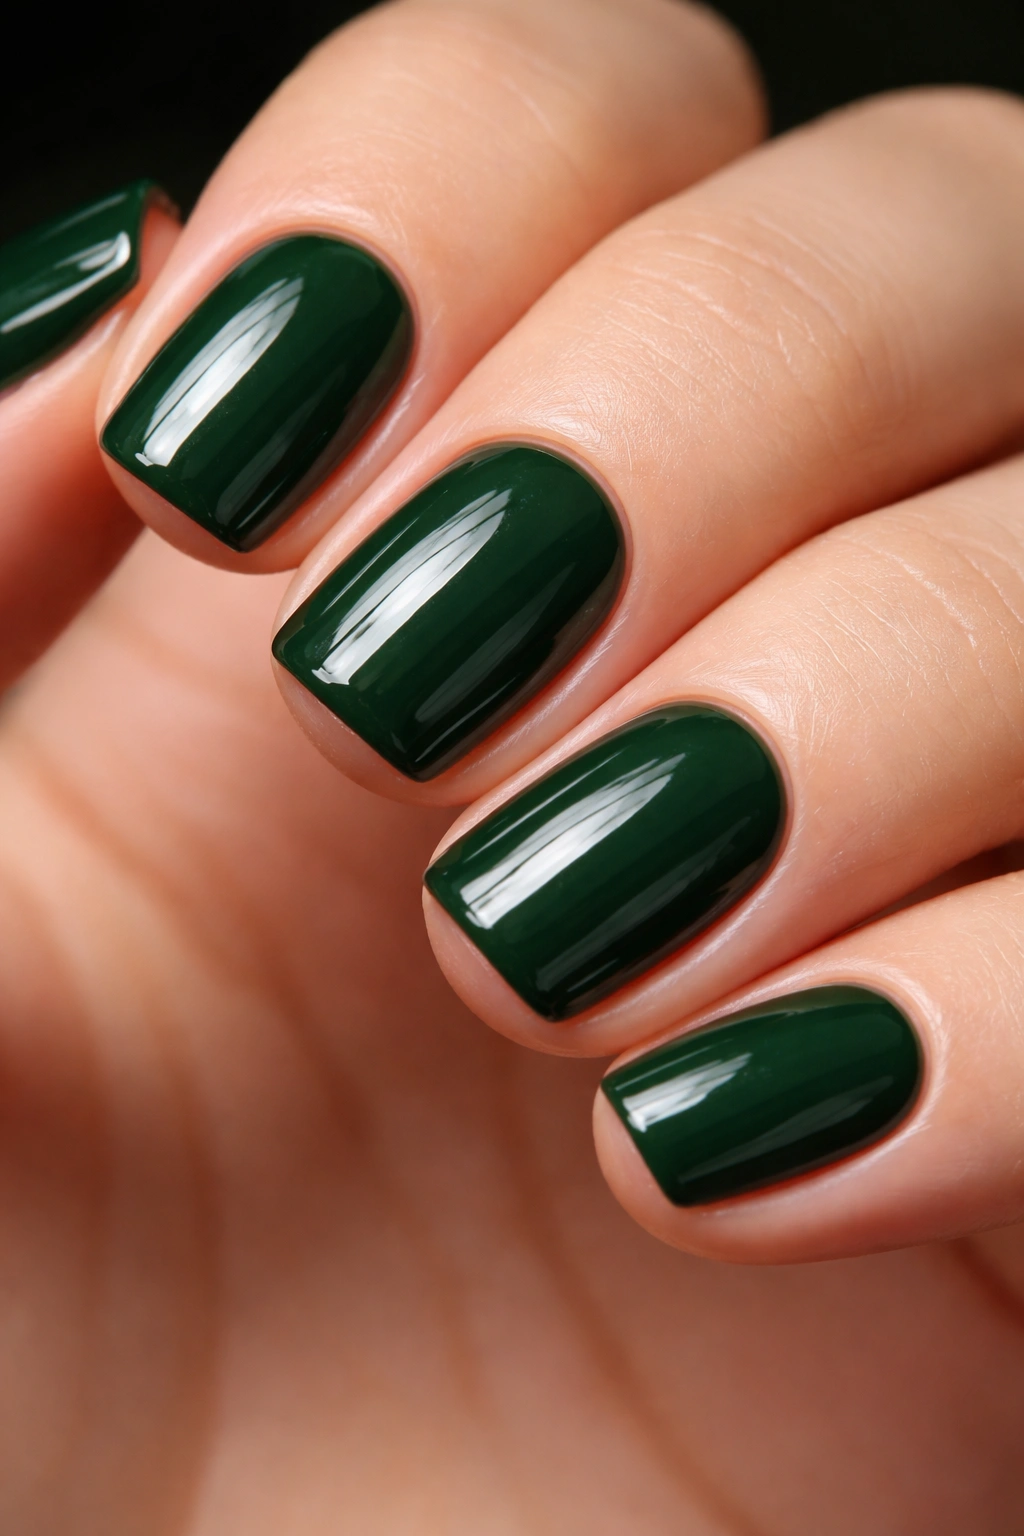
Deep forest green squoval nails in glossy finish create an elegant, nature-inspired look that reads as both sophisticated and grounding. Forest green is richer and more complex than brighter greens, making it feel more grown-up and intentional. This color works beautifully on deeper and medium skin tones, where the richness truly shines, and the glossy finish ensures maximum depth and dimension.
Understanding Forest Green’s Appeal
Forest green sits in that sophisticated realm where color communicates intention and taste rather than accident. It’s not a color people choose lightly—it’s a deliberate statement that you have a considered aesthetic. The glossy finish enhances the richness of the color while maintaining a classic elegance rather than trendy aesthetic.
Perfecting Forest Green Polish
- Start with a base coat to prevent staining
- Apply forest green in 2-3 thin coats, as green pigments often need building for opaque coverage
- A high-quality glossy top coat deepens the color further and creates a glass-like finish
- Forest green shows brushstrokes and application imperfections, so apply slowly and carefully
- This color remains beautiful on short nails because the richness of the color is the statement, not length or design
Pro tip: If forest green feels too bold as a full manicure, try it as an accent nail against a neutral base for the same sophisticated aesthetic with less commitment.
19. Pale Pink with Hand-Painted Minimalist Line Art
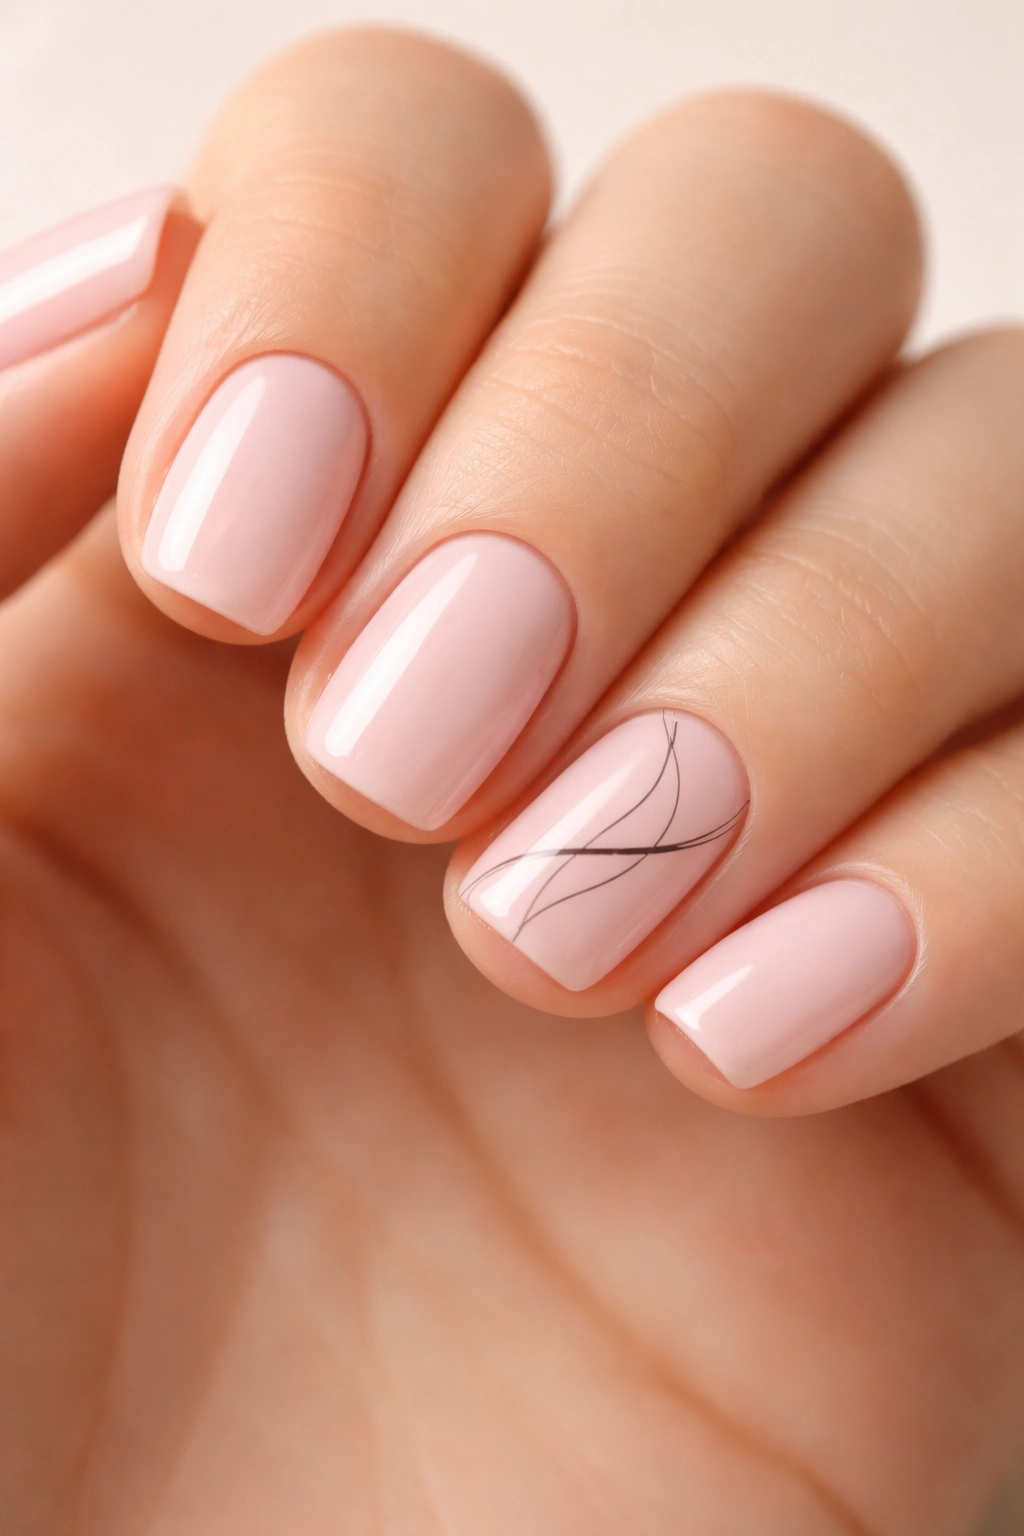
Soft pale pink squoval nails become artistic and intentional when you add minimal line art—perhaps a simple curved line, a geometric shape, or even a tiny abstract design on one or two nails. Hand-painted line art on a pale pink base creates an artistic aesthetic that celebrates the relationship between the nude base and the minimal design. This look works beautifully for creative people who want their nails to reflect artistic sensibility without being loud.
What Makes Hand-Painted Art Special
Hand-painted details have an inherently sophisticated quality—the slight variations that make them imperfect actually enhance their artistic credibility. On pale pink, minimal line art becomes the focal point without overwhelming the overall look. The combination reads as creative and intentional rather than complicated or overdone.
Executing Minimal Line Art
- Paint your pale pink base in 2-3 thin coats and allow it to cure completely
- Use a very thin brush and your line art medium of choice (gel or acrylic paint works beautifully)
- Keep designs truly minimal—a few lines are more striking than a fully rendered image
- Place line art slightly off-center or on the upper third of the nail for the most flattering placement
- Abstract or geometric designs are more forgiving than realistic art if your hand-painting skills are still developing
- Seal with a thick glossy top coat to protect your artwork
Insider note: The slight irregularities in hand-painted art actually add authenticity and artistic credibility—perfection can sometimes make nail art look less sophisticated than controlled imperfection.
20. Warm Beige with Subtle Brown Shadow
Warm beige squoval nails with subtle brown shadow at the base create depth and dimension without being obvious about it. This neutral approach works beautifully for people who want their nails to complement rather than command attention. The color combination is so subtle that from a distance the nails appear as solid warm beige, while closer inspection reveals the thoughtful shading underneath.
Why Subtle Shading Creates Visual Interest
Shading tricks your eye into perceiving depth that wouldn’t otherwise exist on a flat nail surface. The brown shadow makes the beige appear more dimensional while maintaining the overall neutral aesthetic. This technique is perfect for people who appreciate subtle sophistication over bold design statements.
Creating the Beige-to-Brown Gradient
- Paint warm beige as your base across all nails
- Use a makeup sponge or small brush loaded with a warmer, darker brown shade
- Apply the brown very lightly to just the base area of the nail, creating a shadow effect
- Blend the brown into the beige using a clean, damp sponge
- The transition should be so gradual that it reads as depth rather than a two-color design
- Seal with a glossy top coat to create a smooth, unified appearance
Pro tip: If blending feels too tricky, apply a very thin line of brown at the base and allow it to fade naturally as you move toward the tip—this creates a similar depth effect with less precision required.
21. Bright Red with Black Matte Tips
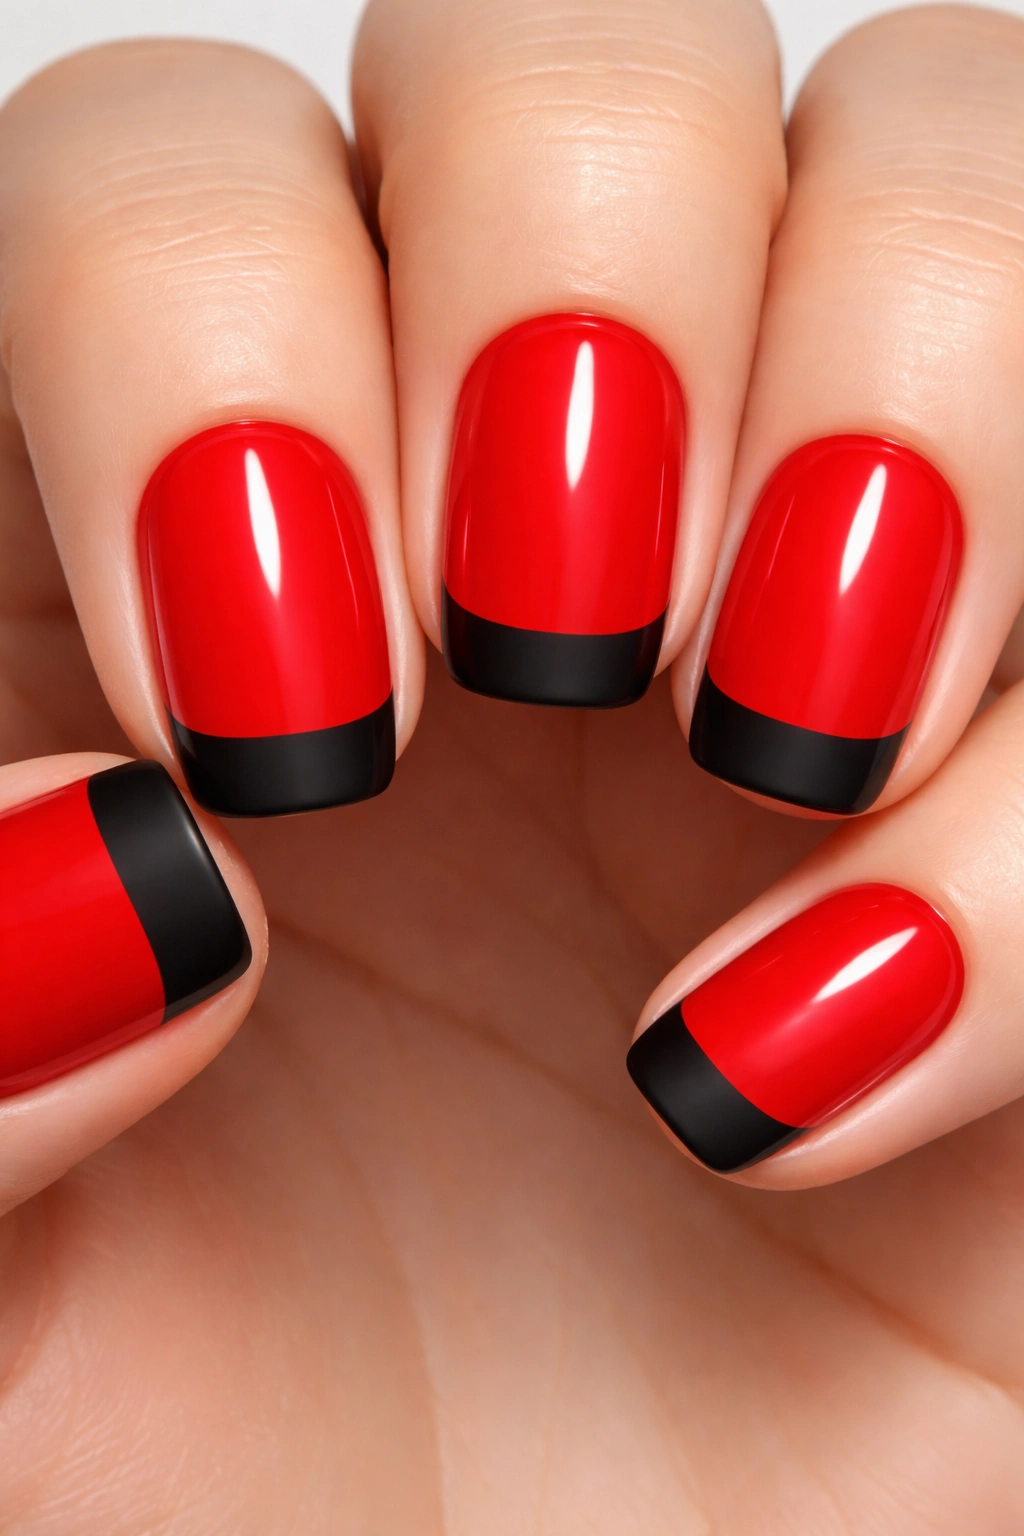
Classic red squoval nails with matte black tips create a striking, graphic look that feels both trendy and timeless. The color-blocking creates visual interest and makes the nail shape even more prominent. This design works beautifully for people who want to make a statement with their nails without committing to full bold color, and the combination is fresh enough to feel current without being trend-dependent.
Why Color-Blocking Works on Short Nails
Color-blocking draws attention to the shapes and lines of your nails, making short squovals feel intentional and designed. The contrast between glossy red and matte black creates visual drama that works for professional settings, events, and everyday wear when you want your nails to make an impression.
Executing Red with Matte Black Tips
- Apply glossy red as your base color across the entire nail
- Use a thin brush or nail tape to create a clean line separating the red from where the black will go
- Apply matte black to the tips, starting at your imaginary line and extending to the edge
- The line between red and black should be as clean and sharp as possible
- Use nail guides or tape to keep your line perfect if freehand feels too challenging
- A glossy top coat on the red and separate matte top coat on the black creates texture contrast
Worth knowing: The placement of your color block (how much of the tip is black versus red) affects the overall visual impact—more black creates a bolder look, while more red maintains emphasis on the red color.
22. Pale Blue with Glossy Finish
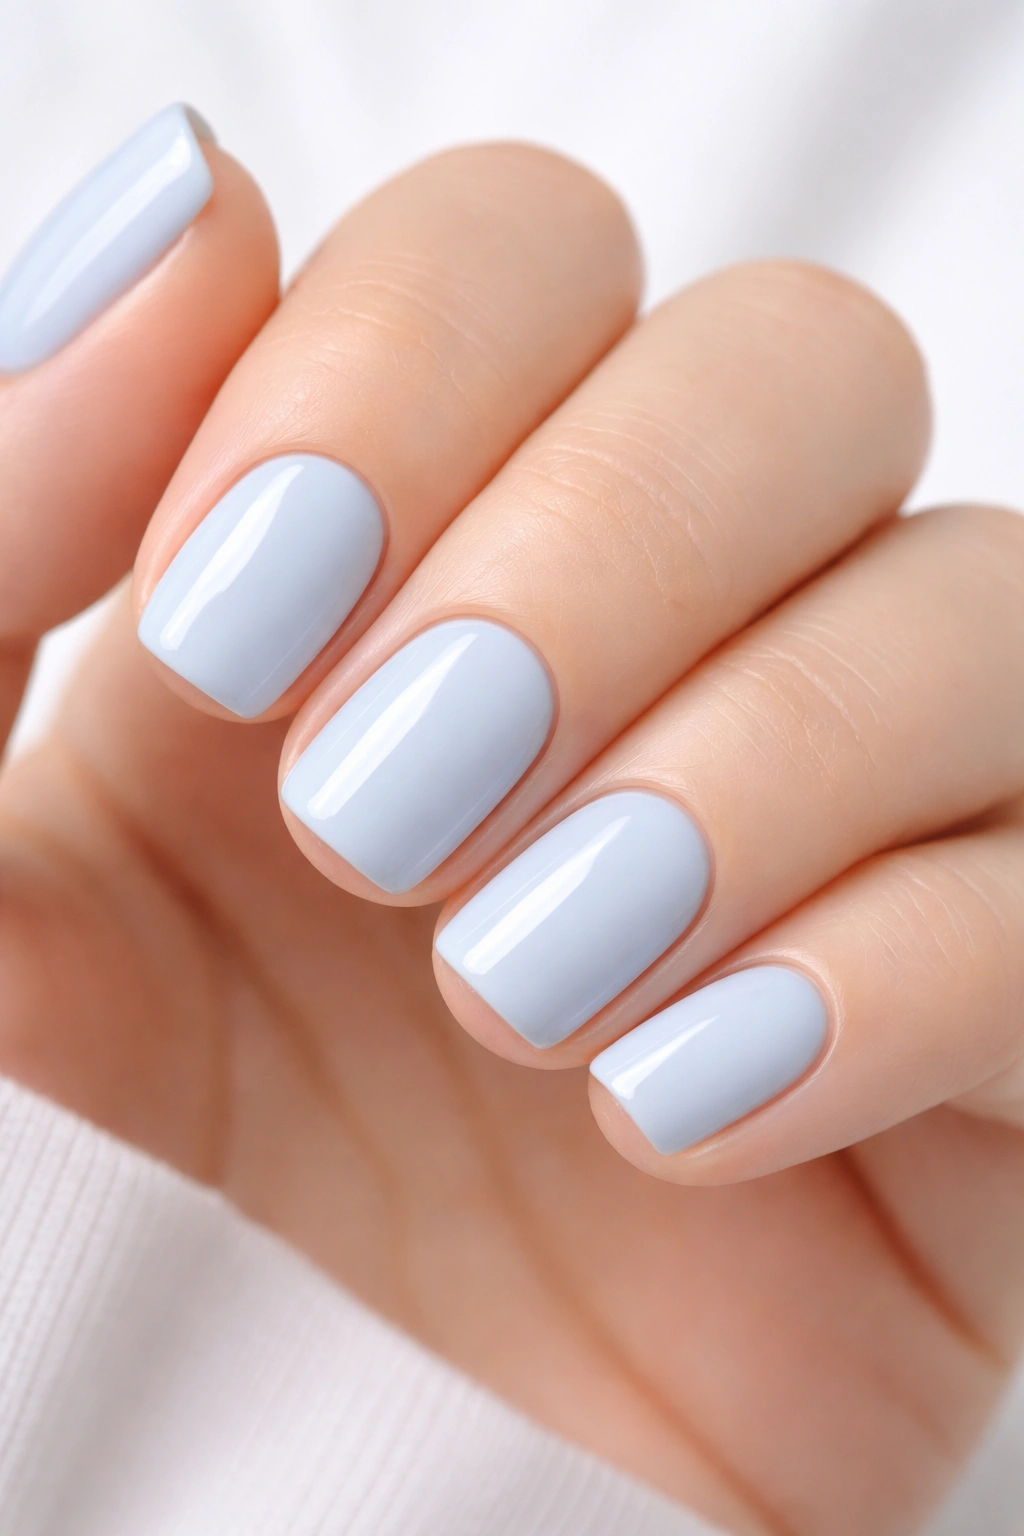
Soft pale blue squoval nails in glossy finish create a serene, calming aesthetic that remains completely wearable and appropriate for virtually every occasion. Pale blue works across skin tones when you choose the right undertone, and the glossy finish maintains the depth of the color while creating a polished, intentional appearance. This is the color choice for people who want their nails to feel special without demanding attention.
Understanding Pale Blue’s Versatility
Pale blue sits in that magical space where it reads as sophisticated without being trendy or fashion-forward in a way that might date itself. The color has calming properties that make it feel intentional and thoughtful rather than accidental. On short squoval nails, pale blue creates an elegant, put-together appearance that coordinates with every outfit.
Achieving Perfect Pale Blue
- Use a high-quality pale blue polish in a glossy formula
- Apply 2-3 thin coats to build opaque, even coverage
- A base coat prevents potential staining and creates a smoother surface for polish application
- A glossy top coat deepens the color and creates a professional, finished appearance
- Pale blue shows imperfections less than darker colors, making it forgiving for less-experienced applicators
- This color remains beautiful as it grows out because the pale tone disguises a growing base
Pro tip: Pale blue photographs beautifully in natural light, making it an excellent choice if you enjoy taking nail photos or using them for social media content.
23. Nude with Shimmering Dust Finish
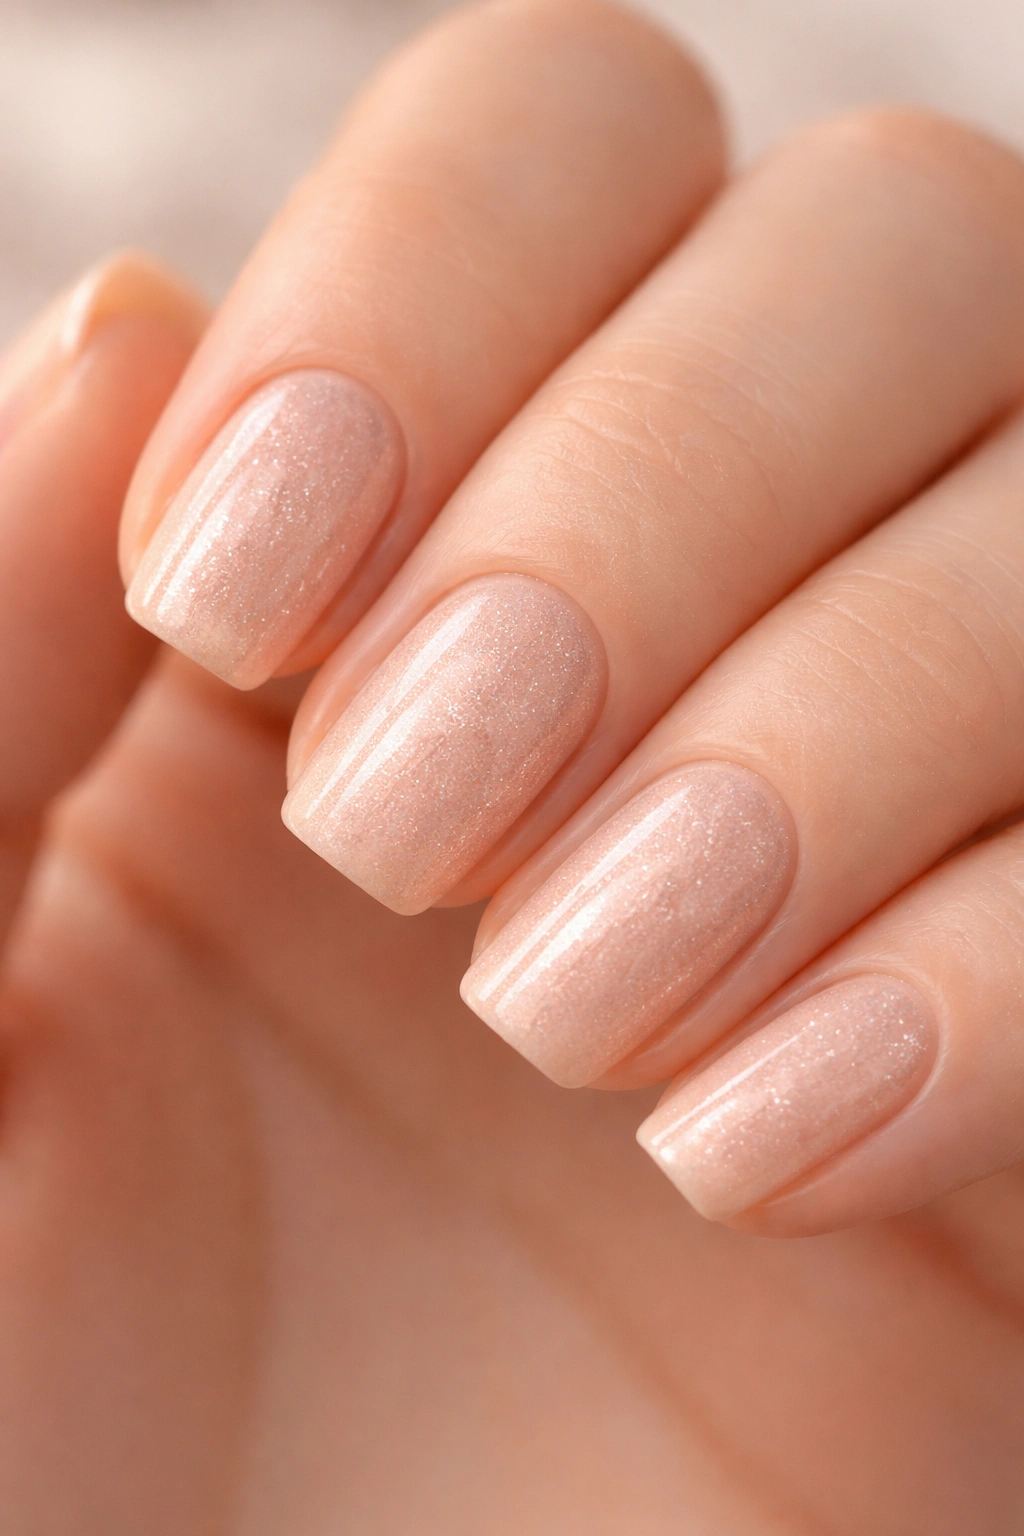
Nude squoval nails with an ultra-fine shimmering dust create an ethereal, luminous look that catches light beautifully from every angle. The dust is so fine that it reads as a glow rather than visible sparkle, creating dimension without the costume-like quality that chunky glitter sometimes has. This is a sophisticated choice for people who want their nails to feel special and intentional without being obviously glittery.
Why Dust Finish Is More Sophisticated Than Glitter
Dust particles are so fine that they create a unified shimmer rather than individual sparkles. The effect is more of a luminous glow than distinct points of light, which reads as more sophisticated and editorial. On short squoval nails, dust finish adds dimension without overwhelming the nail shape or turning the look into something overly elaborate.
Applying Dust for a Perfect Finish
- Paint your nude base and allow it to set
- Use a dust product specifically formulated for nails—facial highlighter dust is not the same
- Apply dust while your base is still slightly tacky, or use a clear gel base designed to hold dust particles
- Use a fluffy brush to apply dust, using pressing motions rather than brushing to distribute particles evenly
- Work in layers, building the intensity of the dust until you achieve the luminousness you want
- Seal with a very thick glossy top coat to prevent dust particles from shifting or peeling
Insider note: Dust finishes will gradually diminish as you wear your manicure and wash your hands, so expect the shimmer to be most visible the first few days and subtler as time passes.
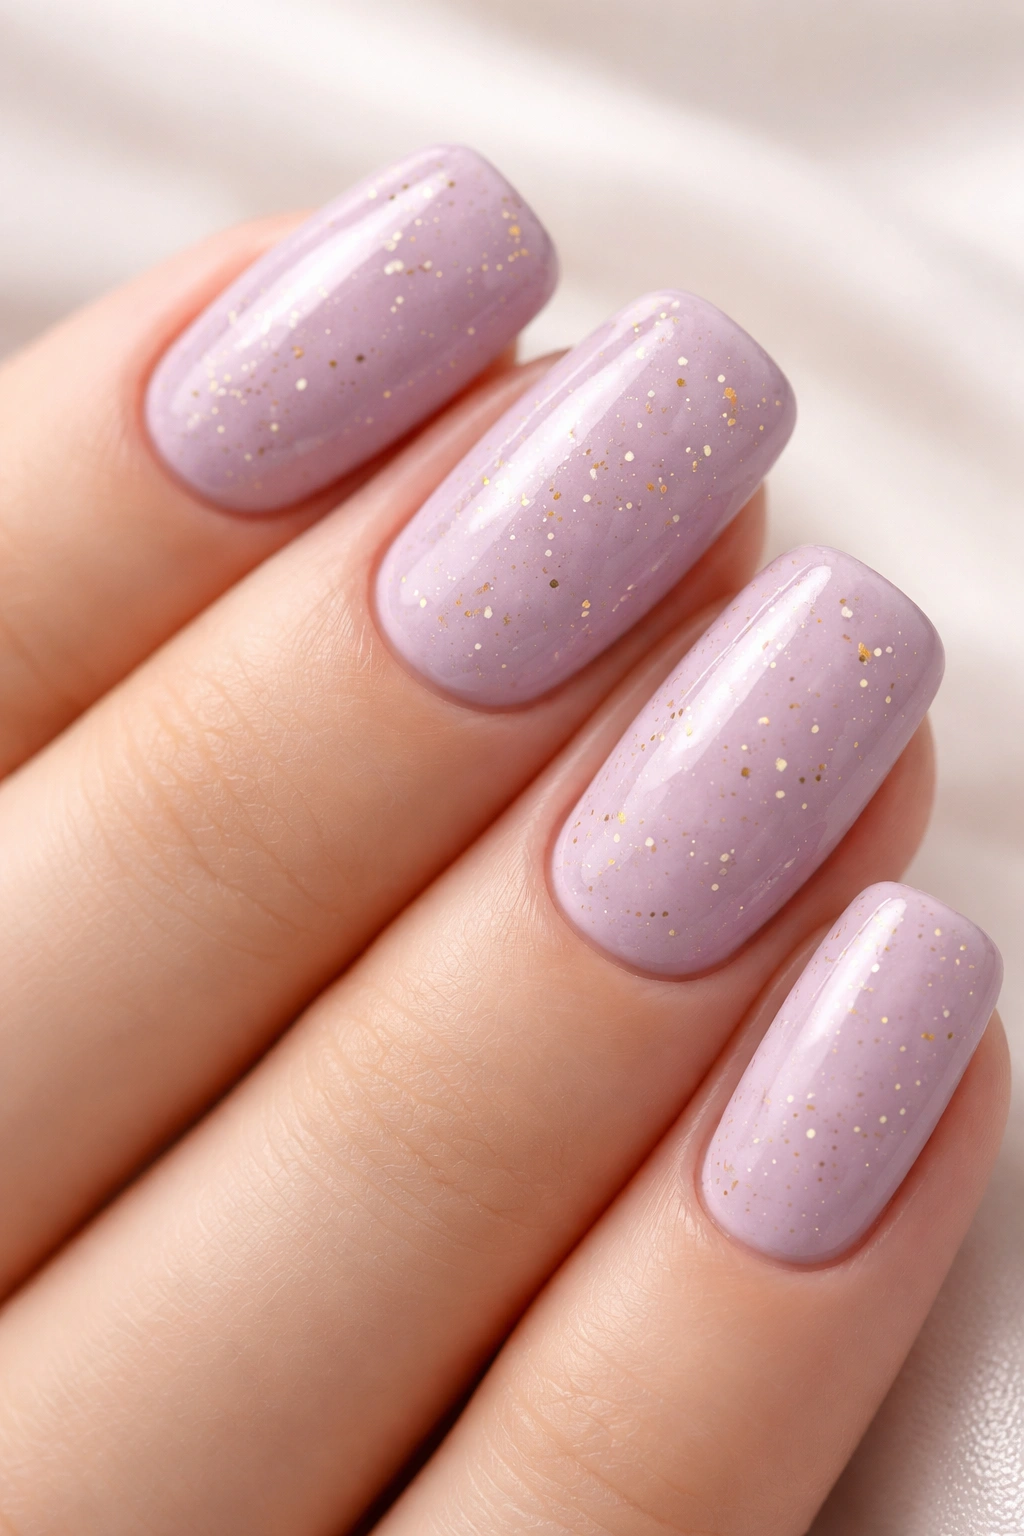
24. Soft Lavender with Tiny Gold Sparkles
Soft lavender squoval nails studded with tiny gold sparkles create a feminine, romantic look that feels both wearable and special. Unlike chunky glitter, tiny sparkles create visual interest without overwhelming the delicate nature of lavender. This design works beautifully for weddings, special occasions, and anytime you want your nails to feel elevated and intentional.
Why Gold Complements Lavender Perfectly
Gold and lavender have a classic, timeless aesthetic together—the warmth of gold against the cool sophistication of lavender creates perfect visual balance. Tiny sparkles add dimension and catch light without competing with the base color. The combination reads as refined rather than costume-like or juvenile.
Creating Lavender with Tiny Gold Sparkles
- Paint soft lavender as your base in 2-3 thin coats
- Use a thin brush to place tiny gold sparkles precisely where you want them, or
- Apply a clear gel base and sprinkle gold micro-glitter while the gel is still sticky
- Placement matters—scattered sparkles feel more sophisticated than dense coverage
- Focus sparkles on the tips and outer edges of the nails, leaving some nail area completely lavender
- Seal with a thick glossy top coat to hold sparkles in place
- The sparkles should feel like an accent to the lavender rather than the main focus
Pro tip: If you want an even more delicate effect, apply sparkles to only one or two nails rather than all five for a subtle accent instead of a statement design.
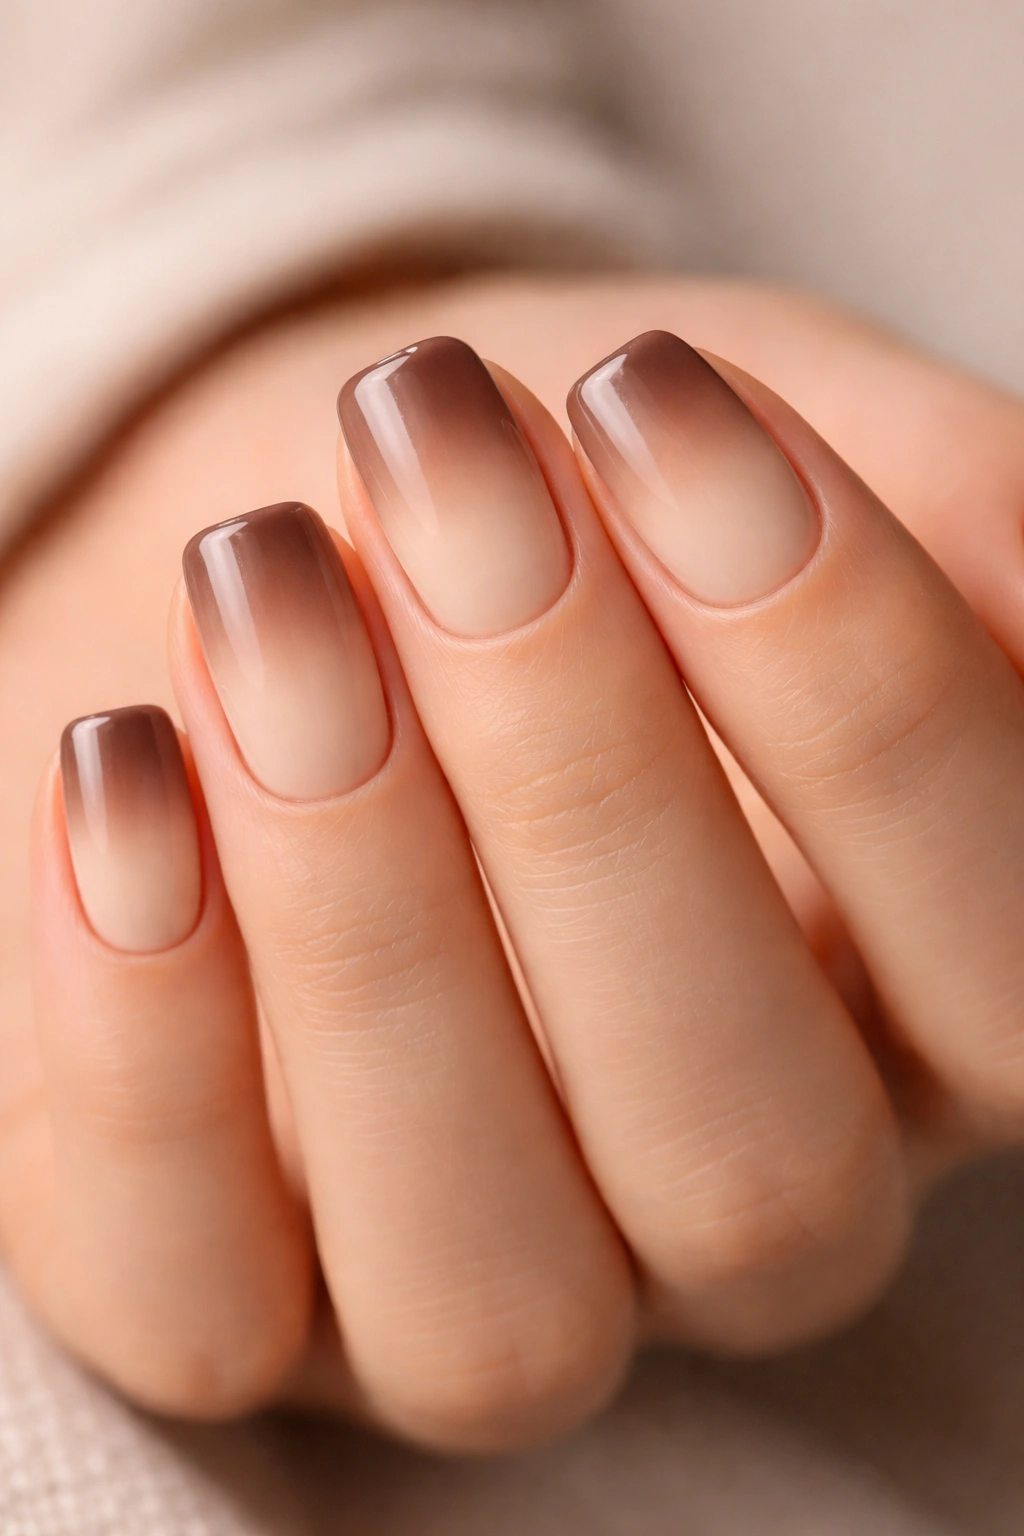
25. Warm Ivory with Soft Brown Ombre Tips
Warm ivory squoval nails fading into soft brown at the tips create an elegant, sophisticated look that feels elevated and intentional. The ombre effect adds dimension and creates the illusion of slightly longer nails while the warm ivory and soft brown color combination is universally flattering and works with every outfit. This is the design for people who want something more interesting than solid color without committing to bold design.
Why This Ombre Combination Is So Flattering
The transition from warm ivory to soft brown creates depth that makes your nails appear more dimensional. The colors work together naturally—they’re warm and harmonious rather than contrasting sharply. The overall effect is elegant and refined without being obvious about the technique being used to create the sophistication.
Creating the Ombre Effect
- Paint warm ivory as your base across the entire nail
- Load a makeup sponge with soft brown shade
- Dab the brown sponge onto the tip area of the nail, gradually building the color from light to dark
- Use a clean, damp sponge to blend the transition between ivory and brown
- The gradient should be gradual enough that the transition feels like a shadow rather than a definitive line
- Apply multiple thin layers of sponging to build the brown gradually
- Seal with a glossy top coat that creates a smooth, unified surface
Worth knowing: Ombre on short nails works beautifully because the gradient follows the natural curve of your nail—the shorter length actually enhances rather than detracts from the ombre effect.
Final Thoughts
Short squoval nails offer incredible versatility, and the collection of designs above represents just a fraction of what’s possible when you work with this flattering shape. Whether you’re drawn to minimalist approaches that let the nail shape and color do the talking, or you prefer designs with more visual complexity and personality, short squoval nails accommodate your aesthetic while maintaining practicality and wearability.
The beauty of short squoval nails is that they work beautifully in professional settings, casual everyday wear, and special occasions without requiring the maintenance commitment that longer nails demand. You can change your design every week or wear the same color for months—both approaches look intentional and polished on this shape. The key is choosing colors and designs that feel authentic to your personal style rather than defaulting to what you think you “should” wear.
Start with designs that excite you and feel achievable with your current skill level, whether that means visiting a salon or doing your nails at home. As you experiment, you’ll discover which colors, finishes, and designs make you feel most like yourself. The combination of the flattering squoval shape with thoughtful design creates nails that genuinely enhance your overall appearance and contribute to that polished, intentional aesthetic that makes people pause and compliment your hands.
