

Squoval nails have become the golden standard for anyone who wants the best of both worlds—the strength and geometry of square nails paired with the softness and elegance of an oval shape. If you’ve been scrolling through nail inspiration and keep seeing this shape everywhere, there’s a reason: it’s genuinely flattering on almost every hand shape, works for every lifestyle, and creates the perfect canvas for endless design possibilities.
The beauty of short squoval nails is that they feel practical without sacrificing style. You get enough length to express creativity through color and detail, but not so much that you’re dealing with breakage or daily frustration. Whether you’re typing all day at a desk, washing dishes, exercising, or just living your life, short squovals stay intact and look intentional. Plus, they strike that sweet spot where nail art actually has room to breathe and shine.
What makes these designs so versatile is that they work whether you’re going for minimalist chic, bold and dramatic, trendy and fun, or understated elegance. A short squoval can be your everyday neutral or the centerpiece of a completely unexpected look. The shape itself is sophisticated enough to pair with formal wear, but casual enough to feel right in jeans and a t-shirt. Real talk—once you go squoval, it’s hard to go back.
Let’s explore 25 nail designs that prove short squovals deserve a permanent spot in your beauty rotation. Each one is designed to work in real life, and they’re all achievable at home or with your favorite nail technician.
1. Crisp White French Manicure
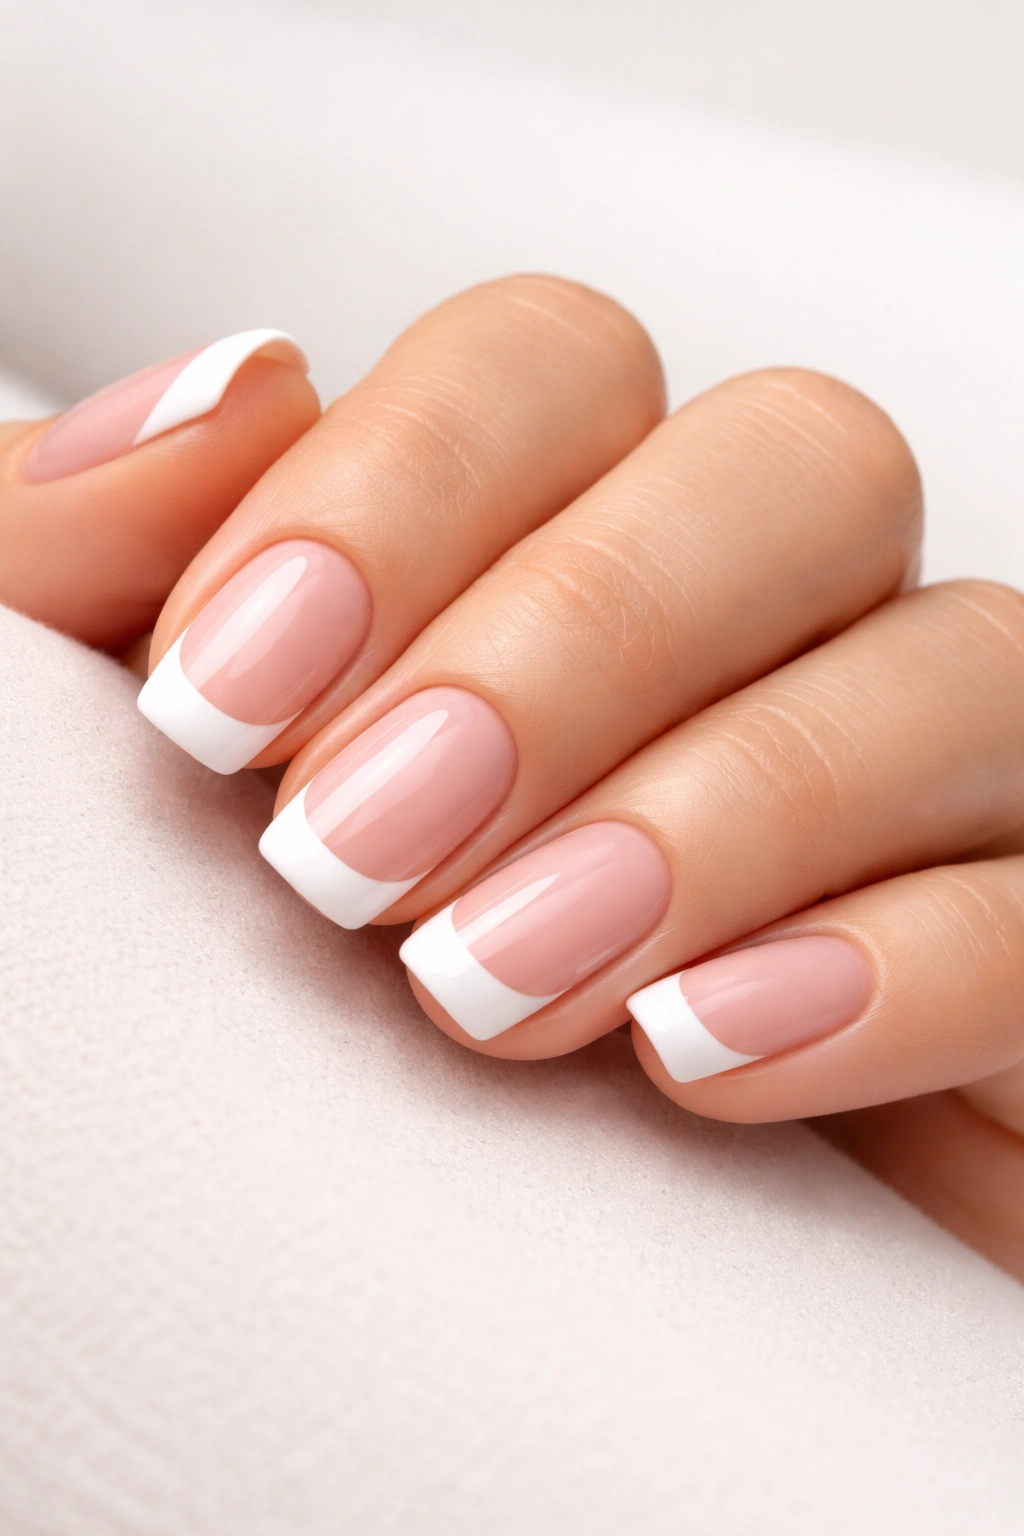
The French manicure is timeless for a reason, and on short squovals, it hits differently. A stark white tip creates a clean, architectural line that highlights the beauty of the squoval shape itself. This design works because the white becomes a frame that emphasizes the nail’s geometry rather than competing with it.
Why It Works for Every Occasion
The classic French manicure transcends trends and seasons. It pairs seamlessly with literally any outfit, any skin tone, and any setting. You can wear it to a wedding, to work, to a casual lunch—it’s that chameleon nail design that simply always looks polished.
How to Perfect the Classic Look
- Use a pure white shade (not cream or off-white) for maximum impact and definition
- Paint the tip at about one-third down from the nail edge—create a clean line, not a thick stripe
- Keep the nude or pink base shade subtle and neutral so the white takes center stage
- Seal everything with a glossy top coat for professional shine
- If you’re doing this at home, use a thin nail art brush or French manicure guide strips to keep the line sharp
This design requires minimal maintenance and looks fresh for weeks with regular top coat touch-ups.
2. Matte Chocolate Brown with Gold Leaf
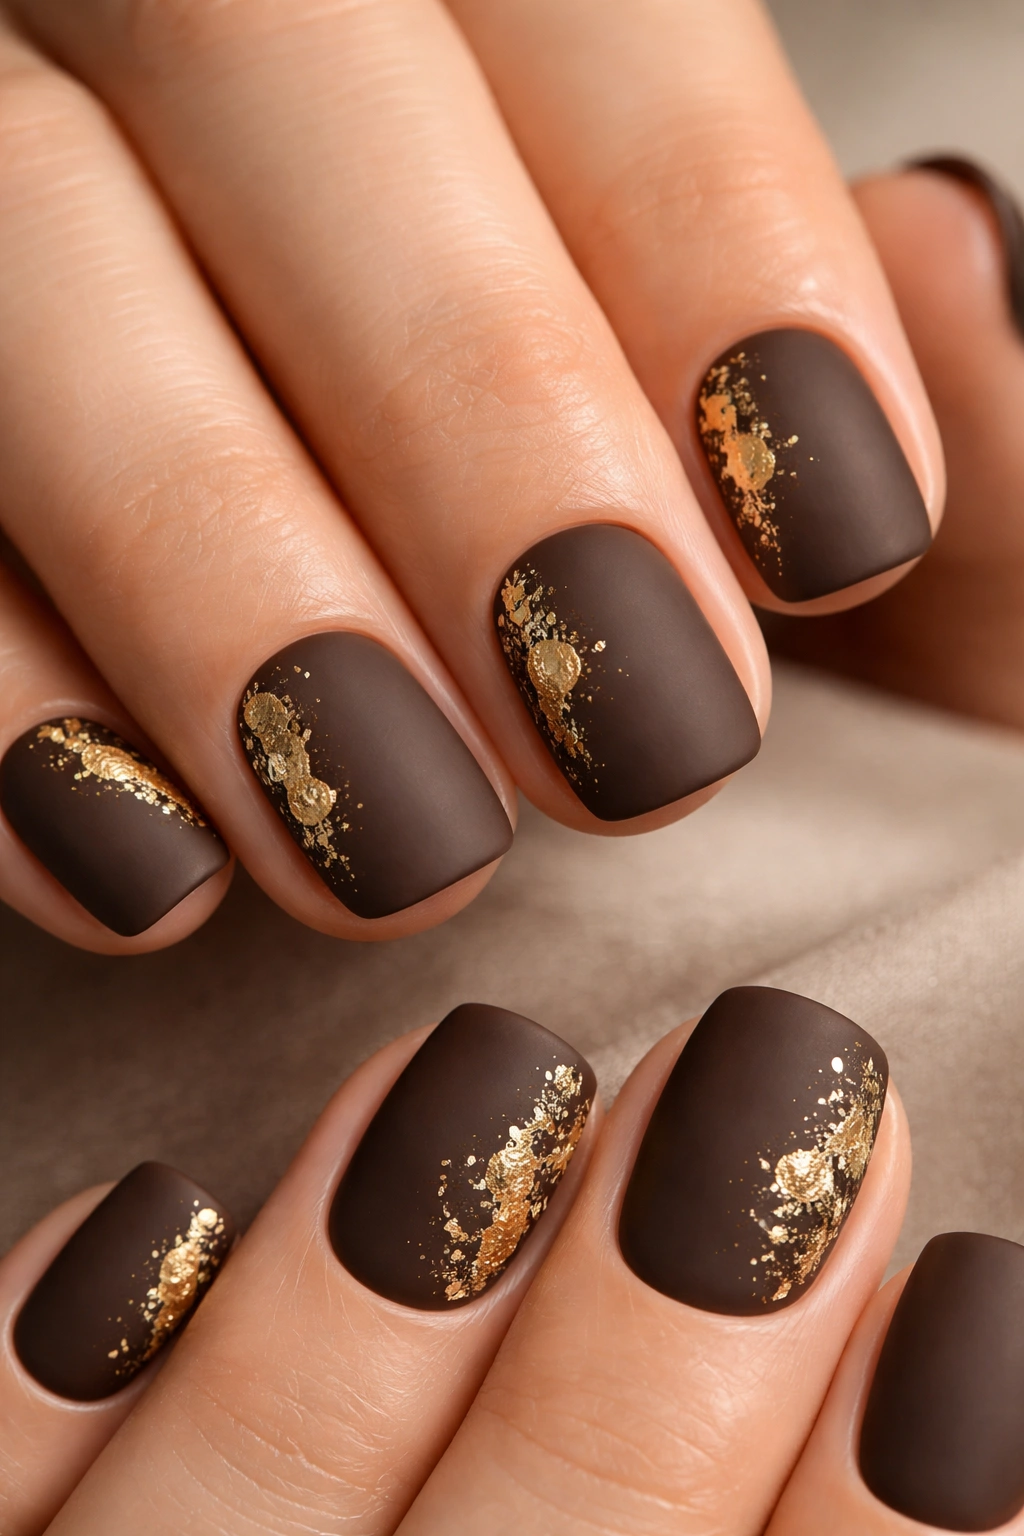
Deep chocolate brown becomes instantly luxe when you pair it with a delicate gold leaf accent. Paint the majority of the nail in a matte warm brown, then apply real or faux gold leaf to catch the light at unexpected angles. The matte finish makes the gold pop in a way that glossy finishes can’t quite achieve.
Why This Combination Is So Chic
Brown is having a major moment because it photographs beautifully, complements deeper skin tones gorgeously, and feels sophisticated without trying too hard. Add even a whisper of gold, and you’ve elevated it from simple to “where did you get this done?”
Application Tips for Foolproof Results
- Apply two coats of the matte brown polish for even coverage and depth
- Let it dry completely before adding the gold leaf
- Apply a tiny amount of gel base or clear polish to the area where you’ll place the leaf (this acts as adhesive)
- Press the gold leaf gently and smooth out any wrinkles
- Seal with a matte top coat to keep everything unified and protected
You can add the leaf to just the accent nail, or scatter pieces across multiple nails for a more artistic vibe.
3. Soft Pink with Delicate Lace
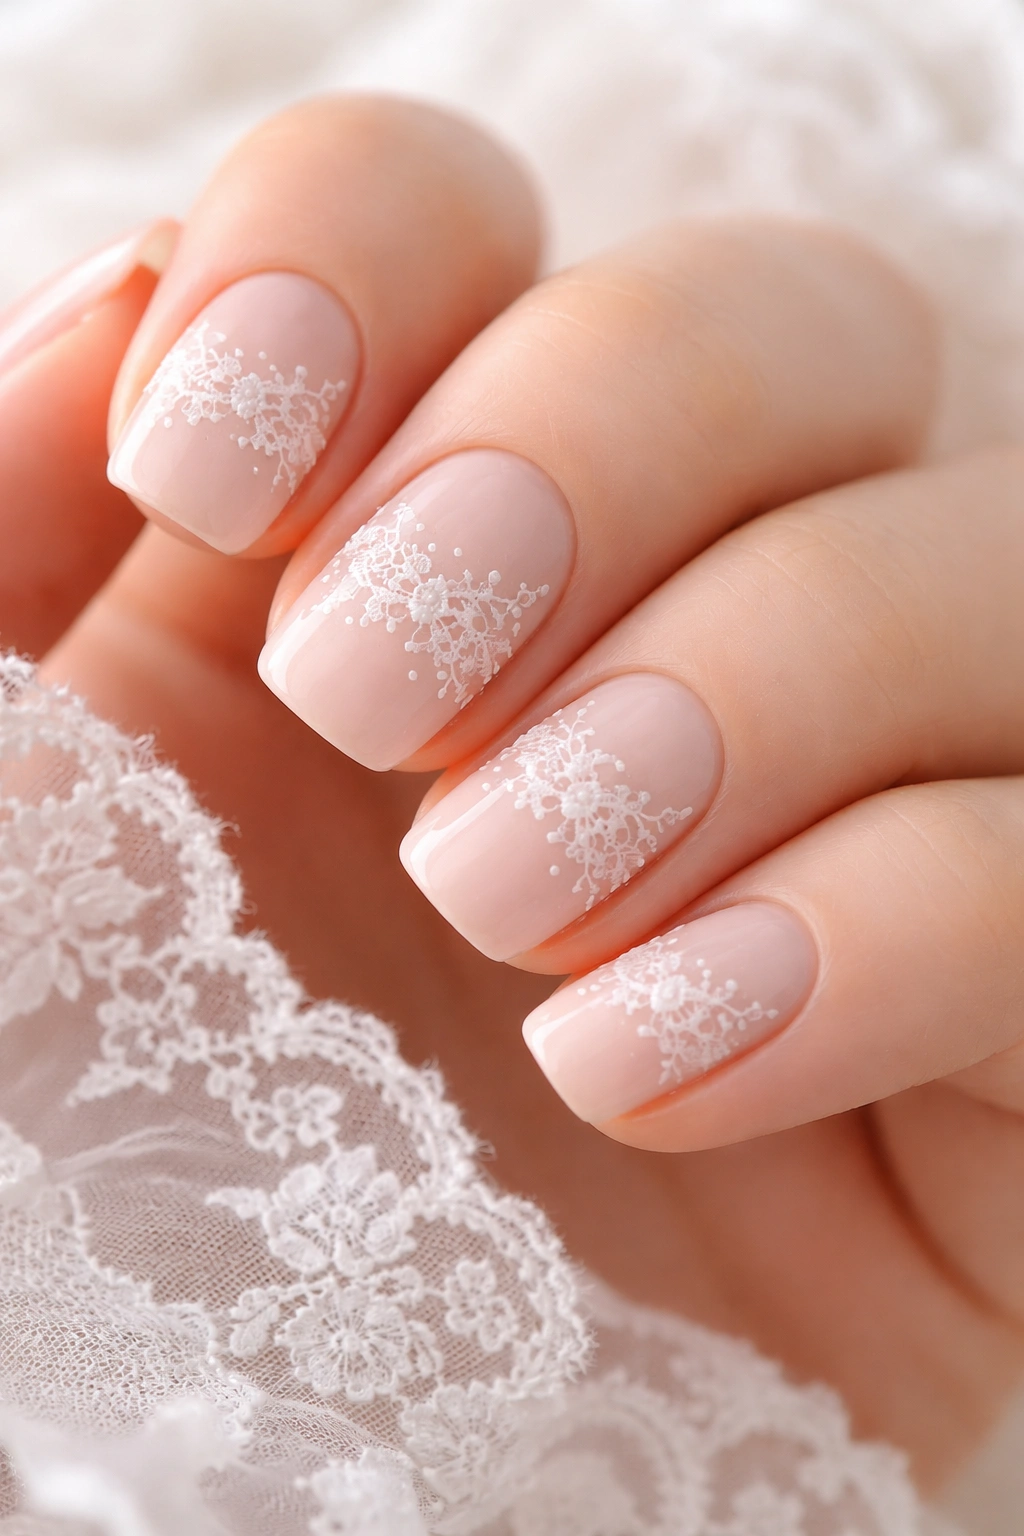
A barely-there pink base decorated with white lace details creates an ethereal, romantic look that feels expensive and handcrafted. The softness of the pink and the intricacy of the lace make this design feel special without being loud. Short squovals give you just enough real estate to show off lace details without them looking cramped.
What Makes Lace Details Feel Elegant
Lace transforms a simple pink manicure into something that feels bridal, special-occasion-worthy, or just quietly beautiful. The negative space (the visible pink between the lace lines) keeps it from feeling busy. Thin white lines create definition and delicacy simultaneously.
How to DIY This Design
- Start with two coats of a dusty or pale pink in a crème finish
- Use a thin nail art brush and white polish to hand-paint lace patterns (think delicate scallops, tiny dots, thin lines forming leaf shapes)
- Paint the lace on just the upper half or create a scattered pattern across the nail
- Add a glossy top coat that covers everything evenly for a finished, polished look
- If free-hand intimidates you, lace nail decals exist and look beautiful when applied correctly
This works for everyday wear, special occasions, or anytime you want something that feels intricate without being trendy.
4. Deep Emerald with Diamond Details
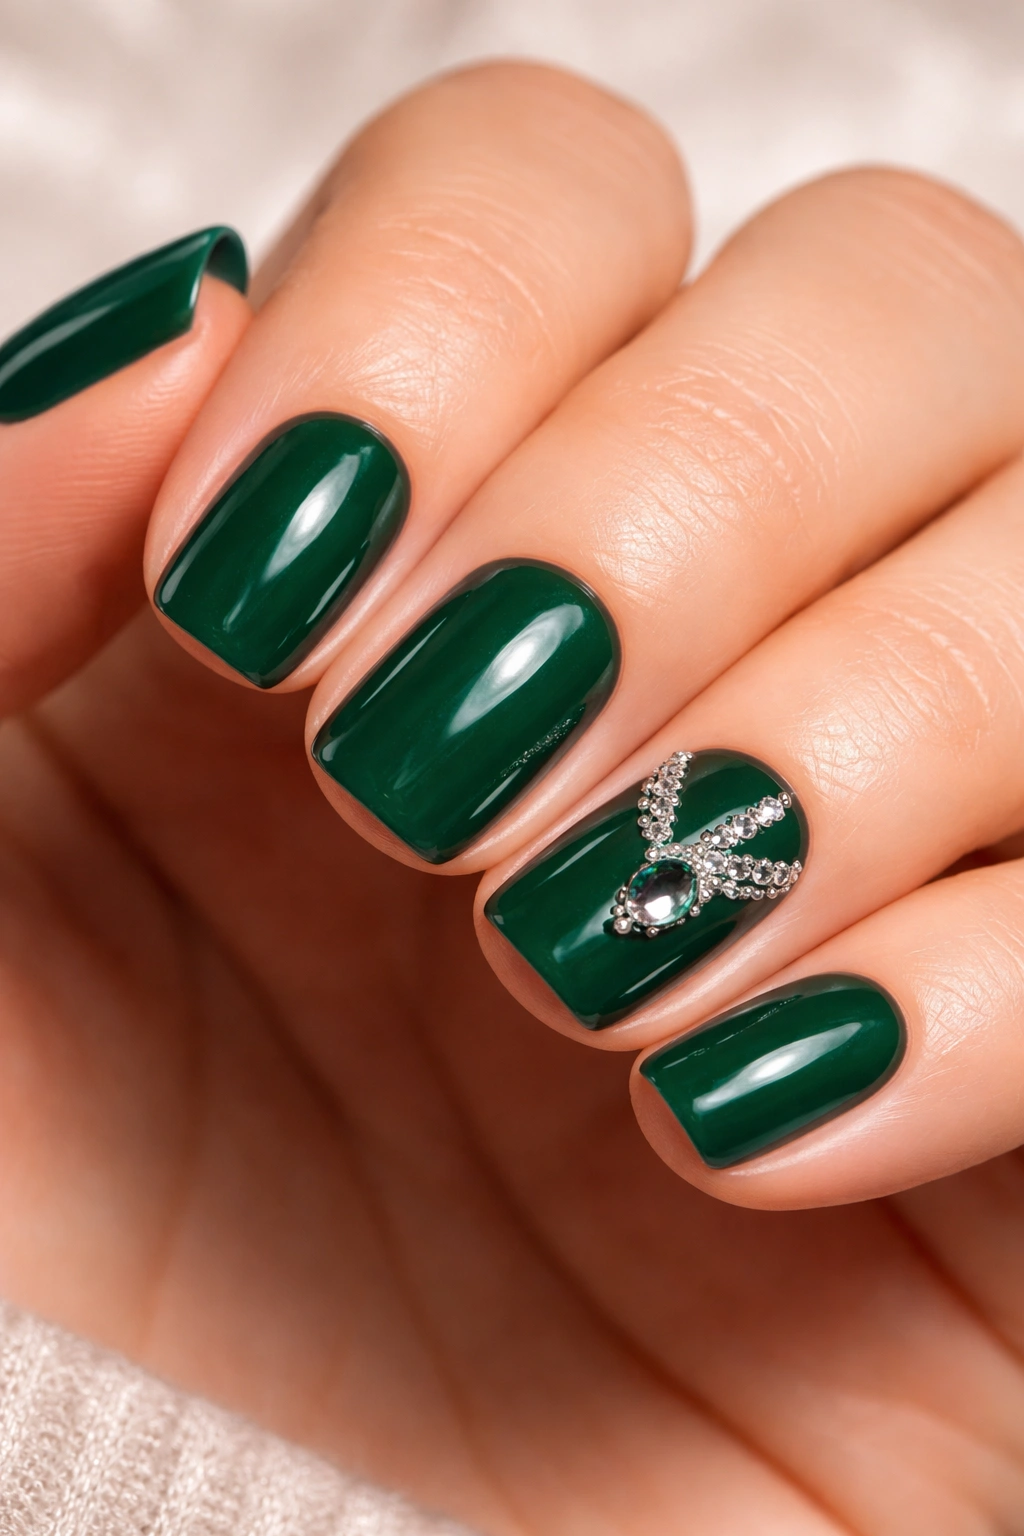
A rich emerald green is jewel-tone luxury that feels expensive and intentional. Add small diamond-shaped rhinestones or hand-painted diamond outlines in gold or silver, and you’ve created something that catches light and looks genuinely glamorous. Short squovals keep the design from becoming overwhelming while still giving you a bold statement.
Why Emerald Green Flatters Everyone
Emerald is a universally flattering shade that works on warm and cool undertones alike. It photographs beautifully, looks rich in person, and somehow feels both trendy and timeless. Paired with geometric details, it becomes almost regal.
Styling the Diamond Details
- Apply emerald polish in two full coats for rich, opaque coverage
- Place small diamond rhinestones in the center of the nail, at the tip, or scattered randomly depending on your vibe
- Alternatively, use a gold or silver brush pen to hand-paint small diamond outlines
- Seal everything with a top coat that will keep rhinestones secure and polish protected
- The diamonds work best clustered on one or two nails, making them special accents rather than covering the entire design
This design reads as intentional jewelry and works for evening events, fancy dates, or when you want to feel put-together.
5. Blush Pink with Soft Baby’s Breath
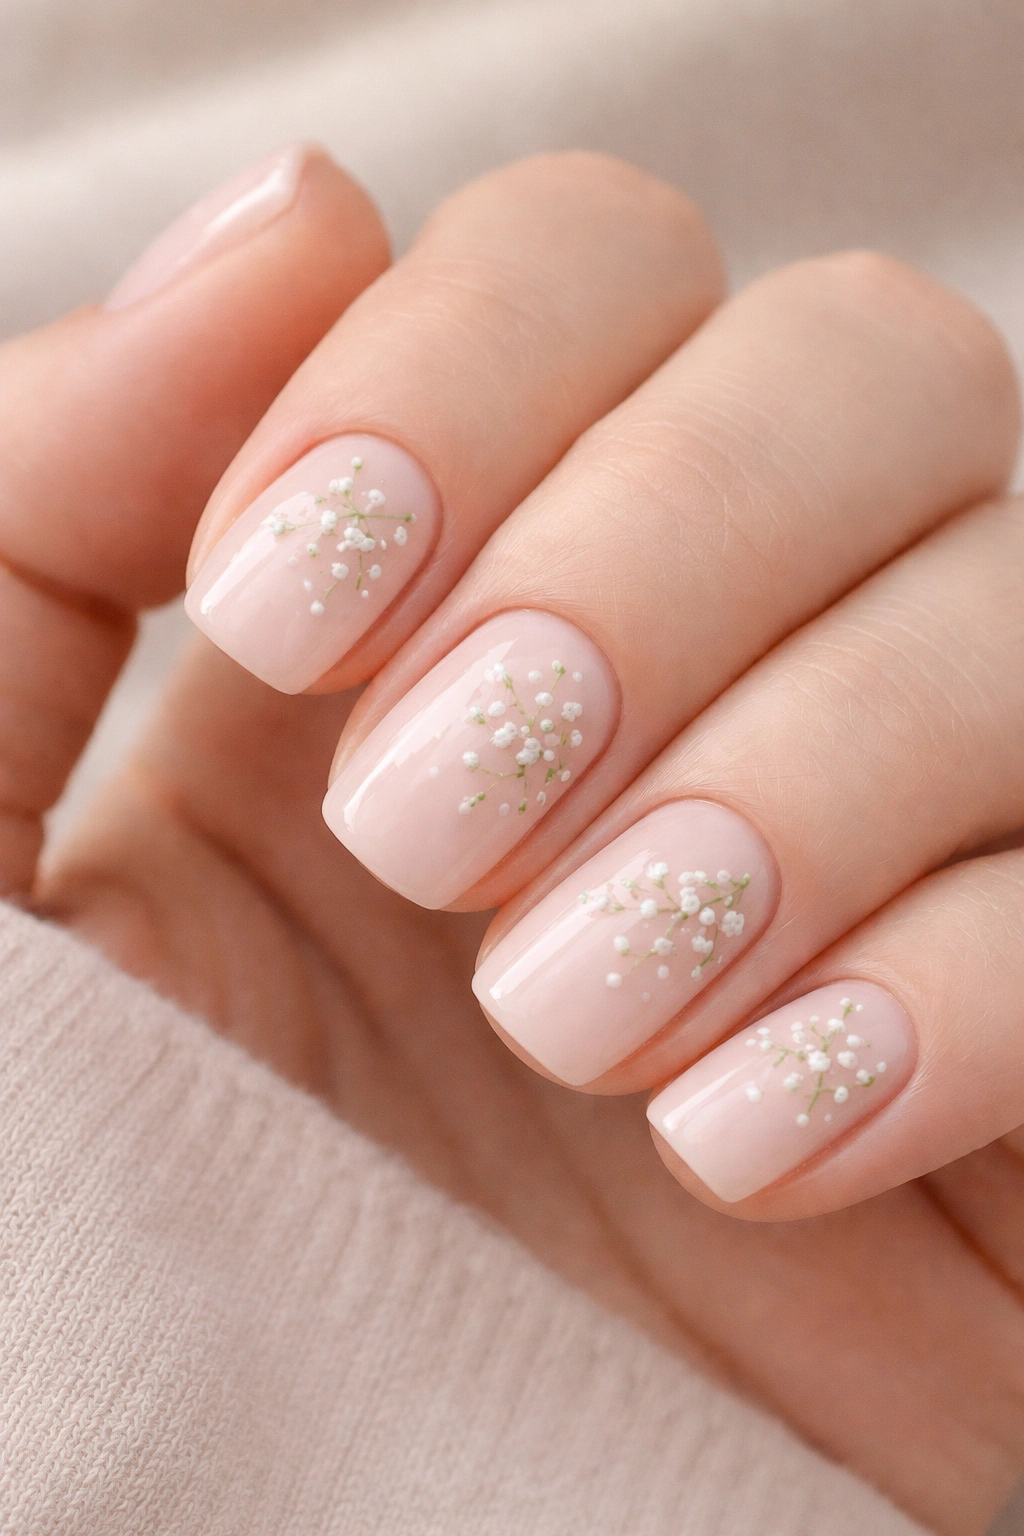
A milky blush pink as the base with tiny white and pale green hand-painted baby’s breath flowers creates a soft, romantic look that feels fresh and thoughtful. The flowers are small enough not to overwhelm the nail, but detailed enough to show you care about the design. Short squovals give you a clean, defined space for this delicate botanical element.
Why Baby’s Breath Details Feel Timeless
Baby’s breath is universally associated with femininity, romance, and thoughtfulness. Even a few tiny painted flowers transform a simple pink base into something that feels intentionally designed and deeply pretty. It’s the kind of detail people ask you about.
Painting Baby’s Breath Effectively
- Start with one or two coats of a soft, warm blush pink
- Use a very thin brush and white polish to create small clusters of tiny dots (these are the individual flowers)
- Add pale green or sage lines underneath for stems and leaves
- Space the clusters naturally across the nail rather than filling every inch
- Seal with a glossy finish that protects the details and adds subtle shine
Paint the flowers on one accent nail or scattered across all ten fingers depending on how delicate or elaborate you want the look.
6. Nude Beige with Understated Nude Stripe
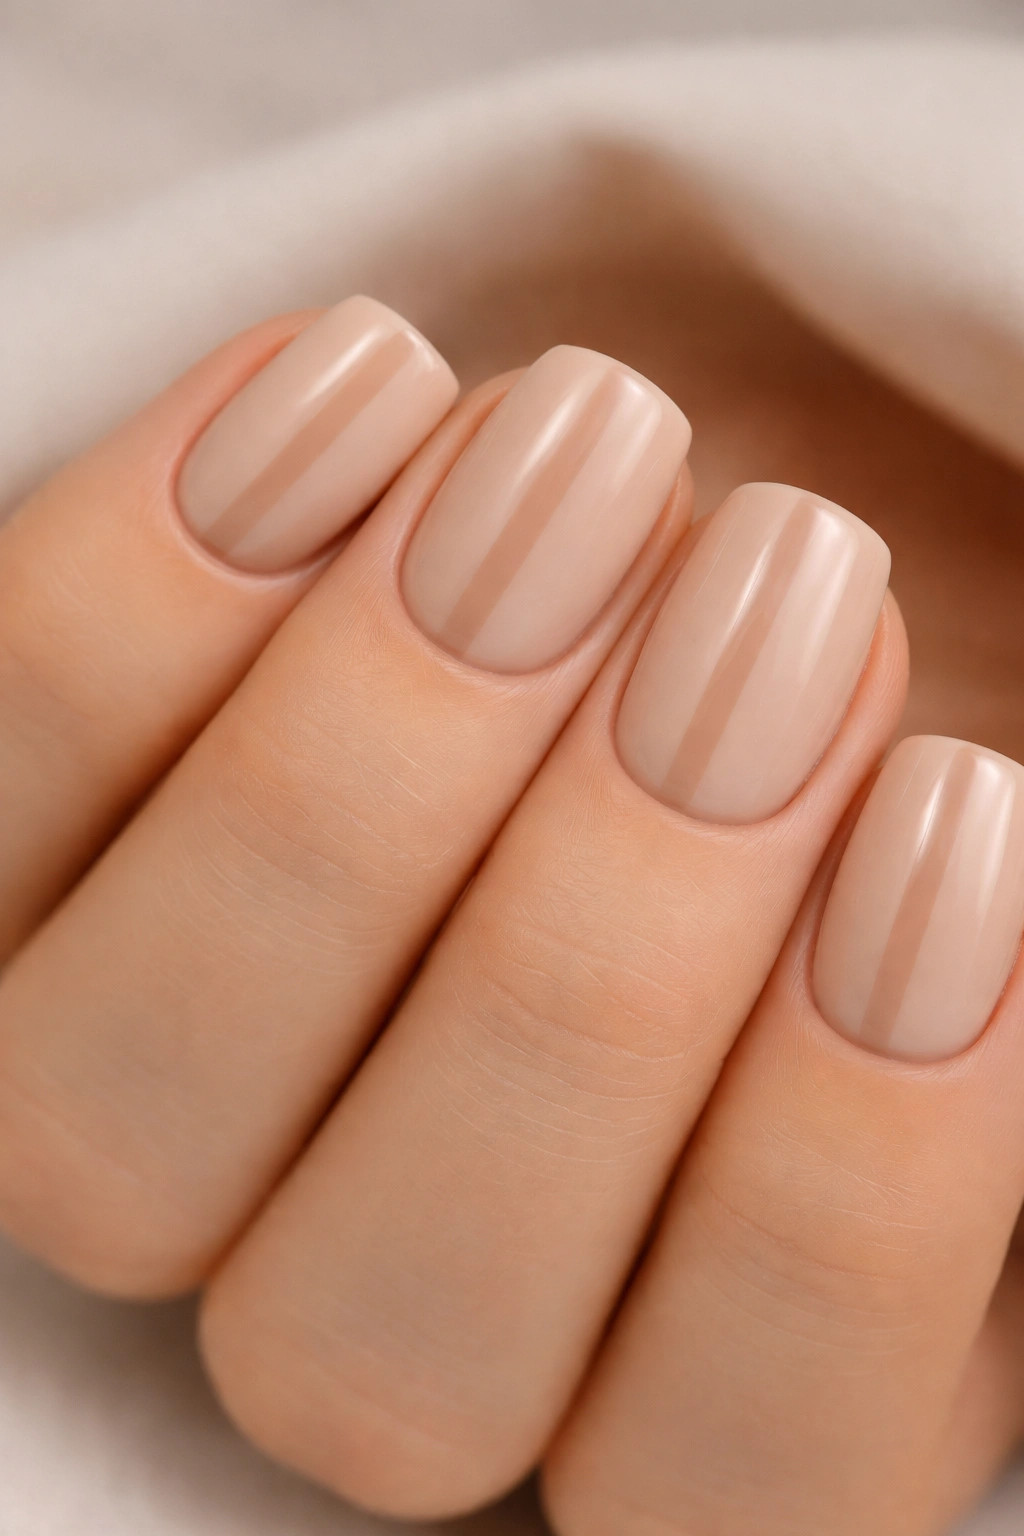
Sometimes the most sophisticated design is almost invisible. A creamy nude base with a slightly darker nude stripe down the center of the nail creates definition through subtlety. The stripe creates visual interest without relying on color contrast. This is peak quiet luxury on short squovals.
The Psychology of Beige-on-Beige Designs
This approach makes your hands look longer and more elegant because there’s no visual line breaking up the nail. The slight variation in shade creates enough interest to feel intentional without feeling busy. It’s the nail design equivalent of a perfect white button-down shirt.
Creating Clean Striping
- Paint the entire nail with your lighter nude base (two coats)
- Use a thin nail art brush or a striping polish to create a centered line in a slightly deeper nude tone
- Make the line perfectly straight and centered—this requires a steady hand or a guide, but it’s worth it
- The line should run from the base of the nail to just before the tip, creating a frame for the nail shape itself
- Seal with a glossy top coat for a polished, intentional finish
You can vary the stripe width slightly from nail to nail for a subtle, art-directed look.
7. Navy Blue with White Polka Dots
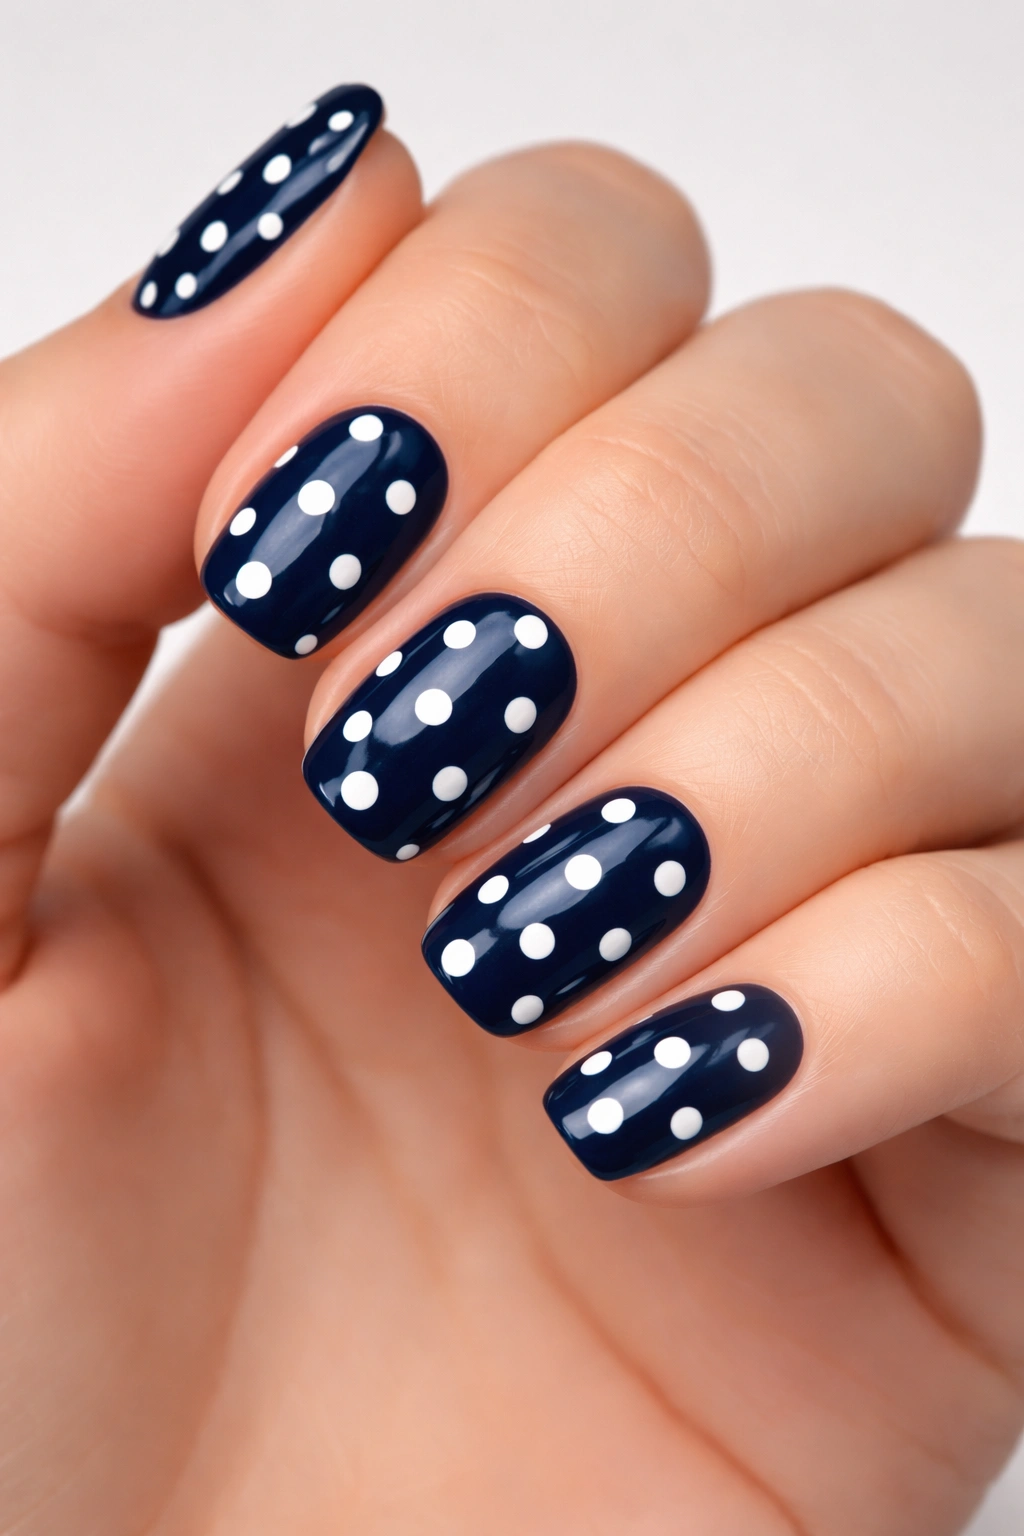
A crisp navy blue base with cheerful white polka dots scattered across creates instant personality and playfulness without being juvenile. Navy is sophisticated enough to feel intentional, and the white dots add pops of brightness and whimsy. On short squovals, the dots are sized perfectly—not too cramped, not too sparse.
Why Polka Dots Work at Any Age
Dots are a design element that somehow transcends age and taste level. They read as fun and creative without being frivolous. Navy and white is a classic color combination, so even though the design is playful, the overall effect is still polished and intentional.
Applying Perfect Polka Dots
- Paint the entire nail with two coats of a saturated navy blue
- Let the navy dry completely (this prevents smudging)
- Use the opposite end of a dotting tool dipped in white polish to create dots
- Make dots roughly the same size, but vary their placement—random looks more intentional than perfectly spaced
- Aim for 5-8 dots per nail depending on how busy you want the look
- Seal with a glossy top coat that protects the dots and creates shine
You can place all the dots on a few nails or distribute them evenly across all ten fingers.
8. Soft Mauve with Rose Gold Glitter Ombre
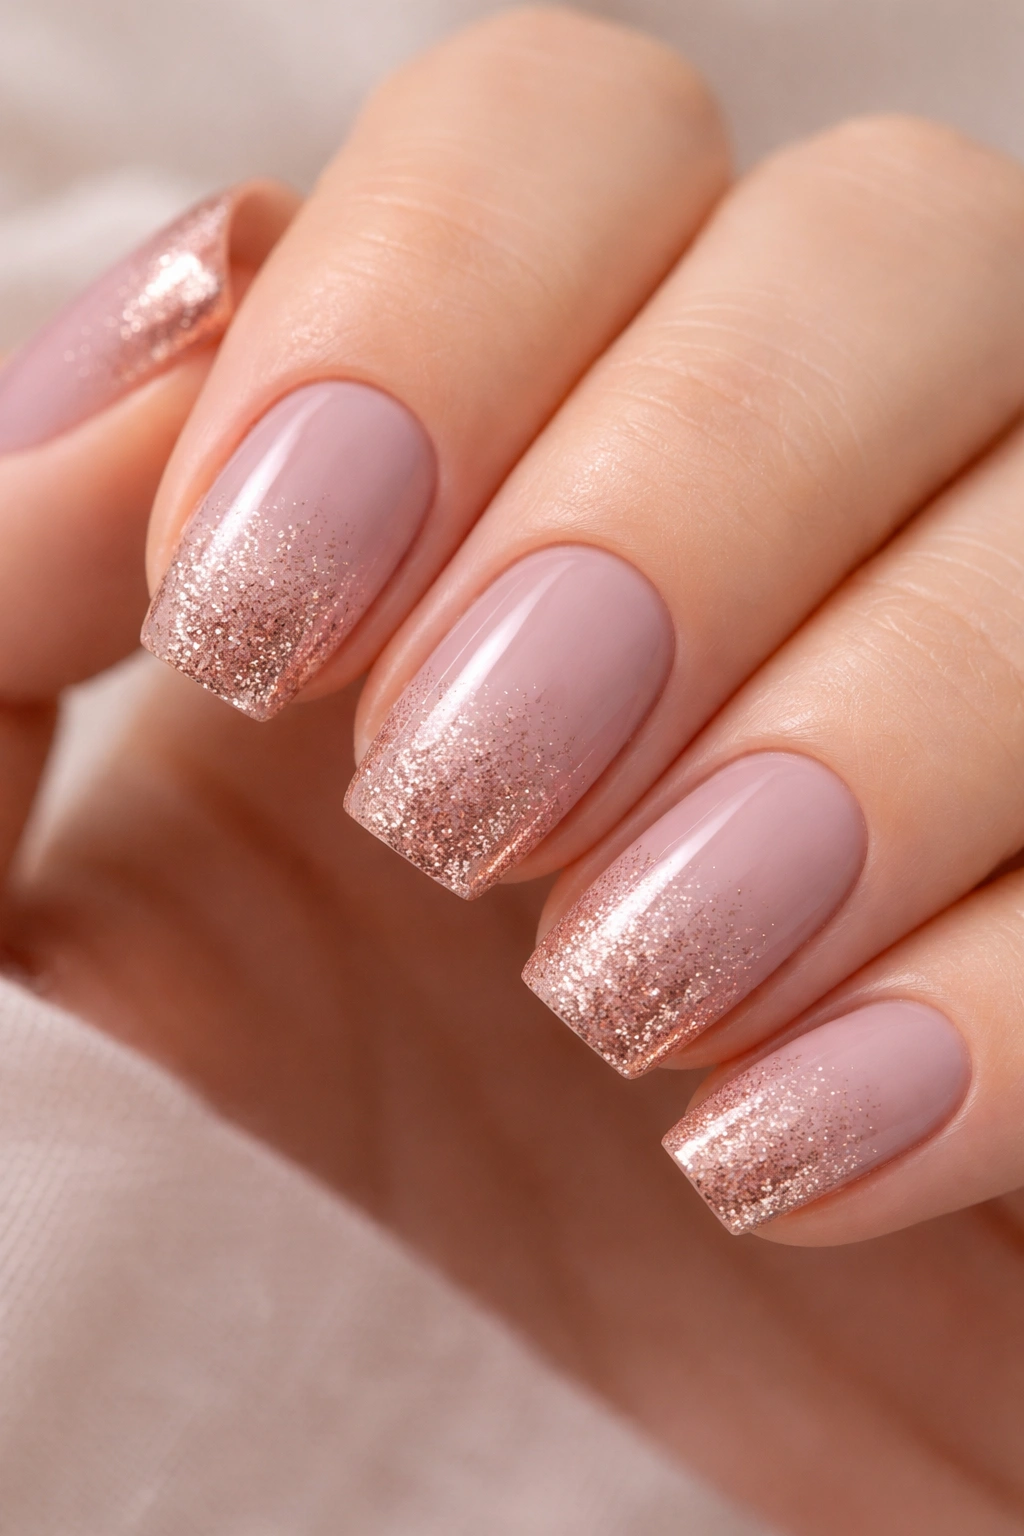
A sophisticated mauve base that fades into rose gold glitter at the tips creates a subtle gradient that catches light beautifully. The mauve keeps the design wearable and elegant, while the glitter adds just enough glamour to feel special. Short squovals make this ombre effect look intentional and balanced rather than chaotic.
Why This Ombre Reads as Luxury
Mauve is a trendy but timeless shade that feels more sophisticated than pink. Rose gold glitter is the perfect warm-toned accent. Together, they create something that feels expensive, intentional, and just a little bit elevated. The gradient transitions from understated to sparkly in the most flattering way.
Creating a Flawless Glitter Ombre
- Paint the entire nail with two coats of mauve polish, starting from the base
- Apply glitter polish or glitter suspension polish to a small makeup sponge
- Dab the glitter onto just the tip of the nail, then gently press and roll the sponge toward the center to create a gradient
- Build the glitter density gradually—it’s easier to add more than to remove it
- Seal everything with a thick, smooth top coat to prevent catching on anything
- The gradient should be soft and blend-able, not a stark line
This works for work, casual outings, or any situation where you want nails that add polish without screaming for attention.
9. Classic Red with Gel Shine
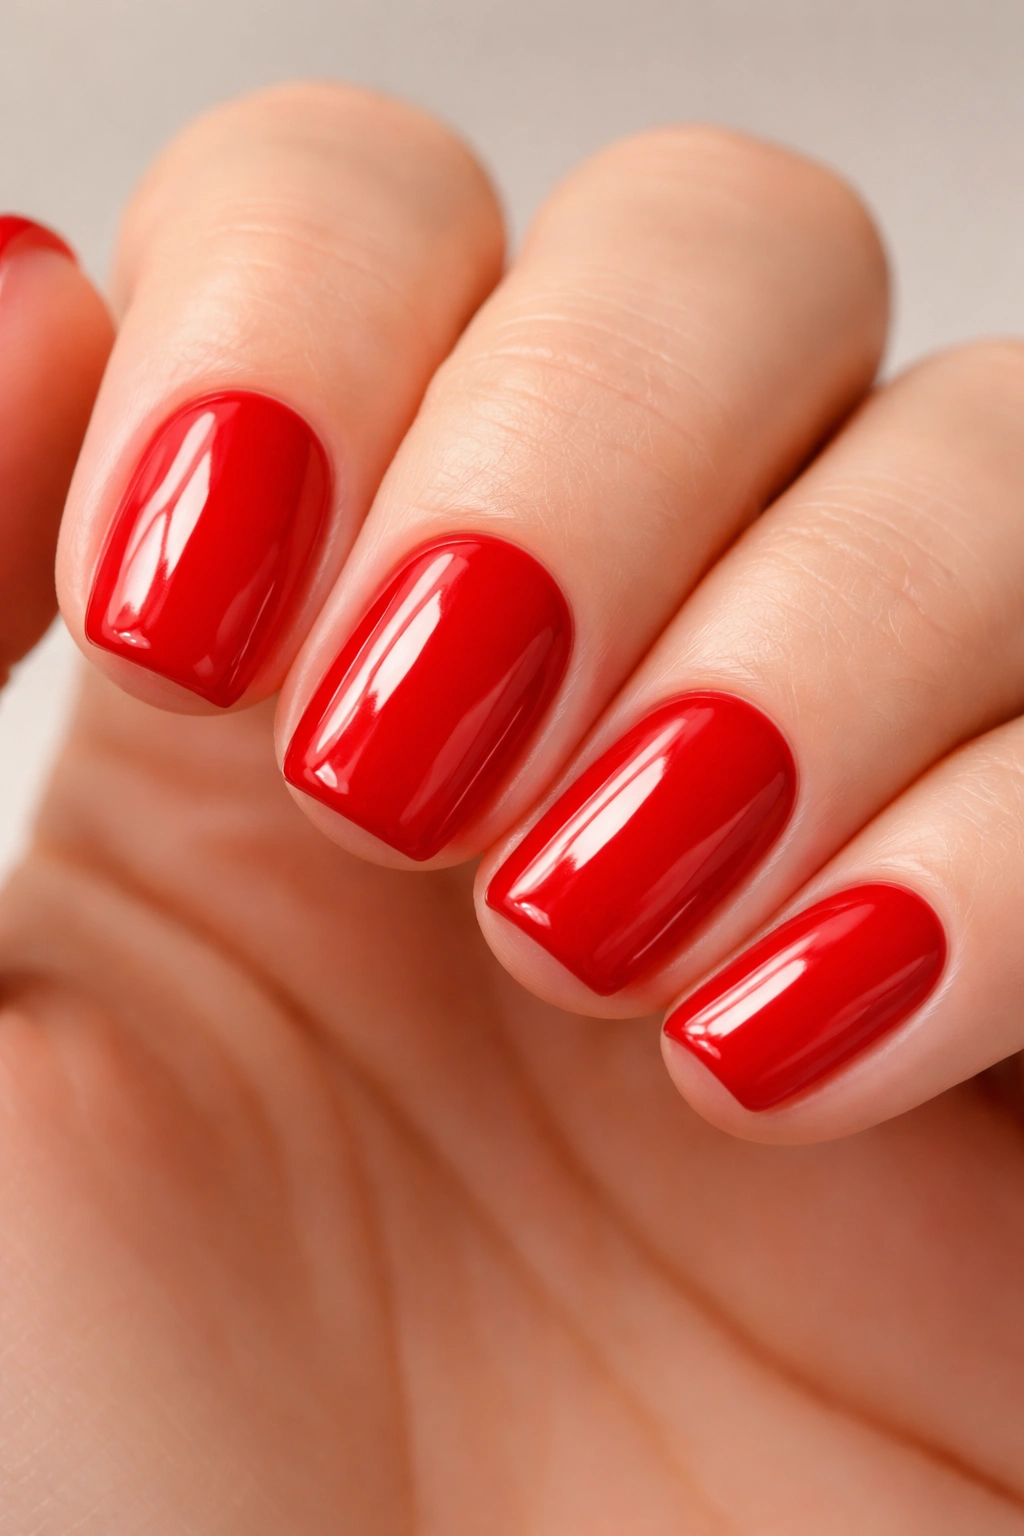
There’s nothing revolutionary about red nails, but short squovals in a perfect red with a high-shine gel finish is elegance personified. A true red or blue-red (not orange-red or brown-red) photographs beautifully and makes a clear statement: you’re put-together and you know what works. The squoval shape keeps red from feeling dramatic and instead makes it feel intentional and controlled.
Why True Red Matters
The undertone of your red matters enormously. A blue-based red looks sophisticated and jewel-toned. A true red feels bold and classic. An orange-red can lean casual. Spend time finding your red, because once you do, it becomes a forever staple.
Achieving That Perfect Red Finish
- Choose a red with good opacity—you might need two coats for perfect coverage, or sometimes one thick coat works
- Apply the red in smooth, even strokes from base to tip
- Use a gel top coat or a high-shine glossy finish for maximum impact
- Red nails demand perfection in shaping and cuticle care, so prioritize filing the squoval shape precisely and keeping cuticles neat
- Red polish chips slightly more noticeably than other colors, so seal the edges of the nail tip with an extra layer of top coat
Red on short squovals works for everything from corporate settings to evening events to just feeling good about yourself.
10. Sage Green with Cream Swirl
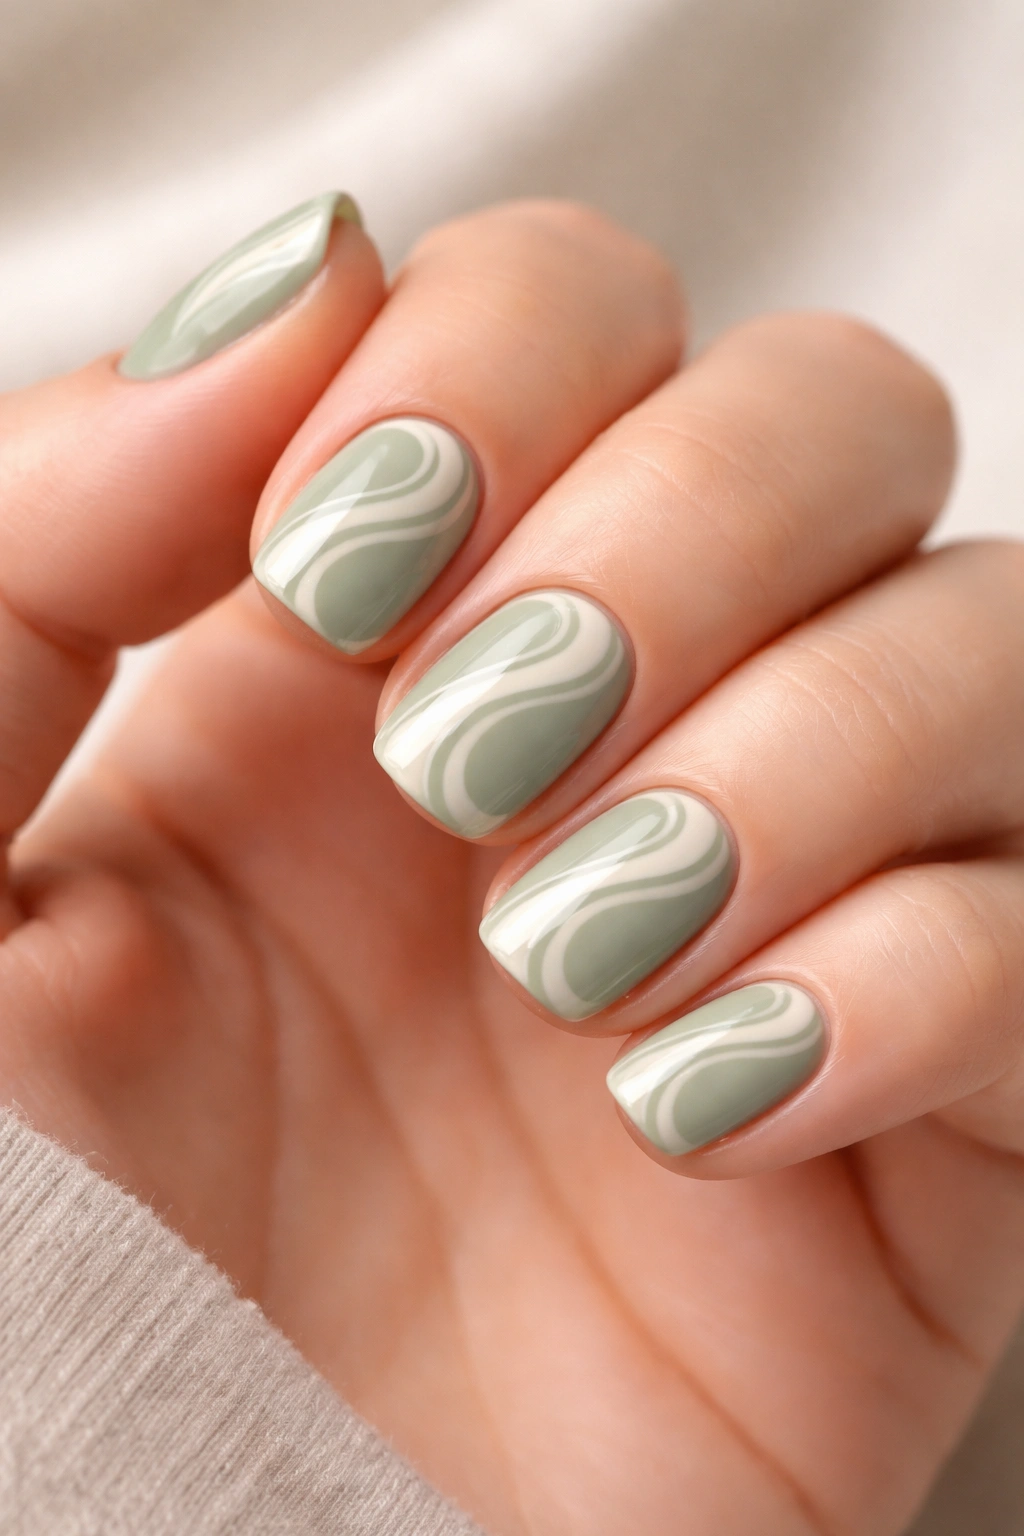
A muted sage green base with cream-colored swirls creates an organic, earthy vibe that feels connected to nature without being trendy for the moment. The swirls look intentional and artistic, but they’re actually quite forgiving to create. Short squovals give you enough space to make the swirls visible without them looking cramped.
The Appeal of Earthy, Organic Designs
Sage green paired with cream feels calming and balanced. It’s sophisticated without being cold, trendy without being dated. The swirl pattern adds movement and personality while the muted palette keeps everything grounded and wearable.
Creating Swirled Designs
- Paint the entire nail with two coats of sage green as your base
- Let the base dry completely
- Use a thin brush and cream polish to paint loose, organic swirls across the nail
- Don’t overthink the pattern—authenticity comes from slight imperfection
- Some swirls can connect to others, some can stand alone; some can be thicker, some thinner
- Seal with a matte or glossy top coat depending on whether you want the finish to look soft or shiny
You can add swirls to all ten nails or create them on just the accent nail for a more understated approach.
11. Black with Gold Art Deco Lines
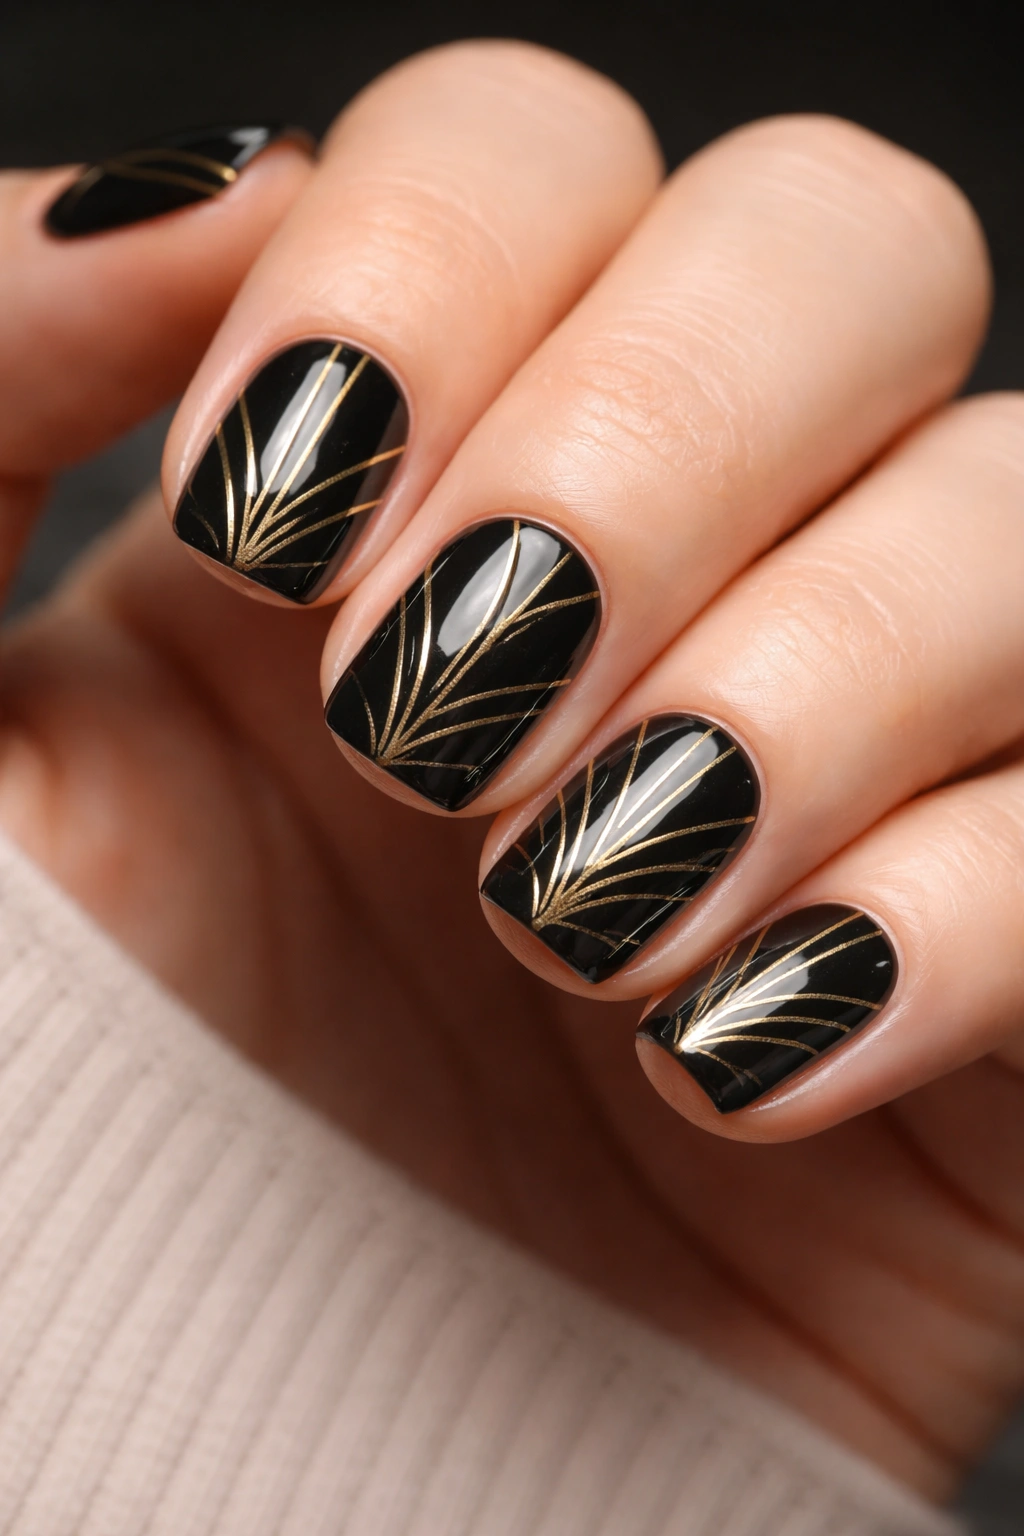
A deep black base with geometric gold lines inspired by art deco creates instant sophistication and a vintage-modern vibe. The geometric precision makes this feel intentional and designed, while the black provides a dramatic backdrop that makes the gold lines stand out. On short squovals, these linear details are just the right size—visible and impactful without overwhelming the nail.
Why Art Deco Inspires Luxury
Art deco design has been associated with glamour, sophistication, and intentional artistry for a century. When translated to nails, it immediately elevates the entire look. The geometry feels mathematical and precise, which reads as intentional and controlled.
Executing Art Deco Line Work
- Apply two coats of a true black polish (one coat often looks patchy and unpolished)
- Use a thin gold brush pen, metallic nail pen, or striping polish to create geometric patterns
- Think symmetrical lines: vertical stripes down the center, diagonal lines at the corners, geometric shapes clustered in one area
- Keep the pattern relatively simple—too many intersecting lines become visually confusing on a short nail
- Gold on black has incredible contrast, so the lines will be visible and impactful
- Seal with a glossy top coat that protects the gold details
This design works for evening events, professional settings where you want subtle drama, or anyone who loves art history.
12. Dusty Rose with Minimal White Line Art
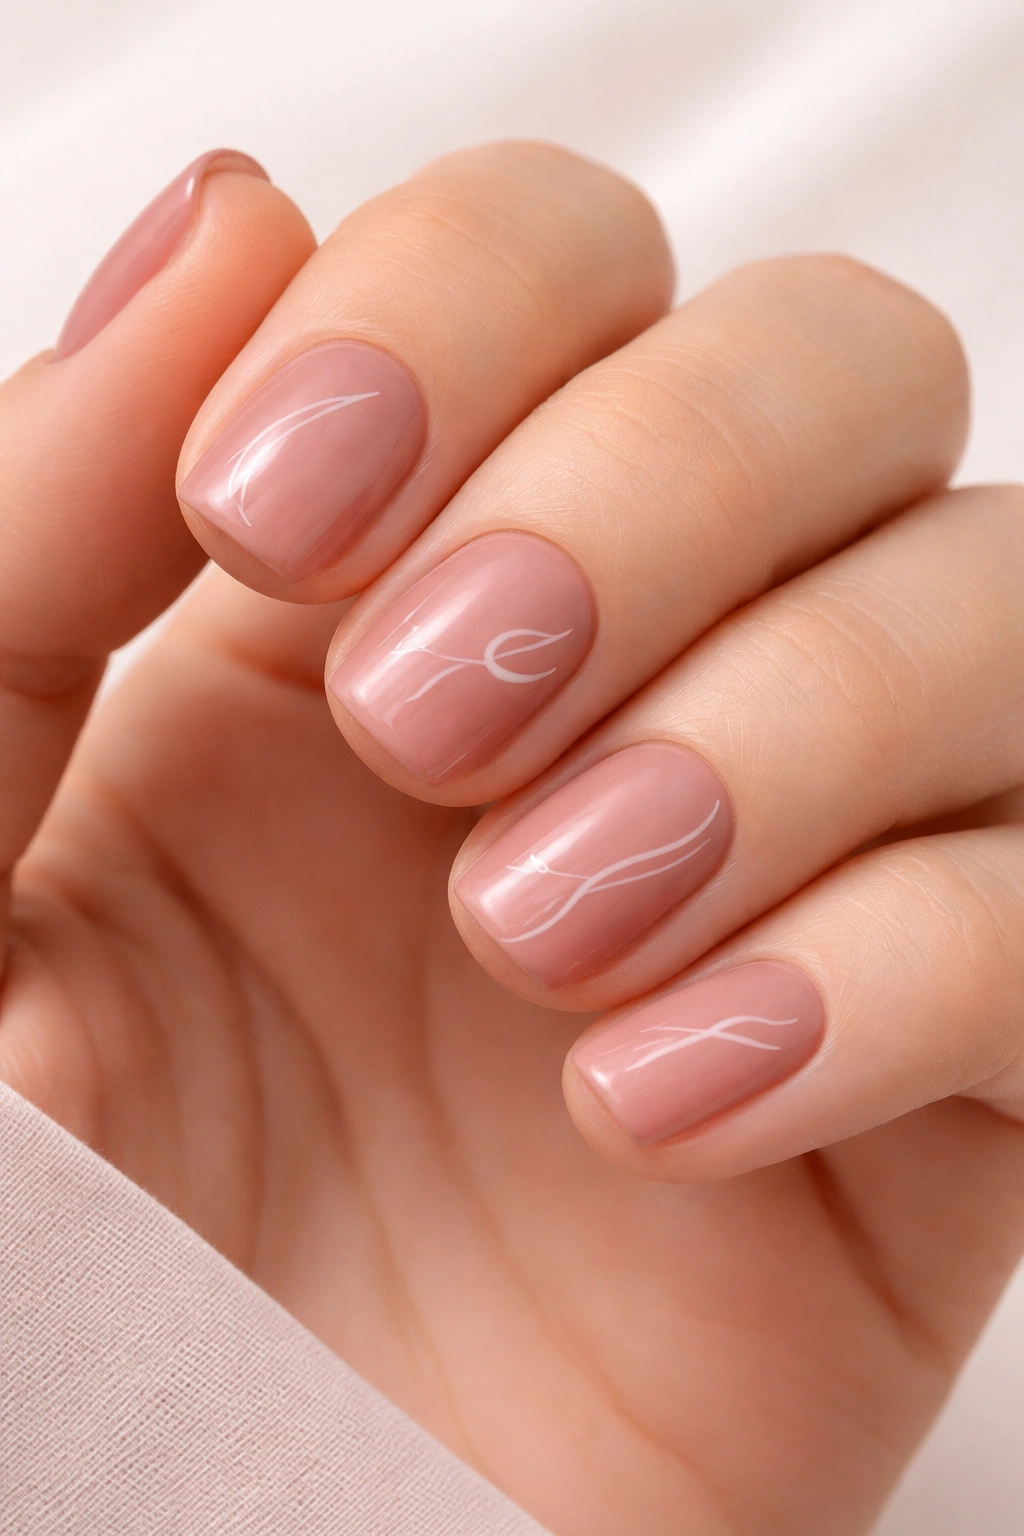
A muted dusty rose base with tiny white line drawings (geometric shapes, simple faces, abstract marks) creates a design that feels artistic and thoughtful without being loud. The dusty rose is calming, the white lines are precise and intentional, and together they create something that feels like wearable art. Short squovals give you the perfect canvas for this kind of detailed line work.
Why White Line Art on Dusty Rose Works
Dusty rose is one of the most universally flattering colors—it complements warm and cool undertones and photographs beautifully. White creates stark contrast without being jarring. The combination feels sophisticated and intentional. Line art feels hand-drawn and personal, which makes it special.
Creating Simple but Striking Line Art
- Paint the entire nail with dusty rose (usually one coat is enough because of how light this shade is)
- Use a very thin white brush pen or white polish on a thin brush to create simple line drawings
- Think minimalist—simple circles, squares, triangles, thin wavy lines, small abstract faces or symbols
- Space the designs across the nail rather than cramming them into one area
- Let the dusty rose show through; the design should feel like minimal marks on a colored field rather than a busy composition
- Seal with a glossy top coat that protects the white lines
This works for creative types, people who love subtle personalization, or anyone wanting nails that start conversations.
13. Coral Orange with Metallic Bronze Accent
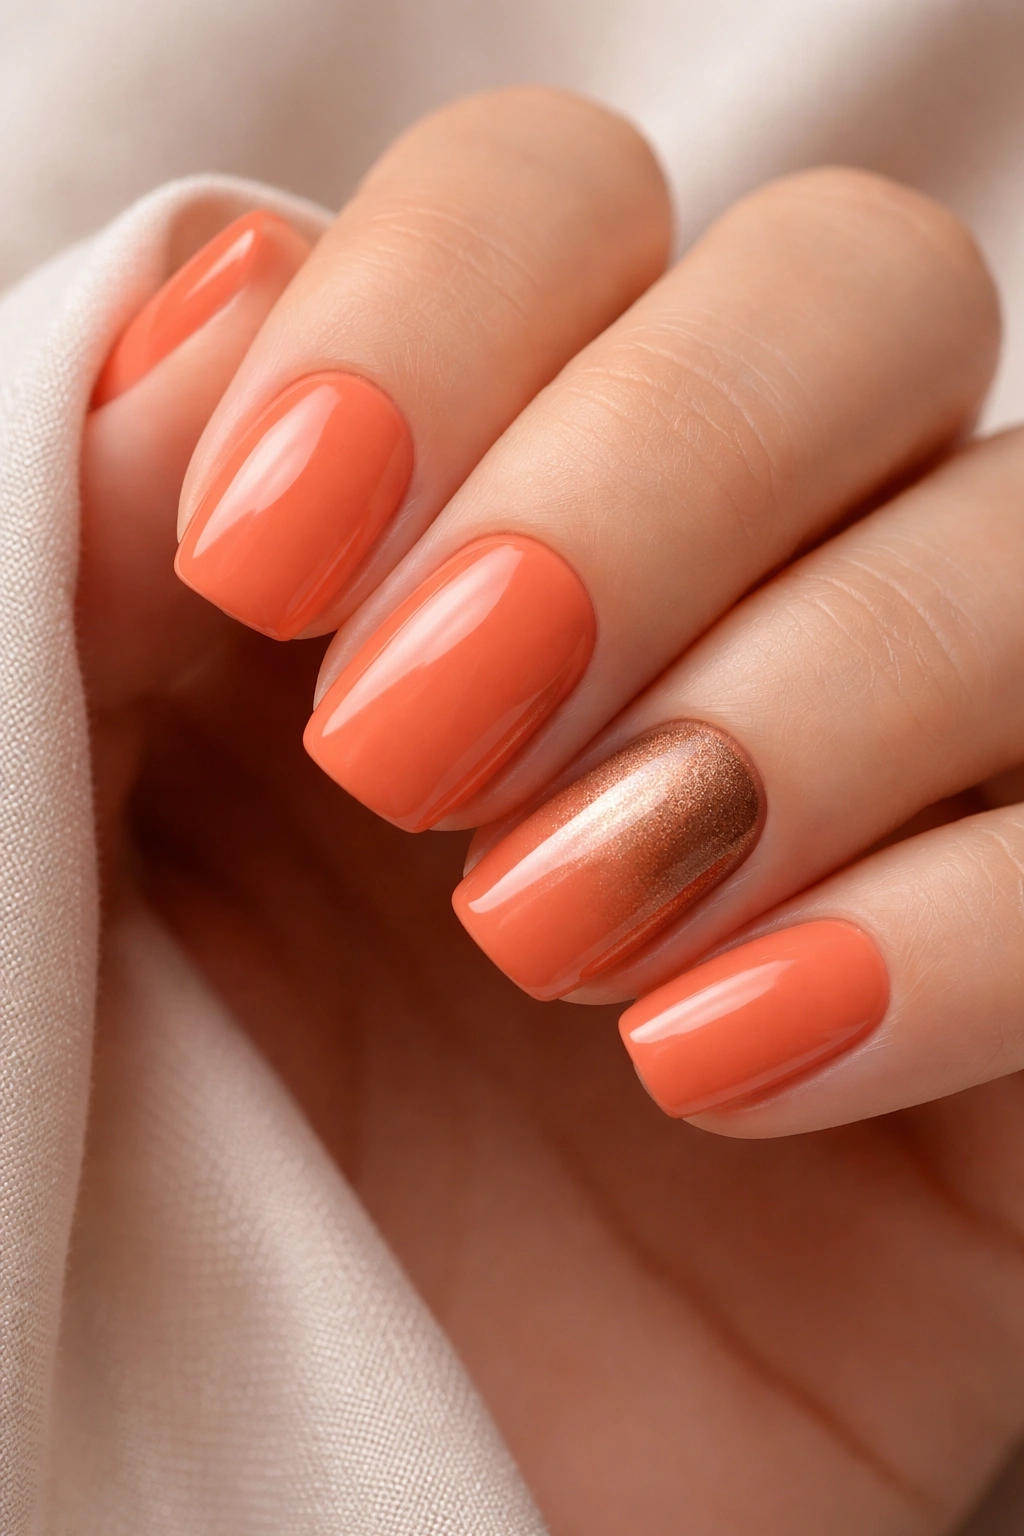
A warm coral orange paired with metallic bronze accents on the accent nail creates a sunset-inspired, warm-toned look that feels energetic but not overwhelming. The coral is cheerful and approachable, while the bronze adds sophistication and visual interest. On short squovals, this combination feels balanced and intentional rather than chaotic.
Why Warm Metallics Enhance Coral
Coral can sometimes read as beachy or casual, but adding a metallic element shifts it into more sophisticated territory. Bronze is warmer than gold, which makes it the perfect partner for coral without feeling too yellow or too cool. The combination feels rich and intentional.
Applying Metallic Accents
- Paint your main nails with two coats of coral orange
- On your accent nail (usually the thumb or ring finger), paint the entire nail coral as well
- Once dry, apply bronze metallic polish or a metallic gel to just the tip area of the accent nail, creating a gradient or ombre effect
- Alternatively, use a bronze nail pen or metallic brush pen to create geometric accent marks on the accent nail
- Seal everything with a glossy top coat that will amplify the metallic shimmer
- The metallics will shift in different lighting, which is part of the appeal
This design works for creative professionals, warmer skin tones, or anyone wanting nails that feel warm and energized.
14. Ivory with Thin Black Outline

An ivory or off-white base with an extremely thin black outline around the edge of the nail creates definition and makes the squoval shape stand out beautifully. This design is minimalist and architectural—the outline frames the nail shape itself rather than adding a decorative element on top of it. On short squovals, this geometric framing is particularly effective.
The Power of Minimal, Purposeful Design
Sometimes the most striking designs are the ones that emphasize the shape itself rather than competing with it. An outline draws attention to the proportion and geometry you’ve created, making the squoval shape itself the focal point. It’s sophisticated and modern without requiring any color variation.
Executing a Perfect Outline
- Paint the entire nail with two coats of ivory or off-white
- Using a thin black nail pen or very thin brush with black polish, create a thin line around the entire perimeter of the nail
- Start at one corner and move slowly and deliberately around the nail edge
- The line should be consistent in thickness and should follow the exact contour of the squoval shape
- Keep the line about 1-2mm from the actual edge of the nail—far enough that it’s clearly intentional but close enough to frame the nail rather than border it
- Seal with a glossy or matte top coat depending on your preference
This design is perfect for minimalist lovers, professional settings, or anyone wanting something that feels modern and controlled.
15. Blush with Pearl Finish
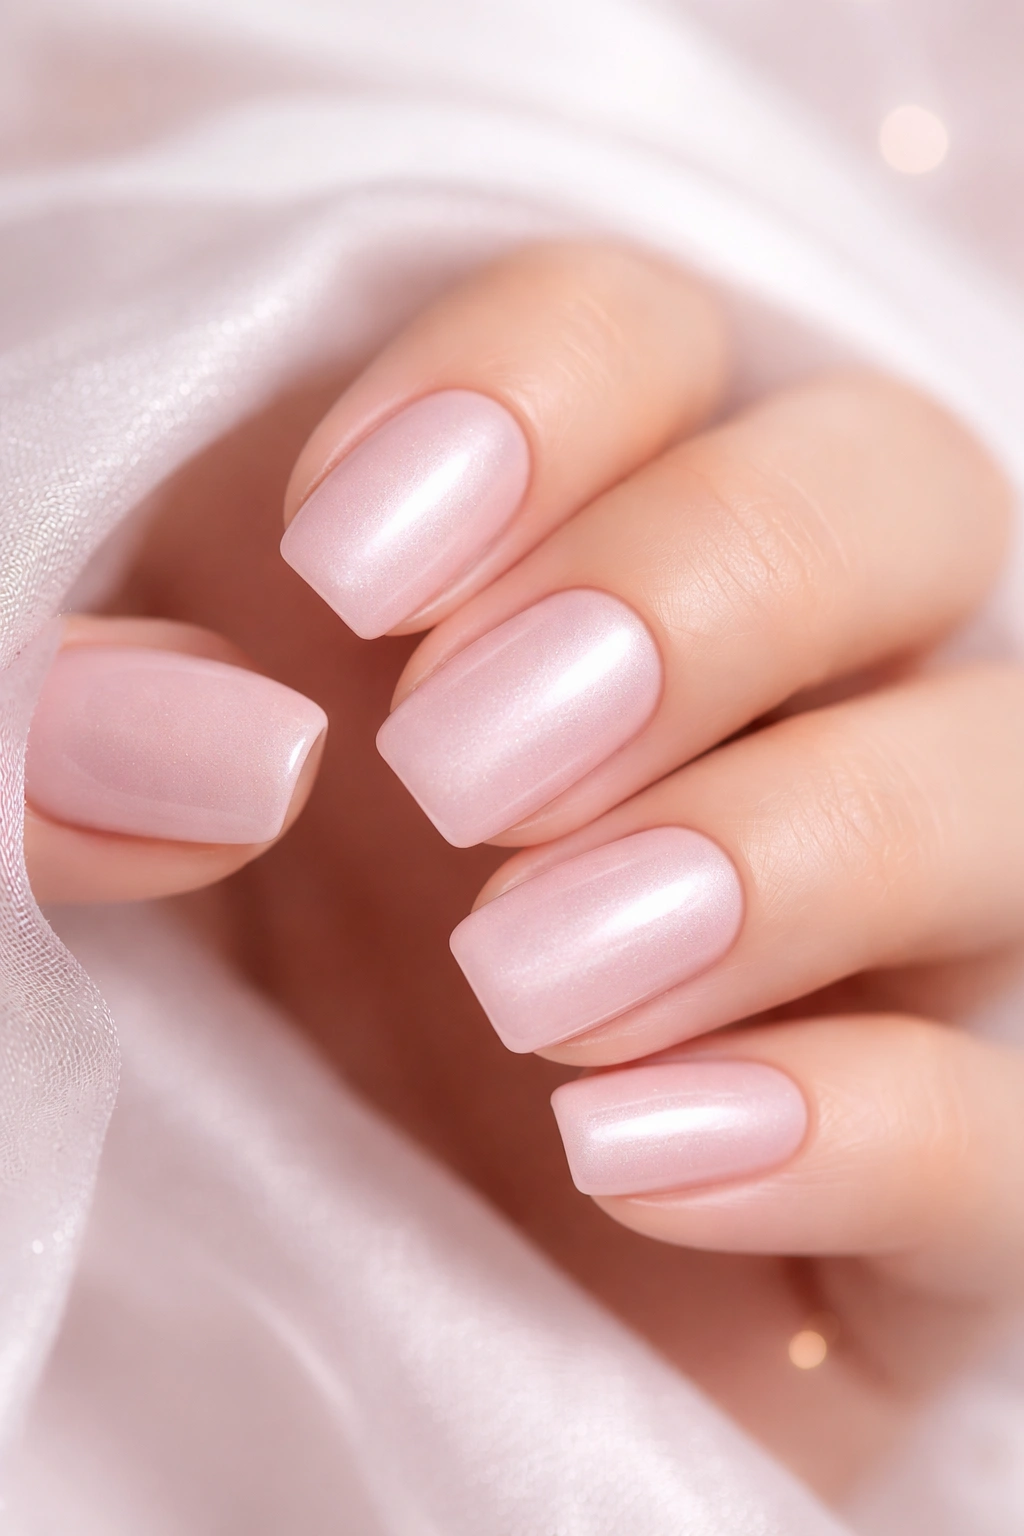
A blush pink with a pearl or iridescent finish creates a soft, dimensional look that shifts slightly in different lighting. The pearl effect adds interest and luxury without adding color variation or patterns. Short squovals in pearlescent finish look elegant and expensive with virtually no design complexity.
Why Pearl Finishes Elevate Simple Colors
Pearls create depth and dimensional interest that a flat color can’t achieve. The subtle shimmer catches light in unexpected ways, which makes even a simple color feel special and thoughtful. This is the nail equivalent of upgrading from satin to silk—it’s a finish improvement that doesn’t require rethinking the design.
Achieving a Flawless Pearl Finish
- Apply two coats of blush pink pearl polish, ensuring even coverage
- Pearl finishes sometimes look streaky if applied too thinly, so generous coverage is important
- Use a glossy top coat (not matte) to enhance the pearlescent effect and add shine
- The finish will shift subtly from angle to angle, showing hints of purple, pink, and champagne depending on the light
- Pearl finishes last well, but be gentle when removing them, as the particles can sometimes cling more than solid colors
This works for anyone wanting understated elegance, everyday wear that still feels special, or any occasion where you want nails that photograph beautifully.
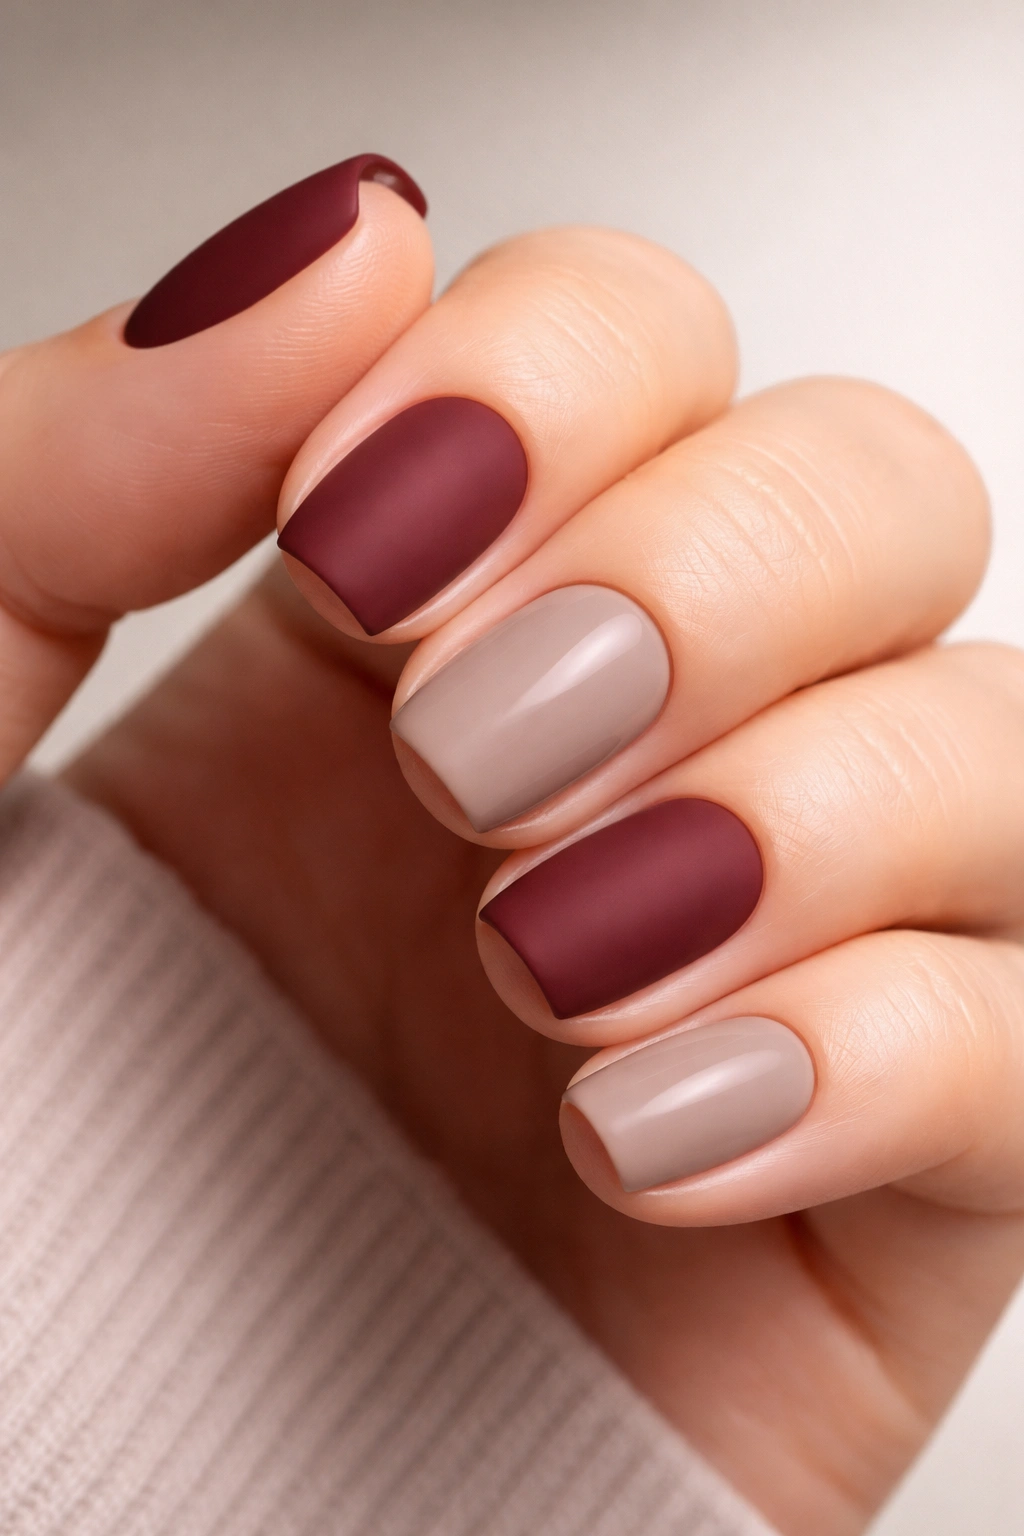
16. Deep Burgundy with Matte Finish
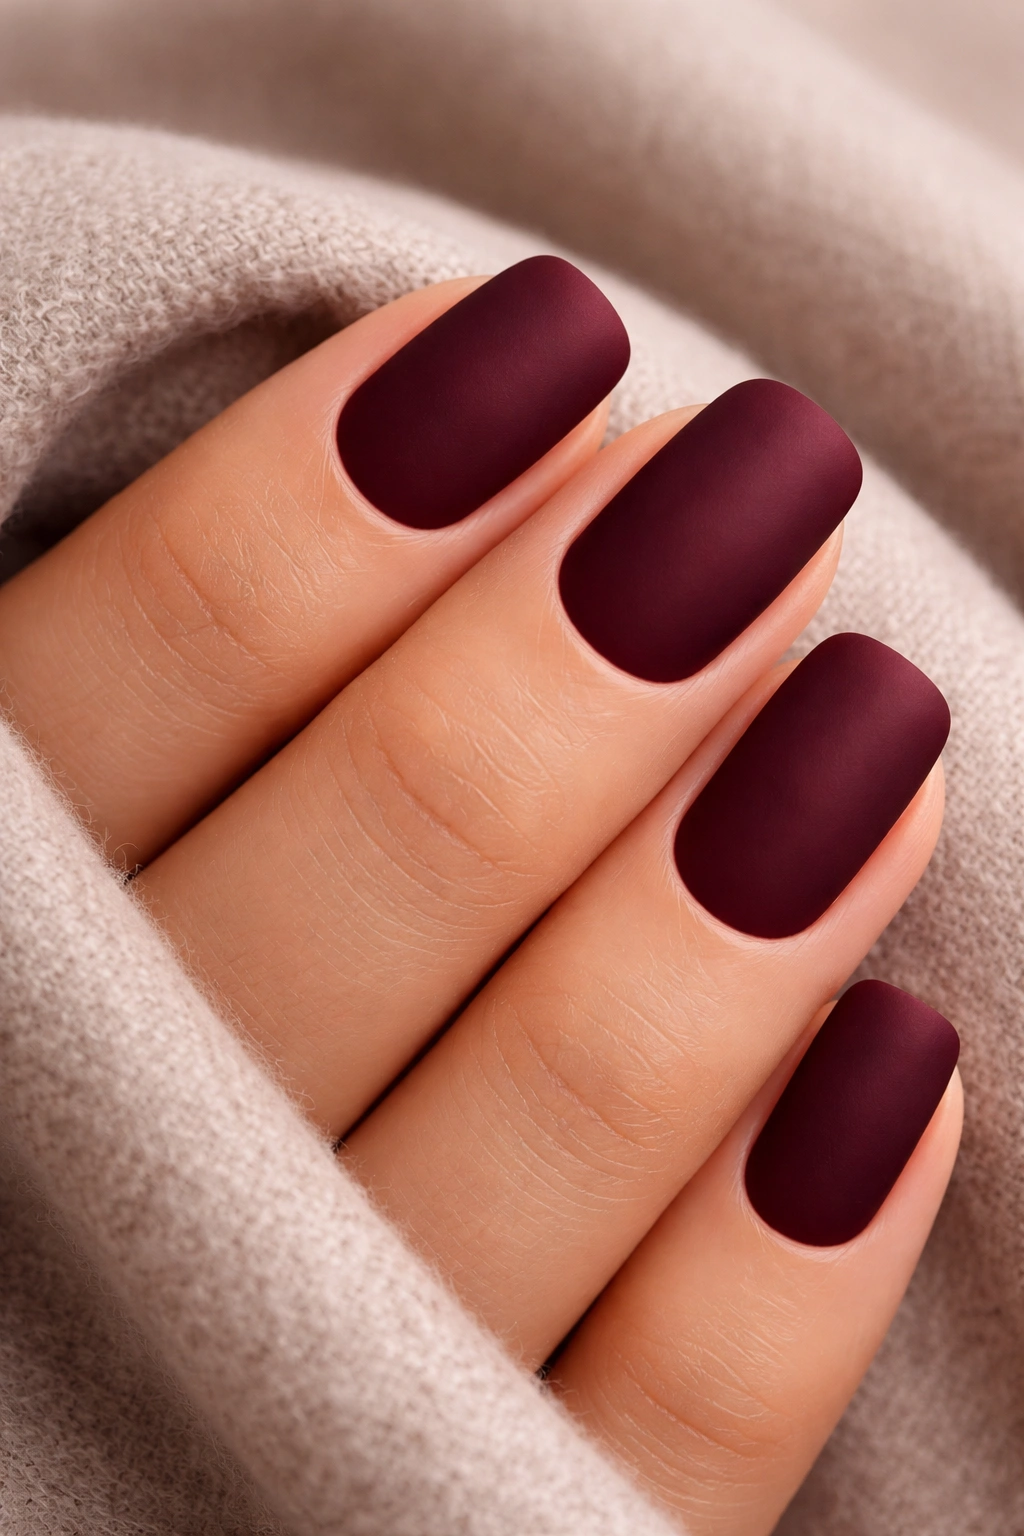
A rich, deep burgundy in a matte finish creates instant sophistication and an elevated, autumnal vibe that somehow works year-round. The matte finish prevents the darkness from feeling heavy—instead, it feels intentional and modern. Short squovals in deep burgundy matte look professional and put-together in every setting.
Why Matte Burgundy Feels Elevated
Matte finishes have a luxe, intentional quality that glossy finishes sometimes lack. Burgundy is universally flattering and feels more sophisticated than red, less severe than black. The combination reads as someone who knows their style and executes it with precision.
Perfecting the Matte Finish
- Choose a true burgundy, not brown-leaning or too purple-leaning
- Apply two coats for opaque, even coverage
- Use a matte top coat rather than a glossy one—this is essential, as it dramatically changes how the color reads
- Matte finishes can make fine lines on the nail surface more visible, so file and smooth your nails carefully before application
- Matte nails benefit from being perfectly shaped and pristine, so prioritize cuticle care and edge sealing
This works for professional settings, creative fields where you want to express style, autumn wardrobes, or anyone who loves moody, sophisticated colors.
17. Light Gray with Metallic Silver Details
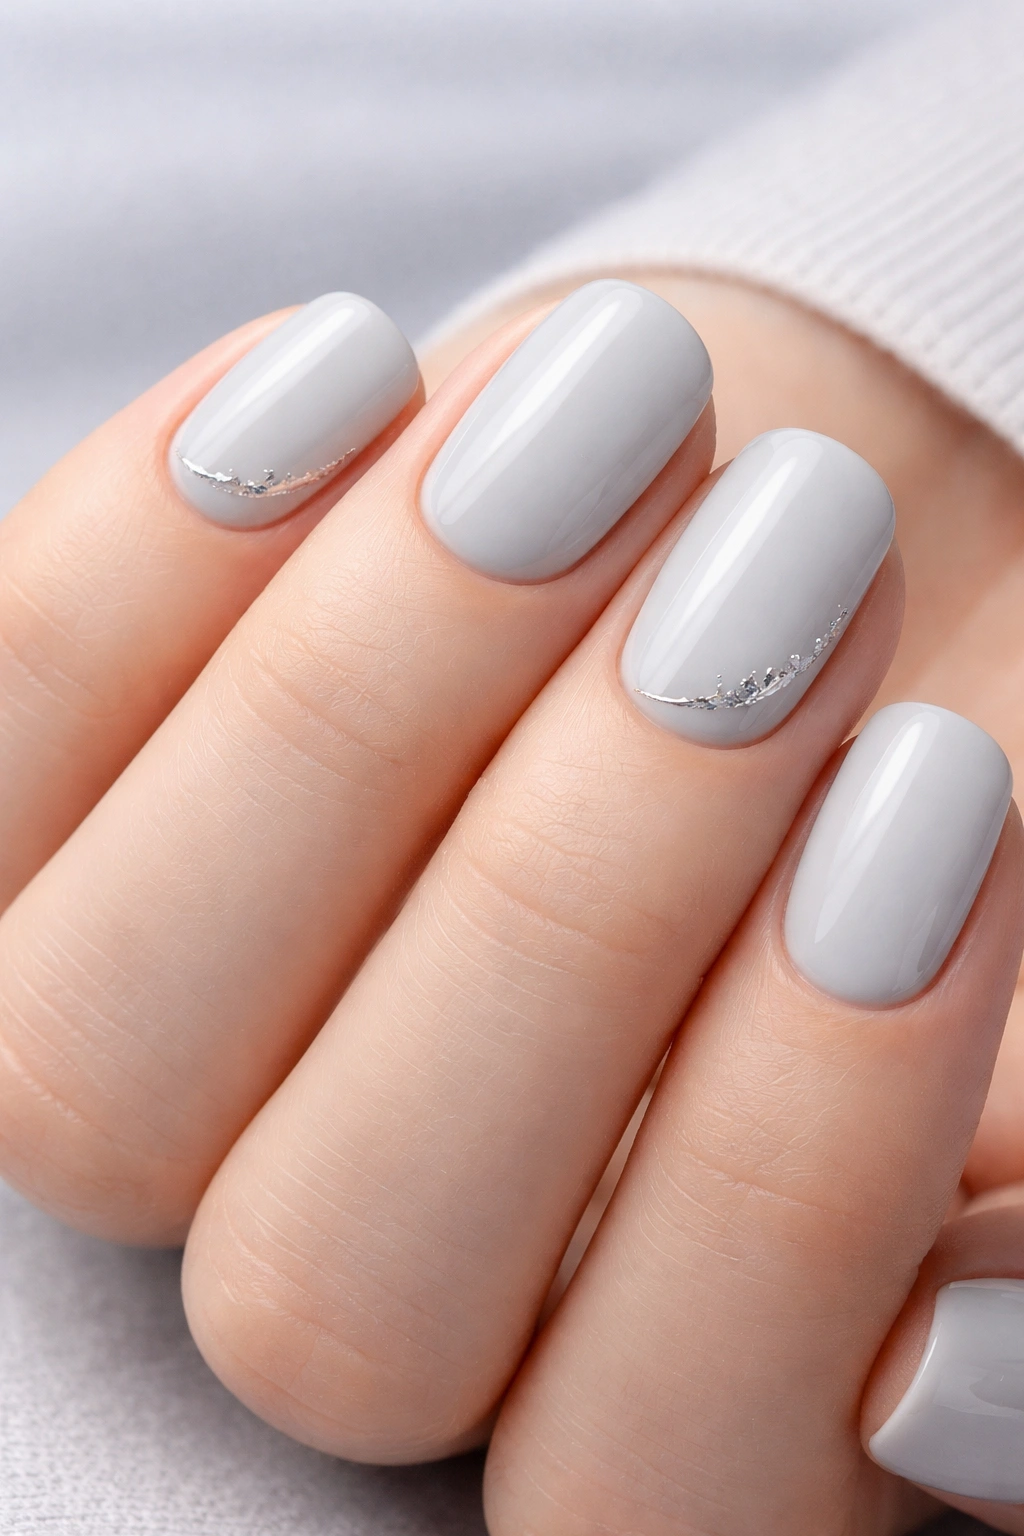
A pale, cool gray base with metallic silver accents creates a modern, almost futuristic vibe that feels contemporary and artistic. The gray is neutral enough to pair with any outfit, while the silver adds just enough shimmer to make it feel special. On short squovals, this combination is understated but clearly intentional.
Why Gray Plus Silver Feels Cutting-Edge
Gray is becoming increasingly popular in nail design because it’s sophisticated, unexpected, and works across seasons and wardrobe changes. Silver metallic creates contrast against the cool gray while maintaining the overall coolness of the palette. Together, they feel modern, intentional, and artistic.
Applying Silver Details to Gray
- Paint the entire nail with two coats of a pale, cool gray (this color can be tricky to apply smoothly, so be patient with coverage)
- Once fully dry, apply silver metallic accents using one of several methods: a metallic brush pen, metallic gel, silver leaf, or a glitter ombre
- Keep the silver accents minimal and purposeful—perhaps a metallic stripe, a ombré fade at the tips, or scattered metallic flecks
- Seal everything with a top coat that will protect the metallic finish
- The cool tones throughout create a unified, sophisticated palette
This design works for artistic people, cool undertones, modern aesthetic lovers, or anyone wanting nails that feel editorial and intentional.
18. Pale Yellow with Tiny Daisy Details
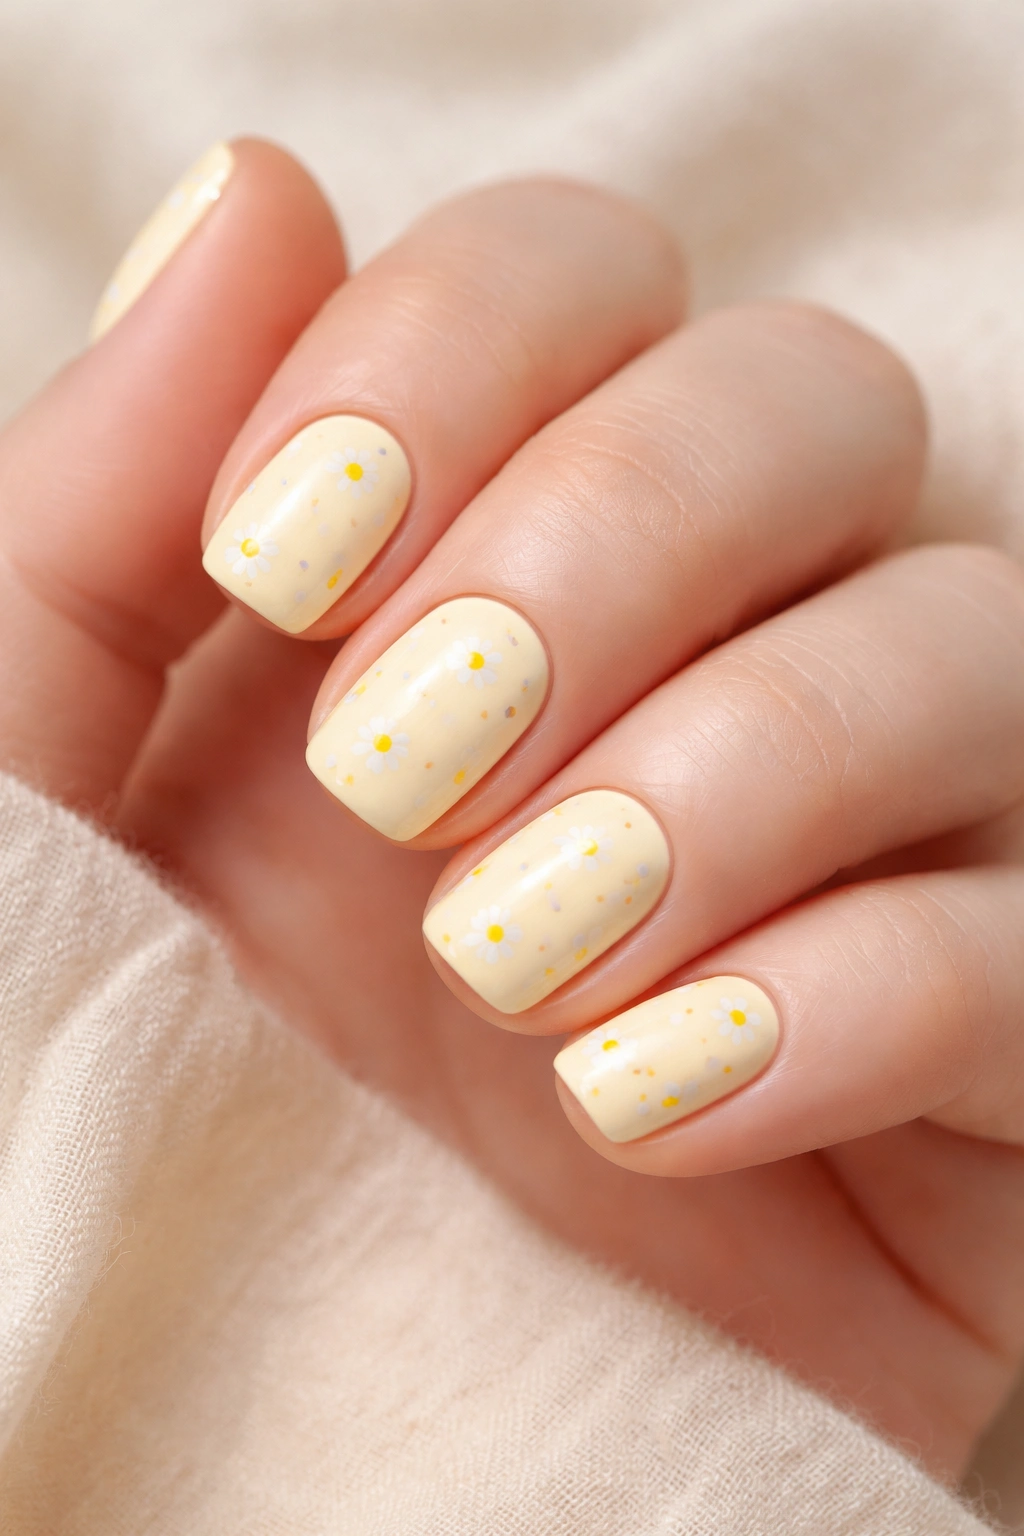
A soft, creamy pale yellow base with miniature white daisies scattered across creates a cheerful, fresh look that somehow feels both playful and sophisticated. The pale yellow is subtle and warm, while the daisy details add personality without overwhelming the design. Short squovals give you the perfect space to make tiny daisies visible without them looking cramped.
Why Daisies Work on Any Nail Design
Daisies represent innocence, cheerfulness, and a connection to nature. They’re universally appealing and somehow read as both youthful and timeless. The flower design feels personal and carefully considered, which makes it special.
Painting Tiny Daisies
- Paint the entire nail with two coats of pale, creamy yellow
- Using a very fine brush and white polish, paint tiny daisy petals (just 5-6 small oval shapes arranged in a circle)
- Add a tiny dot of pale yellow or cream in the center of each daisy to represent the flower’s center
- Vary the size and spacing of the daisies so they feel scattered and natural rather than regimented
- Add thin green lines as stems and leaves connecting some of the flowers
- Seal with a glossy top coat that protects all the delicate details
Paint daisies on all your nails for a cohesive look, or concentrate them on a few accent nails for subtlety.
19. Slate Gray with Nude Ombre
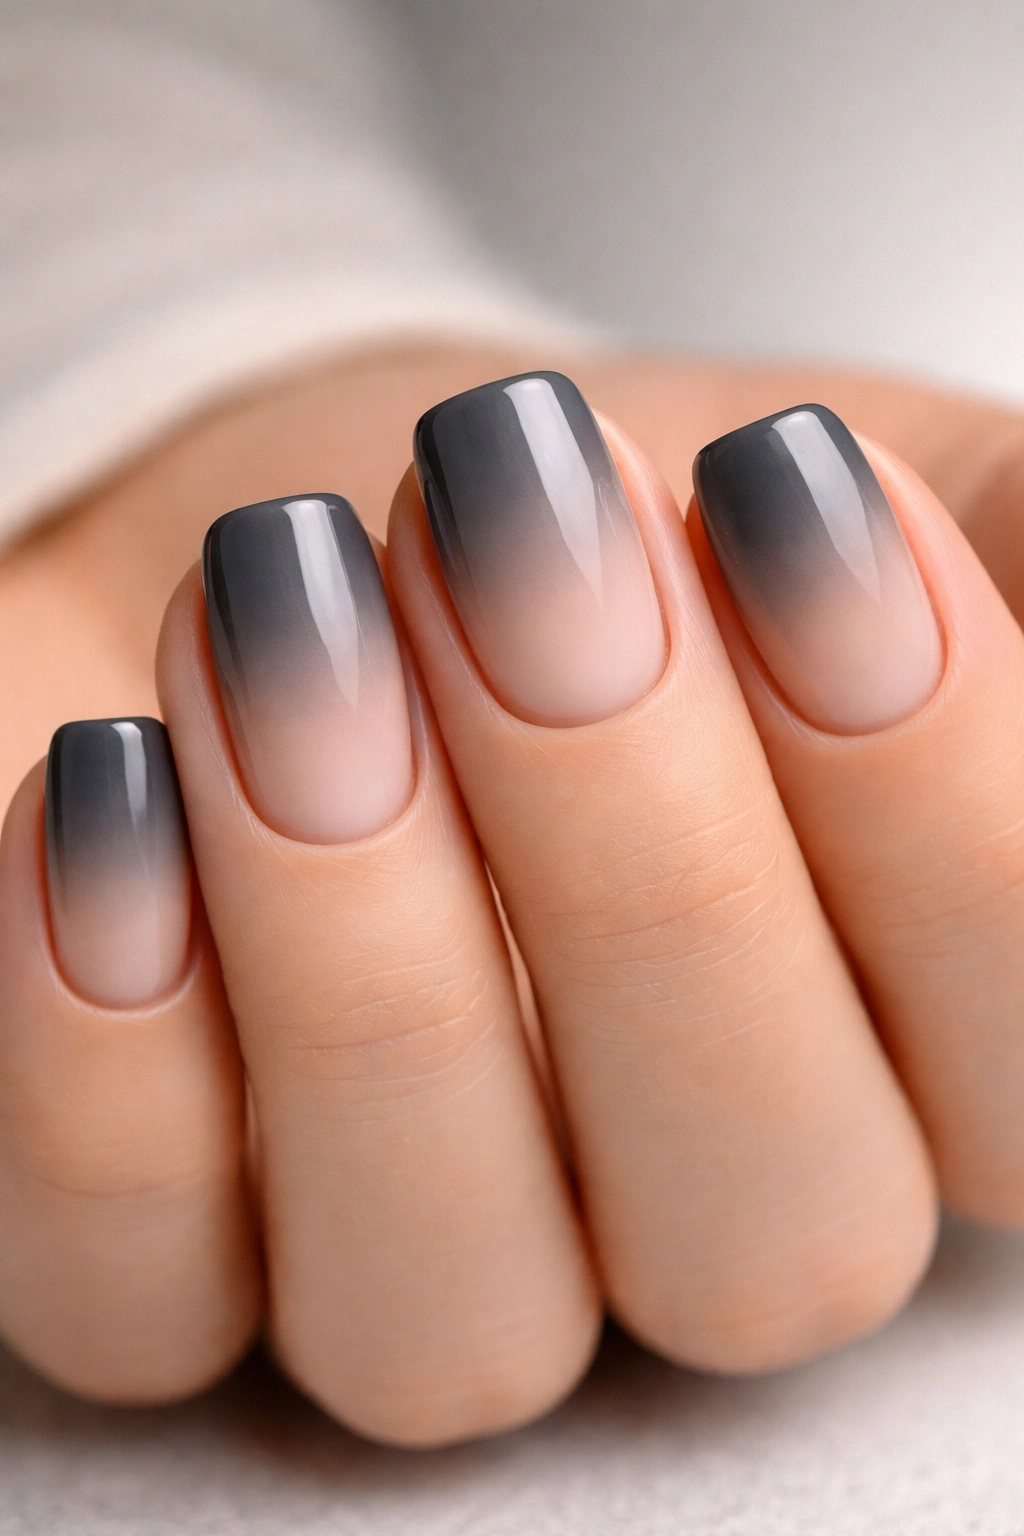
A deep slate gray fading into nude at the tips creates an unexpected, sophisticated ombre that bridges warm and cool tones beautifully. The depth of the gray with the lightness of the nude creates visual interest and dimension. On short squovals, this gradient feels balanced and intentional rather than chaotic.
Why This Gradient Works
Slate gray is a deep, moody color that could feel heavy on its own. By fading it into a neutral nude, you create a visual transition that feels elegant and modern. The two-tone effect makes the nail shape itself more noticeable and creates a sense of movement from base to tip.
Creating a Gradient
- Paint the entire nail with slate gray (this might take two coats for deep coverage)
- Apply nude polish or gel to a makeup sponge
- Dab and blend the nude onto just the tip area, then gently press and roll toward the center to create a gradient
- Build the transition gradually—soft gradients are more elegant than stark lines
- You might add a drop of gray or nude to the middle to soften the transition even further
- Seal with a glossy top coat that will smooth the gradient and create shine
This works for modern aesthetics, professional settings, or anyone who loves unexpected color combinations.
20. Soft Lavender with Rhinestone Crown
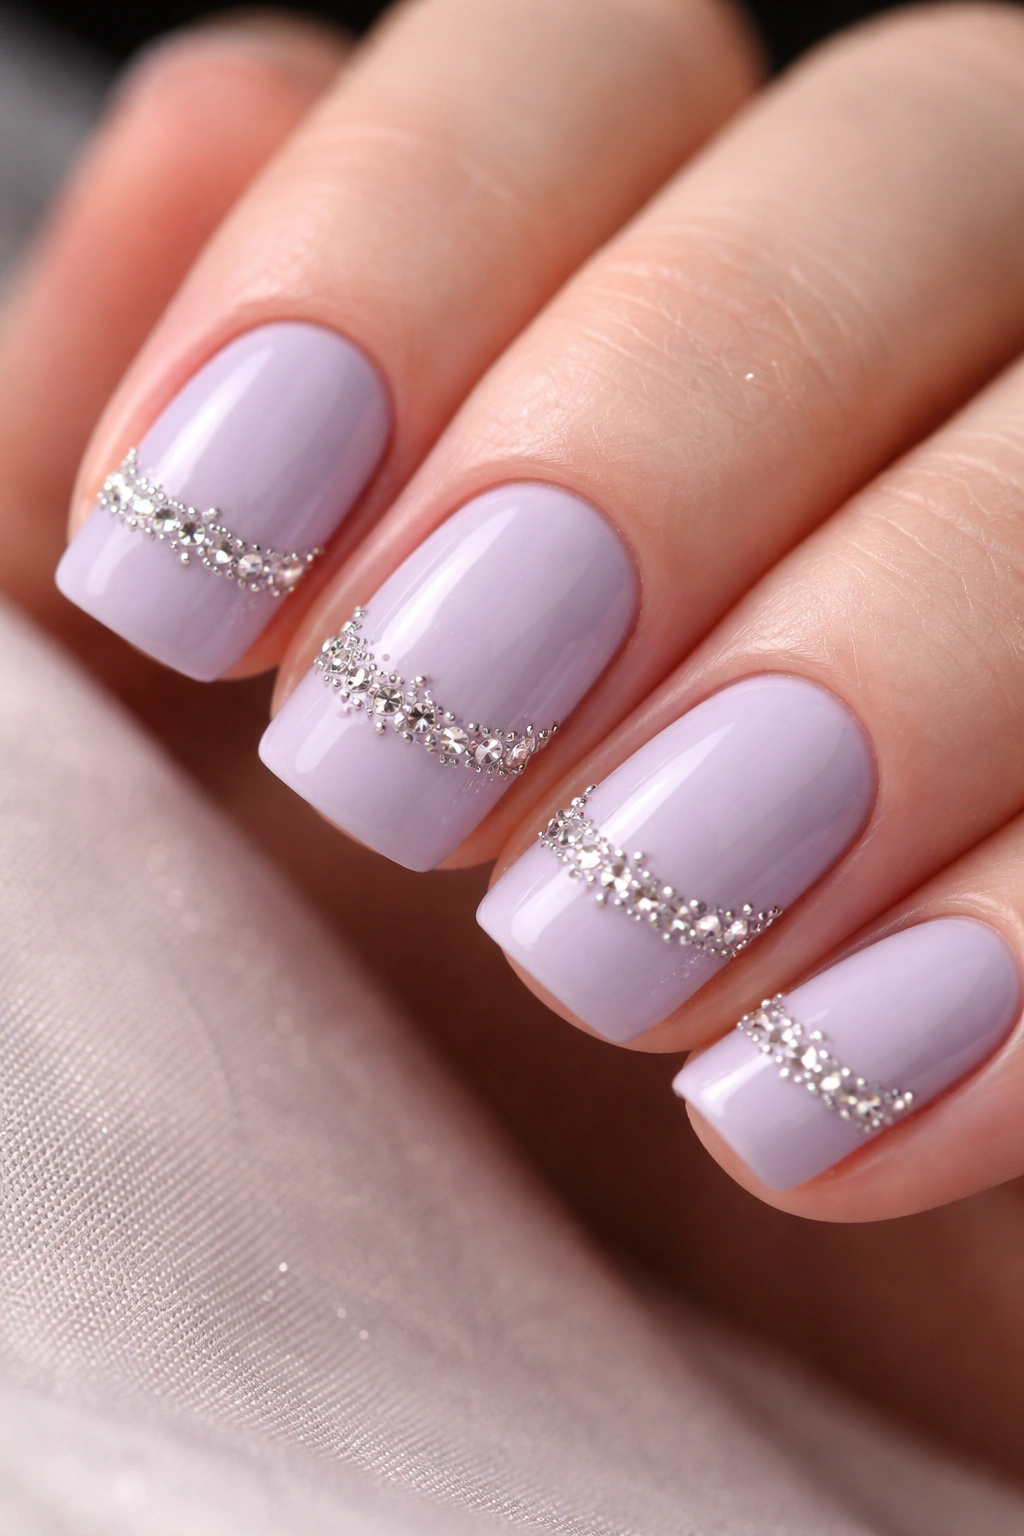
A pale lavender base with small rhinestones arranged in a crown or tiara pattern along the tips creates a delicate, romantic, slightly regal look. The lavender is calming and pretty, while the rhinestones add sparkle and intentional glamour. Short squovals give you just enough room to show off a small rhinestone arrangement without it feeling overwhelming.
Why Lavender Feels Romantic and Timeless
Lavender represents grace, elegance, and sophistication. It’s associated with luxury and calm simultaneously. Adding rhinestones elevates it from simply pretty to genuinely special without pushing it into costume territory.
Applying a Rhinestone Crown
- Paint the entire nail with pale lavender (one or two coats depending on opacity)
- Once completely dry, apply a small amount of nail glue or clear base gel to where you want your rhinestones
- Using tweezers, gently place small-to-medium rhinestones in a crown or tiara pattern across the nail tip
- Arrange them in a gentle curve following the shape of the squoval
- Seal everything with a thick top coat that will hold the rhinestones securely in place
- If using regular nail polish, let the rhinestones set for at least an hour before using your hands
This design works for special occasions, creative self-expression, or anyone wanting a touch of sparkle with sophistication.
21. Warm Taupe with Rose Gold Foil

A neutral taupe base with rose gold foil accents creates warmth and luxury in a completely understated way. Taupe is one of the most universally flattering shades, and rose gold foil catches light beautifully. On short squovals, this combination feels elegant, professional, and deliberately sophisticated.
Why Rose Gold Elevates Neutral Tones
Rose gold is the perfect warm metallic that doesn’t feel yellow or orange—it creates a sophisticated sparkle that works with any skin tone and any outfit. Taupe provides the perfect neutral backdrop that lets the foil shine without competition.
Applying Foil Accents
- Paint the entire nail with two coats of warm taupe
- Once dry, apply a special foil adhesive (this is different from regular polish and is essential for foil to adhere properly)
- Press small pieces of rose gold foil onto the adhesive using a flat-tipped tool, pressing gently
- Create a geometric pattern, random scattered placement, or line the foil along the tips—whatever appeals to you
- Seal with a glossy top coat (the foil might crack under matte finishes)
- Foil details are durable but delicate, so avoid harsh scrubbing on these nails
This design works for anyone loving understated elegance, professional environments where you want subtle sparkle, or anyone who appreciates luxury details done quietly.
22. Mint Green with White Heart Details

A soft mint green base with tiny white hearts scattered or clustered across creates sweetness without being saccharine. The mint is cool and fresh, the hearts add personality and romance, and together they’re cheerful without feeling young or naive. Short squovals are the perfect size for making these tiny hearts visible and charming.
Why White Hearts on Mint Feel Sophisticated
Mint green is having a major moment because it’s fresh, unexpected, and flattering on most skin tones. Small white hearts add a personal, romantic touch without overwhelming the design. The color combination feels modern and intentional rather than juvenile.
Creating Perfect Tiny Hearts
- Paint the entire nail with soft mint green (usually one coat is sufficient)
- Using a thin white brush or nail pen, draw tiny heart outlines
- Start with the top point of each heart, then draw down to create two curves, then bring them together at a point at the bottom
- Vary the size and placement of hearts across the nail—some can overlap, some can stand alone, some can be clustered on one area
- For a busier look, fill some hearts with white; for a minimalist look, use only heart outlines
- Seal with a glossy top coat
Paint hearts on all ten nails for a cohesive look, or concentrate them on a few accent nails for subtlety.
23. Charcoal Black with Holographic Glitter Tips
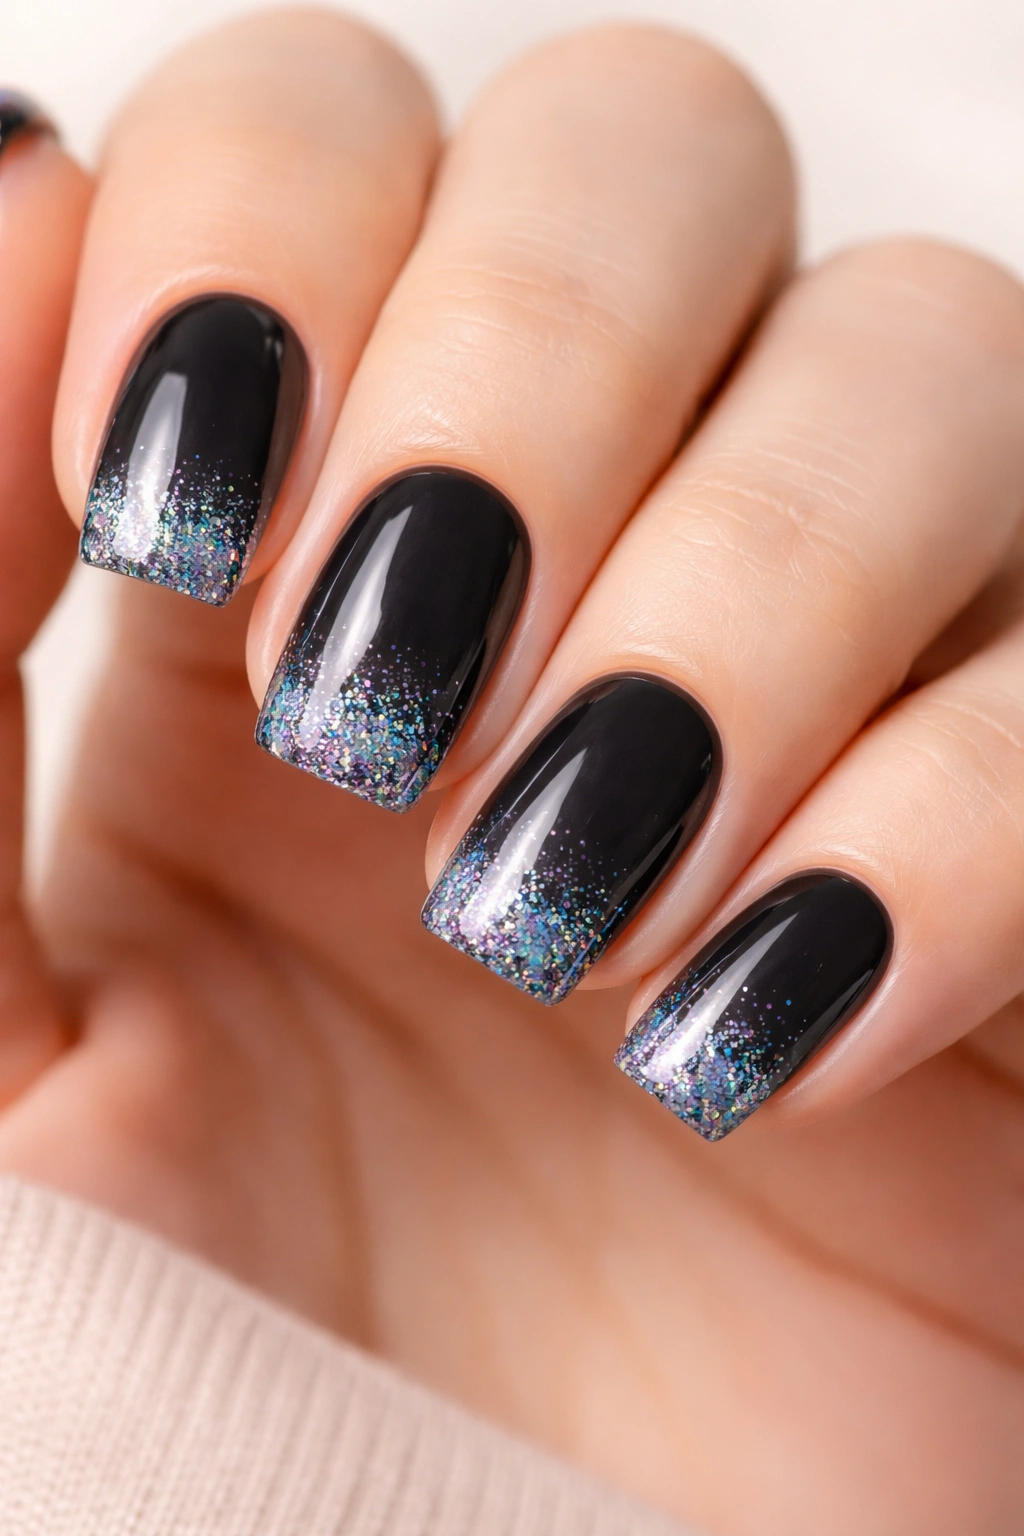
A deep charcoal black base with holographic glitter concentrated at the tips creates a dramatic gradient that shifts colors in different lighting. The black provides a sophisticated backdrop, while the holographic glitter adds just enough sparkle and visual interest. On short squovals, this ombre effect is balanced and editorial.
Why Black and Holographic Glitter Works
Black is the perfect backdrop for any sparkle because the contrast is so high. Holographic glitter shifts between multiple colors depending on angle and lighting, which means these nails look different (and special) in every setting. The combination reads as intentional, artistic, and slightly edgy.
Creating a Holographic Ombre
- Paint the entire nail with two coats of deep charcoal or true black
- Apply a thin layer of clear base gel or nail adhesive to just the tips of the nails (or create a gradient area from mid-nail to tip)
- Apply holographic glitter directly to this adhesive or suspension, concentrating density at the tips
- Build the glitter gradually—it’s easier to add more than remove it
- Create a gradient by reducing glitter density as you move toward the nail base
- Seal with a thick, smooth top coat that will protect all the glitter and prevent catching
- The glitter will shift and sparkle with every movement
This design works for evening events, creative self-expression, or anyone wanting nails that photograph beautifully and shift in different lights.
24. Peachy Nude with Delicate Gold Geometry
A warm peachy nude base with subtle gold geometric shapes or lines creates a design that feels artistic and intentional without being busy or overwhelming. The peachy nude is flattering and neutral, the gold adds warmth and luxury, and the geometric elements create sophistication. Short squovals give you just enough space to make geometric details visible without looking cramped.
Why Geometry on Nude Feels Editorial
Geometric shapes have a modern, intentional quality. When applied to a neutral base in a metallic finish, they read as designed and artistic rather than decorative. The combination feels high-fashion and considered.
Executing Geometric Details
- Paint the entire nail with peachy nude (one or two coats depending on opacity)
- Once dry, use a gold brush pen or thin brush with gold polish to create geometric shapes
- Think triangles, circles, lines, or abstract angular shapes arranged across the nail
- Keep the pattern relatively simple and spread out—too many intersecting lines become confusing
- You can create a repeating pattern or scatter random shapes—both can work beautifully
- Seal with a glossy top coat that will protect the gold details and enhance the shine
- Gold on nude has good contrast, so the details will be visible and impactful
This design works for artistic types, professional settings where you want to express style, or anyone loving modern, clean aesthetics.
25. Sheer Pink with Micro Glitter Throughout
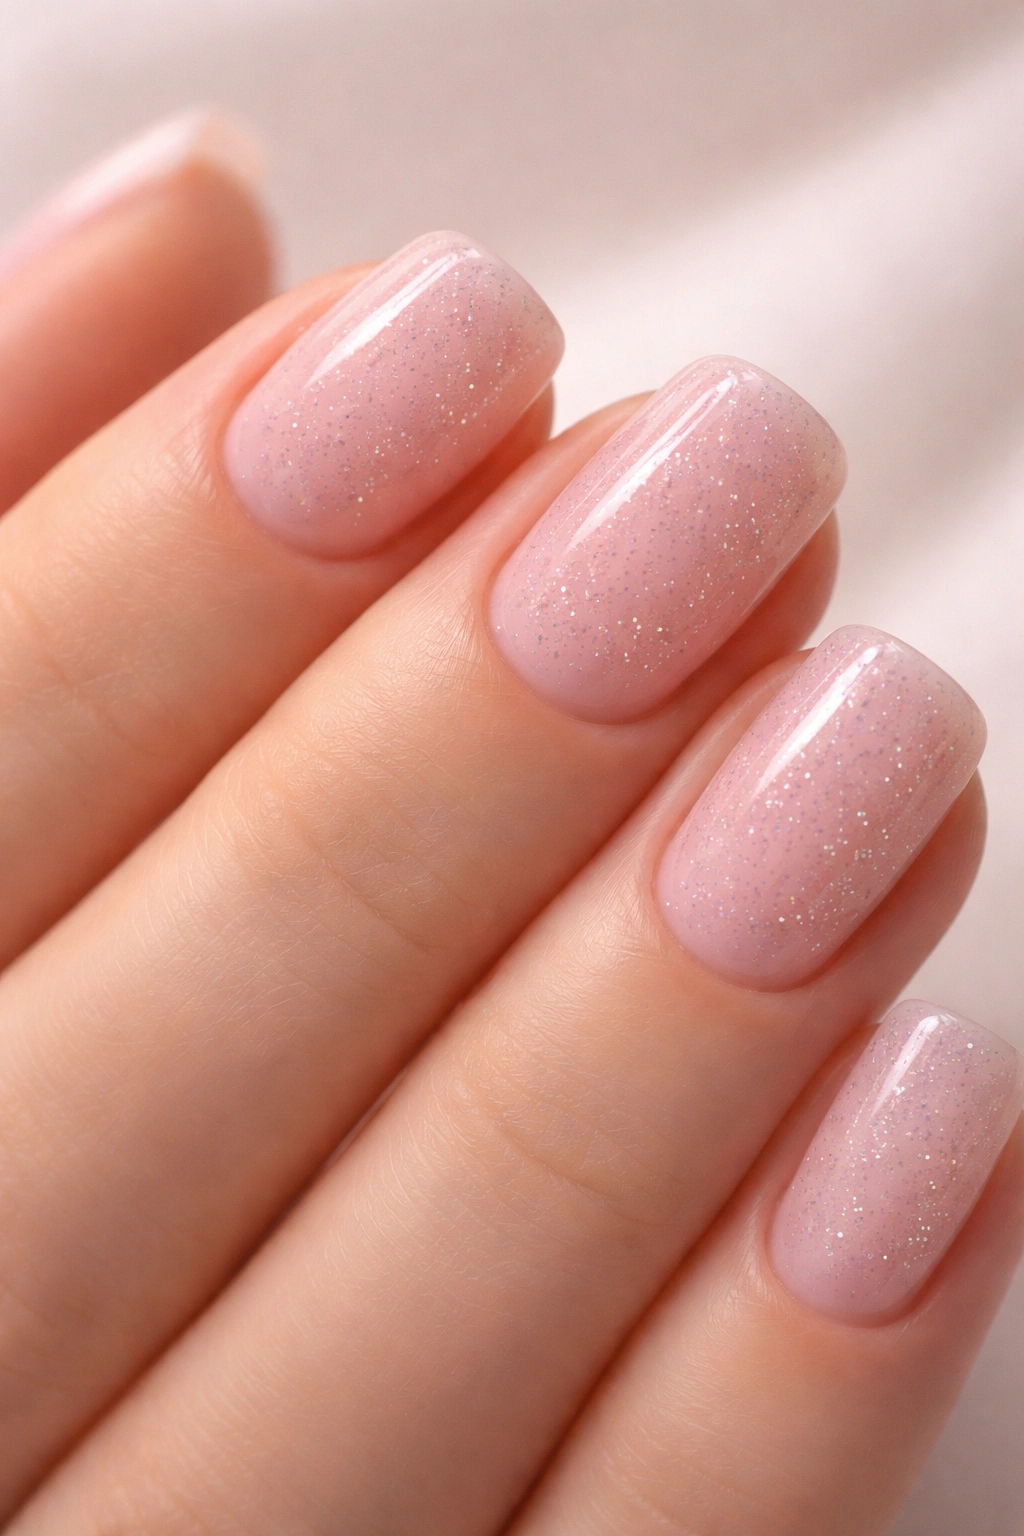
A barely-there sheer pink base with subtle micro glitter mixed throughout creates a fresh, sparkly look that somehow manages to be both fun and sophisticated. The sheer quality keeps it from feeling heavy, the micro glitter adds luminosity without overwhelming the design, and the overall effect is cheerful but intentional. Short squovals in this finish look youthful and polished simultaneously.
Why Sheer Polish Feels Effortless
Sheer pink is one of the most universally flattering finishes. It enhances your natural nail color while adding dimension and interest. Micro glitter adds subtle sparkle that catches light without creating a disco-ball effect. Together, they feel fresh, easy, and genuinely lovely.
Achieving Sheer Pink with Glitter
- Choose a sheer pink polish or a very light, translucent pink that lets your nail bed show through
- Apply one coat of sheer pink—full opacity isn’t the goal here; you want translucent coverage
- While still wet or immediately after, apply a layer of micro glitter suspension or sprinkle micro glitter onto the nails
- The glitter will integrate into the sheer base, creating sparkle throughout rather than a glitter topcoat
- Alternatively, use a sheer pink base coat, then apply regular polish, then seal with a glitter suspension top coat
- Seal with a glossy top coat that will protect everything and enhance the luminosity
- The result should feel effortlessly sparkly, not intentionally bedazzled
This design works for everyday wear that still feels special, fresh and clean aesthetics, or anyone wanting nails that sparkle without screaming for attention.
Final Thoughts
Short squoval nails have earned their place as the most versatile, flattering, and genuinely practical shape in the nail world. Whether you’re drawn to timeless classics like French manicures or more artistic designs with geometric details and hand-painted elements, squovals provide the perfect canvas. The shape itself is forgiving—it looks great on virtually every hand, works for every lifestyle, and photographs beautifully from every angle.
The beauty of having 25 different design options is that you never have to settle for nails that feel boring or off-brand. Some days call for understated elegance in matte burgundy or soft taupe. Other moments demand sparkle and personality through glitter ombres or hand-painted details. The diversity of designs means your nails can genuinely reflect whatever mood, occasion, or aesthetic you’re expressing in that moment.
Start with whichever design speaks to you most urgently, then return to this list whenever you need inspiration or want to try something new. Your short squovals are about to become your favorite accessory.
