

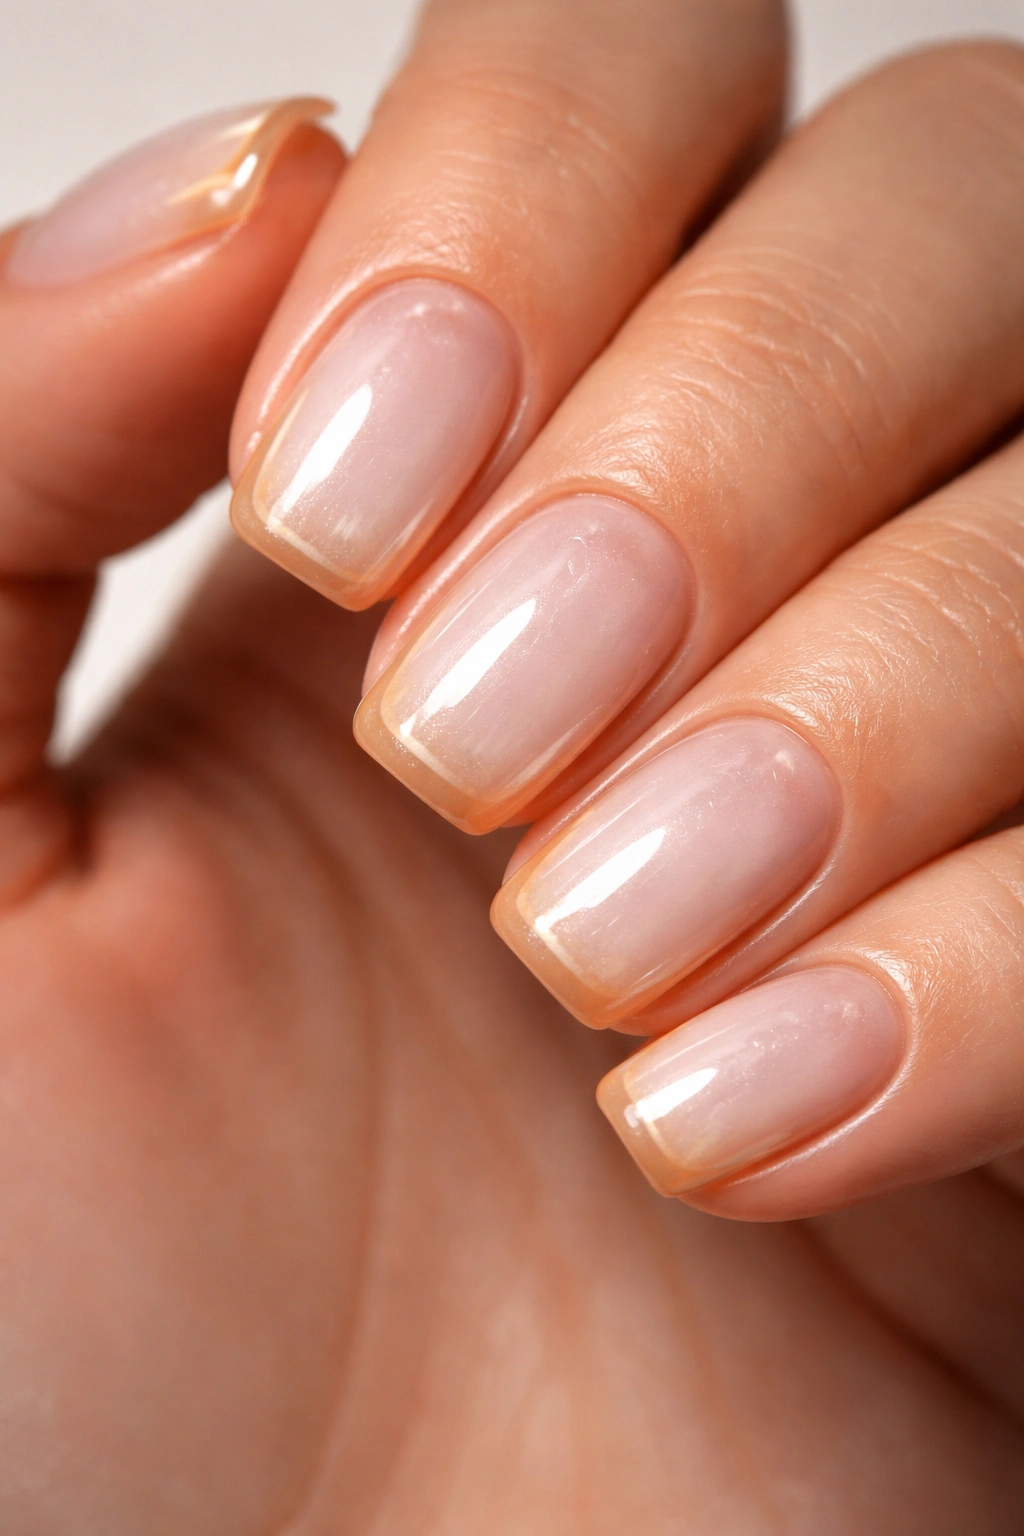
Short squoval nails hit the sweet spot between practical and polished—they’re easier to maintain than long extensions, they don’t break as easily, and they still give you that elegant, modern nail shape everyone’s obsessed with right now. The squoval combines the clean angles of a square nail with the softened, rounded corners of an oval, creating a shape that flatters almost every hand and works beautifully with both bold and subtle designs. If you’re tired of the same old French manicure or you’re looking for nail inspo that actually feels elevated without being over the top, classy short squoval acrylics are where it’s at.
The real magic of this nail style is that it feels inherently sophisticated—there’s something about the proportions that makes even the simplest design look intentional and put-together. Whether you work in a professional environment, deal with your hands constantly, or just prefer nails you can actually move in without banging into things, short squovals deliver that polished look without the drama of long stilettos or coffins. And honestly, the nail art possibilities are endless. You can go full minimalist with just one accent nail, lean into a trendy gloss finish, play with texture, or commit to something with a bit more visual interest. The shape is forgiving enough to handle any of it.
What makes these designs special is that they’re classy—and that word matters. We’re not talking neon or over-the-top glitz here. These are the kinds of manicures you’ll still love looking at weeks from now, the ones that photograph well but feel natural on your actual hand, and the designs that work whether you’re heading to the office, out to dinner, or just living your life. Let’s dive into twenty stunning short squoval nail designs you can take directly to your nail tech.
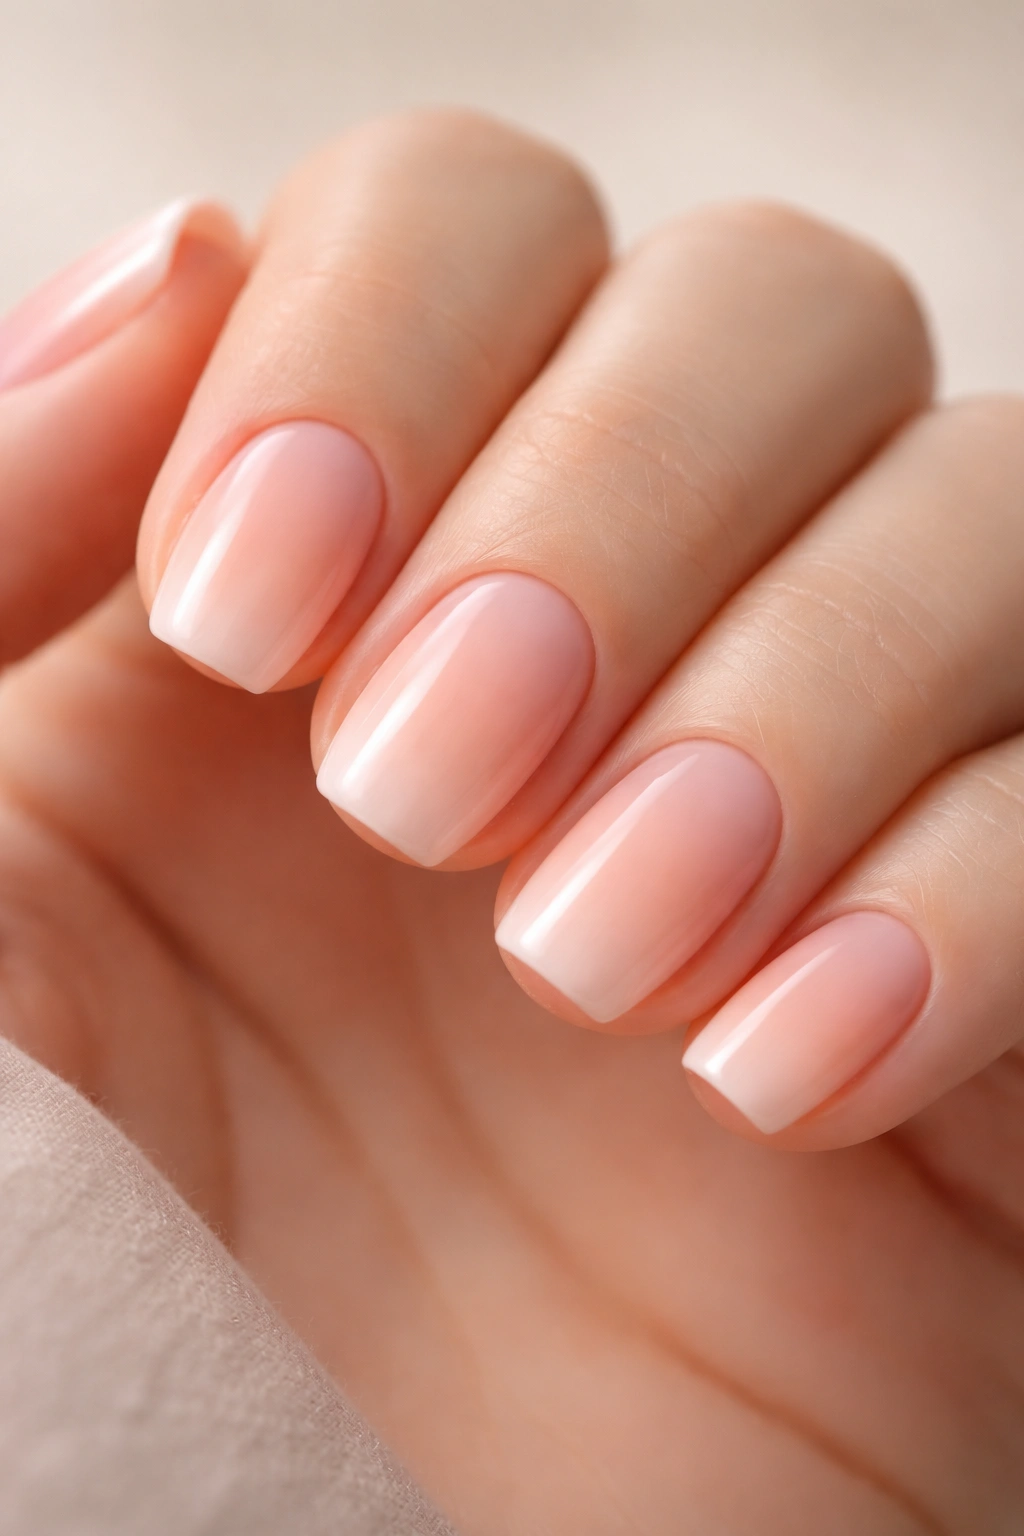
1. Nude Ombre Gradient

A soft gradient that transitions from pale nude at the cuticle to warm peachy-beige at the tips creates an elongating effect that makes short nails feel even more elegant. This design works because it’s subtle enough for any setting but detailed enough to feel intentional and polished. The gradient adds dimension without being loud, and it pairs beautifully with any wardrobe or skin tone.
Why It’s the Ultimate Classic
Nude ombré is the kind of design that never dates itself. It’s influenced by the natural nail look but elevated—you get the sophistication of a manicure without the commitment of a bold color. The ombre effect draws the eye down the length of the nail, which makes even short nails appear more elongated.
What to Request at Your Appointment
- Ask your nail tech to use at least two shades (a light base and a warmer transitional shade)
- Request a soft, blended gradient rather than a sharp line between colors
- Add a glossy top coat to catch the light and amplify the elegant effect
- Consider adding a touch of shimmer to the tips for extra dimension
Pro tip: This design lasts beautifully as your natural nails grow out, so you don’t have to worry about visible regrowth.
2. Glazed Donut Nails
This trendy-yet-timeless look features a sheer, milky base with a darker cream or caramel-toned outline around the edges and a reflective, almost wet-looking shine. The effect is sweet, sophisticated, and has that coveted “glass skin” vibe that translates perfectly to nails. It’s dramatic enough to feel intentional but subtle enough that it works in conservative spaces.
The Appeal of the Glazed Look
Glazed nails play with light in a really special way—they catch the eye without being shiny or glittery. The slightly transparent base allows a hint of your natural nail to show through, which keeps the design feeling fresh and modern. Short squovals showcase this style beautifully because the shape emphasizes the polished rim.
How to Wear It
- Pair with a caramel or warm brown outline for a cozy, sophisticated vibe
- Swap the outline for a cool taupe or grey for a more modern take
- Keep a high-shine top coat for that signature glazed gleam
- The base should feel creamy and opaque but still slightly translucent
Worth knowing: This style looks best with very clean lines, so ask your nail tech to take extra time on the outline for precision.
3. French Tips with Modern Twist
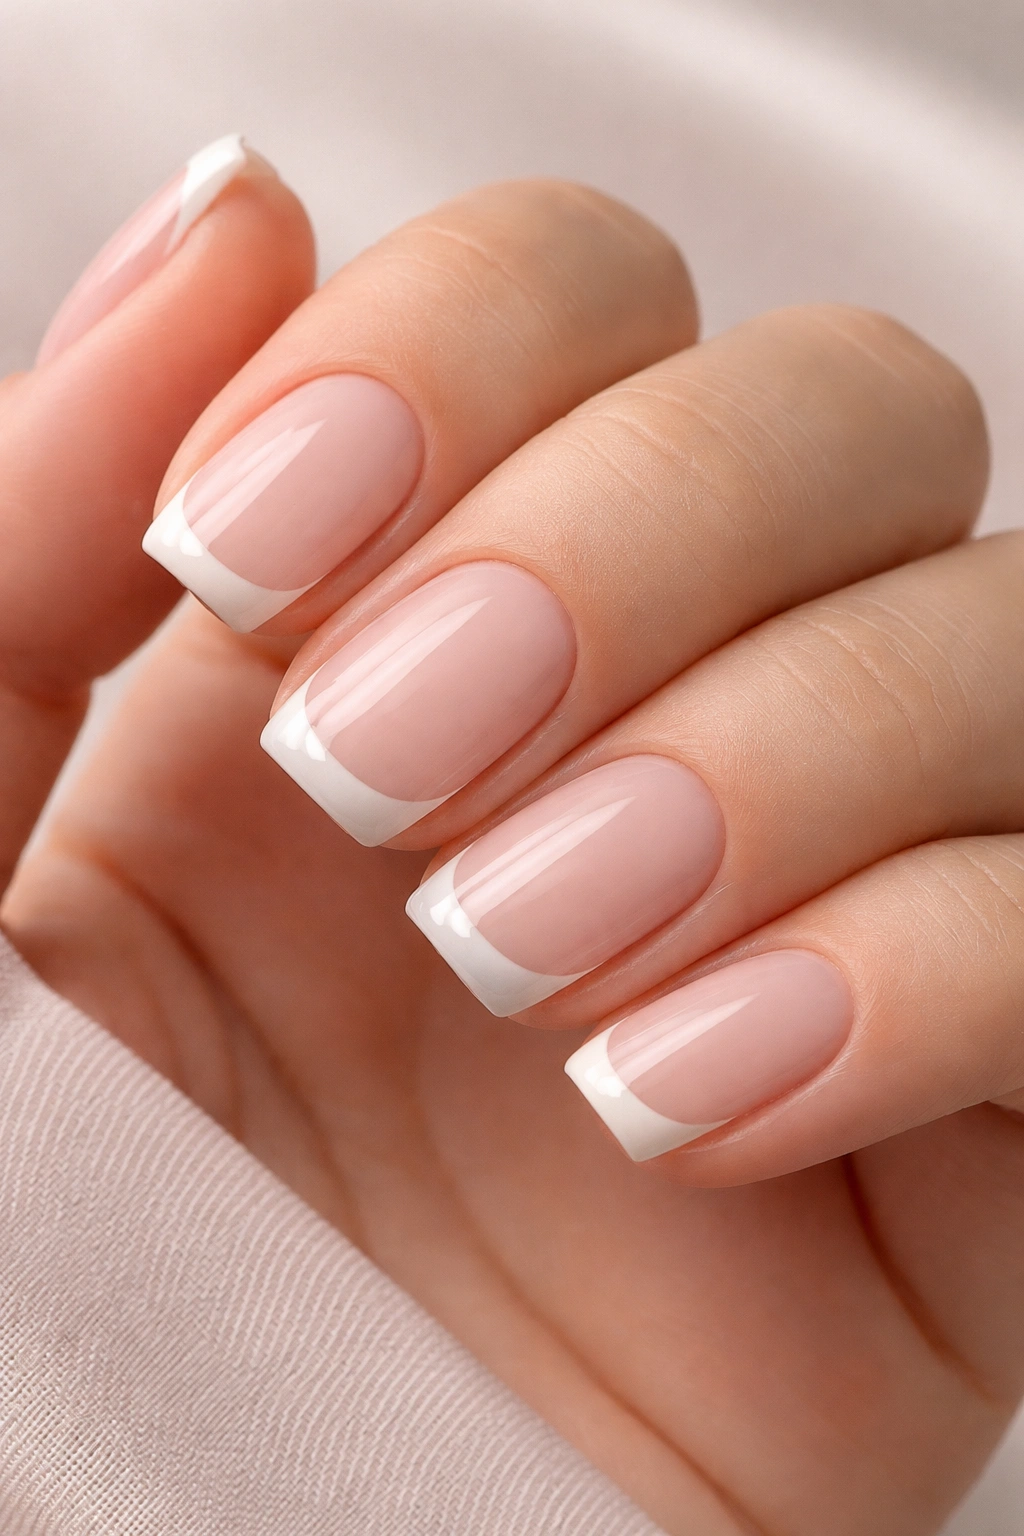
The classic French manicure never dies, but a modern update keeps it feeling fresh. Instead of a stark white tip, try a warmer cream, a soft grey, a barely-there champagne, or even a subtle nude-on-nude version where the tip is just slightly deeper than the base. Squoval nails give you just enough tip to show off the design without the tips becoming too prominent.
Why French Tips Work on Short Nails
The white (or cream or soft shade) tip at the end actually creates the illusion of extra length, even on shorter nails. The horizontal line draws the eye across the tip, creating balance. On a squoval, the curved corners of the shape soften what could feel too geometric about a traditional French tip.
Modern Variations Worth Trying
- Soft cream tip on a barely-there nude base (barely-there French)
- Warm caramel tip with a pink base (the millennial French)
- Cool grey tip with a white or off-white base (the minimalist French)
- Metallic gold tip with a nude base (just enough shine without being over the top)
Insider note: The thinner you keep the tip line, the more modern and elegant it feels compared to the thicker, ’90s-style French tips.
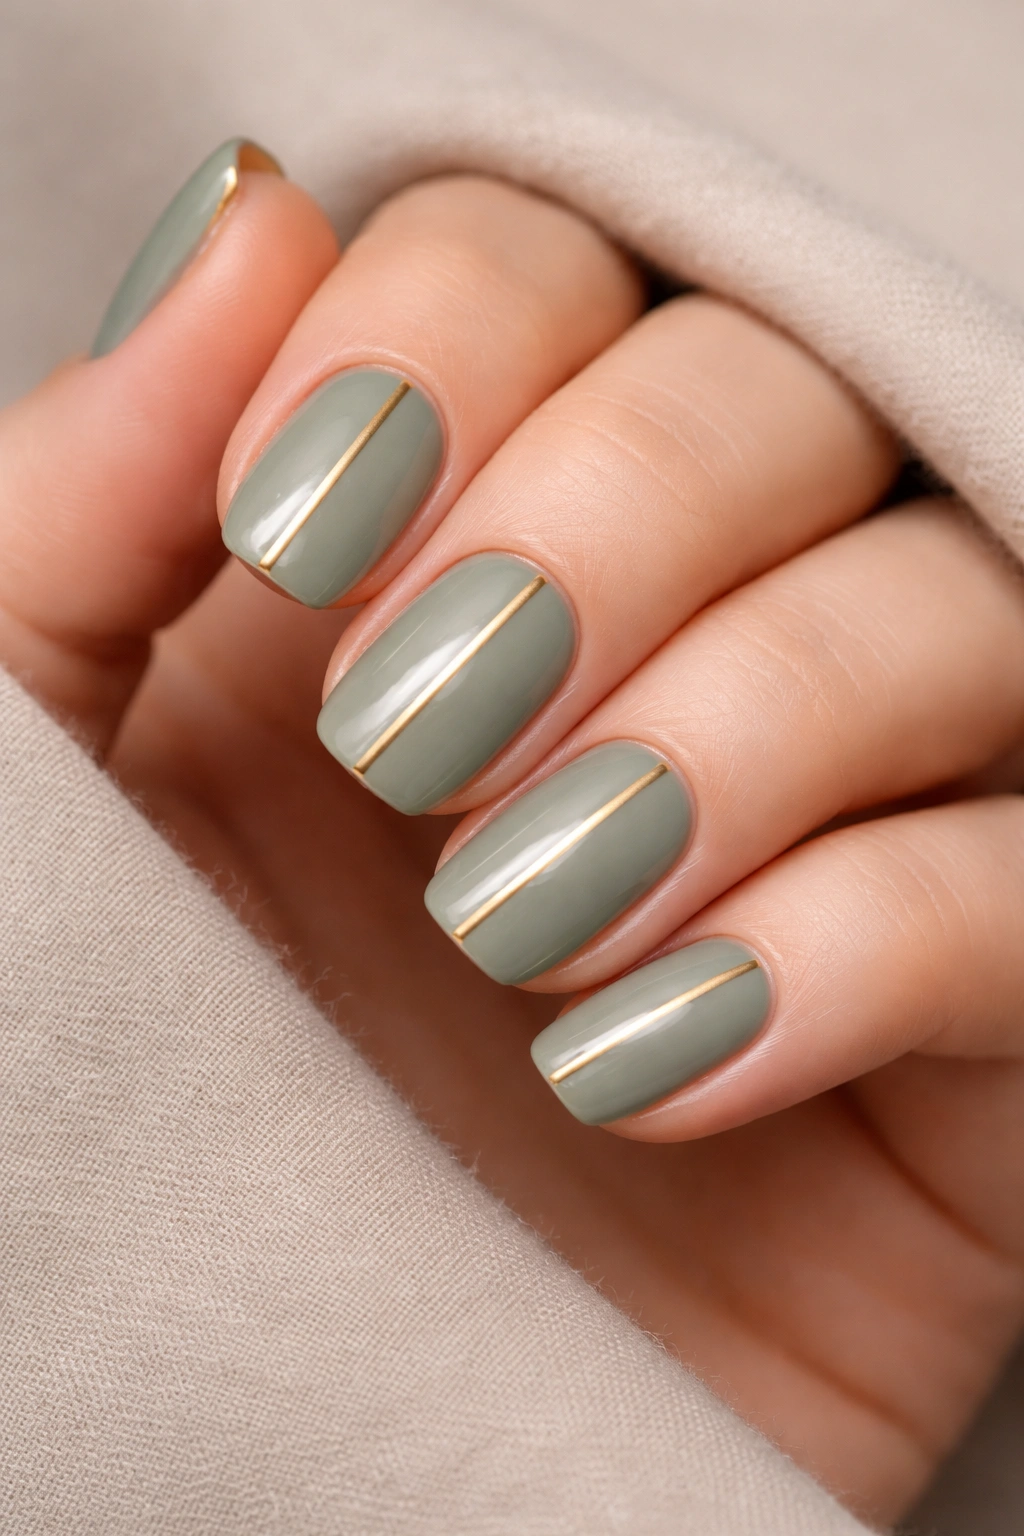
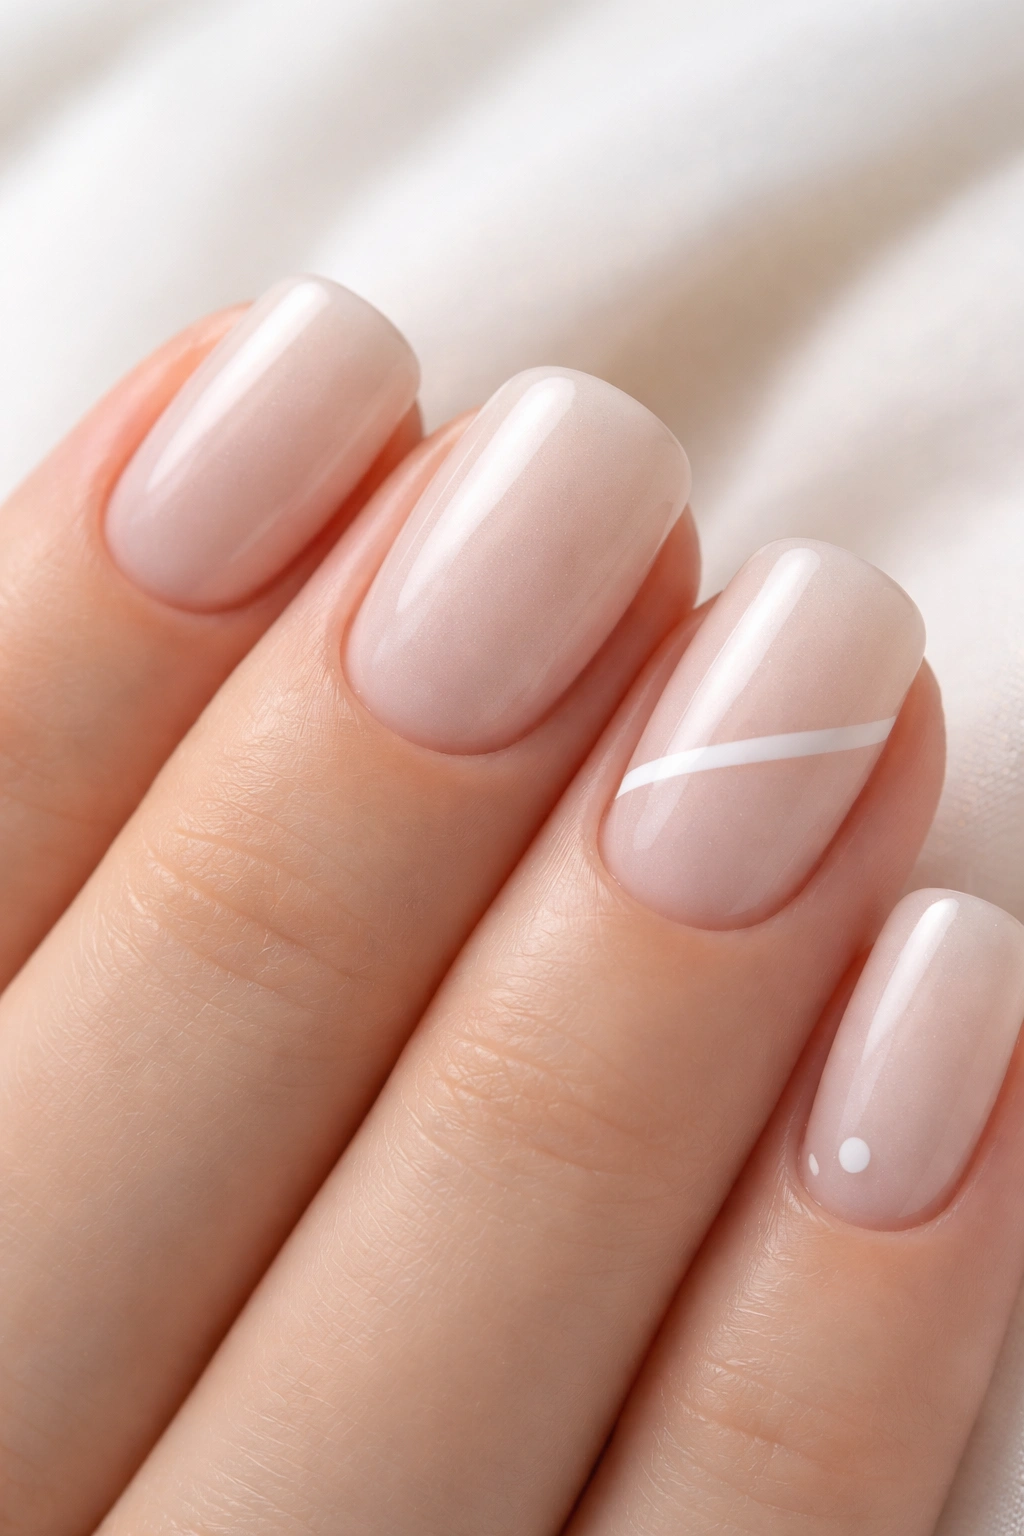
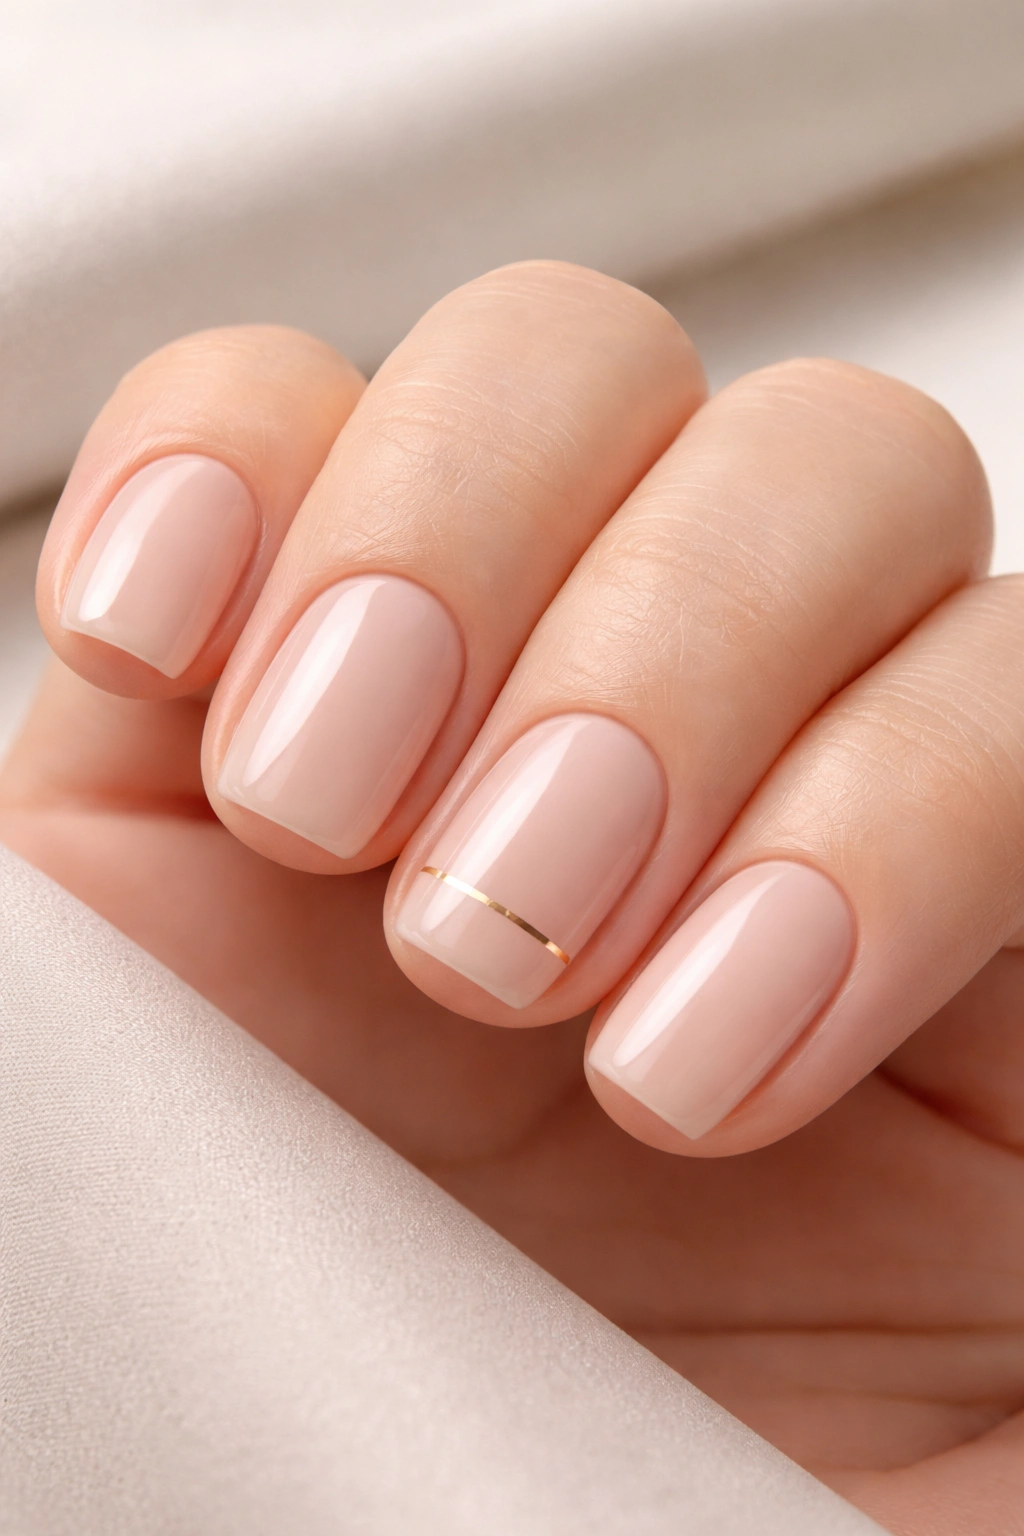
4. Minimalist Gold Line
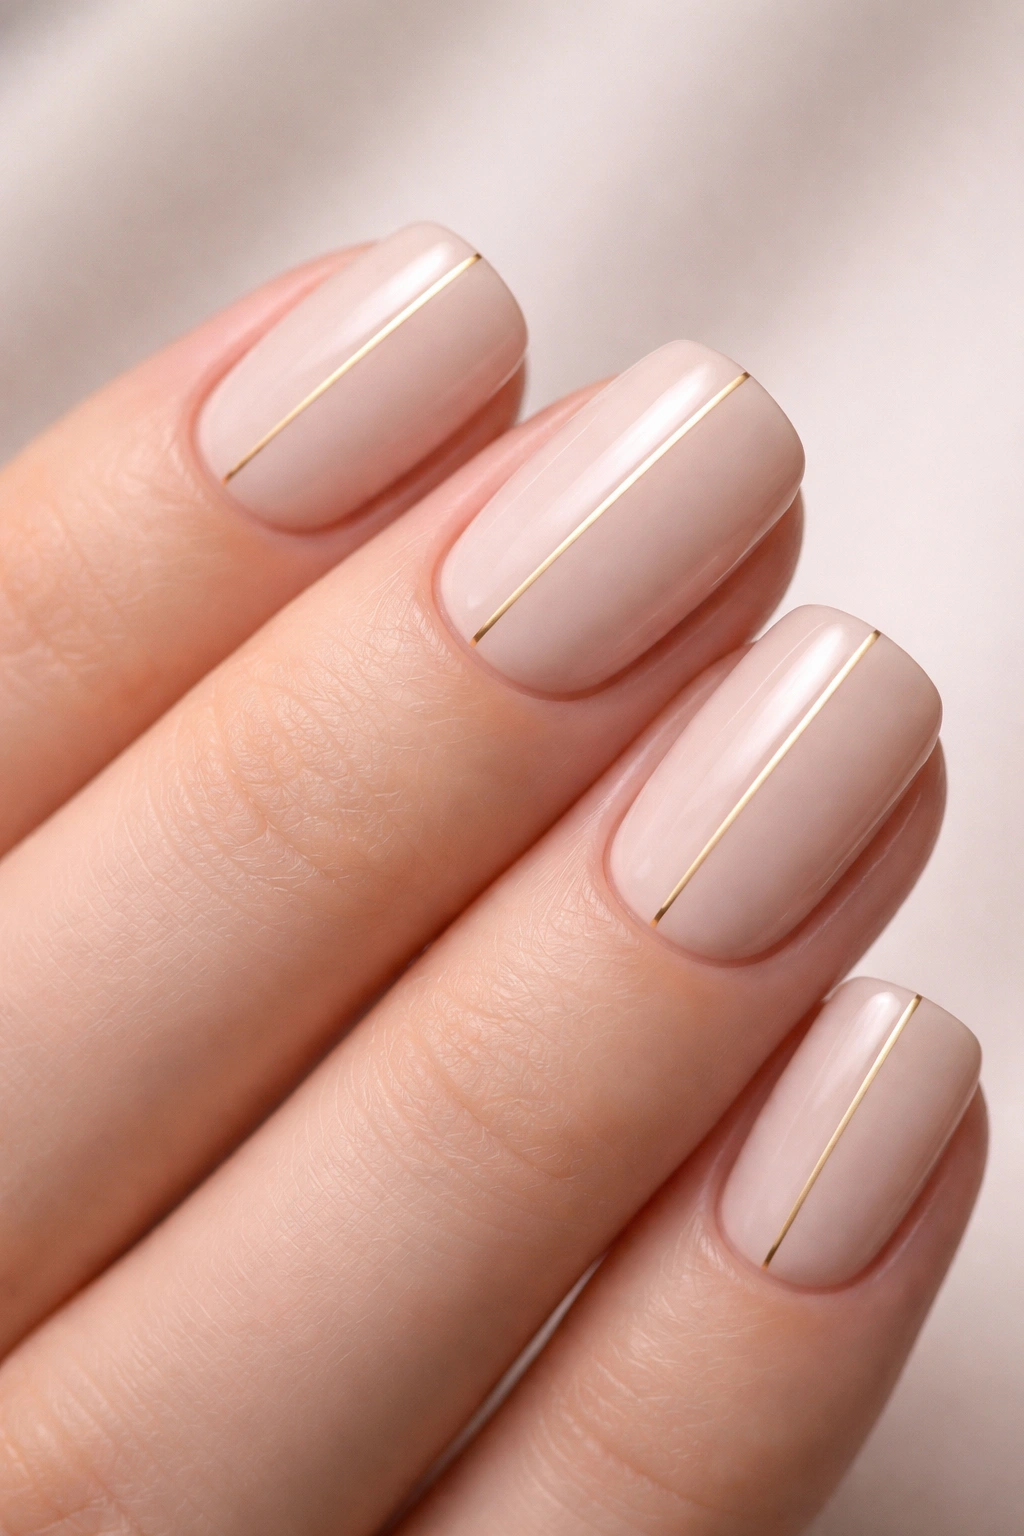
A single thin line of gold leaf or metallic paint running vertically down the center of each nail—or placed off-center for a more contemporary look—creates instant sophistication with nearly zero visual clutter. This is the kind of design that looks more complicated than it actually is, which makes it perfect if you want something special that won’t break the bank or take forever at your appointment.
Why This Design Feels So Elevated
The minimalist philosophy works beautifully on nails because it forces every element to earn its place. One gold line does the work of an entire geometric pattern, and because it’s paired with clean, neutral nails, it feels intentional and high-end rather than busy or overdone. The eye goes directly to that single accent, which is exactly the point.
How to Style It
- Nude, cream, or soft pink base with a vertical center line
- Soft grey or taupe base with an off-center gold line (modern asymmetry)
- White or off-white base with gold placement at the inner edge
- Keep the line as thin as possible for maximum elegance
Quick fact: This design is perfect for people who can’t commit to full-coverage designs but want something more interesting than a solid color.
5. Soft Marble Effect
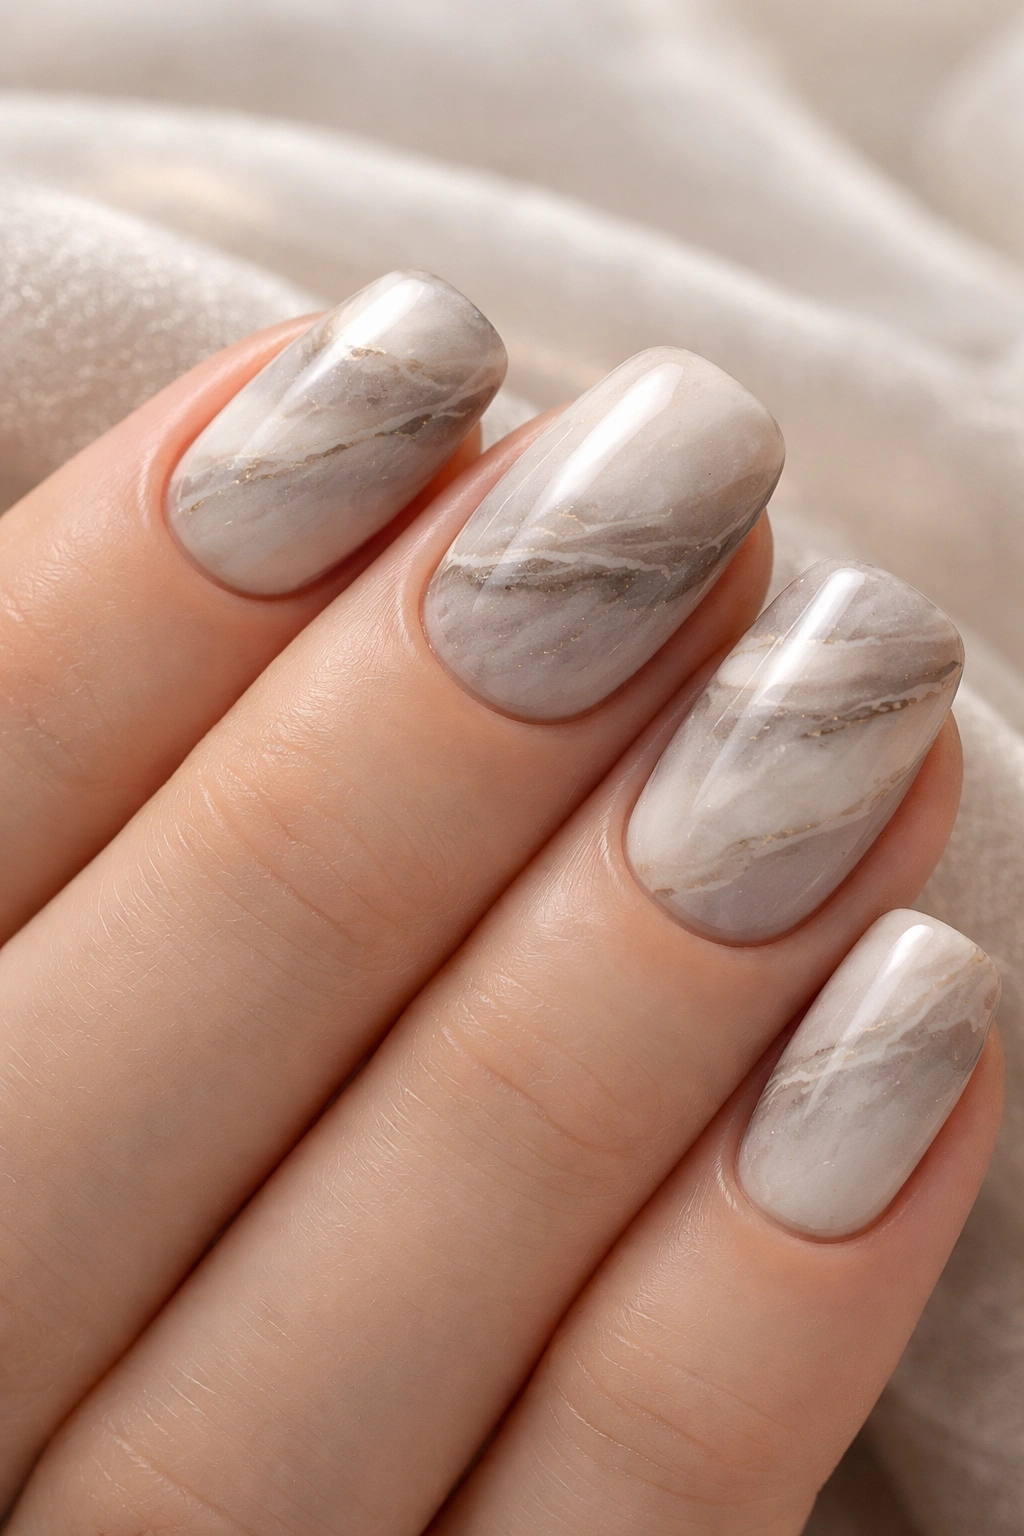
Swirled, cloudy patterns in shades of grey, taupe, and cream create a natural stone look that feels luxurious and expensive without being flashy. Marble is inherently elegant because it’s inspired by real materials that signify luxury—think marble countertops, marble flooring, marble sculptures. That association carries over to your nails.
The Marble on Squovals Advantage
The rounded corners of squoval nails actually work beautifully with marble’s organic, flowing patterns. You don’t have any sharp corners fighting against the soft, natural movement of the design. The shape almost frames the marble pattern.
Getting the Best Marble Results
- Ask your nail tech to use 2–3 colors maximum (grey, taupe, and cream is the sweet spot)
- Request a soft, blended look rather than harsh veining (geological marble, not cracked marble)
- Make sure the base color (usually white or cream) is dominant, with the darker shades as accent veins
- Finish with a high-shine top coat to emphasize the stone-like appearance
Pro tip: Marble looks best when it’s slightly asymmetrical—ask your tech not to make it too uniform or it can feel less natural.
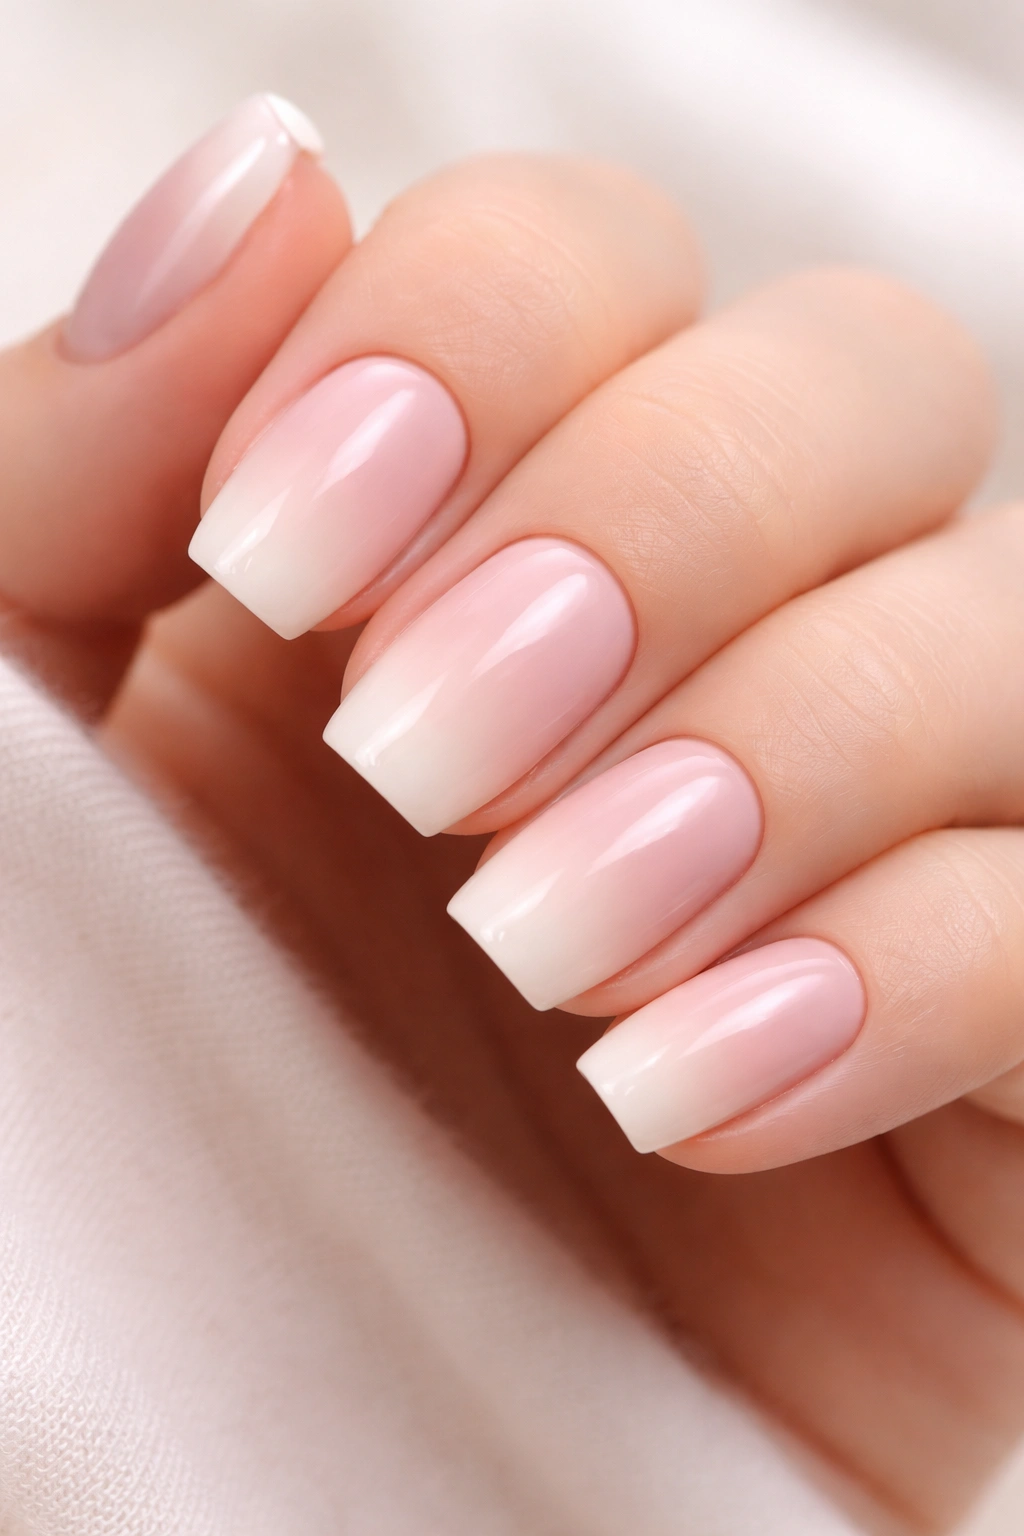
6. Baby Boomer Gradient (Peachy-Pink Ombre)
The baby boomer style is actually a gradient that mimics the look of a French manicure but uses peachy or rosy tones instead of white. Your nail transitions from a pale pink or nude at the base to a slightly warmer, deeper peachy tone at the tip. It’s feminine without being fussy, and it works on any skin tone.
What Makes This Style Classic
Baby boomer nails were a huge trend among actual baby boomers because they’re incredibly flattering and wearable. The gradient is naturally flattering to the hand shape, and because the colors are so close to natural nail tones, the overall effect feels polished rather than costume-y. It’s the opposite of flashy but somehow even more elegant because of that restraint.
The Shade Combination
- Start with a very pale pink (almost nude with a hint of warmth) at the base
- Transition to a soft peachy or warm beige at the free edge
- Make the gradient very soft and blended—no harsh lines
- Use warm undertones throughout to keep the whole look cohesive
Quick fact: This design pairs beautifully with both warm and cool jewelry because the peachy-pink is universally flattering.
7. Chrome Pearl Finish
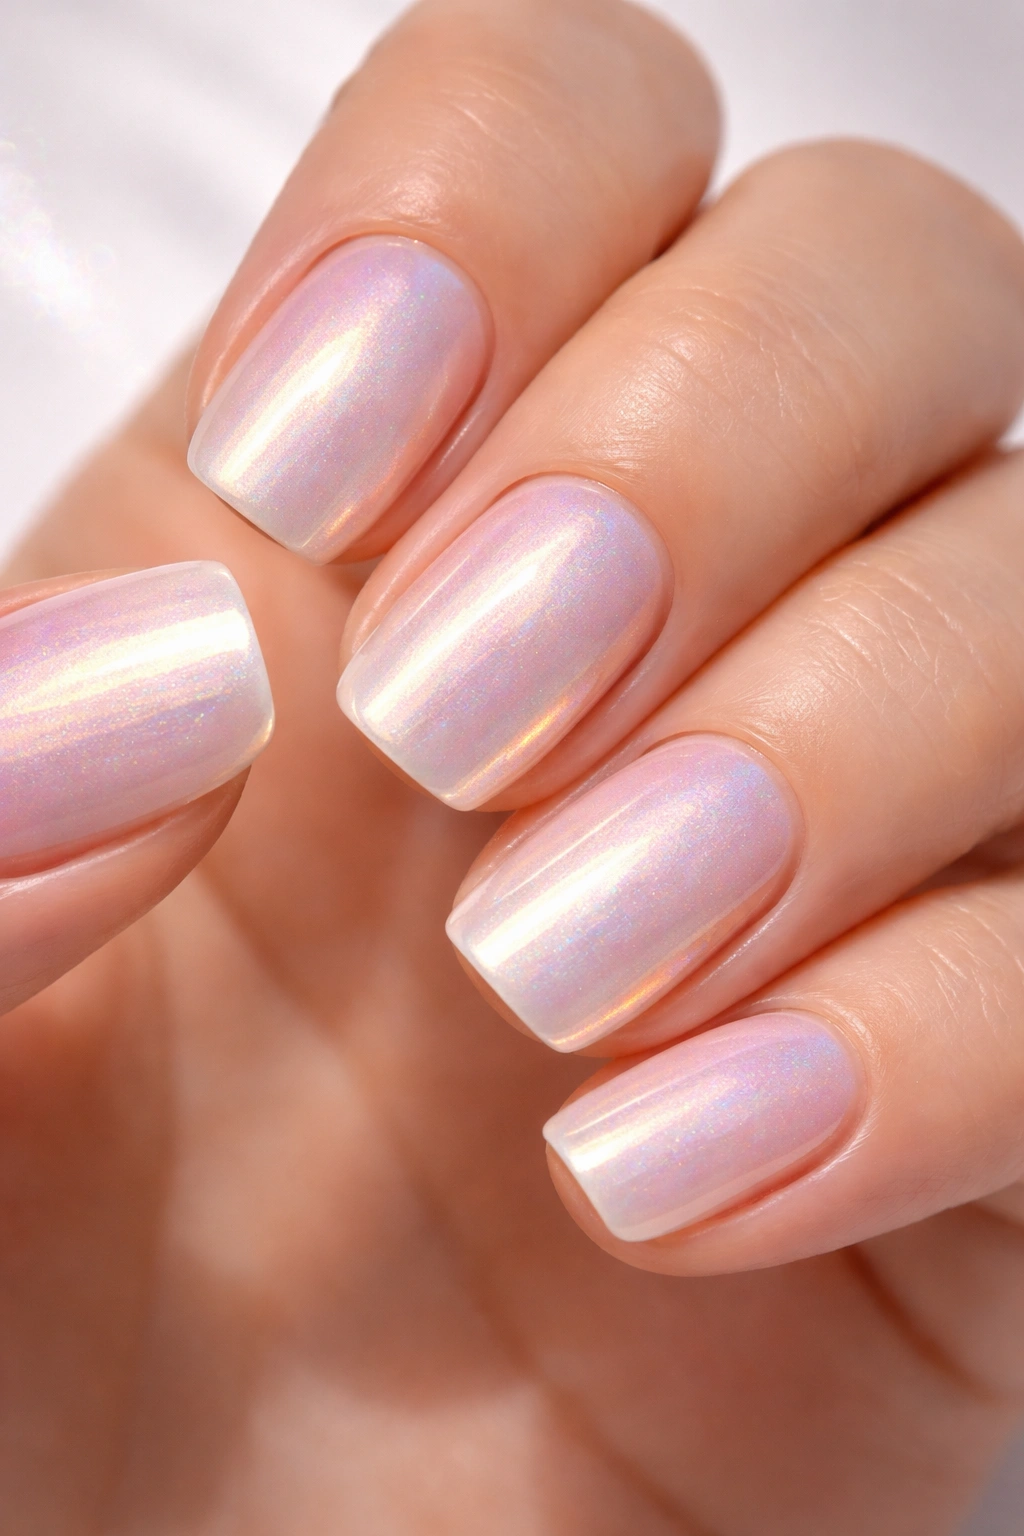
A shimmering, iridescent pearl finish that shifts between soft pink, champagne, and subtle blue depending on how the light hits it brings that luxury feel to short nails. Chrome and pearl finishes have that high-fashion, almost futuristic quality while still feeling wearable and sophisticated. On short squovals, the finish really plays with the light in a way that longer nails sometimes can’t capture as beautifully.
Why Pearl Reflects Light So Beautifully
Pearl isn’t glittery or chunky—it’s a smooth, reflective finish that creates subtle color-shifting magic. It catches light from all angles, so your nails are always catching attention in the most understated way. For short nails, this is perfect because the smaller surface area actually concentrates that shimmer more intensely.
How to Wear Pearl
- Start with a champagne, rose gold, or warm cream base
- Layer the pearl chrome finish over the entire nail for maximum shift
- Keep everything else minimal—skip additional art or accent nails
- Let the finish be the star of the show
Insider note: Pearl works especially well in natural light and photograph beautifully, so this is a great choice if you like taking manicure pictures.
8. Blush and Cream Gradient
Transitioning from a creamy white base to a soft blush pink at the tips creates a romantic, feminine look that’s still incredibly grown-up and sophisticated. This is the design you wear to a fancy dinner, an important work meeting, or literally anywhere you want to look put-together but approachable. It’s polished without being cold, and it works across seasons and settings.
The Color Psychology
Blush pink is universally flattering and suggests softness without weakness. Cream reads as clean and classic. Together, they’re a combination that works on every skin tone and with every style aesthetic. You get sophistication without severity.
Nailing the Execution
- Cream base at the cuticle (not pure white—opt for off-white or ivory)
- Blush pink (a soft, muted pink, not bubblegum) at the free edge
- Gradient should be visible and smooth but not overly dramatic
- Use a glossy finish to amplify the elegance
Pro tip: If you love this but want slightly more impact, ask your tech to deepen the blush at the very tip to a soft mauve.
9. Geometric Negative Space
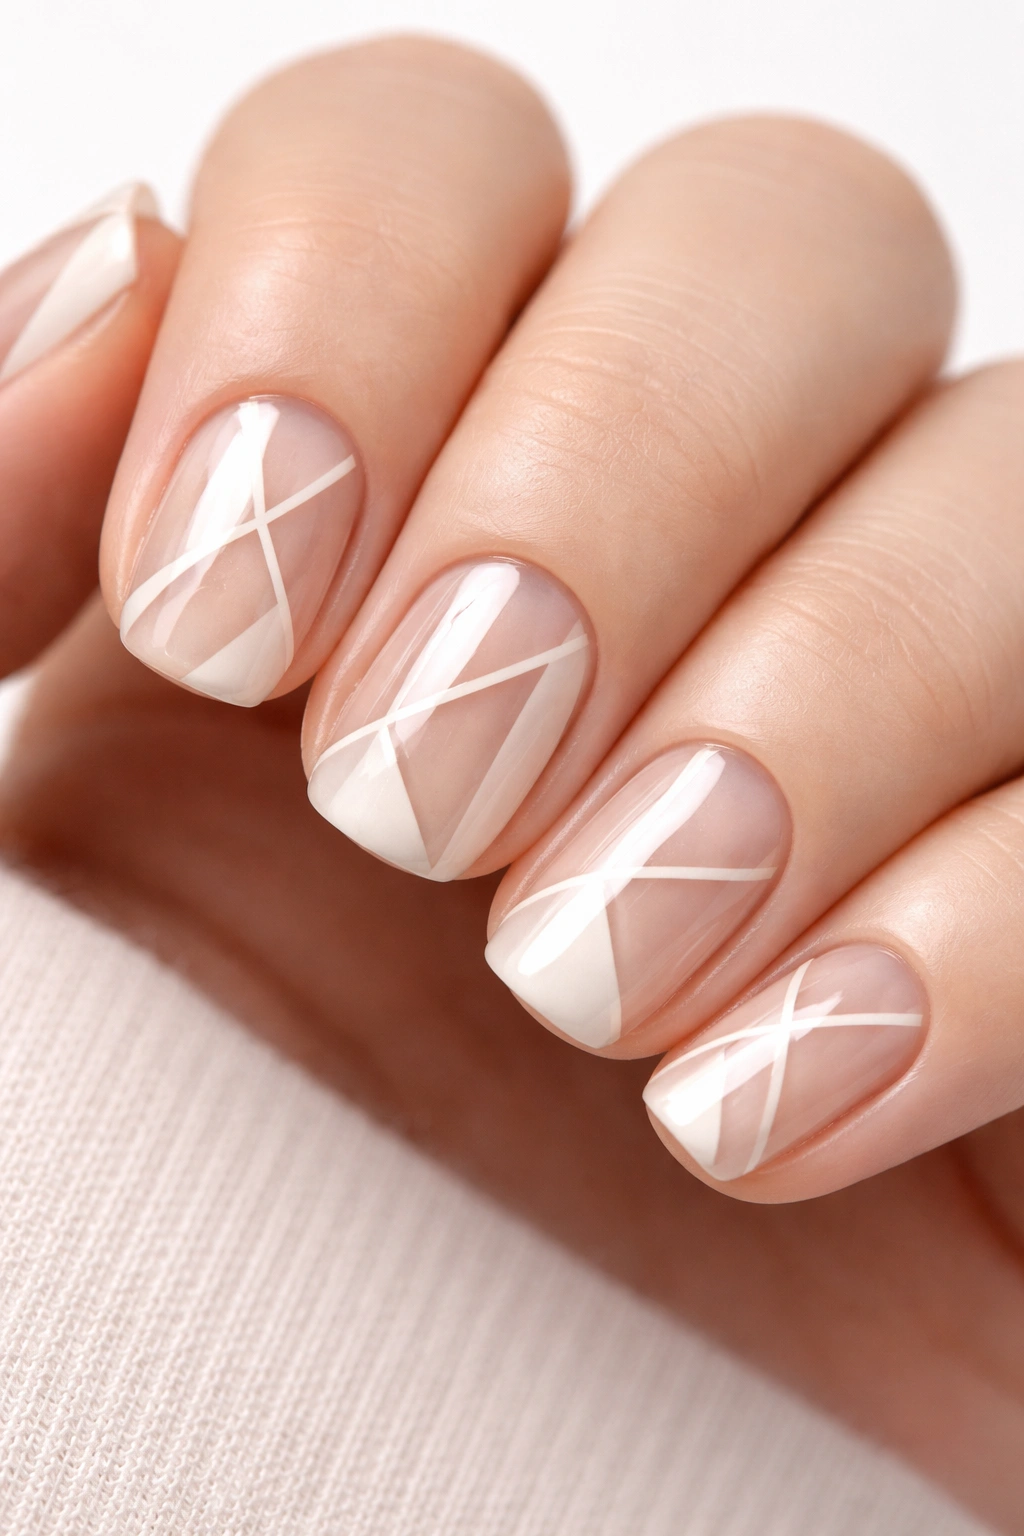
Using the natural nail color as part of the design, clean geometric shapes (triangles, lines, or a French-tip-inspired shape) are created by painting negative space around them. This modern, minimalist approach is incredibly chic and shows off both the nail art and the natural nail underneath. On short squovals, the geometric lines are crisp and graphic without feeling cramped.
Why Negative Space Works
Negative space design proves that what you don’t paint is as important as what you do. It’s sophisticated because it requires restraint and precision. Instead of covering every inch of the nail, you’re using strategic placement to create visual interest. It feels contemporary and art-gallery rather than commercial.
Geometric Negative Space Ideas
- A thin line running horizontally through the middle, leaving the top and bottom unpainted
- A triangle shape in one corner, leaving the rest of the nail bare
- A geometric French tip created by painting around a triangular or diagonal unpainted area
- Vertical lines creating striped sections of painted and unpainted nail
Worth knowing: Negative space looks best with a matte or satin finish on the painted portions to create contrast with the glossy natural nail.
10. Velvet Matte Finish in Warm Brown
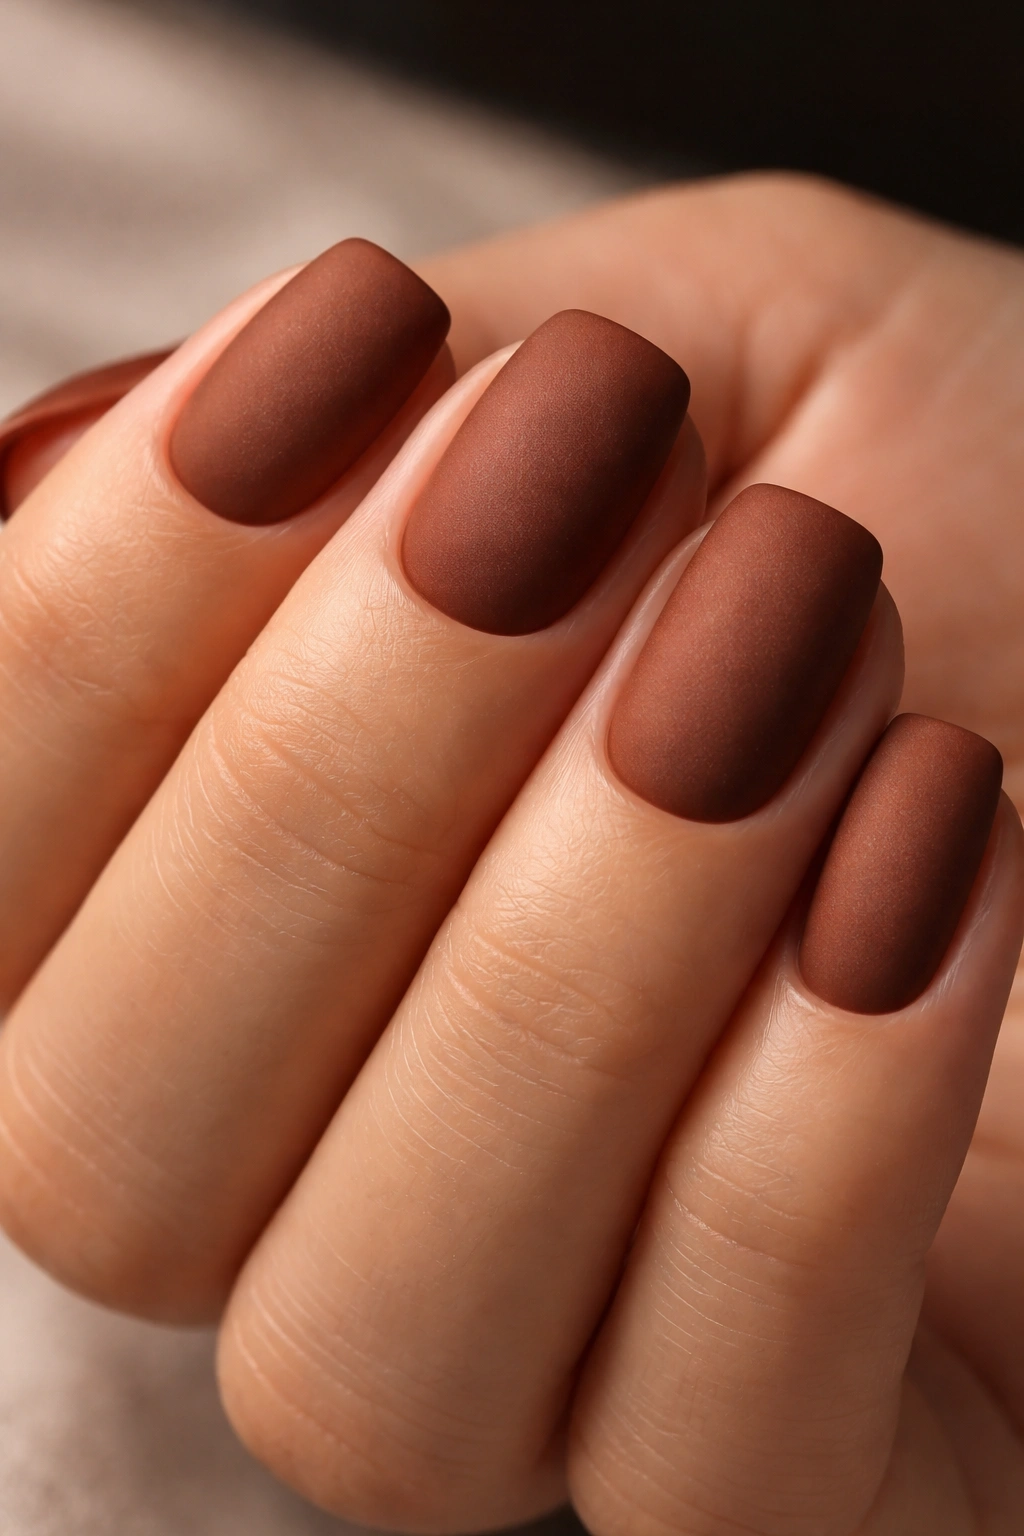
A velvety matte finish in a warm, rich brown (think chocolate or caramel) creates immediate luxury and sophistication without any additional design. The texture is what makes this special—matte finishes feel expensive and intentional, and they photograph beautifully. Brown is an underrated nail color that somehow reads more upscale than you’d expect.
The Matte Finish Magic
Matte finishes are inherently sophisticated because they reference luxury materials like suede, cashmere, and velvet. Instead of reflecting light, they absorb it, which creates a softer, more refined appearance. It’s the nail equivalent of choosing a matte lipstick over a shiny one—more polished, more intentional, more elegant.
Warm Brown as Your Chosen Shade
Brown nails are having a real moment because they feel warm, elegant, and genuinely flattering across all skin tones. A warm brown on short squovals looks especially elevated because the shape keeps the color from feeling too heavy. The squoval is refined enough to balance a deeper tone.
Quick fact: Matte finishes need a specific top coat (usually a matte or satin seal), so ask your tech to use the right product to ensure longevity.
11. Champagne Sparkle with Metallic Accent
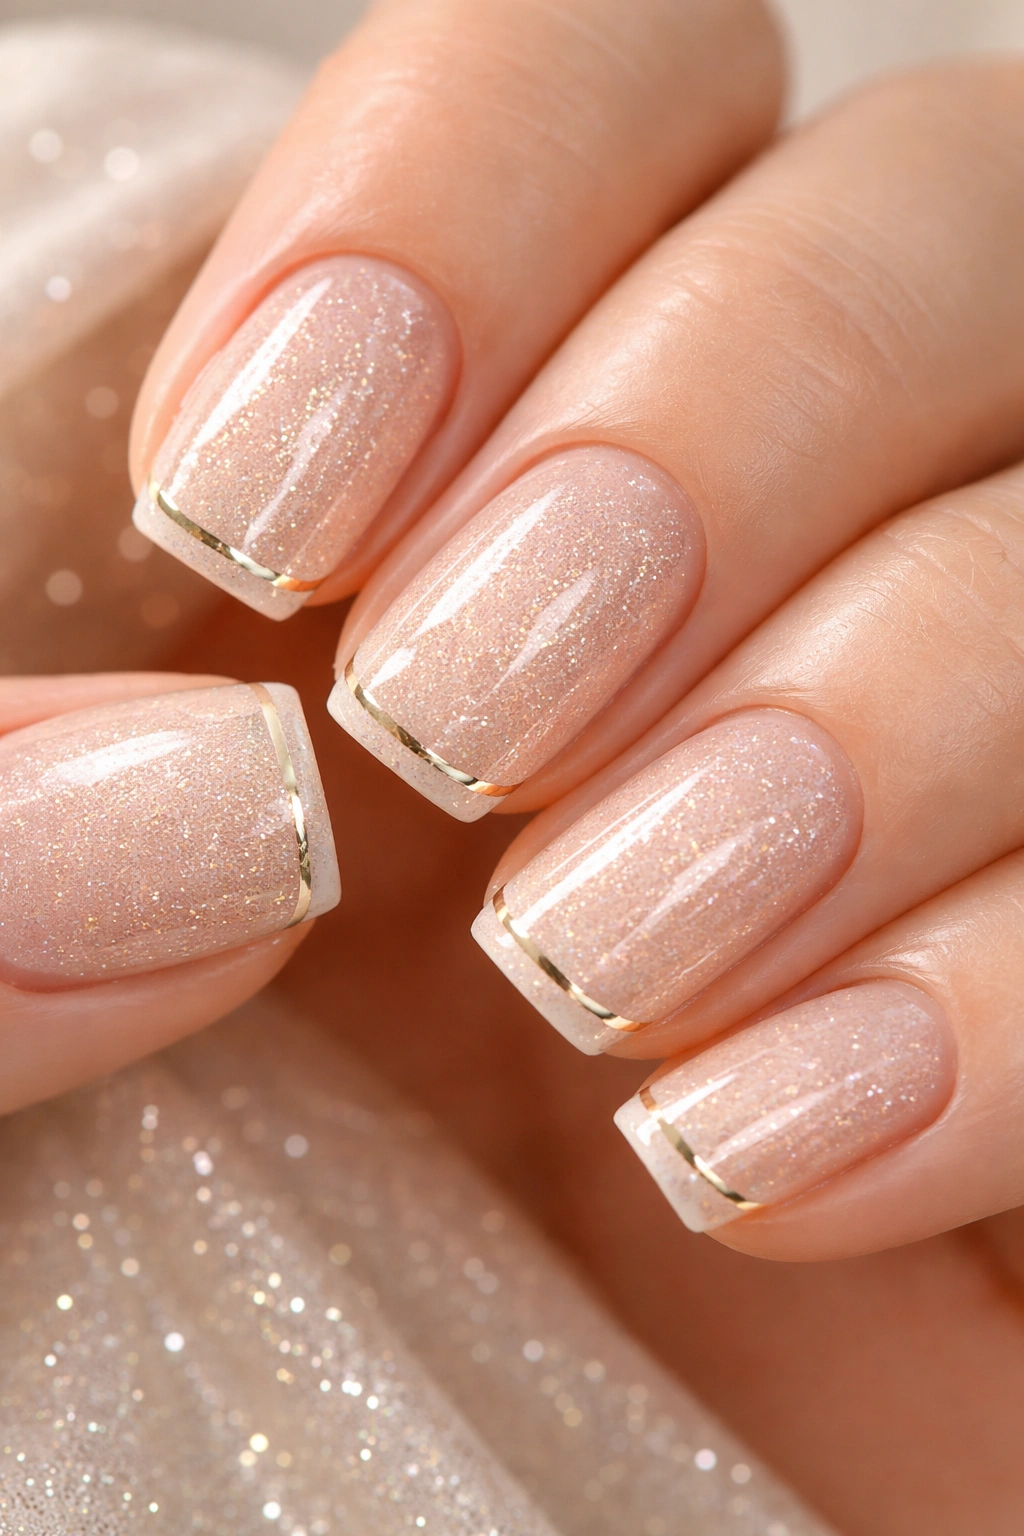
A soft champagne base with subtle sparkle throughout creates that celebratory, luxurious feel without being over the top. Add a thin metallic accent line in gold or rose gold for extra dimension. This design bridges the gap between everyday elegance and special occasion glamour, making it perfect if you want something you’ll actually wear regularly but that still feels special.
The Magic of Champagne
Champagne is genuinely universally flattering. It works with warm skin tones and cool skin tones. It’s festive without being costume-y. It shimmers without being glittery. When paired with short squovals, champagne feels especially refined because the tone and the shape work together to suggest sophistication.
Layering Sparkle the Right Way
- Base coat of soft champagne or nude-champagne blend
- Very fine glitter (not chunky) distributed throughout, or a sparkly top coat
- Thin metallic line for definition and extra shine
- Glossy finish to amplify the shimmer
Pro tip: Ask your tech to concentrate most of the sparkle at the center of the nail and fade it slightly toward the edges for a more refined look.
12. Matte Mocha with Satin Finish
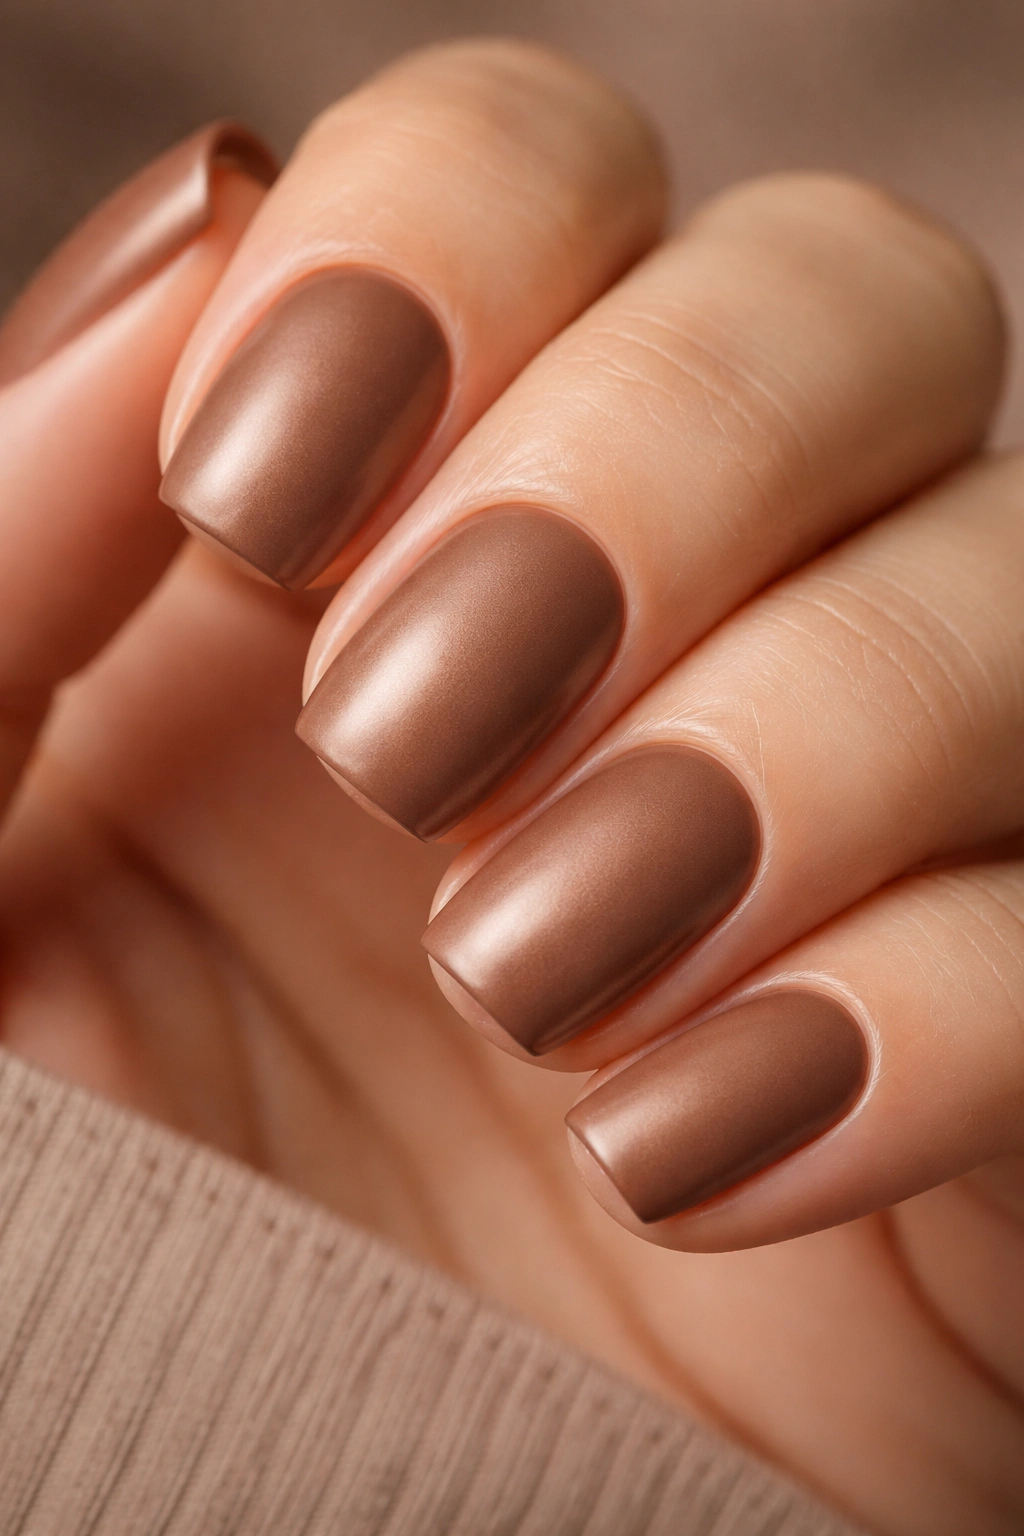
A warm, medium-brown shade with a satin finish (smoother and slightly more reflective than true matte but less shiny than gloss) creates a sophisticated, almost velvety appearance. Mocha is that perfect middle-ground shade that’s deeper than nude but warmer than true brown, making it flattering on every skin tone while still looking intentional and special.
Why Satin is the Perfect Compromise
Satin finish is the Goldilocks of nail finishes—it has just enough shine to feel polished without being overly reflective or glittery. It’s more luxurious-looking than matte but less flashy than gloss. For people who want something special without maximum shine, satin is the answer.
The Mocha Advantage
Mocha is warm without being orange, sophisticated without being dark, and interesting without being bold. It’s the color you wear when you want people to notice your nails but not in an obvious way—more like “why do her hands look so elegant?” rather than “wow, bright nails.” On short squovals, mocha truly shines because it shows off the shape beautifully.
Quick fact: This shade is perfect for transition seasons—it works beautifully in winter but feels equally appropriate in summer.
13. White Tip Reverse French (Modern Update)
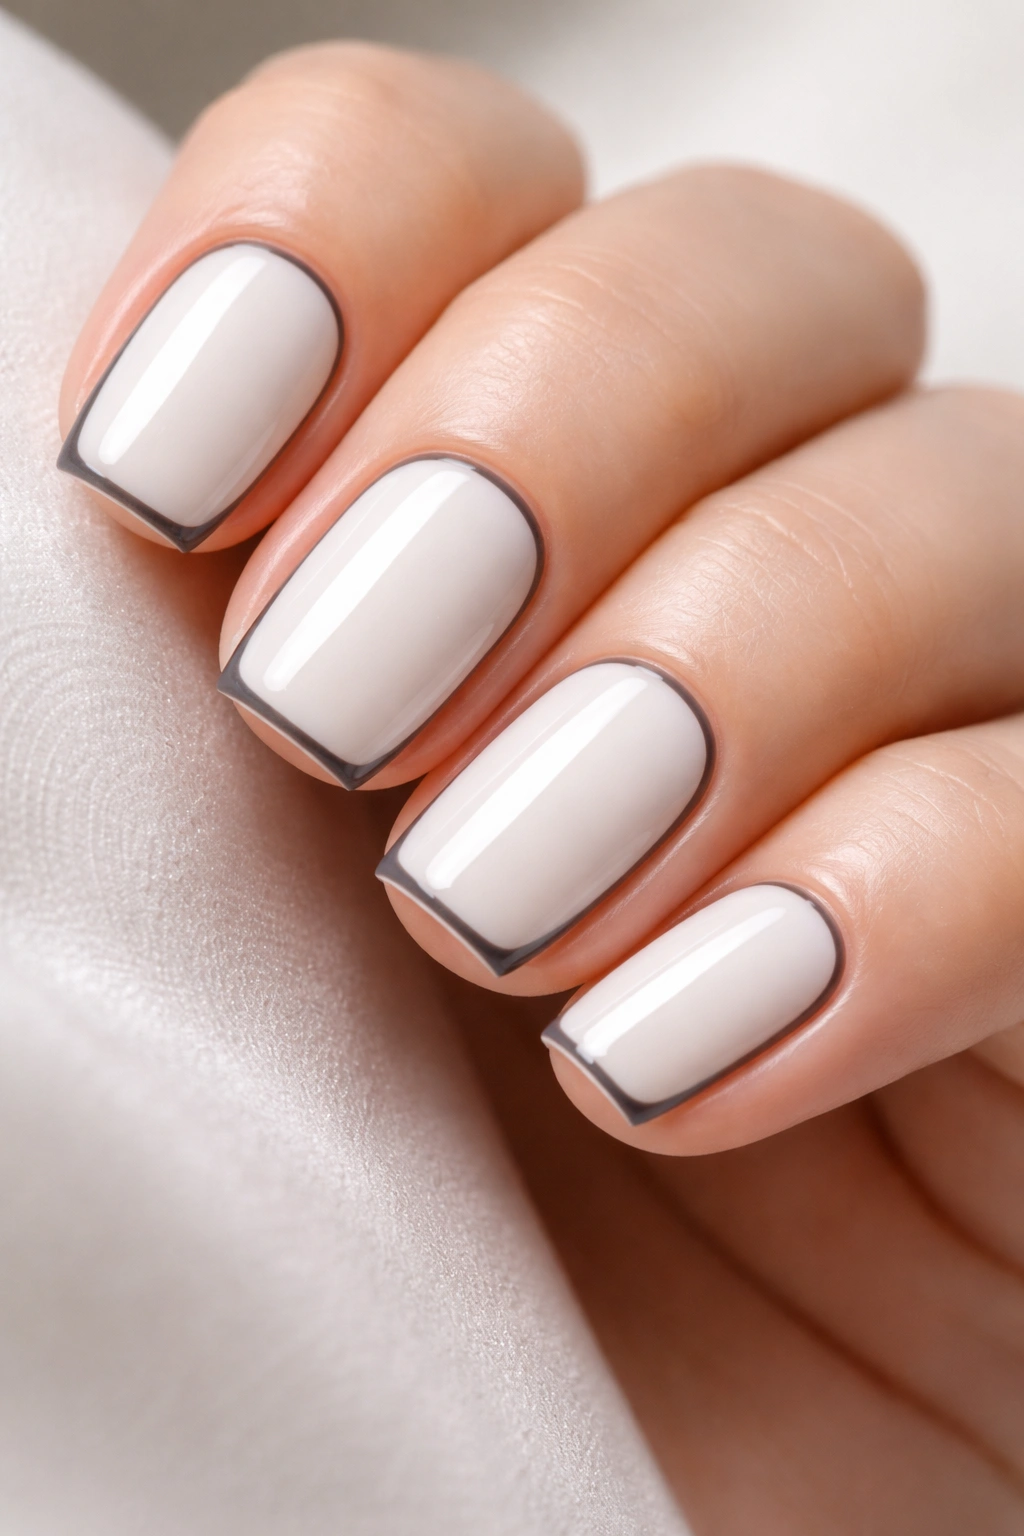
Instead of the traditional French with white tips, try the reverse: a white or cream base with a white outline around the entire edge of the nail, creating a clean frame. This inverted approach feels modern and contemporary while honoring the classic French aesthetic. It’s graphic, clean, and somehow even more elegant than the traditional version because of its unexpected twist.
The Reverse French Revolution
The reverse French (sometimes called the “inverted French” or “framing French”) takes a classic and flips it—literally. By keeping most of the nail white or cream and adding a thin, darker outline or French edge in grey, navy, or black, you create definition and structure. It’s architectural and sophisticated.
Execution Details
- White or cream base covering the entire nail
- Thin outline in a coordinating neutral (grey, charcoal, or taupe work beautifully)
- Outline placed around the perimeter, not just at the tip
- Clean, precise lines are absolutely essential
- Glossy finish to emphasize the graphic nature of the design
Insider note: This design is actually easier to maintain than traditional French tips because the outline is less prominent and imperfections are less noticeable.
14. Rose Gold Confetti on Nude
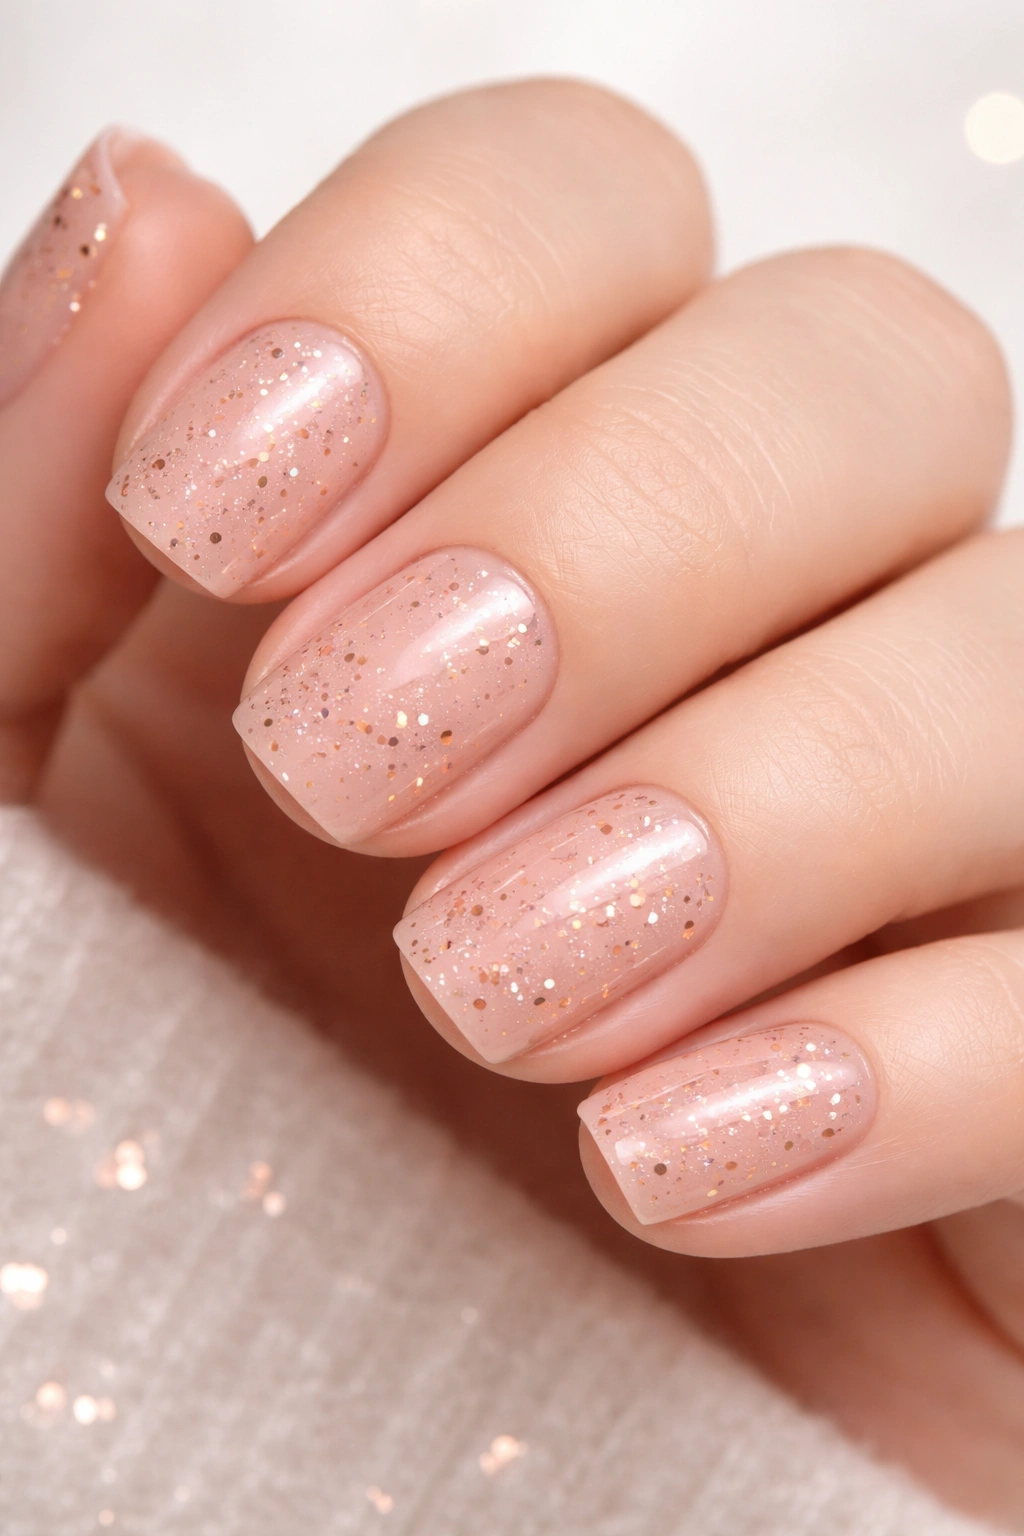
Tiny flecks of rose gold scattered across a soft nude or cream base creates a subtle celebration vibe without glitter overload. This design has that party feeling but in an understated, elegant way. Each tiny accent catches the light just slightly, creating dimension without drama. It’s perfect for someone who wants something more interesting than a solid color but not a full geometric or artistic design.
Why Confetti Works on Short Nails
Confetti is small enough that it doesn’t feel overwhelming on shorter nail beds. Instead of one large design element that might dominate the small space, confetti distributes visual interest evenly across the nail. The result is sophisticated rather than cluttered.
Getting the Look
- Choose a soft, warm nude or cream as your base
- Use rose gold confetti or flakes—not glitter, but actual metallic pieces
- Distribute the confetti across the nail, slightly lighter at the cuticle and slightly denser at the tip
- Use a glossy top coat to seal everything and create shine
Pro tip: Ask your tech to use a confetti that’s specifically for nail art (not loose glitter) so it stays put through your daily routine.
15. Minimalist Floral Accent

A single, tiny floral accent—like a small daisy, a simple rose, or abstract flower petals—placed on just one or two nails creates artistry without overwhelming your nail beds. This design proves that you don’t need full coverage to make a statement. One carefully placed flower on an otherwise nude or cream nail is actually more impactful than covering every inch.
The Power of Restraint
A single floral accent is more eye-catching than you’d think because your eye is drawn directly to that intentional placement. It’s the manicure equivalent of wearing one statement piece of jewelry instead of multiple. The restraint is what makes it feel elevated rather than busy.
How to Wear It
- Nude, cream, or pale pink base on all nails
- Single small floral accent (usually on the ring finger or middle finger, or on both ring fingers)
- Keep the flower simple—detailed linework or intricate petals can look busy on short nails
- Glossy finish to let the base shine while the flower draws attention
Quick fact: This design actually looks MORE elegant on short nails than long ones because the scale of the flower to the nail is better proportioned.
16. Nude Base with Rhinestone Accent

A creamy nude base paired with a small rhinestone accent—either a cluster on one nail or a delicate line detail—brings just enough sparkle without feeling over the top. Rhinestones are inherently elegant because they mimic diamonds, and even a small application brings that luxury feeling. On short squovals, a few rhinestones feel like jewelry for your hands rather than a costume element.
Rhinestones vs. Glitter
Rhinestones are individual, faceted pieces that catch light dramatically. Unlike glitter, which reads as sparkly overall, rhinestones feel intentional and jewel-like. A few quality rhinestones feel more luxurious than tons of glitter, which is the key to keeping this elegant rather than flashy.
Strategic Rhinestone Placement
- Small cluster of 3-5 rhinestones on the ring finger or middle finger
- Delicate line following the curve of the nail (near the edge or near the cuticle)
- Single large rhinestone as a statement accent on one nail
- Keep rhinestones on just 1-2 nails to maintain balance
Pro tip: The quality of the rhinestone matters—ask your tech to use nail-grade rhinestones, not cheap craft store gems, for a genuinely luxurious look.
17. Sage Green with Metallic Detail
A soft, muted sage green base (think pale, sophisticated green, not bright or neon) paired with a thin gold or rose gold metallic line creates a nature-inspired, refined look. Sage is having a major moment in interior design and fashion because it’s calming, sophisticated, and somehow manages to feel both modern and timeless. On nails, it’s an unexpected choice that signals taste and thoughtfulness.
Why Sage Green Reads as Sophisticated
Green is calming and elegant when it’s muted and soft. Sage specifically references nature and wellness, which makes it feel intentional and thoughtful rather than random. It’s different enough from standard nude or pink to be interesting, but not so different that it feels risky or playful. It’s just right for someone who wants something special.
The Metallic Addition
- Soft sage green base covering all nails
- Thin metallic line (gold or rose gold) down the center or along one edge
- Keep the metallic element minimal—this is about the green, not the metal
- Matte or satin finish on the green with subtle shine from the metallic detail
Worth knowing: Sage green pairs beautifully with warm jewelry and natural materials like wood, stone, and linen, so it works if you have that aesthetic.
18. Simple Striped in Two Tones
Thin horizontal stripes in two complementary neutral shades—like cream and taupe, or blush and white—create visual interest with minimal effort. Stripes are graphic and modern, but when done in soft, complementary colors, they read as sophisticated rather than playful. The key is keeping the stripes thin and evenly spaced.
Why Stripes Work on Short Squovals
Horizontal stripes actually have a lengthening effect because they draw the eye across the nail. On short nails, this is a bonus—the stripes create the illusion of more length while the squoval shape keeps everything looking polished and intentional. Thin stripes feel more refined than thick ones.
Stripe Perfection
- Two neutral, complementary colors (warm and cool, or light and darker)
- Very thin stripes—approximately 2-3mm each
- Evenly spaced across the entire nail
- Alternate colors in a consistent pattern
- Glossy finish to emphasize the clean lines
Pro tip: Ask your tech to use tape or a striping brush for precision—even, perfectly parallel stripes are what make this look elegant rather than amateur.
19. Mauve Shimmer with Glossy Finish
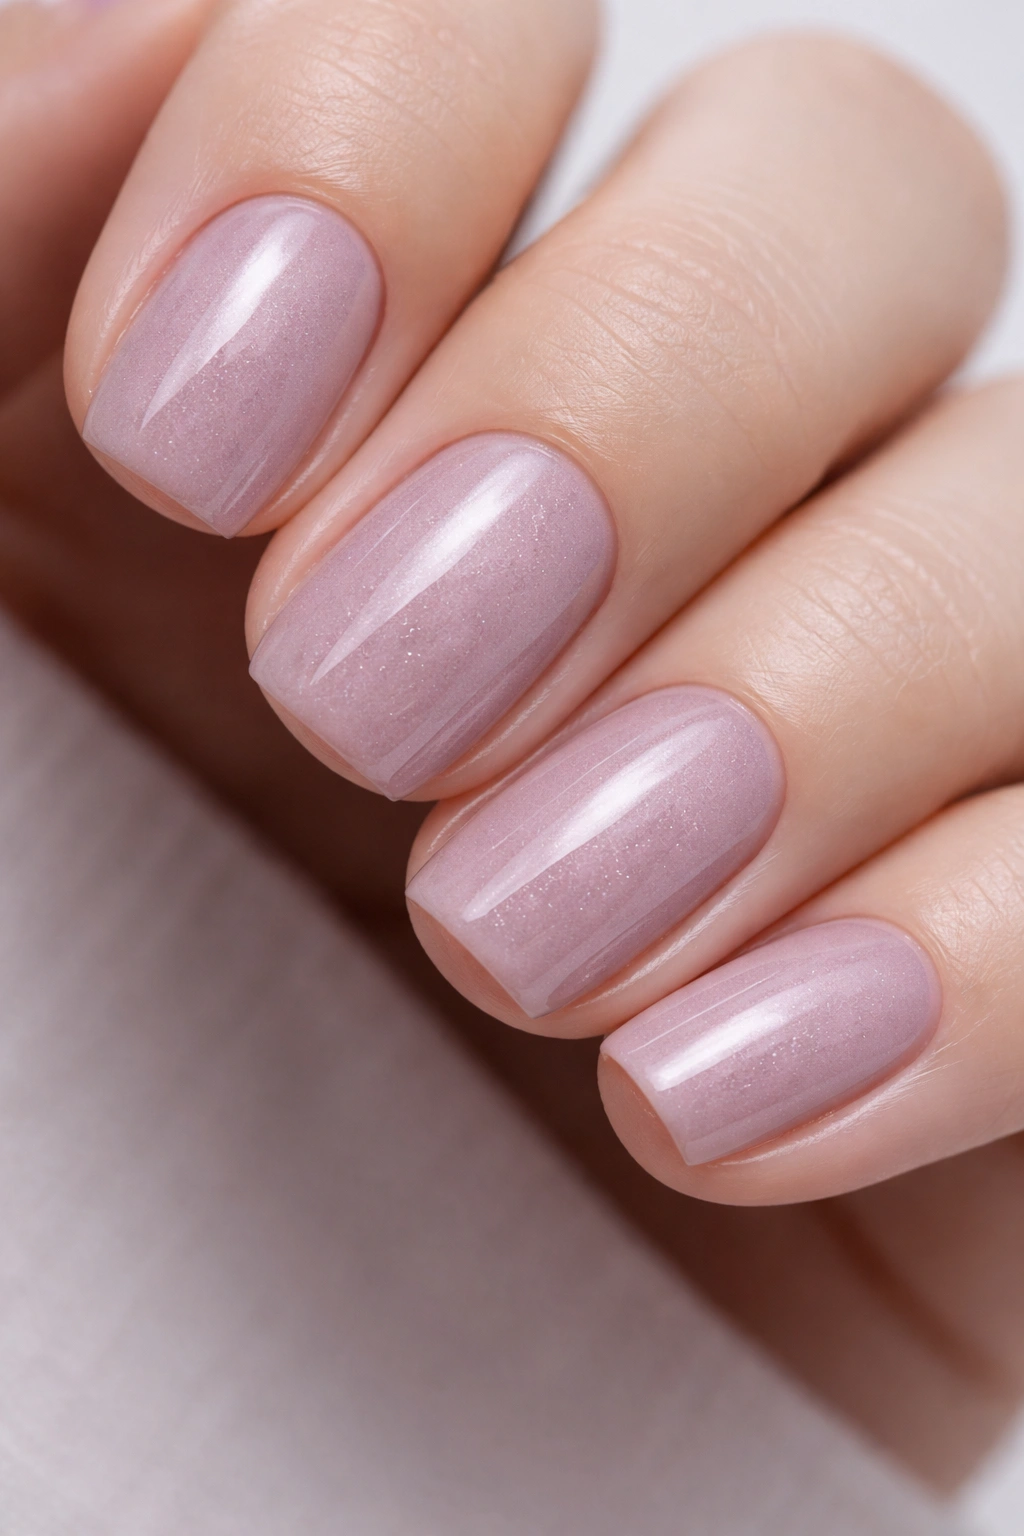
A soft, cool-toned mauve with an integrated shimmer that’s baked into the polish creates a subtle, sophisticated shine without the appearance of glitter. Mauve is that perfect cool-toned neutral that somehow looks more elegant than it has any right to. It’s the color that makes people say “that’s such a pretty shade” without being able to quite explain why.
The Mauve Magic
Mauve bridges the gap between purple and pink and grey, making it incredibly flattering to almost any skin tone. It reads as more interesting than nude but more wearable than a true color. On short squovals, mauve looks especially sophisticated because the shape suggests elegance and the shade follows through on that promise.
The Shimmer Difference
- Shimmer built directly into the polish (not glitter on top)
- Creates a subtle, smooth shine rather than obvious sparkle
- Looks different depending on the lighting (nude-ish in soft light, shimmery in bright light)
- One coat for a more subtle effect, two for more opacity and shimmer
Quick fact: This shade is perfect if you love the idea of some shine but don’t want to commit to sparkle—it’s the minimum-effort maximum-elegance option.
20. Understated Pearl Base with Matte Details
A soft pearl or nude base with tiny matte details—like a single matte stripe, a small matte geometric shape, or matte dots—creates contrast in both color and finish. The juxtaposition of matte and glossy is inherently more interesting than either finish alone, and keeping the matte details minimal and intentional ensures the overall effect stays elegant and refined rather than conflicting.
Finish Contrast as an Art Form
Using two different finishes on one nail is surprisingly sophisticated because it shows intentionality—you didn’t just slap on whatever finish the polish came in, you specifically chose two finishes to work together. Matte against glossy creates visual interest and feels modern and high-end.
How to Combine Finishes
- Pearl or soft nude glossy base (all nails)
- Add matte details on top—a single stripe, a geometric shape, scattered dots
- Keep matte details on just one or two nails for balance
- Ensure the matte element is small enough that it reads as an accent, not the focus
- The glossy base should be the dominant element
Insider note: This design requires a bit more precision from your nail tech, but the effort is worth it for how elegant the final result looks.
Final Thoughts
The beauty of short squoval acrylics is that you don’t need complicated designs or high-maintenance shapes to look genuinely polished. These twenty designs prove that elegance lives in the restraint—in the choice of one perfect shade, in the precision of a thin metallic line, in the intentional placement of a single accent. Squovals themselves are the most wearable nail shape because they’re practical without sacrificing sophistication, and when you pair that shape with thoughtful design choices, you end up with nails you’ll actually want to wear for weeks at a time.
The real secret to nails that feel genuinely classy is focusing on quality over quantity. A perfectly executed nude ombre beats an over-complicated full-nail design every single time. Ask your nail tech to prioritize precision—clean lines, even gradients, symmetrical placement—over flash and glitter. Pay attention to finish choices: matte reads more expensive than gloss, chrome and pearl catch light beautifully, and combining finishes adds sophistication.
Take these designs to your next appointment with specific references and photos, and don’t hesitate to ask your tech questions about their process. A great nail tech will understand exactly what you’re going for and will be excited to execute a design that looks effortlessly elegant. Whether you go for something with shimmer, something with texture, something with an accent line, or something completely solid, the key is choosing a design you genuinely love—because that confidence is what makes any manicure look its absolute best.
