

Short squoval nails hit different when you’re working with warm tones. There’s something inherently elegant about that shape — it’s the sweet spot between a practical square and a softer oval, giving you real length without committing to a full stiletto. Throw in warm, earthy, and golden hues, and you’ve got nails that feel luxurious, sophisticated, and honestly, achievable for everyday wear. Whether you prefer minimalist designs or nails packed with visual interest, warm-toned short squoval acrylics offer endless possibilities that complement a wide range of skin tones and personal styles.
The beauty of warm tones is their versatility. Golds, coppers, terracottas, caramels, and peachy-nudes work year-round and pair beautifully with both casual and formal outfits. Short squoval length means you’re not sacrificing functionality — you can still type, open things, and live your life without the constant worry of breaking a nail. This combination has become a go-to for people who want their nails to look intentional and polished without requiring constant maintenance or being impractical. The designs we’re covering here range from sophisticated and understated to eye-catching and textured, so you’ll find inspiration whether you’re going for a boardroom look or something with more personality.
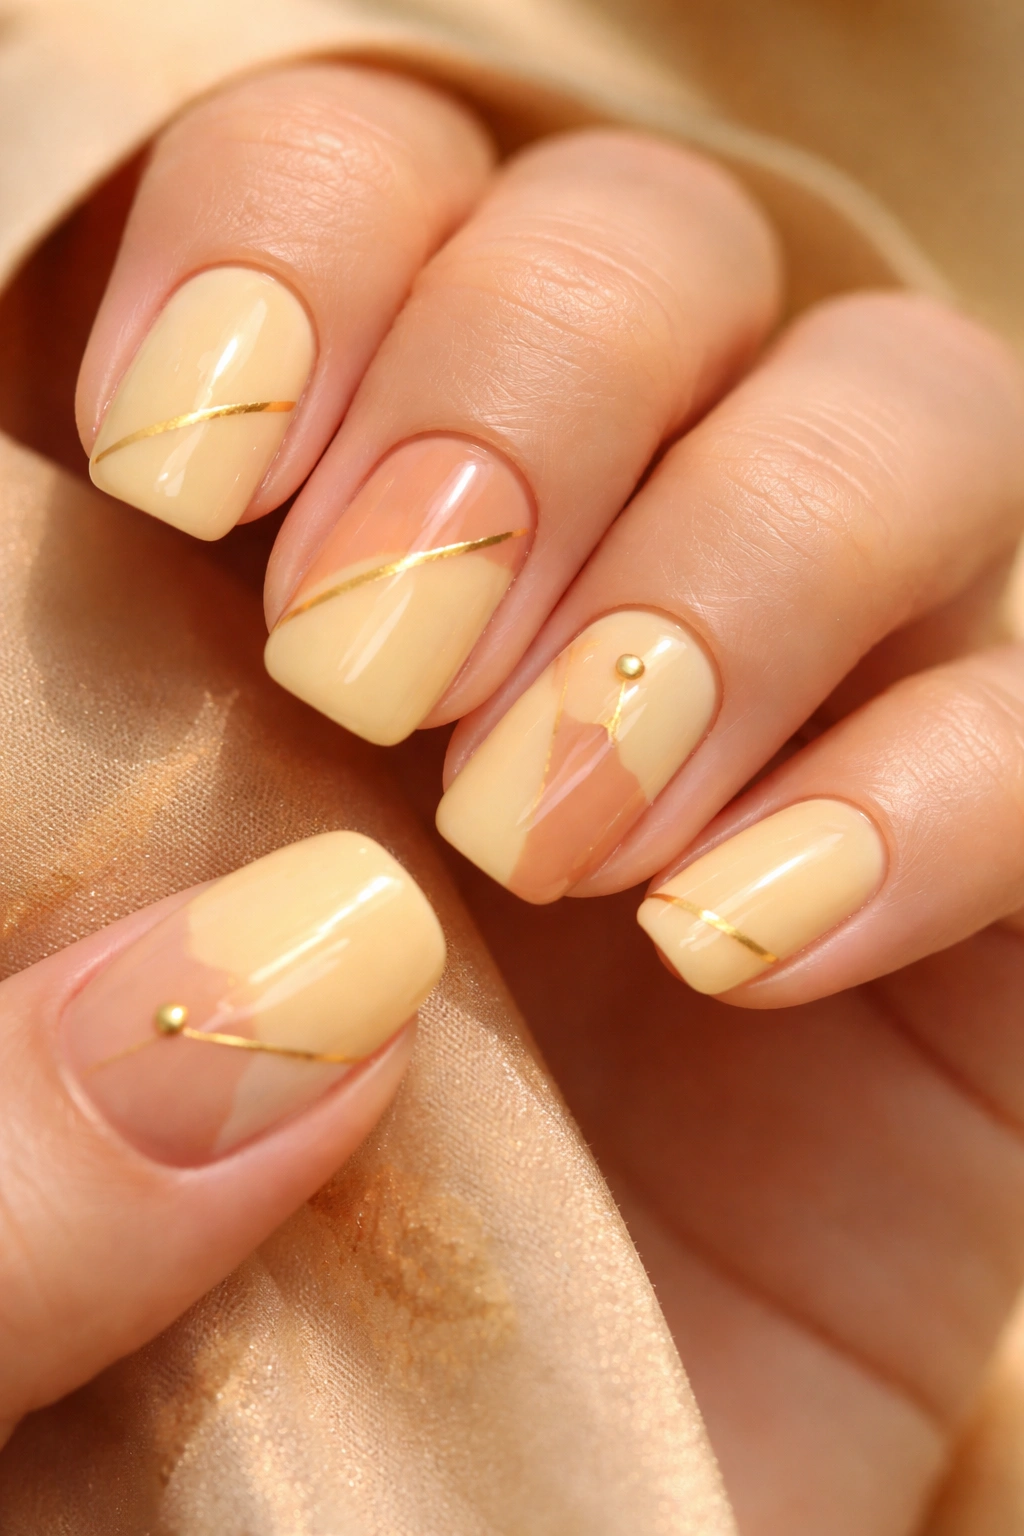
1. Warm Nude with Gold Accents
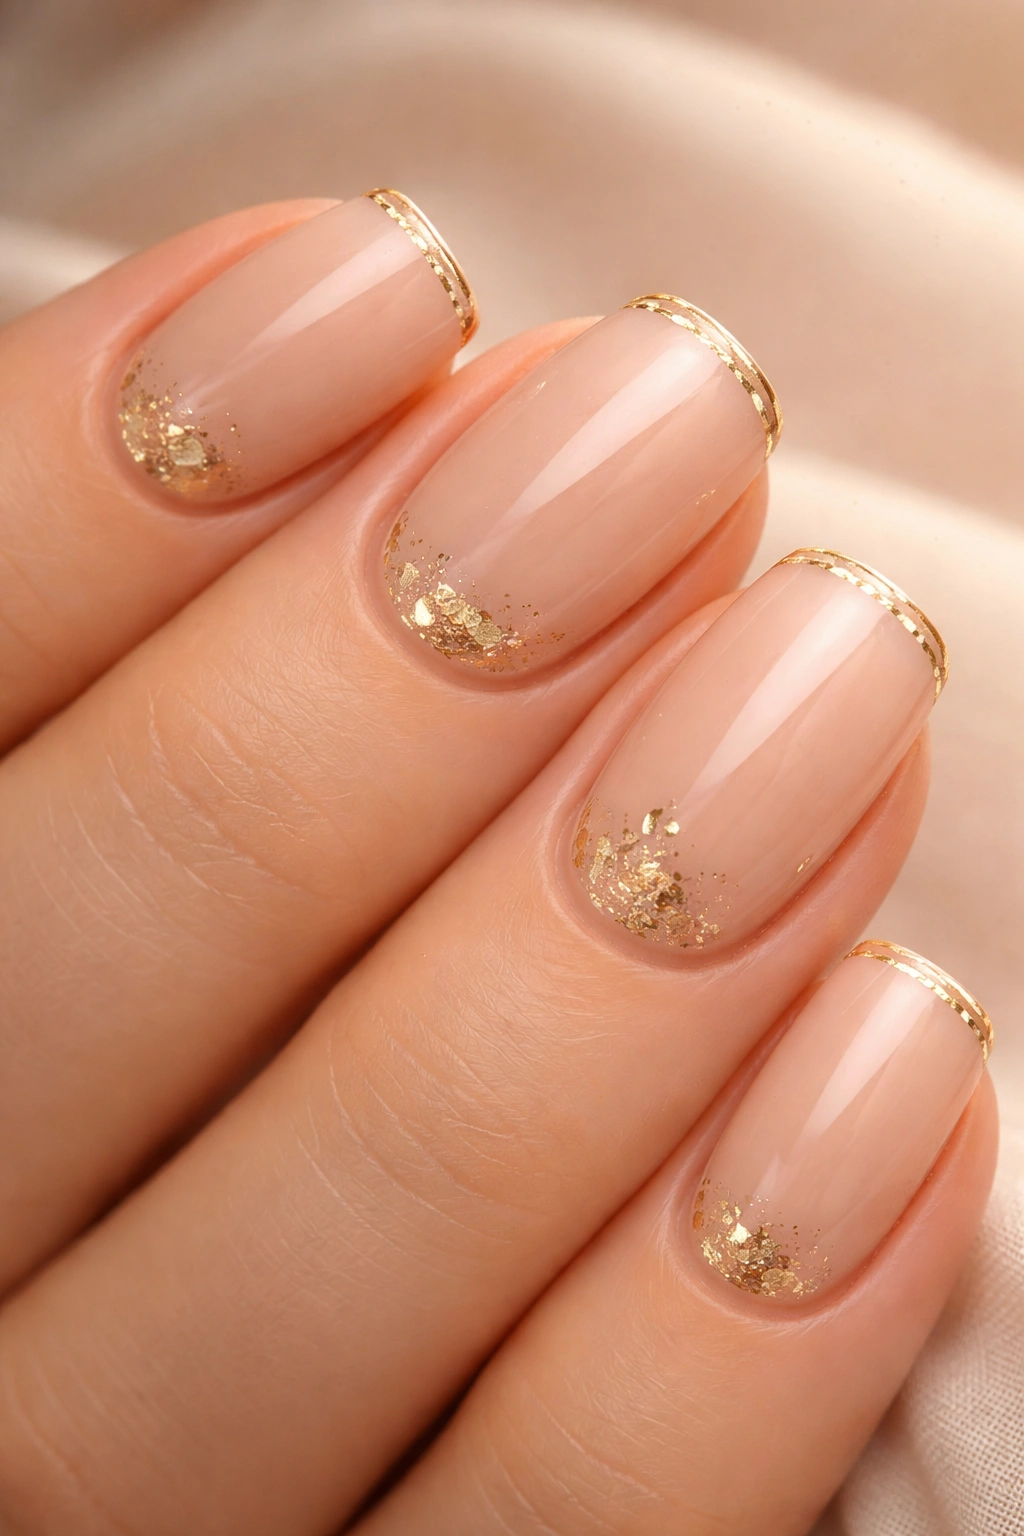
A warm nude base provides the perfect canvas for subtle luxury. Start with a soft, creamy nude shade that leans slightly peachy or tan — something that makes your nail bed look longer and more elegant. The real magic happens when you add delicate gold leaf details or thin gold striping down the center of each nail. You can also opt for a thin gold line along the free edge for a French-inspired touch that feels decidedly modern.
Why This Works Best
The warmth in the nude prevents it from looking washed out or institutional. Gold naturally catches the light and draws attention without overwhelming the design. This is the kind of manicure that looks intentional but requires minimal upkeep, making it perfect for people with busy schedules.
How to Achieve This Look
- Apply two coats of your chosen warm nude base
- Use a thin gold gel pen or striping brush to create delicate lines
- Seal with a glossy topcoat for refined shine
- Consider adding a matte topcoat over just the nude if you want the gold to stand out more
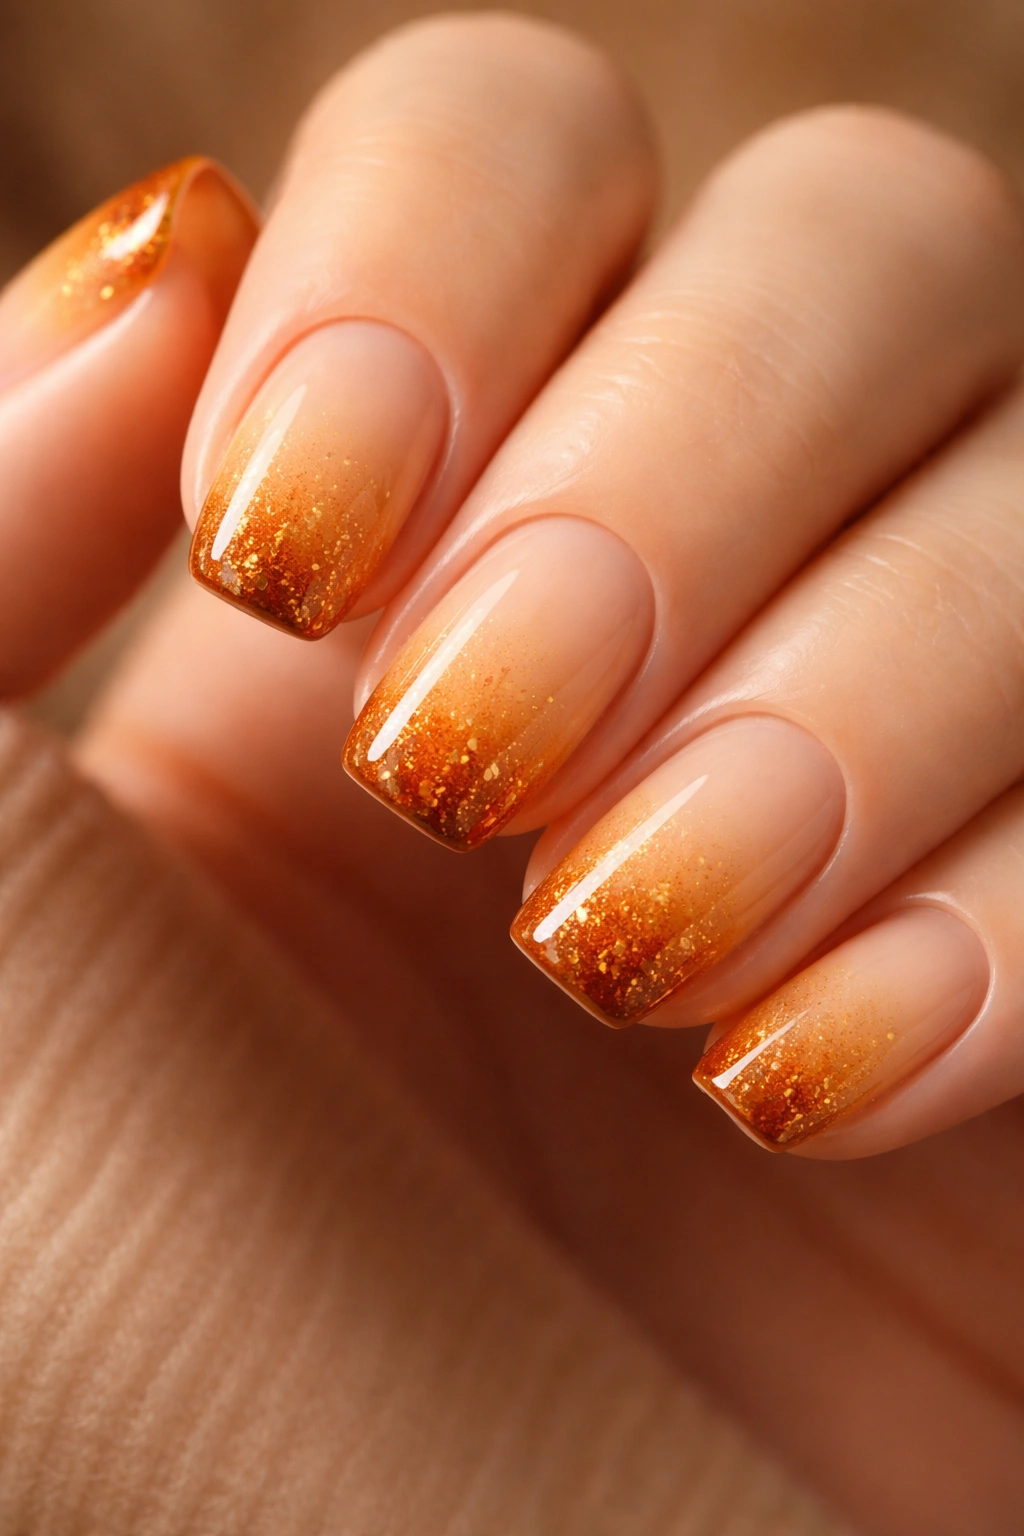
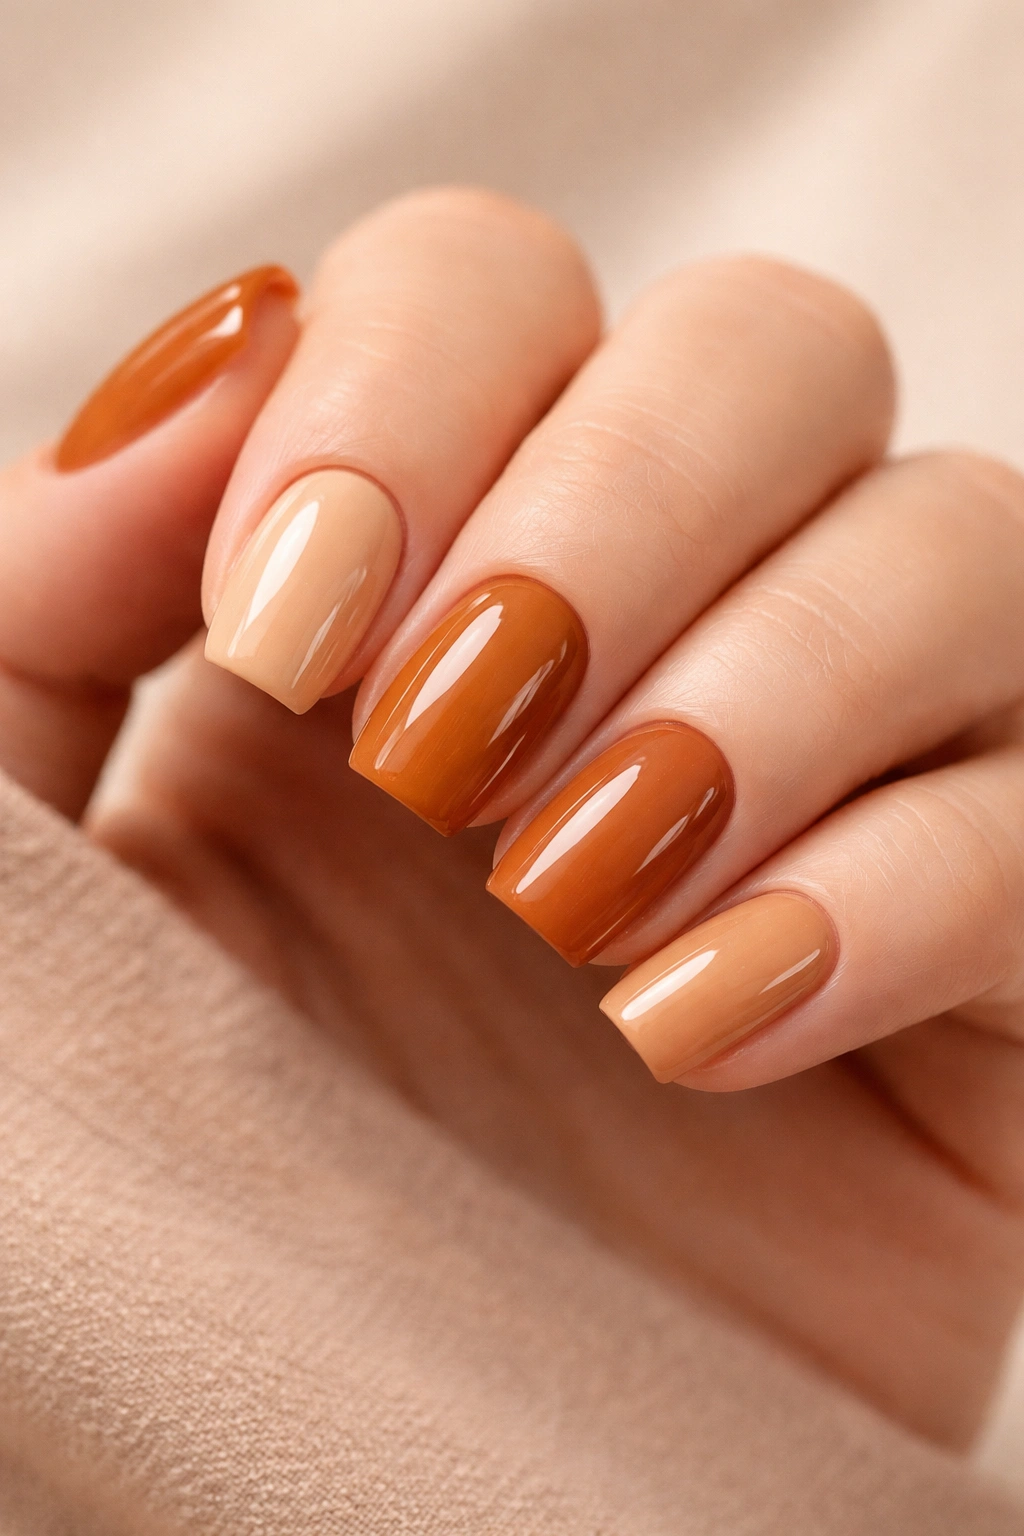
2. Terracotta and Bronze Ombre
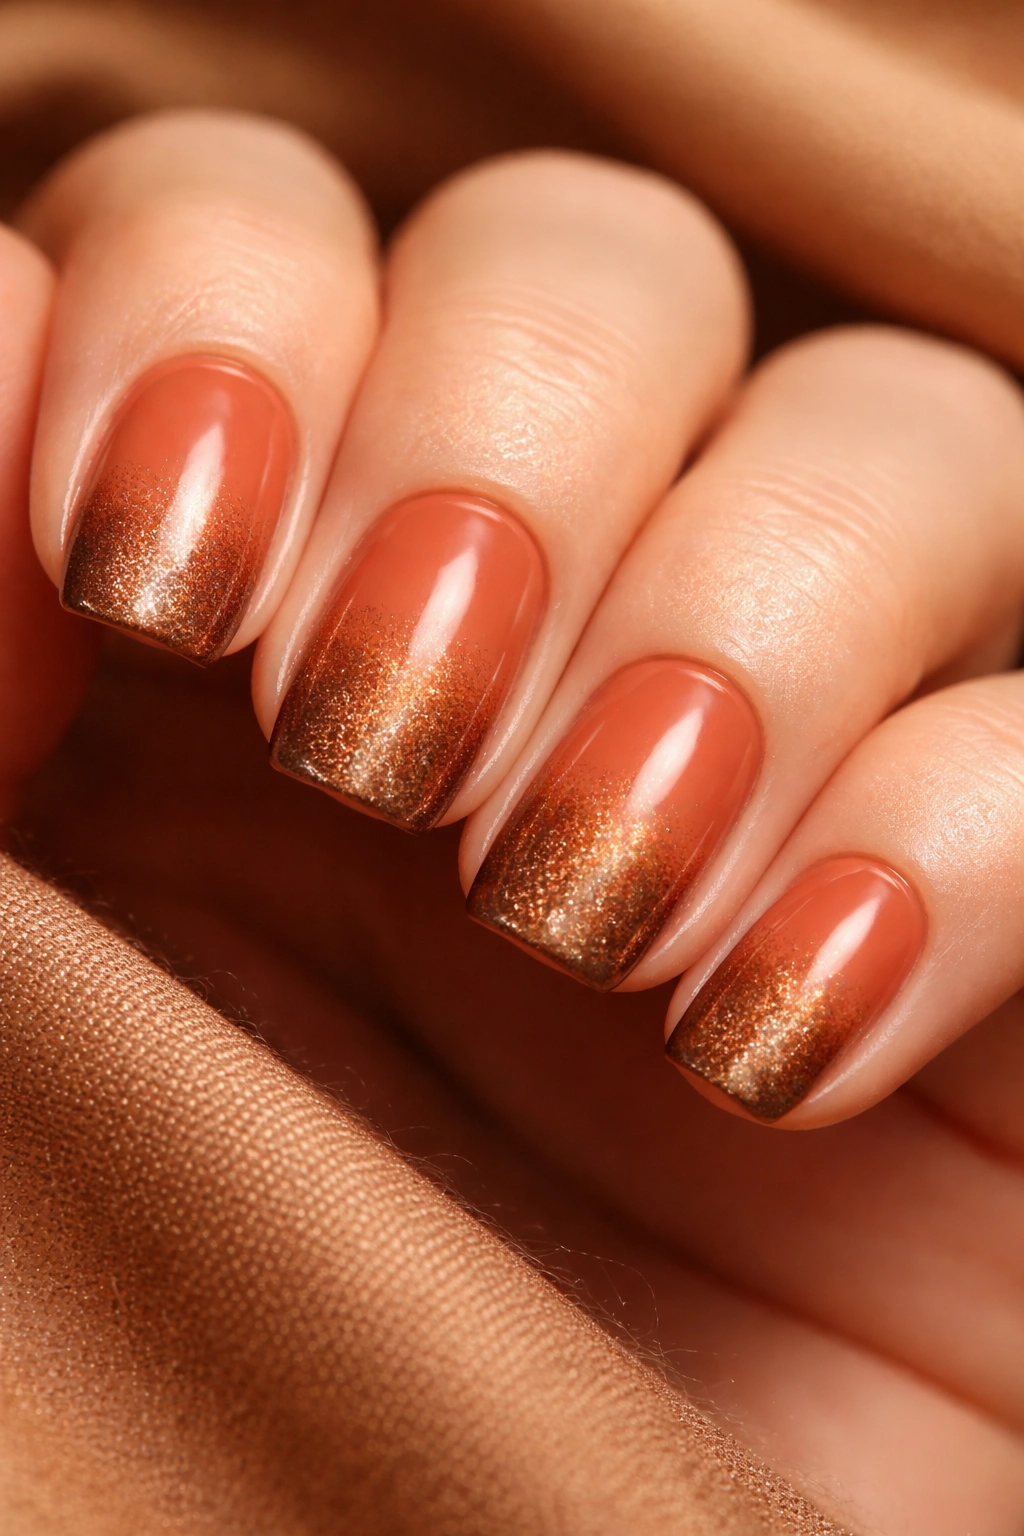
Terracotta is having a moment, and combining it with bronze creates an ombre that feels both earthy and glamorous. Start with a warm, muted terracotta on the nail bed and gradually blend it into a deeper, shimmer-infused bronze toward the tips. The transition should be smooth but visible, creating dimension that’s absolutely captivating.
The Science of This Gradient
When you layer warm undertones on top of each other, something magical happens — they enhance rather than muddy each other. Terracotta brings earthiness while bronze adds that precious metal quality. Together, they create a gradient that photographs beautifully and catches different light depending on how you move your hands.
Application Tips
- Start with a light terracotta base coat
- Apply a slightly darker terracotta toward the tip
- Use a sponge or brush to blend in bronze shimmer particles
- This design benefits from a matte topcoat to enhance the earthy feel
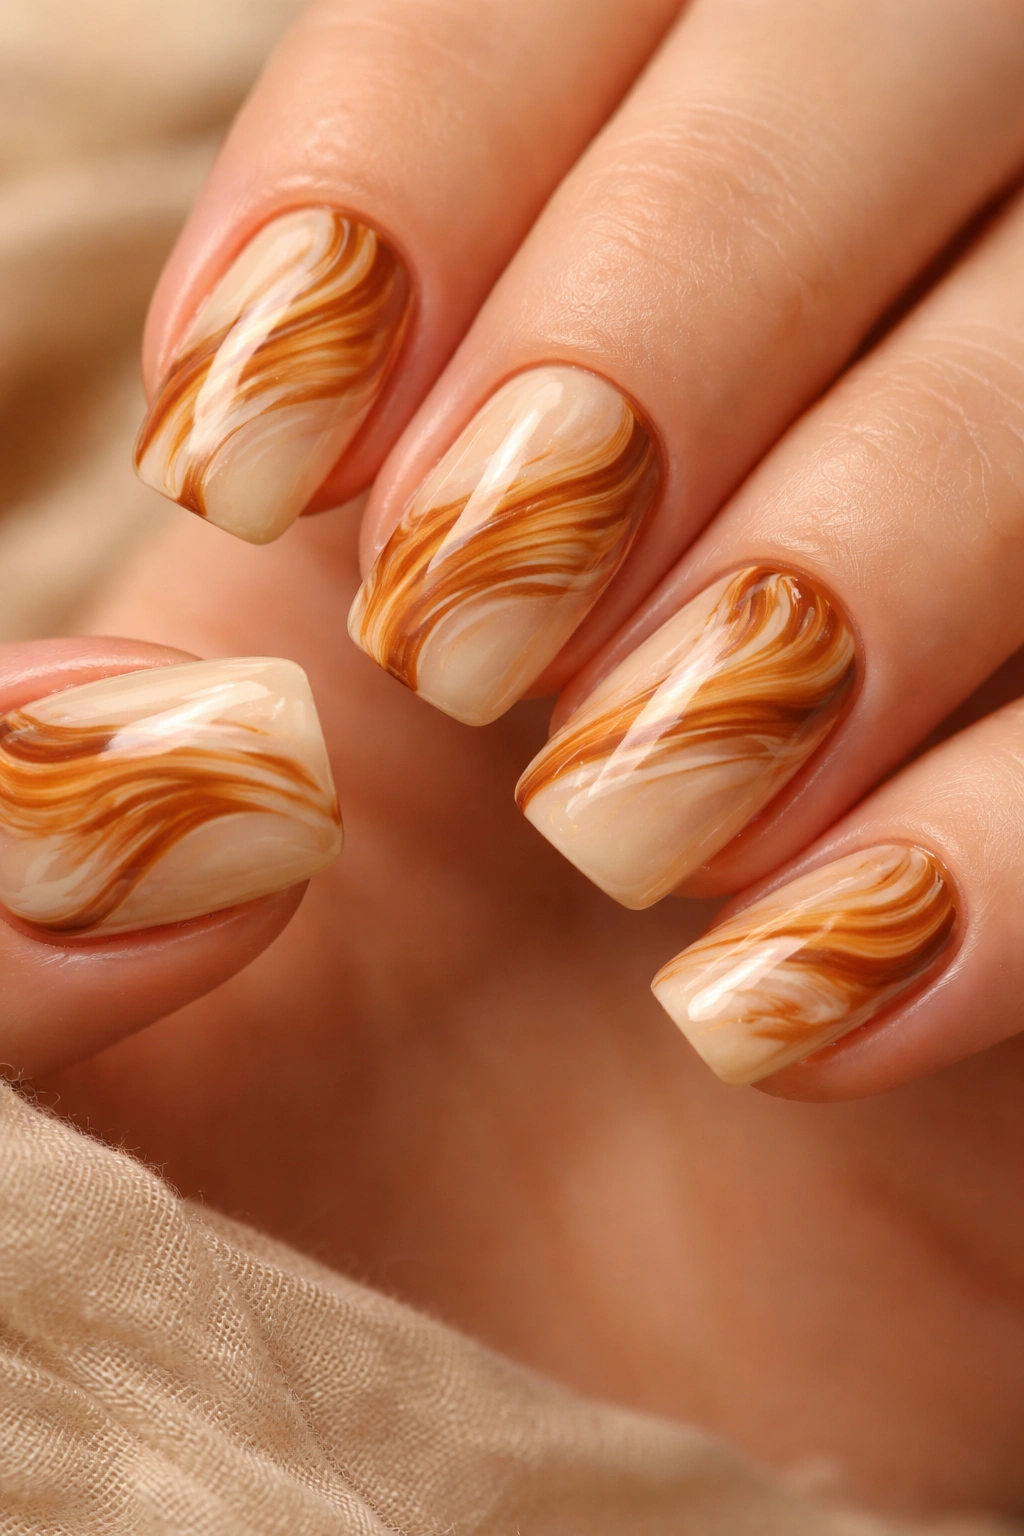
3. Honey Drip
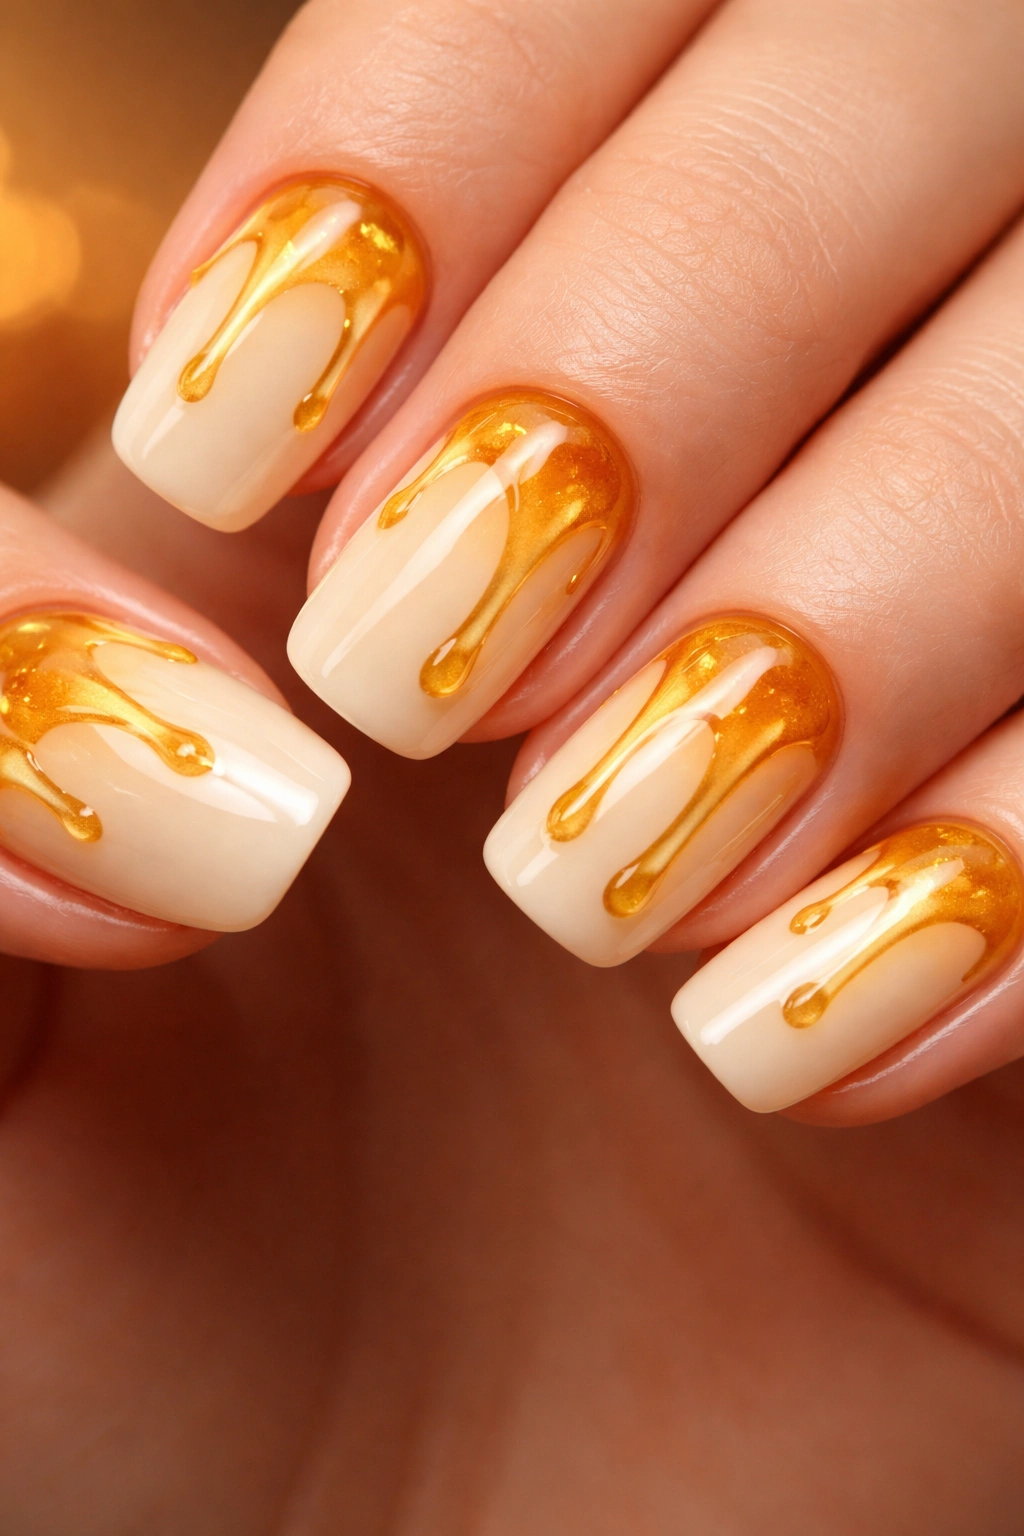
Imagine warm honey slowly dripping down pale cream — that’s the essence of this design. Use a pale, buttery cream as your base and create vertical dripping lines in a rich golden-honey shade. The drips should look organic and imperfect, like real honey catching light as it falls. This design is visual, engaging, and feels way more complex than it actually is to execute.
Why It’s Perfect for Short Squoval
The vertical drip lines actually make short nails appear longer visually. Your eyes follow the drips down, which extends the perceived length. It’s an optical illusion that works beautifully on this particular nail shape.
Execution Details
- Base with a smooth cream shade
- Use a thin striping brush or dotting tool with golden-honey gel
- Create 2-3 main drips per nail, staggering them so they don’t all align
- Let some drips connect or overlap for authenticity
- Seal with a glossy topcoat
4. Rust Ombre Gradient
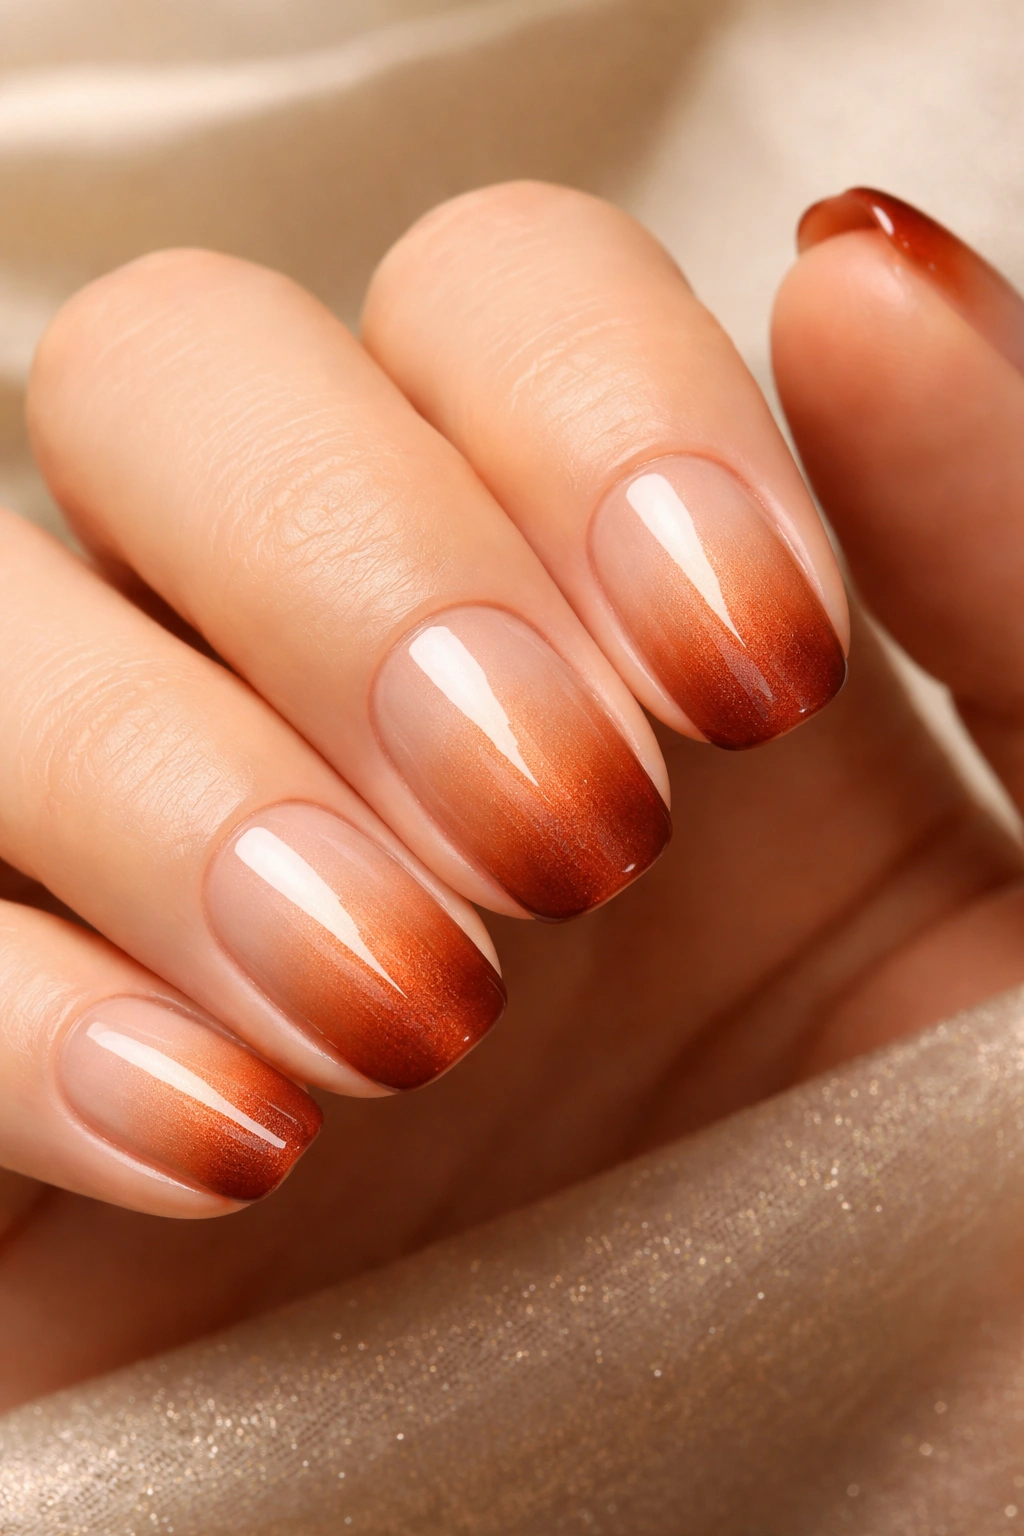
Rust is a surprisingly flattering warm tone that works on nearly every skin tone. Create an ombre that starts pale and warm at the cuticle — think champagne or light tan — and deepens into a rich rust shade at the free edge. The gradient should be gradual enough to feel intentional but distinct enough that the color shift is noticeable and impressive.
What Makes Rust So Wearable
Rust sits perfectly in the warm category without being too bold or orange-toned. It’s sophisticated enough for professional settings but warm enough to feel approachable and welcoming. This shade became popular for good reason — it flatters, it photographs well, and it pairs with virtually any outfit.
Building the Ombre
- Apply a light champagne base as your foundation
- Use progressively darker shades of rust through the middle section
- Concentrate the deepest rust at the tips
- Blend using a sponge technique or brush for seamless transition
5. Caramel Swirl
Think of rich caramel melting into vanilla — that’s the vibe of this design. Use a warm vanilla or pale caramel base, then add thicker caramel swirls that look like they’re marbling through the nail. The swirls should feel organic and natural, like you’re looking at actual mixed caramel and cream. This design has texture and movement that makes it endlessly interesting to look at.
Why Swirls Work on Squovals
The slightly rounded edges of squoval nails soften the directional nature of swirls. They prevent the design from looking too geometric or harsh, allowing the marbling to feel more organic. It’s one of those designs that looks complex but feels totally wearable.
Technique Breakdown
- Begin with a smooth vanilla or pale caramel base
- Drop small amounts of darker caramel gel at intervals
- Use a thin tool to drag through the gel, creating swirl patterns
- Keep swirls loose and imperfect for authenticity
- Finish with a shiny topcoat to enhance the marbled effect
6. Warm Peach Marble
Peach is the ultimate warm tone that bridges the gap between soft and vibrant. Create a marble effect by starting with a pale peach base and adding veining in deeper peach, coral, and gold tones. Real marble has those delicate line work that looks natural and sophisticated — aim for that instead of thick, obvious lines. The result should feel like you’re wearing tiny pieces of polished peach stone.
The Psychology of Peach Nails
Peach reads as both warm and approachable. It doesn’t feel as formal as some neutral tones, but it’s not as casual as bright pinks. It’s the Goldilocks of warm tones — just right for nearly any occasion. The marble effect adds just enough visual interest to keep it from being monotonous.
Execution Method
- Apply a light, creamy peach base coat
- Mix deeper peach, coral, and gold gels in separate small amounts
- Use a thin tool to create organic veining patterns
- Keep some areas softer and less defined than others
- The beauty is in the imperfection
7. Golden Flecks on Champagne
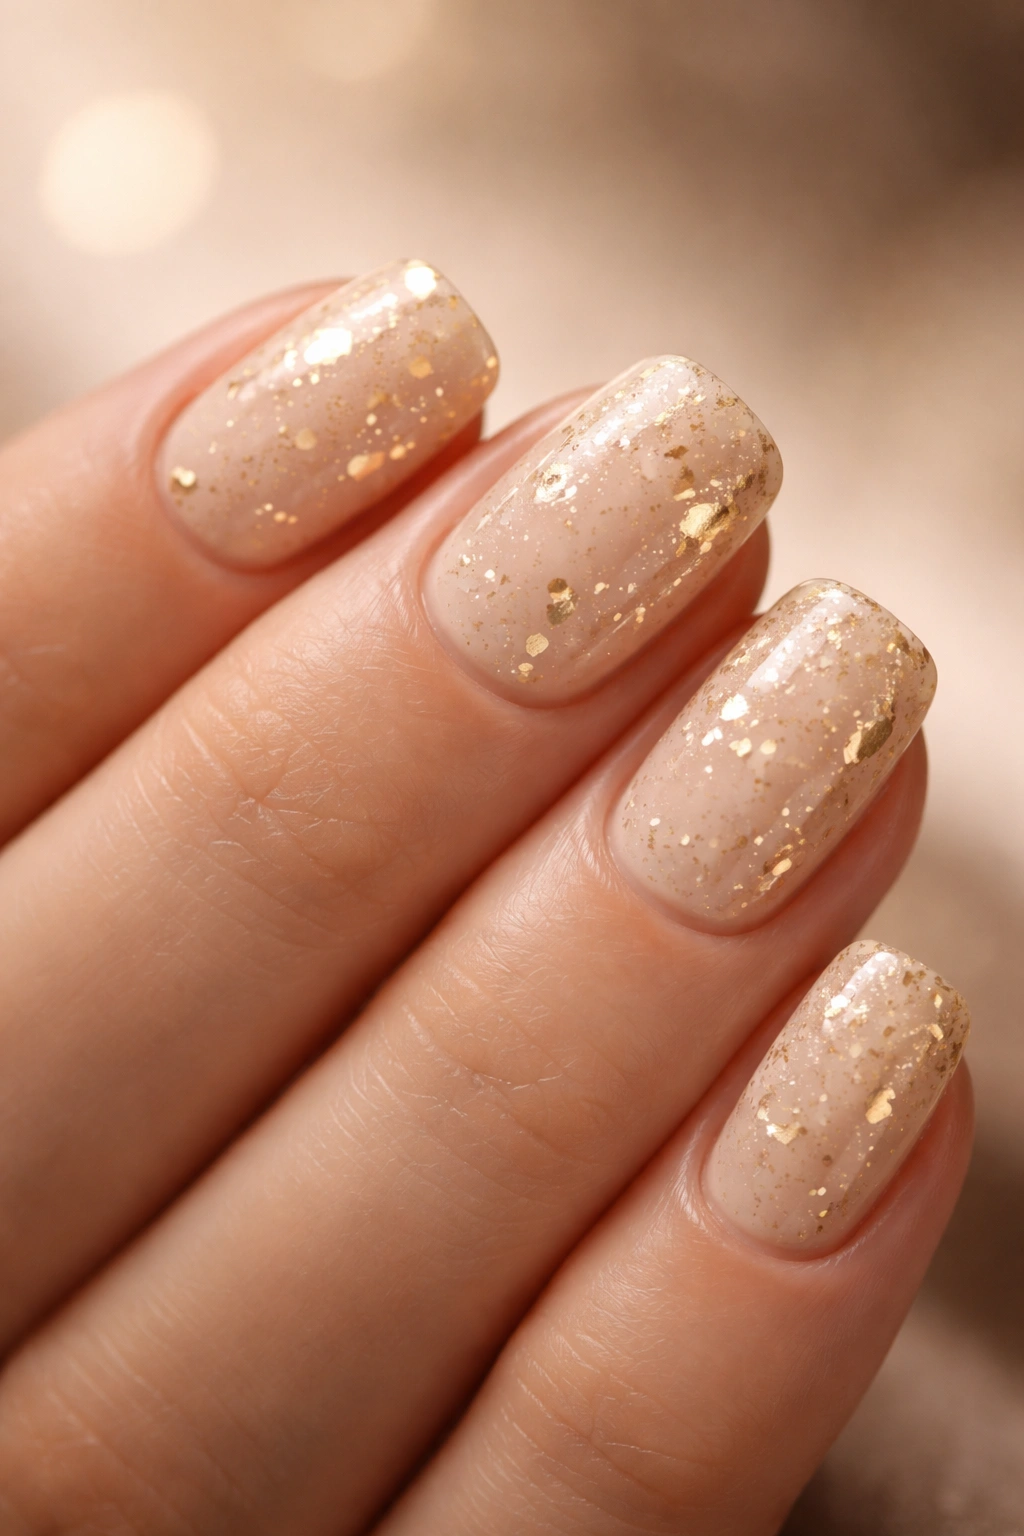
Sometimes minimalism with a sparkly twist is exactly what you need. Use a pale champagne or nude-pink base, then add scattered gold flecks or confetti throughout the entire nail. The flecks should feel like a subtle embellishment rather than a full glitter situation — think delicate and intentional rather than covered. This design works beautifully for people who want something special without overdoing it.
Why This Design Feels Elevated
Gold flecks on a neutral base instantly read as luxurious without trying too hard. It’s sophisticated, wearable, and doesn’t require perfect application. A little imperfection in the fleck placement actually makes it look more authentic and handmade.
How to Apply It
- Start with your champagne base and let it cure
- Spoon a small amount of gold fleck or confetti gel into your palette
- Use a thin brush to carefully place individual flecks across the nail
- Vary the concentration — denser near the center, sparser toward edges
- Seal everything with a clear topcoat
8. Warm Taupe with Geometric Lines
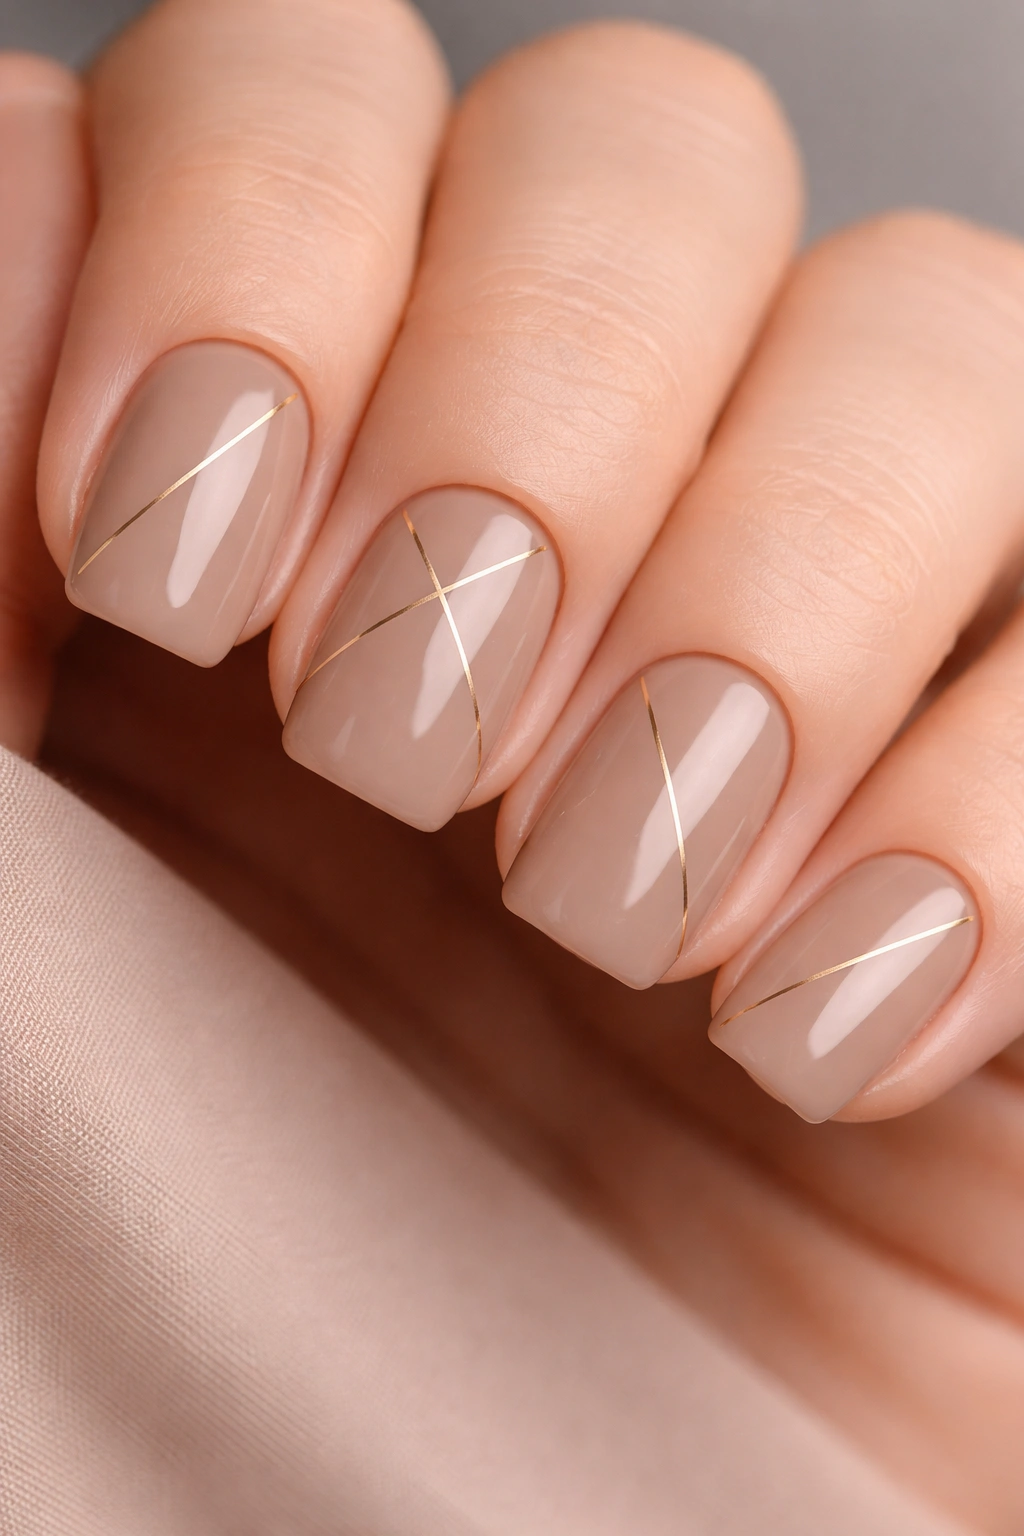
Taupe is underrated in the warm-tone category. It’s sophisticated, neutral, and works with nearly everything in your wardrobe. Elevate a warm taupe base with geometric line work in gold, bronze, or a slightly darker taupe. Think clean lines, sharp angles, or minimalist shapes — maybe just a simple angle across the lower corner, or parallel lines that create visual interest without chaos.
The Minimalist Appeal
Geometric lines on a neutral base appeal to people who appreciate clean design. It’s not about being trendy — it’s about creating a look that’s timeless and intentional. Taupe as a base ensures the geometric elements stand out without competing for attention.
Design Execution
- Polish the entire nail with a warm taupe shade
- Use a thin gold striping brush or gel pen for geometric lines
- Popular options include diagonal lines, angular shapes, or a minimal triangle
- Keep the design to one focal point per nail rather than covering everything
- Glossy topcoat enhances the shine of the geometric lines
9. Burnt Orange and Copper
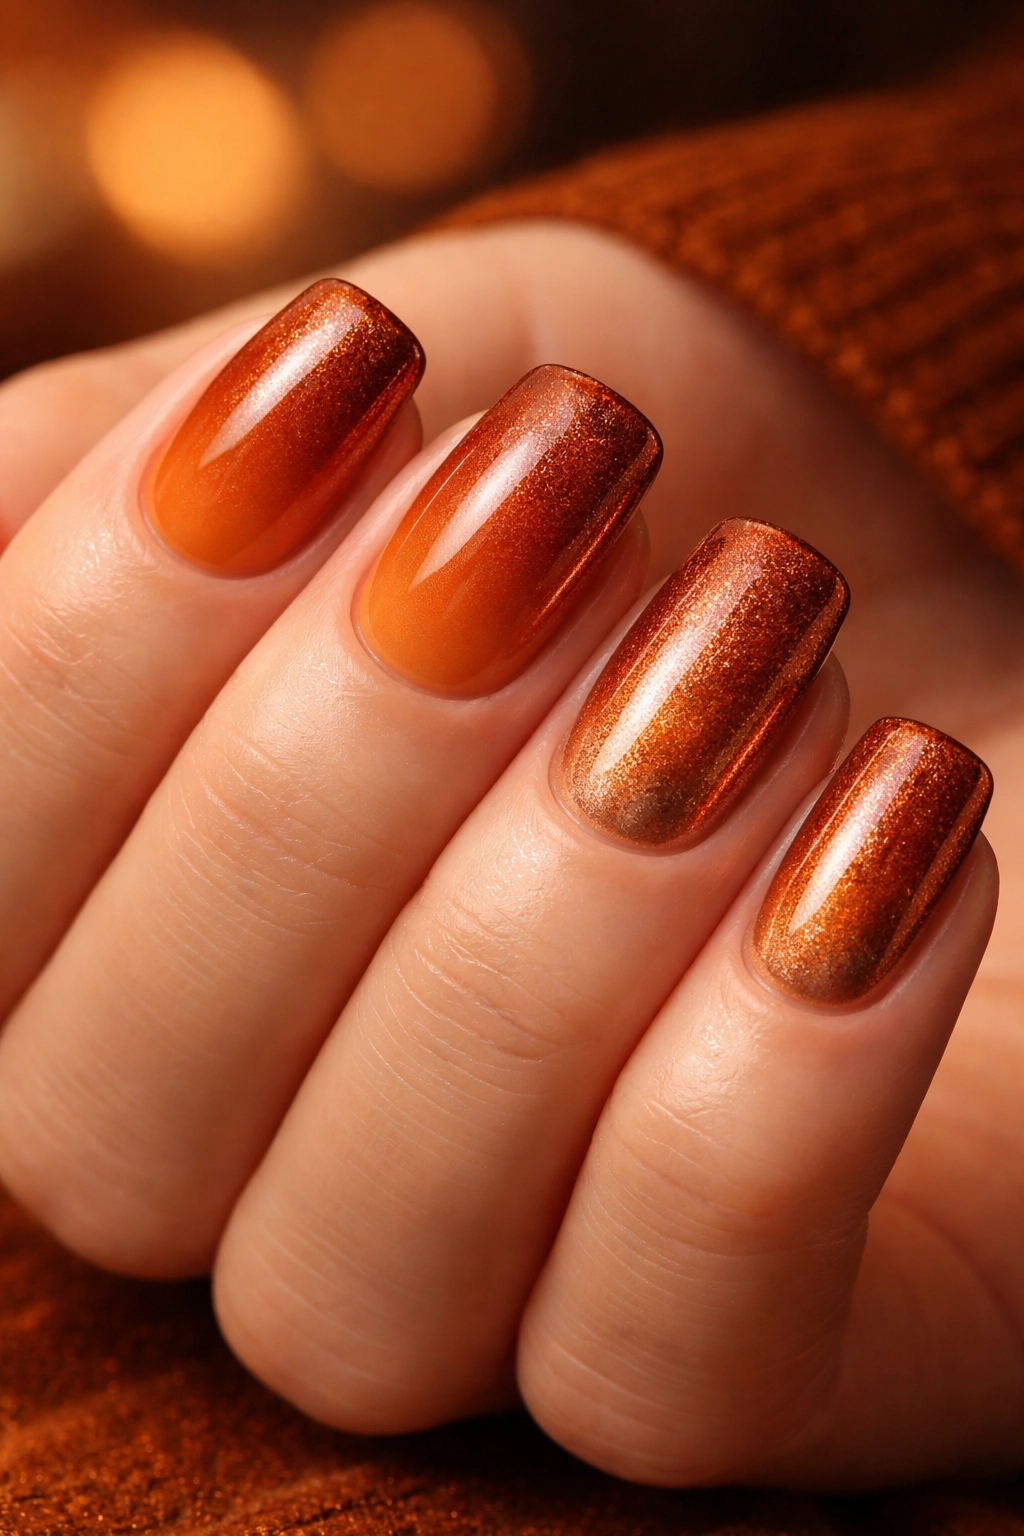
For people who aren’t afraid of slightly bolder color, burnt orange and copper is absolutely stunning. Create an ombre or color-blocking design where burnt orange transitions into shimmering copper. Alternatively, use copper as your base and add burnt orange accents on just one or two nails for asymmetrical interest. Either approach creates a design that feels warm, earthy, and undeniably chic.
When to Wear Burnt Orange Copper
This combination works particularly well during autumn, but honestly, warm tones work year-round. It pairs beautifully with earth-toned outfits, autumn fashion, but also neutrals and even cooler tones for contrast. It’s bold enough to make a statement but not so bright that it feels costume-like.
Application Strategies
- Option 1: Create an ombre from burnt orange (base) to copper (tips)
- Option 2: Alternate nails between burnt orange and copper for color-blocking
- Option 3: Use copper as a full base and add burnt orange geometric accents
- Finish with a shimmer topcoat to enhance the metallic quality
10. Vanilla Latte with Brown Details
Vanilla latte is exactly as comforting as it sounds on your nails. Start with a creamy vanilla or off-white base that has just a hint of warmth, then add brown detail work — maybe a thin line of dark brown near the cuticle, small dots, or a delicate stripe down the center. The brown should feel like espresso or chocolate against the creamy vanilla, creating a design that’s both cozy and elegant.
Why This Design Feels So Soothing
There’s something inherently calming about warm creams and browns. It’s like taking your favorite warm beverage and translating it to your nails. The design feels intimate and personal without requiring bold colors or flashy elements.
Brown Detail Options
- A thin dark brown line at the cuticle line (like a coffee ring)
- Small, scattered brown dots that look like coffee crumbs
- A fine brown stripe running vertically down the center
- A subtle brown French tip instead of the traditional white
- All of the above combined for textural interest
11. Warm Coral Gradient
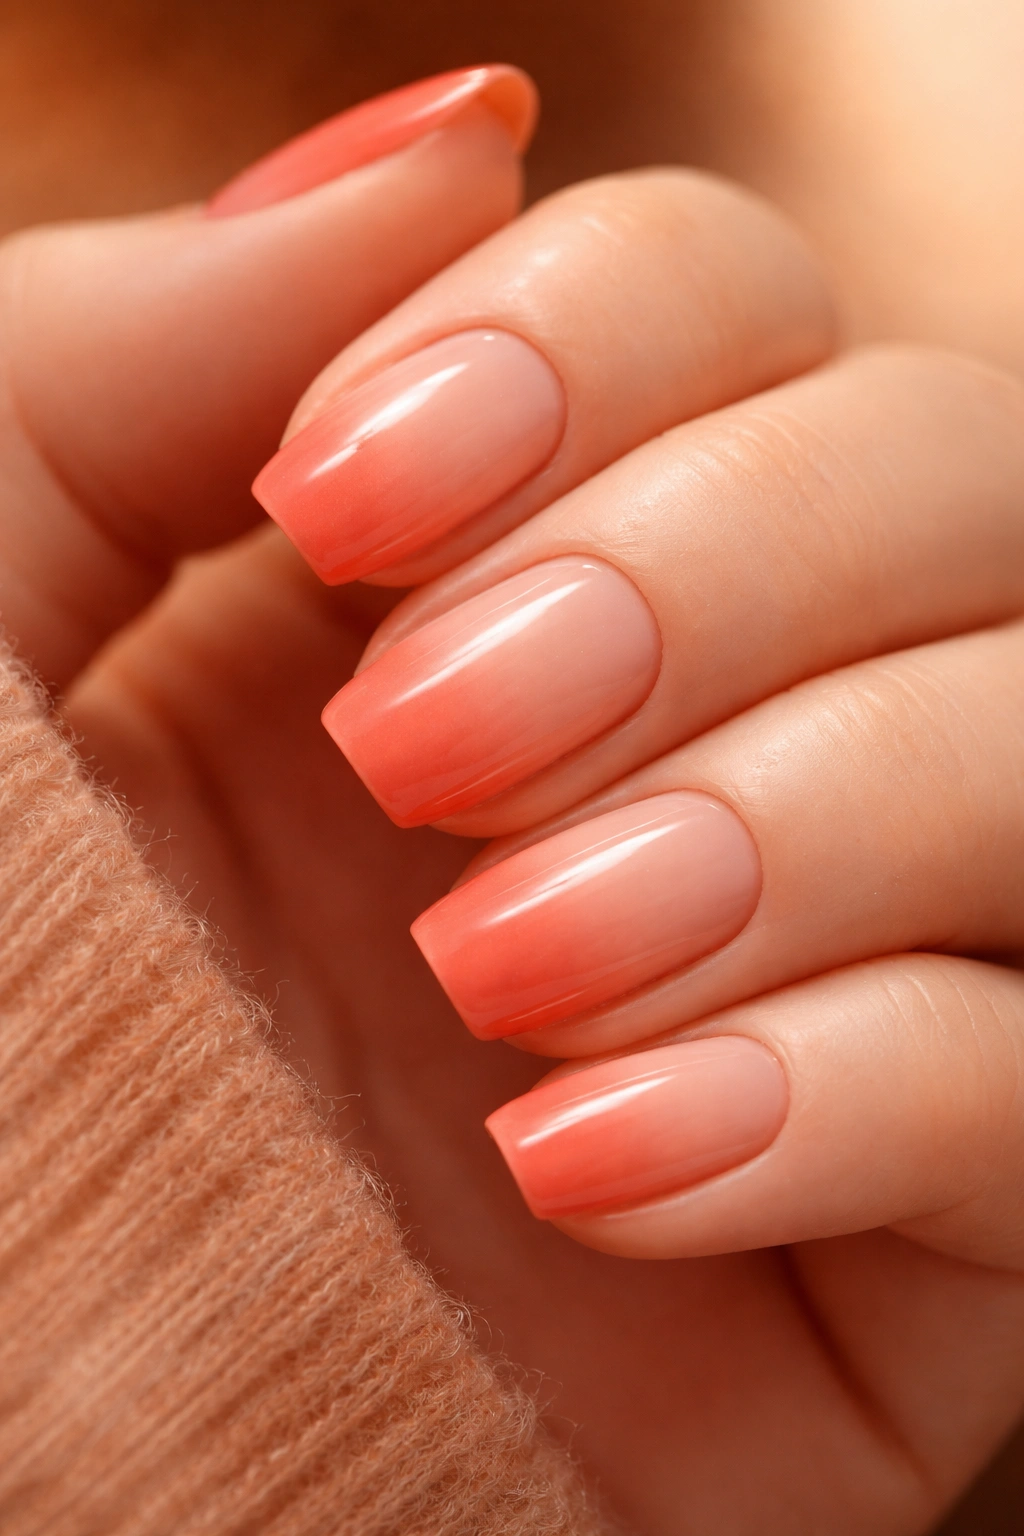
Coral that leans warm is pure joy on short squoval nails. Create a gradient that starts soft and pale at the base — almost a nude-coral — and deepens into a richer coral-peach at the tips. Warm coral avoids the orange-heavy tones that can sometimes clash with skin undertones, instead hitting that perfect balance between warm and flattering. This is a design that actually makes your hands look healthier and more vibrant.
The Flattering Quality of Warm Coral
Coral is known as one of the most universally flattering shades for nails because of its warm undertones. When you create a gradient, you’re essentially building depth that makes the nail bed look longer and your hands look more defined. It’s a subtle optical effect that adds real impact.
Creating the Gradient
- Begin with a pale nude-coral base
- Add a medium coral shade toward the middle
- Deepen to rich coral-peach at the free edge
- Use a sponge to blend transitions smoothly
- Glossy topcoat showcases the gradient perfectly
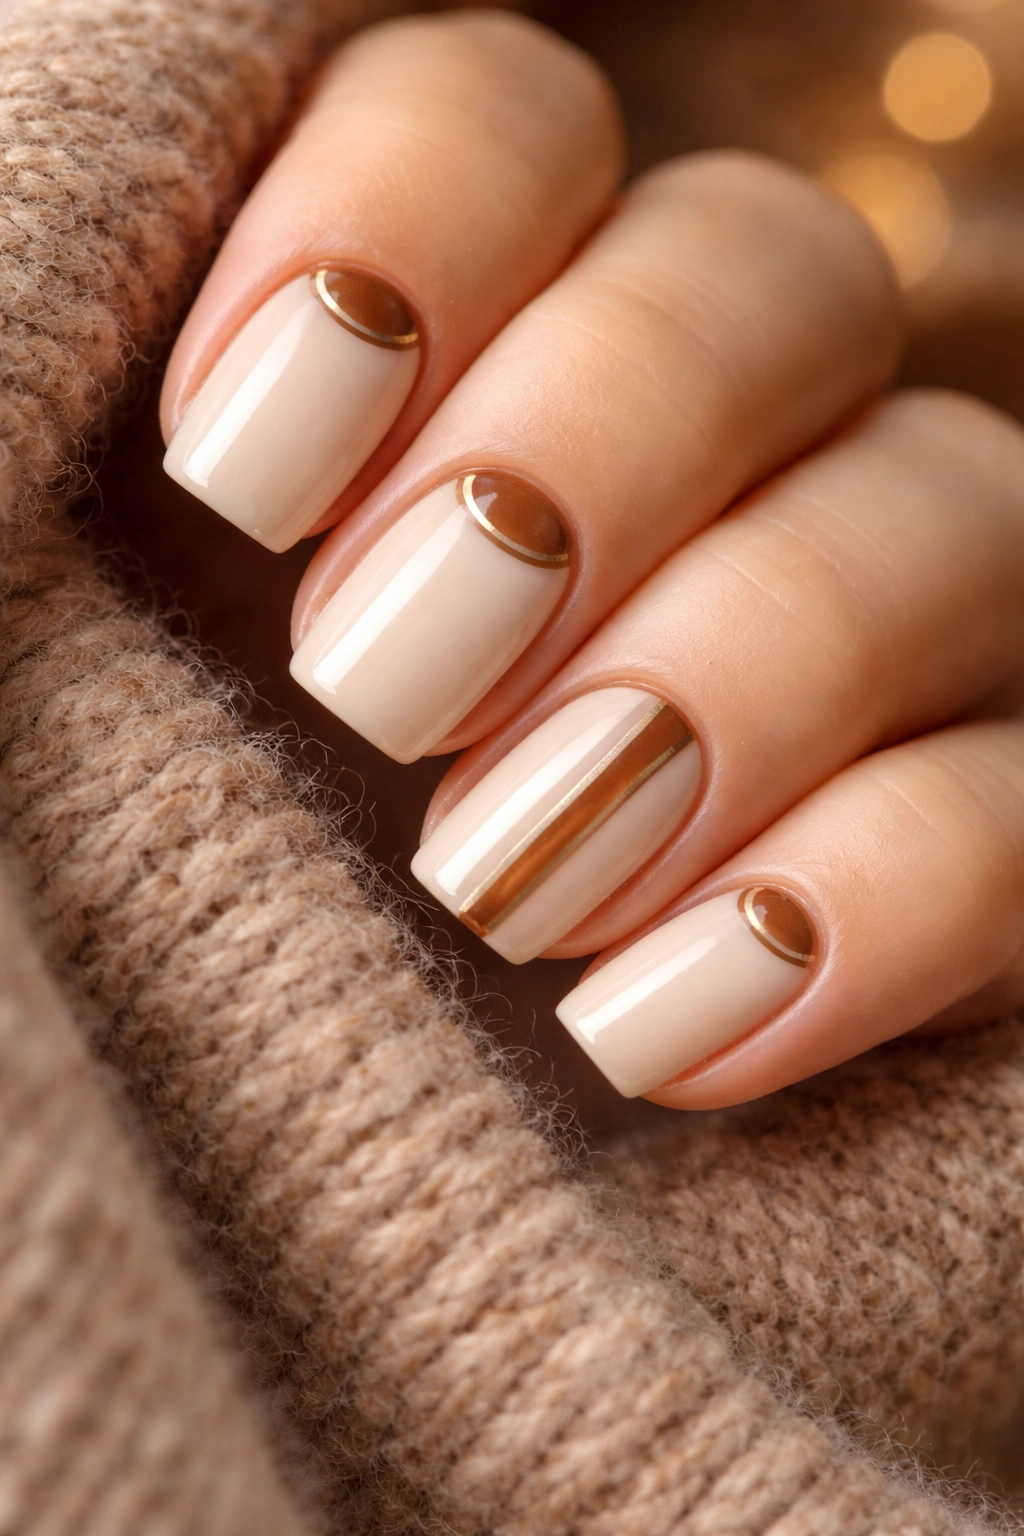
12. Rose Gold Minimalist
Rose gold is the warm-toned precious metal, and using it minimally is absolutely on-trend. Apply a neutral warm base — perhaps a pale beige or nude — and add rose gold detailing in the most restrained way possible. This might be a single thin line down one or two nails, a tiny accent at the cuticle, or even just a rose gold shimmer topcoat over everything for subtle warmth. The restraint is what makes it feel sophisticated.
Minimalism as a Style Statement
There’s real power in doing less. A single rose gold line feels intentional and considered. It shows that you’re confident enough not to need every inch of your nail covered in design — you’re secure in the elegance of simplicity.
Rose Gold Placement Ideas
- One thin rose gold vertical line down the center of two nails
- A small rose gold accent at the cuticle area only
- Rose gold on the tips of just your ring and pinky fingers
- A rose gold shimmer topcoat over the entire neutral base for subtle warmth
- Mixing matte and glossy finishes for added interest
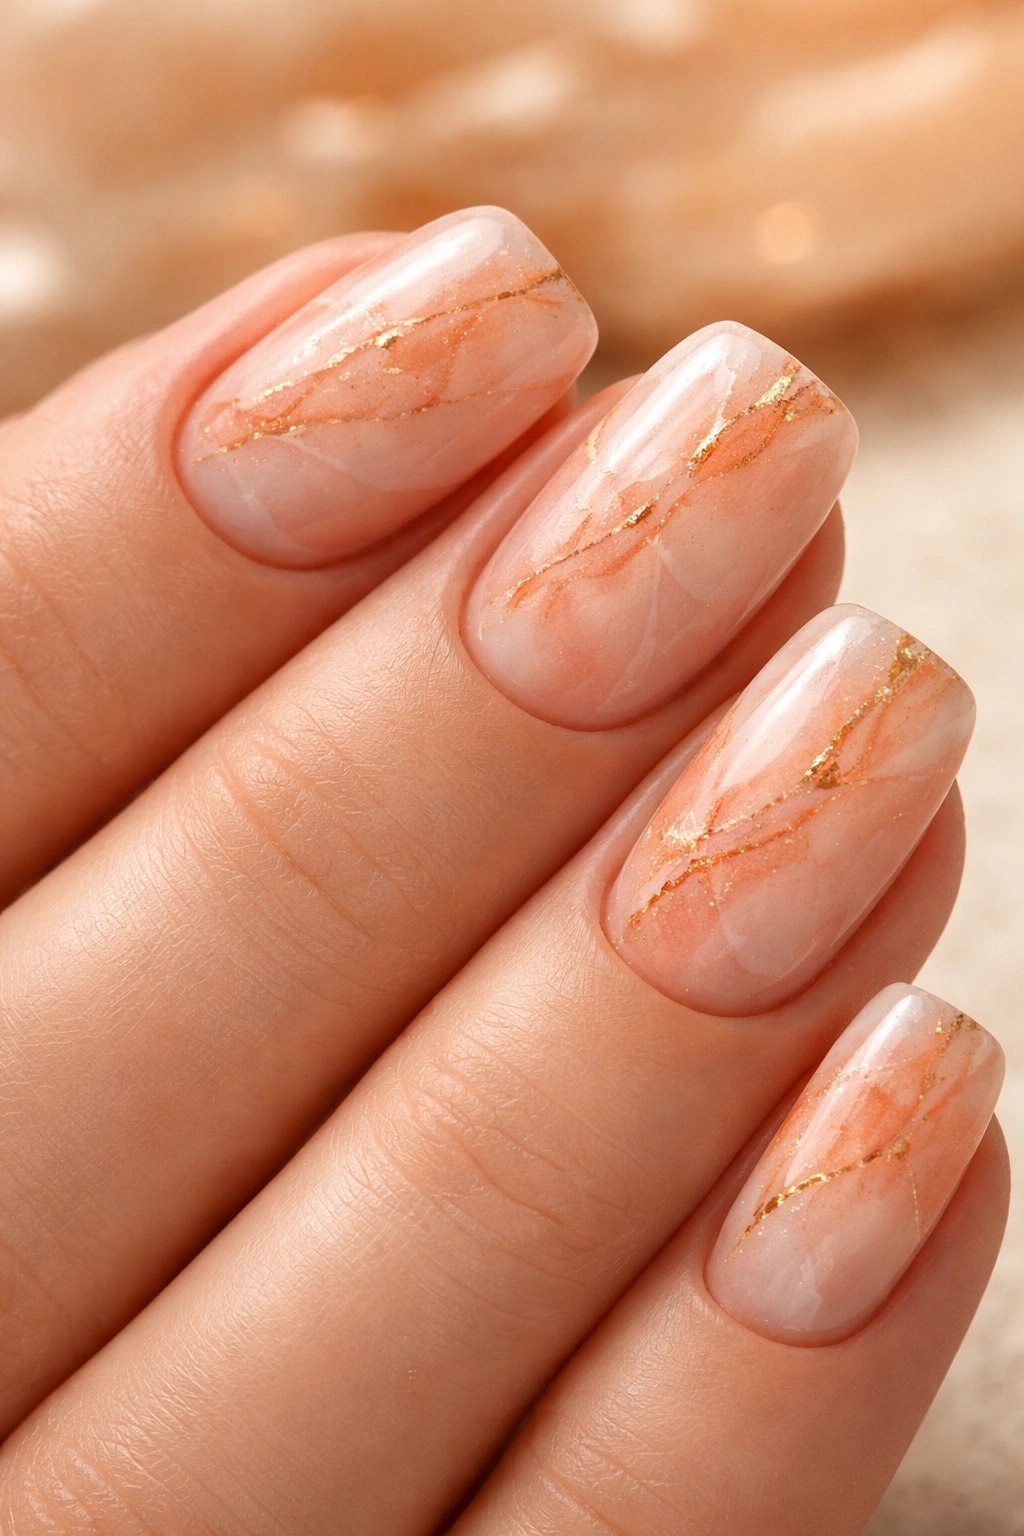
13. Warm Cream with Tortoiseshell
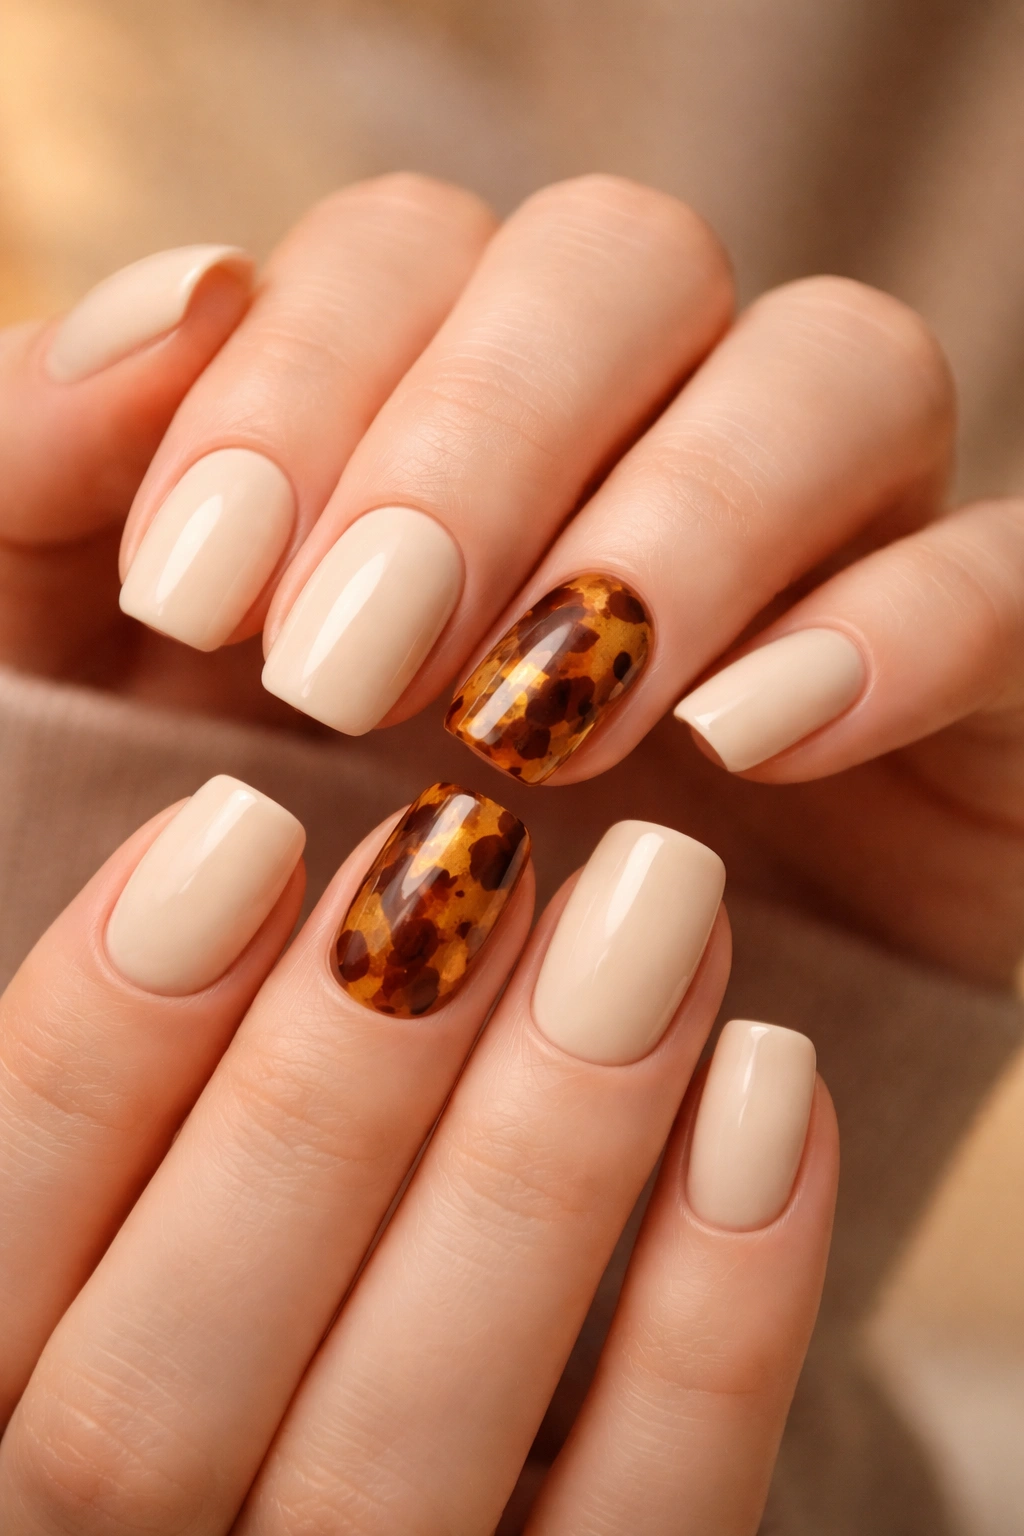
Tortoiseshell is having a major moment, and it’s the perfect warm-toned pattern for this nail shape. Start with a warm cream or vanilla base, then add tortoiseshell patterning in browns, golds, and warm oranges. Tortoiseshell doesn’t need to be perfect — in fact, the best versions look organic and slightly imperfect, like you’re actually looking at pieces of shell. Keep the pattern to one or two nails to let the warm cream shine on the others.
The Versatility of Tortoiseshell
Tortoiseshell works with virtually any outfit. It reads as sophisticated rather than trendy, and it works as well with business casual as it does with weekend wear. The warm cream base ensures the tortoiseshell adds visual interest without overwhelming.
Tortoiseshell Technique
- Apply your warm cream base to all nails and cure
- On one or two nails, add the tortoiseshell pattern using a combination of brown, gold, and warm orange gels
- Use a thin tool to create irregular organic shapes and lines
- Layer the colors so some areas are darker and some are lighter
- Seal with topcoat and allow to cure fully
14. Amber Gradient Glow
Amber feels warm, expensive, and luxurious — perfect for nails that need to feel special. Create a gradient that starts pale and golden at the base and deepens into a rich, almost-brown amber at the tips. If you want to elevate it further, use an amber shade with shimmer or even crushed amber-toned sparkle for a look that literally glows. This design catches light beautifully and makes your hands look radiant.
The Luminosity Factor
Amber naturally has a glow quality because of how light moves through it. When you translate this to nail polish with shimmer or sparkle, you create nails that actually emit light. It’s dramatic without being loud — impressive without being flashy.
Building the Amber Gradient
- Start with a pale golden base
- Move to a medium amber shade in the middle section
- Concentrate your deepest amber at the tips
- Add shimmer or sparkle particles in the deepest section for glow
- Use a glossy topcoat to enhance luminosity
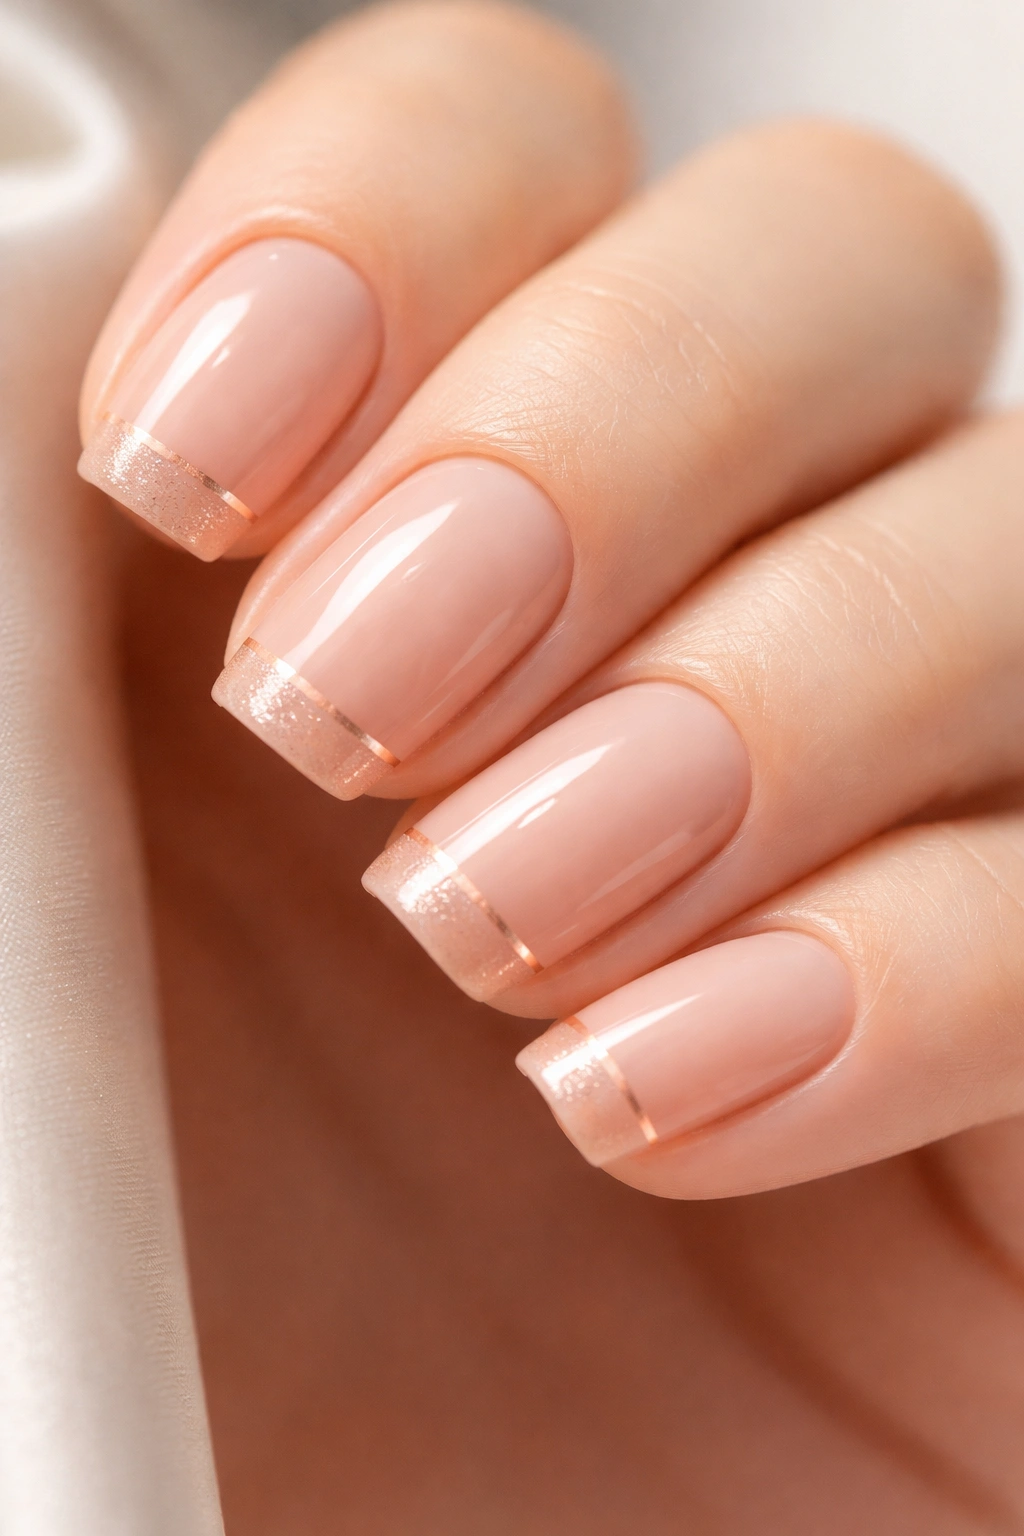
15. Warm Sandy Beige with Metallic Tips

Sandy beige is criminally underrated as a nail color. It’s warm, neutral, and universally flattering without being boring. Transform it into something special by adding metallic tips in gold, copper, or rose gold. This is essentially a warm-toned French manicure but with a metallic twist. The metallic tips catch light and add dimension without requiring pattern work or detailed artistry.
Why Metallic Tips Work
Metallic tips draw attention to your fingertips, which makes hands look more elegant and manicured. The contrast between the matte or semi-matte sandy beige and the shiny metallic creates visual interest that’s both simple and effective. It’s a design that works for conservative settings while still feeling intentional.
Application Steps
- Apply sandy beige as your full base coat
- Use a thin brush to carefully apply your chosen metallic shade to just the tips
- Create a clear line between the beige and metallic, or soften it slightly for a gradient effect
- Two metallic colors on alternating nails creates additional visual interest
- Seal with a clear glossy topcoat
16. Spiced Apple with Glitter
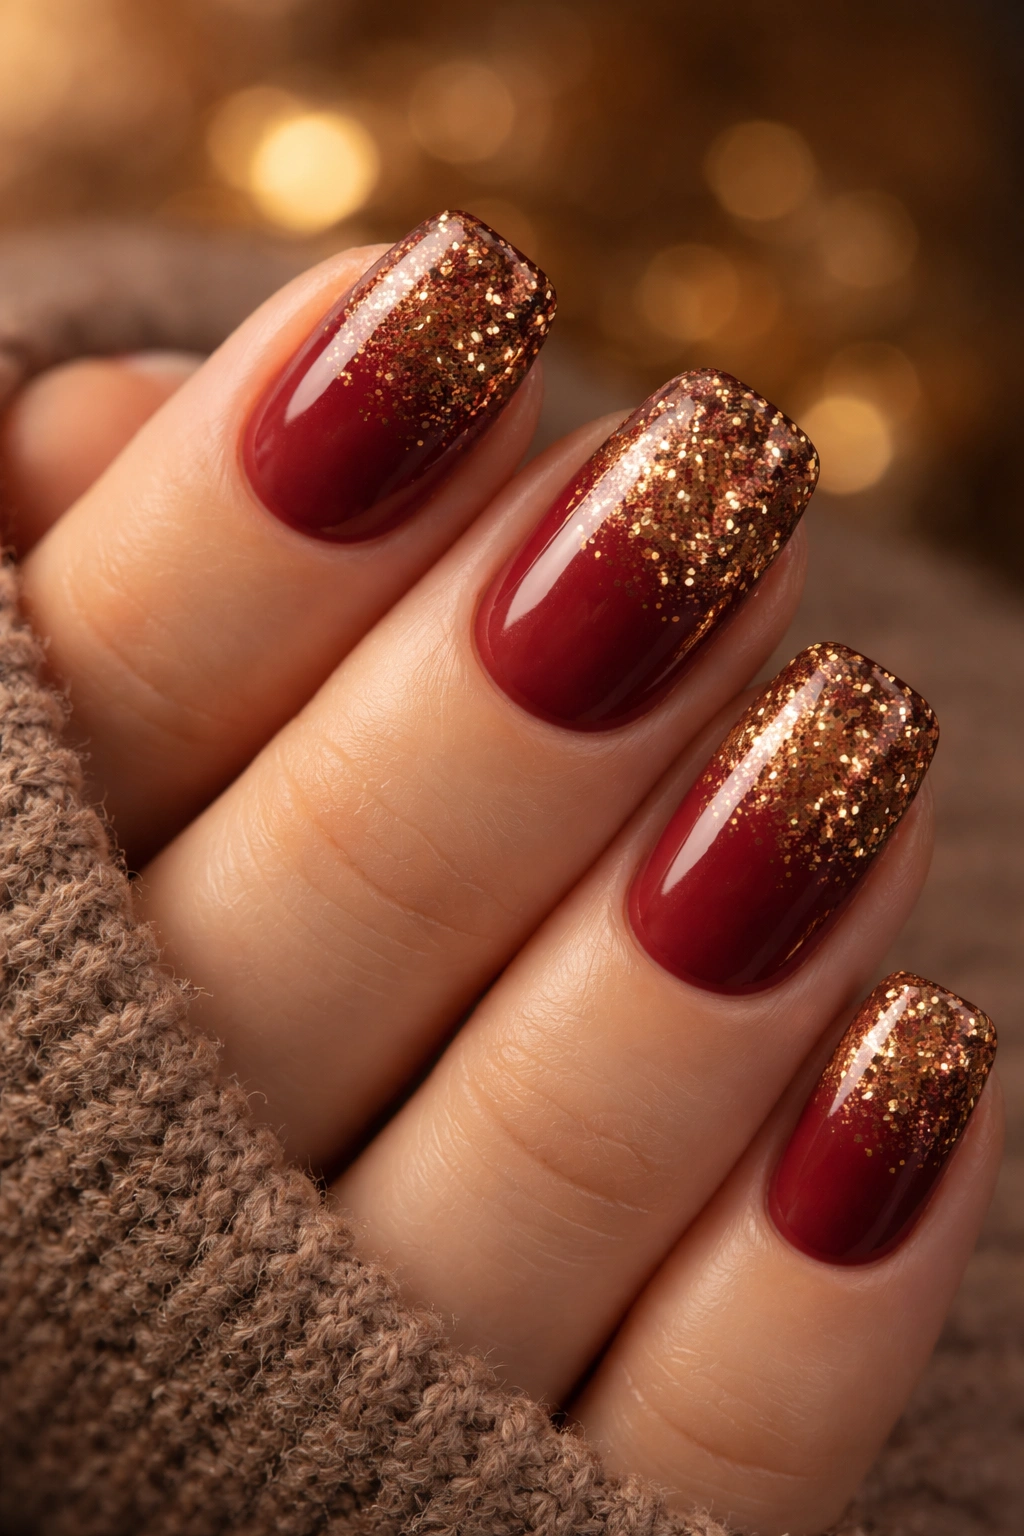
Spiced apple tones — those warm burgundy-reds with brown undertones — are perfect for people who want warmth with a bit more depth. Apply a spiced apple base, then add warm-toned glitter (gold, copper, or bronze) either throughout the entire nail or concentrated toward the tips. The glitter catches light and prevents the color from feeling flat or one-dimensional. It’s a design with personality and visual movement.
When to Reach for Spiced Apple
Spiced apple works beautifully during cooler months but genuinely works year-round with the right outfits. It’s warm enough to feel approachable but has enough depth to feel sophisticated. Adding glitter prevents it from feeling too heavy or dramatic.
Glitter Application Methods
- All-over glitter: Mix glitter with your top coat and apply throughout
- Gradient glitter: Apply solid color base, then add glitter concentrated at tips
- Strategic placement: Use a thin brush to place glitter only on the lower third of the nail
- Mix metallic and holographic glitter for additional complexity
- Seal everything securely to prevent glitter migration
17. Warm Caramel Ombre
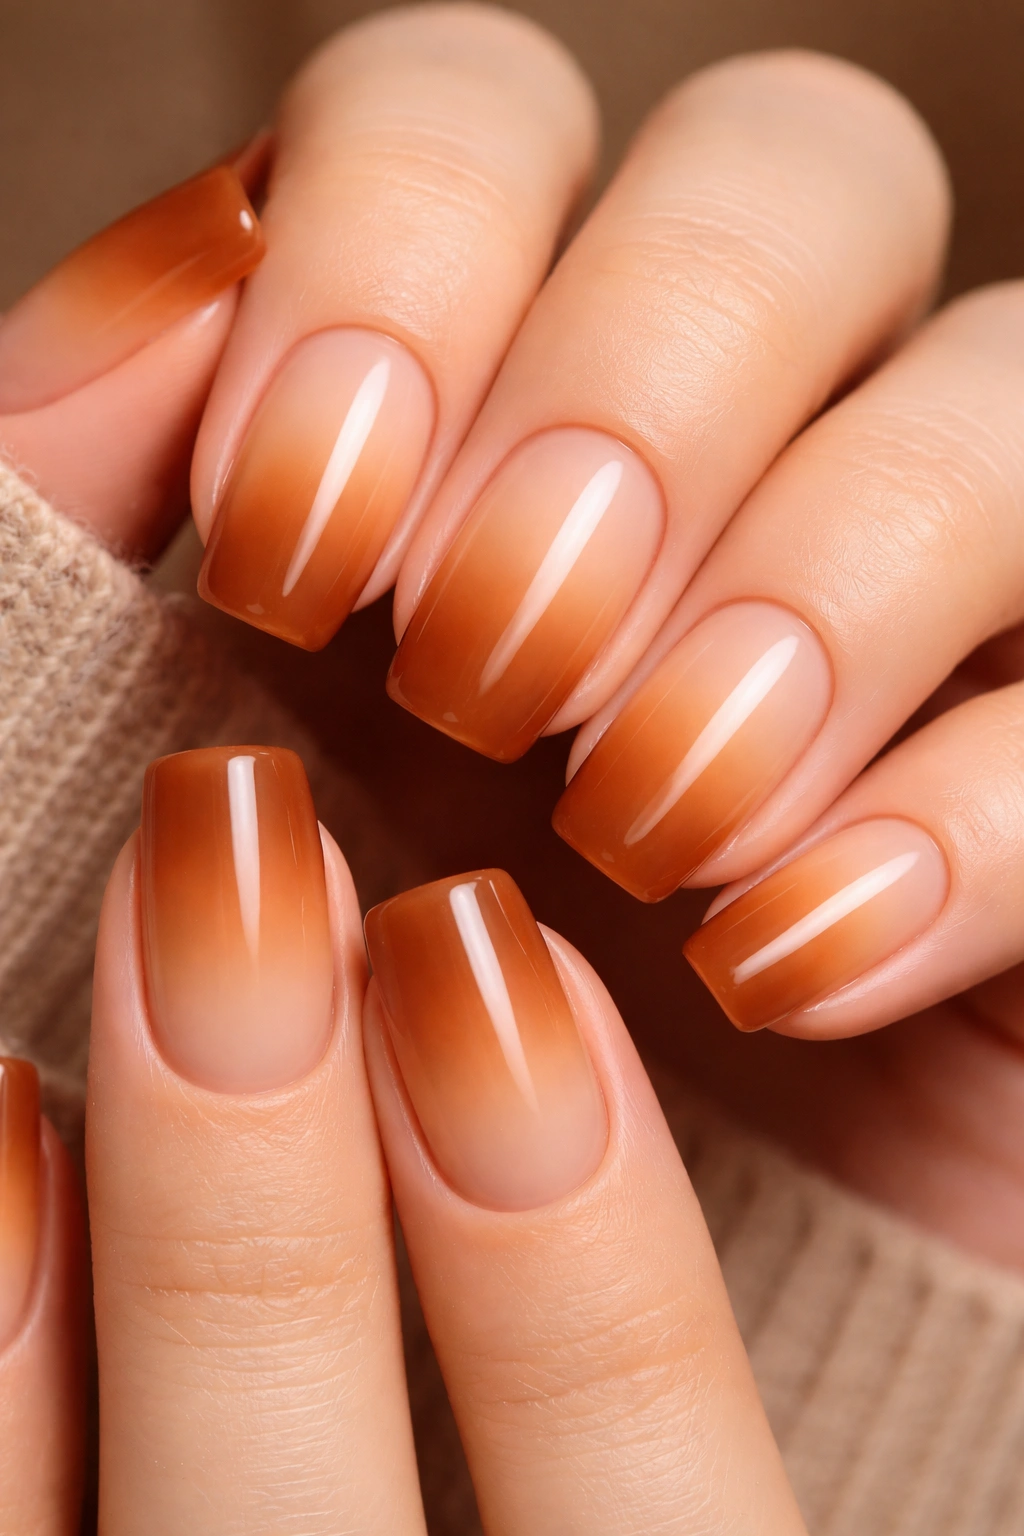
Caramel is essentially liquid warmth in nail form. Create an ombre that starts with a light, creamy caramel at the base and deepens into a rich, dark caramel at the tips. The transition should be smooth and gradual, making it feel like the color is naturally deepening as it flows toward your fingertips. This is an ombre that works on any skin tone because caramel is inherently flattering.
The Universal Appeal of Caramel
Caramel doesn’t compete with your skin tone — it complements it. Whether you have fair, medium, or deep skin, warm caramel makes you look warm, healthy, and polished. An ombre adds dimension and makes the color feel more dynamic than a solid application.
Caramel Ombre Steps
- Select two or three shades of caramel, going from light to dark
- Apply the lightest shade as your base coat
- Apply medium caramel toward the middle and tips
- Concentrate your darkest caramel at the free edge
- Use a sponge to gently blend where colors meet
- Glossy topcoat showcases the gradient beautifully
18. Buttery Yellow with Warm Accents
Yellow might sound bold, but warm, buttery yellow tones are incredibly wearable and flattering. Apply a pale, warm butter-yellow as your base, then add warm accent details in gold, peach, or brown. This could be a thin gold stripe, peach geometric shapes on one nail, or brown detailing near the cuticle. Warm yellow avoids any harshness — it feels friendly, cheerful, and genuinely elegant when executed well.
Why Warm Yellow Works
Yellow immediately lifts and brightens your appearance. Cool yellows can sometimes wash you out, but warm, buttery versions are flattering and sophisticated. The accent colors prevent it from feeling costume-like or juvenile — they ground the brightness in elegance.
Accent Ideas for Yellow
- A thin gold stripe down the center of select nails
- Warm peach geometric shapes on your accent nail
- Brown detailing at the cuticle line for grounding
- A copper ombre fade from yellow to deeper warm tones
- Small gold polka dots scattered across the yellow base
Final Thoughts
Warm-toned short squoval nails represent the best of both worlds: they’re practical and achievable without sacrificing style or elegance. These designs range from understated and minimalist to visually interesting and textured, which means you genuinely can find something that matches your personality and lifestyle. The beauty of warm tones is that they work with nearly every skin tone, season, and outfit, making them a genuinely smart choice for long-term wear.
The short squoval shape keeps everything wearable — you’re not sacrificing functionality for beauty, which means these designs work whether you’re typing all day, cooking dinner, or doing anything else your hands encounter. Start with a design that speaks to you, and don’t hesitate to ask your nail technician questions about application and maintenance. These designs are all achievable by a skilled technician, and most of them translate beautifully into long-lasting gel application that’ll have your nails looking polished for weeks. Your warm-toned squoval nails are waiting.
