

If you’re drawn to dark, dramatic aesthetics and love long nails with an edge, coffin nails are your canvas for expressing gothic style. The coffin nail shape—elongated, slightly tapered, with a flat squared-off top—creates the perfect dramatic silhouette for moody, sophisticated designs. Unlike rounded or stiletto nails, coffin nails offer enough surface area to showcase intricate details while maintaining that bold, slightly menacing aesthetic that defines gothic nail art.
What makes goth coffin nails so compelling is how they transform a manicure into a statement piece. The dark color palettes, intricate symbolism, and layered designs speak to a particular sensibility—one that values individual expression and embraces unconventional beauty. Whether you’re adorning them with mystical symbols, metallic accents, or moody gradients, these designs work as both everyday wear for committed goth enthusiasts and show-stopping looks for special occasions.
The designs that follow aren’t just technically impressive—they’re rooted in the actual techniques, color combinations, and aesthetic principles that make goth nail art feel authentically dark and intentional rather than costume-like. Whether you’re a nail art expert or picking up a brush for the first time, these designs range from simple applications to more intricate work, with practical guidance for achieving each look.
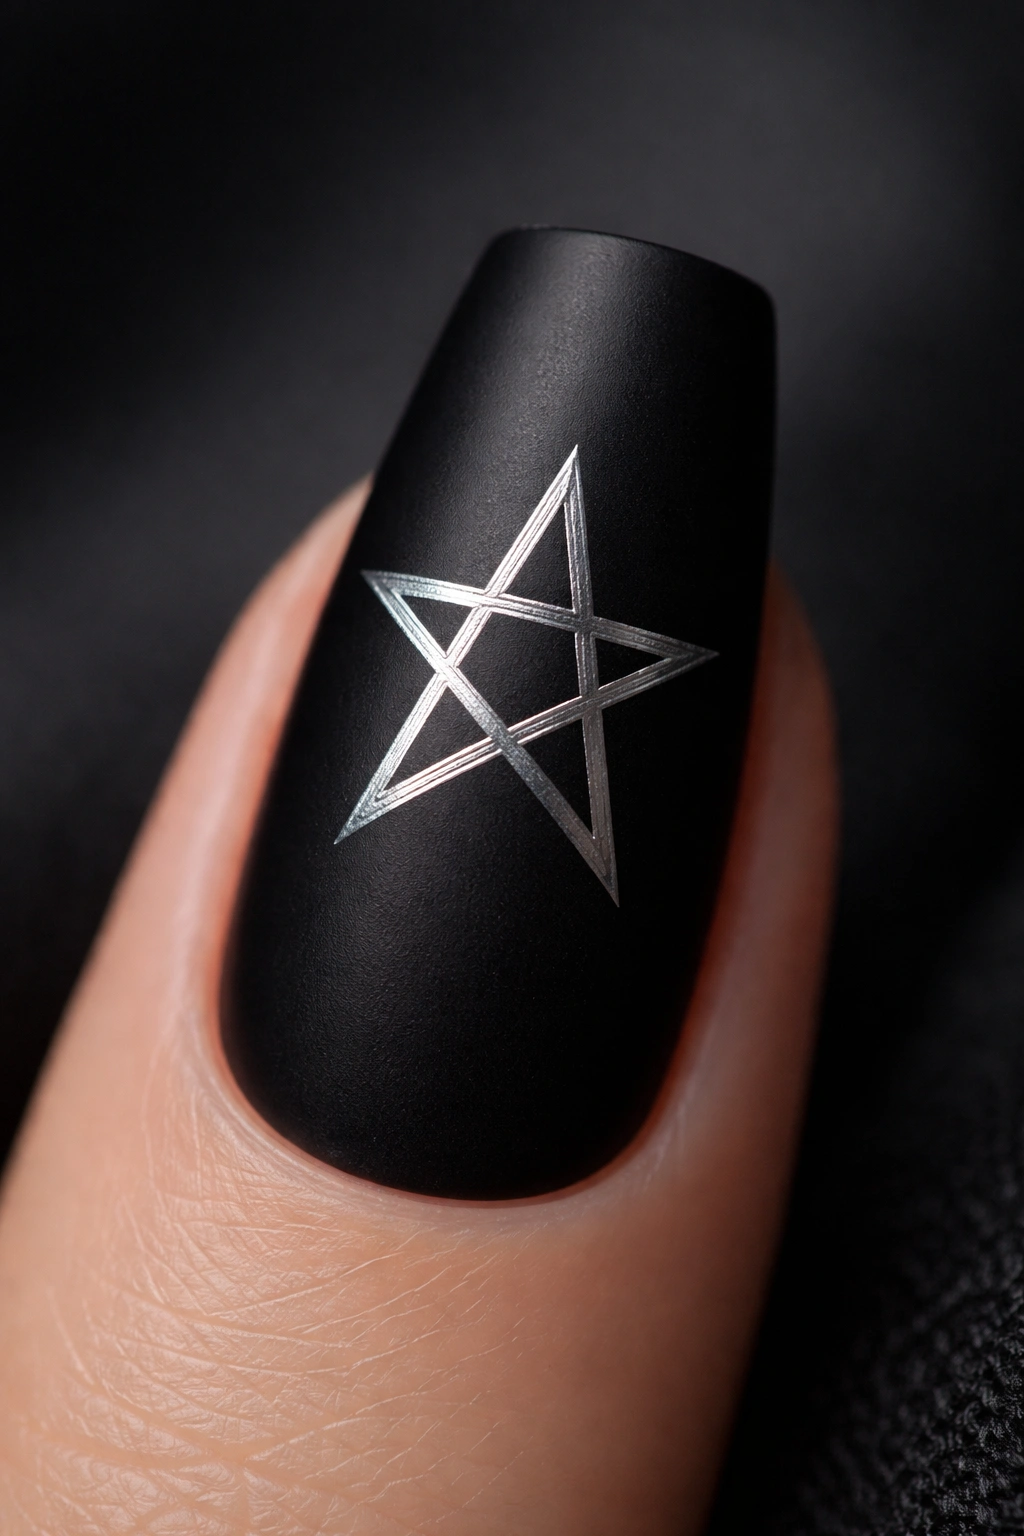
1. Classic Midnight Black with Silver Pentagram
The foundation of any goth nail arsenal starts with deep, pure black paired with silver accents. A flawless black base provides the perfect backdrop for a delicate five-pointed star rendered in metallic silver polish or thin striping tape. This design works because of its simplicity—there’s no room for imprecision, so the execution must be clean. The contrast between matte or glossy black and the reflective silver creates visual depth without overwhelming the nail.
Why This Design Works
The pentagram has deep roots in occult and esoteric symbolism, making it instantly recognizable to anyone familiar with goth aesthetics. More practically, the five-pointed star is geometrically balanced and forgiving to hand-paint. The silver doesn’t need to be perfectly centered—slight irregularity actually adds to the handmade, intentional feel.
How to Achieve It
- Apply 2-3 coats of a true black gel or traditional polish for full opacity
- Once dry, use a thin striping brush or metallic pen to draw the pentagram freehand, or use a stencil for precision
- Seal with a glossy or matte topcoat depending on your preferred finish
- If hand-painting feels risky, thin silver striping tape (available at beauty supply stores) can be arranged into a pentagram shape directly on the nail
Pro tip: Practice the pentagram on a piece of paper first—draw it without lifting your “brush” to get a feel for the continuous motion.
2. Deep Plum with Black Lace Overlay
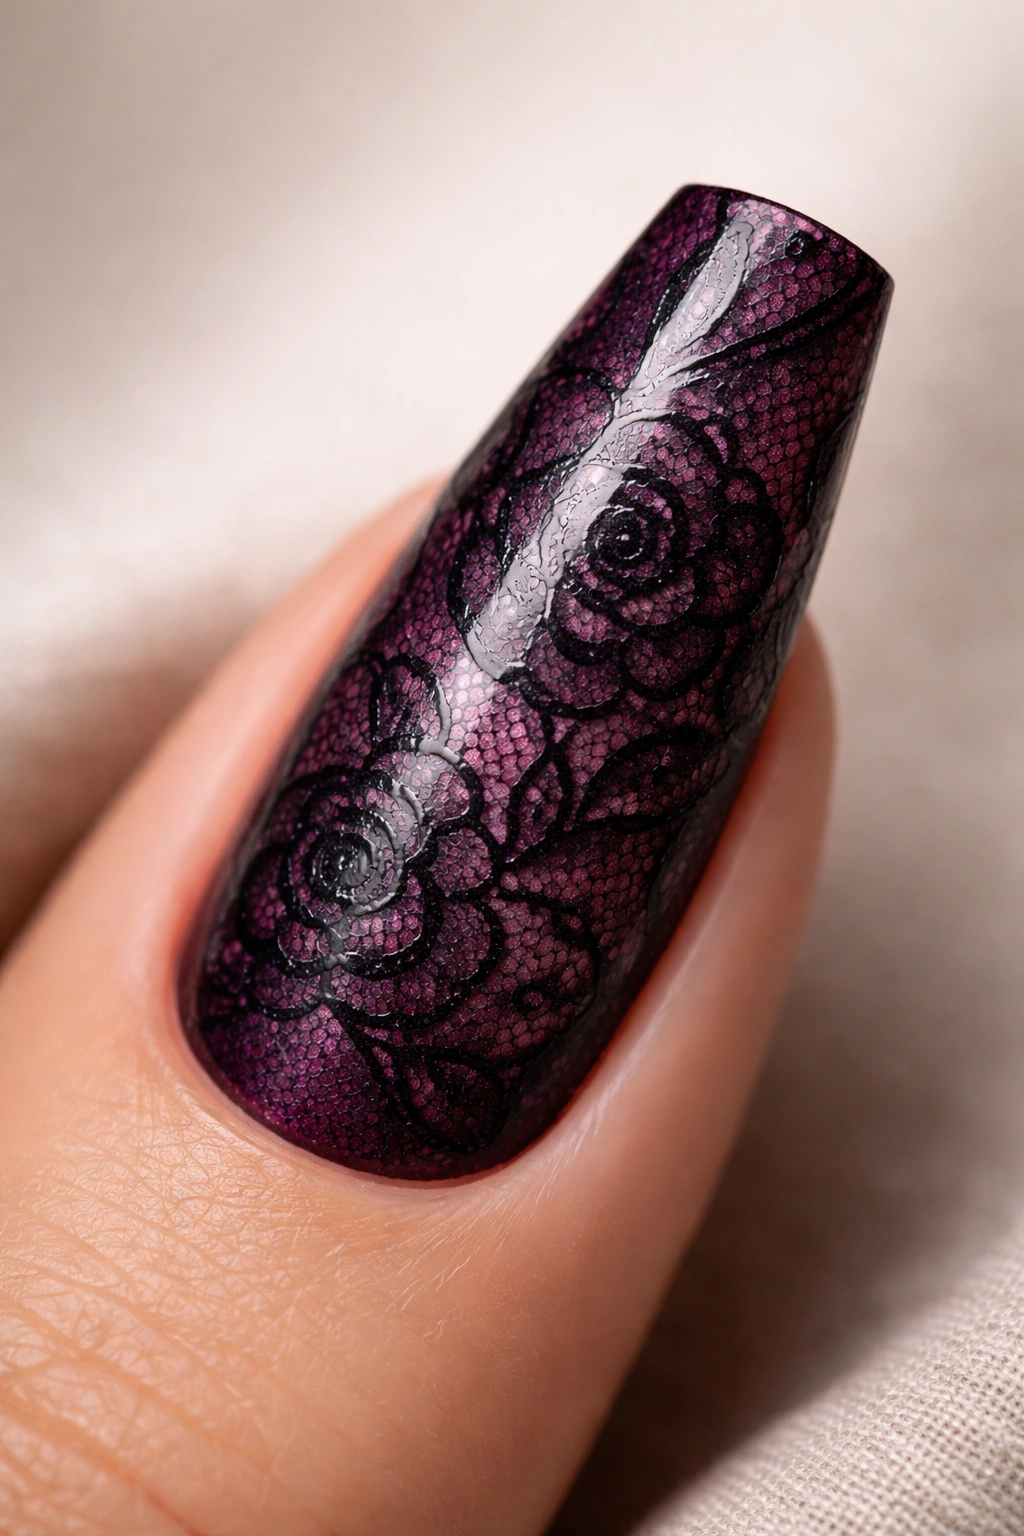
Plum represents a sophisticated alternative to pure black, introducing depth and dimension while maintaining gothic undertones. Layer a fine black lace pattern over plum using stamping plates designed for delicate, intricate patterns, or hand-paint organic lace designs. The contrast between the warm depth of plum and stark black lace creates an unexpectedly elegant look with genuine complexity.
The Color Theory Behind Plum
Deep plum occupies an interesting space—dark enough to read as moody and dramatic, but with enough color variation to feel less flat than pure black. It photographs beautifully and works well across different skin tones. Plum also suggests mystery and transformation, which aligns perfectly with goth aesthetics without being as literal as black.
Building the Lace Effect
- Paint nails in a rich plum shade (look for dark burgundy-plum hybrids, not purple-leaning tones)
- Use a fine stamping plate with lace or doily patterns, or draw fine intersecting lines in black using a 0000 brush
- If hand-painting, focus on one side or corner of the nail first, then fill in gradually to avoid overwhelming the design
- Finish with glossy topcoat to catch light on the lace details
Worth knowing: Lace patterns are forgiving because slight irregularities read as authentically handmade rather than mistakes—embrace the organic quality.
3. Black Roses with Deep Red Accents

Black roses with crimson or deep red petals offset by true black leaves create a classic goth image with romantic undertones. This design showcases the coffin nail shape beautifully, using the extended length to render a full rose bloom. The combination of black and red is a traditional goth pairing that never looks dated because it’s rooted in symbolism rather than trend.
Symbolism and Visual Impact
Black and red together suggest passion, danger, and romance simultaneously—they’re the colors of bleeding hearts and thorned flowers. This combination feels intentionally dramatic without veering into costume territory. The extended coffin nail length allows you to paint a realistic-looking rose with actual depth and dimension.
Painting Technique for Realistic Petals
- Start with a matte black base
- Use a small round brush and dark crimson or burgundy polish to sketch the rose shape lightly
- Build petals from the outside inward, using slightly lighter strokes toward the center
- Add fine black lines to define petal edges and create dimension
- Paint deep green or black leaves around the rose for contrast
- Seal with glossy topcoat to give petals a subtle sheen
4. Gradient Ombre from Black to Burgundy

A gradient that transitions from pure black at the cuticle through deep burgundy to dark crimson at the tip creates movement and dimension without requiring pattern work. This design relies entirely on color blending, making it elegant and modern while maintaining gothic sensibility. The gradient effect can be achieved with gel, acrylics, or careful layering of traditional polish.
Creating Seamless Color Transitions
The secret to a professional-looking gradient is using a sponge to blend polish layers. This technique creates soft transitions that look airbrushed rather than striped. The effect is particularly striking on coffin nails because the shape follows the gradient naturally from base to tip.
Step-by-Step Gradient Application
- Paint the full nail in deep black base
- On a makeup sponge, apply a strip of black on one end, burgundy in the middle, and crimson on the other
- Dab the sponge onto the nail multiple times, shifting slightly each time for even blending
- Add a glossy topcoat to unify the gradient and increase shine
- Use a black gel or polish on the cuticle line to clean up any smudging and create definition
5. White Widow Web with Black Widow Spider
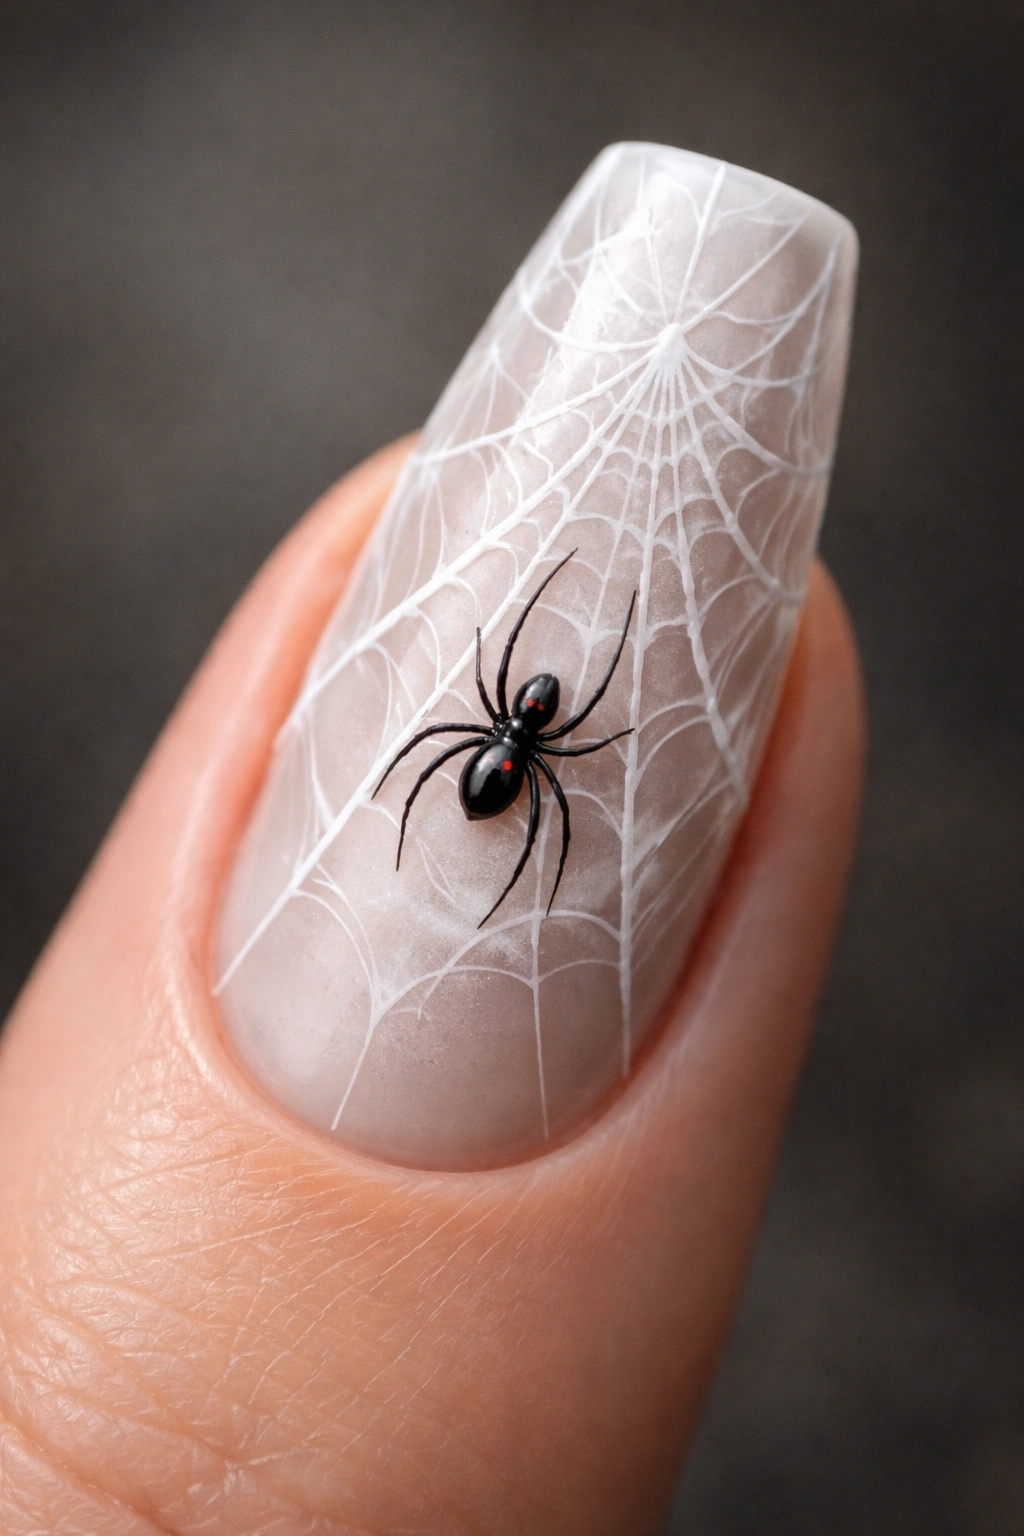
A delicate spiderweb rendered in white or silver against pure black, with a small black widow spider positioned as if crawling across the web, combines elegance with subtle menace. This design showcases fine detail work and makes striking use of negative space. The coffin shape provides just enough room to depict a realistic-looking web with multiple threads.
Fine Detail Work for Web Design
Creating a convincing spiderweb requires a steady hand and the thinnest striping brush available. The key is drawing straight lines from a central point outward, then connecting them with curved lines to form the web pattern. This mathematical approach makes it less intimidating than freehand patterns.
Painting the Web and Spider
- Apply glossy black base and let cure completely
- Using a thin white or silver striping brush, draw 5-6 straight lines emanating from one corner of the nail
- Connect these lines with curved strokes to create the web pattern
- Paint a tiny black widow spider body (small oval) at the center or corner of the web
- Add 8 impossibly thin legs using the striping brush
- Seal with glossy topcoat for depth
Insider note: If the full web feels too ambitious, a simple corner web with just 3-4 threads and one spider still reads as sophisticated.
6. Blood Drip Effect Over Nude or Pale Base
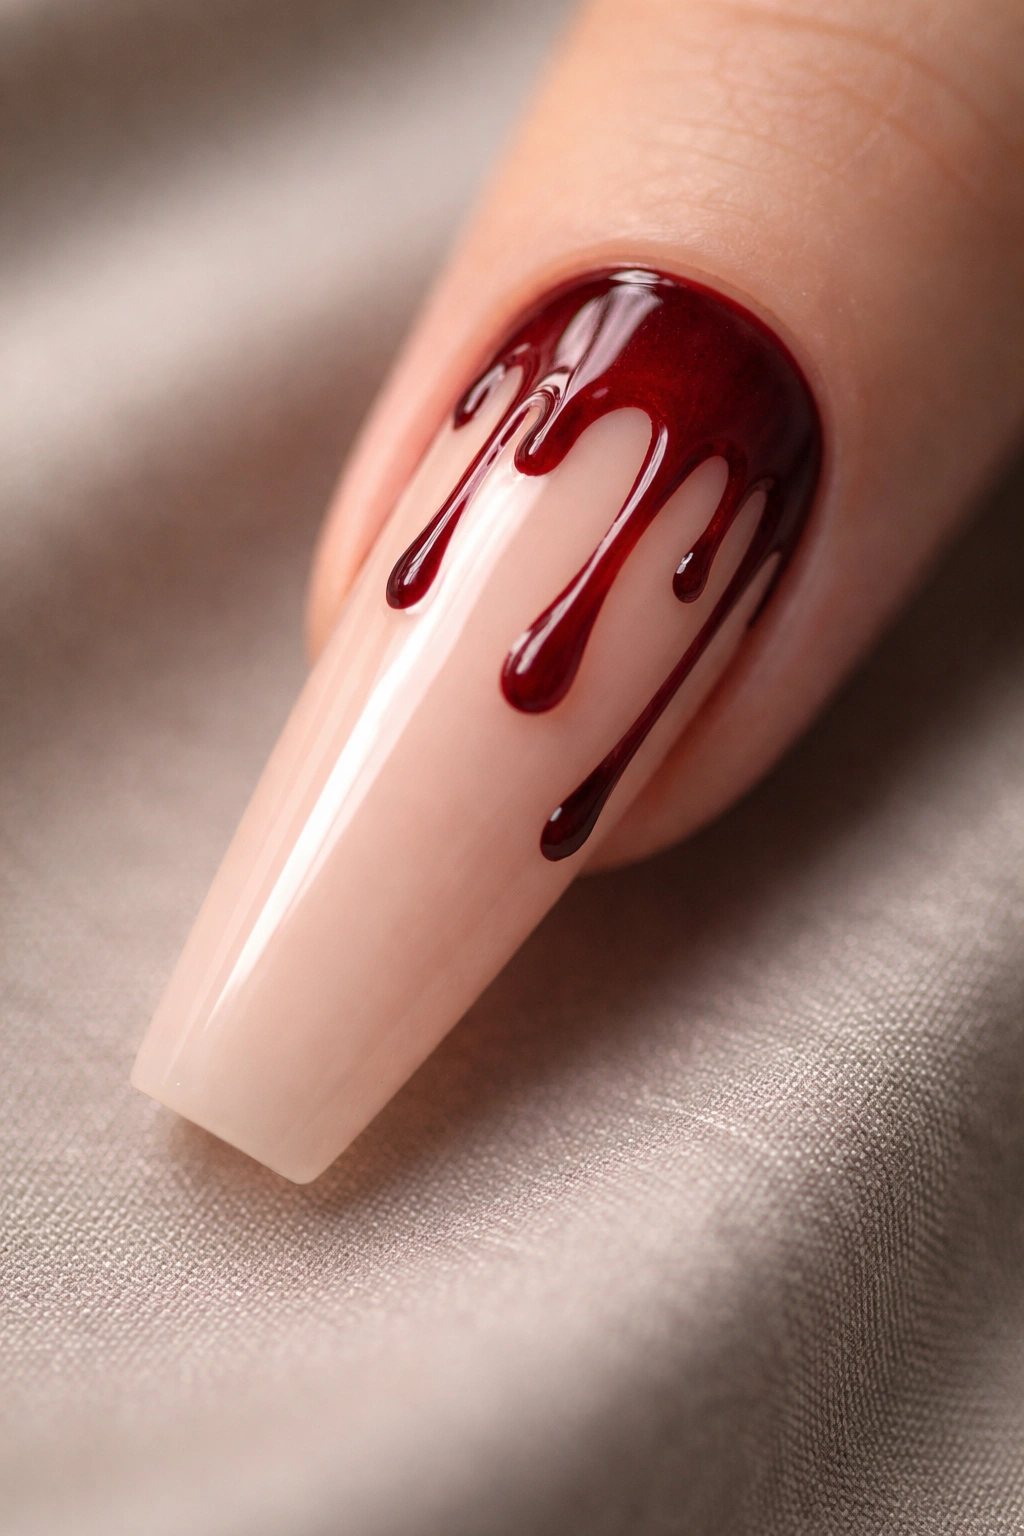
A pale or nude base with deep red “blood” dripping from the cuticle toward the tip creates a striking visual that’s graphic without being cartoonish. This design works particularly well on coffin nails because the length makes the drip effect look dramatic and intentional. The contrast between neutral and vivid red creates maximum impact.
The Psychology of the Blood Drip
Blood drips suggest both danger and vulnerability, which resonates deeply with goth aesthetics. Unlike obvious horror imagery, a well-executed blood drip reads as artistic rather than costume-like. The key is using realistic deep red or maroon rather than bright, artificial-looking red.
Achieving the Drip Effect
- Paint nails in a soft nude or pale pink shade (creates stark contrast with red)
- Using a thin brush and deep burgundy or true red polish, paint irregular drips starting from the cuticle area
- Make some drips thicker at the top and taper toward the bottom
- Vary the length and width of individual drips for organic appearance
- Some drips can be solid while others are just outlines, creating visual variation
- Finish with glossy topcoat to give drips a wet, fresh appearance
7. Matte Black with Holographic Foil Constellation
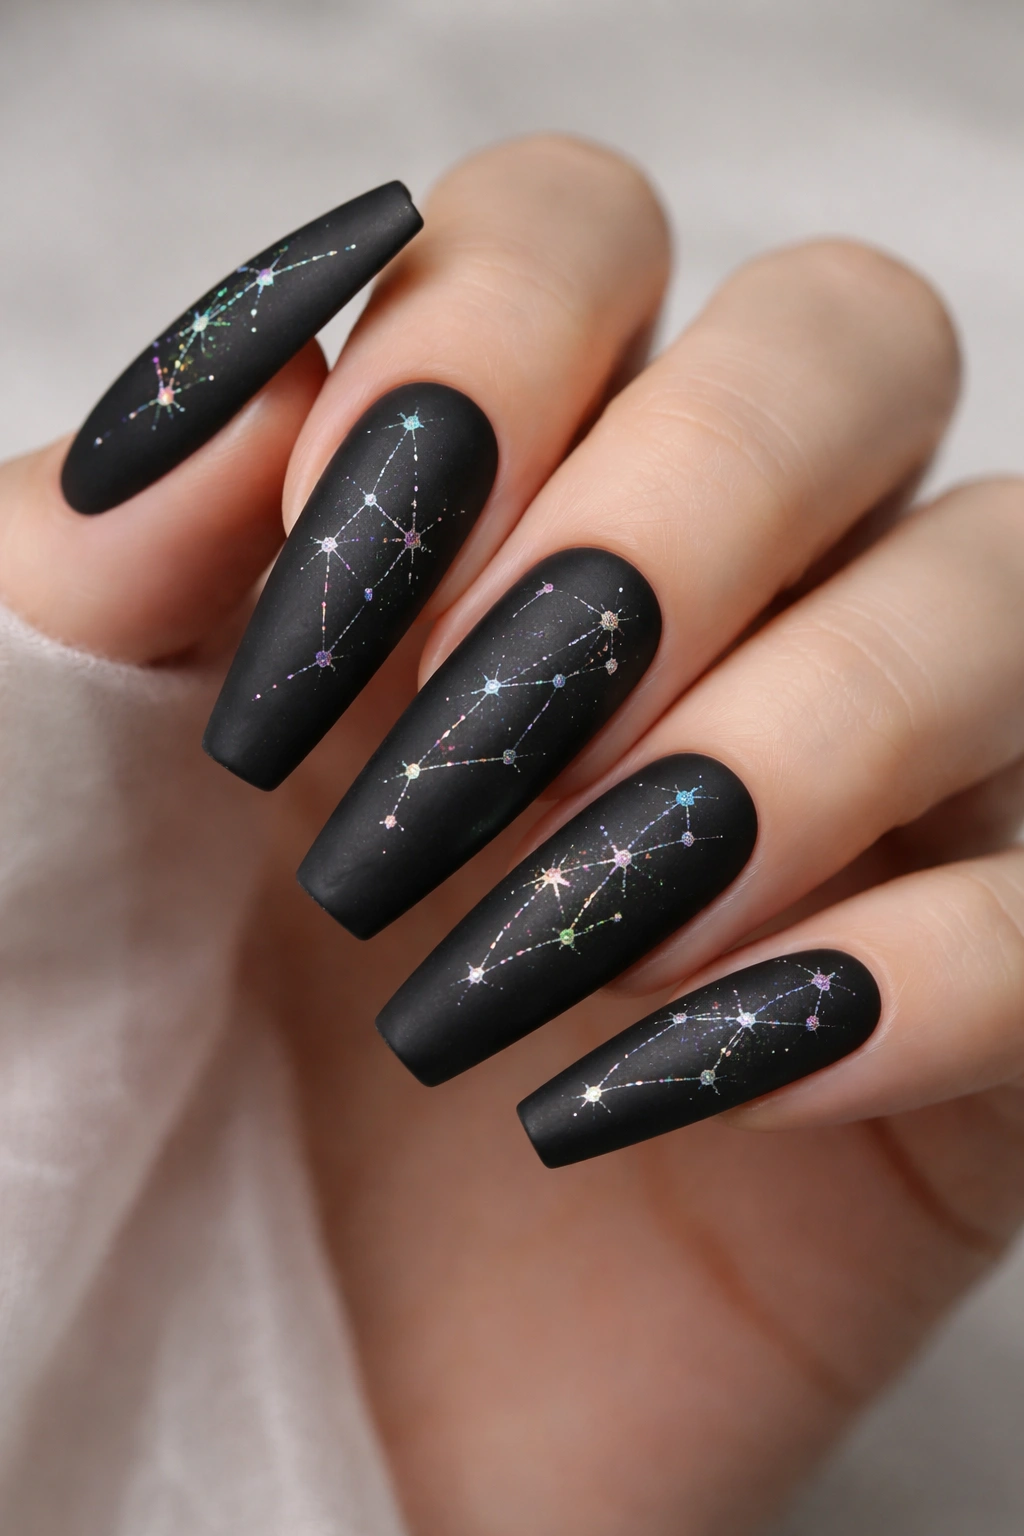
Matte black creates a modern, sophisticated backdrop for a subtle constellation map rendered in holographic foil. The shift between completely matte and reflective holographic creates a sophisticated contrast—the matte base grounds the design while holographic accents add subtle luxury. Constellations add an esoteric, celestial element that appeals to astrology-minded goths.
Why Matte Finishes Feel More Sophisticated
Matte nails automatically read as intentional and high-end because the finish requires either matte polish or a special topcoat. Matte also makes holographic foil pop more dramatically because the matte surface doesn’t compete with the reflective accents. This combination feels modern and considered rather than overdone.
Applying Holographic Foil Accents
- Paint nails with glossy black gel or polish first
- Apply a sticky base layer or foil adhesive (certain products are designed specifically for this)
- Cut small pieces of holographic foil and apply them to create constellation patterns
- Alternatively, use a holographic striping polish to connect dots in constellation patterns
- Seal with matte topcoat, which will make the holographic elements stand out dramatically
- The final look should be mostly matte with subtle rainbow flashes when light hits the foil
8. Black Base with Gold Filigree and Gemstones
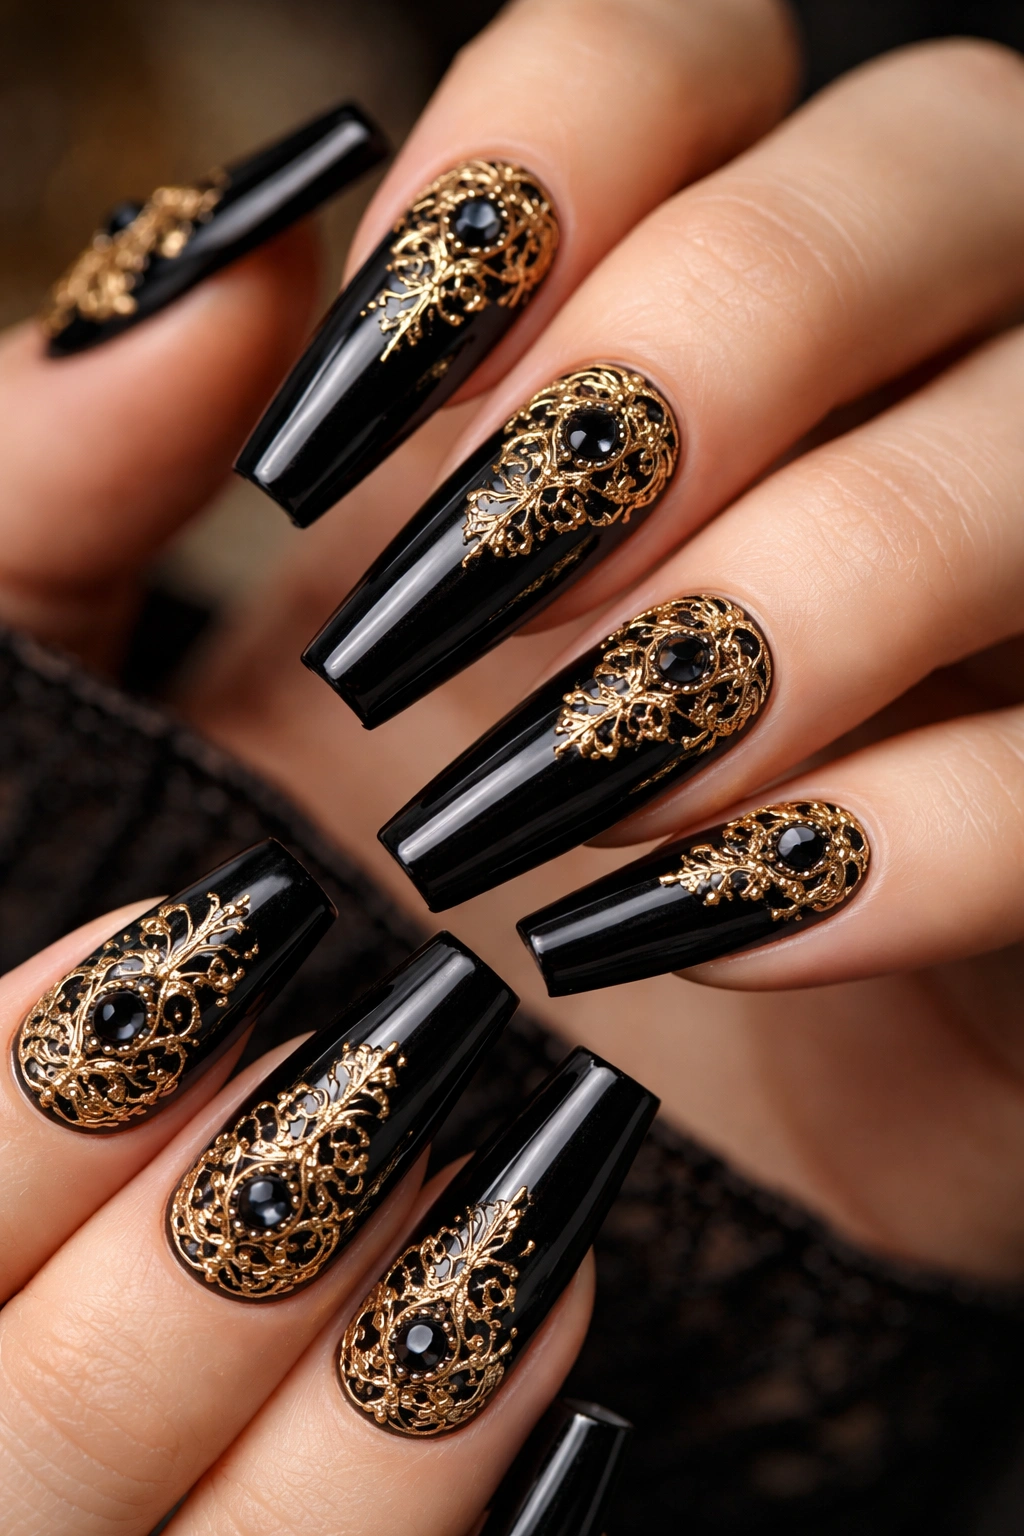
Victorian-inspired filigree patterns rendered in gold with small black or dark gemstones create an opulent, elegant look that subverts typical goth aesthetics through luxury rather than rejecting beauty. This design appeals to romantic goths who appreciate ornate detailing. The gold brings warmth to pure black while maintaining the moody aesthetic.
Balancing Ornate Detail with Sophistication
The key to avoiding a costume-like appearance is keeping the filigree patterns relatively fine and using genuine-quality gemstones rather than chunky plastic gems. The design should read as intentionally luxurious rather than overdone. Coffin nails provide enough surface area to showcase intricate patterns without crowding.
Creating Filigree Effects
- Apply glossy black base
- Use a gold striping polish or thin brush to paint delicate scrolling patterns
- Focus patterns on one corner or side of the nail, leaving some black visible
- Apply small black or dark grey rhinestones (avoid shiny colors) at key points in the filigree pattern
- Use a dab of gel or appropriate adhesive for secure stone placement
- Consider adding a thin gold line along the edge where the nail meets the skin for definition
- Seal with glossy topcoat over the design area (stones may need individual sealing)
Pro tip: Practice filigree patterns on a sticky note first to get the flow and balance right before committing to the nail.
9. Glossy Black with Tiny Skull Motif
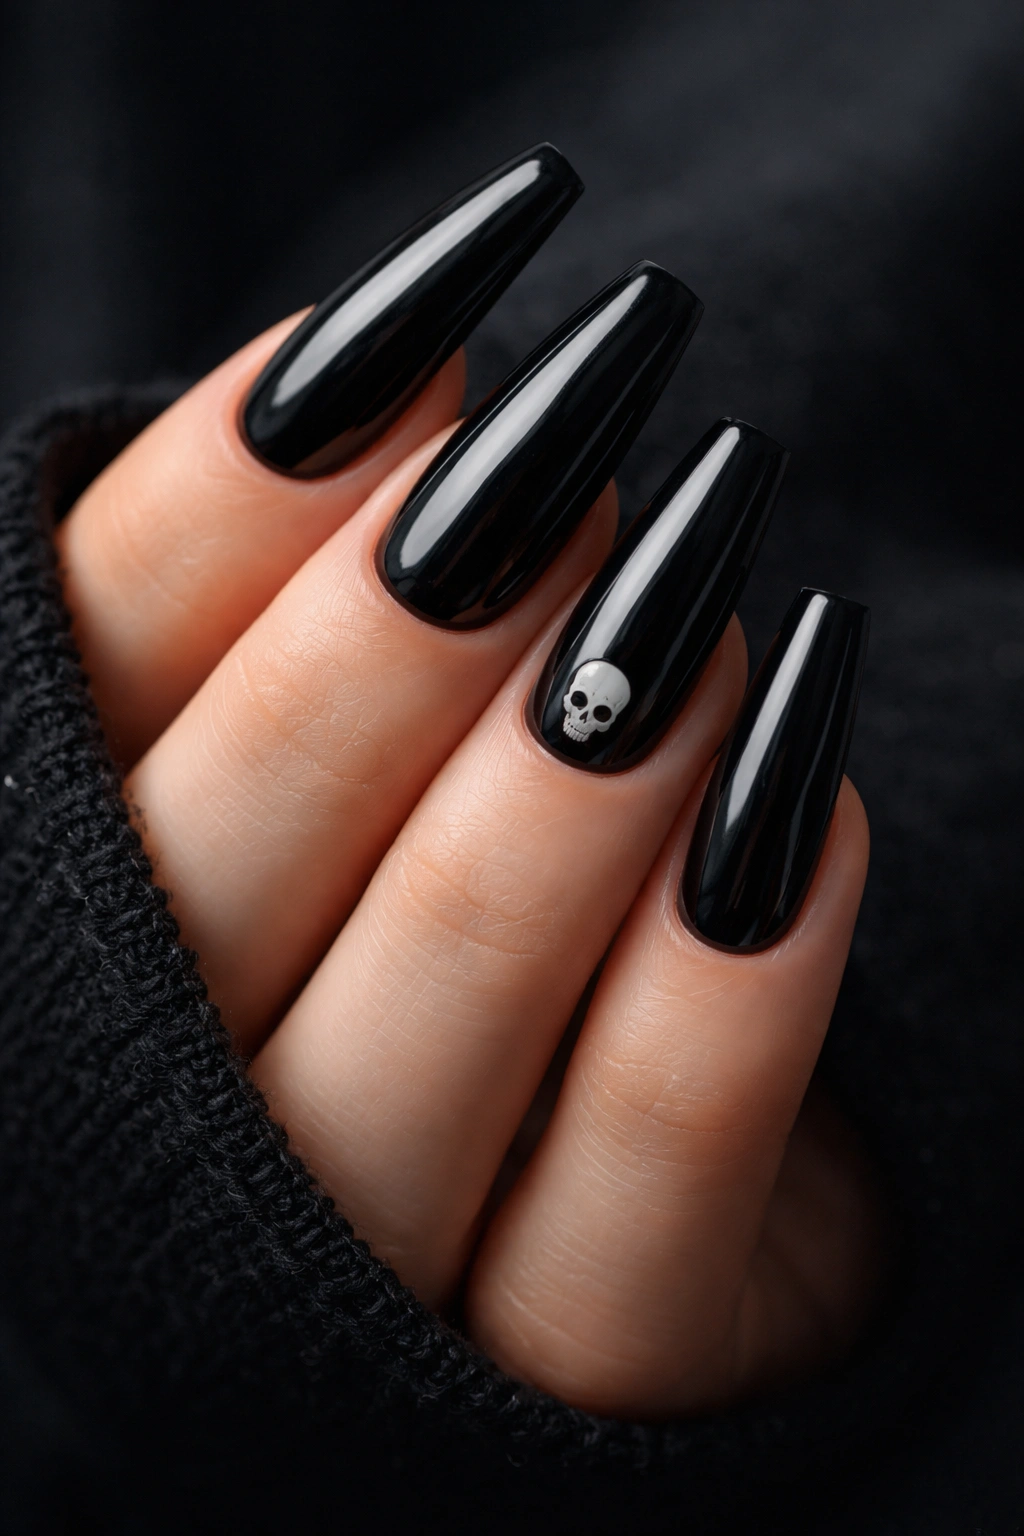
A small skull rendered in white or grey against pure black, positioned toward the cuticle or corner, provides subtle edge without requiring extensive detail work. This design works because of its restraint—a tiny skull reads as intentional rather than overdone. The glossy finish makes the black deep and rich, creating maximum contrast for the skull.
Simplifying Skull Imagery
A realistic skull requires careful shading and detail, but a simplified version—just bone highlights on a dark background—reads as modern and intentional. The key is ensuring eye sockets and nasal cavity are clearly defined so the shape reads immediately as a skull rather than an abstract pattern.
Painting the Skull
- Apply 2-3 coats of deep glossy black
- Using white or light grey polish and a very fine brush, paint the basic skull shape: round cranium with a slightly smaller jaw area below
- Define eye sockets with small dark lines or shadows
- Add a small triangular nose cavity
- Include tiny teeth lines if desired, but restraint often looks better
- Position the skull off-center for modern aesthetic rather than perfectly centered
- Finish with glossy topcoat
10. Deep Purple with Black Cat Silhouette
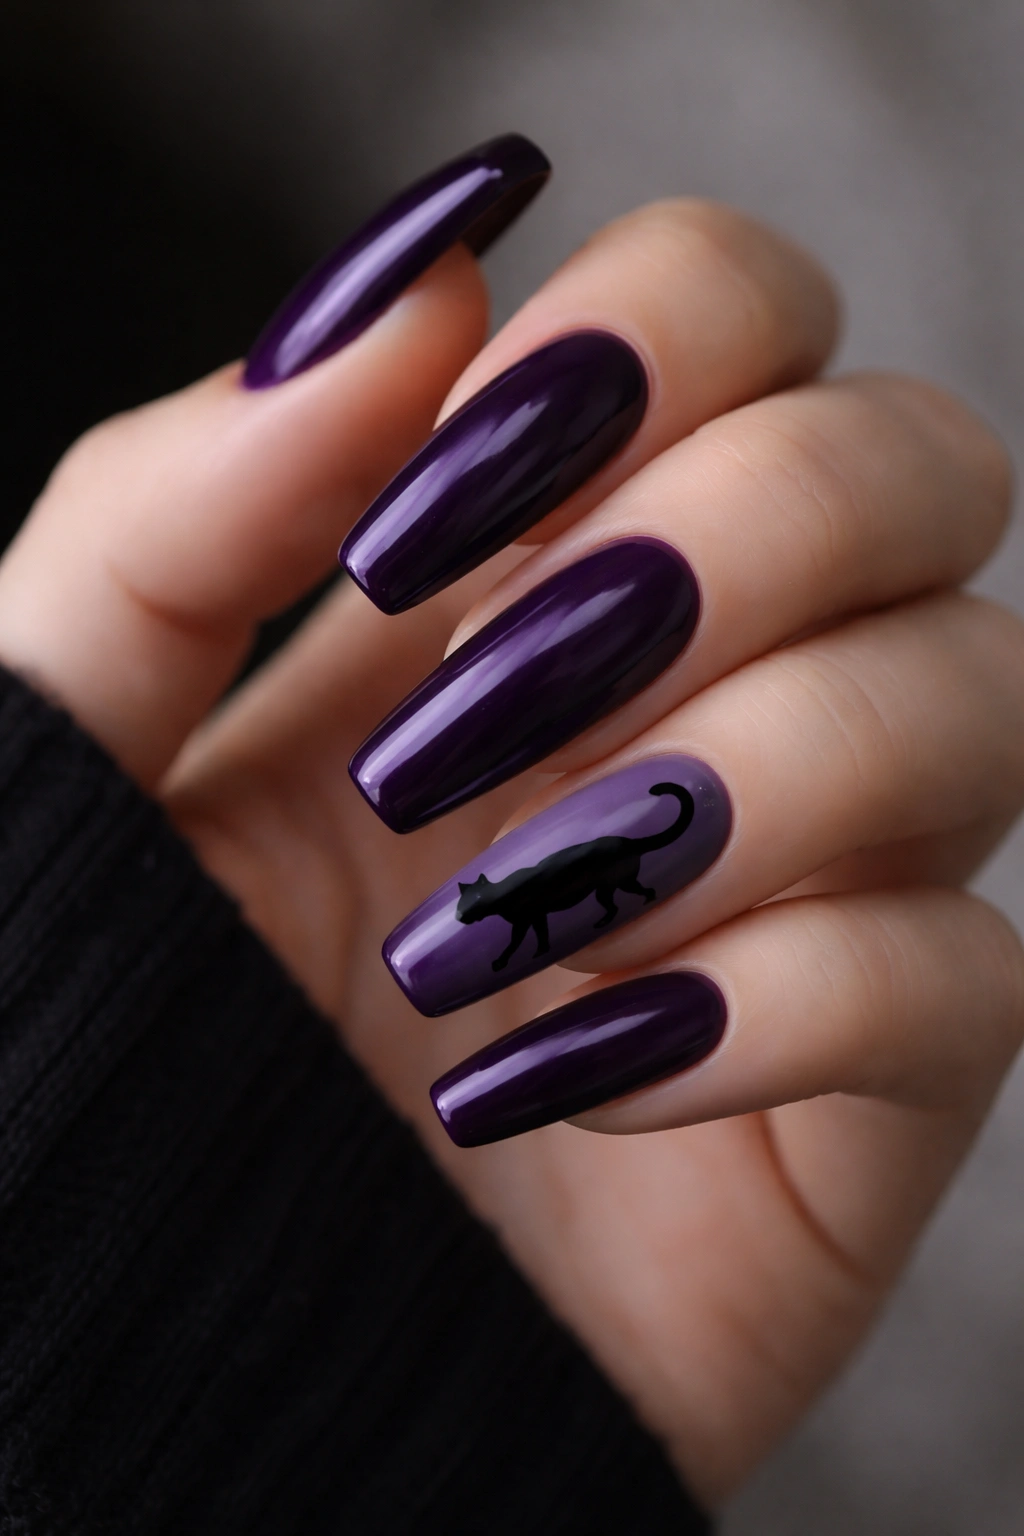
Rich, dark purple provides an alternative to pure black while maintaining gothic sensibility, and a black cat silhouette positioned as if walking across the nail adds playful edge. Cats hold mystical significance in goth culture, making this design both aesthetically appealing and symbolically aligned. The contrast between deep purple and pure black is subtle but striking.
The Goth Connection to Cats
Cats represent mystery, independence, and supernatural association in goth aesthetics—they’re frequently incorporated into design for these symbolic reasons. A silhouette cat reads instantly as intentional rather than decorative. The extended coffin nail length provides enough room to render a realistic cat profile.
Painting a Convincing Cat Silhouette
- Apply 2-3 coats of deep, rich purple (aim for dark eggplant rather than medium purple)
- Using black polish and a small round brush, paint a cat’s profile: pointed ear, rounded head, defined body, curved tail
- The silhouette should be solid black with no interior detail—the outline is what creates the cat shape
- Position the cat as if walking from one end of the nail toward the other
- Tiny details like whiskers can be added with a striping brush for dimension
- Seal with glossy topcoat
11. Black with Silver Crescent Moons and Stars
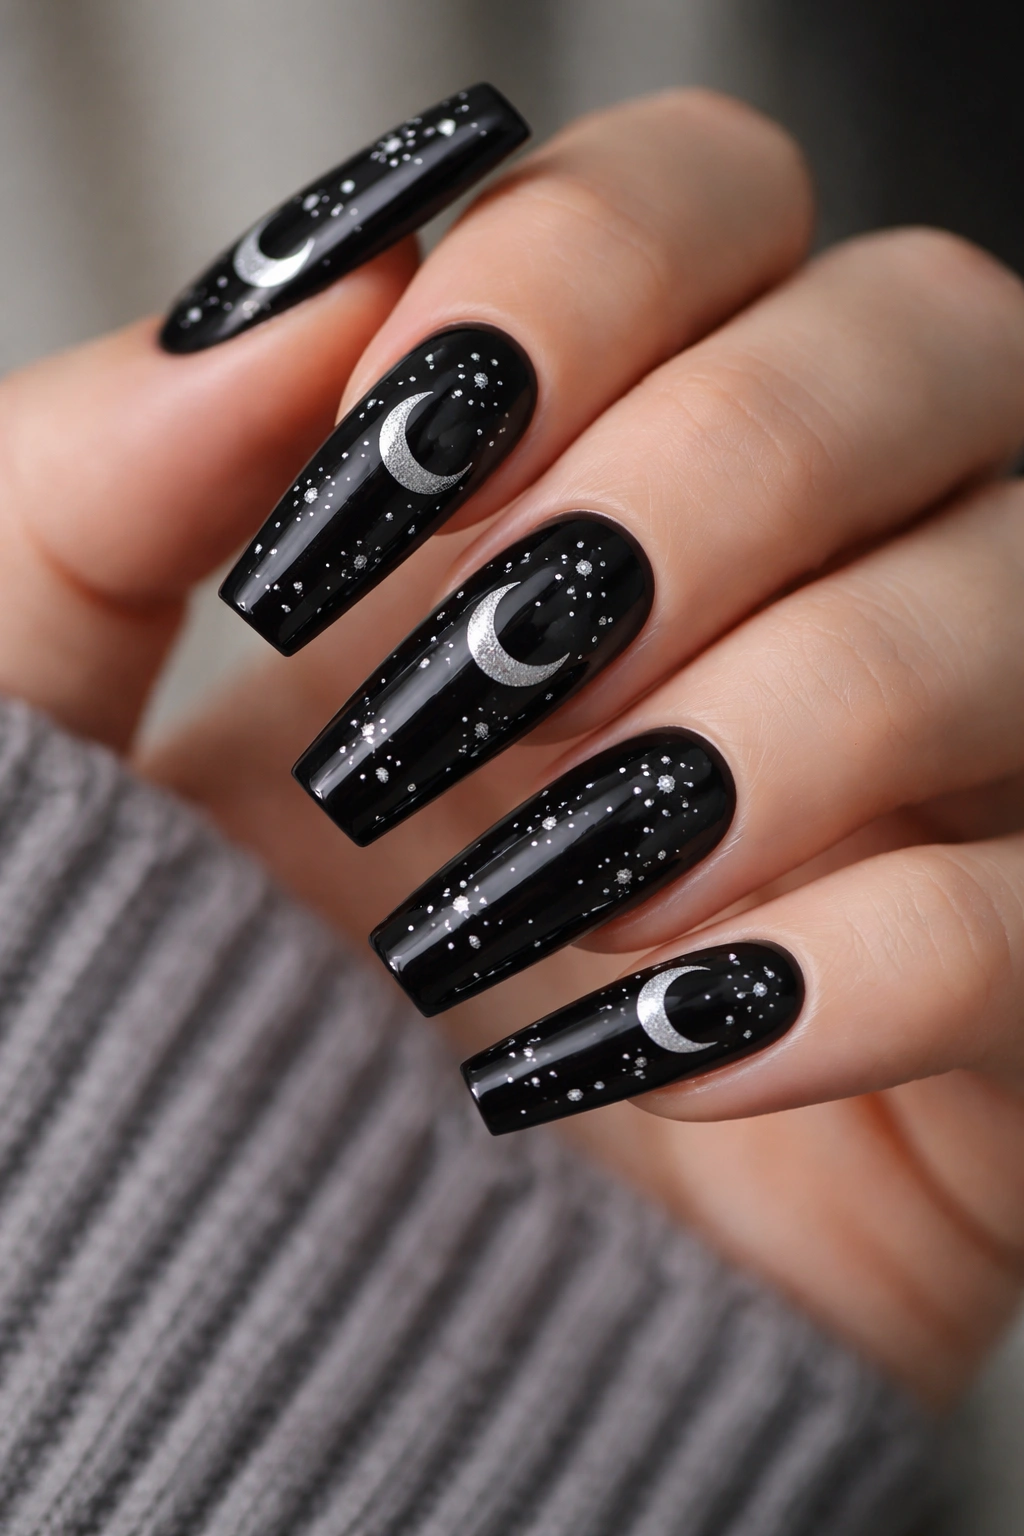
A celestial design featuring silver crescent moons and tiny stars scattered across pure black creates a dreamy, mystical atmosphere while remaining clearly goth. Celestial imagery has always been central to goth aesthetics, representing darkness, mystery, and the unknown. This design is relatively simple to execute, making it accessible for beginners while looking sophisticated.
Celestial Symbolism in Goth Design
Moons and stars represent the night, the hidden realm, and introspection—all core goth themes. Unlike religious symbols, celestial imagery feels universal and accessible to all goths regardless of spiritual practice. The scattered pattern creates movement across the nail without requiring pattern-work skills.
Creating the Celestial Scene
- Paint nails in glossy black
- Using a thin silver striping brush or metalllic pen, paint crescent moon shapes on some nails
- Add tiny 4-pointed or 5-pointed stars scattered between moons
- Vary the size of stars for visual interest
- Position elements asymmetrically rather than in perfect rows
- Some elements can be outlined while others are solid, creating depth
- Seal with glossy topcoat to make silver shine
12. Smokey Charcoal Gradient with Black Tips

A gradient that moves from dark charcoal grey at the base to pure black at the tip creates subtle sophistication and dimension. Unlike stark color contrasts, this gradient feels refined and modern. The monochromatic approach maintains pure goth aesthetics while introducing tonal variation that prevents flatness.
The Power of Monochromatic Gradients
Single-color gradients read as intentionally minimalist rather than boring because they demonstrate technical skill and understanding of tone. The eye naturally follows the gradient from light to dark, creating movement and drawing attention to the nail shape. This design showcases coffin nail structure beautifully.
Blending Charcoal to Black
- Apply charcoal grey base (not too light—should still read as dark and moody)
- Use a gradient sponge with black polish on one end, charcoal on the other
- Dab repeatedly onto the nail, shifting the sponge position slightly each time
- Build the gradient gradually—multiple light applications look better than one heavy application
- Focus the darkest black at the nail tip
- Seal with glossy topcoat for smooth, unified appearance
13. Jet Black with Intricate White Line Work
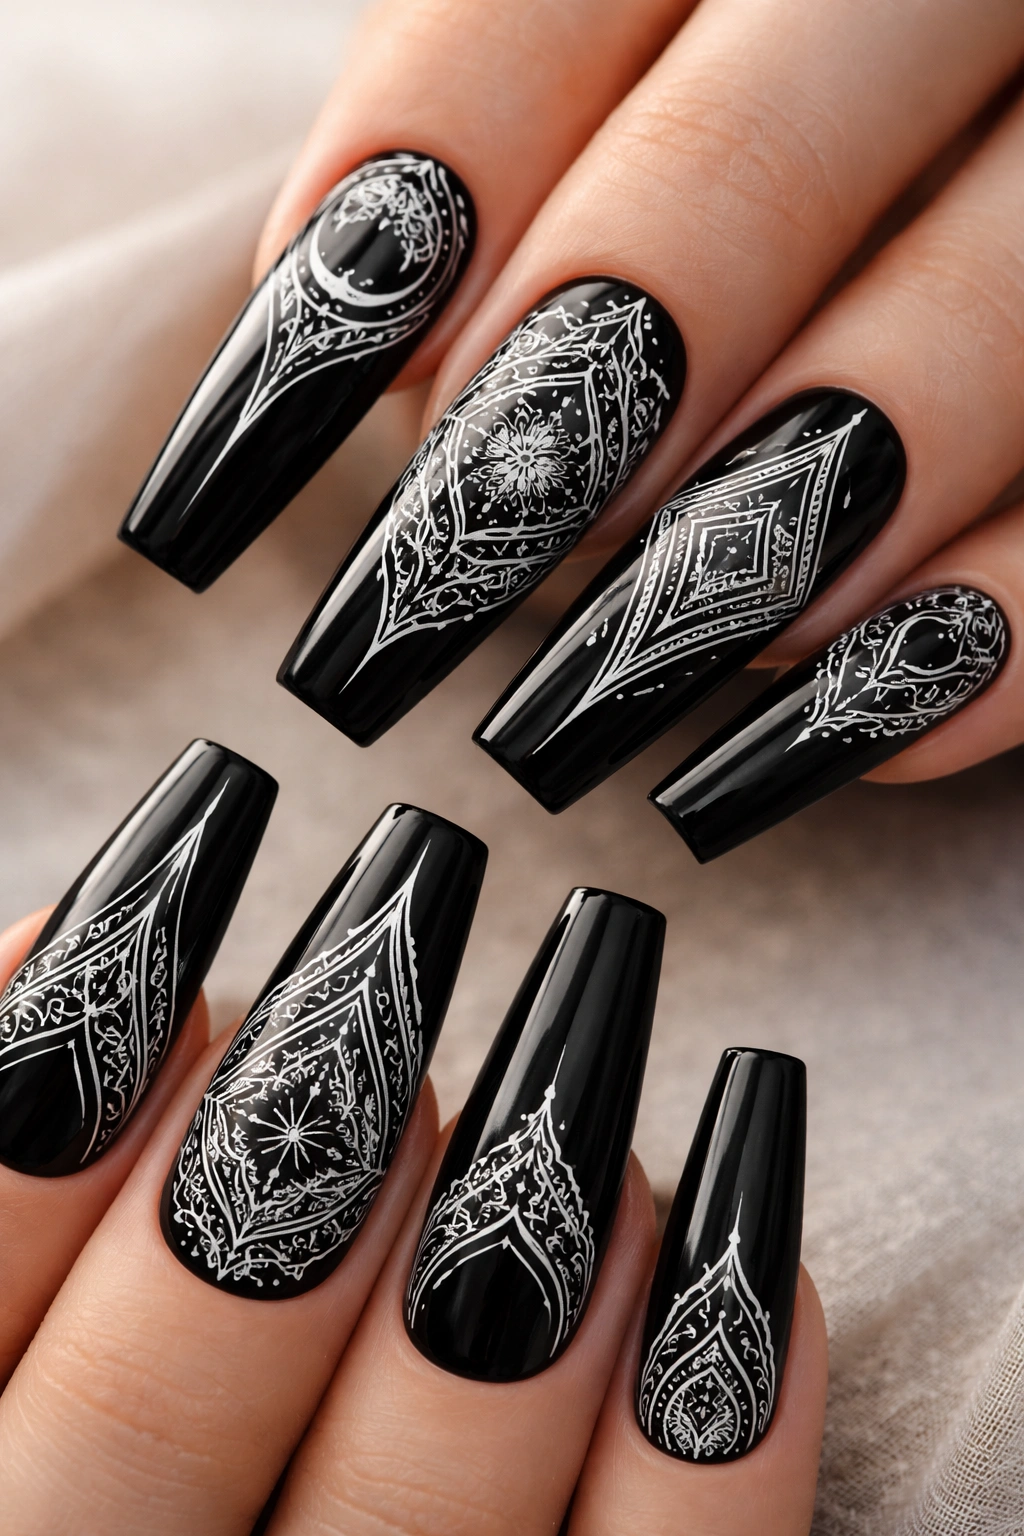
Thin white lines creating geometric patterns, abstract designs, or mandala-inspired elements against pure jet black create an artistic, intentional look that showcases technical precision. This design requires a steady hand and fine line-work skills, but the result reads as genuinely impressive. The stark black-and-white contrast is almost hypnotic.
Fine Line Work as Art Form
Intricate white line work on black nails reads as wearable art rather than decoration. The design requires planning and precision, which translates visually as sophisticated intentionality. Because the elements are purely line-based without color variation, every line must be clean and confident.
Executing Clean Line Work
- Ensure jet black base is completely cured and smooth
- Use a 000 or 0000 striping brush with white gel or polish
- Plan the design mentally before starting—even light sketching with pencil can help
- Draw main pattern lines first, then fill in smaller details
- Maintain consistent line width for cohesion
- Connect lines cleanly at intersections for a finished appearance
- Allow white sections to breathe—negative space (pure black) is part of the design
- Seal with glossy topcoat
Worth knowing: Slightly imperfect line work often looks more authentic than perfectly sterile precision—embrace the handmade quality.
14. Burgundy Black with Tiny Gold Accents
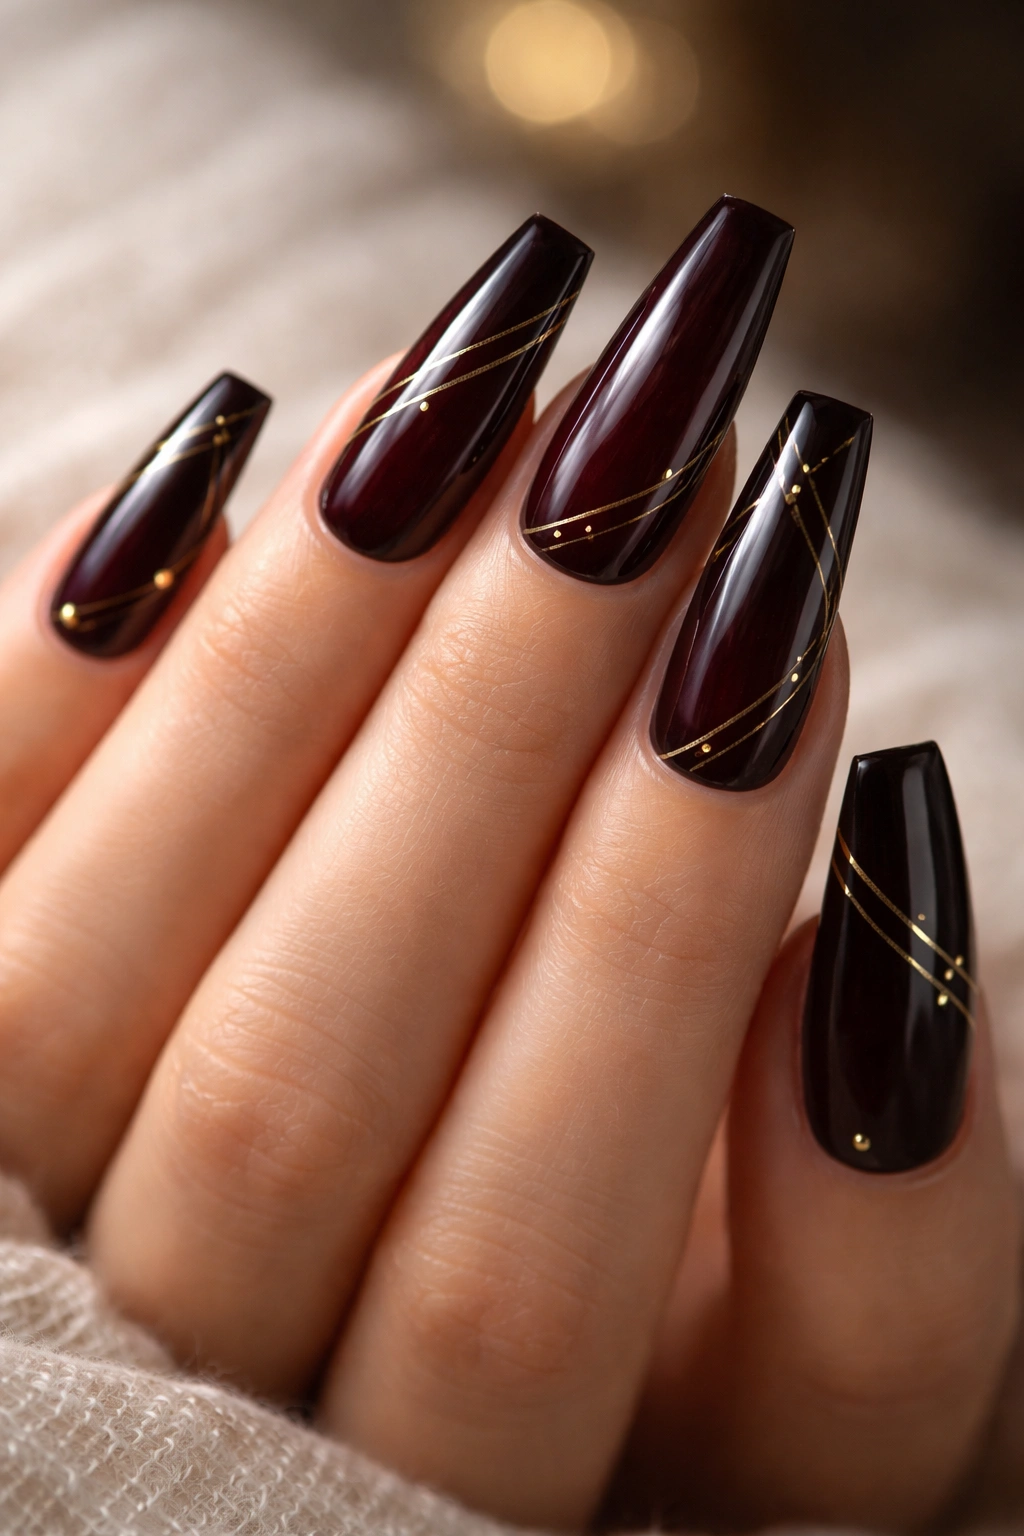
Burgundy-black (a true black with deep red undertones) paired with minimal gold accents creates warmth within darkness. Small gold dots, thin gold striping, or tiny gold shapes positioned strategically prevent the design from feeling flat while maintaining restraint. This combination feels luxurious and intentional rather than costume-like.
Color Theory: Burgundy-Black as Alternative to Pure Black
Burgundy-black reads as black to the eye but introduces warmth that pure black can’t provide. This subtle shift creates sophistication because it suggests knowledge of color theory and intentional choice. Gold accents enhance this warmth without overwhelming the design.
Applying Gold Accents Strategically
- Paint nails in burgundy-black base
- Using a thin gold striping brush, add a fine line along the edge where the nail meets the skin
- Alternatively, create small gold dots positioned asymmetrically across the nail
- Geometric gold shapes (small triangles, lines) can mark corners or create subtle patterns
- Gold should be restrained—approximately 10-15% of the nail’s surface
- Seal with glossy topcoat to make gold shimmer
15. Matte Black with Raised 3D Elements
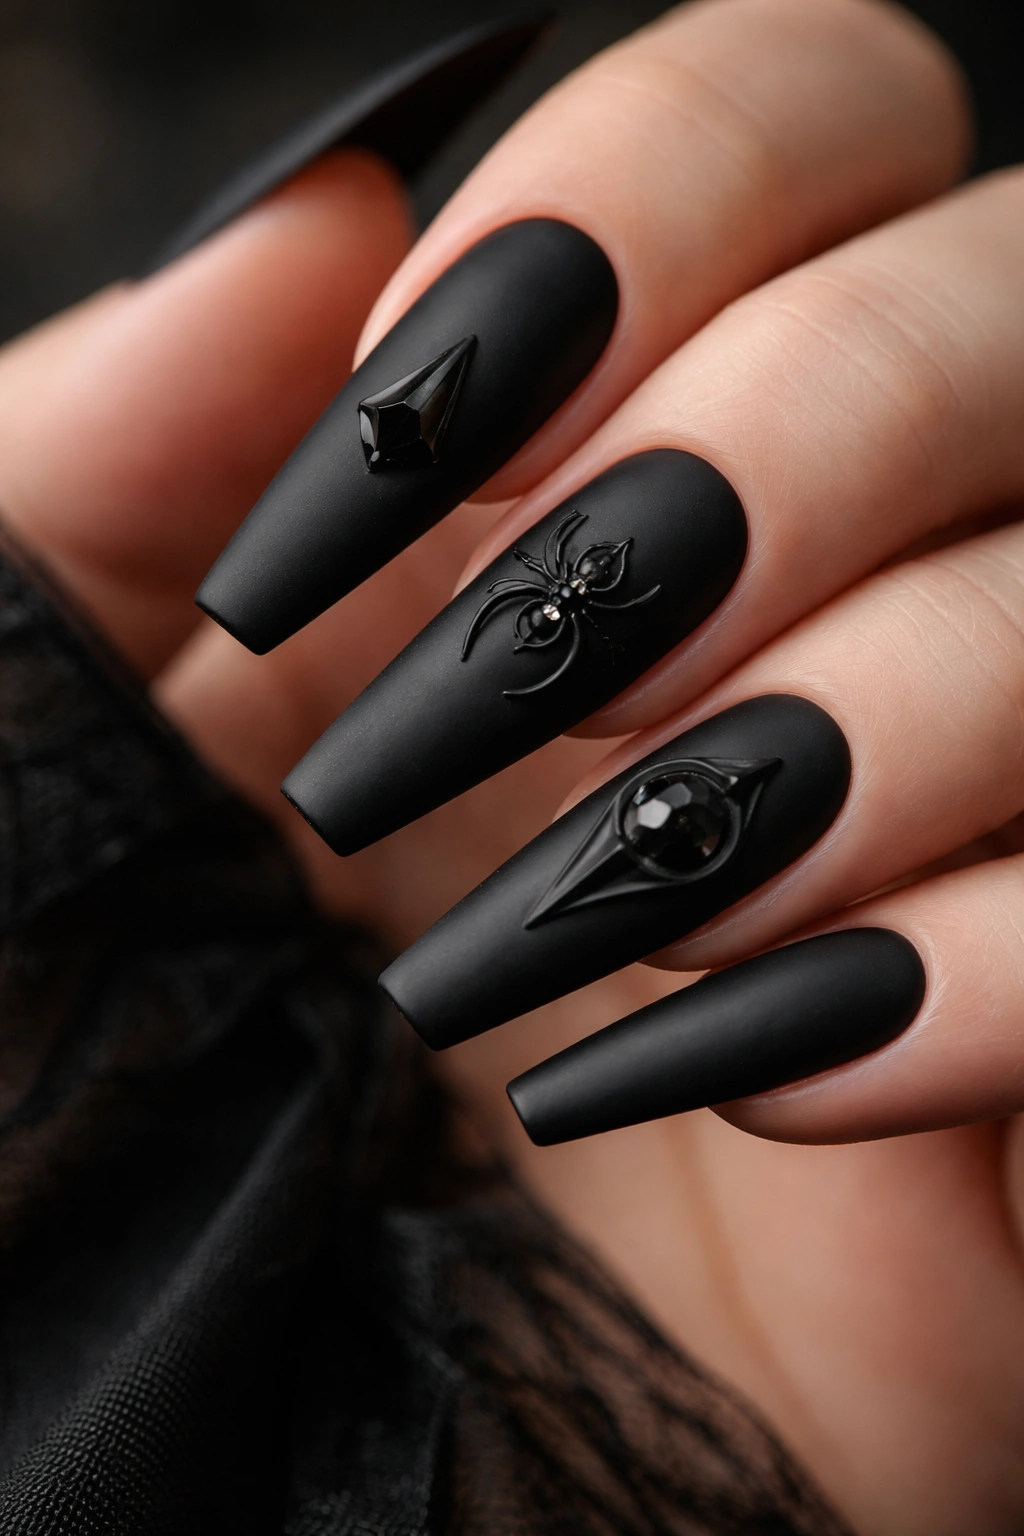
Coffin nails provide enough surface area to support three-dimensional design elements—tiny raised studs, acrylic shapes, or textured components that create actual dimension. This design transcends traditional nail art into sculptural territory, making it a statement piece. The coffin shape particularly suits 3D elements because the flat top provides a natural gallery for dimensional components.
Three-Dimensional Design on Nails
3D elements immediately elevate a design from flat art to wearable sculpture. Tiny studs, small acrylic shapes, or textured overlays create visual and tactile interest. The key to avoiding costume-like appearance is restraint—one or two 3D elements per nail looks sophisticated, while covering the entire nail reads as overdone.
Building 3D Components
- Start with matte black gel or acrylic base
- Apply small metal studs using appropriate adhesive, positioning them asymmetrically
- Alternatively, create tiny geometric shapes from gel or acrylic and build them slightly above the nail surface
- Consider raised line work—thin stripes painted in slightly raised gel create dimension without being chunky
- Limit 3D elements to one corner or edge of the nail rather than covering the entire surface
- Matte finish emphasizes the dimensional shapes better than glossy would
- Seal appropriately depending on material used
16. Black with Tiny Thistle or Thorn Details
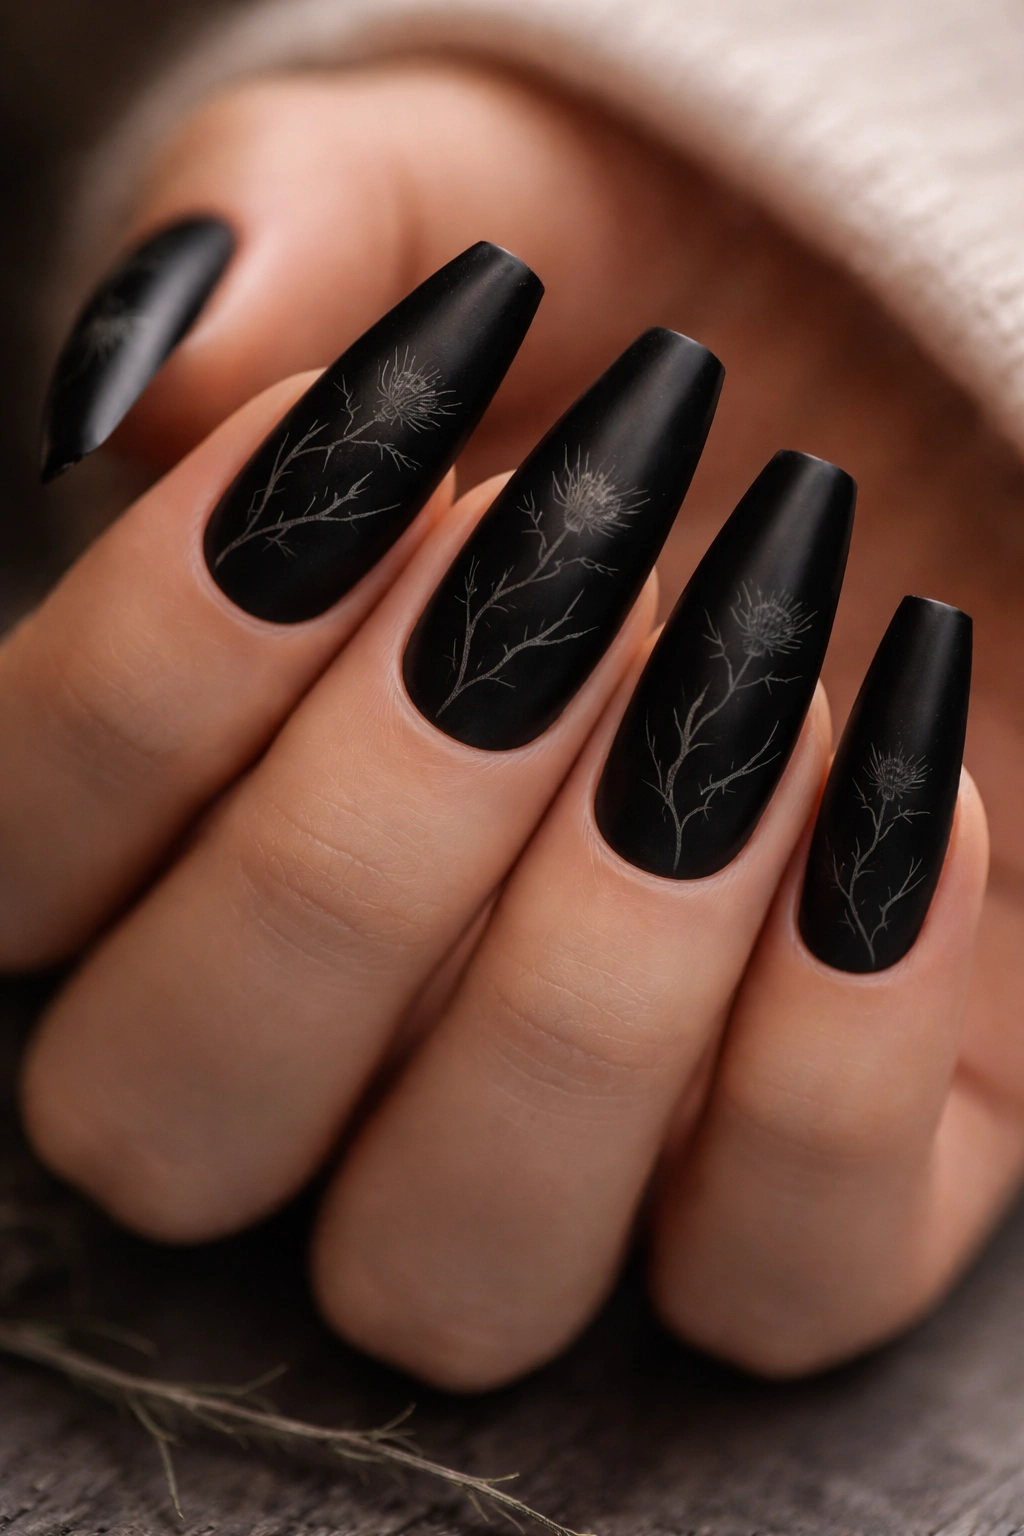
Delicate botanical details—thistles, thorns, or small dark flowers—create organic elegance against pure black. This design appeals to romantic goths and nature-oriented aesthetics. Botanical elements add complexity and sophistication while remaining distinctly goth through dark color palette and prickly plant choices.
Botanical Imagery in Goth Design
Thistles and thorns represent protection, danger, and natural beauty simultaneously—they’re plants with attitude. Unlike soft, delicate flowers, thorny botanicals maintain an edge while introducing organic, natural elements. This balance defines the romantic goth aesthetic.
Painting Fine Botanical Details
- Apply glossy black base
- Using grey and dark green polish with a very fine brush, sketch thistle or thorn shapes
- Thistles require tiny circles clustered together with thin stems—simplified versions read better than overly detailed ones
- Thorns are simply thin curved lines shooting from a stem
- Add tiny leaf shapes for botanical accuracy
- Position elements vertically or asymmetrically rather than centered
- Details can be outline-only or partially filled for variation
- Seal with glossy topcoat
17. Layered Black and Deep Plum with Geometric Accents
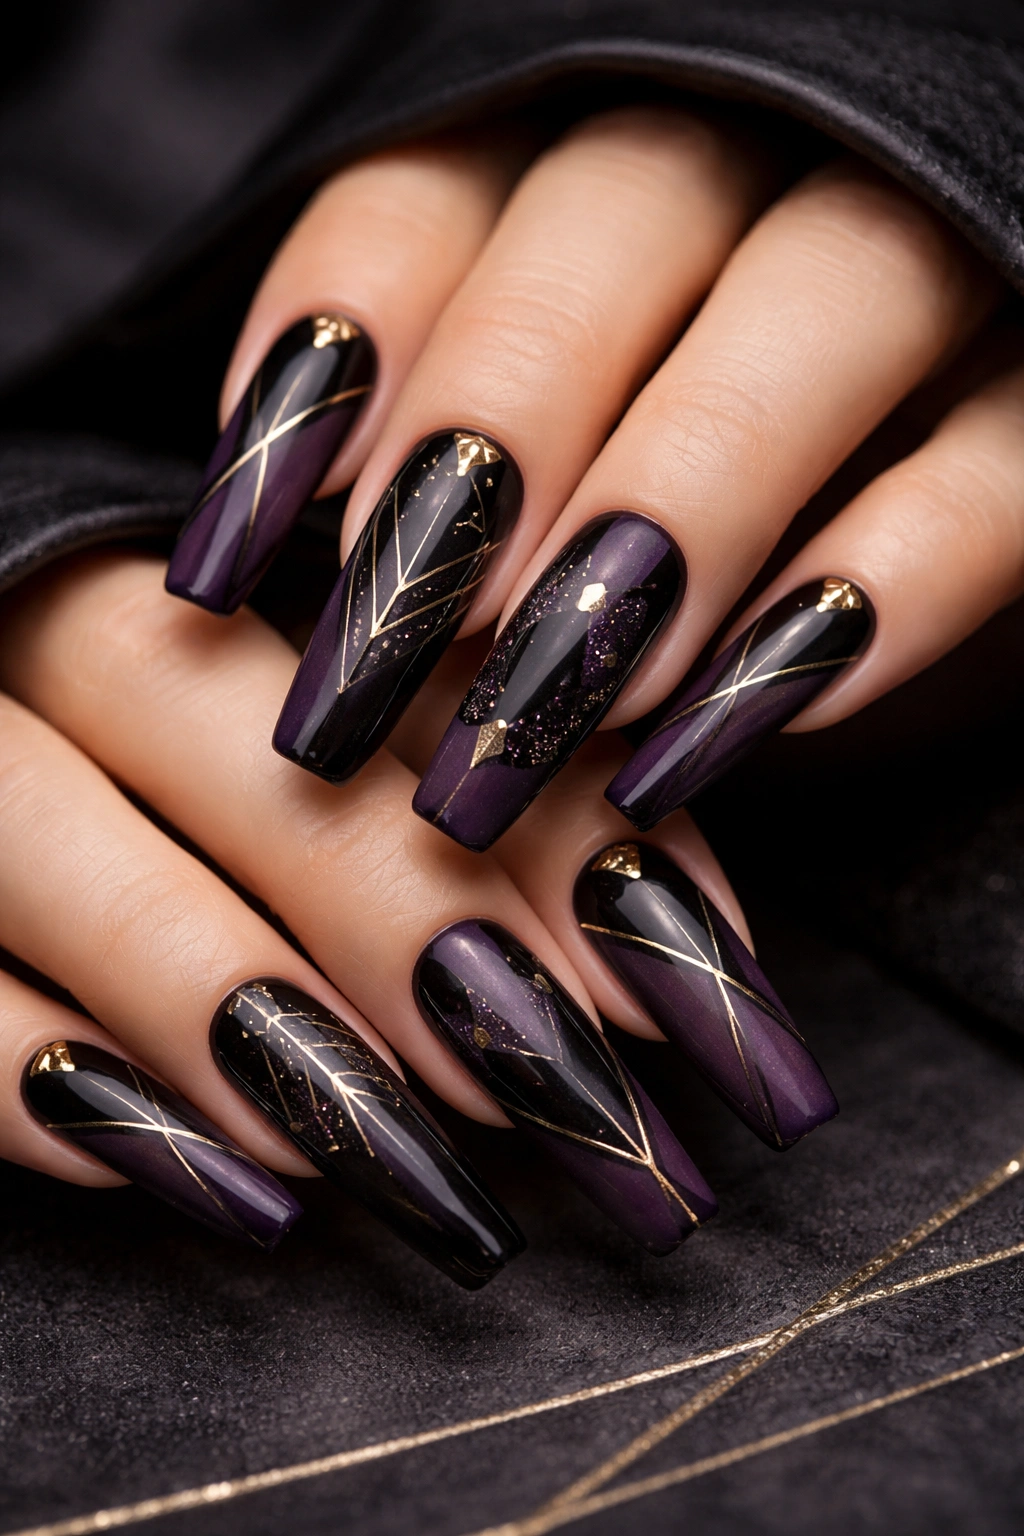
Multiple layers of black and deep plum with geometric accent shapes create depth and complexity. This design requires building elements in stages, but the resulting depth makes it visually striking. The geometric components (triangles, lines, hexagons) add modern edge to the layered, rich colors.
Creating Visual Depth Through Layering
Layering involves painting one color, sealing it, then painting additional colors and patterns on top. This creates actual dimensional depth in the design. Geometric shapes should be positioned to create a sense of movement or balance across the nail.
Building Layered Geometric Design
- Paint rich plum base and seal
- Apply black polish over portions, creating distinct color blocks
- Seal this layer
- Use thin gold or silver striping to create geometric shapes: triangles pointing in various directions, thin lines creating grids, hexagon outlines
- Position geometric elements to connect or divide the color sections
- The final effect should feel balanced despite apparent randomness
- Seal with glossy topcoat
Pro tip: Plan geometric placements before starting—even light pencil sketches prevent mistakes.
18. Pure Matte Black with Dimensional Topcoat Finish
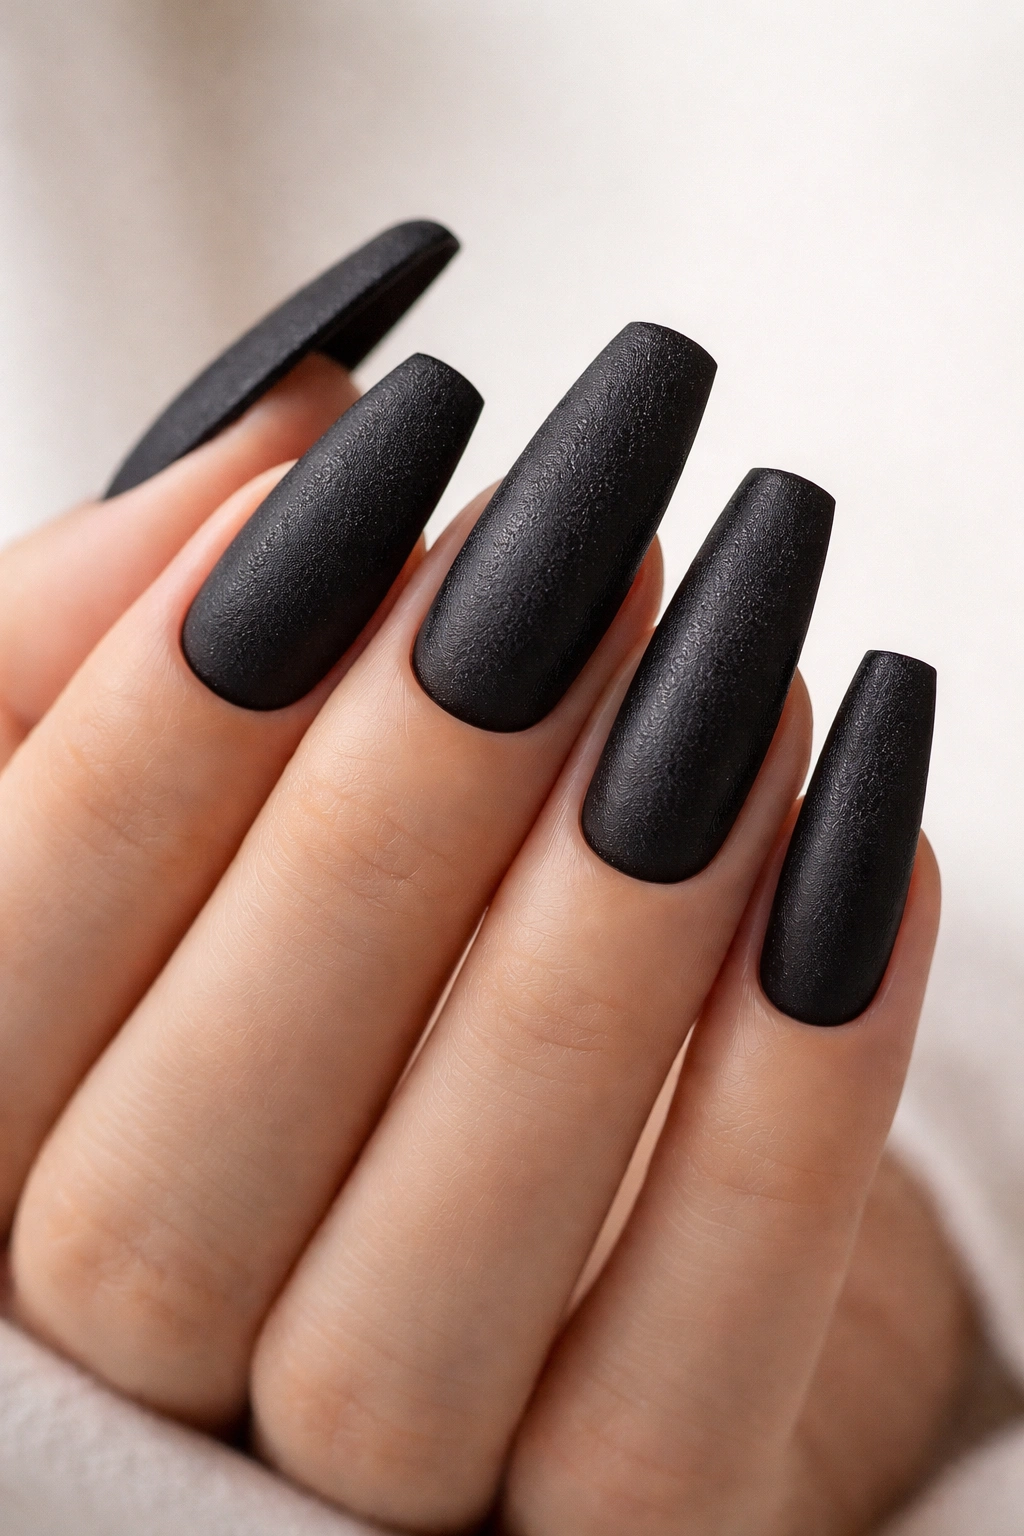
Sometimes the most sophisticated design is no design at all—just perfectly executed pure matte black with a special textured topcoat that creates subtle dimension. This minimalist approach requires perfect application and high-quality products but reads as extremely refined. The focus becomes the nail shape itself rather than any pattern.
Minimalism as Sophistication
Pure black nails read as intentional and sophisticated when executed with precision. The lack of additional elements becomes a design choice rather than a limitation. This approach works perfectly for people who prefer understated elegance or for showcasing the coffin nail shape itself.
Achieving Flawless Matte Application
- Apply 2-3 coats of pure black gel or high-quality traditional polish for complete opacity
- Ensure application is smooth with no visible brush strokes or bumps
- Use a velvet matte topcoat for the most refined finish
- Alternatively, use a specialty textured topcoat that adds subtle dimension without pattern
- The topcoat finish is critical—it’s what elevates this from simple to sophisticated
- Seal edges carefully to prevent chipping and maintain flawless appearance
- Consider a geometric cuticle line in metallic polish for subtle definition
Final Thoughts
Goth coffin nail designs thrive on the intersection of sophistication and edge—taking elements that might feel costume-like and executing them with precision, restraint, and genuine artistry. The coffin nail shape itself contributes to this balance because it’s inherently dramatic without being extreme. The extended length and flat top provide a perfect canvas for everything from minimalist symbolism to intricate detail work.
Whether you’re drawn to pure black minimalism or layered complexity, symbolic imagery or abstract patterns, these designs establish that goth aesthetics aren’t about being shocking or extreme—they’re about intentional choice and refined taste. The best goth nail designs are the ones that feel personally meaningful, executed with skill and care. They’re conversations between the wearer’s identity and available technique, between dark aesthetics and individual expression.
