

Coffin nails have earned their place as one of the most striking and flattering nail shapes for people who love making a bold statement with their hands. The elongated, tapered silhouette creates an elegant canvas that draws the eye and instantly elevates your entire appearance—whether you’re dressing up for a special occasion or just wanting to feel more confident in your everyday style. What makes this shape so special is its versatility: it’s dramatic enough to stand out, yet refined enough to work in professional settings when you choose the right designs and colors.
The beauty of coffin nails lies in how they transform even simple nail art into something that feels intentional and curated. Because of their generous length and width in the bed of the nail, you’ve got plenty of real estate to work with—and that means the design possibilities are genuinely endless. You can go minimal and chic, or you can embrace maximum glamour with intricate patterns, finishes, and embellishments that would look overwhelming on shorter nail shapes. The coffin silhouette actually complements most hand shapes and skin tones, which is why it’s become such a go-to choice for people who want nails that feel both personal and polished.
The designs that follow showcase what’s possible when you combine this iconic shape with colors, textures, and techniques that really make them sing. Whether you’re drawn to understated elegance, bold statement-making looks, or something in between, you’ll find plenty of inspiration here. Each design works beautifully in coffin format, and many of them are achievable both at a salon and at home with a bit of patience and the right products. The key is choosing a design that makes you feel like the best version of yourself—because that’s when nails truly become an accessory that matters.
1. Classic Ombre Gradient Coffin Nails
An ombré gradient on coffin nails creates a sophisticated transition that follows the natural flow of the nail shape, making the length feel even more elegant and intentional. This look typically moves from a deeper shade at the base or cuticle area to a lighter shade at the tip, creating a dimensional effect that catches light beautifully. The gradient style works especially well on coffin nails because the gentle slope of the shape naturally complements the color fade.
Why This Design Works So Well
The ombré technique instantly makes your nails look polished and professionally done, even if you’re creating it yourself at home. The blended colors create visual interest without feeling chaotic or overwhelming—it’s sophisticated enough for formal events but also works perfectly for everyday wear. Because there’s no stark color blocking or intricate detail work required, this style remains wearable and timeless across all occasions and seasons.
How to Achieve This Look
- Choose two complementary nail polish colors—typically a darker and a lighter shade of the same color family (deep burgundy fading to dusty rose, for example)
- Apply your base color to the entire nail and let it dry completely
- Use a makeup sponge to dab and blend the lighter color onto the nail tip, starting about halfway down the nail
- Blend the colors together by stippling the sponge along the transition line until the gradient looks seamless
- Seal everything with a high-quality top coat to protect the design and add shine
Pro tip: The quality of your blending sponge matters more than you’d think—a fine-textured makeup sponge creates much softer gradients than a thick or coarse one.
2. Marble Effect on Coffin Nails
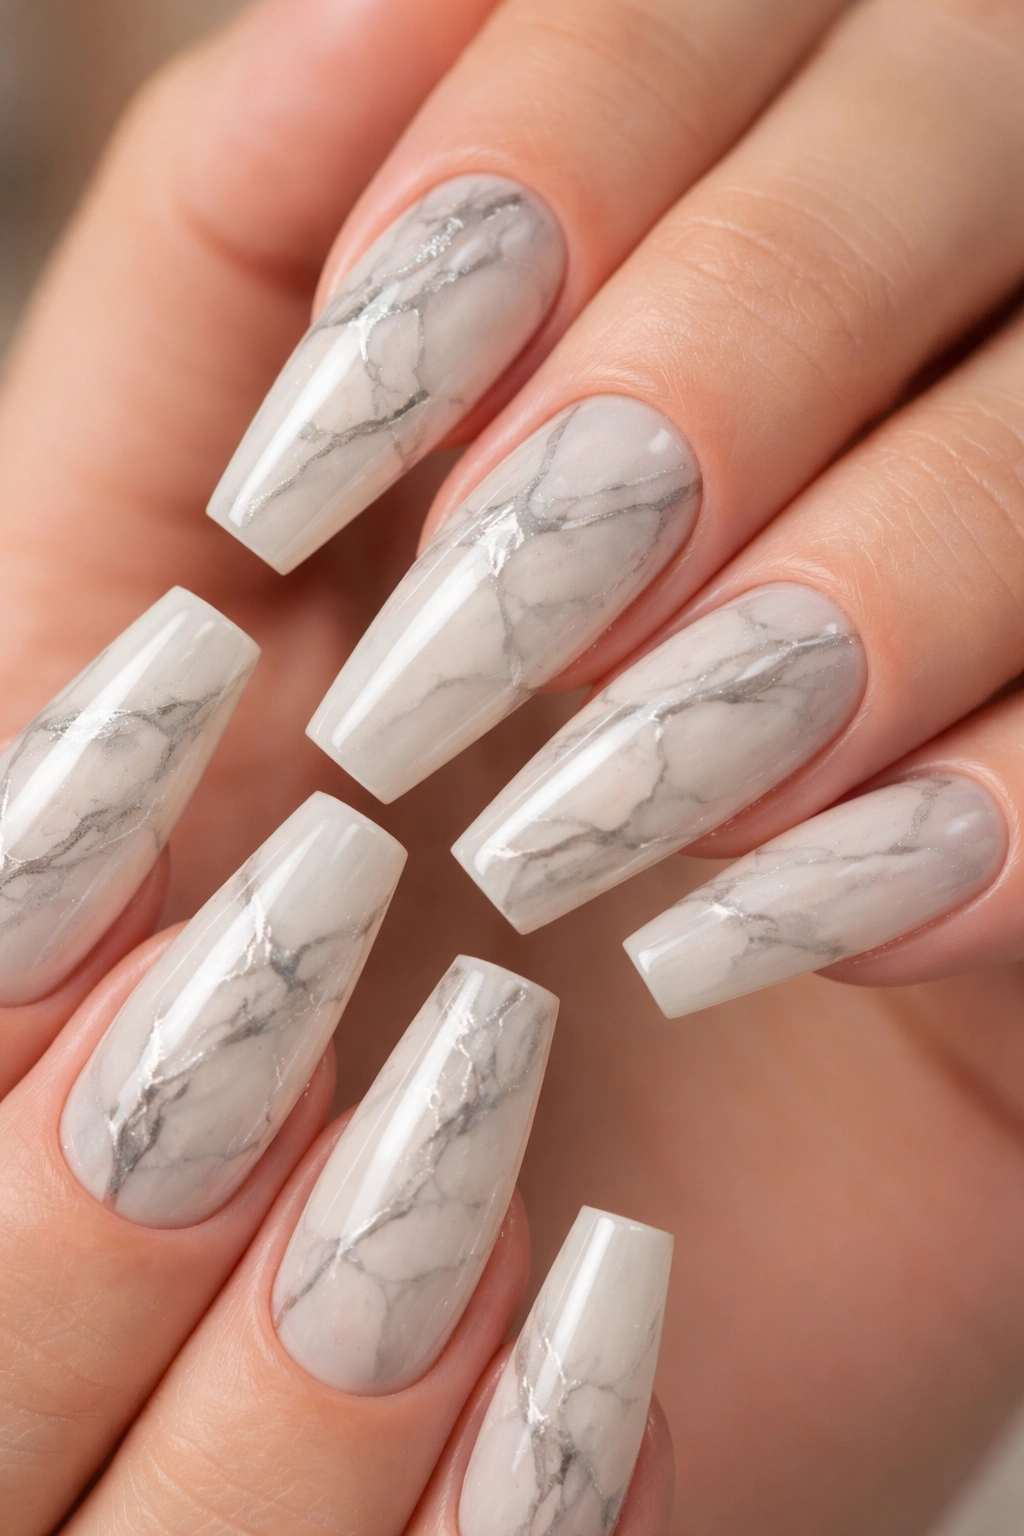
Marble designs bring an artistic, sophisticated vibe to coffin nails by mimicking the natural veining and color variations found in actual marble stone. These designs typically feature a neutral or pastel base with contrasting lines that swirl and flow across the nail surface, creating an organic, almost luxurious appearance. The flowing lines of marble work beautifully with the coffin shape because they emphasize the nail’s length and create movement across the surface.
What Makes Marble So Striking
Marble has an inherent elegance that feels expensive and intentional, even though the technique isn’t as difficult as it looks. The beauty of marble is that imperfect veining actually looks more authentic—you’re not trying to create a perfectly symmetrical design, but rather capturing the natural irregularity of stone. This means you can create this look with confidence knowing that slight variations add to the overall effect rather than detracting from it.
Creating Marble Nails at Home
- Apply a light base color—soft white, pale gray, blush pink, or ivory all work beautifully
- Using a thin nail art brush or a detail brush, draw irregular lines with your contrasting color (typically black, dark gray, or a deep jewel tone)
- While the lines are still wet, use a clean, dry brush to gently drag through the lines, creating that signature marble effect
- You can also create marble using the water droplet technique if you prefer a more abstract approach
- Finish with a glossy or matte top coat depending on your preference
Worth knowing: Matte top coats actually make marble designs look even more like real stone, while glossy finishes add a more polished, contemporary feel.
3. Chrome and Mirror Finish Nails
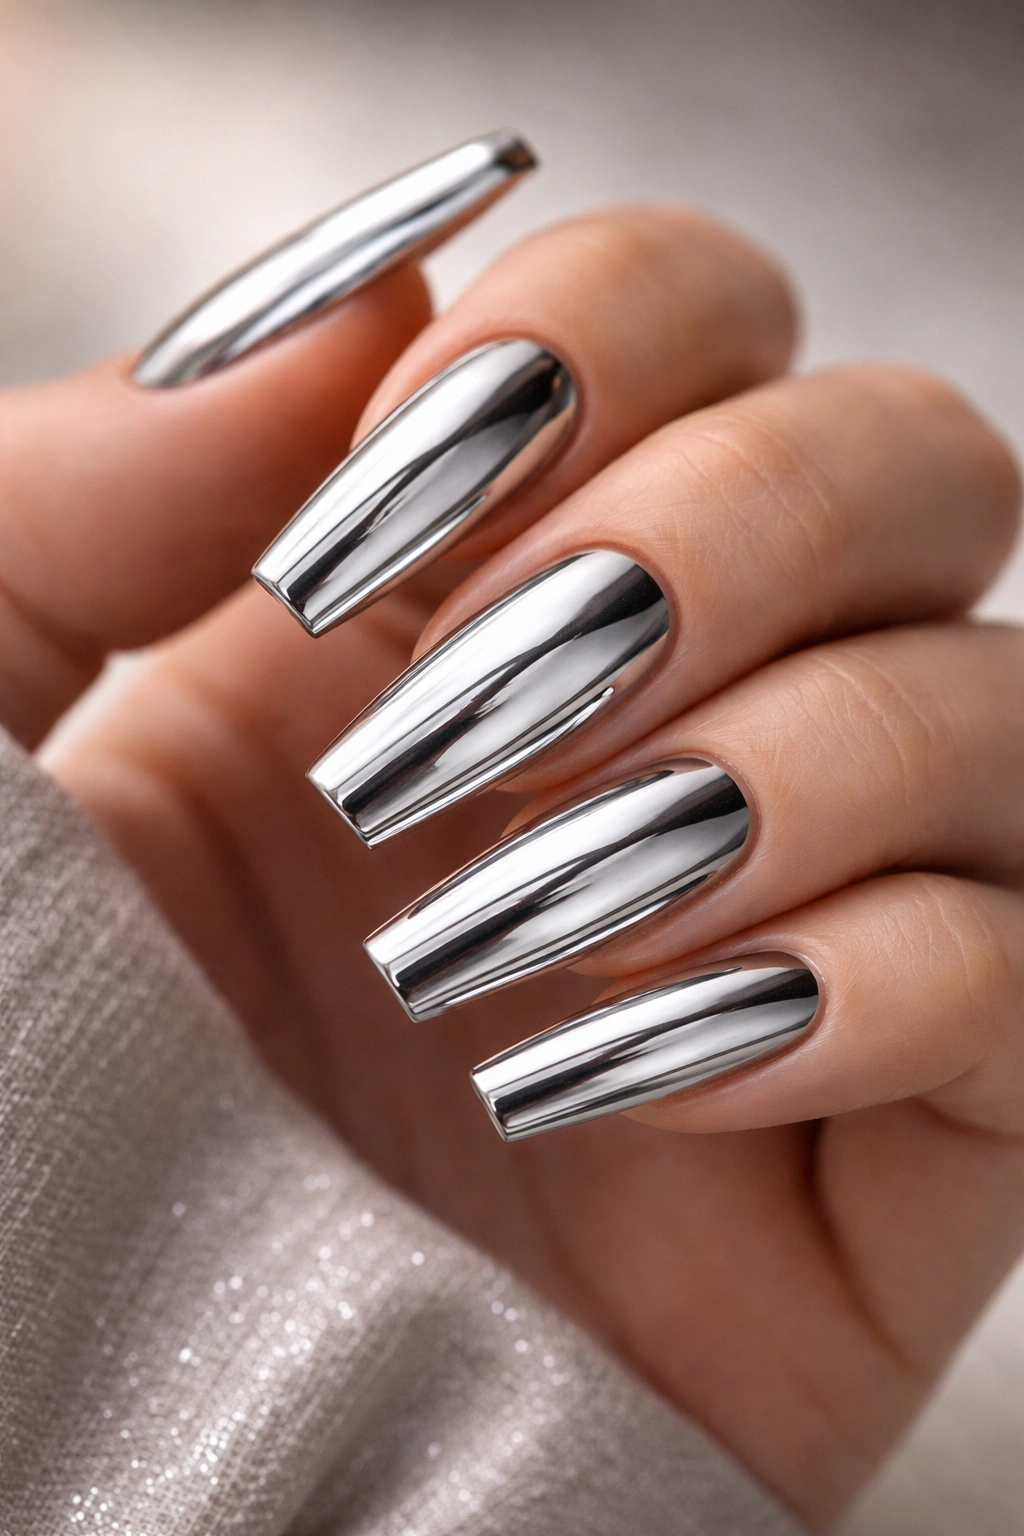
Chrome and mirror finish coffin nails create an ultra-modern, eye-catching look that literally reflects light and stands out from any angle. These finishes use specialized powders and polishes that create a reflective, metallic surface that looks almost liquid or mirror-like. On coffin nails, the chrome effect becomes even more dramatic because the length amplifies the reflective quality and makes your nails look almost futuristic.
Why Chrome Finishes Command Attention
The mirror effect is genuinely impossible to ignore—your nails catch light with every hand movement, creating an almost holographic quality that feels luxurious and bold. What’s remarkable about chrome is that despite how dramatic it looks, it can actually work with both casual and formal aesthetics depending on the color you choose. Rose gold chrome feels romantic, silver chrome feels modern and sleek, and darker chrome shades feel edgy and artistic.
Achieving a Professional Chrome Look
- Start with a smooth, well-prepared nail surface—any bumps or ridges will show through the chrome effect
- Apply a colored base coat appropriate to the chrome color you want (or a clear base if using traditional chrome powder)
- Apply your chrome powder using a velvet or silicone applicator, working in circular motions across the entire nail surface
- Build up layers if needed for a more intense reflective effect
- Seal with a clear, high-shine top coat
Pro tip: Chrome finishes show every little dust particle and imperfection, so apply them in a clean environment and handle your nails carefully until the top coat is fully dry.
4. Glitter Gradient Fade
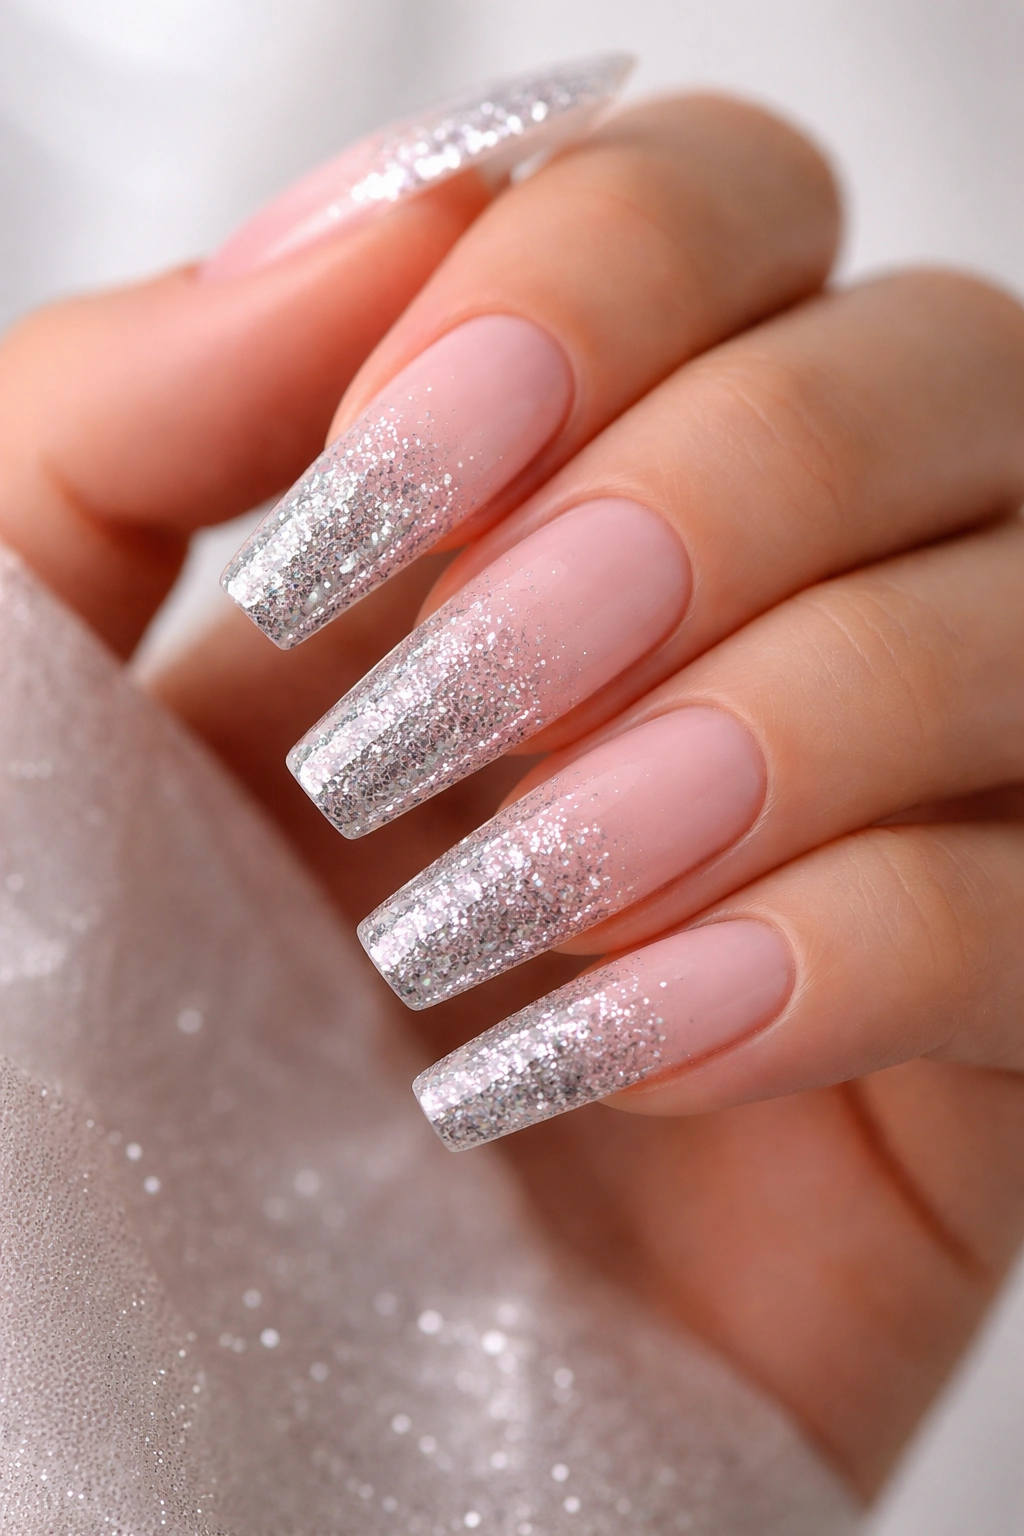
A glitter gradient on coffin nails creates a luxurious effect where glitter is concentrated at the tip and fades toward the base, giving the illusion of embedded sparkle that grows more intense toward the end of the nail. This design combines the sophistication of a gradient with the glamorous impact of glitter, creating something that feels both refined and celebratory. The coffin shape provides the perfect frame for showcasing how the sparkle builds across the nail surface.
Why Glitter Gradients Feel So Glamorous
This look walks the perfect line between elegant and eye-catching—you get the visual interest of glitter without it feeling over-the-top because it’s concentrated at the tips. The gradient transition makes the design feel intentional and artfully executed rather than like you simply applied glitter to your nails. It’s one of the most photographable nail designs because the way light hits the gradient creates different looks depending on the angle and lighting.
Creating a Glitter Gradient Effect
- Apply a solid base color across all nails—this serves as the foundation for your gradient
- On the tip area (roughly the last third of the nail), apply a clear or matching-colored glitter topcoat with visible sparkle particles
- On the middle section, apply a medium amount of glitter mixed with clear gel, creating a semi-transparent sparkle layer
- Leave the base and cuticle area with just the solid color, creating a clear fade from no glitter to maximum glitter
- Seal everything with a generous top coat to smooth the texture and create shine
Insider note: Using glitter in different sizes (combining fine shimmer with chunkier sparkle) creates more dimension than using a single glitter size.
5. Negative Space Designs
Negative space nails on coffins showcase the natural nail underneath in strategic areas, creating a modern, artistic look that plays with what you show and what you hide. This approach typically involves painting sections of the nail while leaving the natural nail color visible, creating geometric patterns, shapes, or abstract designs. The coffin shape works beautifully for negative space because the length gives you room to create interesting patterns without the design feeling cramped.
The Art of Strategic Simplicity
Negative space designs feel contemporary and intentional—there’s something inherently modern about what you don’t paint being just as important as what you do. This approach actually requires more thoughtful design than some other techniques, because every negative space element needs to serve the overall composition. The result feels artistic and curated, like your nails are a miniature canvas rather than a decorative surface.
Designing Your Own Negative Space Nails
- Sketch your design lightly on the nail with a pencil or use nail guides to plan your pattern
- Paint your design using nail polish or gel, being deliberate about which areas you leave bare
- Popular negative space patterns include geometric shapes, swoops, half-moons, or abstract lines
- You can create definition around the negative space with a thin accent color if you want the design to pop more
- Finish with a top coat, making sure it covers both painted and natural areas evenly
Worth knowing: Keeping the natural nail area very clean and polished (rather than matte) makes negative space designs look intentional rather than incomplete.
6. Geometric Patterns and Shapes
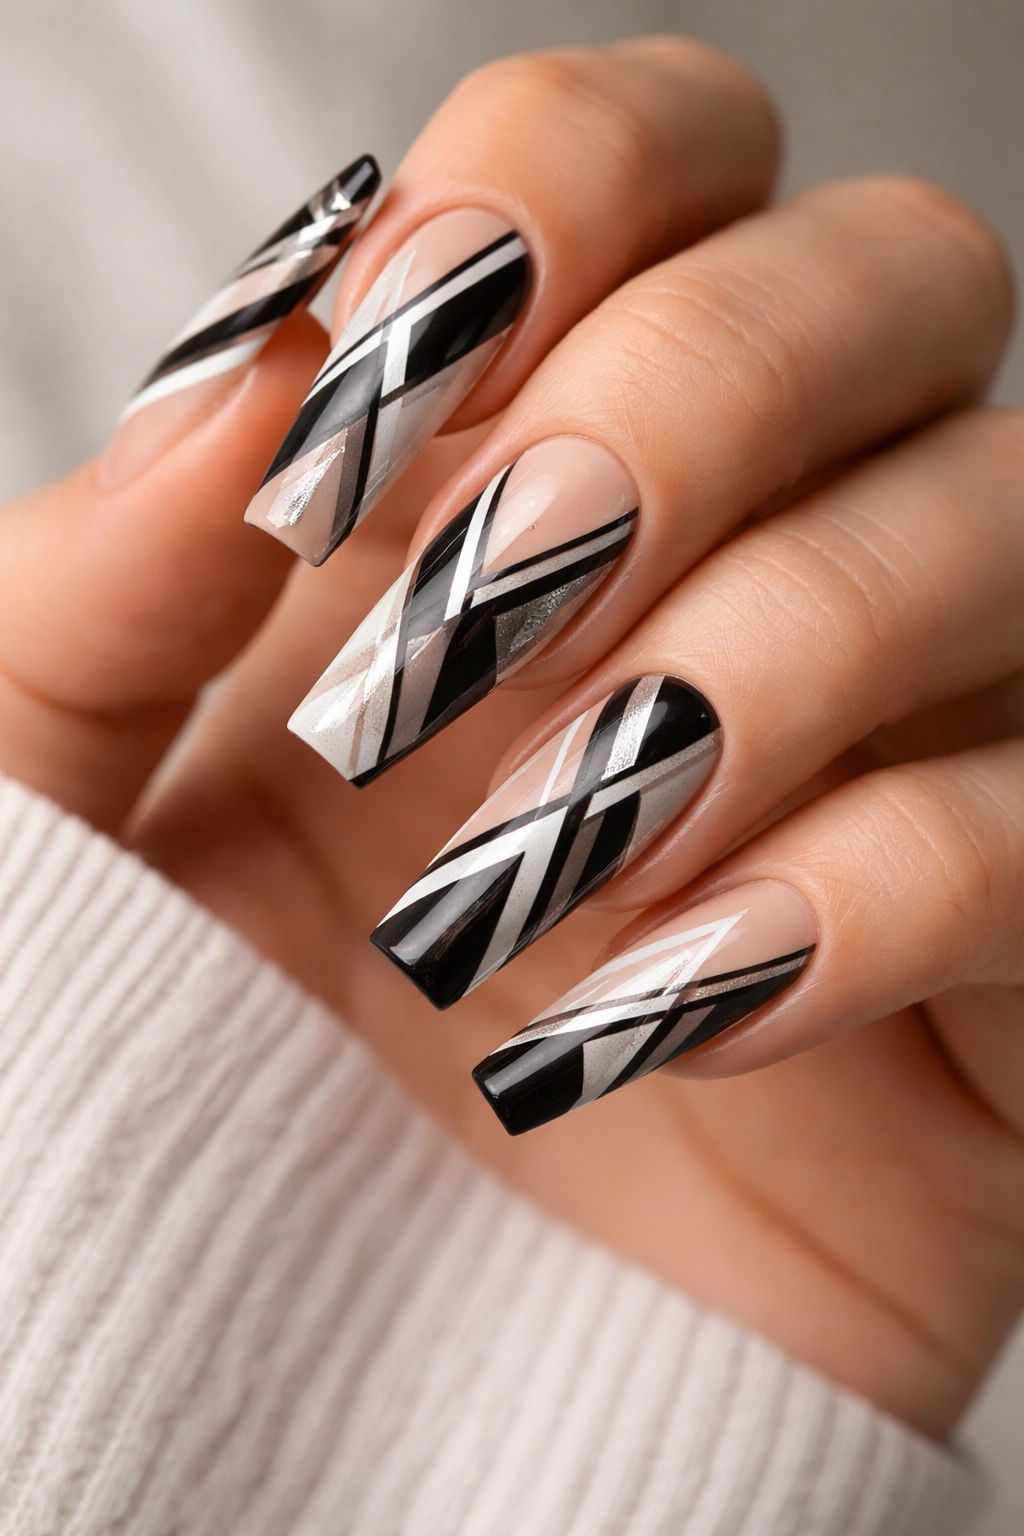
Geometric coffin nail designs use precise lines, shapes, and mathematical patterns to create bold, modern looks that feel contemporary and artistic. These designs might include triangles, squares, stripes, chevrons, or more complex patterns that create movement and visual interest across the nail surface. The clean lines of the coffin shape actually complement geometric designs perfectly, creating a cohesive, intentional aesthetic.
Why Geometric Designs Feel So Intentional
There’s something satisfying about the precision and planning that goes into geometric nail art—it signals that thought and intention went into creating your look. These designs work across color palettes (neon and bold, or neutral and understated) and feel equally at home in creative professional settings as they do in casual, artistic contexts. The coffin shape’s defined edges actually make geometric patterns look even sharper and more defined.
Creating Precise Geometric Patterns
- Use nail guides or thin painter’s tape to create clean, straight lines as your foundation
- Apply a base color first, then carefully apply contrasting colors within your geometric shapes
- A thin detail brush or nail art pen gives you the precision you need for clean lines
- Build your pattern systematically, one element at a time, allowing each section to dry before moving to the next
- Alternatively, use stencils designed for nail art to achieve perfect geometric shapes quickly
- Seal with a glossy or matte top coat depending on the mood you want—matte makes geometric patterns feel more graphic and bold
Pro tip: Geometric designs actually hide imperfections better than solid colors because the eye follows the pattern rather than scrutinizing the nail surface.
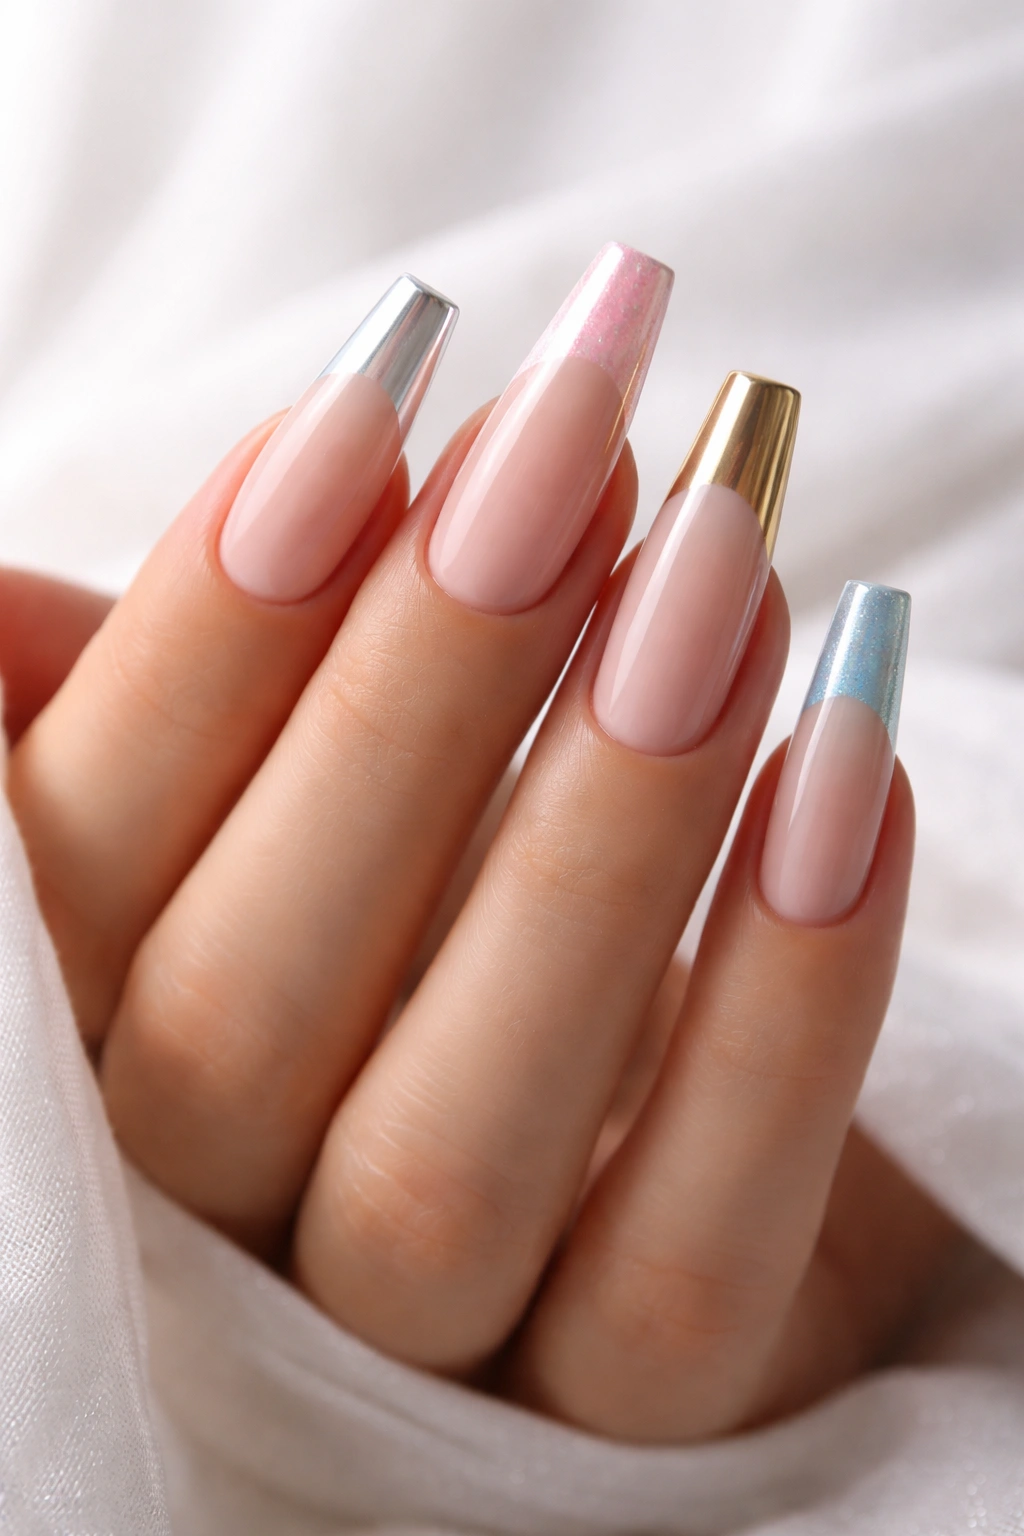
7. Metallic Accents and Gold Details
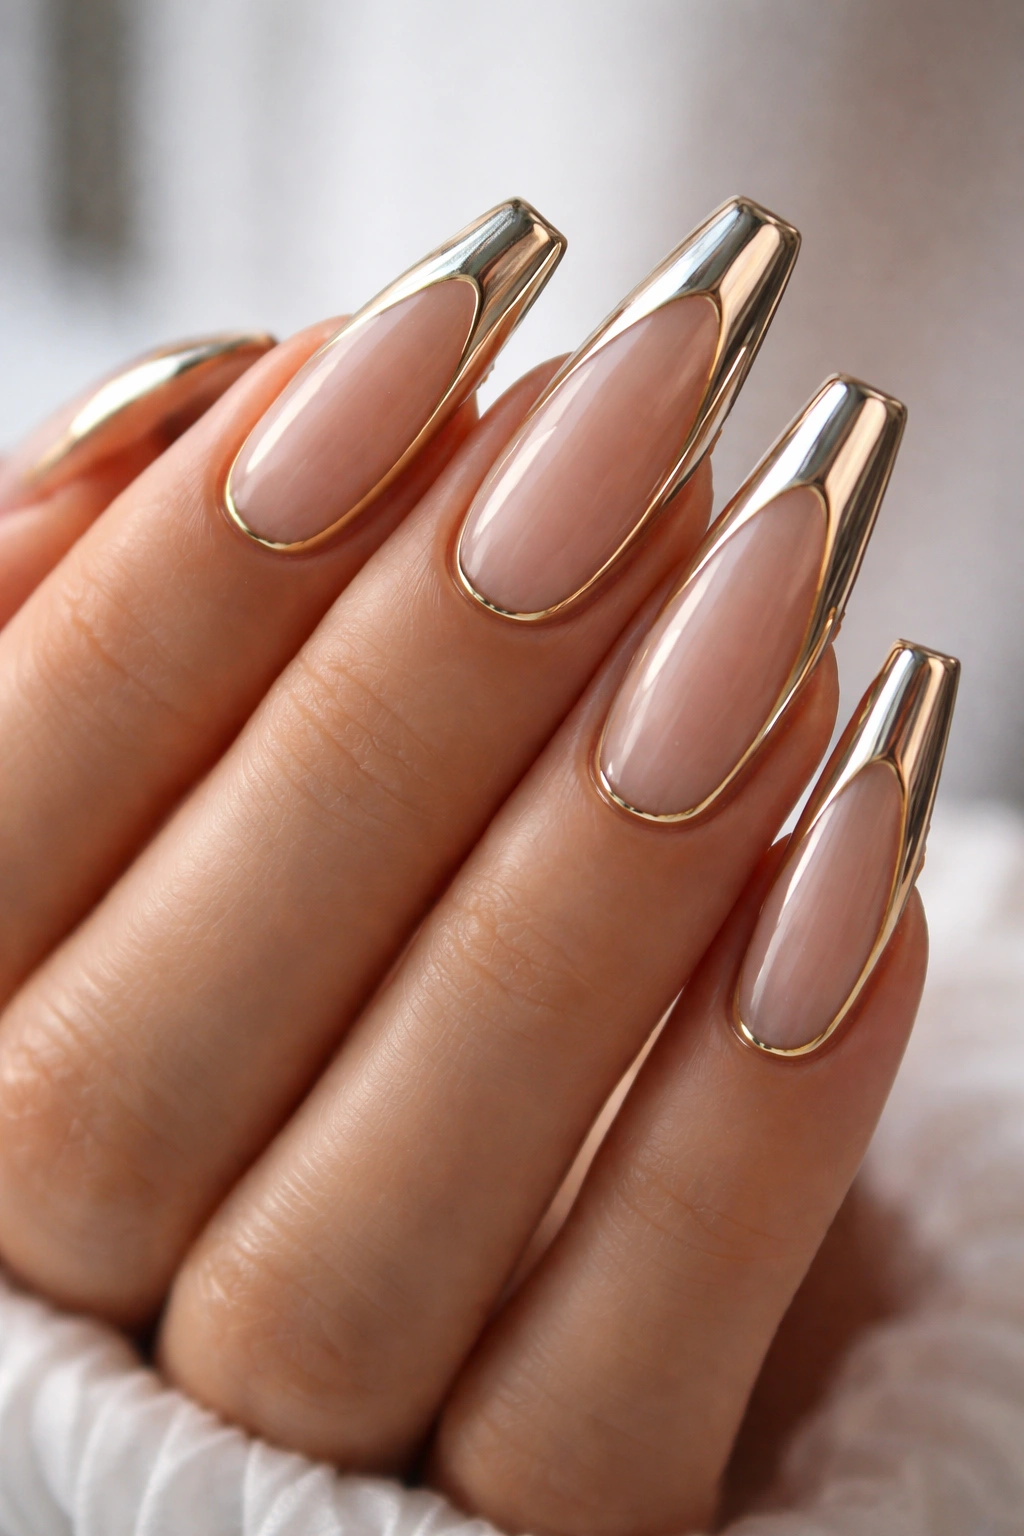
Metallic accents bring luxury and sophistication to coffin nails, whether you’re adding gold striping, silver detailing, or chrome embellishments to complement your base color. These accents can be subtle (a thin gold line near the cuticle or along the edge) or more prominent (metallic tips or geometric sections), creating a personalized level of glamour. The coffin shape’s length makes metallic accents feel even more striking because they have more space to create visual impact.
The Power of Strategic Metallic Details
A single metallic accent line or detail completely transforms a simple nail design, instantly elevating it from basic to polished. Metallics work with virtually any color and any occasion—they’re sophisticated enough for formal events but can also feel playful and creative depending on the placement. The reflective quality of metallics means your nails catch light with every movement, creating an understated but constant visual presence.
Adding Metallic Accents to Your Nails
- Apply your base color and let it dry completely
- Using a thin brush, apply metallic polish in your chosen accent areas—along edges, as thin stripes, or as geometric shapes
- Metallic gel polishes and foil designs offer even more dramatic results if you want a showier effect
- Consider combining multiple metallic tones (rose gold with silver, for example) for a more complex, curated look
- A glossy top coat makes metallics shine brighter, while matte creates a more subdued, contemporary effect
Insider note: Metallic polishes apply most smoothly if you thin them slightly with a clear top coat or polish thinner—straight from the bottle, they can sometimes look streaky.
8. Nude and Minimalist Elegance
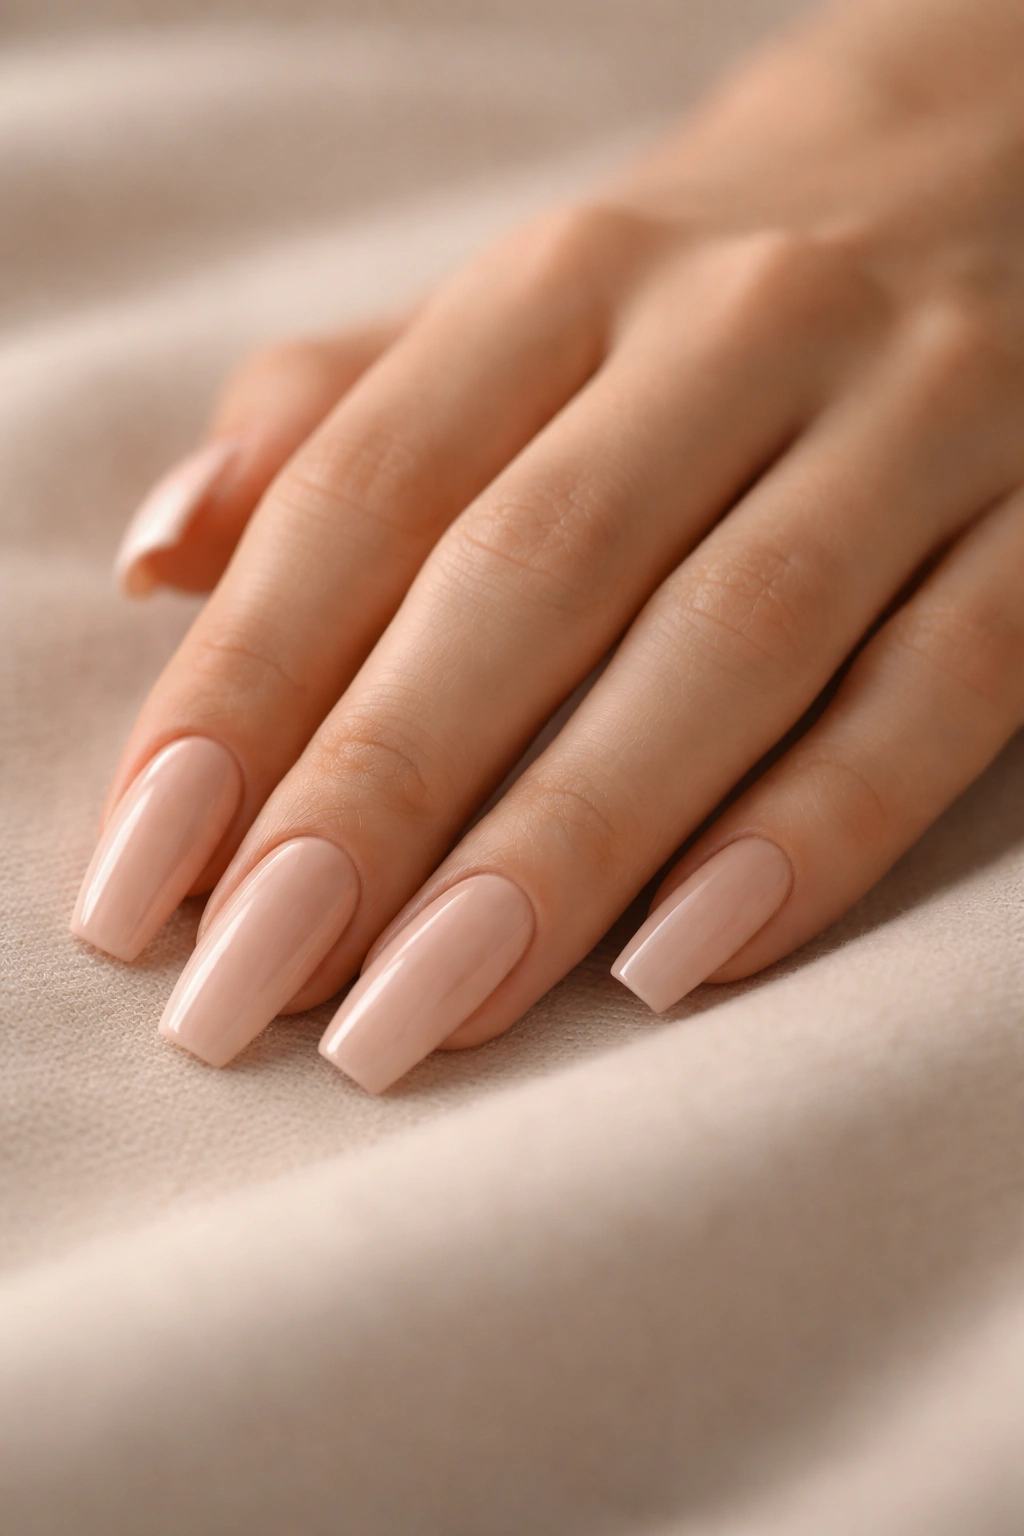
Nude coffin nails showcase the beauty of simplicity by using soft, skin-tone colors that feel elegant and timeless without being boring or plain. This minimalist approach works exceptionally well on coffin nails because the shape itself is a statement, and a refined neutral color lets the nail’s architectural quality take center stage. The coffin silhouette combined with a perfectly matched nude shade creates an almost sculptural appearance that feels expensive and intentional.
Why Nude Nails Never Go Out of Style
Nude nails work beautifully across all skin tones when you choose the right undertone for your complexion, creating an elongated finger appearance while feeling professional and polished. The minimalist approach actually requires more precision than busier designs—there’s nowhere to hide with color, so the base needs to be impeccable. This is the design you reach for when you want nails that feel sophisticated without demanding attention.
Achieving the Perfect Nude Look
- Choose a nude shade that matches or is slightly warmer than your skin tone for maximum elongating effect
- Ensure your nail base is completely smooth and even before applying polish—any ridges will be visible
- Apply thin, even coats, building to full coverage rather than applying one thick coat
- Consider adding a subtle sheen with a semi-gloss or satin finish top coat for more interest than a pure matte
- Optional: add a single accent nail with a metallic shade or a simple detail to keep the look from feeling too plain
Pro tip: A tiny amount of shimmer or a barely-there sparkle mixed into your nude polish adds dimension without compromising the minimalist aesthetic.
9. Pastel Coffin Nails
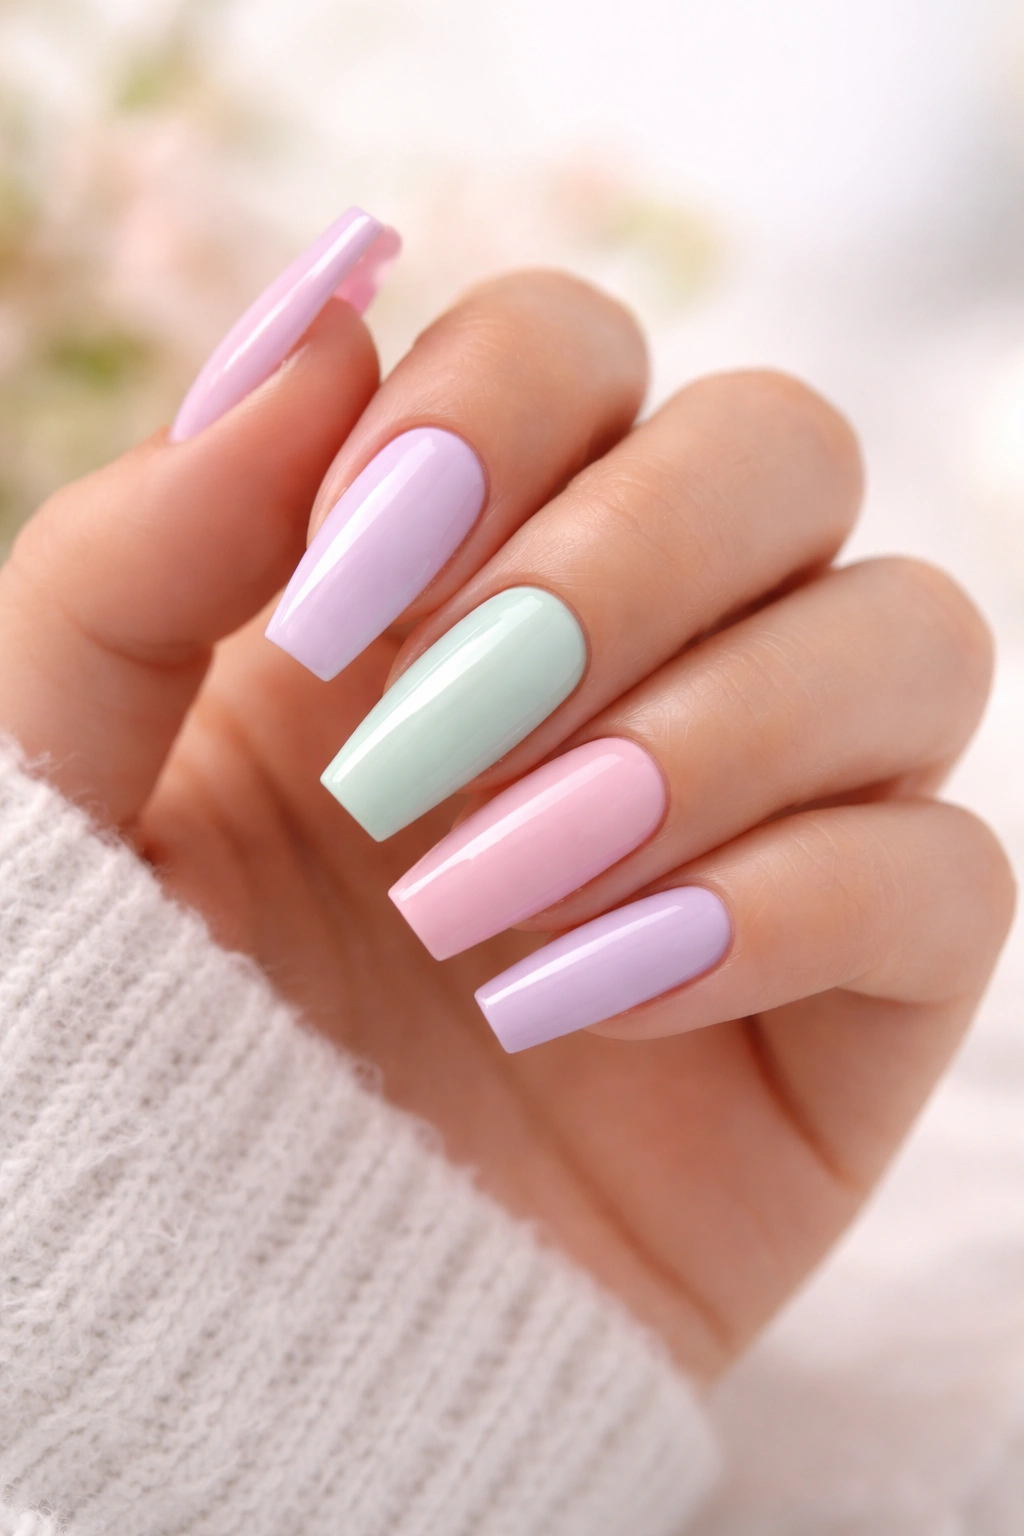
Pastel colors on coffin nails create a soft, dreamy, sophisticated look that feels contemporary and artistic while maintaining an air of quiet elegance. Pastels work beautifully on coffin nails because the soft hues complement the shape’s graceful lines without creating visual harshness. Whether you use a single pastel shade or combine multiple pastels, this approach feels modern, refined, and distinctly feminine without being overly delicate.
The Appeal of Soft Pastels
Pastel colors have a unique quality where they feel both bold and understated at the same time—they draw attention without feeling loud or overwhelming. Pastels photograph beautifully and work across seasons and occasions because they’re inherently elegant. The coffin shape amplifies the dreamy quality of pastels, creating nails that feel almost ethereal while still maintaining strong definition and impact.
Styling Your Pastel Coffin Nails
- Choose pastels that complement your skin tone and personal aesthetic—soft pinks and lavenders work for cool undertones, while soft peaches and yellows flatter warm undertones
- Create monochromatic elegance with a single pastel shade across all nails
- Combine multiple pastels for a playful, color-blocked look—soft pink with pale blue, or lavender with mint green
- Add white accents, negative space, or metallic details to elevate the look without overwhelming the soft color palette
- A glossy finish keeps pastels looking bright and contemporary, while a matte finish creates a more artistic, sophisticated vibe
Worth knowing: Pastels often benefit from a second coat because they can look slightly transparent with just one application.
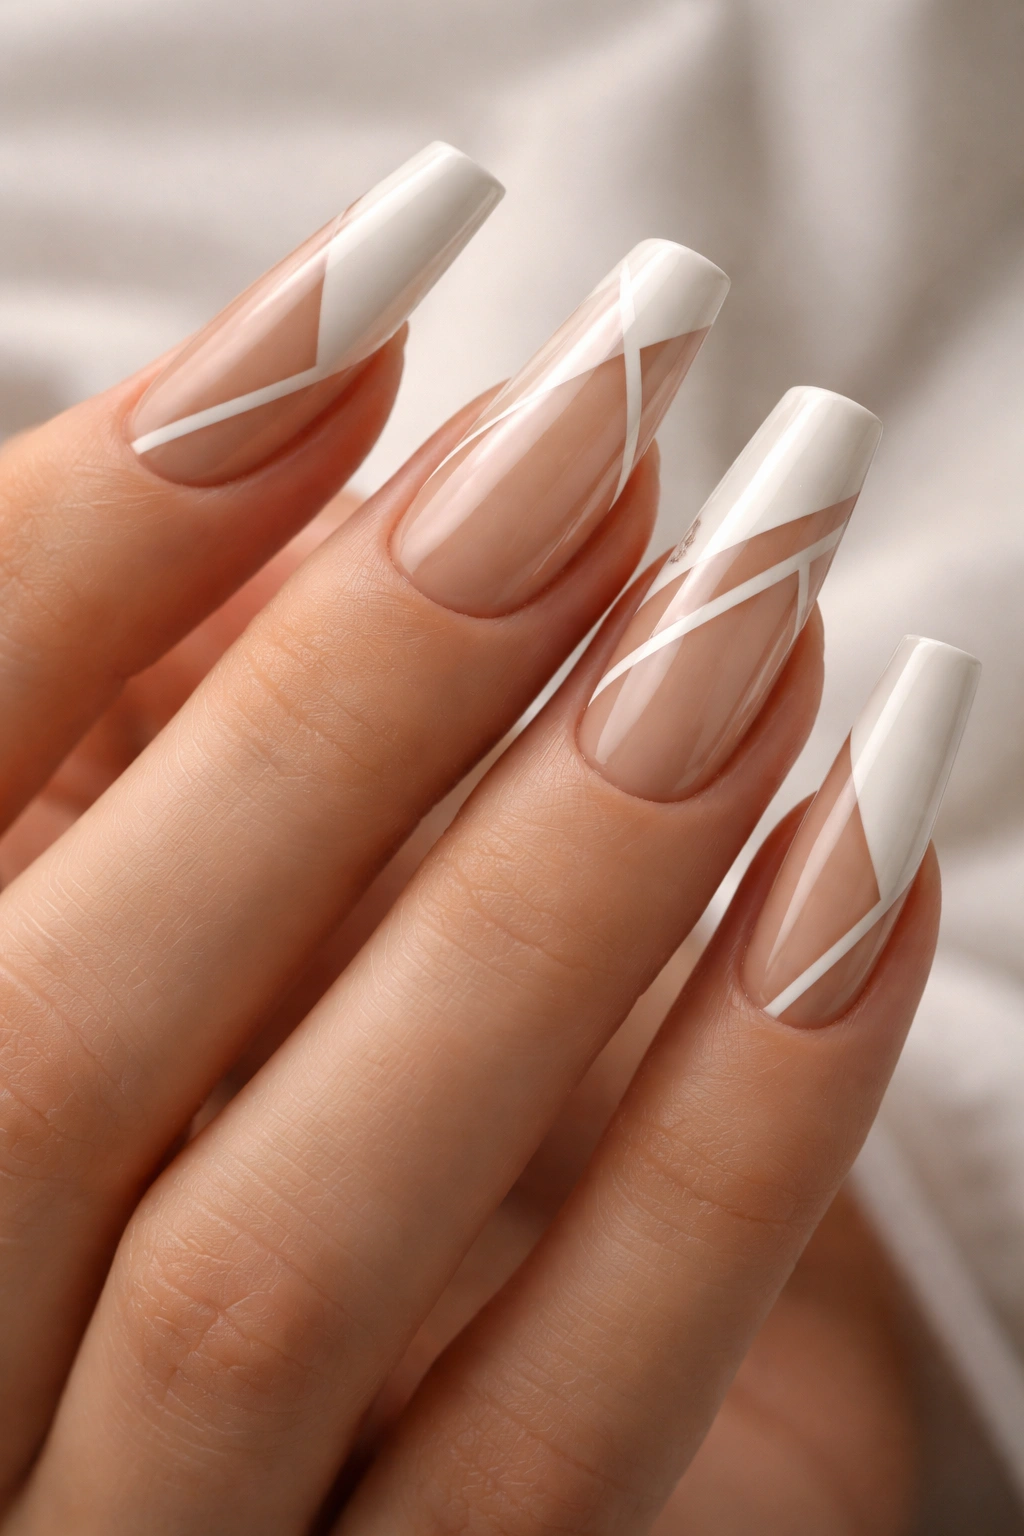
10. French Tip Reinvented
The French tip takes on fresh life when applied to coffin nails, offering endless possibilities for making this classic look feel modern and personalized. Instead of the traditional white tip, coffin-shaped French tips can feature metallic tips, colored tips, ombré transitions, or gradient effects. This approach respects the elegance of the original French tip while allowing for creative interpretation that feels contemporary.
Modernizing a Timeless Design
The French tip’s enduring appeal comes from its sophistication and simplicity, and the coffin shape actually enhances these qualities by giving you more surface area to play with. You can keep it traditional and understated, or push it in creative directions with gradient tips, dual-color tips, or metallic finishes. The coffin French tip works for virtually any occasion and never feels dated—it’s both classic and current simultaneously.
Creating Coffin-Shaped French Tips
- Apply a neutral or matching base color to the entire nail
- Mark where your tip color will begin using a thin guide or tape, typically about a quarter-inch from the free edge
- Apply your tip color (white, metallic, a contrasting shade, or even a gradient) only to the tip area
- Create clean, precise lines where the base color meets the tip color using a detail brush or nail guide
- For a softer look, blend the colors slightly where they meet instead of creating a harsh line
- Consider adding a thin accent line in metallic or contrasting color along the color boundary for extra definition
Pro tip: If precision isn’t your strength, ombre French tips automatically hide slightly imperfect color transitions and look intentionally blended.
11. Floral and Botanical Designs
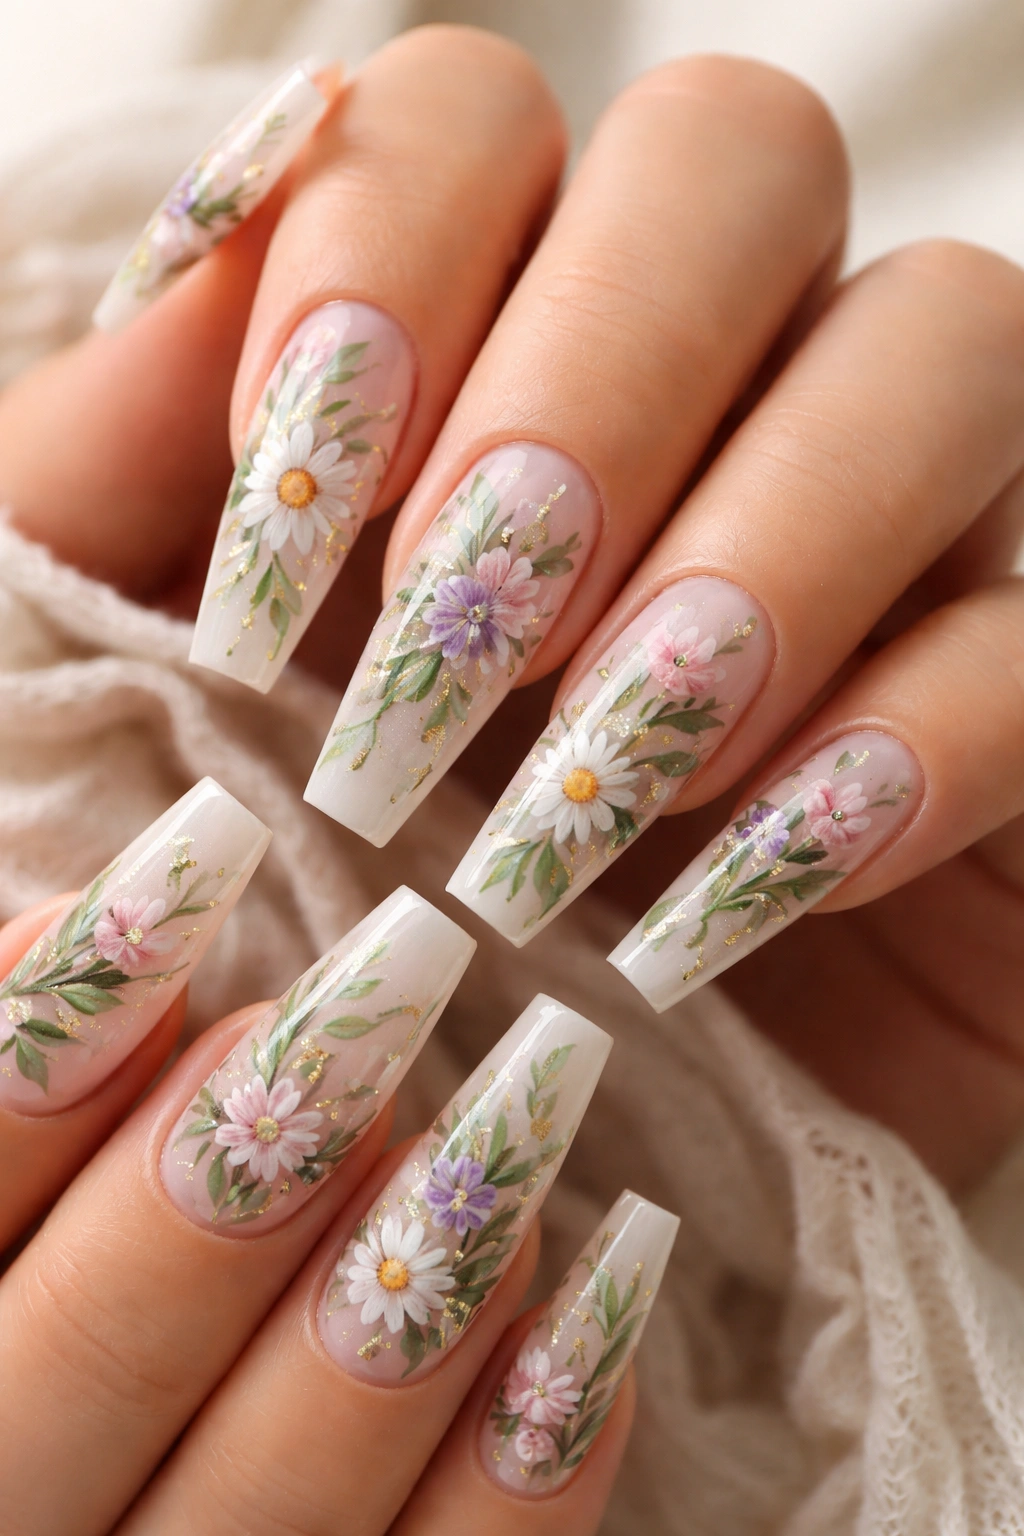
Floral designs on coffin nails bring natural beauty and artistic detail to your hands, featuring painted flowers, leaves, vines, or botanical elements in various styles from realistic to abstract. The coffin shape provides excellent canvas space for intricate floral work without feeling cluttered or cramped. These designs can range from delicate and minimalist (a single small flower per nail) to elaborate and garden-inspired (full botanical scenes).
The Versatility of Floral Nail Art
Floral designs work beautifully across color palettes and styles—from soft pastels to bold, saturated colors, from watercolor-inspired to graphic and graphic. The botanical theme feels both artistic and wearable, sophisticated and joyful simultaneously. Floral designs on coffin nails feel curated and intentional, showing that time and care went into creating your look, and they work for everything from casual dates to weddings to professional settings.
Painting Floral Details on Your Nails
- Start with a neutral or complementary base color—white, cream, soft gray, or a pale pastel all work beautifully as backgrounds for flowers
- Using a thin detail brush, sketch your flowers lightly (or use nail guides/stickers as templates if freehand feels intimidating)
- Build up your flowers layer by layer, starting with the base color and adding details gradually
- Leave plenty of space around flowers—negative space makes floral designs feel more sophisticated than completely filled nails
- Seal with a glossy top coat to protect your detailed work and make colors pop
Insider note: You don’t need to be an accomplished painter to create beautiful floral designs—simple shapes (circles for flower centers, small brush strokes for petals) combine to create surprisingly sophisticated-looking botanical art.
12. Matte Finish Elegance
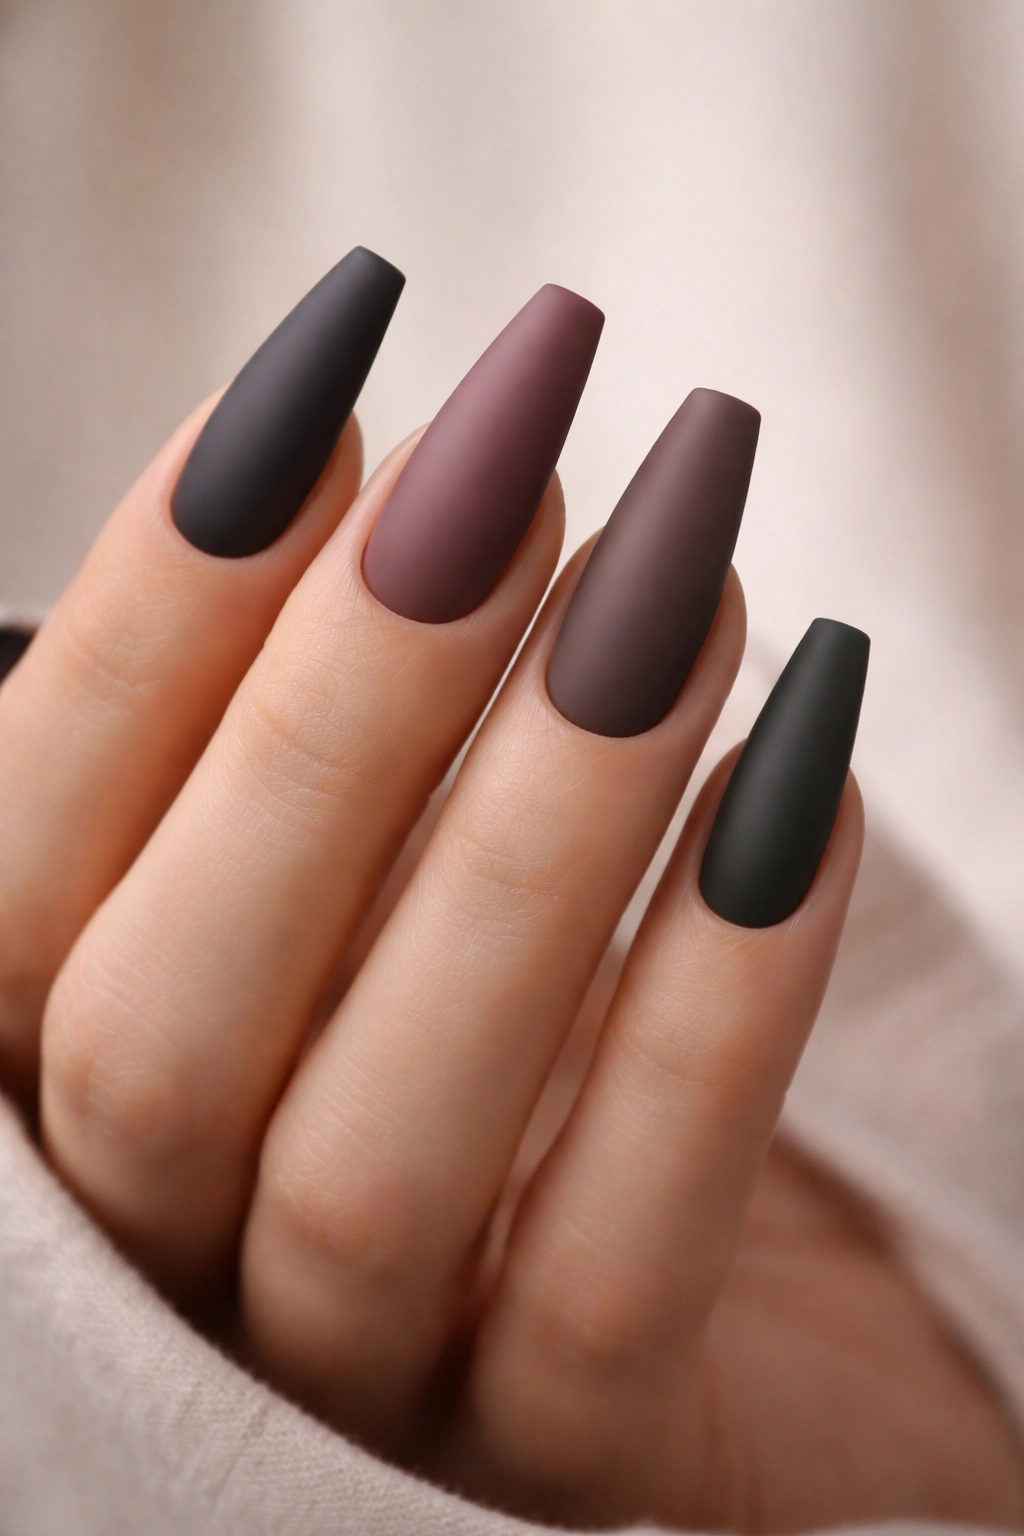
Matte coffin nails create a velvety, contemporary look that feels sophisticated and artistic, with colors appearing deeper and more saturated than their glossy counterparts. The matte texture completely changes how a color reads—deep colors become almost mysterious, pastels feel more artistic, and even nudes take on a more refined quality. This finish has become increasingly popular because it feels modern, intentional, and distinctly different from standard glossy nails.
Why Matte Finishes Feel So Contemporary
There’s something inherently artistic about matte finishes—they feel like a deliberate aesthetic choice rather than just a basic application of polish. Matte reduces shine and glare, which paradoxically makes nails feel more like a curated design element and less like a reflective surface. The coffin shape works beautifully with matte finishes because the texture emphasizes the nail’s architectural quality and makes the shape feel even more defined and intentional.
Achieving a Perfect Matte Finish
- Choose either matte-specific nail polish (which dries naturally without shine) or create a matte effect by applying a matte top coat over any regular polish color
- Matte polishes sometimes require thin, even coats to avoid a streaky appearance, so patience and precision matter
- Consider doing a glossy base coat first, then topping with matte polish for better coverage and smoother finish
- Matte finishes work beautifully with any design—solids, pastels, darker colors, geometric patterns, or accents
- Optional: do a hybrid approach with matte base nails and glossy accents for visual interest and contrast
Pro tip: Matte finishes can sometimes look dry or chalky if not sealed properly—use a dedicated matte top coat rather than a regular glossy top coat for the best result.
13. Holographic and Iridescent Effects
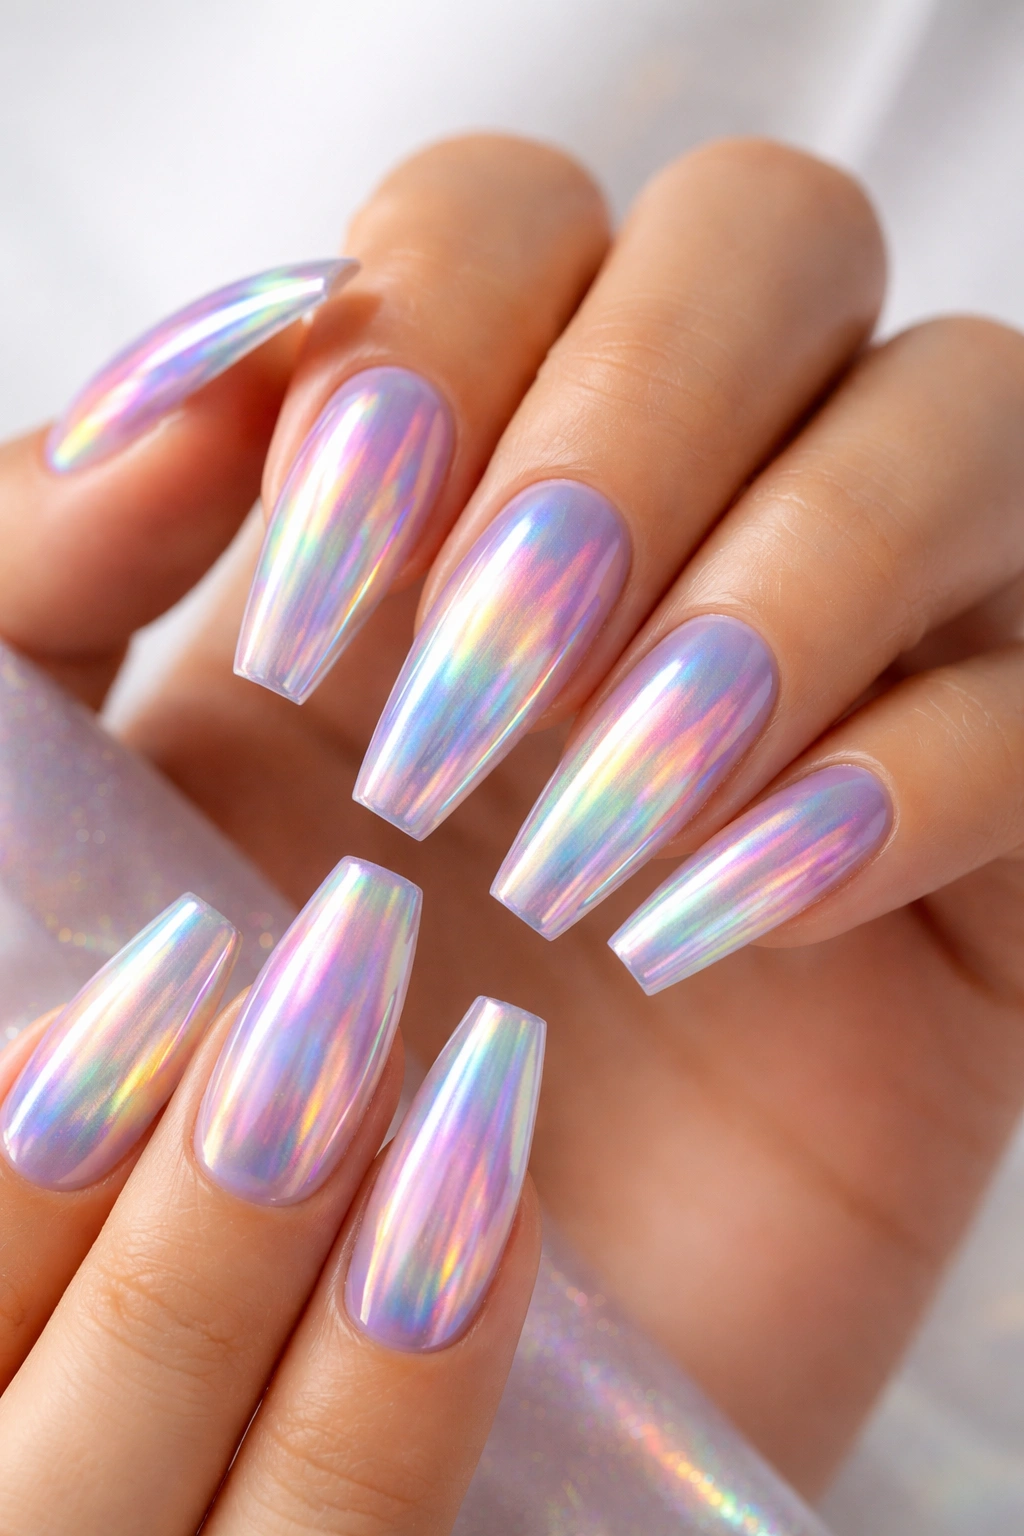
Holographic and iridescent coffin nails create an almost magical, color-shifting effect that changes appearance depending on the angle and lighting, making them genuinely mesmerizing to look at. These finishes use special pigments or chrome powders that refract light differently, creating effects ranging from subtle rainbow shifts to dramatic, eye-catching transformations. On coffin nails, the length amplifies these effects, making the color shifts even more dramatic and noticeable.
The Captivating Quality of Holographic Nails
There’s something inherently fascinating about nails that shift color as you move and change angles—they demand attention in the best way possible. Holographic effects work beautifully in both subtle (soft, understated shifts) and dramatic (bold, colorful transformations) applications. The coffin shape’s elongation actually makes these effects even more visually interesting because the color changes are more visible across the larger surface area.
Creating Holographic Effects on Your Nails
- Choose between dedicated holographic polishes (available in various colors), holographic powders, or chrome-based holographic effects
- Apply a smooth base coat and let it dry completely—any bumps or ridges will disrupt the holographic effect
- For holographic polish: apply thin, even coats, building coverage gradually
- For holographic powder: apply a sticky base (typically a gel base coat), apply the powder carefully, then seal with a top coat
- The more layers you apply, the more intense the holographic effect becomes
- Ensure excellent lighting when you’re applying these finishes so you can see the effect developing
Worth knowing: Holographic nails look absolutely stunning in photos and video, but the effect is even more impressive in person when you can see how the colors shift as you move.
14. Jewel and Rhinestone-Encrusted Nails
Jewel and rhinestone-studded coffin nails create an ultra-glamorous, eye-catching look that’s perfect for special occasions, celebrations, or any time you want your nails to be an absolute statement piece. These designs typically feature strategically placed rhinestones, gemstones, or studs applied to a colored base, creating sparkle and dimensional interest. The coffin shape’s generous surface area provides the perfect canvas for showcasing multiple jewels without the design feeling overcrowded.
The Ultimate Glamour Move
Rhinestone nails instantly elevate your entire look—there’s something about genuine sparkle and dimension that makes your hands feel luxurious and celebratory. These designs work beautifully for weddings, parties, date nights, or any occasion where you want to feel absolutely glamorous. The coffin shape actually showcases rhinestones better than shorter shapes because you have more space to create interesting placement patterns and depth.
Applying Rhinestones Like a Pro
- Start with a smooth, glossy base—either a solid color or a design like ombre or marble
- Let your base dry completely before applying any rhinestones
- Use a nail rhinestone adhesive or super-fine tweezers to apply individual stones, or use pre-made nail gems with adhesive backing
- Create patterns (a line of stones, a scattered effect, a concentrated area) or place them intuitively across the nails
- For maximum sparkle, apply rhinestones to all nails; for a subtler approach, accent only one or two nails
- Seal around and over the rhinestones with a thick layer of clear top coat to ensure they stay secure
Pro tip: Using rhinestones in varying sizes and finishes (crystal clear, holographic, metallic) creates more depth and visual interest than using one type of stone throughout.
15. Ombré with Glitter Tips
Ombré nails with glitter tips combine the soft, blended gradient effect with concentrated sparkle at the tip, creating a look that’s sophisticated and celebratory at the same time. This design features a color gradient that transitions from a deeper shade at the base to a lighter shade in the middle, then explodes into glitter at the tip. On coffin nails, this combination creates a genuinely stunning effect where the gradient draws the eye and the glitter finale feels like a sparkly exclamation point.
Why This Combination Works So Beautifully
The ombré provides elegance and visual interest, while the glitter tip adds excitement and glamour—you get the best of both approaches combined into one cohesive design. This look is sophisticated enough for formal occasions but fun and celebratory enough for parties and celebrations. The coffin shape’s defined tip actually showcases the glitter portion more dramatically than other shapes, making the sparkly finale feel even more impactful.
Creating Ombré with Glitter Tips
- Apply your base color (the deepest shade) to the entire nail
- Create an ombré by blending a lighter shade in toward the tip using a sponge technique, allowing colors to fade gradually
- Once your ombré is complete and dry, switch to a clear or matching-color glitter topcoat for the tip area
- Apply glitter-filled topcoat to roughly the last quarter-inch of the nail, concentrating the sparkle in the very tip
- The transition from solid ombré to glittery tip should be noticeable but not jarring—aim for about half an inch of transition space
- Seal everything with a high-shine top coat
Insider note: Using different-sized glitter particles (combining fine shimmer with chunkier sparkles) in your tip creates more visual complexity and interest.
16. Two-Tone Color Block Design
Two-tone color blocking on coffin nails creates a bold, modern look where two distinct colors divide the nail into distinct sections, making a clear graphic statement. These designs might split the nail vertically down the middle, create a horizontal color block, or use diagonal divisions—the specific placement is up to you and your aesthetic. The coffin shape works beautifully for color blocking because the clean lines of the shape complement the graphic nature of distinct color sections.
The Power of Bold Color Blocking
Color blocking feels contemporary and artistic—there’s something satisfying about the deliberate, graphic quality of clearly divided colors. This approach works beautifully with complementary colors (creating contrast), analogous colors (creating harmony), or bold color combinations (creating impact). Two-tone designs are also incredibly versatile—they work for casual wear, creative professional settings, or as statement pieces depending on your color choices.
Creating Two-Tone Color Blocks
- Decide on your color division—vertical split, horizontal bands, diagonal sections, or other creative divisions
- Use painter’s tape or nail guides to clearly mark where your color boundary will be
- Apply your first color to one section of the nail, painting carefully up to your marked line
- Once that color dries, apply your second color to the remaining section
- Remove your guide gently to reveal clean color boundaries
- For perfectly crisp lines, use a thin brush and steady hand along the color boundary to clean up any rough edges
- A glossy top coat keeps the colors vibrant and makes the graphic quality of color blocking even more striking
Pro tip: Color blocking looks most intentional and graphic when your two colors have clear contrast—either in value (light and dark) or in hue (complementary colors).
Final Thoughts
Coffin nails are genuinely one of the most versatile nail shapes available, capable of showcasing everything from ultra-minimalist designs to maximum glamour without ever feeling overdone or out of place. The shape itself is flattering, sophisticated, and modern—it elongates your fingers while creating visual impact that shorter shapes simply can’t achieve. Whether you’re drawn to understated elegance, bold artistic expression, or shimmering glamour, there’s a coffin nail design here that captures exactly what you’re looking for.
The best design is the one that makes you feel most like yourself when you look down at your hands. That might be a perfectly matched nude that lets the nail shape do the talking, or it might be a fully glittered, jewel-encrusted statement piece—both are equally valid and equally capable of making you feel confident and beautiful. The coffin shape has the presence and sophistication to support your vision, whatever that vision might be.
Getting your nails done (whether at a salon or at home) is genuinely about more than just aesthetics—it’s about feeling polished, intentional, and confident in your appearance. Coffin nails have that special quality where they automatically elevate your entire look, and choosing a design that resonates with you personally makes the effect even stronger. Pick the design that speaks to you, commit to the process, and enjoy the confidence boost that comes with beautiful, well-executed nails.
