

Red and black coffin nails ask for nerve. The shape already has attitude—tapered sides, a squared-off tip, that sharp little finish that makes even a plain nude set look more intentional. Add deep red and black into the mix, and the manicure stops being background detail. It becomes the point.
Not every color pair can handle the coffin shape this well. Pastels can get lost. Soft beige can look flat unless the surface is glossy enough to bounce light back. Red and black, though, love structure. Red brings heat. Black brings edge. On a long coffin tip, those two colors carve clean lines, push contrast harder, and make nail art look crisper than it would on a round or squoval shape.
There’s also a practical side to the appeal. If you want a bold manicure that still looks polished, this color combo gives you room to play with finish, placement, and texture without sliding into chaos. A wine-red base with thin black outlining feels dressy. A matte black set with one blood-red accent nail feels darker, moodier, a little more graphic. Same colors. Different energy.
And that’s the fun of it: red and black coffin nails can lean glam, gothic, sleek, streetwear-heavy, or almost formal, depending on how the colors are split up.
Why Red and Black Work So Well on Coffin Nails

The coffin shape gives contrast room to breathe. That’s the main reason this pairing lands so hard. A narrow almond tip softens color placement because the point pulls your eye inward. Coffin nails do the opposite. The flat tip creates a wider visual end point, so blocks of red, strips of black, diagonal cuts, flames, V-tips, and crystal lines all read from a distance.
Length matters too.
A short coffin set can still wear red and black well, though the cleanest versions usually keep the design simple—French tips, side panels, one accent nail, maybe a tiny foil line. Once the free edge gets longer, around half an inch past the fingertip or more, you can start stacking techniques: ombré, chrome, velvet gel, negative space, stones, hand-painted linework.
Finish changes the mood faster than color does. Gloss makes red look juicier and black look inkier. Matte turns black velvety and makes deep red read almost like fabric. Chrome throws the whole set into a louder lane. Cat-eye gel adds motion because the reflective stripe shifts when your hand moves.
One more thing: placement beats decoration. Two strong colors already do a lot of work. If the base is black, a single slim red detail can carry the whole manicure. If the base is red, black needs a cleaner role—tip, frame, slash, drip, lace, vein. When both colors fight for equal space on every nail, the set can get busy in a hurry.
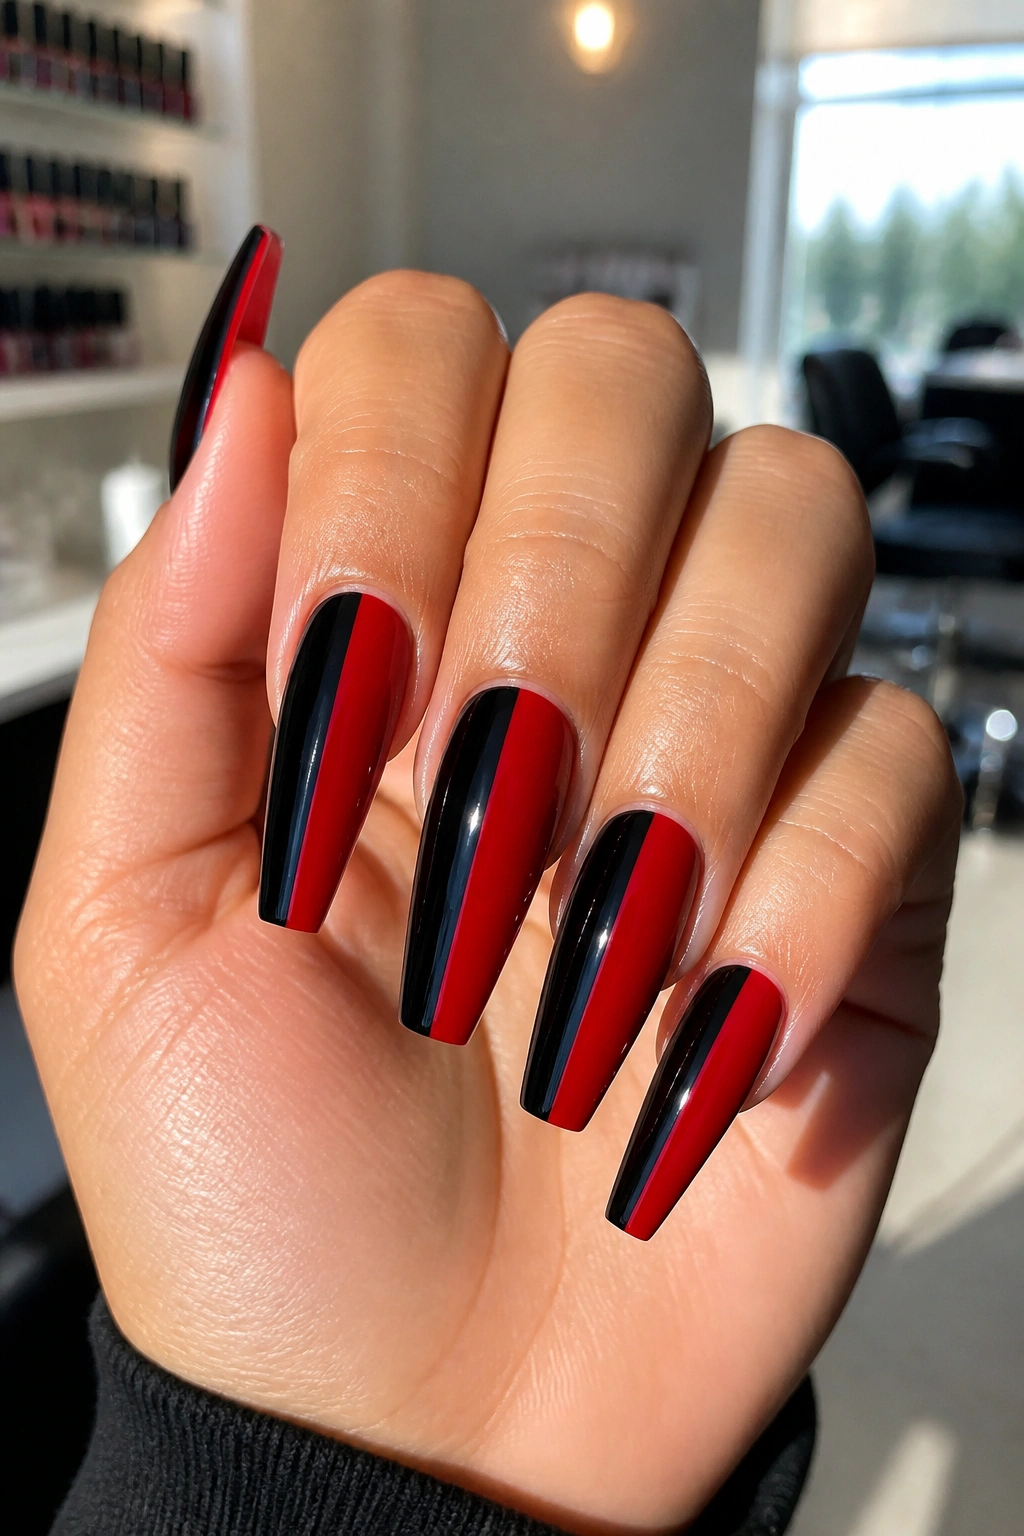
1. Classic Glossy Red and Black Coffin Nails
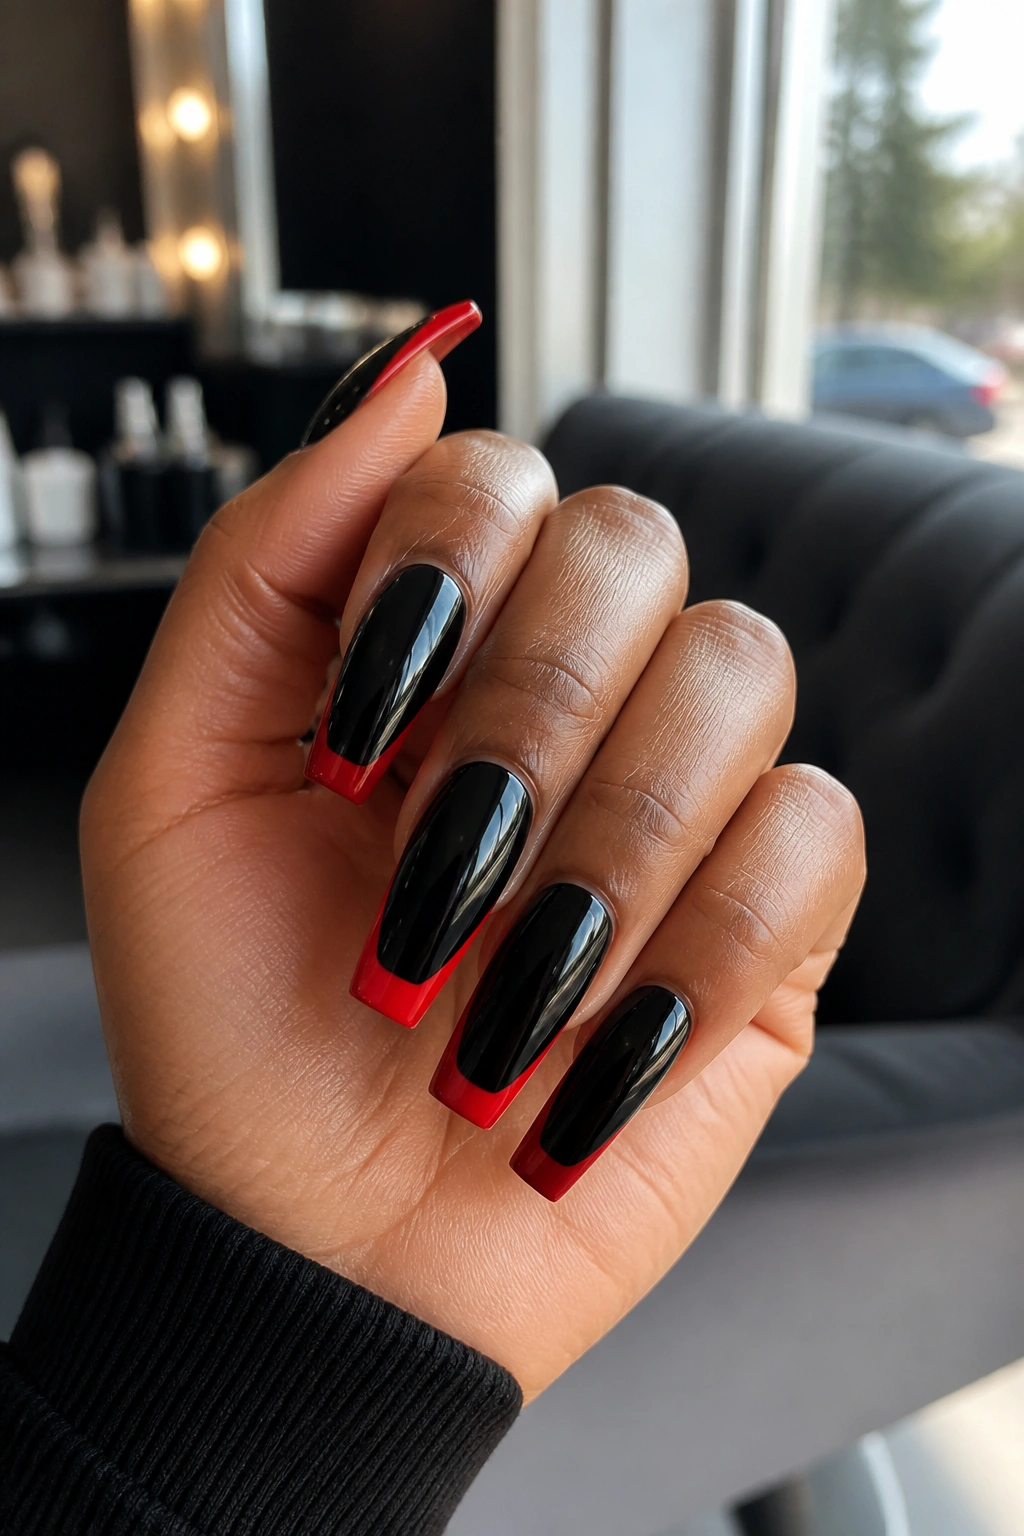
If you want the cleanest possible version of this color story, start here. A glossy black base with rich red French tips—or flip it and wear red base with black tips—looks sharp without needing stones, decals, foil, or extra art. The coffin shape does half the styling for you.
Why this one works so well
The flat tip gives the French line more edge than a rounded nail ever could. On a coffin set, the smile line can stay crisp and shallow, or you can cut it straighter for a more graphic finish. A deep cherry red over black has a dressed-up feel. Black over scarlet reads harder, almost like leather and lacquer.
For the strongest version, keep the red saturated and blue-based rather than orange-red. Tomato shades can work, though they shift the whole manicure into a brighter lane. If your goal is drama, oxblood, crimson, garnet, and black cherry reds usually hit harder.
Quick fit notes
- Medium to long coffin lengths show the color split better than short tips.
- Two thin color coats look cleaner than one heavy coat, especially with black polish.
- A high-gloss top coat makes the line separation look sharper.
- Ask for the tip line to sit 2 to 4 mm from the free edge so the shape still reads coffin, not square.
Wear tip: keep the rest of the nails plain. This design loses some of its bite when every finger gets extra gems or swirls.
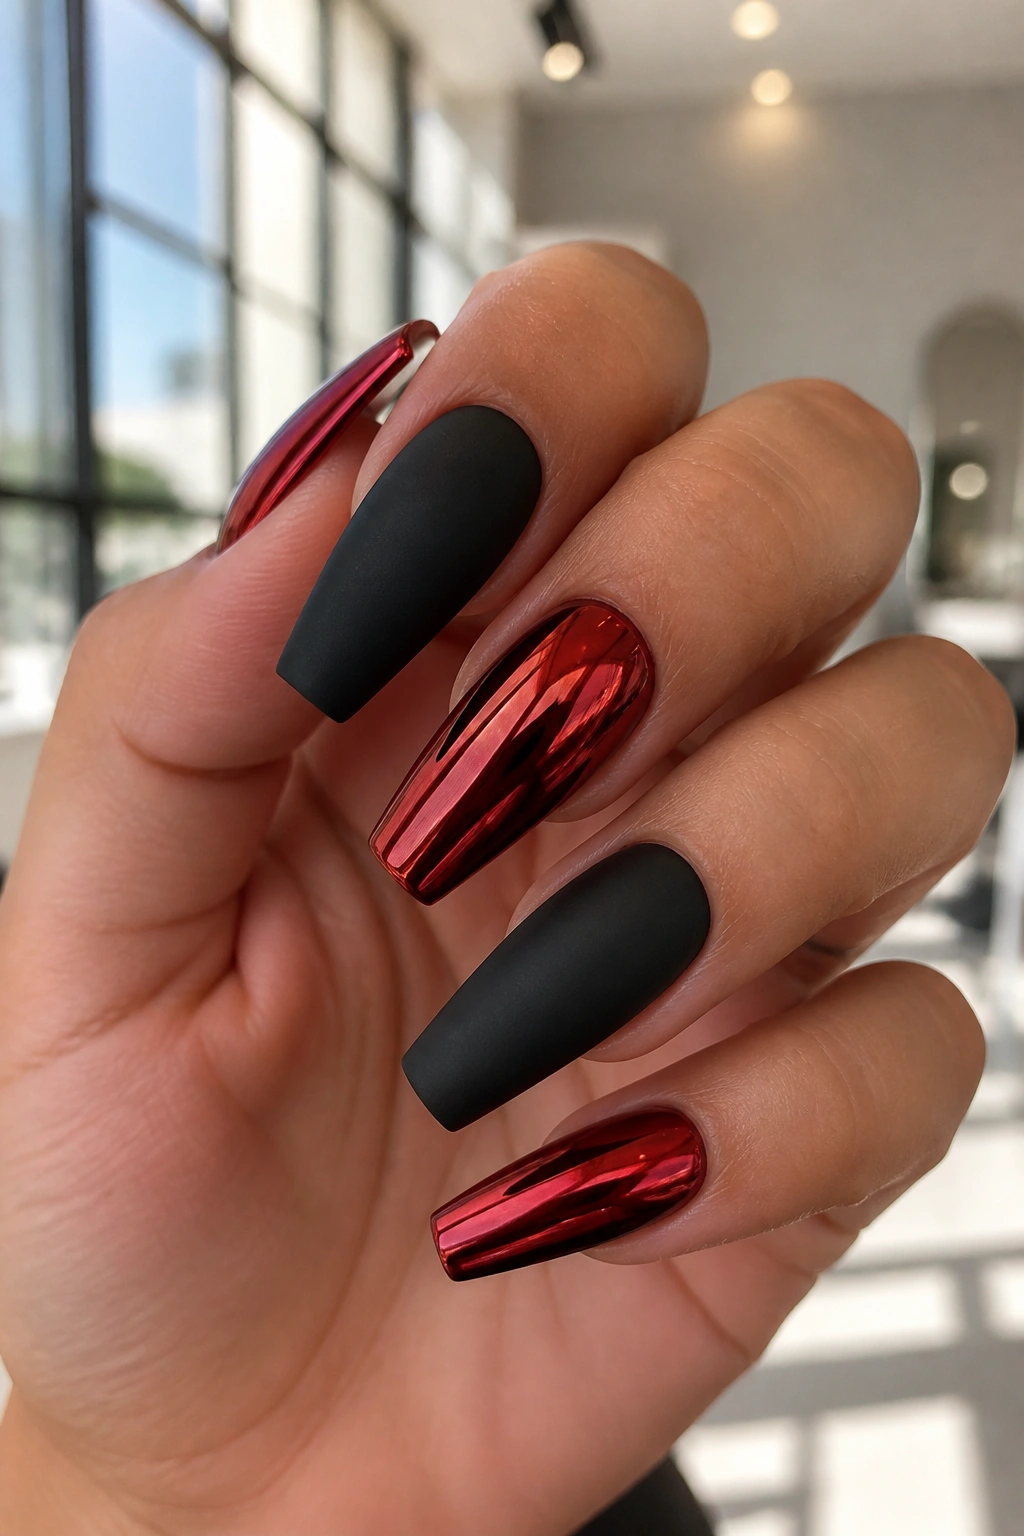
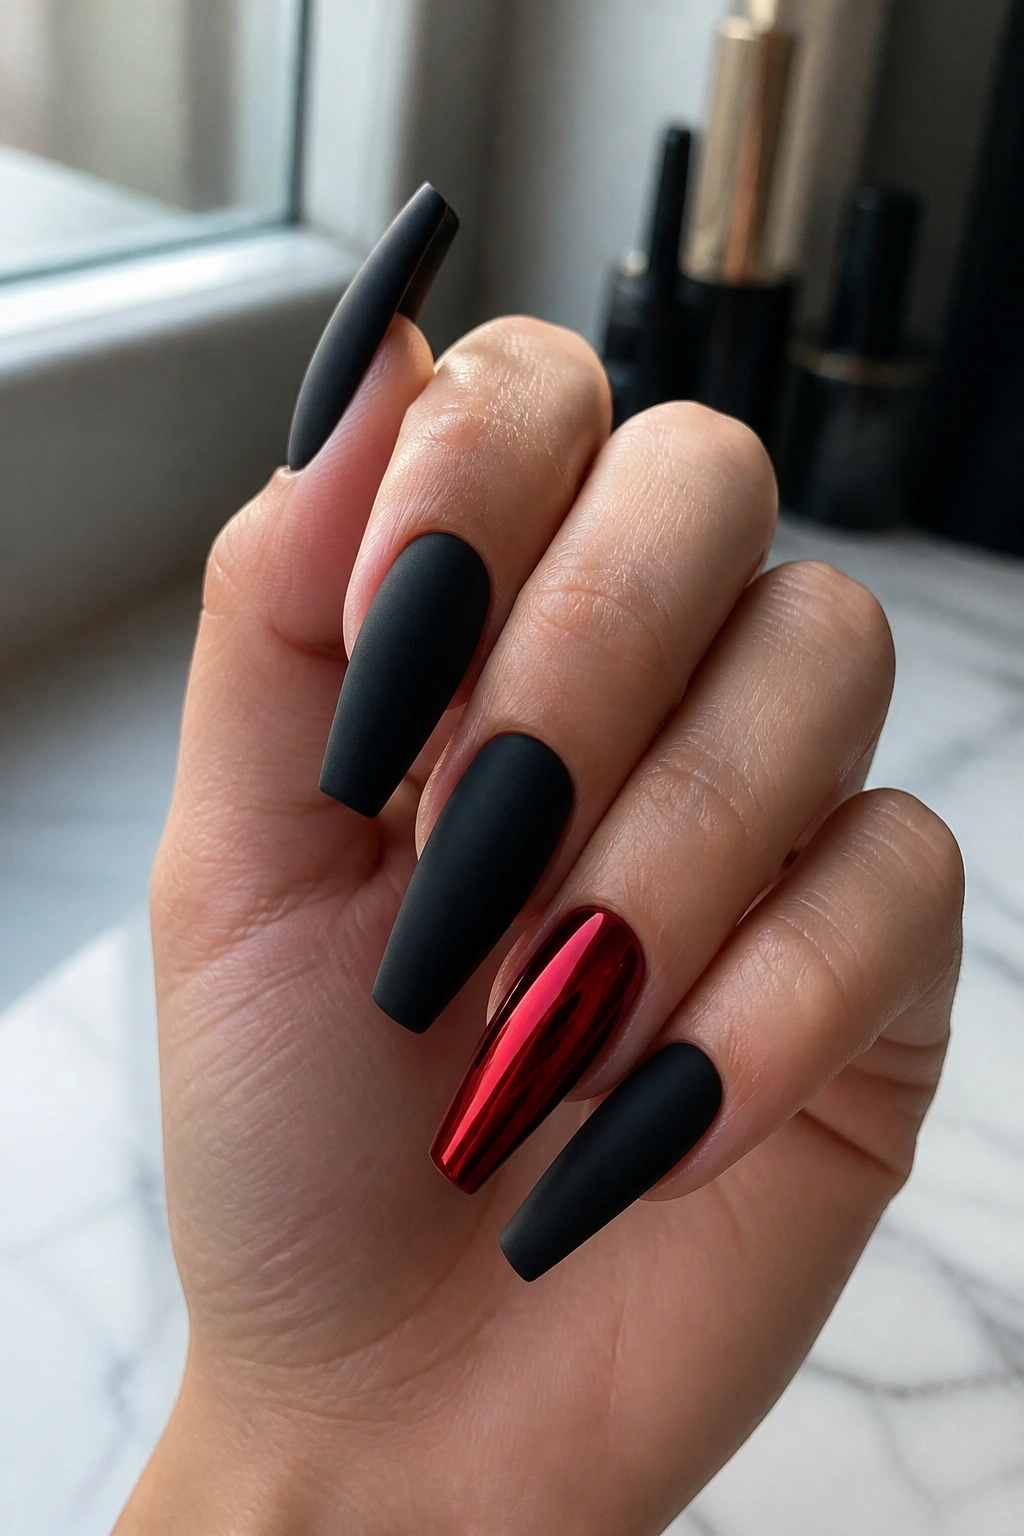
2. Matte Black Nails With a Single Red Accent Blade
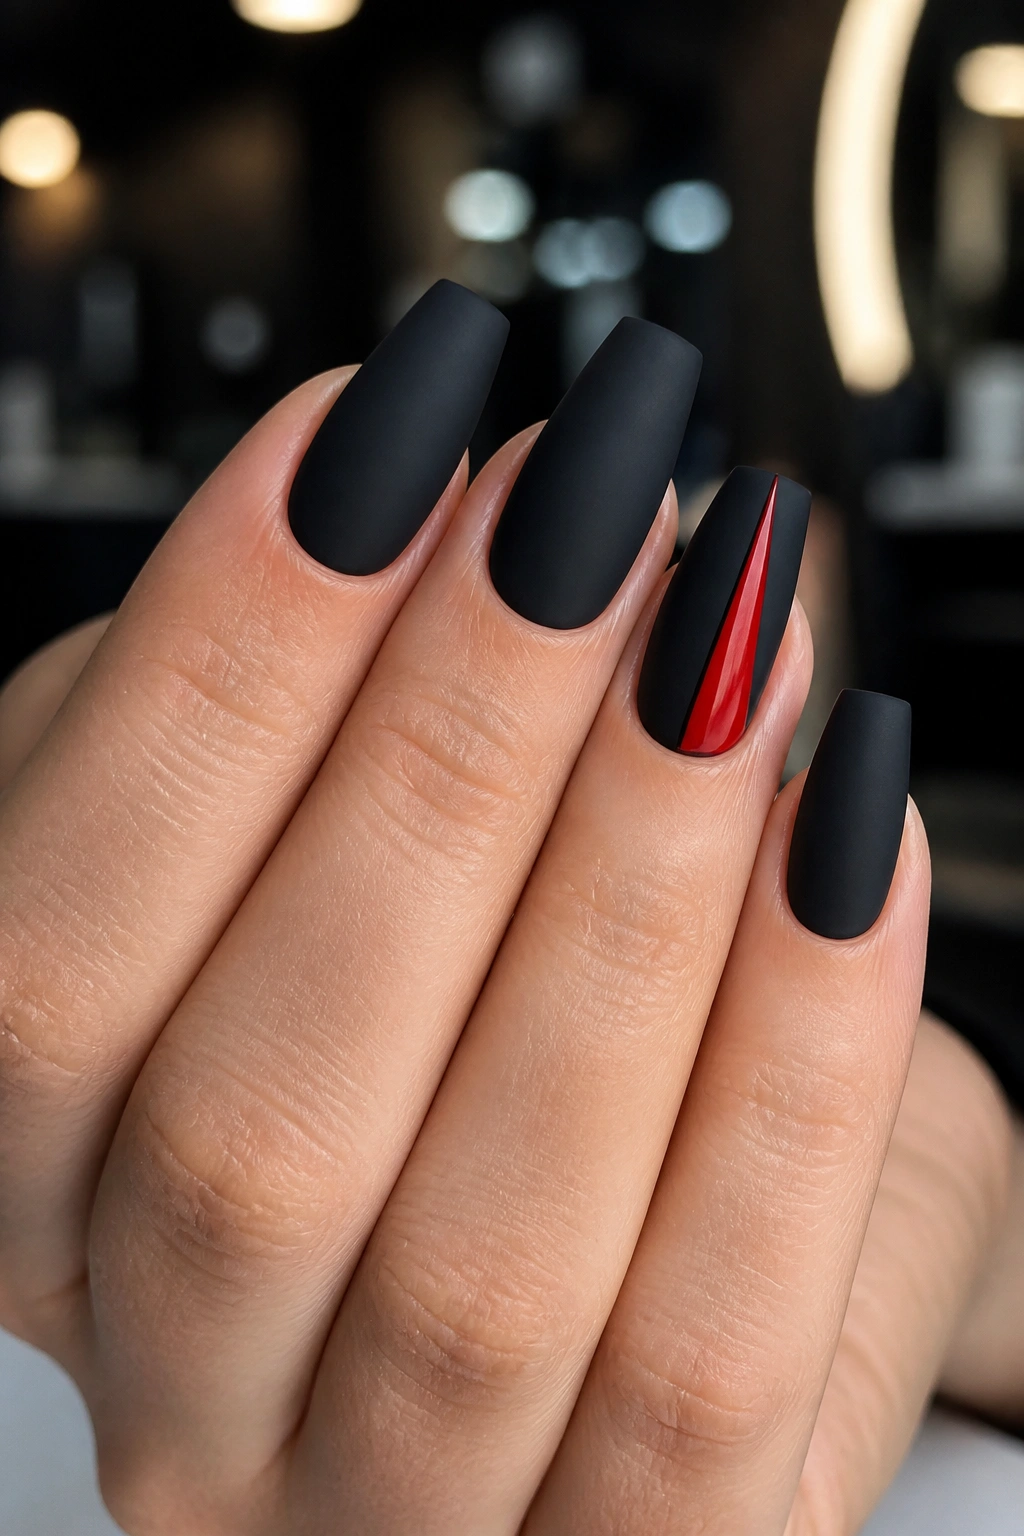
One red nail can do more than five. That’s the charm here. You paint most of the set in matte black, then give one accent nail—often the ring finger or middle finger—a glossy blood-red finish, a sharp red diagonal slash, or a long red “blade” line that follows the center of the nail.
The texture contrast carries the design. Matte black absorbs light, so the surface feels soft and dense, almost powdery. Red, when left glossy, jumps forward. Your eye catches it first, then reads the rest of the set as framing. That order matters. It keeps the manicure strong instead of crowded.
A narrow red blade line looks especially good on longer coffin extensions because it echoes the taper of the shape. Ask for the red detail to start near the cuticle and end near the tip without widening too much through the center. Around 2 to 3 mm is usually enough. Any thicker, and the line starts to feel like a color block instead of a blade.
There is one catch. Matte top coat shows scratches faster than gloss, especially on black. If you type all day, handle boxes, or clean without gloves, the finish can dull at the tip edges first. A quick re-top with matte sealant after a week helps. So does cuticle oil—matte surfaces look better when the skin around them is neat.
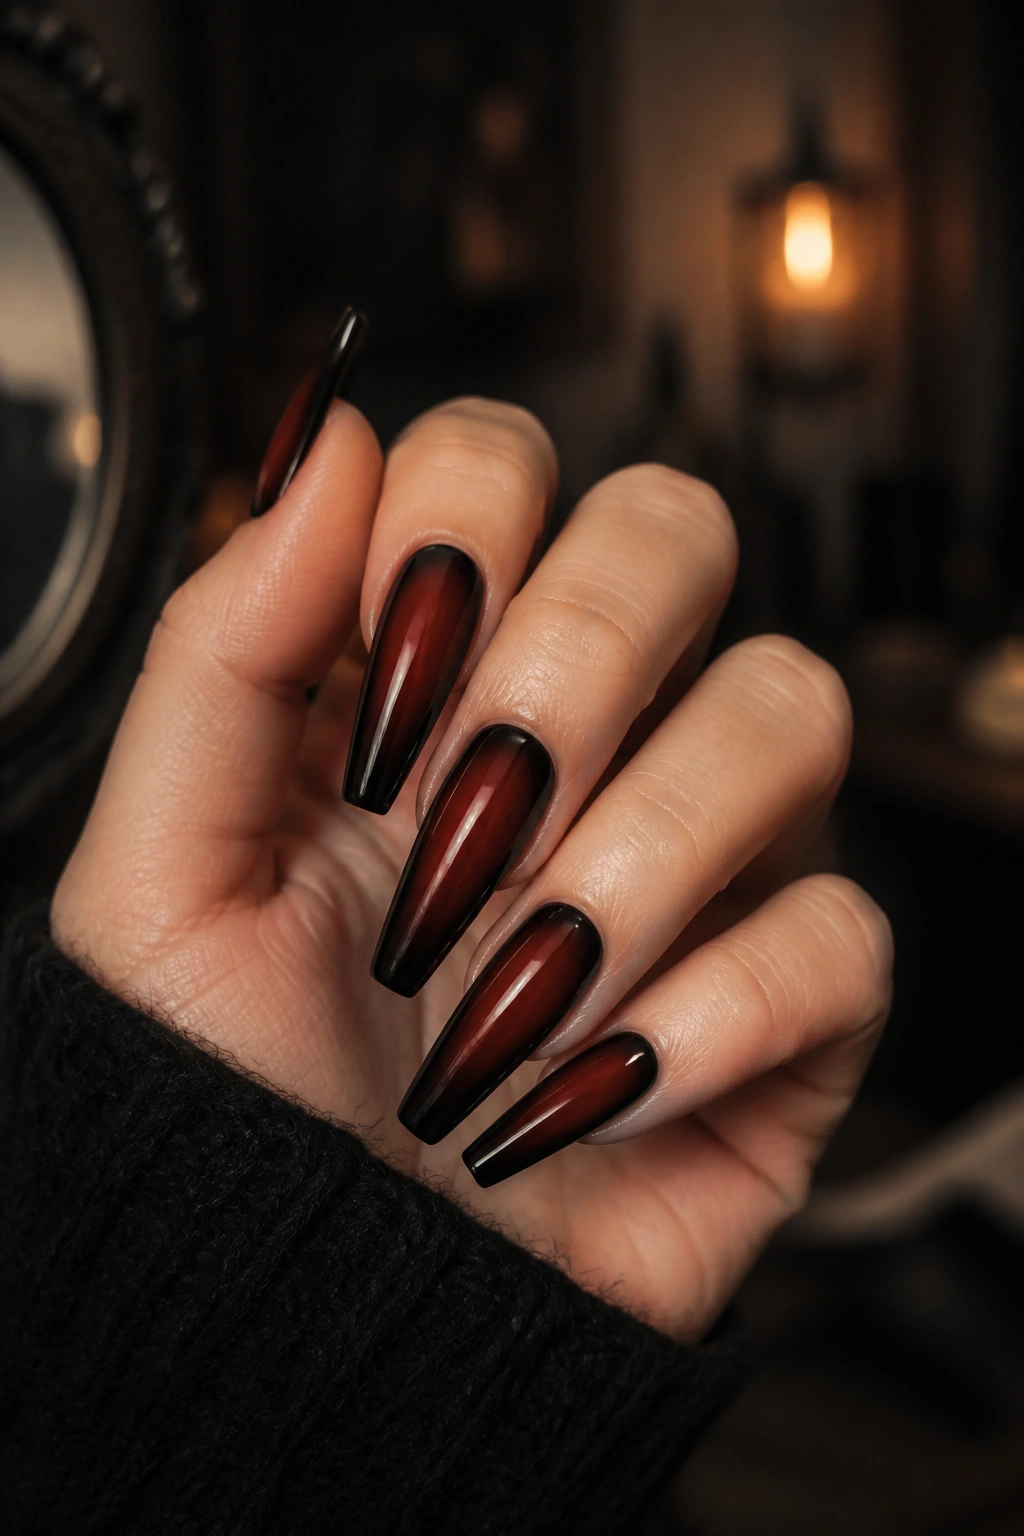
3. Red-to-Black Ombre Coffin Fade
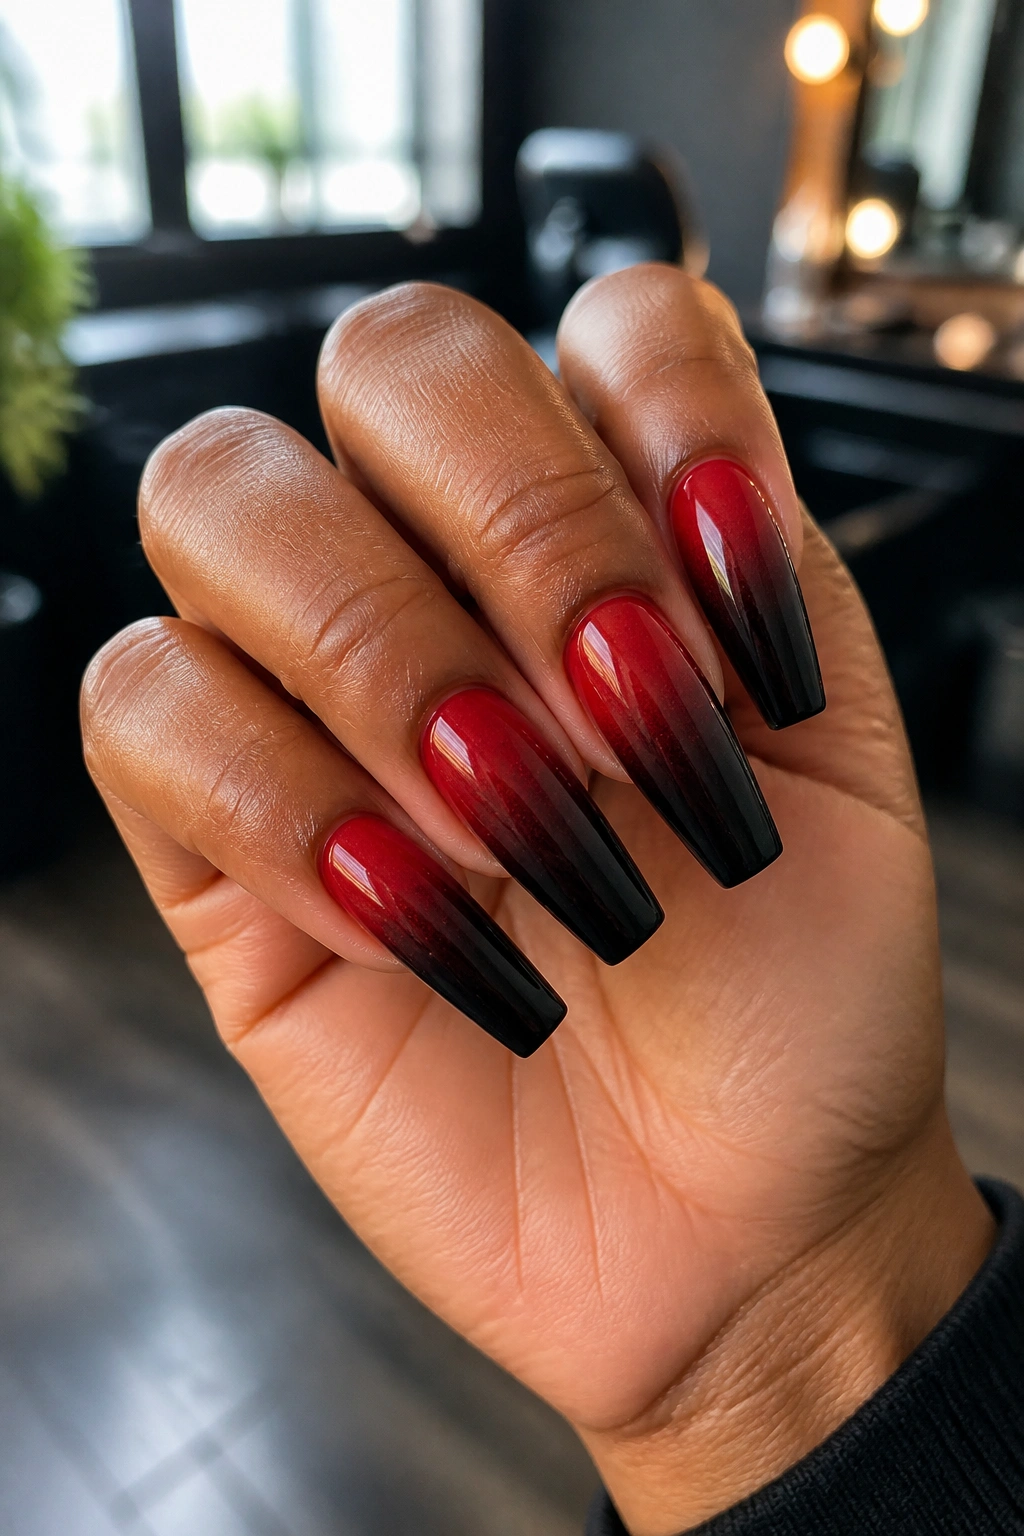
Need something moodier, softer, and still bold? A red-to-black ombré is hard to beat. Instead of dividing the two colors with a hard line, the design blends them from cuticle to tip or side to side, with the red melting into black through the middle of the nail.
Where the fade looks strongest
A vertical fade—from red near the cuticle into black at the tip—usually flatters the coffin shape more than a horizontal blend. The darker tip slims the nail visually, and the red near the base keeps the manicure from looking heavy. Side-to-side ombré can work too, though it needs more length or the blend starts looking cramped.
Application matters here. A clean fade needs at least two sponge blends or an airbrush effect in gel, followed by a smoothing top coat. Rushed ombré work leaves a dusty middle band where the pigments never fully marry. You want the shift to look smoky, not speckled.
How to wear it without overloading the set
Skip detailed art on top of the ombré unless the linework is thin and intentional. Small black stars on the red half, a single chrome stripe, or one tiny stone near the cuticle can work. Full decals, thick swirls, and crowded charms usually fight the blend.
This design also looks better when the red is dark. Wine, merlot, and blackened cherry melt into black more smoothly than bright candy red. The fade feels deeper, and the manicure keeps its edge.
4. Black French Tips on a Deep Cherry Base
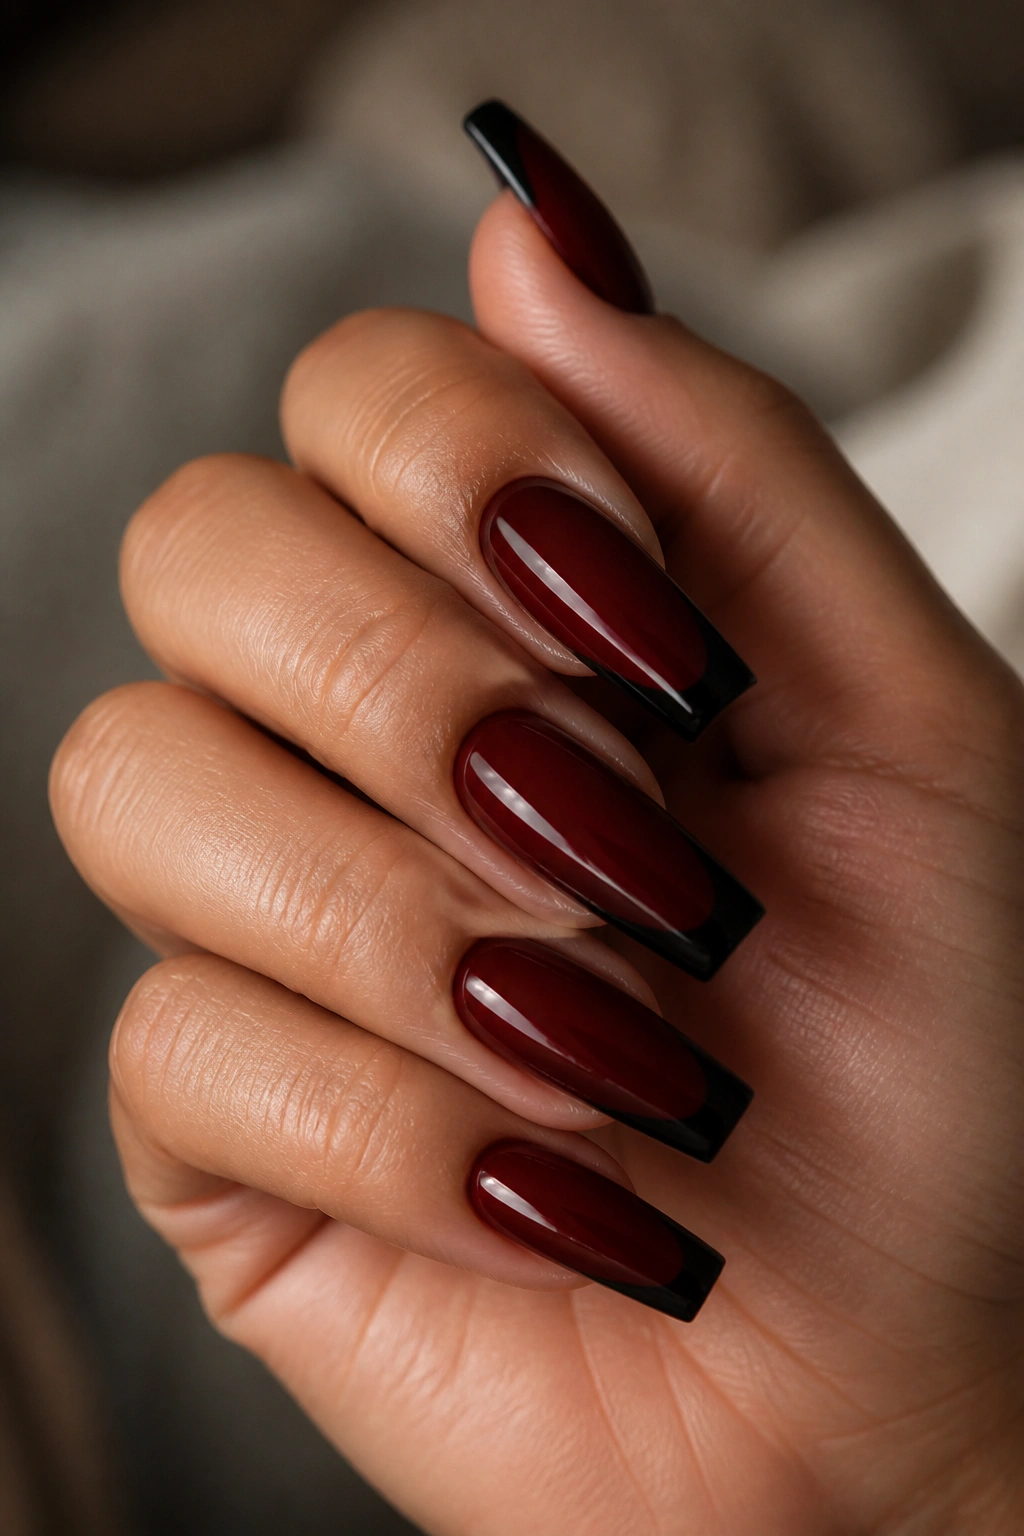
Picture a glassy cherry-red nail with a black tip cut straight across the end, no soft smile line, no extra detail. That’s it. That’s the design. And on coffin nails, it looks expensive.
The trick is restraint. Deep red already gives the nail enough body and warmth, so the black should act like a cap, not a second main event. A tip width of 3 to 5 mm is usually enough on medium lengths. Longer sets can push wider, though leaving some red visible at the sidewalls keeps the shape slimmer.
Details that make the set cleaner
- Choose a deep cherry or burgundy base, not a sheer red jelly, unless you want a softer finish.
- Keep the black line straight or slightly curved—too much smile line makes the shape read more almond than coffin.
- Use a glassy top coat. This design loves reflection.
- Match the black on both hands carefully. Crooked tip width stands out fast on a minimal set.
This is also a strong salon choice if you need something bold that still fits dressier settings. It’s graphic, though not chaotic. You get the mood of black nails without covering the whole hand in black, and the red base adds more life against the skin than a nude base would.
5. Split-Color Red and Black Coffin Nails
A straight half-and-half split sounds simple on paper. On the hand, it can look fierce. One side of each nail is painted red, the other black, divided by a center seam, diagonal line, or slightly offset slash. Because the coffin shape narrows from the base toward the tip, that split creates movement even before you add anything else.
There are two ways to wear it. A clean center split feels symmetrical and graphic. A diagonal split feels faster, sharper, more fashion-forward. If the split runs from one cuticle corner to the opposite tip corner, the nail looks longer than it is. That’s useful on medium lengths that need a little extra drama.
This design benefits from precision more than almost any other red and black coffin nails style. If the line wanders even a little, the whole manicure starts to feel homemade in the wrong way. Gel polish is the safer route here because it lets the artist cure each side cleanly before top coating.
You can leave the seam bare, though a thin metallic divider—silver foil strip, black glitter line over red, red chrome line over black—can clean up the split and hide tiny wobble marks.
No accents needed.
That’s the whole point. The contrast is the art.
6. Red Flames Over a Black Coffin Base
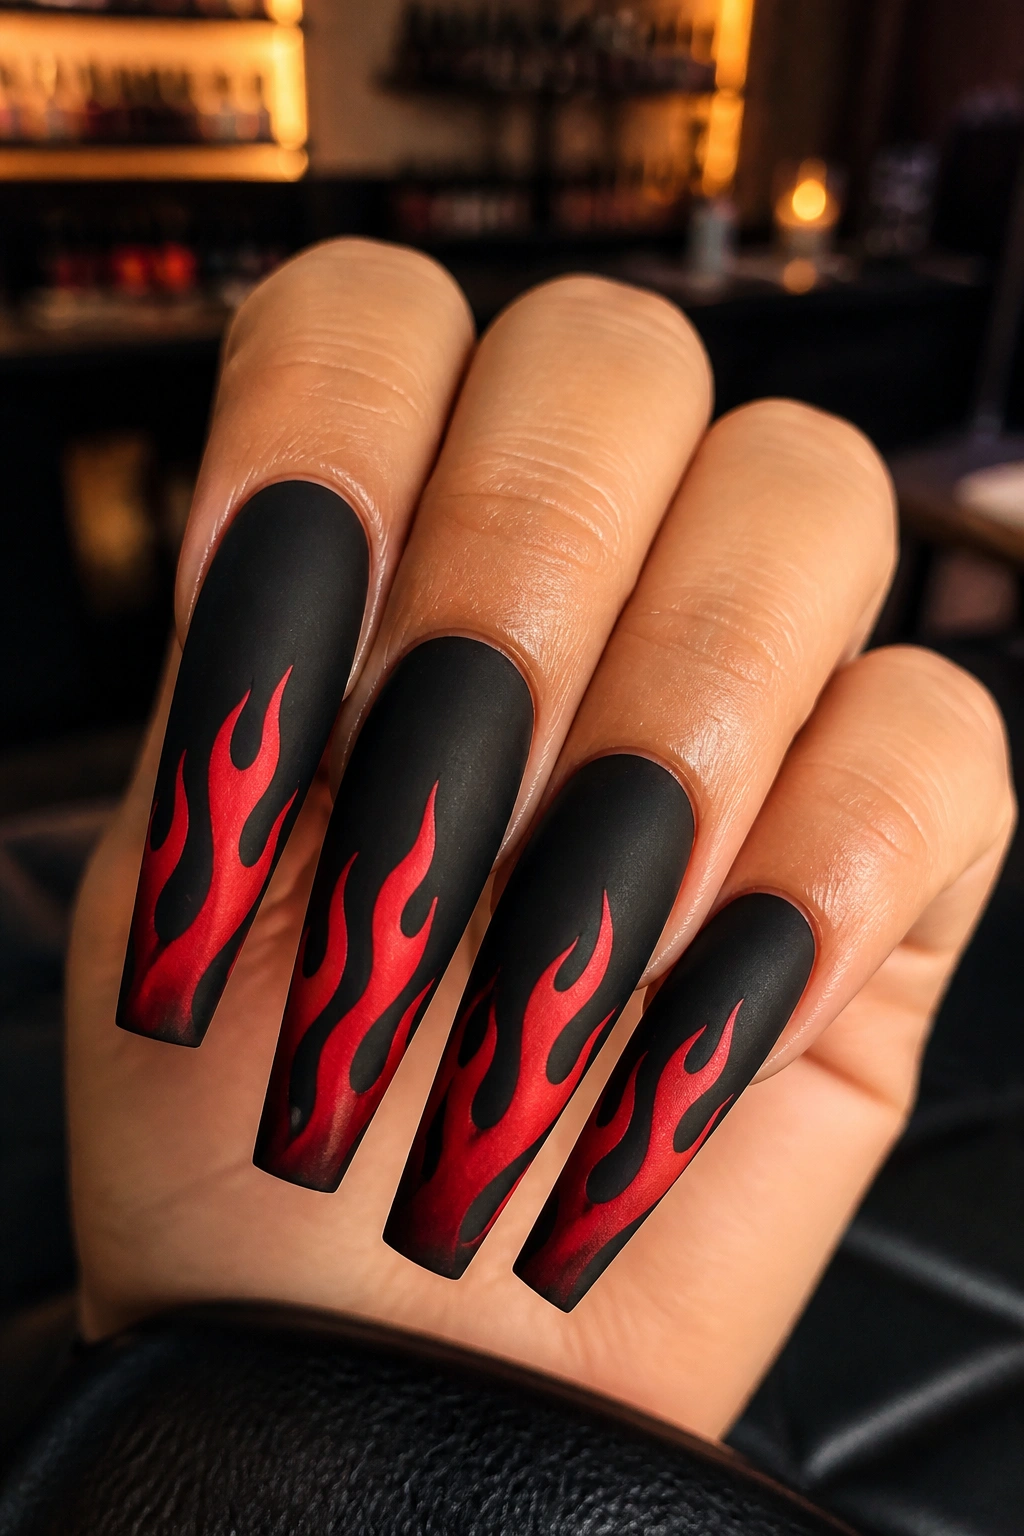
Unlike a neat French tip, flame art wants motion. The lines curve, taper, fork, and stretch up the nail in uneven peaks. On a black coffin base, red flames look hotter and more graphic because the black acts like negative space around every lick of color.
This set suits longer nails. Flames need height. On a short coffin shape, the curves get stubby and the design can look crowded near the cuticle. Give the artist enough space—at least a medium extension—and the flame shape starts to breathe.
The red matters more than people think. Bright fire-engine red gives the design a loud, almost comic-book feel. A deeper crimson makes it moodier. Add a little orange-red highlight at the center of each flame and the set gets more dimension, though black and red alone already carry enough contrast.
A few design choices change the whole mood
- Matte black with glossy flames makes the red stand out harder.
- A glossy black base with outlined flames looks more polished and less rough.
- Flames on every nail read bolder than a mixed set with two accent nails.
- Reverse flames, where the red starts at the cuticle and drips upward, feel stranger—in a good way.
If you like nail art with edge but hate bulky embellishment, flame nails are a strong middle ground. They read detailed from arm’s length, yet the surface stays flat and wearable.
7. Black Drip Art on Candy-Apple Red
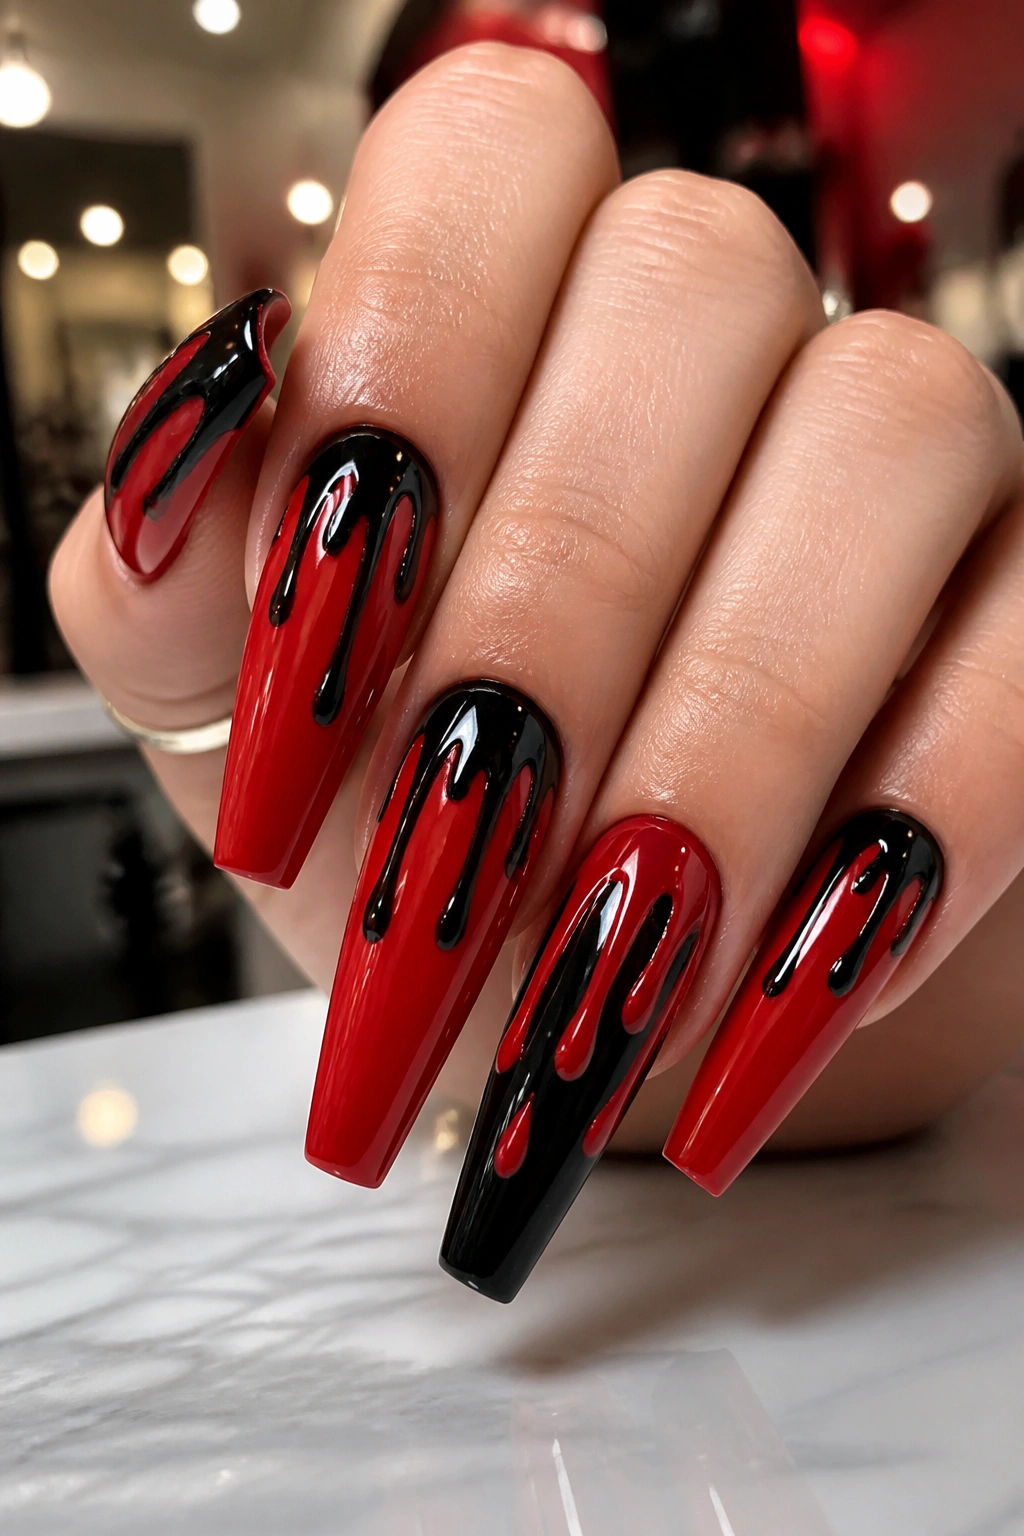
This one looks almost wet. That’s why it works. You start with a saturated red base—think candy-apple, lacquered sports car, hard-shell candy—then add black drip shapes from the cuticle or tip so the design looks like ink or melted vinyl sliding over the surface.
Why the finish matters more than the drawing
Gloss is doing heavy lifting here. Without a shiny top coat, drip art can read flat. With gloss, the rounded lower edges of each drip look fuller and more fluid. Some artists build the drips slightly with builder gel, which gives the black a raised, almost syrupy edge. On a bold set, that small bit of height adds a lot.
The drips themselves should not all match. A natural-looking drip pattern uses one long streak, one short rounded drop, one side-heavy curve, maybe a tiny split line. If every drip is identical, the design loses that liquid feel.
Good places to stop
You do not need drips on every finger. Two or three statement nails mixed with plain red or plain black nails often look stronger. Full drip coverage on all ten can push the set into costume territory unless the shape is long and the application is crisp.
A narrow black outline around the coffin tip can sharpen the whole design, though it is not required. The base red is already loud enough. Let it stay loud.
8. Velvet Red Cat-Eye With Black Framing

One reflective stripe can do more than a handful of rhinestones if the gel is good. A velvet red cat-eye polish pulls light into a soft diagonal or vertical band, almost like brushed metal under sheer color. Add a thin black frame around the nail edge or a black sidewall outline, and the whole set looks deeper.
This is one of the more polished red and black coffin nails ideas because it plays with movement rather than heavy decoration. When you tilt your hand, the light strip shifts. Black framing keeps the reflective red from floating off into space. The eye reads the border first, the glow second.
Best way to place the black
A full border around all four edges looks dramatic, though it can make the nail look smaller if the line is thick. A sidewall frame—black tracing each side and the tip, with no line at the cuticle—often feels cleaner. Keep the outline around 1 mm. Anything wider starts swallowing the red.
Good to know before you book it
- Cat-eye gel needs a magnet pass before curing each nail.
- Medium to long coffin tips show the reflective effect better than short sets.
- Dark ruby magnetic polish reads richer than bright red magnetic polish.
- A smooth top coat is non-negotiable. Any ridge breaks the light streak.
There’s a dressier side to this design, which makes it useful if you like bold nails but still want them to look controlled.
9. Black Lace Detailing Over Wine Red
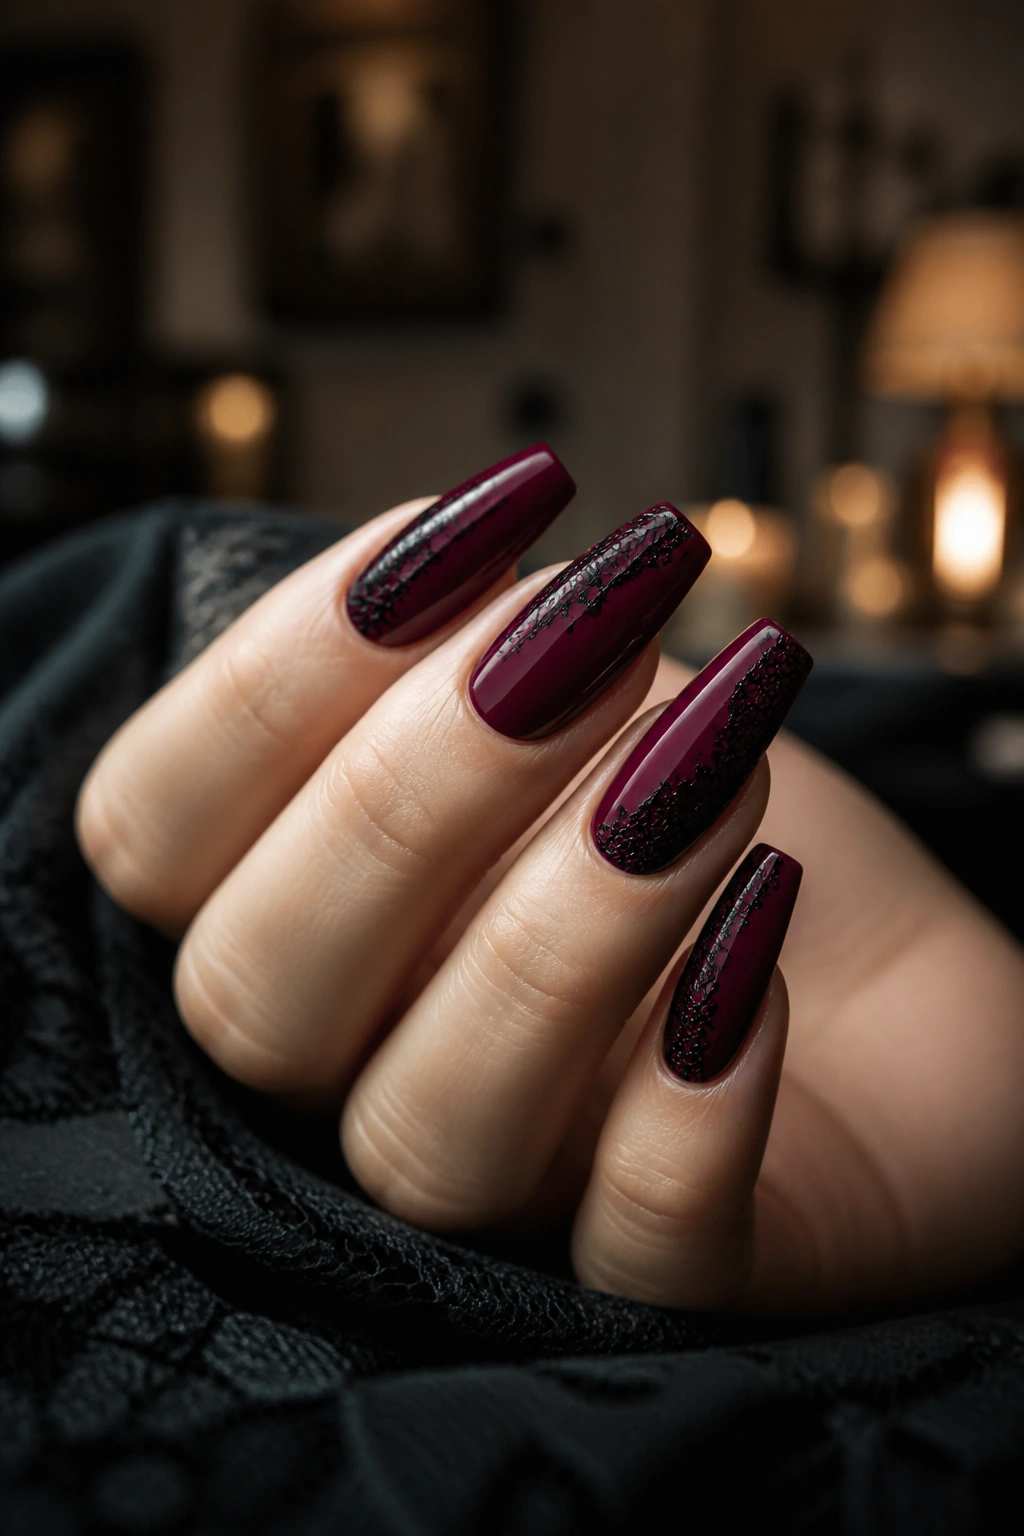
Here’s the surprise: delicate work can look sharper than chunky art on a coffin shape. Black lace painted over a wine-red base gives you that contrast without turning every nail into a billboard. Fine mesh lines, tiny floral loops, scalloped edges, and sheer-looking patches all sit well over dark red.
The key is scale. Lace needs to stay fine. Thick petals and heavy netting kill the elegance of the idea and make the design feel blunt. A good artist uses a liner brush, small negative gaps, and enough empty space that the lace still looks airy. You want the black to suggest fabric, not cover the whole nail.
Placement gives you options. Full lace on one or two accent nails is the easiest route. A lace border along one side of each nail feels lighter. Cuticle lace, where the pattern hugs the base and fades upward, looks especially good on medium coffin sets because it keeps the tips cleaner.
This style also pairs well with small extras: one dark crystal at the cuticle, a thin foil line, a matte top over the lace with gloss underneath. Though—and this is worth saying—a wine-red base with black lace already has plenty going on. More detail is not always more style.
10. Red Rhinestone Cuticle Lines on Jet-Black Nails
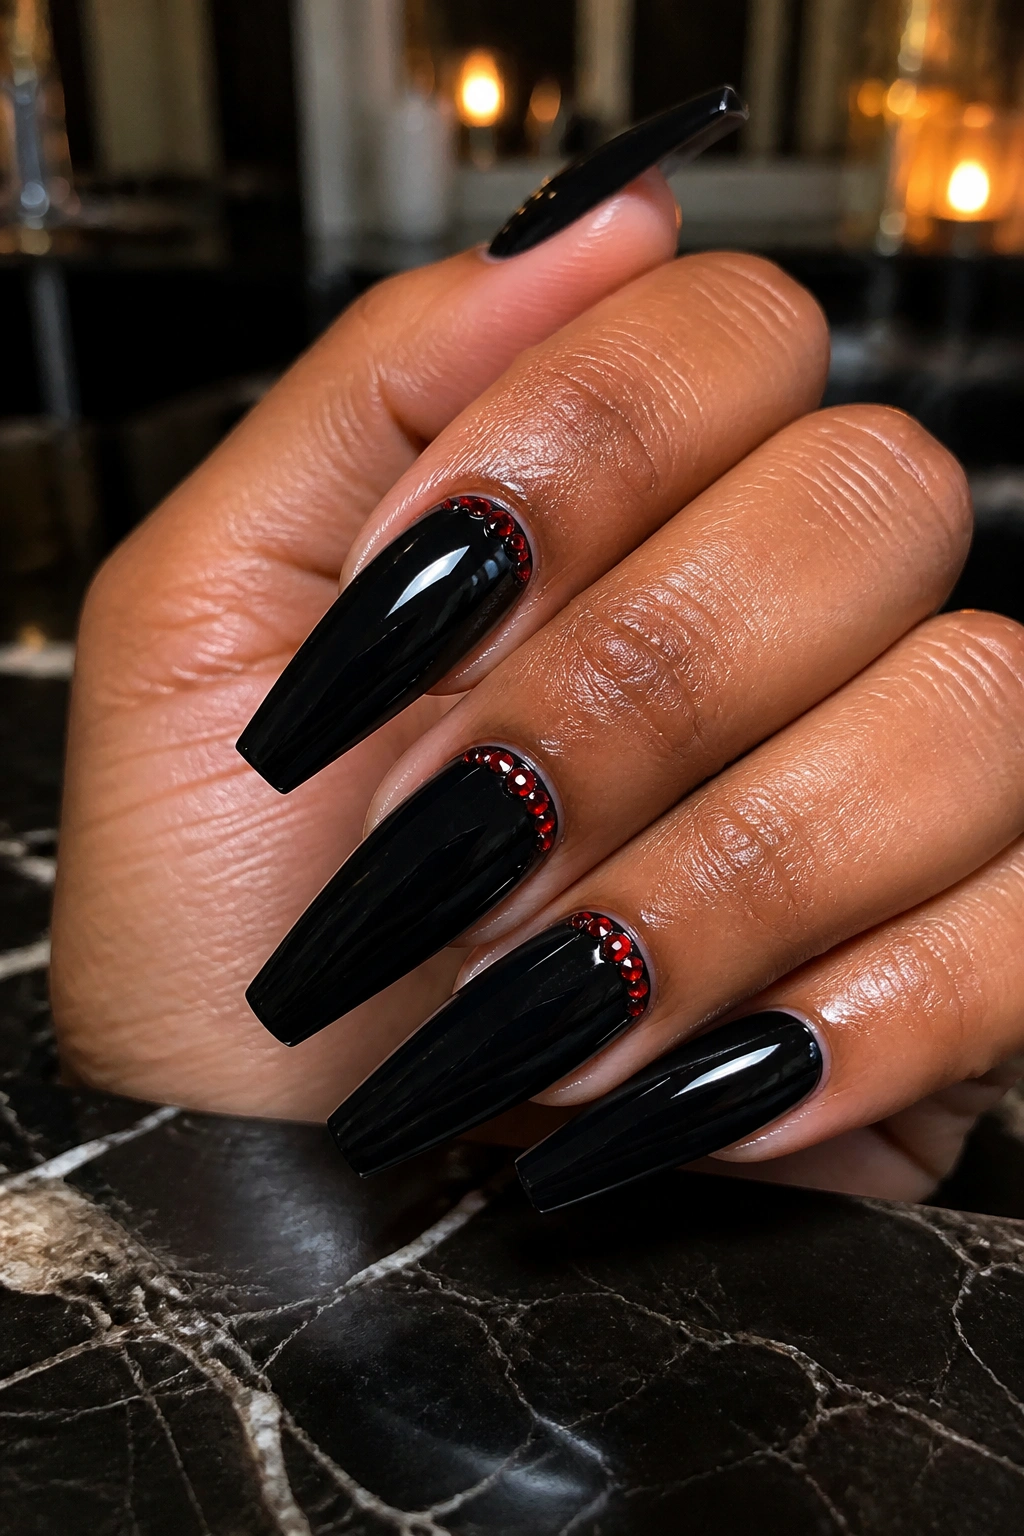
Blunt truth: rhinestones can cheapen a red-and-black set fast if they are scattered with no plan. A clean cuticle line avoids that problem. You keep the nails jet black, then place a row of red stones—small, tight, and symmetrical—right along the base of selected nails.
That placement does two things at once. First, it makes the stones look intentional instead of random. Second, it leaves the rest of the nail bare, so the coffin shape and the black color still lead the design. One curved arc of stones on the ring finger and thumb is often enough.
Stone size makes or breaks this look
Use tiny stones, usually ss3 to ss6 if you’re talking salon sizing. Large crystals can snag hair, bump against pockets, and throw off the line of a tapered nail. A gradual fade from smaller stones at the sides to a slightly larger center stone gives the cuticle arc more shape.
Keep these details tight
- Pair high-gloss black with ruby or garnet stones for a richer finish.
- Use builder gel or gem gel rather than top coat alone if you want better hold.
- Leave a hairline gap between the cuticle and stones so the grow-out looks cleaner.
- Limit full stone placement to two or three nails per hand.
Done well, this design reads more eveningwear than costume. Done poorly, it starts catching on knitwear by day two.
11. Checkerboard Red and Black Coffin Set
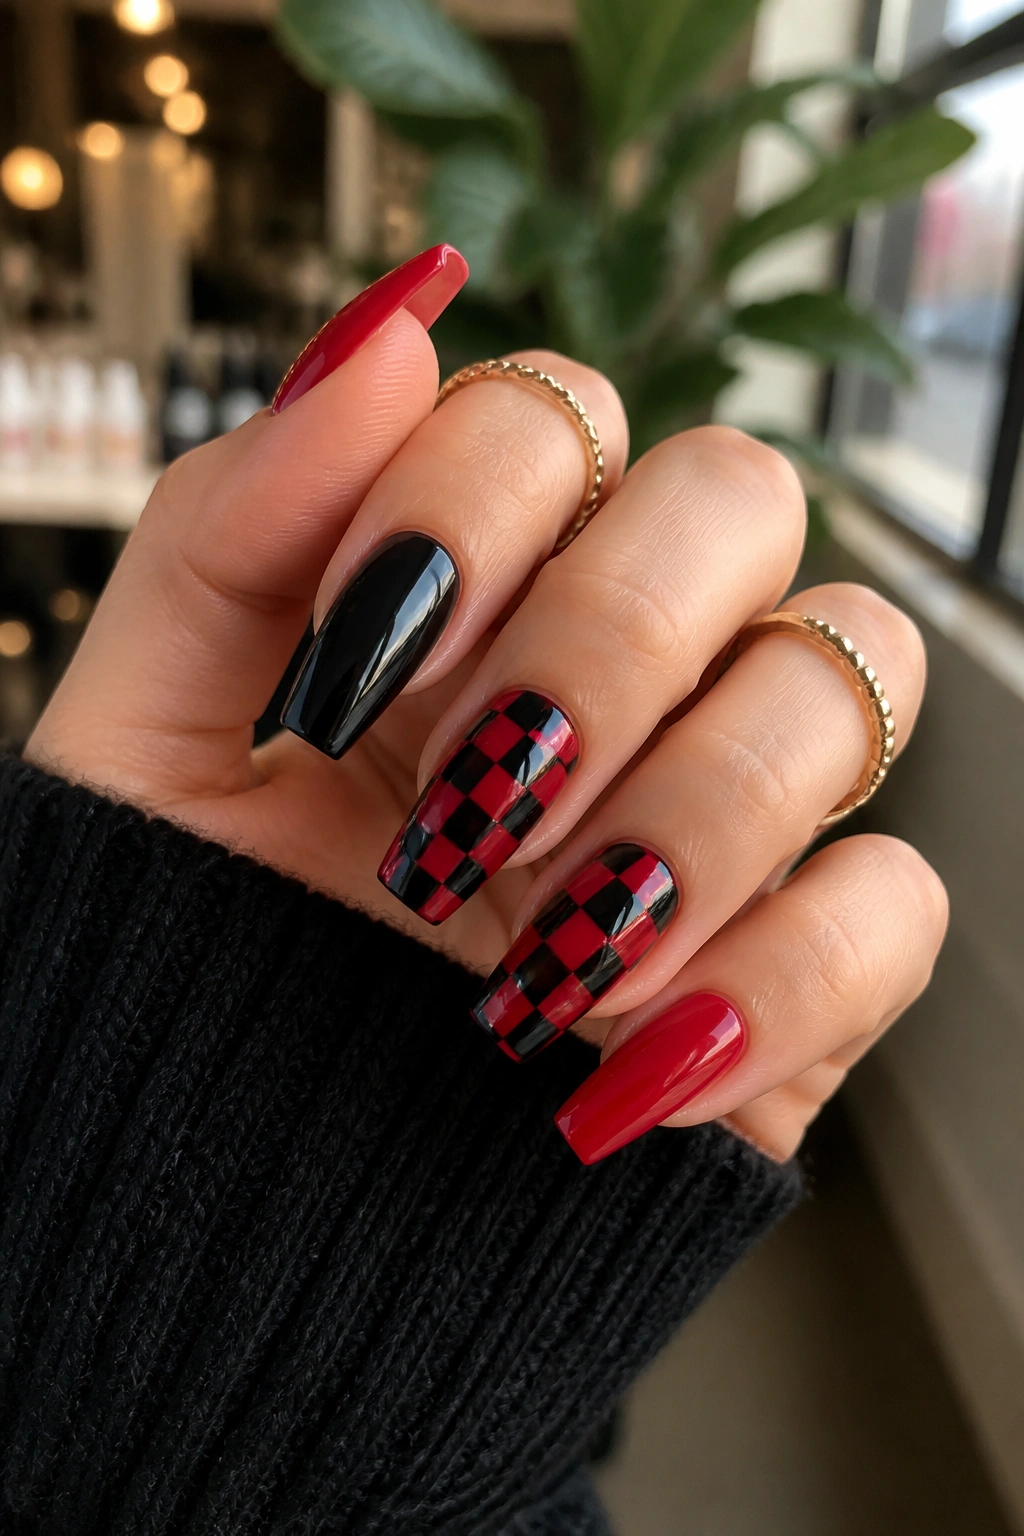
A checkerboard manicure can go bad in a hurry. The pattern is graphic, high contrast, and easy to overdo. On coffin nails, though, it can look sharp if you control the scale and don’t place the pattern on every finger.
The best version uses alternating red and black squares on one or two accent nails, while the rest of the set stays plain black, plain red, or uses a matching French tip. Smaller squares look cleaner than chunky ones because the coffin shape narrows toward the tip. If the pattern blocks are too big, the side columns start getting chopped off and the grid looks uneven.
What makes it feel modern instead of costume-heavy
Try a partial checkerboard instead of full coverage. One side panel, one diagonal corner, or a checker tip keeps the pattern readable without turning the whole hand into a flag. Matte also changes the mood. Gloss checkerboard feels louder. Matte checkerboard looks more graphic and less novelty-driven.
A tiny silver line between colors can sharpen the edges, though black and red usually hold their own. If you do add a line, keep it thin. Nail art like this relies on geometry, and geometry hates clutter.
Some sets look strongest when one nail gets the full pattern and the rest stay almost plain. This is one of them.
12. Black V-Tips With Red Negative Space
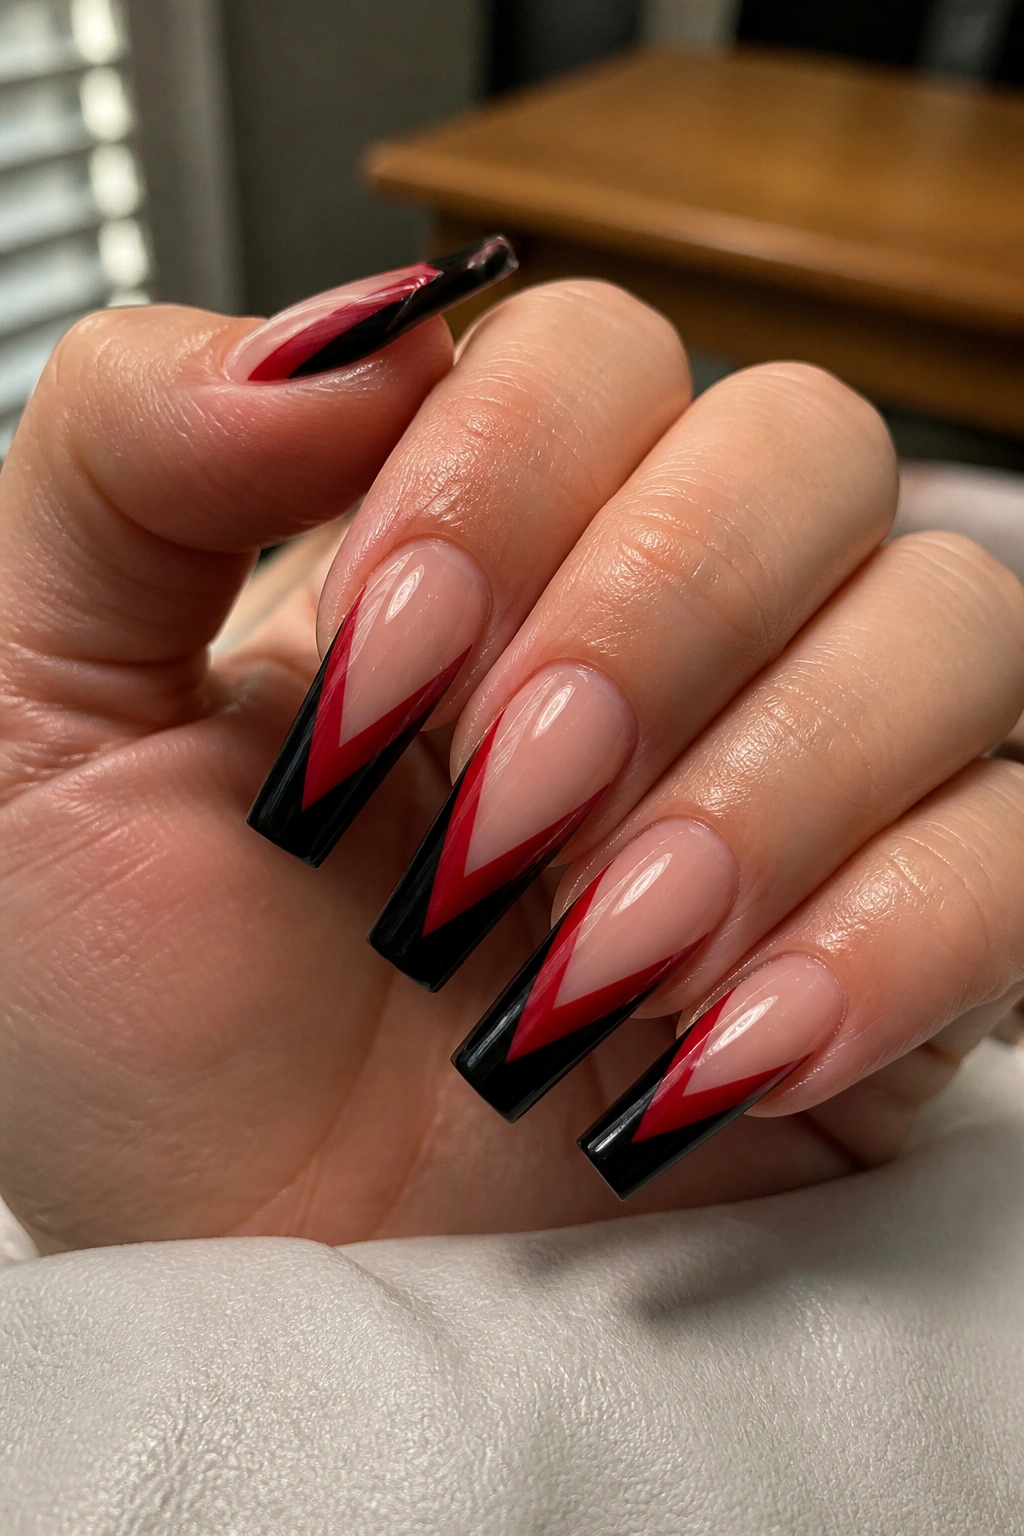
Sharp lines. Bare sections. Strong contrast. That combination works beautifully—scratch that, it works cleanly—on coffin nails because the shape already narrows toward the center. A black V-tip follows that taper and points the eye straight down the nail, while red panels, a sheer base, or small red side details keep the look from going flat.
Why V-tips flatter the coffin shape
A regular French tip cuts across the nail. A V-tip pulls it inward. On medium lengths, that inward movement makes the fingers look longer. On long lengths, it adds a blade-like finish that fits the shape better than a soft curve does.
Negative space helps too. Leaving part of the nail sheer or nude near the base gives the eye a place to rest. It also buys you more wear time before the grow-out starts shouting at you from across the room.
How to keep the design crisp
Ask for the point of the V to sit slightly above the midpoint of the free edge, not all the way down the nail. That keeps the shape readable. A thin red line tracing one side of the V can add interest, though the line should stay fine—around 1 mm—so the black still leads.
No stones needed. No swirls either. This is a line-work manicure, and line-work looks strongest when nothing interrupts it.
13. Dark Rose Marble With Black Veins
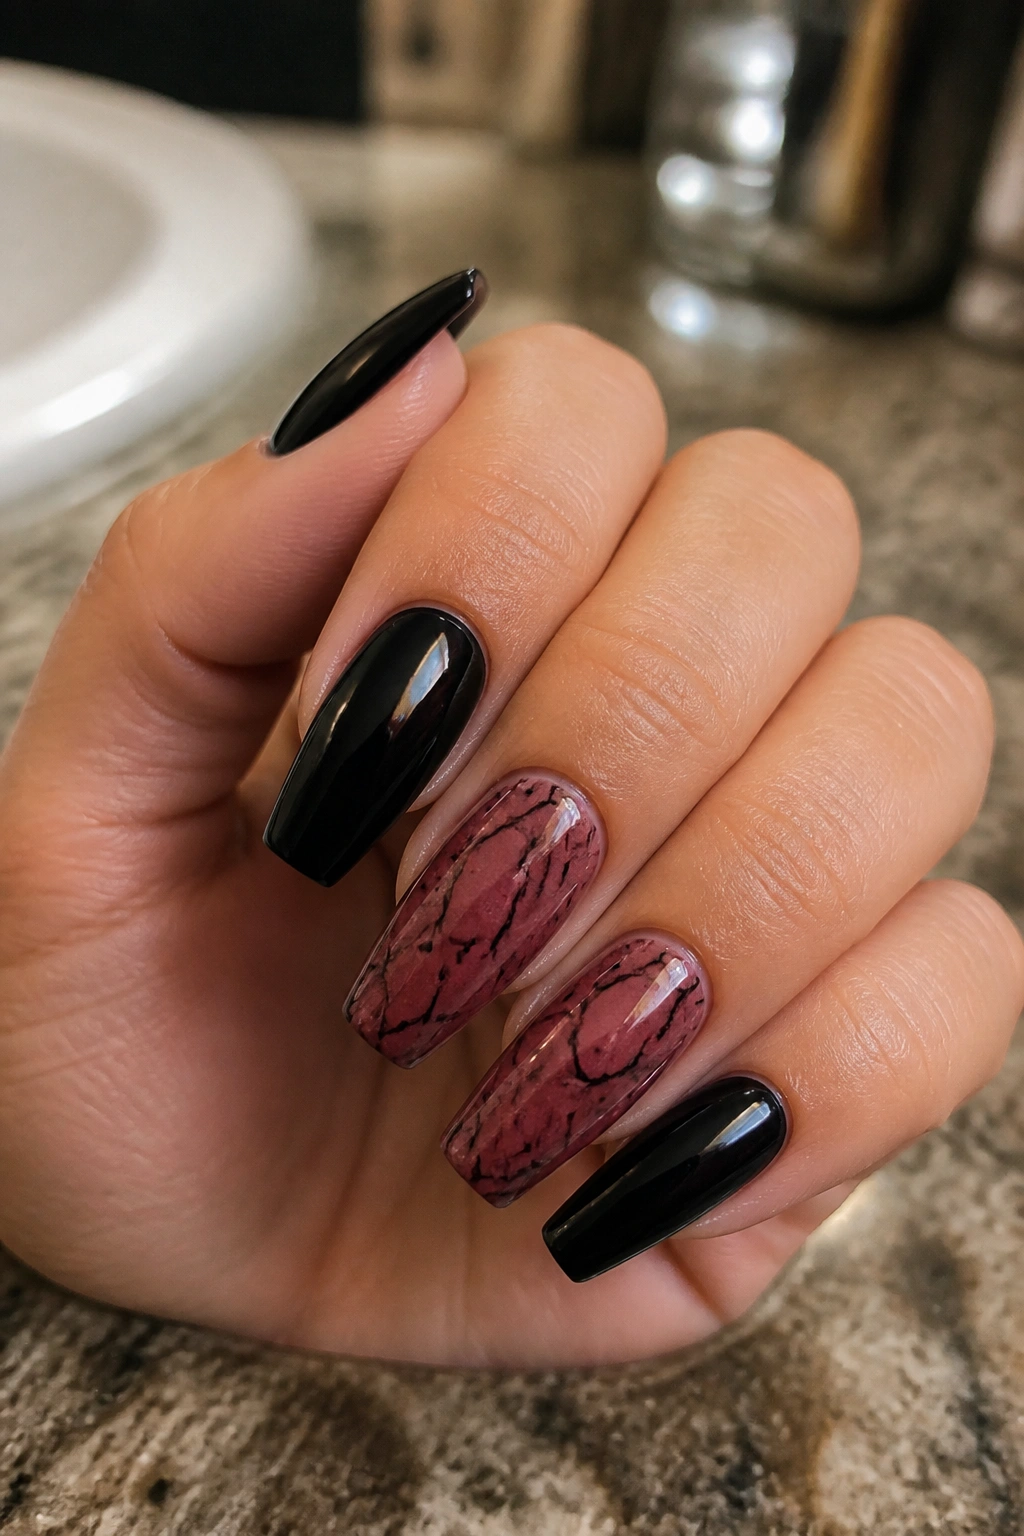
Marble nail art can look muddy when the colors are too close or the artist overmixes the gel. A dark rose base with fine black veins avoids that problem because the contrast stays clear. The red gives the stone effect body; the black creates the fracture lines that make it look intentional.
This design often works best when the red is not a flat crème. A syrupy jelly red, sheer rose gel, or layered burgundy base gives the marble more depth. Then the black lines can stay thin and slightly broken, more like ink in stone than heavy brush strokes.
A few choices change the result fast
- Add a touch of white or smoke gray under the veins if you want stronger stone contrast.
- Keep black veining thin and irregular. Straight lines kill the marble effect.
- Use the marble on two or three nails, then pair it with plain black or plain red nails.
- A glossy finish sells the stone look better than matte.
There’s also a nice middle ground here if you want art but not anything too sharp or gothic. Marble softens the red-and-black story without making it sweet. The set still has edge. It just moves in a quieter way.
14. Red Chrome and Black Matte Mix
Texture contrast can beat pattern. A black matte base on some nails paired with red chrome on others creates enough difference that you barely need any line art at all. One hand movement, and the chrome flashes like polished metal against the dry, velvety black.
This design works because each finish pushes the color in a different direction. Matte black looks dense and flat in the best sense—like suede, charcoal, velvet paper. Red chrome turns reflective and almost liquid. Side by side, the finishes do the talking.
Two layouts that usually look strongest
One option is alternating nails: black matte, red chrome, black matte, red chrome. That’s bold, clean, and easy to wear. Another option uses black matte on most nails, then gives one or two accent nails full red chrome and maybe one slim chrome stripe on a black nail to tie the set together.
A word of caution here: chrome shows surface flaws. Any bump, dip, or uneven apex gets highlighted once the powder goes on. If you’re doing this on acrylic or builder gel, the shaping and buffing need to be precise before the chrome layer touches the nail.
For a harder finish, add a black matte thumb and pinky, then place the red chrome on the middle fingers. The center of the hand catches more light there.
15. Gothic Aura Red and Black Coffin Nails
Aura nails usually lean soft—pink haze, lilac glow, peach center. Change the palette to black and blood-red, and the whole idea gets darker. A black outer edge with a diffused red center creates that airbrushed halo effect, almost like heat glowing under smoke.
The coffin shape helps because the broad tip gives the aura more visible surface area. On a short rounded nail, a red center can look like a dot. On a medium or long coffin tip, the fade spreads enough to feel intentional. The red should sit brightest at the middle of the nail, then soften into black before it reaches the edges.
What makes this aura set look cleaner
Use deep black around the perimeter and a dark, slightly blue-toned red in the center. Brighter scarlet can work, though it shifts the vibe into something less moody. Add one tiny star, cross, or crystal on two nails if you want detail, but keep it small. Aura art already has visual movement.
Best finish for this look
Gloss gives the color cloud more depth. Matte makes the aura look smokier and more diffused. Neither is wrong. Gloss feels richer. Matte feels moodier.
If you like red and black coffin nails that look softer up close and darker from a distance, this one hits a sweet spot.
Making a Bold Coffin Set Look Clean, Not Crowded
A bold manicure can still look polished if the design has hierarchy. One idea should lead. Maybe it’s the color split. Maybe it’s the texture contrast. Maybe it’s the flames or aura fade. Once you know the lead element, the rest of the design should support it, not compete with it.
That’s where many red-and-black sets go off course. The client wants chrome, stones, drips, flames, lace, foil, and 3D charms on the same hand. The colors already carry heavy contrast. Piling five extra ideas on top usually blurs the shape and weakens the whole effect.
A cleaner approach:
- Pick one main art technique for the set.
- Limit chunky embellishment to two nails per hand.
- Keep line work thin if the base colors are dark.
- Use gloss and matte as design tools, not afterthoughts.
- Let one or two nails stay plain so the eye gets a break.
Length should guide the design too. Shorter coffin sets look stronger with tips, diagonal splits, V-shapes, or one accent nail. Longer sets can handle ombré, marble, flames, checkerboard, and aura placement with more breathing room.
And don’t ignore skin around the nails. Black polish, in particular, makes dry cuticles stand out. A sharp design with rough skin around it loses some of its bite.
How to Keep Coffin Nails Sharp for Two to Three Weeks
The bolder the manicure, the more obvious the wear. Chips show faster against black. Grow-out looks louder against red. Chrome scuffs. Matte marks. None of that means you should skip the look. It means prep and upkeep matter more.
Start with structure. Coffin tips need a balanced apex and strong sidewalls, especially once the length passes the fingertip by half an inch or more. A shape that’s too flat through the center or too thin at the corners is more likely to crack at the side edges.
Day-to-day habits that help
- Use cuticle oil once or twice a day. Dry skin makes dark nails look rough.
- Wear gloves for dishwashing and cleaning products.
- Do not use the nail tips to pry open cans, scrape labels, or pop off lids.
- Reapply top coat if your tech recommends it, especially on matte or chrome sets.
- File snags early with a fine-grit file instead of tearing at them.
Red pigment can stain if the top coat breaks near the tip, and black polish tends to make tiny chips look bigger than they are. If you spot lifting, book the repair early. Waiting another week rarely ends well.
One more note: if you love dramatic color but hate visible grow-out, ask for negative space near the cuticle or a design that starts lower on the nail. You’ll buy yourself a few extra days before the regrowth line steals attention.
Final Thoughts
Red and black on a coffin shape works because the geometry and the colors are speaking the same language. Sharp shape, sharp contrast, sharp result. That’s the whole magic of it.
The strongest sets are rarely the busiest ones. A clean French tip, a narrow split color seam, a matte-and-gloss contrast, an aura fade with no extra clutter—those designs let the shape and the palette do what they do best.
Pick the version that matches the mood you want your hands to carry. Hard-edged. Glossy. Dark. Dressy. Graphic. Then commit to it. A bold set looks better when it looks decided.
