

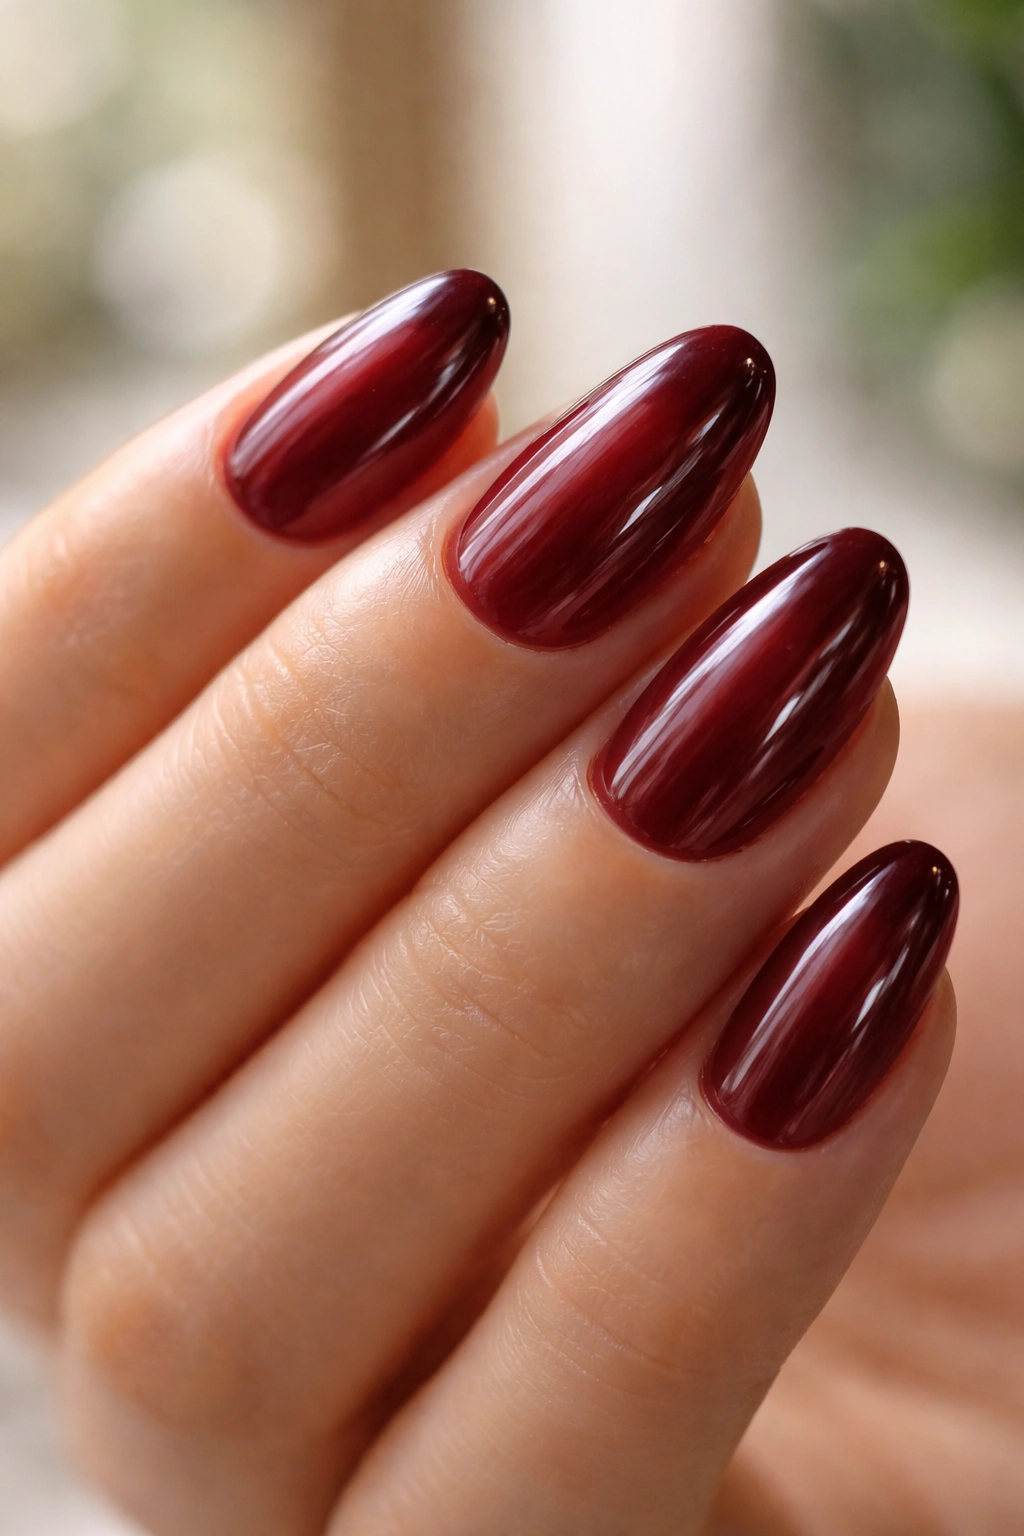
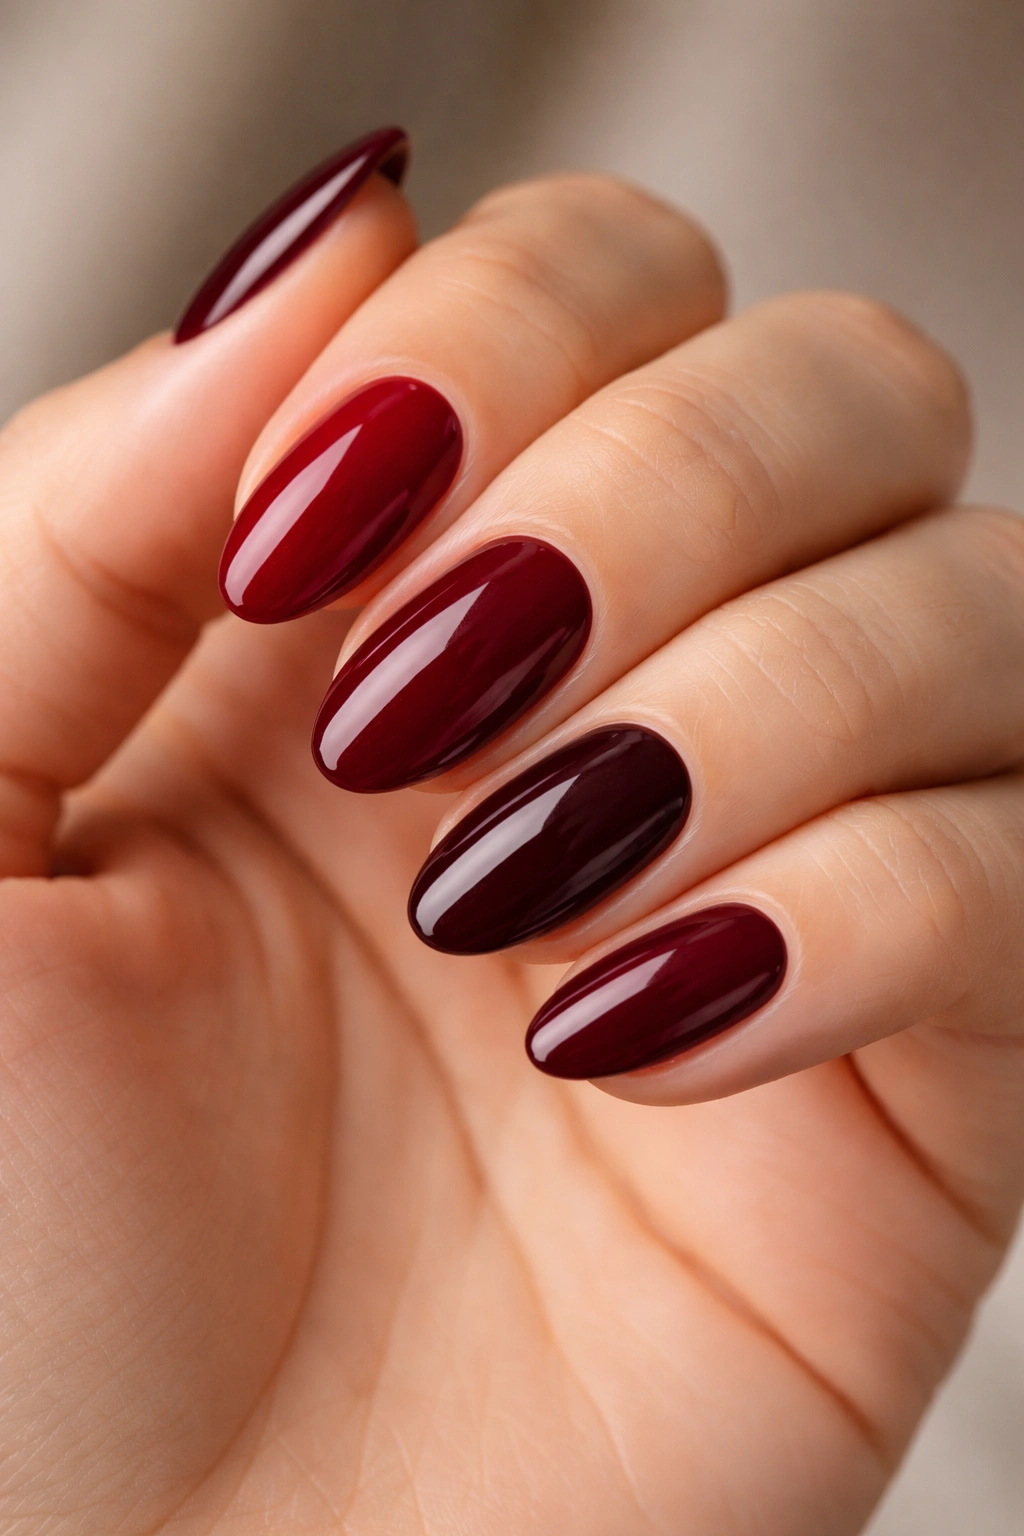
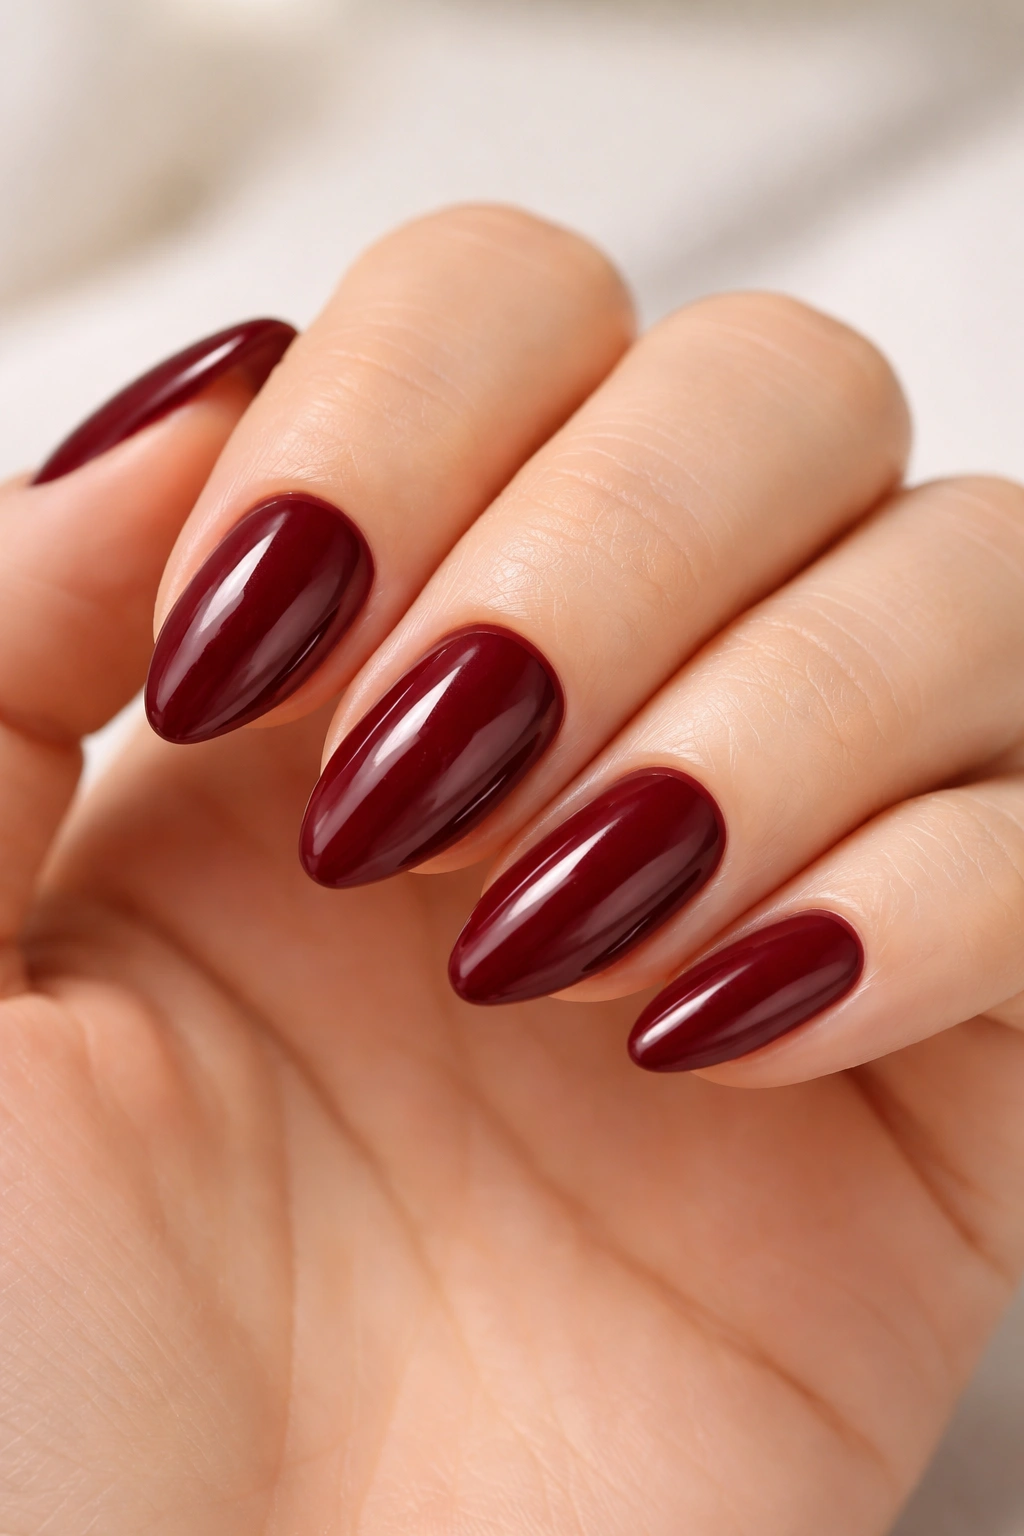
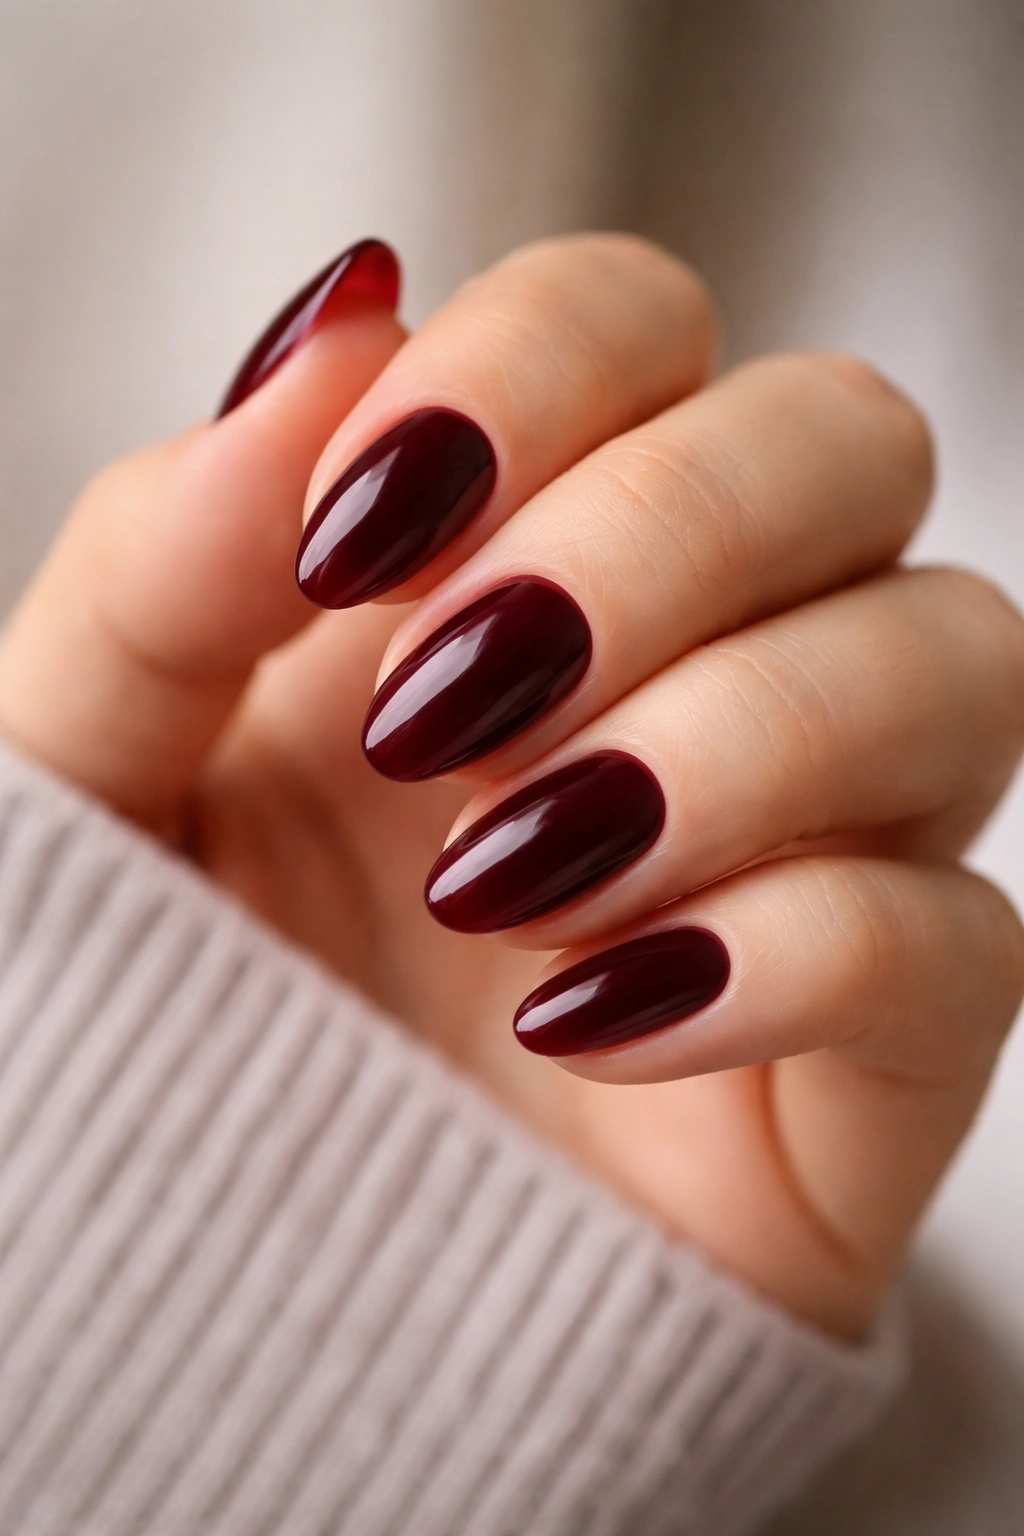
Dark red is one of those nail colors that somehow manages to be both timeless and interesting every single time you wear it. Not pink, not orange, not a standard fire-engine red — we’re talking about the deep, moody end of the red spectrum. Oxblood, burgundy, wine, garnet, dark cherry. The kind of color that looks like it has something to say.
Short almond nails are a shape that gets underestimated. The soft taper toward a rounded point creates a naturally elegant look without needing extreme length, and on shorter nails, it visually elongates the fingers in a way that squared-off shapes can’t quite match. Pair that shape with a dark red shade, and you’ve got something that photographs well and looks even better in person — especially against the skin of the hand, where the depth of the color creates contrast that lighter shades simply can’t achieve.
What’s interesting about dark red specifically — as opposed to bright red — is how much variation lives within the category. A cooler, blue-toned wine reads completely differently from a warm, brick-leaning garnet, even though both technically fall under “dark red.” That range is part of what makes this color family worth exploring. You’re not committing to one look. You’re stepping into a whole palette of options, all of them classy in their own way.
The 15 designs below cover that full spectrum: clean and polished for minimal nail people, textured and dimensional for those who want something more interesting, with some delicate nail art mixed in for good measure. Each one is achievable on genuinely short nails — no extensions, no specialized studio equipment required.
Why Short Almond Nails Are the Best Canvas for Dark Red
Short almond nails have a specific quality that longer shapes sometimes lack: they look intentional without looking high-maintenance. The pointed-but-rounded tip gives the hand a refined look even when the nail barely clears the fingertip. That’s a detail worth paying attention to.
Dark red benefits from this shape in particular because the tapered tip concentrates the color. On a square nail, a dark shade can look flat across the entire face of the nail. On an almond shape, the gradual narrowing toward the tip creates subtle depth — like the color gets richer as it comes to a point. It’s a visual effect you don’t have to engineer. It just happens.
There’s also a very practical angle here. Short nails in the almond shape are far less prone to breaking than longer pointy shapes like stiletto, and they’re easier to maintain week to week. With dark red polish — especially the opaque, deep shades — minor chips are much less visible than they’d be on lighter colors. A small chip on a wine-colored nail needs about 24 more hours before it becomes something you actually need to address. A chip on sheer pink? You’ll notice it within the hour.
For anyone who types at a keyboard most of the day, this length-and-shape combination is the practical answer to wanting beautiful nails without sacrificing anything functional.
1. Classic Deep Crimson with a High-Gloss Top Coat
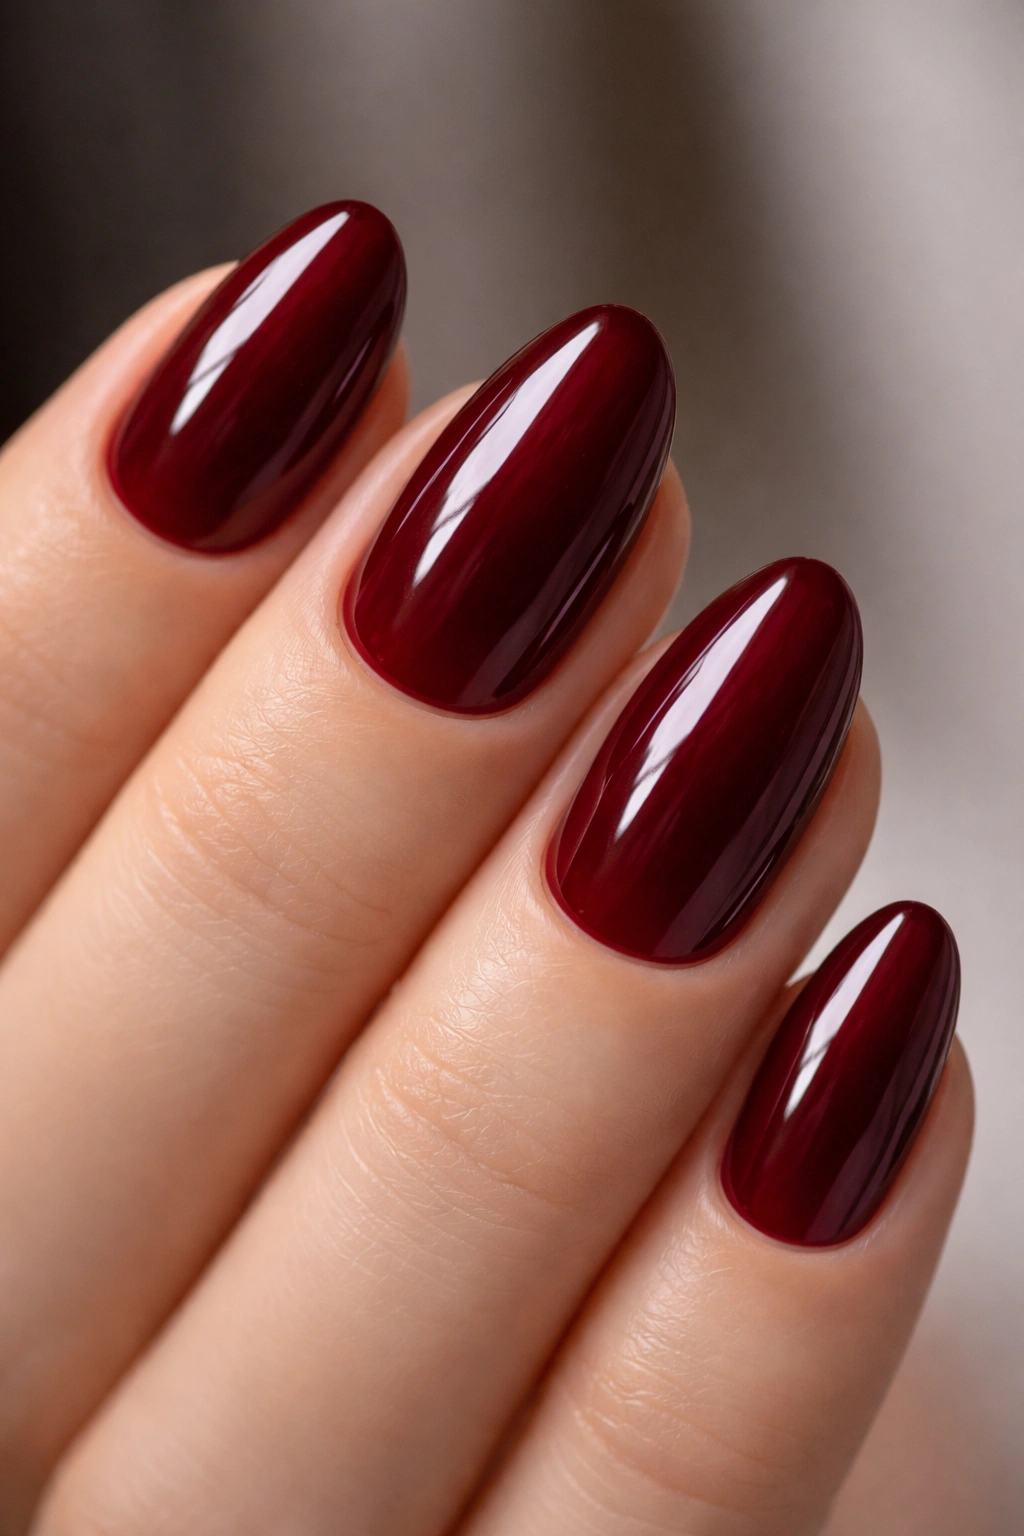
This is the starting point. Not because it’s boring — it isn’t — but because it’s the foundation that everything else in this list is either building on or playing against.
Deep crimson on a short almond nail, finished with a glass-like top coat, is one of the few nail looks that translates across every context: a corporate meeting, a dinner date, a casual Sunday afternoon. The color is rich enough to read as intentional but clean enough that it doesn’t compete with anything you’re wearing.
What Makes This Shade Work
The specific quality to look for here is a cool-toned red — one that leans toward blue rather than orange. Warm reds, especially on shorter nails, can read a little too close to orange in certain lighting, which shifts the whole mood. A blue-leaning crimson stays saturated and jewel-like even under fluorescent light, which matters if you spend most of your day in an office.
For application: two thin coats always beats one thick one. A thick coat takes longer to cure fully and is far more prone to denting during the first few hours. Thin coats dry faster and produce a smoother, more even finish. Seal with a quick-dry glossy top coat — the shinier the better for this particular look.
Quick Details
- Best finish: High-gloss, gel-style top coat for maximum depth
- Works best on: All skin tones — the contrast is especially striking on deeper complexions
- Longevity tip: Cap the free edge by painting slightly over the tip; this is the single most effective thing you can do to prevent chipping at the nail’s edge
- Mood: Classic, composed, completely put-together
2. Oxblood Matte with a Bare Accent Nail
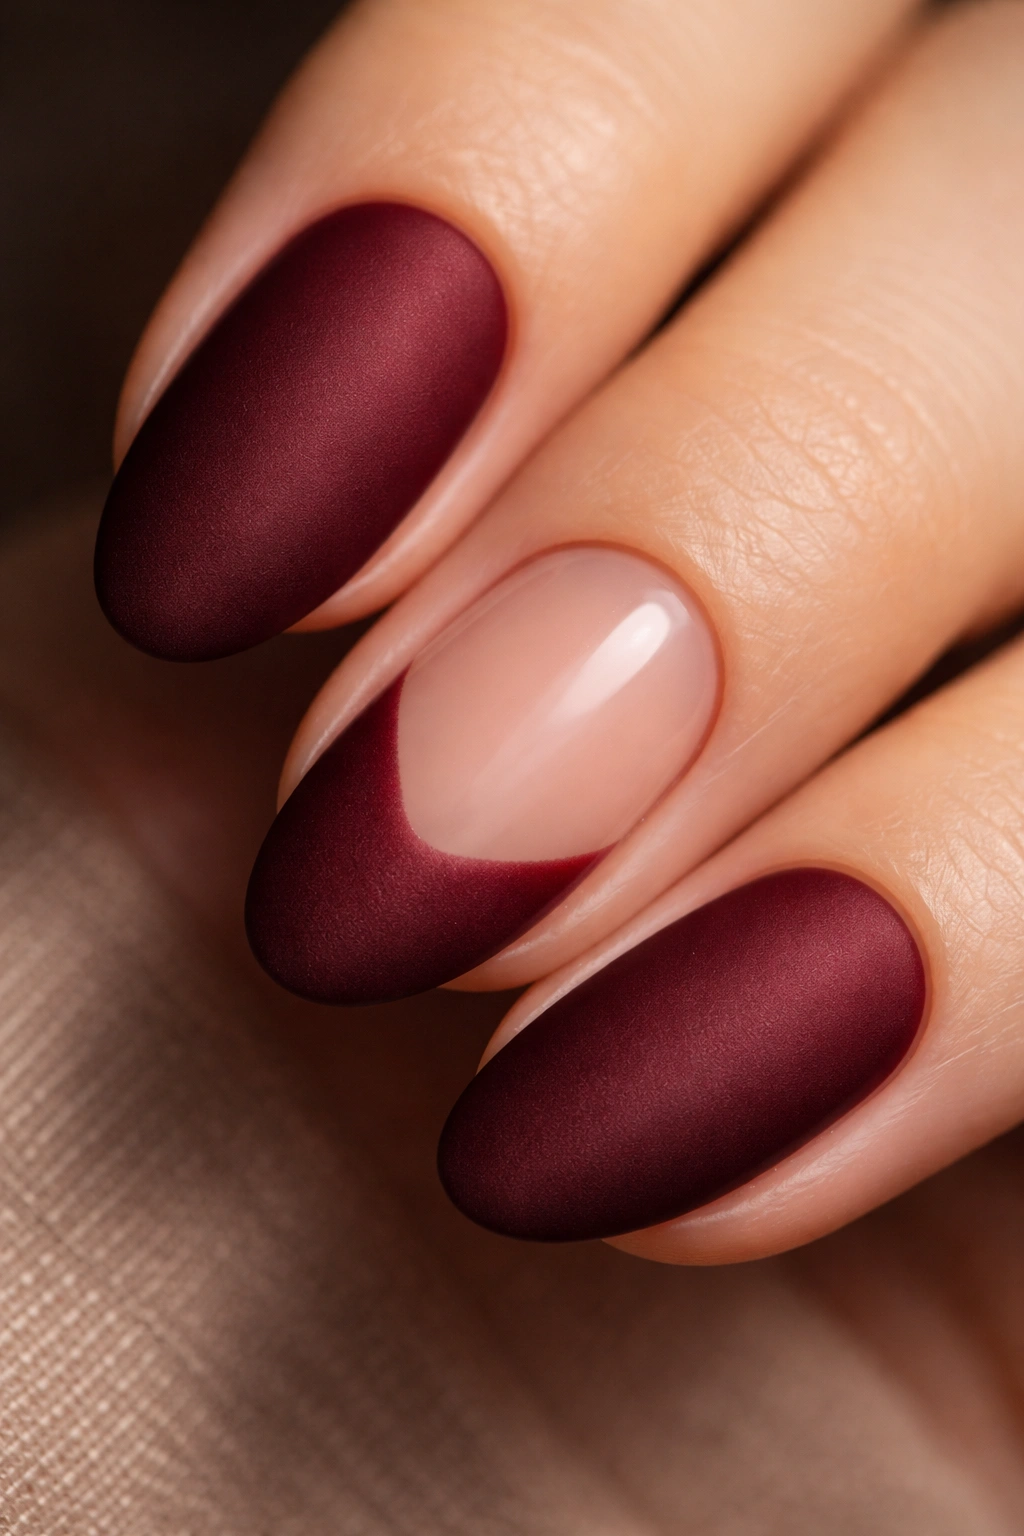
Oxblood is the darkest end of the dark red category — it sits right on the boundary between deep red and brown, and depending on the lighting, it can look almost burgundy or nearly black. In matte finish? It’s one of the most striking nail choices that exists, full stop.
The bare accent nail — meaning one finger left with no polish or just a clear coat — creates contrast that makes the oxblood look richer. It’s a simple approach but the effect feels deliberate rather than lazy. The ring finger is the most visible when your hand rests naturally, so that’s the one to leave bare.
Matte top coats have improved significantly. The older formulas tended to dull the color along with killing the shine, making deep shades look muddy and flat. Better formulas now create a velvety finish that intensifies the color rather than washing it out. Look for a matte top coat labeled “velvety” or “suede” — they give you a flat, dusty finish without that chalky effect that plagued earlier versions.
One thing to know about matte nails: they pick up skin oils faster than glossy ones and can start to look patchy within a few days. Reapplying the matte top coat every two to three days extends the look considerably. And skip the cuticle oil while wearing matte — it creates greasy spots on the surface that are immediately visible.
The bare accent nail is a design choice, not a shortcut. Treating it as such — making sure that single unpainted nail is clean, shaped, and buffed — is what makes the whole look work.
3. Dark Cherry with Gold Foil Detailing
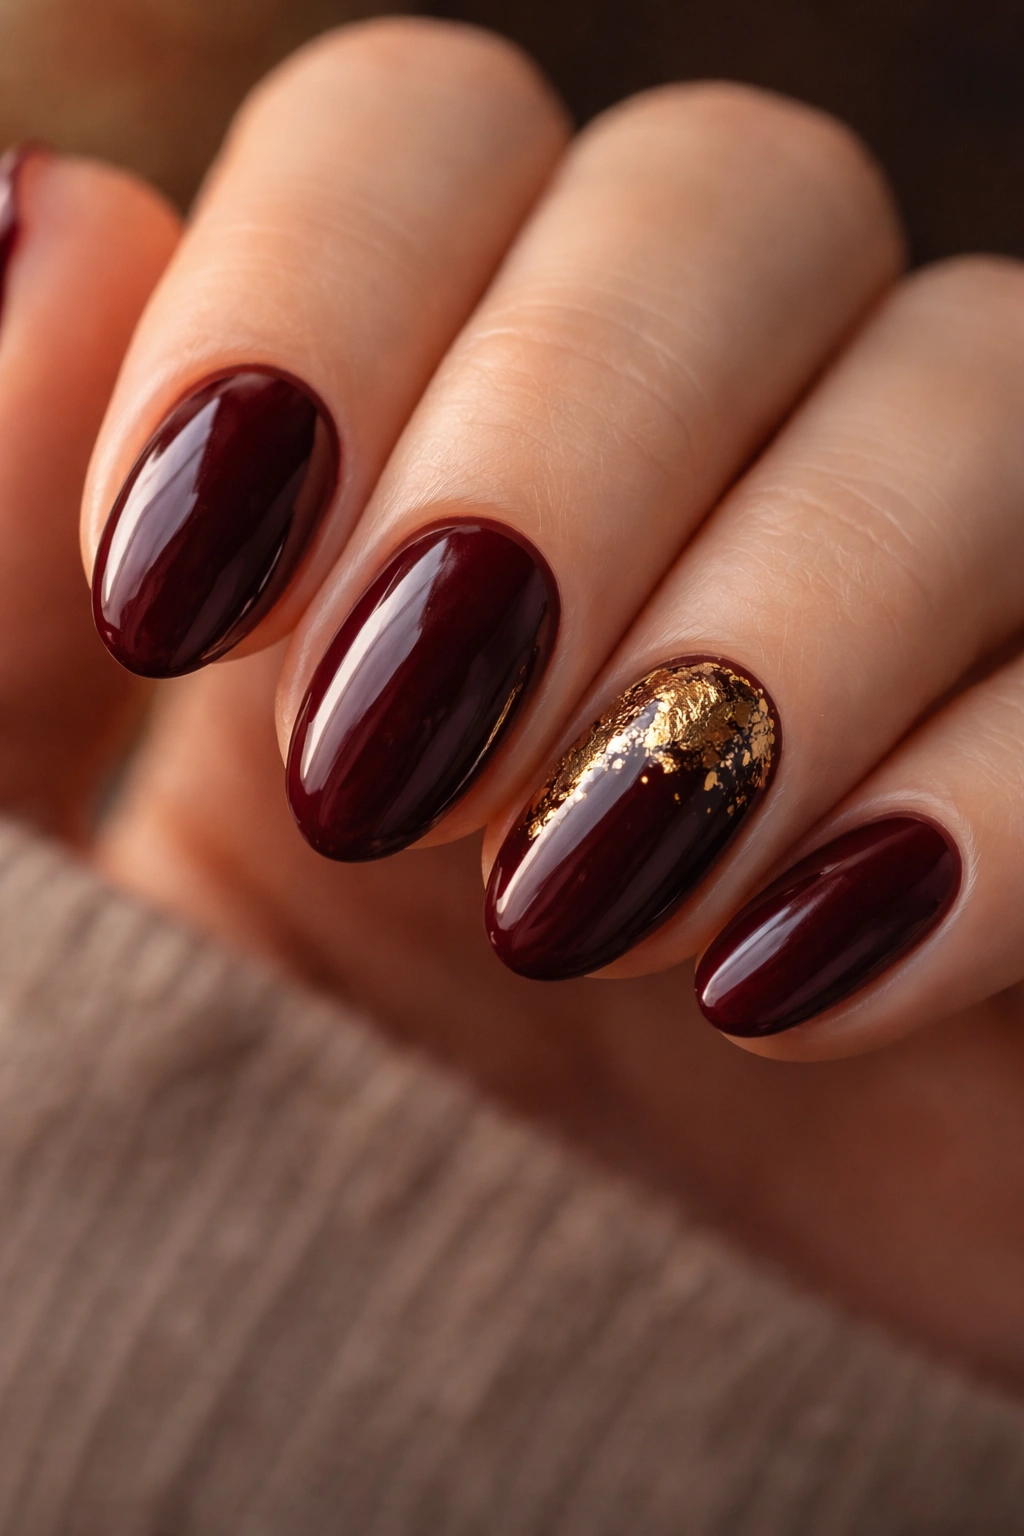
Why does gold foil work so well with dark cherry specifically? It’s a contrast-and-harmony situation. The warm gold against the cool-toned dark cherry creates enough contrast to catch the eye immediately, while the richness of both materials keeps the look from tipping into garish. Two expensive-looking things that happen to agree with each other.
Foil nail art is more accessible than it looks. The technique involves applying a foil glue — essentially a very tacky adhesive base — wherever you want the foil to land, waiting until the glue reaches the right tackiness (not fully dry, but past the wet stage — about 60-90 seconds), then pressing the foil sheet against it and peeling it back. The foil adheres exactly where the glue was and nowhere else. Clean edges, every time.
How to Place the Foil
For a short almond shape, less is more. A few scattered foil fragments across two or three nails looks deliberate. Foiling every single nail can look busy on shorter lengths. The sweet spot is applying small, irregular pieces near the base or along one side of the nail — it mimics crinkled gold leaf, which is where this style gets its expensive quality.
Step-by-Step Approach
- Paint all nails in dark cherry as the base — two thin coats, fully cured
- Apply foil glue to accent nails only (ring finger and pinky work particularly well together)
- Press gold foil onto the tacky adhesive, rub gently with your fingertip, then peel back
- Seal with a non-wipe top coat to prevent foil edges from lifting
The sealed result should feel completely flat and smooth under your finger. If you can feel the foil edges, one more thin top coat layer will solve it.
4. Burgundy Jelly Effect
Burgundy jelly nails have a quality that’s genuinely hard to describe without seeing them: depth without full opacity. The color looks like it’s suspended inside the nail rather than sitting on top of it — like a glass of deep red wine held up to the light.
Picture building this on a Sunday afternoon. Instead of the usual two-coats-and-done process, you layer four or five thin coats of a sheer-to-jelly burgundy formula, letting each one dry completely before the next. By coat three, something shifts. The nail starts to develop a transparent inner glow, and by coat five, you’ve got something that looks genuinely custom and expensive without paying for it to be either.
The jelly effect requires a specific type of formula — one with partial transparency. A standard opaque burgundy won’t achieve this no matter how many layers you apply. Look for shades labeled “jelly,” “sheer,” or “glass” in the product description. Or just hold the bottle up to a light source: if you can see through the liquid to some degree, you’re in the right territory.
- Coats needed: 4-5 thin layers minimum to build the depth effect
- Top coat: High-gloss gel-style to enhance that glass quality
- Best on: Short nails specifically — the transparency actually looks better at shorter lengths because the effect doesn’t thin out over a large surface area
This is one of those looks that people stare at without quite knowing why.
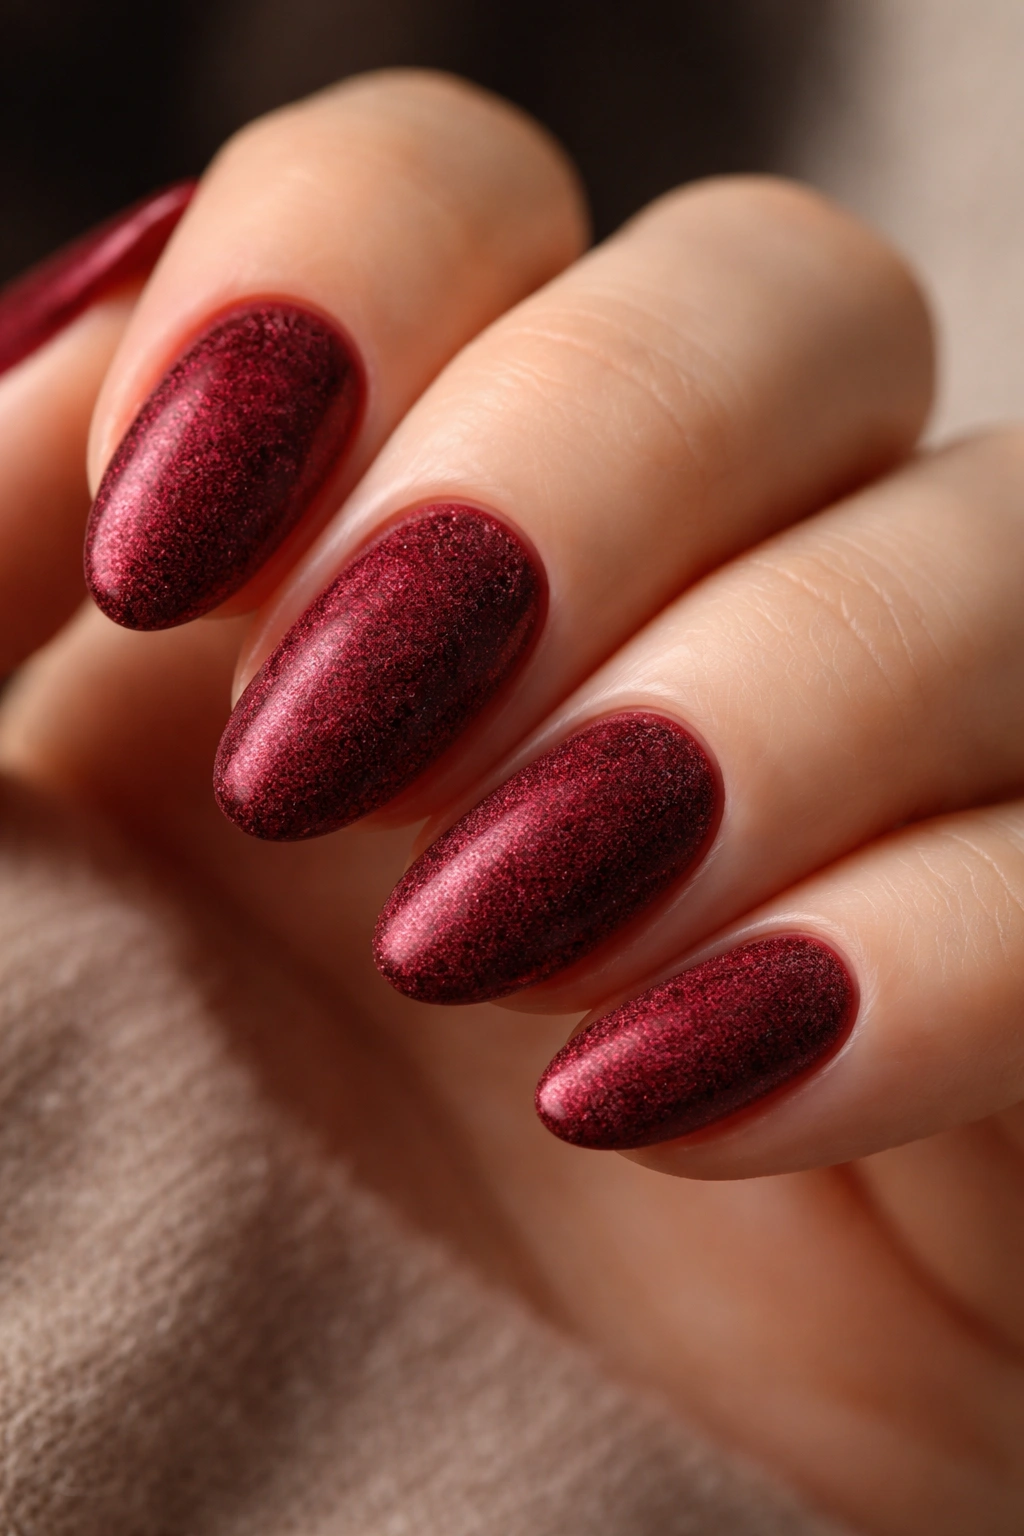
5. Garnet Shimmer with a Glass Fleck Finish
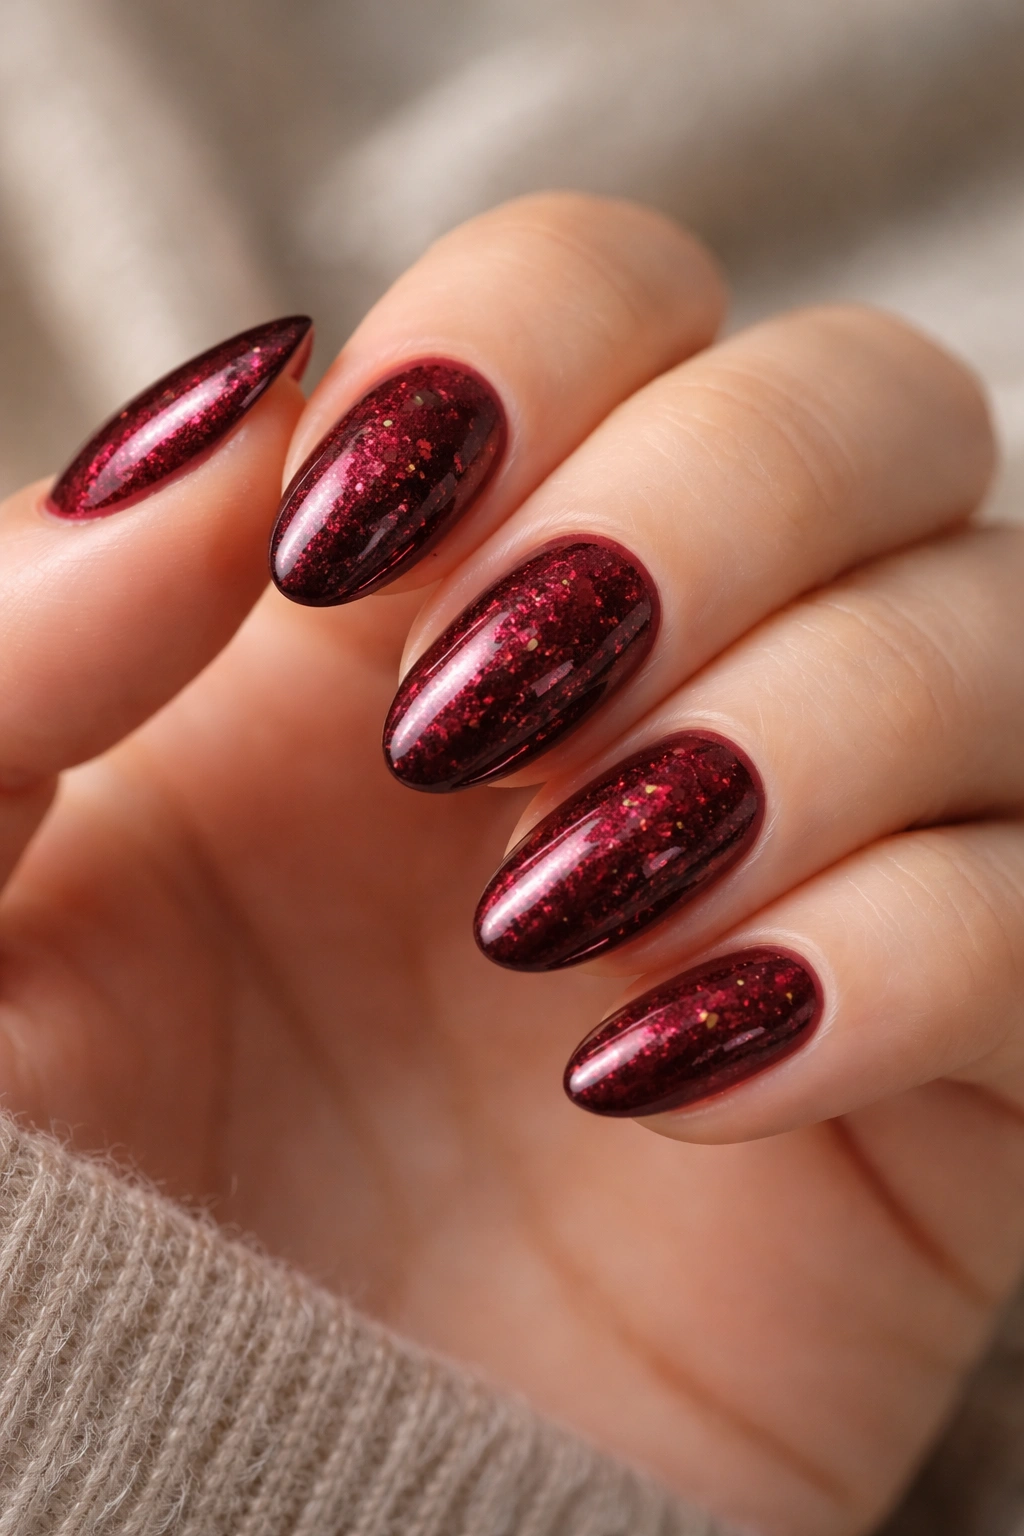
Garnet sits between red and burgundy, with a warm, gemstone quality that shifts with the light. In a dim room, it looks almost like a deep wine. In sunlight, the shimmer particles inside the polish catch the light and the whole nail seems to glow from within. It’s the kind of color that makes people ask what shade you’re wearing.
The glass fleck finish is a specific type of shimmer — not the usual round glitter particles, but thin, flat flecks that lie against the nail and scatter light in multiple directions at once. Polishes described as having “glass fleck,” “foil finish,” or “scattered holographic” particles are exactly what you’re looking for here.
Shimmer polishes tend to show brush strokes more than regular creams if you rush the application. Using a slower, more deliberate stroke — sweeping from base to tip in one continuous motion without going back over a section that’s started to dry — gives you a much more even finish. It’s essentially the same technique as any other polish application, just with more patience baked in.
On a short almond nail, the garnet shimmer catches light at the curved tip in a way that emphasizes the shape. The shimmer particles seem to concentrate there, creating a natural visual accent at the nail’s narrowest point. No nail art needed at all — the polish itself does the work.
6. Deep Red to Black Ombre Tips
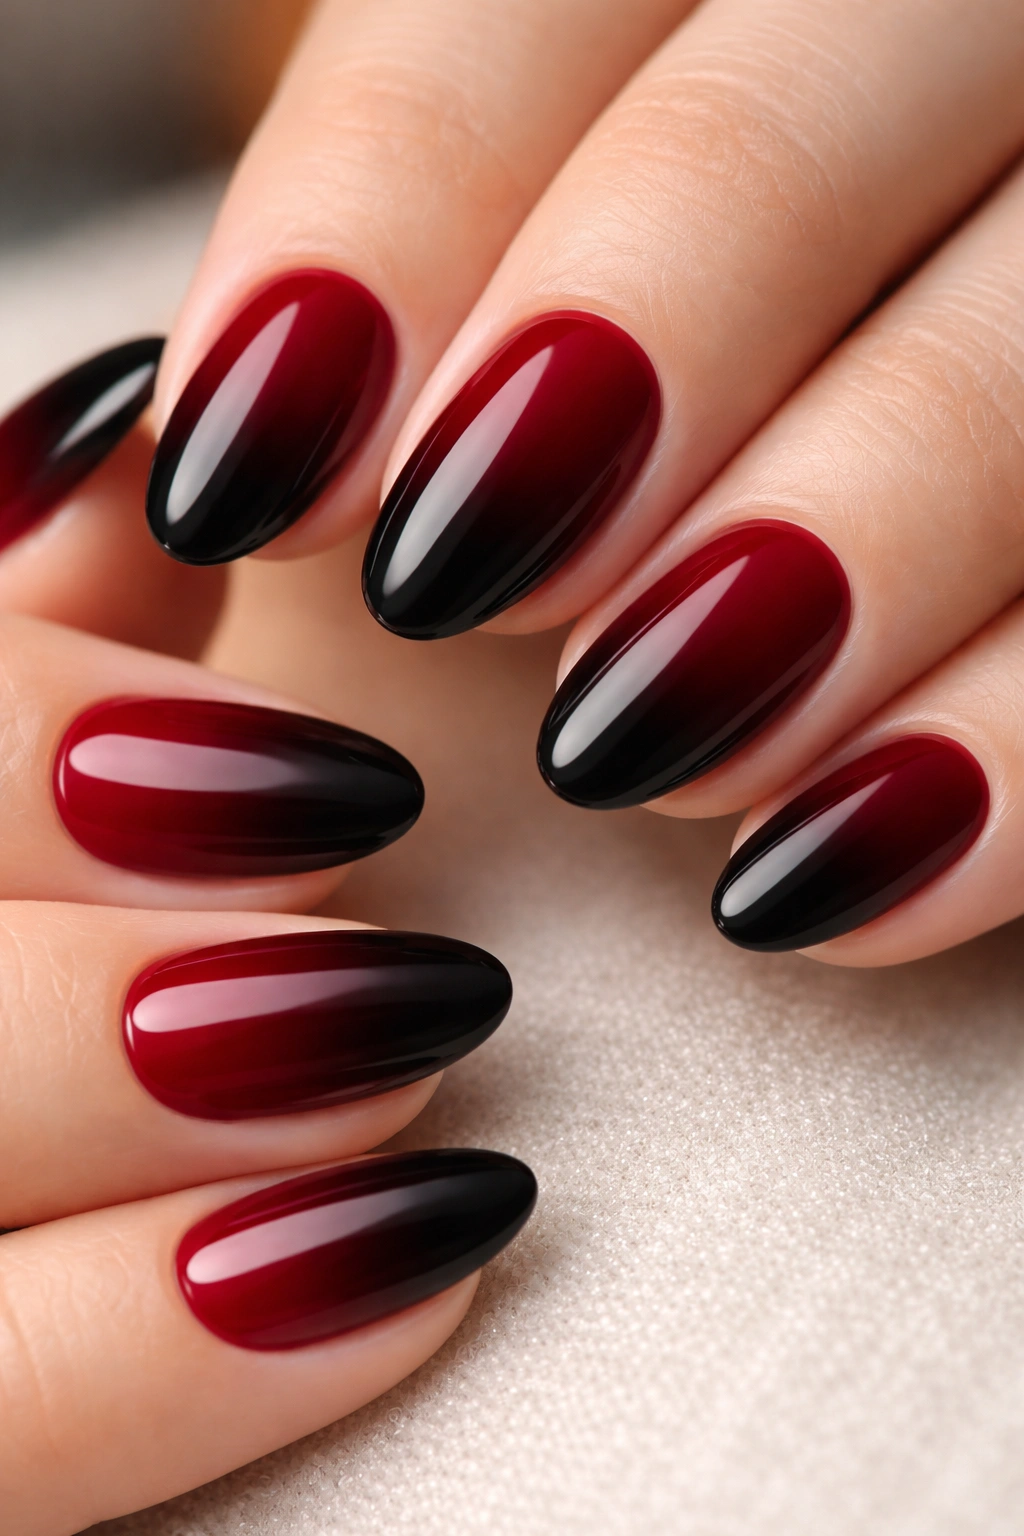
Unlike a standard ombre that blends from one color to a lighter version of itself, a deep red to black ombre moves in the opposite direction — darker at the tips, not lighter. The base stays red (deep cherry or cranberry), and the tips fade into near-black. The result looks like the nails have been dipped in shadow.
This design works especially well on short almond nails because the ombre gradient compresses into a small space, making the color transition more concentrated and more dramatic. On longer nails, the same effect can look gradual and stretched. On short nails, the blend happens within maybe 8 millimeters and the contrast lands harder.
The Technique
Standard sponge ombre method: paint the base red in two full coats and let it dry completely. On a makeup sponge, paint a stripe of deep red and a stripe of near-black directly next to each other, minimal overlap. Dab this onto just the top third of the nail — pressing and lifting rather than dragging. Repeat 3-4 times until the gradient feels opaque. Clean up the edges with a fine brush dipped in acetone, then seal everything with a glossy top coat.
The black shade you choose matters more than you’d expect. Pure black creates a harder, more dramatic transition. A very dark charcoal creates something softer — more like the nail is fading into shadow rather than meeting a hard edge. Both are worth trying. Pick based on how bold you want the result to actually read.
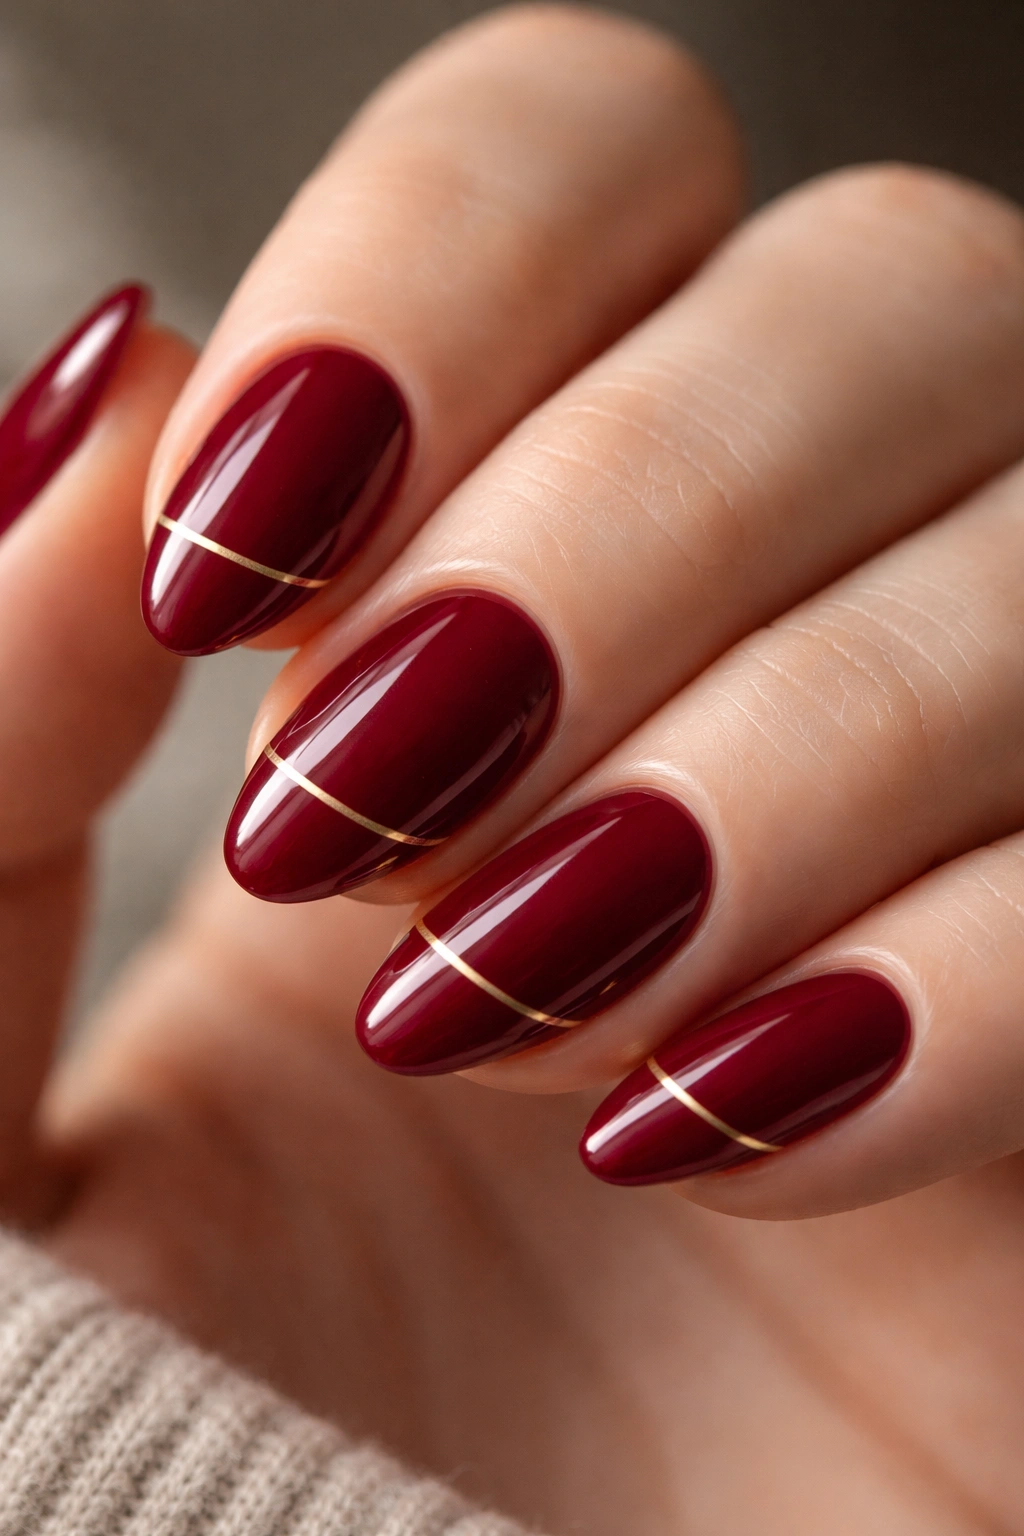
7. Cranberry Red with a Thin Gold Line
Minimal nail art is at its best when the detail is precise. Exactly precise.
A single thin gold line — horizontal, vertical, or diagonal — across a cranberry red base is the kind of nail art that looks like it cost twice what it actually did. The restraint is the whole point. One line. Clean edges. That’s it.
Why Cranberry Specifically
Cranberry has a brightness that other dark reds don’t have. It’s not as warm as brick red, not as cool and moody as burgundy, not as deep as oxblood. It sits at a midpoint in the dark red family — rich enough to read as grown-up, vivid enough to stay interesting. Against a thin gold line, that brightness makes the metallic pop more sharply than it would against a darker, heavier base.
Drawing the Line
Getting a clean line comes down to the right tool. A striping brush — a long, thin nail brush with hairs roughly 8-10mm in length — holds enough polish to complete a full stroke without running dry mid-nail. The alternative is striping tape: apply it to the dry base, paint gold over it, wait 60 seconds (catching it at partial dryness helps prevent peeling), then remove the tape immediately. Both methods work. The brush gives you design freedom; the tape gives you perfect geometry.
One gold line per nail is enough. Don’t add a second. The restraint is what makes this classy rather than cluttered, and that distinction is the difference between an editorial nail and a craft project.
8. Dark Rouge Negative Space Design
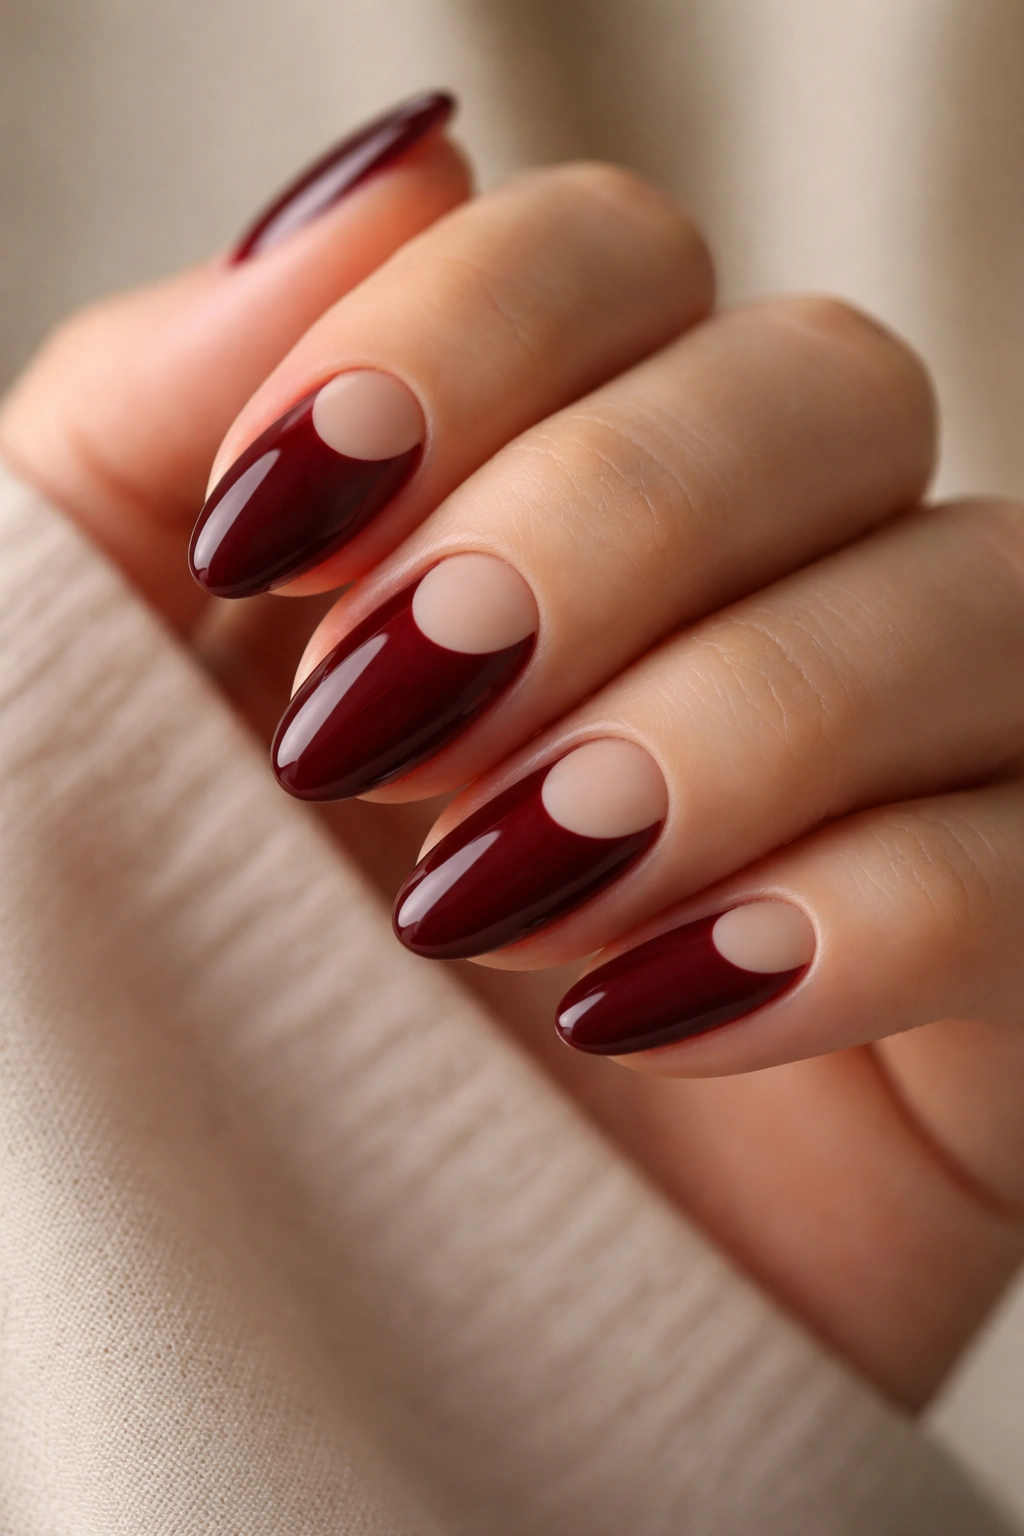
Negative space nail art sounds technical, but the concept is straightforward: part of the natural nail is left intentionally visible as an element of the design. The unpainted area isn’t an absence of polish — it becomes part of the art itself.
On dark rouge — a red with a slight warm-cool balance, sitting between true red and dark maroon — the pale skin of the natural nail creates high-contrast graphic shapes against the deep color. A half-moon left bare at the cuticle, a thin stripe down the center, a small geometric cutout near the tip. All of these work. All of them look intentional when they’re executed cleanly.
The key is precision. Sloppy negative space looks like an unfinished manicure. The clean edges — achieved either by masking with tape before painting or by carefully cleaning up with a fine brush and acetone — are what separate intentional design from accidental gaps. That’s a non-negotiable part of this look.
For short almond nails specifically, a half-moon negative space at the cuticle works best. It keeps the design away from the tapered tip where the nail is narrowest, and it creates a visual break that actually emphasizes the almond shape rather than competing with it.
9. Wine-Red Velvet Texture Finish
Does any nail finish feel as satisfying as velvet texture? Probably not. Running your fingertip across a freshly dried velvet nail — that raised, impossibly soft surface — is one of those small sensory experiences that’s hard to describe but immediately understandable when you feel it.
Velvet nail finishes use a fine flocked powder suspended in the formula, which creates a raised, tactile surface once dry. The finish shifts in interesting ways depending on the viewing angle: flat matte when you look at it straight on, a subtle sheen when the light catches it at an angle. It’s a finish that moves with your hands.
Wine red in velvet texture is a combination where the finish and the color genuinely amplify each other. The muted quality of velvet suits the serious, almost austere character of wine red. Not flashy. The opposite of flashy — which somehow makes it more noticeable than something sparkly would be.
Application is slightly different from standard polish. Use longer, slower strokes with minimal pressure to avoid disturbing the texture particles before they can dry properly. Apply one coat that’s slightly thicker than usual rather than two thin ones — the texture needs mass to develop its full quality. Do not apply a top coat unless you’re willing to sacrifice the texture entirely. A top coat fills in the velvet surface and ruins the whole effect.
Expect five to six days of wear before the texture compresses and loses its character. Shorter than a standard manicure — but worth every day of it.
10. Deep Red with White Abstract Swirls
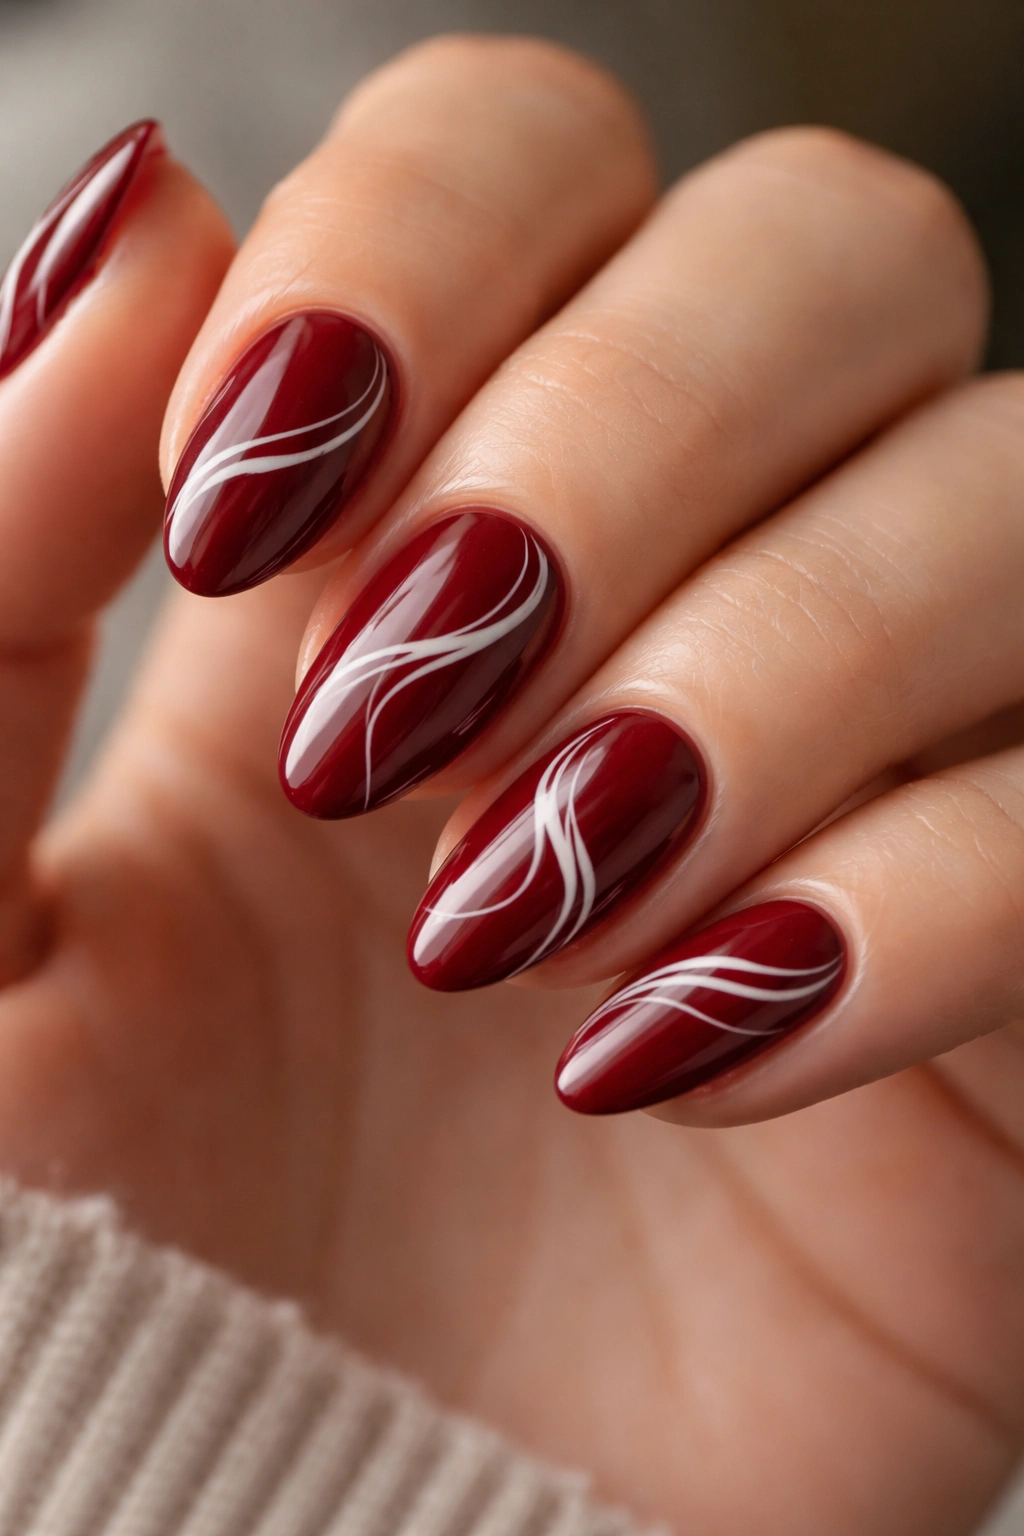
A white abstract swirl on a deep red base sounds like it shouldn’t work. White is so light, so clean, so fundamentally opposite to deep red’s moody richness. And yet the contrast is exactly what makes it striking.
The swirl style that works best here is loose and organic — not a measured spiral but something closer to the lazy curl of smoke from a candle. A thin white line that moves across the nail without a fixed pattern, looping sometimes, trailing off other times. The looser the interpretation, the better it tends to look on short nails.
Here’s what most nail art tutorials won’t tell you: the “mistakes” are features. A line that wavers or curves unpredictably is part of the aesthetic, not a flaw to fix. Trying to make it perfectly symmetrical almost always looks worse than letting your hand move naturally.
To draw the swirls, use a thin detailing brush or the rounded end of a dotting tool dragged across the nail — this creates a specific quality of line that a flat brush can’t replicate. Use a white gel polish or dedicated nail art paint rather than standard white polish, since both have better pigmentation and flow for detail work. Work quickly before the product starts to dry and resist.
Seal with a top coat the moment the white lines feel dry to the touch. Apply the first top coat layer thinly and wait a full two minutes before adding a second — this prevents the white from smearing under the brush.
11. Dark Cherry Chrome Mirror Finish
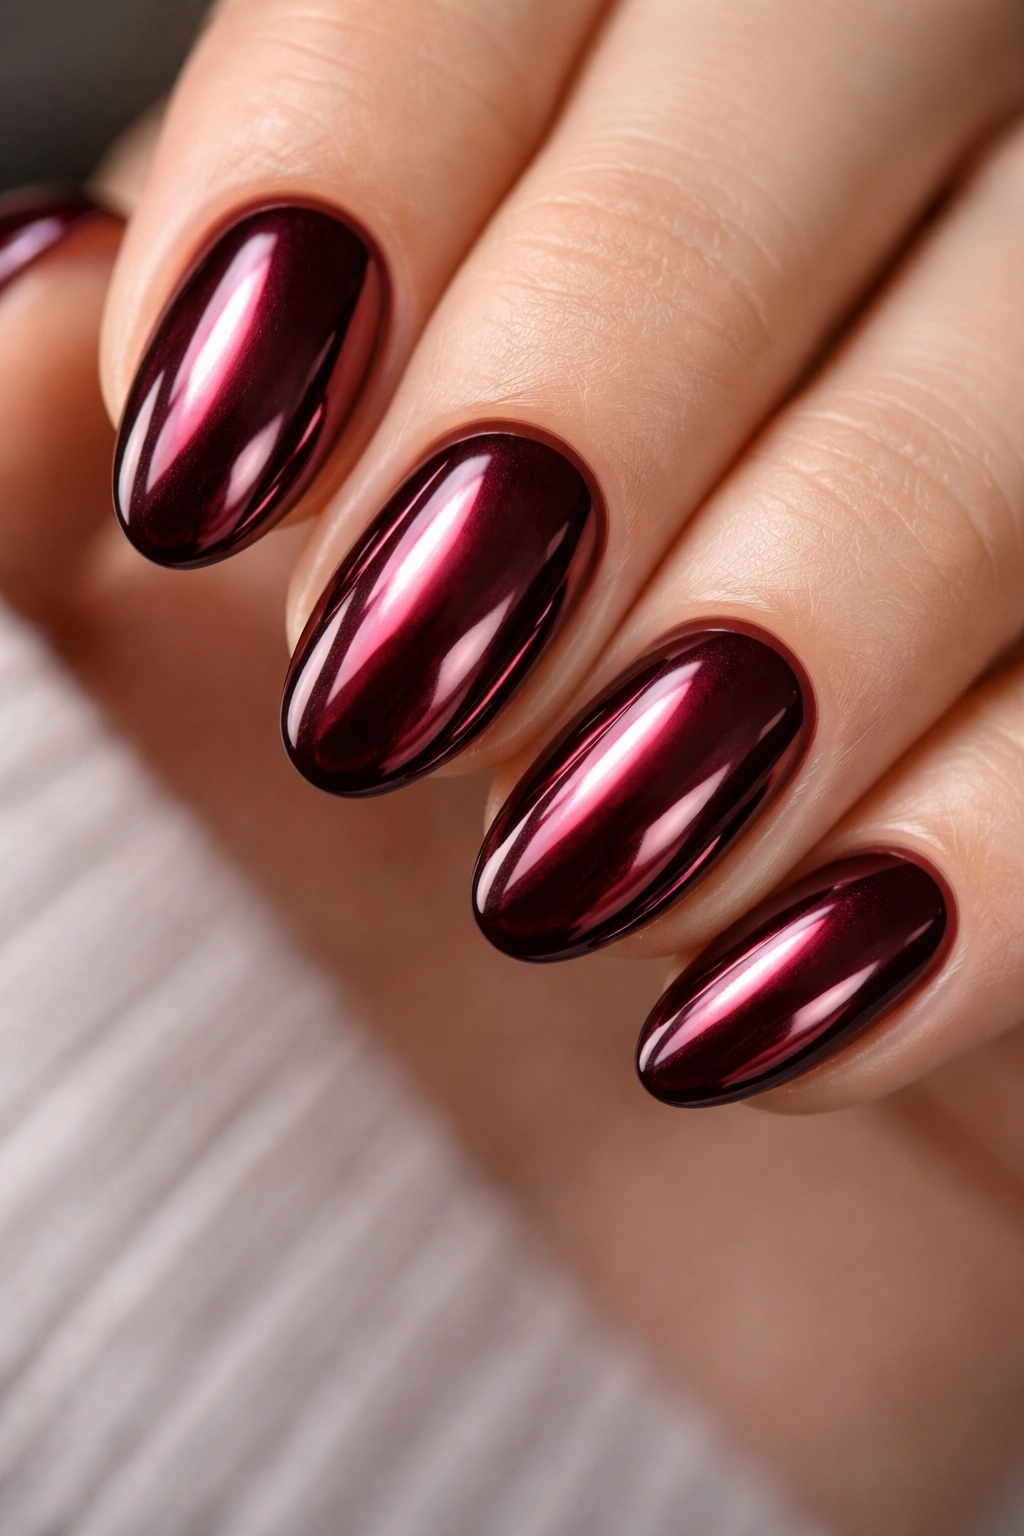
Chrome nails have held their popularity for good reason — the mirror effect is hard to look away from. Most chrome nail looks lean toward silver, gold, or rose gold, though. A dark cherry chrome? That’s something different entirely.
The foundation for a chrome finish has to be gel — either gel polish or a gel top coat cured under a UV/LED lamp. The chrome powder, which is an extremely fine metallic pigment, gets rubbed onto the fully-cured gel surface with a silicone applicator tool. Friction activates the mirror effect, bonding the powder to the gel.
On a dark cherry base, the chrome powder produces something that looks like the inside of a garnet gemstone — deep red with a metallic, slightly holographic depth that shifts in the light. It’s dimensional in a way that standard shimmer polish can’t quite match. The short almond shape works particularly well here because the curved tip reflects light from a different angle than the flat face of the nail, creating a ripple effect as your hand moves.
Fully cure the gel before touching the powder. Any remaining tackiness causes the powder to clump rather than spread evenly, and there’s no fixing that without starting over. Two minutes under the lamp minimum — three if your lamp is older.
12. Maroon Tortoiseshell Pattern in Red and Brown Tones
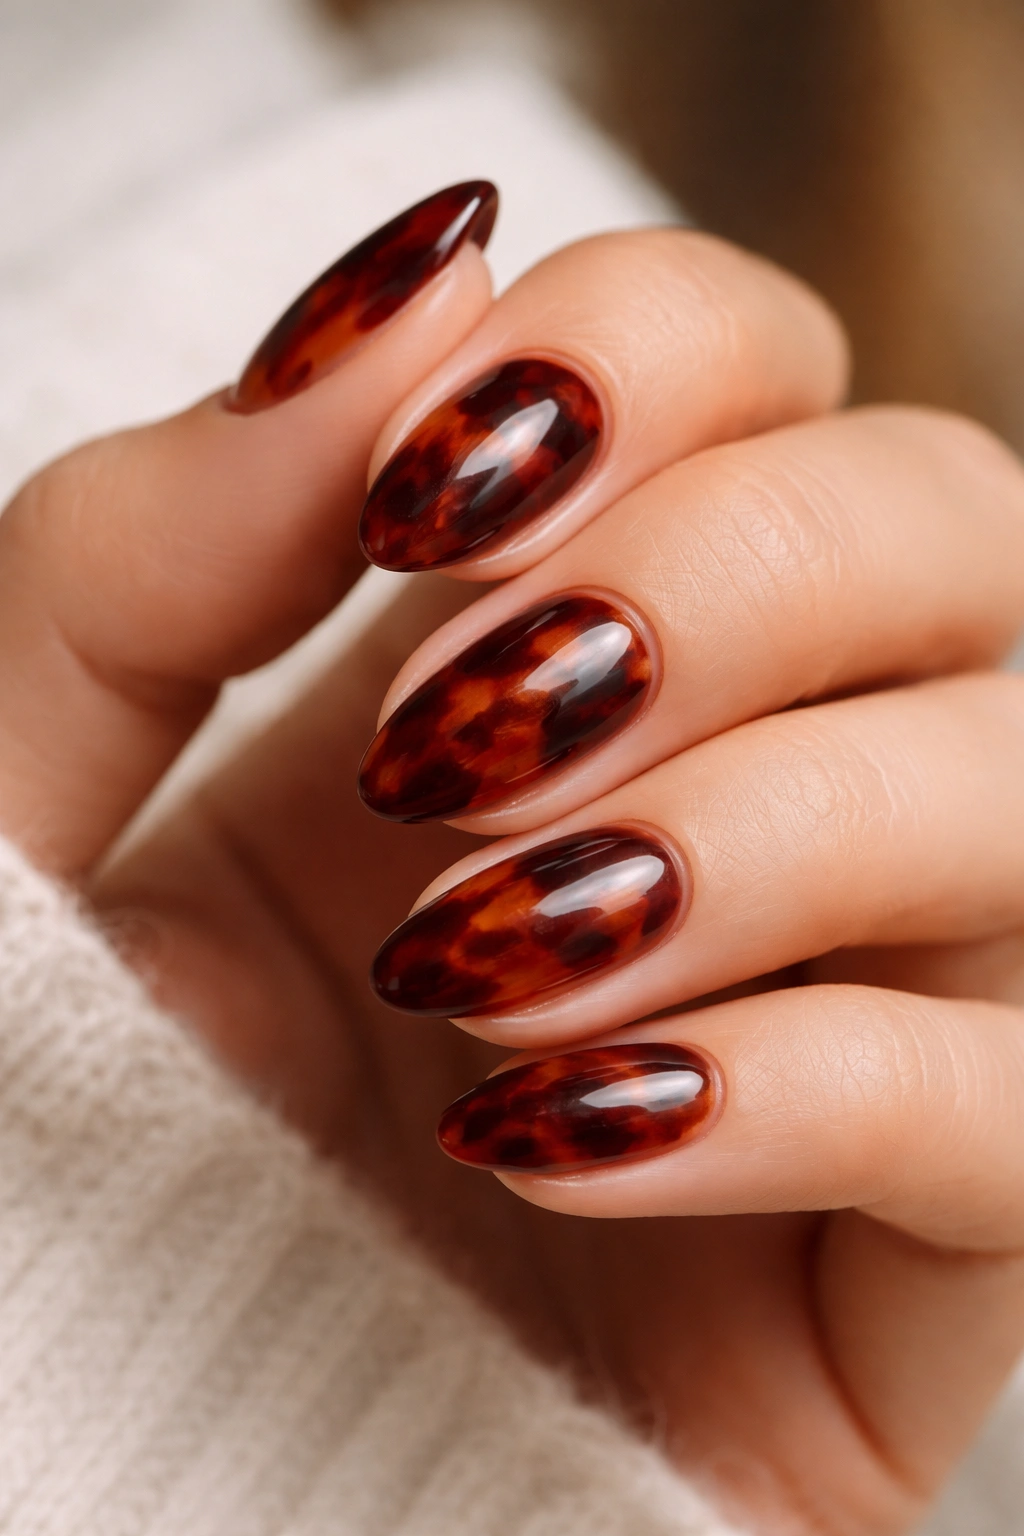
Tortoiseshell nail art looks complicated but is genuinely achievable with basic tools and about ten minutes of practice. The standard tortoiseshell palette uses amber, dark brown, and black. A dark red tortoiseshell swaps those warm browns for maroon, deep red, and burgundy — staying within the red-brown family — and the result is warmer and more unusual than the version you’ve seen everywhere.
The tonal variation in this design is subtle. The different shades are close in value, so they blend in some areas and stay distinct in others. That’s exactly the effect you want — it’s what gives real tortoiseshell its organic, almost biological quality.
Building the Pattern
Start with a warm nude or pale reddish-beige base coat. While it’s still slightly wet — about 40-50 seconds after application — use a thin brush to paint irregular organic patches of maroon, deep red, and dark burgundy across the base. The edges should bleed slightly into the wet base underneath. That soft, slightly blurred edge is the defining characteristic of real tortoiseshell. Then add small dots or short curved marks of near-black in the darkest spots.
Work fast. The blending only happens while the base is still wet. Once it dries fully, any patches you add on top look applied rather than grown, and the whole effect falls apart.
- Seal with: A glossy top coat — the shine mimics the “polished shell” quality beautifully
- Placement tip: Keep the darkest patches toward the center and tip; lighter areas near the cuticle make the pattern read as more natural and less painted-on
13. Deep Red French Tip on a Natural Base
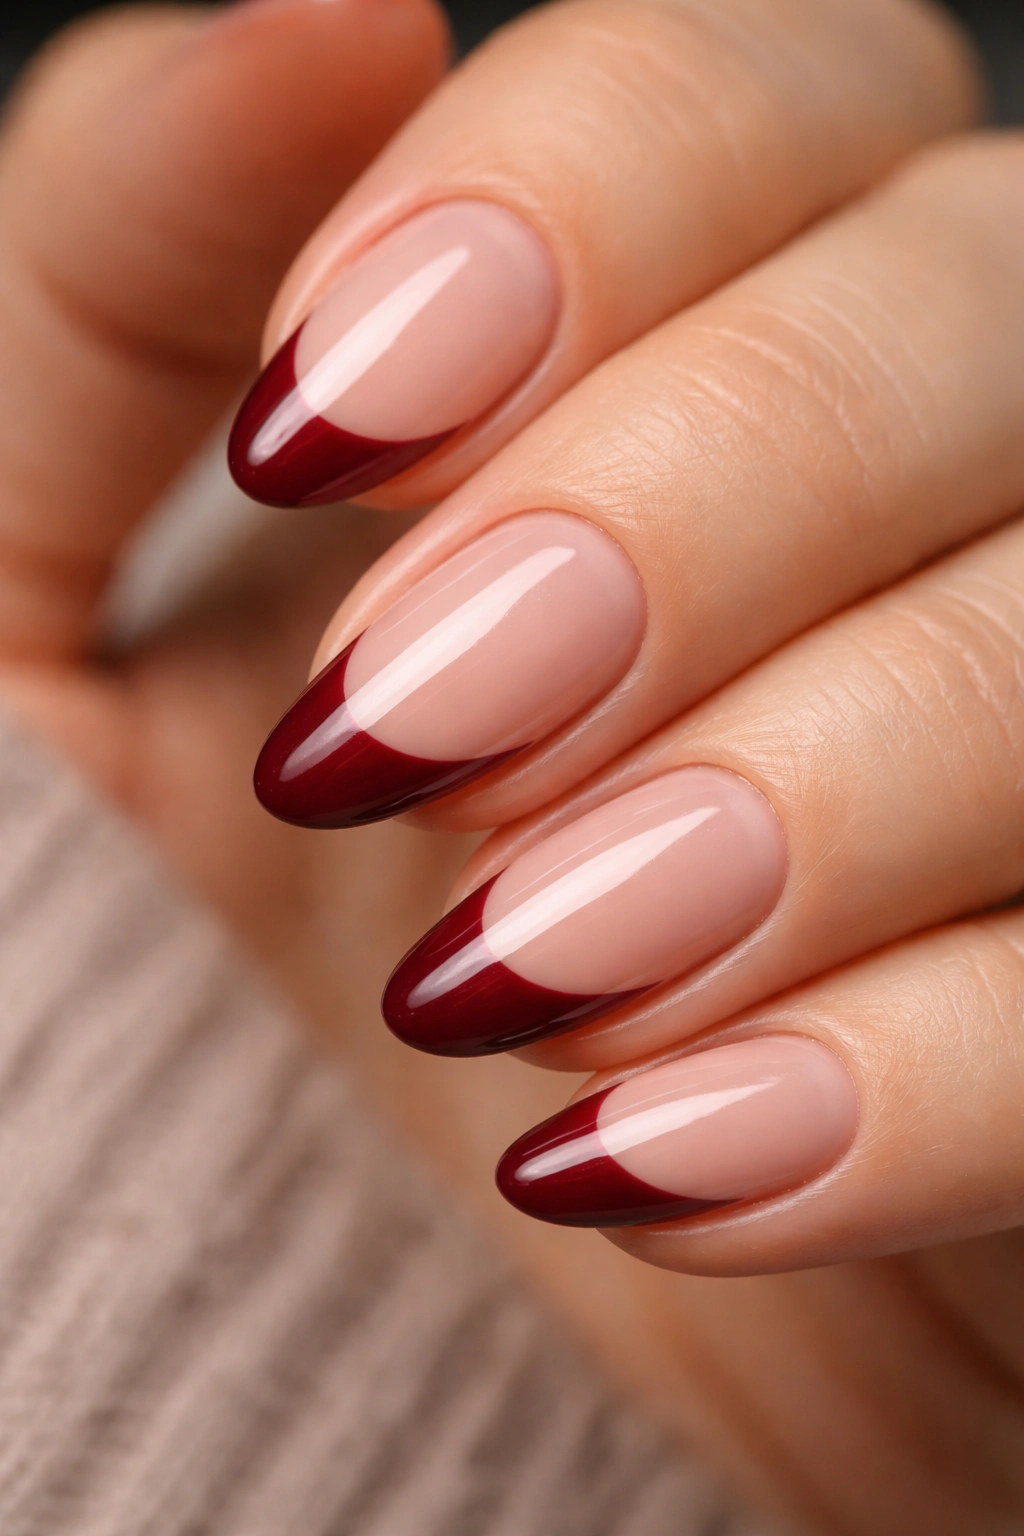
The French tip has been around long enough to feel familiar, almost predictable. A dark red version on a natural nail base is genuinely different from the original, though — less bridal, more editorial.
The natural base — a sheer nude, a base coat, or just the bare nail plate with a clear top coat — lets the nail itself show through. Against a deep red tip, the pale contrast of the natural nail creates a crisp line that emphasizes the almond shape’s characteristic silhouette. The tapered edge makes the smile line curve in a way that square or round nails simply don’t produce.
Getting the Line Clean
Three approaches worth knowing:
- French tip guides: Adhesive sticker guides cut in the curved smile line shape. Press one onto the nail at the correct position, paint the dark red tip, wait about 60 seconds, then peel the guide off carefully.
- Striping tape: Standard nail tape applied in a curved line across the nail. Same process — paint, let reach partial dry (not fully set), remove.
- Freehand: The hardest method, but the most satisfying once you have the muscle memory. Use a short flat brush with a squared edge and paint in one single curved stroke.
Why This Works on Short Almond Nails Specifically
On a short almond nail, the deep red tip covers roughly 3-4mm of the nail — a thin, concentrated sliver of color. That compression makes the red read as precise and considered rather than the thicker bands you’d see on square French manicures. This design rewards the shape. It would look completely different on any other nail shape, and not in a good way.
14. Dark Cherry with a Pressed Dried Flower Accent
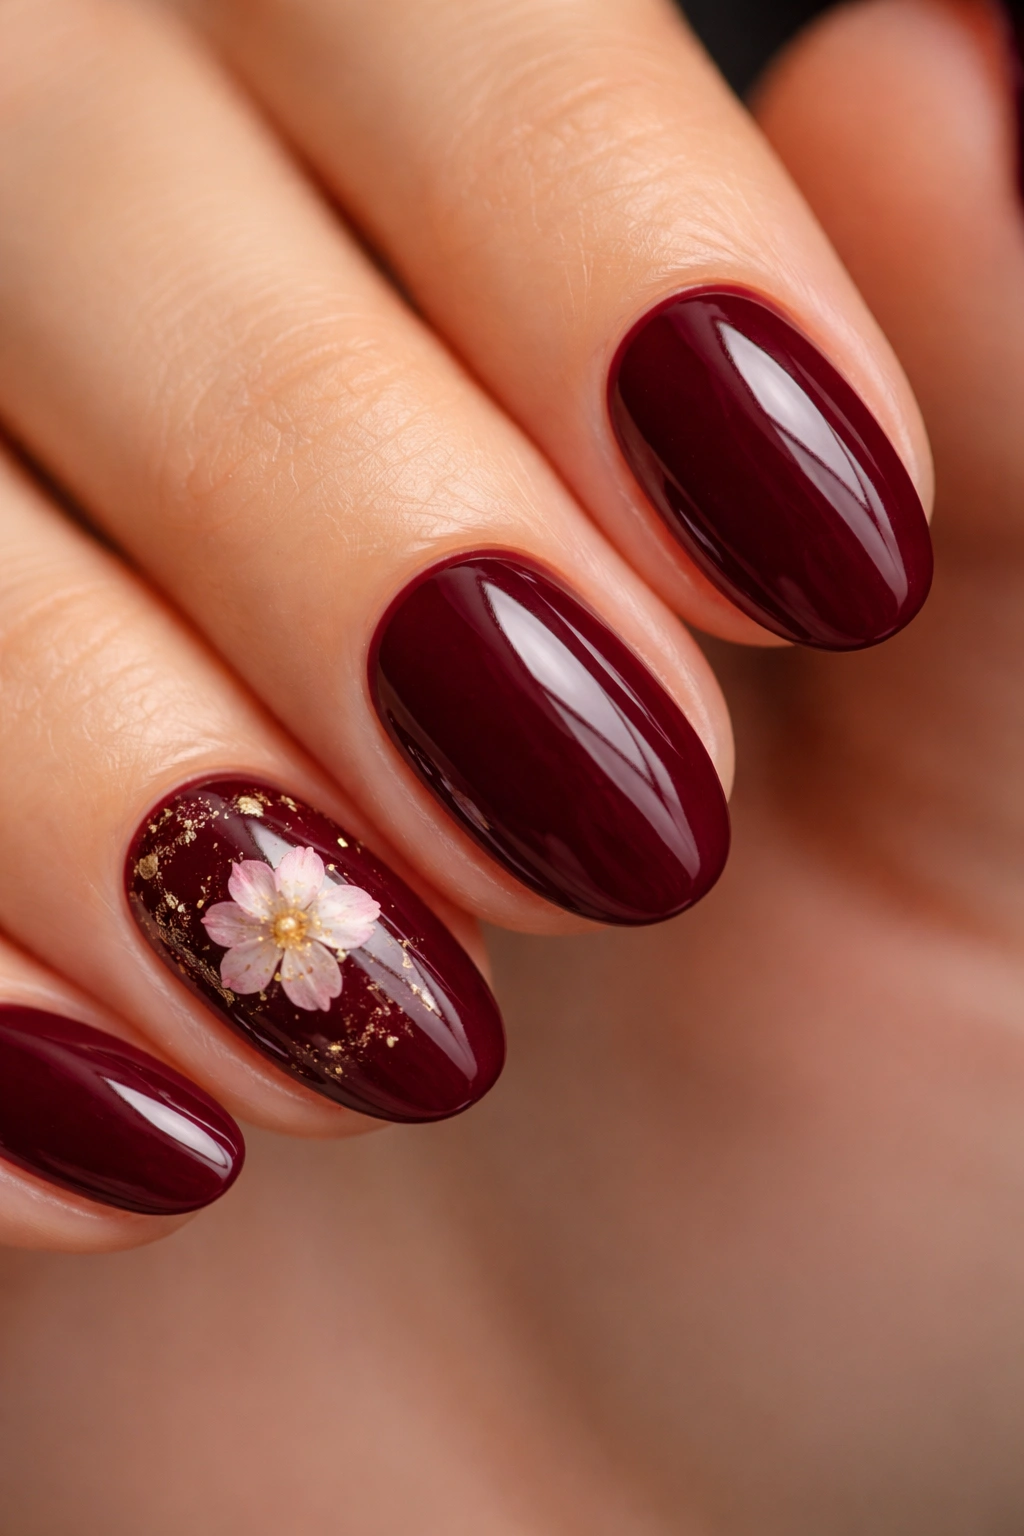
One or two nails with a small dried flower embedded inside gel polish creates a result that lives somewhere between jewelry and nail art. The flower is a real object inside the nail — actual dimension, actual texture, not a printed image of a flower.
Small is the operative word. A tiny flower — forget-me-not-sized or a small pansy petal pressed very flat — is the right scale for short almond nails. Anything larger looks crowded and is more likely to lift out of the gel before it fully cures.
This technique requires gel, not regular polish. There’s no working around that. Apply a gel base coat, cure it under the lamp, place the dried flower (completely moisture-free — any residual moisture will cause cloudiness in the gel around it over time), apply another thin layer of gel over the flower, cure again, then build a final top coat layer over everything. Three cures total. The flower needs to be fully sandwiched between gel layers to stay flat and protected.
Dark cherry underneath intensifies the color of whatever flower you use. Soft pink or white dried flowers look almost luminous against the deep background — a contrast that clear or nude bases don’t create in the same way. It’s a surprisingly dramatic effect from something as simple as a tiny flower.
Buy pre-pressed dried nail flowers from a nail supply source, or press fresh flowers yourself between heavy books for at least two weeks before using them. Do not rush this step — moisture in the flower will ruin the gel finish, and that’s not reversible without removing the nail entirely.
15. Plum-Red Gradient with Holographic Shimmer
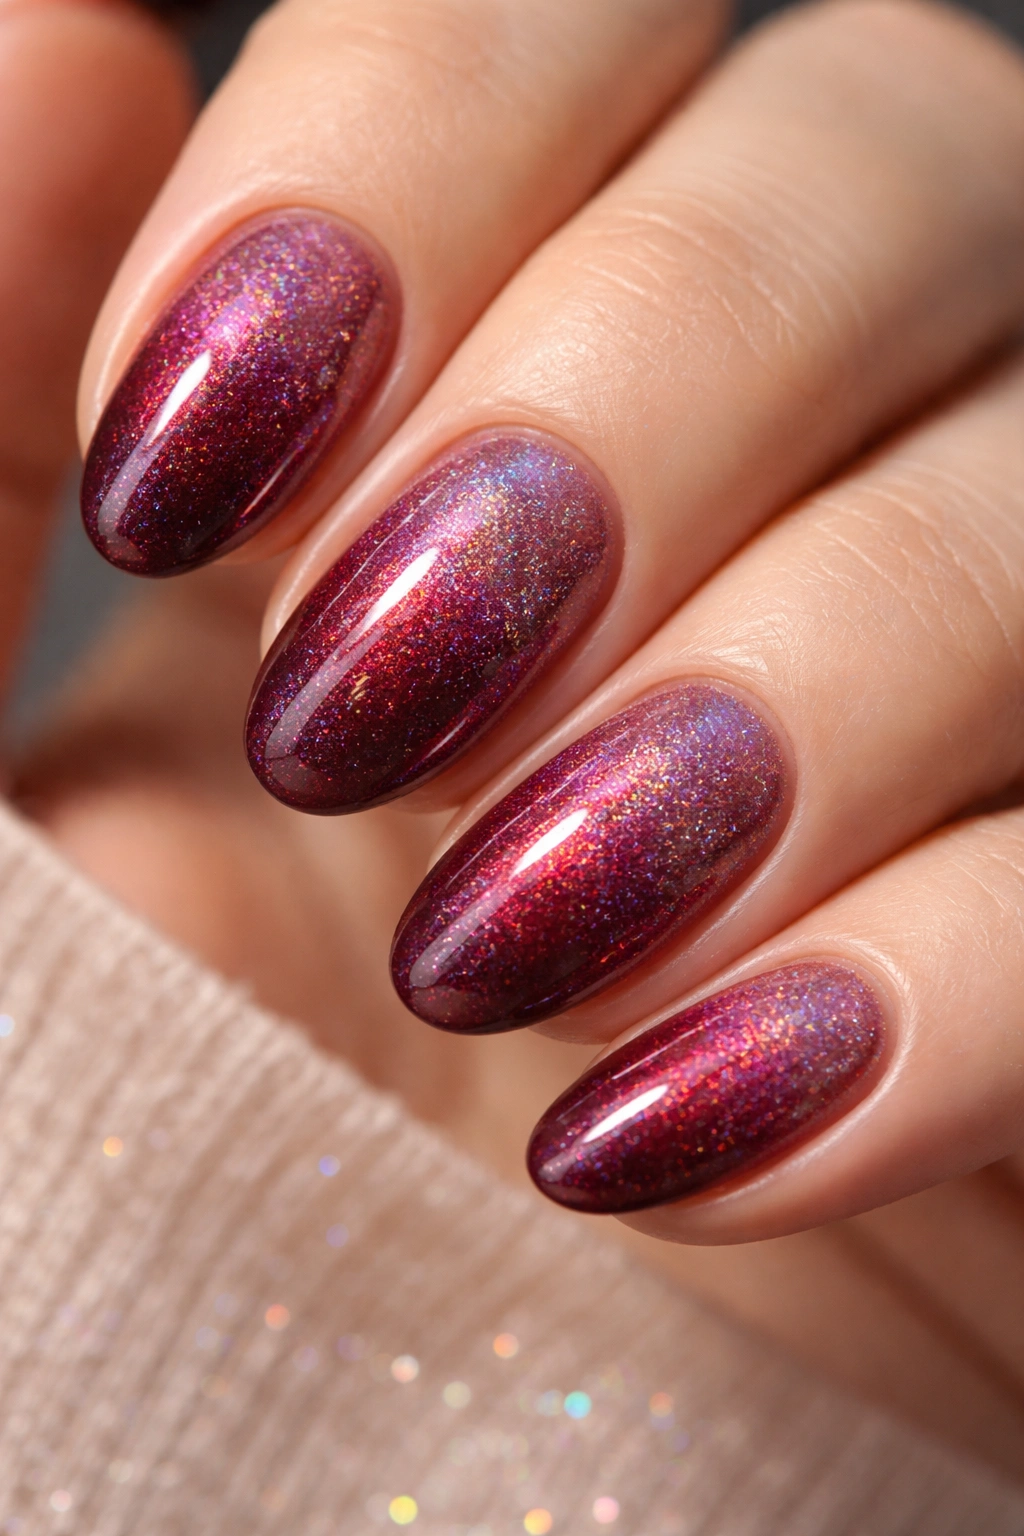
Plum-red sits at the darkest, most blue-toned end of the dark red spectrum — almost purple in certain light, but still firmly red when you look at it straight on. As a gradient, moving from a lighter cranberry at the base to deep plum-red at the tip, with holographic shimmer running through both shades, it produces something that needs to be seen in motion to be fully appreciated.
The holographic element here isn’t a separate step or applied on top — the shimmer is built into the polish formula itself. Holographic polishes contain micro-particles that scatter light into a rainbow spectrum. Sounds like it would look busy, right? On a dark red base, the holographic scatter stays subtle. Visible when the light hits it, invisible from a distance, quietly present the whole time. That’s exactly the right calibration for this look.
The gradient technique is standard sponge ombre: both shades painted onto a sponge, dabbed onto the nail in overlapping layers. What makes this particular gradient work especially well on short almond nails is the color relationship between cranberry and plum-red — they’re close enough in value that the blend is smooth and gradual, with no harsh mid-point. The transition feels continuous rather than divided.
From across the room, this reads as simply “dark red.” Up close, it reveals depth and movement that most solid-color manicures don’t have. That gap between the distant impression and the close-up reality is exactly the right energy for classy.
Choosing the Right Dark Red Shade for Your Skin Tone
Not every dark red works equally well on every person, and this is worth thinking about before you commit to a shade.
Warm undertones — skin with yellow, peach, or golden tones — tend to look best with dark reds that have a warm bias: garnet, cranberry, brick burgundy. These shades harmonize with the warmth in the skin rather than clashing with it.
Cool undertones — skin with pink, red, or bluish veins — suit the cooler end of the dark red spectrum: oxblood, wine, dark cherry, anything with a blue-red quality. These shades intensify the natural contrast between the nail color and the skin.
Neutral undertones are the lucky ones. Most dark reds work. Experiment freely.
Fair skin pairs beautifully with deep wine and burgundy because the contrast is high and dramatic — the dark color pops against a pale background in a way that’s visually arresting. Medium skin tones suit garnet and cranberry, which echo the warmth of olive and medium-brown complexions. On deep and rich dark skin tones, oxblood and dark cherry look striking in a way that’s genuinely hard to describe — the color seems to deepen further against darker skin, almost like the nail is glowing from within.
One more consideration: the finish changes how the shade reads. The same oxblood in glossy looks formal; in matte, it looks editorial; in shimmer, it looks warm and gemstone-like. You’re not locked into one interpretation of the color just because you’ve bought a specific shade.
How to Keep Short Almond Nails Looking Polished for Longer
There’s a specific set of things that extend the life of any manicure, and they’re worth doing properly if you’re investing time in any of the designs above.
Nail prep is the most important step and the most commonly skipped. Buff the surface of the nail lightly before applying polish — this removes the natural oils from the nail plate and gives the polish something to grip. Follow with a dehydrator or rubbing alcohol to remove any remaining residue. Base coat goes on last, before color. This sequence makes a real difference: a nail that’s been properly prepped holds polish significantly longer than one that hasn’t been.
Capping the free edge — dragging the brush lightly over the very tip of the nail with each coat, including the top coat — is the single most effective technique for preventing tip chipping. The free edge is the most vulnerable part of the nail, and most people skip it entirely.
Avoid hot water for at least an hour after your final top coat. Heat expands the nail plate slightly, and thermal expansion while the polish is fresh causes micro-lifting at the edges that you can’t see but that shortens wear time.
Reapply a thin layer of top coat every two to three days. It takes about 90 seconds and extends the manicure by several additional days. Don’t wait until the shine is gone — add a fresh coat while it still looks good.
Cuticle oil is essential for the health of the nail plate and the surrounding skin, but apply it to the cuticle and skin only — not on the nail surface, which can cause polish to peel prematurely. Dry, cracked cuticles also make even the most polished manicure look less refined, so this step matters aesthetically as much as it does for nail health.
And one that seems obvious but needs saying: don’t use your nails as tools. Opening packaging, popping tabs, scratching labels — all of these break almond tips faster than almost anything else.
Final Thoughts
Dark red on short almond nails is one of those combinations that doesn’t age, doesn’t feel like a trend, and doesn’t require you to commit to a single version of itself. The spectrum from light cranberry to near-black oxblood contains enough variation that you could wear a different interpretation every month without repeating yourself.
The designs in this list range from genuinely simple — the classic crimson gloss, the matte oxblood — to slightly more involved techniques like the encapsulated dried flower or the chrome mirror finish. Worth knowing: the more involved ones aren’t necessarily harder, just different. Foil application takes about three minutes once you’ve done it once. Chrome powder is actually faster than painting a design by hand.
If you’re choosing just one to start with, the classic deep crimson or the burgundy jelly effect will give you the most return for the least effort. Both look deliberately done and feel classy in every environment. And they’re the right foundation for understanding what dark red does on this nail shape before you start experimenting with texture and nail art.
Pick one. See how you feel. Dark red has a way of making itself at home.
