

Starting a new school year is the perfect time to refresh your look from head to toe—and your nails are the ideal place to make a bold statement. Short squoval nails have become the go-to shape for students, professionals, and anyone seeking a nail style that’s effortlessly chic, practical, and incredibly versatile. The squoval shape (that perfect hybrid between a square and an oval) strikes the sweet spot: it’s strong enough for daily life, elegant enough for any occasion, and short enough that you won’t be compromising on function or breaking them off at your locker.
The beauty of back to school nails is that you get to show your personality without going overboard. Whether you’re channeling minimalist vibes, embracing playful pastels, or going full maximalist with bold patterns, short squoval nails provide the perfect canvas. They work equally well for middle schoolers making their first big statement, high schoolers ready to stand out, and college students balancing studies with style. Plus, short nails are genuinely more practical when you’ve got a backpack to carry, note-taking to do, and a full schedule to manage.
This is where creativity meets practicality—15 different ways to nail that back to school look (pun intended). Each design works beautifully on short squoval nails, and most can be recreated at home or customized at your favorite nail salon.
1. Soft Blush and White Ombre
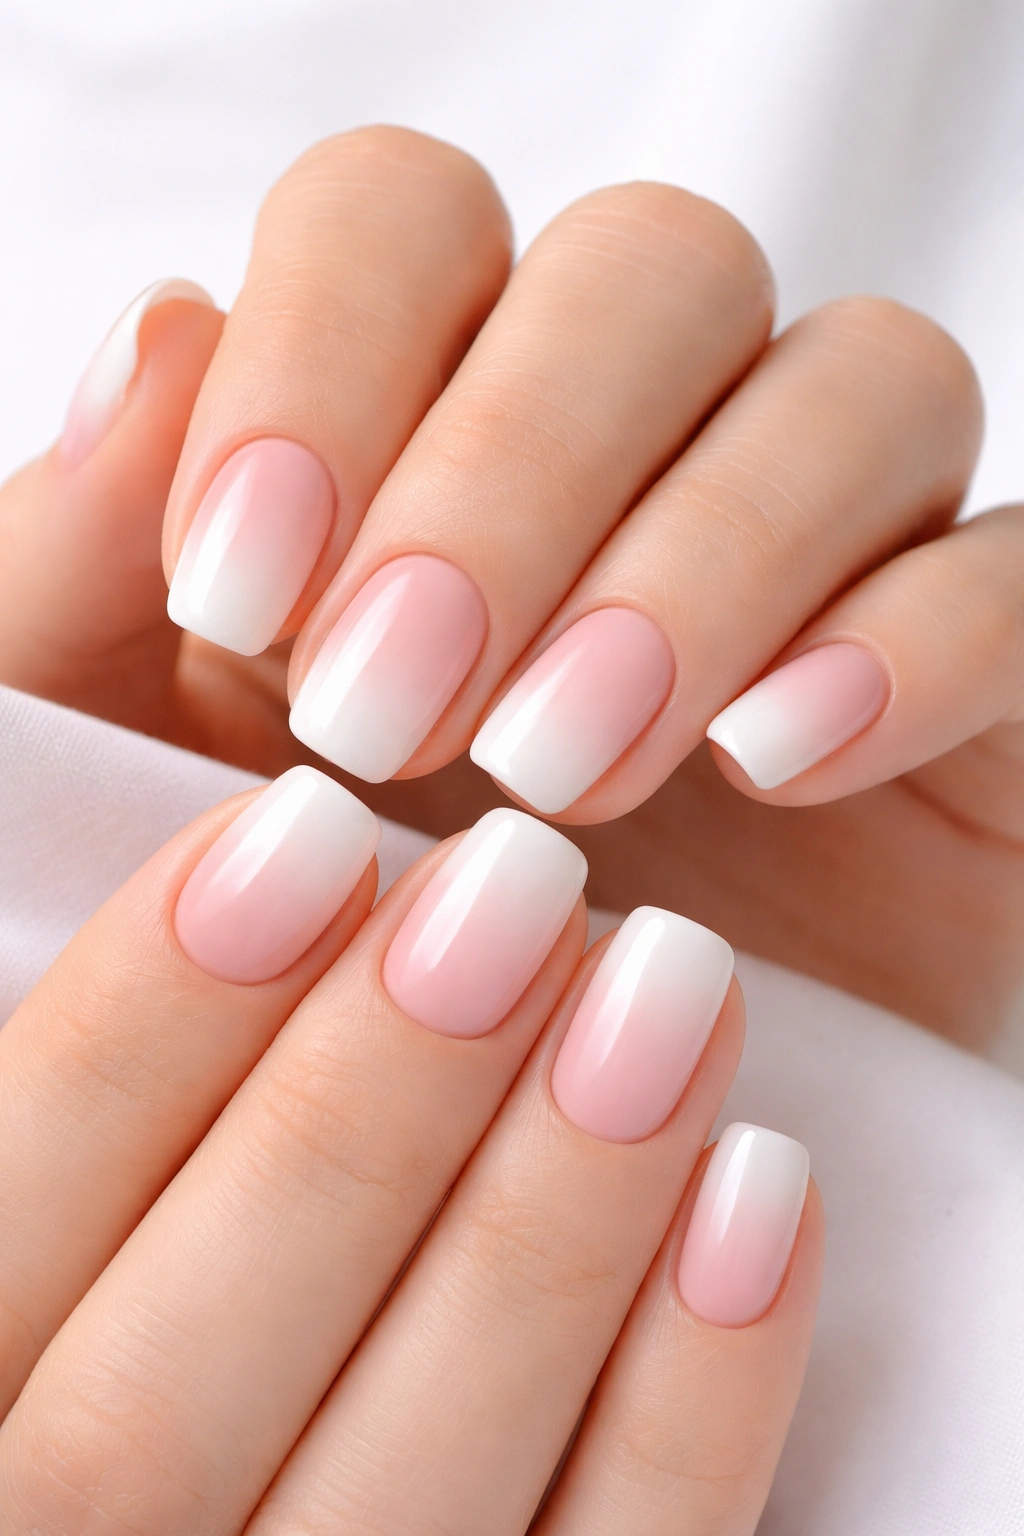
This timeless gradient is pure sophistication. Start with a pale blush pink base that gradually fades to crisp white tips, creating a soft ombre effect that looks expensive and refined. It’s the nail equivalent of a fresh start—perfect for walking into the school year feeling polished and put-together.
Why It’s Perfect for Back to School
The blush-to-white gradient works because it feels both modern and classic simultaneously. You can wear this design to class, to a school assembly, or even to parent-teacher conferences. It’s understated but undeniably elegant, and it photographs beautifully.
How to Get This Look
- Use a warm blush pink as your base coat (think ballet pink or dusty rose, not hot pink)
- Apply 2-3 thin coats for full opacity and an even finish
- Grab a makeup sponge and dab white polish along the tips, blending where the colors meet
- Seal everything with a high-quality top coat for lasting shine and smoothness
- If you’re not confident with blending, ask your nail technician for a gradient design—they can create perfectly seamless transitions
Pro tip: This design lasts longer if you avoid soaking your nails in water immediately after application. Wait at least 12 hours before taking that first shower.
2. Deep Navy with Gold Accents
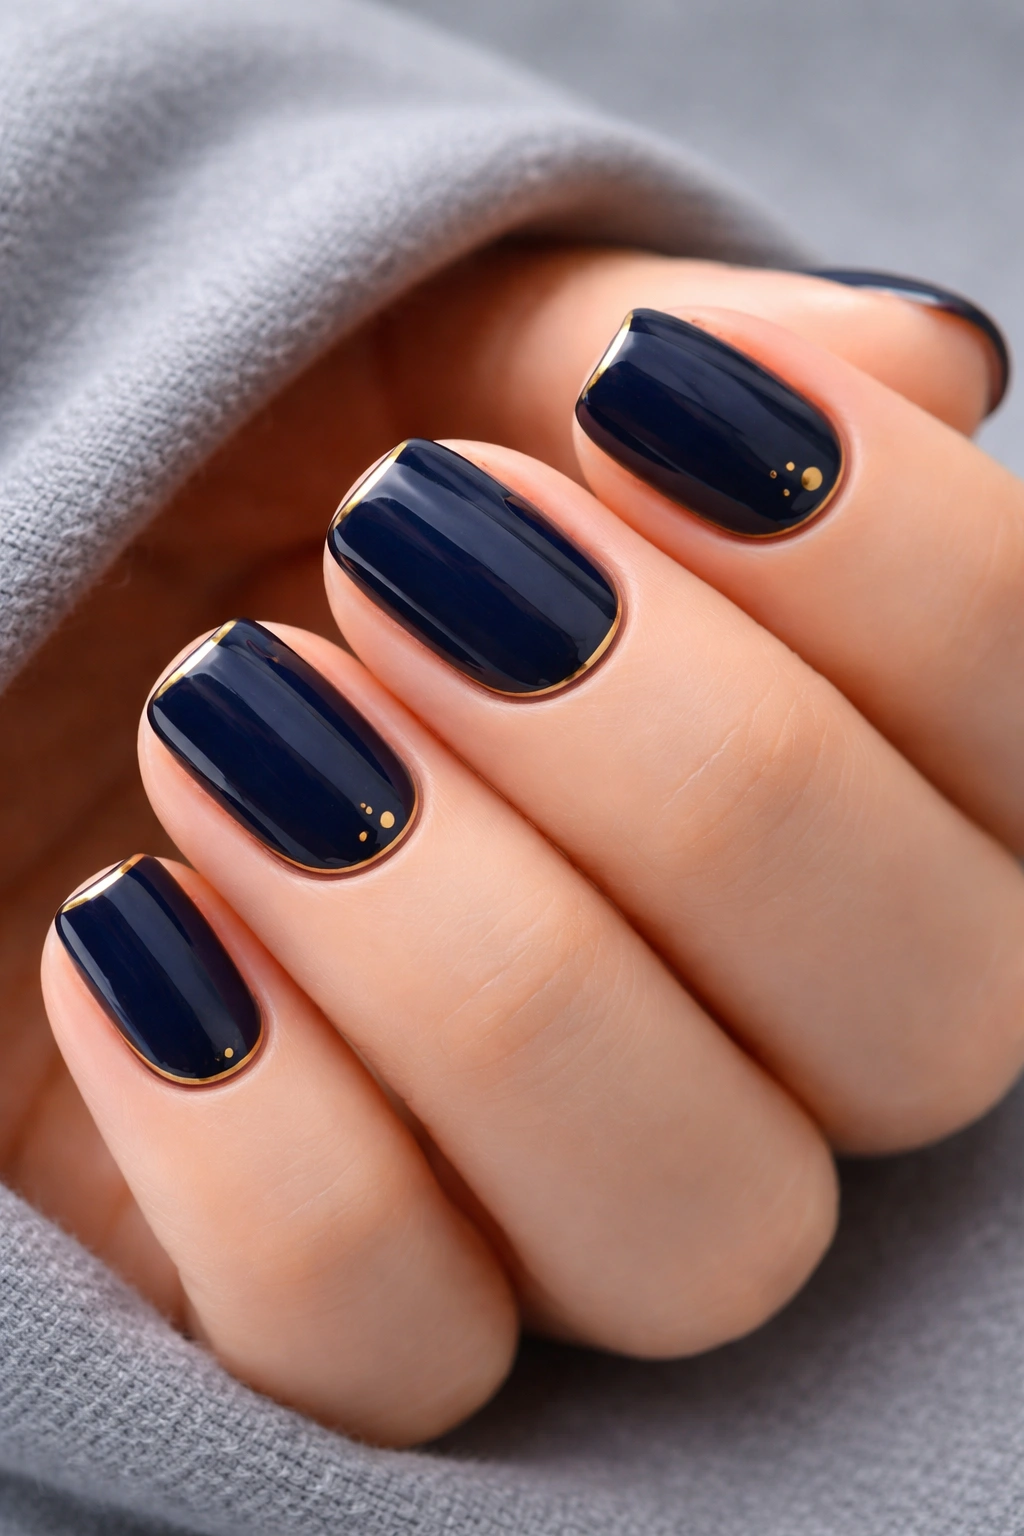
Navy blue screams sophistication, and when you add delicate gold accents—think fine lines, geometric borders, or tiny gold dots—it becomes absolutely stunning. This design feels expensive and polished without trying too hard, making it ideal for students who want to look put-together without making a huge visual statement.
The Luxury Factor
Navy and gold is a color combination that transcends trends. It works for every season, every occasion, and every age. One coat of deep navy blue creates an instantly professional look, while strategic gold details add just enough personality to keep it from feeling boring. The contrast between the cool navy and warm gold is where the real magic happens.
Styling Options
- Paint your entire nail navy, then add a thin gold line 1-2mm from the edge as a French tip variation
- Create a geometric accent nail on your ring finger or middle finger with navy as the base and gold as the pattern
- Try a half-moon manicure where the base is navy and the crescent tip is filled with thin gold stripes
- Add a tiny gold dot to the center of each nail for a subtle, minimalist touch
- Paint navy on most nails and create one accent nail with a navy base and gold confetti-like splatters
3. Classic Red with Matte Finish
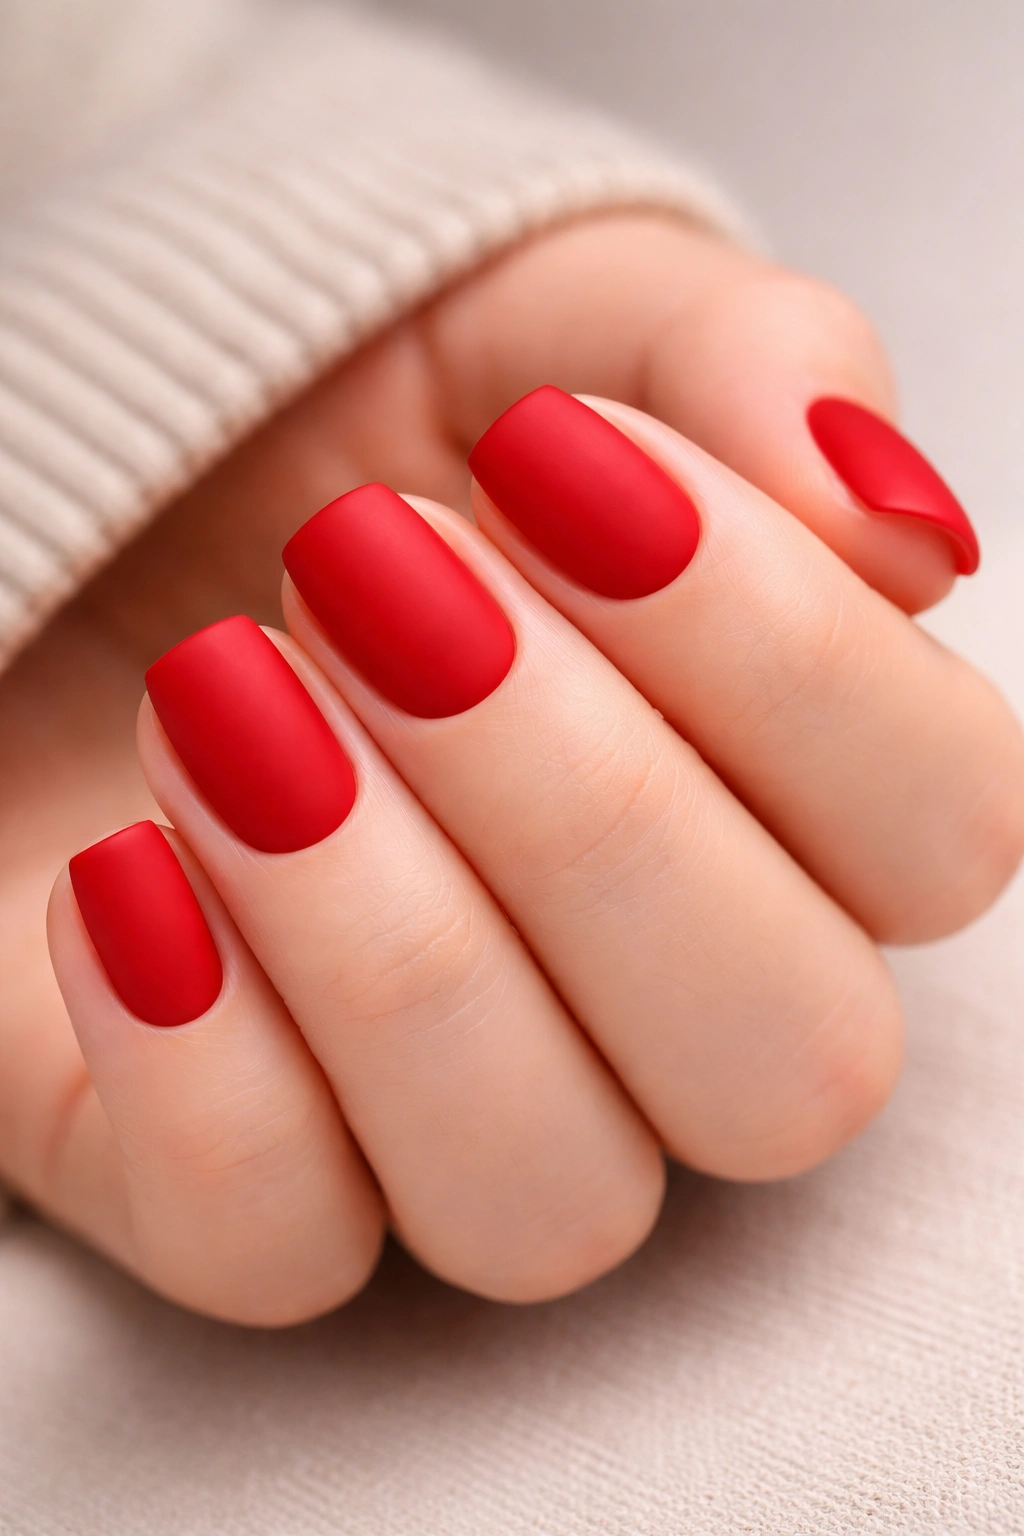
There’s a reason red nails are timeless—they instantly make you feel confident. But matte red is where the real magic happens. Instead of that shiny red that can sometimes feel dated or overly formal, a matte red feels modern, edgy, and unexpectedly cool. It’s bold without being loud.
What Makes Matte Different
Matte finishes flatten light and absorb it rather than reflecting it, which completely changes how a color reads. Red shifts from “formal dinner” to “cool and contemporary” the moment you eliminate the shine. Matte textures also hide minor imperfections better than glossy finishes, so your nails look flawless even if your application wasn’t perfectly perfect.
How to Nail the Matte Red
- Choose a true red without orange or blue undertones—the right shade matters more with matte finishes
- Apply your base coat, then 2 full coats of matte red polish for even coverage
- Top with a matte top coat (not a glossy one) to seal and protect
- If you want added depth, consider a matte red base with a glossy red tip (reverse gradient)
- Clean up any polish around your cuticles with a small brush and acetone for a professional finish
Insider note: Matte finishes can feel a bit chalky or dusty if you skip the top coat. Always seal with a matte topcoat specifically—regular glossy topcoats will make it shiny again.
4. Soft Lilac with Lavender Accents
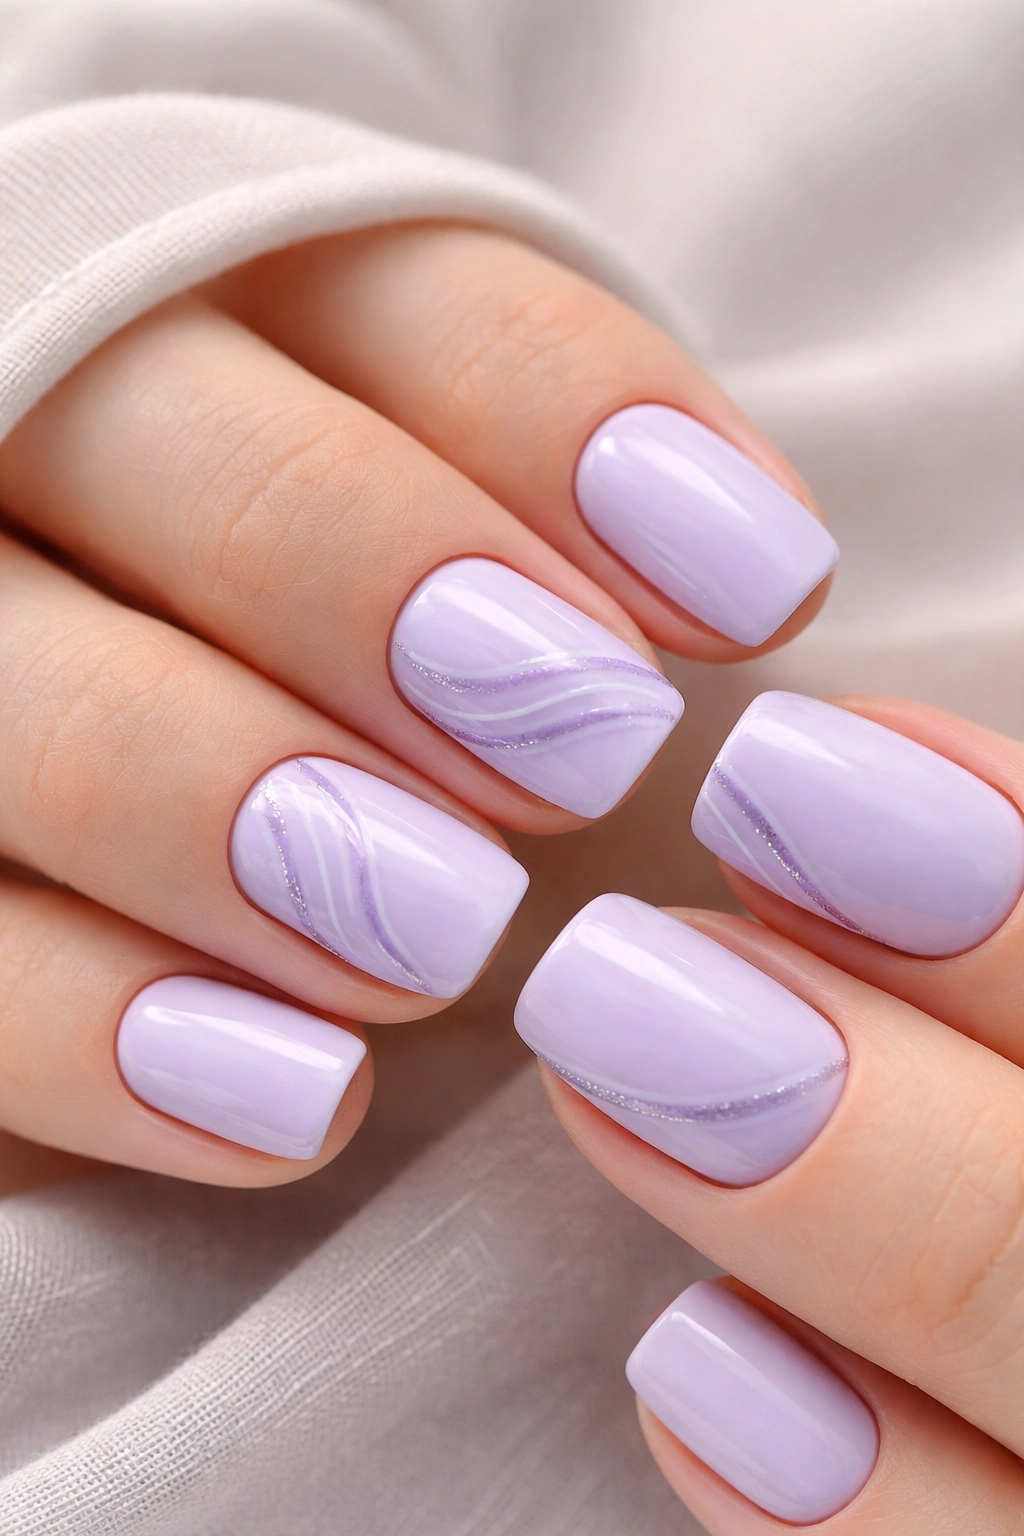
Lilac is having a moment, and it’s perfect for back to school because it feels playful without being juvenile. A soft, creamy lilac base paired with slightly deeper lavender accents creates a design that’s calming, beautiful, and totally age-appropriate for any grade level. The monochromatic purple palette feels cohesive and intentional.
Why Soft Pastels Work Now
Pastels stopped being “babyish” approximately five years ago, and now they’re considered sophisticated and trendy. There’s something about pale, muted colors that reads as intentional and stylish. Soft lilac specifically has an almost ethereal quality that makes you look like you’ve got your life together, even if you’re running late for first period.
Creating This Design
- Paint all nails with a pale lilac base (test it in natural light first—some lilacs can look too gray or too purple)
- On 1-2 accent nails, add a thin stripe of deeper lavender down the center or along the side
- Create a gradient by mixing a bit of your base lilac with deeper lavender to create an in-between shade
- Add a delicate geometric pattern using a thin brush—triangles, lines, or dots work beautifully
- Consider a ombré from lilac at the base to white at the tips for added dimension
5. Preppy Black and White Stripes
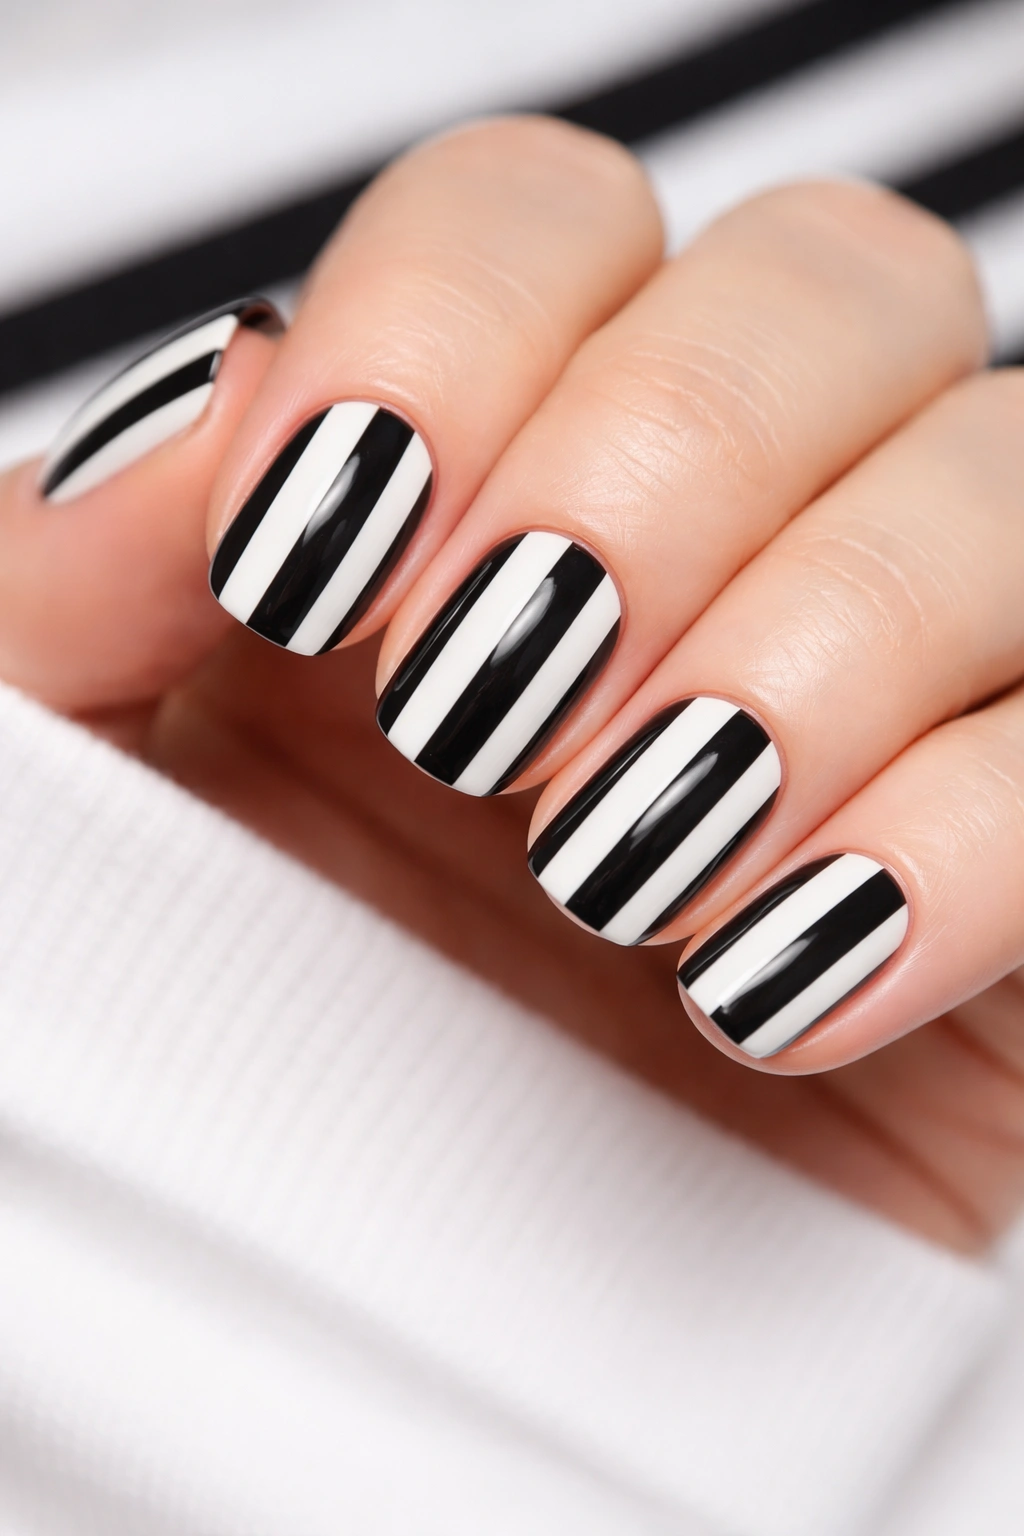
Stripes are the ultimate preppy pattern, and black and white stripes on short squoval nails have major boarding school energy—in the best way. This design says “I’m stylish and I actually put thought into this,” and it pairs perfectly with nearly any school outfit. The graphic quality makes it feel more interesting than a solid color, but the classic color combo keeps it wearable.
The Preppy Appeal
Black and white stripes work because they’re completely timeless. They complement virtually any skin tone, any outfit, and any aesthetic. Whether you’re wearing jeans and a hoodie or a blazer and dress pants, these nails feel appropriate and intentional. Stripes also create a visual lengthening effect, which makes shorter nails appear more elegant.
Stripe Pattern Ideas
- Thin vertical stripes running from base to tip for a classic look
- Horizontal stripes (like the French tip, but with repeated bands of color)
- Diagonal stripes for a more dynamic, playful feel
- Thick and thin stripes alternating for visual interest
- Stripes on just one accent nail with solid black or white on the others
- One nail all black, one all white, and the remaining nails striped—a color-blocking approach
Worth knowing: The thinner your stripes, the more precise you need to be or the fuzzier they’ll look. If you’re doing this at home, use a thin striping brush and let each color dry completely between stripes.
6. Cream with Delicate Floral Accents
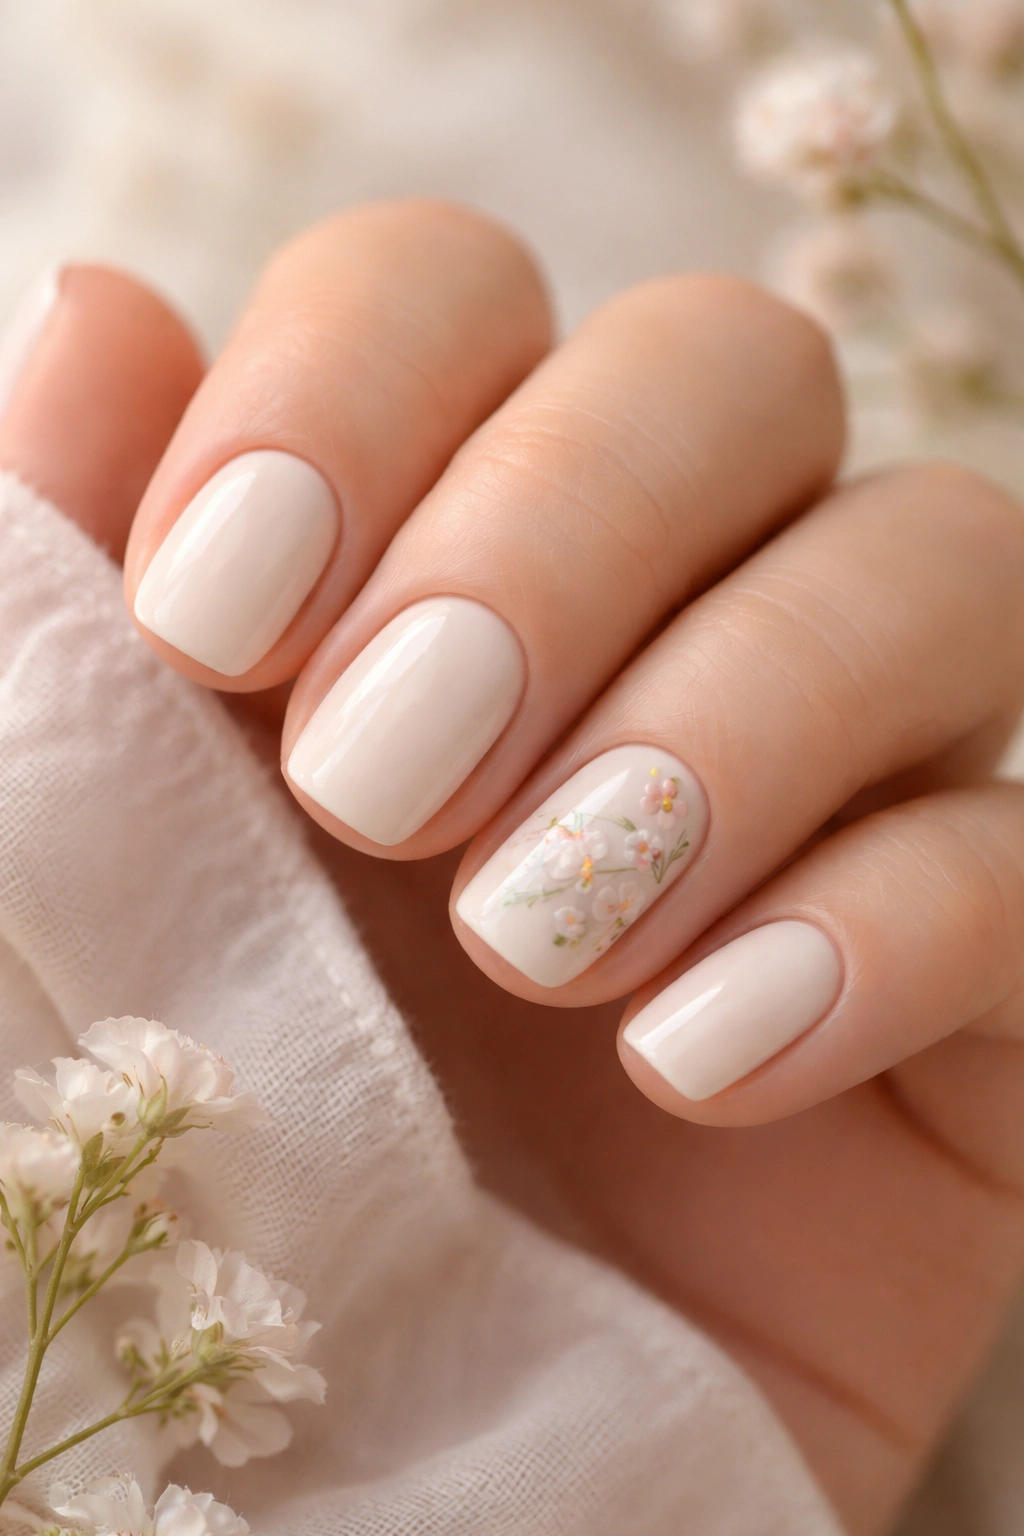
A creamy off-white or vanilla base is like the perfect blank canvas, and when you add delicate florals—think tiny flowers on one or two accent nails—it becomes genuinely romantic and beautiful. This design is perfect for students who want something feminine and elegant without veering into over-the-top territory.
The Floral Advantage
Florals instantly make a manicure feel more intentional and artistic. Even simple, loosely painted flowers suggest that you care about the details. Paired with a neutral base, florals become the star of the show without overwhelming your look. Cream bases also play well with almost any nail art because they’re neutral enough to let accent designs shine.
Floral Design Approaches
- Paint tiny wildflowers (like baby’s breath) scattered randomly on two accent nails
- Create a more structured approach with a small rose or peony on one nail per hand
- Use a stamping plate to create perfect, identical flowers on every nail for a print-like appearance
- Hand-paint simple florals using a very thin brush and nail art colors
- Do negative space florals by leaving the cream base as the flower shape and outlining with thin black or green lines
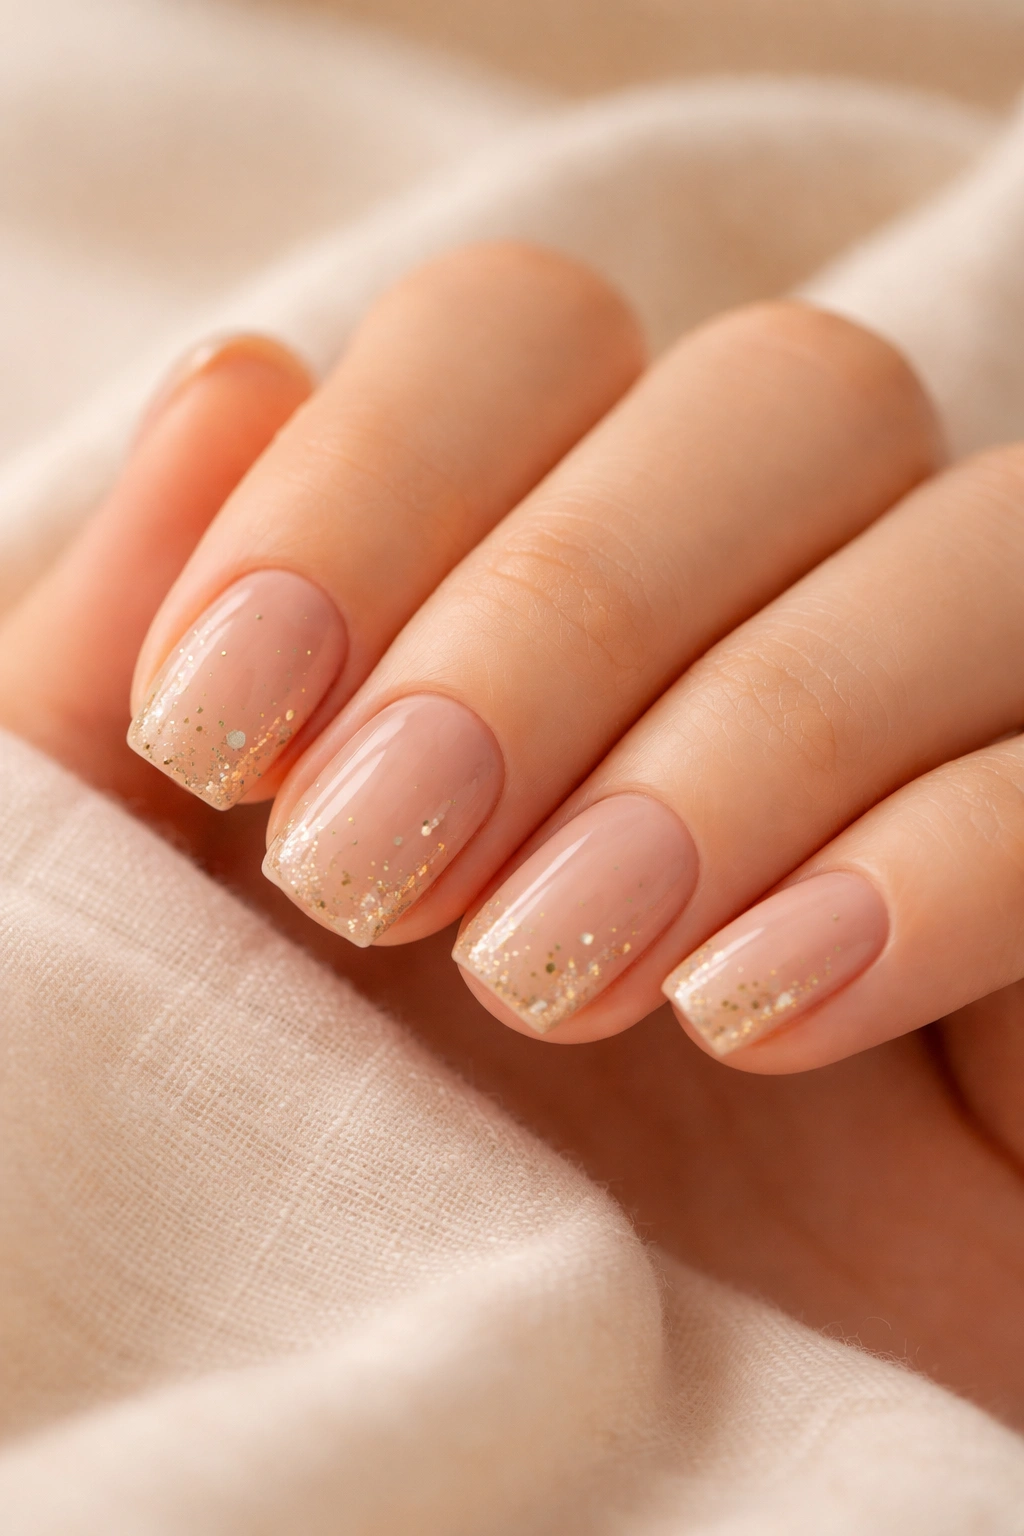
7. Nude with Metallic Gold Tips
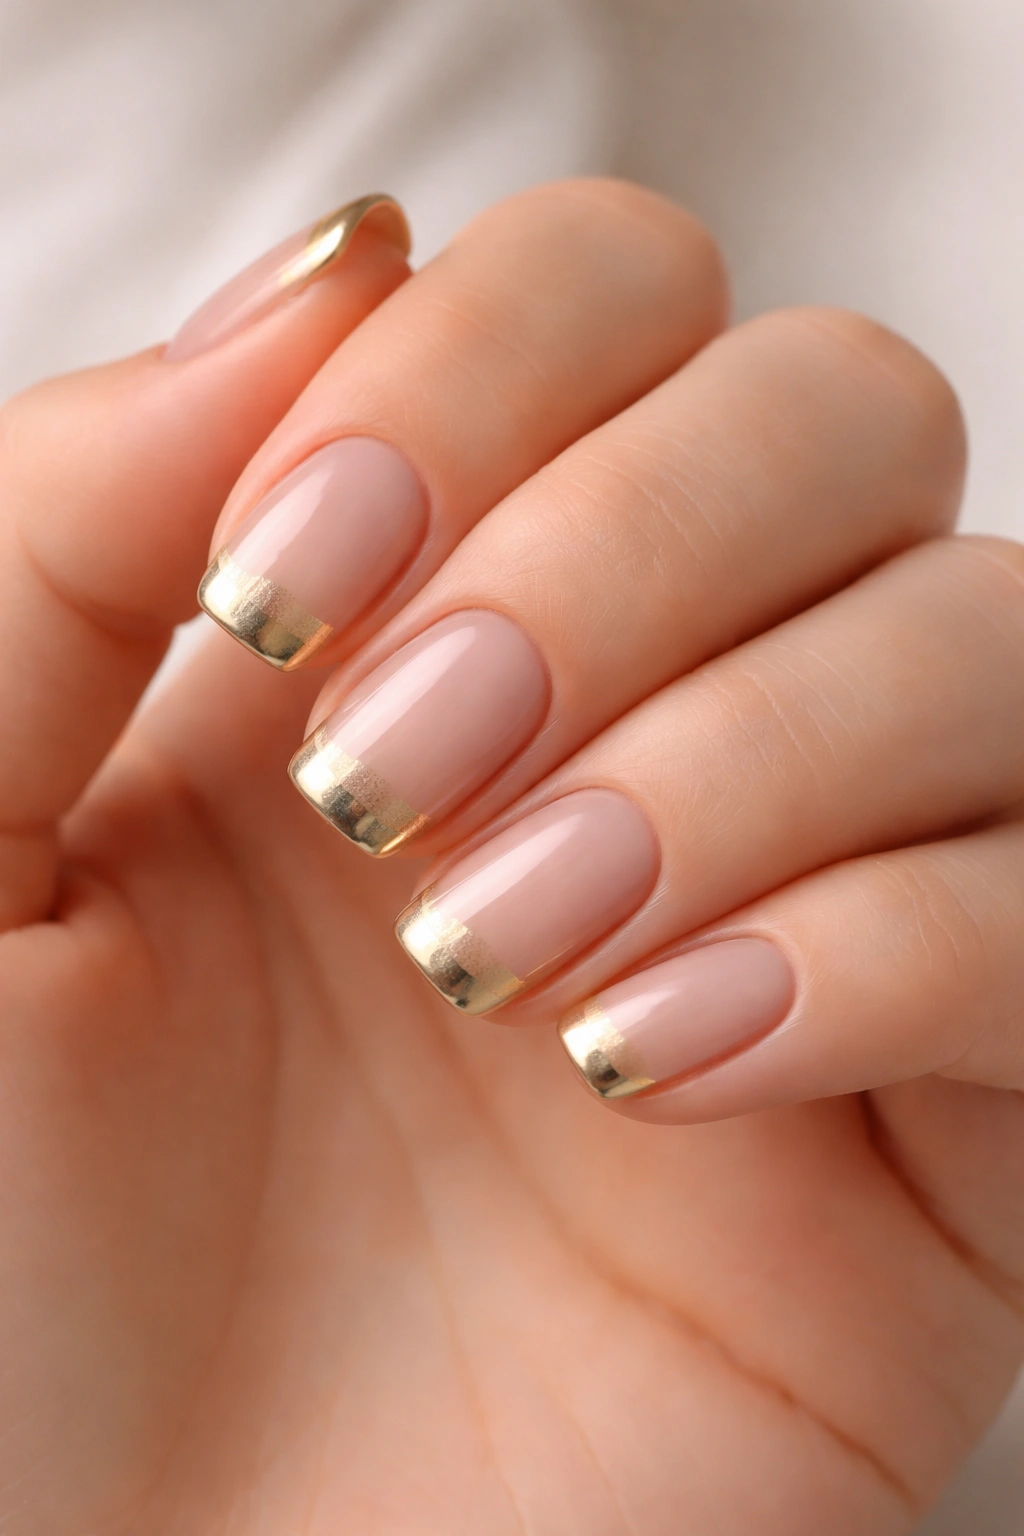
The nude-with-gold-tips design is the sophisticated cousin of the French manicure. It’s understated, elegant, and works on every single person regardless of skin tone (the secret is finding the right nude shade for your undertone). Add a metallic gold tip instead of the traditional white, and suddenly you’ve got something modern and special.
Why This Works So Well
Nude nails are incredibly wearable—they work with absolutely any outfit and any situation. They’re appropriate for the classroom, for job interviews, for formal events. But nude alone can sometimes feel a bit flat or boring. A metallic gold tip adds just enough glamour and personality without breaking the sophisticated vibe. It’s the perfect balance of “I’m put-together” and “I’m also interesting.”
Achieving the Perfect Nude-to-Gold Transition
- Choose a nude that matches your skin tone or is one shade lighter for lengthening effect
- Paint 2-3 coats of your nude base color for full, even coverage
- Paint the tips with a metallicgold polish (gel or traditional lacquer both work)
- Create a ombre effect at the transition by blending the colors slightly, or keep the line clean for a more graphic look
- Finish with a high-quality top coat for protection and shine
- If you’re using traditional polish, let each layer dry completely between coats
Pro tip: The gold tip should start about a quarter-inch from the end of your nail. Starting too far back makes it look more like a reverse French manicure, which is lovely but different from what we’re going for here.
8. Pastel Rainbow for Maximum Fun
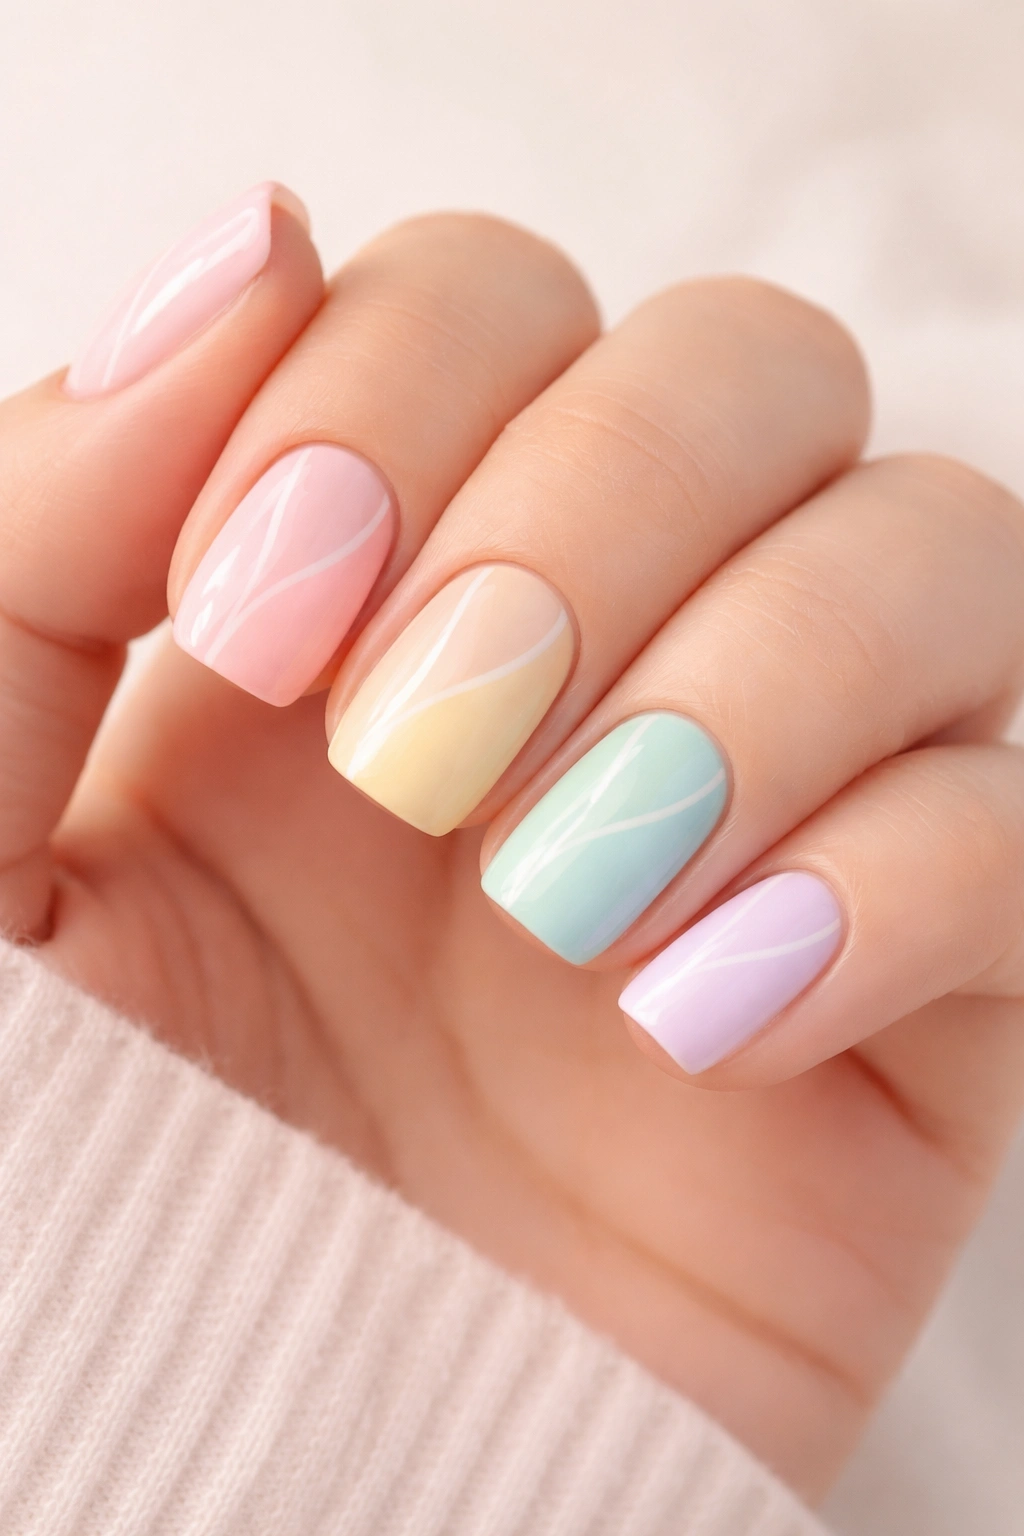
Sometimes you just want to have fun with your nails, and a pastel rainbow design screams joy while maintaining sophistication through soft, muted tones. Each nail gets a different soft pastel color—pale pink, soft peach, light yellow, mint green, powder blue—creating a cheerful, optimistic look that celebrates new beginnings.
Why Rainbow Works at Any Age
Rainbow designs feel celebratory and positive without being childish when executed in soft pastels. The key is the color palette—bright, saturated rainbows feel juvenile, but pastel versions read as artistic, thoughtful, and genuinely cool. It’s the difference between cotton candy vibes and sophisticated artistry.
Creating Your Pastel Rainbow
- Paint each nail a different pastel color, or if you have five nails per hand and want symmetry, mirror the colors across both hands
- Keep the colors soft and muted—avoid anything neon or overly bright
- Add a thin white line separating each color section for a more graphic, intentional appearance
- Use a nude or pale pink base on all nails, then add your pastel colors on the tips for a gradient effect
- Include a metallic silver or white accent line running vertically down each nail for added interest and definition
9. Burgundy with Subtle Shimmer
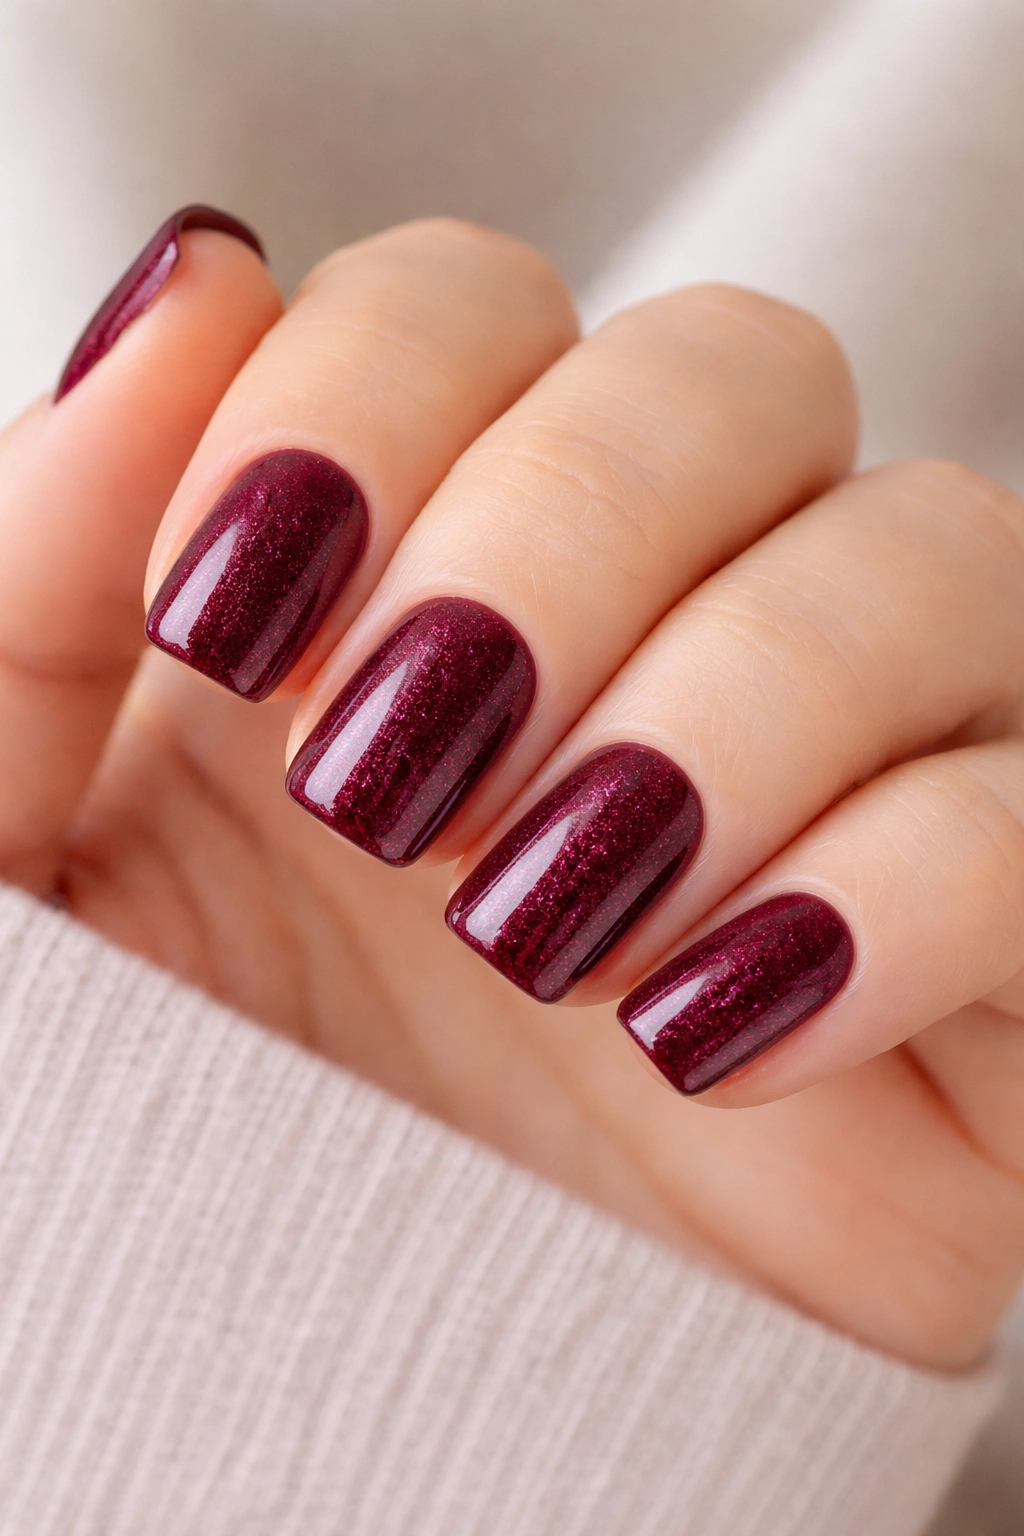
Burgundy is the color of luxury, depth, and understated elegance. Pair it with a subtle shimmer finish instead of high-gloss or matte, and you’ve got a design that catches the light beautifully but never looks over-the-top. This is the nail equivalent of wearing a burgundy sweater—it just looks expensive and intentional.
The Power of Burgundy
Burgundy works on every skin tone because it’s a complex color with both warmth and depth. Unlike bright reds that can feel harsh, burgundy is sophisticated and calming. The shimmer finish (sometimes called a holo shimmer or even a glitter finish) adds dimension without making the design busy. It catches light from different angles, creating interest throughout the day.
Achieving Burgundy Shimmer Perfection
- Start with a burgundy base in a cream or jelly finish (not glitter, just solid color)
- Layer a shimmer top coat designed for burgundy or use a burgundy polish with built-in shimmer
- If you prefer a DIY shimmer effect, dust very fine metallic powder over wet polish before it dries
- Consider adding one accent nail in solid gold or nude to break up the dark color
- Paint just the tips in a lighter shade to create a subtle depth-creating gradient
10. Clean White with Geometric Black Patterns
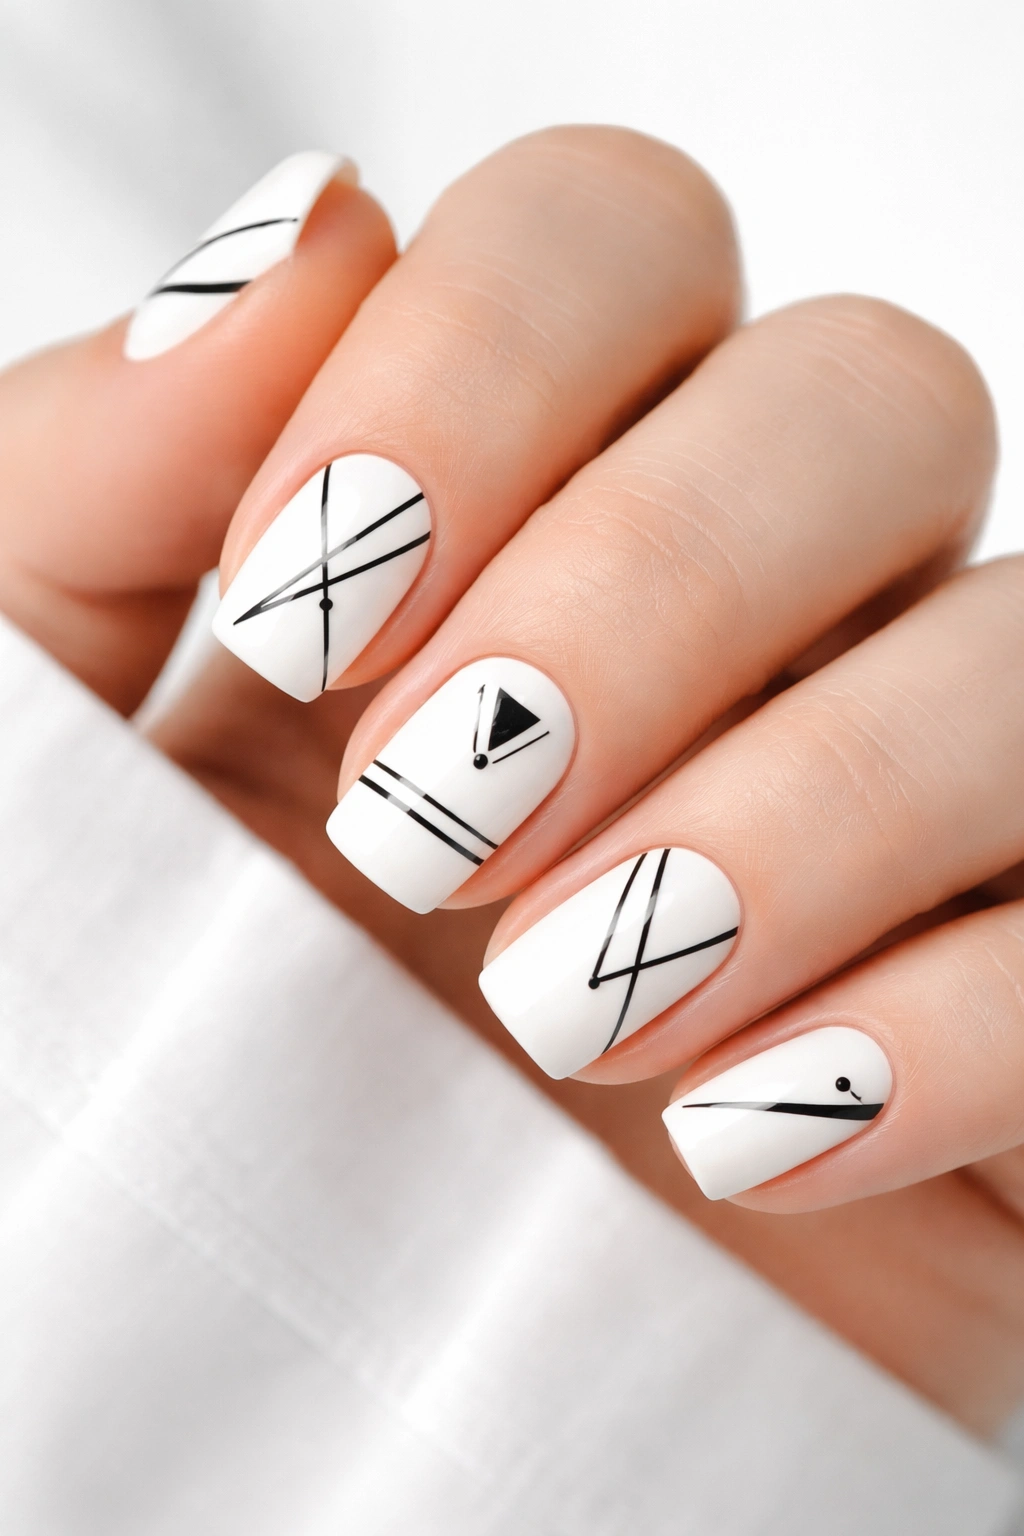
White nails are clean and fresh, and when you add bold geometric patterns in black—think triangles, clean lines, or abstract shapes—it becomes modern and artistic. This design feels very current without chasing trends, and it works beautifully on short squoval nails because the geometry complements the shape.
The Geometry Advantage
Geometric patterns feel intentional and sophisticated. They suggest artistic sensibility and precise execution. Black on white creates maximum contrast and visual impact, so even simple patterns read as striking and professional. These designs also work well for students who prefer minimalist aesthetics but still want their nails to feel special.
Geometric Pattern Ideas
- Thin black lines forming a triangle on each nail, positioned differently on each one
- A half-geometric accent nail—one nail features a bold geometric pattern, the rest stay white
- Parallel lines running diagonally across white nails, creating a striped effect with definition
- A color-blocking approach where one half is white and one half is black, with a clean line separating them
- Minimalist dot patterns—a few precisely placed black dots on each white nail
Design tip: Use a thin-tipped brush or a nail art pen for precise lines. Wobbly lines actually read as more artistic and intentional than perfectly mechanical ones, so don’t stress about perfection.
11. Dusty Rose with White French Tips
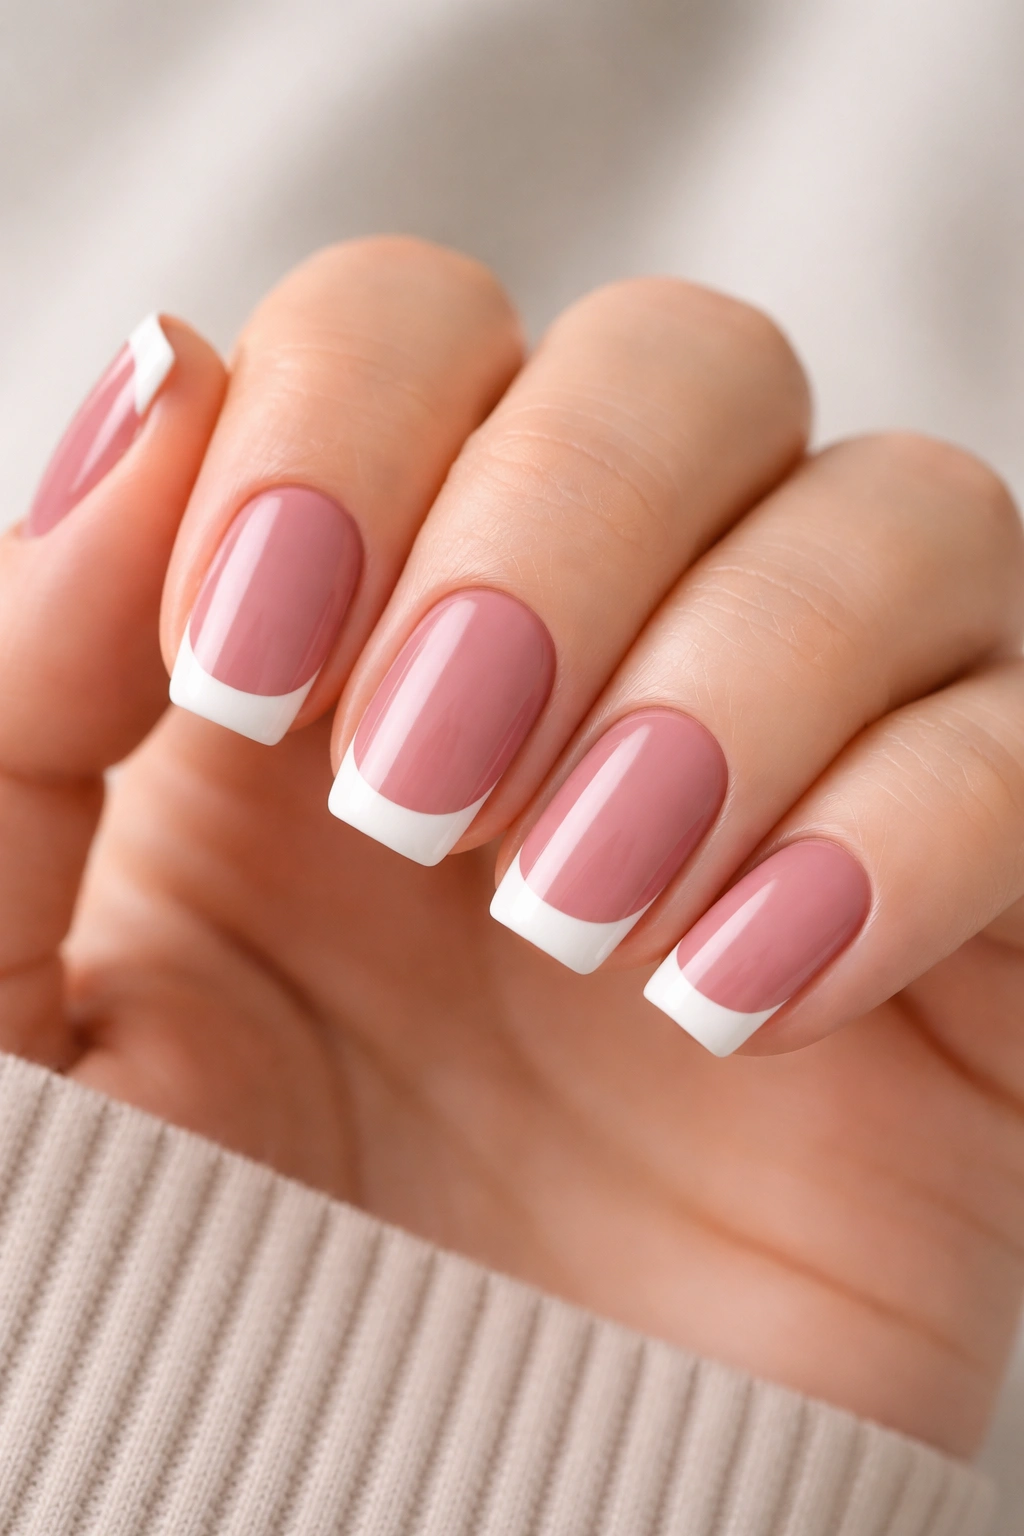
Dusty rose is the nail color that works for literally everyone. It’s warm, soft, and flattering, and it bridges the gap between nude and pink perfectly. Add clean white French tips and you’ve got a design that’s elegant, timeless, and appropriate for any situation—class, presentations, social events, you name it.
Why Dusty Rose Is Universally Flattering
Dusty rose has the warmth of pink without the intensity, and the softness of nude without the flatness. It’s a color that adapts to your skin tone and makes your hands look elegant. The white tips create definition and elongation, which makes shorter nails appear more elegant and intentional. This combination is so universally appealing that it’s hard to imagine someone who wouldn’t look amazing wearing it.
Getting the Dusty Rose French Tips Right
- Paint your entire nail with a dusty rose base—aim for 2-3 thin, even coats
- Once the base is completely dry, use a thin brush or nail tape to apply white polish to the tips
- The white section should start about a quarter-inch from the edge of your nail
- Create either a perfectly straight line (classic) or a slightly curved line (romantic) where the colors meet
- Finish with a glossy top coat for shine and protection
- If white tips look too stark against your dusty rose, try ivory or a pale pink instead
12. Sage Green with Gold Leaf Accents
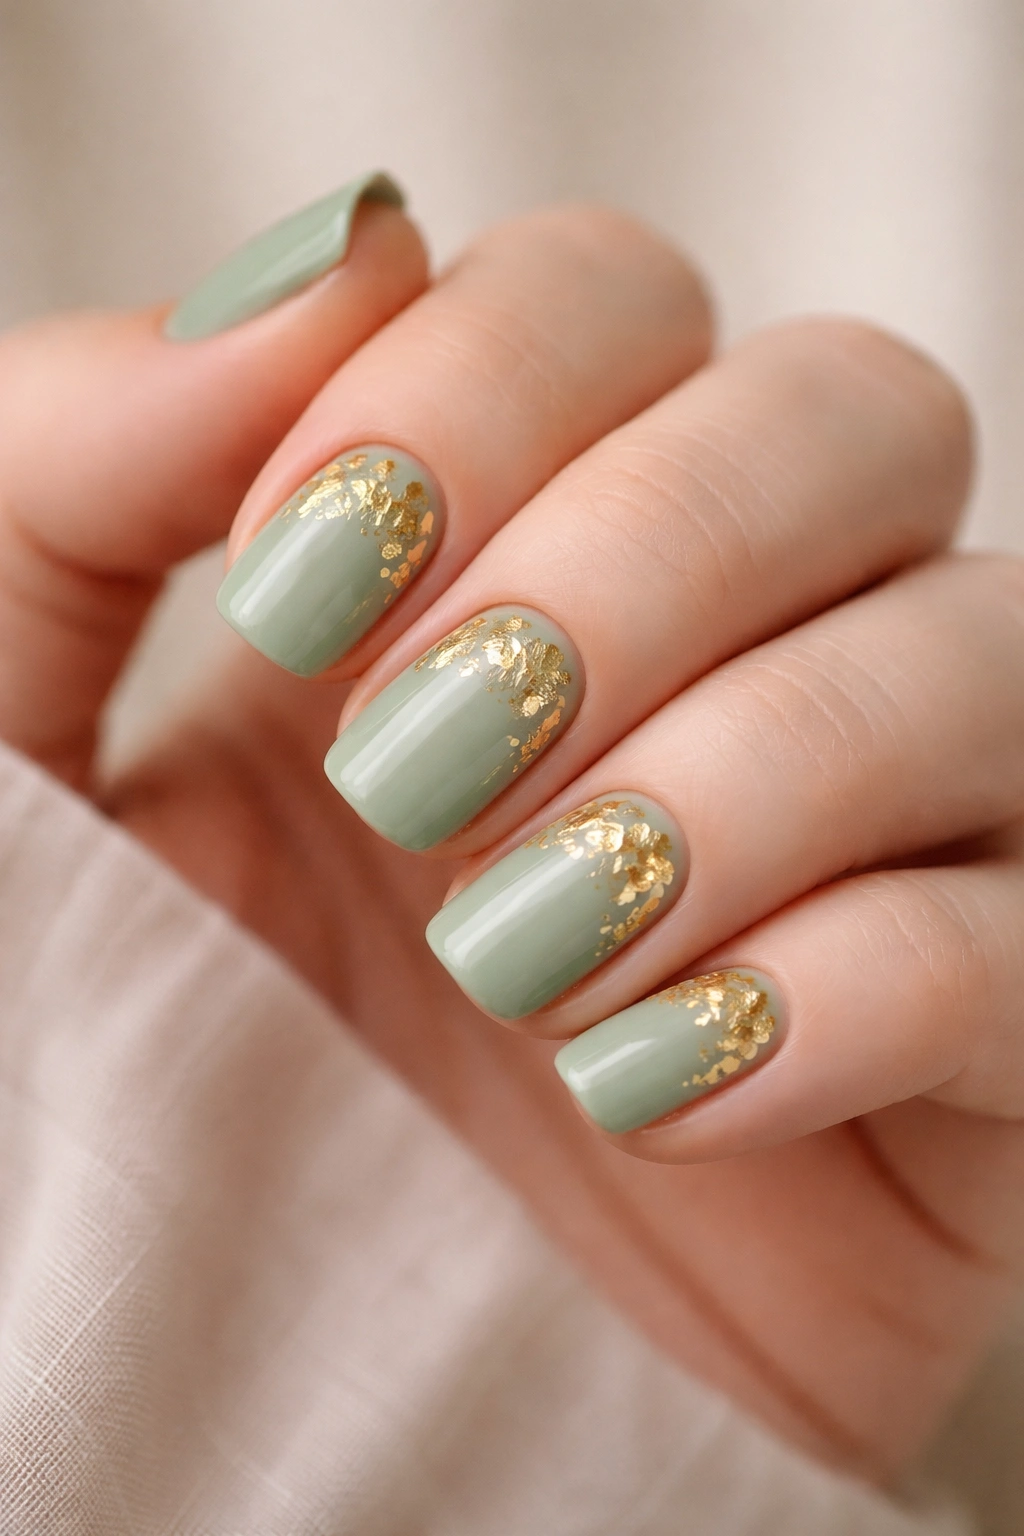
Sage green feels fresh and natural while remaining sophisticated. It’s the color of wellness and calm—perfect for a school year when you might be feeling stressed about new classes and social dynamics. Add gold leaf accents (whether scattered across the nail or concentrated on the tips), and you’ve created something genuinely special and elevated.
The Wellness Aesthetic
Sage green has become the color of intention and self-care. It feels organic, natural, and calming without being boring. Pair it with gold—a warm, precious metal—and you’re creating a design that says “I’m calm, I’m intentional, and I’ve got good taste.” This combination works beautifully for students who care about their mental health and want their nails to reflect that.
Creating Sage Green with Gold Leaf
- Paint all nails with a creamy sage green base, aiming for 2 full coats
- Once dry, use a thin brush to paint a thin strip of clear top coat where you want the gold leaf
- Press actual gold leaf onto the wet top coat (you can find gold leaf at craft stores), or use a gold leaf nail sticker
- Alternatively, paint thin gold stripes or a gold-foil ombre effect along the tips
- Consider using nail foil stickers designed for this look—they’re easier than applying actual gold leaf
- Finish with a glossy top coat to seal everything and protect the delicate gold
Insider note: Gold leaf is real gold that’s been hammered tissue-thin. It’s elegant and genuinely luxurious, but foil stickers and gold foil designs achieve a similar effect with less fuss.
13. Navy Base with Tiny Star Accents
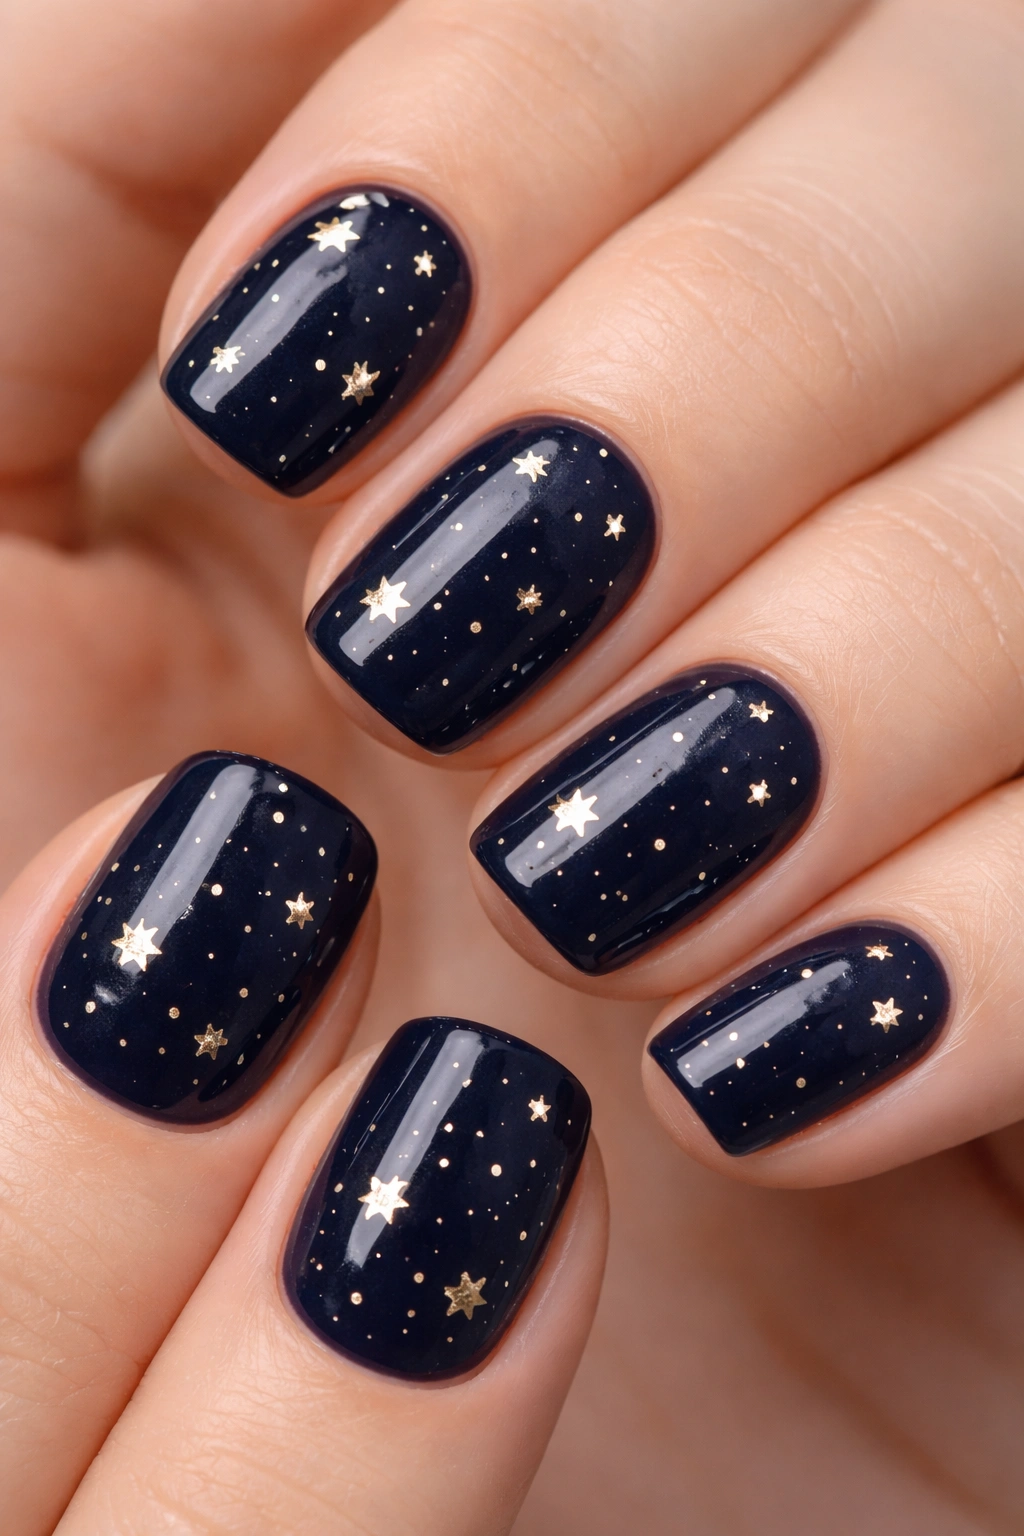
A deep navy base is sophisticated and practical, and when you add tiny white or gold stars scattered across your nails (or concentrated on accent nails), you’ve got a design that’s playful, optimistic, and perfect for someone starting a new chapter. Stars symbolize hope and possibility—exactly what back to school represents.
The Symbolism and Style
Stars work because they’re small enough to maintain sophistication but symbolic enough to add meaning. They’re not childish or babyish when done with a quality, professional-looking navy base. The stars can be tiny and scattered for a subtle look, or slightly larger and concentrated on one or two accent nails for a bolder approach. Either way, you’ve got a design with personality and intention.
Star Design Variations
- Tiny white stars scattered randomly across a navy base—use a dotting tool for perfectly round stars
- A trail of stars running diagonally across the nail from the base to the tip
- Larger, more visible stars on just the accent nails (pinky or ring finger)
- Stars in white on navy on most nails, with a reverse effect (navy stars on white) on one accent nail
- Constellation-style stars—connected with thin lines to form recognizable patterns
- Mix star sizes—a few large stars and several tiny ones on each nail for dimension
14. Blush Pink with Negative Space Design
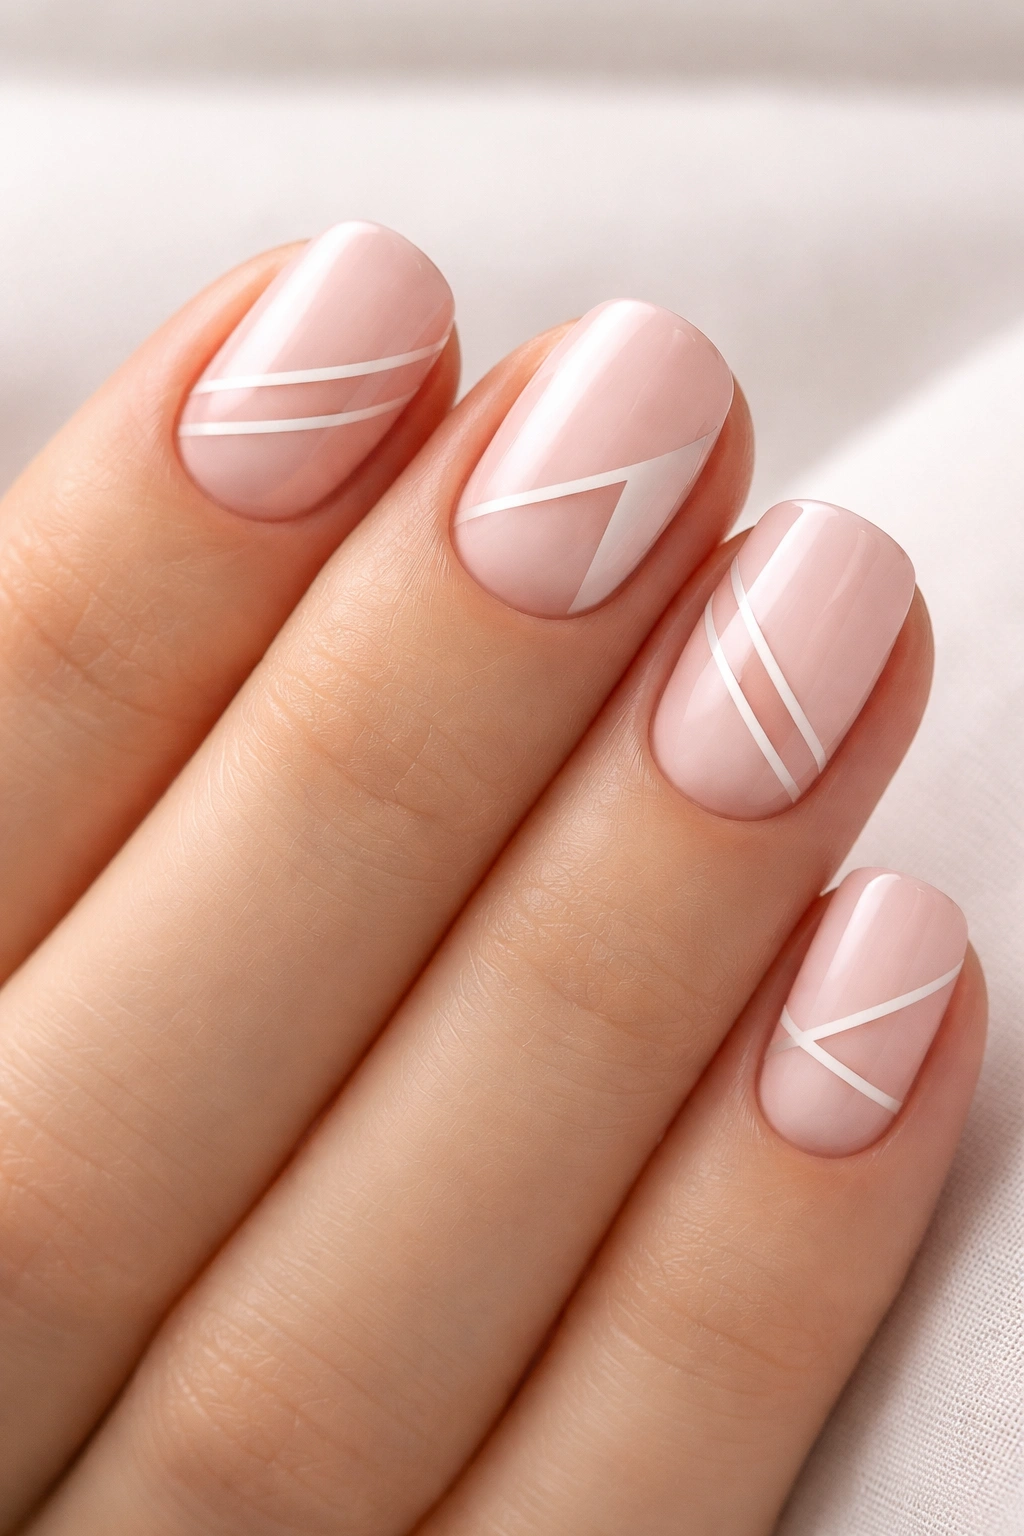
Negative space designs use the natural nail base as part of the design—you’re not covering the entire nail, but rather creating patterns by leaving parts uncovered. A pale blush pink with negative space white or nude geometric shapes is sophisticated and modern. It feels intentional and artistic without being loud or aggressive.
The Power of Negative Space
Negative space immediately reads as modern and intentional. It’s a technique used by professional nail artists because it creates visual interest while keeping the overall look refined. By leaving parts of the nail uncovered, you’re creating contrast and complexity without overwhelming the senses. It’s minimalist without being boring.
Negative Space Ideas
- Paint the base and tips in blush pink, leaving a geometric shape (circle, square, or triangle) in the center unpainted
- Create vertical negative space stripes by painting solid blush on alternating nail sections
- Paint a thin crescent moon shape on each nail in blush, leaving everything else as natural nail
- Use painter’s tape to create precise geometric shapes, remove it after painting, and leave those shapes as unpainted natural nail
- Paint only the outline of a shape in blush or a contrasting color, leaving the interior as unpainted nail
15. Soft Gray with Metallic Accents
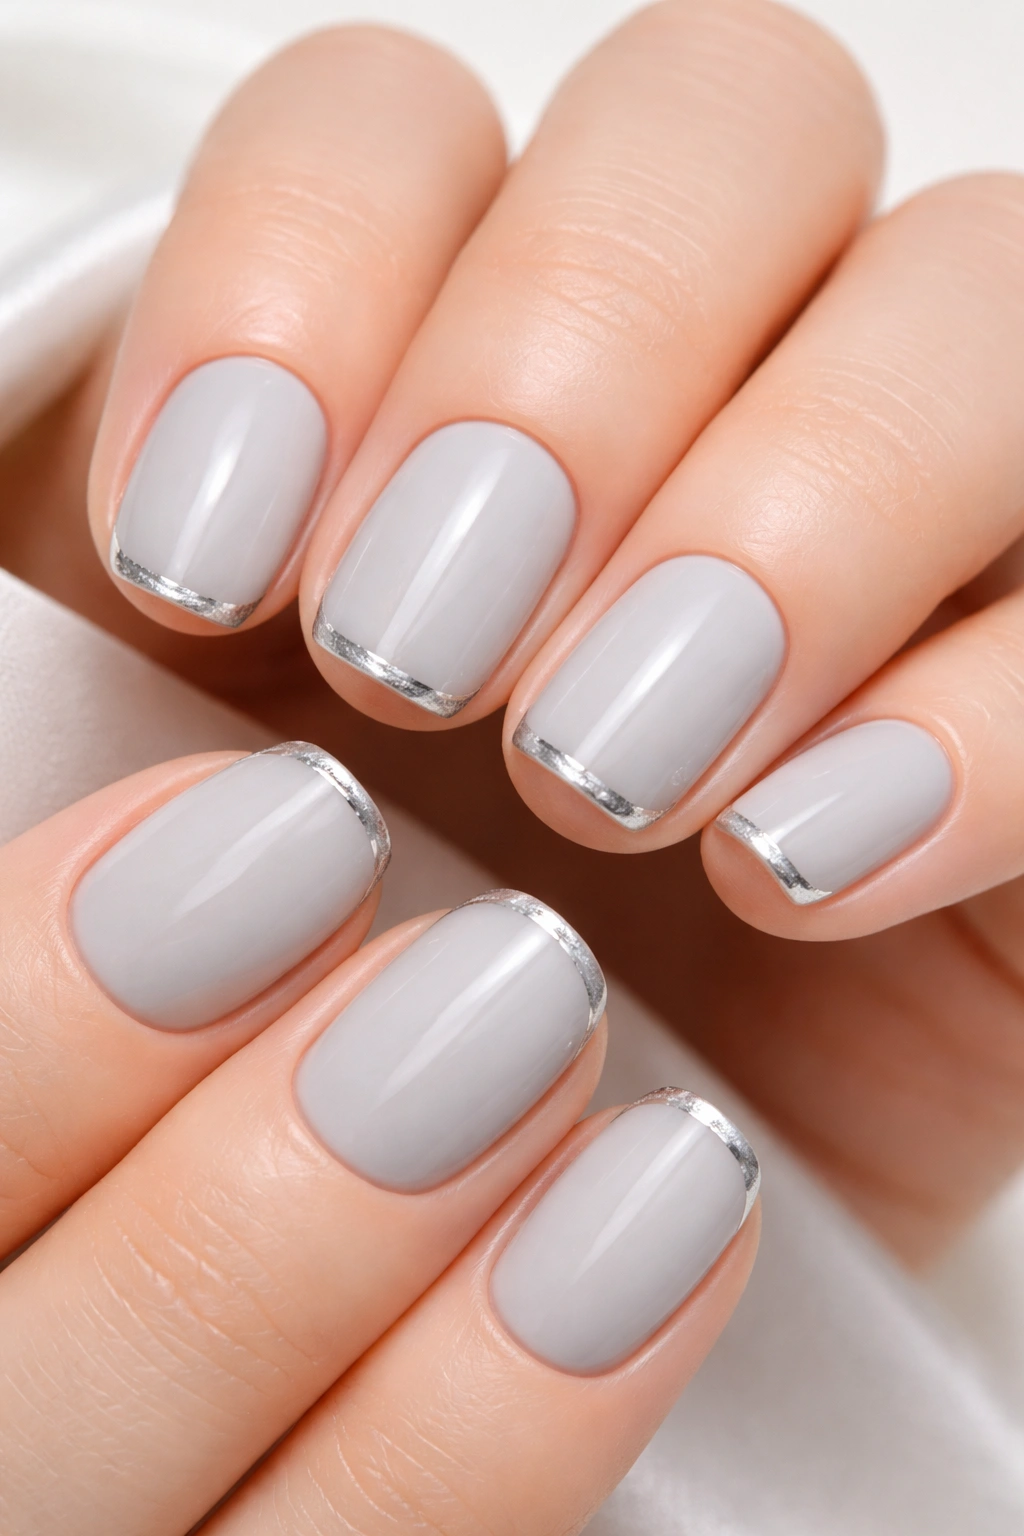
Gray is criminally underrated in nail art. A soft, creamy gray base is sophisticated, versatile, and flattering on every skin tone. Add metallic accents—silver, gold, or rose gold—and you’ve created something genuinely elevated and elegant. This design says “I’m put-together without trying too hard.”
Why Gray Is Actually Genius
Gray is the sophisticated middle ground between bold and neutral. It’s not as trendy as jewel tones or pastels, which means it’s timeless and won’t feel dated next season. It’s neutral enough to pair with any outfit, but distinctive enough to look intentional. Metallic accents transform gray from “boring” to “elevated” in seconds.
Metallic Gray Combinations
- Soft gray base with silver tips for a cool, modern French manicure variation
- Gray foundation with rose gold foil accents on the tips or edges
- A gradient from gray at the base to metallic gold at the tip for depth and dimension
- Solid gray with a metallic stripe running vertically down the center or around the edges
- Gray base with geometric metallic patterns or abstract shapes
- Ombre effect moving from gray into a metallic silver at the tips
Worth knowing: The metallic finish matters. High-gloss metallics read differently than shimmer or foil finishes. Experiment with different finishes to see which resonates most with your aesthetic.
Final Thoughts
Your nails are one of the first things people notice about you, which is why starting a new school year with a manicure that makes you feel confident is genuinely important. Whether you gravitate toward understated elegance like the nude-and-gold design, bold statements like the matte red, or playful personality like the pastel rainbow, there’s a short squoval design that perfectly reflects who you are right now.
The beauty of short squoval nails is that they’re genuinely practical for student life while still giving you room for creativity and self-expression. You’re not sacrificing functionality for style—you’re gaining both. These nails look intentional, professional, and put-together without demanding that you sacrifice everyday comfort or compromise on breaking them during sports, music, or just regular life.
Pick the design that makes you smile when you look at your hands, schedule your appointment (or grab your supplies if you’re going the DIY route), and start this school year feeling like the best, most confident version of yourself. Your nails are just the beginning.
