

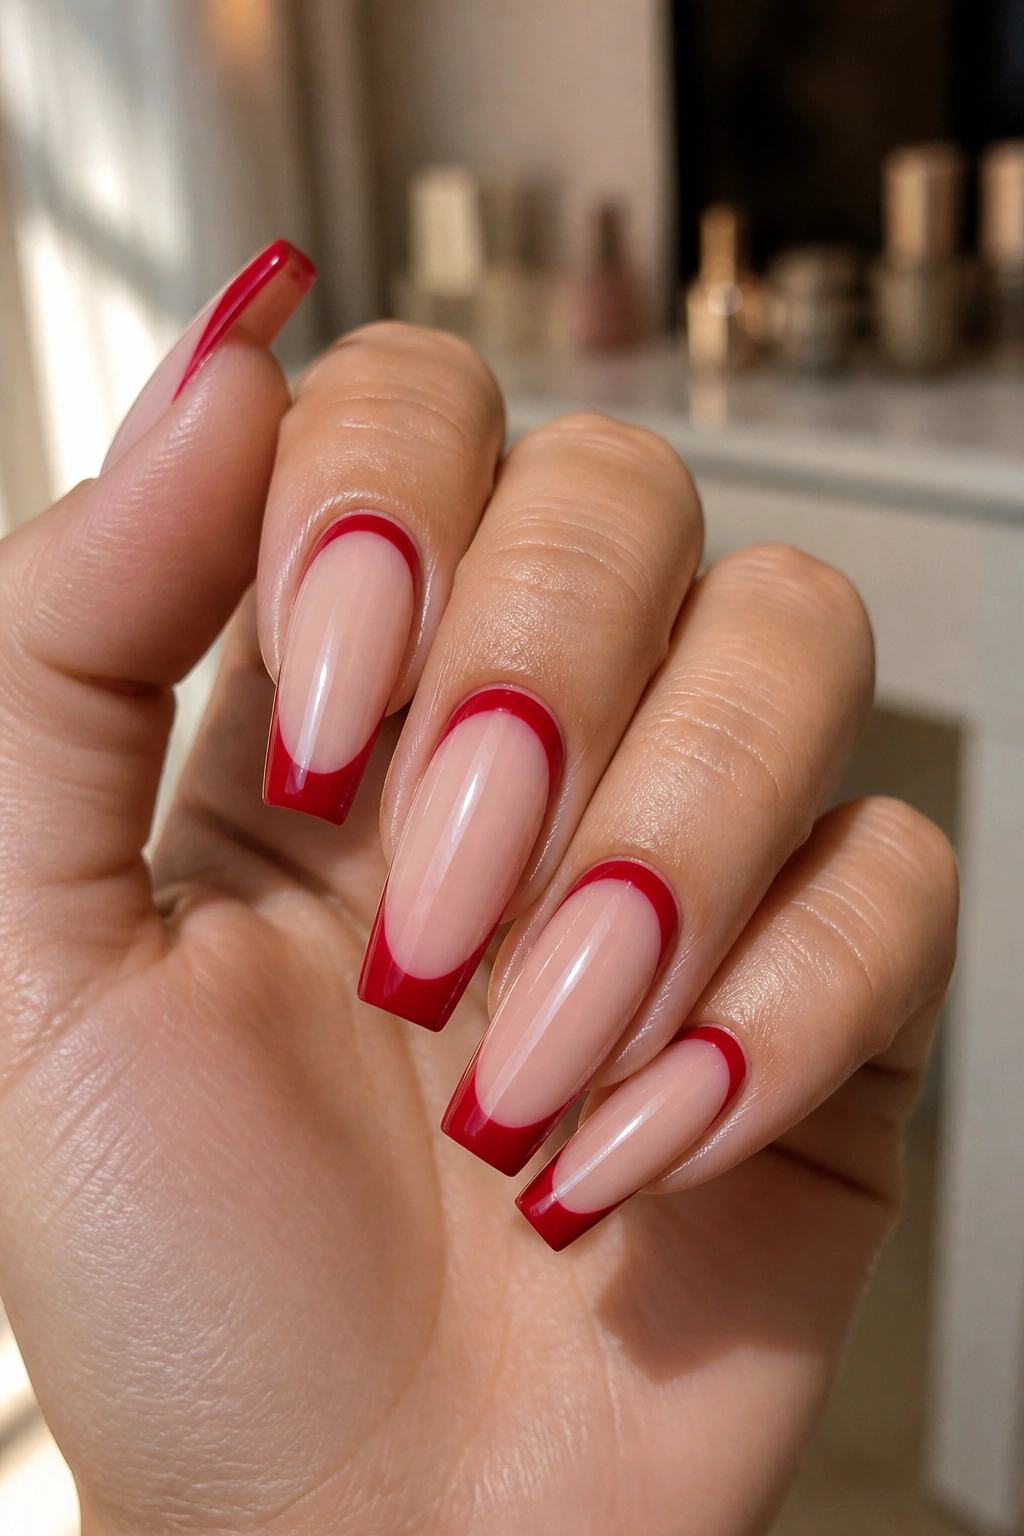
A plain red French tip can look expensive or off-balance, and the difference is usually about two or three millimeters of placement. That’s why red French tip coffin nails are trickier than they look in a salon photo. The coffin shape narrows toward the free edge, so every line gets magnified: the curve of the smile line, the width of the tip, the undertone of the red, even the finish on top.
I’ve always thought red is one of the hardest nail colors to fake well. Pale pink can hide flaws. Milky nude can blur them. Red does not forgive much. If the tip is lopsided, you’ll see it. If the line sits too low on a medium coffin nail, the whole set can look stubby. And if the wrong red fights with your skin tone, the manicure starts wearing you.
That’s also why a good red French set hits so hard. It has the old-school snap of a classic French manicure, but with more attitude and far less sweetness. On a coffin shape, it reads sharp, clean, deliberate. Then you add one twist—a chrome edge, a matte finish, a diagonal sweep, a jelly tip—and it stops looking like every other red set on your saved inspo board.
The details below are the kinds of changes that make people ask for a second look at your hands instead of glancing once and moving on.
1. Glossy Cherry Red Tips With a Deep U-Shaped Smile Line
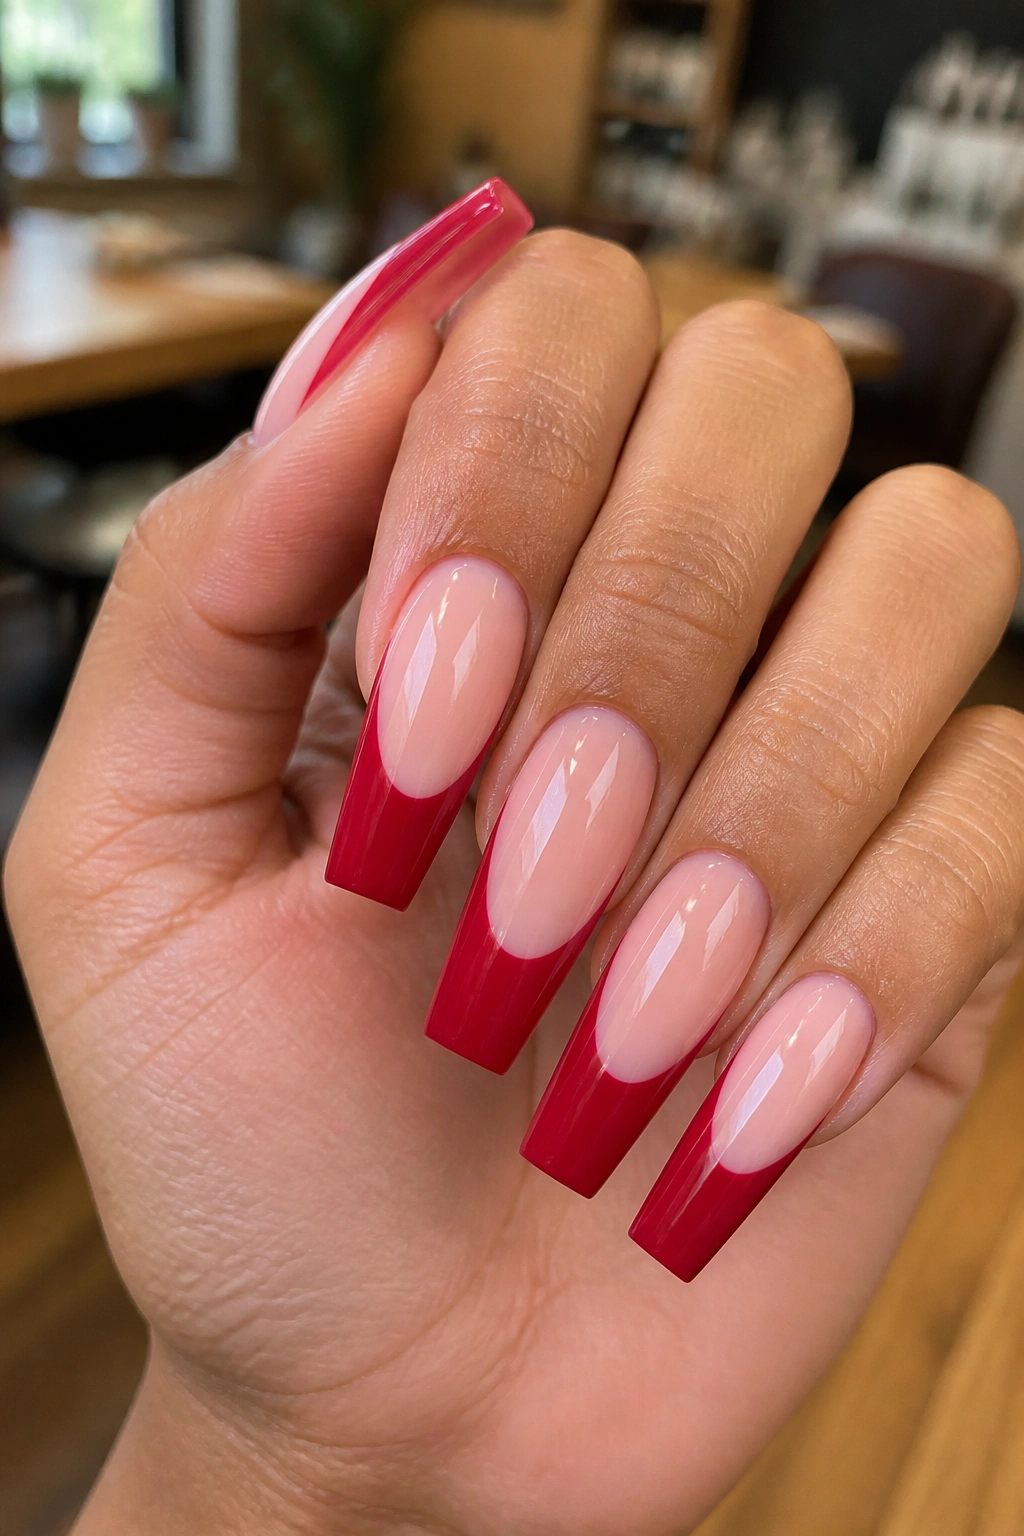
If you only try one version, make it this one. A deep U-shaped smile line is the detail that takes a basic red French manicure from decent to polished. On coffin nails, that deeper curve creates length because the eye follows the dip before it travels out toward the squared tip.
A flat smile line can look heavy, especially on medium-length acrylics or hard gel overlays. The deeper U fixes that. It exposes more of the nude base at the center of the nail, which keeps the red from swallowing the whole design. You still get drama, but the set looks cleaner and more intentional.
Why the shape matters on coffin nails
Coffin nails already taper inward at the sidewalls. A deep smile line plays nicely with that structure because it echoes the narrowing shape instead of fighting it. When the red tip sits in a gentle curve that rises higher on both sides, the whole nail looks longer and slimmer.
Shorter coffin nails benefit most. On a long set, the effect is sleek. On a medium set, it can rescue the proportions.
What to ask your nail tech for
- A cool cherry or true candy-apple red if you want that crisp salon-fresh contrast.
- A milky nude or sheer pink base, not an opaque beige, so the red stays the focus.
- A high-gloss gel top coat that gives the tip a lacquered, wet look.
- A smile line cut with a detail brush, not a bottle brush, which tends to make the curve thicker and less even.
The best version of this design has a tip width of about 3 to 5 millimeters on medium nails and a bit more on longer sets. Any chunkier, and it drifts into color-block territory.
Pro tip: Ask to see one finished nail before all ten are painted. With red, that single preview can save the whole appointment.
2. Matte Crimson Tips With a Thin Gold Outline
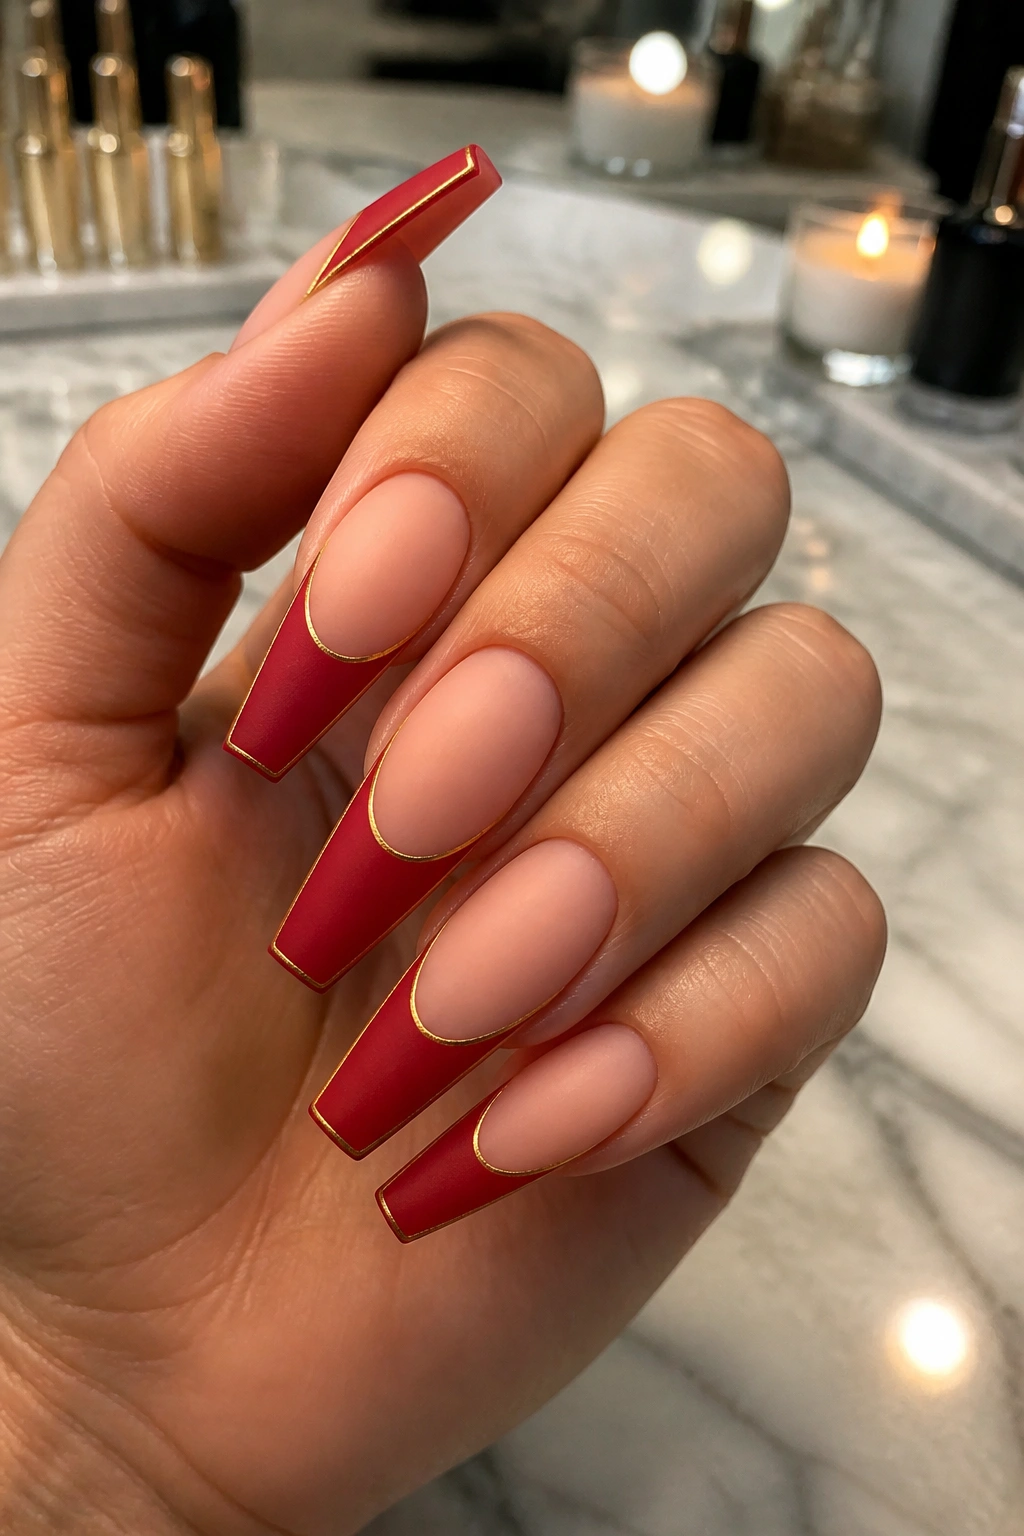
Want red French tips that feel dressier without turning into holiday nail art? Matte crimson with a gold outline is the move. The twist sounds small. It isn’t.
The matte top coat changes the whole personality of the red. Instead of reading glossy and classic, the color looks velvety—almost like crushed fabric. Then that skinny metallic line, sitting exactly where the red meets the nude base, brings the structure back. You get contrast in two ways at once: sheen and color.
This set works best when the gold line stays hair-thin. I mean detail-brush thin, not striping-tape thick. A chunky gold border can start looking costume-y fast, especially if the red is dark. Keep it tight and the manicure feels sharp rather than busy.
Long coffin nails carry this design well because they give the gold line room to breathe. Medium-length nails can wear it too, but the tech needs restraint. The red tip should still own the look. Gold is the punctuation mark, not the sentence.
I’d skip glitter here. Matte plus glitter plus gold can turn messy in a hurry. Metallic foil accents on one or two nails can work, though, if they stay small and low on the nail bed.
One more thing. Matte top coats show surface dents and cuticle oil marks more than glossy ones do. If you choose this set, carry a soft cloth or wipe your nails after lotion. That faint smudge you barely notice on nude polish? On matte crimson, it sits there.
3. Ruby Micro-French Coffin Nails With a Single Crystal Accent
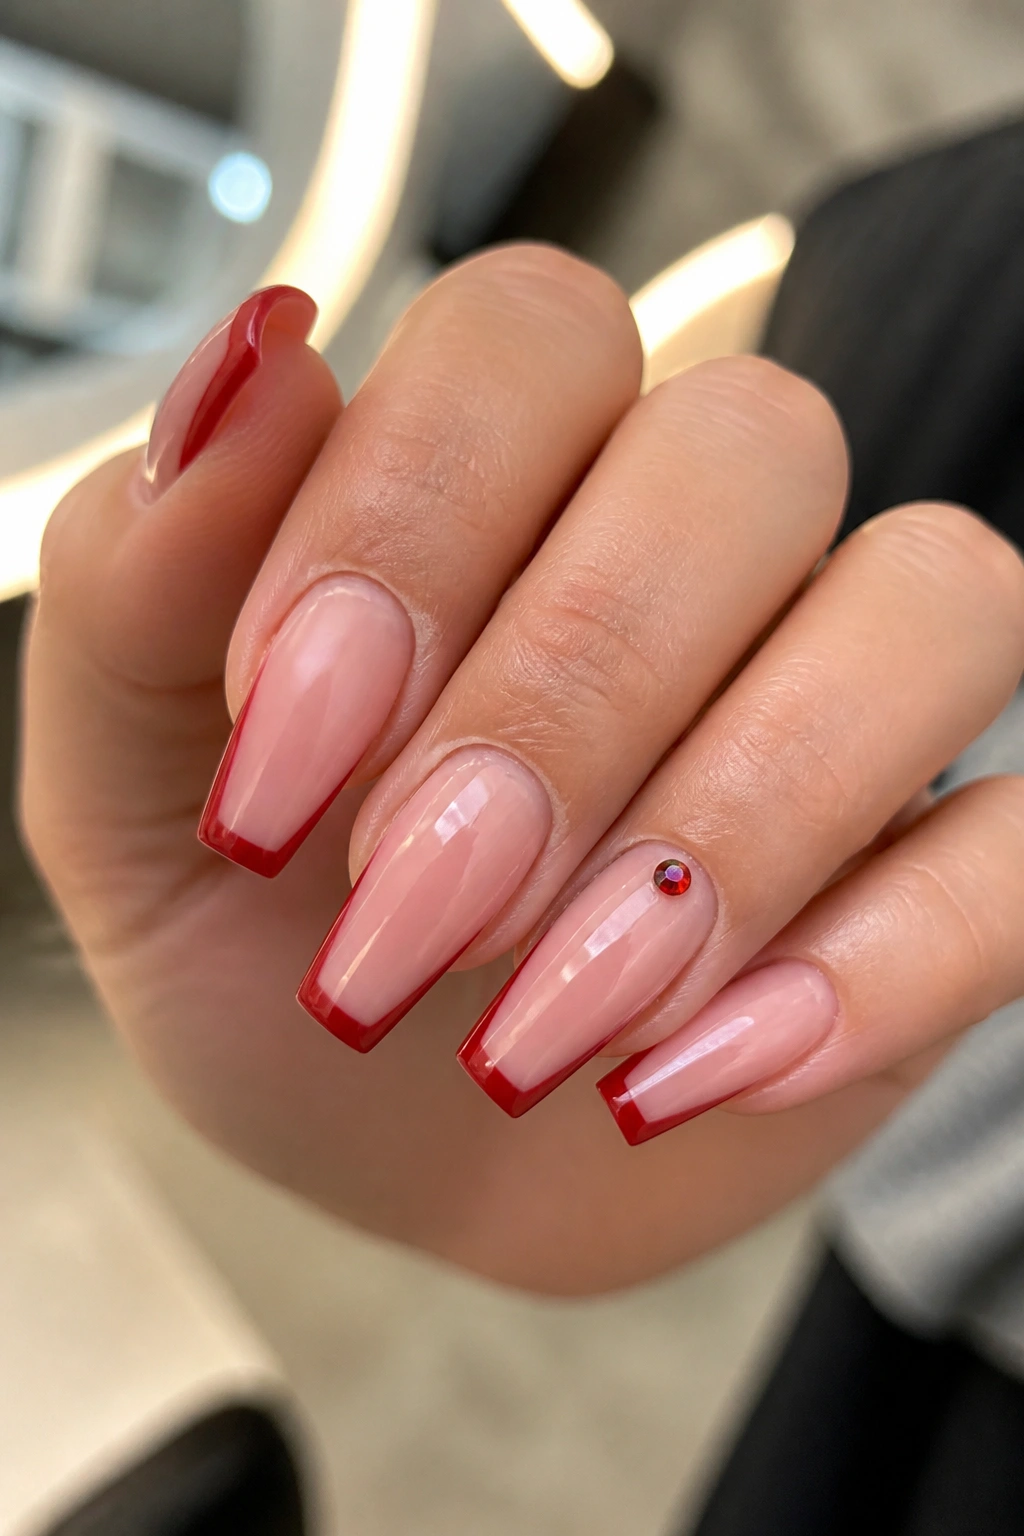
Tiny can hit harder than bold, especially on a coffin shape.
A ruby micro-French is basically the anti-heavy red tip. Instead of covering the outer 4 or 5 millimeters of the nail, the red hugs the edge in a slim arc—often 1 to 2 millimeters wide. That narrow line looks expensive because it takes precision. You cannot hide a wobble in a micro-French.
The crystal accent is the twist that keeps the design from feeling too bare. One small rhinestone near the cuticle on each ring finger is plenty. Two if they’re tiny. Past that, the clean minimal look starts slipping away.
Why does this one work so well?
Because coffin nails already bring shape and presence on their own. You don’t always need a thick tip to make the manicure read. A small ruby edge lets the silhouette do half the work, while the crystal catches a point of light and gives the set a touch of sharpness.
It’s also one of the smartest picks if you type a lot, cook a lot, or get bored of dense nail art. Thick red tips show tip wear sooner. Micro-French styles hold up visually because there’s less painted area to chip at the edge.
How to keep it crisp
Use a sheer blush base, not a fully opaque nude. Micro-French looks best when the nail bed still has a soft, translucent quality. The whole point is lightness.
And do not go big with the stones. A single ss3 or ss5 crystal—small salon sizing, for anyone who doesn’t speak rhinestone—gives enough detail without turning your hand into costume jewelry.
This one doesn’t shout. It narrows its eyes and lets the line work do the talking.
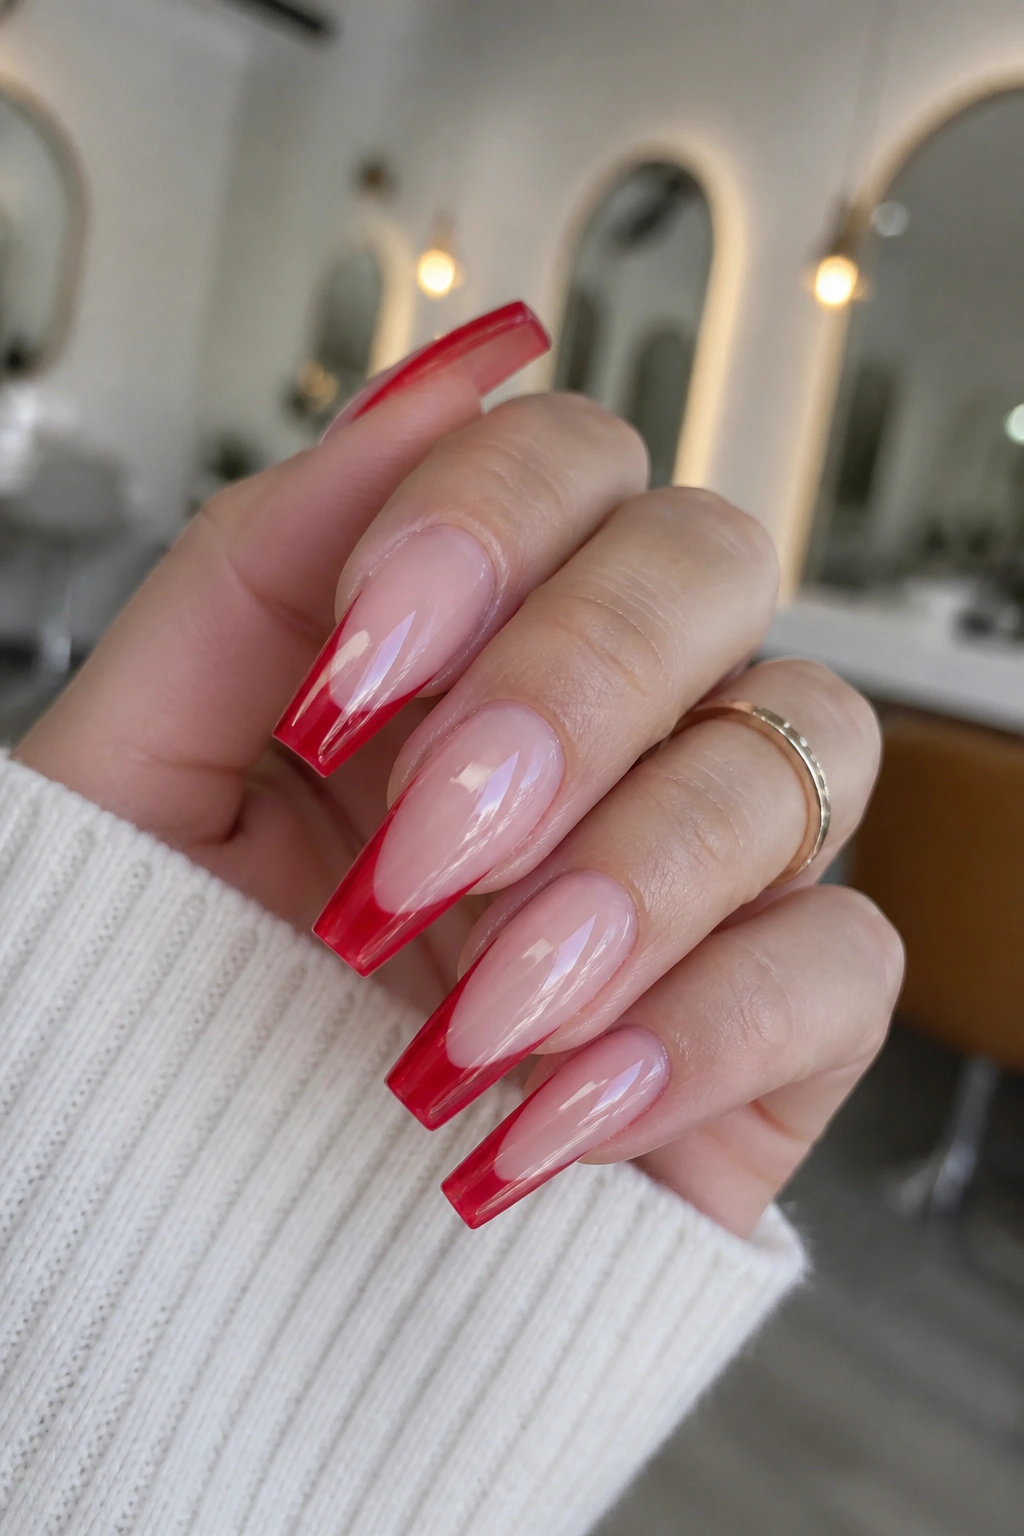
4. Red Ombre French Tips That Fade Into a Milky Nude Base
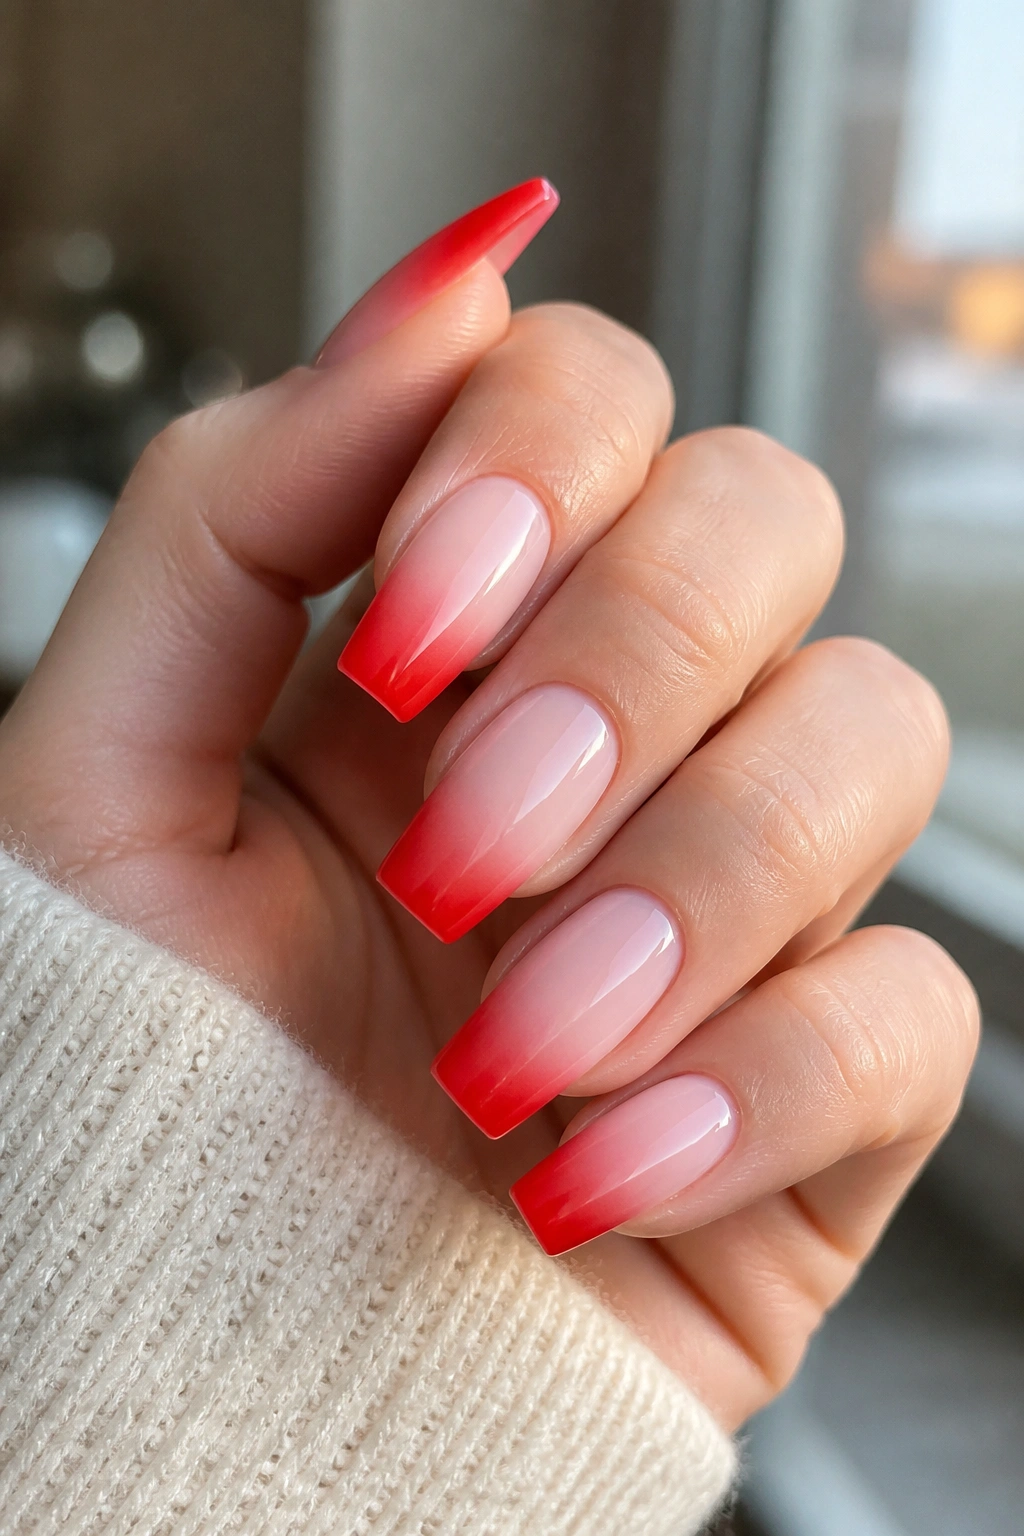
Picture a red French tip that doesn’t stop at a hard line. Instead, the color softens inward, fading from a rich edge into a cloudy pink-nude base. On coffin nails, that blur looks smooth and slightly moody, especially when the red starts deepest at the corners and melts toward the center.
This design is harder to do well than a painted tip. A rough sponge blend can leave patchy spots, and a muddy red-to-pink fade is one of those mistakes you notice from three feet away. The cleanest versions are usually built with airbrush, blooming gel, or a careful gel blend using a sponge and liner brush. If your tech only does basic polish work, I’d pick another set.
The payoff is worth it. Ombre French tips soften red’s usual bite, so the manicure feels less strict than a classic smile line. That makes it a smart choice if you like red but think normal French tips look too stark on you.
Ask for the base to stay milky, not peachy. A peach nude can fight with cooler reds. Milky pink or sheer beige lets the fade look smoky instead of muddy.
A few practical notes help:
- Best length: medium-long to long coffin nails.
- Best finish: gloss, because it smooths out the fade and makes the red look deeper.
- Best red family: blue-red, wine-red, or cherry; orange-red can look abrupt in an ombre.
- Maintenance note: the blended edge hides grow-out better than a sharp French line.
There’s a softness to this set that I like on an angular shape. Coffin nails can lean severe. An ombre red tip takes the edge off—without making the manicure feel sweet.
5. Black-and-Red Double French Lines on Long Coffin Nails
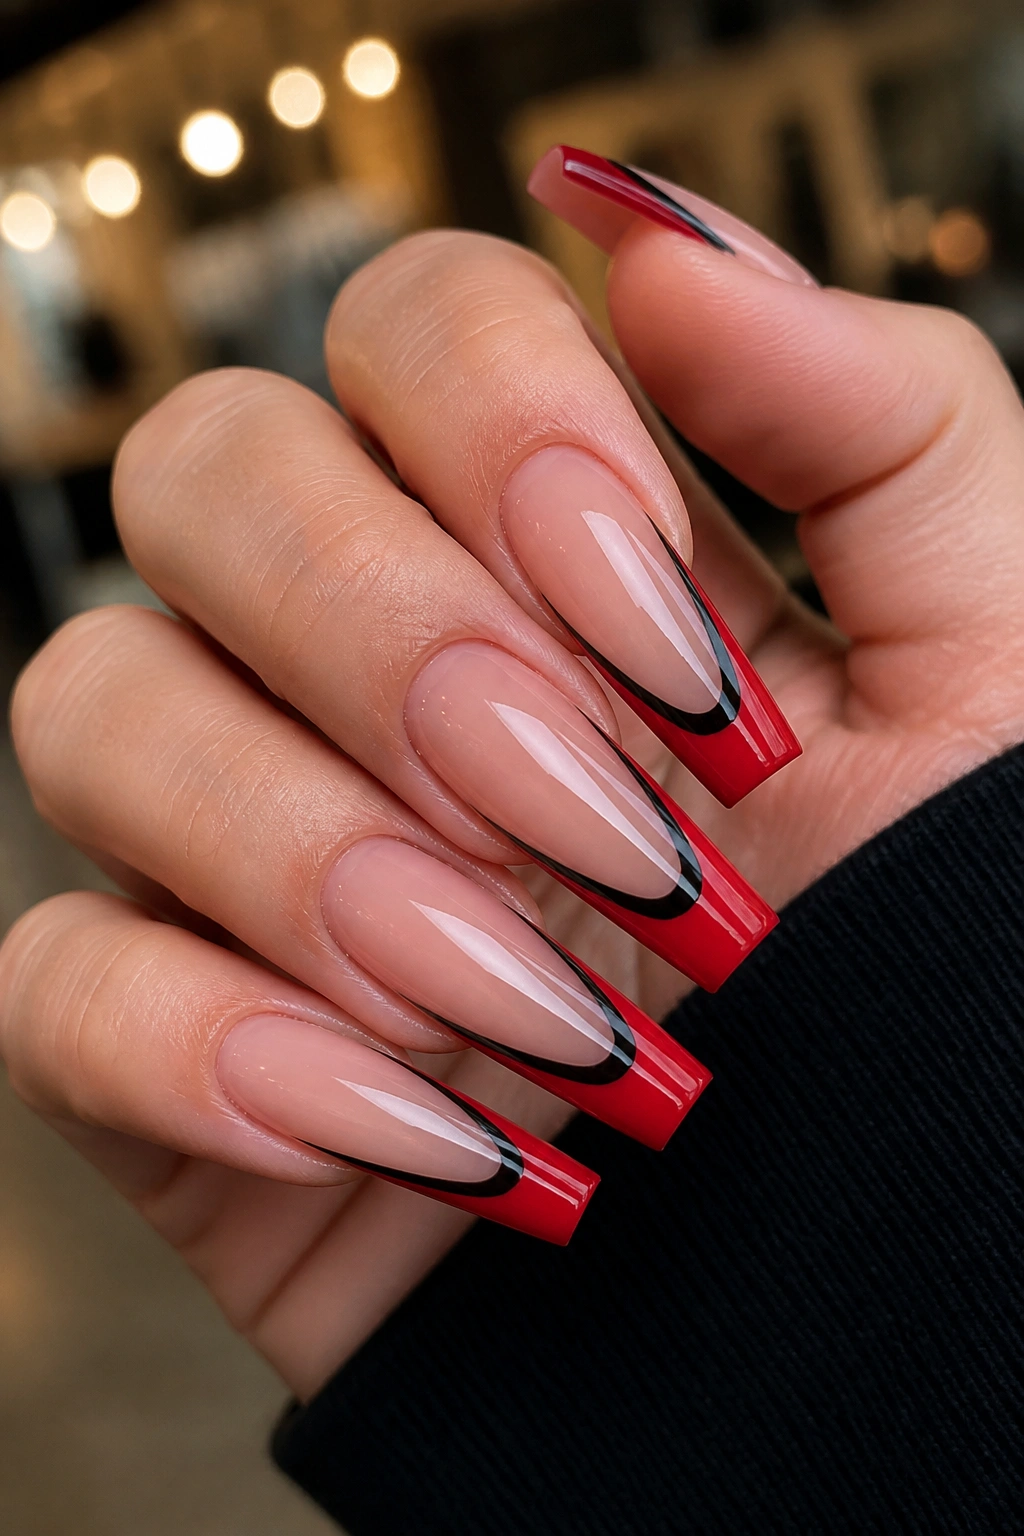
Unlike a single red tip, a double French gives you movement. One red arc sits where you expect it. Then a second line—usually black, placed just above or just below the red—creates a shadow effect that makes the whole nail look sharper.
I’m picky about this one. Done badly, it looks like someone changed their mind halfway through the design. Done well, it feels graphic and clean, almost like tailored clothing. The spacing matters more than the colors. Leave about 1 millimeter of negative space between the two lines, or stack them tightly if the black line is only a hair thick. A weird gap ruins the tension.
Long coffin nails suit this best because the double line needs air around it. On short nails, the design can shrink the nail bed and make the tip area feel crowded. If you wear medium-length coffin nails and still want the look, make the red line thin and the black line thinner.
A glossy finish helps. Matte can flatten the design and make the black look dusty unless the top coat is fresh.
This is also one of the few red French variations that can lean a little edgy without adding charms, flames, or stones. The contrast does the work. Black beside red has a bite to it. You don’t need much else.
I’d keep the rest of the hand quiet—no extra accent nails, no marble, no glitter. Once you’ve got two lines pulling the eye across each tip, clutter is the enemy.
6. Wine Red Croc-Texture Tips for an Edgier Set
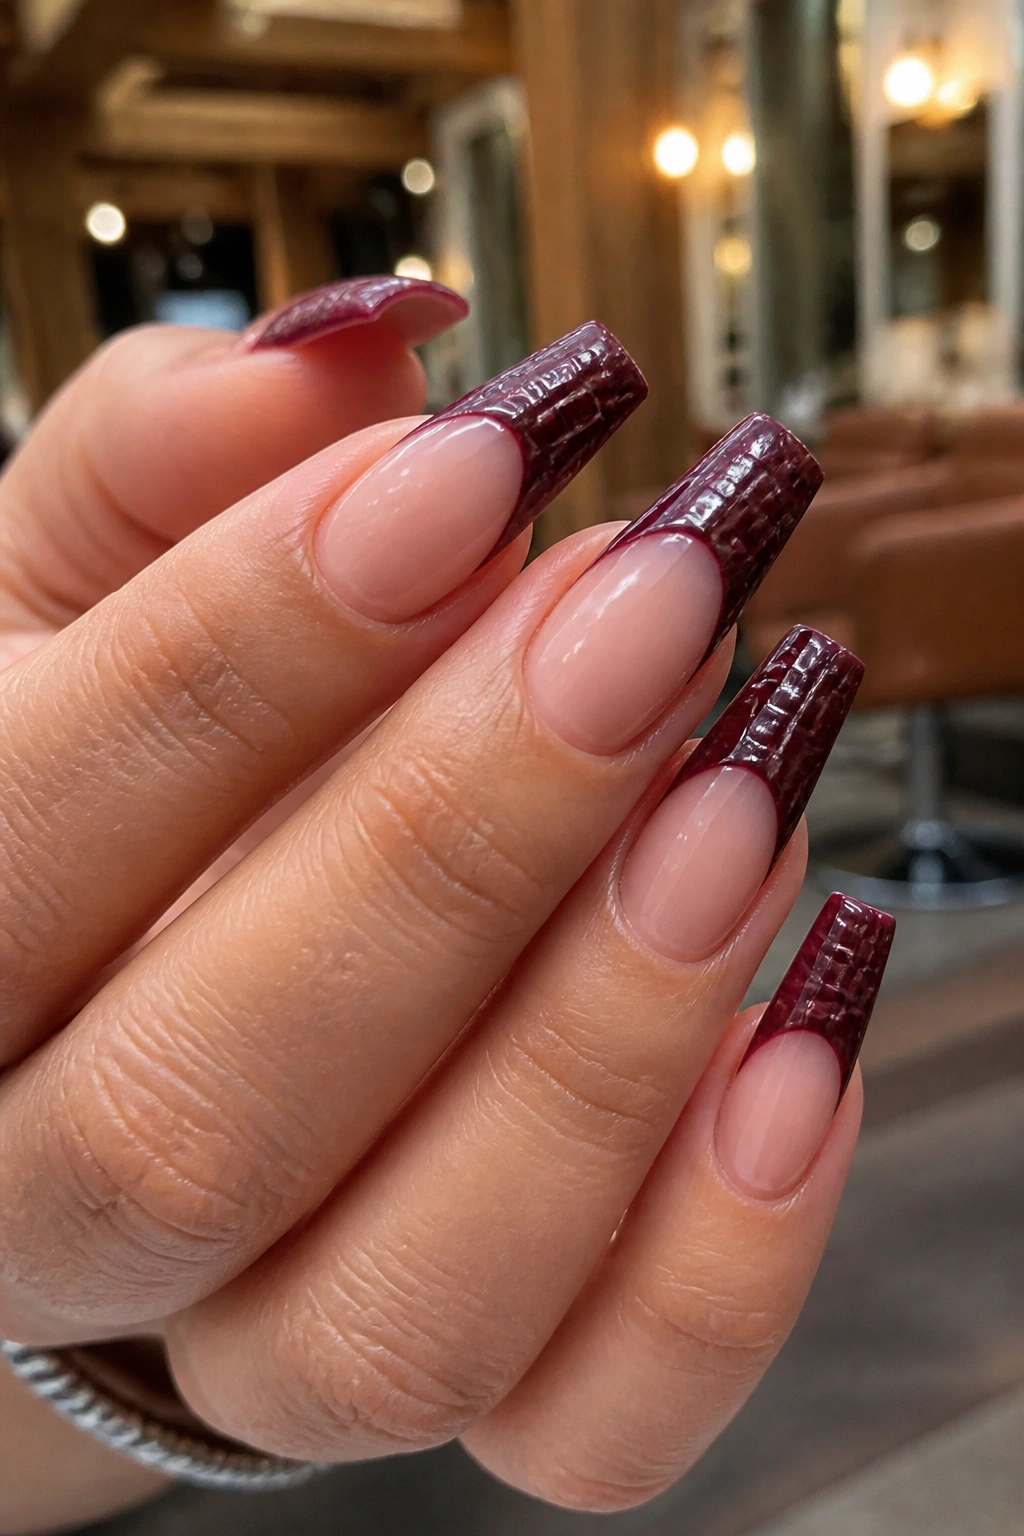
Run your thumb over a well-done croc-texture tip and you’ll feel the difference before you even notice the pattern. There’s a raised, slightly grippy surface under the top coat—or left intentionally unglossed, depending on the finish—and on a deep wine red, it gives the French tip a darker, richer mood.
Texture without bulk
The smartest version of this design keeps the texture only on the tip, not across the whole nail. Coffin nails already have a strong shape. If you add croc texture from cuticle to edge, the set can feel heavy in both look and thickness.
A builder gel or embossed gel is usually used to create the pattern. Your tech paints the wine red tip first, cures it, then builds the croc pattern in irregular cells. Some artists top-coat the nude base only and leave the textured red slightly raised. Others glaze over everything for a smoother touch. I prefer the first method because you can actually see the texture.
Where people go wrong
Too much height. That’s the problem. If the embossed pattern sits up like beads, the nails can snag hair, sweater fibers, even the inside of pockets.
Keep the pattern shallow and the base clean. Also, choose a dark merlot or oxblood red, not a bright fire-engine red. Croc texture looks better when the color has depth.
Quick design notes
- Works best on long coffin nails
- Looks sharper with a soft pink or beige nude base
- Pairs well with one solid wine-red accent nail, if you want a little more weight
- Needs a refill or refresh in about 2 to 3 weeks if the texture starts dulling at the edge
This one is not subtle. That’s the appeal.
7. Candy Apple Red Tips With Tiny White Heart Details

Some heart nail art turns childish fast. This version doesn’t—if you keep the scale under control.
The base design is a glossy candy-apple red French tip, bright and clean, with one tiny white heart placed near the side of the tip on one or two nails. Not centered. Not repeated on all ten. Off to the side, almost as a wink. That placement matters because it keeps the design from looking like themed Valentine nails you forgot to remove.
I like this set on medium coffin nails because the playful detail softens the shape. Coffin nails have straight sidewalls and a squared-off edge, so one little curved heart gives the whole hand a lighter feel. You still have red. You still have structure. You just loosen the mood a bit.
Placement is everything here. A heart that’s too large can eat half the visible tip. Aim for something about 3 to 4 millimeters wide on a medium nail. Tiny. Almost doodled. If the tech can’t paint miniature hearts cleanly, a dotting tool and liner brush can fake it with two dots and a point.
White is the best contrast if you want the heart to read instantly. Silver works too, but it reflects more and can get lost next to glossy red. Black hearts make the set moodier, which can be fun, though then you’re no longer in sweet territory at all.
And yes, you can wear this outside date-night settings. It looks cute with denim, a white shirt, or a gray sweater. That small red-and-white hit at the fingertips feels less themed than you’d think.
8. Side-Swept Diagonal Red French Tips

Straight-across French tips are safe. Diagonal tips have more nerve.
A side-swept red French takes the tip line and pulls it from one sidewall down toward the opposite corner, creating an angled slice of color across the nail. On a coffin shape, that slant works beautifully—no, scratch that, works sharply—because it mirrors the nail’s tapered sides and makes the fingers look longer.
You need balance here. If the diagonal is too steep, the nail starts reading like color-block art instead of French tip variation. I like an angle that begins about one-third down one side and reaches the free edge at the opposite corner. Enough movement to notice, not enough to hijack the whole manicure.
What makes this one different
The diagonal line changes how the eye travels. Instead of stopping at the tip, your gaze moves sideways and out, which gives the set a bit more motion. That’s why it suits people who find classic French tips a little prim.
Best ways to finish it
- Plain glossy red for a clean, graphic look
- A silver outline along the diagonal edge if you want more contrast
- Negative space near the corners to keep the design light
- One diagonal flipped the opposite way on each ring finger for a subtle mismatch
Skip extra decals with this one. The line already has enough attitude.
The other reason I like side-swept tips: they hide minor asymmetry better than standard curved smile lines do. A classic French demands near-perfect symmetry on both sides of each nail. A diagonal design has a little more freedom, which is useful if your natural nail beds don’t match exactly from hand to hand.
9. Jelly Red French Tips Over a Sheer Pink Builder Base
Translucent red is harder to get right than opaque red. It sounds easier. It isn’t.
A jelly red tip lets light pass through the color, so the edge looks stained rather than painted solid. Over a sheer pink builder base, the effect has depth—you can see the shape underneath, and the red almost glows at the edge. On coffin nails, that translucence keeps a longer set from looking too dense.
The trick is controlling how sheer the red stays. Too transparent and it looks unfinished. Too pigmented and you’ve lost the jelly effect. Good techs build this with a syrup gel or a red jelly polish in two thin coats, sometimes layering a touch more color at the free edge to deepen the tip.
This design has a clean, glassy feel that works best with a high-shine top coat. Matte kills the point. You want that hard candy finish, the kind that makes the red look like it’s sitting under clear glass.
What makes builder base matter here?
Because the base can’t be chalky. A sheer pink builder gel gives the nail bed structure while keeping it slightly translucent, which matches the see-through red better than an opaque nude ever could. The two layers talk to each other.
A few details worth caring about:
- Cool pink bases look better with blue-red jelly tips.
- Warmer pink bases work with tomato or poppy reds, though I still prefer cooler reds on coffin nails.
- Longer lengths show the jelly effect more clearly.
- Thin application matters. Thick jelly gel can wrinkle or pool at the sidewalls.
This is one of those sets that looks quiet from across the room and far more considered up close. I have a soft spot for that kind of manicure.
10. Red Chrome French Tips With Mirror Shine
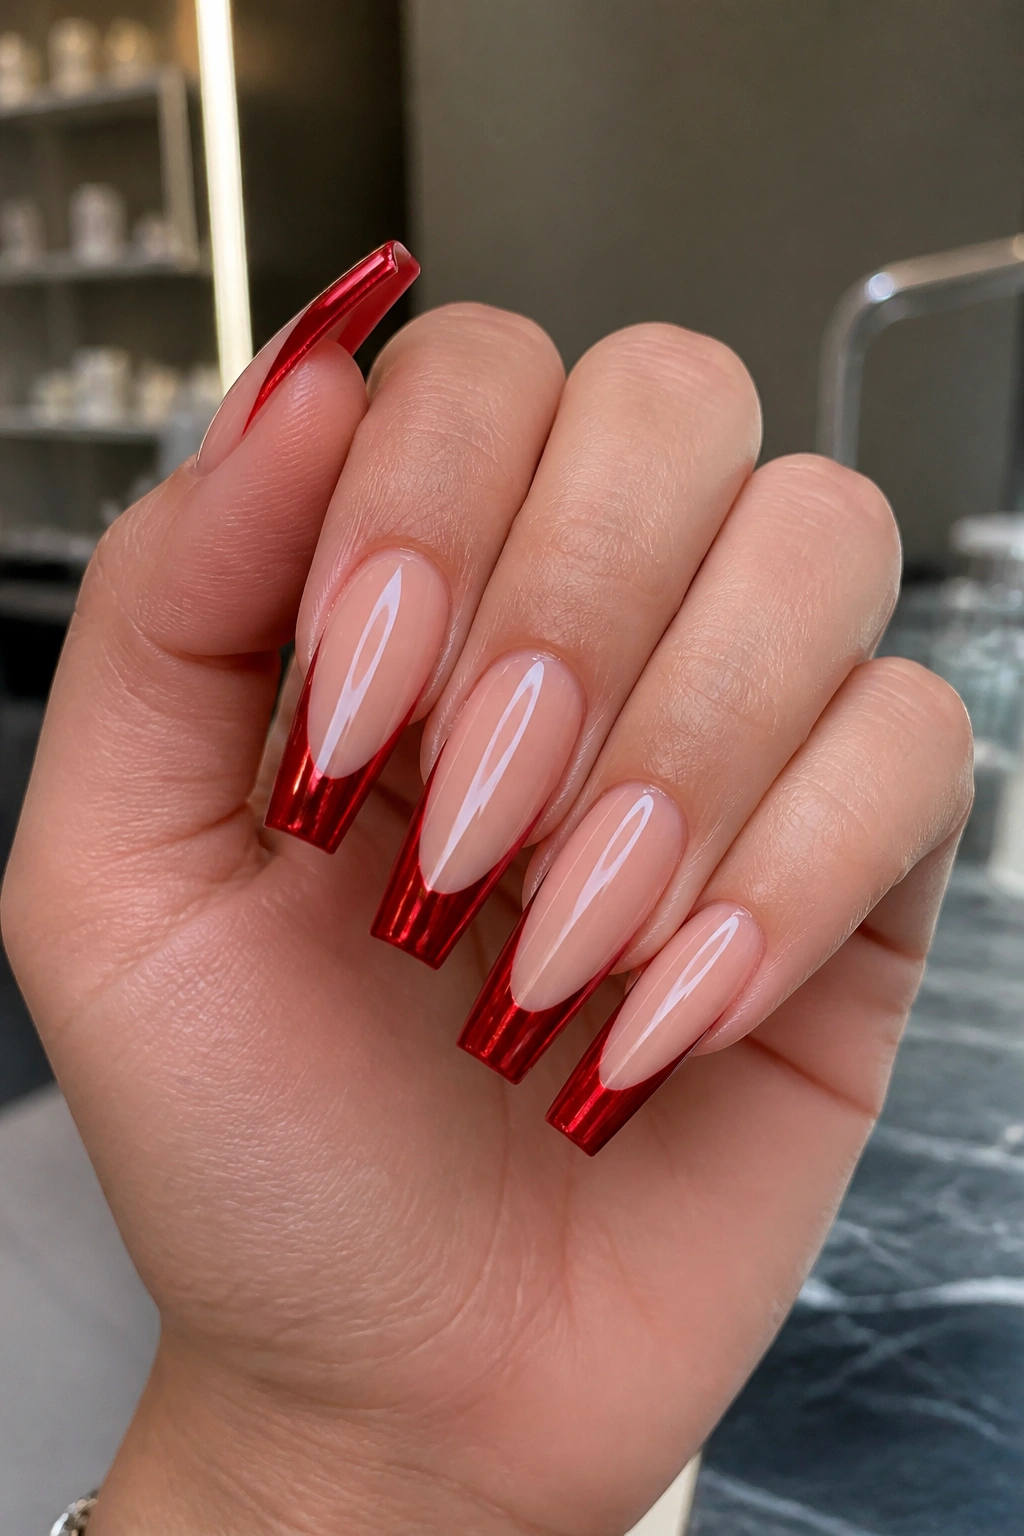
Chrome can go cheap fast. Red chrome, though, has a place when it’s used with restraint.
The cleanest version is a standard French tip shape in a rich red base, topped with a chrome powder that gives the surface a mirrored, almost liquid-metal finish. On a coffin nail, that reflective edge looks crisp because the squared tip catches light in a straight flash instead of a rounded glint.
You do not need chrome on the whole nail. In fact, I’d avoid it. A full red chrome coffin set can feel heavy and costume-like unless you love bold nails and wear them with conviction. Keeping the chrome on the French tip only gives you the shine without turning the hand into armor.
Application matters more here than with plain gel polish. Chrome powder shows every dip and ridge underneath, so the nail surface needs to be smooth before the tip is painted. The powder is usually rubbed over a no-wipe gel top coat, then sealed again. If the tech skips proper sealing at the edge, the chrome can wear off faster than normal color.
One small warning: bright silver-toned chrome over red can shift the shade toward pink or magenta. If you want a richer result, ask for a red chrome powder or a warm ruby mirror finish, not a generic silver chrome over red polish.
Best on longer coffin nails. Best with clean cuticles. Best when the rest of your outfit is not trying to compete.
A manicure like this does enough on its own.
11. Flame-Shaped Red Tips That Follow the Coffin Edge
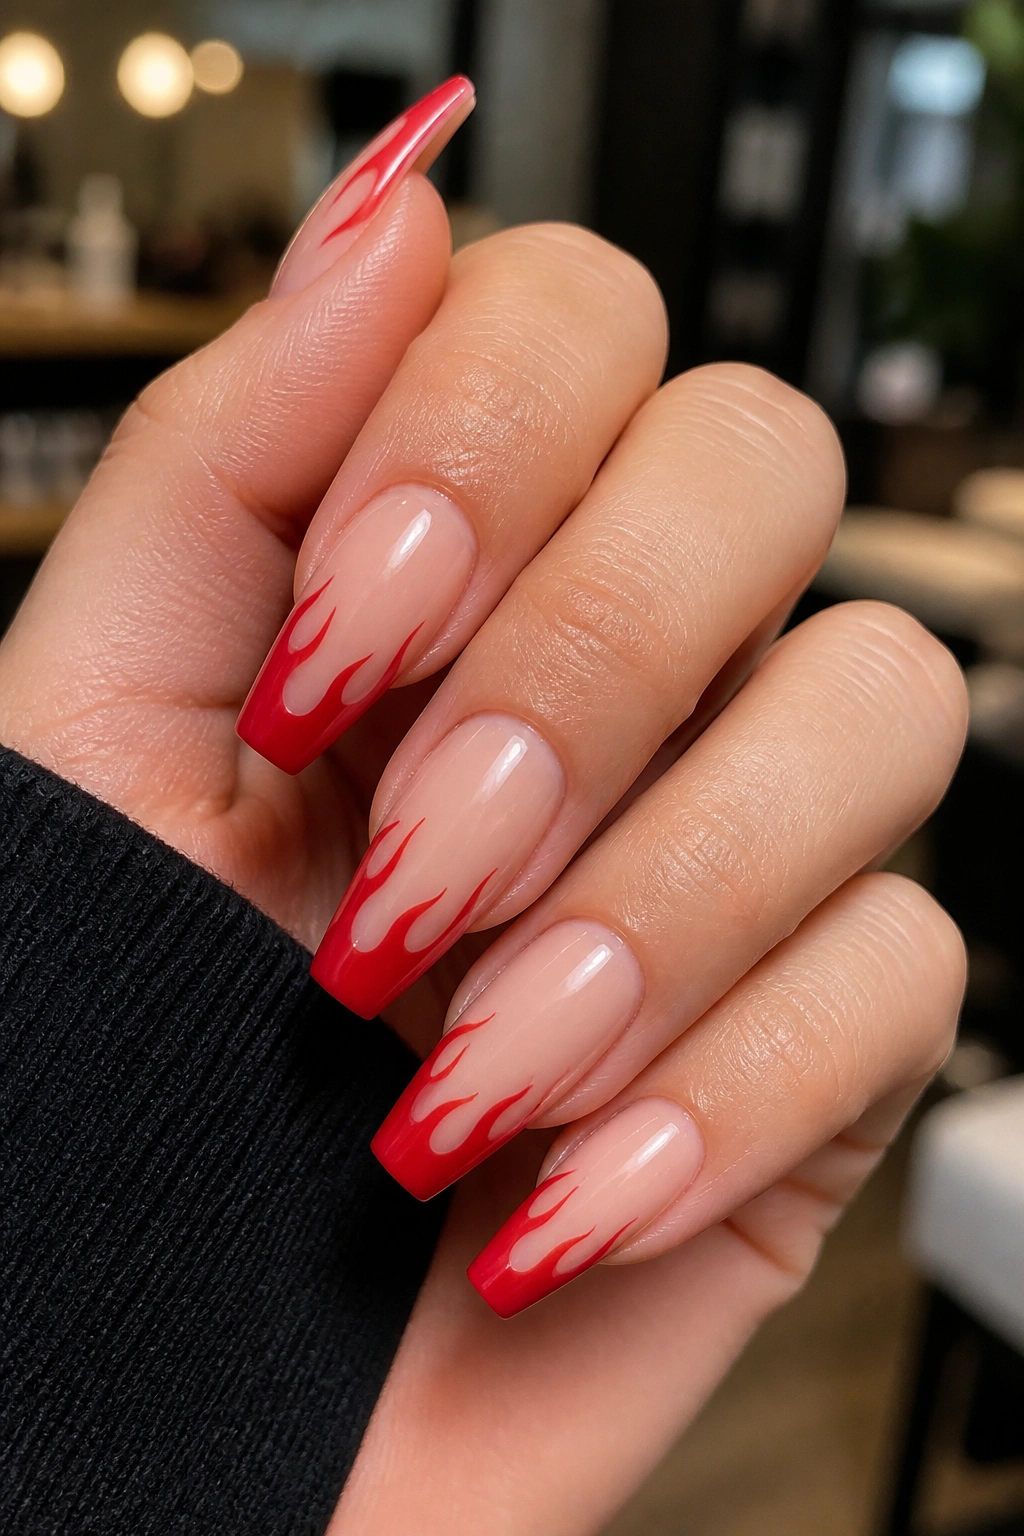
Picture a French tip that climbs upward in narrow red flicks instead of sitting in a smooth arc. That’s the flame version, and on coffin nails it makes sense in a way it doesn’t on softer shapes. The straight sides and flat edge give the flames somewhere to push against.
This design can go wrong in one second. If the flames get too chunky, the whole set starts looking cartoonish. The best flame French tips stay slim and elongated, with two or three upward tongues of color per nail, each ending in a fine point. Think sharp brushwork, not Halloween decals.
The base should stay sheer and clean. Milky nude, blush pink, soft beige—something that makes the red stand out without muddying the silhouette. I also like a little black shadow line tucked beneath one flame on one accent nail, but only if the artist has a steady hand.
Ask for movement, not blobs
Real flame-inspired nail art has direction. The red should appear to lift from the edge of the nail toward the center, with variation from nail to nail so the set doesn’t look stamped.
Good limits keep this wearable
- 2 to 3 flame tips per nail is enough
- Keep the tallest point below half the nail bed on medium lengths
- Gloss works better than matte
- Skip rhinestones unless you want the set to lean theatrical
I like this design when someone wants edge without going full black, silver, or heavy graphic art. Red flames still feel lively. They just happen to have teeth.
12. Reverse Red French Tips With Cuticle Framing
Most French designs live at the tip. A reverse French pulls part of the attention back to the cuticle, and that shift changes the whole manicure.
The version I’d actually wear keeps a slim red crescent near the cuticle and a matching red French tip at the edge, with the nude middle left mostly bare. On coffin nails, that framing effect can look striking because it outlines the nail from both ends without filling the center. You get red, but you also get breathing room.
This one needs clean growth-area work. If your cuticles are dry or overgrown, the reverse crescent will call attention to them. A Russian manicure or careful cuticle prep—nothing aggressive, just neat—makes a big difference before the color even goes on.
When reverse French works best
Use it when you want something less expected than a standard tip but still polished enough for daily wear. The design has a little Art Deco energy to it. Structured. Balanced. Not loud, though it’s not shy either.
A few smart ways to wear it
- Keep both red lines thin and matched in width
- Use a true neutral or sheer pink base so the center doesn’t look vacant
- Try gloss on the tip and matte in the middle if you want texture contrast without extra art
- Leave one nail with only the reverse cuticle crescent for a slight mismatch
There’s precision in this design that I admire. It asks more from the tech and from the wearer. You notice the shape of the whole nail, not only the edge. When it’s clean, it looks like someone thought the manicure through from start to finish.
Final Thoughts
The best red French tip coffin nails aren’t about piling on details. They’re about proportion, finish, and line placement. Get those right, and even a small twist—a gold outline, a jelly tip, a diagonal cut—changes the whole mood of the set.
If you’re torn between bold and wearable, start with the deep smile line, the ombre fade, or the side-swept diagonal. Those three tend to flatter the most hand shapes and still feel different from a standard salon French. If you want something with more bite, the croc texture, double-line black accent, and flame tips have more edge.
One last practical note I wish more people heard before their appointment: ask your tech to paint one full sample nail first when you’re doing red. Red tells the truth fast. That tiny pause before the rest of the set gets painted can save you from ten nails that looked better in your head than they do on your hands.
