

Korean nail art has revolutionized the global manicure landscape, bringing innovative techniques, stunning color combinations, and creative details that keep beauty enthusiasts coming back for more. From Seoul’s nail salons to high-fashion runways and social media feeds worldwide, these distinctive trends showcase the artistry, precision, and unbounded creativity that define K-beauty nails. What makes Korean nail design so compelling is the perfect balance it strikes between elegantly minimalist and audaciously artistic—you can opt for understated sophistication or full-on maximalist drama, often within the same manicure.
The evolution of Korean nail trends reflects both the culture’s deep appreciation for meticulous detail and its fearless approach to experimentation. Celebrity nail artists from major Korean nail studios have perfected techniques that are now being replicated and adapted globally, each with their own twist. Whether you’re drawn to sheer, candy-like finishes or textured metallic elements, there’s a Korean nail trend that speaks to your personal aesthetic. These aren’t just passing fads—they represent a fundamental shift in how we think about nail art as a form of self-expression and wearable art.
1. Jelly Nails
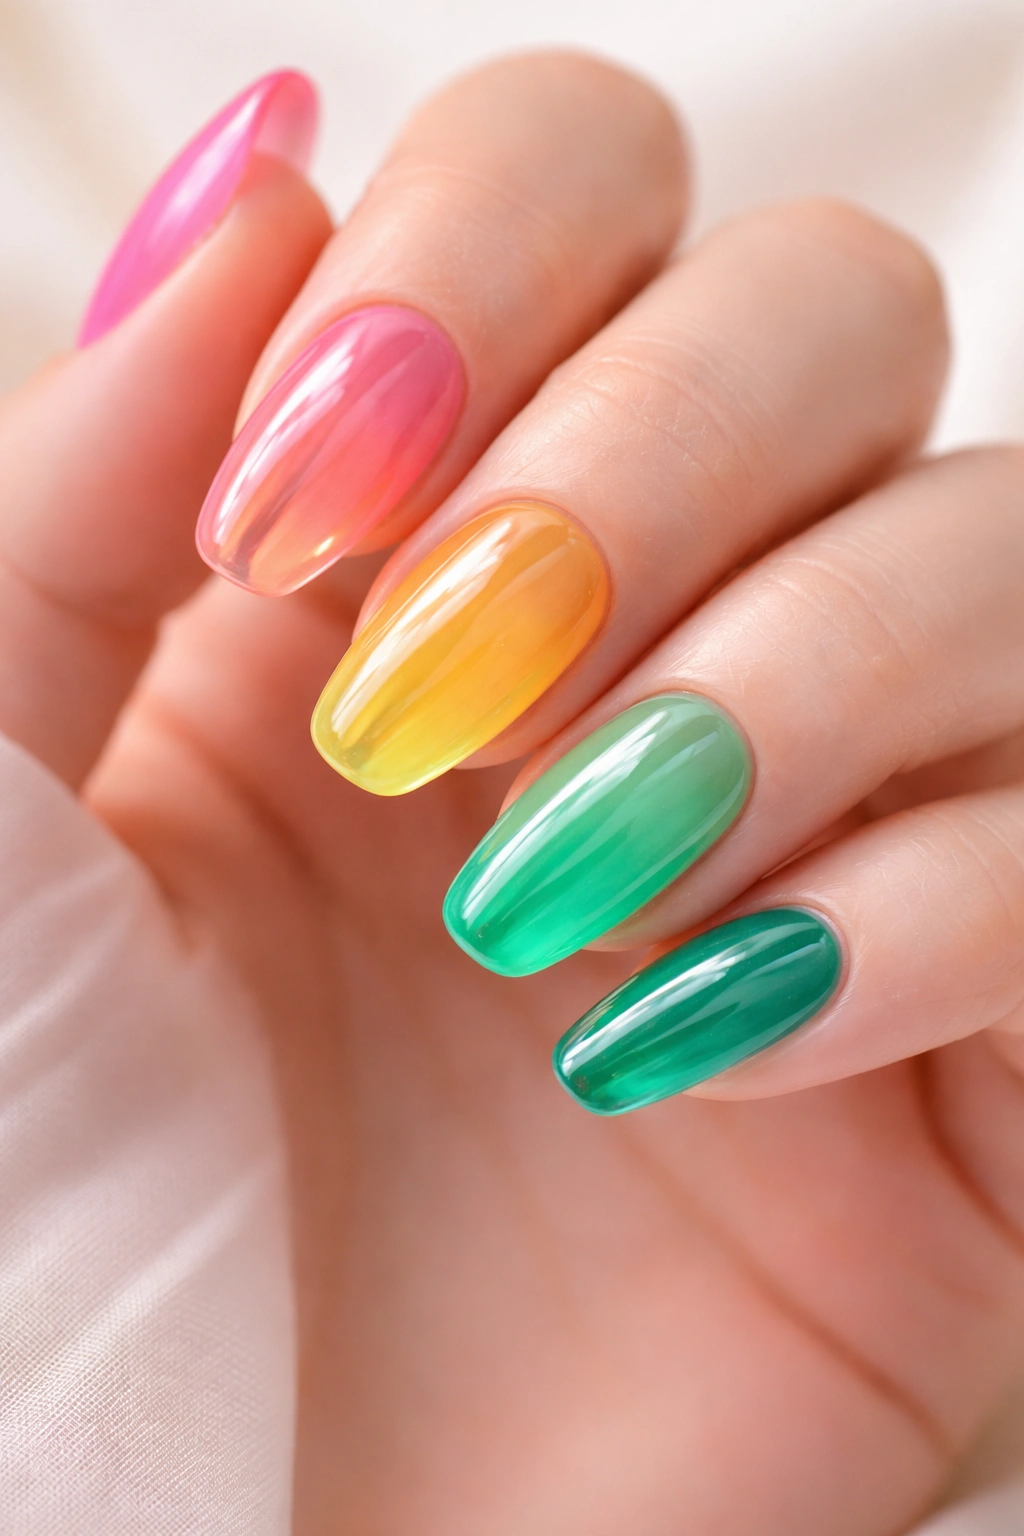
Jelly nails are among the most beloved Korean manicure trends, beloved for their juicy, translucent, glass-like appearance that’s both whimsical and sophisticated. The defining characteristic is that mouth-watering, mouth-watering quality—imagine gazing at hard candies, glistening jam, or perfectly formed gelatin. The polish itself is thick and glossy, creating a 3D effect that looks almost edible while maintaining an effortless elegance. Colors range from soft pastels like milky pink and peachy nude to bold jewel tones like emerald and sapphire, each catching the light in magical ways.
Why This Trend Resonates Globally
Jelly nails captured hearts worldwide because they’re inherently wearable yet visually captivating. The translucent quality means you’re not covering your natural nail completely—instead, you’re enhancing it with a layer of color that feels lightweight and breathable. This makes jelly nails the perfect bridge between “your nails but better” minimalism and full glam maximalism. Nail artist Kesang Gurung notes that Korean gel polishes used for jelly nails are thicker and more viscous than traditional gels, allowing them to self-level beautifully and create that coveted dimensional depth that sets them apart.
How to Achieve the Look
- Apply a clear base coat and allow it to dry completely
- Paint thin, even layers of jelly gel polish, curing each layer under an LED lamp
- Build up 2-3 coats to create the translucent-yet-saturated effect
- Add optional details like glitter, chrome, or delicate stickers between layers
- Seal with a glossy top coat for maximum shine and depth
- The final manicure should look thick, rounded, and jewel-like
Pro tip: Use actual Korean gel polishes if possible—brands like OPI, Essie, and specialized Korean nail brands offer formulas specifically designed for this thick, self-leveling consistency that’s nearly impossible to replicate with standard gel polish.
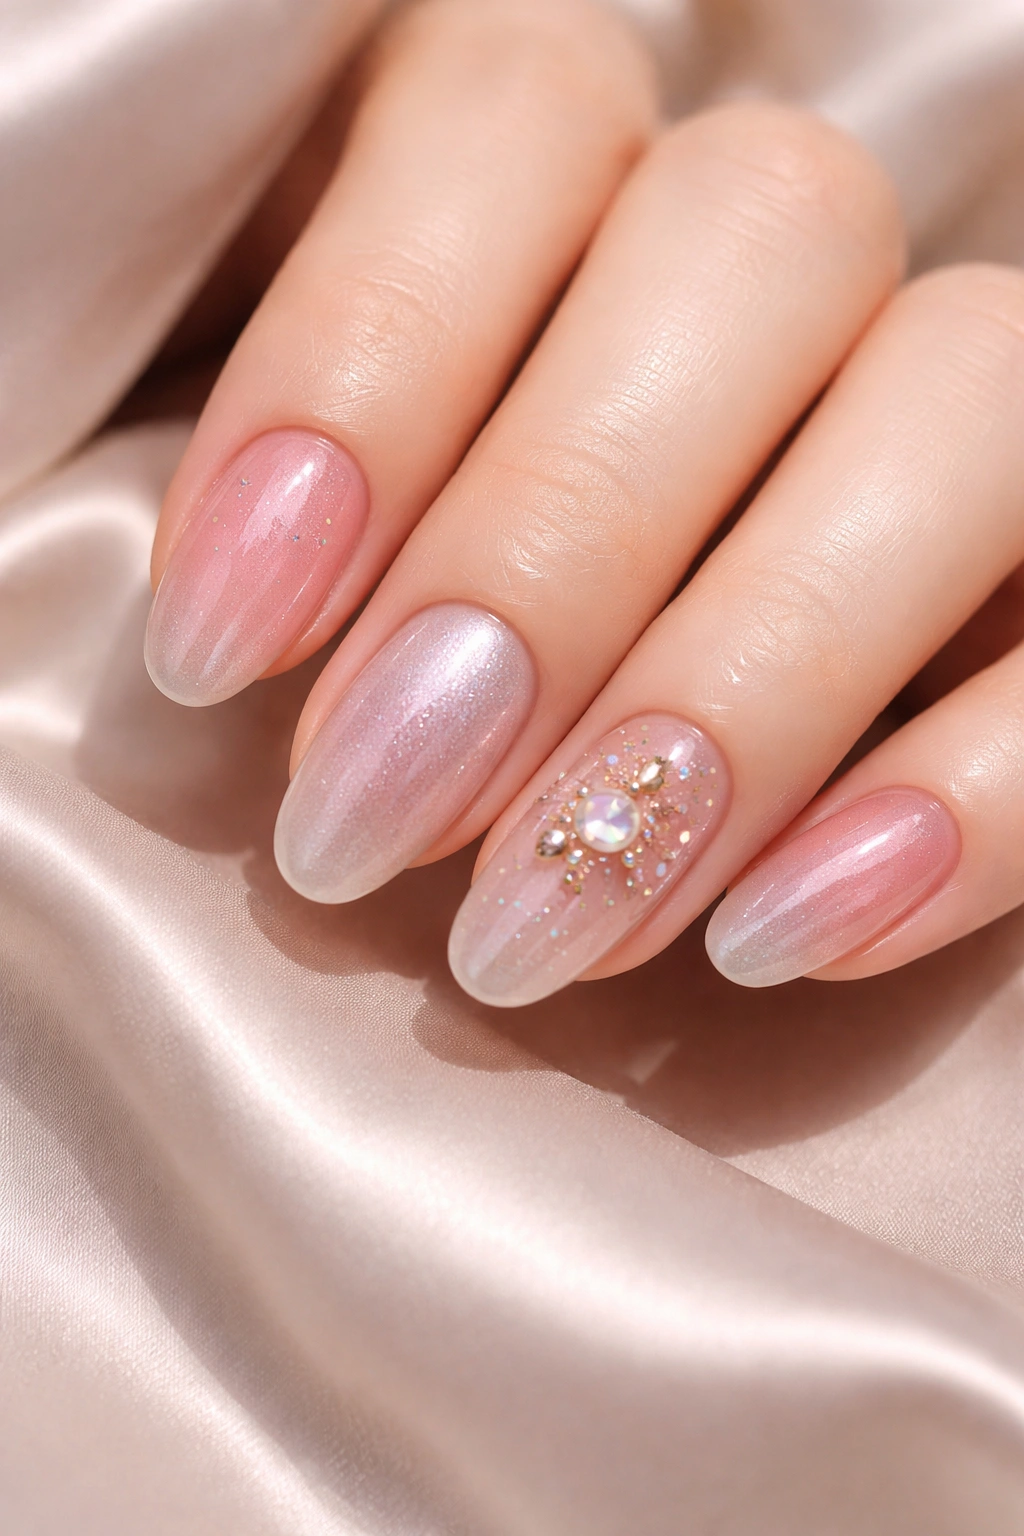
2. Blush Nails
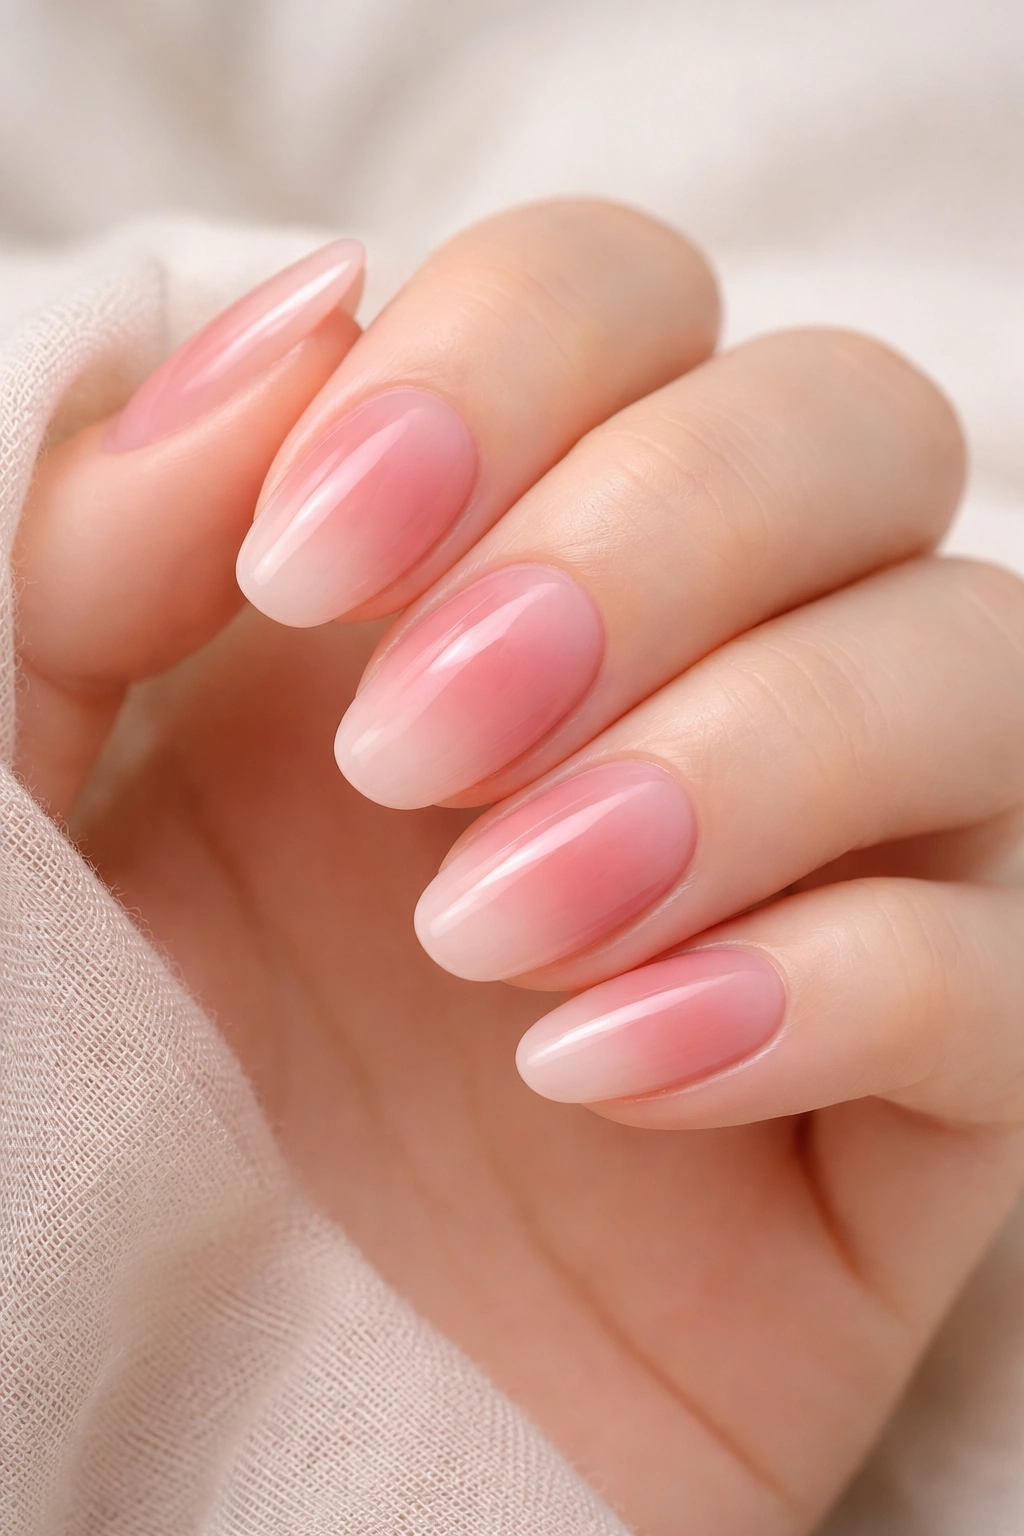
Blush nails are inspired by the soft, rosy flush of naturally flushed cheeks, creating a romantic and deeply flattering manicure that works with virtually any skin tone. Unlike traditional ombré nails where color graduates from base to tip, blush nails concentrate the deepest, most opaque color in the center of the nail, then fade outward toward the edges in a diffused, airbrushed effect. The overall impression is dewy, youthful, and genuinely luminous—as if you’ve applied a flush of cream blush and it’s caught the light from the perfect angle.
The Science Behind the Softness
The magic of blush nails lies in the gradient placement and the polishes used. Manicurists typically layer translucent or semi-sheer pinks, peaches, and nudes to build a gradient that feels organic rather than harsh. The color at the cuticle remains soft and barely there, gradually intensifying toward the center of the nail before fading again toward the free edge. This technique requires precision and patience—each layer must be thin enough to remain translucent but bold enough to contribute to the overall depth. The combination of soft color, glossy finish, and strategic gradient placement creates an effect that’s simultaneously understated and unmistakably gorgeous.
Building Your Blush Manicure
- Begin with a sheer base coat in the palest shade (nearly translucent)
- Apply thin layers of increasingly deeper peachy or rosy tones toward the center
- Use a makeup sponge or gradient brush to blend edges if needed
- Concentrate the deepest color right at the center of the nail bed
- Fade back to palest tones toward the free edge
- Finish with a high-shine, glossy top coat to enhance the dewy effect
Pro tip: Blush nails look best on short to medium nail lengths—the gradient effect is more visible and the overall aesthetic reads as intentional rather than accidentally faded.
3. Barcode Nails
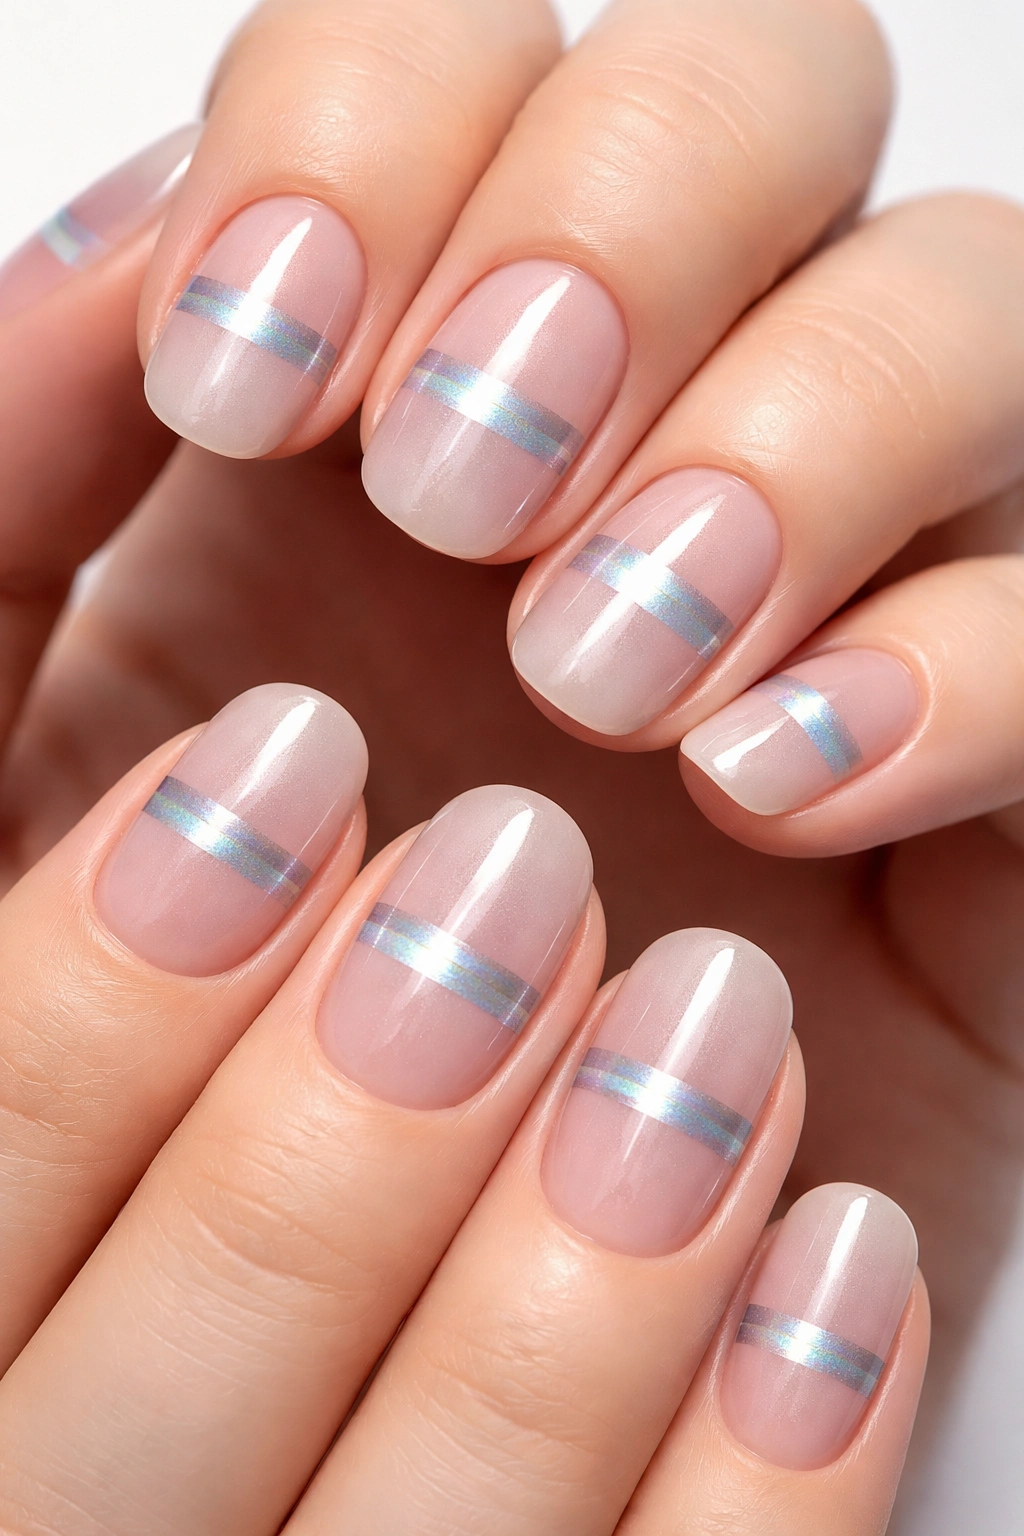
Barcode nails represent one of the most cleverly executed applications of magnetic gel polish, creating horizontal lines that shimmer and shift with movement and light. The design references those thin laser lines that appear when a barcode is scanned, but executed with sophisticated shimmer and metallic polish. A thin, perfectly horizontal stripe runs across the nail bed where your fingerprints are, creating an effect that’s somehow both minimalist and eye-catching. The line appears to move and change as you move your hand, creating an almost hypnotic quality.
The Magnetic Magic Behind the Design
The signature barcode effect relies entirely on magnetic gel polish and precise magnet placement. A rectangular magnet held horizontally against the nail draws metallic particles into a fine, linear formation that creates that distinctive scanning-line appearance. Unlike cat-eye nails, which use vertical lines created with the magnet held vertically, barcode nails demand exact horizontal positioning for maximum impact. The magnetic gel polish particles align themselves along the magnetic field, creating a stripe that catches light and reflects it in a way that standard polish simply cannot replicate. Nail artist Chloe Jeong describes the look as “modern, slightly edgy, without being overwhelming.”
Creating Barcode Nails at Home
- Apply magnetic gel polish to the entire nail surface
- Hold a rectangular magnet horizontally across the nail bed for about 30 seconds
- Position the magnet’s thin edge facing upward for the best line definition
- Keep the magnet steady—movement will disrupt the line formation
- Cure under an LED lamp once the effect is set
- Add optional embellishments like glitter, rhinestones, or additional lines before top coat
Pro tip: Start with a single line on each nail to master the technique, then experiment with multiple parallel lines, different colors, or pairing barcode nails with glitter or chrome dust for added dimension.
4. Soft Waves
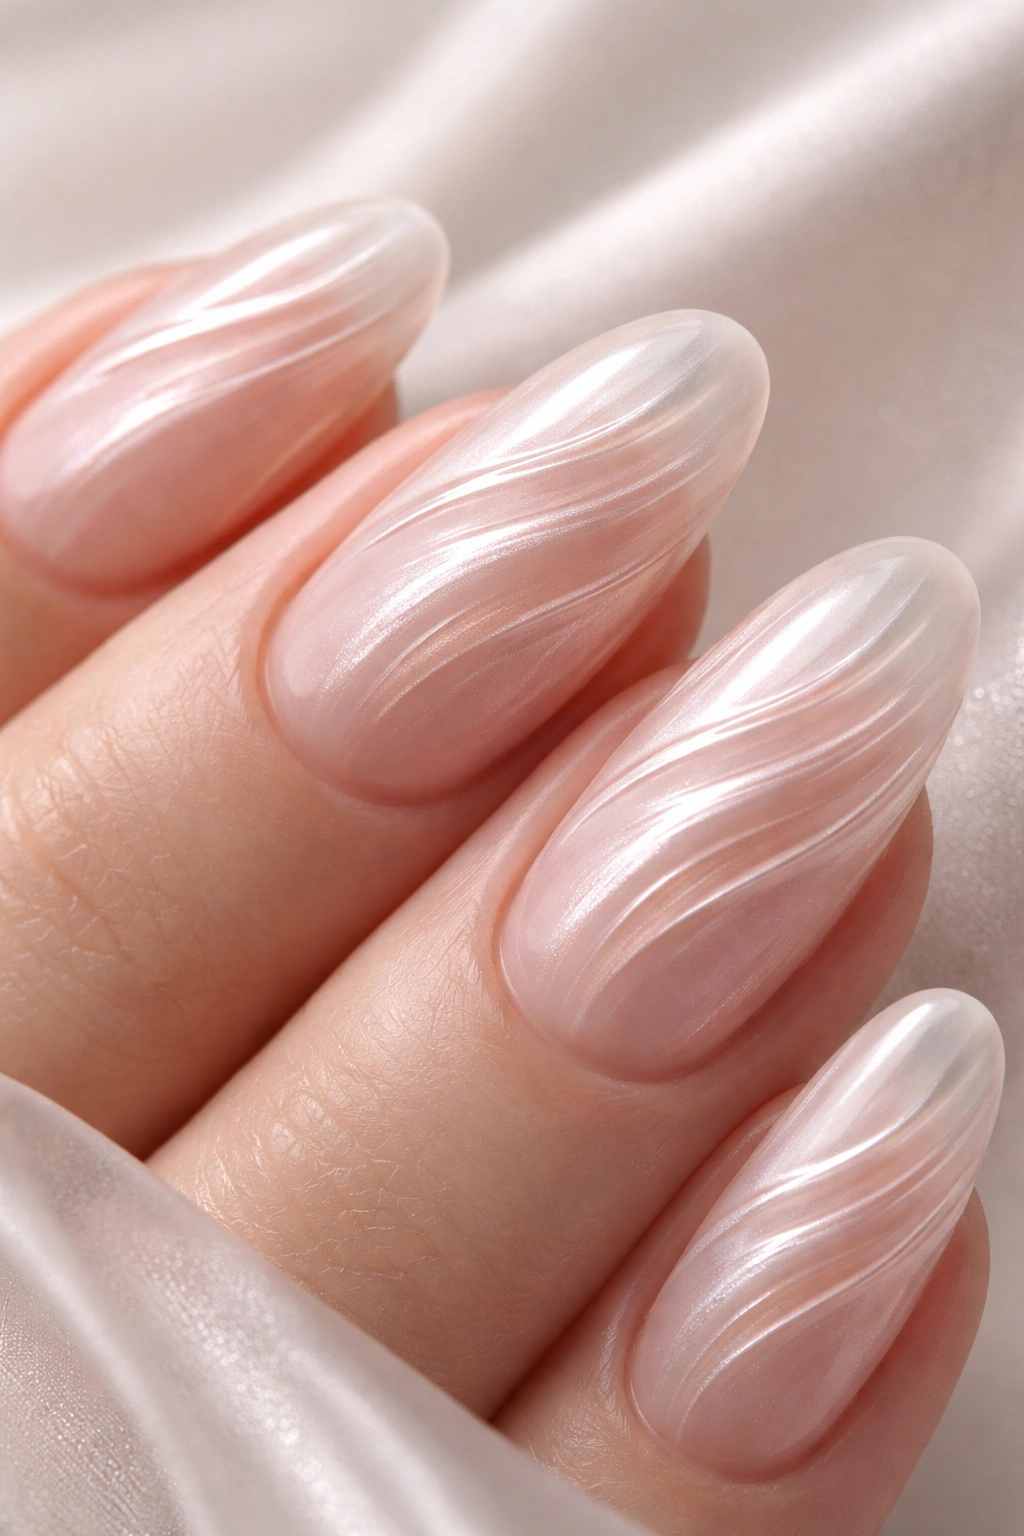
Soft waves represent a beautifully subtle approach to textured nail design, creating gentle ridges and flowing patterns that resemble everything from silk fabric to rippling water. The look features whisper-soft lines, swirls, and undulating patterns created atop a hard gel base using specialized textured brushes. These aren’t bold or dramatic textures—instead, they’re refined, elegant, and designed to catch light in understated ways. The effect often shimmers when paired with metallics or chrome dust, creating nails that look almost liquid and luminous.
Mastering the Texture Technique
Creating soft waves requires specific tools and a delicate touch. A textured flat brush with dense bristles at the base that taper toward the top creates naturally flowing grooves across the nail surface. The brush design mimics a wide-tooth comb, allowing the artist to draw smooth, consistent lines that flow in any direction. When executed properly, these waves create dimension without feeling heavy or overdone—they’re more about subtle surface variation than dramatic 3D effects. Nail artist Yoonsun Lee notes that this trend originated in Japan but Korean nail artists have perfected their own refined version with signature elegance.
Achieving Soft Waves in Your Manicure
- Apply a base layer of hard gel, typically in a metallic or shimmer finish
- Use a textured brush to create flowing wave patterns across the cured gel
- Draw gently and confidently—hesitation creates choppy rather than flowing lines
- Layer waves in different directions for organic, natural-looking texture
- Consider the direction of light and how it will catch the ridges
- Top with chrome dust or shimmer powder to accentuate the waves
- Seal with a clear top coat to preserve the texture dimension
Pro tip: If hand-painting waves feels intimidating, look for gel polishes with built-in texture or no-wipe texture formulas that come with specialized applicators designed to create these effects with minimal skill required.
5. Cat-Eye Nails
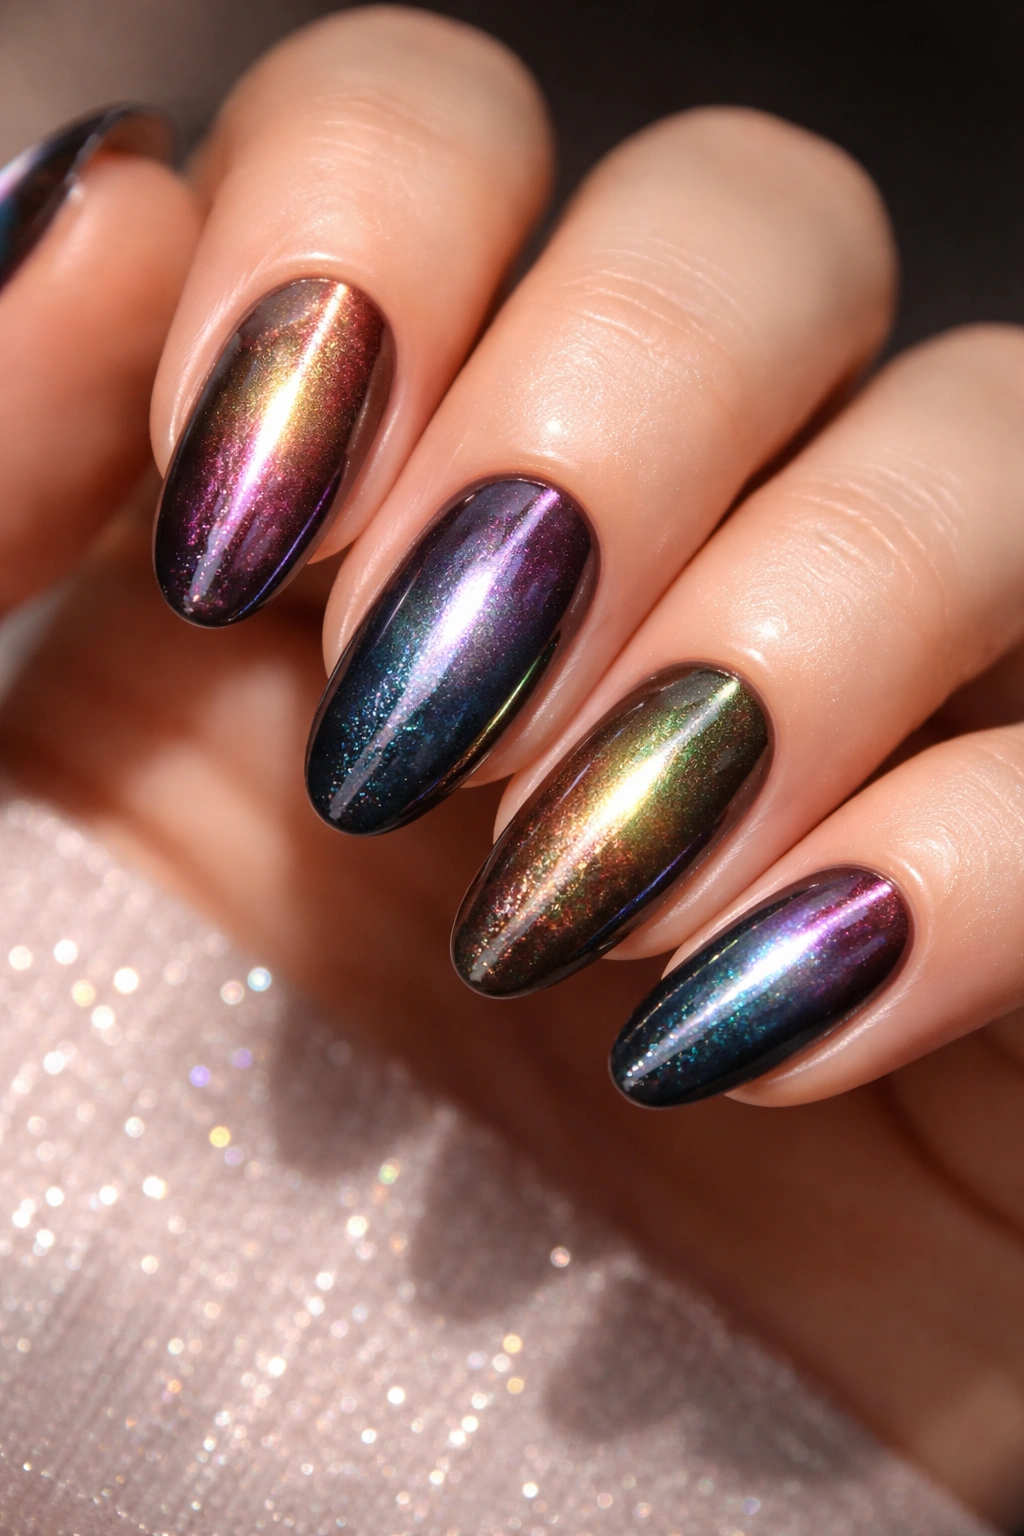
Cat-eye nails—also called magnetic nails or velvet nails—use specialized magnetic gel polish to create a luminous, shifting line that moves across your nail as you change the angle of your hand. The effect mimics the reflective glow of a cat’s eye, particularly in feline animals with vertical pupils. A vertical line of intense shimmer runs down the center of the nail, creating an otherworldly, dimensional appearance that seems to glow from within. As you flex your fingers and rotate your hand, the line shifts and dances, creating a mesmerizing effect that never looks the same way twice.
The Magnetic Polish Innovation
The cat-eye effect is created entirely through the properties of magnetic gel polish, which contains metallic particles suspended in the formula. When a magnet is held vertically against the nail, these particles align along the magnetic field, creating that distinctive vertical line of concentrated shimmer and reflection. Different magnet shapes create different line patterns—thinner magnets create fine, delicate lines while thicker magnets create bolder statements. The quality of the magnetic polish matters tremendously; Korean gel formulas are typically superior because they’re more viscous and contain higher concentrations of metallic particles, resulting in sharper, more defined lines.
Recreating the Cat-Eye Glow
- Choose a magnetic gel polish in your preferred base color
- Apply the base gel to all nails and cure under an LED lamp
- Hold a magnet vertically along the center of the nail for 20-30 seconds
- The magnet pulls metallic particles into a clean vertical line
- Keep the magnet perfectly still—any movement disrupts the effect
- Remove the magnet and cure the nail under the LED lamp
- Add a glossy top coat to enhance the shine and depth
Pro tip: Layer cat-eye polish over jelly or blush nail bases for added dimension, or combine it with 3D elements like rhinestones or crystals for a maximalist take on the trend.
6. Syrup Nails
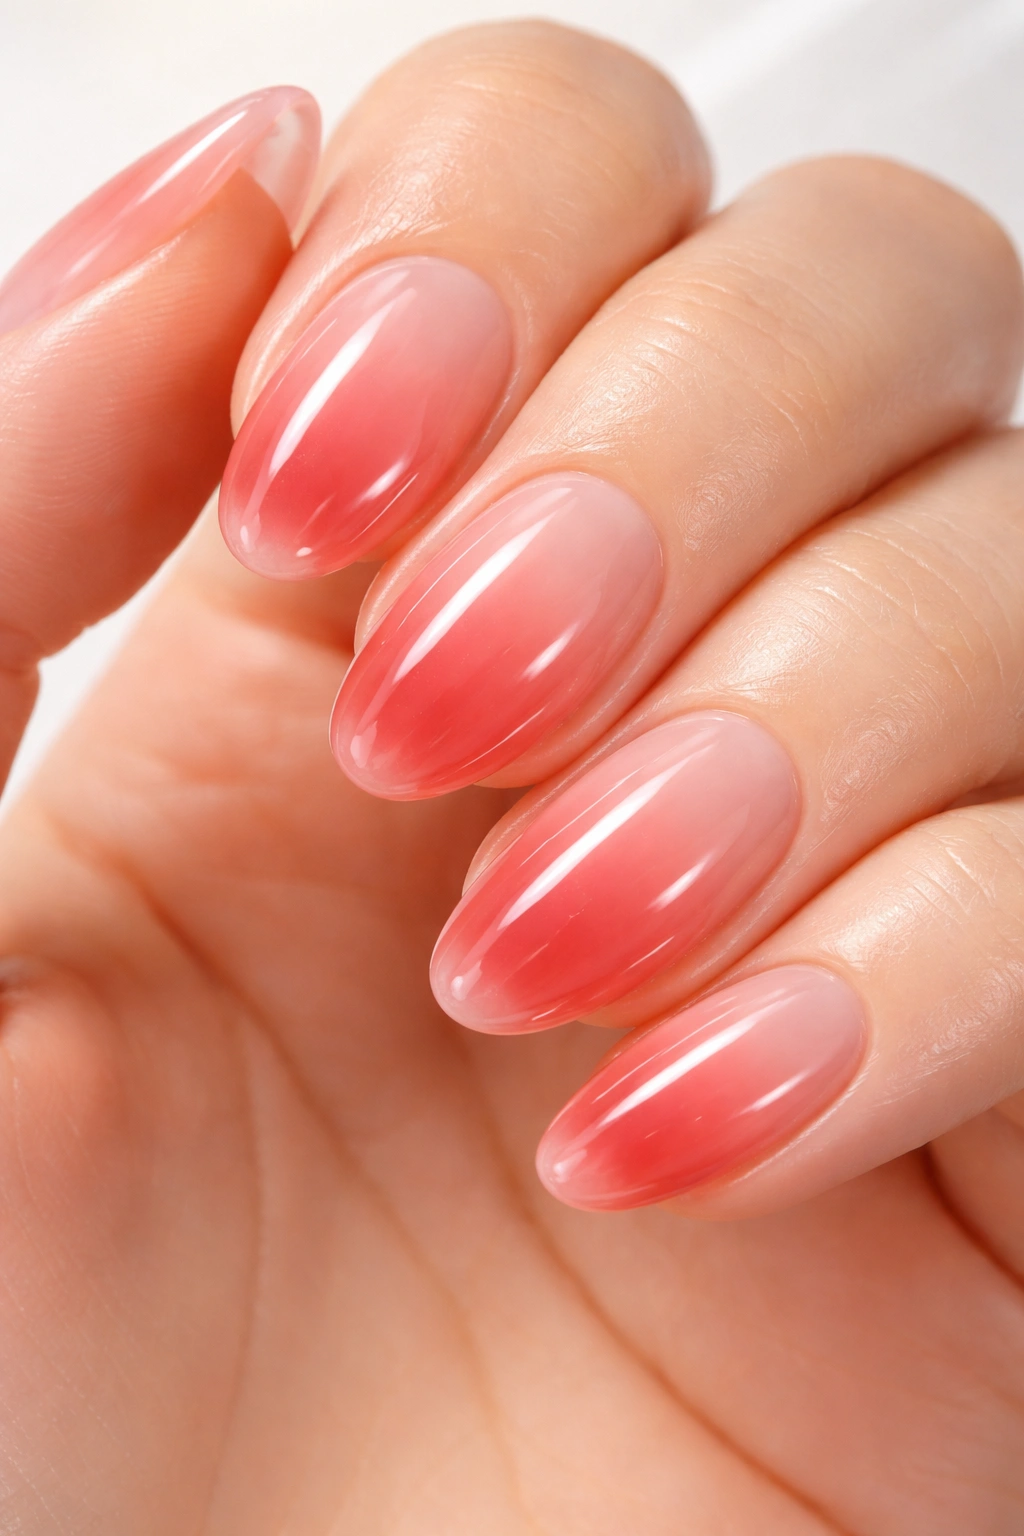
Syrup nails capture the essence of dripping, glossy syrup with a translucent gradient that melts from clear or pale at the cuticle down to a rich, saturated color at the tip. The effect is sticky-sweet and luxurious, resembling maple syrup catching light or honey suspended in motion. What makes syrup nails distinctly Korean is the emphasis on ultra-glossy finish and the technical execution of the gradient—it’s not a harsh, painted ombré but rather a natural, organic-looking transition that appears almost edible. The nails have an incredible depth and dimension that makes them look like they’re catching light from inside.
Building the Perfect Syrup Gradient
Creating syrup nails requires patience and precision with thin layers. Paint the thinnest possible layer of your chosen color just below the cuticle, then continue applying thin layers progressively lower on the nail, with each layer slightly darker or more opaque than the last. By the time you reach the tip, the color should be at its most saturated and opaque, creating a seamless transition from translucent to rich color. This technique works beautifully with warm tones like browns, caramels, and amber, but syrup nails look equally stunning in cooler shades like dusty rose, soft lavender, or pale blue. The key is choosing colors that are complementary and maintaining extreme care with layer thickness.
Layering Your Syrup Manicure
- Apply a clear base coat and cure thoroughly
- Mix your chosen color with clear gel polish to create varying opacity levels
- Apply the lightest, most translucent version near the cuticle
- Continue layering slightly darker versions in progressive bands
- Build toward the deepest, most opaque color at the nail tip
- Each layer should be very thin—you’re building depth through transparency
- Seal with a high-shine, glass-like top coat for maximum depth
Pro tip: Syrup nails look particularly striking when the base color is a warm neutral that complements your skin tone, allowing the glossy depth to do all the visual heavy lifting without overwhelming your overall look.
7. 3D Nail Art
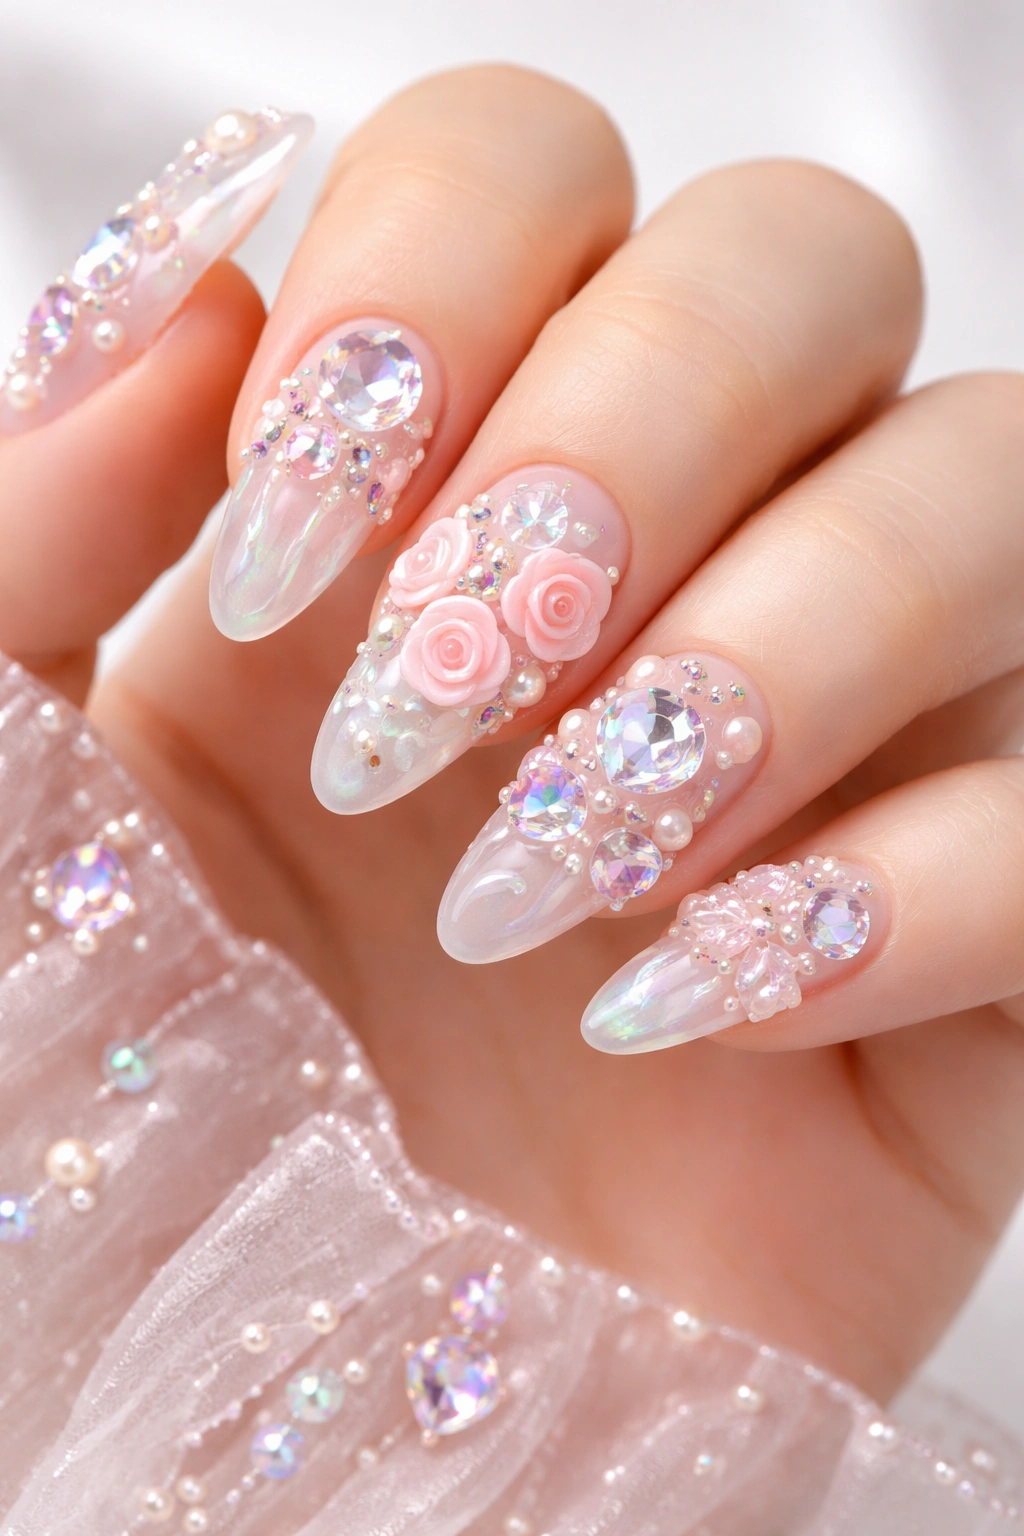
3D nail art elevates Korean nail design to sculptural territory, featuring raised, dimensional elements that transform nails into miniature works of art. From delicate flowers and crystals to geometric shapes, playful characters, and abstract sculptures, 3D nail art operates on the principle that there are literally no boundaries. The technique uses builder gel, acrylic, or specialized 3D gels to create raised elements on the nail surface, then details these additions with hand-painting, embedded gems, or additional texturing. Some 3D designs are subtle and wearable while others are extravagant statement pieces.
The Craftsmanship Behind Dimensional Design
Creating impressive 3D nail art requires advanced technical skill and artistic vision. Nail artists sculpt, mold, and layer materials to create shapes that stand out from the nail surface, then embellish with color, crystals, metals, and fine details. The most coveted 3D designs feature sculptural elements that look nearly realistic—tiny three-dimensional roses, intricate lace patterns, or textured landscapes. Unlike stickers or decals, true 3D art is hand-sculpted and built up layer by layer, making each design unique. The trend has evolved from purely decorative (ultra-long nails covered entirely in crystals and gems) to more refined applications where 3D elements accent an otherwise clean design.
Incorporating 3D Elements Into Your Design
- Start with a solid base color or gradient as your foundation
- Use builder gel to sculpt raised elements directly onto the nail
- Layer and cure multiple times to build height and dimension
- Add embellishments like crystals, pearls, or metal accents with nail adhesive
- Detail sculpted elements with fine brushwork and hand-painted designs
- Consider placement carefully—too many elements create visual chaos
- Seal everything with a durable top coat that will protect raised elements
Pro tip: If you’re getting 3D nails done professionally, discuss durability and daily wear implications—ultra-thick 3D elements can catch on clothing or hair, so balance artistry with practicality based on your lifestyle.
8. Soft Metallics and Textured Finishes
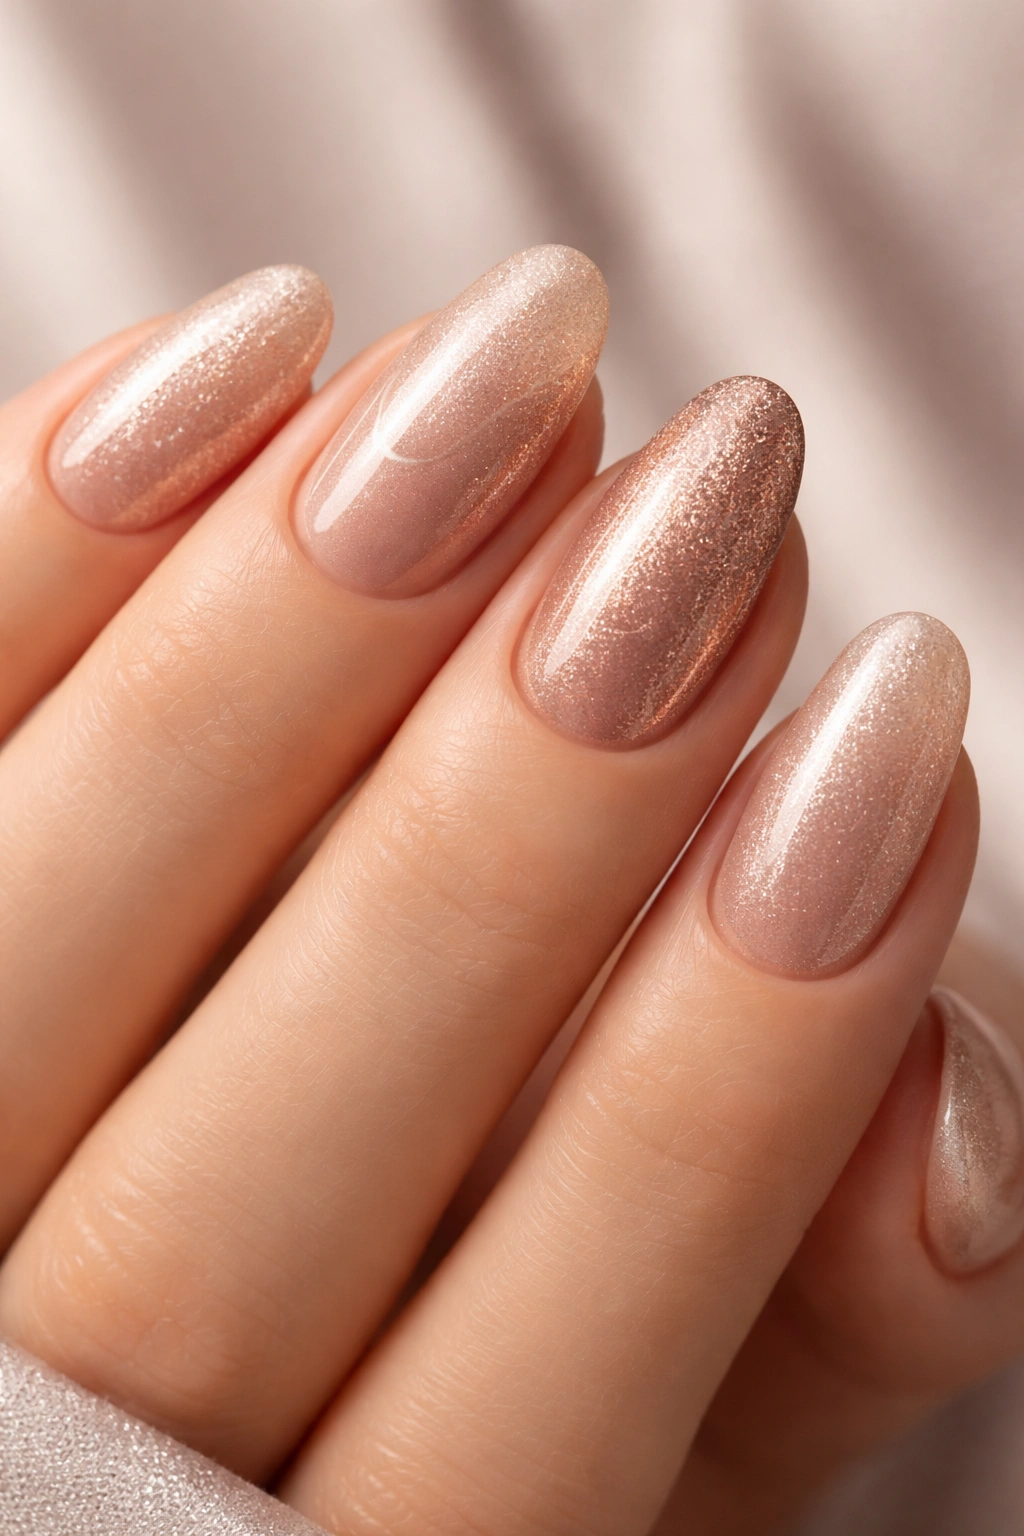
Soft metallics represent Korean nail art’s approach to subtle luxury, using metallic finishes and textured elements that catch light beautifully without screaming for attention. Rather than chrome mirrors or high-shine metallics, soft metallics feature muted, sophisticated shimmer in shades like rose gold, champagne, dusty bronze, and warm silver. These finishes often incorporate texture—whether through specialized brushes, textured gels, or metallic powder applications—creating nails that have dimension and movement when they catch the light. The overall effect is refined, expensive-looking, and entirely wearable for any occasion.
The Art of Understated Shimmer
Soft metallics succeed because they balance brightness with subtlety. Instead of covering the entire nail with bold chrome, Korean nail artists often use metallics as accents or incorporate them into gradients, creating nails that whisper rather than shout. A soft metallic at the cuticle that fades to a neutral cream, or metallic dust applied lightly over a blush base, creates an effect that’s visible and gorgeous but never aggressive. The texture component—whether ridges from a textured brush or the soft focus of finely-milled metallic powder—prevents the finish from feeling flat or one-dimensional, adding depth and sophistication.
Creating Soft Metallic Nails
- Begin with a neutral or soft-colored base coat
- Apply metallic polish or powder in muted, cool-toned shades
- Consider directional placement—cuticle area, tips, or accent nails only
- Layer metallic effects with texture for added dimension
- Use frosted or matte top coats to diffuse brightness and create softness
- Combine soft metallics with other Korean trends like gradients or waves
- The final effect should feel elegant and expensive, never harsh
Pro tip: Soft rose gold and champagne metallics are universally flattering and pair beautifully with both warm and cool undertones in skin, making them ideal if you want metallics that feel personalized without being jarring.
9. Omakase Nails

Omakase nails embrace the Japanese concept of “I’ll leave it to you”—translated into nail art as complete creative freedom for the artist. Rather than choosing a single design and executing it across all ten nails, omakase nails feature a completely customized, mismatched set where each nail tells its own story. One finger might showcase jelly nails, another cat-eye, another 3D art, and another syrup nails—all in a cohesive color story and artistic vision. The beauty is in the artistic collaboration: you provide inspiration and trust your nail artist’s creativity and judgment.
The Philosophy of Artistic Freedom
Omakase nails work because they celebrate the nail artist’s unique vision while honoring client preferences and comfort. The trend reflects a shift away from rigid design templates toward collaborative artistry where the artist’s expertise and creative intuition shape the final result. Celebrity manicurist Juan Alvear, who creates omakase nails for high-profile clients, notes that “attention to subtle detail is a big part of what separates K-manicures”—and omakase allows these details to shine across multiple different design executions. The trend empowers nail artists to showcase their full range of skills while giving clients a truly one-of-a-kind manicure that no one else will have exactly.
Getting the Most From Your Omakase Experience
- Share inspiration photos and color preferences, not specific designs
- Discuss your lifestyle and how much boldness feels comfortable
- Trust your artist’s expertise in design execution and placement
- Ask about the techniques being used if you’re curious
- Be open to creative suggestions that might elevate your vision
- Omakase works best when there’s a collaborative relationship with the artist
- Plan for potentially longer appointment time since multiple techniques are involved
Pro tip: This trend works beautifully if you’ve found a nail artist whose aesthetic aligns with yours—the better they understand your style, the more spectacular the omakase execution will be.
10. Velvet Aura Nails
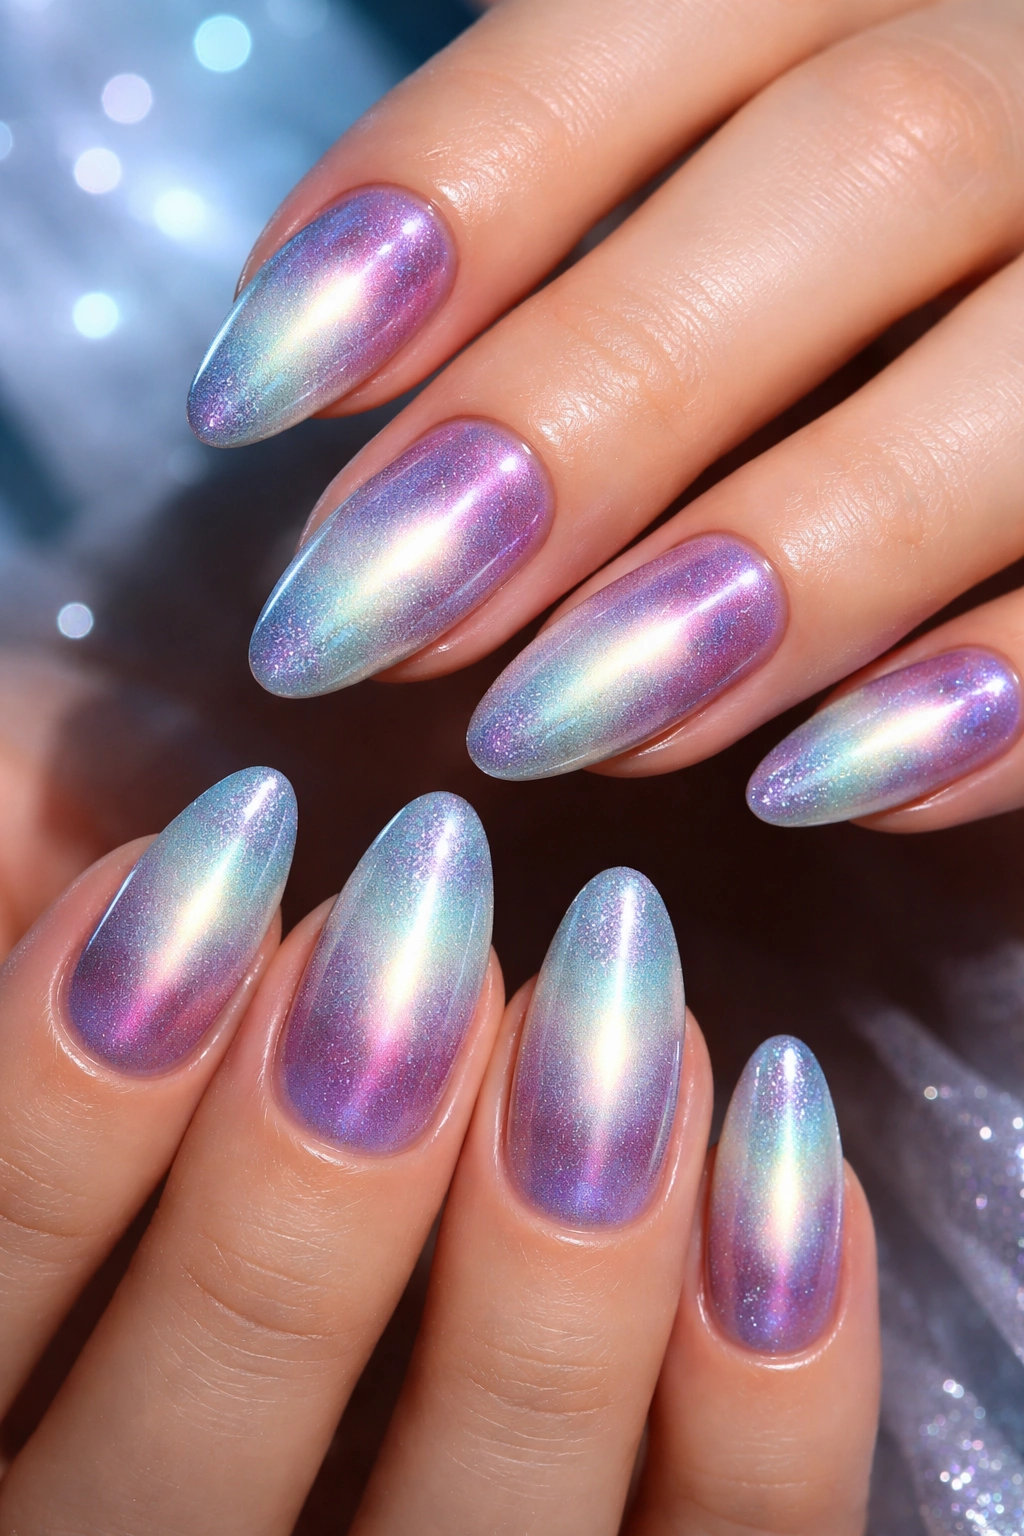
Velvet aura nails combine two beloved Korean trends—the soft, halo-effect gradient of aura nails with the luxurious, light-reflecting shimmer of velvet nails (cat-eye). The result is a nail that shimmers and shifts like silk velvet while maintaining a soft gradient concentrated toward the center of the nail. The effect is impossibly luxurious and dimensional—the nail seems to glow with internal light while the velvet texture adds tactile luxury. Colors shift in different lighting, creating different moods throughout the day, and the texture prevents the finish from ever looking flat or one-dimensional.
Layering Luxury Into One Manicure
Creating velvet aura nails requires combining magnetic polish with gradient placement techniques. The aura gradient places color concentration in the center, fading to lighter shades at the edges, while the magnetic gel polish creates dimensional shimmer that moves and reflects light as your hand moves. When combined, these techniques create a nail that’s simultaneously soft and luxurious, subtle and show-stopping. The velvet texture from the magnetic polish particles prevents the gradient from looking painted-on or harsh, instead creating an organic, luminous effect. This is the kind of manicure that photographs beautifully and catches light in person consistently.
Executing the Velvet Aura Effect
- Apply a clear or pale base coat as your foundation
- Apply magnetic gel polish in your chosen color family
- Use a magnet to create the characteristic cat-eye vertical line
- Build aura gradient by concentrating deeper color toward nail center
- Fade to lighter, nearly translucent color toward cuticle and free edge
- The magnet line should be visible through all gradient layers
- Top with glossy finish to maximize light reflection and dimension
Pro tip: Velvet aura nails look most stunning in rich, saturated colors like jewel tones or warm metallics where the color concentration creates visible depth and the magnetic shimmer has plenty of pigment to work with.
11. Dewdrop and 3D Blob Nails
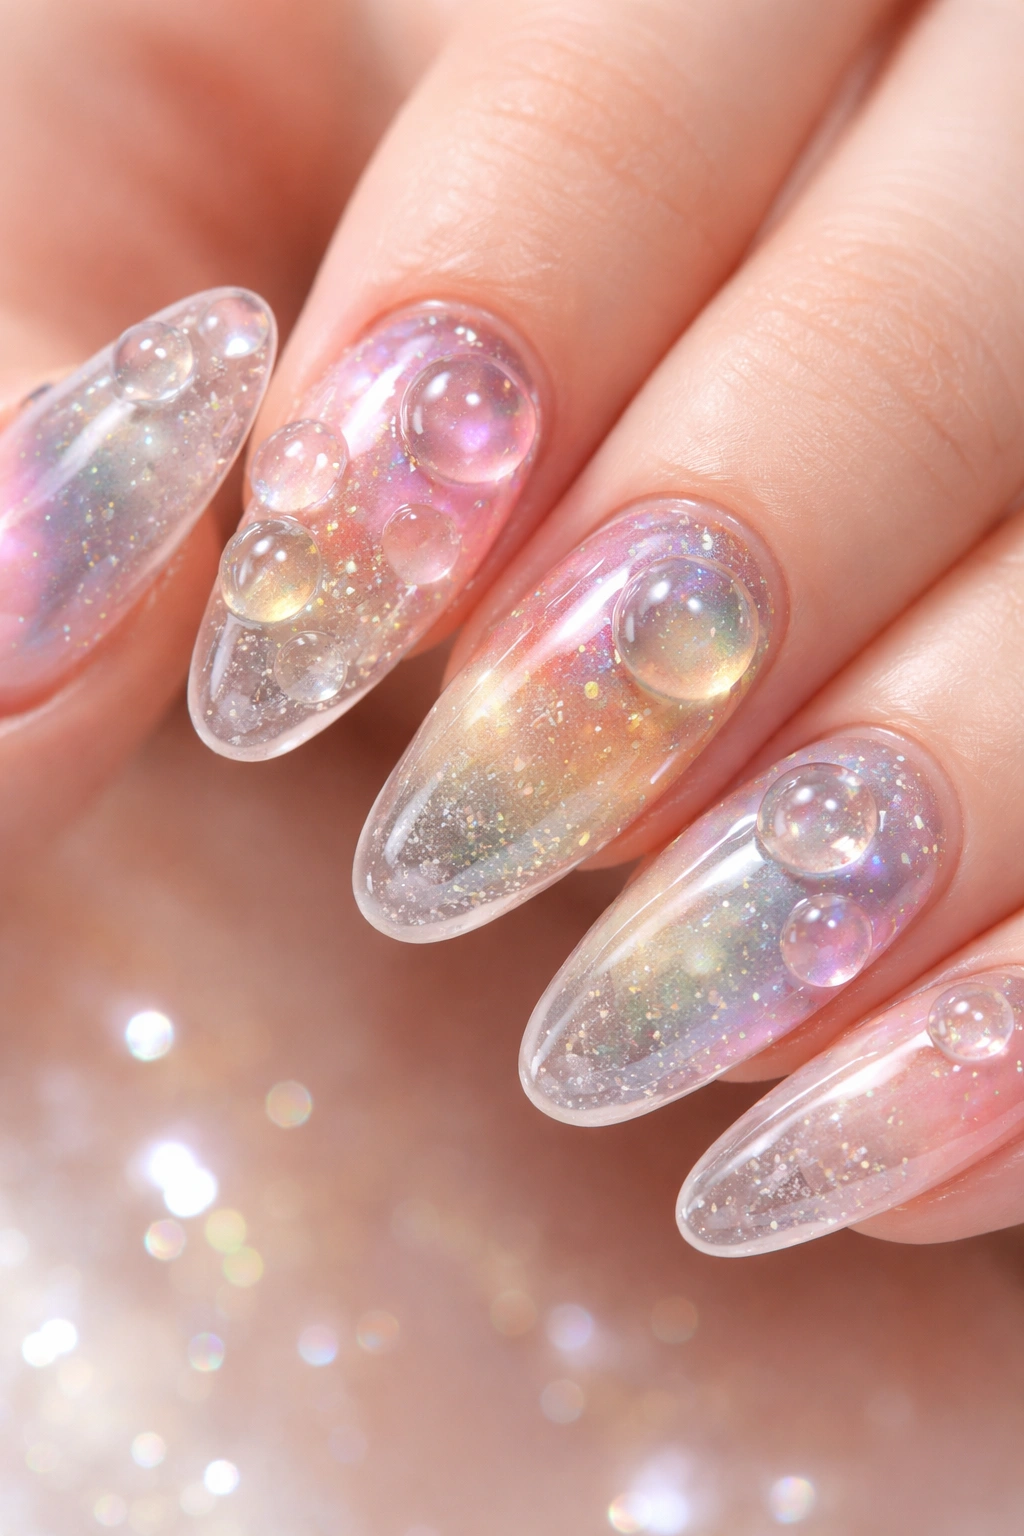
Dewdrop nails—also called 3D blob nails—feature clear, jelly-like domes that sit atop the nail surface, mimicking the appearance of fresh morning dew or water droplets. The effect is whimsical and magical, creating the illusion that liquid pearls or gemstones have been suspended on your nails. Unlike solid 3D art, dewdrop nails maintain transparency, allowing you to see through them while appreciating their perfect dome shape and the way they catch and refract light. They can be kept crystal clear for a minimalist look or tinted with color, glitter, or metallic flakes for added visual interest.
The Chemistry of Perfect Domes
Creating dewdrop nails requires clear builder gel and precision sculpting technique. The artist uses clear builder gel to create perfectly formed, bubble-like domes directly on the nail, curing each layer to build height and maintain the spherical shape. The clarity is essential—any cloudiness or opacity destroys the effect. Some artists add tiny glitter particles, metallic flakes, or even dried flowers inside the domes before sealing them, creating dimensional art inside clear capsules. The technique demands a steady hand and an understanding of gel physics—how thick each layer should be, how long to cure, and how to maintain a smooth dome surface without flattening it.
Building Your Dewdrop Design
- Prepare the nail and apply a base color or design underneath
- Use clear builder gel to sculpt dome shapes atop the nail
- Build height gradually with thin layers and proper curing
- Keep the dome smooth and symmetrical during building
- Add optional inclusions like glitter or flakes before final sealing
- Ensure perfect clarity—cure thoroughly and use quality clear gels
- Seal with a durable top coat to protect the dome
Pro tip: Dewdrop nails work beautifully as accents—placing them on one or two statement nails rather than all ten creates visual interest without overwhelming your overall look, and they’re less likely to catch on things.
12. Negative Space Nails
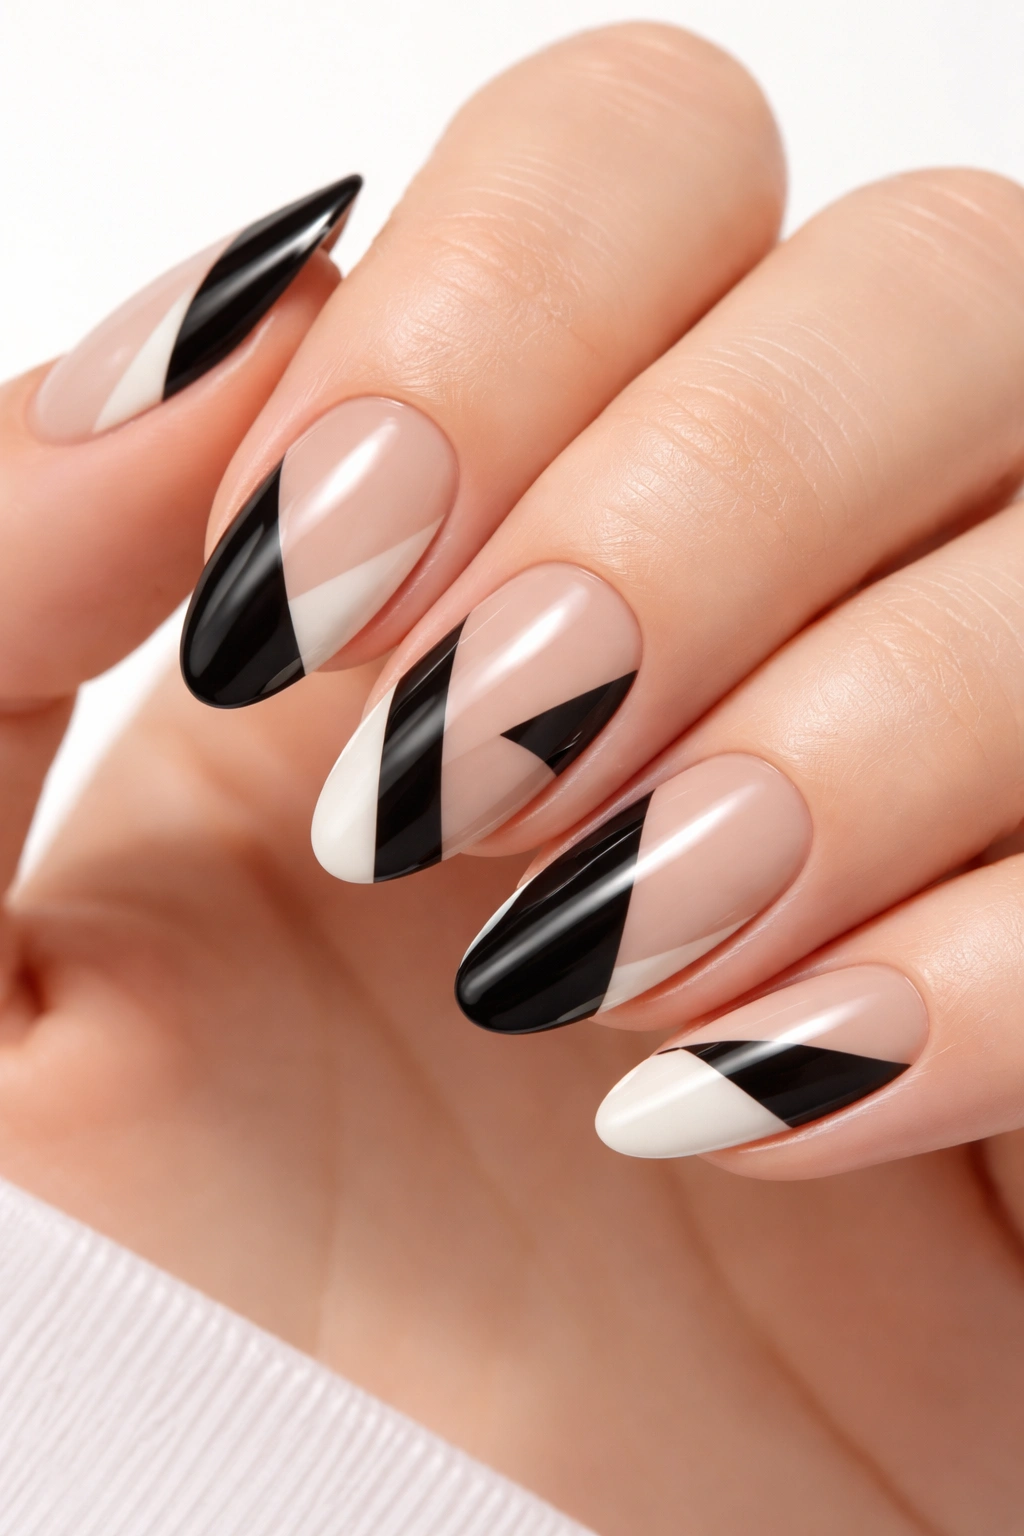
Negative space nails embrace the power of emptiness, using the bare, unpainted nail as an intentional design element rather than an oversight. Whether through geometric cutouts, artistic stripes, or clever line work, negative space nails create striking visual impact by strategically leaving portions of the nail unpolished. The contrast between painted and bare nail creates dramatic, eye-catching designs that often appear more complex than they actually are. This trend appeals to minimalists who want visual interest without full coverage, and to artists who recognize that absence can be as powerful as presence.
The Power of What’s Not There
Negative space nail design leverages visual contrast and geometric principles to create impact. High-contrast designs—like a single unpainted stripe down the center of a dark base, or unpainted geometric sections within colorful polish—create optical illusions and visual dynamism that solid colors cannot achieve. The technique is particularly effective for designs like the high-heel nails trend, where an unpainted vertical stripe creates the silhouette of a pointed-toe shoe. The beauty of negative space nails is their versatility—you can execute them with simple, minimalist line work or incorporate complex geometric patterns, depending on your artistic confidence and design preferences.
Creating Striking Negative Space Designs
- Plan your design carefully before beginning—negative space mistakes are visible
- Apply base color and allow it to dry completely
- Use thin detail brushes or striping tape to define unpainted areas
- Striping tape creates clean lines; freehand offers organic shapes
- The negative space (unpainted nail) should be intentional and visually balanced
- Consider high-contrast color combinations for maximum impact
- Seal with top coat, which will also coat the negative space areas
Pro tip: If you’re nervous about freehand negative space work, use striping tape to create clean lines and geometric patterns—the tape does the heavy lifting, and you simply polish around it, making perfect precision achievable for anyone.
Final Thoughts
Korean nail trends represent far more than passing fads—they embody an entire philosophy of nail art that celebrates innovation, precision, creativity, and the courage to experiment. Whether you’re drawn to the candy-like translucence of jelly nails, the luxurious shimmer of velvet aura, or the artistic freedom of omakase designs, there’s a Korean nail trend that speaks to your personal aesthetic and skill level. The beauty of these trends is their adaptability; you can execute them professionally at a salon or experiment with at-home versions, you can keep them subtle and refined or bold and statement-making, and you can mix and match elements to create something uniquely yours.
What makes Korean nail artistry distinctive is the meticulous attention to detail, the quality of products used, and the genuine artistic vision that guides each creation. The trends showcase techniques ranging from straightforward (applying jelly polish in layers) to advanced (sculpting 3D elements or creating perfect magnetic lines), meaning there’s something for every skill level and comfort zone. As you explore these trends, remember that the goal isn’t to replicate exactly what you see on Instagram—it’s to draw inspiration and adapt these techniques to reflect your own style, lifestyle, and preferences. Your nails should make you feel confident, beautiful, and genuinely excited to show them off.
