

Chocolate brown is one of those versatile, sophisticated nail colors that works for almost any occasion—whether you’re heading to the office, a night out, or just want to elevate your everyday aesthetic. There’s something deeply elegant about rich, warm brown tones on long round nails; they feel polished without being overdone, and they complement virtually every skin tone beautifully. The long, rounded shape is especially flattering because it elongates the finger while maintaining a practical, modern silhouette that doesn’t feel overly dramatic or difficult to maintain.
What makes chocolate brown nails so compelling is their incredible versatility. You can wear them completely bare and minimal for a clean, sophisticated look, or layer them with glitter, metallics, marbling, and intricate designs to create something that catches the light and commands attention. The beauty of this particular shade is that it serves as a perfect canvas—it’s neutral enough to pair with virtually any accent color or technique, yet distinctive enough to feel intentional and curated. Whether you’re drawn to ultra-glossy finishes, velvety mattes, or shimmering embellishments, chocolate brown adapts beautifully to your vision.
Long round nails also happen to be one of the most wearable nail shapes out there. Unlike stiletto or coffin shapes, which can feel theatrical or impractical, round nails maintain a graceful, feminine appearance while still making a statement. The length gives you the visual impact you’re looking for, while the soft curve of the rounded tip means they’re less prone to breaking and won’t catch on things constantly. If you’re someone who’s been hesitant about trying longer nails, chocolate brown long rounds might be exactly the confidence boost you need.
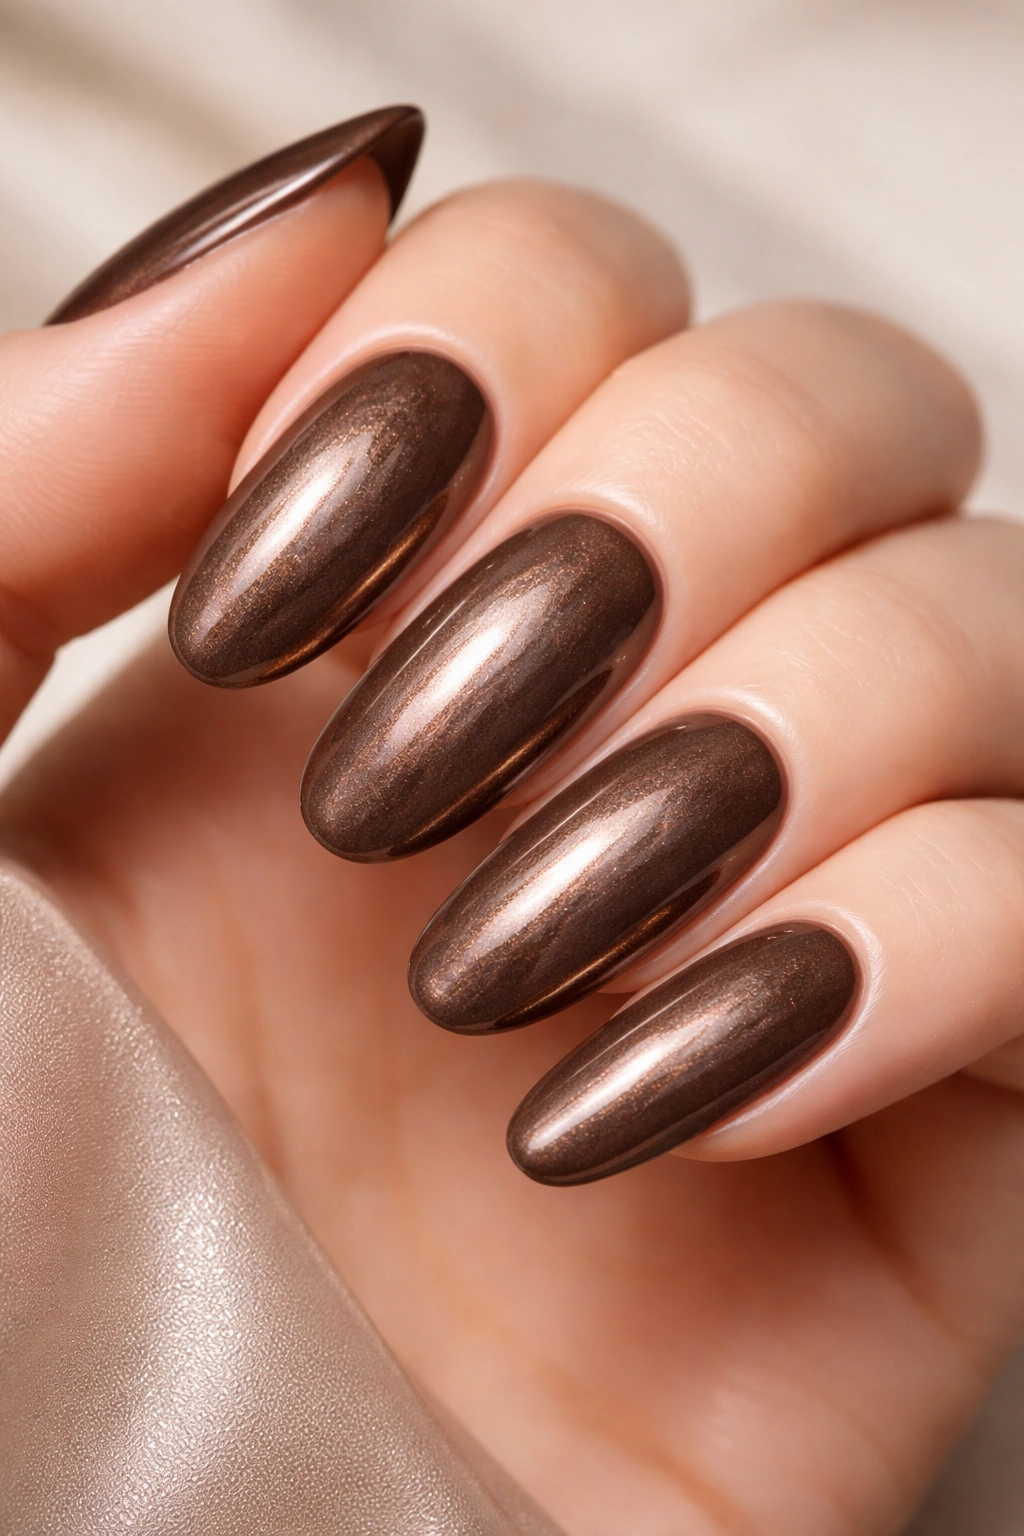
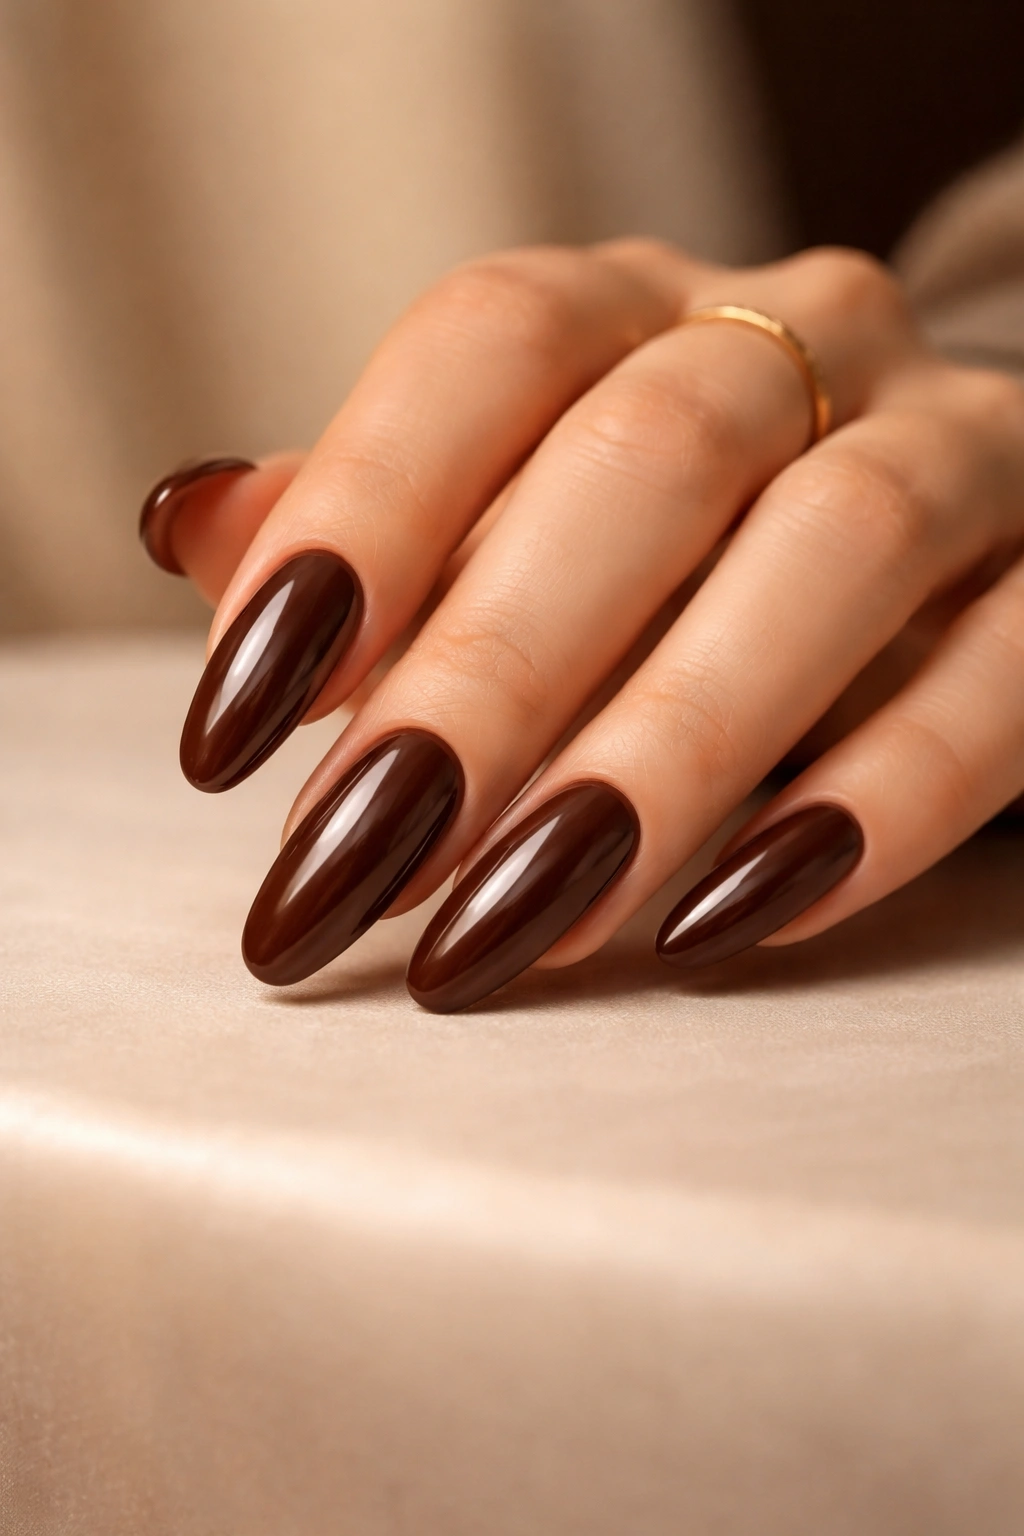
1. Glossy Chocolate Brown with High-Shine Finish
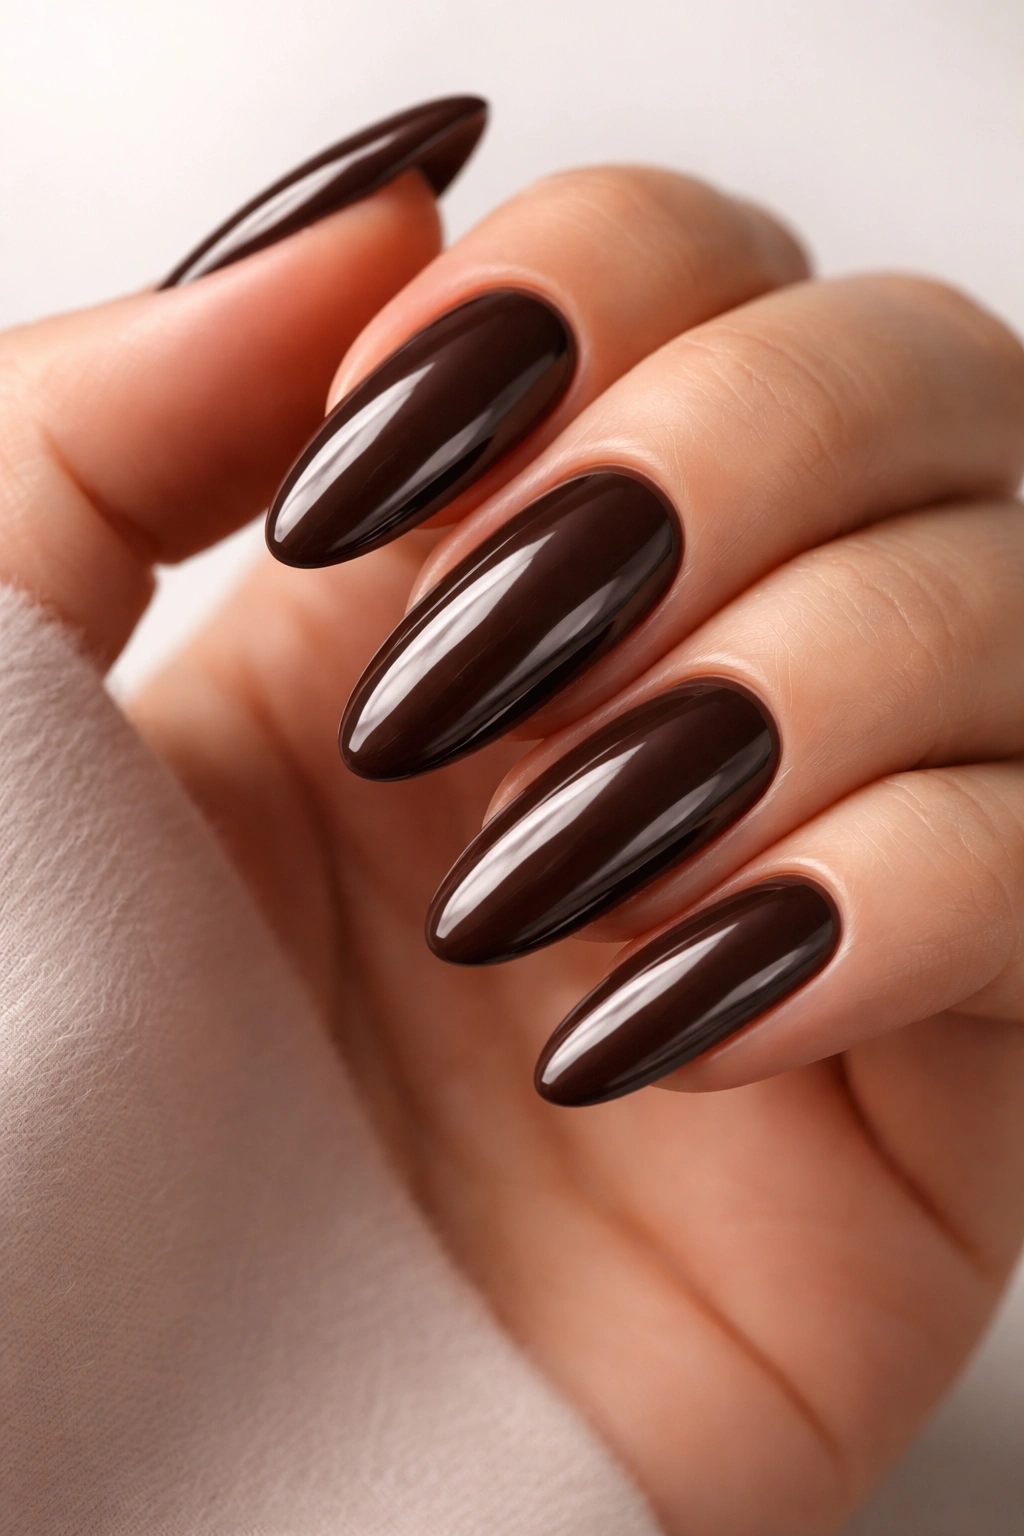
A simple, stunning chocolate brown with a high-shine gel or regular polish finish is the foundation of every great chocolate brown nail collection. This look is all about depth and luminosity—the nail catches light beautifully, creating dimension even though there’s no additional design or embellishment. The glossiness amplifies the richness of the brown, making it feel luxurious and expensive-looking without requiring any special techniques or intricate artwork.
Why This Look Works for Everyday Wear
This style is perfect because it looks polished and intentional while remaining completely practical. You don’t have to worry about intricate designs chipping, and it pairs seamlessly with every outfit in your wardrobe. The shine reflects light evenly across the nail, creating an illusion of length and elegance. Whether you wear it for a formal event or casual day out, glossy chocolate brown reads as put-together and effortless.
Application and Maintenance Tips
- Use a quality base coat to prevent staining (important with darker shades)
- Apply two thin coats rather than one thick coat for even coverage
- Seal with a glossy topcoat for maximum shine and protection
- Reapply topcoat every 3-4 days to maintain that high-shine appearance
- If using gel polish, cure under UV or LED lamp according to product instructions
Pro tip: Pair this with a rich chocolate brown lip color for a completely cohesive, monochromatic moment that feels luxe and intentional.
2. Matte Chocolate Brown with Velvety Texture
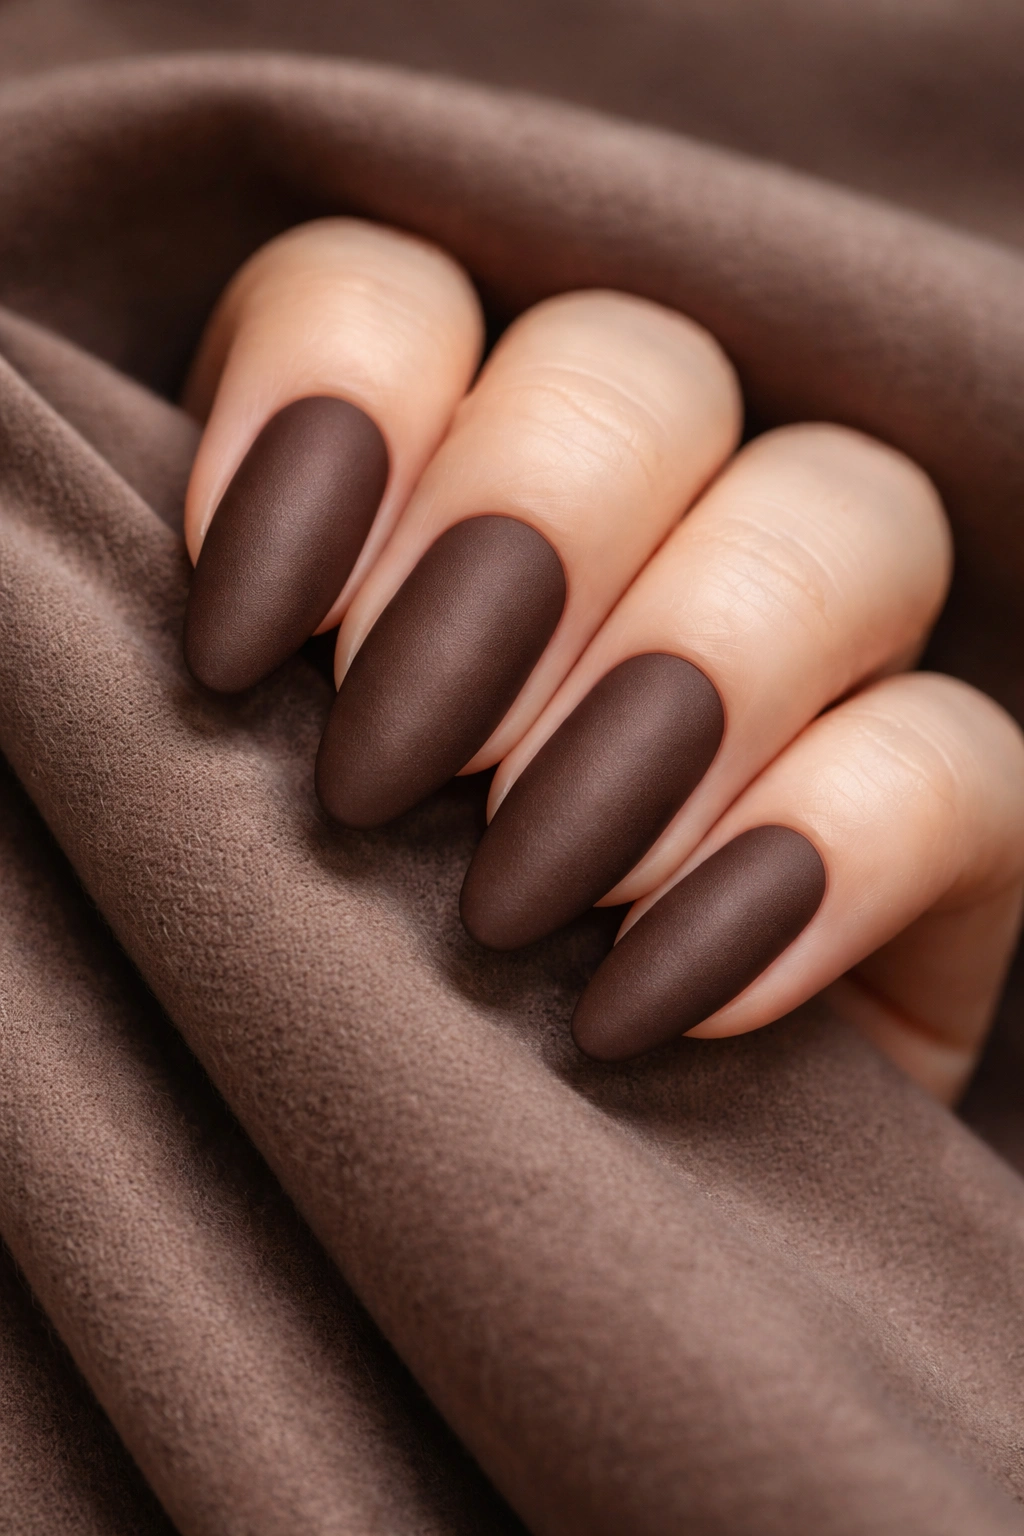
Matte chocolate brown feels modern, sophisticated, and slightly edgier than its glossy counterpart. The velvety finish absorbs light rather than reflecting it, which gives the color an almost deeper, more contemplative appearance. This finish works particularly well if you have a warmer skin tone, as the matte texture enhances the warmth of the brown without any shine to dilute it.
The Appeal of Matte Finishes on Round Nails
Matte polish has become increasingly trendy because it photographs beautifully and feels different from the standard glossy look most people default to. On long round nails, the matte finish emphasizes the clean shape and creates a more artistic, fashion-forward impression. The texture adds visual interest without requiring any stamping, decals, or embellishments—it’s sophisticated minimalism at its finest.
Creating and Maintaining a Matte Finish
- Apply a matte topcoat over dried chocolate brown polish for the velvet effect
- Alternatively, buy pre-mixed matte chocolate brown polish to skip a step
- Avoid regular topcoat, as it will create shine and negate the matte effect
- Matte finishes show fingerprints and dust more readily—plan for more frequent cleaning
- Keep a makeup brush handy to gently dust off particles that settle on the matte surface
Worth knowing: Matte finishes actually tend to last slightly longer than glossy ones because the topcoat can be thicker without appearing plasticky or cheap.
3. Chocolate Brown with Gold Foil and Metallic Accents
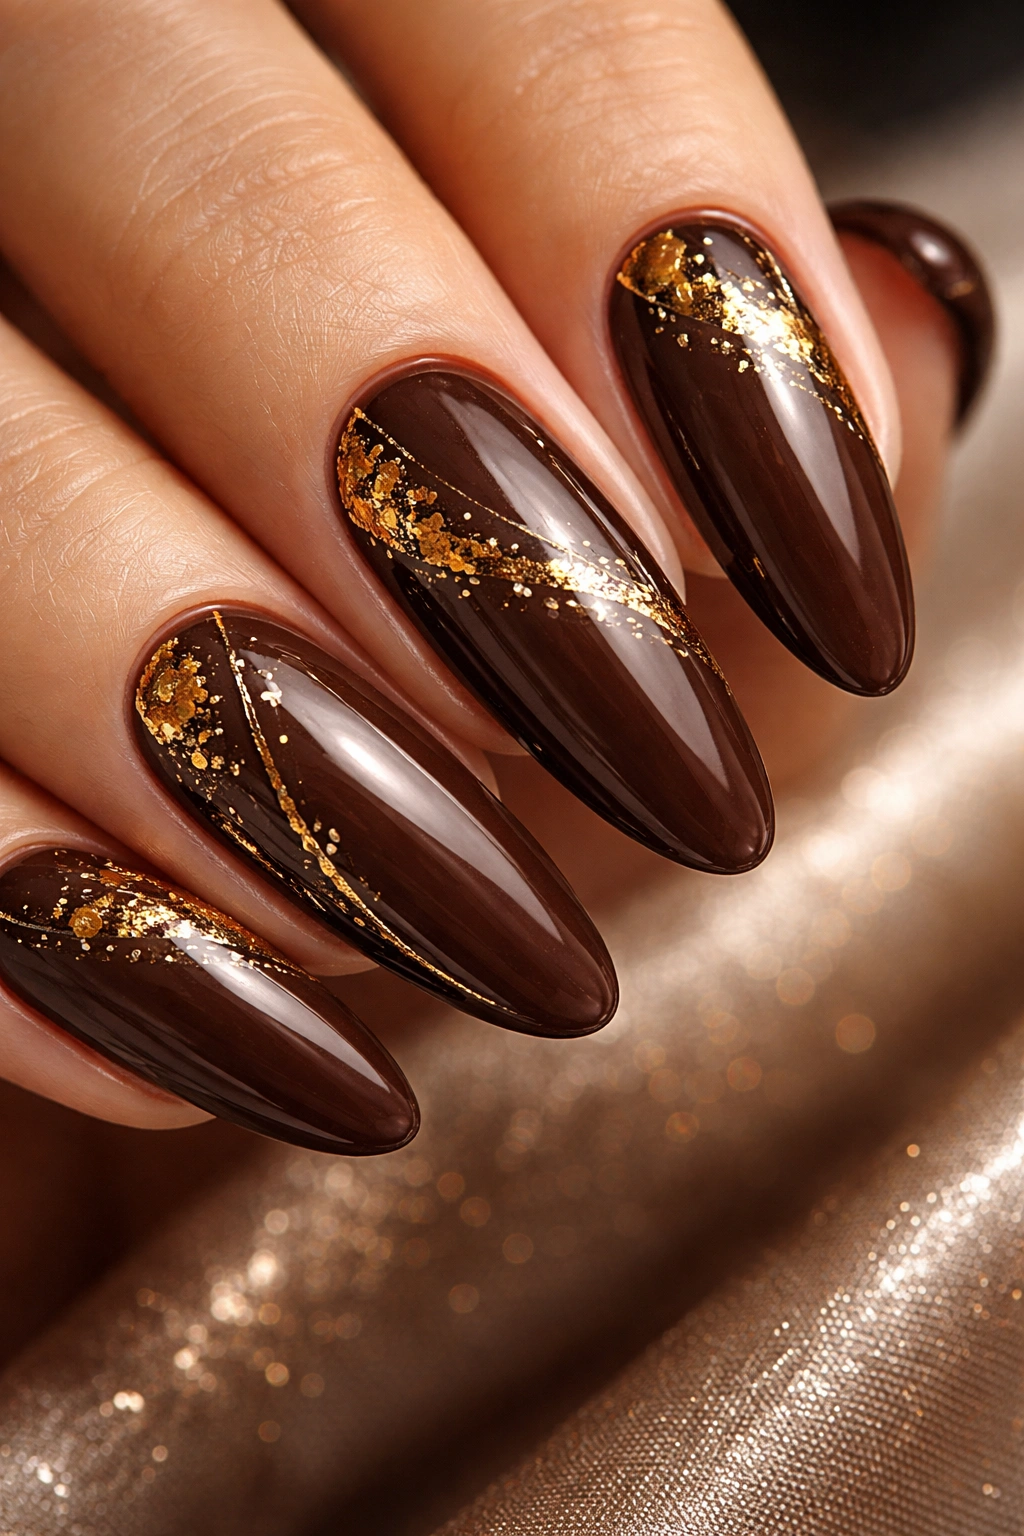
This design combines chocolate brown as your base with strategic placements of gold foil, metallic flakes, or shimmer to create visual interest and glamour. You might apply gold to just the tips (a reverse ombre effect), dust it across the entire nail for a speckled appearance, or create a geometric pattern using thin gold lines. The warm tones of gold complement chocolate brown beautifully, creating a luxe, autumn-inspired aesthetic.
Layering Metallics with Deep Browns
Gold against chocolate brown creates a warm, harmonious color story that feels both elegant and cohesive. The metallic shimmer catches light while the chocolate base provides depth and grounding. This combination works especially well if you’re reaching for a nail look that’s dressier than everyday but not quite costume-level. Think holiday parties, date nights, or celebrations where you want to feel special without appearing overdone.
Techniques for Applying Metallic Accents
- Use a thin detail brush to paint gold lines freehand for geometric patterns
- Apply foil sheets over a tacky topcoat layer for a smooth, embedded metallic effect
- Mix metallic flakes into clear gel and apply as an accent layer
- Sponge gold shimmer onto the tips for a gradient effect
- Apply metallic chrome powder over the chocolate base for a mirror-like sheen
Quick facts:
- Gold foil creates the most dramatic, eye-catching effect
- Metallic flakes offer a more subtle, speckled shimmer
- Chrome powder creates an almost liquid metal appearance
- Combination techniques (foil + flakes) create maximum dimension
4. Ombre Chocolate Brown to Nude Gradient
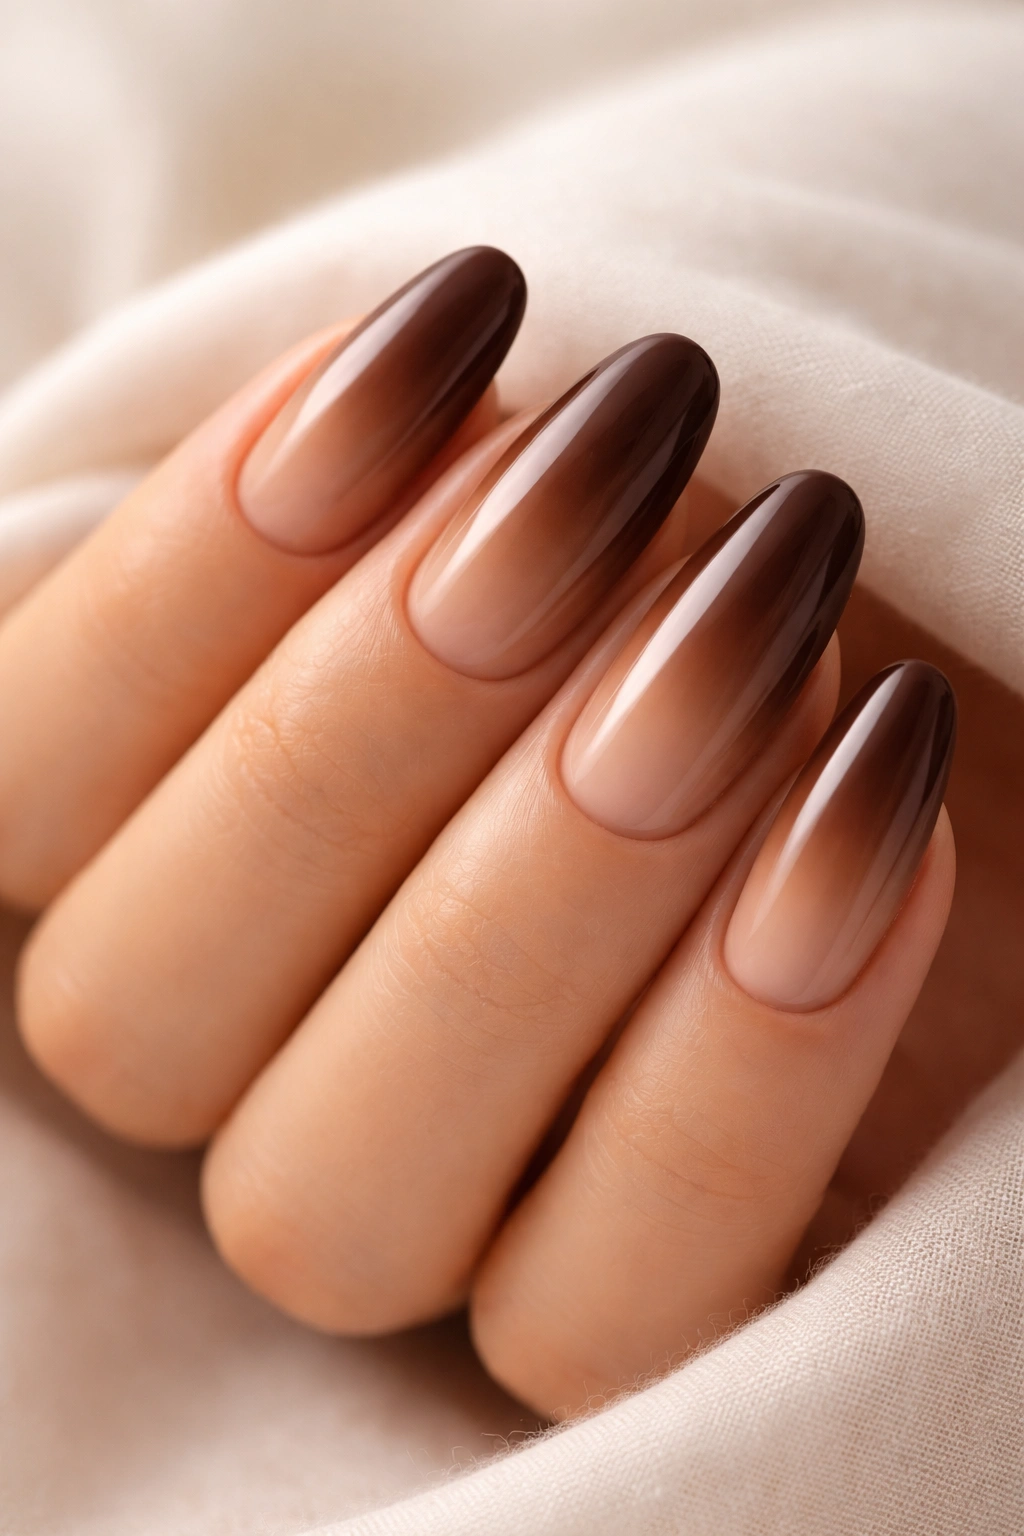
A gradient from chocolate brown at the base through a lighter beige or nude tone toward the tips creates an incredibly flattering, elongating effect. This design draws the eye upward along the nail and softens the chocolate brown slightly with warmer neutral tones. The transition between shades should be soft and blended, creating a seamless flow rather than a sharp line.
Why Ombre Lengthens Your Nails Visually
The gradient effect is a designer trick that creates the illusion of even longer nails than you actually have. Your eye follows the color transition from dark to light, which extends your visual perception of the nail’s length. The lighter tip also creates a subtle French manicure effect, which is universally flattering. This look works beautifully on any skin tone because the customizable blend point allows you to choose shades that complement your specific undertone.
Creating a Perfect Gradient
- Use a makeup sponge to blend two shades together for a soft transition
- Apply chocolate brown to the base, leaving the tips bare
- Dab the nude shade near the tips with your sponge
- Blend back and forth until the line disappears completely
- Seal with a glossy or matte topcoat depending on your preference
Insider note: The longer your nails, the easier this technique becomes—there’s more surface area to work with, so imperfections blend more naturally.
5. Chocolate Brown with White Accent Nail
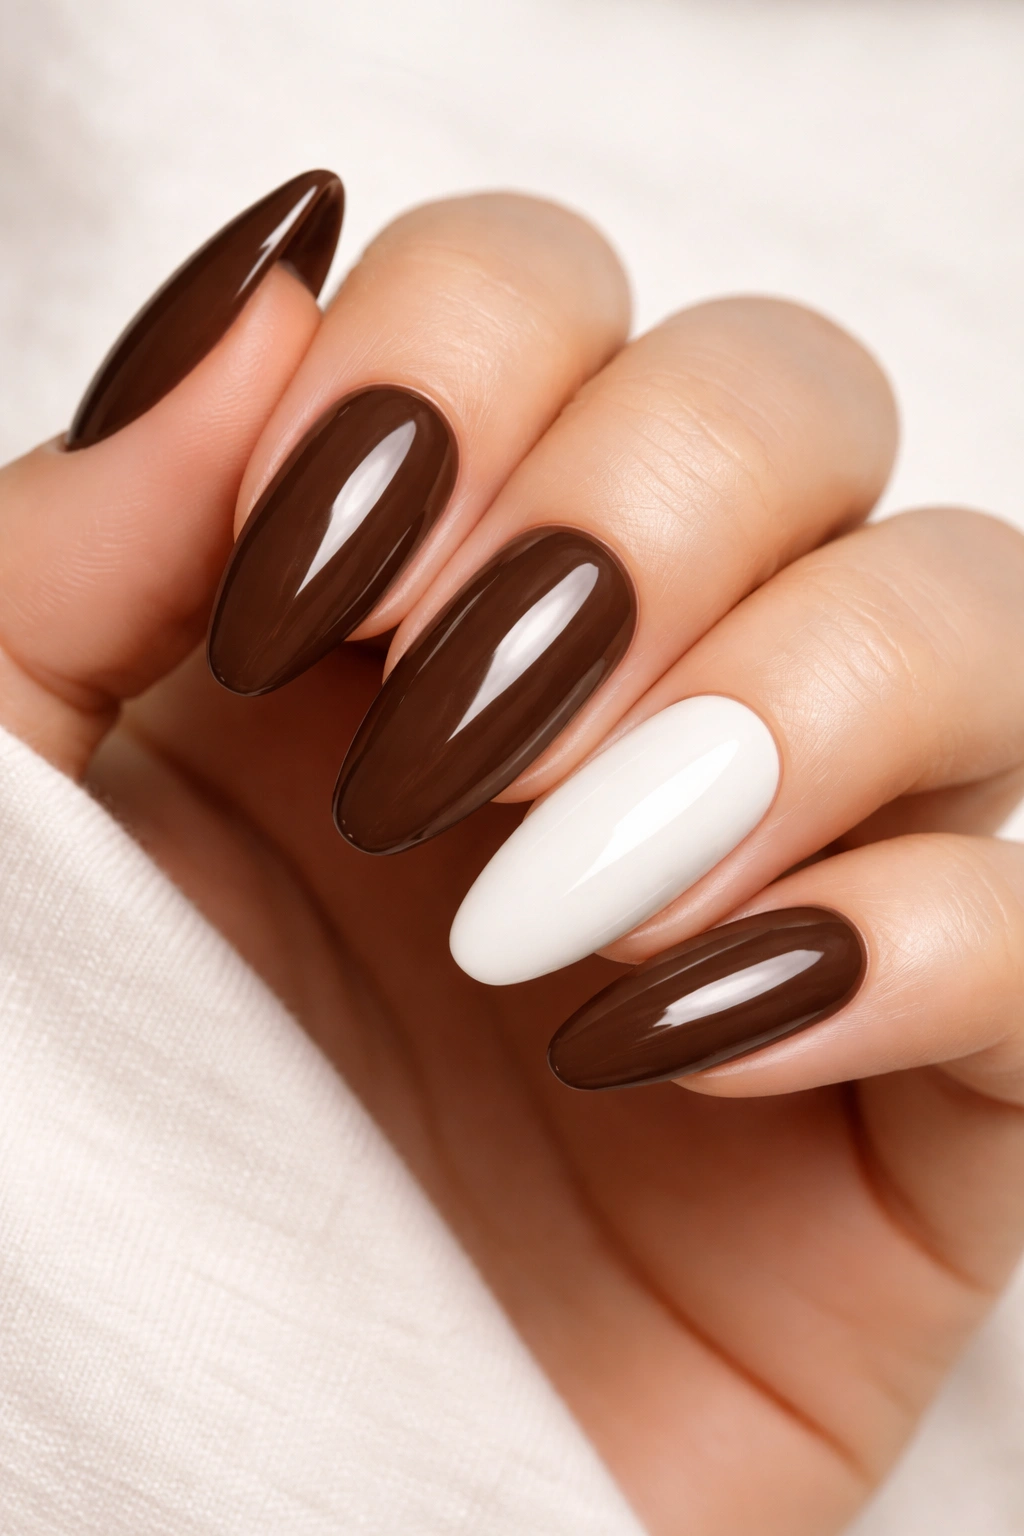
A crisp white accent nail against chocolate brown bases creates striking contrast and visual drama. Choose one accent nail per hand (typically the ring finger) or coordinate them on both hands for symmetry. The white can be solid, or you can add a thin gold or black line separating the two colors for an even more polished appearance. This design feels modern, intentional, and high-fashion without being complicated.
The Psychology of Contrast in Nail Design
High-contrast designs automatically draw attention because our eyes are naturally drawn to visual contrast. The white against chocolate brown creates a bold statement while remaining sophisticated. This look works especially well if you’re tired of your nails blending into your outfit or disappearing in photos. It’s a design choice that says you’re confident and thoughtful about your aesthetic.
Styling the Contrast Accent Nail
- Use a thin striping brush or toothpick to create a clean line between colors
- Add a metallic dividing line (gold, silver, or rose gold) for extra polish
- Stamp a geometric pattern on the white accent for additional interest
- Keep the rest of the nails perfectly smooth and unblemished
- The accent nail placement matters—center it or position it asymmetrically for different effects
Key benefit: This design photographs beautifully and looks intentional in professional settings while still feeling current and fashion-forward.
6. Chocolate Brown with Rainbow Holographic Glitter
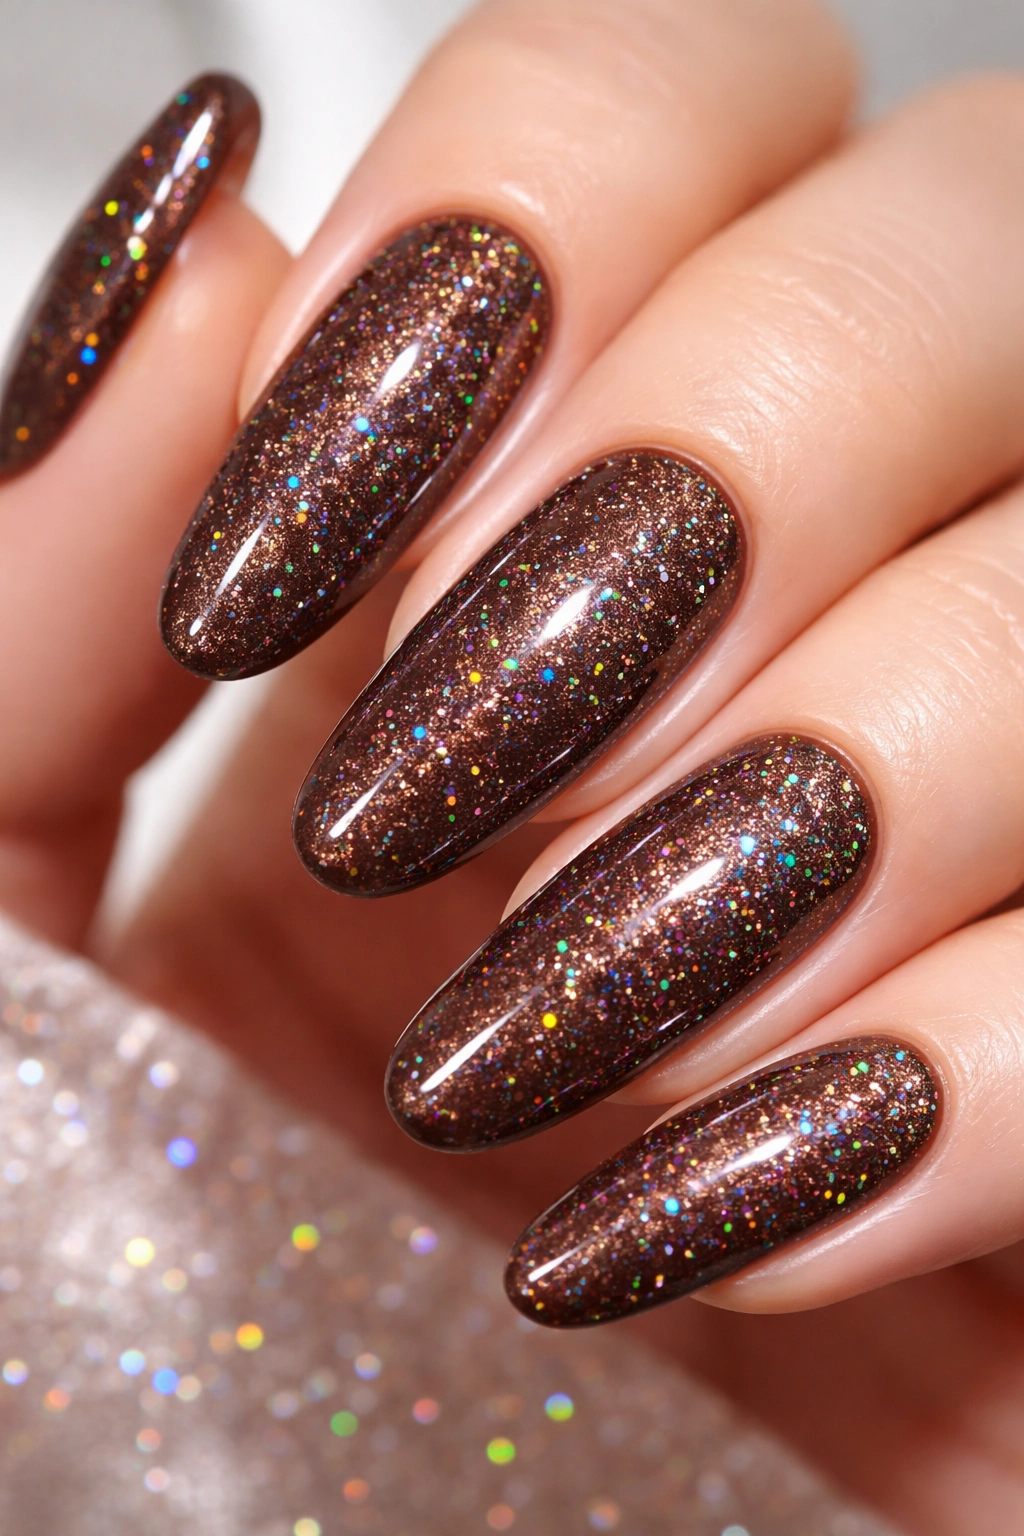
Layer transparent holographic glitter over your chocolate brown base to create a magical effect where rainbow light dances across the nail in the sun. The chocolate brown provides a rich backdrop that makes the holographic sparkle even more visible and dramatic. Holographic glitter catches light from every angle, creating a constantly shifting prism effect that’s impossible not to notice.
Why Holographic Elements Elevate Chocolate Brown
Holographic finishes have a futuristic, magical quality that seems to contradict the warm earthiness of chocolate brown—but that contrast is exactly what makes it work. The holographic shimmer adds movement and interest without making the nails look costume-like or over-the-top. It’s the perfect balance of edgy and elegant, glitter and understated sophistication.
Application Techniques for Glitter Nails
- Apply a base coat and chocolate brown polish first
- While still slightly tacky, press holographic glitter pieces into the surface
- Alternatively, apply glitter-packed gel polish (pre-mixed with holographic particles)
- Seal everything with a thick, clear topcoat to smooth the surface
- Use a gel topcoat for the smoothest finish—regular topcoat can feel lumpy over chunky glitter
Pro tip: Use a small, dense brush or a glitter applicator tool to place holographic pieces strategically rather than covering the entire nail—this creates a more curated, intentional look.
7. Chocolate Brown Marble or Swirl Nail Art
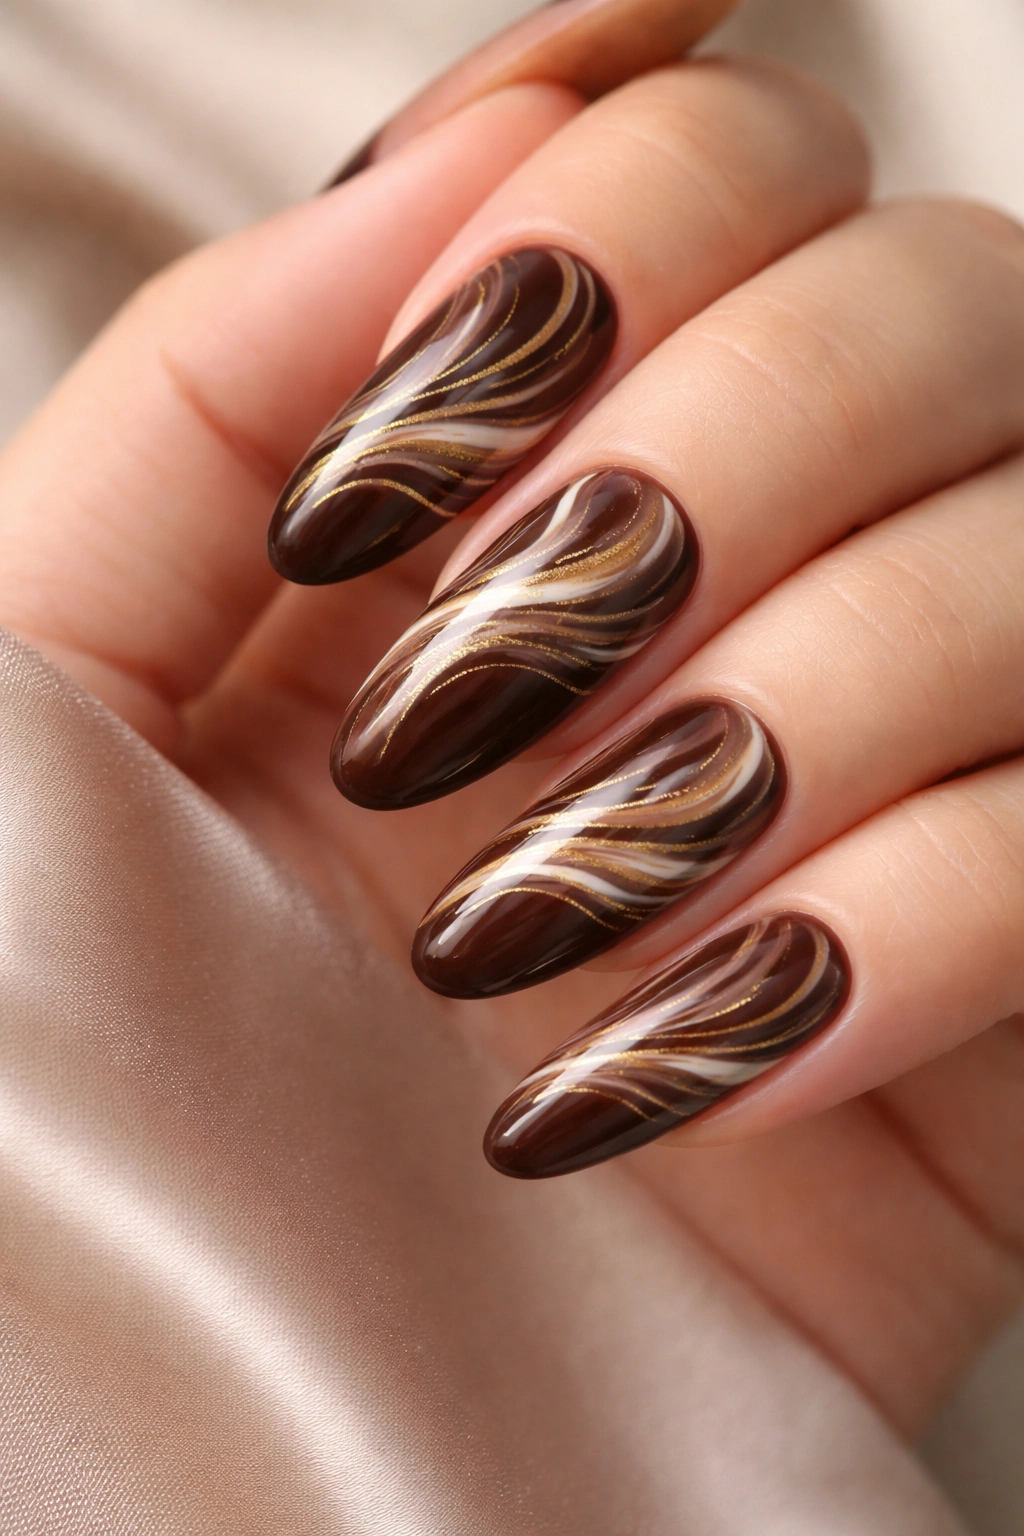
Create organic, flowing marble patterns by swirling white, cream, tan, or gold lines through your chocolate brown base. Marble designs look intricate and complex but are surprisingly achievable with basic tools—a thin brush, a toothpick, or even a sewing needle can create beautiful swirled effects. The key is keeping the marble pattern organic and asymmetrical, letting the lines flow naturally across the nail.
The Timeless Appeal of Marble Designs
Marble nail art feels elegant and artistic without being cutesy or trend-dependent. The pattern is organic enough that slight imperfections actually add to the authentic, handcrafted feel. On long round nails, marble patterns look especially sophisticated because the larger surface area gives you more room to create flowing, interesting designs. This is a look that translates beautifully from casual to formal settings.
Achieving Marble Patterns Without Professional Equipment
- Apply your chocolate brown base coat and let it fully dry
- Mix a second color (white, cream, or gold) into a thin consistency
- Use a thin brush to paint irregular lines across the nail
- While the lines are still wet, drag a toothpick or needle perpendicular to the lines, creating the marble effect
- Work quickly before polish dries, and practice on a few nails before perfecting the technique
Quick facts:
- Marble works best over glossy bases where the wet polish stays workable longer
- Asymmetrical patterns look more intentional than centered designs
- Three-color marble (chocolate brown + white + gold) creates more visual depth
- Sealing with topcoat protects the design and adds shine
8. Chocolate Brown with Chrome or Mirror Finish
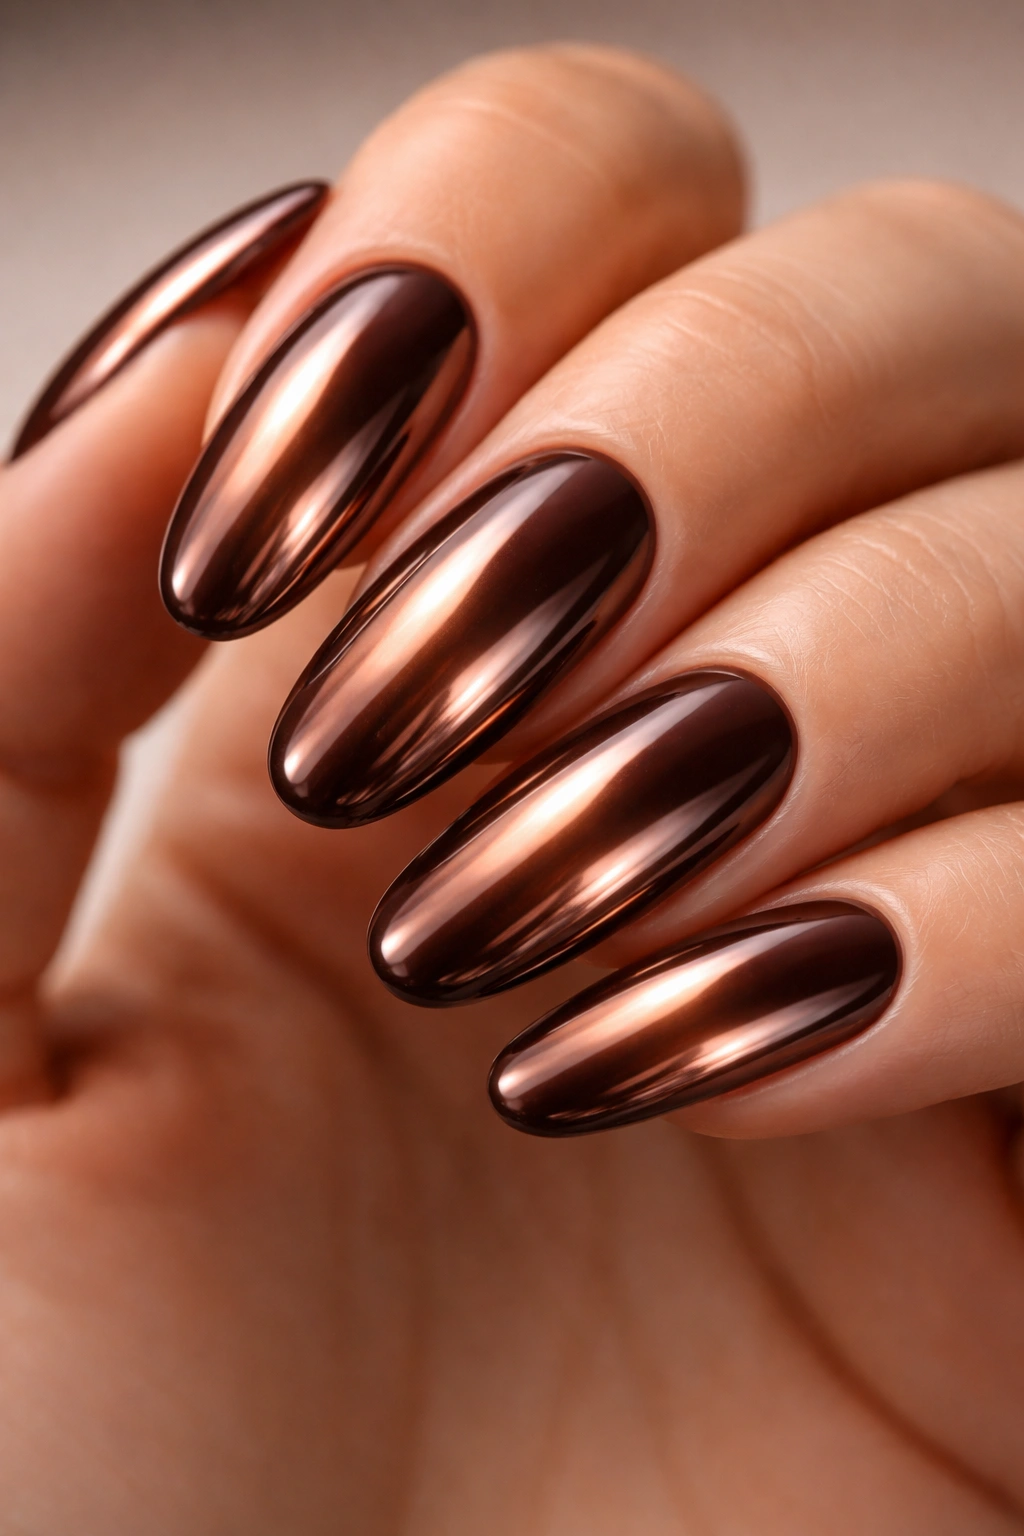
Chrome and mirror finishes create a stunning metallic effect that looks almost liquid metal—like your nails are dipped in chrome. This requires special chrome powder applied over a sticky topcoat base, then buffed to a high shine. The result is an almost holographic, reflective surface that catches light dramatically and looks incredibly luxurious. Chocolate brown chrome has a warm, rose-gold-shifted quality that’s mesmerizing.
The Luxury Factor of Chrome Polish
Chrome finishes automatically elevate any manicure to luxury status. They photograph beautifully, catch everyone’s attention, and feel indulgent. On long round nails, the reflective surface amplifies the length and creates an almost 3D effect. This finish works especially well if you’re heading somewhere special or want to treat yourself to a manicure that feels high-end.
Applying Chrome Powder Like a Professional
- Start with a sticky or tacky topcoat layer on dried chocolate brown polish
- Use a flat or rounded brush to apply chrome powder, pressing firmly into the tacky base
- Buff gently with a soft brush to blend and smooth the chrome finish
- Seal with a clear topcoat once the chrome is fully set
- The powder should be applied in thin layers—multiple thin applications beat one thick application
Worth knowing: Chrome powder is more durable on gel bases than traditional polish, so if you have access to gel services, this technique lasts significantly longer with gel underneath.
9. Chocolate Brown with Pearl or Shimmery Finish
A subtler approach to adding texture and dimension, pearl or shimmer finishes create a soft, nacre-like quality without the extreme reflectivity of chrome or glitter. The finish catches light gently, creating depth and sophistication. Pearl finishes work beautifully on long round nails because they add visual interest without making the nails look busy or overdone. This is an excellent choice if you love the idea of texture but prefer understated elegance.
Pearl Finishes for Sophisticated Subtlety
Pearl finishes occupy a beautiful middle ground between completely smooth and heavily embellished. They add luxury and dimension without demanding attention the way glitter or chrome does. On chocolate brown, pearl creates an almost moonstone-like quality—warm, soft, and deeply sophisticated. This look translates beautifully across all seasons and settings.
Creating a Pearlescent Effect
- Choose a pre-made pearl or shimmer chocolate brown polish (easiest approach)
- Alternatively, mix pearl flakes into clear or semi-transparent base polish
- Apply to nails in thin coats to build the shimmer gradually
- Pearl finishes typically don’t require special application techniques
- Seal with glossy topcoat to enhance the light-catching quality
Quick facts:
- Pearl finishes are more subtle in indoor lighting and more apparent in natural light
- The size of pearl particles affects how obvious the shimmer is
- Pearl works beautifully as a solo design or paired with accent nails
- This finish is more durable than pure glitter
10. Chocolate Brown with Geometric Line Work and Negative Space
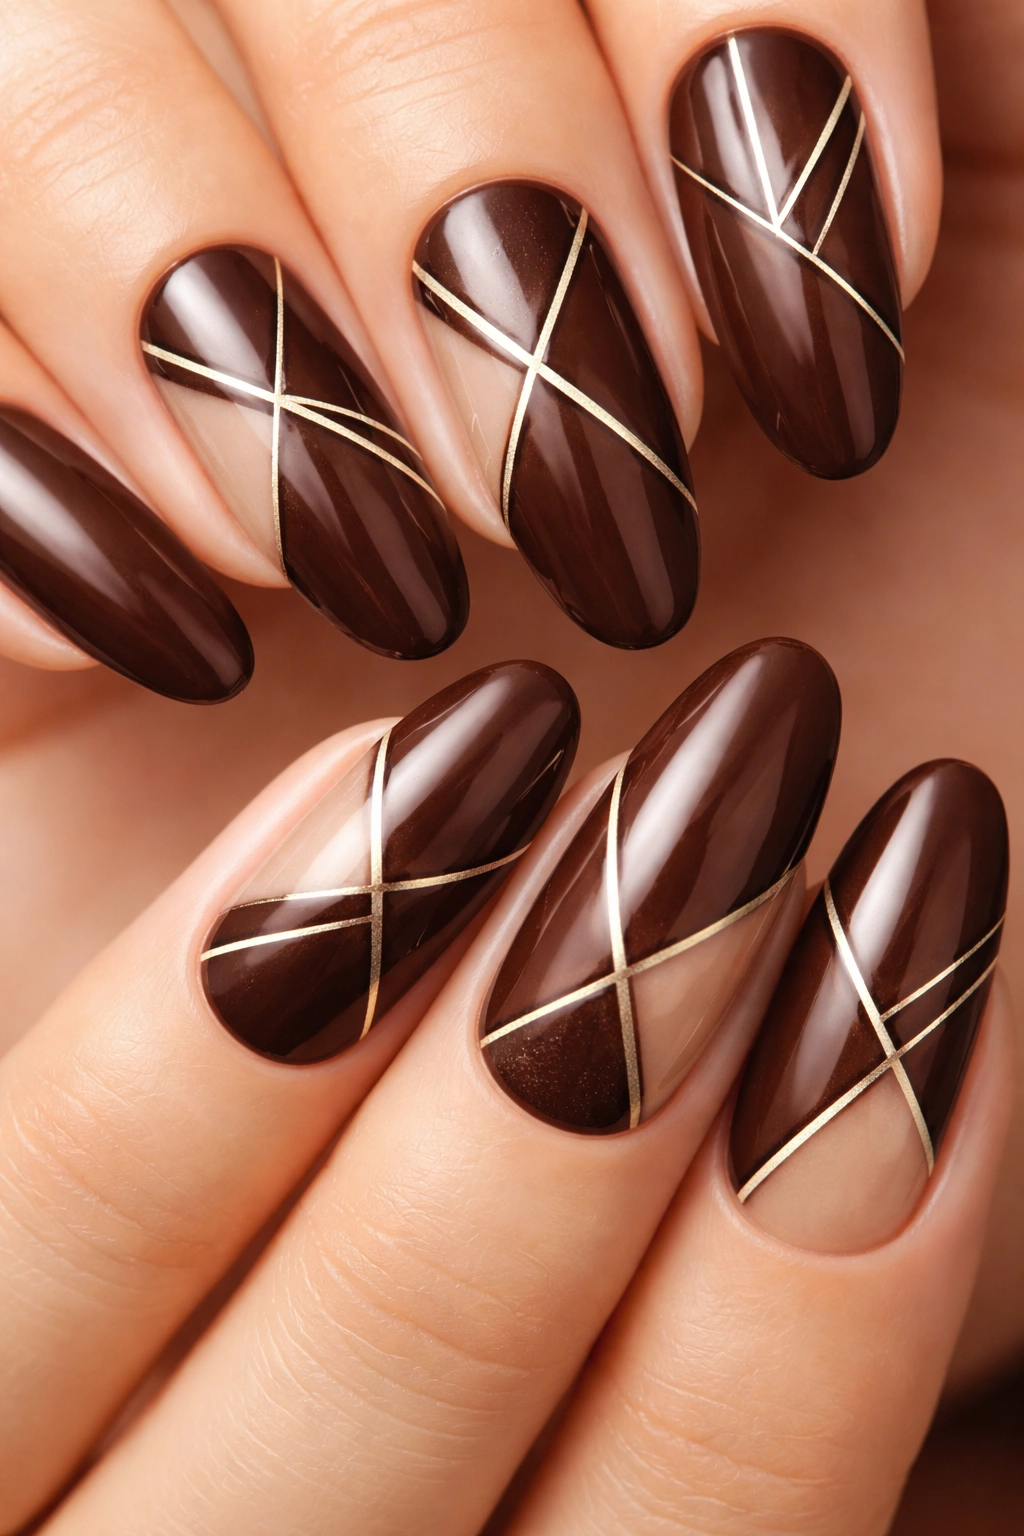
Create modern, artistic designs using thin black or white lines to form geometric patterns—triangles, squares, diagonal stripes, or abstract line work. Leaving some areas bare (negative space) adds to the contemporary aesthetic. Thin metallic lines (gold or silver) create similar effects with a more luxe appearance. These designs feel art-gallery sophisticated while remaining wearable for daily life.
Geometric Design Principles for Nail Art
Geometric work gives your nails an intentional, curated feel that reads as thoughtful and artistic. The key is using sharp, clean lines and ensuring your patterns are symmetrical (or intentionally asymmetrical on purpose). On long round nails, geometric designs look especially striking because the larger surface area showcases the pattern beautifully. This approach works for both minimalist and maximalist aesthetics—you can do one thin line per nail or cover the entire surface with intricate geometric work.
Executing Clean Geometric Patterns
- Use a thin detail brush or striping brush for precise lines
- A toothpick works well for very thin lines if you don’t have proper tools
- Painter’s tape can help create perfectly straight edges if you’re worried about precision
- Let the chocolate brown base dry completely before adding line work
- Seal everything with topcoat to protect your artwork
Pro tip: Practice your pattern on a piece of paper or cardboard before attempting it on actual nails—even a few minutes of practice dramatically improves your precision and confidence.
11. Chocolate Brown with Delicate Floral or Nature-Inspired Art
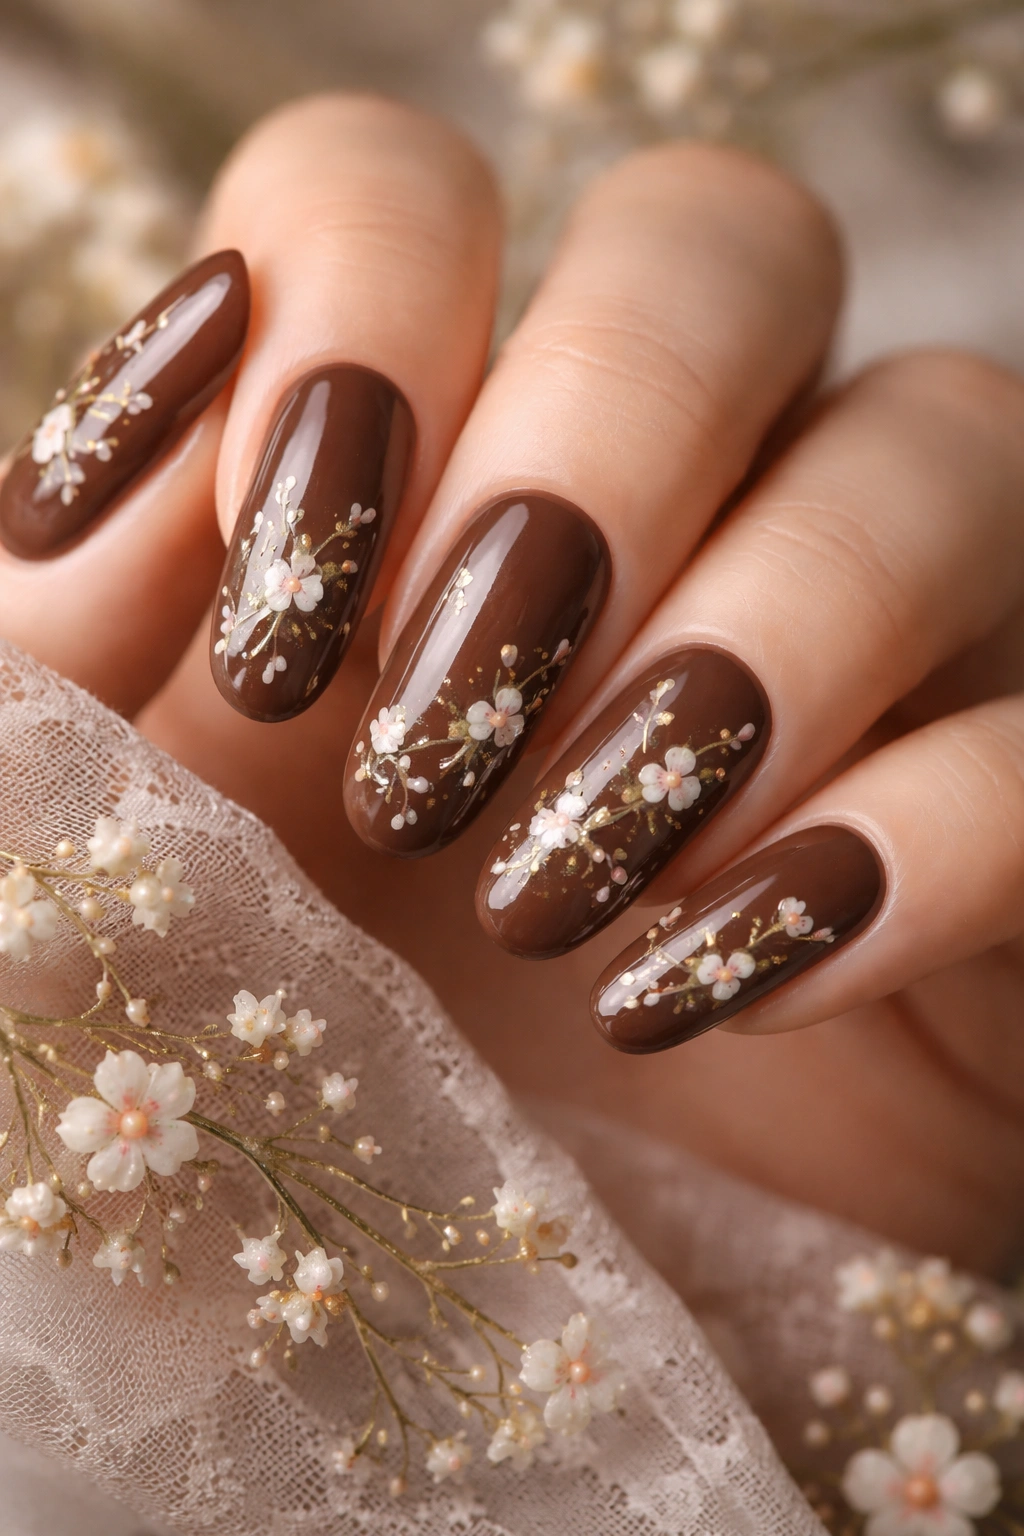
Paint delicate flowers, leaves, vines, or other nature elements across your chocolate brown base using thin brushes and contrasting colors. A single small flower on each nail, or a more elaborate garden scene across multiple nails—both approaches work beautifully. Chocolate brown serves as the perfect neutral backdrop for botanical designs, allowing the floral elements to take center stage without visual clutter.
Botanical Designs Against Warm Browns
Florals and nature-inspired elements feel romantic, artistic, and seasonally appropriate without being seasonal—this is an evergreen aesthetic. Against chocolate brown, delicate flowers feel elevated and gallery-like rather than cutesy. Whether you choose realistic botanical illustrations or stylized abstract flowers, the warm brown backdrop creates sophistication and depth. This design choice signals that you appreciate artistry and nature.
Painting Flowers and Nature Elements
- Start with a base coat of chocolate brown
- Use a very thin brush (size 0 or smaller) for detailed work
- Sketch your design lightly in pencil on the nail before committing to polish
- Paint flowers freehand, or use nail art stickers as guides for more consistent designs
- White, cream, and gold work beautifully against chocolate brown for floral designs
- Seal with topcoat once fully dry
Quick facts:
- Single flowers are easier than elaborate scenes for beginners
- Outline-only flowers (no fill) look more modern than completely filled designs
- Metallic paint creates more dimension than regular polish for flowers
- This design style photographs gorgeously and feels very Instagram-worthy
12. Chocolate Brown with Dual Texture: Matte and Glossy Combination

Combine matte and glossy finishes on the same nail for a textural, artistic effect. You might do a matte base with glossy tips, glossy geometric patterns over a matte base, or alternate matte and glossy nails for a coordinated, intentional look. The contrast between matte and glossy surfaces creates visual interest and dimension that reads as high-design and editorial.
Texture Contrast as a Design Statement
Mixing matte and glossy finishes is sophisticated and unexpected—most people don’t think of combining topcoats creatively, so the effect immediately signals that your manicure is thoughtfully designed. The textural contrast is visible even at a distance and photographs beautifully. This approach works especially well if you’re drawn to both matte and glossy finishes but can’t decide between them.
Creating Matte-Gloss Combinations
- Apply matte topcoat to your full chocolate brown base
- Use glossy topcoat strategically (tips only, accent areas, geometric sections)
- Alternatively, apply glossy first, then matte topcoat over designated areas
- Ensure topcoats are fully dry between applications to prevent muddy, unclear edges
- Glossy topcoat over matte topcoat creates sharper lines than the reverse
Pro tip: Create deliberately asymmetrical matte-gloss patterns for a more artistic, intentional appearance than perfectly balanced designs.
Final Thoughts
Chocolate brown long round nails are incredibly versatile, elegant, and genuinely flattering on every person. Whether you gravitate toward minimalist, high-shine simplicity or prefer intricate designs layered with metallics, glitter, and artistic elements, chocolate brown serves as the perfect foundation. The richness of the color means it works across all seasons and occasions—from professional settings to casual everyday wear to special celebrations.
The beauty of committing to chocolate brown nails is that you never feel limited by your color choice. Brown’s neutrality actually opens more creative possibilities than trendy seasonal shades because it pairs beautifully with virtually every accent color, finish, and design technique. Gold, white, holographic sparkle, marble, chrome, geometric line work—everything complements chocolate brown while adding something different to your rotation.
If you’ve been hesitant about longer nails, chocolate brown long rounds might be your gateway look. The length is glamorous without being impractical, the shape is flattering and universally wearable, and the color is sophisticated enough to feel intentional and curated. Start with a simple glossy chocolate brown if you want something low-maintenance, or explore any of the designs above if you’re drawn to more artistic, embellished looks. The joy of nail color is that you can change it whenever you want—so experiment, have fun, and celebrate the small luxury of beautiful hands.
