

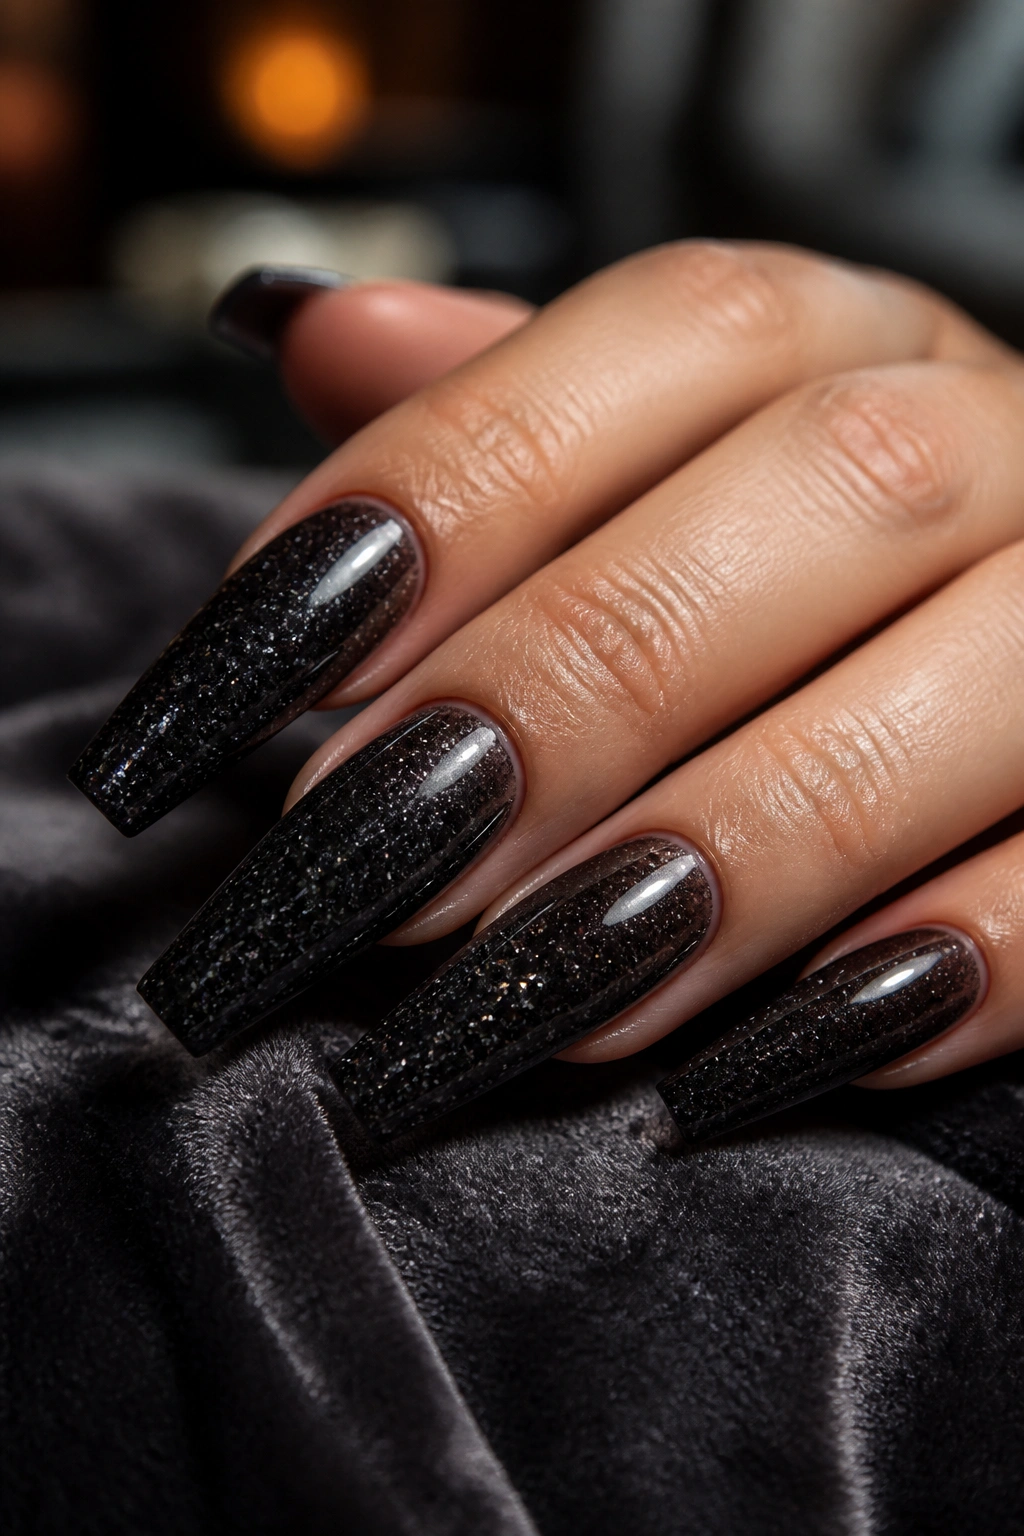
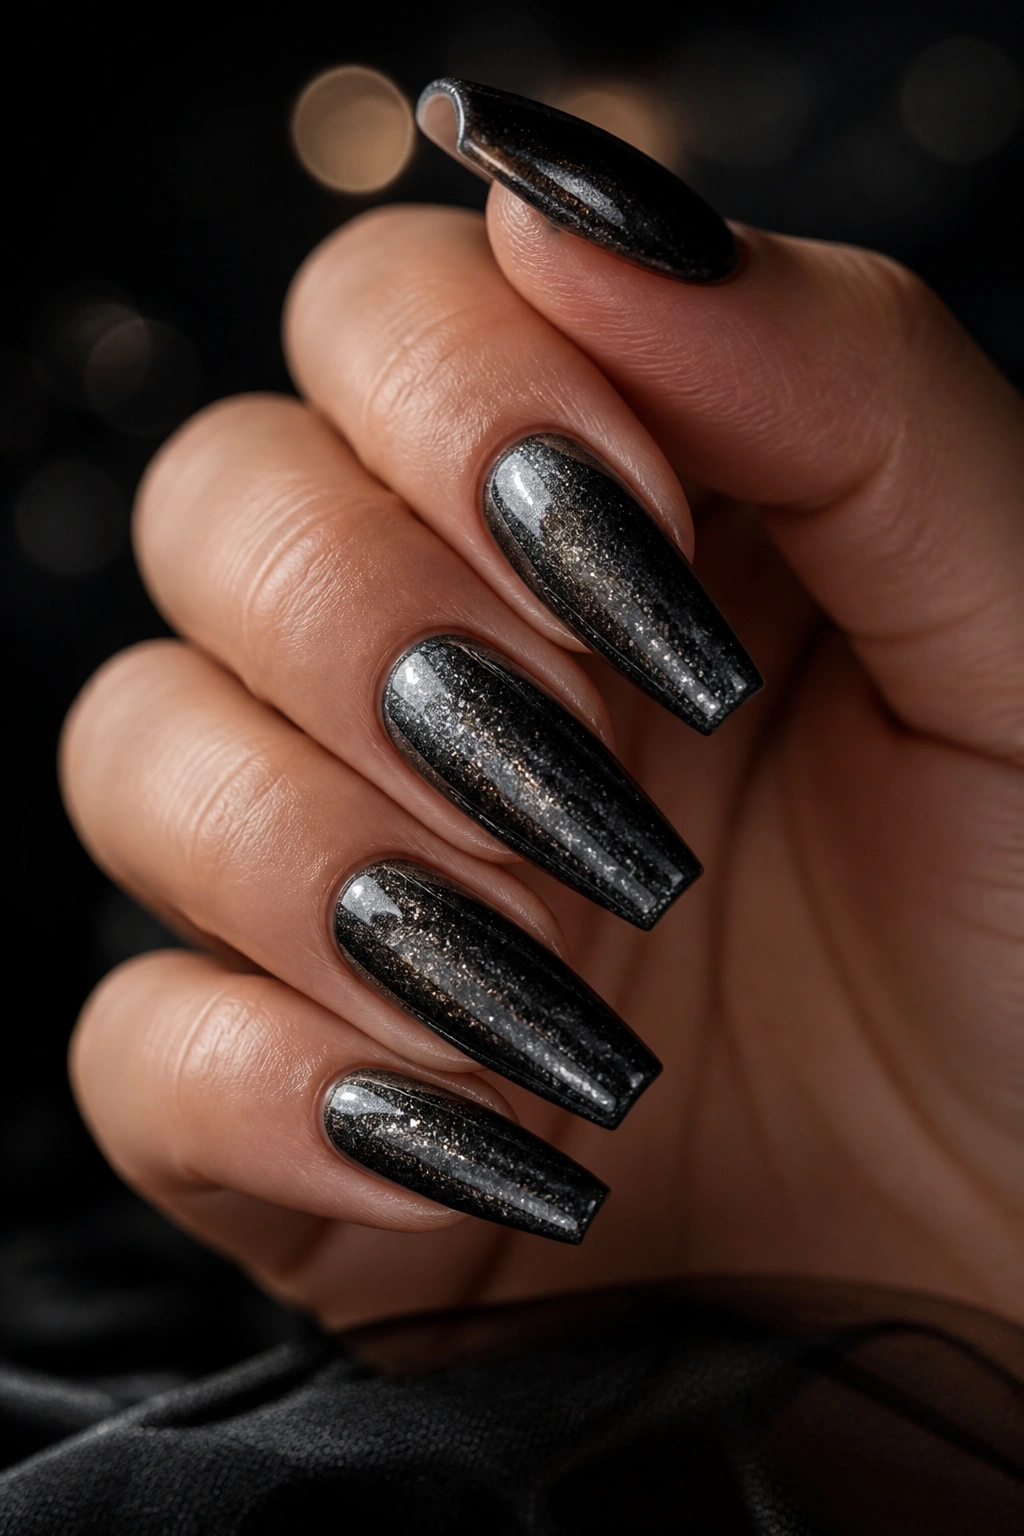
Black glitter coffin nails earn their keep after dark. Under a restaurant pendant light, plain black polish can read flat and heavy; add the right glitter, and the surface starts to move—tiny sparks at the tip, a smoky shimmer through the center, a flash when you reach for your bag. It’s one of the few nail looks that can feel sharp, dressy, and a little dangerous at the same time.
People often lump this style into one big bucket, as if every black sparkly manicure is doing the same job. Not even close. A dense black glitter set with chrome on top reads colder and more futuristic than a sheer nude base with scattered charcoal sparkle. Matte black with a glitter cuticle line gives off a different mood than glossy black flames over clear space. Same color family. Completely different energy.
Shape matters too. A proper coffin nail needs straight sidewalls, a taper that starts after the widest part of the nail, and a crisp squared tip. If your tech narrows it too early, the nail turns almond. If the glitter is too chunky and sits on top instead of being encapsulated, the surface can feel bumpy and catch in your hair by the second wear. Those details sound small. They are not.
Some black glitter looks are made for a leather jacket and a late dinner. Others belong with a satin slip dress, silver rings, and a tiny clutch you can barely fit your phone in. The best set is the one that throws light the way you want it to.
1. Black Glitter Coffin Nails With a Sheer Nude Fade

If you want your fingers to look longer, start with transparency near the cuticle. This design keeps the base soft and bare-looking, then builds black glitter toward the free edge so the nails look elongated instead of blocky. On a coffin shape, that fade also sharpens the silhouette because the eye is pulled outward to the squared tip.
The trick is scale. Fine micro-glitter works better here than large hex pieces because it blends into the nude base without looking like confetti. Ask for a sheer milky beige, pink-beige, or neutral taupe underneath—pick the one that disappears into your skin tone—and then have the glitter packed into the last third of the nail. A hard line ruins the effect.
Why this fade flatters the coffin shape
Coffin nails already narrow toward the end, so a glitter gradient makes that taper look intentional. You get the drama of black at the tip without the heavy, solid block of color that can shorten the look of medium-length nails.
It also wears well. Regrowth is softer on a nude base, which matters if you like to stretch a set close to the 2½- to 3-week mark.
What to ask your nail tech for
- A soft builder-gel or acrylic apex so the glittered tip does not feel thick and bulky.
- Micro-glitter or ultra-fine black sparkle, not craft glitter, which can leave a rough finish and is not made for cosmetic use.
- A fade starting around the lower third of the nail, then packed denser at the tip.
- A glossy top coat if you want the glitter to read wet and glassy under low light.
Best pick for: dinner dates, black dresses, and anyone who wants black glitter coffin nails that feel dressed up without going full gothic.
2. Jet Black Patent Nails With Glitter-Dipped Tips

Want black nails that still catch light when your hand is wrapped around a cocktail glass? Do this one. A full patent-black base gives you that inky, mirror-shine finish, while the glitter sits only on the last 2 to 4 millimeters of the tip, almost like the nail was dipped into black diamond dust.
I like this look when the outfit is already doing a lot. Sequins, satin, sharp tailoring, silver hardware—this manicure can hold its own, but it doesn’t compete. The solid black keeps it clean. The glitter at the edge gives it movement.
Placement matters more than people think. If the glitter line is too thick, the nail starts looking shorter and heavier. If it is too sparse, the design disappears unless you’re standing under direct light. The sweet spot is a concentrated band right at the squared tip, feathered down only a hair. Not much. You still want that crisp separation between the patent base and the sparkle.
There’s also a practical upside. Tip glitter hides minor wear on the free edge better than plain black polish does, which is handy if you type a lot or tap your nails on every hard surface you pass—guilty. Your tech should cap the edge with color and top coat, though. Black chips show fast when that step gets rushed.
Short version: if you love black nails but want a little life in them, glitter-dipped tips are the easiest win.
3. Deep V Black Glitter French Tips on a Nude Base
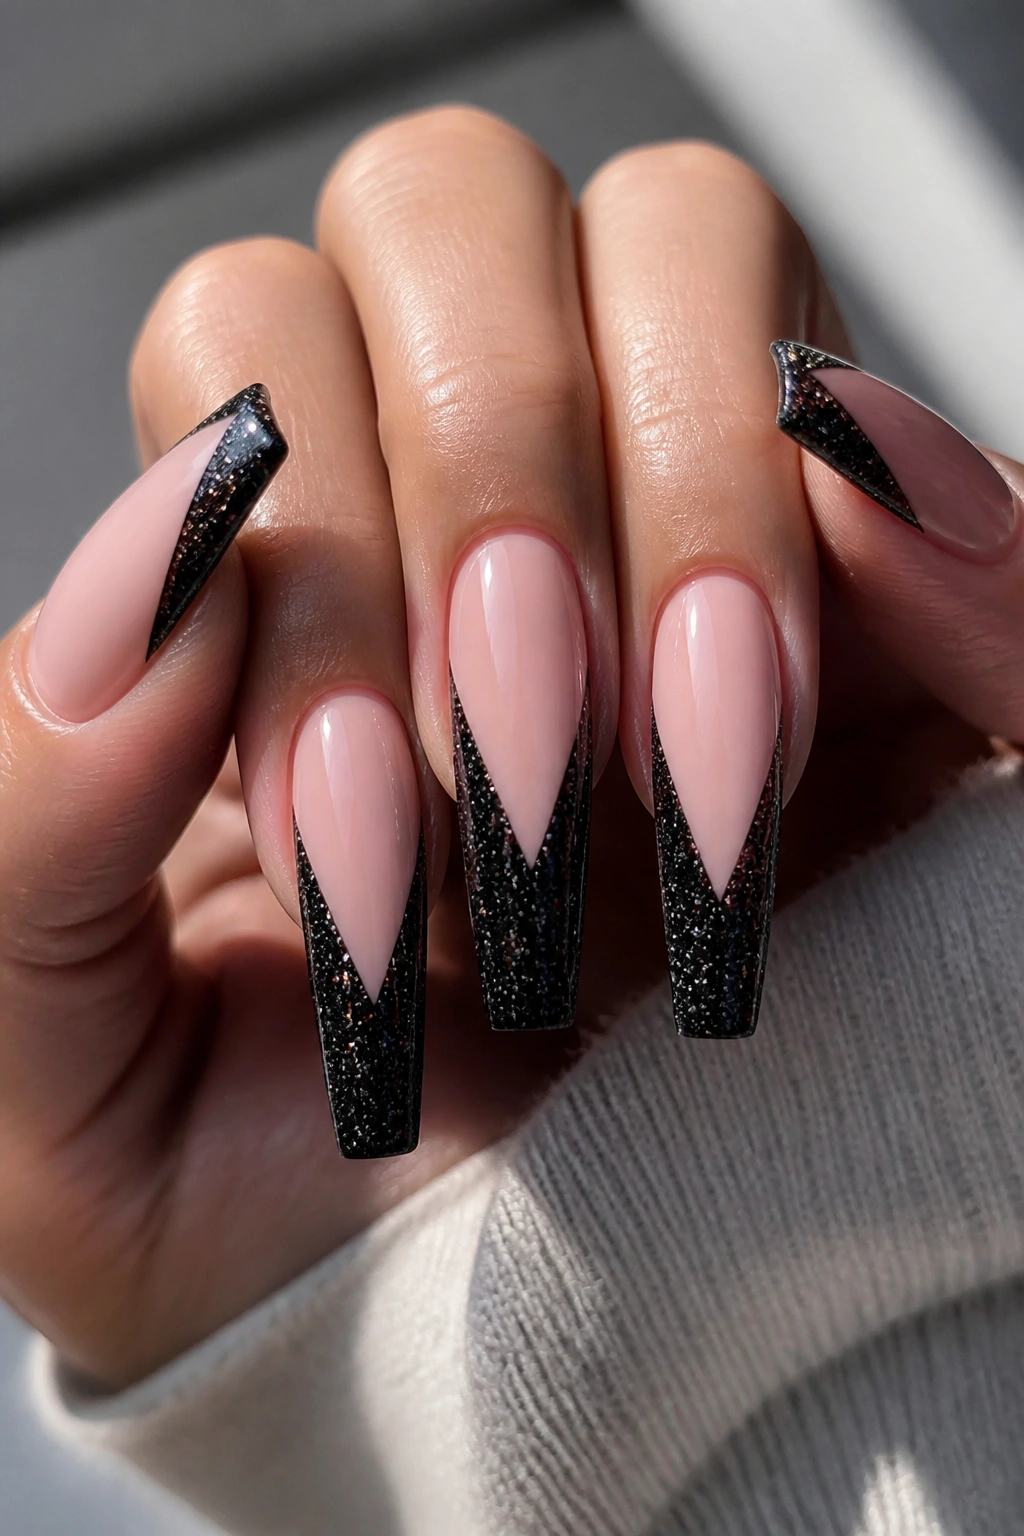
The black glitter French is the one I keep coming back to because it does something a full glitter set never does: it leaves room for shape. You can still see the architecture of the coffin nail. The sidewalls look straighter, the tip looks sharper, and the design reads more expensive because the negative space gives your eye somewhere to rest.
A deep V smile line works best here, not a soft rounded French curve. On coffin nails, that V echoes the taper and makes the whole set look longer. It also feels sharper for a night out. Less sweet. More edge.
Why the V line changes the mood
A rounded French tip looks softer and more classic. Nice, sure, but not the point here. The V pulls the design downward into the center of the nail, which adds length and makes the black glitter feel deliberate instead of decorative.
Dense glitter at the line helps too. You want the French tip opaque enough to read black first and sparkle second.
What to ask for at the salon
Tell your tech you want:
- A deep V French, not a traditional curved smile line
- A nude base with full coverage near the cuticle, not sheer jelly unless you want a more editorial look
- A thin detail brush line first, then the glitter packed over it so the edge stays sharp
- A top coat floated over the tip, which smooths the glitter without flooding the sidewalls
One more thing. If your nails are on the shorter side of medium, do not make the French too deep. Past the halfway mark, the nail can start to look crowded.
4. Matte Black With Glitter Half-Moons at the Cuticle
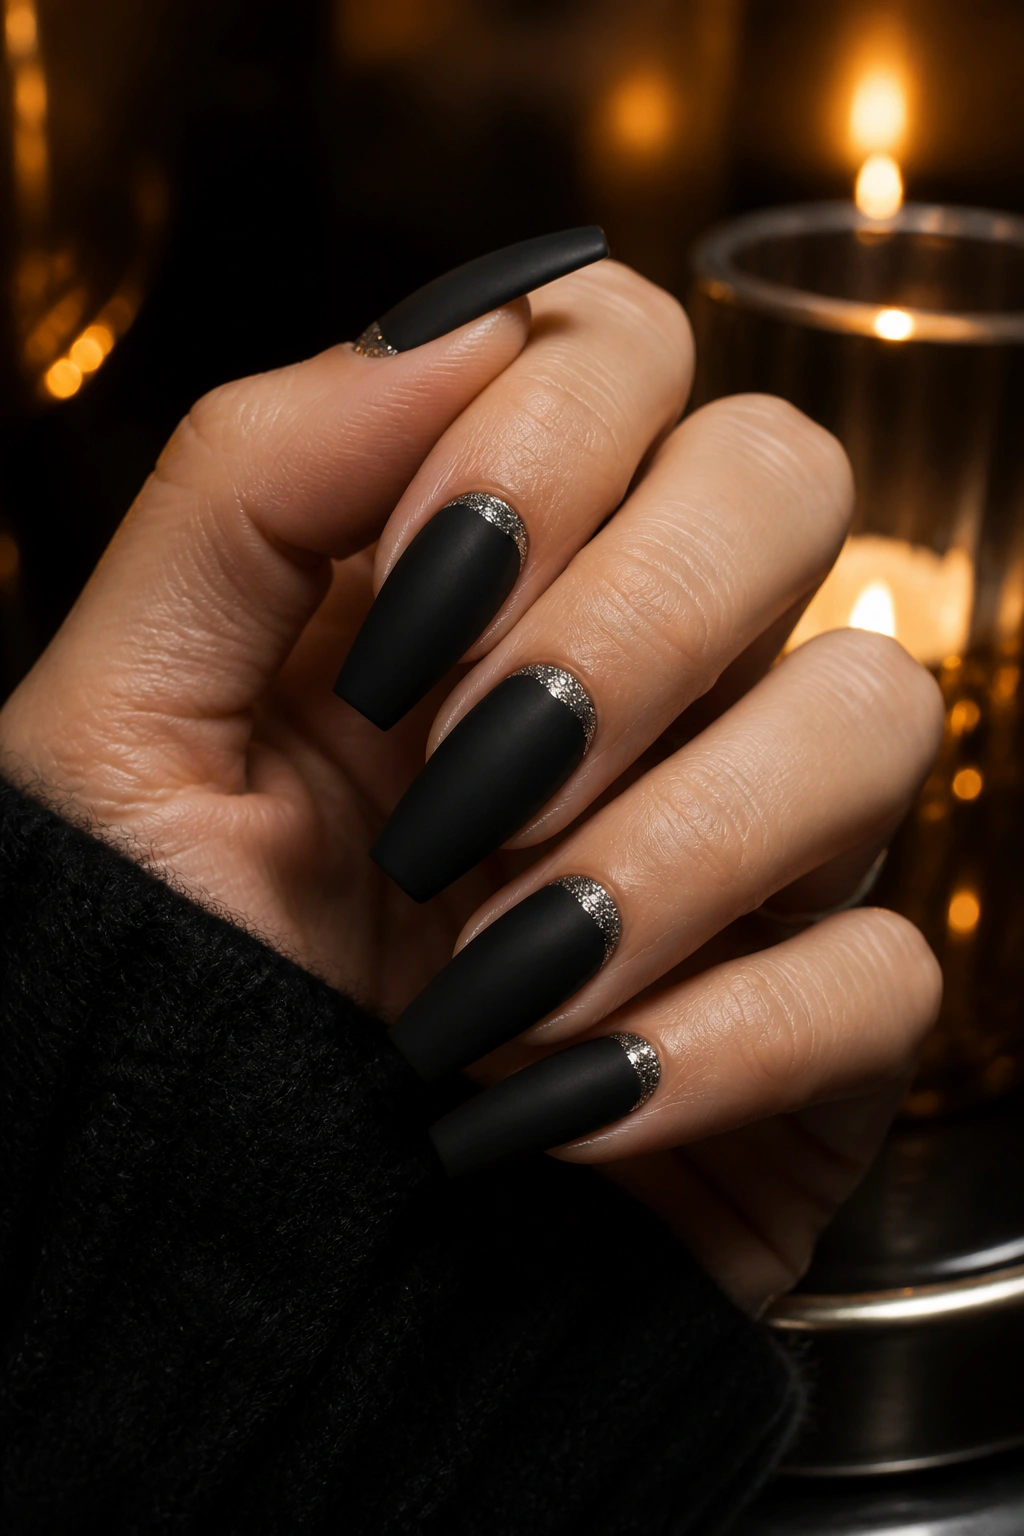
Picture this set across a candlelit table: the nail itself looks velvety and flat, but there’s a clean crescent of black sparkle hugging the cuticle, like a tiny piece of jewelry built into each nail. That contrast does all the heavy lifting.
Matte and glitter together can go wrong fast when the finishes fight each other. Here, they cooperate because the matte black covers most of the surface and the glitter stays contained in one slim arc. You’re not trying to make every square millimeter interesting. You’re choosing one focal point and sticking to it.
This style looks best when the half-moon is narrow—about 1 to 2 millimeters. Any bigger, and it starts eating into the nail bed. On long coffin nails, the little flash at the base also balances the length so the whole design does not feel dark from root to tip.
A few details make or break it:
- Use micro-glitter, not chunky pieces, so the cuticle curve stays clean.
- Matte top coat goes only on the black base, while the glitter moon gets a glossy seal.
- Push the cuticles back cleanly first, because this design frames that area instead of hiding it.
- Choose medium to long coffin lengths if you want the crescent to read clearly from arm’s length.
I like this one for tailored outfits, silver hoops, and nights when you want black nails with texture but not chaos.
5. Smoky Ombré From Black to Charcoal Sparkle
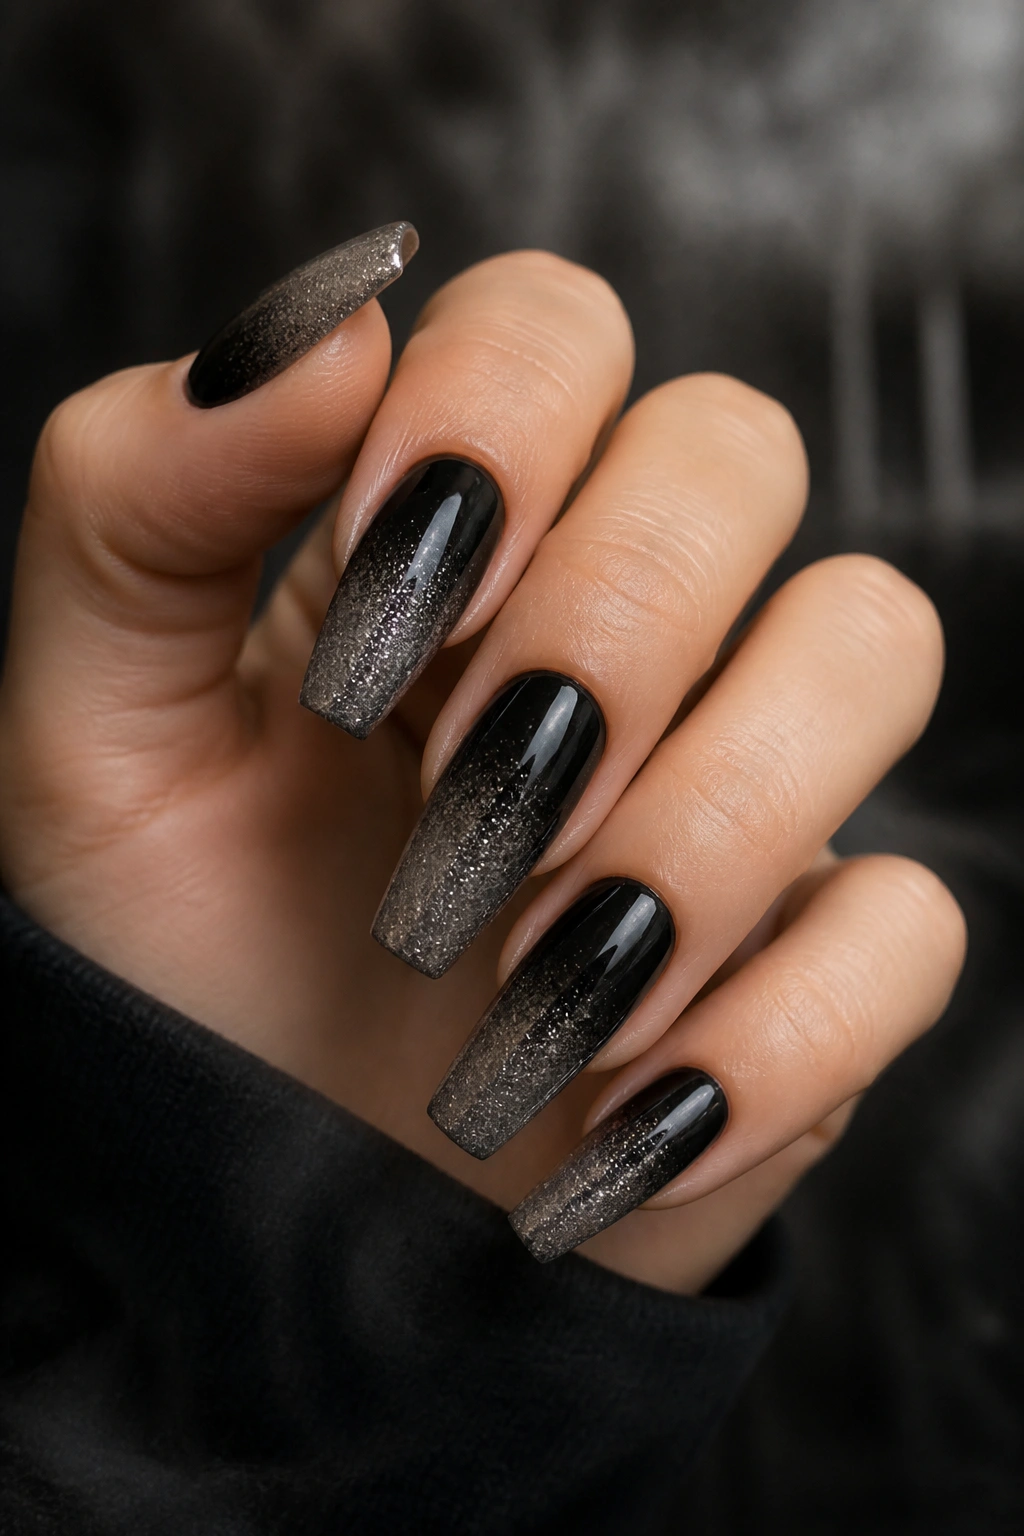
Unlike a harsh black-and-silver contrast, a smoky ombré feels quieter and moodier. It starts with true black near the cuticle or center, then softens into charcoal glitter, graphite shimmer, or gunmetal dust toward the tip. The finish looks almost like cigarette smoke trapped in glass—dark, hazy, and layered.
This is a smart choice if you wear a lot of black already and do not want your manicure to disappear into your outfit. A flat black set can sometimes blend into a blazer sleeve, a handbag, or a black knit dress. A charcoal fade keeps the same dark palette but adds enough shift that your nails still register when your hands are moving.
Application matters. Airbrushing gives the smoothest gradient if your salon offers it. A sponge blend can work too, though it usually needs two or three thin layers and a final float of top coat to blur out the texture. I’d skip large glitter here. The charm is the haze, not the sparkle chunk.
It also works across more lengths than people expect. Long coffin nails make the fade dramatic. Medium coffin nails make it wearable in a way that still feels dressed. I would only avoid it on very short extensions, where the gradient doesn’t have enough room to breathe.
If you like black glitter nails but want them to feel less hard-edged, this is the set I’d put near the top of the list.
6. Matte Black Glitter Coffin Nails With Silver Foil Cracks
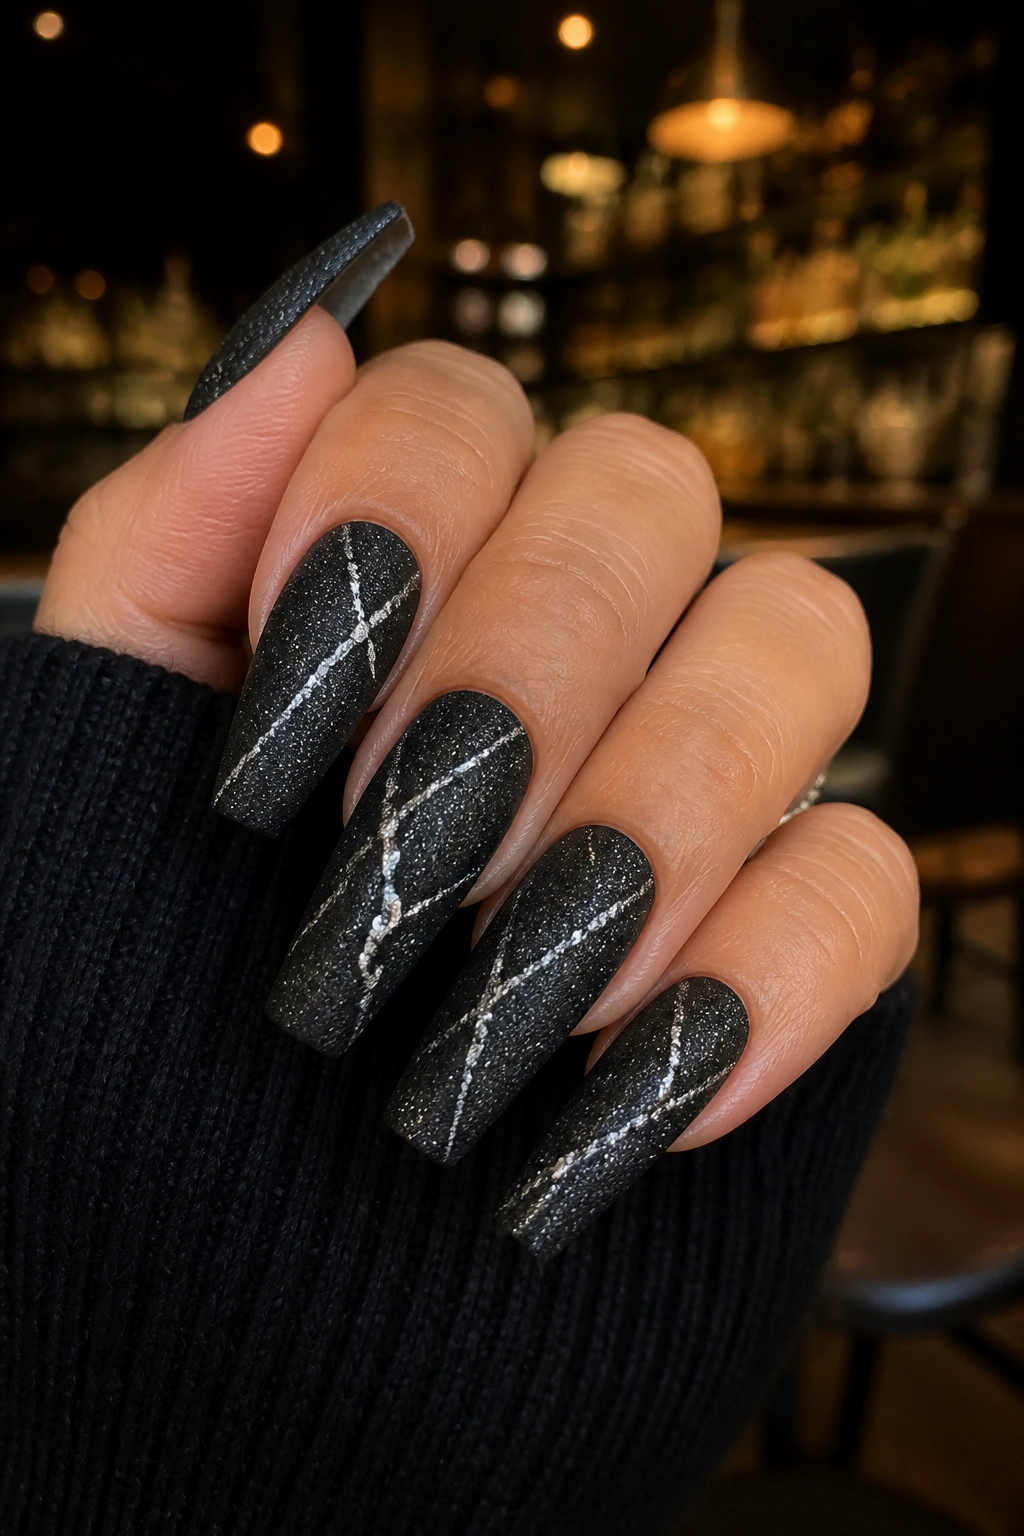
This one looks expensive.
Not because it’s packed with stones or painted within an inch of its life, but because the contrast is tight: matte black on most of the nail, then irregular silver foil cracks or fractured lines cutting through black glitter sections. It gives the set a broken-metal look that feels sharp under bar lighting and almost architectural in daylight.
Texture without the bulk
The best version uses foil sparingly. One or two fractured lines per nail is enough. If your tech starts layering foil, chunky glitter, striping gel, chrome, and rhinestones all on the same hand, the design loses its point. You want tension between flat and reflective surfaces, not a scrapbook.
Encapsulation helps here. When foil and glitter are sealed under builder gel, the nail stays smooth and the silver looks embedded instead of pasted on top. That matters for wear, especially if you run your hands through your hair or pull on knit sleeves all night.
Where this design hits hardest
Use the cracked foil detail on all ten nails if the pattern is restrained, or place it on 2 to 4 accent nails and leave the rest matte black. I lean toward accent placement. The look lands harder when your eye gets a break between details.
And skip yellow-toned silver. Cool silver or gunmetal sits better next to black glitter, especially with silver rings, black leather, and sharper makeup. Warm foil can muddy the whole set.
7. Jelly Black Nails With Suspended Micro-Glitter
Under low light, jelly black looks like smoked glass. You can still see depth through it, which is what makes this design feel different from a standard opaque black manicure. The glitter sits inside the color rather than on top of it, almost floating in the layers.
I love this on longer coffin nails because the translucent effect needs space. Three coats of a black jelly gel usually gives enough depth without turning fully opaque, though the exact number depends on the pigment load. Too little, and the nail looks gray. Too much, and you lose the whole point.
Micro-glitter is the move here. Tiny silver-black shimmer, charcoal flecks, or holographic dust can all work, but the sparkle should stay fine enough that the jelly finish still looks smooth. Think suspended ash, not party glitter. A final high-gloss top coat is non-negotiable because it makes the depth visible from side angles.
DIY fans should be careful with product choices. A lot of people try to mix loose glitter into clear gel polish and end up with lumps, patchy curing, or sharp pieces poking through after two days. Cosmetic-grade glitter suspended in a proper gel base behaves better and cures more evenly.
This design has a late-night feel that’s hard to fake. It’s moody, but not flat. Dressy, but not stiff. If you want black sparkle with a little mystery, jelly black delivers.
8. Velvet Cat-Eye Black Glitter Coffin Nails
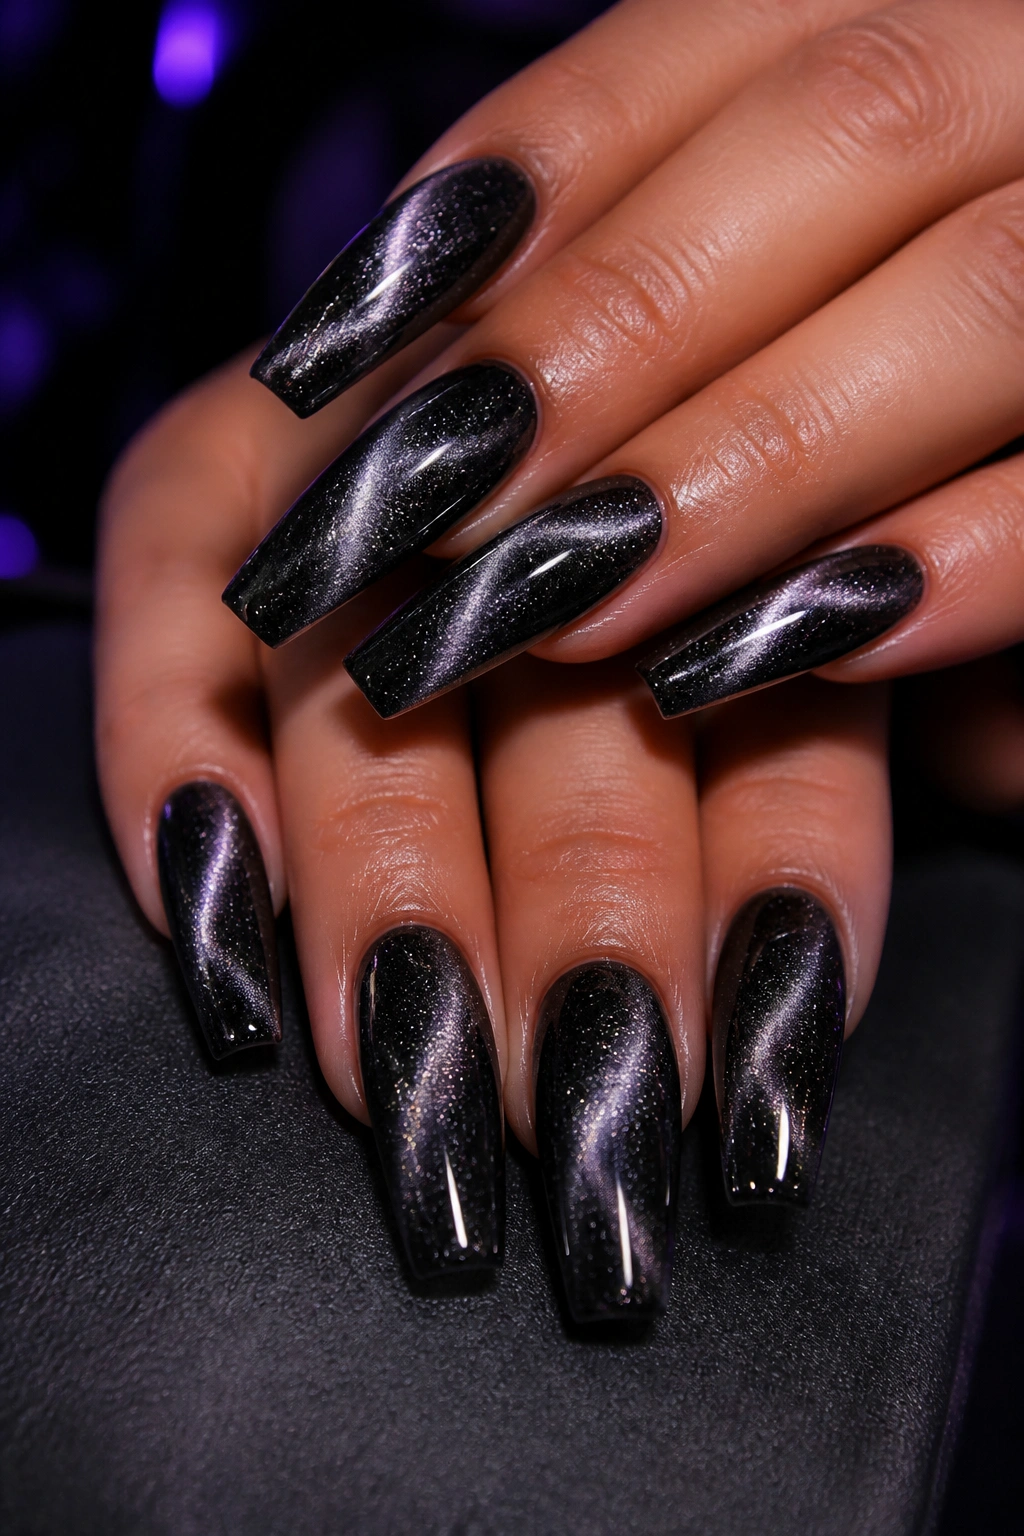
Need a manicure that moves every time you turn your hand? Cat-eye black glitter coffin nails do that better than almost any other finish in this color family. The magnetic particles pull into a soft stripe, halo, or diagonal beam, so the light shifts as your hands move. One angle looks almost solid black. Tilt your fingers, and a ribbon of graphite or silver-black light appears.
The magnet is the whole trick
Cat-eye gel only works when the polish still sits wet and the magnet is held close—usually about 3 to 5 millimeters above the surface—for 10 to 15 seconds before curing. Too far away, and the particles barely move. Too close, and you can distort the polish or drag it toward the sidewall.
Ask for a black cat-eye base with a fine glitter topper if you want extra sparkle, or go with a cat-eye gel that already has shimmer built in. Both work. The first reads more layered. The second looks smoother.
Best ways to wear it
- A diagonal cat-eye line makes coffin nails look longer than a horizontal beam.
- A velvet effect on all ten nails feels rich on medium and long lengths.
- One cat-eye accent nail per hand tones it down if your outfit already has sequins or metallics.
- Glossy top coat only—matte kills the movement that makes this style worth choosing.
I’d skip cheap magnets and bargain cat-eye polish if you’re doing this at home. When the particles are weak, the effect looks muddy instead of crisp.
9. Black Glitter Flames Over a Clear or Nude Base
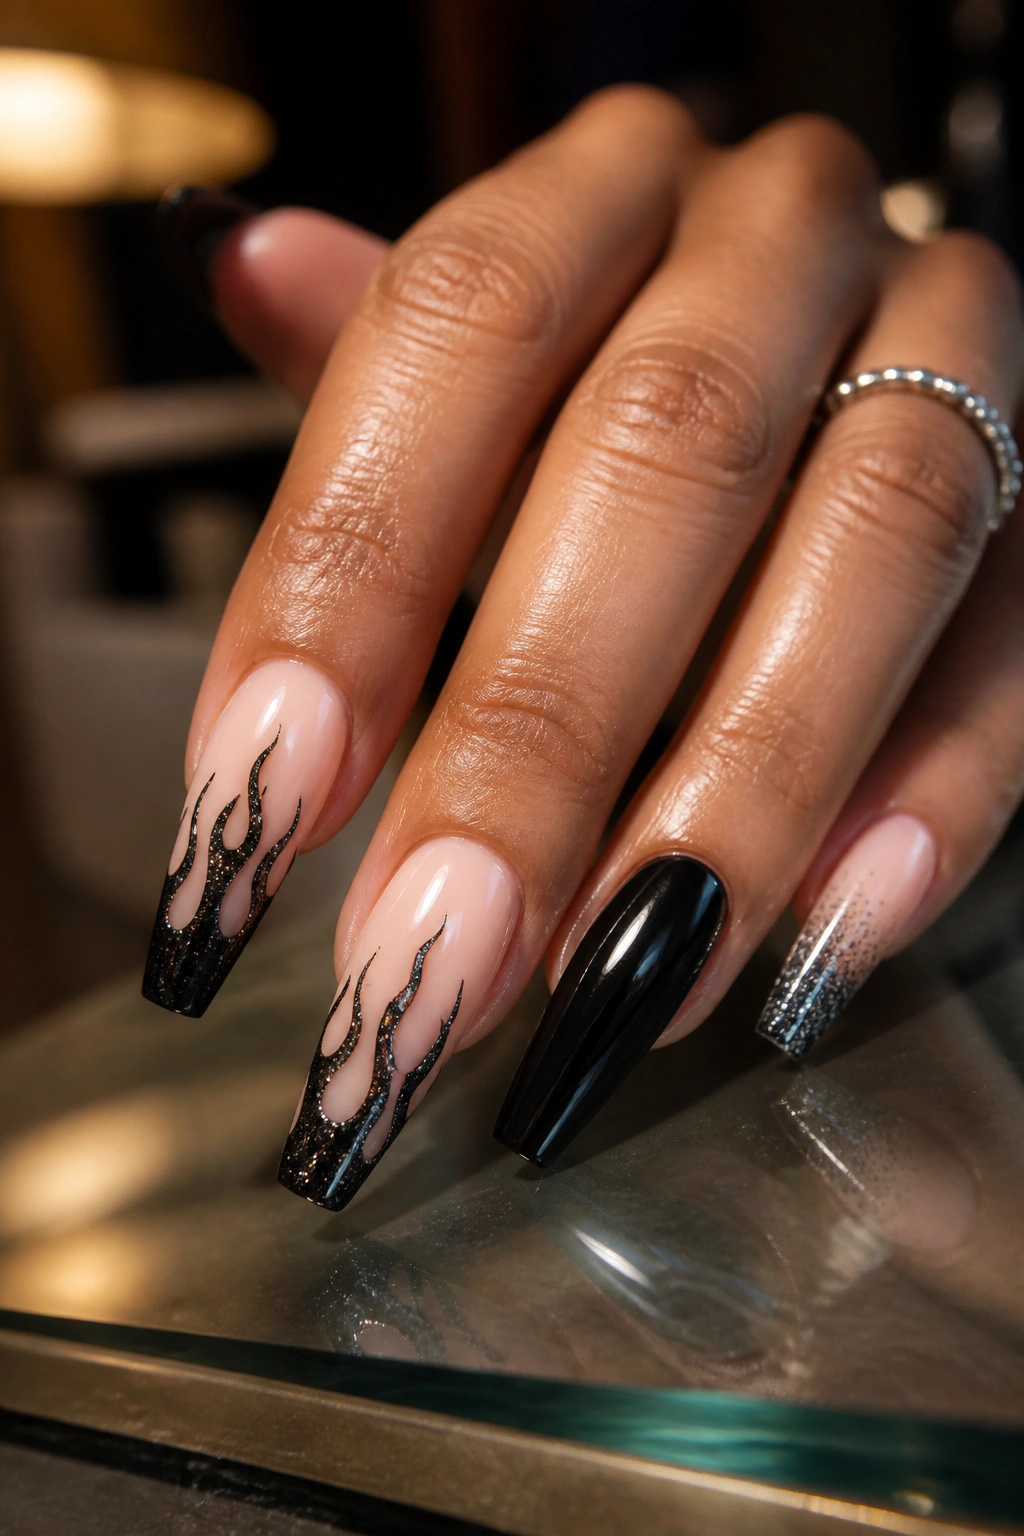
I used to think flame nails belonged to one narrow lane, then I saw a black glitter flame set on a soft nude base and changed my mind in about five seconds. On coffin nails, the flame shape echoes the taper and makes the hand look fast, if that makes sense. Quick. Pointed. A little reckless.
The smart version keeps the flames slim and elongated. Thick cartoon flames can swallow the nail and read heavy, especially once glitter gets layered in. A thin black outline with glitter packed into the center gives you shape first, sparkle second. That order matters.
A clear or sheer nude base is what keeps the look from becoming a solid wall of black. It also makes the design feel more nightlife than costume. You still get the drama, though your skin tone shows through enough to break it up.
This is one of those sets that looks better with restraint. I’d do flames on 4 to 6 nails and keep the rest glossy black or a nude glitter fade. Mixing one loud pattern with one calmer companion nail usually reads sharper than putting the same statement on every finger.
And yes, it can look a little Y2K. That’s part of the charm. The difference is execution. Fine lines, smoother glitter, longer proportions.
10. Black Glitter and Crystal Accent Coffin Nails
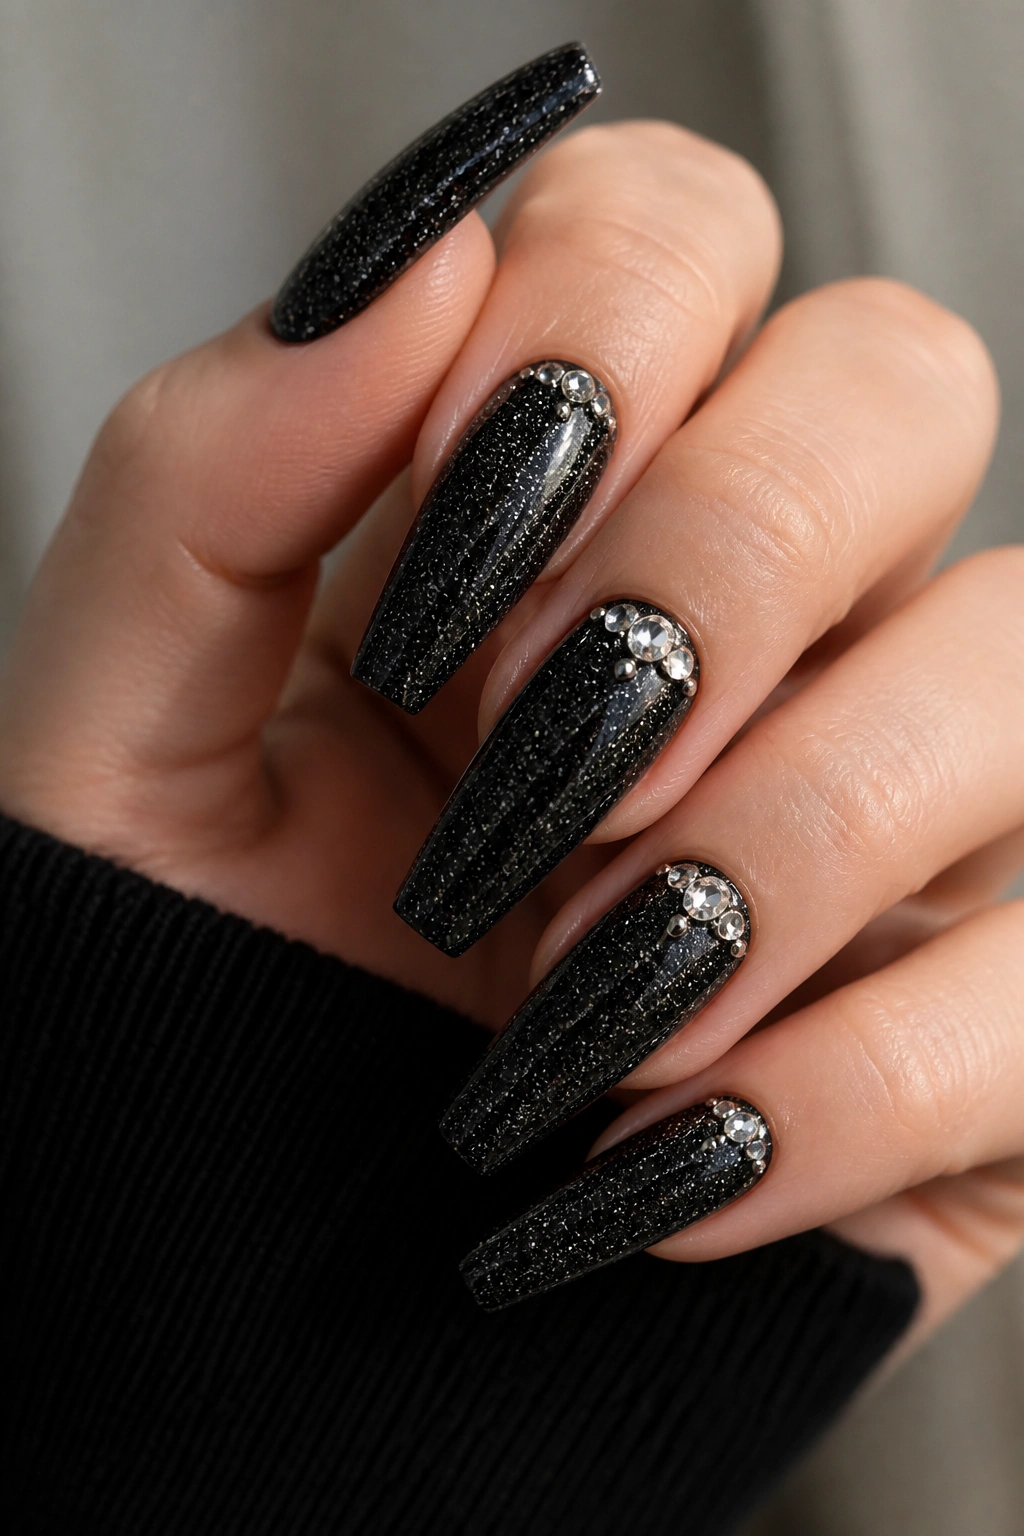
If you wear rings, do not cover every nail in crystals. Your hands will look crowded fast. Black glitter already throws light; stones should act like punctuation, not wallpaper.
This design works best when the crystal placement has a plan. One cuticle cluster on the ring finger. A vertical line of tiny stones on the middle finger. Maybe a black glitter base on the pinky with no stones at all. Once every nail has the same rhinestone pattern, the set loses shape and starts looking heavy.
Here’s the formula I trust most for a night-out set:
- Use stone sizes SS3 to SS10 for balance. Huge rhinestones can overwhelm a coffin tip unless the nails are extra long.
- Place crystals near the cuticle or along one side, not right at the free edge, where they catch on hair and fabric faster.
- Anchor them in thick gel or gem glue, then seal around the base of each stone without flooding the facets.
- Pair them with fine black glitter, not chunky glitter, so the stones stay the main reflective element.
- Limit full crystal nails to one per hand, max.
There’s also a style question here. Silver-clear crystals feel colder and cleaner. Jet-black crystals make the set moodier. Smoky gray stones split the difference and sit well next to gunmetal jewelry.
This one is unapologetically glam. If you like your manicure to announce itself when you pick up your drink, crystals earn their spot.
11. Black Glitter Coffin Nails Under a Gunmetal Chrome Veil
One layer of chrome powder can either sharpen a black glitter set or smother it. The difference comes down to color choice and restraint. A gunmetal chrome veil over black glitter coffin nails gives you that metallic sheen without pushing the set into mirror-silver territory, which can feel too cold or too loud for a night-out look built around black.
Why gunmetal works better than bright silver here
Bright silver chrome wipes out some of the darkness that makes black glitter interesting in the first place. Gunmetal keeps the base in the black-charcoal family, so the nails still read deep and moody while picking up a slick metal sheen on top.
The best version starts with a cured black glitter base, then a no-wipe top coat, then a thin rub of chrome powder. Thin is the key word. Too much powder and you lose the sparkle underneath.
Who should pick this set
Choose this if your outfit leans minimalist—black trousers, sharp blazer, satin top, silver earrings—and you want the nails to supply the edge. It also suits medium coffin lengths, where full-on chunky glitter can look crowded but chrome gives enough presence.
Do not mix this with three other major effects. Chrome plus cat-eye plus stones plus foil is a traffic jam. Chrome over glitter, on its own, already has enough attitude.
12. Lace-Pattern Black Glitter Accent Nails

Not every night-out manicure needs to shout from across the room. A lace-pattern black glitter set works in a closer range. You notice it when someone hands you a card, adjusts a sleeve, lights a candle, reaches for the check. The detail lives in the line work.
Usually, the cleanest version uses a black glitter base on 2 to 4 nails and a lace pattern over sheer nude, smoky gray, or soft beige on the rest. Fine netting, floral lace, scalloped edge motifs—those all suit coffin nails because the long flat sides give the pattern room to sit without curving awkwardly.
How to stop lace from looking fussy
Keep the pattern fine and partial. One corner panel, a side sweep, or a diagonal lace veil is enough. Full-coverage lace on all ten nails can start looking dense, especially once glitter enters the picture.
You can get this look through hand painting, stamping, or high-quality decals sealed under gel. Hand painting looks the most custom. Stamping gives cleaner repetition if you want symmetry. Decals are easier, though they need careful trimming near the sidewalls.
A few pairings I like with this design:
- Glossy black accent nails next to lace-pattern nudes
- Tiny black crystals at the lace edge
- A matte nude background with glossy lace line work
- Black glitter only on the thumb and ring finger for a balanced hand
This one leans dressy and a little romantic, though the black keeps it from turning soft.
Final Thoughts
The best black glitter coffin nails for a night out are not the ones with the most stuff on them. They’re the ones with the clearest point of view. Pick one main effect—fade, French, cat-eye, chrome, crystals, flames, lace—and let the coffin shape do the rest.
Light behavior matters more than people expect. Gloss throws light. Matte absorbs it. Micro-glitter twinkles from a distance; chunky glitter needs closer inspection and more smoothing. If you remember nothing else, remember that the finish changes the mood as much as the color does.
I’d save two or three sets that share the same energy, not twelve random screenshots, then show your tech the one detail you care about most: the fade placement, the V French depth, the crystal layout, the chrome tone. That’s how you walk out with a manicure that feels chosen, not assembled on the fly.
