

Round acrylic nails have become the go-to choice for people who want a polished, sophisticated look without the sharp edges of stiletto or coffin shapes. When you extend the length on round nails, something magical happens — you get enough canvas to showcase intricate designs while maintaining an elegant, slightly less dramatic silhouette than pointy styles. The beauty of longer round acrylics is that they work for almost every occasion, from everyday wear to formal events, and they feel noticeably less aggressive in professional settings while still giving you that satisfying length and durability.
What makes round acrylics particularly appealing is their versatility. Unlike more angular shapes that demand bold, dramatic designs to look intentional, longer round nails actually improve with subtle, sophisticated color work — ombré effects, soft gradients, and delicate details look absolutely stunning on this shape because the curved edges create a naturally flowing canvas. The roundness also means there’s less stress on your nail beds compared to pointy shapes, so if you’ve ever had concerns about breakage or damage, longer round acrylics are a genuinely smarter choice.
If you’re trying to decide whether to commit to a longer round nail design, or you’re searching for your next manicure inspiration, this is the perfect place to start. Each of these twenty designs works beautifully on longer lengths, and they’re all achievable whether you’re visiting a salon or working with a technician who specializes in acrylic extensions. You’ll find soft, wearable options alongside slightly bolder statements — something for every mood, season, and personal style.
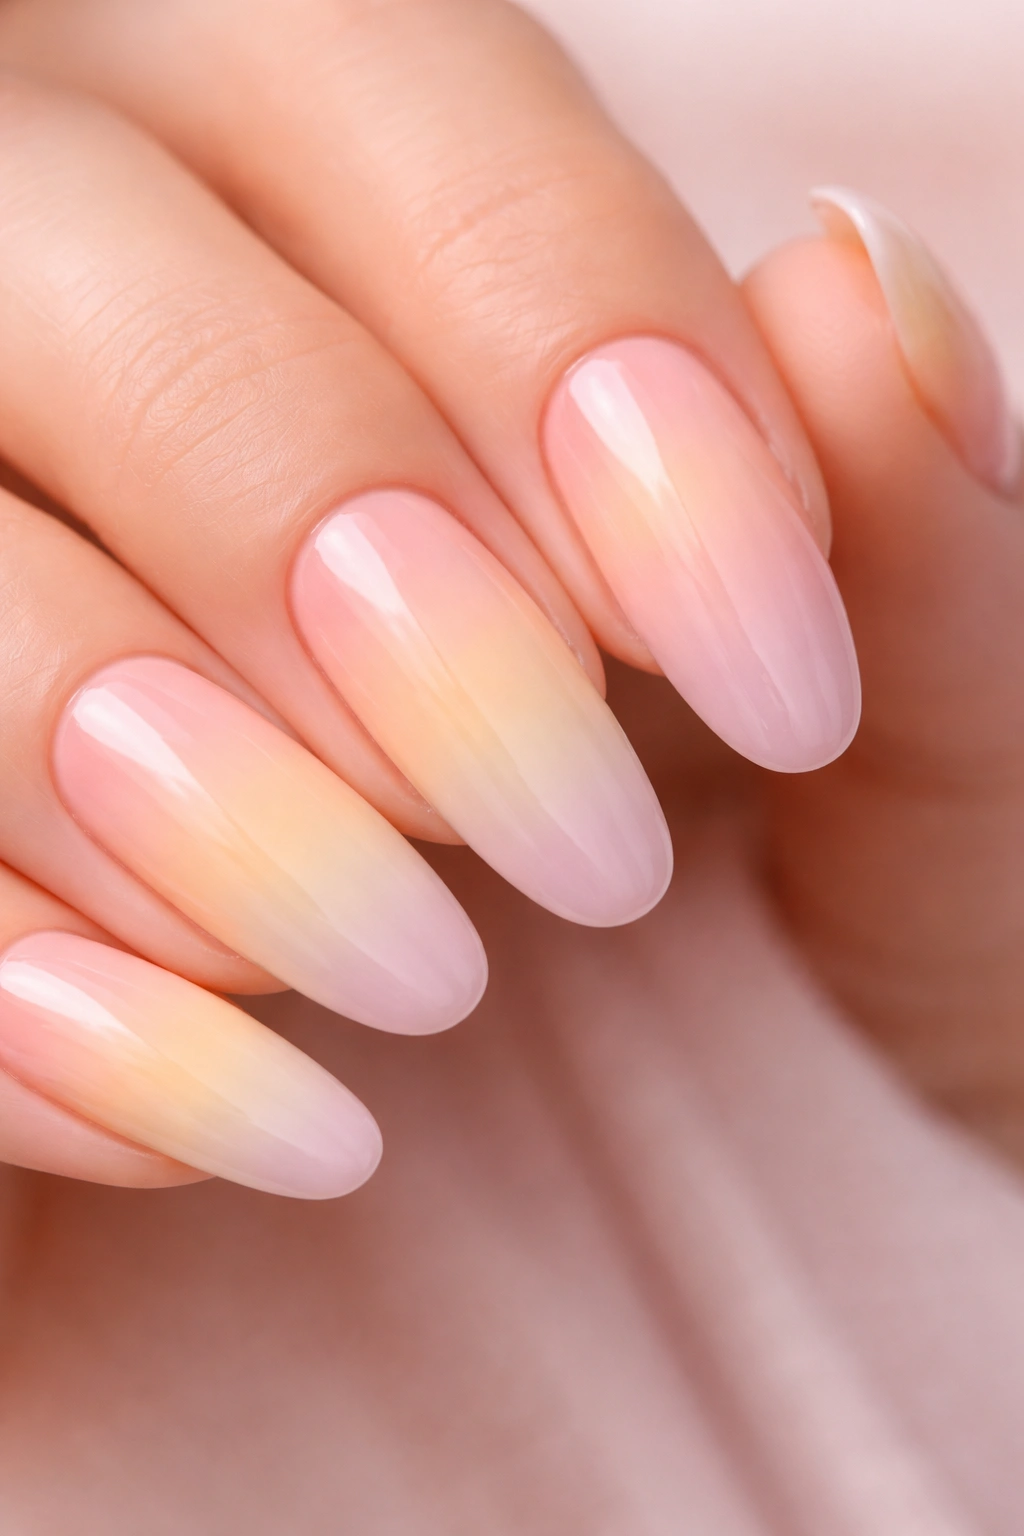
1. Soft Pink Ombre
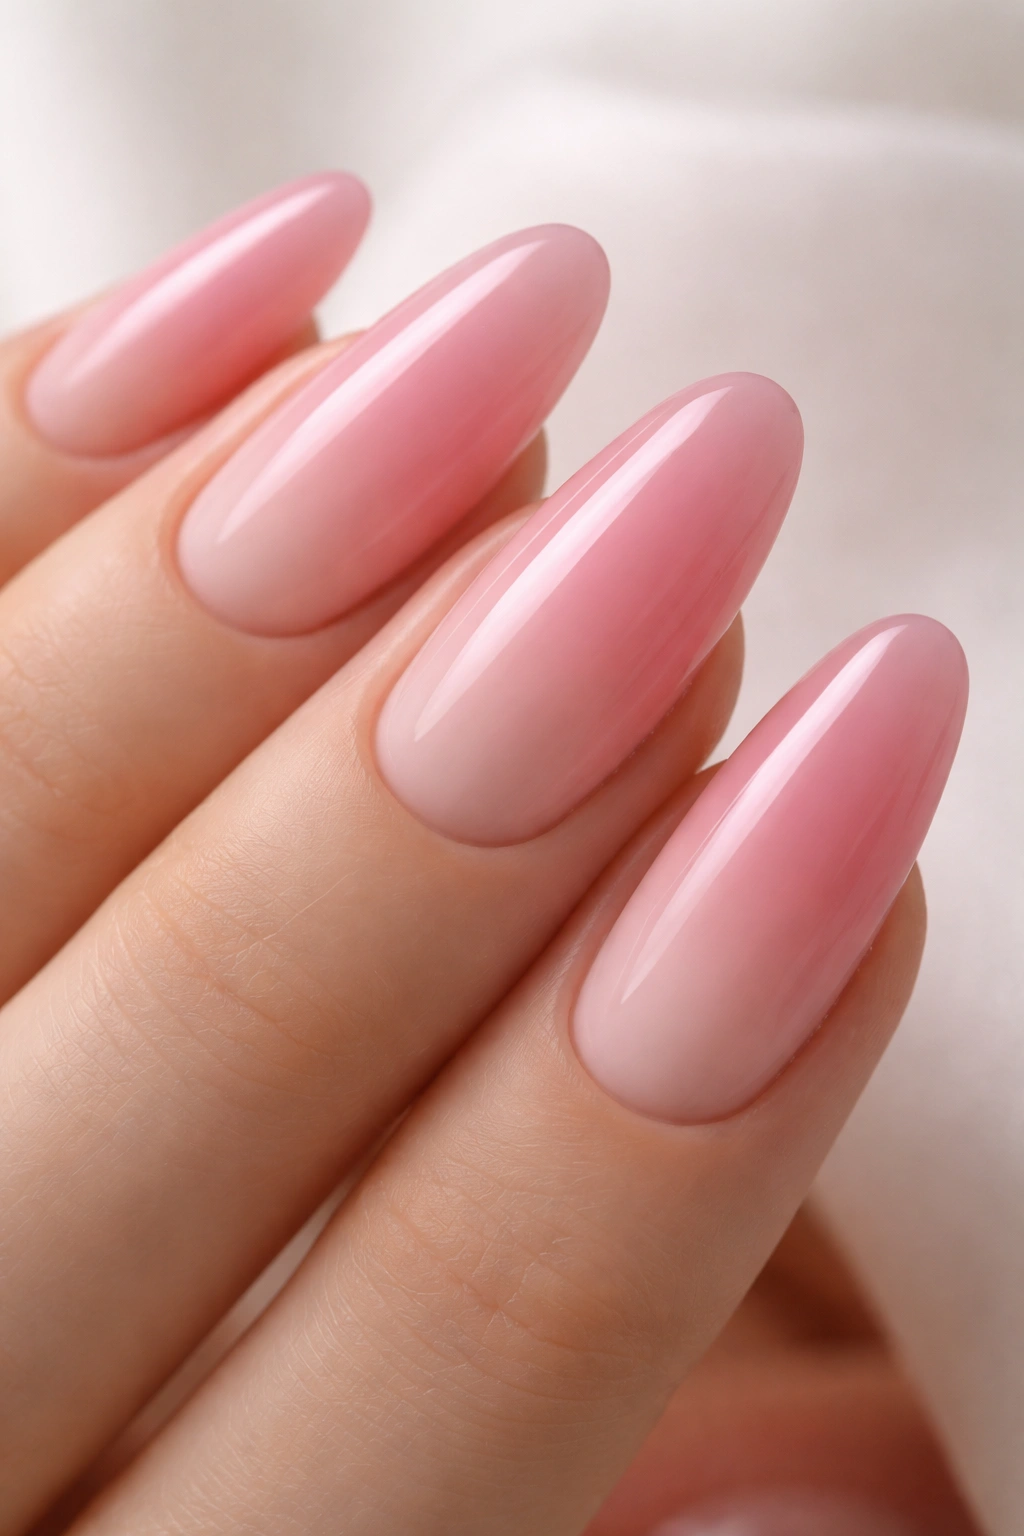
This is the closest thing acrylic nails have to a universally flattering option. The design starts with a sheer pink base that gradually deepens toward the free edge, creating an almost imperceptible gradient that catches light and adds dimension without looking obvious. On longer round nails, this design reads as incredibly elegant because the curved shape allows the color transition to flow smoothly from nail bed to tip.
Why This Design Works on Longer Rounds
The soft pink ombré leverages the natural curvature of round nails to create an effect that appears effortless and expensive-looking. The gradual color transition — usually moving from a pale blush tone to a slightly deeper mauve or rose — feels refined rather than trendy, which means it stays relevant across seasons and occasions. What most people don’t realize is that the ombré effect on round nails actually looks better with length because you’ve got more surface area for the gradient to develop naturally without appearing abrupt.
Application Tips and Customization Ideas
- Choose your base color first (pale pink, champagne, or even nude-pink tones work beautifully) and then select a slightly deeper shade in the same family for the gradient
- Use a dry brush technique or sponging method to apply the darker shade progressively toward the tip — this gives you more control than trying to blend on the nail itself
- Seal everything with a high-shine top coat to enhance the luminous quality of the ombré effect
- If you want more drama, deepen the gradient into a mauve or dusty rose rather than staying strictly in the pink family
Pro tip: This design photographs beautifully and genuinely hides minor imperfections in nail growth, making it perfect if you’re bridging the gap between salon visits.
2. Glazed Donut Nails
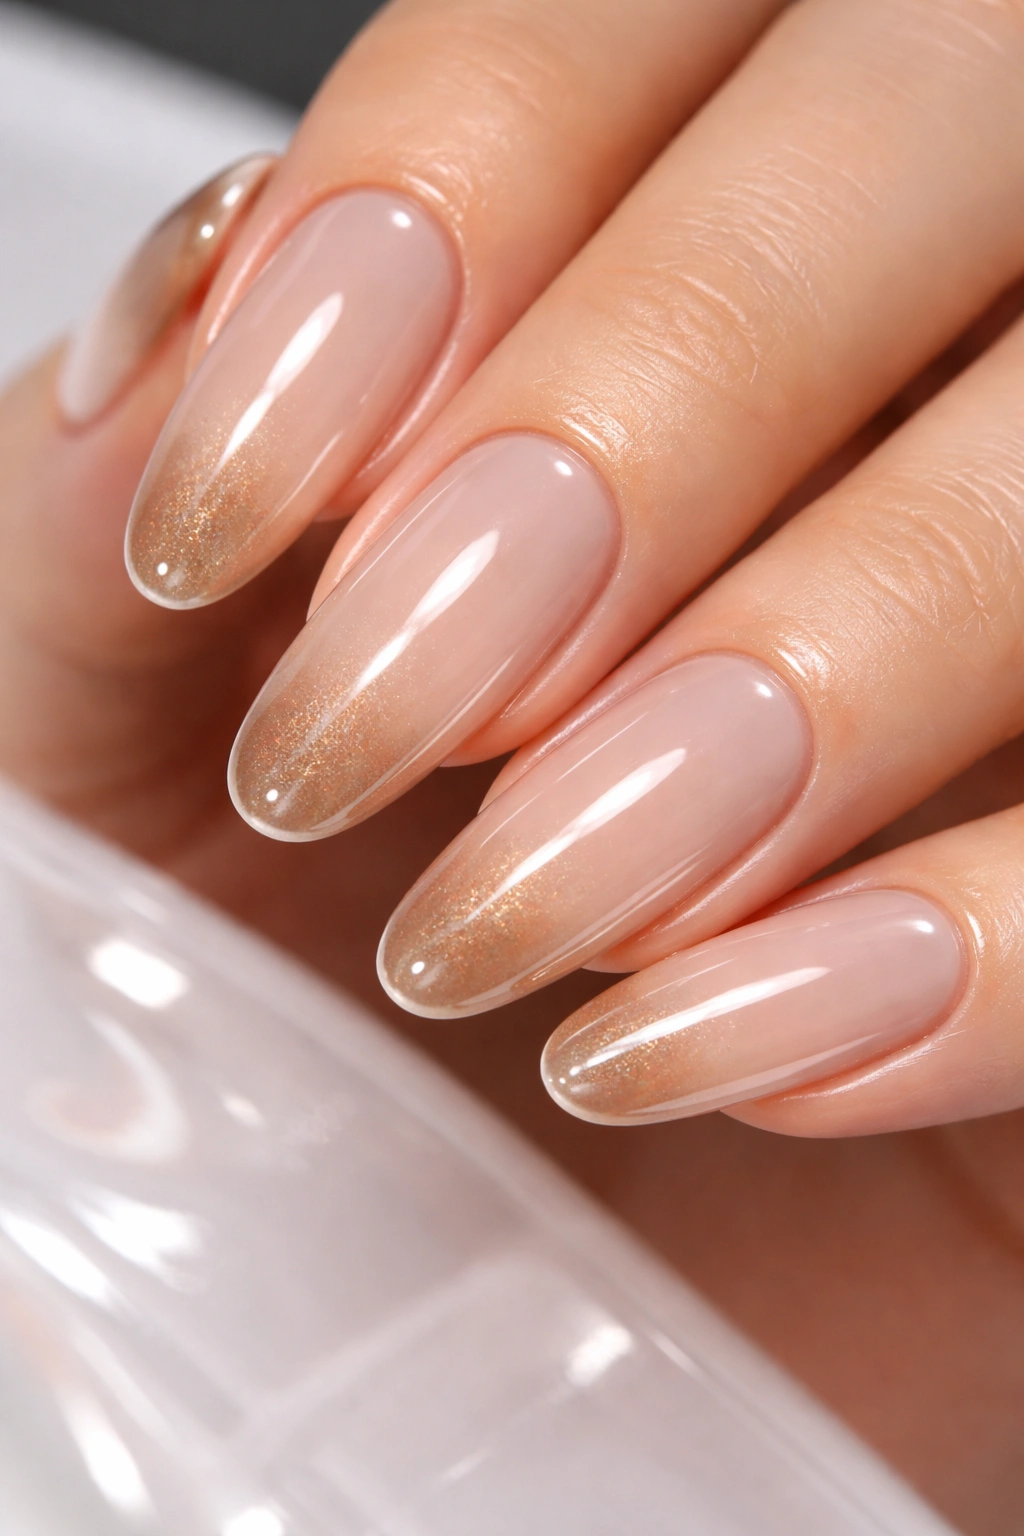
Glazed donut nails have become iconic for good reason — they’re undeniably gorgeous and feel current without being trendy in a way that dates them. The design features a semi-sheer or milky base with a slightly darker or contrasting shade concentrated at the tip and sides, creating that translucent, dewy, “glazed” appearance. On longer round nails, this design is particularly striking because the gloss and the gentle color variation create an almost three-dimensional effect.
The Visual Impact on Round Shapes
What makes glazed donut nails exceptional on round acrylics is how the darker coloring at the edges emphasizes the curved perimeter of the nail. Instead of looking flat, your nails take on an almost sculpted quality. The semi-transparent quality means light passes through the nail rather than sitting on top of it, which creates a luminous, skin-like appearance that actually makes your fingers look longer and more elegant. It’s the kind of design that looks expensive and intentional but isn’t demanding or high-maintenance.
Color Combinations That Shine
- Milky white or beige base with caramel or tan concentrated at the edges creates a creamy, sophisticated look
- Translucent pink with mauve or dusty rose edges leans romantic and feminine
- Nude base with deeper chocolate or bronze edges offers a warmer, more editorial feel
- Pale yellow with peachy-bronze edges creates an unexpectedly warm and unique aesthetic
Worth knowing: This design requires quality semi-sheer gel or acrylic products to achieve the authentic glazed effect — the translucency is non-negotiable for the design to work properly.
3. Nude with Metallic Accents
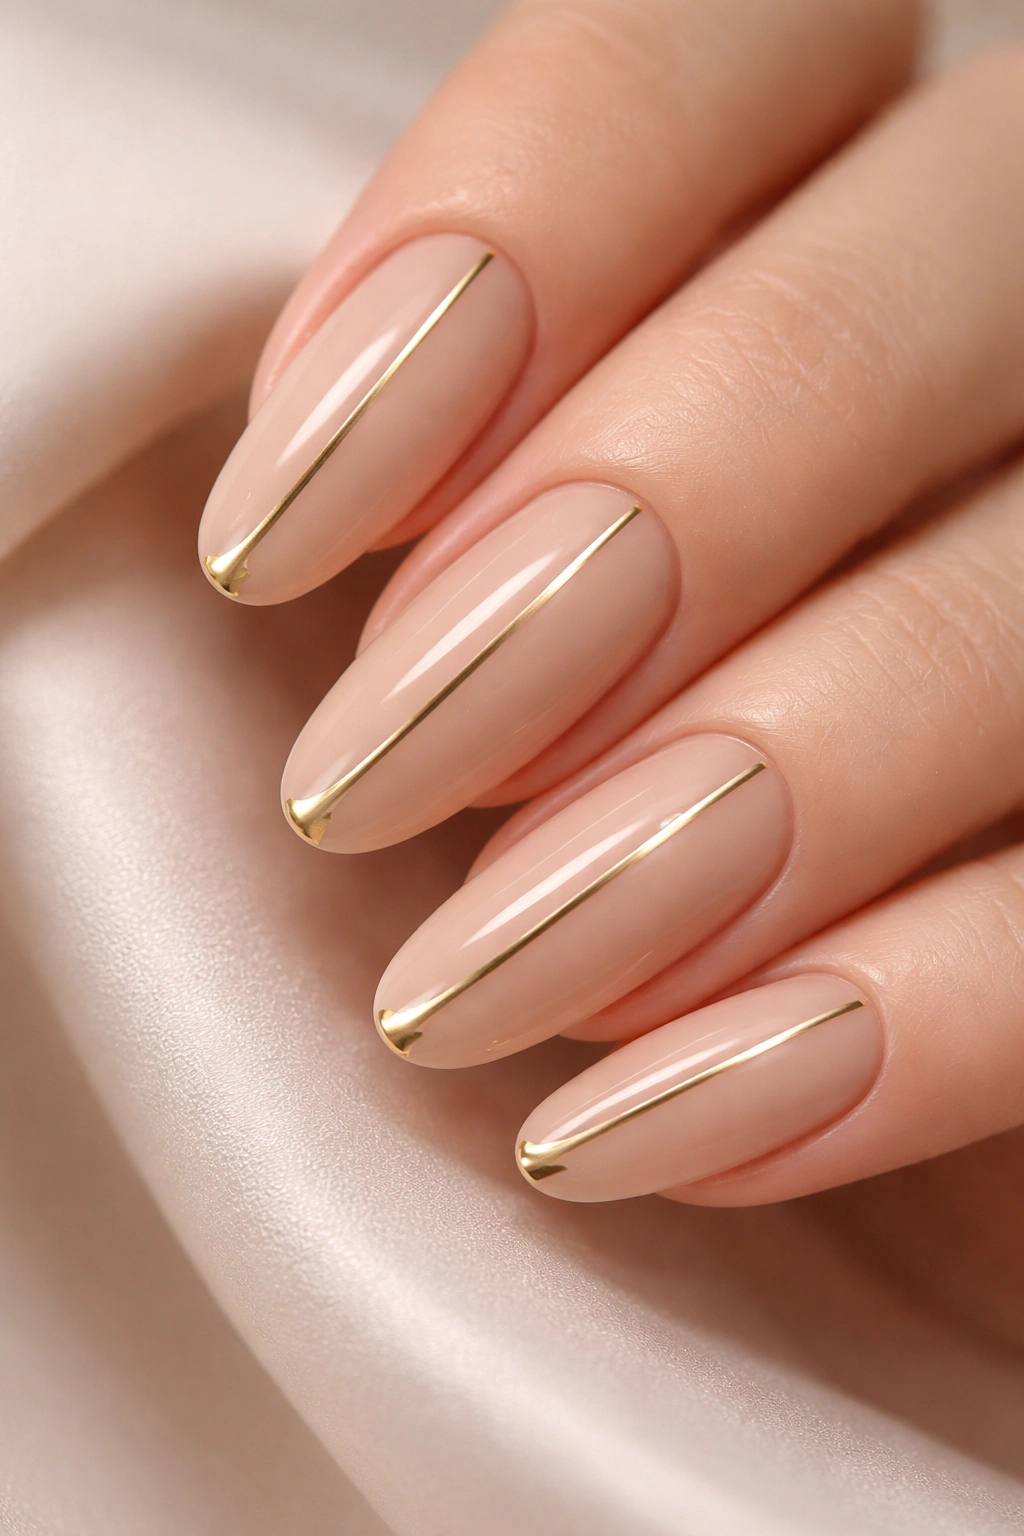
Sometimes the simplest designs make the most impact, and a clean nude base with carefully placed metallic accents proves this concept perfectly. A warm beige, light taupe, or skin-toned acrylic forms the foundation, while thin metallic lines, geometric shapes, or carefully positioned gold or silver details add visual interest without overwhelming the nail. On longer round nails, this restraint feels intentional and sophisticated rather than boring.
Why Metallic Details Elevate Simplicity
The magic of this design lies in the contrast between the matte or satin finish of the nude base and the reflective quality of the metallic accents. Gold feels warm and luxurious, while silver or chrome reads as more contemporary and edgy. The key is using metallic elements as punctuation, not as the main event. A thin vertical gold line down the center of each nail, or a small geometric detail on the corner, or even just a metallic accent along the cuticle area creates a polished, intentional aesthetic that works everywhere from the office to dinner out.
Application Techniques and Accent Placement
- Create thin metallic lines using a fine brush or striping brush after the nude base is cured
- Apply small gold or silver foil pieces for a more texture-heavy approach to accents
- Use metallic gel in a very controlled manner — less is genuinely more here
- Position accents asymmetrically (not every nail identical) for a more editorial, modern feel
- Seal metallic elements carefully to ensure longevity and prevent chipping
Insider note: Metallic accents on round nails look especially sophisticated because they follow the curve of the nail rather than creating harsh lines that draw attention to angles.
4. French Ombré Gradient
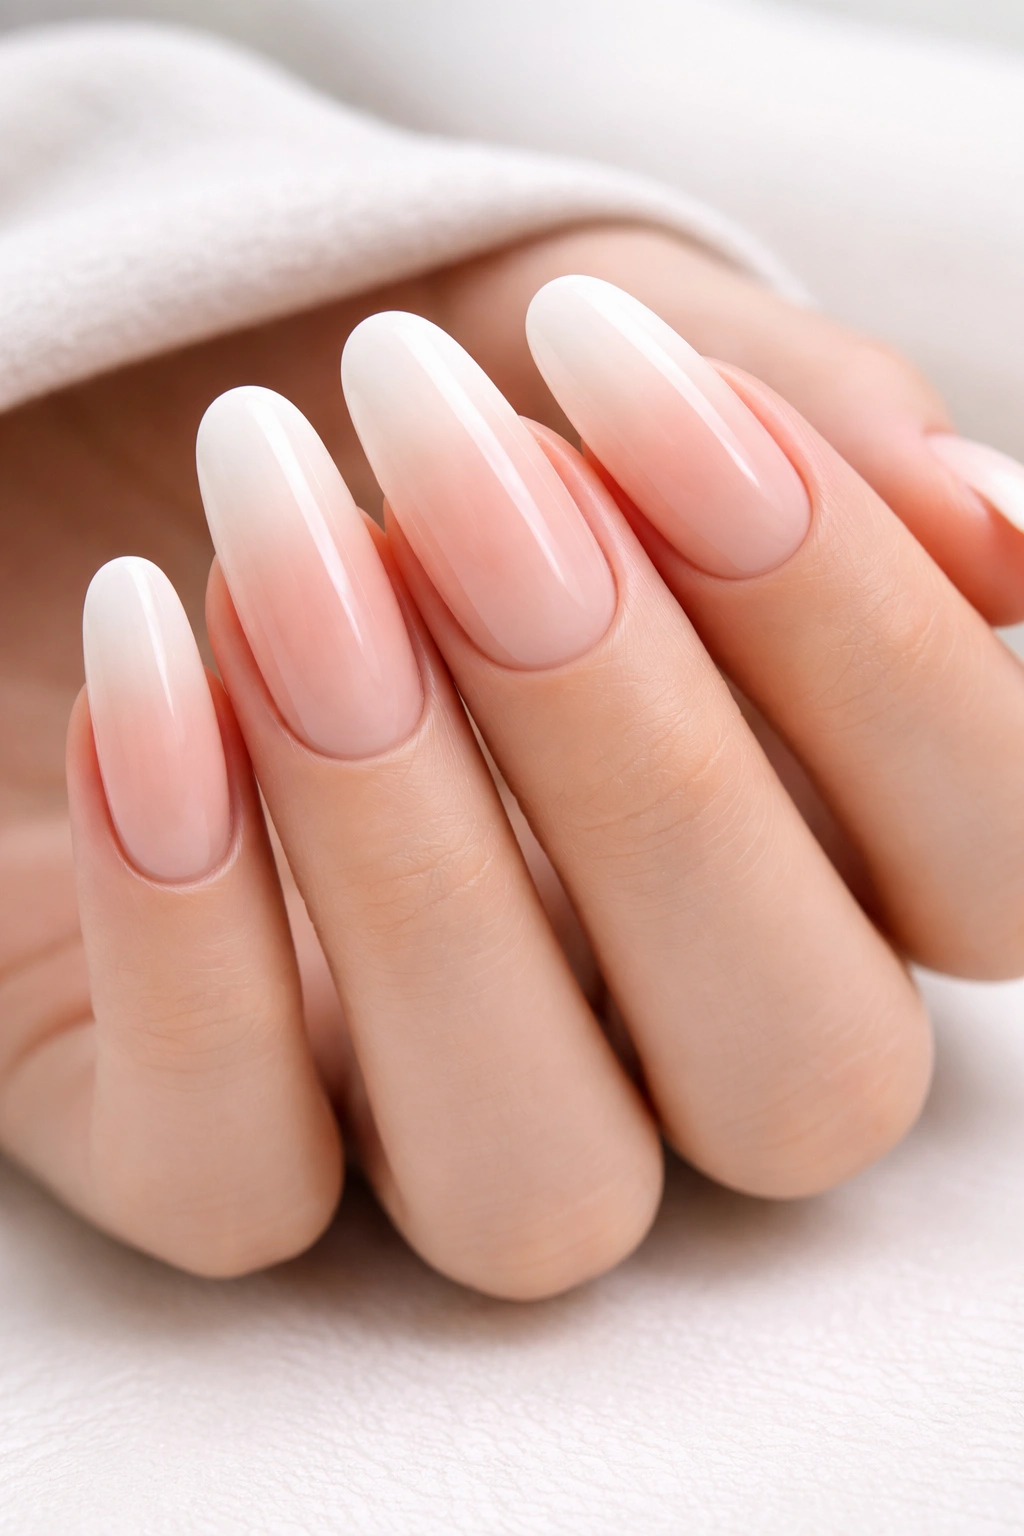
This design combines two classics — the French manicure and the ombré effect — into something that feels fresh and modern. Instead of the traditional stark white tip, you’re creating a gradient that might start with white at the very tip, transition through pale pink in the middle, and blend into a deeper nude or mauve at the base. On longer round nails, this creates an elongated, elegant effect that reads as much more refined than a standard French manicure.
How the Gradient Enhances Length and Shape
The French ombré gradient works exceptionally well on longer rounds because the color transition naturally draws the eye from base to tip, which emphasizes length without the nails looking cartoonish or overly pointed. The rounded shape means there are no harsh lines to catch the eye — instead, the gradient flows continuously and creates a almost fluid appearance. This is the design to choose if you want something that feels both classic and contemporary, familiar and fresh.
Color Progressions and Customization
- White tip → pale pink → warm taupe creates a timeless, wearable progression
- Ivory tip → champagne → soft brown offers a slightly more autumnal feel
- Pure white tip → pale nude → deeper mauve reads as more dramatic and evening-appropriate
- Soft peach tip → warmer peach → light brown creates a cohesive, monochromatic vibe
Real talk: This design requires patience during application because the ombré gradient needs to be smooth and intentional, but the end result is absolutely worth the extra time. A technician experienced with ombré effects can create something that genuinely looks airbrushed.
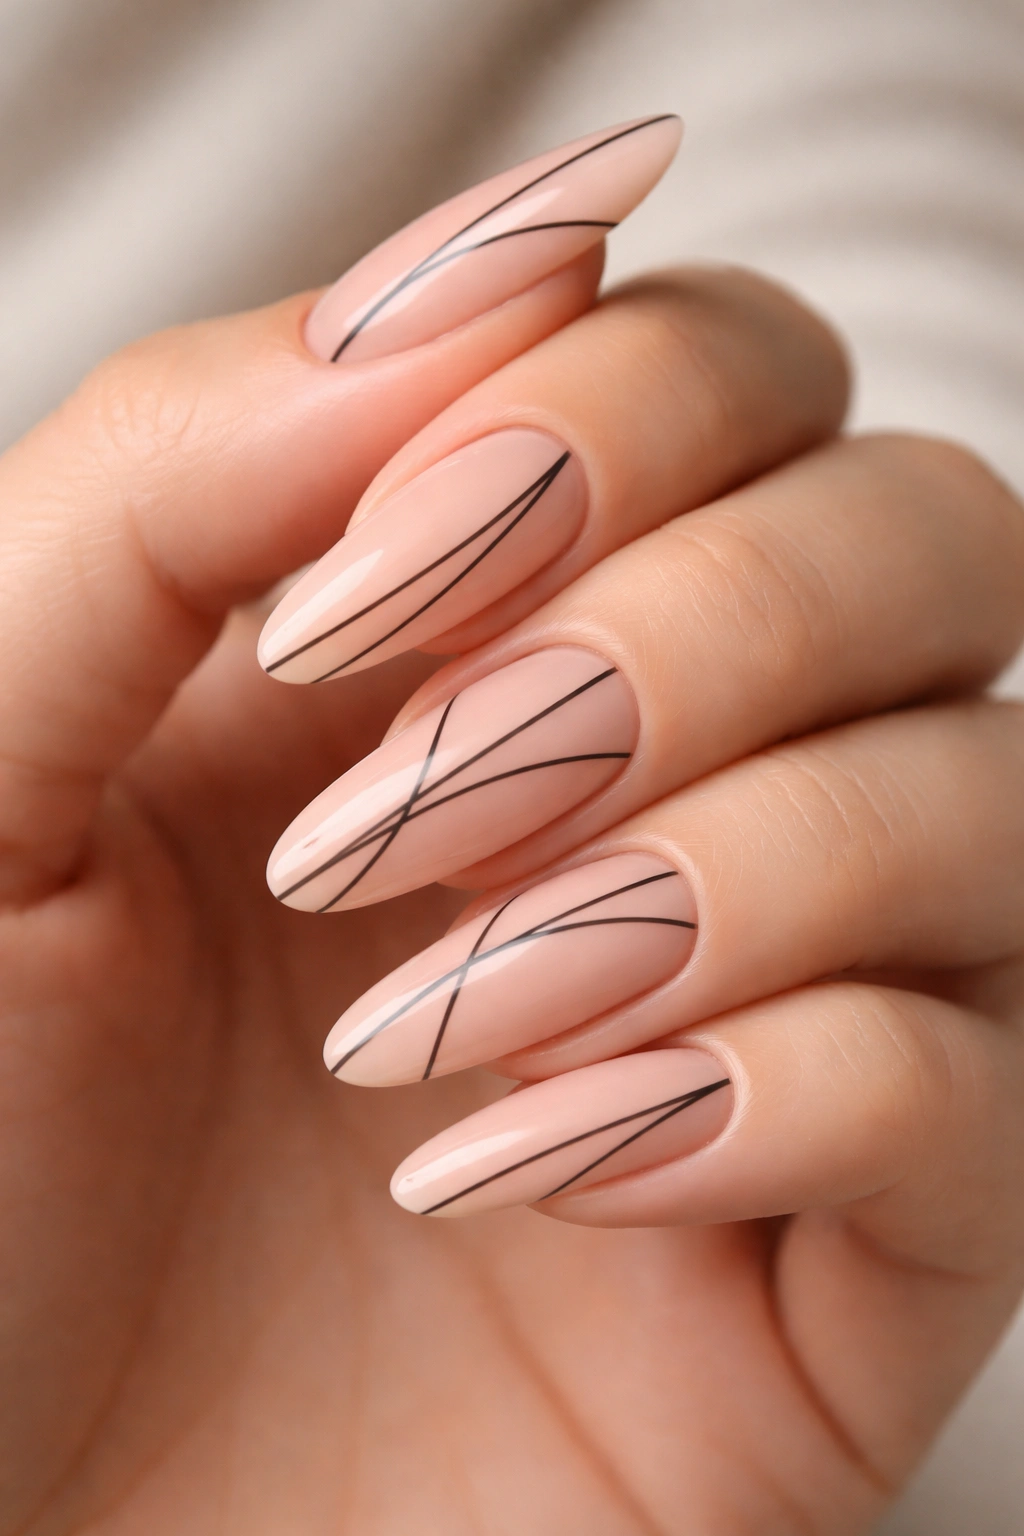
5. Minimalist Line Art
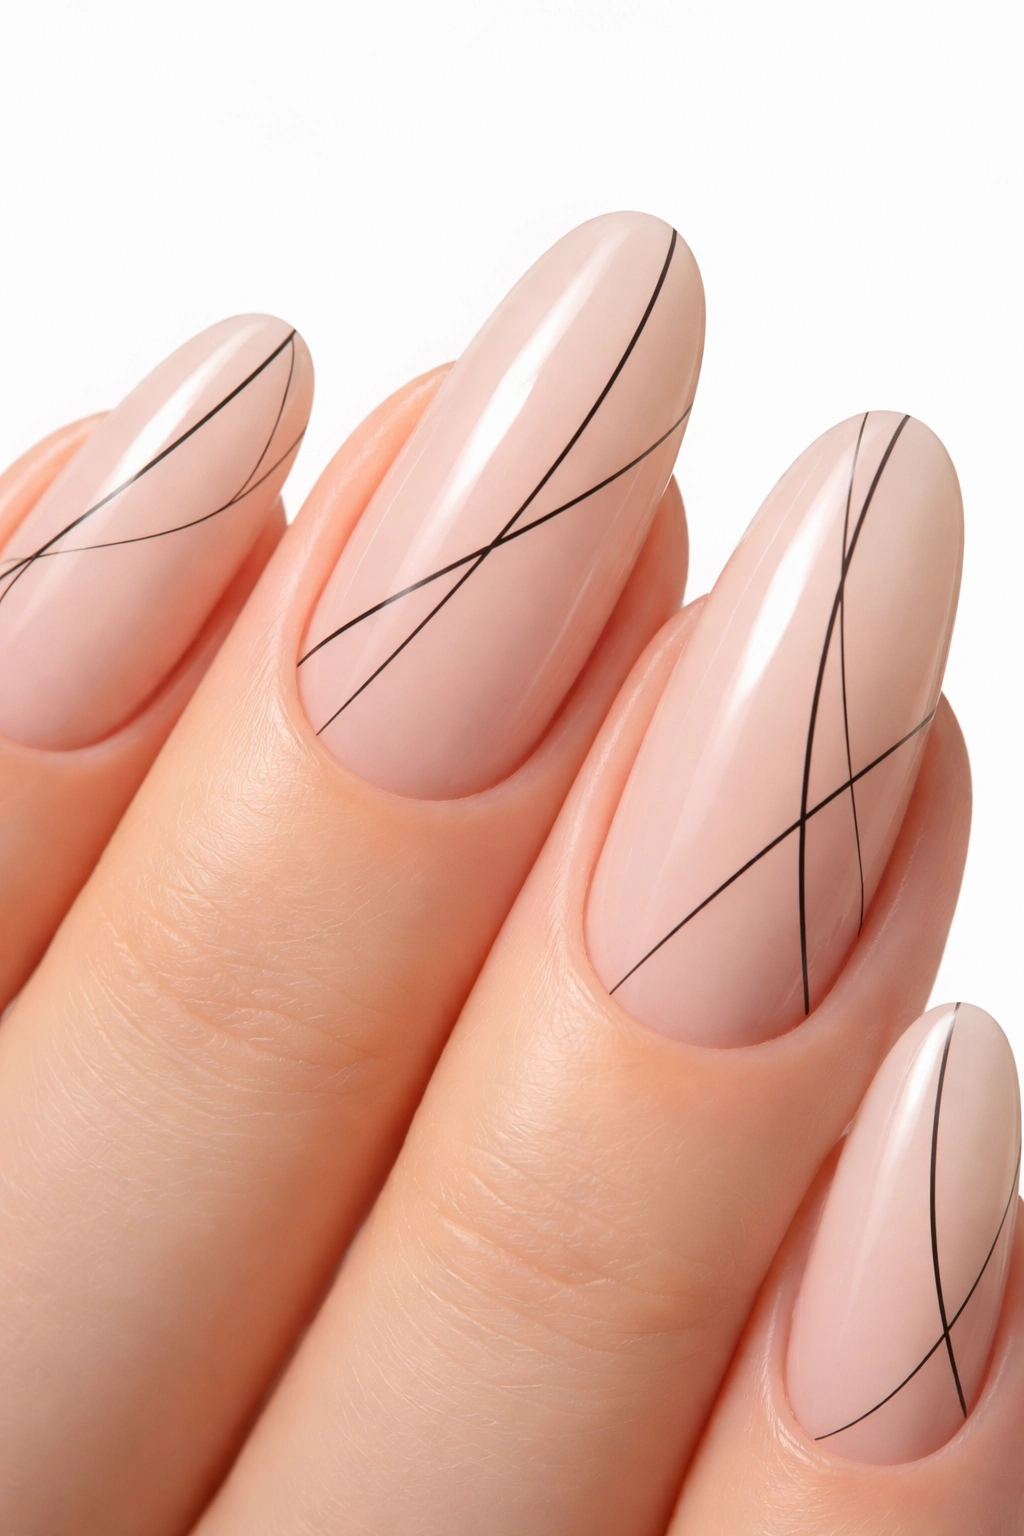
For people who appreciate clean aesthetics and negative space, minimalist line art on longer round acrylics offers an unexpectedly striking option. This design features thin, deliberate lines — perhaps a geometric pattern, an abstract wavy line, or scattered straight lines — rendered in black, navy, or occasionally gold on a clean, minimal base like nude, white, or pale pink. The strength of minimalism is that it allows the shape of the nail itself to be the main event, with the design adding just enough personality without clutter.
The Psychology of Minimalist Design on Round Nails
There’s something inherently calming about minimalist nail art, and when it’s applied to longer round nails, the effect is quite sophisticated. Because round shapes are already visually soft and approachable, adding minimal line work doesn’t create visual chaos — instead, it creates intentional contrast. A single thin line running down the center of each nail, or thin lines creating subtle geometric shapes, or even tiny scattered lines that almost appear accidental demonstrate restraint and confidence. This is the design choice of someone who knows that less is more.
Line Placement Ideas and Variations
- Single vertical line down the center of each nail in fine black or dark navy for maximum simplicity
- Thin diagonal lines creating a subtle grid or crosshatch pattern for slightly more visual interest
- Scattered short horizontal lines of varying lengths that appear almost random but are actually carefully placed
- Curved lines that follow the natural contour of the nail for an abstract, organic feel
- Tiny geometric shapes (triangles, dots, small rectangles) placed strategically on just a few nails
Pro tip: Use a very fine brush or nail art pen for line work — the finer and more precise the line, the more sophisticated the overall effect.
6. Sparkle Gradient Fade
This design takes gradient effects and adds sparkle, creating a sophisticated option that catches light beautifully without the heaviness of full glitter coverage. The design typically starts with a solid, slightly deeper tone at the base and gradually fades to a lighter shade at the tip, with fine sparkle or shimmer elements blended throughout the gradient. On longer round nails, this creates a luminous, dimensional effect that reads as effortless elegance.
Why Gradual Sparkle Works Better Than Full Glitter
When you apply sparkle gradually rather than covering the entire nail, you create sophistication instead of overkill. A nail that’s entirely covered in glitter reads as playful and fun, but a gradient with sparkle elements that fade out toward the tip feels refined and intentional. The sparkle draws the eye across the nail in a way that emphasizes length without making your nails look costume-y or over-decorated. This is genuinely one of the best ways to add glamour while maintaining elegance.
Executing Gradient Sparkle Successfully
- Apply your base color first, then use a second, lighter shade for the gradient
- Add fine sparkle or shimmer elements (not chunky glitter) to the gradient area as you’re blending
- Allow the sparkle to be more concentrated toward the tip and fade out as you approach the base
- Use a high-shine top coat to seal everything and enhance the luminous quality
- Consider using different sparkle sizes for dimension — very fine sparkle mixed with slightly larger flecks creates more visual interest
Worth knowing: This design holds up surprisingly well for an extended period, especially if you choose quality sparkle elements and seal them properly with gel or durable acrylic top coat.
7. Marble with Gold Veining
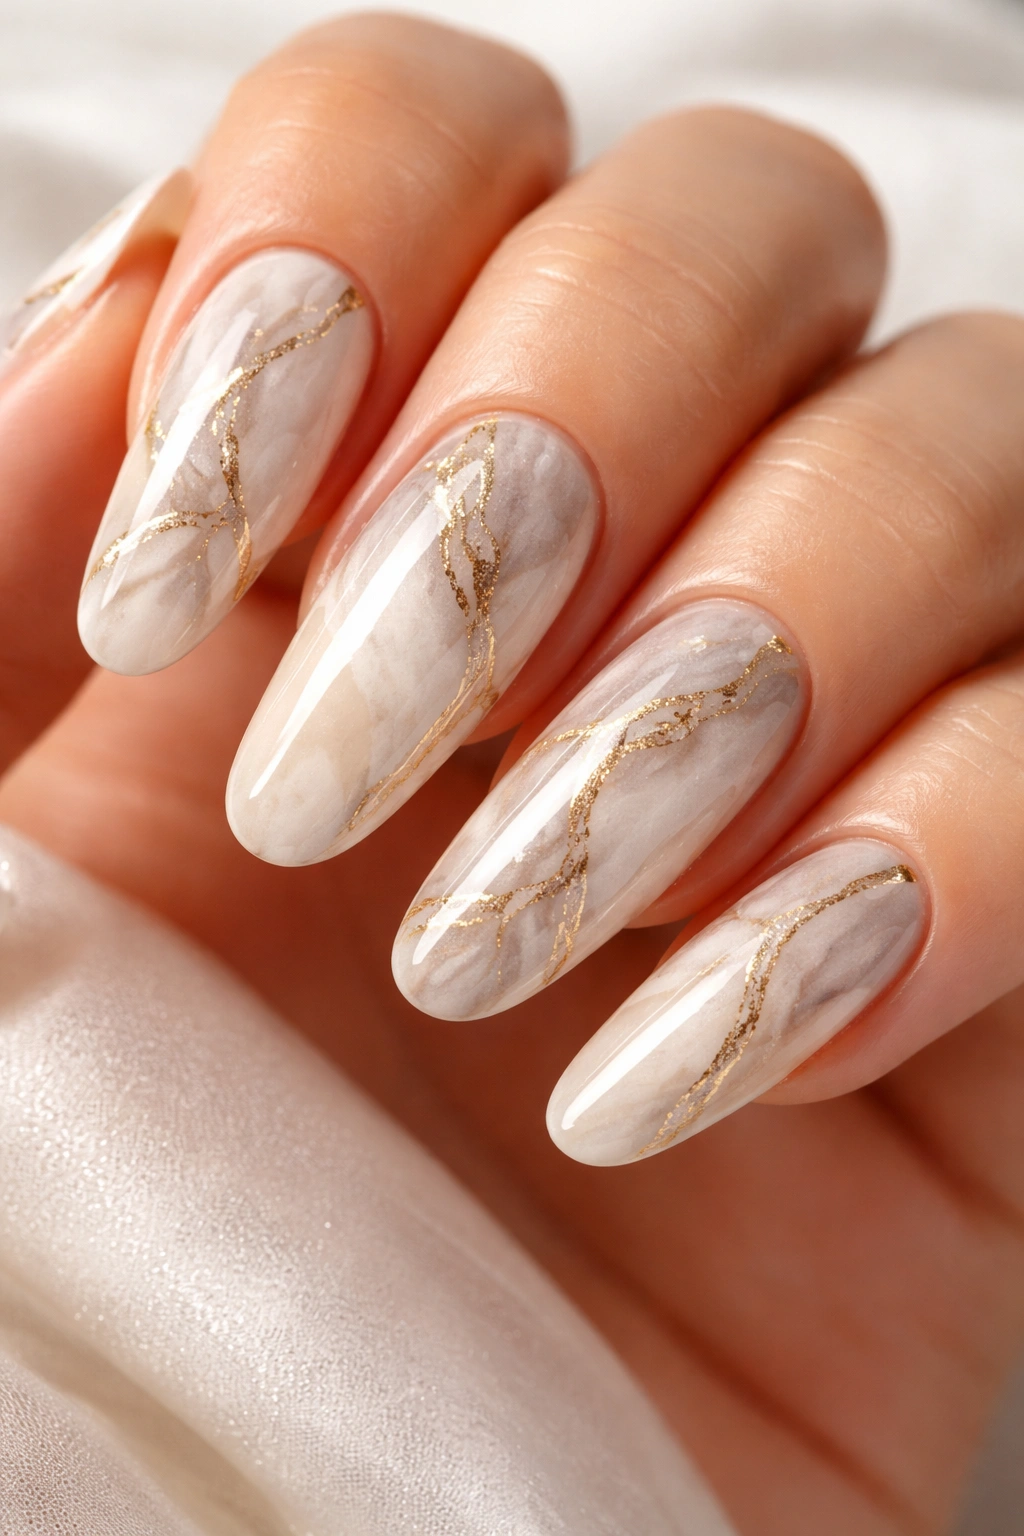
Marble effects on nails create sophisticated, naturally beautiful designs that never look cheap or mass-produced. The design features a creamy base color — typically white, pale gray, or soft taupe — with swirled or veined patterns created using darker shades or black, often with gold or metallic accents following the “veins.” On longer round nails, marble looks particularly chic because the rounded shape allows the veining to flow continuously without sharp edges interrupting the pattern.
The Timeless Appeal of Marble on Round Acrylics
Marble is genuinely one of those designs that works across every season, every setting, and every personal style. It reads as expensive and intentional while actually being quite accessible. The beauty of marble on round nails specifically is that the curved edges complement the organic, flowing nature of the marble pattern. Instead of the pattern looking contained or artificial, it feels like a natural extension of the nail shape itself. Gold veining adds just enough warmth and luxury without making the design feel dated.
Creating Authentic Marble Veining
- Start with your base color fully cured and smooth
- Use a thin brush and black or very dark gray to create irregular, branching lines that mimic actual marble veining
- Don’t create perfectly symmetrical patterns — real marble is beautifully random and asymmetrical
- Add gold accents along some (not all) of the veins for extra dimension
- Seal carefully so the veining doesn’t chip or peel at the edges
- Consider doing marble on all ten nails identically versus creating unique patterns on each nail — both approaches work beautifully
Insider note: Marble nails on longer round acrylics photograph absolutely beautifully, so if you’re someone who documents your manicures, this is definitely worth trying.
8. Matte Almond with Gems
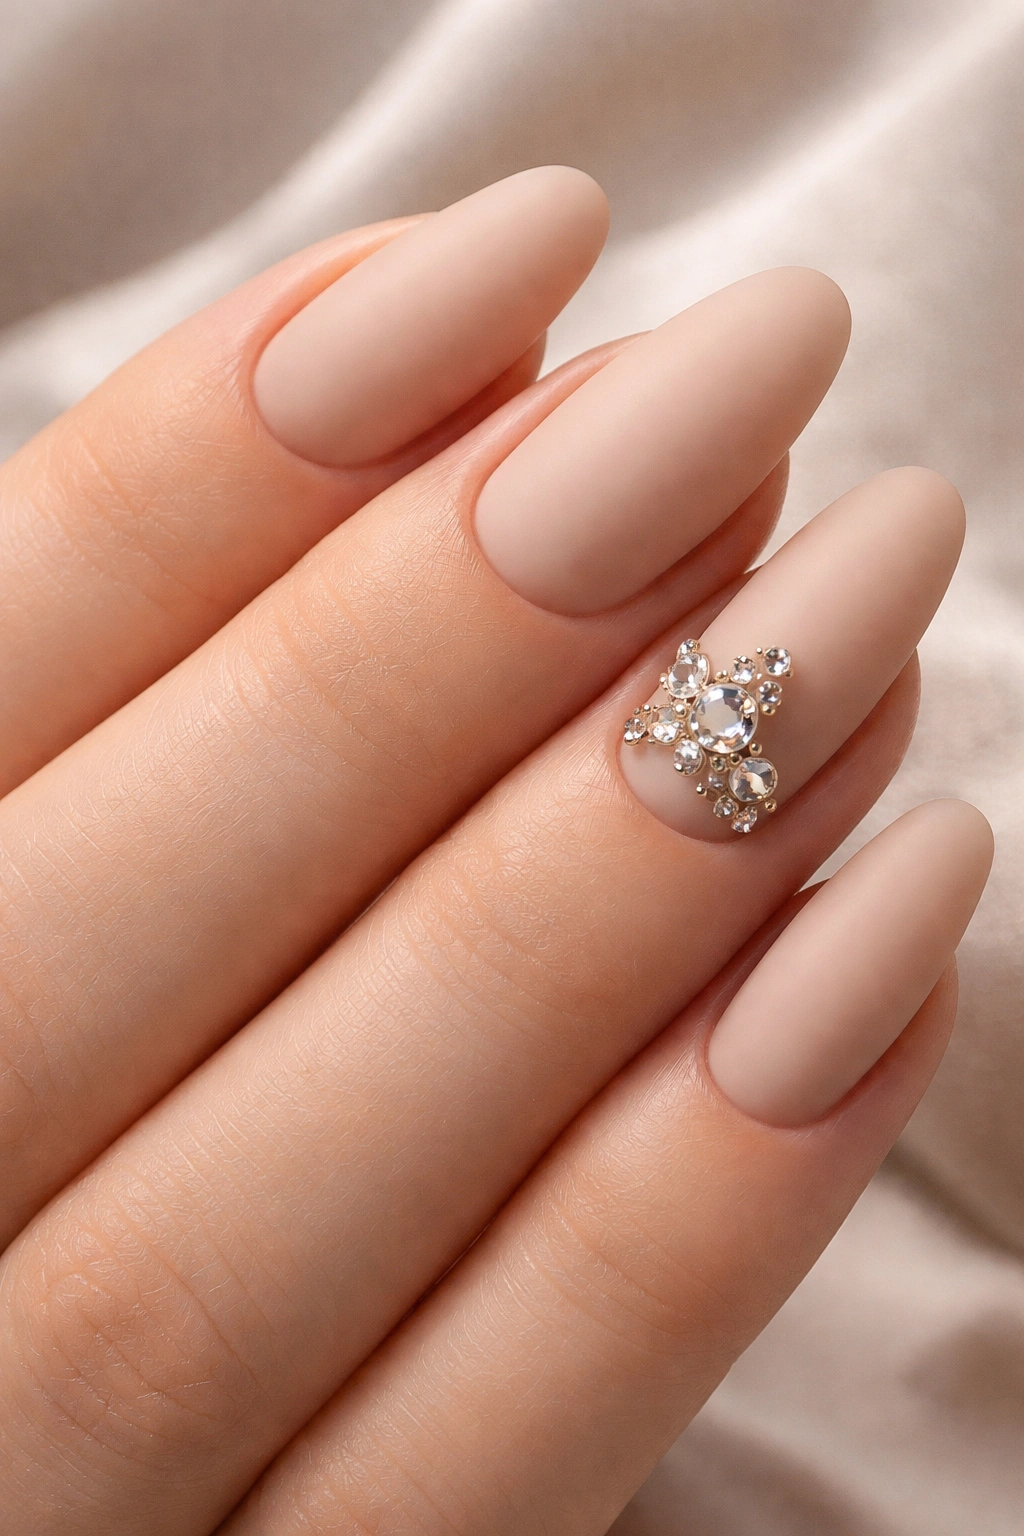
Wait — this one uses the word “almond” but you’re doing round, not almond shaped. What I’m actually describing is a matte-finish base in a flattering neutral tone with carefully placed gems or rhinestones creating a minimalist, luxe accent. Even though “almond” technically refers to a different shape, the design principle translates perfectly to round acrylics. The matte finish creates elegance, and the gems add just enough sparkle to feel special without being over-the-top.
The Power of Matte Finishes on Longer Nails
Matte finishes are experiencing a real moment because they photograph beautifully, feel modern, and offer a subtle sophistication that high-shine sometimes misses. On longer round nails, a matte finish actually emphasizes the shape and nail health more than gloss does — your nails look strong and intentional rather than plastic-y. Adding gems strategically breaks up the matte surface and creates visual interest without overwhelming it. This is particularly effective because gems catch light and draw attention while the matte base keeps things grounded.
Gem Placement and Design Considerations
- Place larger gems (rhinestones or Swarovski crystals) on just one or two nails per hand for statement impact
- Create a small geometric pattern using tiny gems on a few nails (a small triangle, a scattered cluster)
- Position gems at the cuticle area, the side of the nail, or along the tip depending on the look you want
- Mix gem sizes for dimension — large and medium stones together create more visual interest than all-same-size gems
- Make sure gems are properly secured with gel or quality adhesive so they don’t pop off prematurely
Pro tip: Matte finishes with gems work especially well for weddings, formal events, or anytime you want to feel polished and intentional without looking over-dressed or trying too hard.
9. Soft Chrome and Pearl
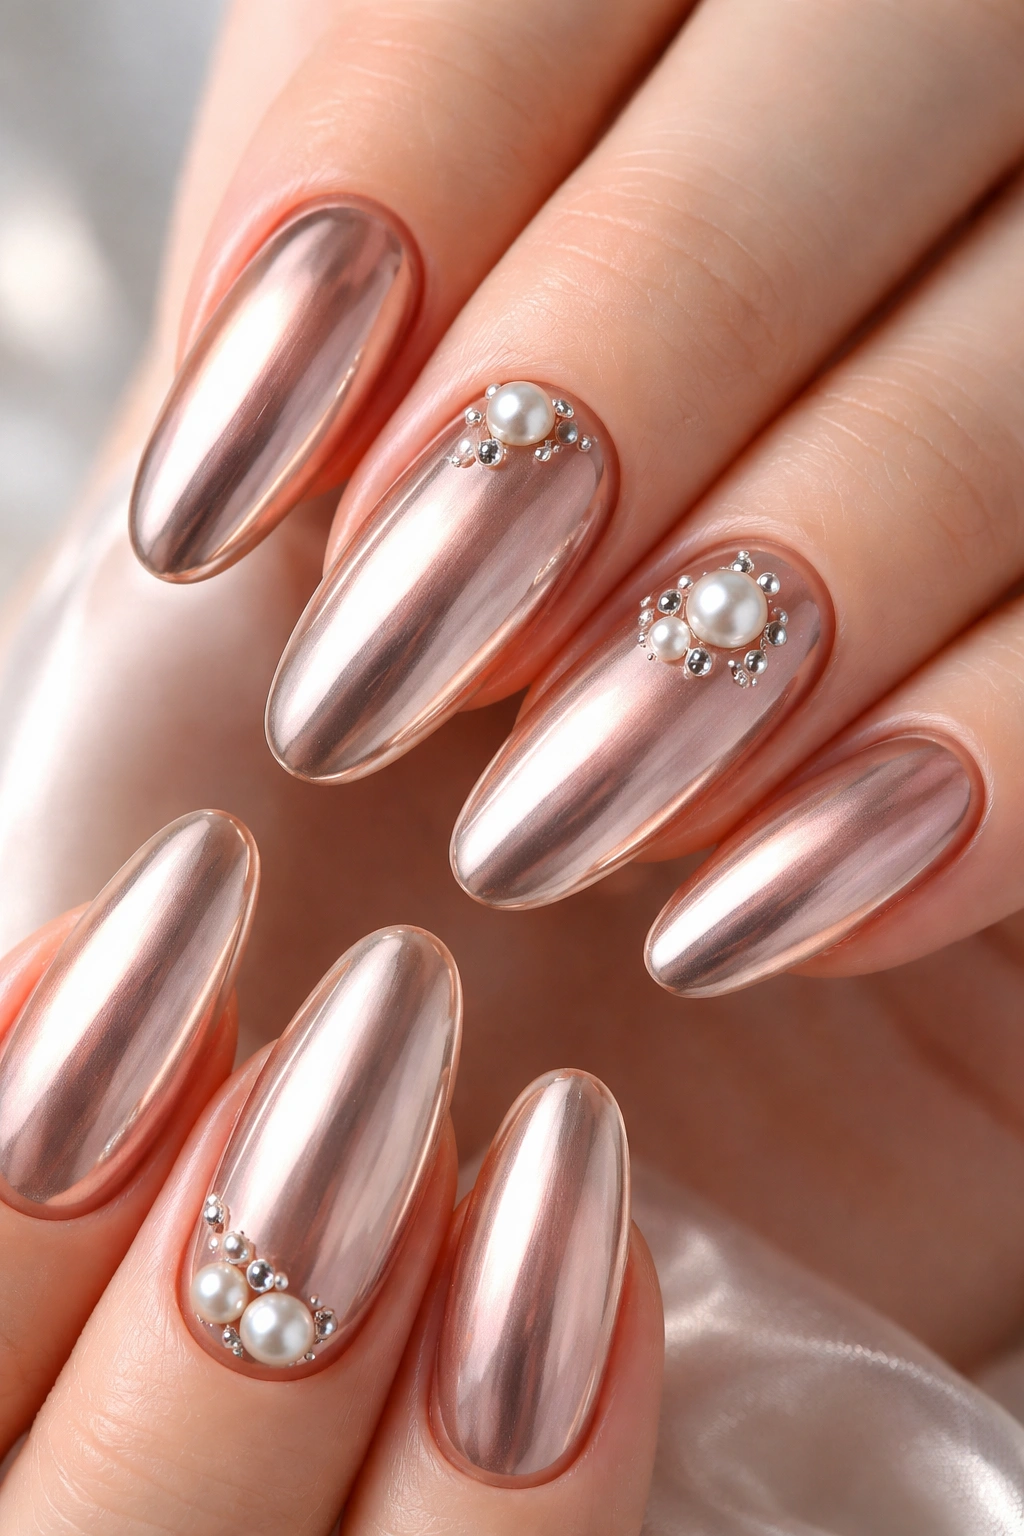
This design combines two trendy finishes in a way that feels sophisticated rather than gimmicky. The base typically features a soft chrome or metallic finish in rose gold, champagne, or soft silver, with pearl accents creating depth and dimension. On longer round nails, the metallic base catches light beautifully while the pearl details add a subtle, luxurious quality that reads as editorial and high-end. The combination of chrome and pearl creates an almost jewelry-like appearance.
Why Chrome and Pearl Create Visual Depth
Chrome finishes are inherently reflective, which creates dimension even on a flat nail surface. Adding pearl accents — which have their own subtle light-catching qualities — creates layers of visual interest. The rounded shape of your nails means light bounces across the entire surface rather than concentrating in one area, which maximizes the beautiful effect of both finishes. This design genuinely looks expensive because the combination of finishes creates an illusion of depth and luxury that simple single-tone finishes can’t quite achieve.
Achieving the Chrome and Pearl Combination
- Apply a chrome base using quality chrome powders or specialized chrome gels — the key is multiple thin layers for a true mirror effect
- Once your chrome base is cured and sealed, add pearl accents using a fine brush or carefully placed pearl pigments
- Pearl details work best concentrated near the tips or cuticle area rather than scattered randomly
- Consider using different pearl shades (warmer versus cooler pearls) for added sophistication
- Seal everything carefully with a top coat designed for metallic finishes to preserve the chrome effect
Worth knowing: Chrome finishes can be tricky to maintain because they show fingerprints and dust more visibly, but on longer round nails, the effect is genuinely so beautiful that most people consider the maintenance worthwhile.
10. Nude with Thin Black Lines
This design proves that you don’t need color or elaborate patterns to create something striking. A perfect nude base — chosen specifically to match your skin tone — paired with thin, intentional black lines creates graphic sophistication. The lines might be simple (one vertical line down each nail), geometric (tiny grid patterns), or slightly more complex (abstract line drawings), but the key is keeping them thin and precise. On longer round nails, this creates an almost Minimalist art feel that’s both contemporary and timeless.
Why Black Lines Elevate Nude Bases
Black creates maximum contrast against any nude tone, which means even very fine lines read as intentional and artistic rather than accidental. The simplicity of this design is actually what makes it so effective — there’s nowhere for your eye to hide, which means every element must be perfect. The rounded shape of your nails means the black lines flow smoothly around the curve without creating harsh angles that would disrupt the elegant aesthetic. This is a design that genuinely looks like you’re thinking about aesthetics rather than just wearing pretty nails.
Line Techniques and Variations
- Create a single vertical line down the center of each nail using a fine brush and black gel or acrylic paint
- Design tiny geometric shapes (triangles, rectangles, crosses) on select nails for a more playful approach
- Create abstract line work that’s intentional but appears almost random — this actually takes more skill and looks more artistic
- Use thin lines to outline the free edge rather than covering the nail surface itself
- Consider using very dark gray or navy instead of pure black for a slightly softer approach that still creates contrast
Real talk: This design requires steady hands and patience, but the visual payoff is genuinely worth the effort. It’s the kind of design that makes people stop and ask where you got your nails done.
11. Pastel Sunset Gradient
Sunset gradients are naturally beautiful because they’re inspired by actual color progressions in nature, but they’re often done in warm, dramatic tones that can feel overwhelming. A pastel version uses the same color family progression — soft yellows moving into pale peachy-pinks into light mauve — but at a reduced saturation level. The effect is romantic, wearable, and genuinely sophisticated. On longer round nails, the gradient has room to develop fully, creating a beautiful color transition that doesn’t feel cramped or abrupt.
Why Pastels Work Beautifully in Gradient Form
Pastel colors are inherently soft and approachable, which means even a gradient with multiple color transitions reads as elegant rather than bold or dramatic. The soft yellow to peachy-pink to mauve progression feels natural and organic — like watching a real sunset rather than wearing a statement nail. On round nails, this gradient is particularly effective because the curved shape allows the colors to blend continuously without harsh lines. The softer saturation also means this design works across seasons and settings in a way that more saturated gradients sometimes struggle with.
Creating a Flawless Pastel Sunset Gradient
- Choose your three colors first — they should sit relatively close to each other on the color wheel to create harmony
- Apply the lightest shade (pale yellow) first across the entire nail and cure
- Apply the middle shade (peachy-pink) in the middle third of the nail using a sponging technique
- Add the deepest shade (light mauve) toward the tip area, blending slightly with the middle shade
- Cure and seal with a shiny top coat to enhance the luminous quality of the pastels
- Consider adding a tiny sparkle element very subtly in the gradient for added dimension without drama
Pro tip: This design is particularly striking on a full set of longer nails because all ten nails displaying the gradient create an impressive visual impact that’s still refined and wearable.
12. Stamped Floral Design
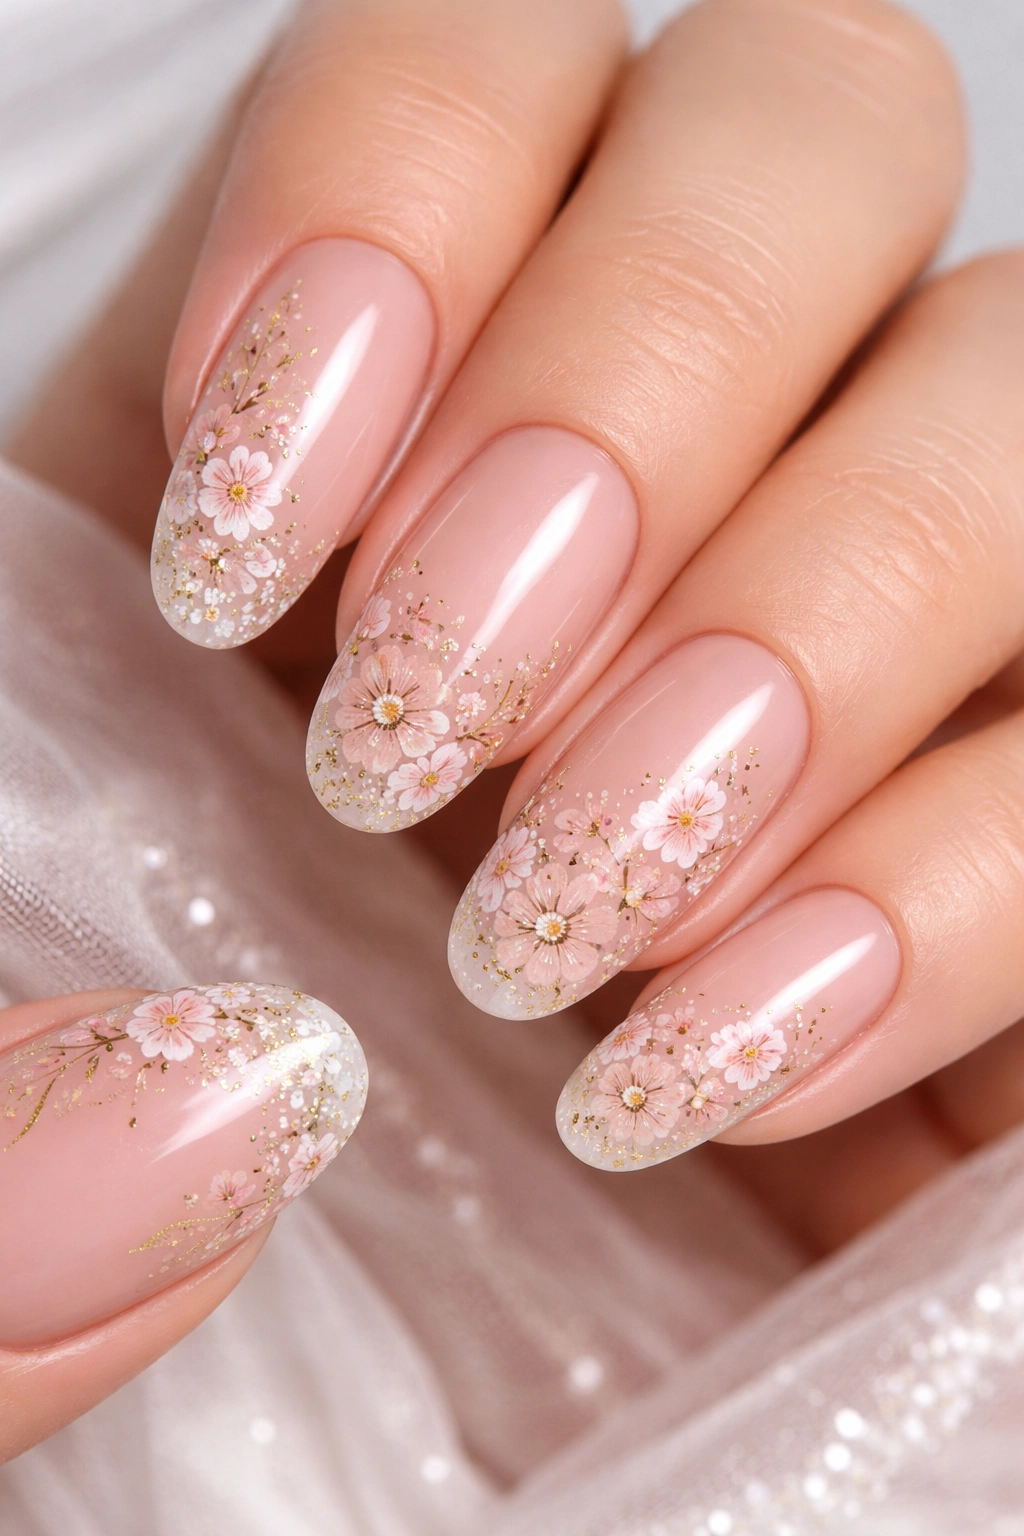
Stamped designs are a perfect middle ground between solid color nails and complex hand-painted art. A stamped floral pattern applied to a nude or soft color base creates a design that looks detailed and thoughtful without requiring free-hand artistry. On longer round nails, floral stamping works exceptionally well because flowers are naturally curved and organic, which complements the rounded shape. The pattern can be delicate or bolder depending on your preference, but the key is choosing a stamp that feels intentional rather than random.
The Versatility of Stamped Florals
Floral stamps come in countless varieties — from delicate single flowers to elaborate multi-flower patterns. On longer round nails, you have enough space to showcase detail without the pattern feeling crowded. A single stamped flower on each nail reads as minimal and intentional, while multiple small flowers create a more botanical, garden-inspired vibe. The beauty of stamping is that you can achieve a professional, detailed design even if you’re not confident in your free-hand painting skills. The rounded shape means the design flows naturally around the curve of the nail without looking awkward.
Stamping Success on Round Acrylics
- Invest in quality stamping plates designed specifically for floral patterns
- Use a high-quality stamper and scraper — cheap stamping tools lead to blurry, imprecise transfers
- Apply stamping design to fully cured acrylic or gel base, then seal with top coat
- Choose a stamping color that contrasts with your base color for crisp, clear design transfer
- Consider stamping on all ten nails versus creating an accent nail — both approaches work beautifully on round shapes
- Layer different colors in the stamped design for dimension (use a second stamping tool for a second color)
Insider note: Stamped designs on longer round nails look particularly beautiful in person and photograph wonderfully because the curved surface creates subtle lighting effects that emphasize the detail.
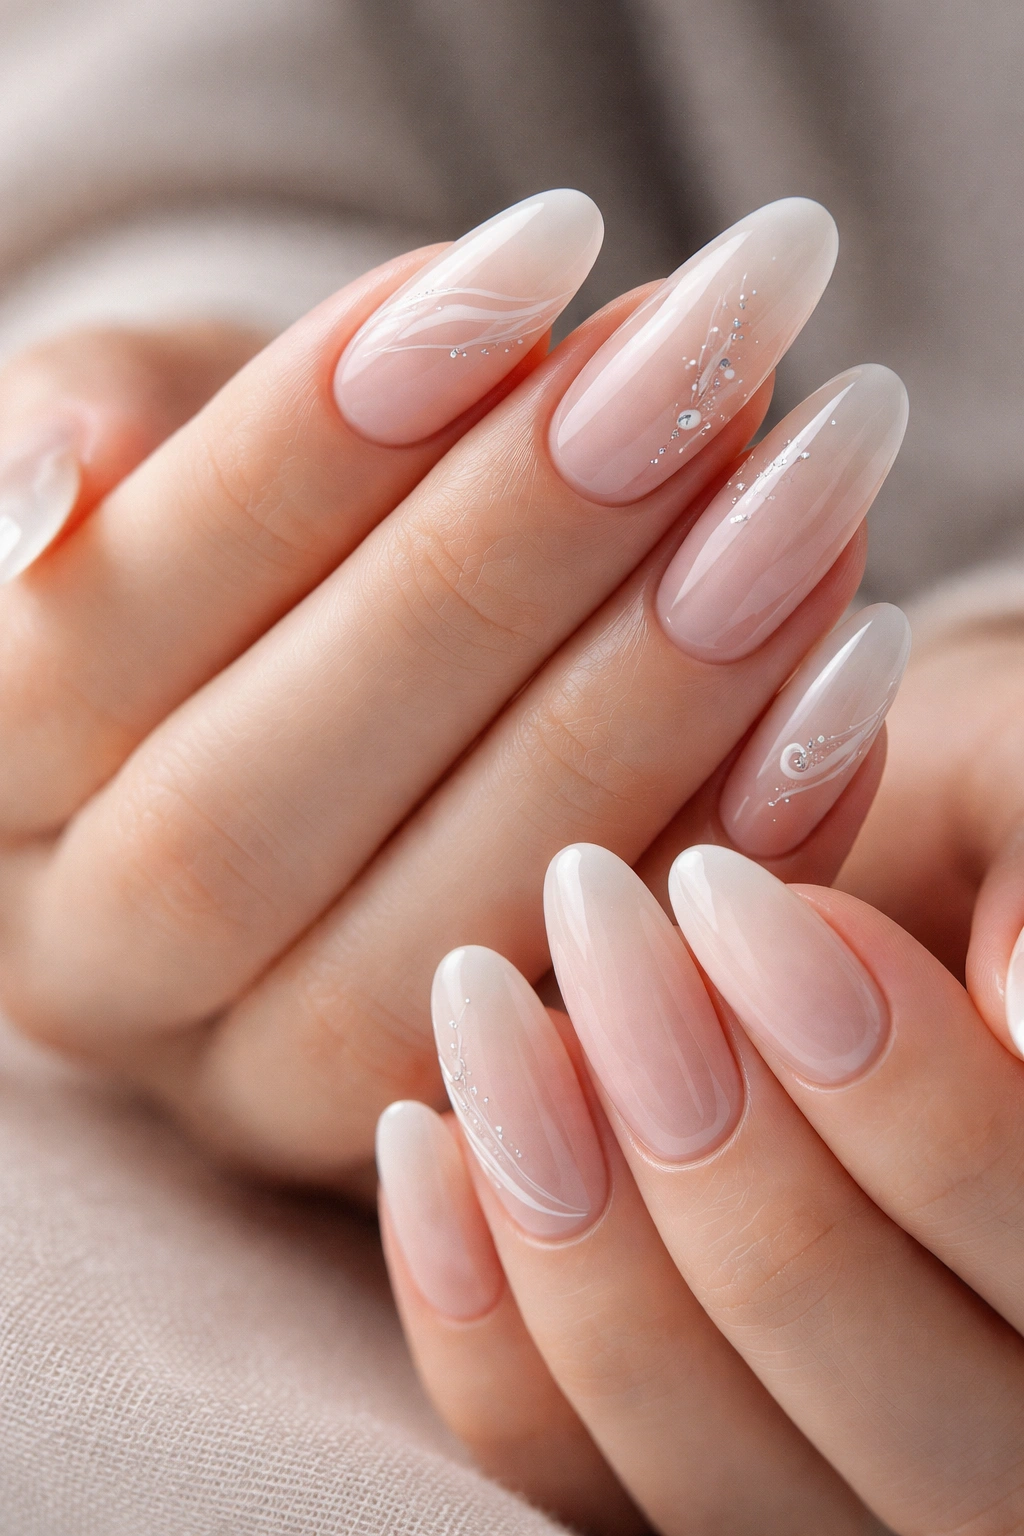
13. Clear with Confetti
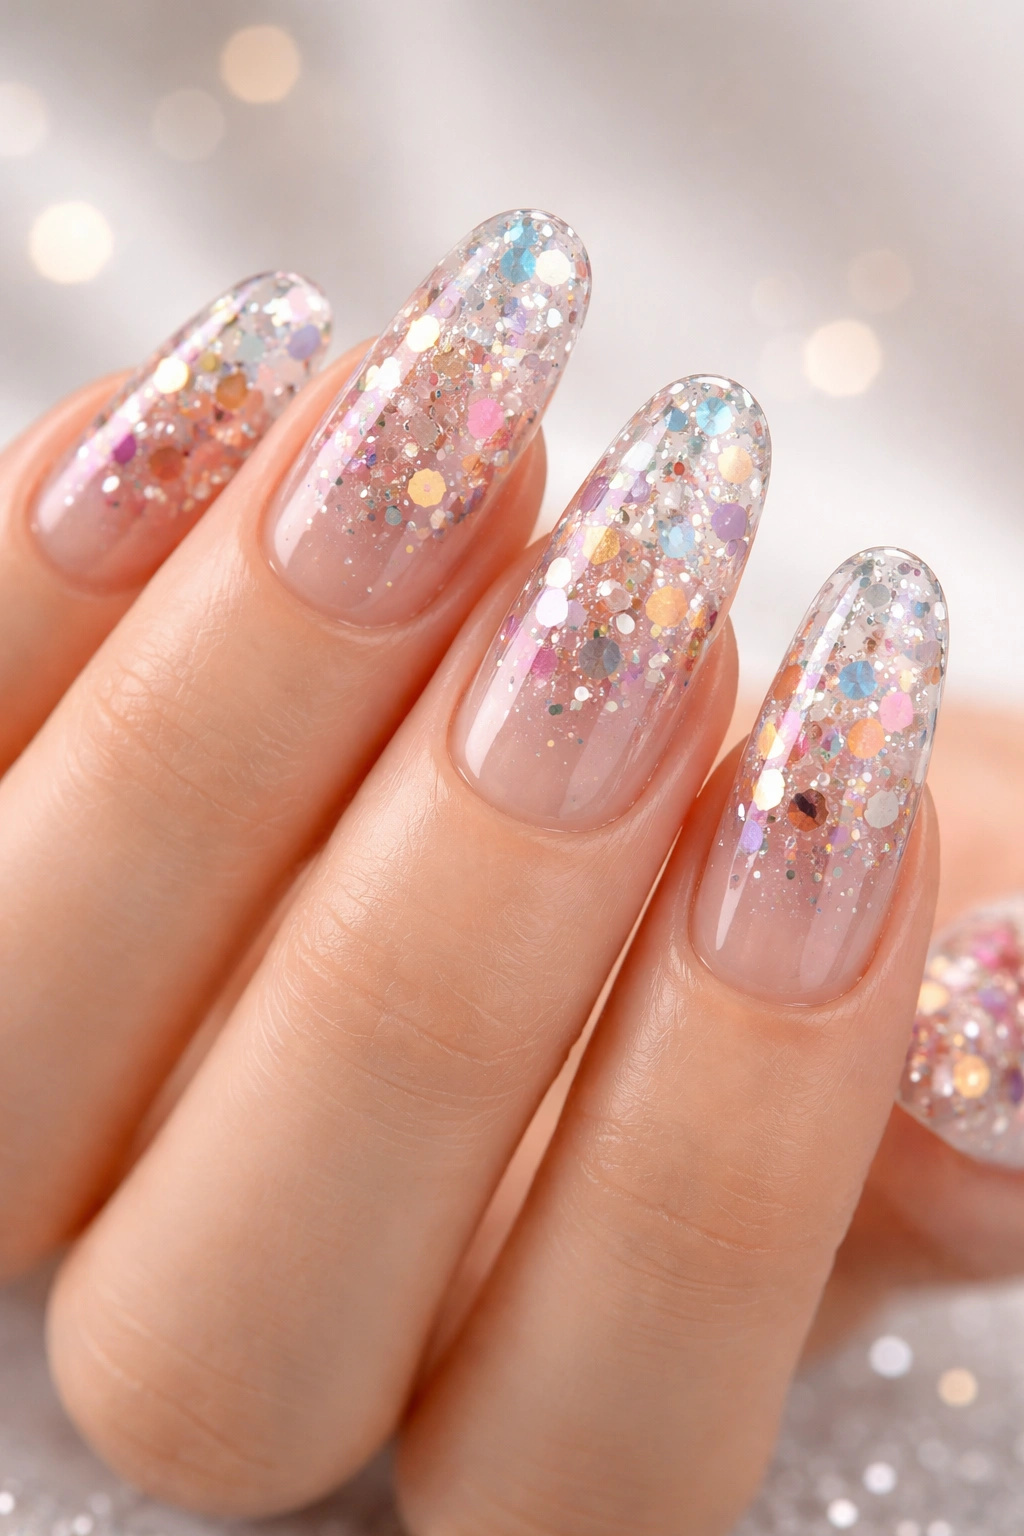
This design is pure joy — a clear base that showcases your natural nail with a confetti element (small colored pieces, metallic flakes, or tiny decorative elements) suspended within the acrylic or applied throughout. On longer round nails, this creates a playful, celebratory vibe that doesn’t feel costume-y because the clear base keeps everything grounded. The confetti elements catch light and create movement without overwhelming the overall aesthetic, and you still get the benefits of longer nails and acrylic durability.
Why Clear-with-Confetti Reads as Intentional
Clear nails with decorative elements work because the transparency creates elegance while the confetti adds personality and fun. The key is the balance — you want enough confetti to create visual interest and intentionality, but not so much that it feels random or excessive. On round nails, confetti elements flow continuously around the curved surface rather than concentrating in corners or edges, which creates a more sophisticated final product. This is genuinely one of the best designs for people who want their nails to feel fun and special without sacrificing sophistication.
Confetti Options and Application Methods
- Use tiny metallic squares or rectangles in gold, silver, and rose gold for a celebratory, luxury feel
- Apply small colored glass beads or rhinestones directly into clear acrylic for sparkle and dimension
- Use holographic confetti pieces that shift colors as you move your hand — these create particularly striking effects on round shapes
- Create a confetti gradient where confetti is more concentrated at the tip and fades toward the base
- Mix different confetti sizes and shapes for visual interest without looking chaotic
- Ensure confetti is properly sealed so pieces don’t eventually lift or separate from the nail
Worth knowing: This design works beautifully on all four seasons and occasions because confetti inherently feels celebratory without being limited to specific times of year.
14. Rose Gold Shimmer
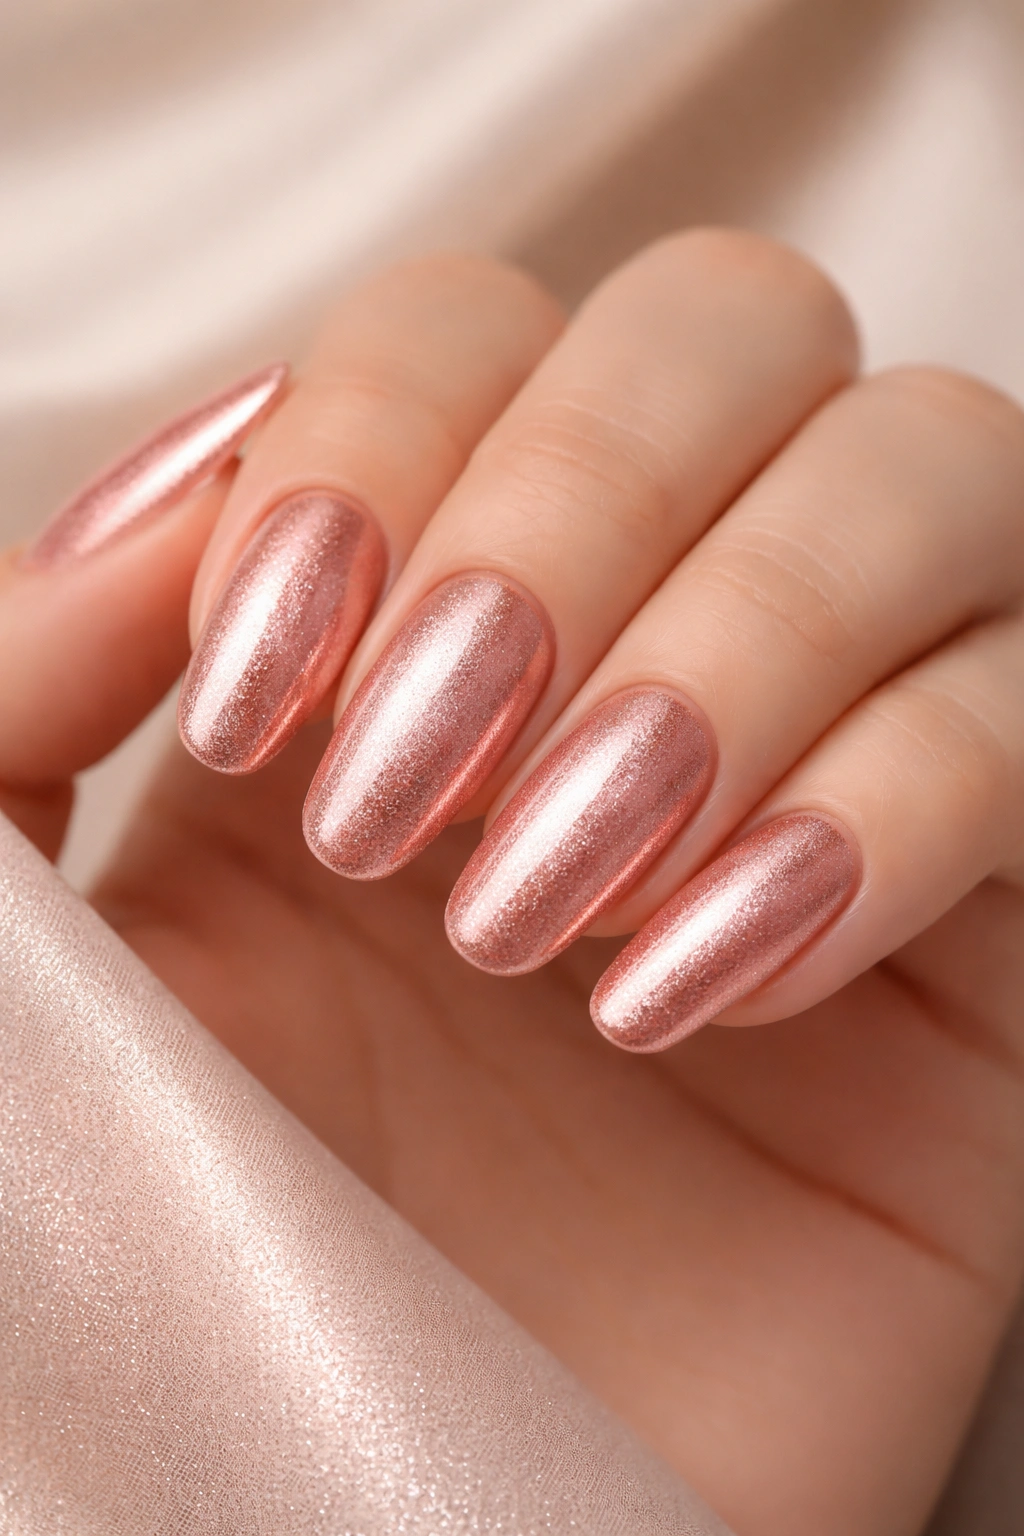
Rose gold has become something of a classic for good reason — the warm, pink-tinted metallic tone works with nearly every skin tone, makes hands look elegant and expensive, and feels both contemporary and timeless. A rose gold shimmer or metallic finish applied to longer round nails creates a design that’s visually interesting because of the light-catching properties without requiring additional pattern work. The rounded shape allows the shimmer effect to be visible from multiple angles, which maximizes the beautiful effect of the metallic finish.
Why Rose Gold Remains a Go-To Choice
Rose gold occupies a unique space in the metallic spectrum — it’s warmer than silver or chrome, more accessible than pure gold, and universally flattering. On longer round nails, rose gold creates the illusion of elegant length without looking dramatic or over-the-top. The shimmer quality means the nail catches light continuously, which creates visual interest and prevents the design from feeling flat or one-dimensional. A rose gold shimmer finish also pairs beautifully with other design elements (subtle gems, thin line work, or a slightly deeper rose gold gradient), making it a versatile base for more complex designs or perfectly stunning on its own.
Achieving the Perfect Rose Gold Shimmer
- Use quality rose gold gel or chrome products specifically formulated to create shimmer effects
- Apply thin layers rather than one thick layer to build up the shimmer gradually and achieve true color depth
- Consider adding a subtle gradient from lighter rose gold at the base to slightly deeper rose gold at the tip for added dimension
- Seal with a high-shine top coat designed for metallic finishes to maximize the light-catching properties
- For added luxury, consider adding a tiny rose gold foil accent or creating subtle rose gold ombré
- If using chrome powder, apply multiple thin layers and seal carefully to preserve the mirror-like effect
Pro tip: Rose gold shimmer is particularly striking on longer round nails when you have at least one accent nail with a complementary design or color.
15. Soft Nude Gel Look
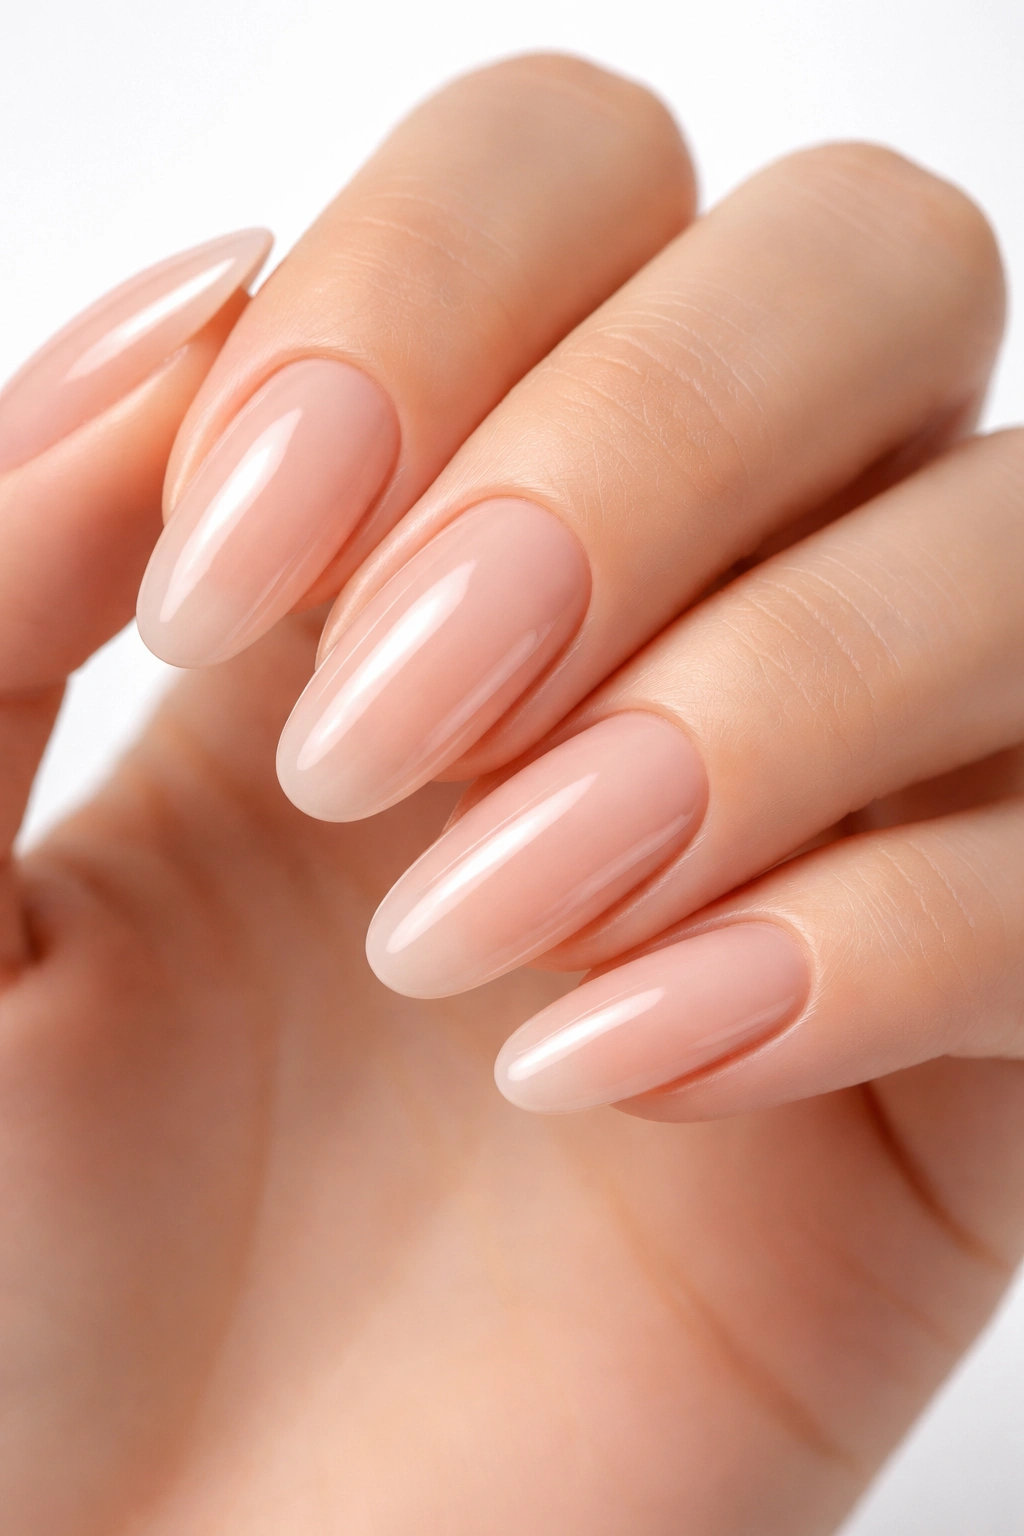
This design mimics the appearance of a freshly applied gel manicure with a perfectly smooth, slightly glossy finish in a nude tone. While it’s technically acrylic, the goal is making it look like a premium gel service with that signature “expensive manicure” appearance. On longer round nails, this design works because the soft, skin-tone color and glossy finish create an elongated, elegant effect without looking artificial or plastic-y. This is the ultimate “low-maintenance luxury” design that works everywhere and with every outfit.
The Timeless Appeal of Soft Nude Gel Look
A perfectly executed soft nude with a gel-like appearance is essentially the little black dress of nail designs — it’s always appropriate, works with everything, and reads as intentionally elegant rather than trying too hard. The key to making acrylic look like gel is getting the finish and shine absolutely perfect. On longer round nails, this creates an effect that’s visibly premium — your nails look healthy, strong, and expensive without any pattern work or decoration required. This is what you choose when you want your hands to look beautiful and taken-care-of without your nails being a statement.
Creating That Premium Gel-Look Finish
- Choose a nude tone that perfectly matches your skin tone — warmer or cooler depending on your undertones
- Apply acrylic in thin, even layers to create a perfectly smooth surface
- Shape to beautiful round edges with no ridges or imperfections
- Apply gel-like top coat (high-shine, self-leveling formulas work best) for that smooth, glossy appearance
- Consider adding a very subtle ombré gradient from slightly lighter at the base to the actual nude tone you chose — this creates depth without being obvious
- Buff and polish to ensure the surface is absolutely smooth — any imperfections become obvious with this minimal design
Worth knowing: This design requires excellent nail hygiene and care because there’s nowhere to hide — every detail is visible. But if you maintain it properly, the soft nude gel look is genuinely the most elegant option available.
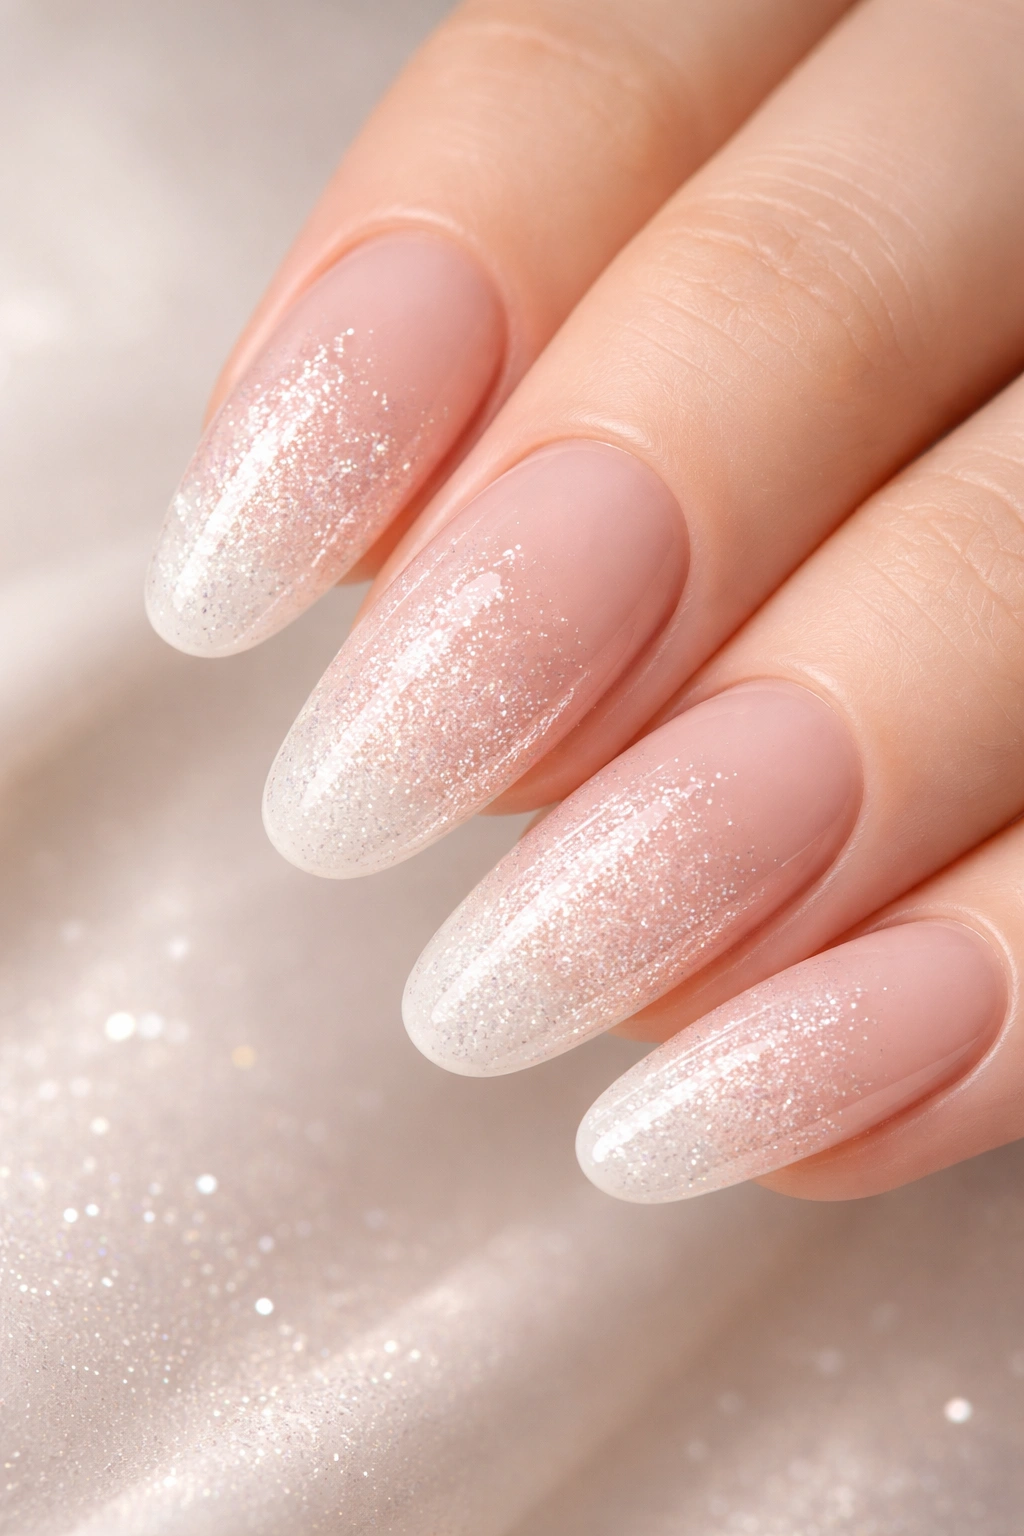
16. Micro Glitter Blend
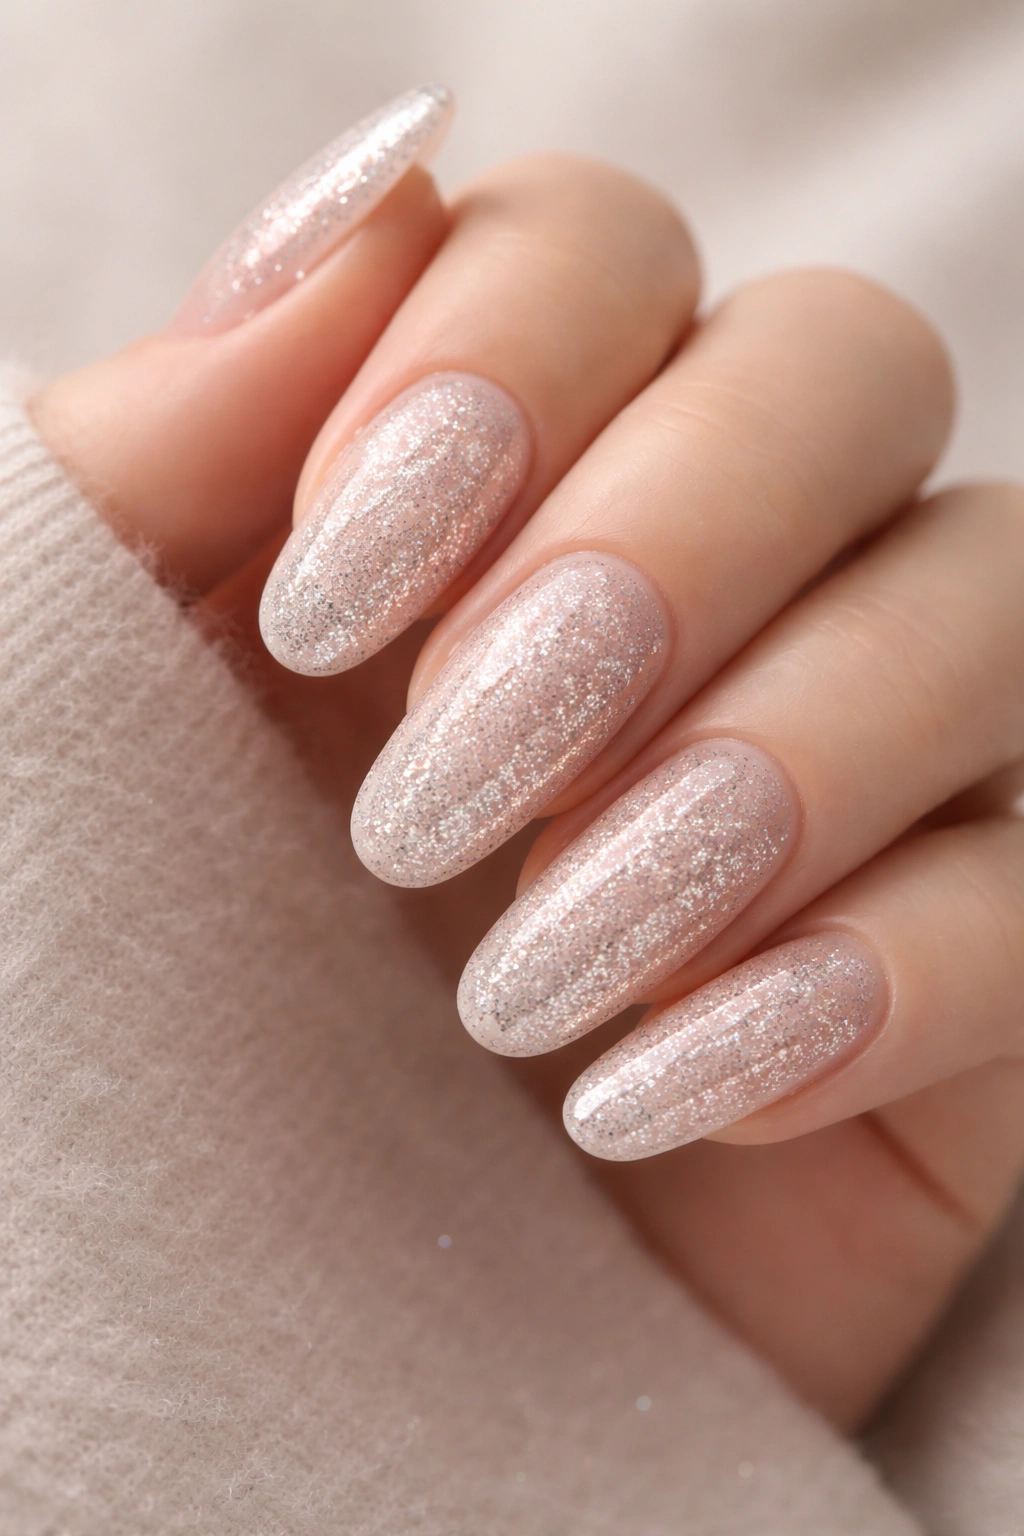
Instead of chunky glitter coverage or full sparkle, micro glitter creates a subtle, sophisticated shimmer that catches light without looking costume-y. This design features ultra-fine glitter blended into a nude, pale pink, or champagne base in a way that creates a seamless, sparkly effect. On longer round nails, micro glitter works beautifully because the fine particles catch light continuously across the curved surface without creating harsh visual breaks. The effect is genuinely luxurious — the kind of nail design that makes people compliment your hands without being able to immediately identify why they look so good.
Why Micro Glitter Is the Sophisticate’s Choice
The beauty of micro glitter is that it’s fine enough to feel refined while still creating visible sparkle and dimension. Unlike chunky glitter that sits on top of the nail surface and feels textured, micro glitter blends seamlessly into the base, creating an almost-iridescent quality. On round nails, this continuous glitter coverage flows smoothly around the curved edges, creating a three-dimensional effect. This is what you choose when you want elegance with personality — sparkle that’s visible enough to be intentional but refined enough to work in professional settings.
Blending Micro Glitter Successfully
- Start with your base color (nude, pink, or champagne) fully cured
- Mix ultra-fine glitter into clear gel or use pre-mixed glitter gels designed for seamless blending
- Apply glitter mixture in a gradient pattern (more concentrated toward the tip) for added dimension
- Ensure glitter is fully sealed with top coat so particles don’t catch and lift
- Consider using different glitter shades (warm gold with cool silver, for example) blended together for subtle color variation
- For extra luxury, add a tiny sparkle accent at the cuticle area or along one edge for asymmetrical interest
Insider note: Micro glitter on longer round nails is genuinely one of the best designs for people who want sparkle without the commitment of full glitter coverage or the high-maintenance feel of chunky stones.
17. Wavy Nude Gradient

This design combines two elements you’ve likely seen before (nude tones and gradients) in an unexpected way. Instead of a typical linear gradient that flows from base to tip, a wavy gradient creates undulating color transitions that follow curved, wave-like patterns across the nail surface. On longer round nails, these waves can flow around the curves of your nail, creating a sophisticated, organic design that feels contemporary. The effect is movement without geometric rigidity — fluid, natural, and genuinely striking.
The Visual Movement of Wavy Gradients
Wavy gradients work because human eyes naturally follow curves and movement, so the wave pattern naturally guides attention across your nail in a way that emphasizes length and shape. Unlike linear gradients that can feel static or boring, waves create visual interest and dynamism. Combined with a soft, neutral color palette (warm nudes flowing into slightly deeper taupes, for example), the wavy gradient feels sophisticated rather than playful. On round nails, the waves flow continuously around the curved edges without feeling cramped or awkward.
Creating Convincing Wavy Patterns
- Design your wave pattern first using a thin brush and a slightly darker shade on your base color
- Use a sponging technique to create gradient color transitions within and around the wave pattern
- Keep waves organic and slightly irregular — perfectly uniform waves read as less sophisticated
- Consider using three tones (light, medium, dark) to create dimension within the wave pattern
- Ensure the base color (usually a soft, pale nude) is visible between and around the waves for balance
- Seal carefully so the wave pattern remains crisp and doesn’t blur
Pro tip: Wavy gradients photograph beautifully on longer round nails because the movement creates visual interest in still images while still reading as intentional and sophisticated.
18. Nude with Tiny Pearl Dots
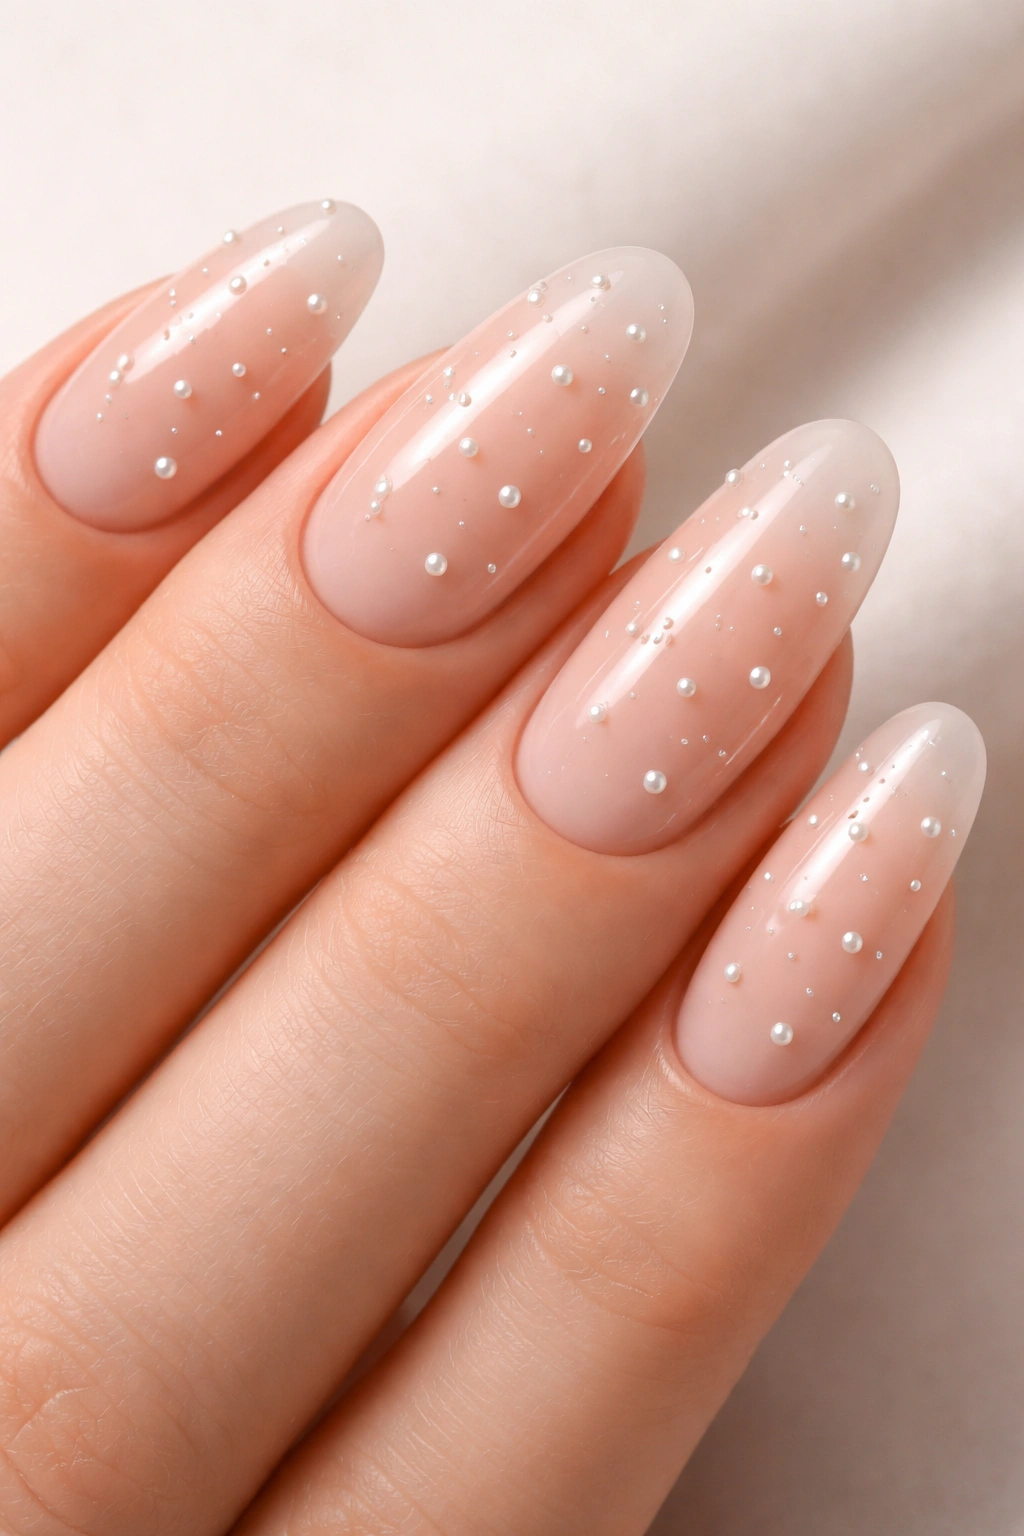
Simplicity taken to the extreme, this design features a perfect nude base with a constellation of tiny pearl dots scattered across the nail surface or concentrated in specific areas. On longer round nails, tiny pearl dots create a refined, understated elegance that feels expensive and intentional. The dots are small enough that they don’t create visual heaviness, but present enough that they add personality and dimension. This is nail art that whispers rather than shouts.
The Quiet Luxury of Pearl Dot Accents
Pearl dots work because they’re just enough visual interest to prevent the design from feeling boring, without crossing into the territory of obvious decoration. The pearls catch light subtly, creating dimension that makes the nail appear three-dimensional. On round nails, dots flow naturally around the curved surface without creating awkward concentrations or gaps. This is the design that reads as understated elegance — the kind of manicure that makes people in professional settings think “she has excellent taste” rather than “that’s a bold design choice.”
Placement and Application of Pearl Dots
- Use a dotting tool or the tip of a fine brush to apply tiny, even pearls dots to your cured base
- Create a scattered constellation pattern (pearls spread somewhat randomly across the nail) for a naturally elegant approach
- Alternatively, cluster tiny pearls along the cuticle line or around the tip area for more intentional placement
- Vary pearl shades subtly (warm pearls mixed with cool pearls) for added sophistication
- Ensure each dot is tiny and uniform — size variation should be minimal for a refined effect
- Seal pearls carefully so they remain in place throughout the life of your manicure
Worth knowing: This design is perfect for people who want subtle elegance and frequent compliments rather than obvious visual statement.
19. Blush Pink with White Tips
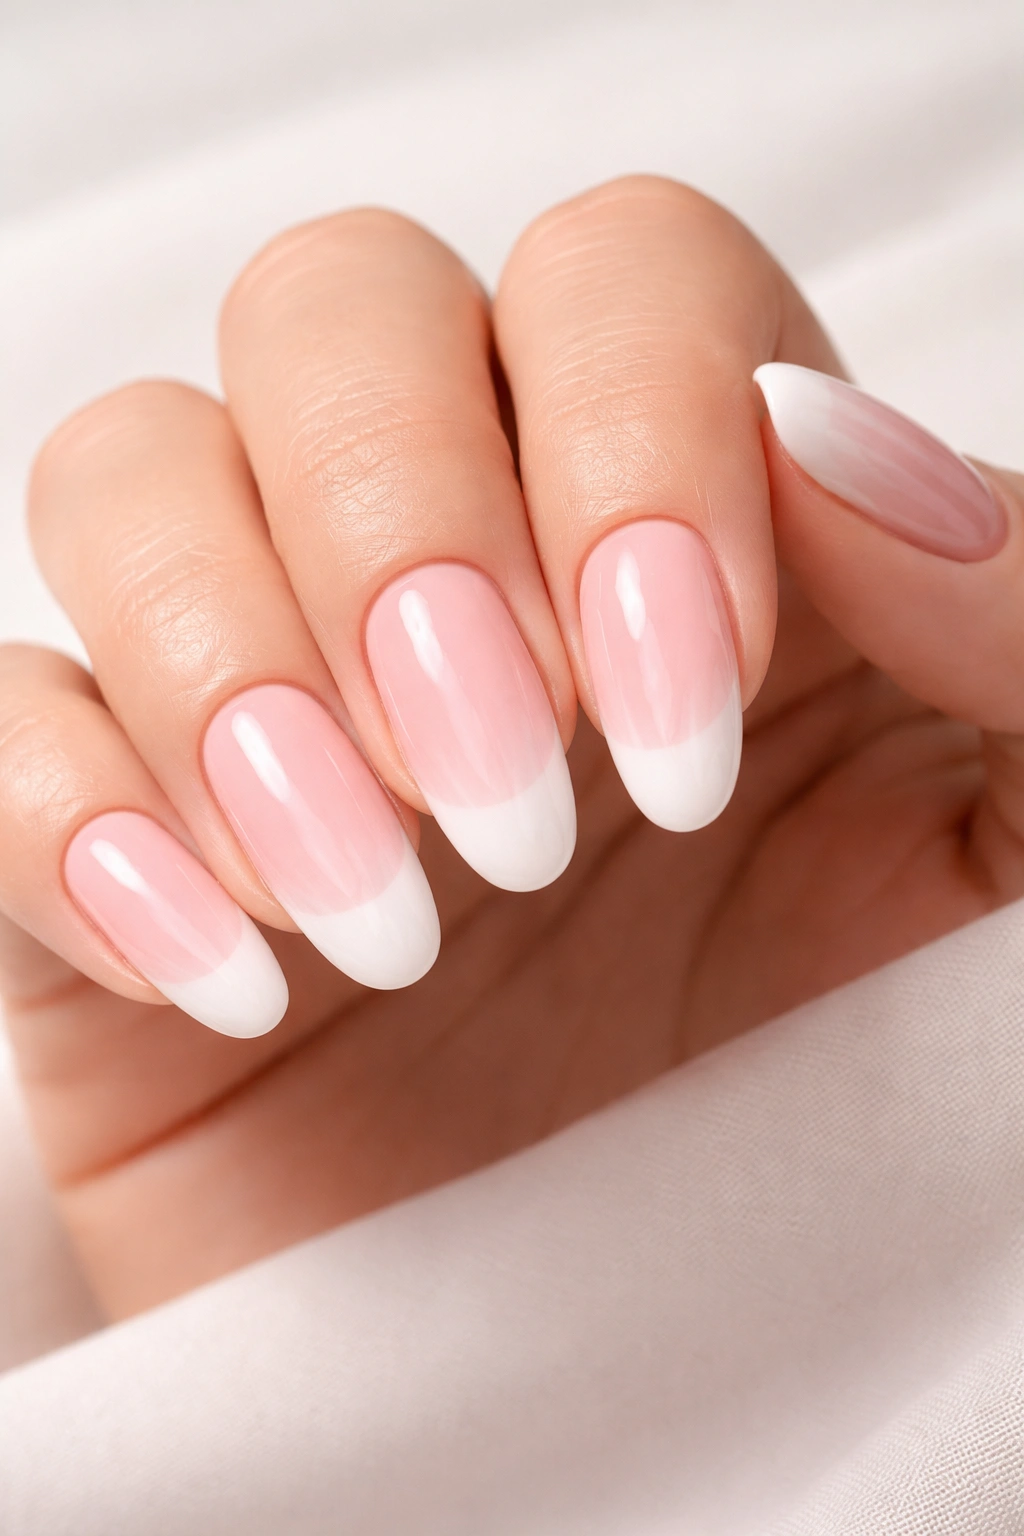
A fresh take on the classic French manicure, this design features a soft blush pink base transitioning into a delicate white tip. The difference from a traditional French manicure is the soft, romantic nature of the blush pink (rather than a stark nude) combined with the white tip. On longer round nails, this creates an elegant, slightly romantic aesthetic that works for everyday wear while feeling special enough for events. The curved shape of round nails means the white tip naturally follows the curve of your nail edge without looking harsh or blocky.
Why Blush and White Is Eternally Elegant
The combination of blush pink and white has an inherent sophistication because it’s not trying too hard to be dramatic or bold — it simply looks beautiful, refined, and intentional. Pink reads as romantic and approachable while white adds clarity and brightness. On longer round nails, the rounded edge means the white tip curves gracefully rather than creating a harsh line. This design works for literally any occasion while still feeling intentional and styled rather than accidental or basic.
Creating a Perfect Blush-to-White Transition
- Choose a soft blush pink tone (not too saturated, not too pale) as your base
- Apply pink evenly across each nail and cure
- Create the white tip using a fine brush or nail art pen — the line should be thin and follow the natural curve of your nail edge
- Consider blending the transition zone slightly so the white doesn’t appear as a stark line but as a soft shift from pink to white
- For a more romantic approach, add a tiny sparkle or pearl element at the transition point where pink meets white
- Seal with high-shine top coat to emphasize the romantic quality of the design
Pro tip: The key to making this design look sophisticated rather than overdone is ensuring the white tip isn’t too thick and the pink isn’t too hot. Softness and delicacy are what make this design work.
20. Neutral Nude with Holographic Accents
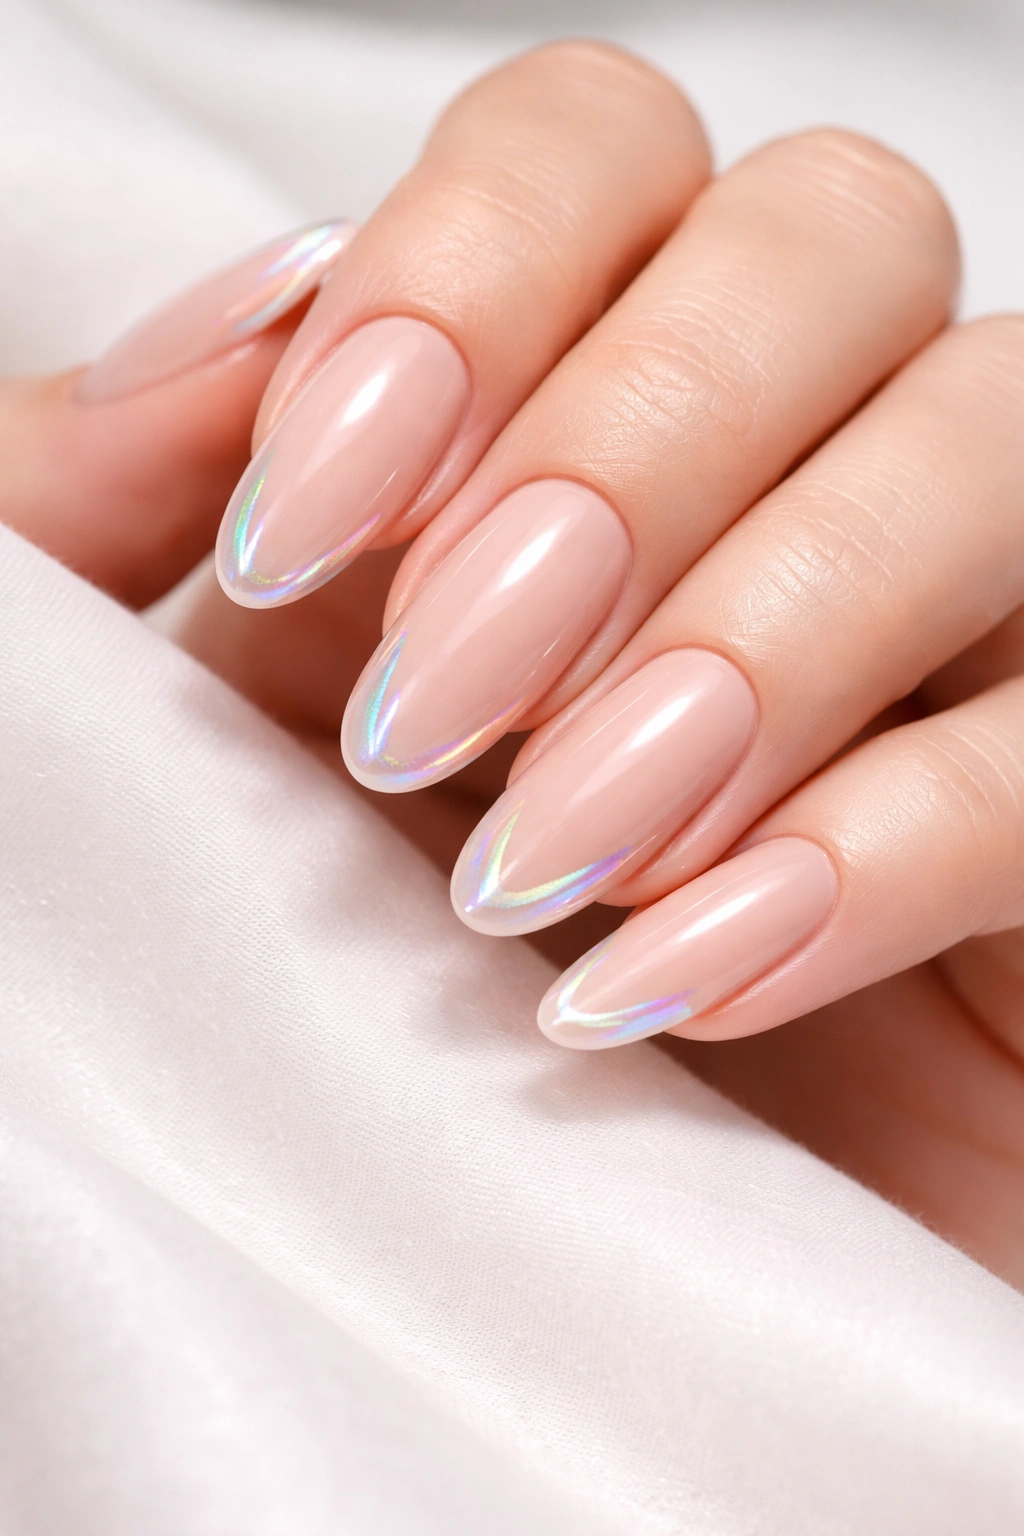
Closing out the list is a design that combines understated elegance with just enough sparkle to feel special — a neutral nude base with holographic accents that shift colors as you move your hand. Holographic elements are more sophisticated than traditional glitter because they create rainbow-like light reflections rather than simple sparkle. On longer round nails, holographic accents can be applied in thin lines, as small geometric shapes, or concentrated along the tip area. The effect is contemporary, luxurious, and genuinely stunning without being over-the-top.
The Luxury of Holographic Effects
Holographic finishes create visual depth and movement because they genuinely shift colors depending on the angle of light and the angle of your hand. This creates an interactive quality to the design — your nails are literally different colors depending on how you look at them. On longer round nails, holographic accents are particularly striking because the curved surface catches light from multiple angles simultaneously, creating a multi-color effect. This is the design that makes people notice and compliment your nails because the effect is genuinely captivating.
Applying Holographic Accents with Intention
- Start with a perfectly smooth neutral nude base in whatever shade complements your skin tone
- Apply holographic elements using thin lines, small geometric shapes, or concentrated at the tip
- High-quality holographic materials are essential — cheap imitations don’t create the true color-shifting effect
- Consider creating an asymmetrical design where some nails have more holographic elements than others
- Seal holographic accents carefully with top coat designed to protect these specialty finishes
- For maximum impact, position at least some holographic elements where they’ll catch light easily
- Consider combining holographic elements with tiny gems or pearls for added luxury
Worth knowing: This design is genuinely conversation-starting because the color-shifting effect genuinely surprises people. It’s perfect if you want your manicure to feel special and elevated without being obvious about it.
Final Thoughts
Longer round acrylic nails offer a genuinely perfect canvas for expressing your personal style, whether you prefer minimal elegance, subtle sparkle, or something with slightly more visual presence. The rounded shape works beautifully with soft gradients, metallic finishes, and delicate details in ways that more angular shapes sometimes struggle with. Each of these twenty designs proves that you don’t need sharp edges or dramatic shapes to make a statement — sophisticated, beautiful nails come from thoughtful design choices and quality execution.
What matters most is choosing a design that makes you feel confident and beautiful, whether that’s a statement-making sparkle gradient or a quietly elegant nude with tiny pearl accents. The wonderful thing about these designs is that they’re all achievable whether you’re visiting a skilled technician or working with someone building their acrylic portfolio. Longer round acrylics genuinely stay relevant across seasons and occasions, and the durability of the acrylic means you can commit to a design longer than you could with traditional nail polish.
Your hands spend most of your day visible to the world — the people you greet, the work you do, the moments you capture in photos. Making sure your nails reflect the care and attention you give to other aspects of your appearance is genuinely worth the investment of time and money. These twenty designs represent everything from timeless elegance to contemporary sophistication, all executed on a nail shape that works beautifully for longer lengths.
