

Short squoval acrylic nails are the perfect sweet spot between edgy and refined. If you’ve been scrolling through nail inspiration and feeling overwhelmed by bold, dark designs, light-toned squovals might be exactly what you’re looking for. They’re sophisticated without being boring, practical for everyday wear, and endlessly versatile for everything from casual to formal occasions.
The beauty of light-toned short squovals is that they work with virtually every skin tone and wardrobe. Whether you’re drawn to warm peachy hues, cool pinky neutrals, or creamy whites, this shape and color combination creates an elongated, flattering silhouette on your fingers while staying low-maintenance and functional. The squoval shape itself—a hybrid between a square and oval—gives you a modern, polished look without the fragility of almond nails or the severity of a hard square edge.
What makes short squovals especially appealing is their versatility with nail art. A light base is the perfect canvas for everything from minimalist line work and geometric patterns to delicate florals and subtle glitter accents. You can keep them completely solid for a classic manicure that screams understated elegance, or dress them up with design details that reflect your personal style.
Ready to explore some gorgeous options? Here are twelve light-toned short squoval acrylic nail ideas that’ll have you texting your nail tech immediately. Each design works beautifully whether you’re getting them done professionally or have the skills to create them at home.
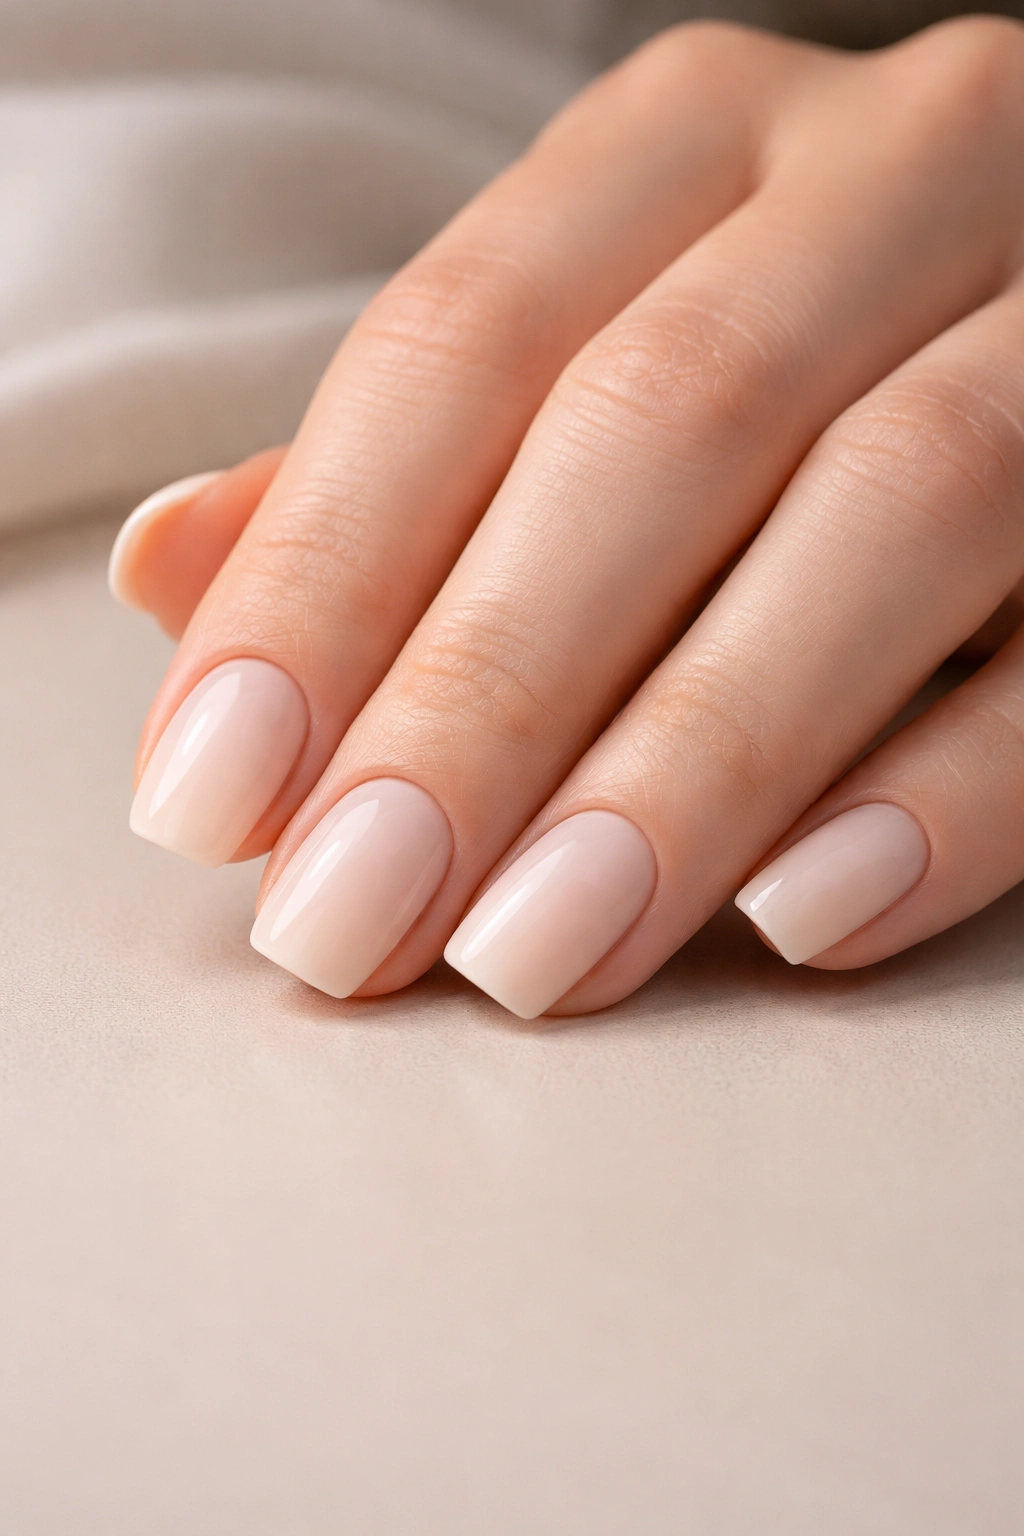
1. Soft White French Ombre
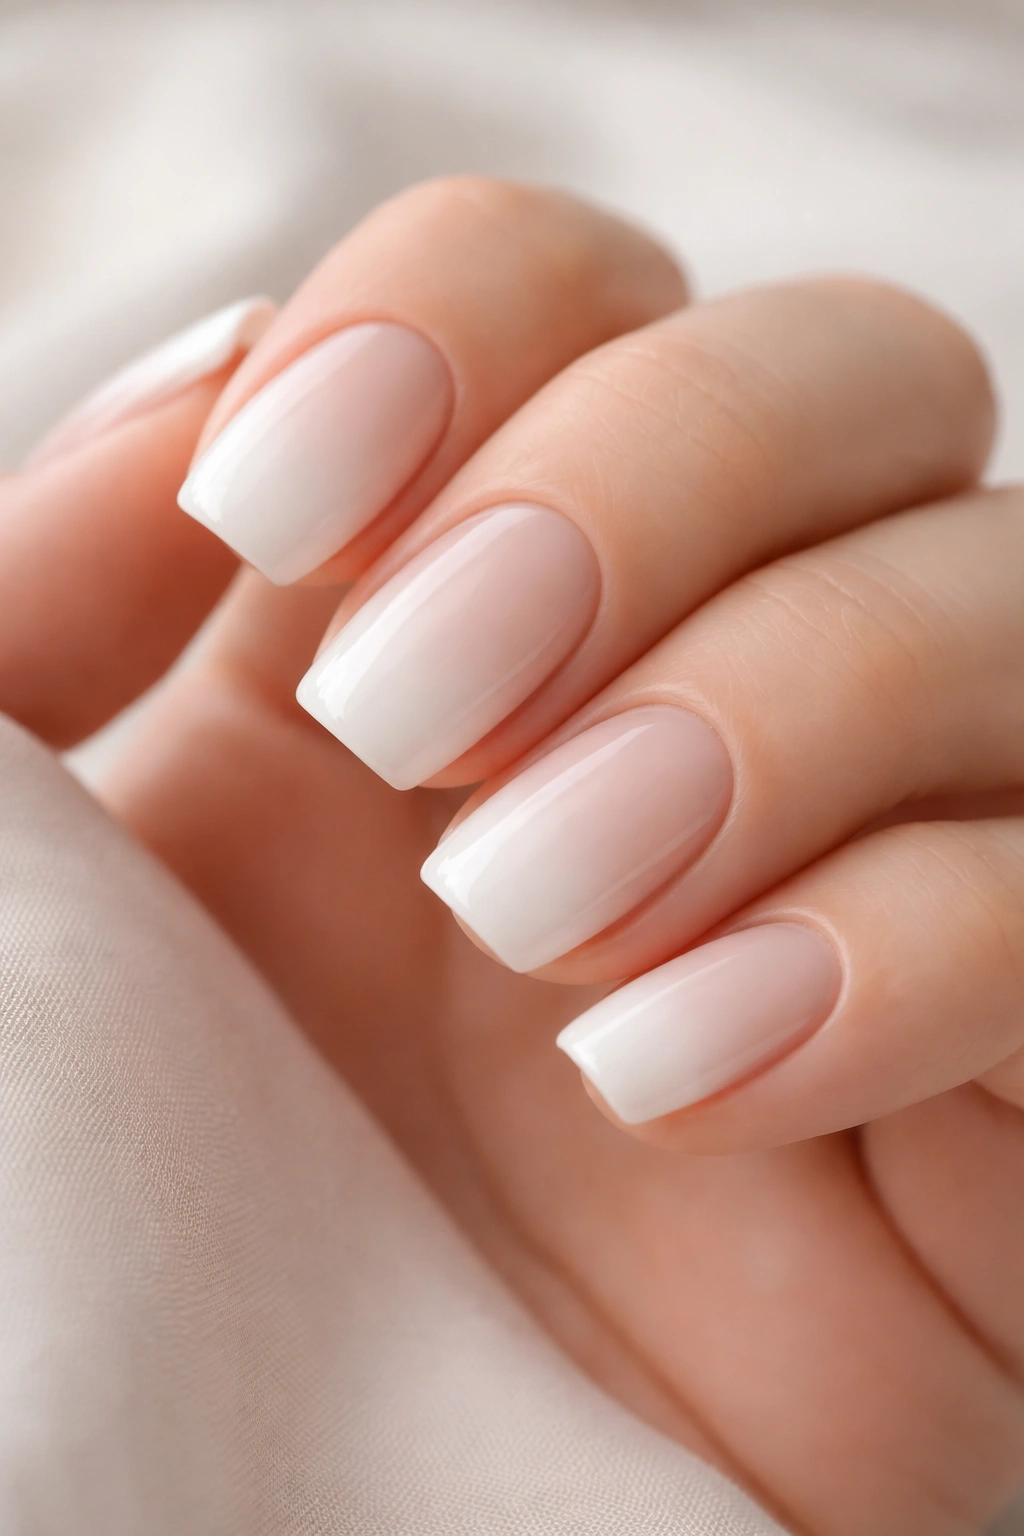
A reimagined French manicure is the definition of timeless elegance on short squoval acrylics. Instead of the classic stark white tip, this design uses a soft, creamy white that gradually transitions into a barely-there beige or pale pink base. The ombre effect creates depth and dimension while maintaining an overall soft, sophisticated appearance that photographs beautifully and never goes out of style.
Why This Design Works So Well
The soft white French ombre strikes the perfect balance between classic and contemporary. You get the instantly recognizable elegance of a French manicure without the harsh line that can sometimes feel dated. The gradient creates visual interest while remaining incredibly wearable for professional settings, date nights, and everyday moments alike. This design is forgiving too—subtle imperfections in the gradient blend actually add to the organic, hand-blended aesthetic.
What Makes It Special
- Creates an instantly elongated, refined appearance on short nails
- The ombre effect adds dimension that reads as intentional and polished
- Works seamlessly with any outfit, season, or occasion
- Requires minimal maintenance between fills—new growth blends naturally into the gradient
- The soft transition means this design looks good even as your acrylics grow out
- Pairs beautifully with any jewelry, from delicate gold to bold silver statement pieces
Pro tip: Ask your nail tech to use a very soft, peachy-toned white rather than a stark bright white. This keeps the overall vibe cohesive and prevents the manicure from looking too clinical or harsh.
2. Peachy Nude with Gold Accents
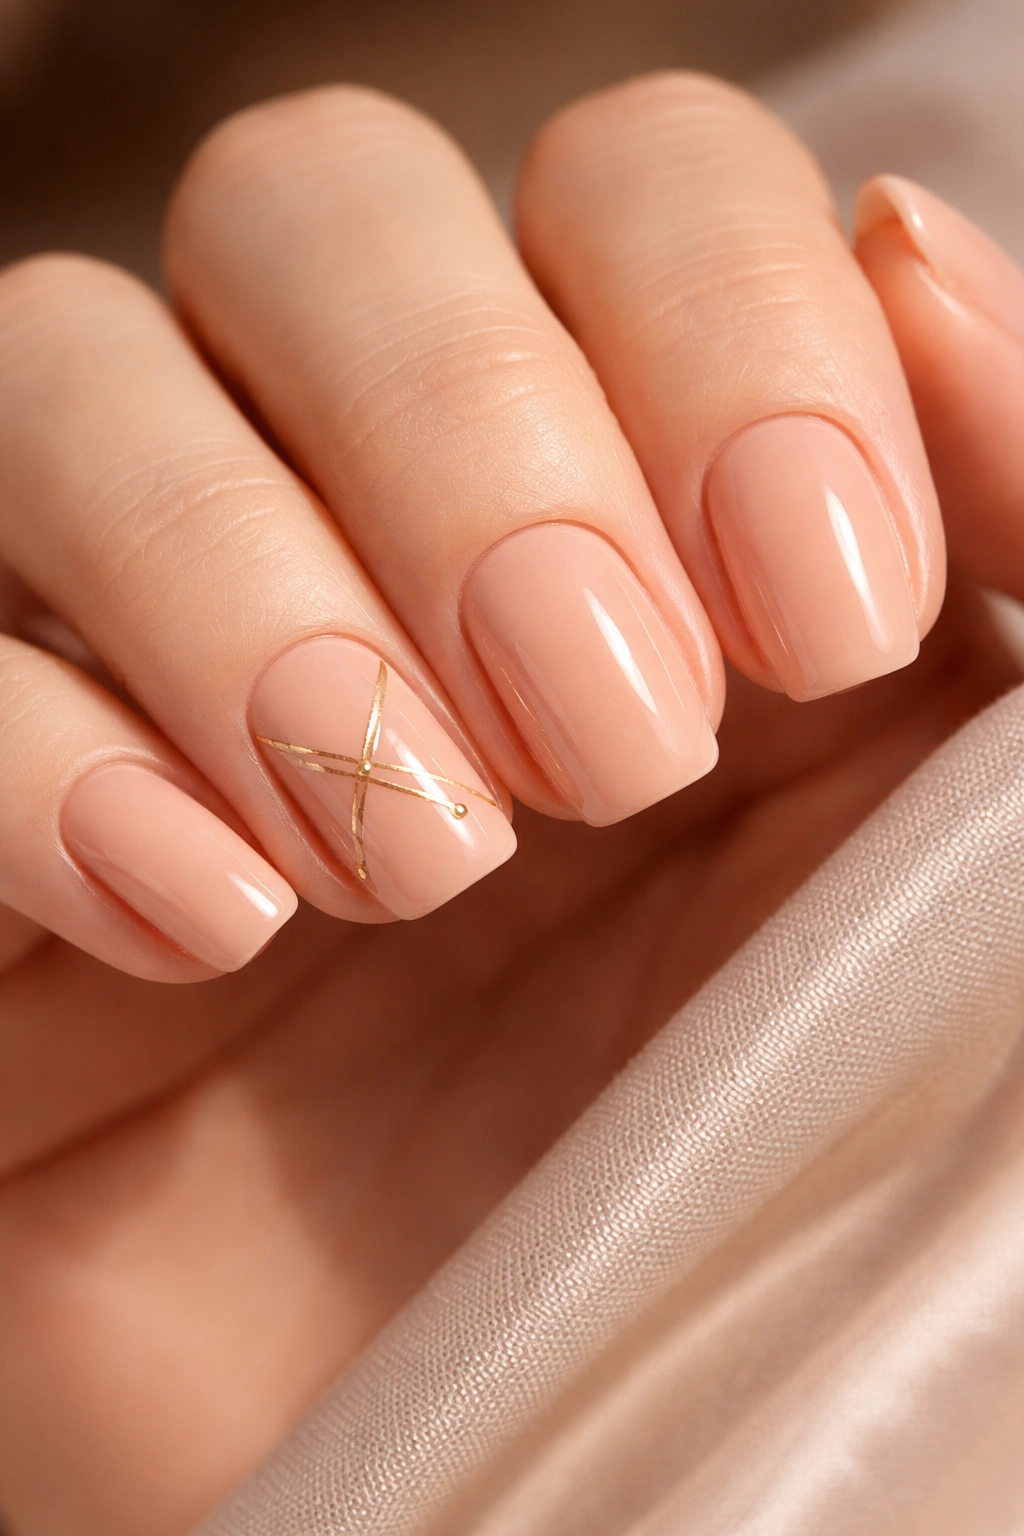
If you want a warm, flattering look that brings out golden undertones in your skin, peachy nude with minimal gold accents is your answer. This design pairs a soft, warm nude-peach base with thin gold lines or small geometric shapes on one or two accent nails. The result feels expensive, intentional, and effortlessly luxurious without screaming for attention.
The Appeal of Warm Undertones
Peachy nude is one of the most universally flattering shades because it works with warm, cool, and neutral skin tones equally well. The addition of gold accents amplifies this effect, creating a cohesive warm-toned aesthetic that feels like it was custom-designed for you. Gold catches the light beautifully on short nails and doesn’t compete with the overall softness of the design. The accents should be subtle—think thin vertical lines, small triangles, or a delicate geometric pattern on your ring finger or pinky.
Design Breakdown
- Base color: A soft, creamy peachy-nude that sits between tan and warm pink
- Gold element: Thin metallic lines, geometric shapes, or a minimalist abstract pattern
- Finish: Matte or satin on the base with shiny metallic gold accents creates beautiful contrast
- Accent placement: Usually looks best on one or two fingers rather than all ten
- Longevity: Gold metallics hold their shine beautifully on acrylics throughout a full growth cycle
Pro tip: If you’re fair-skinned, go for rose gold instead of yellow gold for a cooler, more contemporary feel. If you have deeper skin tones, rich yellow gold or even copper tones will pop beautifully against the peachy base.
3. Cream and Champagne Glitter
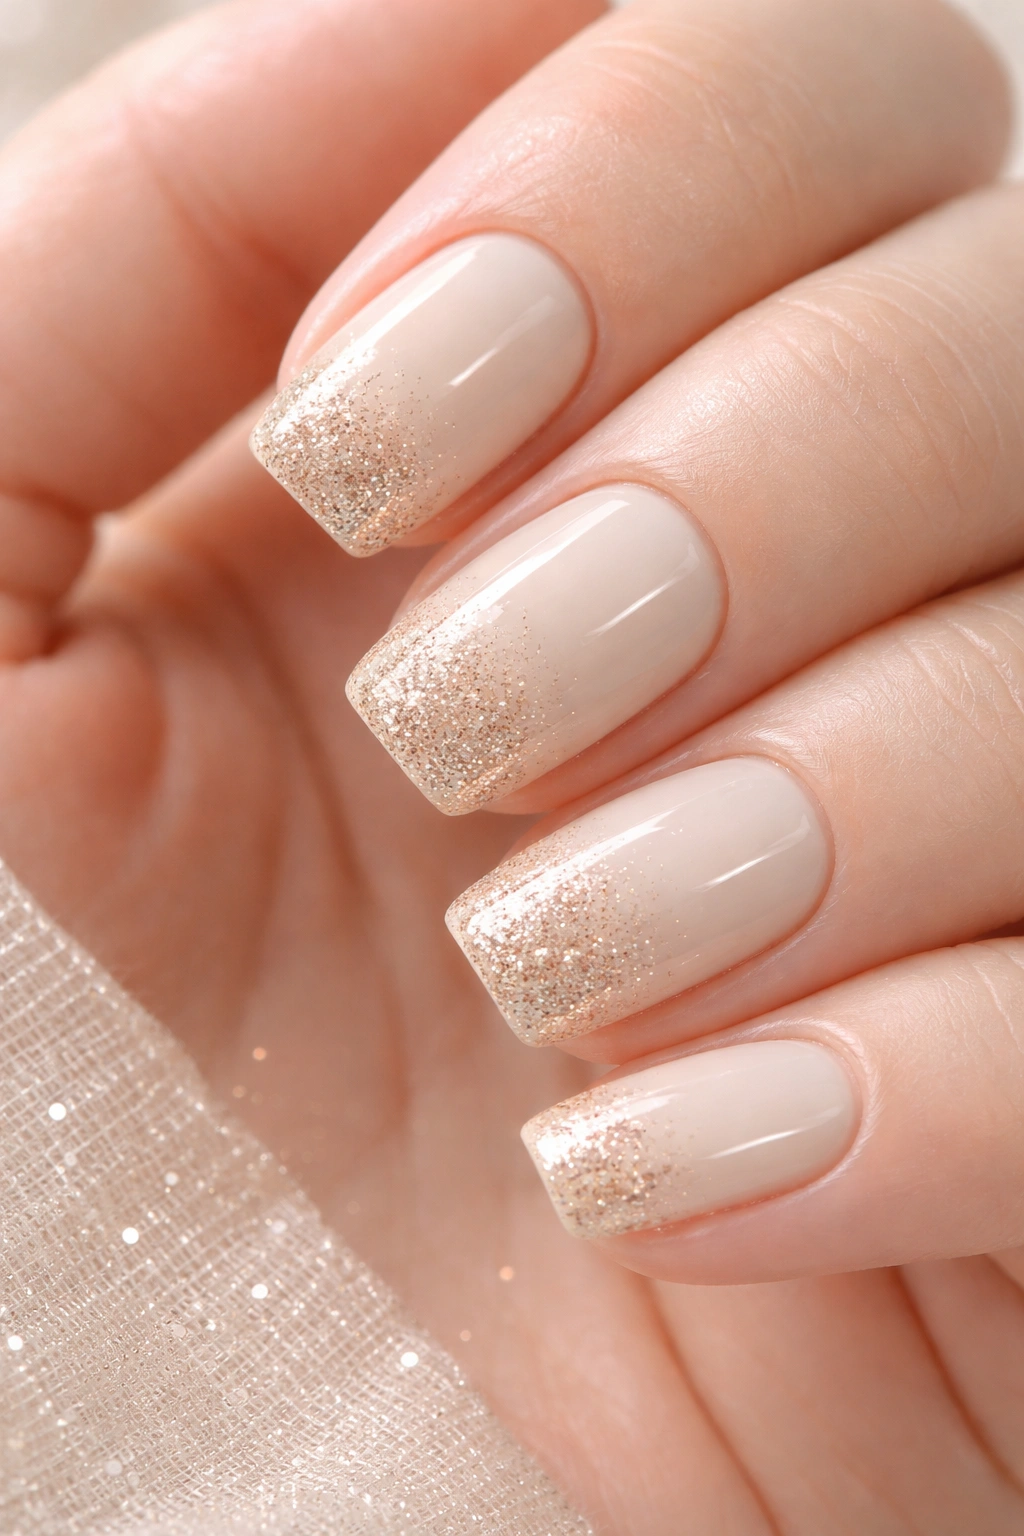
For those moments when you want your nails to catch the light without being flashy, cream and champagne glitter is pure magic. A creamy, pale ivory base is paired with champagne-colored glitter—either scattered throughout all ten nails for a subtle sparkle, or concentrated on the tips or one accent nail for a more sophisticated touch. The glitter reads as understated luxury rather than party nails.
Why Champagne Works Better Than Other Metallics
Champagne and pale gold glitter are the chameleons of the nail world—they complement virtually every shade and never look out of place. Unlike silvery glitter, which can feel icy or harsh, champagne has warmth that harmonizes with soft cream bases. The glitter particles catch light naturally without overwhelming the design, making it appropriate for work environments, formal events, and everyday wear. The key is using fine, delicate glitter particles rather than chunky confetti-style pieces.
Glitter Application Options
- All-over glitter: Fine champagne sparkles distributed evenly across all ten nails creates a soft, shimmering effect
- Gradient glitter: Heavy glitter concentration at the tips that fades into the cream base for dimension
- Accent nail: One or two fingers (usually ring finger or pinky) feature the glitter while others remain solid
- French champagne: A champagne glitter tip instead of traditional white for a contemporary twist
- Buried glitter: Glitter particles suspended within the acrylic for a “trapped” sophisticated look
Pro tip: Request “fine champagne glitter” rather than regular glitter—the smaller particle size sits flush and smooth rather than creating a textured, bumpy surface. A glossy top coat over champagne glitter makes it absolutely luminous.
4. Pale Pink Minimalist Stripes
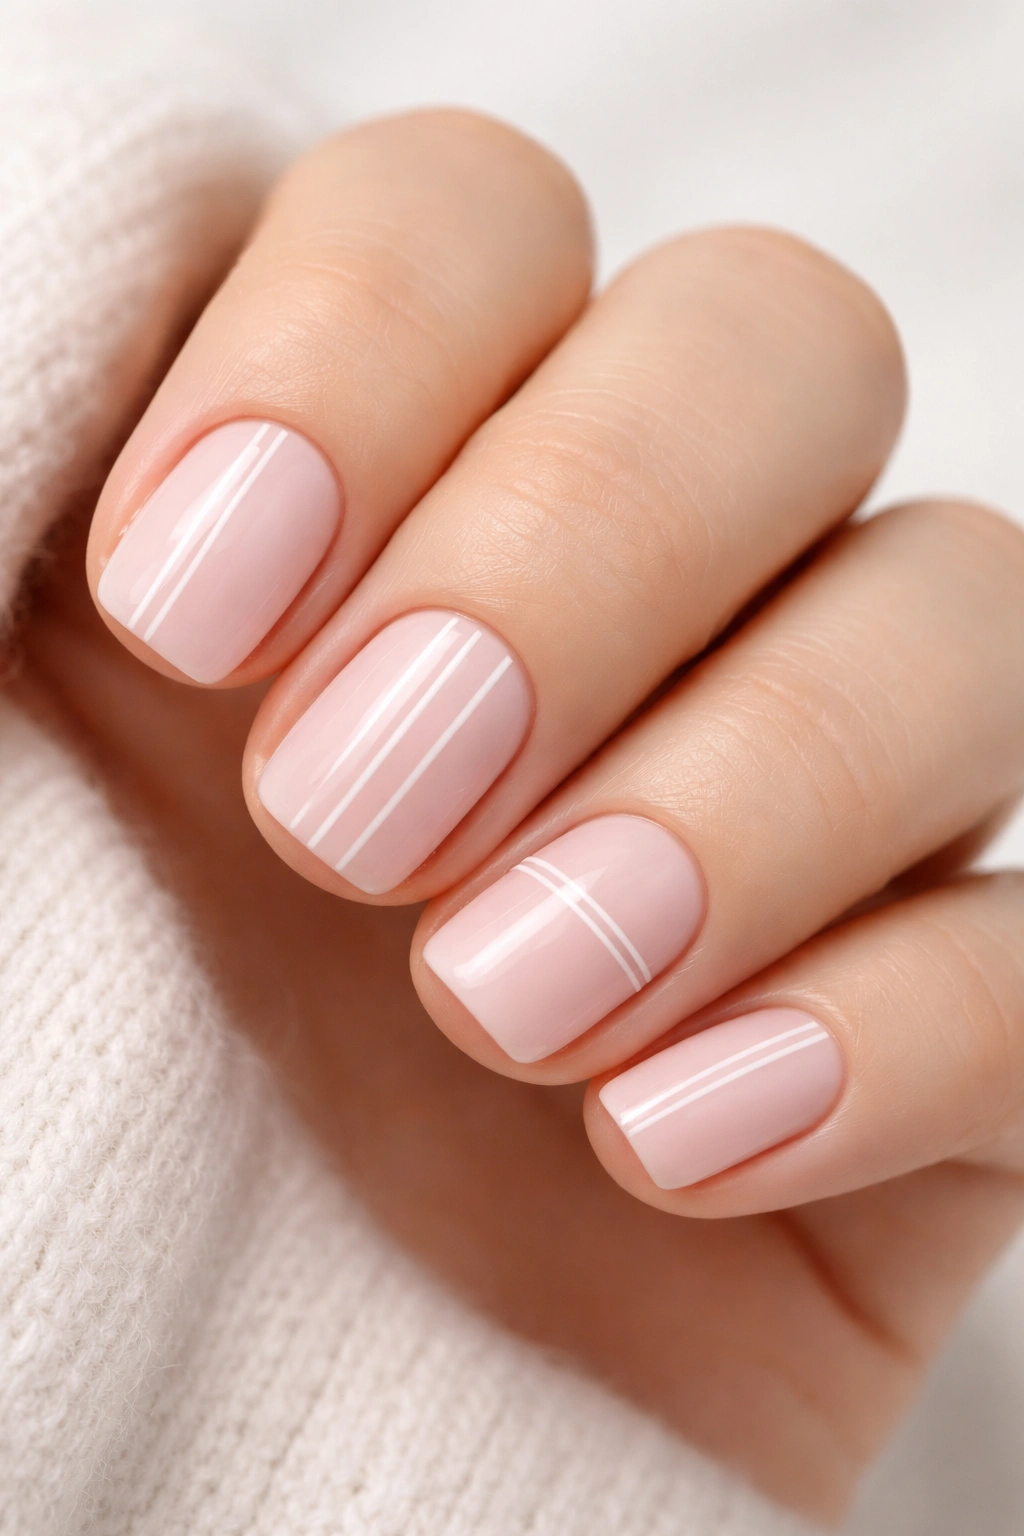
Minimalism meets femininity in this soft, understated design. A pale, barely-there pink base serves as the foundation for ultra-thin white or off-white stripes applied vertically, horizontally, or in subtle geometric patterns. The stripes are intentionally minimal—this isn’t a heavily detailed design, but rather a sophisticated study in negative space and clean lines.
The Power of Restraint
Minimalist nail designs often feel more expensive and intentional than busier alternatives, which is exactly what you get here. Pale pink with white stripes is a color combination that feels effortlessly chic—not overdone, not boring, just perfectly balanced. The lines should be barely visible until someone looks closely, rewarding observation with subtle artistic detail. This is the kind of design that looks expensive whether you paid $60 or created it yourself.
Stripe Variations
- Vertical lines: Thin white lines running from cuticle to tip create an elongating effect
- Horizontal accent: A single white stripe across one nail breaks up the simplicity without overwhelming it
- Geometric crossing: Thin lines forming triangles or geometric shapes on accent nails
- Scattered lines: Seemingly random white marks create an abstract, artistic feel
- Chevron subtle: Soft V-shapes or angle lines rather than perfectly straight stripes
Pro tip: Use a thin liner brush or toothpick dipped in white acrylic paint to create the stripes after your pale pink base is fully set. The key is making them thin enough that they read as intentional detail rather than looking like a smudge or accident.
5. Soft Beige with Floral Details
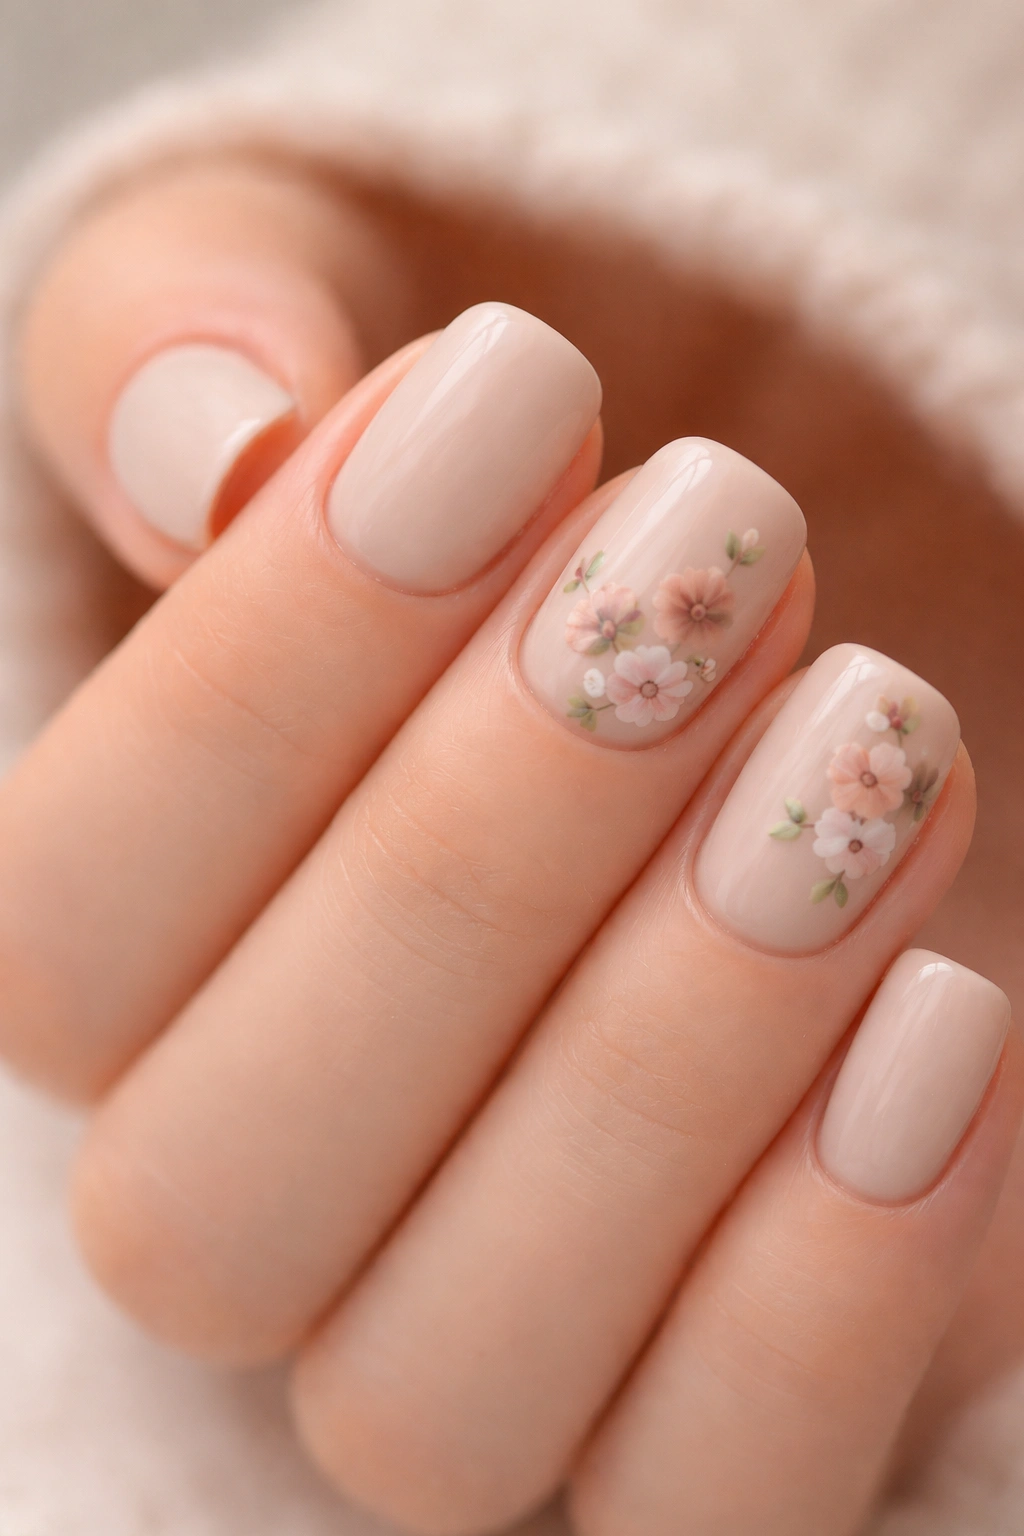
If you love the idea of pattern and detail but want to keep things soft and wearable, beige base with delicate floral designs is your winner. A warm, neutral beige serves as the canvas for tiny, intricate flowers—usually on one or two accent nails while others remain solid. The flowers are rendered in soft pinks, whites, and pale greens, maintaining the overall light, feminine aesthetic without feeling childish or overly decorated.
Creating Micro Florals on Short Nails
Working with floral details on short squoval nails requires precision and a sure hand. The flowers should be small enough that they don’t overwhelm the nail surface but detailed enough to be recognizable. Accent nails—typically your ring finger, pinky, or one nail on each hand—work best for floral designs. Beige is an ideal base because it provides enough contrast for colors to pop without demanding visual attention, creating a sophisticated backdrop for botanical details.
Floral Design Styles
- Delicate hand-painted flowers: Tiny realistic roses, tulips, or wildflowers in muted tones
- Abstract florals: Minimalist flower shapes that suggest blooms rather than depicting them realistically
- Scattered petals: Individual flower petals in a scattered pattern rather than full clustered blooms
- Corner placements: Small floral arrangements in the top corners or bottom corners of accent nails
- Botanical line work: Simple single-line drawings of stems, leaves, and flowers for an artistic touch
Pro tip: Have your nail tech use a very fine detail brush for florals on short nails—larger brushes make control nearly impossible at this scale. If you’re doing this yourself, a 000 or 00 nail art brush with a pointed tip is essential.
6. Light Taupe and White Marble
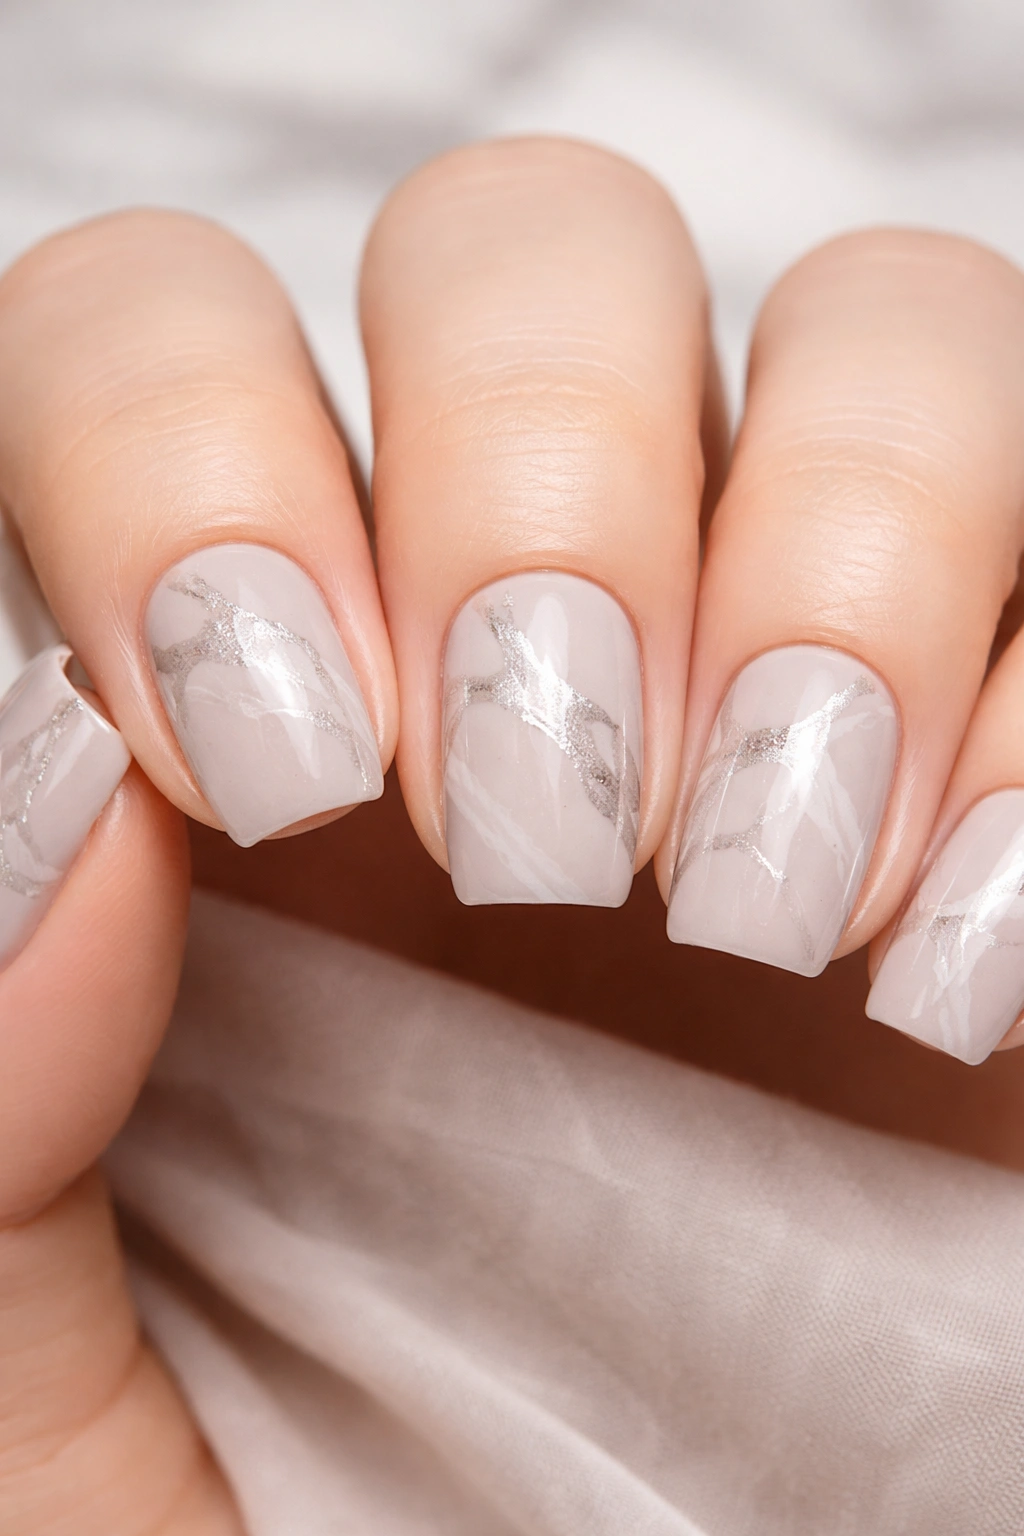
Marble nail designs feel elevated and artistic, but on a light taupe and white combination, they read as sophisticated rather than trendy. A soft, cool-toned taupe base is painted with organic white and pale gray veining that mimics natural stone. The result is a design that looks like tiny pieces of luxury stone adorning your fingertips. Squoval nails showcase marble beautifully because the shape gives you enough surface area for the veining to be visible and striking.
Achieving Realistic Marble Veining
The key to convincing marble nails is creating irregular, organic veining rather than predictable lines. Real marble has natural variation—some areas have dense veining while others are more sparse. Use a thin liner brush and white acrylic paint or gel to create flowing, interconnected lines that pool and branch naturally. Soften the edges slightly by going over the lines with a very slightly damp brush to create subtle blending where white transitions into taupe.
Marble Execution Tips
- Start with a smooth taupe base and allow it to fully cure before adding veining
- Use a toothpick or ultra-thin brush to create the initial line work
- Gray undertones in the veining make the design look more sophisticated than pure white
- Concentrate heavier veining on accent nails and lighter veining on others for dimension
- A glossy top coat makes marble designs absolutely luminous
Pro tip: Study reference photos of real marble before attempting this design—nature is your best teacher for creating believable veining patterns that feel organic rather than geometric.
7. Vanilla with Delicate Lace Pattern
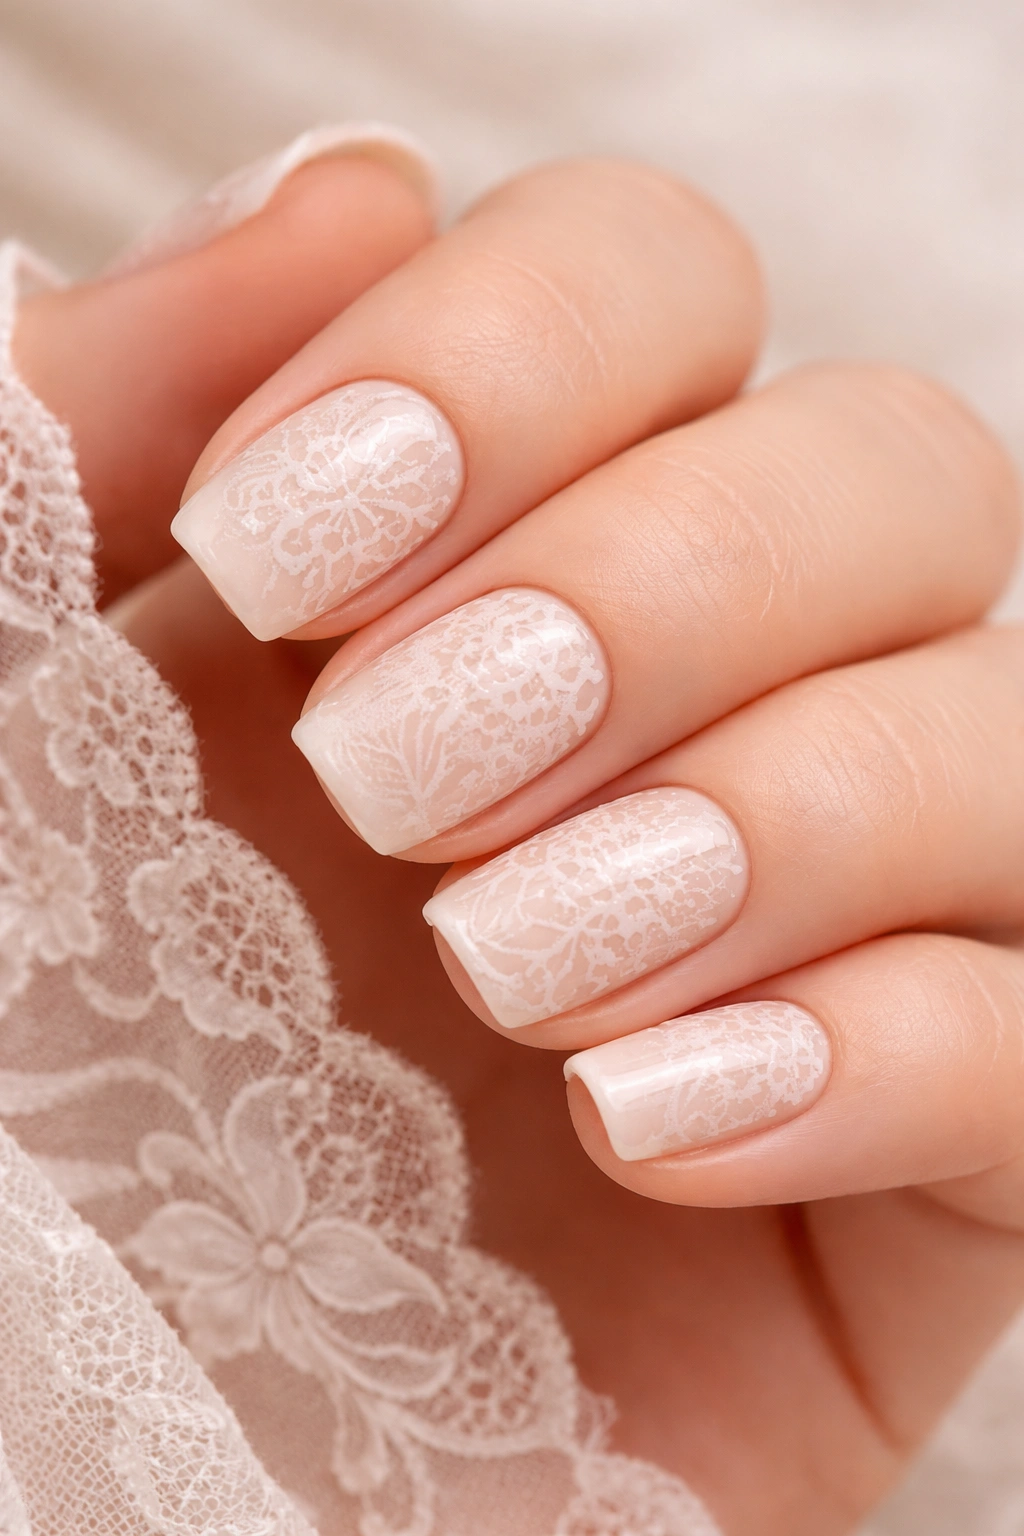
Vanilla-toned acrylics paired with delicate lace work is the nail equivalent of vintage elegance. A soft, creamy vanilla base is overlaid with thin white lace-like patterns that resemble actual lace fabric. The design should feel romantic and intricate without being overwhelming. Think of the finest lace patterns you’d find on wedding dresses or heirloom lingerie—that level of delicate detail translated to your nails.
Lace Techniques for Nail Art
Creating convincing lace on nails requires patience, a steady hand, and usually a very fine detail brush. White paint applied in intricate, interconnected patterns creates the illusion of real lace. The pattern should flow naturally across the nail rather than looking rigid or computer-generated. Many nail artists use lace stamping plates to achieve this effect consistently, but hand-painted lace has an organic quality that stamped designs can’t replicate.
Lace Pattern Options
- All-over lace: Fine lace patterns covering the entire nail for a fully ornate look
- Lace tips: Lace details concentrated at the tips with lace-free cuticle area for a clean transition
- Corner lace: Delicate lace concentrated in the corners of nails for elegant framing
- Lace accents: Only one or two fingers feature the lace pattern while others remain vanilla solid
- Sheer lace: Very light, almost barely-visible lace work that reads as subtle texture rather than obvious pattern
Pro tip: Layer the lace pattern over a slightly damp vanilla base so the white paint blends slightly at the edges, creating a softer, more romantic effect than crisp, hard-edged lines.
8. Pale Yellow Gradient
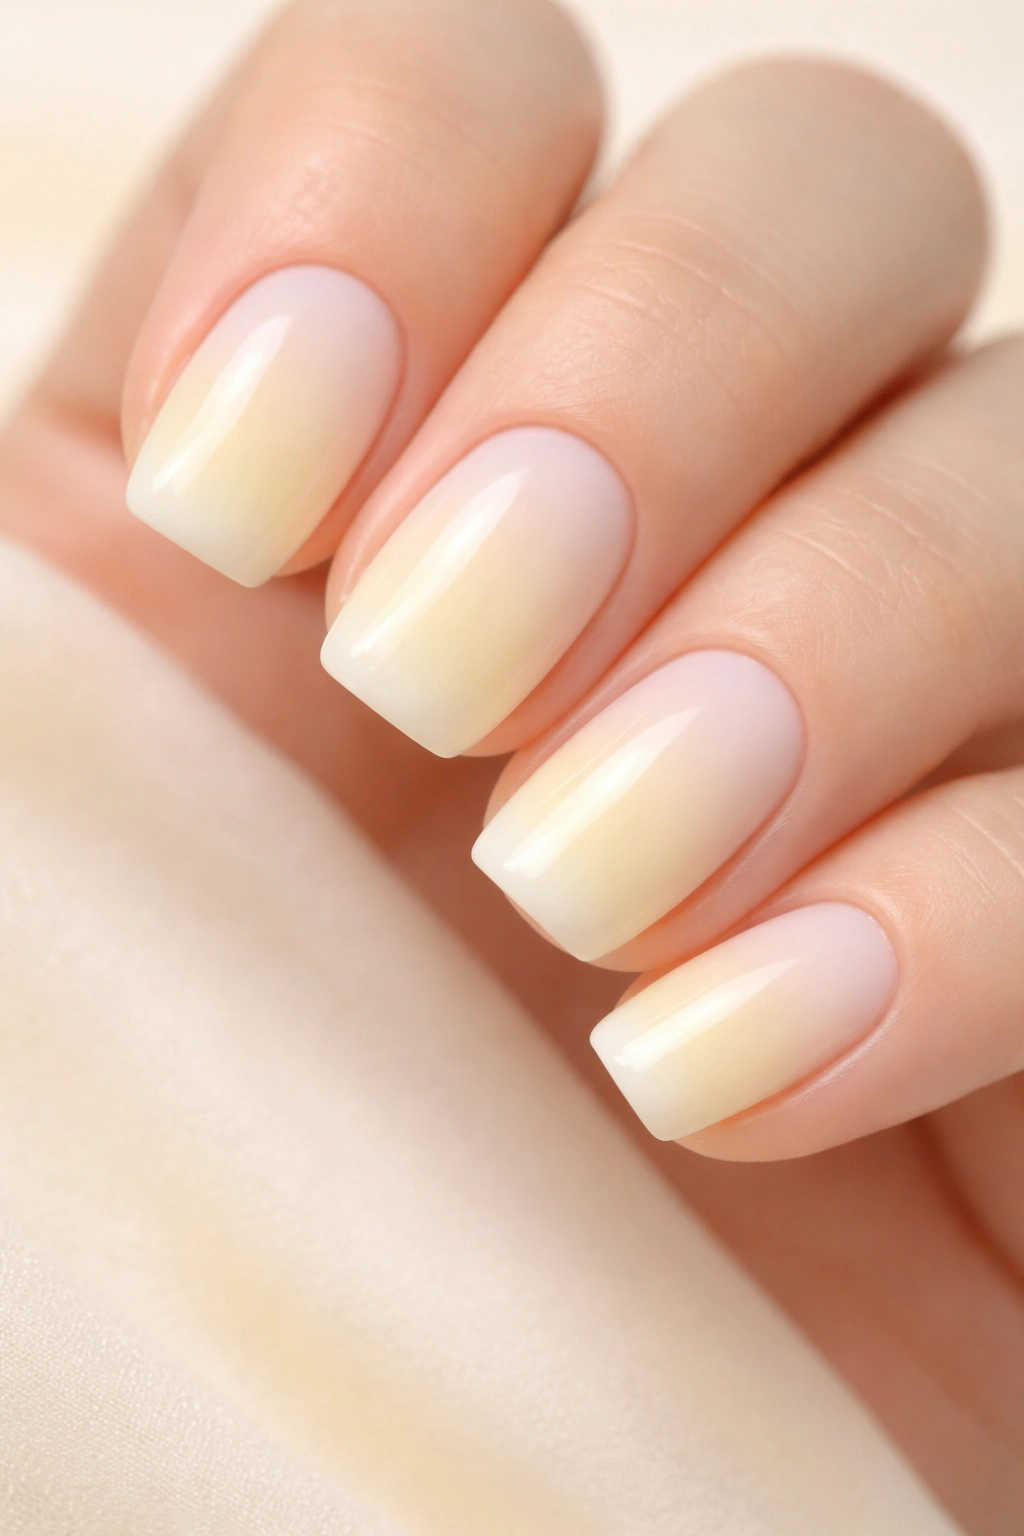
If you want to inject subtle warmth and cheerfulness into your manicure, pale yellow gradient might be your answer. Starting from an almost-white base at the cuticle and gradually deepening to a soft butter yellow at the tips, this gradient is sunny without being loud. The pale yellow reads as sophisticated and intentional rather than bright and playful. Squoval nails showcase gradients beautifully because the shape creates enough surface area for the color transition to be visible and striking.
Creating Smooth Color Transitions
A flawless gradient requires either a sponging technique or a skilled airbrush application. The sponging method—using a small cosmetic sponge to dab and blend colors together—creates visible but soft transitions. An airbrush allows for incredibly smooth, seamless color blending. Either way, the goal is avoiding obvious lines or bands of color. The transition should feel organic, like the color shifts naturally across the nail surface.
Gradient Intensity Levels
- Barely-there gradient: So subtle that it’s nearly imperceptible—looks almost solid until the light hits it
- Soft gradient: Noticeable color shift from white-yellow to pale yellow but still very soft and subtle
- Medium gradient: Clear color distinction but blended edges for softness rather than a hard line
- Reverse gradient: Yellow at the base fading to white at the tips for an inverted effect
- Multi-color gradient: Yellow blending into pale pink or peach for added complexity
Pro tip: Ask for a glossy finish on pale yellow gradients—the shine emphasizes the color transition and makes the whole design look luminous and intentional.
9. Soft Lavender with Metallic Tips
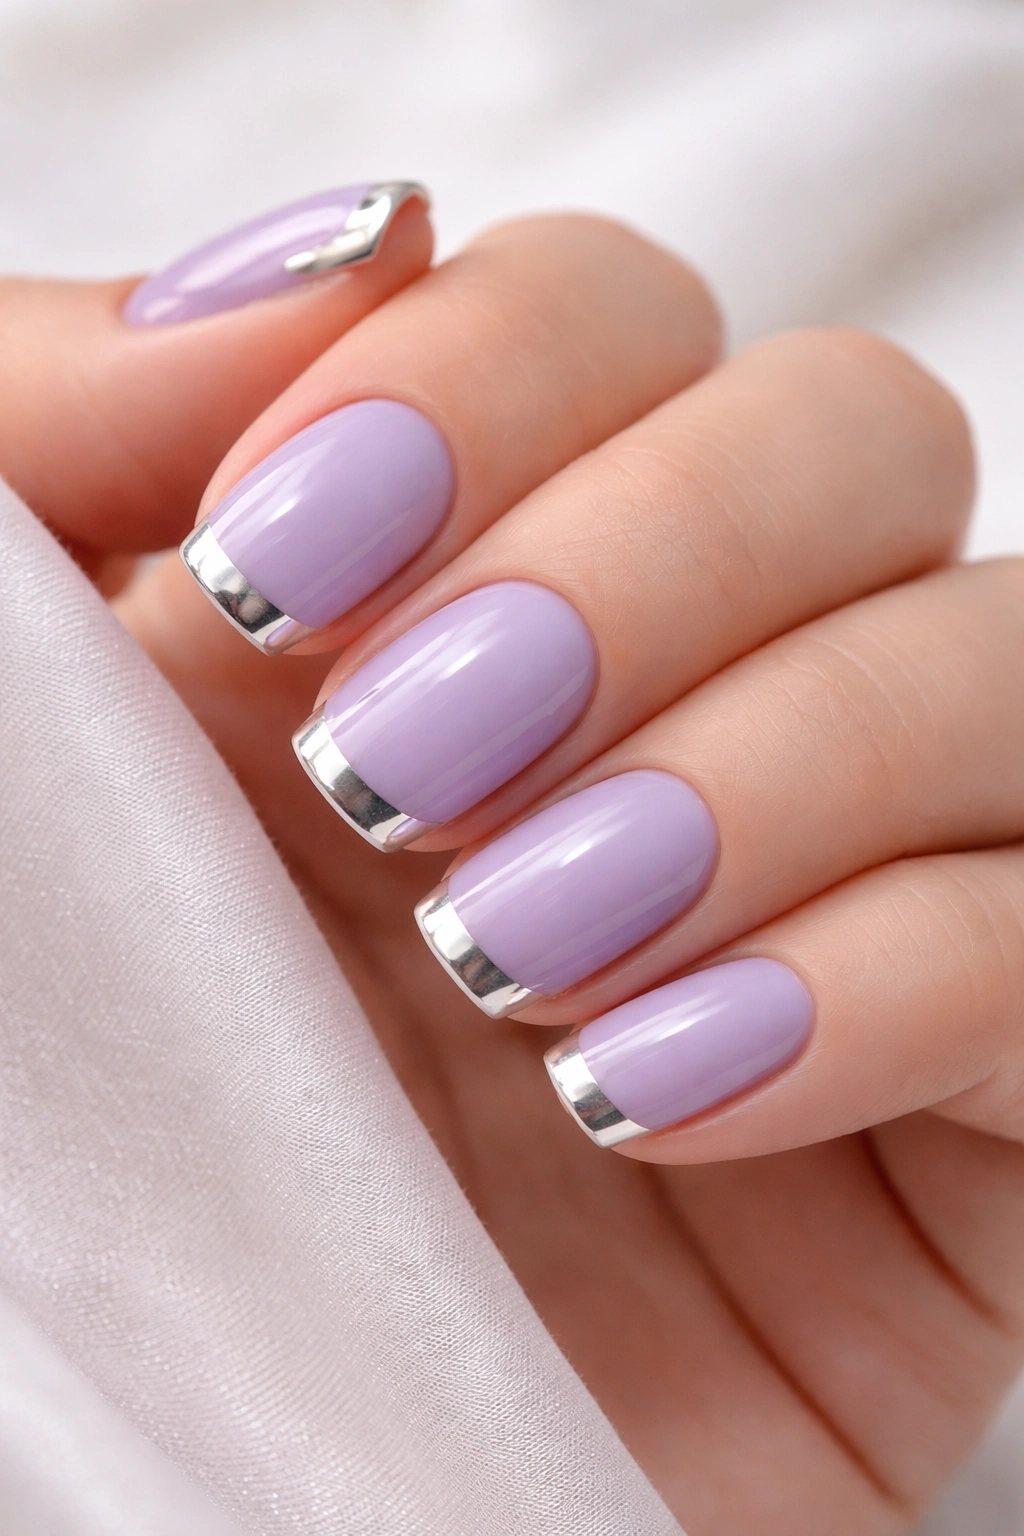
Lavender is having a moment because it works with every aesthetic and flatters virtually every skin tone. Pair soft lavender with metallic tips—silver, gold, or rose gold—for a design that’s feminine without being saccharine, trendy without being dated. The metallic element keeps the overall vibe sophisticated rather than delicate or sweet. This design works beautifully on short squovals because the metallic tips elongate while the soft color base keeps everything grounded.
Why Lavender Is the Perfect Light Tone
Lavender occupies a unique space in the color wheel—it’s cool-toned like purple but softer, almost neutral. This makes it work with warm, cool, and neutral complexions. The metallic tips add just enough edge to prevent the design from feeling too “girly” while maintaining an undeniable elegance. The key is using a true soft lavender rather than a pale purple or grayish-purple. The shade should feel calming rather than intense.
Metallic Tip Variations
- Metallic French: Traditional French tip width in silver, gold, or rose gold
- Metallic ombre: Metallic color fades gradually into the lavender base rather than a hard line
- Geometric metallic: Angular metallic patterns on the tips rather than traditional French shape
- Accent nail metallic: Only one or two nails feature the metallic tips while others stay solid lavender
- Metallic reverse: Metallic base with lavender tips for an inverted look that’s surprisingly stunning
Pro tip: A matte finish on the lavender base with a shiny metallic tip creates the most striking contrast and makes the design feel more intentional and editorial.
10. Cream with Subtle Pearl Finish
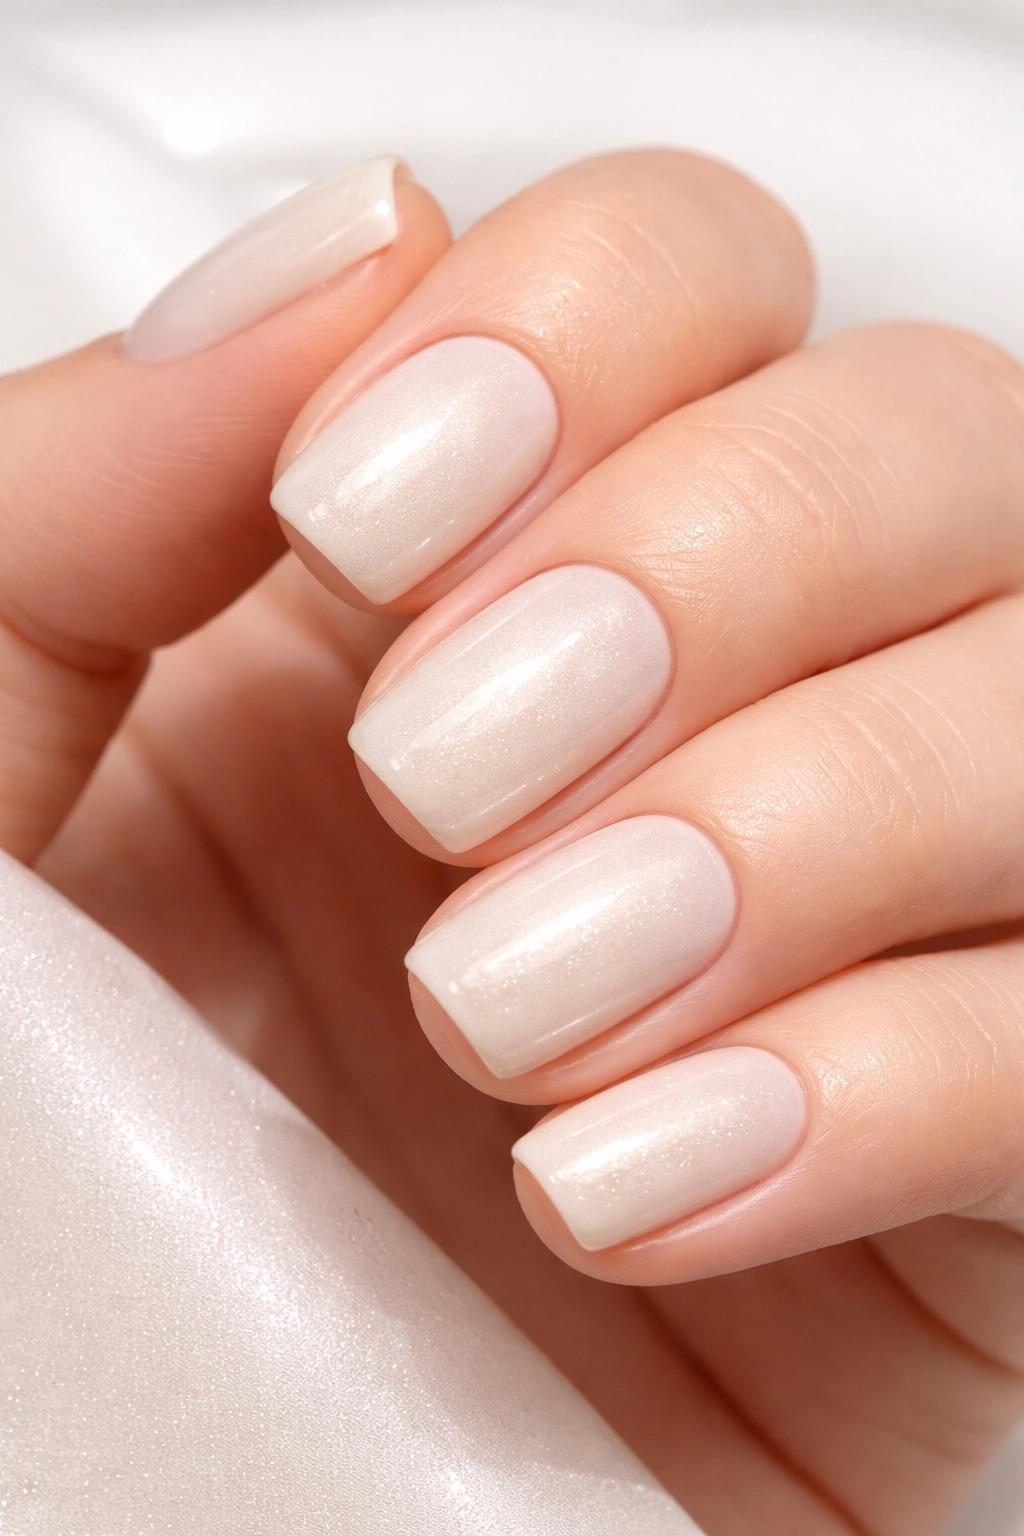
For understated luxury that whispers rather than shouts, cream acrylics with a subtle pearl finish are perfection. A smooth, creamy base is paired with an ultra-fine pearl or shimmer top coat that catches light without screaming sparkle. The effect is sophisticated and luminous—your nails look polished and expensive without any obvious embellishment. Pearl finish is one of those designs that looks better in person than in photos because the light-catching quality is impossible to fully capture digitally.
Pearl vs Glitter: Understanding the Difference
Pearl finishes are incredibly fine, almost imperceptible particles that create a soft shimmer and glow. Glitter, by contrast, consists of larger, more visible particles that create obvious sparkle. Pearl is the choice when you want luxury that’s obvious to observers but not obvious to you—you won’t feel texture or see obvious particles. The finish should feel smooth and natural under your fingertip, like the cream itself is glowing.
Pearl Finish Application Methods
- Full pearl: Entire nail surface is covered in pearl shimmer for an all-over glow
- Pearl top coat: Pearl particles suspended in clear gel applied over solid cream base
- Buried pearl: Pearl suspended within the acrylic layers for a trapped, sophisticated effect
- Duochrome pearl: Pearl that shifts slightly in different lighting for subtle color-changing quality
- Gradient pearl: Pearl concentration increases toward the tips for a subtle enhanced brightness
Pro tip: Request “extra fine pearl” or “dust” rather than larger shimmer particles. The finer the particles, the more luxurious and subtle the final effect.
11. Light Nude with Geometric Lines
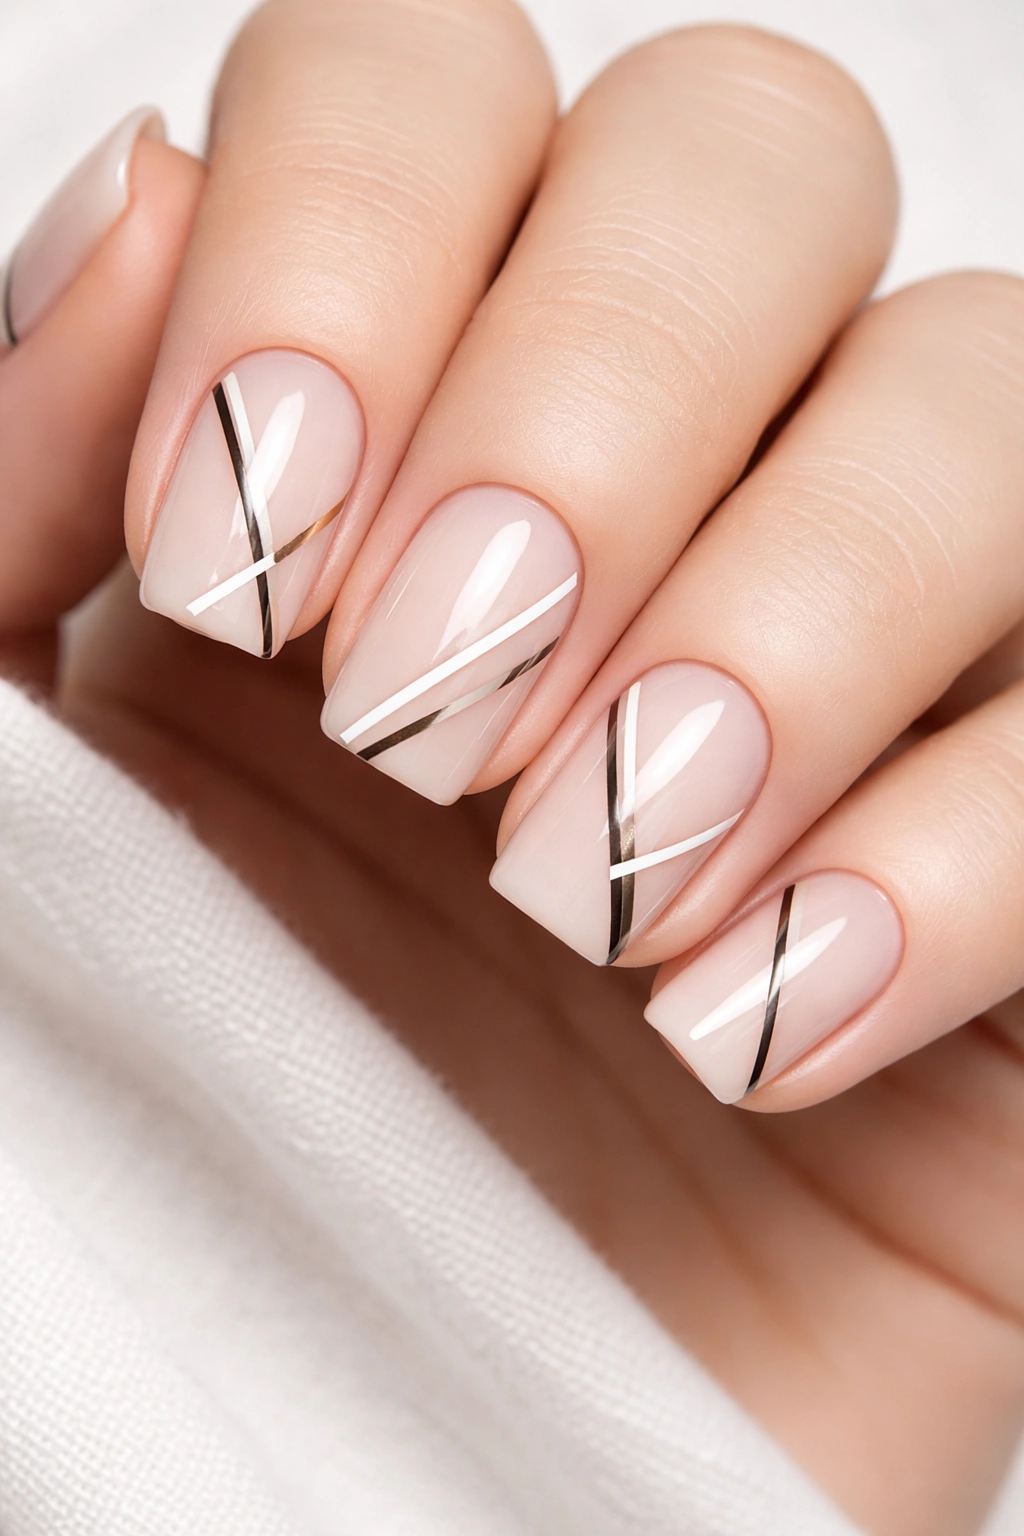
Geometric nail art on short squovals creates clean, contemporary designs that photograph beautifully. A light, universal nude base is paired with black, white, or metallic geometric lines—triangles, hexagons, abstract angle work. The key to making geometric designs work on shorter nails is using negative space effectively. The lines should define shapes and create visual interest without covering the entire nail surface.
Geometric Design Principles on Short Nails
Geometric designs succeed when they’re intentional and balanced. Rather than covering every available inch of nail space, effective geometric work uses clean lines to create defined shapes and spaces. A single triangle in the corner, intersecting lines forming angular shapes, or scattered geometric elements feel sophisticated rather than busy. The negative space—the areas left bare—is just as important as the lines themselves.
Geometric Style Options
- Minimalist angles: Simple intersecting lines creating abstract angular shapes
- Corner geometry: Defined geometric shapes concentrated in corners of nails
- Stacked shapes: Triangles, hexagons, or other shapes stacked vertically along the nail
- Scattered elements: Random geometric shapes distributed across the nail surface
- Dual-tone geometry: Geometric elements in two different colors creating visual contrast
Pro tip: Use a thin liner brush or nail art pen for crisp, clean lines. Practice on a nail wheel before attempting on your actual nails—geometric work requires precision that’s worth practicing.
12. Blush Pink Ombre with Shimmer
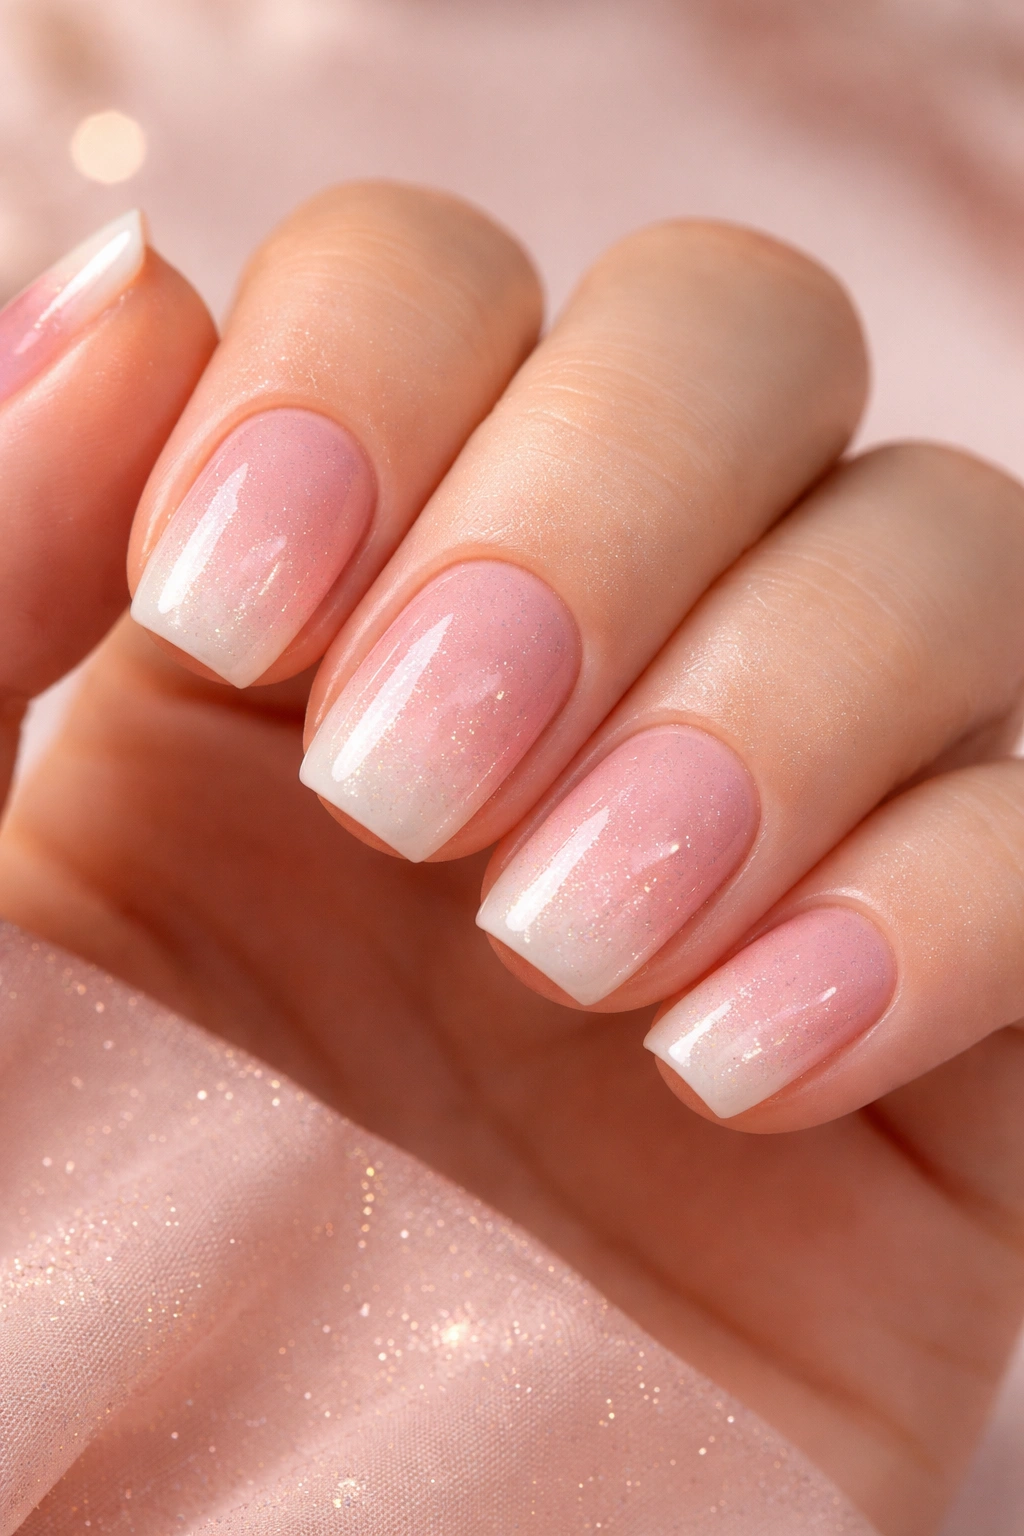
Closing out our list is an absolute showstopper that still maintains the soft, wearable aesthetic of light-toned nails. Blush pink ombre—graduating from nearly white at the base to soft dusty pink at the tips—is enhanced with fine shimmer throughout. The combination creates depth, dimension, and an undeniable romantic quality. This design works beautifully for everyone, from everyday wear to special occasions, because the color palette is universally flattering.
Blending Ombre with Shimmer Effectively
The challenge with shimmer ombre is ensuring the shimmer doesn’t overshadow the color gradient. The solution is using extremely fine glitter or incorporating the shimmer into the topcoat rather than the base colors themselves. Start with a clean ombre gradient using only solid colors, then seal it with a shimmer top coat. This method preserves the gradient visibility while adding the magical light-catching quality of shimmer.
Ombre and Shimmer Combinations
- Gradient shimmer: Shimmer increases in concentration toward the tips
- Buried shimmer: Ultra-fine shimmer particles suspended in clear layers over the ombre
- Full sparkle: Consistent shimmer throughout the entire ombre gradient
- Reverse ombre: Pink at the base fading to white at the tips for variation
- Duochrome ombre: Color shifts not just in intensity but in tone as it progresses
Pro tip: Seal your ombre gradient with a glossy top coat before adding shimmer products—this prevents the shimmer from disrupting the smooth color transition and keeps the gradient looking intentional.
Final Thoughts
Light-toned short squoval acrylics offer something rare in nail design: they’re sophisticated and refined while remaining playful and versatile. Whether you lean toward minimalist designs, romantic details, or subtle embellishment, this shape and color palette gives you room to express yourself without abandoning elegance.
The beauty of these twelve designs is that each one works across different lifestyles and occasions. You can switch between styles as your mood or season changes, knowing that short squovals always read as polished and intentional. Start with a design that speaks to you immediately, but don’t be afraid to branch out—experimentation is how you discover your personal nail aesthetic.
Short squovals in light tones aren’t just a trend; they’re a timeless approach to nail artistry that flatters hands, photographs beautifully, and feels comfortable in your everyday life. Book that appointment with your nail artist, show them the design that resonates with you, and prepare for the confidence boost that comes with gorgeous, expertly manicured nails.
