

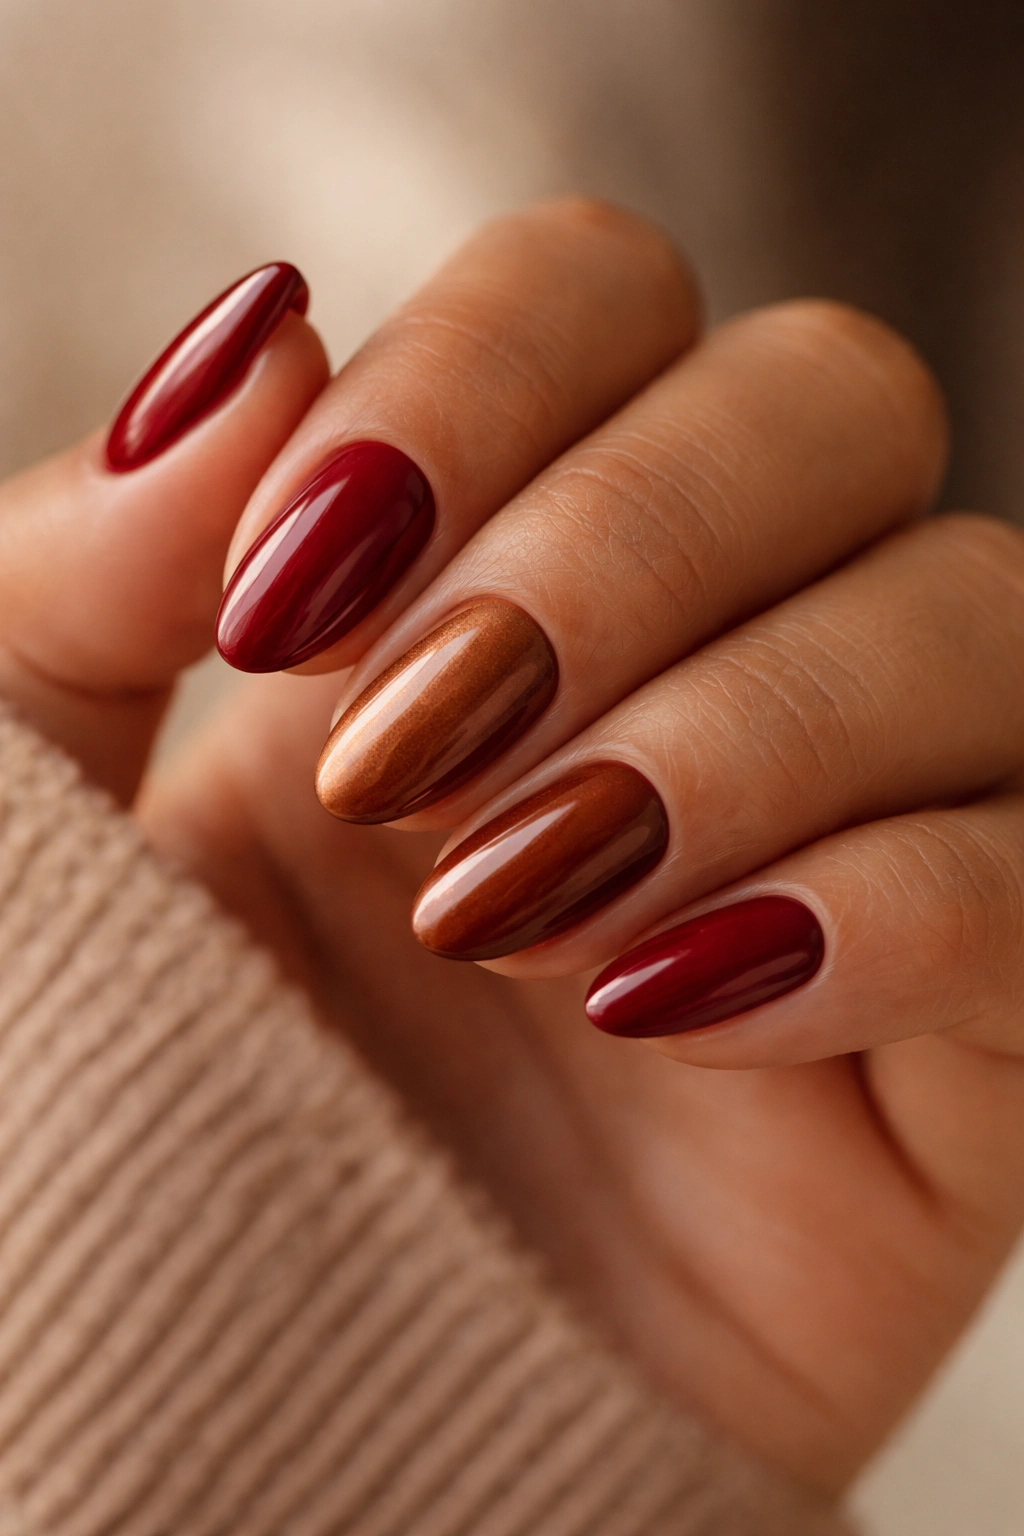
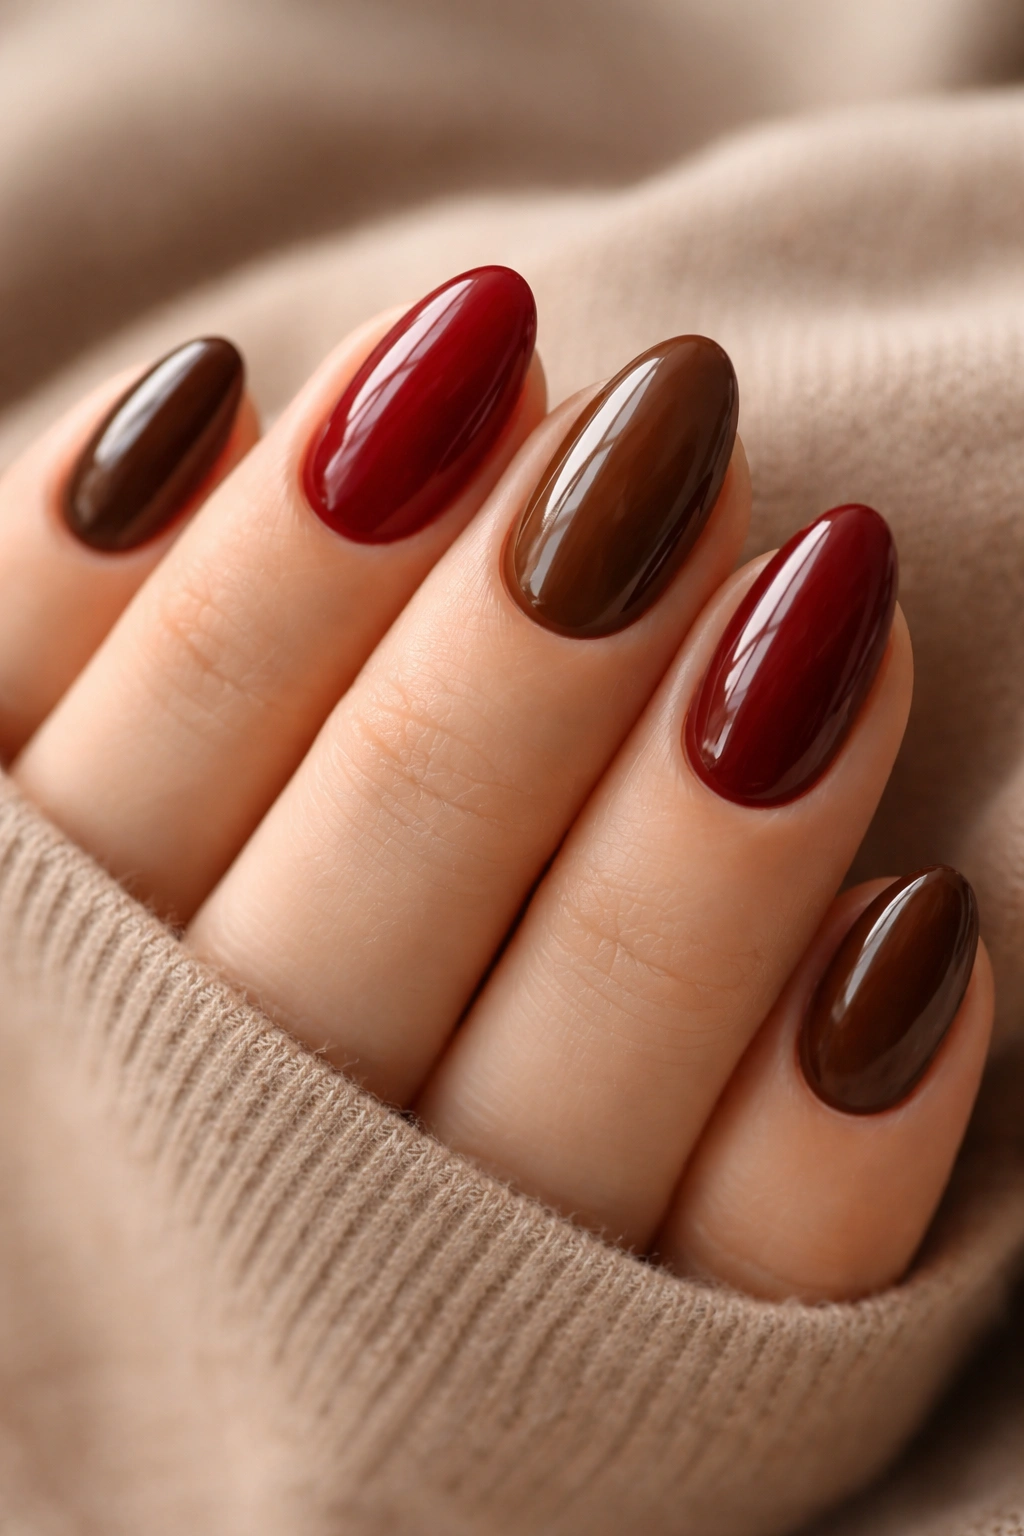
Red and brown might not be the first pairing that comes to mind for nail art. Most people default to red-and-nude or brown-and-beige — safe, predictable combinations that work but never quite stop anyone mid-conversation. Put a deep cherry red next to a warm walnut brown on short almond nails, though, and something genuinely interesting happens. The warmth compounds. The richness deepens. You end up with a set that reads as both earthy and bold at once, which is harder to achieve than most people realize.
Short almond nails — roughly 2 to 4mm of free edge with that signature tapered oval tip — are an underrated canvas for this kind of color work. Long enough to carry multi-tonal designs and detailed accents, but compact enough to stay practical through a full workweek. The almond shape elongates fingers visually, and that slight taper at the tip draws the eye directly toward wherever you’ve placed your most interesting color.
What makes this palette so wearable is temperature consistency. True reds lean warm — orange undertones, not blue ones — and most browns are warm-spectrum by nature. Build a nail design entirely within that warm range and nothing fights for attention. Everything sits together with an earthy richness that looks deliberate without looking labored.
The 20 combinations below range from simple two-tone looks you can finish in under 15 minutes to more detailed designs worth saving for a slower afternoon. Not every option requires serious nail art experience — plenty of them work with two polishes, a sponge, and basic brush control.
Why Short Almond Nails Work So Well for This Color Palette
Most nail art tutorials photograph on longer nails. The extra length gives more visual real estate, which makes dramatic designs easier to see and execute. Short almond nails work differently — the compact shape concentrates color, making even a simple two-tone look more intentional than it would appear on a longer, wider nail.
The tapered tip does specific work here. When you place a deeper shade near the tip — an oxblood, a dark espresso — the narrowing of the nail at that point creates a natural shadow effect. The color appears more saturated and intense than it would on a flat, wide square tip.
Gradients and blended transitions also sit closer together on a short nail, which makes sponge-blended ombre work far less technically demanding. A 4-millimeter gradient on a short almond nail takes about 60 seconds with a makeup sponge. That same effect on a longer coffin nail needs two or three times the blending effort to look smooth.
Deep shades like burgundy and espresso are notorious for showing chips at the tip first — and the shorter that tip is, the smaller any chip appears. A good top coat applied every 2 to 3 days extends the life of these rich, dark shades noticeably.
Matching the Right Red and Brown Shades to Your Skin Tone
Skin tone guidance belongs here, once, before the designs — because the same logic applies to every combo that follows.
Warm or golden skin tones pair most naturally with russet reds, brick reds, and copper-toned browns. These shades share yellow and orange undertones with warm skin, so the combination reads harmonious without any effort.
Cool or pink-toned skin gets the most visual contrast from true cherry reds and deep burgundies paired with espresso or dark walnut browns. The difference between cool skin undertones and deeply warm nail pigments creates vivid pop rather than blending in.
Neutral skin tones have the widest range here. Lean toward wine reds and toffee browns for something softer, or full-saturation cherry and bittersweet chocolate for stronger contrast.
One practical note before diving in: swatch both shades side by side on a piece of white paper first. A blue-toned red sitting next to a yellow-toned brown can turn slightly muddy once applied — keeping both shades in the same temperature range prevents that problem entirely.
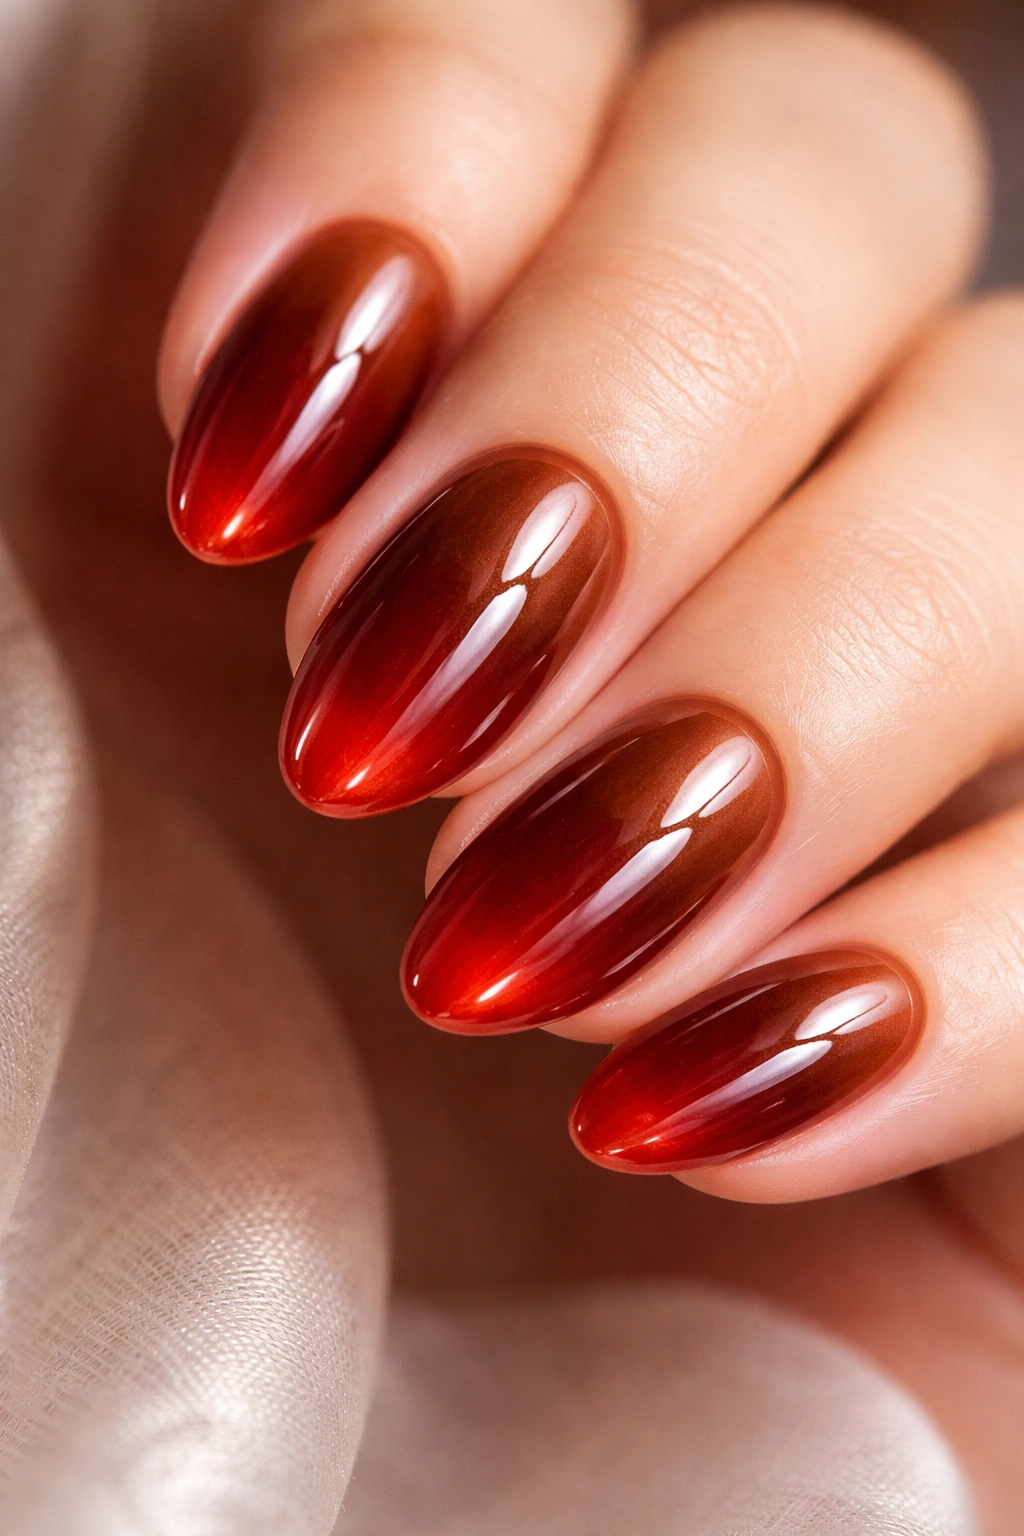
1. Burgundy and Walnut Brown Gradient
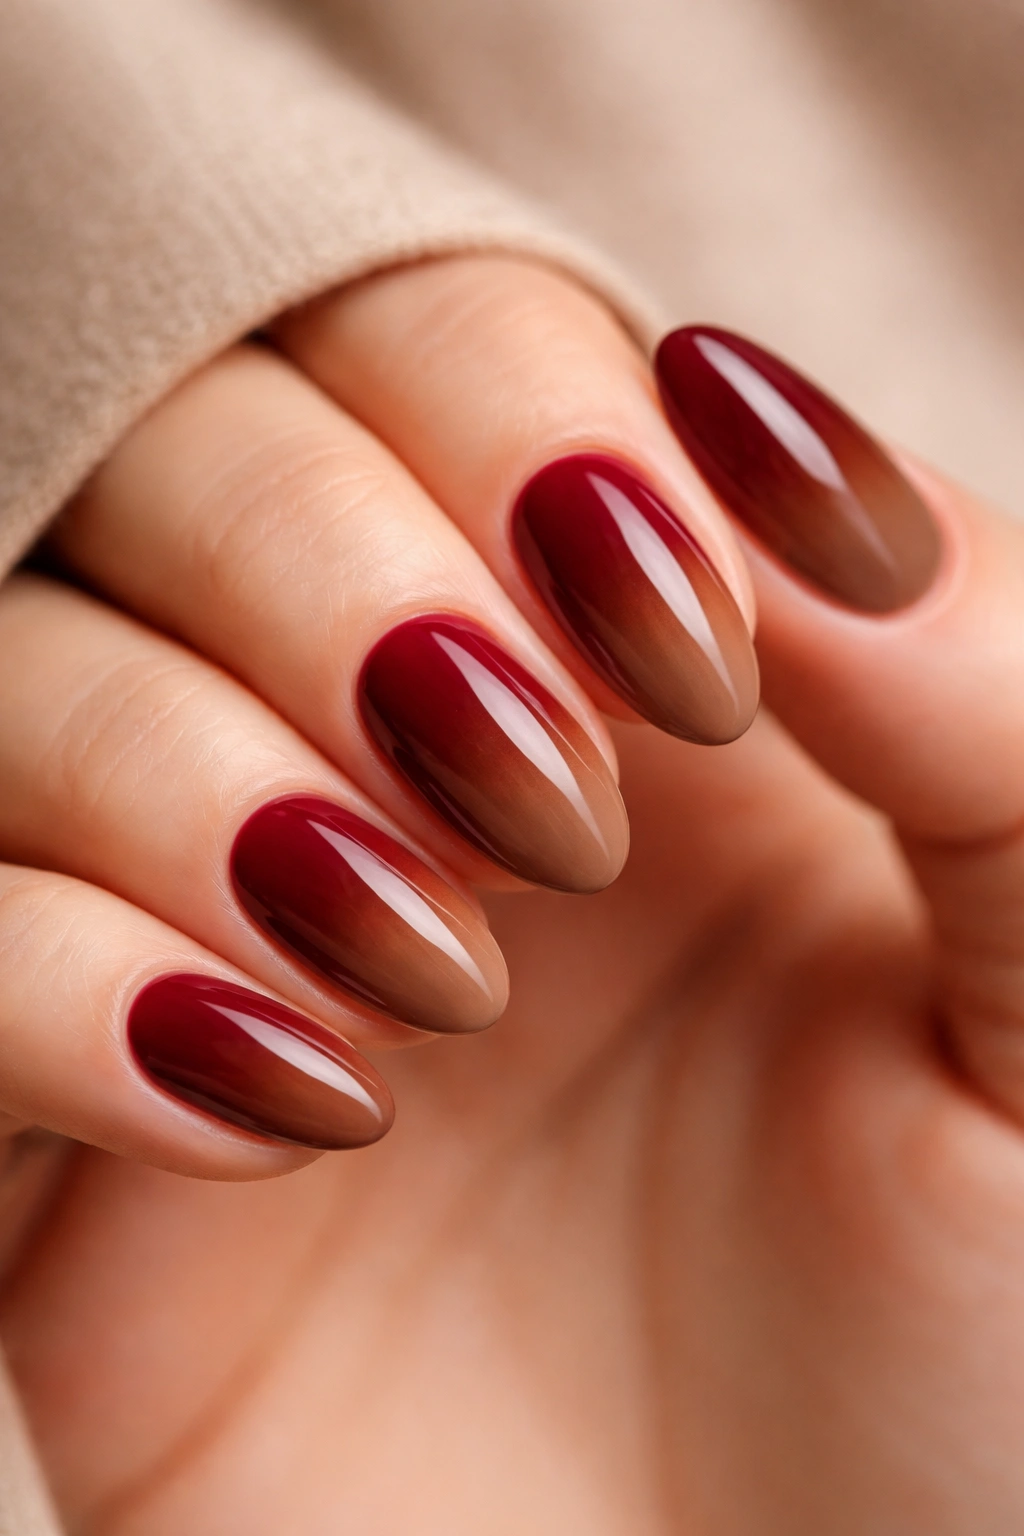
Picture the color of a fall leaf caught exactly between red and brown — that specific in-between moment is what this gradient captures. It feels tied to warmth and depth without being predictably seasonal, which means it stays wearable far longer than most trend-driven nail looks.
Apply walnut brown as your base across all nails and let it cure fully. Then load a small makeup sponge with burgundy — dab it first onto a paper towel to remove excess — and press it gently onto the top third of each nail, building up in thin layers. Three to four light presses works better than one heavy application. The transition zone should sit roughly 40% down from the tip, which keeps the darker value concentrated at the tip while letting the brown breathe at the base.
- Brown base shade: aim for a medium walnut, not too dark — you need visible contrast against the burgundy tip
- Burgundy placement: top 35 to 40% of the nail, blended softly downward
- Finish: both polishes in glossy; a gel top coat gives the most seamless-looking transition
- Optional accent: one nail in solid burgundy with a thin walnut brown stripe near the cuticle
Pro tip: If the transition line looks too sharp after the first round of sponging, dampen the sponge very slightly before the second pass — it softens the edge without depositing too much additional pigment.
2. Cherry Red Tips on a Nude Brown Base
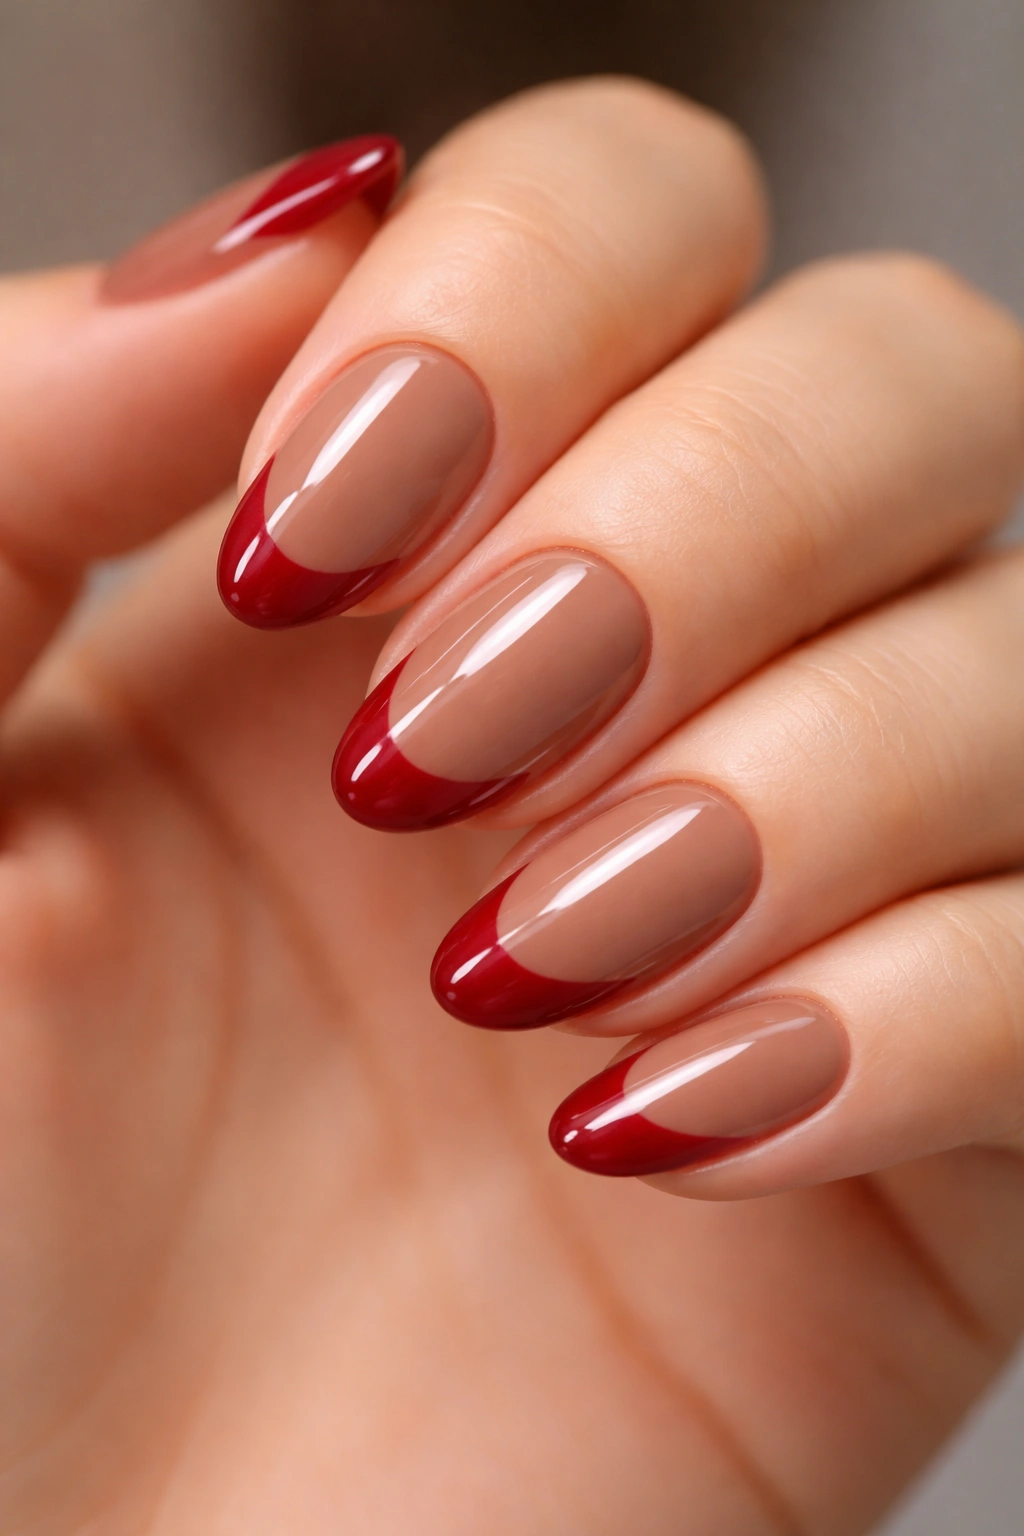
A cherry red tip over a warm nude-brown base is the one design in this list that looks expensive without requiring expensive products. The nude brown acts as a neutral buffer — it doesn’t compete with the red, it frames it.
Apply two coats of a warm beige-brown base (something close to the color of raw cappuccino foam) and let it cure completely. Then use a thin flat brush or a French tip brush to paint a curved line of cherry red roughly 3mm back from the free edge and fill in toward the tip. The curve should mirror the natural arc of your nail tip — a crescent shape rather than a flat horizontal line. That curve is what distinguishes this from a basic French tip; it follows the nail’s anatomy rather than imposing a straight line across it.
Cherry red here needs to be fully opaque in one coat. Most gel shades handle this easily; regular polish usually needs two thin coats applied back to back while still slightly tacky. A high-gloss top coat over the entire nail softens the line between base and tip just enough to look polished.
If you prefer visible contrast, apply matte top coat on the nude-brown area and gloss only over the red tip — the finish shift creates a second layer of visual interest without any additional color work.
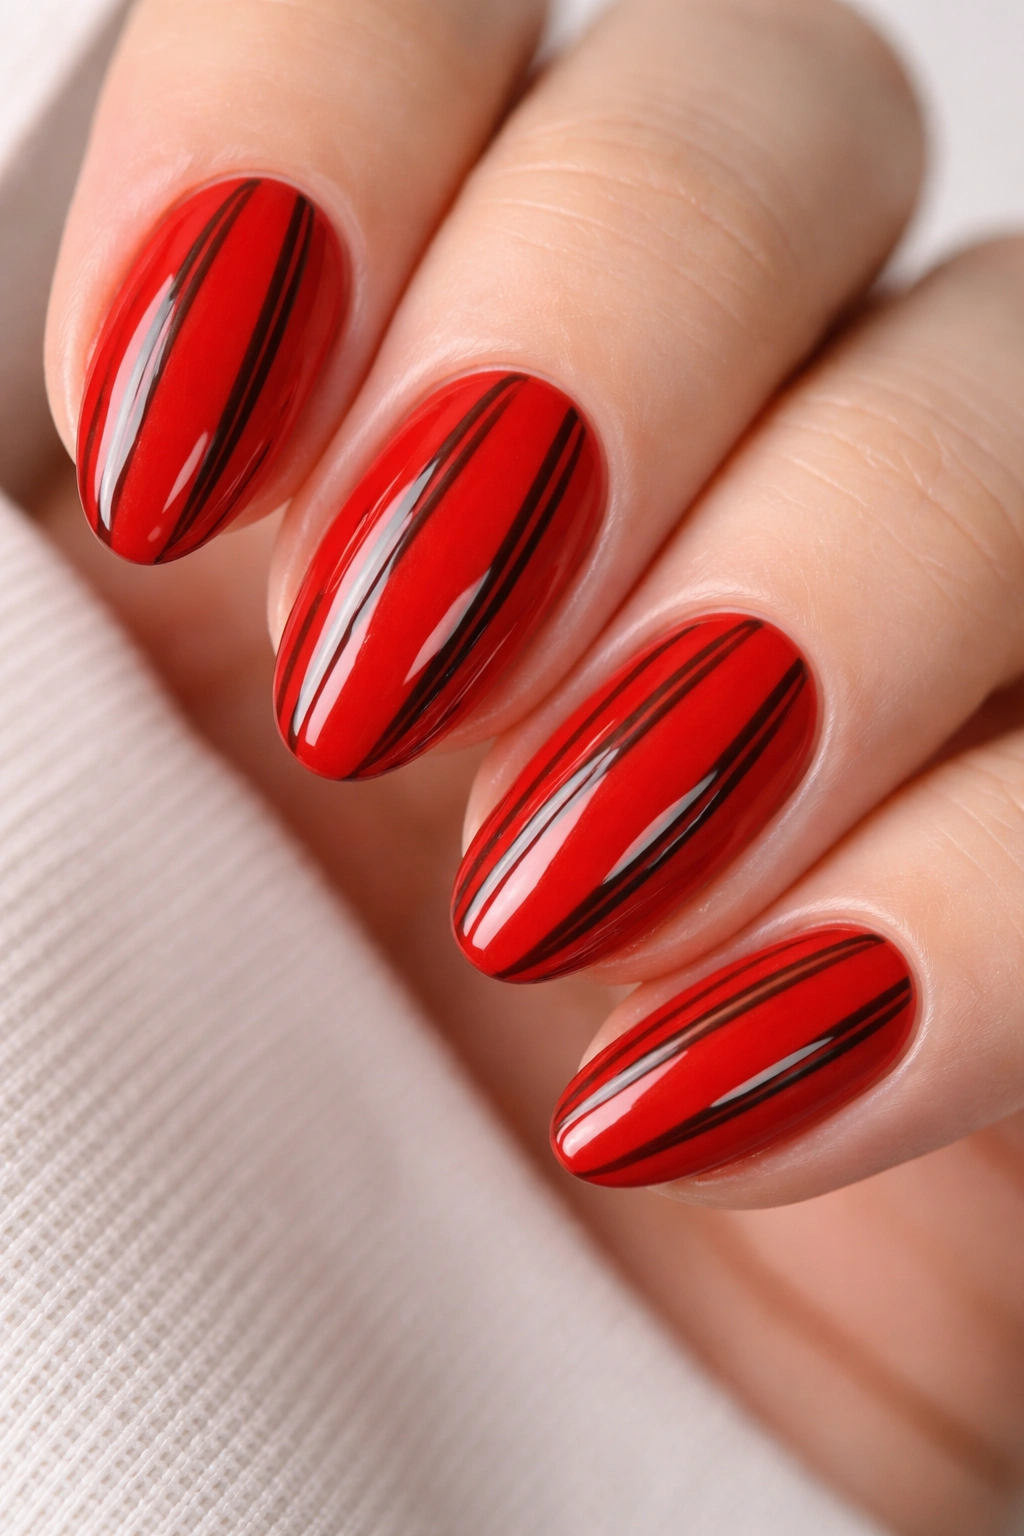
3. Deep Mocha Base with Red Geometric Lines
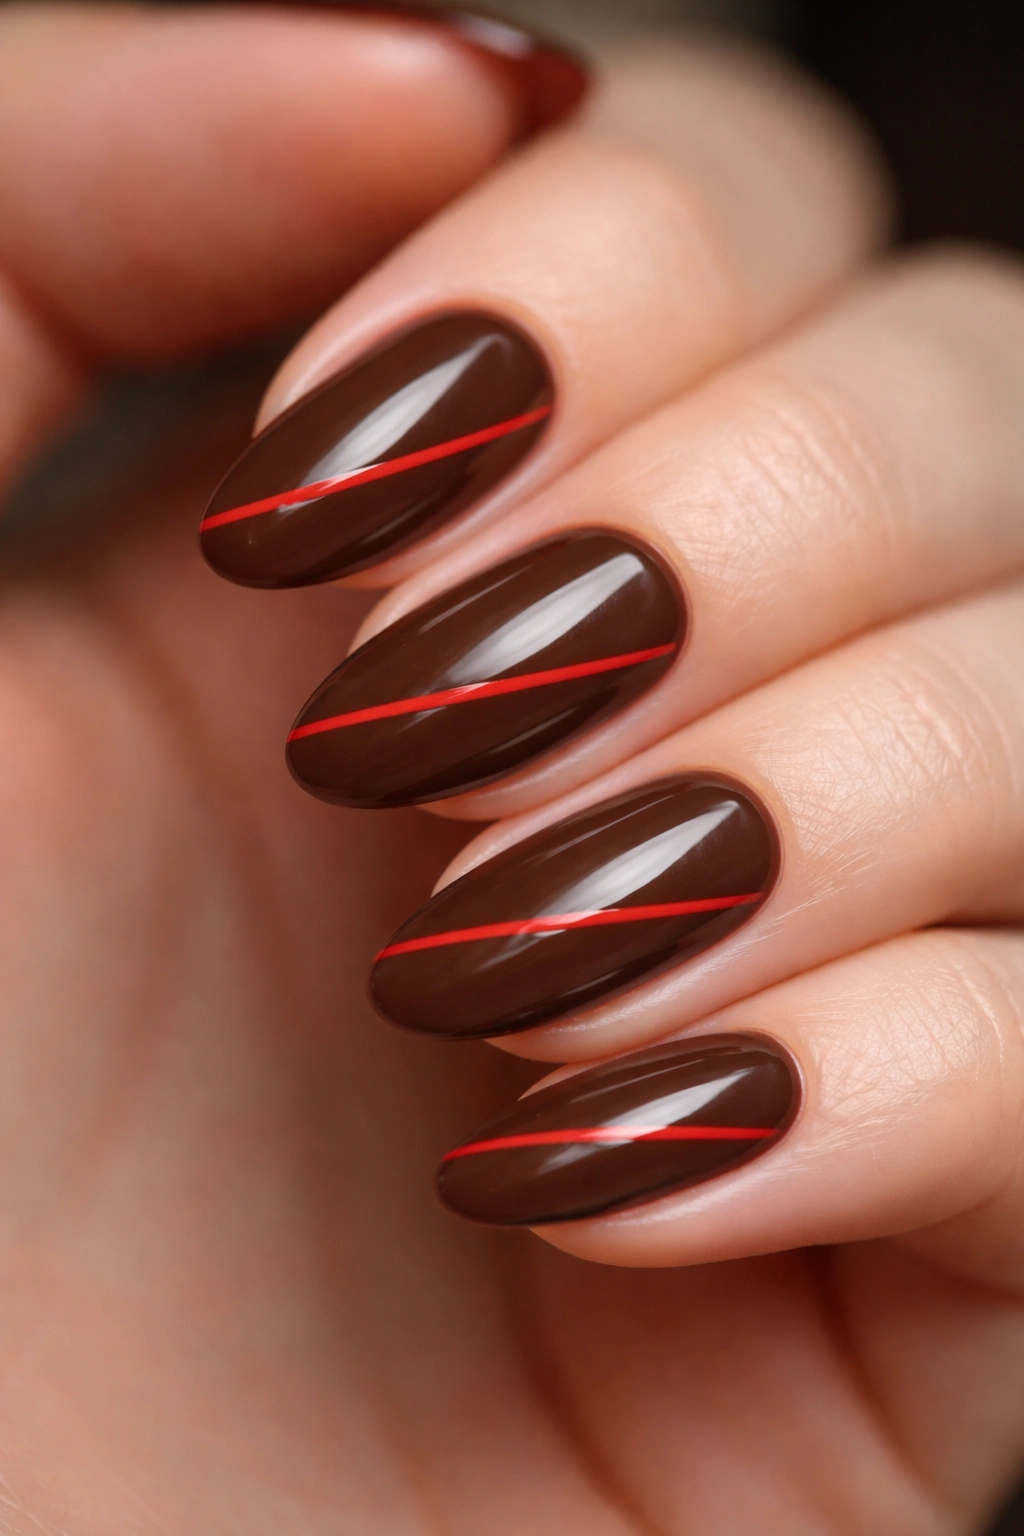
One straight line of red on a mocha brown base is one of those combinations that looks like you put more thought into it than you actually did.
What Makes It Work on Short Nails
Short almond nails are ideal for simple geometric line designs because the compact surface limits how complex the pattern needs to be — one or two lines is genuinely enough. Apply a deep mocha base across all nails and let it cure fully. Then use a striping brush loaded with a bright cherry or tomato red to draw one or two straight lines diagonally across each nail.
The diagonal direction matters: horizontal lines visually widen the nail; diagonal lines create length and movement on a shape that’s already short.
Quick Design Details
- Line width: aim for about 1mm — just barely thicker than a single striping brush hair
- Angle: 45 degrees works well on short almond shapes; steeper angles (60+ degrees) can feel cluttered on a compact nail
- Color: use a high-contrast red like tomato or fire engine, not a dark wine, which disappears against mocha
- Spacing: two lines approximately 2mm apart create more interest than a single centered line
Pro tip: Apply your striping lines before the final top coat, then seal with one thin layer over everything. This prevents the lines from catching on fabric and lifting over time.
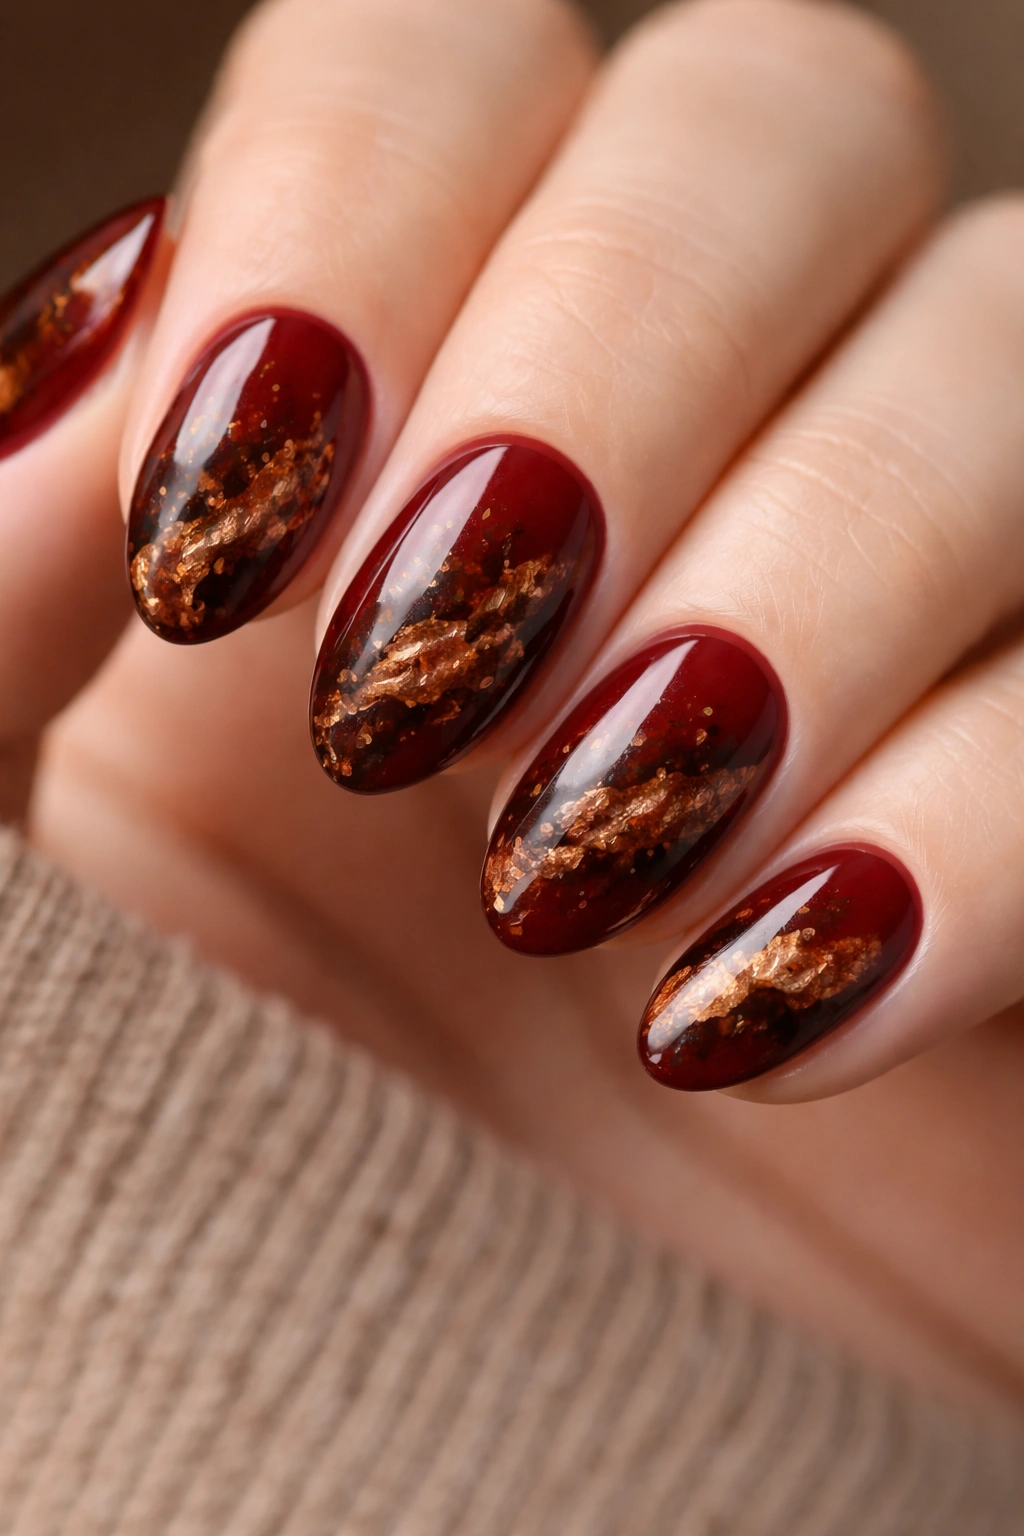
4. Oxblood Red with Terracotta Marble Swirls
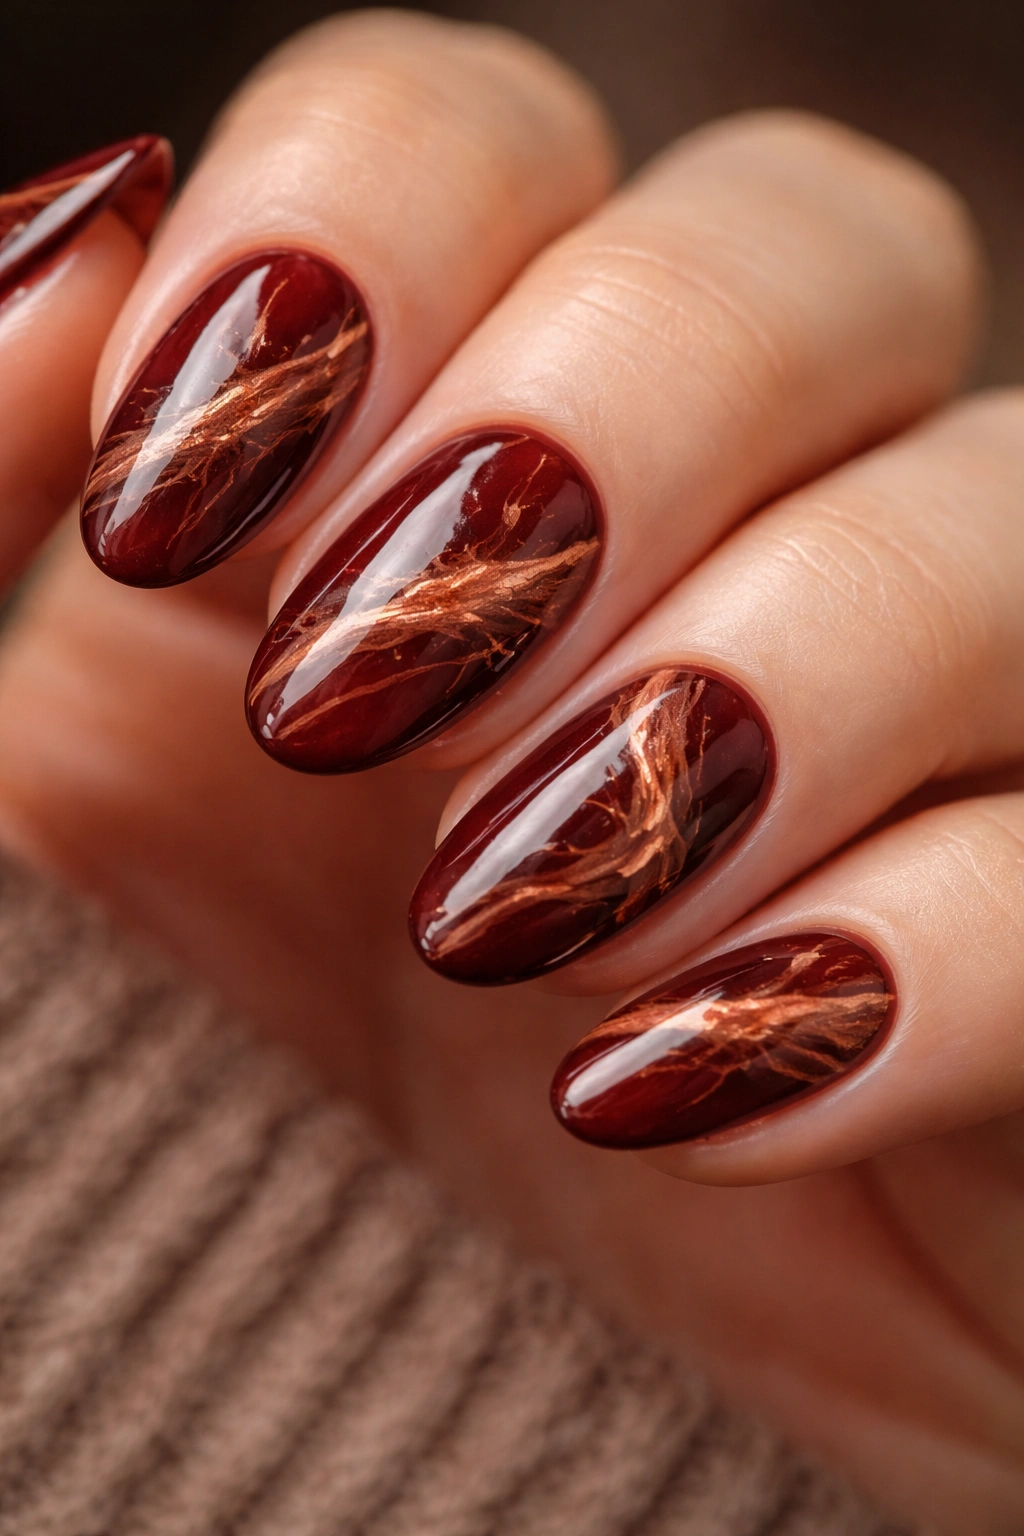
This is the most visually dramatic combination on this list. It earns every bit of that.
Oxblood red sits at the exact boundary between red and brown — enough brown pigment to feel earthy, enough red saturation to read clearly as a statement color. Pairing it with a terracotta marble effect leans into that dual identity. The marbling technique takes the warm red-orange of terracotta and weaves it through the deeper oxblood in thin, irregular veins, mimicking the look of red jasper or bloodstone.
Apply two coats of oxblood red as your base. While the final coat is still slightly tacky (in regular polish) or just before curing (in gel), use a very thin nail art brush or a toothpick dipped in terracotta polish to draw loose, branching vein lines across the nail surface. The lines should be uneven — some thick, some paper-thin, some with small side branches. Marble is irregular by nature; symmetry kills this technique entirely.
Set with a glossy top coat. The depth that gloss creates is what makes the finished nail look almost three-dimensional. For extra complexity, drag a fine copper foil powder along about 10% of the vein lines before sealing — just a touch, not the whole vein, or it tips from sophisticated into overdone.
The best thing about this design? The more imperfect the veining, the more convincing the marble effect.
5. Brick Red and Chocolate Brown Color Block
Why does color blocking look more impressive than the technique warrants?
Because the result appears deliberate and graphic in a way that most nail designs don’t — there’s no blending, no fading, just two colors divided by a sharp line. The painter’s tape method makes this achievable on a first attempt.
Apply a full coat of brick red across all nails and cure completely. This drying step is non-negotiable — tacky polish pulls off with the tape. Place a strip of painter’s tape or nail tape diagonally across the lower half of each nail. Press the tape edge down firmly with a cuticle pusher. Apply two coats of chocolate brown over the exposed upper portion and let it dry. Remove the tape slowly at a low angle — pulling at 90 degrees tends to lift polish along with the tape.
The Finishing Step Most Guides Skip
Before top-coating, press the tape edge down one final time and examine it for any bleeding where chocolate brown overlapped the brick red. A cotton swab dipped in acetone cleans that edge in about 3 seconds. Don’t skip this cleanup — the sharpness of the line is everything. A clean line makes color blocking look intentional; a blurry one looks like a mistake.
Apply glossy top coat and you’re done. Each nail shows two distinct color fields bisected by a diagonal line that adds visible movement to a short, compact shape.
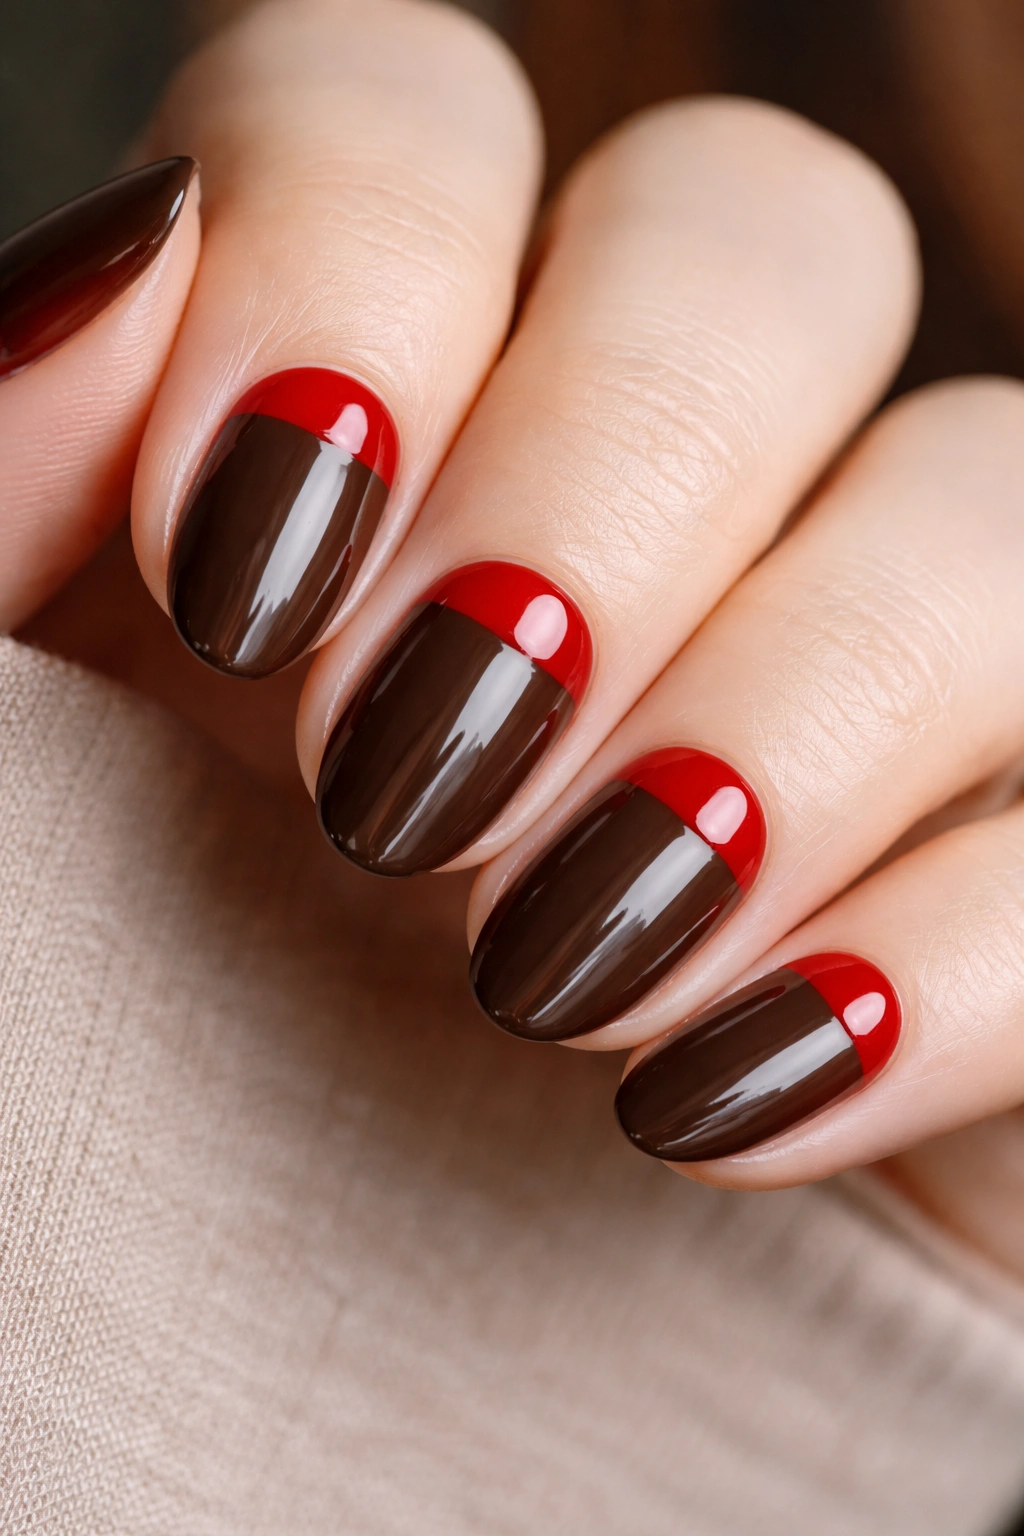
6. Cranberry Red with Caramel Brown French Tip
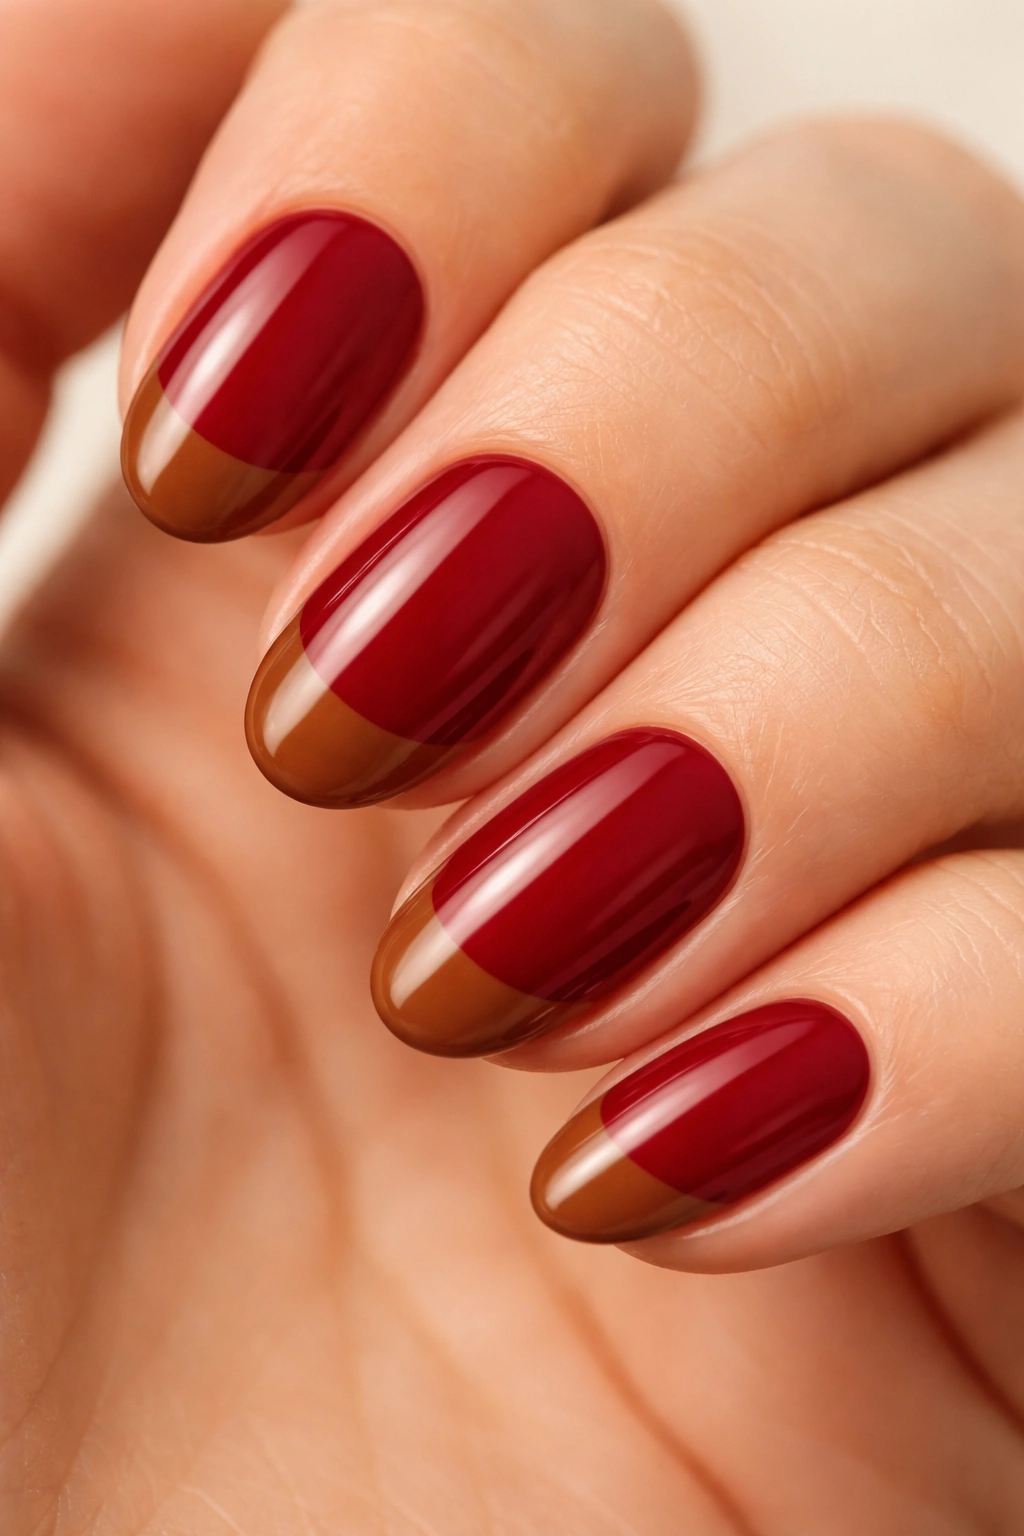
Unlike a traditional white French tip — which skews formal and bridal — the cranberry-and-caramel version is warmer, more personal, and considerably more wearable day to day. The color hierarchy shifts: the cranberry becomes the base, the caramel becomes the accent, and the result feels more like a deliberate design choice than a classic manicure format.
One key difference from a standard French tip is proportion. Classic white tips use a thin 1 to 2mm arc. This version works better with a slightly wider caramel tip — about 3mm — because warm brown needs a bit more surface area to register as a design decision rather than a smudge near the edge.
Apply cranberry red as your base and cure completely. Use a thin curved French tip brush to paint the caramel arc, starting from one corner of the tip and sweeping across in a single motion. Check the width as you go and fill in with a second pass. Let it dry fully before sealing.
Gloss is the right call here. A matte finish on caramel brown reads slightly chalky against the warmth of cranberry, and chalky is not the energy this combination is going for. High-gloss top coat brings the caramel to life and makes the whole set read cohesive.
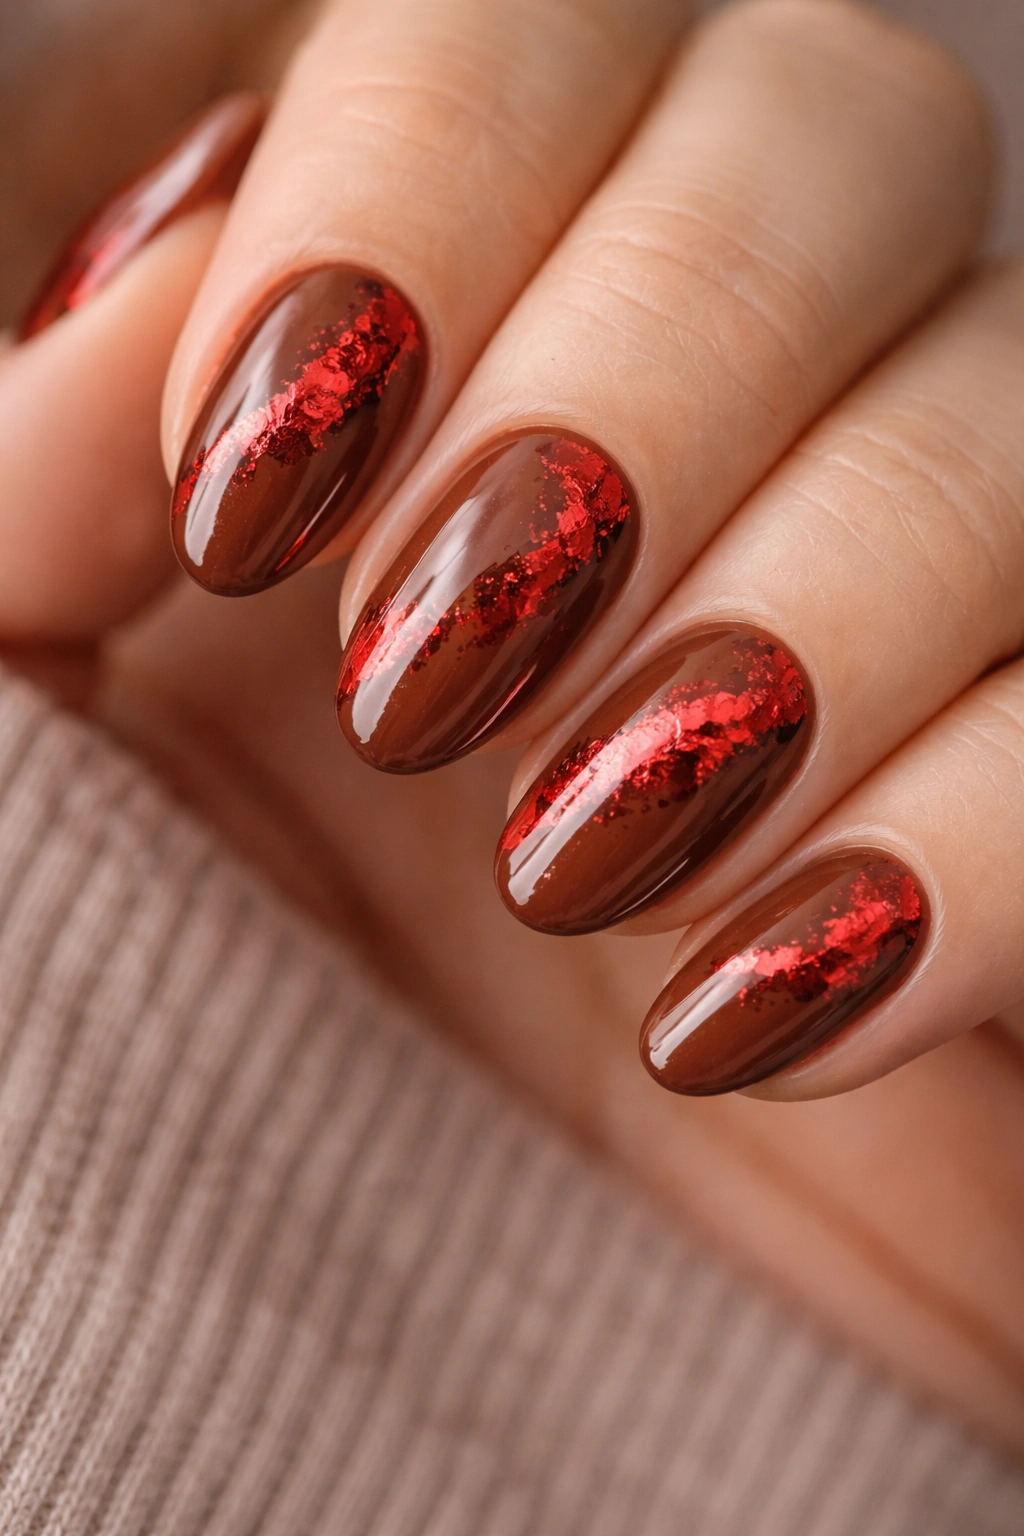
7. Russet Brown and Scarlet Negative Space Design
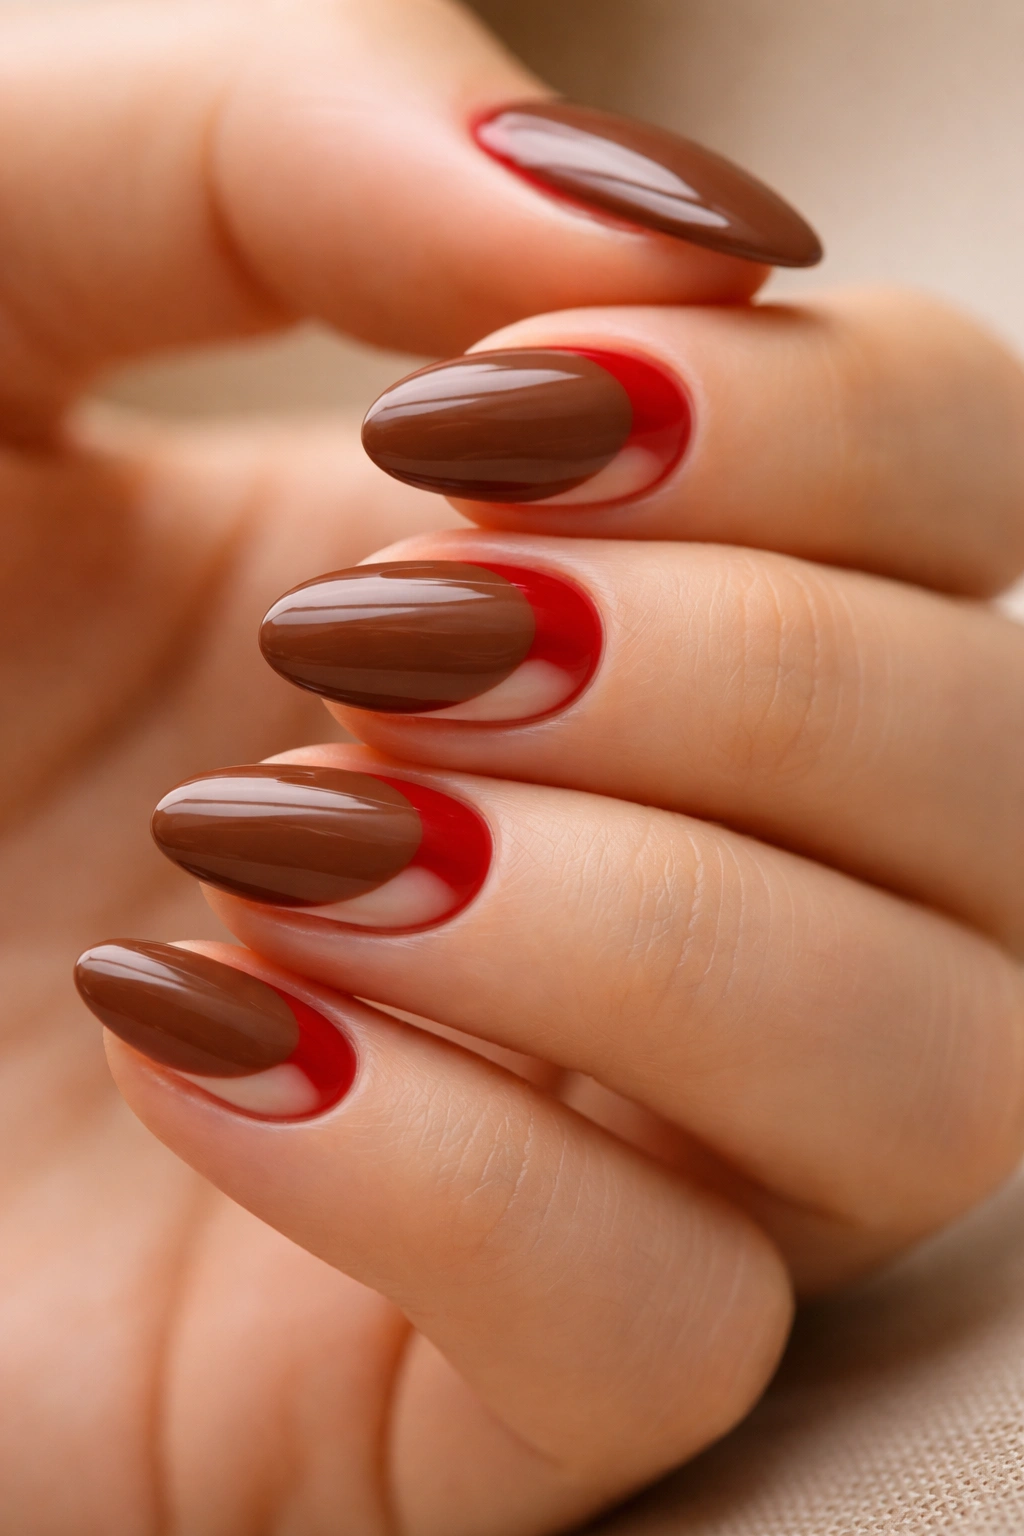
Negative space nail art is the technique that looks most impressive relative to how little technical skill it actually requires. The bare nail acts as a third color — a natural pink or warm beige — sitting between the russet and the scarlet, breaking the design open visually.
On short almond nails, the most effective negative space layout is a thin curved strip running parallel to the cuticle line. Apply russet brown only across the top half of the nail, stopping about 2mm short of the free edge. Apply a thin line of scarlet along the cuticle-adjacent zone, leaving a 1 to 2mm gap of bare nail between the two colors. That exposed strip is the negative space — it gives the design its structure without requiring any additional color.
Slightly uneven lines add character rather than detracting from it. Since the design relies on absence rather than precision, small imperfections disappear once top coat seals everything.
Apply top coat only over the painted sections if you want to preserve the bare-nail look. If the exposed natural nail bothers you, a thin layer of clear base coat over the negative space area gives a polished finish without adding color.
8. Deep Red with Tortoiseshell Brown Swirls
Tortoiseshell and marble both involve irregular patterns, but the similarity stops there. Tortoiseshell is warmer and more organic — amber, chocolate, and rust rather than cold grey veins. On a deep red base, it reads like something between an antique lacquer box and a semi-precious stone.
Breaking Down the Technique
Apply deep red as your base across all nails. While it’s still slightly tacky, use a thin brush or dotting tool to drop small, irregular patches in three shades:
- Dark chocolate brown — roughly 3mm irregular patches scattered across the nail
- Amber or cognac — smaller flecks, 1 to 2mm each, placed near the chocolate patches
- A faint touch of copper or gold — the smallest flecks, just enough to catch light
Don’t blend these in completely. Partial blending with a clean, dry brush softens the edges of the patches just enough to create that mottled, layered look. The irregular spacing matters — no two patches should be the same size or the same distance from each other.
Seal with a high-gloss top coat. The depth that gloss layer adds is what transforms the scattered patches from “random colored dots” into something that genuinely resembles natural tortoiseshell patterning.
9. Cinnamon Brown with Red Foil Accents
Here’s one that takes about 8 minutes total and still looks like it required a full hour.
Cinnamon brown — somewhere between terracotta and classic brown sugar in warmth — serves as a backdrop for metallic accents without looking muddy. Red foil against it reads like a hot coal against ash: vivid, sharp, almost luminous.
Apply cinnamon brown across all nails and cure fully. Apply a thin layer of foil adhesive in whatever shape you want the foil to cover — diagonal strips work well on short nails, as does a cluster of irregular patches near the tip. Wait 45 to 60 seconds for the adhesive to shift from glossy to slightly matte (that color change tells you it’s ready). Press the red foil sheet firmly against the nail and peel away quickly in one direction.
- Better pressure: use the back of a cuticle pusher rather than your fingertip — you get more even contact and cleaner edges
- Second pass: if a patch tears unevenly, press and peel again on the same adhesive spot before it dries completely
- Coverage: 30 to 40% red foil against 60 to 70% cinnamon brown keeps the design rich rather than chaotic
- Sealing: non-wipe gel top coat only — regular top coat dulls foil and causes it to lift within a day
Red foil over a warm brown base creates more visual depth than red foil over a clear or nude base. The dark background adds shadow under the metallic surface, making the foil look richer rather than flat.
10. Cherry Red Half-Moon on Dark Walnut Nails
The half-moon design — sometimes called a lunula design — is one of the oldest nail art formats in existence. It holds up on short almond nails better than most people expect; the compact nail length makes the proportion work naturally. On very long nails, a half-moon arc can look too small relative to the nail body — short nails solve that problem without any adjustment.
Apply dark walnut brown across all nails as your base. Cure completely. Then, using a circular nail art brush or a dotter loaded with cherry red, paint a small curved arch near the cuticle area that mirrors the shape of the natural nail lunula. The arc should span the full width of the nail at its widest point and extend approximately 3 to 4mm toward the center of the nail.
The contrast works because walnut and cherry occupy different positions within the warm color spectrum. Walnut sits in the deep brown-orange range; cherry red sits in the bright red range. They share warm undertones but differ enough in value and saturation to create clear visual separation — they don’t melt together at a distance.
For a cleaner arc, cut a small semicircular hole from a round sticker and use it as a stencil. Press it onto the cured base, paint inside the half-circle, let the cherry red tack for about 20 seconds, then remove the sticker. The result is a more uniform arch than most freehand applications.
11. Red Plaid Pattern on a Chocolate Brown Base

Can you do plaid on short nails without professional tools? Yes — with nail striping tape and two rounds of patience.
The technique uses thin strips of striping tape as a grid guide. Apply chocolate brown as your base and cure completely. Press thin strips of tape horizontally across each nail, spaced roughly 2mm apart. Apply a deep red polish over the taped surface, let it dry to almost-tacky, then peel off the tape slowly. Reapply tape vertically and repeat with a slightly different red — burgundy or wine reads differently from bright cherry, and layering two distinct reds in the grid adds visual depth that makes the pattern read as actual plaid rather than just a colored grid.
Getting the Scale Right on Short Nails
Keep stripe spacing narrow — 2mm between lines or tighter. Wider spacing makes the design look blocky and graphic rather than like woven fabric. Four to five stripes in each direction on a short almond nail is the sweet spot: enough to read as plaid without overcrowding the surface.
The slight irregularity that naturally comes from repositioning tape actually enhances the look here. Perfectly uniform grids feel more like graph paper; slightly varied spacing feels more like real tartan.
12. Matte Brick Red with Glossy Brown Accent Nail
The finish contrast — not the color contrast — drives this design. Most people think of accent nails as a color difference. This version turns that sideways: same warm color family, completely different surface finishes.
Apply matte brick red across three nails on each hand. On the remaining nail (ring finger works well), apply a deep glossy walnut brown. Matte surfaces absorb light; gloss surfaces reflect it. The visual difference between a matte and glossy nail reads almost like two completely different colors, even when the underlying pigments are closely related.
Apply the glossy top coat to all nails first, then apply the matte top coat over only the brick red nails. Doing it in this sequence means if you smudge the matte application, it doesn’t ruin the glossy accent nail.
Worth knowing: matte top coats slightly shift the perceived hue of whatever’s underneath. Brick red under a matte finish picks up a slightly more terracotta quality — which, sitting next to a glossy walnut brown accent nail, creates a warmer, earthier contrast than the polishes themselves would suggest straight from the bottle.
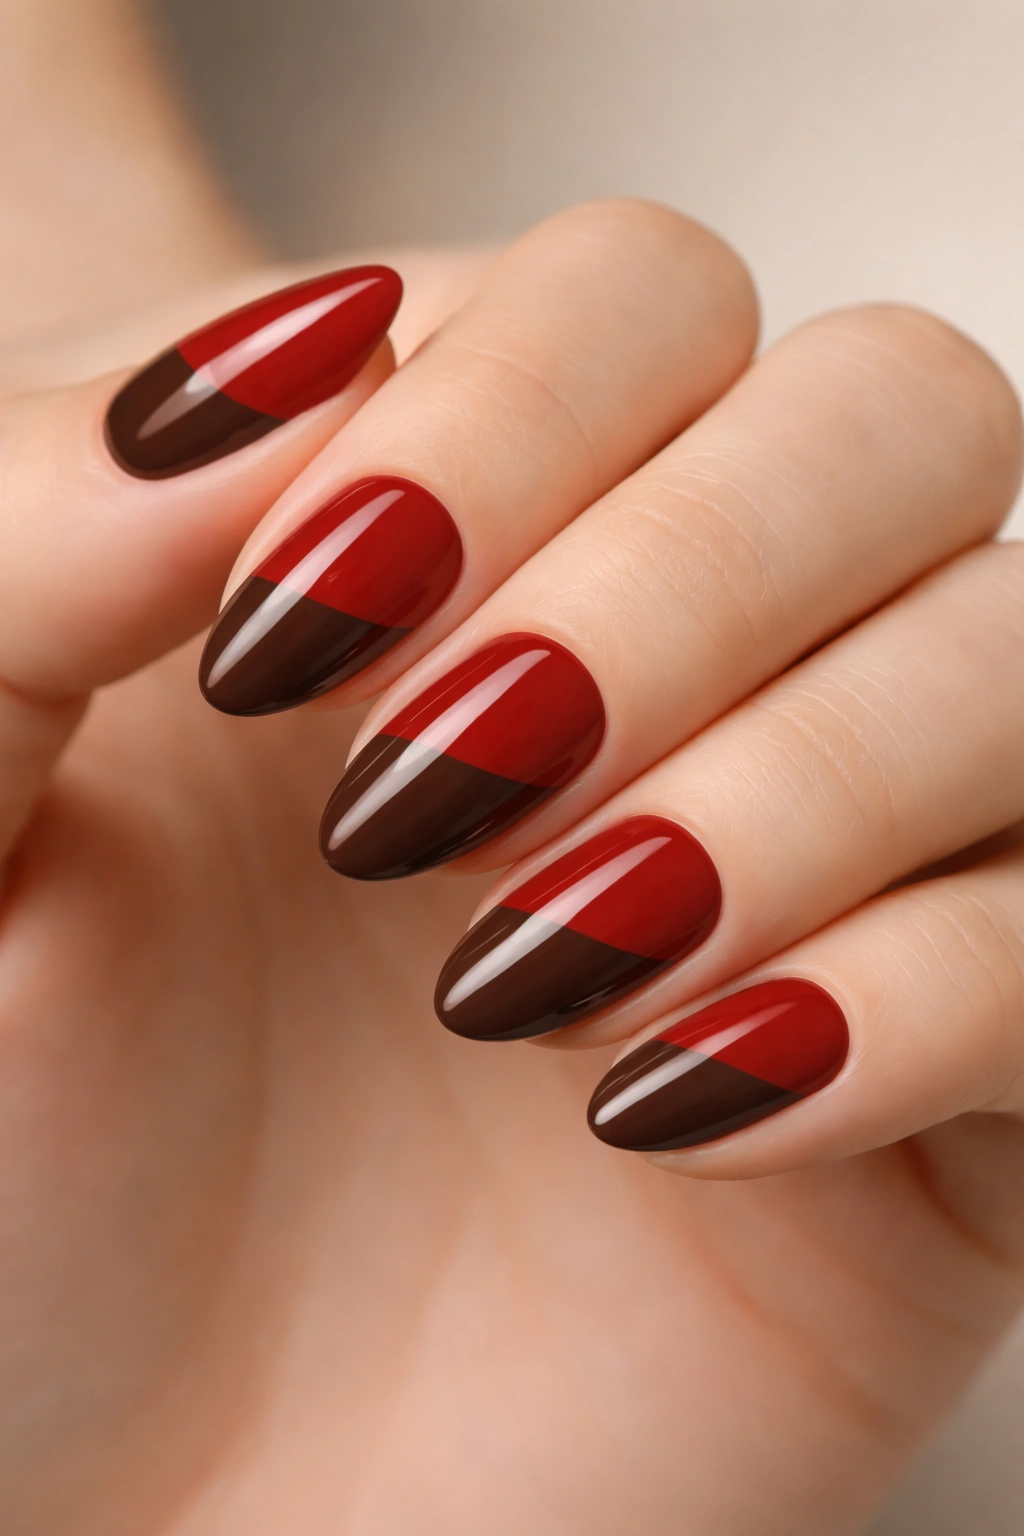
13. Wine Red and Espresso Brown Diagonal Split Design
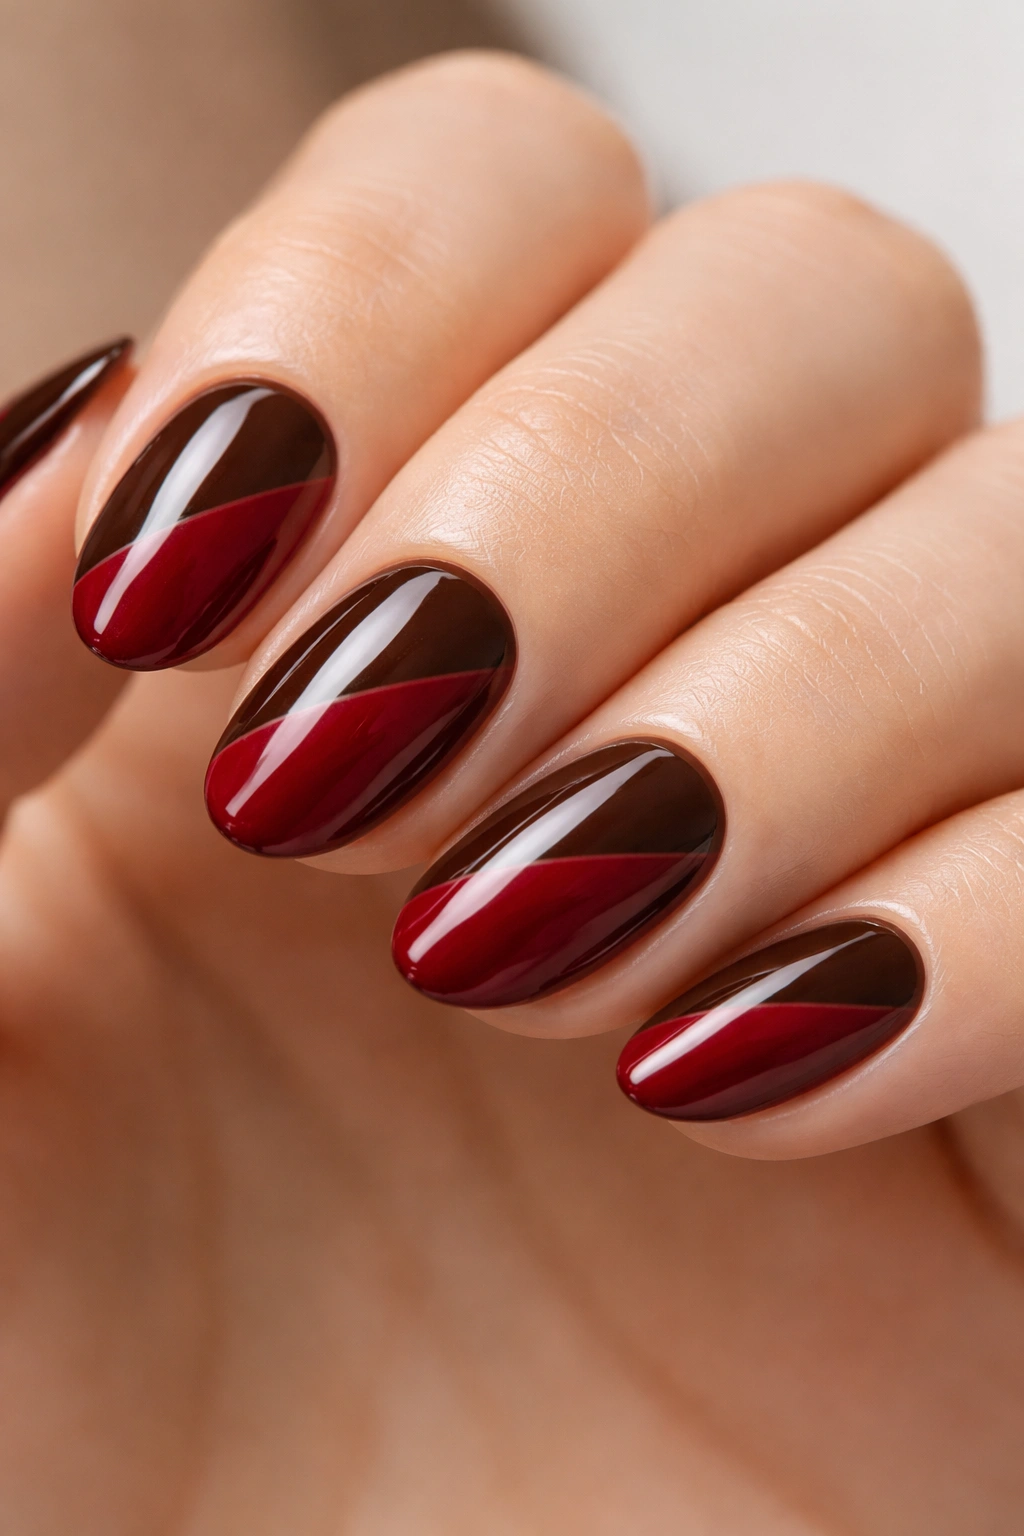
There’s something about a diagonal line on a nail that a horizontal or vertical split doesn’t quite match. The diagonal implies movement on a static surface.
Apply wine red to the lower-left portion of each nail and espresso brown to the upper-right, divided by a clean diagonal line using the painter’s tape method from the color block entry. Position the tape at roughly 30 to 40 degrees from horizontal — too steep and the line reads almost vertical, too shallow and it reads almost horizontal. That 30 to 40 degree range is the sweet spot.
Wine red and espresso are both deeply saturated shades, so the contrast between them is subtle rather than stark. From a distance this reads as a rich, dark monochromatic set; up close, the split between the wine and the espresso is clearly visible. That layered quality — bold from across the room, detailed up close — is exactly what makes it worth doing.
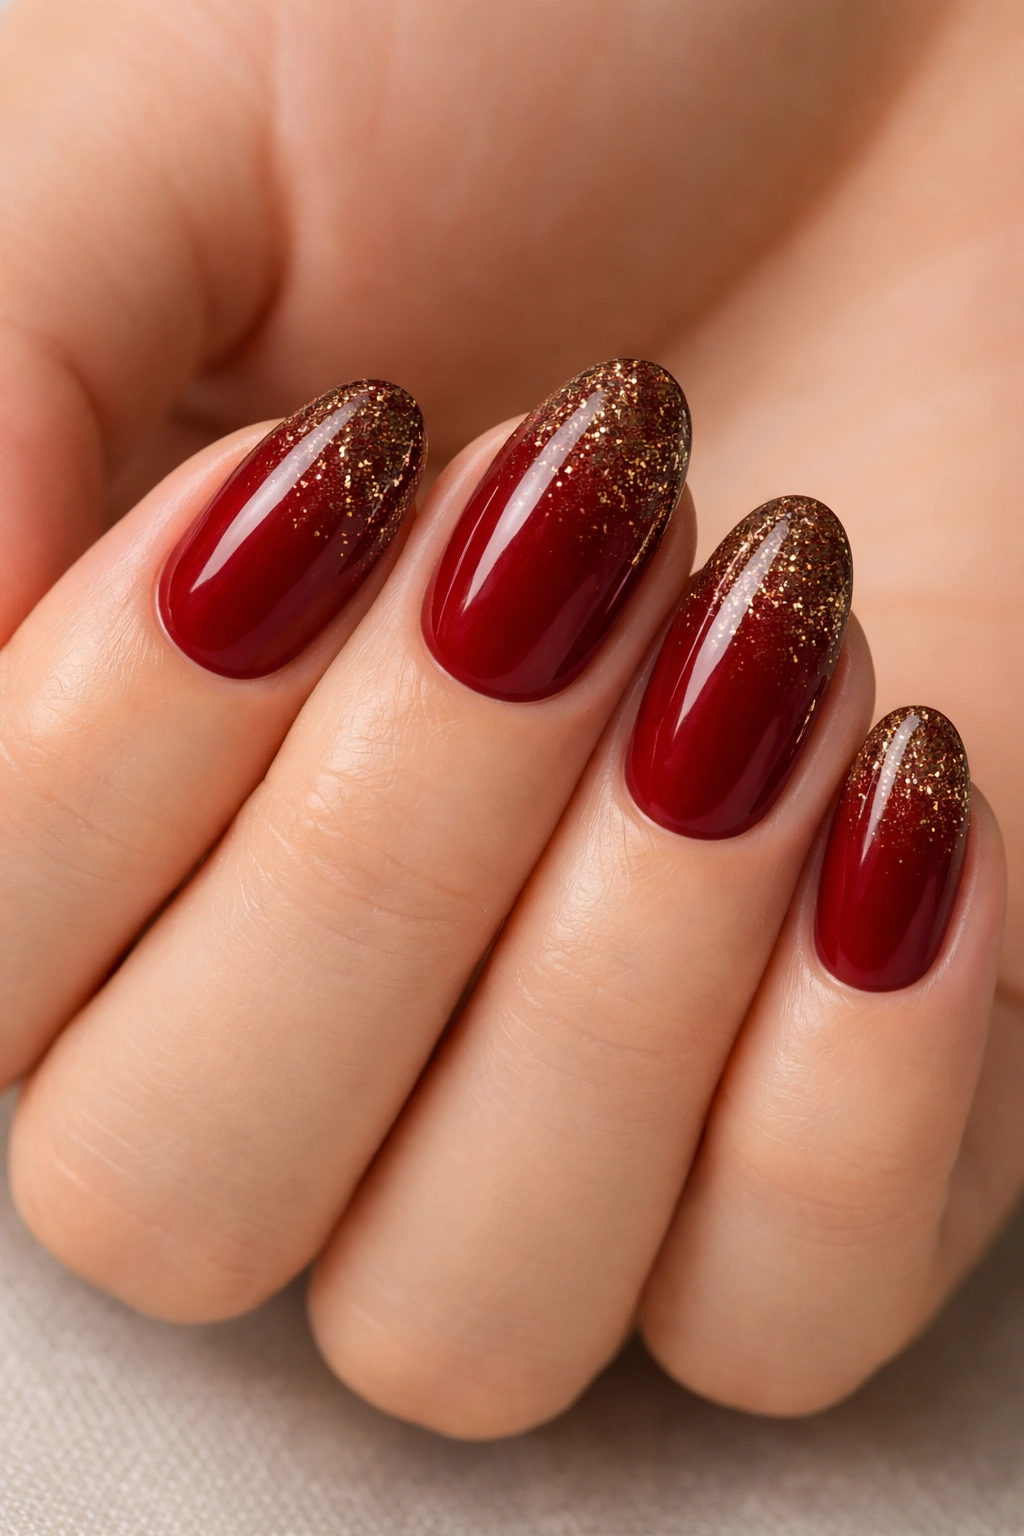
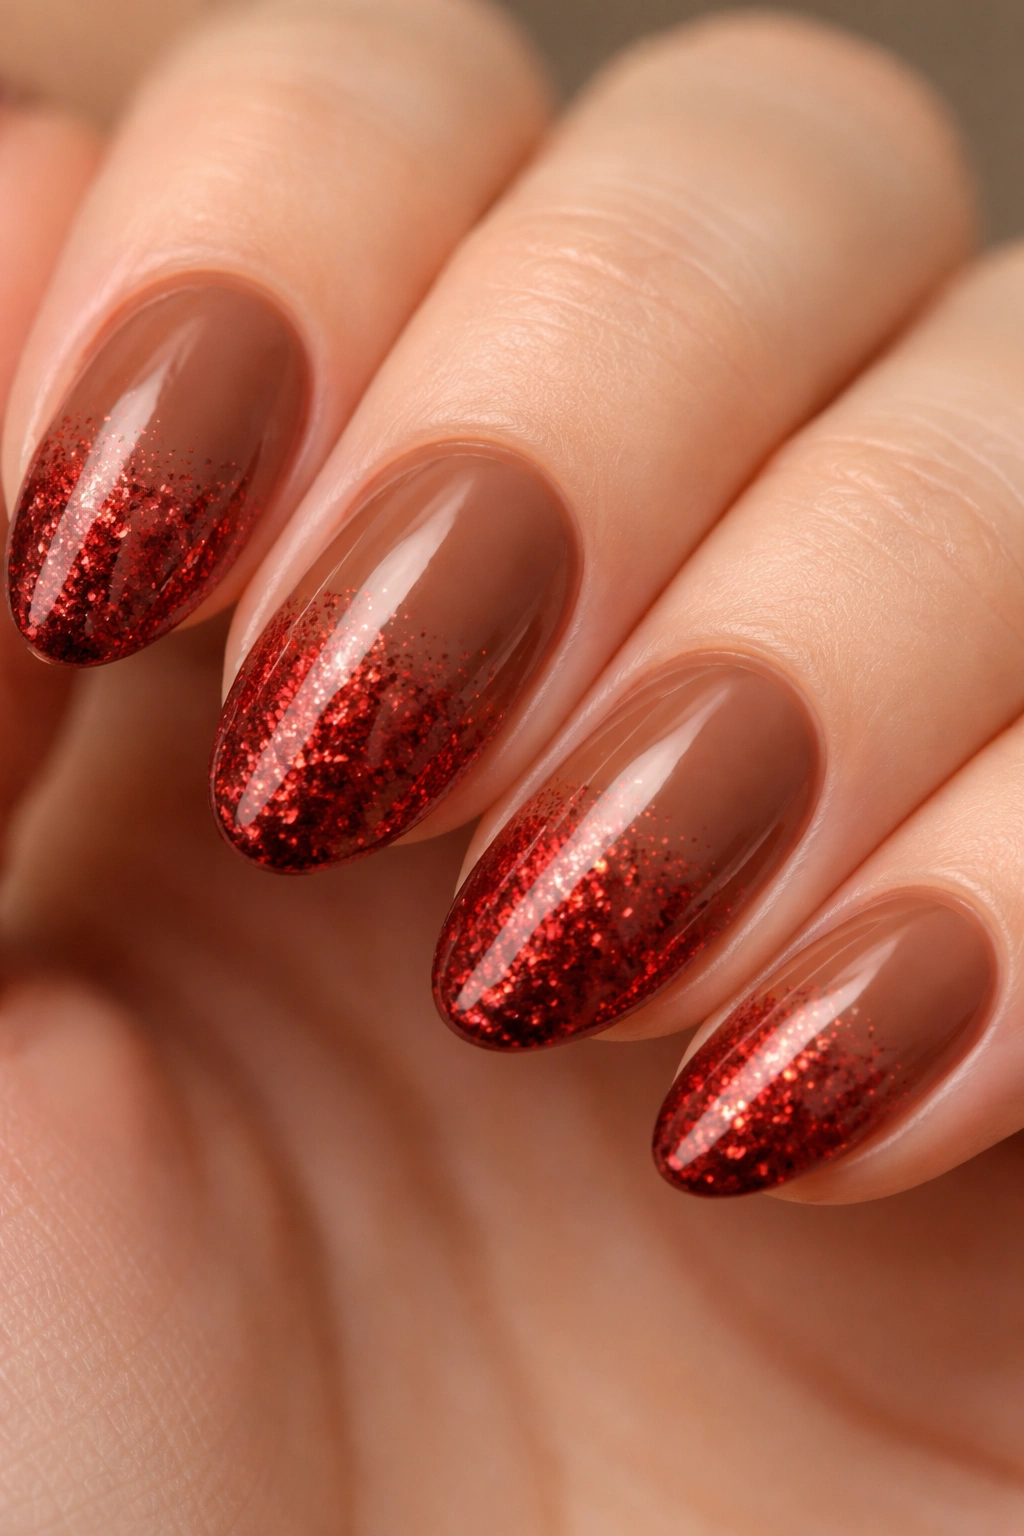
14. Cherry Red with Brown Sugar Glitter Gradient
Glitter gradients on short nails fail for one specific reason: too much glitter applied in the wrong place.
Building a Gradient That Actually Works
Apply cherry red as your base across all nails and cure completely. Cut a small makeup sponge into a thin strip and dab it in a brown sugar glitter polish, then press it onto the tip area only — the top 30 to 35% of the nail. Build up 3 to 4 layers, each layer slightly shorter than the last, so glitter concentration increases as it approaches the free edge. This creates a natural fade rather than a hard line.
Why the Color Combination Works
Brown sugar glitter — warm gold-bronze particles in a clear or tinted base — reads as a dimensional version of brown against cherry red beneath it. The particles catch light differently at every angle, giving the nails a three-dimensional quality rather than a flat appearance. This effect is noticeably more striking on the tapered almond tip than on a flat square edge because the narrow tip concentrates the glitter into a single bright point.
Pro tip: Finish with a thick layer of no-wipe gel top coat to fully encase the glitter particles. Glitter that isn’t completely sealed catches on fabric and peels within a couple of days, regardless of how carefully the design was applied.
15. Dark Auburn Base with Chrome Red Accent Nail
Dark auburn polish sits right at the intersection of red and brown — and that positioning makes it an unusually strong base for a chrome accent nail.
Apply dark auburn across all nails. On one accent nail, apply a deep black base first — chrome powder shows its truest, most mirror-like color over black or very dark bases, not over the colored base directly. Then, using a silicone chrome applicator or the pad of a clean finger, rub a cherry red or fire engine red chrome powder over the accent nail in firm, even circular motions. The powder adheres through friction rather than adhesion, building up a mirror-like metallic surface in about 30 to 40 seconds of consistent rubbing.
The reason this pairing makes sense beyond just aesthetics: auburn already contains visible red pigment. The chrome accent on the ring finger echoes and amplifies the red already present in the base color, creating a visual connection across the full hand. The result feels coordinated without looking matchy.
Seal chrome nails with a no-wipe gel top coat only. Regular top coat — even gel top coat that requires wiping with alcohol — clouds the chrome effect completely and turns the mirror surface into something flat and dull.
16. Toffee Brown Base with Red Floral Nail Art
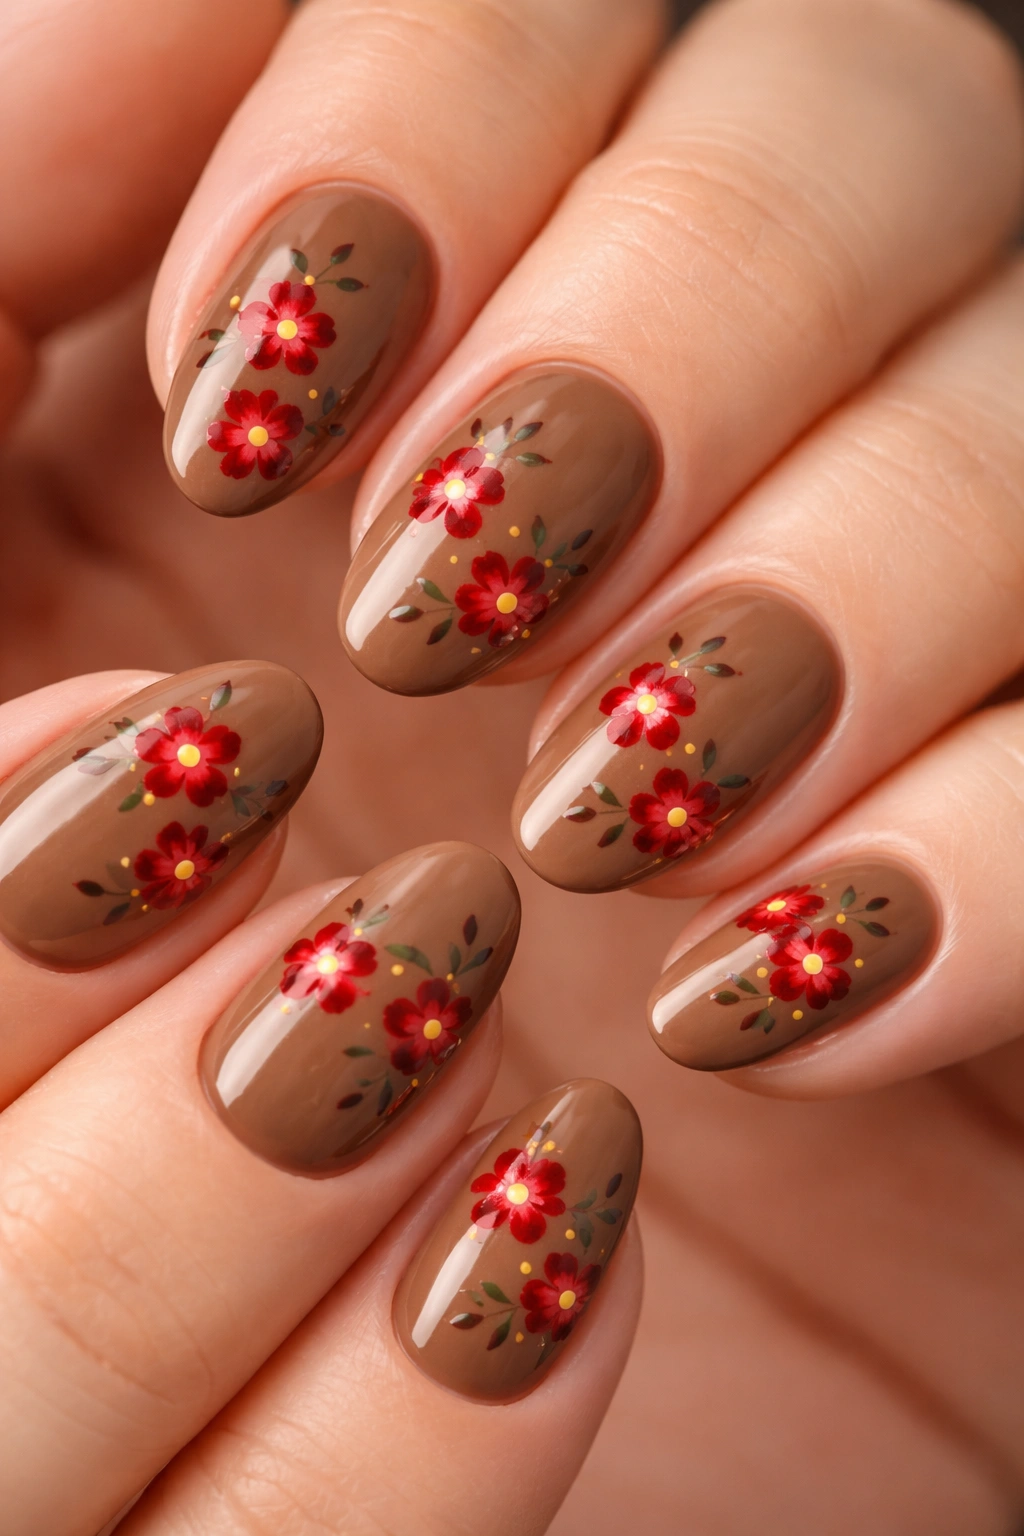
Toffee brown is an underused nail base — most people reach for chocolate or caramel, and toffee gets overlooked. That’s a mistake, especially for this design.
Toffee reads golden-brown, not red-brown, which creates cleaner contrast against red florals on top. If the base is too close in value to the red, the flowers disappear into the background rather than sitting above it.
Apply toffee brown across all nails as your base. Using a small dotting tool, place 5 red dots in a loose circular arrangement to form a five-petal flower. Don’t aim for precision — slightly uneven petals look more natural than perfectly uniform circles. A dot of deep wine red at the center of each flower adds shadow and depth. For leaf details, a thin striping brush loaded with a shade one step darker than the toffee base can add simple curved lines extending from each flower center.
Press slightly harder with the dotting tool on one side of each petal to create a slightly larger dot on that side — this asymmetry mimics the natural shadow on a rounded petal surface. Two to three small flowers per nail on a short almond shape is enough. More than three crowds the design and loses the open, airy quality that makes floral nail art look good at a small scale.
17. Copper Brown with Sheer Red Jelly Overlay
What if the whole appeal isn’t an opaque design at all, but something translucent and glassy?
The jelly overlay technique uses a sheer, high-gloss polish to tint the nail without fully covering what’s beneath it. Apply copper brown as your base — slightly sheer copper lets the nail bed show through and adds warmth, while a full-coverage copper-brown creates more depth.
Apply one coat of a sheer red jelly polish over the entire nail. The sheerness means the copper-brown beneath shows through, and the layered mix of warm copper and transparent red creates a color that doesn’t exist in any single bottle. It reads like deep amber in warm light and like dark cherry under cool fluorescent lighting. The color shifts noticeably depending on where you’re standing, which is part of what makes this combination genuinely interesting to wear rather than just interesting to look at in photos.
A second coat of the jelly overlay deepens the red without losing the translucent quality. Two coats is the maximum before it starts reading more opaque than glassy. A gel top coat over the final layer amplifies the depth considerably — that last coat of gloss is what gives the nails their glass-like quality.
18. Tomato Red with Dark Chocolate Linear Stripes
Compared to the geometric line art on a mocha base from earlier in this list — where red is the mark-making element on brown — this reversal changes the feeling entirely. The red becomes the dominant base and the brown becomes the line work, which shifts visual weight and produces a bolder, warmer result.
Apply two coats of tomato red — specifically an orange-leaning red, not a blue-toned one — across all nails. Let it cure completely. Then use nail striping tape or a very fine striping brush to lay thin, parallel dark chocolate stripes running lengthwise along each nail, from tip to base. Space the stripes approximately 2 to 3mm apart. Two to three stripes per nail on a short almond shape reads clean; four or five starts to feel crowded.
This specific color combination appears in traditional textile patterns across multiple cultures — certain styles of tartan, vintage silk neckwear, hand-painted folk ceramics. It has a heritage quality that feels grounded rather than trend-dependent. A glossy top coat sharpens the contrast between the red base and chocolate stripes; matte dulls it slightly, which works if you prefer a quieter version of the design.
19. Sienna Brown with Red Glitter Tips
Sienna bridges orange, red, and brown into one pigment — and that bridging quality is exactly what makes it a clean partner for a red glitter tip. The sienna and the glitter don’t contrast sharply; they step from one to the other in a way that feels continuous rather than cut off, like two colors from the same family rather than two colors that happen to be next to each other.
Apply sienna brown in a flat, opaque coat across all nails — this base covers roughly 65 to 70% of each nail, from cuticle to mid-nail. Then, using a makeup sponge strip, dab a fine red particle glitter polish onto the tip area, building up 3 light coats and extending about 30 to 35% of the nail’s length downward. The last 5mm of overlap where the glitter meets the sienna creates the natural transition zone.
Fine glitter — the kind with tiny, close-packed particles rather than large hex shapes — reads as pure color at this scale rather than texture. Three light coats build enough density to look fully saturated at the very tip while staying translucent and sheer where it overlaps the sienna base. The tapered almond tip concentrates this glitter into a single narrow point, which creates a comet-like quality that reads clearly even on a compact nail.
20. Red and Brown Abstract Watercolor Effect
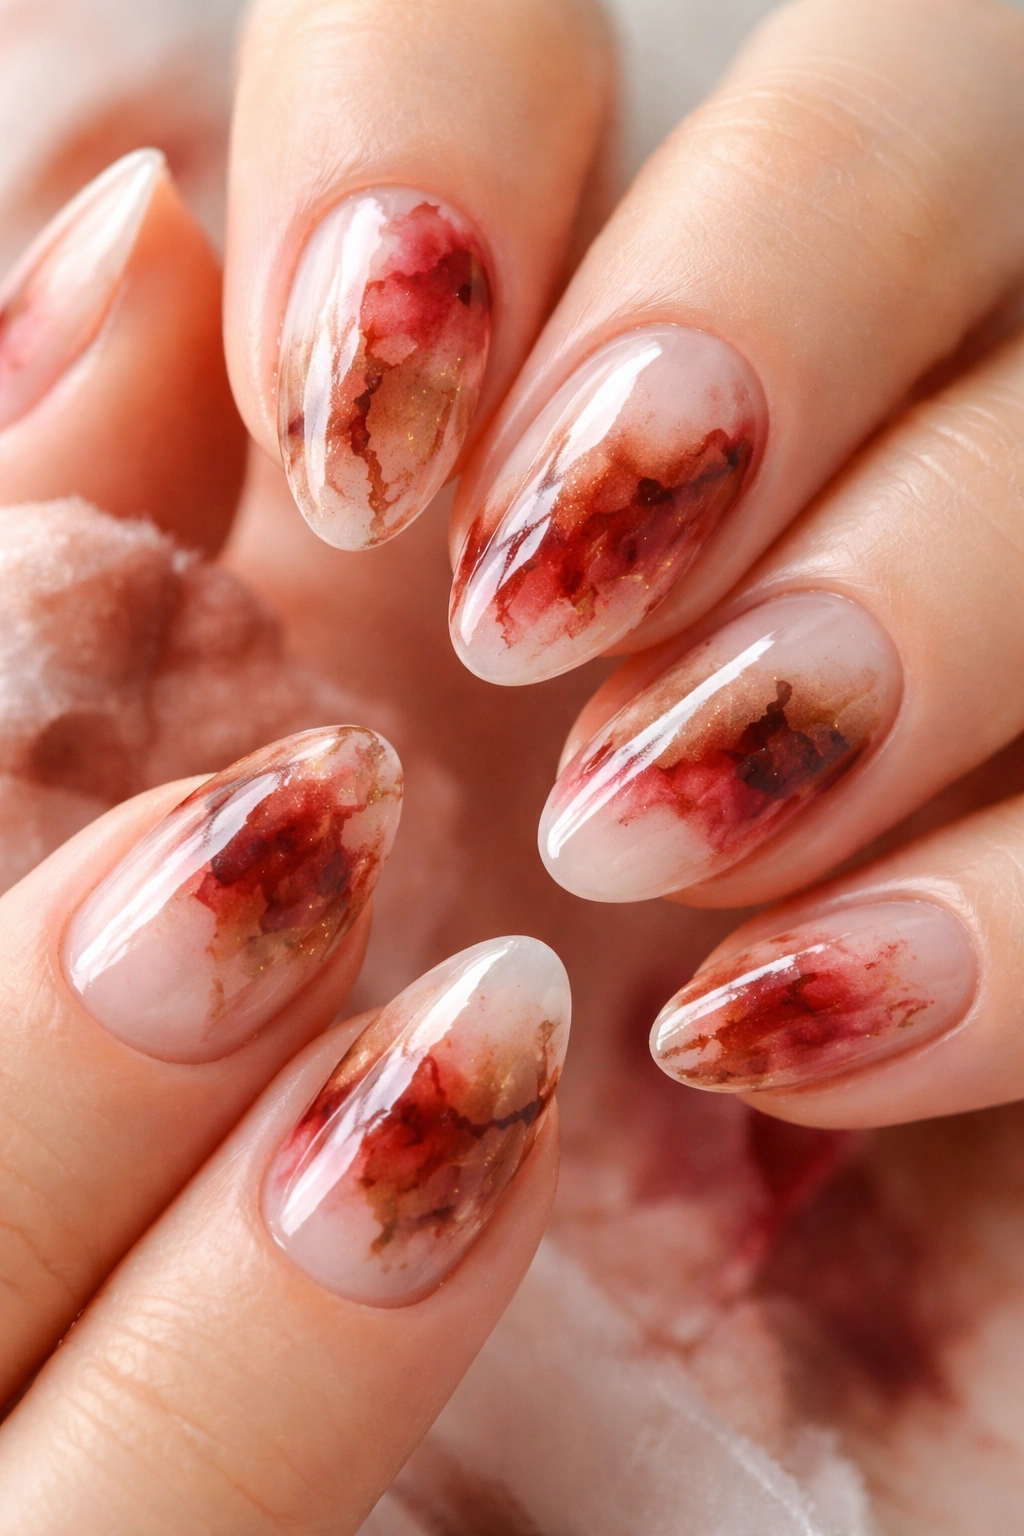
The watercolor effect is the one technique in this list that rewards impatience and punishes perfectionism.
Why the Technique Works Differently
Apply a clear or sheer white base to create a reflective surface for the color washes. While the base is still wet — timing is critical here, don’t let it dry — drop a small pool of sheer red onto one section of the nail using a thin brush. Drop a pool of transparent brown or burnt amber onto a different section. Where the two wet layers meet and bleed into each other, they’ll bloom and spread in irregular patterns that genuinely mimic watercolor paint on wet paper. The shapes that form are unpredictable in the best way.
Making It Work Consistently
- Wet-on-wet is non-negotiable: once the base layer dries, the bleeding effect doesn’t happen — the new color just sits on top as a flat, opaque layer
- Use sheer, thin consistency: thick or fully opaque polish doesn’t spread; it sits in a fixed blob where you placed it
- Leave it alone: once the two colors are meeting and blooming, leave them for 15 to 20 seconds — overworking the wet polish muddles everything into flat brownish grey
- Finish choice matters: a glossy gel top coat makes the design look glassy and luminous; a matte top coat makes it read more like actual watercolor on paper — both are valid, and both look intentional
The randomness of this technique is a feature, not a flaw. No two nails look identical, and the color variation across ten short almond nails creates a cohesive but not rigid look — the kind of quality that makes nail art feel hand-made rather than stamped.
Final Thoughts
Red and brown together do something neither color achieves alone. Red is bold but can tip into aggressive on its own; brown is earthy but reads flat without something warm to push against. Together on short almond nails, they create a combination that’s rich, wearable, and visually interesting without demanding constant attention from whoever’s wearing it.
The designs that hold up best day-to-day are the simpler ones — the gradient, the color block, the French tip variation — because fewer edges means fewer places for chips to start and fewer details to maintain through a busy week. The more intricate designs (tortoiseshell, watercolor, floral art) are worth the extra effort for occasions when you have time to be careful and want the result to be memorable.
Short almond nails are more forgiving than they look, and the warm red-brown palette is more flattering than it gets credit for. Start wherever your current skill level sits — there’s more room to experiment here than most nail guides suggest.
