

Lavender on almond nails has a way of looking soft from across the room and precise up close. The shape does a lot of the work. That tapered sidewall and rounded point give pastel color a cleaner line than square tips ever do, and they stop lilac from tipping too far into sugary territory.
These lavender almond nail ideas work because the shade can move in almost any direction you want. Sheer and glossy looks airy. Chrome feels sharper. Matte turns the whole thing into something quieter and more graphic. A tiny shift in finish changes the mood fast, and that is the part most people miss when they are choosing a manicure.
The other thing worth paying attention to is length. Short almond can look neat and practical if the taper stays gentle. Medium and long almond give you more room for ombré, cat-eye, line art, and little accents that need a bit of breathing space. Clean cuticle work matters too. Lavender shows every rough edge.
Start with the finish, then decide how much detail you want to live with for the next two weeks. That order saves a lot of regret.
1. Lavender Almond Nail Ideas with a Sheer Jelly Finish
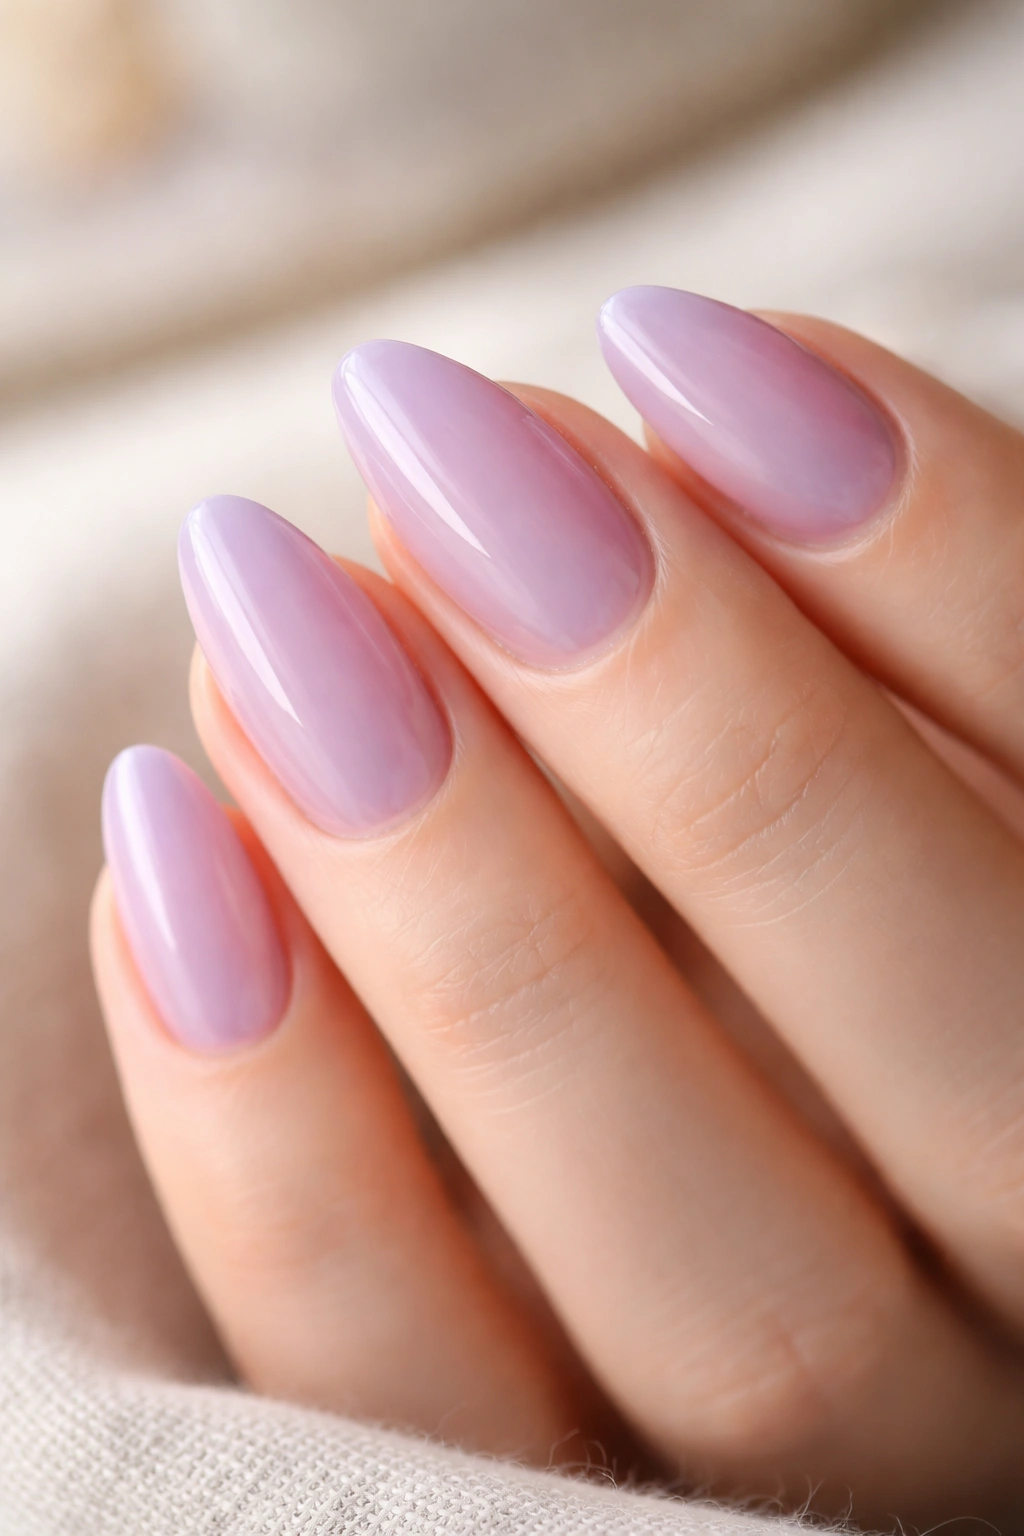
Sheer lavender is the easiest way to make almond nails look polished without feeling heavy. The color sits somewhere between a wash and a tint, which means you still see a hint of the natural nail under it. That little bit of transparency keeps the shape looking light, especially if your almond tips are medium length.
Why It Works
A jelly finish softens the whole manicure without making it disappear. It also makes grow-out less obvious, which is handy if you do not love staring at a harsh line after a week.
- Use one milky base coat under the lavender if your nail bed is uneven.
- Apply one or two thin coats of sheer lilac polish, not three heavy ones.
- Keep the free edge visible by stopping the color a hair before the tip gets too opaque.
- Seal with a high-gloss top coat so the surface stays glassy, not chalky.
Pro tip: If the coat starts to look foggy instead of translucent, you’ve gone too thick. Thin layers are the whole point.
This is the version I like for people who want lavender almond nails without the salon chair drama. It looks calm, clean, and a little expensive in the best way. Not flashy. Not dull either.
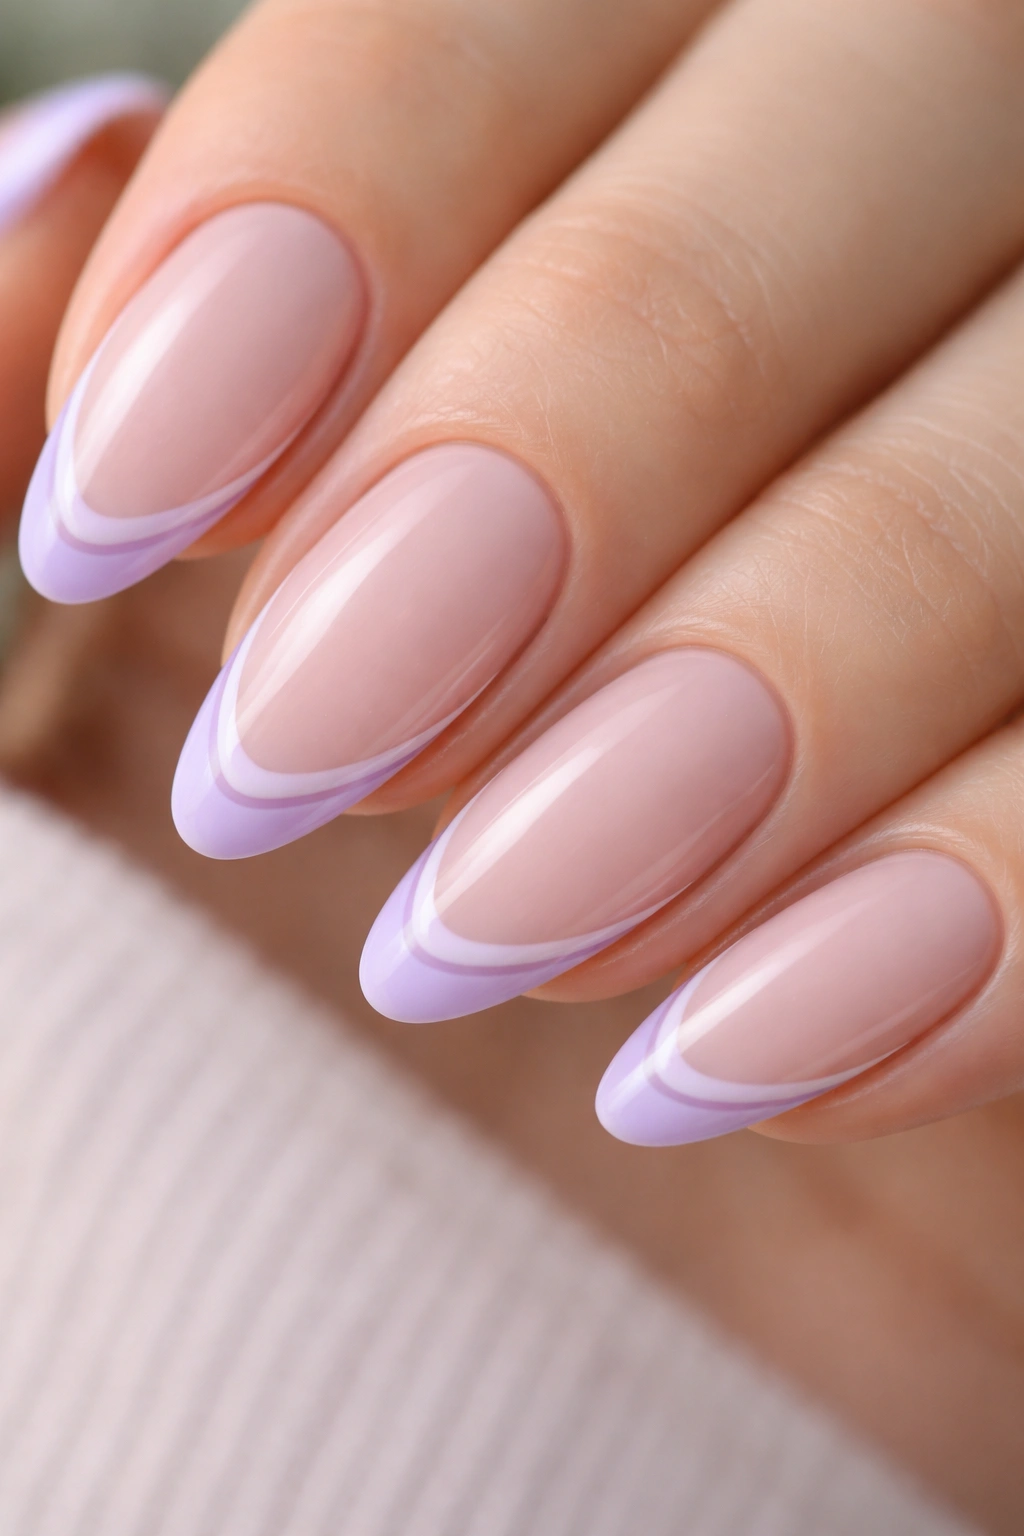
2. Milky Lavender French Tips on Almond Nails
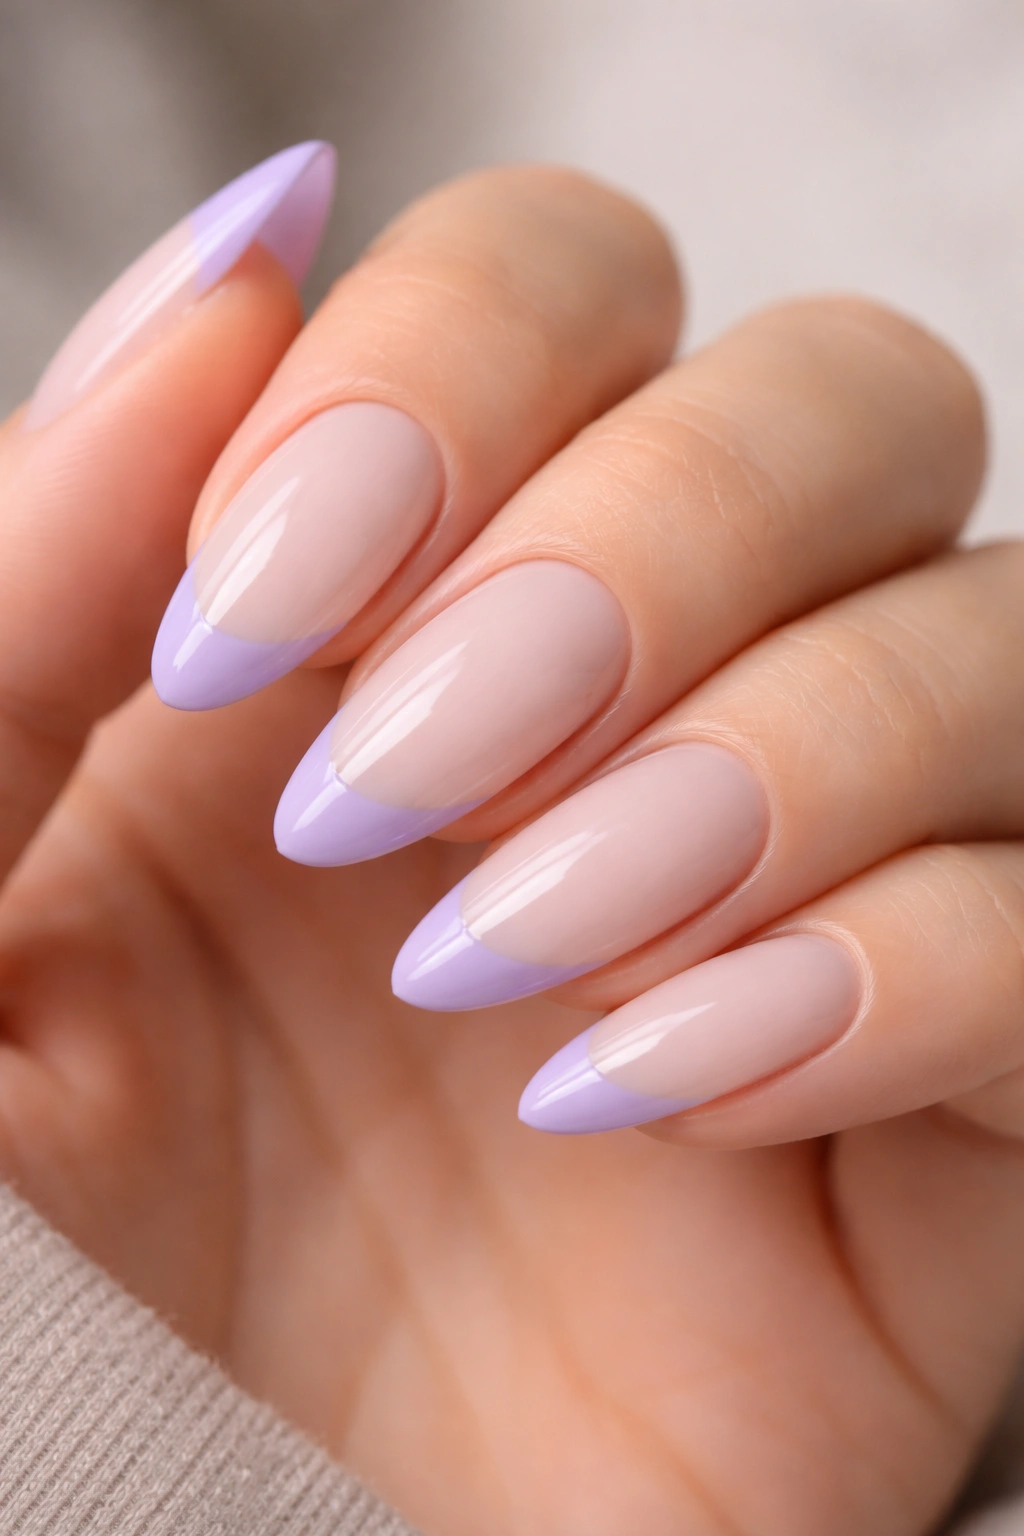
A French tip in lavender is sharper than a solid pastel set, and that’s exactly why it works so well on almond nails. The line at the tip keeps the design from floating away, while the milky base gives the color something to sit on. The result feels tidy, but not stiff.
The trick is keeping the tip slim. A lavender French that’s too thick starts fighting the almond shape. A thin, rounded smile line follows the contour of the nail and makes the whole finger look longer. I like this one on short to medium almond because it doesn’t ask for much length to look finished.
Use a sheer pink or milk-white base, then paint the tip with a soft lavender cream. If you want the set to look cleaner, keep the tips all the same width. If you want a little movement, let the ring finger tip sit a touch deeper than the rest. Tiny shifts like that stop the manicure from looking stamped on.
And yes, this is one of those lavender almond nail ideas that works with almost anything you wear. Denim, linen, black knits, wedding guest dresses, all of it. The manicure does its job quietly.
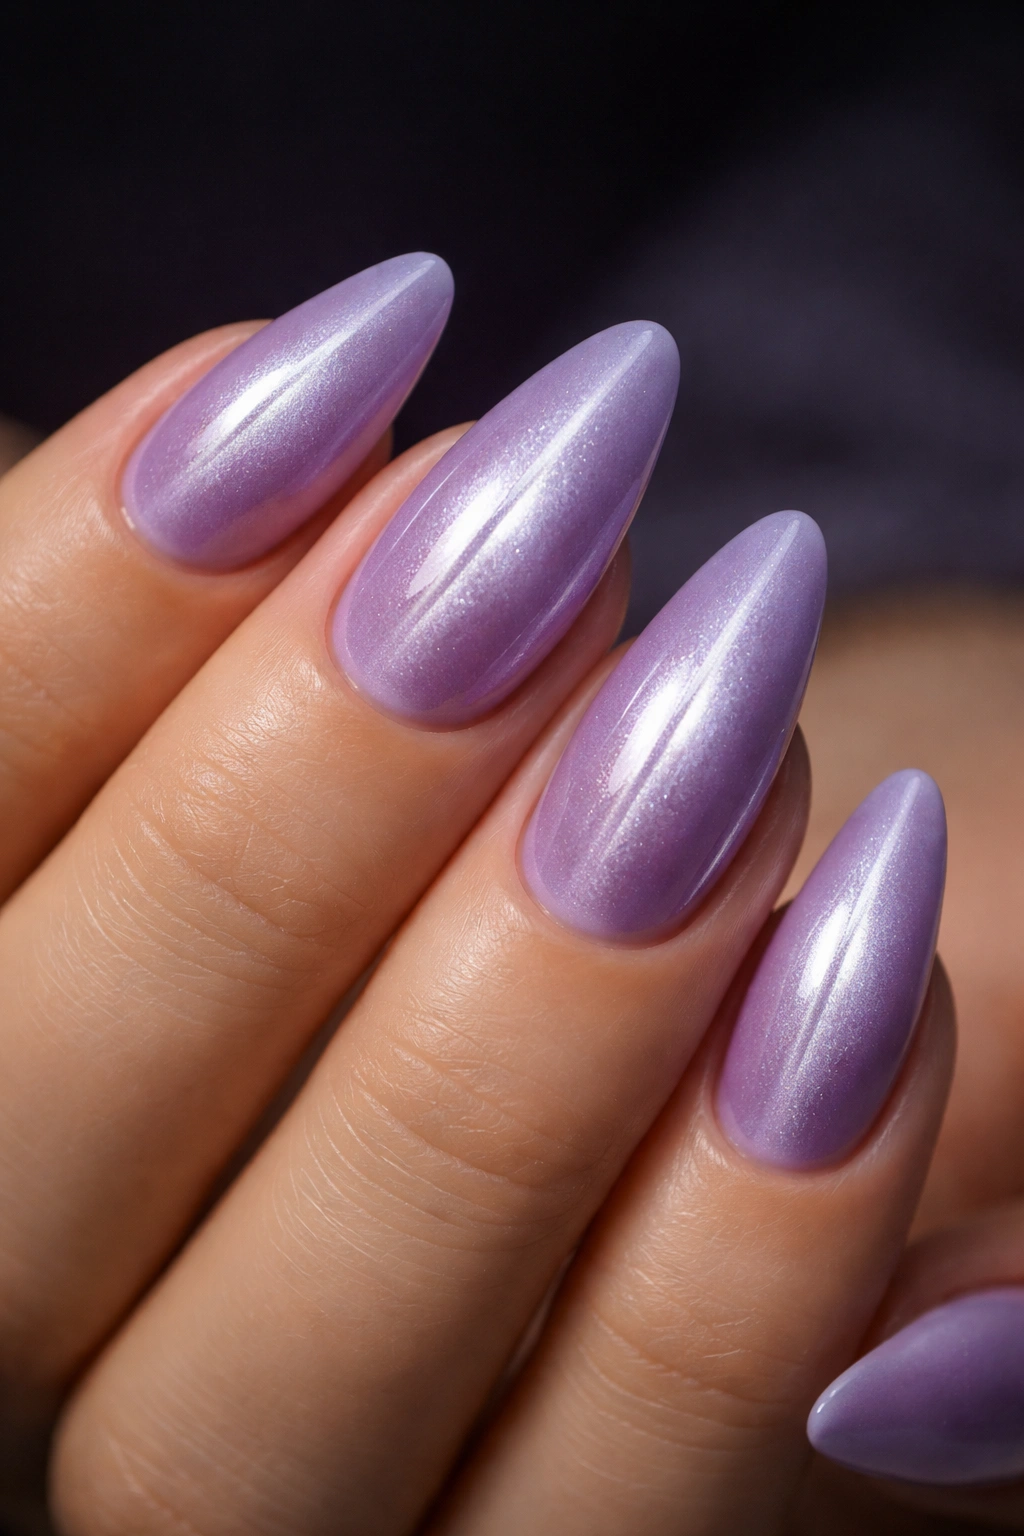
3. Lavender Chrome Almond Nails with a Soft Mirror Finish
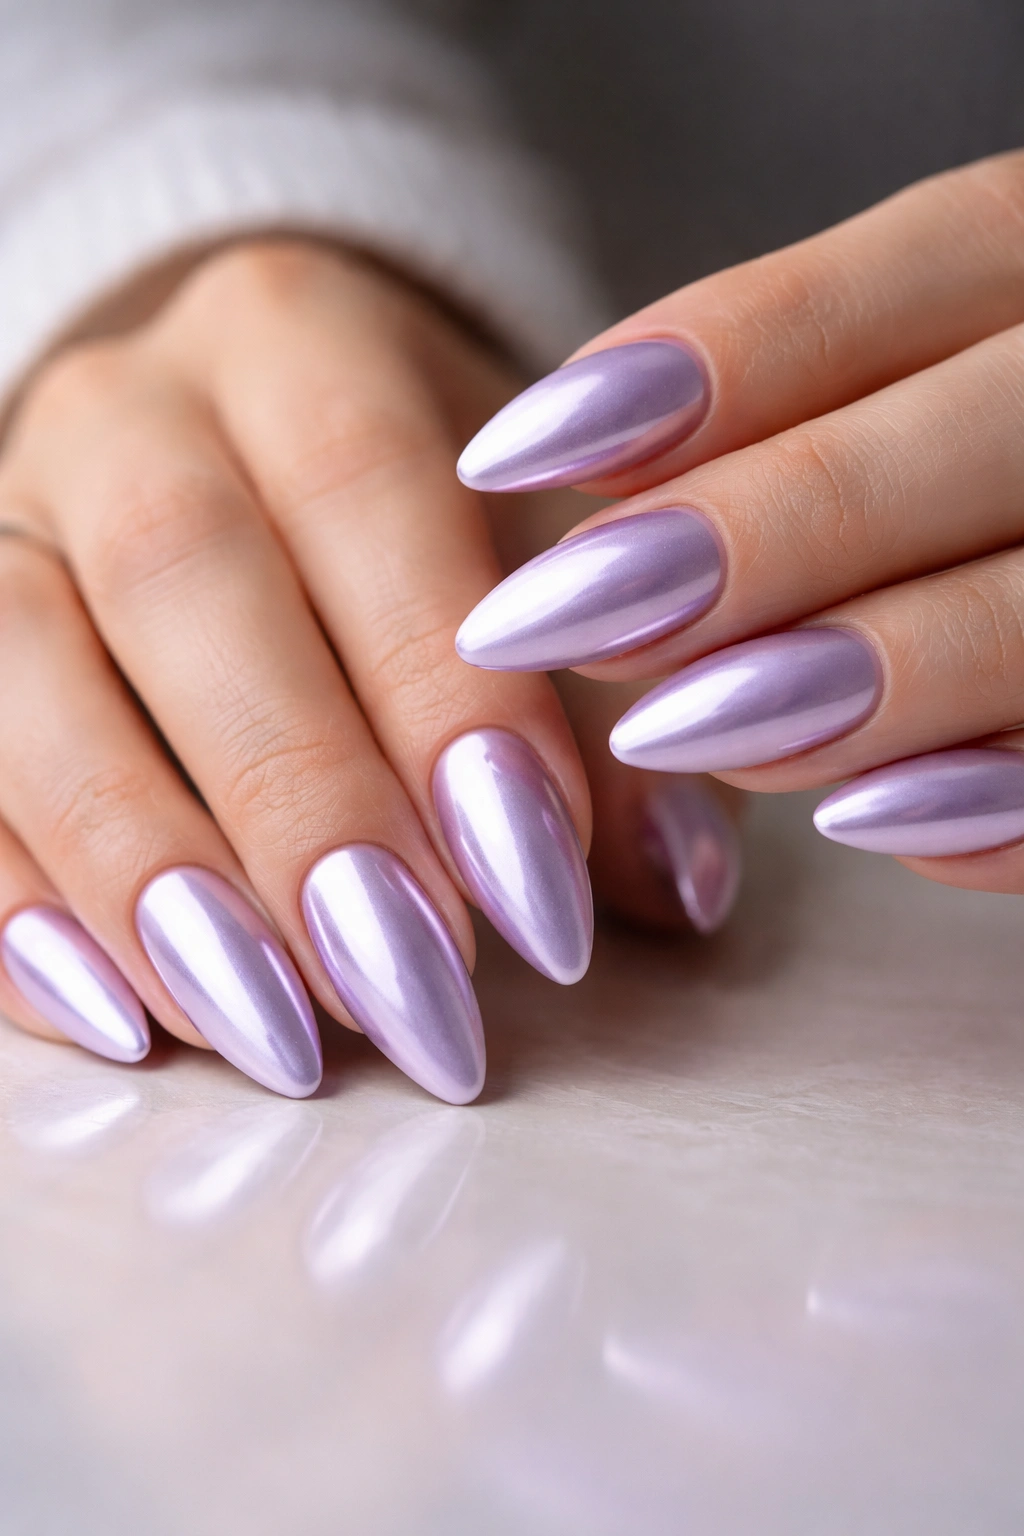
Why does chrome look so good on almond nails? Because the shape gives the shine a clean runway. The tapered edge catches the reflective powder, and that makes even a pale lavender base feel more deliberate. Chrome changes the mood in one step.
A good lavender chrome manicure starts with an opaque pastel base, not a sheer one. Once that base is cured and topped with a no-wipe top coat, you rub in the chrome powder until the surface turns smooth and reflective. Seal the free edge carefully. Chrome chips at the tip faster than people expect if the edge is left thin.
What Makes It Different
The finish does most of the talking here, so the color doesn’t need to be loud. A cooler lavender chrome reads sleek and almost icy. A warmer lilac chrome leans softer, closer to pearl.
This is the set I’d pick if you like jewelry that’s simple, maybe silver hoops or a slim watch. It sits in the same lane. Not boring. Not screaming either. And on almond nails, that shine has room to move.
4. Matte Lavender Nails with Glossy Edge Lines
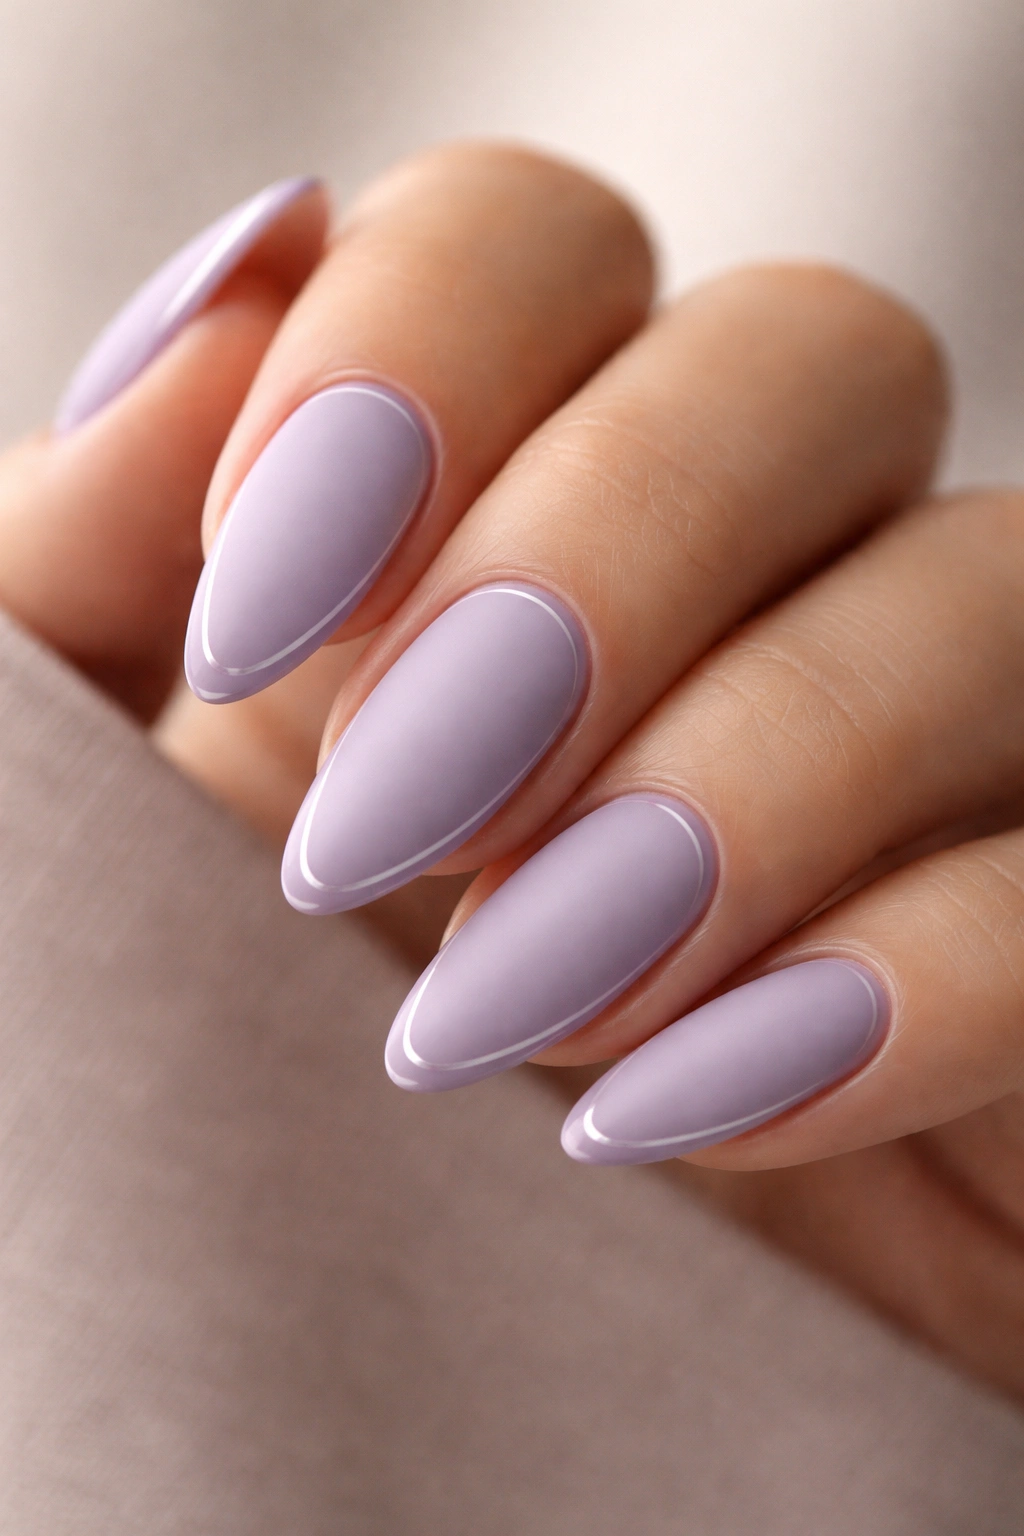
If you like a manicure that reads tidy from a distance and still has a trick up its sleeve, matte lavender with a glossy contour line is hard to beat. The matte finish flattens the color a little, which makes the almond shape look more graphic. Then the gloss line cuts across it and brings the whole set back to life.
This design works best when the line is thin. A 1 to 2 mm striping line around the cuticle or along one side of the nail is enough. If the glossy detail gets too wide, the contrast turns messy fast. You want the eye to notice the difference in texture before it notices the size of the line.
- Start with a solid lavender base on all nails.
- Add a matte top coat and let it set fully.
- Paint the contour line with a glossy striping gel or thin brush.
- Keep the line in the same place on each nail so the set stays cohesive.
The nice part is that it looks more complicated than it is. It isn’t. But it does look edited, and that matters.
5. Lavender Ombré That Fades into Nude

A lavender ombré fade looks like the color was brushed on lightly and then softened at the edges. That’s the appeal. On almond nails, the fade follows the taper in a way that feels natural, not forced. You get the softness of pastel without a hard color block sitting at the cuticle.
The cleanest version starts with a nude or milky base and lets lavender gather toward the tip. If you want the manicure to feel softer, reverse it and keep the deeper color closer to the cuticle, then pull it out toward the center of the nail. Both versions work. The choice depends on whether you want the nails to look longer or fuller.
A sponge can work, though I prefer a dense makeup sponge or a small gel brush for more control. Pat the color on in thin passes, cure or dry between layers, and keep building the fade until the middle looks feathered, not striped. A good ombré should look like one color easing into another, not two coats arguing.
The biggest mistake is trying to force the blend in one pass. That rarely ends well. Slow wins here.
6. Tiny White Florals on a Lavender Base
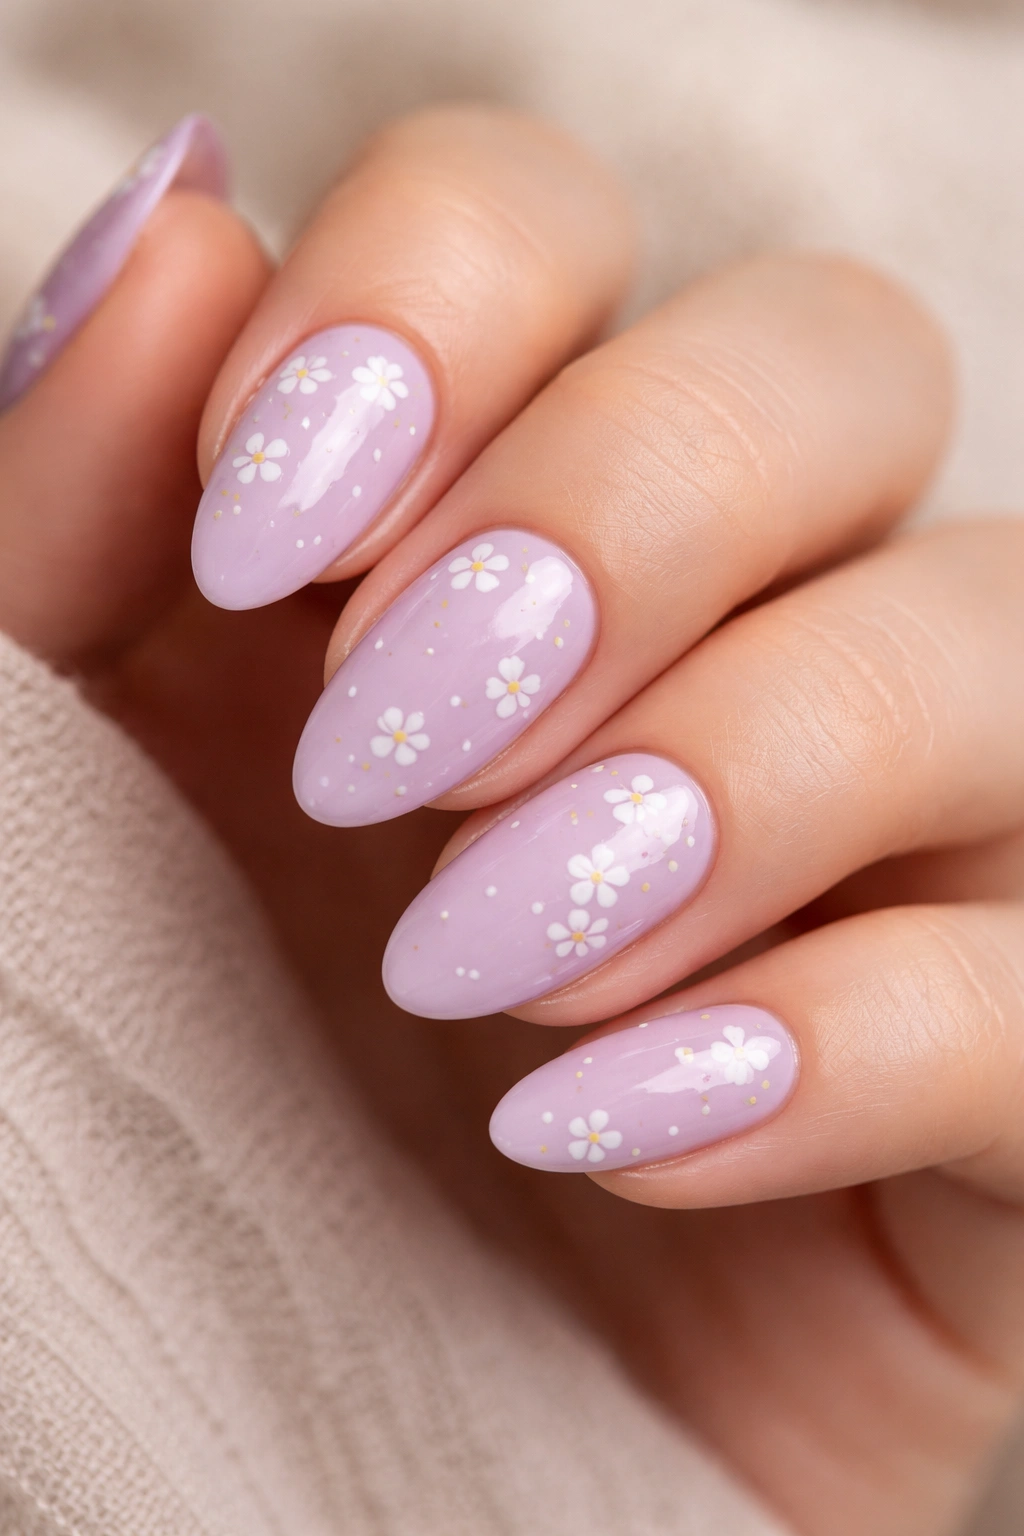
Unlike a full floral set, tiny white blossoms give lavender room to breathe. That matters on almond nails, which already have a graceful shape and do not need a lot of extra noise. One or two small flowers on the ring finger, maybe a soft cluster on the thumb, is usually enough.
This is the manicure for someone who wants the color to feel a little sweet but not cute in an overdone way. The base can be sheer lavender or a creamier pastel, and the flowers should stay small enough that you can still see the nail around them. I like five-dot petals, a tiny yellow or gold center, and a few thin leaves if the nail has enough space.
What Makes It Different
Full floral sets can tip into craft-store territory fast. Small florals avoid that. They keep the manicure light and give the almond shape a gentler read.
This design also works well if you wear rings. The little white petals echo the metal without fighting it. If you want the flowers to look more modern, leave a patch of negative space around each one. A crowded floral design can flatten the whole nail.
7. Lavender Aura Nails with a Soft Center Glow
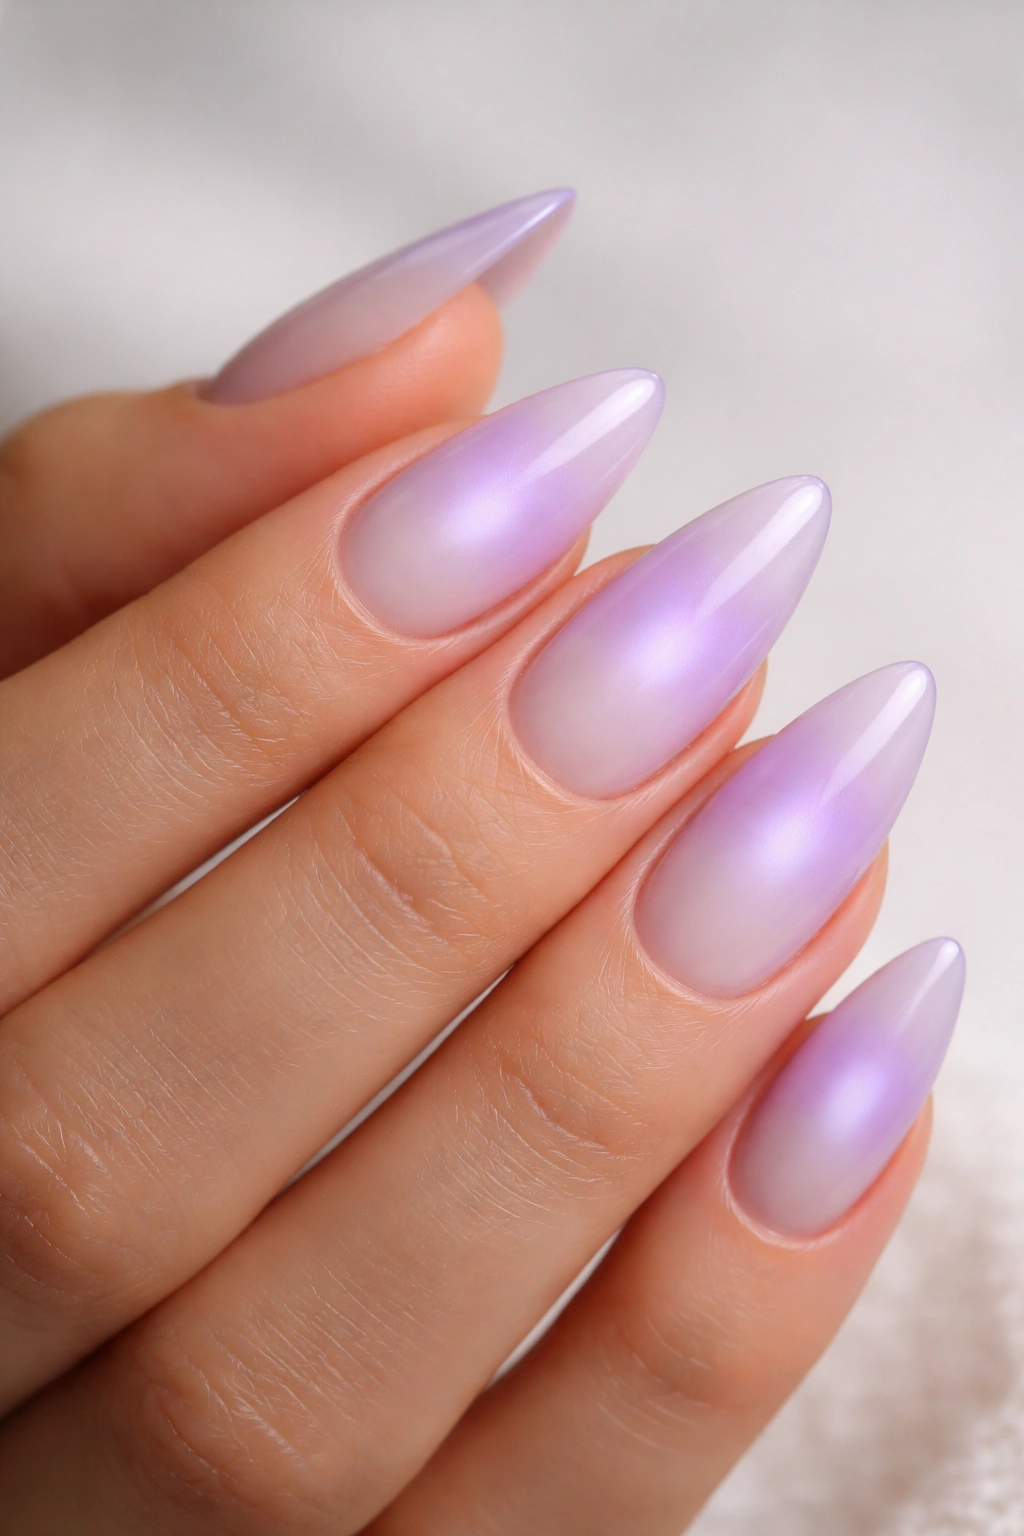
A soft lavender halo works best when the center glow is barely brighter than the edge. That subtle shift is what gives aura nails their depth. On almond nails, the effect feels especially smooth because the shape already pulls the eye toward the center line.
How to Get the Glow
Start with a milky base, then place a more saturated lavender in the center of the nail. Blend outward with a sponge or a soft airbrush pass until the edges blur. The center should look like it belongs there, not like a sticker dropped on top.
- Use two shades of lavender if you want a stronger halo.
- Keep the glow centered slightly above the middle on longer almond nails.
- Leave the cuticle area soft and diffused.
- Finish with a glossy top coat to keep the gradient from looking dusty.
This style needs a little room to spread. Medium or long almond nails give the aura more surface area, which makes the effect easier to read. Short nails can still wear it, but the glow needs to stay restrained or the design gets cramped.
I keep coming back to this one because it looks airy without being empty. There’s a difference.
8. Lavender Marble Nails with White Veining
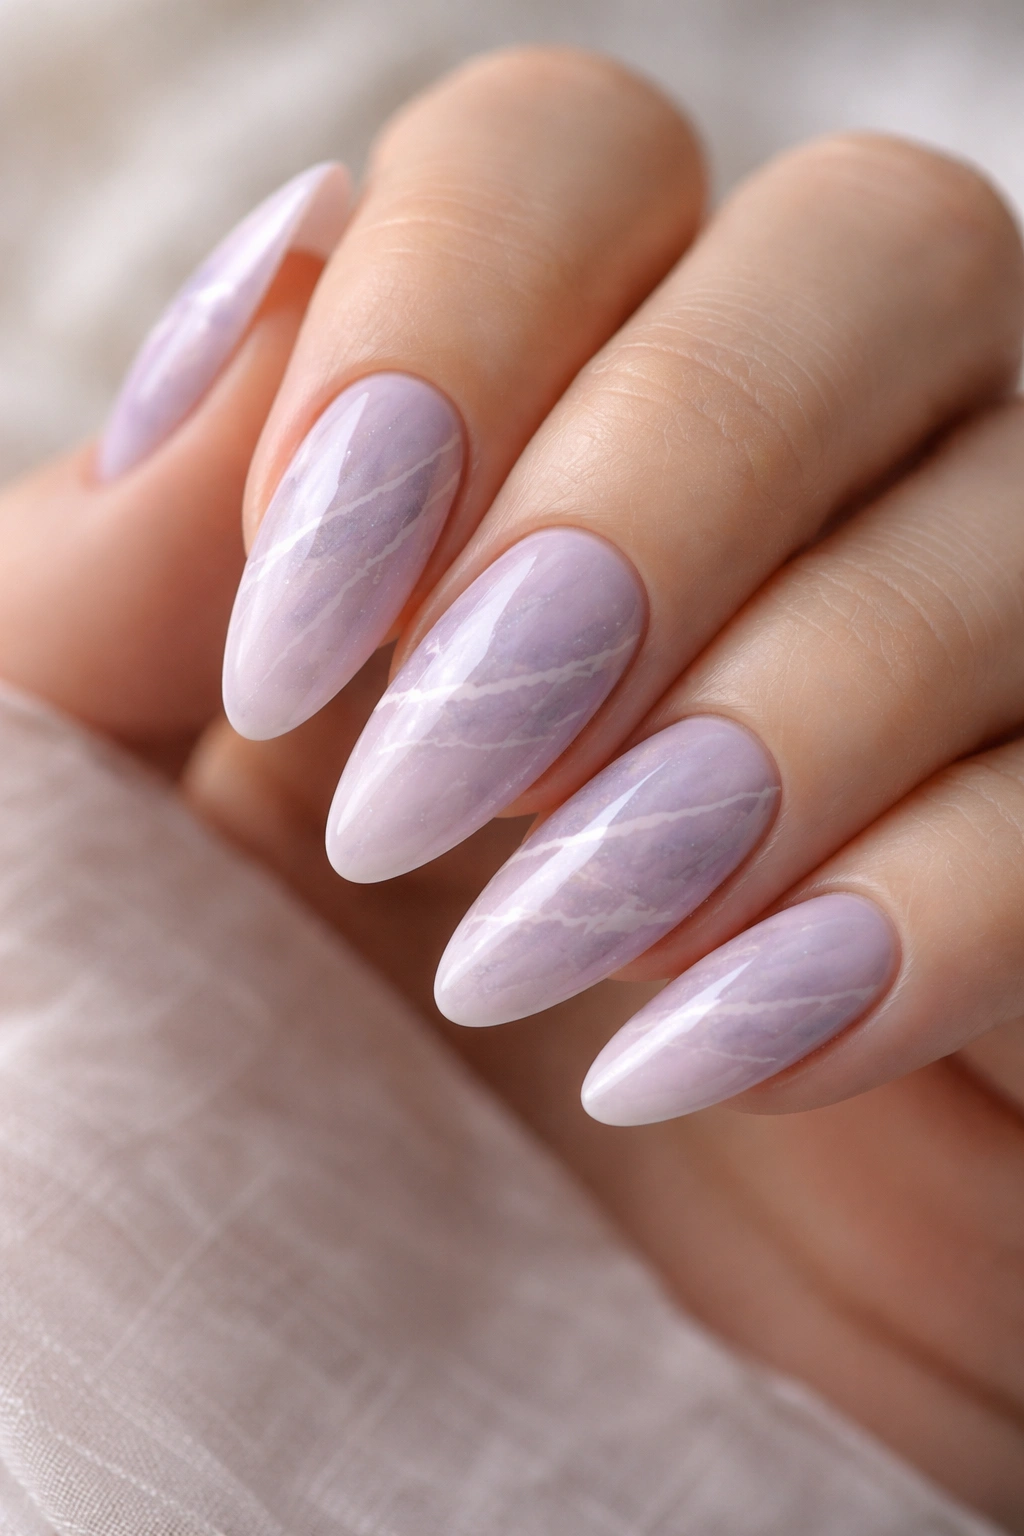
Marble is the easiest way to make lavender feel more grown-up without switching colors. The stone-like movement gives the manicure texture, and the white veining keeps the base from going flat. On almond nails, the soft point at the tip makes the marbling feel almost natural, like a polished stone chip.
The best version is not too busy. Use a pale lavender base, then pull in a few wisps of white, a touch of gray, maybe a faint pink if you want warmth. A thin liner brush dipped in a diluted polish can create the vein lines. A damp brush or a fine cleanup brush helps blur them before they dry too hard.
One accent nail is enough if you like a quiet set. Full marble can be beautiful, but it needs restraint. Too many veins, too many colors, and it starts looking like a tie-dye experiment instead of nail art.
That balance matters. Marble should look like it has depth, not clutter.
9. Cat-Eye Lavender Nails with a Silver Beam
Why does cat-eye lavender look so polished on almond nails? The magnetic shimmer follows the curve of the nail in a way that the shape can handle. The line of light gives the manicure direction. Without that line, the shade can read flat.
A cat-eye gel in lavender or lilac usually looks best over a darker base, even if the final effect is still soft. Hold the magnet 5 to 8 seconds before curing, and angle it slightly higher toward the center if you want the nails to look longer. A centered beam reads balanced. A diagonal beam feels more dynamic.
How to Wear It
Keep the rest of the set plain if the shimmer is strong. One reflective finish is enough. If you add glitter, chrome, and stones to the same manicure, the almond shape gets buried under all the noise.
This is the version for someone who likes a little drama but does not want a full sparkle overload. It catches movement. It still looks neat. And in dim light, the shimmer gives lavender a deeper, moodier edge that plain polish can’t touch.
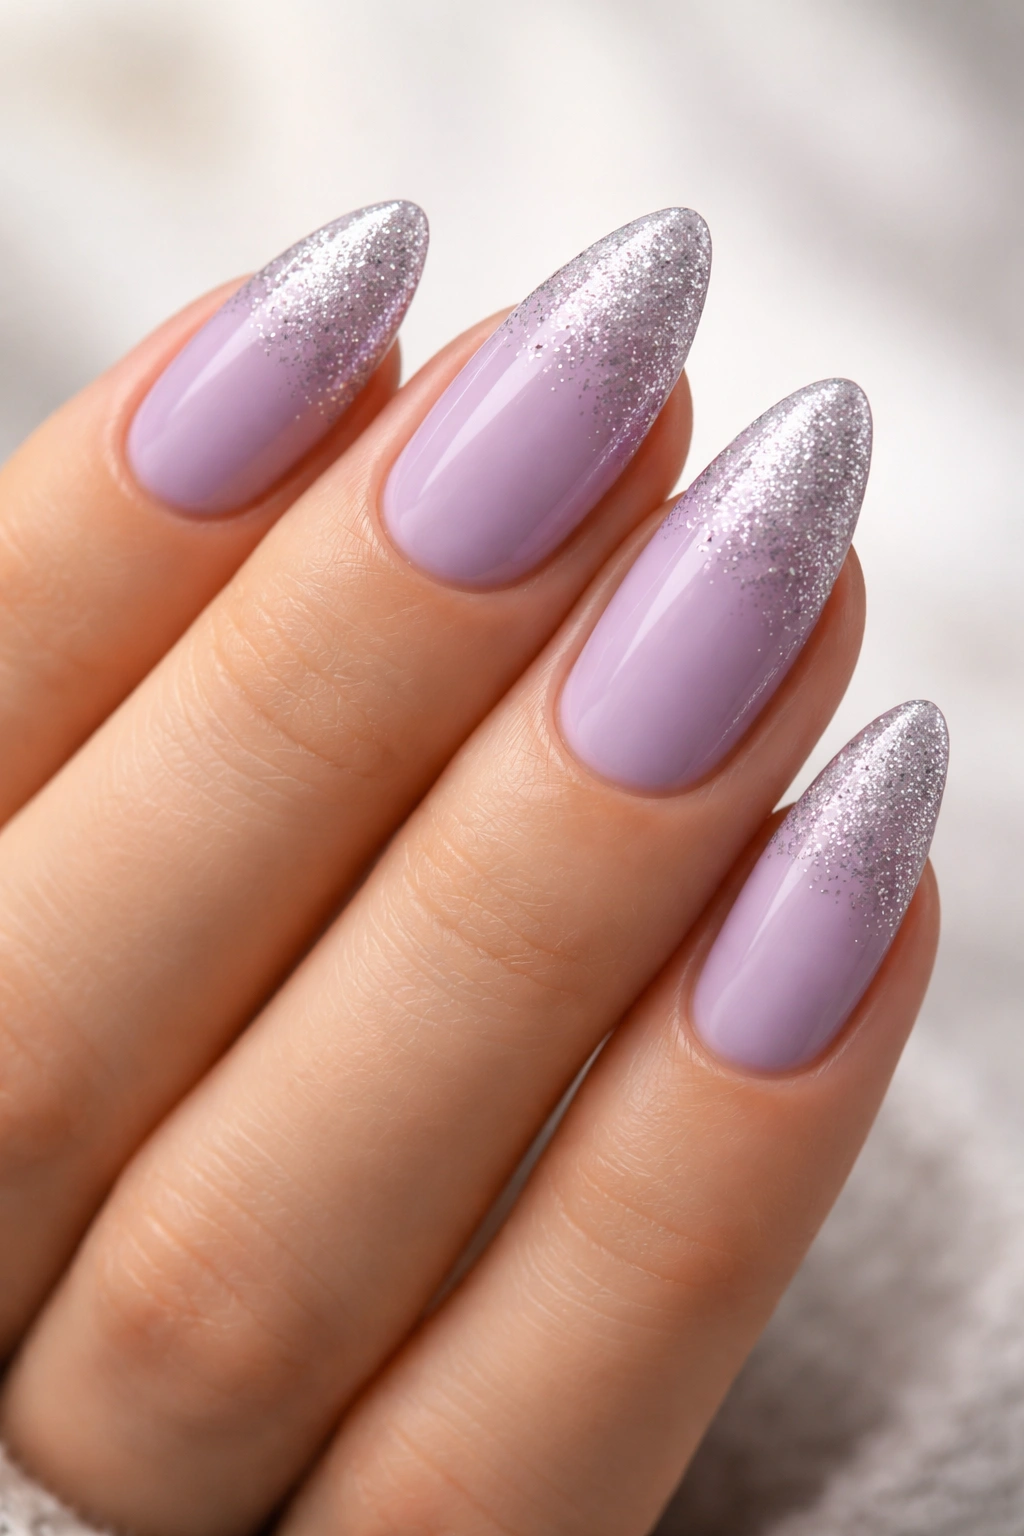
10. Lavender Almond Nail Ideas with a Silver Glitter Fade
If you want your manicure to survive a busy week without looking tired, a silver glitter fade is the one I trust most. The reason is simple: glitter hides the soft grow-out at the tip better than a solid color does. On almond nails, the fade also echoes the shape, so the eye moves naturally from base to point.
Keep the glitter fine. Chunky pieces can overpower the taper and make the nail look wider than it is. A dusting of micro silver glitter from the tip upward, or from the cuticle down if you like reverse fades, is enough. The lavender base should still be visible underneath.
- Concentrate glitter on one-third of the nail.
- Use fine silver shimmer, not large flakes.
- Leave at least two nails plain if you want the set to feel wearable.
- Seal the tip with two layers of top coat so the texture stays smooth.
The best part is that it looks festive without begging for attention. Clean, but with a bit of sparkle. That’s the sweet spot.
11. Mauve-Lavender Nails with a Tortoiseshell Accent
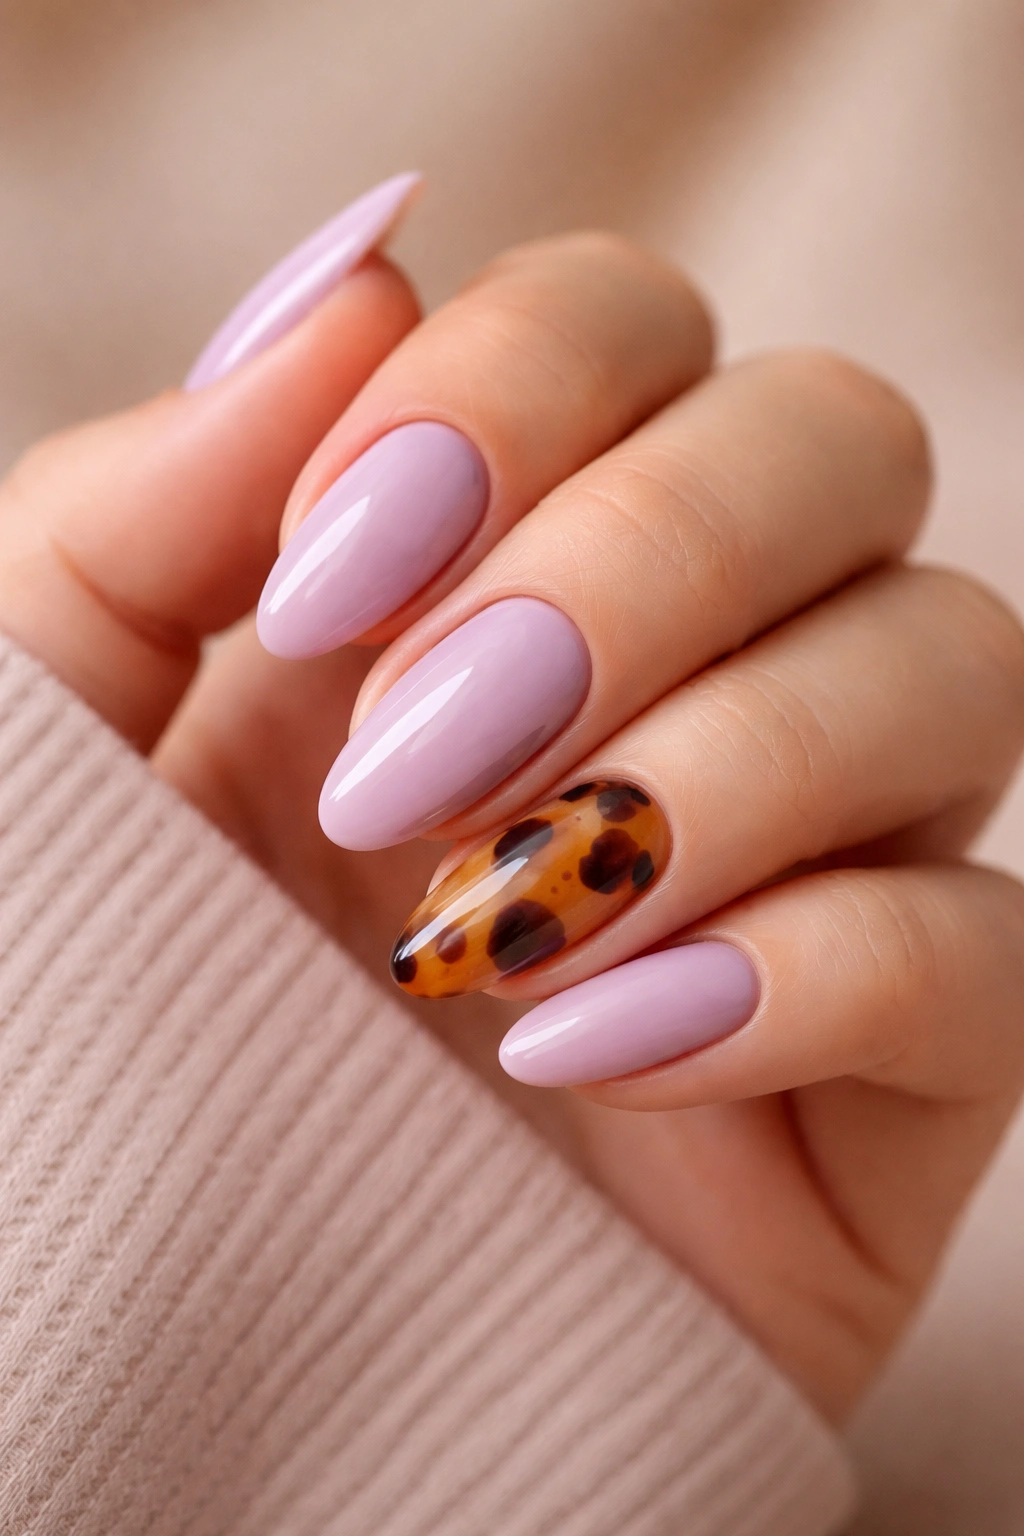
A mauve-lavender set gets a lot more interesting when one tortoiseshell accent nail enters the picture. The warm amber-brown pattern breaks up the cool pastel and stops the manicure from leaning too sweet. On almond nails, that contrast feels deliberate, not random.
I like this mix when the lavender is dusty rather than icy. A softer base color helps the tortoiseshell accent sit in the same family. The accent itself should use translucent caramel, espresso, and a few irregular black spots layered on top. The trick is transparency. If the tortoiseshell becomes opaque, it loses that glassy depth that makes it work.
Wear the accent on the ring finger or thumb, and keep the rest of the nails simple. One warm nail is enough. Two can work if the pattern is tiny. More than that, and the manicure starts drifting away from lavender entirely.
This is one of those sets that looks better in real life than people expect. The contrast is subtle, then suddenly it is not. That little surprise is the point.
12. Micro French Lavender Tips on a Clear Base
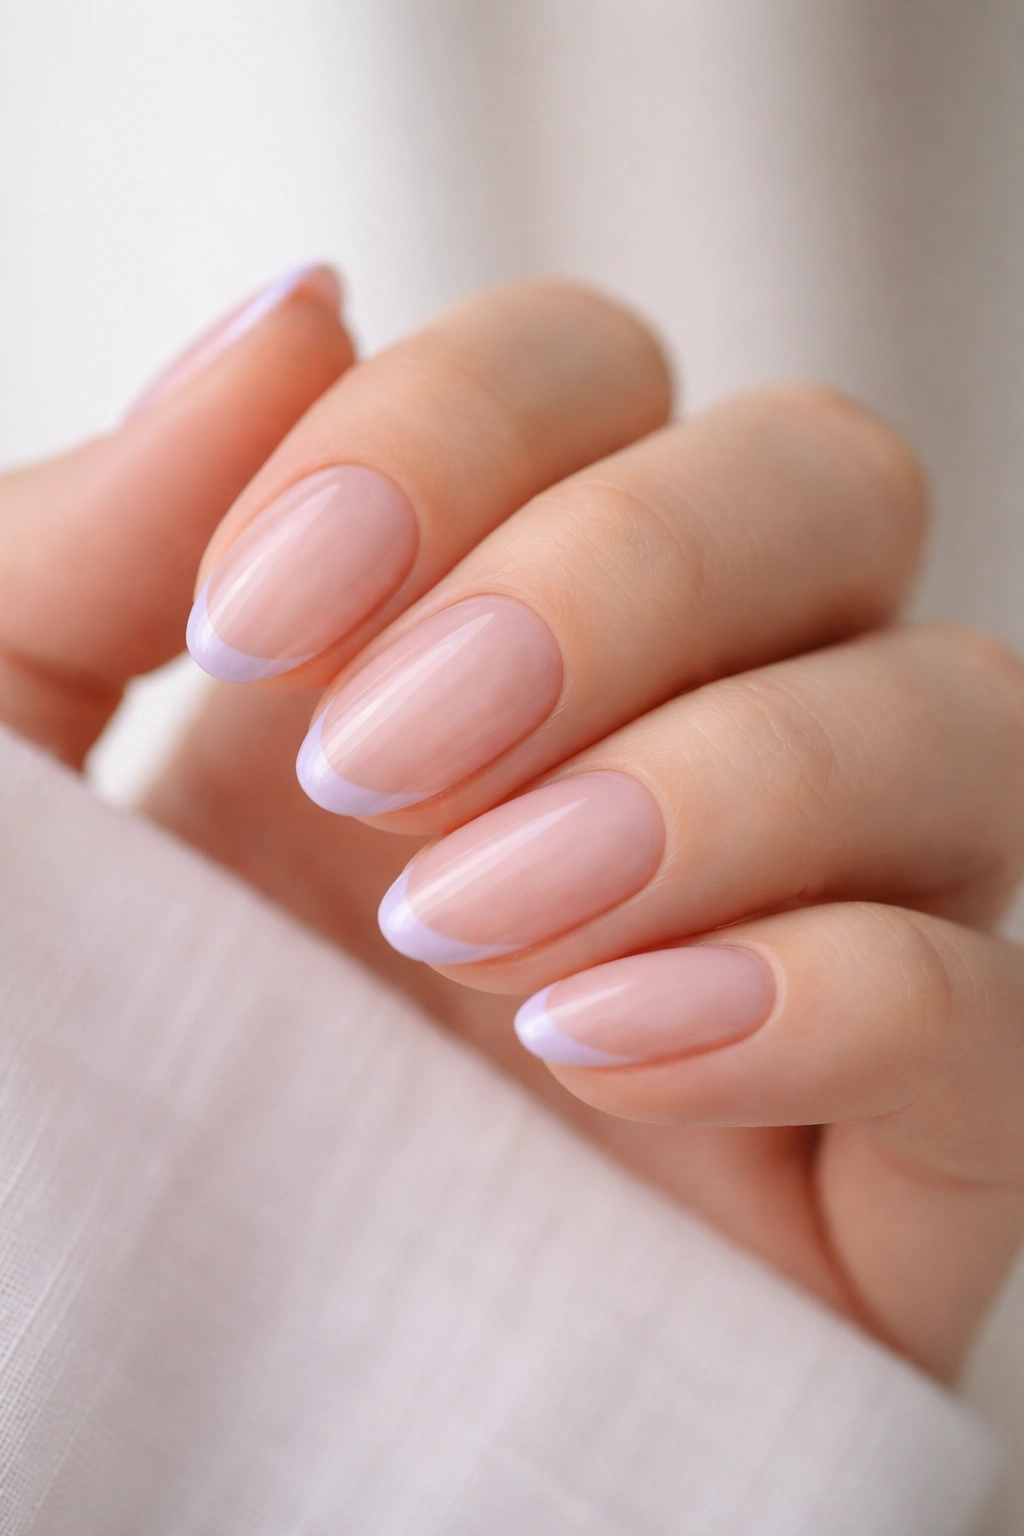
A micro French is the calmest lavender almond nail idea on this list, and I mean that in a good way. Unlike a full coverage manicure, it leaves most of the nail open, which means the shape stays airy and the grow-out is forgiving. The lavender only has to do a small job, and that keeps the look crisp.
This works especially well on short to medium almond nails. A tiny tip, usually 1 to 2 mm wide, is enough. A thicker line starts to look like a block. Thin is the whole game here. Use a 5 to 7 mm liner brush if your hand is steady, and keep the smile line soft rather than harshly curved.
Who is it best for? People who want color but don’t want maintenance to become a hobby. It’s also a good office-friendly option if your workplace leans conservative. You still get lavender. You just get it quietly.
If you hate seeing grow-out, this is one of the smartest choices on the list. It ages well, and that matters more than people admit.
13. Chunky Lavender Sweater Nails for Texture

Textured sweater nails are not subtle, and that’s why they work. The raised knit pattern gives lavender almond nails a tactile look that flat polish can’t match. On longer almond tips, a cable-knit or ribbed design can feel cozy without becoming costume-y, especially if you keep it to one or two accent nails.
Why Texture Works
A matte lavender base makes the raised lines easier to see. The 3D detail catches light in ridges and shadow, which gives the manicure depth even when the color stays in one family.
- Use thick gel paint or a sculpting gel for the knit lines.
- Cure each raised layer fully before adding the next one.
- Keep the texture away from the sidewalls so the nail still looks slim.
- Limit the design to 2 accent nails if you want the set to stay wearable.
One warning: Keep the raised pattern low near the cuticle. High texture there can snag hair and sleeves, and that gets annoying fast.
I like sweater nails more on cooler days, but the style itself is timeless enough to wear whenever you want a tactile manicure. It’s the kind of detail people notice when they’re close enough to see the ridges.
14. Lavender Cloud Nails with White Swirls
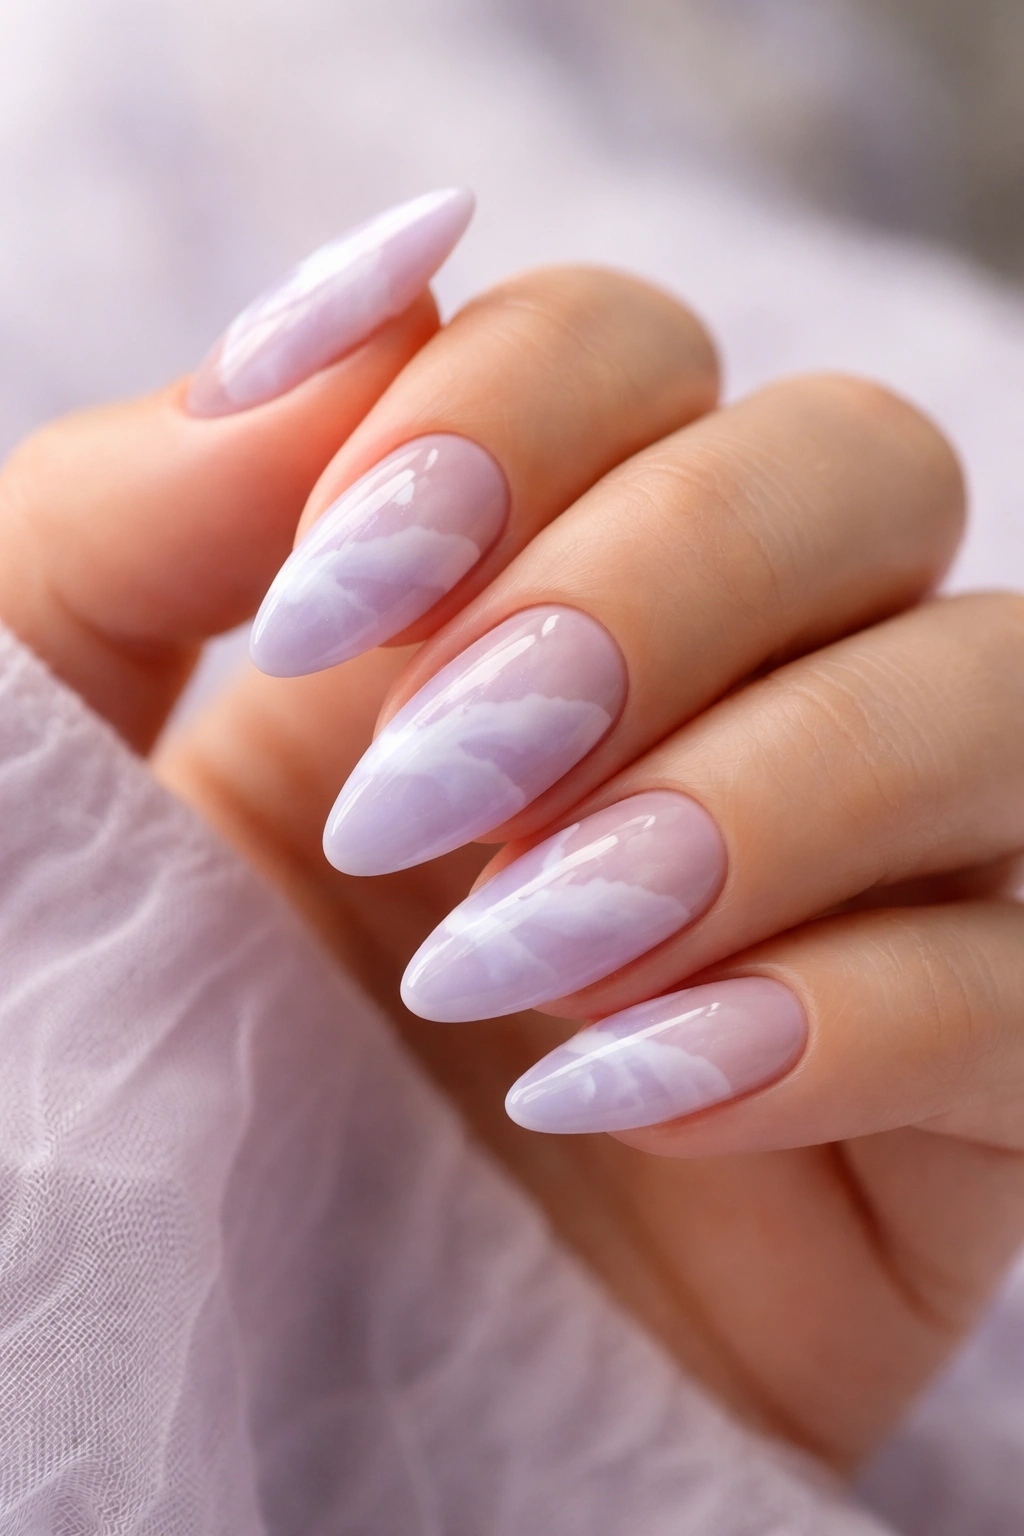
A cloud manicure sounds sweet, but it only works on almond nails when the shapes stay loose. Too many rounded puffs and the design starts looking juvenile. The better approach is to let the white swirls drift across the lavender base in uneven, airy patches. Not everything needs to match.
The negative space matters here. Leave at least 30 to 40 percent of the nail visible so the clouds don’t swallow the shape. A milky lavender base with white airbrushed swirls or brush-drawn cloud edges gives the manicure a soft, floating feel. If you want more contrast, place the densest cloud on just one nail and keep the others lighter.
This is a good option if you like nail art but hate anything too structured. There’s no grid, no hard line, no need for exact symmetry. The design looks best when it feels a little loose around the edges.
And yes, that looseness is what makes it modern. If every cloud looks identical, the charm goes out of it fast.
15. Lavender Nails with Pearls and Tiny Crystals
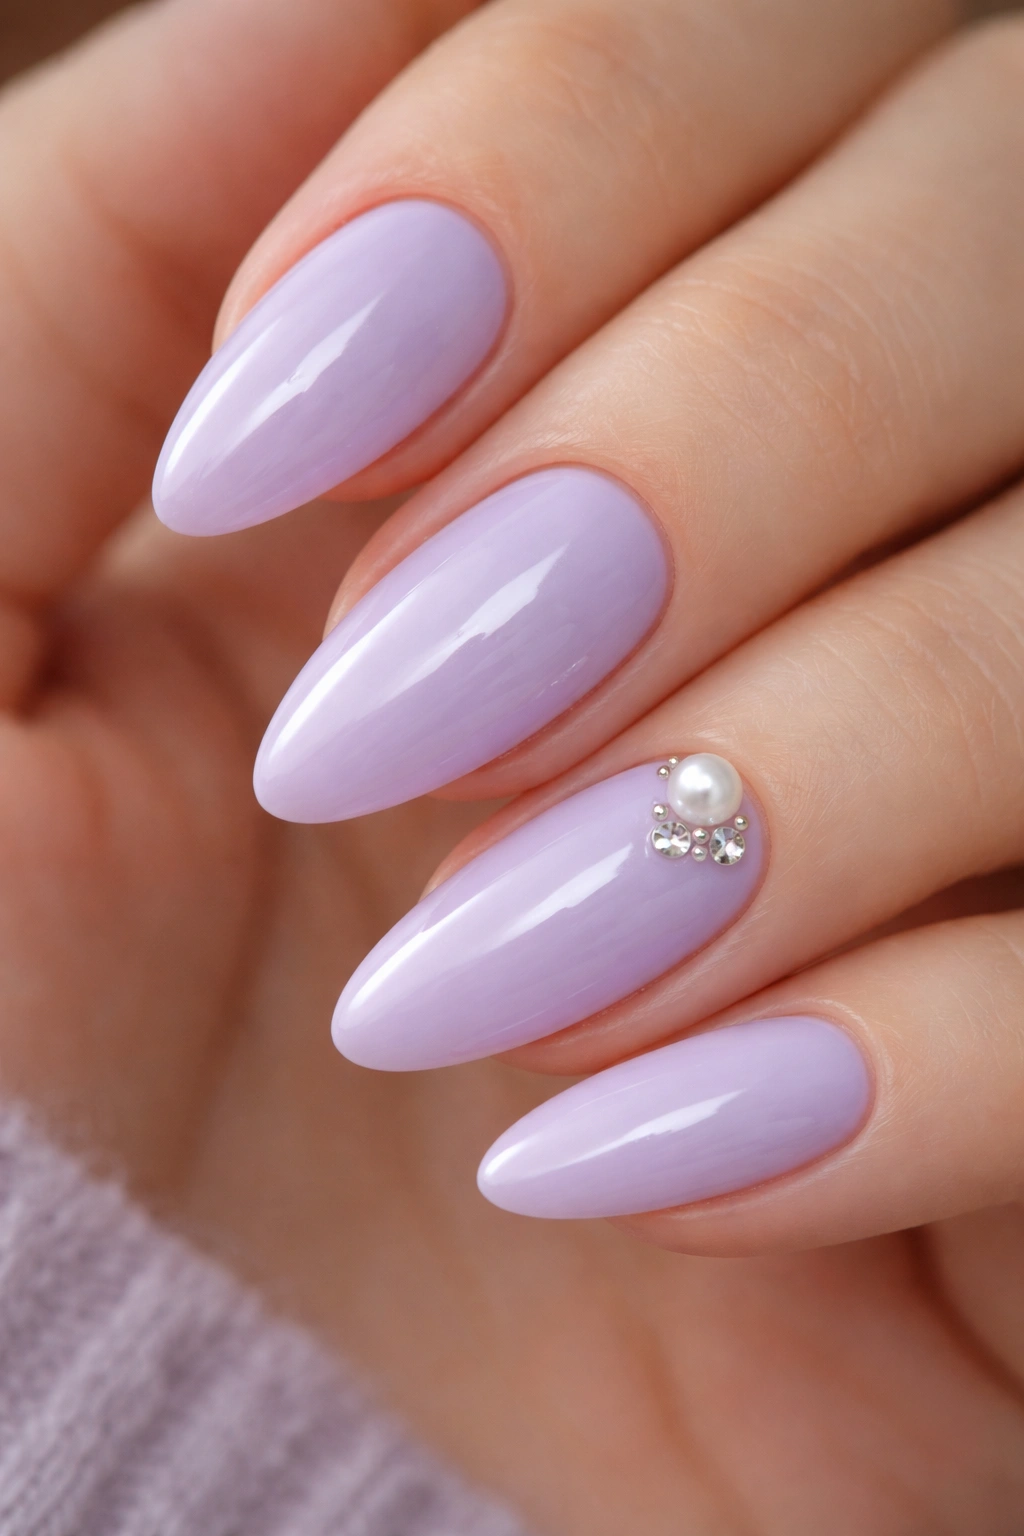
Do pearls make almond nails look fussy? Not if you place them with a light hand. A single pearl near the cuticle or a tiny cluster of flat-back crystals on one nail can make lavender feel dressed up without turning the set into formalwear. The almond shape already brings elegance. The embellishment just sharpens it.
Where to Place the Sparkle
Keep the stones small, usually 1.5 to 3 mm, so they sit close to the nail instead of standing tall. High domes snag more easily, and they can make the tip feel top-heavy.
- Place one pearl near the base of the ring finger.
- Use two to three crystals on the thumb or index if you want balance.
- Keep the rest of the manicure plain lavender or softly sheered out.
- Seal around the embellishment edge so it doesn’t catch on fabric.
This style is best when the lavender is pale and creamy. A strong violet base can make pearls feel disconnected. A soft lilac base lets the embellishment feel anchored.
I prefer this look for events where you want your nails to read finished without screaming for attention. It has presence. It also knows when to stop.
16. Double French Lavender Nails with a Slim Smile Line
If your usual French tip feels too plain, a double line fixes that. Two slim lavender arcs add detail without crowding the almond shape, and the extra line gives the tip a little more structure. The manicure feels sharper, but not louder.
The easiest version uses a sheer nude base, then one lavender line hugging the tip and a second line just beneath it in a lighter or slightly darker shade. Keep the gap narrow, around 1 mm, so the design reads like one idea rather than two separate ones. On longer almond nails, the double French can curve gracefully. On shorter nails, keep the arcs shallow.
- Use two shades of lavender for a soft contrast.
- Keep both lines thin and even.
- Match the curve from nail to nail.
- Finish with a glossy top coat so the lines look crisp.
This is one of those designs that sounds busy until you see it on. Then it makes sense. The lines give the eye a place to land, and the almond point keeps the whole thing elegant.
17. Abstract Lavender Line Art on Nude Almond Nails

A single line can do a lot. Abstract lavender art on nude almond nails works because the design stays loose and leaves most of the nail open. That open space gives the shape room to breathe, and it keeps the manicure from feeling boxed in.
I like ribbon lines, little squiggles, or one continuous stroke that bends from one sidewall to the other. Use a fine liner brush and keep the paint thin. Thick line art looks clumsy fast. A lavender ink line over a nude or sheer pink base has enough color to stand out without taking over the nail.
This is the set I’d choose for someone who wants art but not a scene. No flowers. No gems. No sparkle dust. Just a few flowing lines that make the manicure feel intentional.
The best part is that each nail does not need to match exactly. A repeated hand and a consistent color are enough. Perfect symmetry would almost ruin it.
18. Lavender and Sage Botanical Nail Art
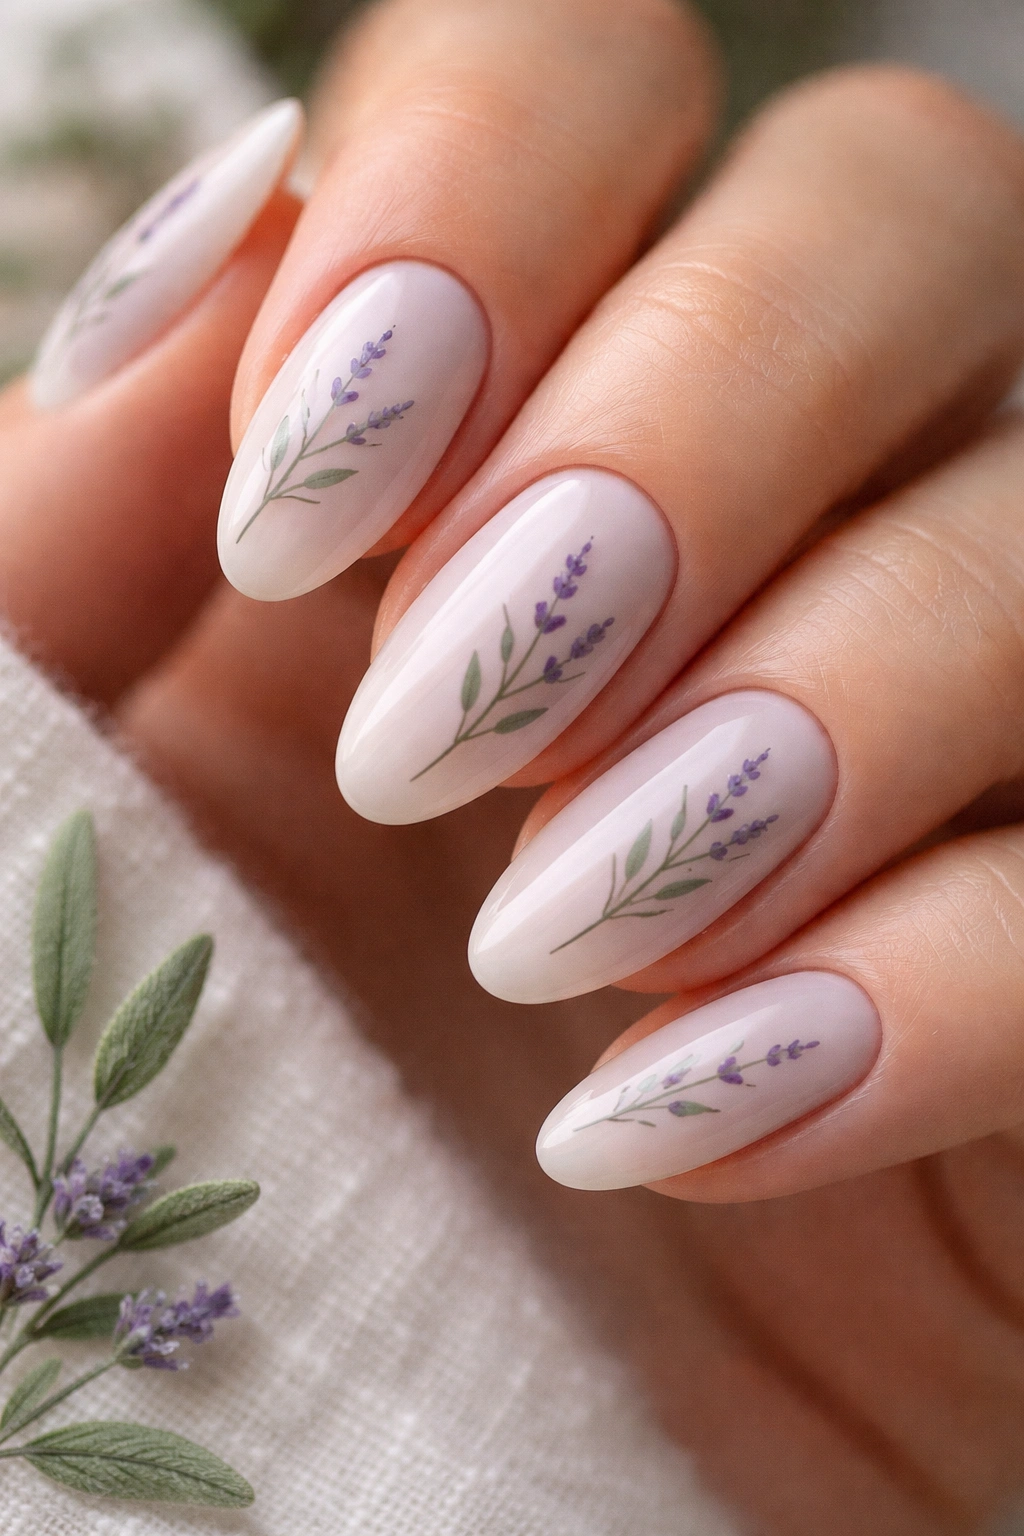
Lavender and sage make a calm pair because they sit in the same soft, muted lane. On almond nails, that combination feels especially easy on the eye. The shape gives the botanical details a gentle frame, and the colors keep the design from getting too sweet.
Unlike a full floral manicure, botanical art can lean leaf-first. That means slim sage sprigs, tiny stems, and one or two lavender buds instead of crowded blossoms. A milky lavender base works well here, though a clear nude base can make the green stand out more if you want contrast.
This style suits people who like a quieter palette. The sage pulls the manicure away from dessert-shop territory and into something more grounded. If you wear earthy clothes, gold jewelry, or soft neutrals, the combination falls into place fast.
One thing I like here: the pattern does not need to cover every nail. A single botanical accent on the ring finger, with the rest kept plain, looks finished. More than that can feel busy.
19. Velvet Lavender Nails with Chrome Moon Details
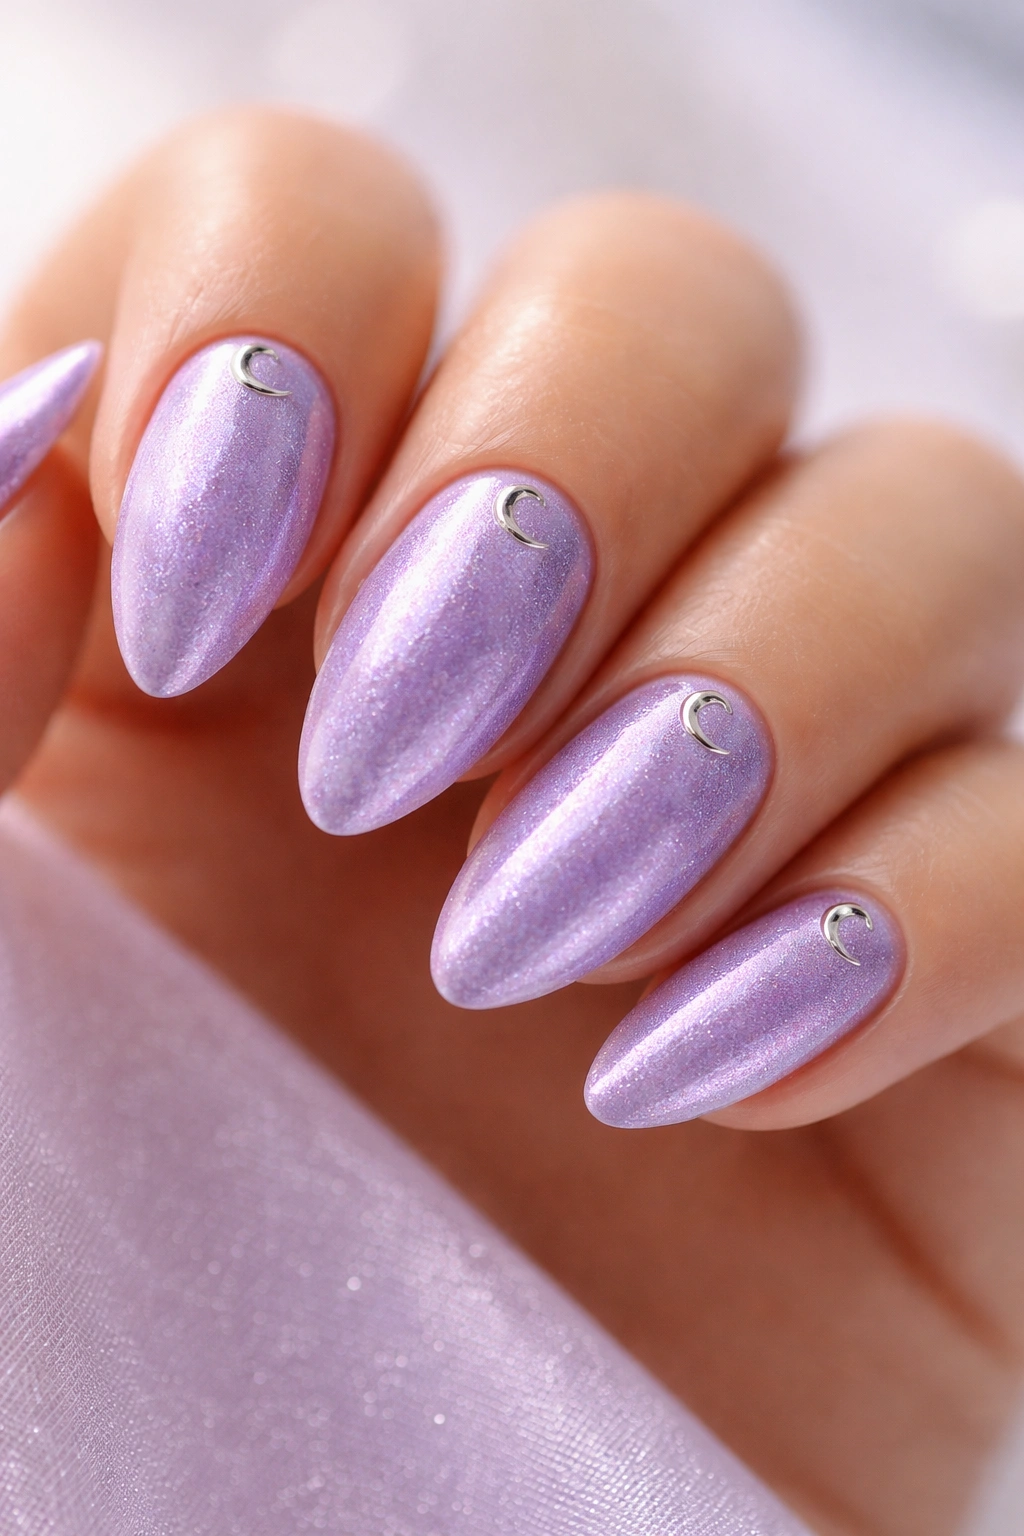
Velvet lavender is a little different from standard shimmer. The magnetic particles gather into a soft band that looks plush rather than sparkly, which gives the manicure a richer feel on almond nails. Add a tiny chrome moon near the cuticle or tip, and the whole thing picks up a sharper edge.
What Makes It Different
The velvet finish already has movement, so the moon detail should stay small and deliberate. A crescent that hugs one side of the nail is enough. If the moon sits too large or too centered, it starts competing with the shimmer.
- Use a cat-eye gel in a pale lavender or lilac tone.
- Hold the magnet until the band forms cleanly, then cure right away.
- Add a tiny chrome crescent with a detail brush or foil transfer.
- Keep the moon placement consistent from nail to nail.
This design is for someone who wants a little mood in the manicure. Not drama for its own sake. Just enough depth that the nails look different when the light shifts. On almond tips, that movement feels especially good.
20. Lavender Almond Nail Ideas for a Mixed Set
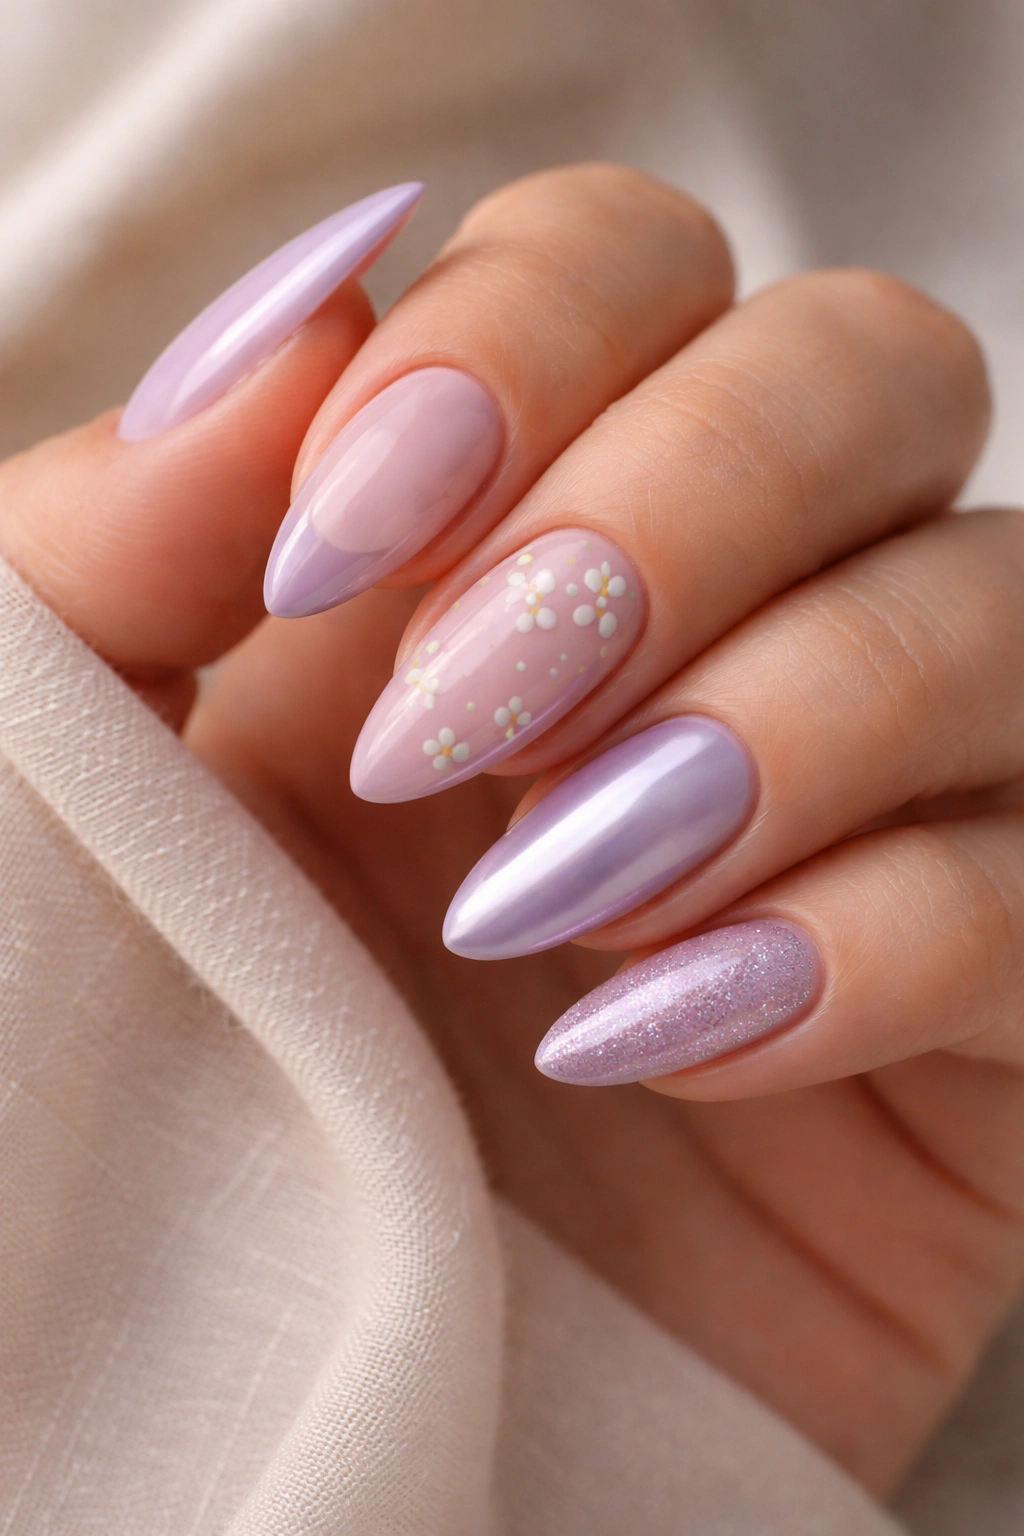
The strongest mixed sets usually share one rule: one lavender family, one dominant finish, and a few controlled accents. That keeps the manicure from turning into a grab bag. On almond nails, a mixed set can be gorgeous because the shape already gives everything a clean frame.
I like combining a sheer solid, one micro French, one tiny floral accent, one chrome nail, and one soft shimmer. That sounds busy on paper. It isn’t, if the lavender tone stays consistent. A dusty lilac next to a cooler pastel can look mismatched fast, so pick a family and stay inside it.
The One Rule That Keeps It Cohesive
Use one repeated detail across the whole set. Maybe the same glossy top coat on every nail. Maybe the same pale base. Maybe the same silver accent on two fingers. That repetition is what stops the mix from feeling random.
- Keep two nails plain.
- Let one texture or finish be the star.
- Repeat the same lavender temperature across the set.
- Keep embellishments small and spaced out.
This is the best choice if you get bored easily. It gives you variety without losing the thread. And on almond nails, that balance looks smart rather than chaotic.
Final Thoughts
The easiest lavender almond nails are the ones with one clear idea. Sheer jelly, micro-French, and soft ombré wear well because they don’t fight the shape. Chrome, cat-eye, and velvet finishes give you more impact, but they work best when you keep the rest of the design simple.
I’d also pay attention to upkeep, not just the first-day look. Almond nails show wear at the tip faster than people expect, so anything with a thin free edge, a fine glitter fade, or a soft French line tends to age more gracefully than a crowded full-set design.
Pick the version that matches how much time you want to spend maintaining it. That is the part people skip, and it matters more than the polish shade itself.
