

Black polish on an almond nail shape has a way of looking sharper than it has any right to. The taper keeps the color from feeling heavy, and that soft point at the tip gives black room to look sleek instead of flat. Black almond nail ideas work so well because the shape does half the styling for you before any art goes on.
Glossy black reads like patent leather. Matte black feels more like suede. Chrome, velvet, negative space, foil — all of them change the mood without changing the base idea, which is exactly why this shape keeps showing up on people who want dark nails that still feel clean and intentional.
The trick is not finding a “safe” version of black. It’s picking the finish that matches the attitude you want. Some sets look expensive with almost no detail at all. Others need a little grit, a little shine, or one sharp accent to stop them from feeling plain.
Start with the finish, because the right black changes everything.
1. Glossy Jet-Black Almonds

Slick wins. Every time. A deep, glossy black on an almond shape is the kind of manicure that looks simple from a distance and strangely expensive up close, especially when the surface is smooth and the curve is even from sidewall to sidewall.
What makes this work is the shine. Black polish can go flat fast if the top coat is dull or the nail surface has little bumps from filing. Ask for a high-shine top coat and, if you wear extensions, a soft apex so the nail keeps its shape instead of looking like a thin shell. On shorter almonds, keep the taper gentle. Too sharp and the set starts to feel pointy in a way that fights the color.
I like this look for people who want black nails without any fuss. No art needed. Just crisp cuticles, a deep pigment, and that glassy finish that catches the light when you move your hands.
2. Matte Black With Glossy Tips
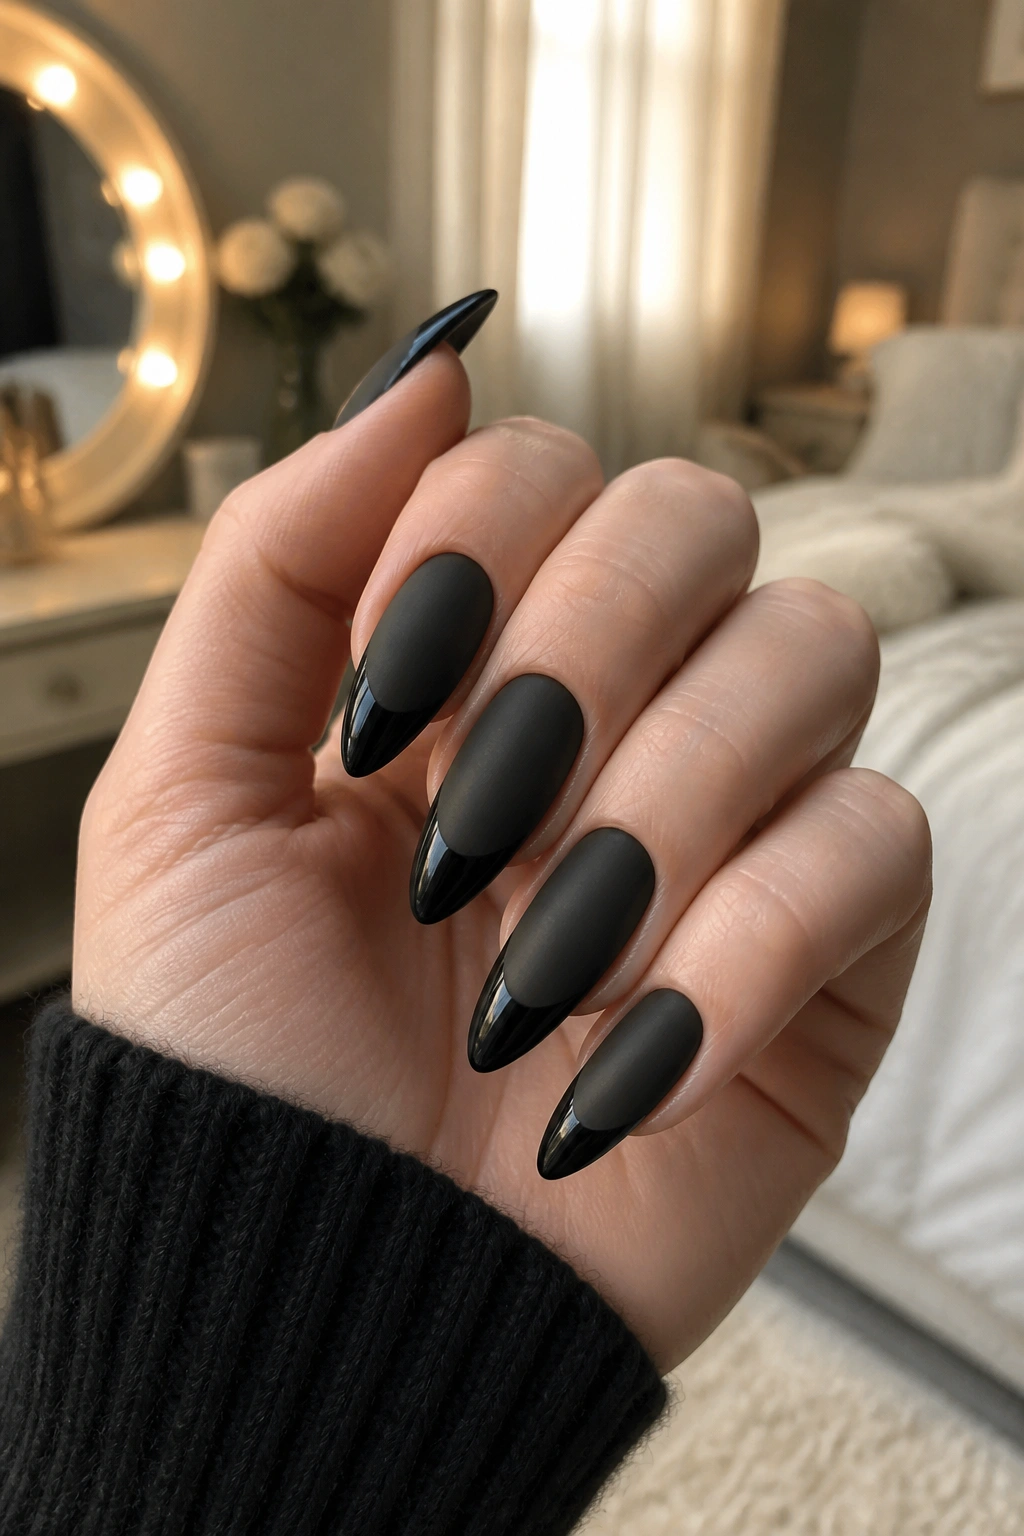
The contrast does the work here. A matte black base with glossy tips looks quiet at first, then catches your eye when the nails move, and that tiny shift is what makes it feel modern instead of flat.
Why the contrast works
Matte black absorbs light, while a glossy tip throws it back. That split makes the almond shape look longer, because the eye follows the shine right to the point. It’s a small trick, but it changes the whole set.
You can keep the tip narrow for a cleaner line or go wider if you want something more graphic. A thin glossy French edge on a matte base is the safest version, and it wears well because the contrast still looks tidy when the manicure grows out a little.
What to ask for
- Matte black gel over the full nail.
- A glossy top coat only on the free edge.
- A soft almond tip, not a sharp point.
- Thin cuticle cleanup so the finish looks deliberate.
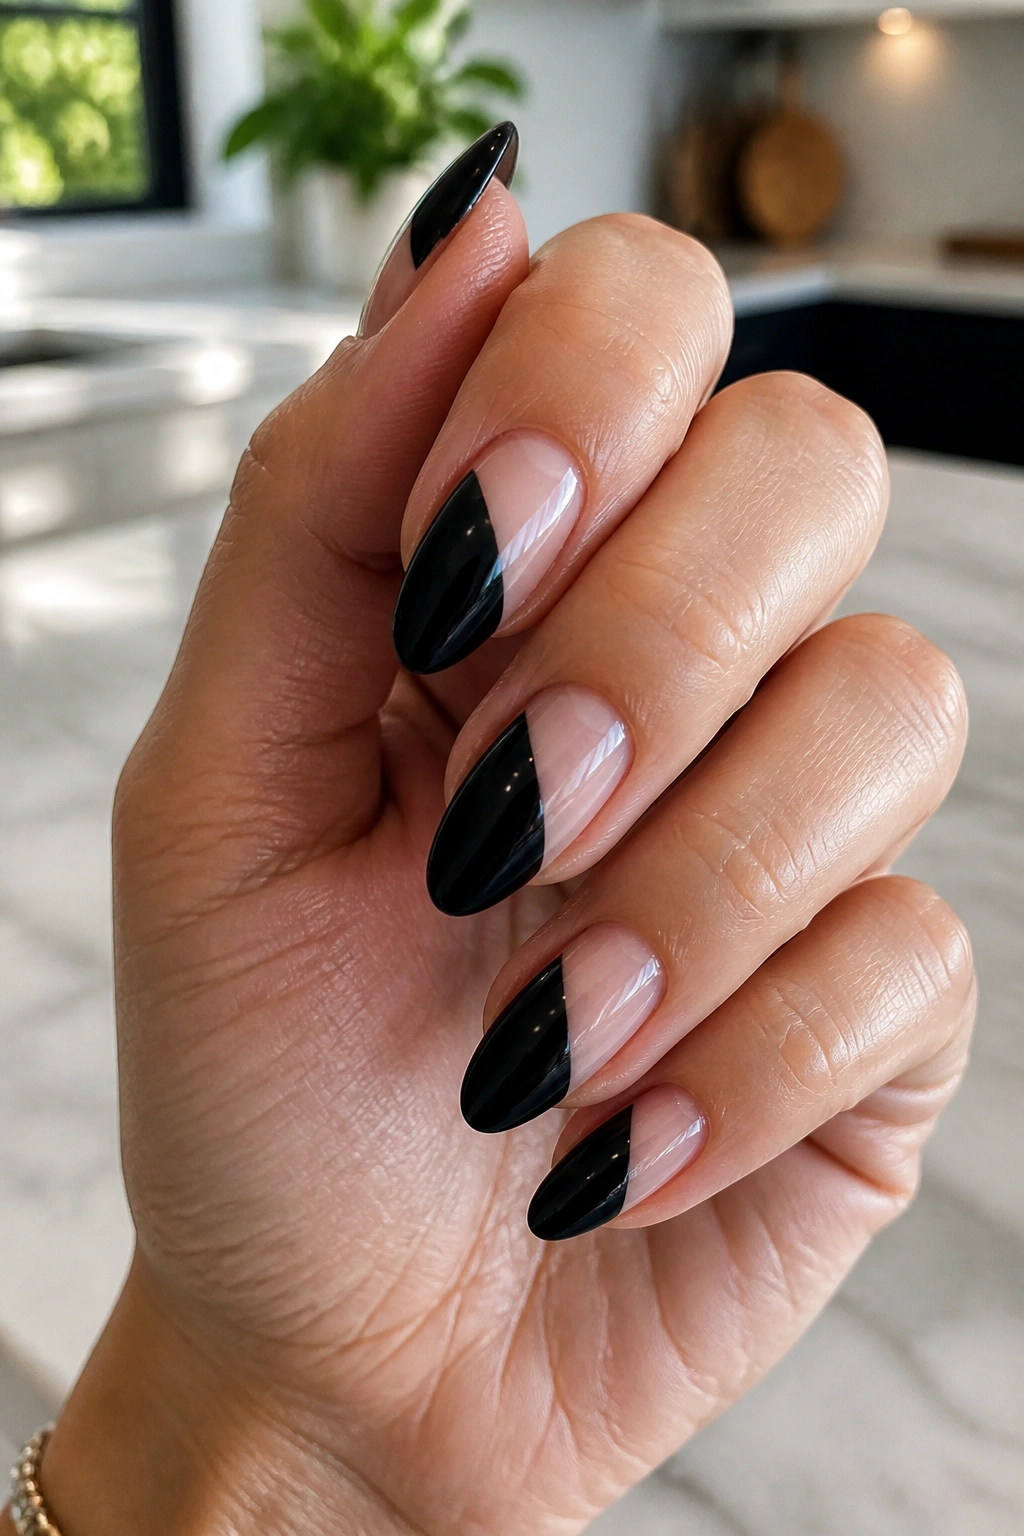
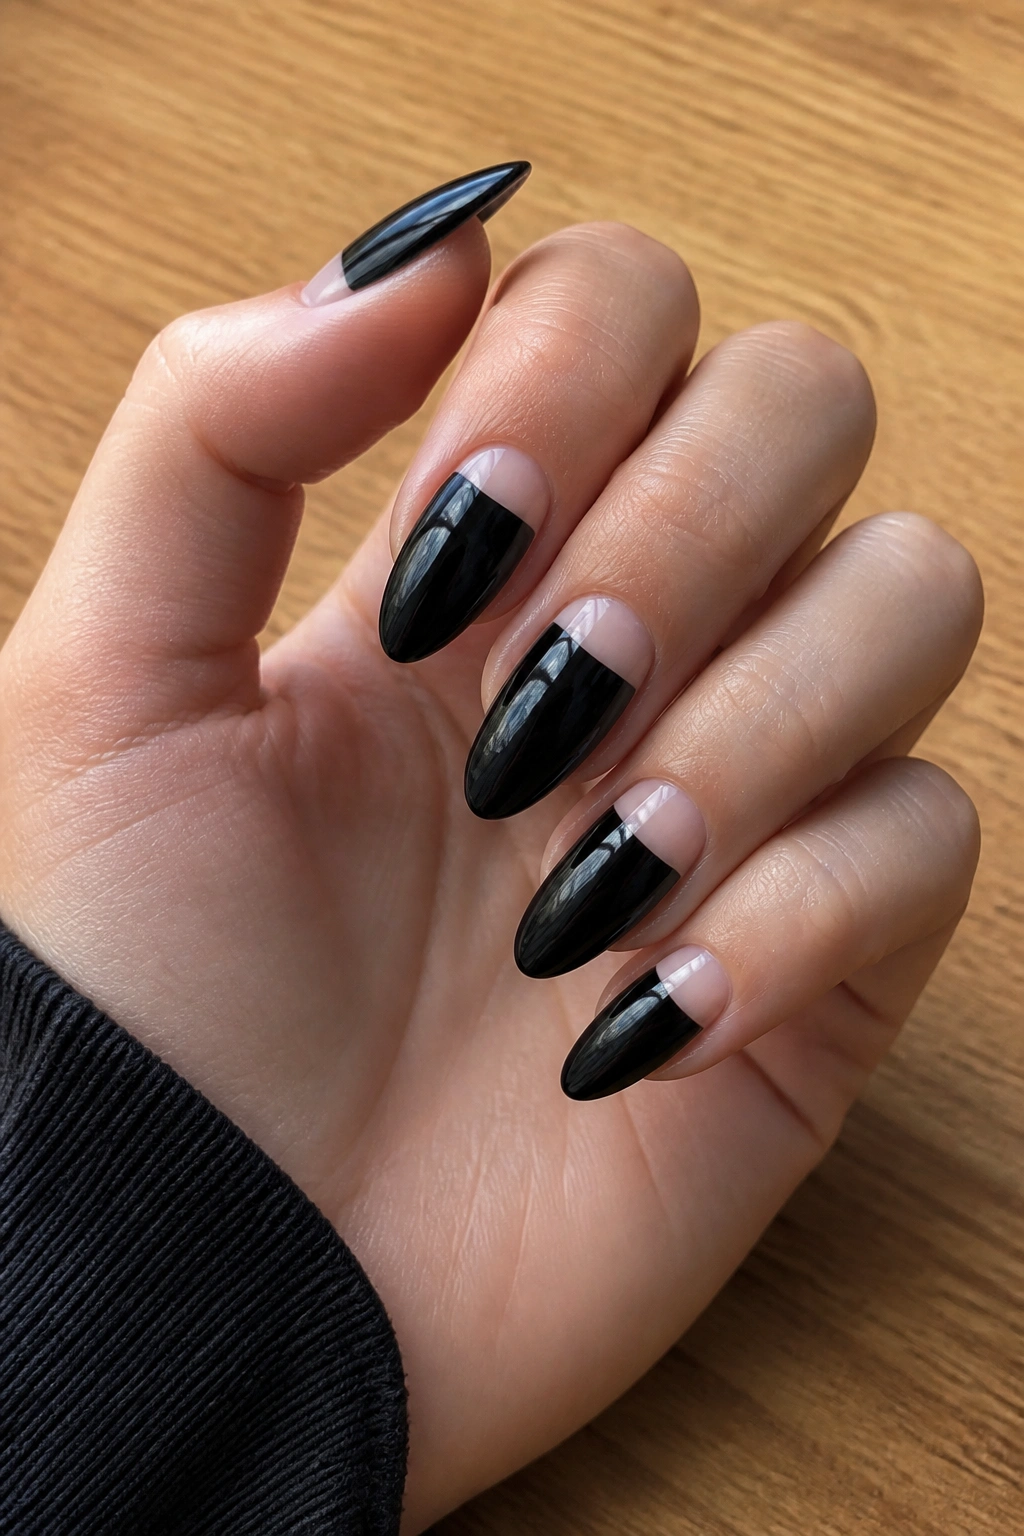
3. Sheer Nude With Black French Tips
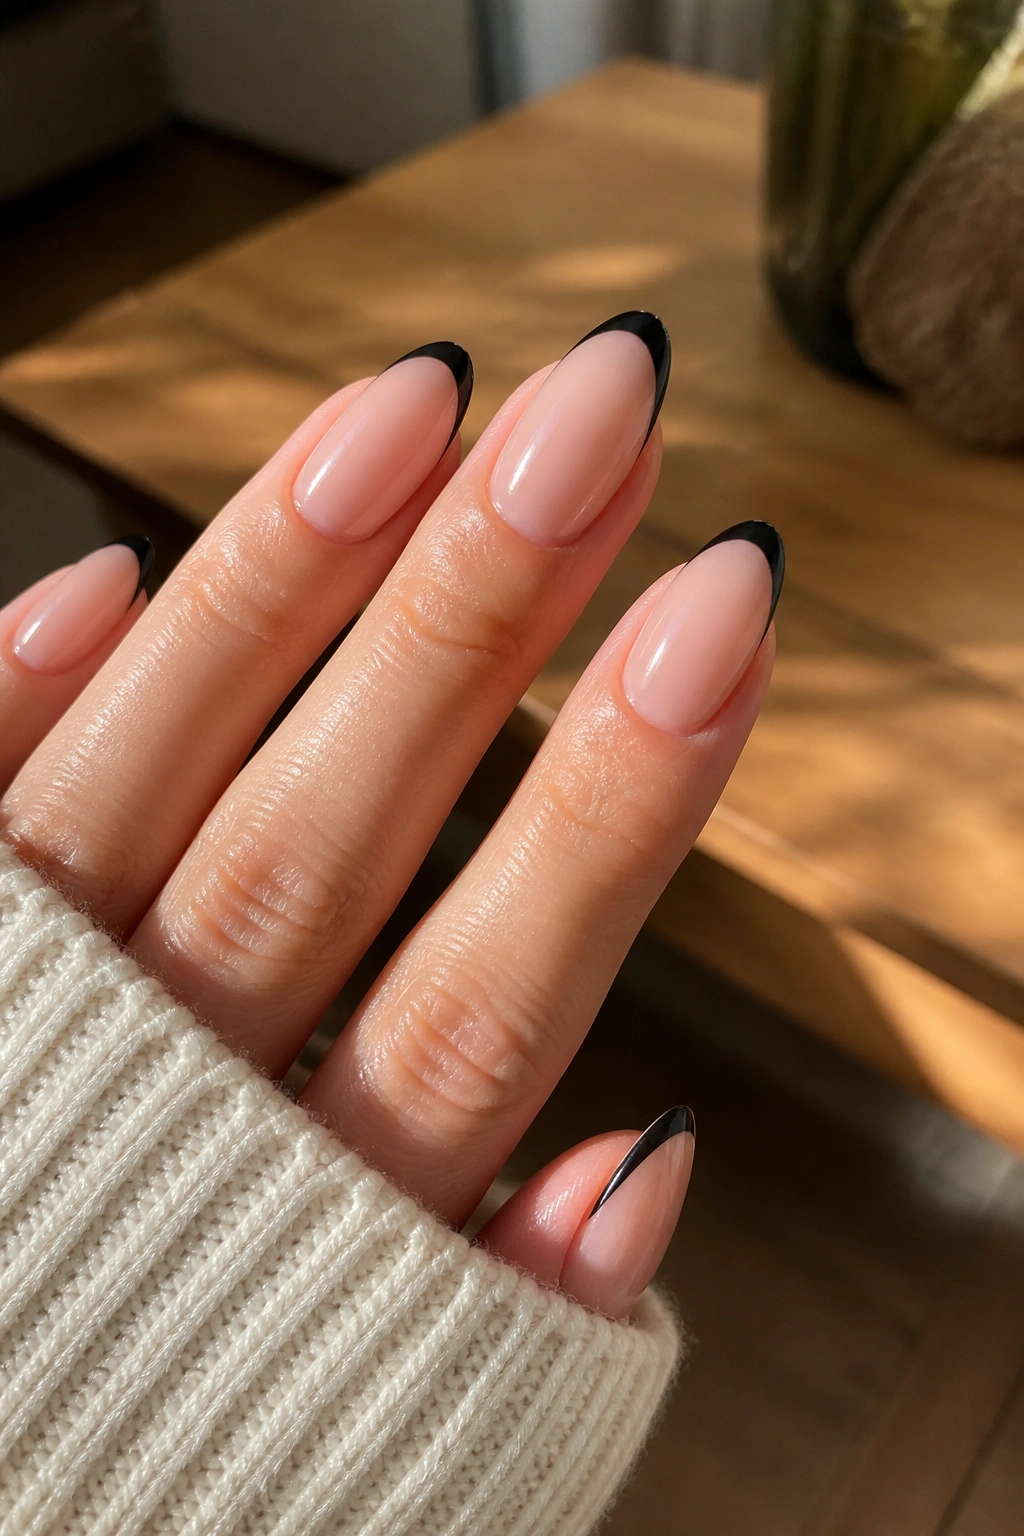
A black French tip on a sheer nude base is one of those designs that looks neat and a little ruthless at the same time. It keeps the nail light at the base, then hits you with black at the edge, which makes the almond shape look longer without drowning the hand in color.
Keep the tip narrow if your nails are short to medium. On a longer almond, a deeper smile line gives the set more shape and stops the tip from looking like a thin stripe someone forgot to finish. Two to three millimeters is enough for a subtle version; go wider only if you want the French to be the star.
This design wears well because the grow-out is forgiving. The nude base buys you time, and the black tip still looks sharp even after a couple of weeks of wear. It’s one of the easiest ways to make black feel edged-up instead of heavy.
4. Black Chrome Almond Nails
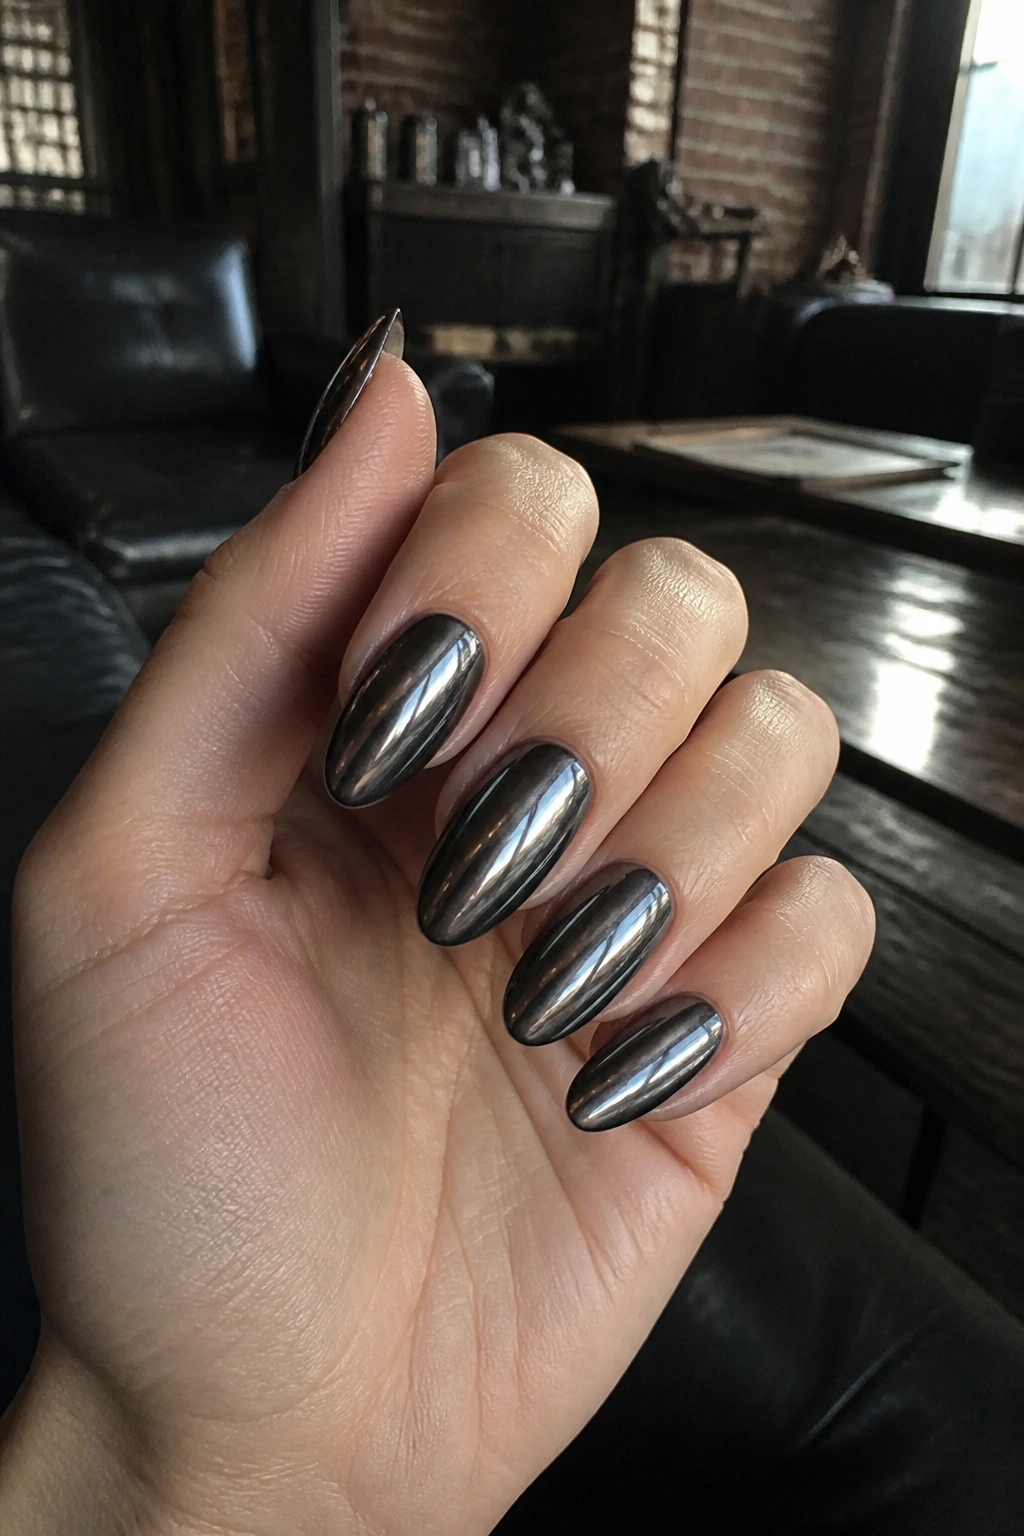
Chrome on black has attitude. Not the loud kind. The polished, metallic kind that looks like it belongs on a leather jacket, a ring-heavy hand, or someone who knows exactly what they like and doesn’t need to explain it.
What makes chrome hit harder over black
A black base makes chrome look deeper and less toy-like. Without that dark layer underneath, chrome can slide toward silver mirror territory. On black, it turns into gunmetal, oil-slick metal, or that dark reflective finish that shifts when the hand tilts. That’s the sweet spot.
Smooth prep matters here. Chrome shows every ridge, so the nail surface has to be buffed evenly before the no-wipe top coat goes on. If the top coat is lumpy, the powder will show it. No mercy.
I like this best on medium-length almonds. The shape gives the metal a cleaner line, and the finish looks strongest when the curve is soft, not pointy.
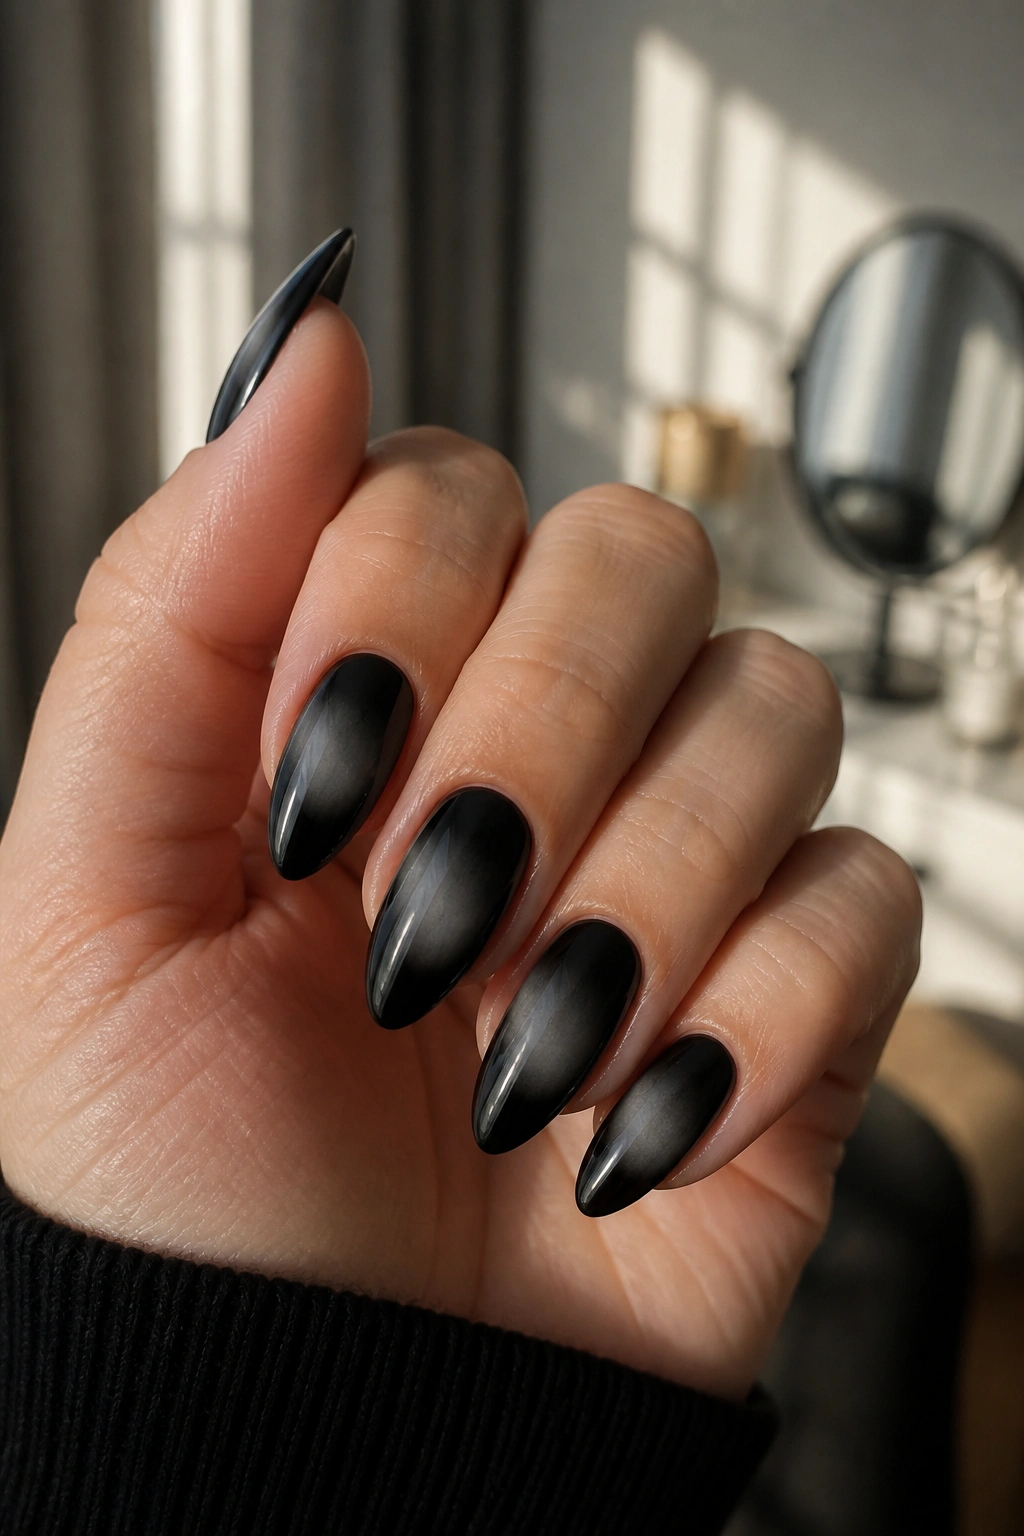
5. Velvet Cat-Eye Black
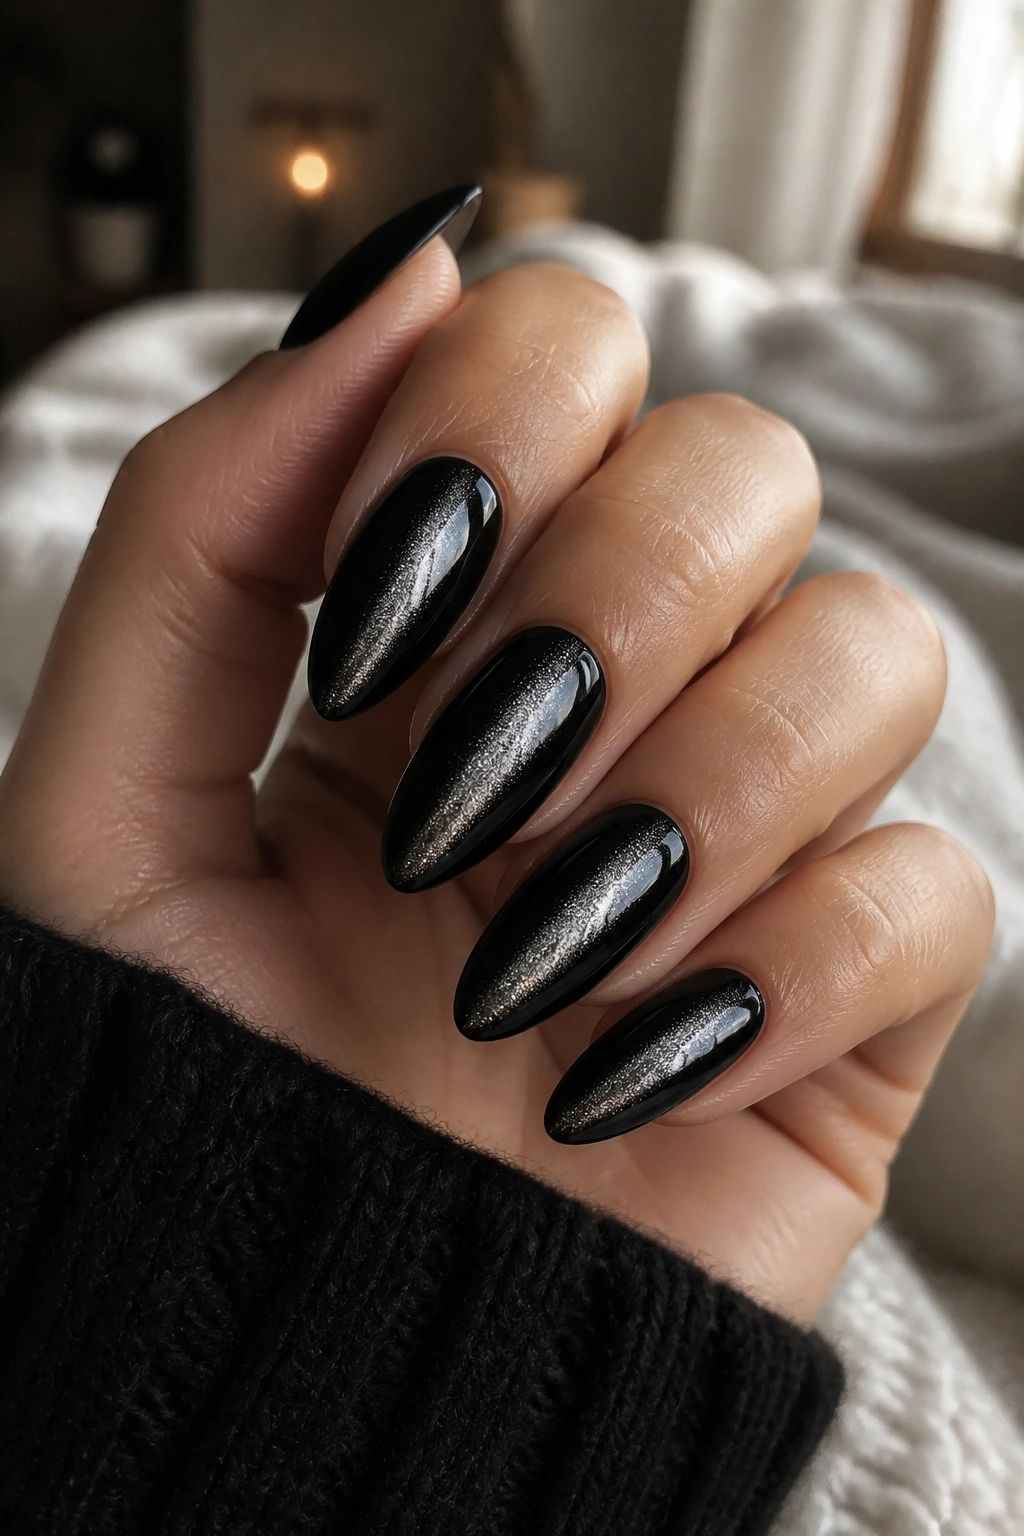
Cat-eye black is for anyone who wants movement in the manicure without piling on extra art. The magnetic shimmer creates a soft line through the polish, and that line changes as you tilt your hand, which gives the set a little life.
The best version is not muddy. It’s deep, dark, and focused, with the magnetic stripe pulled straight through the center or pushed diagonally for a sharper look. Hold the magnet close to the nail for a few seconds before curing, and the shimmer will gather where you want it instead of floating around in a messy cloud.
What the magnet changes
- A centered stripe makes the almond shape look longer.
- A diagonal stripe feels more pointed and sharp.
- A side-pulled line gives the manicure a smoky, uneven edge.
This is one of those designs that looks expensive even when the rest of the outfit is plain. It has texture without obvious decoration, and that’s a nice place to be.
6. Sharp Negative-Space Slashes
A single black slash across a bare or sheer base can look mean in the best way. It’s clean, graphic, and a little severe, which is exactly why it works so well on almond nails. The shape softens the line just enough that it doesn’t feel too hard.
Think of this as manicure minimalism with a pulse. One diagonal stroke near the cuticle, or a long slash cutting across the center of the nail, can do more than a whole pile of tiny decorations. Negative space also helps the design breathe, so it doesn’t feel crowded on shorter nails.
This is a good choice if you like black but don’t want full coverage. It also grows out better than most busy designs because the open space makes small gaps less obvious. One nail with a slash can be enough. Five nails with slashes can feel too engineered.
7. Black Swirl Art on a Sheer Base
Why does one loose swirl look cooler than a full set packed with detail? Because it leaves room for the eye to move. A single black line, drawn in a curve that slips across the almond shape, gives the manicure a sense of motion without turning it into a pattern parade.
How to keep swirls from looking fussy
Use a thin liner brush and keep the line weight uneven. A swirl that starts thick near the cuticle and thins out toward the tip looks more natural than a line that stays the same width all the way across. Black over a milky nude base works best here, because the contrast stays clean.
If you want the set to lean harder, add a second swirl on only one or two nails. That gives the whole manicure a little imbalance, which I like. Perfect symmetry can feel stiff with this kind of art, and black swirls do better when they look a bit restless.
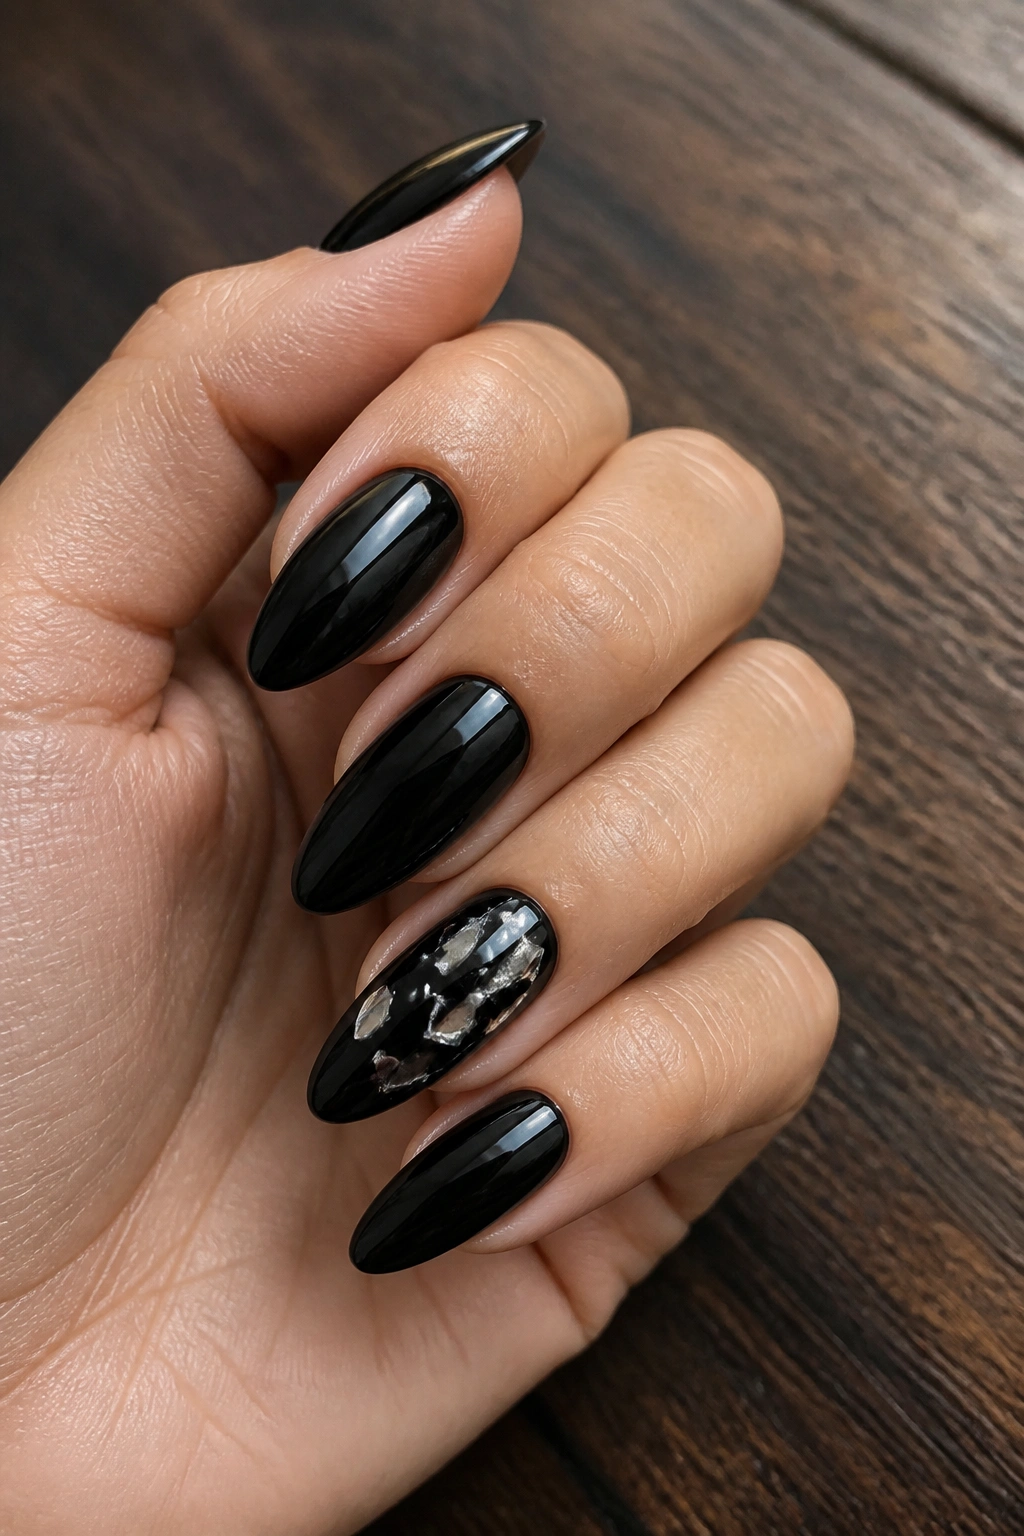
8. Black Nails With Silver Foil Fragments
Torn silver foil on black polish has that broken-metal look that a lot of people try to fake with too much sparkle. Don’t overdo it. A few irregular pieces, pressed into the tacky layer, give you the right kind of rough edge.
The key is placement. Spread the foil unevenly so it looks chipped, not decorated. One accent nail can carry the whole set, especially if the other nails stay plain glossy black. On an almond shape, the foil looks best when it sits a little off-center, so the design follows the curve instead of fighting it.
Small details that matter
- Tear the foil into uneven shapes instead of cutting it.
- Press it down with tweezers or a silicone tool.
- Seal it with a smooth top coat so the edges don’t snag.
- Keep one nail bare of foil if you want the set to feel cleaner.
This is one of my favorite options for people who like dark nails but still want a little noise.
9. Gothic Lace and Web Details
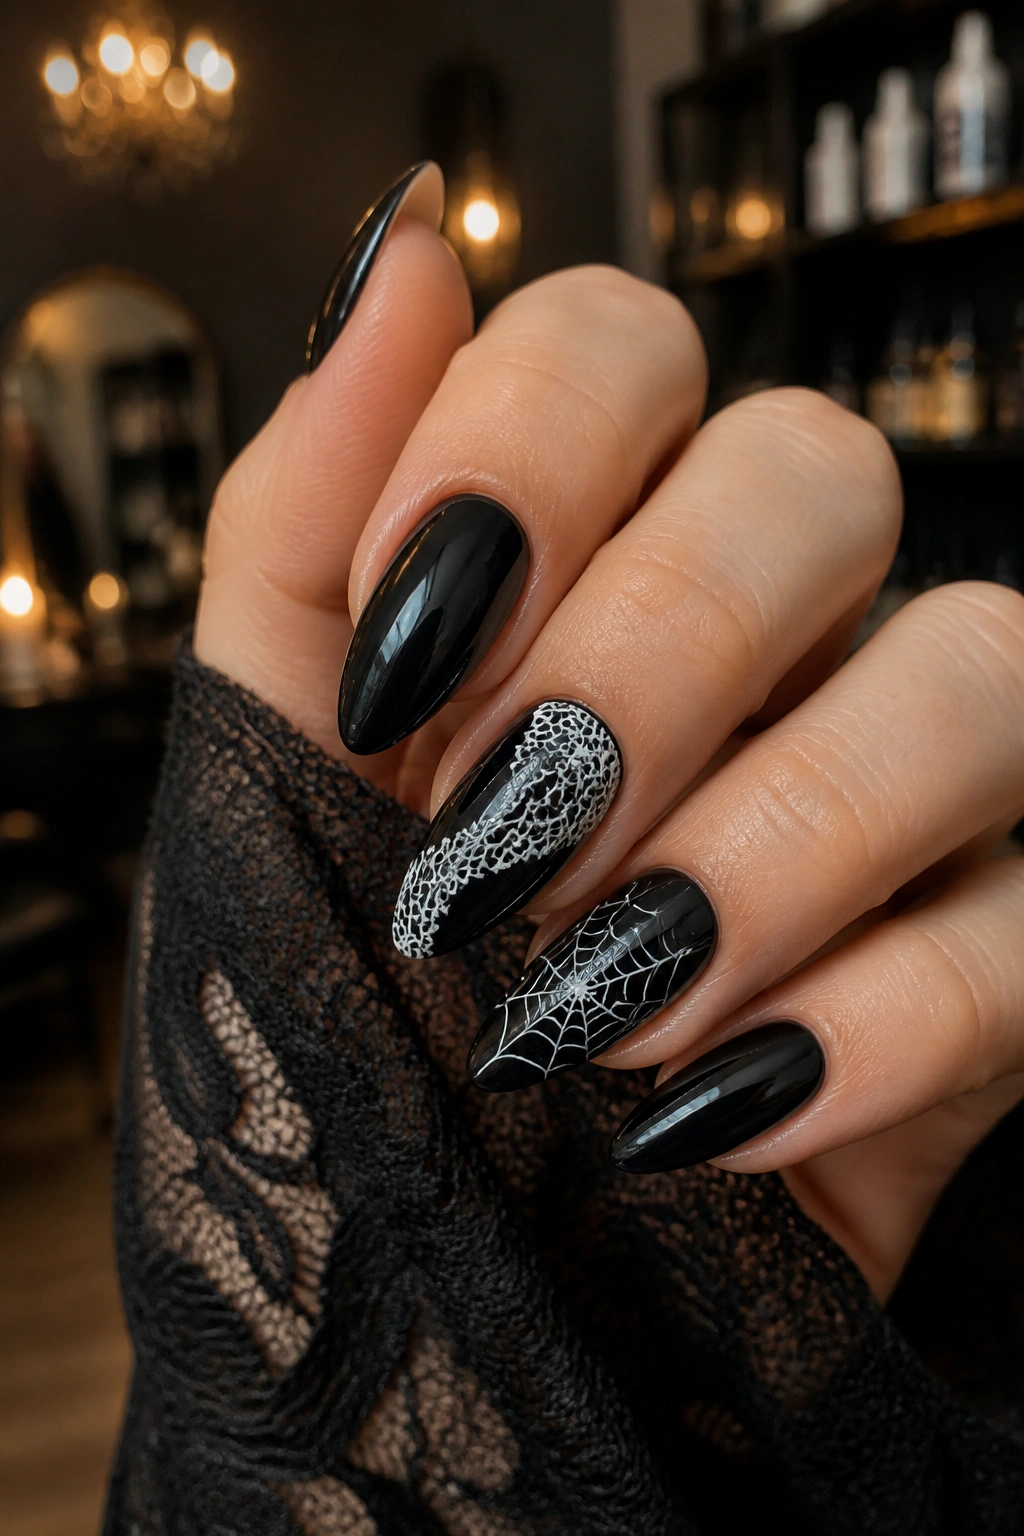
Lace and spiderweb patterns live on the edge between pretty and a little eerie, which is exactly why they work with black almond nails. The trick is to keep the pattern open enough that it breathes. Too much detail, and the design turns heavy fast.
A fine liner brush is your best friend here. Black lace lines over a nude base read more delicate, while white or silver webbing on black gives the manicure a sharper, more graphic feel. I prefer the second option when the goal is “edgy” rather than “sweet.”
Use the detail on one or two nails, not all five. That small break keeps the set from looking costume-like. And if you want the design to feel more grown-up, leave part of the nail empty so the black art has space to stand on its own.
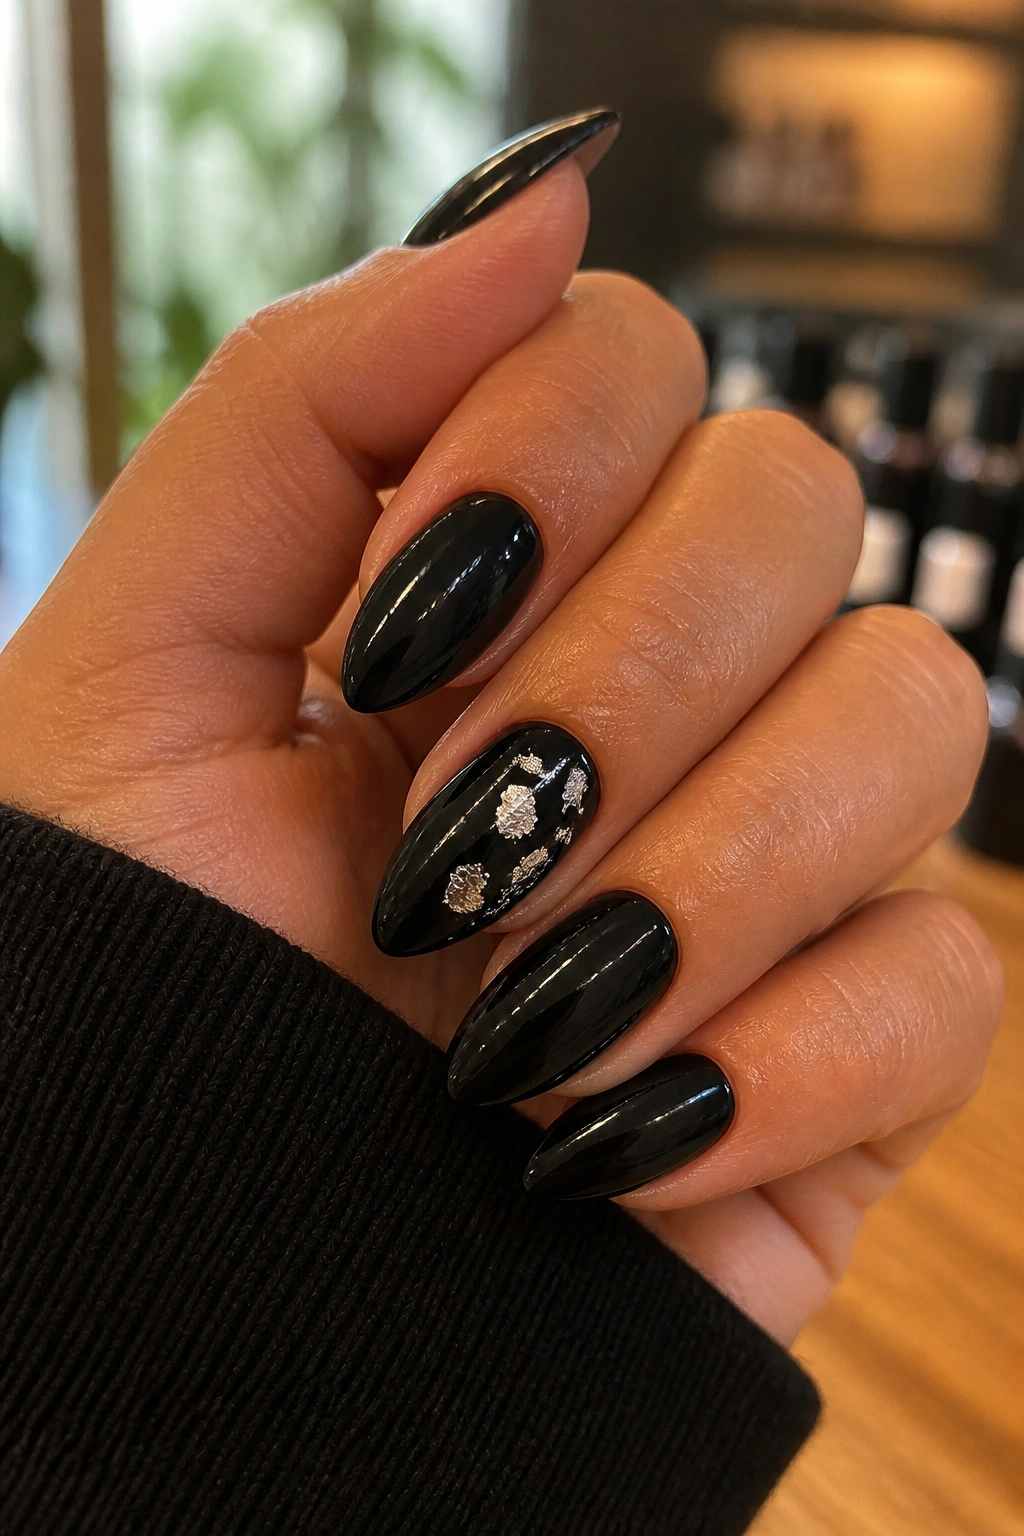
10. Tiny Stars on a Black Sky Base
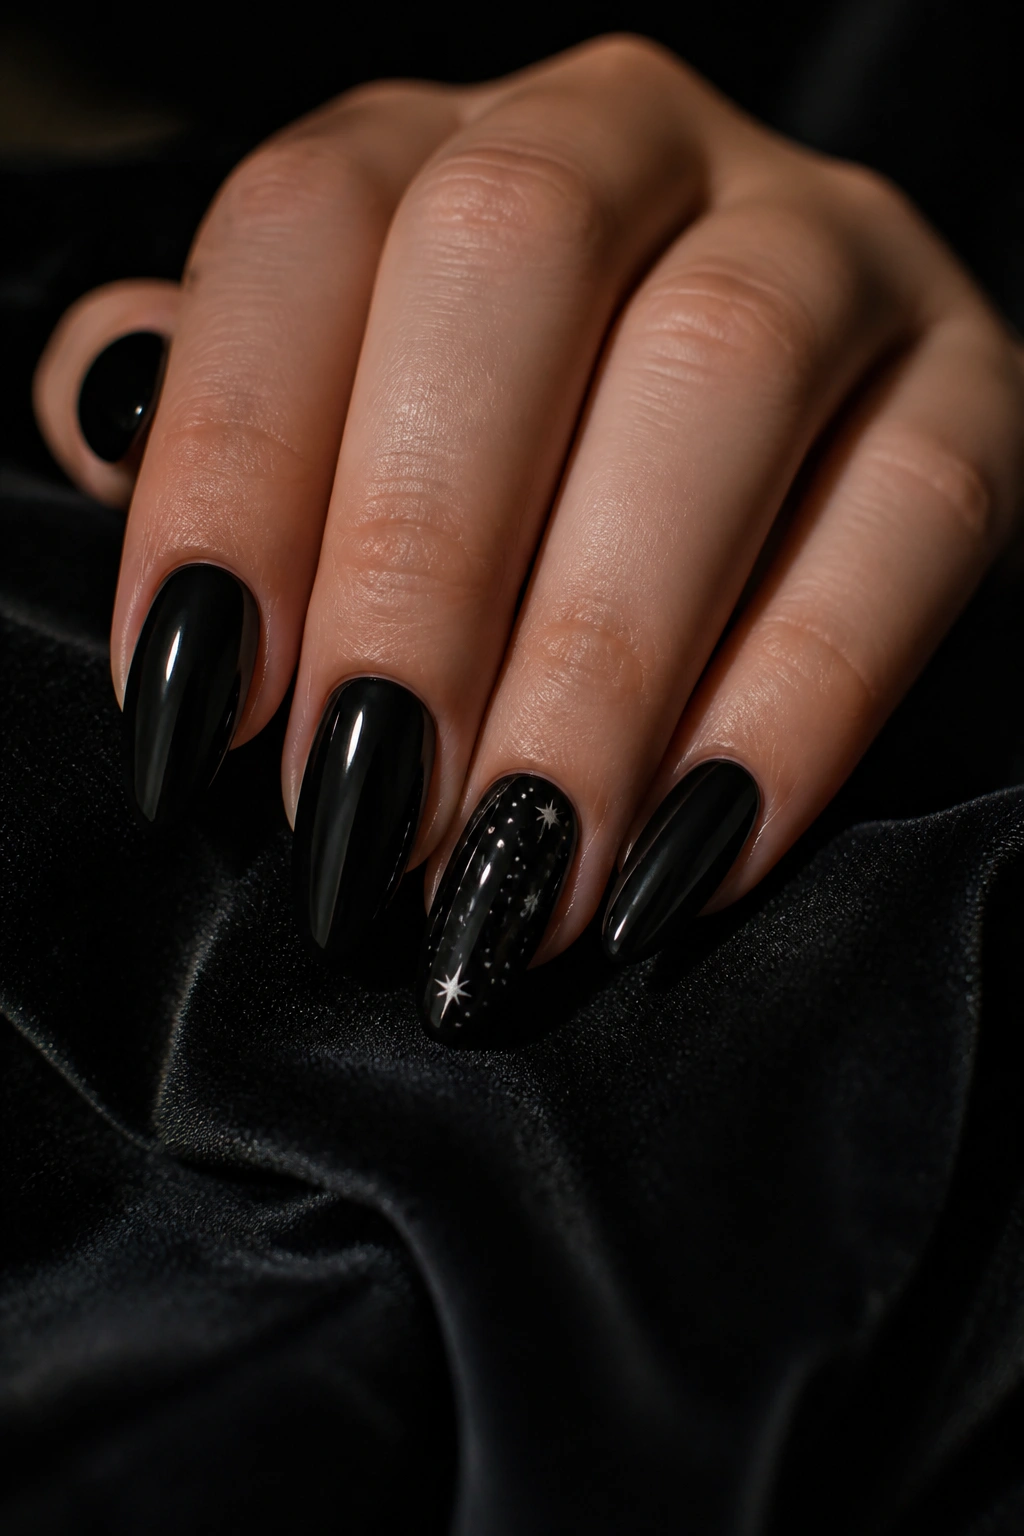
Small metallic stars on black polish can go either way. Cute or sharp. The difference is scale. Keep the stars tiny, the spacing loose, and the rest of the set plain, and the manicure starts to feel more like night sky than sticker sheet.
Silver dots work better than chunky glitter here. A few of them near the cuticle, a tiny star on the ring finger, maybe one thin line connecting two points — that’s enough. The almond shape helps because the pointed tip gives the whole design a faint comet feel, even when the art is minimal.
This is a good one if you want a black manicure that doesn’t feel heavy in daylight. It still reads dark and sleek, but the little metal details keep it from disappearing into a flat block of color.
11. Black Marble Smoke
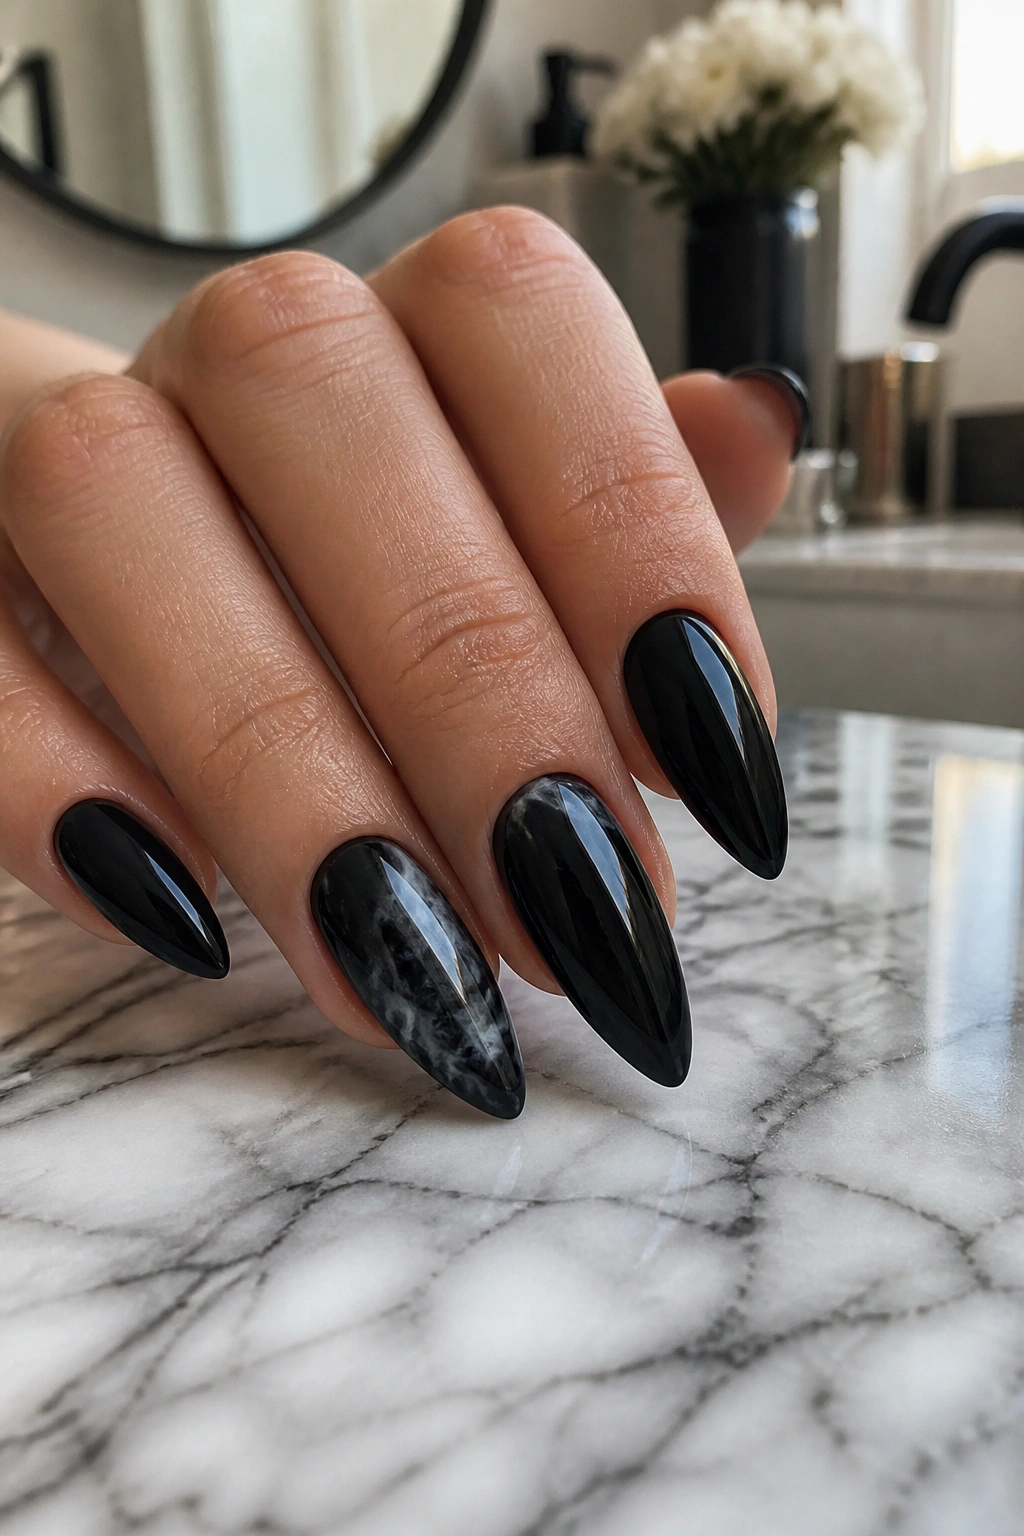
Black marble looks best when it stops trying too hard to be marble. You want soft gray and white wisps, not obvious veins drawn like a countertop sample. The effect should feel smoky, a little blurred, and slightly uneven.
How to get the smoke right
Start with a black base or a deep smoky gray. Then drop in thin ribbons of white or charcoal on a wet layer or blooming gel, and pull them gently with a fine brush. Don’t make the lines match. The messy parts are what sell it.
I like this on one or two accent nails because the movement breaks up a full black set. On almond nails, marble near the center of the nail looks better than marble packed at the tip. It gives the design a heavier, more grounded look.
If you wear jewelry, this manicure plays well with silver rings. The contrast is already doing a lot of the visual work.
12. Black Tortoiseshell
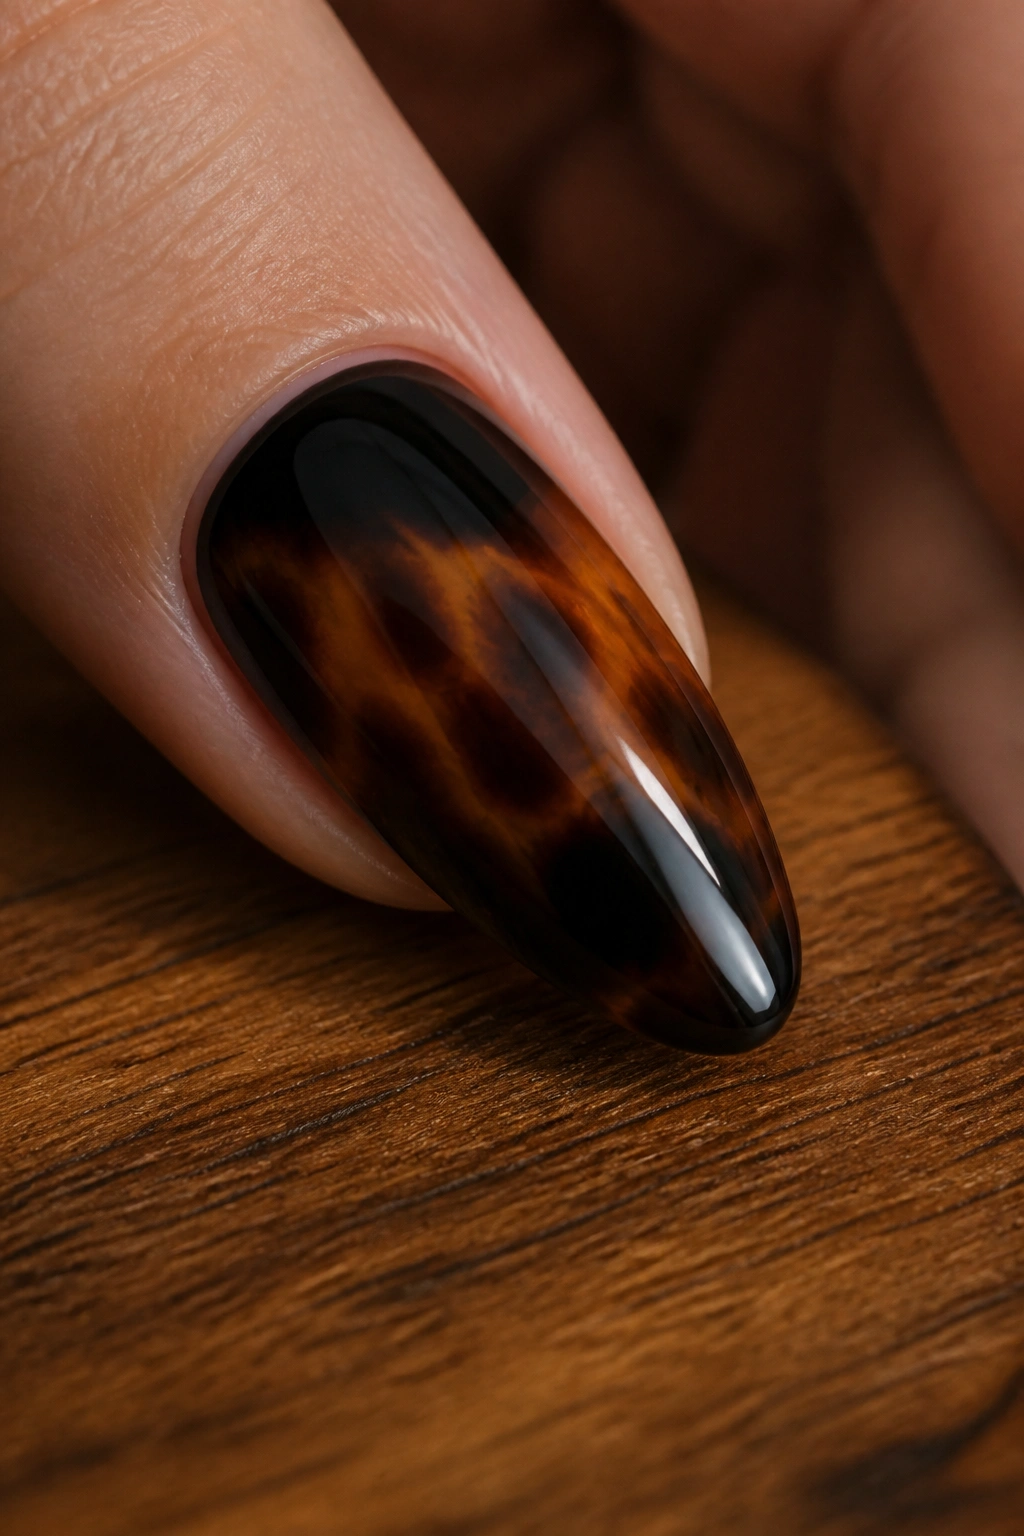
Black tortoiseshell is a sneaky good look. It keeps the depth of black, but the amber and espresso tones stop it from going flat. The result feels vintage, smoky, and a little bit dangerous, which is a rare combination in nail design.
The best version uses translucent brown, caramel, and deep smoke layered over a black or very dark base. If the brown is too orange, the whole thing loses its edge. Keep the warm tones dark and stained rather than bright. On almond nails, tortoiseshell looks especially good when it wraps the middle of the nail and leaves the edges a little darker.
Tone matters here
- Use espresso and amber, not bright orange.
- Keep the layers sheer so the depth shows.
- Limit the design to two nails if you want it to feel polished.
- Pair it with glossy top coat, not matte.
This is the kind of black-adjacent design that works when you want something richer than plain polish.
13. Smoky Black Ombré Fade
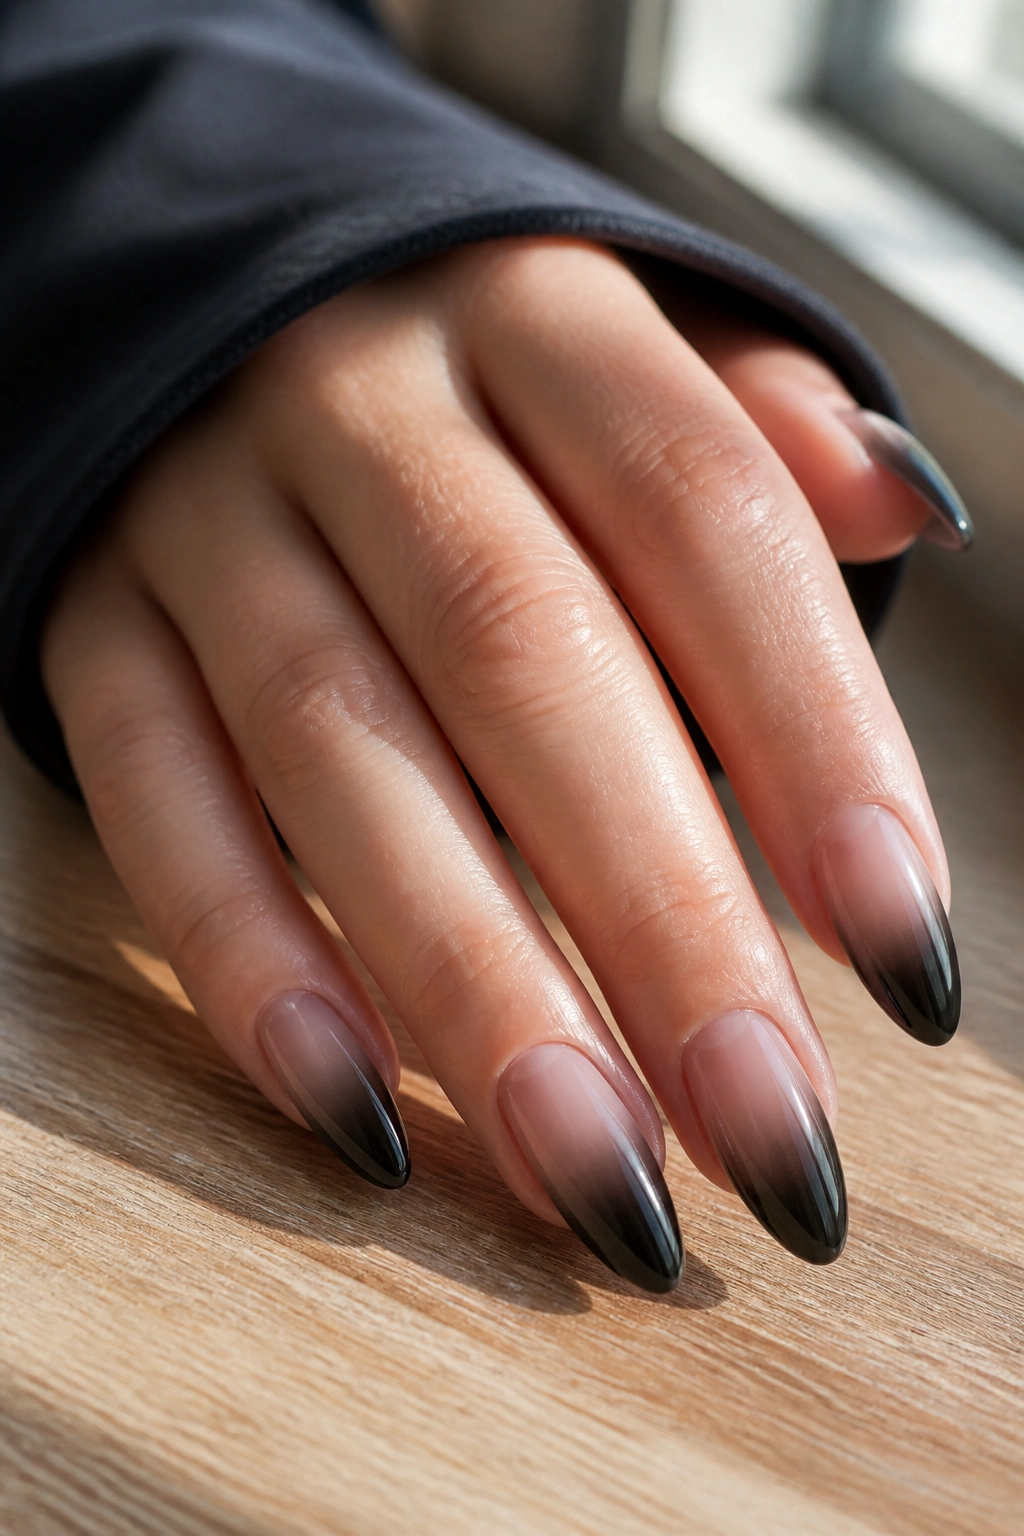
Can black ombré feel softer than a full black set? Absolutely. When the fade is done well, it gives you the same dark mood with a little more air around the edges.
A smoky ombré usually works best when the black is strongest at the tip and dissolves toward a nude or sheer base. You can also flip it and fade from the cuticle downward if you want a heavier, rooted look. A sponge works fine for this, but an airbrush gives the cleanest blur. If you see hard stripes, the fade wasn’t blended enough.
This style is smart for longer almond nails because the extra length gives the gradient room to show. It can look muddy on very short nails if the fade gets crowded. Keep the transition soft, and the manicure feels moody without looking dense.
14. Matte Black With Tiny Rhinestones
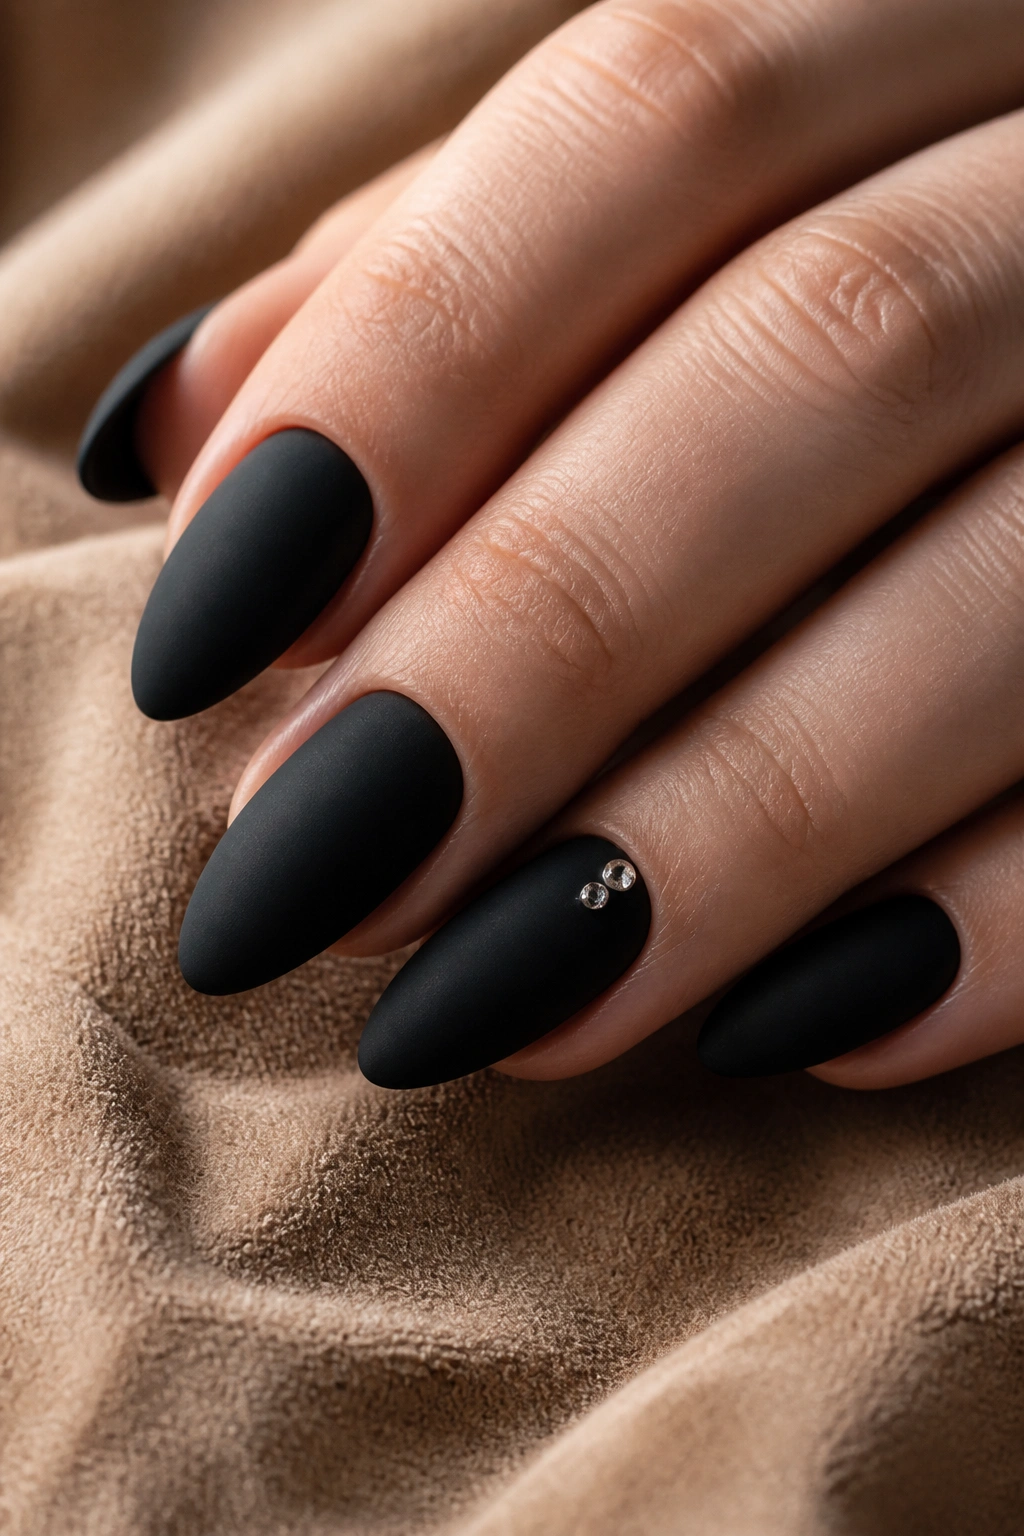
A matte black base with a few tiny crystals near the cuticle is a good reminder that sparkle does not have to shout. The matte finish keeps the whole set serious, and the stones act like a small flash of light instead of the main event.
The size matters. Pick flatback stones that are small enough to sit close to the nail without snagging on hair or sweaters. I’d rather see three tiny stones on one accent nail than a whole row of oversized gems. That kind of restraint makes the manicure look sharper.
If you want extra grip, have the stones set into builder gel or a strong art gel and capped lightly around the edges. Tiny placement near the cuticle usually lasts better than a scatter across the center of the nail. The almond shape already gives you drama; the stones just sharpen it.
15. Black-and-Clear Checkerboard
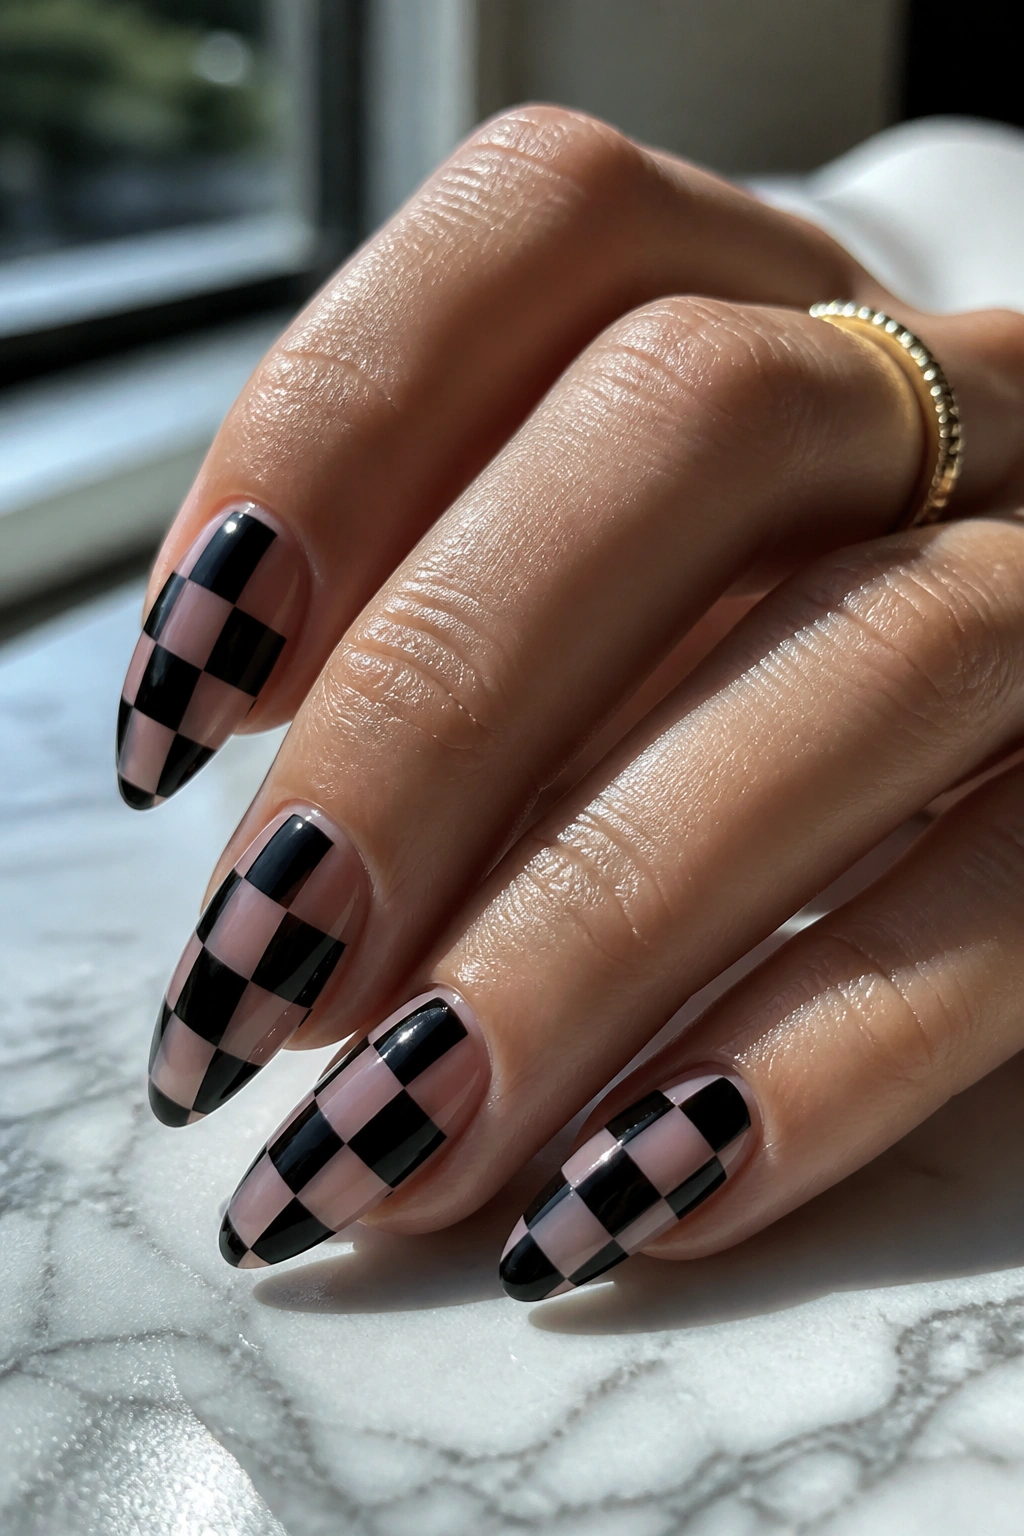
Checkerboard nails look graphic by nature, but black and clear makes them feel cleaner than the usual black-and-white version. The empty squares let the nail breathe, which helps the pattern stay edgy instead of cartoonish.
The square size matters more than people think. On a shorter almond, tiny squares keep the nail from looking crowded. On a longer almond, bigger blocks can handle the curve better and give the pattern a stronger rhythm. I’d keep the checkerboard to one or two accent nails, unless you want the whole set to be loud.
What makes it work
- The clear spaces keep the design from getting heavy.
- The black squares should have crisp edges.
- The pattern looks best when it follows the taper of the nail.
- A glossy finish keeps the design sharp.
It’s a strong choice if you like black but also like your manicure to feel a little graphic and a little mean.
16. Black Flame Tips
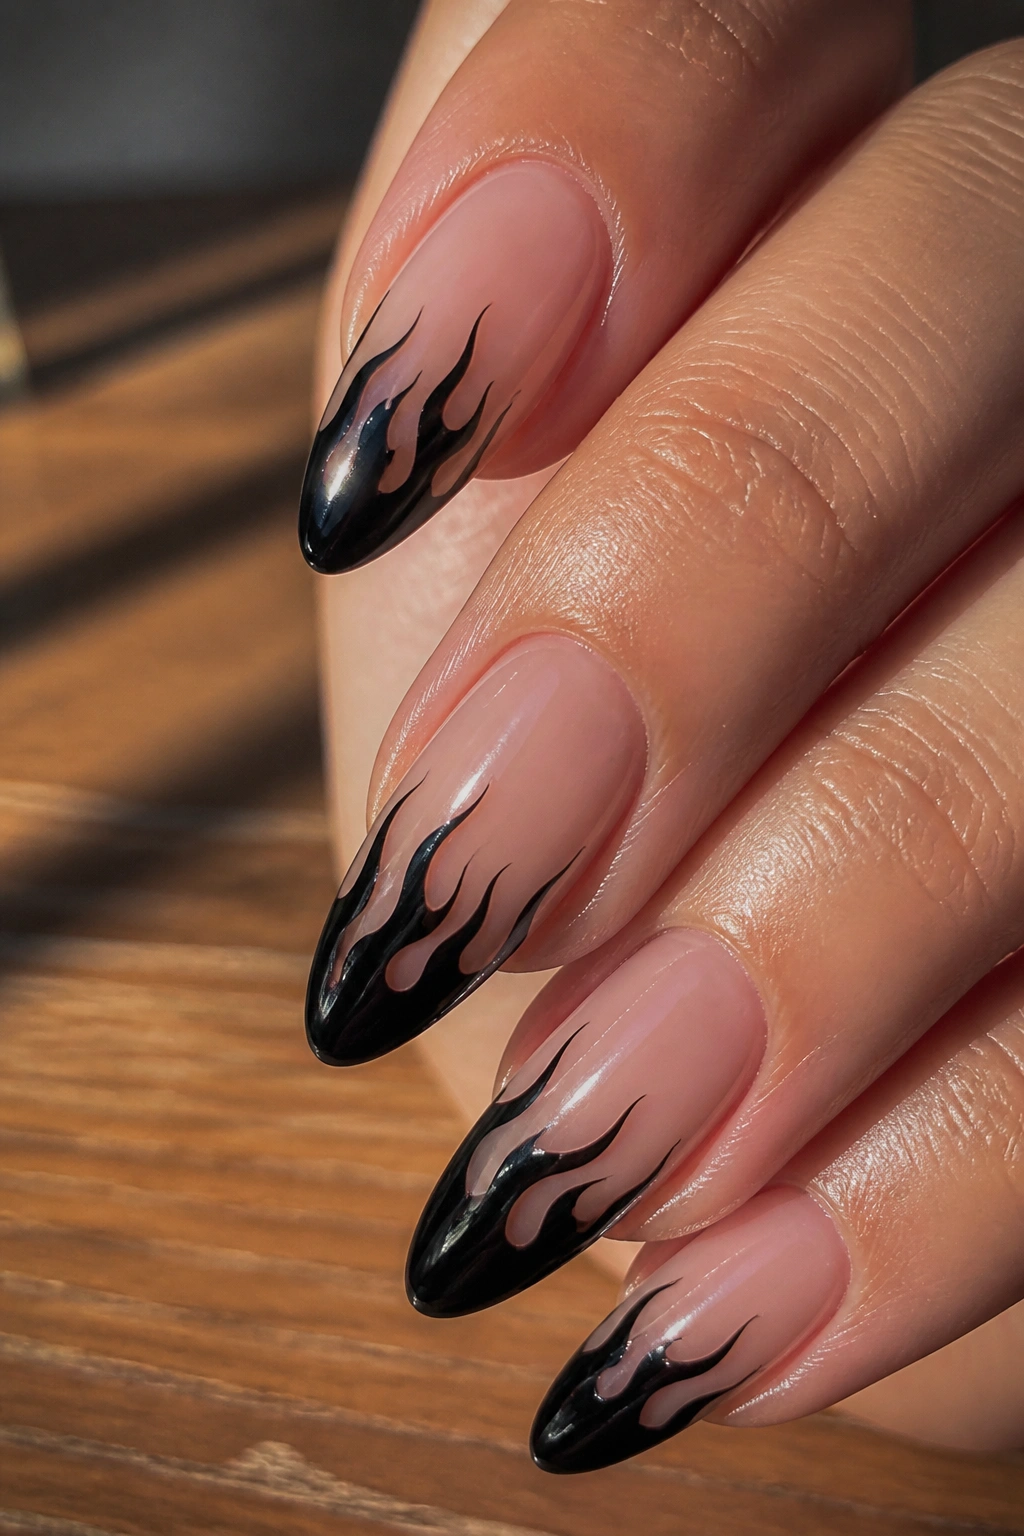
Black flames are a strange little miracle. They can feel playful, rebellious, or straight-up punk depending on the base color and how high the flames climb. On almond nails, the pointed tip gives the flames a natural place to flare out, which helps the whole design feel coherent.
A sheer nude base keeps the flames readable. A black base with glossy flames on top makes the design quieter but still sharp. Use a thin brush and let the flame tongues vary in length. If every flame looks copied and pasted, the set loses its bite.
This is one of those designs that looks better when it isn’t too perfect. The tips should feel alive, not measured. A little asymmetry is your friend here, and it stops the manicure from sliding into novelty.
17. Black Nails With Chain Hardware
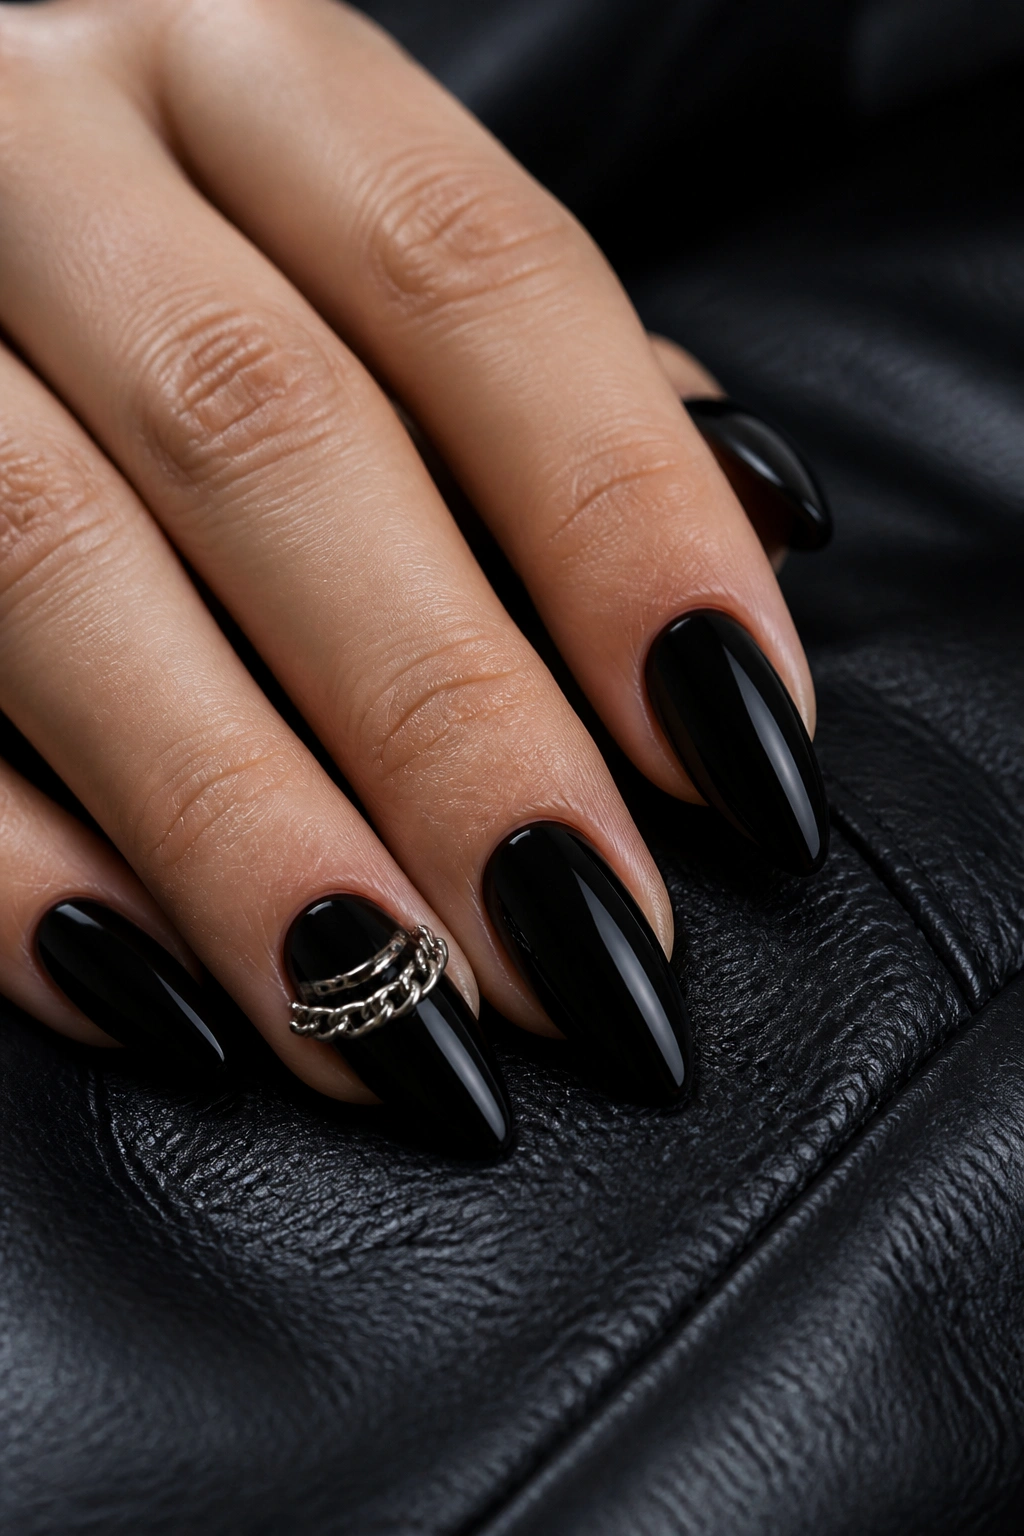
Chain details change the whole attitude of a manicure. The black base is still there, but the hardware makes it feel heavier, more punk, and a lot less polished in the soft sense of the word.
Hardware versus rhinestones
Rhinestones sparkle. Chain hardware clanks, even when it’s tiny. That difference matters. Chains and micro studs give the set a tougher read, while crystals lean glam. If you want something that feels more biker jacket than evening dress, choose the metal.
Keep the hardware to one or two nails. A full hand of chains can snag on everything, and that’s not a cute trade-off. A single chain across the cuticle line, or a small faux piercing detail near the tip, is enough to get the point across.
This is not the manicure I’d pick for typing all day. But for a night out, a concert, or just a mood, it hits hard.
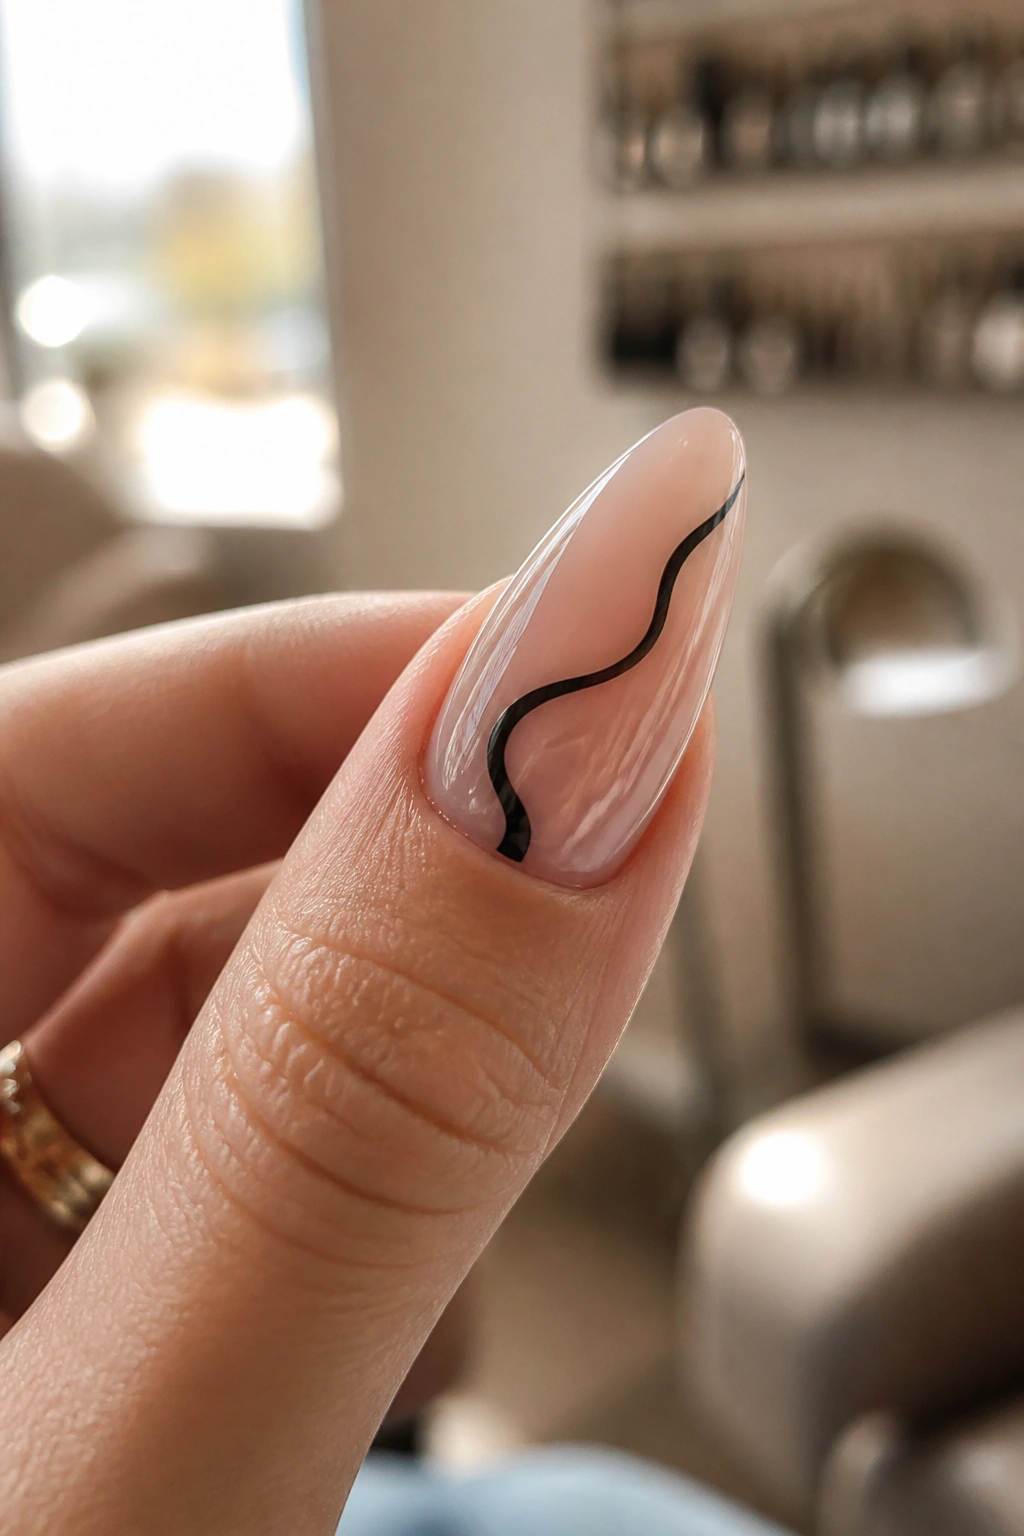
18. Abstract Black Line Art
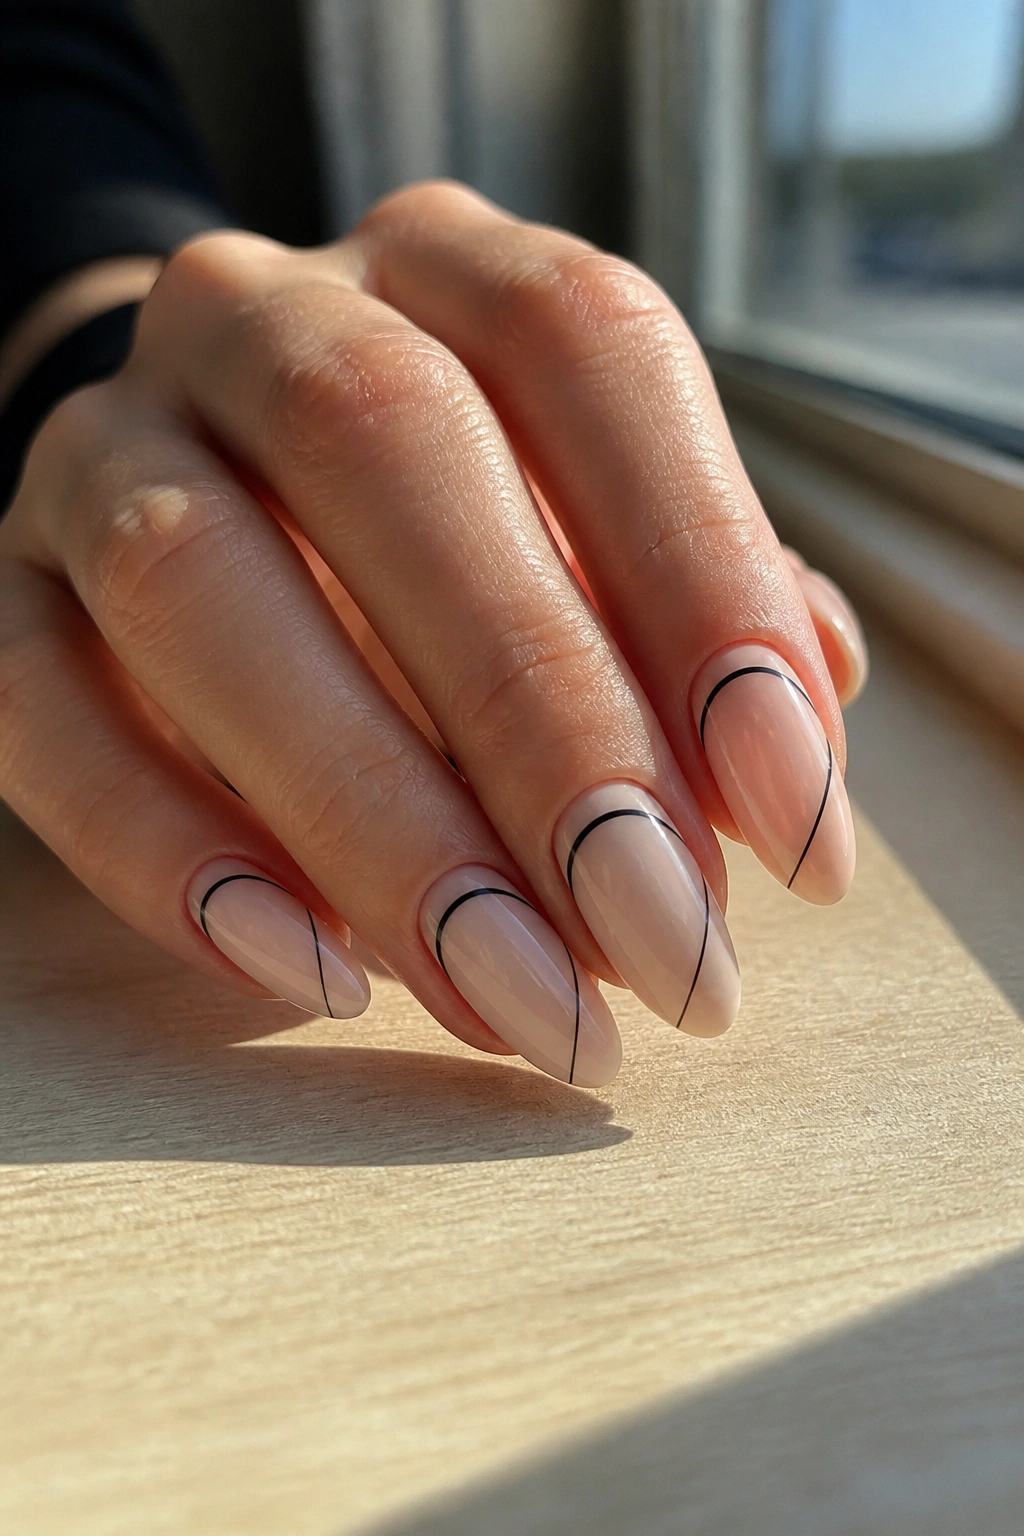
A few loose black lines over a pale base can look far more stylish than a pile of little symbols. The reason is space. You get to see each line on its own, which makes the art feel considered rather than busy.
What works here is restraint. Draw one line that curves around the cuticle, another that cuts diagonally across the nail, maybe a tiny dot where the line ends. That’s enough. The almond shape helps because the narrow tip gives the lines a place to land without crowding them.
How to keep it from looking random
Use a thin brush and vary the line weight. One line can be bold; the next can fade out. If you want the set to feel more severe, keep the lines off-center and leave one side of the nail mostly open. Black line art is strongest when it looks like it was placed with a sharp eye, not copied from a sticker pack.
19. Black and Deep Red Accents
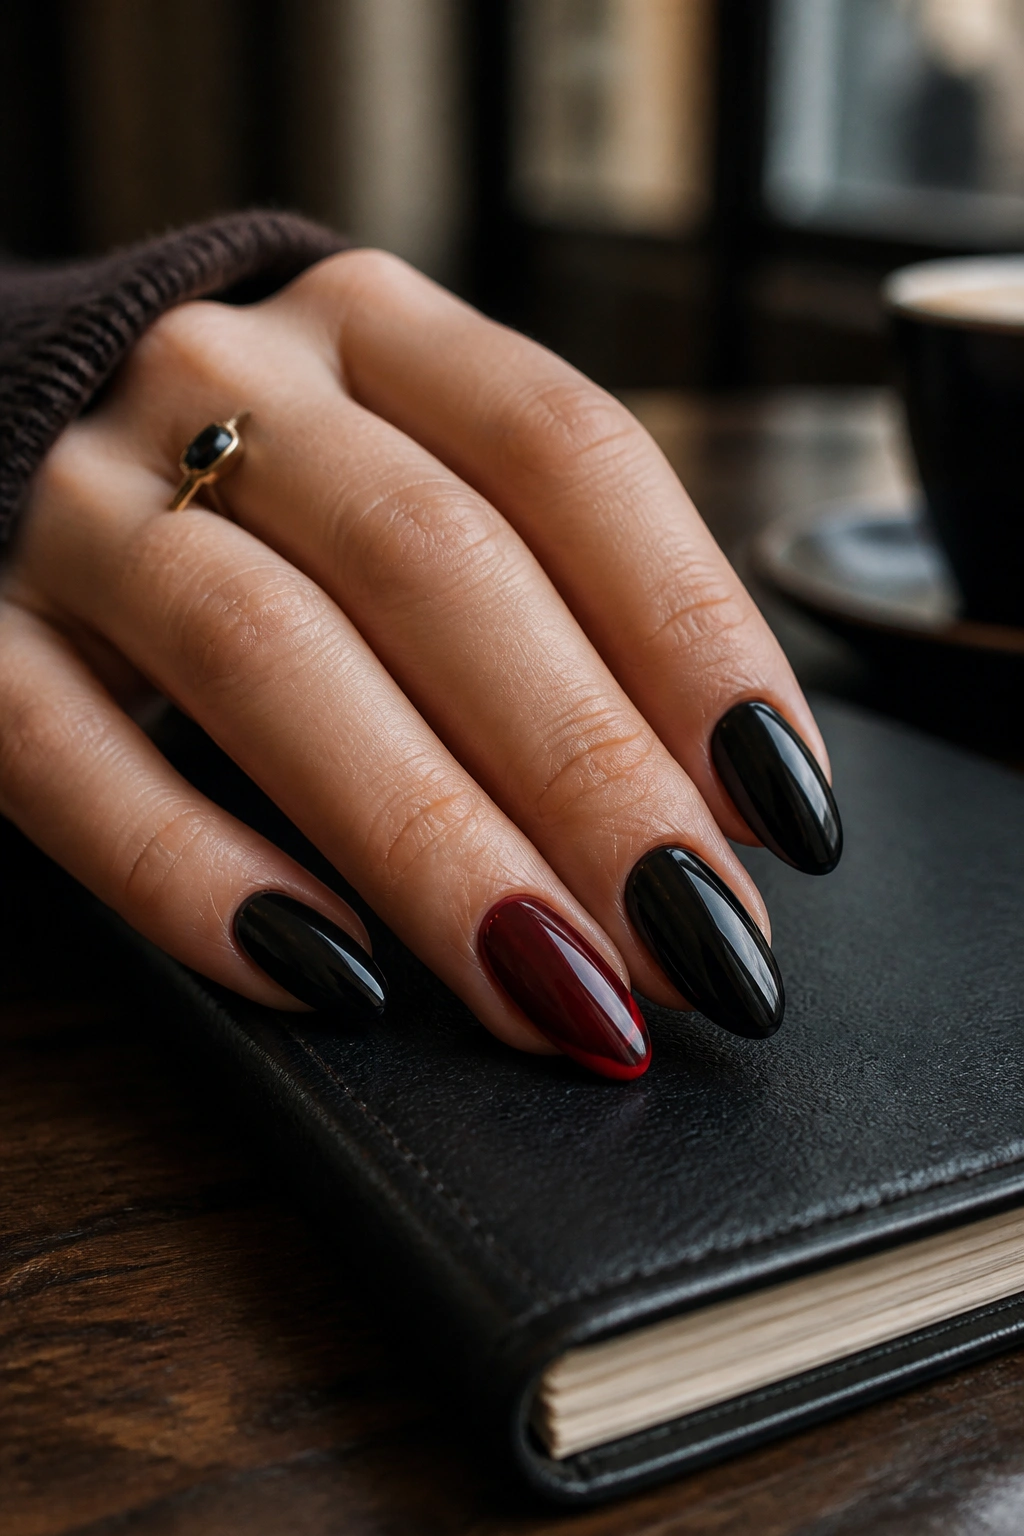
Black and deep red together can go in a lot of directions, but the best versions keep the red dark and rich. Think burgundy, oxblood, dried rose, or blood-red chrome — not bright candy red. The deeper tone keeps the manicure moody.
A red accent nail among black nails is the easiest place to start. A red French tip on black is sharper. A half-red moon near the cuticle has a more gothic feel. The almond shape helps because the taper pulls the eye toward the color shift, and that little movement keeps the set from feeling blocky.
I like this pairing when the outfit is mostly black and the nails need one small jolt of color. It’s dramatic without being loud. And if you’re someone who gets bored fast, this one still has enough contrast to stay interesting for a while.
20. Minimal Constellation Dots
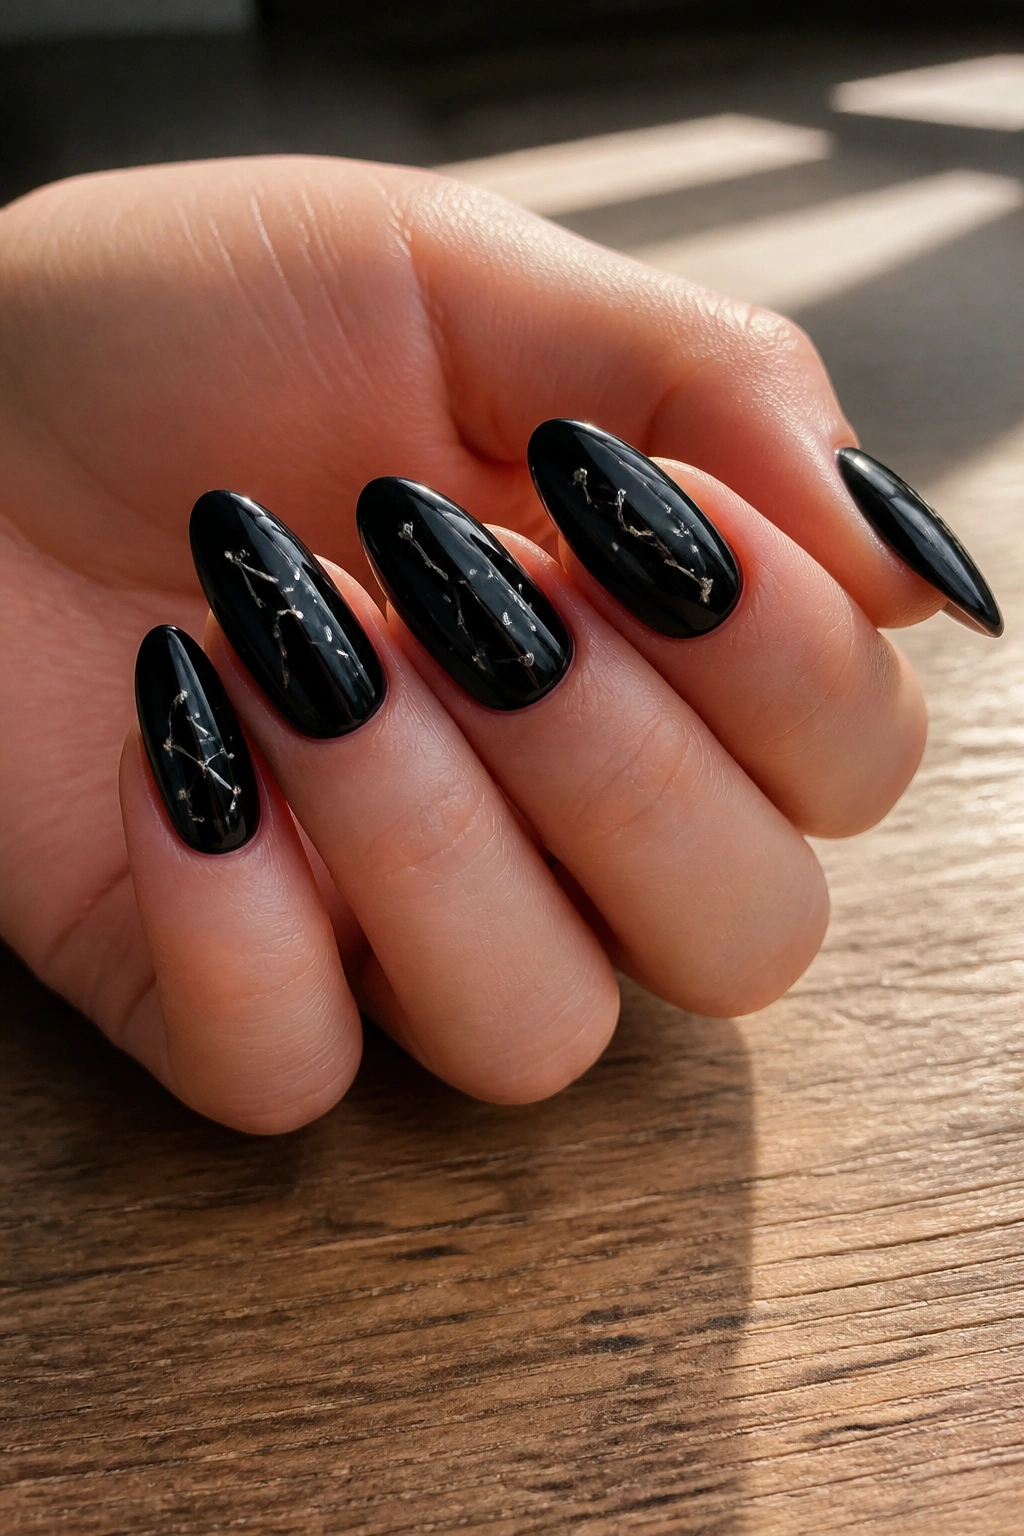
Tiny dots connected by thin silver lines can turn black almond nails into something that looks quiet at first and then reveals itself a second later. That slow reveal is part of the appeal. The manicure doesn’t need a giant motif to feel finished.
Keep the dots sparse. Three or four per nail is plenty. If you crowd the surface, the set starts looking like a sticker sheet again. A fine dotting tool or the end of a striping brush makes this easy to place, and silver tends to read crisper than gold on black.
This idea works especially well on short almond nails, where a full design would feel cramped. The small scale keeps it elegant, but the black base still gives it edge. Not soft. Just neat.
21. Embossed Snakeskin Texture
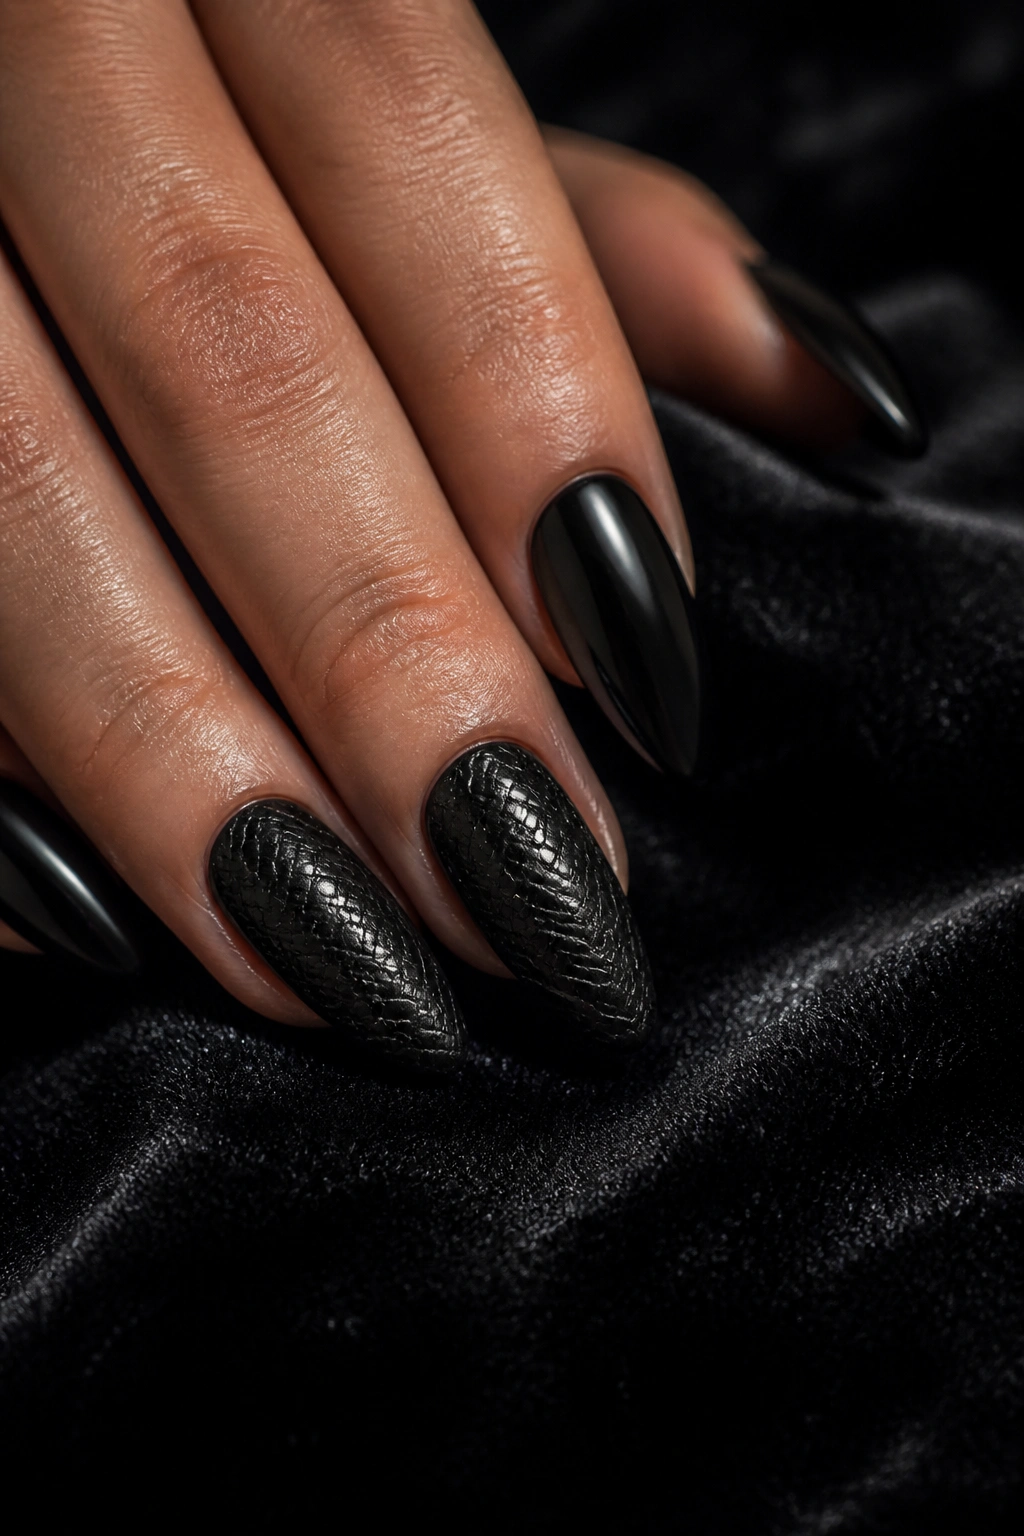
Snakeskin texture gives black nails a physical edge, not just a visual one. You can see the pattern, but you can also feel the raised surface if the design is done with embossing gel or a stamping plate with enough depth.
That texture looks strongest when the rest of the manicure stays plain. One or two textured accent nails, then smooth black on the others, is usually enough. If every nail has the same pattern, the effect can feel busy and a little costume-like. The almond shape helps because the texture follows the taper in a natural way.
Where texture matters most
- Keep the pattern fine, not giant.
- Use glossy top coat if you want the scales to pop.
- Leave the cuticle area clean so the texture reads intentional.
- Pair it with a plain black thumb or pinky to break the set up.
This one is for people who like their manicure to have a bit of bite.
22. Black Aura Nails
Aura nails are softer than a lot of the ideas here, but black aura nails can still look edgy if the center glow is smoky enough. The trick is to keep the halo muted, not pastel. Think charcoal fog around a black base, or a dusky gray bloom that fades into darkness.
How the halo changes the mood
When the glow sits in the center of the nail, the almond shape feels rounder. When it sits nearer the cuticle, the set gets more dramatic and a little darker. That placement choice changes the whole vibe. It’s subtle, but it matters.
Airbrush gives the smoothest aura, though a sponge can work if you’re careful with the blend. The effect should look cloudy and soft at the edges. If the fade is harsh, the nail stops reading as aura and starts looking like a bad gradient.
I like aura nails when black needs a break from hard lines. They add movement without giving up the dark base.
23. Shattered Glass Foil
Shattered glass foil on black is one of those looks that feels sharp even when the pieces are tiny. The irregular foil catches light in broken little flashes, which gives the manicure texture without needing a full design.
The best way to keep it from going overboard is to use it on one or two nails and keep the shards scattered, not packed. Too much foil can make the nails look noisy. A few larger pieces mixed with smaller fragments usually gives the best result. Seal the surface carefully, because foil edges can poke through if the top coat is too thin.
A few practical notes
- Silver foil looks cooler; iridescent foil looks more futuristic.
- Black gel underneath makes the foil pop harder.
- Put the shards near the center if you want more flash.
- Spread them out if you want a rougher, broken-metal look.
This design has a little attitude without needing extra color.
24. Reverse French Half-Moons
Reverse French nails put the accent at the cuticle instead of the tip, which gives black almond nails a slightly sharper read than the standard French. The shape near the lunula draws attention inward, and that makes the whole nail look a touch more architectural.
A bare half-moon with black covering the rest of the nail feels clean and graphic. Flip it, and a black half-moon against a nude or sheer base looks more dramatic. The version I like most uses a narrow curve, not a huge block, because the almond shape already gives you enough line work.
This is a good choice if you hate watching your manicure grow out. The base area naturally leaves room for a little wear, so the set keeps its shape longer. It’s practical, but it still looks sharp. That’s a nice combination.
25. Center Stripe Noir
A single black stripe down the center of an almond nail sounds plain until you see it in motion. Then it becomes strange in a good way. The line emphasizes the taper, makes the nail look longer, and gives the set a clean, almost severe finish.
Keep the stripe narrow if you want it quiet. Make it slightly off-center if you want a little tension. A glossy stripe over a matte base is one of my favorite versions, because the finish contrast does half the visual work without adding more art. You can also reverse it and place the matte stripe over a glossy nail, which has a similar effect but feels less expected.
This is the design I’d pick when I want black almond nails to look disciplined. No foil, no stars, no extra drama. Just one hard line and a shape that already knows what it’s doing.
