

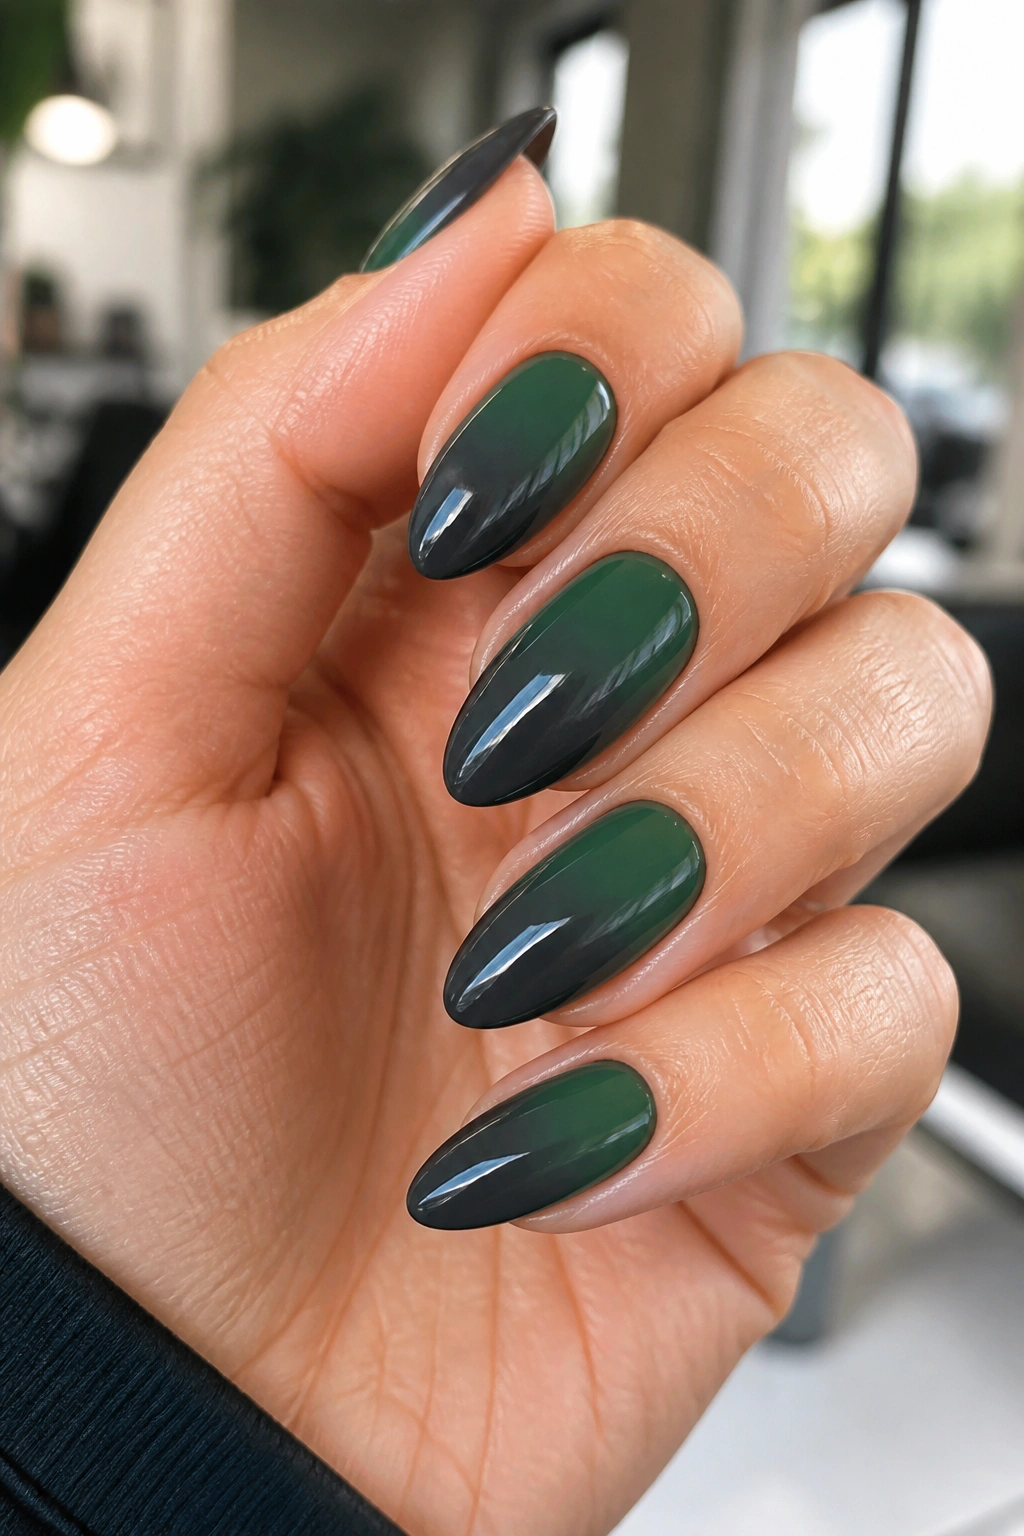
Dark green almond nails have a way of looking expensive without trying too hard. The color is deep enough to feel polished, but not so dark that it disappears into black. On an almond shape, that richness gets softened a little, so the whole manicure looks sleek instead of heavy.
That’s the part people miss. The almond tip does a lot of quiet work here. It stretches the finger visually, keeps dark polish from feeling blunt at the ends, and gives the color room to look smooth rather than flat. A forest green cream on short almond nails feels tidy and chic. A pine green chrome on longer almonds feels sharper. Same color family. Totally different mood.
The trick is matching the finish to the vibe you want. Gloss makes the shade look deeper. Matte turns it earthy. Gold foil, thin French tips, and tiny line art each push the manicure in a different direction without making it feel fussy. And yes, dark green is forgiving in some ways, but it will also show sloppy cuticle work fast. Clean prep matters here.
1. Glossy Forest Green Almond Nails
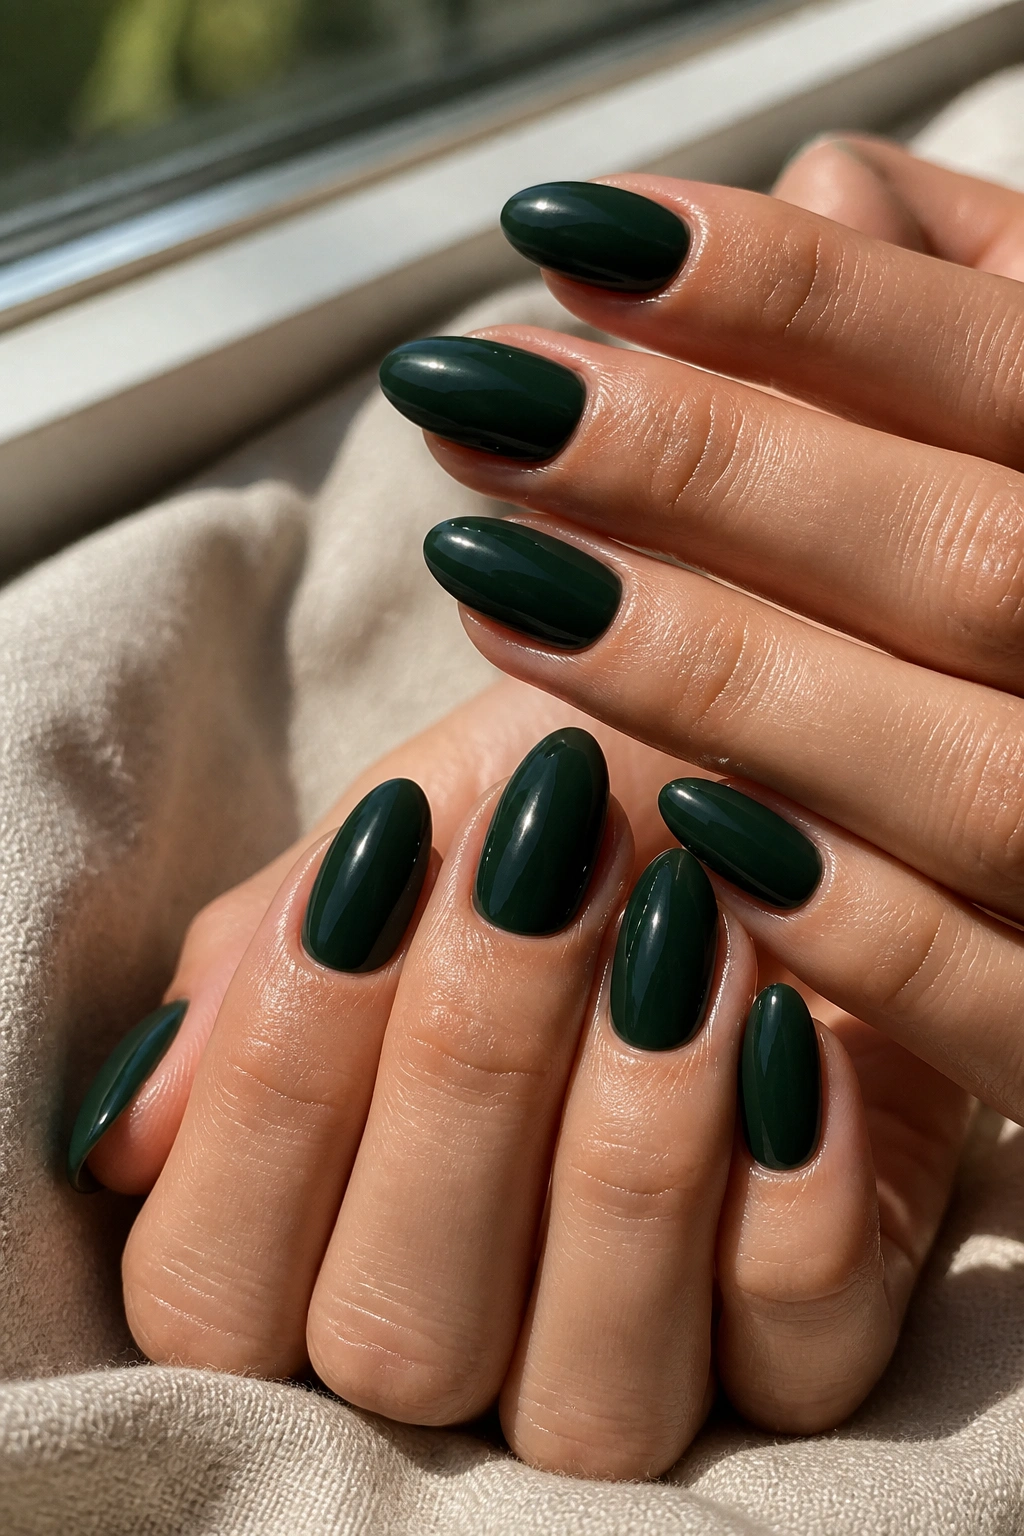
If you want the safest place to start, this is it. A glossy forest green cream polish on almond nails is clean, rich, and easy to wear with almost anything. It gives that inky, polished look people usually try to fake with too many extras.
The finish matters more than the design. A smooth, high-shine top coat turns forest green into something that looks almost lacquered, while a streaky formula makes the whole manicure feel flat. Two thin coats are usually enough if the polish is dense, and a third sheer coat can help if the green leans a little too black on the nail.
Keep the shape neat. Almond nails should taper gently, not come to a point that looks sharp or brittle. The color already brings enough drama. You do not need an aggressive tip.
A manicure like this works especially well when the cuticles are tidy and the length is balanced. Too short, and the green can feel heavy. Too long, and it starts to look costume-y. That sweet middle zone is where this style really lands.
2. Matte Olive Almond Nails

Why does matte olive look so different from glossy olive? Because the finish strips away glare and leaves you with something softer, dustier, and a little more grounded. On almond nails, that gives the whole hand a calmer look.
What Makes It Work
Matte top coat can be a blessing and a problem. It hides shine, which is the point, but it also shows ridges and uneven prep more clearly than glossy polish. A ridge-filling base coat helps. So does a steady hand with the color coats, because every rough patch gets magnified once the shine disappears.
Olive green sits in a nice middle place. It has enough darkness to feel moody, but it still keeps a little warmth. That makes it easy to wear with gold rings, cream sweaters, camel coats, or simple black clothing when you want the nails to be the focal point.
Best Pairings
- Thin gold bands keep the look warm.
- Shorter almond length makes matte olive feel tailored.
- A soft neutral wardrobe lets the color stand out without fighting other details.
If you hate shine but still want a rich manicure, this is the one.
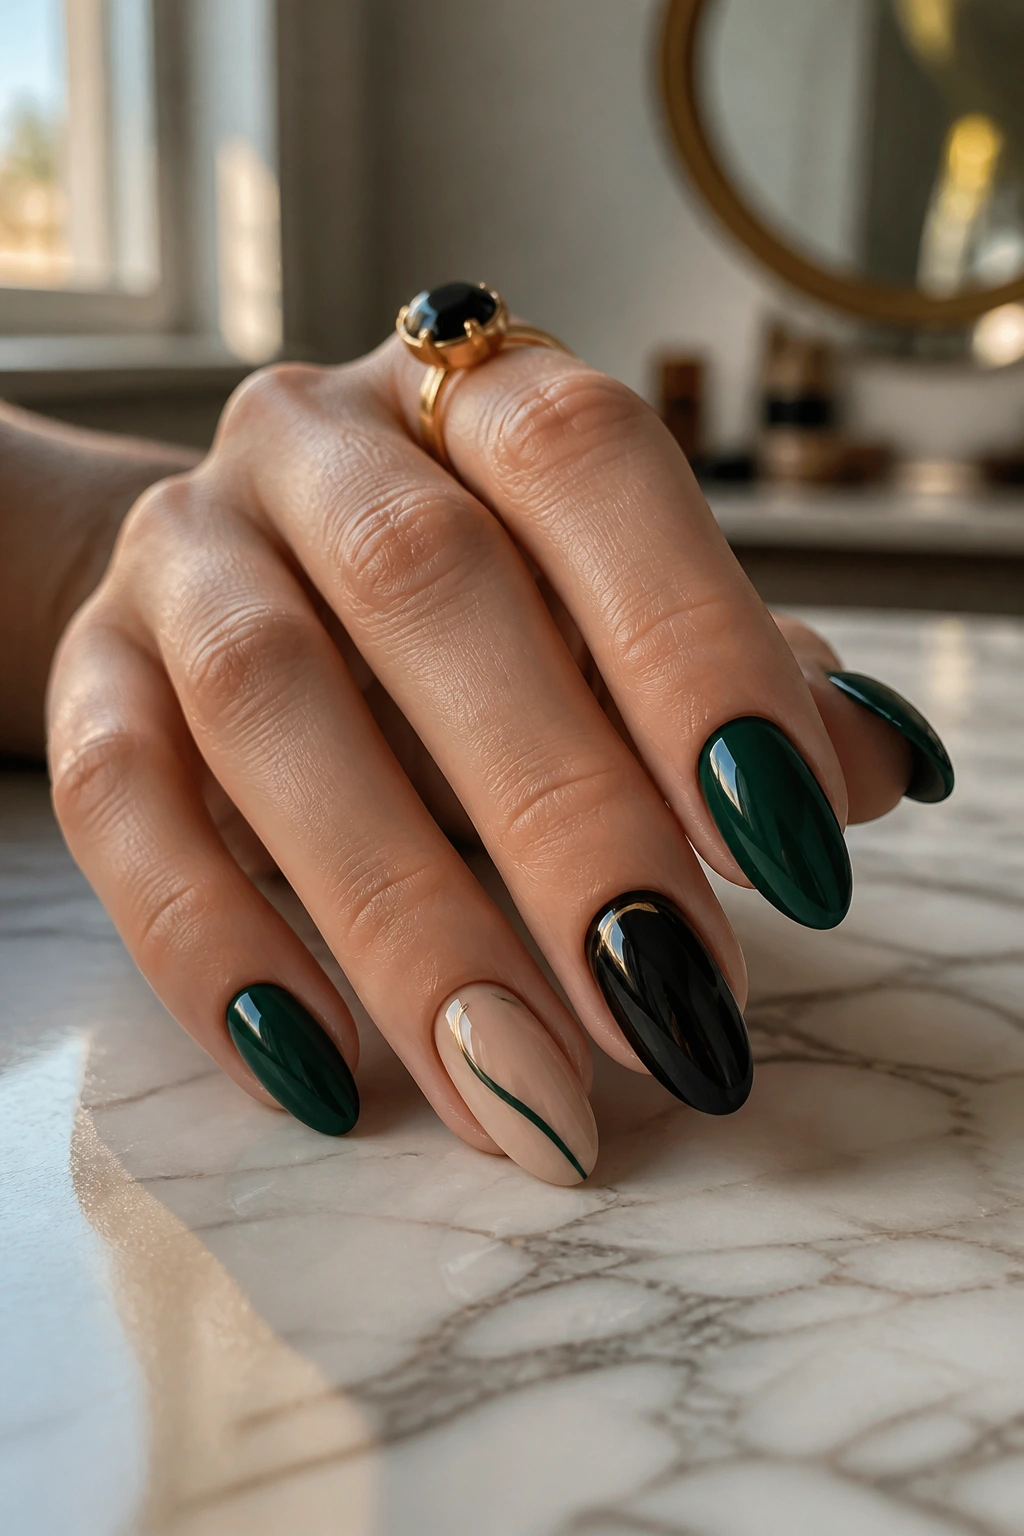
3. Dark Green French Tips on a Nude Base
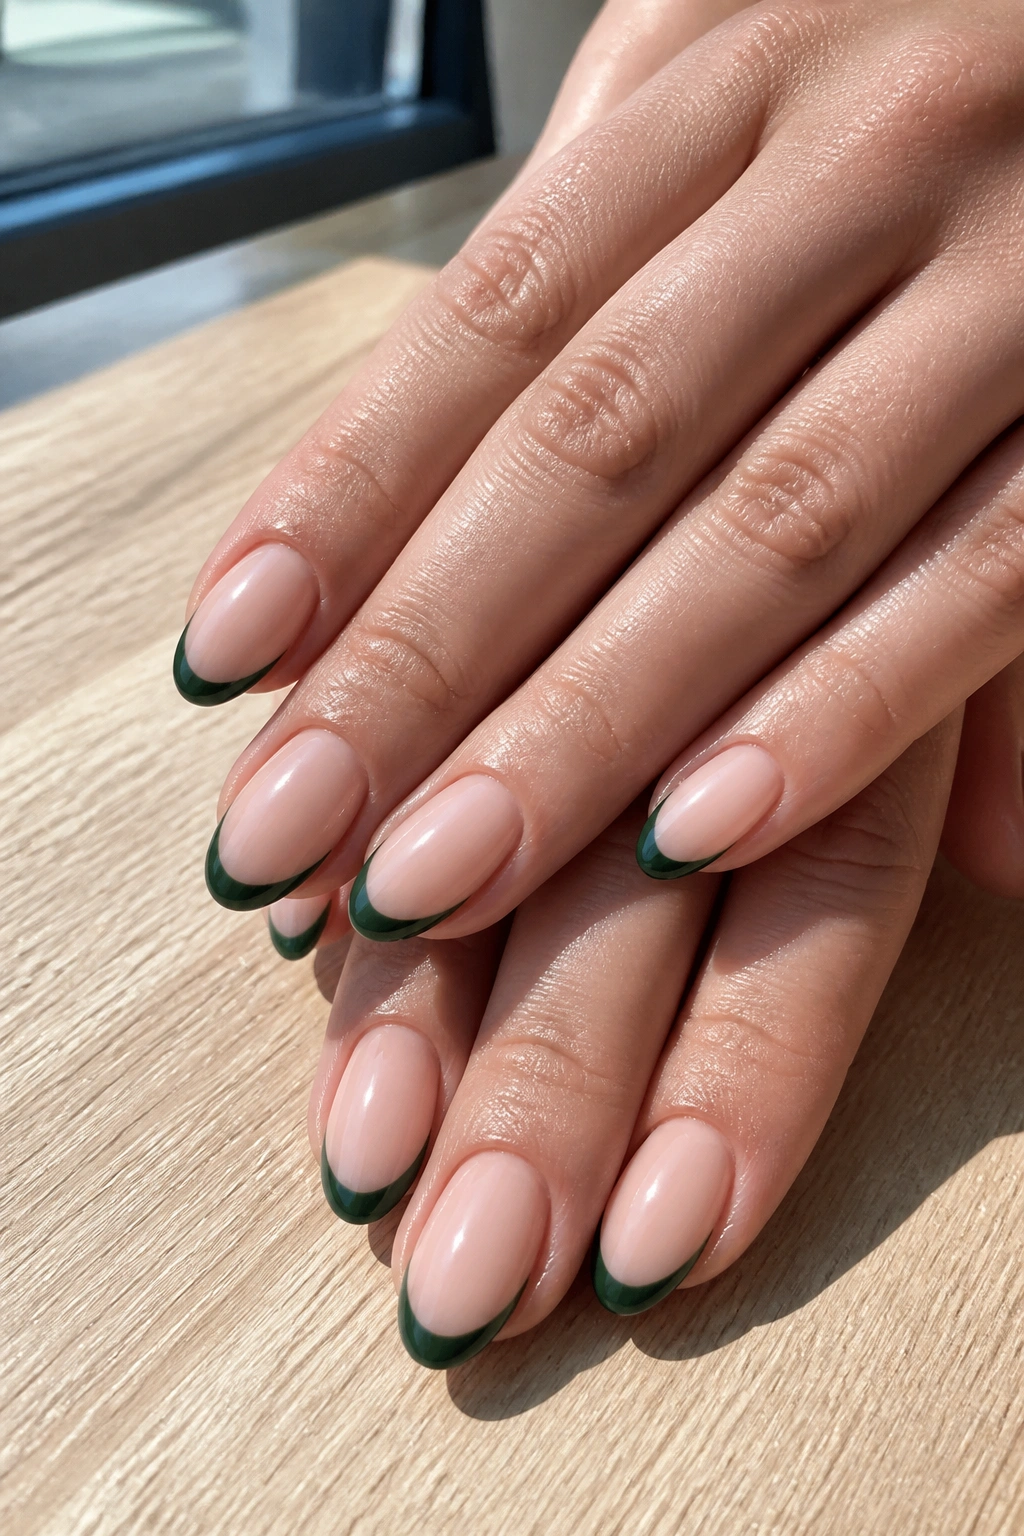
Full coverage is not the only way to wear dark green. A nude base with deep green French tips gives you color at the edge and keeps the nail bed looking light, which is useful if you want something cleaner than an all-over dark coat.
The almond shape helps this design more than most people realize. That soft taper mirrors the curve of the tip, so the green line looks intentional instead of pasted on. Keep the tips slim. Thick French tips can make almond nails look top-heavy, and that ruins the balance fast.
A sheer pink or beige base works better than an opaque one. You want the contrast to feel airy. If the base is too milky, the tip can look dull. If the tip is too wide, the whole design starts reading like a half-moon block instead of a French.
How to Keep It Crisp
- Use a thin liner brush, not the polish brush.
- Sketch the smile line in two passes if needed.
- Seal the free edge so the tips do not chip first.
This is the sort of manicure that looks quiet at a glance and smarter up close. Nice little trick.
4. Emerald Cat-Eye Almond Nails
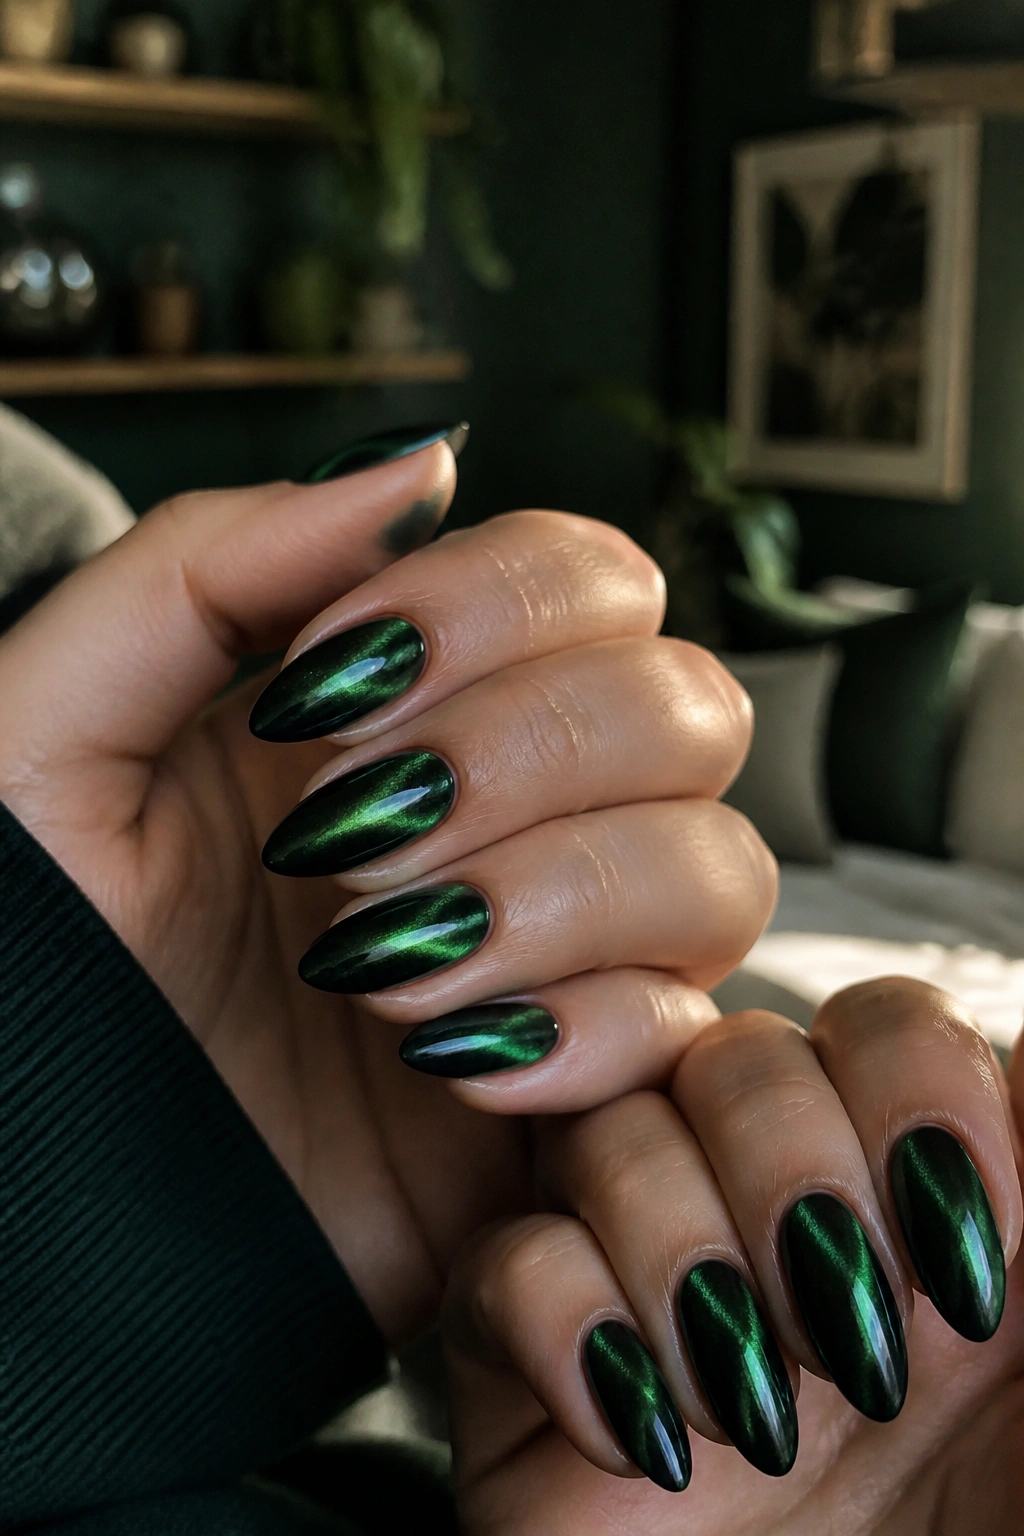
This one has a stronger personality. Emerald cat-eye polish gives dark green nails a moving band of light that shifts as your hand turns, and almond nails are one of the best shapes for it because the reflection follows the curve.
The magnetized line does the heavy lifting, so you do not need nail art on top. A deep green magnetic polish over a black or very dark base usually gives the richest result. Hold the magnet close for a few seconds before curing, and do not rush that part. If the line gets fuzzy, the whole effect loses its sharp edge.
The best cat-eye greens are the ones that still look dark in low light. Bright green magnetic polish can feel a little loud. A deeper emerald shade stays more grown-up and makes the shimmer show only when it should.
This design is for someone who wants drama without clutter. No florals. No foil. Just that shifting stripe and a glossy almond finish.
5. Dark Green Nails with Gold Foil Accents
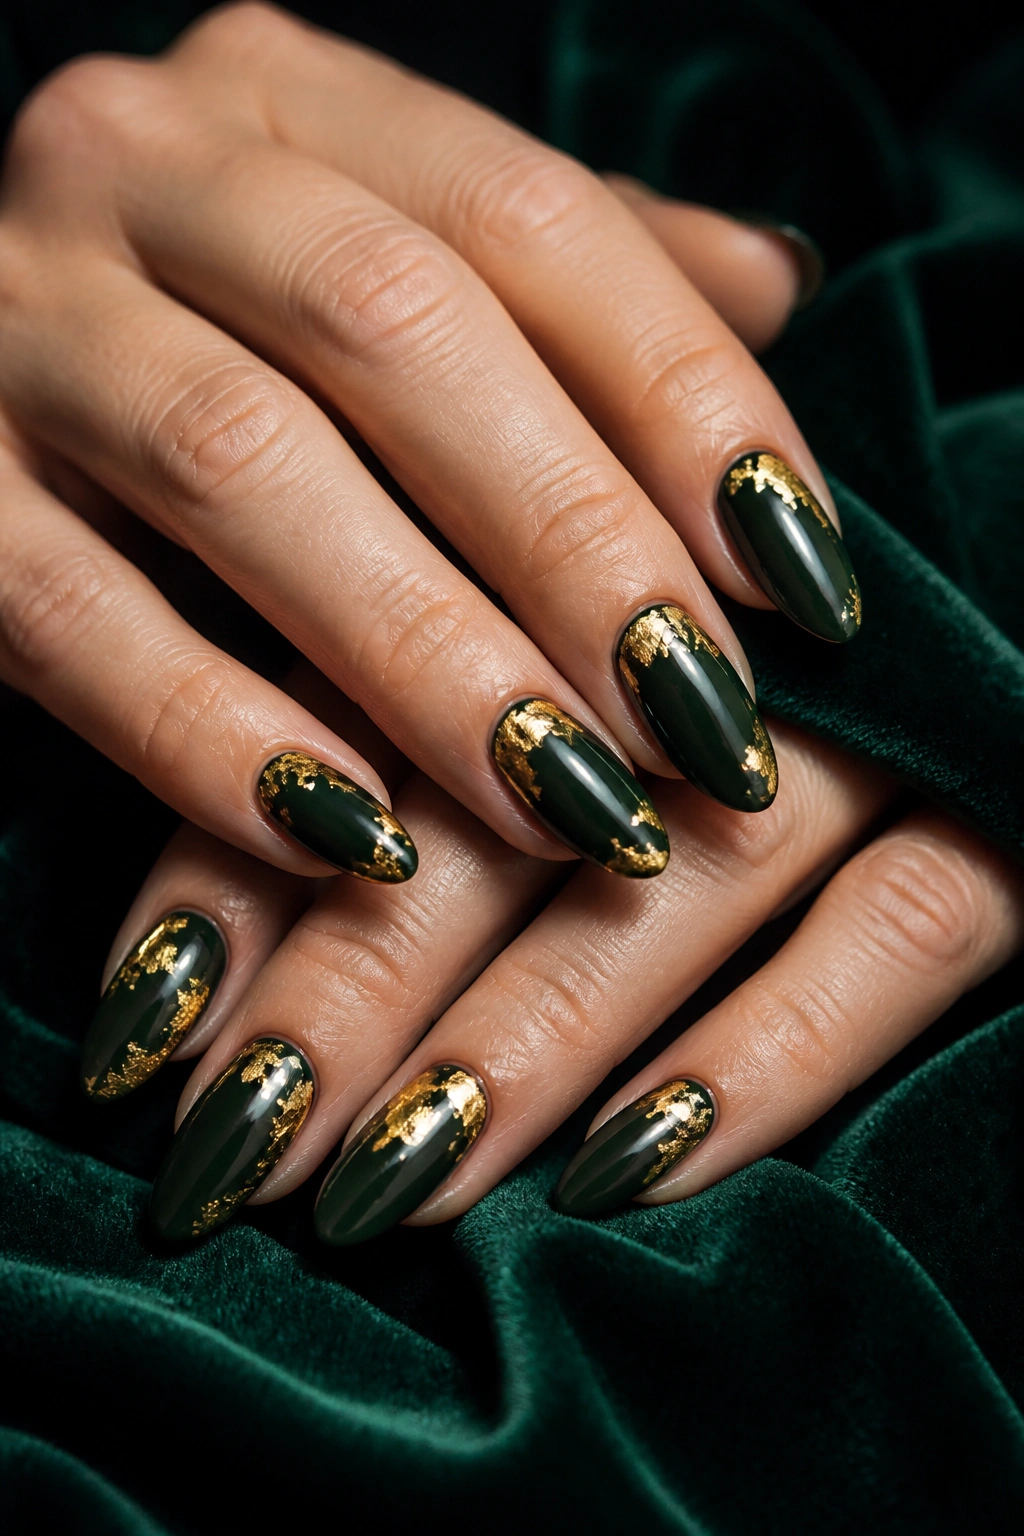
Gold foil on dark green is one of those combinations that never really stops working. It feels rich, but not stuffy. A few torn pieces of foil scattered near the cuticle or along one side of the nail are usually enough.
The key is restraint. Foil can look messy fast if it is piled on too thickly. A small cluster on the ring finger, a narrow streak on the index, or a half-moon of foil near the base gives the manicure some sparkle without making the green disappear. The almond shape helps the foil feel more fluid because there’s already a soft line built into the nail.
I like this look best with a deep pine or bottle green base, not a bright jewel tone. The darker shade gives the gold something to sit against. If the green is too light, the foil starts stealing the show.
Placement Ideas
- One foil accent nail on each hand.
- Thin foil dusting at the cuticle edge.
- Scattered flakes on a matte green base for more texture.
It’s a nice answer when you want something dressed up but still wearable on a Tuesday.
6. Tortoiseshell and Dark Green Almond Nails
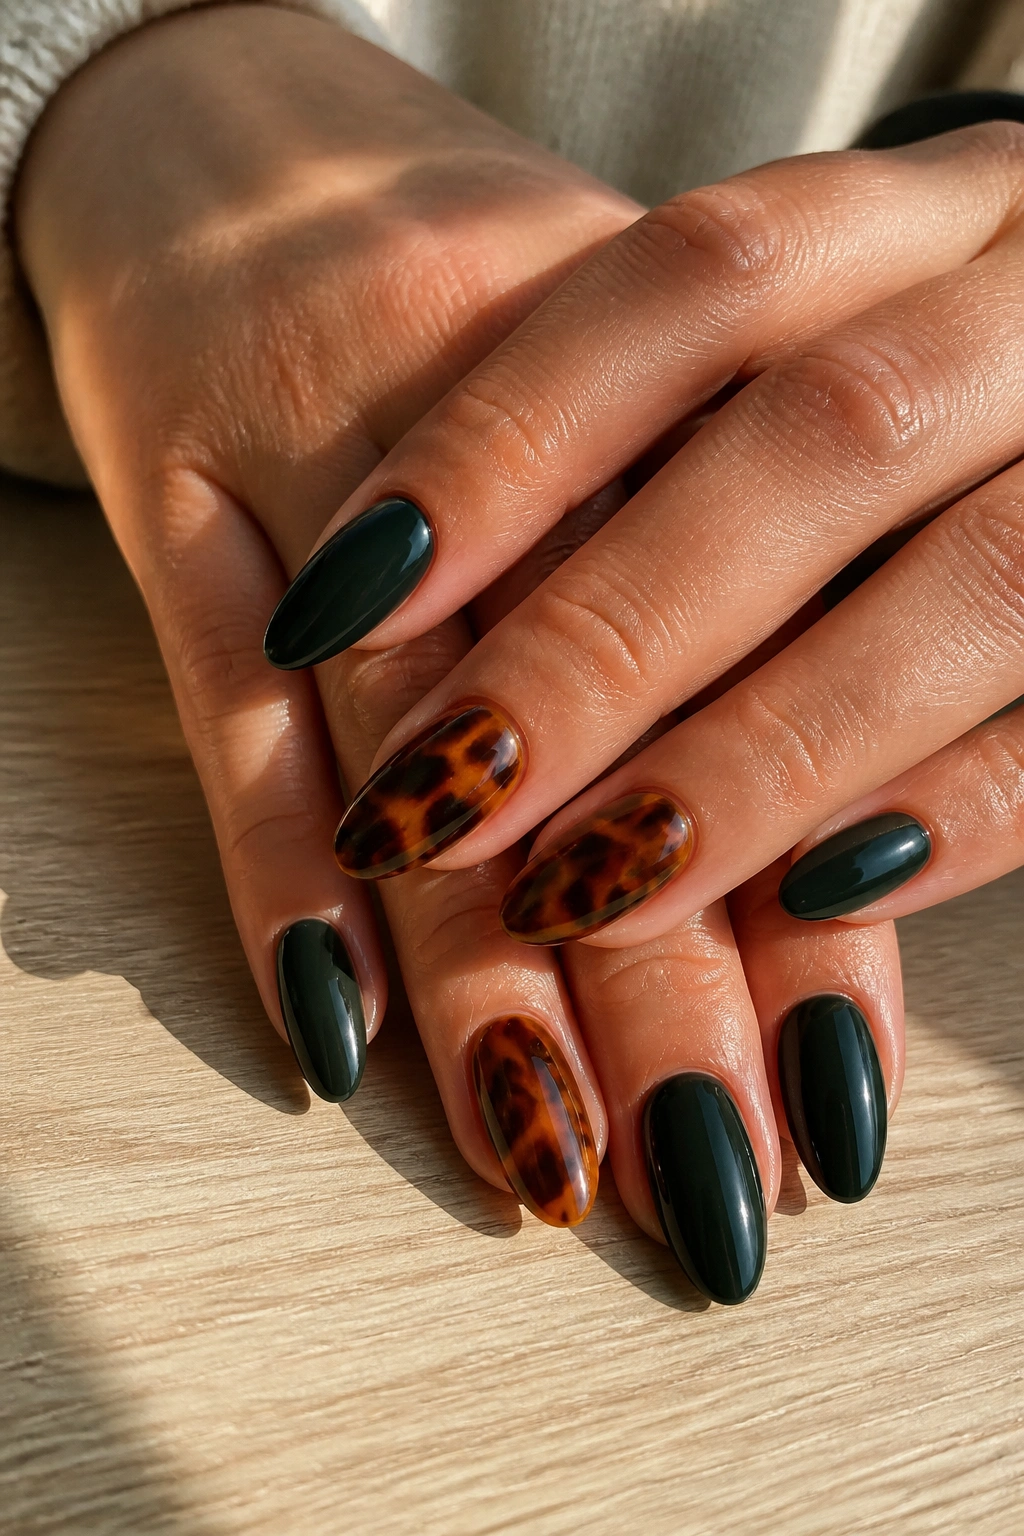
Tortoiseshell can go cheesy if it’s overdone. Paired with dark green, though, it feels much sharper. The brown and amber tones warm up the green, and the almond shape gives both patterns enough space to breathe.
Unlike a full animal-print manicure, this version works best when only two or three nails carry the tortoiseshell pattern. Let the other nails stay dark green or nude. That contrast keeps the set from turning into visual noise. On long almond nails, the tortoiseshell can run vertically and look sleek. On shorter almonds, keep the pattern tighter and a little more translucent.
Where to Put the Pattern
- Accent nails on the ring and middle fingers.
- A tortoiseshell tip with dark green base.
- Split design: half tortoiseshell, half green.
The combination works because it has depth. You get the shine and layering of tortoise, then the dense color of the green beside it. It feels more styled than a plain dark manicure, but it does not shout. Good middle ground.
7. Dark Green Chrome Almond Nails
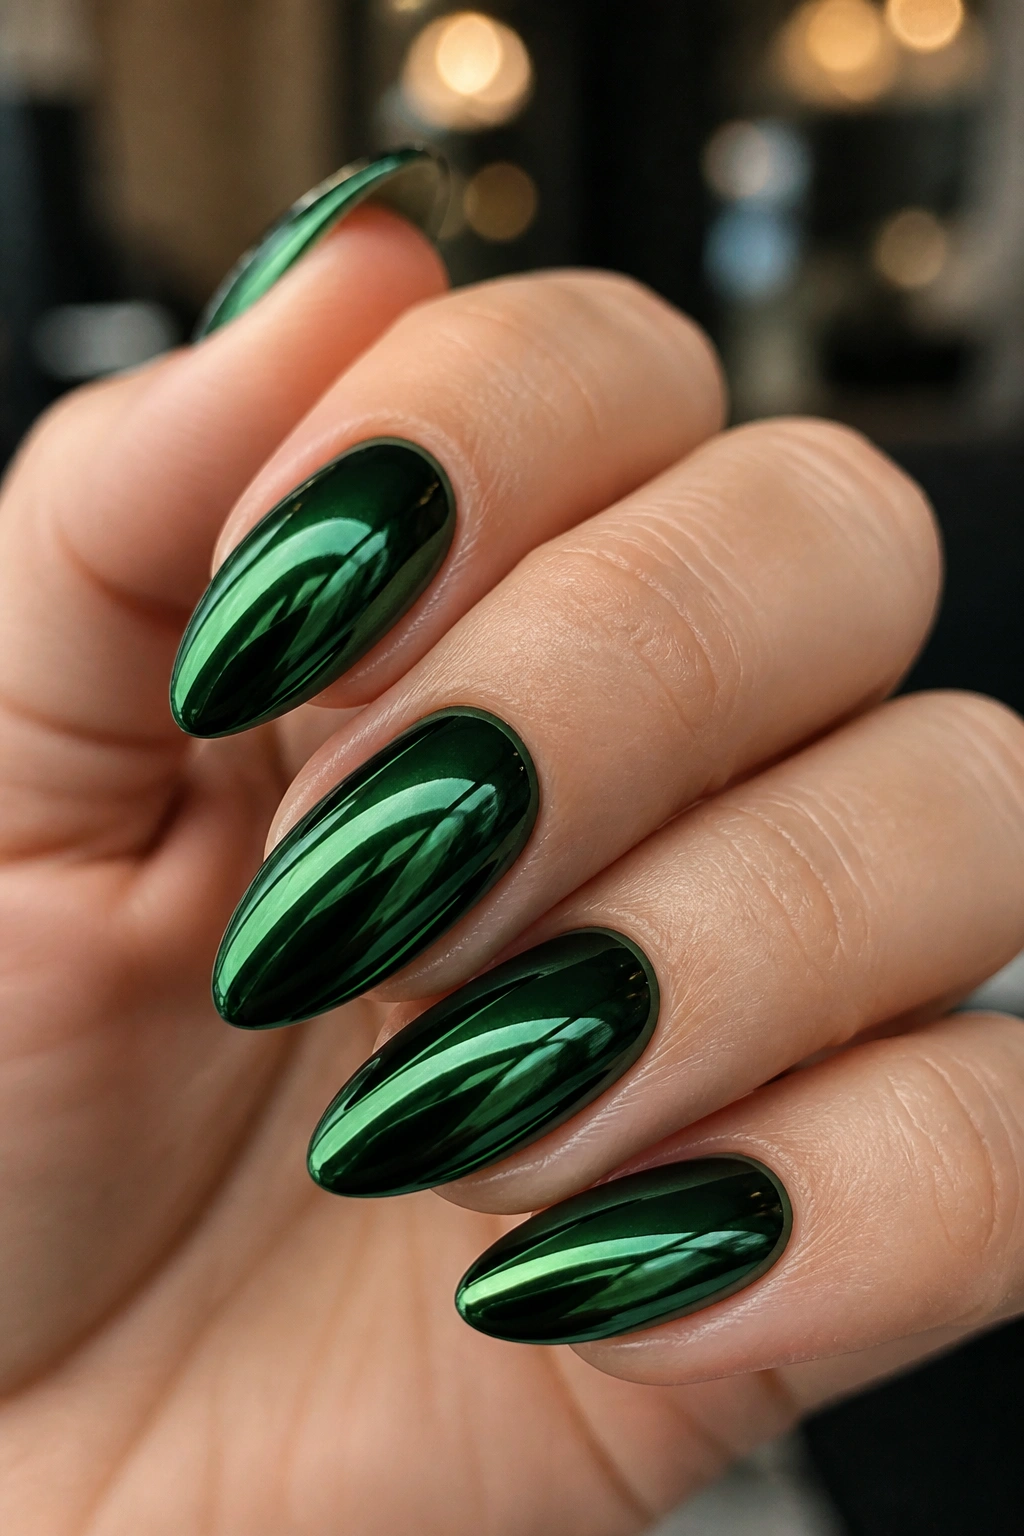
Chrome changes the whole mood. Dark green chrome almond nails look slick, reflective, and a little more edited than regular shimmer. The color still reads green, but the metallic surface makes it feel cooler and sharper.
The base shade matters a lot. A blackened green or deep forest base usually gives the best result because the chrome layer picks up the depth underneath. If the base is too bright, the chrome turns loud. If the base is too sheer, the finish can look patchy instead of mirror-like.
Chrome also exposes flaws fast. Any ridge, dent, or dusty edge becomes easier to see once the metallic powder goes on. Buff the nail surface smooth before color, then seal the edges carefully after applying the powder. That tiny bit of extra care is the difference between sleek and sloppy.
This style has a cool, almost liquid feel to it. On almond nails, that shine follows the taper and makes the shape look longer. It is a strong look, but not a messy one.
8. Blackened Green with Micro Glitter
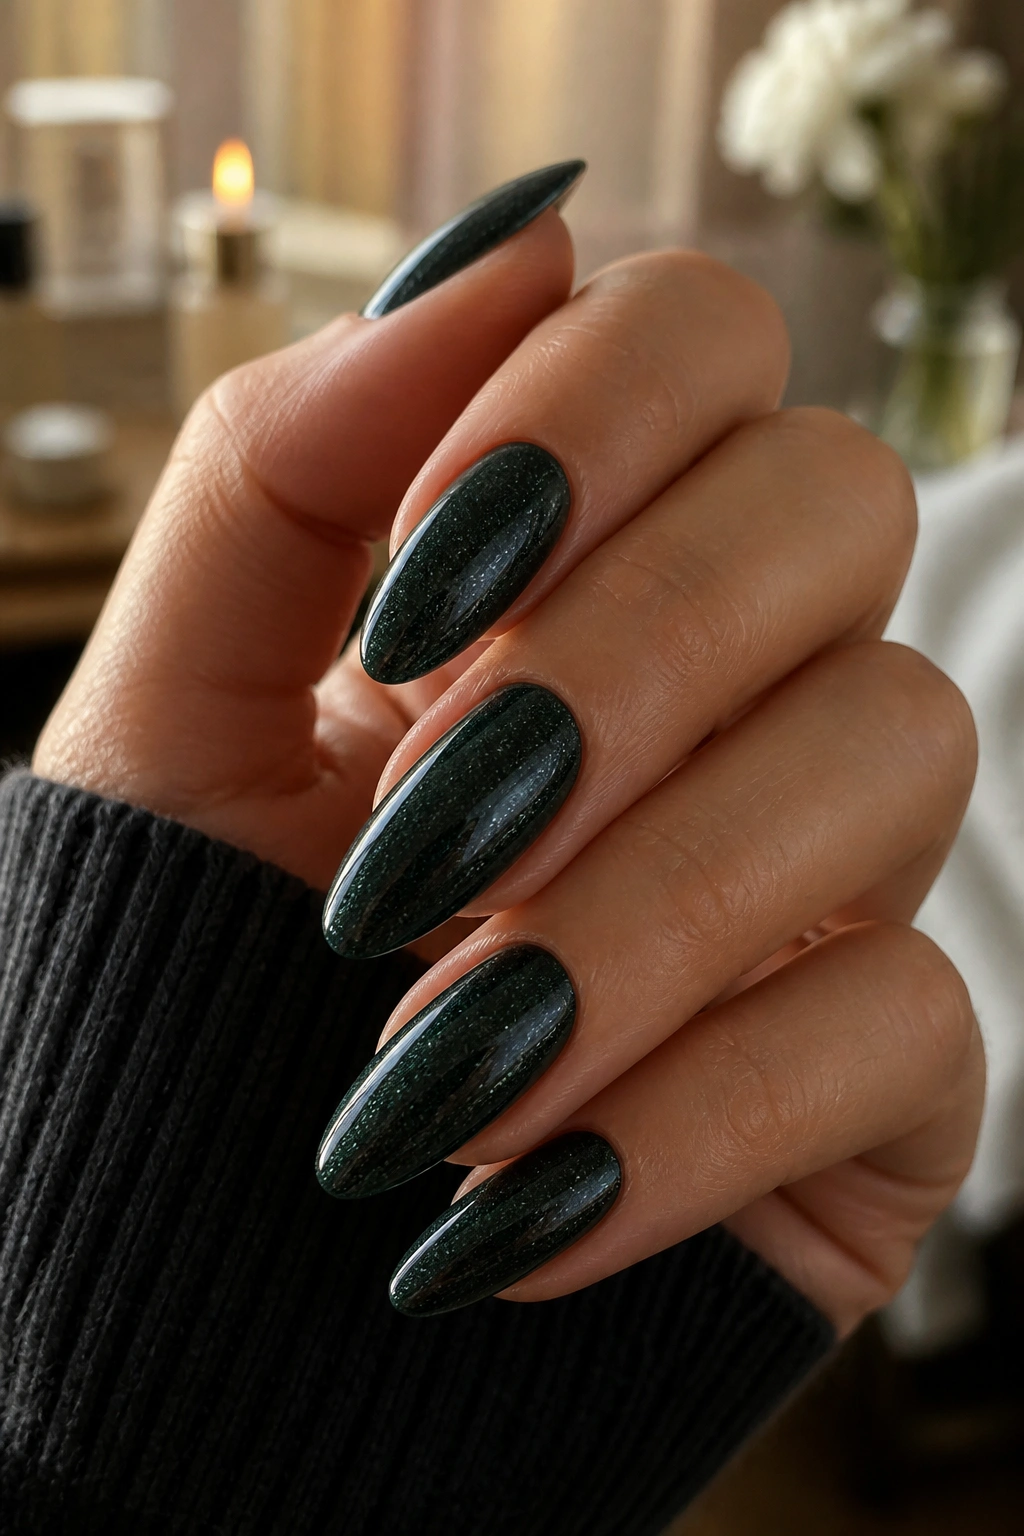
If you want dark green nails that still catch light without turning sparkly in a loud way, micro glitter is the move. Not chunky glitter. Tiny flecks. The kind that look like dust until the light shifts.
A blackened green base keeps the manicure moody, and a fine green, silver, or gold glitter gives it just enough movement. On almond nails, that subtle shimmer works especially well because the shape already feels elegant. You do not need oversized shine to make it interesting.
What to Ask For
- A fine glitter topcoat, not chunky confetti glitter.
- Two color coats if the base is sheer.
- A second top coat to smooth the texture.
A lot of people skip the smoothing step and then wonder why the nails feel gritty. They do. Glitter polish needs extra sealing if you want a clean finish. Otherwise the surface can look bumpy and catch on hair or knit sleeves.
This is a good pick when you like dark nails but still want something with a tiny bit of life. Low drama. Good payoff.
9. Half-Moon Dark Green Almond Nails
What happens if you leave the base of the nail bare? You get a half-moon look that feels cleaner and more graphic than a full green manicure. On almond nails, the curve at the cuticle already gives you a natural guide.
The shape helps the negative space look intentional. A small nude or clear crescent near the base keeps the manicure from feeling heavy, which matters when the polish itself is a dark green. Keep the line soft and even. If the gap is too big, the nail starts to look unfinished. If it’s too tiny, the design loses its point.
Why the Gap Matters
The empty space does more than save time. It lightens the whole nail and makes the dark color feel sharper by contrast. That is especially useful if your nails are medium length and you want them to look a little longer.
A thin liner brush makes this design much easier. Some people use nail guides, but I find freehand easier once you get a steady angle. The result is clean, modern, and a little less expected than a standard full-coverage green manicure.
10. Green Marble Swirl Almond Nails

Marble nails are one of the few nail art styles that can look expensive even when they are a little imperfect. Dark green marble on almond nails feels like polished stone, especially when you mix in white, charcoal, or a touch of translucent olive.
The trick is to keep the swirls soft. Hard lines make the design look painted on in a rush. Soft streaks, on the other hand, give you that cloudy, stone-like depth. A fine detail brush or a thin liner brush works better than a wide one because it lets you make broken, uneven veins instead of cartoon lines.
I like this style most when not every nail is identical. One or two nails can be more marbled, while the others stay mostly dark green with a faint swirl near the tip. That keeps the set from feeling overworked. A full ten-nail marble set can get busy fast, and busy is not what this shape wants.
The finish should be glossy. Matte marble has its place, but on dark green it can start looking chalky. Shine keeps the pattern alive.
11. Dark Green Plaid Almond Nails
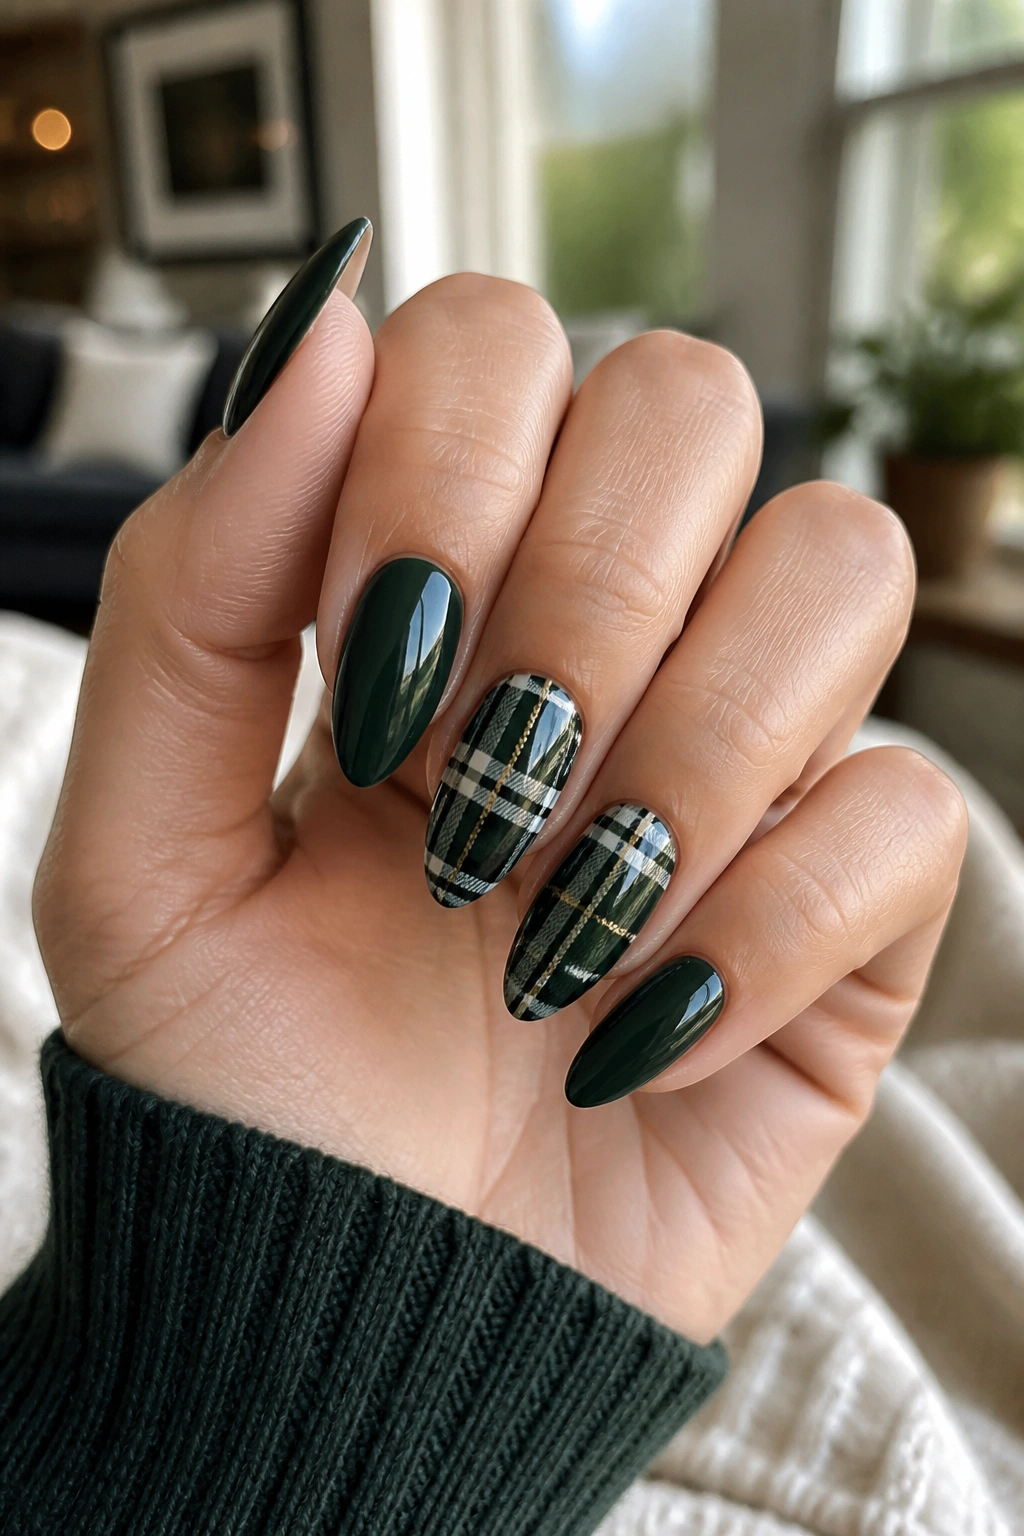
Plaid sounds like a cold-weather nail idea, but deep green plaid can work any time if the colors stay dark and muted. Think pine green, black, cream, and maybe a thin gold line if you want to warm it up. On almond nails, the pattern looks a little softer than on square tips, which helps a lot.
Keep the Lines Tight
A striping brush is the easiest way to do this well. The lines should not all be the same thickness. A couple of crisp vertical stripes, a few thinner cross-lines, and one or two deliberate overlaps are enough to sell the look. If every line is the same width, the design starts to look stiff.
Plaid works best as an accent on two nails, not all ten. The rest can stay solid dark green or nude. That keeps the manicure from becoming too loud. The almond shape already gives you movement, so the plaid just needs to echo that a little.
This is a good option if you like patterned nails but want something with structure. It feels neat, not sugary.
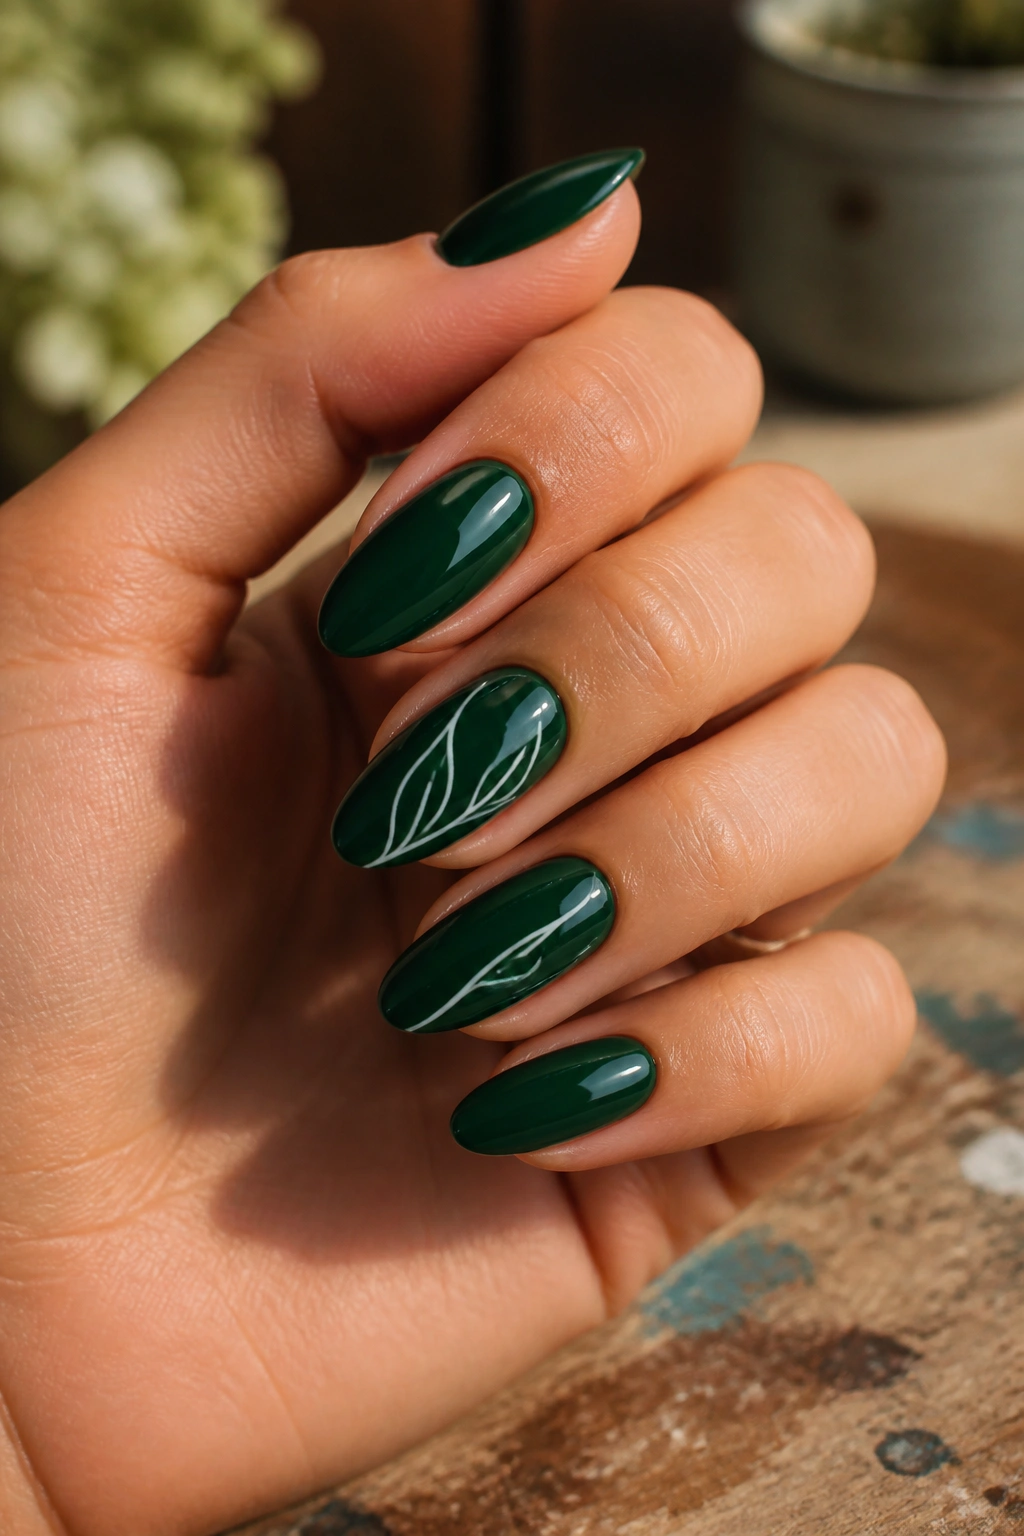
12. Botanical Leaf Art on Sheer Green
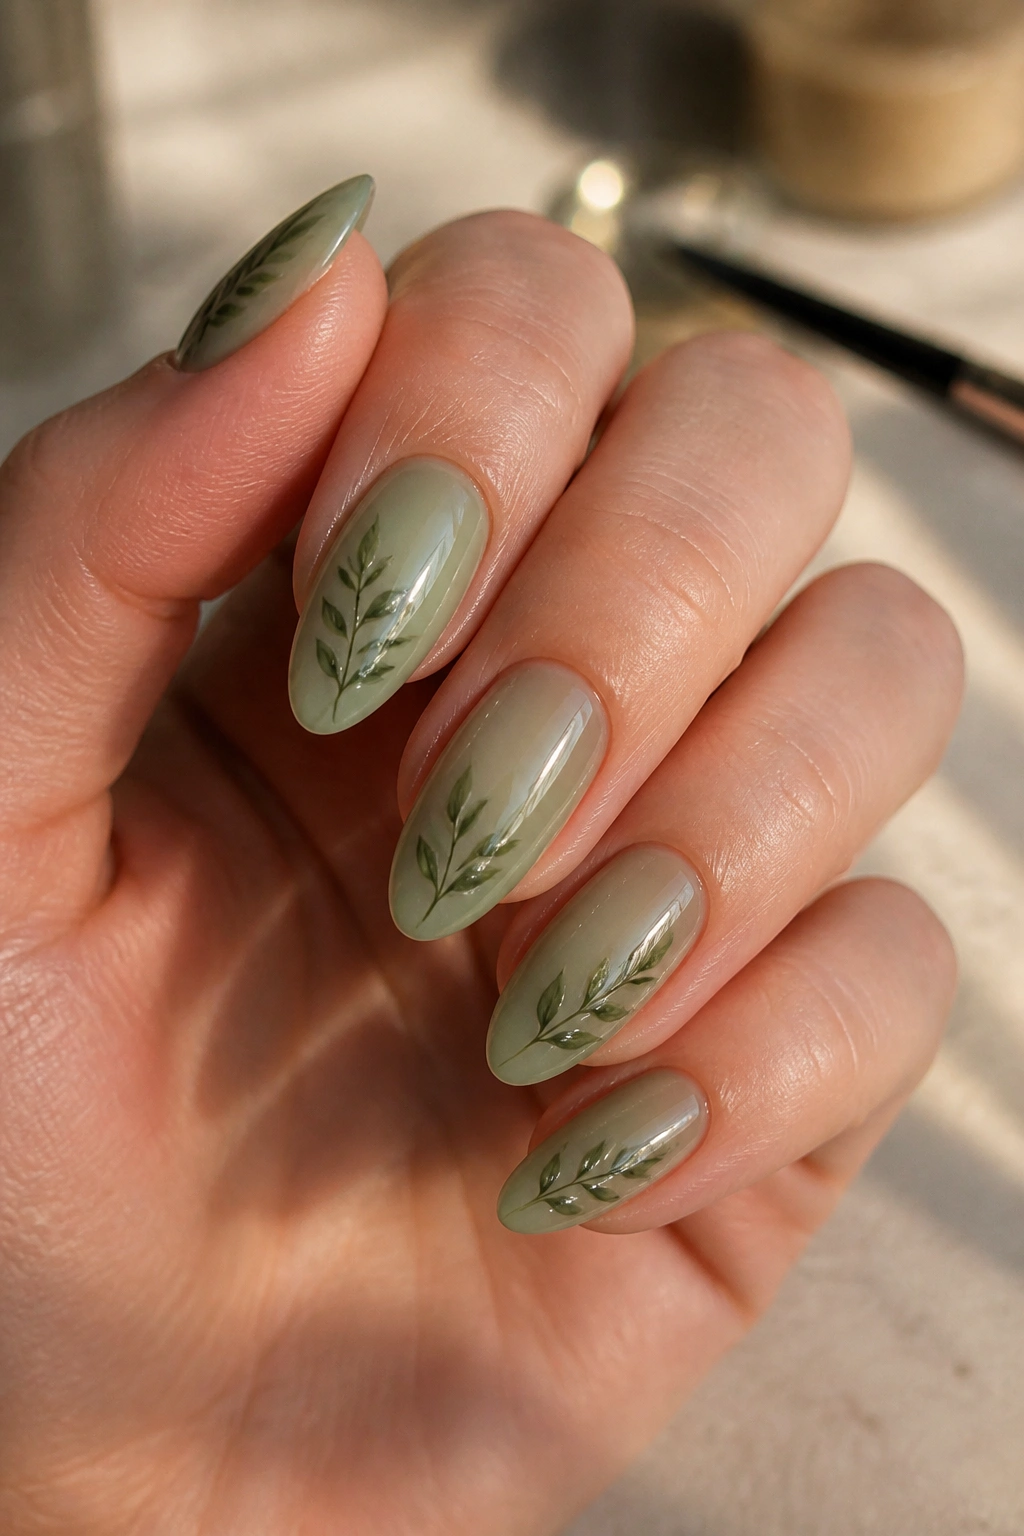
This is the gentlest way to wear dark green almond nails. Start with a sheer nude, milky pink, or translucent beige base, then paint tiny leaves in deep green along one side of the nail or near the tip. It looks restrained, which is the whole point.
The leaf art should stay sparse. Two or three small branches per hand are usually enough. If you cover every nail, the design loses its airiness and starts feeling busy. Almond nails give the leaves a long, graceful canvas, so even a tiny branch can look deliberate.
How to Stop It From Looking Childish
- Keep the leaves small and irregular.
- Use one lighter green for the stem and one darker green for depth.
- Leave at least half the nail bare on each accent nail.
That bare space is doing work. It makes the green look sharper and more grown-up. A glossy top coat finishes the job and keeps the line work from looking chalky. It is a quiet manicure, but not a dull one.
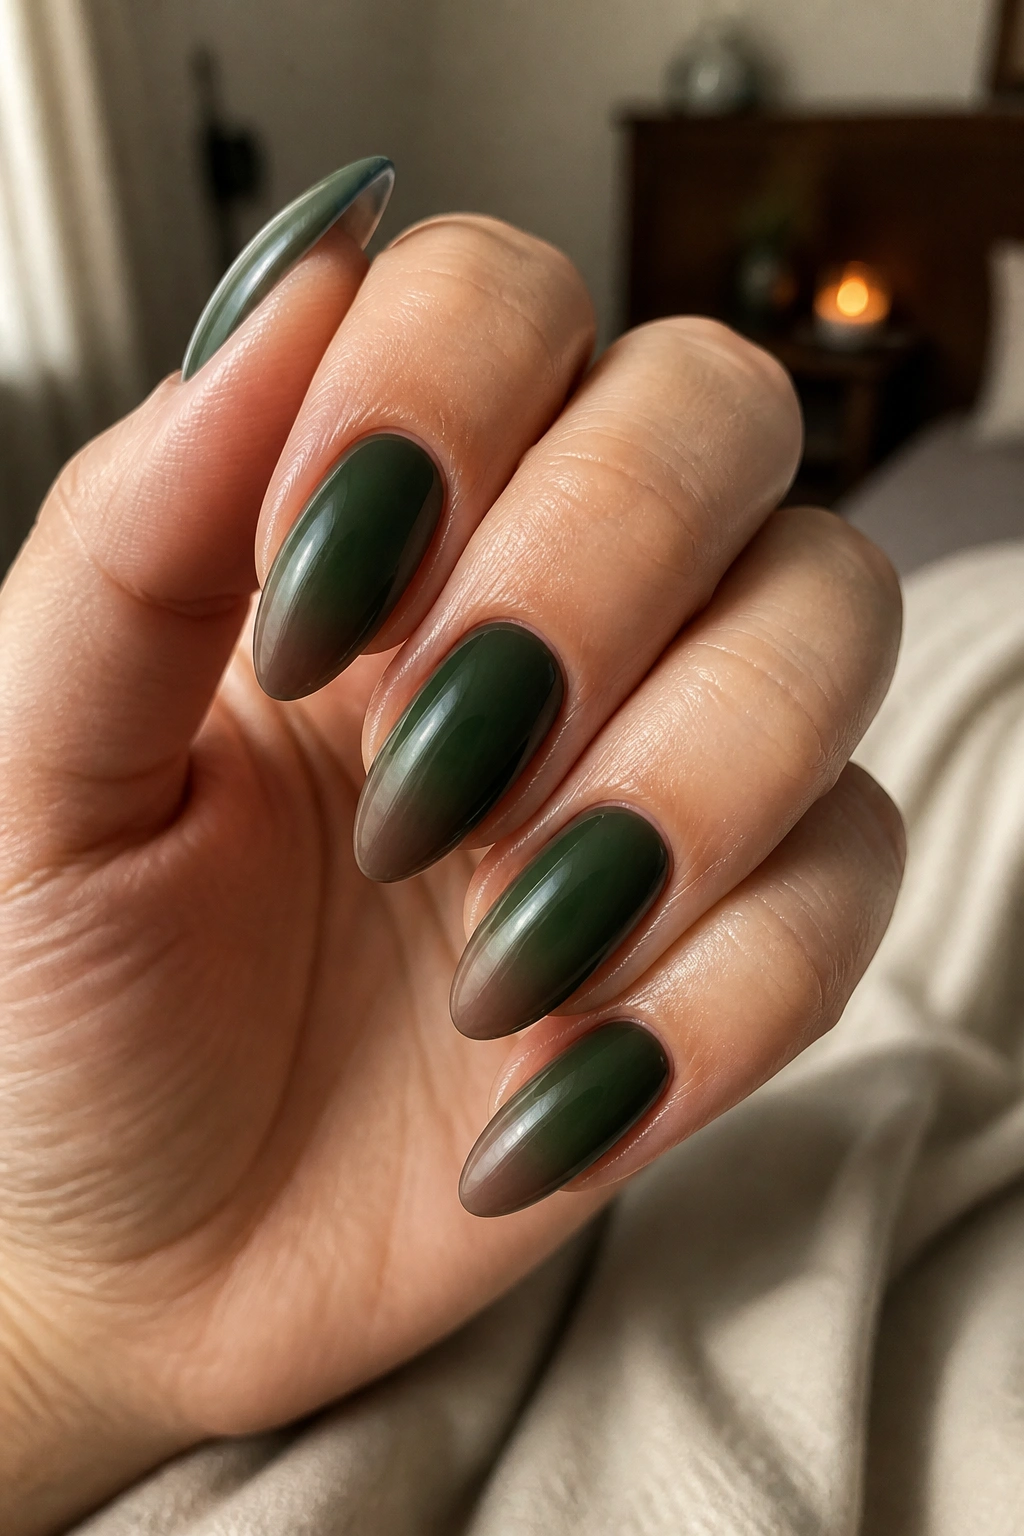
13. Charcoal-to-Green Ombré Almond Nails
A good ombré should feel like a fade, not a stripe. Dark charcoal blending into deep green gives almond nails a smoky, layered look that feels moody without relying on any extra art.
This is one of those styles where the base color matters less than the blend. A sponge can help blur the boundary, but the edge still needs to be softened with a clean brush before curing. If the transition is too hard, the manicure turns blocky. If it is too faint, the colors lose their contrast. You want that middle zone where the green almost seems to rise out of the dark.
It helps to keep the darkest tone at either the tip or the cuticle, depending on the shape of your hand. Dark at the tip makes the almond silhouette feel sharp. Dark at the base feels softer. Try both if you wear this style often.
The best part is how forgiving ombré can be on grown-out nails. The fade hides a lot.
14. Dark Green Almond Nails with Gold Studs
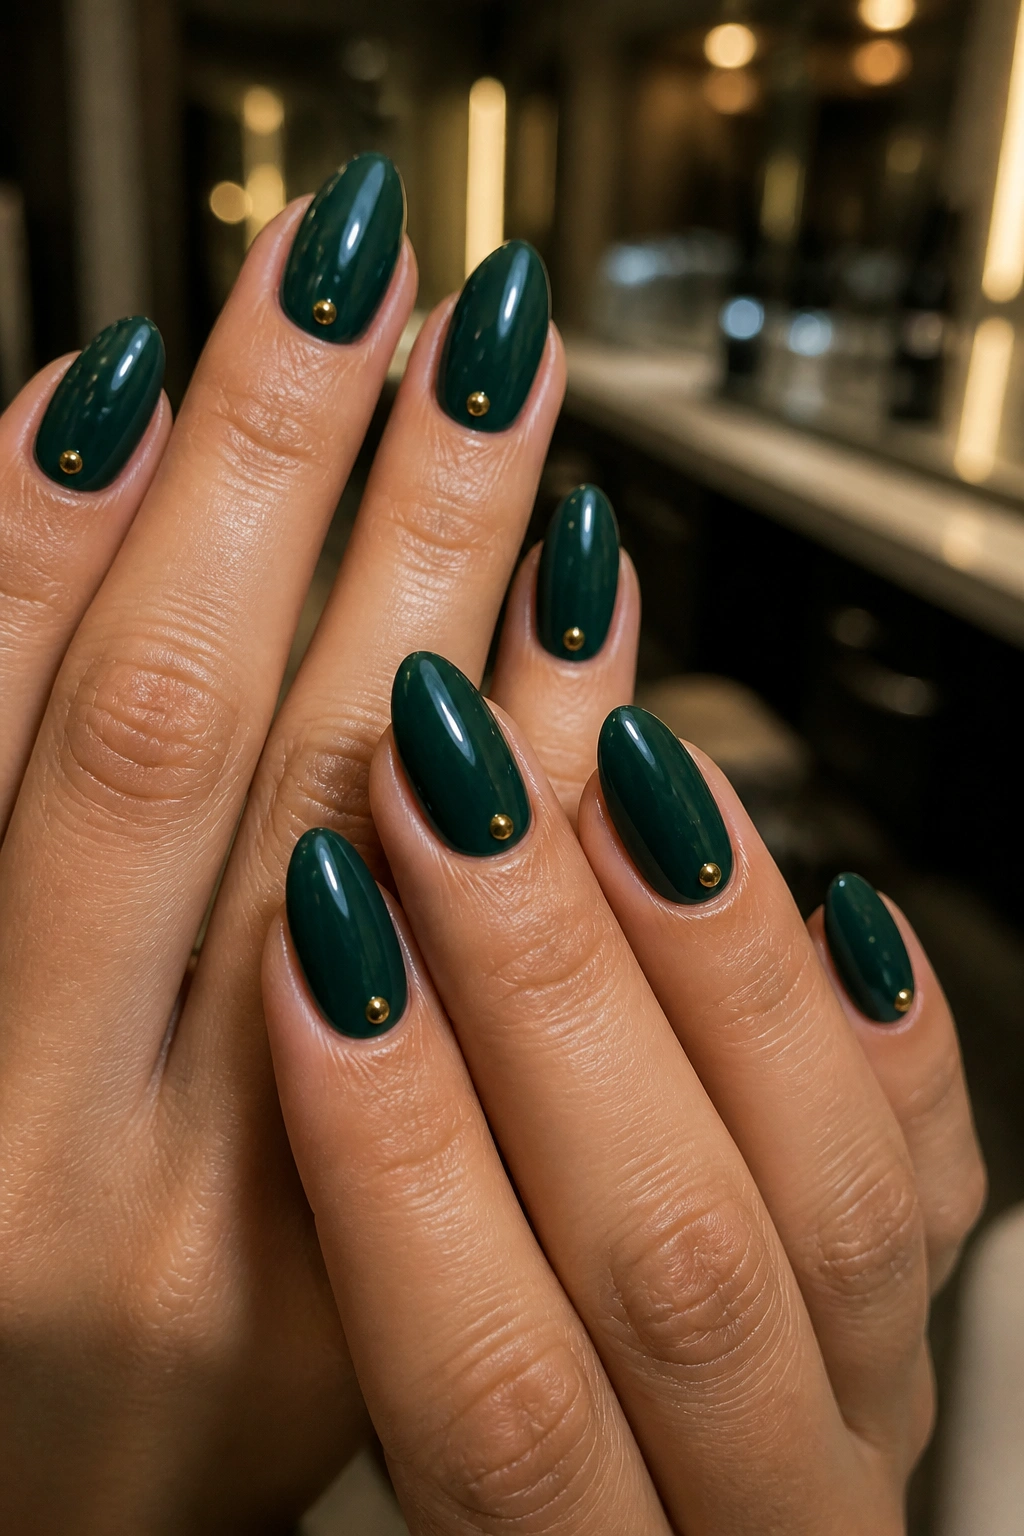
A few small gold studs can change a plain green manicure without turning it into full nail art. Tiny studs near the cuticle give the nails a jewelled look. A single stud placed off-center feels more modern. Either way, the dark green makes the metal pop.
This design needs a steady hand and a small amount of restraint. Too many studs and the nails start to feel heavy. One per nail, or even just a couple across both hands, is usually enough. The almond shape keeps the set from feeling bulky because the tapered tip balances the raised hardware.
Where to Place the Studs
- At the cuticle center for a classic look.
- Off to one side for a softer, less symmetrical feel.
- On just the ring fingers if you want to keep the rest plain.
A thick top coat around the base of each stud helps lock it down. Don’t flood the metal itself, though. You want the stud to stay visible, not get buried under layers of shine. This is a clean way to add interest without turning the manicure into a project.
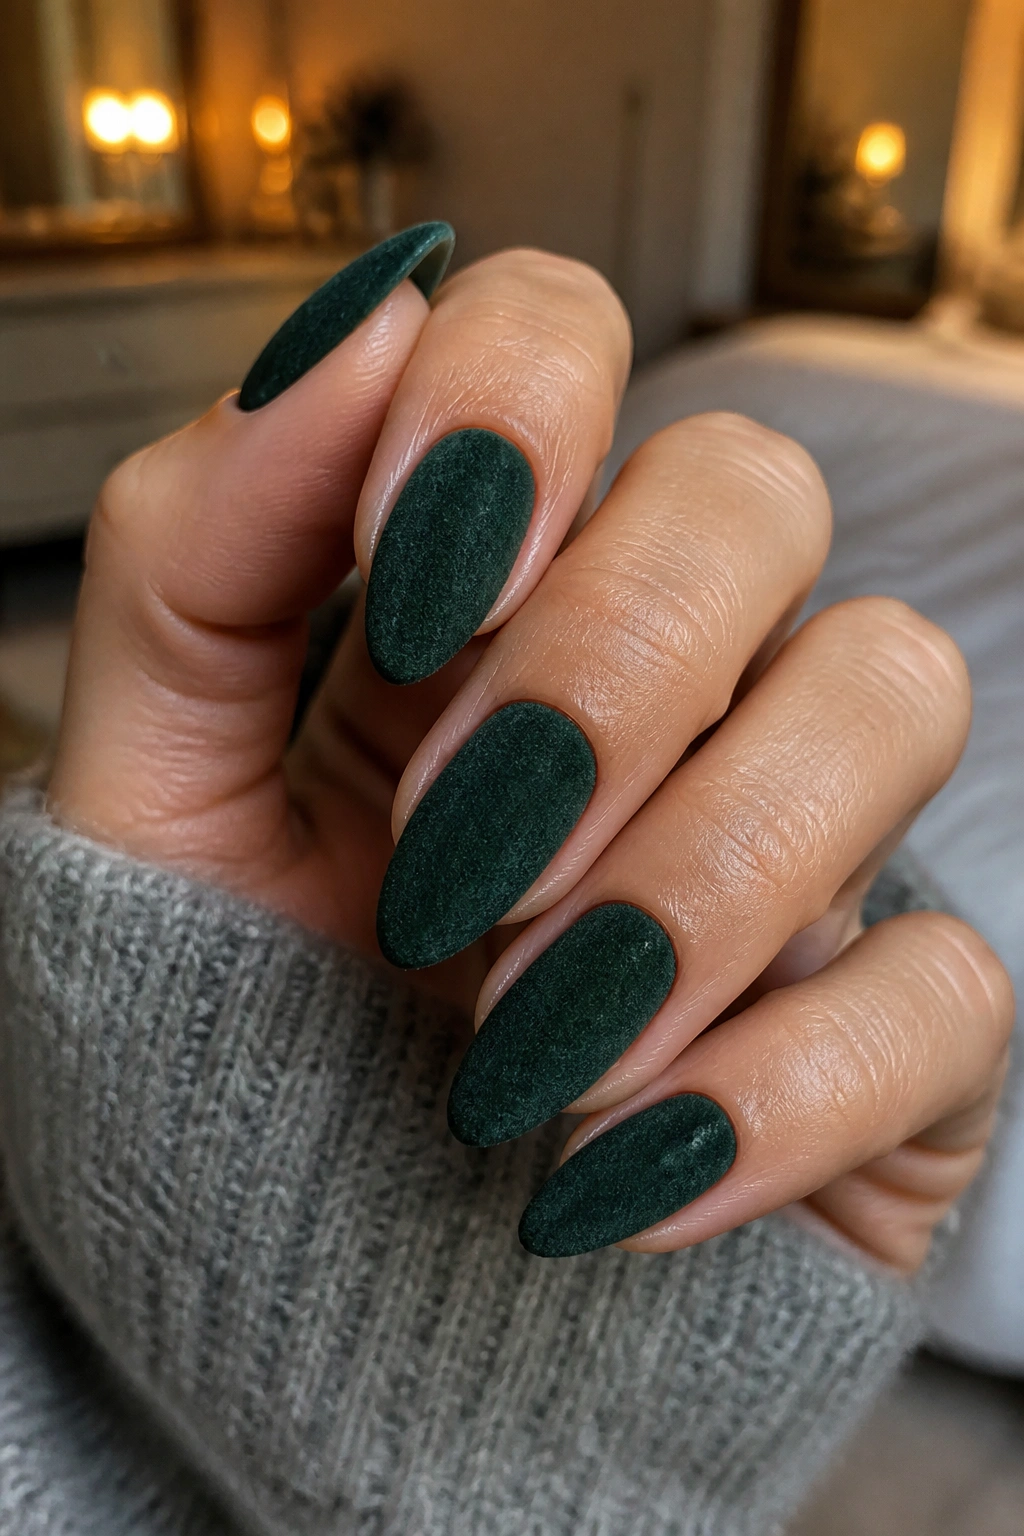
15. Velvet Pine Green Almond Nails
Velvet nails have a soft, plush look that people either fall for fast or ignore completely. In dark pine green, the effect is rich and velvety, almost like fabric under dim light.
Why the Finish Changes Everything
Magnetic velvet polish does not create the sharp stripe you get with cat-eye nails. The shimmer spreads out more evenly, so the surface looks soft instead of streaky. That makes it a smart choice if you want depth without a strong line across the nail.
Almond nails suit this finish well because the reflection follows the taper. On shorter almonds, the style feels smooth and compact. On longer ones, it gets a little more dramatic, but still not loud. The nail is doing half the work for you.
If you have never worn a velvet finish before, keep the rest of the manicure simple. No foil. No studs. No second pattern. The texture already gives you enough to look at, and that plush surface tends to show off the shape better than any add-on.
16. Two-Tone Sage and Dark Green Almond Nails
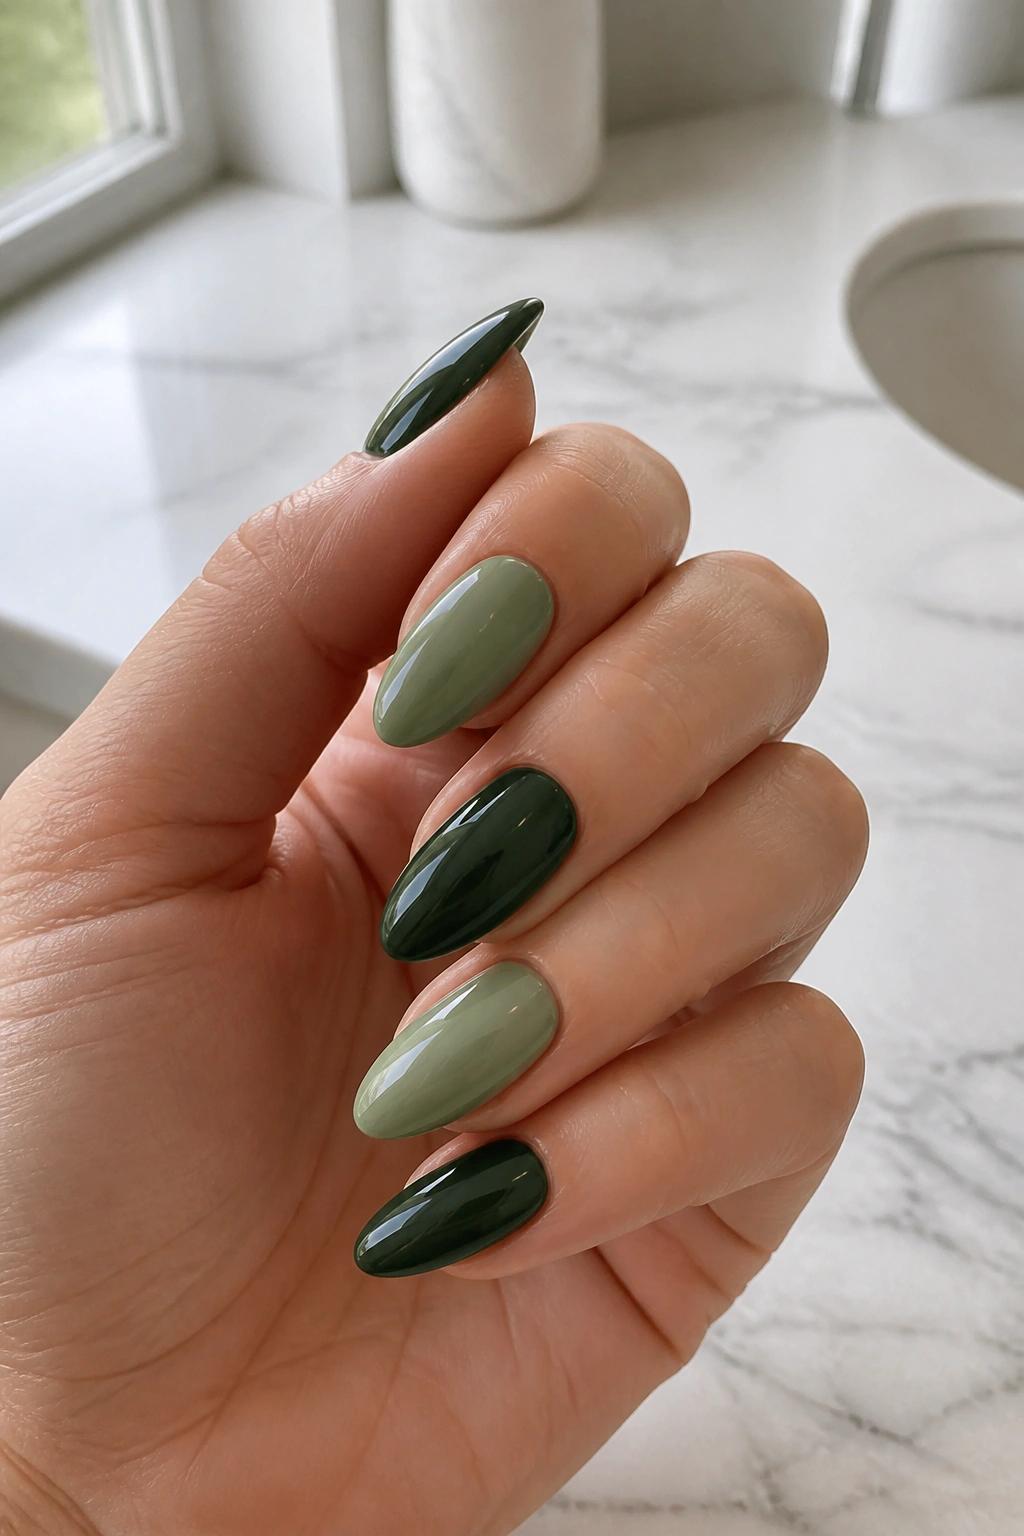
Pairing dark green with sage may sound like a small move, but it changes the whole mood. The lighter green keeps the manicure from feeling too dense, and the almond shape helps the two shades flow together instead of clashing.
This works best when both colors share a similar undertone. If one green is yellow-based and the other is cool and blue-based, the contrast can feel accidental. Use alternating nails, a split-half design, or even a slim sage stripe against a dark green base. All three versions can work, but they need clean spacing.
The reason I like this mix is simple: dark manicures can sometimes feel a little heavy around the knuckles, especially on shorter nails. Sage lightens the set. It gives the eye somewhere to rest.
Easy Ways to Wear It
- Alternate sage and dark green nails.
- Use sage only on the ring fingers.
- Paint a diagonal color block across each almond nail.
The result feels soft but not bland. That’s harder to pull off than it sounds.
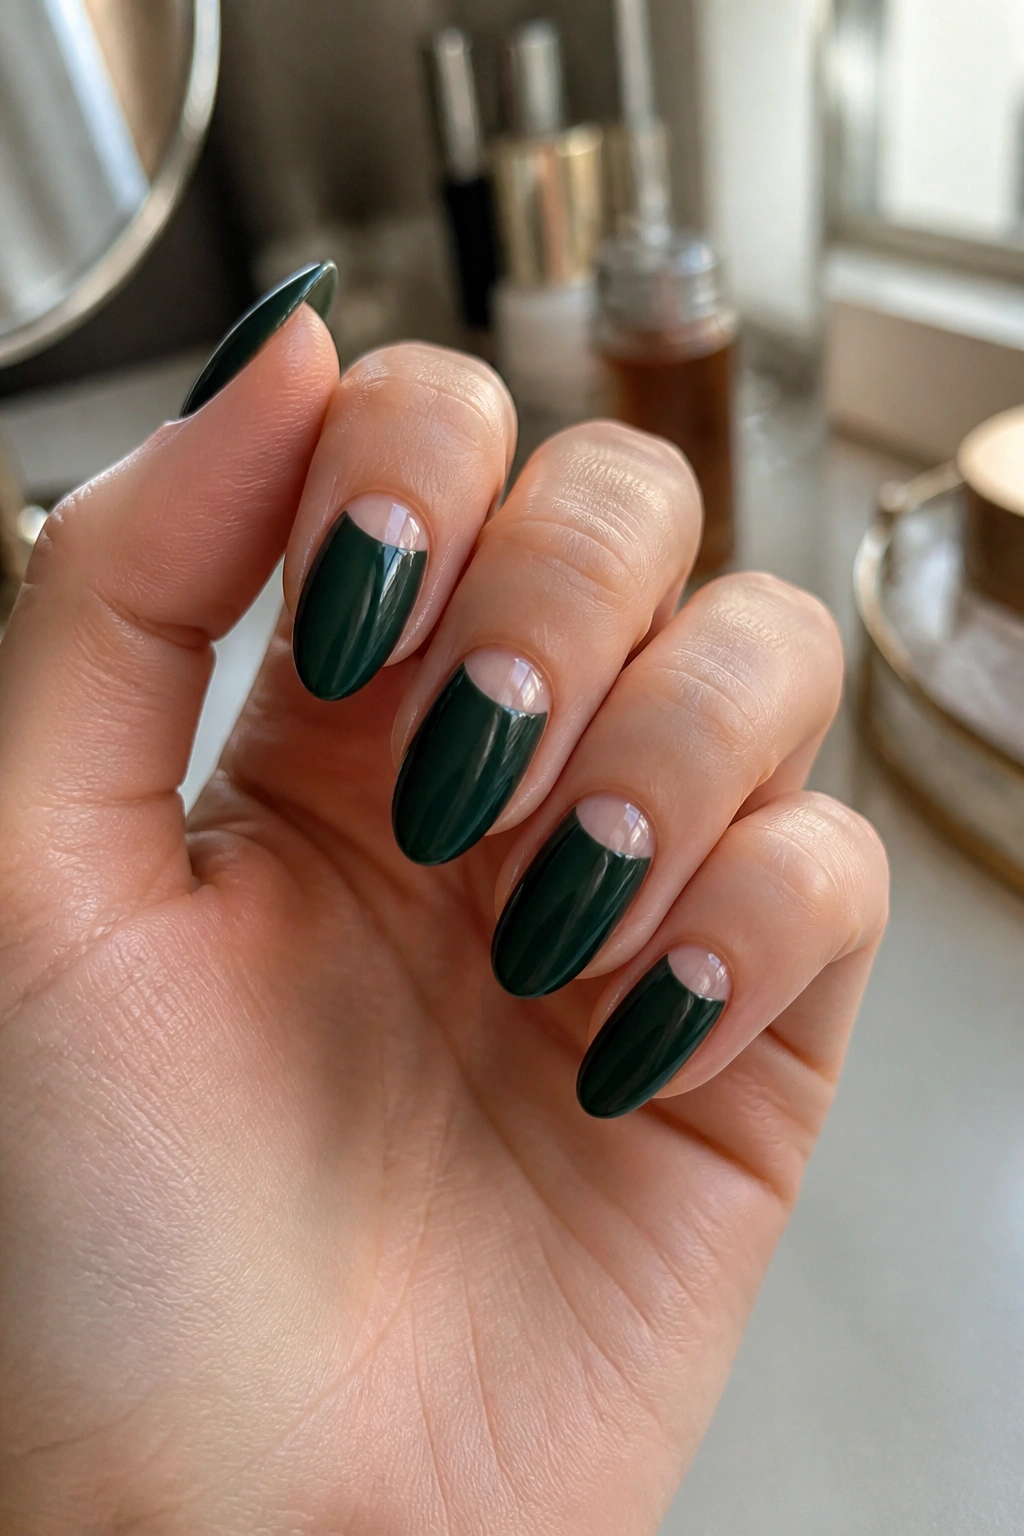
17. Slim Green French Curve Almond Nails
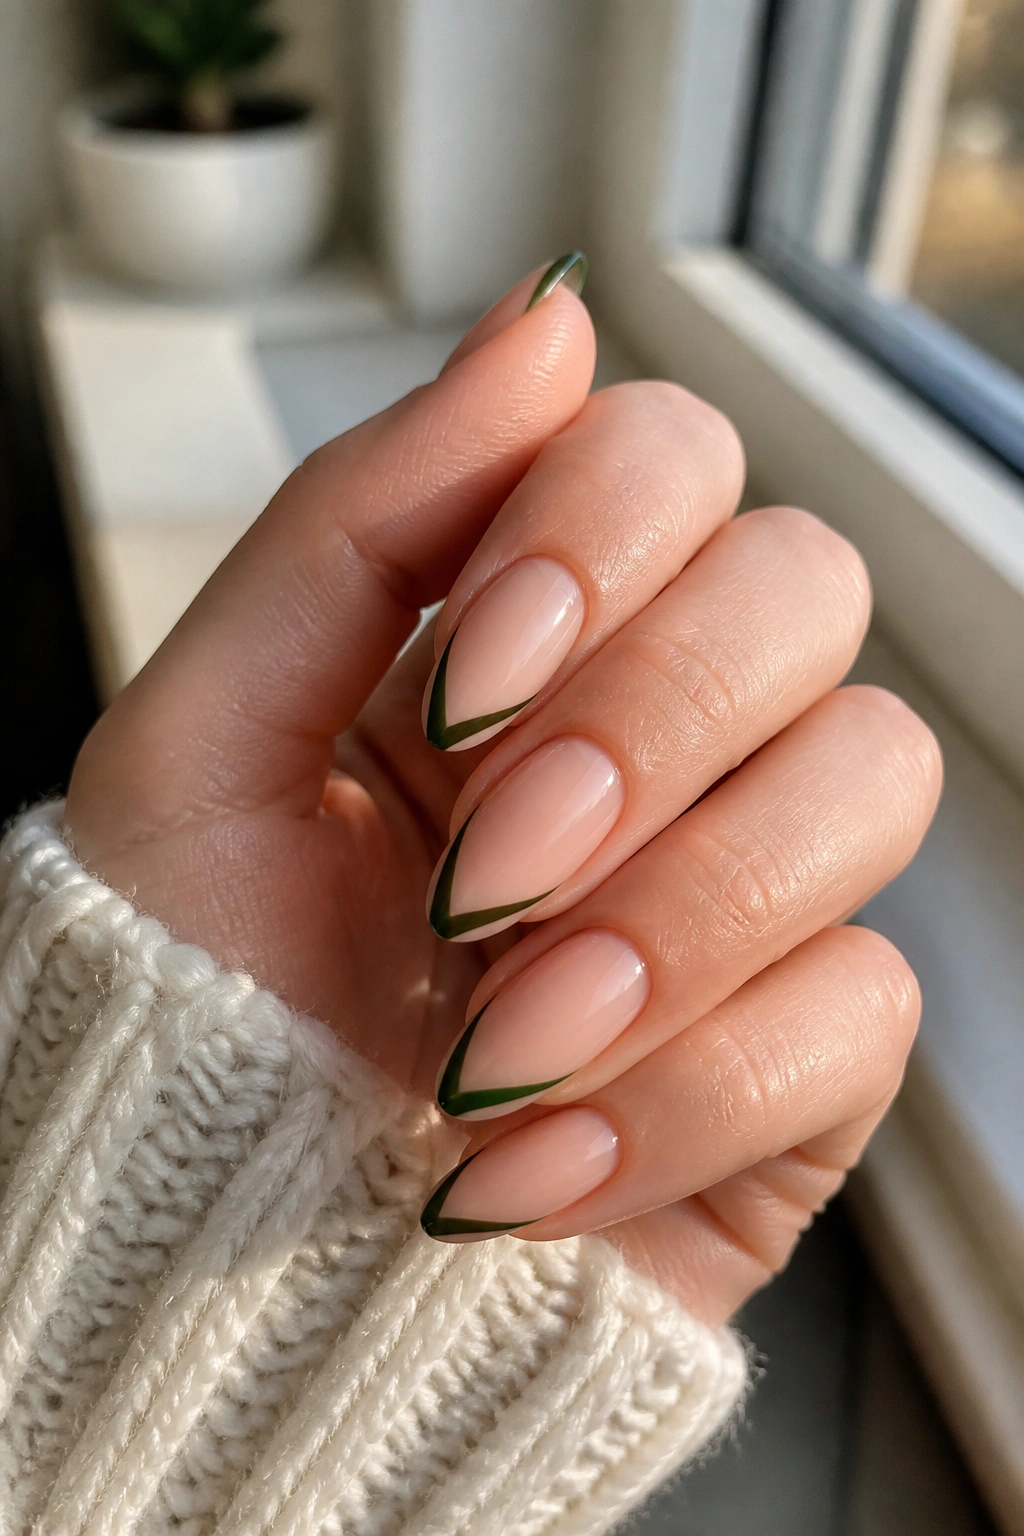
A slim French curve is one of the quietest ways to wear dark green. Instead of a thick tip, you trace a narrow line along the outer edge of the almond shape and let the curve do the work. It feels clean, modern, and a little more precise than a standard French.
The smaller the line, the better this looks. A wide green tip can flatten the shape, while a slim curve keeps the nail looking long. A nude, sheer pink, or milky beige base works best. The contrast should be soft enough that the line feels like an outline rather than a block.
I like this style for people who want green nails but do not want the color taking over every inch of the manicure. It gives you just enough dark tone to feel intentional. That’s useful if you wear rings or stacked bracelets and want the nails to support the whole look instead of stealing it.
The brush matters more than people think. A fine detail brush gives you control at the sidewall, and that’s where most French curves go wrong.
18. White Line Art on Deep Green Almond Nails
Dark green is a strong backdrop, which is exactly why thin white line art looks so crisp on it. Think simple stems, tiny arches, abstract squiggles, or a single fine curve across the center of the nail. The contrast does the heavy lifting.
Keep the Drawing Loose
- One line per nail can be enough.
- Tiny floral stems look cleaner than full bouquets.
- Uneven spacing keeps the design from feeling stiff.
The line art should feel deliberate but not precious. If the drawing is too detailed, the manicure starts looking crowded. Almond nails already offer a graceful shape, so the art only needs to echo that length and softness. A few white marks on one or two accent nails can carry the whole set.
This design is useful when you want something artistic but not fussy. The dark green gives the white enough contrast to stand out, and the white keeps the green from feeling too heavy. It is a small design with a clear point of view.
19. Jewel-Tone Mix with Dark Green, Nude, and Black
A mixed set can be a smart choice if you like dark nails but want a little more movement across the hand. Use dark green as the anchor, then add one nude accent, one black accent, and maybe a tiny metallic detail to tie the whole set together.
The key is balance. If every nail has a different finish, the manicure turns chaotic. Keep one element consistent, usually the almond shape itself and the glossy top coat. Then vary the color placement instead of the whole design. A black ring finger, a nude middle finger with a thin green line, and the rest deep green can look very clean.
This kind of set works because the dark colors talk to each other. Black makes green look deeper. Nude keeps the whole thing from feeling too heavy. A small gold stripe or a single stud can bridge the gap between them if needed.
It is not a minimalist manicure, but it is also not busy. That middle ground is where it gets interesting.
20. Dark Green Aura Fade Almond Nails
Aura nails can be overdone when the colors are too bright, but a dark green aura fade on almond nails feels softer and moodier. The color blooms from the center or the tip and melts into a nude or black base, which gives the nail a kind of smoky glow.
The easiest version uses a sponge or airbrush effect to feather the green outward. The center should stay the richest part of the shade, with the edges fading out gently. If the fade stops too suddenly, it loses the point. If the center is too small, the design disappears.
A dark green aura works especially well when the rest of the manicure stays simple. No studs. No foil. No extra line art. The fade needs space to breathe. On almond nails, the soft edge of the shape reinforces that blurred look and keeps the style from feeling harsh.
If you only plan to try one dark green almond nail idea, I’d still give glossy forest green the first spot. But this aura fade comes close. It has more movement, more softness, and just enough edge to keep people looking twice.
