

There’s something undeniably fierce about coffin-shaped nails. They’ve got that perfect balance of edgy and elegant—squared tips with tapered sides that create an elongated, dramatic silhouette. Celebrities like Kylie Jenner, Khloé Kardashian, and Cardi B can’t get enough of them, and honestly? Once you try coffin acrylics, you’ll understand the obsession.
The shape itself isn’t new. Coffin nails (also called ballerina nails because they resemble pointe shoes) became popular in the ’90s and have stayed relevant ever since. But right now, they’re experiencing a major resurgence, showing up all over Instagram and TikTok with increasingly creative designs.
What sets coffin nails apart from other shapes is their versatility. They’re bold enough to make a statement but refined enough for formal occasions. The flat tip provides a larger canvas than stiletto nails, giving you more space for intricate nail art, rhinestones, or whatever design catches your eye.
If you’re thinking about making the switch to coffin acrylics, you’re in the right place. We’re breaking down everything you need to know about this show-stopping shape, plus over 20 design ideas that’ll have you screenshotting like crazy.
What Sets Coffin Nails Apart from Other Shapes
Coffin nails share some similarities with stiletto nails—both are long and tapered. But here’s where they differ: instead of ending in a sharp point, coffin nails have a squared-off tip. Think of it as a stiletto that someone flattened out at the end.
This squared tip is what gives coffin nails their distinctive appearance. Celebrity nail artist Chaun Legend describes them as having “an edgier vibe than an almond nail but more feminine than square nails.” It’s that sweet spot between shapes that makes them so appealing.
The name might sound a bit dark, but it’s just describing the silhouette. If “coffin” doesn’t sit right with you, go ahead and call them ballerina nails instead. Both terms refer to the same shape—long, tapered sides with a flat, squared tip.
How Coffin Nails Compare to Square Tips
Square nails and coffin nails both feature those sharp, 90-degree corners. The difference? Square nails maintain the same width from base to tip, while coffin nails taper inward as they grow longer. This tapering creates an optical illusion that makes your fingers appear longer and more slender.
Nail artist Natalie Minerva points out that coffin nails work best at medium to longer lengths. “It can be a little odd looking to taper a shorter nail, making the coffin shape less impactful,” she explains. You’ll want at least some length to really showcase the shape’s dramatic effect.
Why Coffin Acrylics Are Taking Over Right Now
Scroll through any nail inspiration account, and you’ll see coffin nails everywhere. There’s a reason this shape keeps popping up in your feed. For starters, it’s incredibly flattering. The tapered sides and squared tip elongate the fingers, creating a sleek, sophisticated look that works on any hand shape.
The flat tip also offers a practical advantage over stiletto nails. You’ve still got that dramatic length, but the squared-off end is sturdier and less likely to catch on things. You can actually type on your phone without feeling like you’re going to stab the screen.
Coffin acrylics provide the perfect canvas for nail art. That flat tip gives nail techs more surface area to work with, whether they’re creating intricate designs, applying rhinestones, or experimenting with chrome finishes. The extra space means your nail art really pops.
The Celebrity Effect
Let’s be honest—celebrity influence plays a huge role in nail trends. When Kylie Jenner consistently sports coffin nails, millions of people take notice. Jennifer Lopez recently showed off coffin-shaped tips for her birthday, complete with designer flair. These high-profile endorsements have helped cement coffin nails as a go-to choice for fashion-forward individuals.
But it’s not just about copying celebrities. Coffin nails have staying power because they genuinely look good. They’re edgy without being too out there, making them suitable for both everyday wear and special occasions. You can dress them up with bold designs or keep them simple with a nude polish—either way, they make a statement.
Classic French Tips with a Coffin Twist
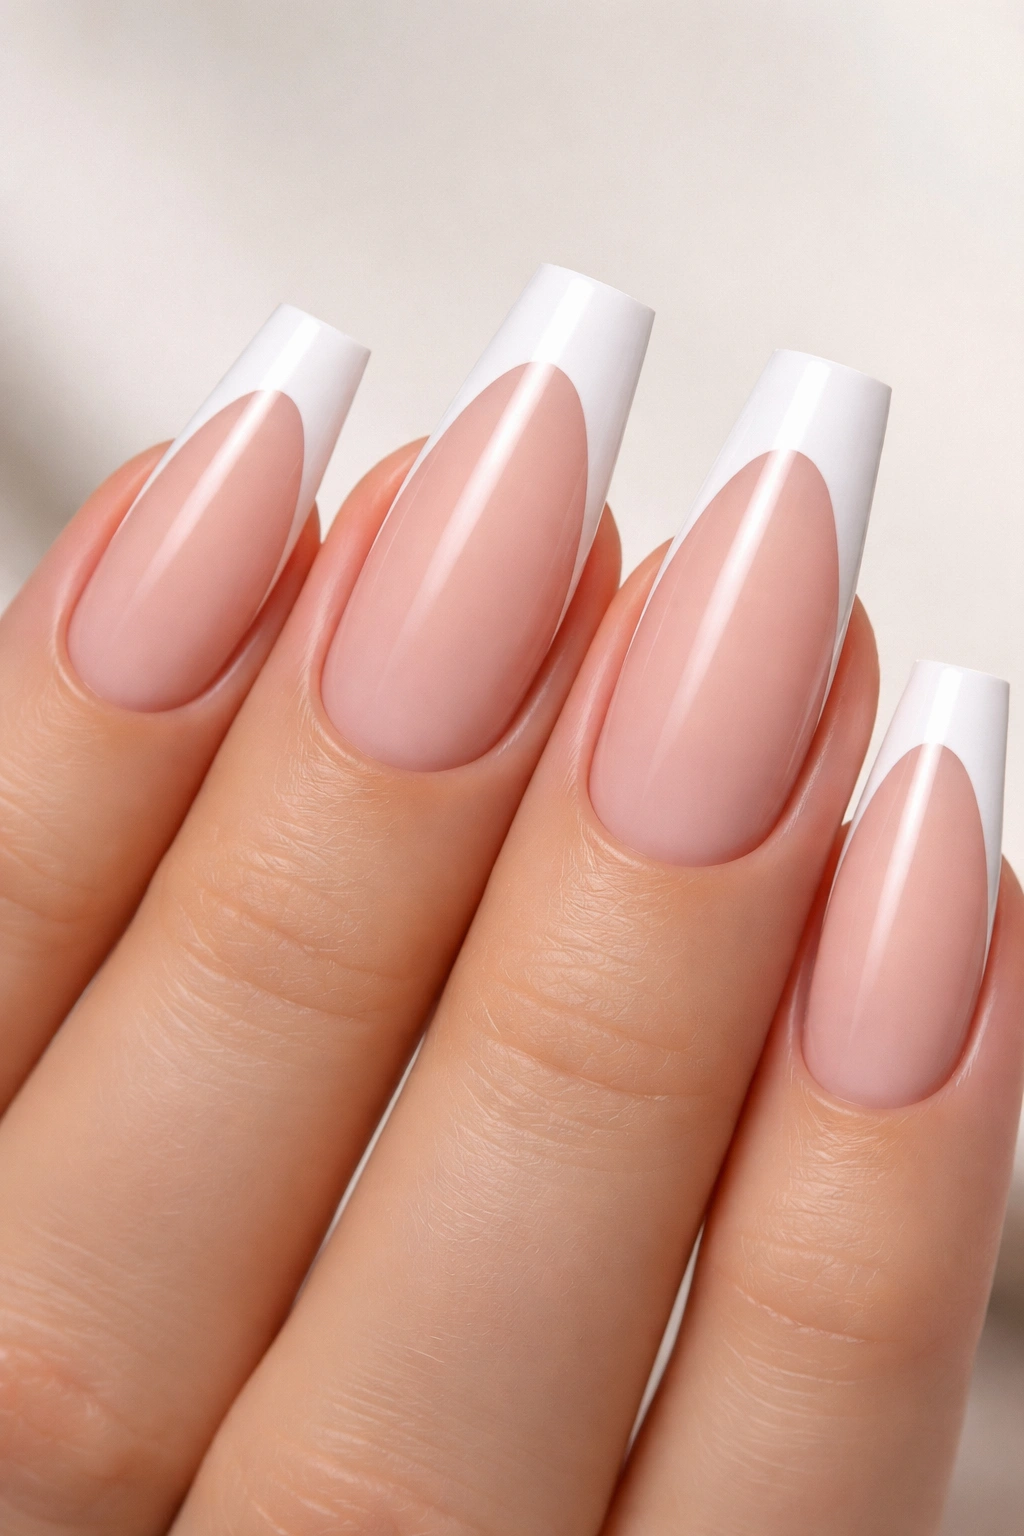
French manicures and coffin nails are a match made in heaven. The clean lines of a French tip complement the angular shape perfectly, creating a polished, sophisticated look that never goes out of style. The squared tip provides crisp corners that make the white line look especially sharp and intentional.
You can stick with the traditional white tip on a nude or pale pink base, or switch things up with different colors. Burgundy French tips look moody and elegant, perfect for fall or winter. Pink tips add a playful, feminine touch that works year-round. Even black French tips are having a moment, offering an edgy alternative to the classic white.
Here’s a fresh take: try a V-shaped French tip instead of the traditional rounded curve. This sharp, angular design emphasizes the coffin shape’s bold aesthetic. The pointed tip draws the eye and adds an extra dose of drama to an already statement-making shape.
Invisible French Manicures
The invisible French is one of the coolest modern updates to the classic design. Instead of a colored tip, you’re using negative space to create the French effect. It’s minimalist, avant-garde, and surprisingly versatile. The barely-there design lets the coffin shape shine while still giving you that polished, put-together vibe.
For an even more elevated look, add a thin metallic line where the negative space meets your base color. Gold or silver strips create subtle definition that catches the light beautifully. It’s one of those details that people might not immediately notice, but when they do, they’ll ask where you got your nails done.
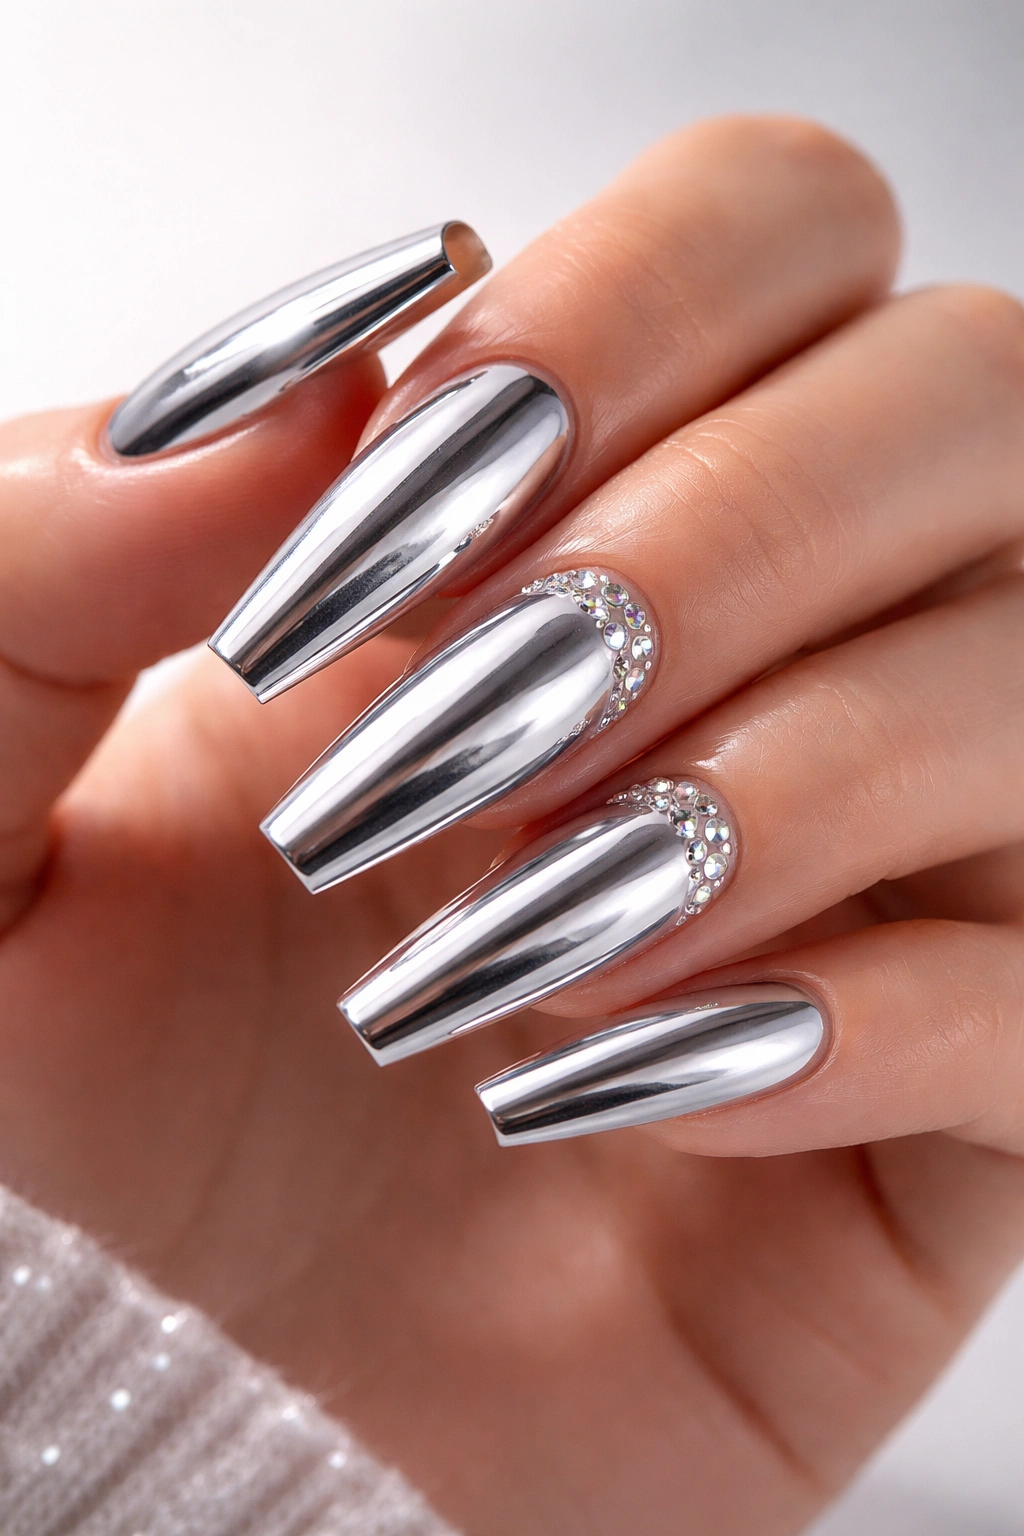
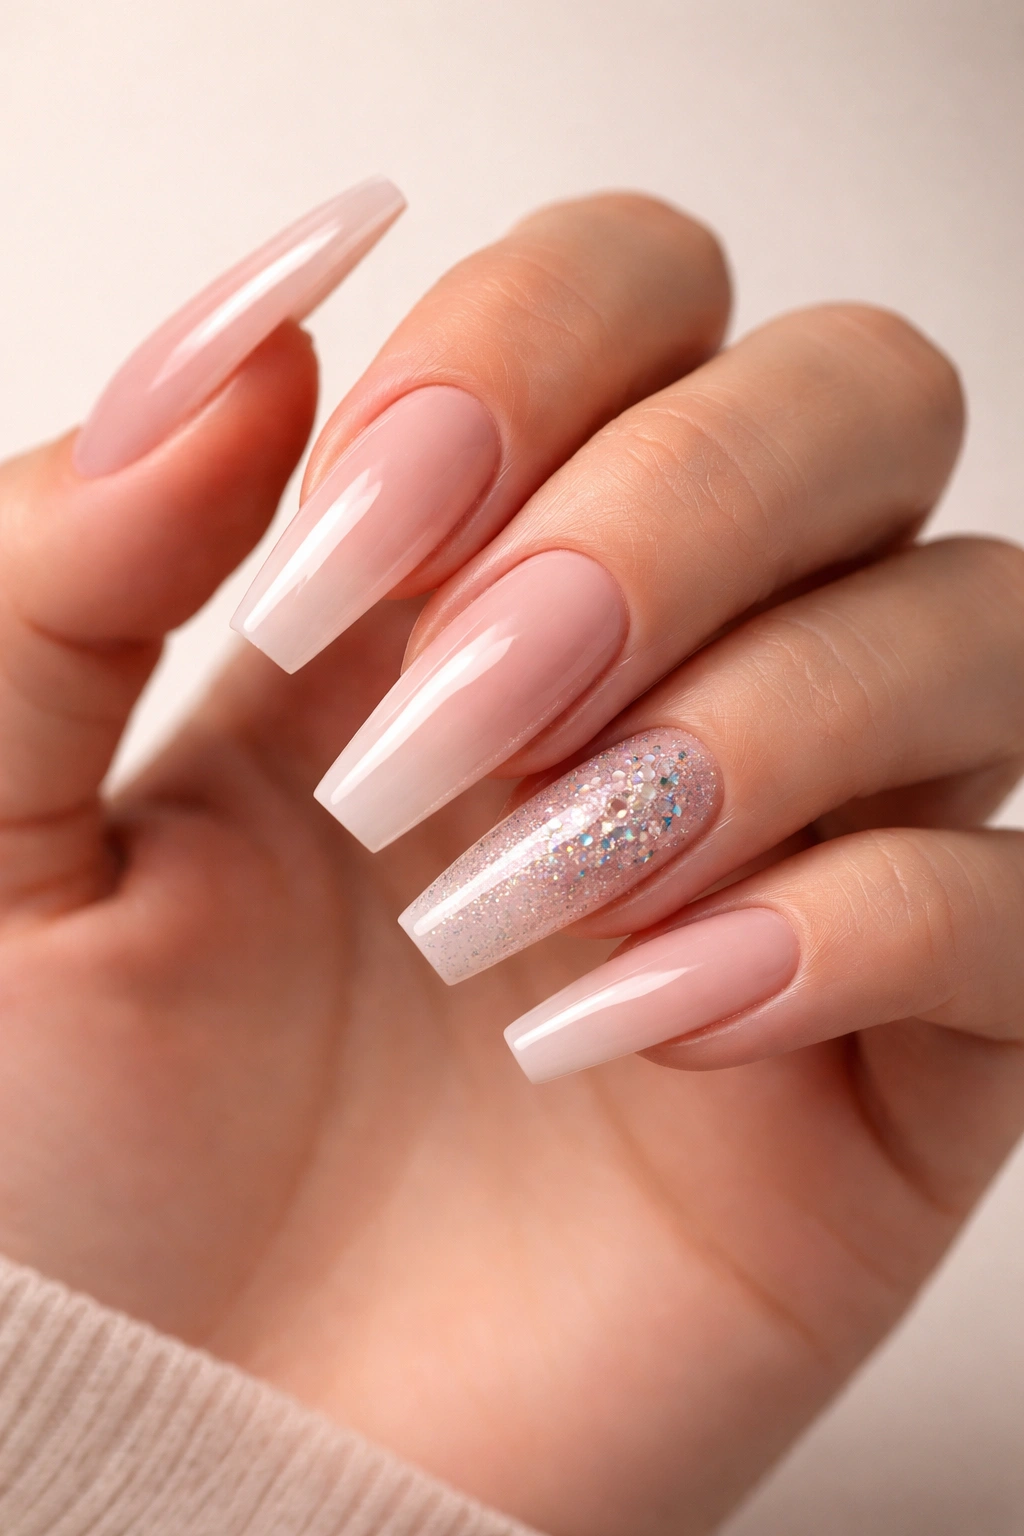
Glitter and Chrome for Maximum Impact
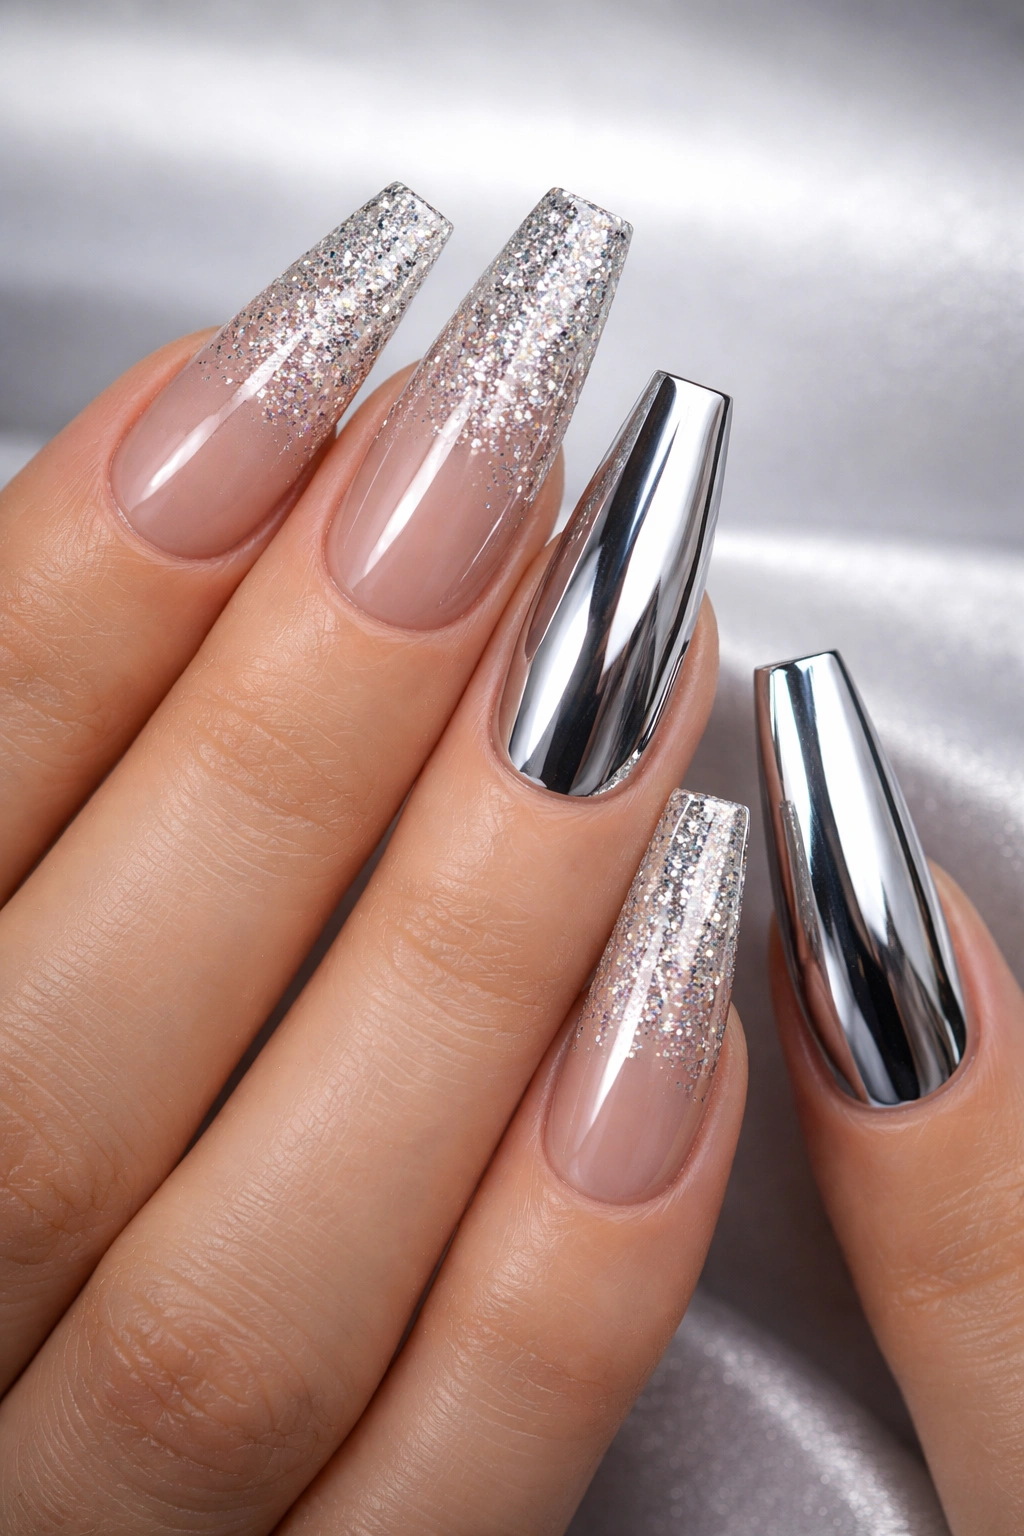
If you’re going for drama, glitter and chrome finishes are your best friends. The coffin shape provides ample surface area to showcase these eye-catching finishes, and the results are absolutely stunning. Glazed donut nails—that viral chrome look popularized by Hailey Bieber—look particularly gorgeous on coffin-shaped tips.
You don’t have to commit to an all-over glitter look if that feels like too much. Try glitter on just the tips for a sparkling French manicure, or add a glitter accent nail while keeping the rest of your nails in a complementary solid color. Even a subtle shimmer can elevate a simple manicure.
Chrome powder creates that high-shine, mirror-like finish that’s been dominating social feeds. Pink glass nails pair the soft, feminine color with chrome’s metallic sheen for a look that’s both bold and wearable. For something more dramatic, metallic magenta or cobalt blue chrome nails are absolute showstoppers.
Cat Eye Magnetic Polish
Cat eye polish uses magnetic particles to create a dimensional, light-reflecting effect. When you hold a magnet over wet polish, it draws the particles into striking patterns that resemble a cat’s eye. On coffin nails, this creates a mesmerizing vertical line that emphasizes the length and elegant taper of the shape.
Rich, jewel tones work especially well with cat eye finishes. Deep emerald green, sapphire blue, or copper shades create depth and dimension that change as you move your hands. It’s one of those finishes that photographs beautifully and looks even better in person.
Bold Colors That Command Attention
Coffin nails are made for bold color choices. The dramatic shape can handle intense hues that might overwhelm shorter, more conservative nail shapes. Deep burgundy is a perennial favorite, offering sophistication with an edge. It’s moody without being gothic, making it suitable for both professional settings and nights out.
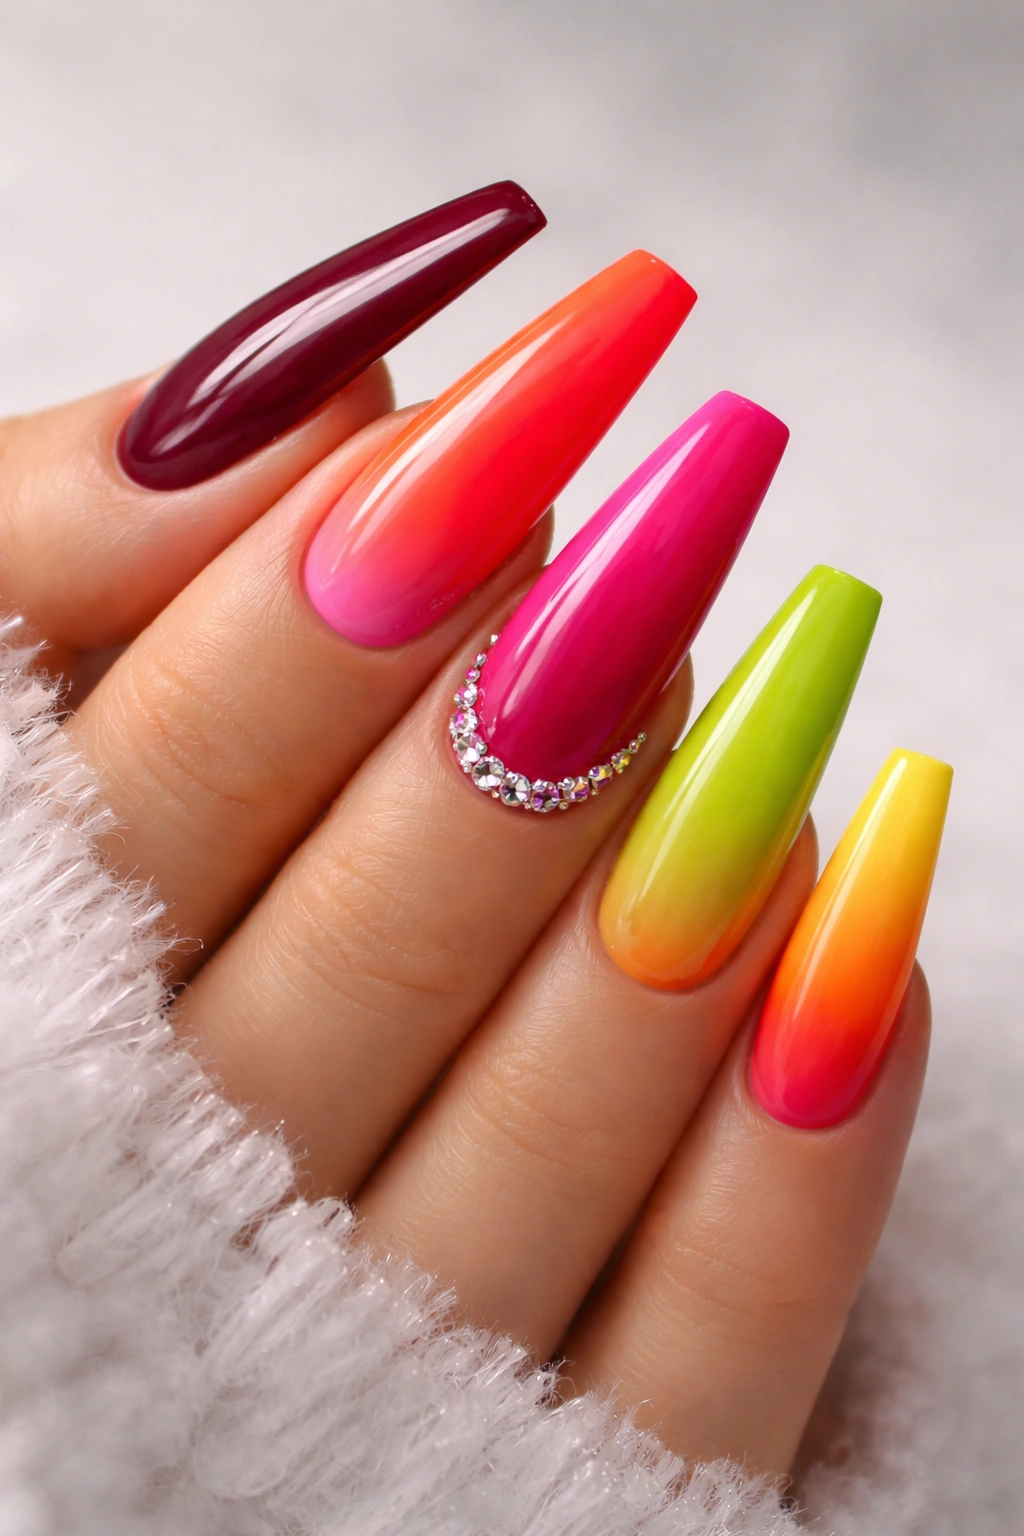
Neon shades are having a moment, and coffin nails are the perfect way to try this trend. The long, tapered shape balances out the brightness of neon pink, yellow, or green. If full-on neon feels too intense, incorporate it as an accent—neon tips on a neutral base, or one neon accent nail in an otherwise muted set.
Don’t sleep on classic red. Red coffin nails are seductive, confident, and timeless. The bold color paired with the dramatic shape creates main character energy. Go for a glossy finish for maximum impact, or try matte red for a modern, sophisticated twist.
Unexpected Color Combinations
Coffin nails give you room to play with multiple colors at once. Gradient effects that transition from one shade to another across your hand create visual interest without feeling too busy. Try shades of orange fading from light peach to burnt orange, or go monochromatic with different tones of green from sage to forest.
Split designs are another fun option. Paint half the nail in one color and half in another—sage and white, for example—for an artsy, abstract look. The clean line down the center emphasizes the nail’s length and creates a graphic, modern aesthetic.
Nail Art Designs That Pop on Coffin Shapes
The flat, squared tip of coffin nails provides an ideal canvas for detailed nail art. From minimalist designs to maximalist creations, this shape can handle it all. Floral designs look particularly stunning, with enough space to create realistic petals and leaves that feel like tiny works of art.
Abstract swirls in contrasting colors create movement and visual interest. These work especially well when you keep the base color neutral—think bold swirls of blue and green on a white or clear base. The organic shapes play nicely against the sharp, angular coffin silhouette.
Geometric patterns and tribal designs complement the coffin shape’s clean lines. Triangles, stripes, and angular patterns emphasize the nail’s architecture. You can go all-out on every nail or keep it to one or two accent nails while leaving the rest solid.
3D Embellishments and Texture
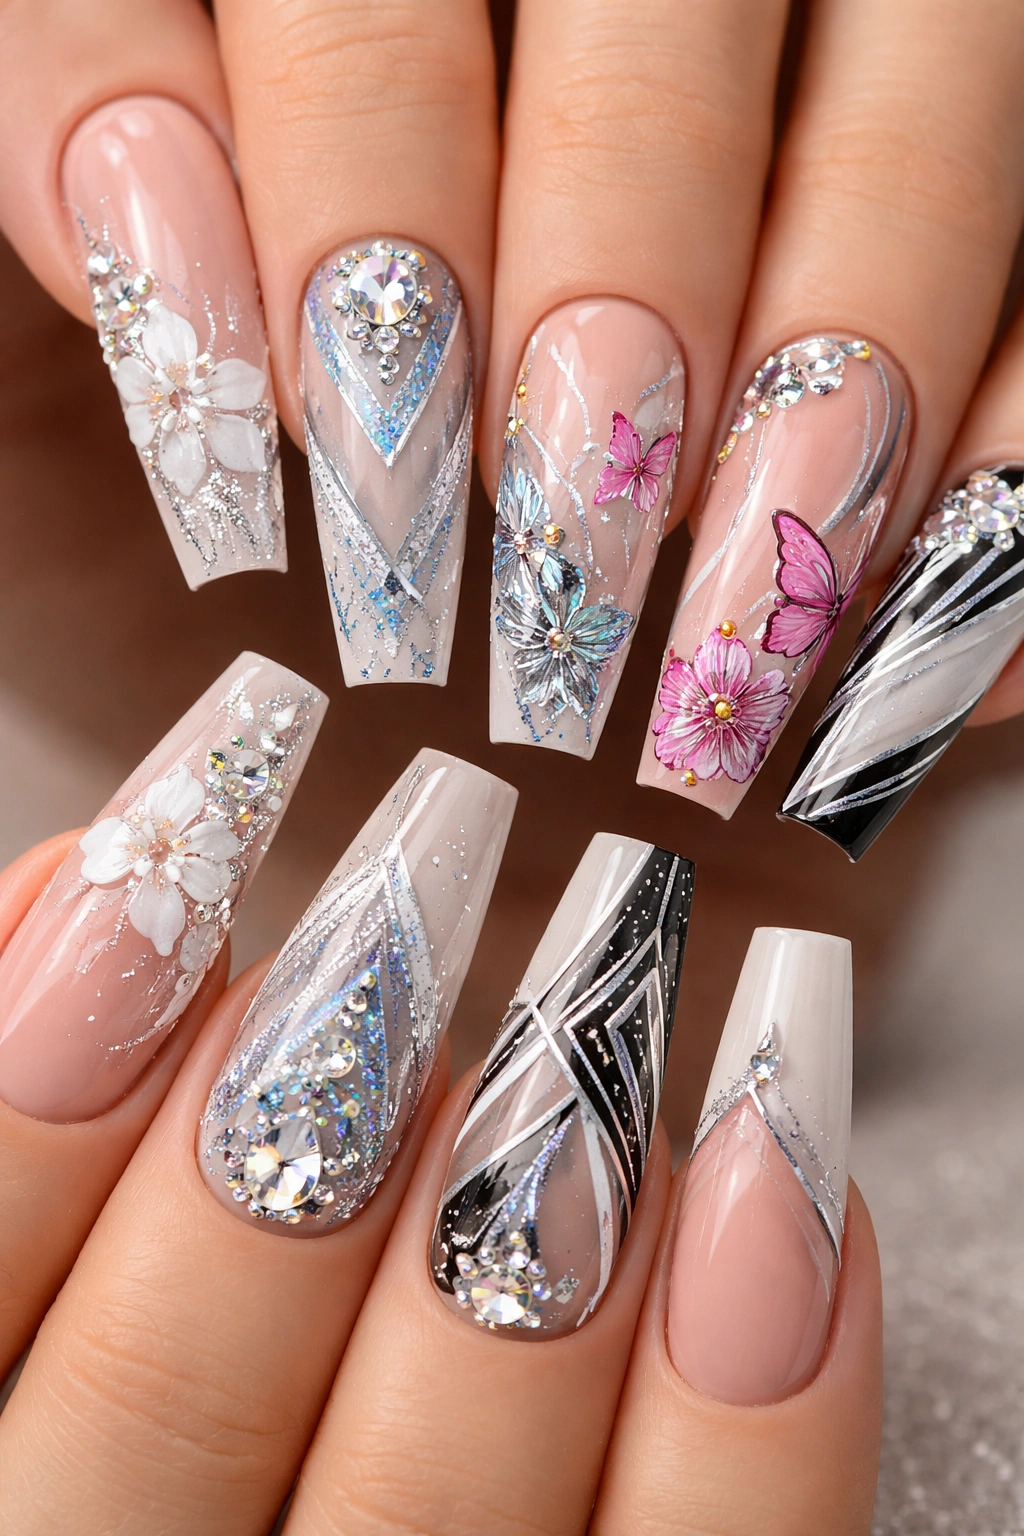
Coffin nails are strong enough to support 3D elements without breaking. Rhinestones are the obvious choice—they catch the light beautifully and add instant glamour. Cluster them near the cuticle, create a line down the center of the nail, or go full-on bejeweled with stones covering the entire tip.
Sculptural elements using builder gel or acrylic create texture and dimension. Nail artists are creating everything from raised swirls to 3D flowers to tiny sculptural details that make your nails feel like wearable art. These details stand out even more on the coffin shape’s generous surface area.
Pearls, chains, and even tiny charms can be adhered to coffin nails for an ultra-luxe look. The key is balance—if you’re going heavy on embellishments, keep the base color simple so the decorations don’t feel overwhelming.
Seasonal Designs for Coffin Nails
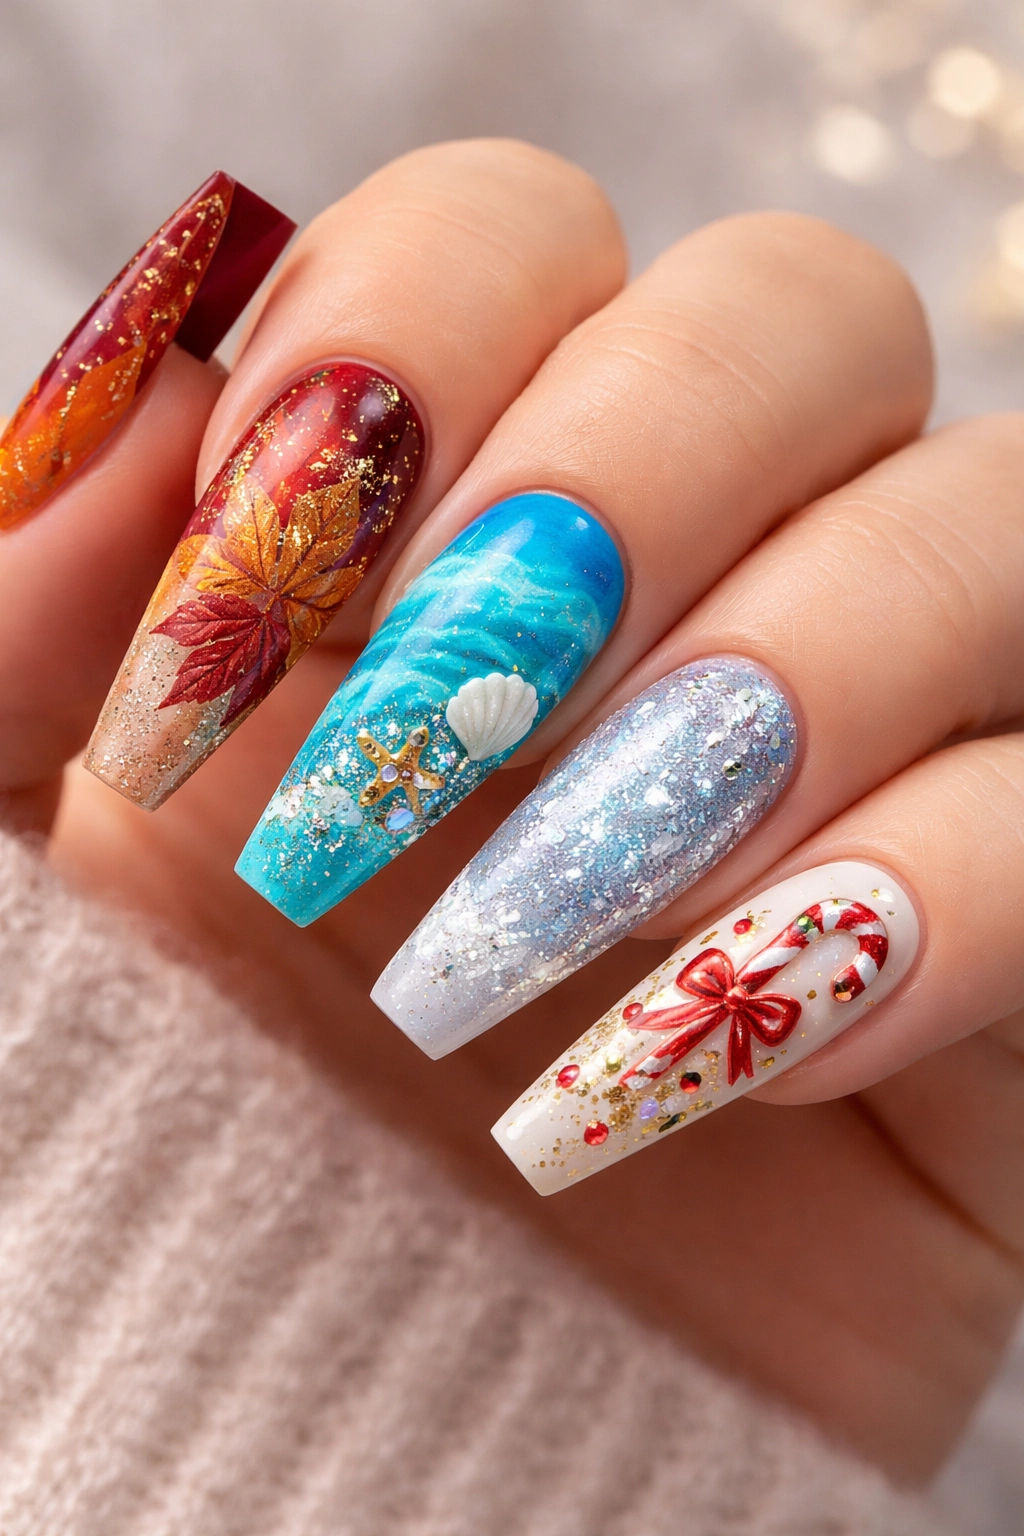
Different seasons call for different vibes, and coffin nails adapt beautifully. Fall coffin nails lean into warm, earthy tones—think burnt orange, deep burgundy, olive green, and chocolate brown. Add cable knit patterns or tiny painted leaves for a cozy autumn aesthetic.
Summer designs are all about fun and vibrancy. Bright colors, tropical patterns, seashells, and ocean-inspired blues and greens capture that vacation energy. Ombré blues that fade from light aqua to deep navy look like the ocean itself, especially with some shimmer mixed in.
Winter calls for moody, sophisticated designs. Deep jewel tones, metallic finishes, and sparkly accents feel festive without being overly themed. Icy blue coffin nails with silver chrome details look like a winter wonderland on your fingertips. For Valentine’s Day, go for romantic pinks, reds, and hearts.
Holiday and Special Occasion Nails
Coffin nails are perfect for special events where you want your manicure to stand out. Wedding nails often feature soft, romantic colors with delicate details—think nude bases with white lace patterns, tiny pearls, or subtle shimmer. The elegant shape complements formal attire beautifully.
For Halloween, coffin nails (pun intended) are basically mandatory. Goth-inspired black coffin nails with dark designs, or playful options like orange and black patterns, spider webs, or even glow-in-the-dark polish make the holiday extra fun.
Birthday manicures deserve something special. Go all-out with rainbow gradients, mixed glitter finishes, or your favorite color in the most dramatic version possible. Coffin nails are celebration-appropriate—they’ve got that “I’m here to have a good time” energy.
Neutral and Minimalist Coffin Designs
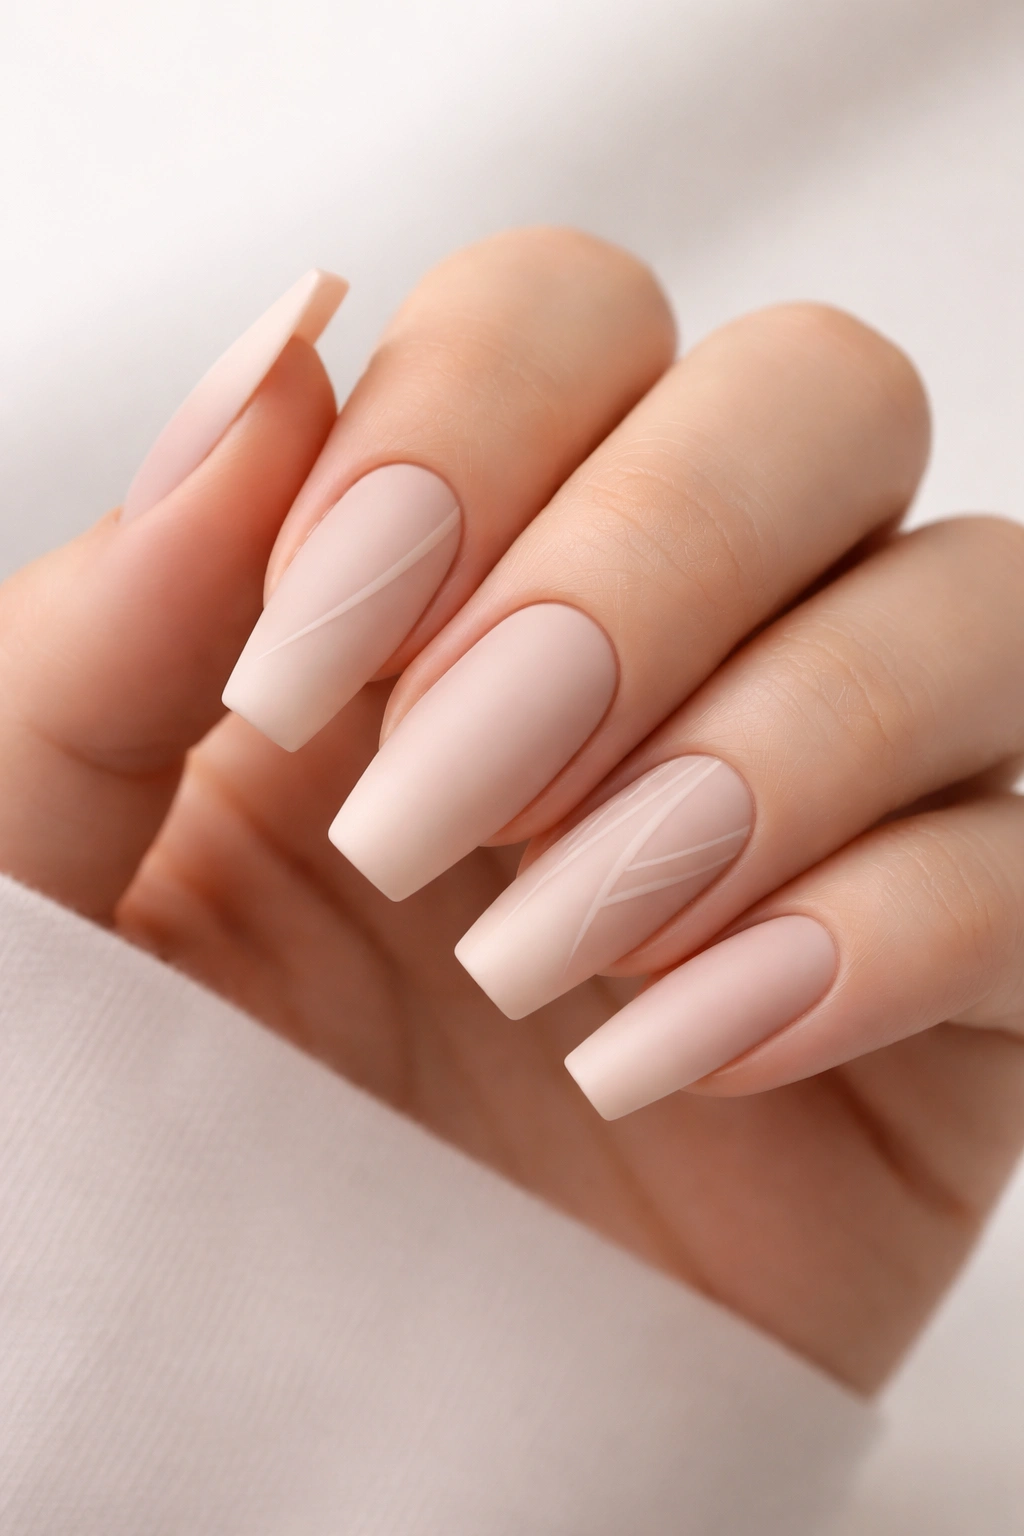
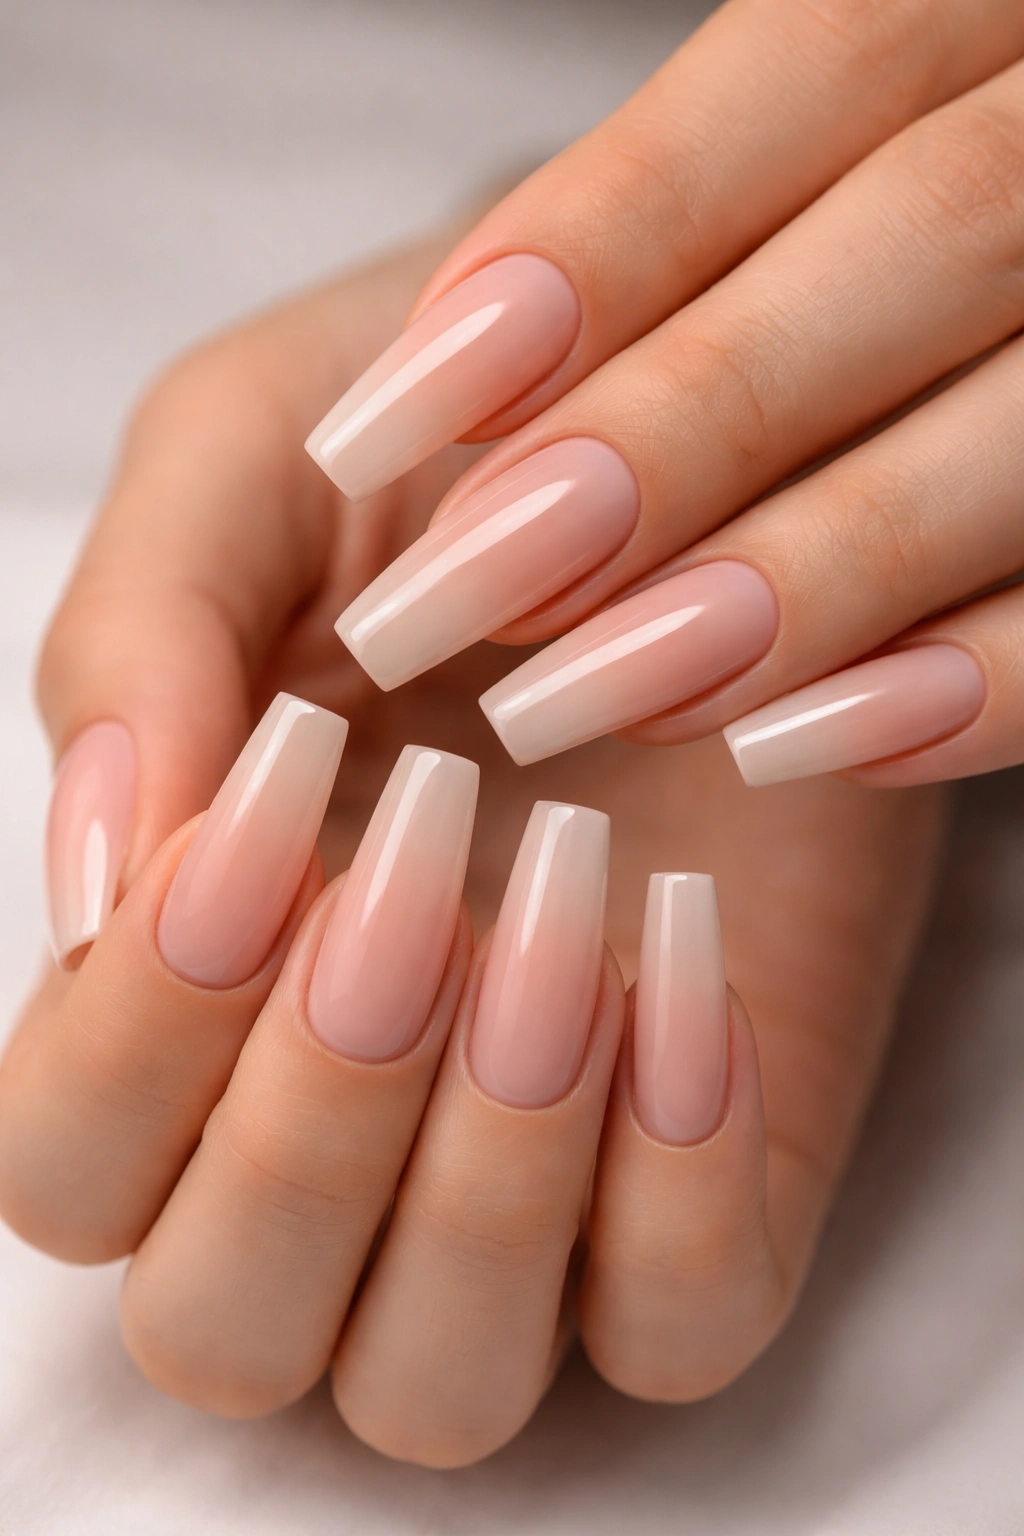
Not everyone wants bold, attention-grabbing nails. Coffin shapes work just as well for minimalist aesthetics. Nude coffin nails are elegant and understated, elongating the fingers without drawing too much focus. Choose a shade close to your natural skin tone for a seamless, sophisticated look.
Matte finishes modernize even the simplest colors. A matte nude or soft pink has a refined, velvety appearance that feels expensive and intentional. Matte black coffin nails are edgy and cool without being too over-the-top.
Negative space designs keep things interesting while maintaining a minimalist vibe. Leave portions of the nail bare or use transparent polish, then add simple lines, dots, or geometric shapes. The result is clean, contemporary, and surprisingly versatile.
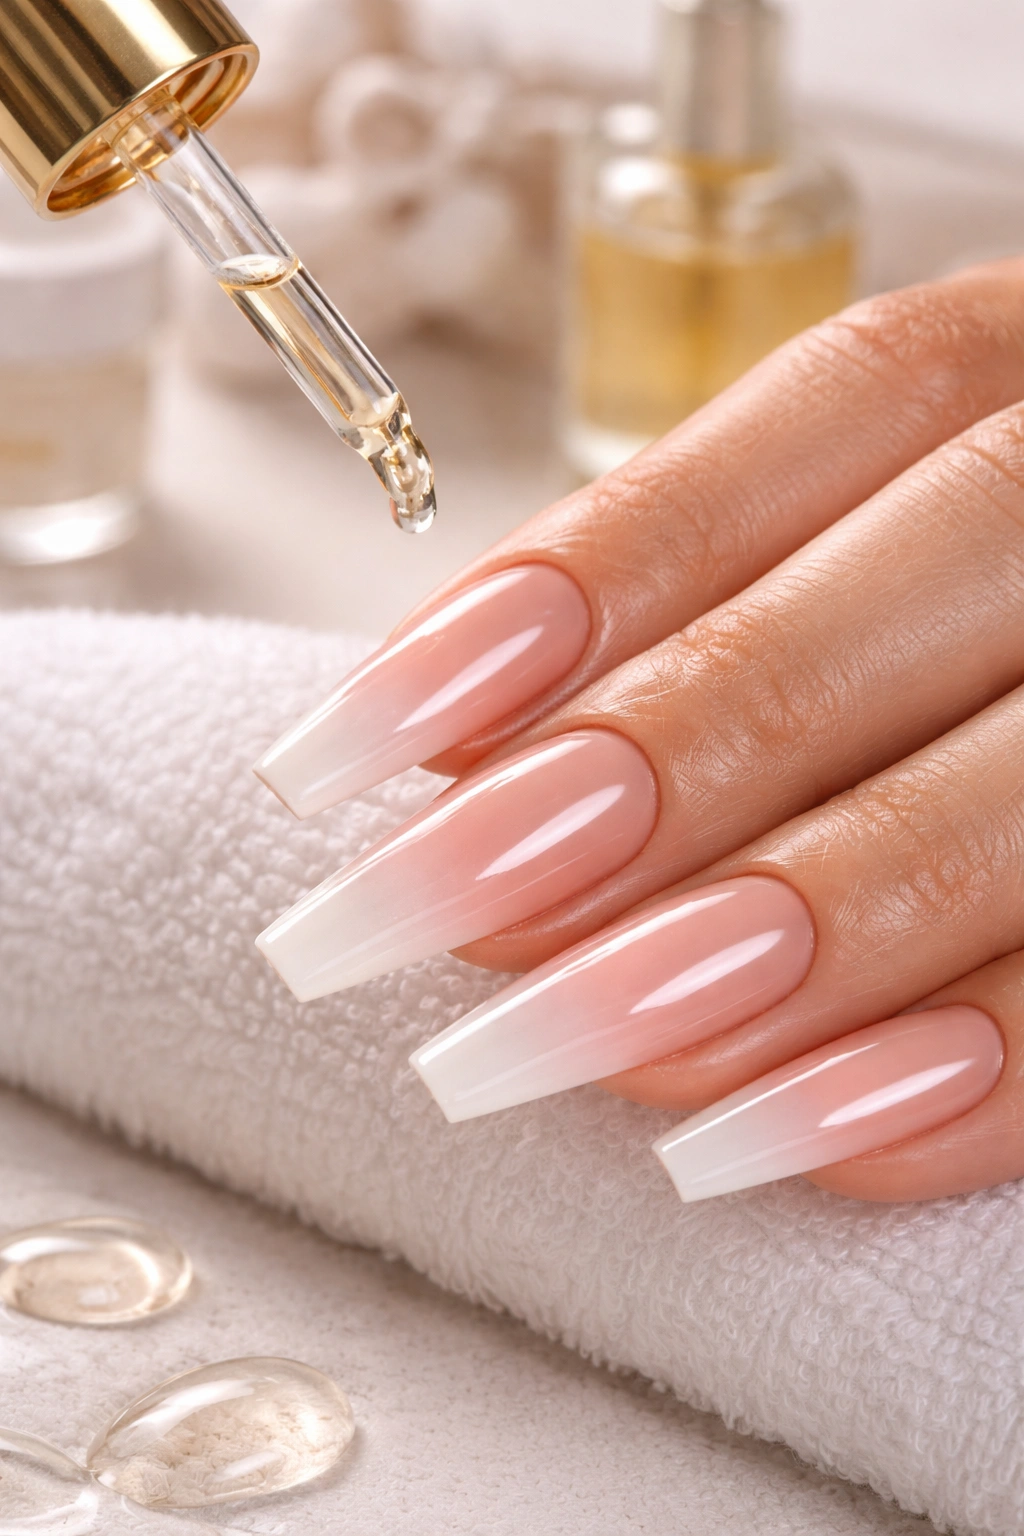
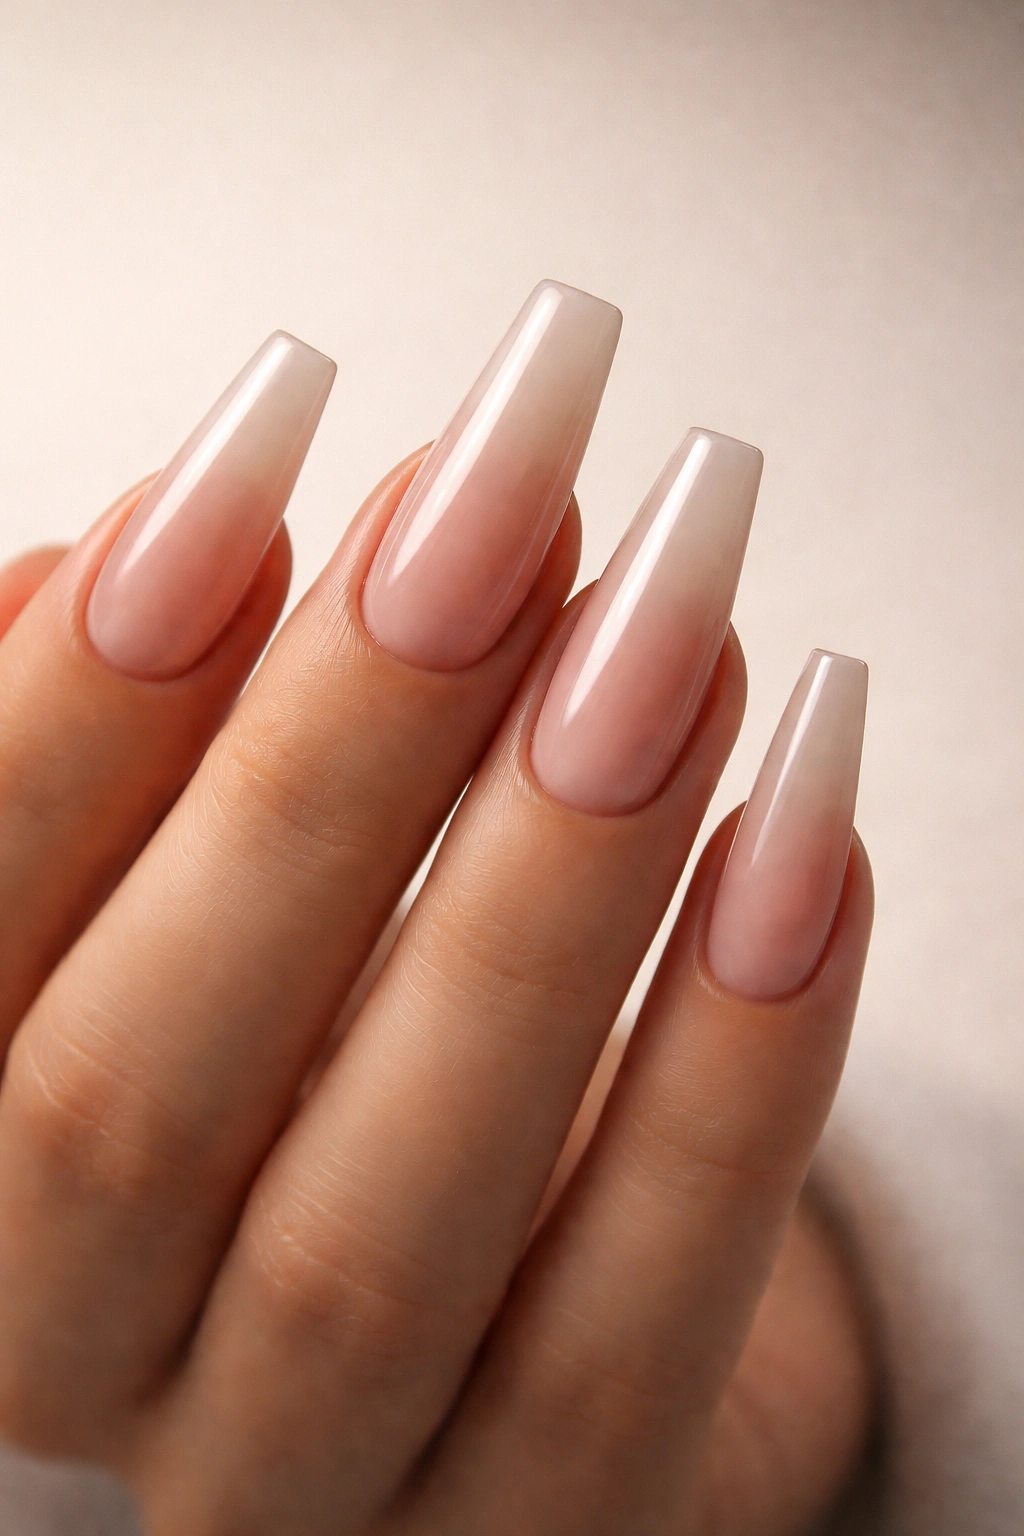
Milk Bath and Jelly Nails
Milk bath nails have that soft, milky translucence that’s incredibly flattering. The sheer white or pale pink gives you coverage without looking opaque, creating a clean, fresh aesthetic. Add subtle 3D details or thin metallic accents for a bit more interest without losing the minimalist feel.
Jelly nails use translucent, see-through polish that shows the natural nail underneath. Layer different sheer colors for depth, or add glitter or small charms that appear suspended inside the nail. It’s playful but still refined, and the coffin shape makes it feel more grown-up than it might on shorter nails.
Choosing the Right Length for Your Lifestyle
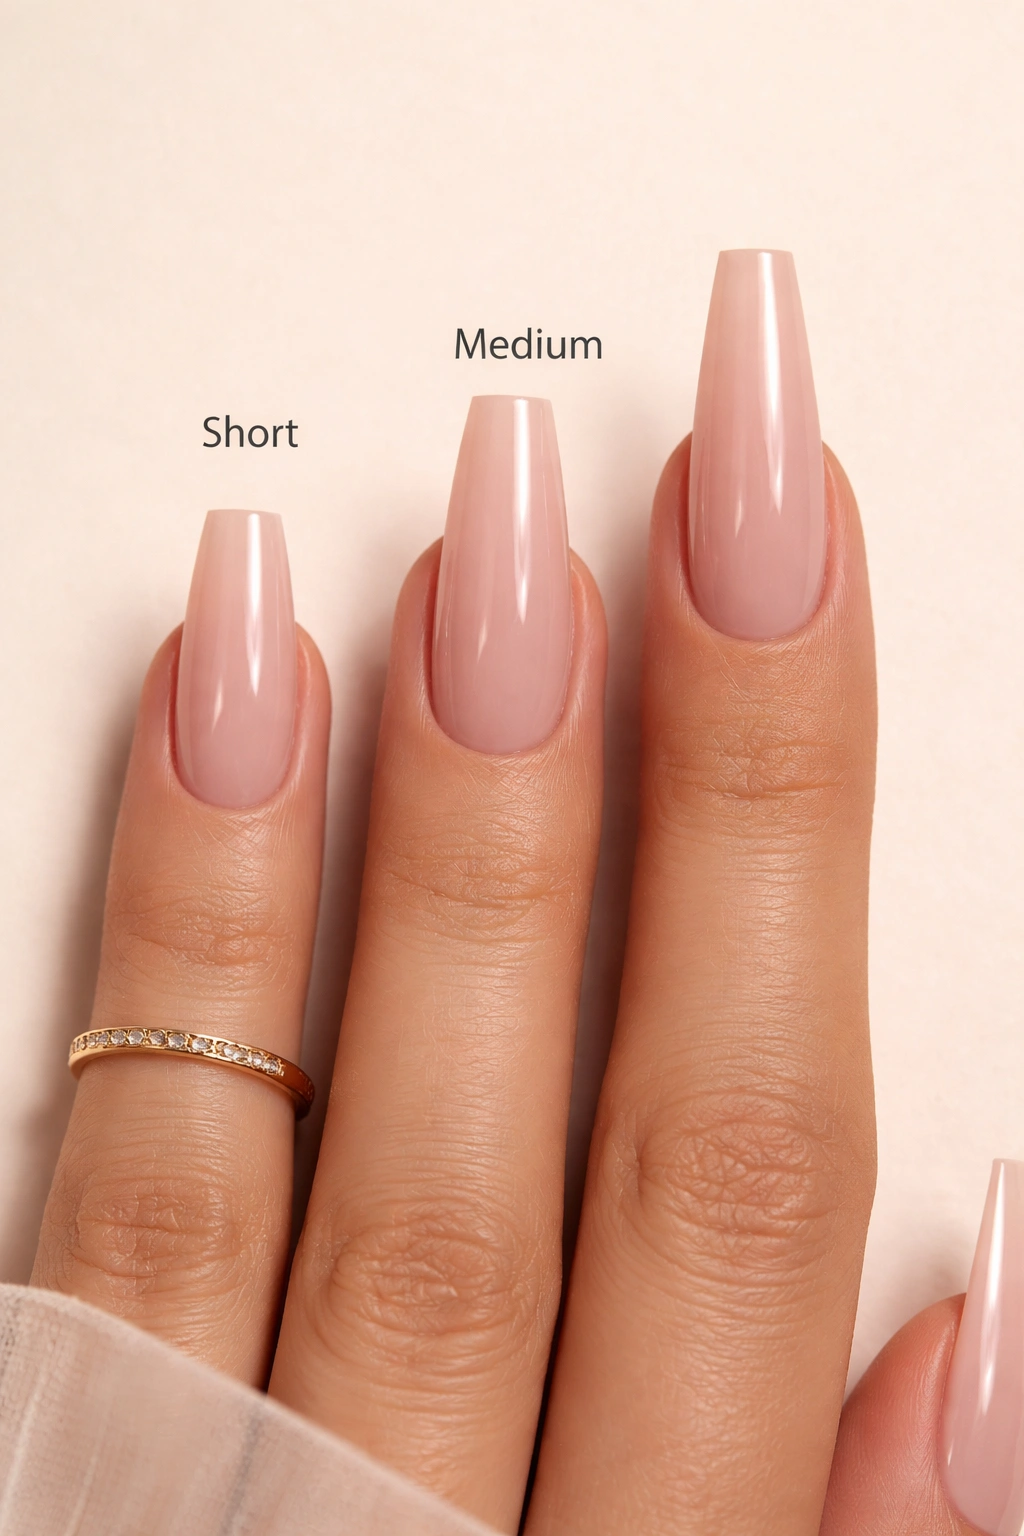
Not everyone can (or wants to) rock super long coffin nails. The good news? This shape works at different lengths, though it does have a sweet spot. Medium-length coffin nails offer the best balance—long enough to show off the tapered shape, but practical enough for daily tasks.
If you type a lot, work with your hands, or just aren’t used to long nails, start with a medium length. You’ll still get that coffin silhouette without the adjustment period that comes with extra-long tips. You can always go longer at your next appointment if you decide you want more drama.
Long coffin nails are undeniably stunning, but they do require some lifestyle adjustments. Opening cans, typing on your phone, and putting in contact lenses all become trickier. Give yourself a few days to adapt—you’ll develop new techniques for everyday tasks.
Short Coffin Nails: Do They Work?
Technically, yes, but with a caveat. Shorter nails don’t provide as much space to create that signature taper. Nail artist Natalie Minerva notes that attempting the coffin shape on short nails can create an odd trapezoid look because the taper has to be so abrupt.
If you prefer shorter nails, squoval or almond shapes might be more flattering options. But if you’re set on coffin nails, extensions are your friend. Acrylic or gel tips add the length needed to properly showcase the shape without requiring you to grow out your natural nails.
Making Your Coffin Acrylics Last
Acrylic coffin nails are an investment, so you’ll want them to last as long as possible. With proper care, they can stay looking salon-fresh for two to three weeks before needing a fill. Avoid using your nails as tools—that means no opening cans, peeling off stickers, or prying things open. Your nails might be strong, but they’re not indestructible.
Keep your cuticles moisturized with cuticle oil. This prevents dryness and helps your manicure look polished. Dry, ragged cuticles can make even the most gorgeous nails look unkempt. Apply cuticle oil daily, especially before bed.
The corners of coffin nails are prone to dullness from regular use. Typing, texting, and general hand use can round off those sharp edges over time. Be mindful when using your hands, and consider filing the tips gently between appointments to maintain the shape.
Protecting Your Manicure
Wear gloves when doing dishes, cleaning, or any activity involving water and chemicals. Prolonged water exposure can weaken the bond between your natural nail and the acrylic, leading to lifting. Harsh chemicals can also dull the shine of your polish or damage embellishments.
Apply a fresh layer of top coat every few days to maintain that glossy, just-done appearance. This is especially helpful if you’ve got glitter or chrome finishes—the extra top coat layer helps keep everything sealed and prevents chipping at the tips.
If you notice any lifting at the edges or base, don’t try to fix it yourself. Peeling or picking at lifted acrylic can damage your natural nail. Instead, book an appointment with your nail tech for a proper repair or fill.
Finding the Right Nail Tech
A good nail technician makes all the difference with coffin acrylics. This shape requires skill to execute properly—those tapered sides and crisp corners don’t happen by accident. Look for a tech with a portfolio showcasing coffin nails. Check their Instagram or website to see if they’re comfortable with this particular shape.
When booking your appointment, mention that you want coffin-shaped nails. This gives your tech a heads-up and ensures they have adequate time blocked off. Coffin nails, especially with detailed designs, can take longer than simpler shapes and styles.
Don’t be shy about bringing reference photos. Screenshots from Instagram, Pinterest, or TikTok help your nail tech understand exactly what you’re envisioning. Be clear about length, color, and any design elements you want included.
What to Expect at Your Appointment
A full set of coffin acrylic nails typically takes 1.5 to 2 hours, depending on the design complexity. Your nail tech will start by prepping your natural nails, then apply the acrylic tips or sculpt them using forms. Once the acrylic is set, they’ll file and shape it into the coffin silhouette.
The shaping process requires precision. Your tech will file down the sides to create that taper, then square off the tips at just the right point. Watch as they work—a skilled tech will create symmetrical nails where each one mirrors the others in length and shape.
After shaping comes the fun part: design and polish. Whether you’re going for a simple solid color or an intricate nail art masterpiece, this is where your nails really come to life. Expect to pay at least $40-60 for a basic set, with prices increasing based on length, design complexity, and your location.
Press-On Coffin Nails: A Budget-Friendly Option
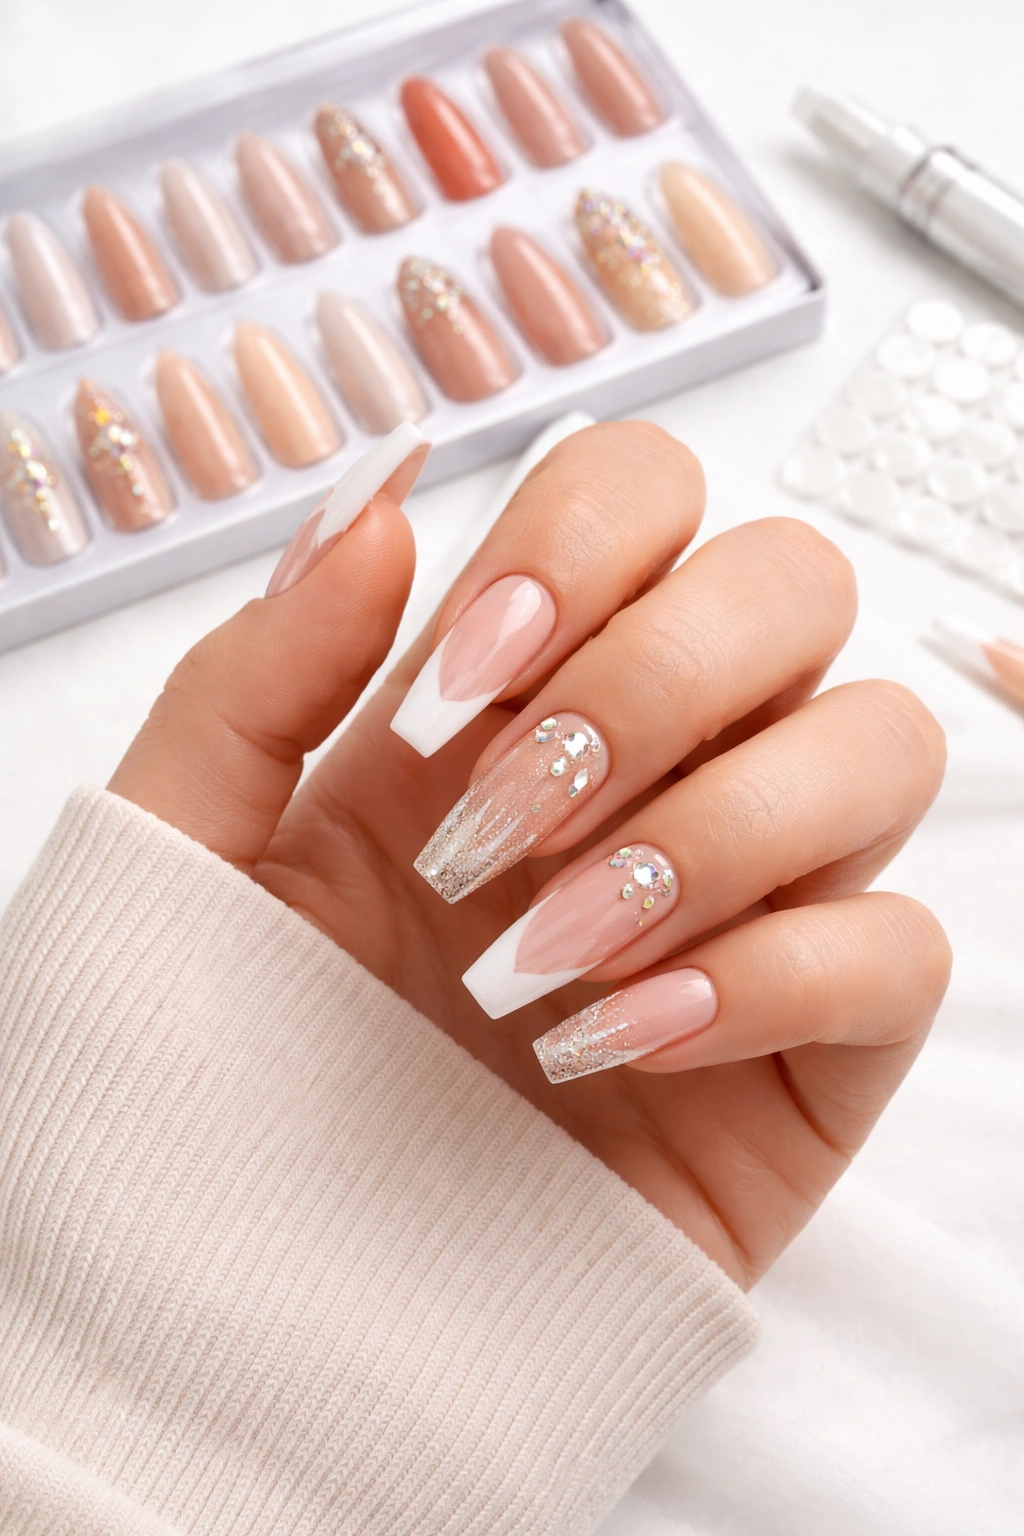
Not ready to commit to acrylics? Press-on coffin nails offer a low-commitment way to try the shape. Modern press-ons have come a long way—they’re sturdy, well-shaped, and available in countless designs. You can find everything from simple nudes to elaborate nail art, all ready to apply at home.
The application process is straightforward. Clean your natural nails, choose the correct size for each finger, apply glue or adhesive tabs, and press on. The whole process takes maybe 20 minutes. Quality press-ons can last up to two weeks with proper care.
Press-ons are perfect for special events or occasions when you want a temporary style change. Trying out a bold design you’re not sure about? Test it with press-ons first. They’re also great for vacations—pack a set in your suitcase and apply them when you arrive.
Making Press-Ons Last Longer
Start with clean, dry nails. Any oil or moisture on your natural nails will prevent the adhesive from bonding properly. Push back your cuticles and lightly buff your nail surface to create better adhesion.
Use nail glue rather than adhesive tabs if you want your press-ons to last longer. Apply a thin layer of glue to both your natural nail and the press-on, then hold firmly for 10-15 seconds. The bond will be stronger than tabs alone.
Avoid water for at least an hour after application to let the glue fully cure. After that, treat them like regular acrylics—wear gloves for dishes and cleaning, apply cuticle oil, and avoid using your nails as tools.
Wrapping Up Your Coffin Nail Journey
Coffin acrylic nails aren’t just a trend—they’re a modern classic that’s here to stay. The shape flatters every hand, provides endless design possibilities, and strikes that perfect balance between edgy and elegant. Whether you go for simple nude nails or full-on rhinestone glamour, the coffin shape elevates any look.
Start by deciding on your length. Medium coffin nails offer versatility and practicality, while long coffins make a bolder statement. Think about your lifestyle and choose accordingly. You can always adjust at your next appointment once you see how you adapt to the length.
Choose designs that reflect your personal style. Love minimalism? Stick with nudes, French tips, or subtle nail art. Want to make a statement? Go for bold colors, glitter, chrome, or 3D embellishments. The beauty of coffin nails is their versatility—there’s a version of this shape for everyone.
Find a skilled nail tech who understands the coffin shape and can execute it properly. Good craftsmanship makes all the difference between nails that look professionally done and ones that just look long. Check portfolios, read reviews, and don’t be afraid to shop around until you find your perfect nail artist.
Most importantly, have fun with it. Nails are one of those beauty choices that’s relatively low-stakes—if you don’t love what you end up with, you can change it in a few weeks. Try different colors, experiment with designs, and figure out what makes you feel most confident. That’s what coffin nails are all about: bold, unapologetic style that makes you feel amazing every time you look at your hands.
