

Most pink and black nail sets miss for one simple reason: the balance is off. The pink leans too sugary, the black takes over, and the coffin shape ends up carrying a design that never had enough structure in the first place. Pink and black coffin nails look best when each color has a job, not when both fight for the same space.
That shape matters more than people think. A coffin tip gives you straight sidewalls, a tapered end, and a flat free edge, which means line placement shows up fast. If the black tip is 2 millimeters too thick, your nail can look shorter. If the pink base is too chalky, the whole set loses depth and starts to look cheap under salon lights.
I’ve always liked this color pairing because it can go in opposite directions without falling apart. You can make it soft with a milky blush base and thin black detail, or sharp with matte black panels and hot pink accents. Either way, the coffin silhouette keeps it from drifting into messy territory—assuming the file is clean and the art has some restraint.
And restraint matters here more than people expect. Black gel can make lines look wider after top coat. Some pinks go gray under matte finish. A design that looks clean on a swatch wheel can look heavy on an actual hand. The sets below are the ones that keep their shape, keep their contrast, and still look good after the second or third day, not only in the first salon photo.
Why Pink and Black Coffin Nails Work So Well
Why does this combo land so much harder on a coffin shape than on a square or almond nail?
It comes down to geometry. The coffin shape gives black a clean edge to sit on, especially at the tip or sidewall, while pink softens the middle of the nail so the set doesn’t read as flat or harsh. You get structure from the dark shade and lift from the lighter one. That push-pull is the whole appeal.
Length changes the effect too. On a short coffin—think a free edge around 2 to 4 millimeters—pink keeps the nail from looking boxed in. On a medium or long coffin, black can be used in bolder ways because the taper creates more room for negative space, outlines, diagonal French lines, and cuticle framing.
Where the contrast should sit
When a pink and black design looks expensive, the contrast usually sits in one of three places:
- At the tip, where the coffin edge makes French lines, V-cuts, and angled blocks look crisp.
- Along the sidewalls, where thin black framing can make the nail look longer.
- Near the cuticle, where a reverse line or half-moon adds shape without covering the full nail.
Put dark color in all three places at once and you risk a crowded set.
A good rule I keep coming back to: let one color dominate about 65 to 75 percent of the nail, then use the other shade as punctuation. That ratio keeps the set readable from arm’s length, which is how people actually see your nails most of the time.
The Salon Details That Keep the Design Looking Clean

A strong color combo cannot save a sloppy file.
Before you settle on one of these coffin nail designs, decide on three things: length, finish, and line thickness. Short coffin nails need thinner black detailing—usually under 1 millimeter—because the surface area disappears fast. Medium and long sets can carry chunkier French tips, flames, checker patterns, and outlined edges without looking cramped.
Pink undertone is the next make-or-break detail. A cool baby pink paired with a soft black can look polished. A peachy nude with a blue-black gel can clash if your nail bed has a cooler cast. If you want the grow-out to stay neat, ask for a pink base that sits close to your natural nail bed rather than a candy shade on every finger.
Matte and gloss change the mood more than the design itself. Gloss makes black look deeper. Matte makes black look softer but also shows scratches sooner. On pink, matte can turn a creamy shade flat if the polish underneath is streaky. Nail techs know this, but it helps to say it out loud before the service starts.
Ask for these specifics at the table:
- Straight sidewalls first, taper second. If the taper starts too high, the coffin shape turns narrow and pinched.
- A 180-grit file on enhancements for final shaping, which helps keep the edge crisp without chewing it up.
- Two thin coats of black gel instead of one heavy one. Thick black polish floods sidewalls fast.
- A fill every 2 to 3 weeks if your design has cuticle detail or negative space you want to keep neat.
- Cuticle oil twice a day if you’re wearing matte. Dry skin makes a matte set look rough long before the nails are old.
Those little calls change the finish of the whole manicure.
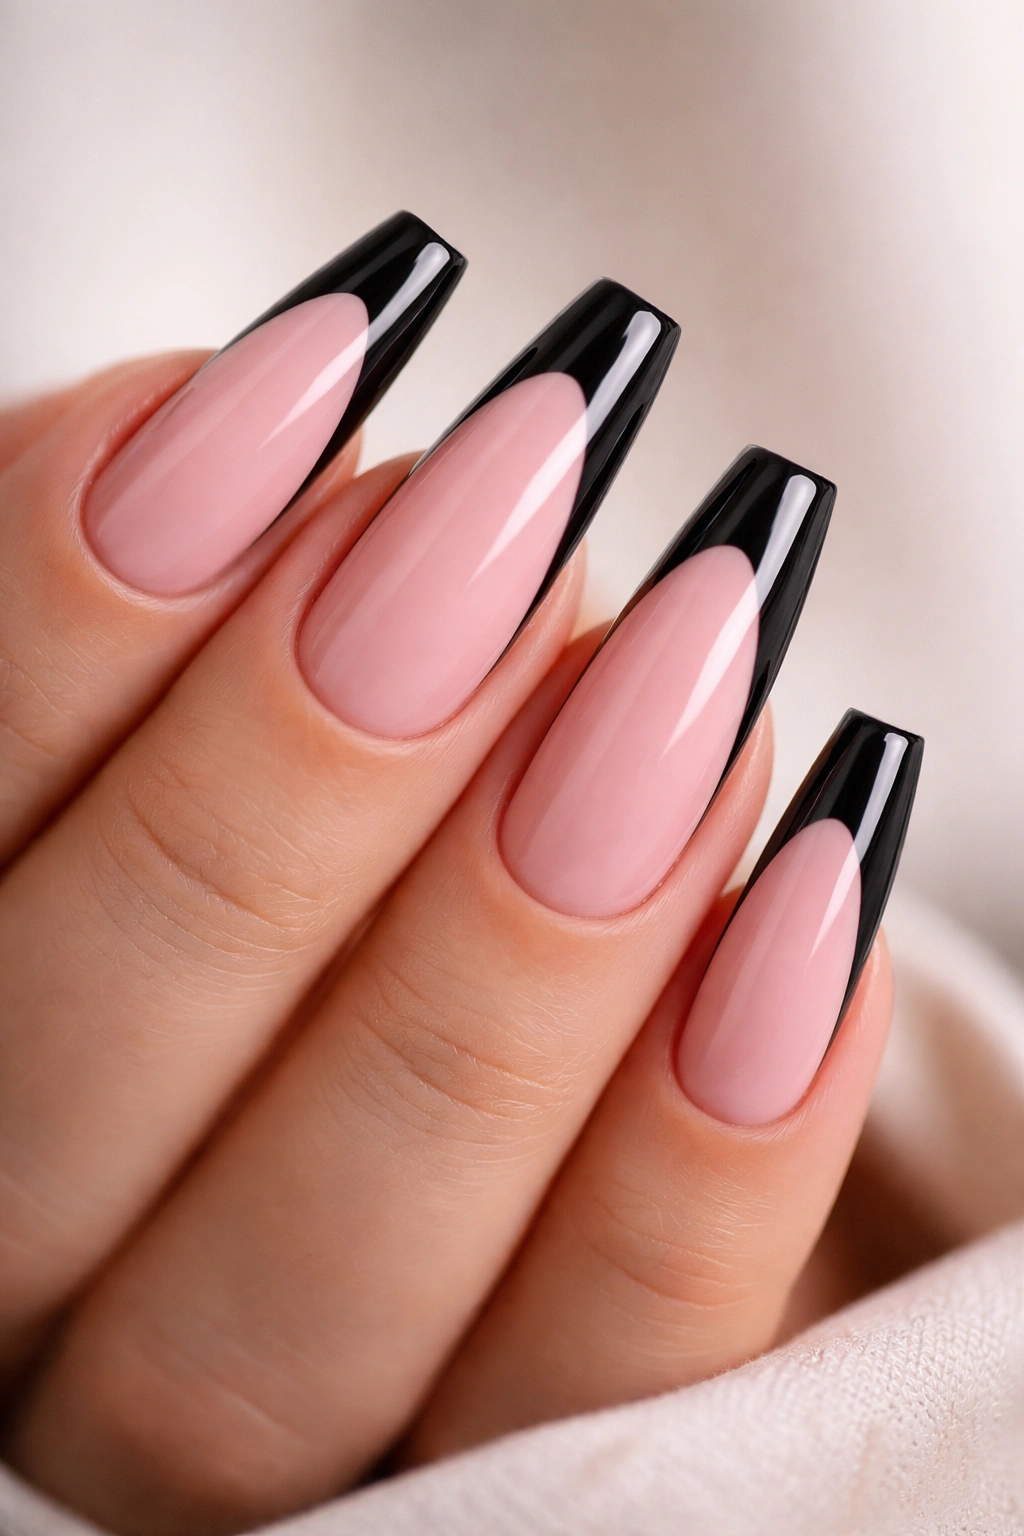
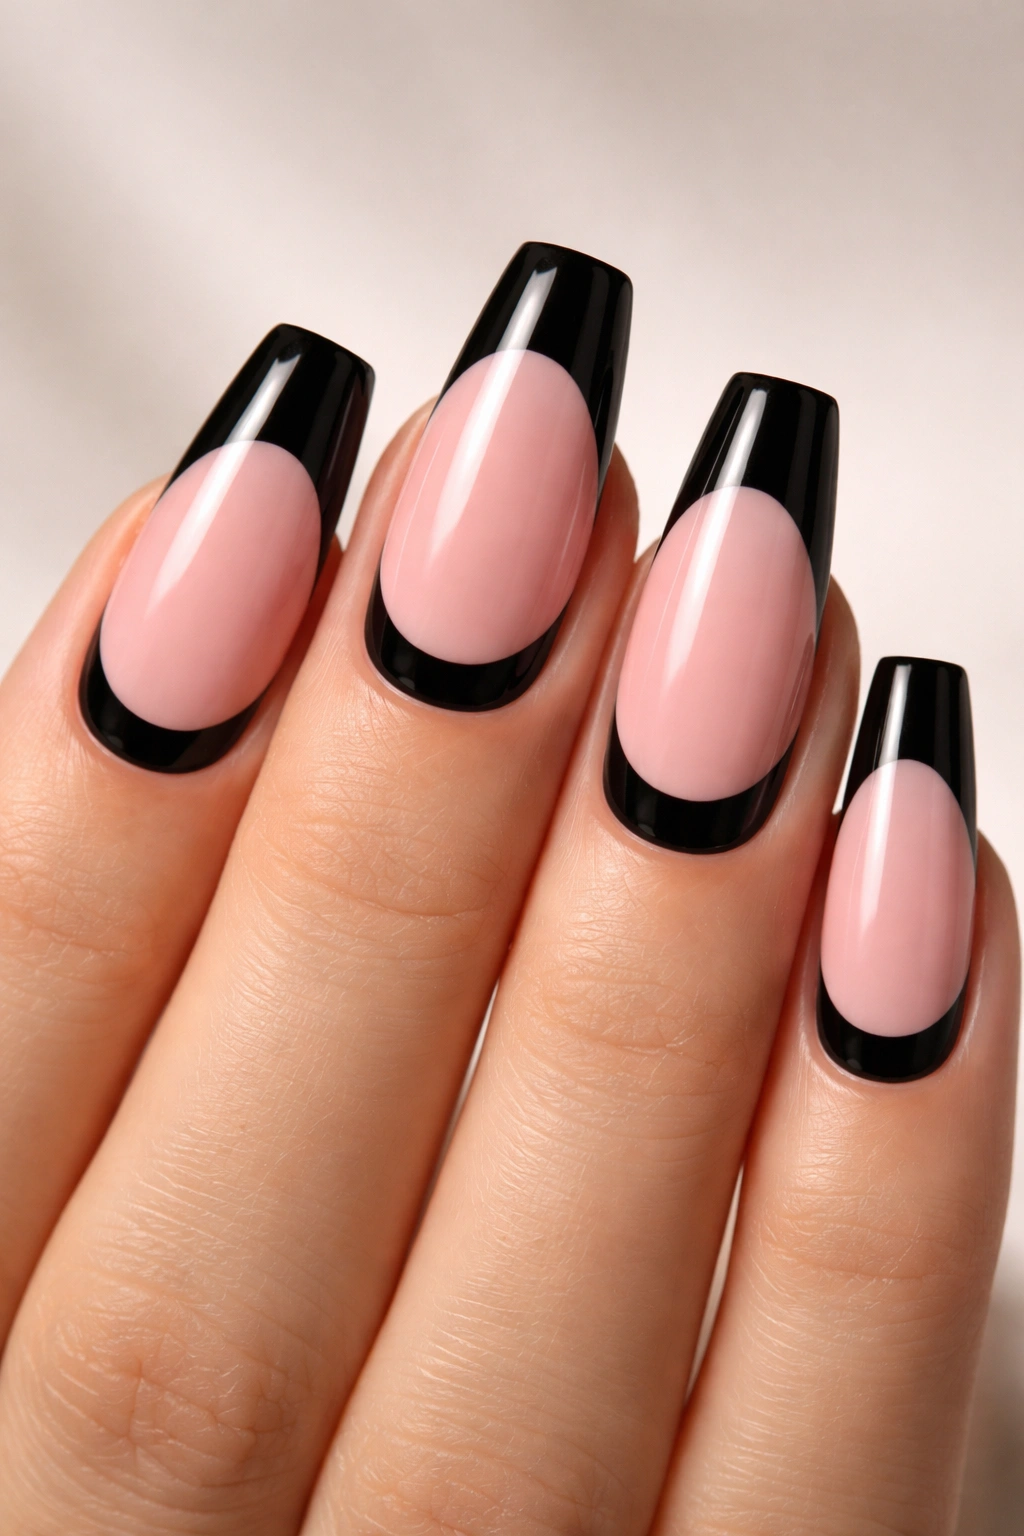
1. Glossy French Pink and Black Coffin Nails
A sheer pink base with a black French tip has that sharp, fresh look that makes coffin nails make sense in the first place. It’s clean. It’s direct. And it doesn’t need rhinestones, chrome powder, or five accent tricks to get attention.
The reason it works is placement. Black sits exactly where the coffin shape is strongest—right at the flat tip—while the pink base keeps the nail bed open and longer-looking. On medium length nails, I like a French line that sits around 3 to 4 millimeters deep. On a shorter coffin, keep it closer to 2 millimeters or the tip starts eating the whole nail.
Why it holds up so well
A classic black tip over pink grows out better than most high-contrast designs because the base stays soft and natural-looking. Minor chips show near the edge, not across the full nail.
Quick salon notes
- Ask for a milky pink rather than an opaque pastel if you want the set to stay light.
- A deep smile line gives the design a dressier feel.
- A straight-across French edge looks bolder; a slightly curved one softens the coffin shape.
- Finish with a high-gloss top coat so the black keeps its ink-like depth.
Best pick for: anyone who wants pink and black coffin nails that still read polished from Monday through Sunday.
2. Matte Blush Pink With One Jet-Black Accent Nail
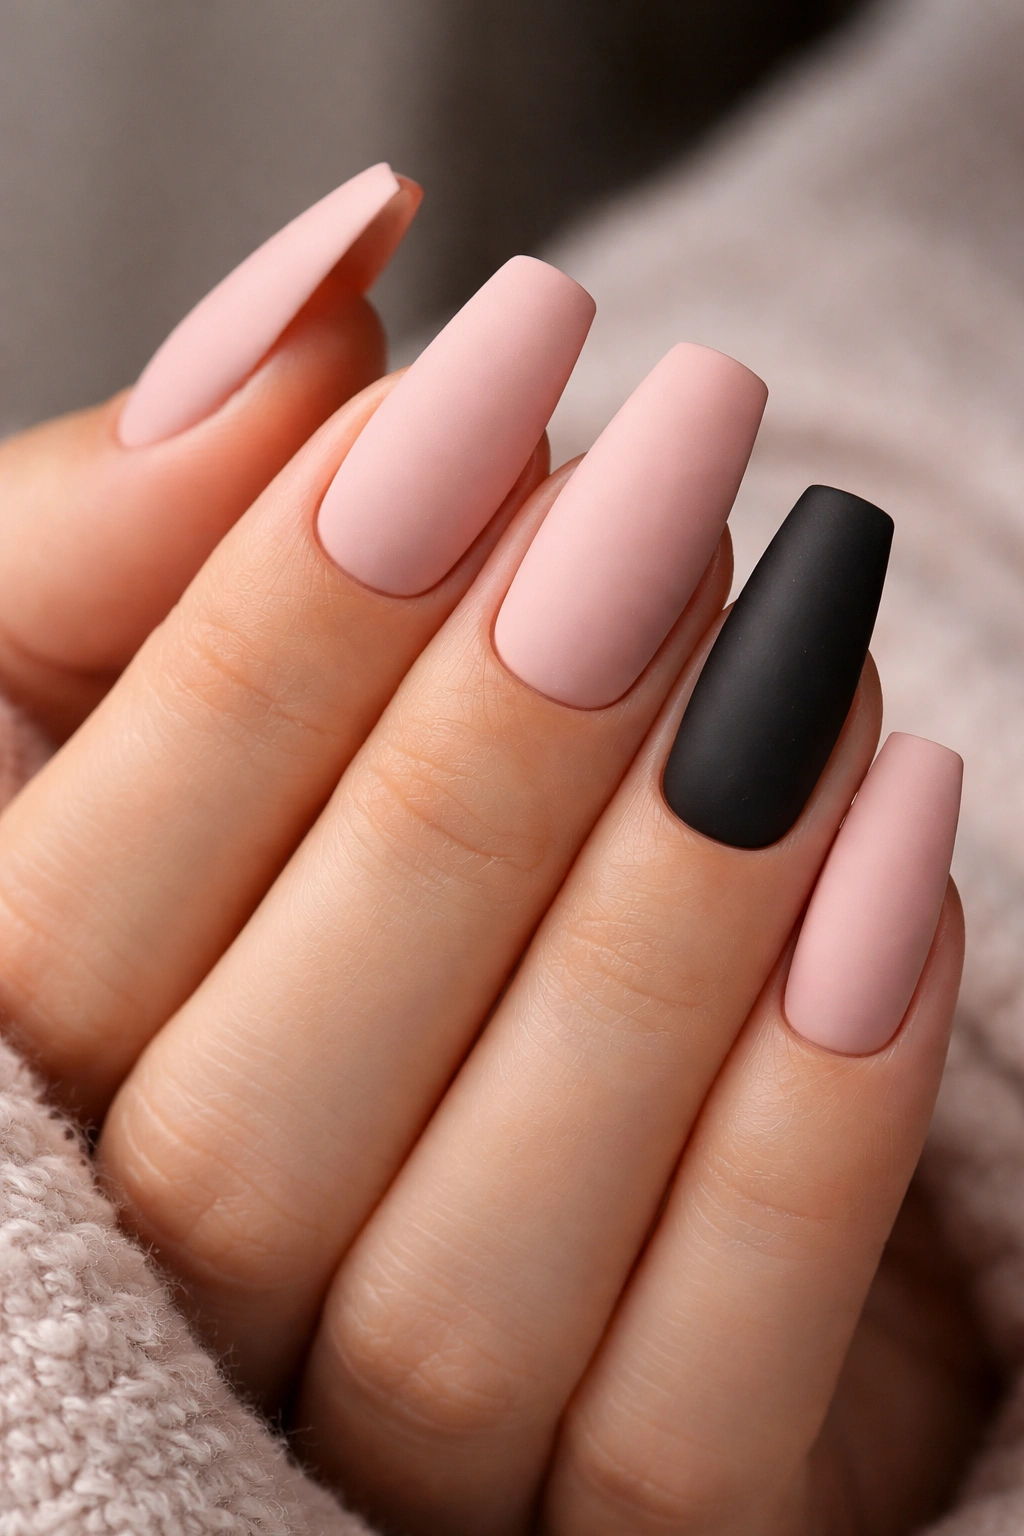
This is the set I suggest when someone likes contrast but does not want every finger shouting at the same volume. Four nails stay blush pink with a velvety matte finish, and one nail—usually ring finger or thumb—goes full black. The result is quieter than a full black-and-pink pattern, yet it still has bite.
What makes this design work is the restraint. You’re not spreading black across all ten nails, so the dark shade becomes a deliberate interruption instead of background noise. A soft blush with a hint of beige keeps the pink from feeling childish, and matte top coat turns the whole set more velvety than glossy candy.
There is a catch, though. Matte pink shows wear earlier than gloss, especially around the sidewalls where hand cream, makeup, and hair products leave shine marks. If you touch your face a lot or keep cuticle oil in heavy rotation, be ready for the matte finish to soften after a few days. Some people love that worn-in look. I usually do not.
A black accent nail also looks best when the shape is identical across the whole set. Even a tiny difference in sidewall taper shows up more on the dark finger, which means your tech needs to be a little obsessive—in the good way—about filing.
3. Diagonal Black French Tips on a Milky Pink Base
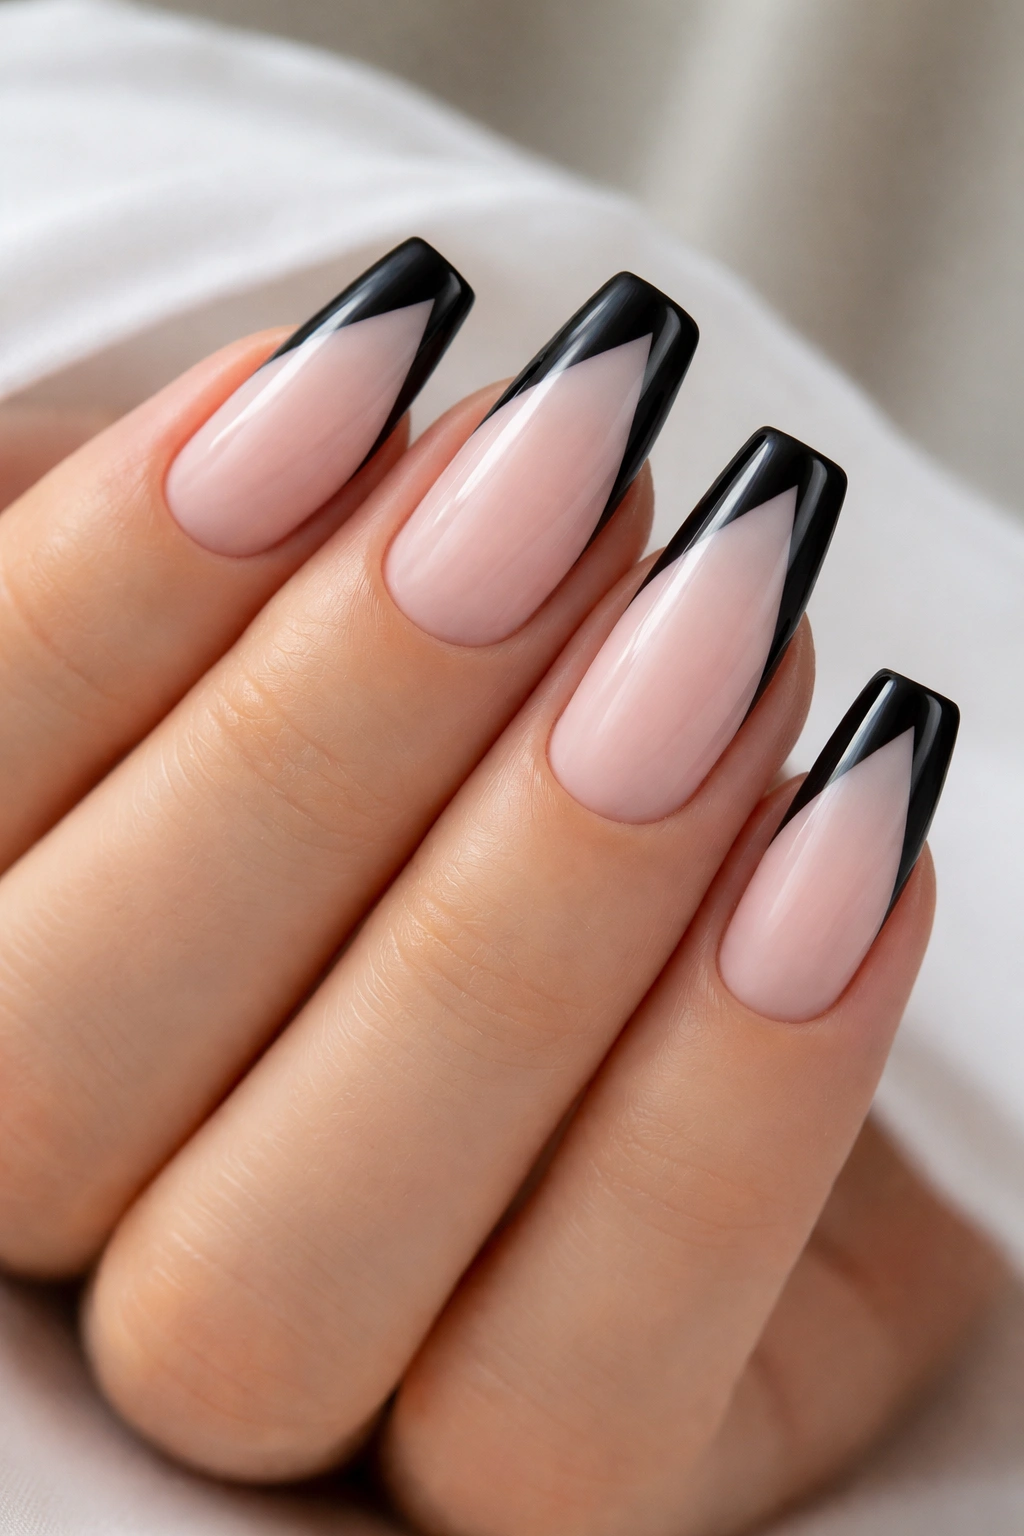
Why does an angled French tip often look better than a straight one on shorter coffin nails?
Because the diagonal line pulls the eye across the nail instead of chopping it off at the tip. That shift matters. On fingers that look shorter or wider, a slanted black tip can create more length without pushing you into long acrylic territory.
A milky pink base keeps the nail bed soft while the black corner adds structure. I like the line starting around one sidewall and cutting toward the free edge at a shallow angle, not a steep slash. Keep the black section under one-third of the nail plate and the design stays sleek rather than graphic.
What to ask for at the salon
Tell your tech you want a thin diagonal French, not a color block. Those are not the same thing. A diagonal French leaves more pink exposed and usually uses a cleaner edge. If you want balance, mirror the angle on each hand so the design feels intentional when both hands are side by side.
This set is a smart middle ground. You get more edge than a classic French, less maintenance drama than a full outlined nail, and a design that still looks right on medium-short coffin shapes.
4. Hot Pink and Black Flame Coffin Nails
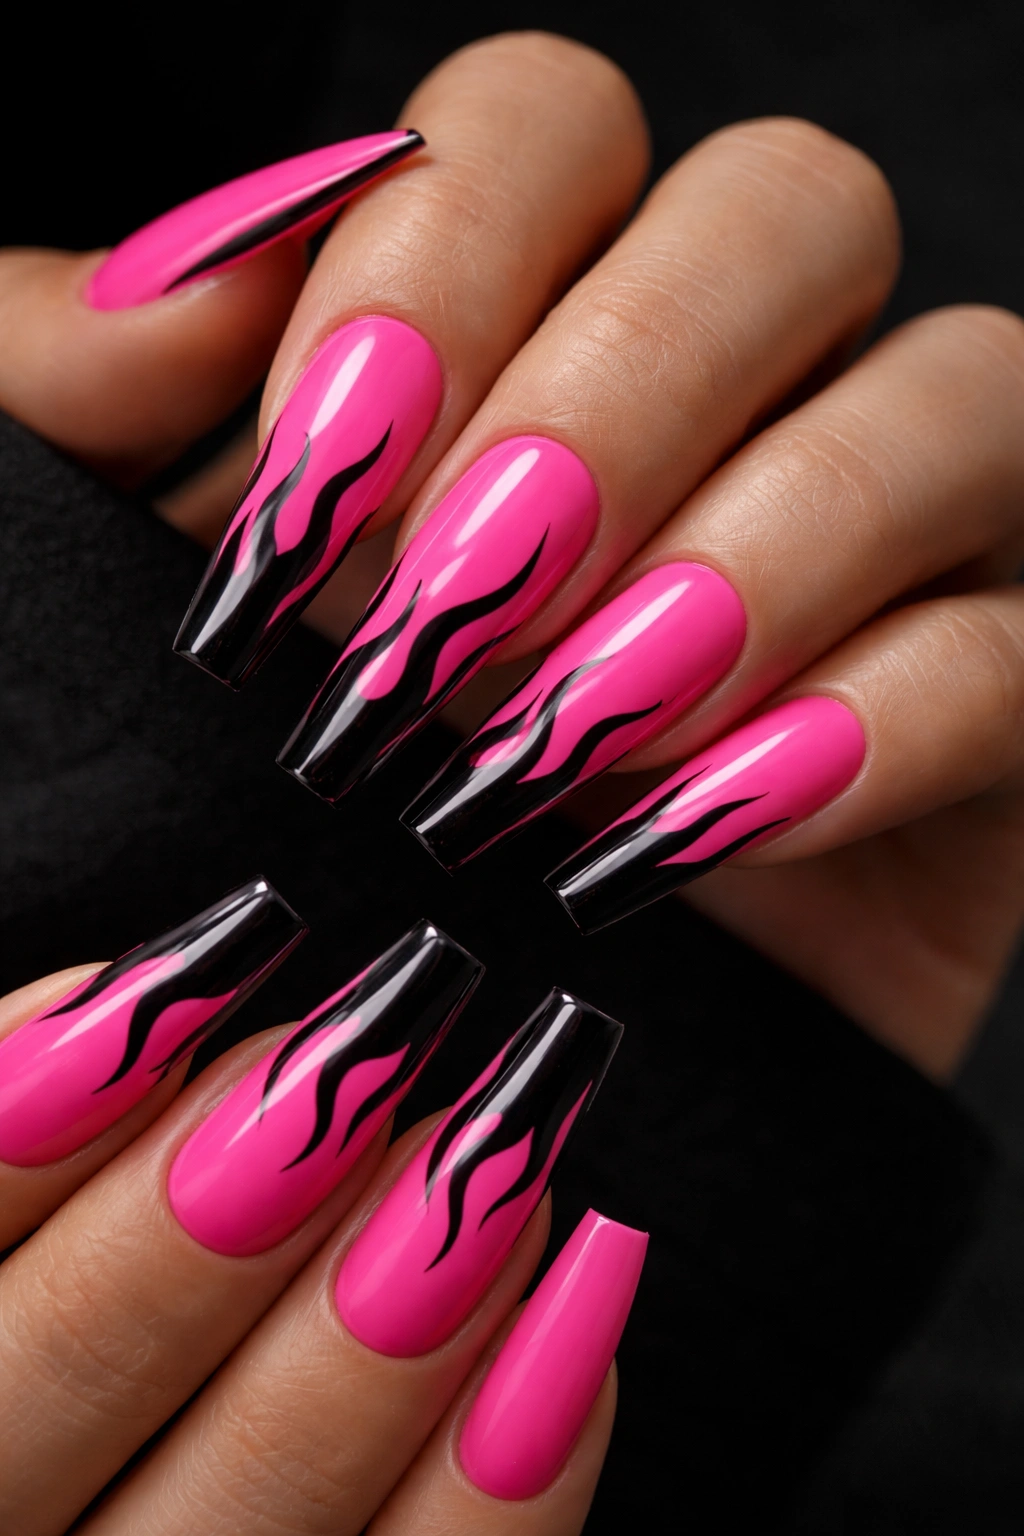
Picture a long coffin set under low light: glossy black flames crawling over a hot pink base, or hot pink flames over a black nail with a little negative space near the cuticle. Flame nails can go wrong fast, but when they’re done with some discipline, they look sharp instead of costume-like.
The shape does half the work here. Coffin nails already have a tapered edge, so flame art follows the same visual direction and feels natural on the nail. The trick is keeping the flame points narrow and uneven. Flames that are too thick look cartoonish. Flames that all match look stamped on.
A few details matter more than people expect:
- Put flame art on 2 to 4 nails per hand, not all ten, unless the set is extra long.
- Keep the black outline hairline thin if the base is hot pink.
- Use gloss, never matte, unless you want the flames to lose depth.
- Ask for full-coverage color under the art so patchy sheer spots do not show between linework.
I like this design best when the pink leans electric rather than pastel. Soft baby pink with flames can look undecided. Hot pink knows what it’s doing.
5. Soft Blush Ombre With a Thin Black Outline
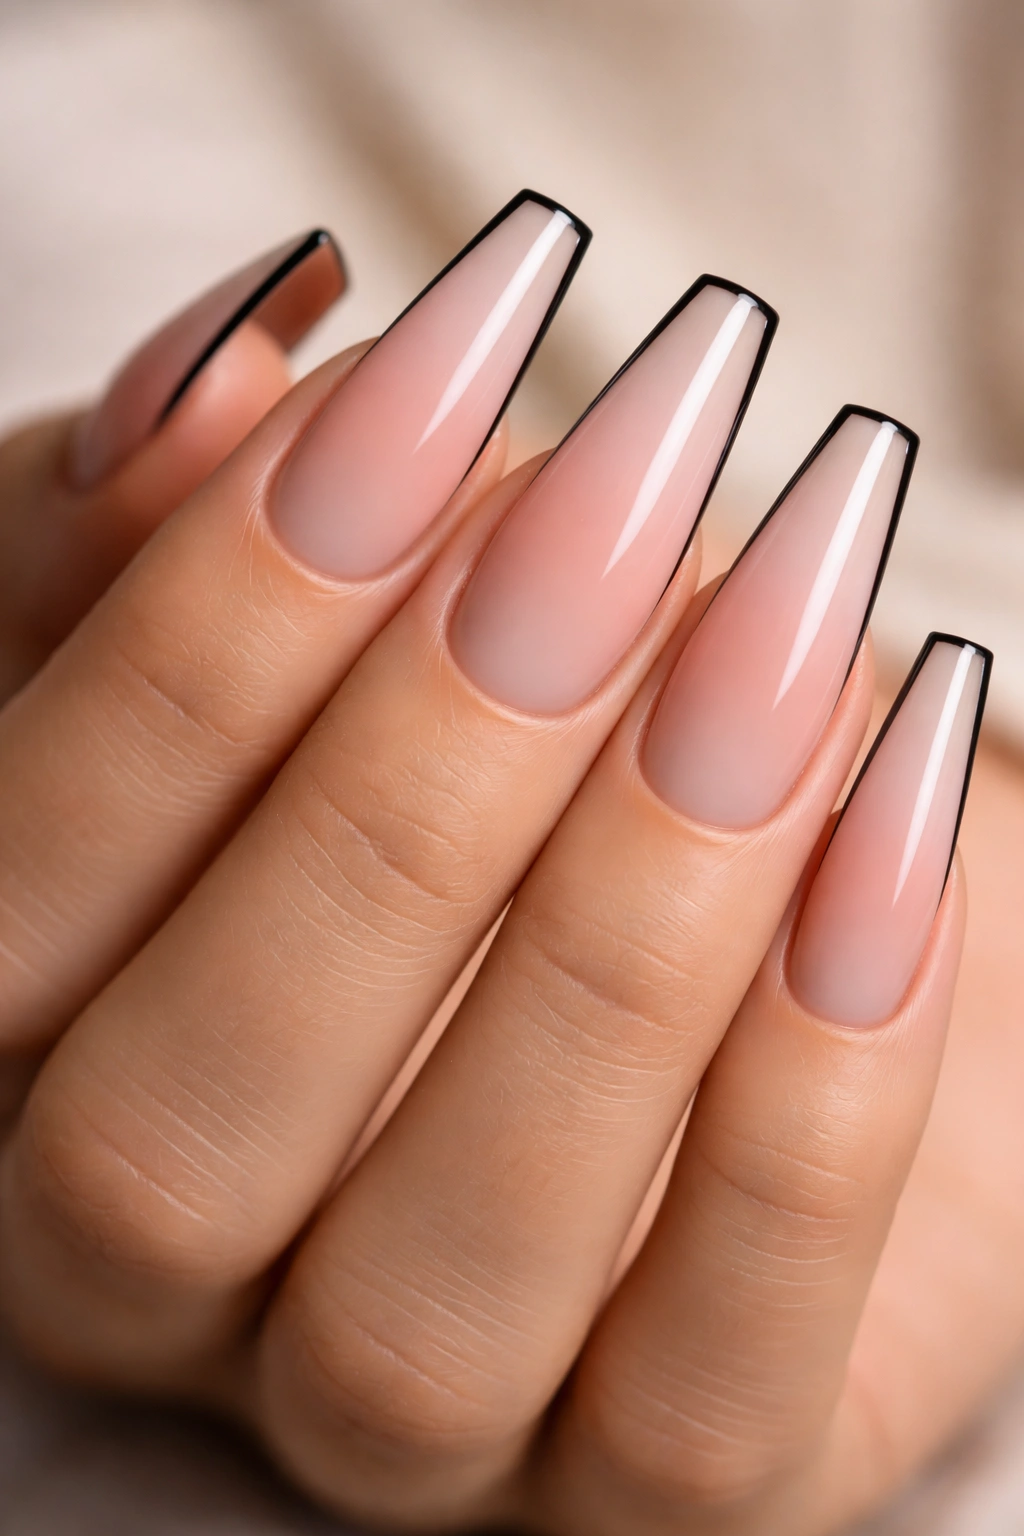
If you want drama without loading the nail with dark color, this is one of the best pink and black coffin nail ideas around.
A soft blush ombre fading into a nude or clear base gives the nail a hazy center, and a fine black outline around the sidewalls and tip turns that soft fade into something much cleaner. You get contrast without the weight of a solid black panel. From a distance, the nail still looks light. Up close, the outline does all the shaping.
This design needs a steady hand. The outline should sit around 0.5 to 1 millimeter thick, especially along the sidewalls. Any wider and the nail starts reading narrow. Any wobble in the line shows, which means hand-painted liner gel usually beats a thicker polish brush here.
Long coffin lengths carry this design best because the fade has room to breathe. On a short set, the ombre can disappear before it even starts. If you want the idea on shorter nails, skip the full sidewall outline and frame only the tip.
I keep coming back to this one because it has range. It fits a dressy night out, but it doesn’t look misplaced with denim and a sweatshirt either.
6. Black Chrome Stripes Over Dusty Pink Coffins
Unlike glitter, black chrome gives you shine without texture. That matters on coffin nails, where raised art can throw off the clean profile of the shape and start catching on everything from sweater cuffs to fitted sheets.
Dusty pink is the right partner here because it has enough gray or mauve in it to stand next to chrome without looking sugary. A bright cotton-candy pink can fight with the metallic flash. A dusty base lets the chrome carry the highlight while the pink keeps warmth in the set.
You do not need much chrome, either. One stripe down the center, a half-tip, or a slim side frame is enough. On medium coffin nails, a vertical stripe about 2 millimeters wide can make the nail look longer. Horizontal chrome bands are harder to pull off and can make the nail look stubby unless the set is long.
Who wears this best? Someone who wants a manicure with shine but not sparkle. There’s a difference. Chrome looks cleaner, colder, and more architectural. Glitter looks softer and more playful. I like both, but chrome has more edge.
7. Pink Aura Centers With Black Framed Edges
Aura nails have a soft-focus middle that feels almost airbrushed, and that hazy center looks even better when the perimeter is kept under control. A baby pink or rose aura in the center of the nail, paired with a black frame at the tip or outer edge, creates depth without making the set feel heavy.
Done wrong, aura nails can look muddy. Done right, they look like the color is glowing from under the top coat.
Who this shape-and-color combo suits best
This is one of the better choices for medium to long coffin nails, especially if you like soft color but do not want a flat wash of pink across the whole hand. The aura center keeps the middle light, and the black border gives the coffin edge a clear finish line.
A few pointers make a big difference:
- Use a translucent pink center, not an opaque blob.
- Keep the black detail at the outer third of the nail.
- Pick gloss top coat so the aura fade stays deep.
- Leave one or two nails with aura only if you want the set to feel lighter.
Airbrush gives the smoothest aura effect, though sponge blending can still look good when the color is sheer enough. If your tech is heavy-handed with pigment, ask to see one nail before committing to all ten.
8. Black Lace Art Over a Nude Pink Base
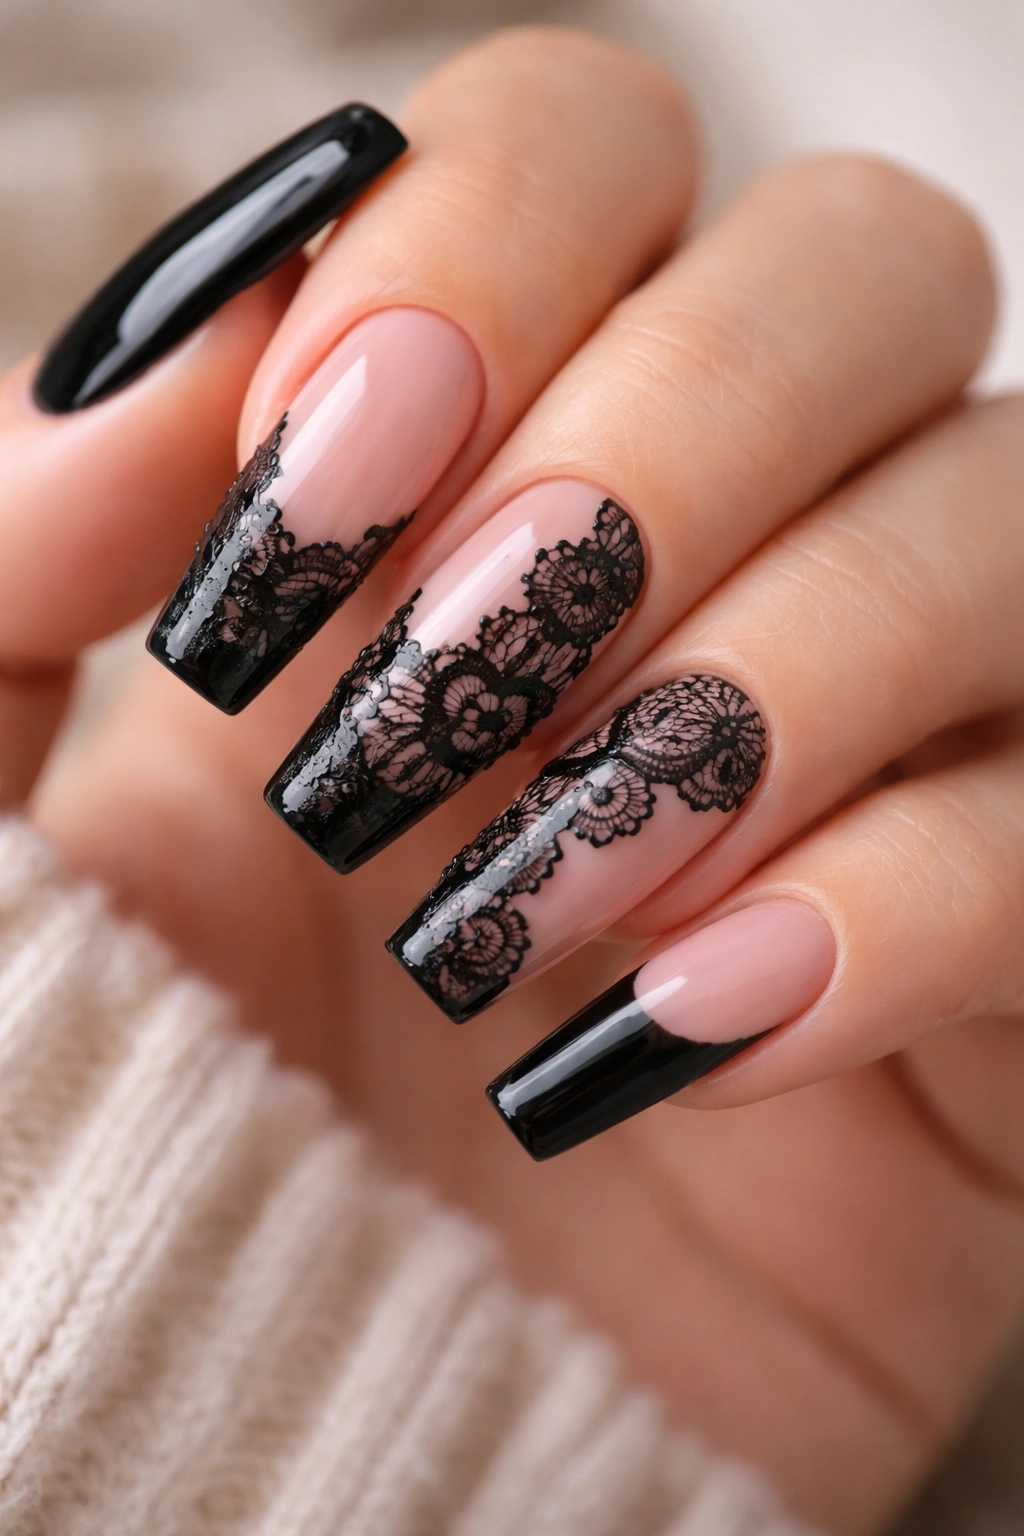
There’s a line between delicate and fussy, and lace nail art lives right on it. The reason this version works is the base: a nude pink that stays close to skin tone, so the black lace has room to breathe instead of piling on top of loud color.
Hand-painted lace looks best on one or two feature nails per hand. More than that, and the pattern can start to feel dense—especially on medium coffin lengths. Fine mesh, floral loops, scalloped edges, and tiny dot clusters all sit well on the shape because the straight sidewalls give the pattern a clear border. Shorter oval nails can make lace feel cramped. Coffin nails give it more order.
Stamping is quicker, but I still prefer hand-painted lace when the budget allows. The line weight can be adjusted to the nail size, and that matters. A black lace pattern that looks balanced on a long size 5 tip can look thick and heavy on a short natural nail overlay. Scale matters in nail art more than people think.
This is one of the few pink and black nail looks that can go romantic without getting syrupy. The black keeps it grounded. The nude pink stops it from turning harsh. A tiny crystal near the cuticle can work here, though I would stop at one per hand.
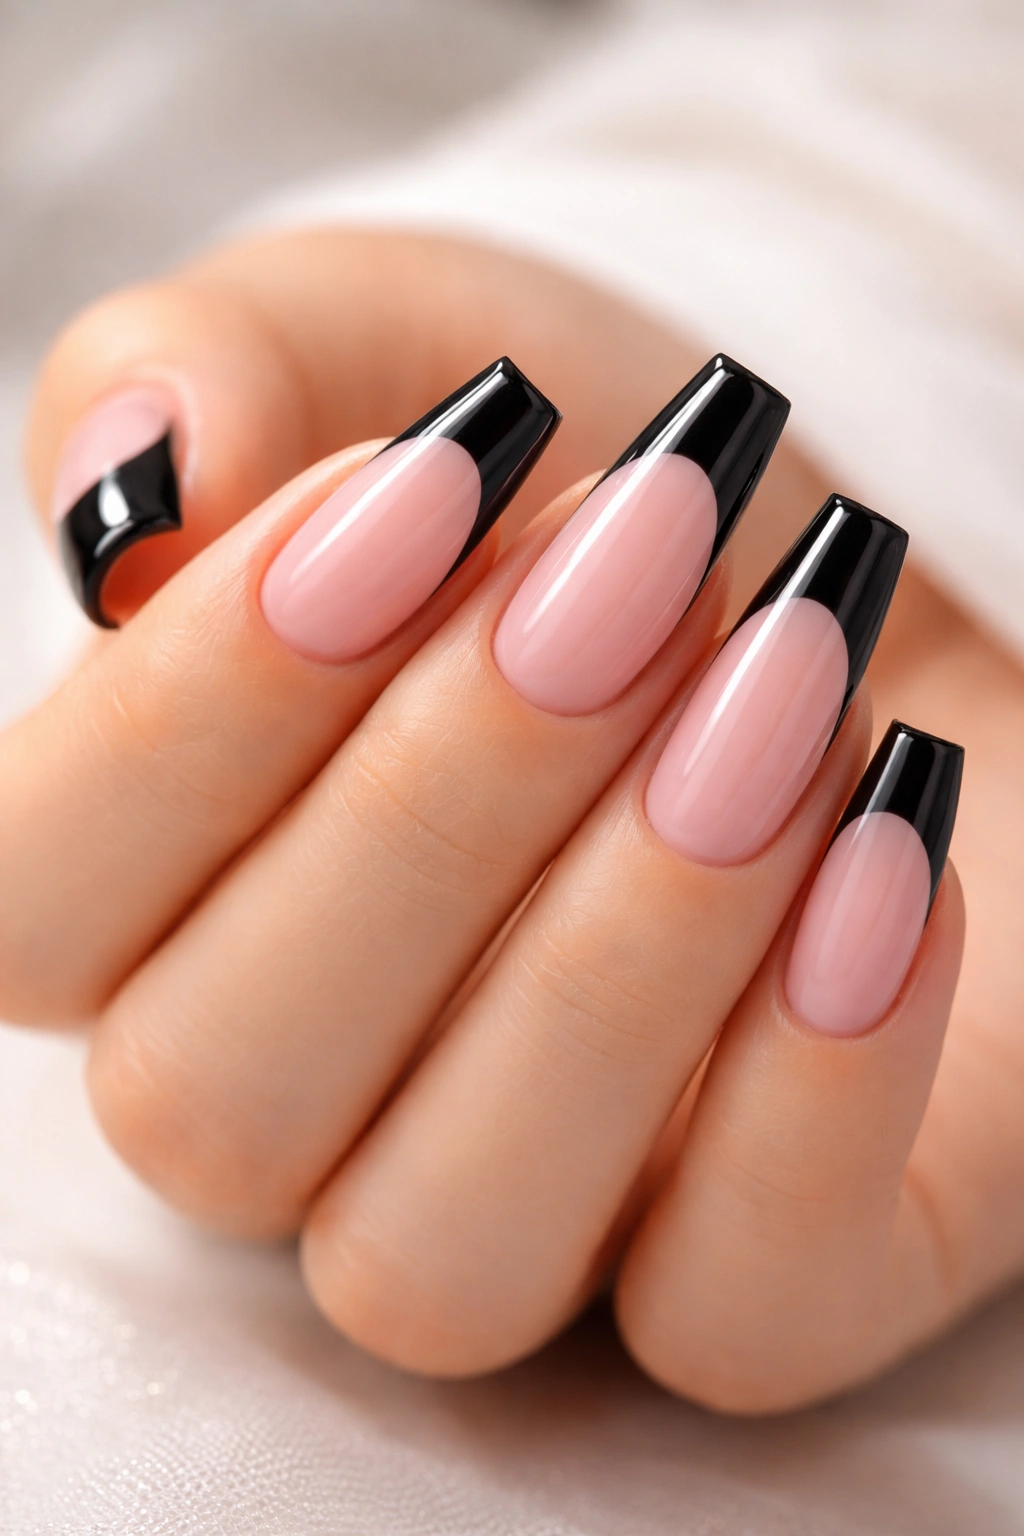
9. Half-Moon Pink and Black Coffin Nails
The half-moon layout puts black near the cuticle in a curved shape while pink covers the rest of the nail, and that old-school placement still looks fresh on a coffin silhouette. It has a bit of retro in it, though the sharp tip keeps it from drifting too vintage.
I like this design for practical reasons as much as visual ones. A half-moon can make grow-out look cleaner than a heavy cuticle-to-tip color block, especially if the pink body is close to your natural nail bed shade. The eye reads the curve as intentional shape, not as a gap that needs fixing.
Why it earns a spot
- The curved black moon can make the nail plate look more even if your cuticle line is naturally irregular.
- It works on short, medium, or long coffin nails, which isn’t true for every high-contrast design.
- You can finish it in matte or gloss without losing the main effect.
- A moon that sits about 2 to 3 millimeters deep usually keeps the balance right.
Ask your tech to match the moon curve to your natural cuticle rather than painting the same arc on every nail. That tiny adjustment makes the set look custom instead of templated.
10. Pink Glitter Fade With Sharp Black V-Tips
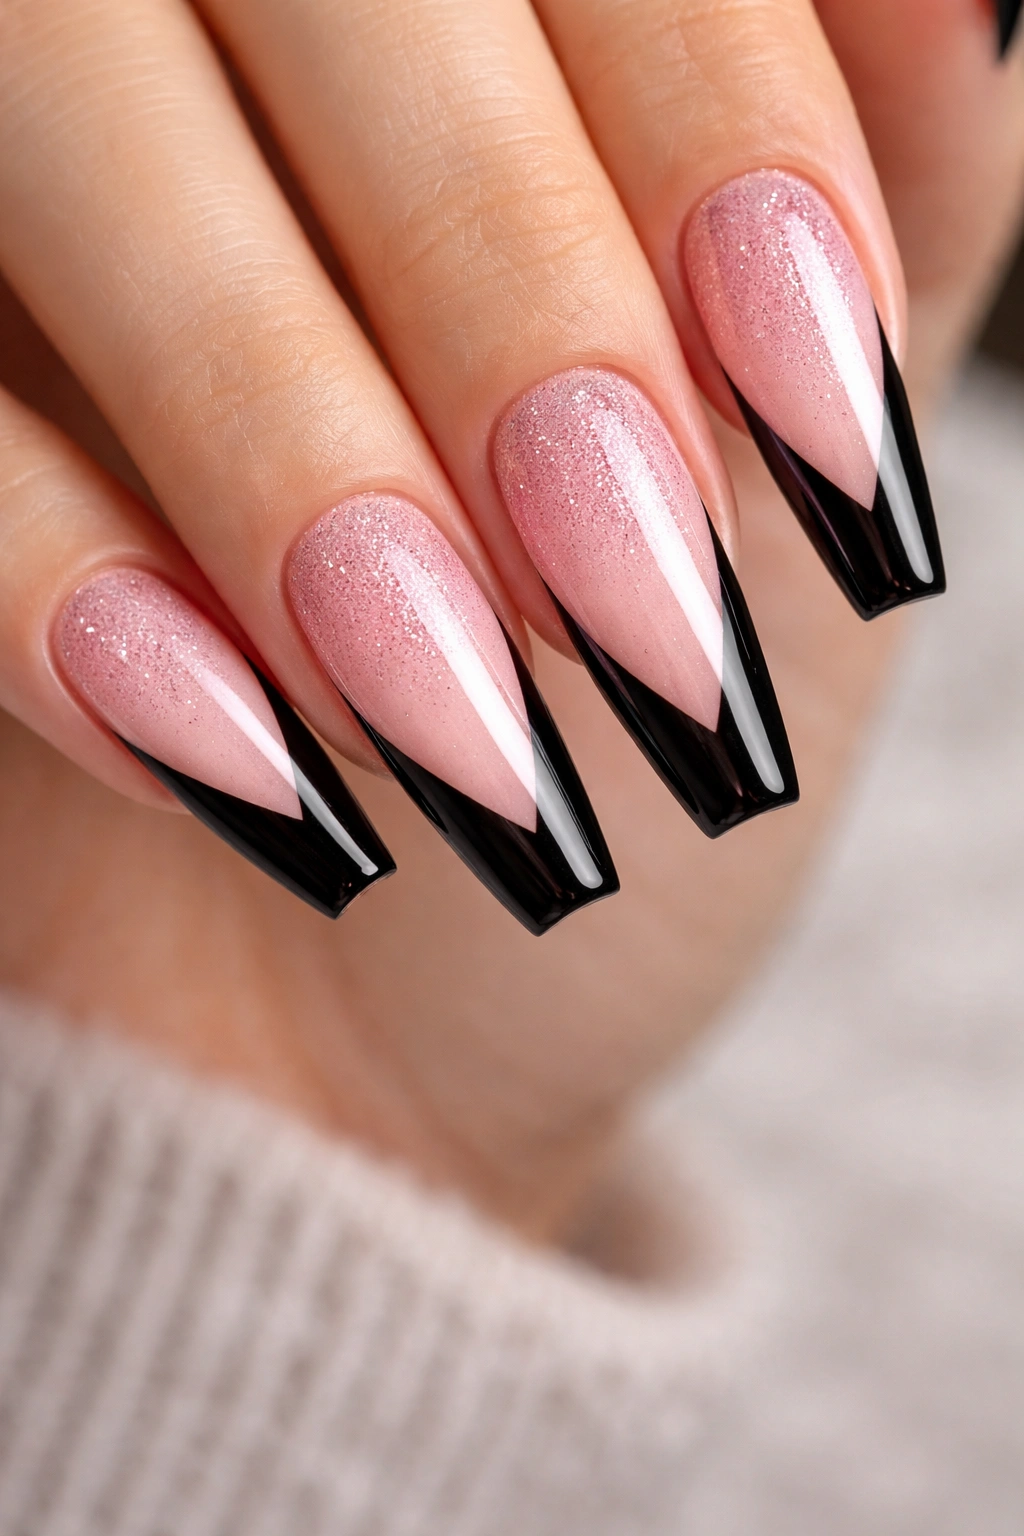
Why do V-tips hit harder than standard French tips on a coffin shape?
Because the V echoes the taper. Your eye follows the black lines inward, then down to the point where the tip flattens out. That movement makes the nail look longer and more deliberate, especially on medium and long lengths.
A pink glitter fade softens the graphic edge of the black V. The best version uses a fine glitter, not chunky pieces, fading from the middle of the nail toward the tip so the black lines still stay readable. Chunky glitter can swallow the outline and make the whole thing feel busy. Fine shimmer gives depth without crowding the structure.
How to ask for this without getting a messy version
Say you want a thin black V-French over a pink glitter fade, not a full glitter nail with black details on top. That wording matters. You want the V to remain the skeleton of the design. Ask for the point of the V to stop short of the free edge by a hair, which keeps the tip from looking bulky after top coat.
This set shines hardest under direct light, but it still reads clean in daylight because the black lines keep the glitter in check. If you want one louder set in this lineup, this is a strong contender.
11. Bubblegum Pink Coffins With Checkerboard Accent Nails
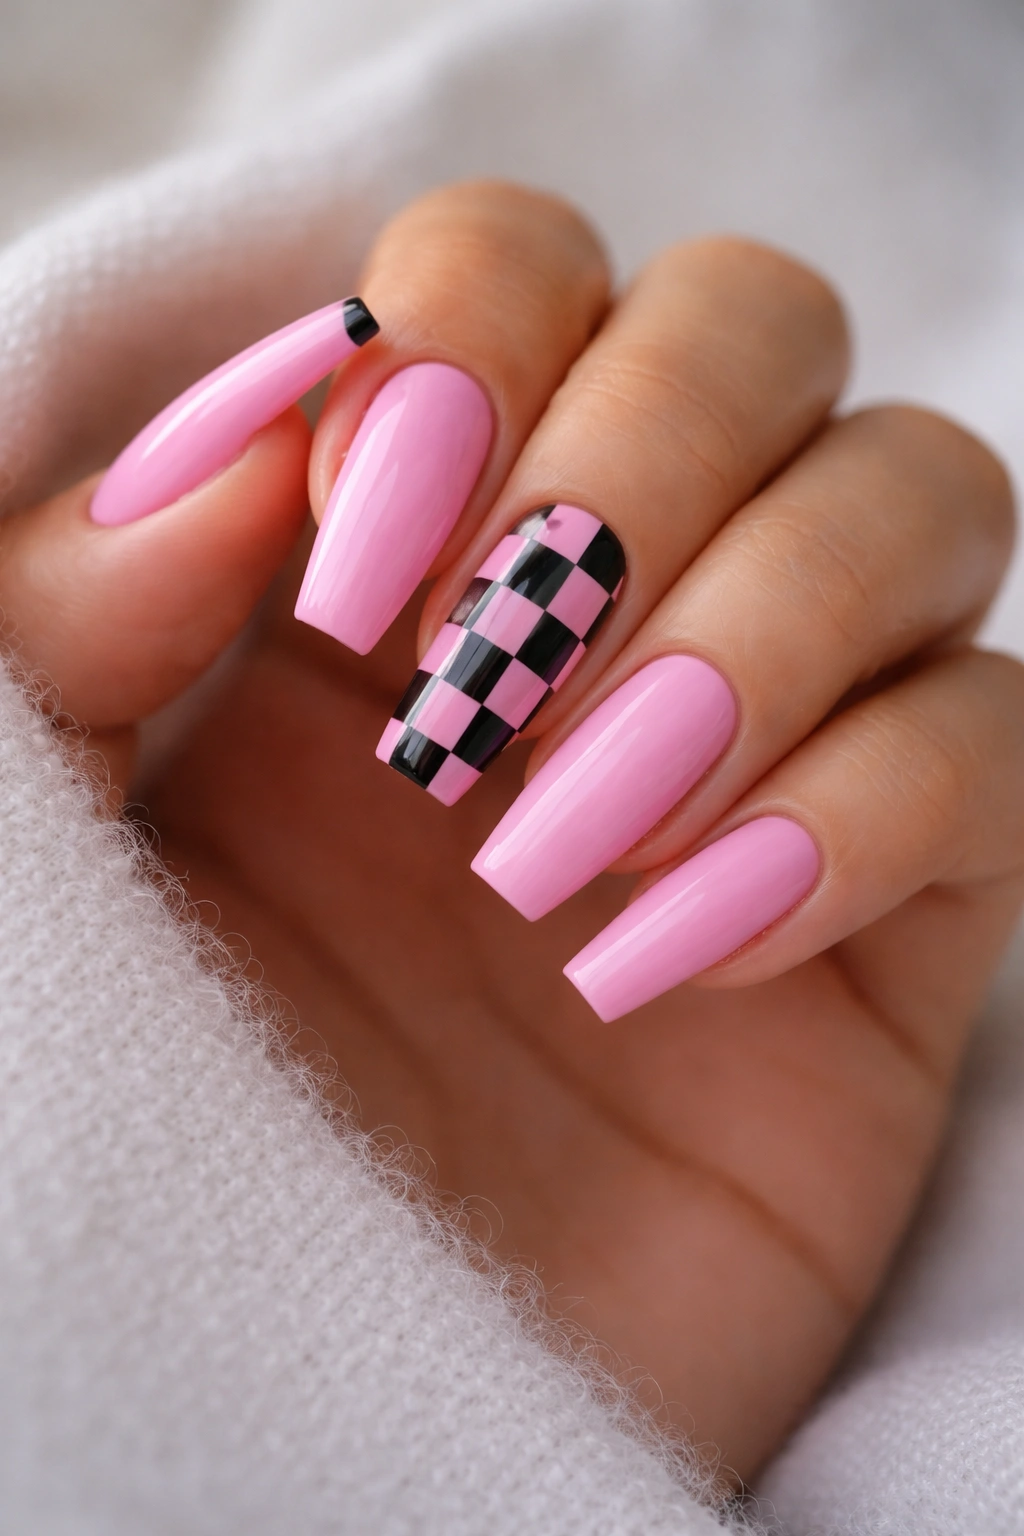
Checkerboard can look cheap in about ten seconds if the squares are too big.
That’s the whole risk and the whole challenge. On coffin nails, a checker pattern needs scale control or it starts reading like a costume prop. The best version uses bubblegum pink on most nails, black-and-pink checkerboard on one or two accent nails, and maybe a slim black micro-French on another finger to tie the set together.
Keep each square around 2 to 3 millimeters wide on medium nails. Bigger than that, and you lose the crisp grid. Smaller than that, and the pattern can blur once top coat goes on. A white accent can help separate the black from the pink, though I’d use it only as a thin line or small square, not as a third major color.
This design has energy. It’s playful. It leans younger. I would not call it subtle, and that is fine. Not every manicure needs to whisper.
The mistake people make is spreading checkerboard across all ten nails. Two accent nails are enough. Let the rest of the hand breathe.
12. Pink, Black, and White Marble Swirls on Coffin Tips
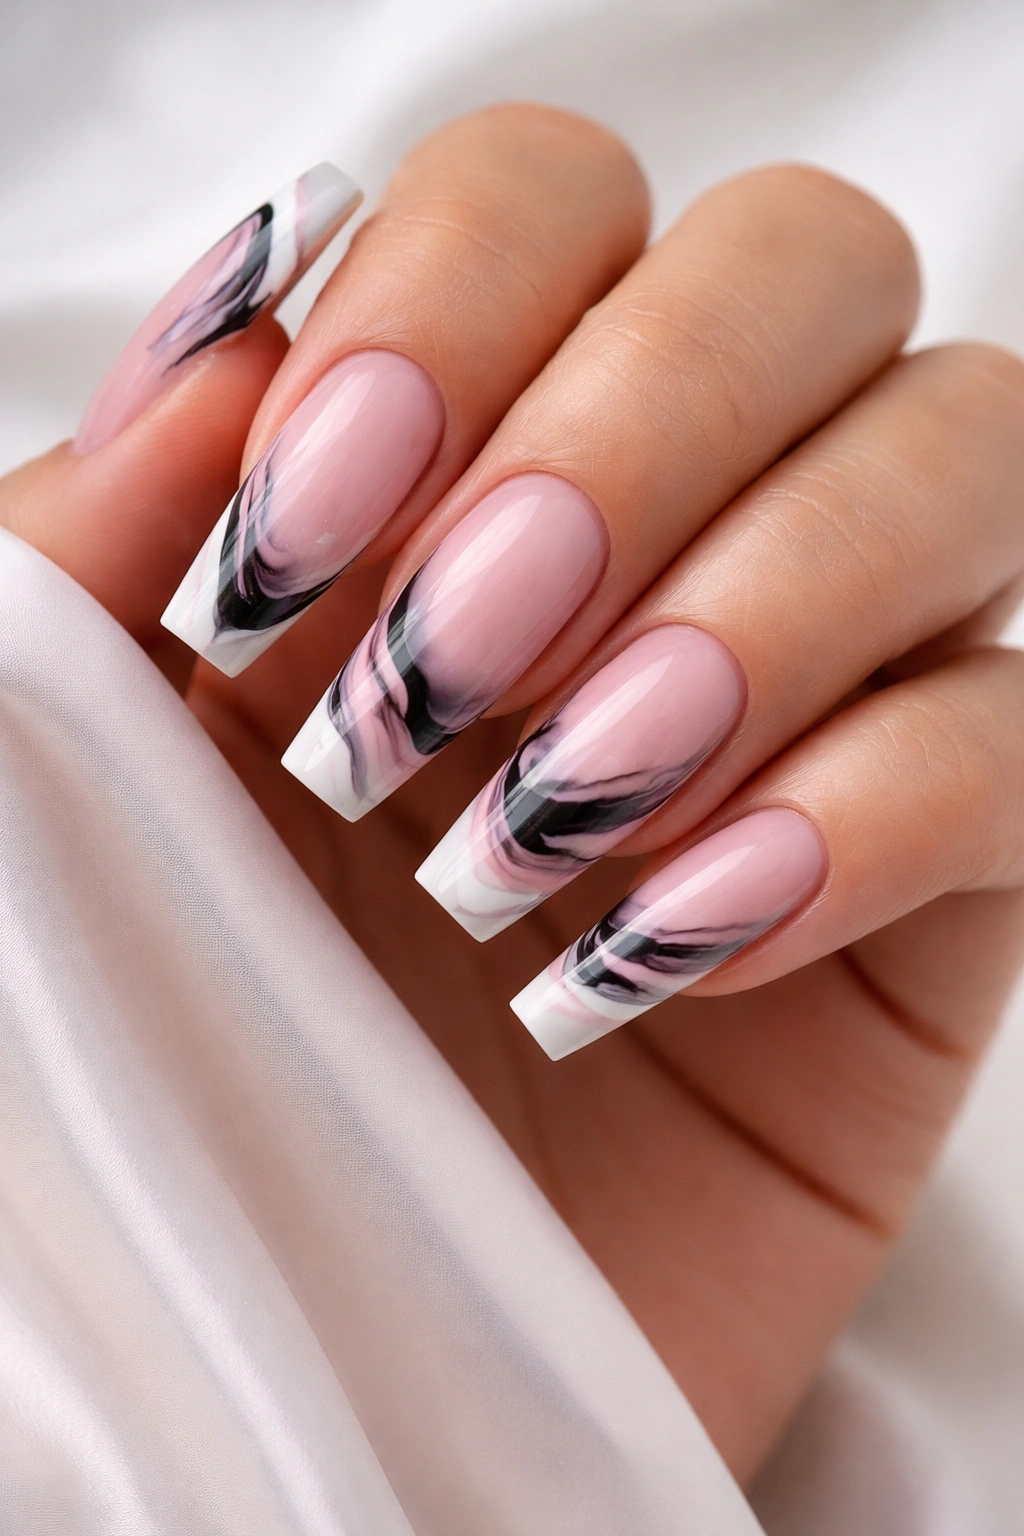
Unlike strict color blocking, marble gives the eye somewhere to wander. That softer movement is useful when you’re mixing black with pink, because hard edges in both colors can feel too rigid if every nail is painted the same way.
A translucent pink base works best here. Over that, black and white gel are dragged with a liner or blooming gel into thin veins and soft swirls. The white is not filler; it separates the black from the pink so the marble keeps depth instead of turning muddy. Without that buffer, the design can collapse into a gray blur.
Who should pick this? Someone who likes a little chaos but still wants a controlled shape. Every nail can look slightly different, which is part of the charm, though the sidewalls and tip still need to stay neat or the whole set loses direction.
Marble also hides tiny imperfections better than crisp line art. That’s useful on a lived-in manicure. If you know you type hard, use your hands a lot, or tend to notice every microscopic flaw by day four, a swirl design is more forgiving than a thin outline or razor-sharp French.
13. Pink Jelly Coffin Nails With Tiny Black Stars
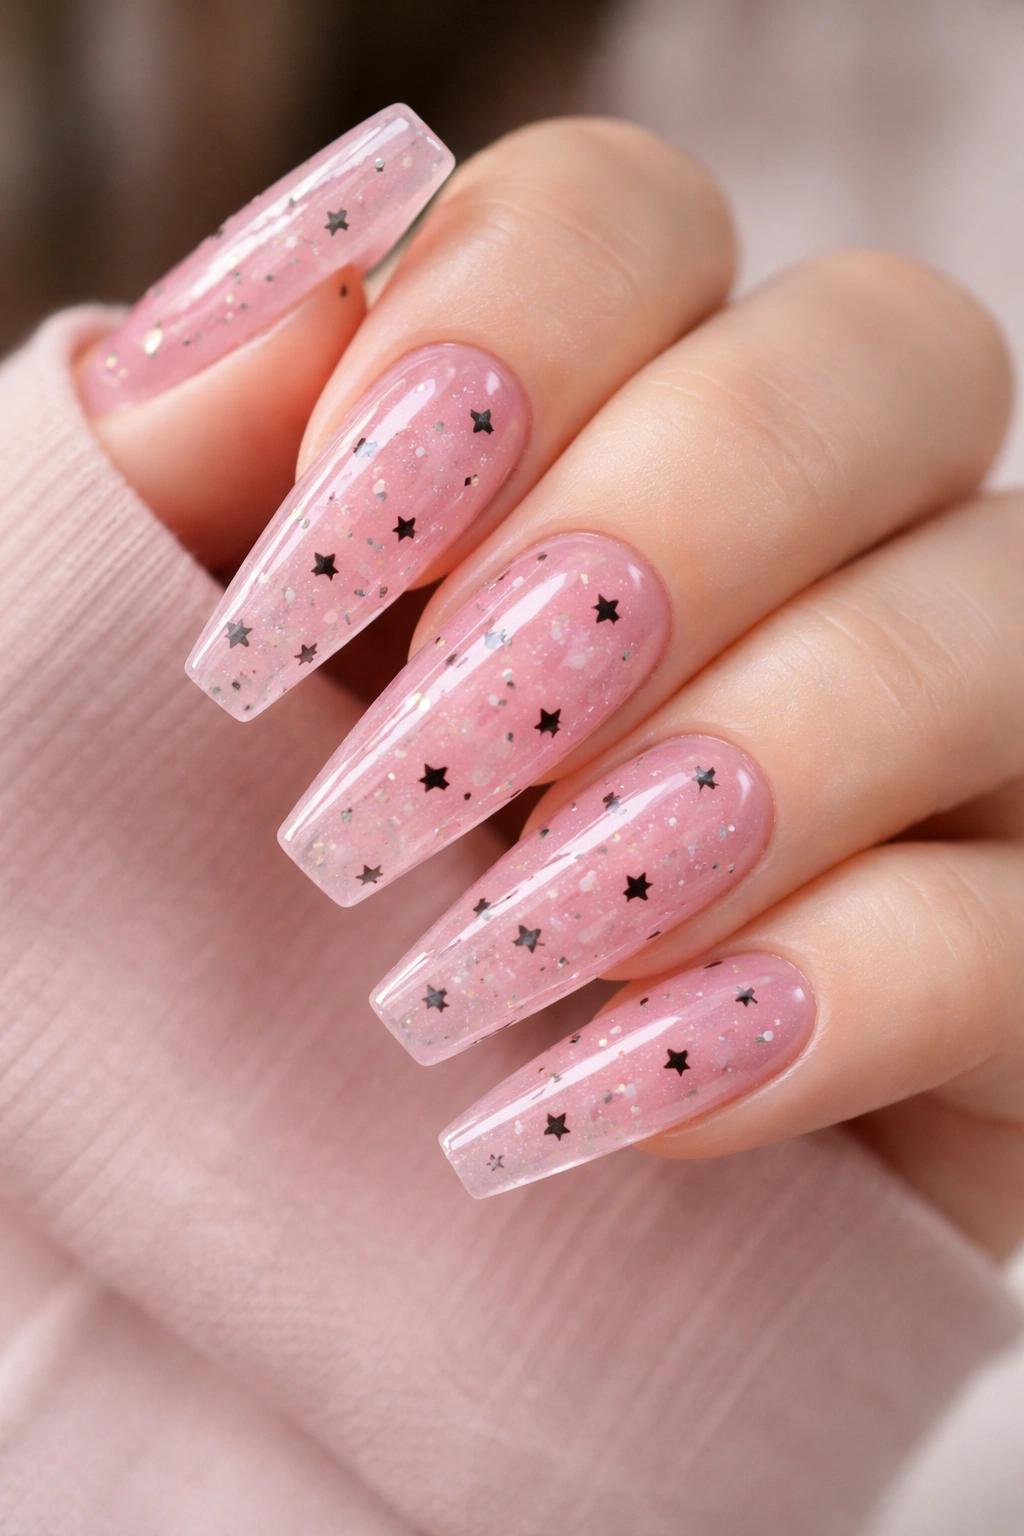
Some nail sets look flat the second the top coat cures. Jelly nails do the opposite. A translucent pink jelly base has depth built in, almost like tinted glass, and tiny black stars floating on top—or encapsulated under a layer of clear gel—give the set a little spacey mood without weighing it down.
The coffin shape is a good match because the straight sides keep the jelly from looking gummy or rounded. On a long set, that semi-clear pink can look almost candy-like. On a shorter coffin, it reads cleaner and more wearable, especially if the stars stay tiny and spaced out.
I’d keep the star count low. Three to five small black stars across a nail is enough unless you’re building a full constellation layout with dots and fine connecting lines. Overcrowd the surface and the jelly effect disappears under the art. You want depth first, detail second.
This one is more casual than lace, more playful than chrome, and easier to wear than flames if you like pink but want black detail in a lighter way. A glassy top coat is non-negotiable here. Matte would kill the whole point.
14. Short Pink and Black Coffin Nails With Thin Side Tips

Most photo galleries push long sets, but short pink and black coffin nails can look sharper in daily life because the design has to be edited down to what matters. Thin black side tips on a soft pink base are a good example. You run a slim line from one sidewall toward the tip, then wrap it lightly across the edge. That’s it.
No clutter. No extra stones. No giant decals trying to make a short nail act long.
What makes it work on short lengths
The side tip changes the direction of the eye. Instead of chopping the nail straight across, it pulls the gaze diagonally and outward, which helps a short coffin keep some length. It also leaves more of the pink base open, so the manicure still feels light on the hand.
Quick fit notes
- Best on a true short coffin with a free edge around 2 to 3 millimeters.
- Keep the black line thin enough to see pink on both sides of it.
- Use a creamy pink, not a sheer wash, if your natural free edge shows strongly.
- Pick gloss if you want the line to stand out faster.
I like this set for people who want nail art but still need to type, cook, open cans, and live their lives without thinking about their hands every five minutes.
15. Matte Black Nails With Thin Pink Cuticle Frames
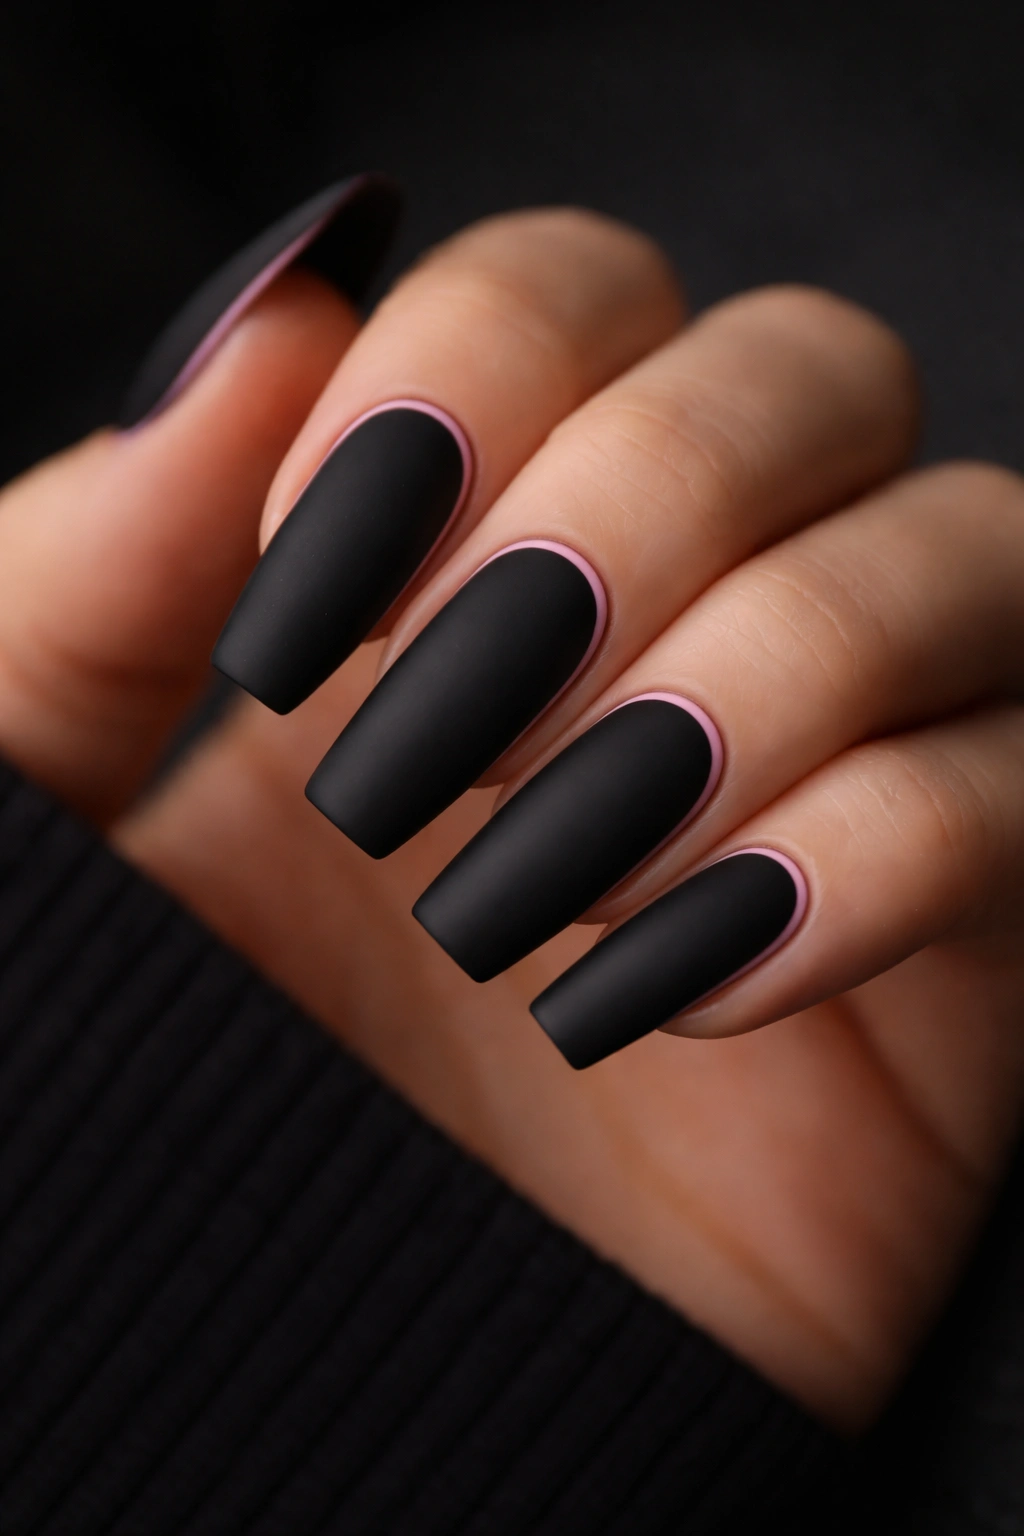
This one flips the usual idea on its head. Instead of pink as the main color and black as the accent, the nail goes matte black and a slim pink line traces the cuticle area like a halo. It’s moodier, cleaner, and less sweet than most pink-and-black combinations.
The pink frame has to be precise. A shaky cuticle line shows instantly on matte black, and the contrast gives you nowhere to hide. That is why I’d save this design for a tech who is strong with liner gel and shape work. On acrylic or hard gel enhancements, the effect is crisp. On a rushed regular polish manicure, it often turns uneven.
Dusty rose or muted blush tends to work better than neon here. Black already carries enough weight. A softer pink line breaks it up without fighting for the lead.
A few final notes help:
- Keep the cuticle frame around 0.5 millimeter thick.
- Leave the sidewalls mostly black so the pink line does not crowd the base.
- Refill on time—around 2 weeks for fast growers—because grow-out shows early with cuticle art.
- Use matte top coat on the black only if you want the pink line to stay a little glossier and more visible.
If I had to pick one set from this list for someone who wants pink and black coffin nails without anything sugary, I’d point here first. It has attitude. It still looks controlled.
Final Thoughts
The best pink and black coffin nails are not the busiest ones. They’re the sets where shape, contrast, and finish all pull in the same direction. A clean diagonal French, a thin outline over a blush fade, a matte black nail with a pink cuticle frame—those ideas last because the structure is doing the heavy lifting.
If you’re stuck between two designs, pick the one that matches your nail length first and your mood second. Short coffin nails need restraint. Longer sets can carry more pattern, more negative space, and stronger black placement without losing balance.
And if you only take one practical note from all of this, make it this one: ask for thinner black details than you think you need. Top coat adds bulk, dark pigment spreads wider than expected, and a design that looks crisp on paper can look heavy on the hand fast. Get that part right, and the rest of the manicure usually falls into place.
